User Manual for Video Drone
Package contents
|

Mobile Phone Holder
|

Rechargeable Battery
|

Remote Control
|

Fisheye HD Camera
|
|

Replacement Propellers
|

Landing Gear
|

Protection Rings
|

Charging Adapter
|
|

The screwdriver
|
|
|
|
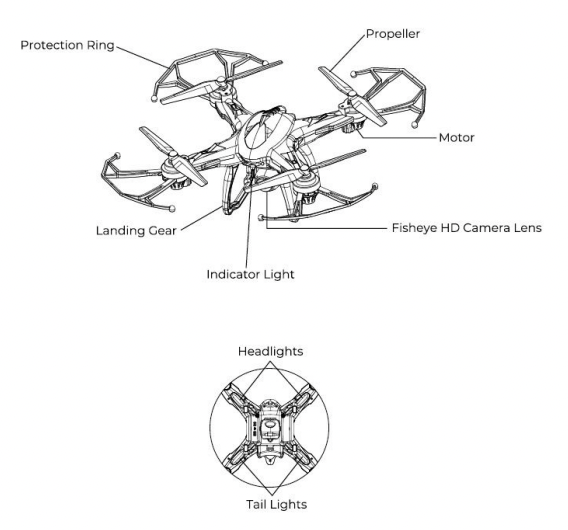
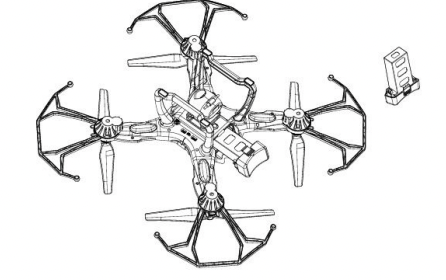
A Quick Look at Your Drone
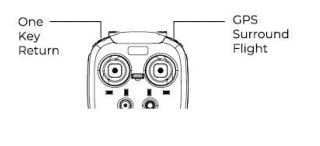
A Quick Look At Your Remote Control

Inserting Batteries Into Your Remote
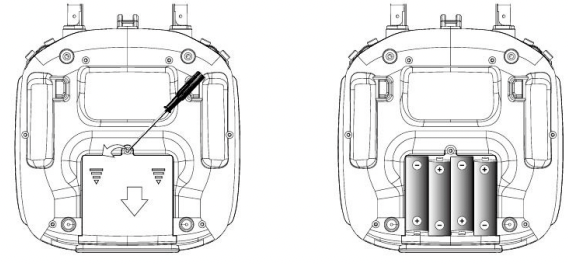
Use a screwdriver to open up the battery compartment located on the rear of your remote control.
Insert 4 AA 15V batteries. making sure that the batteries are inserted with the correct polarity (+. as displayed in the battery compartment.
Once the batteries are inserted. put the battery compartment cover back on the battery compart ment. and use a screwdriver to close it securely.

- Do not mix rechargeable and non-rechargeable batteries.
- Do not mix old and new batteries or different types of batteries.
- Remove exhausted batteries and dispose of them based on the rules of your local municipality.
- Remove the batteries from your remote control if it will not be in use for an extended period of time.
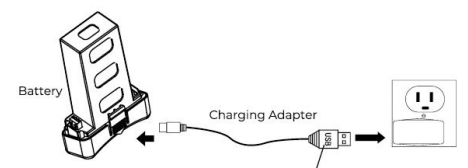
Charging Your Drone’s Battery
Use the included charging adapter to charge your drone's battery.
 (Blinking red)= Charging Adapter didn't Plug In
( Solid red) = Charging Adapter Plugged In
( Solid red) = Battery Charging
 (No lights)=Battery Fully Charged
Charging takes about five hours to complete.
- It is recommended to use a 5V. 1-2A charger (not included) to charge your battery.
- Do not leave the charger unattended in the presence of children.
- Do not expose the battery to excessive heat or flames.
- While charging your battery. keep it away from flammable materials.
- When the quadcopter's battery is on low power and cannot fly. he power switch of quadcopter must be turned off.
Once your battery is fully charged it can be inserted directly into the battery slot on the underside of your drone.
Calibrating Your Drone (Preparing for Flight)
To power on your drone. slide the ON/OFF switch on the bottom of your drone to the ON position.
To power on your remote control. press the ON/OFF button.
Once your drone and remote control are powered on. follow the calibration steps below in order to prepare your drone for flight.
|
Calibrating Your Drone with Your Remote Control
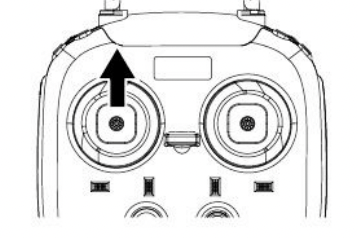
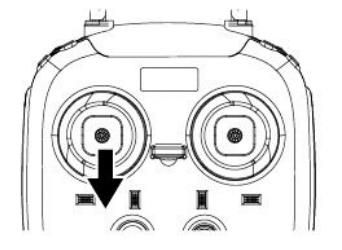
Pull the throttle stick all the way down and then push it all the way up.
When the LED lights on the rear legs of your drone are solid blue and the LED lights on the front legs of your drone are solid red then your drone is synchronized with your remote control and ready to fly.
When the LED lights on the rear legs of your drone are solid green and the LED lights on the front legs of your drone are solid red then your drone is in GPS mode.
Calibrating Your Drone’s Internal Gyroscope
Calibrate your drone's internal gyroscope to ensure smooth and balanced flight. Before you start. make sure your drone is placed on a flat. stable surface.
Pull the throttle stick and the directional stick all the way down and to the left simultaneously. Release them after about 2-3 seconds.
The LED lights on the rear legs of your drone will turn blue and green and start blinking rapidly. The LED lights on the front legs of your drone will turn red and start blinking rapidly while synchronizing.
The LED lights on the rear legs of your drone will turn solid blue. and the LED lights on the front legs of your drone will turn solid red to indicate that your drone's internal gyroscope is calibrated.
Aircraft Compass Calibration
The aircraft compass calibration allows your drone to be tracked over GPS. Before you start. make sure your drone is placed on a flat. stable surface.
Press the geomagnetic calibration button on the remote control.
Rotate your drone horizontally. spinning it in a clockwise direction for 3 revolutions. The lights on the front legs of your drone will solidly shine red. while the lights on the back legs of your drone will solidly shine green
Turn the head downwards and rotate your drone vertically. spinning it for 3 revolutions. When you see green lights shining solidly. calibration is complete.
|
|


|
- When flying your drone in GPS mode. make sure you are in a wide open space.
- Do not calibrate your drone in areas where there are strong magnetic fields.
- When calibrating. do not carry ferromagnetic materials such as keys or cell phones.
- Do not calibrate near large sheets of metal.
Locking and Unlocking Your Drone
Unlocking Your Drone
If your drone is locked. push the throttle stick all the way up and the pull it back to its mid-point and your drone will be unlocked.
Locking Your Drone
With your drone in a landed position. pull the throttle stick all the way down and hold it down for approximately 3 seconds. The motor will stop and your drone will be locked in place.
Flying Your Drone
Pre-Flight Preparation
If you have never used a drone before and you are not an experienced pilot. make sure to read these instructions carefully before flying. Get familiar with all of the controls. If necessary. read through these instructions many times and practice handling the remote control until you feel completely comfortable and ready.
1. Place your drone in a clear. open field. Make sure that it is resting on a secure. flat surface.
2. Practice using the throttle stick and the directional control stick (see below).
3. By simulating the use of the remote and both sticks. you will grow more comfortable with the natural motions required during flight and you will learn to react more rapidly to unexpected circumstances.
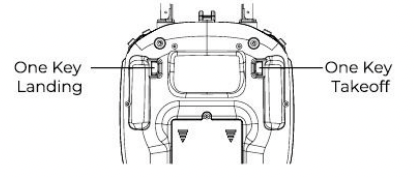
One Key Takeoff & Landing
Once your drone is unlocked. you can press the one key takeoff button and the drone will automatically hover 1.5 meters above the ground.
By pressing the one key landing button. your drone will automatically land on the ground.
Headless Mode
Headless mode allows users to fly their drone without worrying about the drone’s orientation. Regardless of which way the drone is facing. this function ensures that the drone will always follow controls from your perspective all the time.
To enter headless mode. before your drone takes off. stand in front of your drone and press the headless mode button on your remote control.

Return Functions
When your drone is properly calibrated to be tracked over GPS. then you can use multiple return functions which allow your drone to return to a specific destination.
NOTES:
1. In order to make sure that your drone can be tracked over GPS. complete the “aircraft compass calibration” process discussed earlier in this manual.
2. You can use the Vivitar SkyEYEview app to view your drone’s GPS status.
3. Make sure to fly your drone in clear areas with strong GPS signal in order to use the return to home functions successfully.
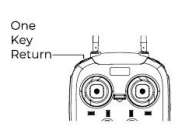
Smart Return Function
The Smart Return Function returns your drone to the location of your remote control or phone. Push the one key return button on your remote control. or the corresponding button in the Vivitar SkyEYEview app to enter Smart Return mode. When in Smart Return mode. you can use the directional control stick to control the drone’s landing point. Push the throttle stick to exit Smart Return mode.
NOTE: If GPS signal and remote control signal is lost for more than 6 seconds while in Return to Home mode. the drone will descend slowly until it lands on the ground.
Failsafe Return Function
If GPS signal and remote control signal is lost for more than 6 seconds while flying. the Failsafe
Return Function automatically returns your drone to the origin of its flight. This feature is only available when you begin your flight with a strong GPS signal.
NOTE: When in Failsafe Return mode. your drone is unable to automatically avoid obstacles.
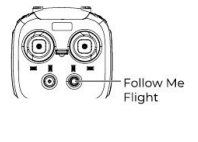
Follow Me Flight Mode
When your remote control and your drone receive GPS signal. press the follow me flight button on the remote control. and your drone will automatically fly towards the remote control and follow it as it moves around.
When in follow me flight mode. the drone will stay between
4-20 meters of your remote control. Push the directional control stick forward to move the drone further from the remote control. Pull it back to bring the drone closer to the remote control. If the drone gets closer than 4 meters to the remote control. or further than 20 meters away. then press the follow me flight button again to bring your drone back in range.
Follow me flight mode can be used with both your remote control or your phone. If you are using both together. your drone will stay within range of your remote control
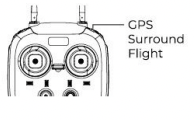
GPS Surround Flight Mode
When your remote control and your drone receive GPS signal. press the GPS Surround Flight button on the remote control. and your drone will automatically fly in circles around the remote.
When in GPS Surround Flight. push the directional control stick to the left and the drone will fly in counterclockwise circles. Push the directional control stick to the right and the drone will fly in clockwise circles. Push the directional control stick forward to enlarge the radius of the circle or pull it backwards to shrink the diameter of the circle.
Emergency Stop Function
lf your drone is flying abnormally press the one key return button and the GPS surround flight buttons on your remote control simultaneously to trigger an emergency stop.
Using the Vivitar SkyEYEview App
1. Connect Mobile Phone Holder to the Remote Control
|

Press the button on the side of your phone holder. and pull down the hooks so that you can slide your phone in the holder
|

Slide your phone into the phone holder so that it rests securely on the hooks. Push down on the top of your phone holder to hold your phone in place
|

Connect the phone holder to the remote control. Make sure that the connection wedge on the phone holder slides under the connection clasp on your remote control.
Use the tightening screw to hold the phone holder in place.
|
2. Download the Vivitar SkyEYEview App
Go to the App Store or Google Play store and search for the Vivitar SkyEYEview app. Follow the instructions to proceed to download the app. You can also scan the applicable QR code below.
3. Using Wifi to Connect the Drone to Your Phone
- Power on your drone. LED lights will illuminate to indicate that it is powered on.
- On your mobile phone. find the Wifi Settings menu. Select the network labeled SKEYE WiFi-xxxxxx in order to sync your drone with your phone.
- Open the Vivitar SkyEYEview application on your phone. Press the “TAKE OFF" option on the menu screen in order to open the control interface.

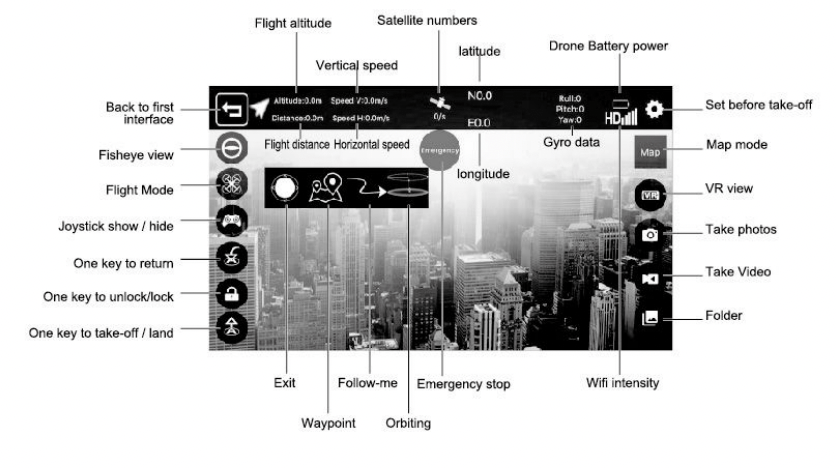
4. Control Interface Functions
5. Menu Screen Options
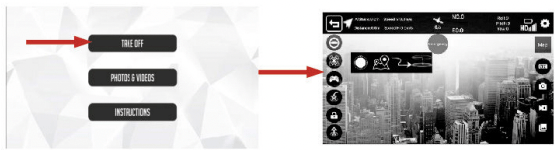
Tap “Take Off” to access the control interface.
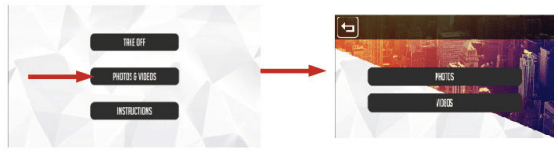
Tap “Photos and Videos" to view photos and videos recorded with your drone’s camera.
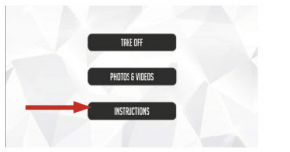
For more information on using your app. tap"instructions”
Troubleshooting
Problem: During calibration. the red lights on the front legs as well as green and blue lights on the rear legs flash slowly.
- Solution: The drone and remote control are not recognizing each other. Turn both units off. turn them back on and then try calibrating your drone and remote control again.
Problem: The drone is not connecting to GPS.
- Solution: There may not be a strong enough GPS signal available. Try moving outside to a clear spacious area. Then reattampt the compass calibration process.
Problem: The drone won't unlock.
- Solution: The drone's battery may be drained. Try replacing or recharging the battery. Also. the remote control and the drone may not be synchronized. Try turning both off and then try recali brating them.
Remote Control Light Indicators
The green light is flashing slowly
The remote control is still calibrating.
The green light is flashing slowly while the remote is making repeated beeping sounds.
The batteries are running low on power and need to be replaced.
There is a red light flashing slowly while the remote is making repeated beeping sounds.
The remote control is not yet sensing a GPS connection.
There is a red light shining steadily.
The remote control is connected to GPS
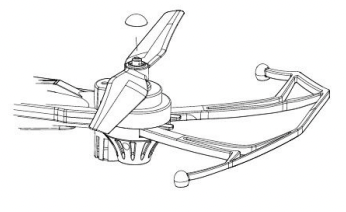
Replacing Your Propeller Blades
Remove the cap covering the propeller.
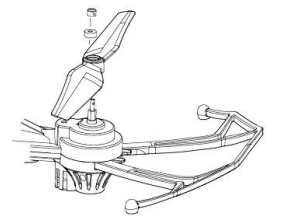
Unscrew the propeller so that your current propeller can be removed and replaced with a new one.
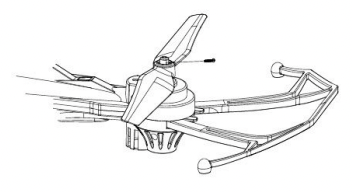
Screw the new propeller on and then place the cap back on the propeller..