User manual Printer
Troubleshooting
Home > Troubleshooting
Error and Maintenance Messages
Home > Troubleshooting > Error and Maintenance Messages
As with any sophisticated office product, errors may occur and supply items may have to be replaced. If this happens, your machine identifies the error or required routine maintenance and shows the appropriate message. The most common error and maintenance messages are shown in the table.
(MFC-J1170DW)
If the touchscreen displays errors and your Android™ device supports the NFC feature, touch your device to the NFC symbol on the control panel and browse the latest FAQs from your device. (Your mobile telephone provider's message and data rates may apply.)
Make sure the NFC settings of both your Brother machine and your Android™ device are set to On.
Related Information references are at the bottom of this page.
MFC-J1010DW/MFC-J1012DW
| Error Message |
Cause |
Action |
| Absorber NearFull |
The ink absorber box is nearly full. |
The ink absorber box must be replaced soon. Call Brother Customer Service or a Brother Authorized Service Center to have your machine serviced.
The ink absorber box absorbs the small amount of ink emitted during print head cleaning.
|
| B&W Print Only |
One or more of the color ink cartridges have reached the end of their lives.
You can use the machine in black and white mode for approximately four weeks depending on the number of pages you print.
While this message appears on the LCD, each operation works in the following way:
If the media type is set to Plain Paper and you selected Grayscale in the printer driver, you can use the machine as a black & white printer.
If the paper type is set to Plain Paper, you can make copies in black and white.
If the paper type is set to Plain Paper, the machine will receive and print the faxes in black and white.
|
Replace the ink cartridges.
See Related Information: Replace the Ink Cartridges.
Although the Cause column lists options for using the machine after this error appears, you will not be able to use the machine until you replace one or more of the ink cartridges under the following condition:
If you unplug the machine or remove the ink cartridge.
|
|
Cannot Clean XX
Cannot Start XX
Cannot Print XX
|
The machine has a mechanical problem.
-OR
A foreign object, such as a paper clip or a piece of ripped paper, is in the machine.
|
Open the scanner cover and remove any foreign objects and paper scraps from inside the machine. If the error message continues, disconnect the machine from the power for several minutes, and then reconnect it.
See Related Information: Paper is Jammed Inside and in the Front of the Machine (Jam Inside/Front).
If you cannot print documents and received faxes, transfer them to another fax machine or to your computer before disconnecting the machine so you will not lose any important messages. Then, disconnect the machine from the power for several minutes and reconnect it.
See Related Information: Transfer Your Faxes or Fax Journal Report.
|
| Cannot Detect |
You installed a new ink cartridge too quickly and the machine did not detect it. |
Take out the new ink cartridge and reinstall it slowly and firmly until it locks into place.
See Related Information: Replace the Ink Cartridges.
|
| An ink cartridge is not installed correctly. |
| A used ink cartridge was reinstalled. |
Remove the used ink cartridge and install a new one. |
|
The ink cartridge must be replaced.
The new ink cartridge has an air bubble.
|
Slowly turn the ink cartridge so that the ink supply port is pointing downward, and then reinstall the cartridge. |
| The wrong Brother model ink cartridge was installed. |
Check the model numbers of the ink cartridges and install the correct ink cartridges. |
| Cannot Scan XX |
The machine has a mechanical problem. |
Disconnect the machine from the power for several minutes, and then reconnect it.
If you cannot print documents and received faxes, transfer them to another fax machine or to your computer before disconnecting the machine so you will not lose any important messages. Then, disconnect the machine from the power for several minutes and reconnect it.
See Related Information: Transfer Your Faxes or Fax Journal Report.
|
| Comm. Error |
Poor telephone line quality caused a communication error. |
Send the fax again or connect the machine to another telephone line. If the problem continues, call the telephone company and ask them to check your telephone line. |
| Connection Error |
Other devices are trying to connect to the Wi-Fi Direct network at the same time. |
Make sure there are no other devices trying to connect to the Wi-Fi Direct network, and then try to configure the WiFi Direct settings again. |
| Connection Failed |
The Brother machine and your mobile device cannot communicate during the Wi-Fi Direct network configuration. |
• Move the mobile device closer to your Brother machine.
• Move your Brother machine and the mobile device to an obstruction-free area.
• If you are using the PIN Method of WPS, make sure you have entered the correct PIN.
|
| Cover is Open. |
The scanner cover is not locked in the closed position. |
Lift the scanner cover and then close it again. |
| Make sure the interface cable (if used) has been guided correctly through the cable channel and out the back of the machine. |
| The ink cartridge cover is not locked in the closed position. |
Firmly close the ink cartridge cover until it locks into place. |
| Data Remaining |
Print data is left in the machine's memory. |
Press Stop/Exit. The machine will cancel the job and clear it from the memory. Try to print again. |
| Disconnected |
The other person or other person's fax machine stopped the call. |
Try to send or receive again.
If calls are stopped repeatedly and you are using a VoIP (Voice over IP) system, try changing the Compatibility to Basic (for VoIP).
See Related Information: Telephone Line Interference/VoIP
|
| Document Jam |
The document was not inserted or fed correctly, or the document scanned from the ADF was too long. |
Remove the jammed document, and then press Stop/Exit. Set the document in the ADF correctly.
See Related Information: Load Documents in the Automatic Document Feeder (ADF).
See Related Information: Document Jams.
|
| DR Mode in Use |
The machine is in Distinctive Ring mode. You cannot change the Receive Mode from Manual to another mode. |
Set Distinctive Ring to Off.
See Related Information: Turn off Distinctive Ring.
|
| High Temperature |
The room temperature is too high. |
After cooling the room, allow the machine to cool down to room temperature. Try again when the machine has cooled down. |
| Ink Absorber Full |
The ink absorber box is full. These components are periodic maintenance items that may require replacement after a period of time to ensure optimum performance from your Brother machine. Because these components are periodic maintenance items, the replacement is not covered under the warranty. The need to replace these items and the time period before replacement is dependent on the number of purges and flushes required to clean the ink system. These boxes acquire amounts of ink during the different purging and flushing operations. The number of times a machine purges and flushes for cleaning varies depending on different situations. For example, frequently powering the machine on and off will cause numerous cleaning cycles since the machine automatically cleans upon power up. |
The ink absorber box must be replaced. Call Brother Customer Service or a Brother Authorized Service Center to have your machine serviced. |
| Ink Low |
The ink level is low. If the sending machine has the ability to convert it, the color fax will be printed at your machine as a black & white fax. |
Prepare a new ink cartridge. You can continue printing until the LCD displays Replace Ink.
See Related Information: Replace the Ink Cartridges.
You can still scan even if the ink is low or needs to be replaced.
|
|
Jam Front
Repeat Jam Front
|
The paper is jammed in the machine. |
Gently remove the jammed paper.
See Related Information: Paper is Jammed in the Front of the Machine (Jam Front).
Make sure the paper guides are set to the correct paper size.
DO NOT extend the paper tray when you load A5 or smaller size paper.
|
|
Jam Inside/Front
Repeat Jam
|
The paper is jammed in the machine. |
Gently remove the jammed paper.
See Related Information: Paper is Jammed Inside and in the Front of the Machine (Jam Inside/Front).
Make sure the paper guides are set to the correct paper size.
DO NOT extend the paper tray when you load A5 or smaller size paper.
|
| Jam Rear |
The paper is jammed in the machine. |
Gently remove the jammed paper.
See Related Information: Paper is Jammed in the Back of the Machine (Jam Rear).
Make sure the paper guides are set to the correct paper size.
DO NOT extend the paper tray when you load A5 or smaller size paper.
|
| Paper dust has accumulated on the surface of the paper pick-up rollers. |
Clean the paper pick-up rollers.
See Related Information: Clean the Paper Pick-up Rollers.
|
| Low Temperature |
The room temperature is too low. |
After warming the room, allow the machine to warm up to room temperature. Try again when the machine has warmed up. |
| No Caller ID |
There is no incoming call history. You did not receive calls or you have not subscribed to the Caller ID service from your telephone company. |
To use the Caller ID feature, call your telephone company.
See Related Information: Caller ID.
|
| No Device |
When configuring the Wi-Fi Direct network, the Brother machine cannot find your mobile device. |
• Make sure your machine and mobile device are in the Wi-Fi Direct mode.
• Move the mobile device closer to your Brother machine.
• Move your Brother machine and the mobile device to an obstruction-free area.
• If you are manually configuring the WiFi Direct network, make sure you have entered the correct password.
• If your mobile device has a configuration page for how to obtain an IP address, make sure the IP address of your mobile device has been configured via DHCP.
|
| No Ink Cartridge |
An ink cartridge is not installed correctly. |
Remove the ink cartridge and re-install it slowly and firmly until it locks into place.
See Related Information: Replace the Ink Cartridges.
|
| No Paper Fed |
The machine is out of paper or paper is not correctly loaded in the paper tray. |
Do one of the following:
• Refill the paper tray, and then press  . .
• Remove and reload the paper, and then press .
See Related Information: Load Paper.
|
| The Jam Clear Cover is not closed correctly. |
Make sure the Jam Clear Cover is closed evenly at both ends.
See Related Information: Printer Jam or Paper Jam.
|
| Paper dust has accumulated on the surface of the paper pick-up rollers. |
Clean the paper pick-up rollers.
See Related Information: Clean the Paper Pick-up Rollers.
|
| No Paper Fed Again |
Paper dust has accumulated on the surface of the paper pick-up rollers. |
Clean the paper pick-up rollers.
See Related Information: Clean the Paper Pick-up Rollers.
|
| No Response/Busy |
The number you dialed does not answer or is busy. |
Verify the number and try again. |
| Not Registered |
You tried to access a Speed Dial number that has not been stored in the machine. |
Set up the Speed Dial number. |
| Out of Fax Memory |
The fax memory is full. |
Print the faxes that are in the memory.
See Related Information: Print a Fax Stored in the Machine's Memory.
|
| Out of Memory |
The machine's memory is full. |
If a fax-sending or copy operation is in progress:
• Press Stop/Exit and wait until the other operations that are in progress finish, and then try again.
• Press c to select Partial Print to copy the pages scanned so far.
• Print the faxes that are in the memory.
See Related Information: Print a Fax Stored in the Machine's Memory.
|
| Paper Size Mismatch |
The paper size setting does not match the size of paper in the tray.
-OR
You did not set the paper guides in the tray to the indicators for the paper size you are using.
|
1. Check that the paper size you chose on the machine's display matches the size of the paper in the tray. See Related Information: Change the Paper Size and Paper Type.
2. Make sure you loaded the paper in a Portrait position, by setting the paper guides at the indicators for your paper size. See Related Information: Load Paper.
3. After you have checked the paper size and the paper position, press .
|
|
If you are printing from your computer, make sure the paper size you selected in the printer driver or in the application you use to print matches the size of paper in the tray.
See Related Information: Print Settings (Windows).
|
| Replace Ink |
One or more of the ink cartridges have reached the end of their lives. The machine will stop all print operations. |
Replace the ink cartridges. |
| While memory is available, black and white faxes will be stored in the memory. If the sending machine has the ability to convert it, the color fax will be stored in the memory as a black and white fax. |
See Related Information: Replace the Ink Cartridges.
You can still scan even if the ink is low or needs to be replaced.
|
| The maximum number of devices are already connected using Wi-Fi Direct. |
The maximum number of mobile devices are already connected to the Wi-Fi Direct network when the Brother machine is the Group Owner. |
After the current connection between your Brother machine and another mobile device has shut down, try to configure the Wi-Fi Direct settings again. You can confirm the connection status by printing the Network Configuration Report.
See Related Information: Print the Network Configuration Report.
|
| Tray not detected |
The paper tray is not completely inserted. |
Slowly push the paper tray completely into the machine. |
| Paper or a foreign object has prevented the paper tray from being inserted correctly. |
Pull the paper tray out of the machine, and remove the jammed paper or foreign object. If you cannot find or remove the jammed paper, see Related Information: Printer Jam or Paper Jam. |
| Tray Settings |
This message is displayed when the setting to confirm the paper type and size is enabled. |
To not display this confirmation message, change the setting to Off.
See Related Information: Change the Check Paper Setting.
|
| Wrong Ink Cartridge |
The ink cartridge model number is not compatible with your machine. |
Verify whether the cartridge model number will work with your machine. |
| Wrong Ink Color |
An ink cartridge has been installed in the wrong position. |
Check which ink cartridges are not matched by color to their ink cartridge positions and move them to their correct positions. |
MFC-J1170DW
| Error Message |
Cause |
Action |
| B&W Print Only |
One or more of the color ink cartridges have reached the end of their lives.
You can use the machine in black & white mode for approximately four weeks depending on the number of pages you print.
While this message appears on the LCD, each operation works in the following way:
If the media type is set to Plain Paper and you selected Grayscale in the printer driver, you can use the machine as a black & white printer.
If the paper type is set to Plain Paper, you can make copies in black & white.
If the paper type is set to Plain Paper, the machine will receive and print the faxes in black & white.
|
Replace the ink cartridges.
See Related Information: Replace the Ink Cartridges.
Although the Cause column lists options for using the machine after this error appears, you may not be able to use the machine until you replace one or more of the ink cartridges under the following condition:
If you unplug the machine or remove the ink cartridge.
|
|
Cannot Clean XX
Cannot Initialize XX
Cannot Print XX
|
The machine has a mechanical problem.
-OR
A foreign object, such as a paper clip or a piece of ripped paper, is in the machine.
|
Open the scanner cover and remove any foreign objects and paper scraps from inside the machine. If the error message continues, disconnect the machine from the power for several minutes, and then reconnect it.
See Related Information: Paper is Jammed Inside and in the Front of the Machine (Jam Inside/Front).
If you cannot print documents and received faxes, transfer them to another fax machine or to your computer.
See Related Information: Transfer Your Faxes or Fax Journal Report.
|
| Cannot Detect |
You installed a new ink cartridge too quickly and the machine did not detect it. |
Take out the new ink cartridge and reinstall it slowly and firmly until it locks into place.
See Related Information: Replace the Ink Cartridges.
|
| An ink cartridge is not installed correctly. |
| The new ink cartridge has an air bubble. |
Slowly turn the ink cartridge so that the ink supply port is pointing downward, and then reinstall the cartridge. |
| The wrong Brother model ink cartridge was installed. |
Check the model numbers of the ink cartridges and install the correct ink cartridges. |
| Cannot Scan XX |
The machine has a mechanical problem. |
Disconnect the machine from the power for several minutes, and then reconnect it.
If you cannot print documents and received faxes, transfer them to another fax machine or to your computer.
See Related Information: Transfer Your Faxes or Fax Journal Report.
|
| Comm.Error |
Poor telephone line quality caused a communication error. |
Send the fax again or connect the machine to another telephone line. If the problem continues, call the telephone company and ask them to check your telephone line. |
| Connection Error |
Other devices are trying to connect to the Wi-Fi Direct network at the same time. |
Make sure there are no other devices trying to connect to the Wi-Fi Direct network, and then try to configure the WiFi Direct settings again. |
| Connection Failed |
The Brother machine and your mobile device cannot communicate during the Wi-Fi Direct network configuration. |
• Move the mobile device closer to your Brother machine.
• Move your Brother machine and the mobile device to an obstruction-free area.
• If you are using the PIN Method of WPS, make sure you have entered the correct PIN.
|
| Cover is Open. |
The scanner cover is not locked in the closed position. |
Lift the scanner cover and then close it again. |
| Make sure the interface cable (if used) has been guided correctly through the cable channel and out the back of the machine. |
| The ink cartridge cover is not locked in the closed position. |
closed position. Firmly close the ink cartridge cover until it locks into place. |
| Data Remaining in Memory |
Print data is left in the machine's memory. |
Press  . The machine will cancel the job and clear it from the memory. Try to print again. . The machine will cancel the job and clear it from the memory. Try to print again. |
| Disconnected |
The other person or other person's fax machine stopped the call. |
Try to send or receive again.
If calls are stopped repeatedly and you are using a VoIP (Voice over IP) system, try changing the Compatibility to Basic (for VoIP).
See Related Information: Telephone Line Interference/VoIP.
|
| Document Jam/too Long |
The document was not inserted or fed correctly, or the document scanned from the ADF was too long. |
Remove the jammed document, and then press . Set the document in the ADF correctly.
See Related Information: Load Documents in the Automatic Document Feeder (ADF).
See Related Information: Document Jams.
|
| DR Mode in Use |
The machine is in Distinctive Ring mode. You cannot change the Receive Mode from Manual to another mode. |
Set Distinctive Ring to Off.
See Related Information: Turn off Distinctive Ring.
|
| High Temperature |
The room temperature is too high. |
After cooling the room, allow the machine to cool down to room temperature. Try again when the machine has cooled down. |
| Ink Absorber NearFull |
The ink absorber box is nearly full. |
The ink absorber box must be replaced soon. Call Brother Customer Service or a Brother Authorized Service Center to have your machine serviced.
The ink absorber box absorbs the small amount of ink emitted during print head cleaning.
|
| Ink Absorber Pad Full |
The ink absorber box is full. These components are periodic maintenance items that may require replacement after a period of time to ensure optimum performance from your Brother machine. Because these components are periodic maintenance items, the replacement is not covered under the warranty. The need to replace these items and the time period before replacement is dependent on the number of purges and flushes required to clean the ink system. These boxes acquire amounts of ink during the different purging and flushing operations. The number of times a machine purges and flushes for cleaning varies depending on different situations. For example, frequently powering the machine on and off will cause numerous cleaning cycles since the machine automatically cleans upon power up. |
The ink absorber box must be replaced. Call Brother Customer Service or a Brother Authorized Service Center to have your machine serviced. |
| Ink Low |
The ink level is low. If the sending machine has the ability to convert it, the color fax will be printed at your machine as a black & white fax. |
Prepare a new ink cartridge. You can continue printing until the touchscreen displays Replace Ink.
See Related Information: Replace the Ink Cartridges.
You can still scan even if the ink is low or needs to be replaced.
|
|
Jam Front
Repeat Jam Front
|
The paper is jammed in the machine. |
Gently remove the jammed paper.
See Related Information: Paper is Jammed in the Front of the Machine (Jam Front).
Make sure the paper guides are set to the correct paper size.
DO NOT extend the paper tray when you load A5 or smaller size paper.
|
|
Jam Inside/Front
Repeat Jam Inside/ Front
|
The paper is jammed in the machine. |
Gently remove the jammed paper.
See Related Information: Paper is Jammed Inside and in the Front of the Machine (Jam Inside/Front).
Make sure the paper guides are set to the correct paper size.
DO NOT extend the paper tray when you load A5 or smaller size paper.
|
| Jam Rear |
The paper is jammed in the machine. |
Gently remove the jammed paper.
See Related Information: Paper is Jammed in the Back of the Machine (Jam Rear).
Make sure the paper guides are set to the correct paper size.
DO NOT extend the paper tray when you load A5 or smaller size paper.
|
| Paper dust has accumulated on the surface of the paper pick-up rollers. |
Clean the paper pick-up rollers.
See Related Information: Clean the Paper Pick-up Rollers.
|
| Low Temperature |
The room temperature is too low. |
After warming the room, allow the machine to warm up to room temperature. Try again when the machine has warmed up. |
| No Caller ID |
There is no incoming call history. You did not receive calls or you have not subscribed to the Caller ID service from your telephone company. |
To use the Caller ID feature, call your telephone company.
See Related Information: Caller ID.
|
|
No Device
No device found.
|
When configuring the Wi-Fi Direct network, the Brother machine cannot find your mobile device. |
• Make sure your machine and mobile device are in the Wi-Fi Direct mode.
• Move the mobile device closer to your Brother machine.
• Move your Brother machine and the mobile device to an obstruction-free area.
• If you are manually configuring the WiFi Direct network, make sure you have entered the correct password.
• If your mobile device has a configuration page for how to obtain an IP address, make sure the IP address of your mobile device has been configured via DHCP.
|
| No Ink Cartridge |
An ink cartridge is not installed correctly. |
Remove the ink cartridge and re-install it slowly and firmly until it locks into place.
See Related Information: Replace the Ink Cartridges.
|
| No Paper Fed |
The machine is out of paper or paper is not correctly loaded in the paper tray |
Do one of the following:
• Refill the paper tray, and then follow the LCD instructions.
• Remove and reload the paper, and then follow the LCD instructions.
See Related Information: Load Paper.
|
| The Jam Clear Cover is not closed correctly. |
Make sure the Jam Clear Cover is closed evenly at both ends.
See Related Information: Printer Jam or Paper Jam.
|
| Paper dust has accumulated on the surface of the paper pick-up rollers. |
Clean the paper pick-up rollers.
See Related Information: Clean the Paper Pick-up Rollers.
|
| No Response/Busy |
The number you dialed does not answer or is busy. |
Verify the number and try again. |
| Out of Fax Memory |
The fax memory is full. |
Do one of the following:
• Clear the data from the memory. To gain extra memory, you can turn off Memory Receive. See Related Information: Turn Off Memory Receive.
• Print the faxes that are in the memory.
See Related Information: Print a Fax Stored in the Machine's Memory.
|
| Out of Memory |
The machine's memory is full. |
If a fax-sending or copy operation is in progress:
• Press or Quit and wait until the other operations that are in progress finish, and then try again.
• Press Partial Print to copy the pages scanned so far.
• Clear the data stored in the memory. To gain extra memory, you can turn off Memory Receive.
See Related Information: Turn Off Memory Receive.
• Print the faxes stored in the memory.
See Related Information: Print a Fax Stored in the Machine's Memory.
|
| Paper Size Mismatch |
The paper size setting does not match the size of paper in the tray.
-OR
You did not set the paper guides in the tray to the indicators for the paper size you are using.
|
1. Check that the paper size you selected on the machine's display matches the size of the paper in the tray. See Related Information: Change the Paper Size and Paper Type.
2. Make sure you loaded the paper in the correct orientation and set the paper guides at the indicators for your paper size. See Related Information: Load Paper.
3. After you have checked the paper size and the paper orientation, follow the LCD instructions.
|
|
If you are printing from your computer, make sure the paper size you selected in the printer driver or in the application you use to print matches the size of paper in the tray.
See Related Information: Print Settings (Windows).
|
| Paper Tray not detected |
The paper tray is not completely inserted. |
Slowly push the paper tray completely into the machine. |
| Paper or a foreign object has prevented the paper tray from being inserted correctly. |
Pull the paper tray out of the machine, and remove the jammed paper or foreign object. If you cannot find or remove the jammed paper, see Related Information: Printer Jam or Paper Jam. |
| Repetitive No Paper Fed |
The machine is out of paper or paper is not correctly loaded in the paper tray. |
Do one of the following:
• Refill the paper tray, and then follow the LCD instructions.
• Remove and reload the paper, and then follow the LCD instructions.
See Related Information: Load Paper.
|
| Paper dust has accumulated on the surface of the paper pick-up rollers. |
Clean the paper pick-up rollers.
See Related Information: Clean the Paper Pick-up Rollers.
|
| Replace Ink |
One or more of the ink cartridges have reached the end of their lives. The machine will stop all print operations. While memory is available, black and white faxes will be stored in the memory. If the sending machine has the ability to convert it, the color fax will be stored in the memory as a black and white fax. |
Replace the ink cartridges.
See Related Information: Replace the Ink Cartridges.
You can still scan even if the ink is low or needs to be replaced.
|
| The maximum number of devices are already connected using Wi-Fi Direct. |
The maximum number of mobile devices are already connected to the Wi-Fi Direct network when the Brother machine is the Group Owner. |
After the current connection between your Brother machine and another mobile device has shut down, try to configure the Wi-Fi Direct settings again. You can confirm the connection status by printing the Network Configuration Report.
See Related Information: Print the Network Configuration Report.
|
| Touchscreen Init. Failed |
The touchscreen was pressed before the power on initialization was completed. |
Make sure nothing is touching or resting on the touchscreen, especially when plugging the machine in. |
| Debris may be stuck between the lower part of the touchscreen and its frame. |
Insert a piece of stiff paper between the lower part of the touchscreen and its frame and slide it back and forth to push out the debris. |
| Tray Settings |
This message is displayed when the setting to confirm the paper type and size is enabled. |
To not display this confirmation message, change the setting to Off.
See Related Information: Change the Check Paper Setting.
|
| Wrong Ink Cartridge |
The ink cartridge model number is not compatible with your machine. |
Verify whether the cartridge model number will work with your machine. |
| Wrong Ink Color |
An ink cartridge has been installed in the wrong position. |
Check which ink cartridges are not matched by color to their ink cartridge positions and move them to their correct positions. |
Transfer Your Faxes or Fax Journal Report
Home > Troubleshooting > Error and Maintenance Messages > Transfer Your Faxes or Fax Journal Report
If the LCD shows:
• [Cannot Clean XX]
• [Cannot Initialize XX]
• [Cannot Start XX]
• [Cannot Print XX]
• [Cannot Scan XX]
We recommend transferring your faxes to another fax machine or to your computer.
See Related Information: Transfer Faxes to Another Fax Machine.
See Related Information: Transfer Faxes to Your Computer.
You can also transfer the Fax Journal report to see if there are any faxes you must transfer.
See Related Information: Transfer the Fax Journal Report to Another Fax Machine.
Transfer Faxes to Another Fax Machine
Home > Troubleshooting > Error and Maintenance Messages > Transfer Your Faxes or Fax Journal Report > Transfer Faxes to Another Fax Machine
If you have not set up your Station ID, you cannot enter Fax Transfer mode.
>> MFC-J1010DW/MFC-J1012DW
>> MFC-J1170DW
MFC-J1010DW/MFC-J1012DW
1. Press Stop/Exit to clear the error temporarily.
2. Press Settings.
3. Press  or
or  to make your selections:
a. Select [Service]. Press OK.
b. Select [Data Transfer]. Press OK.
c. Select [Fax Transfer]. Press OK.
4. Do one of the following:
• If the LCD displays [No Data], there are no faxes left in the machine's memory.
Press , and then press Stop/Exit.
• Enter the fax number where faxes will be forwarded.
5. Press Black Start.
MFC-J1170DW
1. Press to clear the error temporarily.
2. Press  [Settings] > [All Settings] > [Service] > [Data Transfer] > [Fax Transfer].
3. Do one of the following:
• If the touchscreen displays [No Data], there are no faxes left in the machine’s memory.
Press [Close], and then press  .
.
• Enter the fax number where faxes will be forwarded.
4. Press [Fax Start].
Transfer Faxes to Your Computer
Home > Troubleshooting > Error and Maintenance Messages > Transfer Your Faxes or Fax Journal Report > Transfer Faxes to Your Computer
You can transfer the faxes from your machine's memory to your computer.
>> MFC-J1010DW/MFC-J1012DW
>> MFC-J1170DW
MFC-J1010DW/MFC-J1012DW
1. Press Stop/Exit to clear the error temporarily.
2. Make sure you have installed the Brother software and drivers on your computer, and then turn on PC-FAX Receive on the computer.
3. Launch  (Brother Utilities), and then click the drop-down list and select your model name (if not already selected).
4. Click PC-FAX in the left navigation bar, and then click Receive.
5. Read and confirm the instructions on your computer.
Faxes in the machine's memory will be sent to your computer automatically.
When faxes in the machine's memory are not sent to your computer:
Make sure you have set [PC Fax Receive] on the machine.
Press or to select [Backup Print: On] or [Backup Print: Off]. Press OK.
If faxes are in the machine's memory when you set up PC-Fax Receive, an LCD message prompts you to transfer the faxes to your computer.
Press to transfer all faxes in the memory to your computer.
MFC-J1170DW
1. Press to clear the error temporarily.
2. Make sure you have installed the Brother software and drivers on your computer, and then turn on PC-FAX Receive on the computer.
3. Launch (Brother Utilities), and then click the drop-down list and select your model name (if not already selected).
4. Click PC-FAX in the left navigation bar, and then click Receive.
5. Read and confirm the instructions on your computer.
Faxes in the machine's memory will be sent to your computer automatically.
When faxes in the machine's memory are not sent to your computer:
Make sure you have set [PC Fax Receive] on the machine.
If faxes are in the machine's memory when you set up PC-Fax Receive, the touchscreen prompts you to transfer the faxes to your computer.
If Fax Preview is set to Off, you will be asked if you want to print backup copies.
Press [Yes] to transfer all faxes in the memory to your computer.
Error Messages When Using the Brother Web Connect Feature
Home > Troubleshooting > Error and Maintenance Messages > Error Messages When Using the Brother Web Connect Feature
Your Brother machine displays an error message if an error occurs. The most common error messages are shown in the chart.
Connection Error
| Error Messages |
Cause |
Action |
|
(MFC-J1010DW/MFC-J1012DW) Connection Error 02
(MFC-J1170DW) Connection Error 02
|
The machine is not connected to a network. |
(MFC-J1010DW/MFC-J1012DW)
• Verify that the network connection is good.
• If WEB was pressed soon after the machine was turned on, the network connection may not have been established yet. Wait and try again.
(MFC-J1170DW)
• Verify that the network connection is good.
• If the Web or Apps option was pressed soon after the machine was turned on, the network connection may not have been established yet. Wait and try again.
|
|
(MFC-J1010DW/MFC-J1012DW) Connection Error 03
(MFC-J1170DW) Connection Error 03
|
• Network or server settings are incorrect.
• There is a problem with the network or server.
|
(MFC-J1010DW/MFC-J1012DW)
• Confirm that network settings are correct, or wait and try again later.
• If WEB was pressed soon after the machine was turned on, the network connection may not have been established yet. Wait and try again.
(MFC-J1170DW)
• Confirm that network settings are correct, or wait and try again later.
• If the Web or Apps option was pressed soon after the machine was turned on, the network connection may not have been established yet. Wait and try again.
|
|
(MFC-J1010DW/MFC-J1012DW) Connection Error 07
(MFC-J1170DW) Connection Error 07
|
Date and time settings are incorrect. |
Set the date and time correctly. Note that if the machine's power cord is disconnected, the date and time settings may have reset to factory settings. |
Authentication Error
| Error Messages |
Cause |
Action |
| Authentication Error 01 |
The PIN you entered to access the account is incorrect. The PIN is the four-digit number that was entered when registering the account to the machine. |
Enter the correct PIN. |
| Authentication Error 02 |
The temporary ID that was entered is incorrect. |
Enter the correct temporary ID. |
| The temporary ID that was entered has expired. A temporary ID is valid for 24 hours. |
Apply for Brother Web Connect access again and receive a new temporary ID, and then use the new ID to register the account to the machine. |
| Authentication Error 03 |
The name you entered as the display name has already been registered to another service user. |
Enter a different display name. |
Server Error
| Error Messages |
Cause |
Action |
| Server Error 01 |
The machine's authentication information (needed to access the service) has expired or is invalid. |
Apply for Brother Web Connect access again to receive a new temporary ID, and then use the new ID to register the account to the machine. |
| Server Error 03 |
The file you are trying to upload may have one of the following problems:
• The file exceeds the service's limit on number of pixels, file size, etc.
• The file type is not supported.
• The file is corrupted.
|
The file cannot be used:
• Check the service's size or format restrictions.
• Save the file as a different type.
• If possible, get a new, uncorrupted version of the file.
|
| Server Error 13 |
There is a problem with the service and it cannot be used now. |
Wait and try again. If you get the message again, access the service from a computer to confirm if it is unavailable. |
Shortcut Error
| Error Messages |
Cause |
Action |
| Shortcut Error 02 |
The shortcut cannot be used because the account was deleted after the shortcut was registered. |
Delete the shortcut, and then register the account and shortcut again. |
Document Jams
Home > Troubleshooting > Document Jams
Document is Jammed in the Top of the ADF Unit
Home > Troubleshooting > Document Jams > Document is Jammed in the Top of the ADF Unit
1. Remove any paper from the ADF that is not jammed.
2. Open the ADF cover.
3. Remove the jammed document by pulling it upward.
4. Close the ADF cover.
5. Press Stop/Exit or .
IMPORTANT To avoid future document jams, close the ADF cover correctly by pressing it down in the center.
Document is Jammed inside the ADF Unit
Home > Troubleshooting > Document Jams > Document is Jammed inside the ADF Unit
1. Remove any paper from the ADF that is not jammed.
2. Lift the document cover.
3. Pull the jammed document out to the left.

4. Close the document cover.
5. Press Stop/Exit or .
Remove Paper Scraps Jammed in the ADF
Home > Troubleshooting > Document Jams > Remove Paper Scraps Jammed in the ADF
1. Lift the document cover.
2. Insert a piece of stiff paper, such as cardstock, into the ADF to push any small paper scraps through.
3. Close the document cover.
4. Press Stop/Exit or .
Printer Jam or Paper Jam
Home > Troubleshooting > Printer Jam or Paper Jam
Paper is Jammed Inside and in the Front of the Machine (Jam Inside/ Front)
Home > Troubleshooting > Printer Jam or Paper Jam > Paper is Jammed Inside and in the Front of the Machine (Jam Inside/Front)
If the LCD displays [Jam Inside/Front], [Repeat Jam Inside/Front] or [Repeat Jam], follow these steps:
1. Unplug the machine from the AC power outlet.
IMPORTANT (MFC-J1010DW/MFC-J1012DW) Before you unplug the machine from the power source, you can transfer your faxes that are stored in the machine's memory to your computer or another fax machine so you will not lose any important messages.
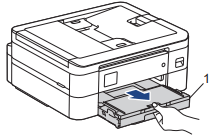
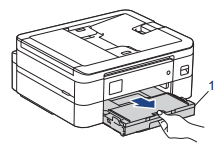
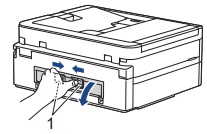
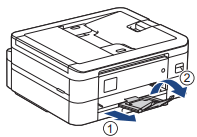
2. Pull the paper tray (1) completely out of the machine as shown by the arrow.
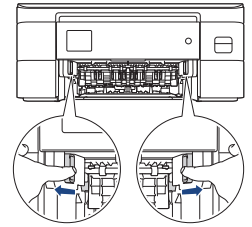
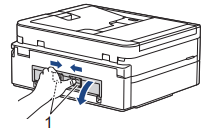
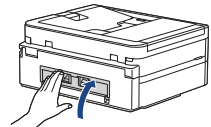
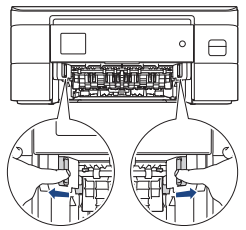
3. Pull the two green levers inside the machine to release the jammed paper.
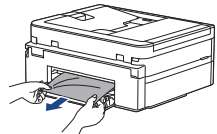
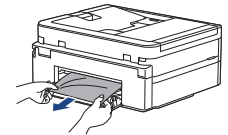
4. Slowly pull the jammed paper (1) out of the machine.

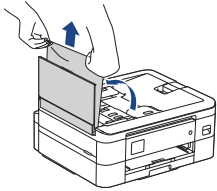
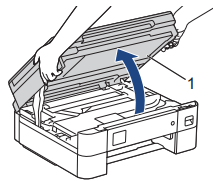
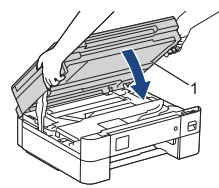
5. Place both hands under the plastic tabs on both sides of the machine to lift the scanner cover (1) into the open position.
6. Slowly pull the jammed paper (1) out of the machine.
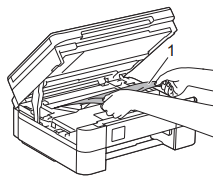
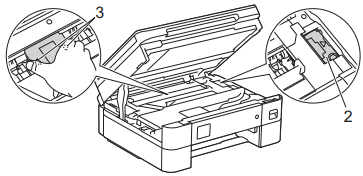
IMPORTANT
- DO NOT touch the encoder strip, a thin strip of plastic that stretches across the width of the machine (1). Doing this may cause damage to the machine.

- If the print head is in the right corner as shown in the illustration (2), you cannot move it. Follow these steps:
a. Close the scanner cover, and then reconnect the power cord.
b. Open the scanner cover again, and then press and hold Stop/Exit or until the print head moves to the center.
c. Unplug the machine from the power source and gently remove the jammed paper.
- If the paper is jammed under the print head, unplug the machine from the power source, and then move the print head to remove the paper.
Hold the concave areas with the triangle marks as shown in the illustration (3) to move the print head.
- If ink gets on your skin or clothing, immediately wash it off with soap or detergent.
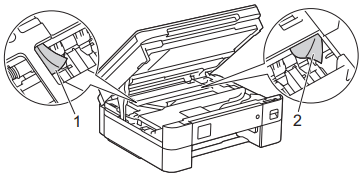
If your LCD error message was [Repeat Jam Inside/Front] or [Repeat Jam], move the print head (if needed) to remove any paper remaining in this area. Make sure scraps of paper are not left in the corners of the machine (1) and (2).
7. Gently close the scanner cover using both hands.
If your LCD error message was [Repeat Jam Inside/Front] or [Repeat Jam], do the following:
a. Make sure you look carefully inside (1) for any scraps of paper.
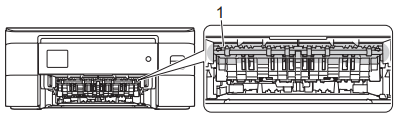
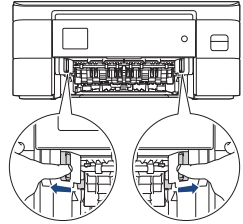
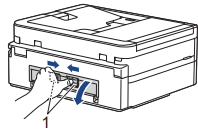
b. Squeeze both levers (1), and then open the Jam Clear Cover at the back of the machine.
c. Slowly pull the jammed paper out of the machine.

d. Close the Jam Clear Cover. Make sure the cover is closed completely.

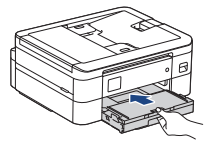
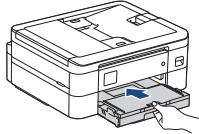
8. Slowly push the paper tray completely into the machine.
9. Pull out the paper support (1) until it locks into place, and then unfold the paper support flap (2).

10. Reconnect the power cord.
Paper is Jammed in the Front of the Machine (Jam Front)
Home > Troubleshooting > Printer Jam or Paper Jam > Paper is Jammed in the Front of the Machine (Jam Front)
If the LCD displays [Jam Front] or [Repeat Jam Front], follow these steps:
1. Unplug the machine from the AC power outlet.
IMPORTANT (MFC-J1010DW/MFC-J1012DW) Before you unplug the machine from the power source, you can transfer your faxes that are stored in the machine's memory to your computer or another fax machine so you will not lose any important messages.
2. Pull the paper tray (1) completely out of the machine as shown by the arrow.
3. Pull the two green levers inside the machine to release the jammed paper.
4. Slowly pull out the jammed paper (1).

If your LCD error message was [Repeat Jam Front], do the following:
a. Make sure you look carefully inside (1) for any scraps of paper.

b. Squeeze both levers (1), and then open the Jam Clear Cover at the back of the machine.
c. Slowly pull the jammed paper out of the machine.
d. Close the Jam Clear Cover. Make sure the cover is closed completely.
5. Slowly push the paper tray completely into the machine.
6. Pull out the paper support (1) until it locks into place, and then unfold the paper support flap (2).

7. Reconnect the power cord.
Paper is Jammed in the Back of the Machine (Jam Rear)
Home > Troubleshooting > Printer Jam or Paper Jam > Paper is Jammed in the Back of the Machine (Jam Rear)
If the LCD displays [Jam Rear], follow these steps:
1. Unplug the machine from the AC power outlet.
IMPORTANT (MFC-J1010DW/MFC-J1012DW) Before you unplug the machine from the power source, you can transfer your faxes that are stored in the machine's memory to your computer or another fax machine so you will not lose any important messages.
2. Pull the paper tray (1) completely out of the machine as shown by the arrow.

3. Pull the two green levers inside the machine to release the jammed paper.
Depending on the paper size, it is easier to remove the jammed paper from the front of the machine rather than from the back of the machine.
4. Squeeze both levers (1), and then open the Jam Clear Cover at the back of the machine.
5. Slowly pull the jammed paper out of the machine.
6. Close the Jam Clear Cover. Make sure the cover is closed completely.
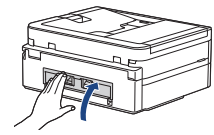
7. Slowly push the paper tray completely into the machine.
8. Pull out the paper support (1) until it locks into place, and then unfold the paper support flap (2).
9. Reconnect the power cord.
If You Are Having Difficulty with Your Machine
Home > Troubleshooting > If You Are Having Difficulty with Your Machine
For technical help, you must call the country where you bought the machine. Calls must be made from within that country.
If you think there is a problem with your machine, check the following topics. You can correct most problems yourself.
Paper Handling and Printing Problems
Home > Troubleshooting > If You Are Having Difficulty with Your Machine > Paper Handling and Printing Problems
Printing Difficulties
| Difficulties |
Suggestions |
| No printout |
(Windows)
Check that the correct printer driver has been installed and selected.
|
|
Check to see if the machine's display is showing an error message.
See Related Information: Error and Maintenance Messages.
|
|
Check that the machine is online:
- Windows 10, Windows Server 2016, and Windows Server 2019
Click  > Windows System > Control Panel. In the Hardware and Sound group, click View devices and printers. Right-click the Brother XXX-XXXX Printer (where XXX-XXXX is the name of your model). Click See what’s printing. If printer driver options appear, select your printer driver. Click Printer in the menu bar and make sure Use Printer Offline is not selected. > Windows System > Control Panel. In the Hardware and Sound group, click View devices and printers. Right-click the Brother XXX-XXXX Printer (where XXX-XXXX is the name of your model). Click See what’s printing. If printer driver options appear, select your printer driver. Click Printer in the menu bar and make sure Use Printer Offline is not selected.
Move your mouse to the lower right corner of your desktop. When the menu bar appears, click Settings > Control Panel. In the Hardware and Sound group, click View devices and printers. Right-click the Brother XXX-XXXX Printer (where XXX-XXXX is the name of your model). Click See what's printing. If printer driver options appear, select your printer driver. Click Printer in the menu bar and make sure Use Printer Offline is not selected.
Click Control Panel on the Start screen. In the Hardware group, click View devices and printers. Right-click the Brother XXX-XXXX Printer (where XXX-XXXX is the name of your model). Click See what’s printing. If printer driver options appear, select your printer driver. Click Printer in the menu bar and make sure Use Printer Offline is not selected.
Move your mouse to the lower right corner of your desktop. When the menu bar appears, click Settings > Control Panel. In the Hardware group, click View devices and printers. Right-click the Brother XXX-XXXX Printer (where XXX-XXXX is the name of your model). Click See what's printing. If printer driver options appear, select your printer driver. Click Printer in the menu bar and make sure Use Printer Offline is not selected.
- Windows 7 and Windows Server 2008 R2
Click  (Start) > Devices and Printers. Right-click Brother XXX-XXXX Printer (where XXX-XXXX is the name of your model) and click See what's printing. If printer driver options appear, select your printer driver. Click Printer in the menu bar. Make sure Use Printer Offline is not selected. (Start) > Devices and Printers. Right-click Brother XXX-XXXX Printer (where XXX-XXXX is the name of your model) and click See what's printing. If printer driver options appear, select your printer driver. Click Printer in the menu bar. Make sure Use Printer Offline is not selected.
Click (Start) > Control Panel > Hardware and Sound > Printers. Rightclick Brother XXX-XXXX Printer (where XXX-XXXX is the name of your model). Make sure Use Printer Online is not listed. If it is listed, click this option to set the driver Online.
One or more ink cartridges have reached the end of their life.
See Related Information: Replace the Ink Cartridges.
|
|
If old, unprinted data remains in the printer driver spooler, it will prevent new print jobs from printing. Open the printer icon and delete all data as follows:
- Windows 10, Windows Server 2016, and Windows Server 2019
Click > Windows System > Control Panel. In the Hardware and Sound group, click View devices and printers > Printers.
Move your mouse to the lower right corner of your desktop. When the menu bar appears, click Settings > Control Panel. In the Hardware and Sound group, click View devices and printers > Printers.
Click Control Panel on the Start screen. In the Hardware group, click View devices and printers > Printers.
Move your mouse to the lower right corner of your desktop. When the menu bar appears, click Settings > Control Panel. In the Hardware group, click View devices and printers > Printers.
- Windows 7 and Windows Server 2008 R2
Click /Start > Devices and Printers > Printers and Faxes.
Click (Start) > Control Panel > Hardware and Sound > Printers.
Click the System Preferences > Printers & Scanners.
|
| The headers or footers appear when the document is displayed on the screen but do not appear when the document is printed. |
There is an unprintable area on the top and bottom of the page. Adjust the top and bottom margins in your document to allow for this.
See Related Information: Unprintable Area.
|
| Cannot perform ‘Page Layout’ printing. |
(Windows )
Check that the paper size setting in the application and in the printer driver are the same.
See Related Information: Change the Paper Size and Paper Type .
|
| Print speed is too slow. |
(Windows)
Try changing the printer driver setting. The highest resolution needs longer data processing, sending, and printing time. Try the other quality settings in the printer driver as follows:
In the printer driver, clear the Color Enhancement (True2Life) checkbox on the Advanced tab.
|
| Turn the Borderless feature off. Borderless printing is slower than normal printing. See Related Information: Print Settings (Windows). |
| Turn off the Quiet Mode setting. Print speed is slower in Quiet Mode. See Related Information: Reduce Printing Noise. |
|
Make sure the Media Type setting in the printer drivers, your application, or the Paper Type setting on the machine matches the type of paper you are using.
See Related Information: Change the Paper Size and Paper Type.
See Related Information: Print Settings (Windows).
|
Paper Handling Difficulties
| Difficulties |
Suggestions |
| The machine does not feed paper. |
Make sure the paper tray is pushed in all the way until it locks into place.
Make sure the Jam Clear Cover at the back of the machine is closed.
If the machine's LCD displays a Paper Jam message and you still have a problem, see Related Information: Error and Maintenance Messages.
If the paper tray is empty, load a new stack of paper into the paper tray.
If there is paper in the paper tray, make sure it is straight. If the paper is curled, straighten it. Sometimes it is helpful to remove the paper, turn the stack over and put it back in the paper tray.
Reduce the amount of paper in the paper tray, and then try again.
Clean the paper pick-up rollers.
See Related Information: Clean the Paper Pick-up Rollers.
Make sure that the paper is within specifications for the machine.
See Related Information: Paper Capacity of the Paper Tray.
|
| Photo paper does not feed correctly. |
When you print on photo paper, load one extra sheet of the same photo paper in the paper tray. |
| Machine feeds multiple pages. |
• Make sure the paper is loaded correctly in the paper tray.
• Remove all the paper from the tray and fan the stack of paper well, then put it back in the tray.
• Make sure you do not push the paper in too far.
See Related Information: Load Paper.
|
|
Make sure the Jam Clear Cover is closed correctly.
See Related Information: Printer Jam or Paper Jam.
|
|
Make sure the Base Pad in the paper tray is not dirty.
See Related Information: Clean the Base Pad.
|
| There is a paper jam. |
See Related Information: Printer Jam or Paper Jam.
Make sure the paper guides are set to the correct paper size.
|
|
Use the jam prevention settings.
For copying:
See Related Information: Change the Print Options to Improve Your Print Results.
For printing:
See Related Information: Change the Print Options to Improve Your Print Results.
See Related Information: Prevent Smudged Printouts and Paper Jams (Windows).
|
| The paper jams when you use 2- sided print. |
If paper jams occur frequently during 2-sided printing, the paper feed rollers may be stained with ink. Clean the paper feed rollers.
See Related Information: Clean the Paper Feed Rollers.
|
Printing Received Faxes
| Difficulties |
Suggestions |
|
• Condensed print
• Horizontal streaks
• Top and bottom sentences are cut off
• Missing lines
|
This is usually caused by a poor telephone connection. Make a copy; if your copy looks good, you probably had a bad connection, with static or interference on the telephone line. Ask the other party to send the fax again. |
| Black lines when receiving. |
The sender’s scanner may be dirty. Ask the sender to make a copy to see if the problem is with the sending machine. Try receiving from another fax machine. |
| Left and right margins are cut off or a single page is printed on two pages. |
If the received faxes are divided and printed on two pages or if you get an extra blank page, your paper size setting may not be correct for the paper you are using.
See Related Information: Change the Paper Size and Paper Type.
|
|
Turn on Auto Reduction.
See Related Information: Shrink Page Size of an Oversized Incoming Fax.
|
| Received color fax prints only in black and white. |
Replace the color ink cartridges that have reached the end of their life, and then ask the other person to send the color fax again.
See Related Information: Replace the Ink Cartridges.
|
Other Problems
Home > Troubleshooting > If You Are Having Difficulty with Your Machine > Other Problems
Copying Difficulties
| Difficulties |
Suggestions |
|
Black lines or streaks appear in copies.

|
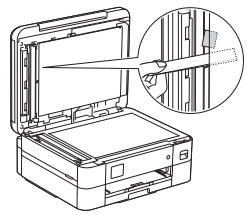
Black lines on copies are typically caused by dirt or correction fluid on the glass strip. Clean the glass strip, scanner glass, and the white bar and white plastic above them.
See Related Information: Clean the Scanner.
|
| Black marks or spots appear in copies. |
Black marks or spots on copies are typically caused by dirt or correction fluid on the scanner glass. Clean the scanner glass and white plastic above it.
See Related Information: Clean the Scanner.
|
| Copies are blank. |
Make sure you are loading the document correctly.
See Related Information: Load Documents in the Automatic Document Feeder (ADF).
See Related Information: Load Documents on the Scanner Glass.
|
| Poor copy results when using the ADF. |
Try using the scanner glass.
See Related Information: Load Documents on the Scanner Glass.
|
| Fit to Page does not work correctly |
Make sure the document is not skewed on the scanner glass. Reposition the document and try again. |
| Smudge or stain on the reverse side of the page when using the 2- sided copy feature. |
Change the print options.
See Related Information: Change the Print Options to Improve Your Print Results.
|
Scanning Difficulties
| Difficulties |
Suggestions |
| TWAIN or WIA errors appear when starting to scan. (Windows) |
Make sure the Brother TWAIN or WIA driver is selected as the primary source in your scanning application. For example, in Nuance™ PaperPort™ 14SE, click Desktop > Scan Settings > Select to choose the Brother TWAIN/WIA driver. |
| OCR does not work. |
Try increasing the scanning resolution. |
| Poor scanning results when using the ADF. (Black lines appear in the scanned data.) |
Clean the white bar and the glass strip underneath it.
See Related Information: Clean the Scanner.
|
|
Try using the scanner glass.
See Related Information: Load Documents on the Scanner Glass.
|
Software Difficulties
| Difficulties |
Suggestions |
| Cannot print. |
Uninstall the drivers (Windows) and the Brother software and reinstall the latest version of both. |
| “The device is busy.” appears on the computer screen. |
Make sure there is no error message on the machine's display. |