User's Guide Printer
Control Panel Overview
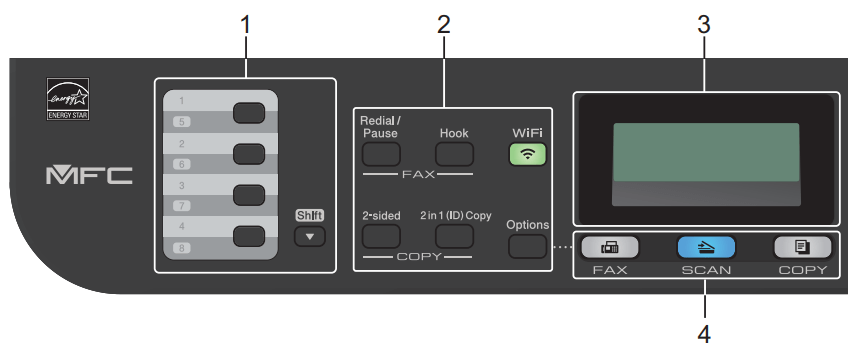
1. One Touch Buttons
Store and recall up to eight fax and telephone numbers. To access stored One Touch fax and telephone numbers 1-4, press the One Touch button assigned to that number. To access stored One Touch fax and telephone numbers 5-8, press and hold Shift as you press the button.
2. Function Buttons
Redial/Pause - Press to dial the last number you called. This button also inserts a pause when programming quick dial numbers or when dialing a number manually.
Hook - Press Hook before dialing to ensure a fax machine answers, and then press Start. If the machine is in Fax/Tel (F/T) Mode and you pick up the handset of an external telephone during the F/T ring (pseudo double-rings), press Hook to talk.
WiFi (for wireless models) - Press the WiFi button and launch the wireless installer on your computer. Follow the on-screen instructions to set up a wireless connection between your machine and your network. When the WiFi light is on, your Brother machine is connected to a wireless access point. When the WiFi light blinks, the wireless connection is down, or your machine is in the process of connecting to a wireless access point.
Resolution (for certain models only) - Press to change the Fax resolution.
2 in 1 (ID) Copy - Press to copy both sides of an identification card onto a single page
2-sided - Press to copy on both sides of a sheet of paper.
Options - Press to access temporary settings for faxing, scanning, or copying.
3. Liquid Crystal Display (LCD)
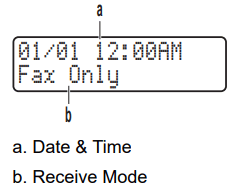
Displays messages to help you set up and use the machine. If the machine is in Fax Mode, the LCD displays:
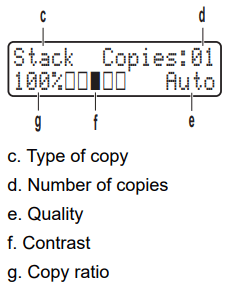
When you press COPY, the LCD displays:
4. Mode Buttons
FAX Press to switch the machine to Fax Mode.
SCAN Press to switch the machine to Scan Mode.
COPY Press to switch the machine to Copy Mode.
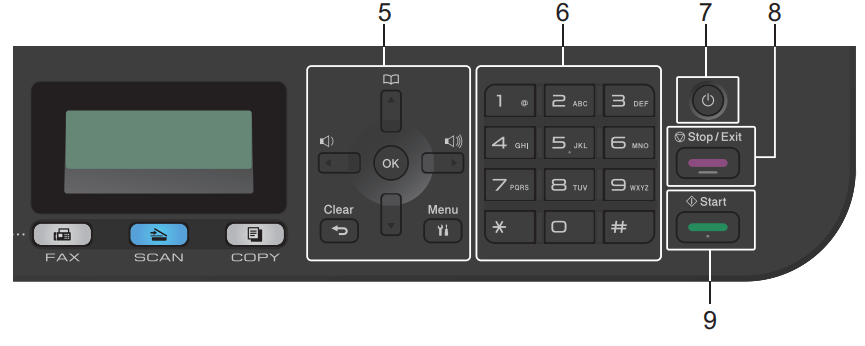
5. Menu Buttons
Clear - Press to delete entered data or cancel the current setting.
Menu - Press to access the Menu for programming your machine settings.
OK - Press to store your machine settings.
 or
or  - Press to scroll back or forward through menu selections.
 or
or  - Press to scroll up or down through menus and options. Press to change the resolution in Fax Mode.
 - Press to access speed dial numbers.
6. Dial Pad
- Use to dial fax and telephone numbers.
- Use as a keyboard to enter text or characters.
7.  Power On/Off
- Turn on the machine by pressing .
- Turn off the machine by pressing and holding . The LCD displays [Shutting Down] and stays on for a few seconds before turning off. If you have an external telephone or TAD connected, it is always available.
8. Stop/Exit
- Press to stop an operation.
- Press to exit from a menu.
9. Start
- Press to start sending faxes.
- Press to start copying.
- Press to start scanning documents.
Print from Your Computer (Windows)
Print a Document (Windows)
1. Select the print command in your application.
2. Select Brother XXX-XXXX (where XXXX is the name of your model), and then click the printing properties or preferences button.
The printer driver window appears.
3. Make sure you have loaded the correct size paper in the paper tray.
4. Click the Paper Size drop-down list, and then select your paper size.
5. In the Orientation field, select the Portrait or Landscape option to set the orientation of your printout. Notes: If your application contains a similar setting, we recommend that you set the orientation using the application.
6. Type the number of copies (1-999) you want in the Copies field.
7. Click the Media Type drop-down list, and then select the type of paper you are using.
8. To print multiple pages on a single sheet of paper or print one page of your document on multiple sheets, click the Multiple Page drop-down list, and then select your options.
9. Change other printer settings, if needed.
10. Click OK.
11. Complete your print operation.
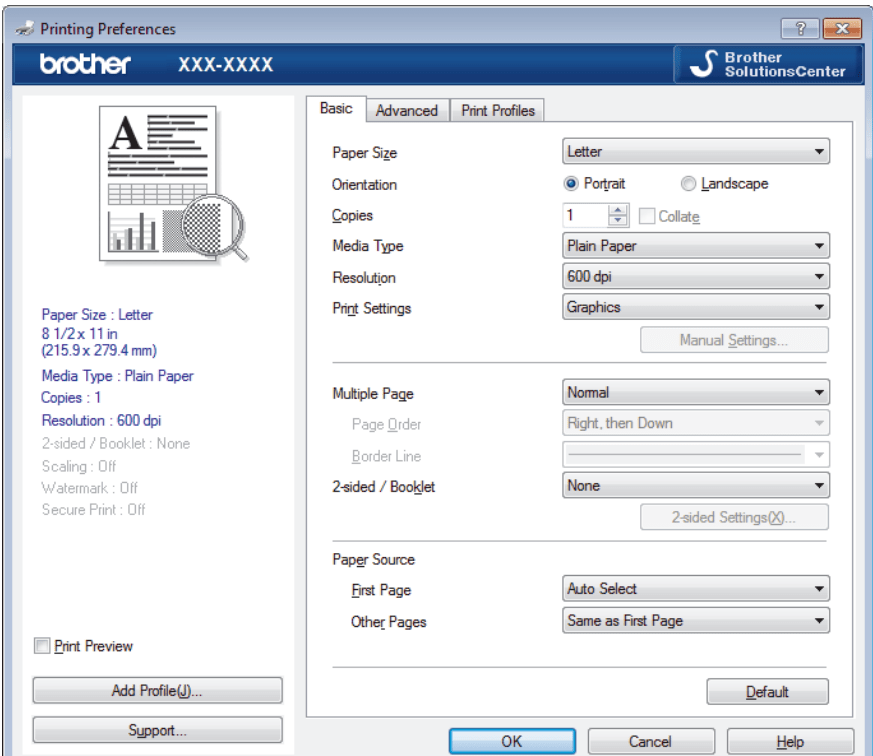
Print Settings (Windows)
Basic Tab
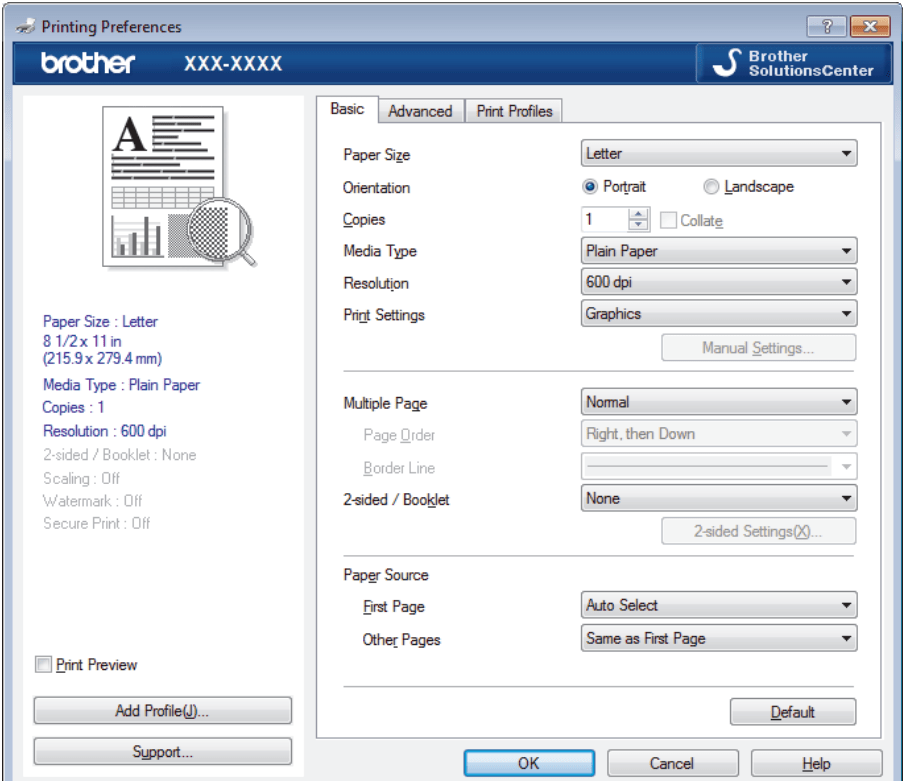
1. Paper Size - Select the size of the paper you want to use. You can either choose from standard paper sizes or create a custom paper size.
2. Orientation - Select the orientation (portrait or landscape) of your printout. If your application contains a similar setting, we recommend that you set the orientation using the application.
3. Copies - Type the number of copies (1-999) that you want to print in this field. Collate Select this option to print sets of multi-page documents in the original page order. When this option is selected, one complete copy of your document will print, and then reprint according to the number of copies you choose. If this option is not selected, then each page will print according to the number of copies chosen before the next page of the document is printed.
4. Media Type - Select the type of media you want to use. To achieve the best print results, the machine automatically adjusts its print settings according to the selected media type.
5. Resolution - Select the print resolution. As print resolution and speed are related, the higher the resolution, the longer it will take to print the document.
6. Print Settings - Select the type of document you want to print
Manual Settings... Specify advanced settings such as brightness, contrast, and other settings
Graphics
Use Printer Halftone - Select this option to use the printer driver to express halftones.
Brightness - Specify the brightness.
Contrast - Specify the contrast.
Graphics Quality - Select either Graphics or Text for the best print quality, based on the type of document you are printing.
Improve Gray Printing - Select this option to improve the image quality of shaded areas.
Improve Pattern Printing - Select this option to improve the pattern printing if printed fills and patterns are different from the fills and patterns you see on your computer screen.
Improve Thin Line - Select this option to improve the image quality of thin lines.
Use System Halftone - Select this option to use Windows to express halftones.
TrueType Mode (Available only for certain models)
Mode - Select how the fonts are processed for printing.
Use Printer TrueType Fonts - Select whether to use built-in fonts for the font processing.
7. Multiple Page - Select this option to print multiple pages on a single sheet of paper, or print one page of your document on multiple sheets.
Page Order: Select the page order when printing multiple pages on a single sheet of paper.
Border Line: Select the type of border to use when printing multiple pages on a single sheet of paper.
8. 2-sided / Booklet - Select this option to print on both sides of the paper, or print a document in booklet format using 2-sided printing.
2-sided Settings button: Click this button to select the type of 2-sided binding. Four types of 2-sided bindings are available for each orientation.
9. Paper Source - Select the paper source setting according to your print conditions or purpose.
First Page: Select the paper source to use for printing the first page.
Other Pages: Select the paper source to use for printing the second and subsequent pages.
Advanced Tab
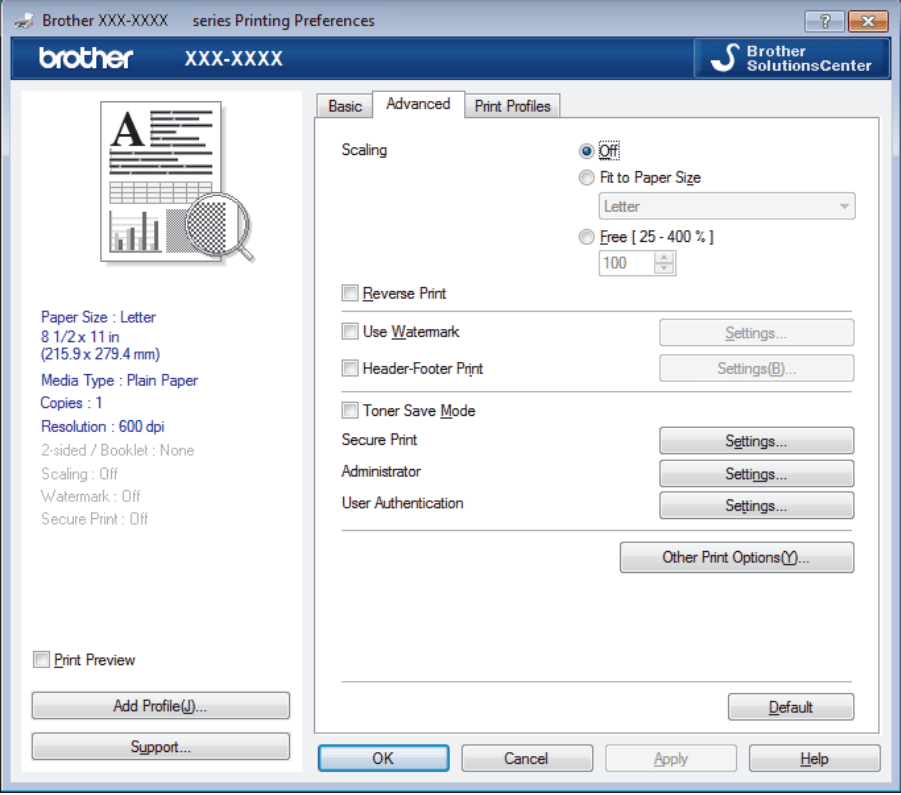
1. Scaling Select these options to enlarge or reduce the size of the pages in your document.
Fit to Paper Size - Select this option to enlarge or reduce the document pages to fit a specified paper size. When you select this option, select the paper size you want from the drop-down list.
Free [25 - 400%] - Select this option to enlarge or reduce the document pages manually. When you select this option, type a value into the field.
2. Reverse Print - Select this option to rotate the printed image 180 degrees.
3. Use Watermark - Select this option to print a logo or text on your document as a watermark. Select one of the preset watermarks, add a new watermark, or use an image file you have created.
4. Header-Footer Print - Select this option to print the date, time and PC login user name on the document.
5. Toner Save Mode - Select this feature to conserve toner by using less toner to print documents; printouts appear lighter, but are still legible.
6. Secure Print (Available only for certain models) - This feature ensures that confidential or sensitive documents do not print until you enter a password on the machine's control panel.
7. Administrator - This feature allows you to change the administrator password and restrict various printing functions.
8. User Authentication (Available only for certain models) - This feature allows you to confirm the restrictions for each user.
9. Other Print Options button
Sleep Time: Select this option to set the machine to enter sleep mode immediately after printing.
Macro (Available only for certain models): Select this feature to print an electronic form (macro), which you have stored in your machine's memory, as an overlay on the print job.
Density Adjustment: Specify the print density.
Improve Print Output: Select this option to reduce the amount of paper curling and improve the toner fixing.
Skip Blank Page: Select this option to allow the printer driver to automatically detect blank pages and exclude them from printing.
Print Text in Black: Select this option when you want to print color text in black.
Print Archive: Select this option to save the print data as a PDF file to your computer.
Eco settings: Select this option to reduce printing noise.
Change the Default Print Settings (Windows)
When you change an application's print settings, the changes only apply to documents printed with that application. To change print settings for all Windows applications, you must configure the printer driver properties
1. Do one of the following:
• For Windows Server 2008 Click  (Start) > Control Panel > Hardware and Sound > Printers.
• For Windows 7 and Windows Server 2008 R2 Click (Start) > Devices and Printers.
• For Windows 8 Move your mouse to the lower right corner of your desktop. When the menu bar appears, click Settings, and then click Control Panel. In the Hardware and Sound group, click View devices and printers.
• For Windows 10 and Windows Server 2016 Click  > Windows System > Control Panel. In the Hardware and Sound group, click View devices and printers.
• For Windows Server 2012 Move your mouse to the lower right corner of your desktop. When the menu bar appears, click Settings, and then click Control Panel. In the Hardware group, click View devices and printers.
• For Windows Server 2012 R2 Click Control Panel on the Start screen. In the Hardware group, click View devices and printers.
2. Right-click the Brother XXX-XXXX icon (where XXXX is your model name), and then select Printer properties. If printer driver options appear, select your printer driver.
3. Click the General tab, and then click the Printing Preferences... or Preferences... button. The printer driver dialog box appears.
• To configure the tray settings, click the Device Settings tab(Available only for certain models).
• To change the printer port, click the Ports tab.
4. Select the print settings you want to use as defaults for all of your Windows programs.
5. Click OK.
6. Close the printer properties dialog box.
Monitor the Status of the Machine from Your Computer (Windows)
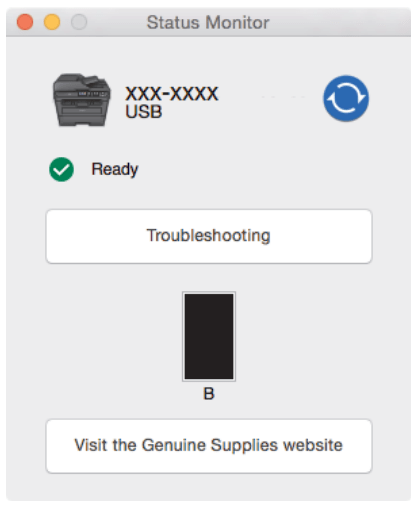
The Status Monitor utility is a configurable software tool for monitoring the status of one or more devices, allowing you to get immediate notification of errors. Do one of the following:
- Double-click the  icon in the task tray.
- (Windows 7) Click (Start) > All Programs > Brother > Brother Utilities. Click the drop-down list and select your model name (if not already selected). Click Tools in the left navigation bar, and then click Status Monitor.
- (Windows 8) Click  (Brother Utilities), and then click the drop-down list and select your model name (if not already selected). Click Tools in the left navigation bar, and then click Status Monitor.
- (Windows 8.1) Move your mouse to the lower left corner of the Start screen and click  (if you are using a touchbased device, swipe up from bottom of the Start screen to bring up the Apps screen). When the Apps screen appears, tap or click (Brother Utilities), and then click the drop-down list and select your model name (if not already selected). Click Tools in the left navigation bar, and then click Status Monitor.
- (Windows 10) Click  > Brother > Brother Utilities. Click the drop-down list and select your model name (if not already selected). Click Tools in the left navigation bar, and then click Status Monitor.
Print from Your Computer (Mac)
Print a Document (Mac)
- Make sure you have loaded the correct size paper in the paper tray.
- From an application, such as Apple TextEdit, click the File menu, and then select Print.
- Select Brother XXX-XXXX (where XXXX is your model name).
- Type the number of copies you want in the Copies field.
- Click the Paper Size pop-up menu, and then select your paper size.
- Select the Orientation option that matches the way you want the document to print.
- Click the application pop-up menu, and then select Print Settings. The Print Settings options appear.
- Click the Media Type pop-up menu, and then select the type of paper you are using.
- Change other printer settings, if needed.
- Click Print.
Print Options (Mac)
Page Setup
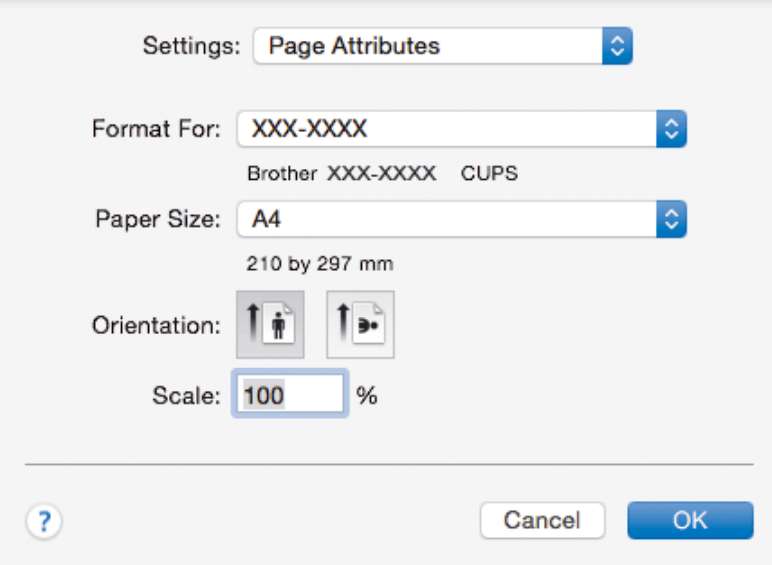
1. Paper Size Select the size of the paper you want to use. You can either choose from standard paper sizes or create a custom paper size.
2. Orientation Select the orientation (portrait or landscape) of your printout. If your application contains a similar setting, we recommend that you set the orientation using the application.
3. Scale Type a value into the field to enlarge or reduce the pages in your document to fit the selected paper size.
Layout
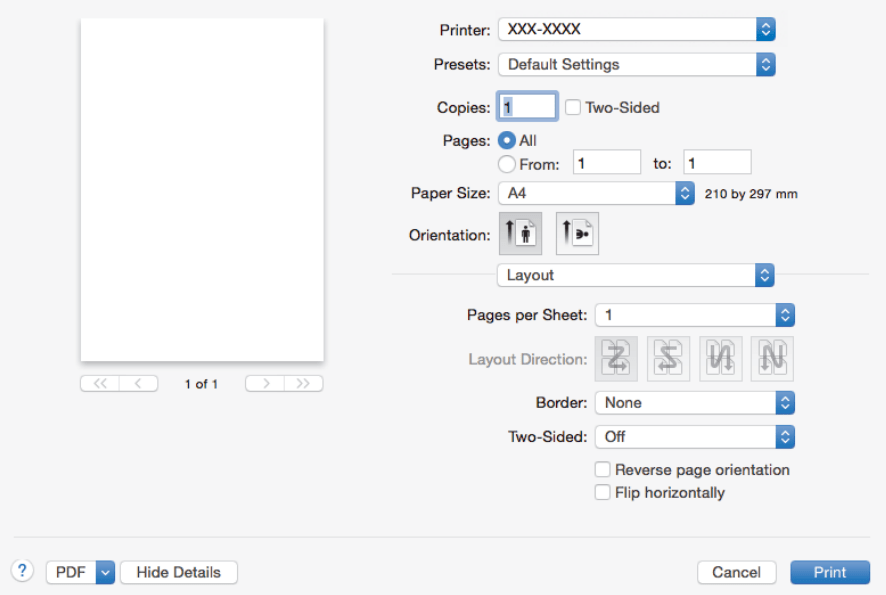
1. Pages per Sheet Select the number of pages to print on a single sheet of paper.
2. Layout Direction Select the page order when printing multiple pages on a single sheet of paper.
3. Border Select the type of border to use when printing multiple pages on a single sheet of paper.
4. Two-Sided Select whether to print on both sides of the paper.
5. Reverse page orientation Select this option to rotate the printed image 180 degrees.
6. Flip horizontally Select this option to reverse the printed image on the page horizontally from left to right.
Paper Handling
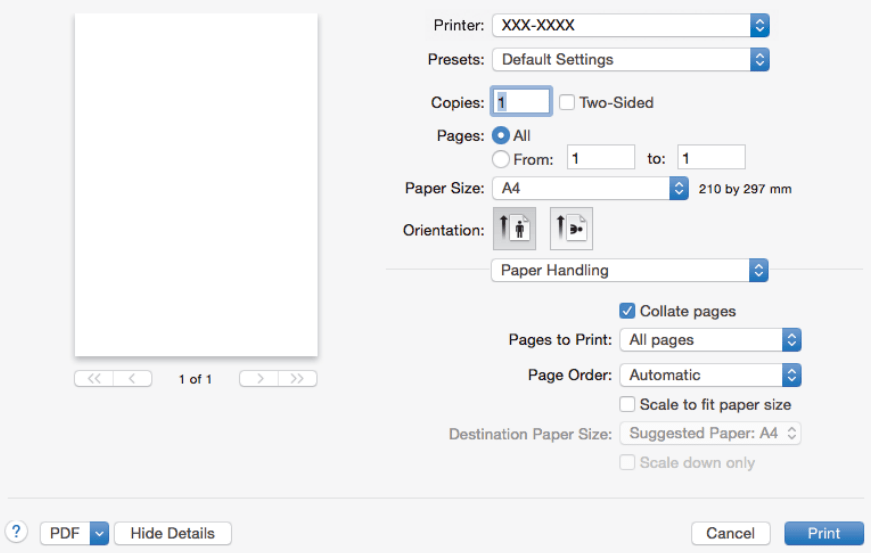
1. Collate pages Select this option to print sets of multi-page documents in the original page order. When this option is selected, one complete copy of your document will print, and then reprint according to the number of copies you choose. If this option is not selected, then each page will print according to the number of copies chosen before the next page of the document is printed.
2. Pages to Print Select which pages you want to print (even pages or odd pages).
3. Page Order Select the page order.
4. Scale to fit paper size Select this option to enlarge or reduce the pages in your document to fit the selected paper size.
5. Destination Paper Size Select the paper size to print on.
6. Scale down only Select this option if you want to reduce the pages in your document when they are too large for the selected paper size. If this option is selected and the document is formatted for a paper size that is smaller than the paper size you are using, the document will be printed at its original size.
Print Settings
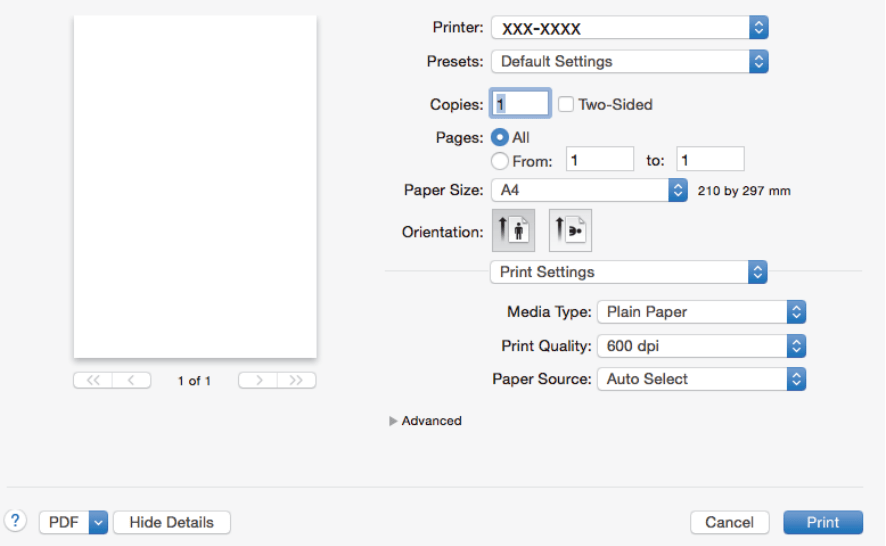
1. Media Type Select the type of media you want to use. To achieve the best print results, the machine automatically adjusts its print settings according to the selected media type.
2. Print Quality Select the print resolution you want. Because print quality and speed are related, the higher the quality, the longer it will take to print the document.
3. Paper Source Select the paper source setting according to your print conditions or purpose.
4. Advanced
Toner Save Mode Select this feature to conserve toner by using less toner to print documents; printouts appear lighter, but are still legible.
Graphics Quality Select either Graphics or Text for the best print quality, based on the type of document you are printing.
Improve Print Output Select this option to reduce the amount of paper curling and improve the toner fixing.
Density Adjustment Specify the print density.
Quiet Mode Select this option to reduce printing noise.
Other Print Options
Skip Blank Page Select this option to allow the printer driver to automatically detect blank pages and exclude them from printing.
Secure Print

1. Secure Print (Available only for certain models) This feature ensures that confidential or sensitive documents do not print until you enter a password on the machine's control panel.
Monitor the Status of the Machine from Your Computer (Mac)
The Status Monitor utility is a configurable software tool for monitoring the status of a device, allowing you to get immediate notification of error messages, such as paper empty or paper jam, at preset update intervals. You can also access Web Based Management.
1. Click the System Preferences menu, select Print & Scan or Printers & Scanners, and then select your machine.
2. Click the Options & Supplies button.
3. Click the Utility tab, and then click the Open Printer Utility button. Status Monitor starts.
Cancel a Print Job
HL-L2390DW/DCP-L2550DW/MFC-L2690DW/MFC-L2690DWXL/MFC-L2710DW/ MFC-L2717DW
1. Press Stop/Exit. To cancel multiple print jobs, press and hold Stop/Exit for four seconds.
HL-L2395DW/MFC-L2730DW/MFC-L2750DW/MFC-L2750DWXL
1. Press  . To cancel multiple print jobs, press and hold for about four seconds.
Test Print
HL-L2390DW/MFC-L2690DW/MFC-L2690DWXL/MFC-L2710DW/MFC-L2717DW
1. Press Menu.
2. Press  or
or  to display the [Printer] option, and then press OK.
3. Press or to display the [Print Options] option, and then press OK.
4. Press the [Test Print] option, and then press OK.
5. Press Start. The machine prints a Test Print page.
6. Press Stop/Exit.
DCP-L2550DW
1. Press Menu.
2. Press or to display the [Printer] option, and then press OK.
3. (For Printer Emulation Supported models) Press a or b to display the [Print Options] option, and then press OK.
4. Press or to display the [Test Print] option, and then press OK.
5. Press Start. The machine prints a Test Print page.
6. Press Stop/Exit.
HL-L2395DW/MFC-L2730DW/MFC-L2750DW/MFC-L2750DWXL
1. Press  [Settings] > [All Settings] > [Printer] > [Print Options] > [Test Print].
2. Press [Yes].
3. Press  .
.
Troubleshooting
Use this section to resolve typical problems you may encounter when using your Brother machine. You can correct most problems yourself.
IMPORTANT
For technical help, you must call the country where you bought the machine. Calls must be made from within that country.
Using non-Brother supplies may affect the print quality, hardware performance, and machine reliability. (MFC-L2690DW/MFC-L2690DWXL/MFC-L2710DW/MFC-L2717DW)
To prevent you from losing the received fax data in the machine's memory, transfer the data to another Fax machine or to your computer before turning off the machine.
Error and Maintenance Messages
Home > Troubleshooting > Error and Maintenance Messages
As with any sophisticated office product, errors may occur and supply items may have to be replaced. If this happens, your machine identifies the error or required routine maintenance and shows the appropriate message. The most common error and maintenance messages are shown in the table.
HL-L2390DW/DCP-L2550DW/MFC-L2690DW/MFC-L2690DWXL/MFC-L2710DW/ MFC-L2717DW
| Error Message |
Cause |
Action |
| 2-sided Disabled |
The back cover of the machine is not closed completely. |
Close the back cover of the machine until it locks in the closed position. |
| The 2-sided tray is not installed completely. |
Install the 2-sided tray firmly in the machine. |
|
Cartridge Error Put the Black (BK) Toner Cartridge back in.
Put the Toner Cartridge back in.
|
The toner cartridge is not installed correctly. |
Pull out the drum unit and toner cartridge assembly, take out the toner cartridge, and put it back in the drum unit again. Put the drum unit and toner cartridge assembly back in the machine.
If the problem continues, contact Brother Customer Service or your local Brother dealer.
|
| Comm.Error |
Poor telephone line quality caused a communication error. |
Send the fax again or connect the machine to another telephone line. If the problem continues, contact the telephone company and ask them to check your telephone line. |
| Cover is Open. |
The front cover is not completely closed. |
Open and then firmly close the front cover of the machine. |
| The fuser cover is not completely closed or paper was jammed in the back of the machine when you turned on the power. |
Close the fuser cover located inside the back cover of the machine. |
| The ADF cover is not completely closed. |
Close the ADF cover.
If the error message remains, press Stop/Exit.
|
| Disconnected |
The other person or other person's fax machine stopped the call. |
Try to send or receive again.
If calls are stopped repeatedly and you are using a VoIP (Voice over IP) system, try changing the Compatibility to Basic (for VoIP).
|
| Document Jam |
The document was not inserted or fed correctly, or the document scanned from the ADF was too long. |
Remove the jammed paper from the ADF unit.
Clear any debris or scraps of paper from the ADF unit paper path.
Press Stop/Exit.
|
| DR Mode in Use |
The machine is set to Distinctive Ring mode. You cannot change the Receive Mode from Manual to another mode. |
Set Distinctive Ring to Off. |
| Drum ! |
The corona wire on the drum unit must be cleaned. |
Clean the corona wire on the drum unit.
|
| The drum unit or the toner cartridge and drum unit assembly is not installed correctly. |
Put the toner cartridge in the drum unit. Then reinstall the toner cartridge and drum unit assembly in the machine. |
| Drum End Soon |
The drum unit is near the end of its life. |
Order a new drum unit before you get the Replace Drum message. |
| Jam 2-sided |
The paper is jammed in the 2-sided paper tray. |
Pull the paper tray and the 2-sided tray out completely, open the back cover and then remove all jammed paper. Close the back cover, and put the paper tray and the 2-sided tray firmly back in the machine. |
| Jam Inside |
The paper is jammed inside the machine. |
Open the front cover and remove the toner cartridge and drum unit assembly. Pull out all jammed paper. Close the front cover. If the error message remains, press Start. |
| Jam Rear |
The paper is jammed in the back of the machine. |
Open the fuser cover and remove all jammed paper. Close the fuser cover. If the error message remains, press Start. |
| Jam Tray |
The paper is jammed in the indicated paper tray. |
Pull the paper tray out completely and remove all jammed paper. Put the paper tray firmly back in the machine. |
| Manual Feed |
Manual was selected as the paper source in the printer driver, but there is no paper in the manual feed slot. |
Place paper in the manual feed slot. |
| No Caller ID |
There is no incoming call history. You did not receive calls or you have not subscribed to the Caller ID service from your telephone company. |
If you want to use the Caller ID feature, call your telephone company. |
| No Paper |
The machine is out of paper, or paper is not loaded correctly in the paper tray. |
• Refill paper in the paper tray. Make sure the paper guides are set to the correct size.
• If paper is in the tray, remove it and load it again. Make sure the paper guides are set to the correct size.
• Do not overfill the paper tray.
|
| No Response/Busy |
The number you dialed does not answer or is busy. |
Verify the number and try again. |
| No Toner |
The toner cartridge or the toner cartridge and drum unit assembly is not installed correctly. |
Remove the toner cartridge and drum unit assembly. Remove the toner cartridge from the drum unit, and reinstall the toner cartridge back in the drum unit. Reinstall the toner cartridge and drum unit assembly back in the machine. If the problem continues, replace the toner cartridge with a new one. |
| Out of Memory |
The machine's memory is full. |
If a fax-sending or copy operation is in process
Do one of the following:
• Press Start to send or copy the scanned pages.
• Press Stop/Exit and wait until the other operations in progress finish, and then try again.
• Print the faxes that are in the memory.
• Clear the data in the memory. To gain extra memory, you can turn off Memory Receive.
If a print operation is in process
Do one of the following:
• Reduce the Resolution.
• Clear faxes from the memory.
|
| Print Unable XX |
The machine has a mechanical problem. |
• (MFC-L2690DW/ MFC-L2690DWXL/ MFC-L2710DW/MFC-L2717DW) To prevent you from losing the received fax data in the machine's memory, transfer the data to another Fax machine or to your computer before turning off the machine.
• Press and hold to turn off the machine, wait a few minutes, and then turn it on again.
• If the problem continues, contact Brother Customer Service. Contact Brother Customer Service at: 1-877-BROTHER (1-877-276-8437) (in USA).
|
| Replace Drum |
It is time to replace the drum unit. The drum unit counter was not reset when a new drum was installed. |
Replace the drum unit.
Reset the drum unit counter.
|
| Replace Toner |
The toner cartridge is at the end of its life. The machine stops all print operations.
While memory is available, faxes are stored in the memory.
|
Replace the toner cartridge with a new one. |
| Scan Unable XX |
The machine has a mechanical problem. |
• (MFC-L2690DW/ MFC-L2690DWXL/ MFC-L2710DW/MFC-L2717DW) To prevent you from losing the received fax data in the machine's memory, transfer the data to another Fax machine or to your computer before turning off the machine.
• Press and hold to turn off the machine, and then turn it on again.
• If the problem continues, contact Brother Customer Service. Contact Brother Customer Service at: 1-877-BROTHER (1-877-276-8437) (in USA)
|
| Self-Diagnostic |
The temperature of the fuser unit does not rise to a specified temperature within the specified time. |
• (MFC-L2690DW/ MFC-L2690DWXL/ MFC-L2710DW/MFC-L2717DW) To prevent you from losing the received fax data in the machine's memory, transfer the data to another Fax machine or to your computer before turning off the machine.
• Press and hold  to turn off the machine, wait a few seconds, and then turn it on again. Leave the machine idle for 15 minutes with the power on. to turn off the machine, wait a few seconds, and then turn it on again. Leave the machine idle for 15 minutes with the power on.
|
| The fuser unit is too hot. |
| Size Error DX |
The paper size specified in the printer driver and the machine's paper size setting are not available for automatic 2-sided printing. |
r driver and the machine's paper size setting are not available for automatic 2-sided printing. Press Stop/Exit. Choose a paper size supported by 2-sided printing.
Paper sizes available for automatic 2- sided printing are Letter, Legal and Folio.
|
| The paper in the tray is not the correct size and is not available for automatic 2-sided printing. |
Load the correct size of paper in the tray and set the tray for that paper size.
Paper sizes available for automatic 2- sided printing are Letter, Legal and Folio.
|
| Size Mismatch |
The paper in the tray is not the correct size. |
Load the correct size of paper in the tray and set the size of paper to the tray. |
| Toner Ended |
The toner cartridge is at the end of its life. The machine stops all print operations. |
Replace the toner cartridge with a new one. |
| Toner Low |
If the LCD displays this message, you can still print. The toner cartridge is near the end of its life. |
Order a new toner cartridge now so a replacement toner cartridge is available when the LCD displays Replace Toner. |
| Wait for a while |
The temperature of the inside of the machine is too hot. The machine will pause its current print job and go into cooling down mode. During the cooling down mode, you will hear the cooling fan running while the LCD displays Wait for a while. |
Wait until the machine has finished cooling down. Make sure all vents on the machine are clear of obstructions. When the machine has cooled down, the machine will resume printing. If the fan is not spinning, disconnect the machine from the power for several minutes, then reconnect it. |
HL-L2395DW/MFC-L2730DW/MFC-L2750DW/MFC-L2750DWXL
| Error Message |
Cause |
Action |
| 2-sided Disable |
The back cover of the machine is not closed completely. |
Close the back cover of the machine until it locks in the closed position. |
| The 2-sided tray is not installed completely. |
Install the 2-sided tray firmly in the machine. |
| Access Denied |
The function you want to use is restricted by Secure Function Lock 3.0. |
Call your administrator to check your Secure Function Lock Settings. |
| Cartridge Error Put the Toner Cartridge back in. |
The toner cartridge is not installed correctly. |
Pull out the drum unit and toner cartridge assembly, take out the toner cartridge, and put it back in the drum unit again. Put the drum unit and toner cartridge assembly back in the machine.
If the problem continues, contact Brother Customer Service or your local Brother dealer.
|
| Comm.Error |
Poor telephone line quality caused a communication error. |
Send the fax again or connect the machine to another telephone line. If the problem continues, contact the telephone company and ask them to check your telephone line. |
| Cooling Down |
The temperature of the inside of the machine is too hot. The machine will pause its current print job and go into cooling down mode. During the cooling down mode, you will hear the cooling fan running while the LCD displays Cooling Down. |
Wait until the machine has finished cooling down. Make sure all vents on the machine are clear of obstructions.
When the machine has cooled down, the machine will resume printing.
If the fan is not spinning, disconnect the machine from the power for several minutes, then reconnect it.
|
| Cover is Open |
The front cover is not completely closed. |
Open and then firmly close the front cover of the machine. |
| The fuser cover is not completely closed or paper was jammed in the back of the machine when you turned on the power. |
Close the fuser cover located inside the back cover of the machine. |
| The ADF cover is not completely closed. |
Close the ADF cover.
If the error message remains, press  . .
|
| Disconnected |
The other person or other person's fax machine stopped the call. |
Try to send or receive again.
If calls are stopped repeatedly and you are using a VoIP (Voice over IP) system, try changing the Compatibility to Basic (for VoIP).
|
| Document Jam |
The document was not inserted or fed correctly, or the document scanned from the ADF was too long. |
Remove the jammed paper from the ADF unit.
Clear any debris or scraps of paper from the ADF unit paper path.
Press .
|
| DR Mode in Use |
The machine is set to Distinctive Ring mode. You cannot change the Receive Mode from Manual to another mode. |
Set Distinctive Ring to Off. |
| Drum ! |
The corona wire on the drum unit must be cleaned. |
Clean the corona wire on the drum unit.
|
| The drum unit or the toner cartridge and drum unit assembly is not installed correctly. |
Put the toner cartridge in the drum unit. Then reinstall the toner cartridge and drum unit assembly in the machine. |
| Drum End Soon |
The drum unit is near the end of its life. |
Order a new drum unit before you get the Replace Drum message. |
| Jam 2-sided |
The paper is jammed in the 2-sided paper tray. |
Pull the paper tray and the 2-sided tray out completely, open the back cover and then remove all jammed paper. Close the back cover, and put the paper tray and the 2-sided tray firmly back in the machine. |
| Jam Inside |
The paper is jammed inside the machine. |
Open the front cover and remove the toner cartridge and drum unit assembly. Pull out the jammed paper. Close the front cover. |
| Jam Rear |
The paper is jammed in the back of the machine. |
Open the fuser cover and remove all jammed paper. Close the fuser cover. If the error message remains, press Retry. |
| Jam Tray |
The paper is jammed in the indicated paper tray |
Pull the paper tray out completely and remove all jammed paper. Put the paper tray firmly back in the machine. |
| Limit Exceeded |
The print limit set in Secure Function Lock 3.0 was reached. |
Call your administrator to check your Secure Function Lock Settings. |
| Manual Feed |
Manual was selected as the paper source in the printer driver, but there is no paper in the manual feed slot. |
Place paper in the manual feed slot. |
| No Caller ID |
There is no incoming call history. You did not receive calls or you have not subscribed to the Caller ID service from your telephone company. |
If you want to use the Caller ID feature, call your telephone company. |
| No Paper |
The machine is out of paper, or paper is not loaded correctly in the paper tray. |
• Refill paper in the paper tray. Make sure the paper guides are set to the correct size.
• If paper is in the tray, remove it and load it again. Make sure the paper guides are set to the correct size.
• Do not overfill the paper tray.
|
| No Response/Busy |
The number you dialed does not answer or is busy. |
Verify the number and try again. |
| No Toner |
The toner cartridge or the toner cartridge and drum unit assembly is not installed correctly. |
Remove the toner cartridge and drum unit assembly. Remove the toner cartridge from the drum unit, and reinstall the toner cartridge back in the drum unit. Reinstall the toner cartridge and drum unit assembly back in the machine. If the problem continues, replace the toner cartridge with a new one. |
| Out of Memory |
The machine's memory is full. |
If a fax-sending or copy operation is in process
Do one of the following:
- Press or Quit, and wait until the other operations that are in progress finish, and then try again.
- Press Send Now to send the pages scanned so far.
- Clear the data in the memory. To gain extra memory, you can turn off Memory Receive.
- Print the faxes that are in the memory.
If a print operation is in process
Do one of the following:
- Reduce the Resolution.
- Clear faxes from the memory.
|
| Print Data Full |
The machine’s memory is full. |
Press and delete the previously stored secure print data. |
| Print Unable XX |
The machine has a mechanical problem. |
• Press and hold to turn off the machine, wait a few minutes, and then turn it on again.
• If the problem continues, contact Brother Customer Service. Contact Brother Customer Service at: 1-877-BROTHER (1-877-276-8437) (in USA)
|
| Replace Drum |
It is time to replace the drum unit. |
Replace the drum unit. |
| The drum unit counter was not reset when a new drum was installed. |
Reset the drum unit counter. |
| Replace Toner |
The toner cartridge is at the end of its life. The machine stops all print operations.
While memory is available, faxes are stored in the memory.
|
Replace the toner cartridge with a new one. |
| Scan Unable |
The document is too long for 2‑sided scanning. |
Press . Use an appropriate size paper for 2‑sided scanning. |
| Scan Unable XX |
The machine has a mechanical problem. |
• Press and hold to turn off the machine, and then turn it on again.
• If the problem continues, contact Brother Customer Service. Contact Brother Customer Service at: 1-877-BROTHER (1-877-276-8437) (in USA)
|
| Self-Diagnostic |
The temperature of the fuser unit does not rise to a specified temperature within the specified time. |
Press and hold to turn off the machine, wait a few seconds, and then turn it on again. Leave the machine idle for 15 minutes with the power on. |
| The fuser unit is too hot. |
| Size Error 2-sided |
The paper size specified in the printer driver and the machine's paper size setting are not available for automatic 2-sided printing. |
Press . Choose a paper size supported by 2-sided printing.
Paper sizes available for automatic 2- sided printing are Letter, Legal and Folio.
|
| The paper in the tray is not the correct size and is not available for automatic 2-sided printing. |
Load the correct size of paper in the tray and set the tray for that paper size.
Paper sizes available for automatic 2- sided printing are Letter, Legal and Folio.
|
| Size mismatch |
The paper in the tray is not the correct size. |
Load the correct size of paper in the tray and set the size of paper to the tray. |
| Toner Ended |
The toner cartridge is at the end of its life. |
Replace the toner cartridge with a new one. |
| Toner Low |
If the LCD displays this message, you can still print. The toner cartridge is near the end of its life. |
Order a new toner cartridge now so a replacement toner cartridge is available when the LCD displays Replace Toner. |
| Touchscreen Initialisation Failed |
The touchscreen was pressed before the power on initialization was completed. |
Make sure nothing is touching or resting on the touchscreen. |
| Debris may be stuck between the lower part of the touchscreen and its frame. |
Insert a piece of stiff paper between the lower part of the touchscreen and its frame and slide it back and forth to push out the debris. |
Error Messages When Using the Brother Web Connect Feature
Home > Troubleshooting > Error Messages When Using the Brother Web Connect Feature
Your Brother machine displays an error message if an error occurs. The most common error messages are shown in the table.
You can correct most errors yourself. If, after reading this table, you still need help, the Brother Solutions Center offers the latest troubleshooting tips.
Connection Error
| Error Messages |
Cause |
Action |
| Connection Error 02 Network connection failed. Verify that the network connection is good. |
The machine is not connected to a network. |
• Verify that the network connection is good.
• If the Web button was pressed soon after the machine was turned on, the network connection may not have been established yet. Wait and try again.
|
| Connection Error 03 Connection failed to server. Check network settings. |
• Network or server settings are incorrect.
• There is a problem with the network or server.
|
• Confirm that network settings are correct, or wait and try again later.
• If the Web button was pressed soon after the machine was turned on, the network connection may not have been established yet. Wait and try again.
|
| Connection Error 07 Connection failed to server. Wrong Date&Time. |
Date and time settings are incorrect. |
Set the date and time correctly. Note that if the machine's power cord is disconnected, the date and time settings may have reset to factory settings. |
Authentication Error
| Error Messages |
Cause |
Action |
| Authentication Error 01 Incorrect PIN code. Enter PIN correctly. |
The PIN you entered to access the account is incorrect. The PIN is the four-digit number that was entered when registering the account to the machine. |
Enter the correct PIN. |
| Authentication Error 02 Incorrect or expired ID, or this temporary ID is already used. Enter correctly or reissue temporary ID. Temporary ID is valid for 24 hours after it is issued. |
The temporary ID that was entered is incorrect . |
Enter the correct temporary ID. |
| The temporary ID that was entered has expired. A temporary ID is valid for 24 hours. |
Apply for Brother Web Connect access again and receive a new temporary ID, and then use the new ID to register the account to the machine. |
| Authentication Error 03 Display name has already been registered. Enter another display name. |
The name you entered as the display name has already been registered to another service user. |
Enter a different display name. |
Server Error
| Error Messages |
Cause |
Action |
| Server Error 01 Authentication failed. Do the following: 1. Go to http://bwc.brother.com to get a new temporary ID. 2. Press OK and enter your new temporary ID in the next screen. |
The machine's authentication information (needed to access the service) has expired or is invalid. |
Apply for Brother Web Connect access again to receive a new temporary ID, and then use the new ID to register the account to the machine. |
| Server Error 03 Failed to upload. Unsupported file or corrupt data. Confirm data of file. |
The file you are trying to upload may have one of the following problems:
• The file exceeds the service's limit on number of pixels, file size, etc.
• The file type is not supported.
• The file is corrupted.
|
The file cannot be used:
• Check the service's size or format restrictions.
• Save the file as a different type.
• If possible, get a new, uncorrupted version of the file.
|
| Server Error 13 Service temporarily unavailable. Try again later. |
There is a problem with the service and it cannot be used now. |
Wait and try again. If you get the message again, access the service from a computer to confirm if it is unavailable. |
Shortcut Error
| Error Messages |
Cause |
Action |
| Shortcut Error 02 Account is invalid. Please register account and shortcut again after deleting this shortcut. |
The shortcut cannot be used because the account was deleted after the shortcut was registered. |
Delete the shortcut, and then register the account and shortcut again. |
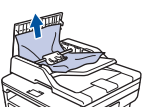
Document is Jammed in the Top of the ADF Unit
Home > Troubleshooting > Document Jams > Document is Jammed in the Top of the ADF Unit
Related Models: DCP-L2550DW/MFC-L2690DW/MFC-L2690DWXL/MFC-L2710DW/MFC-L2717DW/ MFC-L2730DW/MFC-L2750DW/MFC-L2750DWXL
1. Remove any paper from the ADF that is not jammed.
2. Open the ADF cover.
3. Pull the jammed document out to the left. If the document rips or tears, be sure you remove any debris or scraps to prevent future jams.
4. Close the ADF cover.
5. Do one of the following:
• (DCP-L2550DW/MFC-L2690DW/MFC-L2690DWXL/MFC-L2710DW/MFC-L2717DW)
Press Stop/Exit.
• (MFC-L2730DW/MFC-L2750DW/MFC-L2750DWXL)
Press .
Document is Jammed under the Document Cover
Home > Troubleshooting > Document Jams > Document is Jammed under the Document Cover
Related Models: DCP-L2550DW/MFC-L2690DW/MFC-L2690DWXL/MFC-L2710DW/MFC-L2717DW/ MFC-L2730DW/MFC-L2750DW/MFC-L2750DWXL
1. Remove any paper from the ADF that is not jammed.
2. Lift the document cover.
3. Pull the jammed document out to the right. If the document rips or tears, be sure you remove any debris or scraps to prevent future jams.
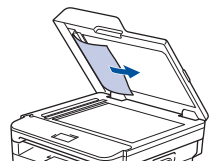
4. Close the document cover.
5. Do one of the following:
• (DCP-L2550DW/MFC-L2690DW/MFC-L2690DWXL/MFC-L2710DW/MFC-L2717DW)
Press Stop/Exit.
• (MFC-L2730DW/MFC-L2750DW/MFC-L2750DWXL)
Press .
Remove Small Scraps of Paper Jammed in the ADF
Home > Troubleshooting > Document Jams > Remove Small Scraps of Paper Jammed in the ADF
Related Models: DCP-L2550DW/MFC-L2690DW/MFC-L2690DWXL/MFC-L2710DW/MFC-L2717DW/ MFC-L2730DW/MFC-L2750DW/MFC-L2750DWXL
1. Lift the document cover.
2. Insert a piece of stiff paper, such as cardstock, into the ADF to push any small paper scraps through.

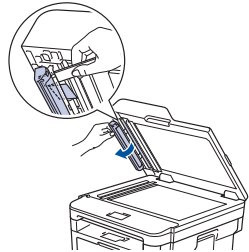
3. Close the document cover.
4. Do one of the following:
• (DCP-L2550DW/MFC-L2690DW/MFC-L2690DWXL/MFC-L2710DW/MFC-L2717DW)
Press Stop/Exit.
• (MFC-L2730DW/MFC-L2750DW/MFC-L2750DWXL)
Press .
Paper is Jammed in the Paper Tray
Home > Troubleshooting > Paper Jams > Paper is Jammed in the Paper Tray
If the machine's control panel or the Status Monitor indicates that there is a jam in the paper tray, follow these steps:
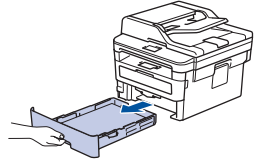
1. Pull the paper tray completely out of the machine.
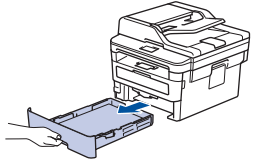
2. Slowly pull out the jammed paper.
Pulling the jammed paper downward using both hands allows you to remove the paper more easily.
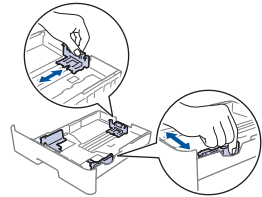
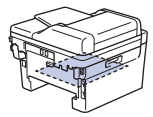
4. Make sure the paper is below the maximum paper mark ( ).
).

5. Put the paper tray firmly back in the machine.
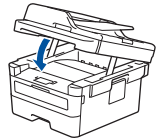
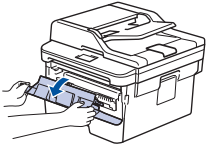
Paper is Jammed in the Output Paper Tray
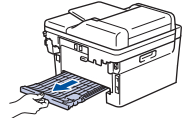
When the paper is jammed in the output paper tray, follow these steps:
1. Use both hands to open the scanner.

2. Remove the paper.
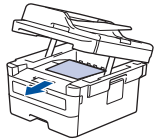
3. Push the scanner down with both hands to close it.
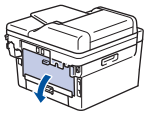
Paper is Jammed in the Back of the Machine
Home > Troubleshooting > Paper Jams > Paper is Jammed in the Back of the Machine
If the machine's control panel or the Status Monitor indicates that there is a jam in the back (Rear) of the machine, follow these steps:
1. Leave the machine turned on for 10 minutes for the internal fan to cool the extremely hot parts inside the machine.
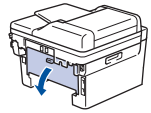
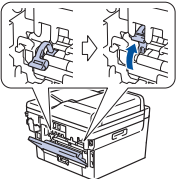
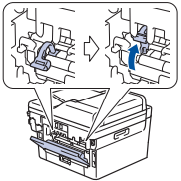
2. Open the back cover.
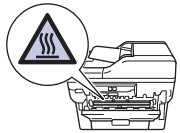
3. Pull the blue tabs at the left and right sides toward you to release the fuser cover.
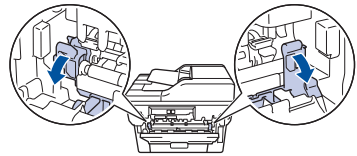
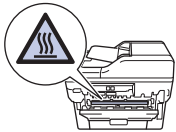
WARNING
HOT SURFACE The machine's internal parts will be extremely hot. Wait for the machine to cool down before touching them.
If the green envelope levers inside the back cover are pulled down to the envelope position, lift these levers to the original position before pulling the green tabs down.
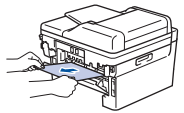
4. Use both hands to gently pull the jammed paper out of the fuser unit.
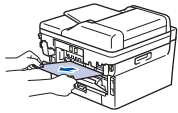
5. Close the fuser cover.
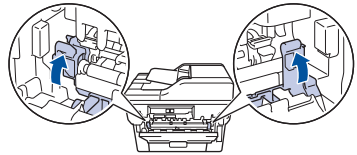
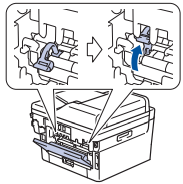
If you print on envelopes, pull down the green envelope levers to the envelope position again before closing the back cover.
6. Close the back cover until it locks in the closed position.
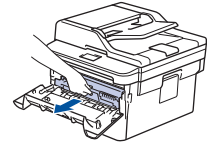
Paper is Jammed inside the Machine
Home > Troubleshooting > Paper Jams > Paper is Jammed inside the Machine
If the machine's control panel or the Status Monitor indicates that there is a jam inside the machine, follow these steps:
1. Leave the machine turned on for 10 minutes for the internal fan to cool the extremely hot parts inside the machine.
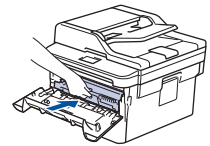
2. Open the front cover.
3. Remove the toner cartridge and drum unit assembly.
WARNING
HOT SURFACE The machine's internal parts will be extremely hot. Wait for the machine to cool down before touching them.
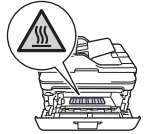
4. Pull out the jammed paper slowly.
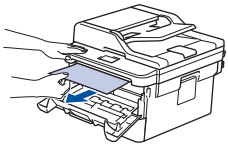
5. Install the toner cartridge and drum unit assembly into the machine.
6. Close the front cover.
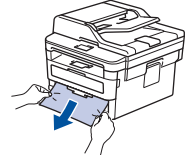
Paper is Jammed in the 2-sided Tray
If the machine's control panel or the Status Monitor indicates that there is a jam in the 2-sided paper tray, follow these steps:
1. Leave the machine turned on for 10 minutes for the internal fan to cool the extremely hot parts inside the machine.
2. Pull the paper tray completely out of the machine.
3. At the back of the machine, pull the 2‑sided tray completely out of the machine.
4. Pull the jammed paper out of the machine or out of the 2‑sided tray.

5. Remove paper that may have jammed under the machine due to static electricity.
6. If paper is not caught inside the 2-sided tray, open the back cover.
WARNING
HOT SURFACE The machine's internal parts will be extremely hot. Wait for the machine to cool down before touching them.
7. Use both hands to gently pull the jammed paper out of the back of the machine.
8. Close the back cover until it locks in the closed position.
9. Put the 2-sided tray firmly back in the rear of the machine.
10. Put the paper tray firmly back in the front of the machine.
Printing Problems
Home > Troubleshooting > Printing Problems
| Difficulties |
Suggestions |
| No printout |
Check the machine is not in Power Off mode.
If the machine is in Power Off mode, press on the control panel, and then send the print data again.
|
| Check that the correct printer driver has been installed and selected. |
| Check to see if the Status Monitor or the machine's control panel displays an error status. |
|
Check that the machine is online:
• Windows7 and Windows Server 2008 R2
Click  (Start) >Devices and Printers . Right-click Brother XXX-XXXX and click See what's printing. Click Printer in the menu bar. Make sure Use Printer Offline is not selected. (Start) >Devices and Printers . Right-click Brother XXX-XXXX and click See what's printing. Click Printer in the menu bar. Make sure Use Printer Offline is not selected.
• Windows Server 2008
Click (Start) >Control Panel > Hardware and Sound > Printers. Right-click Brother XXX-XXXX. Make sure Use Printer Online is not listed. If it is listed, click this option to set the driver Online.
• Windows 8 and Windows Server 2012
Move your mouse to the lower right corner of your desktop. When the menu bar appears, click Settings > Control Panel. In the Hardware and Sound group, click View devices and printers. Right-click the Brother XXX-XXXX. Click See what's printing. If printer driver options appear, select your printer driver. Click Printer in the menu bar and make sure that Use Printer Offline is not selected.
• Windows 10 and Windows Server 2016
Click  > Windows System > Control Panel. In the Hardware and Sound group, click View devices and printers. Right-click the Brother XXX-XXXX. Click See what's printing. If printer driver options appear, select your printer driver. Click Printer in the menu bar and make sure that Use Printer Offline is not selected. > Windows System > Control Panel. In the Hardware and Sound group, click View devices and printers. Right-click the Brother XXX-XXXX. Click See what's printing. If printer driver options appear, select your printer driver. Click Printer in the menu bar and make sure that Use Printer Offline is not selected.
• Windows Server 2012 R2
Click Control Panel on the Start screen. In the Hardware group, click View devices and printers. Right-click the Brother XXX-XXXX. Click See what’s printing. If printer driver options appear, select your printer driver. Click Printer in the menu bar and make sure Use Printer Offline is not selected.
|
• Mac Click the System Preferences menu, and then select the Printers & Scanners option. When the machine is offline, delete it using the  button, and then add it using the button, and then add it using the  button. button. |
| The machine is not printing or has stopped printing. |
Cancel the print job and clear it from the machine's memory. The printout may be incomplete. Send the print data again.
See Related Information:Cancel a Print Job.
|
| The headers or footers appear when the document displays on the screen but they do not show up when it is printed. |
There is an unprintable area on the top and bottom of the page. Adjust the top and bottom margins in your document to allow for this. |
| The machine prints unexpectedly or it prints garbage. |
Cancel the print job and clear it from the machine's memory. The printout may be incomplete. Send the print data again.
See Related Information:Cancel a Print Job.
|
| Check the settings in your application to make sure they are set up to work with your machine. |
| Confirm that the Brother printer driver is selected in your application's Print window. |
| The machine prints the first couple of pages correctly, then some pages have missing text. |
Check the settings in your application to make sure they are set up to work with your machine. |
| Your machine is not receiving all of the data sent from the computer. Make sure you connected the interface cable correctly. |
| The machine does not print on both sides of the paper even though the printer driver setting is 2-sided and the machine supports automatic 2-sided printing. |
Check the paper size setting in the printer driver. You must select Letter, Legal, Folio, or Mexico Legal paper that is 16 to 28 lb (60 to 105 g/m2). |
| Print speed is too slow. |
Try changing the printer driver setting. The highest resolution needs longer data processing, sending and printing time. |
| If you have enabled the Quiet Mode, disable the Quiet Mode on the printer driver or the machine's menu setting. |
| The machine does not feed paper. |
If there is paper in the paper tray, make sure it is straight. If the paper is curled, straighten it. Sometimes it is helpful to remove the paper, turn the stack over and place it back in the paper tray. |
| Reduce the amount of paper in the paper tray, and then try again. |
| (For models with Manual Feed Slot)Make sure Manual is not selected for Paper Source in the printer driver. |
| Clean the paper pick-up rollers. |
|
The machine does not feed paper from the Manual feed slot.
(For models with Manual Feed Slot)
|
Use both hands to push one sheet of paper firmly into the manual feed slot until the top edge of the paper presses against the paper feed rollers. Continue pressing the paper against the rollers until the machine grabs the paper and pulls it in further. |
| Put only one sheet of paper in the manual feed slot. |
| Make sure Manual is selected as Paper Source in the printer driver. |
| The machine does not feed envelopes. |
(For models with Manual Feed Slot)Load one envelope at a time in the manual feed slot. Your application must be set to print the envelope size you are using. This is usually done in the Page Setup or Document Setup menu of your application. |
| |
|
| |
|
| |
|
| |
|
Improve the Print Quality
Home > Troubleshooting > Improve the Print Quality
If you have a print quality problem, print a test page first. If the printout looks good, the problem is probably not the machine. Check the interface cable connections and try printing a different document. If the printout or test page printed from the machine has a quality problem, check the examples of poor print quality and follow the recommendations in the table.
IMPORTANT
Using non-genuine supplies may affect the print quality, hardware performance, and machine reliability.
1. To get the best print quality, we suggest using recommended print media. Make sure you use paper that meets our specifications.
2. Check that the toner cartridge and drum unit are installed correctly.
| Examples of poor print quality |
Recommendation |
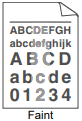 |
• If the machine indicates Replace Toner status, install a new toner cartridge.
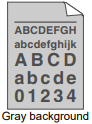
• Check the machine’s environment. Conditions such as humidity, high temperatures, and so on, may cause this print fault.
• If the whole page is too light, Toner Save may be turned on. Turn off Toner Save mode in the machine's menu settings or the printer driver.
• Clean the drum unit.
• Clean the corona wire on the drum unit.
• Replace the toner cartridge with a new toner cartridge.
• Replace the drum unit with a new drum unit.
|
 |
• Check the machine’s environment. Conditions such as high temperatures and high humidity can increase the amount of background shading.
• Clean the drum unit.
• Replace the toner cartridge with a new toner cartridge.
• Replace the drum unit with a new drum unit.
|
 |
• Check the machine’s environment. Conditions such as low humidity and low temperatures may cause this print quality problem.
• Select the appropriate media type in the printer driver.
• Make sure the two green levers inside the back cover are in the up position. Pull up the two green levers until they stop.
• Clean the drum unit.
• Replace the drum unit with a new drum unit.
• Replace the toner cartridge with a new toner cartridge.
• The fuser unit may be contaminated.
Contact Brother Customer Service. In USA: 1-877-BROTHER (1-877-276-8437)
|
 |
• Make sure the media type setting in the driver matches the type of paper you are using.
• Clean the drum unit.
• The toner cartridge may be damaged. Replace the toner cartridge with a new toner cartridge.
• The drum unit may be damaged. Replace the drum unit with a new drum unit.
• The fuser unit may be contaminated. Contact Brother Customer Service. In USA: 1-877-BROTHER (1-877-276-8437)
|
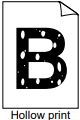 |
• Select Thick Paper mode in the printer driver or use thinner paper than you are currently using.
• Select the appropriate media type in the menu setting.
• Check the machine’s environment. Conditions such as high humidity can cause hollow print.
• The drum unit may be damaged. Replace the drum unit with a new drum unit.
|
 |
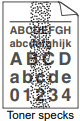
• Clean the corona wire inside the drum unit.
• The drum unit may be damaged.
Replace the drum unit with a new drum unit.
|
 |
• Select the appropriate media type in the printer driver.
• Select the appropriate media type in the menu setting.
• The problem may disappear by itself. Print multiple blank pages to clear this problem, especially if the machine has not been used for a long time.
• Clean the drum unit.
• The drum unit may be damaged. Replace the drum unit with a new drum unit.
|
 |
• Clean the drum unit.
• The drum unit may be damaged. Replace the drum unit with a new drum unit.
|
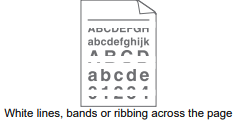 |
• Check the machine's environment. Conditions such as high humidity and high temperatures may cause this print quality problem.
• Clean the drum unit.
• If the problem is not solved after printing a few pages, replace the drum unit with a new drum unit.
|
|
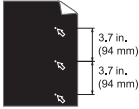
White Spots on black text and graphics at 3.7 in. (94 mm) intervals
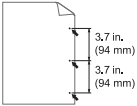
Black spots at 3.7 in. (94 mm) intervals
|
• Make 10-15 copies of a blank, white sheet of paper. If the problem is not solved after printing the blank pages, the drum unit may have foreign material, such as glue from a label, stuck on the drum. Clean the drum unit.
See Related Information: Clean the Drum Unit Using Drum Dot Print.
• The drum unit may be damaged. Replace the drum unit with a new drum unit.
|
 |
• If you use label sheets for laser printers, the glue from the sheets may sometimes stick to the drum surface. Clean the drum unit. See Related Information: Clean the Drum Unit Using Drum Dot Print.
• If you used paper that has clips or staples, the drum unit may be damaged.
• If the unpacked drum unit is in direct sunlight (or room light for long periods of time), the unit may be damaged.
• Clean the drum unit.
• The toner cartridge may be damaged. Replace the toner cartridge with a new toner cartridge.
• The drum unit may be damaged. Replace the drum unit with a new drum unit.
|
|
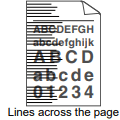
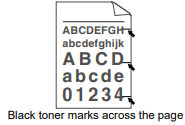
Black lines down the page
Printed pages have toner stains down the page
|
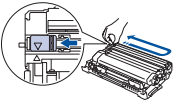
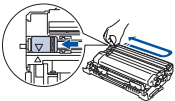
• Clean the corona wire inside the drum unit by sliding the green tab. Make sure that the green tab on the drum unit is in the Home position.
• The toner cartridge may be damaged. Replace the toner cartridge with a new toner cartridge.
• The drum unit may be damaged. Replace the drum unit with a new drum unit.
• The fuser unit may be contaminated.
Contact Brother Customer Service. In USA: 1-877-BROTHER (1-877-276-8437)
|
|
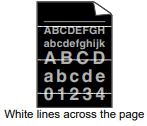
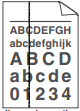
White lines down the page
|
• Make sure foreign material such as a torn piece of paper, sticky notes or dust is not inside the machine and around the toner cartridge and drum unit.
• The toner cartridge may be damaged. Replace the toner cartridge with a new toner cartridge.
• The drum unit may be damaged. Replace the drum unit with a new drum unit.
|
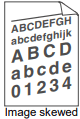 |
• Set the document correctly in the ADF or on the scanner glass if the skew only occurs when making copies.
• Make sure the paper or other print media is loaded correctly in the paper tray and the guides are not too tight or too loose against the paper stack.
• Set the paper guides correctly.
• The paper tray may be too full.
• Check the paper type and quality.
• Check for loose objects such as torn paper inside the machine.
• If the problem only occurs during automatic 2-sided printing, check for torn paper in the 2-sided tray. Verify the 2-sided tray is inserted completely and the back cover is closed completely.
|
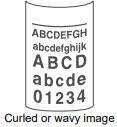 |
• Check the paper type and quality. High temperatures and high humidity will cause paper to curl.
• If you do not use the machine often, the paper may have been in the paper tray too long. Turn over the stack of paper in the paper tray. Also, fan the paper stack, and then rotate the paper 180° in the paper tray.
• Open the back cover (face up output tray) to let the printed paper exit onto the face up output tray.
• Choose Reduce Paper Curl mode in the printer driver when you do not use our recommended print media.
|
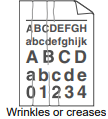 |
• Make sure paper is loaded correctly.
• Check the paper type and quality.
• Turn over the stack of paper in the tray or rotate the paper 180° in the input tray.
|
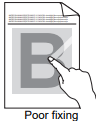 |
• Make sure the two green levers inside the back cover are in the up position. Pull up the two green levers until they stop.
• Make sure the media type setting in the printer driver matches the type of paper you are using.
• Choose Improve Toner Fixing mode in the printer driver.
If this selection does not provide enough improvement, change the printer driver setting in Media Type to a thick setting. If you are printing an envelope, choose Env. Thick in the media type setting.
|
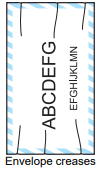 |
• Make sure the two green levers inside the back cover are pulled down to the envelope position when you print envelopes. After you have finished printing, reset the levers back to their original position. Pull up the levers until they stop.
• Make sure envelopes are printed with the back cover (face up output tray) opened.
• (For models with Manual Feed Slot) Make sure envelopes are fed only from the manual feed slot.
|
Telephone and Fax Problems
Home > Troubleshooting > Telephone and Fax Problems
Related Models: MFC-L2690DW/MFC-L2690DWXL/MFC-L2710DW/MFC-L2717DW/MFC-L2730DW/ MFC-L2750DW/MFC-L2750DWXL
Telephone Line or Connections
| Difficulties |
Suggestions |
| Dialing does not work. (No dial tone) |
Check all line cord connections. Make sure the telephone line cord is plugged into the telephone wall jack and the LINE jack of the machine. Make sure your machine has a dial tone by pressing the Hook button in Fax mode. If you subscribe to DSL, VoIP or MagicJack services, call your service provider for connection instructions. |
|
(Available only for some countries.)
Change the Tone/Pulse setting.
|
| Send a manual fax by pressing Hook button, and dialing the number. Wait to hear fax-receiving tones before pressing Start button. |
| If there is no dial tone, connect a known working telephone and telephone line cord to the jack. Then lift the external telephone’s handset and listen for a dial tone. If there is still no dial tone, ask your telephone company to check the line and/or wall jack. |
| The machine does not answer when called. |
Make sure the machine is in the correct receive mode for your setup.
Check for a dial tone. If possible, call your machine to hear it answer. If there is still no answer, check that the telephone line cord is plugged into the telephone wall jack and the LINE jack of the machine. Make sure your machine has a dial tone by pressing the Hook button in Fax mode. If there is no ringing when you call your machine, ask your telephone company to check the line.
|
Handling Incoming Calls
| Difficulties |
Suggestions |
| Sending a Fax Call to the machine. |
If you answered on an extension telephone, press your Fax Receive Code (the factory setting is *51). If you answered on the external telephone (connected to the EXT. jack), press the Start button to receive the fax.
When your machine answers, hang up.
|
| Custom features on a single line. |
If you have Call Waiting, Call Waiting/Caller ID, Caller ID, Voice Mail, an answering machine, an alarm system or other custom feature on a single telephone line with your machine, it may create a problem sending or receiving faxes.
For Example: If you subscribe to Call Waiting or some other custom service and its signal comes through the line while your machine is sending or receiving a fax, the signal can temporarily interrupt or disrupt the faxes. Brother’s ECM (Error Correction Mode) feature should help overcome this problem. This condition is related to the telephone system industry and is common to all devices that send and receive information on a single, shared line with custom features. If avoiding a slight interruption is crucial to your business, we recommend using a separate telephone line with no custom features.
|
Receiving Faxes
| Difficulties |
Suggestions |
| Cannot receive a fax. |
Check all line cord connections. Make sure the telephone line cord is plugged into the telephone wall jack and the LINE jack of the machine. If you subscribe to DSL, VoIP, or MagicJack services, call your service provider for connection instructions. If you are using a VoIP system, try changing the VoIP setting to Basic (for VoIP). This will lower modem speed and turn off Error Correction Mode (ECM). |
| Make sure your machine has a dial tone by pressing the Hook button in Fax mode. If you hear static or interference on your fax line, contact your local telephone provider. |
|
Make sure the machine is in the correct Receive Mode. This is determined by the external devices and telephone subscriber services you have on the same line as the Brother machine.
• If you have a dedicated fax line and want your Brother machine to automatically answer all incoming faxes, you should select Fax only mode.
• If your Brother machine shares a line with an external answering machine, you should select the External TAD mode. In External TAD mode, your Brother machine will receive incoming faxes automatically and voice callers will be able to leave a message on your answering machine.
• If your Brother machine shares the line with a Voice Mail subscriber service, see Related Information: Voice Mail.
• If your Brother machine is on a line with the Distinctive Ring subscriber service, see Related Information: Distinctive Ring.
• If your Brother machine shares a line with other telephones and you want it to automatically answer all incoming faxes, you should select the Fax/Tel mode. In Fax/Tel mode, your Brother machine will receive faxes automatically and produce a pseudo/double-ring to alert you to answer voice calls.
• If you do not want your Brother machine to answer any incoming faxes automatically, you should select the Manual mode. In Manual mode, you must answer every incoming call and activate the machine to receive faxes.
|
|
Another device or service at your location may be answering the call before your Brother machine answers. To test this, lower the Ring Delay setting:
• If the Receive Mode is set to Fax Only or Fax/Tel, reduce the Ring Delay to one ring. See Related Information: Set the Number of Rings Before the Machine Answers (Ring Delay).
• If the Receive Mode is set to External TAD, reduce the number of rings programmed on your answering machine to two.
|
| • If the Receive Mode is set to Manual, DO NOT adjust the Ring Delay setting. |
|
Have someone send you a test fax:
• If you received the test fax successfully, your machine is operating correctly. Remember to reset your Ring Delay or answering machine setting back to your original setting. If receiving problems recur after resetting the Ring Delay, then a person, device, or subscriber service is answering the fax call before the machine has a chance to answer.
• If you were not able to receive the fax, then another device or subscriber service may be interfering with your fax reception or there may be a problem with your fax line.
|
|
If you are using a telephone answering machine (External TAD mode) on the same line as the Brother machine, make sure your answering machine is set up correctly.
1. Plug the telephone line cord directly from the wall telephone jack to your Brother machine’s LINE jack.
2. Remove the protective cap from your Brother machine’s EXT jack, and then plug the telephone line cord from your answering machine into the EXT jack.
3. Set your answering machine to answer within 4 rings. If you are having problems receiving faxes or voice messages, set your answering machine to answer within 2 or 3 rings.
4. Record the outgoing message on your answering machine.
• Record five seconds of silence at the beginning of your outgoing message.
• Limit your speaking to 20 seconds.
• End your outgoing message with your Fax Receive Code for people sending manual faxes. For example: “After the beep, leave a message or press *51 and Start to send a fax.”
5. Set your answering machine to answer calls.
6. Set your Brother machine’s Receive Mode to External TAD.
See Related Information: Choose the Correct Receive Mode.
|
| Make sure your Brother machine’s Easy Receive feature is turned On. Easy Receive is a feature that allows you to receive a fax even if you answered the call on an external or extension telephone. |
| If you often get transmission errors due to possible interference on the telephone line or if you are using a VoIP system, try changing the Compatibility setting to Basic(for VoIP). |
| Contact your administrator to check your Secure Function Lock Settings. |
Sending Faxes
| Difficulties |
Suggestions |
| Cannot send a fax. |
Check all line cord connections. Make sure the telephone line cord is plugged into the telephone wall jack and the LINE jack of the machine. Make sure your machine has a dial tone by pressing the Hook button in Fax mode. If you subscribe to DSL, VoIP, or magicJack services, call your service provider for connection instructions. |
| Make sure you pressed Fax and the machine is in Fax mode. |
| Print the Transmission Verification Report and check for an error. |
| Contact your administrator to check your Secure Function Lock Settings. |
| Ask the other party to check that the receiving machine has paper. |
| Poor sending quality. |
Try changing your resolution to Fine or S.Fine. Make a copy to check your machine’s scanner operation. If the copy quality is poor, clean the scanner. |
| Transmission Verification Report says RESULT:NG |
There is probably temporary noise or static on the line. Try sending the fax again. If you are sending a PC-Fax message and get RESULT:NG on the Transmission Verification Report, your machine may be out of memory. To free up extra memory, you can turn off Fax Storage, print fax messages in memory or cancel a delayed fax. If the problem continues, ask the telephone company to check your telephone line. |
| If you often get transmission errors due to possible interference on the telephone line or if you are using a VoIP system, try changing the Compatibility setting to Basic(for VoIP). |
| Sent faxes are blank. |
Make sure you are loading the document correctly. When using the ADF, the document should be face up. When using the scanner glass, the document should be face down. |
| Vertical black lines when sending. |
Black vertical lines on faxes you send are typically caused by dirt or correction fluid on the glass strip. Clean the glass strip. |