BRAdmin Professional 4
for Microsoft Azure
User’s Guide
ENG
Version A
i
© 2022 Brother Industries, Ltd. All rights reserved.
Information in this document is subject to change without notice. The software described in this document is
furnished under a license agreement. The software may be used or copied only in accordance with the terms of
those agreements. No part of this publication can be reproduced in any form or by any means without prior written
permission of Brother Industries, Ltd.
Brother is either a trademark or a registered trademark of Brother Industries, Ltd.
Any trade names and product names of companies appearing on Brother products, related documents, and any
other materials are all trademarks or registered trademarks of those respective companies.
Some functions may not be available depending on the model.
This user's guide is a description of BRAdmin Professional 4 connected to the Microsoft Azure Storage service.
For the same operation as the regular BRAdmin Professional 4, see the BRAdmin Professional 4 User's guide.
The screens or images in this User's Guide are for illustration purposes only and may differ from those of the
actual products.
The contents of this document and the specifications of this product are subject to change without notice.
Copyright
Trademarks
Important Note

ii
1 Introduction............................................................................................................................................. 1
1.1 Overview .................................................................................................................................. 1
1.2 System Requirements .............................................................................................................. 2
2 Microsoft Azure....................................................................................................................................... 3
2.1 Configure Microsoft Azure Account.......................................................................................... 3
2.2 Microsoft Azure Settings .......................................................................................................... 3
2.3 Shared Access Signature (SAS) Settings in Microsoft Azure Storage Explorer ...................... 3
3 Setup Using BRAdmin Professional 4 .................................................................................................... 4
3.1 Configure the Master................................................................................................................ 4
3.2 Configure the Client.................................................................................................................. 4
3.3 Cloud Connection Settings ....................................................................................................... 5
4 Actions.................................................................................................................................................... 7
4.1 Master: Devices Tab ................................................................................................................ 7
4.2 Master: Clients Tab .................................................................................................................. 8
4.3 Client ........................................................................................................................................ 8
5 Troubleshooting and Support ................................................................................................................. 9
5.1 Connection Difficulties.............................................................................................................. 9
5.2 Disconnecting from Microsoft Azure and Removing Data........................................................ 9
5.3 Troubleshooting...................................................................................................................... 10
Table of Contents
1
1.1 Overview
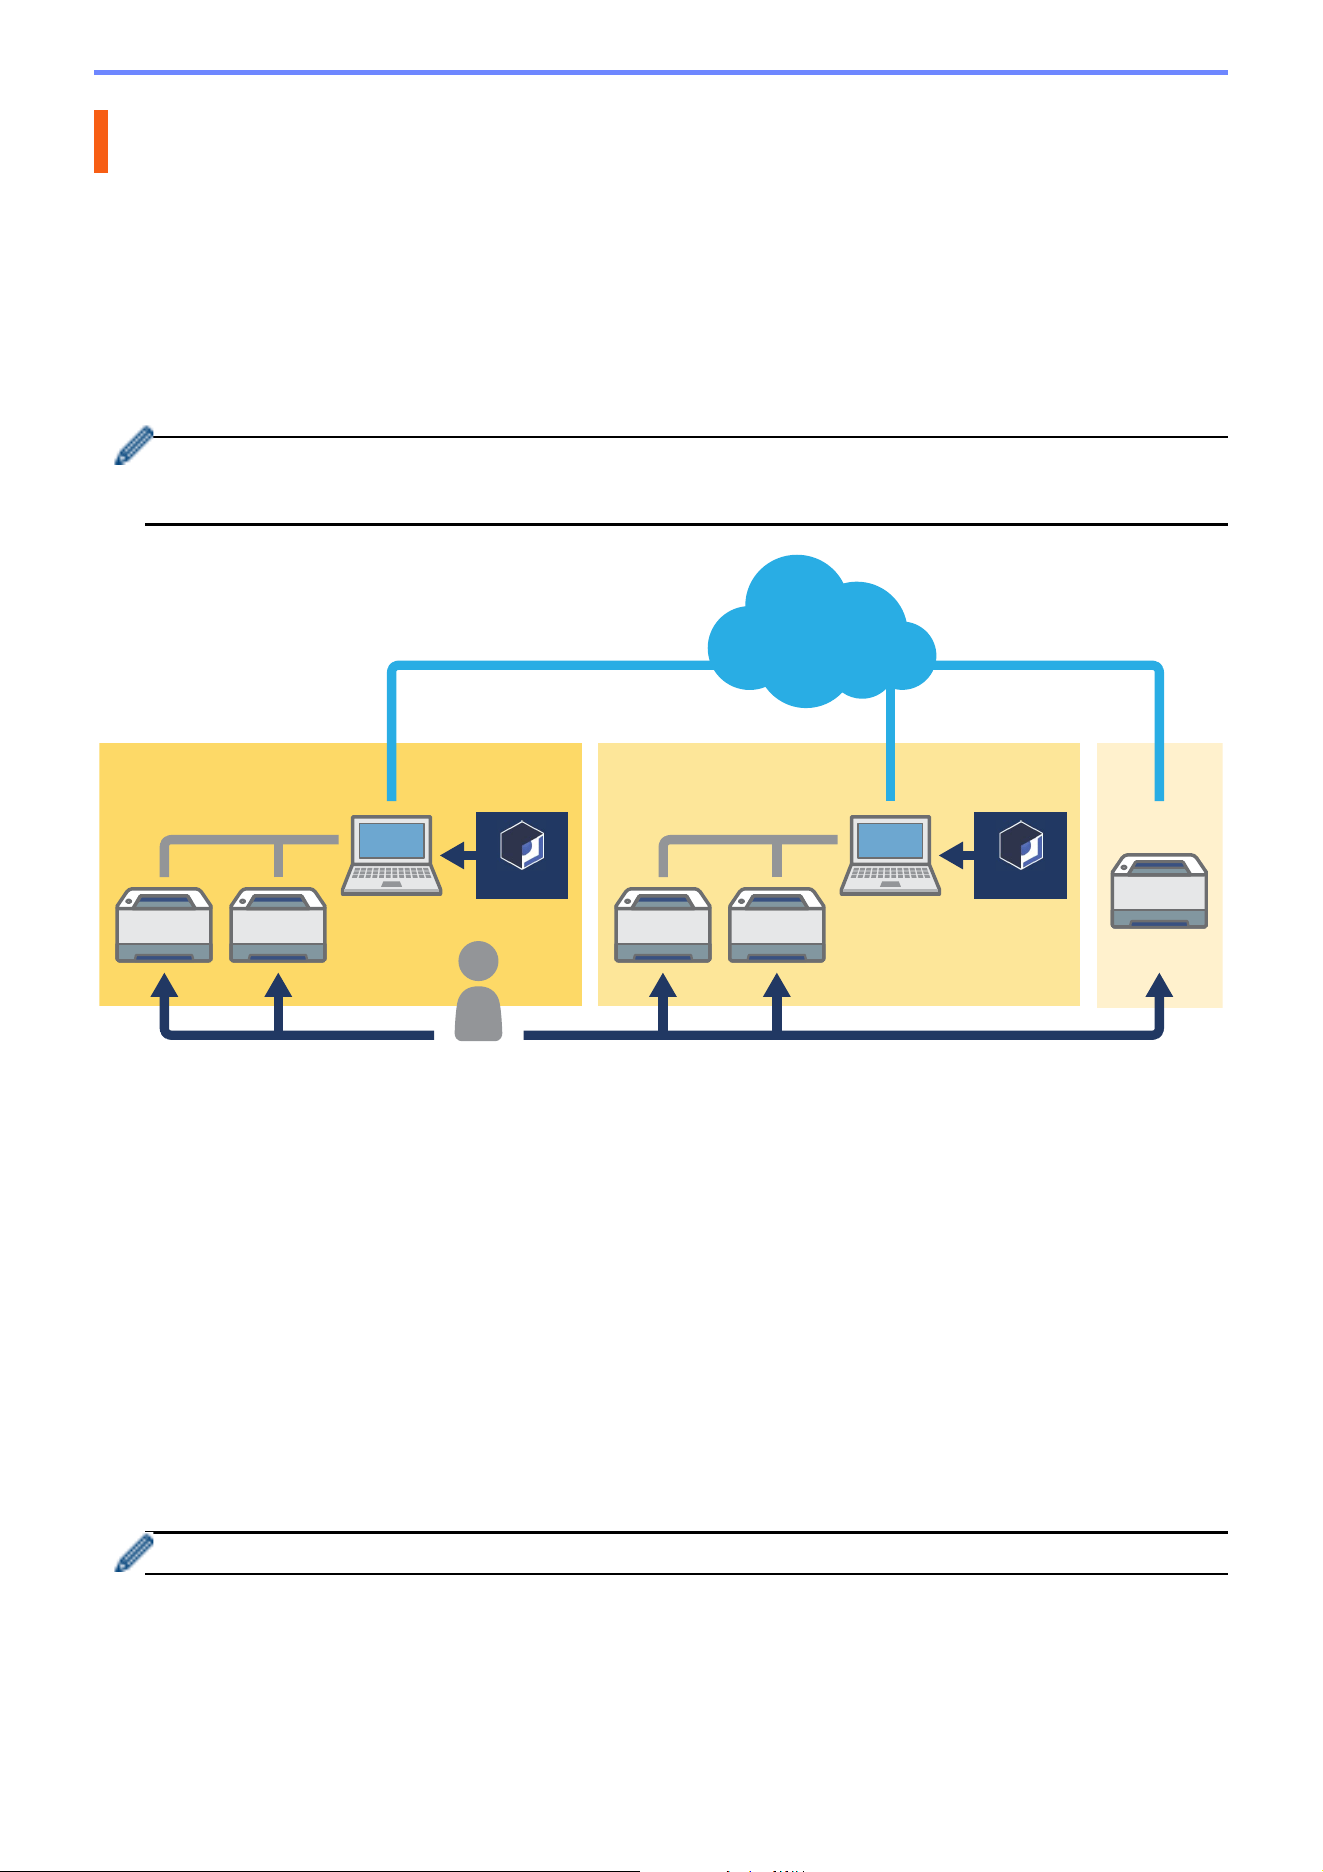
BRAdmin Professional 4 is an application for managing Brother devices and monitoring their status.
BRAdmin Professional 4 can connect to Microsoft Azure Storage services to allow IT professionals to remotely
manage devices in multiple locations.
• Microsoft Azure Storage (Cloud) stores device information for each location.
• BRAdmin Professional 4 Administrators must have access to Microsoft Azure Storage (Cloud).
• Device management is not a real-time process.
• Web Based Management is not available via Microsoft Azure.
Master
When BRAdmin Professional 4 is configured as the “Master”: The Master manages Clients, Cloud Connections,
and local devices, collects information from multiple devices managed by each Client or Cloud Connection via
Microsoft Azure Storages, and runs instant tasks.
Client
When BRAdmin Professional 4 is configured as the “Client”: BRAdmin Professional 4 compatible-devices connect
to Microsoft Azure via the Client. The Client regularly uploads device data to Microsoft Azure. This requires the
Client-installed computer to always be ON. When a Client computer is OFF, any devices connected to that Client
show as Connection error on the Master device list.
Cloud Connection
Cloud Connection-compatible devices connect directly to Microsoft Azure, and uploads data to the Microsoft Azure
regularly.
Each device can only be managed with one connection type - Client OR Cloud Connection.
1 Introduction
Azure
BRAdmin BRAdmin
Master Client
Cloud
Connection

2
1.2 System Requirements
BRAdmin Professional 4 and Cloud Connection devices must be able to access Microsoft Azure over the Internet.
Operating Systems Windows 10 (32-bit and 64-bit) / Windows 11 (64-bit)
Windows Server 2012 or later (64-bit)
Additional Software .NET Framework 4.8 or later
3
Please note that Microsoft Azure terms may change at any time.
2.1 Configure Microsoft Azure Account
To connect BRAdmin Professional 4 to Microsoft Azure, you need a Microsoft Azure subscription and
a
Microsoft Azure Storage account.
Using BRAdmin Professional 4 with Microsoft Azure will incur charges to your Microsoft Azure subscription.
2.2 Microsoft Azure Settings
Open a web browser and go to the Microsoft Azure portal page.
Please prepare the following items:
• Resource Group
• Storage Account
• Blob Storage Container
•Table
• Preexisting Tables and Blob Storage Containers cannot be reused when connecting to Microsoft Azure.
You must create new Tables and Blob Storage Containers for each Microsoft Azure Profile.
• Create an access policy for the Table with Read, Add, Update, and Delete permissions selected.
• Create an access policy for the Blob container with Read, Add, Create, Write, Delete and List selected.
2.3 Shared Access Signature (SAS) Settings in Microsoft Azure
Storage Explorer
Do not share your SAS with anyone.
• BRAdmin Professional 4 works with data within Table Storage and Blob Storage.
Do not directly edit the data contained within Table Storage and Blob Storage containers used by
BRAdmin Professional 4.
• For a Cloud Connection device to appear in the correct Azure profile, make sure the Table and Blob SAS
keys match those in the profile.
For more instructions, visit Brother Support for IT Administrators. This page is available only in English.
2Microsoft Azure
4
For each Azure profile, set up the Master first, then Client/Cloud Connection using the same Table and Blob
storage containers. For more information, see
3.1 Configure the Master.
To use the Client, see 3.1 Configure the Master and 3.2 Configure the Client.
To use Cloud Connection, see 3.1 Configure the Master and 3.3 Cloud Connection Settings.
To use both, see 3.1 Configure the Master, 3.2 Configure the Client and 3.3 Cloud Connection Settings.
3.1 Configure the Master
1. Download the latest version of BRAdmin Professional 4 onto your computer.
2. From the Master, click the Devices tab and then select the New Azure profile from the left navigation bar.
3. Type the SAS key into the Blob URI: and Table URI: fields, and then click OK.
4. Configure the Azure polling periods, and then click Upload. BRAdmin Professional 4 is set up as the Master.
Depending on your network environment, configure the proxy server settings as needed in Application
settings > Network > Proxy.
3.2 Configure the Client
If you have already installed BRAdmin Professional 4, then you have jumped ahead of the instructions we give below:
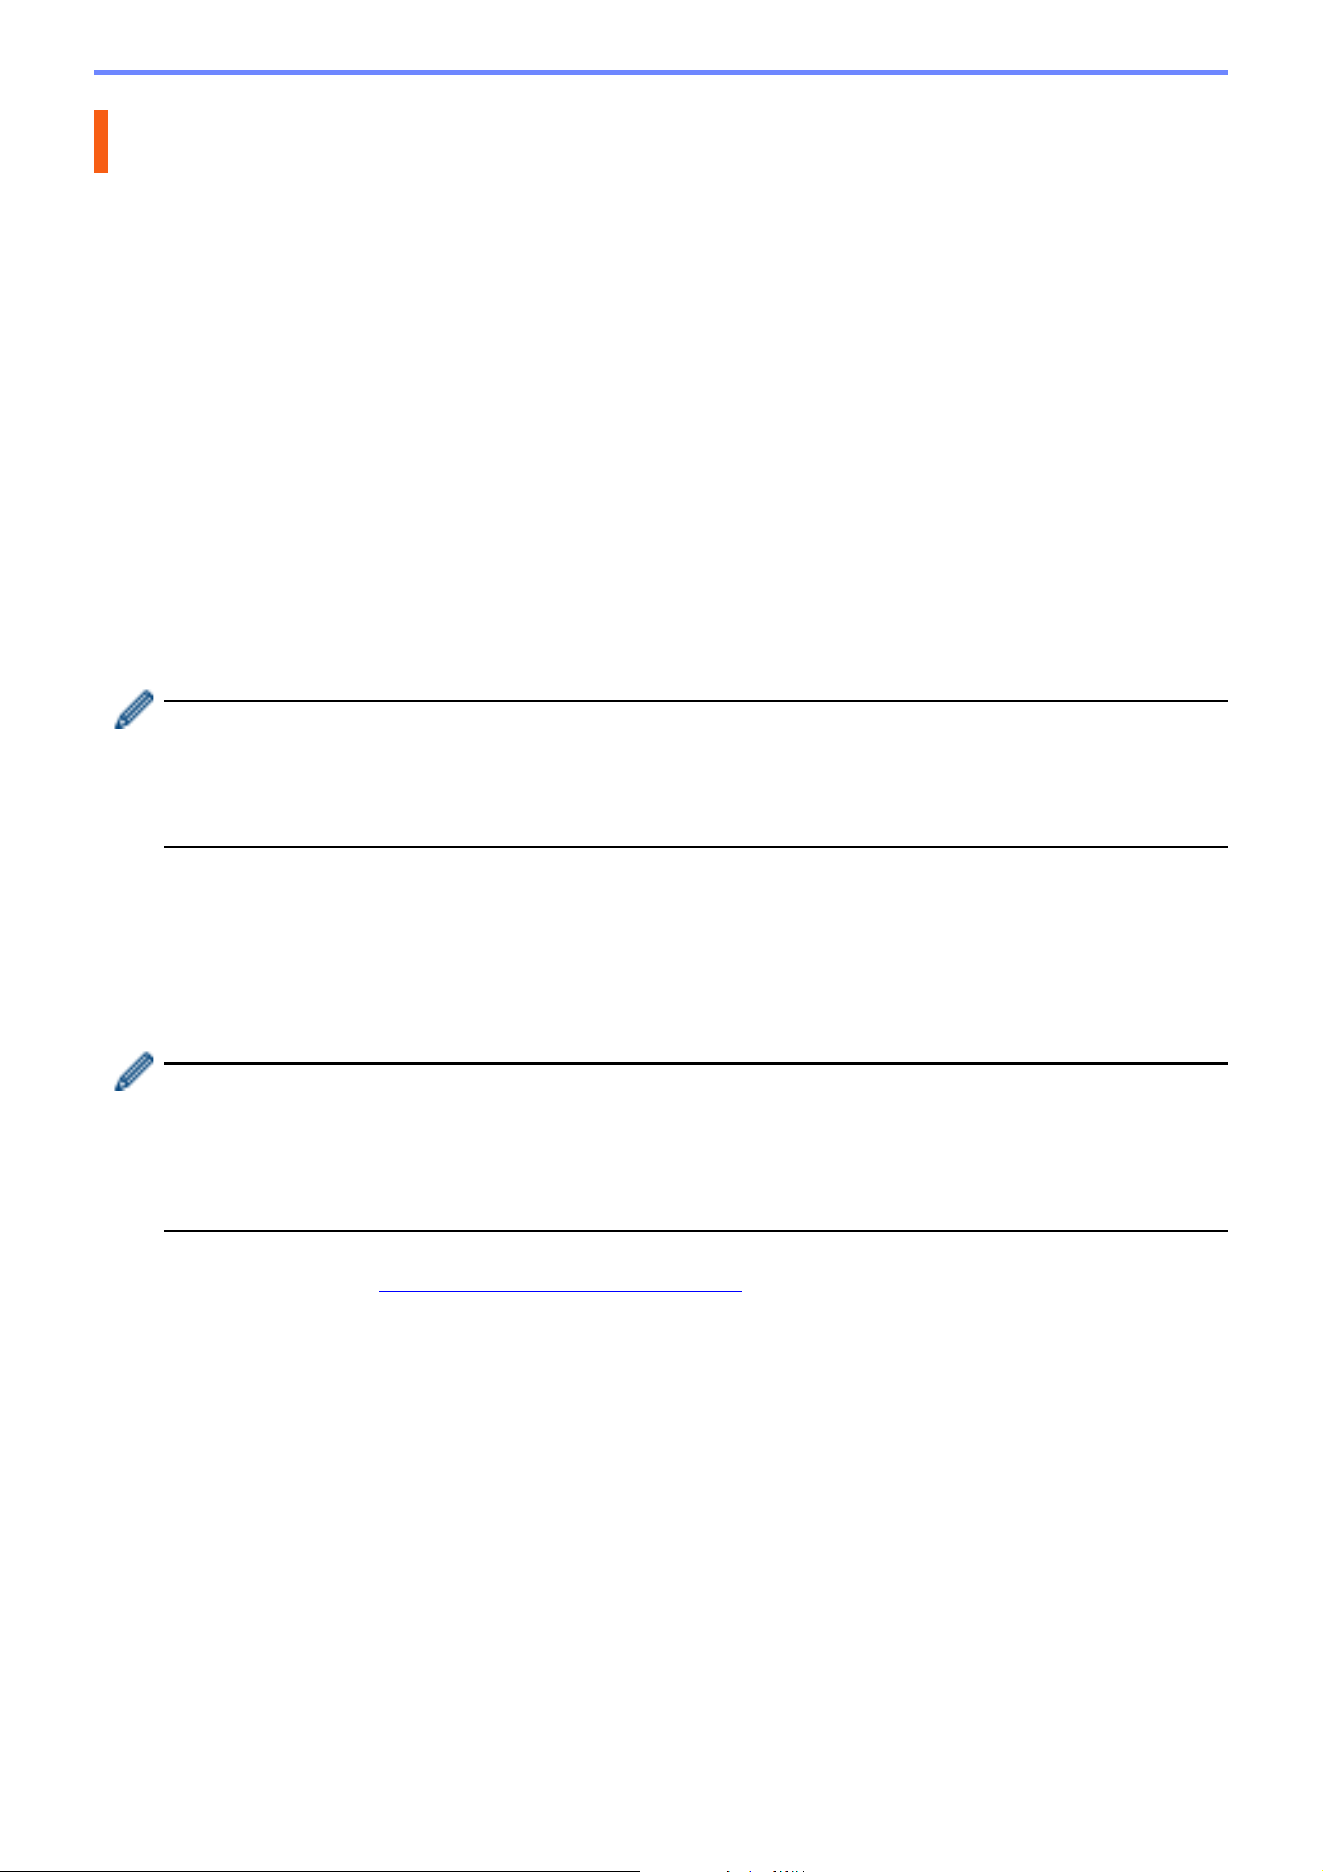
1. Export the Client INI file from the Master, and then configure the Client setting lock.
Click Export client INI file… button to create a Client setting lock password - (between 1-255 ASCII characters).
This password is required to unlock the Client setting lock.
Handling of INI files you have exported caution.
3 Setup Using BRAdmin Professional 4
Master
5
2. Save the BRAdmin Professional 4 installer (the same installer as the Master) and the exported INI file in the
same folder on the Client computer.
3. Run the installer and follow the on-screen instructions to complete the installation.
4. BRAdmin Professional 4 Client will automatically search for and discover devices according to the configuration
in the settings.ini file.
When it finishes, click the discovery button in the Master to discover the Client devices.
Depending on your network environment, configure the proxy server settings as needed in Application
settings > Network > Proxy.
To convert an existing installation of BRAdmin Professional 4 to a Client:
1. Make sure you have updated your installation to the latest version of BRAdmin Professional 4, and then import
the Client settings ini file exported from the Master using the Import backup file function of Back up
application settings: in Application settings. This will overwrite any existing configuration, so reconfigure
as
necessary.
2. Click the discovery button in the Client to discover devices.
3. Click the discovery button in the Master to discover the Client devices.
3.3 Cloud Connection Settings
The Cloud Connection connects devices directly to Microsoft Azure.
1. Apply and download the Microsoft Azure-supported firmware from the Brother support website at
support.brother.com.
For applicable models, contact your Brother technical support team.
2. Configure Microsoft Azure connection settings in Web Based Management.
1. Start your web browser.
2. Type “http://machine's IP address” in your browser's address bar (where “machine's IP address” is the
IP address of the machine or the print server name). For example: http://192.168.1.2.
3. If the machine prompts you for a password, type it in, and then click .
• The default login password to manage machine settings is on the back of the machine and marked “Pwd”.
• We recommend changing the default login password in order to protect your machine from unauthorized
access.
4. Click the Administrator tab.
5. Click Network Profile in the left navigation bar, and then click FTP for Profile 1.
6. Select the Azure radio button, and then click Submit.
7. Typing the SAS key in the Blob URI: and Table URI: fields, type a Profile Name, and then click Submit.
8. Configure the date and time, or configure SNTP settings.
We recommend using SNTP.
9. Get the correct CA certificates to access Microsoft Azure storage.
For information regarding CA certificates, visit Brother Support for IT Administrators
.
To configure the CA certificates:
1. Click the Security in Network tab.
2. Click CA Certificate in the left navigation bar, and then click Import CA Certificate.
3. Select the files, and then click Submit.
Depending on your network environment, configure the proxy server settings as needed.
1. Click the Network tab, and then click the Protocol in the left navigation bar.
2. Make sure the Proxy checkbox is selected, and then click Submit.
3. In the Proxy field, click Advanced Settings.
4. Enter the proxy server information, and then click Submit.

6
10. Click the Administrator tab, and then click BRAdmin Cloud Connection in the left navigation bar.
11. Select On the BRAdmin Cloud Connection radio button, select Profile 1 (the profile you just configured),
and then click Submit.
12. Confirm the status by checking the Connection Status.
13. Click the discovery button in the Master to discover the device.
7
After setting up Master, Client, and Cloud Connection, Azure Devices appear in the devices list when you run
a
device discovery on the Master.
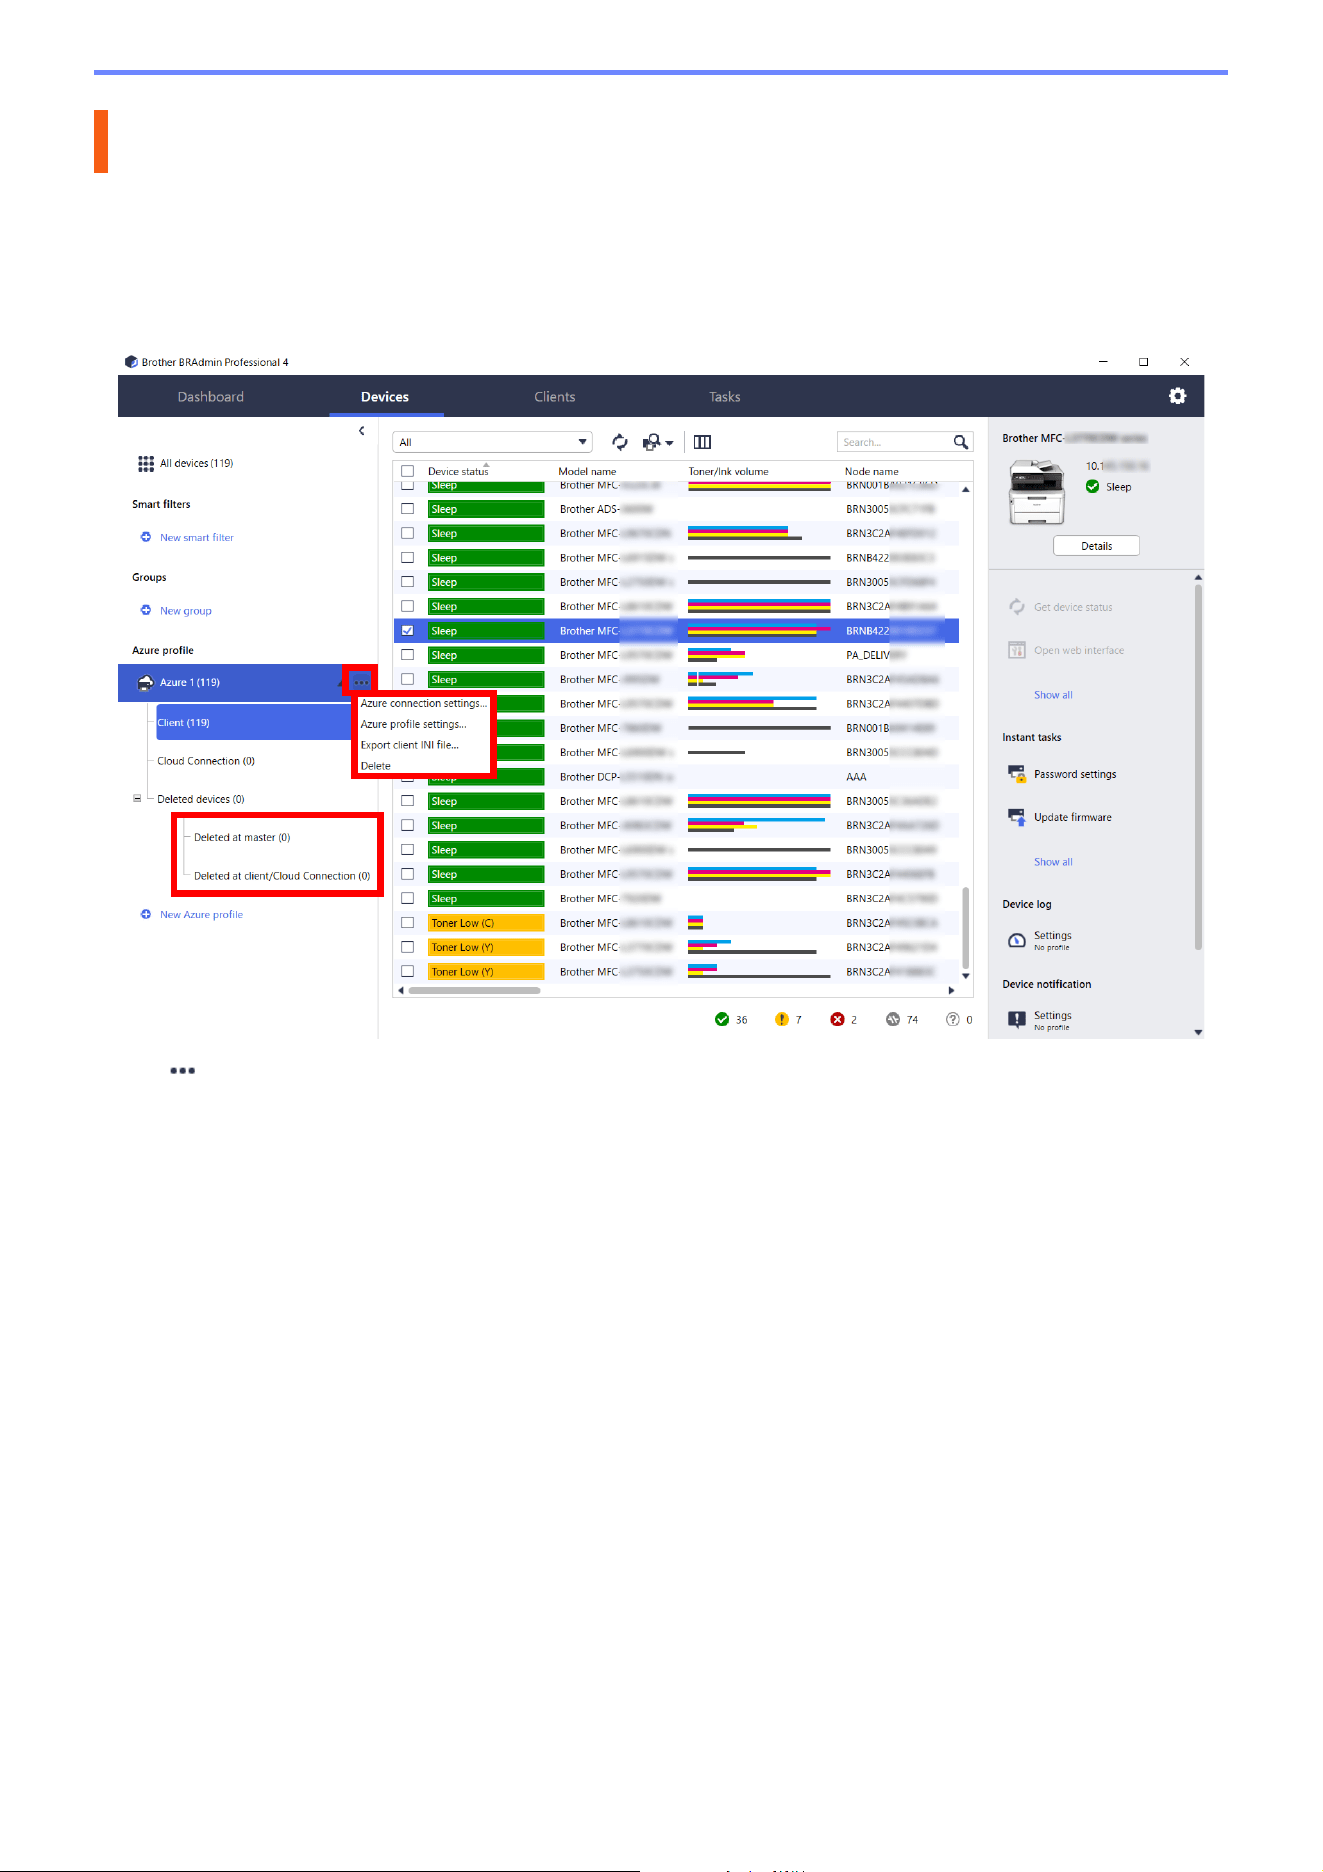
4.1 Master: Devices Tab
Click to complete these actions:
- To change the Azure connection:
Select Azure connection settings…
Change the Blob URI: and Table URI: fields, as needed, or enable or disable the Azure connection.
- To change the configuration of the Azure profile:
Select Azure profile settings… to display Azure profile.
- To export the client INI file:
Select Export client INI file…
- To delete the Azure profile:
Select Delete.
When you delete a profile, any Clients associated with that profile are removed from the Clients tab, and the
Client data is removed from the database.
When the device list refreshes, any devices associated with the deleted profile will display Connection Error
in the Devices tab.
Deleted devices
When you delete Azure devices, BRAdmin moves them to the Deleted devices list, located in the associated
Azure profile. Deleted devices cannot be discovered, but their names remain in the Deleted devices list.
- Deleted at master
The devices that you have deleted at the Master are listed here.
To restore a deleted device, right-click on the device name or select Redisplay to Azure devices list in the
right pane.
- Deleted at client/Cloud Connection
The devices that you have deleted at the Client are listed here. This includes any devices with Microsoft Azure
disabled on the Client and Cloud Connections.
4Actions
8
To rediscover after deleting a device listed from the Deleted at master or Deleted at client/Cloud Connection
lists:
- To rediscover a Client device, start device discovery on the appropriate BRAdmin Professional Client.
- To rediscover a Cloud Connection device, disconnect and reconnect the device to the Microsoft Azure using
Web Based Management.
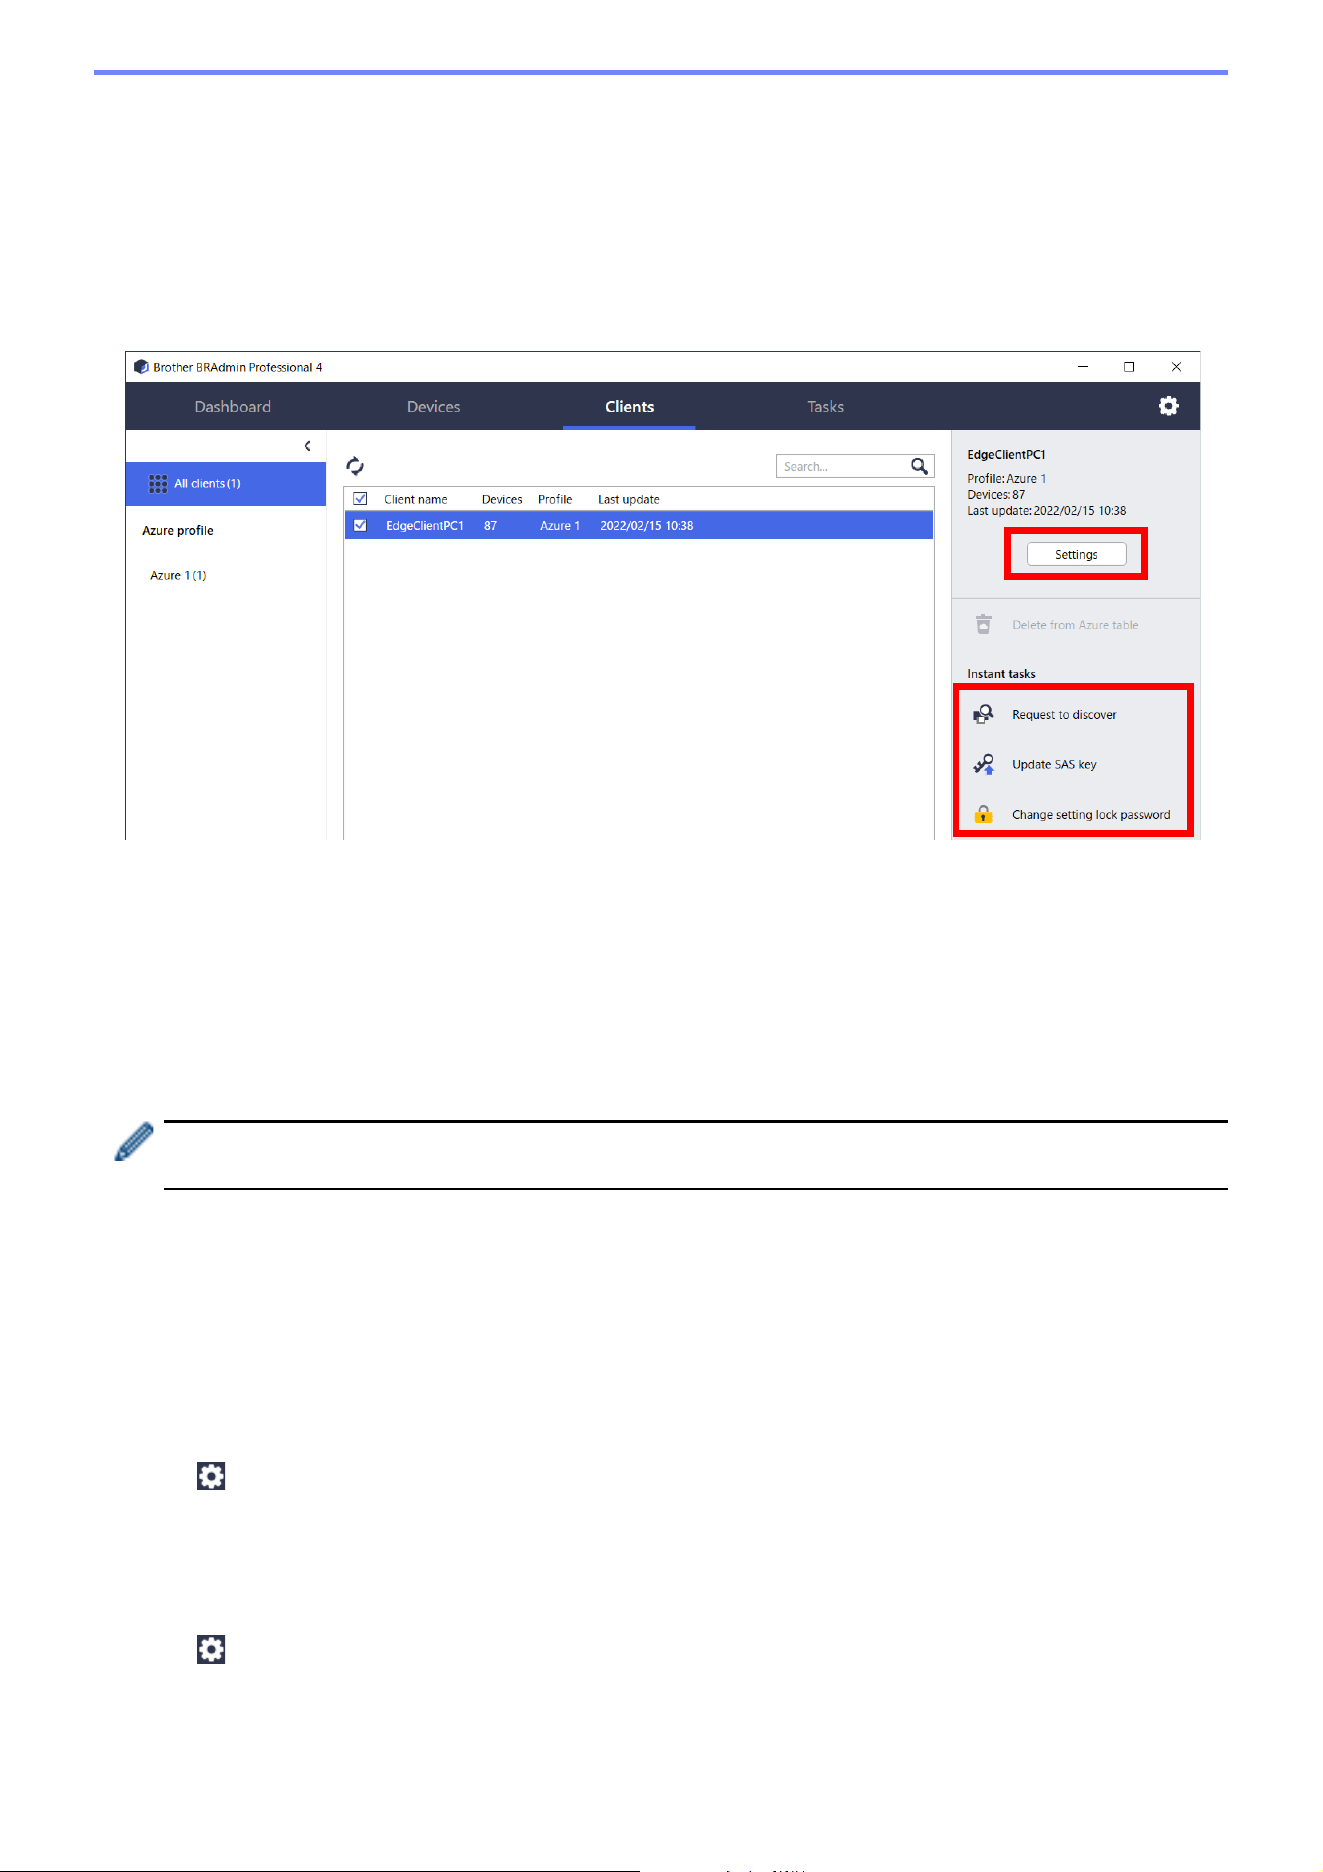
4.2 Master: Clients Tab
To perform Client actions or execute tasks, select one or more Clients, and then select the action or task you want
from the right pane.
- To change Client settings, click the Settings button in the right pane.
- To execute Instant tasks, select one of the following:
• Request to discover
Run a search for devices at the Client.
• Update SAS key
• Change setting lock password
If all clients use the same setting password, you can select multiple clients and change the password for all of
them at the same time.
4.3 Client
Access to settings in the Client is locked by default. This is to avoid changing application or device settings without
the administrator's permission.
To change either the Client settings or the settings of the device connected to the Client, you need to unlock the
setting lock.
To unlock the Client setting lock:
1. Click to open the Application settings.
2. Select General.
3. Click Unlock, and type the client setting lock password.
The client setting lock password is the password you created when exporting the client INI file.
To check the Azure connection:
1. Click to open the Application settings.
2. Select Azure connection.

9
If the problem persists, contact your Brother technical support team.
5.1 Connection Difficulties
If you are having difficulty discovering the device or cannot clear a connection error, check the following:
• Master, Client, Cloud Connection all have the same SAS key or each Table/Blob has the same SAS key.
• Ensure the SAS key, permission settings, and expiration date are accurate.
Master
If you cannot rediscover or refresh devices on the Master, check the following:
• The Master's computer is connected to the network.
• The target device is displayed on the Client.
Client
If you cannot rediscover or refresh devices on the client, first rediscover and make sure the Client detects the device.
If you still cannot find devices, check the following:
Regardless of your type of your network connection, make sure that:
• Your computer is connected to the network and is powered ON.
• The target device is connected to the network and is powered ON.
• The discovery has not been interrupted by any security software or firewalls.
• The target device meets the discovery conditions and criteria.
• The target device is within the reach of the Broadcast packet. If it is not, you may need to try the unicast search
or use the BRAgent software.
For USB-connected devices, make sure that:
• The target device is using the correct driver.
• The target device is connected to the USB direct interface.
• The target device is not busy.
Cloud Connection
Make sure that:
• BRAdmin Cloud Connection by Web Based Management is enabled.
• The correct profile is selected.
• CA certificates are installed and they have not expired.
• Proxy settings are correct.
• The latest firmware has been downloaded.
• Any devices using Cloud Connection are connected to the network and are able to access the internet.
• The Cloud Connection is connected to Microsoft Azure. You can see the status on Web Based Management.
5.2 Disconnecting from Microsoft Azure and Removing Data
Disable Microsoft Azure connection for all Master, Client, and Cloud Connections.
Delete all the data that remains in the Table and Blob, or delete the resource group you created for
BRAdmin
Professional 4.
5 Troubleshooting and Support
10
5.3 Troubleshooting
Error Solution
Timeout error - The task did not finish
within the timeout limit due to too many
devices or too many devices with
connection errors.
Wait and discover new devices again on the Master, reduce the
number of target devices, or increase the timeout setting in
Application settings > Network.
Profile is inactive To activate a profile, open Azure profile, click Azure connection
settings..., and enable Azure.
No profile available Create the profile again.
Timeout error - No response from client/
Cloud Connection.
Make sure the network connection is good. Make sure Client,
Cloud Connection, or both are not offline or busy.
Timeout error - The task was delivered to
client/Cloud Connection, but no task result
was returned.
Make sure Client, Cloud Connection, or both are working properly.
For more information, see
5.1 Connection Difficulties.
Blob access error Make sure the Blob key is correct.
Encryption error Delete all Table data.
Decryption error It is possible that new Table data has been added or changed.
Delete the data. If you are unsure, follow these steps:
1. Initialize Table data.
2. Upload profile settings from the Master.
3. Re-register Client and Cloud Connection.