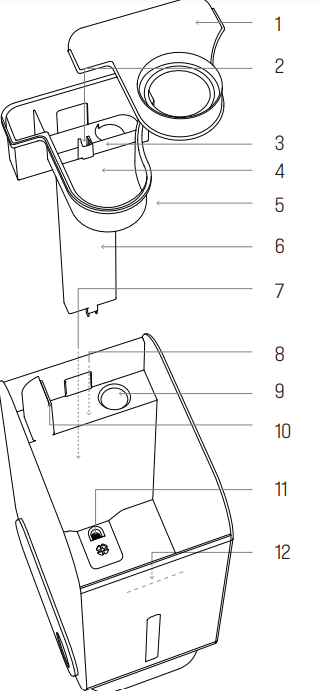
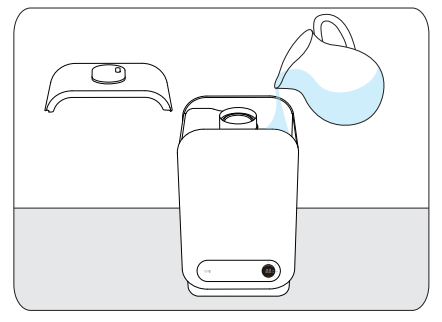
Remove the tank cover, fill the water tank with water till the Max Water Level Line. Put the tank cover back on. Make sure it fits securely for smooth misting.
Note: Do not add essential oils to the water tank. Do not add water in the fan vent. Excessive water will flow out from the overflow hole when you overfill the tank. When putting back the tank cover, try the other way if it doesn’t fit well.
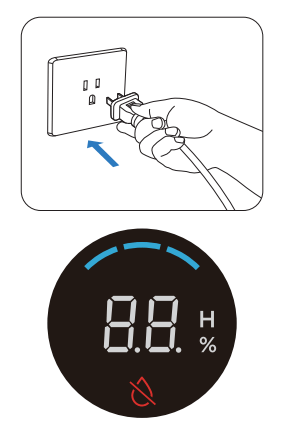
Power On & Off
Connect the power cord of the humidifier to a power source. A beep sound will be heard; the LED display will light up and dim after 2s if no button is touched. The unit is now in standby mode.
Note: If there is not enough water inside the water tank or mist chamber (Low Water icon will blink 3 times and turn off), the humidifier will not mist. (Refer to the Troubleshooting section of this Guide.) Do not lift the tank / mist cover when misting in case of leakage.
Mist Adjustment
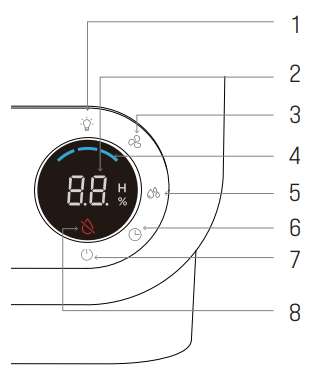
When the unit is on, tap the Mist Level button to cycle through Low -> Medium -> High mist levels. The corresponding LED indicator(s) will light up solid blue with a beep sound.
Note: When powered on again, the device will memorize the last mist level setting if not disconnected.
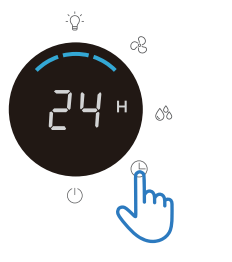
Timer Setting
Tap the Timer button to enter the timer settings. Tap the Timer button again to choose from 1H – 24H and the LED display will show the number accordingly.
To cancel the timer setting, tap the Timer button repeatedly until “00” is shown on the LED display after “24H”.
Note:
When you’re setting the timer, the humidity level number will dim; 2s after setting is completed, the device will exit the timer setting mode and the humidity level will show again.
Tap and hold the Timer button for 2s to exit timer setting.
When it’s powered on, you need to set the timer again if needed (last setting not memorized).
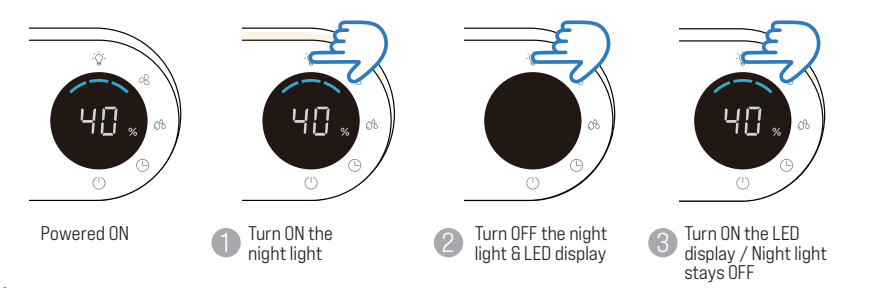
Night Light Setting
When the humidifier is in standby mode, tap the Night Light button to turn on the night light; to turn the light off, tap the button again.
When the humidifier is powered on (LED display is on), tap the Night Light button to turn on the night light; tap the button again, both the night light and LED display will be off. Tap a third time, LED display will be on but night light stays off; a fourth tap will turn on the night light.
When the humidifier is in standby mode, tap the Night Light button to turn on the night light, tap the button again to turn the light off; the LED display stays off all the time.
Note: When the device is powered off (tap the Power button when it’s on), all settings including mist, timer, night light and LED display will be off.
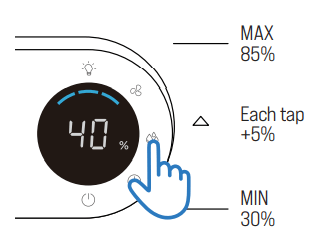
Humidity Setting
Your Toppin humidifier has a sensor to detect changes to humidity and temperature in the surrounding area. The humidity level control function thus can keep the humidity level as you set via the sensing technology.
When the humidifier is on, the current humidity level will be detected by the sensor and shown in percentage (relative humidity level, depending on the ambient air temperature) on the LED display.
When the humidifier is powered on, tap the Humidity button to enter humidity setting. The current humidity number will turn blinking, waiting for desired humidity setting. Tap the button again to increase humidity to the level of the smallest multiple of 5 (for example, when the current humidity level is 51%-54%, tap to increase to 55%); each tap brings an increment of 5%, until to the maximum level of 85% (tap again to cycle from 30%).
After the humidity is set, the current humidity percentage will be shown again. Tap the Humidity button once to check the last desired humidity; tap the button again to increase the humidity by 5% increment as described in the last step.
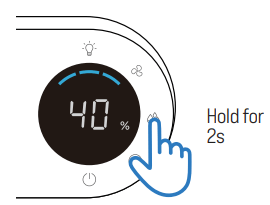
To cancel the humidity setting, tap and hold the Humidity button for 2s. The humidity number will turn to a dash, blinking 3 times (once every 1s), and the current humidity percentage will be shown again.
Note:
When you’re setting the timer, the humidity level number will dim; 2s after setting is completed, the device will exit the timer setting mode and the humidity level will show again.
Tap and hold the Timer button for 2s to exit timer setting.
When it’s powered on, you need to set the timer again if needed (last setting not memorized).
Low Water Protection
Low water level in water tank: When a low water level is detected in the water tank, the humidifier will be off (fan off 20s later). 3 beeps will be heard (once every 3s) and the Low Water icon flashes 7s. It is designed for safety concern to prevent the humidifier from possibly overheating and damaging the nebulizer.
Low water level in mist chamber: When a low water level is detected in the mist chamber, the nebulizer will be off (pump and fan still work). 10s later if there’s still no water detected in the chamber, the humidifier will be off (similar process with the “low water level in water tank” situation).
Dry run of nebulizer: When a dry run of the nebulizer is detected, the humidifier will be off (similar process with the “low water level in water tank” situation).
CLEANING AND MAINTENANCE
Daily Cleaning & Maintenance
For daily cleaning and maintenance of the exterior of the humidifier, use a soft, damp cloth to wipe clean in case of dust or stains.
Water Tank Cleaning
Follow the steps to clean all detachable parts and the water tank:
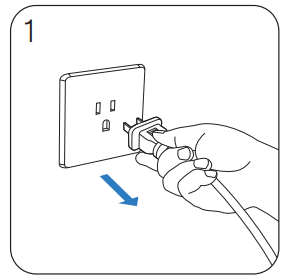
1. Turn off the humidifier, unplug from the wall outlet.
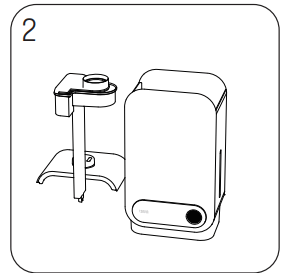
2. Remove the tank cover, mist cover and mist chamber section.
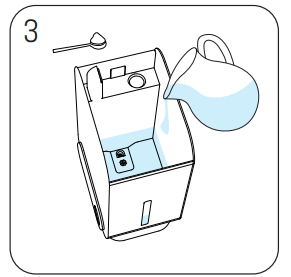
3. Fill the tank with water, add one teaspoon of white vinegar or other cleaning agents to remove possible build-up.
4. Leave it still for 15-20mins
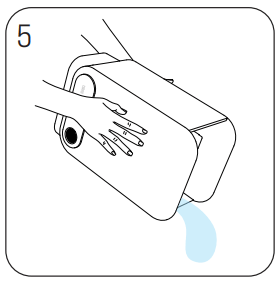
5. Empty the tank. Add water to tank and clean thoroughly. Repeat a few times until the smell of white vinegar or other agents becomes unobservable.
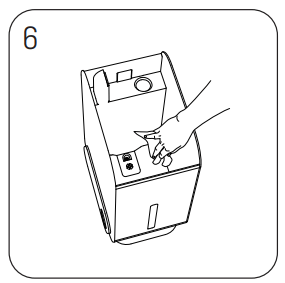
6. Wipe clean the interior with a soft clean cloth especially the nebulizer. And dry thoroughly with a soft cloth.
Note:
Pay attention when lifting both the covers in case of water drops on the surface.
Empty water from the water tank away from the air outlet.
The ceramic disc should not come in contact with any hard or sharp objects.
To remove possible buildup, rinse with a white vinegar and water solution.
Dry thoroughly with a soft cloth.
Do not use strong cleaning agents. Make sure the power cord and plug are let dry before next use.
SPECIFICATIONS
Model
TPHM001
Water Tank Material
ABS
Working Voltage
110V-, 60Hz
Power Consumption
30W
Frequency
1.7±0.1MHz
Water Tank Capacity
5L/1.3gal
Mist Level
3 levels [Low / Medium / High]
Run Time per Tank
Up to 14H [high mist level]
Up to 30H [medium mist level] Up to 72H [low mist level]
Timer Options
1H-24H
Operating Noise
<29dB [from 3ft away]
Low Water Level Protection
Supported
Dimensions
368 x 210 x 146mm /14.5 x 8.3 x 5.7in
Net Weight
1.7kg / 3.75lbs
TROUBLESHOOTING
Problem
Possible Causes & Solution
Water vapor and humidity are not produced.
Power plug - unplug cord from the humidifier, try again.
Power failure - when power is restored, try again.
Tank/Mist cover installation - make sure both tank cover and mist cover are attached correctly.
The surface of the nebulizer is dirty - wipe with soft cloth.
Air blows but water vapor is not produced.
Dirty tank - wash out tank and try again.
Dirty mist chamber - wash out chamber and try again.
Dirty nebulizer-wipe clean the part with a soft cloth.
Use of distilled water - 3 pinches of salt must be added to distilled water, stir to ensure thorough mixing. Caution: Add salt only by pinch, because too much salt added to the water can cause excessive boiling, blowing of fuse, or a stuck circuit breaker.
Ambient humidity is higher than desired level.
Humidity level is low.
The surface of the nebulizer is dirty - Wipe the part with a soft cloth.
The water in the unit is too cold - replace with cool, but not cold, water.
The mist has a bad smell.
Poor maintenance or dirty water - clean the tank and chamber thoroughly according to instructions above and fill with fresh water.
White dust is forming on nearby furniture.
Hard water may deposit a dust-like residue. In addition, dust in the air may settle due to the added humidity in the room, if this becomes a nuisance, use distilled water.
CHECK THE FOLLOWING IF YOUR HUMIDIFIER IS NOT WORKING CORRECTLY:
Problem
Possible Causes & Solution
Unit has stopped working.
Low to no water - unplug unit and refill tank.
Water is accumulating outside of unit or area surrounding unit.
Saturation of humidity - lower mist control setting.
Unit not level - unplug and place on level surface. Raise unit on a water-resistant level surface 2-3 feet off of floor.
Water dripping when refilling.
Loose cap - tighten cap by slightly moving unit it snaps into place.
Water remaining on bottom of tank - wipe tank and chamber or tilt to drain before transporting.
increased noise level.
Unit on uneven surface - unit must be placed on a flat, hard surface. Make sure it is NOT placed on a soft or absorbent surface.
Lower Water icon flashing after 3 beeps.
Indicates low water - unplug and refill tank. Check whether there's water in the tank if water level in the chamber is up the Low Water Sensor [tank]; if yes, the pump may be broken, please contact Toppin customer support.
LED Display Error Messages
Problem
Possible Cause
Action
L
When the ambient humidity level . detected is lower than the minimum 7 detection va!ue[30%], the error code "L" will be displayed.
/
H
When the ambient humidity level detected is higher than the maximum detection va!ue[85%], the error code “H" will be displayed.
No L or H displayed when low water level is detected.
E1
Low water level detected by the Low Water Sensor [chamber]: The Lower Water icon flashes for 3 times [for about 7s] with 3 beeps. The humidifier will enter standby mode and then turn off [fan off 15s later].
Add water till max water level line, tap the Power button to turn on
E2
Low water level detected by the Low Water Sensor [tank]: The Lower Water icon flashes for 3 times [for about 7s] with 3 beeps. The humidifier will enter standby mode and then turn off [fan off 15s later].
Add water till max water level line, tap the Power button to turn on
E3
Dry run: The Lower Water icon flashes for 3 times [for about 7s] with 3 beeps. The humidifier will enter standby mode and then turn off [fan off 15s later].
Add water till max water level line, tap the Power button to turn on