|
PROBLEMS
|
POSSIBLE CAUSES
|
SOLUTIONS
|
|
The Air Conditioner will not start
|
The air conditioner is unplugged
|
- Make sure the air conditioner plug is pushed completely into the outlet
|
|
The fuse is blown/circuit breaker is tripped
|
- Check the house fuse/circuit breaker box and replace the fuse or reset the breaker
|
|
Power failure
|
- The unit will automatically restart when power is restored
- There is a protective time delay (approx. 3 minutes) to prevent tripping of the compressor overload. For this reason, the unit may not start normal cooling for 3 minutes after it is turned back on.
|
|
The current interrupter device is tripped
|
- Press the RESET button located on the power cord plug
- If the RESET button will not stay engaged, discontinue use of the air conditioner and contact a qualified service technician
|
|
The Air Conditioner does not cool as it should
|
Airflow is restricted
|
- Make sure there are no curtains, blinds, or furniture blocking the front of the air conditioner
|
|
The temperature control may not be set correctly
|
- Lower the set thermostat temperature
|
|
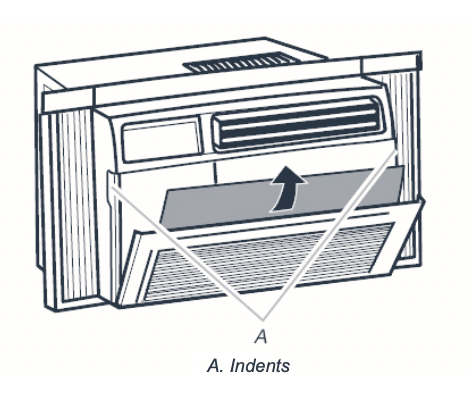
The air filter is dirty
|
- Clean the filter. See the Cleaning and Care Section of the manual
|
|
The room may be too warm
|
- Please allow time for the room to cool down after turning on the air conditioner
|
|
Cold air is escaping
|
- Check for open furnace registers and cold air returns
|
|
The cooling coils are frozen
|
- See “Air Conditioner is freezing up” below
|
|
The Air Conditioner is freezing up
|
Ice blocks the air flow and stops the air conditioner from cooling the room
|
- Set the MODE dial to HIGH FAN or HIGH COOL and set the thermostat to a higher temperature
|
|
The Remote Control is not working
|
The batteries are inserted incorrectly
The batteries may have run out
|
- Check the position of the batteries
- Replace the batteries
|
|
Water is dripping outside
|
Hot and Humid weather
|
|
|
Water is dripping inside the room
|
The air conditioner is not correctly tilted outside
|
- For proper water drainage, make sure the air conditioner is slightly tilted downward from the front of theunit to the rear
|
|
Water collects in the base pan
|
Moisture removed from the air is draining into the base pan
|
- This is normal for a short period in areas with low humidity and normal for a longer period in areas with high humidity
|
|
Digital Display reads “E1”,“E2”
|
A sensor has failed
|
|
 and
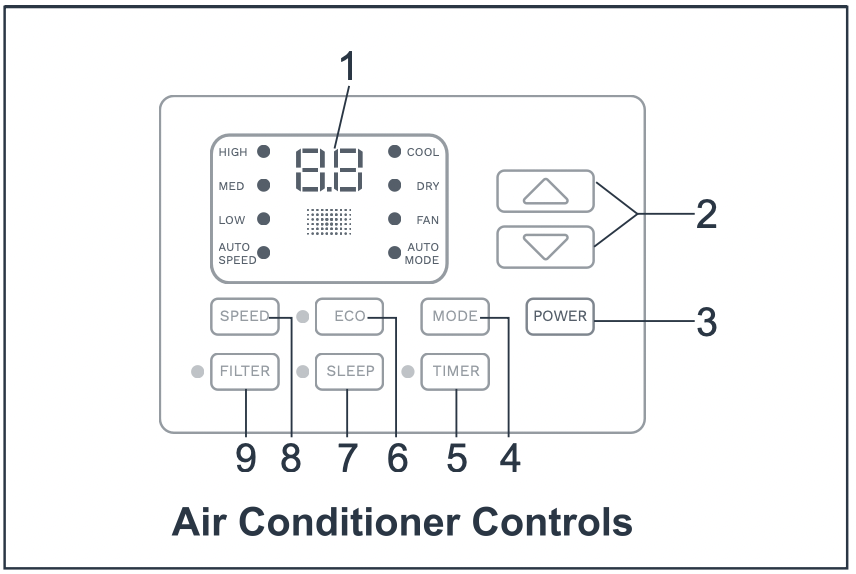
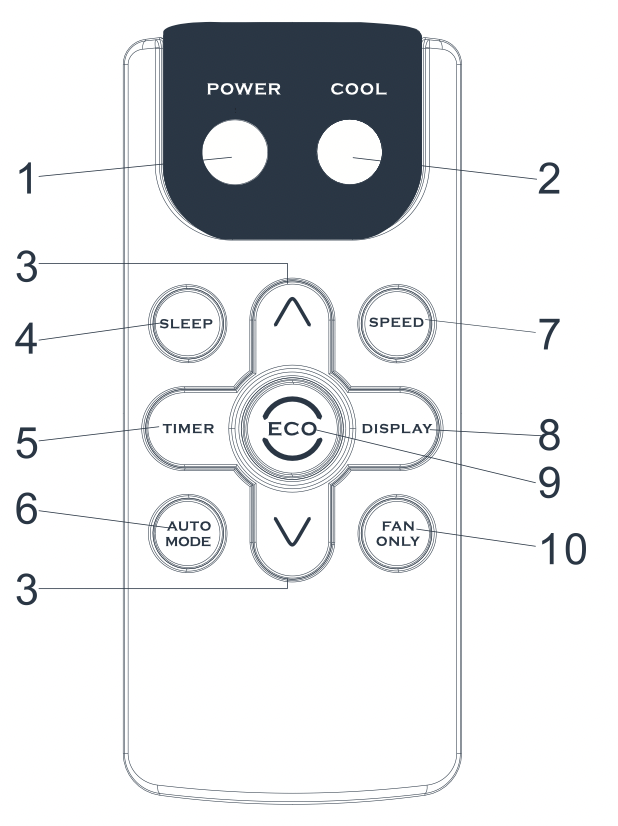
and  Button: Use these buttons on the control panel and remote to increase or decrease the Set Temperature or Timer. Temperature range: 61°F~88°F or 16°C ~31°C.
 and
and  : Use these buttons on the control panel and remote to increase or decrease the Set Temperature or Timer. Temperature range: 61°F-88°F or 16°C-31°C.