Operating Instructions for Cordless Handset
Getting Started
Setting up
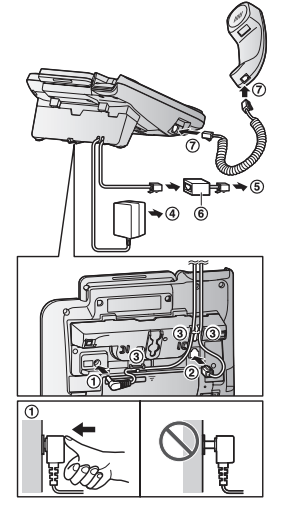
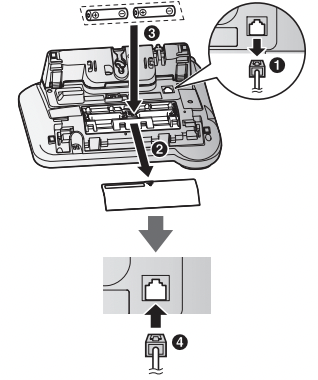
Connections
Base unit
- Connect the AC adaptor to the unit by pressing the plug firmly.
- Connect the telephone line cord to the unit until you hear a click.
- Fasten the AC adaptor cord and the telephone line cord by hooking it.
- Connect the AC adaptor to the power outlet.
- Connect the telephone line cord to the single-line telephone jack (RJ11C) until you hear a click.
- A DSL/ADSL filter (not supplied) is required if you have a DSL/ADSL service.
- Connect the corded handset cord to the corded handset and the base unit until you hear a click.
Note:
- Use only the supplied Panasonic AC adaptor PNLV226.
- Follow the directions on the display to set up the unit.
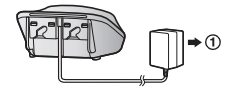
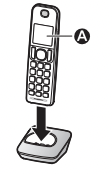
Charger
- Connect the AC adaptor to the power outlet.
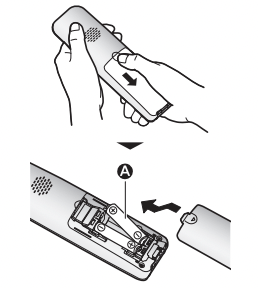
Handset battery installation
- USE ONLY rechargeable Ni-MH batteries AAA (R03) size
 ).
).
- Do NOT use alkaline/manganese/Ni-Cd batteries.
- Confirm correct polarities (
 ).
).
- Follow the directions on the display to set up the unit.
Handset battery charging
Charge for about 7 hours.
- Confirm “Charging” is displayed ).
- When the batteries are fully charged, “Fully charged” is displayed.
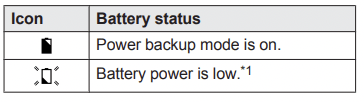
Handset battery level
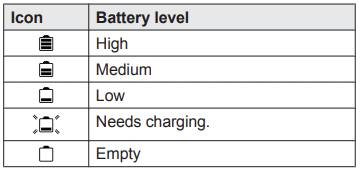
Panasonic Ni-MH battery performance (supplied batteries)
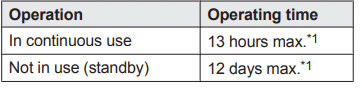
*1 If eco mode is on
Note:
- Actual battery performance depends on usage and ambient environment.
Base unit battery installation (for power backup)
You can insert 2 AAA (R03) batteries (not supplied) into the base unit that will power the unit temporarily in the event of a power failure.
Important:
- The following batteries can be used with the base unit:
– Rechargeable Ni-MH batteries*1, *2 (including the batteries used in your handset(s))
– Standard (non-rechargeable) alkaline batteries*3
- Do NOT use manganese batteries.
- Confirm correct polarities ().
*1 The base unit can fully charge Ni-MH batteries in about 15 hours.
*2 We recommend using HHR-4DPA batteries (page 4).
*3 Only insert alkaline batteries once a power failure occurs. Remove the alkaline batteries when power is restored.
- Disconnect the telephone line cord
 .
.
- Open the battery cover
 .
.
- Install the batteries in the battery compartment
 .
.
- Close the cover, then reconnect the telephone line cord

Note:
- If your phone service provider requires additional devices in order to make and receive calls, such as a modem, you may still not be able to make and receive calls even if the base unit’s backup power feature is functioning.
Base unit battery status when a power failure occurs
1. If  begins flashing on the base unit, replace the batteries with new ones as soon as possible. If you replace Ni-MH batteries with alkaline batteries, insert the Ni-MH batteries into the base unit again after the power is restored so that they will be recharged.
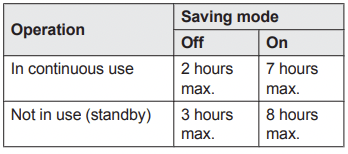
Battery saving mode setting
This feature allows the base unit to reduce its power consumption by limiting the available functions and therefore extend battery life during a power failure. The following settings are available:
– “On”: The unit will work as a standard telephone. Only the corded handset can be used to make and receive calls. (You cannot use the base unit display, phonebook, one-touch dial, answering system, speakerphone, etc.) The base unit display is blank.
– “Off” (default): You can use the full functions of the base unit, but battery life is not extended. The brightness level for the base unit display is lowered.
Base unit

 : Select the desired setting.
Note:
- Once the battery saving mode is set to “On”, the unit rings with the volume level 1 even if the ringer volume for the base unit is set to “Off” to let you know an incoming call is being received.
Panasonic Ni-MH battery performance (optional batteries) when operating on backup battery power
Note:
- Battery performance depends on the type of batteries.
- Actual battery performance depends on usage and ambient environment.
Note when setting up
Note for connections
- The AC adaptor must remain connected at all times. (It is normal for the adaptor to feel warm during use.)
- The AC adaptor should be connected to a vertically oriented or floor-mounted AC outlet. Do not connect the AC adaptor to a ceiling-mounted AC outlet, as the weight of the adaptor may cause it to become disconnected.
Note for Ni-MH battery installation
- Handset: Use the supplied rechargeable batteries.
- Handset/Base unit: For replacement, we recommend using the Panasonic rechargeable batteries noted on page 4, 6.
Note for battery charging
- It is normal for the handset to feel warm during charging.
- Clean the charge contacts of the handset and charger with a soft and dry cloth once a month. Before cleaning the unit, disconnect from power outlets and any telephone line cords. Clean more often if the unit is exposed to grease, dust, or high humidity.
Intelligent eco mode
This feature automatically reduces handset power consumption by suppressing handset transmission power when the handset is close to the base unit.
- When this feature is activated,
 is displayed.
- Eco mode is turned off when the clarity booster is activated (page 17).
Controls
Handset
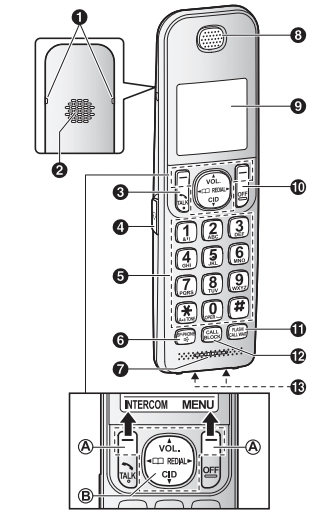


Base unit

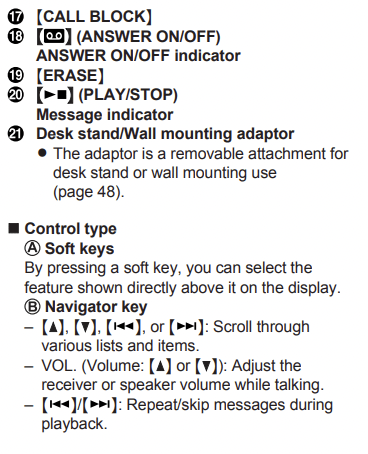
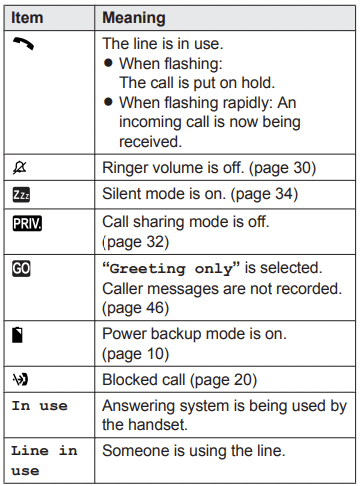
Display icons
Handset display items
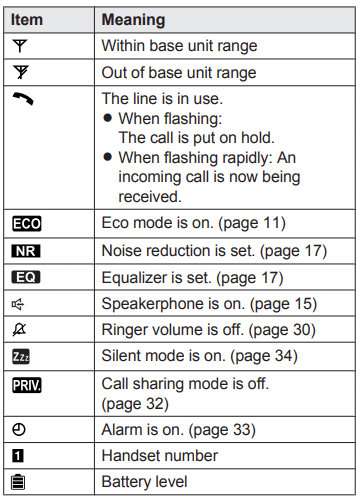
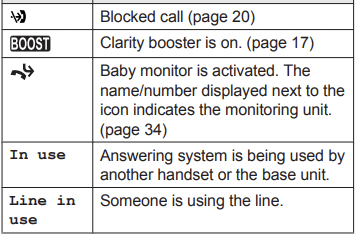
Base unit display items
Language settings
Display language
You can select either “English” or “Español” as the display language. The default setting is “English”.
Handset / Base unit

- : Select the desired setting.


- Proceed with the operation for your unit.
- Handset:

- Base unit:

Voice guidance language
You can select either “English” or “Español” as the voice guidance language of the answering system. The default setting is “English”. You can configure this setting using either the base unit or one of the handsets.
Handset / Base unit

- : Select the desired setting
- Proceed with the operation for your unit.
- Handset:
- Base unit:
Date and time
You can configure this setting using either the base unit or one of the handsets.
Handset / Base unit

- Enter the current month, date, and year by selecting 2 digits for each. Example: July 12, 2015


- Enter the current hour and minute (12-hour clock format) by selecting 2 digits for each. Example: 9:30

-
Proceed with the operation for your unit. Handset:  : Select “AM” or “PM”. Base unit:
  : Select “AM” or “PM”.
-
-
Proceed with the operation for your unit.
- Handset:

- Base unit:
Note:
- When English is selected as the display language, 12-hour clock format is used. When Spanish is selected, 24-hour clock format is used.
Recording your greeting message
You can record your own greeting message instead of using a pre-recorded greeting message. See page 40 for details.
You can configure this setting using either the base unit or one of the handsets.
Handset / Base unit

- “Yes”

- Record a greeting message.
- Proceed with the operation for your unit.
- Handset:
- Base unit:
Other settings
If you cannot make calls, change this setting according to your telephone line service. The default setting is “Tone”.
“Tone”: For tone dial service.
“Pulse”: For rotary/pulse dial service.
You can configure this setting using either the base unit or one of the handsets.
Handset / Base unit

- : Select the desired setting.
- Proceed with the operation for your unit.
- Handset:
- Base unit:
Making/Answering Calls
Using the handset
1. Lift the handset and dial the phone number.
 To correct a digit, press
  .
.
2. 
3. When you finish talking, press or place the handset on the charger.
Using the speakerphone
1. Dial the phone number and press  .
.
2. When you finish talking, press.
Note:
- To switch back to the receiver, press

Making a call using the redial list
The last 5 phone numbers dialed are stored in the redial list (each 48 digits max.).
1.  REDIAL
2. : Select the desired phone number.
3. 
Erasing a number in the redial list
1. REDIAL
2. : Select the desired phone number. a MERASEN
3. : “Yes”
4.
Using the base unit
1. Dial the phone number.
2. Lift the corded handset.
3. When you finish talking, place the corded handset on the cradle.
Note:
- You can also dial the phone number after lifting the corded handset.
- While on a call, you can switch from the base unit to the cordless handset as follows.
The call sharing mode must be on (page 32).
1 Handset: Press .
2 Base unit: Place the corded handset on the cradle. When the speakerphone is used, press .
Using the speakerphone
1. During a conversation with the corded handset, press to turn on the speakerphone.
- You can place the corded handset on the cradle.
- Speak into the base unit microphone.
2. When you finish talking, press .
Note:
- To switch to the receiver, lift the corded handset.
Making a call using the redial list
The last 10 phone numbers dialed are stored in the redial list (each 48 digits max.).
1. 
2. : Select the desired phone number.
3. Lift the corded handset.
Note:
- In step 1, you can also access the redial list as follows:
 : “Outgoing call”
Erasing a number in the redial list
1.
2. : Select the desired phone number. 
3. “Yes”
4.
Using Caller ID service
Important:
- This unit is Caller ID compatible. To use Caller ID features, you must subscribe to a Caller ID service. Contact your phone service provider for details.
Caller ID features
Handset / Base unit
When an outside call is being received, the caller information is displayed.
Caller information for the last 50 callers is logged in the caller list from the most recent call to the oldest.
- If the unit cannot receive caller information, the following is displayed:
– “Out of area”: The caller dials from an area which does not provide a Caller ID service.
– “Private caller”: The caller requests not to send caller information.
– “Long distance”: The caller makes a long distance call.
- If the unit is connected to a PBX system, caller information may not be properly received. Contact your PBX supplier.
Missed calls
Handset / Base unit
If a call is not answered, the unit treats it as a missed call. The display shows “Missed call”.
Note:
- Even when there are unviewed missed calls, “Missed call” disappears from the standby display if the following operation is performed by one of the units:
– A handset is replaced on the charger.
– Pressing on a handset.
– Pressing on the base unit.
Phonebook name display
When caller information is received and it matches a phone number stored in the phonebook, the stored name in the phonebook is displayed and logged in the caller list.
Talking Caller ID
Handset / Base unit
This feature lets you know who is calling without looking at the display.
To use this feature, you must:
– subscribe to a Caller ID service of your phone service provider.
– turn this feature on (page 30).
When caller information is received, the handsets and/or base unit announce the caller’s name or phone number received from your phone service provider following every ring.
The unit announces in English only.
- Name pronunciation may vary. This feature may not pronounce all names correctly.
- Caller ID service has a limit of how many characters can be displayed. If the caller’s name is too long, the unit may not be able to display or announce the entire name.
Phonebook name announcement
When caller information is received and it matches a phone number stored in the phonebook, the stored name in the phonebook is announced.
Answering system
The answering system can answer and record calls for you when you are unavailable to answer the phone.
You can also set the unit to play a greeting message but not to record caller messages by selecting “Greeting only” as the recording time setting (page 46).
Important:
- Make sure the unit’s date and time setting is correct (page 14).
Memory capacity (including your greeting message)
The total recording capacity is about 17 minutes. A maximum of 64 messages can be recorded.
Note:
- When message memory becomes full:
– “Messages full” is shown on the handset and base unit display.
–  on the base unit flashes rapidly if the answering system is turned on.
– If you use the pre-recorded greeting message, the unit automatically switches to another pre-recorded greeting message asking callers to call again later.
– If you recorded your own greeting message, the same message is still announced to callers even though their messages are not recorded.
Error messages
|
Display message
|
Cause/solution
|
|
Ask phone company for VM access #
|
- You have not stored the voicemail access number. Store the number (page 47).
|
|
Base no power or No link. Re- connect base AC adaptor.
|
- Confirm the base unit’s AC adaptor is connected to the unit and the power outlet correctly.
- The handset has lost communication with the base unit. Move closer to the base unit and try again.
- Unplug the base unit’s AC adaptor to reset the unit. Reconnect the adaptor and try again.
- The handset’s registration may have been canceled. Re-register the handset (page 37).
|
|
Busy
|
- The called unit is in use.
- Other units are in use and the system is busy. Try again later. R The handset you are using is too far from the base unit. Move closer and try again.
|
|
Check tel line
|
- The supplied telephone line cord has not been connected yet or not connected properly. Check the connections (page 9).
|
|
Error!!
|
- Recording was too short. Try again.
|
|
Invalid
|
- There is no handset registered to the base unit matching the handset number you entered.
- The handset is not registered to the base unit. Register the handset (page 37).
|
|
Requires subscription to Caller ID.
|
- You must subscribe to a Caller ID service. Once you receive caller information after subscribing to a Caller ID service, this message will not be displayed.
|
|
Use rechargeable battery.
|
- A wrong type of battery such as alkaline or manganese was inserted. Use only the rechargeable Ni-MH batteries noted on page 4, 6.
|
Troubleshooting
If you still have difficulties after following the instructions in this section, disconnect the base unit’s AC adaptor, then reconnect the base unit’s AC adaptor. Remove the batteries from the handset, and then insert them into the handset again.
If the base unit batteries for power backup are installed, remove the batteries from the base unit, and then insert them into the base unit again.
General use
|
Problem
|
Cause/solution
|
|
The handset does not turn on even after installing charged batteries.
|
- Place the handset on the charger to turn on the handset.
|
|
The unit does not work.
|
- Make sure the batteries are installed correctly (page 9).
- Fully charge the batteries (page 10).
- Check the connections (page 9).
- Unplug the base unit’s AC adaptor to reset the unit. Reconnect the adaptor and try again.
- The handset has not been registered to the base unit. Register the handset (page 37).
|
|
I cannot hear a dial tone.
|
- The base unit’s AC adaptor or telephone line cord is not connected. Check the connections.
- Disconnect the base unit from the telephone line and connect the line to a known working telephone. If the working telephone operates properly, contact our service personnel to have the unit repaired. If the working telephone does not operate properly, contact your phone service provider.
|
|
The base unit beeps.
|
- New messages have been recorded. Listen to the new messages (page 41).
|
|
The unit does not work during a power failure.
|
- You can insert 2 AAA (R03) batteries (not supplied) into the base unit that will power the unit temporarily in the event of a power failure (page 10).
- The base unit display is blank if the saving mode is “On” (page 11).
|
Menu list
|
Problem
|
Cause/solution
|
|
The display is in a language I cannot read.
|
- Change the display language (page 13).
|
|
I cannot register a handset to a base unit.
|
- The maximum number of handsets (6) is already registered to the base unit. Cancel unused handset registrations from the base unit (page 37).
|
Battery recharge
|
Problem
|
Cause/solution
|
The handset beeps and/or flashes. flashes. |
- Battery charge is low. Fully charge the batteries (page 10).
|
|
I fully charged the batteries, but
– still flashes,
– is displayed, or is displayed, or
– the operating time seems to be shorter.
|
- Clean the battery ends (
 , ,  ) and the charge contacts with a dry cloth and charge again. ) and the charge contacts with a dry cloth and charge again.
- It is time to replace the batteries (page 9).
|
Making/answering calls, intercom
|
Problem
|
Cause/solution
|
 is displayed. is displayed. |
- The handset is too far from the base unit. Move closer. R The base unit’s AC adaptor is not properly connected.
- Reconnect AC adaptor to the base unit.
- The handset is not registered to the base unit. Register it (page 37).
|
| Noise is heard, sound cuts in and out. |
- You are using the handset or base unit in an area with high electrical interference. Re-position the base unit and use the handset away from sources of interference.
- Move closer to the base unit.
- If you use a DSL/ADSL service, we recommend connecting a DSL/ADSL filter between the base unit and the telephone line jack. Contact your DSL/ADSL provider for details.
|
| The handset or base unit does not ring. |
- The ringer volume is turned off. Adjust the ringer volume (page 16, 30).
- Silent mode is turned on. Turn it off (page 16, 34).
|
| I cannot make a call. |
- The dialing mode may be set incorrectly. Change the setting (page 14).
|
| I cannot make long distance calls. |
- Make sure that you have long distance service.
|
Caller ID/Talking Caller ID
|
Problem
|
Cause/solution
|
|
Caller information is not displayed.
|
- You must subscribe to Caller ID service. Contact your phone service provider for details.
- If your unit is connected to any additional telephone equipment such as a Caller ID box or cordless telephone line jack, plug the unit directly into the wall jack.
- If you use a DSL/ADSL service, we recommend connecting a DSL/ADSL filter between the base unit and the telephone line jack. Contact your DSL/ADSL provider for details.
- The name display service may not be available in some areas. Contact your phone service provider for details.
- Other telephone equipment may be interfering with this unit. Disconnect the other equipment and try again.
|
|
Caller information is displayed or announced late.
|
- Depending on your phone service provider, the unit may display or announce the caller’s information at the 2nd ring or later.
- Move closer to the base unit.
|
|
Caller information is not announced.
|
- The ringer volume is turned off. Adjust the ringer volume (page 30).
- The Talking Caller ID feature is turned off. Turn it on (page 30). R The number of rings for the answering system is set to “2 rings” or “Toll saver”. Select a different setting (page 45).
- If the base unit and another handset are having an intercom call, your handset does not announce caller information.
|
|
The caller list/incoming phone numbers are not edited automatically.
|
- The Caller ID number auto edit feature is turned off. Turn it on and try again (page 31).
- You need to call back the edited number to activate Caller ID number auto edit.
|
|
I cannot dial the phone number edited in the caller list.
|
- The phone number you dialed might have been edited incorrectly (for example, the long distance “1” or the area code is missing). Edit the phone number with another pattern (page 39).
|
|
Time on the unit has shifted.
|
R Incorrect time information from incoming Caller ID changes the time. Set the time adjustment to “Manual” (off) (page 30).
|
|
The 2nd caller’s information is not displayed during an outside call.
|
- In order to use Caller ID, call waiting, or Call Waiting Caller ID (CWID), you must first contact your phone service provider and subscribe to the desired service.
After subscribing, you may need to contact your phone service provider again to activate this specific service, even if you already subscribed to both Caller ID and Call Waiting with Caller ID services (CWID).
|
Answering system
|
Problem
|
Cause/solution
|
|
The unit does not record new messages.
|
- The answering system is turned off. Turn it on (page 40).
- The message memory is full. Erase unnecessary messages (page 41, 42).
- The recording time is set to “Greeting only”. Change the setting (page 46).
- Your phone service provider’s voicemail service may be answering your calls before the unit’s answering system can answer your calls. Change the unit’s number of rings setting (page 45) to a lower value, or contact your phone service provider.
- The answering system will not answer incoming calls while the other devices such as handsets are engaged in a call.
|
|
I cannot operate the answering system remotely.
|
- The remote access code is not set. Set the remote access code (page 44).
- You are entering the wrong remote access code. If you have forgotten your remote access code, enter the remote access code setting to check your current code (page 44).
- The answering system is turned off. Turn it on (page 45).
|
|
The unit does not emit the specified number of rings.
|
- If the ring once setting is turned off (page 21), the number of rings decreases by 1 from the specified number of rings.
|
Voicemail
|
Problem
|
Cause/solution
|
|
“Voicemail msg. via phone co.” is shown on the display. How do I remove this message from the display?
|
- This notification is displayed when your phone service provider’s voicemail service (not the unit’s answering system) has recorded a message for you. Typically you can remove this notification from the display by listening to the message. To listen to the message, dial the voicemail number provided by your phone service provider (for most cases, this will be your own phone number), and follow the voice instructions. Depending on your phone service provider, you may need to remove all messages from your voice mailbox to remove the notification. You can also remove this notification by pressing and holding # until the unit beeps.
|
Liquid damage
|
Problem
|
Cause/solution
|
|
Liquid or other form of moisture has entered the handset/base unit.
|
- Disconnect the AC adaptor and telephone line cord from the base unit. Remove the batteries from the handset and leave to dry for at least 3 days. After the handset/base unit are completely dry, reconnect the AC adaptor and telephone line cord. Insert the batteries and charge fully before use. If the unit does not work properly, contact an authorized service center.
|
Caution:
- To avoid permanent damage, do not use a microwave oven to speed up the drying process.