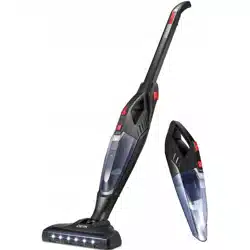
User manual Vacuum Cleaner Deik EV660
Items Supplied and Device Overview
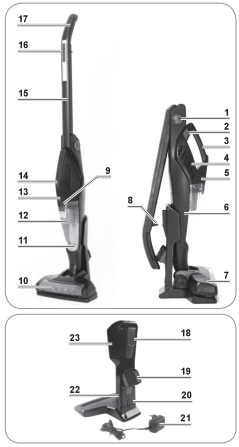
- Joint
- Release button for the motor unit
- Handle of the motor unit
- Ventilation openings
- Motor unit
- Frame
- Turbo nozzle
- Lever for releasing the joint lock
- Battery control lamps
- Control lamps of the turbo nozzle
- Suction opening
- Dust container with filter
- Release button of the dust container
- On/Off switch for using the cordless vacuum cleaner
- Stem
- Operating buttons on the stem:
 Switch on/off
 Increase suction power
- Reduce suction power
 Switch the brush rotation in the turbo nozzle on/off
 - Handle
- Crevice nozzle
- Brush nozzle
- Release button
- Mains adapter
- Socket for connecting the mains adapter
- Charging station
Nozzles
Turbo nozzle (7)
The turbo nozzle (7) is designed for vacuuming floors. It has a rotating cleaning brush to make it easier to pick up hair and flu.
Crevice nozzle (18)
The crevice nozzle (18) is ideal for places which are hard to get to. such as comers. crevices or recesses.
Brush nozzle (19)
The brush nozzle (19) is used for vacuuming upholstery and textiles and for removing dust from delicate objects such as picture frames. lamp shades. keyboards. books etc.
Before Initial Use
CAUTION Keep children and animals away from the packaging material There is a danger of suffocation!
- Unpack all parts and check the items supplied for completeness (see the " items Sup plied and Device Overview’ chapter) and possible transport damage. If you find any damage to the components. do not use the device (!). but contact our customer service department.
- Before using the device. remove all packaging materials and any labels that may be on the device and are used for protection during transportation or for advertising.
- Assemble the device and charging station (23) (see the “Assembly” chapter).
- Fully charge up the battery (see the "Charging Up the Battery" chapter).
Assembly
CAUTION Before you attach or detach any accessories. ensure that the device is not connected to the mains power.
Attaching / Removing Suction Nozzles
- The crevice nozzle (18) and the brush nozzle (19) are inserted as far as they will go into the suction opening (11) of the cordless vacuum cleaner. Pull them out to remove them.
- The turbo nozzle (7) is inserted as far as it will go into the suction opening of the frame (6). Make sure that the pins in the frame (6) fit into the designated recesses in the turbo nozzle (7). To remove it. press the release button for the turbo nozzle and. pull it out at the same time.
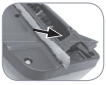
Inserting / Removing the Dust Container
- Inserting: Insert the two locking lugs on the motor unit (6) into the matching openings in the dust container (12) and plug them together. The dust container (12) must be heard to engage in place.
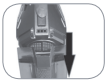
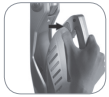
- Removing: Hold the device with the dust container (12) at the bottom. Grip the dust container (12), press the release button (2) and remove the motor unit (5) (see picture).
Inserting / Removing the Cordless Vacuum Cleaner
- Inserting: Hold the cordless vacuum cleaner with the suction opening (14) at the bottom and first insert it into the frame (6) at the bottom. Then press the handle (3) towards the frame (6) until it is heard to engage in place.
- Removing: Press the release button (2) on the side of the handle (3) and pull out the cordless vacuum cleaner.
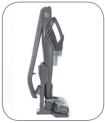
Charging station

- Assembling: Plug together the two parts of the charging station (23) (see picture).
- Taking apart: Press the release button (20) at the bottom on the back and pull both parts of the charging station (23) apart at the same time.
- On the back of the charging station (23) there are holders for storing the crevice and brush nozzle (19). Place the crevice nozzle (18) in the top holder and the brush nozzle (19) in the bottom holder.
 To pull out the brush nozzle (19). grip and pull the bristles at the top end.
- Hook the frame (6) into the charging station (23).
Charging Up the Battery
CAUTION
- The battery may only be charged using the charging station (23) or the mains adapter (21) which is supplied with the device. Do not use the mains adapter (21) or the charging station (23) to charge other batteries.
- The cordless vacuum cleaner must be switched off before charging takes place.
- Store the cordless vacuum cleaner with the frame (6) in the charging station (23). Connect the charging station (23) to the mains power. Do not allow the battery to run down too low so that it is not damaged.
- It is essential that you charge up the battery fully before you first use the device in order to achieve the maximum charging capacity. If the battery is fully discharged during use. it must be fully charged up again before it is next used.
- Place the assembled charging station (23) in a dry location near to a properly installed. easily accessible plug socket.
- First plug the barrel connector on the mains cable into the socket (22) of the charging station (23) and then connect the mains adapter (21) to the plug socket.
- Hook the frame (6) into the charging station (23). The battery control lamps (9) will flash during the charging process.
- If all three battery control lamps (9) light up constantly. the battery is fully charged up.
Use
CAUTION
- Never hold the suction nozzle (11) close to parts of the body or animals during use and never reach inside in order to avoid injuries or becoming stuck to it. Should the cordless vacuum cleaner become stuck. switch the device off immediately
- Only switch on the device once you have made sure that the dust container (12) and the filter are inserted correctly
- Always switch off the device before replacing any accessories
- On no account should the device be used to suck up the following
- Liquids or wet substances (e.g. wet carpet shampoo)
- Glowing ash. cigarette ends. matches. etc.
- Inflammable or explosive substances
- Very fine dust (e.g. concrete dust). ash or toner
- Pointed. hard objects such as large pieces of broken glass
- Empty and if necessary clean the dust container (12) after each use (see the "Cleaning the Device and Accessories” chapter)
- Switch the device off after each surface has been cleaned as this will considerably increase the operating time on each battery charge. Charge up the battery after use (see the "Charging Up the Battery" chapter).
- If the suction performance diminishes. empty the dust container (12) and/or
- When the device is switched on or connected to the charging station (23). the battery status is displayed. If all three battery control lamps (9) are lit up. the battery is full. The fewer lamps are on. the lower the battery charge.
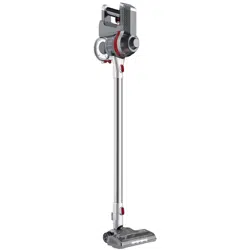
Floor Vacuum Cleaner
To operate the device as a floor vacuum cleaner. the cordless vacuum cleaner and the turbo nozzle (7) must be inserted in the frame (6) (see the “Assembly” chapter).
- Take the frame (6) with the cordless vacuum cleaner from the charging station (23).
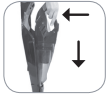
- Hold the turbo nozzle (7) with your foot and tilt the frame (6) downwards. This will release the upright position.
- The stem of the frame (6) contains the operating buttons (16):
Switch on/off
+ Increase suction power by one level
- Reduce suction power by one level
Switch the brush rotation in the turbo nozzle on/off
Switch on the cordless vacuum cleaner and guide the turbo nozzle (7) over the floor. Switch on the brush for more in-depth cleaning. When the brush is switched on. the control lamps (10) on the turbo nozzle (7) light up.
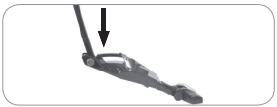
4. Fold down the stem (15) to vacuum under furniture. To do this. pull the lever (8) beneath the handle (17) upwards. This loosens the joint (1) of the frame (6) and makes it flexible.

To allow easy handling. the joint of the turbo nozzle (7) can be moved to the left/right as well as up and down.
5. To park the cordless vacuum cleaner from time to time. put the frame (6) into the upright position. The joint (1) locks in place when the frame (6) and the turbo nozzle (7) form a 90° angle (upright position). To release the upright position. hold the turbo nozzle (7) with your foot and tit the frame (6) downwards.
Handheld Vacuum Cleaner
- Remove the cordless vacuum cleaner from the frame (6). To do this. press the release button (2) on the side of the handle (3) and pull out the cordless vacuum cleaner.
- Plug the crevice or brush nozzle (19) into the suction opening (11). The cordless vacuum cleaner can also be used without a nozzle.
- To switch it on and off. press the switch (14) next to the handle (17).
Cleaning the Device and Accessories
CAUTION
- Clean the fitter after each use to maintain good performance and prevent overheating of the motor.
- Switch off the device before doing any cleaning.
- Keep the motor unit (5). the charging station (23). the turbo nozzle (7). the mains adapter (21) and the mains cable away from water or other liquids to prevent electric shocks. Only the dust container (12) with the filter and the crevice nozzle (18) and brush nozzle (19) may be cleaned with water. However. all parts must be completely dry before they are put back into the device
- The filter is neither machine-washable. dishwasher-safe nor suitable for tumble drying. Never clean the filter with soap or other cleaning agents to prevent damage to the filter.
- Only ever dry the filter in the air. and never use a hair dryer to do so
- Do not use any sharp or abrasive cleaning agents or cleaning pads to clean the device and accessories. These could damage the surfaces.
- To ensure optimum performance of the device. you should empty the dust container (12) (see "Emptying the Dust Container and Cleaning the Filter’ below) after every use.
- If necessary, wipe down the device and accessories with a soft, damp cloth and then wipe them dry.
- Remove hair and fluff from the nozzles.
- Check the mains adapter (21) and the mains cable for damage at regular intervals.
- Keep the device ready for operation and charge up the battery after each use (see the "Charging Up the Battery" chapter).
Emptying the Dust Container and Cleaning the Filter
- Switch off the device.
- Detach the motor unit (5) from the dust container (12): Hold the device with the dust container (12) at the bottom. Grip the dust container (12), press the release button (13) and remove the motor unit (5) (see the "Assembly" chapter. "Inserting / Re= moving the Dust Container’ section).
- Hold the dust container (12) over a dustbin.
- Pull the filter mount out of the dust container (12) (see picture).
- Empty the dust container (12).
- The filter mount contains a small basket that protects the HEPA filter. Twist the small basket a little bit and remove it.
- Tap out both parts and clean them with a soft brush if necessary.
- The filter and the plastic parts can also be rinsed with clear, lukewarm water. CAUTION: Do not use any cleaning agents!
- Let all parts dry completely in the air before you reassemble them. CAUTION: Never assemble wet or damp components or attach them to the motor unit (5)! The device is assembled in the reverse order.
- Attach the dust container (12) to the motor unit (5): First insert the two locking lugs on the fiat side of the motor unit (5) into the matching openings in the dust container (12) and then press the two components together. The dust container (12) must be heard to engage in place.
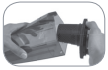
Cleaning the Turbo Nozzle
To make it easier to clean. the brush can be removed from the turbo nozzle (7)
- Press the release button on the turbo nozzle (7) and remove it.
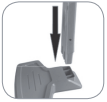
- On the bottom of the turbo nozzle (7) slide the
 switch in the
  direction.
 - Flip open the catch (see picture).
- Take out the brush and remove any contamination.
- Reinsert the brush: First insert the end with the triangular recess. then the end with the metal pin.
- Flip the catch shut and slide the switch in the
 direction.
Storage
- Insert the cordless vacuum cleaner into the frame (6).
- Hook the frame (6) into the charging station (23).
- If necessary. fold back the stem (15) to save space.
- Connect the charging station (23) to the mains power.
Troubleshooting
The device does not start.
- Is the battery flat? Charge up the battery.
Low suction force.
- Is the battery too weak? Charge up the battery.
- Is the dust container (12) full? Empty the dust container.
- Is the filter heavily clogged up? Clean the filter.
- Is the suction opening/nozzle blocked? Switch off the device and remove the blockage.
- It is also possible that some items will be too big/heavy to be picked up by the device.
Dust escapes from the device during cleaning.
- Check whether the dust container (12) and filter have been inserted correctly and adjust the fit if necessary.
- Is the HEPA filter worn or damaged? Order a new HEPA fitter via www.service-shopping.de and replace it
The battery is not charging up. The battery control lamps (9) are off.
- Is the device seated correctly in the charging station (23)?
- Is the mains adapter (21) connected correctly to the plug socket and the charging station (23)?
- Is the plug socket defective? Try another plug socket.
- Check the fuse of the mains connection.
Unusual odour
- A new odour is normal when the device is used for the first time: it disappears after a while.
Removing the Battery
CAUTION
- The motor unit (5) may only be opened for the disposal of the battery
- Take care when opening the motor unit (8): avoid short-circuits
- Do not open the battery as there is a danger of a short-circuit; irritant vapours or caustic liquids may also escape
- Do not expose the battery to strong sunlight. heat or fi. There is a risk of explosion.
This device contains a built-in battery pack. This must be removed prior to disposal of the used device in the following way:
- Undo the screws on the side of the motor unit (5).
- Take apart the side parts.
- Remove the battery pack from the device.
- First disconnect the red. then the black connecting cable.
- Dispose of the battery in an environmentally friendly manner ( collection points or retailers).