Sharp Q5000U 43" Class Full HD Smart TV
Product's Documents
Below are documents related to this product, you can read online or download:
- Owner's manual - (English) Read Online | Download pdf

USER MANUAL TELEVISION
You have several options for connecting your TV to different devices. The method in which you connect will be based upon the type of cables you have and the available outputs on your device.
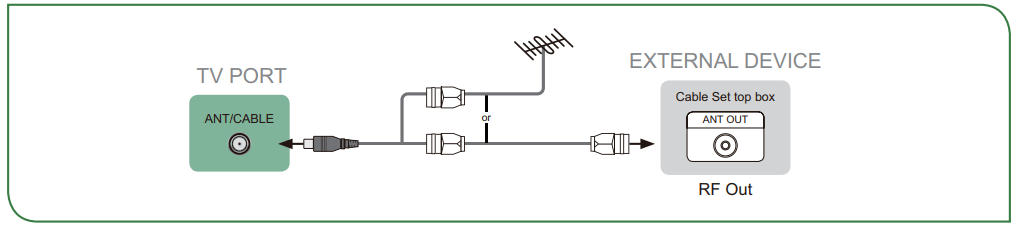
To connect an antenna,cable set-top box or satellite receiver:
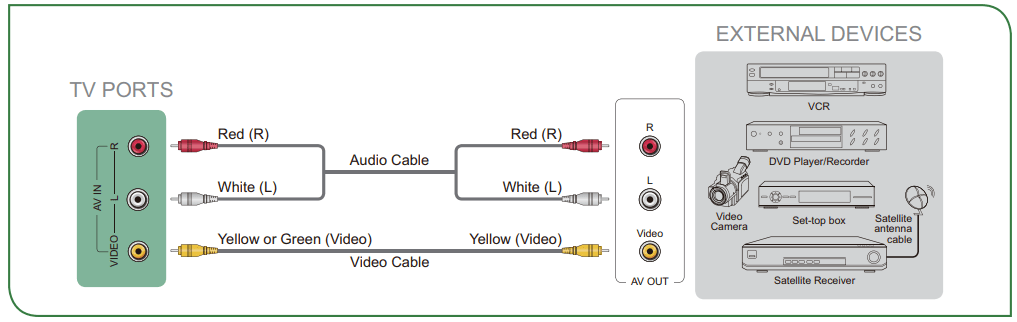
Connecting a satellite receiver, DVD player or other audio visual (AV) device with a composite video cable (yellow/red/white)
To connect an AV device with a composite video cable (not provided):
To connect an AV device with a component cable (not provided):

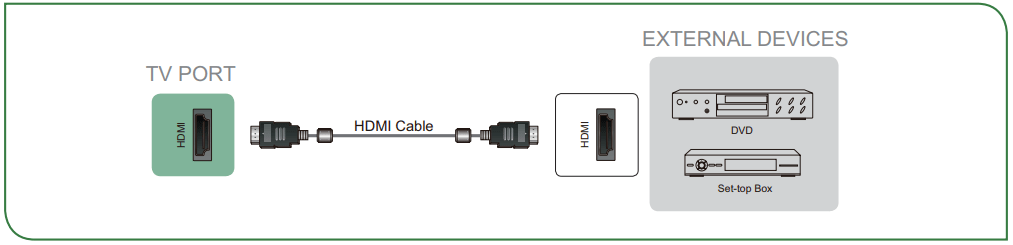
This 4K TV has three high-powered HDMI version 2.0 inputs that enable you to connect 4K Ultra-HD external devices. For example,if you have an X-box or Blu-ray player that supports the 2.0 standard,more details will be transmitted to the TV screen to maximize your entertainment experience.
Please refer to the User Manual that came with your device for step-by-step instructions.
To connect an AV device with an HDMI cable (not provided):
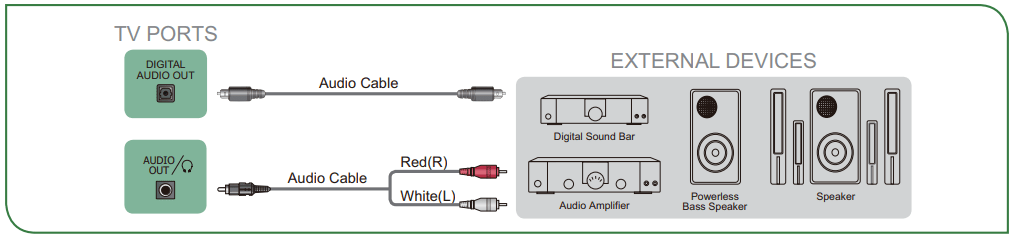
| You can connect headphone (not provided) to the AUDIO OUT port on your TV. While the headphone is connected, the sound from the built-in speakers will be disabled. | 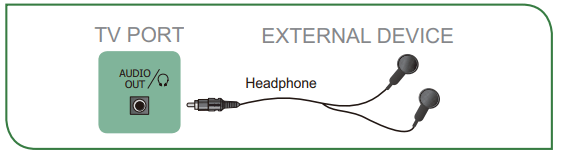 |
To connect speakers or other audio receivers with an audio cable (not provided):
If you’d like to use the Audio Return Channel (ARC) feature to have sound sent from the TV back down an HDMI cable to a digital sound bar, then you will need to connect the cable to the HDMI / ARC port. By using this feature, you will also be able to control the sound bar with your TV remote instead of having to use multiple remotes for each device.
To connect a digital sound bar with an HDMI cable (not provided):
 ] button on your remote and press the [ ˅ ] button of your remote to select Settings and then press OK to enter the Settings menu, go to System > HDMI-CEC.
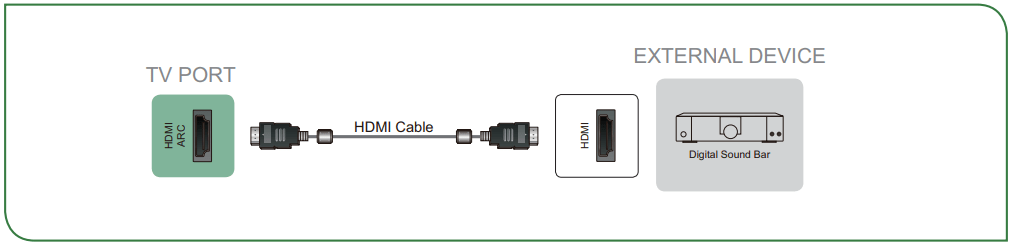
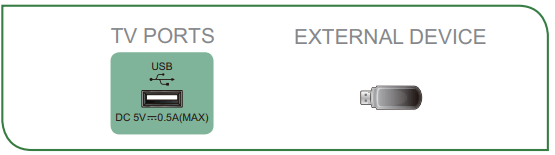
You can connect the USB devices such as hard drives, USB sticks and digital cameras for browsing photos, listening music and watching recorded movies.
|  |
 ] button on the remote to turn on TV. ] button on the remote.
Select the Input Source depending on the video device you have connected to your TV. To select the input source:
To view broadcast programs, press the [TV] button on your remote.
Channel search guide
When you select ANT/CABLE as input, if no TV channels were saved before, you will be prompted to do a channel search. You can also go to Settings menu > Channel to change the channel settings.
Launch Live TV
After channel tuning is done for the first time, the screen will display Live TV operating tips, including: how to load the channel list, how to Load info Bar and so on.
[Menu] Load more functions
[OK] Load Channel List
[ ∧ ] Load Info Bar
[BACK] Load previous channel
Viewing channel information
As you use the [CH ∧ / CH v] button on your remote to scroll through channels, an information banner appears on the top of the screen.

The information banner displays the following information:
If you are watching a particular channel, you can also press the up arrow button of your remote to view channel information.
Viewing a channel list
After you have done an automatic channel scan (if you’re using an antenna) or are receiving your channels through a cable provider, you can view your list of channels by pressing [OK] on your remote.
You will see the channel list display on the right side of the screen.
Creating a Favorite List
To quickly access your most-watched channels, you can create a Favorite List.
To create your Favorite List:
] button on your remote.Viewing your Favorite list
To view channels that you’ve added to your Favorite List simply press [OK] on your remote to call out the channel list.
The channel list appears on the right side of the screen and heart-shaped icons are shown next to the channels that make up your Favorite List. You can press [ < / > ] buttons to switch the channel list (Antenna or Cable) , Favorite and History list.
To quickly access menu function, press the [ ] button on your remote.
Accessibility
You can set Menu Audio, Video Description and High Contrast Menu on or off. The function can be used to meet the needs of visually impaired people.
When the Menu Audio is set on, the contents of each menu displayed can be broadcast out.
When the Video Description is set on, you can hear the introduction of relevant programs.
When the High Contrast Menu is set on, the comparison of menu items is more vivid.
Picture Mode
If you’d like to configure the settings for your picture, then there are seven types of picture modes available: Vivid, Standard, Energy Saving, Theater, Game, Sports and Calibrated.
Sound Mode
Select a preset sound mode to suit the type of content you are listening to: Standard, Speech, Late Night, Music, Theater and Sports.
Picture Size
Adjust the Aspect Ratio to stretch or zoom in on your picture. You can choose from the following settings: Auto, Normal, Zoom, Wide, Direct, Dot-By-Dot, Panoramic and Cinema.
Closed Captioning
You can switch between CC Off, CC On and CC On When Mute in ANT/CABLE mode.
Audio Language(MTS)/SAP
You can choose the Audio Language(MTS) in DTV mode and you can set SAP for Mono, Stereo or SAP in ATV mode.
Audio Only
When you select this option, the screen will not display the picture. You can only listen the audio. Press any button except the [ ] button, Volume [+/-] buttons and [  ] button to restore operation.
HDMI 2.0 Format
Match the connected device output format. You can select Standard format and Enhanced format in HDMI mode.
Settings
The Settings Menu consists of the following settings: Picture, Sound, Network, Channel, Accessibility, System and Support.
Your TV comes with many TV setting features to allow you to customize the picture based on your viewing preference and environment. As you navigate throughout different screens to access settings, some of the indicators appear as words On and Off.
You can press the [ ] button to access the Menu, press the [ v ] button on the D-pad to select Settings, and then press [OK] button to enter the Settings Menu.
The Settings Menu consists of the following settings:
In each menu, you can:
Picture Mode: Select a preset mode that best suits your preference and viewing environment, there are some types of picture modes available: Vivid, Standard, Energy Saving, Theater, Game, Sports and Calibrated. Picture Size: Adjust the picture aspect ratio based on the content you are watching. You can choose from the following settings: Auto, Normal, Zoom, Wide, Direct, Dot-By-Dot, Panoramic or Cinema. Picture Mode Settings: Customize selected Picture Mode.
|  |
Sound Mode: Select a preset mode that best suits your audio environment: Standard, Speech, Late Night, Music, Theater and Sports. Set the sound effects to suit your preference. Configure your audio settings for your sound preferences. Once you choose the mode, you can adjust the audio based on the following settings: Speakers: Switches the sound from the TV speakers to Optical or HDMI ARC output connectors. • Speakers: Switches the sound from the TV speakers to Optical or HDMI ARC output connectors. • Digital Audio Out: Select the digital audio output format for your external audio device. For example, choose RAW (which is uncompressed audio in RAW form) if you have 5.1 Channel Surround Sound Speaker set up. Choose PCM if you have an amplifier that does not support Dolby Digital technology. • Digital Audio Delay: Adjust the digital audio output delay time to sync sound from an external speaker with the images on the TV. • Lip Sync: Synchronize the displayed image with the audio output. • Balance: Emphasizes sound from the left or right speaker. Sound Mode Settings: • Bass Boost: Bass Boost uses DTS TruBassTM to enhance the perception of bass frequencies to provide deep, rich bass response from the TV's internal speakers. • Surround Sound: Surround sound uses DTS TruSurroundTM to deliver an immersive surround sound experience from the TV's internal speakers. • Dialog Clarity: Dialog Clarity uses DTS Dialog ClarityTM to boost the frequency range of the human voice so dialog is clearly understood and heard above audio or surround effects. • Equalizer: Adjust low to high pitch sounds. • Wall Mount setup: Improves sound for wall-mount position. Headphone • Headphone Mode: Disable the TV speaker when you are using a sound bar, ARC or any other external audio amplifiers. • Headphone Volume: Change the way audio is sent through the type of device that's connected to your TV Audio Out port. Advanced Audio Settings: Tune the audio settings and quality of the TV. • Auto Volume Control: Activate to prevent the volume from changing when you switch TV channels. • Preferred Audio Language: Set the audio language based on your preference.(The preferred language must be supported by the broadcaster.) Reset Default Audio Settings: Reset all of the Audio settings in current audio mode to the factory default values. | 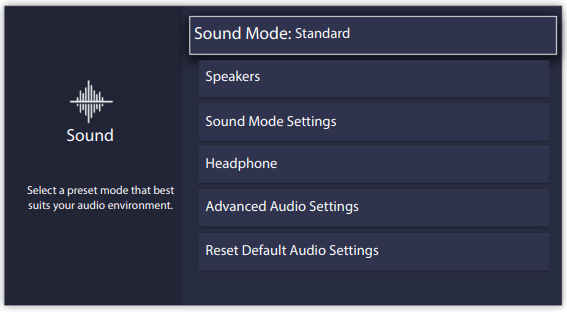 |
Network Configuration: Configure network settings to connect to an available network. When the Connection Type is Wired LAN, means you choose a wired network connection to access the Internet. • IP Settings: Most devices obtain an IP address automatically. Set an IP address manually if you do not have a router, or if your router does not assign IP addresses for you. When the Connection Type is Wireless, means you choose a wireless network connection to access the Internet. • Refresh: Refresh wireless network. • Add: You can add wireless network. • Advanced Settings: Configure the advanced wireless network settings for the TV. Connection Test: Tests the status of your network connection. Network Information: View information about your network connection. Bluetooth: Connects to external devices via Bluetooth. | 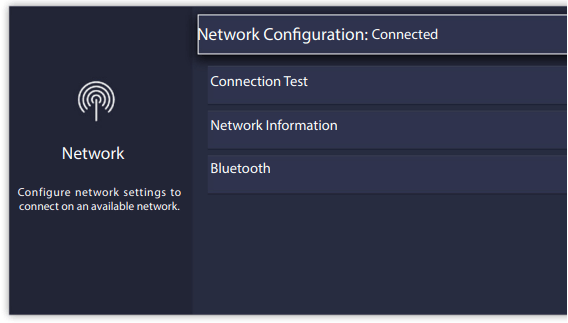 |
The Parental Controls setting allows you to block content that is not appropriate for children to watch. You can do this by creating a 4-digit password
Turning Parental Control On
] button on your remote. You will see the other Parental Control settings change from a greyed out state and become highlighted. When this occurs, begin adding other settings to the Scheduled Blocking, Channel Blocking, Programme Blocking, Input Blocking, App Blocking, Change PIN or Reset Parental Control Defaults features.
When you experience an issue with your TV, turn it off and on again. If this does not resolve the problem, then refer to the tips below. If the problem is still not resolved, then contact us.
| ISSUES | POSSIBLE SOLUTIONS |
| No sound or picture |
|
| I have connected an external source to my TV and I get no picture and/or sound |
|
| When I turn on my TV, there is a delay for a few seconds before the picture appears. Is this normal? |
|
| The picture is normal but there is no sound |
|
| Sound but no picture or black and white picture |
|
| The sound and/or picture is distorted or appears wavy |
|
| The sound and picture is blurry or cuts out |
|
| A horizontal or vertical stripe appears on the picture and/or the picture is shaking |
|
| The plastic cabinet makes a “clicking” type of sound |
|
| The remote control does not work |
|
NOTE
For usage in Mexico , operation of this equipment is subject to the following two conditions :
1 ) it is possible that this device doesn’t cause any detrimental interference and
2 ) this device must take any kind of interference, including that which may cause its malfunctioning.
