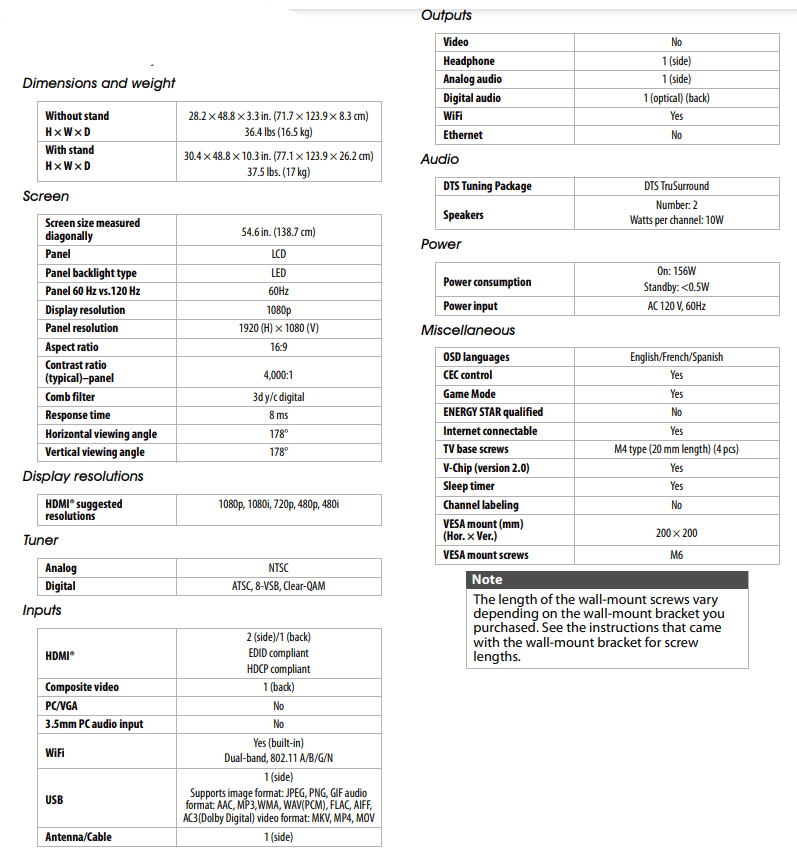
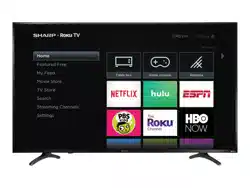
USER GUIDE HDTV Roku TV
Connecting a cable or satellite box
Many cable or satellite TV boxes have more than one connection type. To get the best video, you should use the best connection type available. For more information, see What connection should I use? on page 15. You can connect your cable or satellite box using:
HDMI® (best)
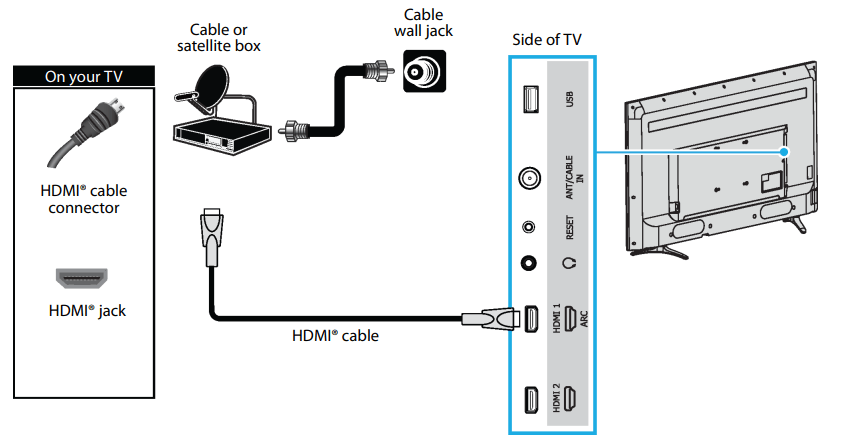
- Make sure that your TV’s power cord is unplugged and all connected devices are turned off.
- Connect the incoming cable from the cable wall jack to the cable-in jack on the cable or satellite box.
- Connect an HDMI® cable (not provided) to an HDMI jack on the side or back of your TV and to the HDMI OUT jack on the cable or satellite box.
- Plug your TV’s power cord into a power outlet, turn on your TV, then turn on the cable or satellite box.
- On the Home screen, press


 or
or  to highlight the HDMI 1, HDMI 2, or HDMI 3 tile, then press OK.
AV (good)
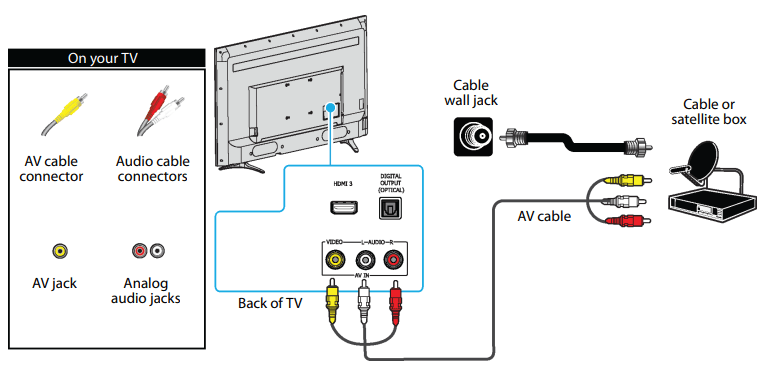
- Make sure that your TV’s power cord is unplugged and all connected devices are turned off.
- Connect the incoming cable from the cable wall jack to the cable-in jack on the cable or satellite box.
- Connect an AV cable (not provided) to the VIDEO jack and L and R AUDIO jacks on the back of your TV and to the AV and audio out jacks on the cable or satellite box.
- Plug your TV’s power cord into a power outlet, turn on your TV, then turn on the cable or satellite box.
- On the Home screen, press or to highlight the AV tile, then press OK.
Coaxial (good)
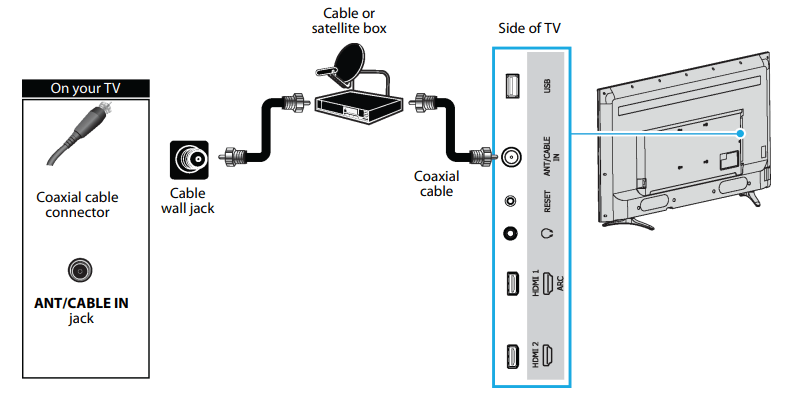
- Make sure that your TV’s power cord is unplugged and all connected devices are turned off.
- Connect the incoming cable from the cable wall jack to the cable-in jack on the cable or satellite box.
- Connect a coaxial cable (not provided) to the ANT/CABLE IN jack on the side of your TV and to the coaxial out jack on the cable or satellite box.
- Plug your TV’s power cord into a power outlet, turn on your TV, then turn on the cable or satellite box.
- Set up the TV tuner to watch broadcast TV. See Setting up Antenna TV
- On the Home screen, press or to highlight the Antenna TV tile, then press OK.
Connecting an antenna or cable TV (no box)
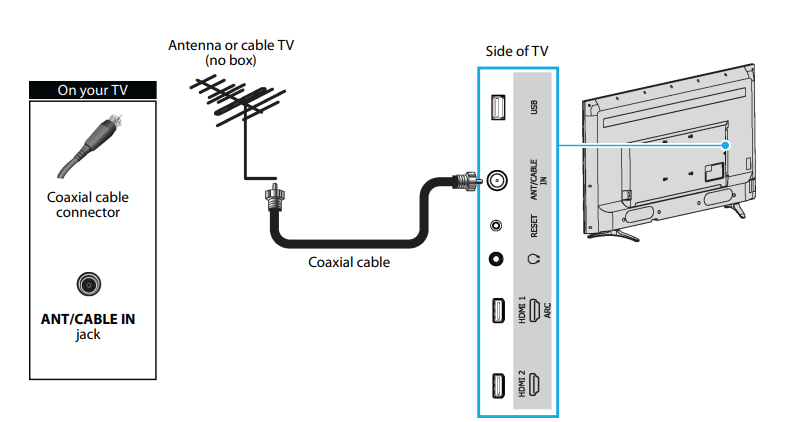
- Make sure that your TV’s power cord is unplugged and all connected devices are turned off.
- Connect a coaxial cable (not provided) to the ANT/CABLE IN jack on the side of your TV and to the antenna or cable TV wall jack.
- Plug your TV’s power cord into a power outlet, then turn on your TV.
- Set up the TV tuner to watch broadcast TV. See Setting up Antenna TV
- On the Home screen, press or to highlight the Antenna TV tile, then press OK.
Connecting a DVD or Blu-ray player
Many DVD or Blu-ray players have more than one connection type. To get the best video, you should use the best connection type available. For more information, see What connection should I use? on page 15. You can connect a DVD or Blu-ray player using:
HDMI® (best)
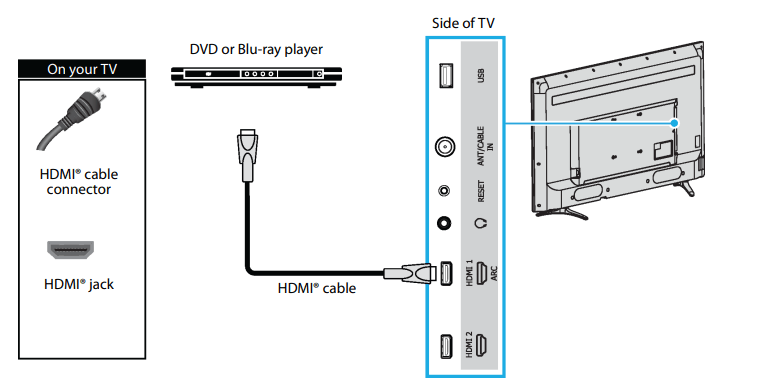
- Make sure that your TV’s power cord is unplugged and the DVD or Blu-ray player is turned off.
- Connect an HDMI® cable (not provided) to an HDMI jack on the side or back of your TV and to the HDMI OUT jack on the DVD or Blu-ray player.
- Plug your TV’s power cord into a power outlet, then turn on your TV and DVD or Blu-ray player.
- On the Home screen, press or to highlight the HDMI 1, HDMI 2, or HDMI 3 tile, then press OK.
AV (good)
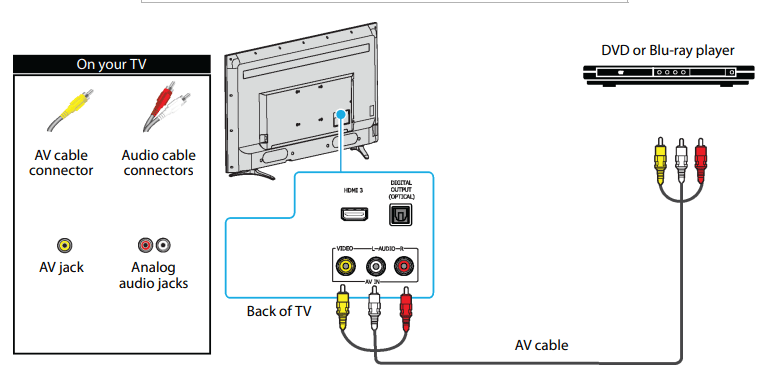
- Make sure that your TV’s power cord is unplugged and the DVD or Blu-ray player is turned off.
- Connect an AV cable (not provided) to the VIDEO jack and L and R AUDIO jacks on the back of your TV and to the AV OUT jacks on the DVD or Blu-ray player.
- Plug your TV’s power cord into a power outlet, then turn on your TV and DVD or Blu-ray player.
- On the Home screen, press or to highlight the AV tile, then press OK.
Connecting a game console
Many game consoles have more than one connection type. To get the best video, you should use the best connection type available. For more information, see What connection should I use? on page 15. You can connect a game console using:
HDMI® (best)
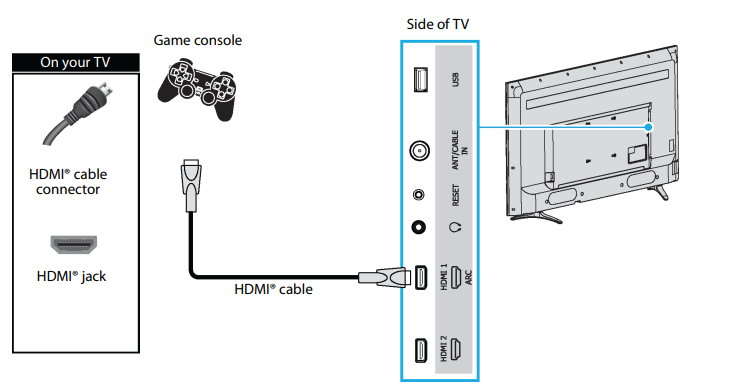
- Make sure that your TV’s power cord is unplugged and the game console is turned off.
- Connect an HDMI® cable (not provided) to an HDMI jack on the side or back of your TV and to the HDMI OUT jack on the game console.
- Plug your TV’s power cord into a power outlet, then turn on your TV and the game console.
- On the Home screen, press or to highlight the HDMI 1, HDMI 2, or HDMI 3 tile, then press OK
AV (good)
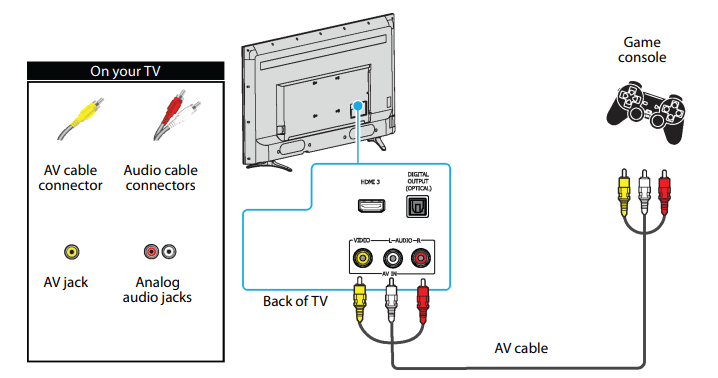
- Make sure that your TV’s power cord is unplugged and the game console is turned off.
- Connect the game console’s AV cable (not provided) to the VIDEO jack and L and R AUDIO jacks on the back of your TV and to the AV jack(s) on the game console.
- Plug your TV’s power cord into a power outlet, then turn on your TV and the game console.
- On the Home screen, press or to highlight the AV tile, then press OK.
Connecting a computer
You can use an HDMI® jack on your TV to connect to a computer.
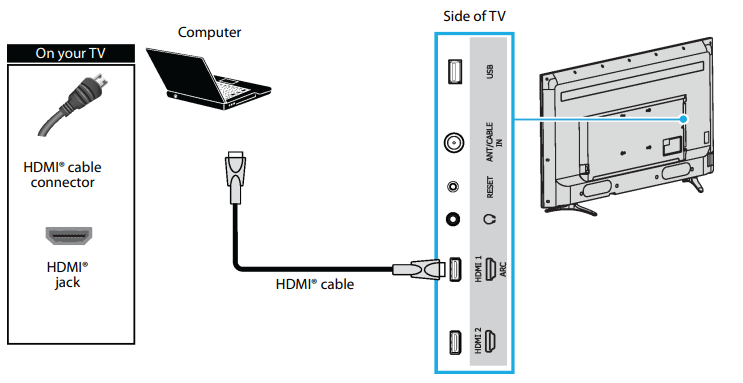
- Make sure that your TV’s power cord is unplugged and the computer is turned off.
- Connect an HDMI® cable (not provided) to an HDMI jack on the side or back of your TV and to the HDMI OUT jack on the computer.
- Plug your TV’s power cord into a power outlet, then turn on your TV and the computer.
- On the Home screen, press or to highlight the HDMI 1, HDMI 2, or HDMI 3 tile, then press OK.
- Adjust the display properties on the computer, if necessary
Connecting a USB flash drive
You can use the USB jack on your TV to view photos and videos and listen to music stored on a USB flash drive.

- Plug a USB flash drive into the USB port on the side of your TV
- Press or to highlight the Roku Media Player or USB Media Player tile, then press OK.
Connecting external speakers or a sound bar
When you connect external speakers or a sound bar, sound plays through your TV speakers and the external speakers or sound bar.
You can connect external speakers or a sound bar using:
Digital audio using the DIGITAL OUTPUT (OPTICAL) jack
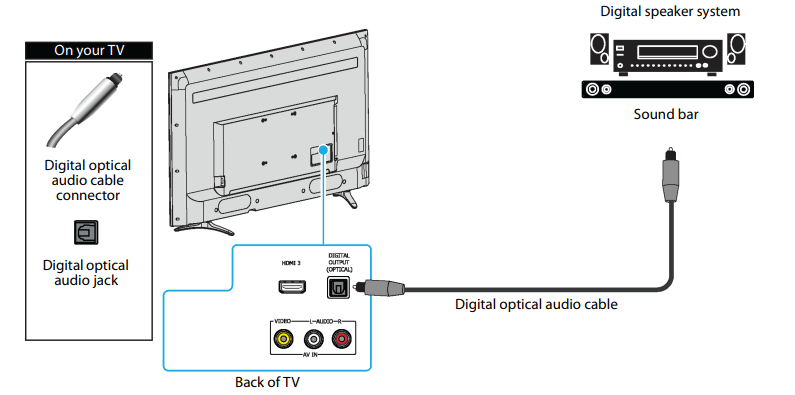
- Make sure that your TV’s power cord is unplugged and the digital speaker system or sound bar is turned off.
- Connect a digital optical audio cable (not provided) to the DIGITAL OUTPUT (OPTICAL) jack on the back of your TV and to the digital optical AUDIO IN jack on the digital speaker system or sound bar.
- Plug your TV’s power cord into a power outlet, then turn on your TV.
- Turn on the digital speaker system or sound bar, then set it to the correct source. For more information, see the documentation that came with the digital speaker system or sound bar.
- To turn off your TV speakers, on the Home menu, press or to highlight Settings, then press OK. Highlight Audio, then press OK. Highlight TV speakers, then press OK. Press OK to remove the check from the TV speakers enabled check box.
Digital audio using the HDMI 1/ARC jack
Your TV can send sound to an ARC device, like an AV receiver, to create a home theater that uses two or more speakers. When you connect external speakers or a sound bar, sound plays through your TV speakers and the external speakers or sound bar.

- Make sure that your TV’s power cord is unplugged and the digital speaker system or sound bar is turned off.
- Connect an HDMI® cable (not provided) to the HDMI 1/ARC jack on the side of your TV and to the HDMI IN jack on the digital speaker system or sound bar.
- Plug your TV’s power cord into a power outlet, then turn on your TV.
- Turn on the digital speaker system or sound bar, then set it to the correct source. For more information, see the documentation that came with the digital speaker system or sound bar.
- To turn off your TV speakers, on the Home menu, press or to highlight Settings, then press OK. Highlight Audio, then press OK. Highlight TV speakers, then press OK. Press OK to remove the check from the TV speakers enabled check box.
- To configure the HDMI 1/ARC jack to output sound to an ARC device, on the Home menu, press or to highlight Settings, then press OK. Highlight System, then press OK. Highlight Control other devices (CEC), then press OK. Highlight HDMI ARC, then press OK to check the box.
Analog audio
When you connect an analog system or sound bar to the AUDIO OUT jack, your TV speakers are muted.
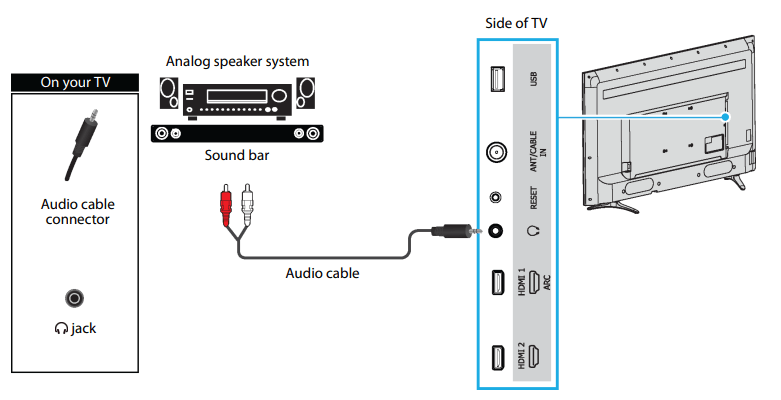
- Make sure that your TV’s power cord is unplugged and the analog speaker system or sound bar is turned off.
- Connect an audio cable (not provided) to the
 jack on the side of your TV and to the AUDIO IN jacks on the analog speaker system or sound bar.
- Plug your TV’s power cord into a power outlet, then turn on your TV.
- Turn on the analog speaker system or sound bar, then set it to the correct source. For more information, see the documentation that came with the analog speaker system or sound bar.
Connecting a home theater system with multiple devices
You can connect an AV receiver and your devices to create a home theater.
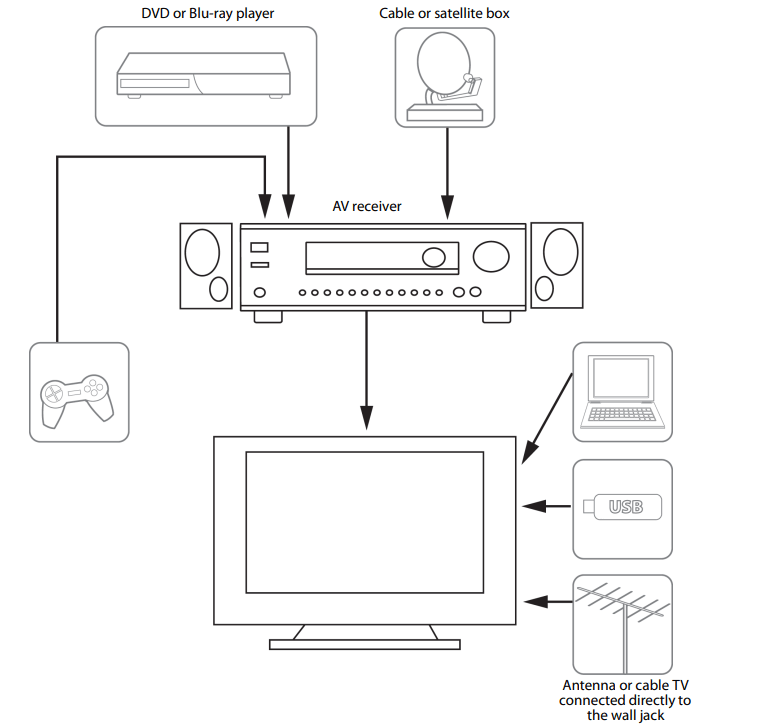
- The connections you make depend on the video and audio jacks available on your devices. Refer to the documentation that came with your devices for connection information.
- Just remember to use the best connection types available for the best picture and sound. For information about connection types, see What connection should I use?
- For information about TV settings for home theaters, see Using your TV in a home theater
Using your TV
This section provides information on using the day-to-day features of your TV.
Status light
Your TV has a single status light on the front panel. It goes on and off and blinks in different ways depending on the status of the TV, as shown in the following table:
| TV condition |
Status indicator |
Meaning |
| On (screen is active) |
Off |
Screen is indicating that your TV is on. |
| Screensaver (screen is active, except when the Picture Mode is set to Low power. Low power turns off the backlight.) |
Off |
Screen is indicating that your TV is on. |
| Off (no power) |
Off |
Your TV is not connected to power. |
| Off (standby) |
On |
Your TV is connected to power and ready to use. |
| Starting up from off state |
Slow pulsing blink until startup completes |
Your TV is doing something |
| On (receiving update from USB) |
Slow pulsing blink until startup completes |
Your TV is doing something |
| On (receiving update from USB) |
Dims on/off once |
Your TV has received your command. |
| Powering down to standby mode |
Slow pulsing blink until the TV reaches standby |
Your TV is doing something |
Standby mode energy savings
- When you turn off your TV, it may remain in a higher power mode for a few minutes, after which it goes into a very low power standby mode. If you turn on the TV again before it has entered the very low power mode, it turns on immediately. After the TV goes into the lower power standby mode, it takes a bit longer to start up
Watching broadcast TV channels
- To watch broadcast TV, select the Antenna TV tile in the Home screen. Your TV remembers the last channel you watched and starts with that channel playing.
- Tip You also can use the
 /INPUT button on your TV to select Antenna TV, as explained in Front features
Changing channels To change channels, you can do any of the following:
- Press the UP arrow to change to the next higher channel.
- Press the DOWN arrow to change to the next lower channel.
- Press the LEFT arrow to display the channel list, and then press the UP and DOWN arrows to move the highlight through the list one channel at a time. Or press REWIND and FAST FORWARD to move the highlight through the list one page at a time. When you’ve highlighted the channel you want to watch, press OK. (If you decide you don't want to change channels, press the RIGHT arrow or BACK button).
- Press
 to switch to the previously tuned channel.
Viewing program information
- To view information about the current program, press OK. Your TV displays a banner at the bottom of the screen with as much information as is available in the program data stream, as shown in the following example.
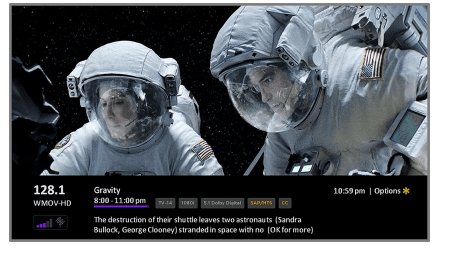
Program information, subject to availability within the broadcast information, includes:
- Channel number
- Channel call sign
- Signal strength
- Program title
- Start time, end time, and graph of program length showing current position
- Content rating
- Video resolution (480i, 480p, 720p, 1080i, 1080p)
- Audio quality (Mono Dolby Digital, Stereo Dolby Digital, 5.1 Dolby Digital, Dolby Digital+)
- Audio features (SAP)
- Closed captioning (CC)
- Current time
- Program description. If the entire description does not fit, press OK to expand the size of the banner and see the entire description.
Adjusting settings
- Press * to display the Options menu. Press the UP and DOWN arrows to highlight an option, and then press the LEFT and RIGHT arrows to change the setting. Adjusting TV settings on page 50 explains each of the settings in detail.
Switching TV inputs
- Switch to a TV input to access the device connected to that input, for example, a Blu-ray player. Switching inputs is as simple as highlighting the input’s tile in the Home screen, and pressing OK. The video signal on the input, if any, appears on the screen.
- Tip You also can use the /INPUT button on your TV to select a TV input, as explained in Front features on page 10. Customizing your TV on page 58 explains how to rename and remove inputs.
- Auto-detecting devices: Your TV automatically detects when you connect a new device to an HDMI® input and turn on its power. The input is automatically added to the Home screen if it isn’t already present.
- Adjusting audio/video settings: While watching video content on any input, press * to display the Options menu. Press the UP and DOWN arrows to highlight an option, and then press the LEFT and RIGHT arrows to change the setting. Adjusting TV settings on page 50 explains each of the settings in detail.
Playing content from USB storage devices
our TV has a USB port that can be used to play personal music, video, and photo files from a personal USB flash drive or hard disk. If your TV is connected to the Internet, your Home screen has the Roku Media Player tile. If your TV has not been connected to the Internet, the Home screen has the USB Media Player tile. To use this feature, first make sure your media files are compatible with the Roku/USB Media Player. As of the publication date of this guide, the following media file formats are supported:
- Video—MKV (H.264/262), MP4, MOV (H.264)
- Music—AAC, MP3, WMA, WAV (PCM), AIFF, FLAC, and AC3, and DTS
- Photo—JPG, PNG (up to 4k x 4k pixels)
To see the latest list of supported formats, view Help in the Media Player.
Playing content from local network media servers
- If you have connected your TV to a network, it can play personal video, music, and photo files from a media server on your local network. Media servers include personal computers running media server software such as Plex or Windows Media Player, network file storage systems that have built-in media server software, and other devices that implement the specifications of the Digital Living Network Alliance. Some servers do not fully implement the DLNA specification but are UPNP (Universal Plug and Play) compatible. The Roku Media Player will connect to them as well.
- Some media servers can convert files into Roku compatible formats. DRM-protected content is not supported
Using your TV in a hotel or dorm room
Hotels, school dorms, conference facilities, and similar locations with public wireless Internet access often require you to interact with a web page to authenticate your access. These restricted public networks are commonly known as captive portal networks. When you select a network of this type, the TV automatically detects that additional information is needed and prompts you through using another wireless device to supply the requested information.
Tips
- Using your Roku TV on a hotel or dorm room network requires wireless availability and use of your network-connected smartphone, tablet, or computer to authenticate access to your account.
- Your TV must already be running software version 7.0. You can find the version number by navigating from the Home screen to Settings > System > About. If it is running an earlier software version, you must use a non-restricted wireless network to link and activate the TV, and then update the software to version 7.2.
- Be sure to bring your Roku TV remote control, because the Remote feature of the Roku mobile app may not work when connected to a hotel or dorm room network.
- Content might be limited or unavailable if you try to connect outside your home country due to geo-filtering.
To connect your TV to the restricted network:
- Either during Guided Setup or after selecting Settings > Network > Set up new wireless connection, you’re presented with a list of available networks
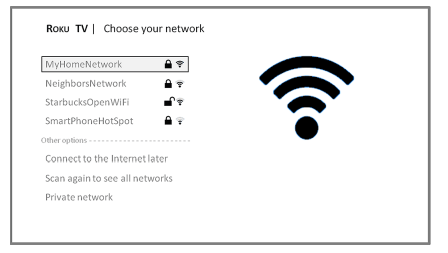
2. If you select a network that requires interaction to grant access to the Internet, the TV detects that additional information is needed and displays the following prompt.

3. If you selected the correct network, highlight I am at a hotel or college dorm, and then press OK. The TV prompts you to use your smartphone, tablet, or laptop to complete the connection.

4. Use a phone, tablet, or wireless-enabled computer to detect wireless networks. In most cases, you can simply open the device’s Wi-Fi Settings or Network Settings screen to start scanning.
5. Connect to the network named on your TV screen. The actual network name varies.
6. The wireless connection process prompts you for a password. Enter the password as shown on the TV screen. The actual password varies.
7. Start the web browser on your smartphone, tablet, or computer. When you attempt to open any web page, the restricted connection will prompt you for whatever information it needs. In most cases, you must agree to terms and conditions, provide identifying information, or enter a password, PIN, or room number to proceed. The information requested depends on the organization that controls the wireless connection.
8. After you enter the requested information, the TV automatically proceeds to complete its connection and resumes normal operation.
9. If the TV prompts you to link to your Roku account, use your smartphone, tablet, or computer to complete the pairing operation and activate your Roku TV.
Adjusting TV settings
You can adjust most picture and sound settings while you are watching a program by pressing * to display the Options menu. If you don’t find what you need, there are additional picture and sound settings in the Settings menu. In most cases, the changes you make apply only to the input you are using. Antenna TV, each separate HDMI® input, and the AV input have their own settings that your TV remembers when you return to that input. Your TV also remembers the settings you specify while viewing streaming content.
Settings menu
Use the Settings menu to adjust overall TV settings. Press to go to the Home screen, and then navigate to Settings > TV picture settings. You can adjust the following overall TV picture settings from the Settings screen:
- TV brightness—If the lighting level in your TV room changes, use this setting to help provide a better viewing experience; set to darker for a darker room, and brighter for a brighter room. Choose among Normal and four other settings to make the overall picture brighter or darker. So that you don’t have to make this type of change for each TV input one at a time, this setting increases or decreases your TV’s general brightness across all TV inputs. This setting is identical to the TV brightness setting you can access in the Options menu while watching a program.
- Settings per input—This section of options lists each TV input. Select an input to switch to that input. Then press * to display the Options menu, where you can adjust the input's settings while watching a live picture and listening to the sound from that input.
Tip You don’t have to go to the Settings menu first—you can display an input's Options menu and adjust its settings whenever you are watching the input by pressing *.
Options menu
- The Options menu for each TV input provides settings for controlling the appearance of the picture and the quality of the audio. To view the Options menu, press * whenever you are watching a TV input or streaming a video. The Options menu is a panel that appears over the left side of the screen:

- To adjust the settings on the Options menu, press the UP or DOWN arrow to highlight a setting, and then press the LEFT or RIGHT arrow to change the setting. You’ll notice the changes you make right away in picture appearance or audio quality.
- Tip When you highlight a setting, the header text explains the effect of its current value. When you begin to adjust a setting, the other options are hidden so you can see more of the screen. Even though the other settings are hidden, you can move the highlight up or down to adjust the other settings.
Options menu settings
- TV brightness—Affects the overall brightness of the picture. This setting applies across your entire TV; that is, to all TV inputs and is identical to the TV brightness setting under Settings > TV picture settings.
- Picture mode—Provides picture presets for various viewing preferences. This setting applies to the currently-selected input only.
- Picture size—Adjusts the aspect ratio of the picture, enabling you to view a picture in its original format, or zoom or stretch it to fill the screen. The Auto setting has been found to produce the best picture in most cases.
- Audio effect—Adjusts the sound quality output from your TV speakers. This setting applies across your entire TV; that is, to all TV inputs. It does not affect the sound quality for headphones, HDMI 1/ARC, or DIGITAL OUTPUT (OPTICAL) (TOSLINK) connectors.
- Sleep timer—Sets a timer that turns off your TV after the specific amount of time. This setting remains in effect even if you stop watching the current input.
- Closed captioning—Controls when you see captions. This setting is only offered for Antenna TV, the AV input, and streaming videos. Any set value remains in effect across only these inputs.
- Antenna TV—Turn captions on or off, or set them to appear only when your TV sound is muted.
- AV input—Turn captions on or off, or set them to appear only when your TV sound is muted.
- Streaming video channel—Turn captions on or off, set them to appear only when your TV sound is muted, or only during instant replay (for streaming content that supports instant replay).
- Captioning track—Selects which caption track to display when Closed Captioning is on. This setting remains in effect on all inputs that provide captions.
- SAP—Selects whether to play a secondary audio program or multichannel television sound, and which choice to play. This setting applies only to Antenna TV on digital channels
Changing privacy settings
By default, when connected to the Internet and activated with your Roku account, the TV uses an advertising identifier to track your usage behavior. You can change the privacy settings on your TV in two ways: resetting the advertising identifier and limiting ad tracking.
Resetting the advertising identifier
Resetting the advertising identifier has the effect of clearing your prior usage history and starting over. From that point forward, your new usage patterns affect the advertisements you see on your TV. To reset the advertising identifier:
- From the Home screen menu, navigate to Settings > System > Privacy.
- Highlight Reset advertising identifier. Press * to view more information about this option. When you finishing reading the information, press OK to close the More Information window.
- Press OK to reset the advertising identifier, and then press OK again to dismiss the verification message.
Limiting ad tracking
You can limit Roku’s tracking of your usage behavior by limiting ad tracking. When you do, your TV will display ads that are not personalized based on your TV’s advertising identifier. To limit ad tracking:
- From the Home screen menu, navigate to Settings > System > Privacy.
- Highlight Limit ad tracking. Press * to view more information about this option. When you finish reading the information, press OK to close the More Information window.
- Press OK to select the Limit ad tracking option.
Customizing your TV
There are several things you can do to personalize your TV.
Rearrange tiles
Whenever you add a TV input tile, it’s added at the top of your Home screen. Whenever you add a new streaming channel from the Roku Channel Store, it’s added at the bottom of your Home screen. You can easily rearrange the order of the tiles on the Home screen to suit your viewing preferences. For example, you might want Antenna TV to be the first tile in your Home screen. But if you mostly watch one streaming channel, you might want its tile to be the first one on your Home screen.
Rearranging tiles is easy:
- From the Home screen, highlight one of the tiles you want to move.
- Press * to display a list of options for the type of tile you selected.
- Select Move input. The list of options disappears and the highlighted tile shows arrows indicating how it can be moved.
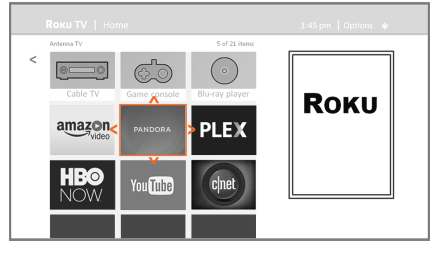
- Use the arrow buttons to move the highlighted tile to its new position. As you move the tile, it pushes other tiles out of its way.
- Press OK to lock the tile into its new position.
- Repeat these steps to move other tiles until you have arranged your Home screen to your liking.
Edit broadcast TV channel lineup
- When you set up the TV tuner as described in Setting up Antenna TV on page 42, your TV adds all the channels with good signals that it could detect in your area. It’s likely that you now have more channels than you want in your channel list.
- To edit the channel lineup, from the Home screen, navigate to Settings > TV inputs > Antenna TV > Edit channel lineup. You’ll see a screen listing all of your channels. Adjacent to the list of channels is a miniature TV screen playing the highlighted channel's picture and sound.
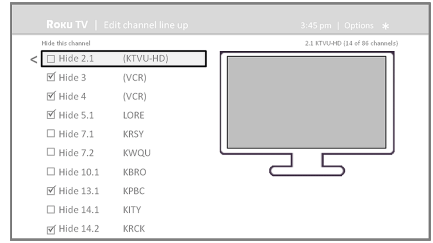
- Highlight each channel you want to hide, and then press OK to hide the channel.
- Tip If you need to see or hear the highlighted channel, wait a couple of seconds for your TV to start playing the channel’s picture and sound. Also note that if you've enabled parental controls and the program on the current channel is blocked, you won’t see a picture or hear sound while editing the channel lineup
Rename inputs
- Rather than trying to remember that your Blu-ray player is connected to HDMI 1 and your game console is connected to HDMI 3, you can rename the TV inputs to match the connected component.
- Tip Renaming an input also changes the icon associated with it.
To rename an input, you can either:
- Highlight the input tile in the Home screen, and then press * to display a list of options. From the list of options, select Rename input. Then select a new name and icon. or
- From the Home screen, navigate to Settings > TV inputs. On the TV inputs screen, select the input you want to rename, select Rename, and then choose a new name and icon from the provided list. Press
 to return to the Home screen. The new name and icon are now in effect.
Remove unwanted tiles
It’s easy to remove unused TV inputs and unwanted channel or app tiles. For example, if you never use the HDMI 3 input, or if you don’t like the weather app you added from the Roku Channel Store, you can remove them from your Home screen.
Tip You also can remove the Antenna TV tile if you never use the TV tuner. But be aware that removing the Antenna TV tile also deletes the broadcast TV channel list. You’ll have to set up the TV tuner again next time you want to view broadcast TV. Instructions for setting up the TV tuner can be found in Setting up Antenna TV
- To remove any tile, highlight the input tile in the Home screen, and then press * to display a list of options. From the list of options, select Remove input. In the screen that follows, confirm you want to remove the input.
- Alternatively, to remove a TV input tile from the Home screen, navigate to Settings > TV inputs. On the TV inputs screen, select the input you want to remove, and then select Remove > Confirm. Then press to return to the Home screen.
Maintaining
- Do not use your TV in areas that are too hot or too cold, because the cabinet may warp or the screen may malfunction. Your TV works best in temperatures that are comfortable to you.
- Storage temperatures are 5° to 113°F (-15° to 45°C).
- Working temperatures are 41° to 95°F (5° to 35°C).
- Do not place your TV in direct sunlight or near a heat source.
Cleaning your TV cabinet
- Clean the cabinet with a soft, lint-free cloth. If the cabinet is especially dirty, moisten a soft, lint-free cloth in a weak detergent solution, squeeze the excess moisture from the cloth, then wipe the cabinet with the cloth. Use a clean cloth to dry the cabinet.
Cleaning your TV screen
- Clean the screen with a soft, lint-free cloth.
Troubleshooting
Warning Do not try to repair your TV yourself. Contact authorized service personnel.
Note If the problem is not solved by using these troubleshooting instructions, turn off your TV, then turn it on again.
Note If you have any other questions about how to use your TV that are not covered in this User Guide, go to http://support.roku.com and select your TV brand and model.
Video and audio
| Symptom |
Possible cause |
Try this... |
| Picture does not fill the screen or there are black bars around the picture |
The picture size may need to be adjusted |
Adjust the picture size (aspect ratio). See the Picture Size option in Options menu settings |
| I don’t see a picture when I select an input |
TV is not on
Cables are not connected correctly
Picture settings may be incorrect
Incorrect input may be selected
Input source not detected
TV input may be bad
|
Make sure that your TV is plugged into a working power outlet, and that your TV is turned on. (Your TV had a light on the front that indicates if your TV is turned off. See Status light)
Make sure that the video cables are connected correctly and securely to your TV. Make sure that the antenna or cable TV is connected correctly and securely. See Connecting a cable or satellite box or Connecting an antenna or cable TV (no box)
Adjust the contrast and brightness. See the TV brightness option in Settings menu on page 50 or Options. Adjust the TV picture. See Advanced picture settings
Make sure that the correct input is selected for the device you want to view. See Switching TV inputs
Make sure that the device connected to the input is turned on. Make sure that the cord to and from the device is connected firmly and correctly to the device and your TV.
Connect a different device to the same input and check to see if it works correctly
|
| TV channel does not appear |
Broadcast TV may be experiencing problems or may not be set up |
- Try another channel. The station may be experiencing problems.
- Make sure that the incoming signal is compatible.
- If you are trying to watch broadcast TV, make sure that Antenna TV is set up. See Setting up Antenna TV
|
| Dark, poor, or no picture (screen is lit), but sound is good |
Broadcast TV may be experiencing problems or may not be set up
Cables may not be connected correctly
Picture settings may be incorrect
|
Try another channel. The station may be experiencing problems. If you are using an antenna and the signal strength is low, adjust the antenna or use a highly directional outdoor antenna or set-top antenna with a built-in amplifier.
Make sure that the antenna or cable TV is connected correctly and securely. See Connecting a cable or satellite box or Connecting an antenna or cable TV (no box). Make sure that the video cables are connected correctly and securely to your TV. The video cable(s) you are using may be bad. Try a new set.
Adjust the brightness. See the TV brightness option in Settings menu or Options menu. Change to a different picture mode. See the Picture mode option in Options menu settings or Advanced picture settings menu options
|
| No color, dark picture, or color is not correct |
Picture settings may be incorrect
Broadcast TV may be experiencing problems
Cables are not be connected correctly
|
Adjust the contrast, color, and brightness settings. See the TV brightness option in Settings menu on page 50 or Options menu
Try another channel. The station may be experiencing problems. If you are using an antenna and the signal strength is low, adjust the antenna or use a highly directional outdoor antenna or set-top antenna with a built-in amplifier.
Make sure that the antenna or cable TV is connected correctly and securely. See Connecting a cable or satellite box or Connecting an antenna or cable TV (no box). Make sure that the video cables are connected correctly and securely to your TV. The video cable(s) you are using may be bad. Try a new set.
|
| Only snow (noise) appears on the screen |
Broadcast TV may be experiencing problems or may not be set up
Cables may not be connected correctly
|
Try another channel. The station may be experiencing problems. If you are trying to watch broadcast TV, make sure that Antenna TV is set up. See Setting up Antenna TV. If you are using an antenna and the signal strength is low, adjust the antenna or use a highly directional outdoor antenna or set-top antenna with a built-in amplifier.
Make sure that the antenna or cable TV is connected correctly and securely. See Connecting a cable or satellite box or Connecting an antenna or cable TV (no box)
|
| Picture quality is good on some channels and poor on others. Sound is good |
Broadcast signal may be weak |
If you connect to cable without a set-top box and experience poor picture quality, you may need to install a set-top box to improve signal reception and picture quality. Contact your cable TV provider about upgrading to a set-top box. |
| Dotted lines or stripes appear on the screen |
Cables may not be connected correctly
Broadcast signal may be weak
|
Make sure that the antenna or cable TV is connected correctly and securely. See Connecting a cable or satellite box or Connecting an antenna or cable TV (no box). Make sure that the video cables are connected correctly and securely to your TV. The video cable(s) you are using may be bad. Try a new set.
If you are using an antenna and the signal strength is low, adjust the antenna or use a highly directional outdoor antenna or set-top antenna with a built-in amplifier. Other devices (for example, a surround sound receiver, external speakers, fans, or hair dryers) may be interfering with your TV. Try turning off one device at a time to determine which device is causing interference. After you have determined which device is causing interference, move it further from your TV to eliminate the interference.
|
| Double images |
Broadcast signal may be weak |
If you are using an antenna and the signal strength is low, adjust the antenna or use a highly directional outdoor antenna or set-top antenna with a built-in amplifier. If you are using an antenna and the signal strength is low, switch to a cable or satellite box. |
| The picture has a few bright or dark spots |
This is normal in LED TVs |
A few bright or dark spots on a TV screen is normal. It does not affect the operation of your TV. |
| Good picture, but no sound |
Volume is down or muted
Headphones may be connected
TV speakers may be turned off
You may need to change the audio mode
Home theater system, sound bar, or external speaker system may not be turned on or may not be set up correctly
Bad content, no audio
Cables may not be connected correctly
|
A few bright or dark spots on a TV screen is normal. It does not affect the operation of your TV.
Increase the volume. Make sure that the sound is not muted.
Make sure that you do not have headphones connected. When headphones are connected, no sound comes from your TV speakers.
If you want sound to play through your TV speakers, make sure that your TV speakers are turned on. See Turning off the speakers
Change to a different audio mode. See Changing the audio mode
If you are using a home theater system, sound bar, or external speaker system, make sure that it is turned on and is not muted and that it is set to the correct source. If you connected an ARC audio device to the HDMI 1/ARC jack, make sure that you have turned on the ARC feature. See the HDMI ARC option in Setting up a digital audio connection. If you are using a home theater system, sound bar, or external speaker system and have connected it with a digital audio cable, see Setting up a digital audio connection. Make sure that the audio cables are connected correctly and securely to your TV.
Make sure that the selected channel or content is intended to be broadcasting with sound.
Make sure that the antenna or cable TV is connected correctly and securely. See Connecting a cable or satellite box or Connecting an antenna or cable TV (no box). The audio cables you are using may be bad. Try a new set.
|
| Poor picture |
Light in the viewing area may be interfering
A connected camera or camcorder may be interfering
|
Make sure that the room is not too bright. Light reflecting off the screen can make the picture difficult to see.
If an S-VHS camera or a camcorder is connected while another connected device is turned on, the picture may be poor. Turn off one or more devices.
|
| Audio noise |
Other devices may be interfering |
Other devices (for example, a surround sound receiver, external speakers, fans, or hair dryers) may be interfering with your TV. Try turning off one device at a time to determine which device is causing interference. After you have determined which device is causing interference, move it further from your TV to eliminate the interference. |
| After images appear |
|
Do not display a still image, such as a logo, game, or computer image, for an extended period of time. This can cause a permanent after-image to be burned into the screen. This type of damage is not covered by your warranty. |
Remote control
| Symptom |
Possible cause |
Try this... |
| My TV doesn’t turn on using the remote control |
No power to TV
Line-of-sight obstructed
Remote not responding
TV frozen
|
Make sure that the power cord is correctly connected to both your TV power connector and power outlet. See Connecting power on page 31. You should see an LED in the front of the TV panel when a button on the remote is pressed. If you see no LED activity, try another outlet or check your fuse box.
Make sure that no objects (or pets) are obstructing the line-of-sight from the remote control to the remote sensor on the front of your TV. See Aiming the remote control
Open the battery compartment and make sure that the batteries are seated in the correct positions (+ and - in the correct positions). See Installing remote control batteries on page 32. Make sure the batteries are fresh and working correctly. Replace the batteries, if necessary
If the front LED is not responding, or abnormally bright, disconnect the power cord from the power outlet, wait a few seconds, then reconnect the power cord.
|
| Trouble programming your existing universal remote contro |
Remote control may not be programmed correctly
Batteries may be dead
|
See instructions in Using a universal remote on page 71. For instructions on programing a universal remote control, visit: www.roku.com/universalremote. Refer to the User Guide that accompanied your universal remote control and contact the manufacturer if problems persist
Replace dead batteries with new batteries. Refer to the User Guide that accompanied your universal remote control.
|
General
| Symptom |
Possible cause |
Try this... |
| No power |
Power cord may not be connected correctly
Other devices may be interfering
|
Make sure that the power cord is correctly connected to both your TV power connector and power outlet. See Connecting power on page 31. You should see an LED in the front of your TV panel when a button on the remote is pressed. If you see no LED activity, try in another outlet or check your fuse box. Unplug the power cord, wait 60 seconds, then plug the cord back in and turn on your TV.
Other devices (for example, a surround sound receiver, external speakers, fans, or hair dryers) may be interfering with your TV. Try turning off one device at a time to determine which device is causing interference. After you have determined which device is causing interference, move it further from your TV to eliminate the interference.
|
| My TV tuner does not pick up as many over-the-air channels as it should |
Antenna may not be placed optimally
Broadcast TV may not be set up
|
Adjust the antenna location and rescan. See Scanning for broadcast TV channels again on page 67. Go to Settings > TV inputs. Reception can vary by channel depending on the broadcast power level of a given station. Contact your cable or satellite TV provider. Make sure that the antenna or cable/satellite TV is connected securely to your TV. Try replacing the cable between the antenna/cable or cable/satellite box and your TV.
Make sure that Antenna TV is set up. See Setting up Antenna TV
|
| One or more channels do not display |
Channels may be blocked or hidden
The wrong input may be selected
You may need to use the remote control that came with the cable or satellite box
|
Make sure that the channels are not blocked. See Blocking unrated programs. Make sure that the channels are not hidden. The channel may have been deleted from the channel list. You can add the channel back to the channel list. See Edit broadcast TV channel lineup
Make sure that you have selected the correct input tile for the device or service you are trying to use. See Switching TV inputs
If you are using a cable or satellite box, use the remote that came with that box to change channels.
|
| I lost my parental control PIN |
Need PIN recovery
|
You will need to factory reset your TV, as the PIN cannot be recovered or reset any other way. See Factory reset everything on page 69. Go to Settings > System > Advanced system settings > Factory reset. |
| Some settings cannot be accessed |
Not all settings are available for all devices or inputs |
If the * icon or a menu option is grayed, you cannot adjust settings for the current video input mode. |
| TV cabinet creaks |
This is normal |
When your TV is in use, the temperature rises naturally and may cause the cabinet to expand or contract which can cause a creaking noise. This is not a malfunction. |
| Control buttons do not work |
TV may be frozen |
Unplug the power cord, wait a few seconds, then plug the cord back in and turn on your TV. |
| TV keeps turning off |
Sleep timer may be turned on |
Make sure that the sleep timer is not turned on. See the Sleep Timer option in Options menu settings on page 51 or Changing time settings |
| Some features are not available |
The wrong TV mode may be selected |
You may have Set up for store mode when you set up your TV. Store use mode is for retail environments only. In Store use mode, some of your TV’s features are missing or limited. If you selected Set up for store use and you want to change to Set up for home use, you have to reset your TV to the factory defaults. See Factory reset everything on page 69. Go to Settings > System > Advanced system settings > Factory reset. |
Roku
| Symptom |
Possible cause |
Try this... |
| I can’t turn my TV on with the Roku mobile app |
Your TV is “asleep” |
You will need to use the physical remote button to “wake up” or turn on your TV. |
| I can’t find my TV with the Roku mobile app |
TV and mobile app not on same wireless network
TV not powered or working normally
|
Make sure that your TV and the mobile app are on the same network.Make sure that your TV and the mobile app are on the same network.
Make sure that your TV is connected to a working power outlet and that your TV is turned on. See Connecting power
|
| I cannot screen mirror to my TV |
TV on older software
Mobile device not supported
|
Always keep your TV updated. See Getting system updates. Go to Settings > System > System update.
Screen mirroring is a beta feature currently, so a select set of devices will work.
|
Network
| Symptom |
Possible cause |
Try this... |
| I cannot connect to the Internet |
Network connection may not be set up
Network name or password may have changed
|
If you did not connect to the Internet when you first set up your TV, see But what if I didn’t connect my TV?
If your network name or password had changed, you need to update your network connection. See Changing network settings
|
| Streaming keeps pausing to load more data |
Wireless LAN not optimized
Insufficient broadband speed
|
Rotate wireless router slightly. Elevate the router. Turn off other wireless connections. Use 5.0Ghz, if possible. Roku TVs supports dual band.
Turn off other wireless connections that may also be using bandwidth.
|
CEC-compatible devices
| Symptom |
Possible cause |
Try this... |
| My TV is not displaying the video from the connected CEC device |
Cables may not be connected correctly
Picture settings may be incorrect
The selected input may be incorrect
Connected device may not be a CEC device
CEC control may not be set up correctly
|
Make sure that the HDMI® cable is connected securely to your TV and the device. Make sure that the device is connected to your TV with an HDMI® cable.
Try adjusting your TV picture. See Advanced picture settings
Make sure that the correct input tile is selected. See Switching TV inputs
Make sure that the device is a CEC device. See the documentation that came with the device for more information.
Make sure that your TV has searched for CEC devices. See Discovering connected CEC devices
|
| My TV is not playing the audio from the connected CEC device |
Cables may not be connected correctly
Volume may be too low or muted
TV speakers may be turned off
Connected device may not be a CEC device
CEC control may not be set up correctly
Connected audio device may not be set up correctly
|
Make sure that the HDMI® cable is connected securely to your TV and the device.
Make sure that the volume on your TV and the device is turned up and not muted.
If you want sound to play through your TV speakers, make sure that your TV speakers are turned on. See Turning off the speakers
Make sure that the device is a CEC device. See the documentation that came with the device
Make sure that your TV has searched for CEC devices. See Discovering connected CEC devices
If you are using a home theater system, sound bar, or external speaker system, make sure that it is set to the correct source. If you are using a home theater system, sound bar, or external speaker system and have connected it with a digital audio cable, make sure that you have set up digital audio. See Setting up a digital audio connection. If you connected an ARC audio device to the HDMI 1/ARC jack, make sure that you have turned on the ARC feature. See Enabling HDMI ARC
|
| My TV’s remote control does not control the device |
Connected device may not be turned on
Line-of-sight obstructed
Connected device may not support some or all CEC features
CEC control may not be set up correctly
|
Make sure that the device is turned on.
Make sure that no objects (or pets) are obstructing the line-of-sight from the remote control to the remote sensor on the front of your TV and the device. See Aiming the remote control
Depending on the device, all the buttons may not work. The device may not support this feature. See the documentation that came with the device for more information.
Make sure that your TV has searched for CEC devices. See Discovering connected CEC devices. If you are trying to control the volume on an HDMI® CEC audio receiver using your TV remote control, make sure that your TV speakers are turned on. See Turning off the speakers. If you are trying to control the volume on an HDMI® CEC audio receiver using your TV remote control, make sure that the system audio control is turned on. See Enabling system audio control
|
| The device does not show up in the CEC device list |
Connected device may not be a CEC device
Cables may not be connected correctly
CEC control may not be set up correctly
|
Make sure that the device is a CEC device. See the documentation that came with the device.
Make sure that the HDMI® cable is connected securely to your TV and the device. Make sure that the device is connected to your TV with an HDMI® cable.
Make sure that your TV has searched for CEC devices. See Discovering connected CEC devices o
|
| My device does not turn off when I turn off my TV |
Connected device may not be a CEC device
Connected device may not support some or all CEC features
CEC control may not be set up correctly
|
Make sure that the device is a CEC device. See the documentation that came with the device.
The device may not support this feature. See the documentation that came with the device for more information.
Make sure that your TV has searched for CEC devices. See Discovering connected CEC devices. Make sure that system standby is turned on. See Enabling system standby
|
| My TV does not turn on when I turn on my device |
Connected device may not be a CEC device
Connected device may not support some or all CEC features
CEC control may not be set up correctly
|
Make sure that the device is a CEC device. See the documentation that came with the device.
The device may not support this feature. See the documentation that came with the device for more information.
Make sure that your TV has searched for CEC devices. See Discovering connected CEC devices. Make sure that 1-touch play is turned on. See Enabling 1-touch play
|
Specifications