For best results when baking it is recommended that you preheat your oven for 30 minutes. Preheat the grill for 3 minutes to obtain best results. Pre-heating your appliance allows it to reach the required temperature quickly and efficiently
With “rapid heat”
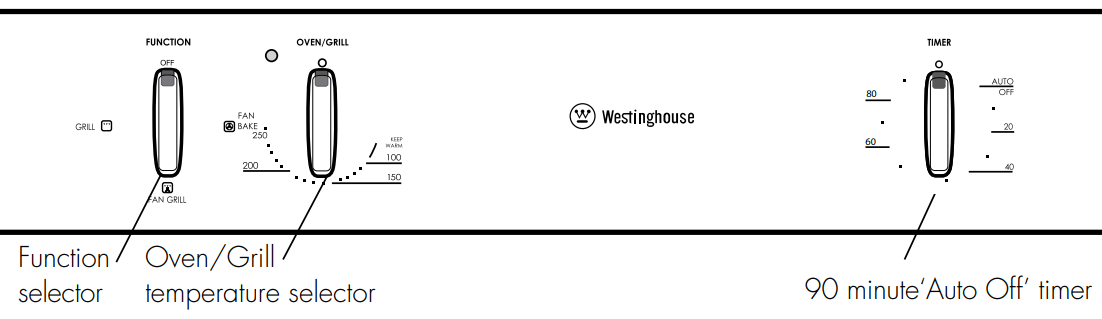
For electric multifunction appliances preheat your oven by selecting the “rapid heat” function. This function allows your oven to reach the preset temperature quicker than any other cooking function.
Turn the function selector to “rapid heat”.
Set the desired preheat temperature, by rotating your oven temperature selector. When the indicator light above the temperature selector goes out, the oven has reached the desired temperature. Select the oven function you require for cooking or baking and place the food in the oven.
With “bake/pizza”
It is recommended you preheat your appliance when cooking or baking.
Set the desired preheat temperature, by rotating your oven temperature selector. When the indicator light goes out the oven has reached the desired preset temperature, place your food in the oven, close the door and set the timer if you desire.
With “fan bake”
It is recommended to preheat your appliance when cooking or baking
Set the desired preheat temperature, by rotating your oven temperature selector. When the indicator light goes out the oven has reached the desired preset temperature, place your food into the oven, close the door and set the timer if you desire.
With “grill”
Preheat the grill for at least 3 minutes to obtain best results. This will help to seal the natural juices of steak, chops and other meats for a better flavour.
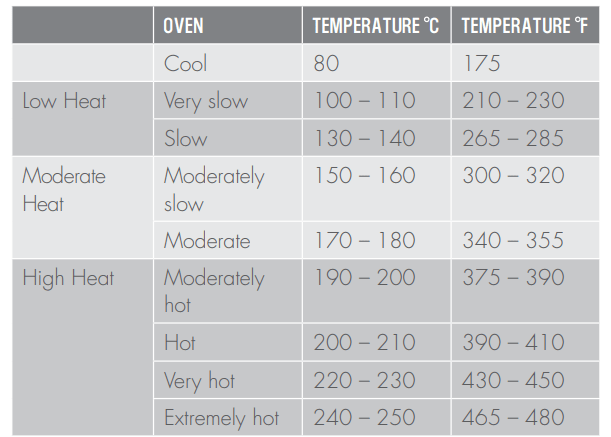
Setting temperatures
The following table displays the temperature settings for recipes which do not show actual temperatures for non fan modes. For fan-forced modes the temperature should be reduced by 10°C
Please refer to the cooking guide to choose the best oven setting for your recipes.
NOTE: DO NOT line oven with foil, it will damage the enamel. DO NOT use the base of the oven for cooking – it will damage the enamel.
USING YOUR COOKTOP
Cleaning your ceramic hotplate
1. Remove all spilt food and fat with a razor blade scraper (supplied with the unit) while the ceramic glass is still warm, but not hot. Wipe clean with dishwashing detergent on a damp cloth.
2. If aluminium foil, plastic items or high sugar content liquids/foods are allowed to melt on the ceramic glass, these should be removed immediately with a scraper before the surface has cooled down, otherwise pitting of the surface can occur.
NOTE: Items with high sugar content not only include jam and fruit but also vegetables such as peas, tomatoes and carrots.
3. When the ceramic glass is cool, apply a suitable cleaner (supplied with the unit).
4. It is important to follow the cleaner manufacturer’s instructions. Remove any cleaning residue from the surface as staining of the cooktop may occur.
5. Do not use abrasive sponges or scourers, oven sprays or stain removers as they may scratch the cooktop.
6. Any pitting, staining, scratches or other surface deterioration is excluded from the warranty.
7. All stains/water marks can be removed by vigorous cleaning, using the supplied ceramic cleaner.
Dealing with cooktop problems
Problem
Possible cause
What to do
Heating elements not working
1. Power not switched on
• Check cooktop is plugged in and power is on
2. Controls incorrectly set
• Check correct knob turned for element
3. Household fuse blown If the fuse continues to blow, contact the Service Centre
• Replace household fuse
Benchtop becoming too hot and/or beginning to discolour
1. Wrong type of cooking pot
• Make sure bases are not concave
2. Pot may overhang cooktop
• Place pot on centre of element so that it does not overhang
3. Pot is too large
• Use a smaller pot
Food taking too long to cook
1. Pot base is not flat
• Make sure pot base is flat or slightly convex
2. Pot may be off centre
• Centre pot over element making sure it does not overhang the cooktop
3. Need to use larger element
• Move pot to a larger element
4. Using a round based wok
• Use a flat based wok on electric cooktops
5. Controls are incorrectly set
• Check control is correct
• Check setting and increase setting
Cannot simmer food
1. Control set too high
• Turn control to lower setting
2. Element too large
• Use a smaller element
Elements giving off smoke or odours when first used
Protective oils being removed in first cooking
• Do not worry. This is normal
Glass surface becomes milky white when pot removed
Base of pot is concave
• Use a flat based pot
OPERATING THE ELECTRONIC CLOCK
Touch Control (selected models only)
General features
Your touch control clock has the following features:
• Timer – allows you to set a countdown time that will beep when the set time has elapsed.
• Cooking duration – You can set a cooking duration. A timer will count down the preset cooking time, beep when the time has elapsed and turn the oven off.
• End cooking time – you can set a cooking finish time. A timer will count down the preset cooking time, beep when the finish time has been reached and turn the oven off.
• Delayed start cooking time – You can combine the cooking time and stop cooking time to switch the oven on and off at a specific time during the day.
Note: Your touch control clock only operates with your upper oven
Setting the time of day
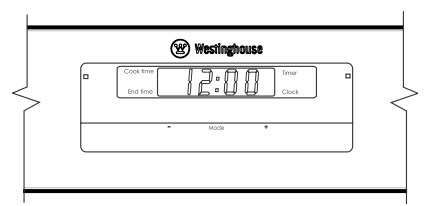
You must set the time of day before you can operate your appliance. When power is supplied to your oven “12.00“ will be displayed and the “clock” indicator will flash.
To set the time of day in hours and minutes, press – or +. 5 seconds after the last change, the “clock” indicator will disappear, confirming the time has been set.
Change the time of day (Daylight saving)
Press “mode” until the “clock” indicator begins flashing.
Press – or + to change the time. 5 seconds after the last change, the “clock” indicator will disappear, confirming the time has been set.
Setting the timer
Press “mode“ until the “timer” indicator begins flashing.
Set the countdown time you want by using – and +. 5 seconds after the last change the “timer” indicator will stop flashing, confirming the timer has been set.
To stop the beeper, press –, + or “mode”.
Setting the cooking duration
Check the clock displays the correct time of day.
Select the desired oven function and temperature. The oven indicator light will glow and the heating source will come on.
Press “mode“ until the “cook time” indicatorbegins flashing
Set the cooking duration you want by using – or +. 5 seconds after the last change, the “cook time” indicator will stop flashing, and the time of day will be displayed.
Setting the cooking end time
Check the clock displays the correct time of day.
Select the desired oven function and temperature. The oven indicator light will glow and the heating source will come on.
Press “mode“ until the “end time” indicator begins flashing.
Enter the time of day you want to finish cooking by pressing – or +. 5 seconds after the last change, the “end time” indicator will stop flashing and the current time of day will be displayed.
Setting the delayed start cooking time
Program the “cook time“ and “end time“ as described in the relevant sections. Once both the “cook time“ and “end time“ have been set, the “cook time“ and “end time” indicators will stop flashing and the current time of day will be displayed.
To check or cancel settings
To check your settings, press “mode” until the setting you want is displayed. A red light will flash next to the mode (cook time, end time etc) that is currently on display
To cancel “delayed start” press “mode” until a light flashes next to “cook time”. Press and hold “–” until the clock no longer reverses (“0:00” and you will hear a beep). If you have left the temperature and function knobs at a setting the oven will start once the “end time” light stops flashing.
To cancel “auto off” press “mode” until a light flashes next to “cook time”. Press and hold “–” until the clock no longer reverses (“0:00” and you will hear a beep). This automatically cancels “delayed start”. If you have left the temperature and function knobs at a setting, the oven will start once the “cook time” light stops flashing. Because you have cancelled “auto off” the oven will continue to heat until you manually turn it off.
CLEANING YOUR APPLIANCE
Enamel
• Rub persistent stains vigorously with a nylon scourer or creamed powder cleansers.
NOTE: You can also use household oven enamel cleaners – follow the manufacturer’s instructions carefully
Stainless steel
• All grades of stainless steel can stain, discolour or became greasy. You must clean these areas regularly by following the procedures below, if you want your appliance to look its best, perform well and have a long life.
Care must be taken when wiping exposed stainless steel edges... they can be sharp!
Your stainless steel appliance is manufactured from a mark resistant stainless steel. This special stainless steel resists marks such as finger prints and water spots. To keep your stainless steel appliance looking at its best, you should clean it regularly with warm soapy water. Wipe with clean water and a soft clean cloth to remove soap residue.
NOTE: Ensure you follow the polish or brushing lines in the steel.
DO NOT use stainless steel cleaners, abrasive pads or other cleaners as they are likely to scratch the surface. Damage due to poor cleaning technique is not covered by your warranty
Glass
• Glass surfaces on doors and control panels are best cleaned immediately after soiling.
• A damp cloth may help remove baked on food deposits.
• Oven cleaners can be used to remove stubborn marks and stains.
Oven
• Always keep your appliance clean. Ensure that fats and oils do not accumulate around elements, burners or fans.
• Always keep the oven dish, baking trays, grill dish and grill dish inserts clean, as any fat deposits may catch fire.
• Always wrap your meats in foil or an oven roasting bag to minimise cleaning. Any polyunsaturated fats can leave a varnish-like residue which is very difficult to remove.
Grill
• Always keep the grill dish and grill dish insert clean, as any fat deposits may catch fire.
Cleaning your oven accessories
Removing the trays and shelves from your appliance
• Slide the dish and grill tray towards you until they reach the front stop.
• Tilt them up at the front to clear the side supports, taking care not to spill the contents.
• Lift them clear.
• Wash the tray and shelves in hot soapy water.
• Reverse the above steps to put the grill tray and shelves back again.
• Ensure that they are placed between the 2 support wires. See page 9 for more details (excluding POR881)
Removing the side racks or shelf supports (excluding POR881)
• Grasp the shelf support at the front.
• Pull it firmly inwards.
• To install the shelf support, see page 8.
CATALYTIC LINERS (wherefitted)
Some models come with Catalytic liners. These models contain: 2 Catalytic side liners (to be fitted by you) 1 Catalytic fan cover (already fitted)
NOTE: If your oven does not have catalytic liners and you wish to purchase them, they are available from the Customer Care Centre.
Operation
The catalytic liners are coated with a specially formulated enamel coating, over a base of regular enamel. This enamel coating has a rough surface which is also porous. During normal cooking, fats and other food spatter is partially absorbed into the surface and then oxidised away. This oxidisation of the fat works best if the oven is set at high temperatures. If you do a lot of lower temperature baking, say around the normal 180ºC, then the cleaning process may not be complete. Every now and then you should turn the oven on to 260ºC for around one hour to completely remove the soil.
Cleaning
Should the panels become heavily soiled, they will need to be taken out of the oven and cleaned by hand. They should be soaked in warm, soapy water for at least 2 hours and then wiped clean with a soft cloth.
NOTE: Solid cleaning powders, creamy cleansers, caustic oven cleaners, steel wool or other scourers will ruin the catalytic surface and must NEVER BE USED.
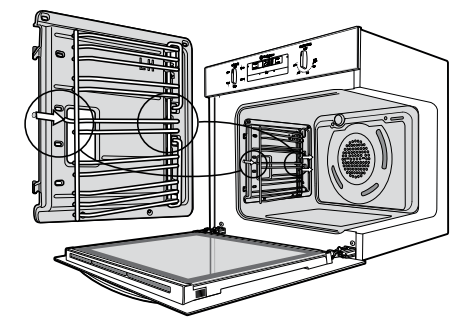
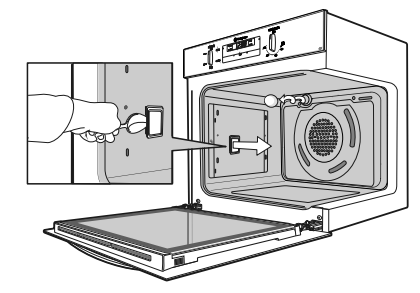
Removing the catalytic liners
• Remove Side Racks.
• Lift the liner up to disengage the hooks.
• The liners should now be free to be pulled in towards the centre of the oven.
• Refer to page 8 for re-installing your side liners.
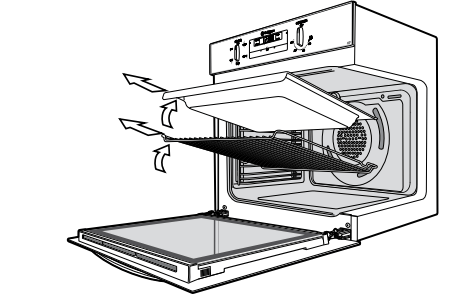
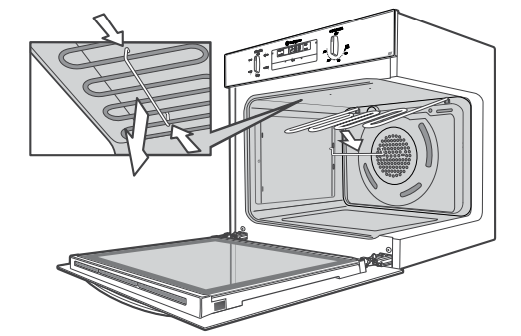
Removing and replacing the catalytic fan baffle (where fitted)
The oven must be switched off before removing the fan baffle, and the fan baffle must be replaced in accordance with instructions.
• Remove the 2 retaining screws on the top edge of the fan baffle.
• Pull the top edge towards you and then disengage to bottom tabs from the oven back.
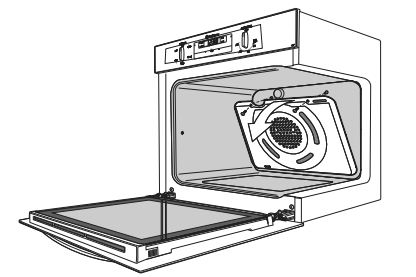
Note: It is critical that the fan baffle is replaced after cleaning, before the oven is operated again.
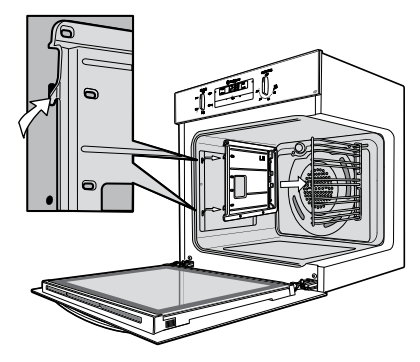
• Insert the two tabs at the bottom of the fan baffle into their corresponding slots in the oven back.
• Push the top home and insert screws firmly into appropriate holes.
• The fan baffle must not be loose. The fan baffle must be flush with the back wall of the oven.
Removing and replacing the oven light and side light (where fitted)
• Turn oven light glass anticlockwise to remove it for globe replacement.
• A special high temperature resistant globe should be used. This can be purchased from the Customer Care Centre.
• To remove side light, place a spoon under the light glass and lever off. Replace globe and snap glass cover back into position.
WARNING: Make sure the appliance is turned off before you remove or replace parts, to avoid the possibility of electric shock.
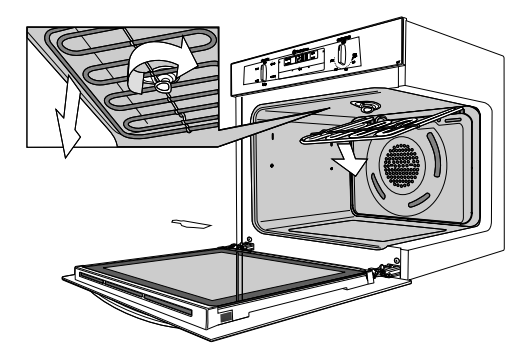
Releasing the grill element
We have designed the upper element with a hanger clip to help you reach your oven roof for cleaning.
Retaining wire models
• Lift element up carefully.
• Pull hanger clip to the left or right to unhook it. The element will drop down freely.
Rotating latch models
• Rotate latch 180º. The element will drop down freely.
Cleaning oven door (except models POR883 & POR881)
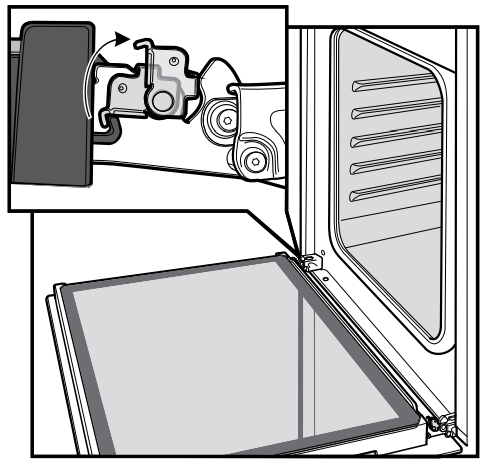
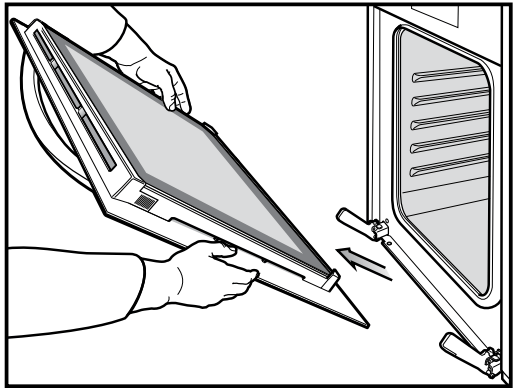
Removing the oven door
Your oven is equipped with a door that can be disassembled in order to clean all the panes of glass. Remove the door before cleaning.
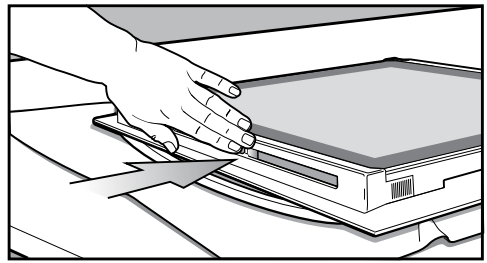
• Open the door fully to access the hinges then rotate the ‘stirrups’ (highlighted in the image) on both hinges fully towards the oven.
• Slowly close the oven door until it is stops against the ‘stirrups’ (about 45°).
• Grasp the oven door with a hand each side of the door and remove it from the oven by pulling it towards you.
• Lay the oven door with the outer side facing downwards on something soft and flat (for example a blanket on a kitchen table) to prevent scratches.
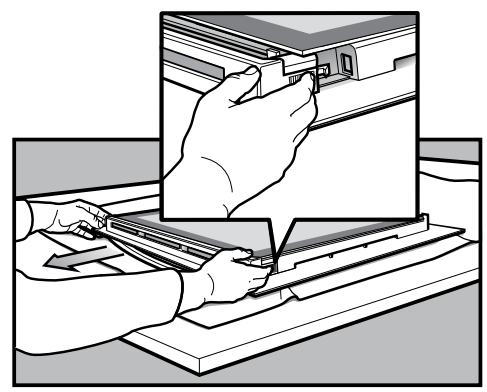
Removing oven door top trim
• Take hold of the grid embossed sections of the door trim at each end and press inwards to release the clips. Remove the door trim by pulling it towards you.
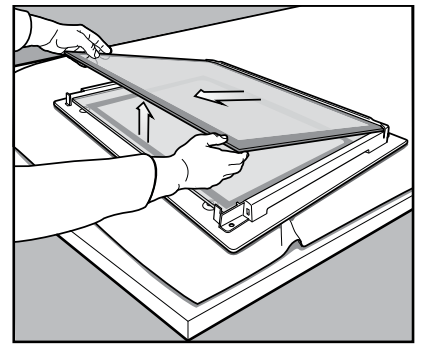
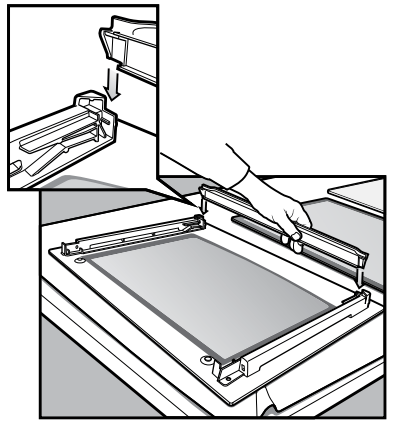
Removing door glass panels
WARNING: Rough handling, especially around the edges can cause the glass to break.
• Lift the black bordered glass panel out of the guide.
• Repeat this for the smaller clear glass panel (when fitted).
Cleaning door glass panels
WARNING: Do not to use harsh abrasives on the glass panes as the reflective surface plays a role in the function of the oven. Do not place glass in dishwasher. Hand wash only with a soft cloth and warm soapy water. When dry polish with a soft cloth and ensure the glass is dry before reassembly
Bottom trim (on selected models)
• The bottom trim may be removed for cleaning by snapping out and lifting away from the glass.
Re-assembling bottom trim
• Push down to “snap” each side of bottom trim back into door columns.
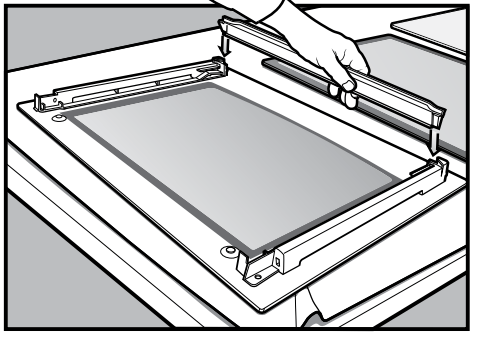
Re-assembling door glass panels
• Insert the smaller clear glass panel (when fitted) first from above and at an angle to the profile of the door.
• Repeat for the black bordered glass panel ensuring the painted surface is facing to the downside.
Re-assembling top door trim
• Take hold of the top door trim at each side and position it to the inside edge of the glass.
• Push the trim down with its top edge over glass panel until the clip snaps in on each side of the trim.
• Push the middle of the trim down to ensure it is straight and firm against the glass panel.
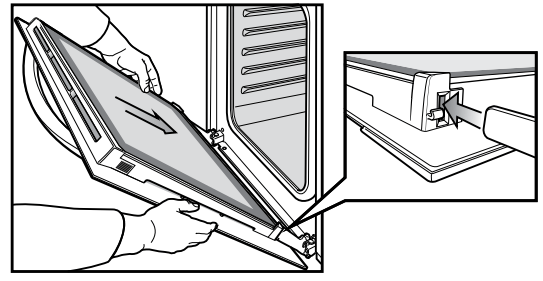
Fitting the oven door
• Take hold of the oven door with a hand on each side and with the door at an angle of 45º, position the recesses at the bottom of the door onto the hinge arms of the oven. Let the door slide down the hinge arms as far as it will go.
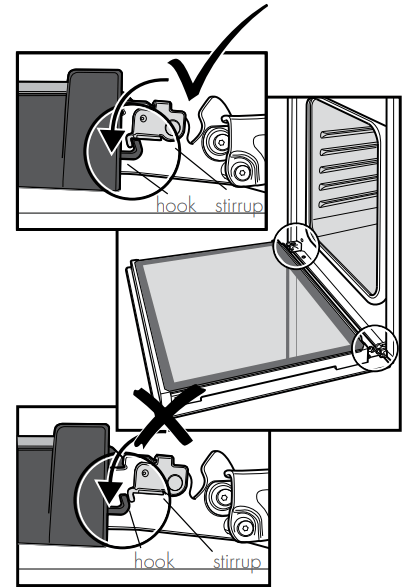
• Open the door fully to access the hinges then rotate the ‘stirrups’ (see image below) until they lock into the hook. The oven door may now be closed.
Side open door
Side open door models have been designed to allow for the inner glass panels to be removed for cleaning.
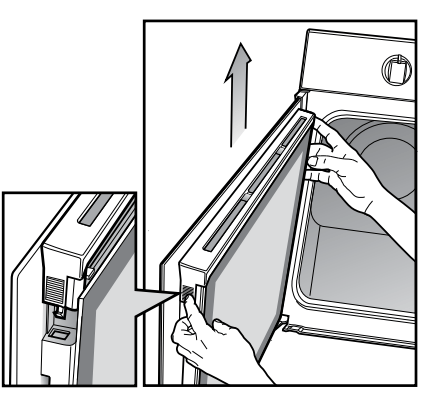
Removing side open door top trim
• Take hold of the grid embossed sections of the door trim at each end and press inwards to release the clips. Then remove the door trim by lifting it upwards.
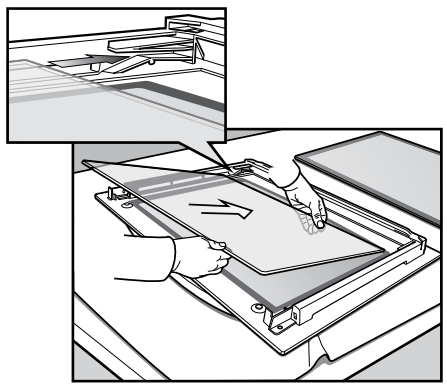
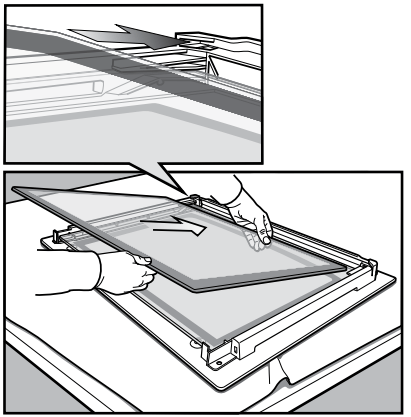
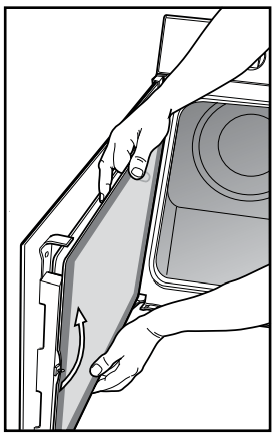
Removing side open door glass panel
• Take hold of the black bordered glass panel with a hand on its upper and lower edge. Lift and rotate the glass around the retainer to remove it from the guide
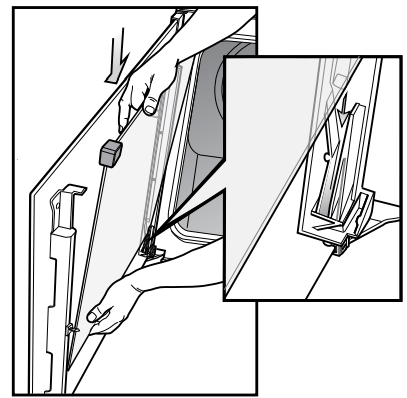
• Take hold of the smaller clear glass panel (when fitted) with a hand on its upper and lower edge. Lift the glass to remove it from the retainer.
• The rubber moulding on the upper corner of the small clear glass panel may be removed. Please take care that it is not misplaced.
Cleaning side open door glass panels
WARNING: Do not to use harsh abrasives on the glass panes as the reflective surface plays a role in the function of the oven. Do not place glass in dishwasher. Hand wash only with a soft cloth and warm soapy water. When dry polish with a soft cloth and ensure the glass is dry before reassembly.
Re-assembling door glass panels
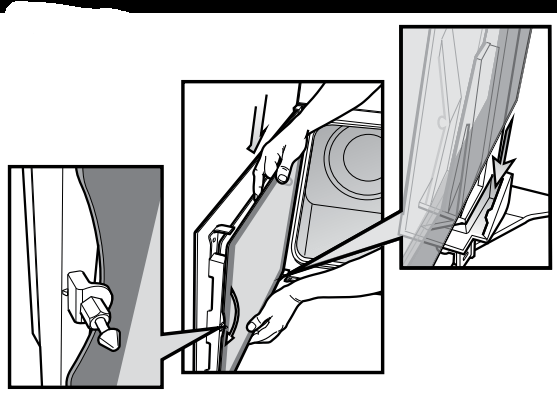
• Ensure the rubber moulding is on the upper corners of the smaller clear glass panel.
• Insert the smaller glass panel (when fitted) first from above and at an angle to the profile of the door.
• Repeat for the black bordered glass panel ensuring the painted surface is facing toward the outside of the door.
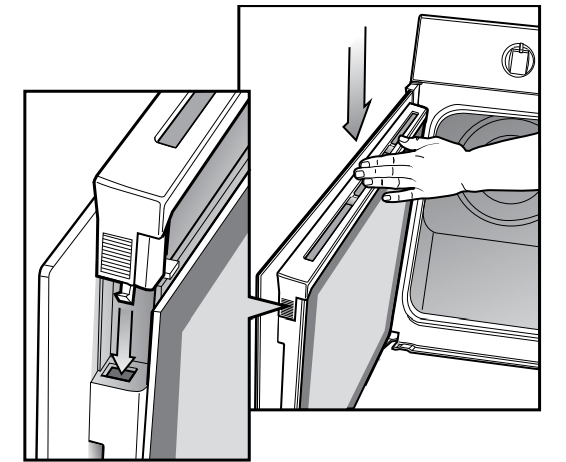
Replacing top door trim
• Take hold of the top door trim at each side and position it to the inside edge of the glass.
• Push the trim down with its top edge over glass panel until the clip snaps in on each side of the trim.
Solving problems
Faults
If there is a problem with the oven and/or grill, please:
• Check the points listed below before calling for service. It may be possible to avoid a call by fixing the problem yourself – and so continue cooking.
• For cooking problems refer to page 25.
NOTE: We may charge for service even in the guarantee period if your problem is due to the causes listed below.
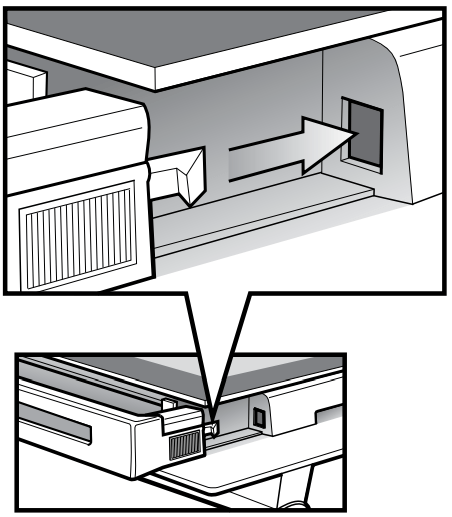
Data Plate
When you need information, service or replacement parts please:
• Tell us the 1. Model, 2. Model Number & 3. Serial Number shown on the data plate. The data plate is visible when the oven or grill door is open.
If you need more information, please contact the Customer Care Centre on: 13 13 49 (Australia – Centre is open 8.00am – 5.00pm M – F Eastern Standard Time) or +649 573 2384 (New Zealand – Centre is open 8.00am – 5.00pm M – F). If you have a warranty or spare parts enquiry, you should call the number listed on the back page.
Problem
Possible cause
Oven or grill not working:
• Time of day not set.
• Power not turned on.
• Controls are incorrectly set.
• Household fuse has blown or power supply is off.
• Child-proof oven lock activated. (Refer to operating instructions).
NOTE: If the household fuse continues to blow, call the Customer Care Centre.
Oven light not working:
• Lamp blown or loose in socket.
• Household fuse has blown.
NOTE: If the household fuse continues to blow, call the Customer Care Centre.
Oven not heating enough:
• Foil or trays on bottom of oven.
Oven not working:
• Timer is in “AUTO” mode. (Refer to timer operating instructions)
• Household fuse has blown.
NOTE: If the household fuse continues to blow, call the Customer Care Centre.
Timer flashing on display:
• Power failure or interruption.
NOTE: Reset time of day and any cooking functions you were using. (Refer to TIMER operating instructions).
Unit smoking when first used:
• Protective oils being removed.
Condensation building up:
• Reduce amount of water used in cooking. (Some condensation is normal)
Door cannot be replaced after removal
• Stirrup not engaged properly.
Pyrolytic cycle not working
• All accessories must be removed from the oven
NOTE: Only authorised personnel should carry out servicing.

 will flash.