MS5-STR30SC(BK)
請在操作前仔細檢查本說明書。
使用說明書
智能蒸氣焗爐

目錄
產品安全
預防措施
重要安全說明
配件
安裝注意事項
產品介紹
清潔和護理
水箱使用
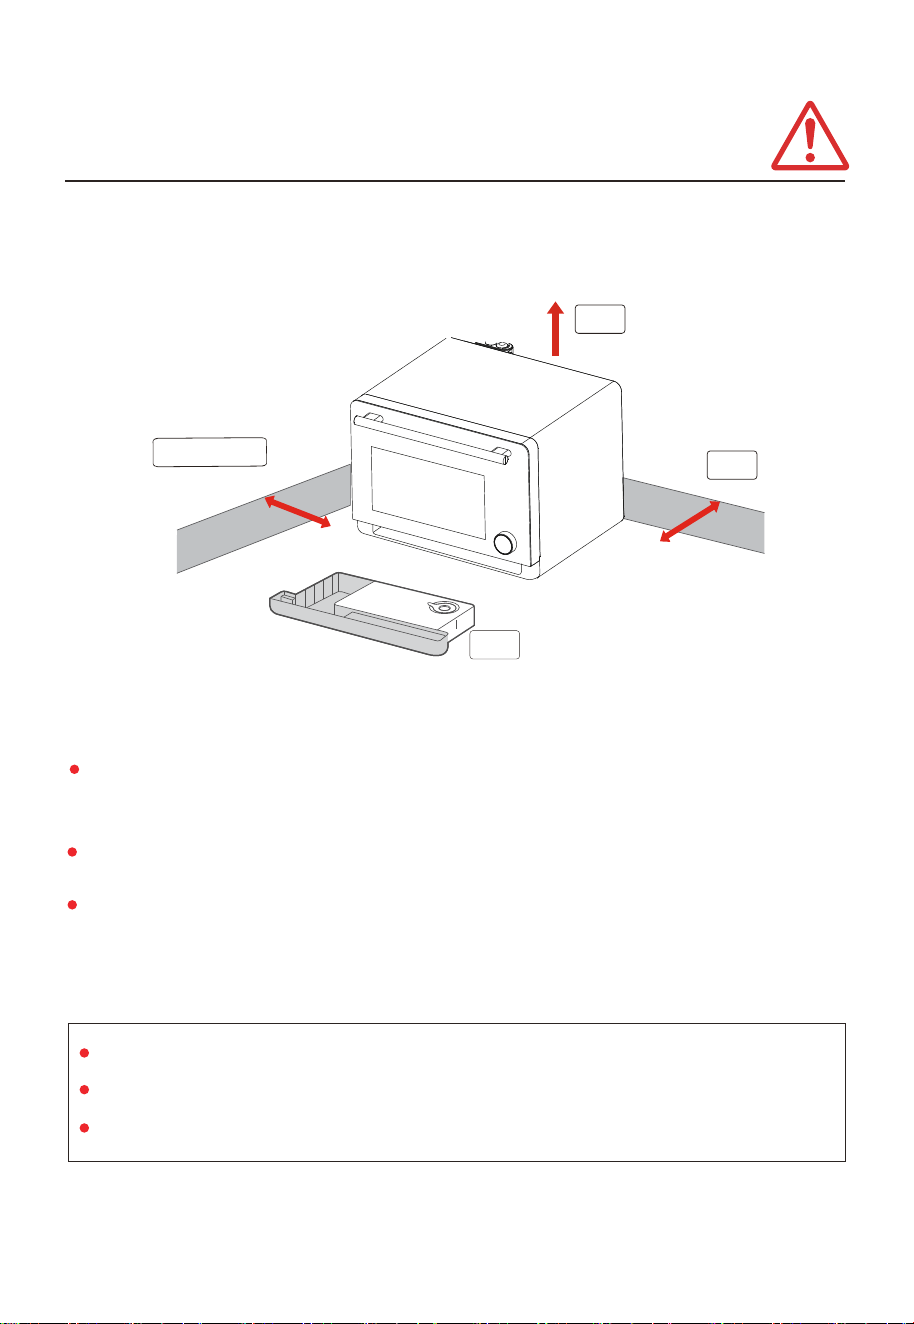
安裝空間及注意事項
初次使用
首次使用前
IOT智能控制
產品無線網絡連接
...........................................................................................................................CN-4
如何連接上TSmartLife APP?
.................................................................................................CN-5
app的操作界面
................................................................................................................................CN-8
美食交流圈的使用說明
...................................................................................................................CN-10
...........................................................................................................................................CN-11
..................................................................................................................................CN-12
...................................................................................................................................................CN-15
.................................................................................................................................CN-16
....................................................................................................................CN-17
...........................................................................................................................................CN-18
清潔和維護的預防措施
.........................................................................................................................................CN-20
.......................................................................................................................................CN-21
................................................................................................................CN-22
CN-2

維護
疑難解答
使用說明
操作說明
功能總表
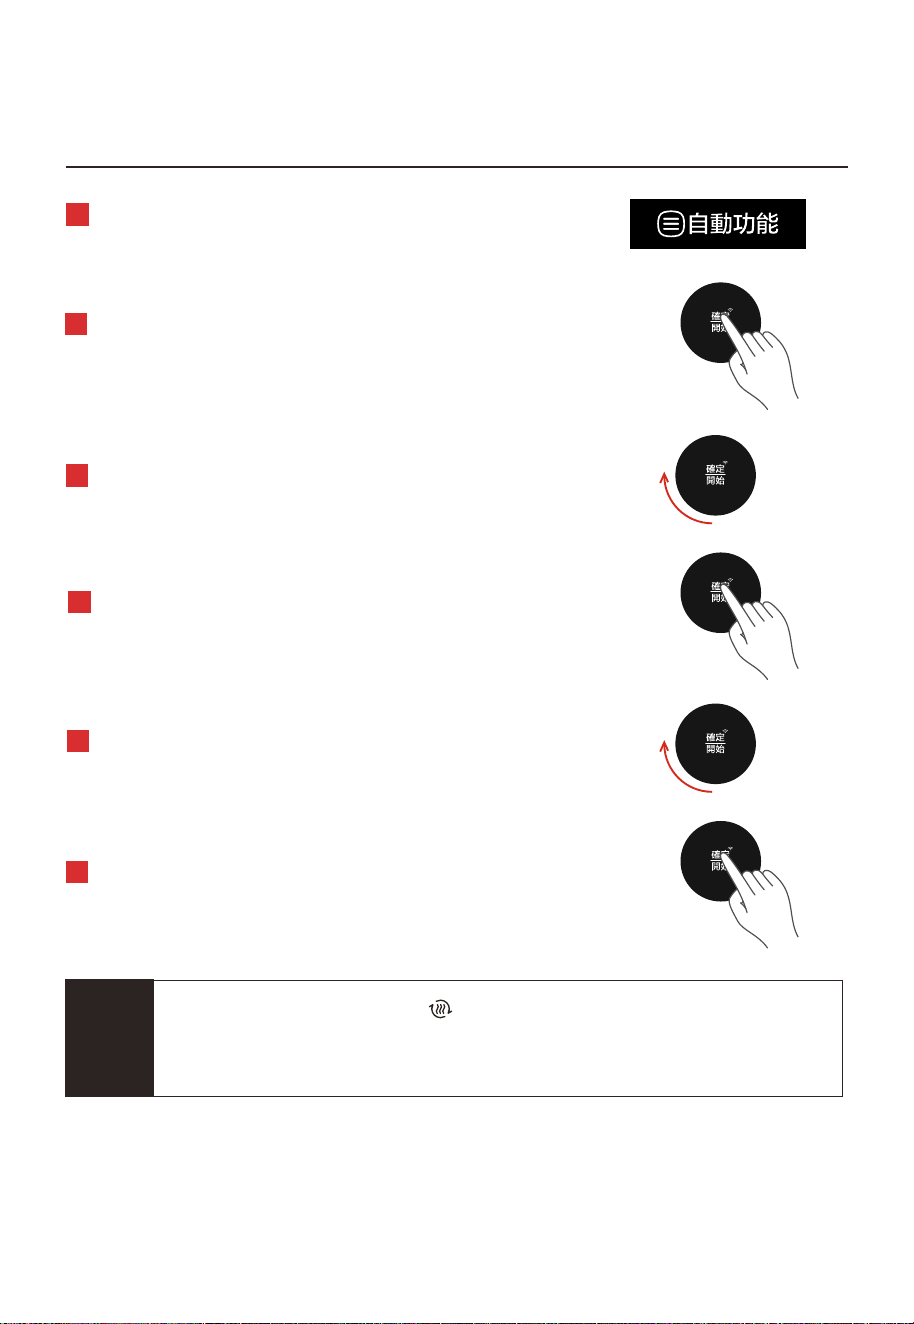
1. 烹調功能-原味純蒸
2. 烹調功能-高溫蒸氣
3. 烹調功能-營養慢燉
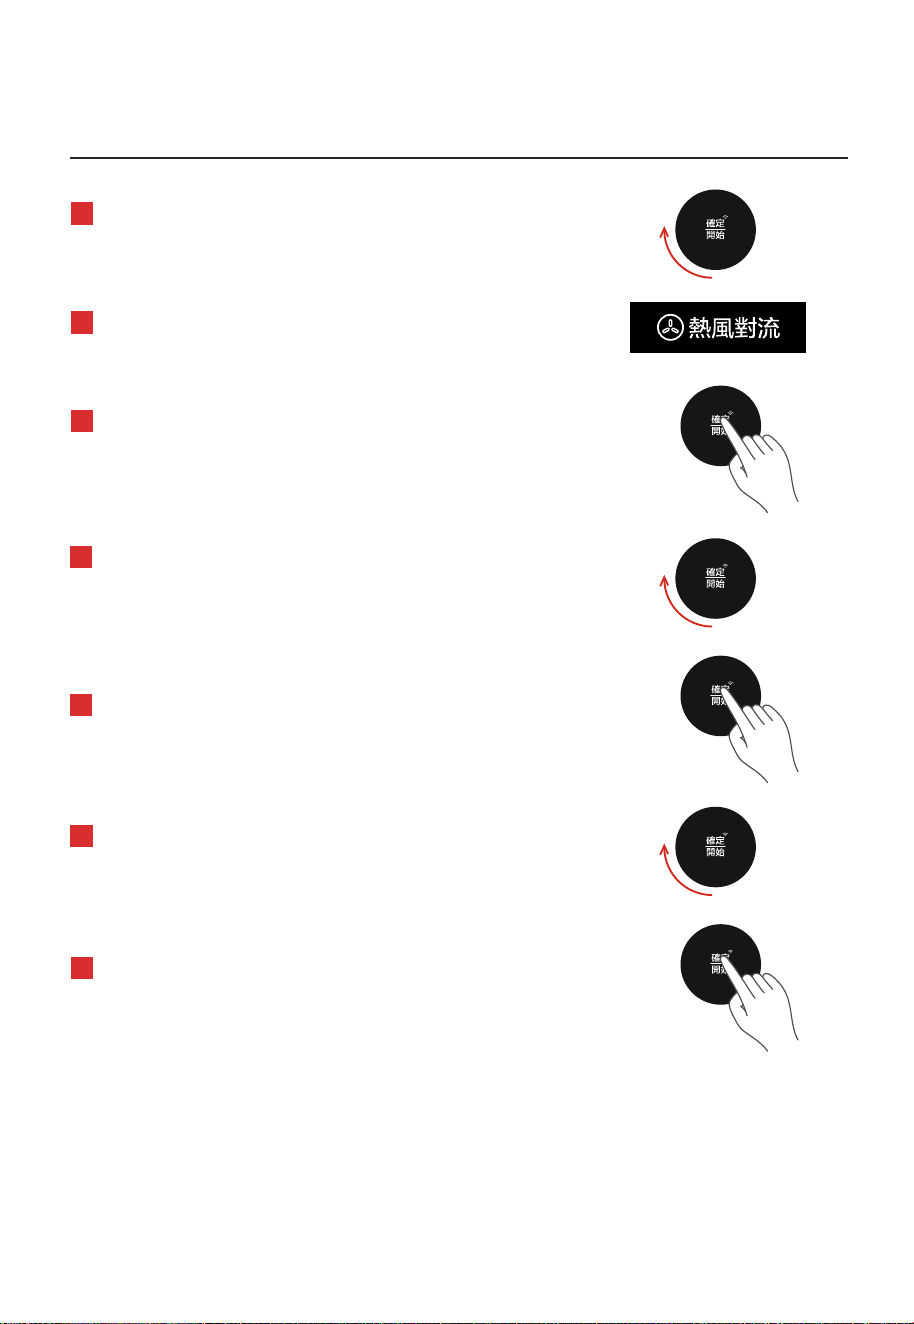
4. 烹調功能-熱風對流
5.
烹調功能-蒸氣烤焗
6.
烹調功能-上管熱風
7 .
烹調功能-上管燒烤
8 .
烹調功能-低温發酵
9 .
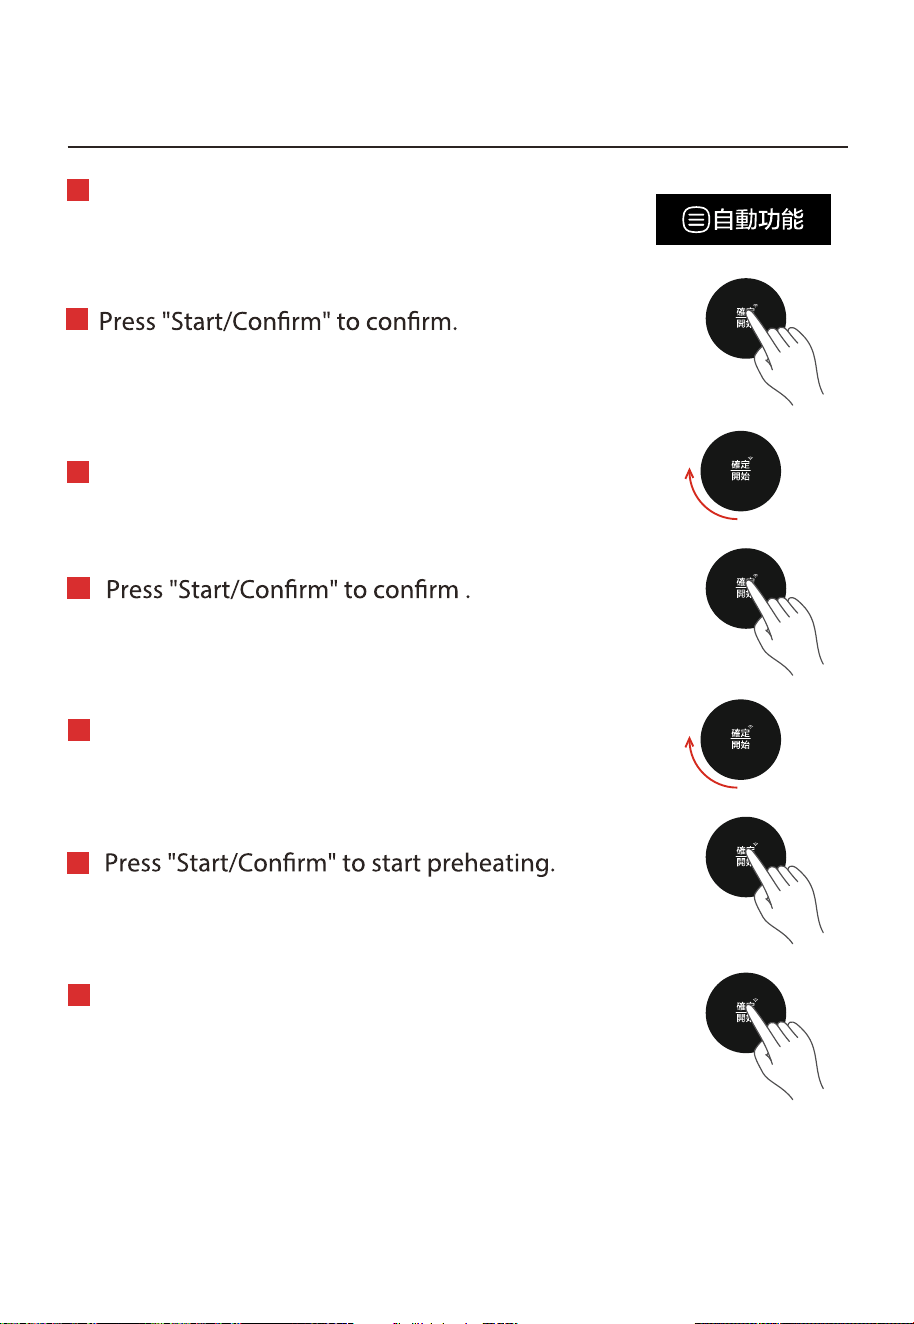
爐腔預熱功能
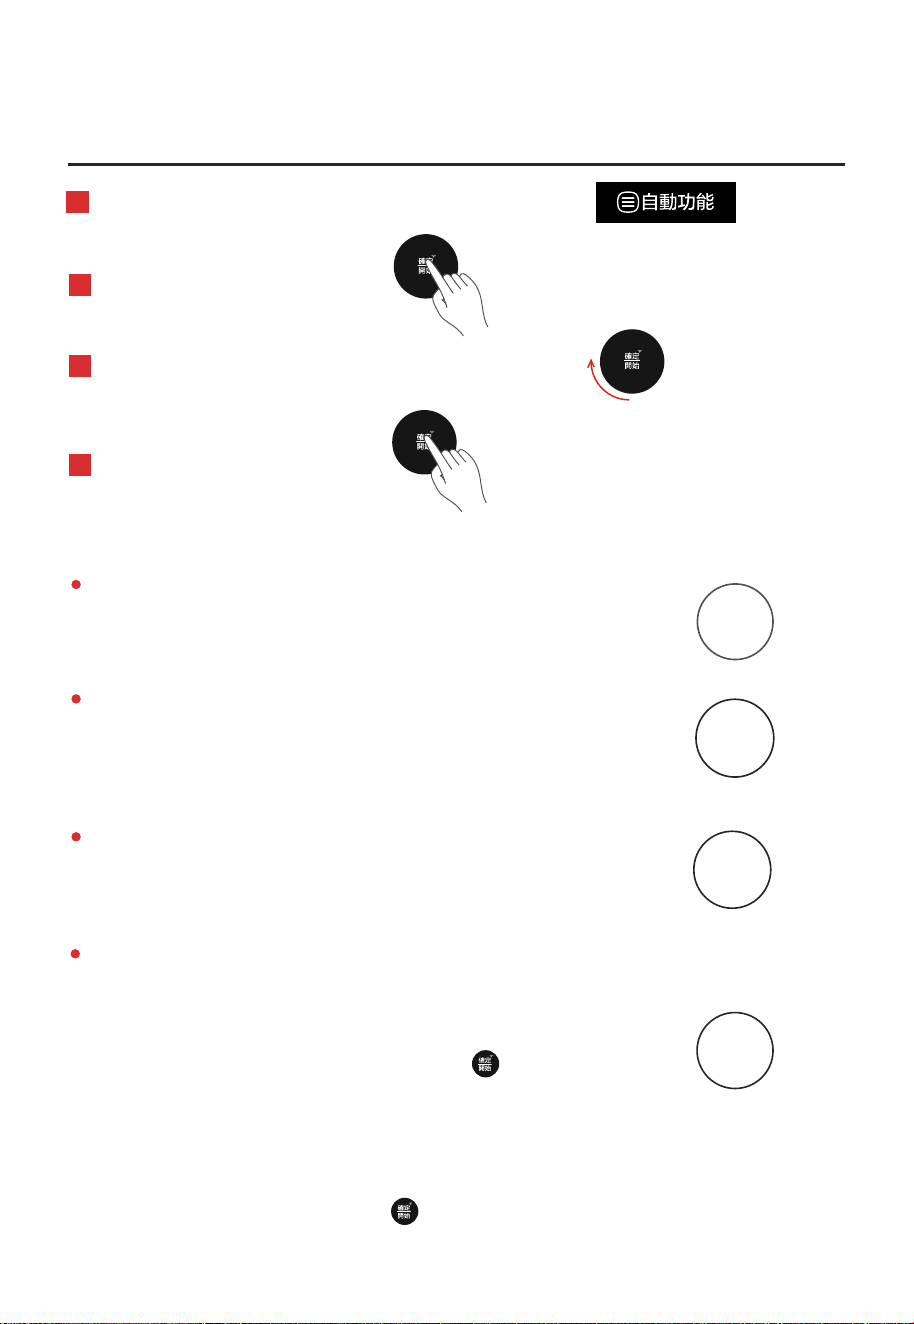
10. 自動功能(02-03,05-07,09-17,24,33-36) – 需預熱
10. 自動功能 (01,04,08,18-23,25-32) – 無需預熱
10. 自動功能 (37-40) - 清潔
10. 自動功能設置表
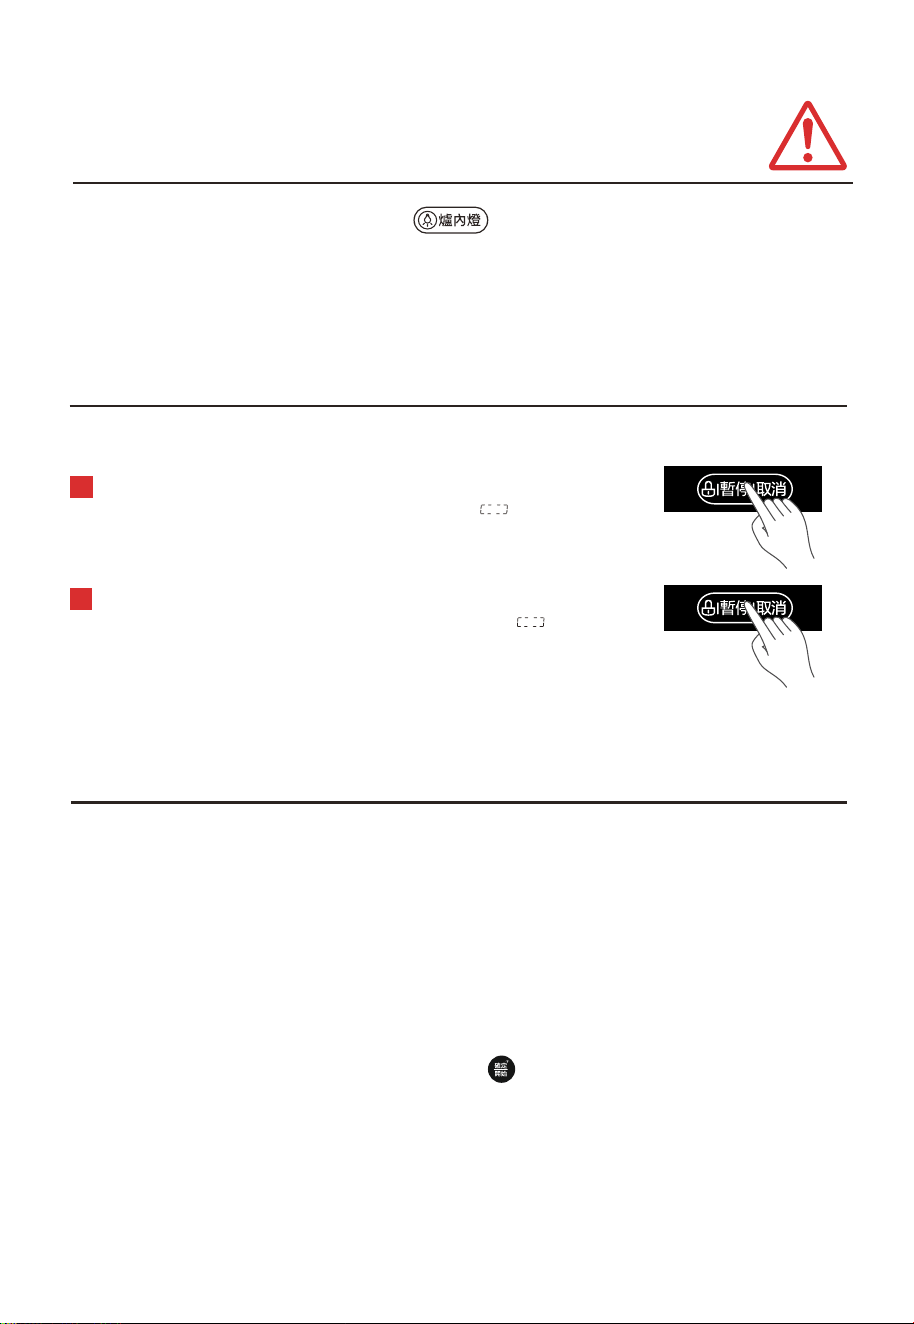
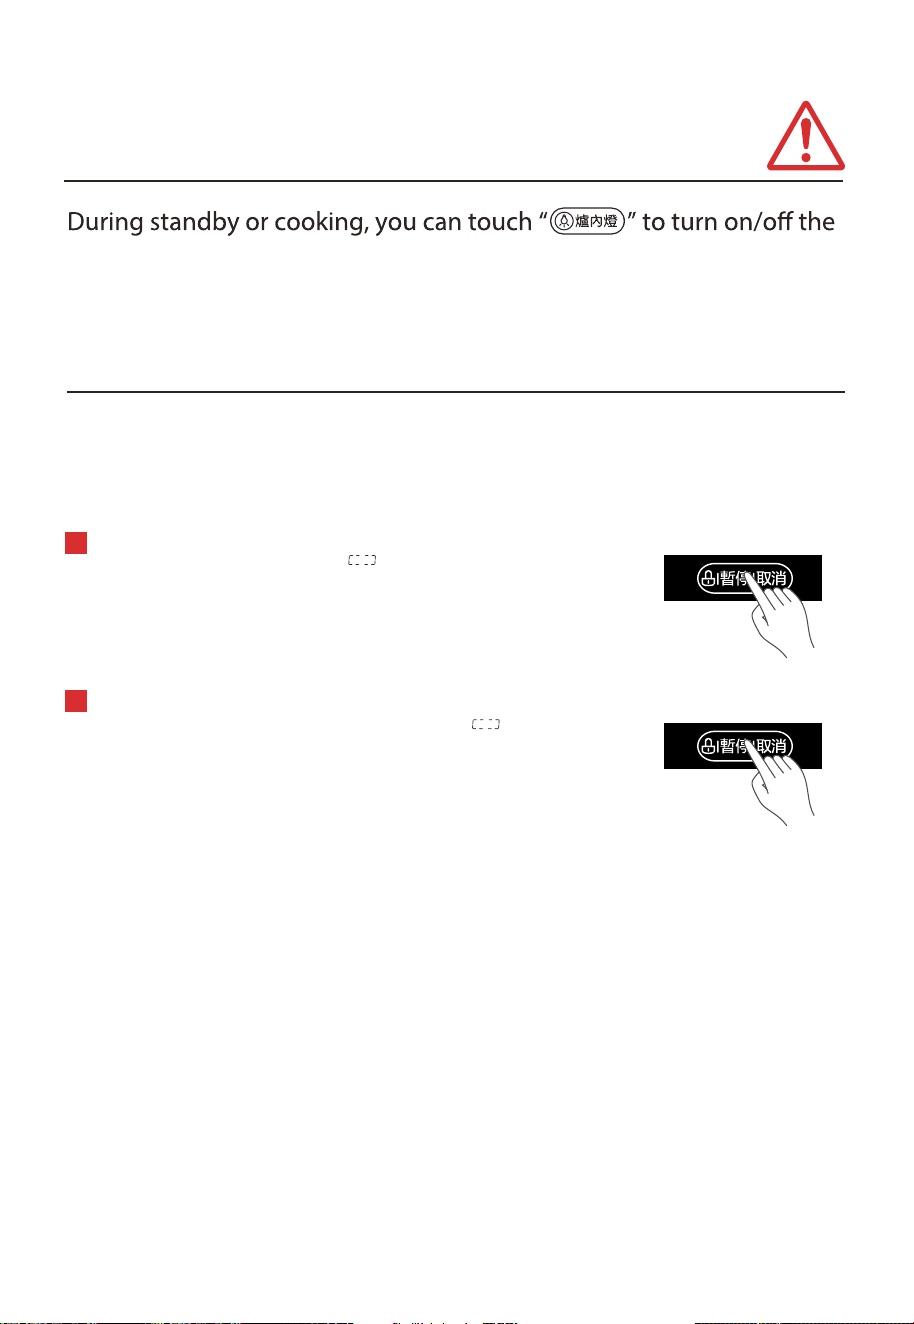
爐內燈
兒童鎖功能
指示燈及其他功能提示
其他重要提示
規格
.........................................................................................................................................CN-25
..........................................................................................................................................CN-26
..................................................................................................................CN-27
.................................................................................................................CN-28
..................................................................................................................CN-29
..................................................................................................................CN-30
..................................................................................................................CN-31
..................................................................................................................CN-32
..................................................................................................................CN-33
..................................................................................................................CN-34
.............................................................................................................................CN-35
.............................................CN-36
.......................................................CN-37
...................................................................................................CN-38
......................................................................................................................CN-39
...............................................................................................................................................CN-41
.......................................................................................................................................CN-41
.................................................................................................................CN-41
..................................................................................................................................CN-42
...........................................................................................................................................CN-43
...................................................................................................................................................CN-44
CN-3

IOT智能控制
產品無線網絡連接
1 連接網絡
按住「 」( / 確定 )鍵 3 秒,直到 “ 嗶 ” 一聲,
“AP” 和閃爍「 」顯示出來。如果沒有顯示出來,
“ ” 將顯示出來,烤箱將在 30 秒後恢復待機狀態
。
2 斷開與網絡的連接
按住並保持「 」8 秒 ,
如果連結已成功刪除,螢幕會顯示 “8888”,3 秒後
回到待機狀態 ; 如果連接失敗,螢幕會顯示 “FFFF”,
烤箱會在 3 秒後回到待機狀態
- 目前僅支持1個主帳戶分享給其他家庭成員共同使用
(即不可同時有多於1個的主帳戶控制產品)
開始
CN-4
N0~N5
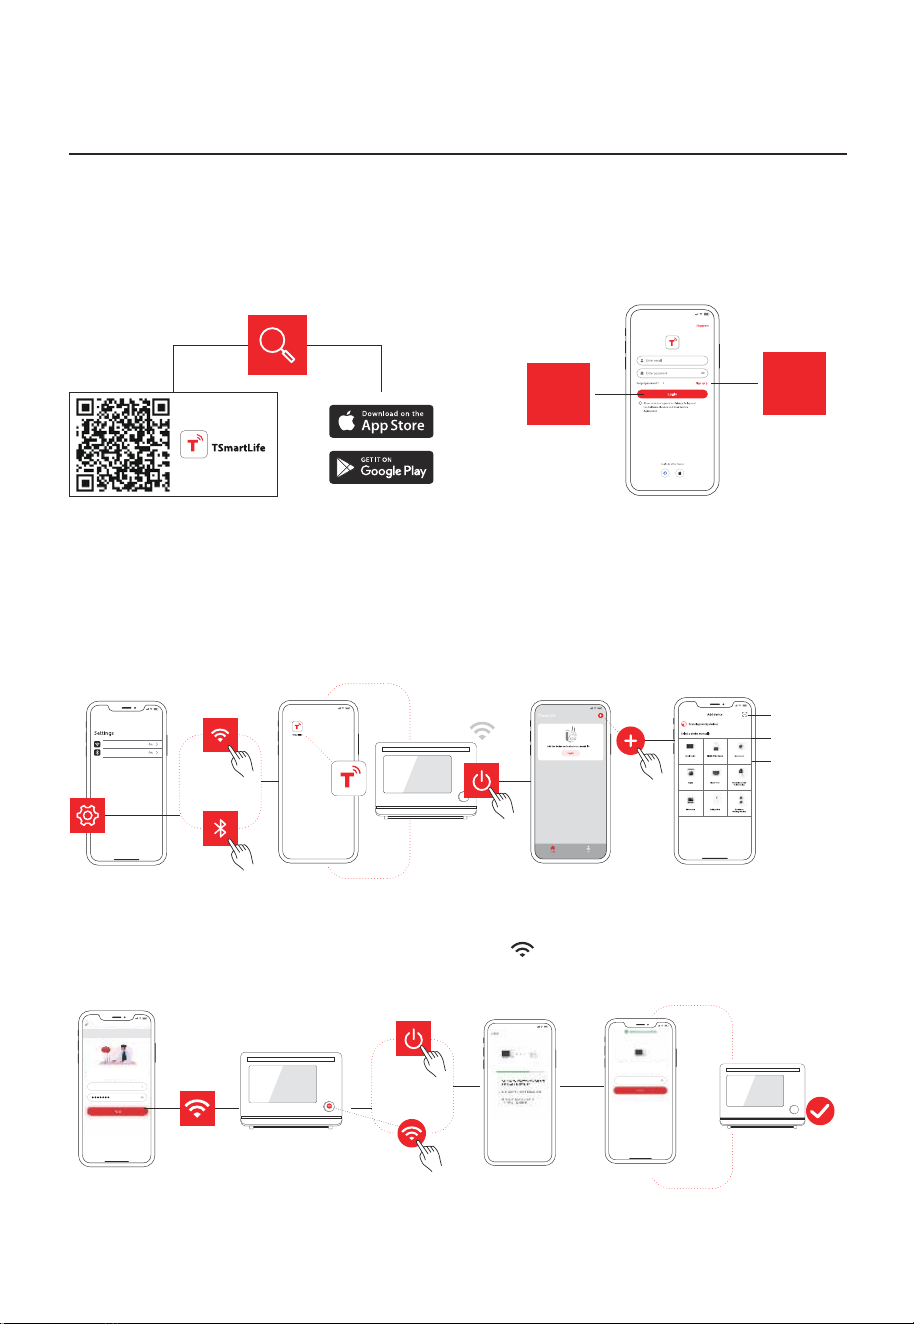
如何連接上TSmartLife APP?
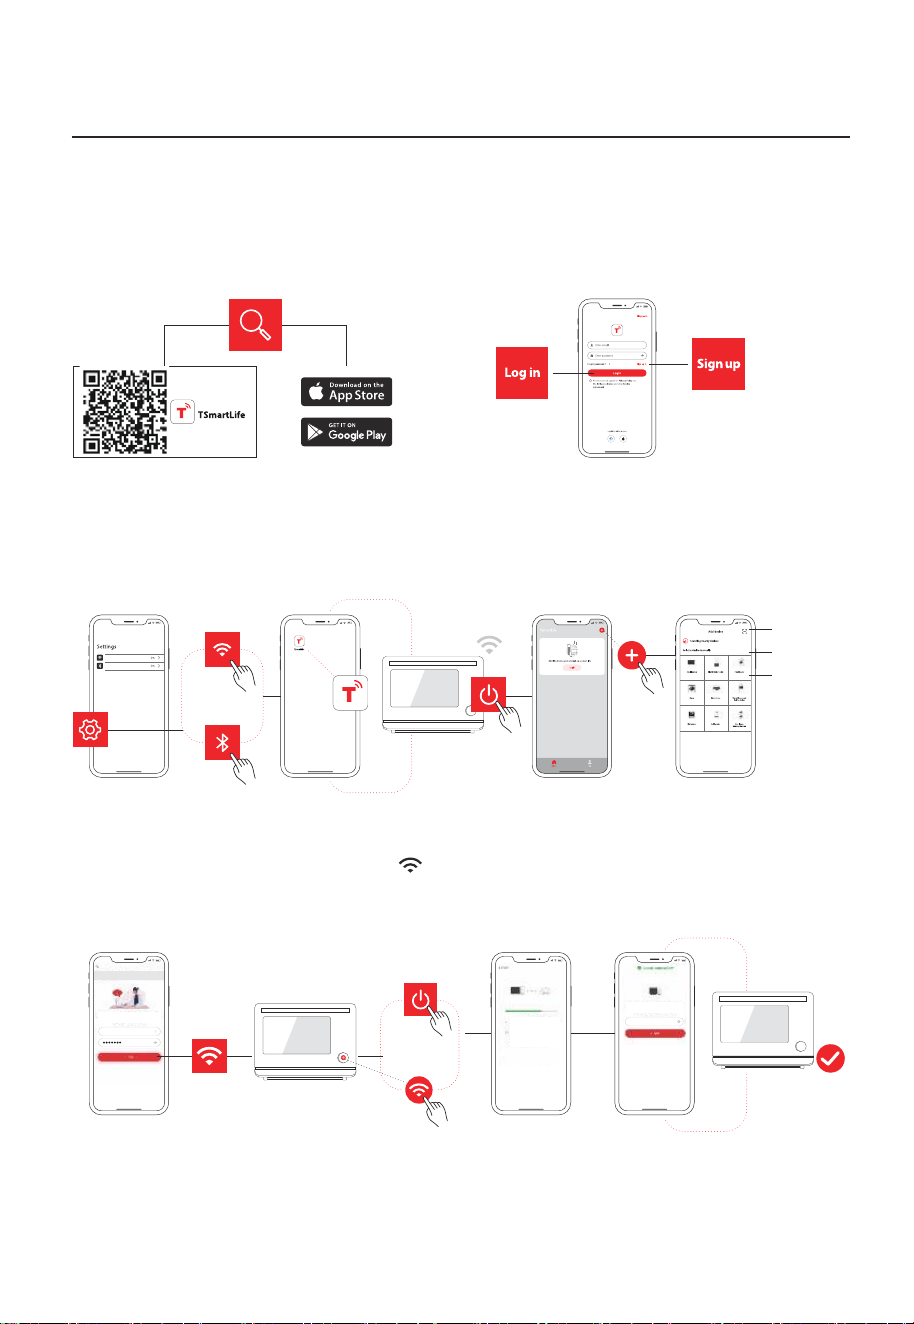
1 下載 TSmartLife App
掃描QR code,或從應用程式下載
2
註冊或登入
請登 現有帳戶或註冊新帳戶
WLAN
Bluetooth
第一步
連接無線網絡(wifi),
開啟藍牙
第二步
打開TSmartLife App
設備連上電源
通過以下方式添加設備:
第三步
3 將您的設備連接到 TSmartLife
手動選擇
搜尋設備
掃描產品QR code
第四步
確保設備和應用程式
處於同一無線網絡環境下
第六步
您可為產品重新命名,
亦可嘗試遠距離控制
第五步
長按面板上的「 」3秒
根據應用程式指示設置,
產品將自動連接
Toshiba
Please select wireless network
for device to connect
Toshiba
Hi,l’m your device!
How would you call me:
登入
註冊
CN-5
已連接
入

如何連接上TSmartLife APP?
請確保產品連接電源;
連接期間,請將您的手提電話貼近
產品
;
請將您的手提電話連接到家中無線網絡(wifi);
請在您的無線網絡路由器上啟用2.4GHz頻率(暫時不支援5GHz網絡);
請注意:產品無法連接需要認證的無線網絡(wifi)或公共網絡(如酒店、餐廳
等)。
建議使用僅帶有字母及數字的無線網絡(wifi)。若您的網絡名稱帶有特殊字
符,請在路由器上修改;當產品連接網絡時,請停用WLAN+ Android 或
WLAN Assistant (iOS);
如欲將產品連接到無線網絡(wifi),請在應用程式主畫面上點擊“+”,根據
APP提示,按產品種類、型號重新添加。
小貼士
CN-6
( )
•
•
•
•
•
•
•
•
•
•
•
如果第一次無法加入網路
如果可以加入網路但連接不穩定
如果設備離線,請檢查連接狀態。請確認
TSmartLife
CN-7
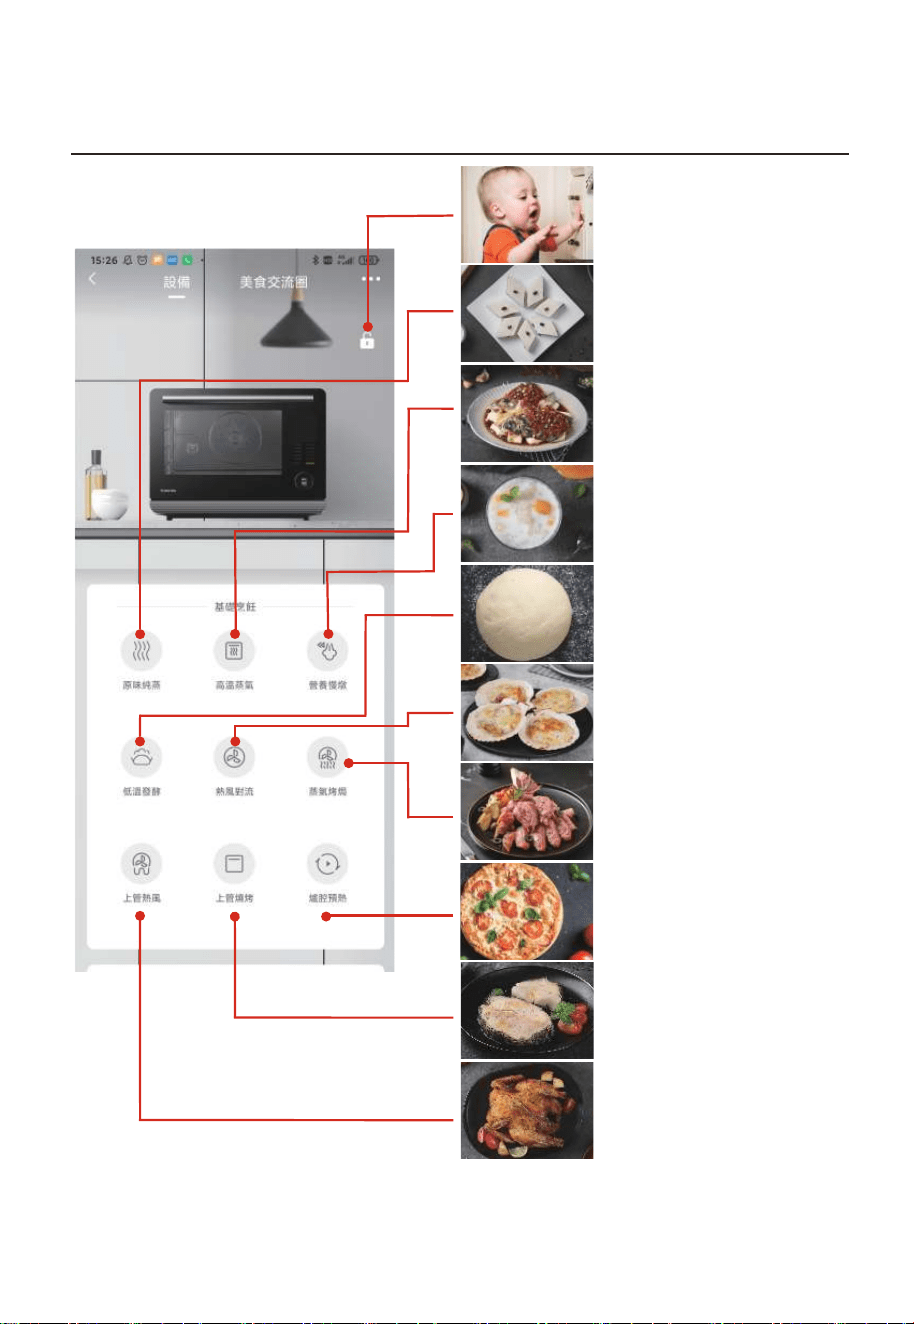
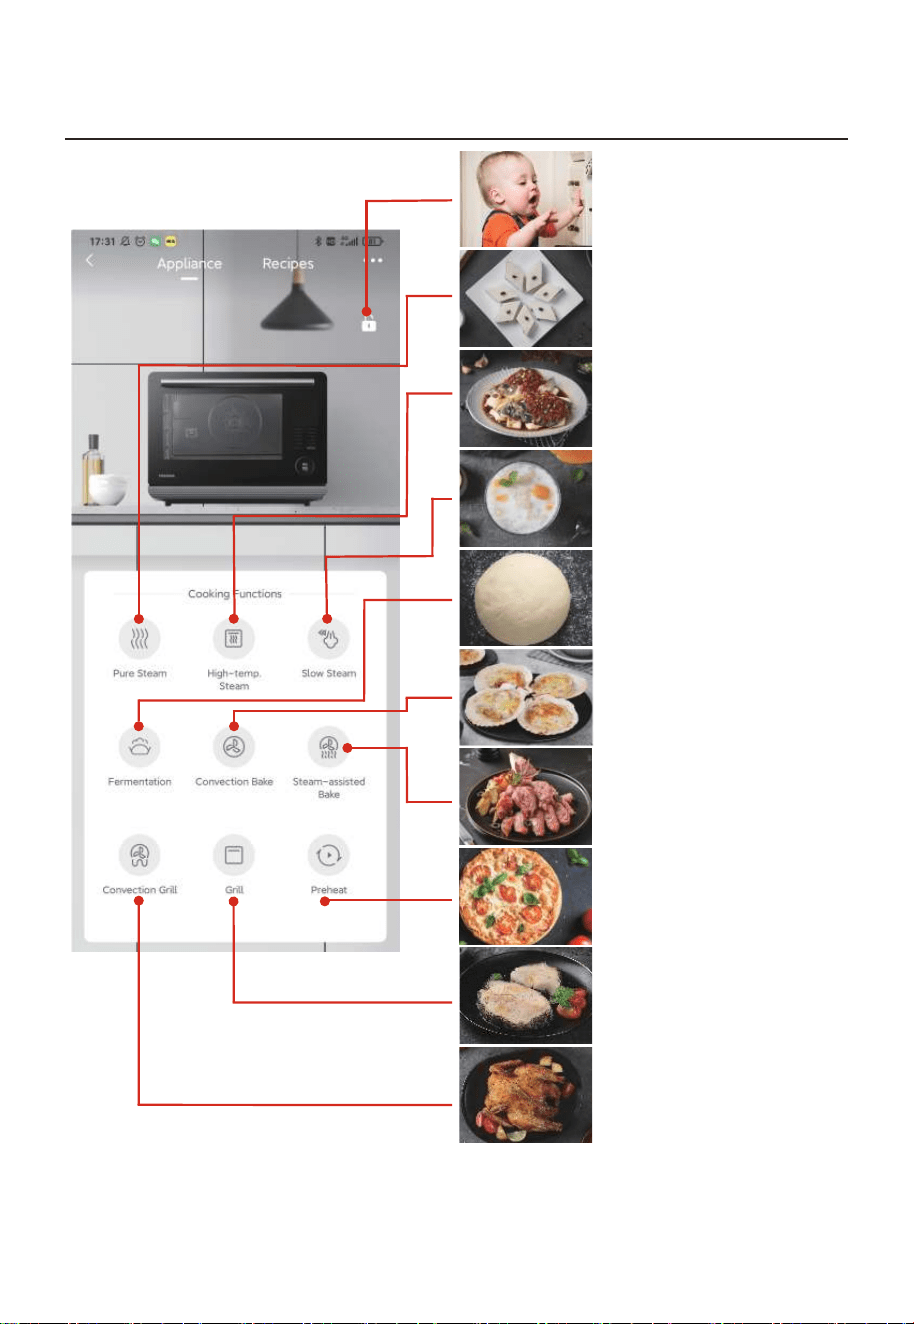
APP的操作界面
界面 介紹
原味純蒸
高溫蒸氣
營養慢燉
低溫發酵
熱風對流
蒸氣烤焗
童鎖
爐腔預熱
上管熱風
上管燒烤
CN-8
CN-9
APP的操作界面
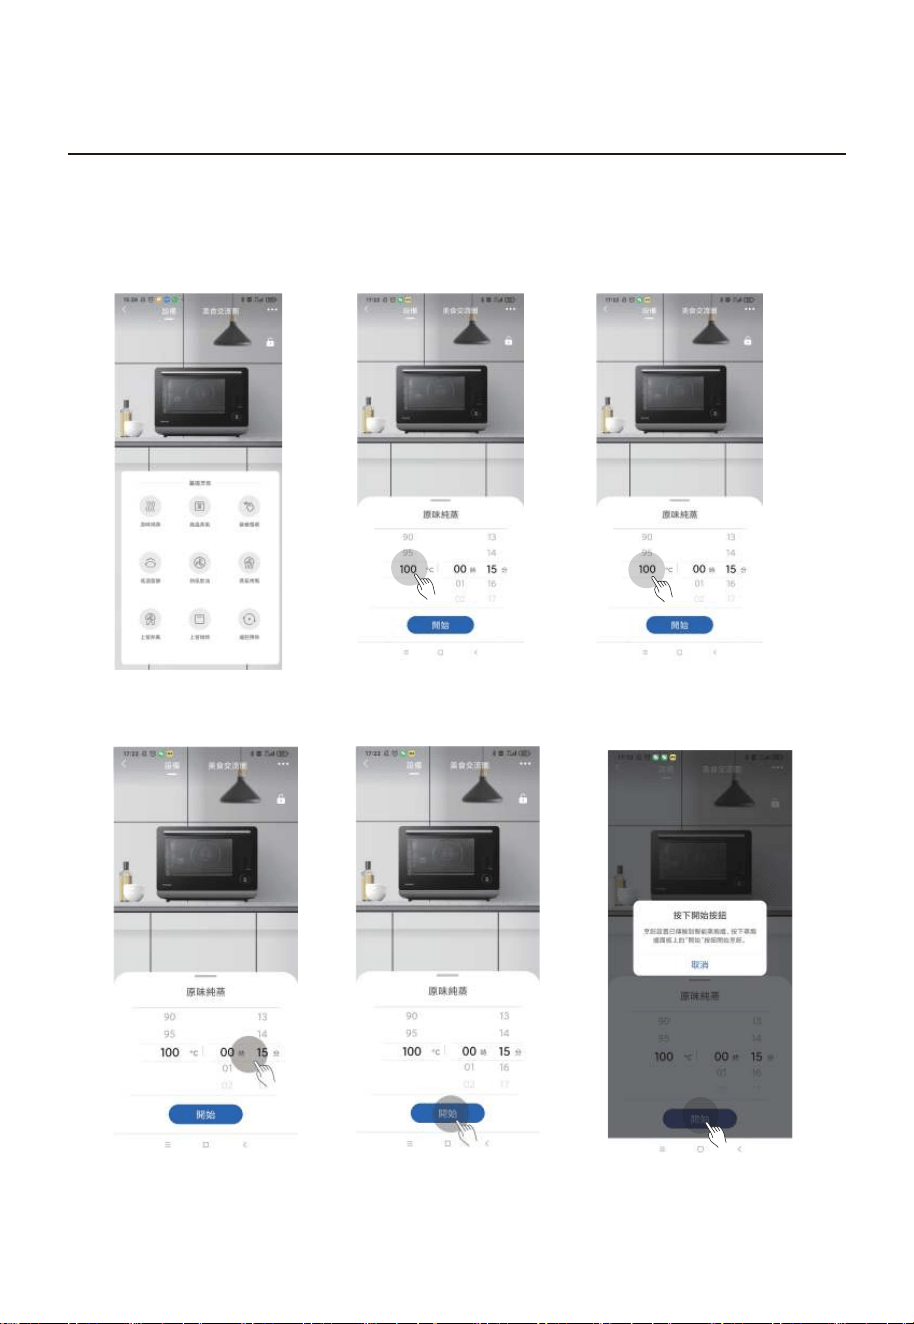
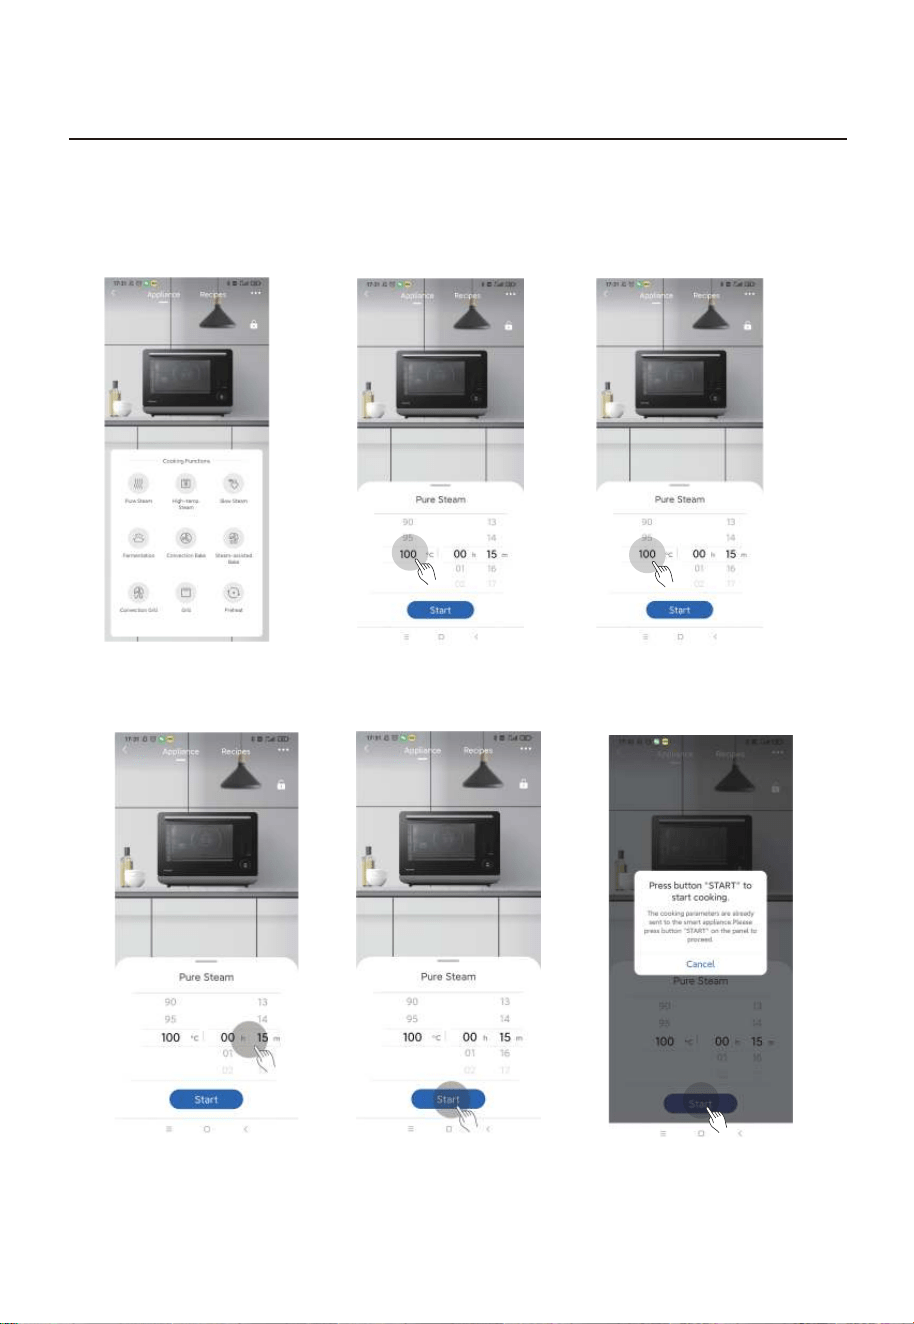
如何開始烹飪?
1 選擇所需烹飪程序
2 點擊溫度控制位置
3 滑動溫度數字,
選擇所需溫度
4 滑動時間數字,
選擇所需時間
5 按[開始]鍵後,
手機界面出現提示語
6 根據指引,在焗爐上
按[開始],開始烹飪。
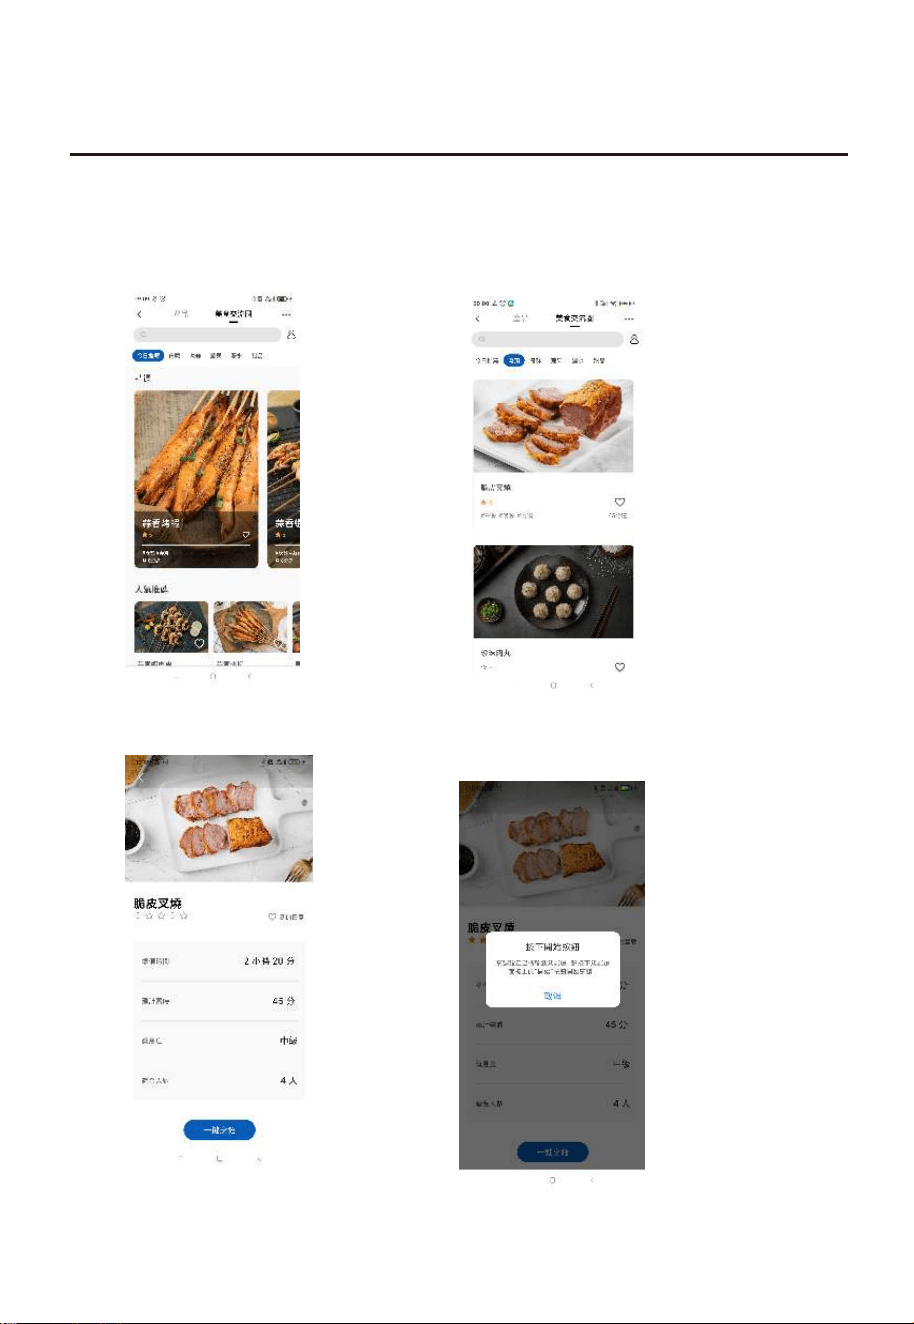
美食交流圈的使用說明
美食交流圈上的食譜
1 選擇美食交流圈
2 選擇心儀的食譜進行烹飪
3 查看食譜,開始烹飪
4 按[一鍵烹飪]鍵後,在
上按 [開始],開始烹飪。
CN-10

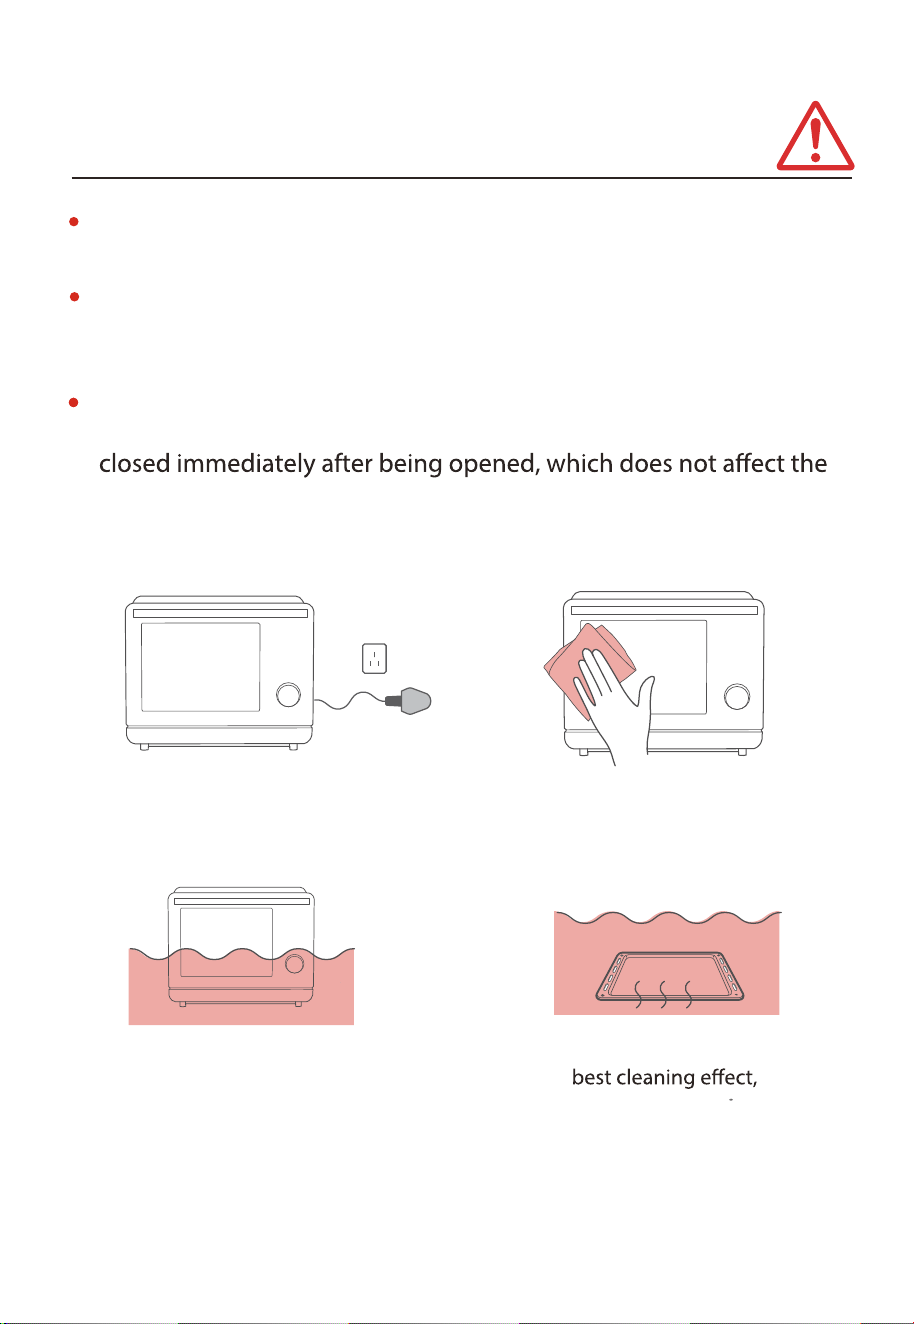
(a)
不要試圖在門打開的情况下操作蒸氣。請勿破壞或更改安全連鎖。
(b) 不要在蒸氣正面和門之間放置任何物體,也不要讓污垢或清潔劑殘留物積聚
在密封面上。
注意
如果設備未能保持良好的清潔狀態,其表面可能會退化,使用壽命也會縮短,
引致危險情况。
預防措施
CN-11
產
產品安全
產品安全

閱讀並遵循具體的注意事項。
請將本電器及其電線放在 8 歲以下兒童接觸不到的地方。
電線如有損壞,請由製造商、代理商或具類似資格的專業人士更換,以免發生
危險。
警告:更換燈泡之前,請確保已關閉產品電源,以免觸電。
使用塑膠或紙製容器加熱食物時,請注意蒸氣,因為可能會著火。
警告:除了合資格人員外,任何人進行任何檢查或維修等操作都是危險的。
僅使用本推薦的溫度探測器。(如蒸氣配備使用溫度感應探針設備。)
8歲及以上兒童、身體、感官或心智弱能人士,或缺乏經驗及知識人士,需在了
解相關風險,並得到監督或指引有關本電器的安全使用方法之下方可使用。兒童
不得把玩本產品。除非兒童為 8 歲以上,並且受到監督,否則不得清潔及維護
本產品。未滿 8 歲的兒童,除非常時受到看管,否則應遠離產品。
為降低使用時發生執行期錯誤、觸電、人身傷害的風險,請遵循
基本預防措施,包括以下幾點:
重要安全說明
本產品供家居及類似環境使用,如:
- 店舖內的員工廚房區域、辦公室及其他工作環境;
- 供客戶於酒店、汽車旅館及其他住宅類型環境;
- 農舍;
- 民宿類型環境。
CN-12

警告:使用期間,可接觸部件可能會變熱。幼兒應遠離產品。
不得使用蒸氣清洗器。
儲物櫃的表面可能會變熱。
警告:產品及其可觸及部件在使用期間發熱。注意避免接觸加熱元件。未滿 8 歲
的兒童,除非常時受到看管,否則應遠離產品。
在使用過程中,產品會變熱。應注意避免接觸產品內的加熱元件。
不得使用蒸氣清潔器清潔產品。
重要安全說明
請仔細閱讀並保存以備日後參考
每次使用後,應清理收集污水箱、爐內和水箱中的水。
請勿使用耐溫性低於120度的紙杯和塑膠容器。並使用適合烹調溫度的容器。可
以使用玻璃、陶瓷、不銹鋼器皿。
本產品的主要功能是原味純蒸。
使用與蒸氣相關的功能時,蒸氣焗爐運轉過程中爐腔內會產生大量蒸氣,爐腔內
多餘的蒸氣會通過出風口排出,但少部分蒸氣由於環境溫度,會凝結在出風口處,
或部分蒸氣可能從門縫四周漏出,這是正常現象。
切勿將本產品安裝在裝飾門後面,以免過熱。
從產品取走容器時,應注意不要移動轉檯。
警告:移動產品時,不要使用手柄。(產品超重時,手柄容易折斷。)
(*注: 如發現爐內有水漬仍為正常現象,因產品先進行了進出
水測試。請先將爐
內水抹乾。)
CN-13
1 產品隨附短電源線,以減低長電源線纏繞及絆到造成的危險。
2 如使用長電源線組或延長線:
1) 電源線組或延長線標記的電氣額定值應至少與產品的電氣額定值一樣大。
2) 延長線必須為接地型 3 線電源線。
3) 應妥善擺放長電源線,使其不會掛在檯面或桌面,以免被兒童拉扯或意外絆倒。
重要安全說明
觸摸部分內部組件,可導致嚴重的人身傷害或死亡。
請勿拆解本產品。
危險 觸電危險
本產品必須接地。如發生電氣短路,接地可通過為電流提供逃逸通路來降低觸電
危險。本產品配備帶有接地線及接地插頭的電源線。插頭必須插入正確安裝並接
地的插座。
如未充分理解接地說明,或對產品是否正確接地存有疑問,請諮詢合資格電工或
維修人員。如需要使用延長線,請僅使用 3 線延長線。
接地使用不當可導致觸電。在正確安裝產品並將其接地之前,請勿插入電源插座。
觸電危險警告
CN-14
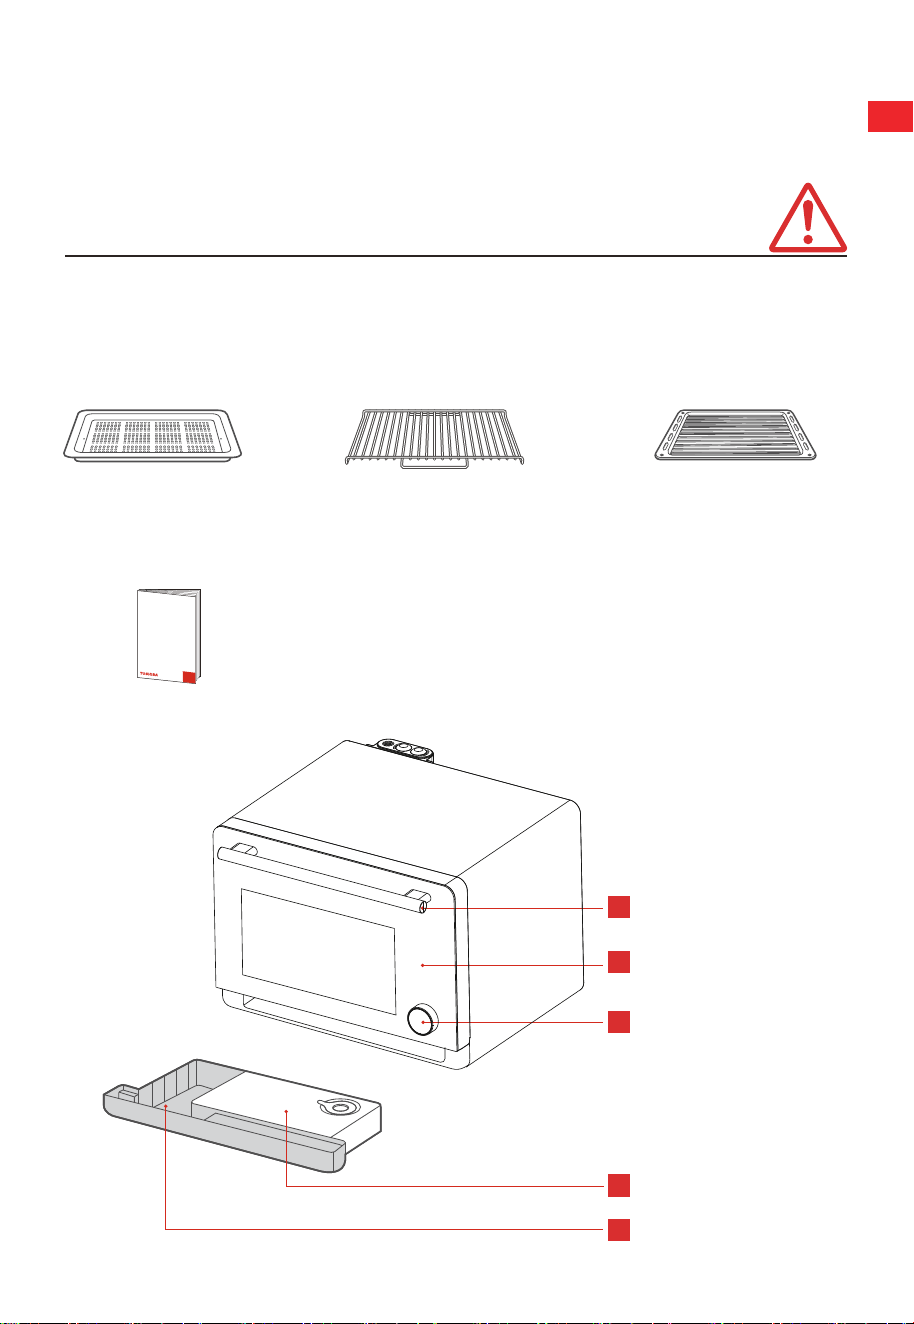
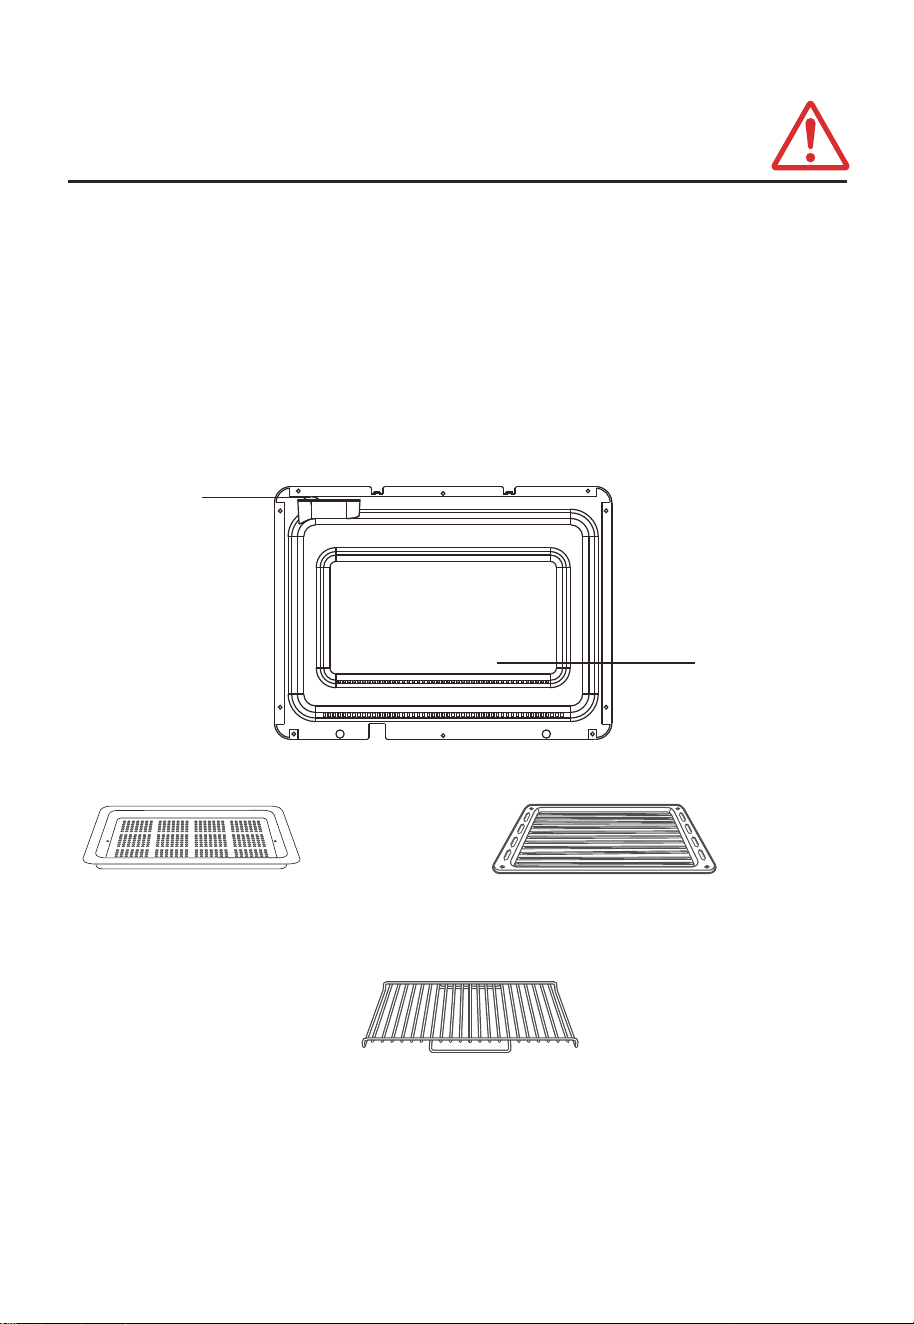
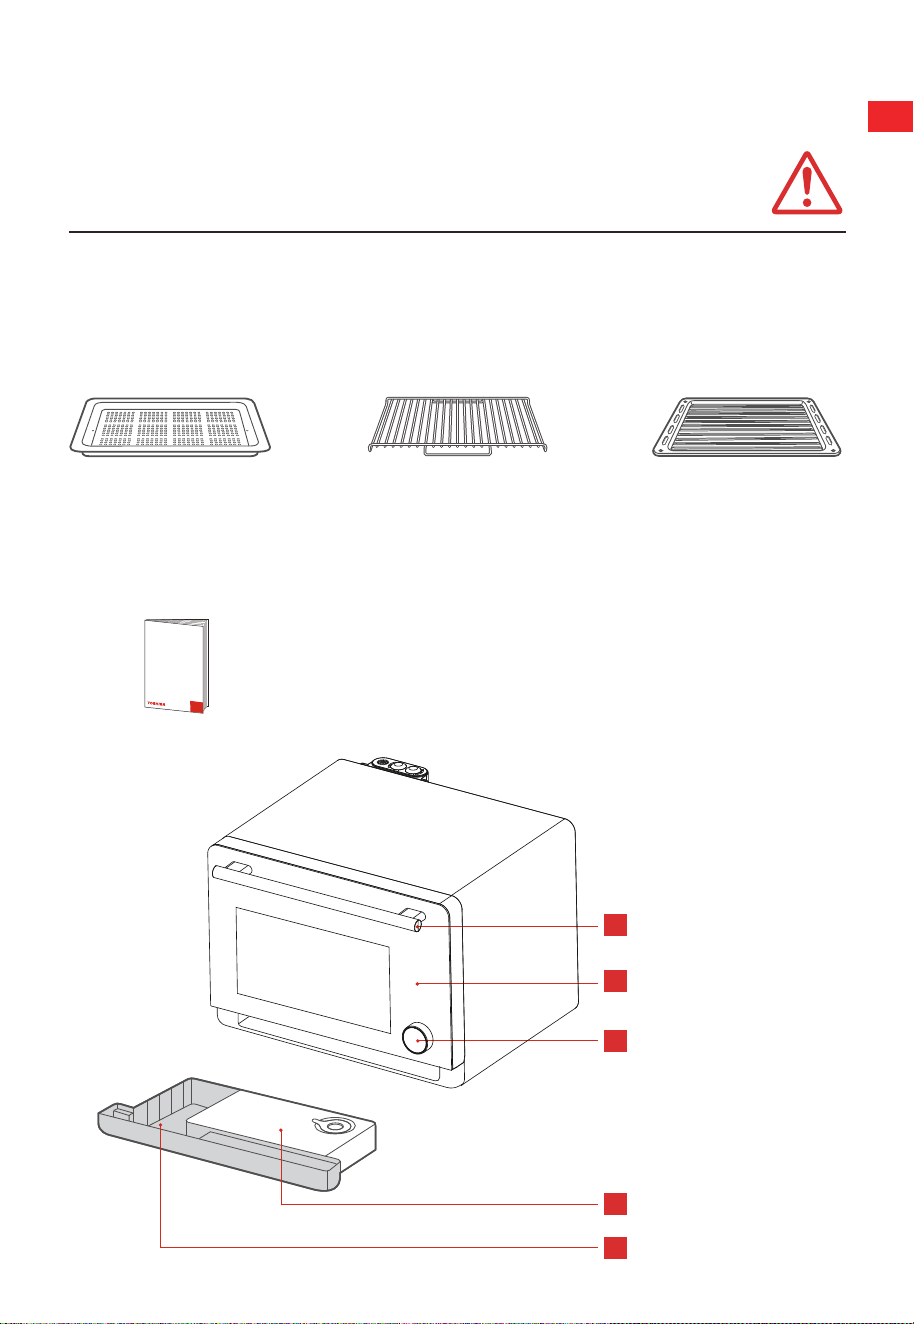
配件
使用說明書
蒸盤 烤盤
從紙箱中取出蒸氣焗爐及所有材料。蒸氣焗爐配備以下配件:
蒸氣焗爐零件和附件名稱
手柄
控制面板
旋鈕
水箱
污水箱
(可用於熱風對流和蒸氣烤焗功能。)
(使用時請在托盤上放上鍚紙。)
(只能在蒸煮功能下使用)
1
2
3
4
5
CN-15
產品介绍
蒸烤架
(燒烤、烘焙以及 烹飪情況下使用,置於
腔體平板使用或配合烤盤使用;有微波功能禁
止使用蒸烤架)
蒸氣

本設備不被設計於商業環境使用。
請遵守提供的安裝說明。注意,此設備只能由合資格技師安裝。
設備配有插頭,必定只能連接到正確安裝的接地插座。
如果需要新插座,安裝和電纜連接過程必須由合資格電工完成。如果安裝後無
法再接觸到插頭,則必須在安裝側安裝接觸間隙至少為 3 mm 的斷極裝置。
不得使用轉接器、多路接線板和延長線。超載會導致火災。
如果裝置沒有安裝電源線和插頭,連線裝置必須在所有極點上有一個提供完全
斷極的觸點間隔。裝置必須按照佈線規則進行固定佈線。
操作期間,可接觸表面可能會變熱。
安裝注意事項
CN-16
爲了避免從排氣口排出的油和煙污染傢俱,或至烹飪過程中因過熱
而造成火災,蒸氣焗爐應與牆壁和櫥櫃保持一定距離。請按照下圖
所示,將其放置在安全距離內。
安裝空間及注意事項
前面
開放空間
背部
≥ 1cm
左側/右側
≥ 1cm
頂部
爲了避免使用者受傷和財產損失,產品主體和《使用說明書》包括了許多重要內
容,如正確使用方法。
圖示和符號爲幫助使用者理解而設計,或與真實產品有所區別。
使用前請仔細閱讀相關標籤,並嚴格遵守;請妥善保管它們,以備日後參考。
≥ 5cm
* 為避免火災事故或爆炸,請勿此爐或附近加熱或使用易燃材料。
注意
如果實物與圖之間有任何矛盾,應以實物爲準。
請參考圖中標記的安全距離來放置產品。
本產品為桌面產品,禁止作為嵌入式產品使用。
CN-17
初次使用
使用前請仔細閱讀《使用說明書》,並嚴格遵守;請妥善保管它,以備日後參考。
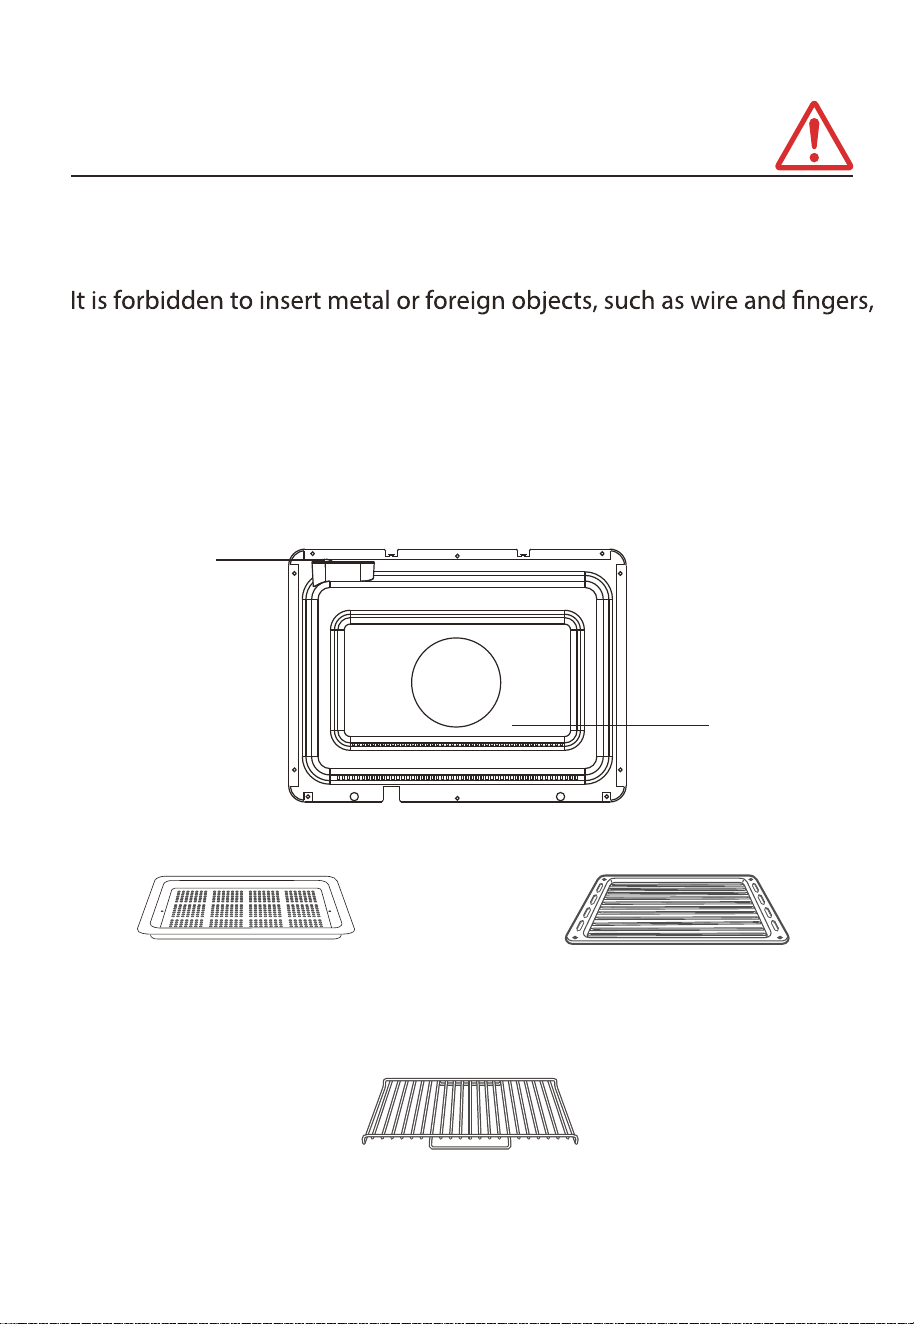
嚴禁將金屬或異物,如鐵絲、手指等插入蒸氣爐後側的吸氣口、排氣口和百葉窗內。
否則,可能會引致觸電或受傷。如果有任何異物意外插入產品,請拔掉電源線並聯
繫我們的客戶服務中心。
吸氣口
背面圖
排氣口
百葉窗
烤盤(可用於熱風對流和蒸氣烤焗功能)
蒸盤(可用於蒸煮功能)
CN-18
蒸烤架(燒烤、烘焙以及 烹飪情況下使用,置於腔體
平板使用或配合烤盤使用;有微波功能禁止使用蒸烤架)
蒸氣

初次使用
a. 如發現爐門封條鬆脫,只需用力按回門邊凹
槽內即可。
b. 清潔後,不要立即用手觸碰爐腔。
c. 請待冷卻後,才用軟布擦去爐腔內的積水。
d. 在爐腔完全冷卻之前,不要關閉烤箱門。
1 打開蒸氣焗爐門,取出所有物件,然後把門關上。
2 加滿水箱,旋轉旋鈕,選擇 自動功能;按 確認。然後將旋鈕旋轉到
[38 清潔 ]。
3 按 鍵開始清洗,大約需時 10 分鐘
4 清潔完成後,蜂鳴器會響一次。請隨即開啟烤箱門進行冷卻。
提醒 :
(*注: 如發現爐內有水漬仍為正常現象,因產品先進行了進出
水測試。請先將爐內水抹乾。)
爐腔
CN-19
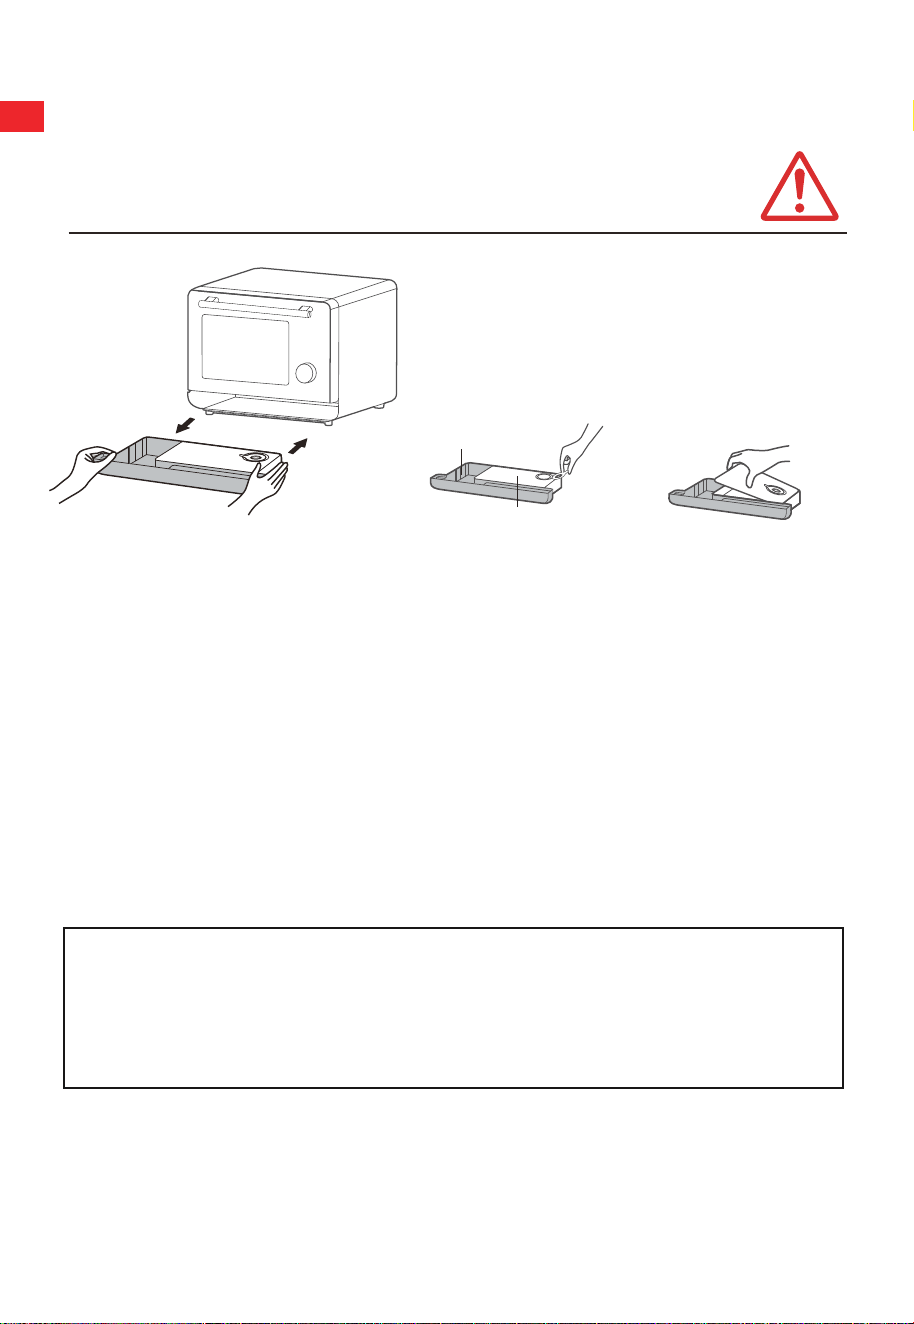
水箱使用
污水箱
揭開橡膠圈,加入適量的
室溫開水/蒸餾水,蓋上橡
膠圈,確保它們配合良好。
揭開水蓋進行清洗,
或排出剩餘的水。
取出 / 重新裝入
淨水箱
1 在水箱中加入室溫開水/蒸餾水,以免產生水垢影響機器使用壽命。
2 烹調後,必須倒去污水箱和水箱中的水,以免滋生細菌。
當水箱缺水時,水泵會發出類似蜂鳴聲的提示,提醒使用者機器缺水。此時請及
時將水箱加滿水。如果水箱一直處於缺水狀態,機器將發出 5 聲提示音後停止工
作,同時螢幕會顯示 [F02]。請將水加到乾淨的水箱中,直到水位達到「MAX」
線,然後將水箱重新裝入蒸氣焗爐,繼續烹調。
請及時將水箱裝滿水。
CN-20
清潔和護理

初始清潔。
拆除蒸氣爐前面的所有保護箔。首次使用前,請參閱 " 清潔同保養”部分獲取更
多資訊。
首次清潔同加熱。
加熱前,最好用濕布擦拭蒸氣焗爐內部。這樣就能夠去除储存和解黐器具在包装
過程中積聚的爐灰或者殘留的包裝材料。
首次使用前
金屬部件有一層保護塗層,首次加熱時可能會散發輕微氣味。
這種氣味同任何蒸氣會在短時間内消散,並非表示連接或機 件有故障。另外,
請確保首次加熱時廚房通風良好。
請拆下所有配件並在焗爐外清洗。
新電器首次使用時通常會有異味。首次使用前,請使用自動功能39進行清潔來
去除異味。
CN-21

爐門和蒸氣焗爐外殼
-用微濕的布擦拭。首先用溫和的肥皂擦拭頑漬,然後用微濕的布擦拭。
-
警告 不要用太大量的水清洗,否則可能會使蒸氣焗爐生鏽,造成損壞。
蒸氣排氣口
-用微濕的布擦拭。進行蒸煮後,在蒸氣排氣口附近會有白色的痕跡(水中的可
溶解物質)。以擰乾的膠布小心擦拭。
清潔和維護的預防措施
爐腔和爐門(內部)
- 用微濕的布擦拭。有頑漬的部份可以在溫和的肥皂溶液中浸泡30 分鐘後再擦
拭。
- 進行蒸氣加熱後,等待蒸氣爐冷卻,然後用乾布擦去冷凝水。
-
警告 不要使用尖銳的物體,如鋼絲刷或叉子,因為這可能造成劃痕或裂縫。
爐門封條
-如果水滴或食物殘渣卡在爐門封條上,請小心地拆下封條。擰乾水分後用軟布
擦拭乾淨,然後安裝到正確位置。
警告
1. 清潔時,不要大力刮擦或擦拭封條造成損毁,否則可能引起蒸氣洩漏。
2. 拆卸和安裝封條時要小心,否則可能引起蒸氣洩漏。
CN-22

用蘸有軟性洗滌劑(如洗潔精)的布擦拭蒸氣焗爐外殼,然後用濕布擦拭,最後
用乾布擦拭。請勿用硬物(如鋼絲刷)擦拭產品。
請勿清洗門安全鎖系統
-
警告 不要使用粗糙的洗滌劑或鋒利的金屬刮刀來清潔爐門玻璃。這可能導致
玻璃破損。
請保持爐門和爐身接縫位清潔
定期用溫水清洗配件。長時間烹飪後,請勿立即用冷水清洗。
烹飪過程中產生的油脂會腐蝕爐腔,影響加熱效果,改變食物味道。因此,請待
爐腔完全冷卻後,用濕布或用軟性洗滌劑浸濕的布清潔。
不要用劣質清潔劑或腐蝕性、揮發性化學溶劑擦拭蒸氣焗爐,以免損壞蒸氣焗爐。
為避免損壞您的裝置表面,請勿使用:含有蘇打、氨、酸或氯化物的清潔劑 含有除
垢劑的清潔劑,如粉末清潔劑和奶油清潔劑,堅硬的研磨海綿和刷子,如鍋鏟,不
鏽鋼清洗劑。
小提示
清潔和維護的預防措施
CN-23
清潔和維護的預防措施
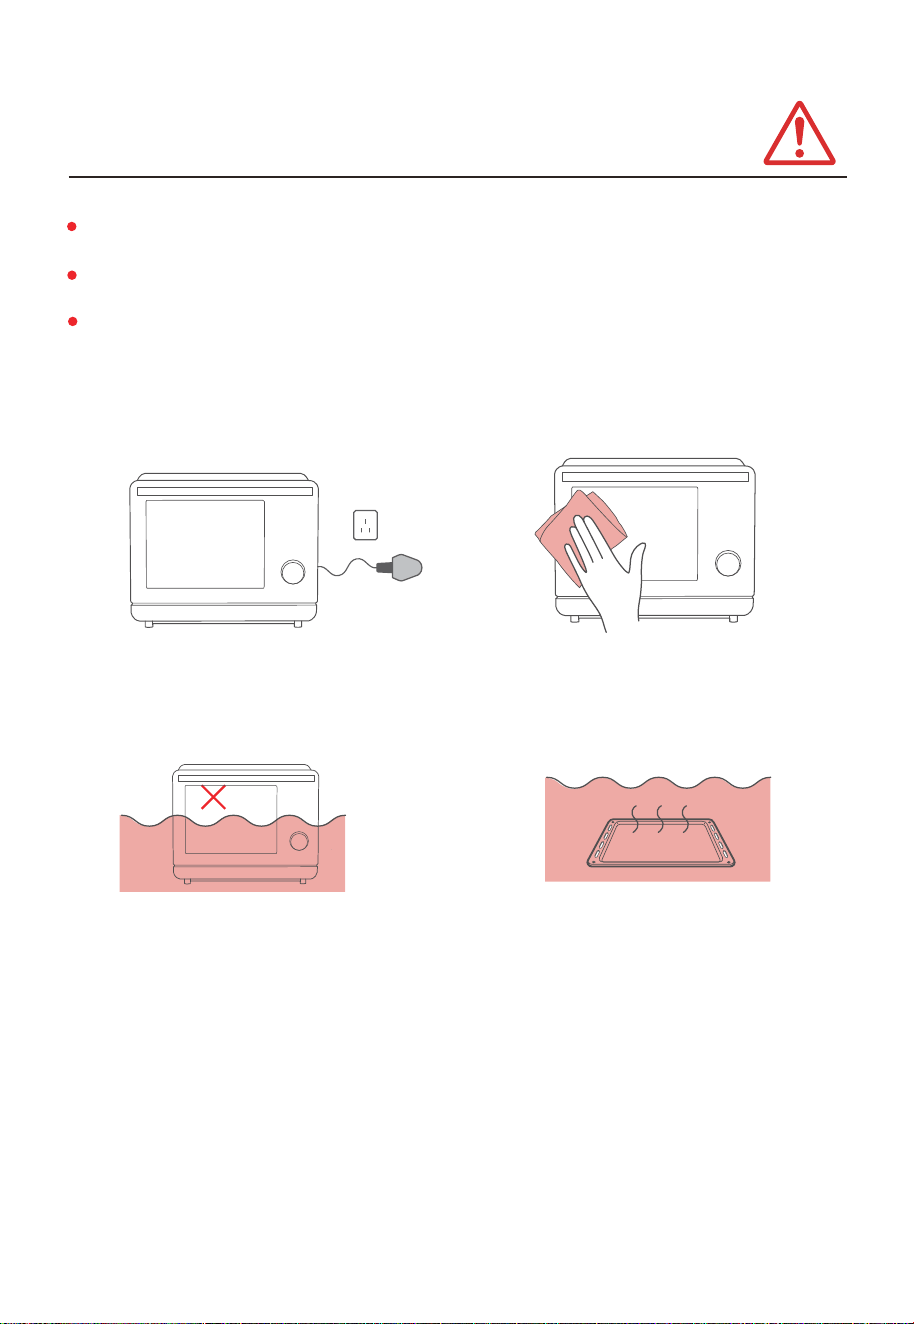
拔掉裝置的插頭,
等待機器完全冷卻。
嚴禁將蒸氣焗爐浸泡在水或
其他液體中。
爲了達到最佳的清潔效果,
建議用溫水清洗配件。
用蘸有軟性洗滌劑的布擦拭
烘箱外殼,
並以濕布擦拭乾淨。
請勿使用粗糙的洗滌劑或鋒利的金屬刮刀來清潔爐門玻璃。這可能導致玻璃破損。
不要把電源線和插頭直接放在外罩上,以免外罩的餘熱損壞電源線。
當焗爐處於高溫狀態時,內部蒸氣會膨脹。門在開啟後立即關閉,聽到出於氣壓
的空氣流通聲是正常的。這不影響使用。開門後約10 秒,烤箱溫度會略為下降,
關門時不會有聲音。
CN-24
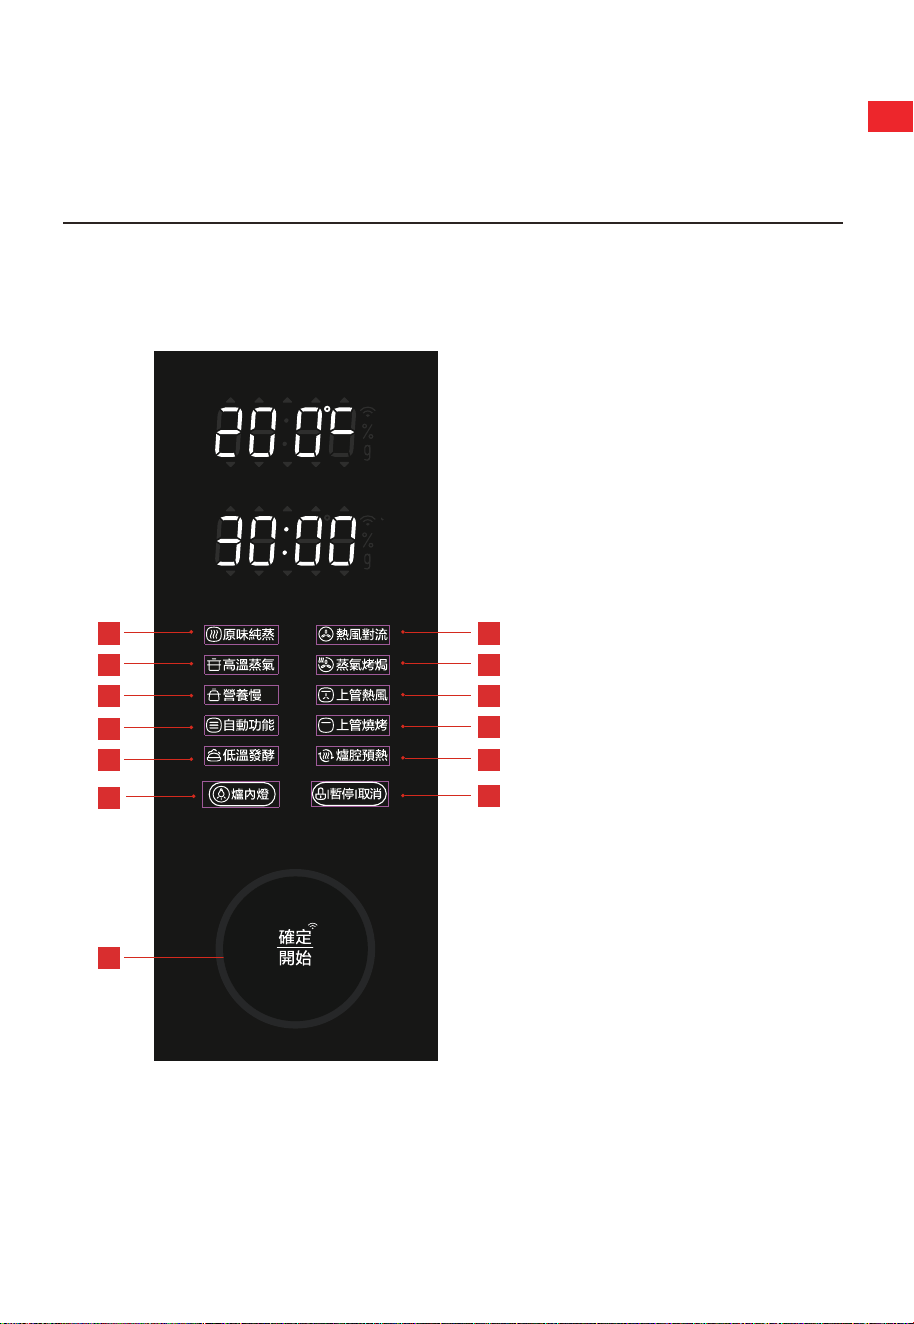
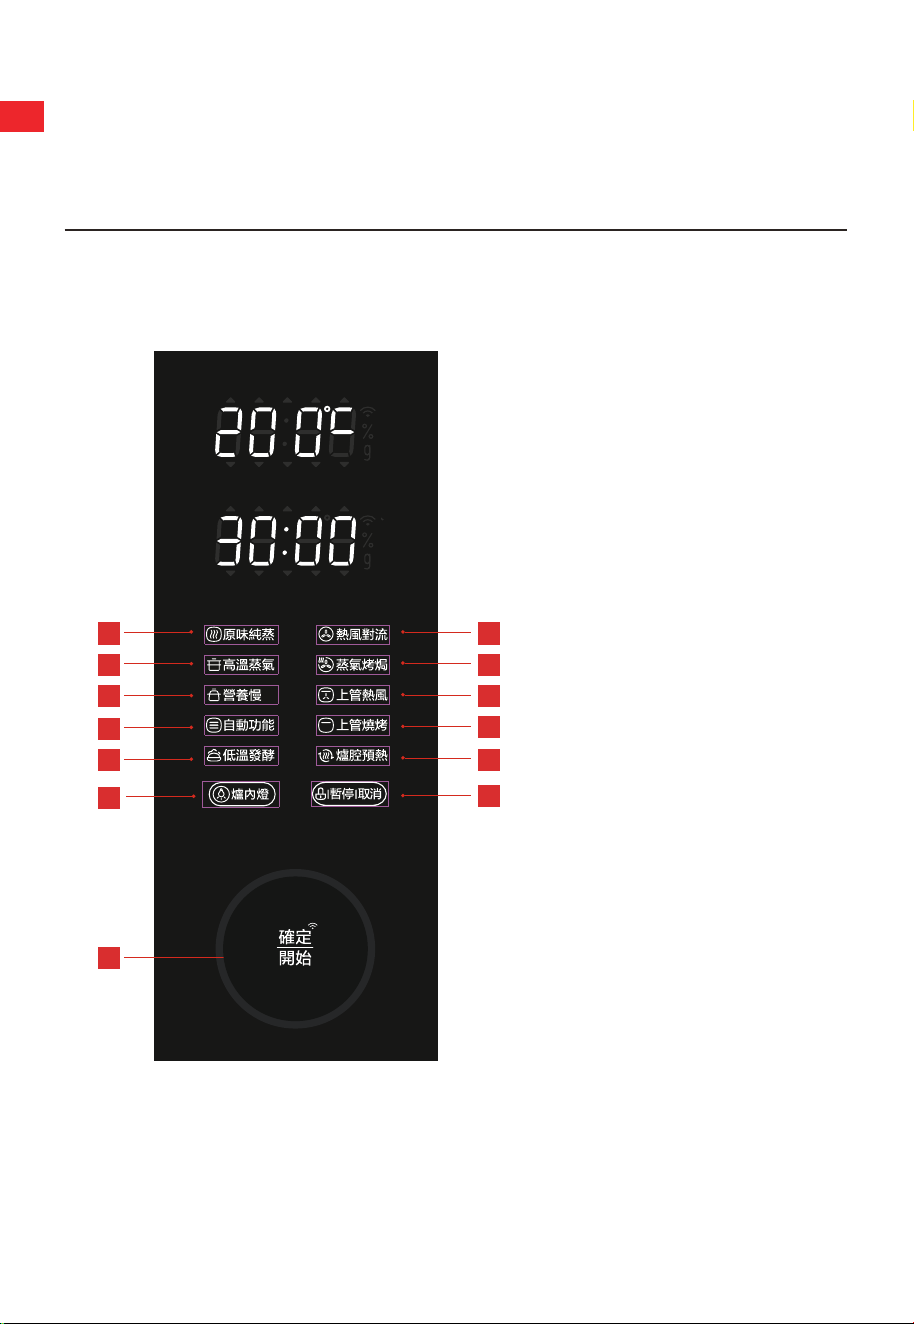
操作說明
控制面板
1. 原味純蒸
2. 高溫蒸氣
3. 營養慢燉
4. 自動功能
5. 低温發酵
6. 爐內燈
7. 熱風對流
8. 蒸氣烤焗
9. 上管熱風
10.上管燒烤
11.爐腔預熱
12.暫停 / 取消
13.確定 / 開始/WIFI
燉
使用說明
7
8
9
10
11
12
1
2
3
4
5
13
6
CN-25
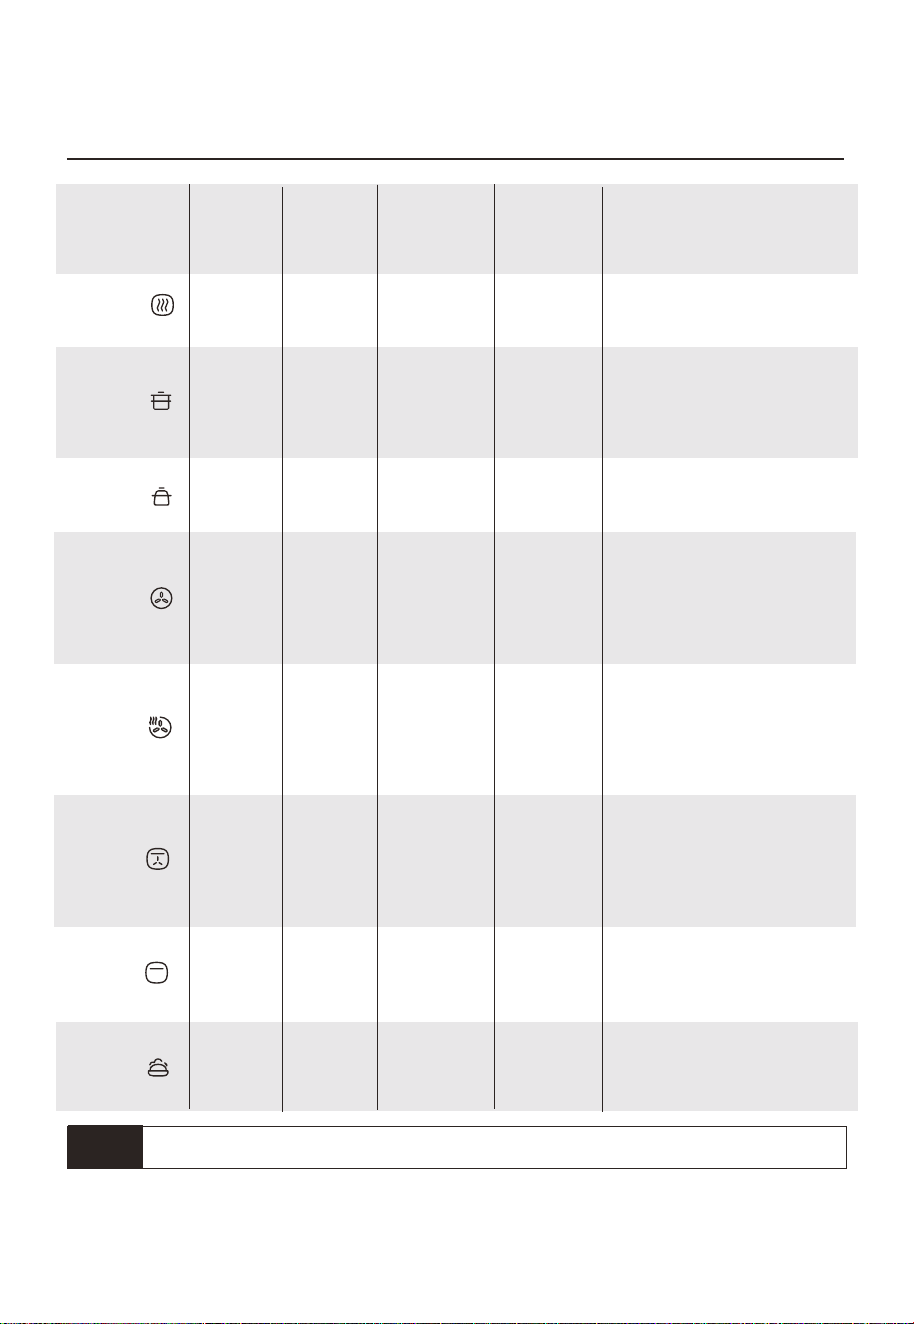
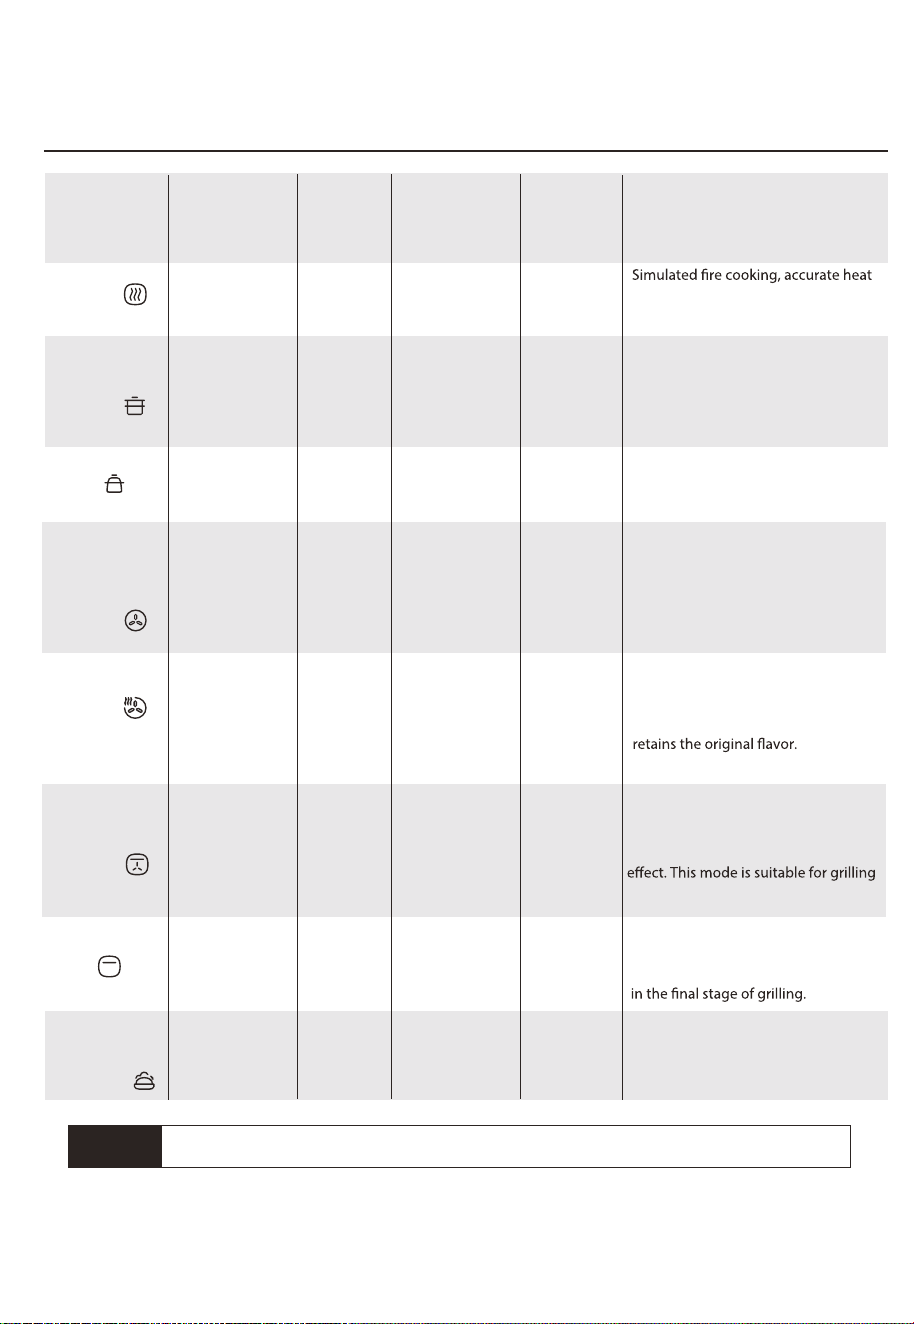
功能總表
功能溫度每5℃進行微調。
注意
功能
預設溫度
(°C)
預設時間
(分鐘)
可調節溫度
可調節時間
原味純蒸
100
80~100°C
1~120分鐘
1~60分鐘
1分鐘-
5小時
1分鐘-
12小時
1~120分鐘
1~120分鐘
1~120分鐘
1~120分鐘
100~140°C
35~100°C
30~45°C
100~230°C
100~230°C
100~230°C
100~200°C
15
10
30
40
30
30
30
30
130
100
35
180
180
190
180
高溫蒸氣
營養慢燉
低温發酵
熱風對流
上管熱風
蒸氣烤焗
上管燒烤
描述
模擬爐火蒸煮,火力精準
適用於肉類、蒸蛋、包點等家常菜
以大火力於短時間内蒸熟食物,保
留食物鲜味
適用於海鮮、蔬菜、急凍食物
在此模式下,肉眼可見的蒸氣量較
少
以溫和火力燉煮食物
適用於燉品、慢煮
火力均匀,金黃香脆
爐内背部設有風扇,使熱力均勻散
布整個爐腔,烤焗出色澤金黃的食
物
適用於烘焗肉類、炸物、烘焙蛋糕、
麵包等
減油減鹽, 外脆內軟
在熱風對流過程中加入蒸氣烹調,
為食物提供水分
令食物快速烤熟且鎖住內部水分,
保留原始鮮味
適用於烤焗蔬菜、麵包蛋糕、肉類
穩定的低温發酵溫度
適用於低温發酵麪糰、乳酪等。
上方的發熱管及和上方風扇會同時
運作。
熱力均勻包裹食物,加速烹調,創
造酥脆口感。
適用於外脆內嫩的肉類燒烤。
上方發熱管單獨發熱,適合燒燒食
物。
適用於燒烤的最後階段,令食物更
金黃鬆脆
CN-26
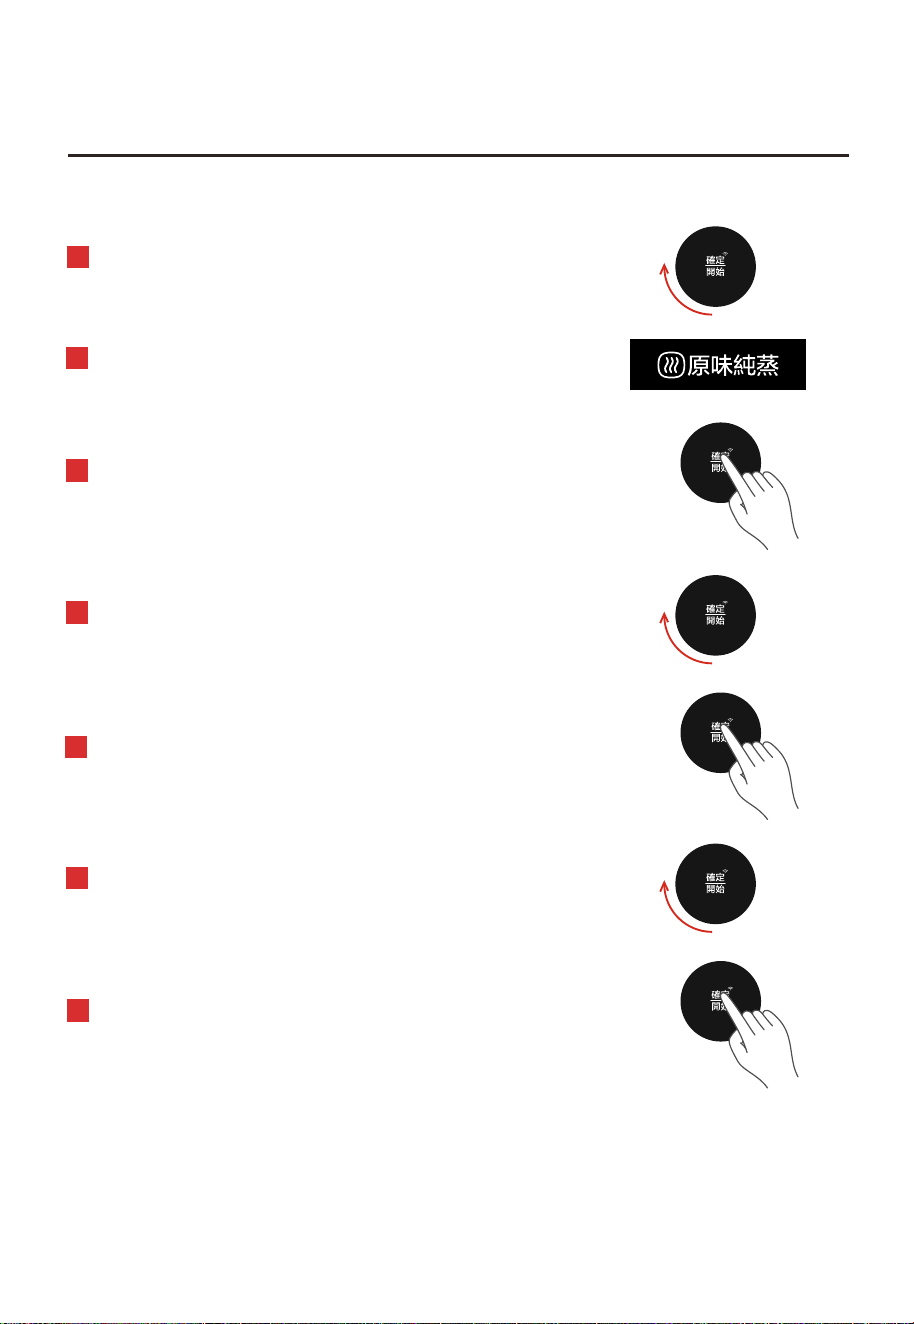
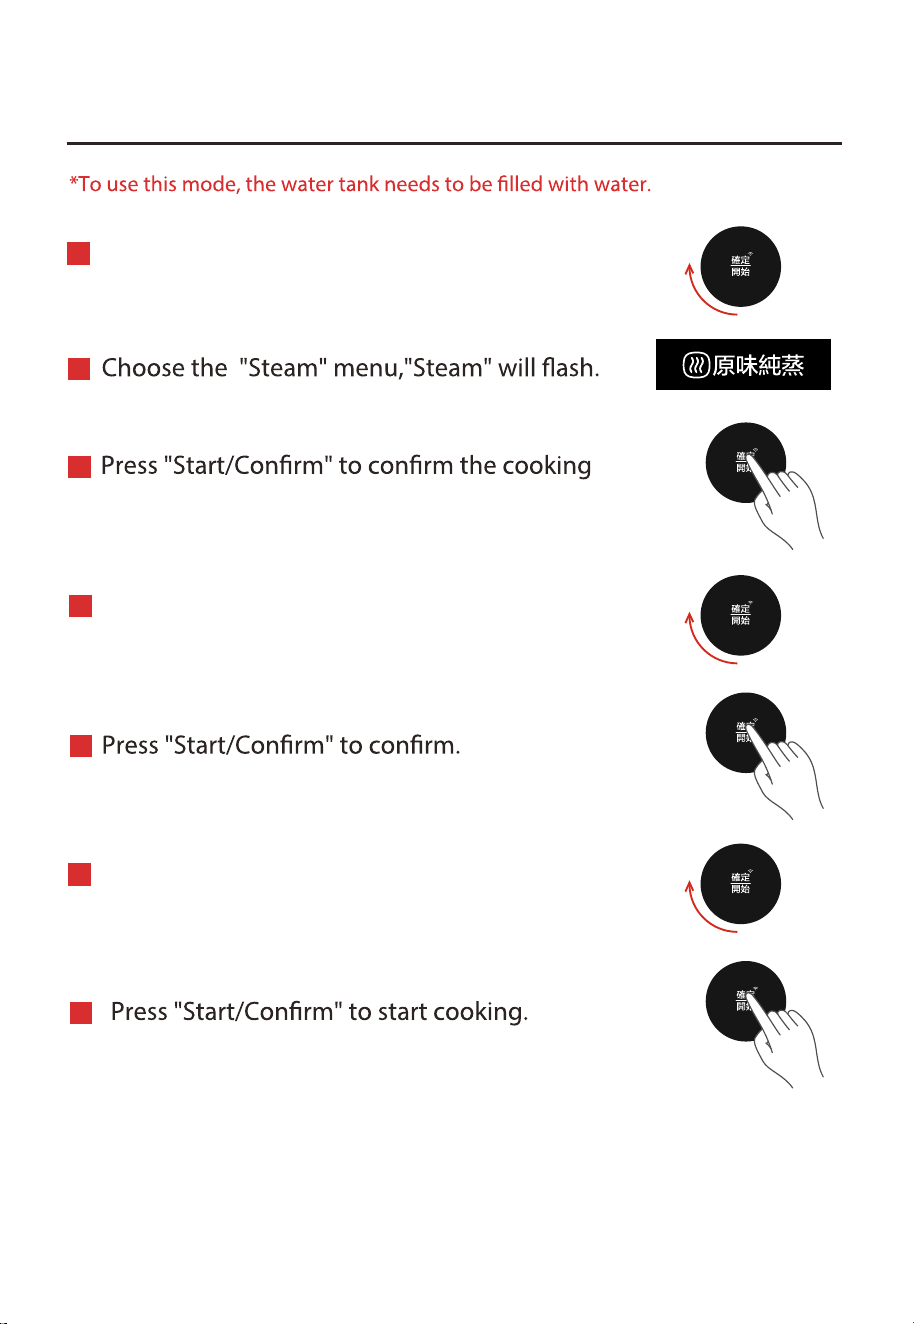
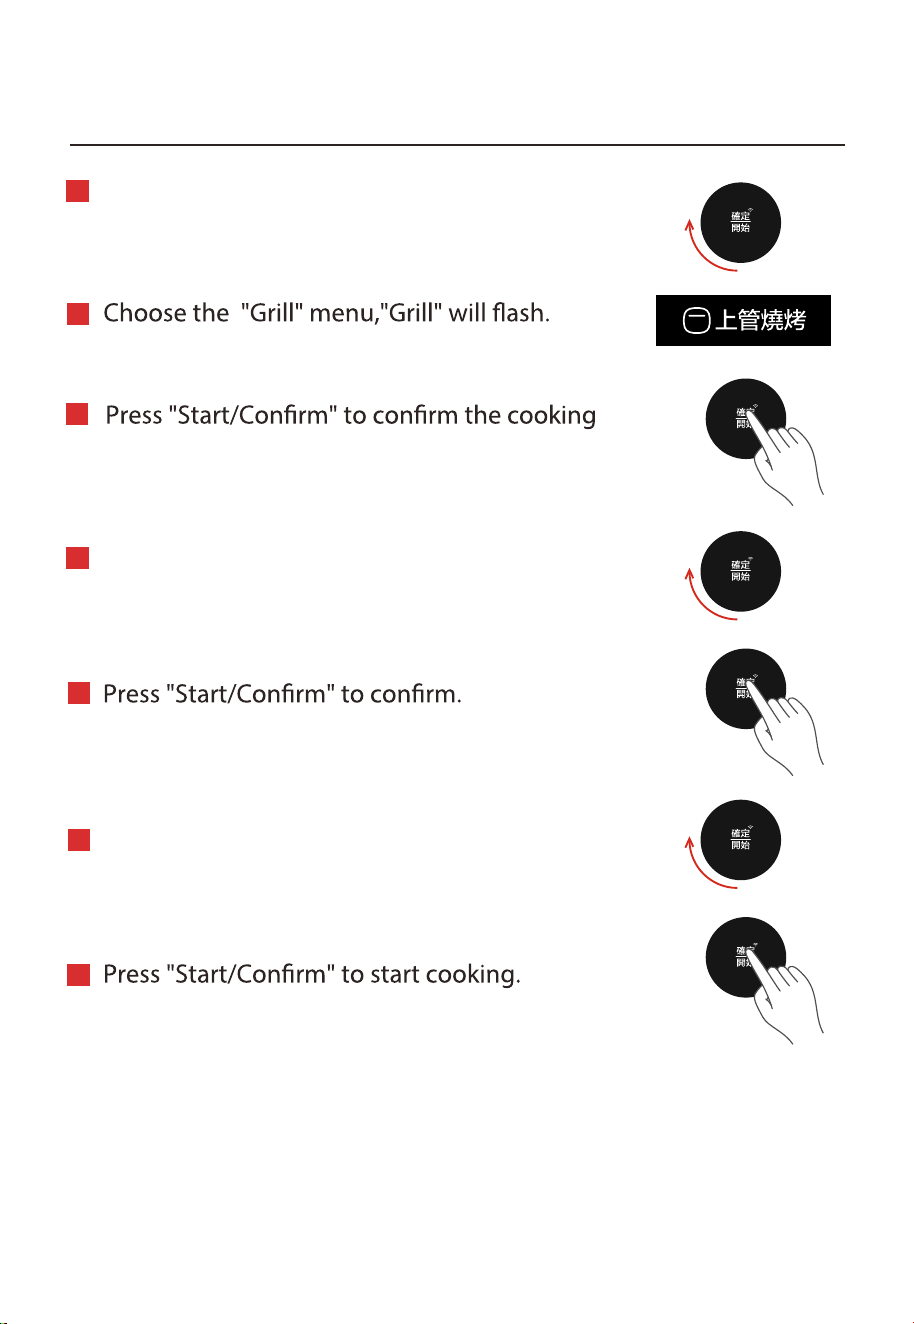
1.烹調功能-原味純蒸
待機時,向右旋轉旋鈕,選擇烹調模式。
共有8種模式可供選擇。
選擇「原味純蒸」時,「原味純蒸」會亮起。
轉動旋鈕,設置溫度至「80-100°C」之間。
默認溫度為 100°C。
按 「確定 / 開始」以確認烹調模式。
按「確定 / 開始」進行確認。
按 「確定 / 開始」開始烹調。
旋轉旋鈕,設置時間至「1-120 分鐘」之間。
默認時間為 15 分鐘。
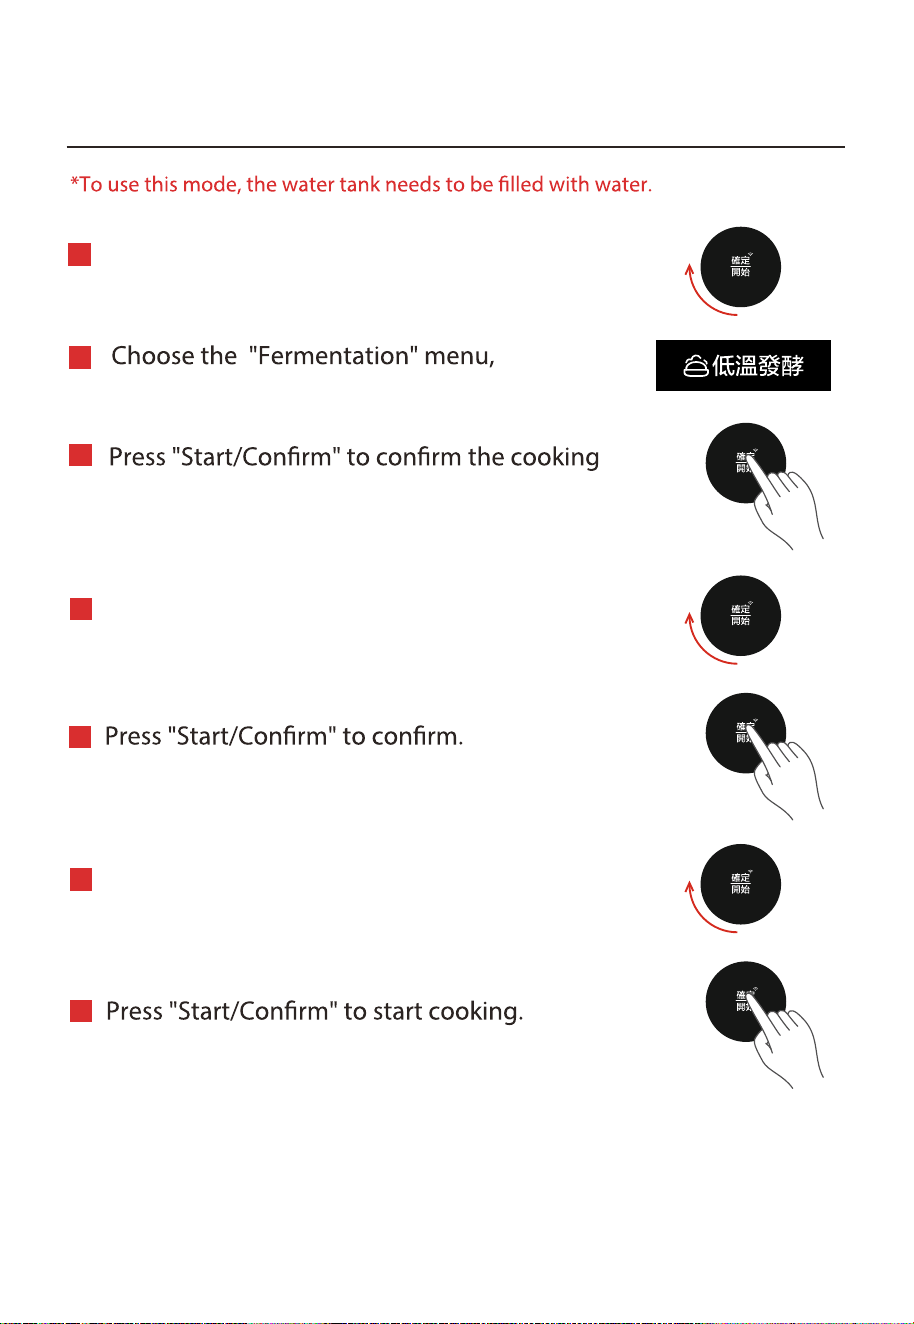
*要使用此模式,水箱需要注满水。
1
2
3
4
5
7
6
CN-27
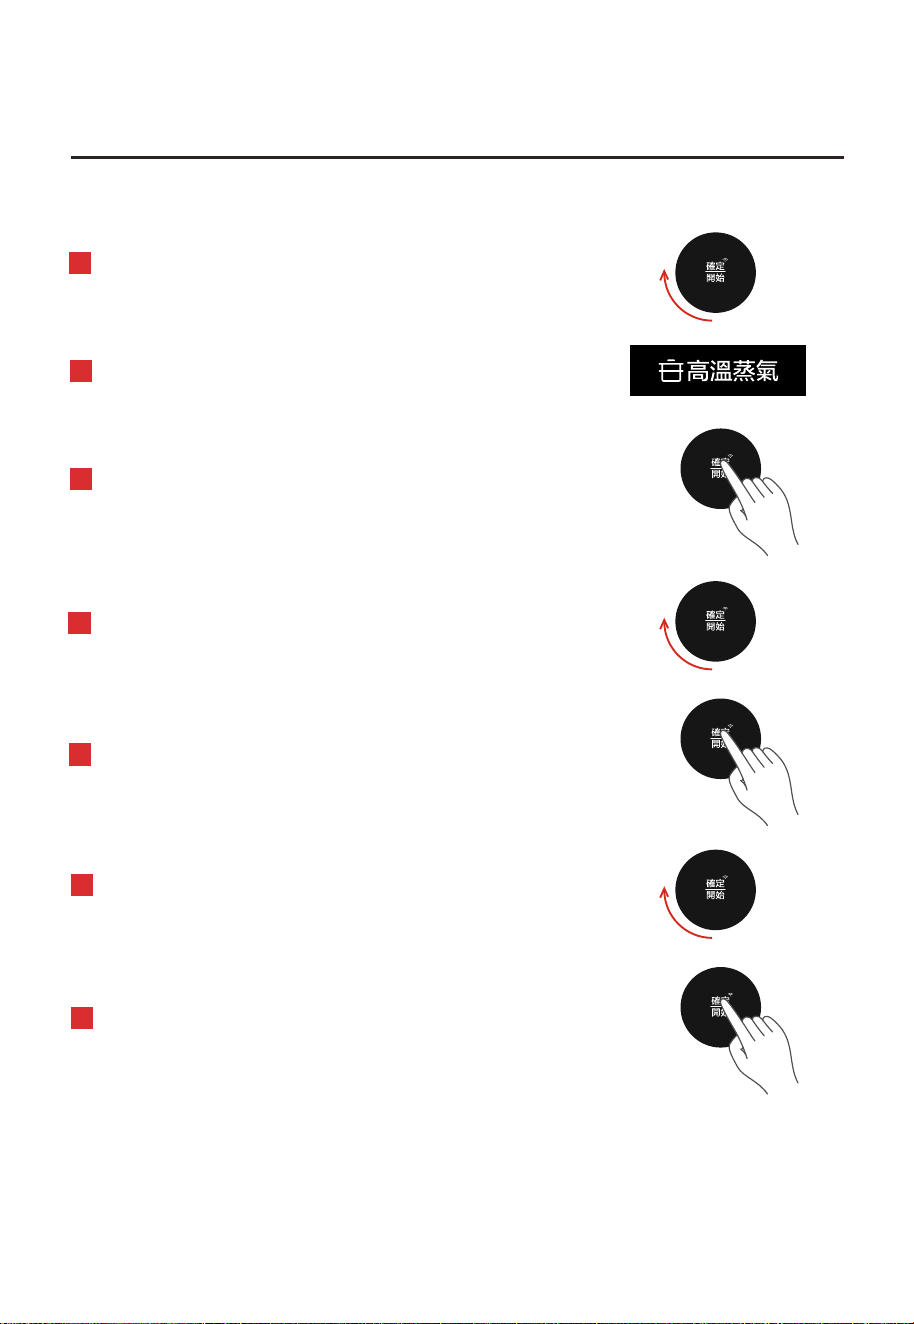
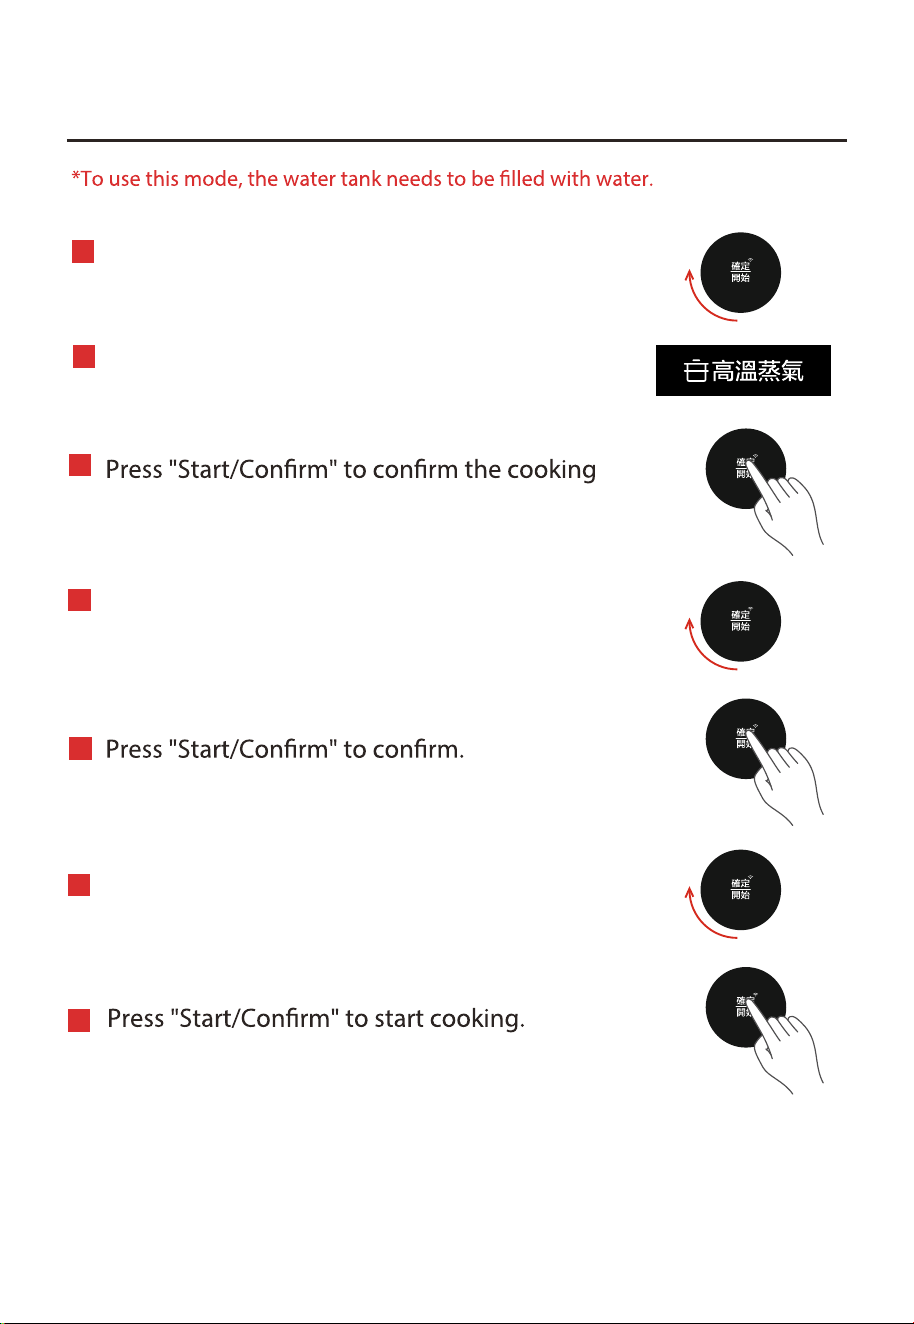
2.烹調功能-高溫蒸氣
待機時,向右旋轉旋鈕,選擇烹調模式。
共有8種模式可供選擇。
選擇「高溫蒸氣」時,「高溫蒸氣」會亮起。
轉動旋鈕,設置溫度至「100-140°C」之間。
默認溫度為 130°C。
按 「確定 / 開始」以確認烹調模式。
按「確定 / 開始」進行確認。
按 「確定 / 開始」開始烹調。
轉動旋鈕,設置時間至「1-60 分鐘」之間。
默認時間為 10 分鐘。
*要使用此模式,水箱需要注满水。
1
2
3
4
5
7
6
CN-28

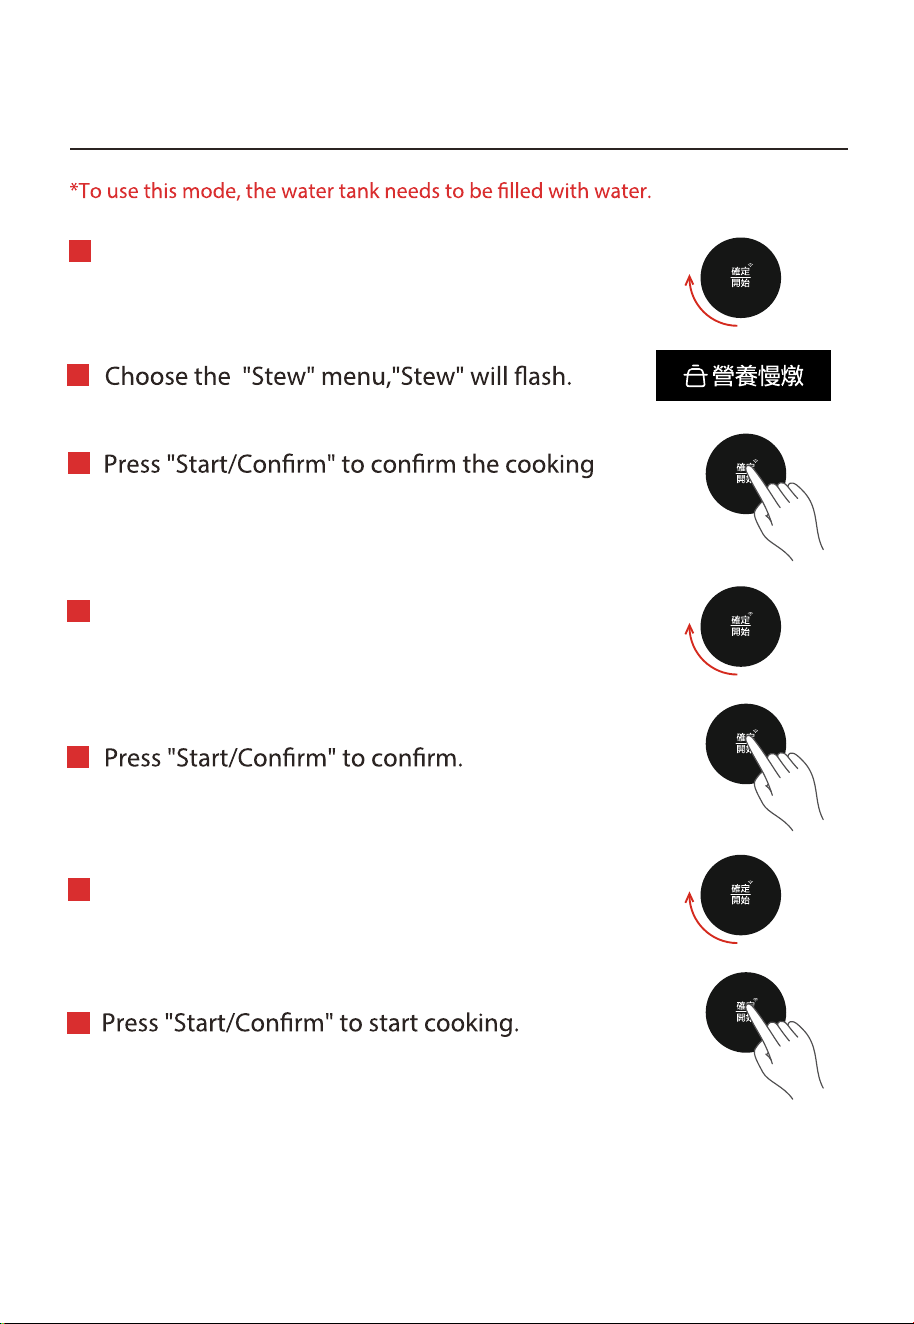
3.烹調功能-營養慢燉
待機時,向右旋轉旋鈕,選擇烹調模式。
共有8種模式可供選擇。
選擇「營養慢燉」時,「營養慢燉」會亮起。
轉動旋鈕,設置溫度至「35-100°C」之間。
默認溫度為 100°C。
按 「確定 / 開始」以確認烹調模式。
按「確定 / 開始」進行確認。
按 「確定 / 開始」開始烹調。
轉動旋鈕,設置時間至「1分鐘~5小時」
之間。默認時間為 30 分鐘。
*要使用此模式,水箱需要注满水。
1
2
3
4
5
7
6
CN-29
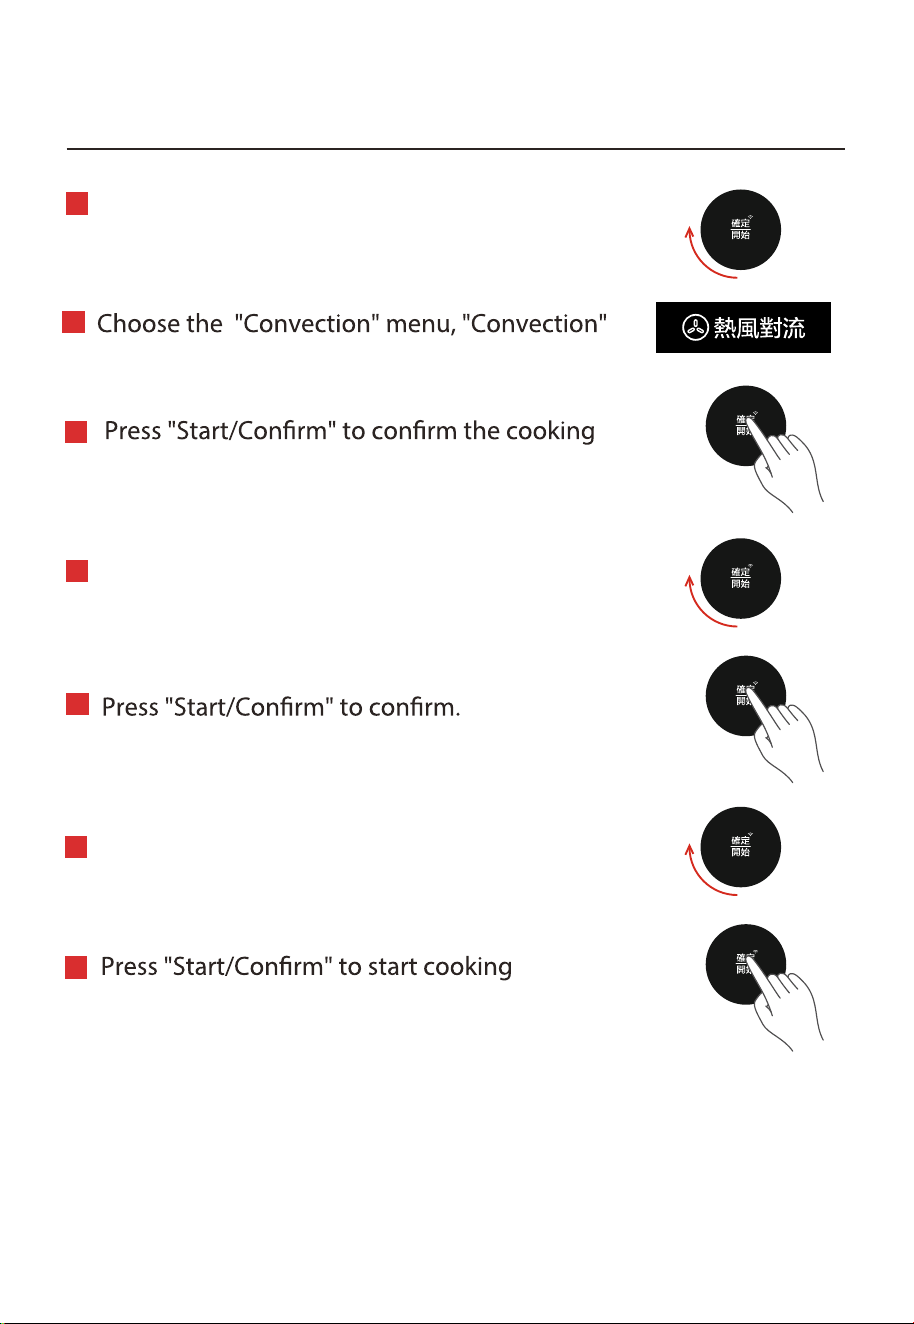
4.烹調功能-熱風對流
待機時,向右旋轉旋鈕,選擇烹調模式。
共有8種模式可供選擇。
選擇「熱風對流」時,「熱風對流」會亮起。
轉動旋鈕,設置溫度至「100-230°C」之間。
默認溫度為 1 0°C。
按 「確定 / 開始」以確認烹調模式。
按「確定 / 開始」進行確認。
按 「確定 / 開始」開始烹調。
轉動旋鈕,設置時間至「1-120 分鐘」之間。
默認時間為 30 分鐘。
8
1
2
3
4
5
7
6
CN-30

*要使用此模式,水箱需要注满水。
5.烹調功能-蒸氣烤焗
待機時,向右旋轉旋鈕,選擇烹調模式。
共有8種模式可供選擇。
選擇「蒸氣烤焗」時,「蒸氣烤焗」會亮起。
轉動旋鈕,設置溫度至「100-230°C」之間。
默認溫度為 190°C。
按 「確定 / 開始」以確認烹調模式。
按「確定 / 開始」進行確認。
按 「確定 / 開始」開始烹調。
轉動旋鈕,設置時間至「1-120 分鐘」之間。
默認時間為 30 分鐘。
1
2
3
4
5
7
6
CN-31
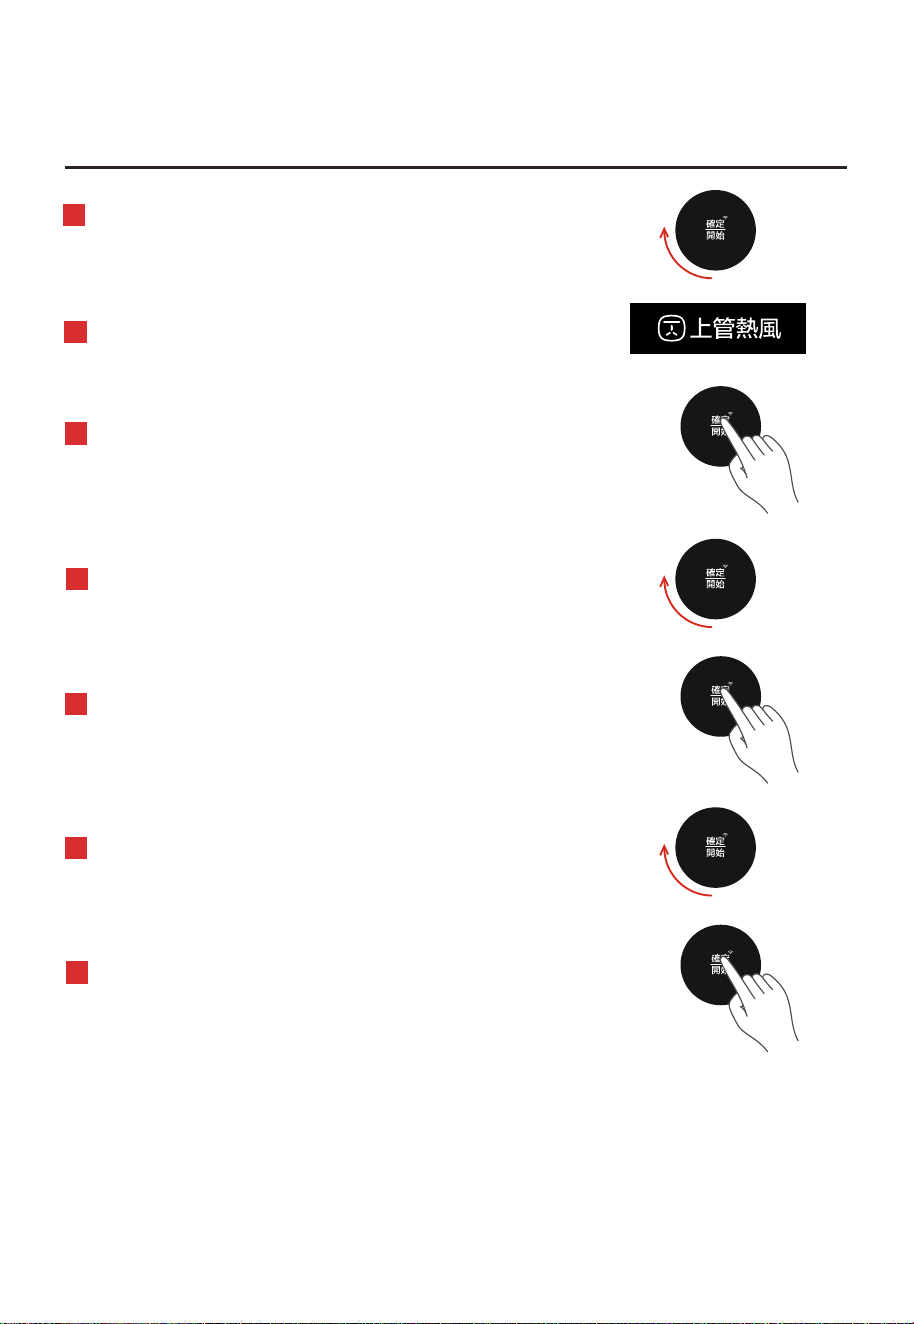
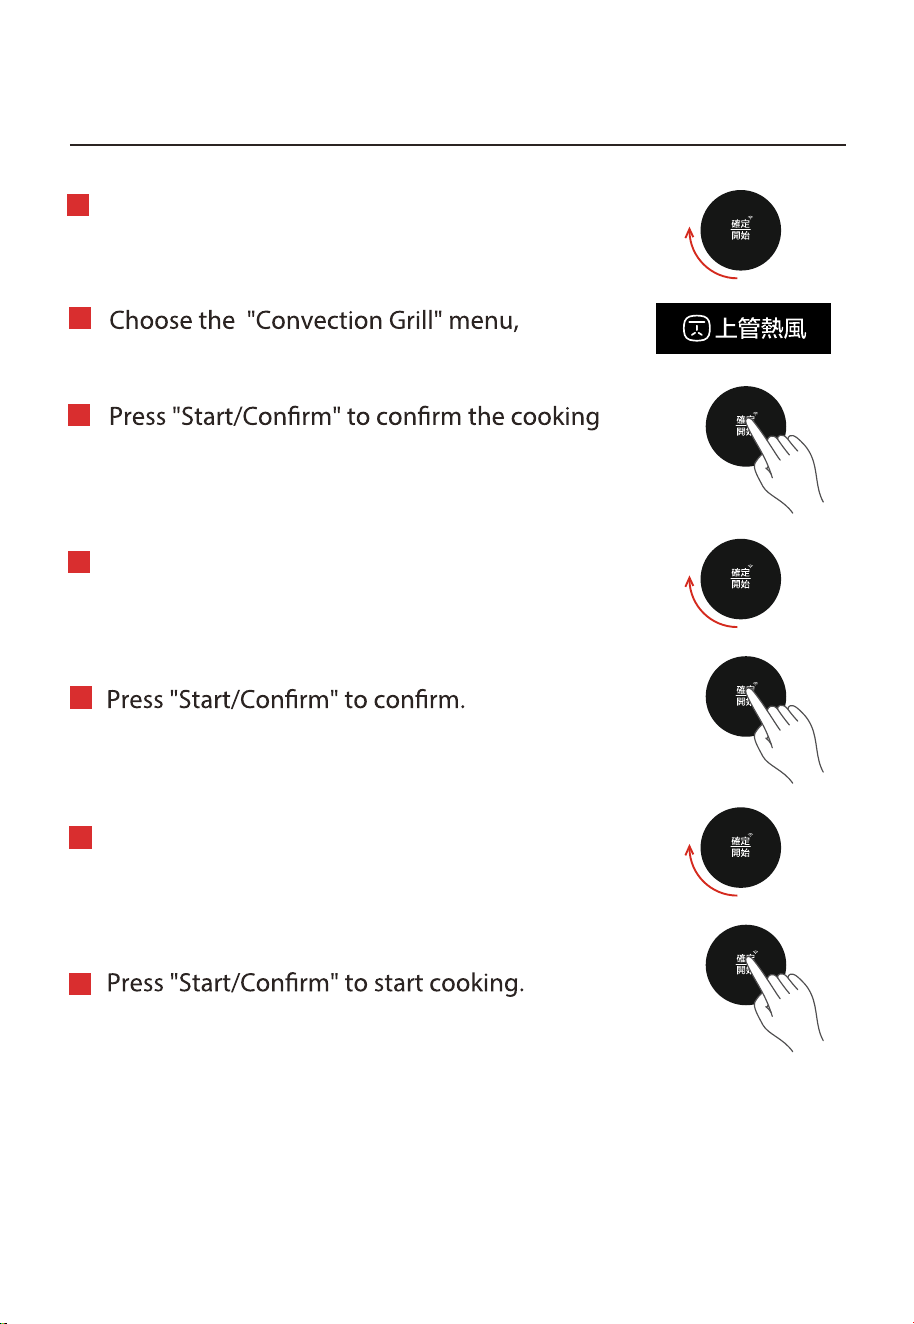
6.烹調功能-上管熱風
待機時,向右旋轉旋鈕,選擇烹調模式。
共有8種模式可供選擇。
選擇「 」時,「 」會亮起。
轉動旋鈕,設置溫度至「100-230°C」之間。
默認溫度為 180°C。
按 「確定 / 開始」以確認烹調模式。
按「確定 / 開始」進行確認。
按 「確定 / 開始」開始烹調。
轉動旋鈕,設置時間至「1-120 分鐘」之間。
默認時間為 30 分鐘。
1
2
3
4
5
7
6
CN-32
上管熱風 上管熱風
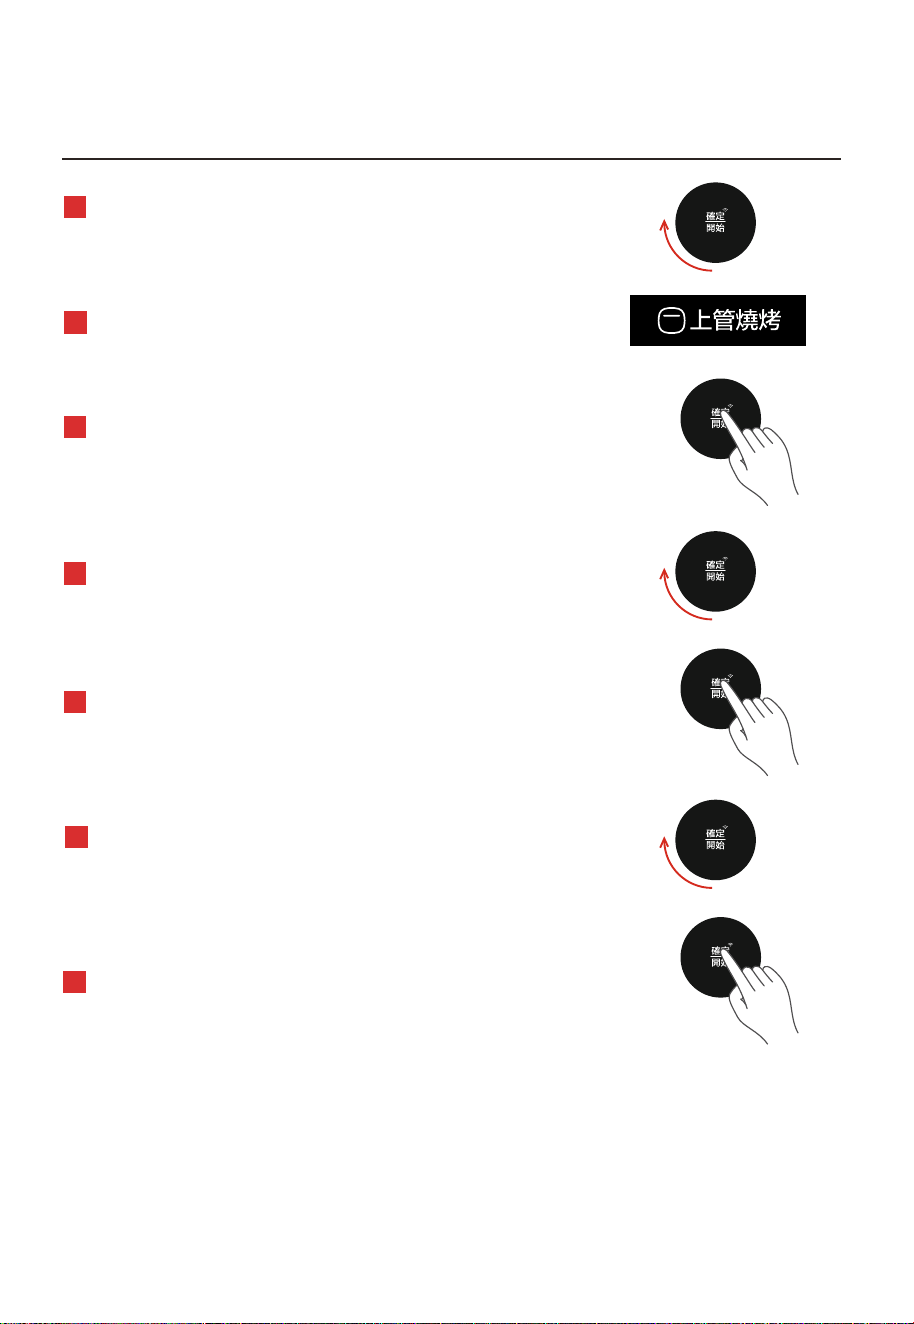
7. 烹飪功能 - 上管燒烤
待機時,向右旋轉旋鈕,選擇烹調模式。
共有8種模式可供選擇。
選擇「上管燒烤」時,「上管燒烤」會亮起。
轉動旋鈕,設置溫度至「100-200°C」之間。
默認溫度為 180°C。
按 「確定 / 開始」以確認烹調模式。
按「確定 / 開始」進行確認。
按 「確定 / 開始」開始烹調。
轉動旋鈕,設置時間至「1-120 分鐘」
之間。默認時間為 30 分鐘。
1
2
3
4
5
7
6
CN-33

*要使用此模式,水箱需要注满水。
8.烹調功能-低温發酵
待機時,向右旋轉旋鈕,選擇烹調模式。
共有8種模式可供選擇。
選擇「低温發酵」時,「低温發酵」會亮起。
轉動旋鈕,設置溫度至「30-45°C」之間。
默認溫度為 35°C。
按 「確定 / 開始」以確認烹調模式。
按「確定 / 開始」進行確認。
按 「確定 / 開始」開始烹調。
轉動旋鈕,設置時間至「1 分鐘~12小時」之間。
默認時間為 40 分鐘。
1
2
3
4
5
7
6
CN-34
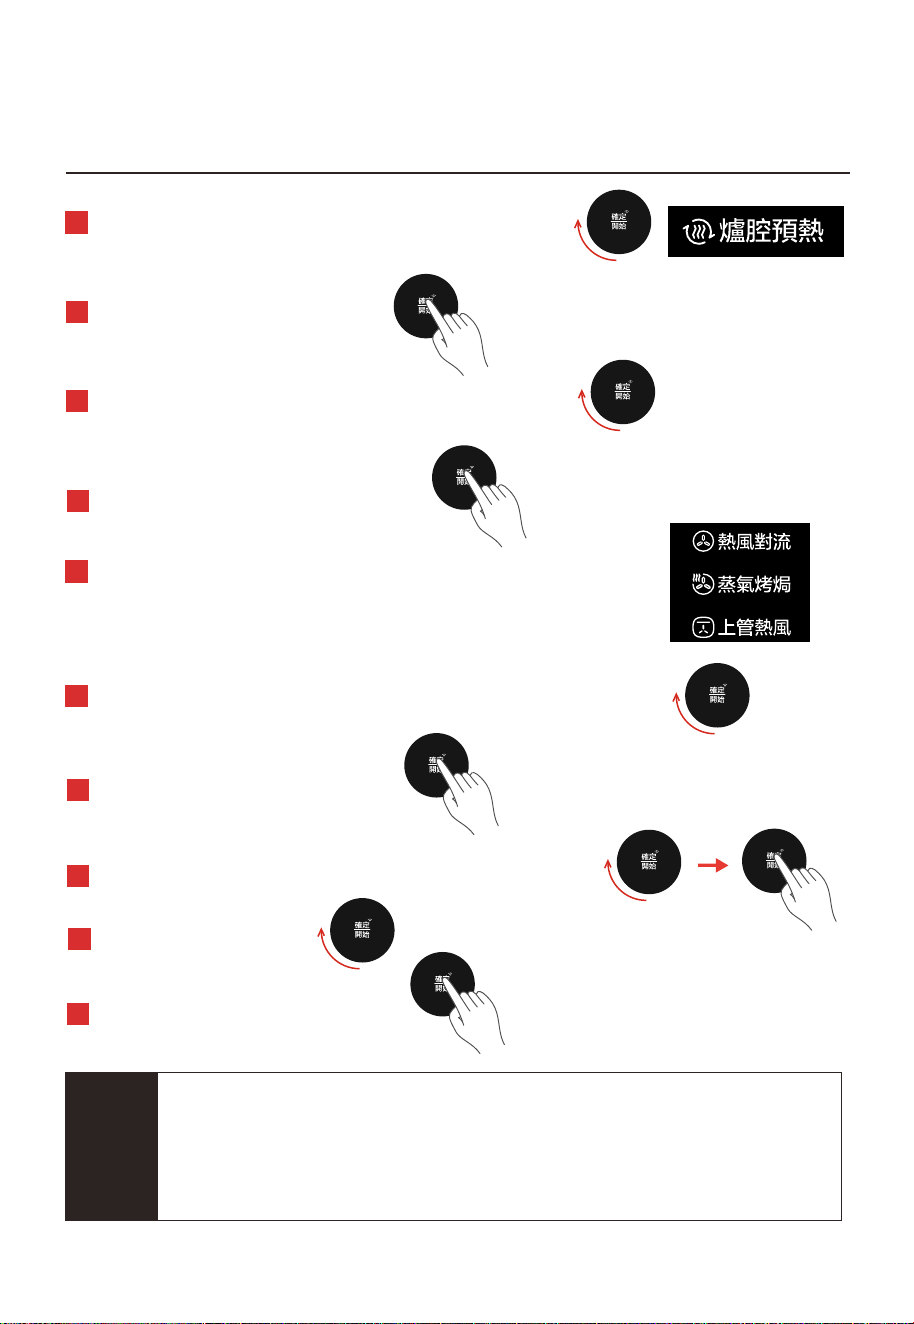
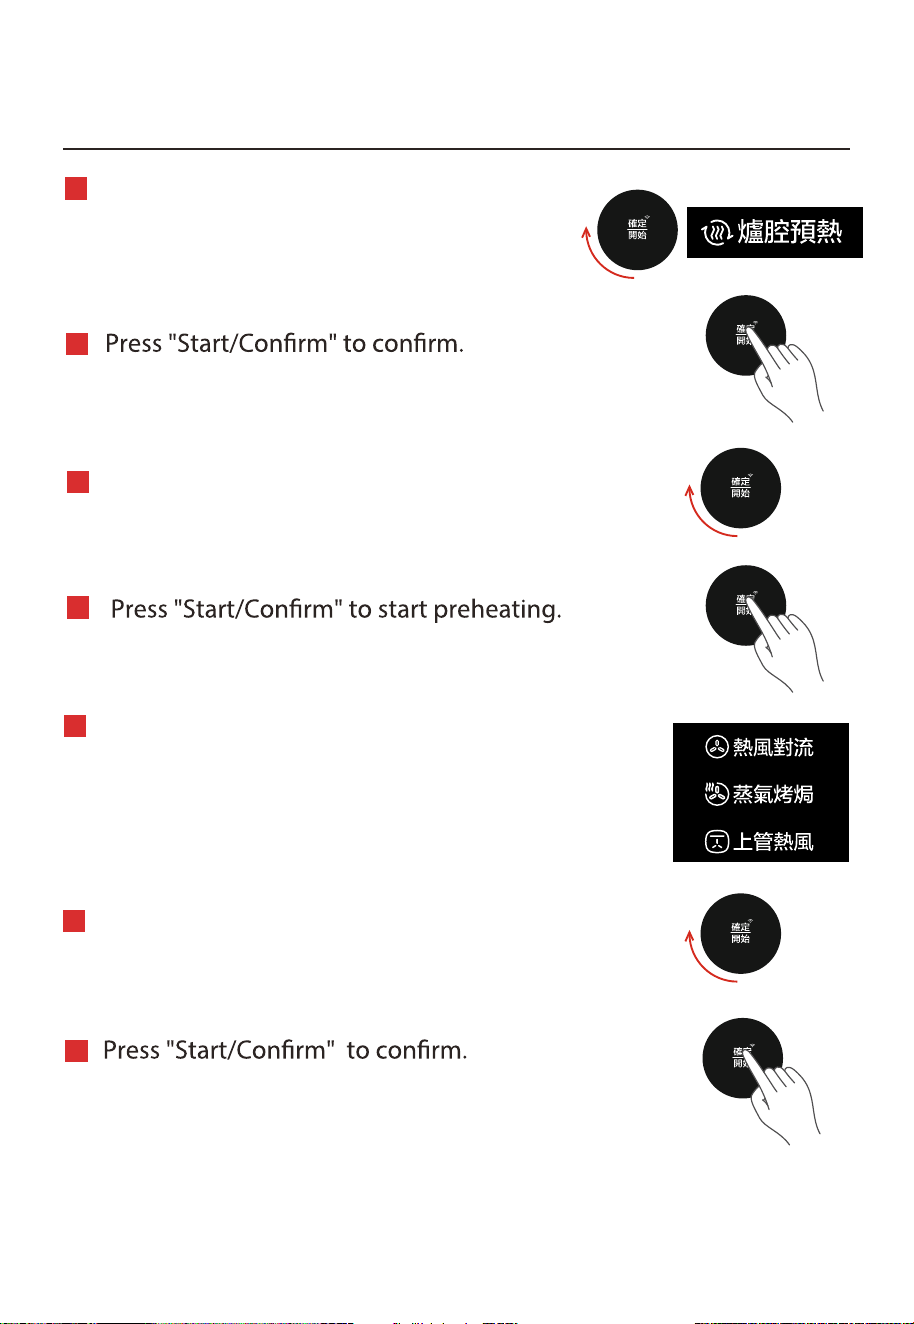
9.爐腔預熱功能
待機時,向右旋轉旋鈕,選擇「爐腔預熱」模式,
轉動旋鈕,設置溫度至「100-230°C」之間。
默認溫度為 180°C。
按「確定 / 開始」進行確認。
按「確定 / 開始」開始爐腔預熱
按「確定 / 開始」進行確認
蜂鳴器響三聲表示爐腔預熱結束。打開並關閉烤箱門時,
「熱風對流」功能 。同時,螢幕會顯示另外兩個功能
和默認時間「30:00」。
轉動旋鈕以選擇烹飪模式:「熱風對流」、「 」
和「上管熱風」。
轉動旋鈕設置溫度。
1
2
3
4
5
6
7
8
·
30 分鐘內未達到爐腔預熱溫度時,蜂鳴器會鳴響三聲,強制爐腔預熱
完成,進入保溫階段。
·
在保溫階段,如果使用者 60 分鐘內沒有打開爐門,焗爐會在一聲蜂鳴
後返回待機狀態。在等待的 60 分鐘過程中,蜂鳴器每15秒會響 3 次。
注意
轉動旋鈕設置時間。
10
按「確定 / 開始」進行確認。
按 「確定 / 開始」開始烹調。
9
CN-35
「爐腔預熱」會閃爍。
蒸氣烤焗
閃爍

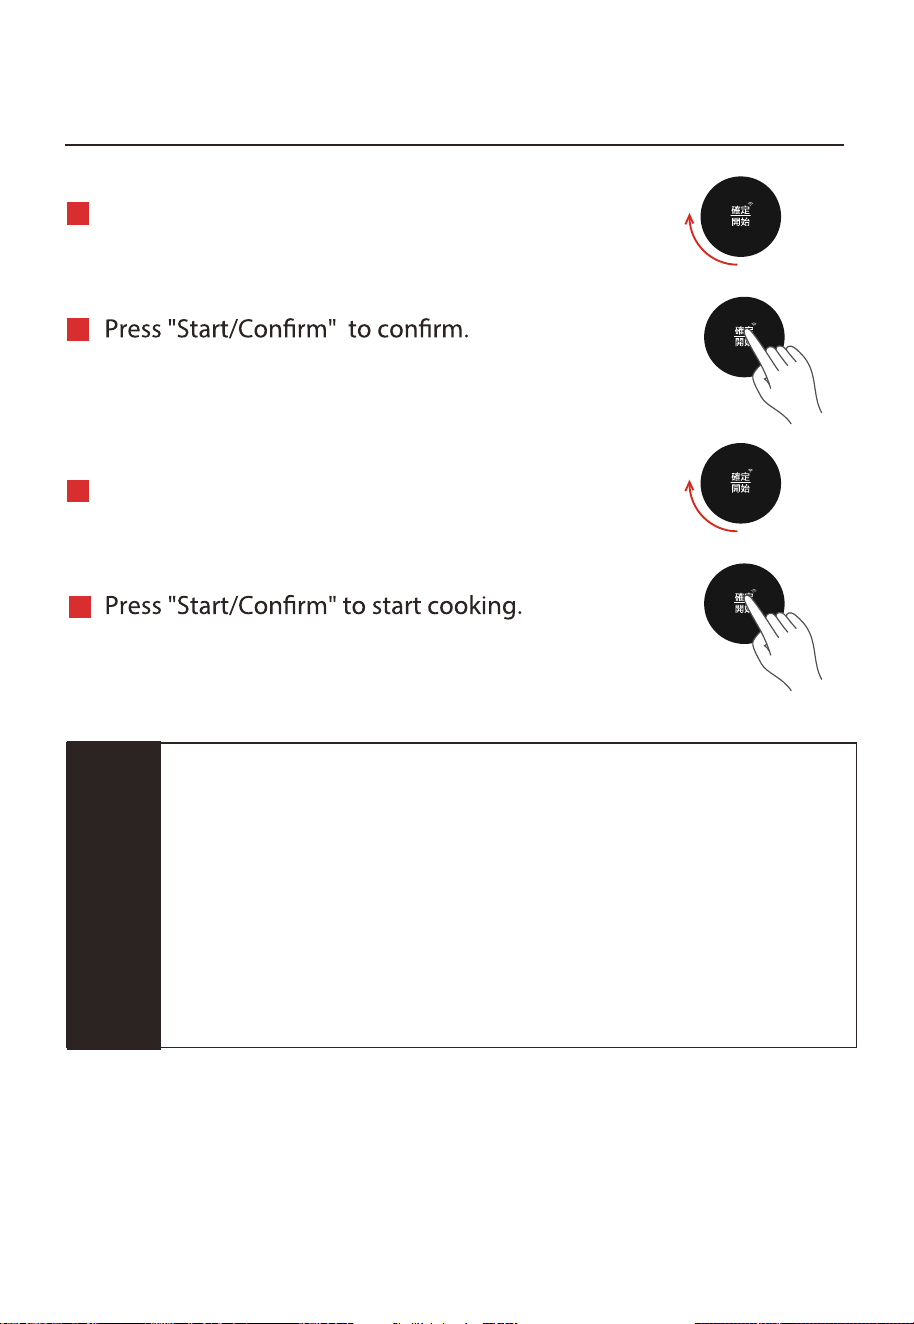
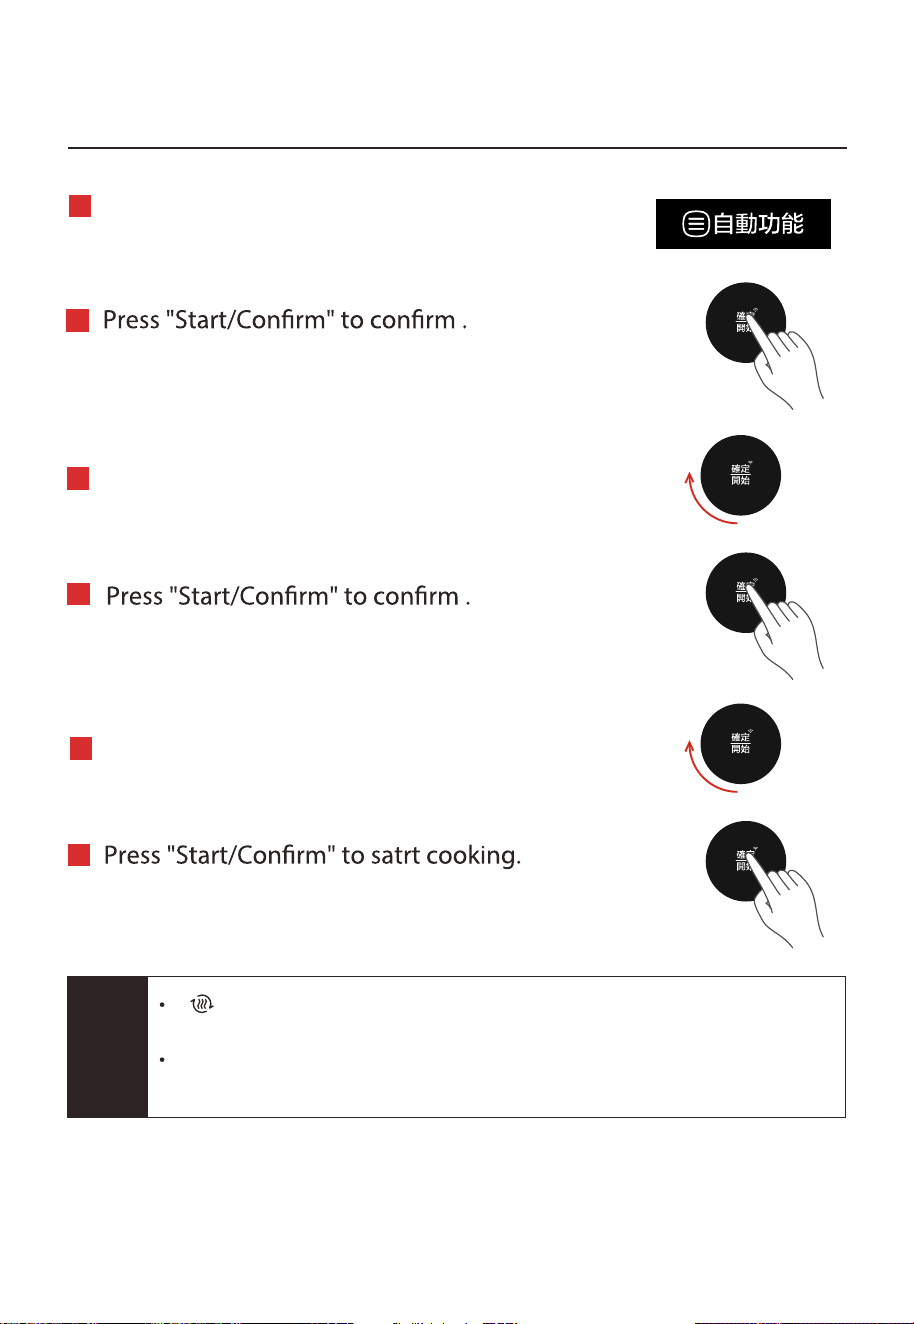
待機時,向右旋轉旋鈕,選擇「自動功能」模式,
「自動功能」會閃爍。
轉動旋鈕,選擇所需功能。(例如自動功能 02)
可旋轉旋鈕,修改該自動功能的烹調時間。
(可以跳過這一步)
10.自動功能
(02-03,05-07,09-17,24,33-36)
– 需預熱
按「確定 / 開始」進行確認。
按「確定/ 開始」開始預熱, 「自動功能」
及 「爐腔預熱 」燈亦會同時亮起。
按「確定 / 開始」進行確認。
預熱完成後, 「爐腔預熱 」燈將閃爍提示預熱完成,
將食物放在爐內,然後按「確定/ 開始」開始烹調。
1
2
3
4
5
7
6
CN-36
·
當自動功能要需要預熱,「 爐腔預熱」將會亮起,並在預熱完成後,
閃爍提示。
·
「自動功能37-40」按「確定/ 開始」後將直接開始清潔。
注意
待機時,向右旋轉旋鈕,選擇「自動功能」模式,
「自動功能」會閃爍。
10.自動功能
(01,04,08,18-23,25-32)
– 無需預熱
轉動旋鈕,選擇所需功能。(例如自動功能 01)
按「確定 / 開始」進行確認。
按 「確定 / 開始」開始烹飪。
可旋轉旋鈕,修改該自動功能的烹調時間。
(可以跳過這一步)
1
2
3
5
6
CN-37
按「確定 / 開始」進行確認。
4
餐具消毒 (自動功能 37)
清潔時間
30 分鐘
此功能適用於消毒各類餐具(耐熱 100° C 以上)。
*
使用餐具清洗功能時,請確保餐具的耐熱溫度高於 100° C,且水箱內充滿水。
爐腔清潔 (自動功能 38)
在烹飪後,適合以蒸氣和熱力清潔爐腔。機器會噴出蒸氣來
軟化污漬,使污漬更容易擦去。
清潔時間
10 分鐘
爐腔除 (自動功能 39)
烹飪結束和進行自動功能38後,抹淨爐腔,然後選擇此功能,
利用爐內風扇清除爐腔餘味。
清潔時間
5 分鐘
* 使用爐腔清潔功能時,請確認水箱內已注滿水。
10.自動功能
(37-40)
- 清潔
待機時,向右旋轉旋鈕,選擇「自動功能」模式,
轉動旋鈕,選擇所需功能。(例如自動功能 37)
按「確定 / 開始」進行確認。
按「確定 / 開始」進行清潔。
蒸氣系統清潔(自動功能 40)
第 1 步「PP1」(用檸檬酸)清潔(55 分鐘)
1.將10g檸檬酸倒入500ml的水中;攪拌使檸檬酸融化,然後
倒入水箱。
2.選擇自動功能 40 蒸氣系統清潔,按「 」開始蒸氣系統
清潔。
清潔時間
第 2 步「PP2」(水)清潔(5 分鐘)
3.當清潔時間剩餘 5 分鐘時,程式將暫停,螢幕顯示"PP2" 及 "5:00"。
請將水箱中的含檸檬酸的水倒掉,換上清水。
4.將水箱放回爐,按"確定/開始 "開始,蒸氣系統清潔功能
將繼續直至清潔時間結束。
* 除檸檬酸,請問放入其他物質,如清潔劑
1
2
3
4
60 分鐘
CN-38
「自動功能」會閃爍。
味

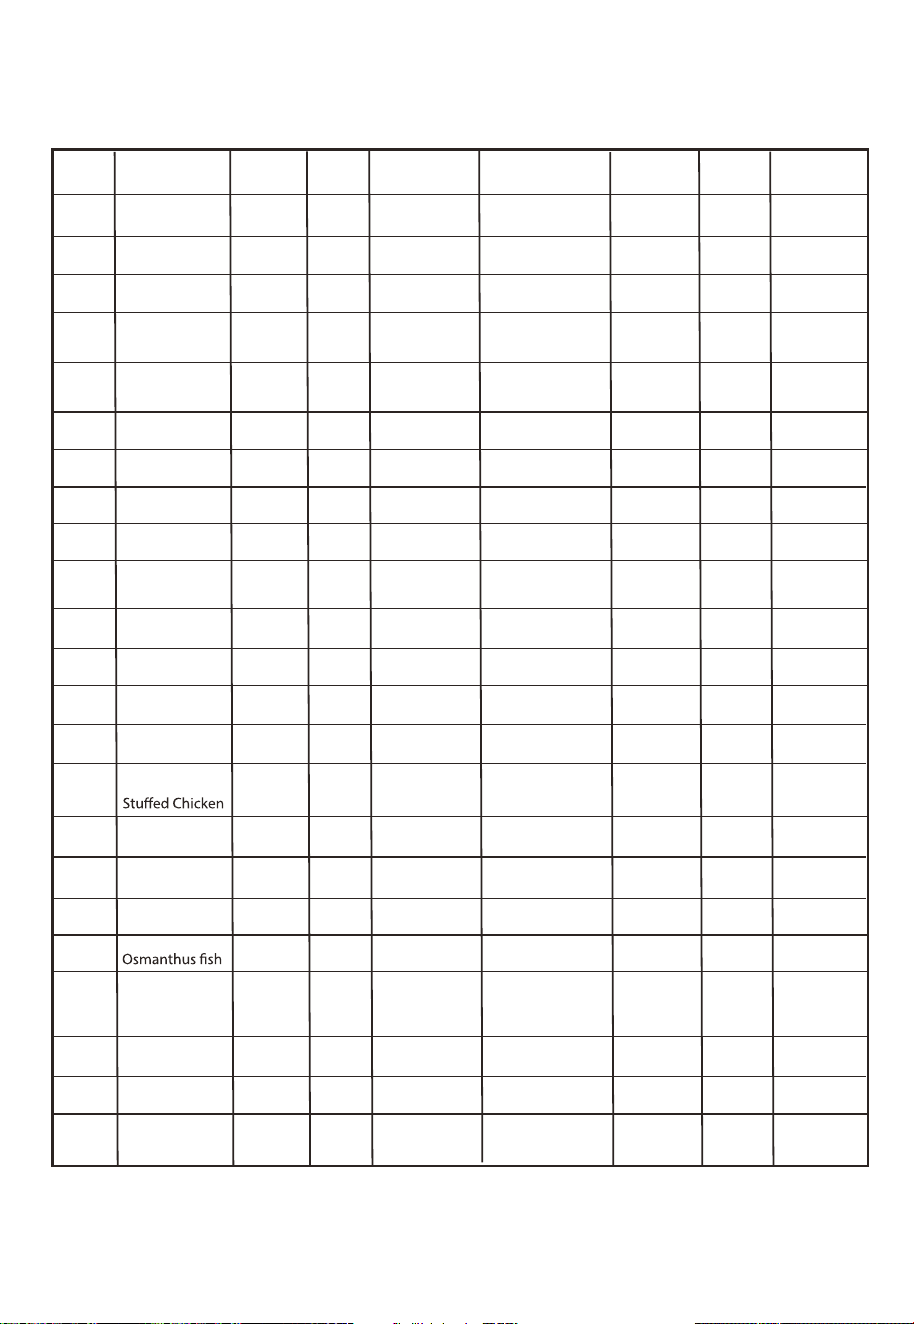
10.自動功能設置表
功能 功能名稱 數量/重量 預熱 預設溫度 預設時間 放置位置
A01
香草烤雞
1100g / 220°C 41 分鐘
A02
A03
A04
A05
A06
A07
A08
A09
A10
A11
可調節時間
33-49
分鐘
使用功能
下層
熱風對流x
蒸氣烤焗
法式小羊架
820g V 200°C 35 分鐘
28-41
分鐘
中層 蒸氣烤焗
脆皮叉燒
450g V 45 分鐘
36-54
分鐘
中層 蒸氣烤焗
德國鹹豬手
1300g / 1 鐘
1
分鐘
下層
原味純蒸X
熱風對流x
蒸氣烤焗
黑椒牛排
500g V 230°C 1 鐘
分鐘
上層
芝士焗龍蝦
650g V 200°C 1 鐘
分鐘
中層
芝士焗扇貝
8 V 2 °C 鐘
分鐘
上層
醬燒豬肋骨
500g / 170°C 36 分鐘
29-43
分鐘
中層 蒸氣烤焗
香烤鱈魚
220g V 230°C 鐘
7-
分鐘
上層
黑椒蜜糖雞翼
450g V 220°C 17.5 分鐘
14-21
分鐘
中層 蒸氣烤焗
蒜香蝦肉串
600g V 230°C 鐘
分鐘
上層
A12
蒜香烤蝦
250g V 230°C 7 分鐘
6-8
分鐘
上層
A13
A14
A15
A16
A17
A18
A19
A20
A21
A22
A23
蘆筍煙肉卷
g V 230°C 8 分鐘
7-9
分鐘
中層 蒸氣烤焗
沙嗲雞肉串
1000g V 230°C 17 分鐘
1
分鐘
上層
蔬菜雞肉卷
550g V 2 °C 鐘
分鐘
中層
咖哩雞肉串
200g V 230°C 15 分鐘
12-18
分鐘
中層
海鮮薄餅
600g V 200°C 鐘
分鐘
中層
栗子蒸雞
800g / 100°C 30 分鐘
24-36
分鐘
中層 原味純蒸
孔雀開屏魚
500g / 100°C 18 分鐘
15-21
分鐘
中層 原味純蒸
梅菜扣肉
1000g / 100°C 60 分鐘
48-72
分鐘
下層 原味純蒸
清蒸龍脷柳
500g / 100°C 18 分鐘
15-21
分鐘
中層 原味純蒸
花蟹蒸蛋
300g / 100°C 10 分鐘
8-12
分鐘
中層 原味純蒸
南瓜蒸排骨
600g / 100°C 18 分鐘
15-21
分鐘
中層 原味純蒸
A24
鮮味蘆筍
300g V 230°C 9 分鐘
A25
A26
7-11
分鐘
中層 蒸氣烤焗
松茸燉羊排
2000g / 100°C 90 分鐘
72-108
分鐘
下層 原味純蒸
清蒸石斑魚
490g / 120°C 15 分鐘
1
分鐘
中層 高溫蒸氣
30
300
10
46 分
0 分
7 分
9 分
17-175
8-12
14-20
7-11
9 分
10 分
11
8-12
28 分
4-20
22-34
24 分
19-29
2-18
CN-39
0°C
°C+
170 +19°C
100 +130
°C
°C°C
200 +200
上管燒烤
熱風對流x
熱風對流
蒸氣烤焗
熱風對流
熱風對流
熱風對流
熱風對流
熱風對流
熱風對流
熱風對流

10.自動功能設置表
A27
A28
A29
A30
A31
A32
A33
白菜豬肉蒸餃
500g
/ 100°C
20 分鐘
16-24
分鐘
中層 原味純蒸
香菇鮮肉包
12
/ 100°C
25 分鐘
20-30
分鐘
中層 原味純蒸
蒸沙薑雞
900g
/ 110°C
40 分鐘
32-48
分鐘
下層 高溫蒸氣
冰糖燉雪梨
2000g
/ 100°C
60 分鐘
48-72
分鐘
下層 原味純蒸
紅棗薑汁糕
1200g
/ 100°C
45 分鐘
36-54
分鐘
原味純蒸
艾草茶粿
12
/ 100°C
12.5 分鐘
10-15
分鐘
中層 原味純蒸
杏仁瓦片
325g
V 150°C
2 分鐘
分鐘
中層
A34
蔓越莓餅乾
450g
V 160°C
分鐘
分鐘
中層
A35
裸麥麵包
500g
V 210°C
分鐘
分鐘
中層
A36
蔓越莓麵包
400g
V 170°C
25 分鐘
21-29
分鐘
中層
A37
餐具消毒
/
/ 100°C
30 分鐘
/
/ /
A38
爐腔清潔
/
/ /
10 分鐘
/
/ /
A39
爐腔除味
/
/ /
5 分鐘
/
/ /
A40
蒸氣系統清潔
/
/ /
分鐘
/
/ /
功能 功能名稱
數量/重量
預熱 預設溫度
預設時間
放置位置
可調節時間
使用功能
4
23
21
19-29
18-28
17-27
60
CN-40
熱風對流
熱風對流
熱風對流
熱風對流
下層
兒童鎖功能
您可以使用此功能以防止兒童意外開啟烹調模式。
開:在待機狀態, 按 住「暫停 / 取消」三秒鐘。
蒸氣焗爐會發出一聲嗶,然後顯示 。
關:在待機狀態下,按 住「暫停 / 取消」三秒鐘。
蒸氣焗爐會發出一聲嗶聲,鎖定的圖標 會消失。
爐內燈
在待機或烹飪過程中,您可以輕觸「 」 打開 / 關閉爐燈,以便您隨時觀察
焗爐中的食物。
1
2
選擇過程
在選擇功能過程中,焗爐被閒置 5 分鐘,選擇過程將自動取消。
待機模式
在待機模式下,焗爐被閒置 5 分鐘,整個面板關閉。要將焗爐重
啟到待機模式,旋轉旋鈕「 」,按任意功能,或打開烤箱門。
焗爐過熱
如果出現“F01”,則表示爐腔溫度高於可用溫度範圍。產品冷卻
後方可使用產品。
如果出現“F02”和聽見五聲叮聲,則表示水箱缺水或未安裝到正
確位置。請將加水至水箱的「MAX」線,然後將水箱重新裝入焗
爐,繼續烹飪過程。
缺水
指示燈及其他功能提示
CN-41

請勿太用力刮擦封條,可否則蒸氣很容易漏出。
請小心安裝 / 拆卸封條;否則蒸氣可能會洩漏。
使用烤箱前,請務必安裝封條。
其他重要提示
警告
1
2
3
在烘烤食物時,請在烤盤上鋪上錫紙,然後將食物放在上面。請不要直接
用
醋、檸檬、果汁等酸性物質污染烤盤。
使用原味純蒸功能後,建議打開爐門,有助去除積水。
爐門封條設計可拆卸。如果水滴或食物殘渣卡在爐門封條上,請小心取下封條,
擰乾水分後用軟布擦拭,擦拭乾淨,然後放回原處。
蒸氣可能從爐門四周縫隙處溢出。使用與蒸氣相關的功能時,產品運轉過程中爐
腔內會產生大量蒸氣,部分蒸氣可能從門縫四周漏出,這是正常現象。
CN-42

使用下表檢查問題,並嘗試針對每個問題解決。
疑難解答
問題
可能的原因
烤箱無法啟動
a. 沒有插緊電源。
b. 爐門未關。
c. 錯誤操作。
a. 重新插入插座。
b. 關閉爐門重試。
c. 檢查說明
電弧或火花
可能的補救措施
a. 使用了不適用於蒸氣的用具。
b. 蒸氣空著運作。
c. 濺出的食物殘留爐腔。
a. 僅使用適用於蒸氣的用具。
b. 不要空著運作蒸氣。
c. 用濕毛巾清潔爐腔。
煮得不均勻的食物
a. 使用了不適用於蒸氣的用具。
b. 食物沒有完全解凍。
c. 烹飪時間、功率不合適。
d. 食物沒有被旋轉或攪拌。
a. 僅使用適用於蒸氣的用具。
b. 徹底解凍食物。
c. 使用正確的烹飪時間和功率。
d. 旋轉或攪拌食物。
煮過頭的食物 烹飪時間、功率不合適。
使用正確的烹飪時間和功率。
未煮熟的食物
a. 使用了不適用於蒸氣的用具。
b. 食物沒有完全解凍。
c. 通風口阻塞。
d. 烹飪時間、功率不合適。
a. 僅使用適用於蒸氣的用具。
b. 徹底解凍食物。
c. 檢查以確保通風口不受阻塞。
d. 使用正確的烹飪時間、功率
解凍不當
a. 使用了不適用於蒸氣的用具。
b. 烹飪時間、功率不合適。
c. 食物沒有被旋轉或攪拌。
a. 僅使用適用於蒸氣的用具。
b. 使用正確的烹飪時間和功率。
c. 旋轉或攪拌食物
傳感器烹調的食物
未被正確煮熟
a. 覆蓋未通風的食物。
b. 在螢幕顯示傳感器檢測到的烹
間之前,爐門已打開。
a. 食物的覆蓋物必須有用於排出蒸
氣的通風孔。
b. 在螢幕顯示傳感器檢測到的烹飪
時間之前,請勿打開爐門攪拌或
旋轉食物。
維護
CN-43
飪時

容量
額定電壓 / 頻率
熱風對流功率
原味純蒸功率
30L
220-230V~50Hz
1550-1700W
蒸氣烤焗
外形尺寸
(闊 x 深 x 高)
爐腔尺寸
(闊 x 深 x 高)
472x465x375 mm
410x325x230 mm
產品影片
規格
1550-1700W
CN-44
1500-1600W
1500-1600W
產品尺寸為闊 × 深 × 高,總深度包括把手長度和背板拉展長度,高度數值
包括爐腳。
爐腔尺寸包括拉展長度,爐腔體積為寬度、深度和高度相乘。由於產品不斷
升級,體積參數與標註的數據可能存在偏差,偏差範圍為 ±12%。
由於我們的產品在不斷改進,實際參數可能與標註的有所不同。具體請參考
實際參數。
1
2
3
上管燒烤

#
Details
Matter


USER MANUAL
MS5-STR30SC(BK)
Please review this instruction manual before operating.
SMART CONTROL STEAM OVEN

CONTENTS
PRODUCT SAFETY
PRECAUTIONS
IMPORTANT SAFETY INSTRUCTIONS WARNING
SETTING UP YOUR OVEN
IMPORTANT INFORMATION ABOUT INSTALLING
PRODUCT INTRODUCTION
CLEANING AND CARE
WATER BOX USE
ATTENTION IN PLACEMENT
INITIAL USE
BEFORE USING
IOT SMART CONTROL
PRODUCT WIRELESS NETWORK CONNECTION
............................................................................EN-4
QUICK START GUIDE
..........................................................................EN-5
TSmartlife OPERATION
.....................................................................................................................EN-8
HOW TO USE ONLINE RECIPES?
.....................................................................................................EN-10
..................................................................................................................................EN-11
........................................................................EN-12
...............................................................................................................EN-17
......................................................................EN-18
...........................................................................................................EN-19
.......................................................................................................................................EN-21
CLEANING AND MAINTENANCE PRECAUTIONS
..............................................................................................................................EN-23
.................................................................................................................................EN-24
........................................................................EN-25
...............................................
EN-2

MAINTENANCE
TROUBLESHOOTING
INSTRUCTION FOR USE
OPERATION INSTRUCTIONS
MENU SUMMARY CHART
1.COOKING FUNCTION-STEAM
2.COOKING FUNCTION-HIGH TEMP. STEAM
3.COOKING FUNCTION-STEW
4.COOKING FUNCTION-CONVECTION
5.COOKING FUNCTION-COMBI.
6.COOKING FUNCTION-CONVECTION GRILL
7.COOKING FUNCTION-GRILL
8.COOKING FUNCTION-FERMENTATION
9.PREHEAT FUNCTION
10.AUTO MENU (02-03,05-07,09-17,24,33-36)– PREHEAT
10.AUTO MENU(01,04,08,18-23,25-32)– NO PREHEAT
10.AUTO MENU(37-40)-CLEANING
10.AUTO MENU SETTING
OVEN LIGHT
CHILDREN LOCK FUNCTION
SIGNAL INDICATION
OTHER IMPORTANT TIPS
PRODUCT PARAMETERS
........................................................................................................EN-28
..............................................................................................................EN-29
....................................................................................................EN-30
.............................................................................EN-31
......................................................................................................EN-32
.......................................................................................EN-33
...................................................................................................EN-34
............................................................................EN-35
.......................................................................................................EN-36
...................................................................................EN-37
..................................................................................................................EN-38
.......................................................EN-40
............................................................EN-41
.............................................................................................EN-42
..............................................................................................................EN-43
....................................................................................................................................EN-45
........................................................................................................EN-45
......................................................................................................................EN-46
.............................................................................................................EN-47
.....................................................................................................................EN-48
...............................................................................................................EN-49
EN-3

IOT SMART CONTROL
PRODUCT WIRELESS NETWORK CONNECTION
1 Connect the network
Press and hold " " 確定/開始 (Start/Confirm) for 3 seconds, till a beep sounds,
flashing "
" show on display. If it fails, "N0~N5" will display, and the
to standby after 30 seconds.
2 Disconnect from the network
Press and hold " " for 8 seconds, till a beep sounds, "--" flashes for few seconds,
if the link has been removed successfully, the screen will display "8888" and then
return to standby after 3 seconds. f it fails, "FFFF" will display, and the oven will
return to standby after 3 seconds.
- NOTE: Only 1 main account allowed to control the device and invite other
family accounts to use at current stage.
I
"AP" and
oven will return
EN-4
QUICK START GUIDE
1 DOWNLOAD THE TSmartLife App
Scan QR code or find us on your App
store
3 CONNECT YOUR DEVICES TO TSmartLife
2 REGISTER AND LOG IN
Log in for existing users or sign up
for new users
CONNECT YOUR DEVICE TO YOUR MOBILE PHONE WITH TSmartLife App
SELECT
MANUALLY
SEARCH
DEVICES
SCAN PRODUCT
QR CODE
connected
Toshiba
Please select wireless network
for device to connect
Connected device and send wireless
network information
Device is networking
Bind device to Toshiba TSmartLife
Toshiba
Hi,l’m your device!
How would you call me:
WLAN
Bluetooth
Connect to wireless network
and enable Bluetooth.
STEP 1.
Open the TSmartLife App.
Power on selected device.
STEP 2.
Add your device using one
of the following methods:
STEP 3.
Ensure device and App are
under same wireless network.
STEP 4.
STEP 5.
Rename your device and
try to remote control it.
STEP 6.
Press “ ” button for 3 seconds
on the panel.Following
instruction to set up, it will
connect automatically.
EN-5

HOW CONNECT YOUR DEVICES TO TSmartLife
TIPS
Make sure your devices are powered on.
Keep your mobile phone close to your device during connection.
Connect your mobile phone to the wireless network at home.
Enable the 2.4GHz frequency on your wireless network router. Contact the
manufacturer if unsure whether the router supports 2.4GHz.
The device is unable to connect to wireless network that requires authentication
and also appears in public areas such as hotels and restaurants.
It is recommended to use a wireless network name that only contains letters and
numbers. If your wireless network name contains special characters, modify it in
the router. Disable WLAN+ (Android) or WLAN Assistant (iOS) when connecting
your devices to the network.
To reconnect a device to the wireless network, click “+” on the App home screen
and add the device again by the category and model according to the App
prompts.
EN-6

EN-7
TSmartLife APP TROUBLESHOOTING
Background :
Offering dual-band support provides choices and maximum flexibility of the product to have successful experience
on home network. Home networks can be expected to have multiple
service possibilities, depending on how
their router is configured. There are four
router configuration modes: A, B, C and D.
A. 2.4 GHz only … e.g. older model
router
o In this case dual band radio will automatically operate at 2.4GHz
B. 5 GHz only … some people may choose to turn off older 2.4GHz band due to conflicting interference
o In this case dual band radio will automatically operate at 5GHz
C. 2.4G Hz and 5GHz sharing same SSID name … e.g. Johns
o In this case the
router and dual-band radio will negotiate the best frequency to use
D. 2.4GHz and 5GHz with different SSID names … e.g. Johns
_2G and Johns _5G
o In only this case is there a choice which
band to use.
If unable to join network at the first time
• Cannot see home SSID network :
o Weak signal … Since appliance radio is dual-band this means neither 2.4GHz nor 5GHz signal is being
received by the appliance. Just because the
signal can be seen by the phone doesn’t necessarily mean
that the appliance radio can see it if the signal is marginal. Long distance between router and appliance or
encountering too many barriers can reduce the signal level too much. Reorienting the router may improve
the situation slightly. A better solution would be a
repeater or a higher quality router. Recognize that
all
routers transmit power is limited by federal regulations, but a higher quality router can do a better
job of transmitting the signal equally in all directions, have more sensitive receivers to better handle weak
signals, and have higher quality software to minimize the dropping of connections.
• SSID network seen but cannot join:
o Networks requiring authentication …often used with public networks at restaurants or hotels.
Products cannot accept the legal agreement required to join the network. Please switch to a network
that does not require authentication.
o Insufficient encryption … for cybersecurity reasons Toshiba does not recommend products to join
non-encrypted or insufficiently encrypted networks (e.g. WEP encryption).
o Password length … for cybersecurity reasons Toshiba recommends networks to have strong passwords,
but the maximum password length supported is 32 characters.
o Incorrect password … If trying to join a different network than the one the phone is currently using,
then it is always possible that the network password in the phone is no longer correct. In this case,
new credentials will need to be provided.
o Illegal SSID name … TSmartLife App accepts any SSID name, but the App may issue warning when
attempting to join network with certain non-alphanumeric or foreign language characters.
• WLAN+ (Android) or WLAN Assistant (iOS) functions are turned on, please turn off and reconnect to the Internet.
If can join network but the connection is unstable
For
configuration modes A, B and C, follow the instructions provided by your router manufacturer to make the
indicated router configuration changes :
• In case of router configuration A (see above), Toshiba recommends enabling 5GHz band if it is disabled in your
router and choosing a distinct SSID name for the 5GHz band (e.g. SSIDname_5G). Then follow the normal joining
instructions to join the 5GHz network. If your router is an older 2.4GHz only router, Toshiba recommends
upgrading to a newer dual-band router.
• In case of router configuration B (see above), Toshiba recommends enabling 2.4GHz band (all routers that offer
5GHz also support 2.4GHz), and choose a distinct SSID name for the 2.4GHz band (e.g. SSIDname_2G). Then follow
the normal joining instructions to join the 2.4GHz network.
• In case of router configuration C (see above), Toshiba recommends assigning distinct SSID names for the 2.4GHz
and 5GHz bands. Then follow the normal joining instructions to one of the networks, and subsequently follow the
troubleshooting instructions for
mode D.
For these steps router configuration changes are not required:
• In case of router configuration D (see above), then it is worthwhile to try operation on the other band before
making changes to the router configuration or upgrading the router. In other words, if unstable connection using
2.4GHz then try 5GHz instead. Or if unstable connection using 5GHz then try 2.4GHz instead. Follow the
instructions below “How to set the network to 2.4GHz or 5GHz.”
• WLAN+ (Android) or WLAN Assistant (IOS) functions are turned on, please turn off and reconnect to the Internet.
If your Device offline, check your connection status Please confirm that
• Whether the device is properly powered.
• Whether the network signal is stable.
• Whether the
name or password has been changed, if so, please add the device again.
Having a dual band radio in the appliance means it is not necessary to change routers or router configuration unless
problems are experienced, in which case knowing what
router configuration you have (see above A, B, C or D) is
important to know and understand.
TSmartlife OPERATION
INTERFACE INTRODUCTION
Pure Steam
High-temp. steam
Slow Steam
Fermentation
Convection Bake
Steam-assisted Bake
Child Lock
Preheat
Convection Grill
Grill
EN-8
TSmartlife OPERATION
How to start cooking
1 Select Cooking Program
2 Click temperature
3 Select temperature
4 Select time
5 Press "start" button
on the phone
6 Press "Confirm/Start"
button on the device
EN-9

HOW TO USE ONLINE RECIPES?
1 Select "Recipes"
2 Select one recipe you prefer
3 Check recipe details or
start cooking by press
"one-click start"
4 Press "Start/Confirm" button
on the device
EN-10

PRODUCT SAFETY
1 Do not attempt to operate this oven with the door open. It is
important not to break or tamper with the safety interlocks.
2 Do not place any object between the oven front face and the door
or allow soil or cleaner residue to accumulate on sealing surfaces.
ADDENDUM
If the apparatus is not maintained in a good state of cleanliness,
apparatus and lead to a dangerous situation.
PRECAUTIONS
EN-11
Keep the appliance and its cord out of reach of children less than 8
years.
If the supply cord is damaged, it must be replaced by the
manufacturer, its service agent or similarly qualified persons in
order to avoid a hazard.(For appliance with type attachment)
Read and follow the specific:”PRECAUTIONS”.
WARNING:
the lamp to avoid the possibility of electric shock.
When heating food in plastic or paper containers, keep an eye on
the oven due to the possibility of ignition.
WARNING: It is hazardous for anyone other than a competent
person to carry out any service or repair operation.
Only use the temperature probe recommended for this oven.(for
ovens provided with a facility to use a temperature-sensing probe.)
This appliance can be used by children aged from 8 years and above
and persons with reduced physical, sensory or mental capabilities or
lack of experience and knowledge if they have been given supervision
orinstruction concerning use of the appliance in a safe way and
understand the hazards involved. Children shall not play with the
appliance. Cleaning and user maintenance shall not be made by
children unless they are older than 8 and supervised. Children less
than 8 years of age shall be kept away unless continuously supervised.
your appliance, follow basic precautions, including the following:
IMPORTANT SAFETY INSTRUCTIONS WARNING
EN-12
This appliance is intended to be used in household and similar
applications such as:
-by clients in hotels, motels and other residential type environments;
-farm houses;
-bed and breakfast type environments.
The appliance shall not be cleaned with a steam cleaner.
WARNING: Accessible parts may become hot during use. Young
children should be kept away.
Steam cleaner is not to be used.
Surface of a storage drawer can get hot.
WARNING: The appliance and its accessible parts become hot during
use. Care should be taken to avoid touching heating elements.
Children less than 8 years of age shall be kept away unless
continuously supervised.
During use the appliance becomes hot. Care should be taken to
avoid touching heating elements inside the oven.
The appliance must not be installed behind a decorative door in
order to avoid overheating. (This is not applicable for appliances
with decorative door.)
Care should be taken not to displace the turntable when removing
containers from the appliance.
IMPORTANT SAFETY INSTRUCTIONS WARNING
WARNING: When move the oven, do not carry handle.( Oven is
overweight, handles are easily broken.)
The water in the receiving tank, inside the oven and in the water tank
should be cleaned up after each use.
EN-13
READ CAREFULLY AND KEEP FOR FUTURE REFERENCE
Do not use paper cups and plastic containers with a temperature
resistance of less than 120 degrees.And use a container suitable for
cooking temperature.Can use glass, ceramics, stainless steel utensils.
Steam is the main heating function for this product.
IMPORTANT SAFETY INSTRUCTIONS WARNING
a normal phenomenon as part of the factory test.
The combi steamer produces a large amount of steam under steam
cooking mode. Most of the steam will be vented from the frontal
ventilation and some condensation water will be found around the
ventilation vent.
EN-14

TO REDUCE THE RISK OF INJURY TO PERSONS
GROUNDING INSTALLATION
Touching some of the internal components can cause serious personal
injury or death.
Do not disassemble this appliance.
DANGER
Electric Shock Hazard
This appliance must be grounded. In the event of an electrical short
circuit, grounding reduces the risk of electric shock by providing an
escape wire for the electric current. This appliance is equipped with a
cord having a grounding wire with a grounding plug. The plug must
be plugged into an outlet that is properly installed and grounded.
instructions are not completely understood or if doubt exists as to
whether the appliance is properly grounded. If it is necessary to use
an extension cord, use only a 3-wire extension cord.
Improper use of the grounding can result in electric shock. Do not
plug into an outlet until appliance is properly installed and grounded.
Electric Shock Hazard
WARNING
EN-15

1 A short power-supply cord is provided to reduce the risks resulting
from becoming entangled in or tripping over a longer cord.
2 If a long cord set or extension cord is used:
1) The marked electrical rating of the cord set or extension cord should
be at least as great as the electrical rating of the appliance.
2) The extension cord must be a grounding-type 3-wire cord.
3) The long cord should be arranged so that it will not drape over the
counter top or tabletop where it can be pulled on by children or
tripped over unintentionally.
TO REDUCE THE RISK OF INJURY TO PERSONS
GROUNDING INSTALLATION
EN-16
SETTING UP YOUR OVEN
Steaming tray
Baking tray
Remove the oven and all materials from the carton and oven cavity.
Your oven comes with the following accessories:
NAMES OF OVEN PARTS AND ACCESSORIES
1
2
3
4
5
Handle
Control panel
knob
Water box
Dirty water box
(Can be used in convection
and combi function. )
(Please spread tinfoil on the
tray when it is used.)
(Can only be used in
pure steam function)
PRODUCT INTRODUCTION
EN-17
Steam rack
(For grilling, baking and steam
cooking, place it on a flat plate in
the cavity or use it with a baking
Instruction
Manual
rack with microwave function)
tray; it is forbidden to use a steam

This appliance is NOT intended for use in a commercial environment.
Please observe the installation instructions provided and note that
properly installed earthed socket.
In case a new socket is needed, installation and cable connection
accessible following installation, a pole disconnecting device must
be present on the installation site with a contact gap of at least 3 mm.
Adapters, multi-way strips and extension cords must not be used.
connection equipment must have a contact separation in all poles
that provide full disconnection, and the appliance must be
The accessible surface may be hot during operation.
IMPORTANT INFORMATION ABOUT INSTALLING
EN-18

In order to avoid the oil and smoke discharged from the exhaust
the cooking process, the steam oven should be kept at a certain
distance from walls and cabinets. Please place it at a safe distance as
indicated in the figure below.
ATTENTION IN PLACEMENT
Front
Open space
Rear ≥ 1cm
Left and right side ≥ 1cm
Top
In order to avoid injure and property damage to the user, the
product body and the User' s Guide contain important contents,
such as proper usages.
from the real product.
Please read the relevant labeling carefully before use and strictly
observe it; please keep it properly for future reference.
≥ 5cm
the appliance.
EN-19
ATTENTION IN PLACEMENT
Notes
product.
This product is a desktop product, and it is forbidden to be used as a
built-in product.
EN-20
INITIAL USE
Please read the User’ s Guide carefully before use and keep it properly
for future reference.
into the suction vent, exhaust port, and louver in the rear side of the
steam oven.
Otherwise, it may cause electric shock or injury. If any foreign object is
inserted into the product by accident, please unplug the power cord
and contact our customer service center.
Suction port
Rear view
Exhaust vent
Louver
Baking tray (Can be used in convection
Steaming tray (Can be used in
steam function)
and the combi function)
EN-21
Steam rack (For grilling, baking and steam cooking, place it on a flat plate
in the cavity or use it with a baking tray; it is forbidden to use a steam
rack with microwave function)
」
INITIAL USE
Do not touch the oven chamber with your hands immediately after
cleaning.
soft cloth after cooling.
d. Do not close the oven door before the chamber is completely
cooled down.
1 Open the door of the steam oven, take out
everything, and then close the door.
2 Fill up the water box, rotate the selector to select auto function;
「
38 Cavity Cleaning
3 Press the key to start cleaning, which takes about 10 minutes.
4 When cleaning is completed, the buzzer will sound for one times,
and then please open the oven door for cooling.
Reminder :
*Note: If water stains are found in the furnace, it is
still normal, because the product has been tested for
a.If the seal of the furnace door is found loose, press it back into the
groove.
b.
c
EN-22
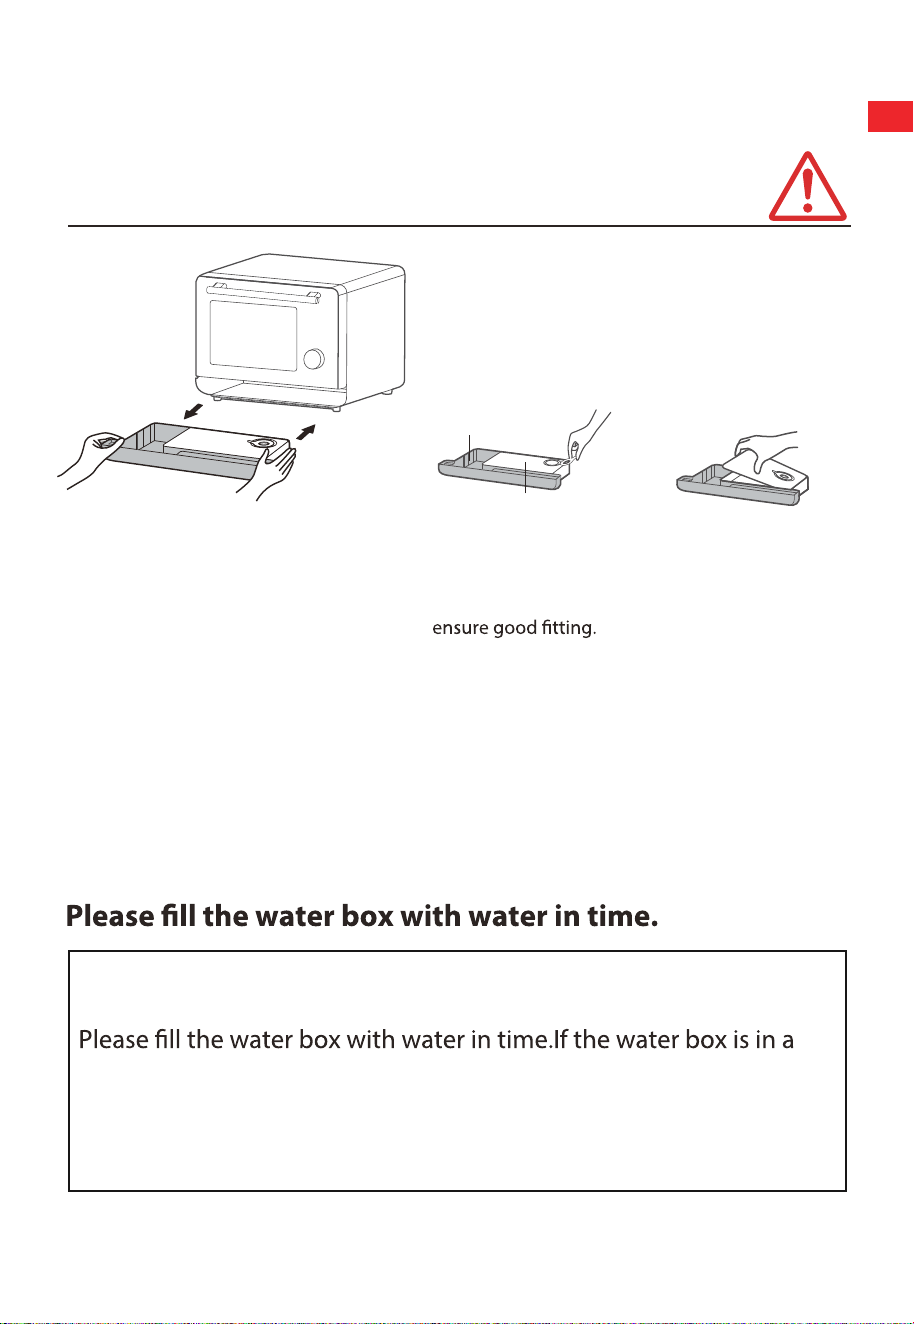
WATER BOX USE
cover the rubberring and
Uncover the water lid
to clean, or drain the
remaining water.
Take out/reload
Waste water box
Uncover the rubber ring, add
a proper amount of room-
temperature boiled water,
1
a proper amount of room-temperature boiled water in the water
box to prevent scale from affecting the service life of the machine.
2 After cooking, the water in the waste water box and the clean water
box must be drained to avoid generating bacteria.
When the water box is short of water, the water pump will send out a
beep-like prompt to remind the user of water shortage.
water shortage state all the time, the machine will stop working 5
beep sounds,and the screen will diaplay [F02 ] at the same time.
Please add water to clean water box until reach "MAX" line, then
reload the water box to the oven to continue cooking process.
CLEANING AND CARE
.
Clean water box
EN-23

First cleaning
Remove all protective foils from the front of the steam oven. Before
using, please check the "Cleaning and Care" section for more
information.
Cleaning before using
Before heating, wipe the inside of the steam oven with a damp
cloth to remove dust accumulated during the process and residual
packaging material.
BEFORE USING
There is protective coating on metal parts, which may emit a slight
odor when first heated.
Please remove ALL accessories and clean outside the
oven
There is often odor when new appliance is first used. Please use
Auto Menu No.39 for cleaning to remove odors.
This odor dissipates in a short time along with vapor. This does NOT
indicate any mechanical faults. Also, please make sure the kitchen
is well ventilated when you first heat it up.
EN-24
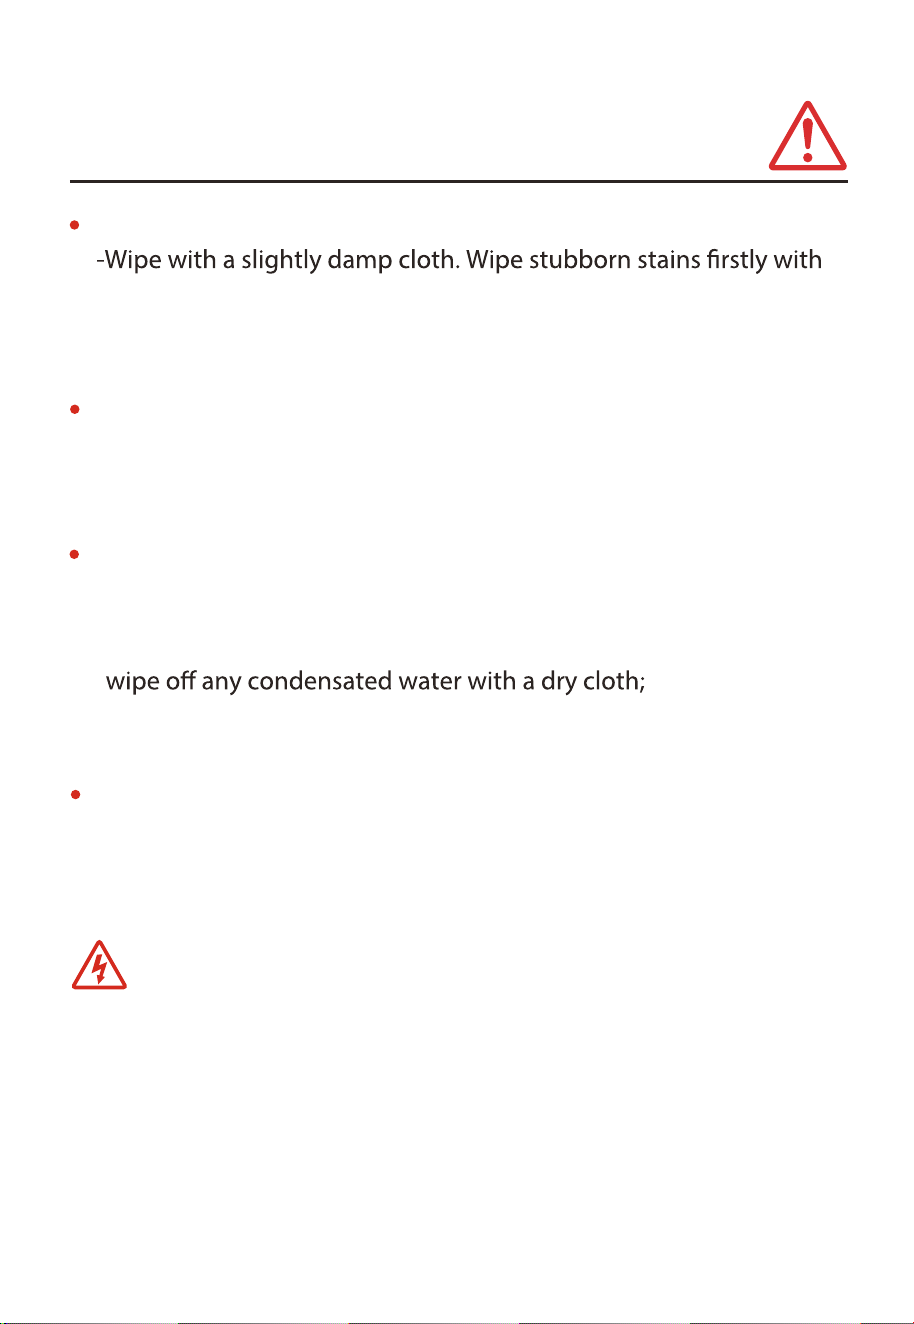
Oven door and enclosure
mild soap and then wipe with a slightly damp cloth;
-
WARNING
Do not clean with much water, or water may rust the
appliance and cause damage;
Vapor vent
-Wipe with a slightly damp cloth. After steam cooking, there will be
white marks (dissolvable substances in the water) near the vapor
vent. Carefully wipe with a wrung-out colth;
CLEANING AND MAINTENANCE PRECAUTIONS
Oven cavity and door (interior)
-Wipe with a slightly damp cloth. parts with stubborn stains can be
soaked in a mild soap solution for 30 minutes before wiping;
-After steam heating, wait for the steam oven to cool down, and then
-WARNING Do not use sharp objects, such as a wire brush or fork, as
this may result in scratches or cracks;
Door Seal
-If water drops or food residues get stuck in the door seal, please
remove the seal with care. Wipe and clean it with a soft cloth after
wringing out the water, and then install it in place;
WARNING
1 When cleaning, do not scrape or wipe the seal vigorously to avoid
damage to the seal, or it may result in steam leakage.
2 Be careful when removing and installing the seal,or else it may result
in steam leakage.
EN-25
Wipe the enclosure with a cloth dampened with a soft detergent
(such as detergent), then wipe it. with a damp cloth, and. Finally
wipe it with a dry cloth. Do not wipe the product with a hard object
such as a wire brush. Do not clean the door safety lock system.
-
WARNING Do not use a rough scrubbing agent or a sharp metal
scraper to clean the glass of the oven door, which may cause the
glass to shatter.
Always keep the door and the body joint clean
Clean accessories with warm water regularly. Do not clean with cold
water immediately after cooking for a long time.
The grease produced during cooking can corrode the chamber and
Therefore, please clean the oven cavity with a damp cloth or a cloth
dampened with a soft detergent when the chamber is fully cooled
down.
Do not wipe the oven with poor cleaning agent or corrosive, volatile
chemical solvent to avoid damage to the oven.
To avoid damaging the surfaces of your appliance, do not use:
cleaning agents containing soda, ammonia, acids or chlorides.
Cleaning agents containing descaling.
Agents abrasive cleaning agents, e.g. powder cleaners and cream
cleaners,hard, abrasive sponges and brushes, e.g. pot scourers.
Stainless steel cleaning agents.
Tips and Notes
CLEANING AND MAINTENANCE PRECAUTIONS
EN-26
CLEANING AND MAINTENANCE PRECAUTIONS
Unplug the machine and
wait for the machine to
cool down completely.
It is strictly forbidden to
immerse the steam oven
in water or other liquids.
In order to achieve the
it is recommended to clean
accessories with warm water.
Wipe the product housing
with a cloth moistened
with soft detergent, and then
wipe it with a damp cloth.
Do not use coarse scrubbing agent or sharp metal scraper to clean
the glass of the oven door, which may cause the glass to shatter.
Do not put the power cord and plug directly on the outer cover, so
as to prevent the residual heat of the outer cover from damaging the
power cord.
When the oven is at high temperature, the internal steam expands.
Due to the air pressure, it is normal to hear an air sound if the door is
use. About 10 seconds after opening the door, the oven temperature
drops slightly, and there will be no sound during door closing.
EN-27
OPERATION INSTRUCTIONS
CONTROL PANEL
1.Steam
6.Oven Light
7.Convection
8.Combi.
9.Convection Grill
10.Grill
11.Preheat
12.Pause/Cancel
2.High Temp. Steam
3.Stew
4.Auto Menu
5.Fermentation
INSTRUCTION FOR USE
EN-28
燉
7
8
9
10
11
12
1
2
3
4
5
13
6
13.Start/Confirm
MENU SUMMARY CHART
• The step quantities for the temperature of the coding switch is 5 °C
NOTE
Menu
Default
Temperature
(°C)
Default
Time(min)
Temperature
Range
Time
Range
Steam
100
80~100°C
1~120mins
1~60mins
1min-5hrs
1min-12hrs
1~120min
1~120min
1~120min
1~120min
100~140°C
35~100°C
30~45°C
100~230°C
100~230°C
100~230°C
100~200°C
15
10
30
40
30
30
30
30
130
100
35
180
180
190
180
High Temp.
Steam
Stew
Fermentation
Convention
Convention
Grill
Combi.
Grill
Description
power
Suitable for home cooking food such
as meat, steamed eggs and buns
Steaming the food in a short time
with high heat power to keep the
delicious taste of the food
Suitable for home cooking food such
as seafood, vegetables and
quick-frozen food
In this mode, less steam is visible to
eyes
Simmering food with moderate
heat power
Suitable for stews and slowly
-cooked food
Evenly distributed heat power,
cooking crispy food with golden color
There is a fan at the back of the oven
to evenly spread the heat throughout
the cavity. Giving your baked food
a golden color.
Suitable for baked meat, fried food,
baked cake, bread, etc.
Reduced oil and salt, crisp outside and
soft inside Steam is added to cook in
the process of hot air convection, which
provides water for food to be cooked
quickly, locks the internal water and
Suitable for baked vegetables, bread,
cakes and meat
Stable fermentation temperature,
temperature range: 30-45°C
Suitable for fermented dough,
yogurt, etc.
In this mode, the upper heating
element and the hot air fan on the back
work at the same time. The heat wraps
the food in all directions, speeding up
the cooking time and creating a crispy
meat that needs a crispy exterior and a
juicy interior.
The upper heating tube separately
generates heat, which is suitable for
grilling food. The goldenness and
crispness of the food can be enhanced
EN-29
1.COOKING FUNCTION-STEAM
In waiting state, turn the knob right to select
the cooking mode. 8 modes are available.
1
2
3
4
Turn the knob to set the temperature which
°C
" , the default
5
7
6
Turn the knob to set the time which should
should be within "80-100
be within "1-120minutes " , the default time
EN-30
mode.
temperature is 100
°C
.
is 15minutes.
2.COOKING FUNCTION-HIGH TEMP. STEAM
In waiting state, turn the knob right to select
the cooking mode. 8 modes are available.
Choose the "High Temp. Steam" menu,
Turn the knob to set the temperature which
°C
" , the default
Turn the knob to set the time which should
1
2
3
4
5
7
6
should be within "100-140
be within "1-60minutes " , the default time
EN-31
"High Temp. Steam" will flash.
°C
.
mode.
temperature is 130
is 10 minutes.
3.COOKING FUNCTION-STEW
In waiting state, turn the knob right to select
the cooking mode. 8 modes are available.
Turn the knob to set the temperature which
°C
" , the default
Turn the knob to set the time which should
1
2
3
4
5
7
6
should be within "35-100
be within "1min-5hrs " , the default time is
EN-32
mode.
temperature is 100
°C
.
30 minutes.
4.COOKING FUNCTION-CONVECTION
In waiting state, turn the knob right to select
the cooking mode. 8 modes are available.
Turn the knob to set the temperature which
°C
" , the default
.
Turn the knob to set the time which should
1
2
3
4
5
7
6
should be within "100-230
be within "1-120minutes " , the default time
EN-33
mode.
will flash.
temperature is 180
°C
.
is 30 minutes.

5.COOKING FUNCTION-COMBI.
In waiting state, turn the knob right to select
the cooking mode. 8 modes are available.
Turn the knob to set the temperature which
Turn the knob to set the time which should
1
2
3
4
5
7
6
should be within "100-230°C " , the default
be within "1-120minutes " , the default time
EN-34
mode.
temperature is 190°C.
is 30 minutes.
6.COOKING FUNCTION-CONVECTION GRILL
In waiting state, turn the knob right to select
the cooking mode. 8 modes are available.
Turn the knob to set the temperature which
Turn the knob to set the time which should
1
2
3
4
5
7
6
should be within "100-230°C " , the default
be within "1-120minutes " , the default time
EN-35
mode.
"Convection Grill" will flash.
temperature is 180°C.
is 30 minutes.
7.COOKING FUNCTION-GRILL
In waiting state, turn the knob right to select
the cooking mode. 8 modes are available.
Turn the knob to set the temperature which
Turn the knob to set the time which should
1
2
3
4
5
7
6
should be within 100-200°C " , the default
be within "1-120minutes " , the default time
EN-36
mode.
temperature is 180°C.
is 30 minutes.
8.COOKING FUNCTION-FERMENTATION
In waiting state, turn the knob right to select
the cooking mode. 8 modes are available.
Turn the knob to set the temperature which
Turn the knob to set the time which should
1
2
3
4
5
7
6
should be within "30-45°C " , the default
be within"1min-12hrs " , the default time is
EN-37
"Fermentation" will flash.
mode.
temperature is 35°C.
40 minutes.
9.PREHEAT FUNCTION
In waiting state, turn the knob right to select
the preheating function.
Turn the knob to set the temperature which
Turn the knob to select the cooking mode,
1
2
3
4
5
6
should be range "100-230°C " , the default
"Convection", "Combi." and "Convection Grill"
EN-38
temperature is 180°C.
are avilable.
The buzzer will sound three times to remain
that the preheating has finished, opening
and close the oven door, "Convection" will
flash, another two menus and the default
time "30:00" will display meanwhile.
7
• When the preheating temperature has not been reached
within 30 minutes, the buzzer will sound three times to
force the preheating to complete and enter the heat
preservation stage
• In heat preservation stage, if the oven door not be opened
within 60 minutes. it return to the standby state with one
buzzing sound. In the process of waiting for 60 minutes, the
NOTE
Turn the knob to set the temperature.
Turn the knob to set the time.
9.PREHEAT FUNCTION
8
10
EN-39
9
11
buzzer will sound three times every 15 seconds.
In waiting state, turn the knob right
Turn the knob to select the desired
Turn the knob to set the cook time of the
10.AUTO MENU (02-03,05-07,09-17,24,33-36)– PREHEAT
1
2
3
4
5
7
6
to select the "Auto Menu" mode.
homologous menu. (Can skip this step)
EN-40
menu. (e.g Auto Menu 02)
After the preheating is completed, the
"Preheat" light will flash to indicate that the
preheating is complete, put the food in the
oven, and then press "Start/Confirm" to start
cooking.
NOTES
In waiting state, turn the knob right to select
the "Auto Menu" mode.
10.AUTO MENU(01,04,08,18-23,25-32)– NO PREHEAT
Turn the knob to select the desired menu.
(e.g Auto Menu 01)
Turn the knob to set the time. (Can skip this step)
1
2
3
5
6
EN-41
4
爐腔預熱
" " will flash in those menu which have preheat function
when the preheating has finished.
Press "Start/Confirm" to start cooking directly between "37-40" menus
when the homologous number flashing.
Tableware disinfection (Auto Menu 37)
This function is suitable for sterilizing all kinds of tableware (heat resistance higher than 100°C).
*When using the tableware cleaning function, please make sure that the heat resistance of tableware is higher than 100°C
Cleaning
time
30 minutes
Cavity cleaning (Auto Menu 38)
Clean the oven cavity with steam and heat, which is suitable for cleaning the oven cavity after
cooking. The machine will spray steam to soften the stains, which will make it easier to wipe
the stains away.
Cleaning
time
10 minutes
Cavity deodorization (Auto Menu 39)
function to remove the residual smell from the cavity by the built-in fan.
Cleaning
time
5 minutes
10.AUTO MENU(37-40)-CLEANING
In waiting state, turn the knob right to select
the "Auto Menu" mode.
Turn the knob to select the desired menu.
(e.g Auto Menu 37)
(e.g Auto Menu 37)
Steam System Cleaning (Auto Menu 40)
Step 1 "PP1" (with citric acid) cleaning (55 minutes)
1.Put 10g citric acid into 500ml water; stir to melt the citric acid then pour it into water tank.
2.Select auto function 40 Steam System Cleaning,press " " to start steam system cleaning.
Cleaning
time
Step 2 "PP2" (water) cleaning (5 minutes)
3.When the remaining cleaning time is 5 minutes, the oven will be paused and the screen will
display "PP2" and "5:00". Please pour the water with citric acid from the water tank and
replace it with clean water.
4.Put the water tank back into the oven, press " " to start Steam System Cleaning function
*Please don't use other substances, such as detergent, except citric acid.
1
2
3
4
60 minutes
EN-42
10.AUTO MENU SETTING
Function
Function Name
Quantity
/weight
Preheat
Default
temperature
Default time
Place
A01 Roast Chicken
1100g
/
220°C
41 mins
A02
A03
A04
A05
A06
A07
A08
A09
A10
A11
Optional
time
33-49
mins
Power
lower
layer
Convection
+Combi.
French Lamb
Rack
820g
V
200°C
35 mins
28-41
mins
middle
layer
Combi.
Crispy Golden
450g
V
0°C
45 mins
36-54
mins
middle
layer
Combi.
German Pork
Knuckle
1300g
/
°C+
146 mins
117-175
mins
lower
layer
Steam
+Convection
+Combi.
Roasted Steak
with Black
Pepper
500g
V
230°C
10 mins
mins
top
layer
Convection
Baked Lobster
with Cheese
650g
V
200°C
17 mins
14-20
mins
middle
layer
Baked Scallop
with Cheese
8
V
2 °C
ins
mins
top
layer
Convection
Barbecue Pork
Ribs
500g
/
170°C
36 mins
29-43
mins
middle
layer
Grilled Cod Fish
220g
V
230°C
ins
7-11
mins
top
layer
Convection
Honey Black
Pepper Chicken
Wings
450g
V
220°C
17.5 mins
14-21
mins
middle
layer
Combi.
Shrimps
Skewers
600g
V
230°C
ins
mins
top
layer
Convection
A12
Grilled Shrimps
250g
V
230°C
7 mins
6-
mins
top
layer
Convection
A13
A14
A15
A16
A17
A18
A19
A20
A21
A22
A23
Bacon
Asparagus Roll
g
V
230°C
8 mins
7-9
mins
middle
layer
Combi.
Satay Chicken
Skewers
1000g
V
230°C
17 mins
14-20
mins
top
layer
Convection
Julienne
Vegetable-
550g
V
2 °C
ins
mins
middle
layer
Curry Chicken
Skewers
200g
V
230°C
15 mins
12-18
mins
middle
layer
Seafood Pizza
600g
V
200°C
ins
mins
middle
layer
Braised Chicken
with Chestnuts
800g
/
100°C
30 mins
24-36
mins
middle
layer
Steam
Steamed
500g
/
100°C
18 mins
15-21
mins
middle
layer
Steam
Steamed Pork
Belly with
Preserved
Vegetable
1000g
/
100°C
60 mins
48-72
mins
lower
layer
Steam
Steamed Sole
Fillet
500g
/
100°C
18 mins
15-21
mins
middle
layer
Steam
Steamed Eggs
with Crab
300g
/
100°C
10 mins
8-12
mins
middle
layer
Steam
Steamed Pork
Ribs with
Pumpkin
600g
/
100°C
18 mins
15-21
mins
middle
layer
Steam
Char Siu
170 +19
Convection
+Grill
8-12
30
9 m
7-11
9 m
10 m
8-12
8
300
10
28 m
22-34
24 m
19-29
EN-43
°C
100 +130
°C
°C°C
200 +200
Combi.
Convection
Combi.
Convection

10.AUTO MENU SETTING
Function
Function Name
Quantity
/weight
Preheat
Default
temperature
Default time
Place
A24
Steamed
Asparagus
300g
V
230°C
9 mins
A25
A26
A27
A28
A29
A30
A31
A32
A33
Optional
time
7-11
mins
Power
middle
layer
Combi.
Stewed Lamb
Chops with
Matsutake
2000g
/
100°C
90 mins
72-108
mins
lower
layer
Steam
Steamed Sea
Bass
490g
/
120°C
15 mins
12-1
mins
middle
layer
High Temp.
Steam
Pork and
Cabbage
Dumplings
500g
/
100°C
20 mins
16-24
mins
middle
layer
Steam
Pork and
Mushroom
Steamed Buns
12
/
100°C
25 mins
20-30
mins
middle
layer
Steam
Steamed
Chicken with
Sand Ginger
Powder
900g
/
110°C
40 mins
32-48
mins
lower
layer
High Temp.
Steam
Steamed Pear
with Rock Sugar
2000g
/
100°C
60 mins
48-72
mins
lower
layer
Steam
Jujube and
Ginger Juice
Steamed Cake
1200g
/
100°C
45 mins
36-54
mins layer
Steam
Sweet Green
Rice Ball
12
/
100°C
12.5 mins
10-15
mins
middle
layer
Steam
Almond Tuiles 325g
V
150°C
24 mins
mins
middle
layer
A34
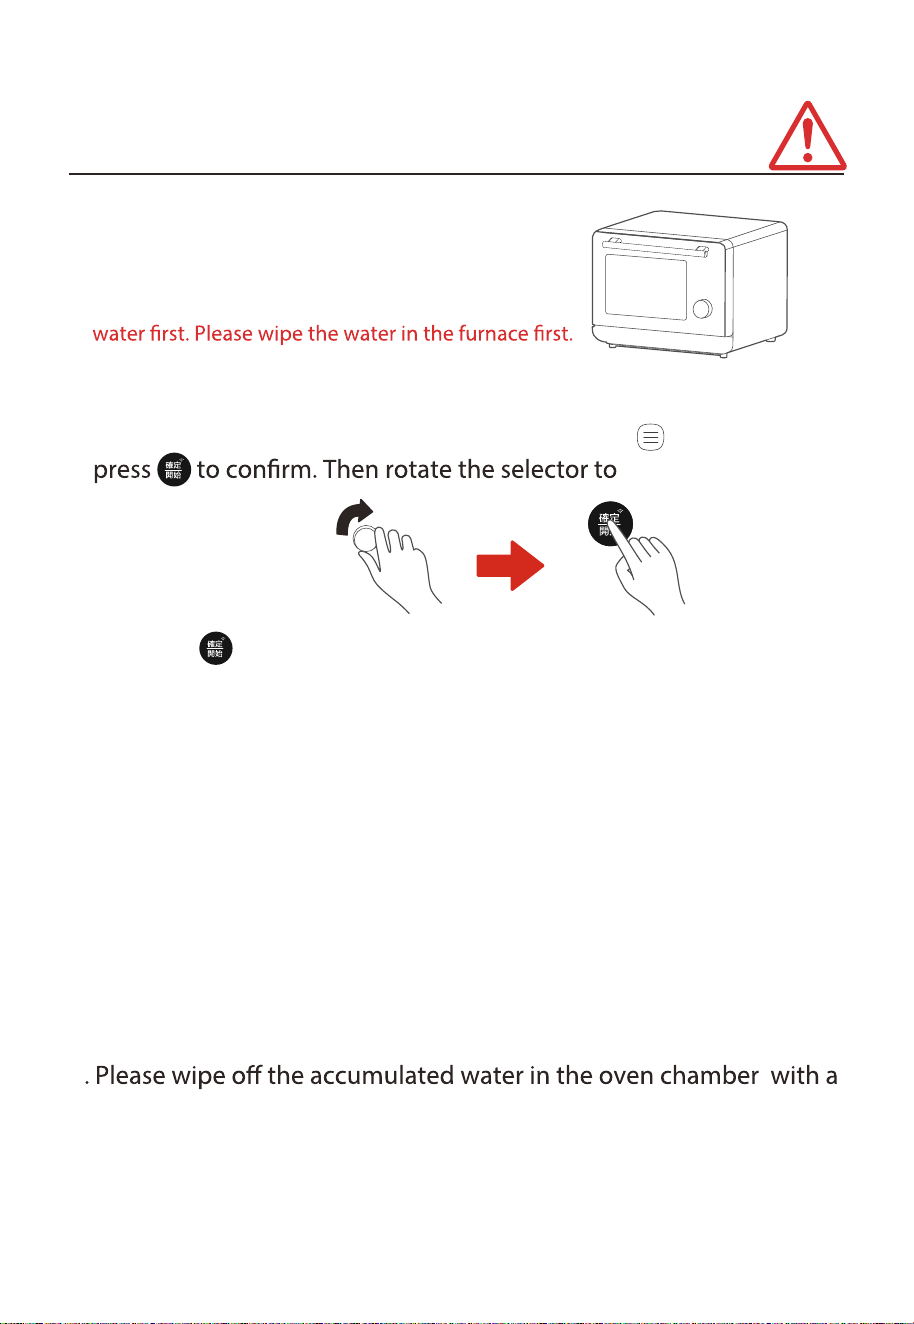
Cranberry
Cookies
450g
V
160°C
ns
mins
middle
layer
A35 Rye Bread 500g
V
210°C
ns
mins
middle
layer
A36 Cranberry Bread 400g
V
170°C
25 mins
21-29
mins
middle
layer
A37
Tableware
Disinfection
/
/
30 mins
/ / /
A38 Cavity Cleaning /
/
/
10 mins
/ / /
A39
Cavity
Deodorization
/
/
/
5 mins
/ / /
A40
Steam System
Cleaning
/
/
/
/ / /
lower
8
19-29
23 mi
18-28
21mi
17-27
60 mins
EN-44
100°C
Convection
Convection
Convection
Convection
CHILDREN LOCK FUNCTION
You can use this function to prevent children from accidentally turning
the oven on.
To activate the lock: In waiting state, press and hold " " for three seconds.
A long beep sounds and the will display.
To deactivate the lock: In locked state, press and hold "
" for three seconds.
One short beep sounds and the locked icon will disappear.
OVEN LIGHT
oven lamp, so that you can observe the food in the oven at any time.
1
2
Pause/Cancel
Pause/Cancel
EN-45

Selection
process
During the function selection process, if the oven is left idle for 5
minutes,the selection process will be canceled.
Standby
mode
In the standby mode, the oven is left idle for 5 minutes, the whole
To activate the oven to the standby mode, rotate the knob “ ”,
press any of the functions or open the oven door.
Oven
overheat
If “F01”appears, it indicates that the oven chamber temperature is
higher than the functional temperature range, and the product can
be used only after it is cooled down.
If “F02” appears
water box is short of water or not installed in place.Please add
water to clean water box until reach "MAX" line, then reload the
water box to the oven to continue cooking process.
Water
shortage
SIGNAL INDICATION
, and 5 beep sounds, it indicates that the clean
EN-46
escape.
Please install/remove the seal carefully; otherwise, steam may leak.
Be sure to install the seal before using the oven.
OTHER IMPORTANT TIPS
When baking food in the oven, please spread tin foil on the baking
tray, and then put the food on it. Please do not directly stain the
baking tray with acidic substances, such as vinegar, lemon and juice.
After using of the steaming function, it is recommended to open the
oven door, which is helpful to remove the accumulated water.
The oven door seal is designed to be removable. If water drops or
food residues get stuck in the oven door seal, please remove the seal
carefully, wipe it with a soft cloth after wringing out the moisture,
wipe it clean, and then put it back.
Warning
Steam might leaks out from all four sides of the oven door.When a
function related to steam is used, a lot of steam are generated in the
oven cavity during operation of the product. Some steam may leak
from all four sides of the oven door. It is normal.
1
2
3
EN-47

Check your problem by using the chart below and try the solutions for
each problem.
TROUBLESHOOTING
Trouble
Possible Cause
Oven will not
a.Electrical cord for oven is not plugged in.
b.Door is open.
c.Wrong operation is set.
a.Plug into the outlet.
b.Close the door and try again.
c.Check instructions
Arcing or
Possible Remedy
a.Materials to be avoided in microwave oven
were used.
b.The oven is operated when empty.
c.Spilled food remains in the cavity.
a.Use microwave-safe
cookware only.
b.Do not operate with oven
empty.
c.Clean cavity with wet towel.
Unevenly
a.Materials to be avoided in microwave
oven were used.
b.Food is not defrosted completely.
c.Cooking time, power level is not suitable.
d.Food is not turned or stirred.
a.Use microwave-safe
cookware only.
b.Completely defrost food.
c.Use correct cooking time,
power level.
d.Turn or stir food.
Overcooked
Cooking time, power level is not suitable.
Use correct cooking time,
power level.
Undercooked
a.Materials to be avoided in microwave
oven were used.
b.Food is not defrosted completely.
c.Oven ventilation ports are restricted.
d.Cooking time, power level is not suitable.
a.Use microwave-safe
cookware only.
b.Completely defrost food.
c.Check to see that oven
venti-lation ports are not
restricted.
d.Use correct cooking time,
power level.
Improper
a.Materials to be avoided in microwave
oven were used.
b.Cooking time, power level is not suitable.
c.Food is not turned or stirred.
a.Use microwave-safe
cookware only.
b.Use correct cooking time,
power level.
c.Turn or stir food.
Sensor cooked
a.Cover or lid on food not vented.
b.Door opened before sensor-detected
cooking time appears in display.
a.Cover or lid over food must
contain vent hole for escaping
steam.
b.Do not open door to stir or
turn food before sensor-
detected cooking time appears
in display.
foods not
cooked foods
start
sparking
foods
foods
defrosting
properly cooked
EN-48
MAINTENANCE
Volume
Rated voltage/
frequency
Convection
power
Steam power
220-230V~50Hz
1550-1700W
1500-1600W
Combination
Overall dimensions
(width x depth x height)
Oven cavity dimensions
(width x depth x height)
410x325x230 mm
Product videos
PRODUCT PARAMETERS
472x465x375 mm
30L
1550-1700W
EN-49
1500-1600W
Grill power
The product dimensions are width × depth × height, and the overall depth
includes the length of handle and back plate stretching length, and the height
value includes oven foot.
The dimensions of the oven cavity includes the stretching length, and the cavity
volume is obtained by multiplying the width, depth and height. Due to the
parameters and labeled data, with a deviation range of ±12%.
As our products are constantly improving, the physical parameters may be
1
2
3
PN:16170000A95113

#
Details
Matter
