

OWNER’S MANUAL AND SAFETY INSTRUCTIONS
PORTABLE MOBILITY SCOOTER
ITEM # 99680 BLUE / 99681 RED
SAVE THIS MANUAL. KEEP THIS MANUAL FOR SAFETY WARNINGS, PRECAUTIONS, ASSEMBLY,
OPERATION, INSPECTION, MAINTENANCE AND CLEANING PROCEDURES. WRITE THE PRODUCT’S
SERIAL NUMBER ON THE BACK OF THE MANUAL, OR THE MONTH AND YEAR OF PURCHASE IF
PRODUCT HAS NO SERIAL NUMBER
FOR QUESTIONS, PLEASE CALL CUSTOMER SERVICE: 909.628.0880

SAFETY WARNINGS
Read all safety warnings and instructions. Failure to follow the warnings and instructions
may result in injury and/or property damage. Save all warnings and instructions for
future reference.
The warning and safety instructions in this manual are not meant to cover all possible conditions and
situations that may occur. Common sense, caution and care must be exercised when operating or
cleaning tools and equipment. Always contact your dealer, distributor, service agent or manufacturer
about problems or conditions you do not understand before operating the product.
1
• Avoid knock or bumping the tiller console and scooter components.
• Avoid exposure of your scooter to extreme conditions such as hot or cold temperatures and moisture.
• Keep the tiller console clean and dry.
• Check all connectors to ensure that they are tight and secured properly.
• Check all electrical connectors including the charger’s connectors. Make sure they are all tight and
are not corroded. Batteries must sit at in the battery tray with the battery terminals facing each other;
not backwards.
• When you are nished daily usage, please pull out the key to reduce unnecessary consumption of
the power.
• This product has a power saving feature. When the scooter is powered on and has not been used
for 20 minutes, the power will shut off automatically. To turn the scooter back on when this happens,
remove and reinsert the key.
• The body shroud has been sprayed with a clear sealant coating, and you can apply a light coat of
car wax to help it retain it high-gloss appearance.
• All wheel bearings are pre-lubricated and sealed. They request no subsequent lubrication.
• Always use discretion when operating your scooter. Do not subject the scooter do conditions you are
unsure if it can perform in. If the conditions are questionable, do not attempt or damage to the scooter
and personal injury may occur.
• This scooter is designed to hold only one rider. Do not attempt in any situation to put a second rider,
even a child, on the scooter with you.
• The scooter has a maximum weight capacity of 300 LBS. Do not under any circumstances exceed
this weight capacity.
WARNING! Do not modify your Mobility Scooter in any way not authorized by XtremePowerUSA. Do not
use accessories if they have not been tested or approved for XtremePowerUSA Products.
WARNING! Do not attempt to lift or move your Travel Scooter by any of its removable parts, including
the armrests, seat, or shroud.
WARNING! Do not use your scooter in manual freewheel mode without an attendant present. Failure to
do so may cause personal injury.
WARNING! Do not attempt to place your scooter in manual freewheel mode while seated on it, or while
on an incline. Personal injury may result.
WARNING! When climbing up an incline, do not zigzag or drive at an angle up the face of an incline.
Drive your scooter straight up the incline. This greatly reduces the possibility of a tip or a fall. Always
exercise extreme caution when negotiating an incline. Don’t drive up or down a potentially hazardous
incline (areas covered with snow, ice, cut grass, wet leaves etc.).
WARNING! Do not operate your scooter on slippery roads with ice or snow. Failure to do so may cause
personal injury and affect the performance of you scooter.

SAFETY WARNINGS SAFETY WARNINGS
1 2
WARNING! Never drive down an incline backwards. This can cause personal injury and damage to the
scooter.
• The maximum incline capable for this scooter is 8º. If a slope is less than this angle, it is safe for your
scooter to climb.
WARNING! The maximum incline capable for this scooter is 8º. If an incline over this maximum rating
is attempted, the scooter may tip or fail which can result in personal injury and/or damage to your
scooter.
• Your scooter is designed to provide optimum stability and performance under normal driving
conditions-dry level surfaces composed of concrete, blacktop, asphalt, or hard dirt. Avoid driving on
the following road:
1.) Surfaces that you feel unsure about or soft pavement.
2.) Tall grass that can become tangled in the running gear.
3.) Loosely packed gravel and beach sand.
WARNING! Do not use your scooter in manual freewheel mode without an attendant present. Failure to
do so may cause personal injury.
WARNING! Do not attempt to place your scooter in manual freewheel mode while seated on it, or while
on an incline. Personal injury may result.
• Electrical devices may be affected by Electromagnetic Interference (EMI) or Radio Frequency
Interference (RFI) that are produced by radio waves from radio stations TV stations and other radio
transmitters. Like any electrical devices, your scooter may be affected by EMI/RFI, especially when
your scooter is driven in the interference inuence range of these radio transmitters. In this case, your
scooter may be out of order due to their interferences.
WARNING! If unintended motion occurs due to EMI/RFI, please immediately return turn your scooter off
and contact your authorized provider. We are not liable for any damage and/or injuries due to failure
to do so.
• To avoid an injury, follow the safety precautions below when you are getting on or off your scooter.
1.) Remove the key from the key switch (ignition).
2.) Ensure your scooter in not in the manual freewheel mode.
3.) Flip up or move away the armrest.
4.) Reduce the distance between you and the scooter.
WARNING! Avoid putting all your weight on the footplate. Such use may cause your scooter to top,
resulting in personal injury.
WARNING! Before transferring, position yourself as far back as possible in the scooter seat to prevent
the scooter from tipping and causing injury.
WARNING! Avoid putting all your weight on the armrests. Failure to do so may cause your scooter to tip
or the armrest to break, resulting in personal injury or damage to the scooter.
WARNING! Do not expose your scooter to any type of moisture at any time (rain, snow, mist or wash).
Such exposure will damage your scooter. Never operate your scooter if it has been exposed to moisture
until it has been dried thoroughly.
SPECIFICATIONS / TROUBLESHOOTING
3
ASSEMBLY
PARTS INFORMATION
4

SPECIFICATIONS / TROUBLESHOOTING
ASSEMBLY
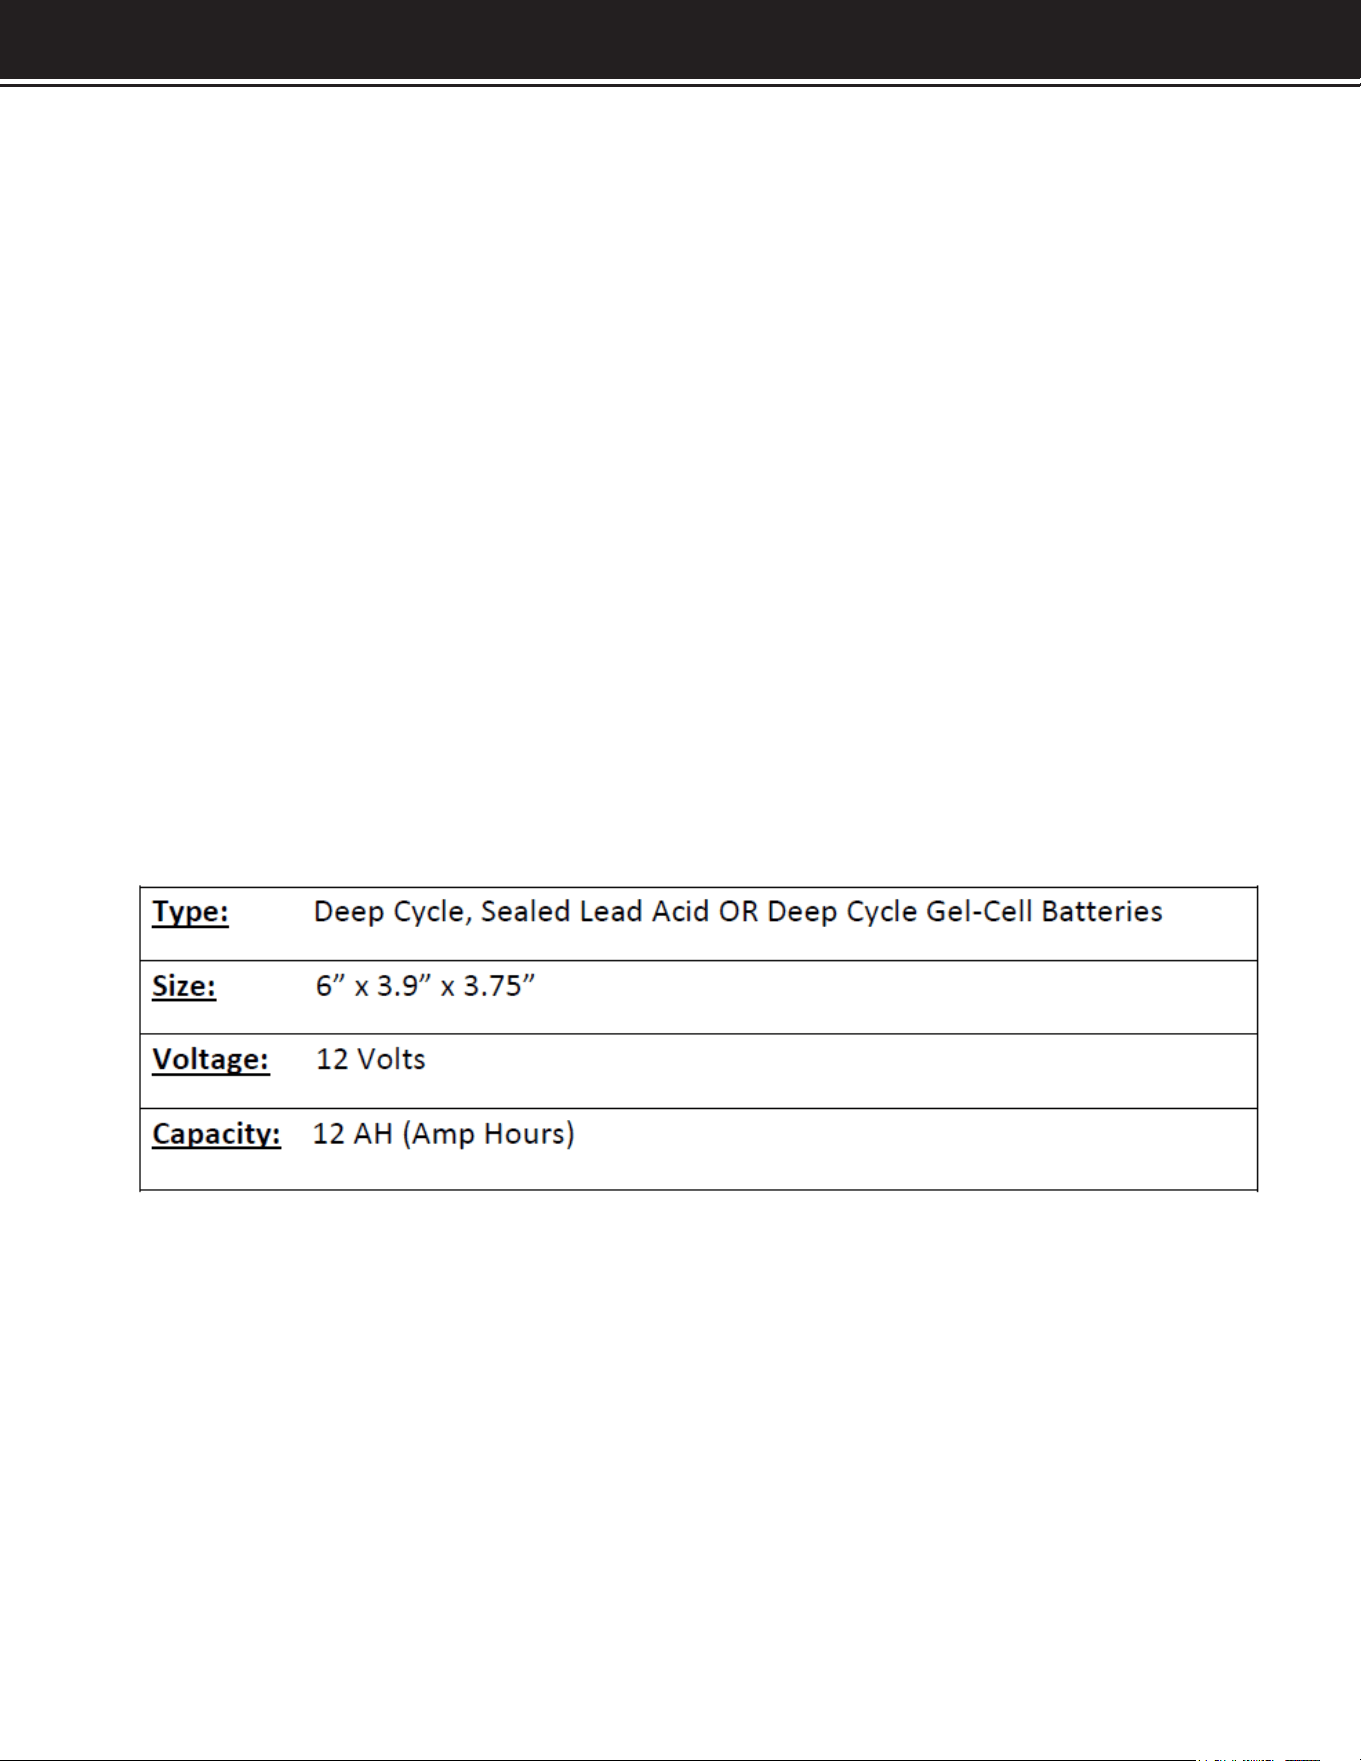
TECHNICAL SPECIFICATIONS
4
SPECIFICATIONS / TROUBLESHOOTING
5
ASSEMBLY
ASSEMBLY
6
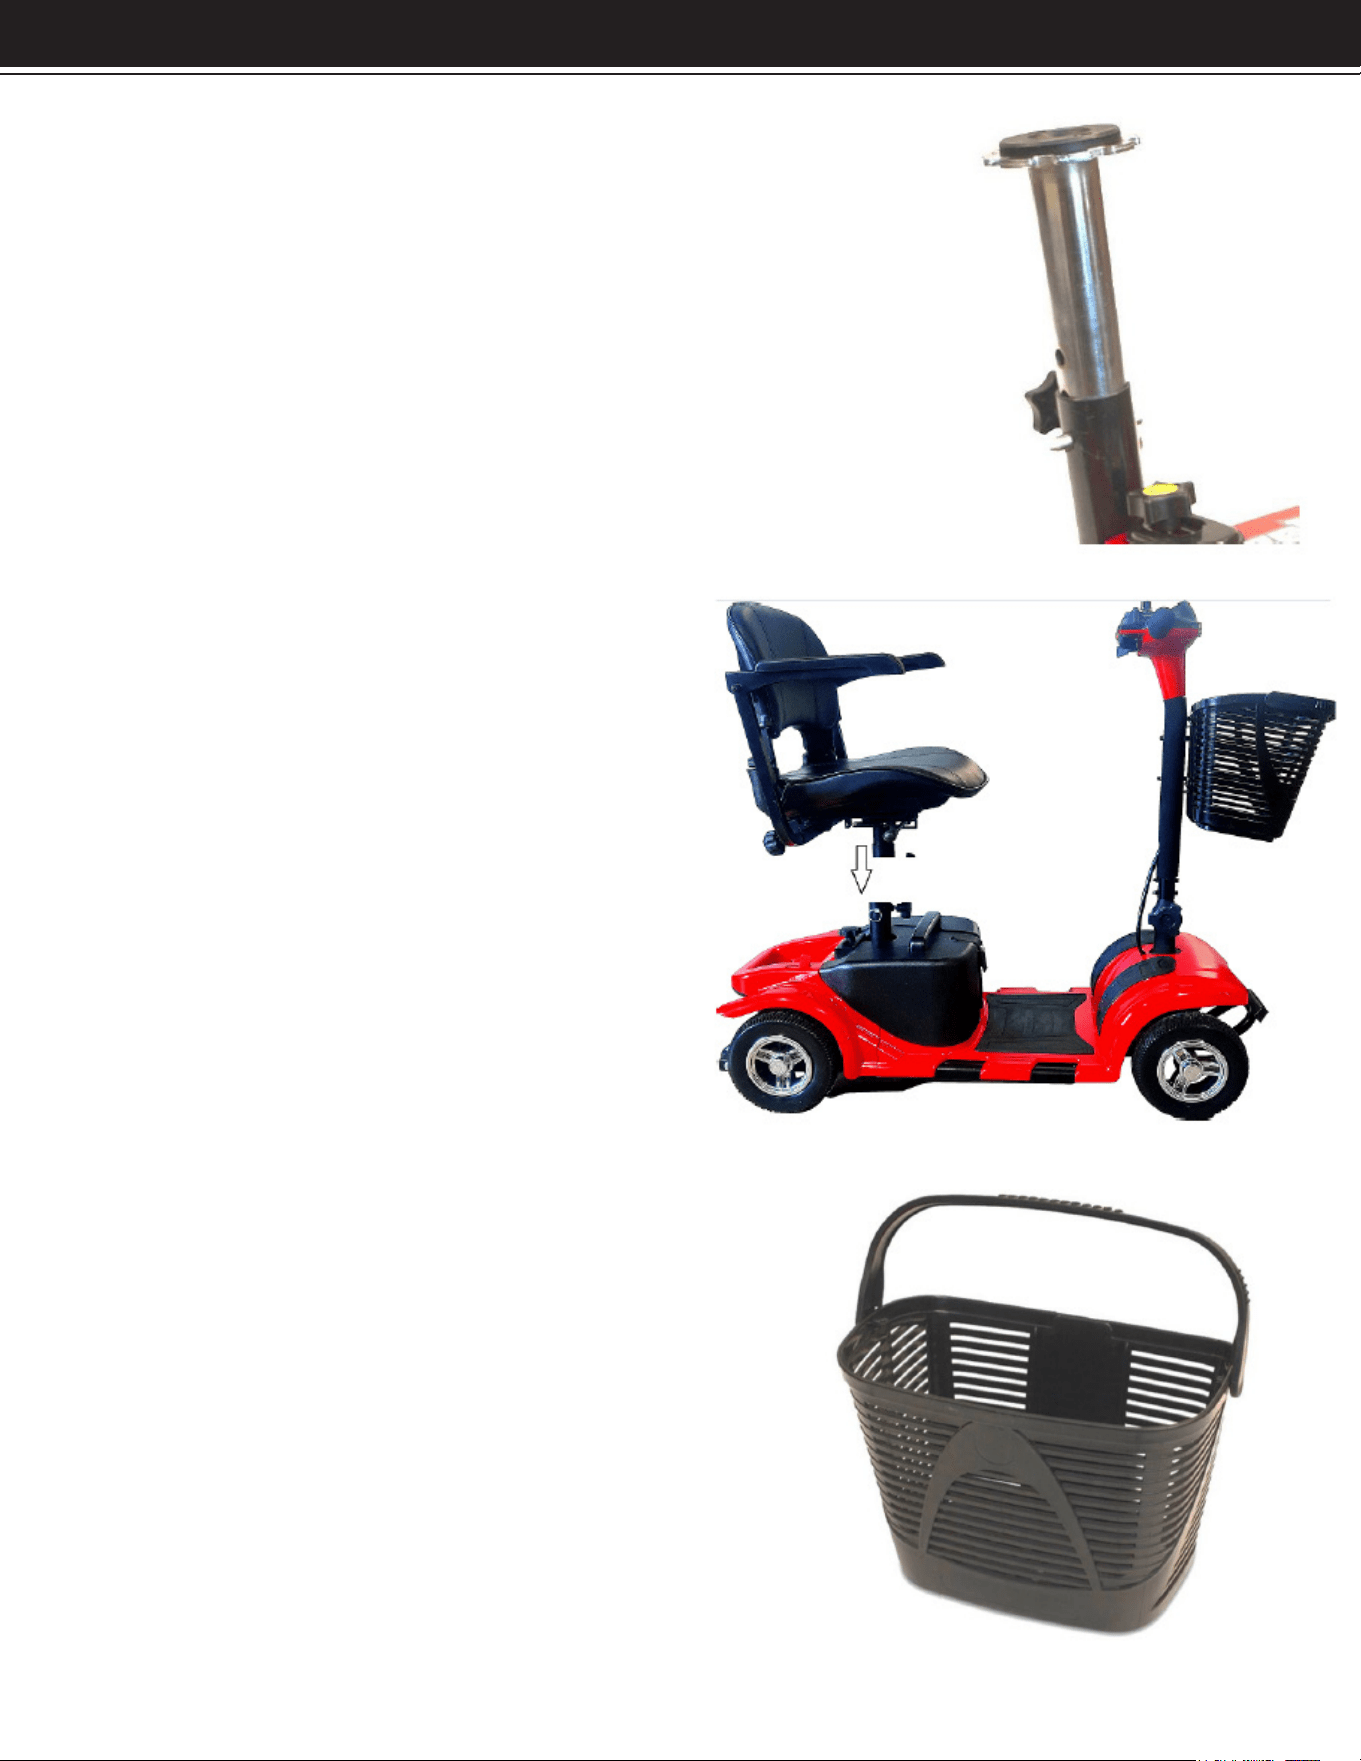
Installing the Seat Post
1.) Place the seat post into the frame of the back half.
2.) Place the seat post securing pin through a hole in the
silver seat post and through the black seat post holding
frame.
3.) Tighten the post securing and stabilizing knob on to
nish securing.
Installing the Seat Post
1.) Place the seat post into the frame of
the back half.
2.) Place the seat post securing pin
through a hole in the silver seat post
and through the black seat post holding
frame.
3.) Tighten the post securing and
stabilizing knob on to nish securing.
Installing the Basket
1.) Unwrap basket from plastic
2.) Slide Basket onto handlebar bracket.
3.) Ensure the basket tab is locking the
basket in place.

ASSEMBLY
6
Installing the Battery Pack
1.) Check that the battery securing knob is
loose, and the battery securing plate is facing
vertically with the body of the scooter.
2.) Place the battery pack on the scooter.
3.) Turn the battery securing plate horizontal
over the top lip of the battery pack.
4.) Tighten down the battery
securing knob.
Front Half to Back Half Connection
1.) The scooter will come with the front and back half already connected. See steps
for disassembly under disassembly section of manual.
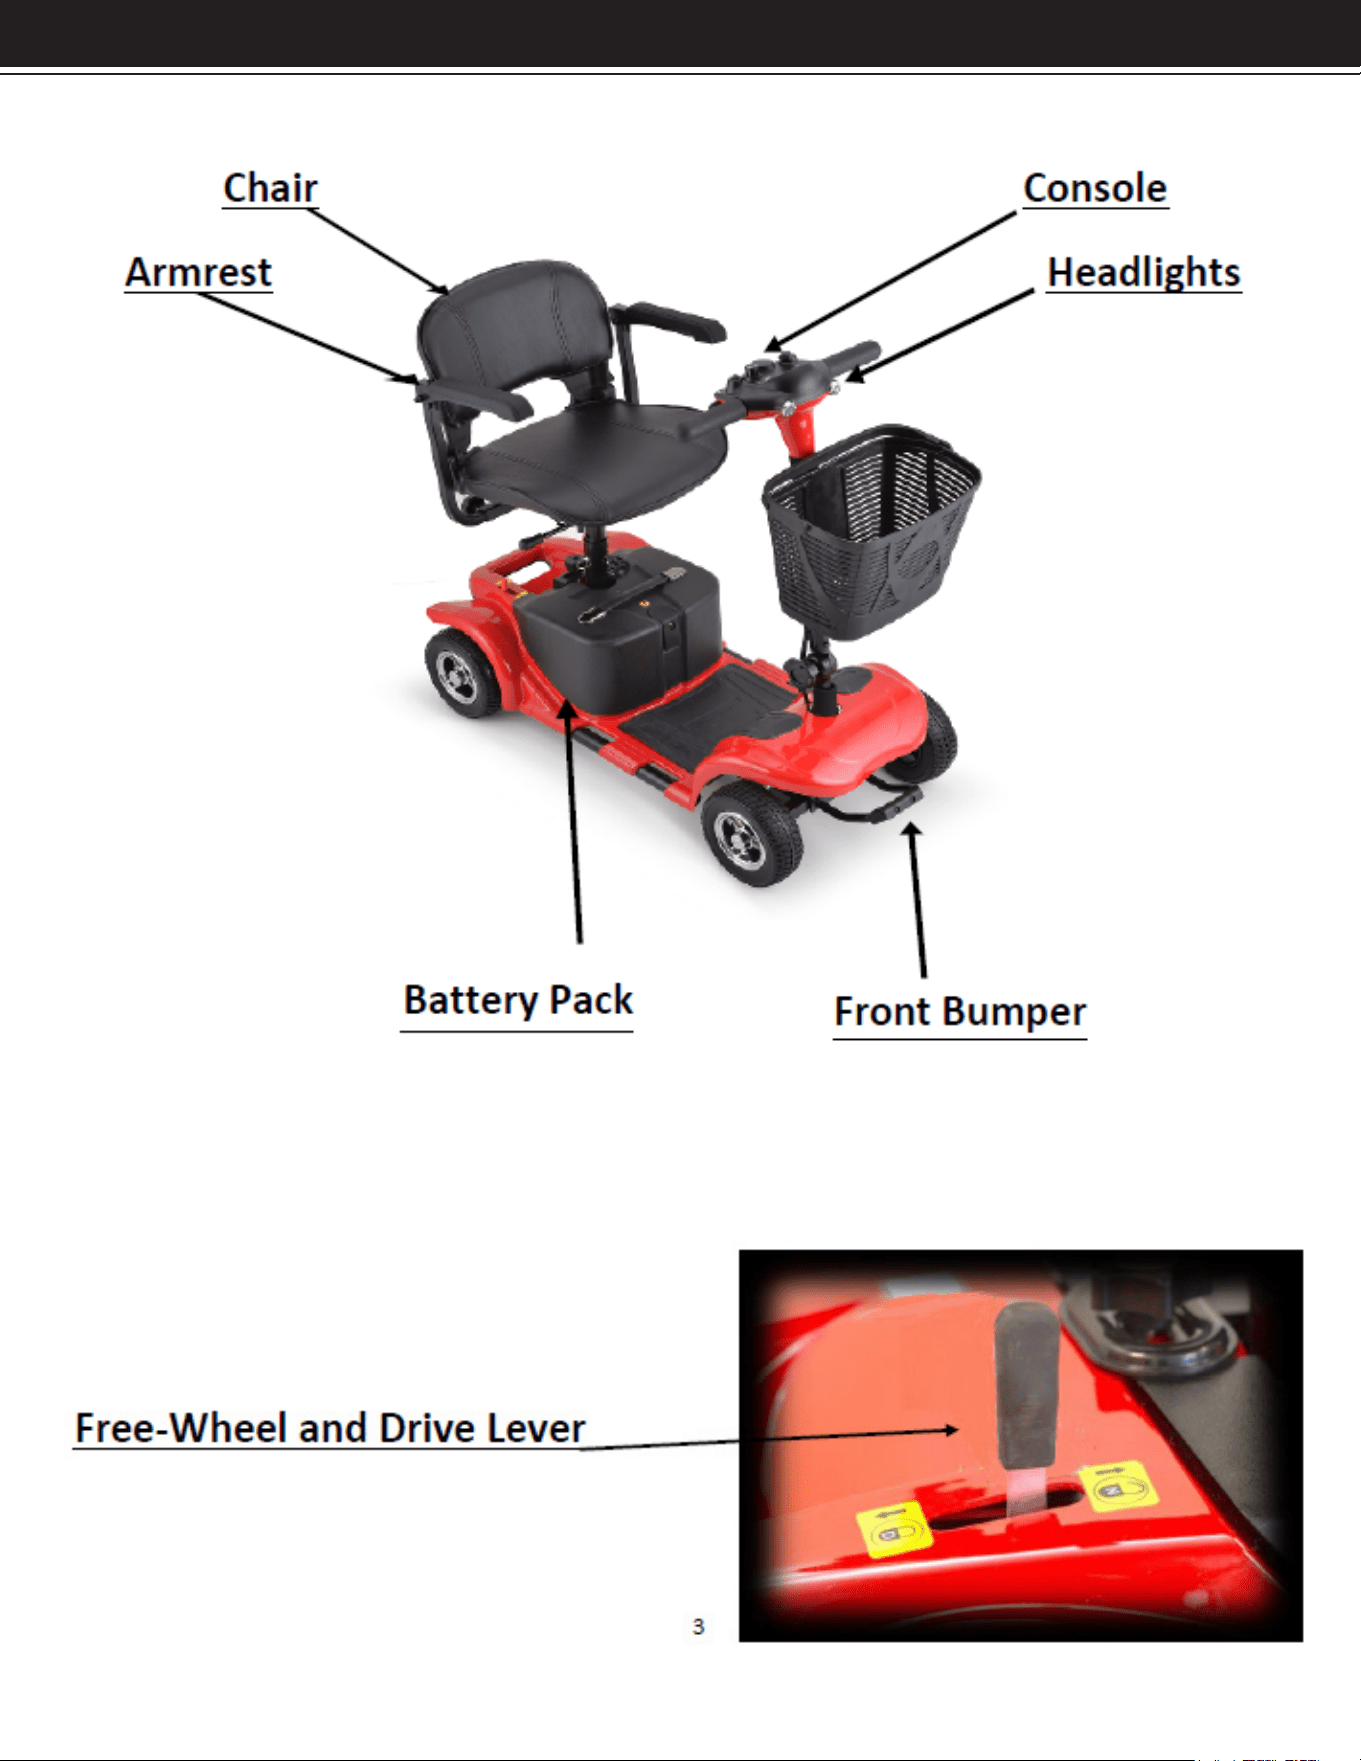
Main Scooter Components:
SPECIFICATIONS / TROUBLESHOOTING
ASSEMBLY
DISASSEMBLY
Remove the basket, seat, and seat post the same way there were installed on the
scooter. See below for steps of disconnecting the front half of the scooter from the
back half of the scooter.
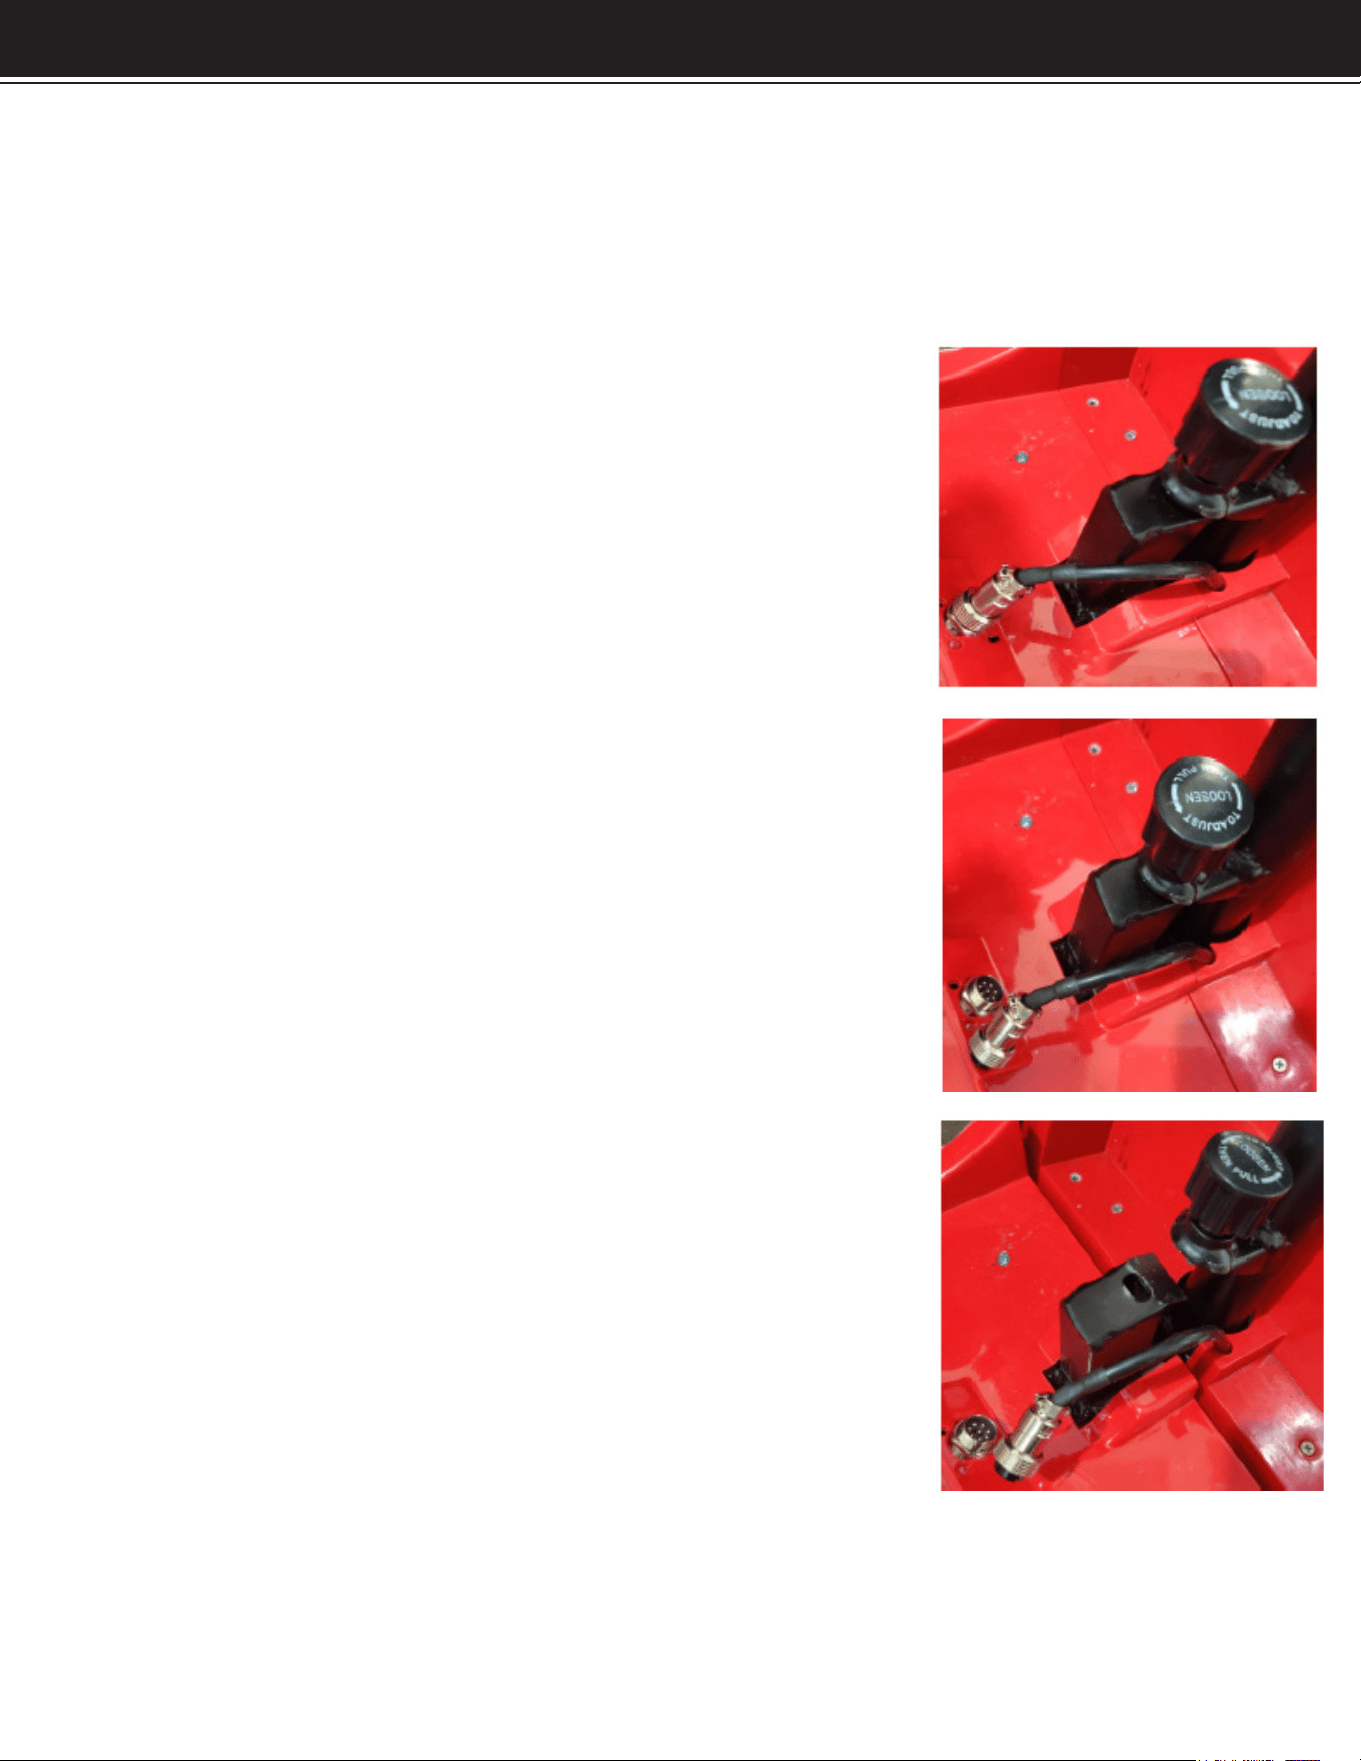
Steps for Frame Separation
1. Spin the securing washer for the power supply
cable counter clockwise to loosen until it is loose
from the threads.
2. Pull the power supply cable out of the socket
where it plugs into and set aside in a way that it
will not get pinched when the frame pieces are
separated.
3. Separate the two frame components from each
other. When reinstalling, make sure the black side
frame guides line up.
Warning!
Pull out power key before making any adjustments;
never do it while driving or with the scooter power
turned on.
7

DISASSEMBLY
Adjusting Seat Height
• Pull up the seating xing bar to release the seat.
• Remove the seat from the seat post.
• Loosen the seat post securing and stabilizing knob.
• With one hand hold the silver seat post, and the with other hand remove the seat
post securing pin.
• Adjust to desired position.
Seat Rotations
• Pull up the seat lock lever to release the seat.
• Rotate the seat to the desired position.
• Release the seat lock lever and the seat will automatically lock in place.
Armrest Width Adjustment
• Find the armrest securing knobs on the frame of the seat where the armrest brackets
attach to the scooter.
• Loosen the securing knob on the desired side.
• Adjust the armrest to the desired position.
• Retighten the armrest securing knobs.
Tiller Angle Adjustment
• Loosen the front tiller securing knob.
• Adjust the tiller to the desired position.
• Retighten the tiller securing knob.
Charging and Battery Information:
WARNING!
Your scooter must be charged with the off-board charger supplied by Dealers. Do not
use aftermarket or automotive charger for you scooter.
Charging Batteries with the Off-Board Charger
Positon the scooter or the battery pack (if removed from the scooter) close to a
standard wall outlet.
Lift the charger port covering door on the battery pack.
If installed on the scooter, ensure the scooter is turned off.
Plug the charger cord into the baeries 3-pin charger port.
Plug the charger cord into the standard wall outlet.
The blue light indicates the scooter is charging.
When the recharge is completed, the charger light will turn green. You
can continue to charge the battery for 1 to 2 more hours.
7 8
SPECIFICATIONS / TROUBLESHOOTING
ASSEMBLY
DISASSEMBLY
It is not recommended to charge the batteries for more than 12 hours. When the charge
is complete, unplug the charger from the standard wall outlet before unplugging the
charger from the battery pack. The battery pack can be charged while on the scooter,
or while removed.
New Battery Usage
-Please follow the steps below to efciently break-in the new batteries.
• Fully charge the new batteries prior to initial use. This allows for 90% battery
performance upon rst use.
• Move slowly at rst, and do not travel too far until you are aware of the capable
driving distance based on the battery indicator.
• Recharge the batteries again fully after rst ride. This will allow over 90% battery
performance on the following ride.
• After approximately four to ve more charging cycles, the batteries will allow for
100% battery performance.
If the batteries need to be replaced, please contact your delear to buy new
replacement batteries.
9 10

OPERATION
Tiller Console
The tiller console houses all the controls needed to drive the scooter, including the
key switch, speed adjustment knob, delta throttle lever, battery charge indicator,
horn button and headlight button.
Key Switch
Push the key into the key hole on the tiller and push downwards to turn on the scooter.
WARNING!
Turn the scooter power off when stopped to avoid unintended motion that may occur
by accidentally hitting the delta throttle.
Horn Button
• This button activates a warning horn when pushed.
• The horn will only sound when the button is being pushed.
Delta Throttle Lever Scooter Operation:
This lever allows you to control the forward and reverse speeds of your scooter up to
the maximum speed preset with the speed adjustment knob.
• Pull the ride side of the delta throttle lever towards you to disengage the brakes
and make the scooter start moving forwards. Conversely, the scooter starts moving
backwards if you push the right side of the delta throttle lever forwards.
• Pull the left side of the delta throttle lever towards you to disengage the brakes
and make the scooter start moving backwards. Conversely, the scooter starts moving
forwards if you push the left side of the delta throttle lever forwards.
• The more the delta throttle lever is pulled or pushed, the faster the scooter will travel.
• When you release the delta throttle lever completely, it automatically returns to the
primary (stopped) position and engages the scooter’s brakes to slow the scooter until
it comes to a complete stop.
WARNING!
If your scooter experiences unintended motion, please release the delta throttle
control immediately. The scooter will automatically come to a stop unless the lever is
out of order.
Speed Adjustment Knob
This knob determines the top speed the scooter can travel when the delta throttle
paddle fully pulled. The maximum forward speed is 3.7 MPH, and the maximum reverse
speed is 2.2 MPH.
WARNING!
Until you are completely aware of how the scooter operates and performs, keep the
speed adjustment knob to the lowest position.
9 10

SPECIFICATIONS / TROUBLESHOOTING
ASSEMBLY
OPERATION
Battery Charge Indicator
• When the scooter is turned on, this indicator will show the remaining charge the
scooter has. The green indictor lights show the current charge level. There are three
different colors ranges: red, yellow and green.
• Green – This is the full charge range for the scooter.
• Yellow – This is the half charge range for the scooter.
• Red – This is the low charge range.
• When the remaining battery lights are in the red range, we recommend recharging
the scooter as soon as possible.
Headlight Button
• Push the lights button to activate the headlights.
• Push the button again to turn off the headlights.
Overload Protector
• The overload protector is a safety device.
• When an overload occurs, this protector automatically trips to protect the motor and
other electronic devices.
• When the protector trips, the scooter will be powered down immediately.
• If tripped, wait at least one minute before pushing the button on the protector to turn
the scooter power back on.
• The protector is located on the battery pack, right by the charger port.
Free-Wheel and Drive Lever
• The is a lever underneath the seat (shown on page 3) that will allow for the machine’s
brakes to engage, or disengage.
• When the lever in towards the closed pad lock symbol, the electric brakes are
engaged.
• When the lever in towards the open pad lock symbol, the electric brakes are
disengaged and the machine can be pushed freely.
CAUTION!
1.) When the scooter is in free-wheel mode, the brake system is disengaged, and the
functions of the delta throttle paddle are inhibited by the control system. Meanwhile,
the horn sounds
while the power is on when in free-roll mode.
2.) Never use your scooter in free-wheel mode without your attachment. Failure to do
so may cause personal injury.
3.) Never put your scooter in free-wheel mode on any incline or decline. Failure to do
so may cause damage and personal injury.
11 12
OPERATION
WARNING!
When trying to drive the scooter, the free-roll and drive lever must be in the drive
position. If the lever is in free-roll mode, the braking system will not function and may
cause personal injury or damage to the scooter.
3-Pin Charger Socket
• This socket is used to connect the charger.
• While the scooter is charging, the socket connection will not allow the machine to
drive.
WARNING!
A wrong connection may cause damages to the charger, connectors and electronics.
Pre-Ride Safety Checklist
• Check all electrical connections. Make sure they are tight and not corroded.
• Check the brakes. Make sure they are sensitive and reliable.
• Check the battery charge level.
12

SPECIFICATIONS / TROUBLESHOOTING
ASSEMBLY
OPERATION OPERATION
General Guidelines:
• Avoid knock or bumping the tiller console and scooter components.
• Avoid exposure of your scooter to extreme conditions such as hot or cold temperatures
and moisture.
• Keep the tiller console clean and dry.
• Check all connectors to ensure that they are tight and secured properly.
• Check all electrical connectors including the charger’s connectors. Make sure they
are all tight and are not corroded. Batteries must sit at in the battery tray with the
battery terminals facing each other; not backwards.
• When you are nished daily usage, please pull out the key to reduce unnecessary
consumption of the power.
• This product has a power saving feature. When the scooter is powered on and has
not been used for 20 minutes, the power will shut off automatically. To turn the scooter
back on when this happens, remove and reinsert the key.
• The body shroud has been sprayed with a clear sealant coating, and you can apply
a light coat of car wax to help it retain it high-gloss appearance.
• All wheel bearings are pre-lubricated and sealed. They request no subsequent
lubrication.
• Always use discretion when operating your scooter. Do not subject the scooter do
conditions you are unsure if it can perform in. If the conditions are questionable, do
not attempt or damage to the scooter and personal injury may occur.
• This scooter is designed to hold only one rider. Do not attempt in any situation to put
a second rider, even a child, on the scooter with you.
Outdoor Driving Surfaces
• Your scooter is designed to provide optimum stability and performance under normal
driving conditions-dry level surfaces composed of concrete, blacktop, asphalt, or
hard dirt. Avoid driving on the following road:
1.) Surfaces that you feel unsure about or soft pavement.
2.) Tall grass that can become tangled in the running gear.
3.) Loosely packed gravel and beach sand.
Manual Freewheel Mode
• Your scooter is equipped with a manual freewheel lever that allows the scooter to
be manually pushed by your attendant. For more information, please visit page 17-18.
WARNING!
Do not use your scooter in manual freewheel mode without an attendant present.
Failure to do so may cause personal injury.
13 14

OPERATION
• Electrical devices may be affected by Electromagnetic Interference (EMI) or Radio
Frequency Interference (RFI) that are produced by radio waves from radio stations TV
stations and other radio transmitters. Like any electrical devices, your scooter may
be affected by EMI/RFI, especially when your scooter is driven in the interference
inuence range of these radio transmitters. In this case, your scooter may be out of
order due to their interferences.
WARNING!
If unintended motion occurs due to EMI/RFI, please immediately return turn your
scooter off and contact your authorized provider. We are not liable for any damage
and/or injuries due to failure to do so.
When Transferring On Or Off Scooter
• To avoid an injury, follow the safety precautions below when you are getting on or
off your scooter.
1.) Remove the key from the key switch (ignition).
2.) Ensure your scooter in not in the manual freewheel mode.
3.) Flip up or move away the armrest.
4.) Reduce the distance between you and the scooter.
WARNING!
Before transferring, position yourself as far back as possible in the scooter seat to
prevent the scooter from tipping and causing injury.
WARNING!
Avoid putting all your weight on the armrests or footplate. Failure to do so may cause
your scooter to tip or the armrest to break, resulting in personal injury or damage to
the scooter.
WARNING!
If unintended motion occurs due to EMI/RFI, please immediately return turn your
scooter off and contact your authorized provider. We are not liable for any damage
and/or injuries due to failure to do so.
13 14

SPECIFICATIONS / TROUBLESHOOTING
ASSEMBLY
OPERATION
General Operation - Mirrors
If your scooter is equipped with mirrors, orient them so that you can see behind you.
Orient the mirrors while sitting on the scooter but while the scooter is not moving and is
not in operation. Never attempt to adjust the mirrors while operating the scooter. Proper
orientation of the mirrors should allow you to see behind you and should minimize
blind spots.
General Operation – Lights and Signals
If your scooter is equipped with headlights and turn signals, use them. Using headlights
at night, and even at day, increases your visibility to other vehicles. Using turn signals
provides warning to vehicle and pedestrian trafc near you.
General Operation – Driving Outdoors
Your scooter is designed to be driven on clean, even, dry surfaces. We does not
recommend you store your scooter outdoors. Your scooter is susceptible to damage
to electronic, mechanical, or other components if exposed to water. If you are caught
outside during inclement weather, seek shelter or ask someone for assistance.
Always ensure that the power is switched off when getting on or off the scooter. Never
attempt to mount or dismount the scooter if it is operational or moving. Do not switch
the power off when the scooter is still moving forward or in reverse. Always check that
the variable speed switch is set to the desired speed setting. Always check that the
desired direction of forward or reverse travel is selected when ready to drive.
General Operation – Public Roads
31
Unless specically permitted or authorized by the state, do not drive your scooter on
public roads. If you need to drive along a public road, use the sidewalk adjoining the
road. Always use care when driving near to or around public roads, as you may be less
visible to motor vehicles when riding the scooter because of your smaller relative size
and slower relative speed. Always be aware of state and local rules of trafc, and take
those rules into account when operating your scooter; it is your responsibility to know
those rules, obey them, and understand how other trafc will operate in accordance
with such rules. we recommends that you gain your rst experiences with your scooter
well away from public roads, so that you can learn and understand how the scooter
operates and handles in a comfortable and quiet environment.
General Operation – Alternate Surfaces
Do not drive your scooter onto stairs or escalators; serious injury will result. Do not
attempt to drive your scooter onto stairs or escalators. Most elevators are safe for use
with the scooter. When confronted with stairs or escalators, navigate to the closest
elevator instead. Conduct a visual inspection and assess the quality and condition of
the elevator before using it. Use care; some elevators have awkward entrance angles
that can make ingress and egress difcult.
15 16

OPERATION
General Operation – Curbs
Curbs generally are formed in two manners: abrupt, vertical curbs and gradual, smooth
curbs. Your scooter cannot drive over or off of an abrupt, vertical curb. Do not attempt
to do so, as this will cause serious damage to your scooter and likely injury to yourself.
Do not drive over a curb or object exceeding 4 inches in height. Your scooter can
drive over most gradual, smooth curbs. Approach such curbs head-on, so that the
scooter is oriented perpendicular to the curb. Consistently apply speed over the curb
until the rear wheels of the scooter have moved just past the curb. Do not approach
the curb at an oblique angle; doing so can increase the risk that your scooter tips
over. Likewise, when moving down a curb, approach the curb perpendicular to it and
not at an oblique angle. Avoid stopping completely when going over small objects,
curbs, or other obstacles and obstructions.
General Operation – Incline Control
Your scooter can handle a wide range of inclines and declines. The scooter is safe
for operation on most handicap-accessible ramps. However, do not use the scooter
on inclines of a degree which makes operation of the scooter difcult; if the scooter
does not readily climb the incline, move off of the incline and/or ask for assistance.
Likewise, do not use the scooter on declines of a degree which makes operation of
the scooter difcult; if the scooter moves too quickly on an incline, fully apply the
brakes, move off of the decline, and/or ask for assistance. we recommends that you
only use ramps which have a roughened surface to prevent slipping. Never drive in
a transverse direction across an incline or turn sharply on an incline. Never drive in a
reverse direction down an incline. Because the capability of your scooter to climb an
incline or descend a decline depends on a number of factors, such as the scooter’s
specications, your size and weight, the quality of the surface, and your personal
setup of the scooter, we does not guarantee the scooter’s safety on a specic angle of
incline or decline. However, we does not recommend you use your scooter on inclines
or declines greater than 10 degrees, while making no guarantees of performance
and safety on angles less than 10 degrees.
General Operation – Cornering
Always reduce your speed when making sharp turns. Always control your speed when
cornering. As with any vehicle, maneuvering a corner at a high speed increases the
risk of tipping the scooter. You should maneuver at a speed which is reasonable for
the scooter, its specications and conditions, your size and weight, your angle of
approach, the type of turn, and the surface conditions.
General Operation – Inuences
Do not operate the scooter while under the inuence of alcohol, drugs, or other
medications which may impair your ability to operate a vehicle. The scooter is heavy
and can reach signicant speeds, but even at low speeds it is dangerous to operate
under the inuence of alcohol, drugs, or other medications which may alter or impair
your coordination, reaction time, reexes, and other capabilities.
ground and the switch is in the off position. Brace yourself against a sturdy piece of
furniture, or use a cane or other walking assistive equipment. Use your upper body to
15 16

SPECIFICATIONS / TROUBLESHOOTING
ASSEMBLY
OPERATION / MAINTENANCE
assist your legs in lowering you onto the scooter seat. Move downwardly slowly. Apply
and buckle the safety belt. Sit for a few minutes before operating the scooter. Also
exercise care when moving off of your scooter. Ensure the scooter is braked on level
ground and the switch is in the off position. Unbuckle the safety belt. Getting up quickly
or the wrong way could lead to injury. Look around for a sturdy piece of furniture, or
use a cane or other walking assistive equipment. Use your upper body to assist your
legs in lifting you. Lift slowly and pause for a few moments if you feel unsteady. Stand
for a few minutes before moving further.
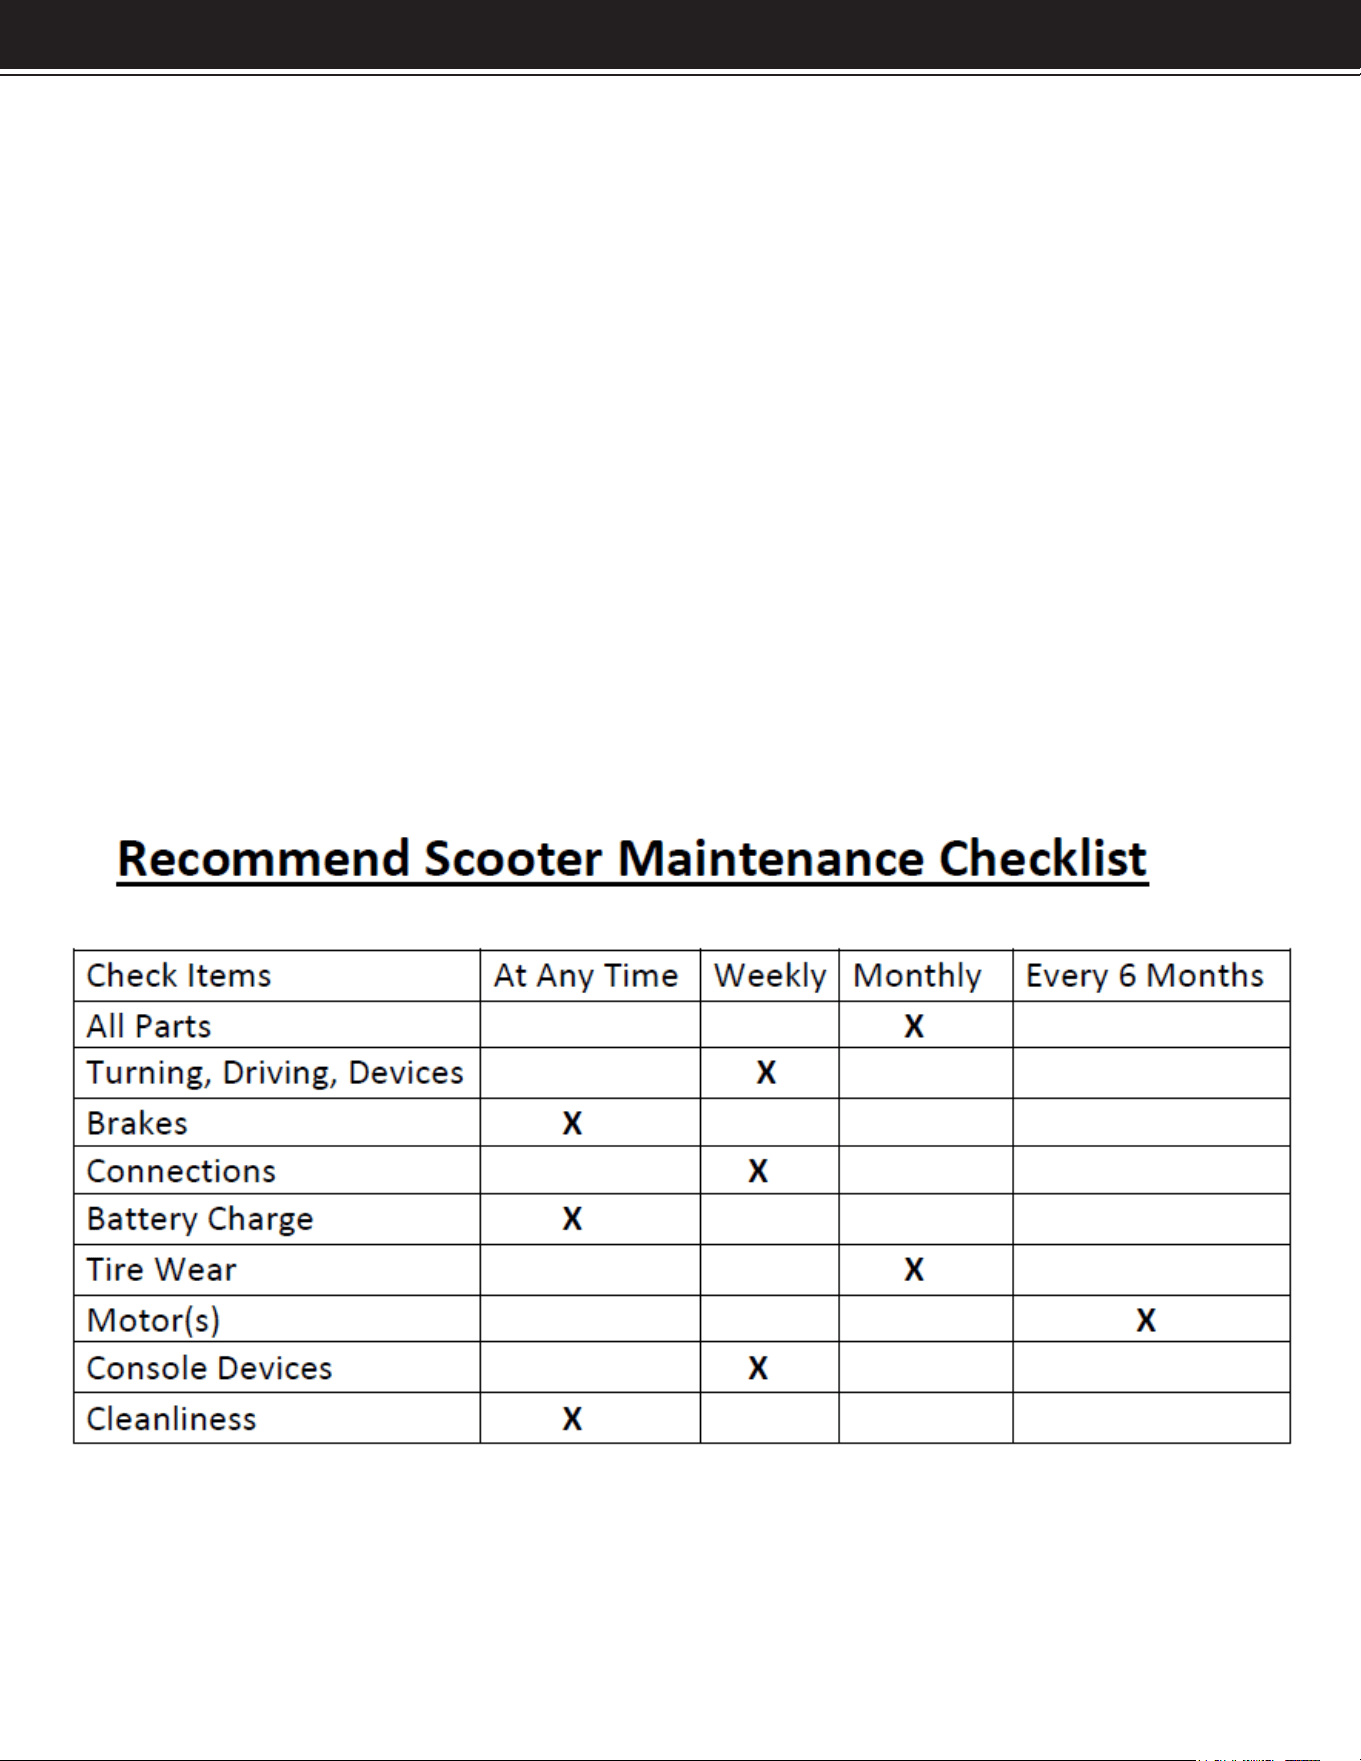
Regular Maintenance
ventilated area. we recommends that you always check your scooter for normal
operation, loose parts, and defects before operating. If you nd a problem, have it
repaired before operating.
Keep your scooter clean and dry. Do not use a high-pressure water sprayer to clean
the scooter. If you wash your scooter, use a damp sponge or cloth, and dry the scooter
thoroughly before operating. Do not immerse any components in water.
Always check your scooter for wear or damage to the tires before operating.
Keep tires inated to their recommended tire pressure at all times. Regularly check
tires for wear, cracks, nails, or other damage. Keep tires clean and replace them
when damaged. Failure to maintain the tires at the recommended tire pressure will
cause premature wear, and failure to maintain the tires could lead to damage or
personal injury.
Use Within a Motor Vehicle
Do not sit in or operate your scooter in a motor vehicle such as a train, bus, or large
van. Stow or rack your scooter according to the motor vehicle’s guidelines before
entering or when entering the motor vehicle. Never sit in your scooter while it is on or
in a motor vehicle which is operating or in motion.
Batteries
Do not use automotive batteries with your scooter. Always charge your scooter’s
batteries in a well-periodically charge your batteries, such as once a month, when
your scooter is not in regular use. Ensure the switch is in the off position when the
batteries are charged. Ensure that the power plug is inserted and plugged rmly into
the battery during charging. Do not use an extension cord while charging the batteries.
Do not use a battery which is cracked, leaking, or otherwise damaged. Do not use
your scooter if the battery is cracked, leaking, or otherwise damaged. Keep tools and
other metal elements away from the contact terminals of the batteries. Remove the
batteries when transporting your scooter.
17 18

MAINTENANCE
Modications to the Scooter
Do not disassemble or modify your scooter on your own. Do not remove or disable
any element or feature of your scooter. Do not modify the programmable controller
governing the scooter’s electric, electronic, and electro-mechanical operations.
While there are a wide range of after-market products available to modify and alter
scooters, some may make your scooter more dangerous to operate or may impair
your ability to operate the scooter safely. We makes no claim or warranty as to the
safety, effectiveness, and operability of any aftermarket product added to your
scooter, or as to any modication you make or have made to your scooter, which are
not performed by approved vendors. we is not responsible for damage to the scooter
or personal injury caused by disassembly, modication, or other alteration of your
scooter.
17 18
DISCLAIMER
19
PLEASE READ THE FOLLOWING CAREFULLY
THE MANUFACTURER AND/OR DISTRIBUTOR HAS PROVIDED THE PARTS LIST AND ASSEMBLY
DIAGRAM IN THIS MANUAL AS A REFERENCE TOOL ONLY. NEITHER THE MANUFACTURER OR
DISTRIBUTOR MAKES ANY REPRESENTATION OR WARRANTY OF ANY KIND TO THE BUYER THAT HE
OR SHE IS QUALIFIED TO MAKE ANY REPAIRS TO THE PRODUCT, OR THAT HE OR SHE IS QUALIFIED
TO REPLACE ANY PARTS OF THE PRODUCT. IN FACT, THE MANUFACTURER AND/OR DISTRIBUTOR
EXPRESSLY STATES THAT ALL REPAIRS AND PARTS REPLACEMENTS SHOULD BE UNDERTAKEN
BY CERTIFIED AND LICENSED TECHNICIANS, AND NOT BY THE BUYER. THE BUYER ASSUMES
ALL RISK AND LIABILITY ARISING OUT OF HIS OR HER REPAIRS TO THE ORIGINAL PRODUCT OR
REPLACEMENT PARTS THERETO, OR ARISING OUT OF HIS OR HER INSTALLATION OF REPLACEMENT
PARTS THERETO.
Record Product’s Serial Number Here:
Note: If product has no serial number, record month and year of purchase instead.
Note: Some parts are listed and shown for illustration purposes only and are not available
individually as replacement parts.
MADE IN CHINA
