
Technical Support and E-Warranty Certificate
www.vevor.com/support
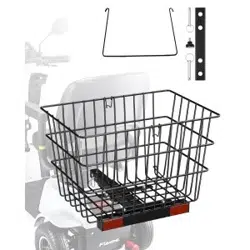
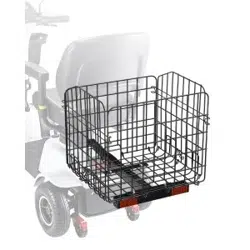
Car Basket
MODEL: J950
We continue to be committed to provide you tools with competitive price.
"Save Half", "Half Price" or any other similar expressions used by us only
represents an estimate of savings you might benefit from buying certain tools
with us compared to the major top brands and does not necessarily mean to cover
all categories of tools offered by us. You are kindly reminded to verify carefully
when you are placing an order with us if you are actually Saving
Half in comparison with the top major brands.

- 1 -
MODEL: J950
NEED HELP? CONTACT US!
Have product questions? Need technical support? Please feel free to
contact us:
Technical Support and E-Warranty Certificate
www.vevor.com/support
This is the original instruction, please read all manual instructions
carefully before operating. VEVOR reserves a clear interpretation of our
user manual. The appearance of the product shall be subject to the
product you received. Please forgive us that we won't inform you again if
there are any technology or software updates on our product.
Thank you very much for choosing this product.
Please read all of the instructions before using it.The information will help
you achieve the best possible results.
Car Basket

- 2 -
Operation safety
WARNING:
Please read all instructions before using this product
It is the Owner's responsibility to ensure that all users of this
product are fully aware of all warnings and precautions.
Please read all instructions before using this product.
1. Keep children and pets away from the product while using it. Children
should not use it. The product. No adult supervision.
2. Please check the installation and product size on the reading page to
make sure your car fits.
3. Do not place items that exceed the maximum load bearing capacity.
4. Fasten the screw periodically. Wear gloves when installing the screw for
the first time.
Note: The maximum load of the basket cannot exceed 33bs
- 3 -
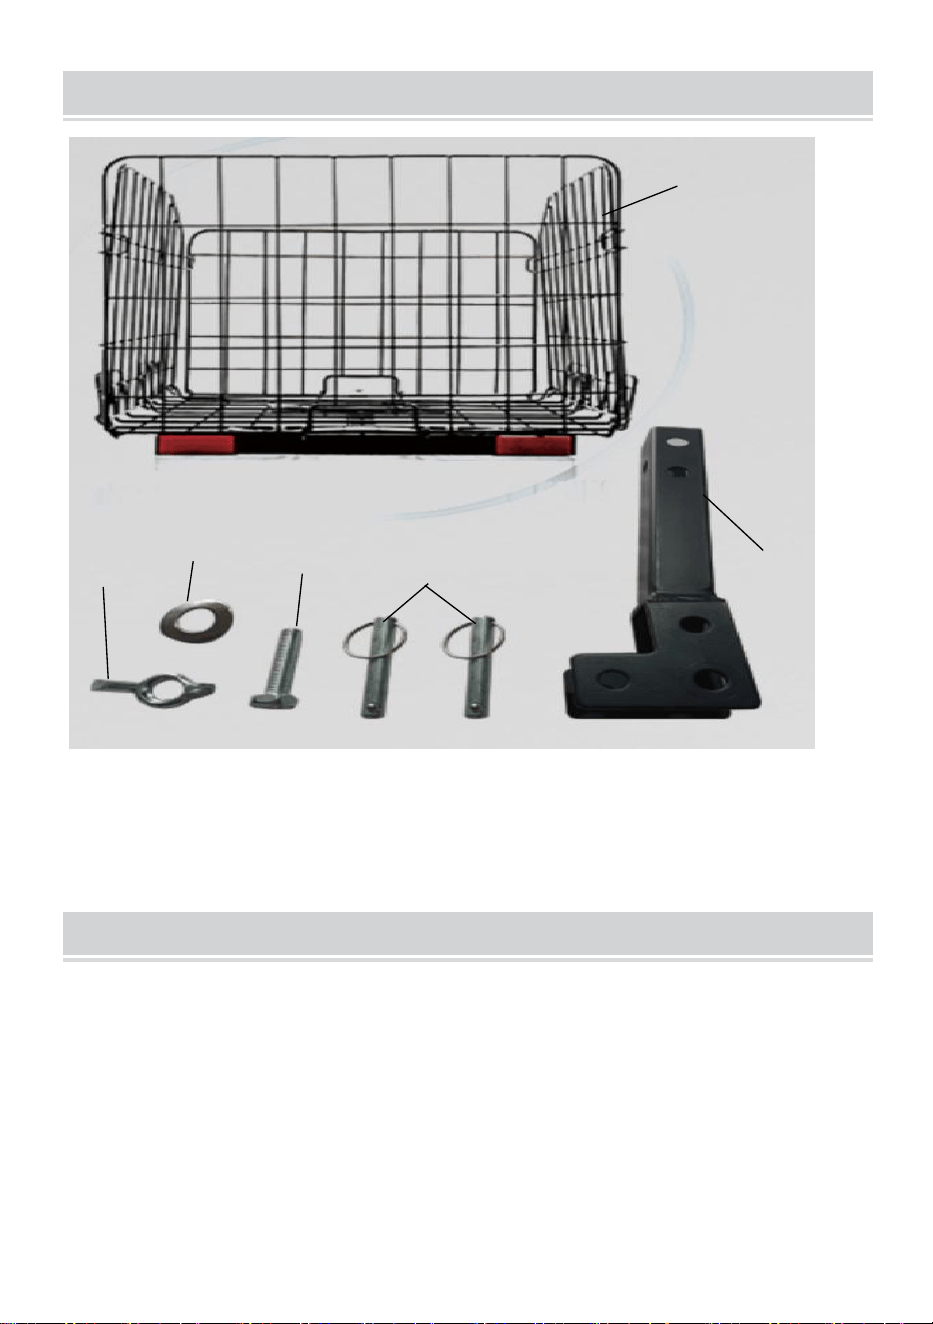
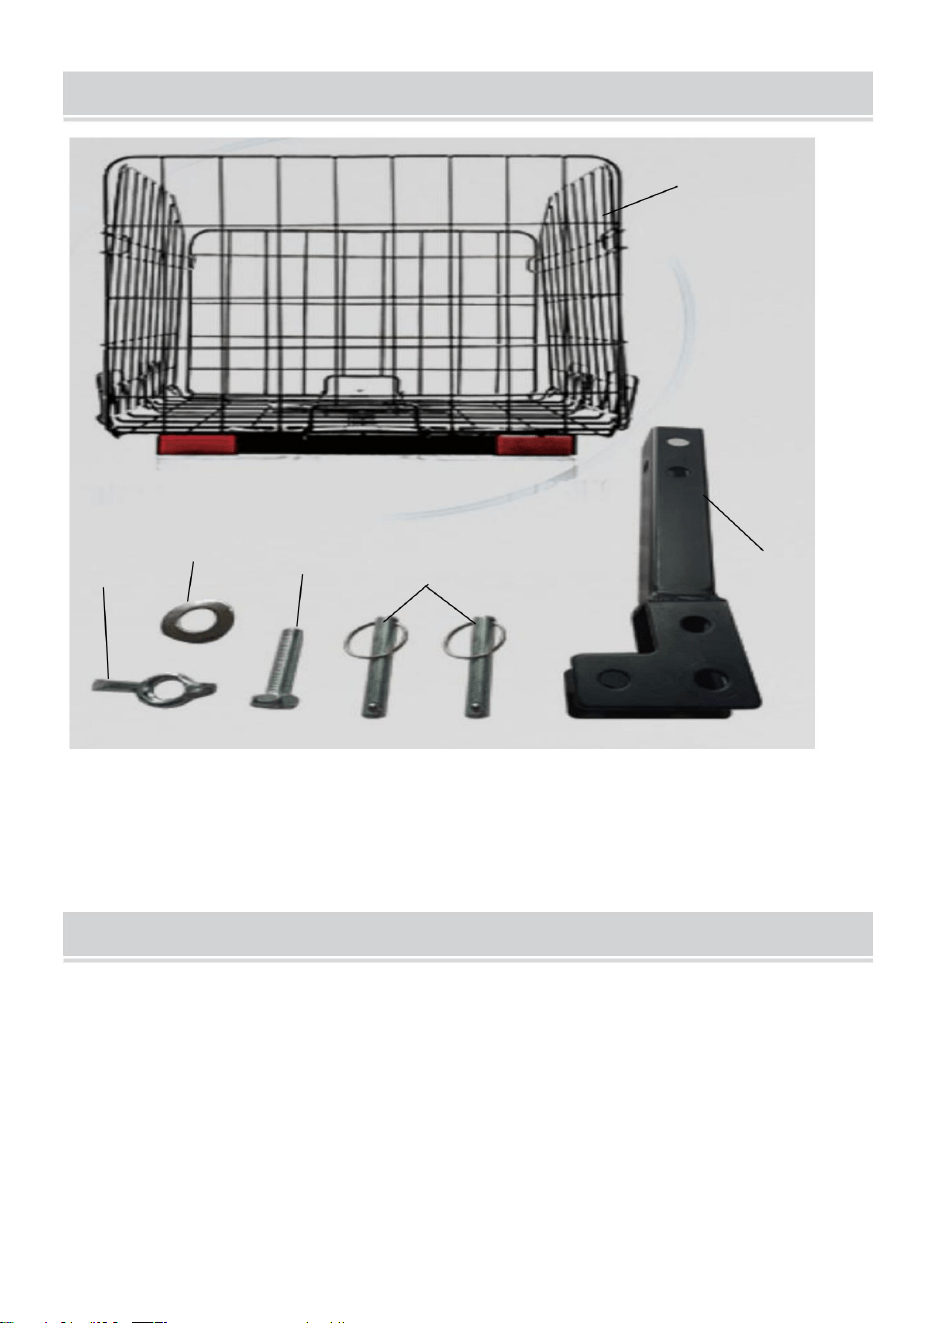
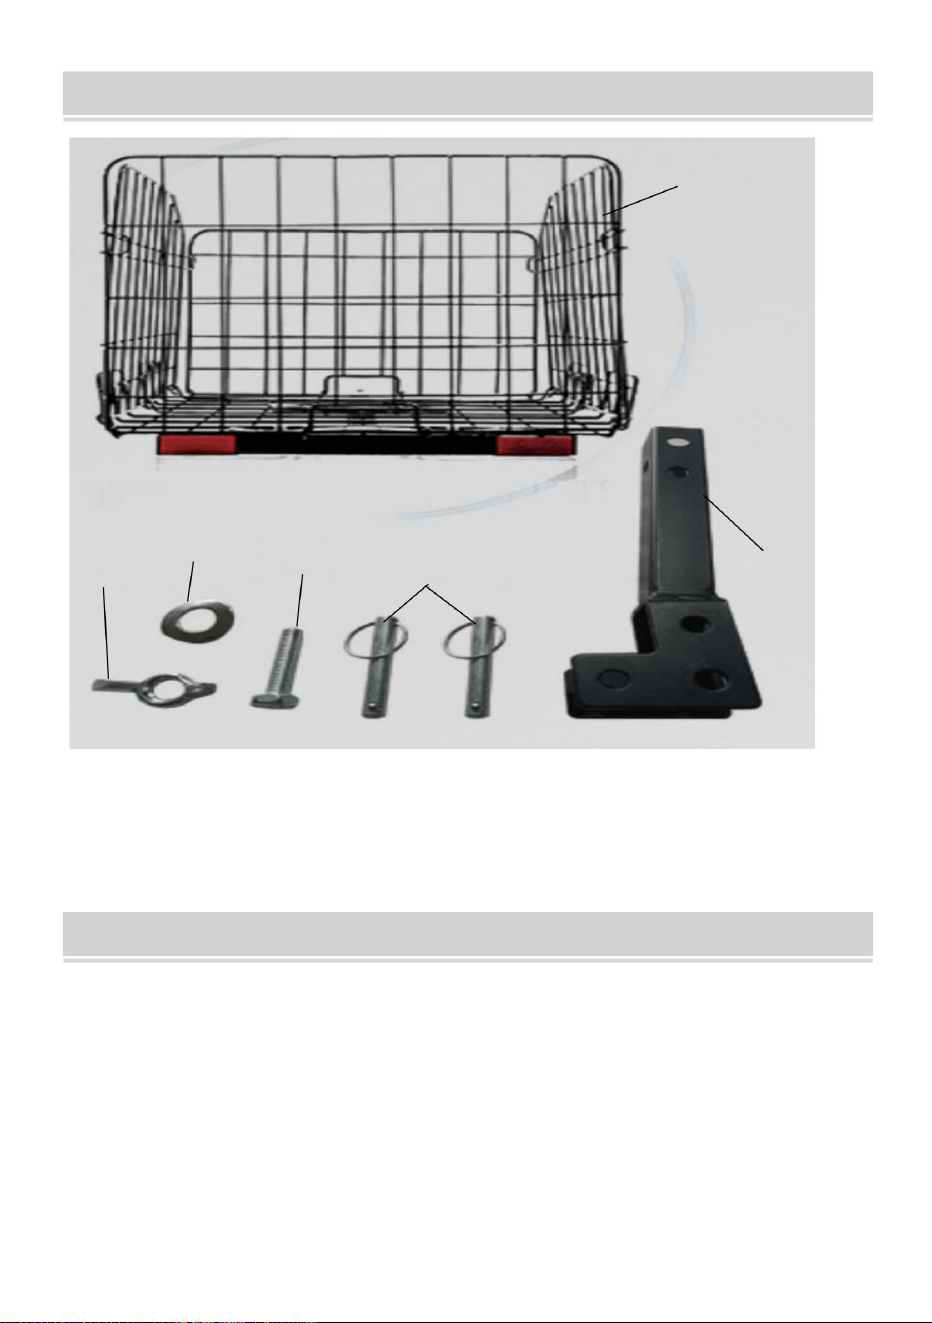
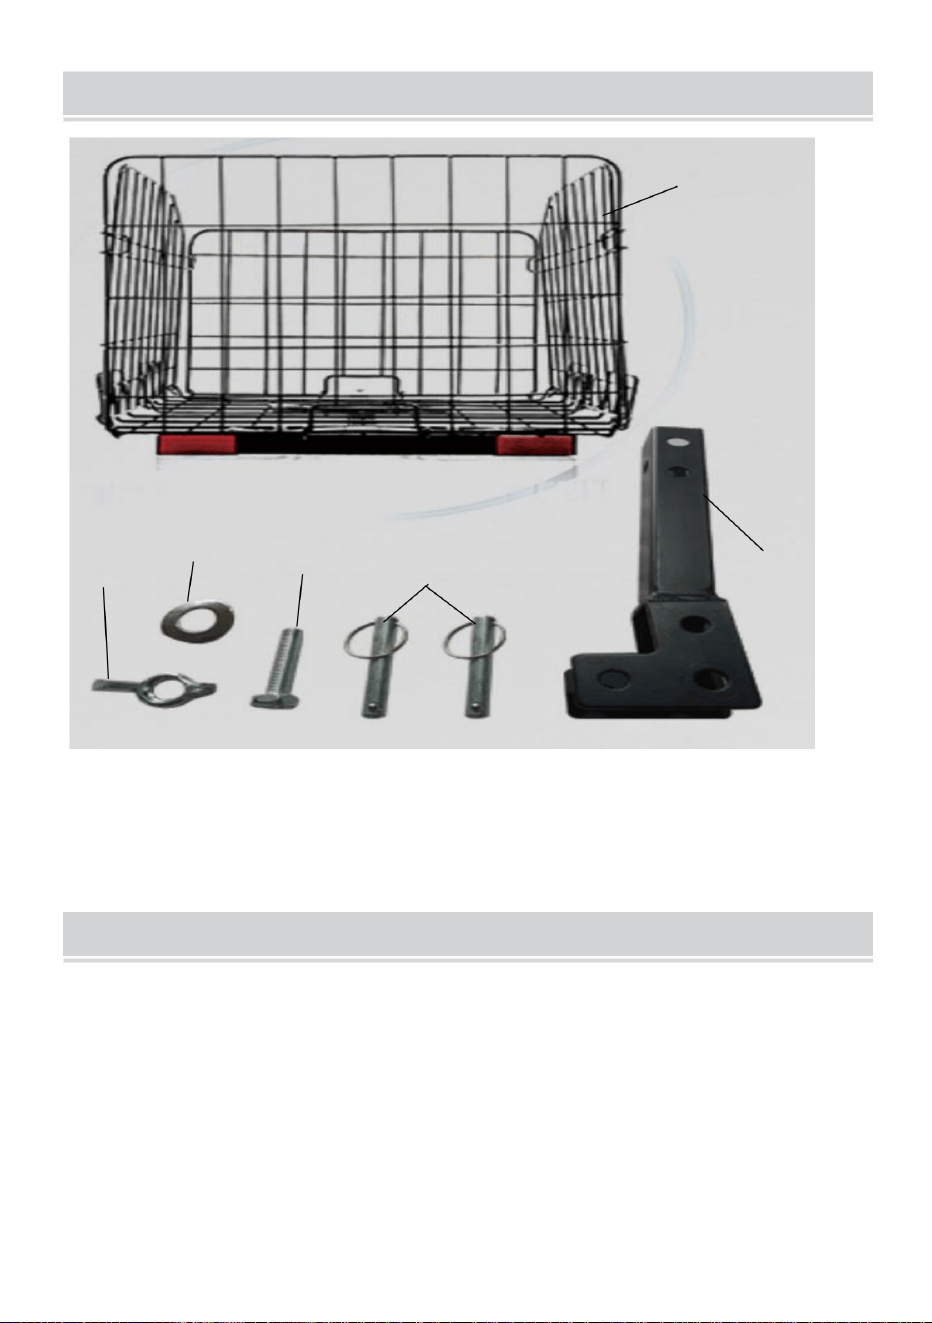
Part List
1. Basket 2. L-Shaped Bracket 3. Clevis Pin
4. Bolt with Nut 5. Washers 6. Butterfly nut
assembly
Tools Needed (optional): 16mm wrench
Unfold the basket walls one side at a time. Press each side firmly to
secure.
With the basket side up, line the two horizontal holes of the L-shaped of the
bracket with the two holes of the basket bracket. The L-shaped bracket
should be standing like the letter L, and you want to line up the two holes at
the bottom of the “L." The L-shaped bracket should be facing away from
the bar. figure1
①
②
③
④
⑤
⑥
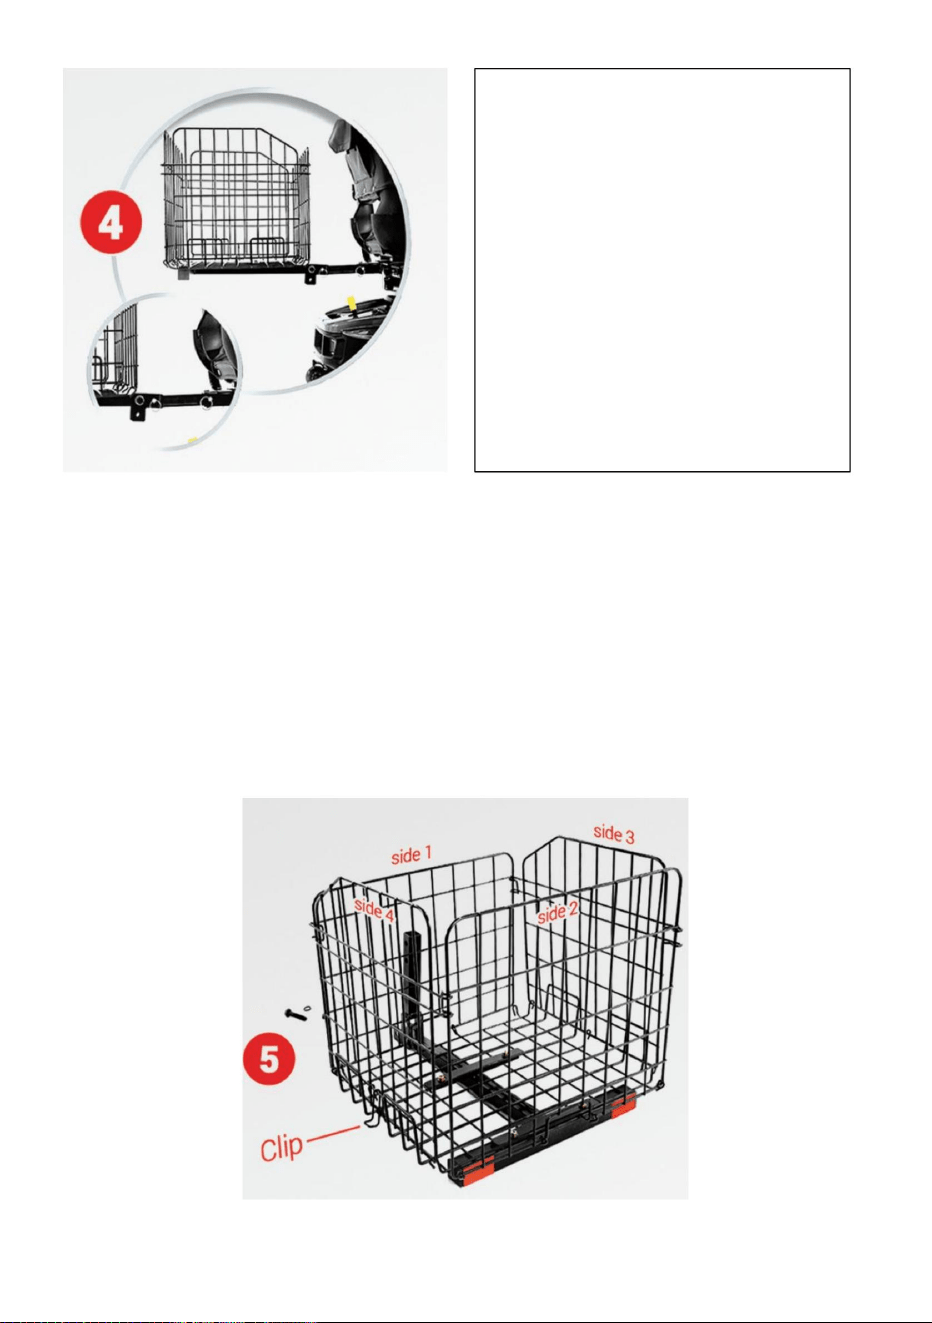
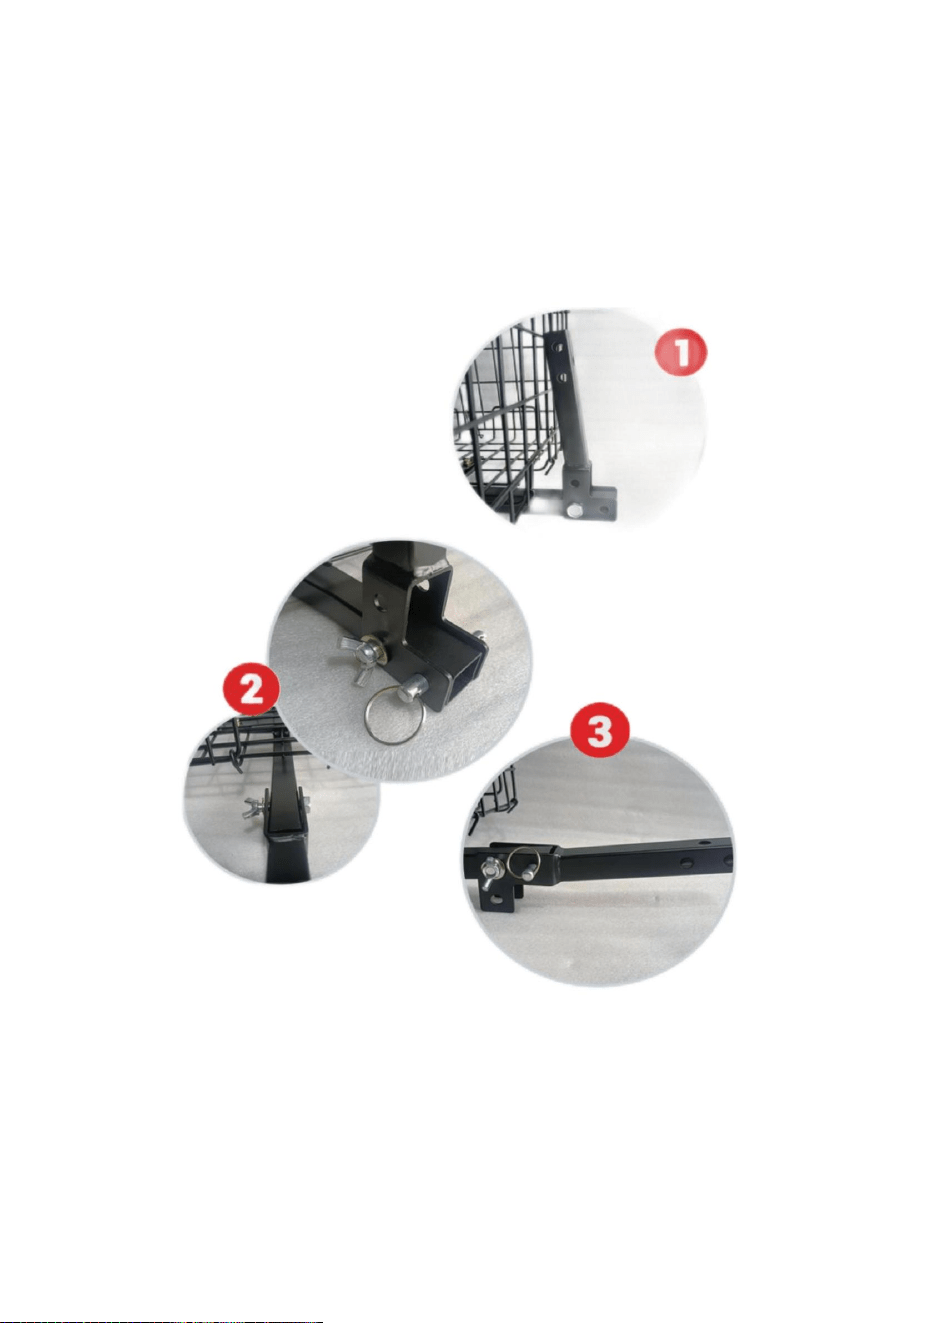
- 4 -
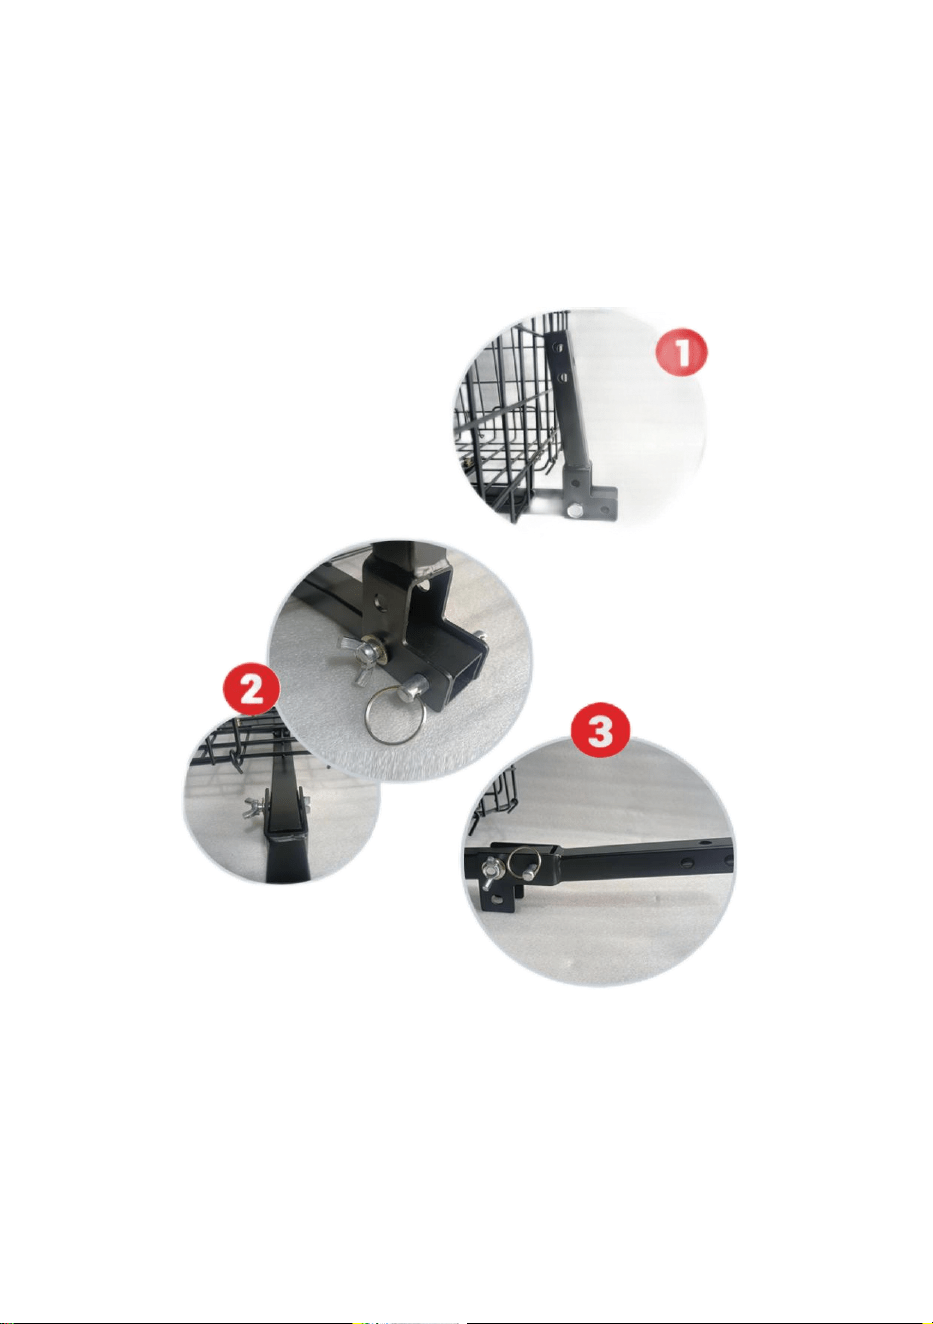
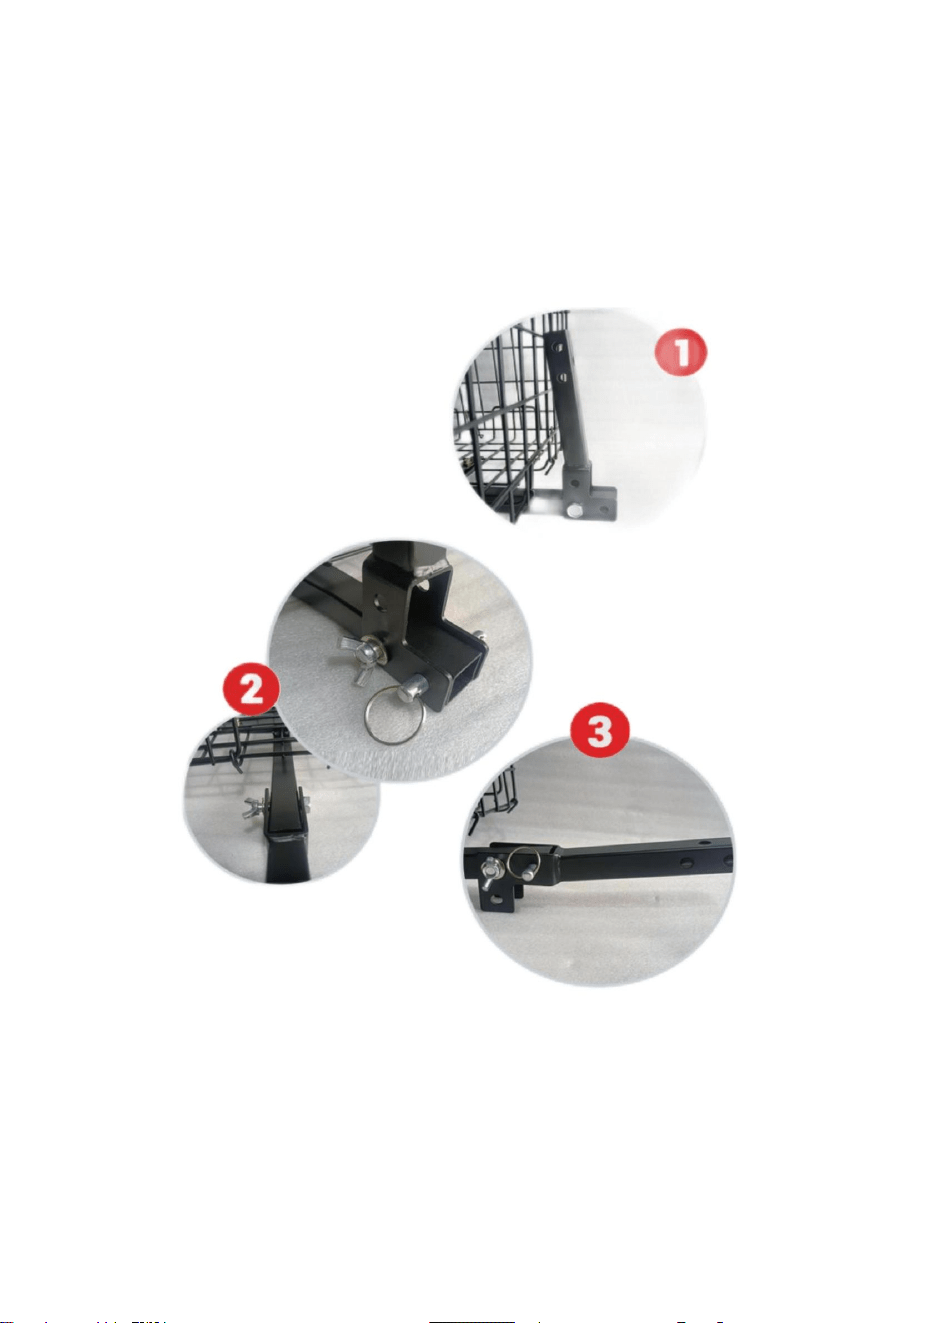
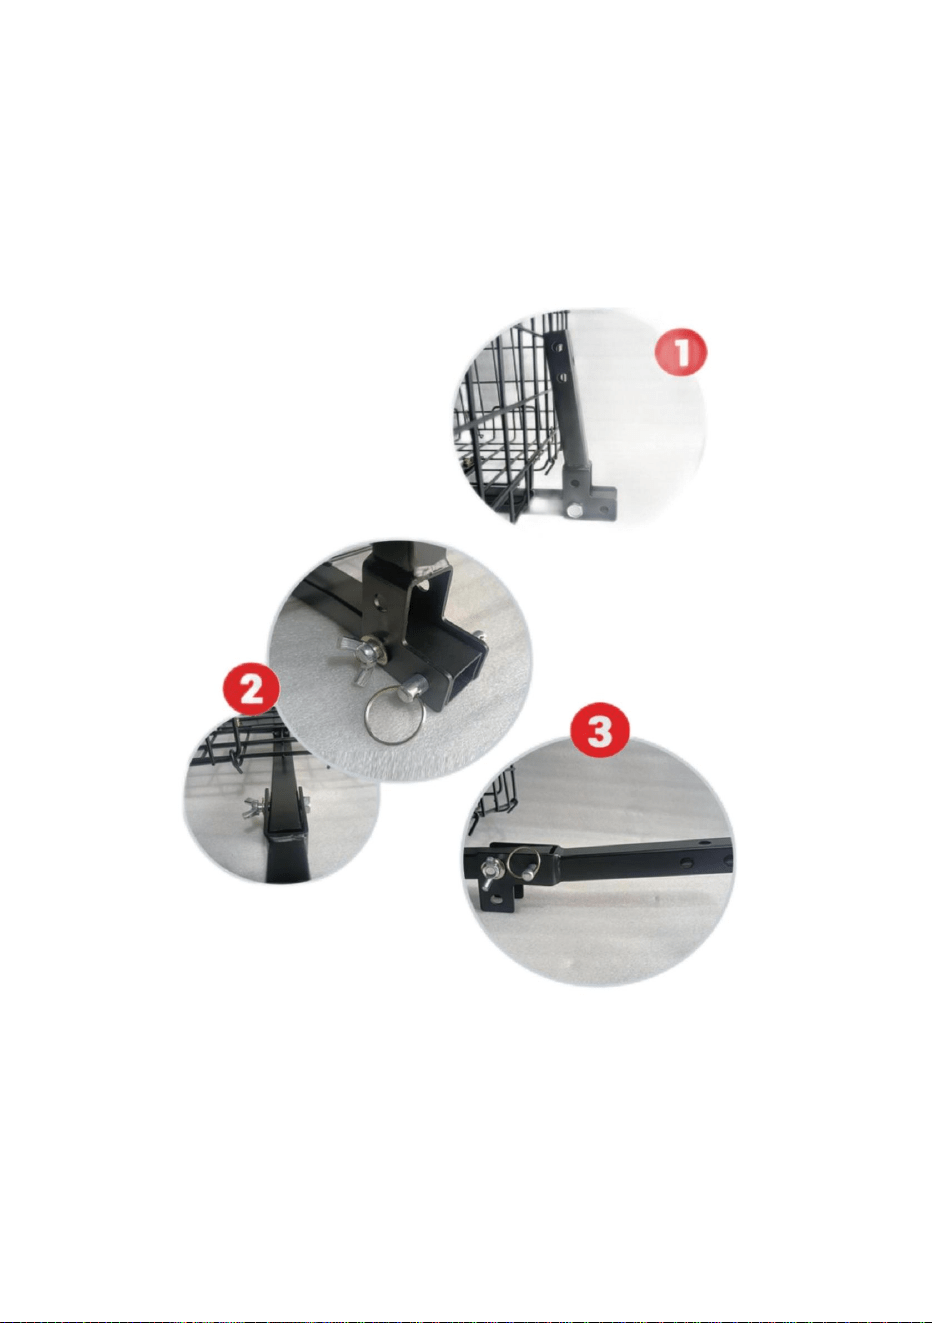
Push the bolt through the first hole towards the basket and secure with the
nut and washers. Tighten with your hand or optional 16mm wrench (not
included)Do not over tighten. figure2
Push one of the Clevis pins through the hole next to the nut and bolt at the
bottom of the L-shaped bracket. figure3
To attach to your scooter or power chair, push a Clevis pin through the
universal accessory hitch. figure 4
- 5 -
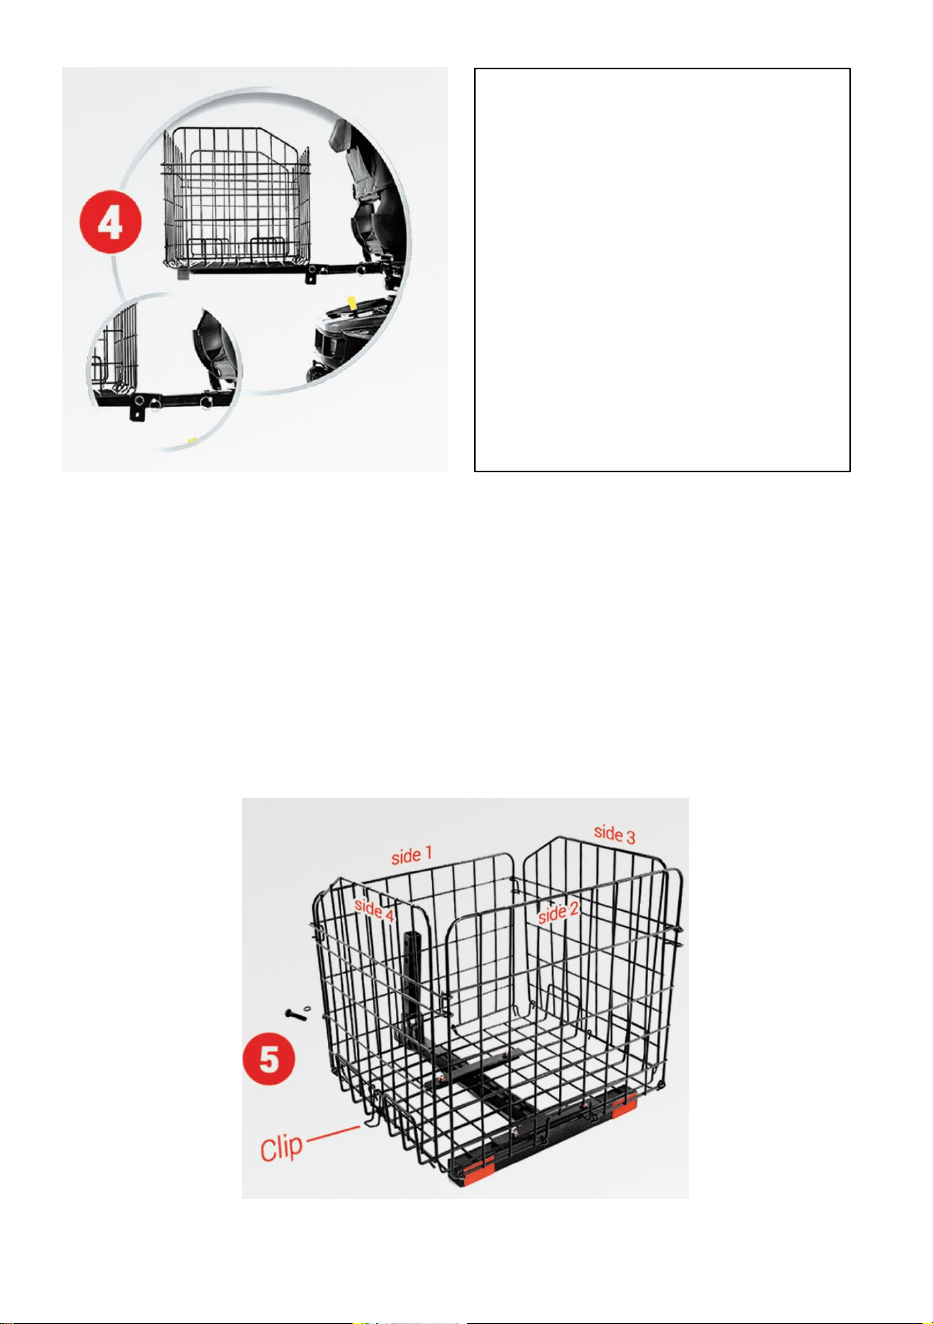
UNFOLDING
Pull Clevis pin out
Align the basket to a 180°angle
and insert the Clevis pin.
figure3
Facing the back of the basket,
unlock the clip on the left side.
Pull up the sides and secure.
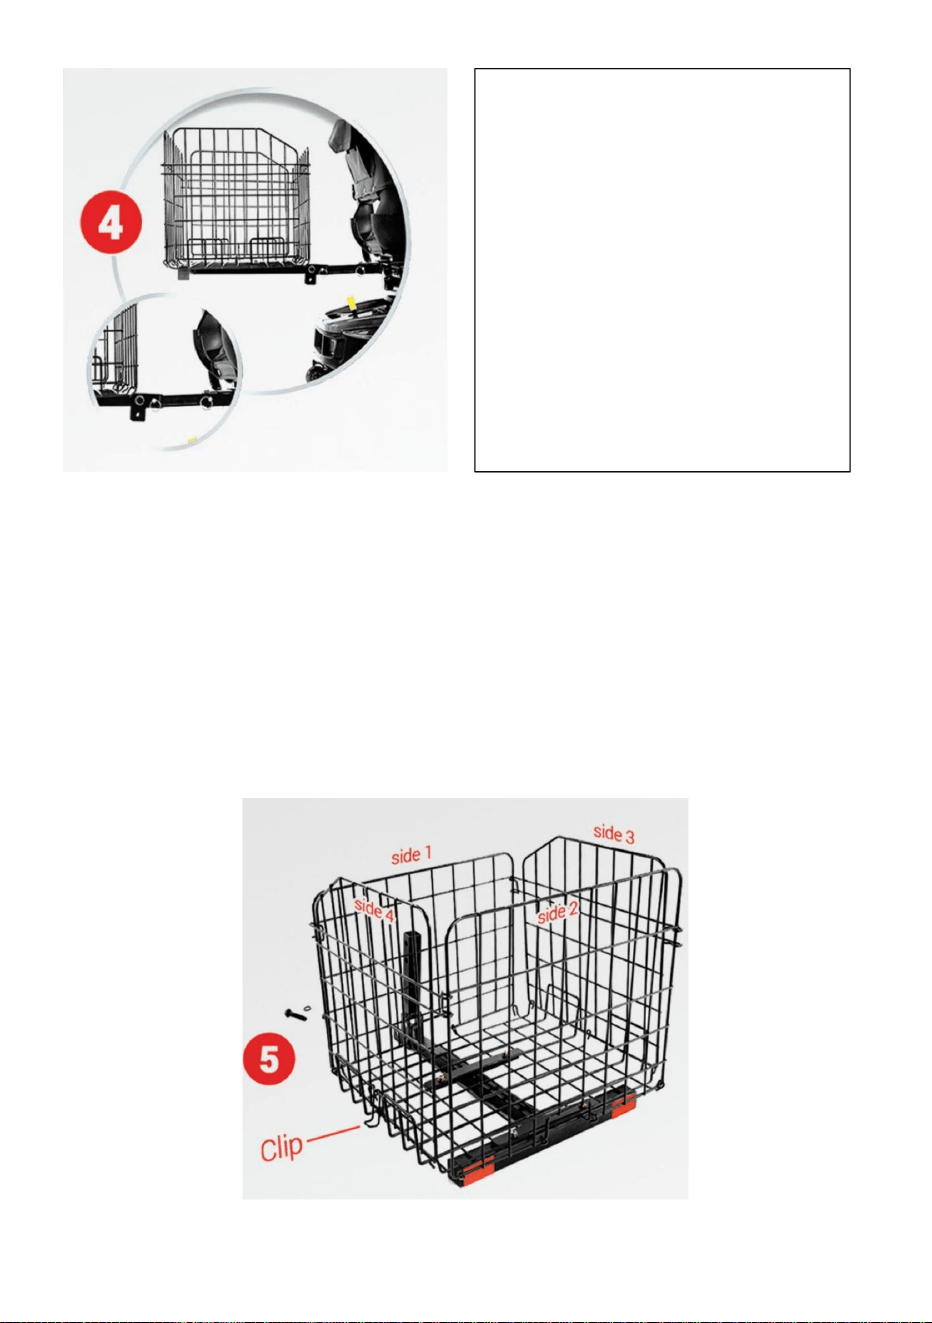
FOLDING
-Push down the sides of the basket one side at a time starting with Side 1,
then 2then 3, then 4. figure5
-Secure with the clip. figure5
-Remove the Clevis pin that's next to the nut and bolt.
-Fold up basket against the back of your scooter or power chair.
-Push the Clevis pin into the bottom hole.

- 6 -
Cleaning and disinfection
1. Wipe the surface with a wet cotton cloth.
2. Check the screws regularly every 3 months for loosening and tighten
the screws
Manufacturer: Shanghaimuxinmuyeyouxiangongsi
Address: Shuangchenglu 803nong11hao1602A-1609shi, baoshanqu,
shanghai 200000 CN.
Imported to AUS: SIHAO PTY LTD. 1 ROKEVA STREETEASTWOOD
NSW 2122 Australia
Imported to USA: Sanven Technology Ltd. Suite 250, 9166 Anaheim
Place, Rancho Cucamonga, CA 91730
REP
UK
YH CONSULTING LIMITED. C/O YH Consulting
Limited Office 147, Centurion House, London
Road, Staines-upon-Thames, Surrey, TW18 4AX
REP
EC
E-CrossStu GmbH
Mainzer Landstr.69,
60329 Frankfurt am Main.


Panierdevoiture
MODÈLE:J950
Assistancetechniqueetcertificatdegarantie
électroniquewww.vevor.com/support
«Économisezlamoitié»,«Moitiéprix»outouteautreexpressionsimilaireutiliséepar
nousnereprésentequ'uneestimationdeséconomiesquevouspourriezréaliserenachetant
certainsoutilscheznousparrapportauxgrandesmarquesetnecouvrepasnécessairementtoutes
lescatégoriesd'outilsquenousproposons.Nousvousrappelonsdebienvouloirvérifier
soigneusementlorsquevouspassezunecommandecheznoussivous
économisezréellementlamoitiéparrapportauxgrandesmarques.
Nouscontinuonsànousengageràvousfournirdesoutilsàdesprixcompétitifs.
Machine Translated by Google

MODÈLE:J950
BESOIND'AIDE?CONTACTEZNOUS!
Mercibeaucoupd'avoirchoisiceproduit.
Ils'agitdelanoticed'utilisationd'origine.Veuillezlireattentivementtoutesles
instructionsdumanuelavantdel'utiliser.VEVORseréserveledroitd'interpréterclairement
notremanueld'utilisation.L'apparenceduproduitdépendduproduitquevousavez
reçu.Veuilleznousexcuser,nousnevousinformeronsplusencasdemiseàjourtechnologique
oulogicielledenotreproduit.
Vousavezdesquestionssurnosproduits?Vousavezbesoind'assistancetechnique?
N'hésitezpas
ànouscontacter:Assistancetechniqueetcertificatdegarantie
électroniquewww.vevor.com/support
Veuillezliretouteslesinstructionsavantdel'utiliser.Lesinformationsvousaiderontàobtenir
lesmeilleursrésultatspossibles.
Panierdevoiture
1
Machine Translated by Google

produitsontpleinementconscientsdetouslesavertissementsetprécautions.
1.Gardezlesenfantsetlesanimauxdomestiqueséloignésduproduitpendantsonutilisation.
nedoitpasl'utiliser.Leproduit.Pasdesurveillanced'unadulte.
3.Neplacezpasd’objetsdépassantlacapacitédechargemaximale.
Veuillezliretouteslesinstructionsavantd'utiliserceproduit
Veuillezliretouteslesinstructionsavantd'utiliserceproduit.
Ilestdelaresponsabilitédupropriétairedes'assurerquetouslesutilisateursdece
AVERTISSEMENT:
2.Veuillezvérifierl'installationetlatailleduproduitsurlapagedelecturepour
4.Serrezlavispériodiquement.Portezdesgantslorsdel'installationdelavispour
lapremièrefois.
Assurezvousquevotrevoitureestadaptée.
Remarque:lachargemaximaledupaniernepeutpasdépasser33lb
Sécuritédefonctionnement
2
Machine Translated by Google

4.Boulonavecécrou
Outilsnécessaires(facultatif):cléde16mm
Dépliezlesparoisdupanieruncôtéàlafois.Appuyezfermementsurchaquecôtépour
6.Écroupapillon
labarre.figure1
5.Rondelles
2.SupportenL
3.Axedechape
supportaveclesdeuxtrousdusupportdupanier.LesupportenformedeL
devraitsetenircommelalettreL,etvousvoulezalignerlesdeuxtrousà
lebasdu«L».LesupportenformedeLdoitêtretournéàl'opposéde
1.Panier
sécurisé.
Aveclecôtépanierverslehaut,alignezlesdeuxtroushorizontauxduLdu
Listedespièces
assemblée
3
Machine Translated by Google
4
Poussezleboulonàtraverslepremiertrouverslepanieretfixezleavecl'écrou
etlesrondelles.Serrezàlamainouavecunecléde16mmenoption(non
fournie).Neserrezpastrop.figure2
Poussezl'unedesgoupillesdechapeàtraversletrouàcôtédel'écrouetdu
boulonaubasdusupportenL.figure3Pour
fixeràvotrescooteroufauteuilélectrique,poussezunegoupilledechapeà
traversl'attelageuniverselpouraccessoires.figure4
Machine Translated by Google

Faceàl'arrièredupanier,déverrouillez
leclipsurlecôtégauche.
Appuyezsurlescôtésdupanieruncôtéàlafoisencommençantparlecôté1,
puis2,puis3,puis4.figure5
Enfoncezlagoupilledechapedansletrouinférieur.
etinsérezl'axedechape.figure3
Relevezlescôtésetfixezles.
Alignezlepanieràunanglede180°
Retirerlagoupilledechape
Repliezlepaniercontrel’arrièredevotrescooteroudevotrefauteuilélectrique.
Retirezlagoupilledechapequisetrouveàcôtédel'écrouetduboulon.
Fixeravecleclip.figure5
DÉPLOIEMENT
PLIANT
5
Machine Translated by Google

REPRÉSENTANTDELACE
REPRÉSENTANTDUROYAUMEUNI
Fabricant:ShanghaimuxinmuyeyouxiangongsiAdresse:
Shuangchenglu803nong11hao1602A1609shi,baoshanqu,shanghai200000CN.
YHCONSULTINGLIMITED.C/OYHConsultingLimited
Bureau147,CenturionHouse,LondonRoad,Staines
uponThames,Surrey,TW184AX
2.Vérifiezrégulièrementlesvistousles3moispourvoirsiellessontdesserréeset
resserrezles.
1.Essuyezlasurfaceavecunchiffonencotonhumide.
ImportéenAUS:SIHAOPTYLTD.1ROKEVASTREETEASTWOODNSW2122Australie
ImportéauxUSA:
SanvenTechnologyLtd.Suite250,9166AnaheimPlace,RanchoCucamonga,CA
91730
ECrossStuGmbH
MainzerLandstr.69,
60329FrancfortsurleMain.
Nettoyageetdésinfection
6
Machine Translated by Google


MODELL: J950
„Sparen Sie die Hälfte“, „Halber Preis“ oder andere ähnliche Ausdrücke, die wir verwenden,
stellen nur eine Schätzung der Ersparnis dar, die Sie beim Kauf bestimmter Werkzeuge bei uns
im Vergleich zu den großen Topmarken erzielen können, und decken nicht unbedingt alle von uns
angebotenen Werkzeugkategorien ab. Wir möchten Sie freundlich daran erinnern, bei der
Bestellung bei uns sorgfältig zu prüfen, ob Sie im Vergleich zu den großen
Topmarken tatsächlich die Hälfte sparen.
Wir sind weiterhin bestrebt, Ihnen Werkzeuge zu wettbewerbsfähigen Preisen anzubieten.
Autokorb
Technischer Support und E-Garantie-Zertifikat
www.vevor.com/support
Machine Translated by Google

Vielen Dank, dass Sie sich für dieses Produkt entschieden haben.
Lesen Sie vor der Anwendung bitte alle Hinweise sorgfältig durch. Die Informationen helfen Ihnen
dabei, optimale Ergebnisse zu erzielen.
Dies ist die Originalanleitung. Bitte lesen Sie alle Anweisungen sorgfältig durch, bevor Sie
das Gerät in Betrieb nehmen. VEVOR behält sich eine klare Auslegung unserer Bedienungsanleitung
vor. Das Erscheinungsbild des Produkts richtet sich nach dem Produkt, das Sie erhalten
haben. Bitte verzeihen Sie uns, dass wir Sie nicht erneut informieren, wenn es Technologie- oder
Software-Updates für unser Produkt gibt.
Haben Sie Fragen zum Produkt? Benötigen Sie technischen Support? Bitte kontaktieren Sie
uns:
Technischer Support und E-Garantie-Zertifikat www.vevor.com/
support
- 1 -
Brauchen Sie Hilfe? Kontaktieren Sie uns!
MODELL: J950
Autokorb
Machine Translated by Google

- 2 -
Betriebssicherheit
1. Halten Sie Kinder und Haustiere während der Benutzung vom Produkt fern. Kinder
Bitte lesen Sie alle Anweisungen, bevor Sie dieses Produkt verwenden.
Das Produkt darf nicht ohne Aufsicht eines Erwachsenen verwendet werden.
2. Bitte überprüfen Sie die Installation und Produktgröße auf der Leseseite, um
Es liegt in der Verantwortung des Eigentümers, sicherzustellen, dass alle Benutzer dieser
Produkt sind sich aller Warnungen und Vorsichtsmaßnahmen voll bewusst.
Bitte lesen Sie alle Anweisungen, bevor Sie dieses Produkt verwenden
WARNUNG:
Stellen Sie sicher, dass Ihr Auto passt.
3. Platzieren Sie keine Gegenstände, die die maximale Tragfähigkeit überschreiten.
4. Ziehen Sie die Schraube regelmäßig fest. Tragen Sie beim Eindrehen der Schraube Handschuhe für
das erste Mal.
Hinweis: Die maximale Belastung des Korbes darf 33bs nicht überschreiten
Machine Translated by Google
3. Gabelkopfbolzen
ÿ
sollte wie der Buchstabe L stehen, und Sie möchten die beiden Löcher an
die Unterseite des „L“. Die L-förmige Halterung sollte von
5. Unterlegscheiben
2. L-förmige Halterung
Halterung mit den beiden Löchern der Korbhalterung. Die L-förmige Halterung
4. Schraube mit Mutter
Mit der Korbseite nach oben, richten Sie die beiden horizontalen Löcher der L-förmigen des
1. Korb
sicher.
Klappen Sie die Korbwände jeweils eine Seite nach der anderen auf. Drücken Sie jede Seite fest an, um
Erforderliche Werkzeuge (optional): 16-mm-Schraubenschlüssel
ÿ
6. Schmetterlingsnuss
die Bar. Abbildung 1
ÿ ÿ
ÿ
Stückliste
ÿ
Montage
- 3 -
Machine Translated by Google

- 4 -
Schieben Sie die Schraube durch das erste Loch in Richtung Korb und sichern Sie sie mit der Mutter und
den Unterlegscheiben. Ziehen Sie sie mit der Hand oder einem optionalen 16-mm-Schraubenschlüssel
(nicht im Lieferumfang enthalten) fest. Nicht zu fest
anziehen. Abbildung 2 Schieben Sie einen der Gabelkopfbolzen durch das Loch neben der Mutter und
Schraube an der Unterseite der L-förmigen Halterung.
Abbildung 3 Um sie an Ihrem Scooter oder Elektrorollstuhl zu befestigen, schieben Sie einen
Gabelkopfbolzen durch die universelle Zubehörkupplung. Abbildung 4
Machine Translated by Google

-Drücken Sie die Seiten des Korbes nach unten, beginnend mit Seite 1,
Die Seiten hochziehen und festmachen.
dann 2, dann 3, dann 4. Abbildung 5
- Entfernen Sie den Gabelkopfbolzen, der sich neben der Mutter und der Schraube befindet.
und stecken Sie den Gabelkopfbolzen ein.
Abbildung 3
Wenn Sie vor der Rückseite des Korbs stehen,
entriegeln Sie den Clip auf der linken Seite.
Richten Sie den Korb in einem 180°-Winkel aus
Gabelkopfbolzen herausziehen
- Klappen Sie den Korb gegen die Rückseite Ihres Scooters oder Elektrorollstuhls.
-Drücken Sie den Gabelkopfbolzen in das untere Loch.
- Mit dem Clip sichern. Abbildung 5
FALTBAR
ENTFALTUNG
- 5 -
Machine Translated by Google

UK REP
Vertreter der EG
- 6 -
2. Überprüfen Sie die Schrauben regelmäßig alle 3 Monate auf Lockerung und ziehen Sie die Schrauben
fest
Importiert nach AUS: SIHAO PTY LTD. 1 ROKEVA STREETEASTWOOD NSW 2122
Australien Importiert
nach USA: Sanven Technology Ltd. Suite 250, 9166 Anaheim Place, Rancho
Cucamonga, CA 91730
Hersteller: Shanghaimuxinmuyeyouxiangongsi Adresse:
Shuangchenglu 803nong11hao1602A-1609shi, baoshanqu, Shanghai 200000 CN.
1. Wischen Sie die Oberfläche mit einem feuchten Baumwolltuch ab.
E-CrossStu GmbH
YH CONSULTING LIMITED. C/O YH Consulting Limited
Office 147, Centurion House, London Road, Staines-
upon-Thames, Surrey, TW18 4AX
Mainzer Landstr.69,
60329 Frankfurt am Main.
Reinigung und Desinfektion
Machine Translated by Google


MODELLO: J950
"Risparmia la metà", "Metà prezzo" o qualsiasi altra espressione simile da noi
utilizzata rappresenta solo una stima del risparmio che potresti ottenere acquistando
determinati utensili con noi rispetto ai principali marchi principali e non significa
necessariamente coprire tutte le categorie di utensili da noi offerti. Ti ricordiamo
gentilmente di verificare attentamente quando effettui un ordine con noi
se stai effettivamente risparmiando la metà rispetto ai principali marchi principali.
Continuiamo a impegnarci per fornirvi strumenti a prezzi competitivi.
Cestino per auto
Supporto tecnico e certificato di garanzia
elettronica www.vevor.com/support
Machine Translated by Google

HAI BISOGNO DI AIUTO? CONTATTACI!
MODELLO: J950
- 1 -
Grazie mille per aver scelto questo prodotto.
Si prega di leggere attentamente le istruzioni prima di utilizzare il prodotto. Le informazioni fornite
vi aiuteranno a ottenere i migliori risultati possibili.
Questa è l'istruzione originale, si prega di leggere attentamente tutte le istruzioni del
manuale prima di utilizzare. VEVOR si riserva una chiara interpretazione del nostro manuale
utente. L'aspetto del prodotto sarà soggetto al prodotto ricevuto. Vi preghiamo di
perdonarci se non vi informeremo di nuovo se ci sono aggiornamenti tecnologici o software sul
nostro prodotto.
Hai domande sul prodotto? Hai bisogno di supporto tecnico? Non esitare a contattarci:
Supporto
tecnico e certificato di garanzia elettronica www.vevor.com/
support
Cestino per auto
Machine Translated by Google

Si prega di leggere tutte le istruzioni prima di utilizzare questo prodotto.
1. Tenere i bambini e gli animali domestici lontani dal prodotto durante l'uso. Bambini
non dovrebbe usarlo. Il prodotto. Nessuna supervisione da parte di un adulto.
2. Si prega di controllare l'installazione e le dimensioni del prodotto nella pagina di lettura per
È responsabilità del Proprietario garantire che tutti gli utenti di questo
prodotto siano pienamente consapevoli di tutte le avvertenze e precauzioni.
Si prega di leggere tutte le istruzioni prima di utilizzare questo prodotto
AVVERTIMENTO:
assicurati che la tua auto sia adatta.
3. Non posizionare oggetti che superino la capacità di carico massima.
4. Serrare la vite periodicamente. Indossare guanti quando si installa la vite per
Nota: il carico massimo del cestello non può superare i 33bs
la prima volta.
Sicurezza operativa
- 2 -
Machine Translated by Google

Dispiegare le pareti del cestino un lato alla volta. Premere saldamente ogni lato per
ÿ
Strumenti necessari (opzionale): chiave da 16 mm
6. Dado a farfalla
il bar. figura1
dovrebbe essere in piedi come la lettera L, e vuoi allineare i due fori a
3. Perno a forcella
ÿ
la parte inferiore della "L". La staffa a forma di L deve essere rivolta lontano da
2. Staffa a L
5. Rondelle
staffa con i due fori della staffa del cestello. La staffa a L
Con il cestello rivolto verso l'alto, allineare i due fori orizzontali della forma a L del
4. Bullone con dado
1. Cestino
sicuro.
ÿ ÿ
ÿ
ÿ
Elenco delle parti
assemblaggio
- 3 -
Machine Translated by Google

- 4 -
Spingere il bullone attraverso il primo foro verso il cestello e fissare con il dado e le
rondelle. Serrare a mano o con una chiave da 16 mm opzionale (non inclusa)
Non serrare eccessivamente. figura2
Spingere uno dei perni a forcella attraverso il foro accanto al dado e al bullone nella
parte inferiore della staffa a L. figura3 Per
fissare allo scooter o alla sedia a rotelle elettrica, spingere un perno a forcella
attraverso il gancio universale per accessori. figura 4
Machine Translated by Google
Sollevare i lati e fissarli.
poi 2, poi 3, poi 4. figura5
-Spingere verso il basso i lati del cestino un lato alla volta iniziando dal lato 1,
-Fissare con la clip. figura5
e inserire il perno a forcella.
figura3
Rivolgendosi verso la parte posteriore
del cestello, sbloccare la clip sul lato sinistro.
Allineare il cestino a un angolo di 180°
Estrarre il perno a forcella
-Rimuovere il perno a forcella che si trova accanto al dado e al bullone.
-Spingere il perno a forcella nel foro inferiore.
-Ripiega il cestino contro lo schienale dello scooter o della sedia a rotelle elettrica.
PIEGHEVOLE
SVOLGIMENTO
- 5 -
Machine Translated by Google

Rappresentante della CE
RAPPRESENTANZA DEL REGNO UNITO
- 6 -
Produttore: Shanghaimuxinmuyeyouxiangongsi Indirizzo:
Shuangchenglu 803nong11hao1602A-1609shi, baoshanqu, shanghai 200000 CN.
Importato in AUS: SIHAO PTY LTD. 1 ROKEVA STREETEASTWOOD NSW 2122
Australia Importato negli
USA: Sanven Technology Ltd. Suite 250, 9166 Anaheim Place, Rancho Cucamonga,
CA 91730
2. Controllare regolarmente le viti ogni 3 mesi per allentarle e stringerle
1. Pulire la superficie con un panno di cotone umido.
YH CONSULTING LIMITED. C/O YH Consulting Limited
Ufficio 147, Centurion House, London Road, Staines-upon-
Thames, Surrey, TW18 4AX
Mainzer Landstr.69,
60329 Francoforte sul Meno.
E-CrossStu GmbH
Pulizia e disinfezione
Machine Translated by Google


Cestaparaelcoche
"Ahorrelamitad","mitaddeprecio"ocualquierotraexpresiónsimilarqueutilicemos
solorepresentaunaestimacióndelahorroquepodríaobteneralcomprarciertas
herramientasconnosotrosencomparaciónconlasprincipalesmarcasynonecesariamente
significaquecubratodaslascategoríasdeherramientasqueofrecemos.Lerecordamos
que,alrealizarunpedidoconnosotros,verifiquecuidadosamentesi
realmenteestáahorrandolamitadencomparaciónconlasprincipalesmarcas.
Seguimoscomprometidosabrindarleherramientasaprecioscompetitivos.
MODELO:J950
Soportetécnicoycertificadodegarantía
electrónicawww.vevor.com/support
Machine Translated by Google

Muchasgraciasporelegiresteproducto.
Leatodaslasinstruccionesantesdeusarlo.Lainformaciónleayudaráalograrlosmejores
resultadosposibles.
Estassonlasinstruccionesoriginales,leaatentamentetodaslasinstruccionesdel
manualantesdeutilizarelproducto.VEVORsereservaunainterpretaciónclaradenuestro
manualdeusuario.Laaparienciadelproductoestarásujetaalproductoquerecibió.
Perdónenospornoinformarlenuevamentesihayactualizacionesdetecnologíaosoftwareen
nuestroproducto.
¿Tienepreguntassobreelproducto?¿Necesitaasistenciatécnica?Nodudeenponerseen
contactocon
nosotros:Asistenciatécnicaycertificadodegarantíaelectrónica
www.vevor.com/support
1
¿NECESITAAYUDA?¡CONTÁCTENOS!
MODELO:J950
Cestaparaelcoche
Machine Translated by Google

Leatodaslasinstruccionesantesdeutilizaresteproducto.
1.Mantengaalosniñosylasmascotasalejadosdelproductomientrasloutiliza.Niños
Nodebeusarseelproductosinlasupervisióndeunadulto.
Laprimeravez.
EsresponsabilidaddelPropietariogarantizarquetodoslosusuariosdeeste
productosonplenamenteconscientesdetodaslasadvertenciasyprecauciones.
Leatodaslasinstruccionesantesdeutilizaresteproducto.
ADVERTENCIA:
4.Aprieteeltornilloperiódicamente.Useguantesalinstalareltornillo.
3.Nocoloqueelementosqueexcedanlacapacidadmáximadecarga.
Nota:Lacargamáximadelacestanopuedesuperarlos33bs.
Asegúresedequesucocheencaje.
2.Verifiquelainstalaciónyeltamañodelproductoenlapáginadelectura.
Seguridaddeoperación
2
Machine Translated by Google
6.Tuercademariposa
DebequedarcomolaletraLydebesalinearlosdosagujerosen
Labarra.figura1
3.Pasadordehorquilla
2.SoporteenformadeL
soporteconlosdosagujerosdelsoportedelacesta.ElsoporteenformadeL
5.Arandelas4.Pernocontuerca
Conlacanastahaciaarriba,alineelosdosorificioshorizontalesdelaformadeLdela
laparteinferiordela"L".ElsoporteenformadeLdebeestarorientadohaciaafuera.
1.Cesta
seguro.
Desplieguelasparedesdelacestadeunladoalavez.Presionecadaladoconfirmezapara
Herramientasnecesarias(opcional):llavede16mm
Listadepiezas
asamblea
3
Machine Translated by Google
4
Empujeelpernoatravésdelprimerorificiohacialacanastayasegúreloconlatuercay
lasarandelas.Aprieteconlamanooconunallaveopcionalde16mm(noincluida).
Noaprietedemasiado.figura2Empujeuno
delospasadoresdehorquillaatravésdelorificiojuntoalatuercayelpernoenlaparte
inferiordelsoporteenformadeL.figura3Para
sujetarloasuscooterosillaeléctrica,empujeunpasadordehorquillaatravésdel
enganchedeaccesoriosuniversal.figura4
Machine Translated by Google

Levantelosladosyasegúrelos.
luego2,luego3,luego4.figura5
Empujahaciaabajolosladosdelacanasta,unladoalavez,comenzandoconellado1.
Asegúreloconelclip.figura5
einserteelpasadordehorquilla.
figura3
Mirandohacialaparteposteriordela
cesta,desbloqueeelclipdelladoizquierdo.
Alineelacestaenunángulode180°
Saqueelpasadordehorquilla
Retireelpasadordehorquillaqueestáalladodelatuercayelperno.
Cestaplegablecontralapartetraseradesuscooterosillaeléctrica.
Empujeelpasadordehorquillaenelorificioinferior.
PLEGABLE
DESPLIEGUE
5
Machine Translated by Google

REPRESENTANTECE
REPRESENTANTEDELREINOUNIDO
6
Fabricante:ShanghaimuxinmuyeyouxiangongsiDirección:
Shuangchenglu803nong11hao1602A1609shi,baoshanqu,shanghai200000CN.
ImportadoaAUS:SIHAOPTYLTD.1ROKEVASTREETEASTWOODNSW2122Australia
ImportadoaEE.UU.:
SanvenTechnologyLtd.Suite250,9166AnaheimPlace,RanchoCucamonga,CA91730
2.Reviselostornillosperiódicamentecada3mesesparaversiestánflojosyapriételos.
1.Limpielasuperficieconunpañodealgodónhúmedo.
YHCONSULTINGLIMITED.ALADIRECCIÓNDEYH
ConsultingLimitedOficina147,CenturionHouse,London
Road,StainesuponThames,Surrey,TW184AX
MainzerLandstr.69,
60329FráncfortdelMeno.
ECrossStuGmbH
Limpiezaydesinfección
Machine Translated by Google


Koszyk samochodowy
MODEL: J950
Wsparcie techniczne i certyfikat gwarancji
elektronicznej www.vevor.com/support
„Oszczędzaj połowę”, „Połowa ceny” lub inne podobne wyrażenia używane przez
nas stanowią jedynie szacunkowe oszczędności, jakie możesz uzyskać, kupując u nas
określone narzędzia w porównaniu z głównymi markami i niekoniecznie oznaczają one
objęcie wszystkich kategorii oferowanych przez nas narzędzi. Uprzejmie przypominamy,
aby przy składaniu zamówienia dokładnie sprawdzić, czy faktycznie
oszczędzasz połowę w porównaniu z głównymi markami.
Nadal staramy się oferować Państwu narzędzia w konkurencyjnych cenach.
Machine Translated by Google

Dziękujemy bardzo za wybranie tego produktu.
To jest oryginalna instrukcja, przed użyciem należy uważnie przeczytać wszystkie
instrukcje. VEVOR zastrzega sobie jasną interpretację naszej instrukcji obsługi. Wygląd produktu
będzie zależał od produktu, który otrzymałeś. Prosimy o wybaczenie, że nie poinformujemy
Cię ponownie, jeśli w naszym produkcie pojawią się jakiekolwiek aktualizacje technologiczne lub
oprogramowania.
Masz pytania dotyczące produktu? Potrzebujesz wsparcia technicznego? Skontaktuj się z nami:
Wsparcie
techniczne i certyfikat E-Gwarancji www.vevor.com/support
Przed użyciem należy przeczytać całą instrukcję. Zawarte w niej informacje pomogą w osiągnięciu
najlepszych możliwych rezultatów.
POTRZEBUJESZ POMOCY? SKONTAKTUJ SIĘ Z NAMI!
MODEL: J950
Koszyk samochodowy
- 1 -
Machine Translated by Google

użytkownik produktu jest w pełni świadomy wszystkich ostrzeżeń i środków ostrożności.
1. Trzymaj dzieci i zwierzęta domowe z dala od produktu podczas jego używania. Dzieci
nie należy go używać. Produkt. Bez nadzoru osoby dorosłej.
2. Proszę sprawdzić instalację i rozmiar produktu na stronie czytelniczej, aby
Przed użyciem tego produktu należy przeczytać wszystkie instrukcje.
Przed użyciem produktu należy przeczytać całą instrukcję.
Właściciel jest odpowiedzialny za zapewnienie, że wszyscy użytkownicy tego serwisu
OSTRZEŻENIE:
3. Nie umieszczaj przedmiotów, których nośność przekracza maksymalną nośność.
4. Okresowo dokręcaj śrubę. Podczas instalowania śruby załóż rękawice.
po raz pierwszy.
upewnij się, że Twój samochód pasuje.
Uwaga: Maksymalne obciążenie koszyka nie może przekroczyć 33bs
Bezpieczeństwo działania
- 2 -
Machine Translated by Google

4. Śruba z nakrętką
Potrzebne narzędzia (opcjonalnie): klucz 16 mm
Rozłóż ścianki koszyka po jednej stronie na raz. Mocno dociśnij każdą stronę, aby
6. Nakrętka motylkowa
pasek. rysunek 1
5. Podkładki
2. Wspornik w kształcie litery L
3. Sworzeń widełkowy
uchwyt z dwoma otworami uchwytu kosza. Uchwyt w kształcie litery L
powinien stać jak litera L i chcesz ustawić dwa otwory w jednej linii
dolna część litery „L”. Wspornik w kształcie litery L powinien być skierowany na zewnątrz
1. Koszyk
bezpieczny.
Ułóż koszyk stroną do góry i wyrównaj dwa poziome otwory w kształcie litery L.
Lista części
montaż
- 3 -
Machine Translated by Google

- 4 -
Przesuń śrubę przez pierwszy otwór w kierunku koszyka i zabezpiecz nakrętką i
podkładkami. Dokręć ręką lub opcjonalnym kluczem 16 mm (brak w zestawie).
Nie dokręcaj zbyt mocno. Rysunek 2
Przesuń jeden z kołków widełkowych przez otwór obok nakrętki i śruby na dole
wspornika w kształcie litery L. Rysunek 3 Aby
przymocować do skutera lub wózka elektrycznego, przesuń kołek widełkowy
przez uniwersalny zaczep akcesoriów. Rysunek 4
Machine Translated by Google
Stojąc tyłem do kosza, odblokuj
zatrzask po lewej stronie.
-Naciskaj boki koszyka po kolei, zaczynając od strony 1.
następnie 2, następnie 3, następnie 4. Rysunek 5
- Wsuń sworzeń widełkowy w dolny otwór.
i włóż sworzeń widełkowy.
Rysunek 3
Podnieś boki i zabezpiecz.
Wyrównaj kosz pod kątem 180°
Wyciągnij sworzeń widełkowy
- Wyjmij sworzeń znajdujący się obok nakrętki i śruby.
- Złóż koszyk, mocując go z tyłu skutera lub wózka elektrycznego.
-Zabezpiecz za pomocą klipsa. Rysunek 5
SKŁADANIE
ROZKŁADANIE
- 5 -
Machine Translated by Google

REP WIELKIEJ BRYTANII
Przedstawiciel UE
Producent: Shanghaimuxinmuyeyouxiangongsi Adres:
Shuangchenglu 803nong11hao1602A-1609shi, baoshanqu, szanghaj 200000 CN.
YH CONSULTING LIMITED. C/O YH Consulting Limited Biuro
147, Centurion House, London Road, Staines-upon-
Thames, Surrey, TW18 4AX
2. Regularnie co 3 miesiące sprawdzaj, czy śruby się nie poluzowały i dokręcaj.
1. Przetrzyj powierzchnię wilgotną bawełnianą ściereczką.
Importowane do AUS: SIHAO PTY LTD. 1 ROKEVA STREETEASTWOOD NSW 2122 Australia
Importowane do USA:
Sanven Technology Ltd. Suite 250, 9166 Anaheim Place, Rancho Cucamonga, CA 91730
E-CrossStu GmbH
Mainzer Landstr.69,
60329 Frankfurt nad Menem.
Czyszczenie i dezynfekcja
- 6 -
Machine Translated by Google


Bilkorg
"Spara hälften", "halva priset" eller andra liknande uttryck som används av oss
representerar bara en uppskattning av besparingar du kan dra nytta av att köpa vissa
verktyg hos oss jämfört med de stora toppmärkena och betyder inte nödvändigtvis att täcka
alla kategorier av verktyg som erbjuds av oss. Du påminns om att noggrant kontrollera
när du gör en beställning hos oss om du verkligen sparar hälften i
jämförelse med de främsta varumärkena.
Vi fortsätter att vara engagerade i att ge dig verktyg till konkurrenskraftiga priser.
MODELL: J950
Teknisk support och e-garanticertifikat
www.vevor.com/support
Machine Translated by Google

Tack så mycket för att du valde denna produkt.
Läs alla instruktioner innan du använder den. Informationen hjälper dig att uppnå bästa möjliga
resultat.
Detta är den ursprungliga instruktionen, läs alla instruktioner noggrant innan du
använder den. VEVOR reserverar sig för en tydlig tolkning av vår användarmanual. Utseendet
på produkten är beroende av den produkt du fått. Ursäkta oss att vi inte kommer att
informera dig igen om det finns någon teknik eller mjukvaruuppdateringar på vår produkt.
Har du produktfrågor? Behöver du teknisk support? Kontakta oss gärna: Teknisk support och
e-
garanticertifikat www.vevor.com/support
- 1 -
BEHÖVER HJÄLP? KONTAKTA OSS!
MODELL: J950
Bilkorg
Machine Translated by Google

Läs alla instruktioner innan du använder denna produkt.
1. Håll barn och husdjur borta från produkten när du använder den. Barn
ska inte använda den. Produkten. Ingen vuxen tillsyn.
2. Kontrollera installationen och produktstorleken på lässidan för att
Det är Ägarens ansvar att se till att alla användare av detta
produkten är fullt medveten om alla varningar och försiktighetsåtgärder.
Läs alla instruktioner innan du använder denna produkt
VARNING:
se till att din bil passar.
3. Placera inte föremål som överskrider den maximala bärförmågan.
4. Skruva fast skruven med jämna mellanrum. Använd handskar när du monterar skruven för
Obs: Den maximala belastningen på korgen får inte överstiga 33bs
första gången.
Driftsäkerhet
- 2 -
Machine Translated by Google

6. Fjärilsmutter
ska stå som bokstaven L, och du vill rada upp de två hålen vid
baren. figur1
3. Clevis Pin
2. L-formad fäste
ÿ
fästet med de två hålen i korgfästet. Det L-formade fästet
5. Brickor4. Bulta med mutter
Med korgsidan uppåt, linjera de två horisontella hålen i den L-formade
botten av "L." Det L-formade fästet ska vara vänt bort från
1. Korg
säkra.
Vik ut korgväggarna en sida i taget. Tryck fast varje sida ordentligt
ÿ
Verktyg som behövs (tillval): 16 mm skiftnyckel
ÿ ÿ
ÿ
ÿ
Dellista
montering
- 3 -
Machine Translated by Google
- 4 -
Skjut bulten genom det första hålet mot korgen och fäst med mutter och
brickor. Dra åt med handen eller valfri 16 mm skiftnyckel (ingår ej) Dra
inte åt för hårt. figur 2 Tryck en av
sprintstiften genom hålet bredvid muttern och bulten i botten av det L-
formade fästet. figur3 För att fästa på
din skoter eller elrullstol, tryck en sprintsprint genom det universella
tillbehörsfästet. figur 4
Machine Translated by Google

Dra upp sidorna och säkra.
sedan 2, sedan 3, sedan 4. figur5
- Tryck ner sidorna av korgen en sida i taget med början på sida 1,
- Säkra med klämman. figur 5
och sätt i Clevis-stiftet. figur
3
Vänd mot baksidan av korgen, lås
upp klämman på vänster sida.
Rikta in korgen till en vinkel på 180°
Dra ut sprintnålen
-Ta bort sprintstiftet bredvid muttern och bulten.
- Skjut in sprintstiftet i det nedre hålet.
- Fäll upp korgen mot baksidan av din skoter eller elstol.
HOPFÄLLBAR
UPPLIKNING
- 5 -
Machine Translated by Google

UK REP
EC REP
- 6 -
2. Kontrollera regelbundet att skruvarna har lossnat var tredje månad och dra åt dem
Importerad till AUS: SIHAO PTY LTD. 1 ROKEVA STREETEASTWOOD NSW 2122
Australien Importerad till
USA: Sanven Technology Ltd. Suite 250, 9166 Anaheim Place, Rancho Cucamonga, CA
91730
Tillverkare: Shanghaimuxinmuyeyouxiangongsi Adress:
Shuangchenglu 803nong11hao1602A-1609shi, baoshanqu, shanghai 200000 CN.
1. Torka av ytan med en våt bomullstrasa.
YH CONSULTING LIMITED. C/O YH Consulting Limited Office
147, Centurion House, London Road, Staines-upon-
Thames, Surrey, TW18 4AX
Mainzer Landstr.69,
60329 Frankfurt am Main.
E-CrossStu GmbH
Rengöring och desinfektion
Machine Translated by Google


MODEL: J950
"Save Half", "Half Price" of andere soortgelijke uitdrukkingen die wij gebruiken, geven alleen
een schatting weer van de besparingen die u kunt behalen door bepaalde gereedschappen bij ons
te kopen in vergelijking met de grote topmerken en betekent niet noodzakelijkerwijs dat alle categorieën
gereedschappen die wij aanbieden, worden gedekt. Wij herinneren u eraan om zorgvuldig te
controleren of u daadwerkelijk de helft bespaart in vergelijking met de grote
topmerken wanneer u een bestelling bij ons plaatst.
Wij streven er voortdurend naar om u gereedschappen tegen concurrerende prijzen te leveren.
Automandje
Technische ondersteuning en e-garantiecertificaat
www.vevor.com/support
Machine Translated by Google

Hartelijk dank dat u voor dit product hebt gekozen.
Lees de volledige instructies aandachtig door voordat u het product gebruikt. Deze informatie
helpt u om de best mogelijke resultaten te behalen.
Dit is de originele instructie, lees alle handleidingen zorgvuldig door voordat u het
product gebruikt. VEVOR behoudt zich een duidelijke interpretatie van onze gebruikershandleiding
voor. Het uiterlijk van het product is afhankelijk van het product dat u hebt ontvangen.
Vergeef ons dat we u niet opnieuw zullen informeren als er technologie- of software-updates
voor ons product zijn.
Heeft u vragen over het product? Heeft u technische ondersteuning nodig? Neem dan gerust
contact met
ons op: Technische ondersteuning en E-garantiecertificaat
www.vevor.com/support
- 1 -
MODEL: J950
HULP NODIG? NEEM CONTACT MET ONS OP!
Automandje
Machine Translated by Google

Lees alle instructies zorgvuldig door voordat u dit product gebruikt.
1. Houd kinderen en huisdieren uit de buurt van het product tijdens het gebruik ervan. Kinderen
mag het niet gebruiken. Het product. Geen toezicht van volwassenen.
2. Controleer de installatie en de productgrootte op de leespagina om
Lees alle instructies voordat u dit product gebruikt
product volledig op de hoogte zijn van alle waarschuwingen en voorzorgsmaatregelen.
Het is de verantwoordelijkheid van de Eigenaar om ervoor te zorgen dat alle gebruikers van deze
WAARSCHUWING:
Zorg ervoor dat uw auto past.
3. Plaats geen voorwerpen die het maximale draagvermogen overschrijden.
4. Draai de schroef regelmatig vast. Draag handschoenen bij het installeren van de schroef voor
Let op: De maximale belasting van de mand mag niet meer dan 33bs bedragen
de eerste keer.
Bedrijfsveiligheid
- 2 -
Machine Translated by Google
Vouw de mandwanden één kant per keer open. Druk elke kant stevig aan om
ÿ
Benodigde gereedschappen (optioneel): 16 mm sleutel
6. Vleugelmoer
moet staan als de letter L, en je wilt de twee gaten op één lijn brengen
de bar. figuur1
3. Gaffelpen
2. L-vormige beugel
ÿ
beugel met de twee gaten van de mandbeugel. De L-vormige beugel
5. Ringen4. Bout met moer
Met de mand naar boven, lijn je de twee horizontale gaten van de L-vorm van de
de onderkant van de "L." De L-vormige beugel moet van de grond af gericht zijn
1. Mandje
zeker.
ÿ
ÿ
ÿ ÿ
Onderdelenlijst
montage
- 3 -
Machine Translated by Google

- 4 -
Duw de bout door het eerste gat richting de mand en zet vast met de moer en
ringen. Draai vast met uw hand of optionele 16mm sleutel (niet meegeleverd).
Draai niet te vast. Afbeelding 2 Duw een
van de Clevis-pennen door het gat naast de moer en bout aan de onderkant van
de L-vormige beugel. Afbeelding 3 Duw een
Clevis-pen door de universele accessoirekoppeling om deze aan uw scooter
of elektrische rolstoel te bevestigen. Afbeelding 4
Machine Translated by Google

Trek de zijkanten omhoog en zet ze vast.
dan 2, dan 3, dan 4. figuur5
-Duw de zijkanten van de mand één voor één naar beneden, beginnend met kant 1,
-Klap de mand op en klem hem tegen de achterkant van uw scooter of elektrische rolstoel.
Plaats de mand in een hoek van 180°
Terwijl u naar de achterkant van de mand
kijkt, ontgrendelt u de clip aan de linkerkant.
en plaats de Clevis-pen. figuur 3
Trek de gaffelpen eruit
-Bevestig met de clip. figuur 5
-Duw de gaffelpen in het onderste gat.
-Verwijder de gaffelpen die zich naast de moer en bout bevindt.
OPVOUWBAAR
ONTVOUWEN
- 5 -
Machine Translated by Google

EC-REP
VK REP
- 6 -
2. Controleer de schroeven regelmatig om de 3 maanden op loszitten en draai de schroeven
vast
Geïmporteerd naar AUS: SIHAO PTY LTD. 1 ROKEVA STREETEASTWOOD NSW 2122
Australië Geïmporteerd
naar de VS: Sanven Technology Ltd. Suite 250, 9166 Anaheim Place, Rancho
Cucamonga, CA 91730
Fabrikant: Shanghaimuxinmuyeyouxiangongsi Adres:
Shuangchenglu 803nong11hao1602A-1609shi, baoshanqu, shanghai 200000 CN.
1. Veeg het oppervlak af met een natte katoenen doek.
YH CONSULTING LIMITED. C/O YH Consulting Limited
Kantoor 147, Centurion House, London Road, Staines-
upon-Thames, Surrey, TW18 4AX
Mainzer Landstr.69,
60329 Frankfurt am Main.
E-CrossStu GmbH
Reiniging en desinfectie
Machine Translated by Google