
www.silverstonetek.com
User manual
High-Expandability Professional
Workstation Chassis with 8 hot-swappable
trays & 360mm Radiator Support
WS380-E
FRONT I/O, INDICATORS
1.Power switch/Power LED
2.Reset switch
3.NIC1/NIC2 LED
4.Alarm LED
5.HDD LED
6.UID LED
7.USB3.0 Type-A
8.USB3.0 Type-C
9.Audio
1
2 3 4 6 7 7 8 9 9
3
5
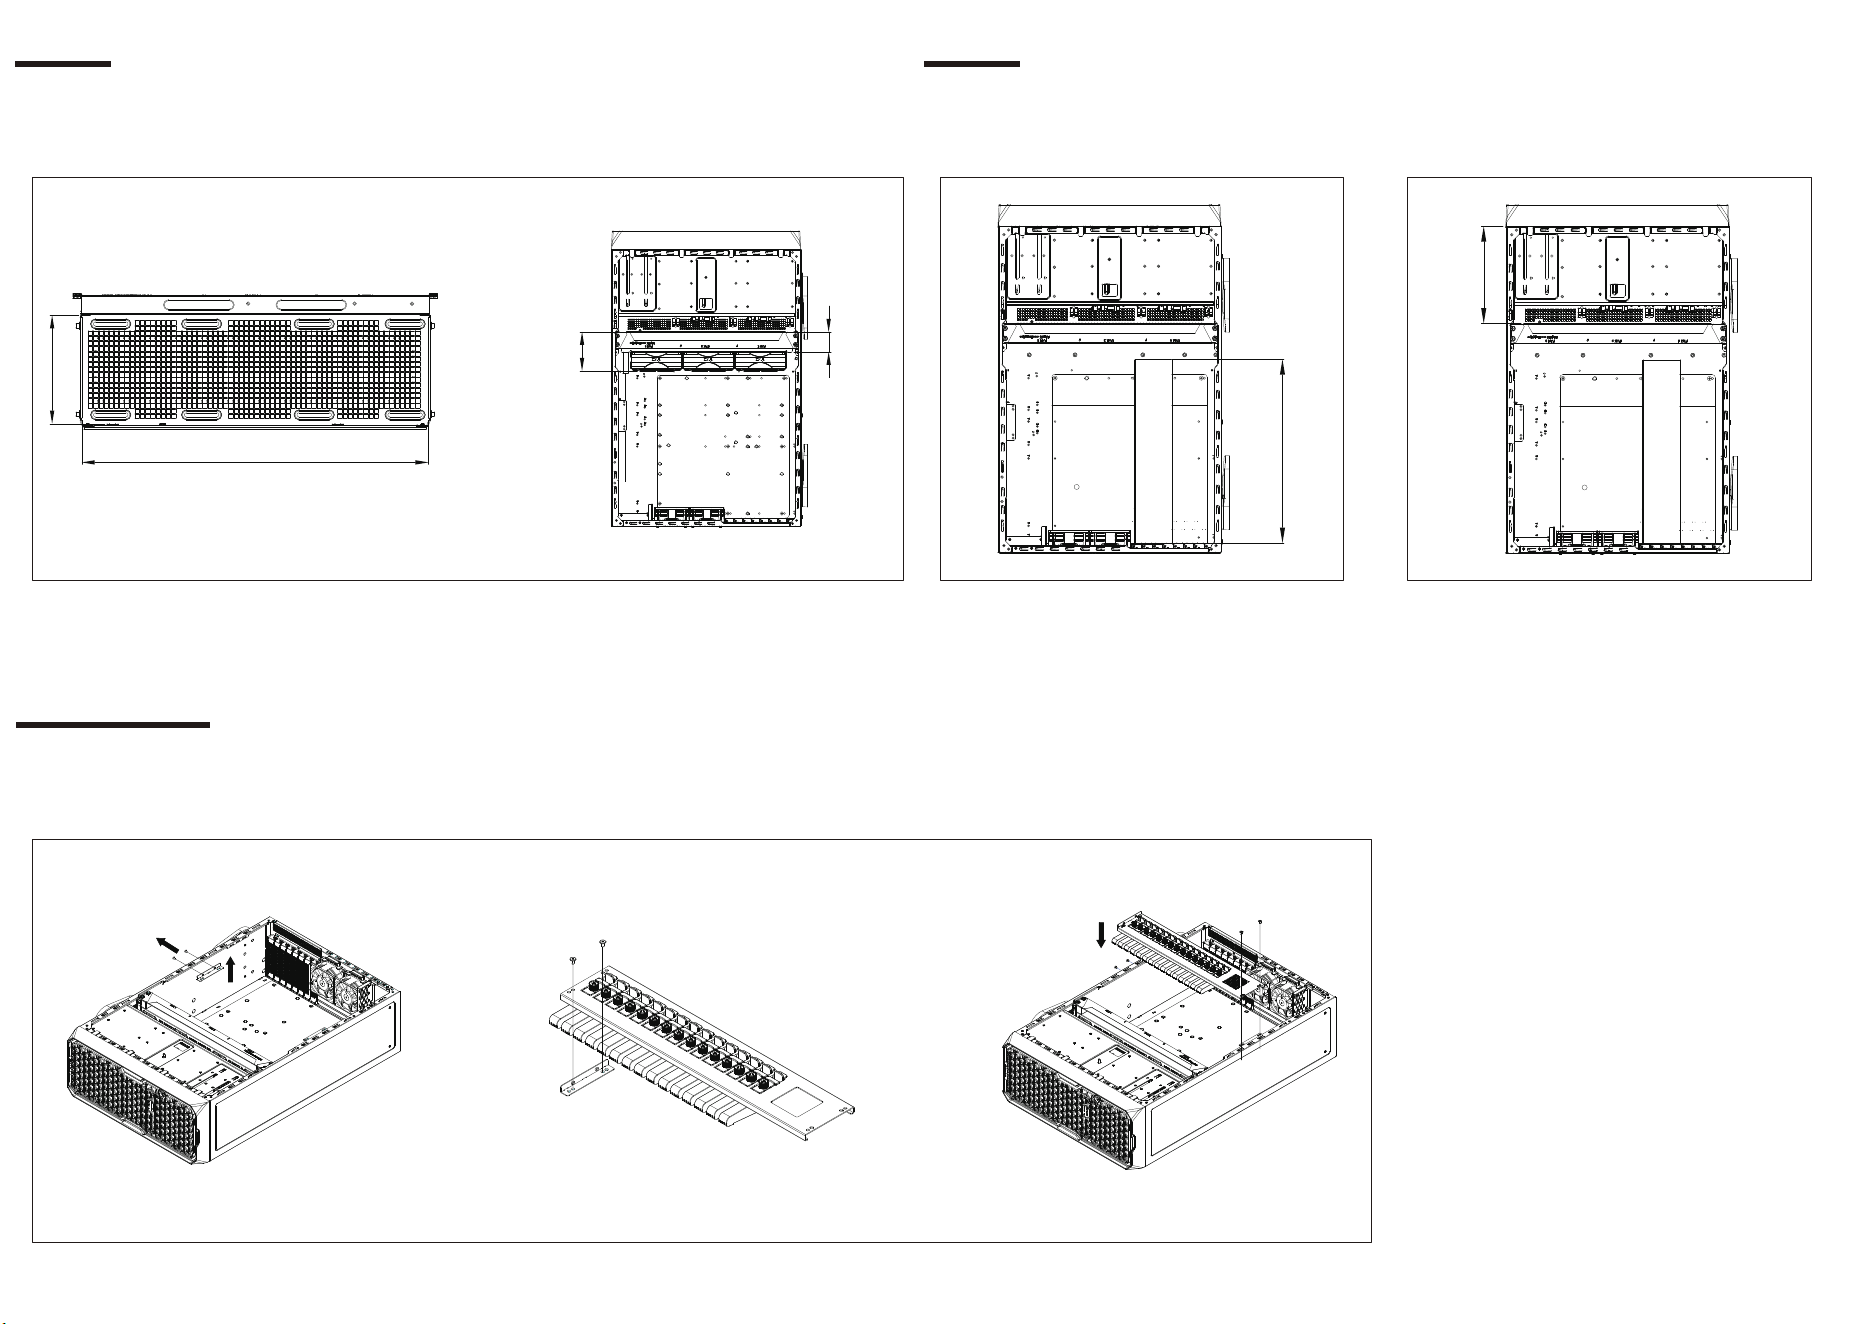
DISASSEMBLE CHART
1.Front panel
2.Side panel
3.Top panel
4.5.25” bay cover
5.3.5” bay cover
1
2
3
4
2
5
6
7
8
9
10
10
6.Hot-swap 3.5” / 2.5” cage
7.Liquid cooling bracket / 120mm fans x3
8.80mm fans x2
9.ATX/PS2 power supply bracket
10.Graphics card holder bracket
Remove the front panel and detach the lower panel
Open the side panel latch, push backward, and remove the side panel
Front and Side Panel Panel RemovalAccessories Content
Motherboard standoff Mounting for motherboard Mounting for PSU
Mounting for 3.5" HDD Mounting for 2.5" SSD Mounting for 5.25" ODD
Front Panel Key Cable ties Fan Extension Cable
CRPS 1+1(2U) Power Bracket and
Mounting Screws
Silverstone 2U redundant power
bracket, insulation washers, bracket
screws
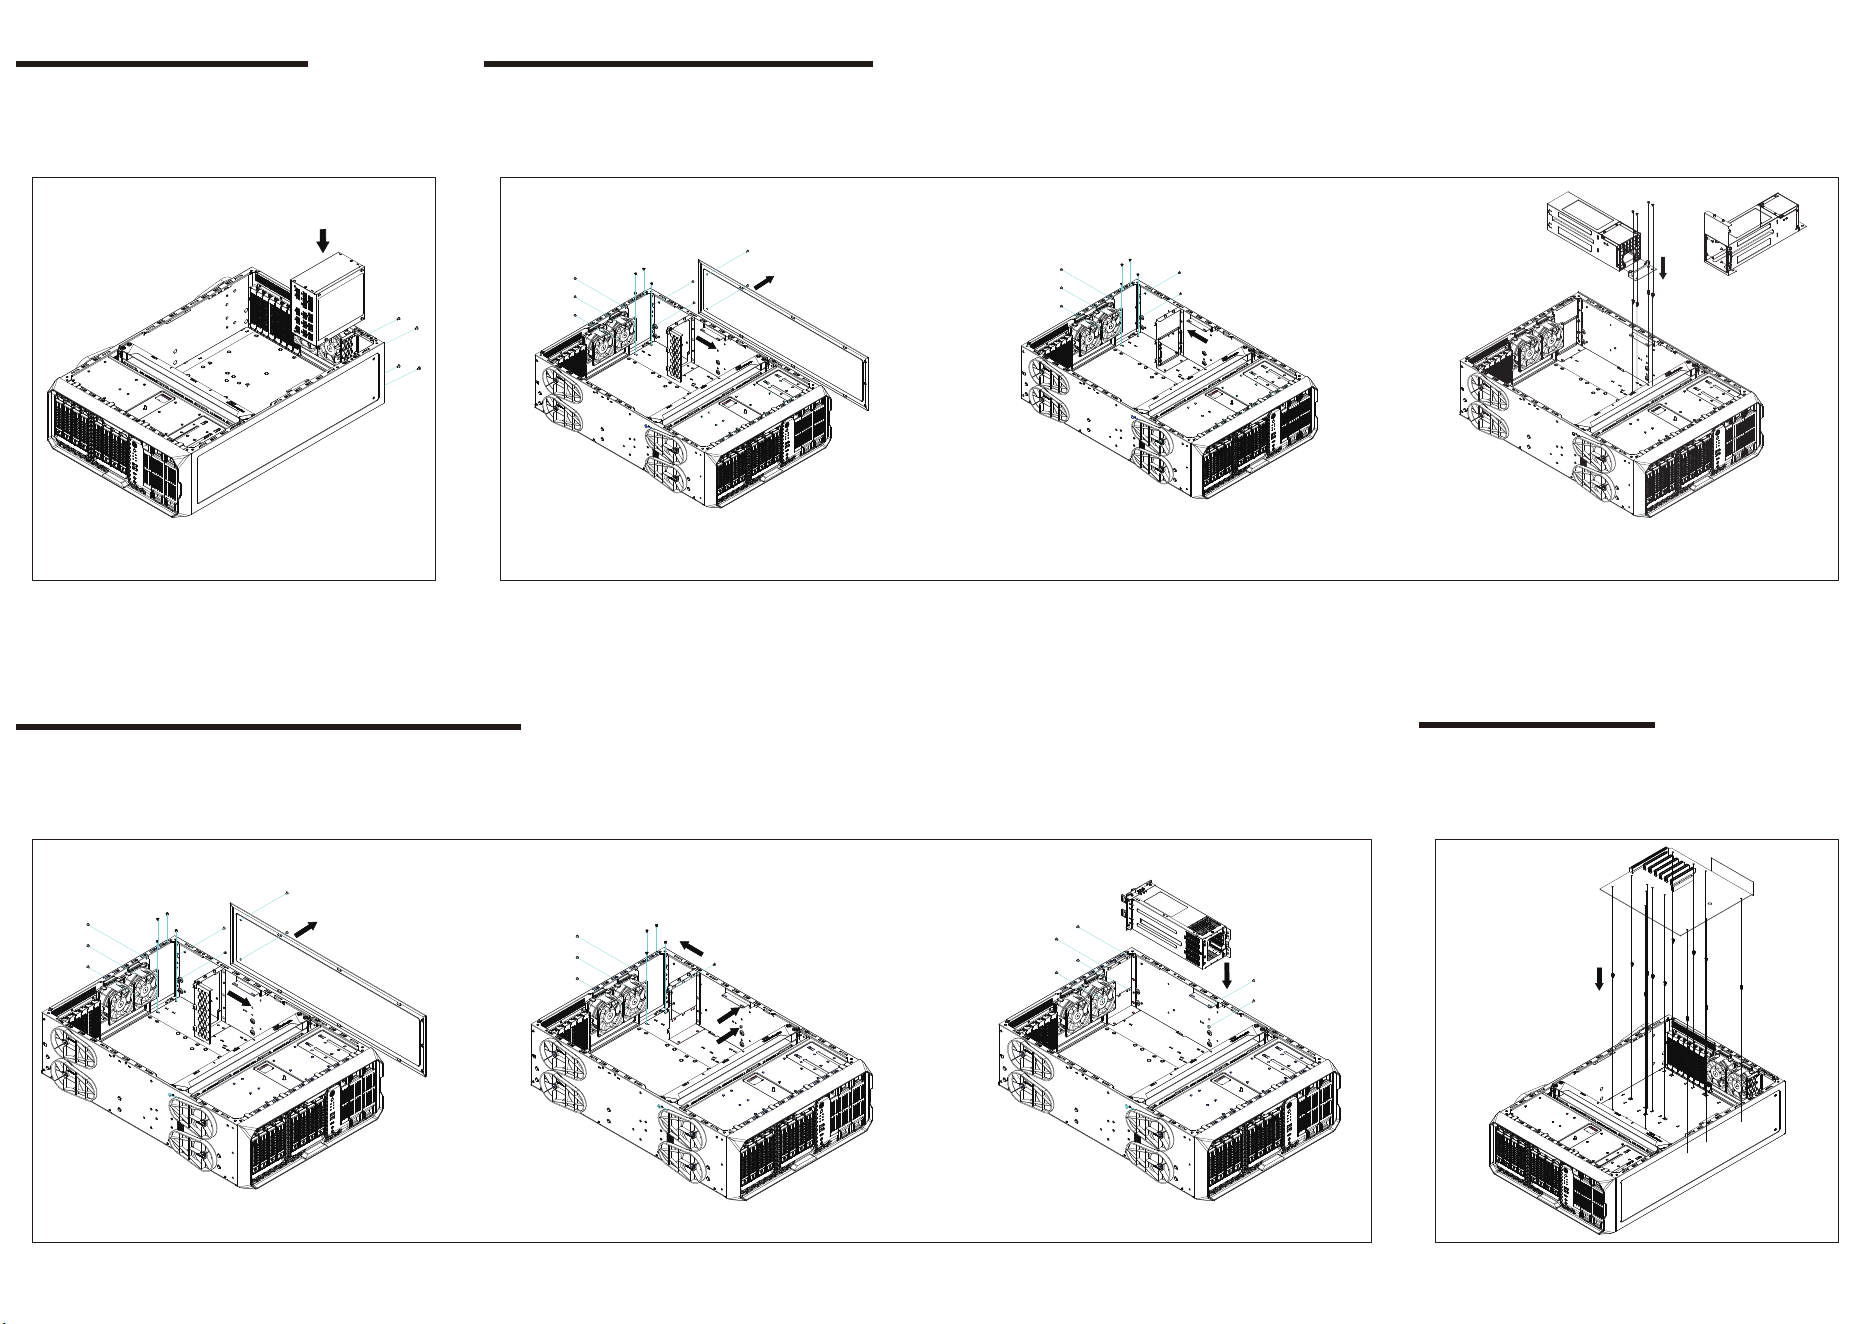
Install ATX/PS2 Power Supply
Power Supply Unit Installation
Install CRPS 1+1(2U) Power Supply
1. Remove the ATX/PS2 power supply bracket
2. Mount the CRPS 1+1(2U) power supply bracket
3. Install CRPS 1+1(2U) power supply
CRPS 1+1(2U) Power Supply Installation
Install 2U Redundant Power Supply
1. Remove the ATX/PS2 power supply bracket
2. Secure the 2U redundant power supply bracket and apply spacers to the corresponding mounting holes
3. Install 2U Redundant power supply
Silverstone 2U Redundant Power Supply Installation
Install motherboard standoffs as needed. Install the motherboard.
Motherboard Installation
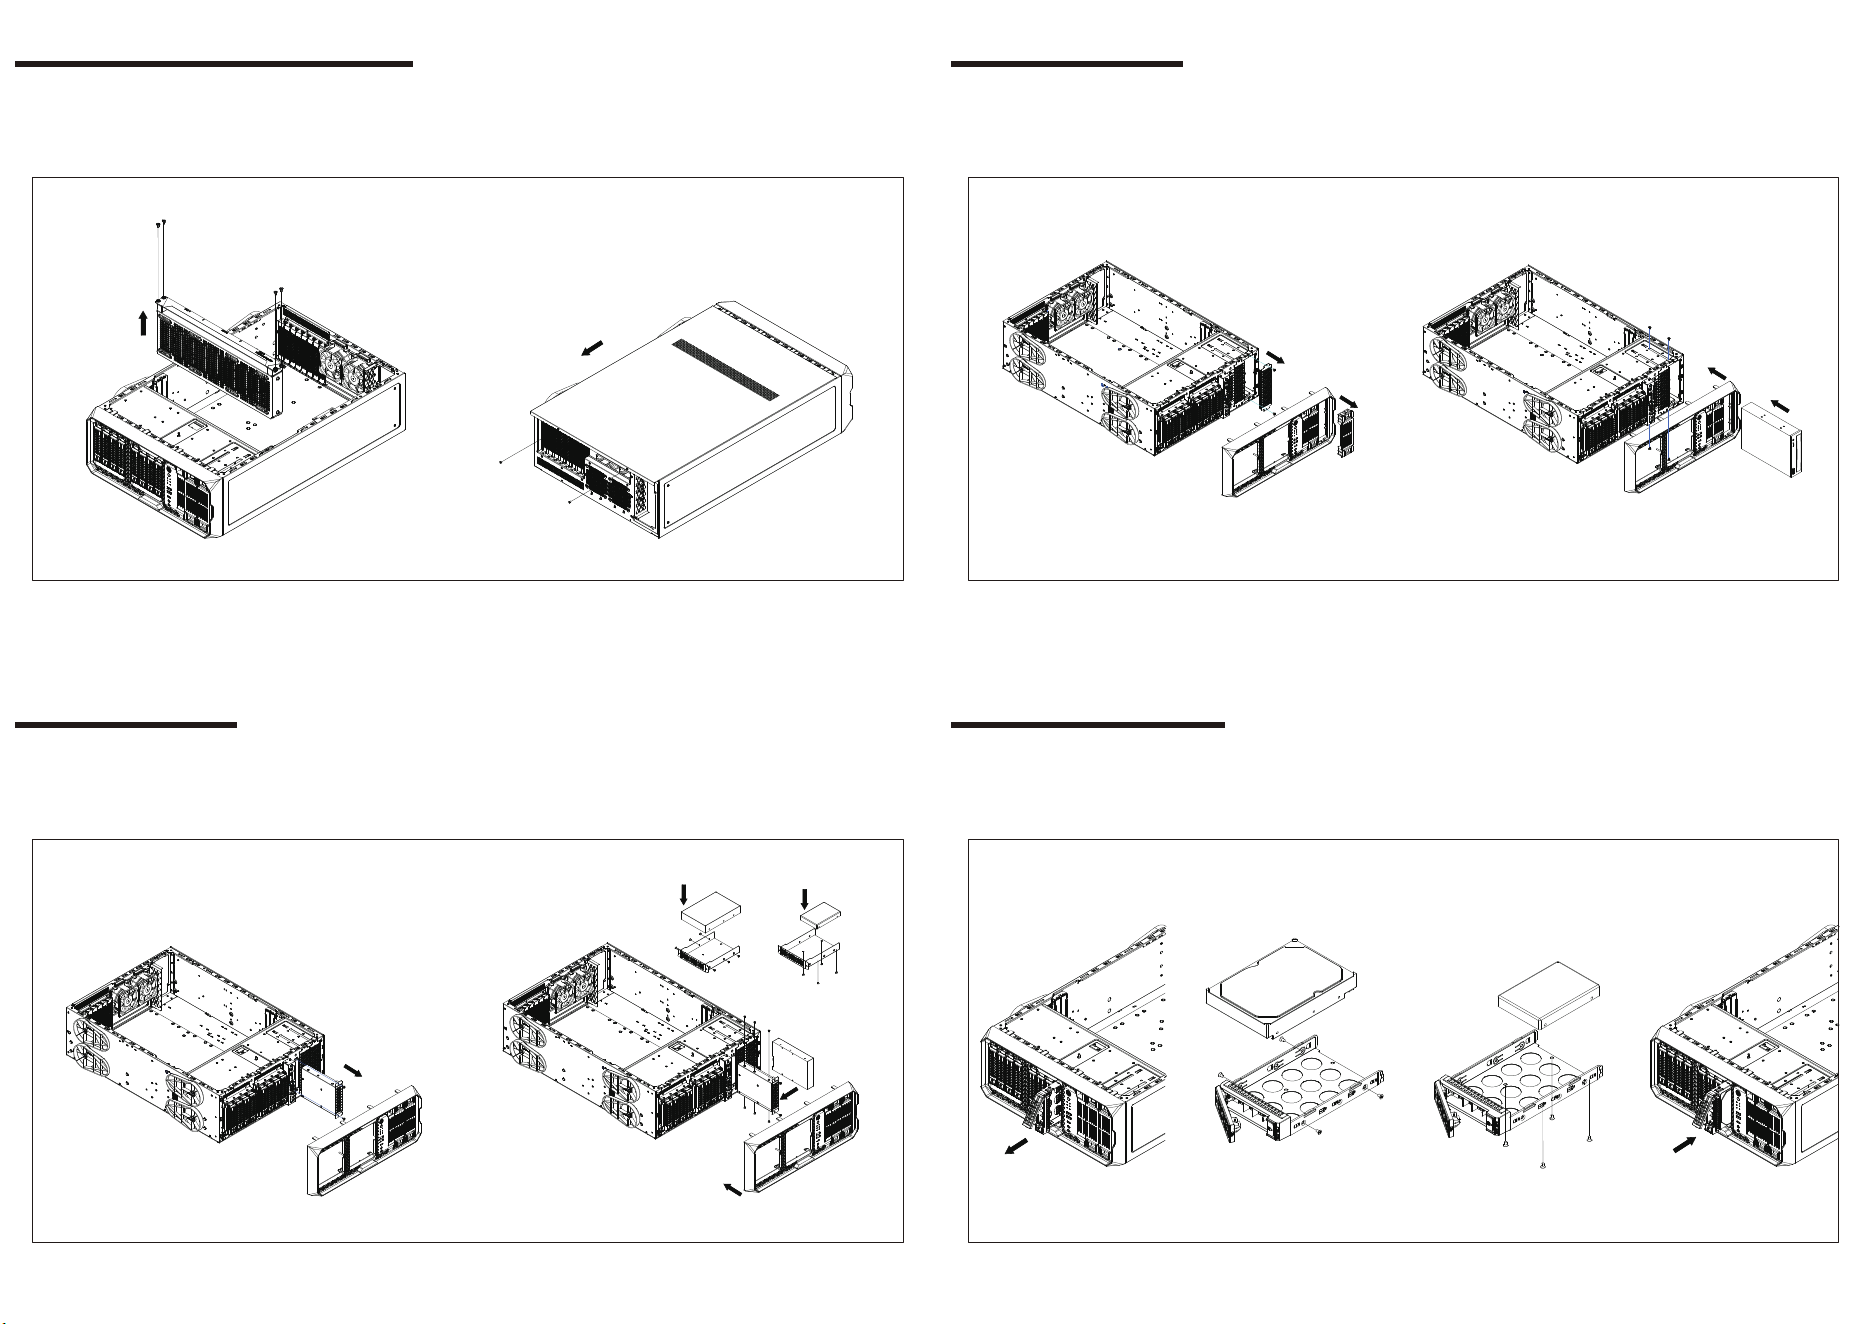
Remove the radiator bracket
Slide backward to remove the side panel
Remove Radiator Bracket and Side Panel
Remove the front panel, 5.25" cover, and internal shield.
Insert the 5.25" device and secure it with screws.
5.25" Device Installation
Remove the front panel, 3.5" bay cover, and drive tray.
Insert the 3.5" device, secure it with screws, and reinstall the front panel.
3.5" Device Installation
Remove the hot-swap module drive trays to install 3.5” or 2.5” devices.
Secure them with screws, and then insert the tray back into the drive bay.
Hot-Swap Drives Installation
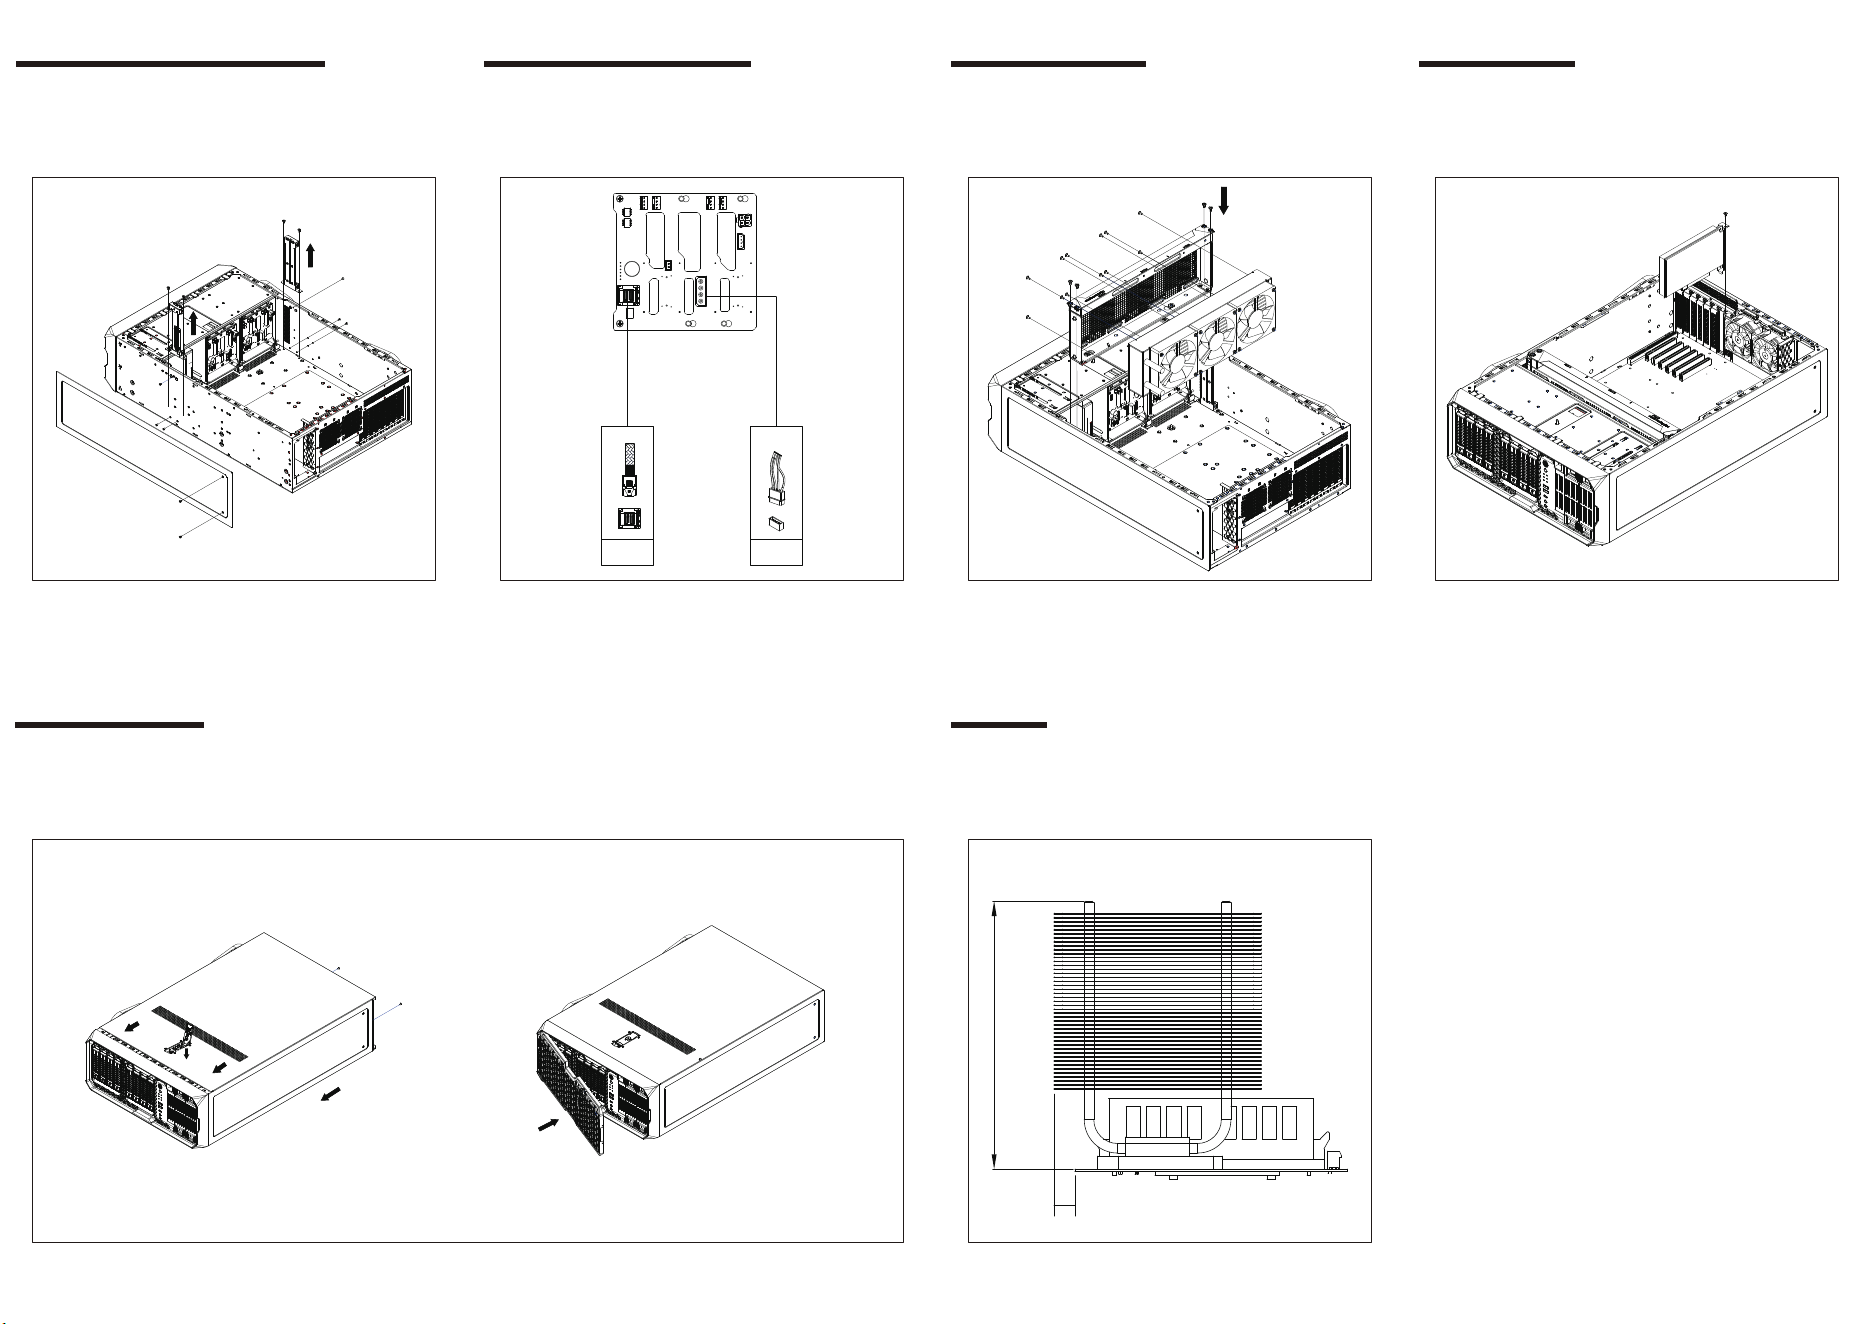
Remove the radiator cable routing bracket and connect the cables for
the front devices and hot-swappable drives.
Connect Front and Drive Cables
Backplane Wiring Diagram (4-Pin Peripheral and Mini SAS SFF-8643)
Backplane Wiring Overview
ꑪ4PIN
Mini-SAS
SFF-8643
Secure the liquid cooler to the bracket, then reinstall the bracket into
the chassis.
Radiator Installation
Install the graphics card.
GPU Installation
After confirming that all necessary cables and connections are properly secured, reinstall the side panel onto the chassis and fasten it with screws.
Install the front panel.
Reassemble Panels
Without graphics card holder installed, cooler height limit: 145mm
Without graphics card holder installed, cooler height limit: 134mm
Cooler width must not exceed motherboard edge by more than 8mm
Limitation
145
8
Radiator length limit: 400mm; width limit: 120mm
Radiator thickness limit: 46mm; with fan: 90mm
400mm
120mm
90mm
46mm
Limitation
Maximum graphics card length: 320mm
Limitation
Graphics card
320mm
Front 5.25" and 2.5" device length limit: 194mm
194mm
Graphics card
Remove the lower bracket of the graphics card holder.
Secure the bracket onto the graphics card holder and reinstall it into the chassis
Optional Installation
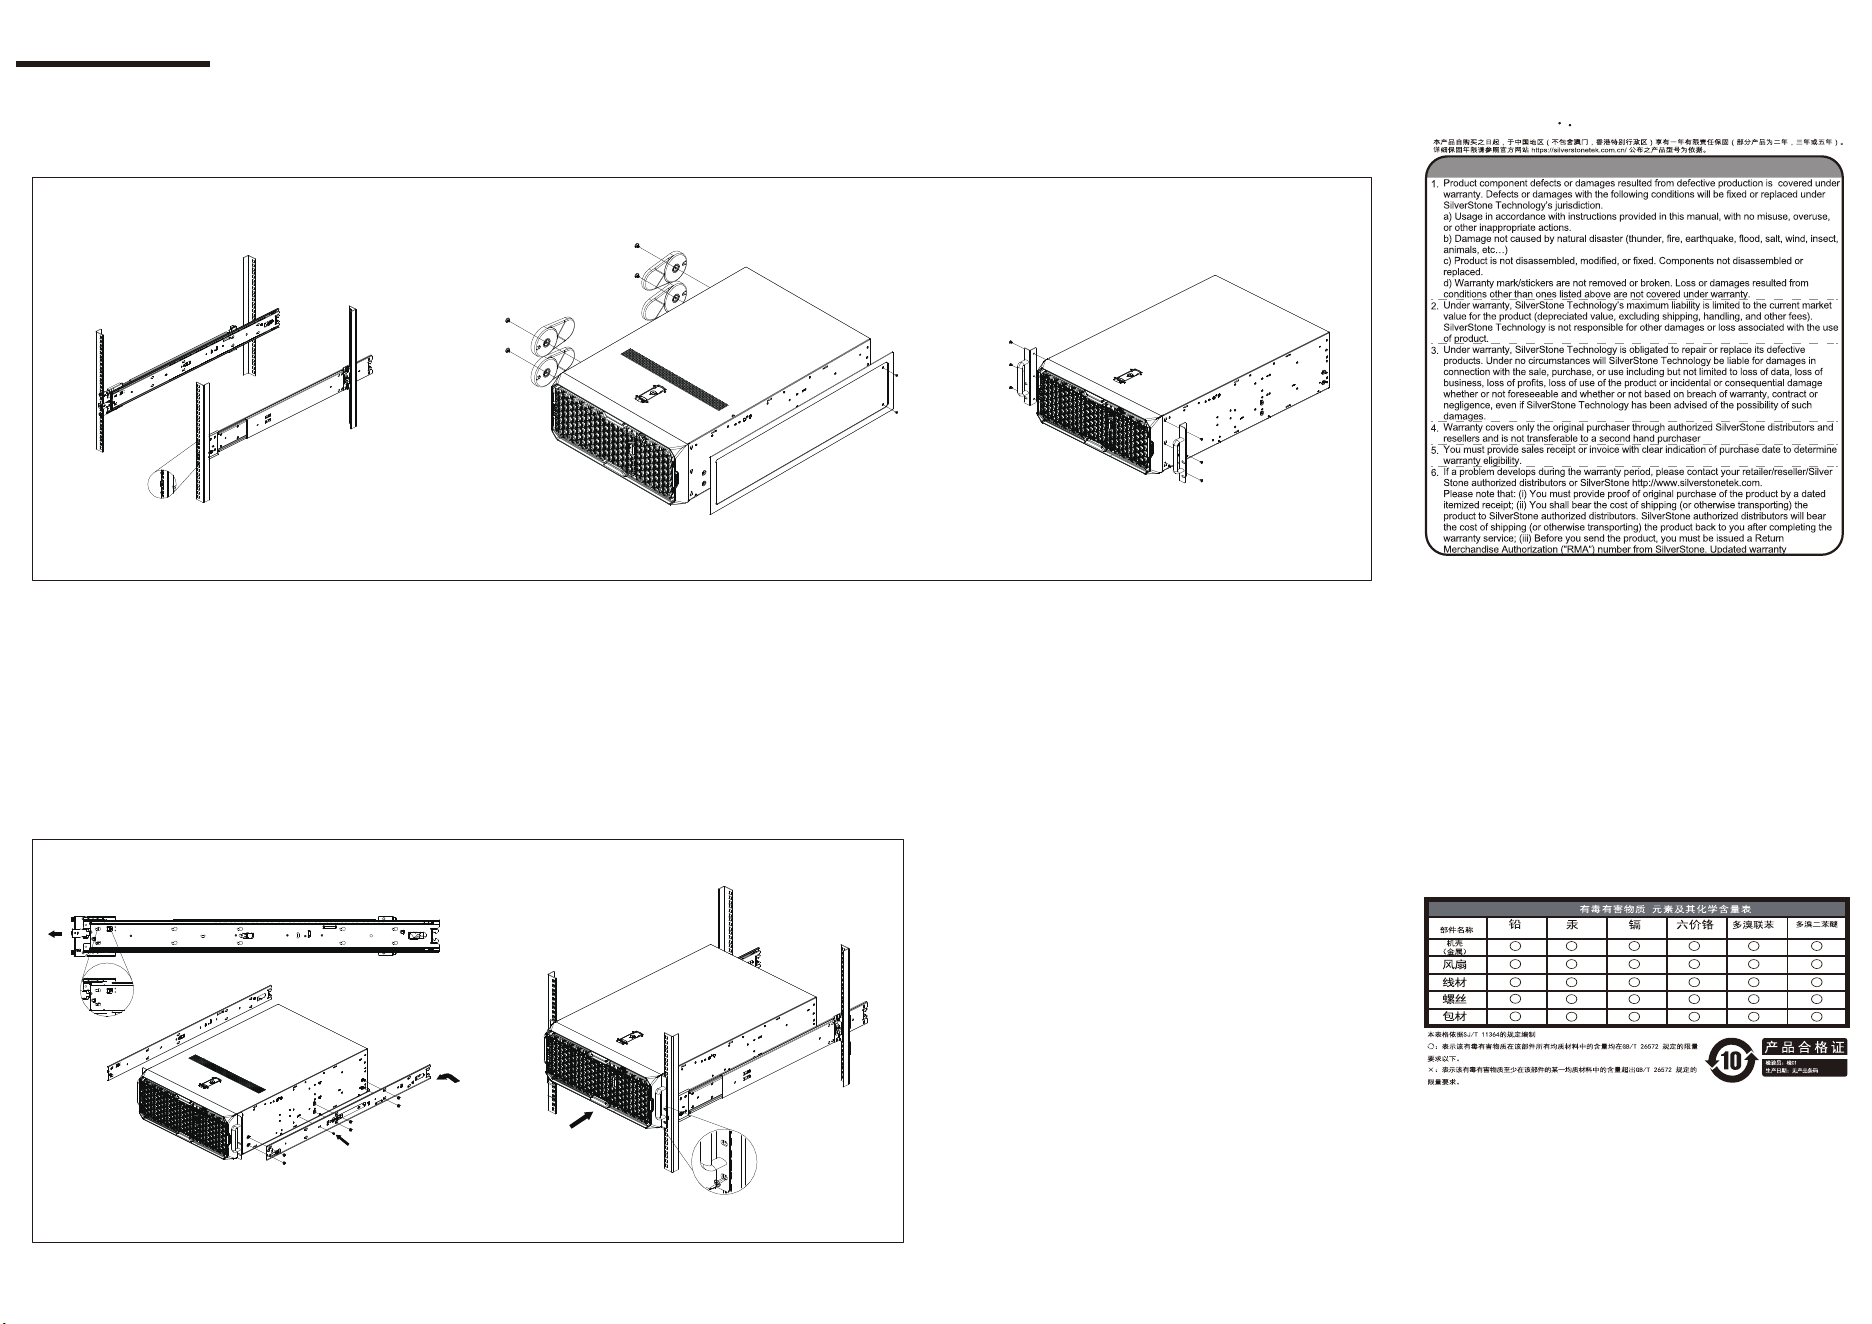
Install the rails onto the rack.
Remove the rubber feet and top cover.
Install the rack handles.
Optional Installation
Pull out the inner rails and install them on both sides of the chassis in the corresponding positions.
Slide the chassis into the cabinet rails to complete the installation.
Chassis Installation into Rack
Warranty terms & conditions
Warranty Information
This product has a limited 1 year warranty in North America and Australia.
For information on warranty periods in other regions, please contact your reseller or SilverStone authorized distributor.
-
Additional info & contacts
For North America (usasupport@silverstonetek.com)
SilverStone Technology in North America may repair or replace defective product with refurbished
product that is not new but has been functionally tested. Replacement product will be warranted
for remainder of the warranty period or thirty days, whichever is longer. All power supplies should
be sent back to the place of purchase if it is within 30 days of purchase, after 30 days, customers
need to initiate RMA procedure with SilverStone Technology in USA by first downloading the “
USA RMA form for end-users” form from the below link and follow its instructions.
http://silverstonetek.com/contactus.php
For Australia only (support@silverstonetek.com)
Our goods come with guarantees that cannot be excluded under the Australian Consumer Law.
You are entitled to a replacement or refund for a major failure and for compensation for any other
reasonably foreseeable loss or damage. You are also en
titled to have the goods repaired or
replaced if the goods fail to be of acceptable quality and the failure does not amount to a major
failure. Please refer to above “Warranty terms & conditions” for further warranty details.
SilverStone Technology Co., Ltd. 12F No. 168 Jiankang Rd., Zhonghe Dist., New Taipei City 235
Taiwan R.O.C. +886-2-8228-1238 (standard international call charges apply)
For Europe (support.eu@silverstonetek.de)
For China (support@silverstonetek.com.cn)
For all other regions (support@silverstonetek.com)
(Hg) (Cd) (Cr(VI))
(PBB)
(PBDE)
3E
G11255010
