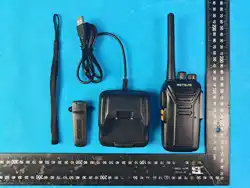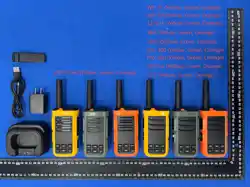
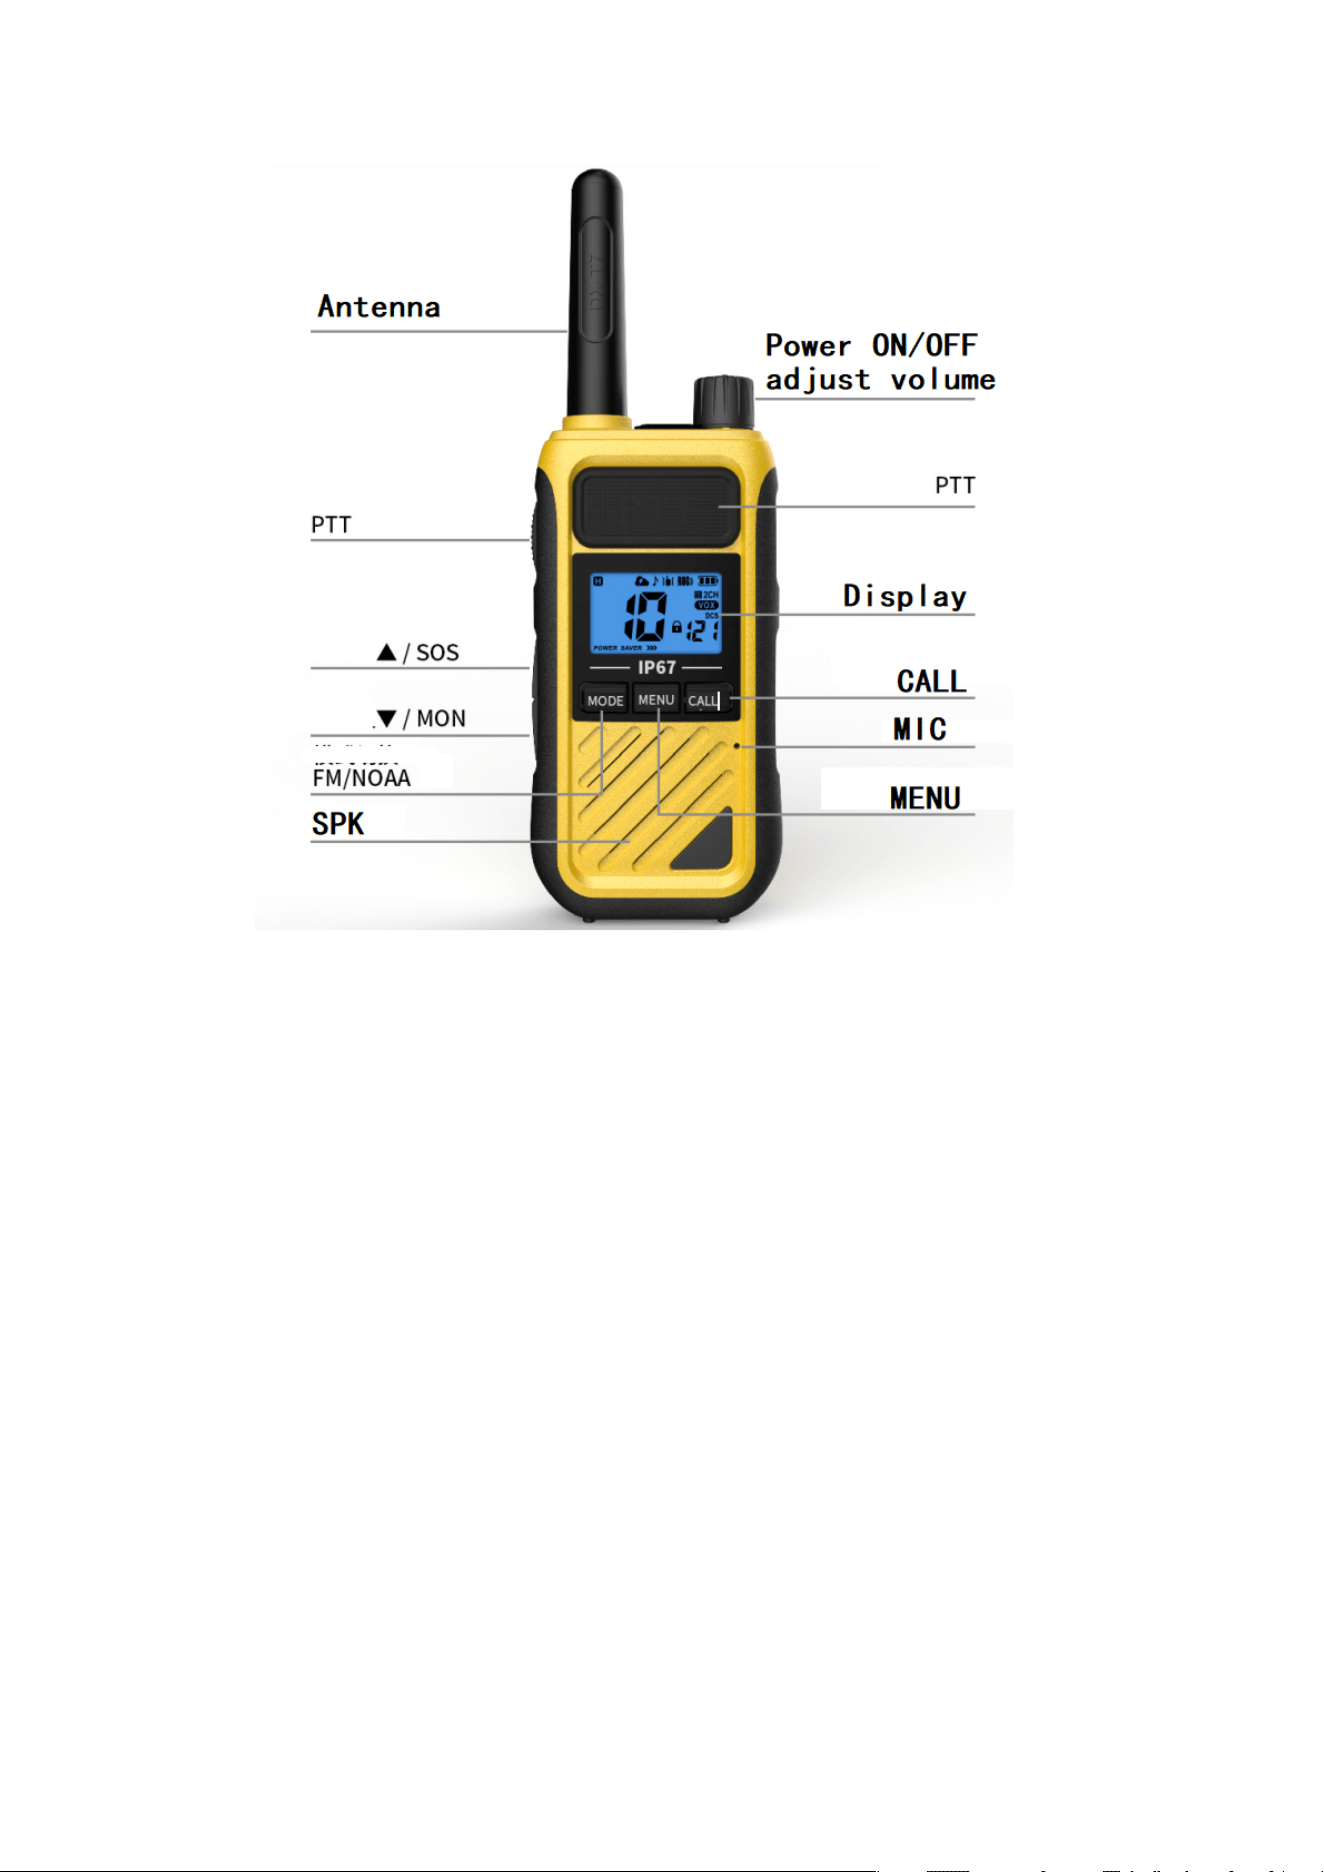
E03 Two-Way Radio User Manual
开关机:
要打开收音机,请顺时针转动电源/音量旋钮。此举同时也会提高音量。逆时针转动电源/音量旋钮可降低音量。继
续逆时针转动以关闭收音机。
Power On/Off:
To turn on the radio, rotate the power/volume knob clockwise. This also increases the
volume. Rotate the power/volume knob counter-clockwise to decrease the volume. Continue
rotating counter-clockwise to switch off the radio.
对讲通信
为了通信,无线电必须设置到相同的频道和隐私代码。
1.为了获得最佳清晰度,请将无线电设备保持在距嘴部 2 到 3 英寸的位置。
2.按住 PTT(按压通话)按钮,并用正常声音对着麦克风说话。
Two-Way Communication
For communication, radios must be set to the same channel and privacy code.
1 For optimum clarity, hold the radio 2 to 3 inches from your mouth.
2 Press and hold the PTT (Push-to-Talk) button and speak into the microphone in a normal voice.
频道选择
E03 有标准的 22 个频道,频道(1-7)和(15-22)拥有高低功率选择,频道(8-14)仅有低功率。
1. 短按并释放 MENU 按钮,频道编号闪烁。
2. 按▲或▼按钮选择频道。(你可以按住▲或▼按钮快速前进)

3. 按 PPT 按钮保存并返回待机模式。或按 MENU 按钮继续其他设置。
提示:10 秒内不进行按钮操作,将自动返回待机模式。
Channel Selection
The E03 features a standard set of 22 channels. Channels (1-7) and (15-22) support
high/low power selection, while channels (8-14) operate on low power only.
1. Short-press and release the MENU button; the channel number will flash.
2. Press the ▲ or ▼ button to select a channel. (You may hold down the ▲ or ▼ button for fast
scrolling.)
3. Press the PTT button to save and return to standby mode. Or press the MENU button to proceed
with other settings.
Note: The unit will automatically revert to standby mode if no button operation is
performed within 10 seconds.
设定 CTCSS/DCS 隐私代码
1. 按 MENU 按钮,直到频道编号右下方 OF 或小数字闪烁。
2. 按▲或▼按钮选择隐私代码。(你可以按住▲或▼按钮快速前进)
3. 按 PTT 按钮保存并返回待机模式。或按 MENU 按钮继续其他设置。
OF:关闭隐私代码
01-38 为 CTCSS 隐私代码。
39-121 为 DCS 隐私代码
Setting CTCSS/DCS Privacy Codes
1. Press the MENU button until “OF” or a small digit flashes at the lower-right of the channel number.
2. Press the ▲ or ▼ button to select a privacy code. (You may hold down the ▲ or ▼ button for fast
scrolling.)
3. Press the PTT button to save and return to standby mode. Or press the MENU button to proceed
with other settings.
OF: Privacy code disabled01-38: CTCSS privacy codes39-121: DCS privacy codes
语音激活传输(VOX)
1. 按 MENU 按钮,直到 VOX 图标显示。
2. 按▲或▼按钮打开或关闭 VOX
3. 按 PTT 按钮保存并返回待机模式。或按 MENU 按钮继续其他设置。
OF:关闭 VOX 模式
1-9:开启 VOX 模式并设定 VOX 灵敏度。
VOX 灵敏度等级以数字 1-9 显示,其中数字 9 为最敏感级别,数字 1 为最不敏感级别。
Voice-Activated Transmission (VOX)
1. Press the MENU button until the VOX icon appears.
2. Press the ▲ or ▼ button to turn VOX on or off.
3. Press the PTT button to save and return to standby mode. Or press the MENU button to proceed
with other settings.
OF: VOX mode disabled1-9: VOX mode enabled with VOX sensitivity setting.

VOX sensitivity levels are indicated by numbers 1-9, where level 9 is the most
sensitive and level 1 is the least sensitive.
省电设置
1. 按 MENU 按钮,直到 POWER SAVER 显示。
2. 按▲或▼按钮选择省电等级
3. 按 PTT 按钮保存并返回待机模式。或按 MENU 按钮继续其他设置。
OF:关闭省电模式
1-4:开启省电模式并设定省电等级
其中数字 4 为最高省电级别,1 为最低省电级别。
Power-Saver Setting
1. Press the MENU button until POWER SAVER is displayed.
2. Press the ▲ or ▼ button to select the power-saver level.
3. Press the PTT button to save and return to standby mode. Or press the MENU button to proceed
with other settings.
OF: Power-saver mode disabled1-4: Power-saver mode enabled with power-saver level
setting.
Level 4 provides maximum power saving, while level 1 provides minimum power saving.
呼叫铃声
1. 按 MENU 按钮,直到字母 CA 显示。
2. 按▲或▼按钮选择呼叫铃声,有 10 种呼叫铃声可供选择。
3. 按 PTT 按钮保存并返回待机模式。或按 MENU 按钮继续其他设置。
按键音开/关
当按键音开启时,每次按下按钮时都会发出声音。
1. 按 MENU 按钮, 直到显示。
2. 按▲或▼按钮选择开启或关闭按键音。
按 PTT 按钮保存并返回待机模式。或按 MENU 按钮继续其他设置。
Call Tones
1. Press the MENU button until the letters CA appear.
2. Press the ▲ or ▼ button to select a call tone. Ten call tones are available.
3. Press the PTT button to save and return to standby mode. Or press the MENU button to proceed
with other settings.
Key Beep On / Off
When key beep is enabled, a tone will sound each time a button is pressed.
1.
2. Press the MENU button until the corresponding indicator appears.
3. Press the ▲ or ▼ button to enable or disable the key beep.

4. Press the PTT button to save and return to standby mode. Or press the MENU button to proceed
with other settings.
Roger Beep 确认音
当您讲话后释放“PTT”按钮时,您的听众将听到提示音。这将提醒对方你已经结束讲话,他们可以继续讲话了。
1. 按 MENU 按钮,直到 ROG)显示。
2. 按▲或▼按钮选择开启或关闭 Roger Beep 确认音
按 PTT 按钮保存并返回待机模式。或按 MENU 按钮继续其他设置。
Roger Beep Confirmation Tone
When you release the PTT button after speaking, your listeners will hear a confirmation
tone. This alerts others that you have finished speaking and they may start to talk.
1. Press the MENU button until ROG) is displayed.
2. Press the ▲ or ▼ button to enable or disable the Roger Beep confirmation tone.
3. Press the PTT button to save and return to standby mode. Or press the MENU button to proceed
with other settings.
显示屏背光颜色
G3 可以设置屏幕背光的颜色或关闭背光灯
1. 按 MENU 按钮,直到 LED 显示。
2. 按▲或▼按钮选择背光颜色或关闭显示屏背光灯
3. 按 PTT 按钮保存并返回待机模式。或按 MENU 按钮继续其他设置。
SOS 紧急警报模式
紧急警报功能可用于向您的同伴发出您需要紧急协助的信号。
警报模式有本地警报/发射警报两种模式。本地报警仅在本机发出警报声音。发射警报可在本机发出警报声音的同
时向当前相同频道/隐私代码的对讲机发出警报声音。
Display Backlight Color
The G3 allows you to set the display backlight color or turn off the backlight.
1. Press the MENU button until is displayed.
2. Press the ▲ or ▼ button to select a backlight color or turn off the display backlight.
3. Press the PTT button to save and return to standby mode. Or press the MENU button to proceed
with other settings.
SOS Emergency Alert
ModeThe emergency alert function can be used to signal your companions that you require
urgent assistance.
There are two alert modes: Local Alert and Transmit Alert.Local Alert only triggers the
alarm sound on the unit itself.Transmit Alert sounds the alarm locally, and also sends
an alarm tone to radios on the same channel and privacy code.
设置本地警报/发射警报
1. 按 MENU 按钮,直到 SOS 图标显示。
2. 按▲或▼按钮选择本地警报或发射警报。
3. 按 PTT 按钮保存并返回待机模式。或按 MENU 按钮继续其他设置。

OF:本地警报
ON:发射警报
Setting Local Alert / Transmit Alert
1. Press the MENU button until the SOS icon appears.
2. Press the ▲ or ▼ button to select Local Alert or Transmit Alert.
3. Press the PTT button to save and return to standby mode. Or press the MENU button to proceed
with other settings.
OF: Local AlertON: Transmit Alert
警报开/关
1. 按住左侧▲按钮 3 秒钟,sos 图标显示并发出警报声音。
2. 按 PTT 按钮关闭警报并返回待机模式。
Alert On / Off
1. Hold down the left-side ▲ button for 3 seconds. The SOS icon will appear and the alarm will sound.
2. Press the PTT button to turn off the alarm and return to standby mode.
振动提醒
振动功能开启后,当对讲机处于闲置状态时,收到对讲信号或呼叫信号时振动。
对讲机在通话结束 6 秒后自动进入闲置状态。6 秒内的连续通话不会重复产生振动。
1. 按 MENU 按钮,直到振动图标显示。
2. 按▲或▼按钮选择开启或关闭。
3. 按 PTT 按钮保存并返回待机模式。或按 MENU 按钮继续下一级设置。
发射功率等级选择
对讲机有 2 种功率等级选择(Hi 和 Lo)。高发射功率(Hi)可获得更远的射程,但同时也会更加耗电。可根据实
际情况进行设置。
1. 按 MENU 按钮,直到字母 Po 显示,Hi 或 Lo 图标闪烁。
2. 按▲或▼按钮选择发射功率等级(Hi:高功率 Lo:低功率)
3. 按 PTT 按钮保存并返回待机模式。或按 MENU 按钮,设置结束并返回待机模式。
Vibration Alert
When the vibration function is enabled, the radio will vibrate upon receiving talk or
call signals while in idle state.
The radio automatically enters idle state 6 seconds after a call ends. Consecutive
calls within 6 seconds will not trigger repeated vibration.
1. Press the MENU button until the vibration icon appears.
2. Press the ▲ or ▼ button to select enable or disable.
3. Press the PTT button to save and return to standby mode. Or press the MENU button to move to
the next setting.

Transmit Power Level Selection
The radio offers two power-level options (Hi and Lo). High transmit power (Hi) delivers
longer communication range yet consumes more battery power. Adjust the setting
according to actual usage conditions.
1. Press the MENU button until “Po” is displayed, with the Hi or Lo icon flashing.
2. Press the ▲ or ▼ button to select the transmit power level (Hi: High Power; Lo: Low Power).
3. Press the PTT button to save and return to standby mode. Or press the MENU button to complete
settings and return to standby mode.
8-14 频道:仅有 Lo 发射功率等级
1-7 和 15-22 频道:可设置 Hi 或 Lo 发射功率等级
注意 :您无法调整 FRS 频道(8~14)的功率设置。根据 FCC 规定,它们设置为低功率 0.5W。
Channels 8-14: Lo transmit power level only
Channels 1-7 and 15-22: Hi or Lo transmit power level selectable
Note: You cannot adjust the power setting for FRS channels (8-14). Per FCC regulations,
these channels are fixed at low power 0.5 W.
双频监听
E03 具有双频监听模式,允许用户能够扫描 2 个频道以查看任何活动。
打开或关闭双频监听模式:
1. 按 MENU 按钮,直到 2CH 图标显示。
2. 按▲或▼按钮选择开启或关闭双频监听。
3. 按 PTT 按钮保存并返回待机模式。或 MENU 按钮设置双频监听的频道和代码。
设置双频监听的频道和代码:
1. 按 MENU 按钮,直到 ▤2CH 图标显示,频道编号闪烁
2. 按▲或▼按钮选择您的频道。
3. 再次按 MENU 按钮,隐私代码编号闪烁。
4. 按▲或▼按钮选择您的隐私代码。
5. 按 PTT 按钮保存并返回待机模式。或 MENU 按钮继续下一级设置。
返回待机模式后,2CH 图标出现,表示双频监听功能已开启。同时两个频道轮流显示。您的无线电开始扫描两个
频道正在使用的频道/代码,并在任何活动频道上停止。当频道处于活动状态时,双频扫描将停止并在活动频道停
留 6 秒,6 秒后恢复双频扫描。
重要提示:
1. 双频监听模式下,您仅可接收双频的第 2 个频道的语音,无法直接对其进行发送语音。
2. 双频模式会加快对讲机耗电。
Dual-Channel Monitor

The E03 features dual-channel monitor mode, which allows users to scan two channels for
any activity.
To turn dual-channel monitor mode on or off:
1. Press the MENU button until the 2CH icon appears.
2. Press the ▲ or ▼ button to enable or disable dual-channel monitor.
3. Press the PTT button to save and return to standby mode. Or press the MENU button to set the
channels and codes for dual-channel monitor.
To set channels and codes for dual-channel monitor:
1. Press the MENU button until the ▤2CH icon appears and the channel number flashes.
2. Press the ▲ or ▼ button to select your desired channel.
3. Press the MENU button again; the privacy code number will flash.
4. Press the ▲ or ▼ button to select your privacy code.
5. Press the PTT button to save and return to standby mode. Or press the MENU button to proceed to
the next setting.
6.
After returning to standby mode, the 2CH icon indicates that dual-channel monitor is
active. The two channels will be displayed alternately. Your radio scans the two
configured channels/codes and stops on any active channel. When a channel becomes
active, dual-channel scanning pauses and stays on the active channel for 6 seconds,
then resumes dual-channel scanning after the 6-second period.
Important Notes:
1. Under dual-channel monitor mode, you can only receive audio from the second monitored channel;
you cannot transmit directly to it.
2. Dual-channel mode increases radio power consumption.
FM 收音机
E03 拥有 FM 收音机功能,可收听 87.5 Hz-108.0 Hz 范围类的所有电台。
打开收音机:按 MODE 按钮 2 次,直到 FM 图标显示,进入收音机模式。
微调电台频率:进入收音机模式后,按 CALL 或 MENU 按钮设置收音机频率。
自动扫描电台:进入收音机模式后,按住 CALL 或 MENU 按钮 3 秒,将自动向前会向后扫描到有信号的电台,扫描
到有信号的电台后立即停止并停留在当前电台。
关闭收音机:再次按 MODE 按钮,收音机关闭并返回待机模式。
提示:收电台的接收和您所在的环境有很大关系,移动到室外高地且无遮挡区域可获得最佳体验。
FM Radio
The E03 is equipped with FM radio function for receiving radio stations within the
frequency range of 87.5 MHz-108.0 MHz.
Turn on the radio: Press the MODE button twice until the icon appears to enter
radio mode.
Fine-tune radio frequency: After entering radio mode, press the ▲ / ▼ buttons to
adjust the radio frequency.

Auto-scan radio stations: In radio mode, press and hold the ▲ or ▼ button for 3
seconds. The radio will automatically scan forward or backward and stop once a
signal-bearing station is found.
Turn off the radio: Press the MODE button again to exit the radio and return to standby
mode.
Note:
Radio reception heavily depends on your local environment. For best performance, move
to an outdoor, elevated and unobstructed area.
NOAA 气象广播
您收音机具有 NOAA 气象功能,可收听美国国家海洋和大气管理局 NOAA 气象广播的 10 个频道。
要选择气象频道,请执行以下操作:
1. 请按 1 次 MODE 按钮进入进入天气模式,此时可收听当前气象频道。
2. 在气象模式下,按 MENU 按钮,气象频道闪烁。然后按▲或▼ 按钮选择想要收听的气象频道。
3. 按左侧 PTT 按钮停留在当前气象频道。
4. 再次按 PTT 按钮或 MODE 按钮,退出气象模式。
NOAA Weather Radio
Your radio features NOAA weather function to receive 10 NOAA weather broadcast channels
from the National Oceanic and Atmospheric Administration.
To select a weather channel:
1. Press the MODE button once to enter weather mode, where the current weather channel can be
received.
2. In weather mode, press the MENU button; the weather channel number will flash. Then press the
▲ or ▼ button to select your desired weather channel.
3. Press the left-side PTT button to lock onto the current weather channel.
4. Press the PTT button or MODE button again to exit weather mode.
NOAA 天气预警
您的收音机具有 NOAA 天气预警功能,您能够自动接收来自指定 NOAA 站的天气预警。
1. 在气象模式下,按 MENU 按钮,气象频道闪烁。然后按▲或▼ 按钮选择想要预警的气象频道。
2. 再次按 MENU 按钮,气象频道编码右侧 OF 或 ON 闪烁
6. 按▲或▼按钮选择打开或关闭天气预警。
5. 按左侧 PTT 按钮或 MENU 按钮返回气象收听模式。
6. 再次按 PTT 按钮,退出气象模式返回待机模式,待机状态下天气警报图标显示。
NOAA Weather Alert
Your radio is equipped with the NOAA weather alert function, enabling automatic
reception of weather alerts from the selected NOAA station.
1. In weather mode, press the MENU button; the weather channel number will flash. Then press the
▲ or ▼ button to select the weather channel for alert monitoring.

2. Press the MENU button again; “OF” or “ON” will flash to the right of the weather channel code.
3. Press the ▲ or ▼ button to turn the weather alert on or off.
4. Press the left-side PTT button or MENU button to return to weather listening mode.
5. Press the PTT button again to exit weather mode and return to standby mode. The weather alert
icon will be displayed in standby state.
6. Press the PTT button again to exit weather mode and return to standby mode. The
weather alert icon will be displayed in standby mode.
注意:
NOAA 气象电台被指定覆盖特定区域,服务可能有限。请咨询当地气象局了解频率和详细信息,或访问美国 www.weather.gov/nwr 查
看您所在地区的合适发射机。使用 NOAA 徽标并不代表 NOAA 国家气象局的认可或默示认可。
与双向无线电接收一样,天气频道的接收取决于您与发射器的距离以及您是在室内还是室外。由于天气频道的传输没有
代码,因此可能包含静电或噪音。
Note:
NOAA weather radio stations are assigned to cover specific geographic areas and service
availability may be limited. Consult your local weather service for frequencies and
details, or visit the U.S. website www.weather.gov/nwr to locate the appropriate
transmitter for your area. Use of the NOAA logo does not constitute endorsement or
implied approval by the NOAA National Weather Service.
Similar to two-way radio reception, weather-channel reception depends on your distance
from the transmitter and whether you are indoors or outdoors. Since weather-channel
transmissions operate without privacy codes, static or noise may be present.
MON 监听模式
当前频道信号弱时。您可以按住▼按钮进入监听模式,释放按钮立即退出监听模式。开启监听模式后可监听当前
频道所有通话,无论是否有设置隐私代码。
扫描:
您的收音机可以自动扫描您储存的 22 组频道和隐私代码组合。如果您想扫描到更多的无线电信号,请将所有频道
的隐私代码关闭后再进行扫描。
开启扫描:请长按 CALL 按钮 3 秒,直到出现【SCAN】图标,对讲机开始扫描频道。
扫描开启时,可执行以下操作:
1.改变扫描方向:短按▲或▼可改变扫描的方向,
2.恢复扫描:在搜索到无线电信号后,短按▲或▼可恢复扫描。
2.取消扫描:短按【MENU】按钮,将取消扫描并返回待机模式。
3.保存扫描到的频道:当侦测到无线电信号传入时停止。短按对讲机 PTT 按钮,保存并停留在扫描到的频道上,
进入待机模式。
提示:当扫描到无线电信号传入时,将停留在扫描到的频道上。如果无线电信号停止传输或不执行其他操作,对
讲机将在 5 秒后继续扫描。
MON Monitor Mode
When the signal on the current channel is weak, press and hold the ▼ button to enter
monitor mode. Release the button to exit monitor mode immediately. When monitor mode is

activated, you can hear all communications on the current channel regardless of the
privacy-code setting.
Scan
Your radio can automatically scan all 22 stored channel and privacy-code combinations.
To detect more radio signals, disable privacy codes for all channels before starting a
scan.
To start scanning: Press and hold the CALL button for 3 seconds until the 【SCAN】 icon
appears; the radio will begin channel scanning.
While scanning is active, the following operations are available:
1. Change scan direction: Short-press ▲ or ▼ to reverse the scan direction.
2. Resume scanning: After a radio signal is detected, short-press ▲ or ▼ to resume scanning.
3. Cancel scanning: Short-press the MENU button to stop scanning and return to standby mode.
4. Save the scanned channel: Scanning pauses when an incoming radio signal is detected. Short-press
the radio’s PTT button to save and stay on the detected channel, then enter standby mode.
Note:
When a radio signal is detected, the radio stays on that channel. If the signal ends
and no further operation is performed, scanning will resume after 5 seconds.
恢复出厂设置
如遇程序 bug 或设置了自己不熟悉的参数,可执行恢复操作,此操作将所有的设置恢复至出厂状态。
首先将对讲机关机。在关机状态下,按住 CALL 按钮不放手,然后顺时针旋转开关旋钮。对讲机振动后开机,恢
复出厂设置成功。出厂设置参数为:频道 1,隐私代码 OF,功率 Hi。
(提示:恢复出厂设置在充电时无法操作)
Factory Reset
Perform a factory reset in case of program bugs or unfamiliar configured parameters.
This operation restores all settings to factory defaults.
First power off the radio. With the radio powered off, hold down the CALL button, then
rotate the power knob clockwise. The radio will power on with vibration, indicating the
factory reset has completed successfully. Default factory settings: Channel 1, Privacy
code OF, Transmit power Hi.
(Note: Factory reset cannot be performed while the unit is charging.)

FCC Statement
This device complies with Part 15 of the FCC rules. Operation is subject to the following two conditions: 1)
this device may not cause harmful interference, and 2) this device must accept any interference received,
including interference that may cause undesired operation.
Note: This equipment has been tested and found to comply with the limits for a Class B digital device,
pursuant to part 15 of the FCC Rules. These limits are designed to provide reasonable protection against
harmful interference in a residential installation. This equipment generates uses and can radiate radio
frequency energy and, if not installed and used in accordance with the instructions, may cause harmful
interference to radio communications. However, there is no guarantee that interference will not occur in
particular installation. If this equipment does cause harmful interference to radio or television reception,
which can be determined by turning the equipment off and on, the user is encouraged to try to correct the
interference by one or more of the following measures:
--Reorient or relocate the receiving antenna.
--Increase the separation between the equipment and receiver.
--Connect the equipment into an outlet on a circuit different from that to which the receiver is connected.
--Consult the dealer or an experienced radio/TV technician for help.
Changes or modifications not expressly approved by the party responsible for compliance could void the
user’s authority to operate the equipment.
ISED compliance statement
This device contains licence-exempt transmitter(s)/receiver(s) that comply with Innovation, Science and
Economic Development Canada’s licence-exempt RSS(s). Operation is subject to the following two
conditions:
(1) This device may not cause interference.
(2) This device must accept any interference, including interference that may cause undesired operation of
thedevice.
L’émetteur/récepteur exempt de licence contenu dans le présent appareil est conforme aux CNR
d’Innovation,
Sciences et Développement économique Canada applicables aux appareils radio exempts de licence.
L’exploitation est autorisée aux deux conditions suivantes :
(1) L’appareil ne doit pas produire de brouillage;
(2) L’appareil doit accepter tout brouillage radioélectrique subi, même si le brouillage est susceptible d’en
compromettre le fonctionnement.

RF Exposure Statement
SAR tests are conducted using standard operating positions according standards with the device
transmitting at its highest certified power level in all tested frequency bands, although the SAR is
determined at the highest certified power level, the actual SAR level of the device while operating can be
well below the maximum value.
This model product has been tested and meets the RF exposure guidelines with the
test distance 25 mm for face up condition. The highest SAR1g value is 0.605W/Kg for face held and
1.459W/Kg for Body worn. The use of belt clips, holsters and similar
accessories should not contain metallic components in its assembly. The use of
accessories that do not satisfy these requirements may not comply with RF exposure
requirements, and should be avoided.
This device complies with RF exposure limits for general population/ uncontrolled RF exposure
environment at operating duty factors of up to 50%.
Les tests de débit d'absorption spécifique (DAS) sont effectués dans des positions d'utilisation normalisées,
conformément aux normes en vigueur, l'appareil émettant à son niveau de puissance certifié le plus élevé
dans toutes les bandes de fréquences testées. Bien que le DAS soit déterminé au niveau de puissance
certifié maximal, le niveau de DAS réel de l'appareil en cours d'utilisation peut être nettement inférieur à
cette valeur maximale.
Ce modèle a été testé et est conforme aux directives relatives à l'exposition aux radiofréquences (RF),
avec une distance de test de 25 mm lorsque l'appareil est orienté vers l'avant (face vers l'extérieur). La
valeur DAS (moyenne sur 1 g de tissu) la plus élevée est de 0,605 W/kg en utilisation devant le visage et
de 1,459 W/kg en utilisation portée sur le corps. Les accessoires tels que les pinces de ceinture, les étuis
ou tout autre dispositif semblable ne doivent comporter aucun composant métallique. L'utilisation
d'accessoires ne répondant pas à ces exigences pourrait entraîner une non-conformité aux normes
d'exposition aux radiofréquences ; il faut donc les éviter.
Cet appareil est conforme aux limites d'exposition aux radiofréquences établies pour le grand public
(environnement d'exposition non contrôlé), avec un facteur de cycle d'utilisation (duty factor) pouvant
atteindre 50 %.