A2S
Dash Cam

50

FCC Statement
This equipment has been tested and found to comply with the limits
for a Class B digital device, pursuant to part 15 of the FCC Rules. These
limits are designed to provide reasonable protection against harmful
interference in a residential installation. This equipment generates,
uses and can radiate radio frequency energy and, if not installed and
used in accordance with the instructions, may cause harmful
interference to radio communications. However, there is no guarantee
that interference will not occur in a particular installation. If this
equipment does cause harmful interference to radio or television
reception, which can be determined by turning the equipment off and
on, the user is encouraged to try to correct the interference by one or
more of the following measures:
?Reorient or relocate the receiving antenna.
?Increase the separation between the equipment and receiver.
?Connect the equipment into an outlet on a circuit different from that
to which the receiver is connected.
?Consult the dealer or an experienced radio/TV technician for help.
Caution: Any changes or modi?cations to this device not explicitly
approved by manufacturer could void your authority to operate this
equipment.
This device complies with part 15 of the FCC Rules. Operation is
subject to the following two conditions:
(1) This device may not cause harmful interference.
(2) this device must accept any interference received, including
interference that may cause undesired operation.
RF Exposure Information
This equipment complies with FCC radiation exposure limits set forth
for an uncontrolled environment. This equipment should be installed
and operated with minimum distance 20cm between the radiator and
your body.

Important Warning ......................................... 1
EN.................................................................. 2
Activate warranty ...................................................................................2
1. About Dashcam ..................................................................................3
2. Powering the Dash Cam On/O ......................................................5
3. Button Functions ...............................................................................5
4. Video Recording Function ................................................................9
5. Photo Mode ........................................................................................9
6. USB Mode ..........................................................................................9
7. Download APP and WiFi Connection ............................................10
8. Firmware Upgrade .........................................................................12
9. Setting Menu ...................................................................................12
10. Troubleshooting ...........................................................................15
DE ................................................................ 17
Garantie aktivieren ..............................................................................17
INHALT ...................................................................................................18
1. Über die Dashcam ............................................................................19
2. Ein- und Ausschalten der Dashcam ..............................................21
3. Tasten Funktionen ...........................................................................21
4. Video Funktion ..................................................................................25
5. Foto-Modus ......................................................................................25
6. USB Modus ........................................................................................25
7. APP und WiFi-Verbindung herunterladen .....................................26
8. Firmware upgrades ........................................................................28
9. Einstellungen Menü .......................................................................29
10. Schwierigkeiten mit Aufnahmen ................................................32

JP ................................................................. 33
アフターサービス..................................................................................... 33
安全上のご注意....................................................................................... 34
1 . ドライブレコ ー ダー について............................................................... 36
2. 電源について....................................................................................... 38
3. 画面アイコンの紹介............................................................................ 38
4. 録画機能.............................................................................................. 42
5. 撮影...................................................................................................... 42
6..USB モード........................................................................................... 42
7. アプリダウンロードと wi 接続.......................................................... 43
8..ファームウェアをアップデートする..................................................... 45
9. 設定メニュー........................................................................................ 45
10. よくある質問....................................................................................... 48

1
Please read this manual thoroughly before using this Dashcam.
Please keep this instruction manual for your reference.
◇ If the machine is damaged, waterlogged or short-circuited,
Please switch o and disconnect the power immediately.
◇ Please use the power cord correctly to ensure that the it is not
damaged or exposed.
◇ The LCD screen is fragile and should not be dropped, squeezed
or knocked.
◇ Do not store the Dash Cam in humid, dusty, super-hot or super
cold environment.
◇ Do not discard the machine and accessories at will. To
avoid environmental pollution, dispose of waste products in
accordance with local laws.
◇ For your benefit, please test and check that the product is in
good condition before using it.
Important Warning
2
Activate warranty
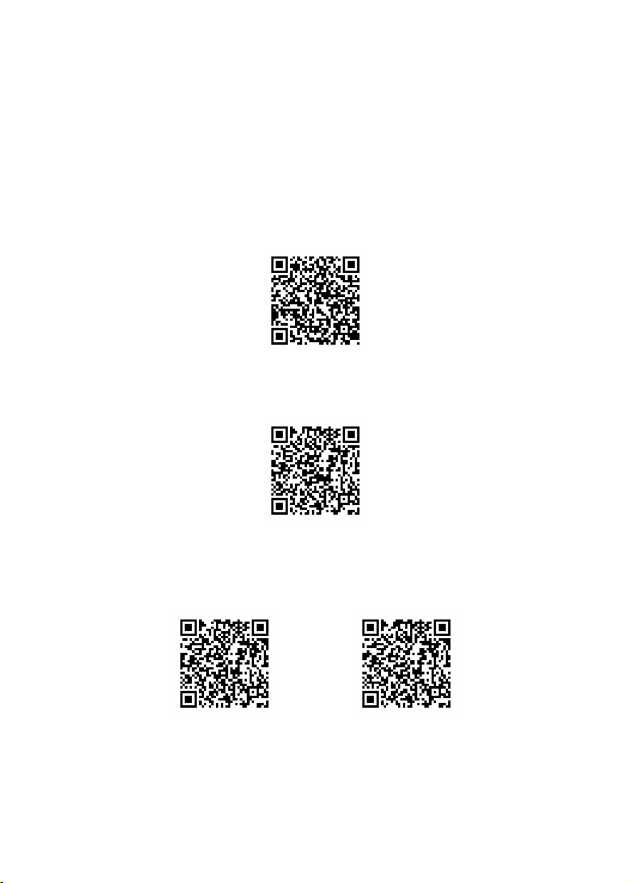
① Scan the QR code to activate the warranty immediately and extend the
warranty to 24 months.
② Enter the URL: www.avylet.com and click Activate Warranty.
① Scan the QR code to sign up as a premium member of Avylet and you can
get professional and timely pre-sale, in-sale and after-sale support.
Scan the QR code to watch more operation video about Dash Cam, such as,
video of front and rear camera switching, the operation video of how to view
the playback recording and how to setup the date/time.
② Enter Avylet on Facebook to follow us on Facebook.
Registered member
Watch operation video
EN
3
Thank you for purchasing Avylet Dashcam.
If you have any questions about products, please feel free to email our after-
sale team mailbox at : service@avylet.com OR our online support center
at: www.avylet.com. We will provide a fast solution in 24 hours.
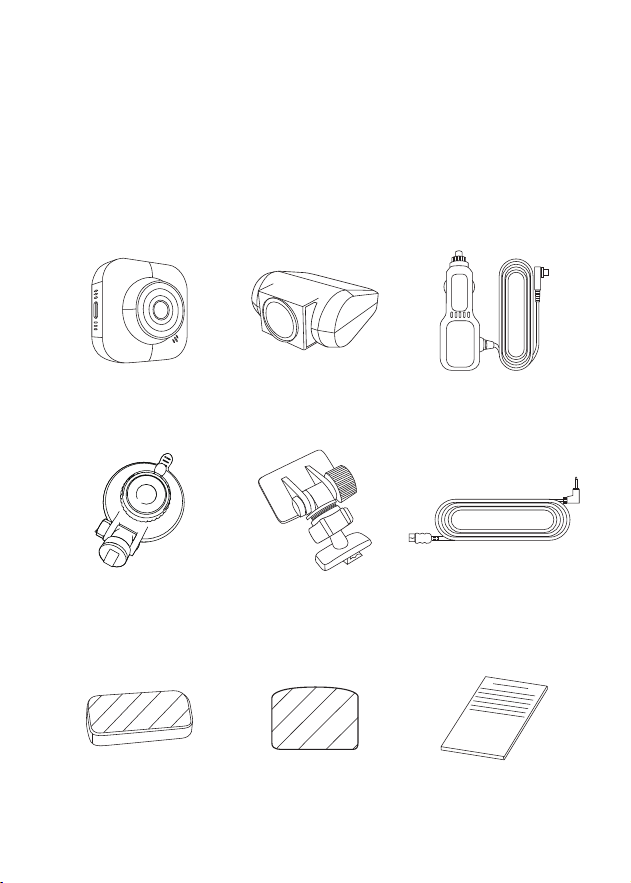
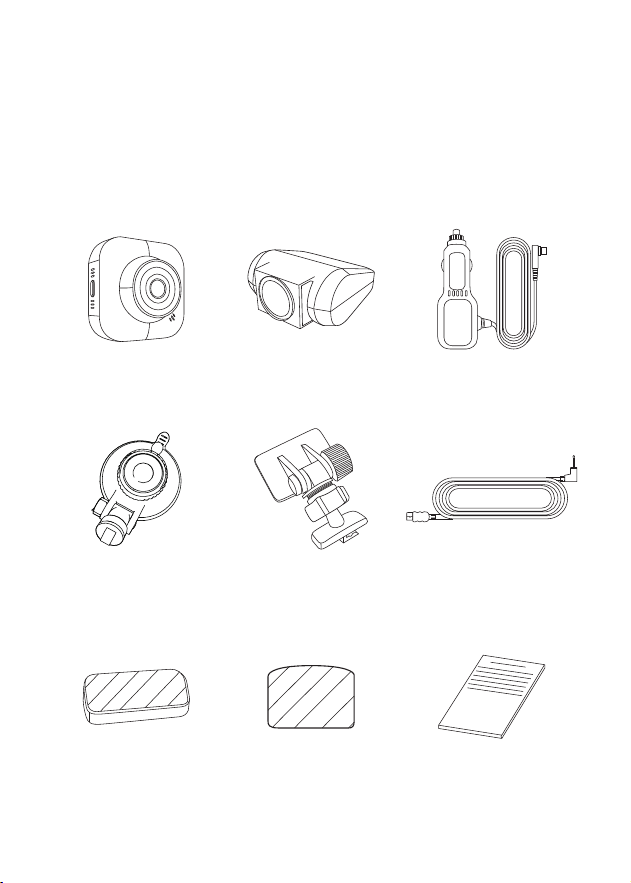
A2S Dash Cam
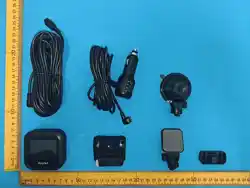
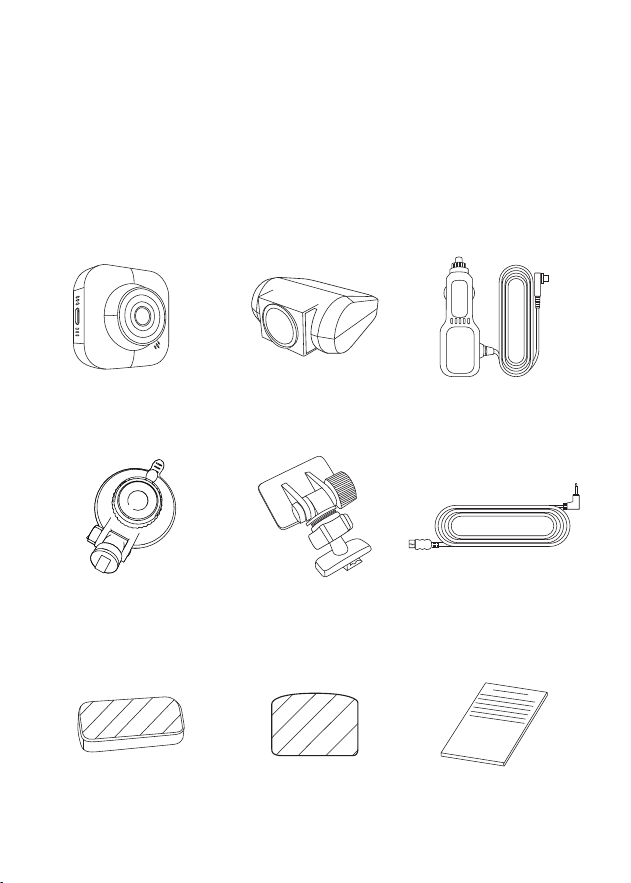
(Front camera)*1
Car Charger with
Type-c Cable*1
Bracket with
3M Adhesive*1
Rear Camera Cable*1
A2S Rear Camera*1
Suction Cup Mount*1
Rear Camera Bracket
with 3M Adhesive*1
User Manual*13M Adhesive*2
1. About Dashcam
1.1 Packing List:
4
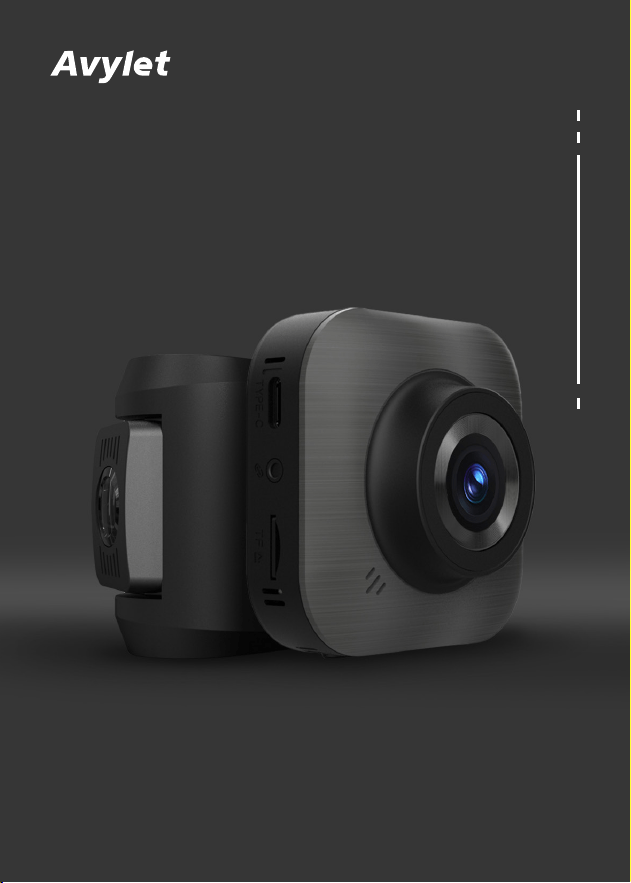
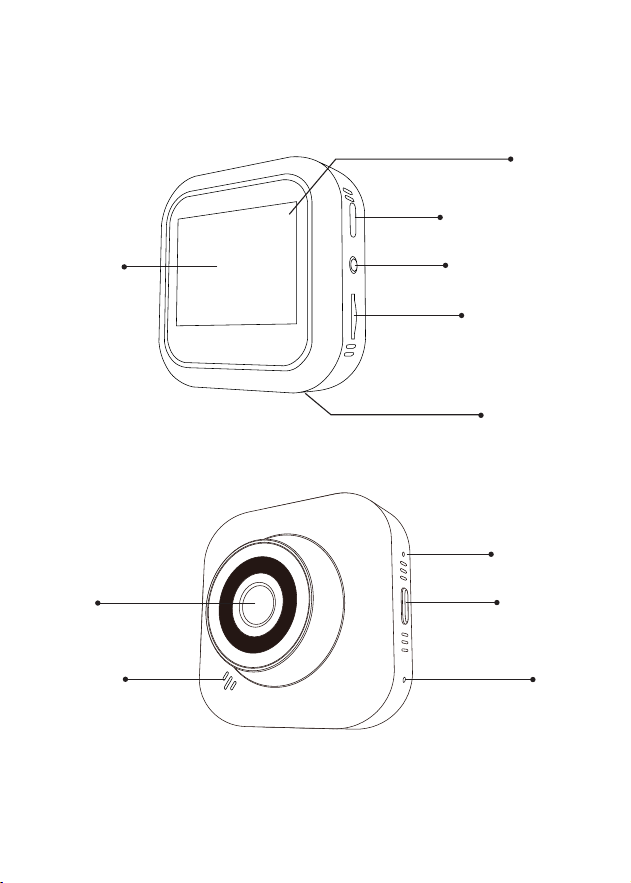
1.2 Product Overview
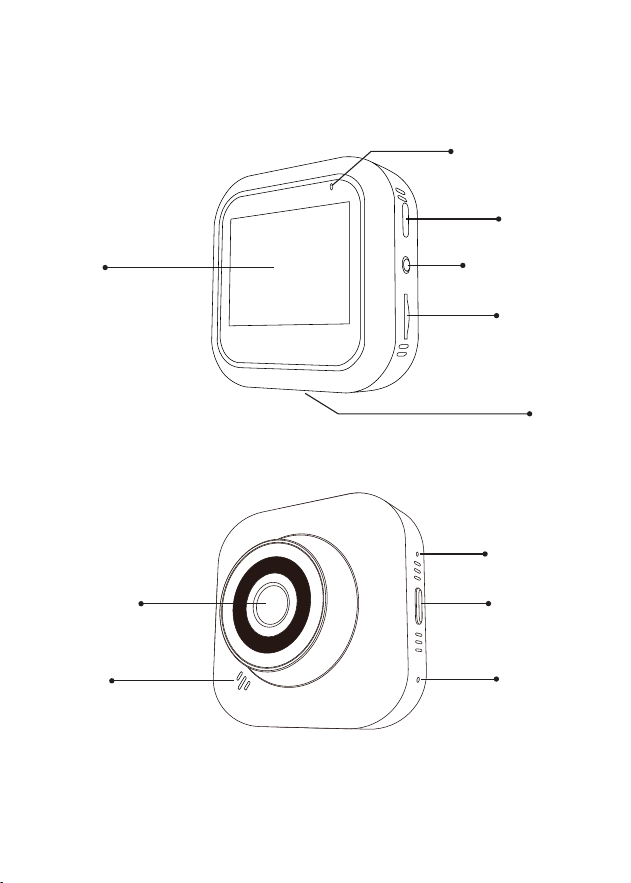
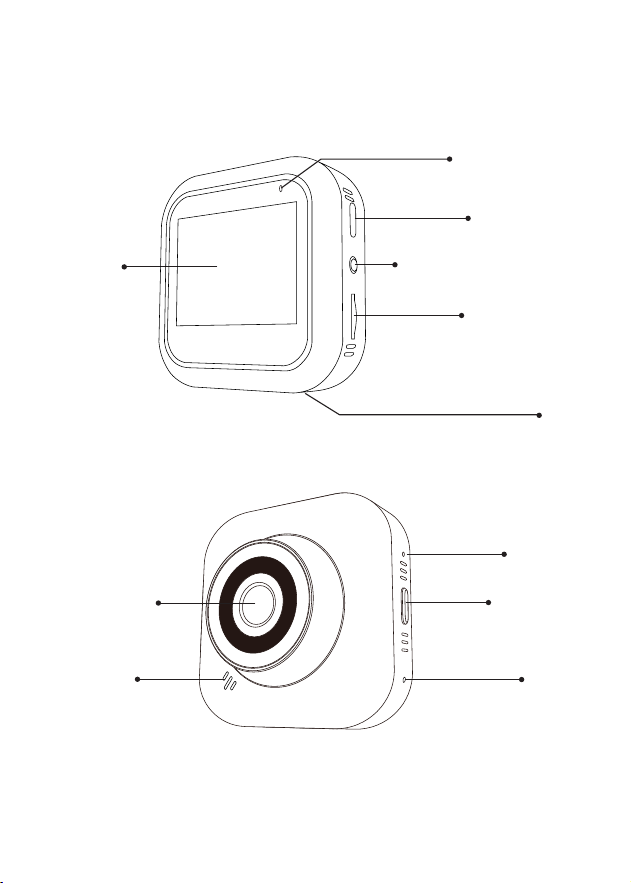
Reset button
Screen
Camera lens
Type-c port
Working status light
Rear camera port
SD card slot
Button
Speaker
Power button
Microphone
5
2. Powering the Dash Cam On/O
3. Button Functions
2.1 Auto Power On/O
This machine has no built-in battery. When the power is connected, the
Dash Cam will start up automatically, and shut down automatically when
the power is o;
2.2 Manual Power On
Short press the power button " " to manually turn on the Dash Cam;
2.3 Manual Power O
When the Dash cam is powered on, short press power button " " to make
the Dash Cam close/open the screen; Long press the power button " "to
shut down the Dash Cam;
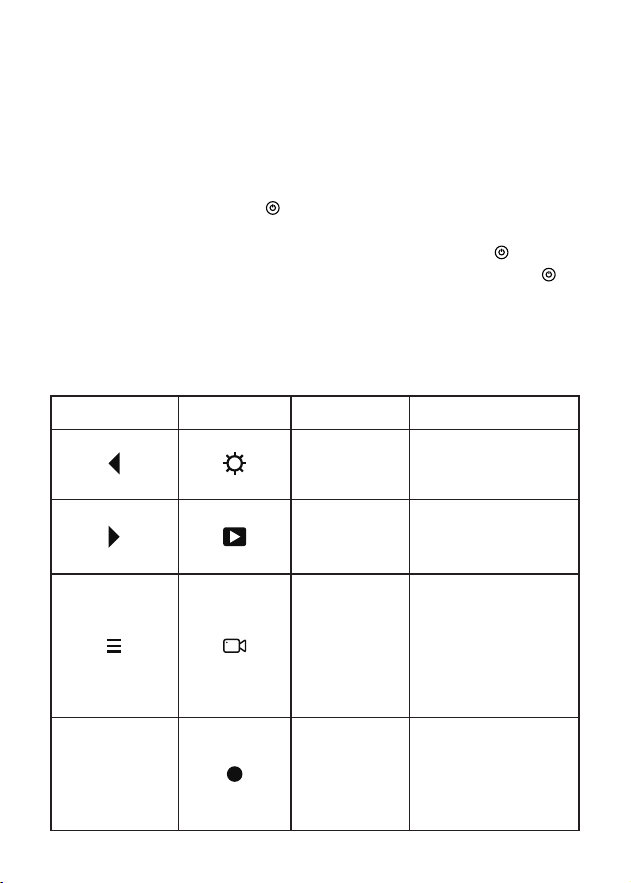
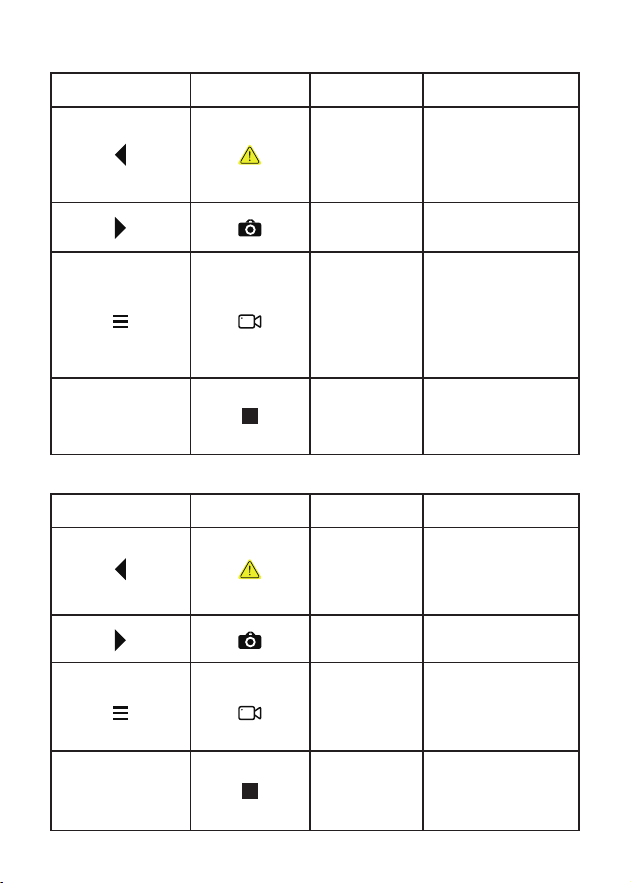
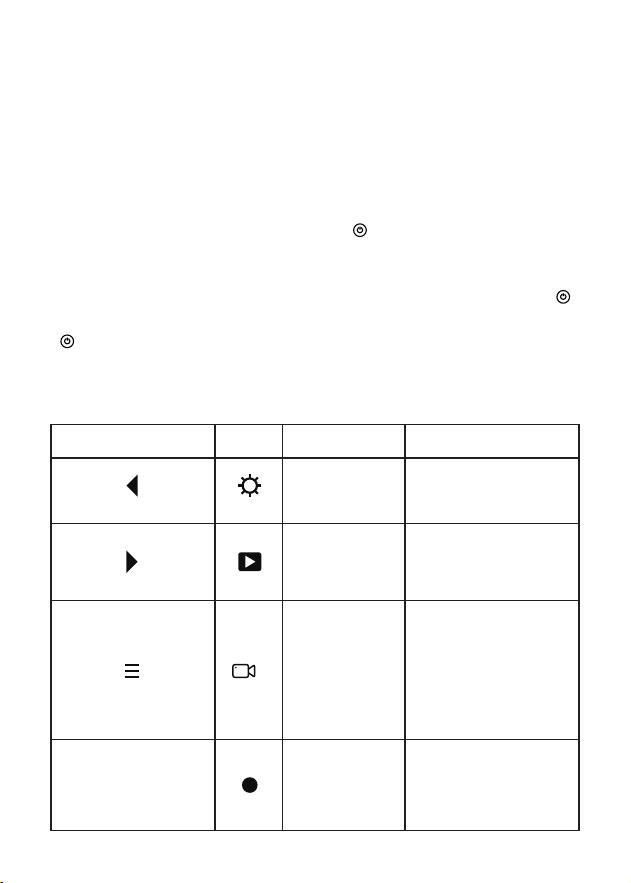
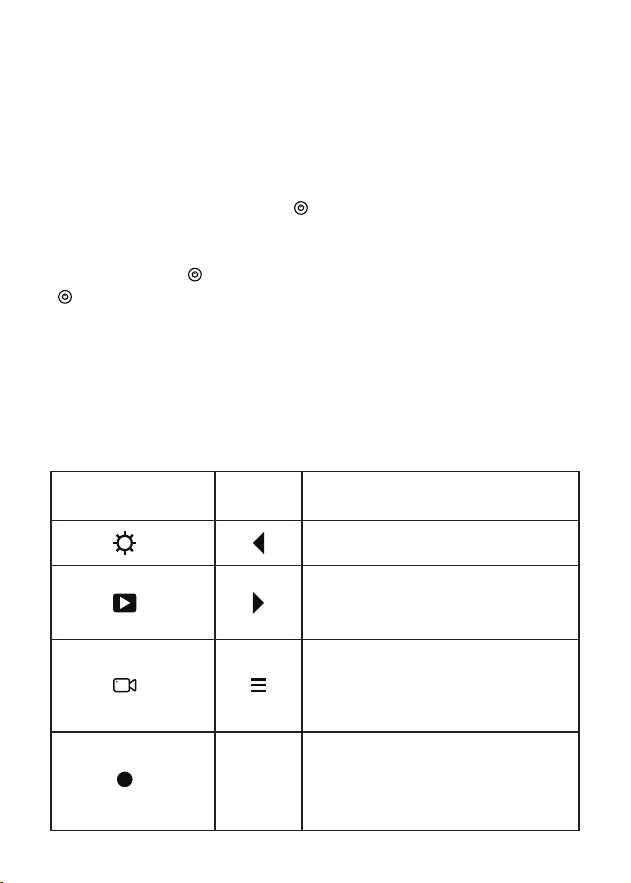
Button illustration Icon illustration Button name
Setup button
Playback button
Switch button
Record buttonOK
Function description
Short press:
Enter setting mode
Long press:
Enter playback mode
Short press:
toggles the display of the
front and rear cameras
on the screen
Long press:
Turn the microphone
on/o
Short press:
Turn recording on/o
Long press:
Turn recording on/o
3.1 Recording mode (no recording)
6
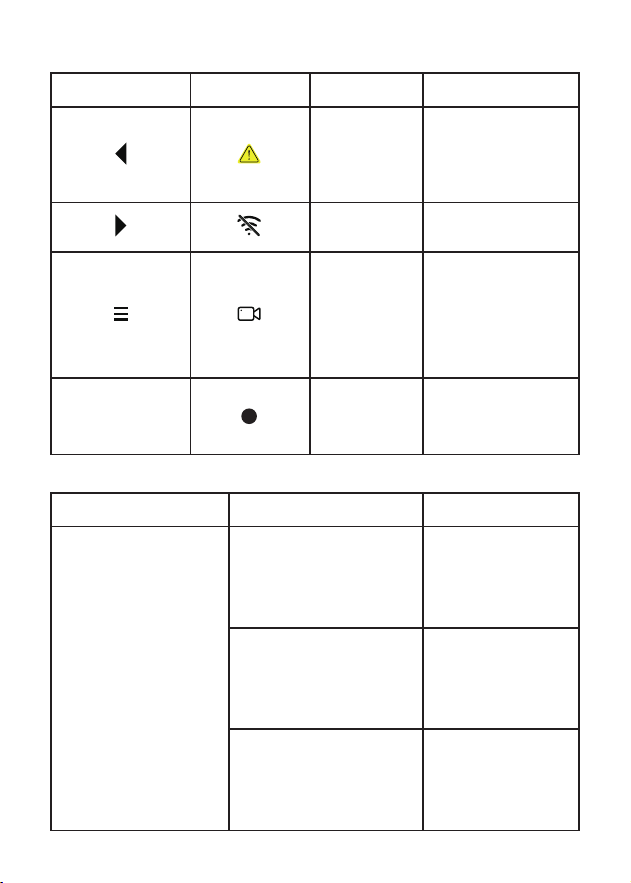
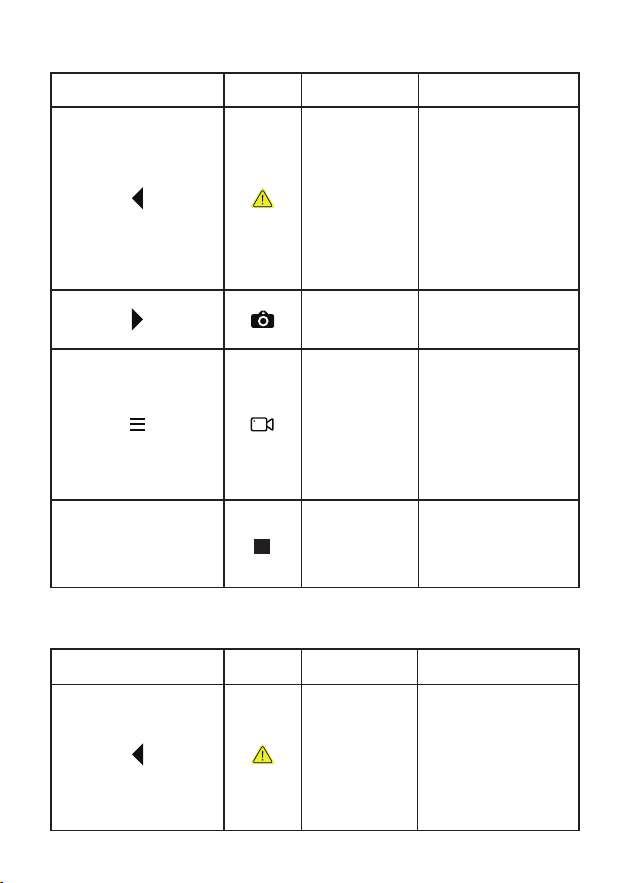
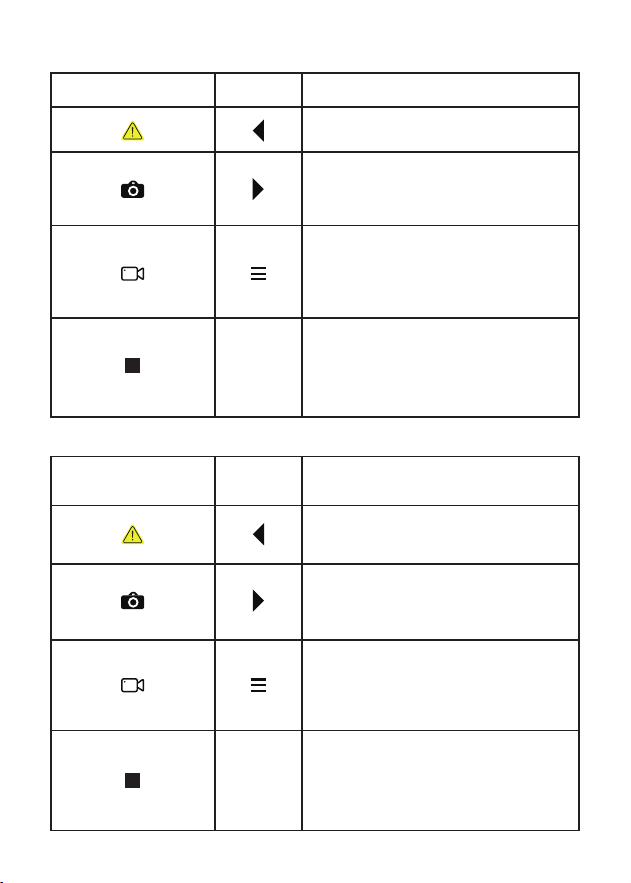
3.2 Recording mode (While recording)
3.3 Recording mode (Connected to wi and While recording)
Button illustration
Button illustration
Icon illustration
Icon illustration
Button name
Button name
Lock le button
Lock le button
Photo button
Photo button
Switch button
Switch button
Record button
Record button
OK
OK
Function description
Function description
Short press:
Locks the current
video to prevent it from
being overwritten by a
looped video
Short press:
locks the current
video to prevent it from
being overwritten by a
looped video
Short press:
Take a photo
Short press:
Take a photo
Short press: Switch
the display of the front
and rear cameras on
the screen
Long press: Turn the
microphone on/o
Short press:
Switch the display
of the front and rear
cameras on the screen
Short press:
Turn recording on/o
Long press:
Turn recording on/o
Short press:
Turn recording on/o
Long press:
Enable/
disable SSID display
7
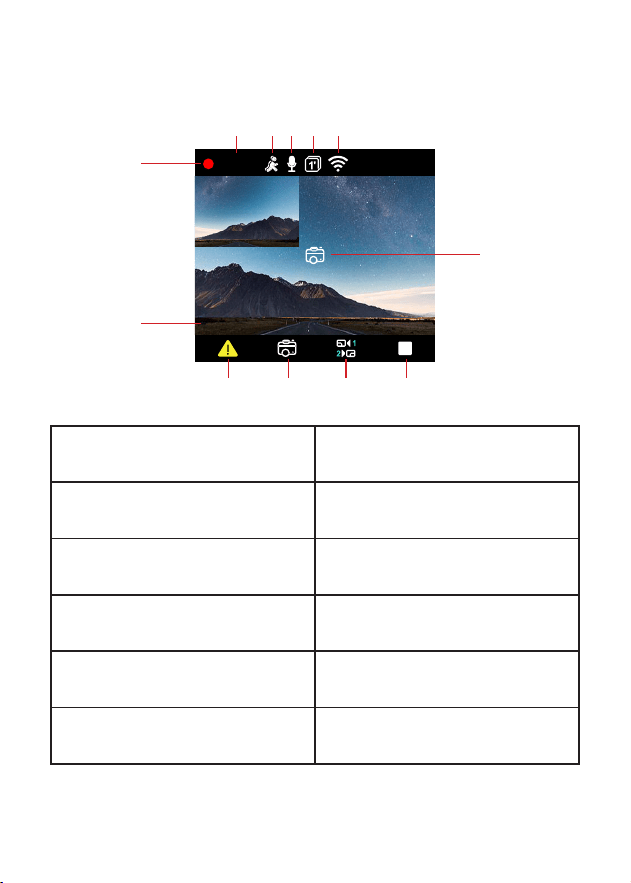
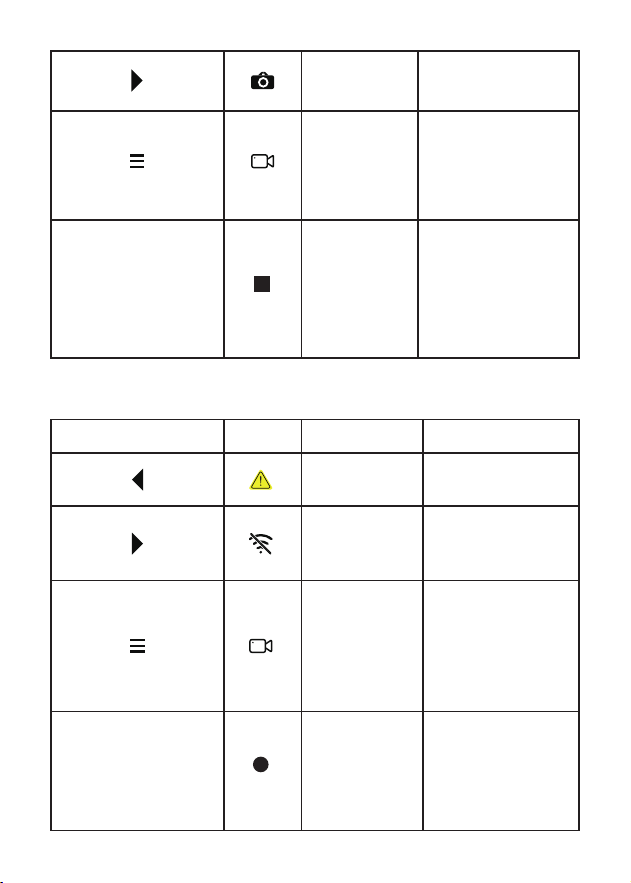
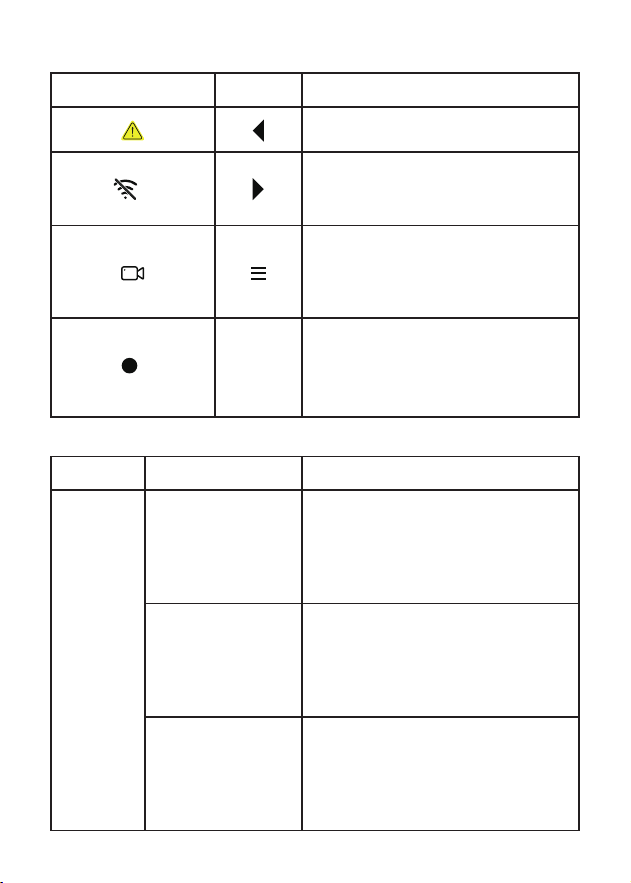
3.4 Recording mode (Connected to wi but no recording)
3.5 Indicator Light
Button illustration
Indicator Light Colors
Green Light
Icon illustration Button name
Status
Light o System shutdown
Steady Light Non-recording mode
Flashing Light Recording mode
Lock le button
wi button
Switch button
Record buttonOK
Function description
Function description
Short press: none
Short press: Turn o wi
Short press: Switch the
display of the front and
rear cameras on the
screen
Short press: Turn
recording on/o
Long press: Enable/
disable SSID display
8
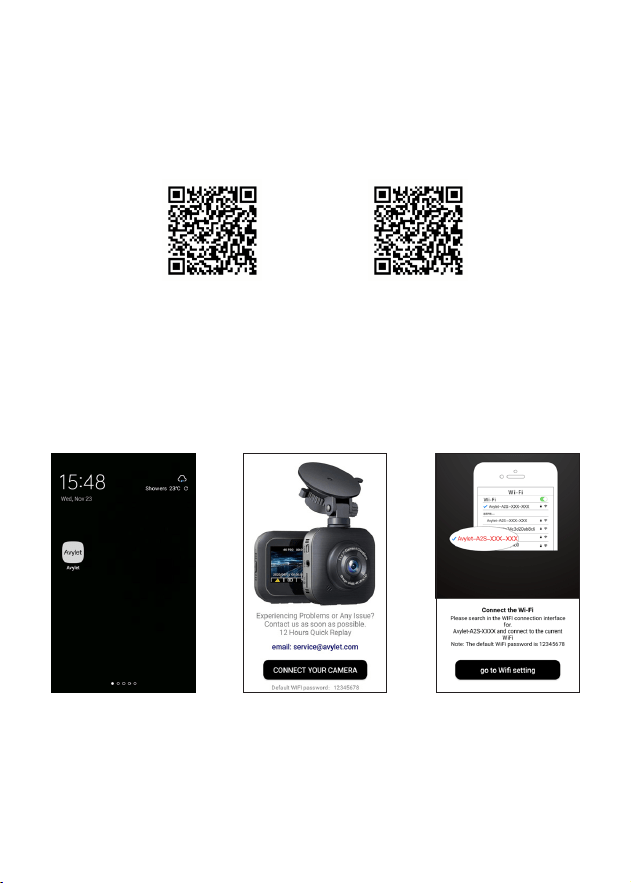
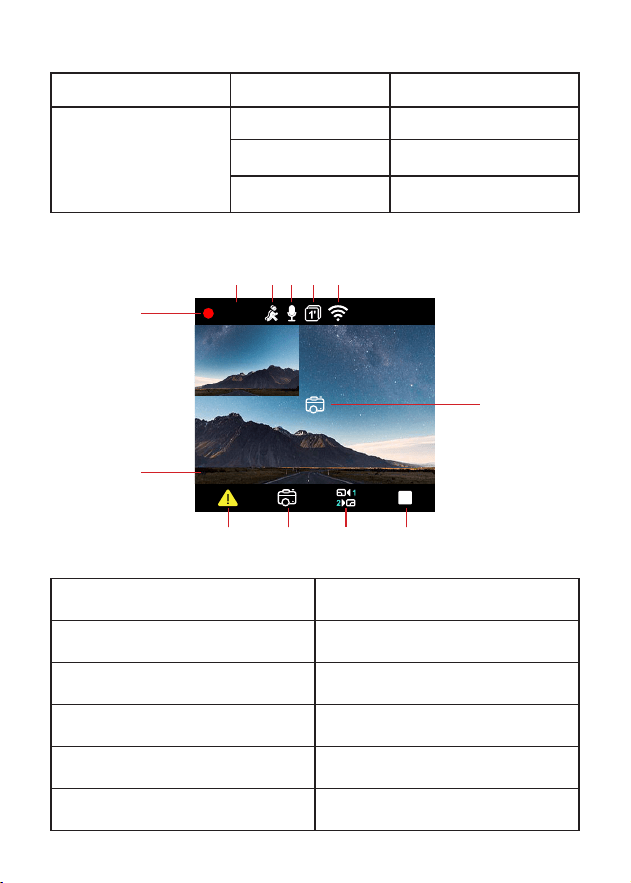
3.6 Screen Display
1. Recording Status
2. Recording Time
3. Motion Detection
4. Microphone On/O
5. Loop Recording
6. Wi-Fi On/O
7. Time/Date
8. Emergency Recording
9. Take Photos
10. Front/Rear Camera Switching
11. Start/Stop Video Recording
12. Take Photos
1
2 3 4 5 6
7
12
8 9 10 11
00:23
2023/01/01
18:18:27
1440P30

9
4. Video Recording Function
5. Photo Mode
6. USB Mode
◇ Loop recording
*Insert the memory card into the memory card slot and the Dash cam will
automatically turn on and start loop recording when it is powered on.
*The default length of each looped recording is 3 minutes.
*Loop recording automatically overwrites old les when the memory card
runs out of space.
◇ G-Sensor (Gravity Sensor)
When the G-sensor is on, the Dash Cam will automatically lock the current
video recording when external force strikes, so as to avoid the video
recording being overwritten in the loop recording.
※ Notes: Adjust the sensitivity of the gravity sensor in the "
G-Sensor
" of
the system menu.
◇ Manual Emergency Recording
During video recording, press the " " button to lock the current video
recording to prevent the video recording from being overwritten during
loop recording.
In video recording mode, shot press " " to take a photo.
Photos are stored in the /PHOTO folder.
① Connect the Dash Cam to the computer with the Type-C cable. (Make sure
the Type-C cable supports data transfer)
② The Dash Cam turns on automatically and the screen displays the USB
icon " ".
③ The computer detects the "AVYLET disk".
④ Open the "AVYLET disk", there are three folders, which are as follows
/VIDEO (loop recording les) / EMERGENCY (Emergency recording les) /
PHOTO (Photo les)
※If no emergency recording is recorded, there is no such folder and
no recording.
⑤ You can copy the required documents to your computer.
10
7. Download APP and WiFi Connection
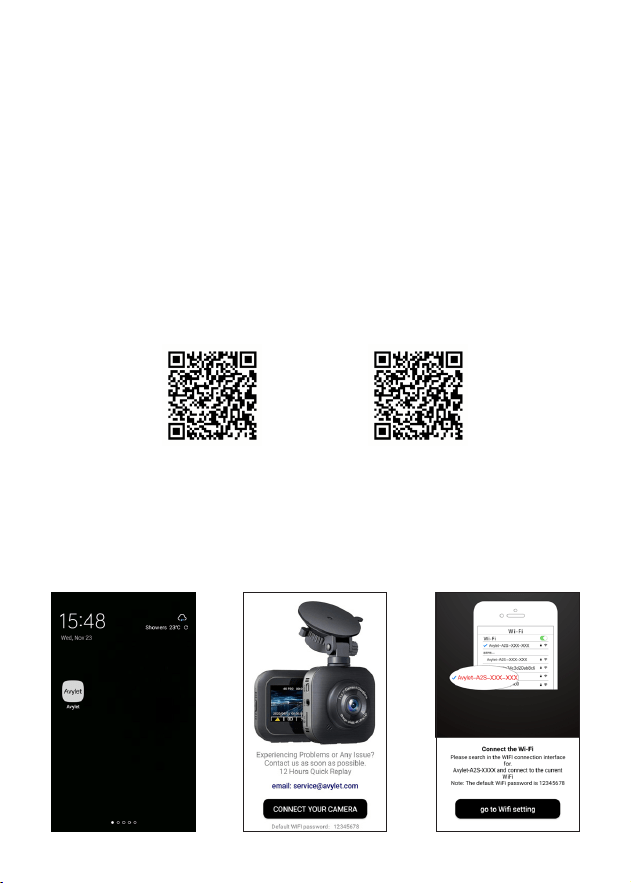
1) Download "Avylet" APP
◇ Scan the QR code below, or search for "Avylet" on Google Play or App
Store to to download the latest app and install it on your smartphone.
Android IOS
2) WIFI Connection
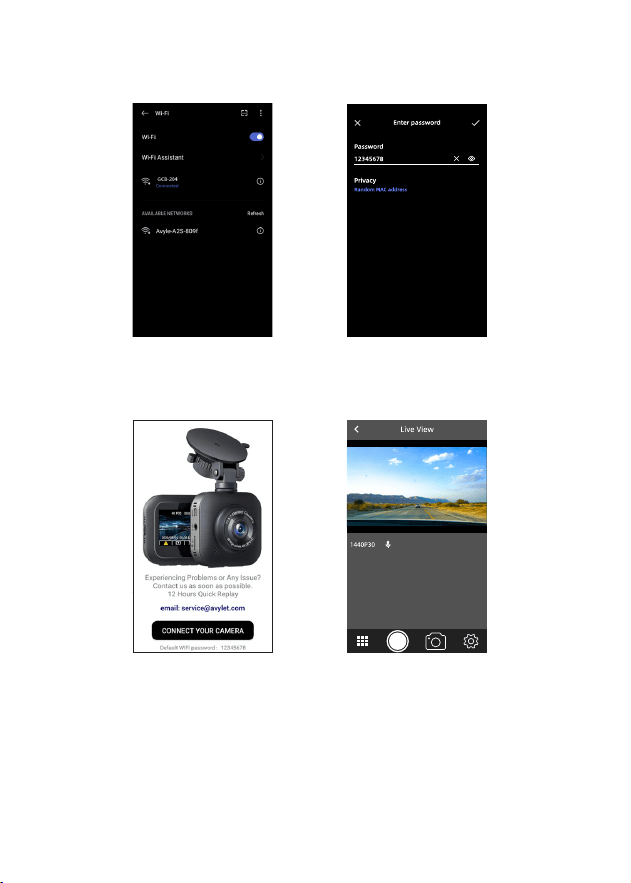
① Open the "Avylet" App
② Click on
"CONNECT YOUR CAMERA"
③ Click on
"go to WiFi setting"
11
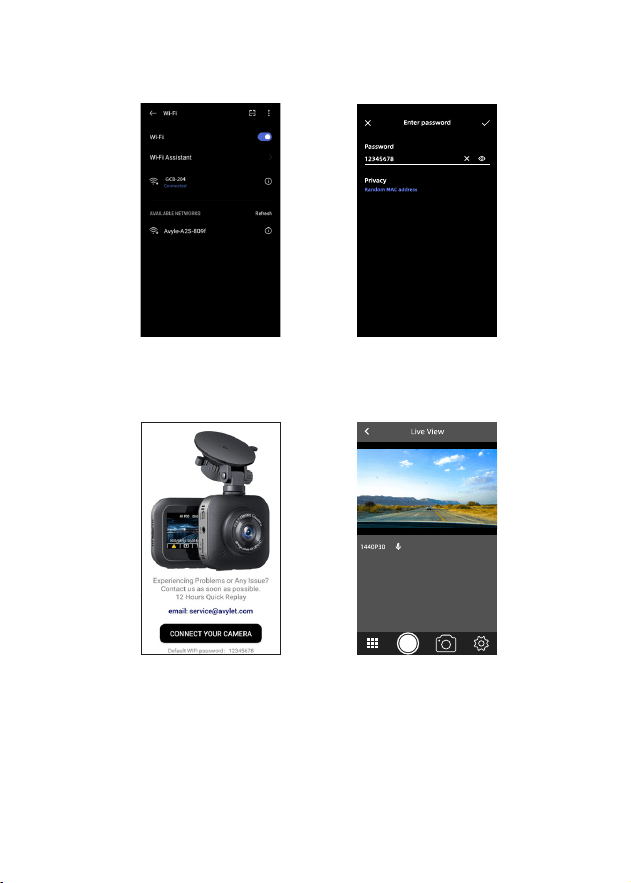
④ Select "Avylet-A2S-XXXX"
⑤ Enter the WiFi password
"12345678"XXXX"
⑥ Click "CONNECT YOUR
CAMERA" again
⑦ Connect successfully

12
Method 2:
① Enter the URL: https://www.avylet.com
② Click“Support”and select "Download Centre" .
③ Choose "Update Firmware".
④ Select the corresponding model, download the latest rmware le and
extract it to the memory card.
⑤ After the download is complete, insert the memory card into the memory
card slot of the Dash Cam.
⑥ Plug in the power and the Dash Cam turns on automatically.
⑦ The LED ashes and the upgrade begins.
⑧ When the upgrade is complete, the Dash Cam automatically reboots and
prompts to format the SD card, select "Yes"
⑨ Go to "Settings – Firmware Version" to check if it is the latest version
※Please make sure to back up your important data before using the
memory card to upgrade the firmware to avoid any data loss that
may cause you problems.
※Before using the memory card to upgrade the rmware, please make
sure to format the memory card on the computer to ensure that the
memory card is stable for reading and writing.
※Please do not power down during the system upgrade. This may
cause the Dash Cam to fail to boot up.
9. Setting Menu
In non-recording mode, press " " to enter the menu settings
◇ WiFi
Turn on/o the WiFi network and check the WiFi name and password.
8. Firmware Upgrade
Method 1:
Please contact our professional customer service team and provide relevant
information, such as, order number, machine version, your problem with a
video, etc. to our customer service team (service@avylet.com). We have a
professional after-sales team to provide after-sales support.

13
◇ Resolution
Set the resolution of the recording video.
Single Len: 1440P/30FPS, 1296P/30PFS, 1080P/60FPS, 1080P/30FPS,
720P/60FPS, 720P/30FPS
Dual Lens: 1080P/30FPS + 1080P/30FPS
◇ Display Mode
Set what is displayed in the screen: Front Camera, Rear Camera, Rear
Overlaid, Front Overlaid.
◇ Rear Camera Mirror
Set whether to display mirror screen on the rear camera. Options: On/O
◇ Loop Recording
Set the recording durationof each video. Options: 1, 3 or 5 minutes.
◇ Date/Time
Set the date/time and date format.
◇ Recording Audio
Set whether to record sound at the same time when recording.
◇ Volume
Set the volume of Beep Sound, System Volume and Playback Volume.
◇ Parking Monitor
Options: O / Motion Detection / 1fps / 2fps / 5fps / 10fps
Motion Detection
After turning on motion detection, the Dash Cam starts recording. If
the picture in the recording does not move for more than 1 minute,
the recording will stop. If the picture in the recording moves again, the
recording will start.

14
1fps / 2fps / 5fps / 10fps
After 1fps/2fps/5fps/10fps is selected, the detection screen of the dash
cam is stationary for about 1 minute and enters the monitoring state. In
this state, 1/2/5/10 frame is recorded per second. When the detection
screen changes, the dash cam starts the recording mode.
◇ G-Sensor
Adjust the sensitivity of the gravity sensor. Options: O/Low Sensitivity/
Medium Sensitivity/High Sensitivity.
◇ Movie Imprint
Date Stamp
Stamp the current date onto the footage for future reference.
◇ EV
The EV value can be adjusted to obtain better recording in dierent light
conditions. Options: +2.0, +5/3, +4/3, +1.0, +2/3, +1/3, +0.0, -1/3, -2/3,
-1.0, -4/3, -5/3, -2.0
◇ WDR
Wide Dynamic Range Mode. Options: on/o
◇ Frequency
Options: 50Hz/60Hz
◇ Screen Saver
Set the time for the screen to turn o automatically.
Options: 30 seconds, 1 minute, o.
◇ Language
Set the language for the Dash Cam. Options: English/ 日 本 語 /Deutsch/
Français/Italiano/Espanol/ 简体中文
◇ Driver Number
9 character driver number can be written

15
10. Troubleshooting
◇ Unable to switch on
1) Check whether the Dash Cam is powered on or the voltage is
insucient.
2) Press the Reset button to reboot.
◇ The screen does not show the display of recording
1) In recording mode, check that the screen display is switched o and
press " " to switch on the screen display.
2) Check whether “Screen Saver” is enabled. There are Three modes of
"O/30 seconds/1minute" in the "Screen Saver" of the system menu.
You can change it.
◇ Memory card is full
Delete unwanted recording/photos from the Dash Cam.
1) Insert the memory card into the computer and delete any locked
recording/photos that are no longer needed.
◇ Format
This operation will delete all data on the memory card.
This operation is irreversible. If you have important les, please back up
your important les in advance before performing this operation.
◇ Format Warning
Set the time to prompt for formatting. Options: O/15 days/30 days/60
days.
◇ Default
Restores the parameters to their factory default values.
Memory Card Capacity
You can view the total, used and remaining capacity of the memory card
currently in the Dash Cam.
◇ Firmware Version
View information on the current rmware version of the Dash Cam.

16
2) Formatting memory cards
3) Changing TF card
※The operation of deleting files and formatting TF card is not
reversible. If there are important les, please back up important les
in advance before performing this operation.
◇ Cannot playback recording
1) Please check if you have changed the le name or folder name of the
recording or photos on the memory card on your computer.
2) Check whether the recording or photos on the memory card have
been processed by a computer or the recording or photos that were not
recorded by the Dash Cam.
3) The memory card is defective.
*If your problem still cannot be solved, please contact us via service@
avylet.com
17
DE
Garantie aktivieren
1.Scannen Sie den QR-Code, um die Garantie sofort zu aktivieren und die
Garantie auf 24 Monate zu verlängern.
2.Geben Sie die URL ein: www.avylet.com und klicken Sie auf Garantie
aktivieren.
1.Scannen Sie den QR-Code, um sich als Premium-Mitglied bei Avylet
anzumelden, und Sie erhalten professionellen und zeitnahen Support vor,
während und nach dem Verkauf.
Registriertes Mitglied
2.Geben Sie Avylet auf Facebook ein, um uns zu folgen.
1.Scannen Sie den QR-Code, um weitere Betriebsvideos über die
Dash Cam zu sehen, wie z. B. das Video zum Umschalten zwischen
vorderer und hinterer Kamera, das Betriebsvideo zur Anzeige der
Wiedergabeaufzeichnung und zur Einstellung von Datum und Uhrzeit.
Betriebsvideo ansehen

18
Warnung
Bitte lesen Sie dieses Handbuch sorgfältig durch bevor Sie die Dash Cam
verwenden. Bitte bewahren Sie diese Bedienungsanleitung zum späteren
Nachschlagen auf.
1.Wenn das Gerät defekt, durchnässt oder kurzgeschlossen ist, schalten Sie
es bitte sofort aus und trennen Sie es vom Stromnetz.
2.Bitte verwenden Sie das Netzkabel korrekt und stellen Sie sicher, dass es
nicht beschädigt, freigelegt usw.
3.Der LCD Bildschirm ist zerbrechlich und sollte nicht fallen gelassen,
zerquetscht oder geschlagen werden.
4.Lagern Sie die Dash Cam nicht in feuchter, staubiger, sehr heißer oder sehr
kalter Umgebung.
5.Es ist verboten das Gerät und Zubehör nach Belieben zu entsorgen. Um
Umweltverschmutzung zu vermeiden, entsorgen Sie die Produkte bitte
gemäß den örtlichen Vorschriften.
※Bitte machen Sie zuerst eine Testaufnahme, um zu überprüfen, ob
die Dashcam funktioniert.
INHALT
19
Danke für den Kauf der Avylet A2S Dashcam.
Bei Fragen über Produkte, kontaktieren Sie uns per E-Mail service@avylet.
com ODER unser Online-Support-Center unter: www.avylet.com. Wir
bieten Ihnen Hilfe innerhalb von 24 Stunden.
1. Über die Dashcam
1.1 Packing List:
A2S Dashcam
(Forderkamera)*1
Auto Ladegerät mit
Typ-c-Kabel*1
3M Klebeband-
Halterung*1
Rückfahrkamera-Kabel*1
A2S Rückfahrkamera*1
Saugnapfhalterung*1
Rückfahrkamera
3M Klebeband-halterung*1
Benutzerhandbuch*13M Klebeband*2
20
1. 2 Produkt Überblick
Reset-Taste
Bildschirm
Kamera-Objektiv
Typ-C-Anschluss
Arbeitsstatusleuchte
Anschluss für Rückfahrkamera
SDKartenschacht
Taste
Lautsprecher
Einschalttaste
Mikrofon
21
2. Ein- und Ausschalten der Dashcam
2.1 Automatisch ein-/ausschalten
Dieses Gerät hat keinen eingebauten Akku. Wenn das Gerät an das
Stromnetz angeschlossen ist, startet die Dash Cam automatisch und schaltet
sich automatisch ab, wenn das Gerät ausgeschaltet wird;
2.2 Manuelles Einschalten
Wenn die Dashcam mit dem Stromkabel verbunden, aber ausgeschaltet
ist, drücken Sie kurz die Einschalttaste " ", um die Dashcam manuell
einzuschalten;
2.3 Manuelles Ausschalten
Wenn die Dashcam eingeschaltet ist, drücken Sie kurz die Einschalttaste " ",
um die Dashcam zu schließen/önen; drücken Sie lange die Einschalttaste
" ", um die Dashcam auszuschalten;
3. Tasten Funktionen
Schaltächenabbildung Symbol Tastenname
Einstellungs-Taste
Wiedergabe-Taste
Umschalt-Taste
Aufnahme-TasteOK
Funktion
Kurz drücken:
Einstellungen önen
Länger halten:
Wiedergabemodus
aufrufen
Kurz drücken:
schaltet die Anzeige
der vorderen und
hinteren Kamera aufdem
Bildschirm um
Länger halten:
Mikrofon ein-/ausschalten
Kurz drücken:
Aufnahme starten
und beenden
3.1 Aufnahme Modus(Wenn nicht aufgezeichnet)
22
Schaltächenabbildung Symbol Tastenname
Schaltäche Datei
sperren
Bild-Taste
Funktion
Aktuelles Video
sperren:
Drücken Sie während
der Aufnahme 1 Mal,
um das Video manuell
zu sperren, damit
es nicht von der
Loop-Aufnahmefunktion
überschrieben wird.
Bild aufnehmen
3.2 Aufnahme Modus (Während der Aufnahme)
Umschalt-Taste
Aufnahme-TasteOK
Kurz drücken:
schaltet die Anzeige
der vorderen und
hinteren Kamera auf
dem Bildschirm um
Länger halten:
Mikrofon ein-/
ausschalte
Kurz drücken:
Aufnahme starten
und beenden
3.3 Aufnahme Modus
(Verbunden mit Wi und während der Aufnahme)
Schaltächenabbildung Symbol
Tastenname
Schaltäche
Datei sperren
Funktion
Aktuelles Video sperren:
Drücken Sie während
der Aufnahme 1 Mal,
um das Video manuell
zu sperren, damit es
nicht von der
Loop-Aufnahmefunktion
überschrieben wird.
23
Bild-Taste
Umschalt-Taste
Aufnahme-TasteOK
Kurz drücken:
Bild aufnehmen
Kurz drücken:
schaltet die Anzeige
der vorderen und
hinteren Kamera auf
dem Bildschirm um
Kurz drücken:
Aufnahme starten
und beenden
Lang drücken:
Aktivieren/Deaktivieren
der SSID-Anzeige
Schaltächenabbildung Symbol Tastenname
Schaltäche
Datei sperren
Wi-Taste
Umschalt-Taste
Aufnahme-TasteOK
Funktion
keine
Kurz drücken:
Wi ausschalten
Kurz drücken:
Umschalten der Anzeige
der vorderen und
hinteren Kamera auf
dem Bildschirm
Kurz drücken:
starten und beenden
Lang drücken:
Aktivieren/Deaktivieren
der SSID-Anzeige
3.4 Aufnahme Modus
(Mit WiFi verbunden und keine Aufzeichnung)
24
Anzeigelicht Farben
Grünes Licht
Status
Systemabschaltung
Konstantes Licht
blinkt
Funktion
erloschen
Nicht-Aufnahmemodus
Video status
3.5 Anzeigelicht
3.6 Bildschirmillustrationen
1/2. Timer der Daueraufnahme 8. Notfallaufnahme
3. Bewegungserkennung 9. Bild aufnehmen
4. Mikrofon ein-/ausschalten
10. schaltet die vorderen und
hinteren Kamera
5. Loop-Aufnahme 11. Aufnahme starten und beenden
6. Wi ein-/ausschalten 12. Bild aufnehmen
7. Datum/Uhrzeit
1
2 3 4 5 6
7
12
8 9 10 11
00:23
2023/01/01
18:18:27
1440P30

25
4. Video Funktion
5. Foto-Modus
◇ Loop-Aufnahme
*Stecken Sie die Speicherkarte in den Speicherkartensteckplatz und
die Dashcam schaltet automatisch die Daueraufnahme ein, wenn sie
eingeschaltet wird.
*Die Standardlänge jeder Daueraufnahme beträgt 3 Minuten.
*Daueraufnahme überschreibt automatisch alte Dateien, wenn der
Speicherplatz auf der Speicherkarte voll ist.
◇ G-Sensor
Wenn der G-Sensor eingeschaltet ist, sperrt die Dashcam automatisch
aktuell aufgenommne Bilder im Falle eines äußeren Aufpralls und
verhindert so, dass das Bild in der Aufnahmeschleife überschrieben wird.
※Hinweise: Stellen Sie die Empfindlichkeit des Schwerkraftsensors
unter "
G-Sensor
" im Systemmenü ein.
◇ Manuelle Notfallaufnahme
Drücken Sie während der Videoaufnahme die Taste " ", um das aktuell
aufgenommene Video zu sperren und zu verhindern, dass das Video
während der Daueraufnahme überschrieben wird.
Drücken Sie im Aufnahmemodus kurz " " um ein Foto aufzunehmen.
Fotos werden im Ordner /PHOTO gespeichert.
6. USB Modus
① Verbinden Sie die Dashcam mit dem Typ-C-Verbindungskabel mit dem
Computer. (Stellen Sie sicher, dass das Typ-C-Verbindungskabel als
Datenübertragung genutzt werden kann)
② Die Dashcam schaltet sich automatisch ein und auf dem Bildschirm wird
das USB-Anschlusssymbol " " angezeigt.
③ Der Computer erkennt die “AVYLET Disk”. Öffnen Sie die “AVYLET
Disk”, es gibt drei Ordner, die wie folgt sind
26
7. APP und WiFi-Verbindung herunterladen
1) Herunterladen der "Avylet" APP
Bitte nutzen Sie Ihr Mobiltelefon um die unteren QR-Codes zu scannnen
und die neuste Appversion herunterzuladen oder suchen Sie “Avylet” im
Google Play/App Store.
Android IOS
/VIDEO (Daueraufnahme Dateien)
/EMERGENCY (Notfallvideo Dateien)
/PHOTO (Foto Dateien)
※Wenn keine Notfallvideodatei aufgezeichnet wird, gibt es keinen
solchen Ordner und kein Video.
④ Sie können die erforderlichen Dokumente auf Ihren Computer kopieren.
2) WIFI Connection
① Öne die "Avylet" App
② Klicke auf
"CONNECT YOUR CAMERA"
③ Klicke auf
"go to WiFi setting"
27
④ Wähle "Avylet-A2S-XXXX" aus
⑤ Gebe das WiFi
Passwort "12345678" ein
⑥ Klicke wieder "
CONNECT YOUR CAMERA"
⑦ Verbinde erfolgreich

28
8. Firmware upgrades
Methode 1:
Bitte wenden Sie sich an unser professionelles Kundenserviceteam (service@
avylet.com) und geben Sie relevante Informationen, Bestellnummer,
Maschinen versionsnummer,eine kurze Beschreibung des Problems, ein
Video, dass das Problem zeigt, usw. an. Wir haben ein professionelles After-
Sales-Team, das After-Sales-Support bietet.
Methode 2:
① Loggen Sie sich in der Avylet Webseite ein : https://www.avylet.com
② Klicke auf "Download Centre" .
③ Wählen Sie "Update rmware" aus.
④ Wählen Sie das entsprechende Modell aus. Laden Sie die neuste
Filmware-Datei herunter und extrahieren Sie sie in das Stammverzeichnis
der Speicherkarte.
⑤ Nach Abschluss des Downloads setzen Sie die Speicherkarte in den
Speicherkartensteckplatz der Dash Cam ein.
⑥ Schließen Sie den Strom an und die Dashcam schaltet sich automatisch
ein.
⑦ Die LED beginnt zu blinken und das Upgrade beginnt.
⑧ Wenn das Upgrade abgeschlossen ist, startet das Gerät automatisch neu
und fordert Sie auf, die SD-Karte zu formatieren. Wählen Sie “Ja”.
⑨ Gehen Sie zu “Einstellungen-Firmware Version”, um zu prüfen ob es
sich um die neuste Version handelt.
※Bitte stellen Sie sicher, dass Sie Ihre wichtigsten Daten sichern, bevor
Sie die Speicherkarteverwenden, um die Firmware zu aktualisieren,
um Datenverluste zu vermeiden, die Ihnen Probleme bereitstellen
könnten.
※Bevor Sie die Speicherkarte zum Aktualisieren der Firmware
verwenden, formatieren Sie die Speicherkarte bitte auf dem
Computer, um sicherzustellen, dass diese noch funktionstüchtig ist.
※Bitte während des System-Upgrades nicht ausschalten! Dies kann zu
einem Defekt des Gerätes führen.

29
9. Einstellungen Menü
In Nicht-Aufnahmemodus, drücken Sie " " um die Sytem-Einstellungen zu
önen
◇ WiFi
Legen Sie fest, ob das WiFi Netzwerk aktiviert werden soll, und überprüfen
Sie den WiFi Namen und das Kennwort.
◇ Auösung
Stellen Sie die Auösung von aufgenommen Video ein
Einzelner Len: 1440P/30FPS, 1296P/30PFS, 1080P/60FPS, 1080P/30FPS,
720P/60FPS, 720P/30FPS
Doppellinse: 1080P/30FPS + 1080P/30FPS
◇ Anzeigemodus
Legen Sie fest, was auf den Haupt-Bildschirm angezeigt wird:
Frontkamera, Rückfahrkamera, Rückseite überlagert, Front überlagert.
◇ Rückfahrkamera Spiegel
Stellen Sie ein, ob der Bildschirm auf dem hinbteren Rekorder angezeigt
wird, mit der Option, ihn ein-oder auszuschalten.
◇ Loop-Aufnahme
Legen Sie den Aufnahmemarket für jedes Video fest: 1,3 oder 5 Minuten.
◇ Datum/Zeit
Stelle das Datum/die Zeit und das Datum-Format für die Dateien ein.
◇ Audio aufnehmen
Legen Sie fest, ob der Ton bei der Aufnahme aufgezeichnet werden soll
oder nicht.
◇ Lautstärke
Stellen Sie die Lautstärke der Tastentöne, der Systemlautstärke und der
Wiedergabelautstärke ein.

30
◇ Parkmodus
Schalten Sie die Parküberwachung aus
Optionen: Aus / Bewegungssensor / 1fps / 2fps / 5fps / 10fps
Bewegungssensor
Schalten Sie Parküberwachung ein: Wenn die Funktion aktiviert ist,
beginnt die Dashcam mit der Aufzeichnung. Wenn das Bild in der
Aufnahme länger als 1 Minute ohne Bewegung andauert, stoppt die
Dashcam die Aufnahme, das Bild in der Aufnahme bewegt sich erneut
und die Haupteinheit beginnt mit der Aufnahme. Wiederholen Sie auf
diese Weise.
1fps / 2fps / 5fps / 10fps
Nachdem 1fps / 2fps / 5fps / 10fps ausgewählt wurde, bleibt der
Erkennungsbildschirm der Dashcam für etwa 1 Minute stehen und geht
in den Überwachungsstatus über. In diesem Zustand wird 1 /2/5/10 Bild
pro Sekunde aufgezeichnet. Wenn sich der Erkennungsbildschirm ändert,
startet die Dashcam den Aufnahmemodus.
◇ G-Sensor
Stellen Sie die Sensibilität des G-Sensor ein: Optionen:Aus/ Geringe
Empndlichkeit , Mittlere Empndlichkeit, Hohe Empndlichkeit .
◇ Datumsanzeige
Legen Sie fest, ob das Datum und die Uhrzeit bei der Aufnahme markiert
werden sollen oder nicht.
◇ Belichtungswert
Der EV Wert kann verändert werden um bessere Ergebnisse in
unterschiedlichen Lichtverhältnissen zu erhalten.
Verfügbar: +2.0, +5/3, +4/3, +1.0, +2/3, +1/3, +0.0, -1/3, -2/3, -1.0, -4/3,
-5/3, -2.0
◇ WDR
Wide Dynamic Mode kann an-/ausgeschaltet werden

31
◇ Lichtquellen Frequenz
Verfügbar:50Hz/60Hz
◇ Bildschirmschoner
Stellen Sie die Zeit ein, nach der der Bildschirm sich automatsich
ausschaltet. Verfügbar: 30Sek,1Min,Aus.
◇ System Sprache
Stellen Sie die Sprache ein in der das Sytem angezeigt wird. Verfügbar:
Englisch, Japanisch, Deutsch, Französisch, Italienisch, Spanisch,
Vereinfachtes Chinesisch.
◇ Fahrer Nummer
9 Zier Fahrer Nummer kann angegeben werden
◇ Formatieren Erinnerung
Dieser Vorgang löscht alle Daten auf der Speicherkarte. Dieser Vorgang
ist inreversibel. Wenn Sie wichtige Dateien haben, sichern Sie diese bitte
im Voraus.
◇ Formatierungstipps
Stellen Sie die Zeit für die Auorderung zur Formatierung ein. Verfügbar:
15 Tage, 30 Tage, 60 Tage oder Aus.
◇ Zurücksetzen
Setzt die Parameter der Werkeinstellungen zurück.
◇ Karte Kapazität
Sie können im Gerät bendliche Speicherkarten die verbrauchten Menge
und die Der Rest Kapazität anzeigen.
◇ Firmware-Version
Informationen zur aktuellen Firmware-Version des Gerätes anzeigen

32
10. Schwierigkeiten mit Aufnahmen
◇ Kann nicht eingeschaltet werden
1. Überprüfe das das Gerät nicht eingeschaltet oder unter Strom ist
2. Klicke die Unit Reset-Taste um zu rebooten
◇ Der Bildschirm zeigt das aufgenommene Bild nicht
1. Im Aufnahmemodus, überprüfe, dass das Display eingeschaltet ist und
drücke " " um das Display einzuschalten.
2.Überprüfen Sie, ob "Bildschirmschoner" aktiviert ist.
Im "Bildschirmschoner" des Systemmenüs gibt es drei Modi: "Aus/30
Sekunden/1 Minute". Sie können sie ändern.
◇ Speicherkarte ist voll
Löschen Sie unerwünschte video/images vom Dash Cam.
1.Legen Sie die Speicherkarte in den Computer ein und löschen Sie die
unerwünschte video/Fotos.
2. Speicherkarten formatieren
3.Ersetzen Sie die TF-Karte
※Dieser Vorgang ist irreversibel. Wenn Sie wichtige Dateien haben,
sichern Sie bitte Ihre Dateien im Voraus, bevor Sie diesen Vorgang
ausführen.
◇ Videos können nicht wiedergegeben werden
1. Überprüfen Sie, ob die Dateinamen oder Ordnernamen der videos oder
Fotos auf der Speicherkarte Ihres Computers geändert haben.
2. Ob die videos oder Fotos auf der Speicherkarte von einem Computer
verarbeitet wurden oder Bilder/fotos sind, die nicht vom Hauptgerät
aufgezeichnet aufgezeichnet wurden.
3. Die Speicherkarte ist beschädigt.
*Wenn die oben genannten Punkte Ihr Problem nicht lösen können,
kontaktieren Sie uns bitte per E-Mail service@avylet.com
33
アフターサービス
1.Avylet 公式 Web サイトにログインし、保証を有効にして、保証期間を 18.か月
に延 長します。
https://www.avylet.com/activate-warranty/ →
support/activate warranty、または、以下の QR コードをスキャンします。
3.Line または Facebook でリアルタイムに連絡を取ります。
Line.ID:「Avylet」、Facebook で「Avylet」を検索、または、以下の QR コードをスキ
ャンします。
2.YouTube をフォローして、操作動画、機能デモ動画、新製品展示などを入手します。
YouTube で「Avylet」を検索、または、以下の QR コードをスキャンします。
JP

34
安全上のご注意
・火災や感電について
・液晶画面について
・使用環境について
この取扱説明書は、本製品の使い方と使用上の注意事項について記載しています。
ご使用前には必ず、この取扱説明書をよくお読みいただき、事故が起こらないよう、
内容にしたがって正しくお使いください。取扱説明書に書かれた使い方以外の使
用方法や注意事項を守らずに、火災・感電などにより死亡や大けがなど人身事故
の原因となり、事故を起こされても責任を負いかねますのでご了承ください。また、
お読みになった後も、この取扱説明書をすぐに取り出せる所へ大切に保存してく
ださい。
◇万一、破損、浸水、電気のショートが発生した場合、すぐに電源を切ってください。
◇ 電 源コ ードを傷 つ けたり、加 工したり、無理 に 曲 げ たり、引っ張ったり、ねじった
りしな いでくだ さい 。
◇電源コードで本機に接続すると、金属部に接触して微弱電流を感じる場合があ
ります。これは、製品内部に電磁干渉を抑制する素子があり、これらの素子で
構成された回路が誘導電流を発生させるためであります。この微弱電流は国
の安全基准値としてとられるので、ご安心になって利用ください。
◇液晶画面に強い力を加えないでください。強い力を加えると、画面のムラや割
れなど故障の原因となります。
◇液晶画面は、乾いた柔らかい布で軽く拭いてください。汚れてきたと思ったら、
こまめに拭くように心がけてください。濡れたもので液晶画面を拭かないでく
ださい。内部に水が入ると故障の原因となります。
◇湿気やほこりの多い場所や、油煙や湯気のあたる場所には置かないでください。
◇直射日光が当たり高温になる場所、極端に低温の場所で使用・保管・放置しな
い でくだ さ い 。発 火・故 障・火 災・傷 害 の 原 因 とな ります。
・廃棄するときのご注意について
◇本機を廃棄する場合は、一般ごみに混ぜて捨てないでください。また、地方自
治体の条例などに従って処分してください。

35
・他 に
・説明書について
◇実際に使用する前に、本機をテストして、正常に動作して動画を撮れるかと確
認してくだ さい 。
◇説明書の内容をわかりやすくて正確に保つよう努めますが、製品更新する場合
あり、実物を基準にしてください。
◇ユーザー体験を向上させるため、アプリは予告なくアップデートされる可能性
がありますので、機能の説明は、実際のユーザー・インターフェースと異なる場
合があります。実際の状況に応じて操作してください。
◇取扱説明書の著作権は当社に帰属します。権利者の許諾を得ることなく、取扱
説明書の内容の全部または一部を複製、改版することは、禁止されております。
36
ご購入頂きありがとうございます。
ご使用中何か不明な点などがございましたら、ご遠慮なくお問い合わせください。
お 問 い 合 わ せ 先:service@avylet.com
1. ドライブレコーダーについて
1.1 パッケージ内容
ドライブレコーダー本体 *1 シガーソケット電源ケーブル *1
3M テープ式スタンド *1
リアカメラケーブル * 1
リアカメラ * 1
吸盤式スタンド*1
リアカメラテープ式スタンド *1
取扱説明書 *13M テープ *2
37
1.2 本体
リセット ボ タ ン
スクリーン
カメラ
Type-C ポート:
製品に電力を供給する
指 示 ライト
リ ア カ メ ラ 接 続 ポ ー ト:
リアカメラに 接 続
S D カ ー ド ス ロット
本体操作ボタン
スピーカー
電 源 スイッチ
マイク
38
2.1 自動電源オン / オフ
本機はバッテリーが内蔵されないです。
Type-C ポートに電力を供給すると、本体は自働的に電源が入れます。.電源ケー
ブルを抜き出すと、自動的に電源が切れます。
2.2 手動で電源オン
本体に電力を供給している状態で、「 」電源スイッチを 1 回押して、本体は電源
が入 れます。
2.3 手動で電源オフ
電源入れの状態で、「 」電源スイッチを押して、スクリーンをオン / オフにします。.
「 」電源スイッチを長押しして、本体は電源が切れます。
※データーを保護するために、本体は完全に電源が切れた後で、SD カードを取
り出してくだ さい 。
2. 電源について
3. 画面アイコンの紹介
アイコン ボタン
OK
機能説明
設定メニュー に入ります。
プレイリストに 入 ります。
短く押して、前後カメラの画面表示を切り替
えます。
長押しして、マイクを ON/OFF にします。
録画を開始 / 停止します。
3.1 電源入れ、非録画状態
39
アイコン ボタン
OK
機能説明
ループ録画で上書きされないように、現在
の録 画ビデオをロックします。
写真 を撮れます。
1 回押して、前後カメラの画面表示を切り替
えます。
長押しして、マイクを ON/OFF にします。
録画を開始 / 停止します。
3.2 電源入れ、録画状態
アイコン ボタン
OK
機能説明
ループ録画で上書きされないように、現在
の録 画ビデオをロックします。
写真 を撮れます。
前後カメラの画面表示を切り替えます。
1 回押して、録画を開始 / 停止します。
長押しして:SSID 表示をオン / オフにします。
3.3 WiFi に接続、録画状態
40
アイコン
色
緑色
ボタン
状態
OK
機能説明
説明
なし
電源切れ
消灯
Wi-Fi をオフにします。
非録画状態
点灯
前後カメラの画面表示を切り替えます。
録画状態点滅
1 回押して、録画を開始 / 停止します。
長押しして :SSID 表示をオン / オフにします。
3.4 WiFi に接続、非録画状態
3.5 指示ライト
41
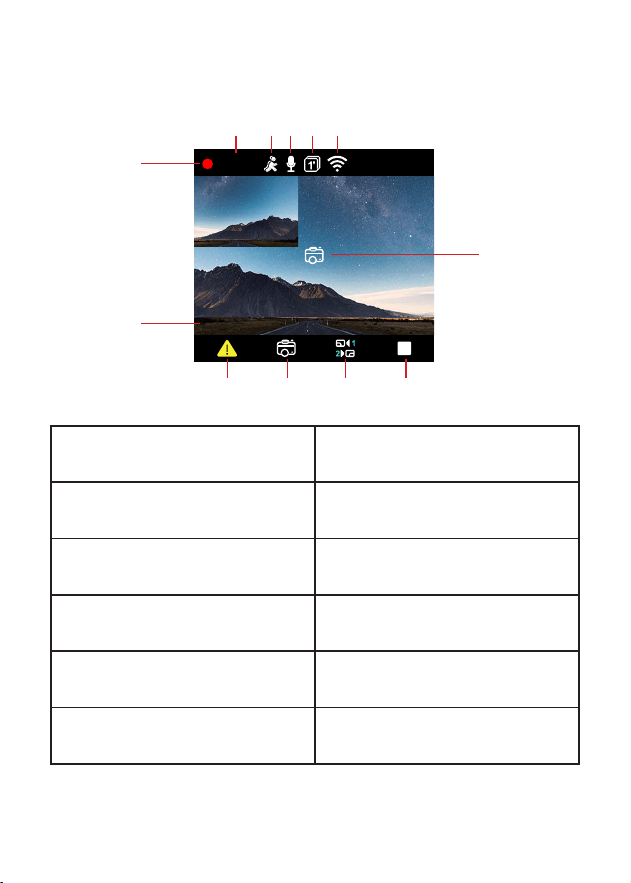
3.6 画面表示
1/2..録画時間(録画中) 8..緊急録画
3...モーション検知 9..撮影
4..マイク.オン / オフ
10..前後カメラ画面を切り替え
5..ループ録画時間 11..録画開始 / 停止
6..WiFi.オン / オフ 12..撮影
7..日付
1
2 3 4 5 6
7
12
8 9 10 11
00:23
2023/01/01
18:18:27
1440P30

42
◇ループ録画
SD カードを挿入し、本体は電源が入れると自働にループ録画します。各ビデオ
のデフォルト時間は 3 分です。1 分間 /3 分間 /5 分間を選択できます。.
SD カードの容量不足の場合、前のデータを自動に上書きします。
◇緊急録画
・自動緊急録画:G- センサー ON の状態で外力衝突が発生すると、現在録画し
ているビデオが自動にロックされます、ビデオが上書きされないようにします。
・手動緊急録画:録画中、本体の「. .」ボタンを押して、現在録画しているビデオ
をロックできて、ビデオが上書きされないようにします。
録画中、本体の「. .」ボタンを押して、写真を撮れます。
「写 真ファイル」フォルダに保 存されています。
① Type-C ケーブルで本機とパソコンに接続します。(データ転送可能な Type-C
ケーブル必要)
②本機は自動にオンになり、画面に「. . 」と 表 示 さ れ て い ま す 。
③パソコンで「AVYLET ディスク」を読み込みます。
④「AVYLET ディスク」を開いて、3 つのフォルダがあります。
・通常録画
・緊急録画
・写 真 ファイル
※緊急録画されない場合、緊急録画フォルダとファイルがありません。
⑤必要 なファイルをパソコンにコピーします。
4. 録画機能
5. 撮影
6. USB モード
43
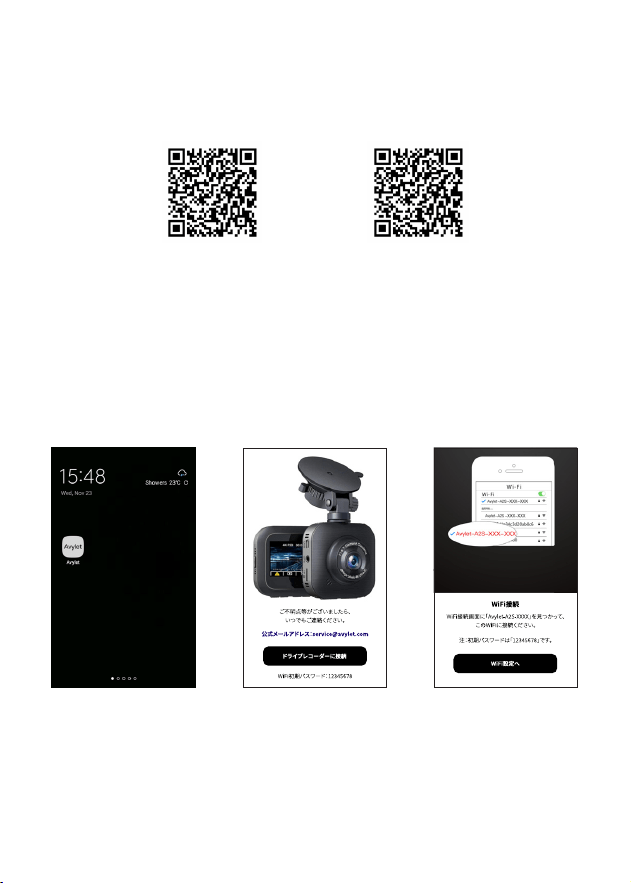
Android. .IOS.
◇スマホで下記のQRコードをスキャンして最新のアプリをダウンロードできます。
あるいは、google.Store/App.Store で「Avylet」を検索してダウンロードできます。
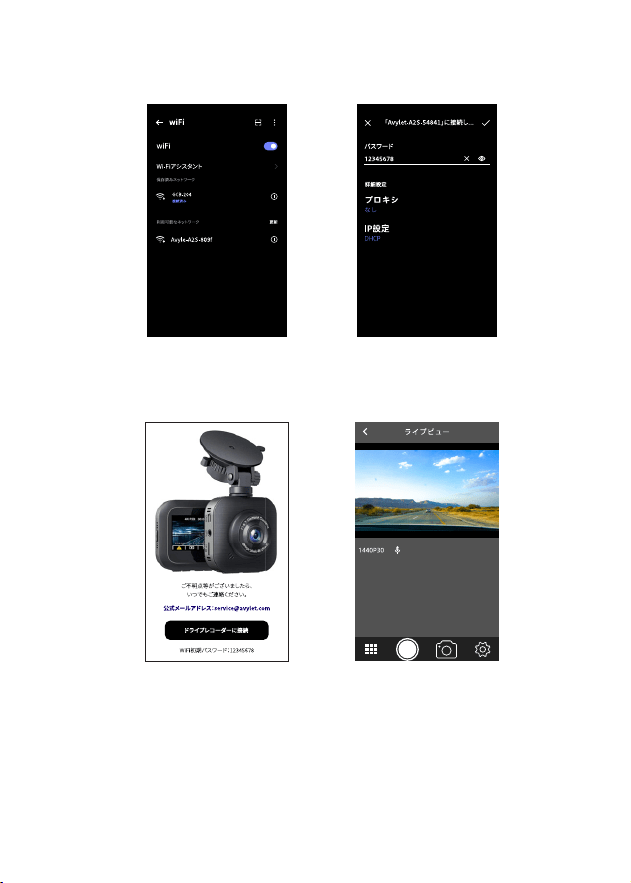
7. アプリダウンロードと wi 接続
①「Avylet」App を 開 き
ま す 。.
②「 ド ラ イ ブ レ コ ー ダ ー に
接続」をクリックします。....
③「WiFi 設定へ」
を ク リ ッ ク し ま す 。.
44
④「Avylet-A2S-XXXX」を選択し
ます。
⑤ wi パスワード
「12345678」を入力します。
⑥再度「ドライブレコーダーに
接 続 」を ク リ ッ ク し ま す 。.
⑦接続成功になります。

45
① Avylet 公式 web サイトにログインします。
https://www.avylet.com
「Support」-----「Download.Center」.-----「Update.Firmware」に入ります。
②モデルを選択し、最 新のファームウェアファイルをダウンロードして、SD カード
の ル ート ディレクトリに 解 凍 しま す。
③本体に SD メモリーカードを挿入します。
④本体は電源を入れます。LED ライトが点滅し、アップデートが始まります。
⑤アップグレードが完了すると、本体は自動に再起動して、SD カードをフォーマッ
トします。
⑥「設定・バージョン情報」で最新バージョンになっているか確認します。
※大切なデータを保護するために、アップデート前に、必ずバックアップをおこな
ってくだ さい 。
※メモリカードを安定に読み書きできるために、アップデート前に、必ずパソコン
でメモリカ ードをフォーマットしてくだ さい 。
※アップデート中、電源は切らないでください。
あるいは、弊店のアフタサービスにご連絡してください。そちらで専門的な技術サ
ポートを提 供しております。
8. ファームウェアをアップデートする
9. 設定メニュー
非録画状態で、. . を押してシステム設 定 に 入ります。
◇ WIFI と WIFI 情報
WiFi オン / オフにします。WiFi 名とパスワードを確認します。
◇解像度
解像度を設定します。.
シングルレンズ:1440P/30FPS、1296P/30PFS、1080P/60FPS、1080P/30FPS、
720P/60FPS、720P/30FPS
デュアルレンズ:1080.P/30.FPS+1080.P/30.FPS

46
◇カメラ画面切り替え
カメラ画面表示を設定します。
◇リアカメラの 画 面
オン / オフにします。
◇記録時間
各ビデオの録画時間を設定します。1/3/5 分間選択可能です。
◇日付 / 時刻設定
日付 / 時間を設定します。
◇録音
録画時に録音するか設定できます。
◇音量設定
ボタン音量、システム音量、再生音量を設定します。
◇駐車モード
駐車監視機能をオン / オフにします。
◇動体検知
動体検知機能をオンにすると、本機は画面静止を検知すると、約 1 分後、録画
停止します。動きを検出して画面が変化すると、録画開始します。
◇ G センサー
重力センサーの感度を設定します。
◇データ付きビデオ
録画時に日付 / 時刻が付くか設定できます。
◇EV値
EV 値を調整することでより良い撮影効果が得られます。

47
◇ WDR
ワイドダイナミックレンジをオン / オフにします。
◇アンチフリッカ
50Hz/60Hz を選択できます。
◇スクリーンセーバ ー
画面が自動的にオフになる時間を設定します。
◇システム言 語
言語を設定できます。
◇ フォ ー マット
すべてのデータを削除します。
※この操作は可逆的ではありません。重要なファイルがある場合は、あらかじめ
重要なファイルをバックアップしてからこの操作を実行してください。
◇ フォ ー マットリマ イン ダ ー
フォーマット時間の提示を設定できます。
◇初期化設定
すべての設定を出荷状態に戻します。
◇カード情報
お使い SD カードの容量を確認できます。
◇バージョン情報
製品の情報を確認できます。

48
以下の他に問題があり、あるいは、以下の説明で問題が解決できない場合、
弊社のアフターサービスまでお気軽に連絡ください。
お 問 い 合 わ せ 先:service@avylet.com
.
Q1 電源が入れない。
1)各接続部の接続が不安定です。
2)部品が破損しました。
3)車の電源が不安定です。
Q2 画面表示しないです。
録画モードで、画面表示をオフにするかと確認してください。. . を 押 し て 、画 面
表示 / 非表示できます。
スクリーンセーバーを設定するかと確認してください。
Q 3 ずっと「メモリカードをフォーマットしてください」と提 示しています。
1)お使い SD カードが仕様要件を満たしていないです。
2)使用前に、パソコンで microSD カードを FAT32 または exFAT ファイルシス
テムにフォーマットしてください。次、ドライブレコーダーに挿入し、本機で再度
フォーマットしてください。使用中、SD カードが認識されない場合は、通常 SD
カードの品質問題であり、より安定に読み書けるメモリカードを交換してくだ
さい。
Q4 本機でファイルを再生できません。
1)パソコンで SD カードに保存されているフォルダーとファイルの名を変更す
るか 確 認してくだ さい 。
2)SD カードは不良があります。
10. よくある質問
49
Manufacturer:Dongguan Haotai Electronic Technology Co., Ltd
Address: No. 16 Xinfa Road, Lincun, Tangxia, Dongguan City ( Block 87, New
Sun IndustrialCity) Guangdong China 523711
Business: HONGKONG WHISPER INNOVATIONS E-COMMERCE CO., LIMITED
Address:UNIT 83, 3/F, YAU LEE CENTRE, NO. 45 HOI YUEN ROAD KWUN
TONG, KOWLOON, HONG KONG
Model: A2S