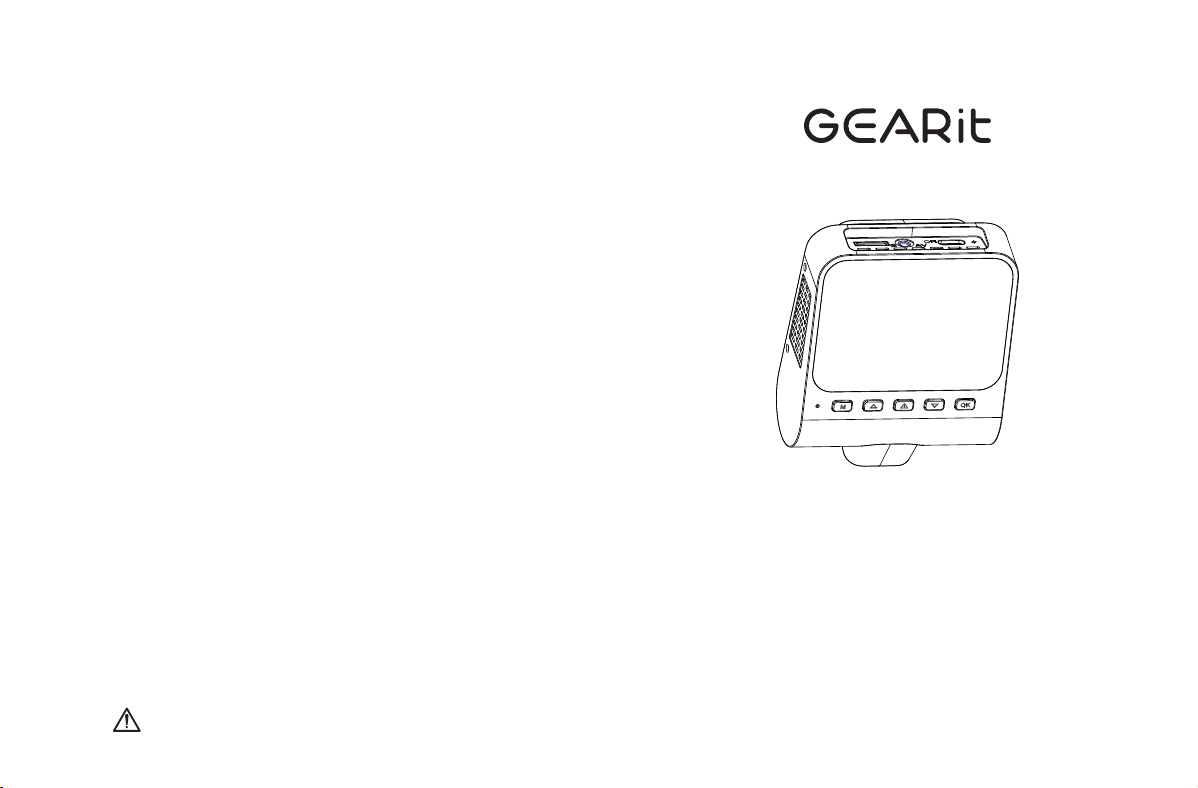
GI-DASH-2CH-4K-BK
User Manual
4K 2-Channel Dash Cam
with Color Display
WARNING: This product can expose you to chemicals
known to the State of California to cause cancer.
For more information, go to www.P65Warnings.ca.gov.
FCC Compliance Statement
This equipment has been tested and found to comply with the limits
for a Class B digital device, pursuant to Part 15 of the FCC Rules. These
limits are designed to provide reasonable protection against harmful
interference in a residential installation. This equipment generates,
uses, and can radiate radio frequency energy and, if not installed
and used in accordance with the instructions, may cause harmful
interference to radio communications. However, there is no
guarantee that interference will not occur in a particular installation.
If this equipment does cause harmful interference to radio or
television reception, which can be determined by turning the
equipment off and on, the user is encouraged to try to correct the
interference by one or more of the following measures:
Reorient or relocate the receiving antenna.
Increase the separation between the equipment and receiver.
Connect the equipment into an outlet on a circuit different from that
to which the receiver is connected.
Consult the dealer or an experienced radio/TV technician for help.
Changes or modifications not expressly approved by the party
responsible for compliance could void the user's authority to operate
the equipment.
This device complies with Part 15 of the FCC Rules. Operation is
subject to the following two conditions:
(1) This device may not cause harmful interference.
(2) This device must accept any interference received, including
interference that may cause undesired operation.

Table of Contents
1. Packaging Contents
2. Technical Specifications
3. Product Overview
4. Getting Started
5. Installation
6. Playing Video Files Using Your Smartphone
7. Video Settings
8. System Settings
9. Playing Video Files Using Your Computer
10. Firmware Update
11. ADAS Intelligent Driving Assistance Calibration
12. FAQ
04
05
07
09
11
14
23
29
36
38
40
42
-02- -03-
Thank you for purchasing your new GEARit 4K 2-Channel
Dash Cam. This user manual will help provide you with all
the information needed to get started. Please read this
manual carefully before using the product and reference it
for later use.
Enjoy your new product.
Live it. Experience it. GEARit.
1. Package Contents 2. Technical Specifications
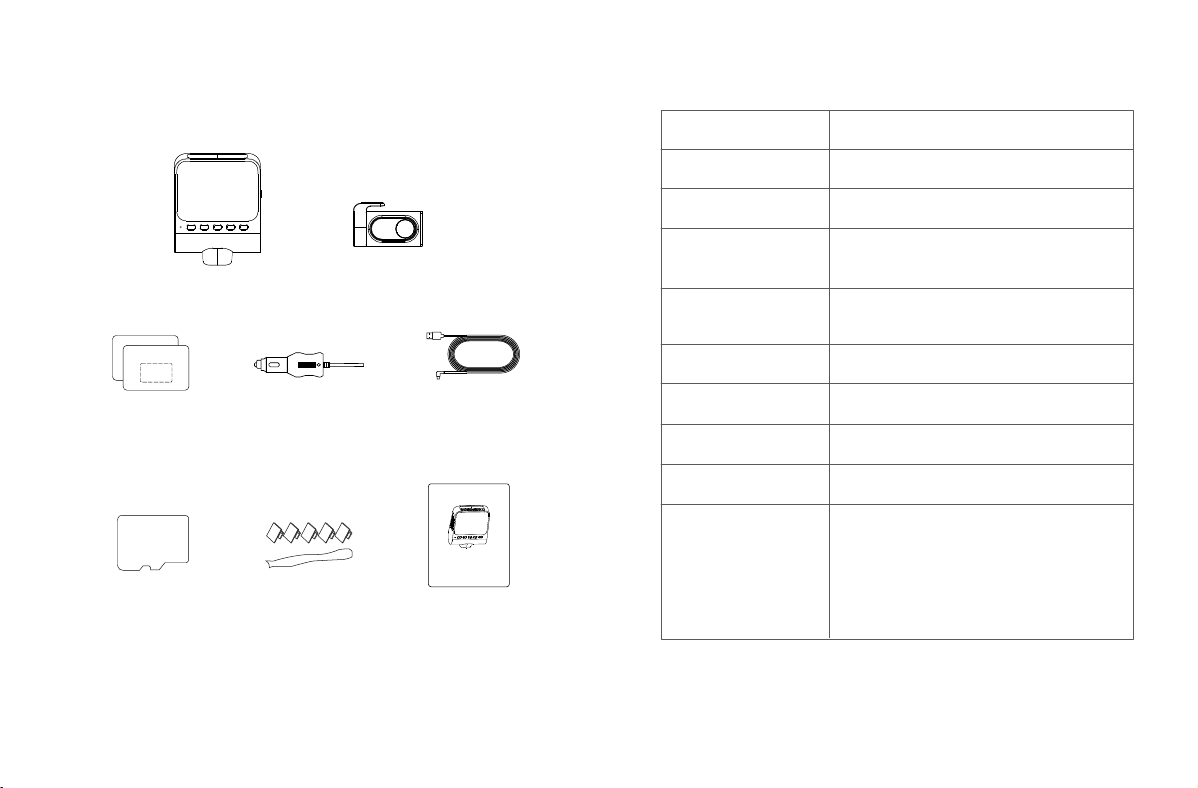
Dash Camera Rear Camera
(6M/20ft)
Electrostatic Film x 2
USB-C Car
Charger
USB-C Power
Cable (3.5M/12ft)
Cable Clips × 5
Pry Tool
64GB microSD Card User Manual
1.Please�paste�the�electrostatic�film�near�t he�top�of�the�fron
2.Please�insert�the�SD�card�and�USB�Power�cable
3.Please�slick�the�device�into�the�dotted�box
1.Please�paste�the�electrostatic�film�near�t he�top�of�the�fron
2.Please�insert�the�SD�card�and�USB�Power�cable
3.Please�slick�the�device�into�the�dotted�box
Warm Prompt
Warm Prompt
Model
Aperture
Color
Language
Memory Card
Video Code
Photo Format
Video Format
LCD Size
Video Resolution
GI-DASH-2CH-4K-BK
F=1.8
Black
English / 日本語 / Deutsch / Français /
Español / Italiano / Русскии
64GB microSD Card Included.
Max support 128GB, U3 Speed
H.264 / H.265
JPG
MP4
2.4 inch IPS Screen
Front:
-4K/3840x2160@30FPS(Default)
-2K/2560*1440@60FPS
-2K/2560x1440@30FPS
-1920x1080@60FPS
-1920*1080@30FPS
64GB
-04- -05-
User Manual
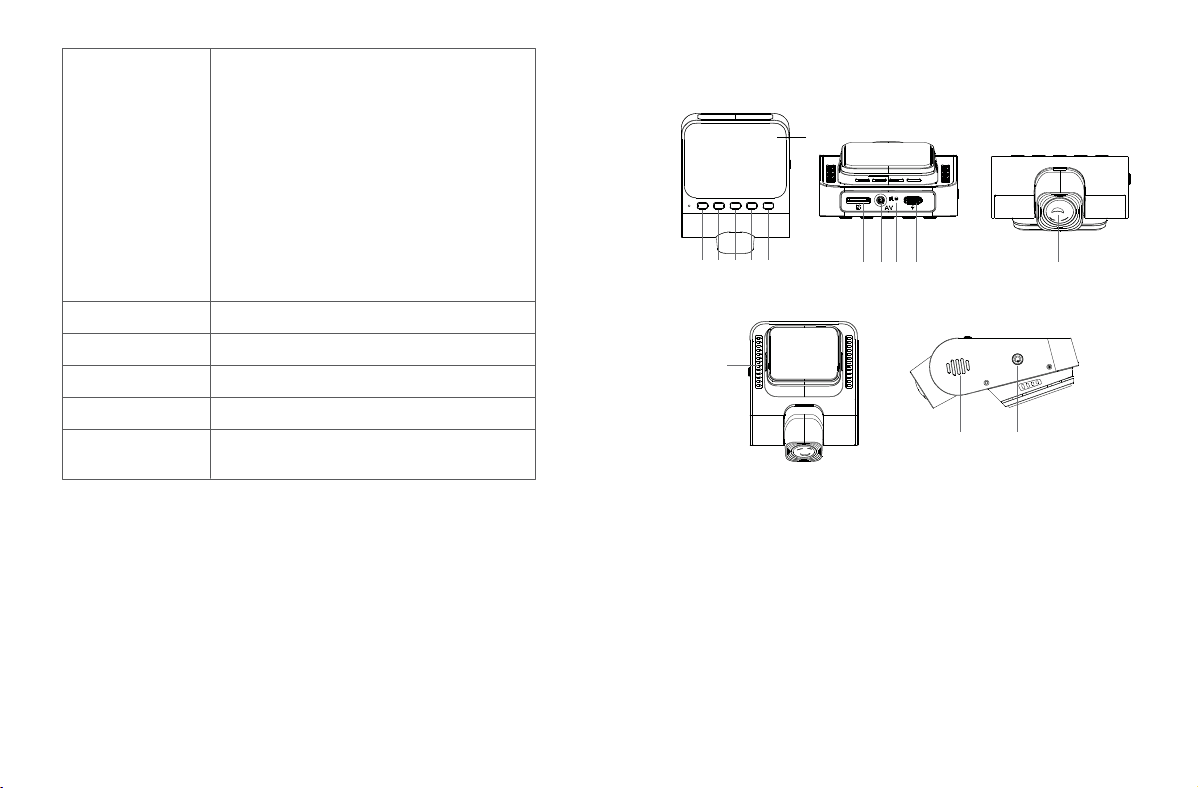
3. Product Overview
Built-invvvvcv
Wi-Fi 6
Built-in Super Capacitor
5V/2.5A
-4°F to 158°F (-20°C to 70°C)
GPS Track
WiFi
Battery
Power Interface
Operating
Temperature
Front + Rear:
-4K/3840*2160 25FPS+1920*1080 25FPS,
support ADAS
-2560*1440 60FPS+1920*1080 30FPS,
not support ADAS
-2560*1440 30FPS+1920*1080 30FPS+HDR,
not support ADAS
-2560*1440 30FPS+1920*1080 30FPS(Default),
support ADAS
-1920*1080 30FPS+1920*1080 30FPS,
support ADAS
Video Resolution
➀➁➂
➃
➇➆ ➈
⑫
➄
➅
⑬
⑭
➀ Menu/Mode ➁ Up ➂ Lock/Wi-Fi
➃ Down ➄ OK/Confirm ➅ microSD Card Slot
➆ Rear Camera Port (AV/IN) ➇ Reset ➈ Charging Port
➉ Lens ⑪ Ventilation Hole ⑫ Speaker
⑬ Power button ⑭ IPS Screen
-06- -07-
➉
⑪
4. Getting Started
The GEARit dash cam is designed to automatically power on and
begin recording once it receives power. When the ignition is turned
off, it will save the current recording and shut down automatically.
-08- -09-
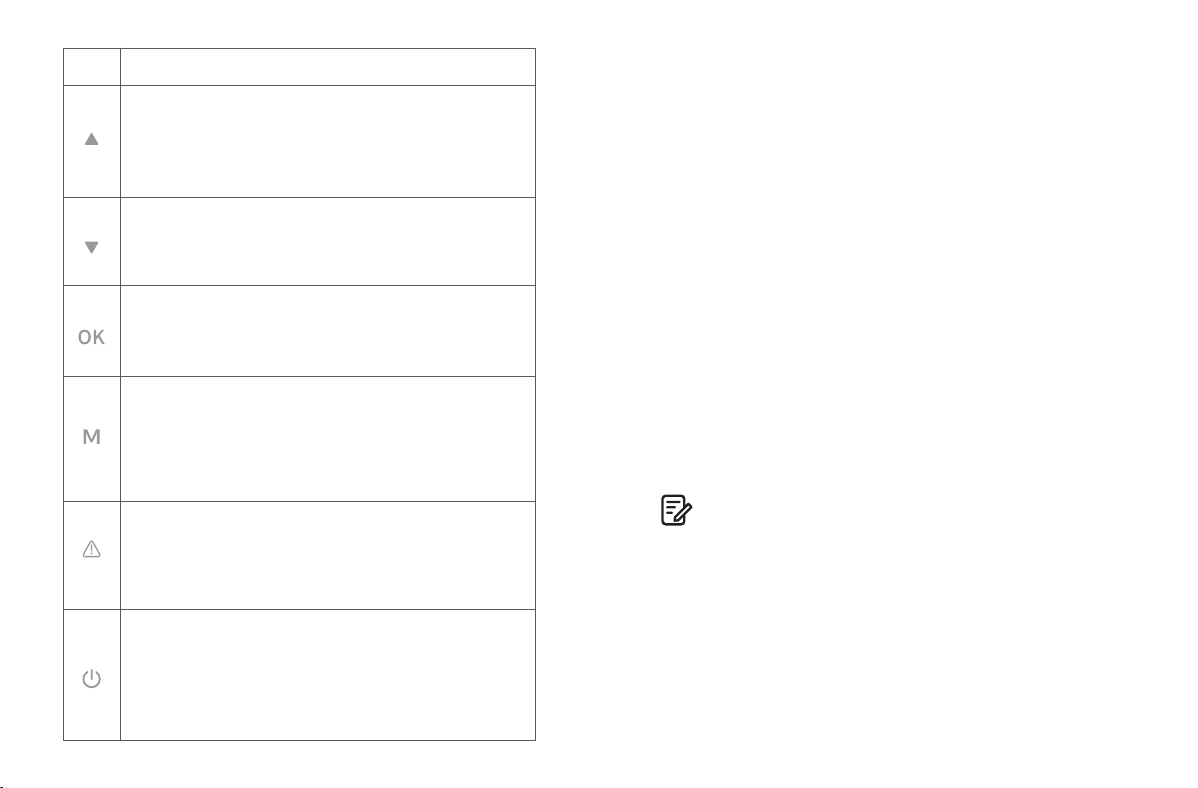
Button Operation and Function
Menu Setting Interface: Short press UP to select.
Playback mode: Short press UP to select.
Recording mode: Short press UP to turn on/off the
recording function, long press to switch between front,
back, and picture-in-picture modes.
Menu setting interface: Short press DOWN to select.
Playback mode: Short press DOWN to select.
Recording mode: Short press DOWN to turn off/on the
screen.
During recording: Short press to lock the current video.
During playback: Short press to return to the nine-grid
thumbnail interface.
During recording or non-recording: Long press to turn on
WiFi/after successful connection, long press to turn off WiFi.
During recording: Short press to enter the menu setting
interface, short press again to exit the menu.
Playback mode: Short press to select file playback, file
deletion, and file lock functions.
Switch modes: Long press to switch recording mode
and playback mode.
Power On: Short press the power button to power on
(connected to an external power source).
Power Off: Long press the power button for 3 seconds to
power off.
Take Photo: When the dash cam is recording, press the
button once to capture a photo.
Recording mode: Short press OK button to start/stop
recording.
Setting, Playback mode: Short press OK button to
execute confirmation function.
1. Auto Power ON/OFF:
Plug car charger to cigarette lighter socket. When the car engine
turns on, the dash cam will power ON and start recording
automatically. When the car engine shuts off, the dash cam
automatically saves the recording and powers OFF.
2. Manual Power ON/OFF
Manually Turn ON: While connected to external power, press the
power button once.
Manually Turn OFF: Press and hold the power button for 2 seconds.
Note:
1. A 64GB microSD card is included. Please format it in the dash
cam before first use.
2. Always use the dash cam while connected to power. The built-in
supercapacitor is not meant for prolonged use.
Note:
1. A 64GB microSD card is included with the dash cam.
Be sure to format your microSD card before first use.
2. Please ALWAYS connect with power when using. As it is built in
Super Capacitor (Only has a 1mAh Lithium Metal Battery used to
memorize time).
3.Setting Date & Time: Please calibrate the date/time based on your
location under the TIME ZONE SETTING by going to APP system
settings menu, please refer to page -33
4.Some vehicles have a 12V power outlet that remains active even
when the engine is off. This can cause the dash cam to keep
recording and eventually drain the car battery.
Solutions:
Option 1: Install a 3-Lead Hardwire Kit to the vehicle’s fuse box for
ignition-based power control.
Option 2: Rewire the 12V outlet to only supply power when the
ignition is in ACC or ON position.
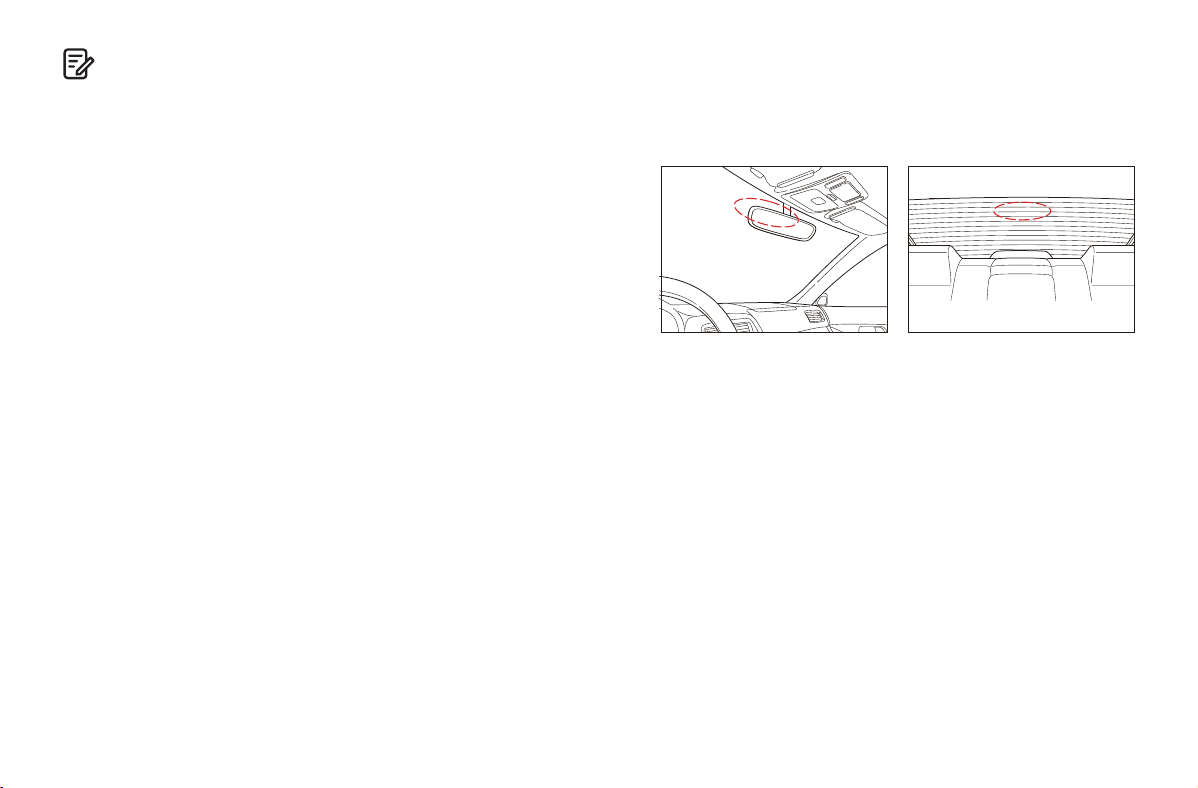
Remove any foreign matter and clean and dry the windshield
before installation. Install the front camera behind the rear view
mirror. Install the rear camera at the top of the rear windshield.
Insert the microSD Card
Turn off the engine and insert a high-speed U3 microSD card (Class
10 or above) into the microSD slot until it clicks into place.
Prepare the Front and Rear Windshield
Find a location behind the rearview mirror that doesn’t block your
vision. Clean and dry the glass. Apply the electrostatic film to this
area of the windshield — it protects from residue when removing the
camera later.
Mount the Front Camera
Remove the adhesive backing from the camera mount. Attach the
camera onto the electrostatic film. Adjust the lens angle so it
captures the road ahead clearly.
Mount the Rear Camera
Peel the adhesive from the rear camera and attach it to the top
center of your rear windshield. Rotate the camera to set the proper
angle, then connect its cable to the front unit.
5. Installation
-10- -11-
-12- -13-
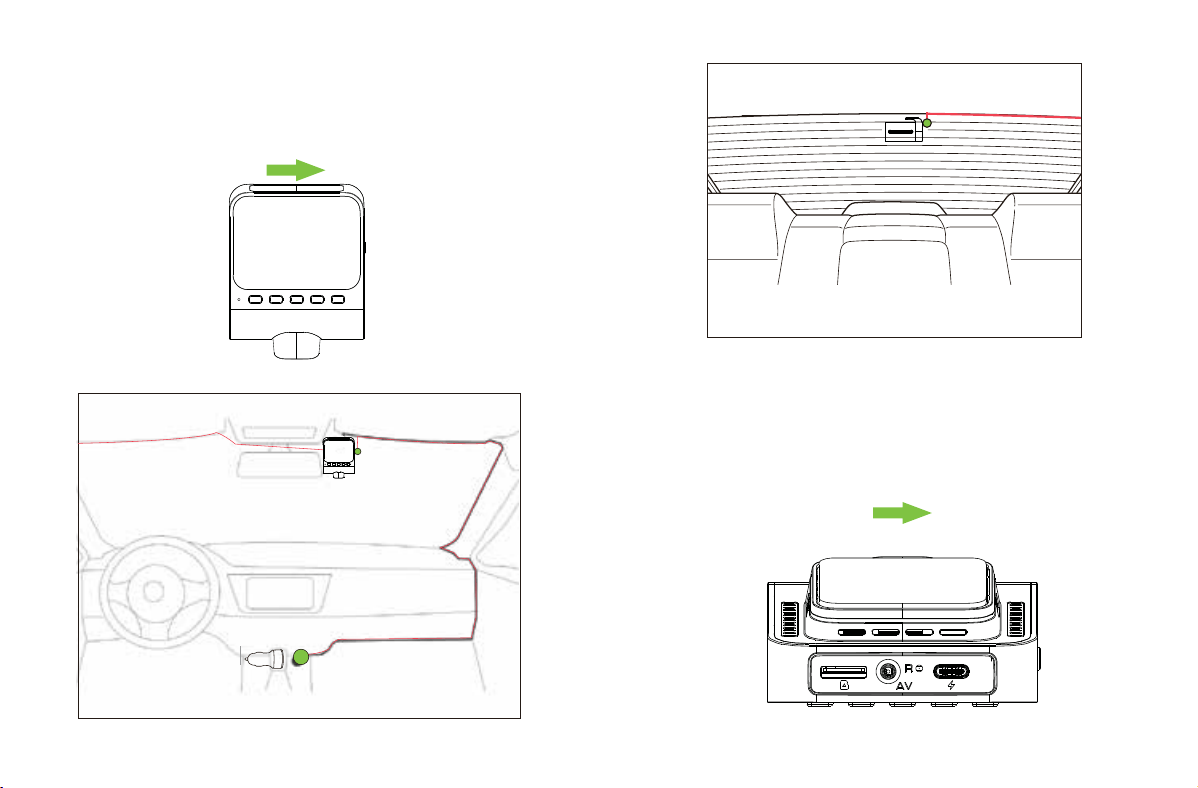
Connect the Power
Plug the provided car charger into the vehicle’s 12V socket. Connect
the USB-C plug to the dash cam. Use the pry tool to tuck the cable
along the headliner, A-pillar, or door trim for a clean install.
Start Your Engine
Once the car starts, the dash cam powers on and begins recording.
Files are saved to the inserted microSD card. When you turn off the
engine, the dash cam automatically shuts down.
Rear camera cable
USB charging cable
Connect to Car Charger
Rear camera cable
Detachable cover
-14- -15-
V���
V���
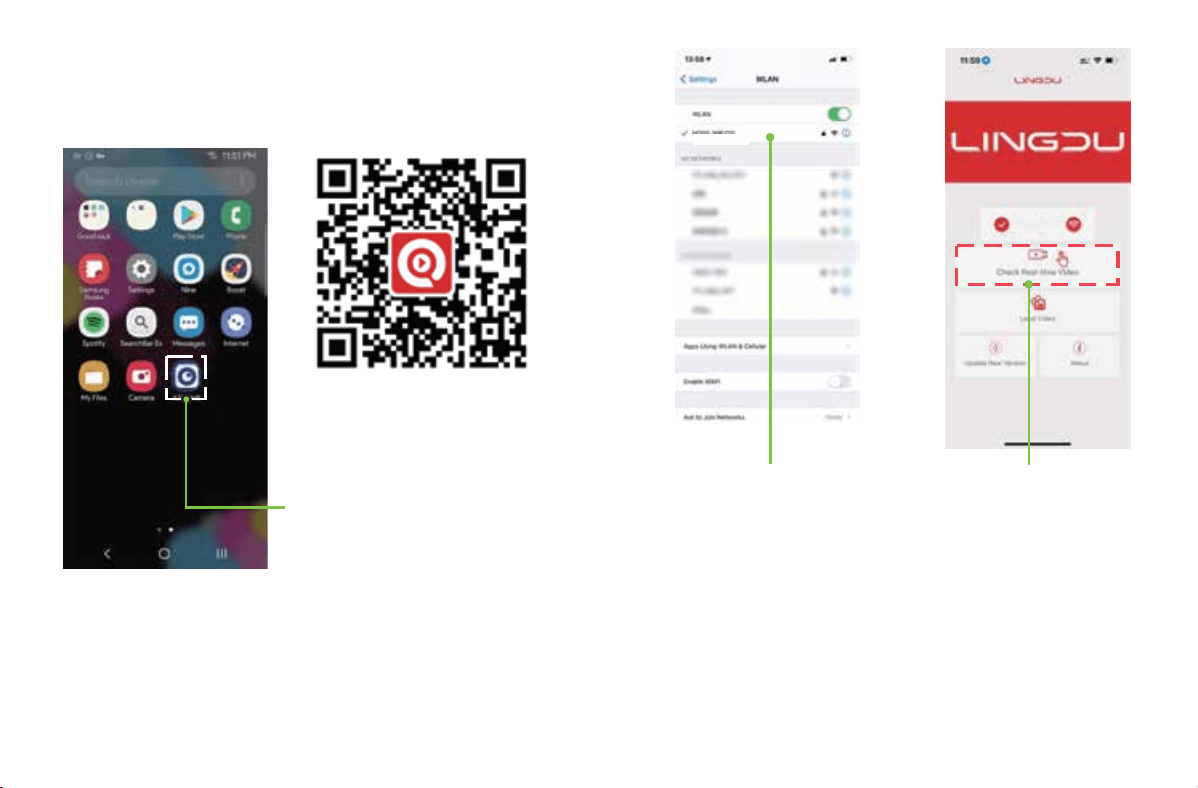
Connect to WiFi (Turn off Cellular
Data and VPN) Please open Phone's
Settings - WLAN Select Dash Cam
WiFi
WiFi Name SSID: GEARit DC2
PASSWORD: 12345678
There will show dash cam
model ***** when
connected successfully.
Tap Check Real-time Video
to preview the live camera
feed.
6. Playing Video Files Using Your Smartphone
Review Real-Time Video Using Your Smartphone
Scan QR code to
download GEARit App
Search for GEARit in the Apple App
Store or Google Play Store, or scan
the QR Code above.
-16- -17-
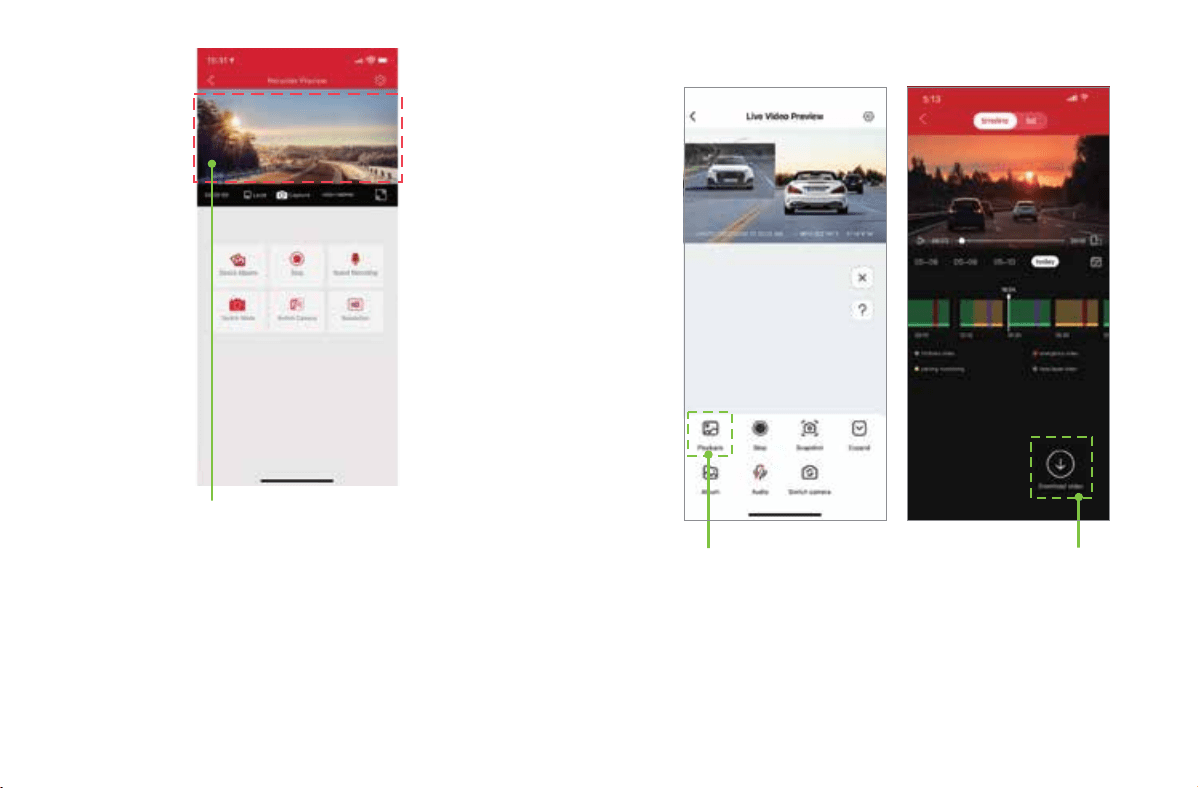
Now you can view the video
currently being recorded in real
time.
Download The Video Files Into Your Smartphone
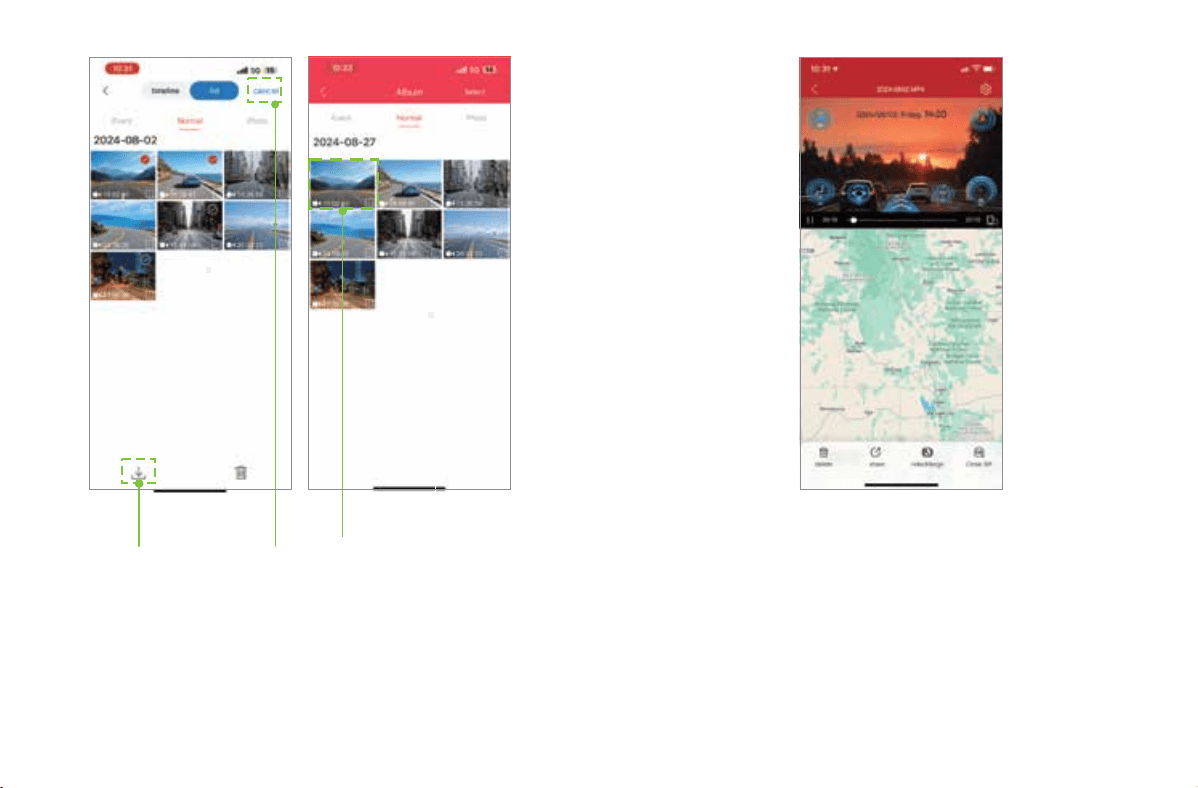
Tap Playback to enter file
browsing mode.
Use the Timeline to locate
the video you want.
Tap the Download Video
icon to save to your phone’s
gallery.
-18- -19-
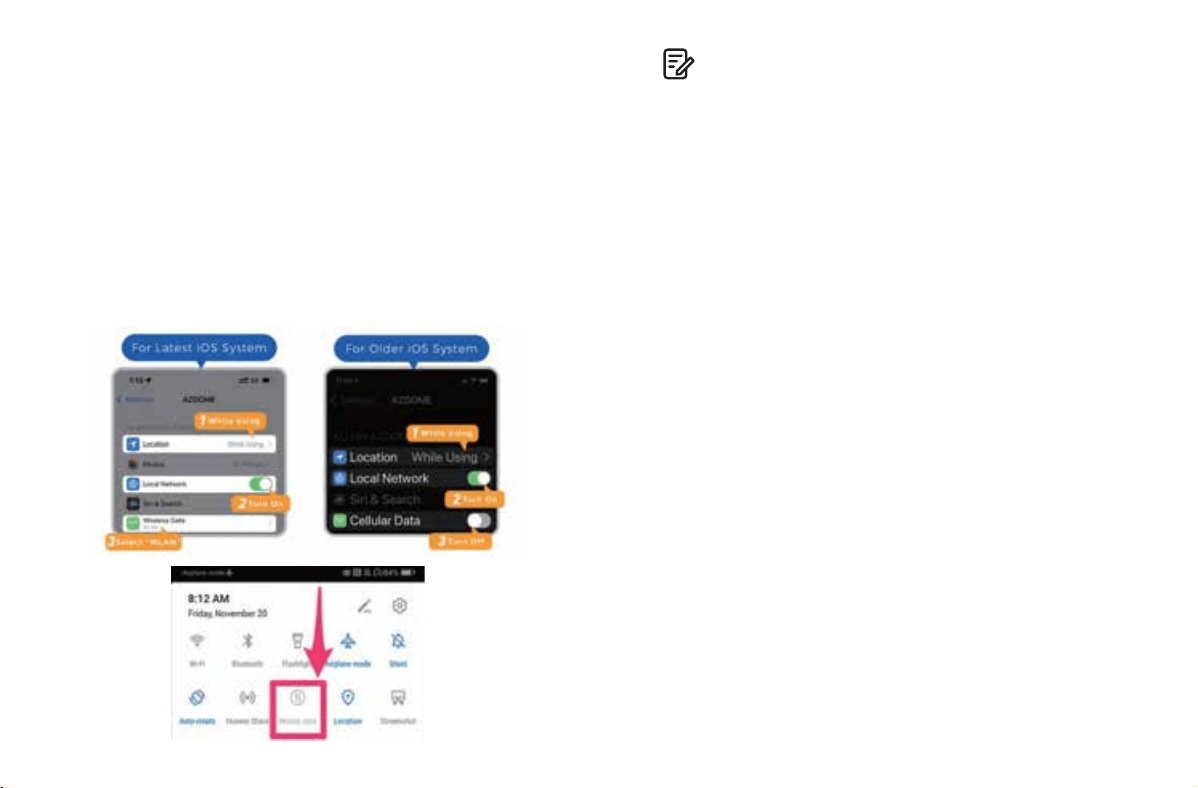
Videos saved here can be
previewed, shared, or stored
to the local video gallery of
your smartphone.
You can view and share the
downloaded video File
details.
Tap to choose video file(s),
then tap the download icon
to save to local phone
storage.
-20- -21-
Note:
1. WiFi Direct enables your smartphone to connect directly to the dash
cam within a range of approximately 10 feet (3 meters)—no internet or
router required.
2. Once connected through the GEARit app, the dash cam will
automatically sync the date and time using your phone’s system
settings.
3. The GEARit app is compatible with devices running Android 5.0 and
above or iOS 9.0 and above.
Can I View Dash Cam Footage Remotely from Anywhere?
No. The GEARit dash cam is not a cloud-based or
internet-connected device. It is not designed to stream or upload
footage to the cloud, and it cannot be accessed remotely. You can
only view live video and recordings while you’re within 10 feet (3
meters) of the dash cam using the built-in WiFi signal and the
GEARit app.
What is the WiFi Range?
The WiFi signal range is approximately 10 feet (3 meters) in open
space without obstructions.
If the GEARit app only shows a default image (like a beach photo)
instead of the live video, it’s likely caused by your phone’s cellular
data interfering with WiFi.
To fix this:
1. Disable Cellular Data for the GEARit app
2. Enable Local Network access
For the latest iOS versions:
1. Go to Settings > GEARit
2. Tap Wireless Data
3.Select WLAN Only
For older iOS versions:
1. Go to Settings > GEARit
2. Turn off Cellular Data
-22- -23-
Front:
3840*2160 30FPS (default)
2560*1440 60FPS
2560*1440 30FPS
1920*1080 60FPS
1920*1080 30FPS
Select your preferred video resolution and frame rate (FPS).
Higher resolution and FPS provide smoother, clearer footage—but
will use more storage space.
First-Time App Setup Tips (Android Devices)
When installing the GEARit app, you’ll see two important permission
requests:
1. Location Access – Select “While using the app” to allow location
access, which is required for WiFi pairing.
2. Media Access – Tap “Allow” to give the app permission to access
your device’s photos and media.
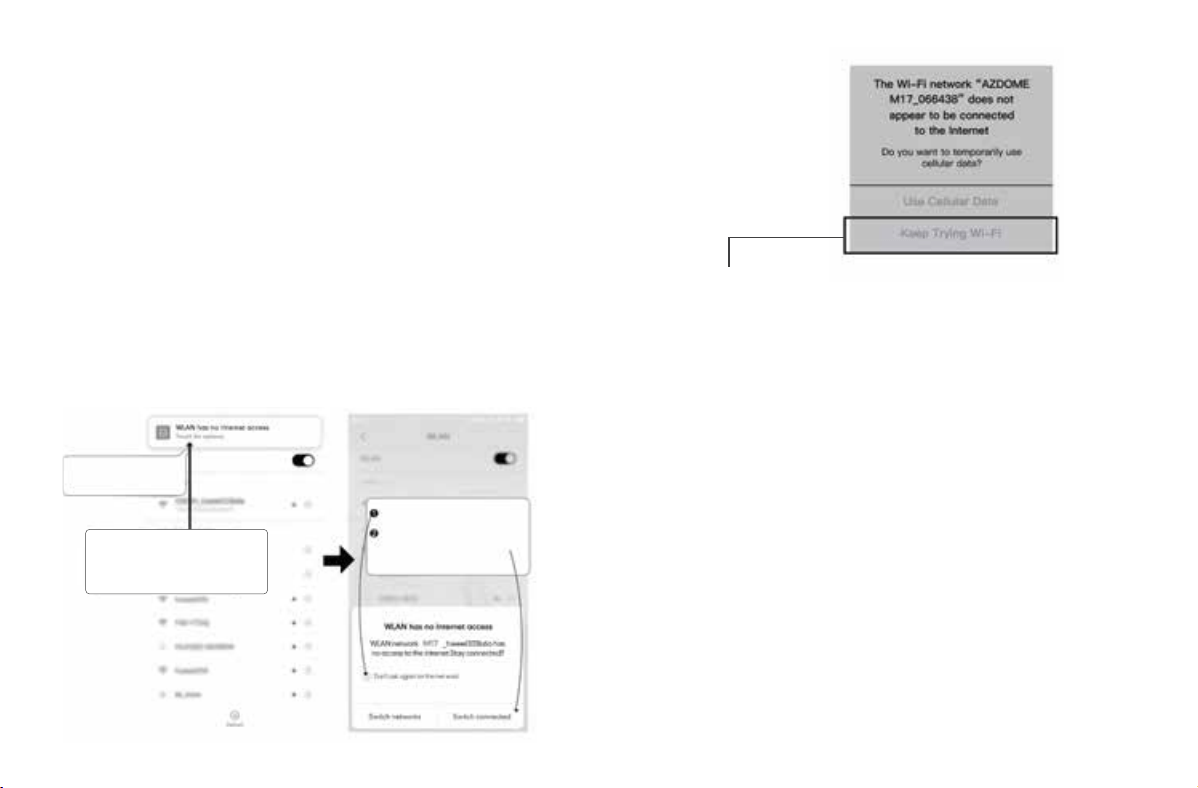
WiFi Setup Notice (No Internet Warning)
The first time you connect to the dash cam’s WiFi, your phone may
display a “No Internet” warning — this is completely normal.
1. Wait about 10–15 seconds until a notification appears.
2. Tap the pop-up that asks if you want to stay connected to this WiFi
network.
3.Confirm by selecting “Yes” or “OK.”
Once you confirm, your phone will remain connected to the dash
cam’s WiFi, and the app will function normally.
iPhone:
If this pop-up appears on your iPhone while using the WiFi feature,
tap “Keep Trying WiFi.” If you don’t, the camera will disconnect, and
you’ll need to forget the GEARit WiFi network and reconnect from the
start.
7. Video Settings
Then tap “YES” to stay
connected to this WiFi and
save this preference.
Tap here to check this box.
Tap as soon as you
see this notification.
Once you enter the WiFi password
and hit connect, you will
see this pop-up in a few seconds.
Video Resolution

-24- -25-
Front + Rear
3840*2160 25FPS+1920*1080 25FPS, supports ADAS
2560*1440 60FPS+1920*1080 30FPS, do not support ADAS
2560*1440 30FPS+1920*1080 30FPS+HDR, do not support ADAS
2560*1440 30FPS+1920*1080 30FPS (default), supports ADAS
1920*1080 30FPS+1920*1080 30FPS, supports ADAS
Loop Recording — Off/ 1min (Default)/ 2min / 3min
Set the length of each loop recording segment (1, 2, or 3 minutes).
When enabled, the dash cam continuously records by
automatically overwriting the oldest files once the memory card is
full.
If set to Off, the camera will record in segments up to 5 minutes and
stop when the card is full.
WDR — On(Default)/ Off
Wide Dynamic Range improves image quality in high-contrast
lighting by balancing highlights and shadows.
This helps capture clearer details in both bright and dark areas of
the frame.
Time Lapse record — Off(Default)/ 4-img/second /2-img/second
/1-img/second /1-img/2-sec
Time Lapse mode captures fewer frames per second, creating
high-speed video playback while saving storage space.
For example: 1 image/second = 30 minutes of real time compressed
into a 1-minute video.
Exposure — -2.0 to +2.0 (Default: 0.0 Auto)
Adjust the exposure setting to make your video brighter or darker,
depending on lighting conditions or personal preference.
Record Audio — On (Default) / Off
On: Audio is recorded with video.
Off: Video is recorded without sound.
Stamp — On (Default) / Off
Toggle display of Date, Time, Speed, GPS coordinates, and GEARit
logo on recorded videos.
Parking Mode G-Sensor — 0 (Off) to 9 (High Sensitivity)
Adjust sensitivity for impact detection while parked.
0 (Off): No impact detection
1 (Low): Triggers recording for light taps
5 (Medium) [Default]: Balanced setting for typical use
9 (High): Only records strong impacts, reducing false triggers
Video Recording G-Sensor — 0 (Off) to 9 (High Sensitivity)
Controls impact detection while driving.
0 (Off): No impact-triggered recording
1 (Low): Records minor bumps
5 (Medium) [Default]: Best for regular driving conditions
9 (High): Captures only major incidents, avoiding false recordings
Adjusting the G-Sensor Sensitivity
You can customize the G-sensor sensitivity to ensure only important
incidents are recorded—while ignoring small bumps or vibrations.
The default setting provides a good balance for most situations.
To disable all impact-based recordings (while parked or driving),
set the sensitivity to Off.

-26- -27-
The G-sensor detects motion along three axes:
Vertical (up/down)
Lateral (side-to-side)
Longitudinal (front/back)
When significant movement or impact is detected—like during a
collision—the dash cam automatically begins recording and saves
the footage.
Parking Mode — On / Off (Default)
This mode activates when the dash cam detects motion or impact
while your vehicle is parked.
If the G-sensor senses a jolt or vibration, the camera powers on and
records a 1-minute video.
This video is saved and locked, preventing it from being erased by
Loop Recording. The camera then shuts off again automatically.
On your next drive, you’ll hear:
“Parking mode was activated while you were away.”
This means footage was captured while you were gone—check the
Event folder to view it.
24HR Auto Parking Mode Options
Off (Default) / Time-Lapse 1fps + G-Sensor / Motion Detection +
G-Sensor / Auto Turn Off + G-Sensor
These modes offer different recording behaviors while parked:
Time-Lapse + G-Sensor: Records at 1 frame per second, switches to
full recording after an impact.
Motion Detection + G-Sensor: Records only when motion is detected
or impact occurs.
Auto Turn Off + G-Sensor: Camera stays off until a strong impact
wakes it.
Important Note
These features require a 3-lead Hardwire Kit (not included). If using a car charger,
a pop-up will appear saying: “This feature will NOT work unless you install the
recommended 3-lead hardwire kit.”
Hardwire Kit Connection Prompt
If prompted with “Kit connected?”, select “YES.”
If the kit isn’t detected, a message will appear:
“Hardwire kit NOT detected. Please connect the 3-lead hardwire kit.”
Tap “YES” again to return to the menu.
The 24HR Auto Parking Mode requires the 3-lead Hardwire Kit (sold
separately) for proper operation.
Time-Lapse 1fps + G-Sensor
With this mode ON and the hardwire kit installed: Turning off the
engine switches the dash cam to 1fps time-lapse mode.
If impact is detected, it records a 1-minute full video, saves it, and
resumes time-lapse.
Motion Detection + G-Sensor
When active with the hardwire kit: The camera goes into motion
detection mode with the screen off.
It records when movement is detected.
If an impact occurs, it saves a 1-minute clip to the events folder and
returns to standby.
Voice alert: “Parking mode was activated while you were away.”
When you start your vehicle again, the camera exits either mode
and resumes normal recording.
Auto Turn Off + G-Sensor
When the engine is off, the dash cam enters impact-only mode and
powers down.
It powers on if an impact is detected and records a 1-minute video.

-28- -29-
8. System Settings
ADAS Intelligent Driving Assistance — Off (Default) / CA / FCW / SNG /
LDWS
ADAS (Advanced Driver Assistance Systems) enhances driving
safety by providing real-time alerts using computer vision and AI.
Features include:
• LDWS: Lane Departure Warning
• FCW: Forward Collision Warning
• SNG: Front Vehicle Start-up Alert
• CA: Pedestrian Collision Warning (only works within the front
camera’s 90° field of view)
📌
Refer to page 40 for ADAS calibration steps.
WiFi — On / Off (Default)
When enabled, the screen displays the dash cam WiFi name:
GEARit-V620_**** | Password: 12345678**
• Keep your phone within 10 ft (3 meters) for a stable connection.
• Use the GEARit app to preview live video and access settings.
📌
While in WiFi mode, dashcam buttons are disabled. To exit, press
and hold the center (emergency) button.
Voice Control — On (Default) / Off
English voice commands supported:
• Turn on/off WiFi
• Take picture
• Lock the video
• Turn on/off audio
• Turn on/off screen
• Show front/rear camera
Hide Status Icons — Off (Default) / 1 min / 3 min / 5 min
Temporarily hides on-screen icons to provide a cleaner full-screen
display:
• Off: Icons always visible
• 1, 3, 5 min: Icons disappear after selected idle time
Speed Unit — KMH / MPH (Default)
Select your preferred unit for displaying vehicle speed.
Live Speed — On (Default) / Off
Enable or disable the live speed overlay on the LCD screen during
driving.
Rotate Front Video — On / Off (Default)
• Off: Front camera records in the standard orientation.
• On: Inverts the video if the camera is installed upside down or in a
non-standard position.
Rotate Rear Video — On / Off (Default)
• Off: Rear camera records in standard upright orientation.
• On: Flips the rear camera video vertically, useful for custom
mounting angles.
Mirror Rear Video — On (Default) / Off
• On: Horizontally mirrors the rear camera view to simulate a
rearview mirror.
• Off: Displays the actual rear view without mirroring.

-30- -31-
Date / Time Setup
Press the [M] button to cycle between fields. Use [UP] and [DOWN] to
set the correct time, then press [OK] to confirm.
Clock Format — 24 Hours / 12 Hours (Default)
Choose your preferred time display format:
• 24 Hours: Displays time from 00:00 to 23:59 (commonly used
globally and in military time).
• 12 Hours: Displays time with AM/PM, from 12:00 AM to 11:59 PM.
Date Format — yyyy/mm/dd, mm/dd/yyyy (Default), dd/mm/yyyy
Select the date format that matches your regional or personal
preference.
Screen Saver Settings
• Live Video Always On (Default): The screen continuously displays
the live recording view.
• Screen Saver ON After 1 Minute: After 1 minute of no operation, the
screen shows only time and live speed.
• LCD OFF After 1 Minute: The screen turns off after 1 minute of
inactivity, but recording continues in the background.
Speaker Volume — Low / Medium (Default) / High
Adjusts the loudness of audio playback from recorded videos.
Beep Sound — On (Default) / Off
Toggle the key tone that plays when buttons are pressed.
Voice Guidance — On (Default) / Off
• On: Enables spoken alerts and status updates from the dash
cam.
• Off: Mutes all voice notifications for a quieter experience.
Boot Up Tone ― On (Default)/ Off
• On: A tone sounds when the dash cam powers on.
• Off: Disables startup sound for silent operation.

-32- -33-
Language — English (Default) / Others
Choose your preferred system language. Available options include:
English, French, Spanish, Portuguese, German, Italian, Simplified
Chinese, Traditional Chinese, Japanese, Russian, and more.
License Plate Setup
Set your license plate number for watermarking.
• Use Up/Down to select characters
• Press [M] to confirm each character
• Press [OK] to save
GPS Info
View real-time GPS data, including:
• Satellite count
• Speed
• Direction
• Time
• Longitude / Latitude
GPS Format — Decimal Degrees / Degrees, Minutes, Seconds
(Default)
Select your preferred format for GPS coordinate display.
Frequency — 50Hz / 60Hz (Default)
Set the video frequency to match your local electrical standard to
reduce flickering:
• 50Hz – UK, Europe, Africa, Asia, Australia
• 60Hz – North America, most of South America, parts of Japan
GPS Time Zone Setting — UTC/GMT+1 to UTC/GMT+12 & UTC/GMT-1 to
UTC/GMT-12 / Default: GMT-7
Use the time zone setting to make sure your dash cam’s timestamps
match your local time.
• Available Range: From UTC/GMT-12 to UTC/GMT+12
• Default Setting: GMT-7
To Set Your Time Zone:
1. Go to the Time Zone option in GPS or time settings.
2. Select your region’s UTC offset.
3.Press OK to confirm.
⚠
Time zone does not auto-update for daylight savings. Adjust
manually as needed.
Setting the correct time zone ensures your dash cam’s recordings
reflect the actual time of events—crucial for accurate records.
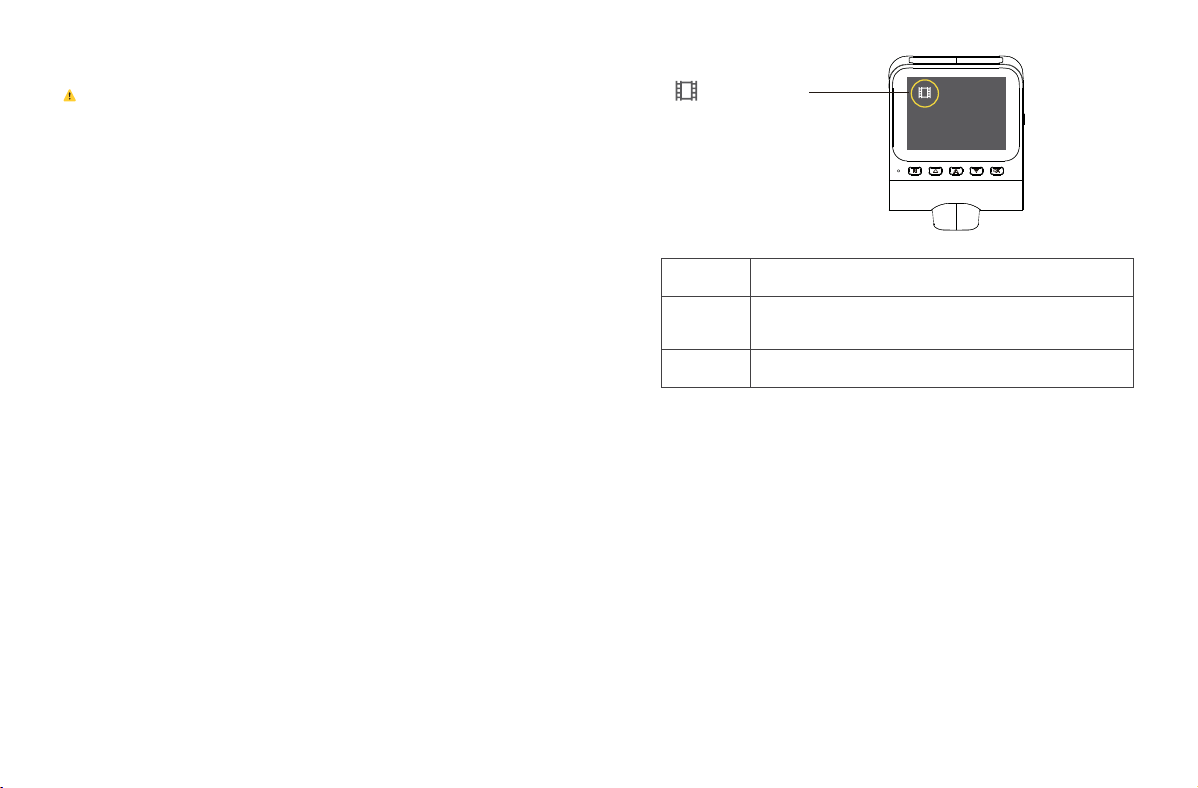
Storage Space — Total / Free / Event / Normal / Photo
You can check memory card usage under this setting.
For best performance, format the memory card regularly to keep
enough free space available.
-34- -35-
Delete Current (Default) / Delete All
Lock Current (Default) / Unlock Current / Lock All /
Unlock All
2 Seconds (Default) / 5 Seconds / 8 Seconds
Delete
Playback Mode
Protect
Slide Show
Format — Cancel / Format
Use this option to format the inserted memory card.
⚠
All data will be erased.
We recommend formatting the card in the dash cam before first
use.
Default Setting — Cancel / OK
Restores all dash cam settings to their original factory defaults.
Firmware Version
Displays the currently installed firmware version.
Check this before updating to ensure you’re using the latest version.
For firmware updates, visit: www.GEARit.com
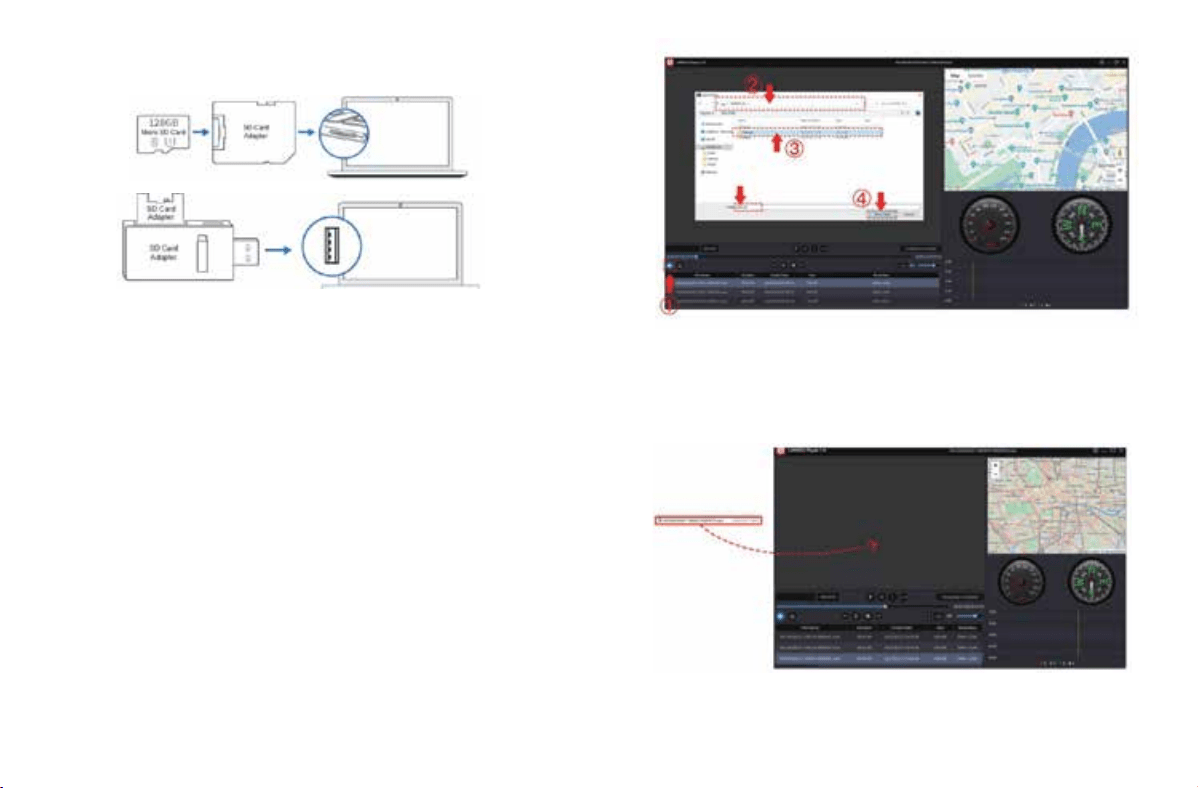
Option B:
Select ‘My Computer’, locate the memory card disk, and choose the
video file you want to play. You can also drag and drop the file
directly into the player, where you’ll be able to view the GPS
information.
9. Playing Video Files Using Your Computer
-36- -37-
The G-sensor detects motion along three axes:
Vertical (up/down)
Lateral (side-to-side)
Longitudinal (front/back)
When significant movement or impact is detected—like during a
collision—the dash cam automatically begins recording and saves
the footage.
Parking Mode — On / Off (Default)
This mode activates when the dash cam detects motion or impact
while your vehicle is parked.
If the G-sensor senses a jolt or vibration, the camera powers on and
records a 1-minute video.
This video is saved and locked, preventing it from being erased by
Loop Recording. The camera then shuts off again automatically.
On your next drive, you’ll hear:
“Parking mode was activated while you were away.”
This means footage was captured while you were gone—check the
Event folder to view it.
24HR Auto Parking Mode Options
Off (Default) / Time-Lapse 1fps + G-Sensor / Motion Detection +
G-Sensor / Auto Turn Off + G-Sensor
These modes offer different recording behaviors while parked:
Time-Lapse + G-Sensor: Records at 1 frame per second, switches to
full recording after an impact.
Motion Detection + G-Sensor: Records only when motion is detected
or impact occurs.
Auto Turn Off + G-Sensor: Camera stays off until a strong impact
wakes it.
Important Note
These features require a 3-lead Hardwire Kit (not included). If using a car charger,
a pop-up will appear saying: “This feature will NOT work unless you install the
recommended 3-lead hardwire kit.”
1. Remove the microSD card from your dash cam.
2. Insert it into a microSD card reader (not included) and connect to
your computer.
3.Download the GEARit GPS Player from:
www.GEARit.com > Support > Downloads
4.Install the player. (If prompted by antivirus software, you can
safely proceed — the file is secure.)
5.In the player, click “Open Files” to browse the media or Lock folder
on the card.
• You’ll see all available videos, events, and photos.
• You can also drag and drop video files directly into the player
window.
Two Ways to Play Files:
Option A:
Click the File > Open icon
Select one folder to view
Note: You can only play videos from one folder at a time.
-38- -39-
10. Firmware Update
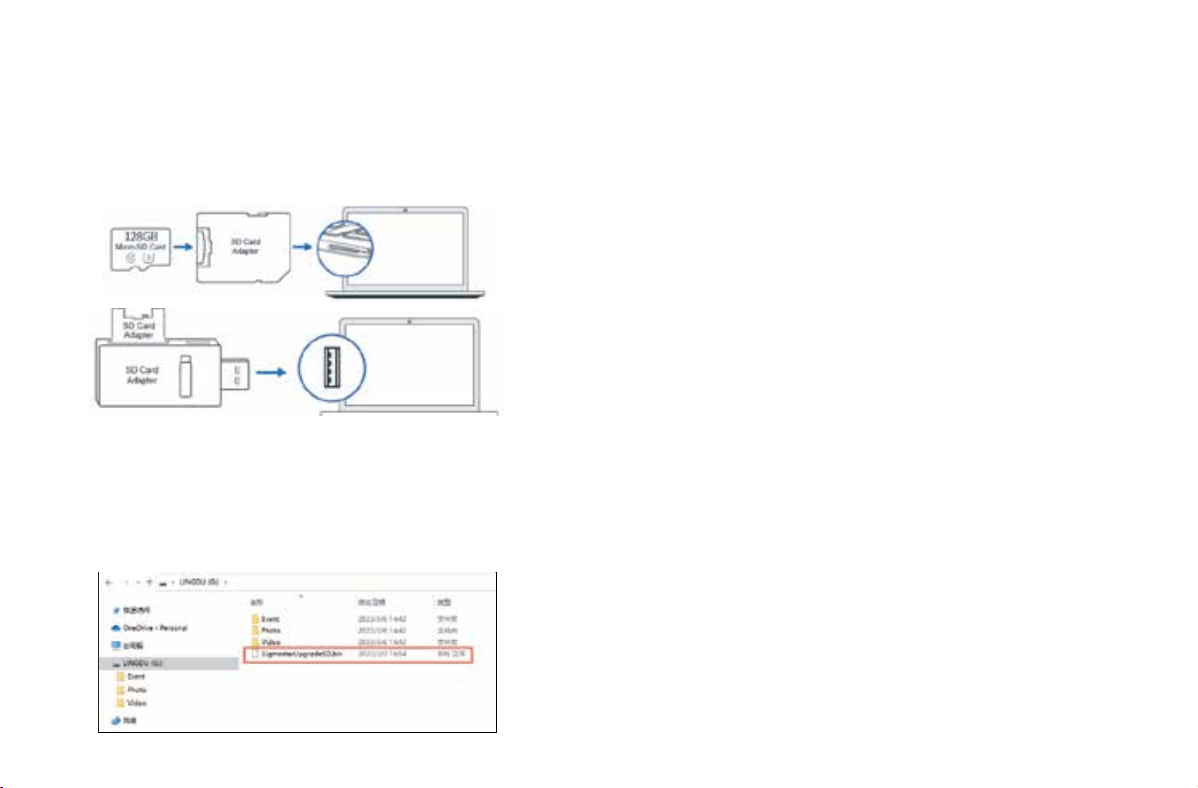
1. First, format your microSD card using your dash cam. The
formatting process may take about 10-30 seconds.
2. Remove the microSD card from the dash cam.
3.Insert the card into a microSD card reader and connect it to your
computer.
4.Download the latest GEARit firmware from www.GEARit.com >
Support > Downloads to your computer.
5.Unzip the downloaded firmware (zip file) and copy the firmware
file “SigmastarUpgradeSD.bin” to the root directory of the microSD
card.
6.Connect the camera to the car charger to begin the firmware
update process. You will see the upgrade progress bar, and the
red light will turn solid, indicating that your GEARit dash camera is
updating the firmware.
Note: The firmware update may take up to 1 minute, so please be
patient. Ensure the power stays connected throughout the update.
Once the firmware is updated, the camera will automatically turn
on. Afterward, format your microSD card again using your dash
cam.
7. To check the latest firmware version, go to the menu > Firmware
Version.
-40- -41-
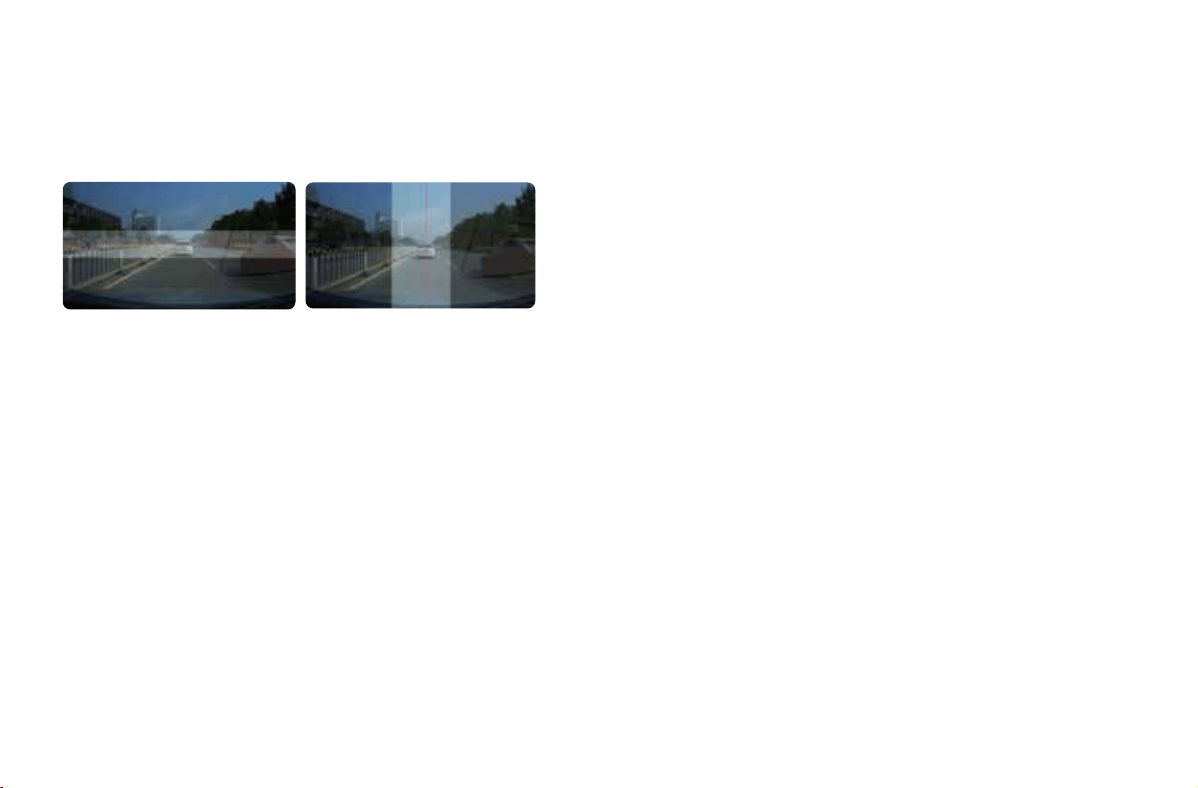
11. ADAS Intelligent Driving Assistance Calibration
The ADAS features include Lane Departure Warning, Forward
Collision Warning, Front Vehicle Start-up Warning, and Pedestrian
Collision Warning.
ADAS Calibration Procedure:
1. Install the device following the “Installation Guide” in the manual.
It is recommended to install it in the suggested location.
2. Adjust the dash cam angle.
3.Press the function key twice in quick succession to activate ADAS.
4.When the calibration conditions are met, the dash cam will
provide a voice prompt: “Calibration of driving assistance begins.”
5.Once the calibration is successful, the dash cam will give a voice
prompt: “Driving assistance calibration successful.”
Calibration Start Conditions
Both of the following conditions must be met:
1. Road conditions: Clear road lines on both sides of the vehicle
ahead, with partial recognition of the vehicle’s front.
2. Vehicle speed: A dashboard speed of 20 MPH (35 kmh) or above.
Note: If both road conditions and speed are not met
simultaneously, the dash cam will not provide a voice prompt to
start calibration.
Calibration Success Conditions
1. When road conditions and vehicle speed are met simultaneously
and maintained for 5 minutes, the dash cam will prompt:
“Calibration successful.”
2. If there is traffic congestion or poor road conditions, the
calibration time may be extended.
Calibration Failure Conditions
If road conditions and vehicle speed are not met simultaneously
and the calibration time exceeds 30 minutes, the dash cam will
provide a voice prompt: “Driving assistance calibration failed,
please recalibrate according to the requirements.”
Calibration Failure Procedure
Recalibrate following the “Calibration Start Conditions” or adjust the
installation position and angle of the dash cam before attempting
to recalibrate.
Note: Generally, the accuracy of ADAS functions can exceed 90%, but
it may be affected by various factors such as weather, road
conditions, and the surrounding environment. Always remain
vigilant and pay close attention to road conditions when using ADAS
functions to ensure driving safety.
Important: The pedestrian collision warning function only applies to
the 90° field of view of the front camera.

-42- -43-
12. FAQ
Q: Camera Does Not Turn ON?
1. Try Different Power Sources:
• Use a different USB cable and your smartphone’s USB charger.
• Plug it into a 110V wall outlet at your home.
2. Check the Camera’s Response:
• Once plugged in, the camera should automatically turn on. If it
doesn’t, press the Power button once to see if that turns it on.
• there is still no response, try removing the memory card from
the camera.
3.Use the Reset Function:
• With the camera still plugged in, use a pen tip or paperclip to
press the RESET button (located at the top) once.
• The camera should now turn on. If it does not, please CONTACT
US for further assistance.
Q: Camera Displays “Memory Error” or “Please Insert Micro SD
Card”?
1. Confirm Micro SD Card Specifications:
• Ensure that the Micro SD card is at least Class 10, U3.
2. Reinstall the Micro SD Card:
• Power off the camera and carefully remove the Micro SD card.
• Check the card for any physical damage or dirt.
• Reinsert the card firmly into the slot, ensuring it is properly
seated.
3.Format the Micro SD Card:
• If the card is not recognized, format the card in the camera (if
possible) or use a computer.
• Remember to back up any important data before formatting, as
this will erase all content on the card.
4.Firmware Check:
• Ensure your camera has the latest firmware, as this can
sometimes resolve compatibility issues with memory cards.
Q: Video is Fuzzy?
• Clean the Lens: Make sure the camera’s lens and windshield are
free of dirt, grease, or smudges.
• Check for Defects: If the lens still appears out of focus after
cleaning, it could be a manufacturing defect. Please contact
support with a screenshot or sample video for assistance.
Q: Why Does the Dash Cam Get HOT?
• Normal Operation: It’s normal for the camera to feel warm to the
touch. The operating temperature range is -4°F to 158°F (-20°C to
+70°C). If the camera feels excessively hot, stop using it and
contact support.
Q: Why Does the Dash Cam Turn On/Off Automatically?
• Reset and Update Firmware: Try resetting the dash cam and
updating the firmware. If the issue persists, please reach out to
customer support for further assistance.
• If these steps don’t resolve the issue, the problem could lie with
the microSD card or the camera’s card reader. Try using a
different microSD card or contact customer support for
additional help.

-44-
Q: Date/Time Always Changes?
• Adjust Time Zone: Go to the camera’s system settings and select
the correct time zone. The date and time will automatically
update once a GPS signal is acquired.
Q: Oldest Video Files Missing?
• Loop Recording Feature: Your GEARit Dash Cam uses Loop
Recording. When set to 1, 2, or 3-minute intervals, the camera will
automatically overwrite the oldest video files once the memory
card is full. This allows continuous recording without the need for
manual deletion.
Q: Why is Video Playback Lagging on PC?
• High Bitrate Files: Laggy playback may be due to high-bitrate
video files that your PC can’t process smoothly. To improve
playback performance, try recording at a lower resolution to
reduce file size and bitrate.
Format — Cancel / Format
Use this option to format the inserted memory card.
⚠
All data will be erased.
We recommend formatting the card in the dash cam before first
use.
Default Setting — Cancel / OK
Restores all dash cam settings to their original factory defaults.
Firmware Version
Displays the currently installed firmware version.
Check this before updating to ensure you’re using the latest version.
For firmware updates, visit: www.GEARit.com
GEARit LIMITED WARRANTY
Warranty Coverage:
We stand behind our products with confidence, offering warranties
designed to give you peace of mind and a worry-free experience. Our
commitment covers most GEARit products with specific warranty periods
based on product type such as cables, cases, wall chargers, and more.
Either way, you’re protected from defects in materials and workmanship.
• Consumer Products: 24 Months
30-Day Money-Back Guarantee:
You may return undamaged products within 30 days for a full refund.
Products must include all accessories and original packaging. Shipping
costs for non-quality-related returns are the responsibility of the buyer.
Replacement Warranty:
If a defect arises within the warranty period, GEARit will repair, replace, or
issue a credit for the product. Repaired or replacement products are
covered for 90 days or the remainder of the original warranty, whichever is
longer.
Need Assistance?
For more information or to file a warranty claim, please visit GEARit's
Warranty Support.
(https://www.gearit.com/pages/warranty-information)
(866) 686-1800
Mon – Fri: 9:00 AM – 5:30 PM (PST)
www.gearit.com