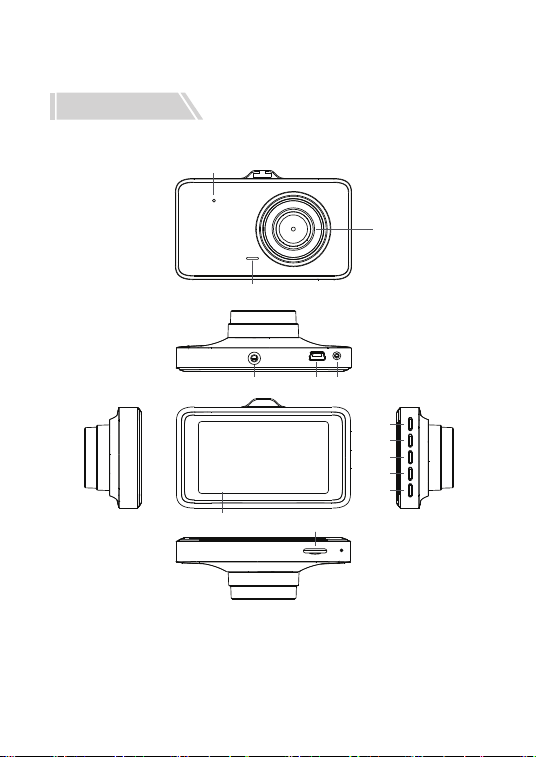
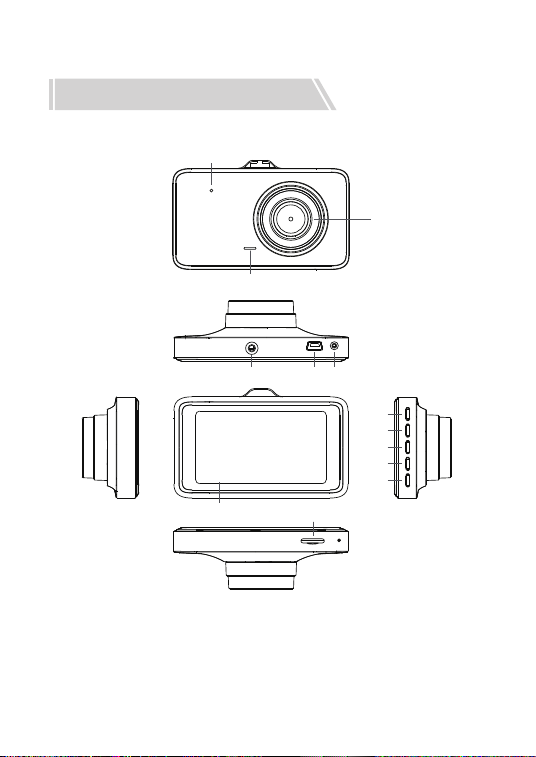
2.USB数据接口
5.向上选择按钮
8.菜单键按钮
11.RESET
3.后拉摄像头接口
6.OK键/电源开关按钮
9.LCD屏
12.镜头
1.背夹固定钩
4.模式选择按钮
7.向下选择按钮
10.TF卡槽
13.喇叭
产品结构
产品说明:
产品说明书
10
2
12
13
11
31
9
4
5
6
7
8

1)背夹固定钩
安装固定录影仪
2)USB数据接口
USB数据接口,①用于连接PC传输数据;②用于连接外接电源给电池
充电或提供工作电源。
3)后拉摄像头接口
4)模式选择按钮/MODE
短按此键在摄像/拍照/回放之间相互切换。
5)向上选择按钮
菜单选项中,向下选择功能键。
6)OK键/录像和拍照确认按钮/电源开关键
摄像模式下,短按此键开始录像,再次短按停止录像;拍照模式下短
按此键拍摄照片;菜单模式下为确认按钮;/ 短按开机;长按关机。
7)向下选择按钮
菜单选项中,向下选择功能键。
8)模式选择按钮/菜单按钮
短按此键在摄像/拍照/回放之间相互切换。
9)LCD屏
图像显示屏
10)TF卡槽
存储卡插槽
11)RESET
当机重启恢复孔
12)镜头
取景窗口
13)喇叭
播放视频或者有声文件的扩音孔,操作音提醒。
按键功能说明:
开机与关机
按压 电源钮一次开机,蓝色指示灯会在开机时亮起;
再次按压 电源钮是关机,此时蓝色指示灯熄灭;
注意:录像仪在低电量时会提示电池电压低后自动关机。
摄像模式
短按MODE键,切换到摄像模式,屏幕左上角显示摄像图标;
短按OK键开始摄像,摄像图标会出现闪动红点,标明录像工作中;
拍照模式
短按MODE键,切换到拍照模式,屏幕左上角显示拍照图标;
短按OK键拍照,拍照时屏幕闪烁一次,表示拍照完成。
视频/照片回放
短按MODE键,切换到回放模式,屏幕左上角显示回放图标;
短按 键可以向上选择文件;
短按 键可以向下选择文件;
短按OK键播放选择的视频文件;
自动开/关机
支持连接车载电源后,汽车启动自动开机录像,熄火自动保存录像并
关机;
不漏秒
移动侦测
支持待机状态静止的情况下,前方如果有目标物移动,会自动将其
移动过程全部记录下来。(开启后机器会在没有移动物体的情况下停止
录像,延长录像储存时间)
特别功能说明:
摄像/拍照基本操作说明:
菜单设置
短按菜单键一下,进入视频设定状态,此时“视频图标”的栏位为是
黄色背景;再次短按菜单键,切换到设置状态,此时“设置图标”的栏
位为黄色背景,短按MODE键,退出设定状态。
在调出的设置项中,通过短按 键,可以在设置子项中上下
选择切换,短按OK键进入设置子项;
时间设置
短按菜单键进入设定状态,再次短按菜单键进入设置菜单,通过
键选择日期时间选项,短按OK键进入,短按菜单键,可以在
年/月/日/时/分/秒之间相互切换,通过 调整需要数值,按OK确
认修改。
有三种方法可以对电池充电,红色充电指示灯会在充电的过程中亮
起,整个充电时间大约为180分钟,红色充电指示灯会在充完电后自动
熄灭。
1.使用电源适配器充电
2.使用PC-USB充电
3.使用车载电源充电
USB模式
将USB线与电脑连接,按开机键后,行车记录仪将自动弹出USB菜
单。有以下两种模式可供选择:
1)USB-Disk
在此模式下可进行视频文件或者照片文件的存取。
2)PC摄像头
连接USB数据线(自行购买)选择此模式将弹出USB视频设备,可
进行实时拍照或者视频聊天。
电池充电说明:
备注:当使用此产品因操作不当引起死机现象,可以用尖物体按按复位
键后再开机,即可恢复正常。
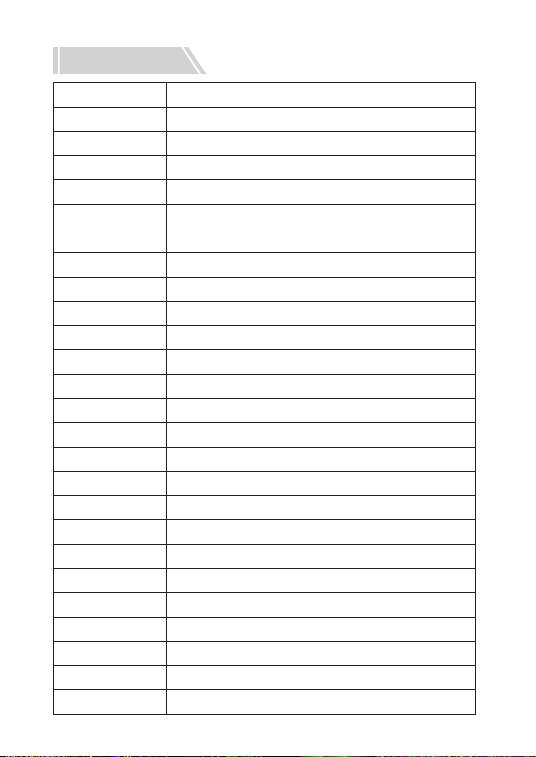
产品规格:
产品名称
产品特点
颜色
显示屏
镜头
文件格式
录像分辨率
录像视频格式
循环录像
随车开关机
移动侦测功能
年月日分
照相模式
照片格式
存储卡
后拉摄像头
停车监控
麦克风
内置音响
视频格式
电流频率
USB功能
电源接口
电池
车载行车记录仪
高清摄像头,高清录像
随机
高清显示屏
170度A+级高解析超广角镜头
俄、日、法、意、德、西、英、中文(简)、
中文(繁)、韩等
AVI
最大1080P
M-JPEG
无缝循环录像,不漏秒
支持汽车打火开机,熄火关机
支持
支持
500万
JPEG
TF (最大支持 32GB)
支持
支持
支持
支持
PAL/NTSC
50HZ/60HZ
1:USB-Disk 2:PC camera
5V 1A
内置电池
语言

在正常操作情况下,如果产品出现问题,请参考一下方法解决:
不能拍照、摄像
检查TF卡是否有足够的空间、是否锁住
录像时,会自动停止
由于高清视频数据巨大,请使用与SDHC相容的高速TF卡,高速TF卡
会有C4或者C6的标识。
重播图片和视频时,出现“档案错误”提示
TF卡存储资料时发生错误,造成档案不全,请使用摄像机“格式化”
功能,重新格式化TF卡。
拍出的影像雾蒙蒙一片
请检查镜头是否有脏物、手指印,在进行拍摄前,使用镜头纸擦拭镜
头。
拍摄天空、水面等场景时,影像非常黑
在大的反差场景中会影响到摄像机的自动曝光功能,可以通过调整机
器设置菜单中的“EV”值进行修正。
在阴天、室內光源下,颜色表现不够完美
请检查机器“白平衡”功能是否设置为自动
图像中有横条纹干扰
这个是由于设置了错误的“光源频率”而产生的,请根据当地的供电
频率,设置为“50Hz”或“60Hz”。
当机
当机后请短按复位键进行恢复重启
解析度:
视频录像分辨率选择,数值越高录像清晰度就越清晰,进去菜单按上
下键选择,按OK键确定选择。
疑难解答:
主菜单详细功能介绍:

拍照质量:
拍照清晰度选择,数值越大拍照的图片越清晰,进去菜单按上下按键
选择,按OK键确定选择。
循环录像:
每段视频录像时间从1分钟到3分钟可选。
白平衡:
用于不同环境下色调选择(建议自动选择,否则会造成颜色失真)。
曝光选择:
用于调整光线进入的明暗,当曝光太高会造成太亮无法识别车牌,建
议选择0。
移动侦测:
打开移动后会增加录像卡的循环录像储存时间,当没有录像的情况下,
录像机会侦测是否有移动物体,当发现移动物体时会自动启动录像。
录像声音:
可以选择是否录制声音,当录像回放没有声音时查看此选项是否打钩。
停车监控:
用于车辆关闭钥匙后,车辆发生震动(重力感应功能配合使用),自
动开机录像,此功能。
需要电池有电的情况下,或者连接降压线直接接入车辆电瓶后此功能
才能有效使用。
WDR:
夜视功能开启关闭,当打开时摄像机检测到光线过暗时,会自动开启
补光模式,画面会增加亮度,(注:此功能在室内开启时有明显亮暗变
化时,屏幕亮度会忽亮忽暗,亮度增加时会影响白天的影响清晰度),
建议白天关闭此功能。
时间水印:
电脑回放录像画面有时间显示
重力感应:
此功能选项有高、中、低功能。

1.当行车时车辆发生剧烈撞击时,影响会加锁,不会被自动循环录像
所删除,(此功能如果开支灵敏度过高会才造成储存卡满,如发现储存卡
总是提示储存卡已满请格式化储存卡后设置此选项为底,建议关闭。)
2.停车监控功能需要此功能打开,当机器有收到震动后机器会自动开
机录像,录像18-20秒后自动关机。
按键声音:
按键声音选择
时间日期:
选择输入时间日期(当电池电量耗尽时会恢复出厂设置时间)需要重
新设置。
自动关机:
当录像机没有录像卡时或者没有录像时,会在所选时间自动关机。
语言选择:
设置所需国家语言文字
光源频率:
此功能默认值50Hz
补光灯:
开启LED灯功能(此功能带有LED灯的产品)
屏幕保护:
开启此功能后录像机会在设置时间内关闭屏幕背光,机器录像功能正常。
格式化:
储存卡格式化(建议在15天左右格式化一次)当被锁视频过多时储存
卡满后用于一次性删除卡内录像内容。
恢复出厂设置:
当设置出现错乱时可以选择出厂设置,用于设置错乱时操作此选项。
固件版本:
工厂生产批次标号
注意:当有重要内容是注意使用此功能。
Product Structure
Product Description:
Product Manual
2. USB data interface
4. Mode selection key
6. OK key / power supply key
8. Menu button
10. TF card slot
12. Lens
1. Back clip fixation hook
3. Rear pull camera interface
5. Upward selection button
7. Down select button
9. LCD screen
11. RESET
13. Horn
10
2
12
13
11
31
9
4
5
6
7
8

1. Back clip fixation hook
Fixed video recording instrument.
2. USB data interface
USB data interface, which is used to
connect the PC transmission data; II is used
to connect the external power supply to the
battery charge or provide work power.
3. Rear pull camera interface
4. Mode selection key
Press this key to switch between camera /
photo / playback.
5. Upward selection button
Menu options, down regulation function
keys.
6. OK key / power supply key
Short press on / off;
Video and photo confirmation button, video
mode, press this button to start the video,
press the video button again to stop the
video; press this button to shoot photos.
7. Down select button
Menu option, down select the function key.
Function Buttons:

8. Menu button
Press this key to call up the menu
Menu mode for confirmation.
9. LCD screen
Image display
10. TF card slot
Memory card slot
11. RESET
Restart recovery hole.
12. Lens
Viewing window.
13. Horn
Play video or sound amplification hole files,
operating sound warning.

Automatic ON/OFF
The camera can automatically starts
recording when connected to the vehicle
power and stops recording with autosave
after the car is stalled.
Loop recording without leakage
seconds
Motion Detection
In standby mode,if there is any movement
in front of the camera,it will automatically
record the whole moving process. The
camera will stop recording when there is no
more movement.
Power-on and shutdown
Press the power button, the blue indicator
will light up when the camera switches on.
Press the power button again to turn off the
camera and the blue indicator will be off.
Special Function Description:
Video/Photo Operation Instruction:
Please NOTE: In low power state, the
video camera will be automatically shut
down after it displays low battery voltage.

Video Mode
Short press the MODE button, switch to the
Video Mode , the camera icon is displayed
on the screen upper left corner.
Short press the OK button to start recording
video,the camera icon will flashing in red
dot to show video recording.
Photo Mode
Short press the MODE button,switch to the
photo mode,the Photo icon is displayed on
the screen upper left corner.
Press the OK button to take a picture,the
screen will flash once when it finished.
Video/Photo Playback
Short press the MODE button,switch to the
playback mode,the playback icon is
displayed on the screen upper left corner.
Short press to select the file up;
Short press to select the file down;
Short press OK button to play the selected
video file.
Menu Setting
Short press the MENU button to enter video
setting, video icon is in the field of the
yellow background;Press the menu button

again,switch to the setting,the setting icon
is in the field of the yellow background,just
short press mode button to exit the setting
status.
In terms of setting up option ,short press to
switch up and down in setting
subitems,short press OK button to enter
setting subitems.
Time/Date Setting
Short pess the MENU button to enter the
setting status, press the menu button again
to enter the setup menu. Press to select
the date and time option, short press the
OK button and short press the menu key,
you can adjust the year / month / day / hour
/ minute / second , press OK button to
confirm the change.
Connect the USB cable to the computer,
pressing the power button, the car camera
recorder will automatically pop up the USB
menu. There are two different modes to
choose as below:
USB MODE

Please NOTE: When improper using this
product and make the camera crash, you
can use a pin to press the Reset button and
then reboot the dash cam.
1: USB-Disk
In this mode, you can save and read video
files or photo files.
2: PC Camera
Connect USB data cable (this kind of cable
is another purchase).Selecting this mode
will pop up USB video device, you can take
photos in real time or have video chat.
There are three ways to charge the battery,
the red indicator will light up in the charging
process, the entire charging process time is
about 180 minutes, the red indicator will be
automatically off when fully charged.
1. Charging via the power adapter
2. Charging via PC-USB
3. Charging via car power supply
Battery charging instructions:
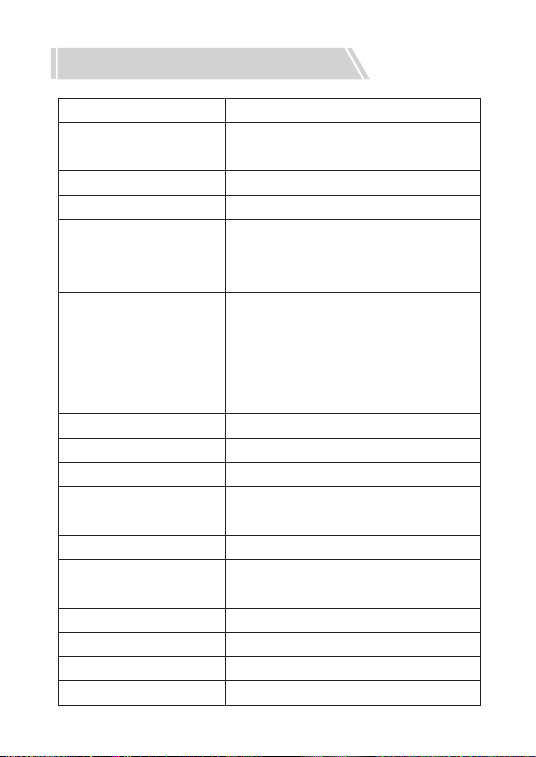
Product Specifications:
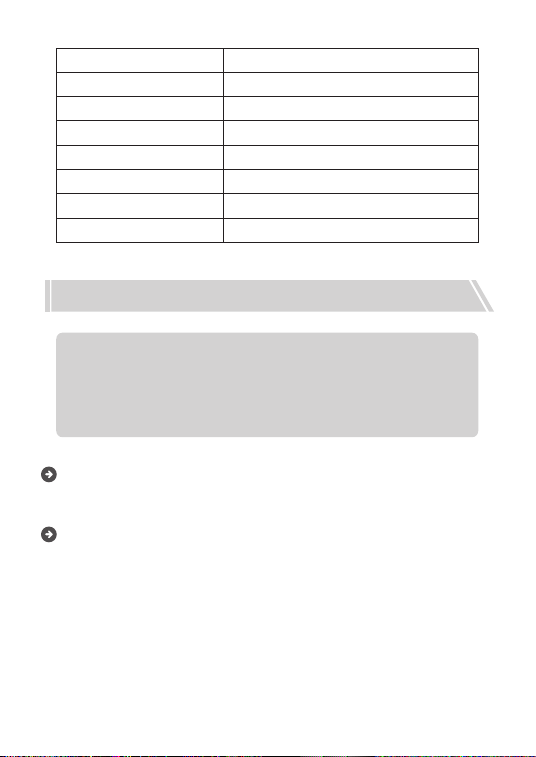
Product name
Colour
Display Screen
File Format
Video Resolution
Video Format
AUTO ON/OFF
Motion Detection
Function
Time/Date
Camera Mode
Photo Format
Storage Card
Car Camera Recorder
HD Camera, HD Video
Recording
Black
HD Display
170 degree A+ Level high
resolution ultra wide angle
lens
Russian,Japanese,French,
Italian,German,Spanish,
English,Chinese(Simplified),
Chinese(Traditional),Korean
and so on
AVI
Maximum 1080P
M-JPEG
Seamless loop recording,
no leakage seconds
Support
Support
5 million
JPEG
TF (maximum support 32GB)
Support
Lens
Product Features
Language
Loop Recording
Troubleshooting Tips and Techniques :
Parking Monitoring
Microphone
Built-in Sound
Video Format
Current Frequency
USB function
Power Interface
Battery
Support
Support
Support
PAL / NTSC
50Hz / 60Hz
1: USB-Disk 2: PC camera
5V 1A
Built-in battery
If there is any problem on the product
in normal use, please refer to these
troubleshooting step to resolve the
problem as below:
Can not take pictures or record video:
Check the TF card storage or if its locked.
The dash cam will automatically stop
when recording:
Because the high-definition video file is
huge,please use high-speed TF card that
compatible with SDHC. High-speed TF card
has C4 or C6 logo.

A "file error" notice appears when play-
back your pictures and videos:
An error occurred while storing data of TF
card and caused that the file incom-
plete.Please use the "Format" function to
reformat the TF card.
Video quality is not clear:
Please check the lens has any dirt or finger
print and use lens paper to wipe the lens
before shooting.
When shooting the sky,water and other
scenes, the image is very dark:
In the contrast scenario,the automatic
exposure feature of the camera cam be
affected which can be modified by adjusting
the values of “EV” in the setting menu.
On cloudy days and indoor lighting, the
color is not perfect:
Please check the white balance if auto.
There’s horizontal stripe interference in
pictures:
This is caused by wrong light source
frequency,please set the frequency 50 Hz

Main menu function introduction:
Resolution:
Different Video recording resolution selec-
tion.The higher resolution value,the more
clear and sharper video quality. Enter the
menu to select up and down button , press
OK to confirm.
Picture Quality:
Different photo clarity selection.The higher
resolution value,the more clear and sharper
picture quality. Enter the menu to select up
and down button , press OK to confirm.
Loop Recording:
You can set it to record from one to three
minutes.
White Balance:
It is used for light adjustment in different
or 60 Hz according to the local power
supply.
Crash:
You can use a pin to press the Reset button
and then reboot the dash cam.

environment(it is recommended to choose
auto,or it may result in color distortion)
Exposure Selection:
It is used to adjust the brightness of the light
in the dark environment.However,when the
exposure is too high, it will be too bright to
recognize the license plate.(Option 0 is
recommended)
Motion Detection:
When you open the motion detection,
camera can record if there is any movement
in front of it and stops when there is not
more movement on front of it. Howev-
er,when you open the motion detection
feature,it will take up more storage of your
SD card and extend the recording storage
time.
Camera Audio:
You can select whether or not to record the
sound.When the video playback is not audi-
ble please check the sound recording
option if selected.
Parking Monitor:
Its used for automatic power on and record-
ing when the car is stalled and vibrates.The
parking monitor can be used when the
battery has enough power or connect the
katallobar to the car battery.
WDR:
Using WDR for night vision.The WDR
(Wide Dynamic Range)automatically adjust
exposure and enhance the brightness of
the image in the low light or in dark environ-
ment.
Time Stamp:
When you use the computer to playback the
video,the time and date will show on the
screen.
G-Sensor:
The G-shock sensitivity can be set to low
medium or high.
1. When the car has intense collision in
driving, the recorded files will be locked and
Please NOTE: this function will affect the
sharpness of the video quality in the day
time when the brightness increases.In the
daytime, if you open WDR indoor,the
screen keeps flickering. (We recommend
you to close this function in the daytime)

not be deleted by loop recording.(If the
G-sensor sensitivity set too high,the
storage card will more easily be filled.If the
SD card always notices no more storage
space,we would recommend to close this
function)
2. The parking monitor function needs to
combine with the G-sensor.The camera will
turn on automatically and start recording
when it feels bump or crash . It will be off
after 18-20 seconds recording.
Key Sound:
Sound selection ON/OFF
Time and Date:
Setting time and date.Once the battery runs
out, the time and date will recover the facto-
ry setting time so you need to reset the time
and date again.
AUTO ON/OFF:
The camera automatically turn off in the
selected time when there’s no SD card or
recording.
Language Selection:
Setting the required language

Light Source Frequency:
The default values is 50Hz
Fill Light:
Turn on the LED function(this product
comes with LED light function)
Screen Saver:
Open this function, the dash cam will turn
off the screen backlight within the selected
time. And the video recording function is
normal.
Format:
Format the memory card (Suggest format
the card once about 15 days). When the
locked video is too large, you can delete all
the videos once. Note: If there are important
videos,please use it carefully.
Restore Factory Settings:
When the setting is error, you can select the
factory settings to recover your system
Firmware version:
Factory products batch label.