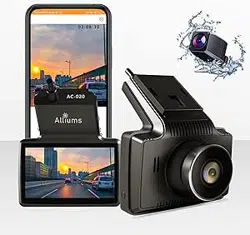
F5
Dual Dash Cam
4K Front and Rear 1080P

Category
Specification
Brand
7Track
Model
F5
Dual Dash Camera
Front Cam 4K Ultra HD (2160P) @30fps +Rear Camera 1080P Full HD
Viewing Angle
Front 170° + Rear 140° Ultra-Wide
Screen Size
3.0 Inch IPS Screen
Video Format
MP4 (H.264 / H.265)
Image Format
JPEG
Working Voltage
DC 5V / 12V / 24V Compatible
Operating Temp.
-20°C ~ 70°C
Storage Support
Free 64GB Micro SD Card Included, Up To 128GB Micro SD Card
(Class 10 Or Above Recommended)
Connectivity
Built-In 2.4GHz WiFi
Night Vision
WDR + Advanced Night Vision Sensors For Enhanced Low-Light Performance
24-Hour Parking
Mode
G-Sensor (Impact Detection), Time-Lapse Recording, Motion Detection
(ACC Cable Required)
Loop Recording
Automatic Overwrite Of Oldest Footage To Enable Continuous Recording
WiFi & App Control
2.4GHz WiFi Connection; Supports Live Preview, Download, And Sharing Via Mobile
App (e.g., Viidure)
Emergency Lock
Auto/Manual File Lock To Prevent Important Videos From Being Overwritten
Audio Recording
Built-In Microphone & Speaker For Clear Audio Capture And Playback
Easy Installation
Includes USB Car Charger And Long Cables For Fast And Convenient Setup
Notice:
Do Not Remove or Insert the Memory Card When The Device is Turned On To Avoid Damaging The Memory Card.
Only Use Micro SD Cards With SDHC Speed Class 10 or Higher and Memory Capacity From 8GB or Higher (up to 128GB).
Please Format the Micro SD Card Before Use.
Please Format the Memory Card Regularly (Recommended Once a Month).
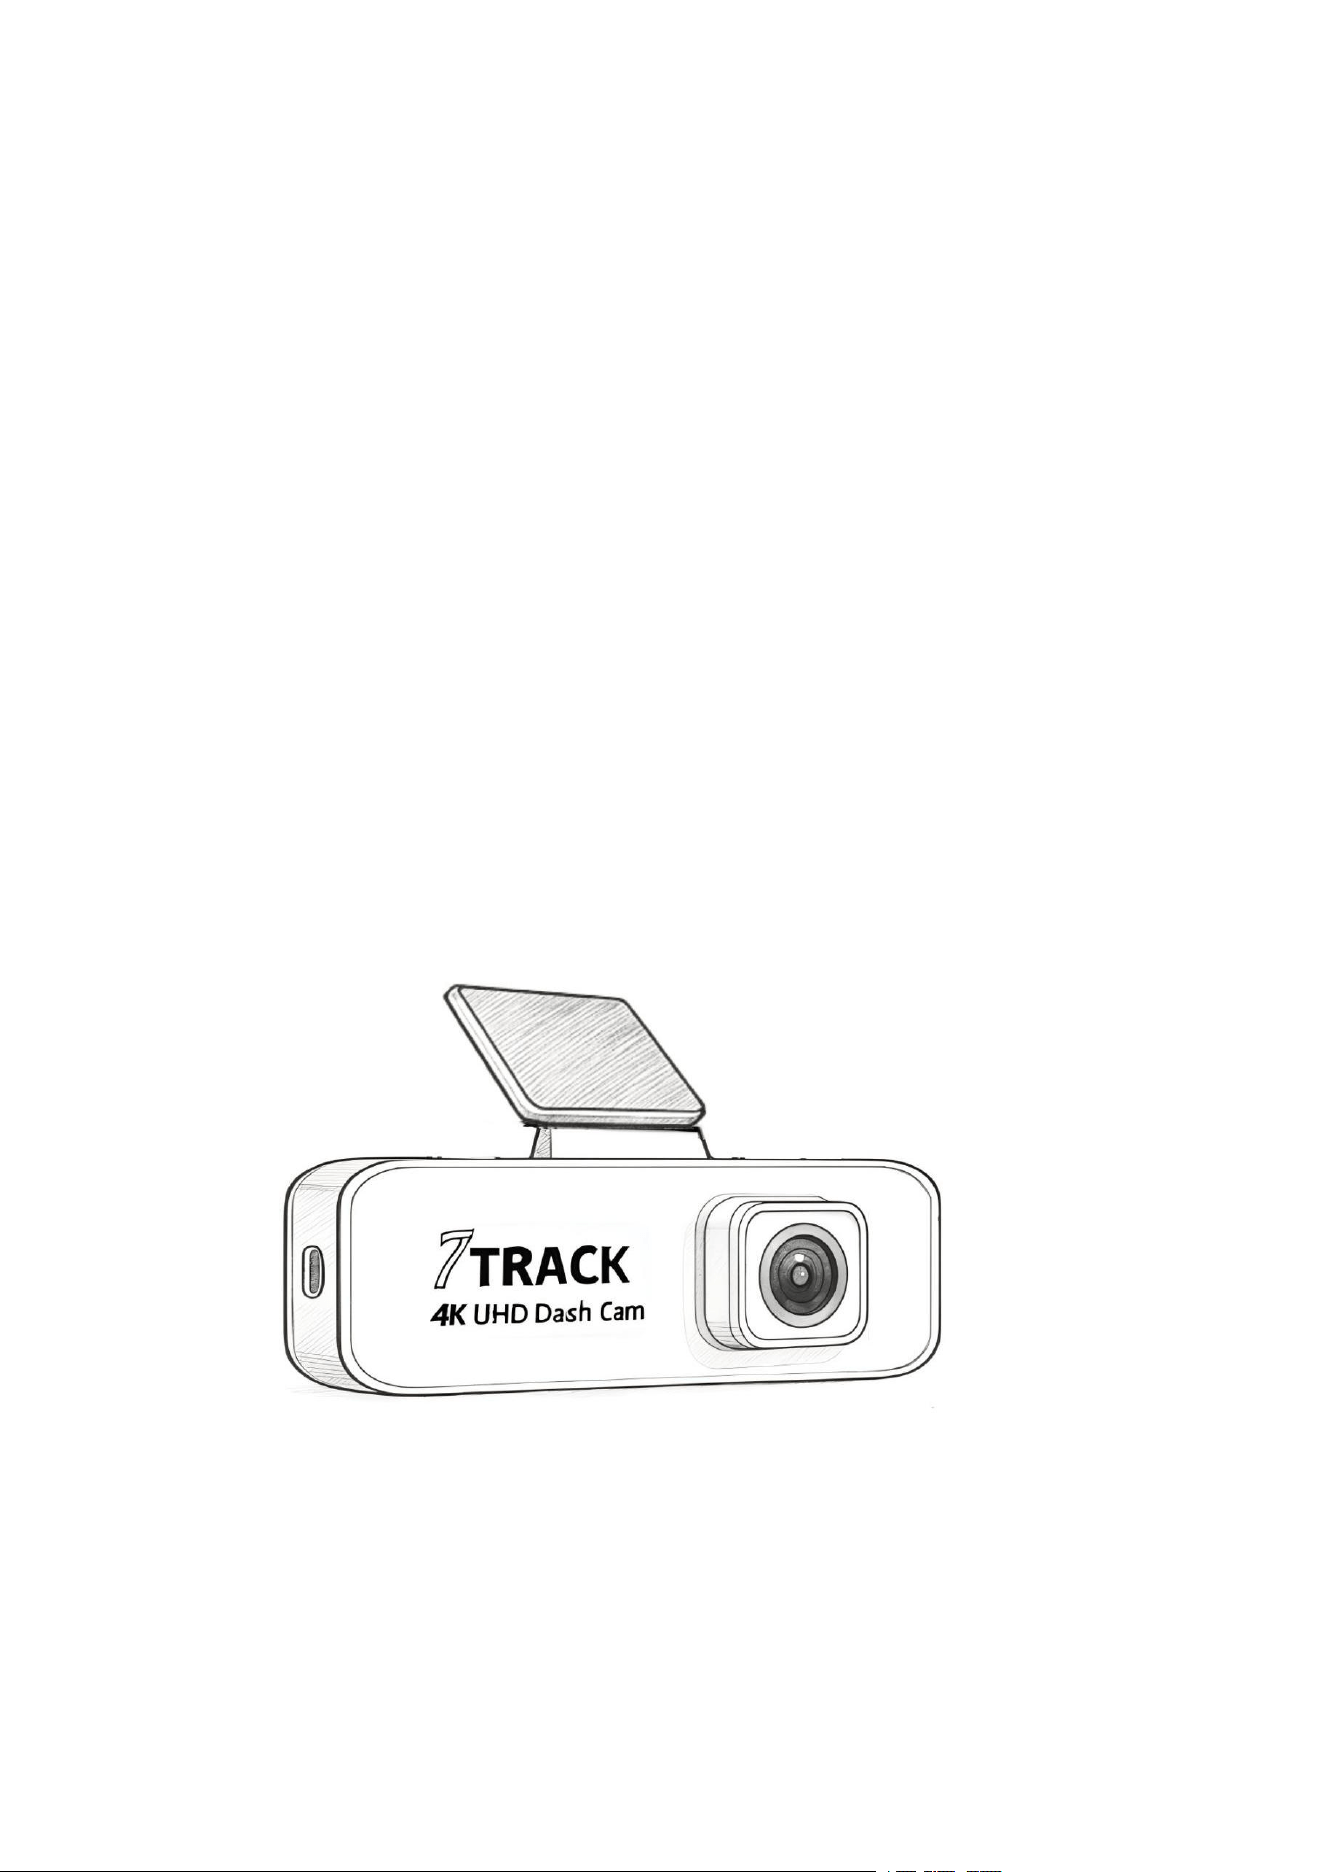
1.
Start-
Up.
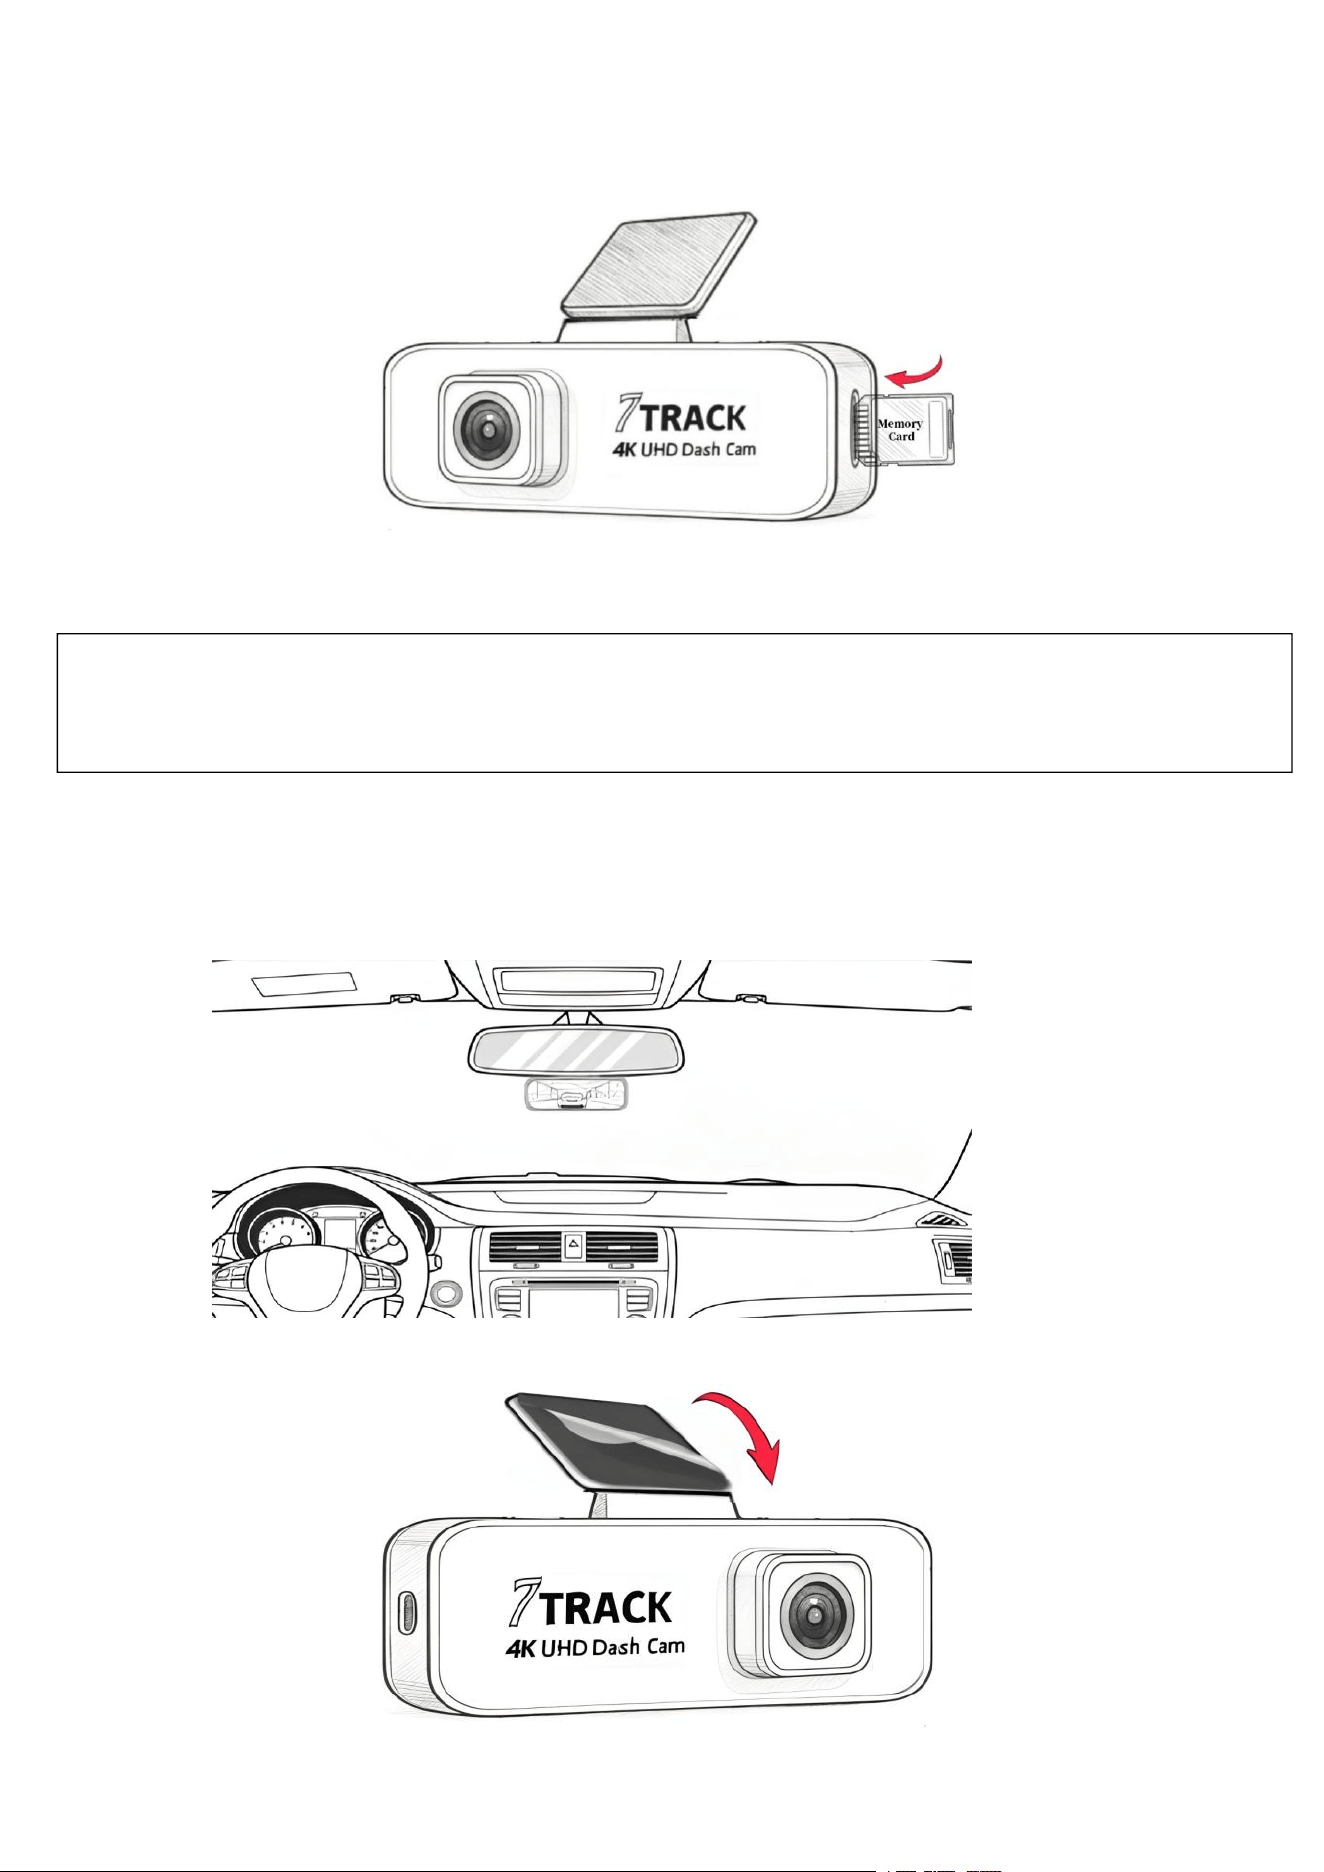
1.1 Use The TF Card : Insert the Memory Card with the Gold Pins Facing Forward and the Device Screen Facing
Forward As Shown in the Picture.
1.2 Take Out the Memory Card:If The Dash Cam is Powered On, Please Turn Off The Power First And Wait For
The Device to Complete The Shutdown Process Before Removing the Memory Card.
2.
Install in the Car.
2.1 Fix the device on the windshield.
Install the static sticker on the windshield in the recommended area shown in the figure below. Please wipe the
glass clean before installation. When installing, please squeeze out the bubbles between the static sticker and
the glass.
2.2 Remove the Release Paper From the Bottom of the Bracket.
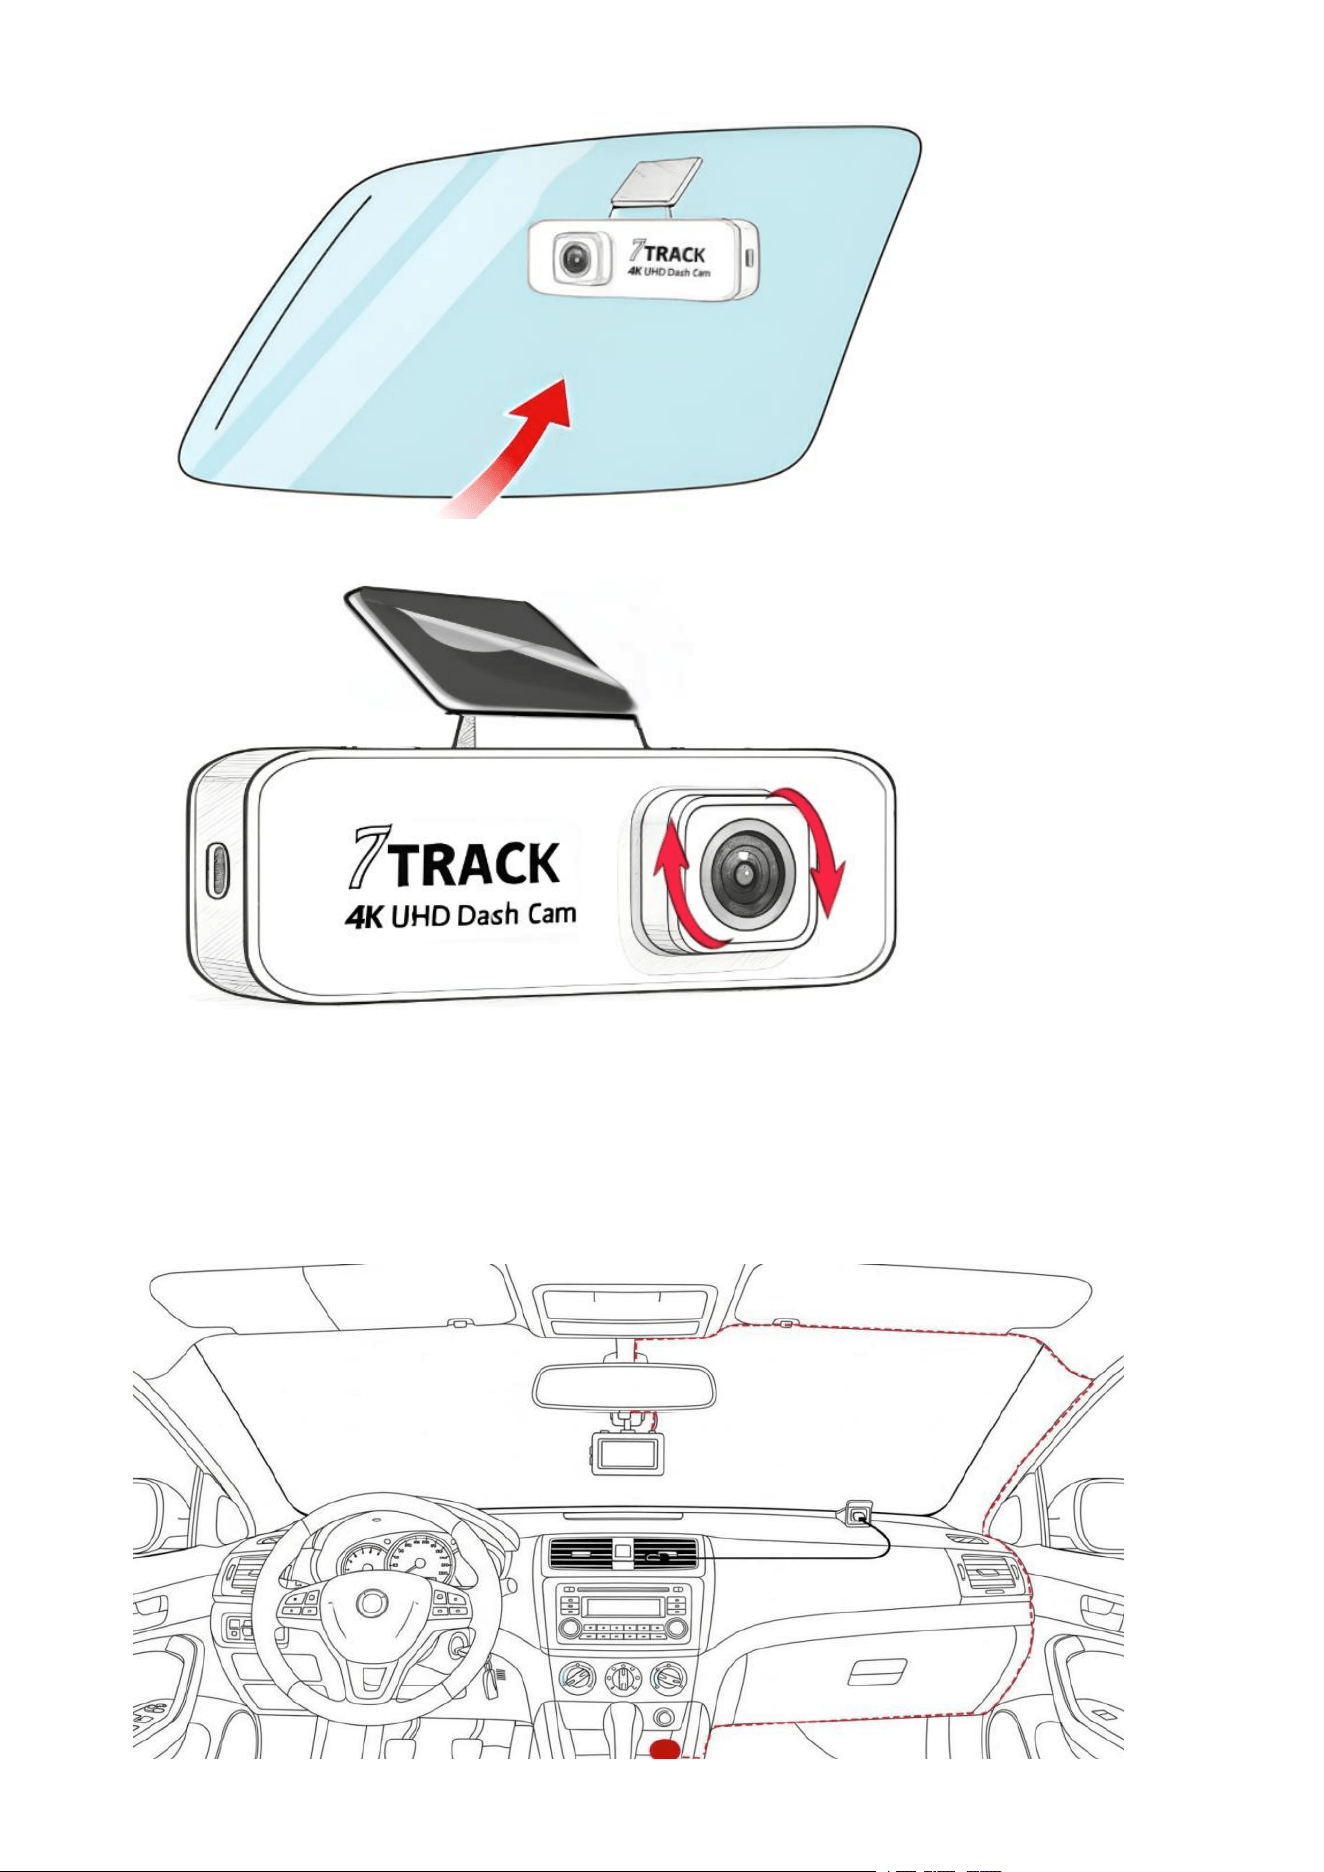
2.3 Stick the Bracket to the Anti-Static Sticker On the Windshield, Press Lightly and Make Sure the Bracket is
Fixed.
2.4 Adjust the Device: Slightly Move the Lens Up and Down to Adjust the Viewing Angle Of the Device.
3.Connecting With the Power.
3.1 Only Use the Power Supply Included In The Product Package to Power The Dash Cam.
1.Connect One End Of The Car Charger To The USB Connector Of The Dash Cam.USB Port Input: DC 5V/2A.
2. Plug the Other End of the Car Charger to the Cigarette Lighter Socket of Your Vehicle. Once the Vehicle
Engine Is Started, the Dash Cam Automatically Powers On. Car Charger Input: DC 12 / 24V.
Note: The Dash Cam Is Built-In With Super Capacitor. When Start The Engine, Please Wait A Few Seconds To
Charge The Dash Cam , And Then It Will Auto Power On And Start Recording.
Note:
1. Some Vehicle Power Supply Would Not Turn On / Off Automatically With The Car Engine Start, If The Dash Cam Cannot
Automatically Power On/Off With The Car Engine, Please Manually Connect The Power Supply With The Vehicle Power, And Then
Power On, Or Manually Power Off The Dash Cam And Then Release The Connector With The Car Power Supply.
2. It Can Be Configured To Save A Video File For Every 1, 2 Or 3 Minutes Of Recording.
3. All The Videos And Photos Are Saved In The Memory Card, If Memory Card Is Full, Loop Recording Will Generally Overwrite
The Oldest Video File.
4. The Dash Cam Is Built-In Super Capacitor. After Start The Car Engine, Please Wait A Few Seconds For Charging The Dash
4.
Powering the Dash Cam On / Off.
4.1 Auto Power On/Off
1. Start The Car Engine, Wait A Few Seconds To Charge The Dash
Cam , And Then Screen Will Light Up And The Dash Cam Will
Automatically Power On And Start Recording.
2. Once The Vehicle Engine Shuts Down, The Dash Cam Automatically
Saves The Recording And Turns Off The Power.
4.2 Manual Power On: Press And Hold The Button 3 Seconds To Turn On And Off.
4.3 Reset: Press The Button 5 Times Quickly To Reset.
5.Using the Car Dash Cam
5.1 Automatic Record
Start The Car Engine, Wait A Few Seconds To Charge The Dash Cam , And Then Screen Will Light Up And The
Dash Cam Will Automatically Power On And Start Recording. Recording Will Automatically Stop When The Engine
is Switched Off.
6.
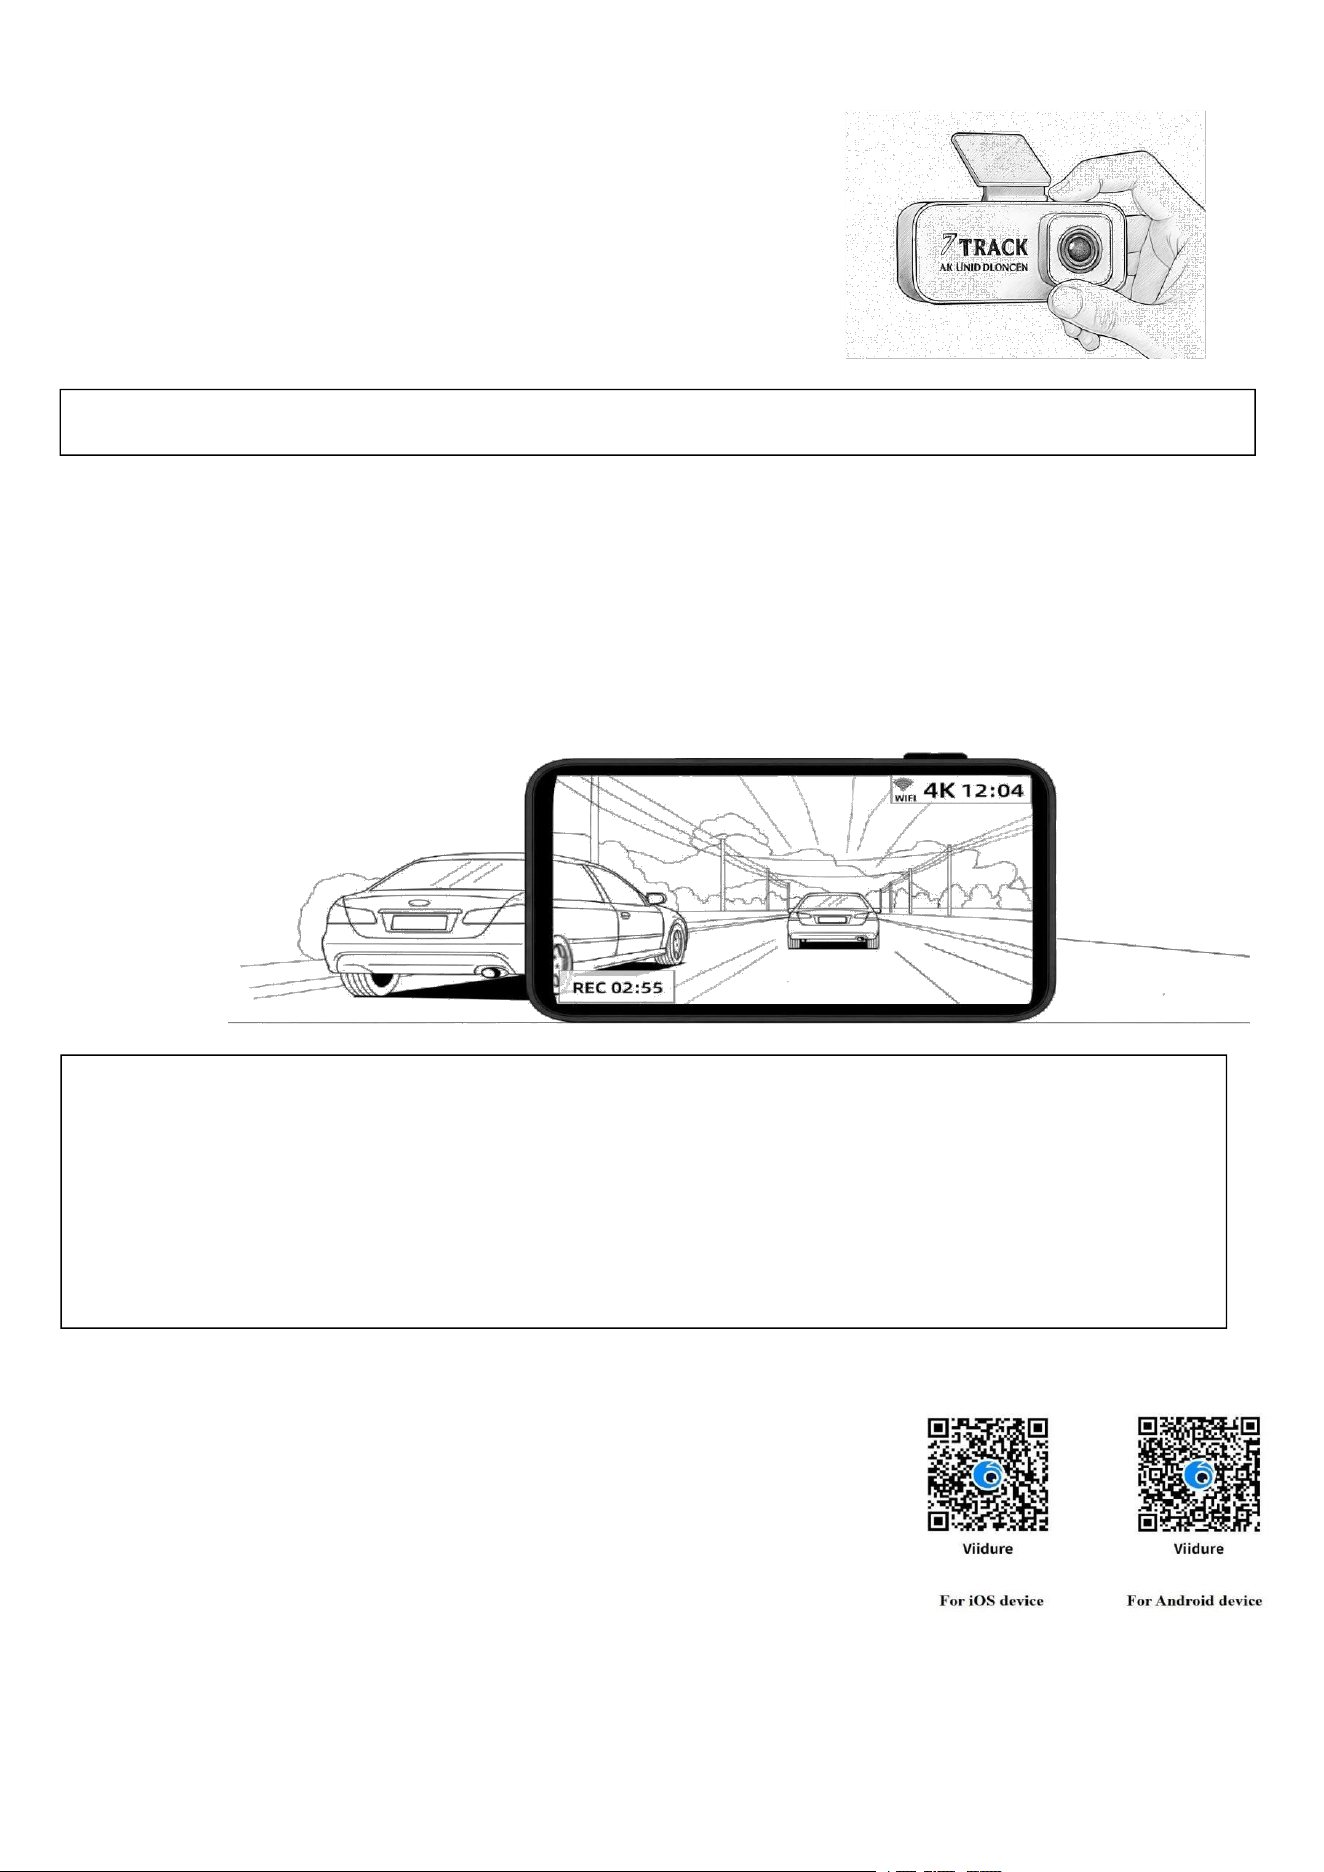
Connect with the Phone App.
6.1Download And Installation
The Dash Cam Allows You To Connect To The Smart Phone Via The App.
When Using For The First Time, Install The Viidure App For Your Smart Phone.
1.Scan Below QR Code Or Download Viidure App From Google Play Or App
Store.
2.Install The App.
3.Tap Wi-Fi Switch Icon to Turn it On.
4.Using the Wi-Fi Function of Your Smart Phone, Search For the WIFI ID“AP-**********”From the list . Enter
Default Password 12345678 and Connected With it.
Note:
1.
The Smart Phone Shall Be Within A Maximum Of A 5m Distance From The Dash Cam Without Any Buildings In Between.
2.
When The Wi-Fi Function Of The Dash Cam Is ON But Not Yet Connected With Your Smart Phone, Or The Connection Is
Disconnected, The Wi-Fi Icon On Dash Cam ’s Screen Will Be White.
3.
After Connecting The Smart Phone With The Dash Cam , And Activate App Feature “Network Streaming”, All The Button Operation
Of The Dash Cam Will Be Disable; All The Operations Shall Be Carried Out Via The Go Viidure App.
4.
The Language Of The Viidure App Will Be Consistent With Your Smart Phone, Beyond The Language Options, The App Will Be
Activated With Default Language.
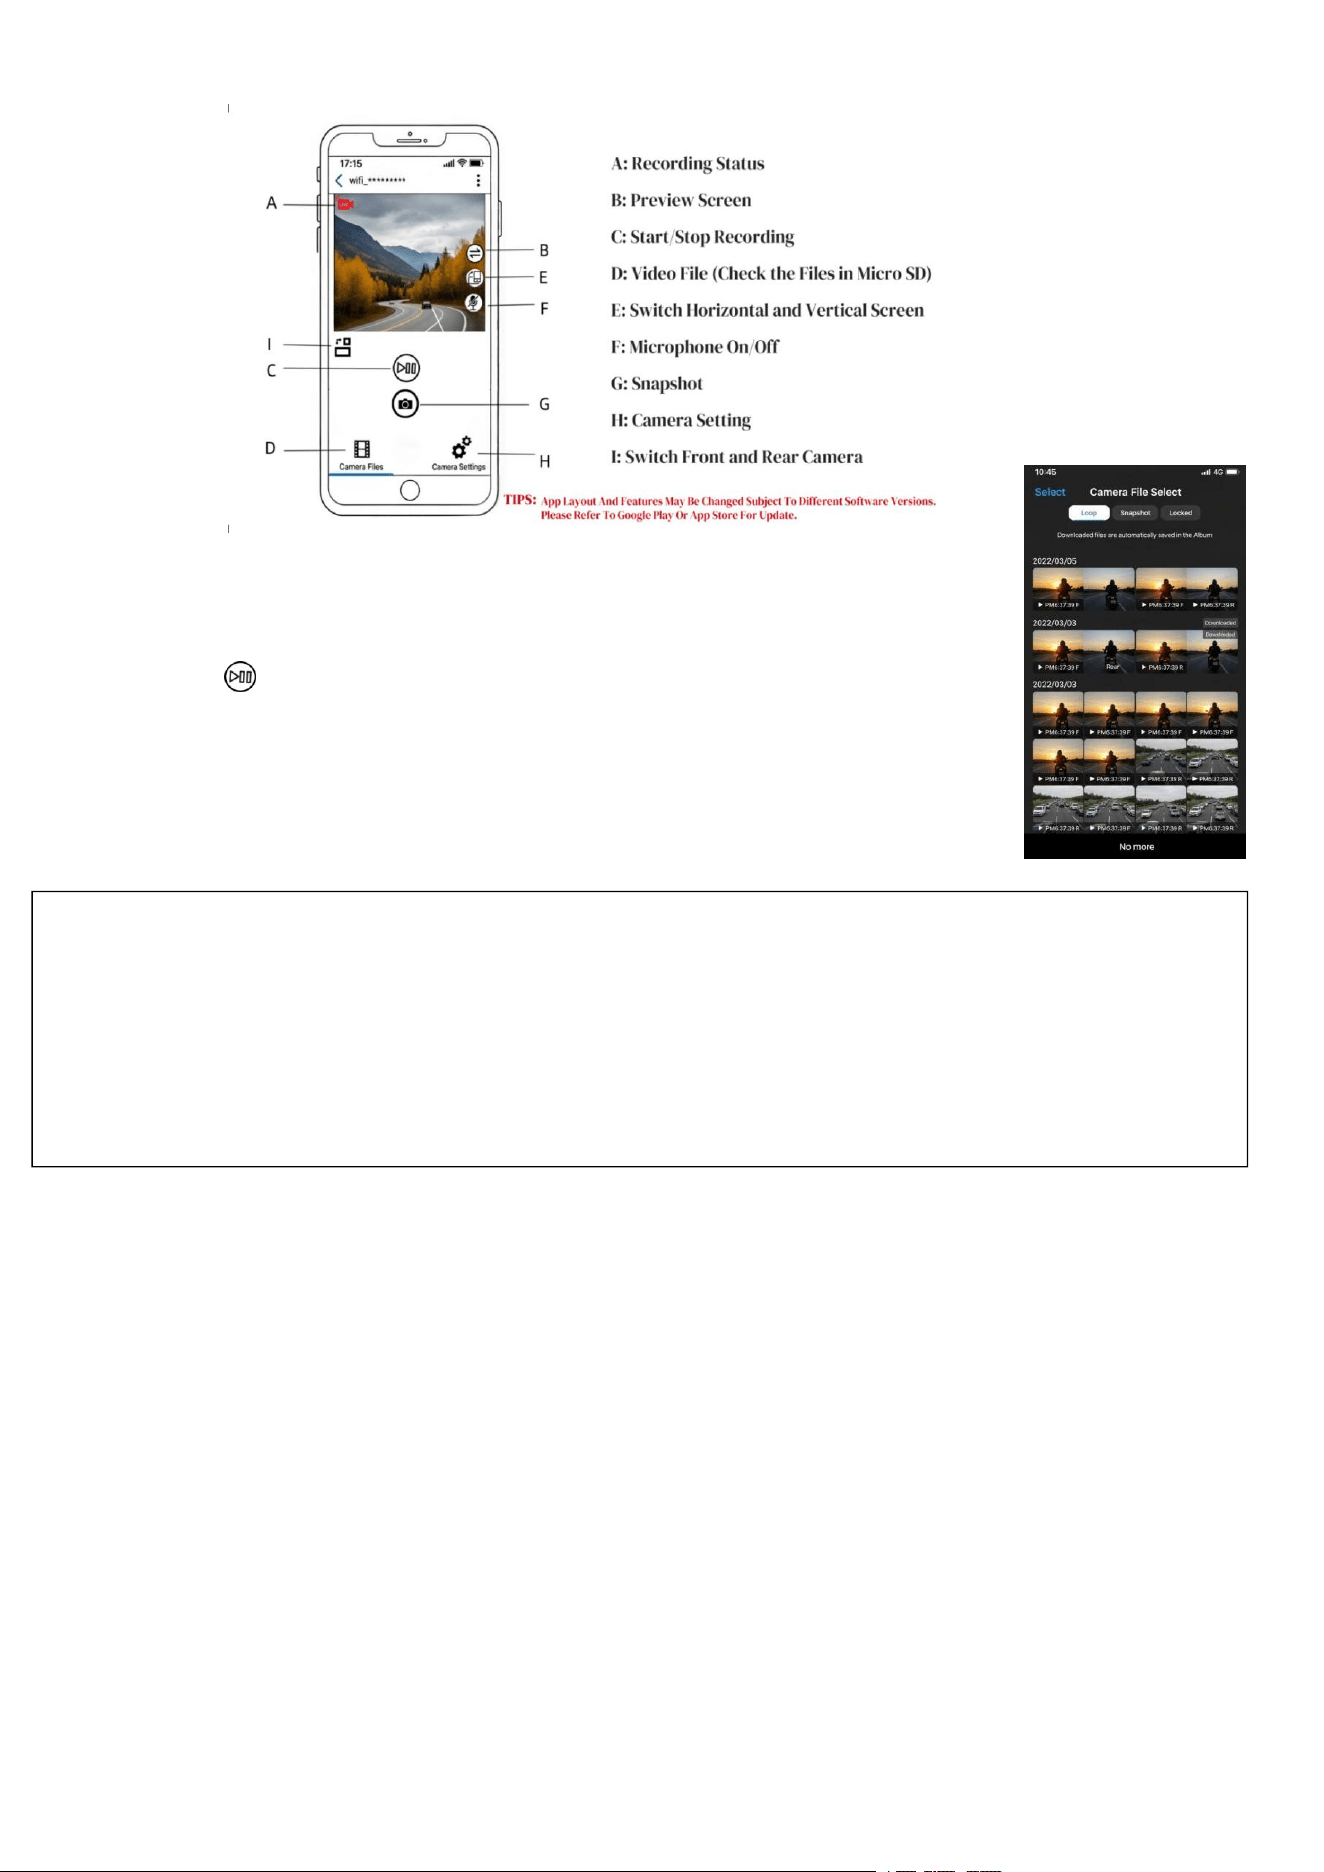
6.2 The Recording Screen
7.Playback, Delete, Download
7.1.
You Can Use This Feature To Playback Or Delete The File Saved In Dash Cam , Or To
Download the File From Dash Cam To Your Mobile Device.
7.2.
Tap The Icon , The Dash Cam Will Stop Recording.
7.3.
The Files Saved In The Dash Cam Will Be Displayed On Your Smart Phone. There Are
Loop And Locked Two Folders. The Thumbnail Image Corner Will Show F Or R, Which
Means Shooting By Front Cam Or Rear Cam. Tap The Files And It Will Start To Playback.
7.4.
Tap the Video File, and Choose the Video You Want Delete or Download.
8.
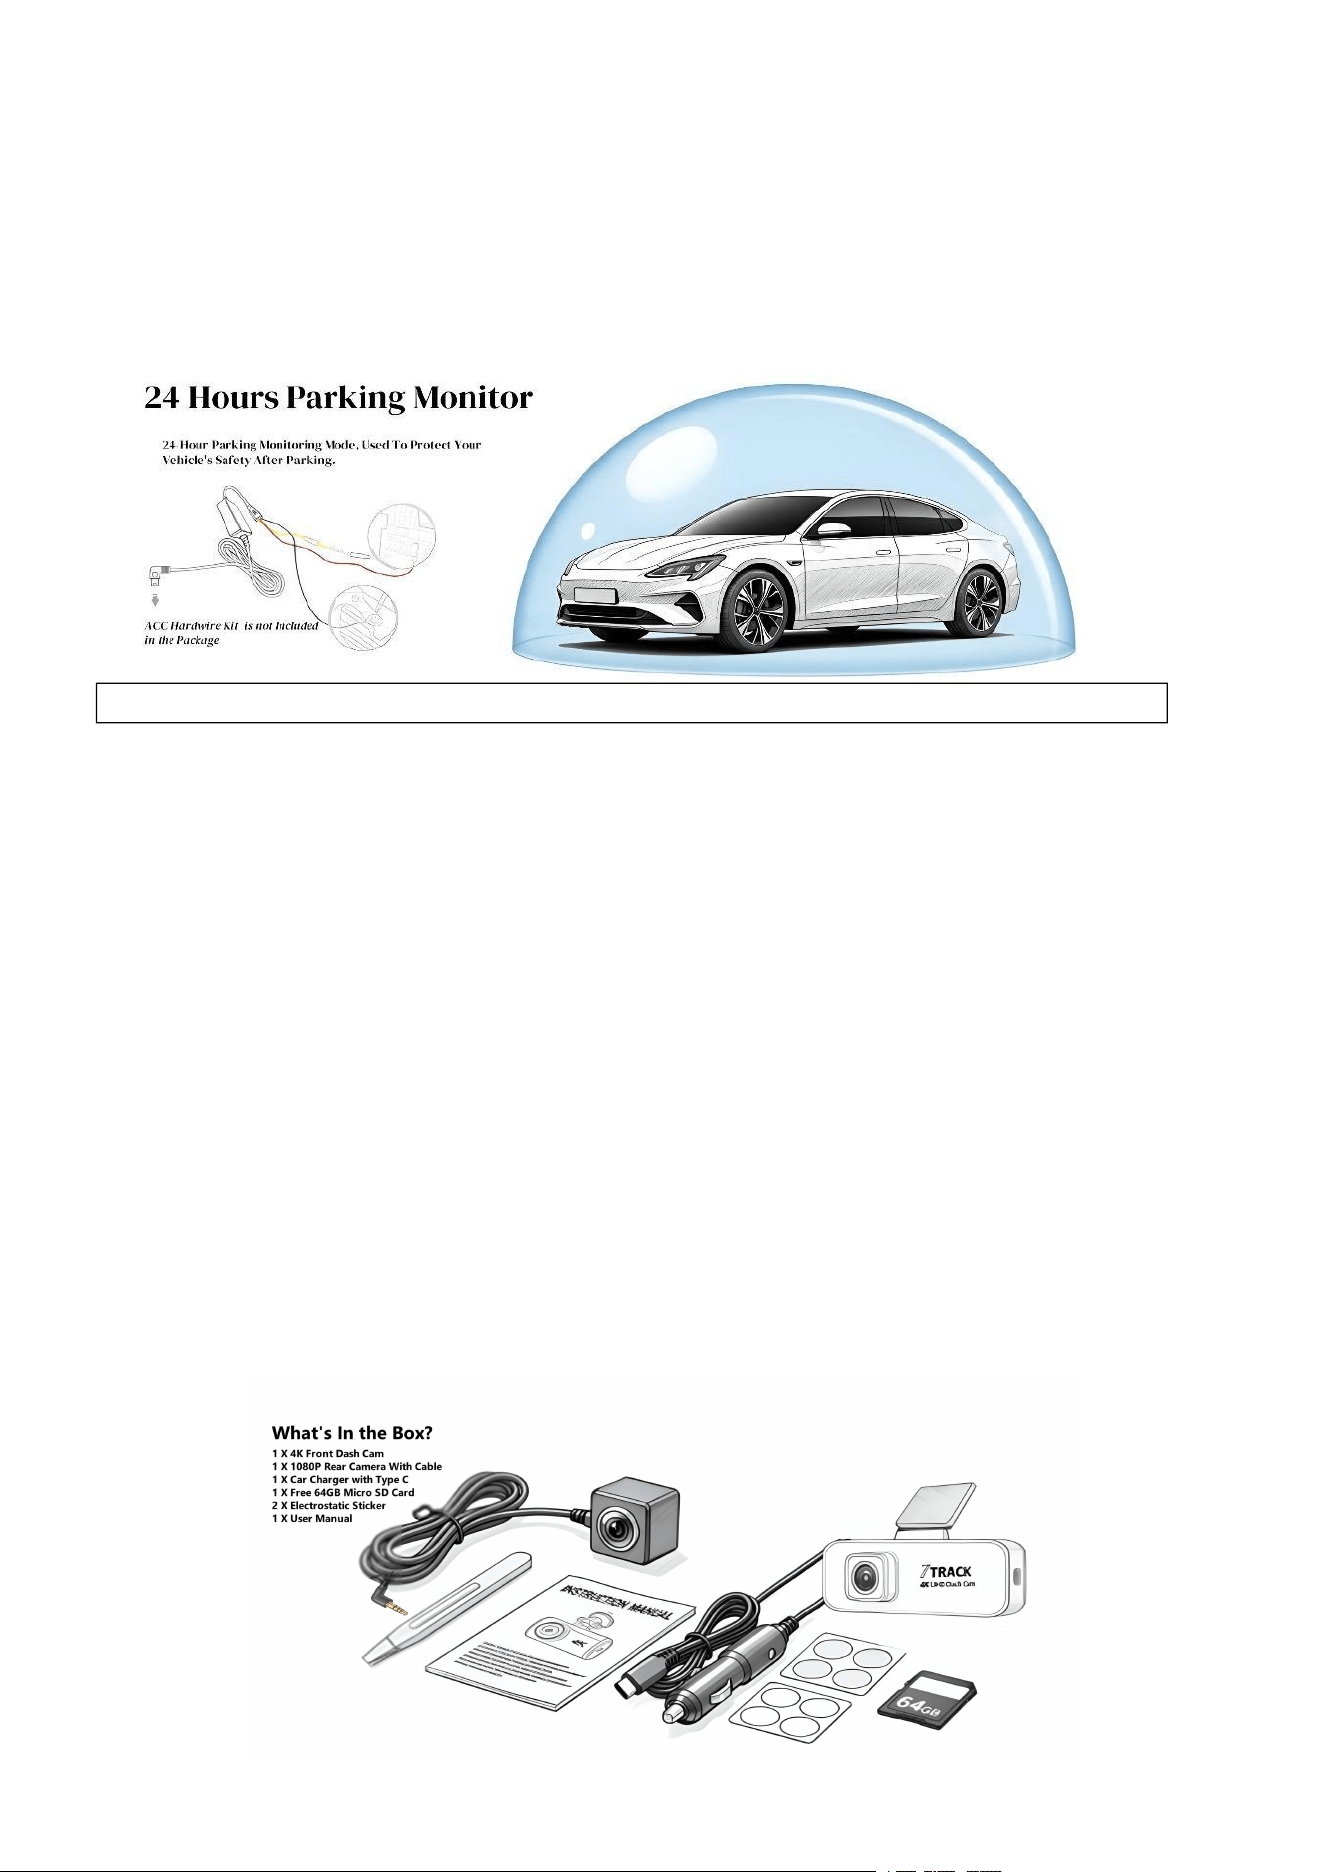
Parking Mode
To Monitor The Vehicle When It Is Parked, You Can Activate Park Recording on Your Viidure App, Or Collision
Detection, Or Time-Lapse. Before You Activate Parking Mode, Please Install ACC Cable Through Professional Car
Service Shop.
Follow The Steps Below To Change The Settings For Parking Mode.
1.Tap Setting To Enter The OSD Menu And Choose Parking Mode.
2.Choose One Of Three Types, And Tap The Right Frame To Turn It On.
3.Park Recording: The Dash Cam Will Turn Off The Screen Temporarily, But Still In Recording Status. The
Recorded Files Will Be Saved In “Normal” Folder. Once The Collision Or Vibration Is Detected, It Will Automatically
Trigger Emergency Recording, And The File Will Be Saved In “Event” Folder. The Recorded File Is According To
Record Interval Setting.
4.Time-Lapse: The Dash Cam Will Turn Off The Screen Temporarily, But Still In 1fps Time-Lapse Recording
Mode. The Recorded Files Will Be Saved In “Normal” Folder. When The Dash Cam Detects Any Vibration/Collision,
It Will Automatically Trigger Emergency Recording And The File Will Be Saved In “Event” Folder. The Recorded File
Is According To Record Interval Setting.
5.Collision Detection: The Dash Cam Will Turn Off The Screen Temporarily, But Still In Standby Detection
Status. When The Dash Cam Detects Any Vibration/Collision, It Will Automatically Trigger Emergency
Recording And Record The Event For 30 Seconds. The File Will Be Saved In “Event” Folder. The Recorded
File Is 30 Seconds Per File.
When The Setting Is Finished, Disconnect ACC, The Dash Cam Will Enter Parking Mode Automatically. When
The ACC Is Once Again Connected, Parking Mode Will Be Automatically Disable And Resume To Normal
Recording.
9.Frequently asked questions
Question: The Preview Screen Cannot Be Displayed When The Mobile Phone App Software Is Opened.
Solution: First, Make Sure Whether The Recorder Is Powered On And Started Normally (Judgment Method:
Observe Whether The Light Is On. Normally, It Is Always On When No Memory Card Is Inserted, And It Flashes
When A Memory Card Is Inserted); Then Check Whether The Mobile Phone Is Connected To The Recorder
Successfully. If The Connection Is Successful,The Device ID Code Of The Recorder Will Be Displayed On The Main
Interface Of The App.
Question: Unable To Record, Unable To Enter The Video Playback Interface, Or
Unable To See The Video File After Entering The Playback Interface.
Solution: These Situations Are Generally TF Memory Card Problems. First, Click Settings On The Recorder App
Interface To Enter, Format The Memory Card Once And Then Exit, Let The Recorder Start Recording For A While
And Try Again. If It Still Doesn't Work, You Must Replace The TF Card (It Must Be A Real High-Speed TF Card,
With A Maximum Support Of 128G). You Can See The File But Can't Play It Back, The Size And Time Of The
Recorded Video File Are Abnormal, And The Video Playback Is Stuck.
10.Package
Note: ACC Hardwire Kit is Not Included In the Package. Please Order the ACC Hardwire Kit Separately.

11.Disclaimer
1.
This Product Records Images, Sounds And Other Related Information During Vehicle Driving. The Data
Stored In The Instrument Is For Reference Only. Our Company Is Not Jointly Liable For Any Loss Caused
By Any Abnormal Use Of This Product, Such As Bad Files And Data Loss.
2.
We Recommend Using A Class 10 Or Higher Brand Memory Card. At The Same Time, To Avoid
Misunderstandings By Users, The Following Instructions Are Made:
3.
The Machine Must Be In Normal Working Condition To Record, But The Last Video Will Be Damaged Or
Lost In The Following Situations:
4.
Pulling Out The Memory Card During Recording, Any Other Abnormal Operation Behavior, May Cause The
Last Video File To Be Damaged Or Lost.
5.
The Video File Is Damaged Or Lost Due To A Destructive Collision Of The Machine During Recording.
6.
During The Use Of The Recorder, Please Be Sure To Remember And Do The Following: Please Use The
Recorder Within The Scope Permitted By Law. Please Keep The Recorder Manual Properly. The Manual
Contains The Initial Connection Information Of The Recorder. Carefully Read The Manual Of The Driving
Recorder And Follow Its Requirements. If The Recorder Is Directly Connected To The Car Power Supply
System And The Engine Is Started, Do Not Use The Recorder For A Long Time, Otherwise It Will Cause
The Car To Lose Power And Fail To Start.
12.
Warranty and Service
This Product Comes With A One-Year Limited Warranty From The Date Of Purchase. During The
Warranty Period, If The Product Fails Under Normal Usage Due To Manufacturing Defects, It Will Be
Repaired Or Replaced Free Of Charge.
This Warranty Does Not Cover Damage Caused By:
1.
Improper Installation Or Use
2.
Accidents, Drops, Or Impact
3.
Unauthorized Repairs Or Modifications
4.
Use Of Incompatible Accessories
5.
Natural Disasters (Floods, Fires, Etc.)
Note: This Warranty Applies Only To The Original Purchaser And Is Not Transferable.
Customer Service & Support
If you have any questions, encounter any issues, or Need Installation Support and
Assistance, Please Contact Us:
Email: lwltech@hotmail.com
Business Name:
LWL Innovation Technology (Shenzhen) Co., Ltd.
Address:
1910, Xinlong Building, Baishilong Community, Minzhi Street, Longhua
District, Shenzhen, Guangdong Province, China