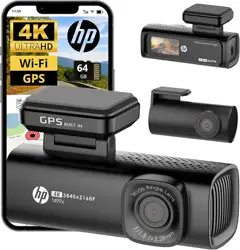

f499x
Car Camcorder
User Manual

1
Index
About This Guide............................................................. 3
Regulatory Notices ......................................................... 3
Prohibition of Co-location .............................................. 3
WEEE Notice ................................................................... 3
CE Regulatory Notice ...................................................... 4
Notes on Installation ...................................................... 4
Caution ...................................................................... 5
1 Introduction ....................................................... 8
1.1 Features ........................................................ 8
1.2 Package Contents ......................................... 8
1.3 Product Overview ......................................... 9
2 Get Start .......................................................... 10
2.1 Storage Media ............................................. 10
2.2 Install .......................................................... 11
2.3 Connecting to Power ................................... 14
2.4 LED Indicator ............................................... 14
2.5 Power on/off and Reset .............................. 15
3 Setting Go Moto Plus App .................................. 16
3.1 Download .................................................... 16
3.2 Wi-Fi Connection ......................................... 17
3.3 App Main Screen ......................................... 18
4 Use the Camcorder ............................................ 20
4.1 Initial Setting .............................................. 20
4.2 Recording .................................................... 20

2
4.3 Emergency Recording ................................. 20
4.4 Preview ....................................................... 21
4.5 Picture in Video ........................................... 20
4.6 Parking Mode .............................................. 22
4.7 Driver Fatigue Alert ..................................... 23
4.8 HUD ............................................................. 24
4.9 Playback,Delete,Download ......................... 24
4.10 Album .......................................................... 28
4.11 Camera Setting ........................................... 31
5 OTA Firmware Upgrade ...................................... 33
6 Specification .................................................... 37
3
About This Guide
The content in this document is for information purpose and is subject to change
without prior notice. We have made every effort to ensure that this User Guide is
accurate and complete. However, no liability is assumed for any errors or
omissions that may have occurred.
The manufacturer reserves the right to change the technical specifications
without prior notice.
Regulatory Notices
This document provides country- and region-specific non-wireless and wireless
regulatory notices and compliance information for your product. Some of these
notices may not apply to your product.
Prohibition of Co-location
This device and its antenna(s) must not be co-located or operated in conjunction
with any other antenna or transmitter.
WEEE Notice
Disposal of Waste Electrical and Electronic Equipment and/or Battery by
users in private households in the European Union
This symbol on the product or on the packaging indicates that this
cannot be disposed of as a household waste. You must dispose of
your waste equipment and/or battery by handling it over to the
applicable take-back scheme for the recycling of electrical and
electronic equipment and/or battery. For more information about
recycling of this equipment and/or battery, please contact your city
office, the shop where you purchased the equipment or your
household waste disposal service. The recycling of materials will
help to conserve natural resources and ensure that it is recycled in a
manner that protects human health and environment.

4
CE Regulatory Notice
The product herewith complies with the requirements of the IEC 62368-1:2018,
the EMC Directive 2014/30/EU, and the RoHS Directive 2011/65/EU.
EU Health Protection: This equipment should be installed and operated with
minimum distance 20cm between the radiator & your body.
Disposal of a battery into fire or a hot oven, or mechanically crushing or cutting
of a battery, that can result in an explosion.
Leaving a battery in an extremely high temperature surrounding environment
that can result in an explosion or the leakage of flammable liquid or gas.
Notes on Installation
1. Please measure the front windshield viewing area, make sure not to block
driver's front view, install the camcorder below the rearview mirror (the
central, higher right position of the front windshield). And we recommend
that the sky and the land occupied by the screen 50%, fix the car holder
and then adjust the camcorder so that the lane is aligned with the screen.
2. Make sure that the lens is within the wiping range of the windscreen wiper
to ensure a clear view even when it rains.
3. Do not touch the lens with your fingers. Finger grease may be left on the
lens and will result in unclear videos or pictures. Clean the lens on a
regular basis.
4. Do not install the camcorder on a tinted window. Doing so may damage
the tint film.
5. Make sure that the installation position is not hindered by the tinted
window.
6. This product is suitable for light windshield or light color heat-resistant
film windows , it will affect video quality if install it on the dark windows or
dark heat-resistant film windows.
7. Use the products of the attached power charger only, please do not use
other brand power charger, in order to avoid equipment burn.

5
Caution
❖ Due to local laws and vehicles safety considerations, do not operate the
camcorder while driving.
❖ Open app and synchronize date and time accurately before you use this
camcorder.
❖ Memory cards have limited life circle. Long-term use may cause
performance of writing speed and storage. In this case, you are
recommended to purchase a new card to replace.
❖ Due to the wide variety of memory card specifications on the market, as
well as inconsistent quality, our products do not guarantee compatibility
with all memory cards. If any issues with memory cards arise, resulting in
the inability to save recorded footage, this is unrelated to the
performance of the dash camera. Please replace the memory card with a
new one from where you purchased.
❖ The firmware function in the camcorder is for reference only, drivers are
advised to exercise discretion based on actual road conditions.
❖ The results of GPS positioning are only for reference, and should not
affect the actual driving situation. The camcorder also cannot ensure the
positioning accuracy.
❖ GPS positioning accuracy may differ depending on weather and location
such as high buildings, tunnels, undergrounds, or forests. GPS satellite
signals cannot pass through solid materials (except glass). Tinted
window will also affect the performance of the GPS satellite reception.
❖ GPS reception performance on each camcorder may differ. The
camcorder cannot determine the accuracy of the positioning results from
different hardware.
❖ The values stamped in this camcorder, such as speed and position, may
be inaccurate due to the influence of surrounding environment. They are
for your reference only.
❖ This product is used only for non-commercial use, within the maximum
limits permitted by applicable law. We do not take any responsibilities
for the loss of use of the product.

6
❖ Wi-Fi Signals are unable to pass through the building. The max limit of
signal transmission is 5m.
❖ Wi-Fi Operation Channel: Ch1~Ch13
❖ The product employs wireless data communication which may interfere,
or be interfered by, a near-by camcorder.
❖ Never use this camcorder in the vicinity of a microwave oven or at places
where there is radio interference.
❖ Radio wave reception may be worsened in specific environments.
❖ Please be advised that if another camcorder is also using the same
2.4GHz band as this product, the processing speed of both camcorders
may slow down.
❖ This camcorder gets warm when in use; this is normal.
❖ Improper use or operation of the product may result in damage of the
product or its accessories and void the warranty.
❖ The radio frequency (RF) generated by this RF electronic camcorder may
cause adverse effects on the operation of other electronic camcorders
and result in malfunctioning. Wireless transmitters and circuitry may
also interfere with other electronic camcorders. Therefore, do observe
the following precautions:
• Aircraft: Never use a radio transmitter when you are in an airplane.
Please switch off the Wi-Fi function of the camcorder.
• Vehicle: The radio frequency transmitted by this camcorder may
affect the electronic system in a motorized vehicle. Please
consult the manufacturer or dealer of your vehicle on the possible
effect.
• Pacemaker: In order to prevent any potential interference to a
pacemaker, anyone who uses a pacemaker should be advised,
that, when using this camcorder, a minimum distance of 15cm (6
inch) should be kept between the camcorder and the pacemaker;
and never put this camcorder in a chest pocket. In case of any
doubt of interference, switch off the camcorder immediately.
• Medical Camcorder: If you use a personal medical camcorder,
consult the camcorder manufacturer or your physician to confirm

7
if your camcorder is sufficiently shielded from the RF
transmission of this camcorder.
• Medical Facilities: Hospitals and medical institutes may use
facilities that are sensitive to an external RF energy. Observe such
instructions when the medical care personnel or any posted sign
requests you to switch off any camcorder that may interfere the
radio frequency.
• Explosion sites or any location with a posted sign: In order to
prevent interfering with an explosion activity, observe all the
signage and instructions in the Explosion Area or in a zone with a
“Switch Off 2-way Radios” sign by switching off camcorders that
may interfere with the radio frequency.
❖ HP Inc. is NOT responsible for the loss of any data/content during
operation.
Before you start using the product, it is assumed that you
agree to the above statement.
8
1 Introduction
Thank you for purchasing this Car Camcorder. This product is
specifically designed for real time video recording when driving.
1.1 Features
• Ultra-high definition 4K (3840x2160)
• Built-in Wi-Fi, preview and playback the files by app
• 1.5-inch color display
• Built-in GPS, synchronize the date/time automatically
• Parking mode
• Wide angle lens
• Collision detection, when a collision is detected, the camcorder
will automatically trigger the emergency recording
• Rear camera supported
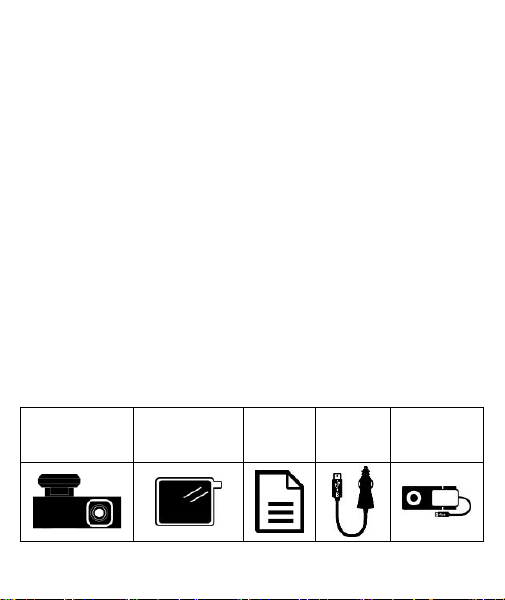
1.2 Package Contents
The package contains the following items. In case there is any
missing or damaged item, contact your dealer immediately.
Car
Camcorder
Electro-static
Sticker
User
Manual
Car
Adapter
Rear
Camera
(optional)
9
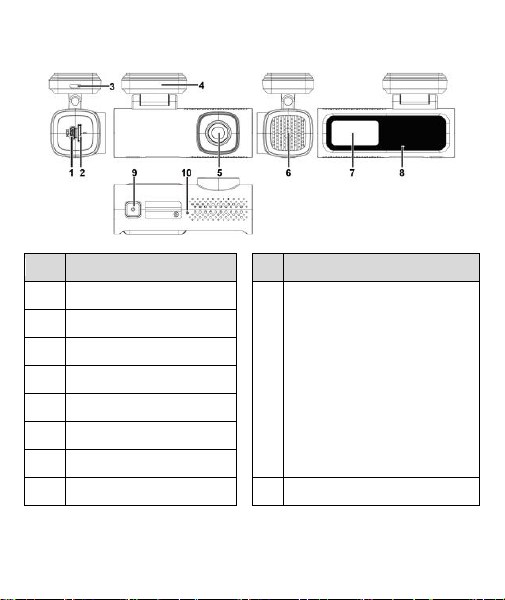
1.3 Product Overview
No
Item
No
Item
1
Power connector
9
Power Button
• Short press: turn on
• Long press 3 sec: turn off
• Press 5 times: default
setting (includes
password)
• Long press 10 sec: reset
2
microSD card slot
3
Rear cam socket
4
Bracket socket
5
Wide angle lens
6
Speaker
7
Color display
8
LED indicator
10
Microphone
10
2 Get Start
2.1 Storage Media
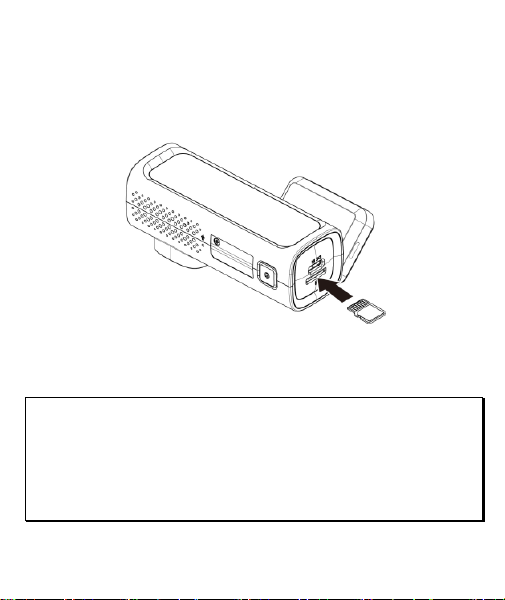
2.1.1 Insert the Memory Card
Insert memory card with the golden pins facing up and forward, see
the picture as below,
2.1.2 Remove the Memory Card
If the device is power on, please power off first and wait for the
procedure of switching-off completed before removing the memory
card.
Note:
1. Do not remove or insert the memory card when the camcorder is turned on. This
may damage the memory card.
2. Support microSD class 10 and memory storage 16GB or above (support up to
128GB).
3. Please use this car camcorder to format the microSD card before the initial use.
4. Periodically format the microSD card (recommended period: once a month).
11
2.2 Install
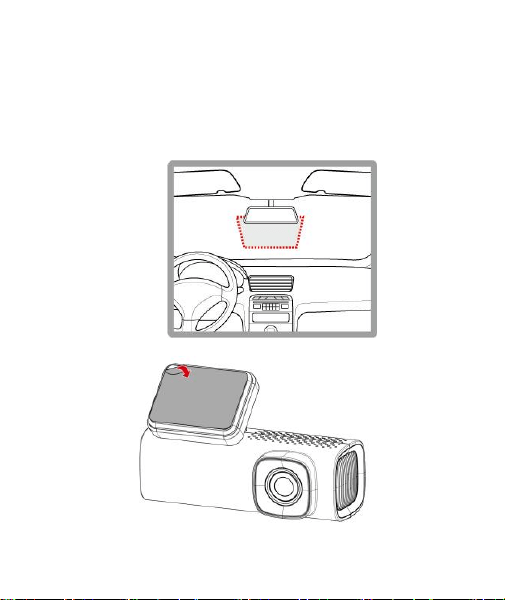
2.2.1 Mount to Windshield Window
1. Put the electrostatic sticker onto the suggested area on the
windshield window. Before putting the sticker, please wipe and
clean the window. During the installation, please make sure
the bubbles in between the sticker and the window are all
gone.
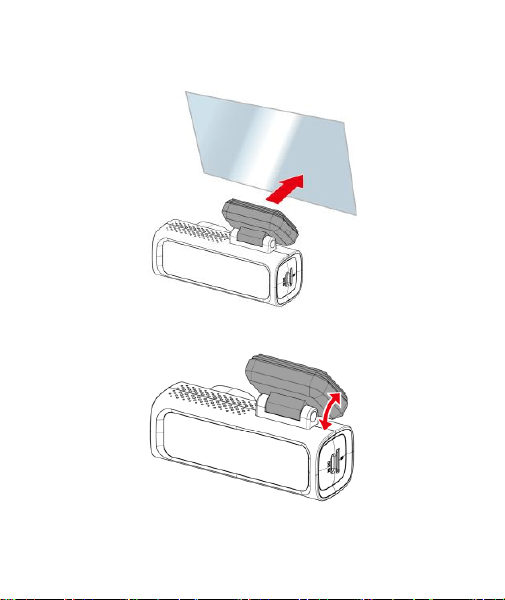
2. Peel off the protective plastic sheet from the adhesive pad.
12
3. Place and press the bracket firmly onto the electrostatic
sticker on the windshield window. Make sure the base is
securely locked in place.
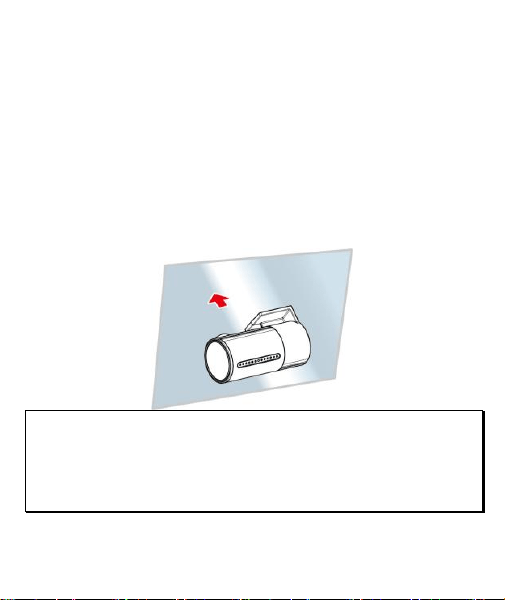
2.2.2 Adjust the Camcorder
1. Adjust the view angle.
2. Make sure the device is securely locked in place.
13
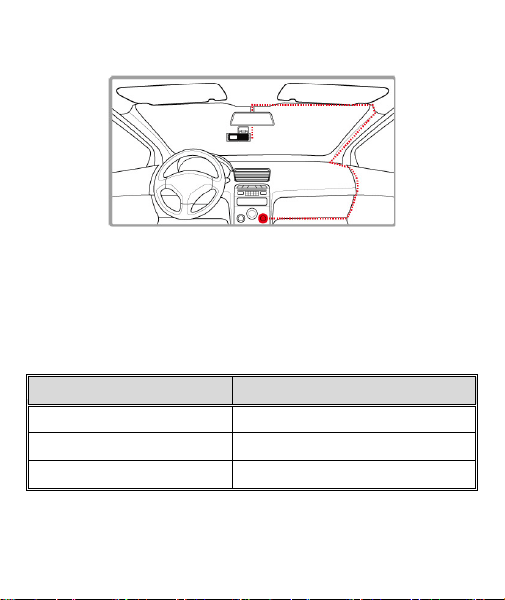
2.2.3 Install Optional Rear Cam
1. Position the rear camera at upper central of rear windshield. Use
cable to connect rear camera with front camera to check the
preview image is in right position (not upside down) before
installation. If the preview image is upside down, please rotate the
base 180゚to make it correct.
2. Check and confirm the field of rear view. Then clean the surface of
the windshield with alcohol to ensure that the adhesion surface is
clean.
3. Remove the film on the base of rear camera, and then hard press
rear camera to ensure firmly stuck.
Note:
1. Do not install the device on a tinted window. Doing so may damage the tint film.
2. This product is suitable for light windshield or light color heat-resistant film
windows, it will affect video quality if install it on the dark windows or dark
heat-resistant film windows.
3. Press power button to switch front and rear camera preview image.
14
2.3 Connecting to Power
Use only the attached power adapter to activate the camcorder.
1.
Connect one end of power connector to USB-C port of the
camcorder. USB port input DC5V/2A.
2.
Plug the other end of car adapter to the cigarette lighter
socket of your vehicle. Once the vehicle engine is started, the
camcorder automatically turns on. Car adapter input DC
12/24V.
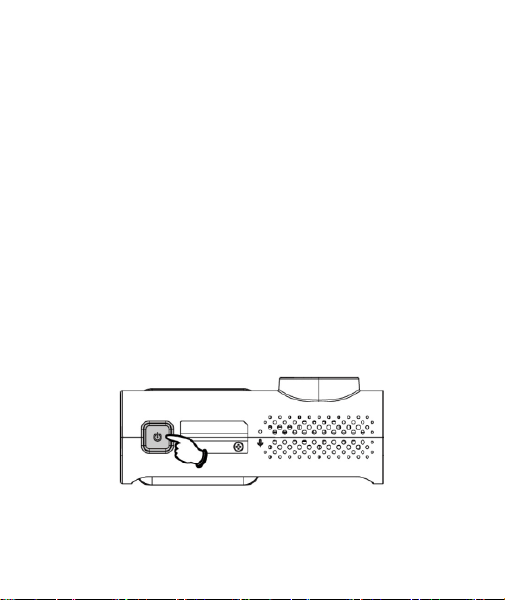
2.4 LED Indicator
Status
LED Indicator
Power on, standby
Red, solid
Recording
Red, slow flashing
Emergency recording
Red, rapid flashing
15
2.5 Power On/Off and Reset
2.5.1 Auto Power On/Off
Once start the car engine, the device will automatically power on and
start recording.
Once the car engine shuts down, the device automatically saves the
recording and turns off the power.
2.5.2 Manually Power On/Off
Press once the power button to power on the device.
Press and hold the power button for 3 seconds to power off the
device.
2.5.3 Device Reset
Press and hold the power button for 10 seconds to reset the device.
2.5.4 Wi-Fi Password Reset
Press the power button 5 times to activate default setting. The Wi-Fi
password will also return to original setting value 12345678.

16
3 Setting Go Moto Plus App
3.1 Download
The camcorder allows you to connect to the smart phone via the app.
When using for the first time, install the [Go Moto Plus] app for your
smart phone.
Scan below QR code or download Go Moto Plus app from Google
Play or App Store.
iOS/Android
APP layout and features may be changed subject to different
software versions. Please refer to Google Play or APP Store for
update.

17
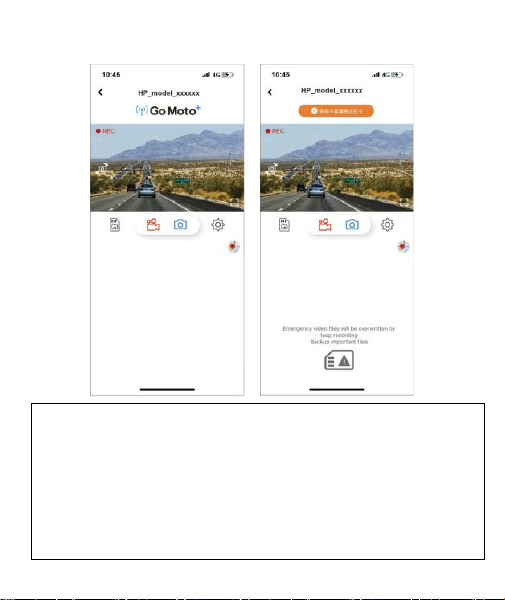
3.2 Wi-Fi Connection
1. Starts the engine, and the device will auto power on and
record.
2. Using the Wi-Fi function of your smart phone and search for
device’s ID ”hp_f499x_xxxx” (last 4 digits are system random
number). Enter default password 12345678.
3. Open app Go Moto Plus and tap “Access Camera”. The app
main screen will pop up and the device’s screen will show
“Network Streaming”. It means you are able to access camera
by app now.
Note:
1. Wi-Fi connection in between with the smart phone and camcorder must within 5
meters open space.
2. The language of the Go Moto Plus app will be consistent with your smart phone,
beyond the language options, the app will be activated with default language.
3. Supports OS: Android 9.0 or higher, iOS 13 or higher, Harmony 2 or higher.
18
3.3 App Main Screen
Note:
1. The App will auto sync the camera's date/time with your smartphone.
2. App layout and features are subject to change, depending on the software
version. Refer to the Google Play Store or iOS App Store for the latest
updates.
3. Android phones please download Google Offline Maps in advance. Firstly,
update Google Maps to the latest version, open the Google Maps app, click
on the user account picture above, and click "Offline Area", select "Custom
Area", select the area where you want to download the offline map, confirm
and press "Download".
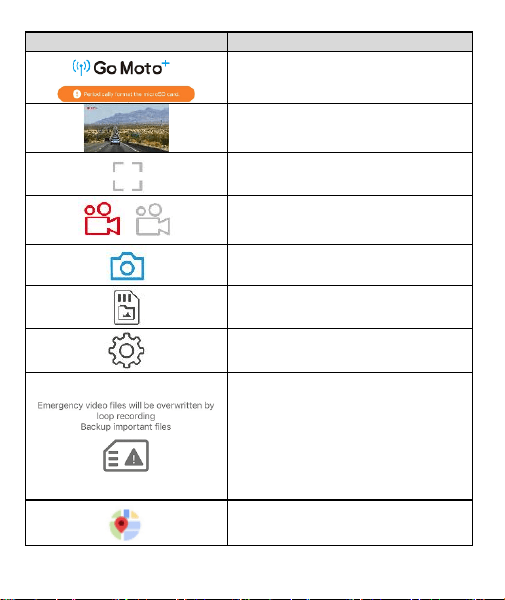
19
icon
Description
/
Go Moto Plus logo / SD card
message
Preview screen
Full screen display
/
Start/Stop recording
Take snapshot
Camera File (check the files in
microSD)
Camera Setting
To remind the emergency files
in the microSD card is about to
be full and going to over write
the oldest files. Backup the
files and clear up the
emergency folder, and this
message will be gone.
Map and driving track

20
4 Use the Camcorder
4.1 Initial Setting
Before use the device, use smart phone’s Wi-Fi to connect with the
device and open Go Moto Plus app to synchronize date/time.
4.2 Recording
Once start the car engine, the device will automatically power on
and start recording.
Recording will automatically stop when the engine is switched off.
Note:
1. It can be configured to save a video file for every 1 or 3 minutes of recording.
2. All the videos and photos are saved in the memory card, if memory card is full,
loop recording will generally overwrite the oldest video file.
4.3 Emergency Recording
If the Collision Detection function is enabled and a collision is
detected, the camcorder will automatically trigger the emergency
recording. The LED indicator will flash rapidly. The emergency file is
created as a new file and save in Emergency folder, which will be
protected to avoid being overwritten by normal loop recording.
Note:
1.The sensitivity of Collision Detection can be adjusted as Low, Middle or High from
app.
2.The emergency video folder will occupy 20% of available memory card capacity.
When the emergency video folder is full, the oldest emergency file will be
automatically deleted by the newest emergency file.
3. The emergency recording’s file length is same as the Recording Interval Setting.
21
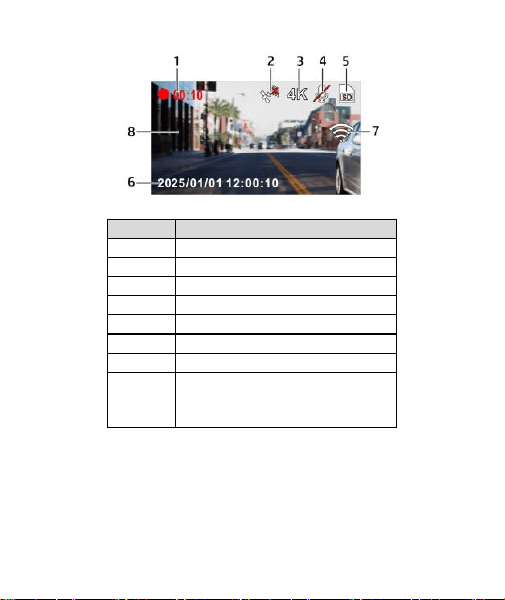
4.4 Preview
No
Description
1
Recording time
2
GPS status
3
Resolution
4
Voice Record
5
microSD card
6
Current Date/Time
7
Wi-Fi
8
Preview Image
(press power button to switch
front and rear cam)
22
4.5 Picture in Video
You can also use this camcorder to take snapshots of the current
scene.
1. Open Go Moto Plus app.
2. Tap icon. A “ka” sound will be heard and which means
snapshot is done.
Note:
1. The screen shots image resolution quality is according to video resolution
setting.
2. The picture resolution is limited by the speed of the target object and changes in
ambient lighting. The photograph function is better used for taking still pictures
in accident scenes or when the car is stopped to wait for a traffic light.
4.6 Parking Mode
To monitor the vehicle when it is parked, you can activate Parking
Mode.
Before you activate Parking Mode, it is required to install
hardwire kit (ACC cable) through professional car service shop.
1. Open Go Moto Plus app.
2. Tap icon, the device stops recording, and you will enter
Menu Setting.
3. Select option of Parking Mode, and then choose one from
options of Park Recording, Collision Detection or Timelapse.
After setting, return to preview page.
4. In the normal recording mode, press and hold the power
button for 3 seconds, or shut down car’s engine, the
23
camcorder will enter parking mode.
5. When car’s engine again starts, the camcorder will disable
parking mode and resume normal loop recording.
6. In Parking Mode, if the collision is detected, the camcorder will
automatically trigger the emergency recording and save the
file in the Emergency folder, which won’t be over written by
the normal loop recording.
Note:
1. The hardwire kit is not included in the package. Please ask for more
information from your distributor.
2. “Parking Mode” option will appear in Menu Setting only when hardwire kit is
installed.
3. Park Recording: Continuously recording. Recorded file is saved in “Normal”
folder. If collision or vibration is detected, the triggered emergency recording
file will be saved in “Event” folder.
4. Collision Detection: Standby mode. Only record emergency file upon collision
or vibration.
5. Timelapse: Continuously records in one second one frame format. For
example, 30 minutes recording will be saved in one minute in one file.
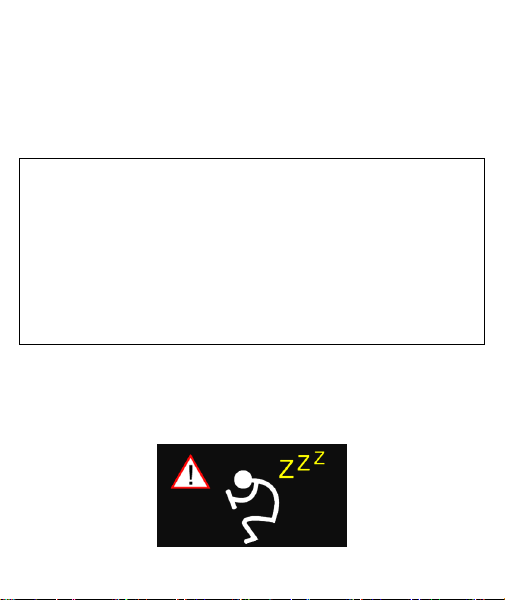
4.7 Driver Fatigue Alert
If Driver Fatigue Alert is enabled, the device will emit a warning
sound and display a reminder message after one hour of continuous
recording. The alert will repeat every 30 minutes thereafter to
encourage the driver to take a break.
24
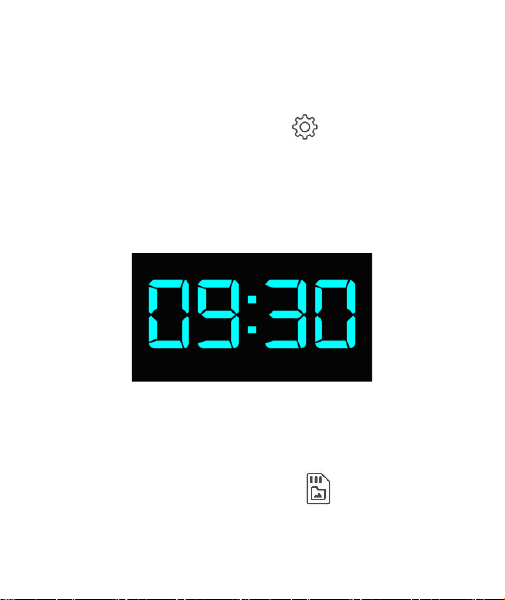
4.8 HUD
HUD mode displays current time. In HUD mode, it won’t interrupt
recording. The Wi-Fi function is also workable and able to access app.
Follow below steps to set up HUD mode,
1. Open Go Moto Plus app. Tap the icon [Camera Setting], and
then tap “LCD Setting”, choose “HUD”.
2. When setting is finished, the HUD mode will automatically
activate 7 seconds after power on. In the preview screen, if
there is no operation in 7 seconds, the device will again enter
HUD mode.
4.9 Playback, Delete, Download
You can use this feature to playback or delete the file saved in the
device, or to download the file from the device to your smart phone.
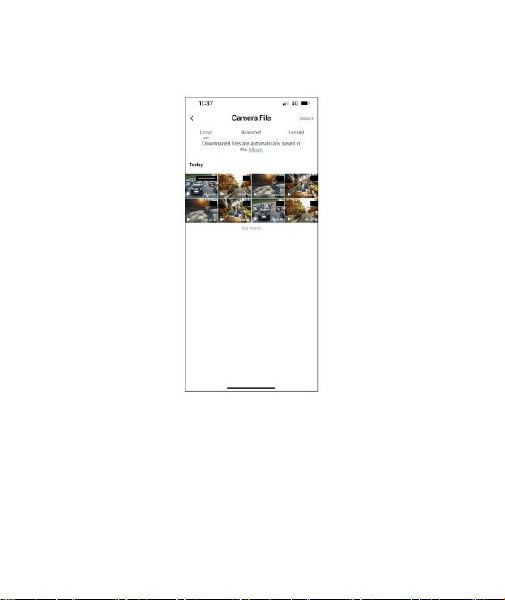
1. Open Go Moto Plus app. Tap the icon [Camera File], the
device will stop recording.
25
2. The files saved in the device will be displayed on your smart
phone. There are Loop, Snapshot and Locked three folders.
Tap the image and it will start to playback.
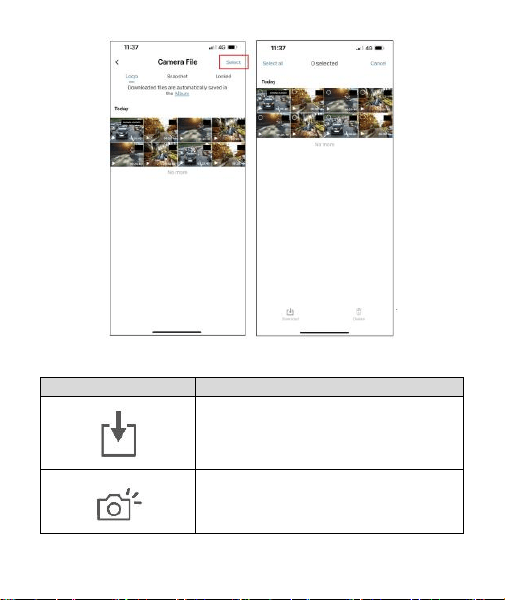
3. Tap the right top corner “Select” and pick up the files that you
want to delete or download, and tap the icon in the screen
bottom to execute.
26
icon
Description
Download the file to “Local Album”.
The downloaded file can be playback
without connecting with the
camcorder.
Video Screenshot.
27
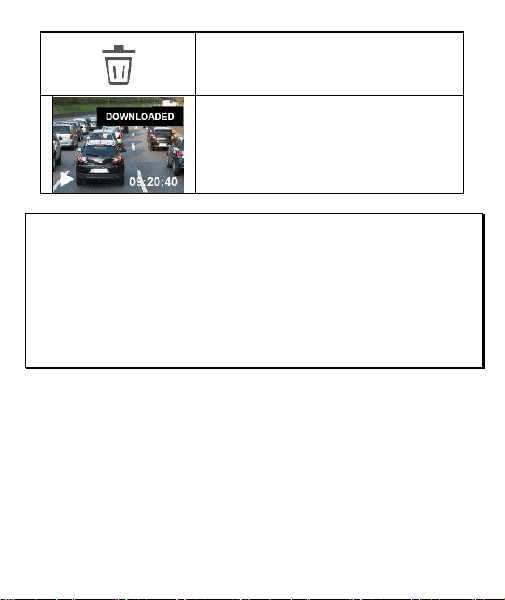
Delete the file in microSD card.
Downloaded file will show
“Downloaded” in thumbnail image.
Note:
1. If you find the video playback without audio, please check if you turn on Voice
Record on the Setting. If you do turn it on, it means the smart phone itself doesn’t
support the video decoding. It’s not the problem of the file. We recommend you
to install a free app software such as VLC to playback the file.
2. Deleted files cannot be recovered. Ensure the files have been backed-up before
deletion.
3.More files to be read or downloaded, you are recommended to take out microSD
card from camcorder and use computer.
28
4.10 Album
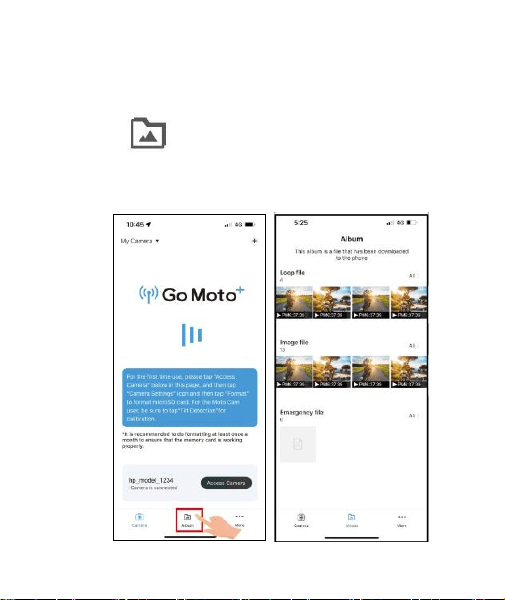
You can use this feature to playback or delete the file that you
download in your smart phone. The files in the Album can be
reviewed without connecting with device.
1. Tap icon [Album]. (It will stop recording if the
camcorder is connected.)
2. Tap the file that you want to playback, delete or edit.
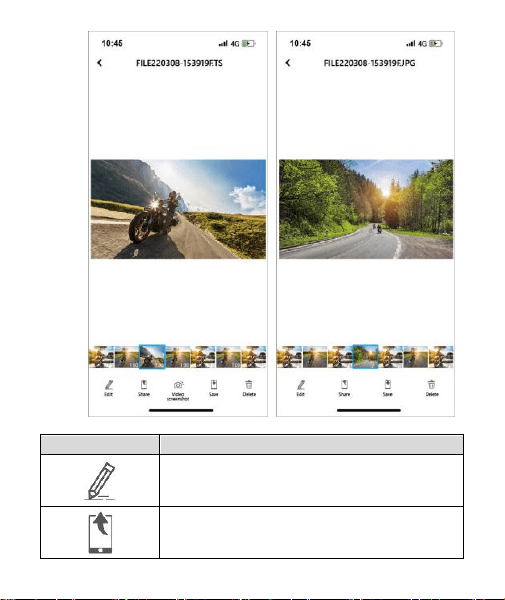
29
Icon
Description
Edit video or snapshot.
Share the file to social media.
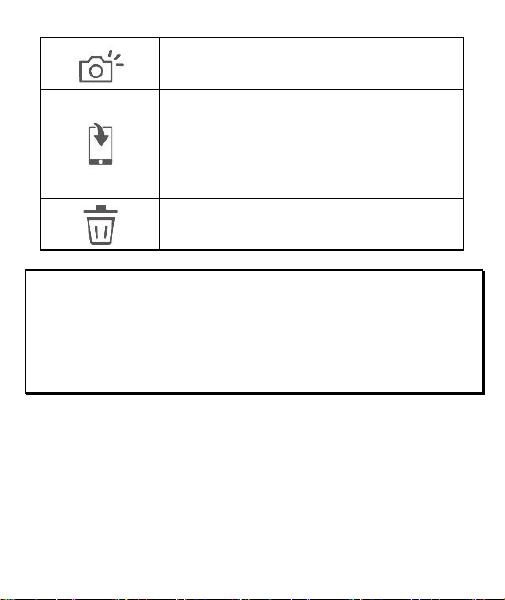
30
Video Screenshot. The file will be saved in
“Album”.
Save the file to smart phone’s album. When
the file saving is done, screen message will
show “Save to smartphone’s album
successfully”, and the smart phone’s album
will create a new folder named “Go Moto
Plus”.
Delete the file in the App’s Album. The file
in the camcorder still exists.
Note:
1. Deleted files cannot be recovered. Ensure the files have been back-up before
deletion.
2. If you find the downloaded files unable to playback or without audio, which
means the smart phone itself does not support the video decoding. It’s not the
problem of the file. We recommend you to install one free App software such as
VLC to playback the file.
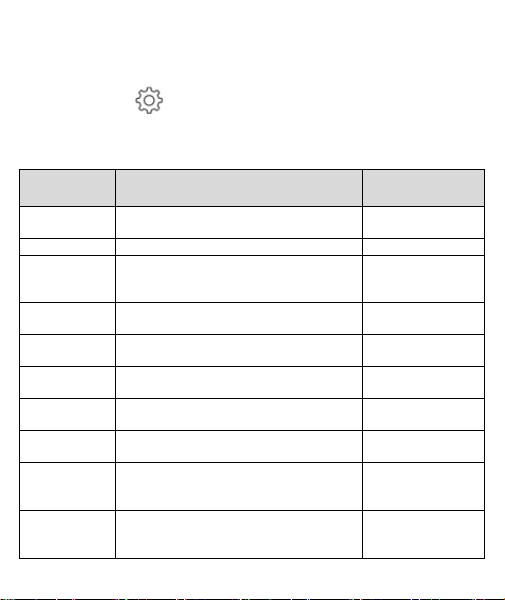
31
4.11 Camera Setting
You can use this feature to set up most of your camcorder options.
1. Tap icon [Camera Setting].
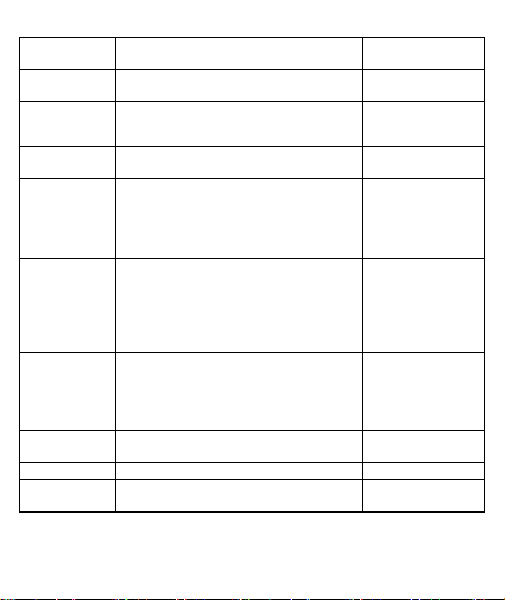
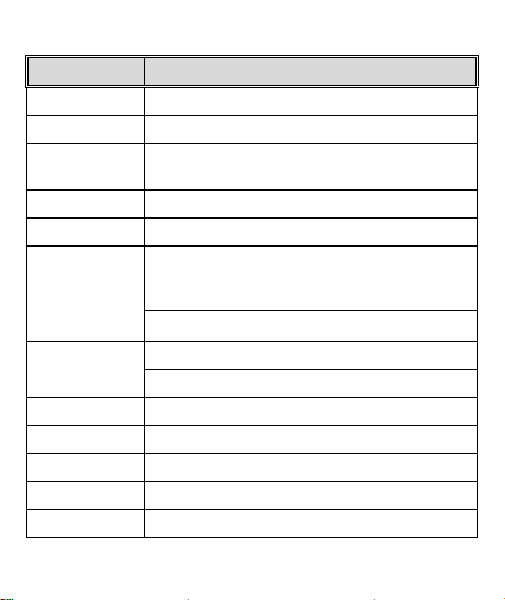
2. Refer to the below table for details of menu items and
available menu options.
Menu
Option
Description
Available
options
Set Time
Zone
Set the time zone you are in.
GMT -12 ~ GMT
+12
Voice Record
Setting for activating audio in the video.
On / Off
Camera
Volume
Setting
Setting volume
1~10
Record
Interval
Save respective video files in a length of
the selected duration.
1 min / 3 min
Collision
Detection
Set up sensitivity level of collision
detection.
Off / High / Mid /
Low
Format
To format the memory card, all the files
in the camcorder will be deleted.
Yes / Cancel
Speed Unit
The system displays the speed setting
unit.
KM/H / MPH
Car Speed
Watermark
To turn on or off car speed watermark.
On / Off
Time Stamp
To turn on or off file stamp including
model number, date/time, car speed and
location info.
On / Off
Resolution
Setting of video resolution.
4K WDR/2K WDR/
1080p WDR
32
Front cam
EV setting
Setting of front cam exposure value.
-3 ~ +3
Rear cam
EV setting
Setting of rear cam exposure value.
-3 ~ +3
LCD screen
setting
Setting LCD screen on/off or HUD mode.
Always on/7 sec
off/1min off/HUD
Voice
Language
To set message announcement’s
language.
According to ship
area.
Parking
Mode
If one of parking mode is activated, the
camcorder will enter parking mode 10
seconds after disconnect the external
power.
*Require to install Hardwire Kit.
Park Recording /
Collision
Detection /
Timelapse / Off
Driver
Fatigue Alert
If Driver Fatigue Alert is enabled, the
device will emit a warning sound and
display a reminder message after one
hour of continuous recording. The alert
will repeat every 30 minutes thereafter
to encourage the driver to take a break.
On / Off
Anti-flicker
Domestic power supply varies by area. It
is recommended that you should check
the “Table of voltage and frequency of
different countries” for the correct
setting.
60Hz / 50Hz
Wi-Fi
Password
To set up Wi-Fi password
Default
Return to factory default setting.
Yes / Cancel
Firmware
Version
Indicates the current camcorder’s
firmware version.
33
5 OTA Firmware Upgrade
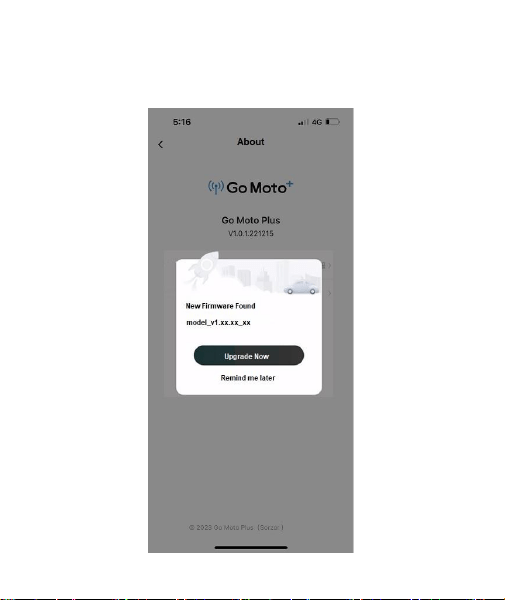
Connect Wi-Fi of the camcorder and smart phone, open the app. If
there is a new firmware published, the screen will show notification
as below.
34
Follow the app instruction,
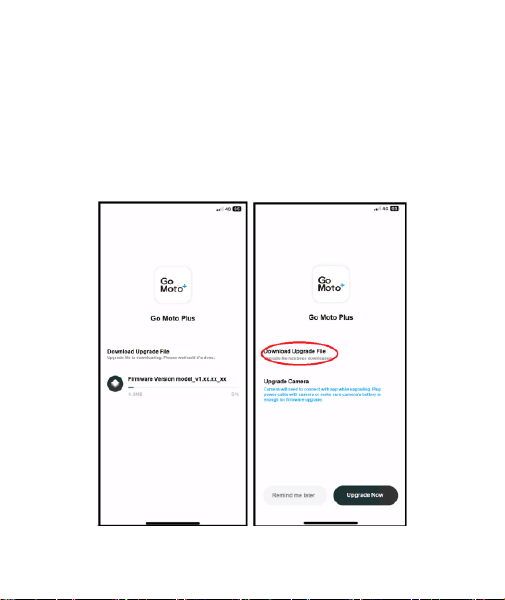
1. Tap “Upgrade Now”
note1
to download the new firmware to smart
phone
note2
. (Figure1)
2. When download is completed, screen will show “Upgrade file has
been downloaded”. Make sure smart phone Wi-Fi is connected
with camcorder, then, tap the “Upgrade Now” on the right bottom
corner. Then, the new firmware will be sent from smart phone to
the camcorder. (Figure2)
Figure1 Figure2
35
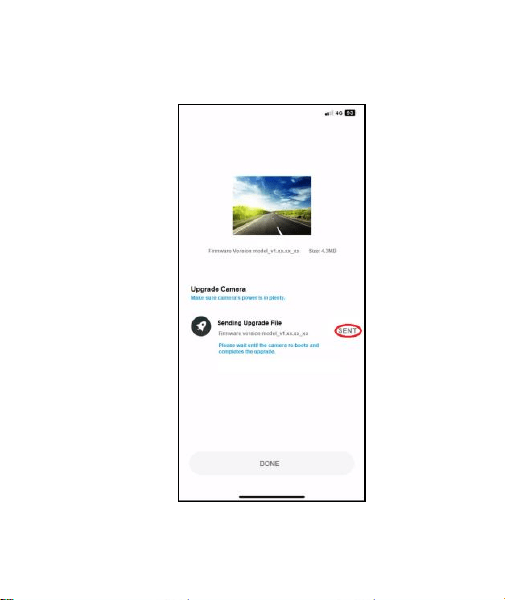
3. When the file is dispatched successfully, screen will show “SENT”.
The camcorder will then re-boot and automatically upgrade the
firmware. After firmware is upgraded, the camcorder will power
off.
4. Manually power on the camcorder, and it will work in the latest
firmware.

36
Note:
1. If tap “Remind me later”, the app notification will pop up every time when the
camcorder is connected.
2.When the smart phone’s Wi-Fi is occupied by the camcorder, iOS system will
auto switch to cellular data, and the network is still useable; but, Android
system won’t. Please attention the following notices to upgrade new
firmware.
(1) iPhone User: Because the smart phone’s Wi-Fi is connected with the
camcorder, iPhone will use cellular data to download the new firmware. If
you don’t want to use cellular data to download, cut off the smart phone’s
Wi-Fi connection with camcorder firstly, then connect with local area
network. Then, open the app once again and tap “Upgrade Now” to
download new firmware to smart phone.
(2) Android User: Because the smart phone’s Wi-Fi is connected with the
camcorder, Android phone has no network to download the file. Please cut
off smart phone’s Wi-Fi connection with the camcorder firstly, and connect
with local area network. Or, turn off the Wi-Fi, and use cellular data. Then,
open the app once again and tap “Upgrade Now” to download new
firmware to smart phone.
37
6 Specification
Item
Description
Image Sensor
5MP CMOS sensor
LCD Screen
1.5 inches color screen
Storage Media
Supports MicroSD 16GB and higher, and class V30
and higher.
Lens
Wide angle fixed focus lens
Focus Range
1.5m~infinity
Video
Resolution: 4K (3840x2160) WDR /
2K (2560x1440) WDR /
1080p (1920x1080) WDR
Format: .MP4
Picture
Resolution: according to video resolution setting
Format: JPG
G-Sensor
3 Axis G-force sensor
GPS
Built-in
Wi-Fi
Built-in
ISO
Auto
White Balance
Auto
38
Item
Description
Microphone
Built-in
Speaker
Built-in
Interface
USB-C, micro USB
Operation
Temperature
0° ~ 45° C
Operation
Humidity
20 ~ 70% RH
Storage
Temperature
-20° ~ 70° C
Supports OS
Android 9.0 and higher
iOS 13 and higher
Harmony 2 and higher
Dimension
97.3 x 59.5 x 40.0 mm
Weight
approximate 110g
Built-in IEEE 802.11b/g/n(HT20) Wi-Fi Chip: SSW101BC
Wi-Fi Band
2412~2472MHz
Wi-Fi Frequency
Ch1~Ch13