
1
Shenzhen Jamr Technology Co., Ltd
A101-301, D101-201, Jamr Science & Technology Park,
No. 2 Guiyuan Road, Guixiang Community, Guanlan Street,
Longhua District, 518100 Shenzhen, PEOPLE'S REPUBLIC OF CHINA
Shanghai International Holding Corp. GmbH (Europe)
Eiffestrasse 80, 20537 Hamburg, Germany
Version Number: 1.0
Revison date: 2025.04.25
2
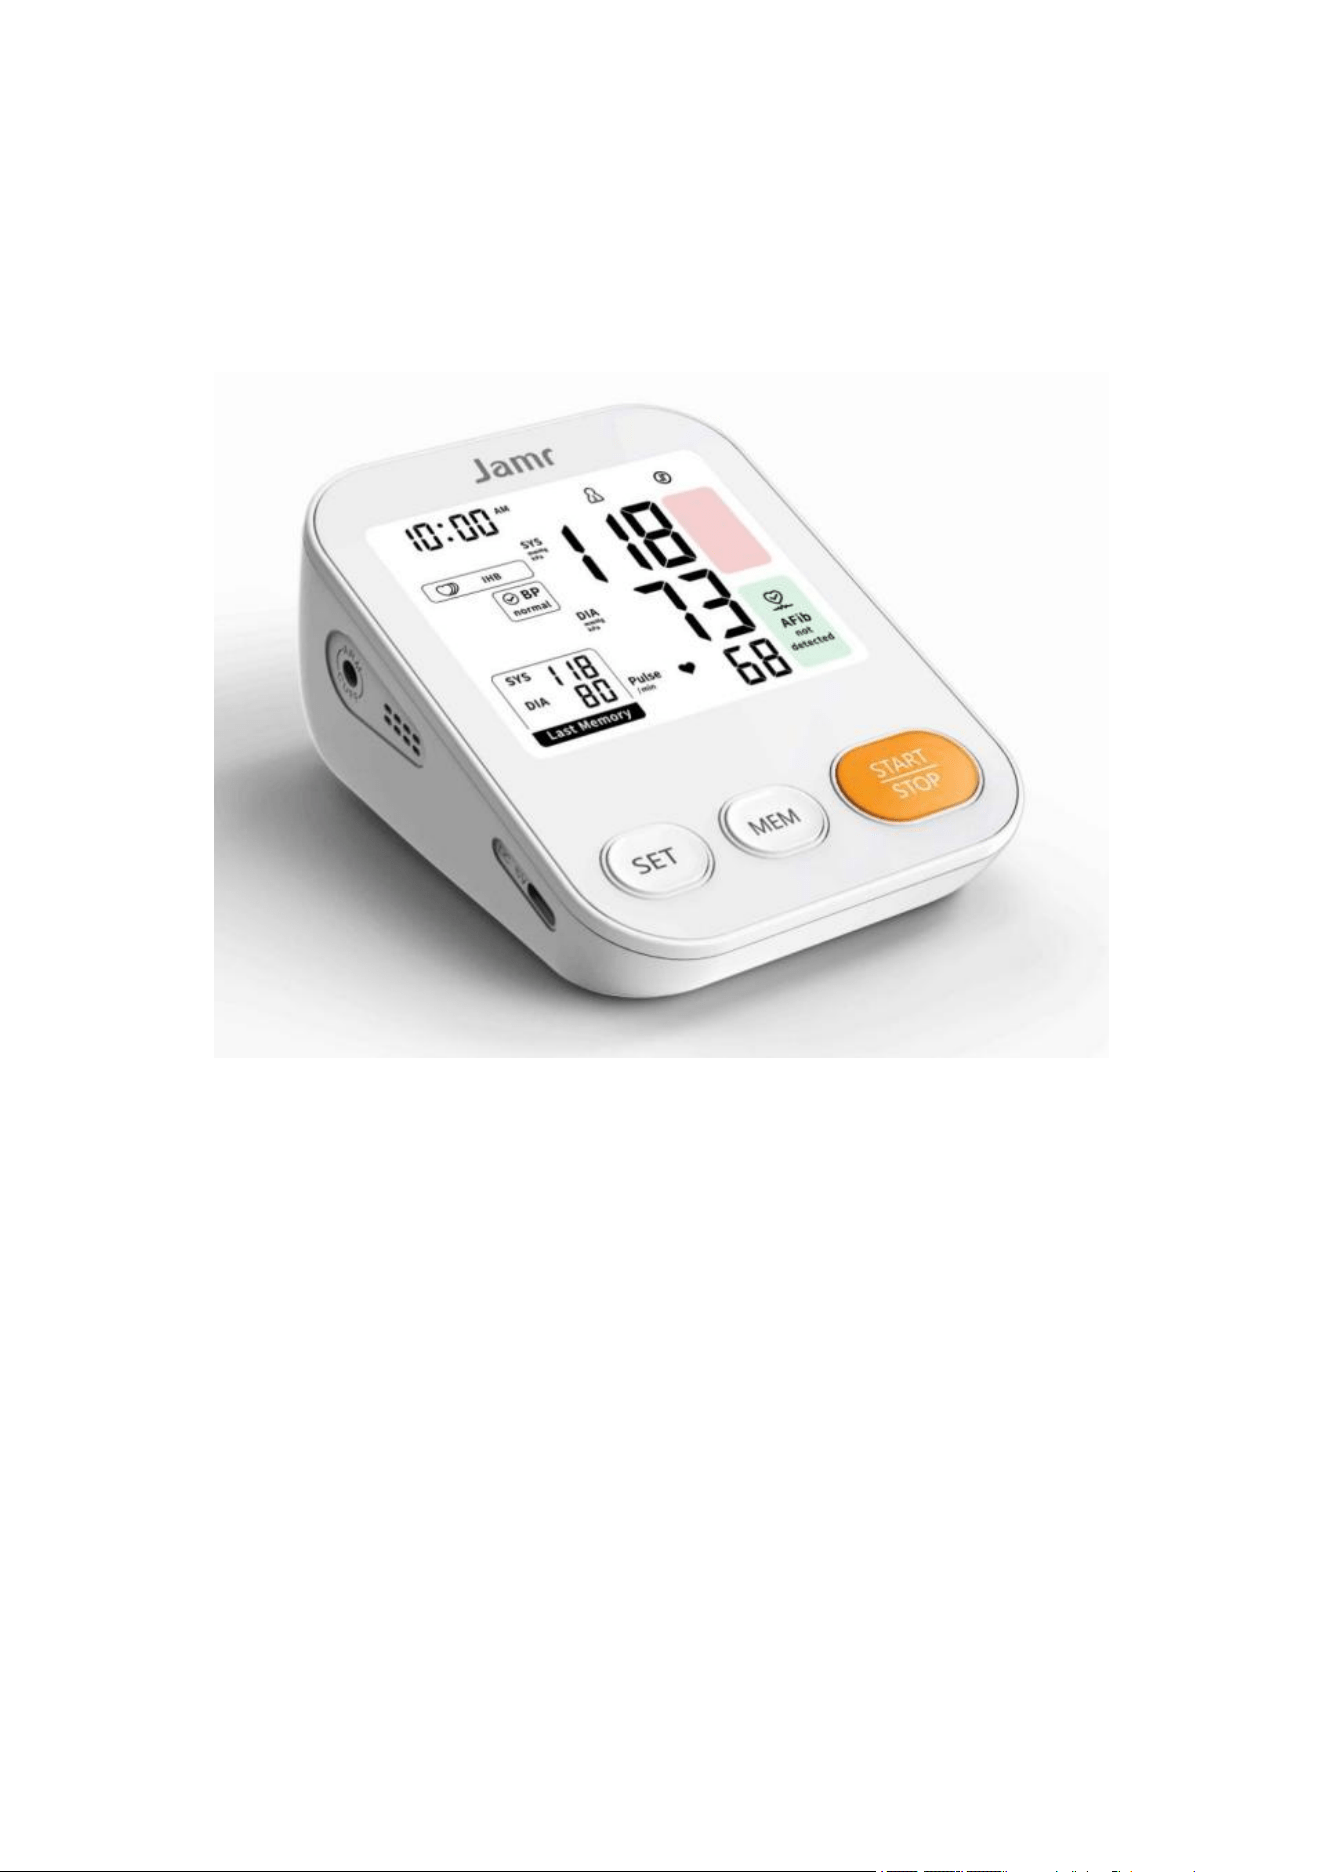
Blood Pressure Monitor
Model Number: A02T
----------------------------------------------------------------
USER’S MANUAL

3
CONTENTS
1 Introduction and Intended Use ...................................................................... 4
2 Important Information on Blood Pressure and its Measurement ................... 6
3 Components of Your Blood Pressure Monitor ...............................................7
4 Using your Monitor for the First Time ............................................................8
5 Measurement Procedure .............................................................................10
6 Care and Maintenance ................................................................................17
7 Warranty/Service .........................................................................................18
8 Certifications ............................................................................................... 18
9 Technical Specification ............................................................................... 18
10 FCC Statement ......................................................................................... 19
11 EMC Declaration ....................................................................................... 19

4
1 Introduction and Intended Use
The device is a fully automatic digital blood pressure measuring device using
oscillometric technique to measure systolic and diastolic blood pressure as
well as the pulse for users that ages are more than 12 years old by wrapping
around the upper arm with cuff circumference ranging from 22cm to 42cm, it
also check whether suspected atrial fibrillation is detected or not at the
same time. The device can be used in medical facilities or at home, and only
for indoor use.
Contraindication: The device is not used for patients under dialysis therapy or
on anticoagulant, antiplatelets, or steroids.
The device is provide accurate blood pressure measurement values that are
effective
and suitable for clinical and home use.
Before using, please read this instruction manual carefully and then keep
it in a safe place.
1.1 Remember…
• Only a health-care professional is qualified to interpret blood pressure
measurements.
• This device is NOT intended to replace regular medical checkups.
• The device is not intended for use pregnant patient.The effectiveness has not
been established in pregnant (including pre-eclamptic) patients.
•In cases of irregular heartbeat, measurements made with this instrument
should only be evaluated after consultation with a physician.
• The products, including accessories, shall be processed in accordance with
local regulations after reaching the life cycle.
• Any serious incident that has occurred in relation to the device should be
reported to the manufacturer and the competent authority of the Member State
in which the user and/or patient is established.
1.2 Warnings and Precautions
Warning: Do not use the AC adapter if the unit or the power cord is damaged.
Turn off the power and unplug the power cord immediately.
Warning: The device is not suitable for use in the presence of flammable
anesthetic mixtures with air or with oxygen or nitrous oxide.

5
Warning: If the patient is an intended operator, the functions of monitoring
blood pressure and pulse rate can be safely used by patient. The routine clean
and changing batteries can be performed by the patient.
Warning: The device provides a DC input port connected to external ac
adapter. It is recommended that use the adapter specified by the manufacturer.
The adapter should meet the following conditions: class II equipment, output
voltage: DC 5V, current: ≥1A, and comply with IEC 60950, IEC 60601-1 or IEC
62368-1, provide at least two MOOP insulation between ac input and dc output.
External adapter connected to medical electrical equipment through the DC
input port must comply with the respective IEC or ISO standards (e.g. IEC
60950 or IEC 62368-1 for data processing equipment). Further more all
configurations shall comply with the requirements for medical electrical
systems (see IEC 60601-1-1 or clause 16 of the 3Ed. of IEC 60601-1,
60601-1-2, respectively). Anybody connecting external adapter to medical
electrical equipment
configurations a medical system and is therefore responsible that the system
complies with the requirements for medical electrical systems. Attention is
drawn to the fact that local laws take priority over the above mentioned
requirements. If in doubt, consult your local representative or the technical
service department.
Warning: Too frequent measurements can cause injury to the PATIENT due to
blood flow interference.
Warning: Don’t place the cuff over wound part.
Warning: Pressurization of the CUFF can temporarily cause loss of function of
simultaneously used monitoring ME EQUIPMENT on the same limb.
Warning: Regularly checking the operation of the blood pressure monitor to
ensure that it does not cause long-term damage to the patient's blood
circulation.
Warning: Apply CUFF and its pressurization on the side of the patient's
mastectomy or
lymph node removal can cause injury.
Warning: To avoid any possibility of accidental strangulation, keep this device
away from children and do not drape tubing around your neck.
Caution: The user must check that the equipment functions safely and see that
it is in proper working condition before being used.
Caution: To avoid damaging the device, keep this unit away from children and
pets.
Caution: The standard material used for the bladder and tubing is latex-free.
Caution: The device is intended to monitor, not to diagnose. Unusual values
have to be always discussed with a physician. Under any circumstance, you
should not alter the dosages of any drugs prescribed by a physician.
Caution: The device cannot be used to substitute the professional ECG
monitor device for monitoring the frequency of heart beat.
Caution: This device can not be used together with HF surgical equipment.
6
Note: To obtain the greatest accuracy from your blood pressure monitor, it is
recommended that the instrument be used within the specified temperature
and the relative humidity, please see the Technical Specifications.
Note:The device can not be used in MRI environment.
Note: The cuff is defined as the applied part. The user should contact the
manufacturer for assistance, if needed, replace, or maintaining the device.
Note: This device contains sensitive electronic components. Avoid strong
electrical or electromagnetic fields in the direct vicinity of the device (e.g.
mobile telephones, microwave ovens) during use. These can lead to erratic
results.
Note: Do not attempt to service or repair this device yourself. Should a
malfunction occur, refer to local distributor or the manufacturer.
2 Important Information on Blood Pressure and its
Measurement
2.1 How does high or low blood pressure arise?
Your level of blood pressure is determined in the circulatory center of the brain
and adjusts to a variety of situations through feedback from the nervous
system. To adjust blood pressure, the strength and speed of the heart (Pulse),
as well as the width of circulatory blood vessels is altered.Blood vessel width is
controlled by fine muscles in the blood vessel walls.
Your level of arterial blood pressure changes periodically during heart activity:
During the “blood ejection” (Systole) the value is highest (systolic blood
pressure value). At the end of the heart’s “rest period” (Diastole) pressure is
lowest (diastolic blood pressure value).
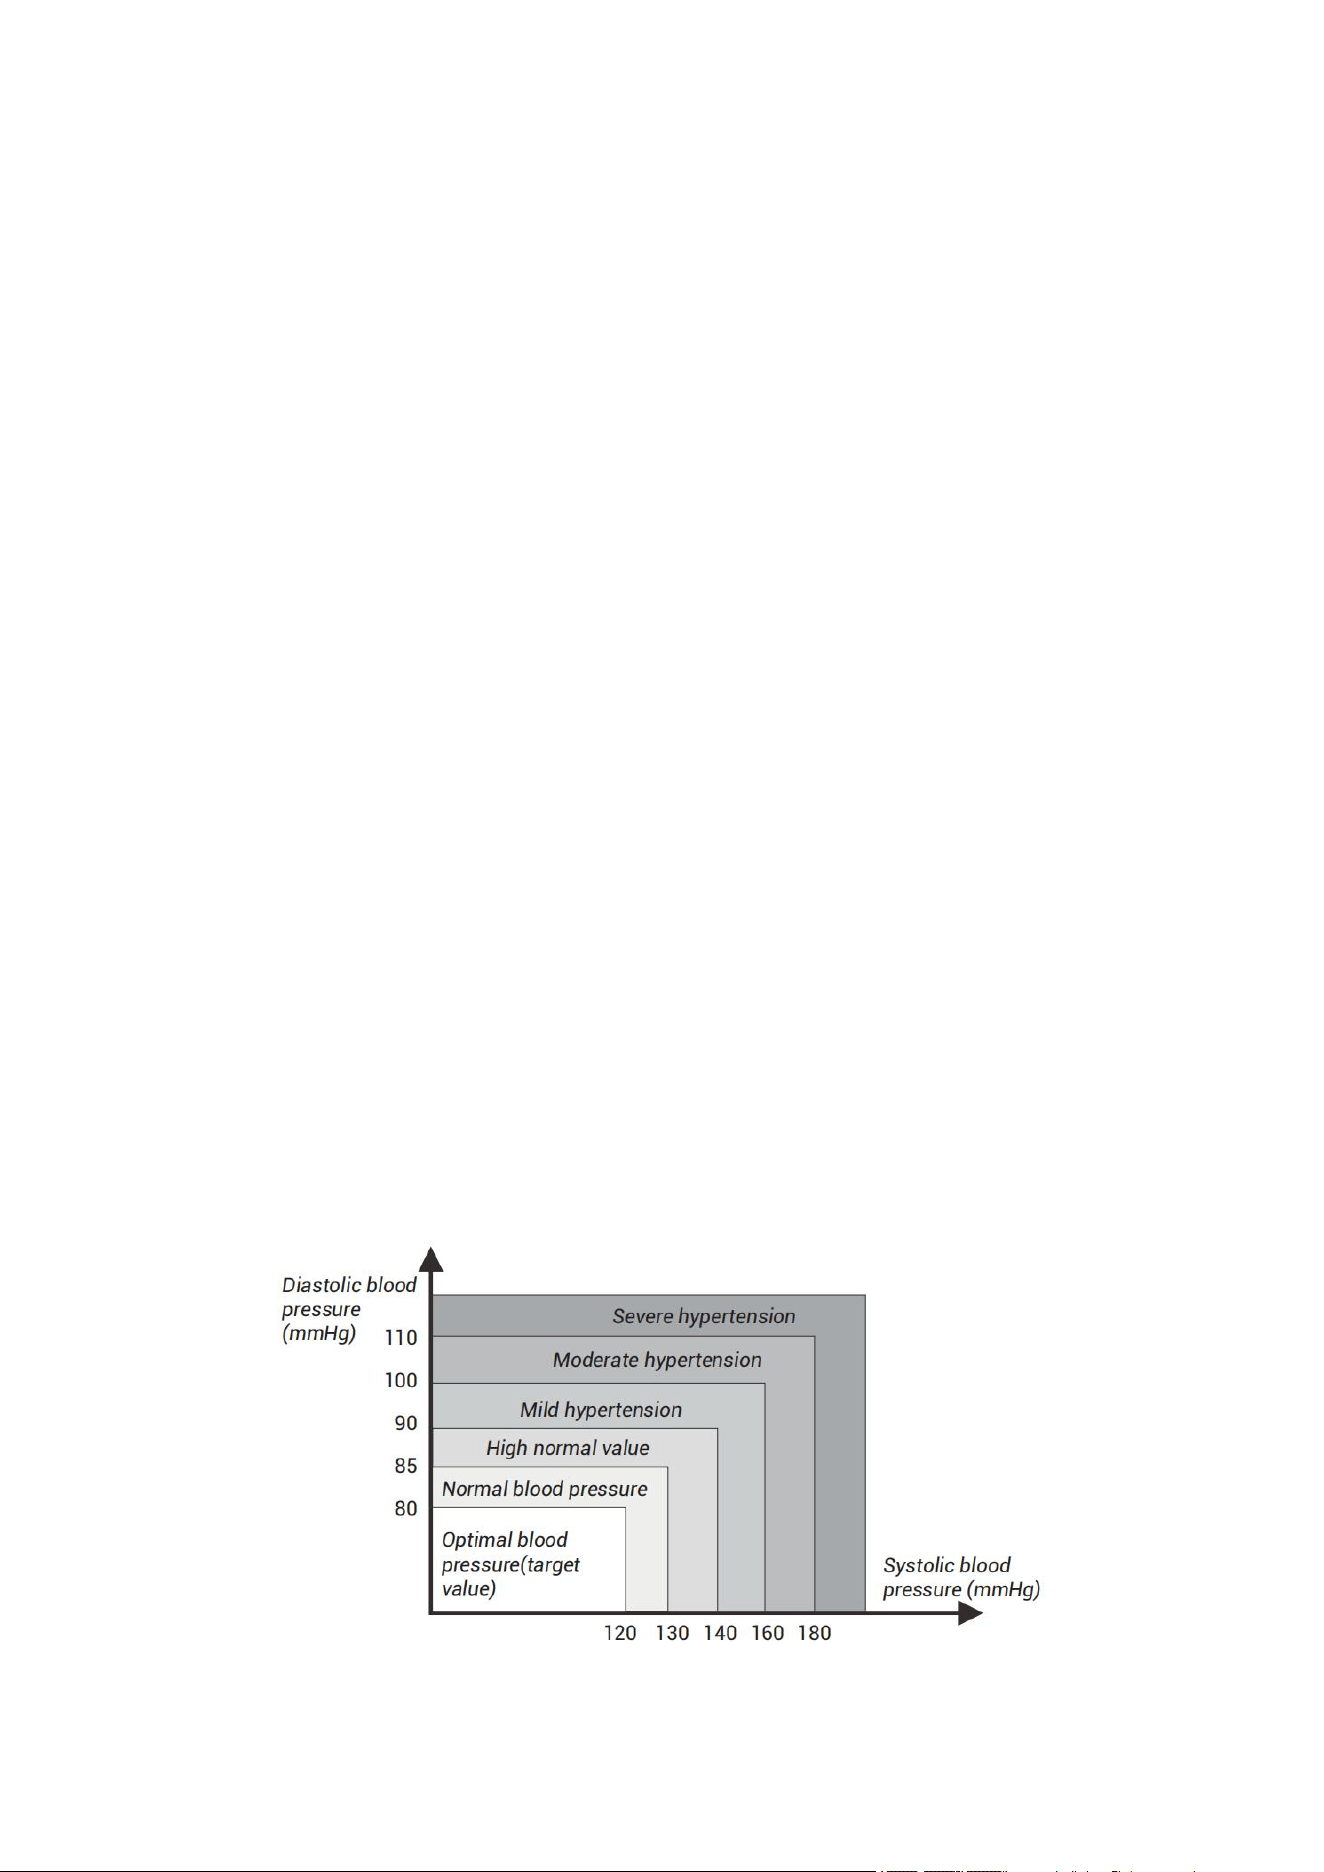
2.2 Which values are normal?
Please refer to the diagram below (Picture-01)
Picture-01
7
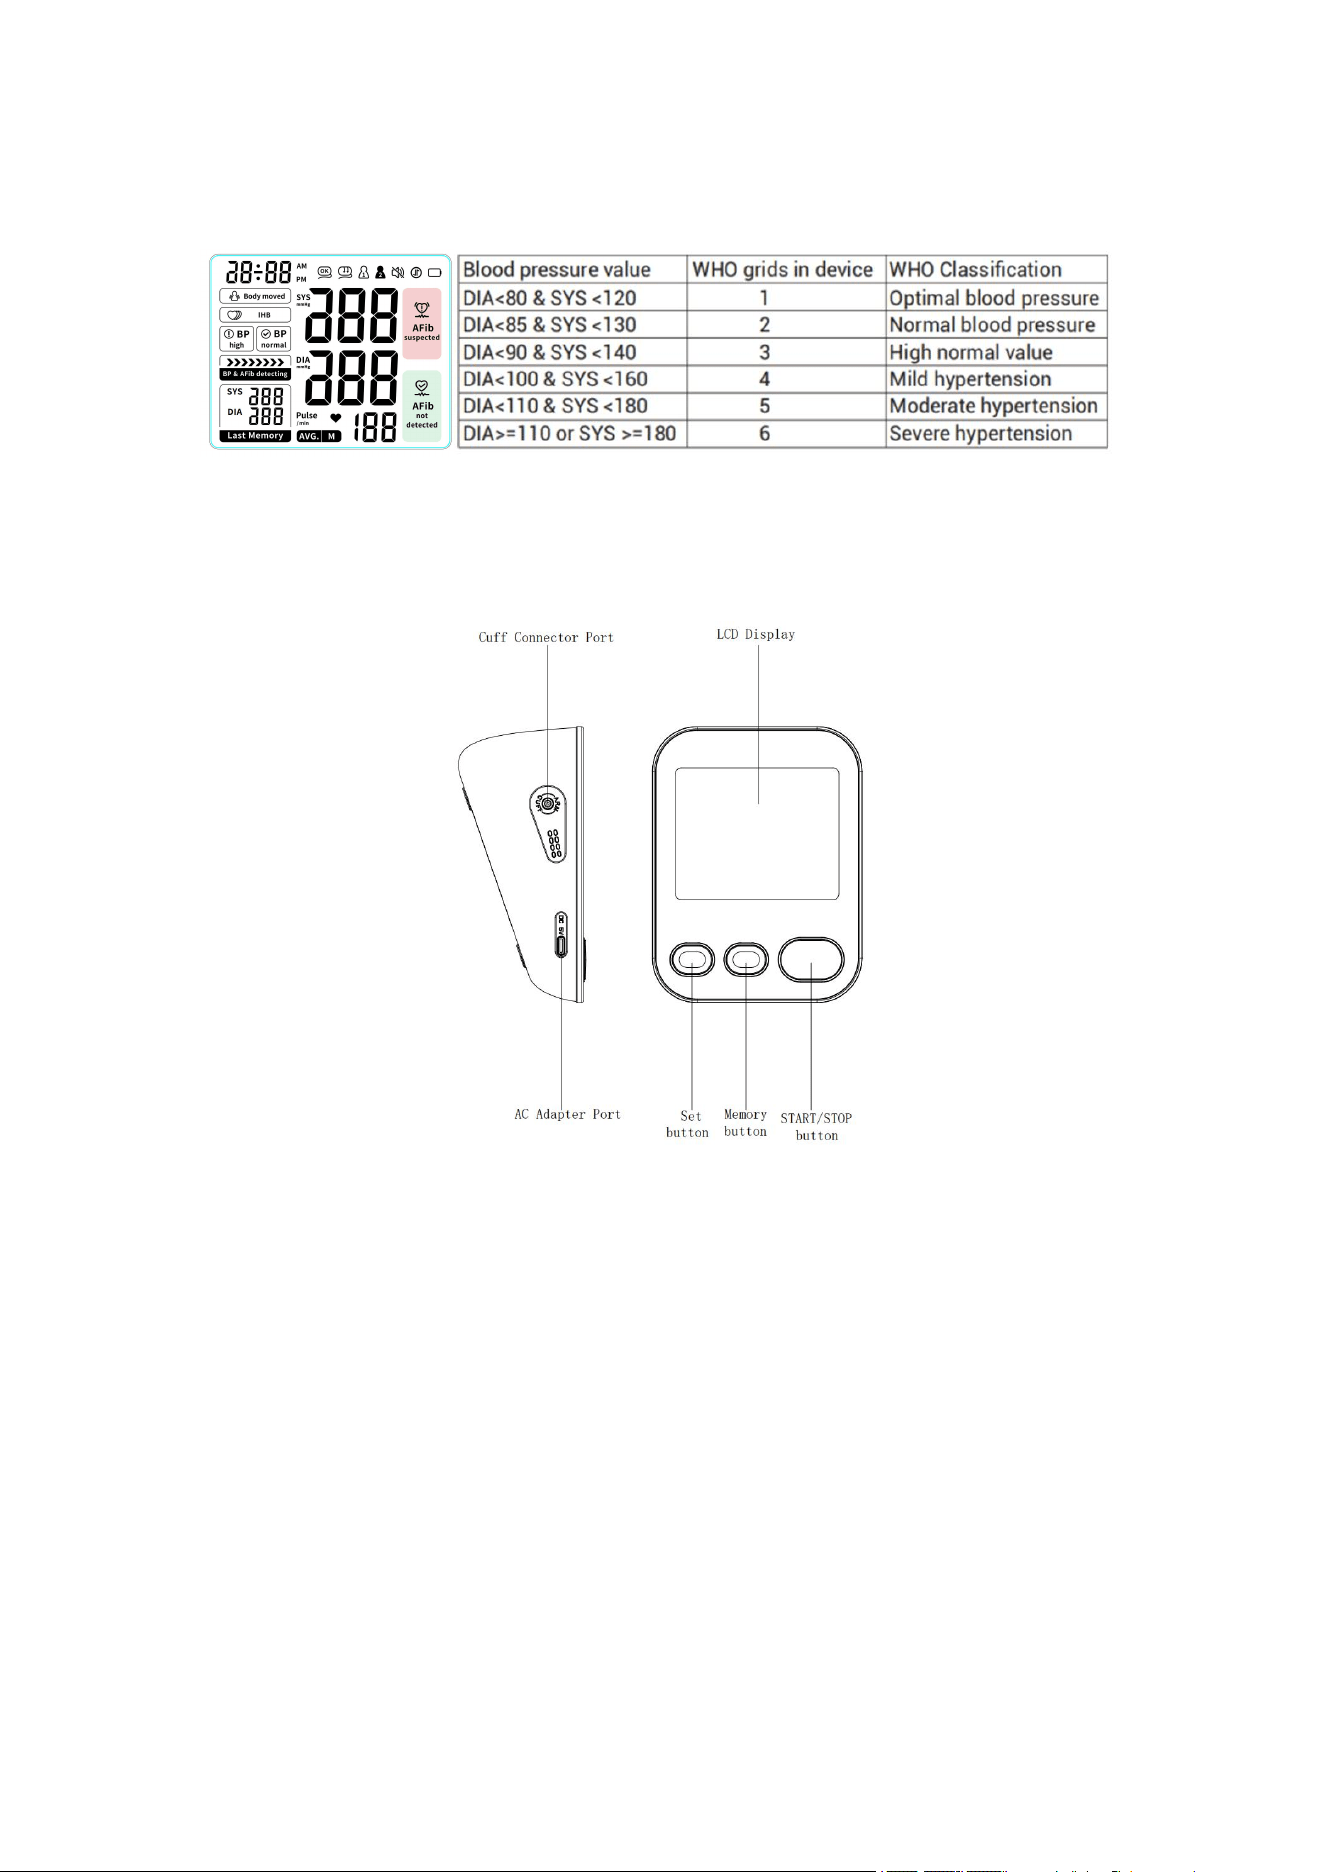
There are six grids in the display of device. Please refer to the Picture-01-01.
Different grids represent different interval scales of WHO.
Picture-01-01
3 Components of Your Blood Pressure Monitor
3.1 Measuring unit
Picture-02
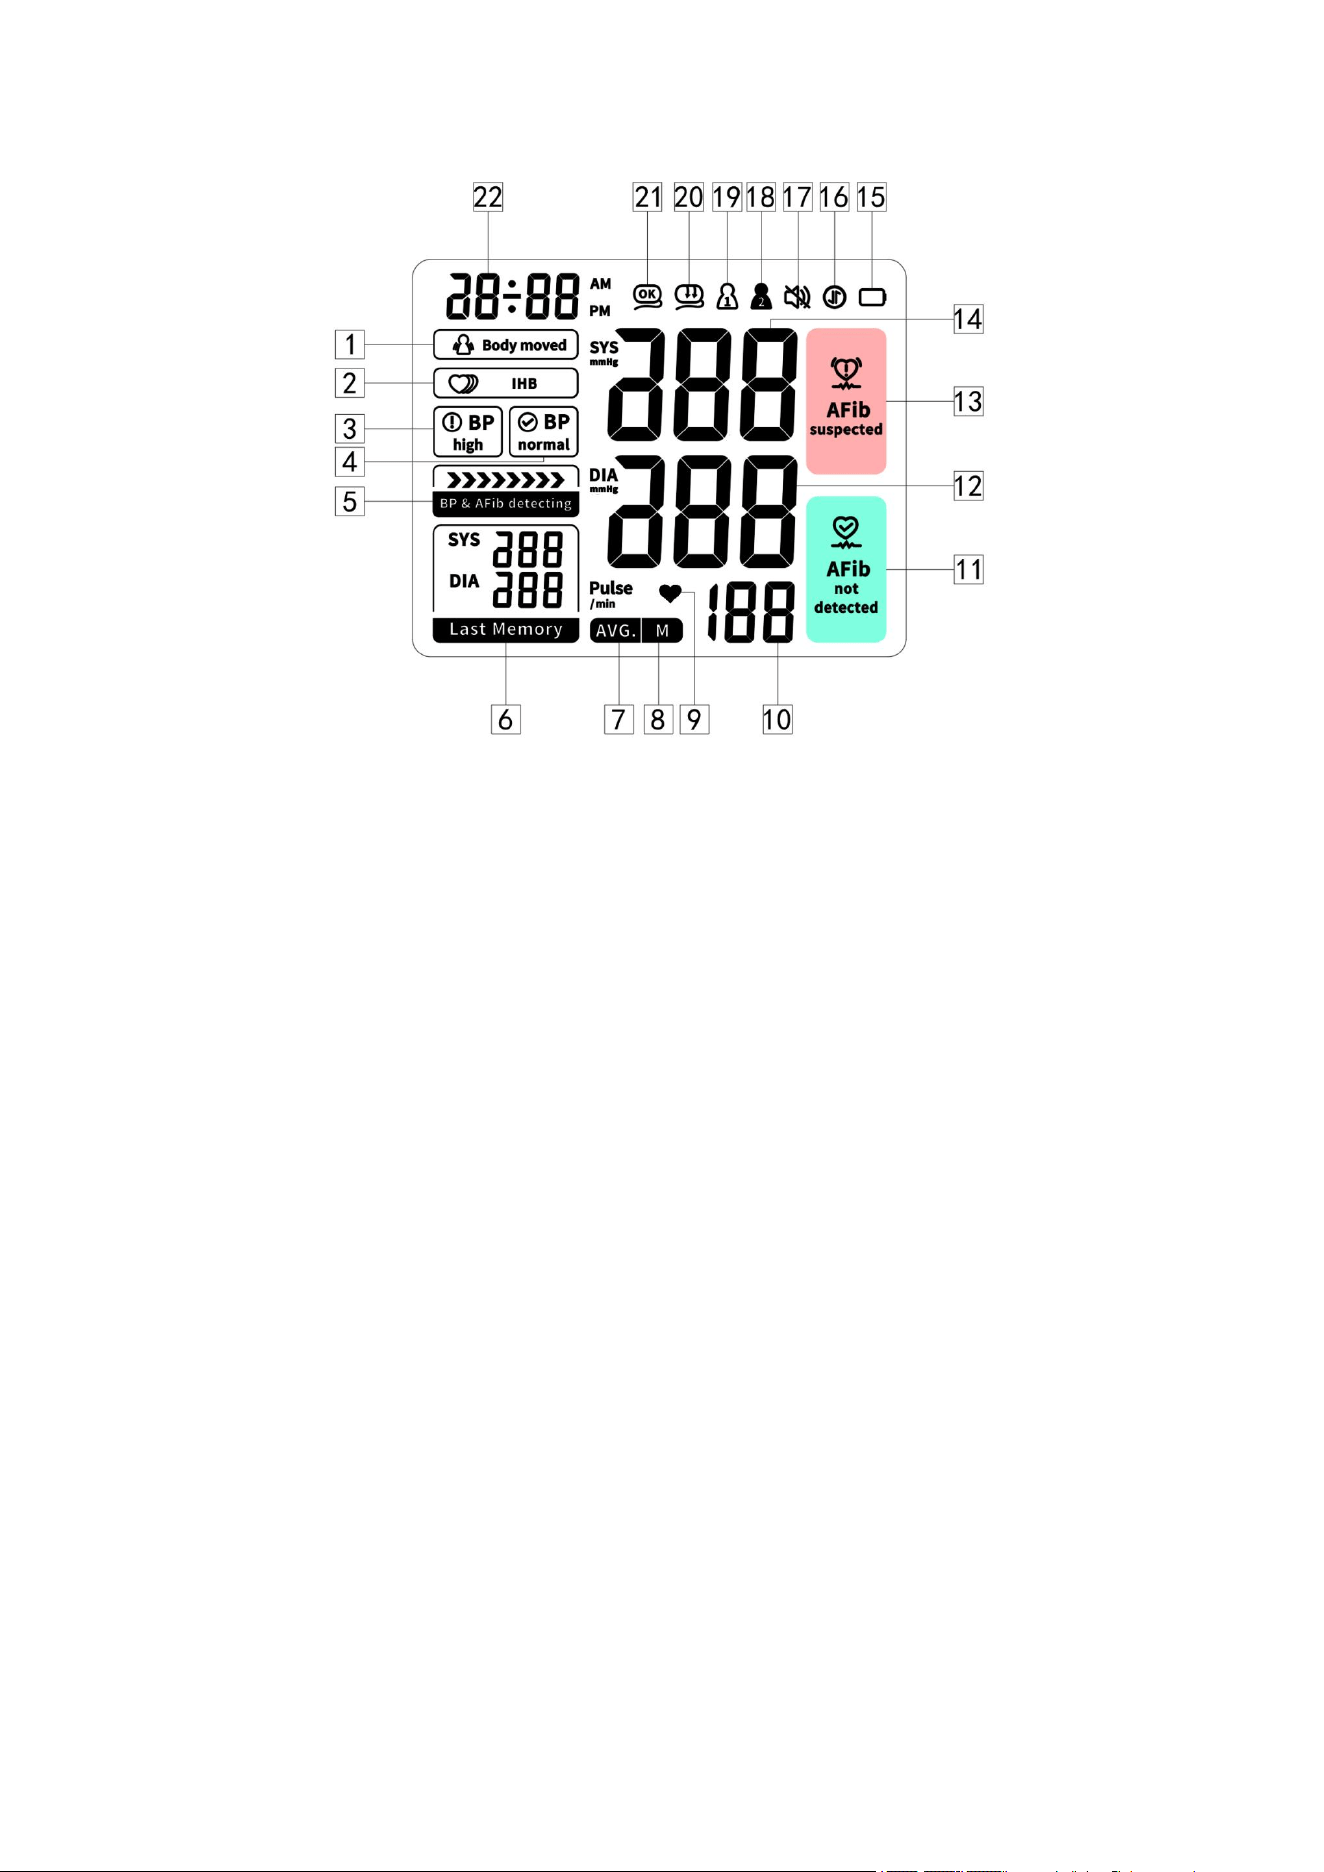
3.2 The symbols on the LCD display
8
Picture-03
1.Body moved symbol 2.Irregular heartbeat symbol
3.High blood pressure symbol 4. Normal blood pressure
symbol
5.Be detecting symbol 6. Last memory symbol
7. Average value symbol 8. Memory symbol
9. Heartbeat symbol 10.Pulse display / Memory
number
11.AFib not detected symbol 12.Diastolic blood pressure
13.Suspected AFib symbol 14. Systolic blood pressure
15. Low battery symbol 16.Bluetooth symbol
17. Mute symbol 18.USER 2
19. USER 1 20.Cuff wrap correct symbol
21.Cuff wrap error symbol 22.Time / date symbol
20. Time / date symbol
3.3 Features of Model A02T
1. Double users: 2 x 120 sets memory 2.Cuff self-checking function
3. Irregular heartbeat checking 4. Average value function
5. Low battery display 6. External power adapter support
7. Auto power-off 8.Volume adjustment
9.Last memory 10. LCD display
11. Suspected AFib detecting 12. Bluetooth function
4 Using your Monitor for the First Time
4.1 Activating the pre-installed batteries
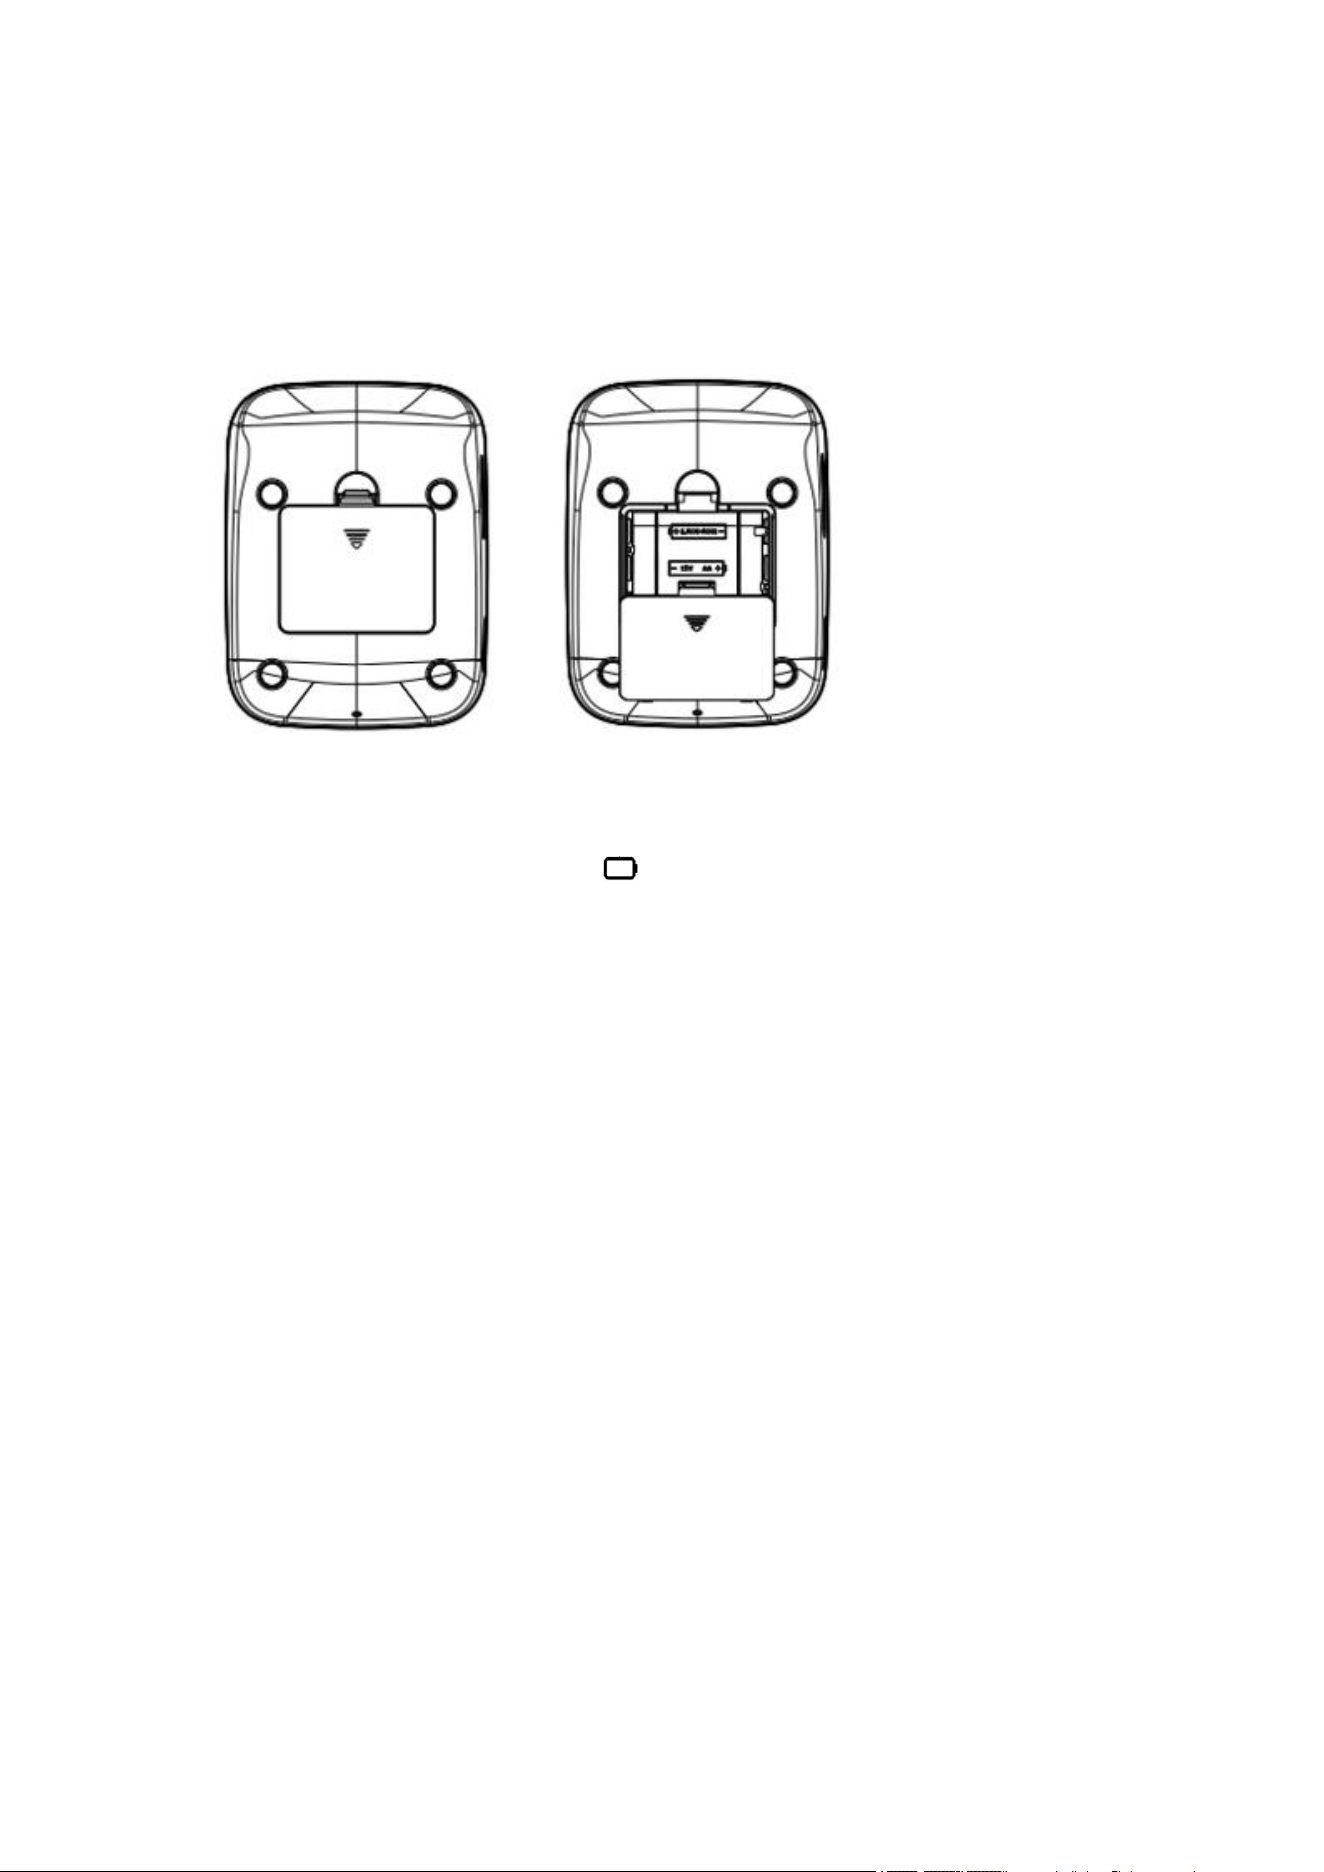
Battery Installation
9
Use only 1.5V “AA” alkaline batteries with this device.
1. Press the hook on the bottom of the battery cover and lift the cover off in the
direction of the arrow (Picture-04).
2. Install 3 “AA” size batteries and make sure the + (positive) and - (negative)
polarities match the polarities of the battery compartment, then close the
battery cover.Make sure that the battery cover is securely in position.
Picture-04
Battery replacement
Low Battery Indicator
1. When the Low Battery symbol appears on the display, turn the monitor
off and remove all the batteries. Replace with 3 new batteries at the same time.
Long-life alkaline batteries are recommended.
2. To prevent the damage of monitor from leaked battery fluid, please take out
of battery if the monitor unused in a long time(generally more than 3 months).
If battery fluid get in your eyes, immediately rinse with plenty of clean water.
Contact a physician immediately.
Dispose of the device, components and optional accessories according to
applicable local regulations. Unlawful disposal may cause environmental
pollution.
4.2 System Settings
Before making system settings, install the battery and turn on the power. Long
press the [SET] key for about 3 seconds under the power off state until the us
er icon flashes in the screen to enter the blood pressure monitor system
setting.
The setting methods are as follows:
1. User setting: when the user icon is flashing, short press the [MEM] key to s
elect the user (1 or 2 ) whose measurement data need to be stored, and
press the [SET] key to confirm after selection for the next setting.
2. Year setting: when the year is flashing, short press the [MEM] key, the year
number will be added forward in the form of incremental year until 2049, and t
hen return to the initial year, after the year is selected, press the [SET] key to

10
confirm, and then proceed to the next setting.
3. Month setting: When the month is flashing, short press the [MEM] key, the
month will be incremented to the previous month, and then press the [SET] ke
y to confirm the selection. Then set the date in the same way, after setting, pr
ess [SET] key to confirm and proceed to the next setting.
4. Hour setting:
When 12/24H icon is flashing, short press [MEM] key to select hour,
and then press [SET] key to confirm the selection, and then proceed to the
next setting.
5. Time setting: when the hour is blinking, short press [MEM] key to add the h
our forward, press [SET] key to confirm after the hour is selected; and then se
t the minutes in the same way, press [SET] key to confirm after the minutes ar
e set, and then proceed to the next setting.
6. Volume setting: When the high pressure position shows vol, there are 1,2,3,
OFF gears to adjust the volume level, switching
by short press [MEM] key, when the low pressure position shows oFF is off,
after selection
press [SET] key to confirm, the setting is completed, the setting result will be s
aved automatically and shut down the machine.
Note: After replacing the battery and powering up, it will enter the system
setting interface directly to remind the user to make settings.
5 Measurement Procedure
5.1 Before measurement
• Avoid eating and smoking as well as all forms of exertion directly before
measurement. These factors influence the measurement result. Find time to
relax by sitting in an armchair in a quiet atmosphere for about ten minutes
before taking a measurement.
• Remove any garment that fits closely to your upper arm.
• Always measure on the same arm (normally left).
5.2 Fitting the Cuff
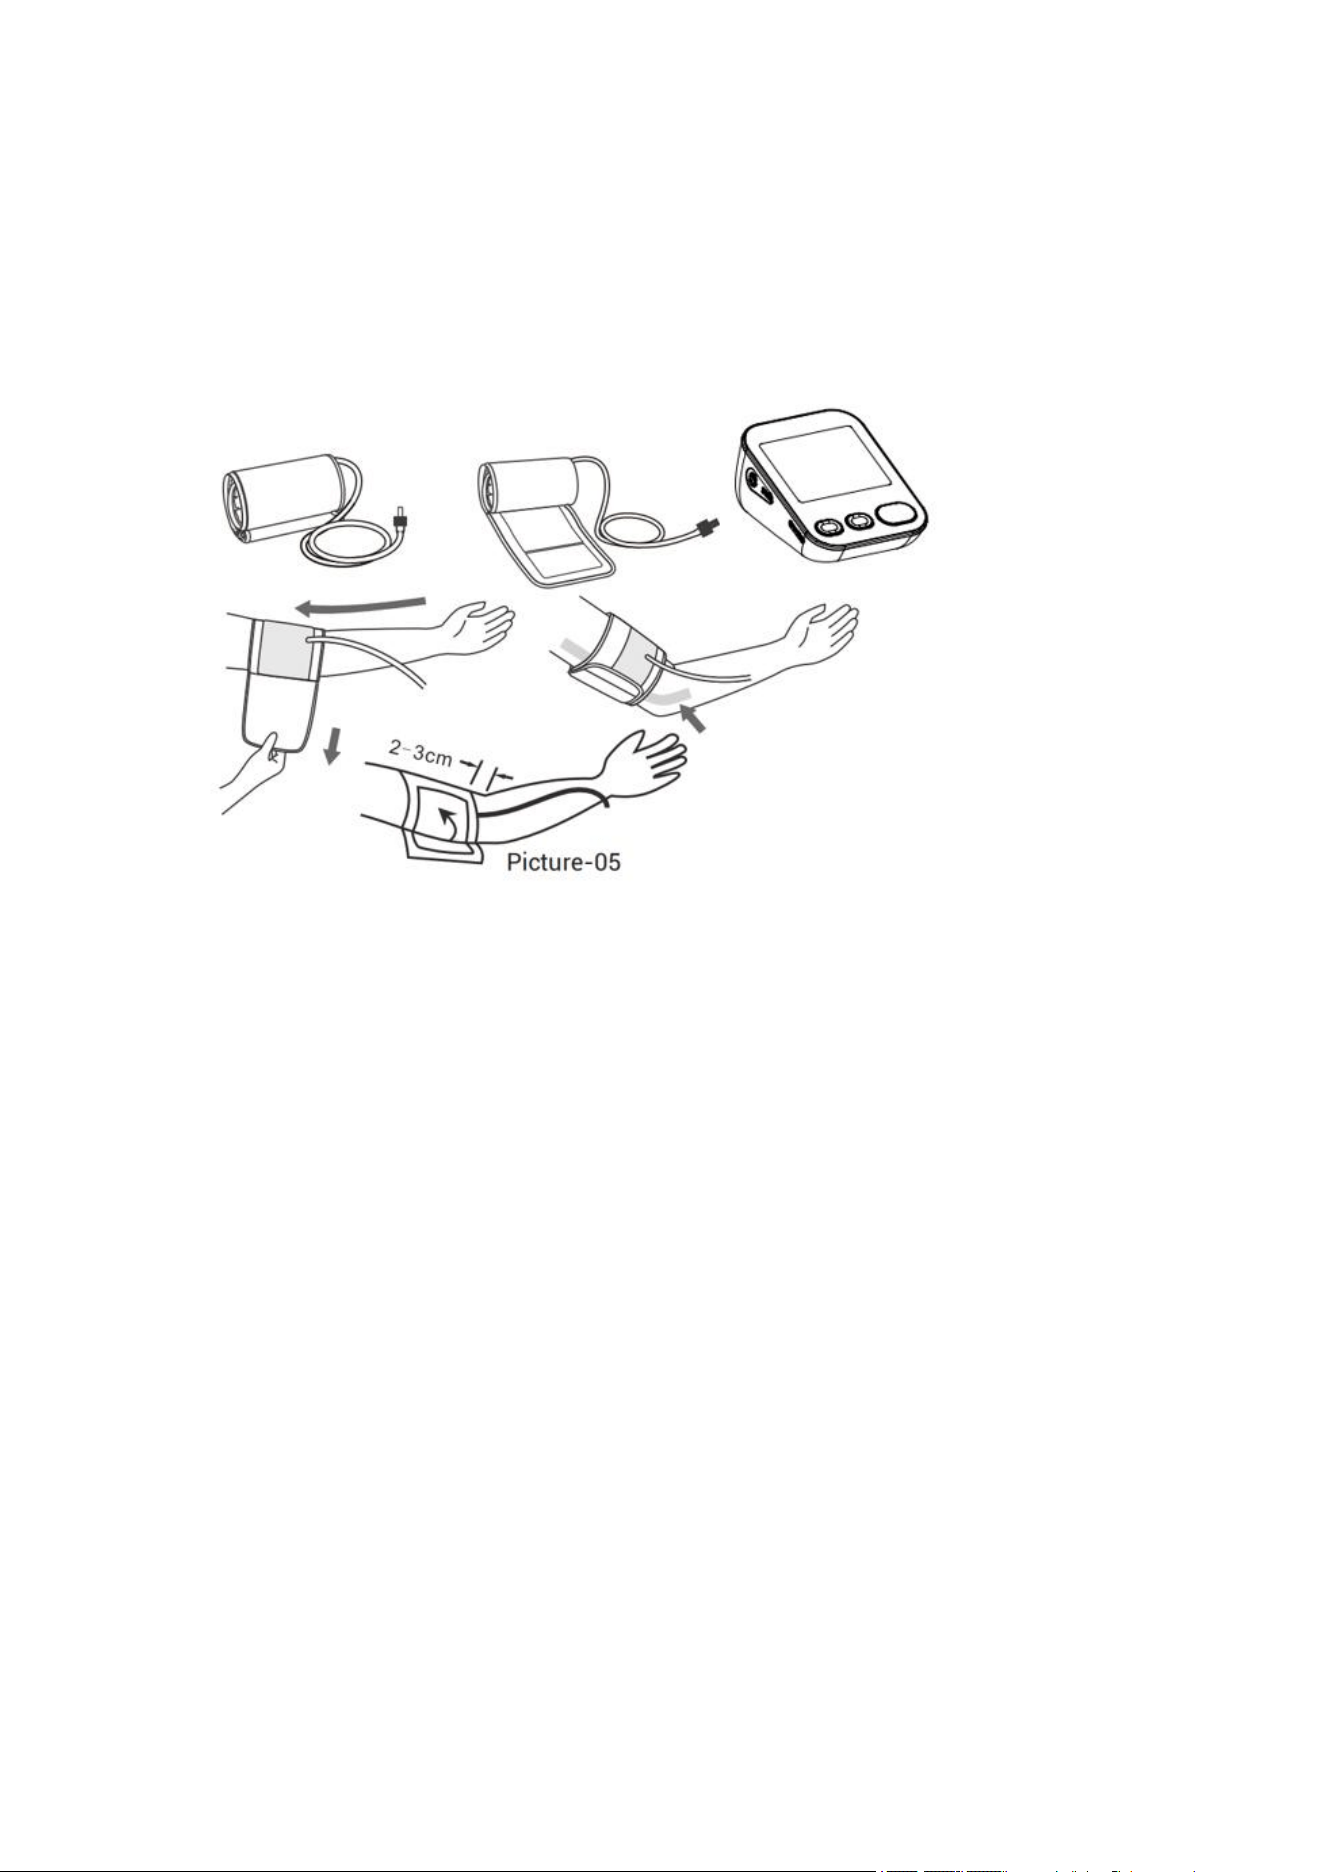
Please refer to picture-05
1. Wrap the cuff around your upper left arm. The rubber tube should be on the
inside of your arm extending downward to your hand. Make certain the cuff lies
approximately 2 to 3 cm above the elbow. Important! The on the edge of
the cuff (Artery Mark) must lie over the artery which runs down the inner side of
the arm.
2. To secure the cuff, wrap it around your arm and press the hook and loop
11
closure together.
3. There should be little free space between your arm and the cuff. You should
be able to fit 2 fingers between your arm and the cuff. Cuffs that don’t fit
properly result in false measurement values. Measure your arm circumference
if you are not sure of proper fit.
4. Lay your arm on a table (palm upward) so the cuff is at the same height as
your heart. Make sure the tube is not kinked.
5.3 Measure Procedure
The device is designed to take measurements and store the measurement
values in memory for two people using User ID 1 and User ID 2.
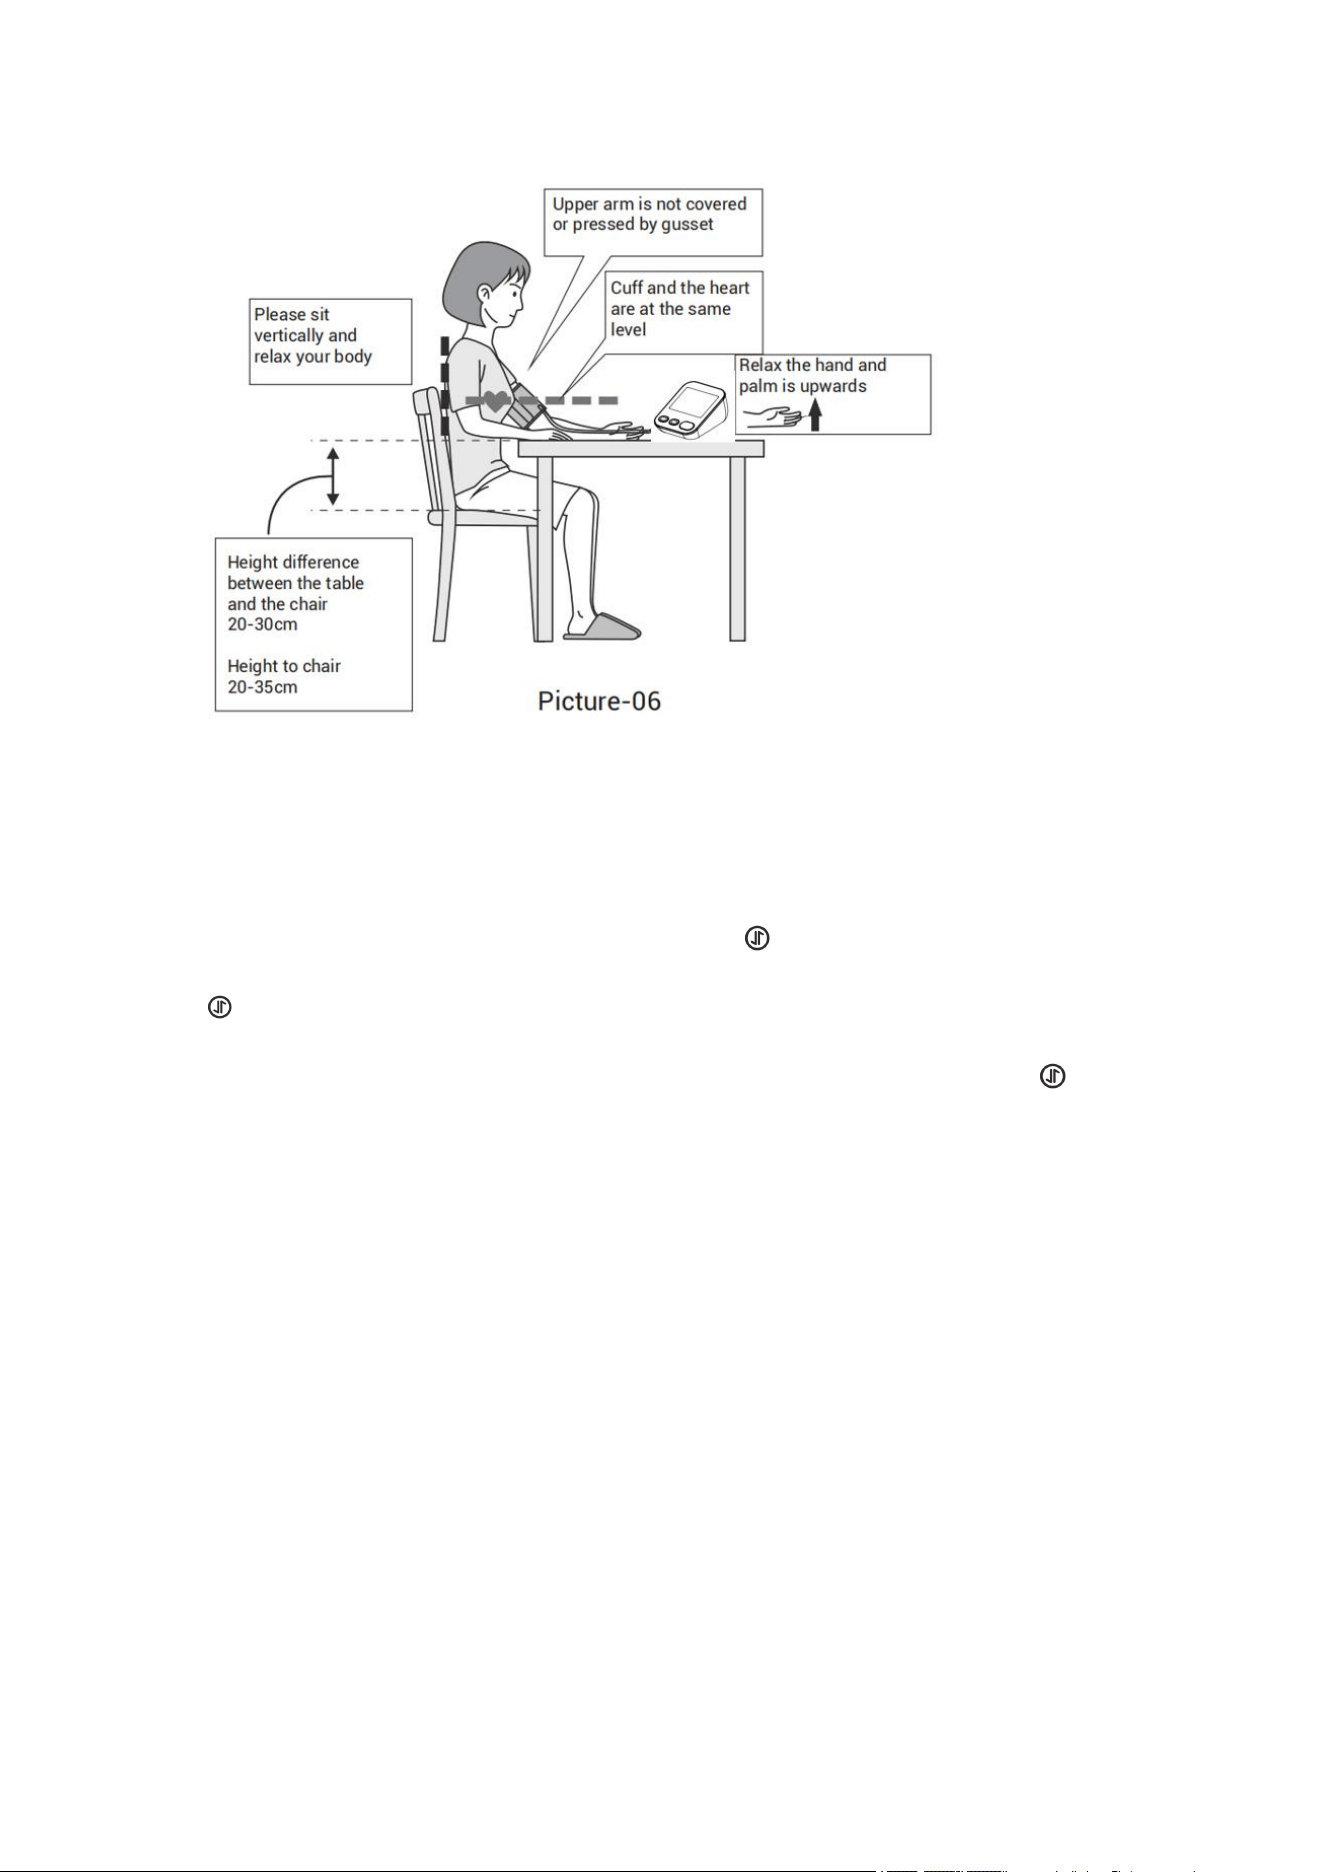
Refer to picture-06
1. Sit comfortably in a chair with your feet flat on the floor.
2. Select your User ID (1 or 2).
3. Stretch your arm forward on the desk and keep relaxing, make sure the
palm of hand is upturned. Make sure arm is in correct position, to avoid body
movement. Sit still and do not talk or move during the measurement.
After the cuff has been appropriately positioned on the arm and connected to
the blood pressure monitor, the measurement can begin:
12
Operate via the App on smart phone with Bluetooth
1. Install the App from Google play store or Apple app store. Open Bluetooth
on smart phone, and then turn on the App.
2. Bluetooth pairing
Turn on the device and the Bluetooth symbol ( ) will flash, Then operate
bluetooth pairing according to the Settings on the APP, The Bluetooth symbol
( ) will stop flashing after the Bluetooth pairing is successful.
3. Bluetooth will be automatically searched and connected when it is powered
on. After the Bluetooth connection is successful, the Bluetooth symbol ( ) will
stop flashing and the measurement data will be uploaded to the APP.
Note:Devices that have been successfully paired will save the pairing
information and do not need to be paired again.
It is recommended to connect the APP through Bluetooth before each
measurement and then start the measurement.
Blood pressure measure and suspected AFib detecting
1. Press the [START|STOP] button to start Measure. The pump begins to
inflate the cuff. In the display, the increasing cuff pressure is continually
displayed.
NOTE: If the voice is playing, you can turn off the voice by pressing the
【
SET/MEM
】
2. After automatically reaching an individual pressure, the pump stops and the
pressure falls. The cuff pressure is displayed during the measurement.
3. When the device has detected your pulse, the heart symbol in the display
begins to blink.

13
4. When the measurement has been concluded, the measured systolic and
diastolic blood pressure values, as well as the pulse will be displayed, it also
displaces whether suspected atrial fibrillation is detected or not at the
same time.
5. The measurement results are displayed until you switch the device off by
pressing the [START|STOP] button. If no button is pressed for 60 seconds, the
device switches off automatically.
Description of symbols during measurement
1.Cuff self-checking symbol ( )
The cuff correct symbol( ) will be displayed if the cuff position is correct,
otherwise the wrong symbol( ) will be displayed. Please check again the
cuff if the wrong symbol( ) is displayed.
2.Movement error symbol ( )
The Movement error symbol ( ) is displayed if you move your body during the
measurement. Please remove the cuff, and wait 2-3 minutes. Reapply the cuff
and take another measurement.
5.4. Irregular heartbeat and suspected Atrial fibrillation Detector
5.4.1 Irregular heartbeat Detector
This symbol( ) - indicates that pulse irregularities were detected during
the measurement.
In this case, the result may deviate from your normal basal blood pressure
repeat the measurement.
Information for the physician on frequent appearance of the Irregular
Heartbeat Symbol.
This instrument is an oscillometric blood pressure monitor device that also
analyzes pulse frequency during measurement. The instrument is clinically
tested.
If pulse irregularities occur during measurement, the irregular heartbeat
symbol is displayed after the measurement. If the symbol appears more
frequently (e.g. several times per week on measurements performed daily) or if
it suddenly appears more often than usual, we recommend the patient to seek
medical advice. The instrument does not replace a cardiac examination, but
serves to detect pulse irregularities at an early stage.
5.4.2 suspected Atrial fibrillation Detector
This symbol ( ) - indicates that susptected atrial fibrillation was
detected during the measurement. Normally, your heart contracts and
relaxes to a regular beat. Certain cells in your heart produce electrical
signals that cause the heart to contract and pump blood. Atrial fibrillation
occurs when rapid, disorganized electrical signals are present in the
heart’s two upper chambers, called the atria; causing them to contract

14
irregularly (this is called fibrillation). Atrial fibrillation is the most
common form of heart arrhythmia. It often causes no symptoms, yet it
significantly increases your risk of stroke. You’ll need a doctor to help
you control the problem. This device is an oscillometric blood pressure
monitor that also analyses pulse irregularity during measurement. The
device is clinically tested. The suspected AFib symbol is displayed after
the measurement, if atrial fibrillation occurred during measuring. If the
suspected AFib symbol appears after having performed a blood
pressure measurement , the patient is advised to perform another
measurement. If the suspected AFib symbol appears again, we
recommend the patient to seek medical advice. it indicates the possible
presence of atrial fibrillation. The atrial fibrillation diagnosis however,
must be made by a cardiologist based on ECG interpretation
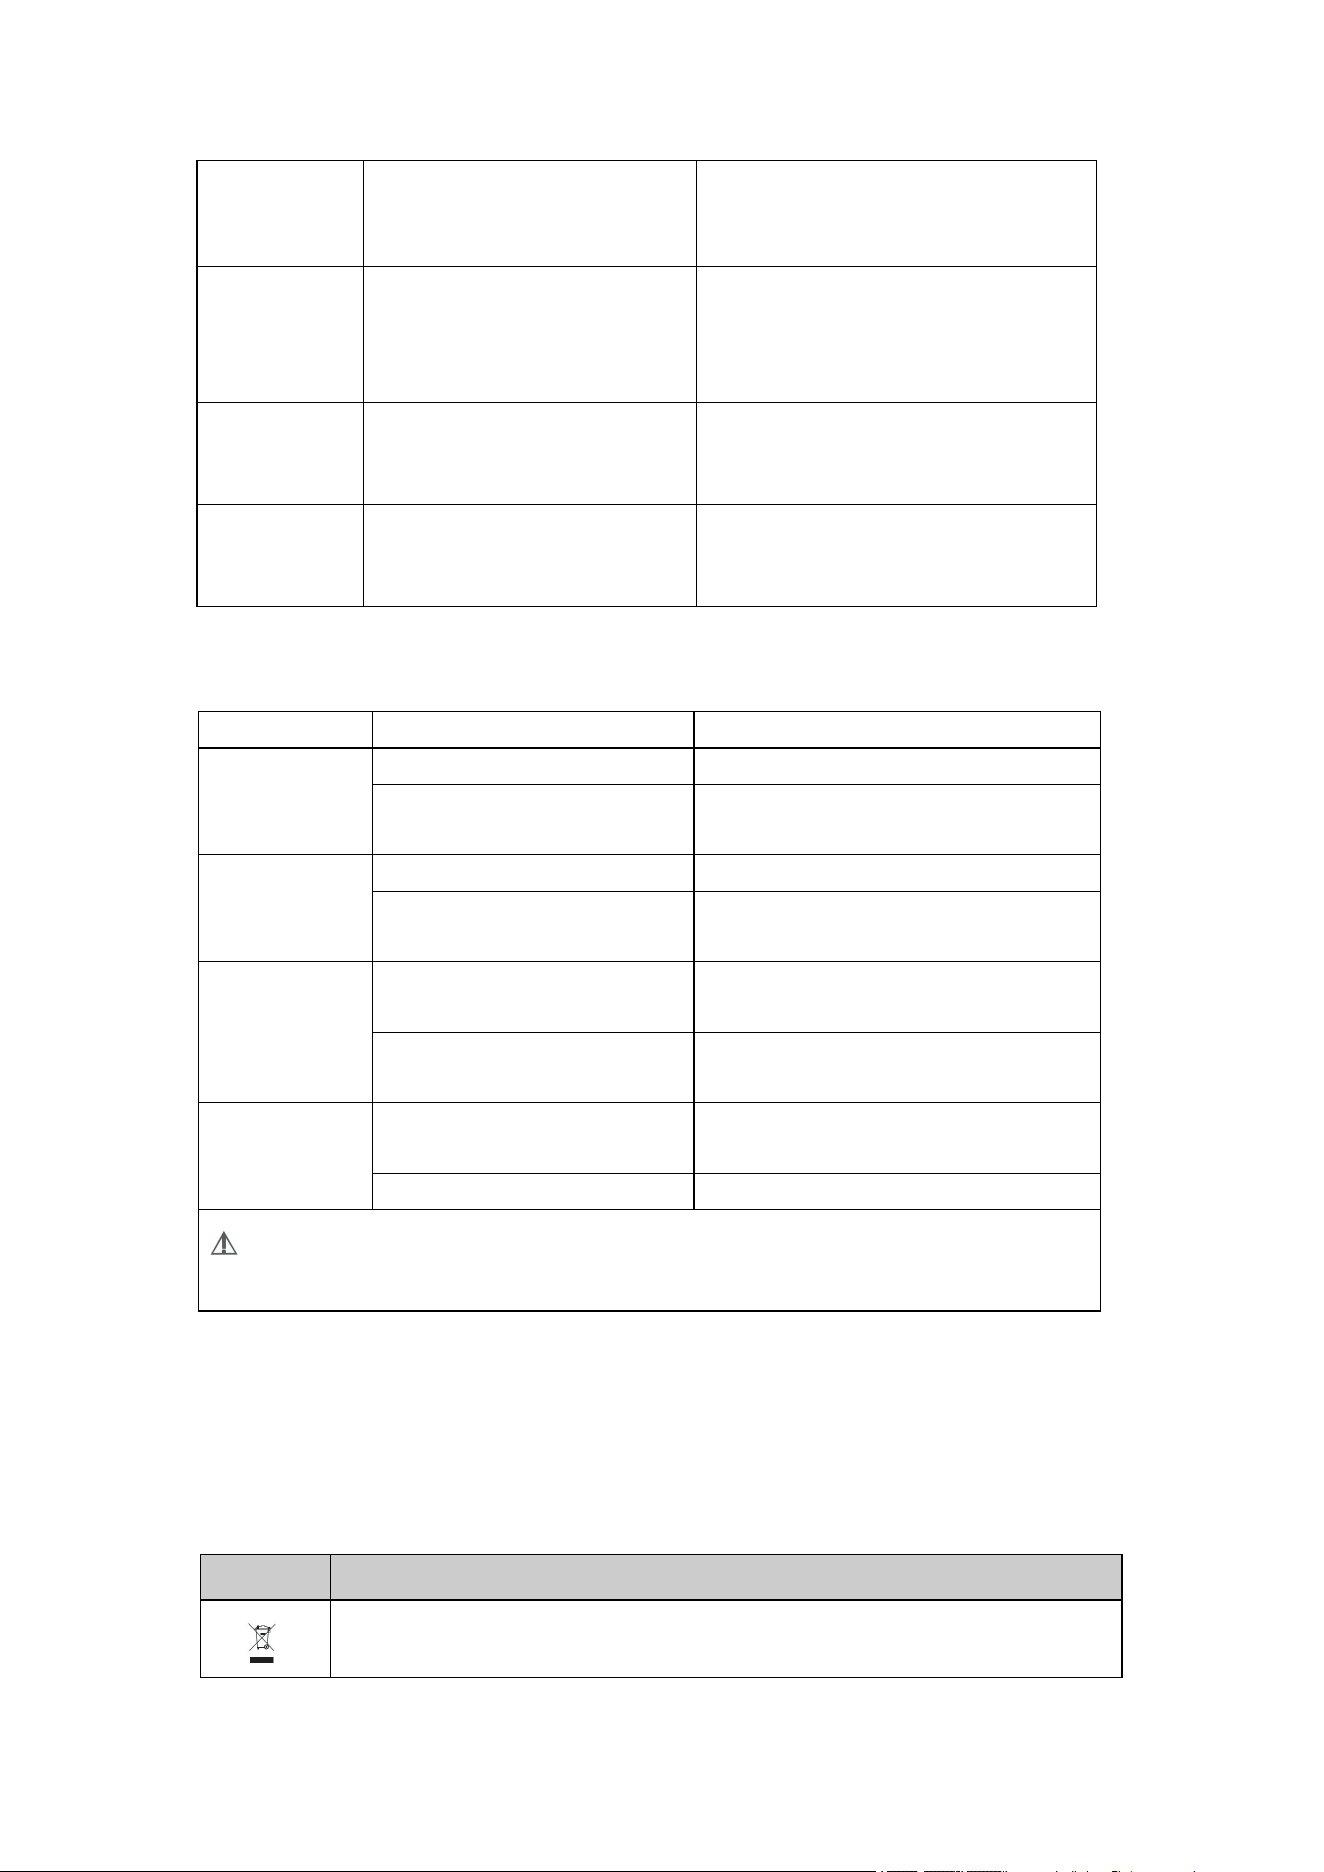
5.5 Error Indicates
The following symbol will appear on the display when measuring abnormal:
SYMBOL
CAUSE
CORRECTION
No display
appears
Weak battery or improper
placement
Replace batteries with new ones.
Check the battery installation for
proper placement of the battery
polarities.
Er1
Sensor abnormal
Please make sure the cuff pressure is
drained and then measure again. If
the error is still displayed, please send
it to local distributor
Er2
Monitor could not detect pulse
wave or cannot calculate the
blood pressure data
Start the measurement again.If the
error is still displayed, please send it
to local distributor
Er3
Measurement results is
abnormal or out the
measurable range of blood
pressure
Please keep quiet and measure again
Er4
Too loose cuff or air leakage
Tie the cuff correctly and make sure
the air plug is properly inserted in the
unit
Er5
The air tube is crimped or the
cuff is tied too tight
Correct it and make the measurement
again
Er6
The sensor is sensing great
fluctuation in the pressure
Please keep quiet and don’t move
15
Trouble removal
Problem
Check
Cause and solutions
No power
Check the battery power
Replace new one
Check the polarity position
Installation for proper placement of the
batteries polarities
No inflation
Whether the plug insert
Insert into the air socket tightly
Whether the plug broken or
leak
Change a new cuff
Err and stop
working
Whether move the arm when
inflate
Keep the body peaceful
Check if chatting when
measured
Keep quite when measure
Cuff leak
Whether the cuff wrap too
loose
Wrap the cuff tightly
Whether the cuff broken
Change a new cuff
Please contact the distributor if you can’t solve the problem, do not disassemble
the unit by yourself!
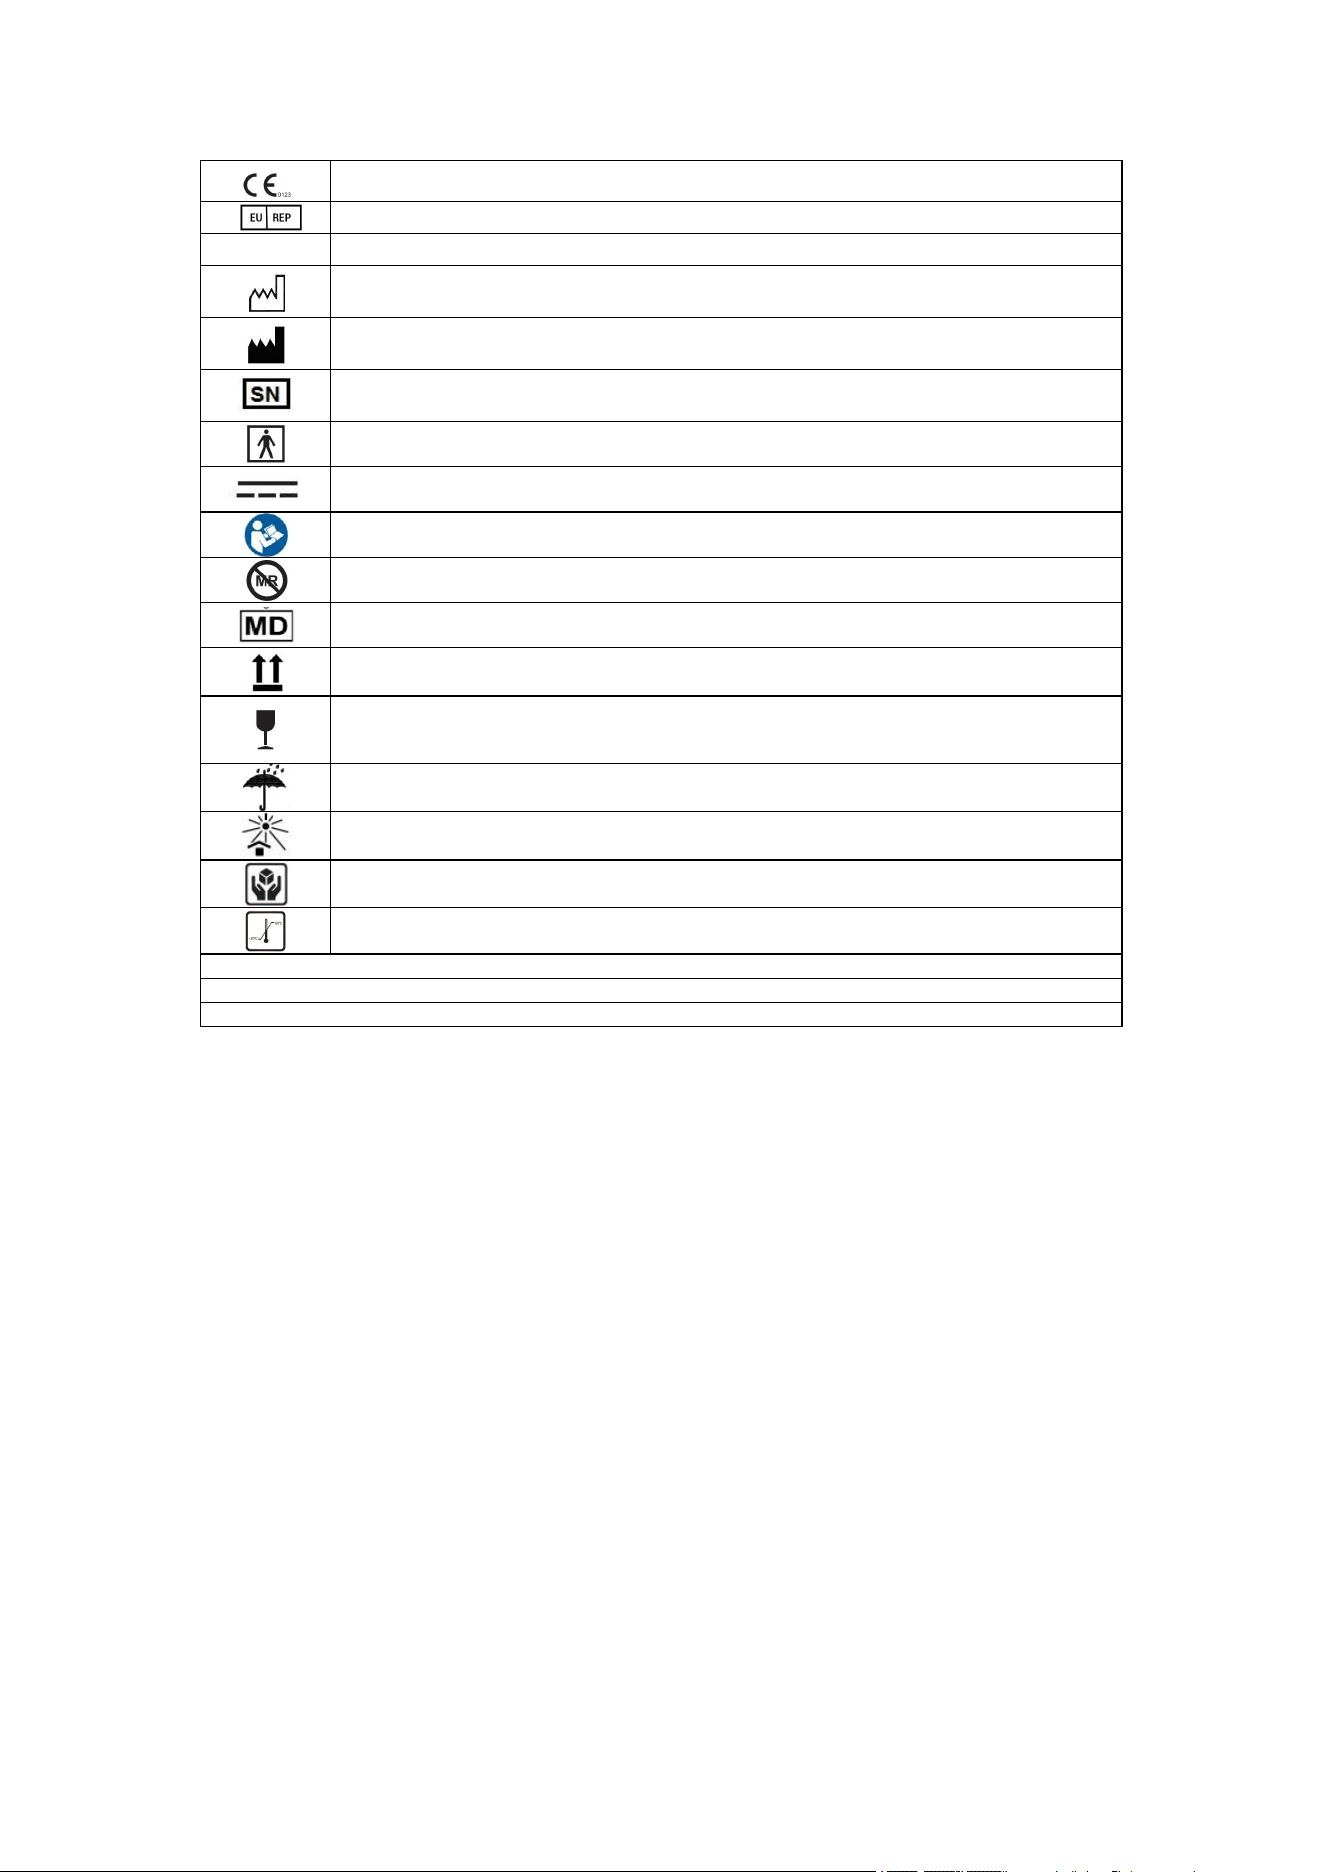
SYMBOL DESCRIPTIONS
The following symbols may appear in this manual, on the Digital Blood
Pressure Monitor A02T, or on it's accessories. Some of the symbols represent
standards and compliances associated with the Digital Blood Pressure Monitor
A02T and its use.
Symbol
Explanation
DISPOSAL: Do not dispose this product as unsorted municipal waste. Collection of
such waste separately for special treatment is necessary.
Er7
The pressure that the sensor
sensing is over the limit
Start the measurement again.If the
error is still displayed, please send it
to local distributor
Er8
The demarcation is incorrect or
the device has not been
demarcated
Please send back to the local
distributor
HI
The pulse rate exceeds the
upper limit (>199 per minute)
Beyond the measurement range,
normal reminder
LO
The pulse rate is less than the
lower limit (<40 per minute)
Beyond the measurement range,
normal reminder
16
CE Mark
Authorized Representative in the European Community
IP21
The degree of avoid ingress of water or particulate matter into ME equipment.
Date of manufacture
Manufacturer
Specifies serial number
Type BF applied part
Direct current
Follow instructions for use
MR unsafe
Medical device
Put up
Fragile
Afraid of the rain
Fear of the sun
Handle gently
Temperature range
No Sterilize requirement
Not category AP / APG equipment
Mode of operation: continuous
5.6 Memory
Each unit stores 120 sets measurements for 2 users, totally 240 sets (User 1
and 2).
Measurements for each user are stored separately. Be certain that you are
viewing the measurements for the correct user.
View the memory
With the unit off, press the [MEM] button. The monitor will display User ID and
an average value of the last 3 times measurements stored in the unit.
( If measurements are less than 3 sets, directly display the first set )
Delete memory
In average value memory viewing mode,the average value symbol ( AVG.) is
being displayed, long press the [MEM] button for 3 seconds, then it will delete
all measurements for the current user.

17
In single set memory viewing mode, long press the [MEM] button for 3
seconds , then it will delete only a set measurement being displayed.
5.7 Discontinuing a Measurement
If it is necessary to interrupt a blood pressure measurement for any reason
(e.g the patient feels unwell), the Start/Stop button can be pressed at any time.
The device then immediately lowers the cuff pressure automatically.
5.8 Using the AC Adapter
You may also operate this monitor using the AC adapter (output d.c. 5V 1A
with Type-C connector).
1. Ensure that the AC adapter and cable are not damaged.
2. Plug the adapter cable into the AC adapter port on the left side of the blood
pressure monitor.
3. Plug the adapter into your electrical outlet. When the AC adapter is
connected, no battery current is consumed.
Note: No power is taken from the batteries while the AC adapter is connected
to the monitor. If electrical power is interrupted,(e.g., by accidental removal of
the AC adapter from the outlet) the monitor must be reset by removing the plug
from the socket and reinserting the AC adapter connection.
6 Care and Maintenance
Wash hands after each time measurement.
If one device is used by different patients, wash hands before and after each
use.
1. Do not expose the device to either extreme temperatures, humidity, dust or
direct sunlight.
2. The cuff contains a sensitive air-tight bladder. Handle this cuff carefully and
avoid all types of stress through twisting or buckling.
3. Clean the device with a soft, dry cloth. Do not use gas, thinners or similar
solvents. Spots on the cuff can be removed carefully with a damp cloth and
soapsuds, if necessary, 70% isopropanol can be used.The cuff with bladder
must not be washed in a dishwasher, clothes washer, or submerged in water.
4. Handle the tube carefully. Do not pull on it. Do not allow the tubing to kink
and keep it away from sharp edges.
5. Do not drop the monitor or treat it roughly in any way. Avoid strong
vibrations.
6. Never open the monitor! This invalidates the manufacturer’s warranty.
7. Batteries and electronic instruments must be disposed of in accordance with
the locally applicable regulations, not with domestic waste.
6.1 Accuracy test

18
Sensitive measuring devices must be checked for accuracy from time to time.
We recommend a periodical inspection of your unit by an authorized dealer
every 1 year. Please turn to local distributor or the manufacturer.
7 Warranty/Service
Your blood pressure monitor is guaranteed for 2 year against manufacturers’
defects for the original purchaser only, from date of purchase. The warranty
does not apply to damage caused by improper handling, accidents,
unprofessional use, not following the operating instructions or alterations made
to the instrument by third parties.
Warranty only applies to the main device and its cuff. All other accessories are
not covered by warranty.
There are no user serviceable parts inside. Batteries or damage from old
batteries is not covered by the warranty.
8 Certifications
Device standard:
This device is manufactured to meet the blood pressure monitors:
IEC 80601-2-30 / IEC60601-1-11 / IEC60601-1
Electromagnetic compatibility:
Device fulfills the stipulations of the International standard IEC60601-1-2
The device was clinicallly investigated and the safety and efficacy is meet the
requirement of ISO 81060-2. If you need to acquire a copy of the summary of
the Clinical Investigation, please contact the manufacturer.
9 Technical Specification
Model: A02T
Weight: 245g(±10g) (Batteries and AC adapter are not included)
Display: 82*66mm LCD Display
Size: 138(L)x105(W)x63(H)mm(±5mm)
Packaging list: 1×Main Device, 1×Cuff, 1×Users manual
Operating Conditions: Temperature: 5
℃
to 40
℃
;Humidity: 15% to 90% RH;
Storage And Shipping Conditions:Temperature: -20
℃
~ +60
℃
;
Humidity:10%RH~93%RH;
Atmospheric pressure range: 70kPa~106kPa
Measuring method: Oscillometric
Pressure sensor: Resistive
Measuring range: DIA: 40-220mmHg; SYS: 60-260mmHg
Pulse: 40 to 199 per minute
Cuff pressure display range:0-295mmHg
Memory: Automatically stores the last 120 measurements for 2 users (total
240)
Measuring resolution: 1 mmHg
Accuracy: Pressure within ± 3 mmHg / pulse ± 5 % of the reading

19
Power source: a) 3*AA batteries, 4.5 V
b) AC adapter INPUT: 100-240V AC 50/60HZ OUTPUT: DC 5V
1A
Accessories: Wide range rigid cuff 22-42 cm
Users: Individuals age more than 12 years
IP classification
:
IP21
Automatically power off: 60 seconds
Expected service life of the device and accessories: 5 years
10 FCC Statement
This device complies with part 15 of the FCC Rules. Operation is subject to the
following two conditions:
(1) This device may not cause harmful interference, and
(2) this device must accept any interference received, including interference
that may cause undesired operation.
This equipment has been tested and found to comply with the limits for a Class
B digital device, pursuant to part 15 of the FCC Rules. These limits are
designed to provide reasonable protection against harmful interference in a
residential installation. This equipment generates, uses and can radiate radio
frequency energy and, if not installed and used in accordance with the
instructions, may cause harmful interference to radio communications.
However, there is no guarantee that interference will not occur in a particular
installation. If this equipment does cause harmful interference to radio or
television reception, which can be determined by turning the equipment off and
on, the user is encouraged to try to correct the interference by one or more of
the following measures:
—Reorient or relocate the receiving antenna.
—Increase the separation between the equipment and receiver.
—Connect the equipment into an outlet on a circuit different from that to which
the receiver is connected.
—Consult the dealer or an experienced radio/TV technician for help.
Caution: Any changes or modifications not expressly approved by the party
responsible for compliance could void the user's authority to operate the
equipment.
This equipment complies with RF radiation exposure limits set forth for an
uncontrolled environment.
This transmitter must not be co
‐
located or operating in conjunction with any
other antenna or transmitter.
The device has been evaluated to meet general RF exposure requirement.
The device can be used in portable exposure condition without restriction.
11 EMC Declaration

20
The ME EQUIPMENT or ME SYSTEM is suitable for home healthcare
environments and so on.
Warning: Don’t near active HF surgical equipment and the RF shielded room
of an ME system for magnetic resonance imaging, where the intensity of EM
disturbances is high.
Warning: Use of this equipment adjacent to or stacked with other equipment
should be avoided because it could result in improper operation. If such use is
necessary, this equipment and the other equipment should be observed to
verify that they are operating normally.
Warning: Use of accessories, transducers and cables other than those
specified or provided by the manufacturer of this equipment could result in
increased electromagnetic emissions or decreased electromagnetic immunity
of this equipment and result in improper operation.”
Warning: Portable RF communications equipment (including peripherals such
as antenna cables and external antennas) should be used no closer than 30
cm (12 inches) to any part of the Blood Pressure Monitor (A02T), including
cables specified by the manufacturer. Otherwise, degradation of the
performance of this equipment could result.
If any: a list of all cables and maximum lengths of cables (if applicable),
transducers and other ACCESSORIES that are replaceable by the
RESPONSIBLE ORGANIZATION and that are likely to affect compliance of
the ME EQUIPMENT or ME SYSTEM with the requirements of Clause 7
(EMISSIONS) and Clause 8 (IMMUNITY). ACCESSORIES may be specified
either generically (e.g. shielded cable, load impedance) or specifically (e.g. by
MANUFACTURER and EQUIPMENT OR TYPE REFERENCE).
If any: the performance of the ME EQUIPMENT or ME SYSTEM that was
determined to be ESSENTIAL PERFORMANCE and a description of what the
OPERATOR can expect if the ESSENTIAL PERFORMANCE is lost or
degraded due to EM DISTURBANCES (the defined term “ESSENTIAL
PERFORMANCE” need not be used).
Technical description
1.all necessary instructions for maintaining BASIC SAFETY and ESSENTIAL
PERFORMANCE with regard to electromagnetic disturbances for the
excepted service life.
2. Guidance and manufacturer’s declaration -electromagnetic emissions and
Immunity
Table 1
Guidance and manufacturer’s declaration - electromagnetic emissions
Emissions test
Compliance
RF emissions CISPR 11
Group 1
RF emissions CISPR 11
Class B
Harmonic emissions IEC 61000-3-2
Class A

21
Voltage fluctuations/ flicker emissions
IEC 61000-3-3
Applied
Table 2
Guidance and manufacturer’s declaration - electromagnetic Immunity
Immunity Test
IEC 60601-1-2
Test level
Compliance level
Electrostatic discharge
(ESD)
IEC 61000-4-2
±8 kV contact
±2 kV, ±4 kV, ±8 kV, ±15 kV
air
±8 kV contact
±2 kV, ±4 kV, ±8 kV, ±15 kV air
Electrical fast transient/burst
IEC 61000-4-4
Power supply lines:±2 kV
input/output lines:±1 kV
100 kHz repetition frequency
Power supply lines:±2 kV
Surge
IEC 61000-4-5
line(s) to line(s):±0.5 kV
line(s) to earth:±2 kV
line(s) to lines(s): ±1 kV
line(s) to line(s):±0.5 kV
line(s) to line(s):±1 kV.
Voltage dips, short
interruptions and voltage
variations on power supply
input lines
IEC 61000-4-11
0% 0.5 cycle
At 0º, 45 º, 90 º, 135 º, 180 º,
225 º, 270 º and 315 º
0% 1 cycle
And
70% 25/30 cycles
Single phase: at 0
0% 300 cycle
0% 0.5 cycle
At 0º, 45 º, 90 º, 135 º, 180 º,
225 º, 270 º and 315 º
0% 1 cycle
And
70% 25/30 cycles
Single phase: at 0
0% 300 cycle
Power frequency magnetic
field
IEC 61000-4-8
30 A/m
50Hz/60Hz
30 A/m
50Hz/60Hz

22
Conduced RF
IEC61000-4-6
150KHz to 80MHz:
3Vrms
6Vrms (ISM and amateur
radio bands)
80% Am at 1kHz
150KHz to 80MHz:
3Vrms
6Vrms (ISM and amateur radio
bands)
80% Am at 1kHz
Radiated RF
IEC61000-4-3
10 V/m
80 MHz – 2,7 GHz
80 % AM at 1 kHz
10 V/m
80 MHz – 2,7 GHz
80 % AM at 1 kHz
Proximity magnetic fields
IEC 61000-4-39
30 kHz: 8A/m
134.2 kHz: 65A/m
13.56 MHz: 7.5A/m
30 kHz: 8A/m
134.2 kHz: 65A/m
13.56 MHz: 7.5A/m
NOTE 1: U
T
is the a.c. mians voltage prior to application of the test level.
Table 3
Guidance and manufacturer’s declaration - electromagnetic Immunity
Radiated RF
IEC61000-4-
3
(Test
specifications
for
ENCLOSUR
E PORT
IMMUNITY to
RF wireless
communicati
ons
equipment)
Test
Frequency
(MHz)
Band
a)
MHz)
Service
a)
Modulation
(W)
IMMUNITY
TEST LEVEL
(V/m)
385
380 to 390
TETRA 400
Pulse
modulation
b)
18 Hz
27
450
430 to 470
GMRS 460,
FRS 460
FM
c)
± 5 kHz
deviation
1 kHz sine
28
710
704 to 787
LTE Band 13,
17
Pulse
modulation
b)
217 Hz
9
745
780
810
800 to 960
GSM 800/900,
TETRA 800,
Pulse
modulation
b)
28
870

23
Table 4
Guidance and manufacturer’s declaration - electromagnetic Immunity
Test frequency
Modulation
IMMUNITY TEST LEVEL
(A/m)
30 kHz
a)
CW
8
134,2 kHz
Pulse modulation
b)
2,1 kHz
65
c)
13,56 MHz
Pulse modulation
b)
50 kHz
7.5
c)
iDEN 820,
CDMA 850,
LTE Band 5
18 Hz
930
1720
1700 to
1990
GSM 1800;
CDMA 1900;
GSM 1900;
DECT;
LTE Band 1, 3,
4, 25; UMTS
Pulse
modulation
b)
217 Hz
28
1845
1970
2450
2400 to
2570
Bluetooth,
WLAN,
802.11 b/g/n,
RFID 2450,
LTE Band 7
Pulse
modulation
b)
217 Hz
28
5240
5100 to
5800
WLAN 802.11
a/n
Pulse
modulation
b)
217 Hz
9
5500
5785
If necessary to achieve the IMMUNITY TEST LEVEL, the distance between the transmitting
antenna and the ME
EQUIPMENT or ME SYSTEM may be reduced to 1 m. The 1 m test distance is permitted by IEC
61000-4-3.
a) For some services, only the uplink frequencies are included.
b) The carrier shall be modulated using a 50 % duty cycle square wave signal.
c) As an alternative to FM modulation, the carrier may be pulse modulated using a 50 % duty cycle
square wave
signal at 18 Hz. While it does not represent actual modulation, it would be worst case.

24
a) This test is applicable only to ME EQUIPMENT and ME SYSTEMS intended for use in the
HOME HEALTHCARE ENVIRONMENT.
b) The carrier shall be modulated using a 50 % duty cycle square wave signal.
c) r.m.s., before modulation is applied.