
User Manual
Smart Color Bulb ZL1/ZB3
20260415-v1.00.74

Contents
Introduction
Factory Reset
Zigbee Mesh Network
Setup with Smart Bridge MZ1
Setup with Third Reality Hub and SKILL
Setup with Compatible Third-Party Zigbee Hubs
Pairing with SmartThings
Pairing with Amazon Alexa
Pairing with Hubitat
Pairing with Home Assistant
Important Safety Information
FCC Regulatory Conformance
01
01
02
03
04
07
09
10
13
16
19
24

Introduction
Third Reality Smart Color Bulb offers an easy smart lighting solution in
your home. The smart color bulb enables you to control your lights in
multiple ways - on/off, dimming, routines, away mode, etc. - through your
Smart Home app on your phones or simply voice commands.
Power the smart color bulb, power cycle(power off and on) smart color
bulb 5 times in a row to factory reset it, it flashes warm white - cold white
- red - green - blue in a row within 3 seconds, then it turns solid warm
white, indicating it enters Zigbee pairing mode. It will exit Zigbee pairing
mode if not paired within 3 min.
Factory Reset
01
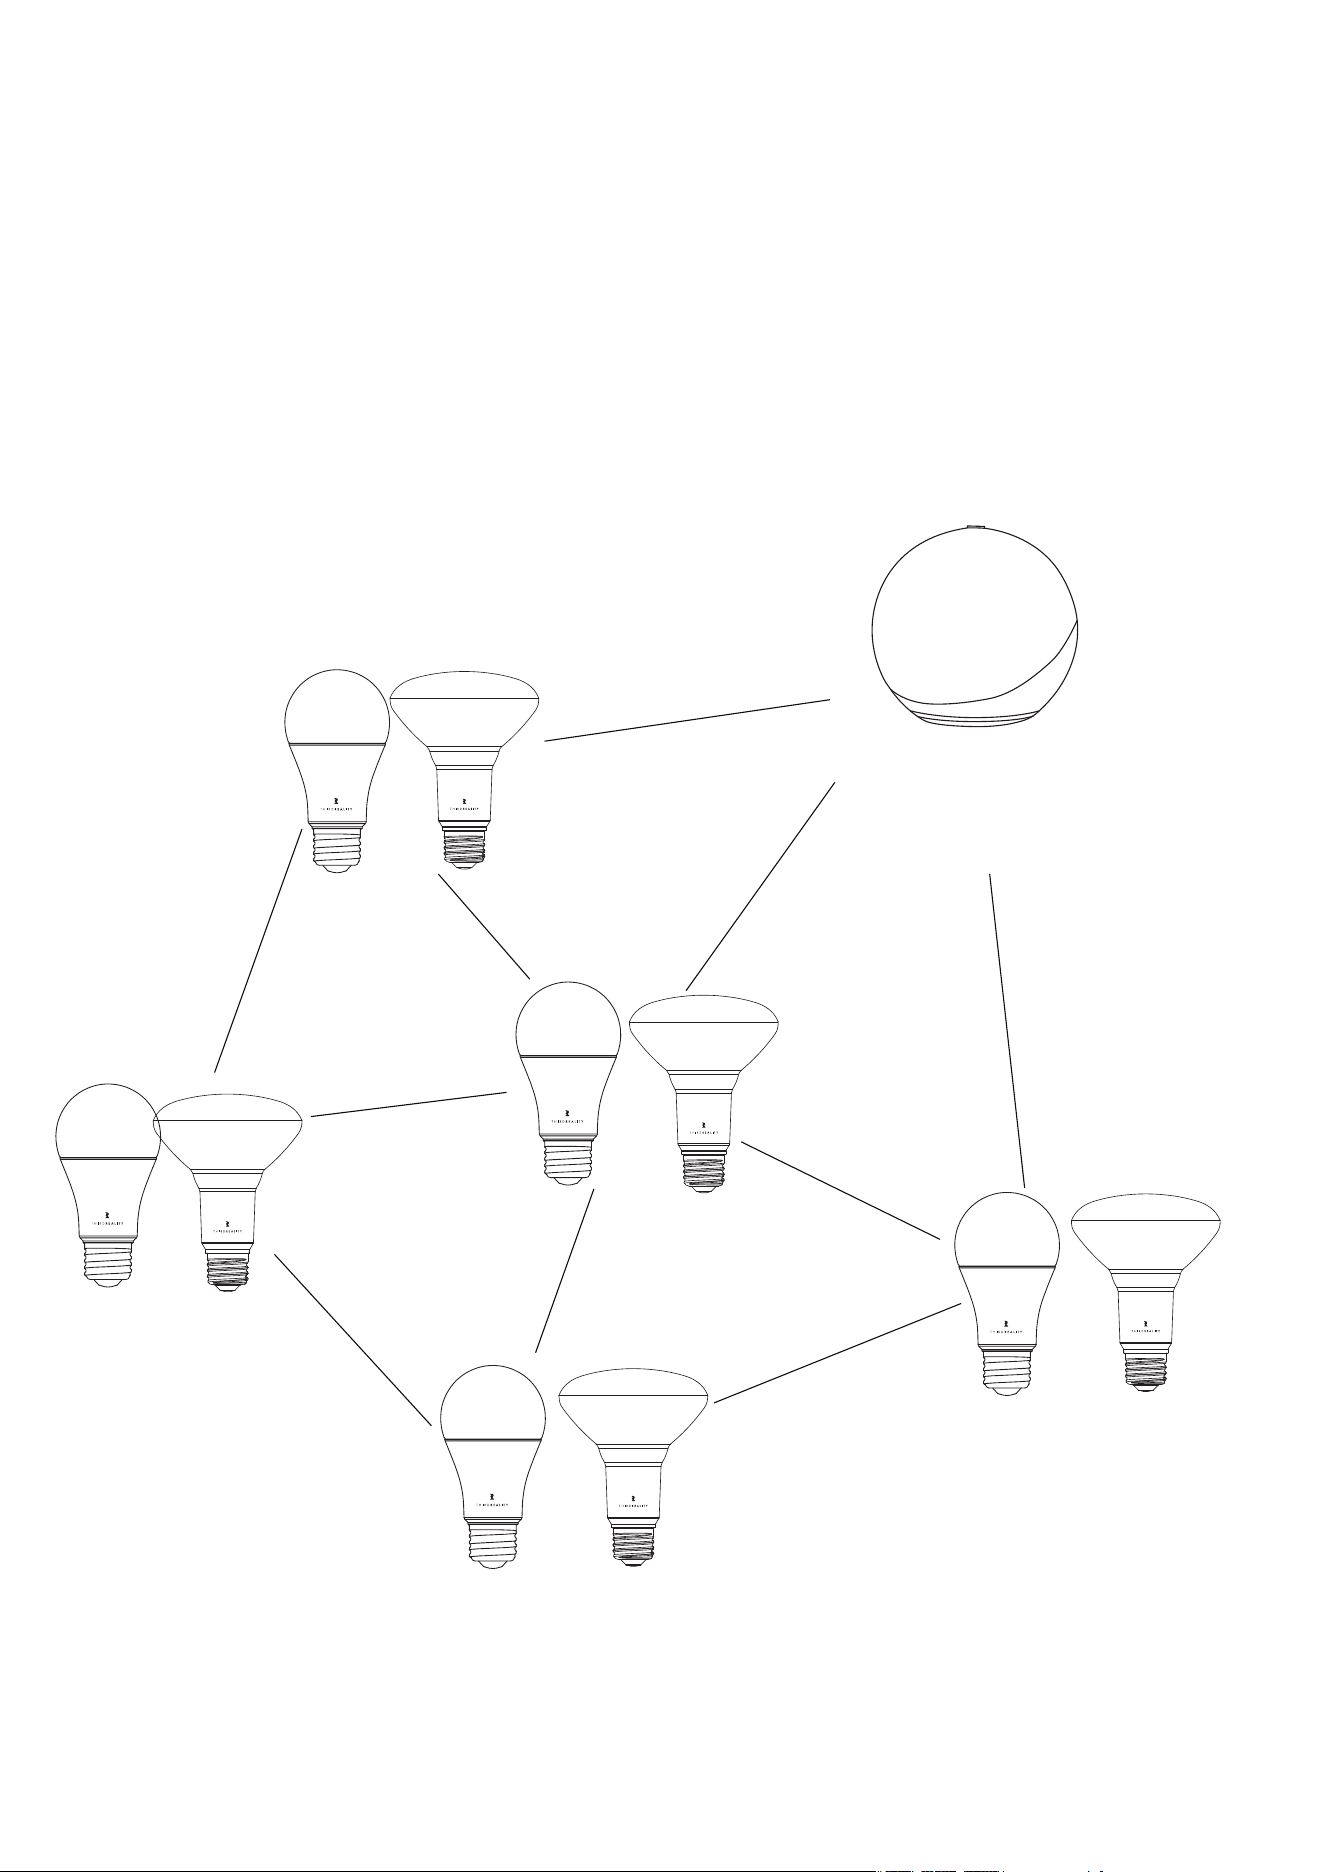
Work as a Zigbee repeater.
Extent the signal range of the Zigbee Mesh Network.
Note: Do not turn off the wall switch that controls the smart bulb,
make sure the smart bulb maintains power to work as a repeater.
Zigbee Mesh Network
03
Echo 4th gen
with smart home hub
(Compatible Zigbee hub)

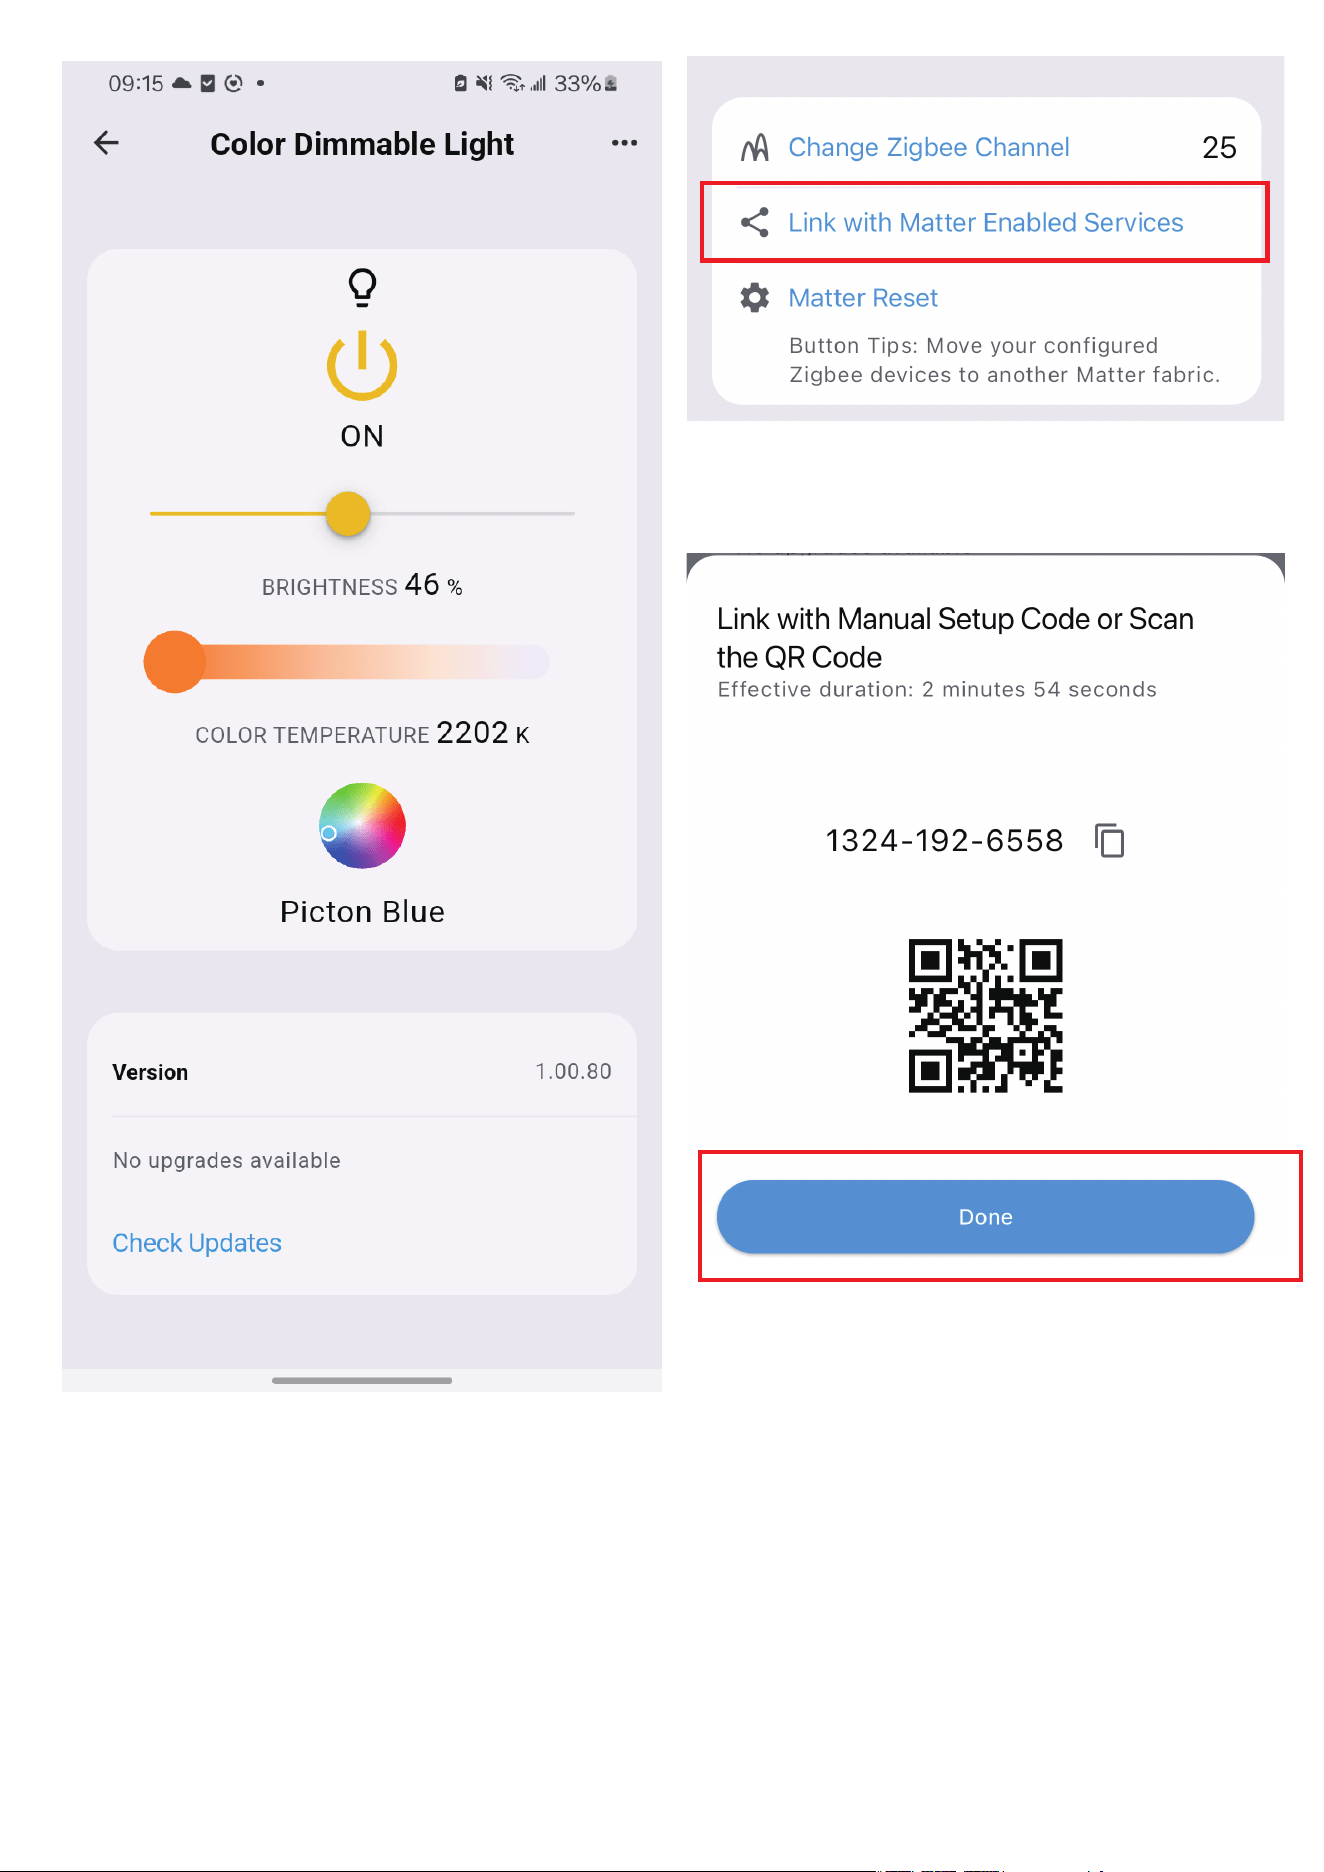
The Smart Bridge (sold separately) enables your Zigbee device to become
Matter-compatible, allowing seamless integration with major Matter eco-
systems like Apple Home, Google Home, Amazon Alexa, Samsung Smart-
Things, and Home Assistant. By setting up your Zigbee light bulb with the
Smart Bridge, it transforms into a Matter compatible smart color bulb,
enabling local control through Matter. Third Reality also offers the 3R-In-
staller App, which lets you configure Zigbee bulb attributes such as de-
fault-on behavior and perform firmware updates.
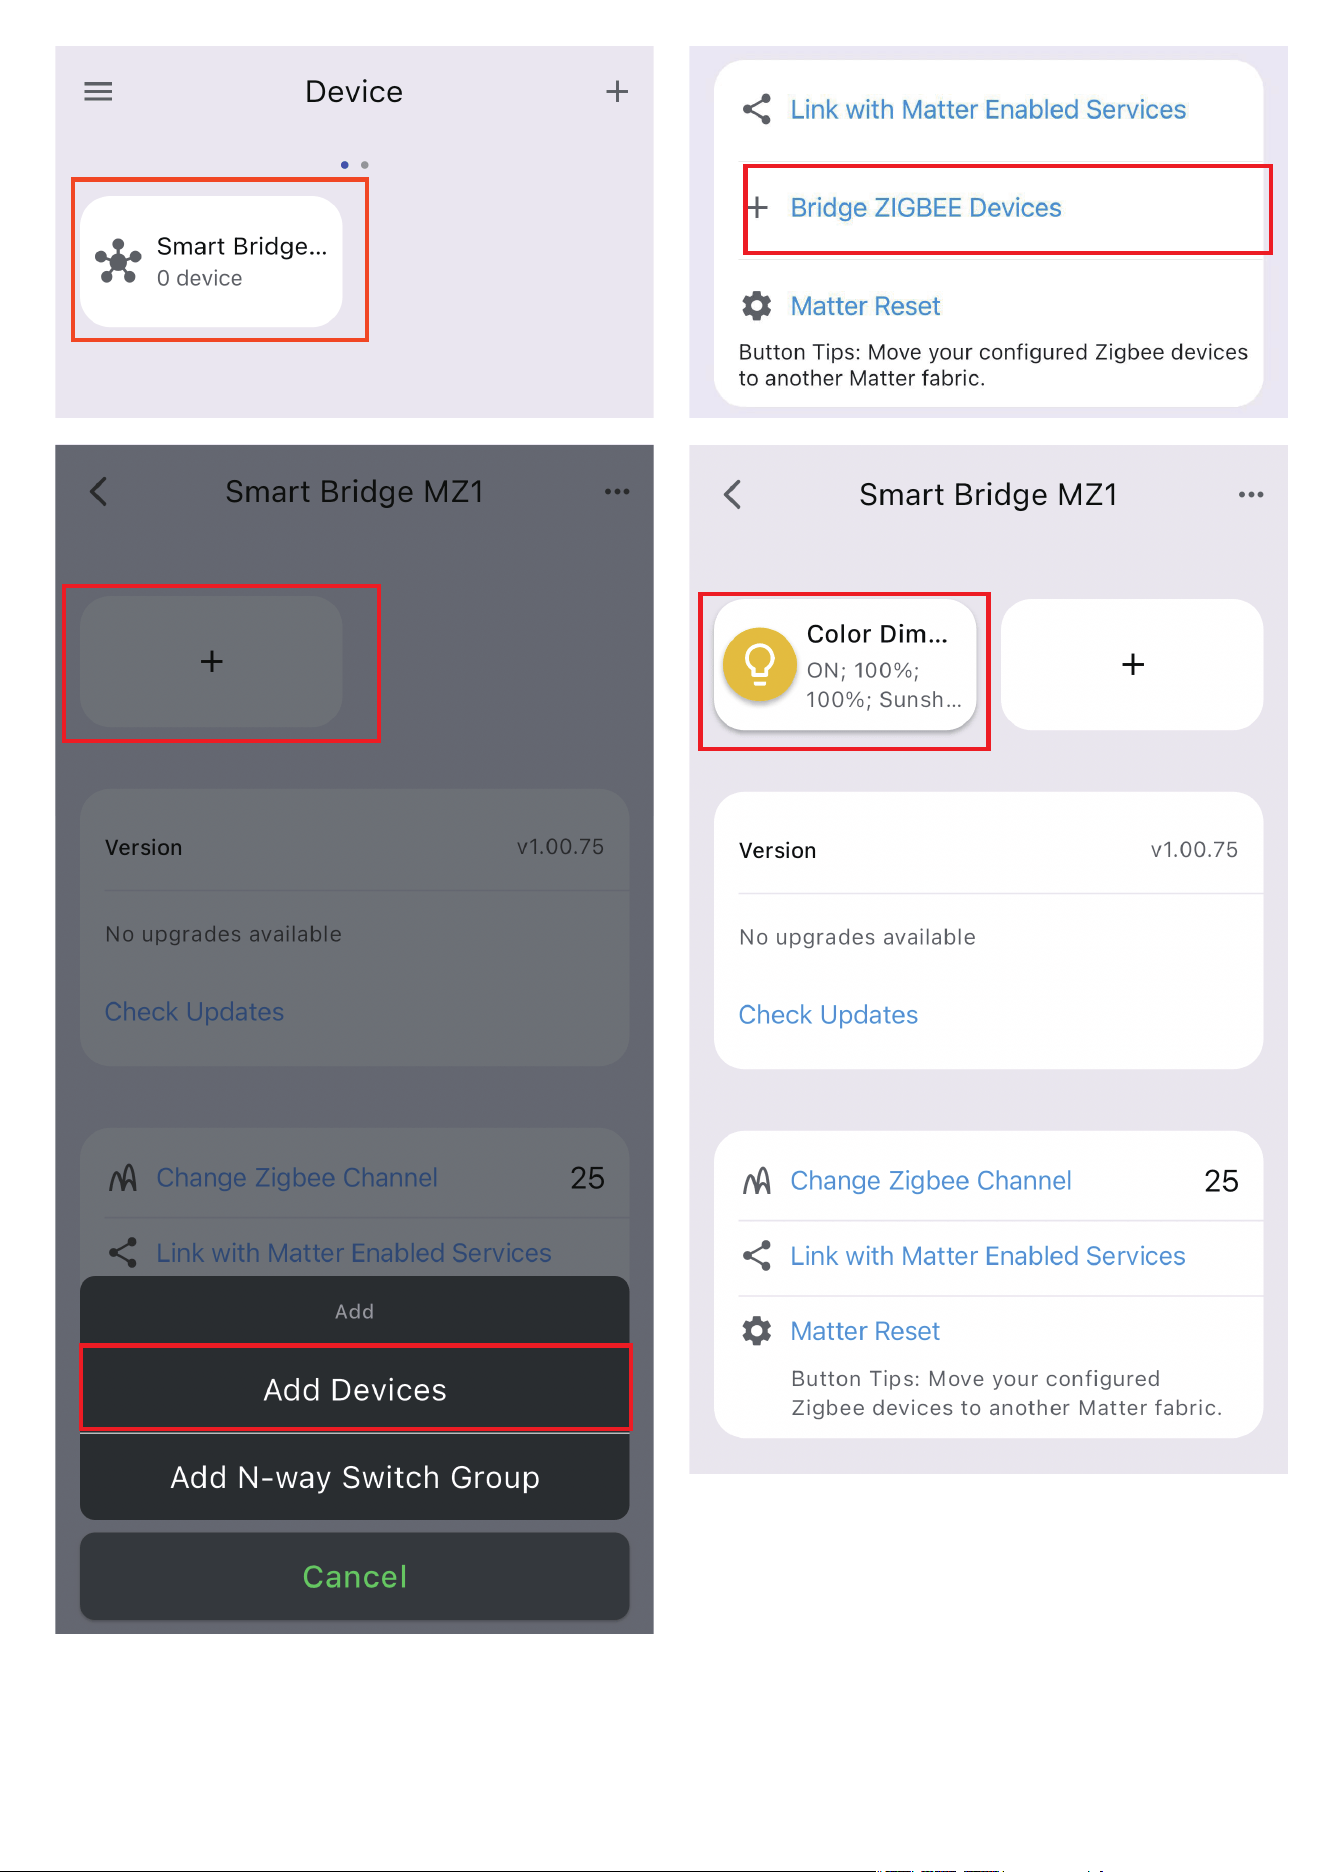
Ensure your bridge is already set up within your smart home
system.
Ensure the light switch controlling the E26 bulb socket is turned off.
Then install the smart color bulb by screwing it securely into the
socket.
Turn on the light bulb and confirm it’s in pairing mode. The smart
bulb will flash warm white, cool white, red, green, and blue within
3 seconds, then turn solid warm white, indicating it has entered
Zigbee pairing mode. If this sequence doesn’t occur, please factory
reset the bulb to initiate pairing mode.
Press the pinhole button on the bridge to activate Zigbee pairing
mode. The Zigbee blue LED should start blinking.
The bulb will pair with the bridge, and a new device will appear in
your smart home app, such as Google Home or Alexa.
Optionally, you can install the 3R-Installer App and use the
multi-admin feature in your smart home app to share permissions
with the 3R-Installer App.
1.
2.
3.
4.
5.
6.
04
Setup with Smart Bridge MZ1
05
06

07
The Third Reality Hub (sold separately) allows you to control your device
remotely via the Third Reality App, making it a great option for smart
home beginners or those without a system from major providers. Addi-
tionally, the Third Reality Cloud supports SKILL integration with Google
Home or Amazon Alexa, enabling you to connect your device to these
platforms. However, due to the potential for slow and unreliable
Cloud-to-Cloud connections, we recommend using the Bridge solution if
Google Home or Alexa is your primary smart home platform.
Ensure your hub is properly set up with Third Reality App.
Ensure the light switch controlling the E26 bulb socket is turned off.
Then install the smart color bulb by screwing it securely into the
socket.
Turn on the light bulb and confirm it’s in pairing mode. The smart
bulb will flash warm white, cool white, red, green, and blue within
3 seconds, then turn solid warm white, indicating it has entered
Zigbee pairing mode with in 3 minuets. If this sequence doesn’t
occur, please factory reset the bulb to initiate pairing mode.
Open the Third Reality App, press the “+” icon next to the hub, and
select “Quick Pair.”
The bulb will pair with your hub and appear in the Third Reality
App.
Optionally, you can enable the Third Reality SKILL in either the
Alexa or Google Home app to enable Cloud-to-Cloud communica-
tion.
1.
2.
3.
4.
5.
6.
7.
Setup with Third Reality Hub and SKILL
08

09
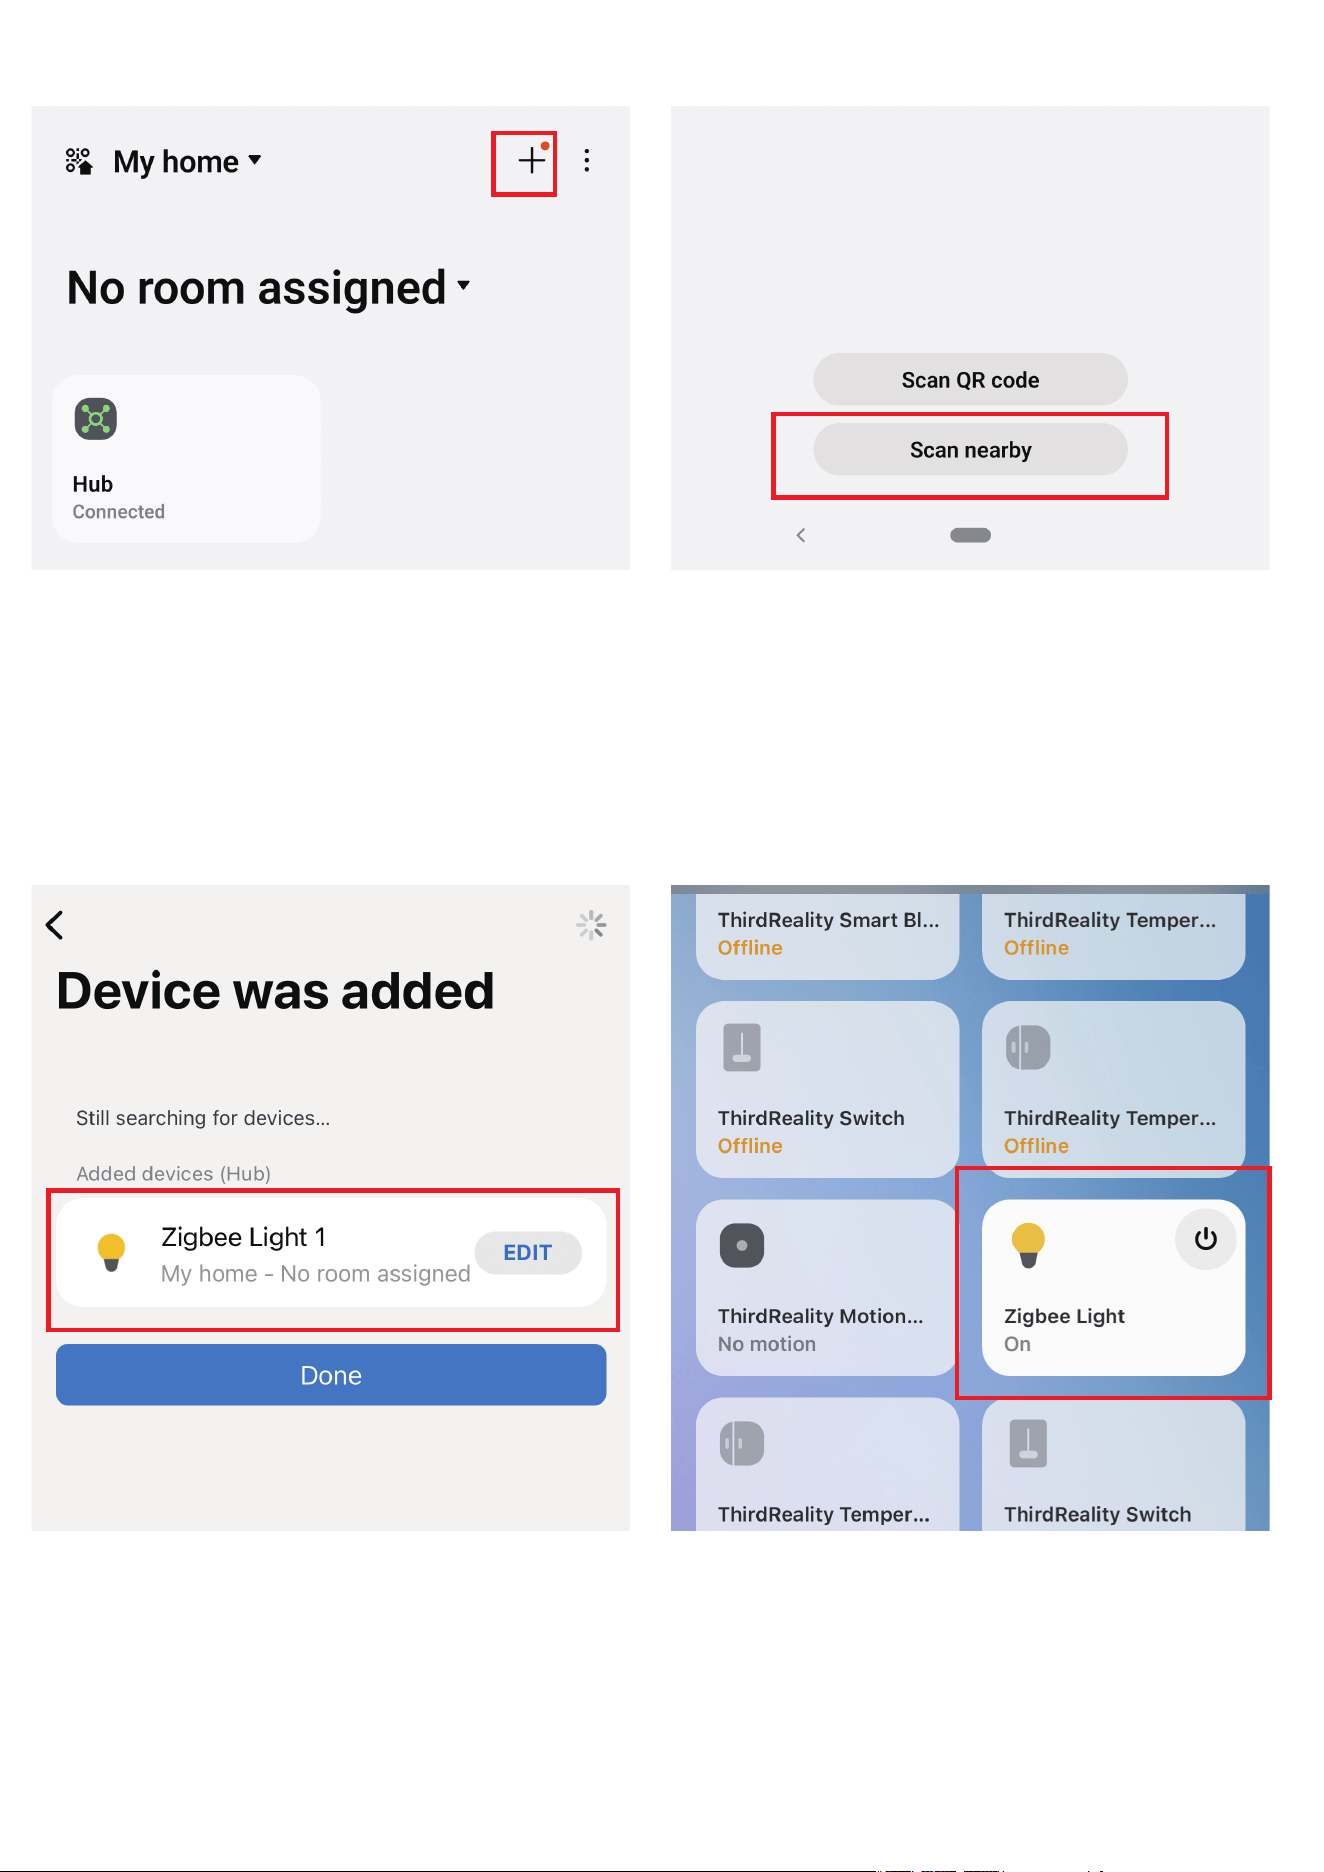
Third Reality supports integration with various open Zigbee platforms,
including Amazon Echo with built-in Zigbee, Samsung SmartThings,
Home Assistant (with ZHA or Z2M), Homey and Hubitat. If you own any of
these devices, you can pair the smart bulb directly without the need for
an additional bridge or hub.
Ensure your Zigbee Hub is already set up within your smart home
system.
Ensure the light switch controlling the E26 bulb socket is turned off.
Then install the smart color bulb by screwing it securely into the
socket.
Turn on the light bulb and confirm it’s in pairing mode. The smart
bulb will flash warm white, cool white, red, green, and blue within
3 seconds, then turn solid warm white, indicating it has entered
Zigbee pairing mode with in 3 minuets. If this sequence doesn’t
occur, please factory reset the bulb to initiate pairing mode.
Open your smart home app and follow the on-screen instructions
to begin the Zigbee pairing process.
The smart bulb will flash and then turn warm white, indicating it
has successfully paired with the Zigbee hub.
You can now use your smart home app to turn the bulb on/off,
adjust its color and color temperature, and create routines.
1.
2.
3.
4.
5.
6.
Setup with Compatible Third-Party
Zigbee Hubs
App: SmartThings App
Devices: SmartThings Hub 2nd Gen(2015) and 3rd Gen(2018), Aeotec
Smart Home Hub.
Before pairing, check for updates to make sure the SmartThings
Hub firmware is up to date.
1.
Turn on the light bulb and confirm it’s in pairing mode. The smart
bulb will flash warm white, cool white, red, green, and blue within
3 seconds, then turn solid warm white, indicating it has entered
Zigbee pairing mode. If this sequence doesn’t occur, please factory
reset the bulb to initiate pairing mode.
Open your SmartThings App, tap “+” on the up right corner to ”Add
device” and then tap “Scan nearby”.
3.
4.
Pairing with SmartThings
Pairing steps:
10
The bulb will be added to your SmartThings hub in a few seconds.5.
11

Create routines to control connected devices.6.
12

13
App: Amazon Alexa
Devices: Echo speakers with built-in Zigbee hub, Echo 4th Gen, Echo Plus
1st & 2nd Gen, Echo Studio
Ask Alexa to check for updates before pairing.
Turn on the light bulb and confirm it’s in pairing mode. The smart
bulb will flash warm white, cool white, red, green, and blue within
3 seconds, then turn solid warm white, indicating it has entered
Zigbee pairing mode. If this sequence doesn’t occur, please factory
reset the bulb to initiate pairing mode.
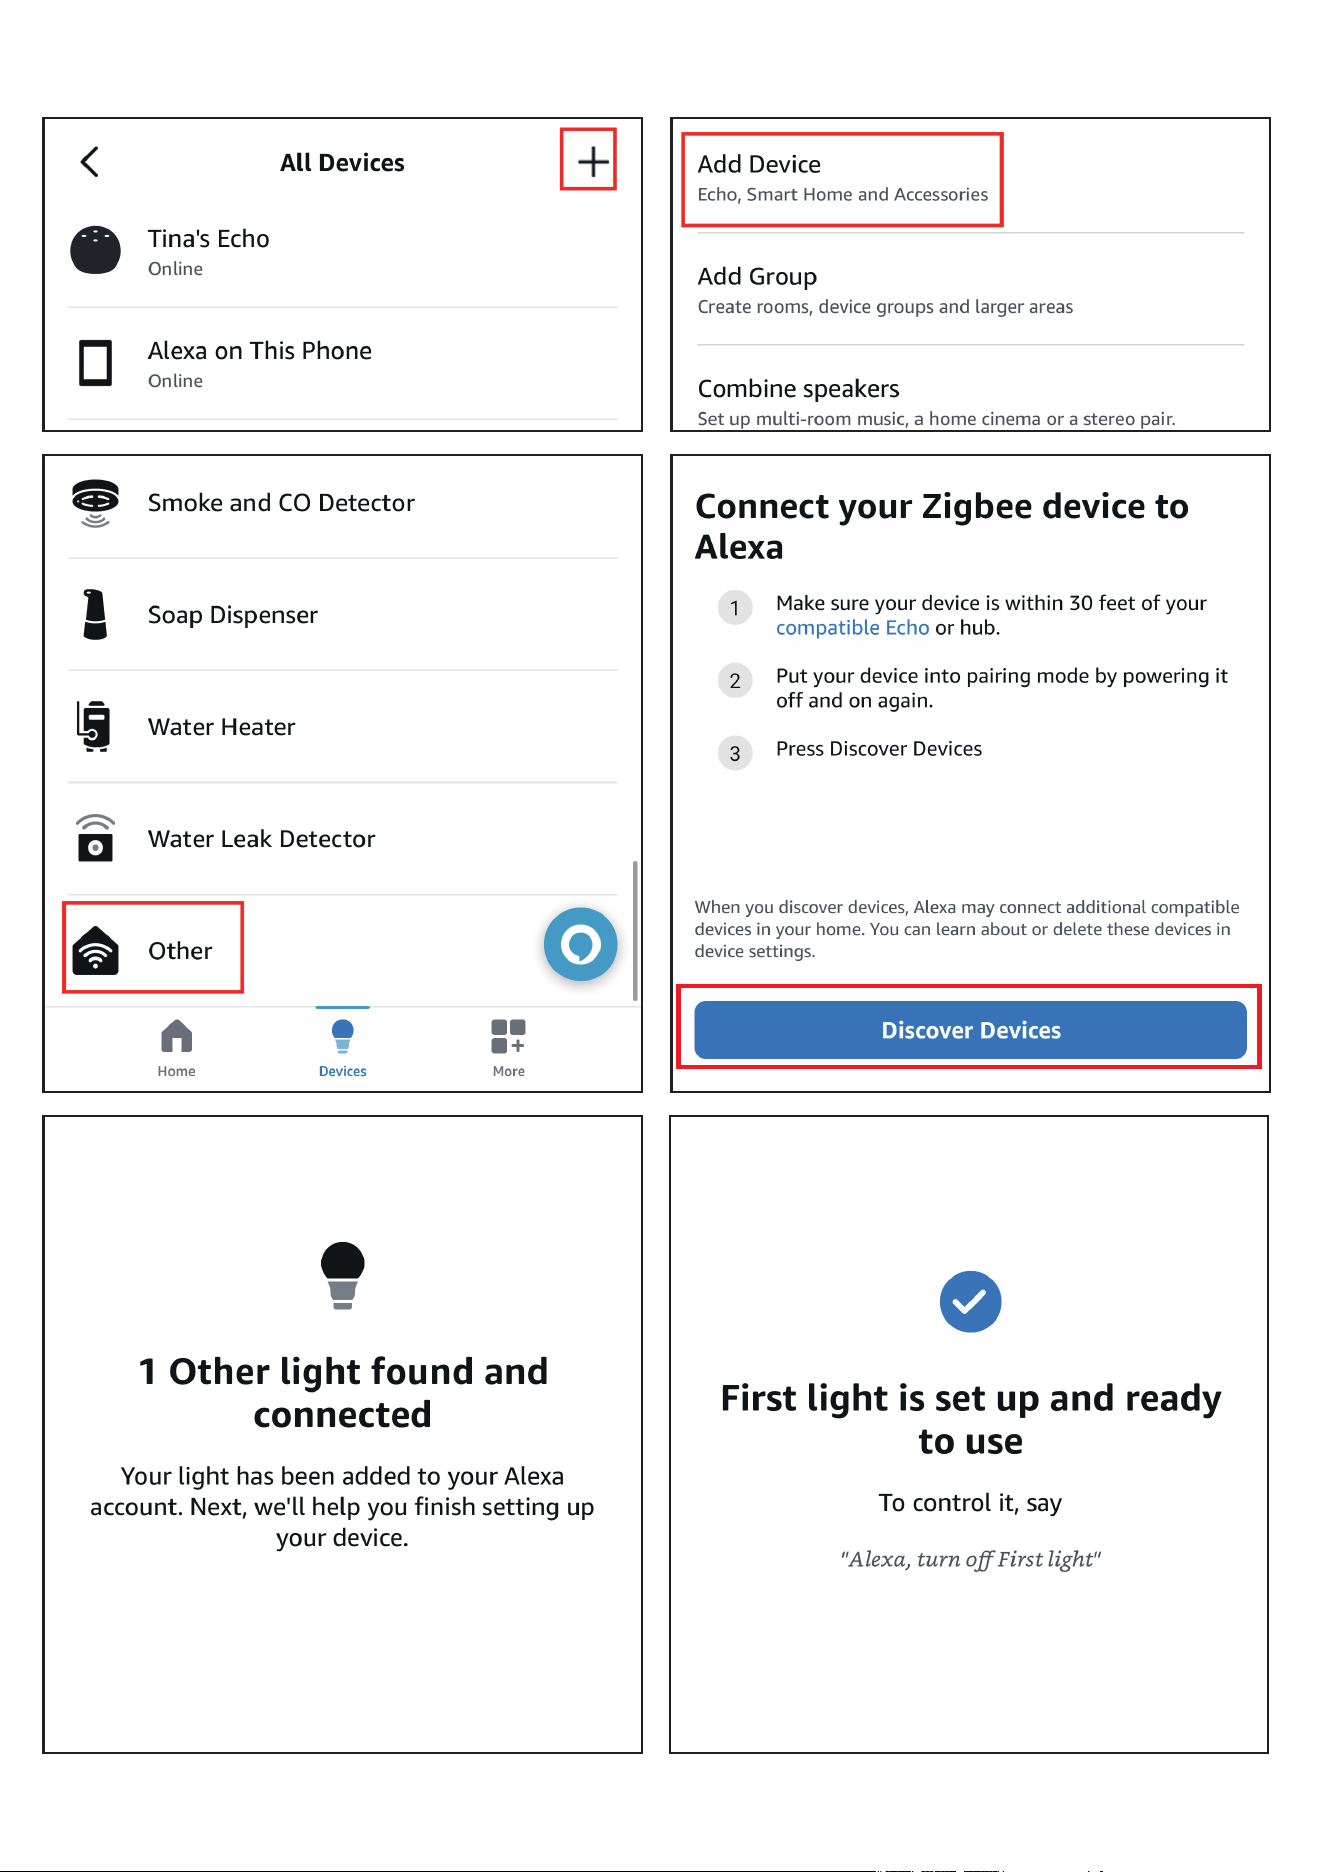
Tap "+" in the Alexa App, choose "Other" and "Zigbee" to add
device, the bulb will be added.
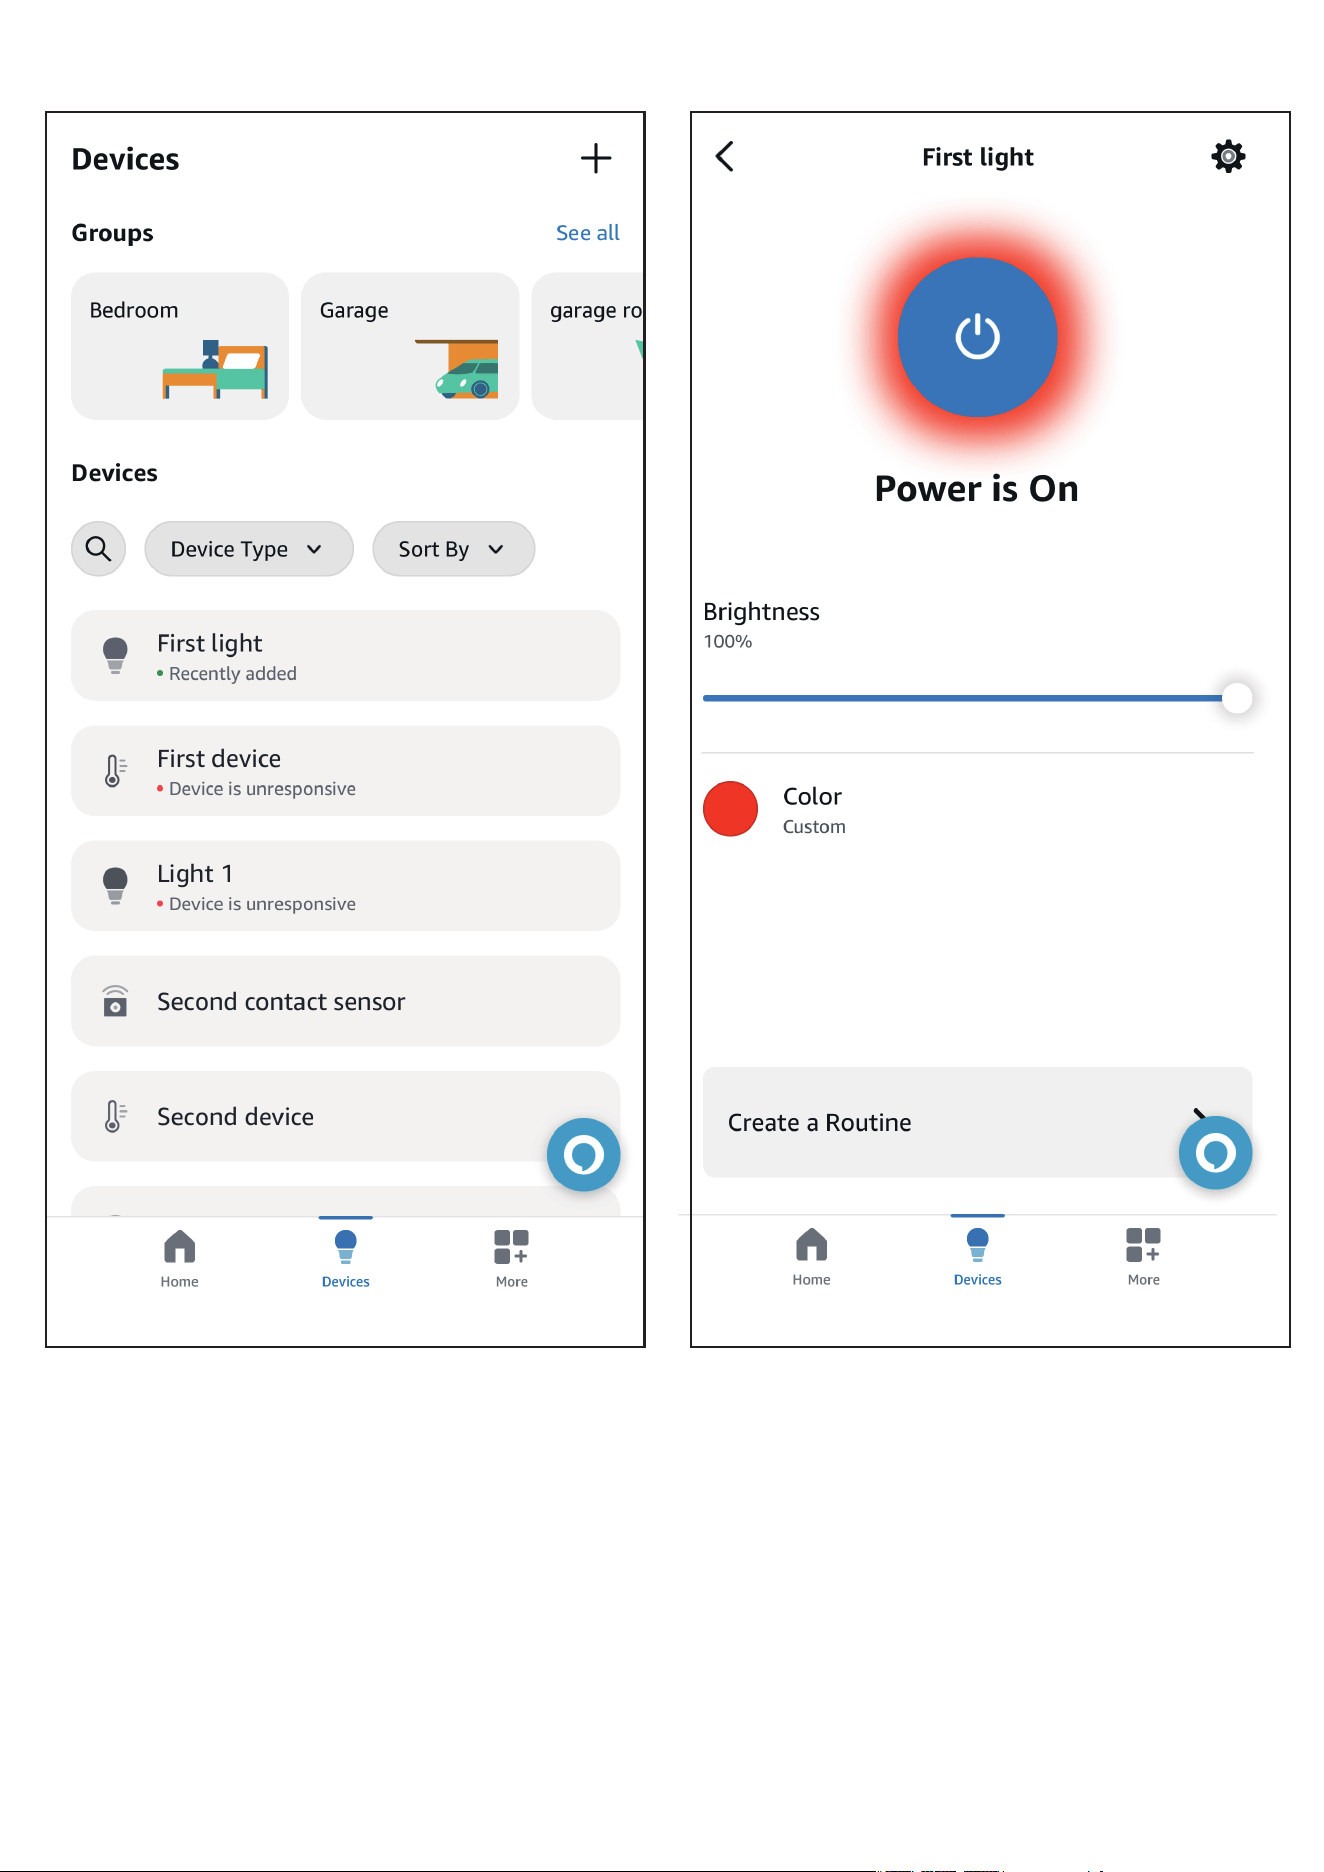
You can create routines with the device.
1.
2.
3.
4.
Pairing with Amazon Alexa
Pairing steps:
14
15

Website: http://find.hubitat.com/
Turn on the light bulb and confirm it’s in pairing mode. The smart
bulb will flash warm white, cool white, red, green, and blue within
3 seconds, then turn solid warm white, indicating it has entered
Zigbee pairing mode. If this sequence doesn’t occur, please factory
reset the bulb to initiate pairing mode.
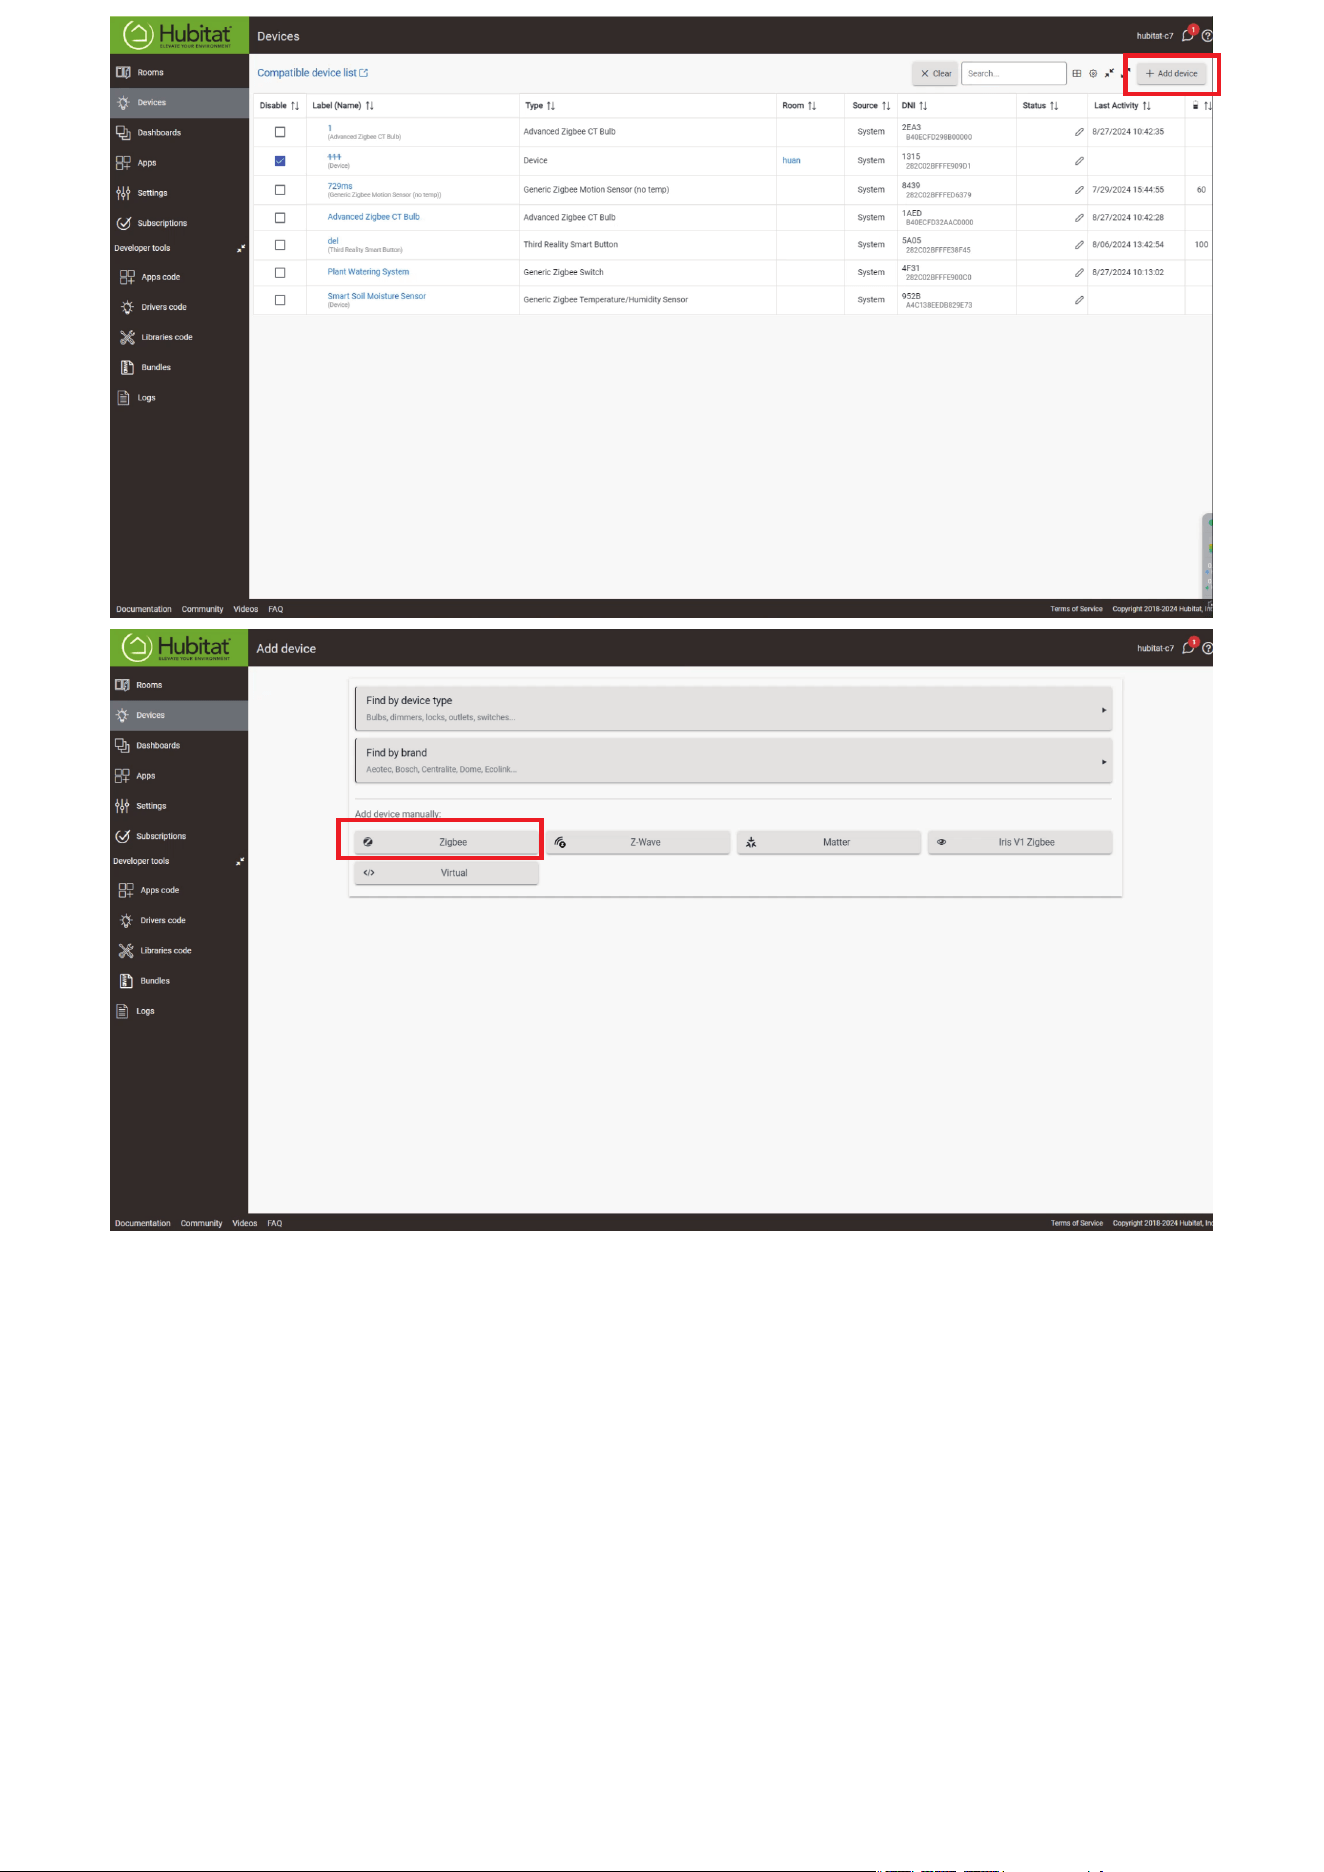
Visit your Hubitat Elevation hub device page from your web brows-
er, select the Devices menu item from the sidebar, then select Dis-
cover Devices in the upper right.
Click Start Zigbee Pairing button after you select a Zigbee device
type, the Start Zigbee Pairing button will put the hub in Zigbee
pairing mode for 60 seconds.
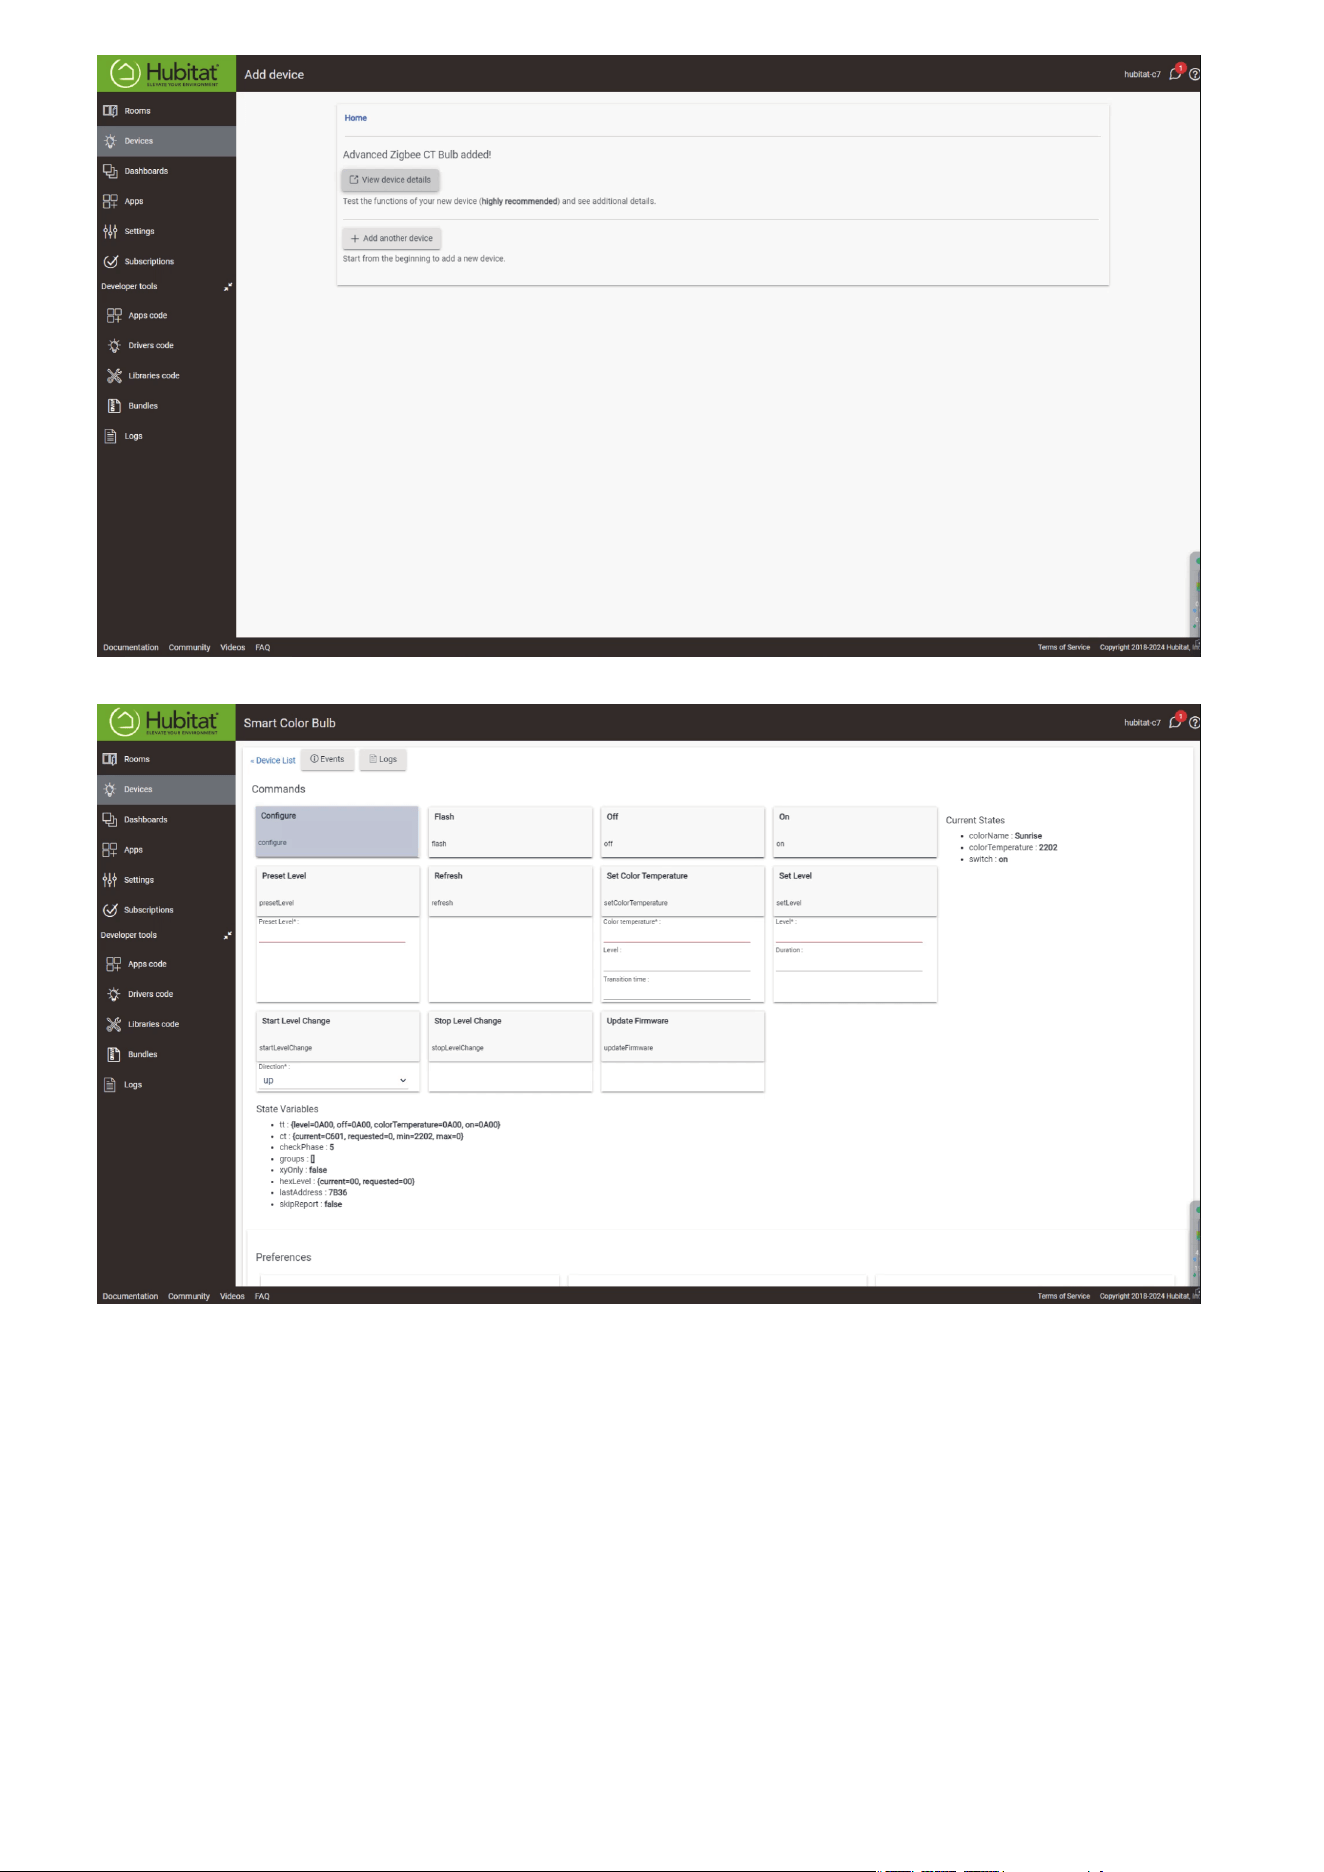
Pairing is completed.
Tap Apps, and Create New Basic Rules.
1.
2.
3.
4.
5.
Pairing with Hubitat
Pairing steps:
16
17
18

Device: Zigbee dongle
Turn on the light bulb and confirm it’s in pairing mode. The smart
bulb will flash warm white, cool white, red, green, and blue within
3 seconds, then turn solid warm white, indicating it has entered
Zigbee pairing mode. If this sequence doesn’t occur, please factory
reset the bulb to initiate pairing mode.
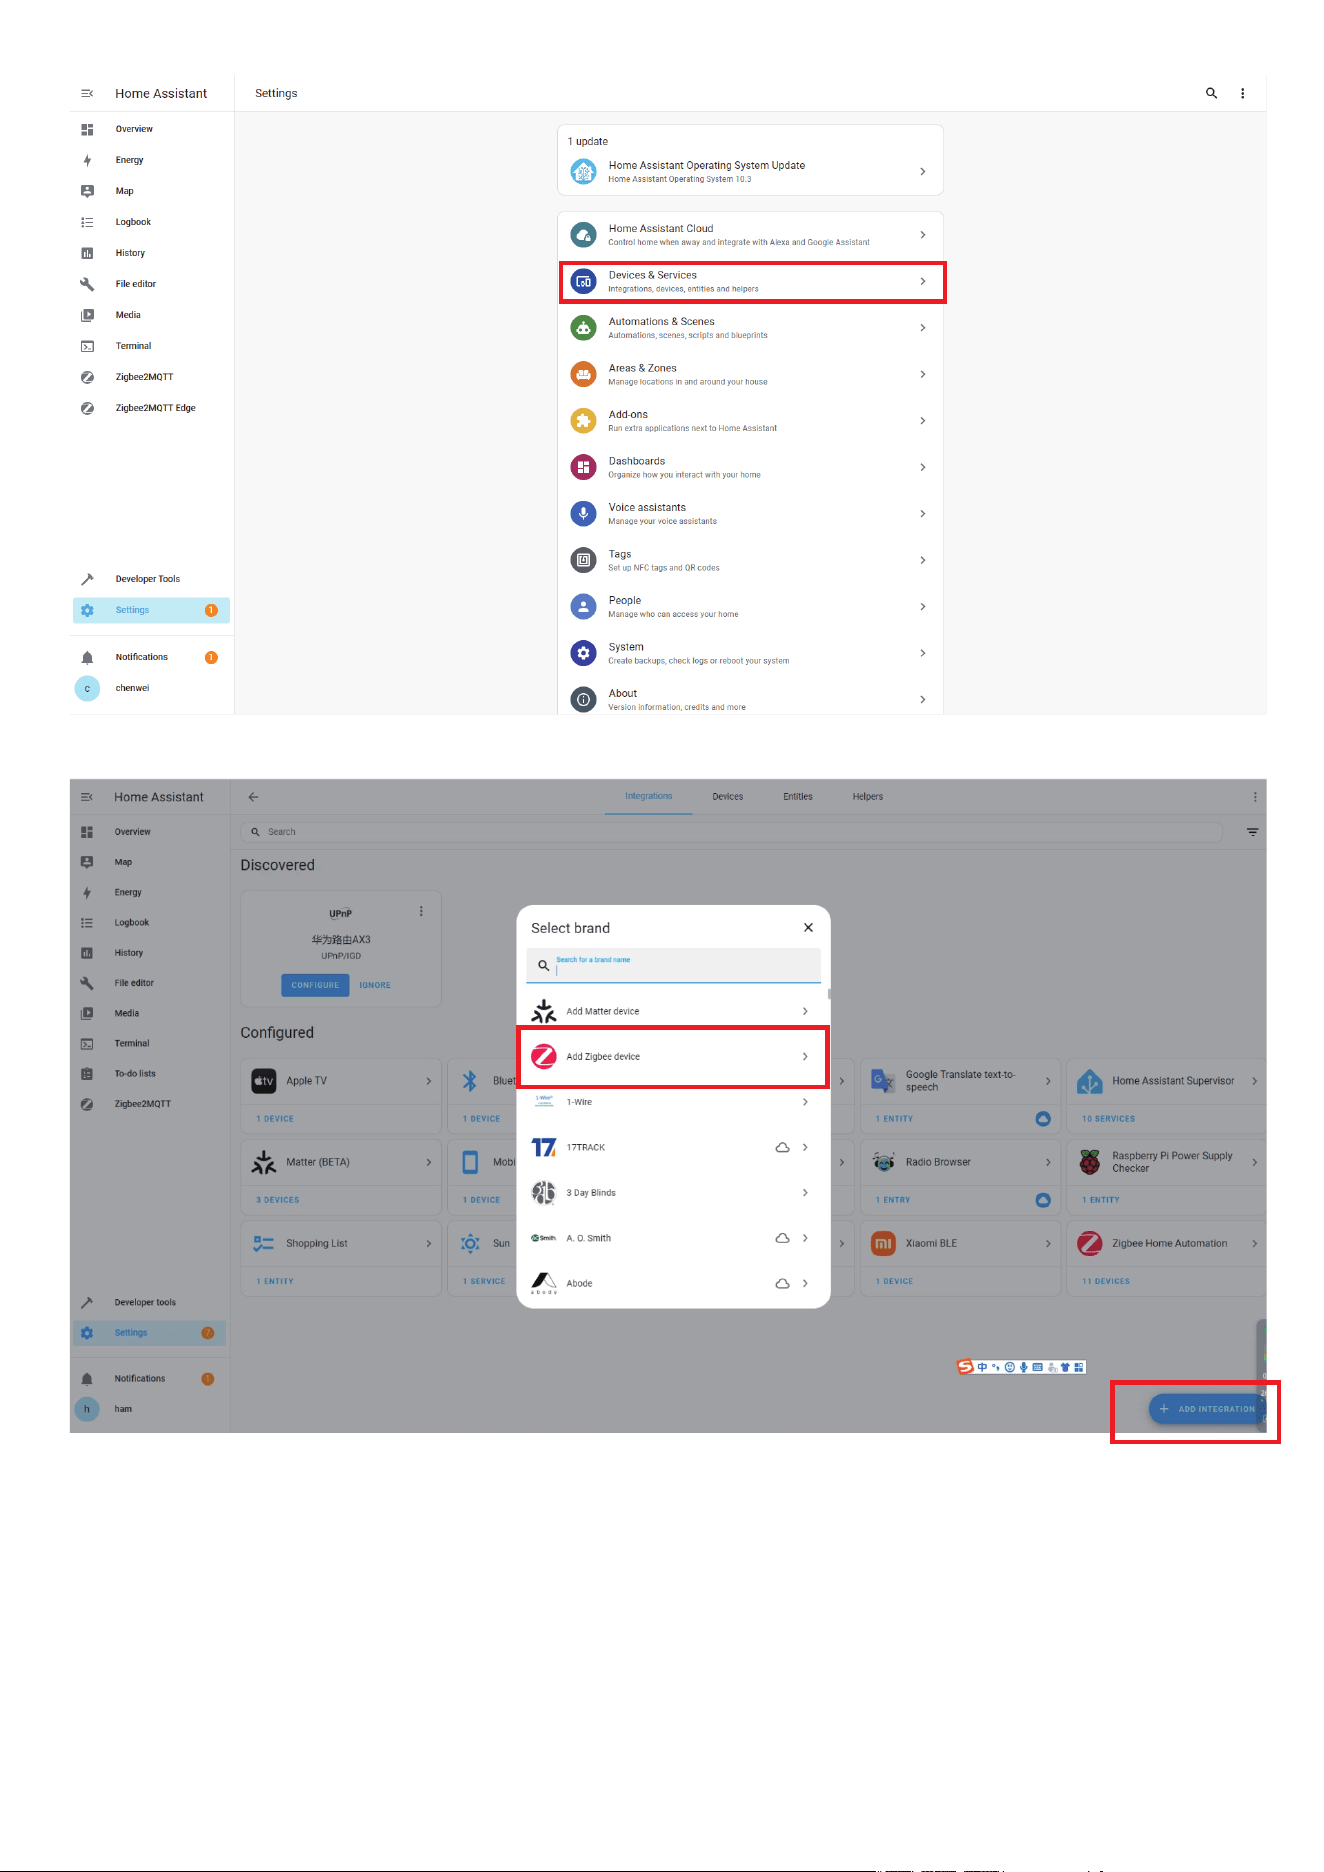
In Zigbee Home Automation, go to “Configuration” page, click “in-
tegration”.
Then click the “Devices” on the Zigbee item, the click “Add Devic-
e s ”.
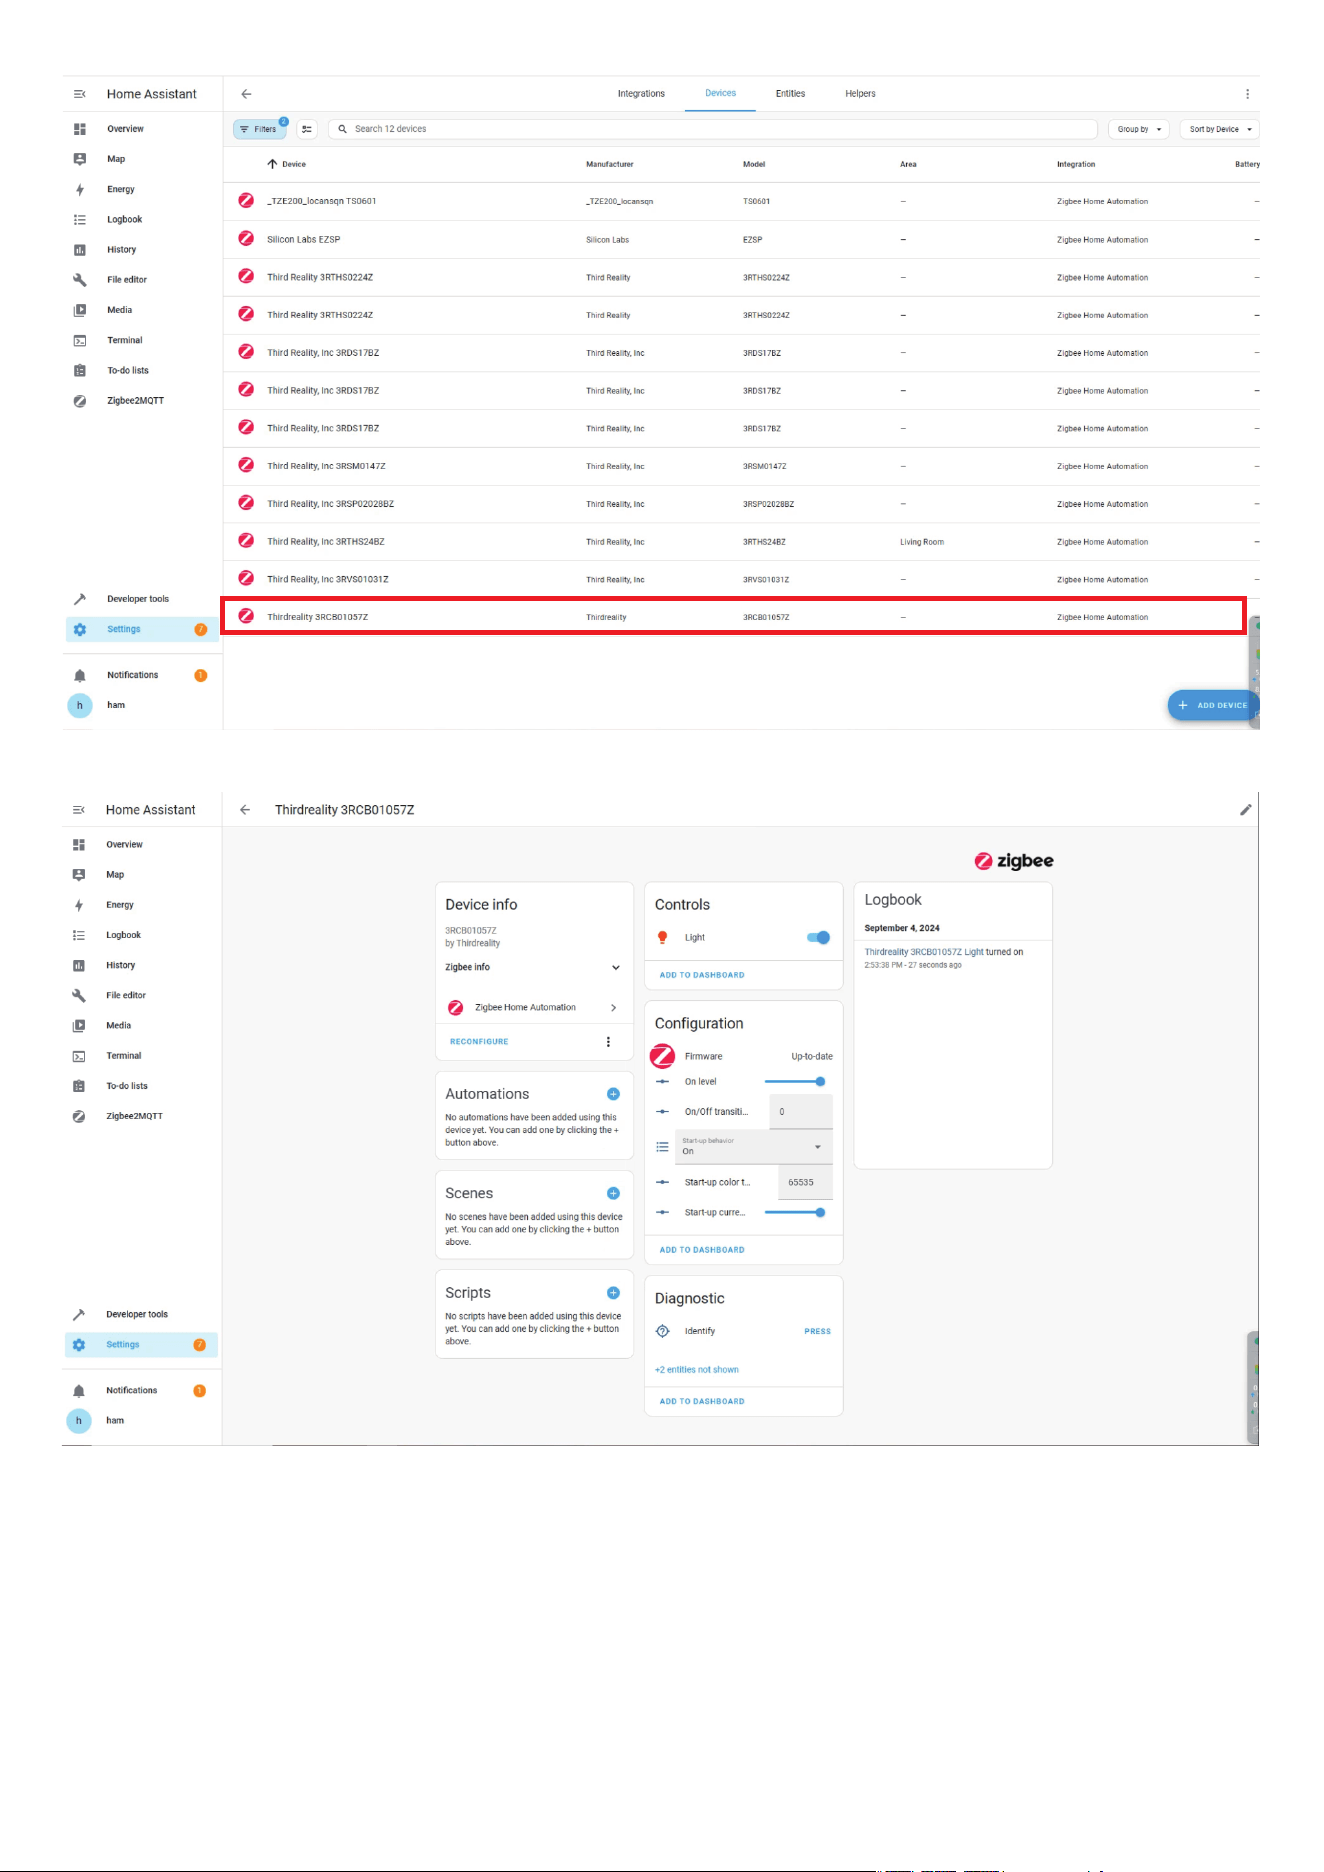
Pairing completed.
Back to “Devices” page to find the sensor added.
Click to enter in the control interface to set the bulb.
Click “+” belongs to Automation and add trigger and actions.
1.
2.
3.
4.
5.
6.
7.
Pairing With Home Assistant
Zigbee Home Automation
19
20
21
Turn on the light bulb and confirm it’s in pairing mode. The smart
bulb will flash warm white, cool white, red, green, and blue within
3 seconds, then turn solid warm white, indicating it has entered
Zigbee pairing mode. If this sequence doesn’t occur, please factory
reset the bulb to initiate pairing mode.
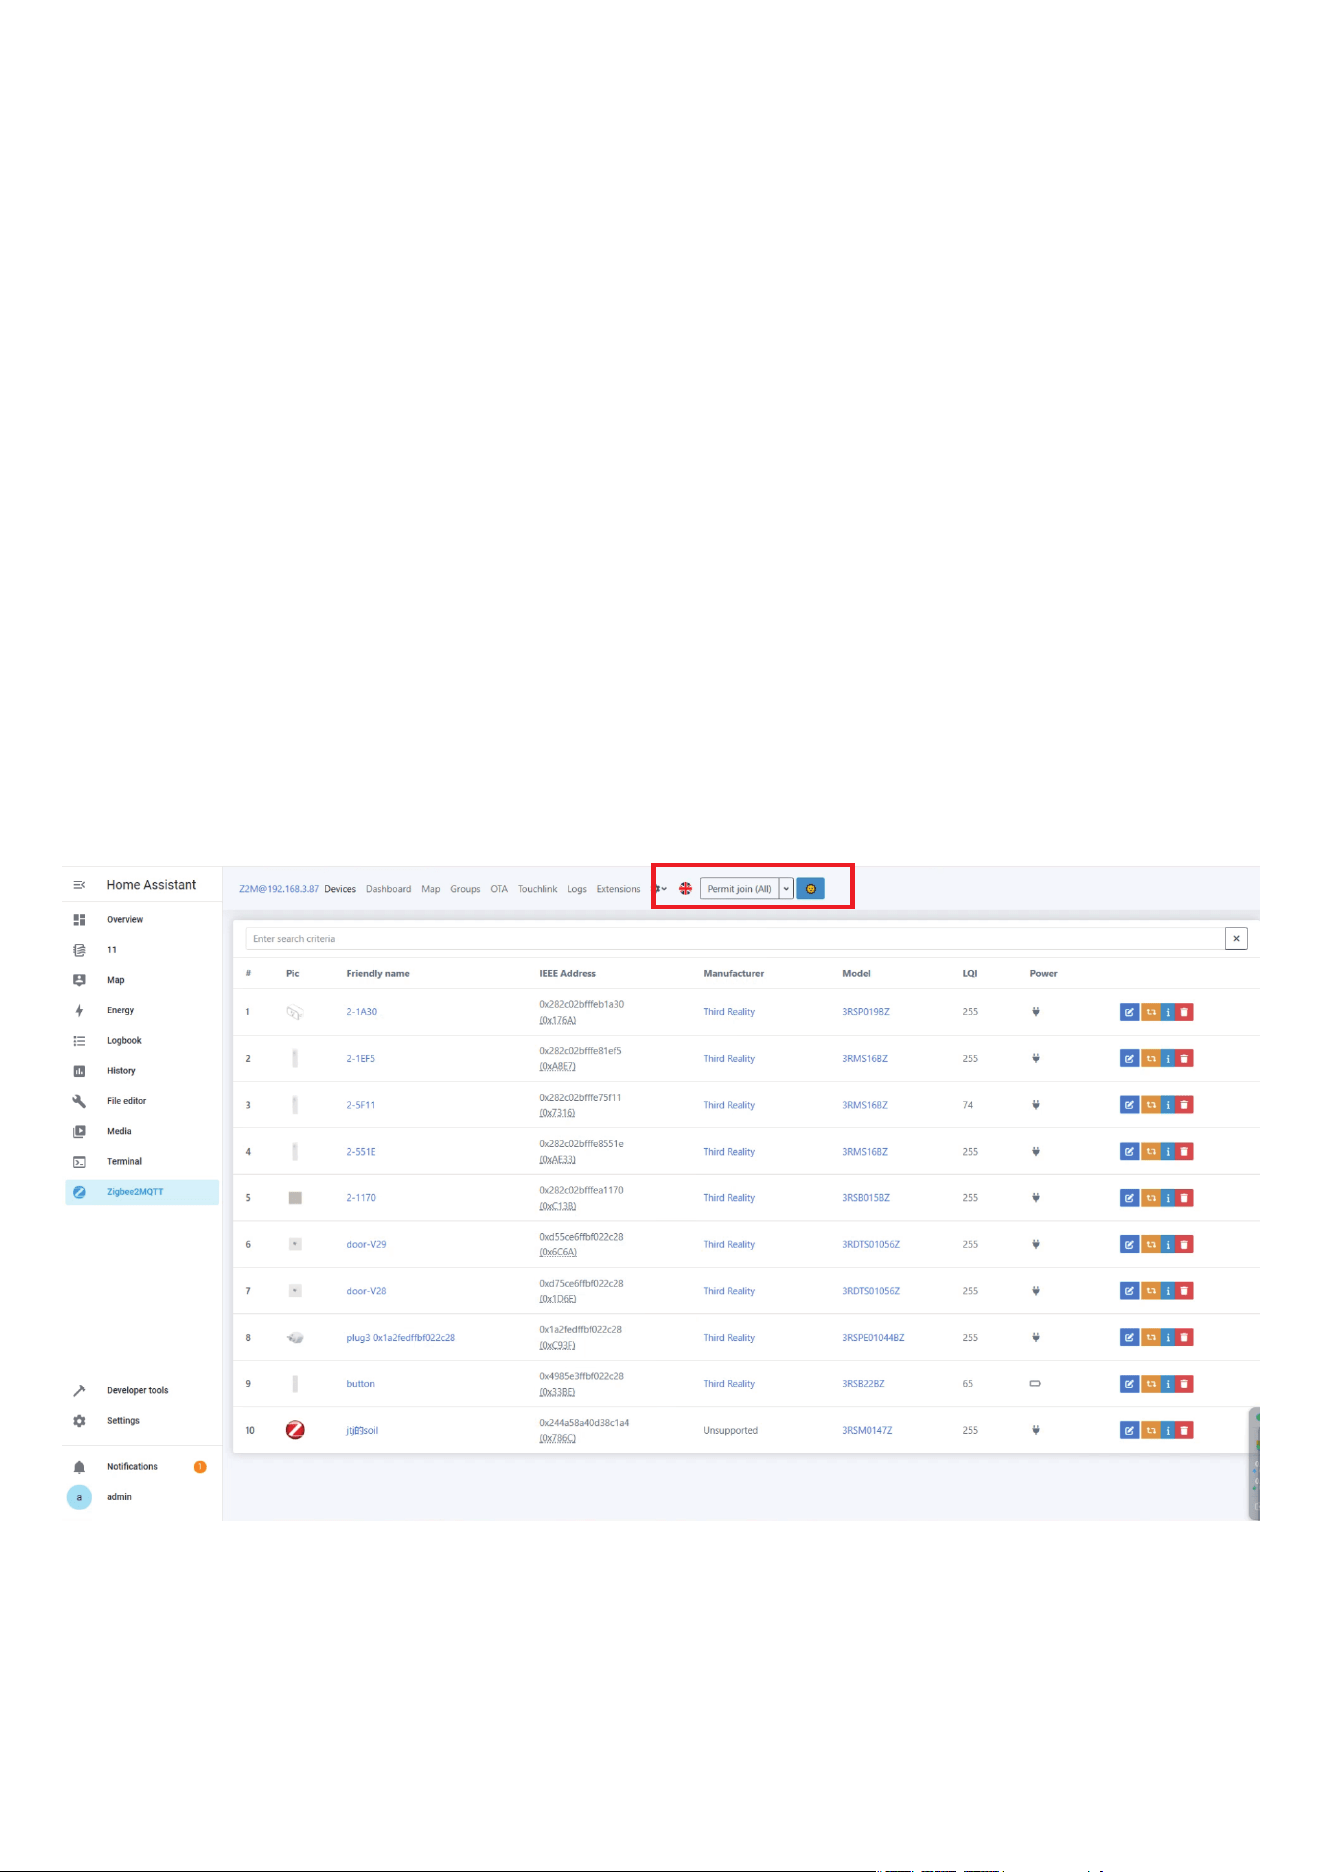
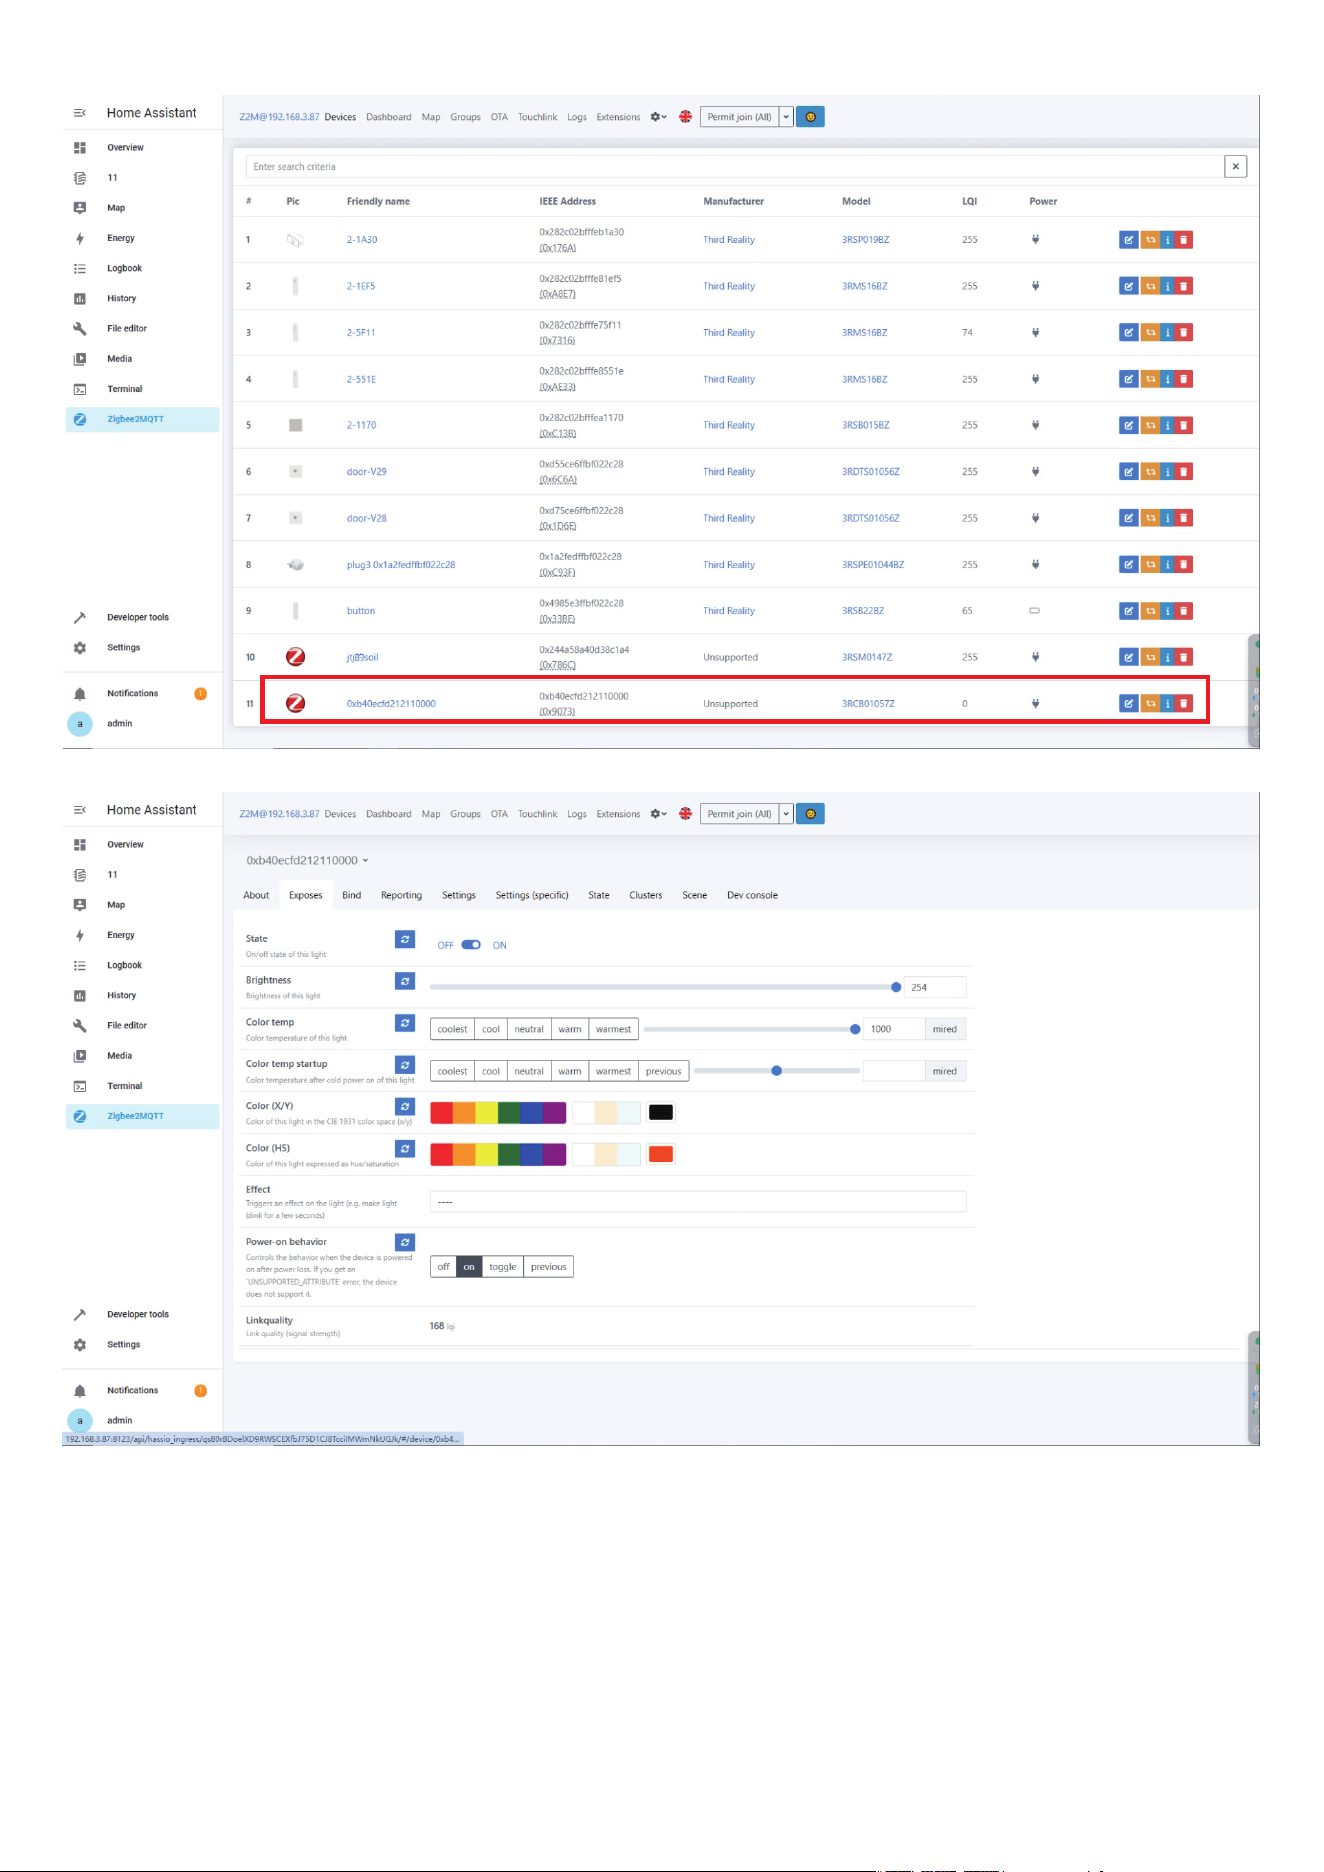
Permit join to start Zigbee pairing in Zigbee2MQTT.
Pairing completed, the bulb will be displayed in the device list
Go to Settings page, create automation.
1.
2.
3.
Zigbee2MQTT
22
23

Important Safety Information
Before installing the Smart Bulbs, please read and follow all precautions,
including:
Turn off power before installation or removal. Discontinue use if dam-
aged.
Warning: risk of electric shock. Do not attempt to disassemble bulb.
Only use the control provided with or specified by these instructions to
control this lamp. This lamp will not operate properly when connected
to a standard (incandescent) dimmer or dimming control.
Suitable for use in operating environment
-4℉ ~ 104℉(-20℃ ~ 40℃).
Utilisez uniquement la commande fournie avec ou spécifiée par ces
instructions pour commander cette lampe. Cette lampe ne fonctionnera
pas correctement lorsqu’elle est raccordée à un gradateur ou à un régu-
lateur de gradation standard (à incandescence).
Convient pour une utilisation en environnement de fonctionnement -4℉
~ 104℉(-20℃ ~ 40℃).
THIS DEVICE IS NOT INTENDED FOR USE WITH EMERGENCY EXITS.
NE CONVIENT PAS AUX SORTIES DE SECOURS.
Indoor use only.
24
Customer Service:
https://3reality.com/email-support/
Forum: https://discuss.3reality.com/
FAQ: https://thirdreality.com/faq-help-center

FCC Regulatory Conformance
This device complies with Part 15 of the FCC Rule. Operation is subject to
the following two conditions: (1) This device may not cause harmful
interference, and (2) this device must accept any interference received,
including interference that may cause undesired operation.
1.Caution statement:
Modifications not approved by the party responsible for compliance
could void user’s authority to operate the equipment.
2. Instruction statement:
This equipment has been tested and found to comply with the limits for
Class B digital device, pursuant to part 15 of the FCC Rules. These limits
are designed to provide reasonable protection against harmful interfer-
ence in a residential installation. This equipment generates, uses and
can radiate radio frequency energy and, if not installed and
used in accordance with the instructions, may cause harmful interfer-
ence to radio or television reception, which can be determined by turn-
ing the equipment off and on, the user is encouraged to try to correct
the interference by one or more of the following measures:
*Reorient or relocate the receiving antenna.
*Increase the separation between the equipment and the receiver
*Connect the equipment into an outlet on a circuit different from that to
which the receiver is connected.
*Consult the dealer or an experienced radio/TV technician for help.
25

ISEDC RSS warning
This device complies with Innovation, Science and Economic Develop-
ment Canada Compliance licence-exempt RSS standard (s). Operation is
subject to the following two conditions: (1) this device may not cause
interference, and (2) this device must accept any interference,including
interference that may cause undesired operation of the device.
Le présent appareil est conforme aux CNR d'Innovation, Sciences et
Développement
économique ISEDC applicables aux appareils radio exempts de licence.
L'exploitation est autorisée aux deux conditions suivantes:
(1) l'appareil ne doit pas produire de brouillage, et
(2) l'utilisateur de l'appareil doit accepter tout brouillage radioélectrique
subi, même si le
brouillage est susceptible d'en compromettre le fonctionnement.
This equipment should be installed and operated with minimum dis-
tance 20cm between
the radiator& your body. This transmitter must not be co-located or op-
erating in conjunction with any other antenna or transmitter.
Cet équipement doit être installé et utilisé avec un minimum de 20cm de
distance entre le radiateur et votre corps.
Cet émetteur ne doit pas être co-localisés ou fonctionner en conjonction
avec une autre antenne ou émetteur.
26
FCC/ ISEDC Radiation Exposure Statement