

Technical Support and E-Warranty Certificate
www.vevor.com/support
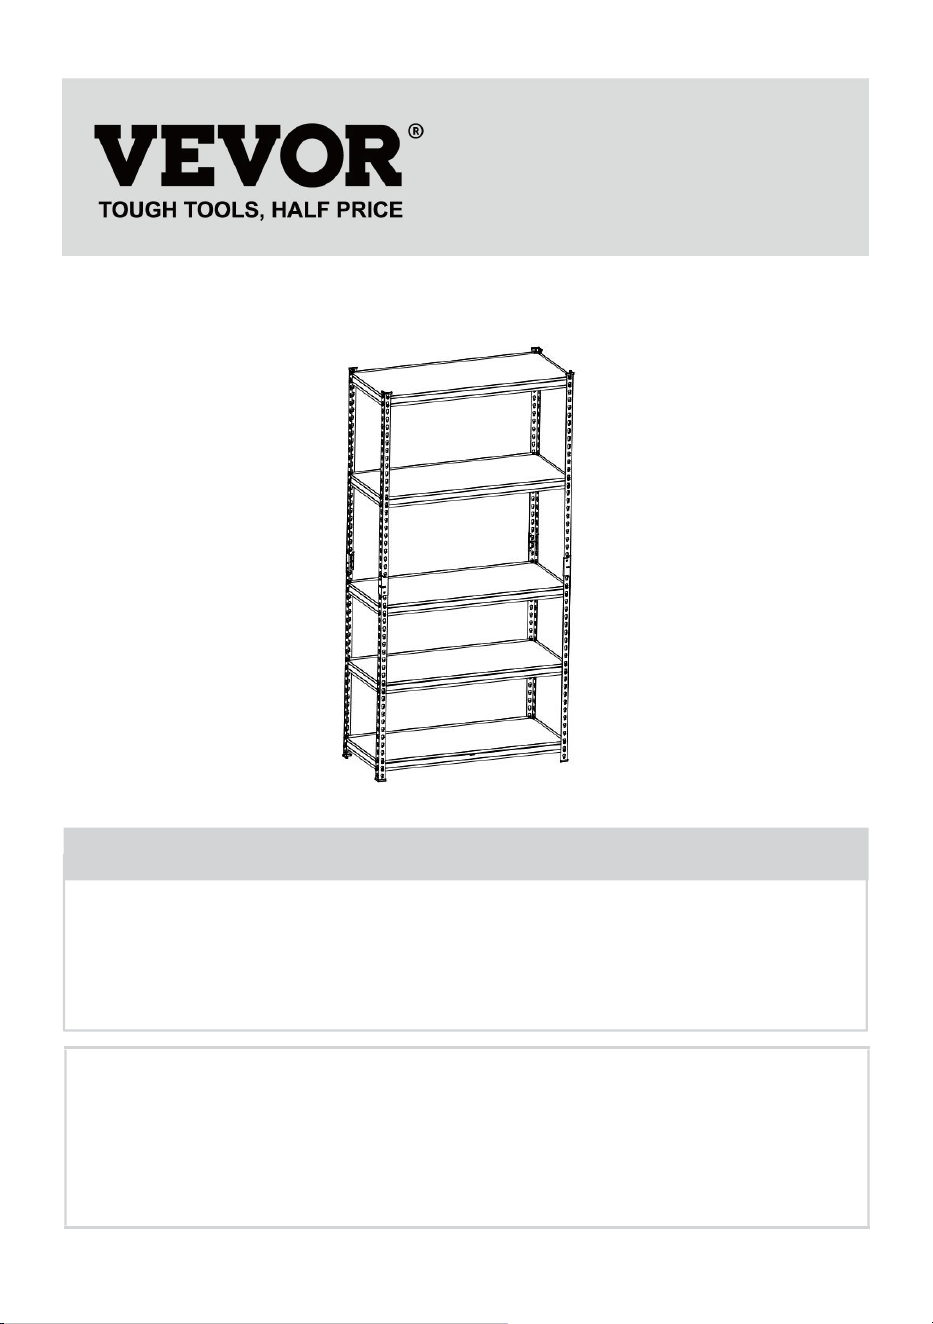
HEAVY DUTY GARAGE SHELVES
USER MANUAL
We continue to be committed to provide you tools with competitive price.
"Save Half", "Half Price" or any other similar expressions used by us only
represents an estimate of savings you might benefit from buying certain tools
with us compared to the major top brands and does not necessarily mean to cover
all categories of tools offered by us. You are kindly reminded to verify carefully
when you are placing an order with us if you are actually Saving
Half in comparison with the top major brands.

- 1 -
MODEL: 326G0P9FV0 / 3676V4VPV0
Have product questions? Need technical support? Please feel free to
contact us:
Technical Support and E-Warranty Certificate
www.vevor.com/support
NEED HELP? CONTACT US!
This is the original instruction, please read all manual instructions
carefully before operating. VEVOR reserves a clear interpretation of our
user manual. The appearance of the product shall be subject to the
product you received. Please forgive us that we won't inform you again if
there are any technology or software updates on our product.
HEAVY DUTY
GARAGE SHELVES
- 2 -
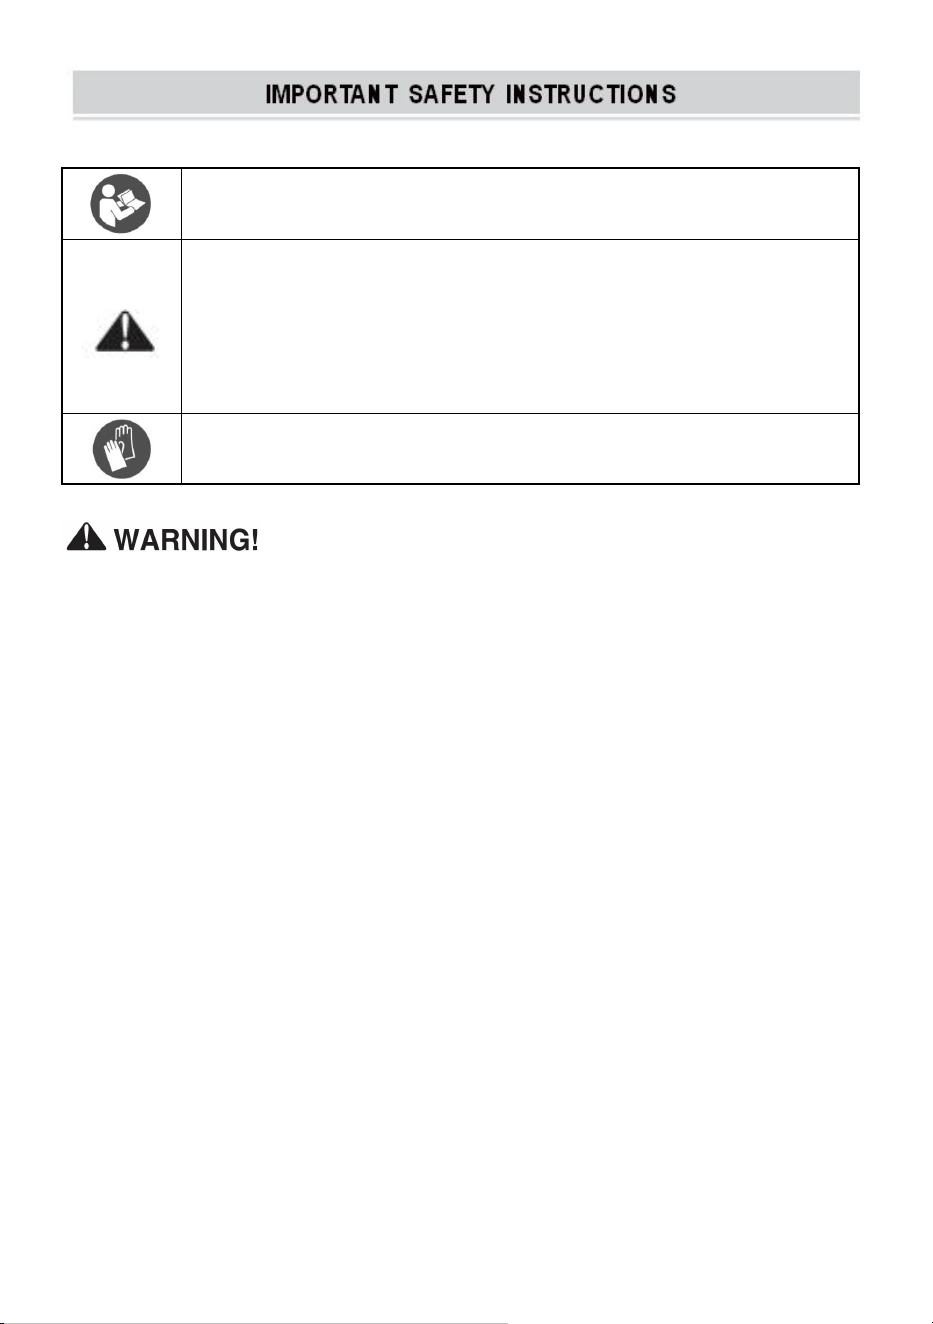
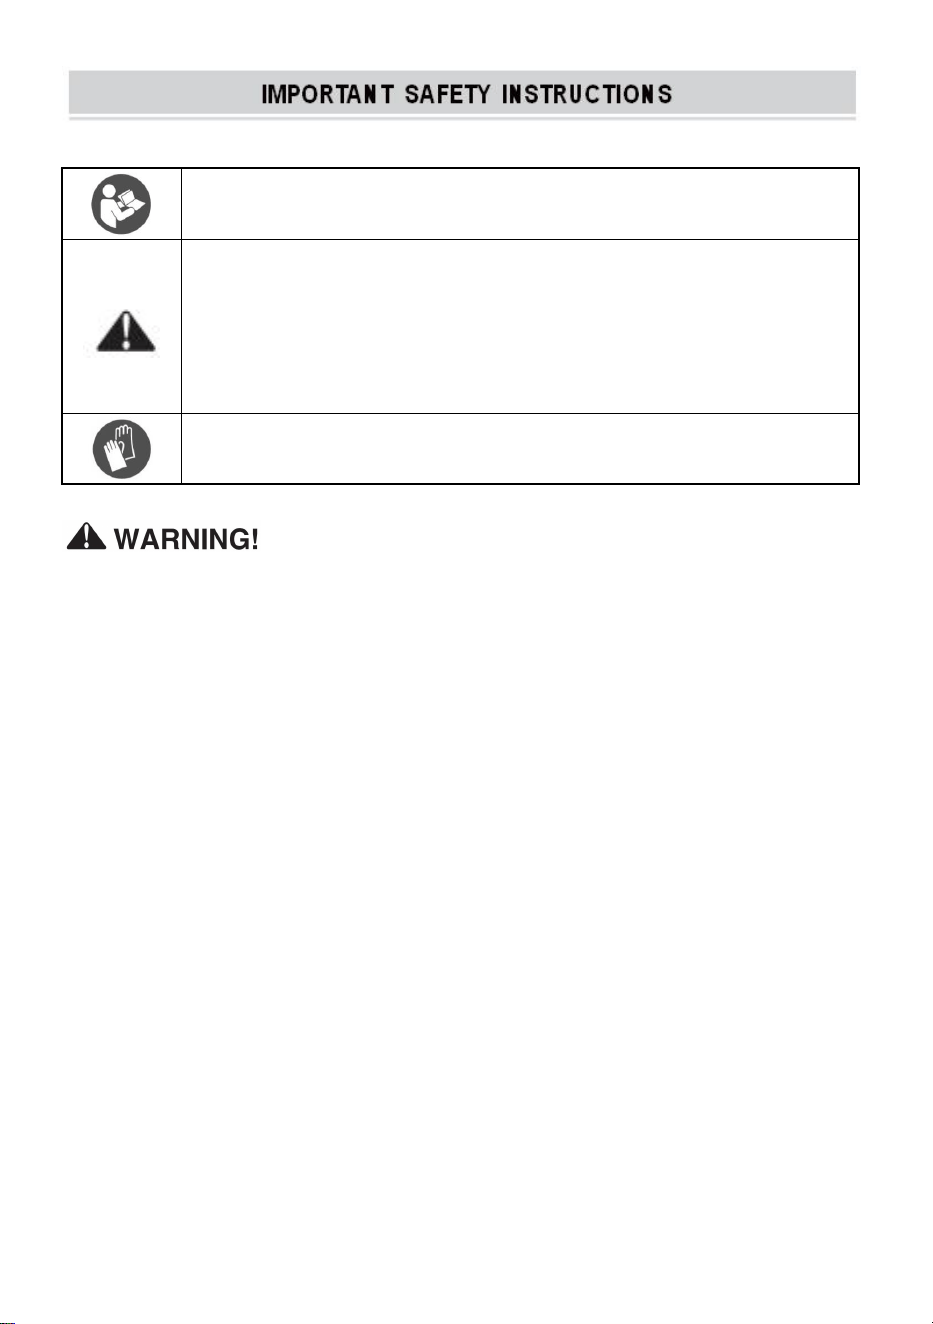
Warning - To reduce the risk of injury, user must read
instructions manual carefully.
This symbol, placed before a safety comment, indicates a
kind of precaution, warning, or danger. Ignoring this warning
may lead to an accident. To reduce the risk of injury, fire, or
electrocution, please always follow the recommendations
shown below.
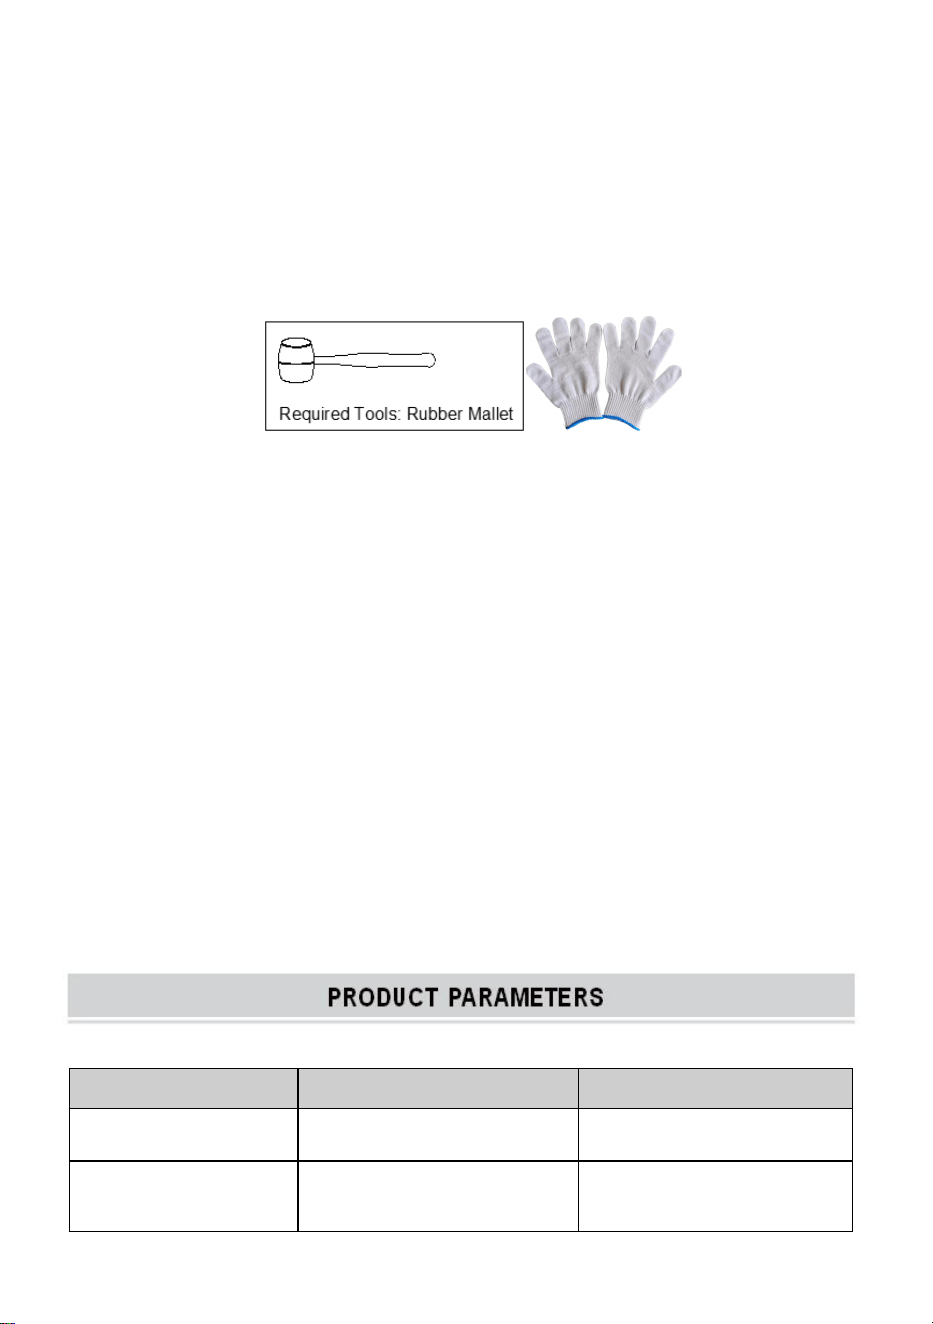
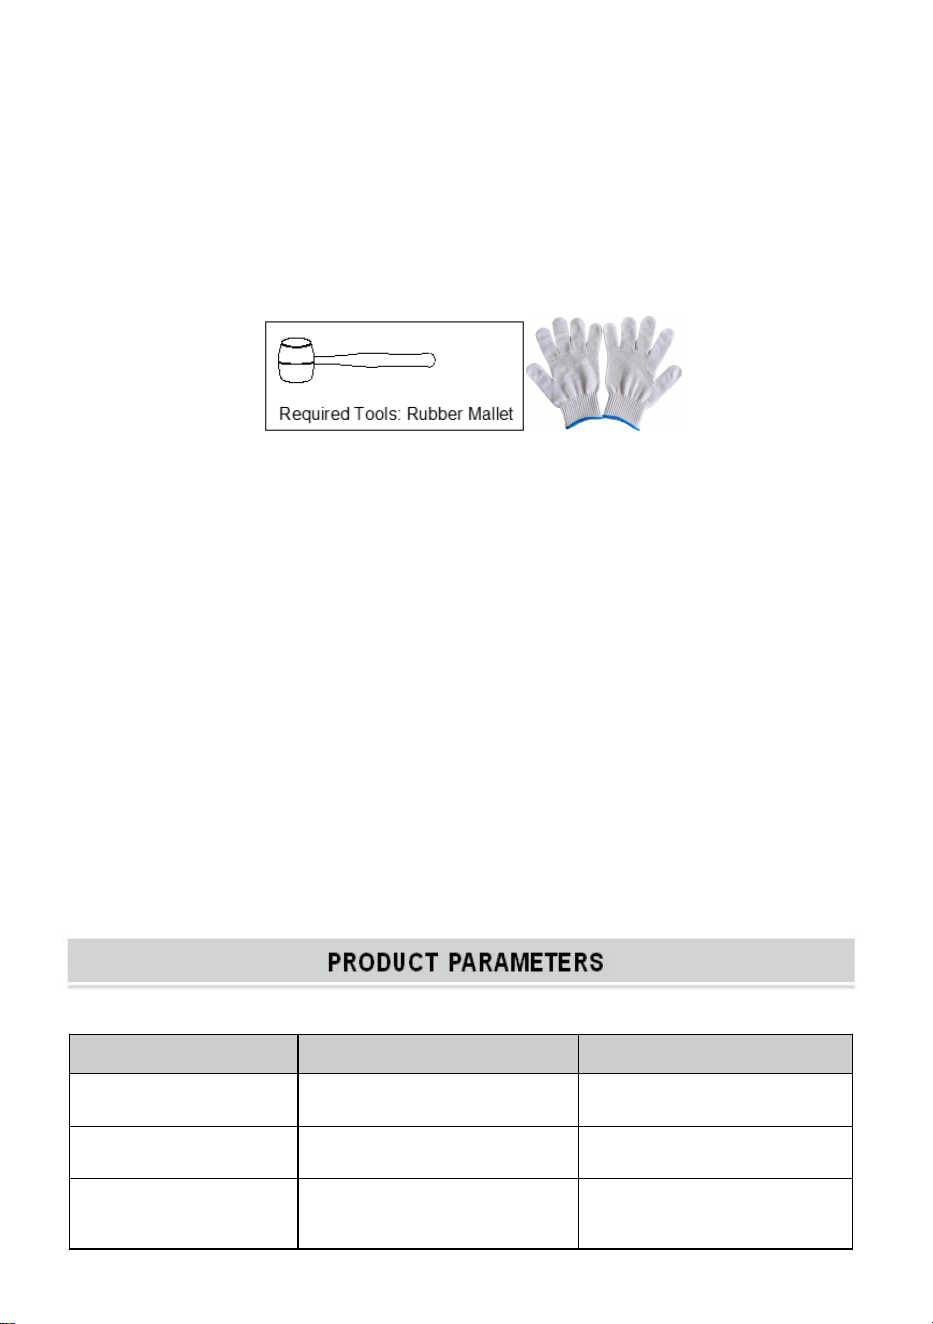
Warning- Be sure to wear gloves when using this product.
1) Keep this manual for the safety warnings and precautions. The
manual offers important information on how to assemble, use and
maintain this product.
2) Please handle metal edges carefully.
3) DO NOT stand on this product or use it as a ladder.
4) DO NOT alter this product in any manner that is not intended, as this
may cause product damage or personal injury.
5) Always assemble on an even surface.
6) The maximum loaded weight for each shelf is no more than 180 kg,
evenly distributed.
7) Store the heaviest items on lower shelves.
8) Attach the unit to the wall if filling to capacity .
ASSEMBLY PRECAUTIONS
1. Please assemble the product in strict accordance with the instructions.
Incorrect assembly could be hazardous.
2. Please wear safety goggles and work gloves properly during assembly.
3.Do not try to assemble the product when feeling tired or when under the
influence of alcohol, drugs or medication.

- 3 -
4.Load bearing capacity and other product parameters are applied to the
properly and completely assembled product only.
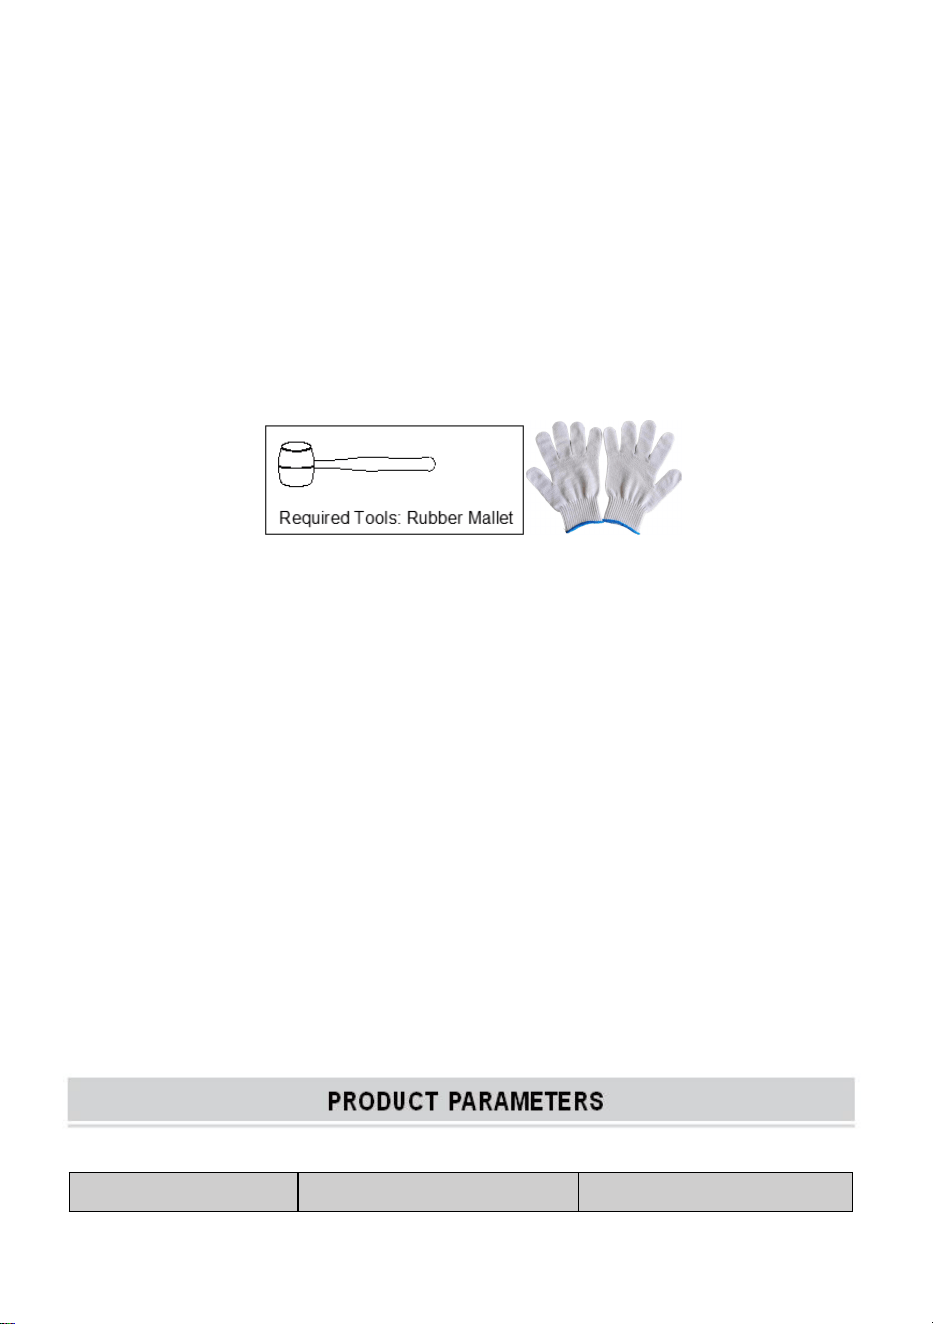
5.A hammer and a pair of gloves may also be used, provided a cloth or
wood block is placed between the hammer head and the parts.
USE PRECAUTIONS
1.This product is not a toy. Do not allow children to play with or get access
to this item.
2.Check carefully before use. Do not use it if parts get loosened or
damaged.
4.Use on flat, level, and hard surfaces only.
5.Do not exceed the listed load bearing capacity. Tighten all the knobs
securely before placing weights on it. Be aware of the dynamic load
bearing capacity! Sudden load changes may temporarily cause excessive
load, resulting in product failure.
SAVE THESE INSTRUCTIONS
1
2
Model
326G0P9FV0
3676V4VPV0
Product size
16×32×62.8inch
16×36×71.4inch
Total load limit
2000lbs
2000lbs
load limit for each
layer
400lbs
400lbs
- 4 -
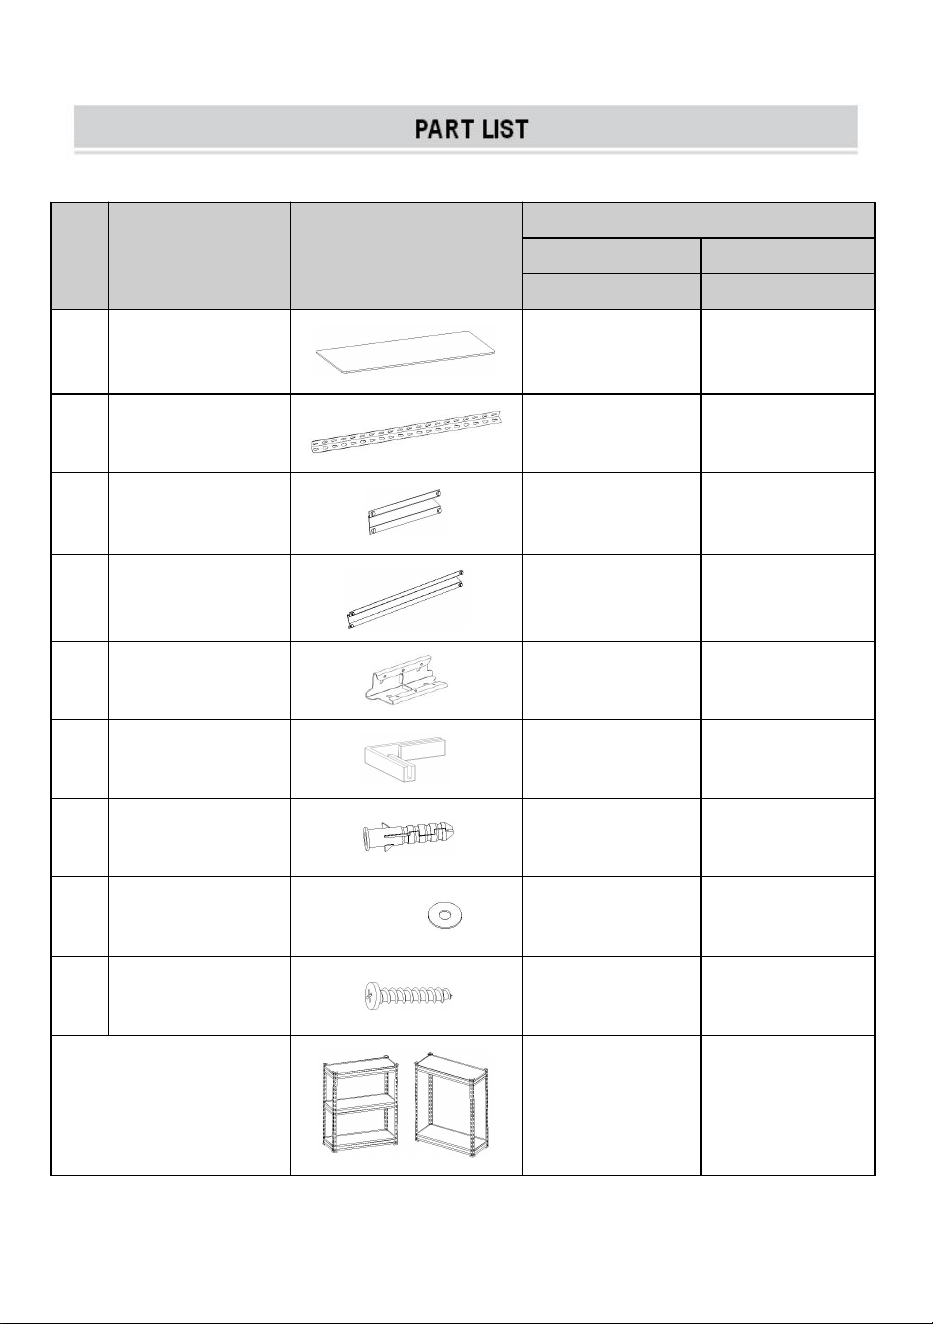
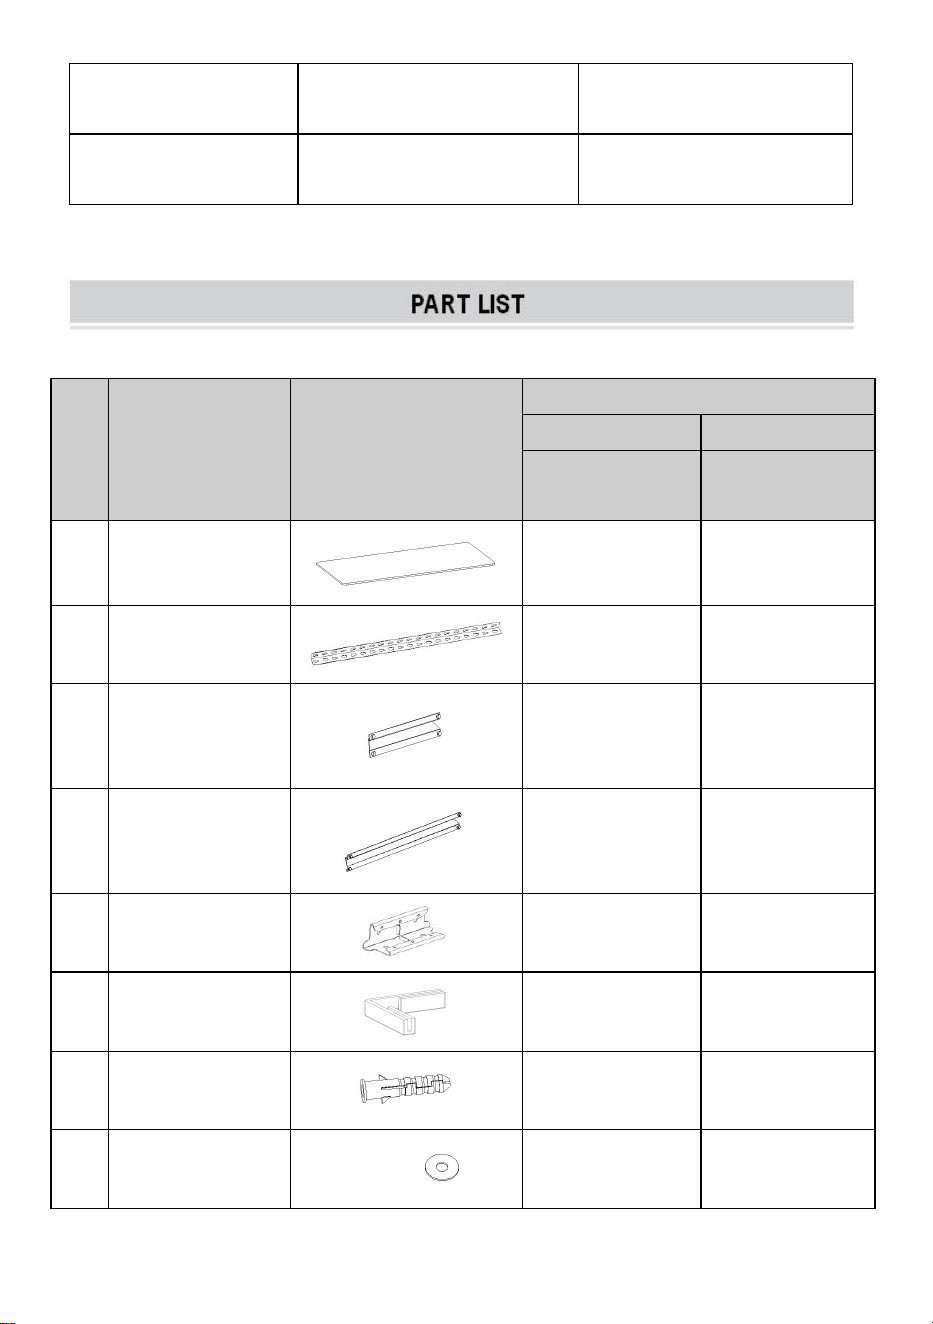
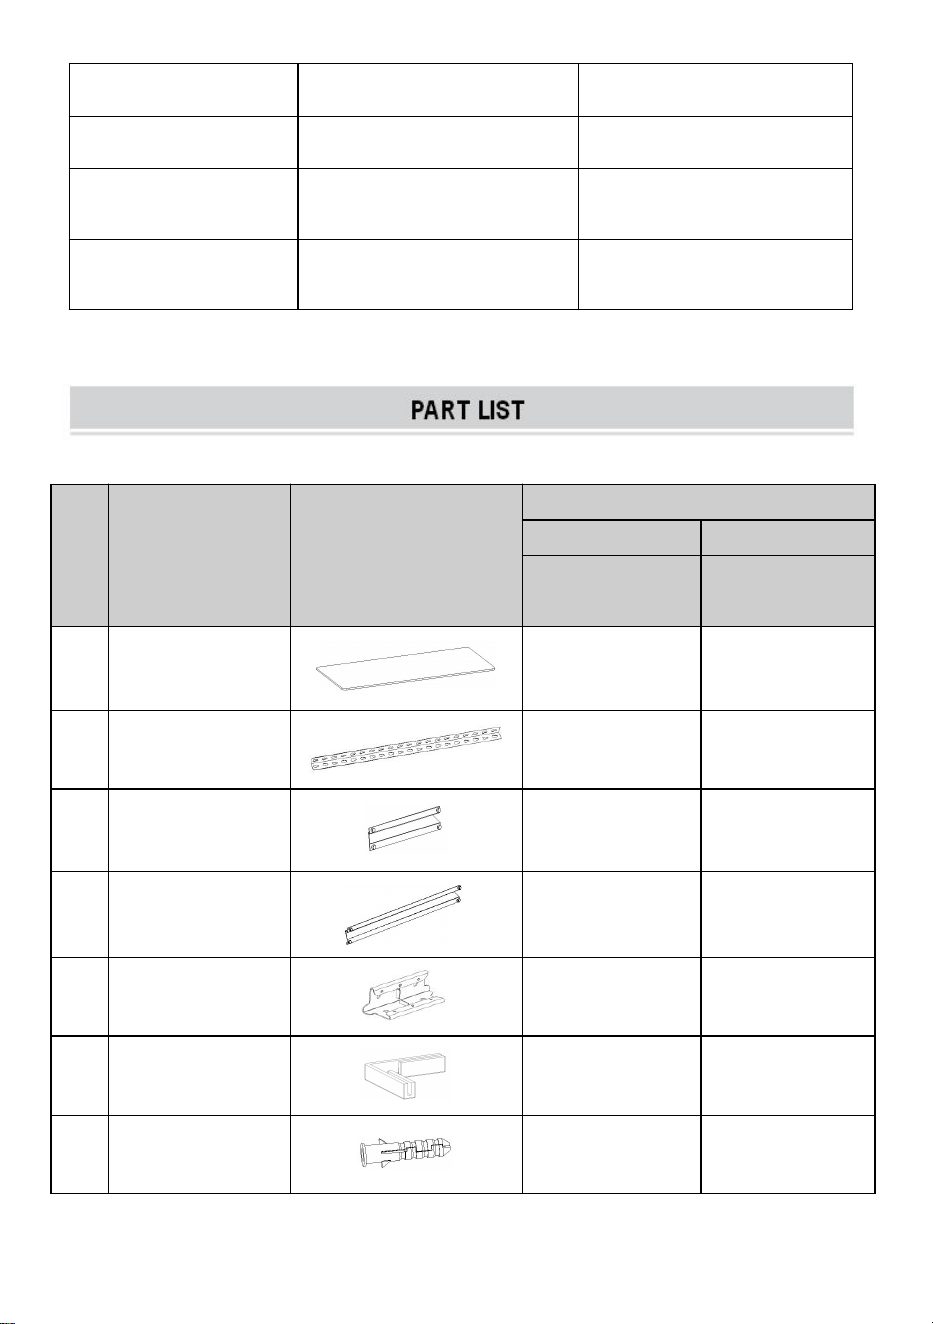
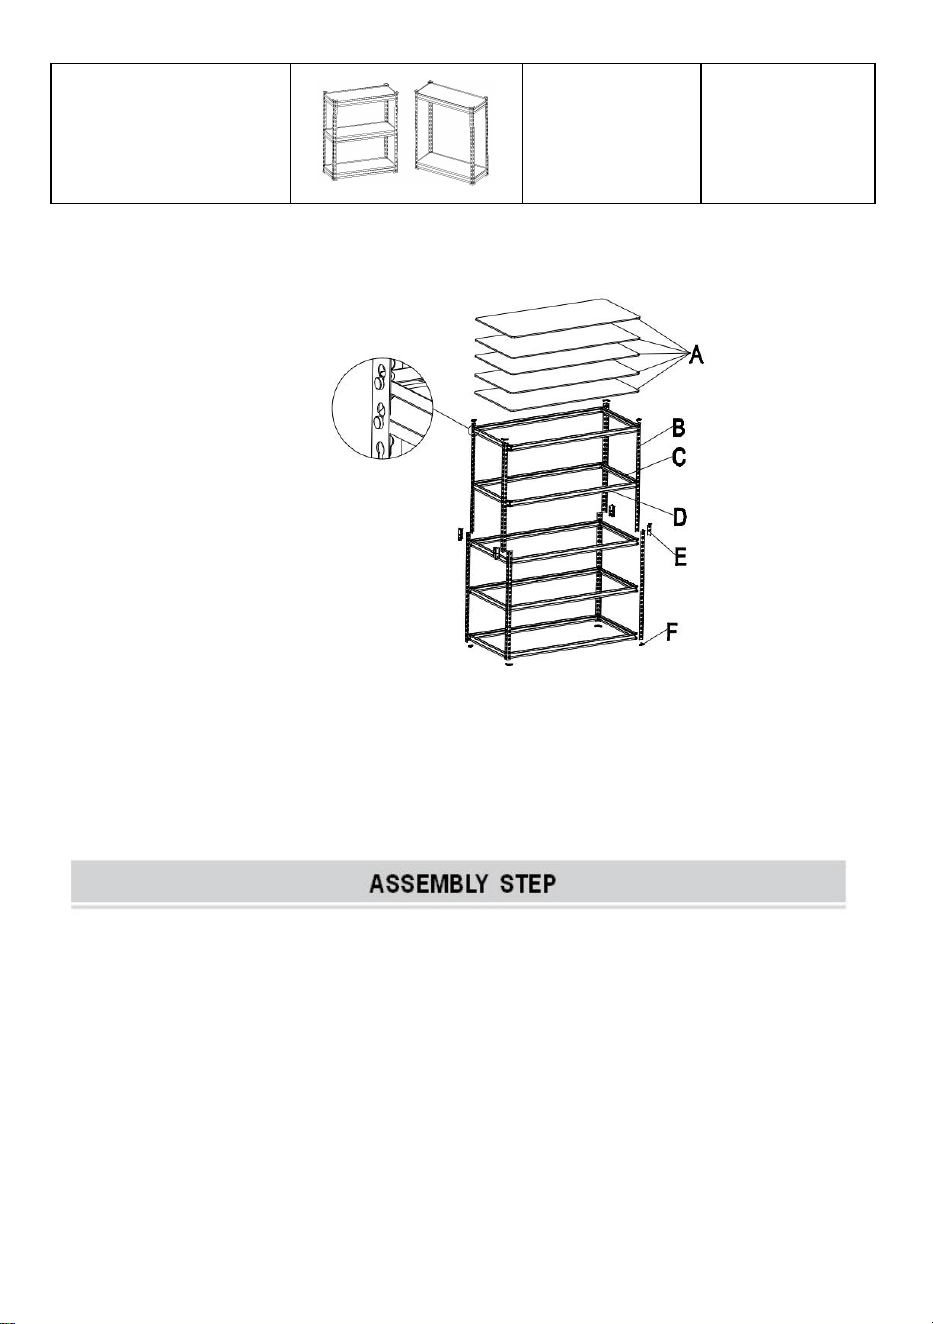
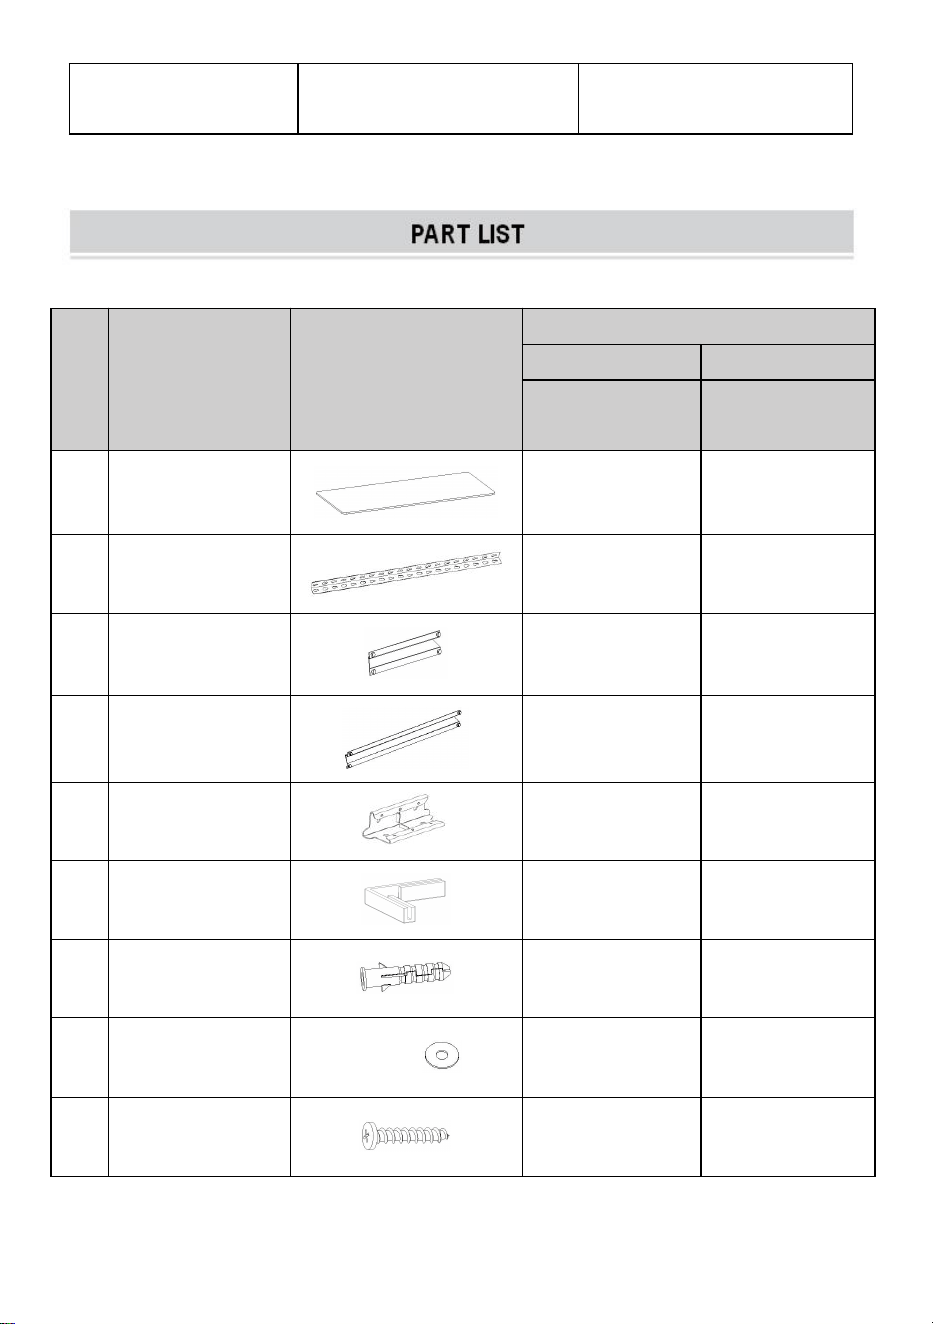
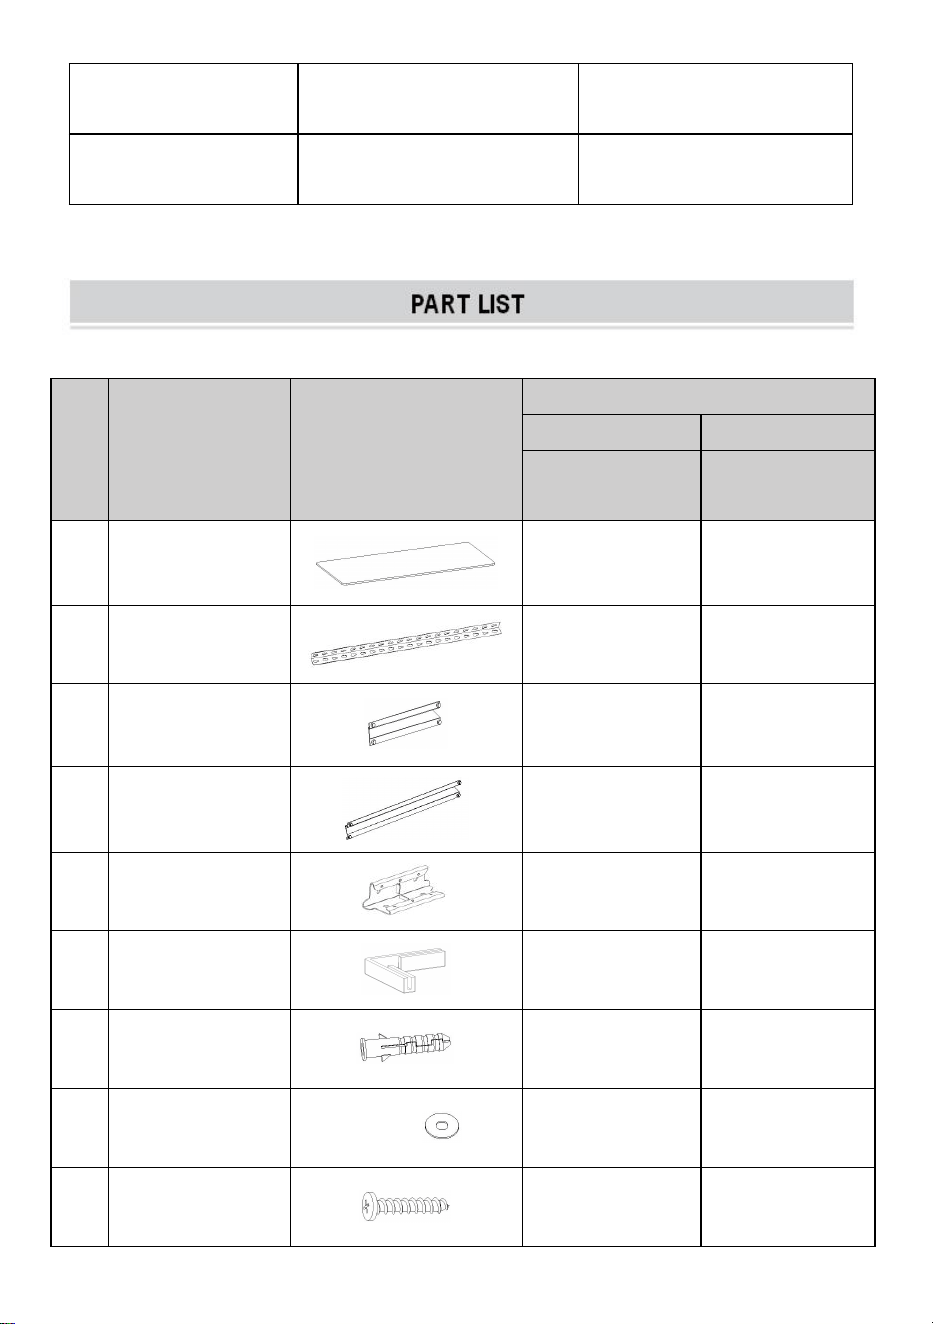
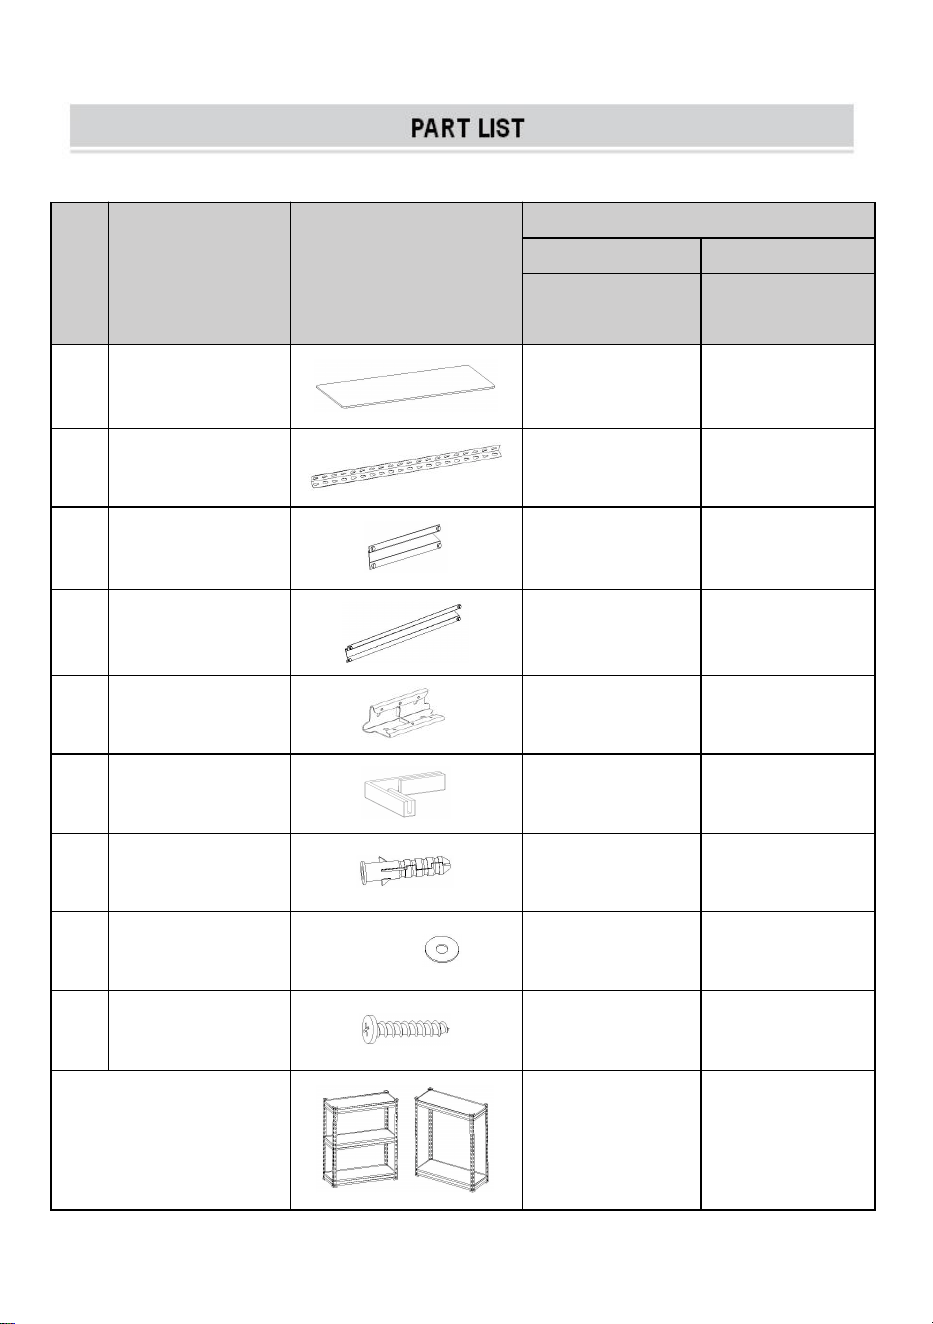
Part
Description
Picture
Part Qty
326G0P9FV0
3676V4VPV0
16×32×62.8inch
16×36×71.4inch
A
7mm MDF
5
5
B
Upright post
8
8
C
Top shelf short
beam
10
10
D
Top shelf long
beam
10
10
E
Fixings
4
4
F
Post cap
16
16
H
Expansion Plug
2
2
I
Washer
2
2
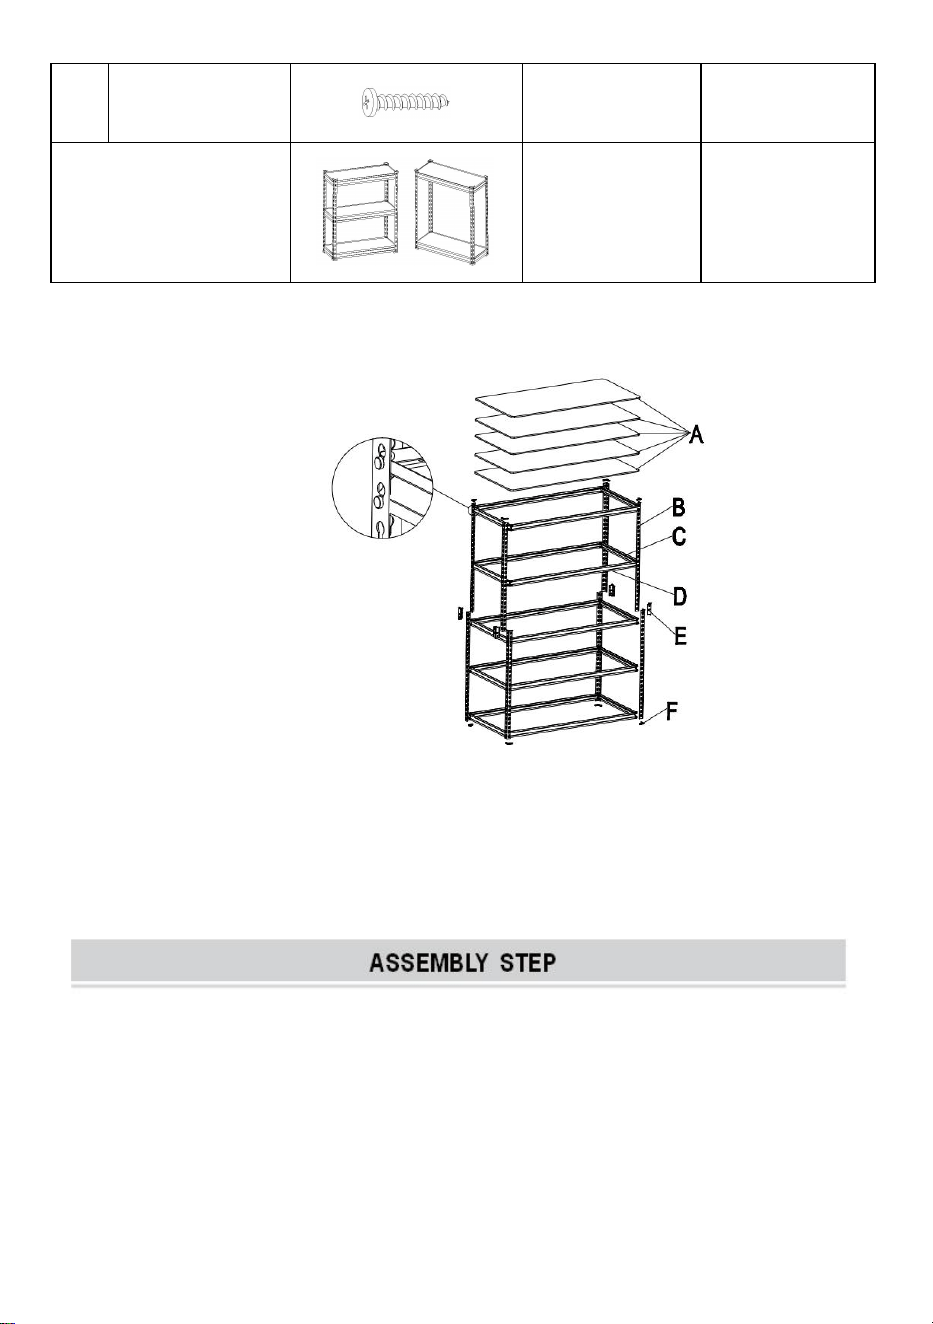
J
Philips Screws
2
2
Height of separated
shelves
31.4inch
35.7inch
- 5 -
Attention:
For additional information regarding the parts listed below, please
refer to the Assembly Diagram in this manual. Unwrap and separate all
parts in a clear work area.
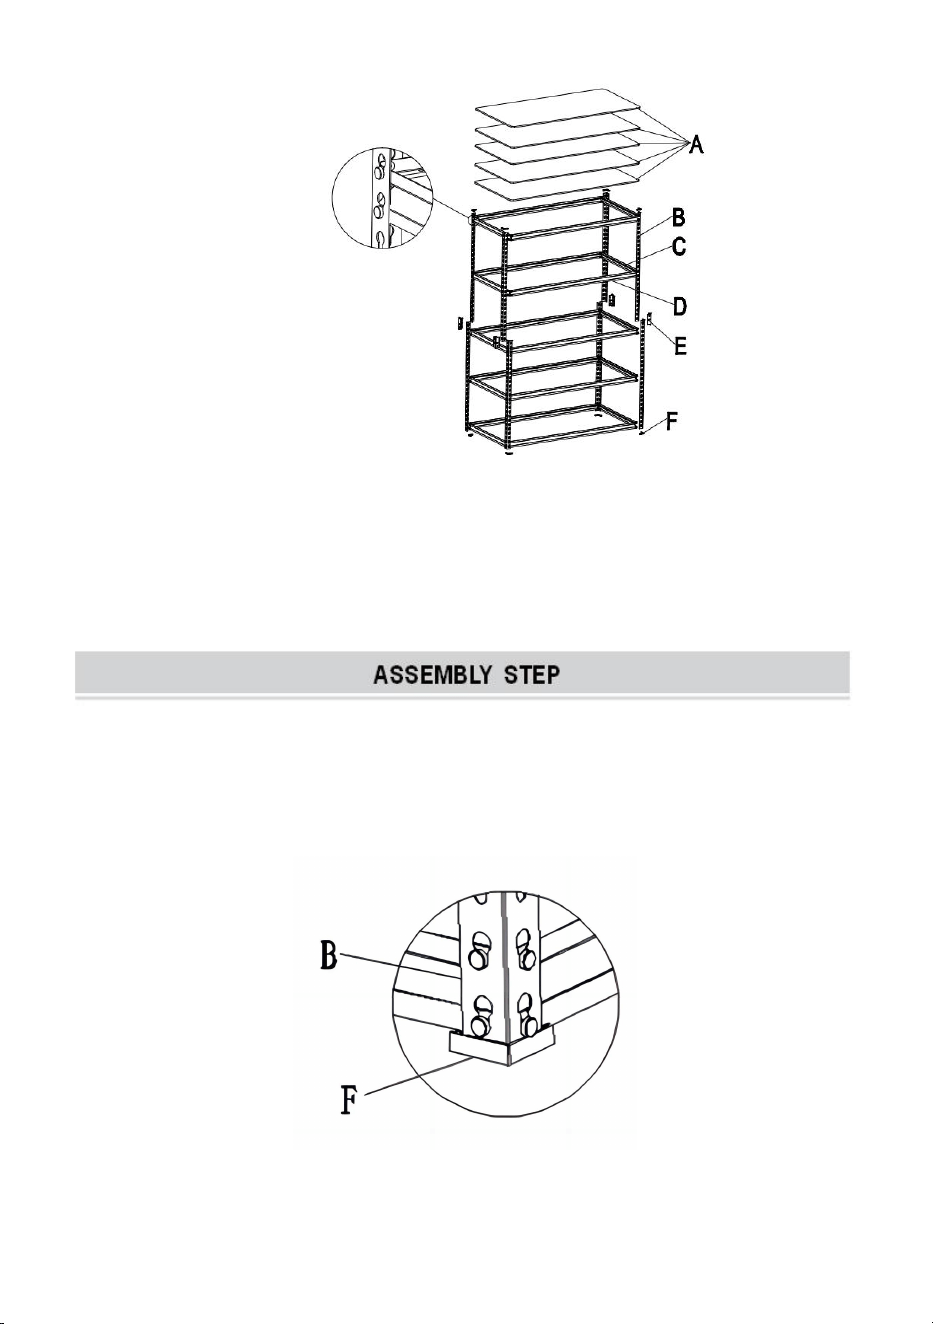
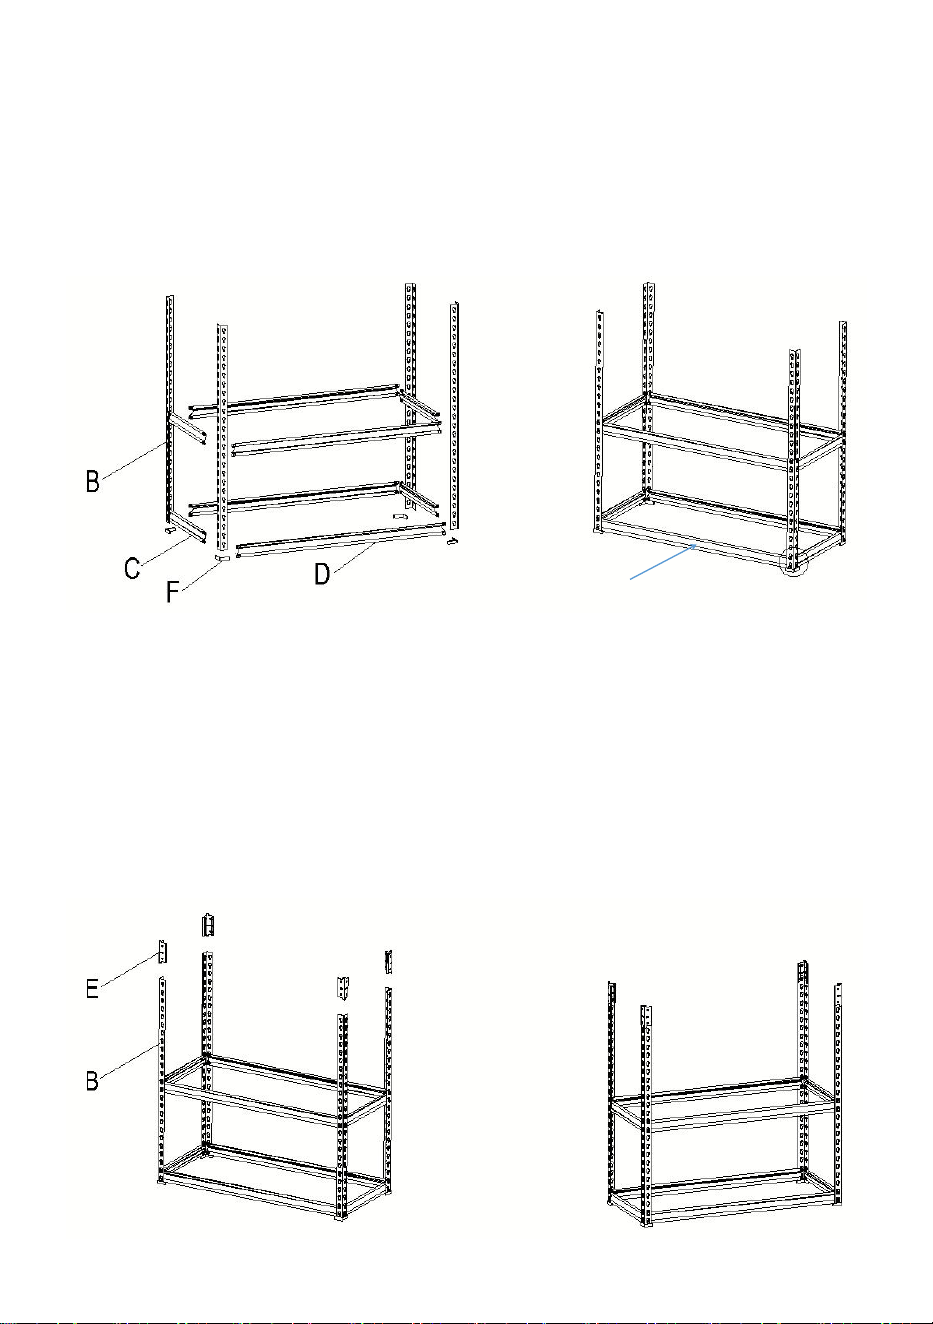
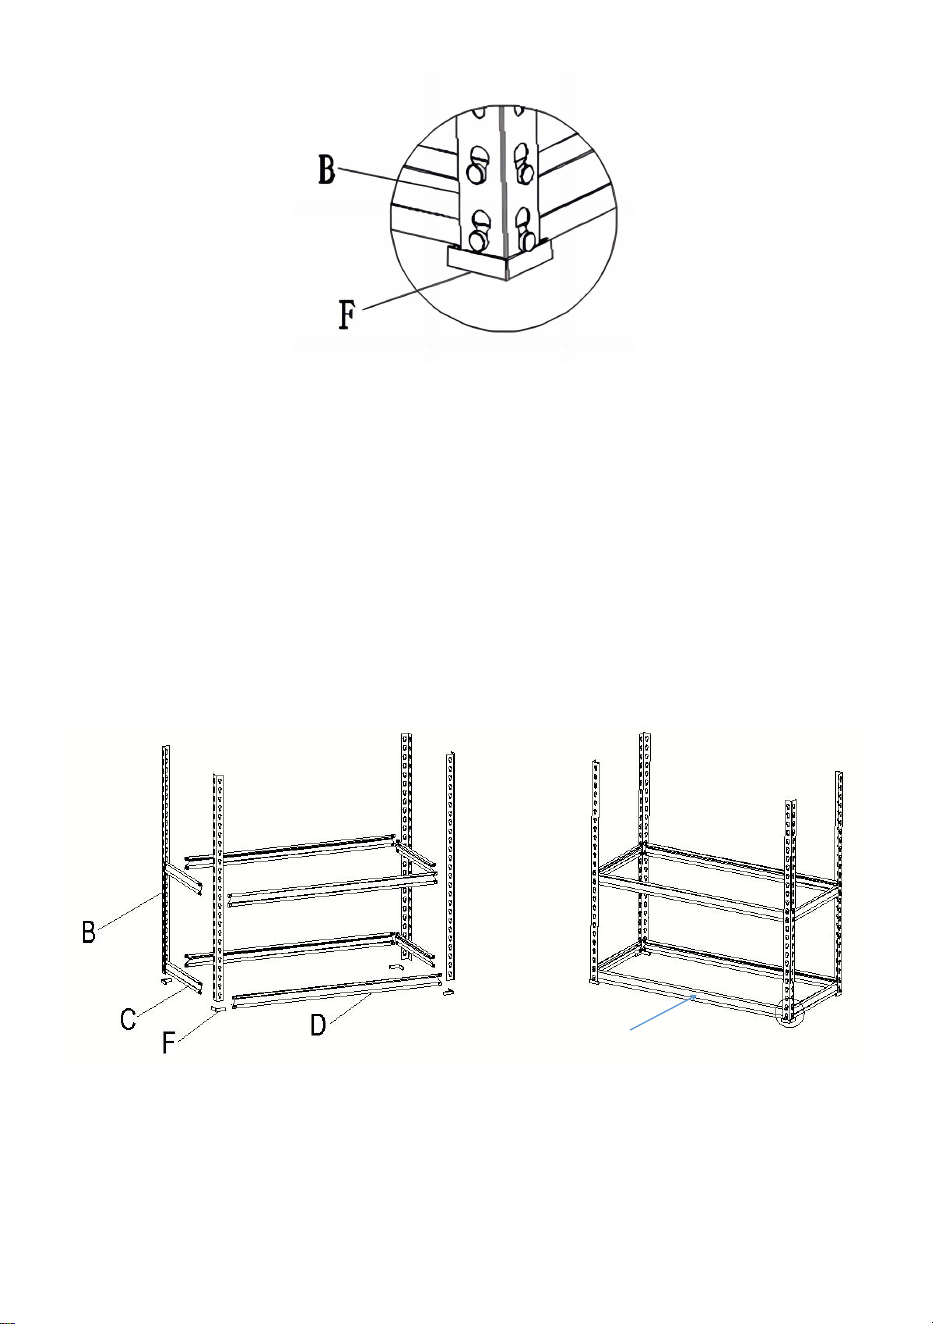
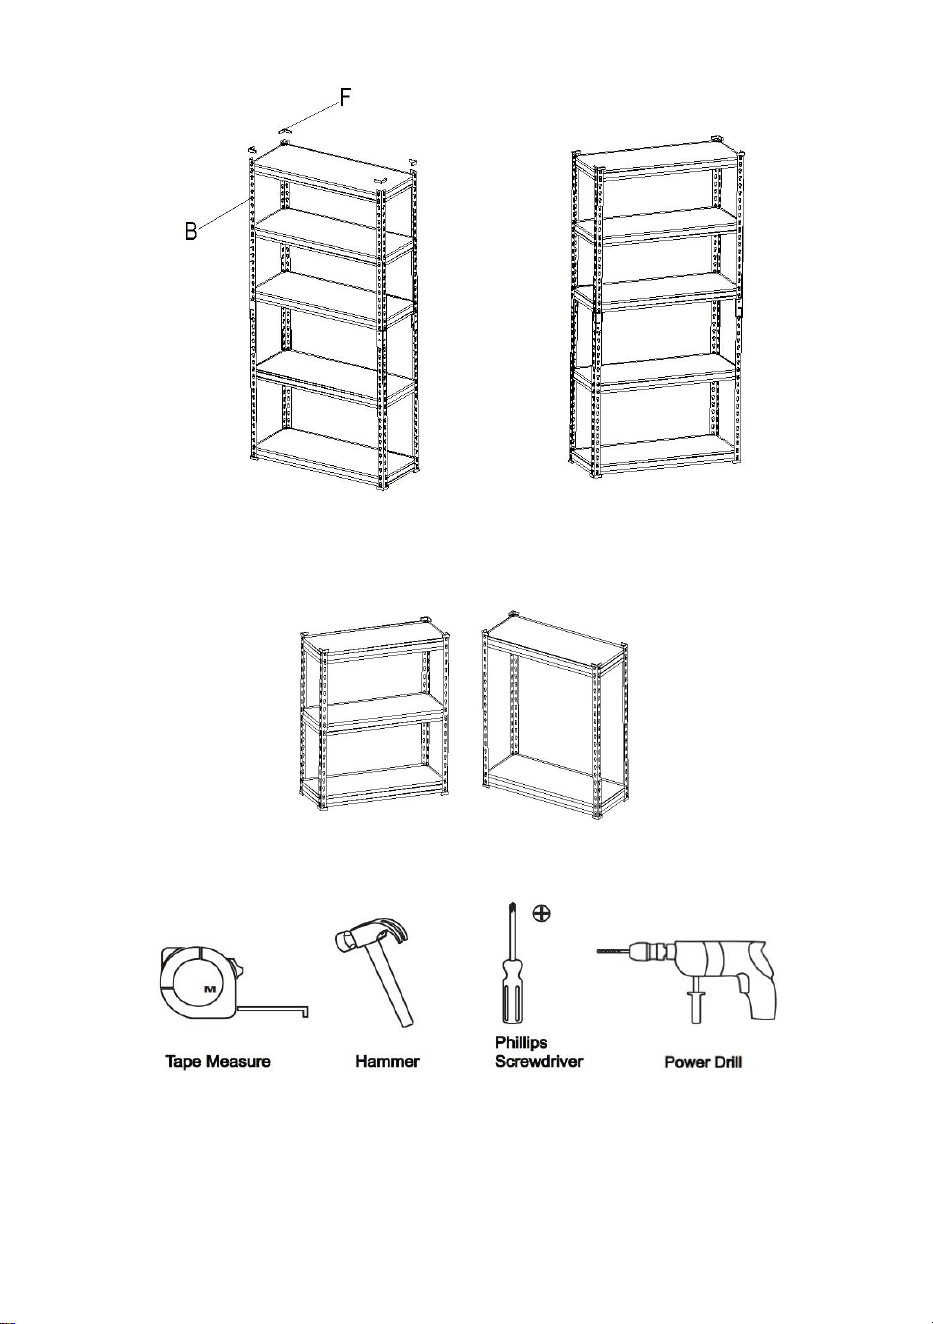
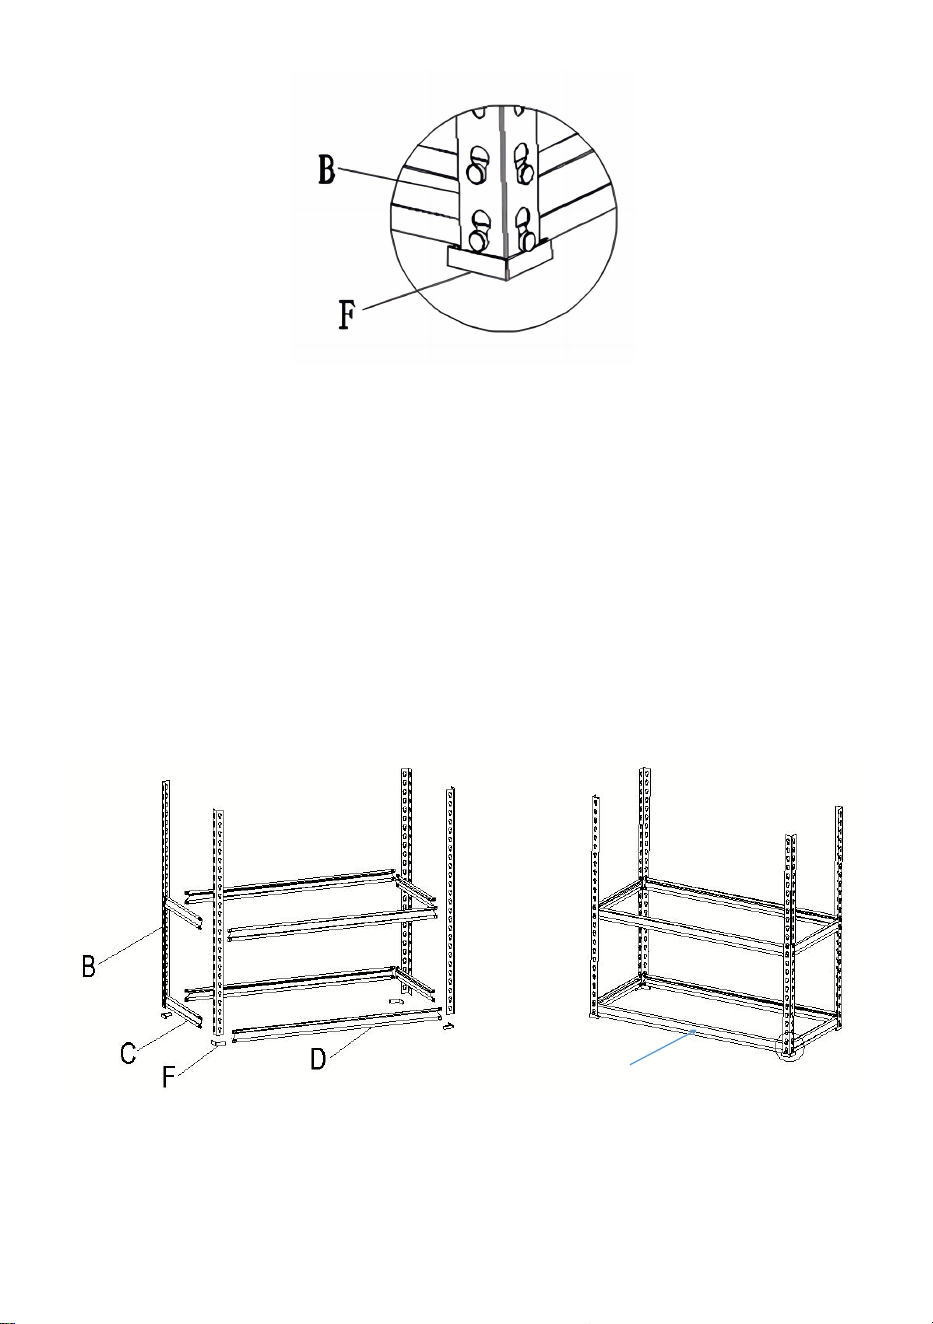
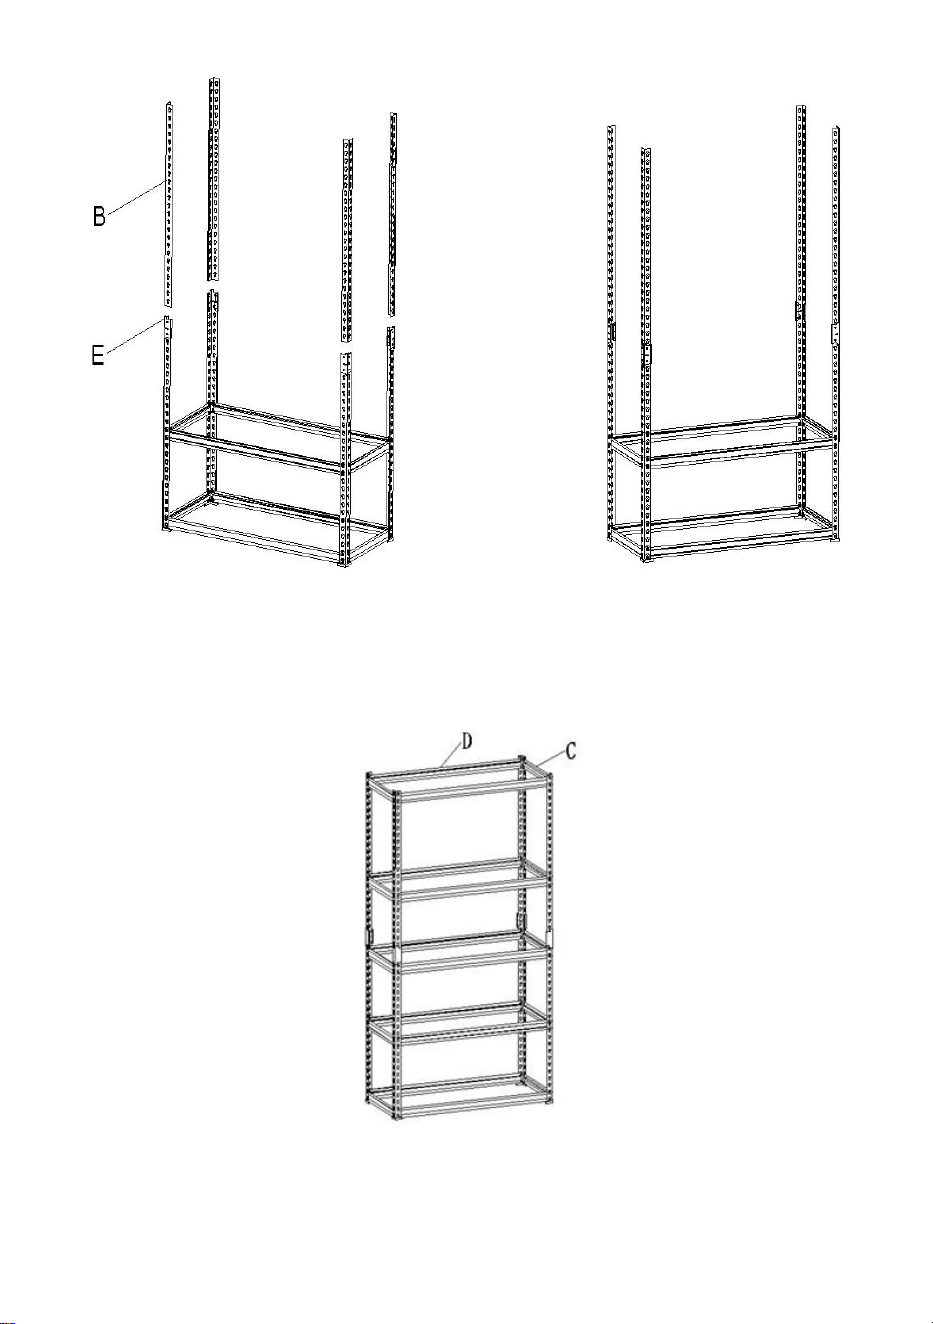
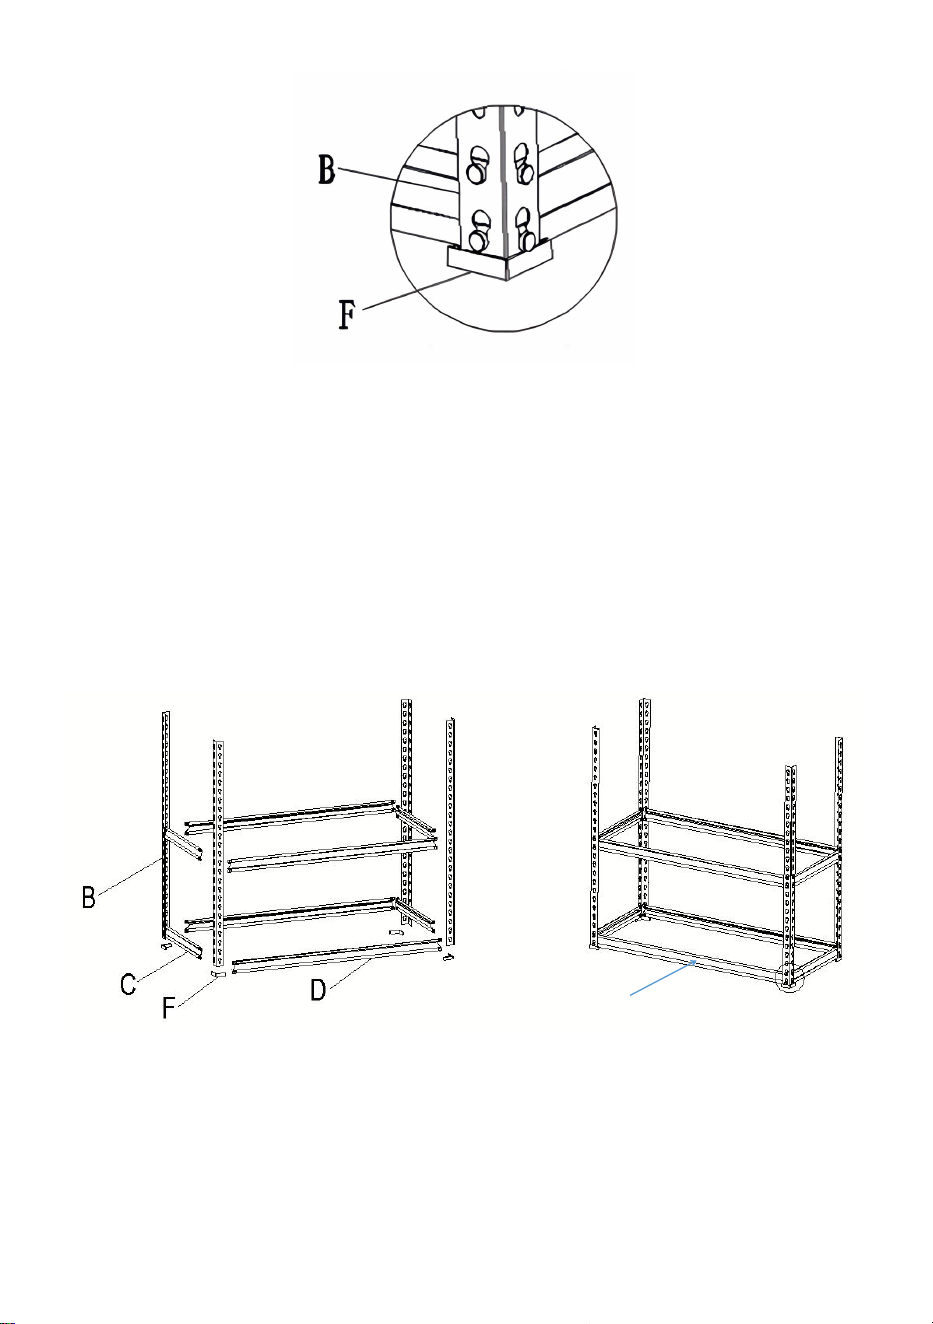
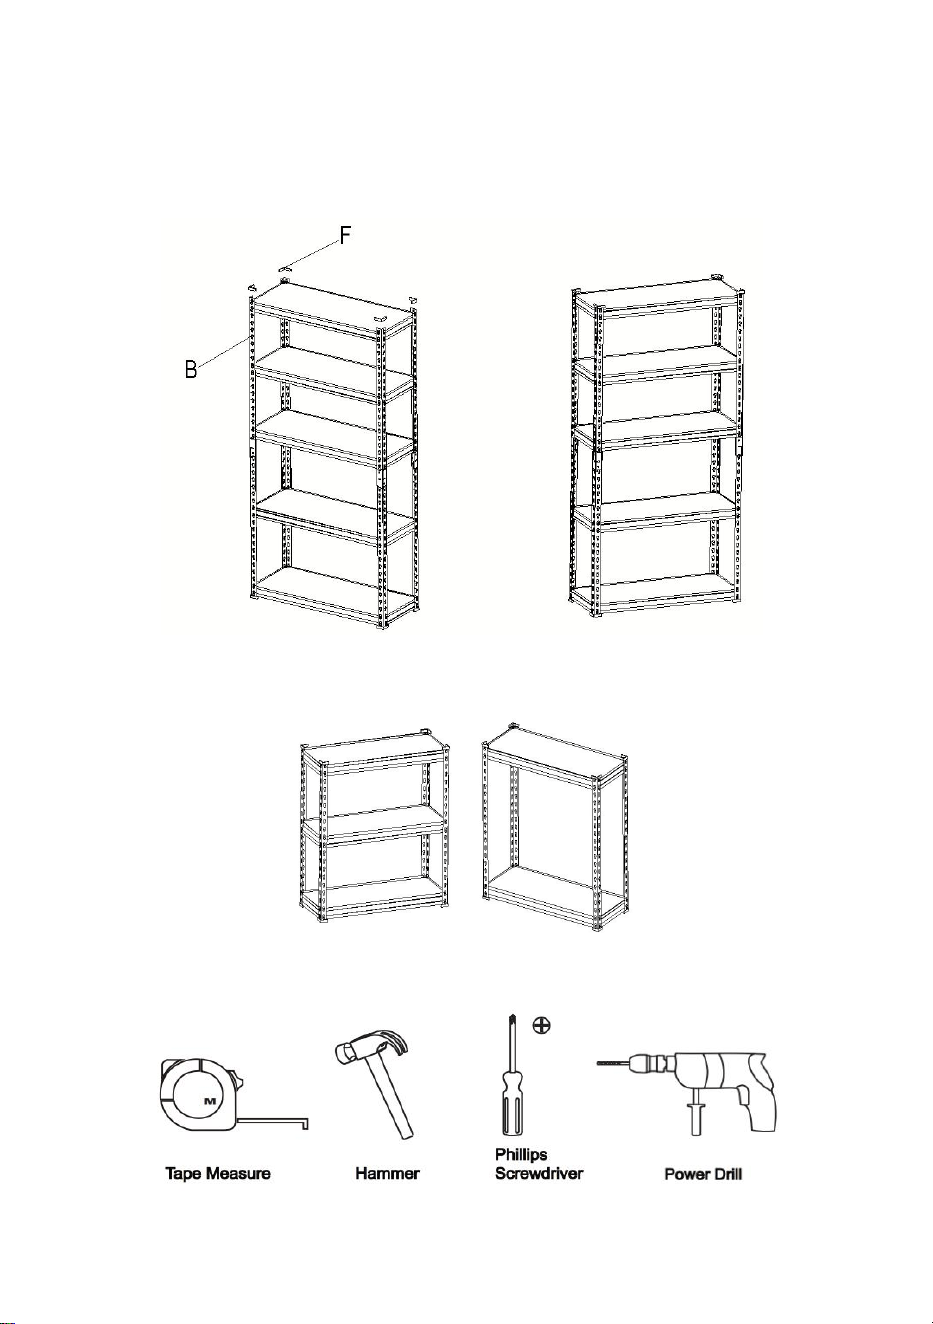
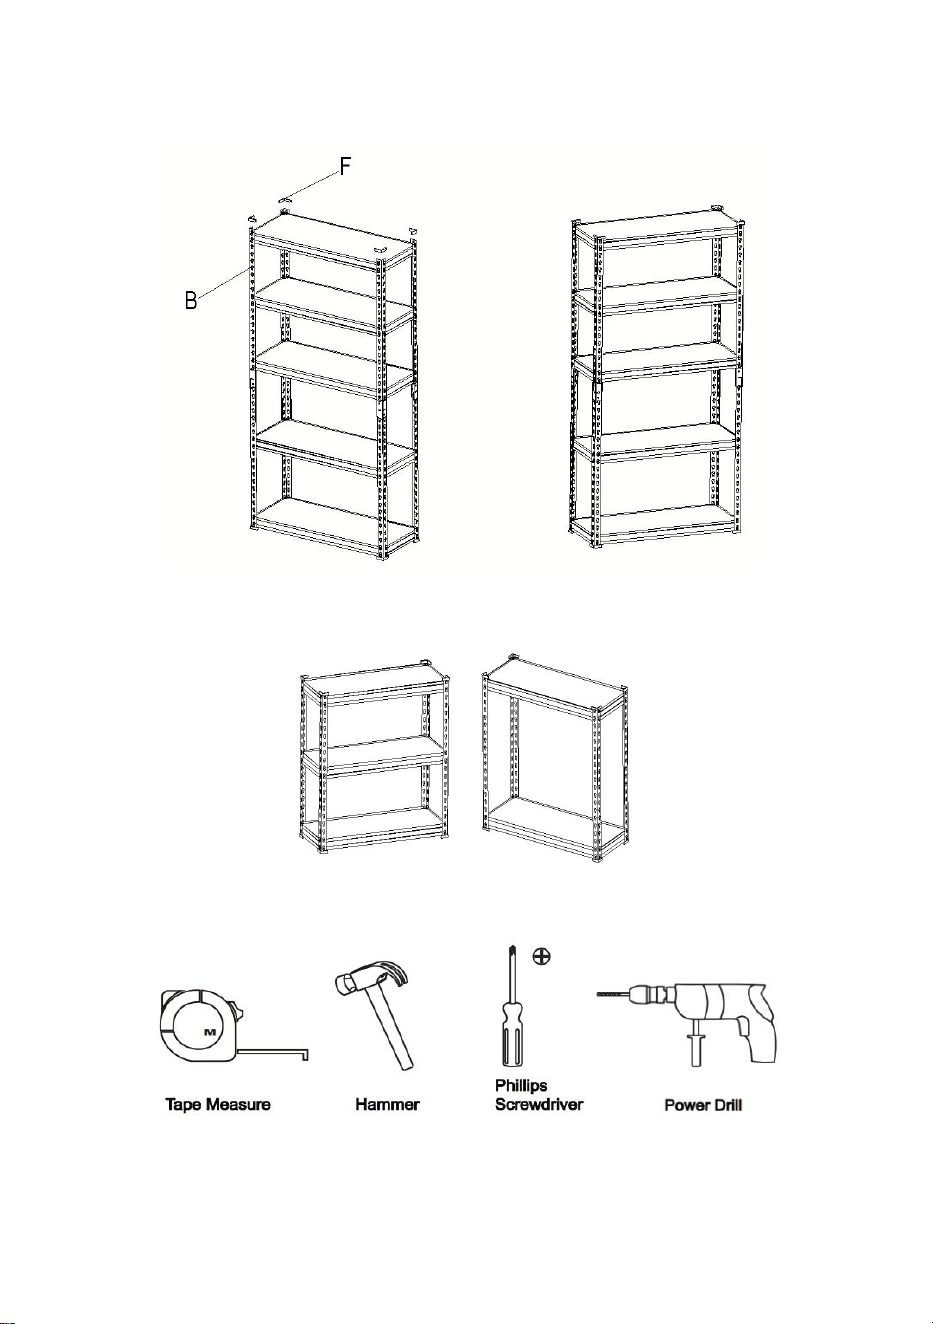
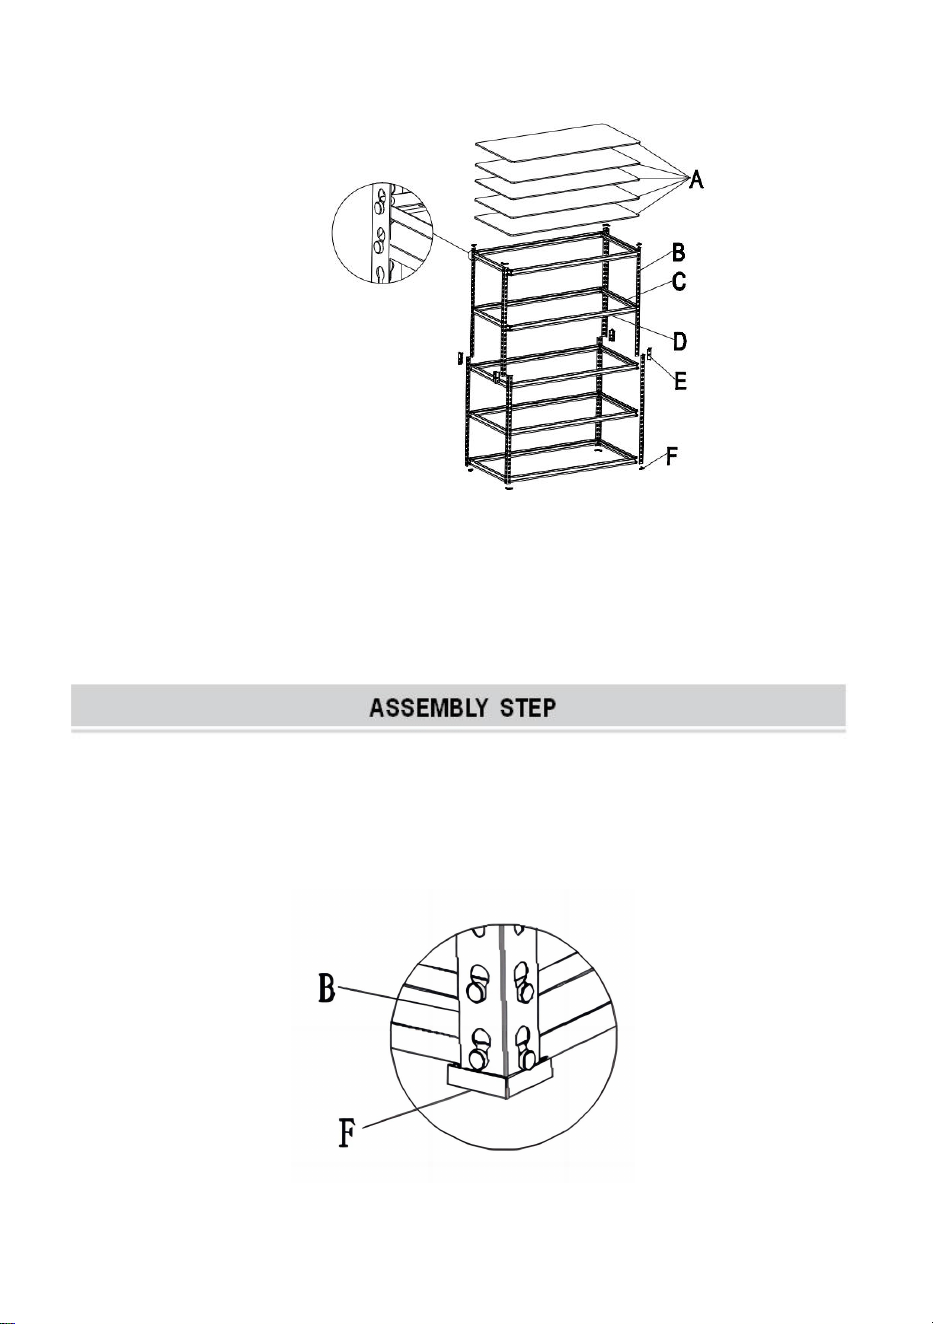
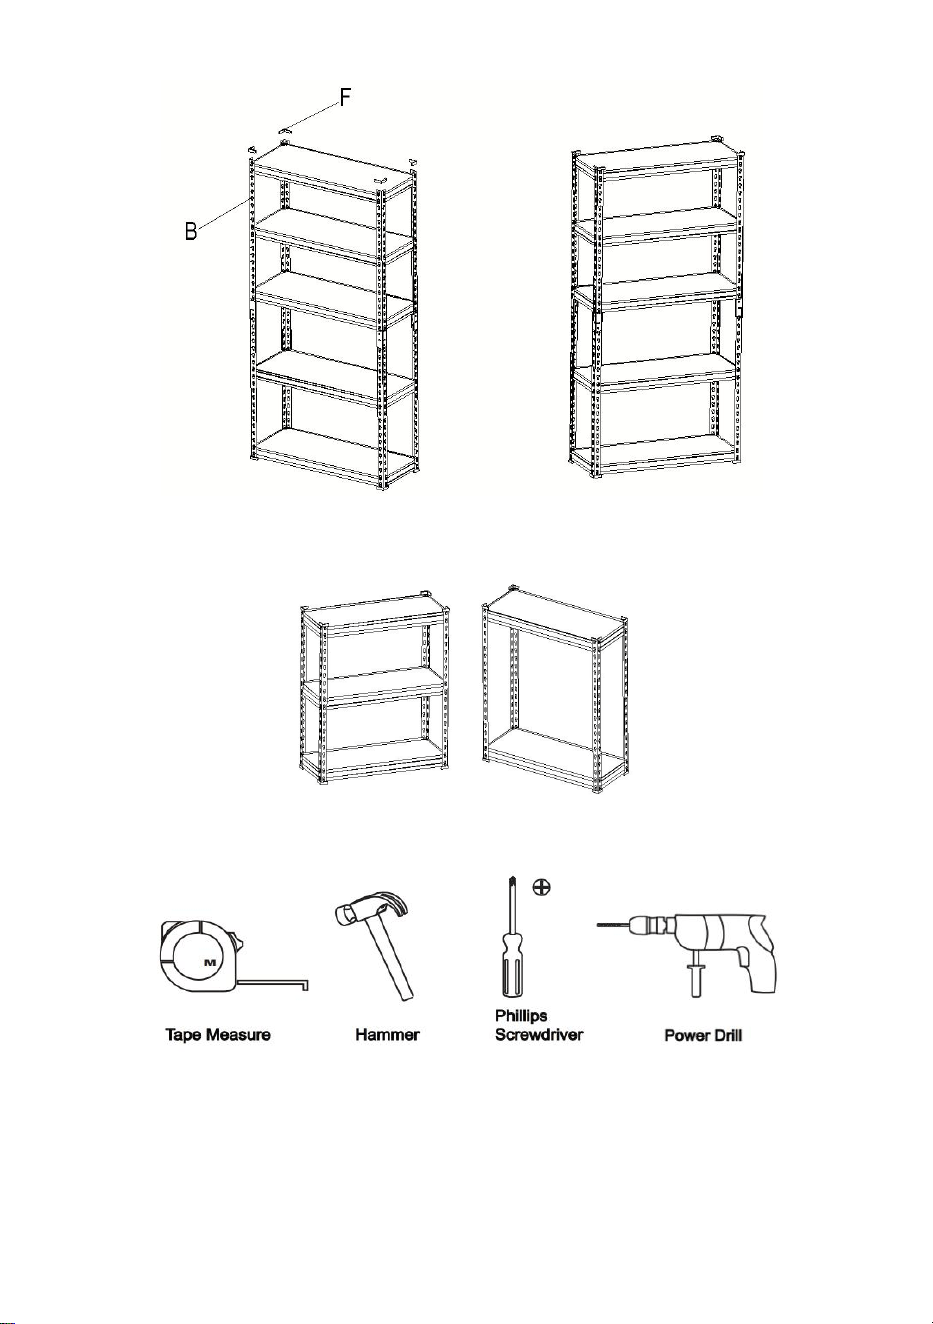
Step 1: Post Cap Assembly
1. Slide each post (B) into post cap (F) as shown.
2. Repeat for all 4 upright posts.
Attention: post caps are for upright feet only.
Top shelf beam rivets has
a design that allowing MDF
to sit.
- 6 -
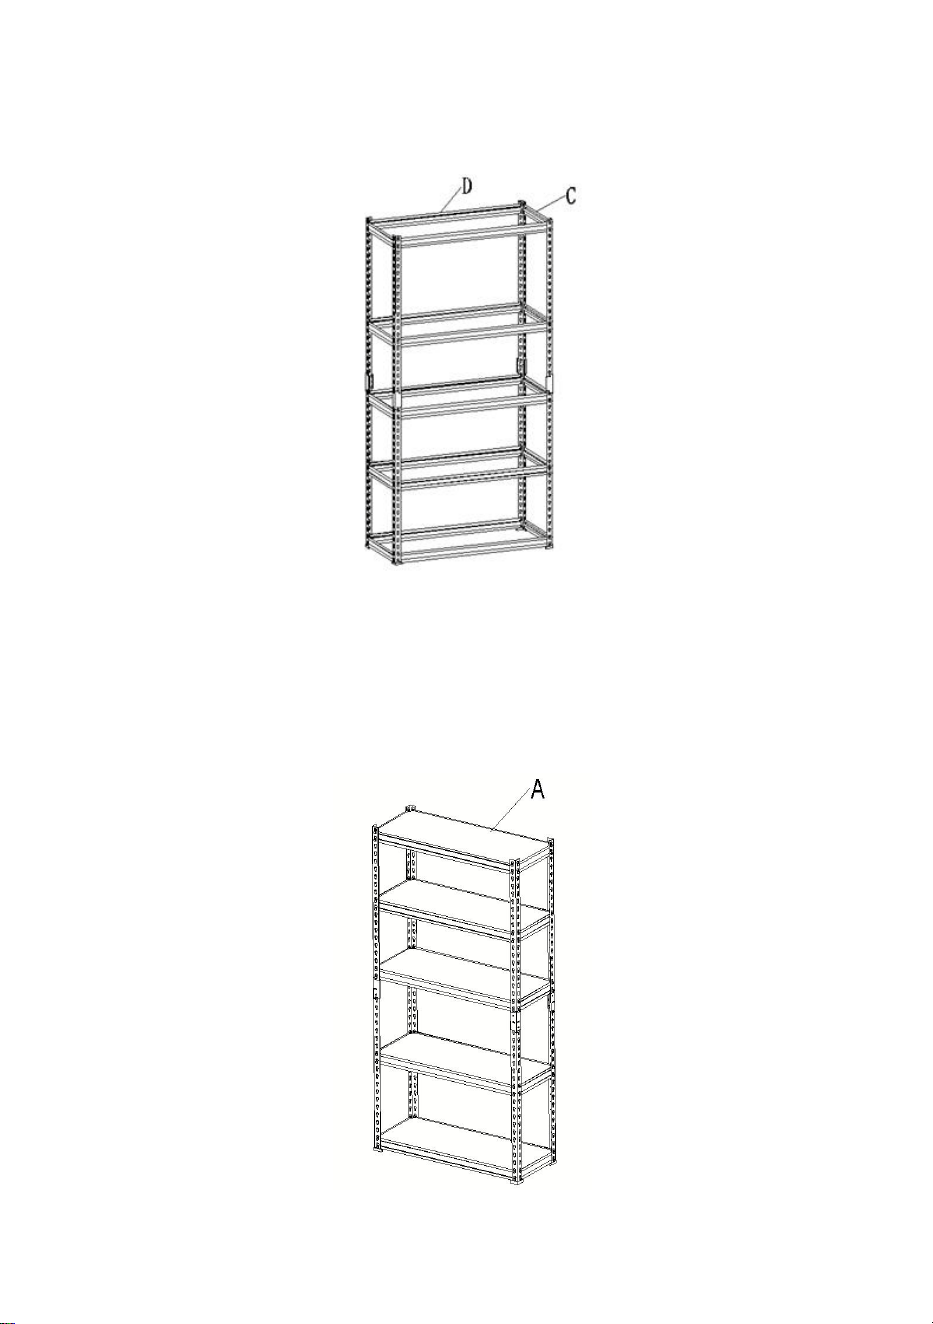
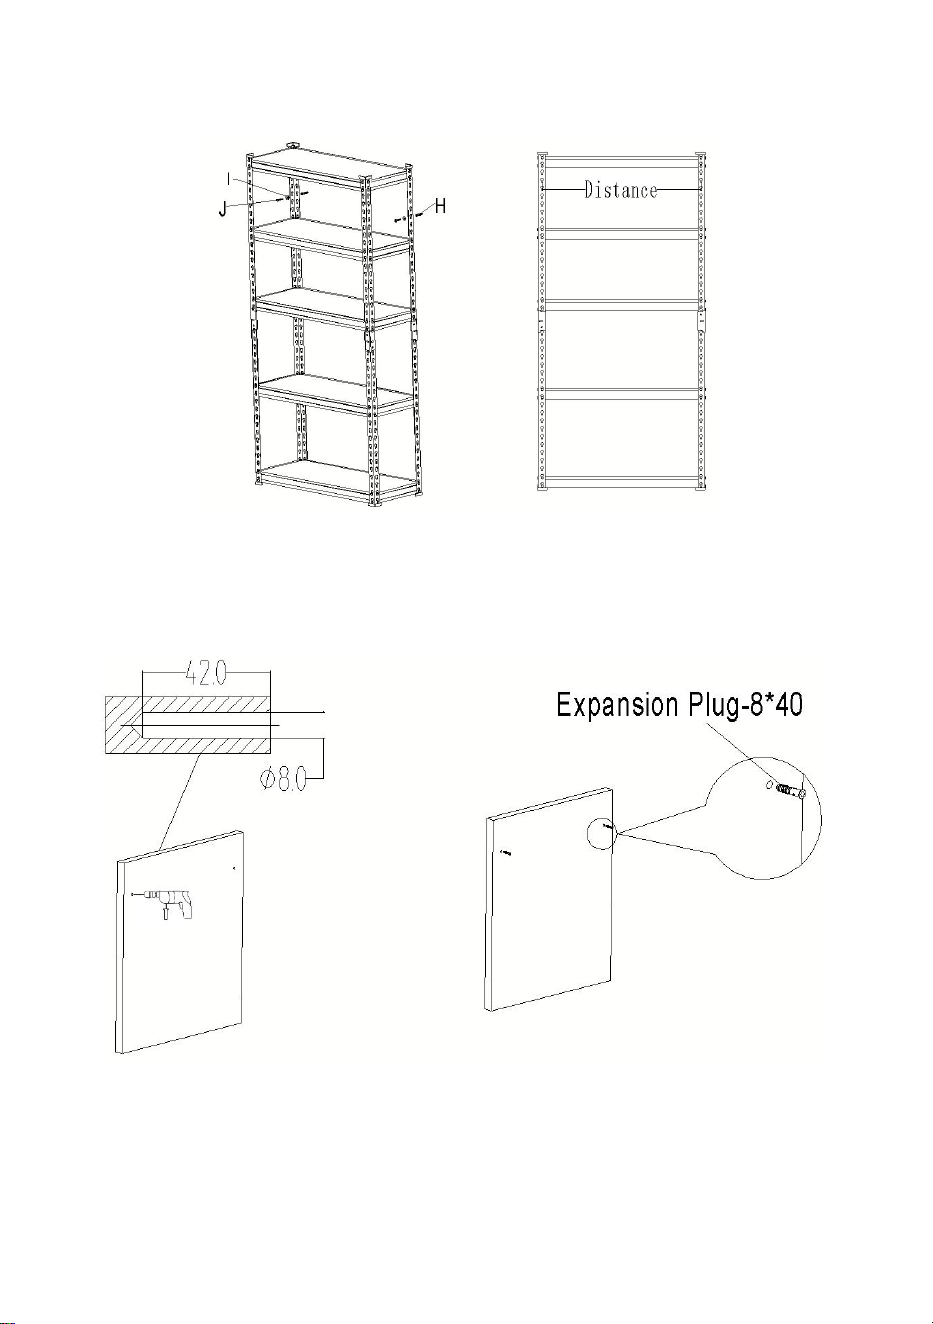
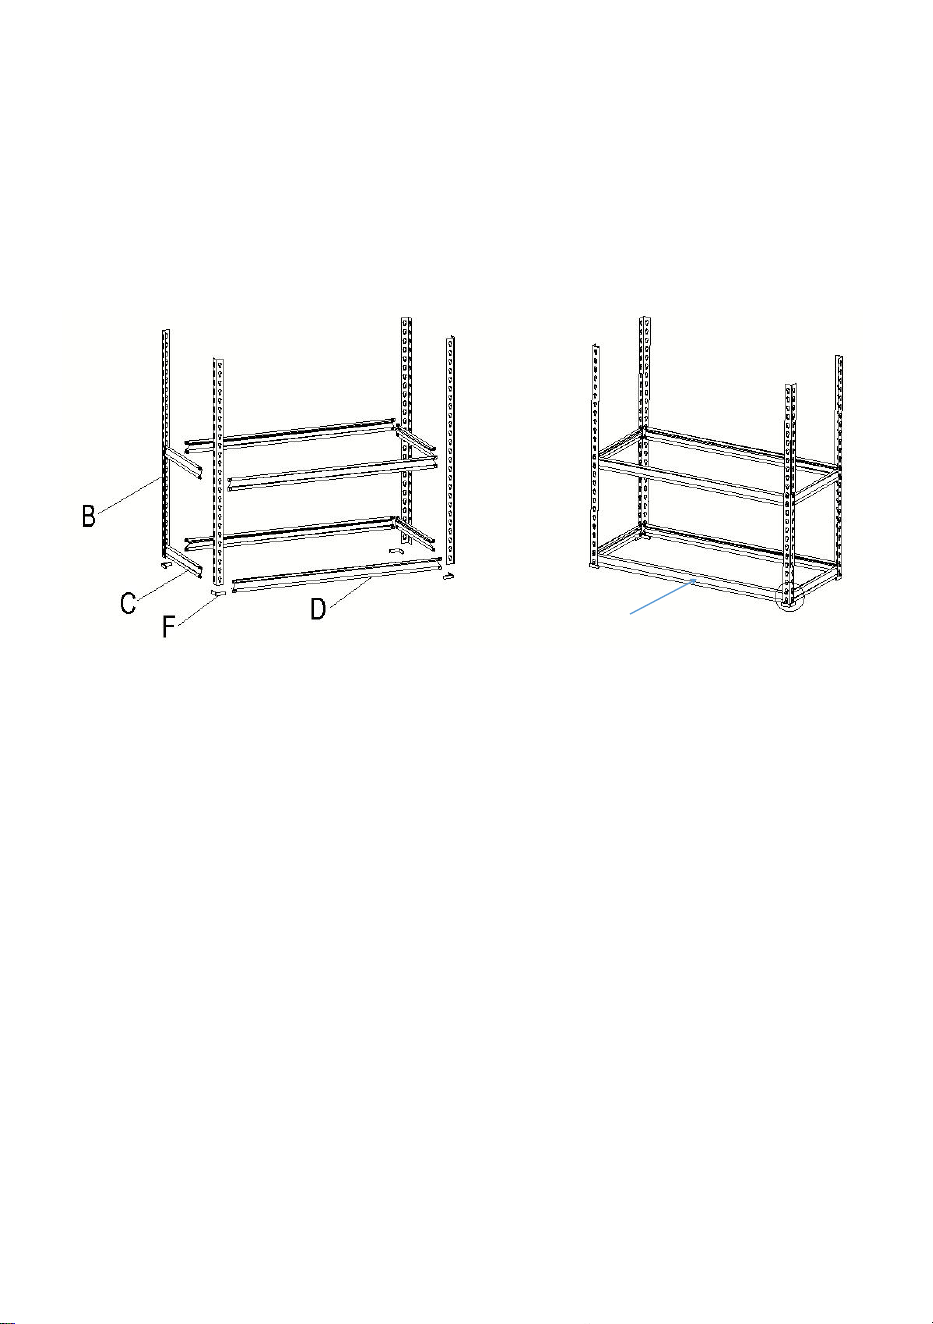
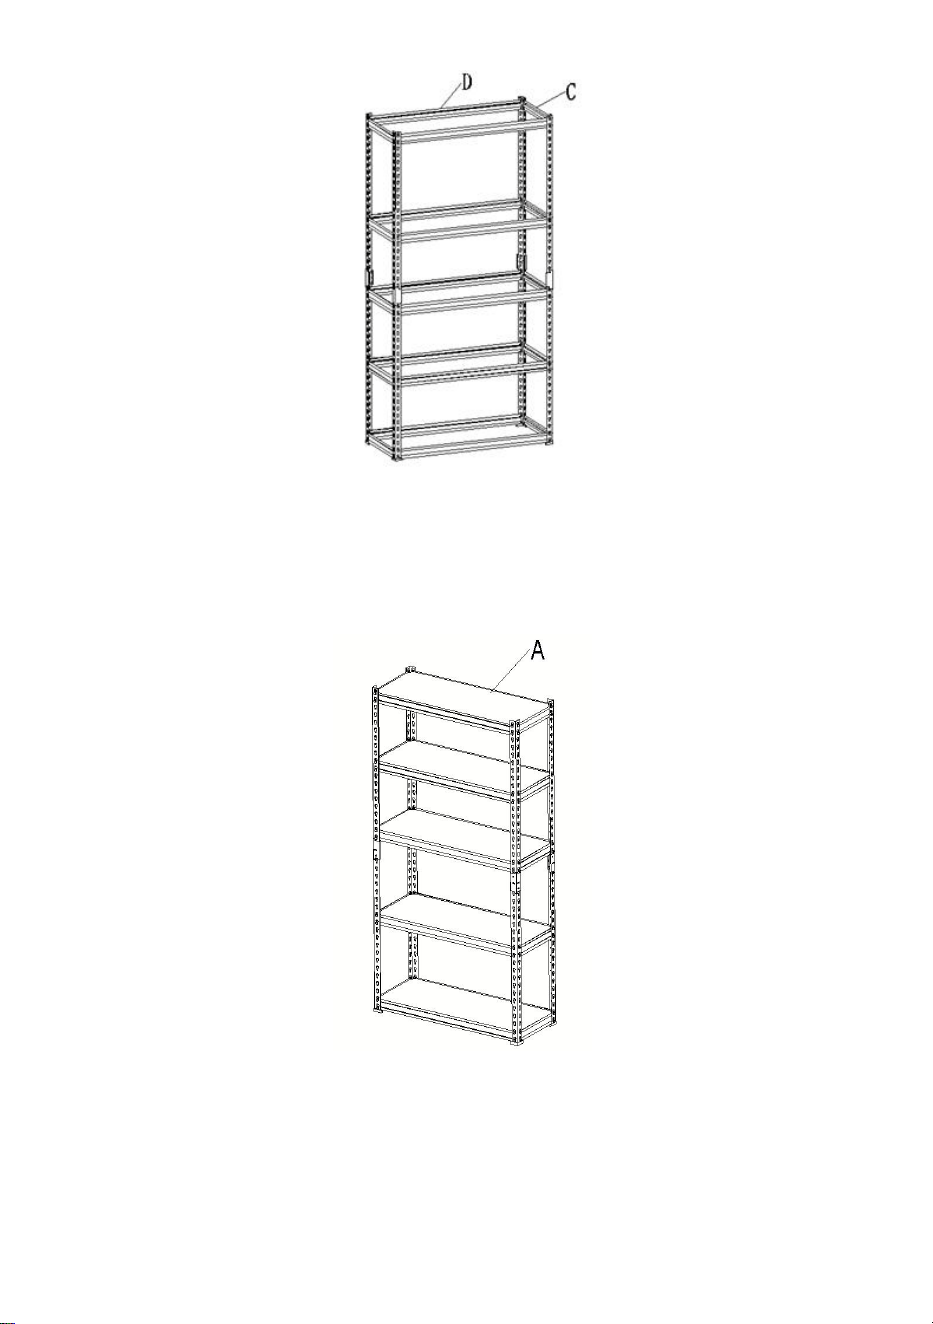
Step 2: Short and Long Beam Assembly
1. Align short beams (C) & top shelf long beam (D) to aligned notches between
four upright posts (B).
2. Once in position, tap firmly using a rubber mallet.
3. Repeat process for opposite side, ensuring both ends
are set at the same height.
Note:
Keep the first layer off the ground within 1 to 3 hole heights to prevent the
columns from deforming and collapsing due to excessive height.
Ensure that the height of each level is as uniform as possible.
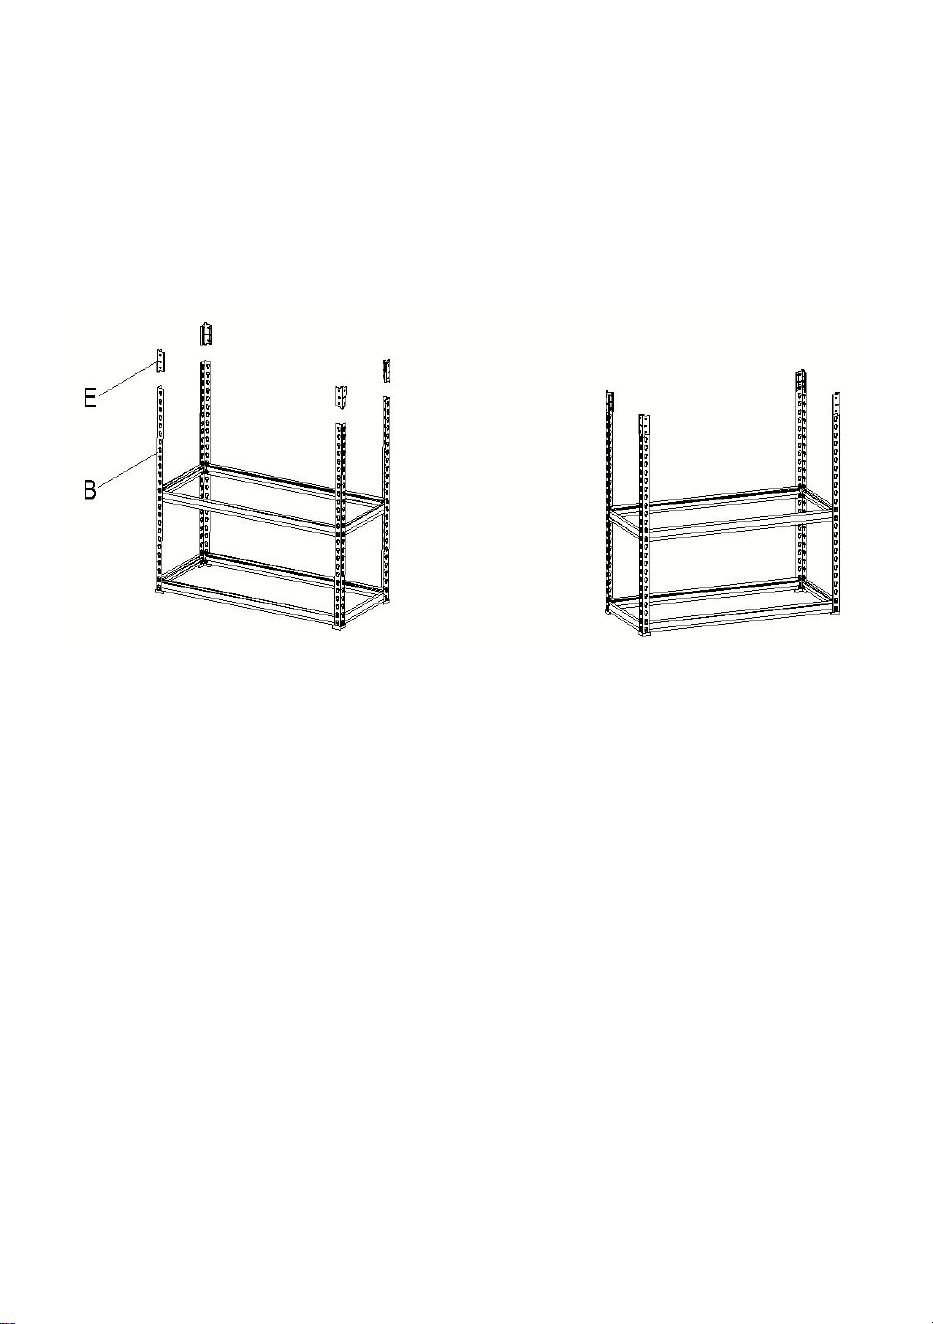
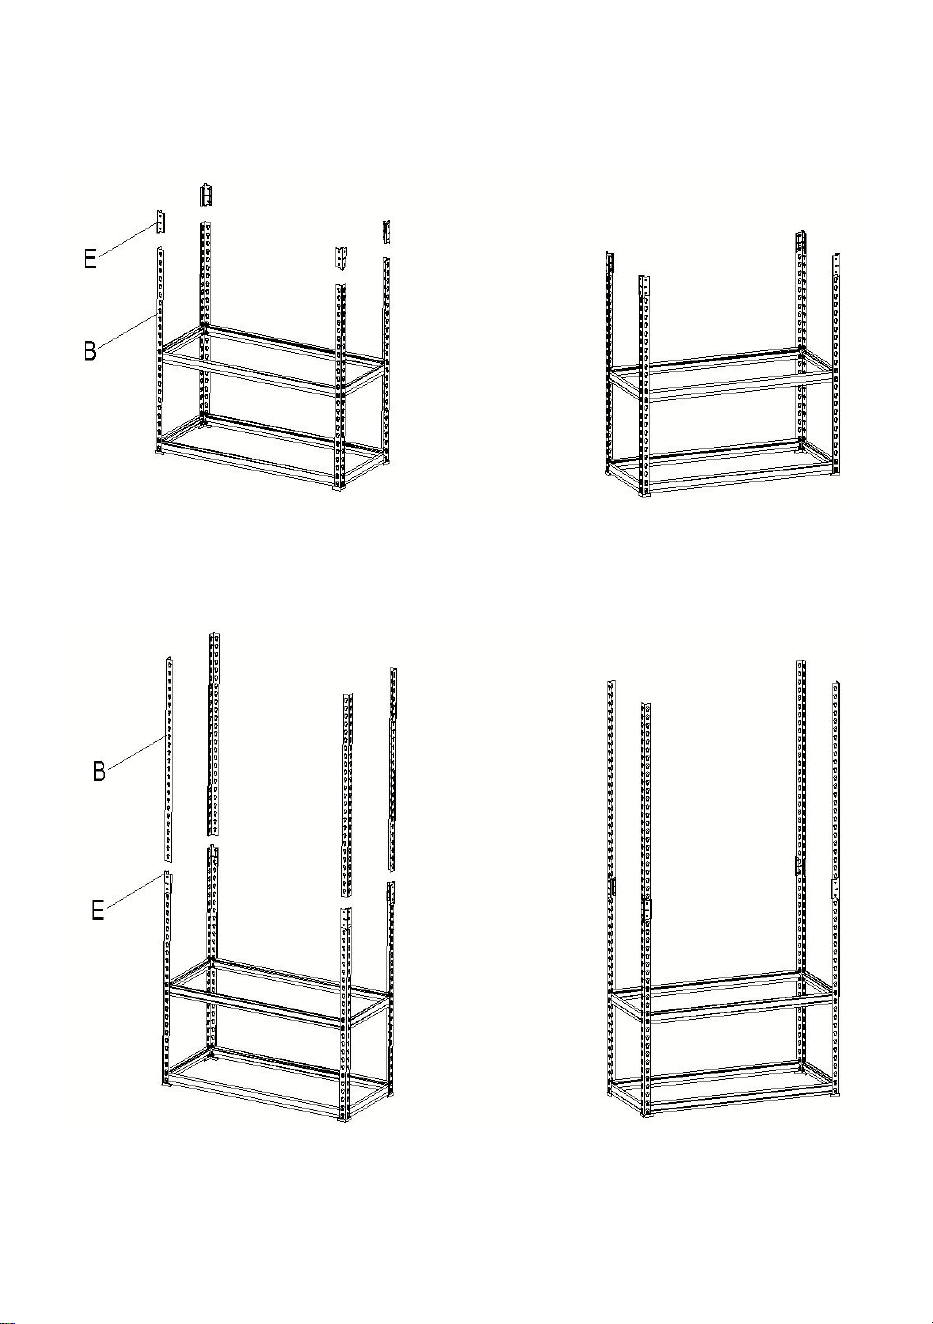
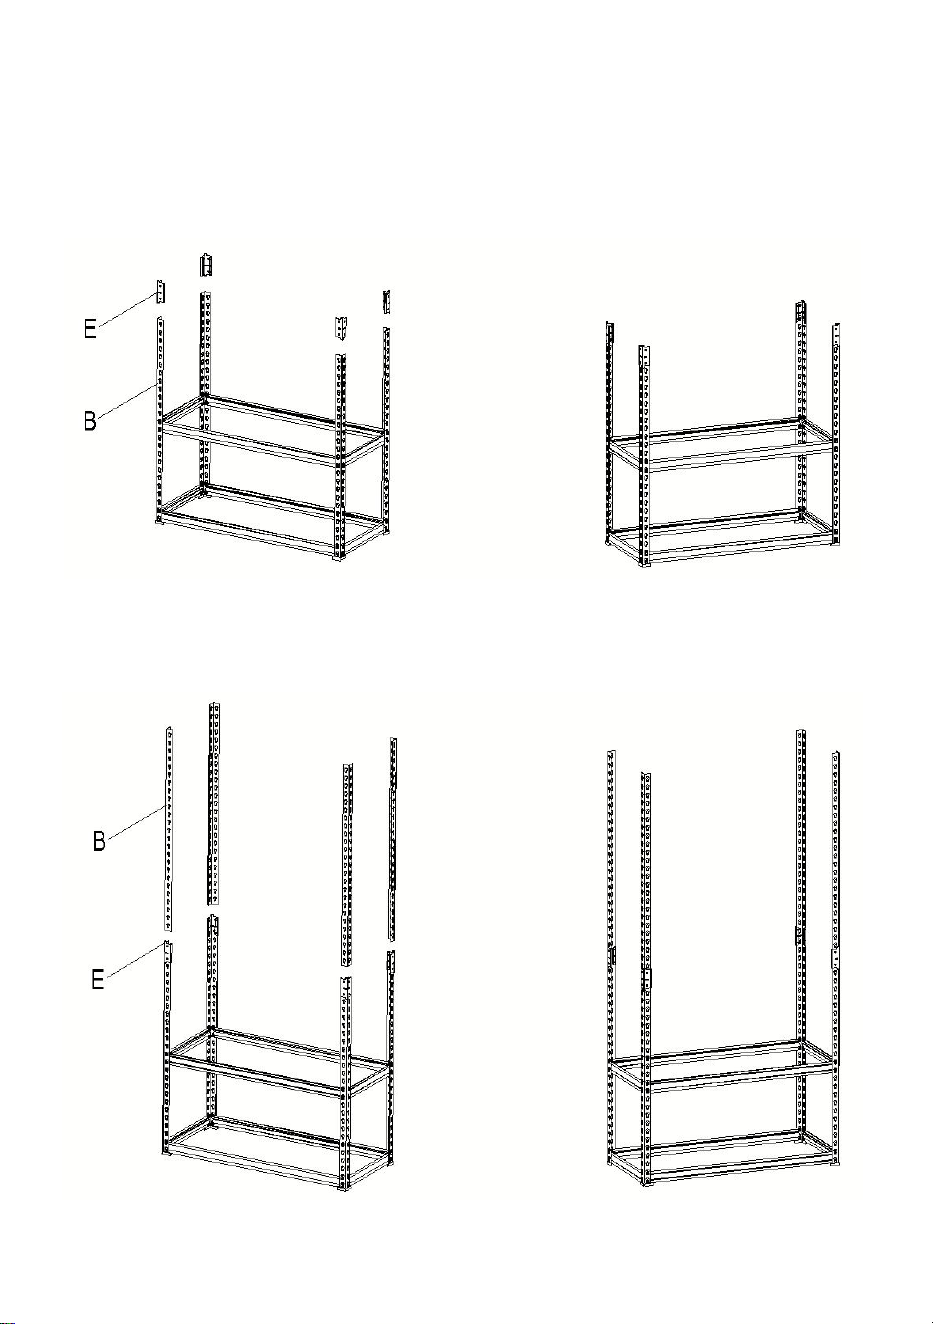
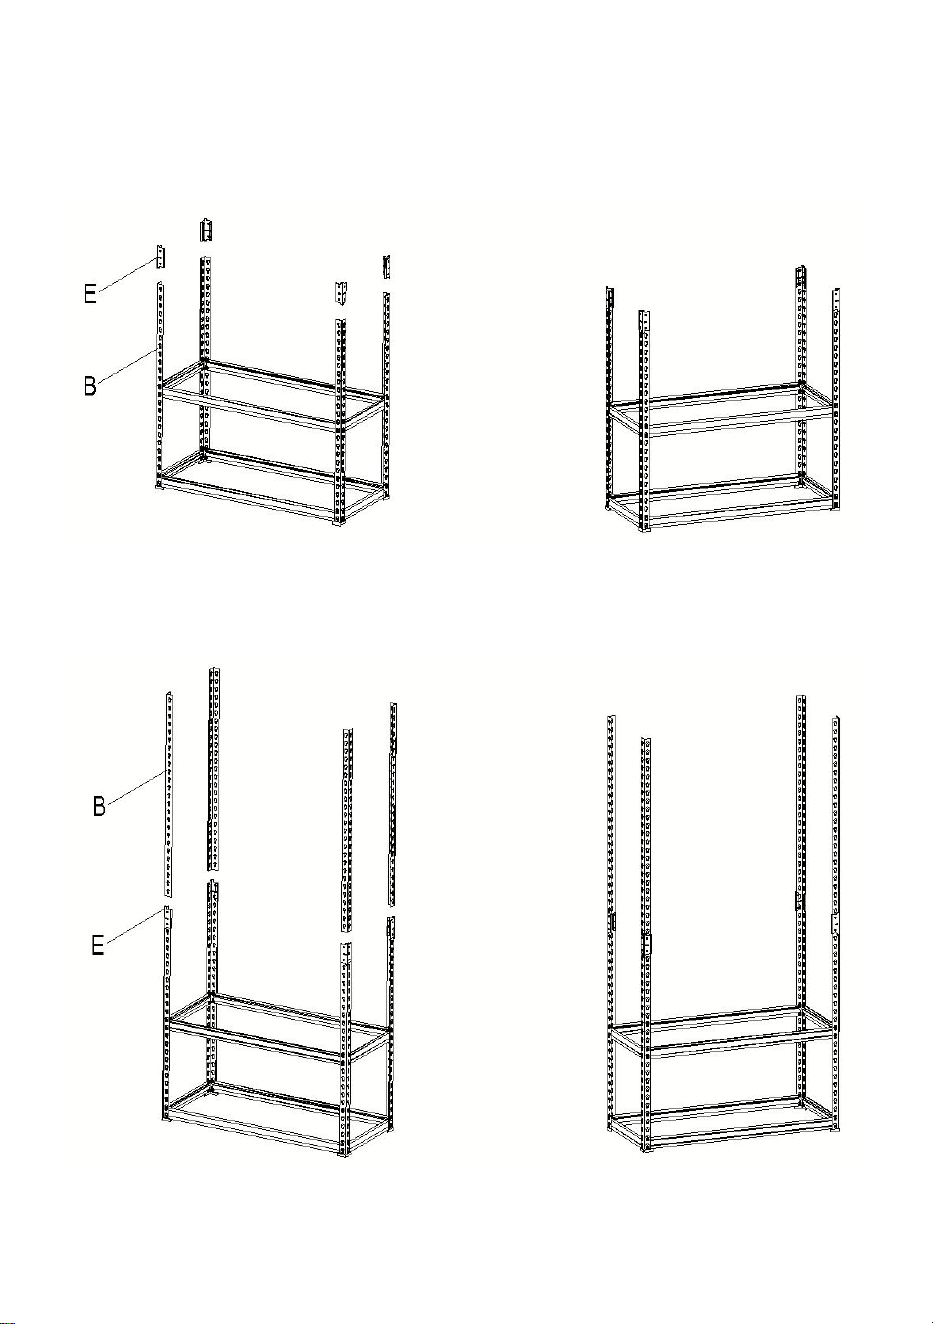
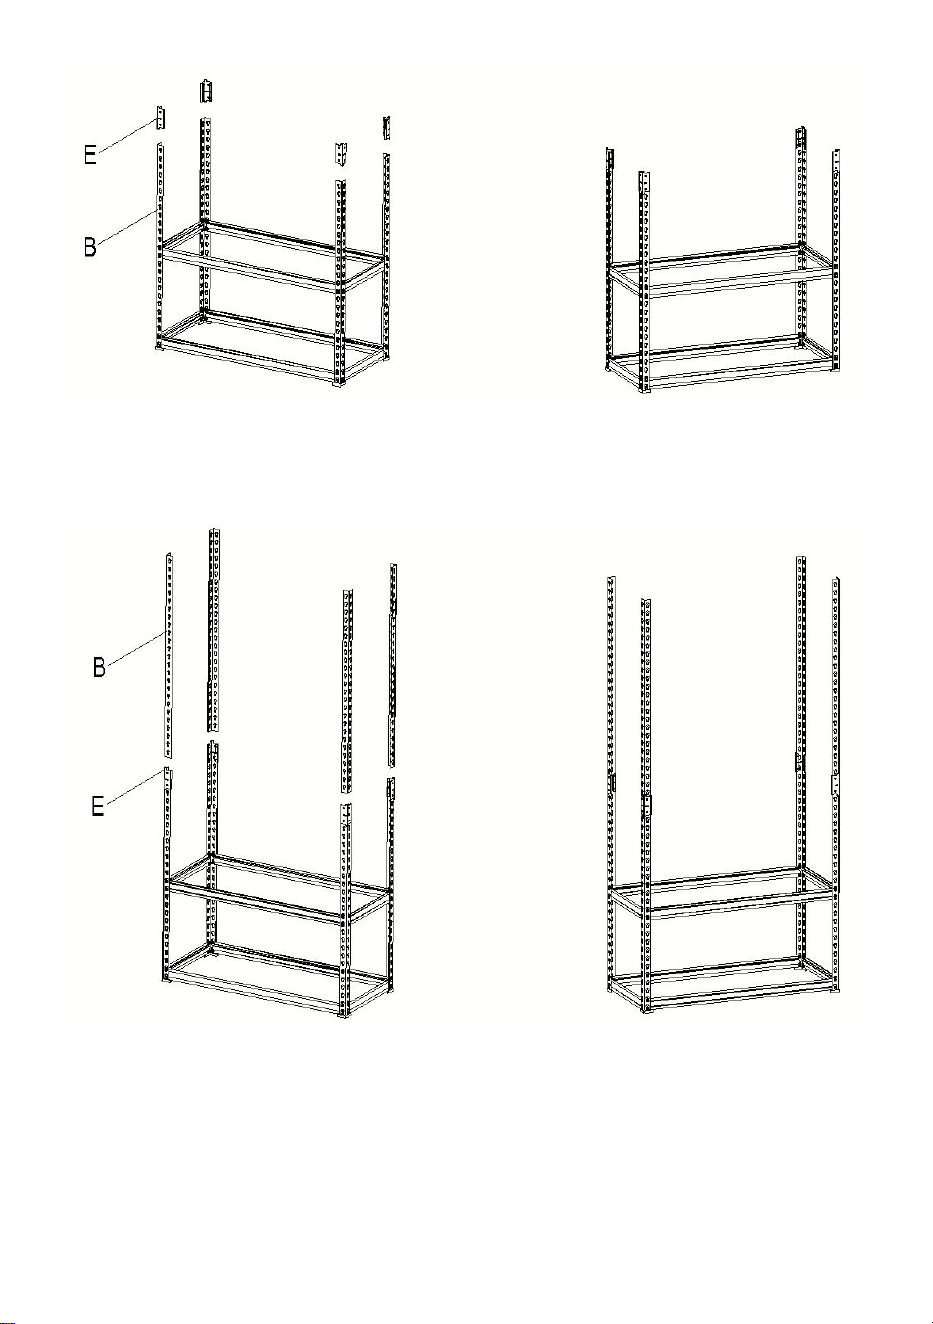
Step 3: Fixings Assembly
1· Fix fixings(E) at the top of the upright post(B), and tap down to the end.
First layer
- 7 -
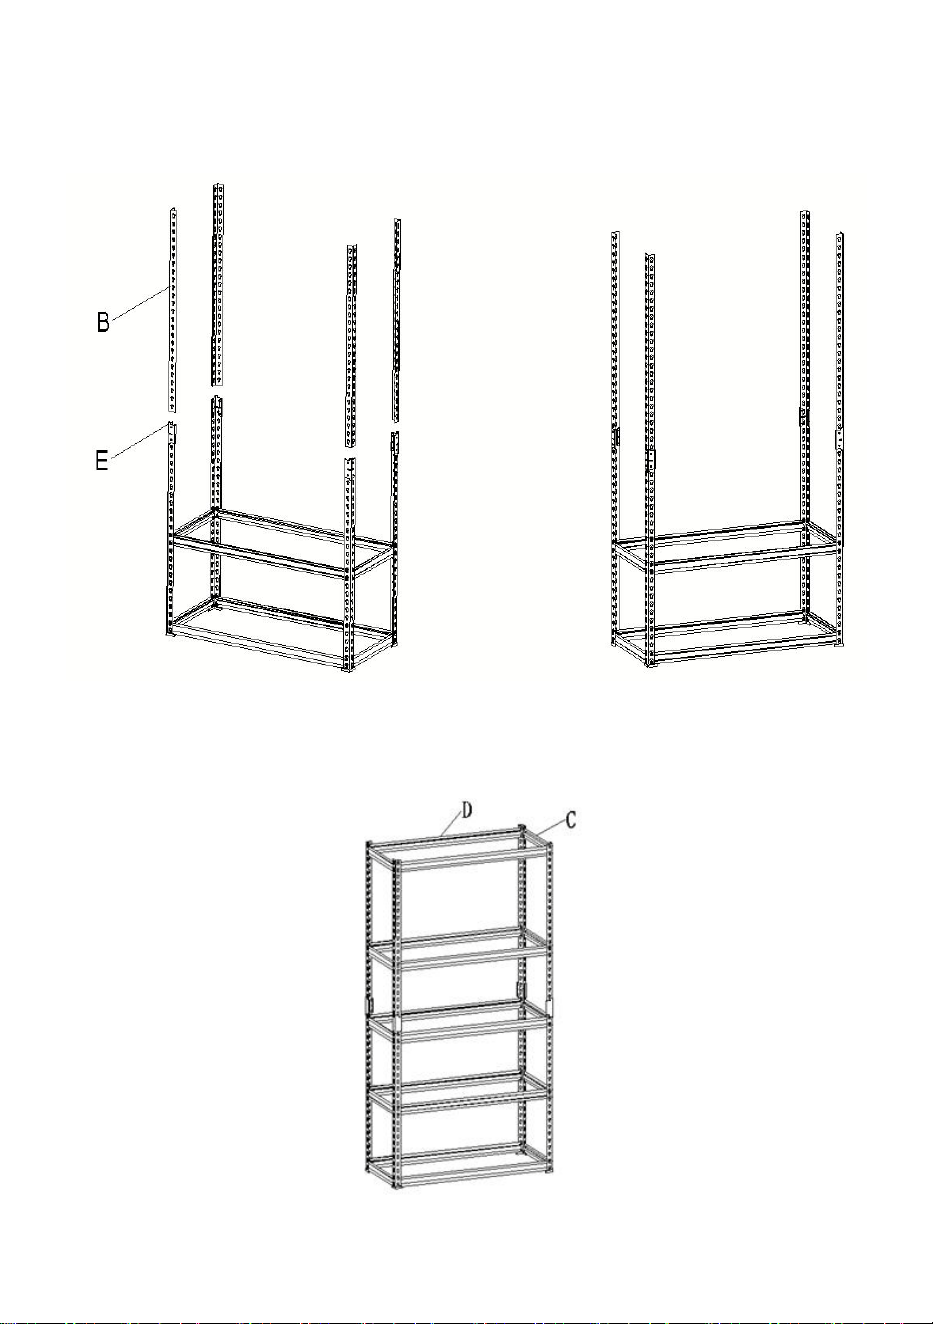
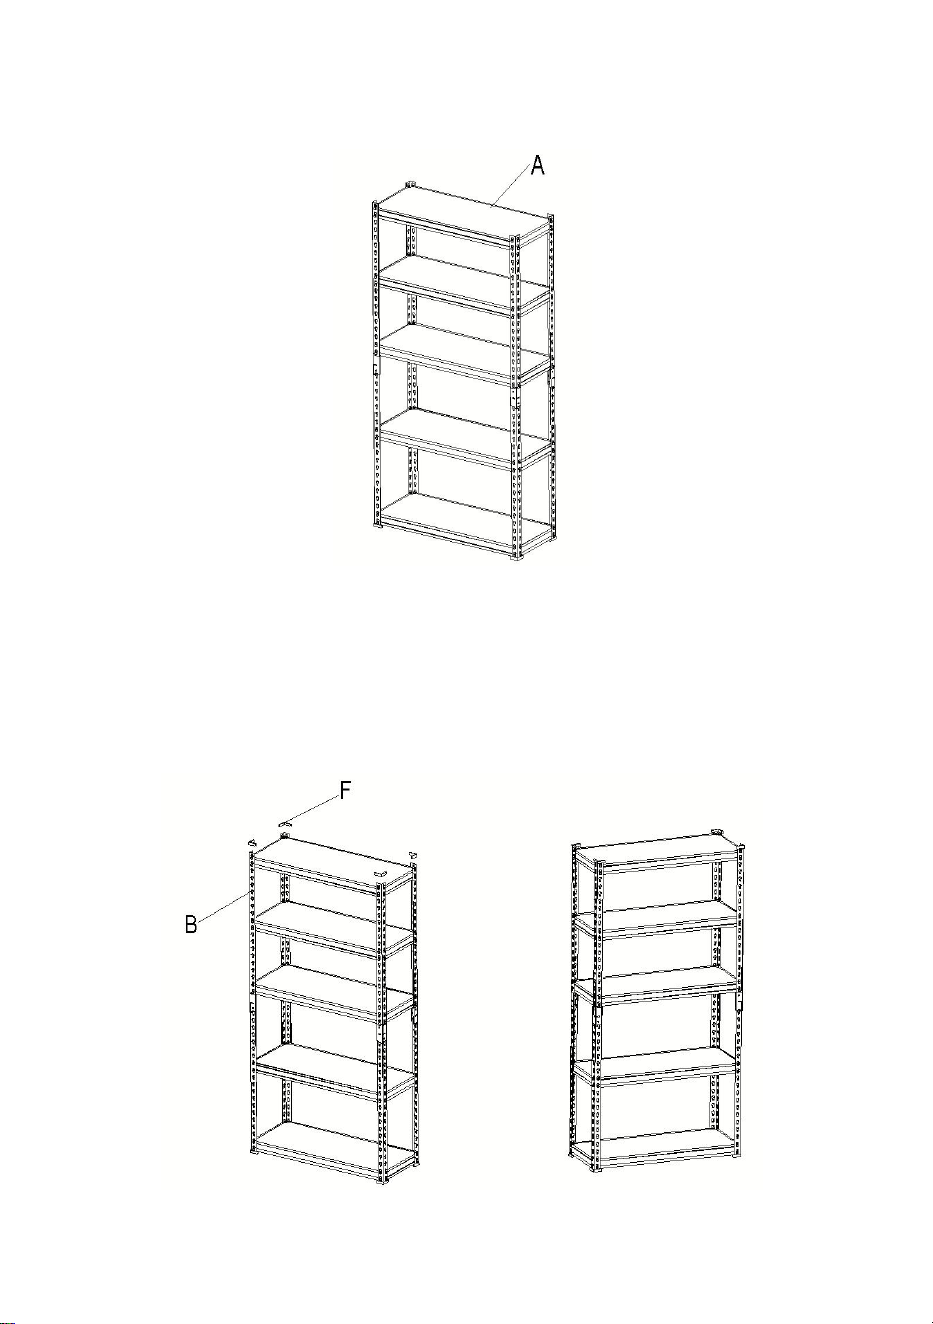
Step 4:Install The Upright Post
1. The bottom of the upright post(B) is secured to each fixing(E), and tap
down to the end.
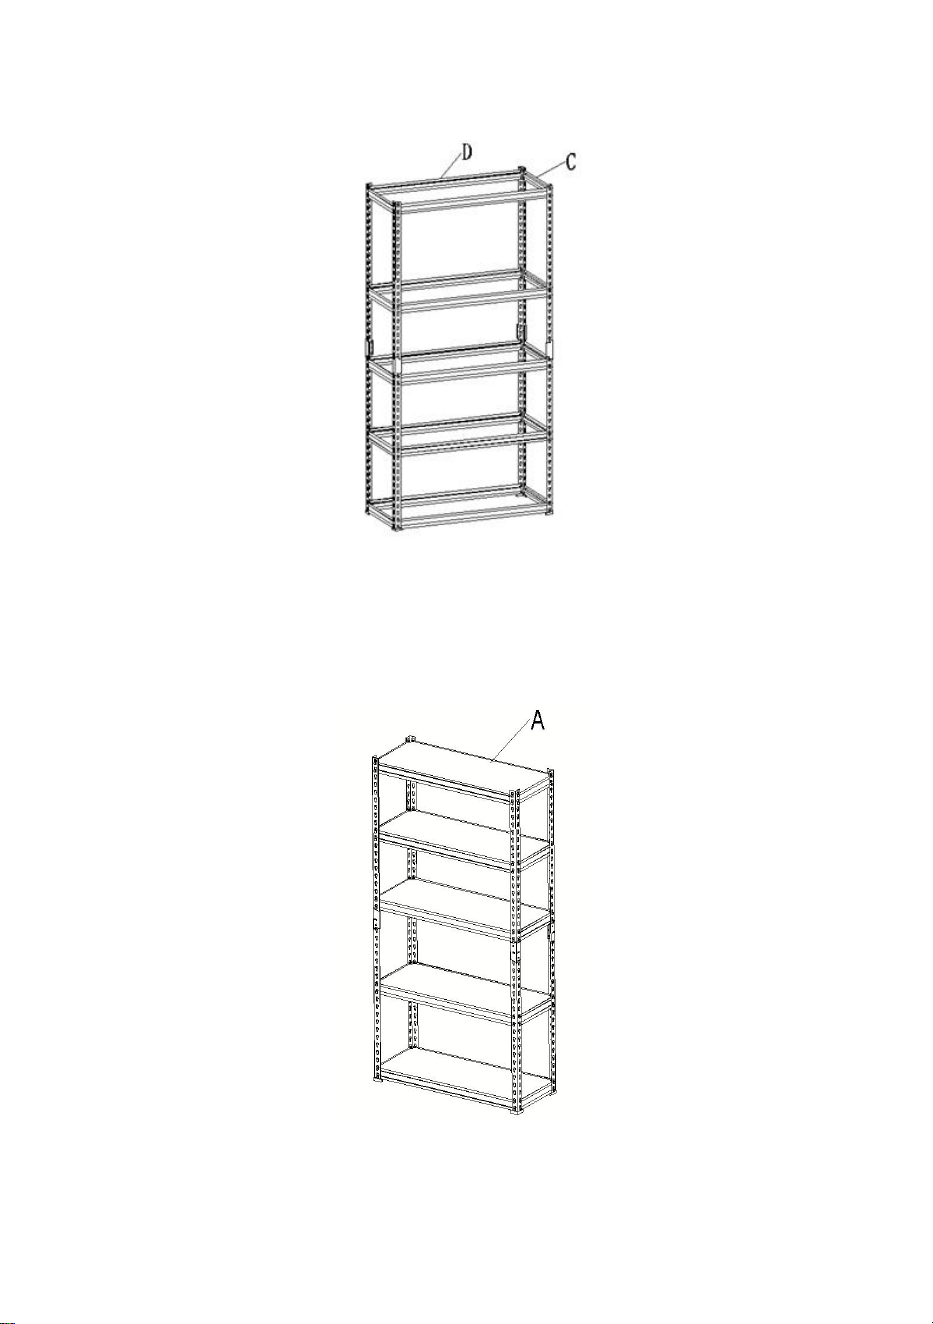
Step 5:Install the third, fourth and fifth top shelf long beam(D) and short
beam(C); the installation method is the same as Step 2.
- 8 -
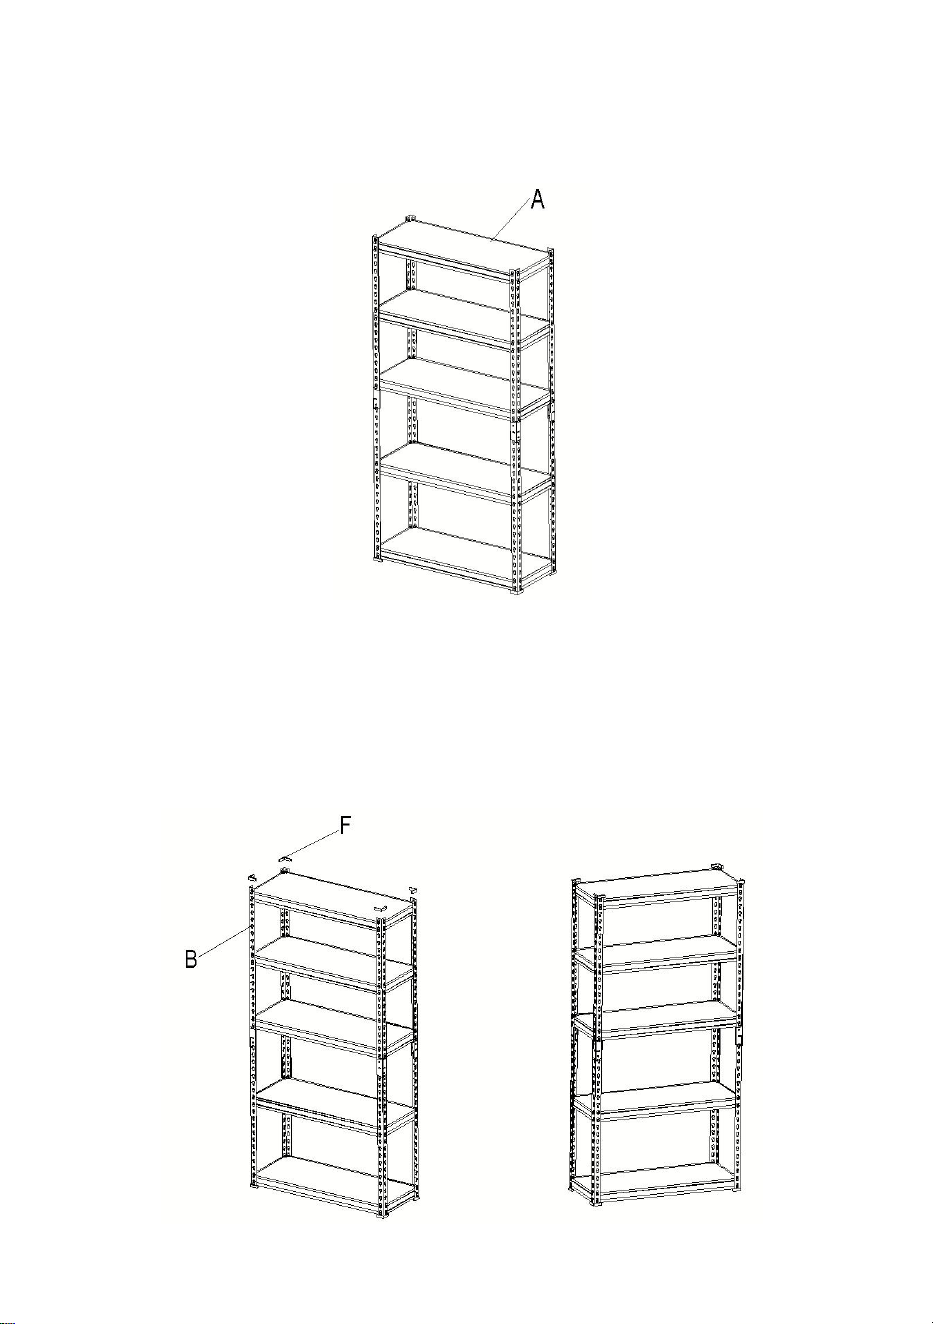
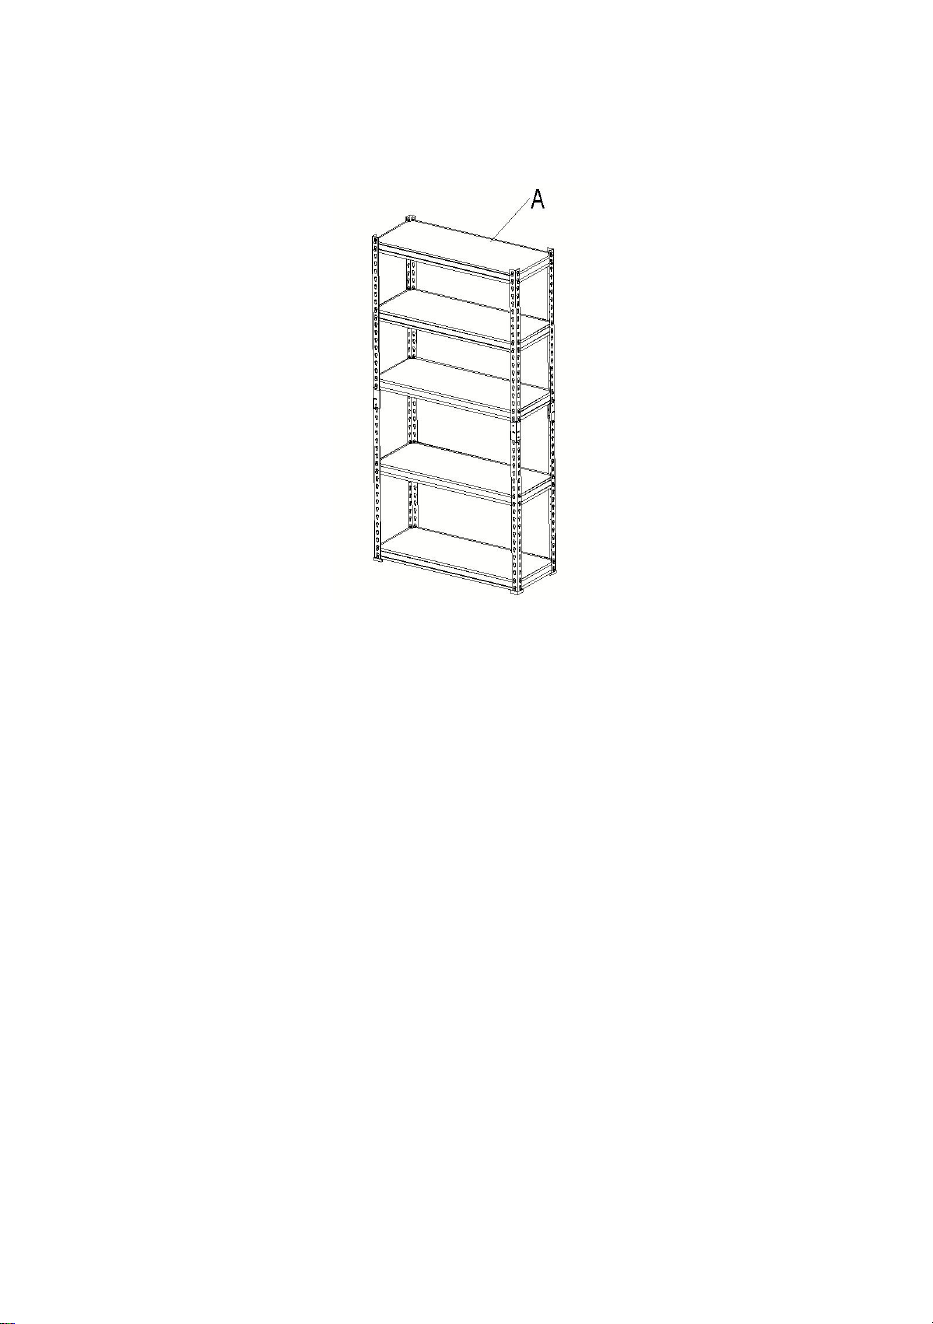
Step 6:7mm MDF Top Shelf Assembly
1.Insert 7mm MDF top shelf (A) onto the top shelf supports.
2. Ensure it sits flush with the top of the unit frame.
Step7:Install The Top Glue Foot
1. Slide each post (B) into post cap (F) as shown.
2. Repeat for all 4 upright posts.
3. Assembly is now complete, and your unit is ready for use.
- 9 -
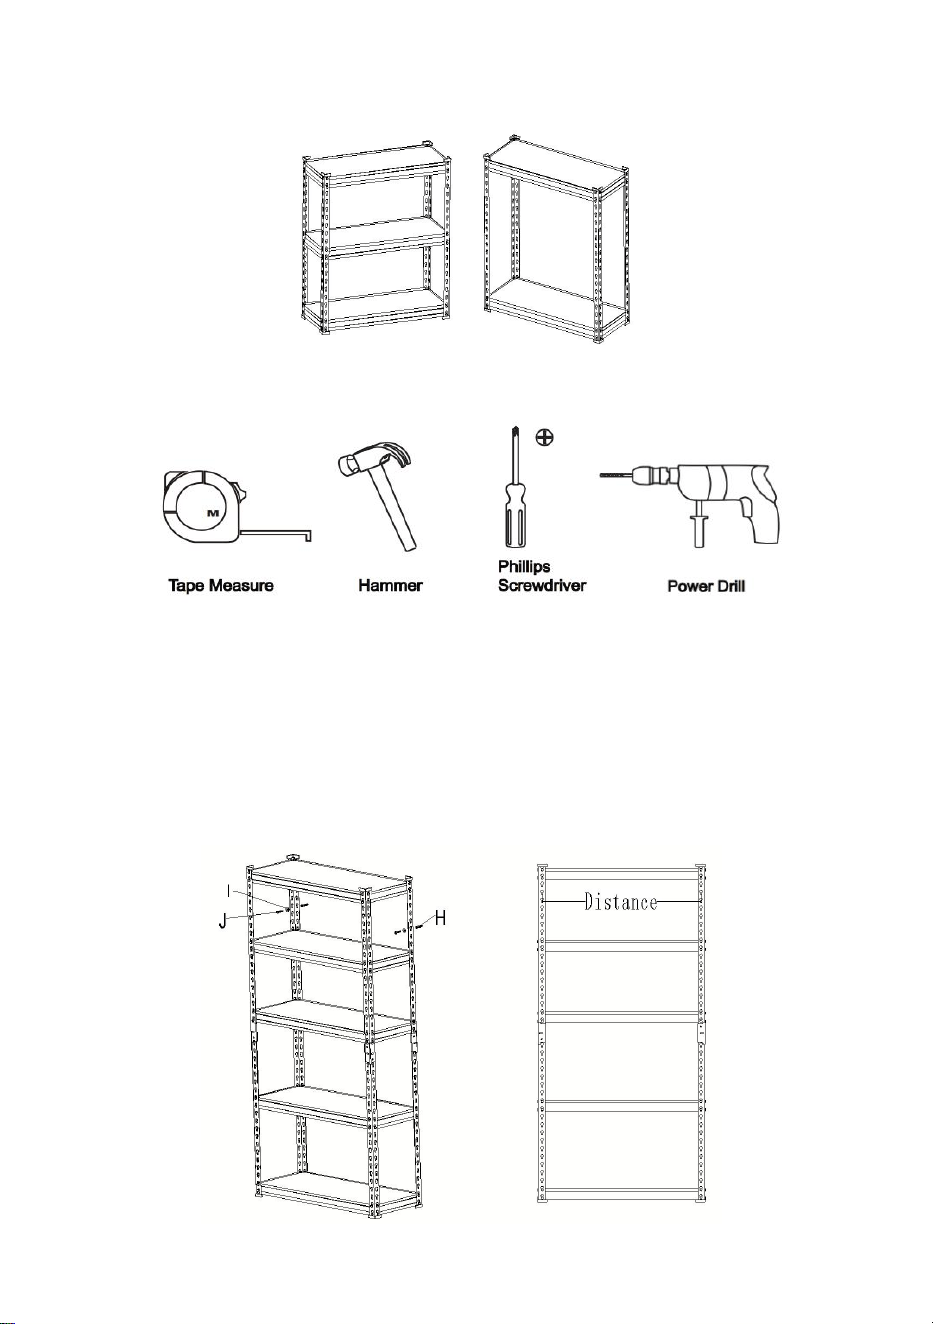
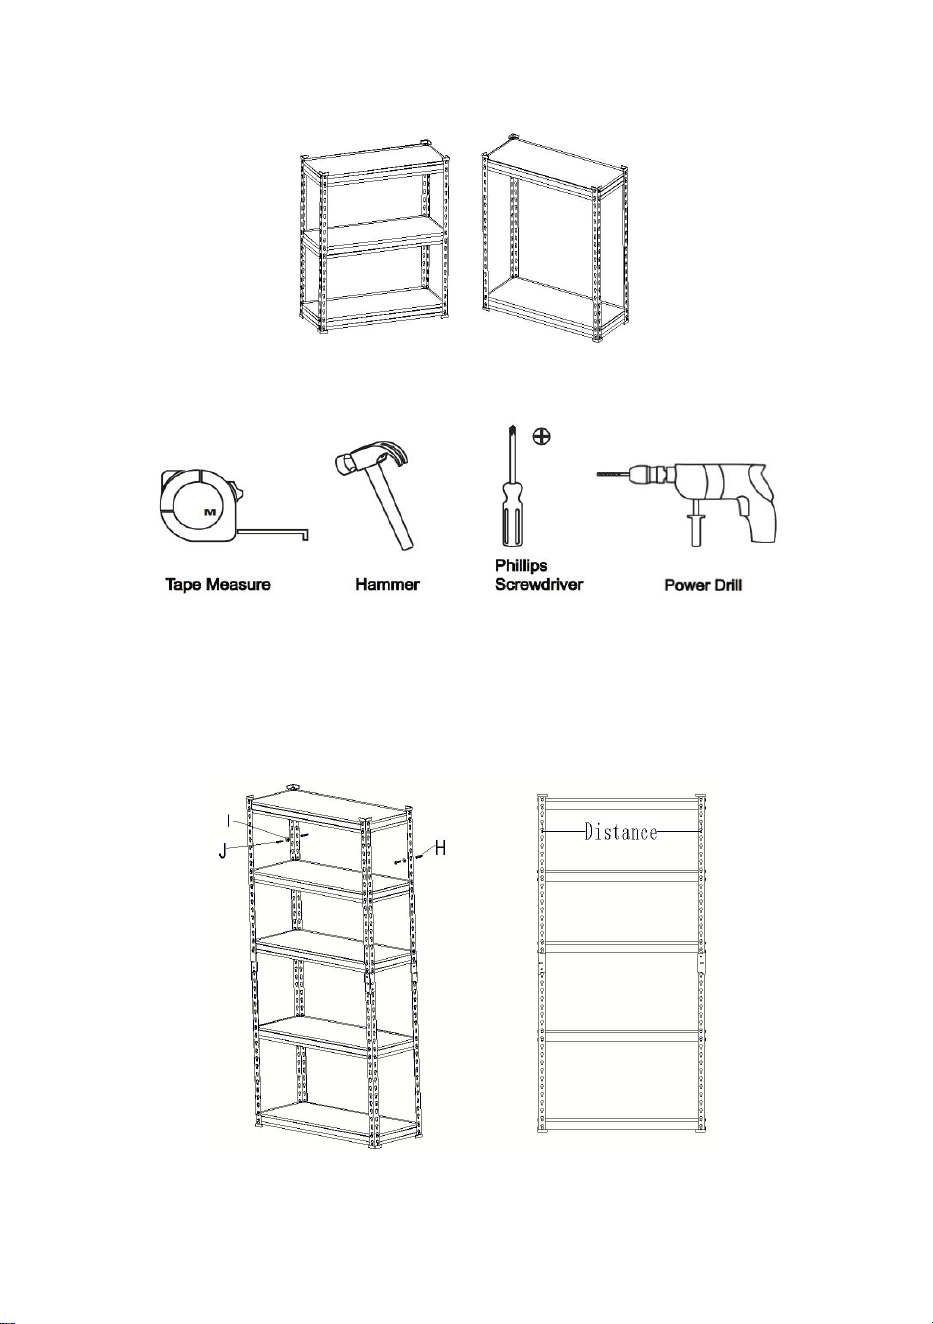
Attention: this product can be separated with two shelf. You can find
the height of each shelf in the table of part list.
Tools Required (not included)
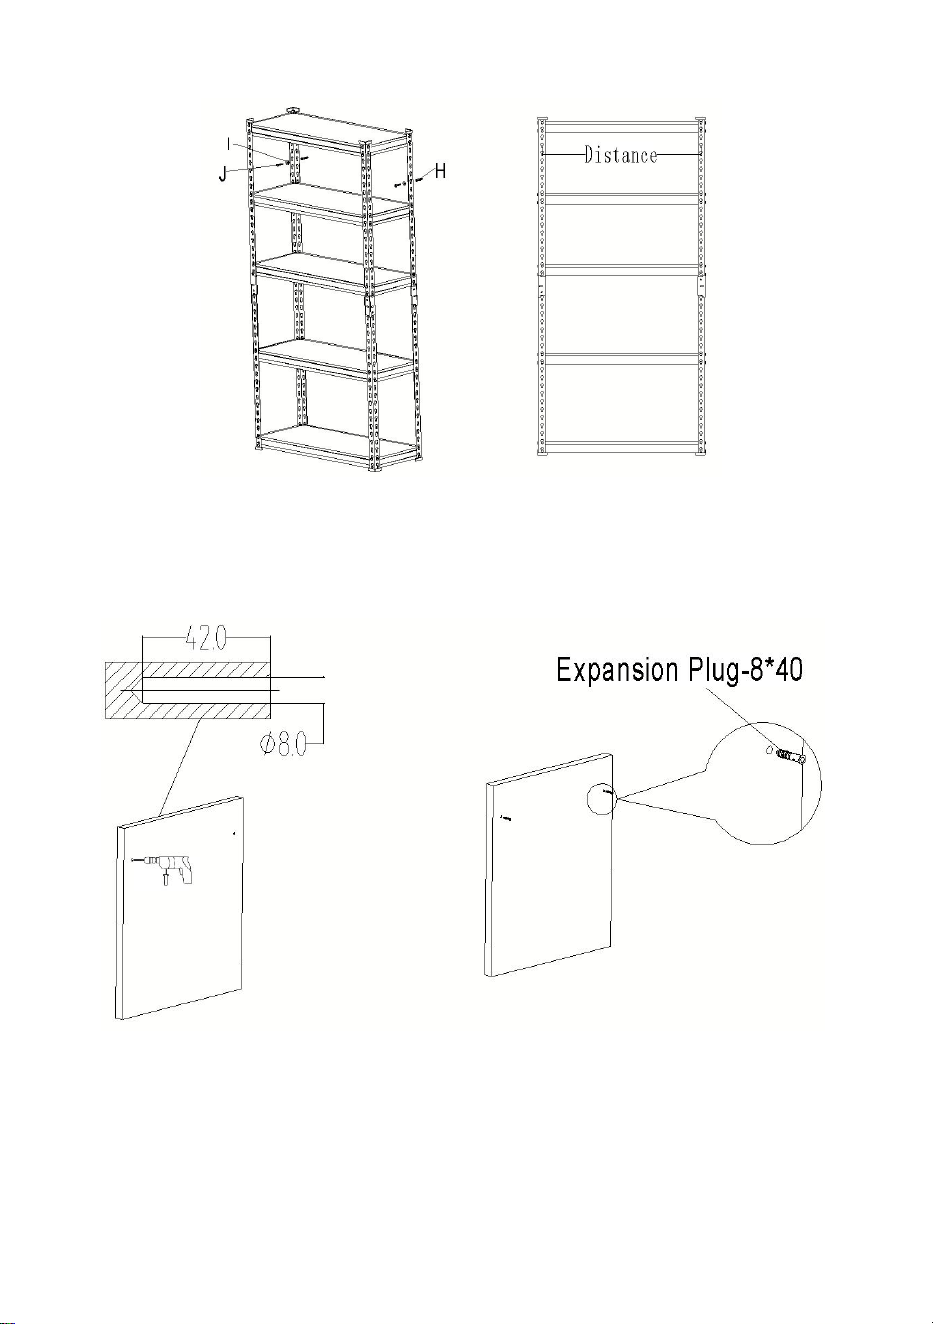
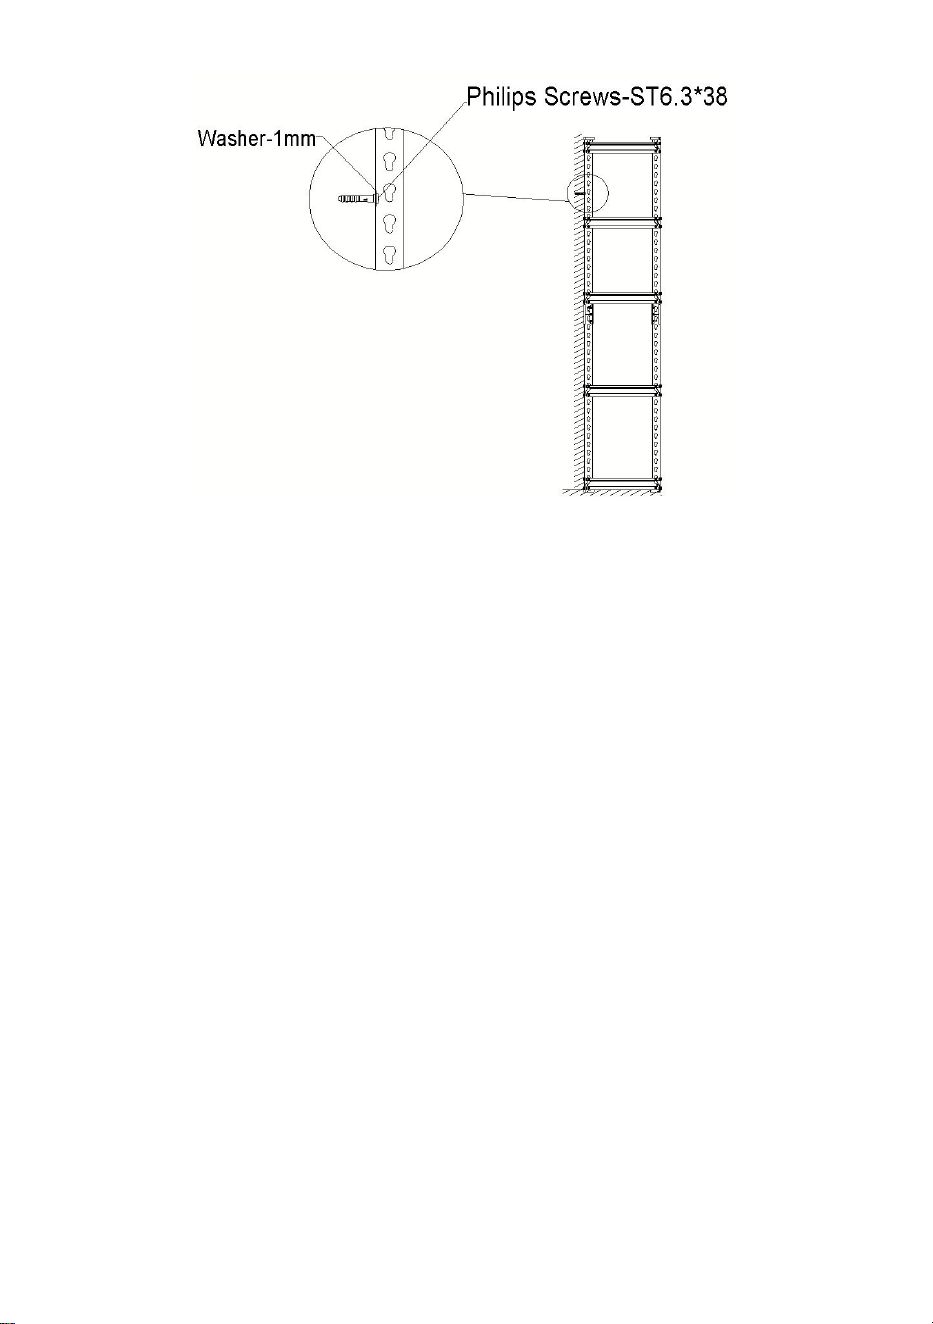
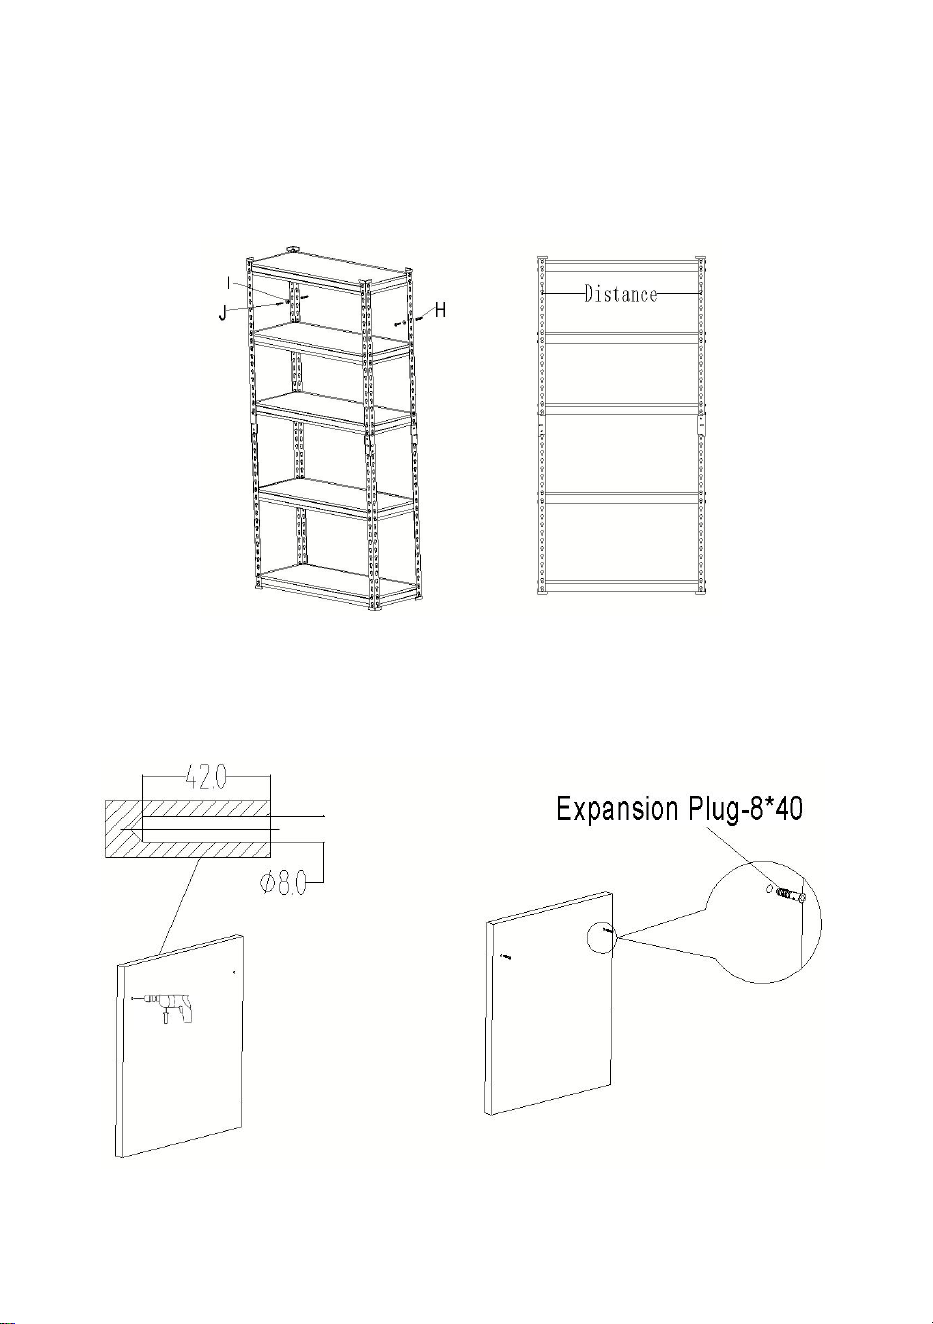
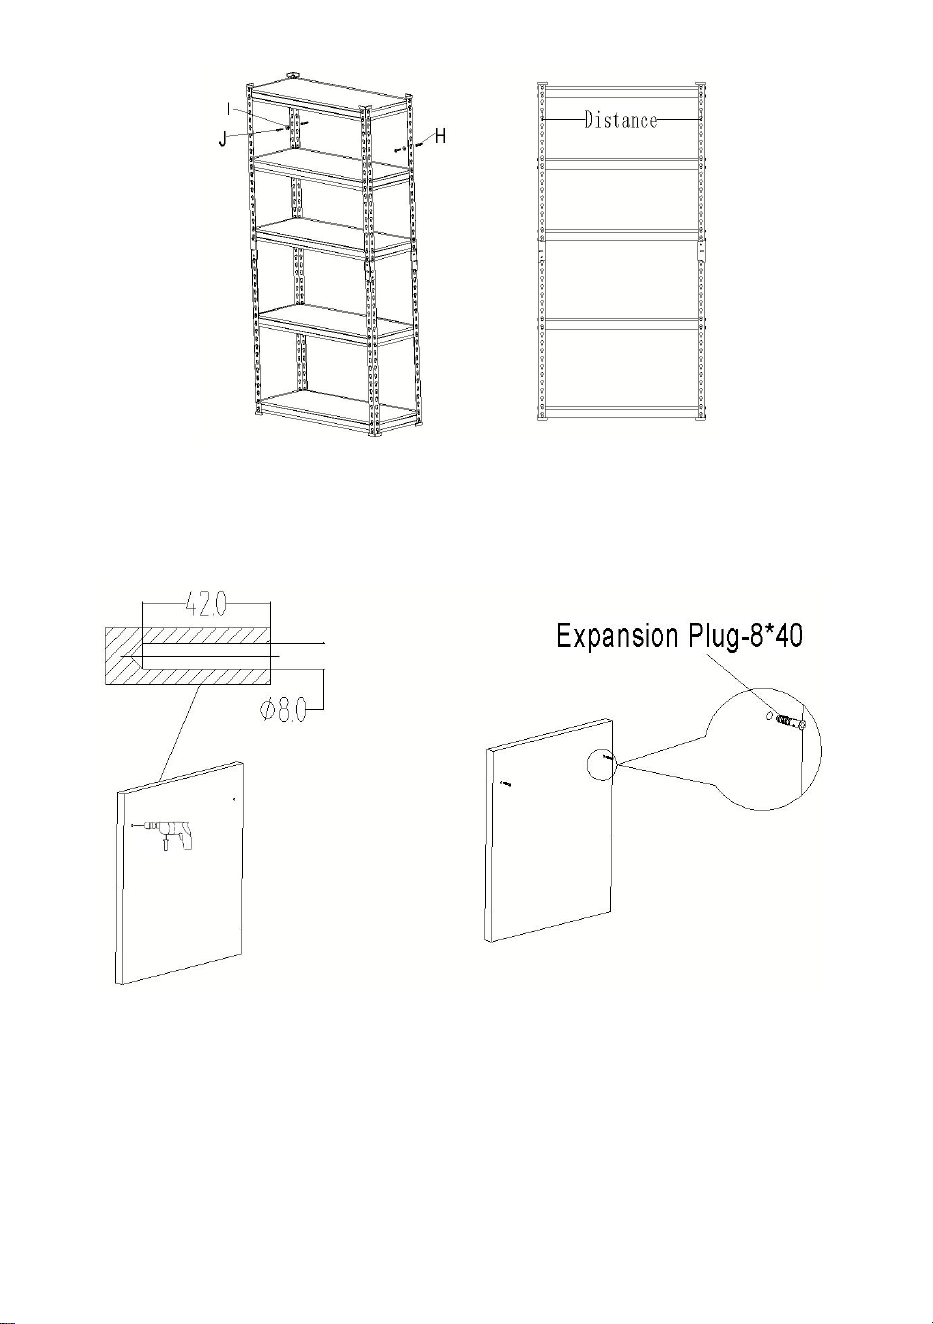
Step8-1:Install the anti-tipping screws
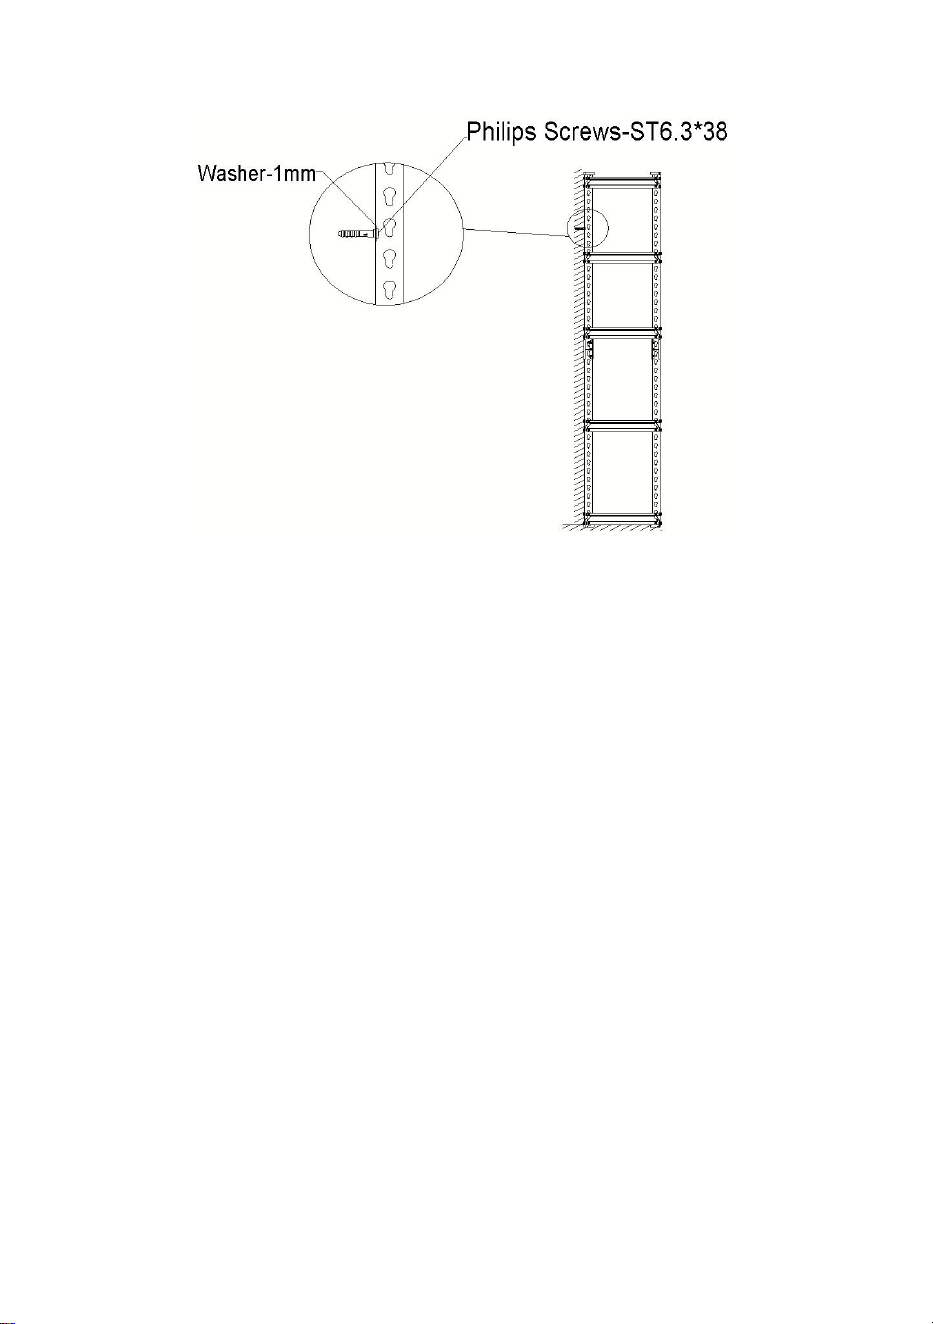
A:Installation on Solid Concrete Walls
1. Measure and mark off the height & width located for drill hole.
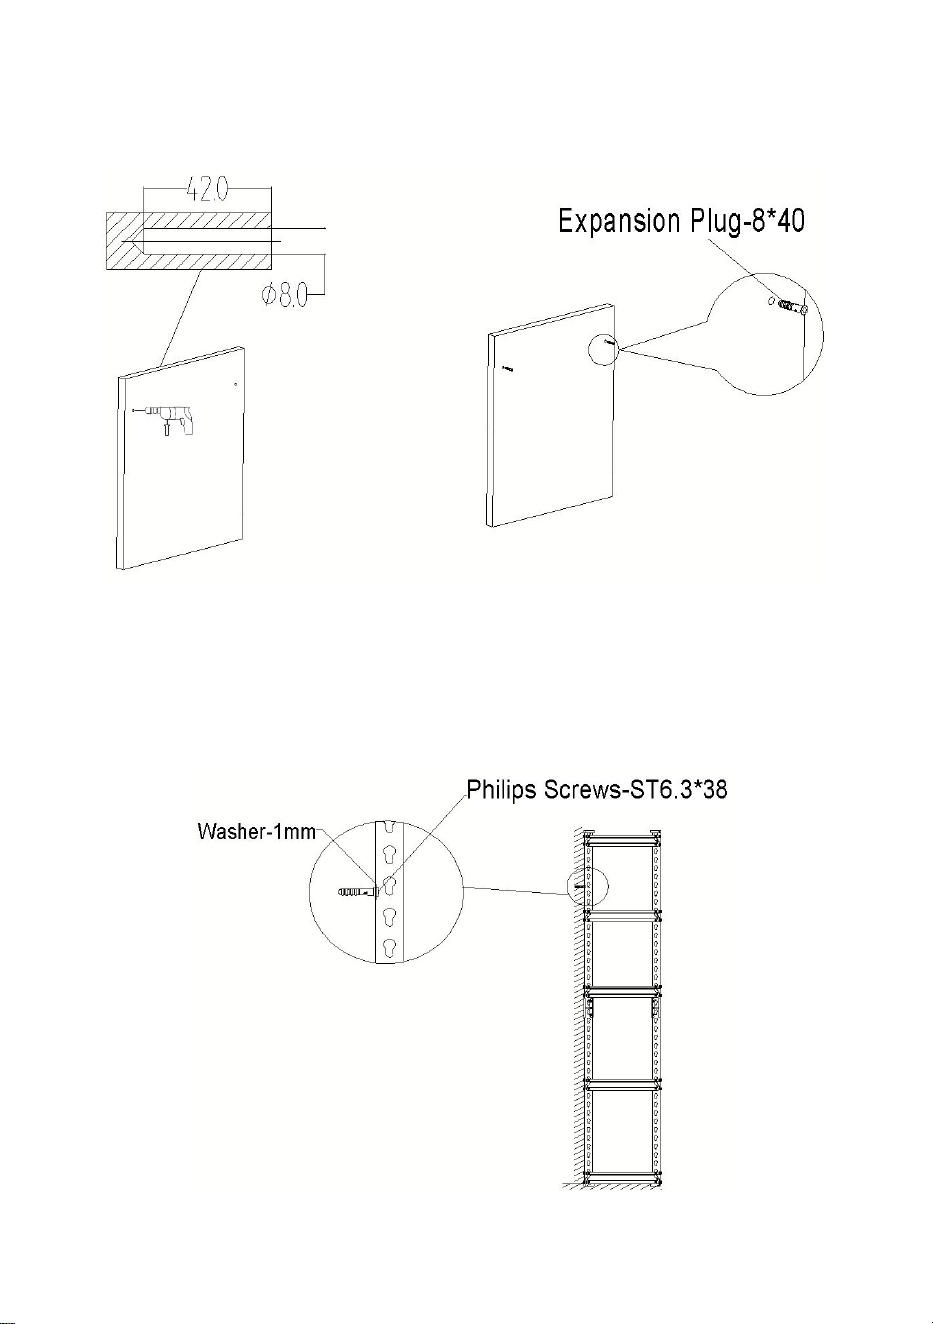
- 10 -
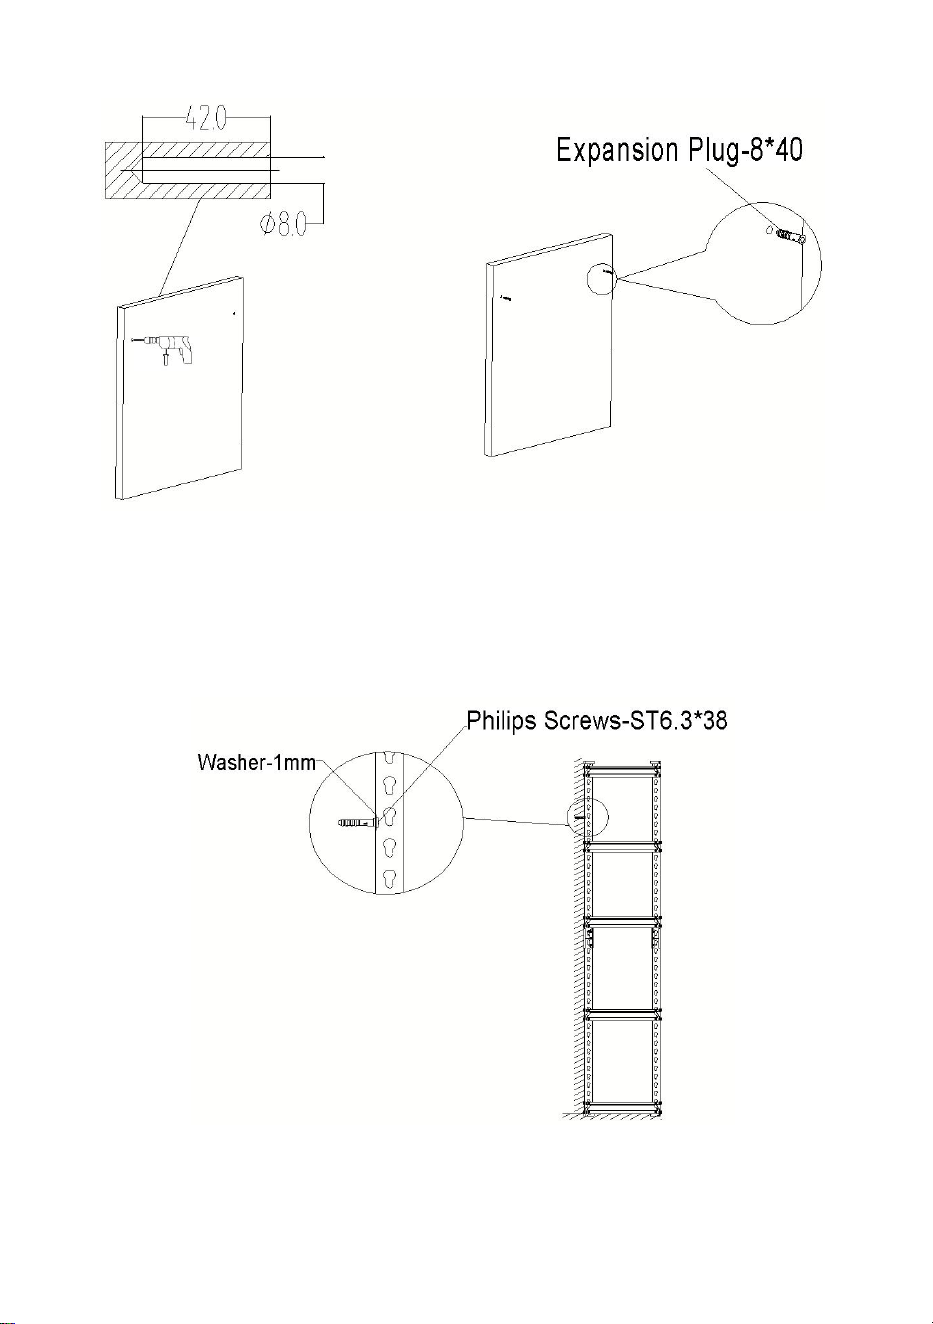
2. Drill 2 holes as marked by power drill.
3. Insert the Plastic Plug with hammer.
4. Attach the shelf to wall, using each 2 pcs,of screw and washer by
screwdriver.

- 11 -
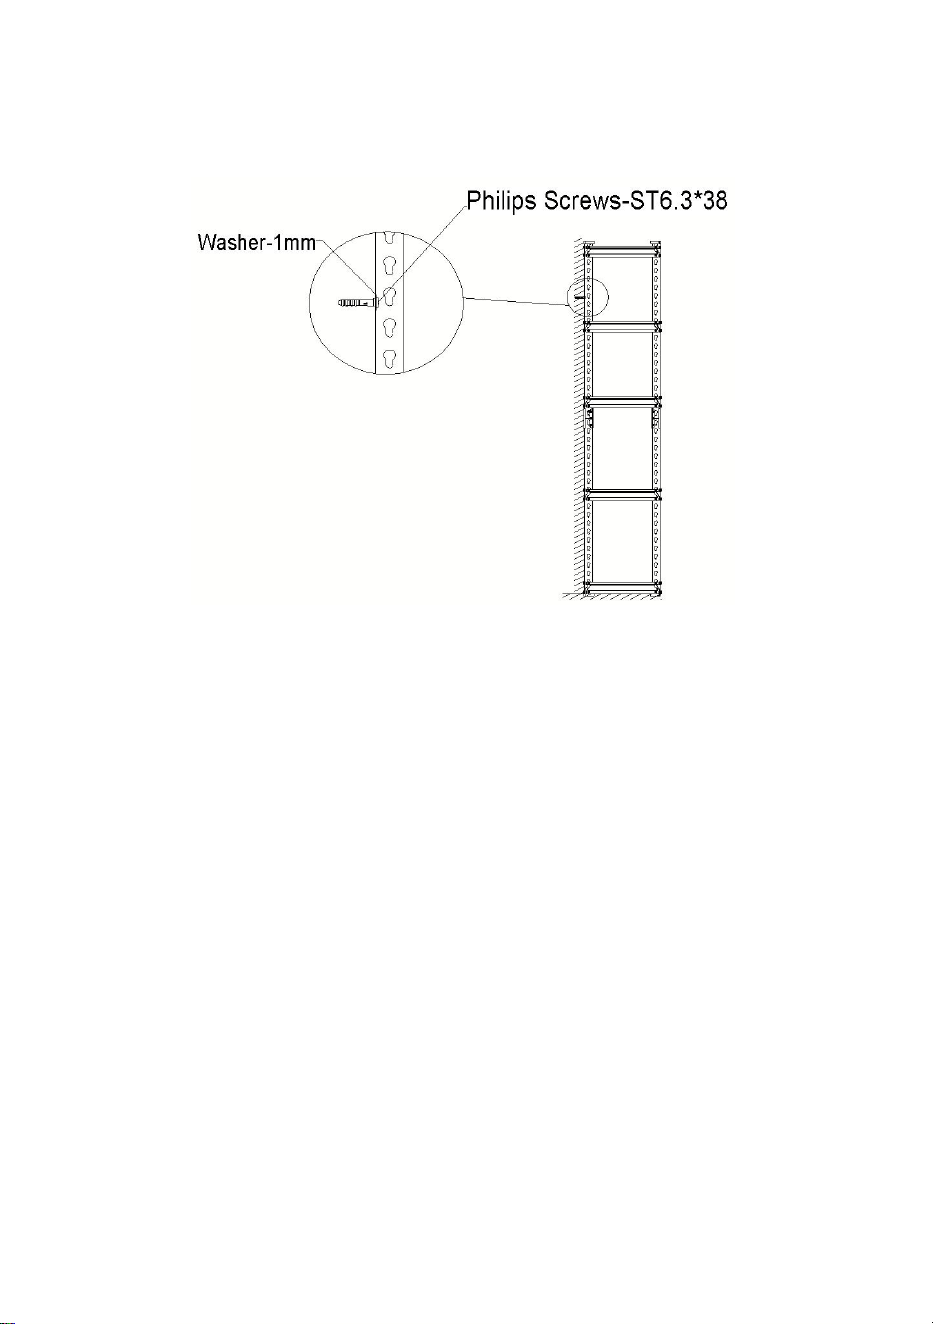
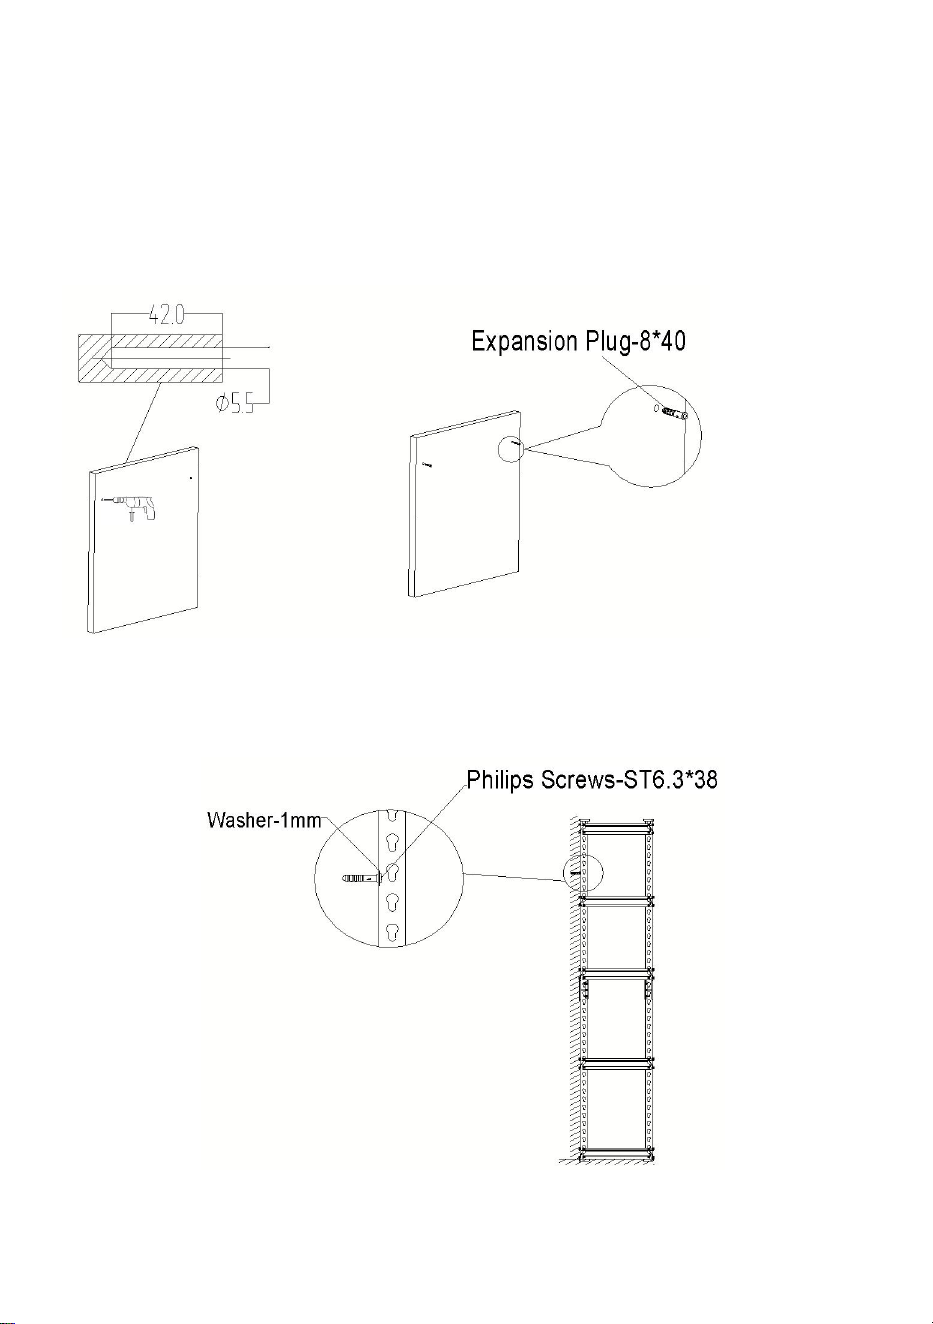
Step8-2:Install the anti-tipping screws
B:Installation on Wooden Wall Post
1.Measure and mark off the height & width located for drill hole.
2. Drill 2 holes as marked by power drill.
3. Insert the Plastic Plug with hammer.
4. Attach the shelf to wall, using each 2 pcs,of screw and washer by
screwdriver.

- 12 -
Manufacturer: Shanghaimuxinmuyeyouxiangongsi
Address: Shuangchenglu 803nong11hao1602A-1609shi, baoshanqu,
shanghai 200000 CN.
Imported to AUS: SIHAO PTY LTD, 1 ROKEVA STREETEASTWOOD NSW
2122 Australia
Imported to USA: Sanven Technology Ltd., Suite 250, 9166 Anaheim Place,
Rancho Cucamonga, CA 91730
REP
EC
E-CrossStu GmbH
Mainzer Landstr.69, 60329 Frankfurt am Main.
REP
UK
YH CONSULTING LIMITED.
C/O YH Consulting Limited Office 147, Centurion House,
London Road, Staines-upon-Thames, Surrey, TW18 4AX


Assistance technique et certificat de garantie électronique
www.vevor.com/support
ÉTAGÈRES DE GARAGE ROBUSTES
MANUEL D' UTILISATION
Nous continuons à nous engager à vous fournir des outils à des prix compétitifs.
« Économisez la moitié », « Moitié prix » ou toute autre expression similaire utilisée par
nous uniquement
représente une estimation des économies dont vous pourriez bénéficier en achetant
certains outils
avec nous par rapport aux grandes marques et ne signifie pas nécessairement couverture
toutes les catégories d'outils que nous proposons. Nous vous rappelons de bien vouloir
vérifier soigneusement
lorsque vous passez une commande chez nous si vous êtes réellement Économie
Moitié par rapport aux plus grandes marques.


- 1 -
MODÈLE : 326G0P9FV0 / 3676V4VPV0
Have product questions? Need technical support? Please feel free to
contact us:
Technical Support and E-Warranty Certificate
www.vevor.com/support
NEED HELP? CONTACT US!
This is the original instruction, please read all manual instructions
carefully before operating. VEVOR reserves a clear interpretation of our
user manual. The appearance of the product shall be subject to the
product you received. Please forgive us that we won't inform you again if
there are any technology or software updates on our product.
HEAVY DUTY
GARAGE SHELVES

- 2 -
Avertissement - Pour réduire le risque de blessure,
l'utilisateur doit lire attentivement le manuel d'instructions.
Ce symbole, placé avant un commentaire de sécurité,
indique un type de précaution, d'avertissement ou de
danger. Ignorer cet avertissement peut entraîner un
accident. Pour réduire le risque de blessure, d'incendie ou
d'électrocution, veuillez toujours suivre les recommandations
ci -dessous.
Avertissement – Assurez-vous de porter des gants lorsque
vous utilisez ce produit.
9) Conservez ce manuel pour connaître les avertissements et
précautions de sécurité. Le manuel fournit des informations importantes
sur la manière d'assembler, d'utiliser et d'entretenir ce produit.
10) Veuillez manipuler les bords métalliques avec précaution.
11) NE PAS monter sur ce produit ni l’utiliser comme échelle.
12) NE MODIFIEZ PAS ce produit d’une manière non prévue, car cela
pourrait endommager le produit ou provoquer des blessures corporelles.
13) Assemblez toujours sur une surface plane.
14) Le poids maximal chargé pour chaque étagère ne dépasse pas 180
kg, uniformément réparti.
15) Rangez les articles les plus lourds sur les étagères inférieures.
16) Fixez l'appareil au mur s'il est rempli à pleine capacité.
PRÉCAUTIONS D'ASSEMBLAGE
3. Veuillez assembler le produit en respectant scrupuleusement les
instructions. Un assemblage incorrect peut être dangereux.
4. Veuillez porter des lunettes de sécurité et des gants de travail
correctement pendant l'assemblage.

- 3 -
3. N'essayez pas d'assembler le produit lorsque vous vous sentez fatigué
ou sous l'influence de l'alcool, de drogues ou de médicaments.
4. La capacité de charge et les autres paramètres du produit s'appliquent
uniquement au produit correctement et complètement assemblé.
5. Un marteau et une paire de gants peuvent également être utilisés, à
condition qu'un chiffon ou un bloc de bois soit placé entre la tête du
marteau et les pièces.
PRÉCAUTIONS D'EMPLOI
1. Ce produit n'est pas un jouet. Ne laissez pas les enfants jouer avec cet
article ou y accéder.
2. Vérifiez soigneusement avant utilisation. Ne l' utilisez pas si des pièces
sont desserrées ou endommagées.
4. Utiliser uniquement sur des surfaces planes, nivelées et dures.
5. Ne dépassez pas la capacité de charge indiquée. Serrez fermement
tous les boutons avant de placer des poids dessus . Soyez conscient de la
capacité de charge dynamique ! Des changements de charge soudains
peuvent temporairement provoquer une charge excessive, entraînant une
défaillance du produit.
CONSERVEZ CES INSTRUCTIONS
1
2
Modèle
326G0P9FV0
3676V4VPV0
Taille du produit
16 × 32 × 62,8 pouces
16 × 36 × 71,4 pouces
- 4 -
Limite de charge
totale
2000 lb
2000 lb
limite de charge
pour chaque couche
400 livres
400 livres
Part
ie
Description
Image
Quantité de pièces
326G0P9FV0
3676V4VPV0
1 6 × 3 2 × 62,8
pouces
16 × 36 × 7 1,4
pouces
UN
7 mm MDF
5
5
B
Poteau vertical
8
8
C
Poutre courte de
l'étagère
supérieure
10
10
D
Étagère
supérieure à
poutre longue
10
10
E
Fixations
4
4
F
Capuchon de
poteau
16
16
H
Fiche d'extension
2
2
je
Rondelle
2
2
- 5 -
J
Les équipes
Philips S
2
2
Hauteur des étagères
séparées
3 1,4 pouces
35,7 pouces
Attention:
Pour plus d'informations sur les pièces répertoriées ci-dessous,
reportez-vous au schéma d'assemblage de ce manuel. Déballez et
séparez toutes les pièces dans une zone de travail dégagée.
Étape 1 : Assemblage du capuchon de poteau
1. Faites glisser chaque poteau (B) dans le capuchon de poteau (F) comme
indiqué.
2. Répétez l’opération pour les 4 poteaux verticaux.
Attention : les capuchons de poteau sont destinés uniquement aux pieds
verticaux.
Top shelf beam rivets has
a design that allowing MDF
to sit.
- 6 -
Étape 2 : Assemblage des poutres courtes et longues
1. Alignez les poutres courtes ( C ) et la poutre longue de l'étagère supérieure
( D ) sur les encoches alignées entre les quatre poteaux verticaux (B).
2. Une fois en position, tapez fermement à l'aide d'un maillet en caoutchouc.
3. Répétez le processus pour le côté opposé, en vous assurant que les deux
extrémités
sont placés à la même hauteur.
Note:
Maintenez la première couche hors du sol dans une hauteur de 1 à 3 trous
pour éviter que les colonnes ne se déforment et ne s'effondrent en raison d'une
hauteur excessive.
First layer
- 7 -
Assurez-vous que la hauteur de chaque niveau est aussi uniforme que
possible.
Étape 3 : Assemblage des fixations
1 · Fixez les fixations (E) en haut du poteau vertical (B) et appuyez
jusqu'au bout.
Étape 4 : Installer le poteau vertical
2. Le bas du poteau vertical (B) est fixé à chaque fixation (E) et enfoncé
jusqu'au bout.

- 8 -
Étape 5 : Installez la troisième, la quatrième et la cinquième poutre
longue ( D ) et la poutre courte ( C ) de l'étagère supérieure ; la méthode
d'installation est la même que celle de l'étape 2 .
Étape 6 : Assemblage de l'étagère supérieure en MDF de 7 mm
- 9 -
1. Insérez l'étagère supérieure en MDF de 7 mm (A) sur les supports d'étagère
supérieure.
2. Assurez-vous qu'il est bien aligné avec le haut du cadre de l'unité.
Étape 7 : Installer le pied de colle supérieur
1. Faites glisser chaque poteau (B) dans le capuchon de poteau (F) comme
indiqué.
2. Répétez l’opération pour les 4 poteaux verticaux.
3. L’assemblage est maintenant terminé et votre appareil est prêt à être
utilisé.
- 10 -
Attention: Ce produit peut être séparé en deux étagères. Vous pouvez
trouver la hauteur de chaque étagère dans le tableau de la liste des
pièces.
Outils requis (non inclus)
Étape 8-1 : Installez les vis anti-basculement
A : Installation sur des murs en béton massif
2. Mesurez et marquez la hauteur et la largeur situées pour le trou de
perçage.
- 11 -
2. Percez 2 trous comme indiqué par la perceuse électrique .
3. Insérez le bouchon en plastique avec un marteau.
4. Fixez l'étagère au mur à l'aide de 2 vis et d'une rondelle à l'aide d'un
tournevis .
- 12 -

- 13 -
Étape 8-2 : Installez les vis anti-basculement
B : Installation sur poteau mural en bois
1. Mesurez et marquez la hauteur et la largeur situées pour le trou de
perçage.
2. Percez 2 trous comme indiqué par la perceuse électrique .
3. Insérez le bouchon en plastique avec un marteau.
4. Fixez l'étagère au mur à l'aide de 2 vis et d'une rondelle à l'aide d'un
tournevis .

- 14 -
Fabricant : Shanghaimuxinmuyeyouxiangongsi
Adresse : Shuangchenglu 803nong11hao1602A-1609shi, baoshanqu,
Shanghai 200000 CN.
Importé en Australie : SIHAO PTY LTD, 1 ROKEVA STREET, ASTWOOD
NSW 2122 Australie
Importé aux États-Unis : Sanven Technology Ltd., Suite 250, 9166 Anaheim
Place, Rancho Cucamonga, CA 91730
REP
EC
E-CrossStu GmbH
Mainzer Landstr.69, 60329 Frankfurt am Main.
REP
UK
YH CONSULTING LIMITED.
C/O YH Consulting Limited Office 147, Centurion House,
London Road, Staines-upon-Thames, Surrey, TW18 4AX


Technischer Support und E-Garantie-Zertifikat
www.vevor.com/support
ROBUSTE GARAGENREGALE
BENUTZERHANDBUCH
Wir sind weiterhin bestrebt, Ihnen Werkzeuge zu wettbewerbsfähigen Preisen anzubieten.
"Sparen Sie die Hälfte", "Halber Preis" oder andere ähnliche Ausdrücke, die wir nur
verwenden
stellt eine Schätzung der Einsparungen dar, die Sie durch den Kauf bestimmter Werkzeuge
erzielen können
mit uns im Vergleich zu den großen Top-Marken und bedeutet nicht unbedingt, Abdeckung
alle von uns angebotenen Werkzeugkategorien. Wir möchten Sie bitten, zu überprüfen
sorgfältig
wenn Sie bei uns eine Bestellung aufgeben, wenn Sie tatsächlich Speichern
Hälfte im Vergleich mit den Top-Großmarken.


- 1 -
MODELL: 326G0P9FV0 / 3676V4VPV0
Have product questions? Need technical support? Please feel free to
contact us:
Technical Support and E-Warranty Certificate
www.vevor.com/support
NEED HELP? CONTACT US!
This is the original instruction, please read all manual instructions
carefully before operating. VEVOR reserves a clear interpretation of our
user manual. The appearance of the product shall be subject to the
product you received. Please forgive us that we won't inform you again if
there are any technology or software updates on our product.
HEAVY DUTY
GARAGE SHELVES

- 2 -
Warnung – Um das Verletzungsrisiko zu verringern, muss
der Benutzer die Bedienungsanleitung sorgfältig lesen.
Dieses Symbol vor einem Sicherheitshinweis weist auf eine
Vorsichtsmaßnahme, Warnung oder Gefahr hin. Das
Ignorieren dieser Warnung kann zu einem Unfall führen. Um
das Risiko von Verletzungen, Bränden oder Stromschlägen
zu verringern, befolgen Sie bitte immer die unten
aufgeführten Empfehlungen .
Achtung: Tragen Sie bei der Verwendung dieses Produkts
unbedingt Handschuhe.
17) Bewahren Sie dieses Handbuch wegen der Sicherheitswarnungen
und Vorsichtsmaßnahmen auf. Das Handbuch enthält wichtige
Informationen zur Montage, Verwendung und Wartung dieses Produkts.
18) Bitte gehen Sie vorsichtig mit Metallkanten um.
19) Stellen Sie sich NICHT auf dieses Produkt und verwenden Sie es
NICHT als Leiter.
20) Verändern Sie das Produkt NICHT in einer Weise, die nicht dafür
vorgesehen ist, da dies zu Produktschäden oder Verletzungen führen
kann.
21) Immer auf einer ebenen Fläche zusammenbauen.
22) Die maximale Belastung jedes Regalbodens beträgt bei
gleichmäßiger Verteilung maximal 180 kg.
23) Lagern Sie die schwersten Gegenstände auf den unteren Regalen.
24) Befestigen Sie das Gerät an der Wand, wenn Sie es bis zum Rand
füllen.
VORSICHTSMASSNAHMEN BEI DER MONTAGE
5. Bitte montieren Sie das Produkt streng gemäß der Anleitung. Eine
falsche Montage kann gefährlich sein.
- 3 -
6. Bitte tragen Sie während der Montage unbedingt eine Schutzbrille und
Arbeitshandschuhe.
3. Versuchen Sie nicht, das Produkt zusammenzubauen, wenn Sie müde
sind oder unter dem Einfluss von Alkohol, Drogen oder Medikamenten
stehen.
4. Die Tragfähigkeit und andere Produktparameter gelten nur für das
ordnungsgemäß und vollständig montierte Produkt.
5. Es können auch ein Hammer und ein Paar Handschuhe verwendet
werden, sofern zwischen Hammerkopf und Teilen ein Tuch oder ein
Holzblock platziert wird.
VORSICHTSMASSNAHMEN BEIM GEBRAUCH
1. Dieses Produkt ist kein Spielzeug. Erlauben Sie Kindern nicht, mit
diesem Artikel zu spielen oder darauf zuzugreifen.
2. Vor Gebrauch sorgfältig prüfen. Nicht verwenden, wenn Teile sich
gelöst oder beschädigt haben.
4. Nur auf flachen, ebenen und harten Oberflächen verwenden.
5. Überschreiten Sie nicht die angegebene Tragfähigkeit. Ziehen Sie alle
Knöpfe fest an, bevor Sie Gewichte darauf legen . Beachten Sie die
dynamische Tragfähigkeit! Plötzliche Laständerungen können
vorübergehend zu einer Überlastung führen und zu einem Produktausfall
führen.
BEWAHREN SIE DIESE ANWEISUNGEN AUF
1
2
- 4 -
Modell
326G0P9FV0
3676V4VPV0
Produktgröße
16 × 32 × 62,8 Zoll
16 × 36 × 71,4 Zoll
Gesamtbelastungsg
renze
2000 Pfund
2000 Pfund
Belastungsgrenze
für jede Schicht
400 Pfund
400 Pfund
Teil
Beschreibung
Bild
Teilemenge
326G0P9FV0
3676V4VPV0
1 6 × 3 2 × 62,8
Zoll
16 × 36 × 7 1,4
Zoll
A
7mm M DF
5
5
B
Aufrechter
Pfosten
8
8
C
Oberes Regal,
kurzer Balken
10
10
D
Oberes Regal mit
langem Balken
10
10
E
Befestigungen
4
4
F
Pfostenkappe
16
16
H
Erweiterungsstec
ker
2
2

- 5 -
IC
H
Waschmaschine
2
2
J
Philips S-
Besatzungen
2
2
Höhe der getrennten
Regale
3 1,4 Zoll
35,7 Zoll
Aufmerksamkeit:
Weitere Informationen zu den unten aufgeführten Teilen finden Sie im
Montagediagramm in diesem Handbuch. Packen Sie alle Teile in einem
freien Arbeitsbereich aus und trennen Sie sie voneinander.
Schritt 1: Montage der Pfostenkappen
1. Schieben Sie jeden Pfosten (B) wie gezeigt in die Pfostenkappe (F).
2. Wiederholen Sie dies für alle 4 aufrechten Pfosten.
Achtung: Pfostenkappen sind nur für Pfostenfüße geeignet.
Top shelf beam rivets has
a design that allowing MDF
to sit.
- 6 -
Schritt 2: Zusammenbau des kurzen und langen Balkens
1. Richten Sie die kurzen Balken ( C ) und den langen Balken des obersten
Regals ( D ) an den ausgerichteten Kerben zwischen den vier aufrechten Pfosten
(B) aus.
2. Sobald es in Position ist, klopfen Sie mit einem Gummihammer fest darauf.
3. Wiederholen Sie den Vorgang für die gegenüberliegende Seite und stellen Sie
sicher, dass beide Enden
sind auf gleicher Höhe eingestellt.
Notiz:
Halten Sie die erste Schicht 1 bis 3 Lochhöhen über dem Boden, um zu
verhindern, dass sich die Säulen aufgrund zu großer Höhe verformen und
einstürzen.
First layer

- 7 -
Achten Sie darauf, dass die Höhe der einzelnen Ebenen möglichst
gleichmäßig ist.
Schritt 3: Montage der Befestigungselemente
1 · Befestigen Sie die Befestigungen (E) oben am aufrechten Pfosten (B)
und klopfen Sie sie bis zum Ende fest.
Schritt 4: Installieren Sie den aufrechten Pfosten
3. Die Unterseite des aufrechten Pfostens (B) wird an jeder Befestigung
(E) befestigt und bis zum Ende festgeklopft.
- 8 -
Schritt 5: Montieren Sie den langen Balken ( D ) und den kurzen Balken
( C ) des dritten, vierten und fünften oberen Regals . Die Montage erfolgt
analog zu Schritt 2 .
Schritt 6 : Zusammenbau des oberen Regals aus 7 mm MDF
1. Setzen Sie das 7 mm dicke MDF-Oberregal (A) auf die oberen Regalstützen.
- 9 -
2. Stellen Sie sicher, dass es bündig mit der Oberseite des Geräterahmens
abschließt.
Schritt 7 : Installieren Sie den oberen Klebefuß
1. Schieben Sie jeden Pfosten (B) wie gezeigt in die Pfostenkappe (F).
2. Wiederholen Sie dies für alle 4 aufrechten Pfosten.
3. Die Montage ist nun abgeschlossen und Ihr Gerät ist einsatzbereit.
Aufmerksamkeit: Dieses Produkt kann mit zwei Regalen geteilt
- 10 -
werden. Die Höhe der einzelnen Regale finden Sie in der Tabelle der
Stückliste.
Erforderliche Werkzeuge (nicht im Lieferumfang enthalten)
Schritt 8 -1: Installieren Sie die Kippschutzschrauben
A: Installation auf massiven Betonwänden
3. Messen und markieren Sie die Höhe und Breite für das Bohrloch.
2. Bohren Sie mit einer Bohrmaschine die beiden markierten Löcher .
3. Den Kunststoffdübel mit einem Hammer einschlagen.
- 11 -
4. Befestigen Sie das Regal mit jeweils zwei Schrauben und
Unterlegscheiben mit einem Schraubendreher an der Wand .

- 12 -
Schritt 8 -2: Installieren Sie die Kippschutzschrauben
B: Montage an Holzwandpfosten
1. Messen und markieren Sie die Höhe und Breite für das Bohrloch.
2. Bohren Sie mit einer Bohrmaschine die beiden markierten Löcher .
3. Den Kunststoffstopfen mit einem Hammer einschlagen.
4. Befestigen Sie das Regal mit jeweils zwei Schrauben und
Unterlegscheiben mit einem Schraubendreher an der Wand .

- 13 -
Hersteller: Shanghaimuxinmuyeyouxiangongsi
Adresse: Shuangchenglu 803nong11hao1602A-1609shi, baoshanqu,
Shanghai 200000 CN.
Nach AUS importiert: SIHAO PTY LTD, 1 ROKEVA STREETEASTWOOD
NSW 2122 Australien
Importiert in die USA: Sanven Technology Ltd., Suite 250, 9166 Anaheim
Place, Rancho Cucamonga, CA 91730
REP
EC
E-CrossStu GmbH
Mainzer Landstr.69, 60329 Frankfurt am Main.
REP
UK
YH CONSULTING LIMITED.
C/O YH Consulting Limited Office 147, Centurion House,
London Road, Staines-upon-Thames, Surrey, TW18 4AX


Supporto tecnico e certificato di garanzia elettronica
www.vevor.com/support
SCAFFALI PER GARAGE AD ALTA
RESISTENZA
MANUALE D' USO
Continuiamo a impegnarci per fornirvi strumenti a prezzi competitivi.
"Risparmia la metà", "Metà prezzo" o altre espressioni simili utilizzate solo da noi
rappresenta una stima dei risparmi che potresti ottenere acquistando determinati strumenti
con noi rispetto ai principali marchi top e non significa necessariamente copertina
tutte le categorie di strumenti da noi offerti. Ti ricordiamo cortesemente di verificare
accuratamente
quando effettui un ordine con noi se sei effettivamente Risparmio
Metà rispetto ai marchi più importanti.


- 1 -
MODELLO: 326G0P9FV0 / 3676V4VPV0
Have product questions? Need technical support? Please feel free to
contact us:
Technical Support and E-Warranty Certificate
www.vevor.com/support
NEED HELP? CONTACT US!
This is the original instruction, please read all manual instructions
carefully before operating. VEVOR reserves a clear interpretation of our
user manual. The appearance of the product shall be subject to the
product you received. Please forgive us that we won't inform you again if
there are any technology or software updates on our product.
HEAVY DUTY
GARAGE SHELVES

- 2 -
Attenzione - Per ridurre il rischio di lesioni, l'utente deve
leggere attentamente il manuale di istruzioni.
Questo simbolo, posto prima di un commento sulla
sicurezza, indica un tipo di precauzione, avviso o pericolo.
Ignorare questo avviso può causare un incidente. Per ridurre
il rischio di lesioni, incendi o folgorazione, seguire sempre le
raccomandazioni mostrate di seguito.
Attenzione: assicurarsi di indossare guanti quando si utilizza
questo prodotto.
25) Conservare questo manuale per le avvertenze e le precauzioni di
sicurezza. Il manuale offre informazioni importanti su come assemblare,
utilizzare e manutenere questo prodotto.
26) Maneggiare con cura i bordi metallici.
27) NON salire sul prodotto né utilizzarlo come scala.
28) NON modificare questo prodotto in alcun modo diverso da quello
previsto, poiché ciò potrebbe danneggiare il prodotto o causare lesioni
personali.
29) Eseguire sempre il montaggio su una superficie piana.
30) Il peso massimo caricabile su ogni ripiano non è superiore a 180 kg,
uniformemente distribuito.
31) Conservare gli oggetti più pesanti sui ripiani più bassi.
32) Fissare l'unità alla parete se è piena.
PRECAUZIONI DI MONTAGGIO
7. Si prega di assemblare il prodotto seguendo scrupolosamente le
istruzioni. Un assemblaggio non corretto potrebbe essere pericoloso.
8. Si prega di indossare occhiali di sicurezza e guanti da lavoro durante il
montaggio.
- 3 -
3. Non provare a montare il prodotto quando ci si sente stanchi o sotto
l'effetto di alcol, droghe o farmaci.
4. La capacità di carico e gli altri parametri del prodotto si applicano solo al
prodotto correttamente e completamente assemblato.
5. È possibile utilizzare anche un martello e un paio di guanti , a
condizione che tra la testa del martello e le parti venga posizionato un
panno o un blocco di legno.
PRECAUZIONI D'USO
1. Questo prodotto non è un giocattolo. Non permettere ai bambini di
giocare con questo articolo o di accedervi.
2. Controllare attentamente prima dell'uso. Non utilizzarlo se le parti si
allentano o si danneggiano.
4. Utilizzare solo su superfici piane, livellate e dure.
5. Non superare la capacità di carico indicata. Stringere saldamente tutte
le manopole prima di posizionare i pesi . Siate consapevoli della capacità
di carico dinamica! Improvvisi cambiamenti di carico possono causare
temporaneamente un carico eccessivo, con conseguente guasto del
prodotto.
SALVA QUESTE ISTRUZIONI
1
2
Modello
326G0P9FV0
3676V4VPV0
Dimensioni del
prodotto
16 × 32 × 62,8 pollici
16 ×36 × 71,4 pollici

- 4 -
Limite di carico
totale
2000 libbre
2000 libbre
limite di carico per
ogni strato
400 libbre
400 libbre
Part
e
Descrizione
Immagine
Parte Qtà
326G0P9FV0
3676V4VPV0
1 6 ×3 2 × 62,8
pollici
16 × 36 × 7 1,4
pollici
UN
7mm MDF
5
5
B
palo verticale
8
8
C
Trave corta del
ripiano superiore
10
10
D
Ripiano superiore
trave lunga
10
10
E
Fissaggi
4
4
F
Tappo del palo
16
16
H
Spina di
espansione
2
2
IO
Rondella
2
2
J
Equipaggi Philips
S
2
2
- 5 -
Altezza dei ripiani
separati
3 1,4 pollici
35,7 pollici
Attenzione:
Per ulteriori informazioni sulle parti elencate di seguito, fare
riferimento allo schema di montaggio in questo manuale. Disimballare e
separare tutte le parti in un'area di lavoro libera.
Fase 1: assemblaggio del tappo del palo
1. Far scorrere ciascun palo (B) nel tappo del palo (F) come mostrato.
2. Ripetere la stessa operazione per tutti e 4 i pali verticali.
Attenzione: i cappucci dei pali sono adatti solo per i piedi in posizione verticale.
Top shelf beam rivets has
a design that allowing MDF
to sit.

- 6 -
Fase 2: Assemblaggio trave corta e lunga
1. Allineare le travi corte ( C ) e la trave lunga del ripiano superiore ( D ) alle
tacche allineate tra i quattro montanti verticali (B).
2. Una volta in posizione, picchiettare con decisione utilizzando un martello di
gomma.
3. Ripetere il procedimento per il lato opposto, assicurandosi che entrambe le
estremità
sono impostati alla stessa altezza.
Nota:
Mantenere il primo strato sollevato da terra entro 1-3 altezze dei fori per
evitare che le colonne si deformino e crollino a causa dell'altezza eccessiva.
Assicurarsi che l'altezza di ogni livello sia il più uniforme possibile.
First layer

- 7 -
Fase 3: Assemblaggio dei fissaggi
1 · Fissare i fissaggi (E) nella parte superiore del montante verticale (B) e
picchiettare fino in fondo.
Fase 4: Installare il palo verticale
4. La parte inferiore del montante verticale (B) viene fissata a ciascun
elemento di fissaggio (E) e fissata fino in fondo.

- 8 -
Fase 5: installare la terza, quarta e quinta trave lunga del ripiano
superiore ( D ) e la trave corta ( C ); il metodo di installazione è lo stesso
della Fase 2 .
Fase 6 : assemblaggio del ripiano superiore in MDF da 7 mm
1. Inserire il ripiano superiore in MDF da 7 mm (A) sui supporti del ripiano
superiore.
2. Assicurarsi che sia a filo con la parte superiore del telaio dell'unità.

- 9 -
Fase 7 : Installare il piedino superiore per la colla
1. Far scorrere ciascun palo (B) nel tappo del palo (F) come mostrato.
2. Ripetere la stessa operazione per tutti e 4 i pali verticali.
3. Il montaggio è ora completato e l'unità è pronta per l'uso.
Attenzione: questo prodotto può essere separato con due ripiani. Puoi
trovare l'altezza di ogni ripiano nella tabella dell'elenco dei componenti.
Strumenti necessari (non inclusi)
Fase 8 -1: Installare le viti antiribaltamento

- 10 -
A: Installazione su pareti in calcestruzzo solido
4. Misurare e segnare l'altezza e la larghezza indicate per il foro.
2. Praticare 2 fori come indicato dal trapano elettrico .
3. Inserire il tappo di plastica con il martello.
4. Fissare la mensola alla parete utilizzando 2 viti e 2 rondelle ciascuna
con un cacciavite .

- 11 -

- 12 -
Fase 8 -2: Installare le viti antiribaltamento
B: Installazione su palo di legno
1. Misurare e segnare l'altezza e la larghezza indicate per il foro.
2. Praticare 2 fori come indicato dal trapano elettrico .
3. Inserire il tappo di plastica con il martello.
4. Fissare la mensola alla parete utilizzando 2 viti e 2 rondelle ciascuna
con un cacciavite .

- 13 -
Produttore: Shanghaimuxinmuyeyouxiangongsi
Indirizzo: Shuangchenglu 803nong11hao1602A-1609shi, baoshanqu,
shanghai 200000 CN.
Importato in AUS: SIHAO PTY LTD, 1 ROKEVA STREETEASTWOOD NSW
2122 Australia
Importato negli USA: Sanven Technology Ltd., Suite 250, 9166 Anaheim
Place, Rancho Cucamonga, CA 91730
REP
EC
E-CrossStu GmbH
Mainzer Landstr.69, 60329 Frankfurt am Main.
REP
UK
YH CONSULTING LIMITED.
C/O YH Consulting Limited Office 147, Centurion House,
London Road, Staines-upon-Thames, Surrey, TW18 4AX


Soporte técnico y certificado de garantía electrónica
www.vevor.com/support
ESTANTES DE GARAJE DE ALTA
RESISTENCIA
MANUAL DEL USUARIO
Seguimos comprometidos a brindarle herramientas a precios competitivos.
"Ahorra la mitad", "mitad de precio" o cualquier otra expresión similar utilizada únicamente
por nosotros
Representa una estimación de los ahorros que podría obtener al comprar ciertas
herramientas.
con nosotros en comparación con las principales marcas líderes y no significa
necesariamente cubrir
Todas las categorías de herramientas que ofrecemos. Le recordamos que debe verificar
con cuidado

Cuando realiza un pedido con nosotros, si realmente está Ahorro
Medio en comparación con las principales marcas líderes.


- 1 -
MODELO: 326G0P9FV0 / 3676V4VPV0
Have product questions? Need technical support? Please feel free to
contact us:
Technical Support and E-Warranty Certificate
www.vevor.com/support
NEED HELP? CONTACT US!
This is the original instruction, please read all manual instructions
carefully before operating. VEVOR reserves a clear interpretation of our
user manual. The appearance of the product shall be subject to the
product you received. Please forgive us that we won't inform you again if
there are any technology or software updates on our product.
HEAVY DUTY
GARAGE SHELVES

- 2 -
Advertencia: Para reducir el riesgo de lesiones, el usuario
debe leer atentamente el manual de instrucciones.
Este símbolo, colocado antes de un comentario de
seguridad, indica un tipo de precaución, advertencia o
peligro. Ignorar esta advertencia puede provocar un
accidente. Para reducir el riesgo de lesiones, incendios o
electrocución, siga siempre las recomendaciones que se
muestran a continuación.
Advertencia: Asegúrese de usar guantes al utilizar este
producto.
33) Conserve este manual para conocer las advertencias y precauciones
de seguridad. El manual ofrece información importante sobre cómo
ensamblar, usar y mantener este producto.
34) Manipule los bordes metálicos con cuidado.
35) NO se suba a este producto ni lo utilice como escalera.
36) NO altere este producto de ninguna manera que no sea la prevista,
ya que esto puede causar daños al producto o lesiones personales.
37) Monte siempre sobre una superficie nivelada.
38) El peso máximo cargado por cada estante no es más de 180 kg,
distribuidos uniformemente.
39) Guarde los artículos más pesados en los estantes inferiores.
40) Fije la unidad a la pared si la va a llenar hasta su capacidad máxima.
PRECAUCIONES DE MONTAJE
9. Por favor, ensamble el producto siguiendo estrictamente las
instrucciones. Un montaje incorrecto podría resultar peligroso.
10. Utilice gafas de seguridad y guantes de trabajo adecuadamente
durante el montaje.

- 3 -
3. No intente ensamblar el producto si se siente cansado o bajo la
influencia de alcohol, drogas o medicamentos.
4. La capacidad de carga y otros parámetros del producto se aplican
únicamente al producto ensamblado de forma correcta y completa.
5. También se pueden utilizar un martillo y un par de guantes , siempre
que se coloque un paño o un bloque de madera entre la cabeza del
martillo y las piezas.
PRECAUCIONES DE USO
1. Este producto no es un juguete. No permita que los niños jueguen con
este artículo ni lo utilicen.
2. Verifique cuidadosamente antes de usar. No lo use si las piezas están
sueltas o dañadas.
4. Úselo únicamente en superficies planas, niveladas y duras.
5. No exceda la capacidad de carga indicada. Apriete bien todas las
perillas antes de colocar pesos sobre el producto . ¡Tenga en cuenta la
capacidad de carga dinámica! Los cambios repentinos de carga pueden
provocar temporalmente una carga excesiva, lo que puede provocar una
falla del producto.
GUARDE ESTAS INSTRUCCIONES
1
2
Modelo
326G0P9FV0
3676V4VPV0
Tamaño del
producto
16 × 32 × 62,8 pulgadas
16 × 36 × 71,4 pulgadas

- 4 -
Límite de carga total
2000 libras
2000 libras
límite de carga para
cada capa
400 libras
400 libras
Part
e
Descripción
Imagen
Cantidad de piezas
326G0P9FV0
3676V4VPV0
1 6 × 3 2 × 62,8
pulgadas
16 × 36 × 7 1,4
pulgadas
A
7 mm MDF
5
5
B
Poste vertical
8
8
do
Estante superior
de viga corta
10
10
D
Estante superior
con viga larga
10
10
mi
Fijaciones
4
4
F
Tapa del poste
16
16
yo
Tapón de
expansión
2
2
I
Arandela
2
2
Yo
Tripulaciones de
Philips S
2
2

- 5 -
Altura de los estantes
separados
3 1,4 pulgadas
35,7 pulgadas
Atención:
Para obtener información adicional sobre las piezas que se
enumeran a continuación, consulte el diagrama de ensamblaje de este
manual. Desembale y separe todas las piezas en un área de trabajo
despejada.
Paso 1: Montaje de la tapa del poste
1. Deslice cada poste (B) en la tapa del poste (F) como se muestra.
2. Repita el procedimiento para los 4 postes verticales.
Atención: las tapas de los postes son solo para patas verticales.
Top shelf beam rivets has
a design that allowing MDF
to sit.
- 6 -
Paso 2: Ensamblaje de vigas cortas y largas
1. Alinee las vigas cortas ( C ) y la viga larga del estante superior ( D ) con las
muescas alineadas entre los cuatro postes verticales (B).
2. Una vez en posición, golpéelo firmemente usando un mazo de goma.
3. Repita el proceso para el lado opuesto, asegurándose de que ambos extremos
están situados a la misma altura.
Nota:
Mantenga la primera capa separada del suelo entre 1 y 3 alturas de agujeros
para evitar que las columnas se deformen y colapsen debido a la altura excesiva.
Asegúrese de que la altura de cada nivel sea lo más uniforme posible.
Paso 3: Montaje de fijaciones
First layer
- 7 -
1 · Fije las fijaciones (E) en la parte superior del poste vertical (B) y
golpéelas hasta el final.
Paso 4: Instale el poste vertical
5. La parte inferior del poste vertical (B) se fija a cada fijación (E) y se
golpea hasta el final.
- 8 -
Paso 5: Instale la tercera, cuarta y quinta viga larga ( D ) y la viga corta ( C )
del estante superior; el método de instalación es el mismo que el del Paso
2 .
Paso 6 : Montaje del estante superior de MDF de 7 mm
1. Inserte el estante superior de MDF de 7 mm (A) en los soportes del estante
superior.
2. Asegúrese de que quede al ras con la parte superior del marco de la unidad.
- 9 -
Paso 7 : Instale el pie adhesivo superior
1. Deslice cada poste (B) en la tapa del poste (F) como se muestra.
2. Repita el procedimiento para los 4 postes verticales.
3. El ensamblaje ahora está completo y su unidad está lista para usarse.
Atención: Este producto se puede separar con dos estantes. Puede
consultar la altura de cada estante en la tabla de la lista de piezas.
Herramientas necesarias (no incluidas)
Paso 8 -1: Instale los tornillos antivuelco
- 10 -
A: Instalación en paredes de hormigón macizo
5. Mida y marque la altura y el ancho ubicados para el orificio de
perforación.
2. Perfore 2 agujeros según las marcas con un taladro eléctrico .
3. Inserte el tapón de plástico con un martillo.
- 11 -
4. Fije el estante a la pared, utilizando 2 piezas de tornillo y arandela con
un destornillador .

- 12 -
Paso 8 -2: Instale los tornillos antivuelco
B: Instalación sobre poste de madera para pared
1. Mida y marque la altura y el ancho ubicados para el orificio de
perforación.
2. Perfore 2 agujeros según las marcas con un taladro eléctrico .
3. Inserte el tapón de plástico con un martillo.
4. Fije el estante a la pared, utilizando 2 piezas de tornillo y arandela con
un destornillador .

- 13 -
Fabricante: Shanghaimuxinmuyeyouxiangongsi
Dirección: Shuangchenglu 803nong11hao1602A-1609shi, baoshanqu,
shanghai 200000 CN.
Importado a AUS: SIHAO PTY LTD, 1 ROKEVA STREETEASTWOOD NSW
2122 Australia
Importado a EE. UU.: Sanven Technology Ltd., Suite 250, 9166 Anaheim
Place, Rancho Cucamonga, CA 91730
REP
EC
E-CrossStu GmbH
Mainzer Landstr.69, 60329 Frankfurt am Main.
REP
UK
YH CONSULTING LIMITED.
C/O YH Consulting Limited Office 147, Centurion House,
London Road, Staines-upon-Thames, Surrey, TW18 4AX


Wsparcie techniczne i certyfikat e-gwarancji
www.vevor.com/support
WYTRZYMAŁE REGAŁY GARAŻOWE
INSTRUKCJA OBSŁUGI
Nadal staramy się oferować Państwu narzędzia w konkurencyjnych cenach.
„Oszczędź połowę”, „Połowa ceny” lub jakiekolwiek inne podobne wyrażenia używane
wyłącznie przez nas
przedstawia szacunkowe oszczędności, jakie możesz uzyskać kupując określone
narzędzia
z nami w porównaniu do głównych, najlepszych marek i niekoniecznie oznacza to okładka
wszystkie kategorie narzędzi oferowanych przez nas. Przypominamy o sprawdzeniu
ostrożnie
gdy składasz u nas zamówienie, jeśli faktycznie Oszczędność
Połowa w porównaniu z wiodącymi markami.


- 1 -
MODELE: 326G0P9FV0 / 3676V4VPV0
Have product questions? Need technical support? Please feel free to
contact us:
Technical Support and E-Warranty Certificate
www.vevor.com/support
NEED HELP? CONTACT US!
This is the original instruction, please read all manual instructions
carefully before operating. VEVOR reserves a clear interpretation of our
user manual. The appearance of the product shall be subject to the
product you received. Please forgive us that we won't inform you again if
there are any technology or software updates on our product.
HEAVY DUTY
GARAGE SHELVES

- 2 -
Ostrzeżenie - Aby zminimalizować ryzyko obrażeń,
użytkownik powinien uważnie przeczytać instrukcję obsługi.
Ten symbol, umieszczony przed komentarzem dotyczącym
bezpieczeństwa, wskazuje na rodzaj ostrożności,
ostrzeżenia lub niebezpieczeństwa. Zignorowanie tego
ostrzeżenia może doprowadzić do wypadku. Aby zmniejszyć
ryzyko obrażeń, pożaru lub porażenia prądem, zawsze
postępuj zgodnie z zaleceniami podanymi poniżej.
Ostrzeżenie: Podczas stosowania tego produktu należy
nosić rękawiczki.
41) Zachowaj tę instrukcję ze względu na ostrzeżenia i środki ostrożności
dotyczące bezpieczeństwa. Instrukcja zawiera ważne informacje na temat
montażu, użytkowania i konserwacji tego produktu.
42) Prosimy o ostrożne obchodzenie się z krawędziami metalowymi.
43) NIE stawaj na tym produkcie i NIE używaj go jako drabiny.
44) NIE modyfikuj tego produktu w żaden sposób niezgodny z
przeznaczeniem, gdyż może to spowodować uszkodzenie produktu lub
obrażenia ciała.
45) Zawsze montuj na równej powierzchni.
46) Maksymalne obciążenie każdej półki nie przekracza 180 kg, przy
równomiernym rozłożeniu ciężaru.
47) Przechowuj najcięższe przedmioty na dolnych półkach.
48) Jeśli zbiornik jest pełny, należy go przymocować do ściany.
ŚRODKI OSTROŻNOŚCI PODCZAS MONTAŻU
11. Proszę złożyć produkt ściśle według instrukcji. Nieprawidłowy montaż
może być niebezpieczny.
12. Podczas montażu należy prawidłowo założyć okulary ochronne i
rękawice robocze.
- 3 -
3. Nie należy podejmować prób montażu produktu, jeśli jest się
zmęczonym lub pod wpływem alkoholu, narkotyków lub leków.
4. Nośność i inne parametry produktu odnoszą się wyłącznie do produktu
prawidłowo i kompletnie zmontowanego.
5. Można również użyć młotka i pary rękawic , pod warunkiem
umieszczenia szmatki lub klocka drewnianego między głowicą młotka a
częściami.
ŚRODKI OSTROŻNOŚCI
1. Ten produkt nie jest zabawką. Nie pozwalaj dzieciom bawić się tym
przedmiotem ani mieć do niego dostępu.
2. Przed użyciem sprawdź dokładnie. Nie używaj, jeśli części się poluzują
lub ulegną uszkodzeniu.
4. Stosować wyłącznie na płaskich, równych i twardych powierzchniach.
5. Nie przekraczaj podanej nośności. Mocno dokręć wszystkie pokrętła
przed umieszczeniem na nim ciężarków . Zwróć uwagę na dynamiczną
nośność! Nagłe zmiany obciążenia mogą tymczasowo spowodować
nadmierne obciążenie, co może doprowadzić do awarii produktu.
ZAPISZ TE INSTRUKCJE
1
2
Model
326G0P9FV0
3676V4VPV0
Rozmiar produktu
16 × 32 × 62,8 cala
16 × 36 × 71,4 cala
Całkowity limit
obciążenia
2000 funtów
2000 funtów
- 4 -
limit obciążenia dla
każdej warstwy
400 funtów
400 funtów
Czę
ść
Opis
Zdjęcie
Ilość części
326G0P9FV0
3676V4VPV0
1 6 × 3 2 × 62,8
cala
16 × 36 × 7 1,4
cala
A
7mm MDF
5
5
B
Słupek pionowy
8
8
C
Górna półka
krótka belka
10
10
D
Długa belka
górnej półki
10
10
mi
Mocowania
4
4
F
Czapka słupka
16
16
H
Wtyczka
rozprężna
2
2
I
Pralka
2
2
J
Załogi Philips S
2
2

- 5 -
Wysokość oddzielnych
półek
3 1,4 cala
35,7 cala
Uwaga:
Aby uzyskać dodatkowe informacje dotyczące części wymienionych
poniżej, zapoznaj się ze schematem montażu w tym podręczniku.
Rozpakuj i oddziel wszystkie części w czystym miejscu roboczym.
Krok 1: Montaż nasadki słupka
1. Wsuń każdy słupek (B) do nasadki słupka (F), jak pokazano.
2. Powtórz tę czynność dla wszystkich 4 słupków pionowych.
Uwaga: zaślepki słupków przeznaczone są wyłącznie do stóp w pozycji pionowej.
Top shelf beam rivets has
a design that allowing MDF
to sit.

- 6 -
Krok 2: Montaż belki krótkiej i długiej
1. Wyrównaj krótkie belki ( C ) i długą belkę górnej półki ( D ) z wyrównanymi
wycięciami pomiędzy czterema pionowymi słupkami (B).
2. Po umieszczeniu na miejscu należy mocno uderzyć gumowym młotkiem.
3. Powtórz proces po przeciwnej stronie, upewniając się, że oba końce są dobrze
połączone.
są ustawione na tej samej wysokości.
Notatka:
Utrzymuj pierwszą warstwę nad ziemią na wysokości od 1 do 3 otworów, aby
zapobiec odkształceniu i zawaleniu się kolumn z powodu zbyt dużej wysokości.
Upewnij się, że wysokość każdego poziomu jest możliwie najbardziej
jednolita.
First layer
- 7 -
Krok 3: Montaż elementów mocujących
1 · Zamontuj elementy mocujące (E) na górze słupka pionowego (B) i dobij
je do końca.
Krok 4: Zainstaluj słupek pionowy
6. Dolną część słupka pionowego (B) należy przymocować do każdego
mocowania (E), a następnie dobić do końca.
- 8 -
Krok 5: Zamontuj trzecią, czwartą i piątą górną półkę – długą belkę ( D ) i
krótką belkę ( C ). Sposób montażu jest taki sam, jak w kroku 2 .
Krok 6 : Montaż górnej półki z płyty MDF o grubości 7 mm
1. Włóż górną półkę z płyty MDF o grubości 7 mm (A) na wsporniki górnej półki.
2. Upewnij się, że przylega równo do górnej krawędzi ramy urządzenia.
Krok 7 : Zainstaluj górną stopkę klejową
1. Wsuń każdy słupek (B) do nasadki słupka (F), jak pokazano.

- 9 -
2. Powtórz tę czynność dla wszystkich 4 słupków pionowych.
3. Montaż jest teraz ukończony i urządzenie jest gotowe do użycia.
Uwaga: ten produkt można rozdzielić na dwie półki. Wysokość każdej
półki można znaleźć w tabeli listy części.
Wymagane narzędzia (nie dołączone)
Krok 8 -1: Zainstaluj śruby zabezpieczające przed przewróceniem
A: Montaż na ścianach z litego betonu

- 10 -
6. Zmierz i zaznacz wysokość i szerokość otworu , w którym chcesz
wywiercić otwór.
2. Wywierć 2 otwory oznaczone wiertarką .
3. Włóż korek plastikowy za pomocą młotka.
4. Przymocuj półkę do ściany za pomocą 2 śrub i podkładek za pomocą
śrubokręta .
- 11 -

- 12 -
Krok 8-2 : Zainstaluj śruby zabezpieczające przed przewróceniem
B: Montaż na słupku ściennym drewnianym
1. Zmierz i zaznacz wysokość i szerokość otworu wiertniczego.
2. Wywierć 2 otwory oznaczone wiertarką .
3. Włóż korek plastikowy za pomocą młotka.
4. Przymocuj półkę do ściany za pomocą 2 śrub i podkładek za pomocą
śrubokręta .

- 13 -
Producent: Shanghaimuxinmuyeyouxiangongsi
Adres: Shuangchenglu 803nong11hao1602A-1609shi, baoshanqu, szanghaj
200000 CN.
Importowane do AUS: SIHAO PTY LTD, 1 ROKEVA STREETEASTWOOD
NSW 2122 Australia
Importowane do USA: Sanven Technology Ltd., Suite 250, 9166 Anaheim
Place, Rancho Cucamonga, CA 91730
REP
EC
E-CrossStu GmbH
Mainzer Landstr.69, 60329 Frankfurt am Main.
REP
UK
YH CONSULTING LIMITED.
C/O YH Consulting Limited Office 147, Centurion House,
London Road, Staines-upon-Thames, Surrey, TW18 4AX


Technische ondersteuning en e-garantiecertificaat
www.vevor.com/support
ZWARE GARAGEPLANKEN
GEBRUIKSAANWIJZING
Wij streven er voortdurend naar om u gereedschappen tegen concurrerende prijzen te
leveren.
"Bespaar de helft", "halve prijs" of andere soortgelijke uitdrukkingen die alleen door ons
worden gebruikt
geeft een schatting van de besparingen die u kunt behalen door bepaalde
gereedschappen te kopen
bij ons vergeleken met de grote topmerken en betekent niet per se dat omslag
alle categorieën van tools die wij aanbieden. U wordt vriendelijk verzocht om te verifiëren
voorzichtig
wanneer u een bestelling bij ons plaatst, als u daadwerkelijk Besparing
Half in vergelijking met de grote topmerken.


- 1 -
MODEL: 326G0P9FV0 / 3676V4VPV0
Have product questions? Need technical support? Please feel free to
contact us:
Technical Support and E-Warranty Certificate
www.vevor.com/support
NEED HELP? CONTACT US!
This is the original instruction, please read all manual instructions
carefully before operating. VEVOR reserves a clear interpretation of our
user manual. The appearance of the product shall be subject to the
product you received. Please forgive us that we won't inform you again if
there are any technology or software updates on our product.
HEAVY DUTY
GARAGE SHELVES
- 2 -
Waarschuwing - Om het risico op letsel te verkleinen, dient
de gebruiker de gebruiksaanwijzing zorgvuldig te lezen.
Dit symbool, geplaatst voor een veiligheidsopmerking, geeft
een soort voorzorgsmaatregel, waarschuwing of gevaar aan.
Het negeren van deze waarschuwing kan leiden tot een
ongeluk. Om het risico op letsel, brand of elektrocutie te
verminderen, dient u altijd de onderstaande aanbevelingen
op te volgen.
Waarschuwing: draag handschoenen wanneer u dit product
gebruikt.
49) Bewaar deze handleiding voor de veiligheidswaarschuwingen en
voorzorgsmaatregelen. De handleiding biedt belangrijke informatie over
hoe u dit product kunt monteren, gebruiken en onderhouden.
50) Ga voorzichtig om met metalen randen.
51) Ga NIET op dit product staan en gebruik het niet als ladder.
52) Wijzig dit product NIET op een manier die niet de bedoeling is, omdat
dit schade aan het product of persoonlijk letsel kan veroorzaken.
53) Monteer het geheel altijd op een vlakke ondergrond.
54) Het maximale belastbare gewicht per plank bedraagt maximaal 180
kg, gelijkmatig verdeeld.
55) Bewaar de zwaarste spullen op de onderste planken.
56) Bevestig het apparaat aan de muur als het tot de maximale capaciteit
is gevuld.
MONTAGEVOORZORGSMAATREGELEN
13. Monteer het product strikt volgens de instructies. Onjuiste montage
kan gevaarlijk zijn.
14. Draag tijdens de montage een veiligheidsbril en werkhandschoenen.

- 3 -
3. Probeer het product niet in elkaar te zetten als u zich moe voelt of onder
invloed bent van alcohol, drugs of medicijnen.
4. Het draagvermogen en andere productparameters worden uitsluitend
toegepast op het correct en volledig gemonteerde product.
5. Ook een hamer en een paar handschoenen kunnen worden gebruikt,
op voorwaarde dat er een doek of blok hout tussen de hamerkop en de
onderdelen wordt geplaatst.
GEBRUIK VOORZORGSMAATREGELEN
1. Dit product is geen speelgoed. Laat kinderen niet met dit item spelen of
toegang ertoe krijgen.
2. Controleer zorgvuldig voor gebruik. Gebruik het niet als onderdelen
losraken of beschadigd raken.
4. Alleen gebruiken op vlakke, vlakke en harde oppervlakken.
5. Overschrijd de vermelde draagkracht niet. Draai alle knoppen stevig
vast voordat u er gewichten op plaatst . Wees u bewust van de
dynamische draagkracht! Plotselinge veranderingen in de belasting
kunnen tijdelijk een te hoge belasting veroorzaken, wat kan leiden tot
productfalen.
BEWAAR DEZE INSTRUCTIES
1
2
Model
326G0P9FV0
3676V4VPV0
Productgrootte
16 × 32 × 62,8 inch
16 × 36 × 71,4 inch
- 4 -
Totale
belastinglimiet
2000 pond
2000 pond
belastinglimiet voor
elke laag
400 pond
400 pond
Dee
l
Beschrijving
Afbeelding
Onderdeel Hoeveelheid
326G0P9FV0
3676V4VPV0
1 6 × 3 2 × 62,8
inch
16 × 36 × 7 1,4
inch
A
7mm MDF
5
5
B
Rechtopstaande
paal
8
8
C
Bovenste plank
korte balk
10
10
D
Bovenste plank
lange balk
10
10
Ik
Bevestigingen
4
4
F
Postdop
16
16
H
Expansieplug
2
2
I
Wasmachine
2
2
J
Philips S-
bemanningen
2
2

- 5 -
Hoogte van de
gescheiden planken
3 1,4 inch
35,7 inch
Aandacht:
Voor aanvullende informatie over de hieronder vermelde onderdelen,
raadpleegt u het montageschema in deze handleiding. Pak alle
onderdelen uit en scheid ze in een open werkgebied.
Stap 1: Montage van de paalkap
1. Schuif elke paal (B) in de paalkap (F) zoals afgebeeld.
2. Herhaal dit voor alle 4 de staande palen.
Let op: de paaldoppen zijn alleen bedoeld voor staande voeten.
Top shelf beam rivets has
a design that allowing MDF
to sit.

- 6 -
Stap 2: Montage van korte en lange balken
1. Lijn de korte balken ( C ) en de lange balk van de bovenste plank ( D ) uit met
de uitgelijnde inkepingen tussen de vier rechtopstaande palen (B).
2. Zodra de onderdelen op hun plaats zitten, tikt u ze stevig aan met een rubberen
hamer.
3. Herhaal het proces aan de andere kant en zorg ervoor dat beide uiteinden
op dezelfde hoogte zijn ingesteld.
Opmerking:
Zorg ervoor dat de eerste laag 1 tot 3 gaten boven de grond blijft om te
voorkomen dat de kolommen vervormen en instorten vanwege de te hoge hoogte.
Zorg ervoor dat de hoogte van elk niveau zo gelijk mogelijk is.
First layer
- 7 -
Stap 3: Montage van de bevestigingen
1 · Bevestig de bevestigingen (E) bovenaan de staander (B) en tik ze tot
het einde vast.
Stap 4: De staande paal installeren
7. De onderkant van de staander (B) wordt aan elke bevestiging (E)
vastgemaakt en tot het einde vastgeschroefd.

- 8 -
Stap 5: Installeer de derde, vierde en vijfde bovenste plank, lange balk ( D )
en korte balk ( C ); de installatiemethode is hetzelfde als stap 2 .
Stap 6 : Montage van de bovenste plank van 7 mm MDF
1. Plaats de bovenste plank (A) van 7 mm MDF op de bovenste plankdragers.
2. Zorg ervoor dat het gelijk ligt met de bovenkant van het frame van de unit.
Stap 7 : Installeer de bovenste lijmvoet
1. Schuif elke paal (B) in de paalkap (F) zoals afgebeeld.
- 9 -
2. Herhaal dit voor alle 4 de staande palen.
3. De montage is nu voltooid en uw apparaat is klaar voor gebruik.
Aandacht: dit product kan worden gescheiden met twee planken. U
kunt de hoogte van elke plank vinden in de tabel met onderdelenlijst.
Benodigde gereedschappen (niet inbegrepen)
Stap 8 -1: Installeer de anti-kantelschroeven
A: Installatie op massieve betonnen muren
- 10 -
7. Meet en markeer de hoogte en breedte van het boorgat.
2. Boor 2 gaten op de markeringen van de boormachine .
3. Plaats de plastic plug met een hamer.
4. Bevestig de plank aan de muur met behulp van 2 schroeven en 2 ringen
per schroevendraaier .

- 11 -
- 12 -
Stap 8 -2: Installeer de anti-kantelschroeven
B: Installatie op houten muurpaal
1. Meet en markeer de hoogte en breedte van het boorgat.
2. Boor 2 gaten op de markeringen van de boormachine .
3. Plaats de plastic plug met een hamer.
4. Bevestig de plank aan de muur met behulp van 2 schroeven en 2 ringen
per schroevendraaier .
- 13 -
Fabrikant: Shanghaimuxinmuyeyouxiangongsi
Adres: Shuangchenglu 803nong11hao1602A-1609shi, baoshanqu, shanghai
200000 CN.
Geïmporteerd naar AUS: SIHAO PTY LTD, 1 ROKEVA
STREETEASTWOOD NSW 2122 Australië
Geïmporteerd naar de VS: Sanven Technology Ltd., Suite 250, 9166
Anaheim Place, Rancho Cucamonga, CA 91730
REP
EC
E-CrossStu GmbH
Mainzer Landstr.69, 60329 Frankfurt am Main.
REP
UK
YH CONSULTING LIMITED.
C/O YH Consulting Limited Office 147, Centurion House,
London Road, Staines-upon-Thames, Surrey, TW18 4AX


Teknisk support och e-garanticertifikat
www.vevor.com/support
KRAFTIGA GARAGEHYLLOR
ANVÄNDARMANUAL
Vi fortsätter att vara engagerade i att ge dig verktyg till konkurrenskraftiga priser.
"Spara hälften", "Halva priset" eller andra liknande uttryck som endast används av oss
representerar en uppskattning av besparingar du kan dra nytta av att köpa vissa verktyg
med oss jämfört med de stora toppmärkena och betyder inte nödvändigtvis att täcka
alla kategorier av verktyg som erbjuds av oss. Du påminns vänligen om att verifiera
försiktigt
när du gör en beställning hos oss om du faktiskt gör det Sparande
Halv i jämförelse med de främsta varumärkena.


- 1 -
MODELL: 326G0P9FV0 / 3676V4VPV0
Have product questions? Need technical support? Please feel free to
contact us:
Technical Support and E-Warranty Certificate
www.vevor.com/support
NEED HELP? CONTACT US!
This is the original instruction, please read all manual instructions
carefully before operating. VEVOR reserves a clear interpretation of our
user manual. The appearance of the product shall be subject to the
product you received. Please forgive us that we won't inform you again if
there are any technology or software updates on our product.
HEAVY DUTY
GARAGE SHELVES
- 2 -
Varning - För att minska risken för skada måste användaren
läsa bruksanvisningen noggrant.
Denna symbol, placerad före en säkerhetskommentar,
indikerar en slags försiktighetsåtgärd, varning eller fara. Att
ignorera denna varning kan leda till en olycka. För att minska
risken för skada, brand eller elstöt, följ alltid
rekommendationerna nedan .
Varning- Var noga med att bära handskar när du använder
denna produkt.
57) Spara denna handbok för säkerhetsvarningar och
försiktighetsåtgärder. Manualen ger viktig information om hur man
monterar, använder och underhåller denna produkt.
58) Vänligen hantera metallkanter försiktigt.
59) STÅ INTE på denna produkt eller använd den som en stege.
60) Ändra INTE denna produkt på något sätt som inte är avsett, eftersom
detta kan orsaka produktskada eller personskada.
61) Montera alltid på en jämn yta.
62) Den maximala lastvikten för varje hylla är inte mer än 180 kg, jämnt
fördelat.
63) Förvara de tyngsta föremålen på de nedre hyllorna.
64) Fäst enheten på väggen om den fylls till max.
FÖRSIKTIGHETSÅTGÄRDER FÖR MONTERING
15. Vänligen montera produkten i strikt enlighet med instruktionerna.
Felaktig montering kan vara farligt.
16. Vänligen använd skyddsglasögon och arbetshandskar ordentligt
under monteringen.
3. Försök inte att montera produkten när du känner dig trött eller är
påverkad av alkohol, droger eller medicin.

- 3 -
4. Bärförmåga och andra produktparametrar tillämpas endast på den
korrekt och färdigmonterade produkten.
5. En hammare och ett par handskar får också användas, förutsatt att en
trasa eller träkloss placeras mellan hammarhuvudet och delarna.
ANVÄND FÖRSIKTIGHETSÅTGÄRDER
1. Den här produkten är inte en leksak. Tillåt inte barn att leka med eller få
tillgång till detta föremål.
2 .Kontrollera noggrant före användning. Använd den inte om delar
lossnar eller skadas.
4.Använd endast på plana, jämna och hårda ytor.
5. Överskrid inte den angivna bärförmågan. Dra åt alla knoppar ordentligt
innan du placerar vikter på den . Var uppmärksam på den dynamiska
bärförmågan! Plötsliga belastningsändringar kan tillfälligt orsaka
överbelastning, vilket resulterar i produktfel.
SPARA DESSA INSTRUKTIONER
1
2
Modell
326G0P9FV0
3676V4VPV0
Produktstorlek
16 × 32 × 62,8 tum
16 × 36 × 71,4 tum
Total lastgräns
2000 pund
2000 pund
belastningsgräns för
varje lager
400 pund
400 pund
- 4 -
Del
Beskrivning
Bild
Del Antal
326G0P9FV0
3676V4VPV0
1 6 × 3 2 × 62,8
tum
16 × 36 × 7 1,4
tum
A
7 mm M DF
5
5
B
Upprätt stolpe
8
8
C
Översta hyllan
kort balk
10
10
D
Översta hyllan
lång balk
10
10
E
Fästen
4
4
F
Stolplock
16
16
H
Expansionsplugg
2
2
jag
Bricka
2
2
J
Philips S
besättningar
2
2
Höjd på separerade
hyllor
3 1,4 tum
35,7 tum
- 5 -
Uppmärksamhet:
För ytterligare information om delarna som listas nedan, se
monteringsdiagrammet i denna manual. Packa upp och separera alla
delar på ett tydligt arbetsområde.
Steg 1: Montering av stolplock
1. Skjut in varje stolpe (B) i stolplocket (F) enligt bilden.
2. Upprepa för alla fyra upprättstående stolparna.
Observera: stolplock är endast för upprättstående fötter.
Top shelf beam rivets has
a design that allowing MDF
to sit.
- 6 -
Steg 2: Kort- och långstrålemontering
1. Rikta in korta balkar ( C ) och den långa balken på översta hyllan ( D ) till
inriktade skåror mellan fyra upprättstående stolpar (B).
2. Väl på plats, knacka ordentligt med en gummiklubba.
3. Upprepa processen för motsatt sida, se till att båda ändarna
är inställda på samma höjd.
Notera:
Håll det första lagret från marken inom 1 till 3 hålhöjder för att förhindra att
kolonnerna deformeras och kollapsar på grund av för hög höjd.
Se till att höjden på varje nivå är så enhetlig som möjligt.
Steg 3: Montering av fästelement
1 · Fäst fästena (E) överst på den upprättstående stolpen (B) och knacka
ner till slutet.
First layer
- 7 -
Steg 4: Installera den upprättstående stolpen
8. Botten av den upprättstående stolpen (B) fästs vid varje fäste (E), och
knacka ner till slutet.
Steg 5: Installera den tredje, fjärde och femte översta hyllan lång balk ( D )
och kort balk ( C ); installationsmetoden är densamma som steg 2 .
- 8 -
Steg 6 :7 mm MDF topphylla
1. Sätt in en 7 mm MDF-överhylla (A) på de övre hyllstöden.
2. Se till att den sitter i jämnhöjd med toppen av enhetens ram.
Steg 7 : Installera den övre limfoten
1. Skjut in varje stolpe (B) i stolplocket (F) enligt bilden.
2. Upprepa för alla fyra upprättstående stolparna.
3. Monteringen är nu klar och din enhet är redo att användas.
- 9 -
Uppmärksamhet: denna produkt kan separeras med två hyllor. Du kan
hitta höjden på varje hylla i tabellen över dellistan.
Verktyg som krävs (ingår ej)
Steg 8 -1: Montera tippskyddsskruvarna
A: Installation på massiva betongväggar
8. Mät och markera höjden och bredden som finns för borrhål.
- 10 -
2. Borra 2 hål som markerats med borrmaskin .
3 . Sätt i plastpluggen med hammare.
4. Fäst hyllan på väggen med vardera 2 st skruv och bricka med en
skruvmejsel .

- 11 -

- 12 -
Steg 8 -2: Montera tippskyddsskruvarna
B: Installation på träväggstolpe
1. Mät och markera höjden och bredden som finns för borrhål.
2. Borra 2 hål som markerats med borrmaskin .
3 . Sätt i plastpluggen med hammare.
4. Fäst hyllan på väggen med vardera 2 st skruv och bricka med en
skruvmejsel .

- 13 -
Tillverkare: Shanghaimuxinmuyeyouxiangongsi
Adress: Shuangchenglu 803nong11hao1602A-1609shi, baoshanqu,
shanghai 200000 CN.
Importerad till AUS: SIHAO PTY LTD, 1 ROKEVA STREETEASTWOOD
NSW 2122 Australien
Importerad till USA: Sanven Technology Ltd., Suite 250, 9166 Anaheim
Place, Rancho Cucamonga, CA 91730
REP
EC
E-CrossStu GmbH
Mainzer Landstr.69, 60329 Frankfurt am Main.
REP
UK
YH CONSULTING LIMITED.
C/O YH Consulting Limited Office 147, Centurion House,
London Road, Staines-upon-Thames, Surrey, TW18 4AX


