
Technical Support and E-Warranty Certificate www.vevor.com/support
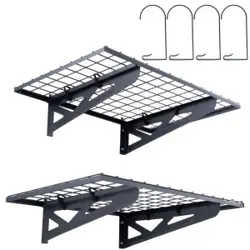
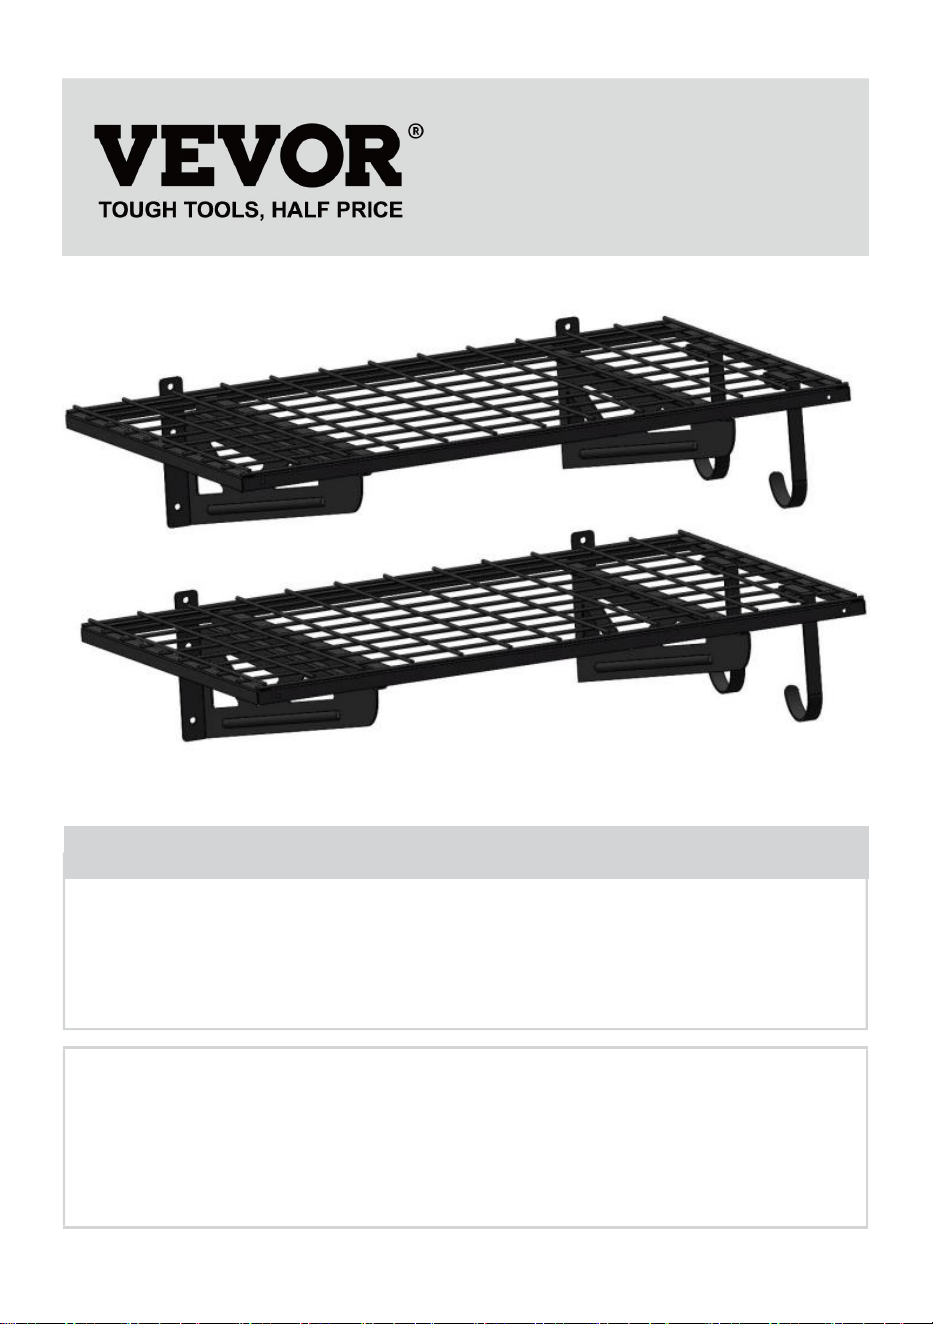
GARAGE WALL SHELVING
MODEL: ML2436
We continue to be committed to provide you tools with competitive price.
"Save Half", "Half Price" or any other similar expressions used by us only represents an
estimate of savings you might benefit from buying certain tools with us compared to the major
top brands and doses not necessarily mean to cover all categories of tools offered by us. You
are kindly reminded to verify carefully when you are placing an order with us if you are
actually saving half in comparison with the top major brands.

- 1 -
MODEL:ML2436
Have product questions? Need technical support? Please feel free to
contact us:
Technical Support and E-Warranty Certificate
www.vevor.com/support
NEED HELP? CONTACT US!
This is the original instruction, please read all manual instructions
carefully before operating. VEVOR reserves a clear interpretation of our
user manual. The appearance of the product shall be subject to the
product you received. Please forgive us that we won't inform you again if
there are any technology or software updates on our product.
GARAGE WALL SHELVING
- 2 -
SAFETY INSTRUCTIONS
WARNING:This product contains small parts. If swallowed, it will pose a
choking hazard. Keep these small parts away from children !
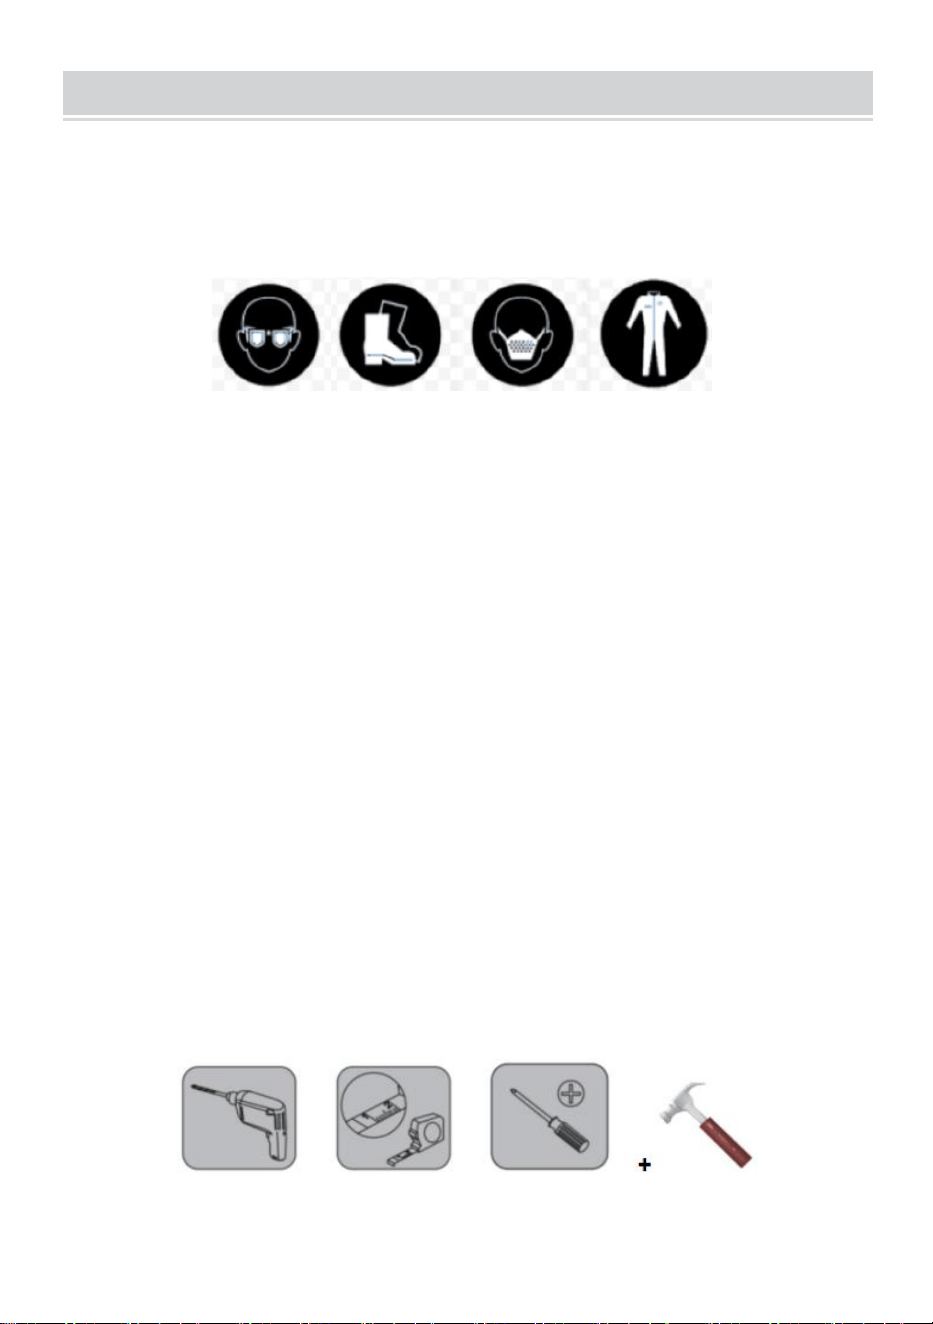
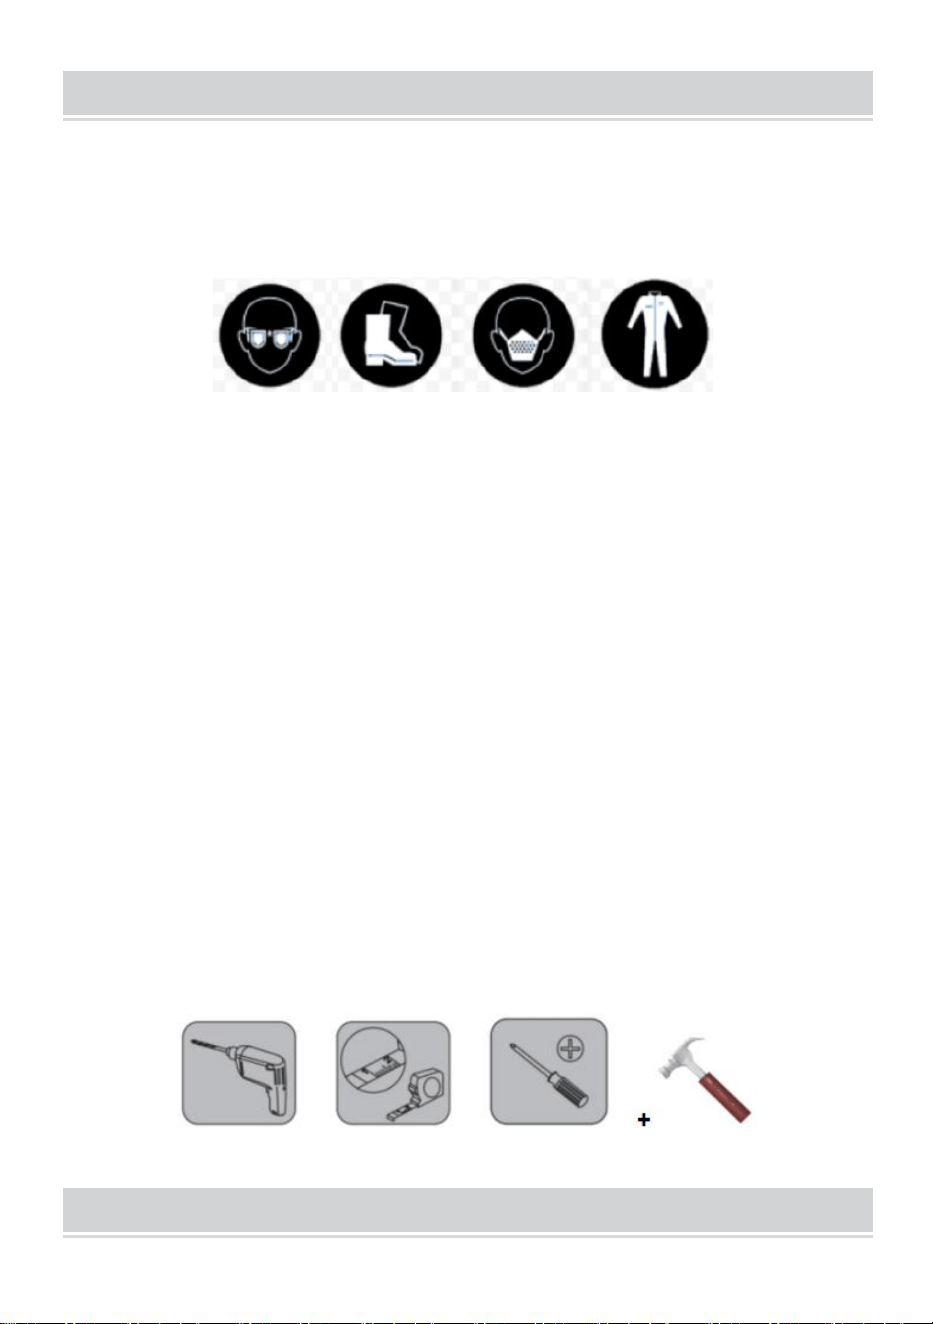
1. Before installation, take protective measures to avoid personal injury!
EYE PROTECTION FOOT PROTECTION DUST MASK PROTECTION WEAR
2. The product must be installed on a wooden or concrete wall. Before
installation, ensure that the bearing capacity of the wall does not exceed the
maximum bearing capacity ! Please strengthen the structure of the wall in
time to consolidate the bearing capacity of the wall ! Otherwise, the product
may be damaged or personal injury may occur !
3. This product is for indoor use only. Outdoor use may cause product
damage or personal injury.
4. Please check and confirm whether the screws are loose every two months.
5. At least two people to complete the installation.
6. Ensure that you have read the instructions and fully understood how to
install. If you do not understand any of the installation steps, contact a
professional installation personnel.
7.
Do not overload !
Maximum capacity : 250 lbs /per layer(evenly distributed)
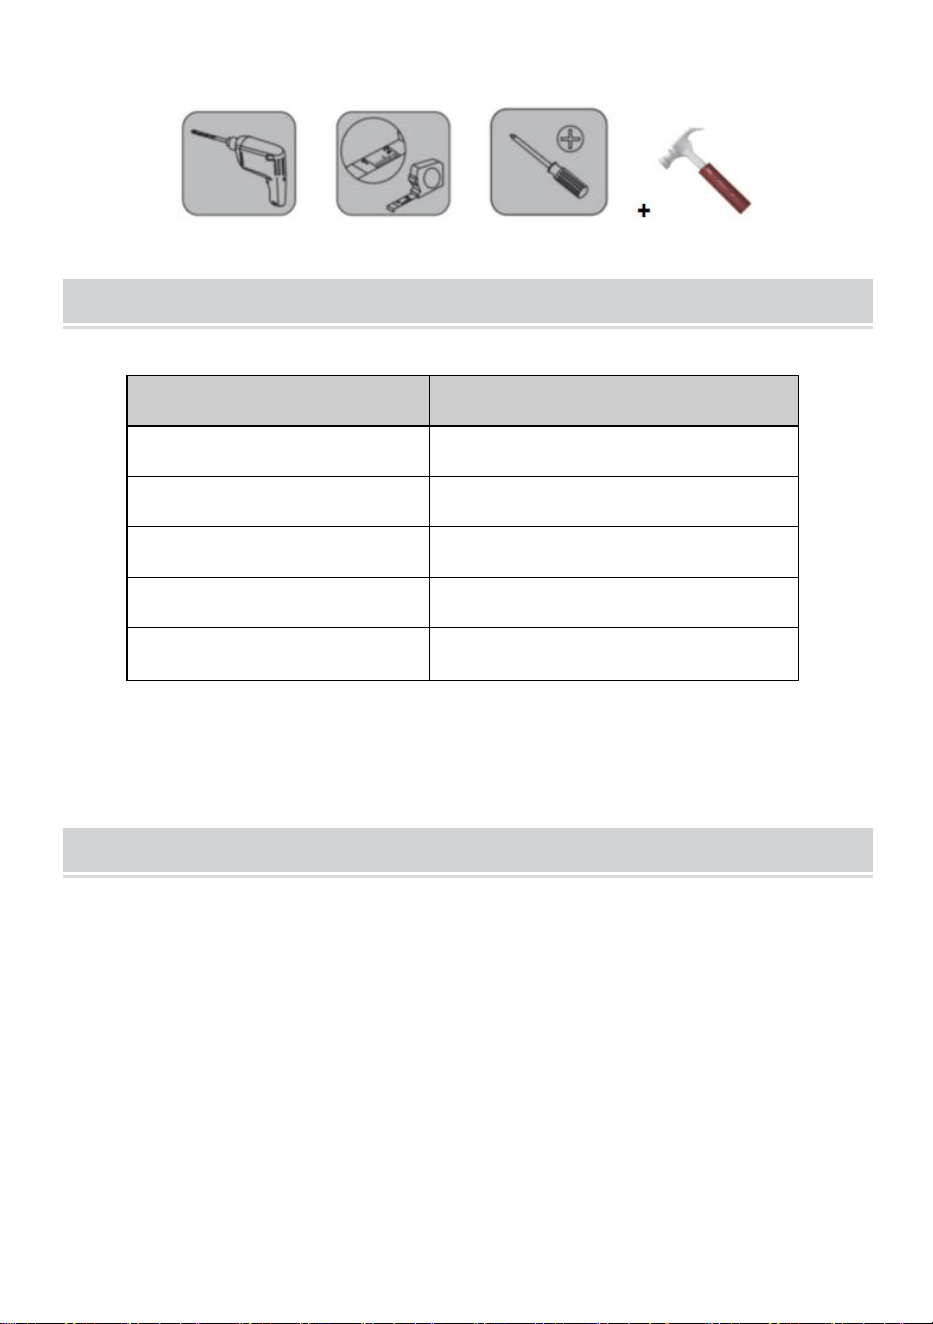
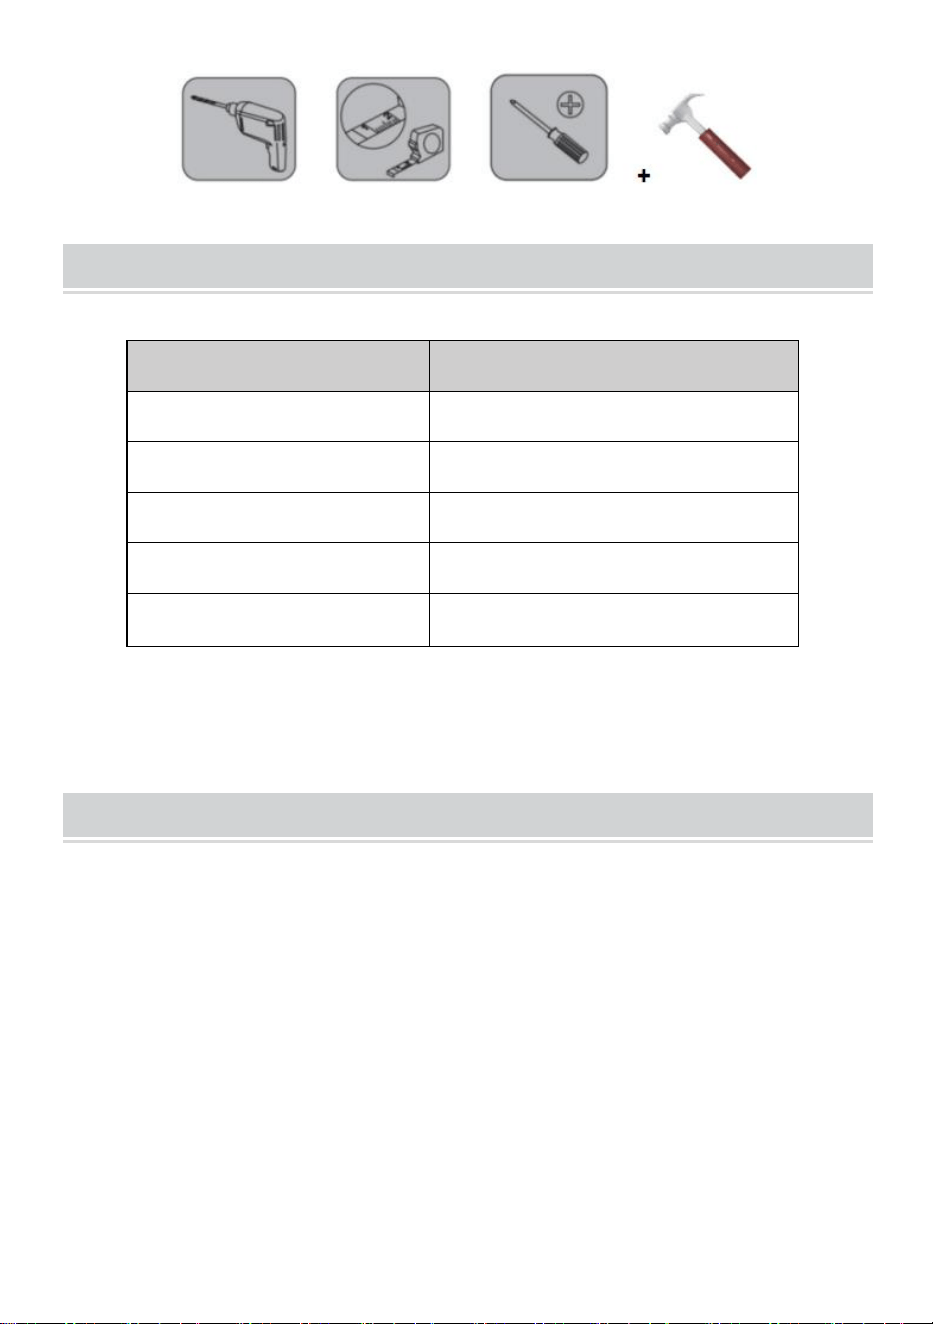
Installation Preparation:
- 3 -
MODEL AND PARAMETERS
Model
ML2436
Number of Layers
2
Shelving Surface Size
36x24 inch
Maximum Bearing Capacity
250 lbs /per layer(500lbs in total)
Material
Steel
Color
Black
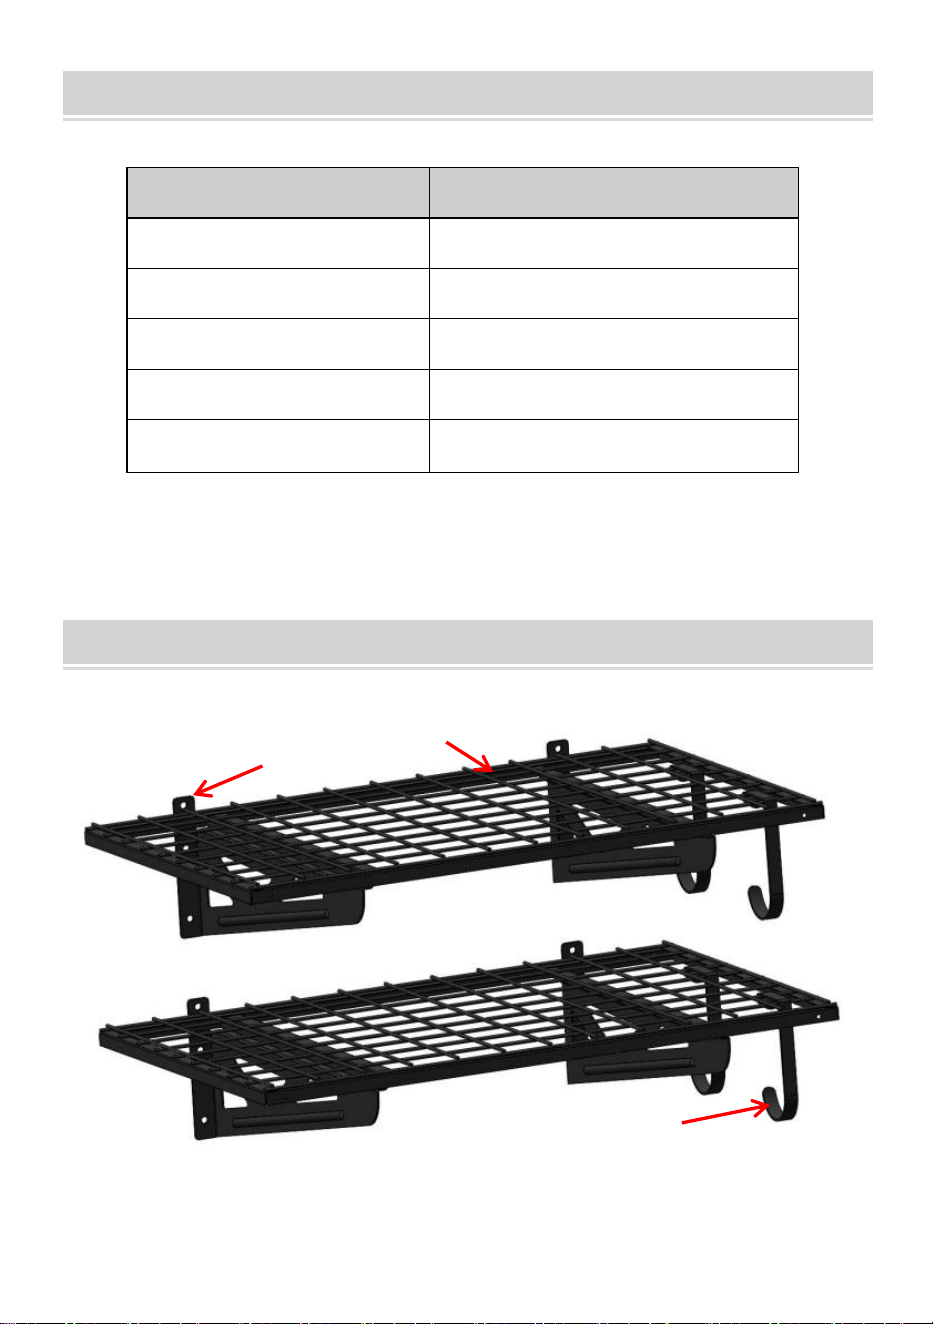
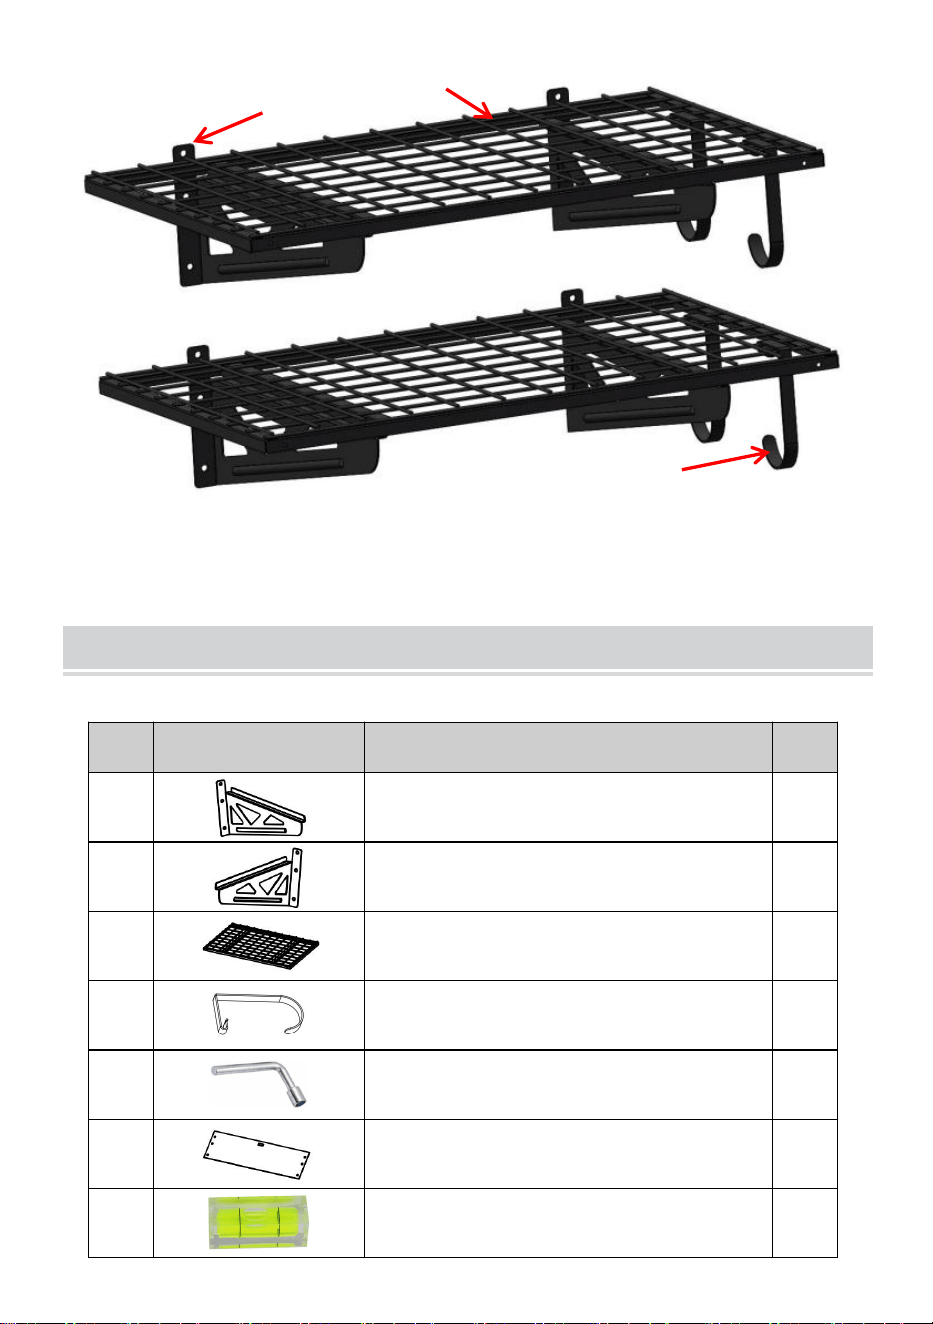
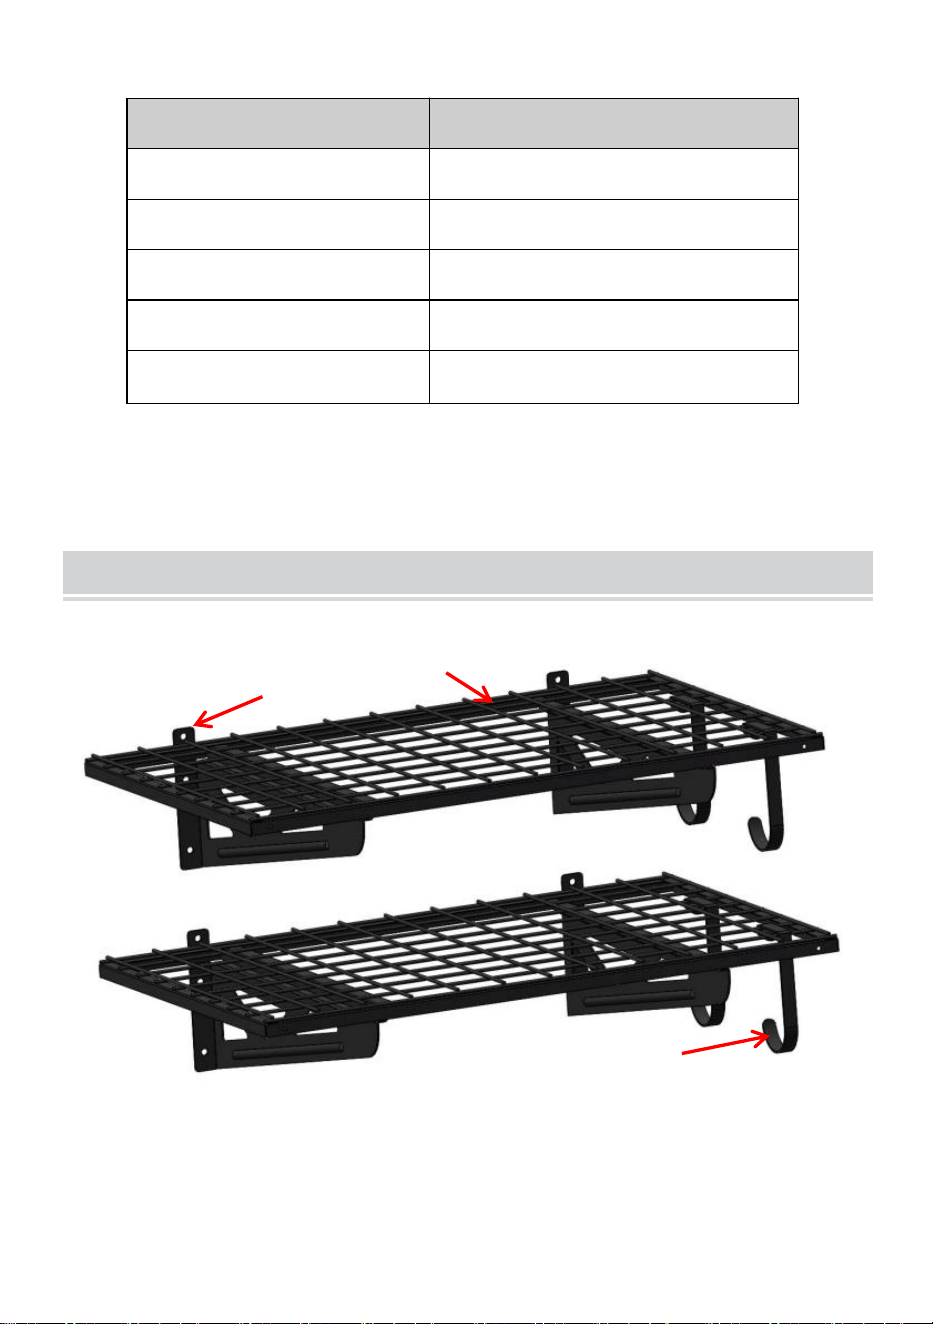
STRUCTURE DIAGRAM
1.Brackets 2.Shelf 3.Hooks
1
2
3
- 4 -
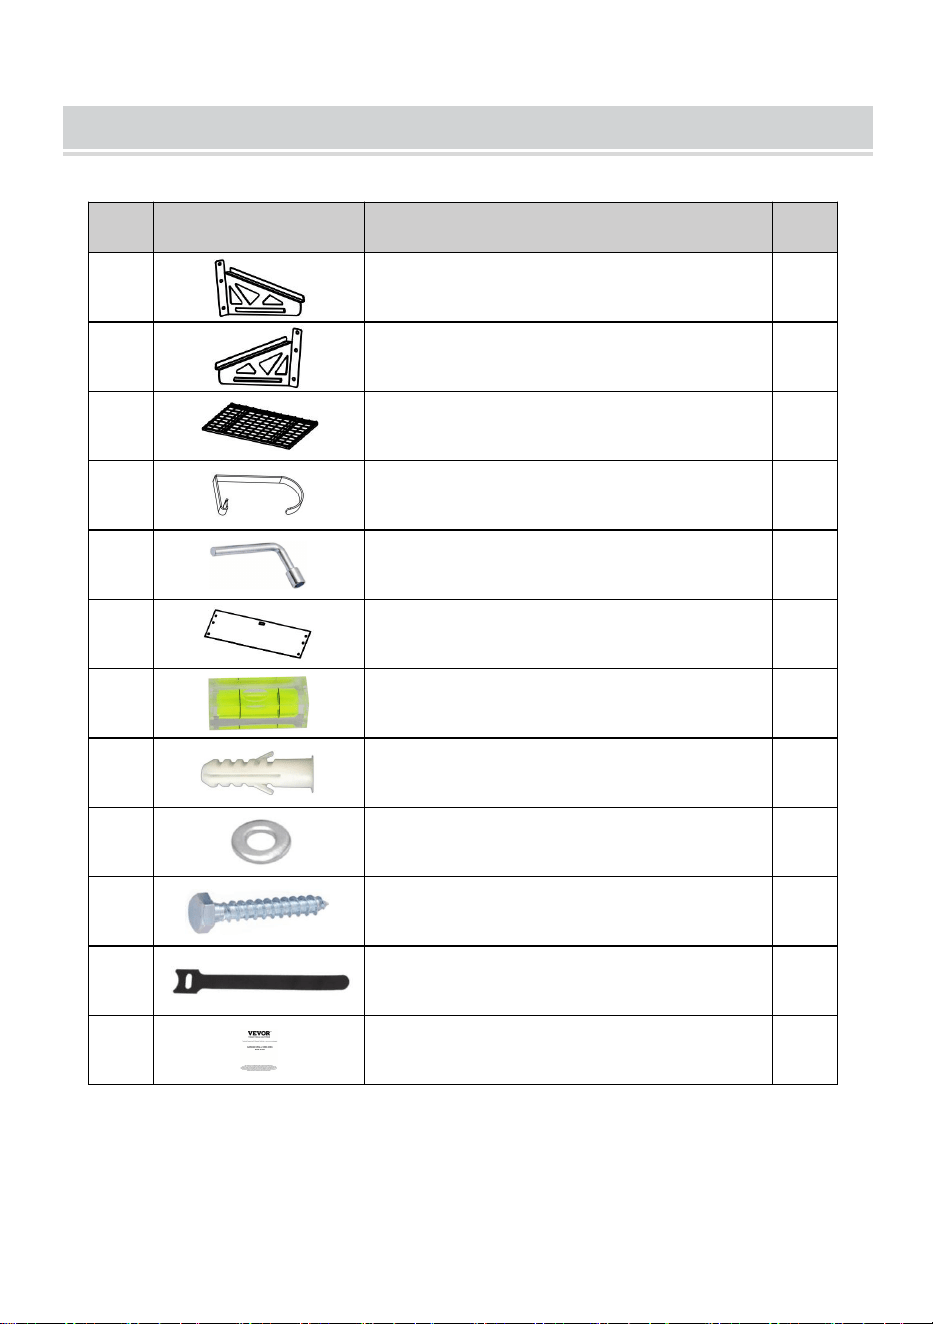
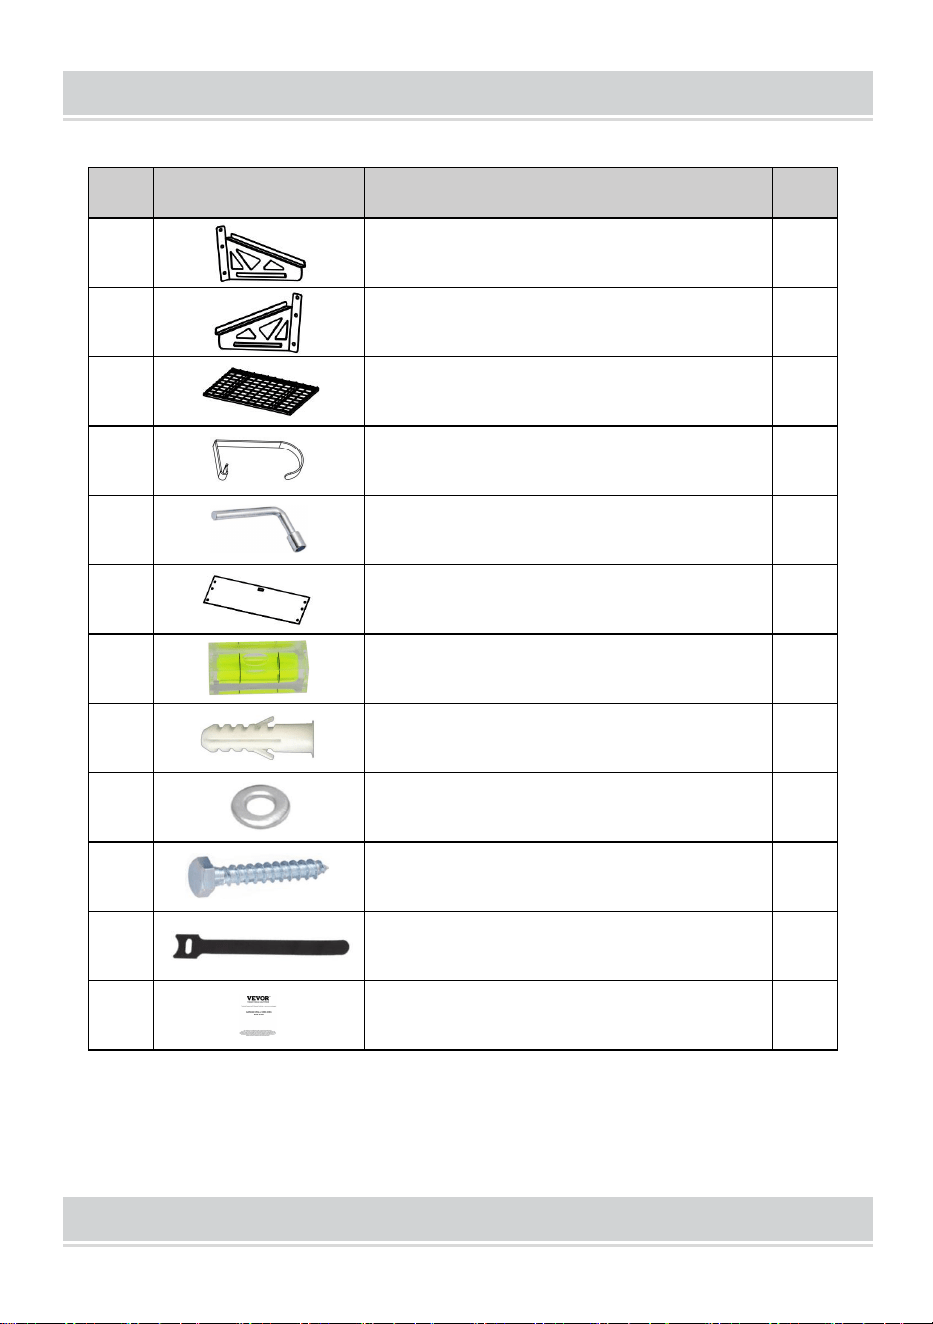
COMPONENTS
No.
Picture
Name
Qty
1
Left Bracket
2
2
Right Bracket
2
3
Shelf
2
4
Hook
4
5
L-shaped Wrench
1
6
Positioning paper
1
7
Micro level vial
1
8
Expansion plug-12*58
12
9
Washer-8.5
12
10
Hexagon self-tapping screw-8*60
12
11
Cable ties-12*250
8
12
User manual
1
- 5 -
ASSEMBLY
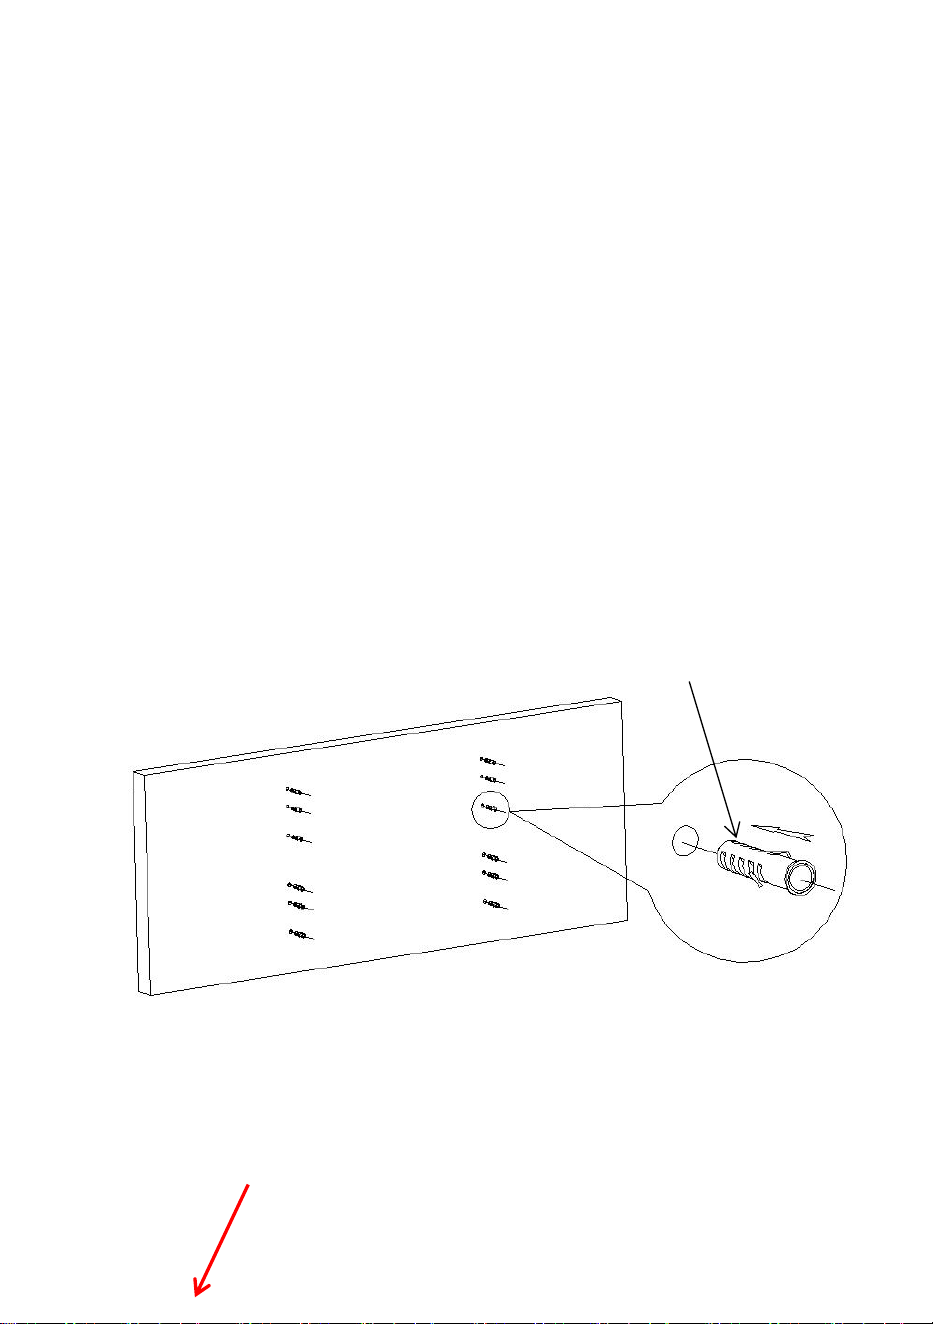
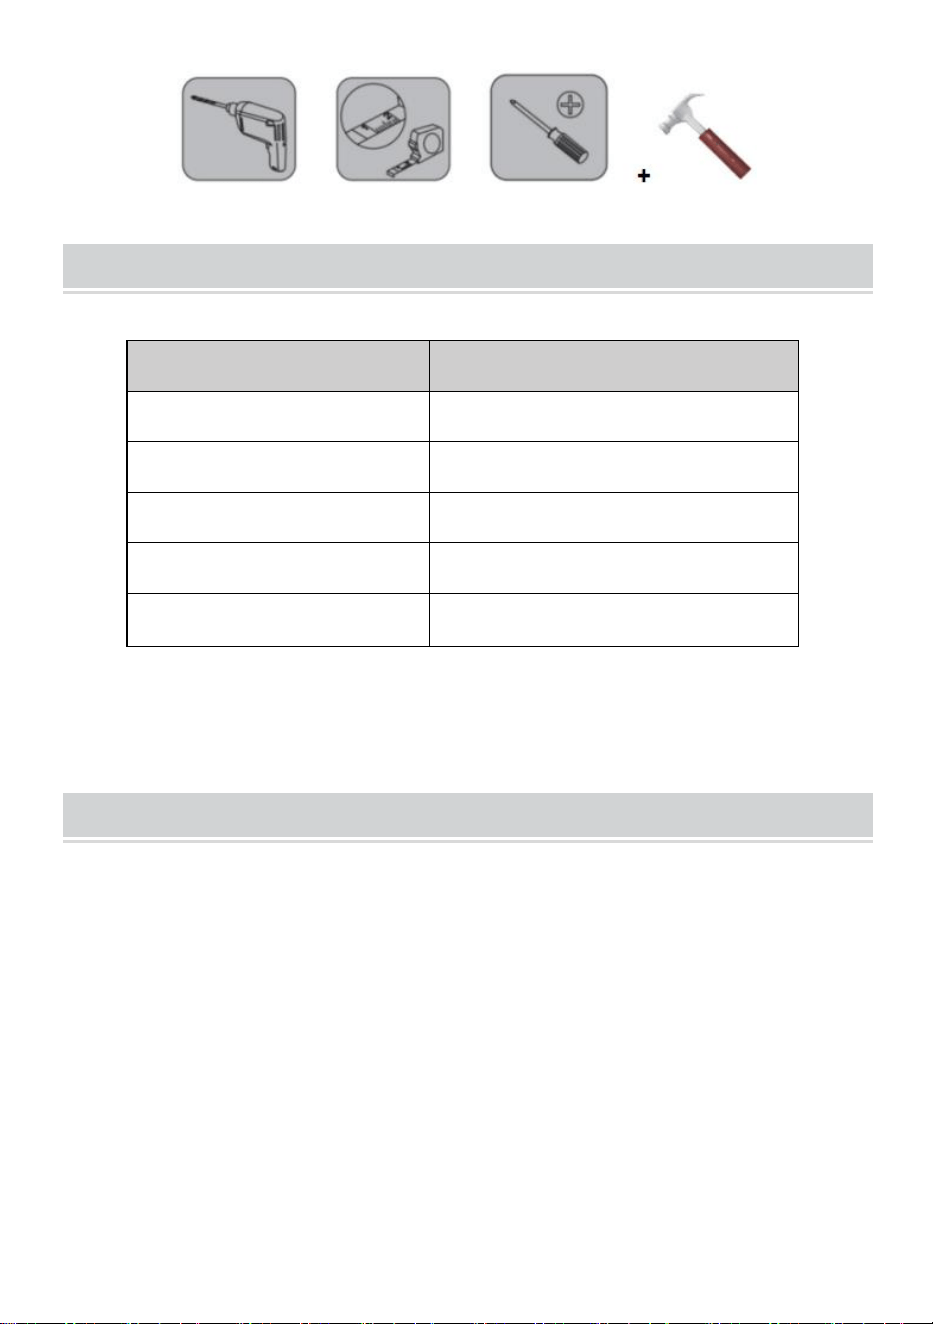
STEP 1-A : Installation on solid concrete walls
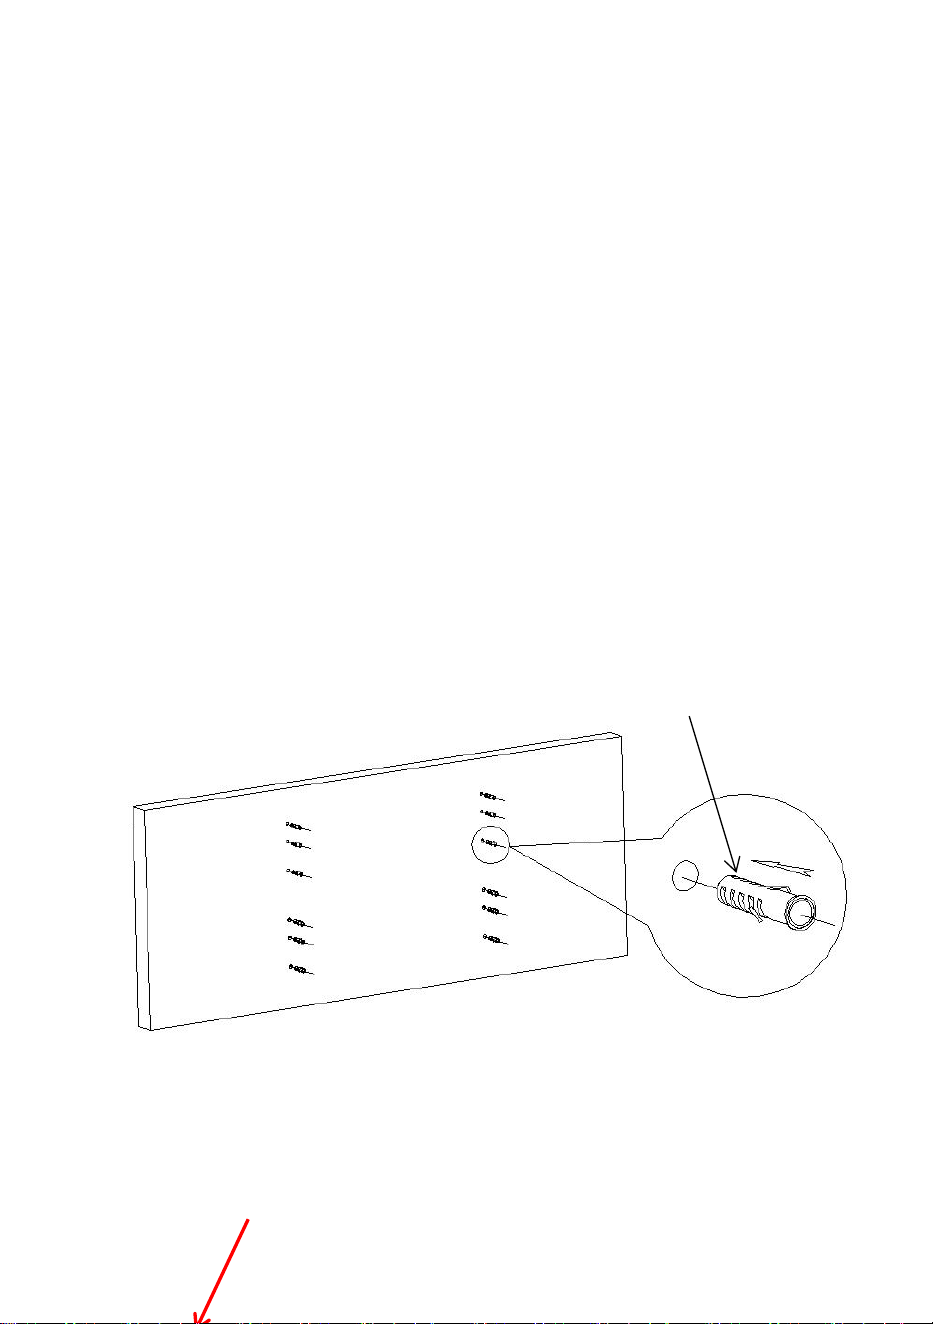
1. Paste the positioning paper to the appropriate height, glue the
Micro level vial to adjust the level, and then use the jackhammer to
lightly drill out the anchor points.
2. Remove the positioning paper and drill holes(Φ12x60mm) into
the wall. (The positioning paper should be reused 2 times.)
Micro level vial
Positioning paper
- 6 -
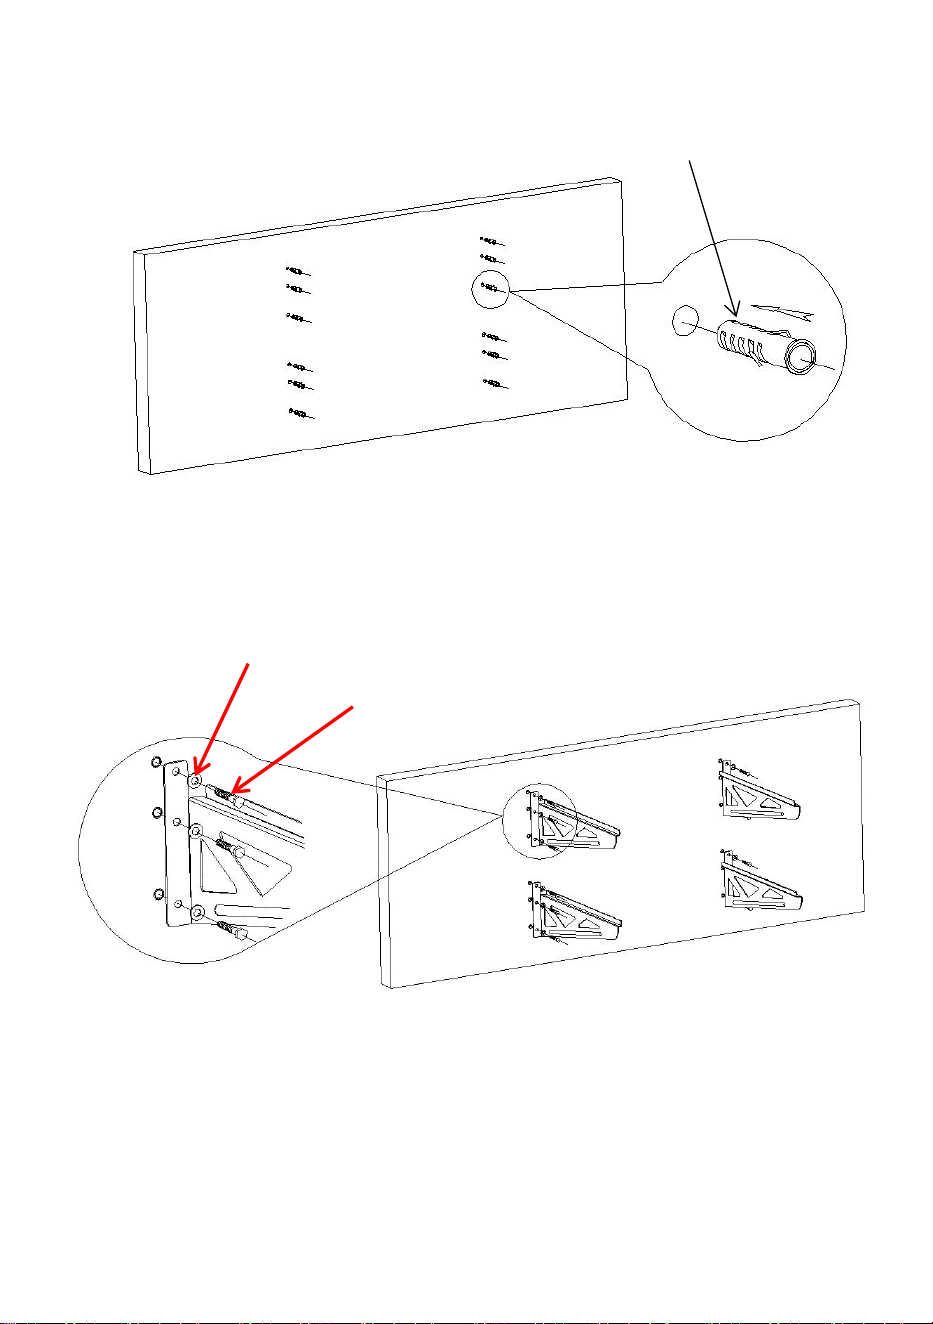
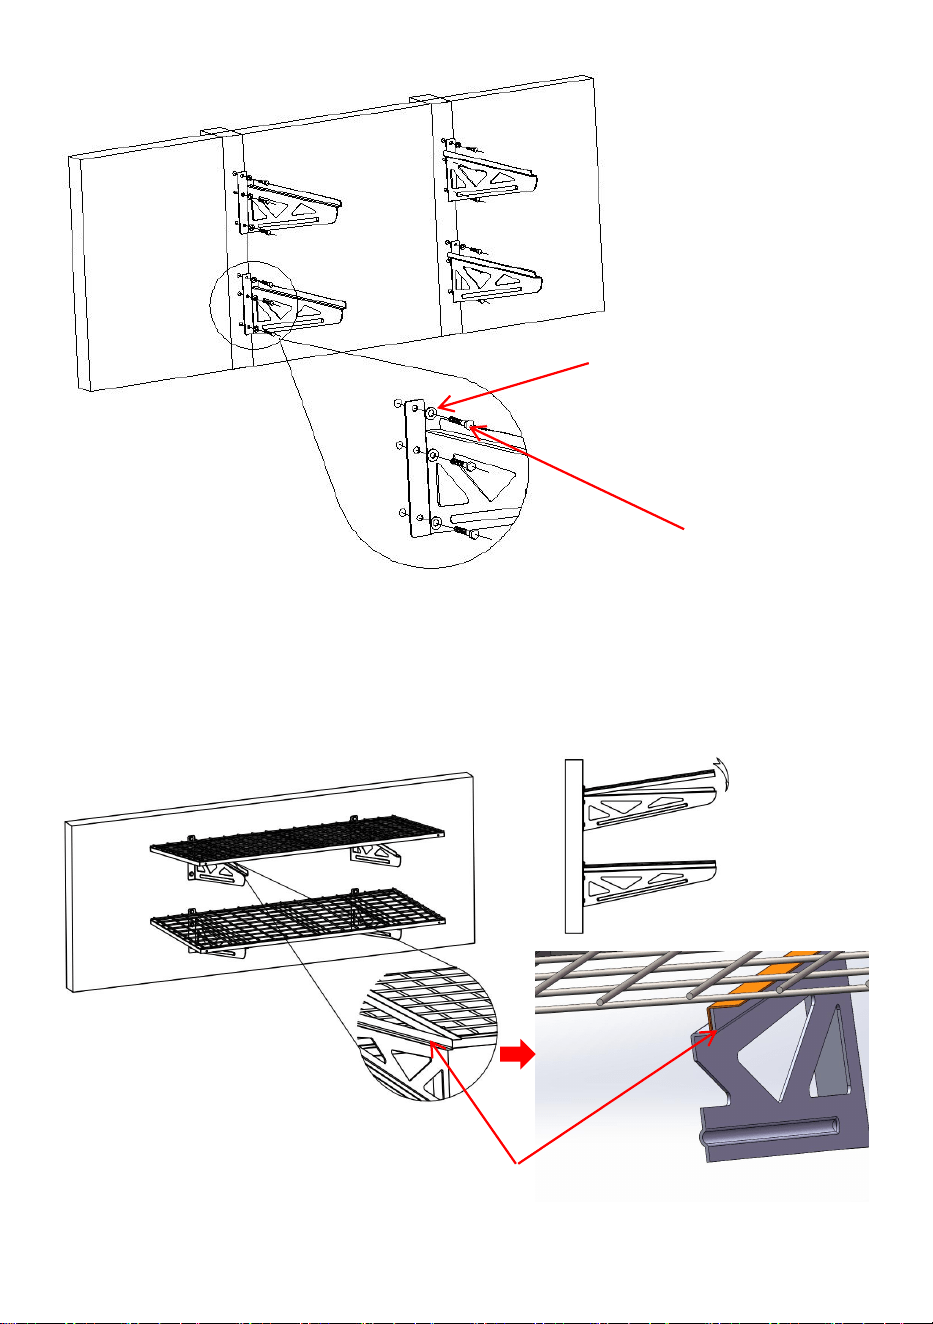
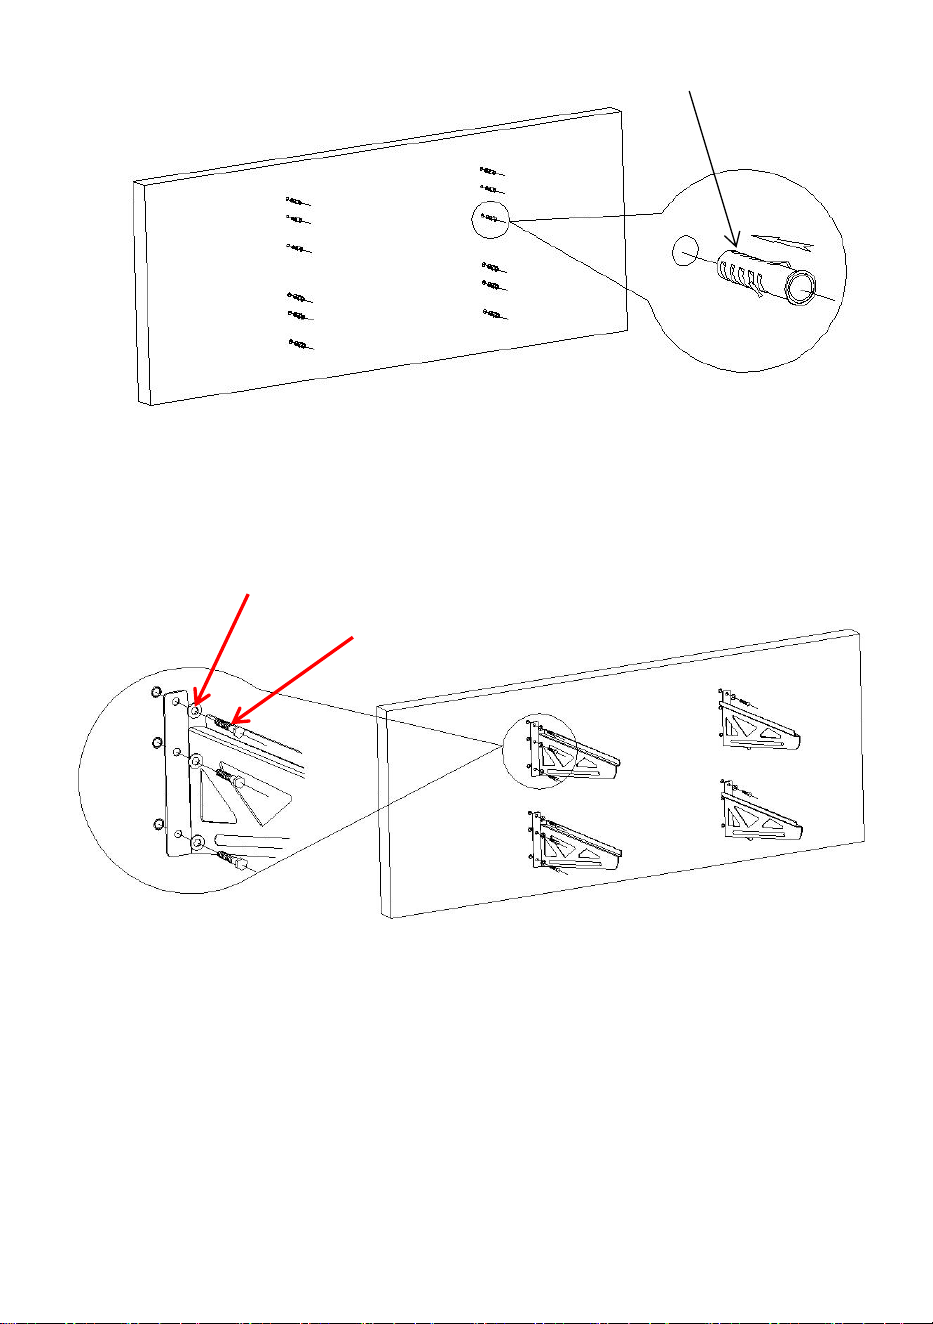
3. After clearing the residual soil in the hole, tap the expansion plug
into the hole completely.
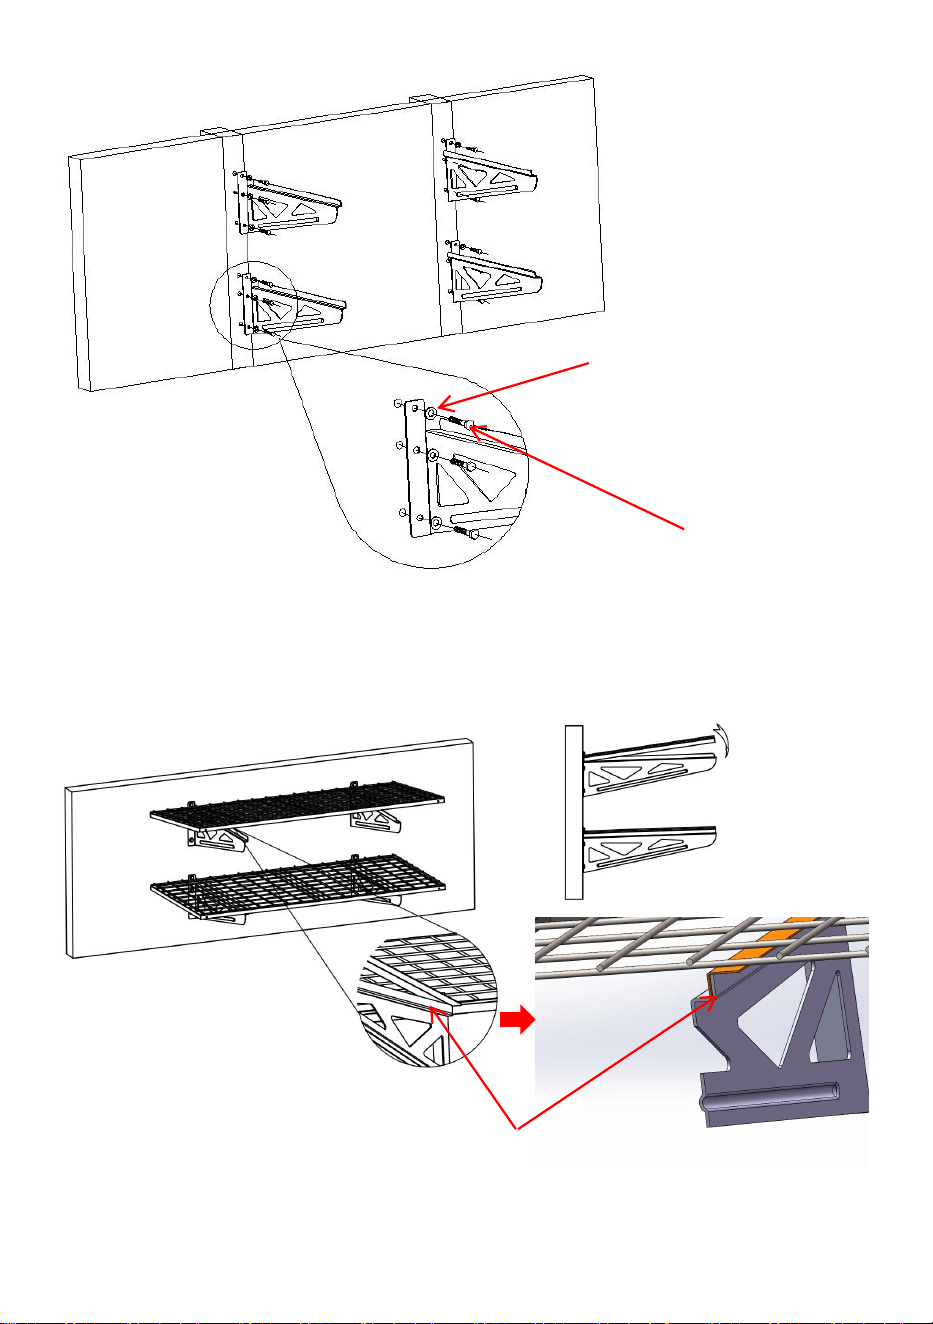
4. Install and fix the left and right bracket. The screw must be
screwed in completely and press tightly !
Expansion plug-12*58
Washer-8.5
Hexagon self-tapping screw-8*60
- 7 -
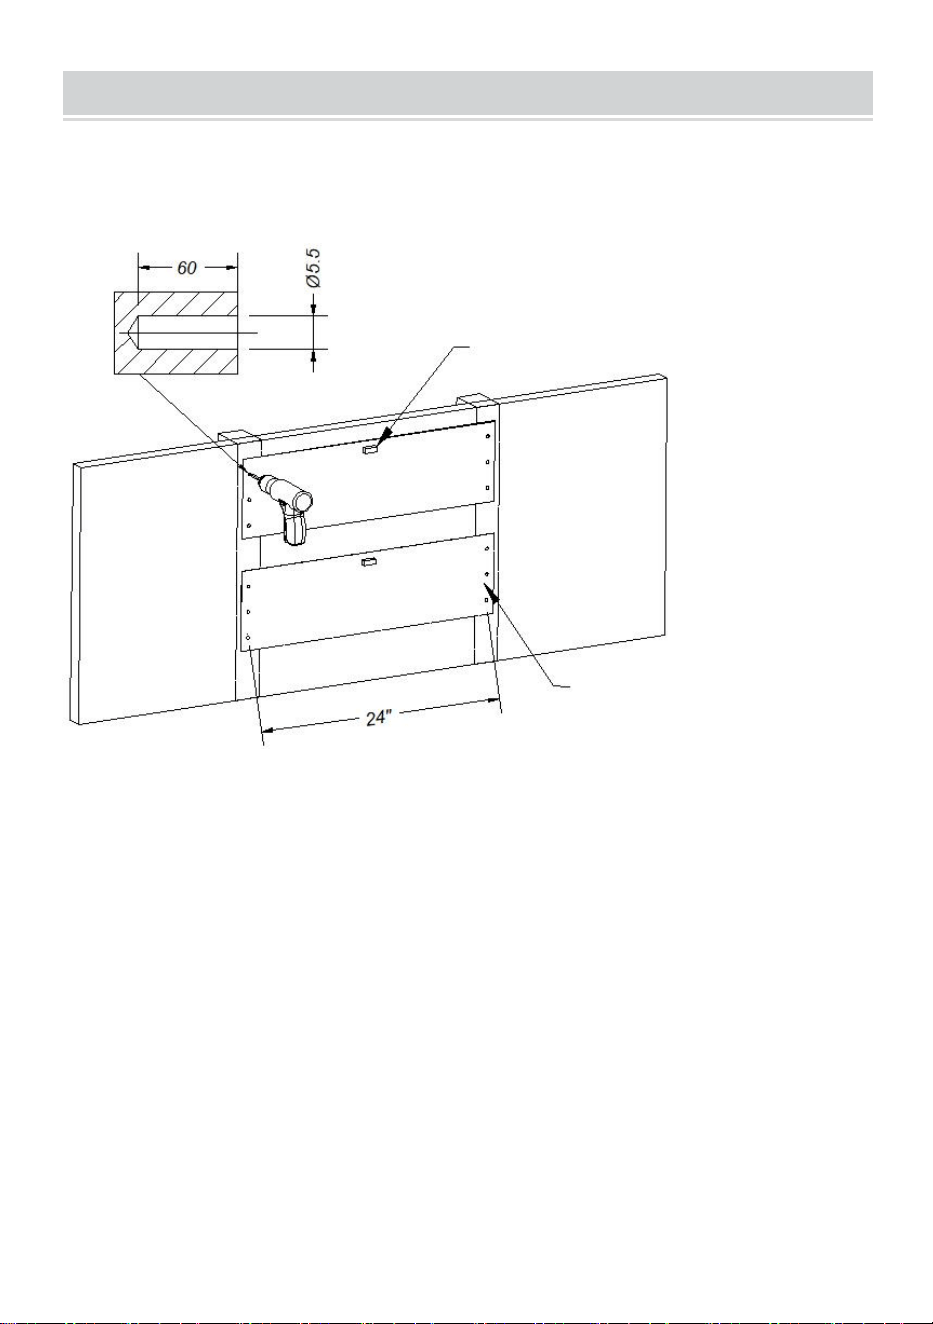
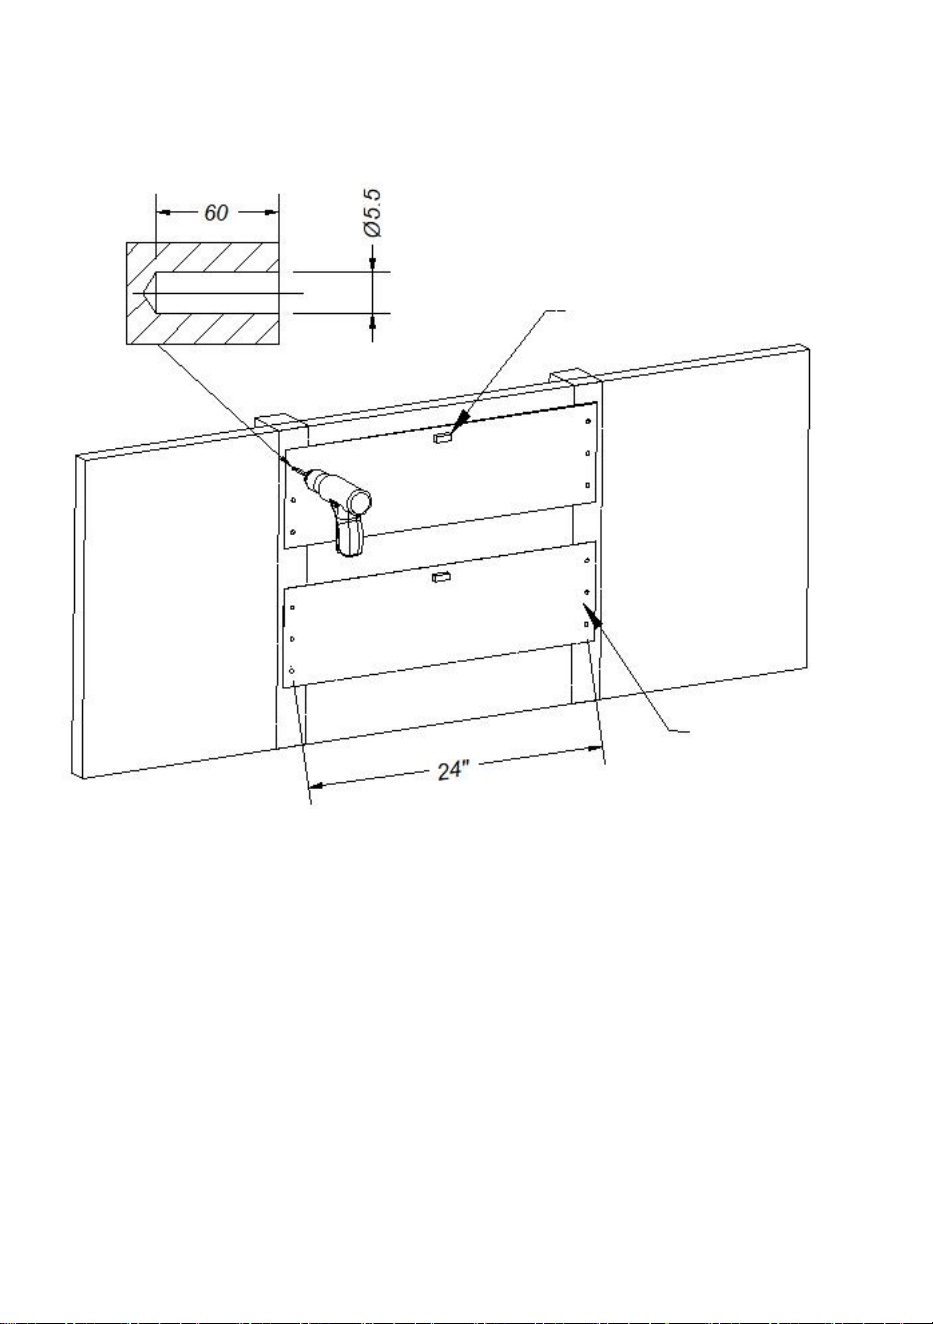
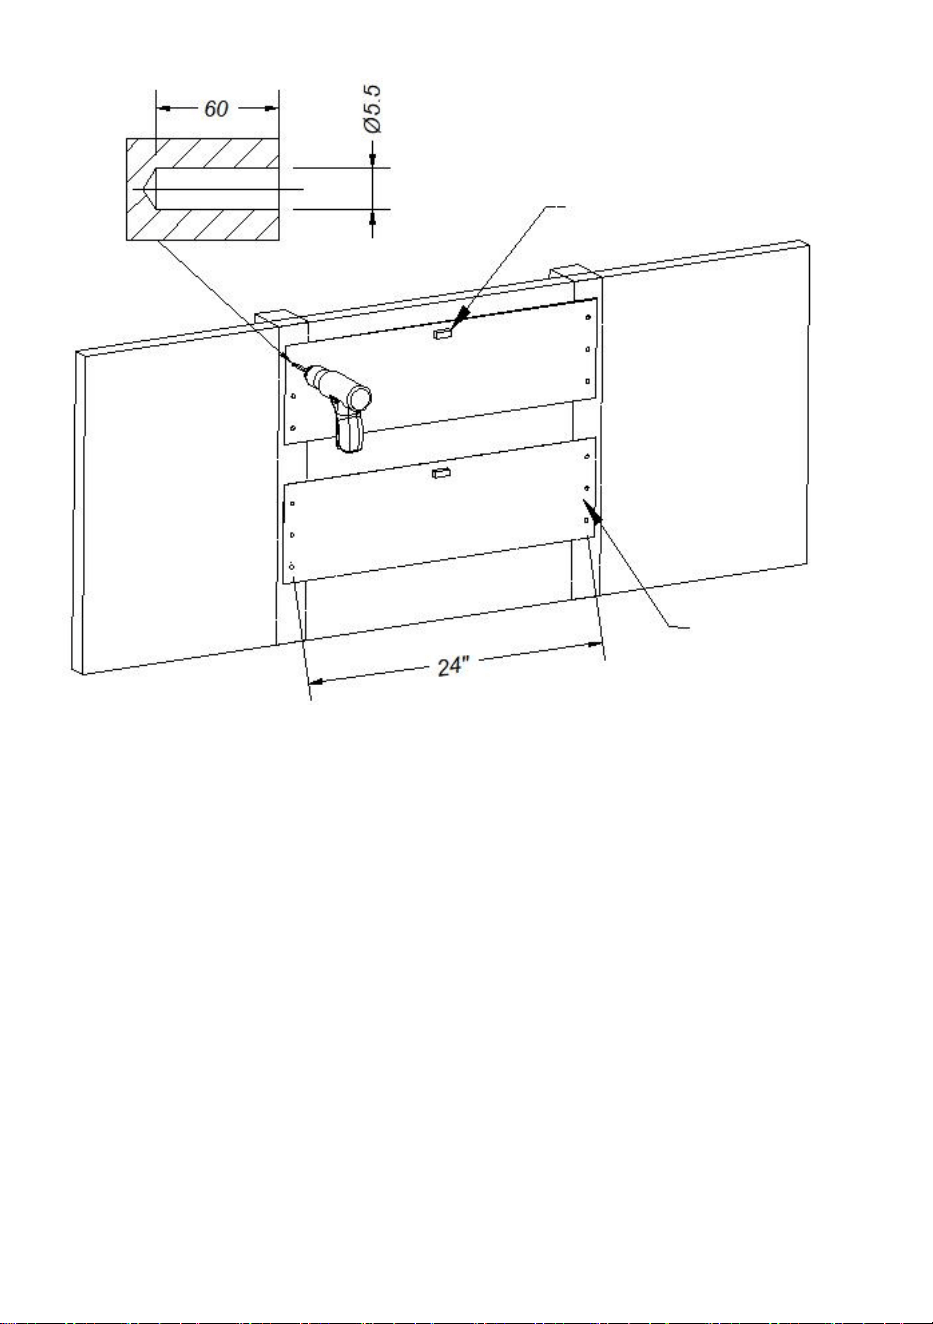
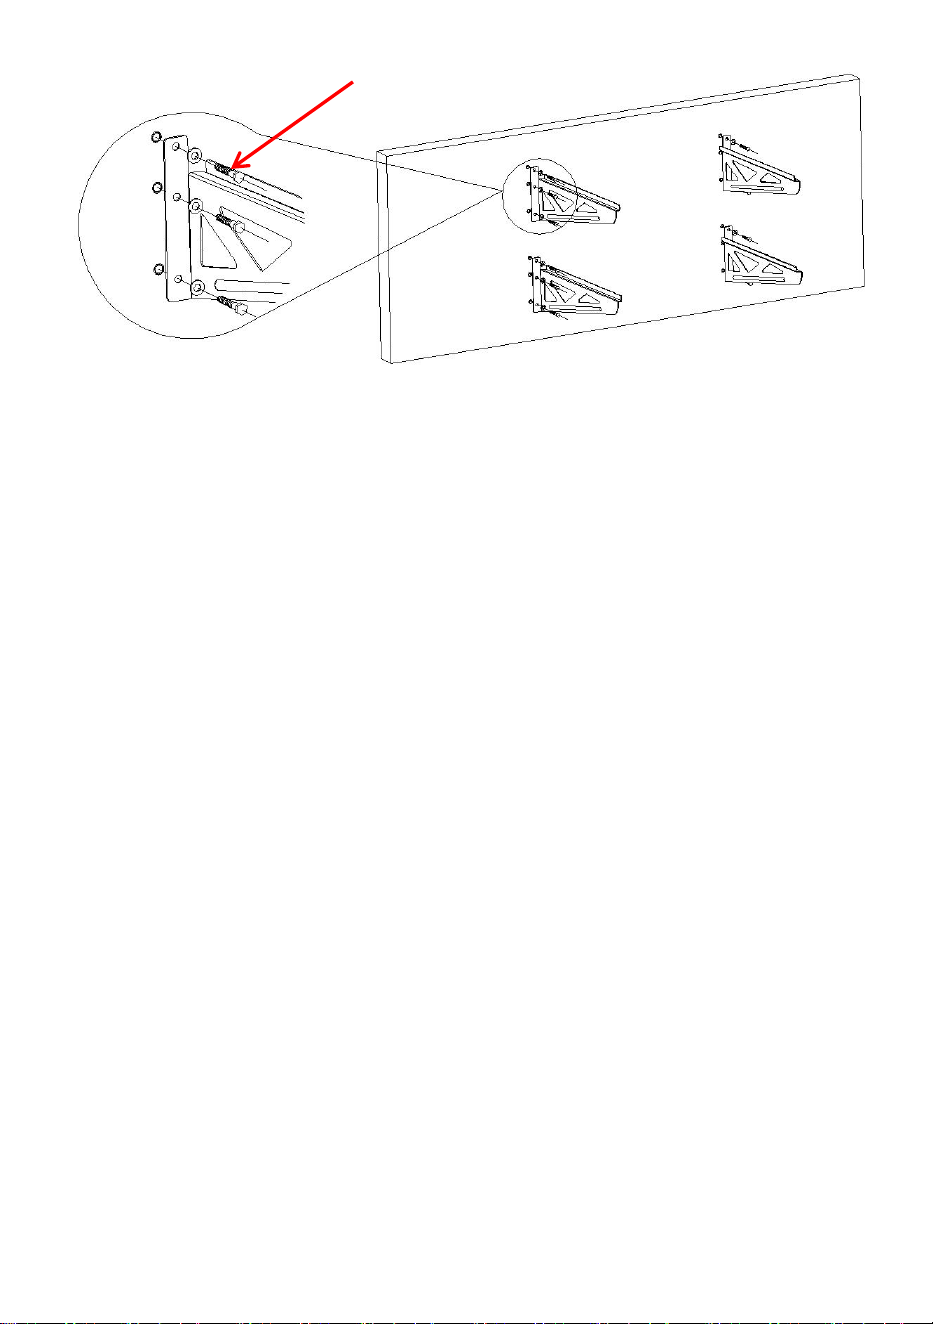
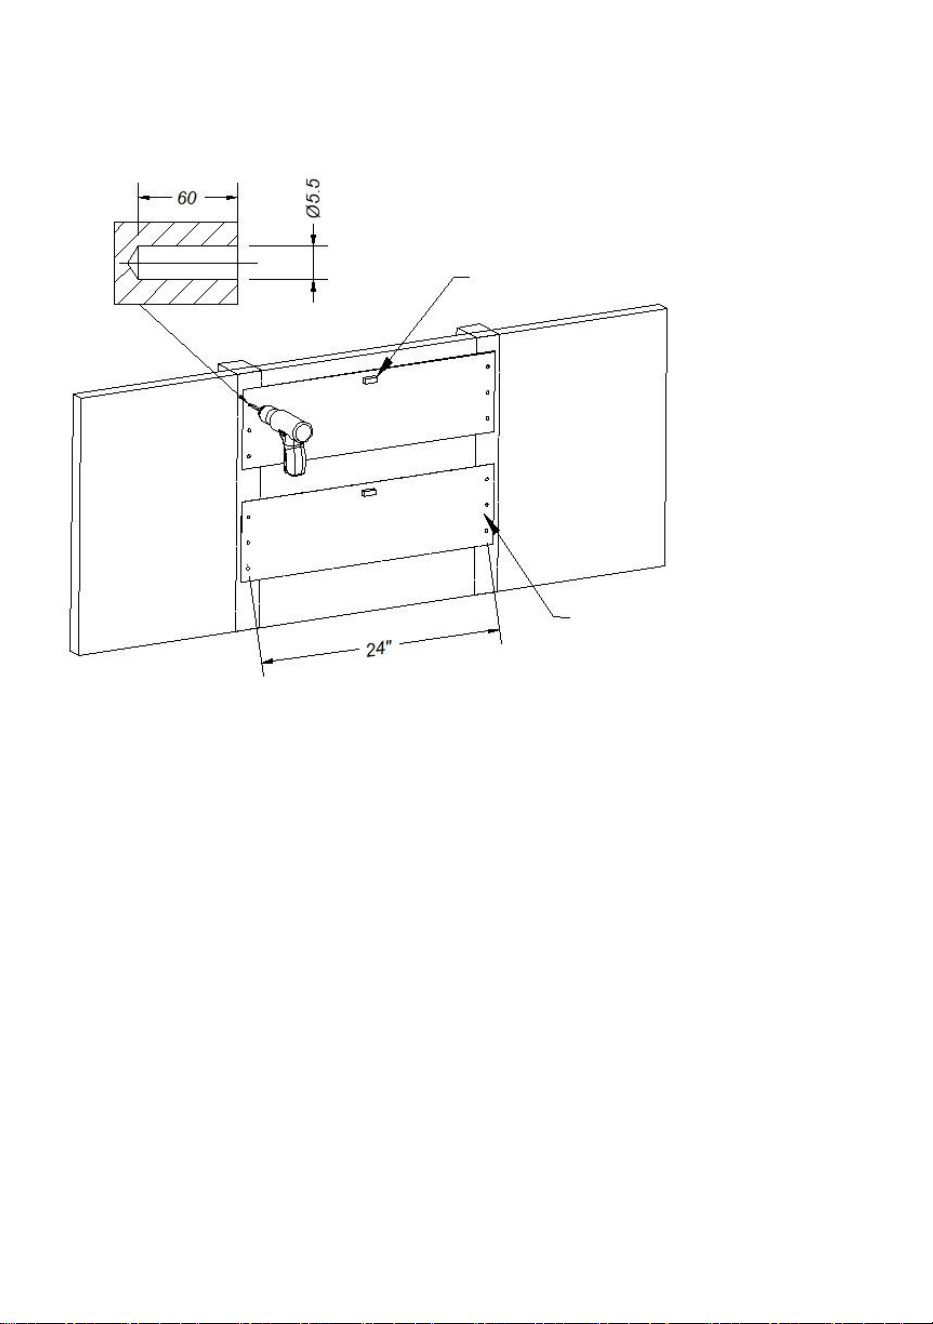
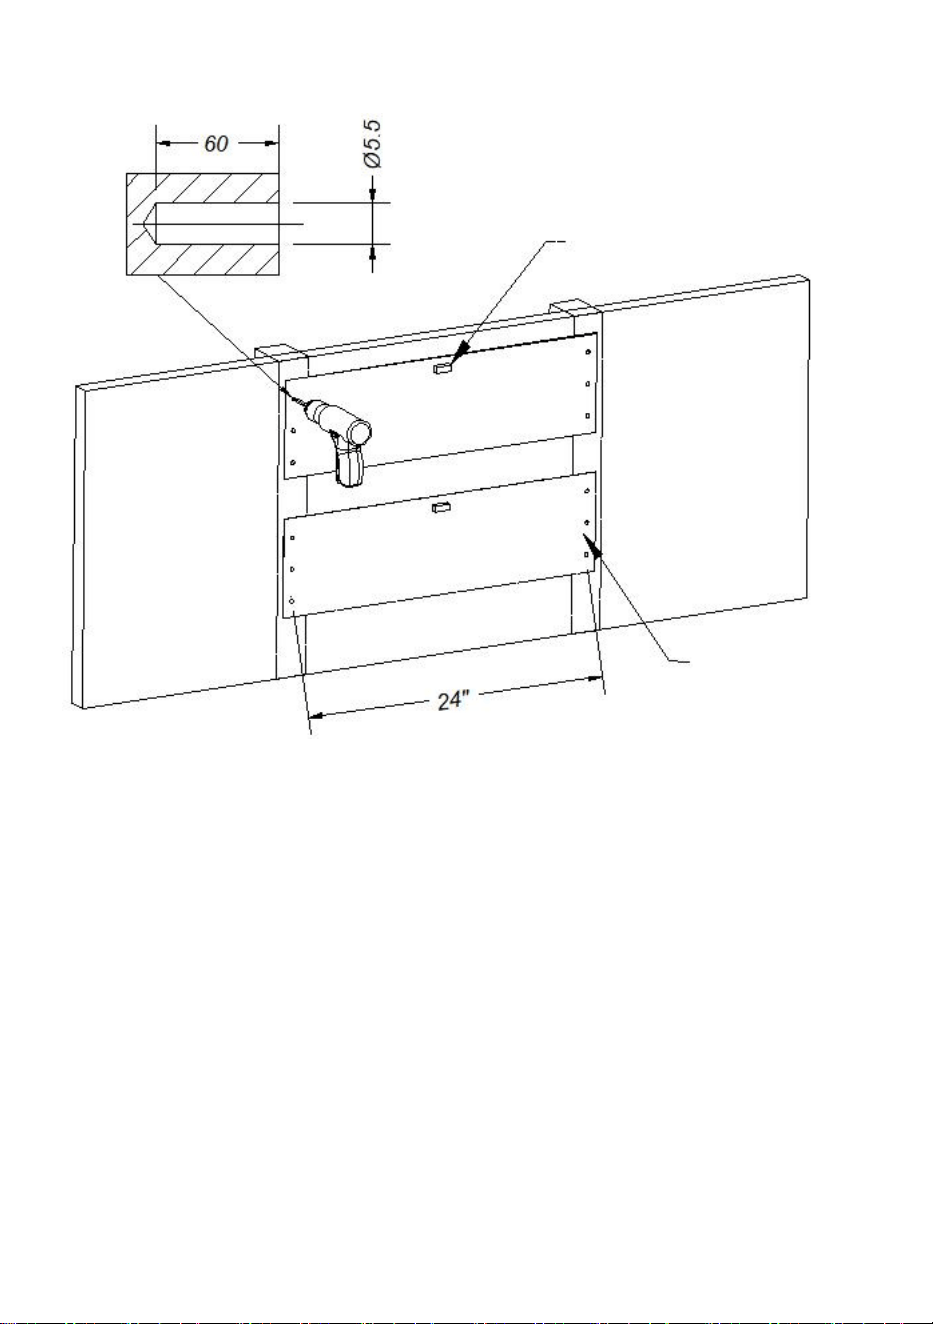
STEP 1-B : Installation on wooden wall post
1. Paste the positioning paper to the appropriate height, glue the
Micro level vial to adjust the level, and then use the jackhammer to
lightly drill out the anchor points.
2. Remove the positioning paper and drill holes(Φ5.5x60mm) into
the wall.(The positioning paper should be reused 2 times.)
Micro level vial
Positioning paper

- 8 -
3. Install and fix the left and right bracket. The screw must be
screwed in completely !
STEP 2 : Installation of the shelf
Washer-8.5
Hexagon self-tapping screw-8*60
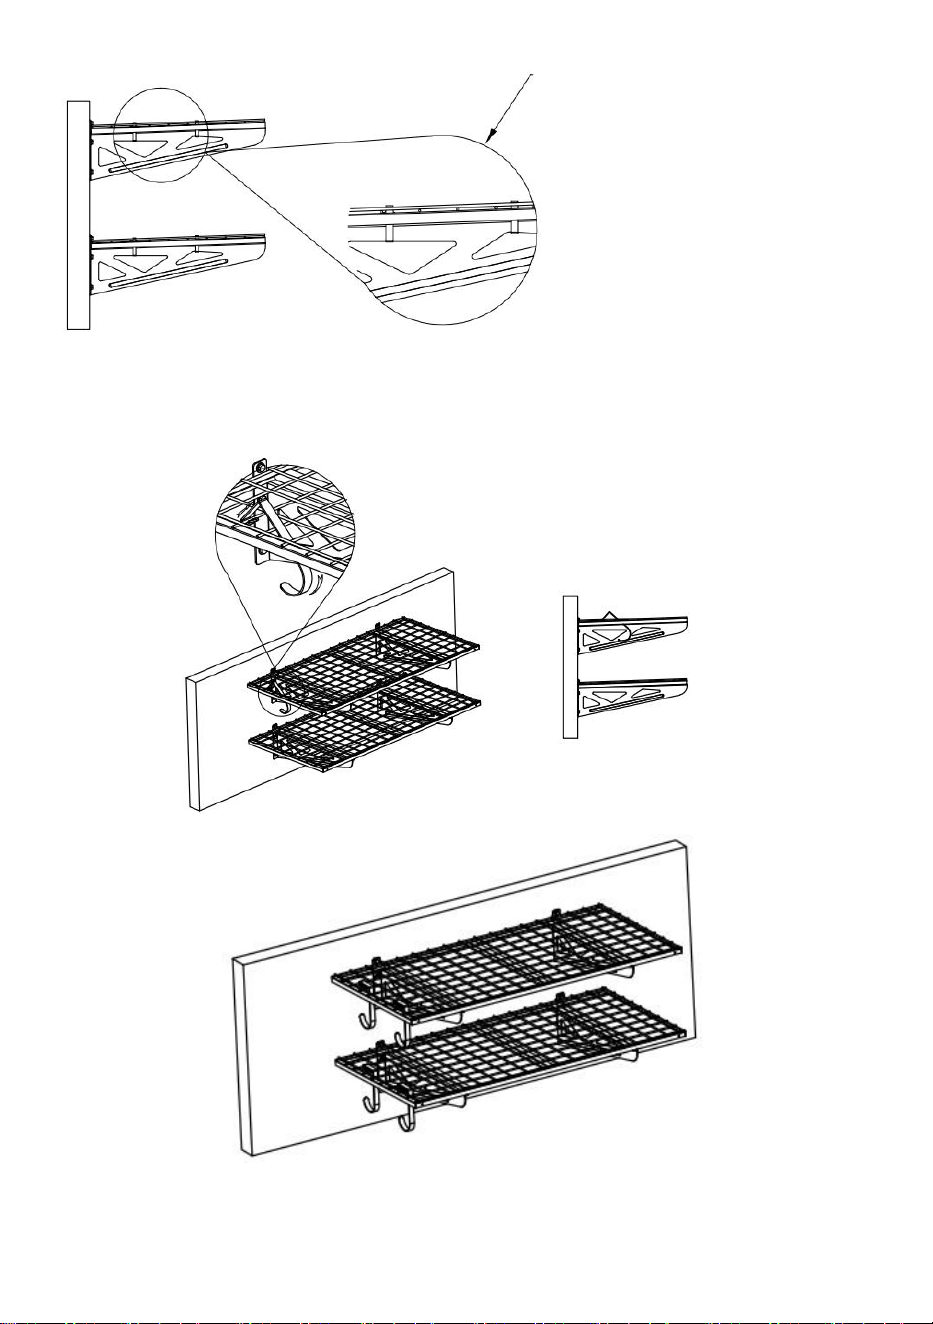
The bracket should be stuck inside
the strengthening Angle iron.

- 9 -
STEP 3 : Mounting hook
Use 2 cable ties to fix
the grid and bracket.

- 10 -
MAINTAIN
1. Do not overload.
2. Please try to avoid putting wet items on shelves. Keep the warehouse not
too wet.
3. Please check and confirm whether the screws are loose every two months.
4. Dust off regularly with a clean rag, and arrange items neatly on shelves.


- 2 -
Assistance technique et certificat de garantie électronique
www.vevor.com/support
ÉTAGÈRE MURALE DE GARAGE
MODÈLE : ML2436
We continue to be committed to provide you tools with competitive price.
"Save Half", "Half Price" or any other similar expressions used by us only represents an
estimate of savings you might benefit from buying certain tools with us compared to the major
top brands and doses not necessarily mean to cover all categories of tools offered by us. You
are kindly reminded to verify carefully when you are placing an order with us if you are
actually saving half in comparison with the top major brands.

- 1 -
MODÈLE : ML2436
Have product questions? Need technical support? Please feel free to
contact us:
Technical Support and E-Warranty Certificate
www.vevor.com/support
NEED HELP? CONTACT US!
This is the original instruction, please read all manual instructions
carefully before operating. VEVOR reserves a clear interpretation of our
user manual. The appearance of the product shall be subject to the
product you received. Please forgive us that we won't inform you again if
there are any technology or software updates on our product.
GARAGE WALL SHELVING

- 2 -
SAFETY INSTRUCTIONS
ATTENTION : Ce produit contient de petites pièces. En cas d'ingestion,
il y a un risque d'étouffement. Gardez ces petites pièces hors de portée
des enfants !
7. Avant l’installation, prenez des mesures de protection pour éviter les
blessures corporelles !
PROTECTION DES YEUX PROTECTION DES PIEDS MASQUE DE PROTECTION CONTRE LA
POUSSIÈRE
8. Le produit doit être installé sur un mur en bois ou en béton. Avant
l'installation, assurez-vous que la capacité portante du mur ne dépasse pas la
capacité portante maximale ! Veuillez renforcer la structure du mur à temps
pour consolider la capacité portante du mur ! Dans le cas contraire, le produit
pourrait être endommagé ou des blessures corporelles pourraient survenir !
9. Ce produit est destiné à une utilisation en intérieur uniquement. Une
utilisation en extérieur peut endommager le produit ou entraîner des
blessures corporelles.
10. Veuillez vérifier et confirmer si les vis sont desserrées tous les deux mois.
11. Au moins deux personnes pour terminer l'installation .
12. Assurez-vous d'avoir lu les instructions et d'avoir parfaitement compris
les étapes d'installation. Si vous ne comprenez pas l'une des étapes
d'installation, contactez un installateur professionnel.
7.
Ne pas surcharger !
Capacité maximale : 250 lb / par couche (uniformément
répartie)
- 3 -
Préparation de l'installation :
MODEL AND PARAMETERS
Modèle
ML2436
Nombre de couches
2
Taille de la surface de l'
36x24 pouces
Capacité de charge
250 lb/par couche (500 lb au total)
Matériel
Acier
Couleur
Noir
STRUCTURE DIAGRAM
2

- 4 -
1. Supports 2. Étagère 3. Crochets
COMPONENTS
Non
Image
Nom
Qua
1
Support gauche
2
2
Support droit
2
3
Étagère
2
4
Crochet
4
5
Clé en L
1
6
Document de positionnement
1
7
Flacon de niveau micro
1
1
3

- 5 -
8
Bouchon d'extension -12*58
12
9
Rondelle-8.5
12
10
autotaraudeuse hexagonale - 8*60
12
11
Collier de serrage s-12*250
8
12
Manuel d'utilisation
1
ASSEMBLY
ÉTAPE 1-A : Installation sur des murs en béton massif
Micro level vial
Positioning paper

- 6 -
5. Collez le papier de positionnement à la hauteur appropriée,
collez le flacon de niveau Micro pour ajuster le niveau, puis utilisez
le marteau-piqueur pour percer légèrement les points d'ancrage .
6. Retirez le papier de positionnement et percez des trous (Φ
12x60mm) dans le mur. (Le papier de positionnement doit être
réutilisé 2 fois.)
7. Après avoir enlevé le sol résiduel dans le trou, enfoncez
complètement le bouchon d'expansion dans le trou.
Expansion plug-12*58
Washer-8.5
Hexagon self-tapping screw-8*60

- 7 -
8. Installez et fixez les supports gauche et droit. La vis doit être
vissée à fond et bien serrée !
ETAPE 1-B : Installation sur poteau mural en bois

- 8 -
4. Collez le papier de positionnement à la hauteur appropriée,
collez le flacon de niveau Micro pour ajuster le niveau, puis utilisez
le marteau-piqueur pour percer légèrement les points d'ancrage .
5. Retirez le papier de positionnement et percez des trous (Φ
5,5x60 mm) dans le mur. (Le papier de positionnement doit être
réutilisé 2 fois.)
Micro level vial
Positioning paper

- 9 -
6. Installer et fixer les supports gauche et droit. La vis doit être
vissée à fond !
ETAPE 2 : Installation de l'étagère
Washer-8.5
Hexagon self-tapping screw-8*60
The bracket should be stuck inside
the strengthening Angle iron.

- 10 -
ÉTAPE 3 : Crochet de montage
Use 2 cable ties to fix
the grid and bracket.

- 11 -
MAINTAIN
5. Ne pas surcharger.
6. Veuillez éviter de mettre des objets mouillés sur les étagères. Veillez à ce
que l'entrepôt ne soit pas trop humide .
7. Veuillez vérifier et confirmer si les vis sont desserrées tous les deux mois.
8. Dépoussiérez régulièrement avec un chiffon propre et rangez
soigneusement les objets sur les étagères .


- 2 -
Technischer Support und E-Garantie-Zertifikat www.vevor.com/support
GARAGENWANDREGALE
MODELL: ML2436
We continue to be committed to provide you tools with competitive price.
"Save Half", "Half Price" or any other similar expressions used by us only represents an
estimate of savings you might benefit from buying certain tools with us compared to the major
top brands and doses not necessarily mean to cover all categories of tools offered by us. You
are kindly reminded to verify carefully when you are placing an order with us if you are
actually saving half in comparison with the top major brands.

- 1 -
MODELL: ML2436
Have product questions? Need technical support? Please feel free to
contact us:
Technical Support and E-Warranty Certificate
www.vevor.com/support
NEED HELP? CONTACT US!
This is the original instruction, please read all manual instructions
carefully before operating. VEVOR reserves a clear interpretation of our
user manual. The appearance of the product shall be subject to the
product you received. Please forgive us that we won't inform you again if
there are any technology or software updates on our product.
GARAGE WALL SHELVING

- 2 -
SAFETY INSTRUCTIONS
ACHTUNG : Dieses Produkt enthält Kleinteile. Bei Verschlucken besteht
Erstickungsgefahr. Bewahren Sie diese Kleinteile außerhalb der
Reichweite von Kindern auf!
13. Treffen Sie vor der Installation Schutzmaßnahmen, um Verletzungen zu
vermeiden !
AUGENSCHUTZ FUSSSCHUTZ STAUBMASKEN-SCHUTZKLEIDUNG
14. Das Produkt muss an einer Holz- oder Betonwand installiert werden.
Stellen Sie vor der Installation sicher, dass die Tragfähigkeit der Wand die
maximale Tragfähigkeit nicht überschreitet! Bitte verstärken Sie die Struktur
der Wand rechtzeitig, um die Tragfähigkeit der Wand zu festigen! Andernfalls
kann das Produkt beschädigt werden oder es können Verletzungen auftreten!
15. Dieses Produkt ist nur für den Gebrauch im Innenbereich bestimmt. Bei
Verwendung im Außenbereich kann es zu Produktschäden oder Verletzungen
kommen.
16. Bitte überprüfen Sie alle zwei Monate, ob die Schrauben locker sind.
17. Für die Installation sind mindestens zwei Personen erforderlich .
18. Stellen Sie sicher, dass Sie die Anweisungen gelesen und die Installation
vollständig verstanden haben . Wenn Sie einen der Installationsschritte nicht
verstehen, wenden Sie sich an einen professionellen Installationsfachmann.
7.
Nicht überladen !
Maximale Tragkraft: 250 lbs / pro Schicht (gleichmäßig
verteilt)
Installationsvorbereitung :

- 3 -
MODEL AND PARAMETERS
Modell
ML2436
Anzahl der Schichten
2
Regalflächengröße
36x24 Zoll
Maximale Tragfähigkeit
250 lbs /pro Schicht (insgesamt
Material
Stahl
Farbe
Schwarz
STRUCTURE DIAGRAM
2

- 4 -
1.Klammern 2.Regal 3.Haken
COMPONENTS
NEI
Bild
Name
Men
1
Linke Klammer
2
2
Rechte Klammer
2
3
Regal
2
4
Haken
4
5
L -förmiger Schraubenschlüssel
1
6
Positionspapier
1
7
Mikro-Wasserwaage
1
1
3

- 5 -
8
Spreizdübel -12*58
12
9
Unterlegscheibe-8.5
12
10
Sechskant- Blechschraube-8*60
12
11
Kabelbinder s -12*250
8
12
Benutzerhandbuch
1
ASSEMBLY
SCHRITT 1-A: Installation auf massiven Betonwänden
Micro level vial
Positioning paper
- 6 -
9. Kleben Sie das Positionierungspapier auf die entsprechende
Höhe, kleben Sie die Mikro-Wasserwaage zum Justieren der Höhe
auf und bohren Sie die Ankerpunkte anschließend mit dem
Presslufthammer leicht heraus .
10. Entfernen Sie das Positionierungspapier und bohren Sie Löcher
(Φ12 x 60 mm) in die Wand. (Das Positionierungspapier sollte 2
Mal wiederverwendet werden.)
11. Nachdem Sie die Erdreste aus dem Loch entfernt haben,
klopfen Sie den Spreizdübel vollständig in das Loch.
Expansion plug-12*58
Washer-8.5
Hexagon self-tapping screw-8*60

- 7 -
12. Montieren und fixieren Sie die linke und rechte Halterung. Die
Schraube muss vollständig eingedreht sein und fest andrücken!
SCHRITT 1-B: Installation auf Holzwandpfosten

- 8 -
7. Kleben Sie das Positionierungspapier auf die entsprechende
Höhe, kleben Sie die Mikro-Wasserwaage zum Justieren der Höhe
auf und bohren Sie die Ankerpunkte anschließend mit dem
Presslufthammer leicht heraus .
8. Entfernen Sie das Positionierungspapier und bohren Sie Löcher
(Φ5,5 x 60 mm) in die Wand. (Das Positionierungspapier sollte 2
Mal wiederverwendet werden.)
Micro level vial
Positioning paper
- 9 -
9. Den linken und rechten Halter montieren und fixieren. Die
Schraube muss dabei vollständig eingedreht werden!
SCHRITT 2: Installation des Regals
Washer-8.5
Hexagon self-tapping screw-8*60
The bracket should be stuck inside
the strengthening Angle iron.
- 10 -
SCHRITT 3: Montagehaken
Use 2 cable ties to fix
the grid and bracket.

- 11 -
MAINTAIN
9. Nicht überladen.
10. Vermeiden Sie bitte, nasse Gegenstände in die Regale zu stellen. Sorgen
Sie dafür, dass das Lager nicht zu feucht wird .
11. Bitte überprüfen Sie alle zwei Monate, ob die Schrauben locker sind.
12. Stauben Sie den Staub regelmäßig mit einem sauberen Lappen ab und
ordnen Sie die Gegenstände ordentlich auf den Regalen an .


- 2 -
Supporto tecnico e certificato di garanzia elettronica www.vevor.com/support
SCAFFALATURA DA PARETE PER
GARAGE
MODELLO: ML2436
We continue to be committed to provide you tools with competitive price.
"Save Half", "Half Price" or any other similar expressions used by us only represents an
estimate of savings you might benefit from buying certain tools with us compared to the major
top brands and doses not necessarily mean to cover all categories of tools offered by us. You
are kindly reminded to verify carefully when you are placing an order with us if you are
actually saving half in comparison with the top major brands.

- 1 -
MODELLO: ML2436
Have product questions? Need technical support? Please feel free to
contact us:
Technical Support and E-Warranty Certificate
www.vevor.com/support
NEED HELP? CONTACT US!
This is the original instruction, please read all manual instructions
carefully before operating. VEVOR reserves a clear interpretation of our
user manual. The appearance of the product shall be subject to the
product you received. Please forgive us that we won't inform you again if
there are any technology or software updates on our product.
GARAGE WALL SHELVING

- 2 -
SAFETY INSTRUCTIONS
ATTENZIONE : Questo prodotto contiene piccole parti. Se ingerito,
potrebbe rappresentare un rischio di soffocamento. Tenere queste
piccole parti lontano dalla portata dei bambini!
19. Prima dell'installazione, adottare misure di protezione per evitare lesioni
personali !
PROTEZIONE DEGLI OCCHI PROTEZIONE DEL PIEDE INDOSSARE LA PROTEZIONE CON MASCHERA
ANTIPOLVERE
20. Il prodotto deve essere installato su una parete in legno o cemento. Prima
dell'installazione, assicurarsi che la capacità portante della parete non superi
la capacità portante massima! Si prega di rafforzare la struttura della parete in
tempo per consolidare la capacità portante della parete! In caso contrario, il
prodotto potrebbe danneggiarsi o potrebbero verificarsi lesioni personali!
21. Questo prodotto è destinato esclusivamente all'uso in ambienti interni.
L'uso all'esterno può causare danni al prodotto o lesioni personali.
22. Controllare e confermare ogni due mesi che le viti siano allentate.
23. Almeno due persone per completare l'installazione .
24. Assicurati di aver letto le istruzioni e di aver compreso appieno come
installare. Se non capisci uno qualsiasi dei passaggi di installazione, contatta
un installatore professionista.
7.
Non sovraccaricare !
Capacità massima: 250 libbre / per strato (distribuito
uniformemente)
Preparazione all'installazione :
- 3 -
MODEL AND PARAMETERS
Modello
ML2436
Numero di strati
2
Dimensioni della superficie
36x24 pollici
Capacità portante massima
250 libbre/per strato (500 libbre in
Materiale
Acciaio
Colore
Nero
STRUCTURE DIAGRAM
2

- 4 -
1. Staffe 2. Ripiano 3. Ganci
COMPONENTS
NO.
Immagine
Nome
Qua
1
Parentesi sinistra
2
2
Parentesi quadra destra
2
3
Mensola
2
4
Gancio
4
5
Chiave a L
1
6
Carta di posizionamento
1
7
Fiala di livello micro
1
1
3

- 5 -
8
Tappo di espansione -12*58
12
9
Rondella-8.5
12
10
Vite autofilettante esagonale -8*60
12
11
Fascetta per cavi s-12*250
8
12
Manuale d'uso
1
ASSEMBLY
FASE 1-A: Installazione su pareti in calcestruzzo pieno
Micro level vial
Positioning paper

- 6 -
13. Incollare la carta di posizionamento all'altezza appropriata,
incollare la fiala Micro Level per regolare il livello, quindi utilizzare il
martello pneumatico per forare leggermente i punti di ancoraggio .
14. Rimuovere la carta di posizionamento e praticare dei fori (Φ
12x60mm) nel muro. (La carta di posizionamento deve essere
riutilizzata 2 volte.)
15. Dopo aver rimosso il terreno residuo dal foro, inserire
completamente il tappo di espansione nel foro.
Expansion plug-12*58
Washer-8.5
Hexagon self-tapping screw-8*60

- 7 -
16. Installare e fissare la staffa sinistra e destra. La vite deve
essere avvitata completamente e premere saldamente!
FASE 1-B: Installazione su palo in legno

- 8 -
10. Incollare la carta di posizionamento all'altezza appropriata,
incollare la fiala Micro Level per regolare il livello, quindi utilizzare il
martello pneumatico per forare leggermente i punti di ancoraggio .
11. Rimuovere la carta di posizionamento e praticare dei fori (Φ
5,5x60mm) nel muro. (La carta di posizionamento deve essere
riutilizzata 2 volte.)
Micro level vial
Positioning paper

- 9 -
12. Installare e fissare la staffa sinistra e destra. La vite deve
essere avvitata completamente!
FASE 2: Installazione dello scaffale
Washer-8.5
Hexagon self-tapping screw-8*60
The bracket should be stuck inside
the strengthening Angle iron.

- 10 -
FASE 3: Gancio di montaggio
Use 2 cable ties to fix
the grid and bracket.

- 11 -
MAINTAIN
13. Non sovraccaricare.
14. Si prega di cercare di evitare di mettere oggetti bagnati sugli scaffali.
Mantenere il magazzino non troppo umido .
15. Controllare e confermare ogni due mesi che le viti siano allentate.
16. Spolverare regolarmente con uno straccio pulito e disporre gli oggetti in
modo ordinato sugli scaffali .


- 2 -
Soporte técnico y certificado de garantía electrónica www.vevor.com/support
ESTANTERÍA DE PARED PARA GARAJE
MODELO: ML2436
We continue to be committed to provide you tools with competitive price.
"Save Half", "Half Price" or any other similar expressions used by us only represents an
estimate of savings you might benefit from buying certain tools with us compared to the major
top brands and doses not necessarily mean to cover all categories of tools offered by us. You
are kindly reminded to verify carefully when you are placing an order with us if you are
actually saving half in comparison with the top major brands.
- 1 -
MODELO: ML2436
Have product questions? Need technical support? Please feel free to
contact us:
Technical Support and E-Warranty Certificate
www.vevor.com/support
NEED HELP? CONTACT US!
This is the original instruction, please read all manual instructions
carefully before operating. VEVOR reserves a clear interpretation of our
user manual. The appearance of the product shall be subject to the
product you received. Please forgive us that we won't inform you again if
there are any technology or software updates on our product.
GARAGE WALL SHELVING

- 2 -
SAFETY INSTRUCTIONS
ADVERTENCIA : Este producto contiene piezas pequeñas. Si se
ingieren, pueden provocar asfixia. ¡Mantenga estas piezas pequeñas
fuera del alcance de los niños!
25. ¡Antes de la instalación, tome medidas de protección para evitar lesiones
personales !
PROTECCIÓN OCULAR PROTECCIÓN DE PIES MÁSCARA DE PROTECCIÓN CONTRA EL POLVO
26. El producto debe instalarse en una pared de madera o de hormigón.
Antes de la instalación, asegúrese de que la capacidad de carga de la pared
no supere la capacidad de carga máxima. Refuerce la estructura de la pared
a tiempo para consolidar la capacidad de carga de la pared. De lo contrario,
el producto podría dañarse o podrían producirse lesiones personales.
27. Este producto es solo para uso en interiores. El uso en exteriores puede
causar daños al producto o lesiones personales.
28. Verifique y confirme si los tornillos están flojos cada dos meses.
29. Al menos dos personas para completar la instalación .
30. Asegúrese de haber leído las instrucciones y de comprender
completamente cómo instalarlo. Si no comprende alguno de los pasos de
instalación, comuníquese con un instalador profesional.
7. ¡
No sobrecargue !
Capacidad máxima: 250 lb por capa (distribuida
uniformemente)
Preparación de la instalación :

- 3 -
MODEL AND PARAMETERS
Modelo
ML2436
Número de capas
2
Tamaño de la superficie de
36x24 pulgadas
Capacidad máxima de
250 libras por capa (500 libras en
Material
Acero
Color
Negro
STRUCTURE DIAGRAM
2
- 4 -
1. Soportes 2. Estante 3. Ganchos
COMPONENTS
No.
Imagen
Nombre
Can
1
Soporte izquierdo
2
2
Soporte derecho
2
3
Estante
2
4
Gancho
4
5
Llave en forma de L
1
6
Documento de posicionamiento
1
7
Vial de nivel micro
1
1
3

- 5 -
8
Tapón de expansión -12*58
12
9
Lavadora-8.5
12
10
autorroscante hexagonal - 8*60
12
11
Brida para cables s-12*250
8
12
Manual de usuario
1
ASSEMBLY
PASO 1-A : Instalación sobre paredes de hormigón macizo
Micro level vial
Positioning paper
- 6 -
17. Pegue el papel de posicionamiento a la altura adecuada, pegue
el vial de nivel Micro para ajustar el nivel y luego use el martillo
neumático para perforar ligeramente los puntos de anclaje .
18. Retire el papel de posicionamiento y taladre agujeros (Φ12x60
mm) en la pared. (El papel de posicionamiento debe reutilizarse 2
veces).
19. Después de limpiar la tierra residual en el agujero, golpee el
tapón de expansión dentro del agujero completamente.
Expansion plug-12*58
Washer-8.5
Hexagon self-tapping screw-8*60

- 7 -
20. Instale y fije el soporte izquierdo y derecho. ¡El tornillo debe
estar completamente atornillado y apretado!
PASO 1-B: Instalación en poste de pared de madera
- 8 -
13. Pegue el papel de posicionamiento a la altura adecuada, pegue
el vial de nivel Micro para ajustar el nivel y luego use el martillo
neumático para perforar ligeramente los puntos de anclaje .
14. Retire el papel de posicionamiento y taladre agujeros (Φ5,5 x
60 mm) en la pared. (El papel de posicionamiento debe reutilizarse
2 veces).
Micro level vial
Positioning paper
- 9 -
15. Instale y fije el soporte izquierdo y derecho. ¡El tornillo debe
estar completamente atornillado!
PASO 2: Instalación del estante
Washer-8.5
Hexagon self-tapping screw-8*60
The bracket should be stuck inside
the strengthening Angle iron.

- 10 -
PASO 3: Gancho de montaje
Use 2 cable ties to fix
the grid and bracket.

- 11 -
MAINTAIN
17. No sobrecargue.
18. Intente evitar colocar artículos húmedos en los estantes. Mantenga el
almacén sin demasiada humedad .
19. Verifique y confirme si los tornillos están flojos cada dos meses.
20. Quite el polvo periódicamente con un trapo limpio y coloque los artículos
de forma ordenada en los estantes .


- 2 -
Wsparcie techniczne i certyfikat e-gwarancji www.vevor.com/support
PÓŁKI ŚCIENNE DO GARAŻU
MODEL: ML2436
We continue to be committed to provide you tools with competitive price.
"Save Half", "Half Price" or any other similar expressions used by us only represents an
estimate of savings you might benefit from buying certain tools with us compared to the major
top brands and doses not necessarily mean to cover all categories of tools offered by us. You
are kindly reminded to verify carefully when you are placing an order with us if you are
actually saving half in comparison with the top major brands.

- 1 -
MODEL: ML2436
Have product questions? Need technical support? Please feel free to
contact us:
Technical Support and E-Warranty Certificate
www.vevor.com/support
NEED HELP? CONTACT US!
This is the original instruction, please read all manual instructions
carefully before operating. VEVOR reserves a clear interpretation of our
user manual. The appearance of the product shall be subject to the
product you received. Please forgive us that we won't inform you again if
there are any technology or software updates on our product.
GARAGE WALL SHELVING

- 2 -
SAFETY INSTRUCTIONS
OSTRZEŻENIE : Ten produkt zawiera małe części. W przypadku
połknięcia istnieje ryzyko zadławienia. Trzymaj te małe części z dala od
dzieci!
31. Przed montażem należy podjąć środki ostrożności, aby uniknąć obrażeń
ciała !
OCHRONA OCZU OCHRONA STÓP Noś maskę przeciwpyłową
32. Produkt musi być zainstalowany na ścianie drewnianej lub betonowej.
Przed montażem upewnij się, że nośność ściany nie przekracza maksymalnej
nośności! Proszę wzmocnić konstrukcję ściany na czas, aby skonsolidować
nośność ściany! W przeciwnym razie produkt może zostać uszkodzony lub
może dojść do obraże
ń
ciała!
33. Ten produkt jest przeznaczony wyłącznie do użytku wewnątrz
pomieszczeń. Stosowanie na zewnątrz może spowodować uszkodzenie
produktu lub obrażenia ciała.
34. Proszę co dwa miesiące sprawdzać, czy śruby nie są poluzowane.
35. Do wykonania instalacji potrzebne są co najmniej dwie osoby .
36. Upewnij się, że przeczytałeś instrukcję i w pełni zrozumiałeś sposób
instalacji. Jeśli nie rozumiesz żadnego z kroków instalacji, skontaktuj się z
profesjonalnym personelem instalacyjnym.
7.
Nie przeciążaj !
Maksymalna ładowność: 250 funtów / na warstwę
(równomiernie rozłożone)
Przygotowanie do instalacji :
- 3 -
MODEL AND PARAMETERS
Model
ML2436
Liczba warstw
2
Rozmiar powierzchni regału
36x24 cale
Maksymalna nośność
250 funtów / na warstwę (w sumie
Materiał
Stal
Kolor
Czarny
STRUCTURE DIAGRAM
2

- 4 -
1. Wsporniki 2. Półka 3. Haki
COMPONENTS
NIE.
Zdjęcie
Nazwa
Iloś
1
Lewy nawias
2
2
Prawy nawias
2
3
Półka
2
4
Hak
4
5
L-kształtny W rench
1
6
Papier pozycjonujący
1
7
Fiolka mikropoziomowa
1
1
3

- 5 -
8
Kołek rozporowy -12*58
12
9
Podkładka-8,5
12
10
samogwintujący sześciokątny -8*60
12
11
Opaska zaciskowa s -12*250
8
12
Instrukcja obsługi
1
ASSEMBLY
KROK 1-A: Montaż na ścianach z litego betonu
Micro level vial
Positioning paper

- 6 -
21. Przyklej papier pozycjonujący na odpowiedniej wysokości,
przyklej mikropoziomicę, aby wyregulować poziom, a następnie
lekko wywierć punkty kotwiczenia za pomocą młota
pneumatycznego .
22. Usuń papier pozycjonujący i wywierć otwory (Φ12x60mm) w
ścianie. (Papier pozycjonujący należy wykorzystać ponownie 2
razy.)
23. Po usunięciu resztek ziemi z otworu, należy dokładnie wbić
kołek rozporowy w otwór.
Expansion plug-12*58
Washer-8.5
Hexagon self-tapping screw-8*60
- 7 -
24. Zamontuj i zamocuj lewy i prawy wspornik. Śruba musi być
wkręcona całkowicie i mocno dociśnięta!
KROK 1-B: Montaż na drewnianym słupku ściennym

- 8 -
16. Przyklej papier pozycjonujący na odpowiedniej wysokości,
przyklej mikropoziomicę, aby wyregulować poziom, a następnie
lekko wywierć punkty kotwiczenia za pomocą młota
pneumatycznego .
17. Usuń papier pozycjonujący i wywierć otwory (Φ5,5 x 60 mm) w
ścianie. (Papier pozycjonujący należy wykorzystać ponownie 2
razy.)
Micro level vial
Positioning paper

- 9 -
18. Zamontuj i zamocuj lewy i prawy wspornik. Śruba musi być
wkręcona całkowicie!
KROK 2: Montaż półki
Washer-8.5
Hexagon self-tapping screw-8*60
The bracket should be stuck inside
the strengthening Angle iron.

- 10 -
KROK 3: Hak montażowy
Use 2 cable ties to fix
the grid and bracket.

- 11 -
MAINTAIN
21. Nie przeciążaj.
22. Staraj się unikać umieszczania mokrych przedmiotów na półkach.
Utrzymuj magazyn w stanie nie za mokrym .
23. Proszę co dwa miesiące sprawdzać, czy śruby nie są poluzowane.
24. Regularnie wycieraj kurz czystą szmatką i układaj przedmioty starannie
na półkach .


- 2 -
Technische ondersteuning en e-garantiecertificaat www.vevor.com/support
GARAGE WANDPLANKEN
MODEL: ML2436
We continue to be committed to provide you tools with competitive price.
"Save Half", "Half Price" or any other similar expressions used by us only represents an
estimate of savings you might benefit from buying certain tools with us compared to the major
top brands and doses not necessarily mean to cover all categories of tools offered by us. You
are kindly reminded to verify carefully when you are placing an order with us if you are
actually saving half in comparison with the top major brands.

- 1 -
MODEL: ML2436
Have product questions? Need technical support? Please feel free to
contact us:
Technical Support and E-Warranty Certificate
www.vevor.com/support
NEED HELP? CONTACT US!
This is the original instruction, please read all manual instructions
carefully before operating. VEVOR reserves a clear interpretation of our
user manual. The appearance of the product shall be subject to the
product you received. Please forgive us that we won't inform you again if
there are any technology or software updates on our product.
GARAGE WALL SHELVING

- 2 -
SAFETY INSTRUCTIONS
WAARSCHUWING : Dit product bevat kleine onderdelen. Als u het
inslikt, kan het verstikkingsgevaar opleveren. Houd deze kleine
onderdelen buiten bereik van kinderen!
37. Neem voor de installatie beschermende maatregelen om persoonlijk
letsel te voorkomen !
OOGBESCHERMING VOETBESCHERMING STOFMASKER BESCHERMING DRAGEN
38. Het product moet op een houten of betonnen muur worden geïnstalleerd.
Controleer vóór de installatie of het draagvermogen van de muur het
maximale draagvermogen niet overschrijdt! Versterk de structuur van de muur
op tijd om het draagvermogen van de muur te consolideren! Anders kan het
product beschadigd raken of kan er persoonlijk letsel optreden!
39. Dit product is alleen voor gebruik binnenshuis. Buitengebruik kan leiden
tot schade aan het product of persoonlijk letsel.
40. Controleer elke twee maanden of de schroeven loszitten.
41. Minimaal twee personen om de installatie te voltooien .
42. Zorg ervoor dat u de instructies hebt gelezen en volledig hebt begrepen
hoe u moet installeren. Als u een van de installatiestappen niet begrijpt, neem
dan contact op met een professioneel installatiepersoneel.
7.
Niet overbelasten !
Maximale capaciteit: 250 lbs / per laag (gelijkmatig
verdeeld)
Installatievoorbereiding :

- 3 -
MODEL AND PARAMETERS
Model
ML2436
Aantal lagen
2
Afmetingen van het
36x24 inch
Maximaal draagvermogen
250 lbs / per laag (totaal 500 lbs)
M ateriaal
Staal
Kleur
Zwart
STRUCTURE DIAGRAM
2

- 4 -
1. Beugels 2. Plank 3. Haken
COMPONENTS
Nee
Afbeelding
Naam
Hoe
1
Linker haak
2
2
Rechterbeugel
2
3
Plank
2
4
Haak
4
5
L-vormige W -vormige kruk
1
6
Positioneringspapier
1
7
Microniveau flesje
1
1
3

- 5 -
8
Expansieplug -12*58
12
9
Ring-8.5
12
10
Zeskant zelftappende schroef-8*60
12
11
Kabelbinder s-12 * 250
8
12
Gebruiksaanwijzing
1
ASSEMBLY
STAP 1-A: Installatie op massieve betonnen muren
Micro level vial
Positioning paper

- 6 -
25. Plak het positioneringspapier op de juiste hoogte, lijm het
microwaterpasflesje vast om het waterpas te stellen en boor
vervolgens met de drilboor de ankerpunten lichtjes uit .
26. Verwijder het positioneringspapier en boor gaten (Φ12x60mm)
in de muur. (Het positioneringspapier moet 2 keer hergebruikt
worden.)
27. Nadat u de resterende grond uit het gat hebt verwijderd, tikt u
de expansieplug volledig in het gat.
Expansion plug-12*58
Washer-8.5
Hexagon self-tapping screw-8*60

- 7 -
28. Installeer en bevestig de linker- en rechterbeugel. De schroef
moet volledig worden vastgedraaid en stevig worden aangedrukt!
STAP 1-B: Installatie op houten muurpaal

- 8 -
19. Plak het positioneringspapier op de juiste hoogte, lijm het
microwaterpasflesje vast om het waterpas te stellen en boor
vervolgens met de drilboor de ankerpunten lichtjes uit .
20. Verwijder het positioneringspapier en boor gaten (Φ5,5x60mm)
in de muur. (Het positioneringspapier moet twee keer worden
hergebruikt.)
Micro level vial
Positioning paper

- 9 -
21. Installeer en bevestig de linker- en rechterbeugel. De schroef
moet volledig worden ingedraaid!
STAP 2: Installatie van de plank
Washer-8.5
Hexagon self-tapping screw-8*60
The bracket should be stuck inside
the strengthening Angle iron.

- 10 -
STAP 3: Montagehaak
Use 2 cable ties to fix
the grid and bracket.

- 11 -
MAINTAIN
25. Niet overbelasten.
26. Probeer te voorkomen dat natte items op planken worden gezet. Zorg dat
het magazijn niet te nat is .
27. Controleer elke twee maanden of de schroeven loszitten.
28. Stof regelmatig af met een schone doek en schik de spullen netjes op de
planken .


- 2 -
Teknisk support och e-garanticertifikat www.vevor.com/support
GARAGE VÄGG HYLLOR
MODELL: ML2436
We continue to be committed to provide you tools with competitive price.
"Save Half", "Half Price" or any other similar expressions used by us only represents an
estimate of savings you might benefit from buying certain tools with us compared to the major
top brands and doses not necessarily mean to cover all categories of tools offered by us. You
are kindly reminded to verify carefully when you are placing an order with us if you are
actually saving half in comparison with the top major brands.

- 1 -
MODELL: ML2436
Have product questions? Need technical support? Please feel free to
contact us:
Technical Support and E-Warranty Certificate
www.vevor.com/support
NEED HELP? CONTACT US!
This is the original instruction, please read all manual instructions
carefully before operating. VEVOR reserves a clear interpretation of our
user manual. The appearance of the product shall be subject to the
product you received. Please forgive us that we won't inform you again if
there are any technology or software updates on our product.
GARAGE WALL SHELVING
- 2 -
SAFETY INSTRUCTIONS
VARNING : Denna produkt innehåller små delar. Om den sväljs kommer
den att utgöra en kvävningsrisk. Håll dessa små delar borta från barn!
43. Före installation, vidta skyddsåtgärder för att undvika personskador !
ÖGONSKYDD FOTSKYDD DAMMASKSKYDDSLÄGG
44. Produkten måste installeras på en trä- eller betongvägg. Före installation,
se till att väggens bärighet inte överstiger den maximala bärigheten ! Förstärk
väggens struktur i tid för att konsolidera väggens bärförmåga! Annars kan
produkten skadas eller personskada uppstå!
45. Denna produkt är endast för inomhusbruk. Användning utomhus kan
orsaka produktskador eller personskador.
46. Kontrollera och bekräfta om skruvarna är lösa varannan månad.
47. Minst två personer för att slutföra installationen .
48. Se till att du har läst instruktionerna och helt förstått hur du installerar. Om
du inte förstår något av installationsstegen, kontakta en professionell
installationspersonal.
7.
Överbelasta inte !
Maximal kapacitet: 250 lbs / per lager (jämnt fördelat)
Installationsförberedelse :
MODEL AND PARAMETERS
- 3 -
Modell
ML2436
Antal lager
2
Hyllplan S ytstorlek
36x24 tum
Maximal lagerkapacitet
250 lbs / per lager (500 lbs totalt)
M aterial
Stål
Färg
Svart
STRUCTURE DIAGRAM
1. Fästen 2. Hylla 3. Krokar
1
2
3
- 4 -
COMPONENTS
Inga
Bild
Namn
Ant
1
Vänster fäste
2
2
Höger fäste
2
3
Hylla
2
4
Krok
4
5
L-formad W rench
1
6
Positioneringspapper
1
7
Mikronivåflaska
1
8
Expansionsplugg -12*58
12
9
Bricka-8,5
12
10
Sexkant självgängande skruv-8*60
12
11
Buntband s-12 * 250
8
12
Användarmanual
1
ASSEMBLY
- 5 -
STEG 1-A : Installation på massiva betongväggar
29. Klistra in positioneringspapperet till lämplig höjd, limma
Micro-nivåflaskan för att justera nivån och använd sedan hammaren
för att lätt borra ut ankarpunkterna .
30. Ta bort positioneringspapperet och borra hål (Φ12x60mm) i
väggen. (Positioneringspapperet ska återanvändas 2 gånger.)
Micro level vial
Positioning paper
Expansion plug-12*58
- 6 -
31. Efter att ha rensat bort den kvarvarande jorden i hålet, knacka
expansionspluggen helt i hålet.
32. Installera och fixera vänster och höger fäste. Skruven måste
skruvas in helt och trycks fast !
STEG 1-B: Installation på väggstolpe av trä
Washer-8.5
Hexagon self-tapping screw-8*60
- 7 -
22. Klistra in positioneringspapperet till lämplig höjd, limma
Micro-nivåflaskan för att justera nivån och använd sedan hammaren
för att lätt borra ut ankarpunkterna .
23. Ta bort positioneringspapperet och borra hål (Φ5,5x60 mm) i
väggen. (Positioneringspapperet ska återanvändas 2 gånger.)
Micro level vial
Positioning paper

- 8 -
24. Installera och fixera vänster och höger fäste. Skruven måste
skruvas in helt!
STEG 2: Installation av hyllan
Washer-8.5
Hexagon self-tapping screw-8*60
The bracket should be stuck inside
the strengthening Angle iron.

- 9 -
STEG 3: Monteringskrok
Use 2 cable ties to fix
the grid and bracket.

- 10 -
MAINTAIN
29. Överbelasta inte.
30. Försök att undvika att lägga blöta föremål på hyllorna. Håll lagret inte för
blött .
31. Kontrollera och bekräfta om skruvarna är lösa varannan månad.
32. Damma av regelbundet med en ren trasa och ordna föremålen snyggt på
hyllorna .

