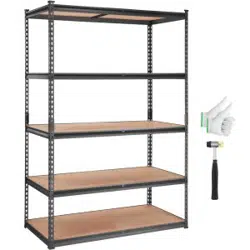
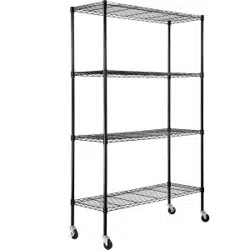
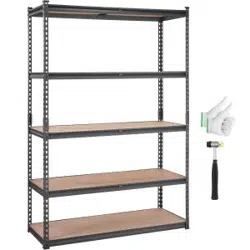
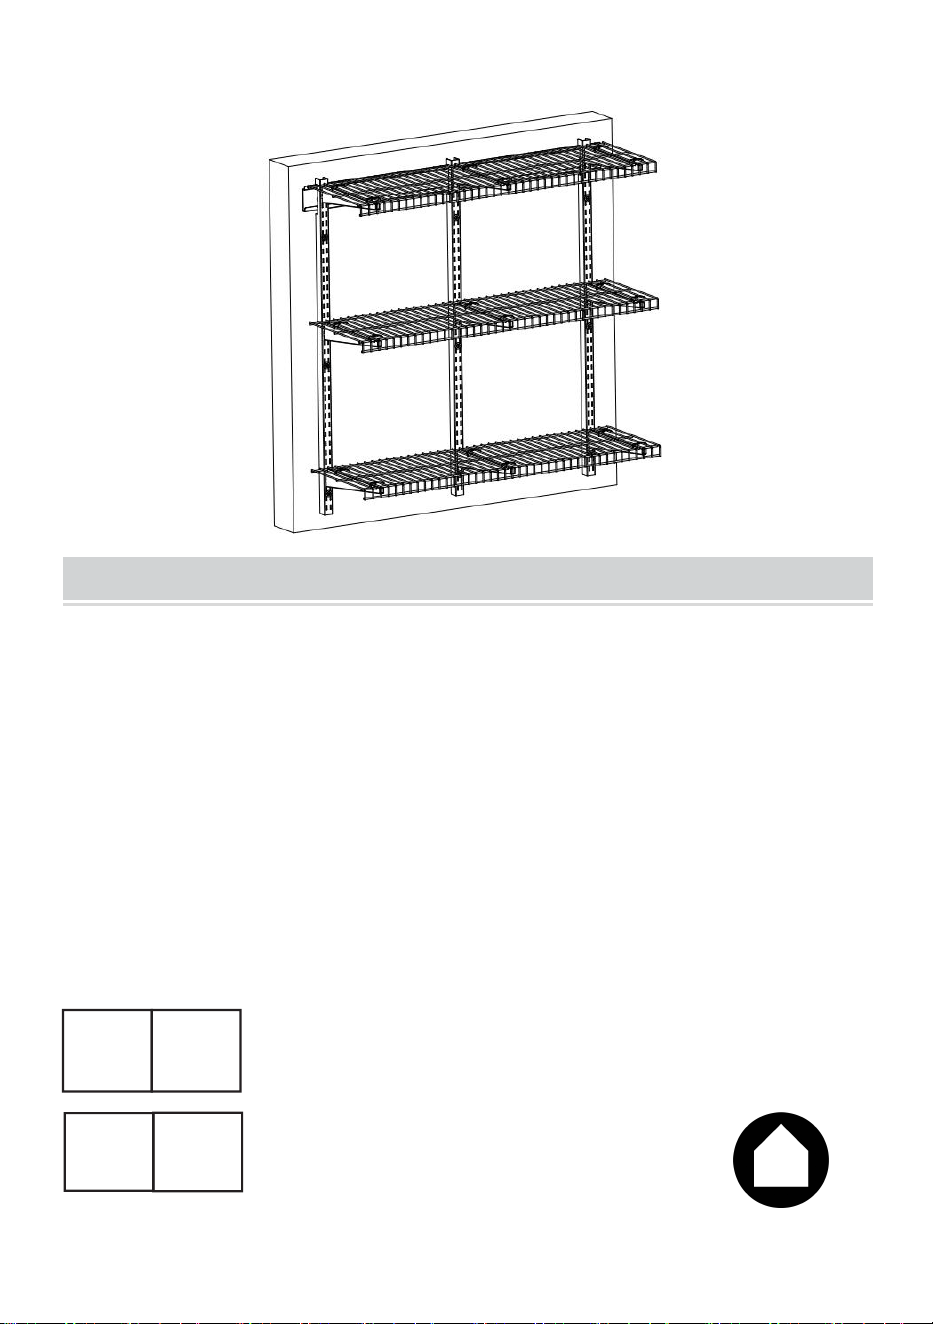
Garage Wall Shelving
MODEL:LR1236

- 1 -
Model:LR1236
NOTE: Photo for Reference. The appearance may be partially improved.
Please refer to your purchase.
This is the original instruction, please read all manual instructions carefully
before operating. VEVOR reserves a clear interpretation of our user
manual. The appearance of the product shall be subject to the product you
received. Please forgive us that we won't inform you again if there are any
technology or software updates on our product..
Garage Wall Shelving

- 2 -
SAFETY INSTRUCTIONS
WARNING:This product contains small parts. If swallowed, it will pose a
choking hazard. Keep these small parts away from children !
1. Before installation, take protective measures to avoid personal injury!
EYE PROTECTION FOOT PROTECTION DUST MASK PROTECTION WEAR
2. The product must be installed on a wooden or concrete wall. Before
installation, ensure that the bearing capacity of the wall exceeds the maximum
bearing capacity ! Please strengthen the structure of the wall in time to
consolidate the bearing capacity of the wall ! Otherwise, the product may be
damaged or personal injury may occur !
3. This product is for indoor use only. Outdoor use may cause product
damage or personal injury.
4. Please check and confirm whether the screws are loose every two months.
5. At least two people are required to complete the installation.
6. Ensure that you have read the instructions and fully understood how to
install. If you do not understand any of the installation steps, contact a
professional installation personnel.
7.
Do not overload !
Maximum capacity :150lbs/per layer(Evenly distributed!)
Installation Preparation:
1. Electric pistol drill.
2. Cross-head Screwdriver
3. Rubber Mallet (or hammer)
4. Pencil
- 3 -
MODEL AND PARAMETERS
Model
LR1236
Number of Layers
3
Shelving Surface Size
11*36inch/275×914mm
Maximum Bearing Bapacity
150lbs/68kg (per layer)
Material
Steel
Color
Black
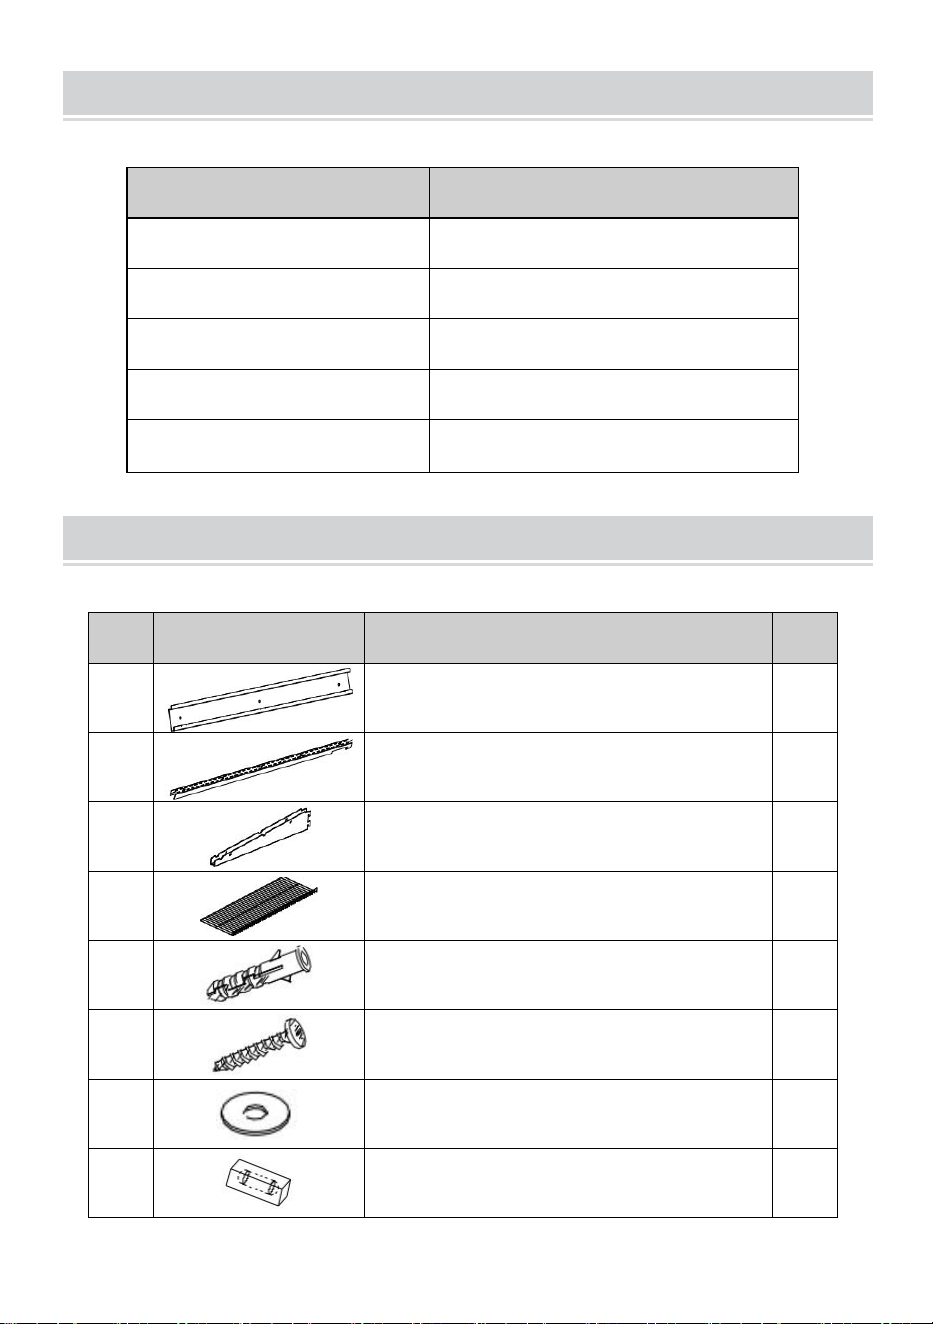
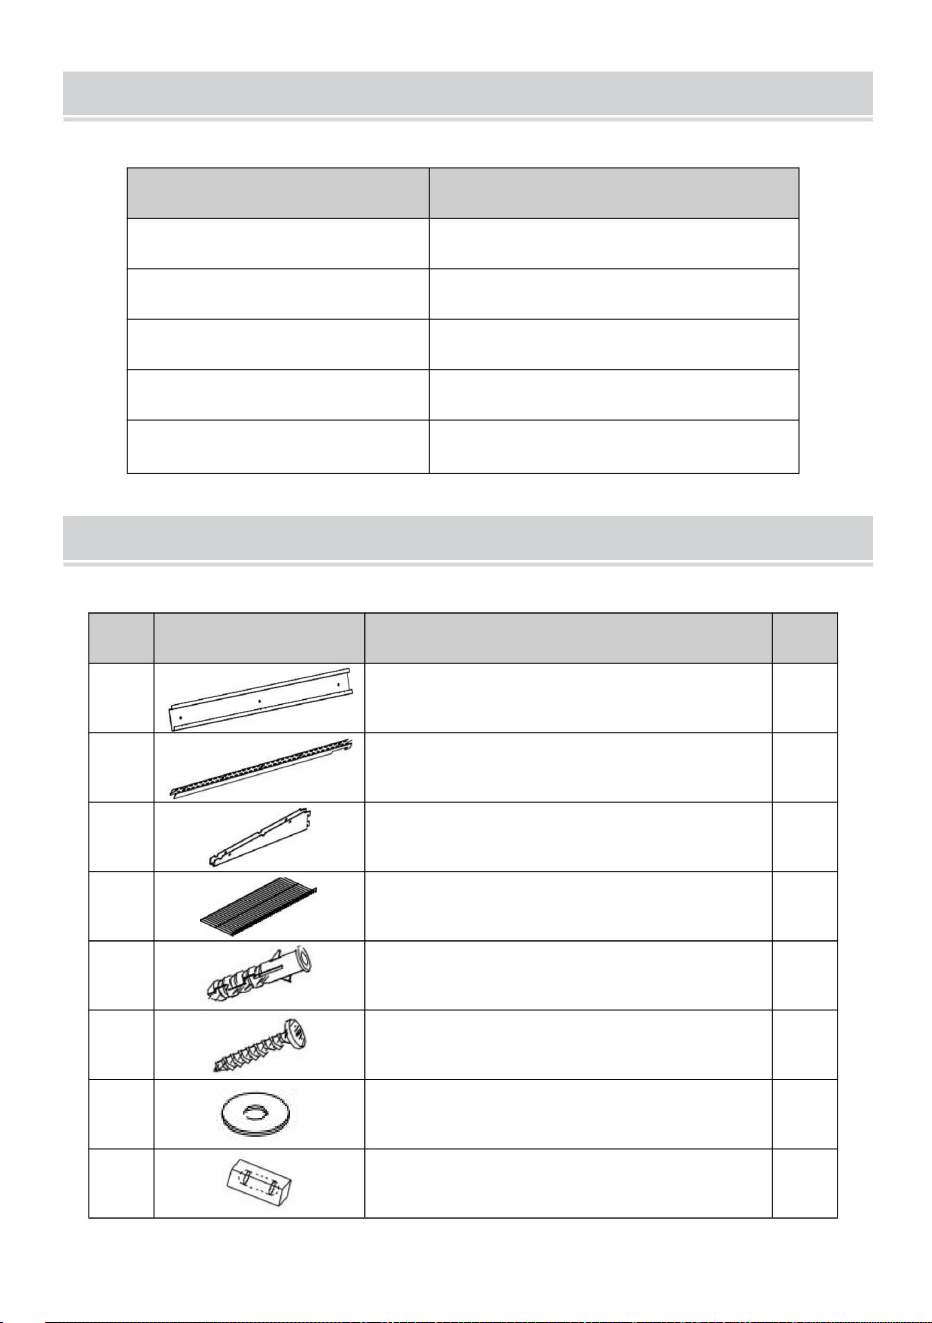
COMPONENTS
No.
Picture
Name
Qty
1
Hanging board
1
2
Vertical beam
3
3
Bracket
9
4
Shelf
3
5
Plastic pin plug
12
6
Screw-ST6.3*60
12
7
Gaskets
12
8
Micro Level Vial
1
- 4 -
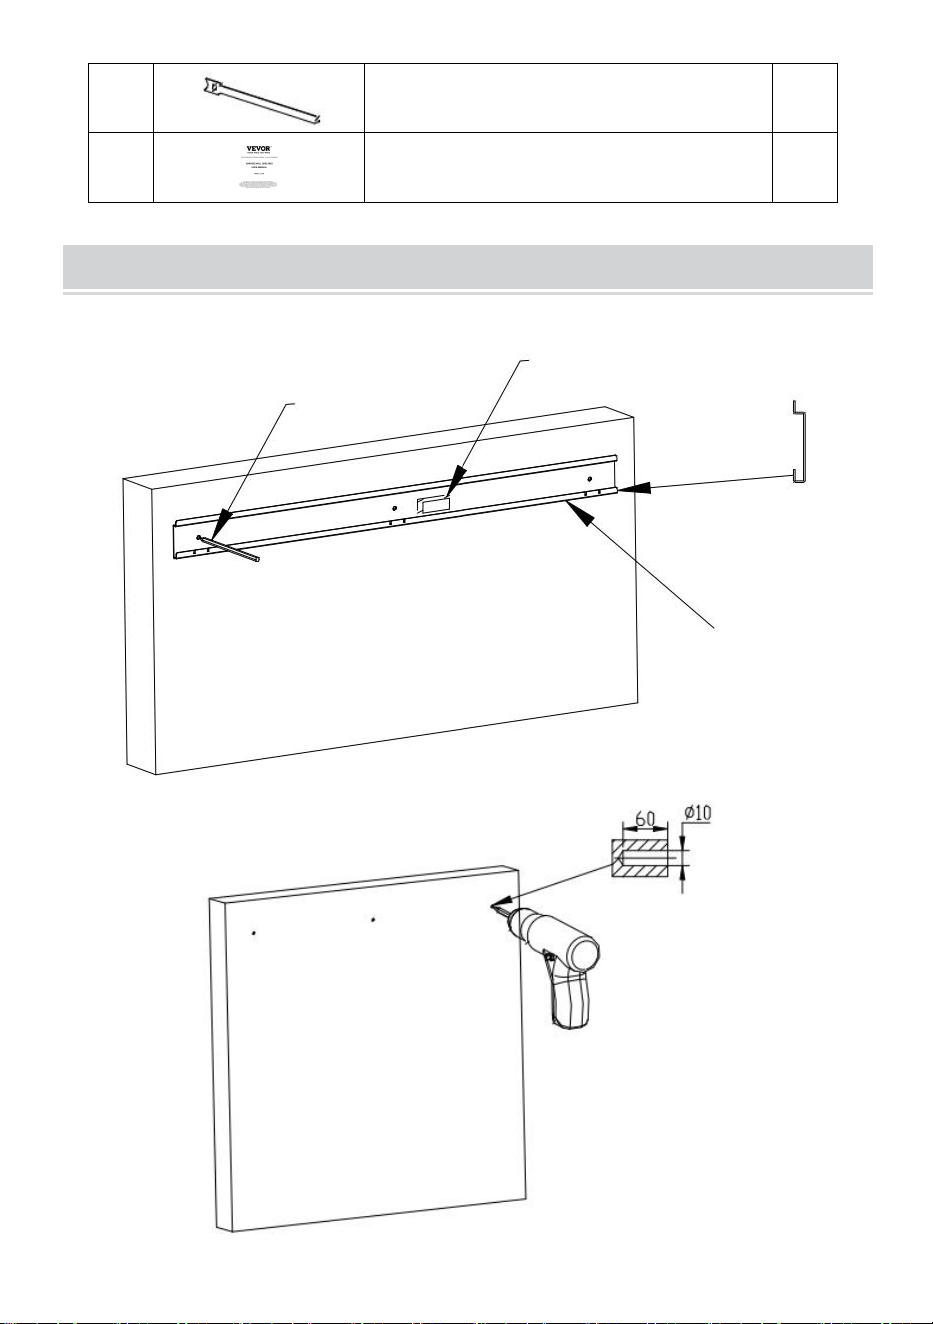
9
Straps
18
10
User Manual
1
ASSEMBLY
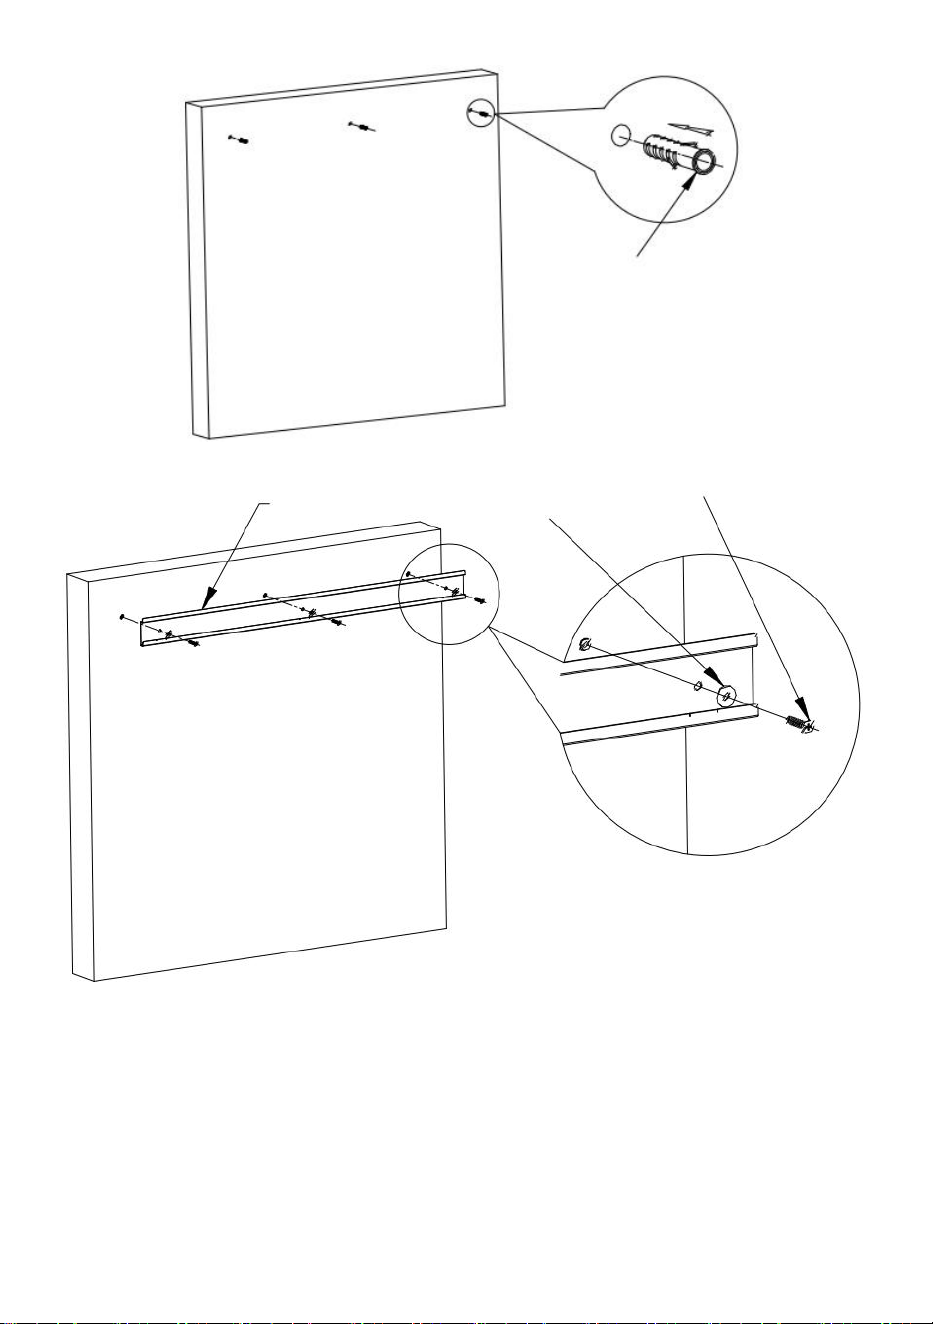
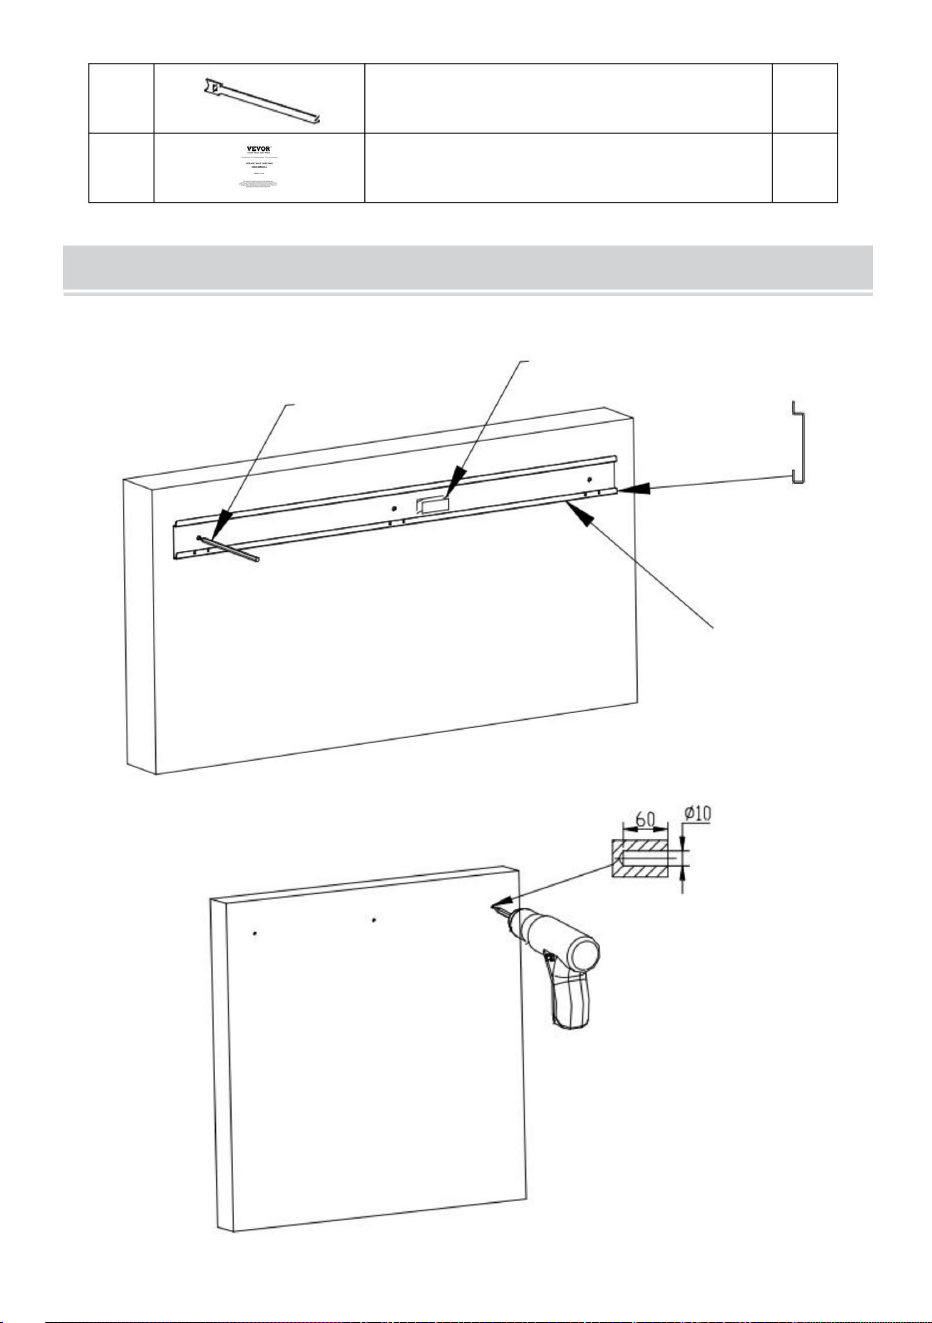
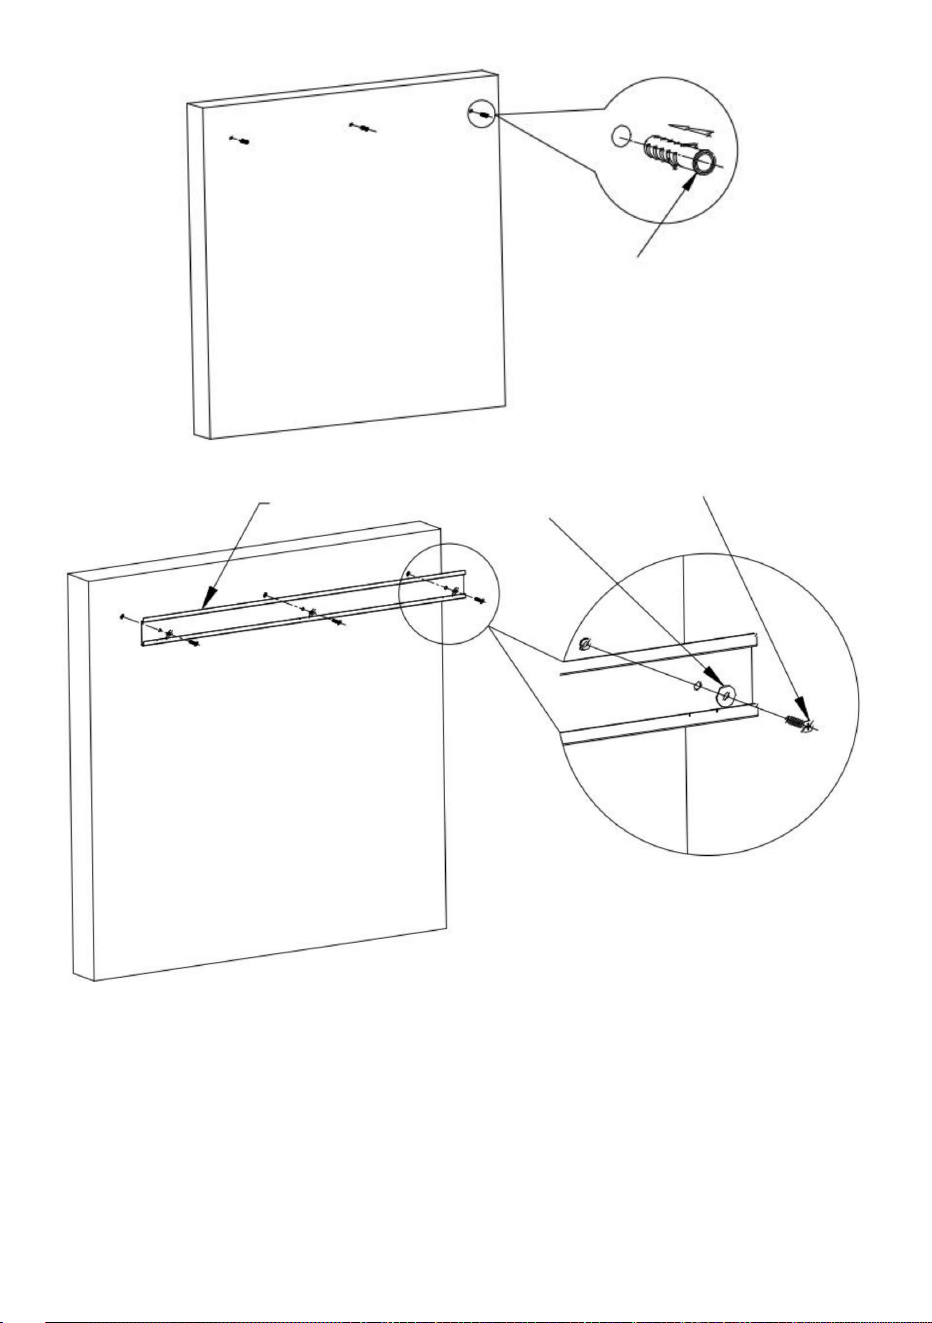
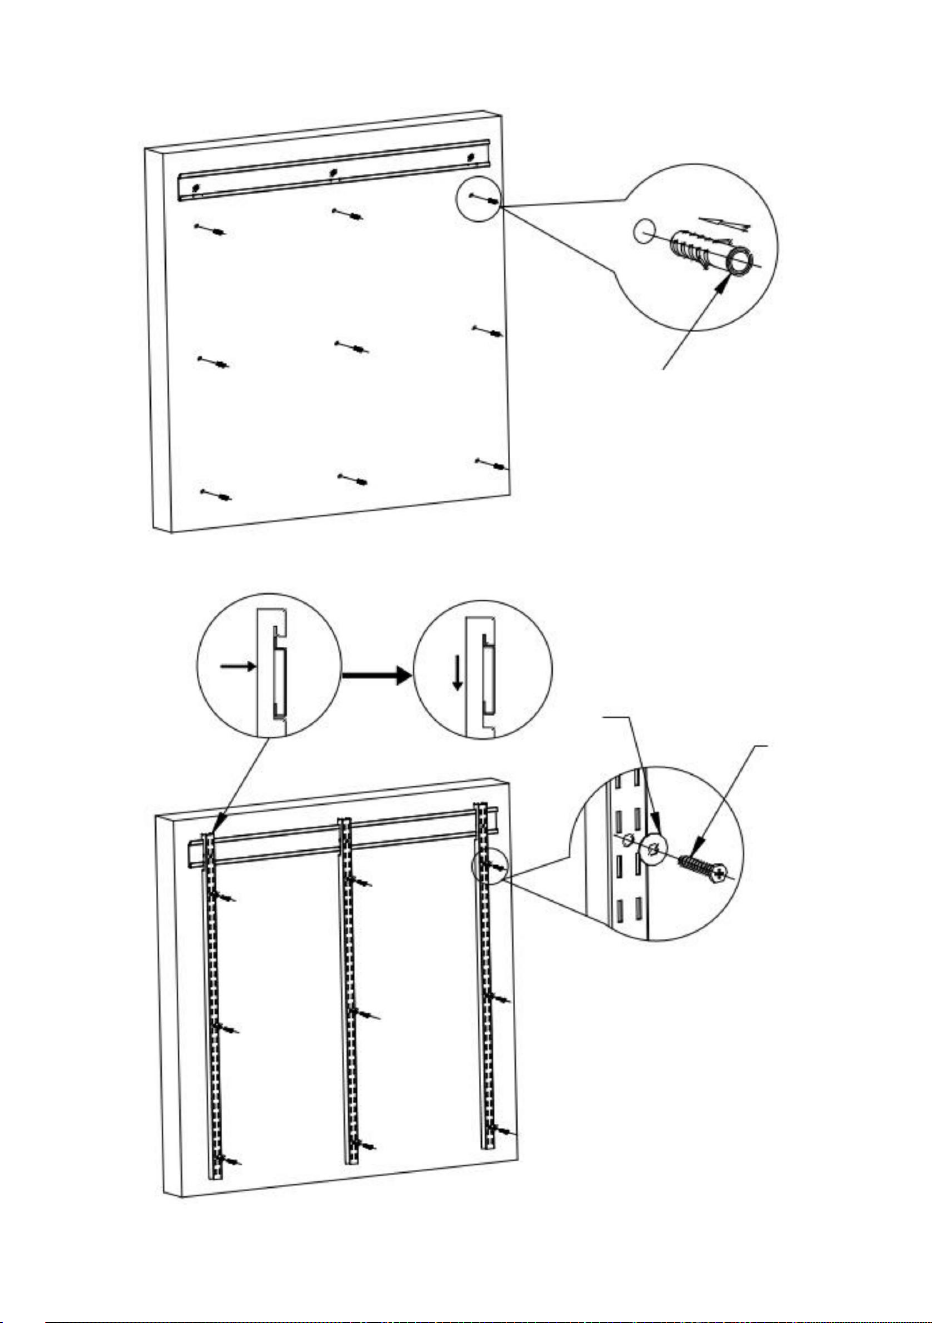
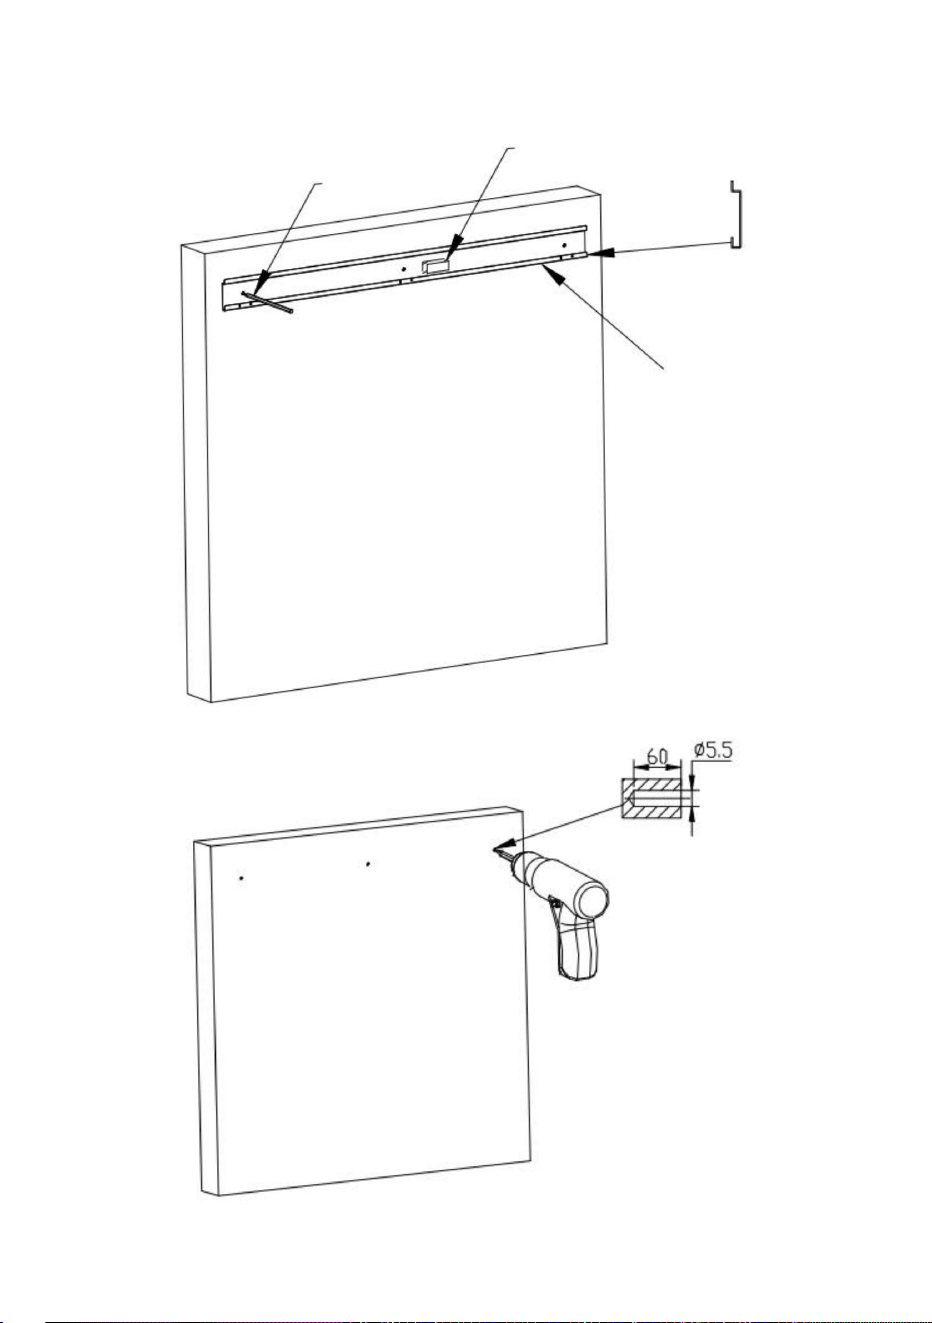
STEP 1-A : Installation on solid concrete walls
Micro Level Vial
Hanging board
Pencil dotting
- 5 -
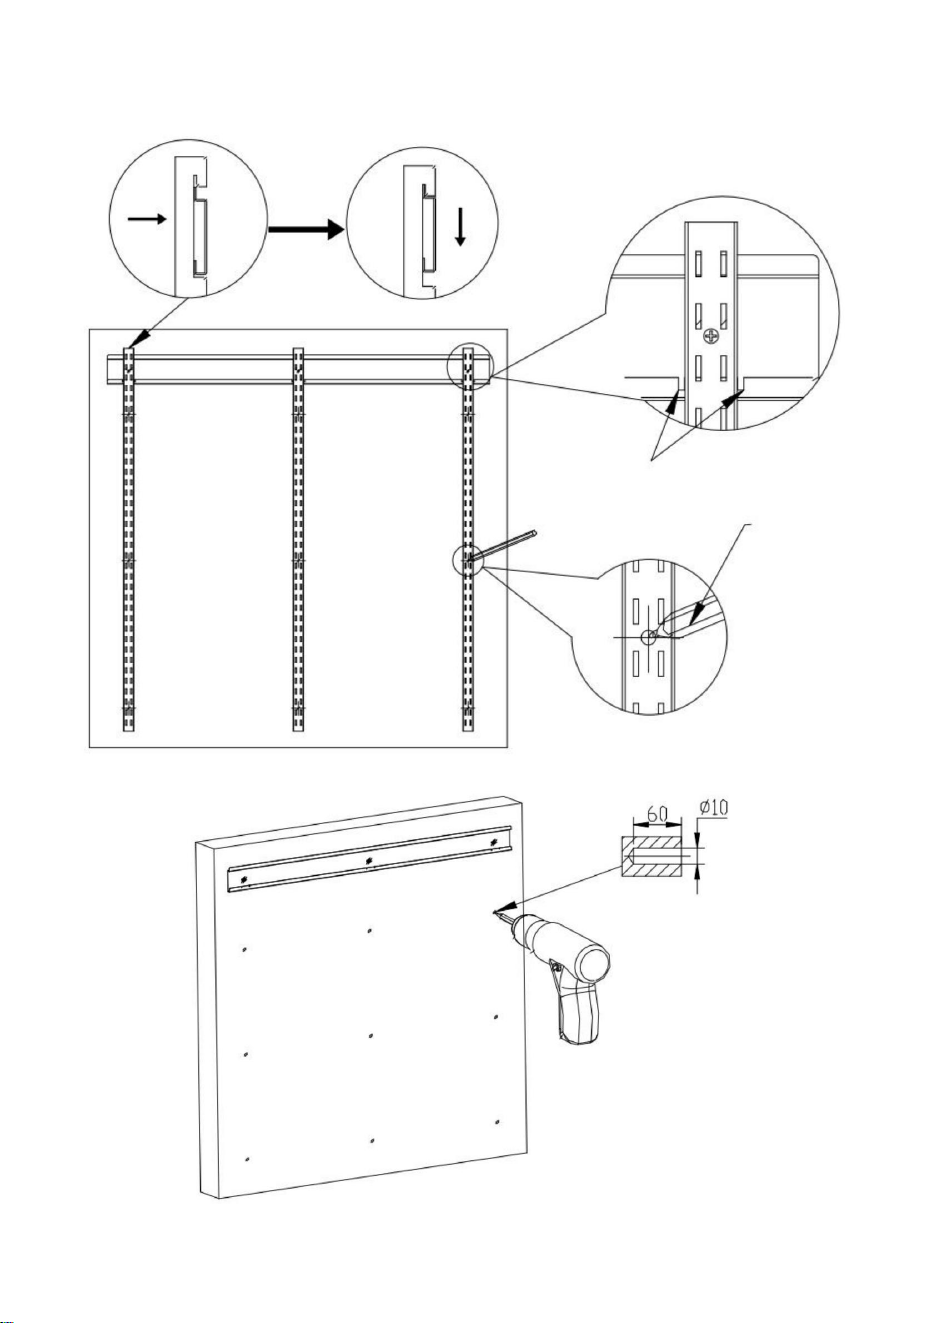
1.Paste the hanging board to the appropriate height, glue the Micro level
vial to adjust the level, and then draw dots with a pencil.
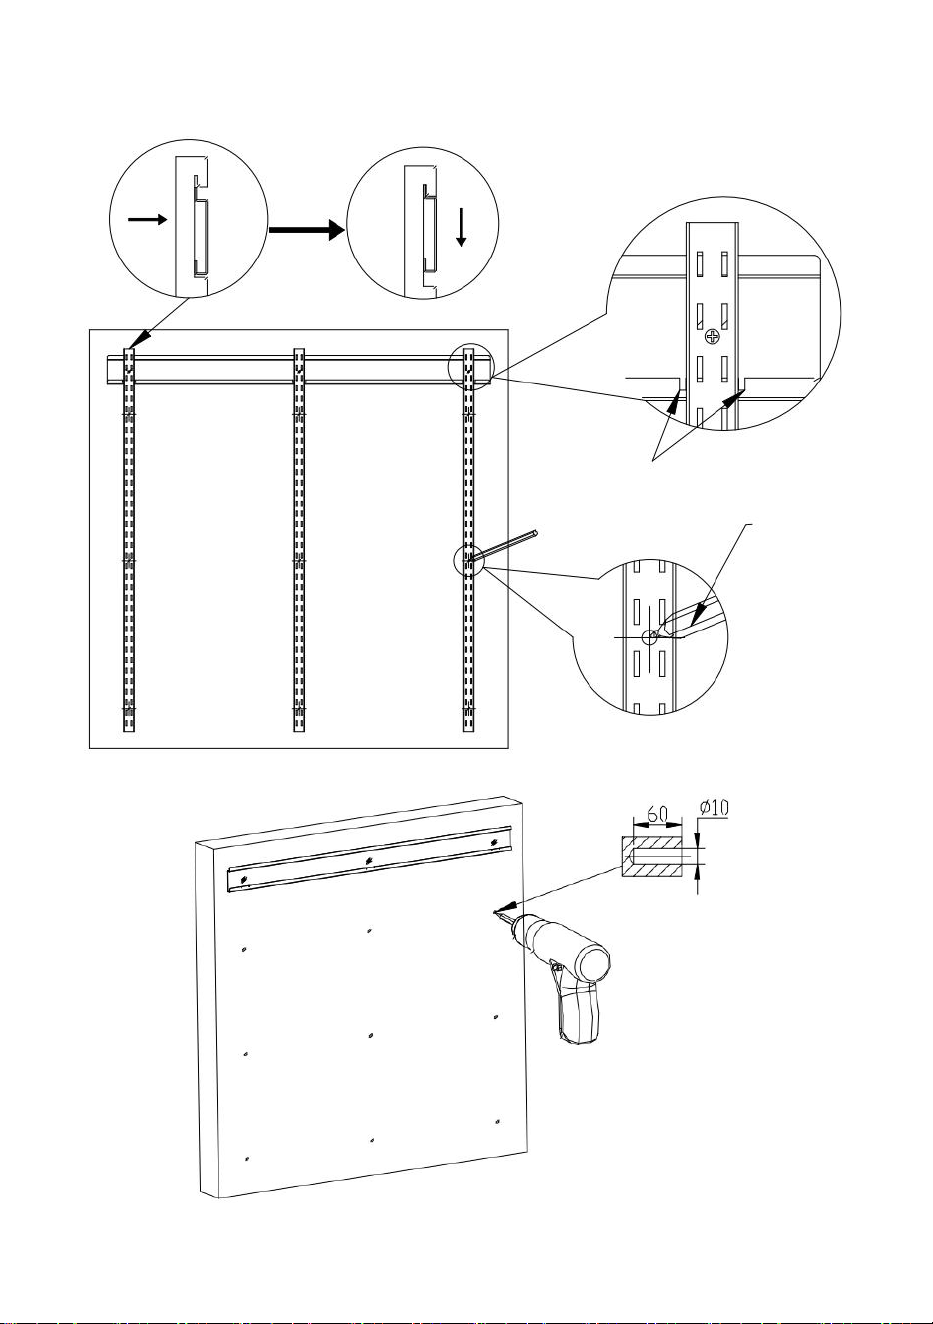
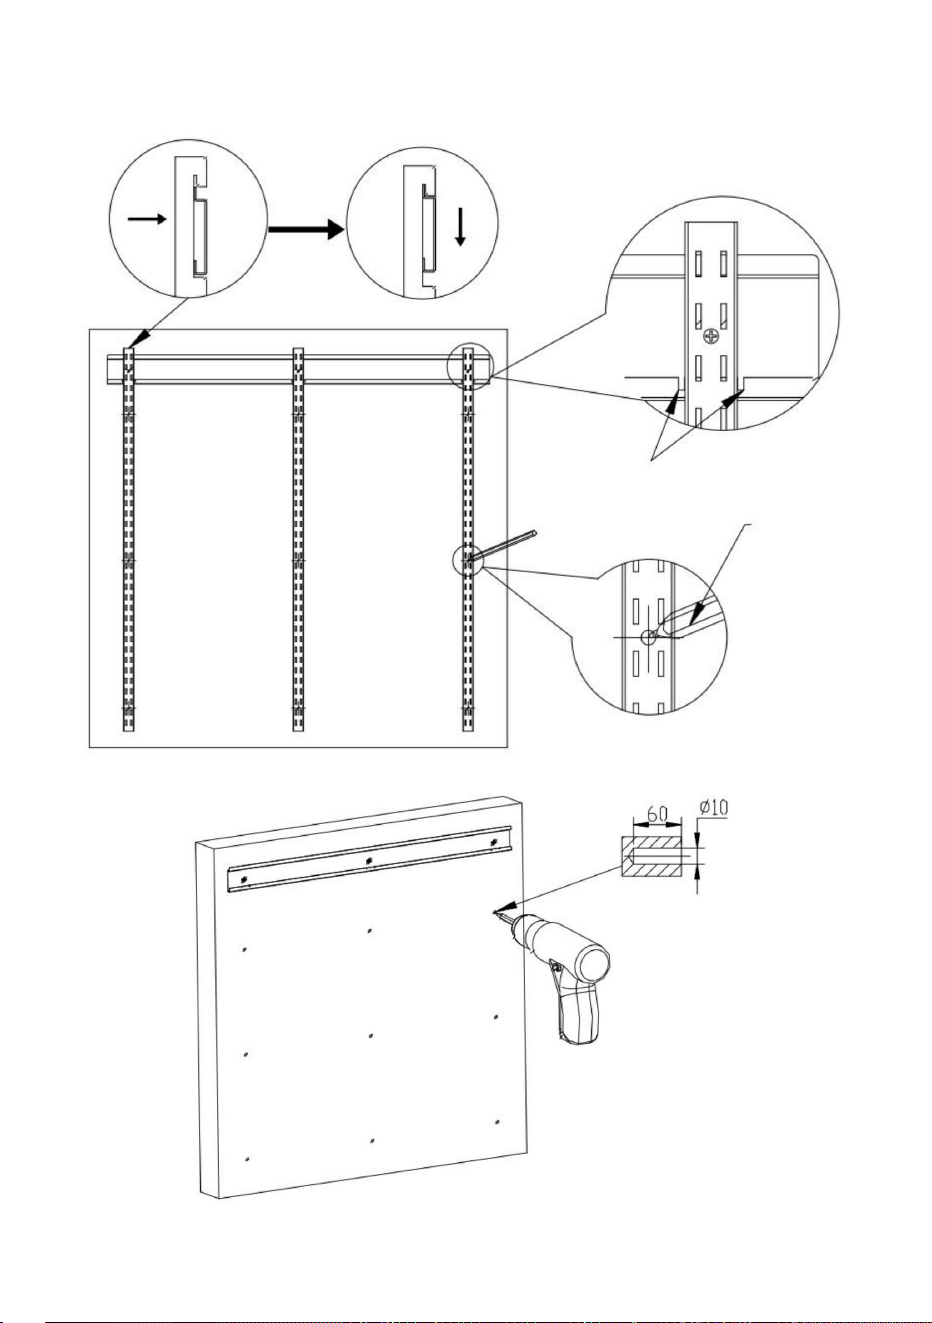
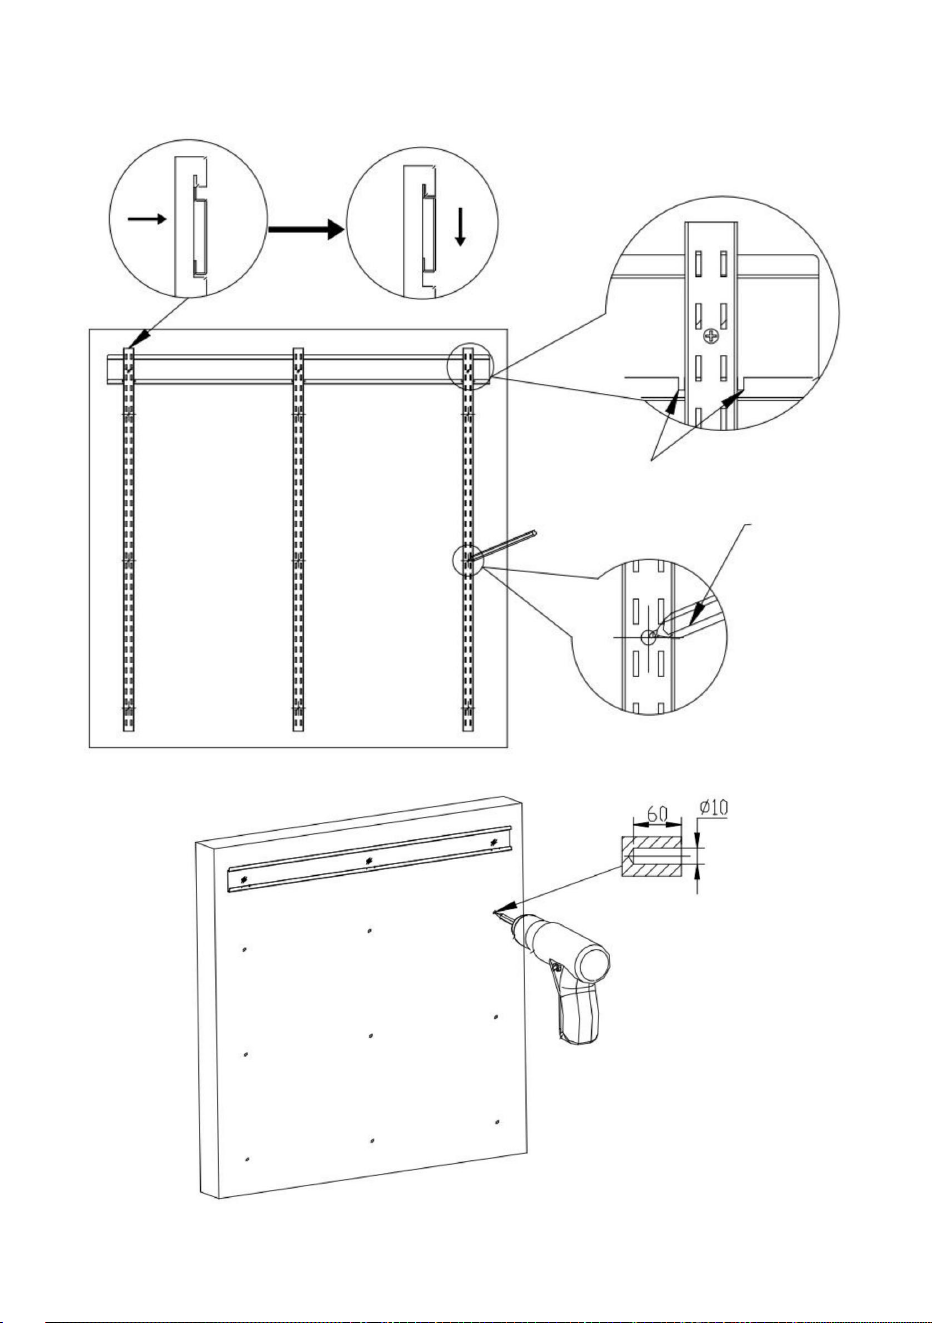
2.Remove the hanging board and drill holes(Φ10x60mm) into the wall.
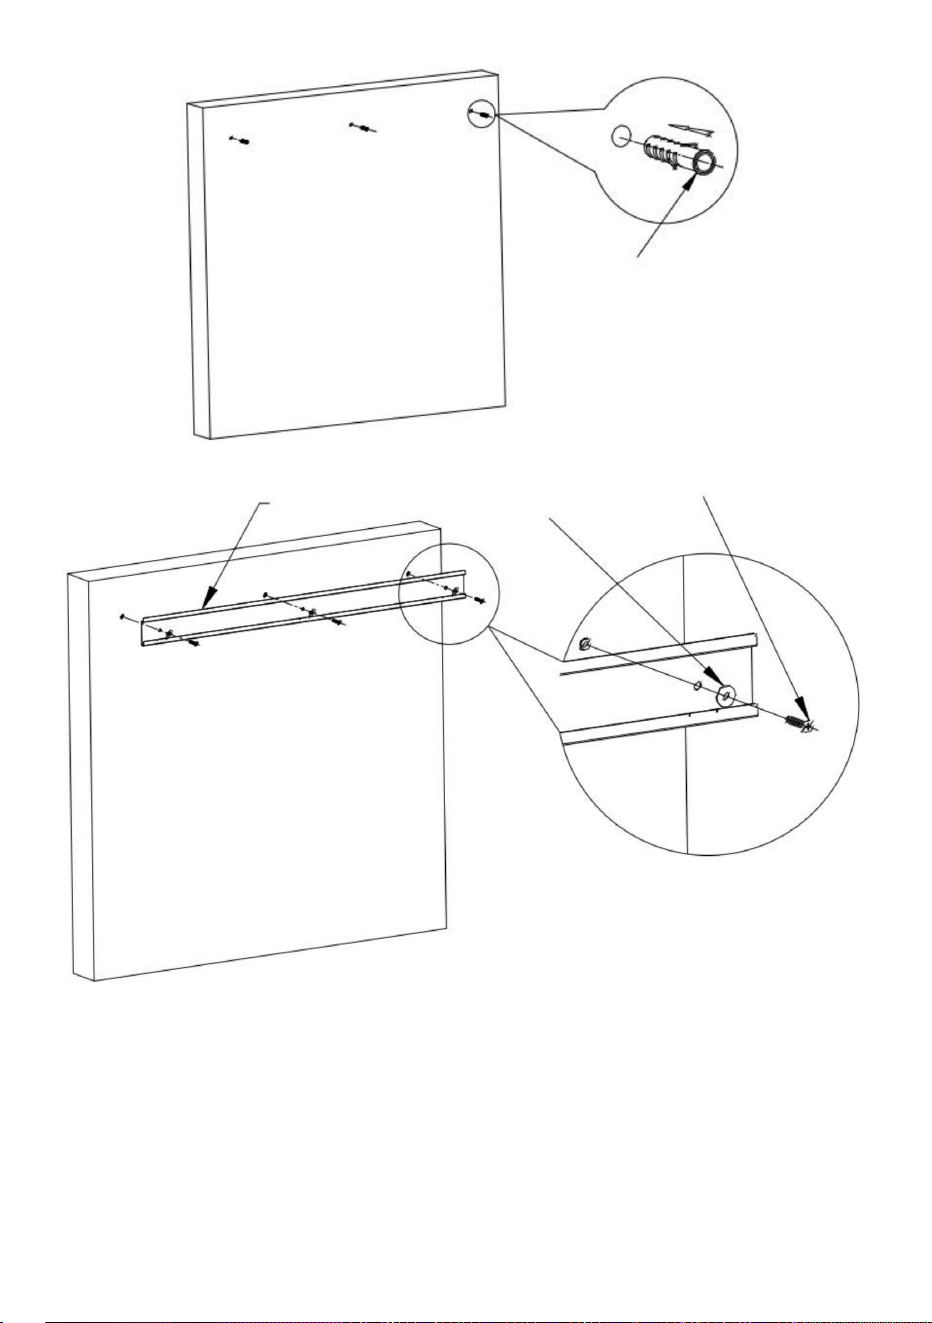
3.After clearing the residual soil in the hole, tap the expansion plug into the
hole completely.
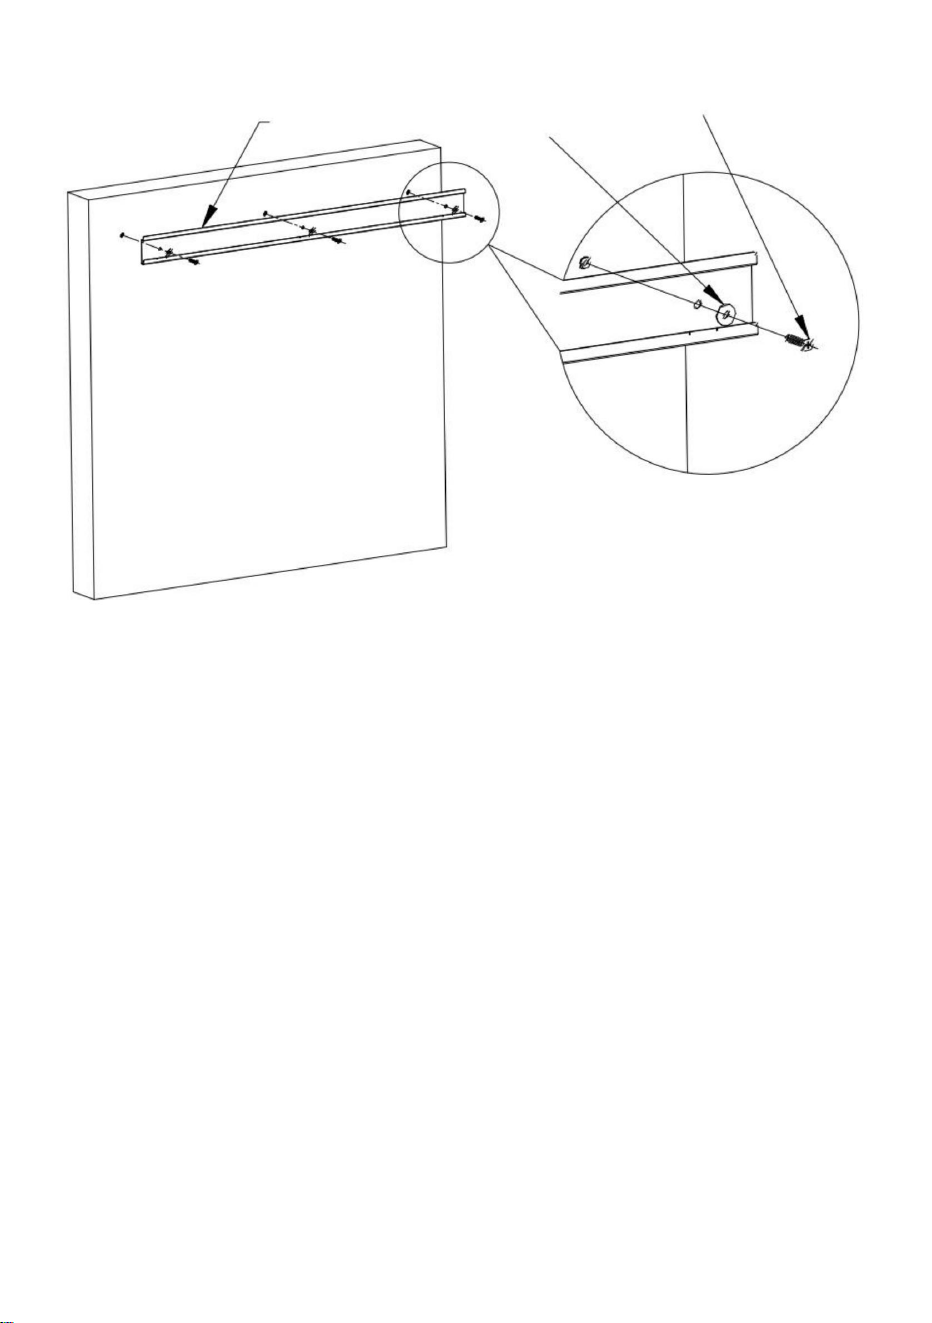
4.Install and fix the hanging board. The screw must be screwed in
completely and pressed tightly !
Plastic pin plug
Hanging board
7.Gaskets
6.Screw-ST6.3*60
- 6 -
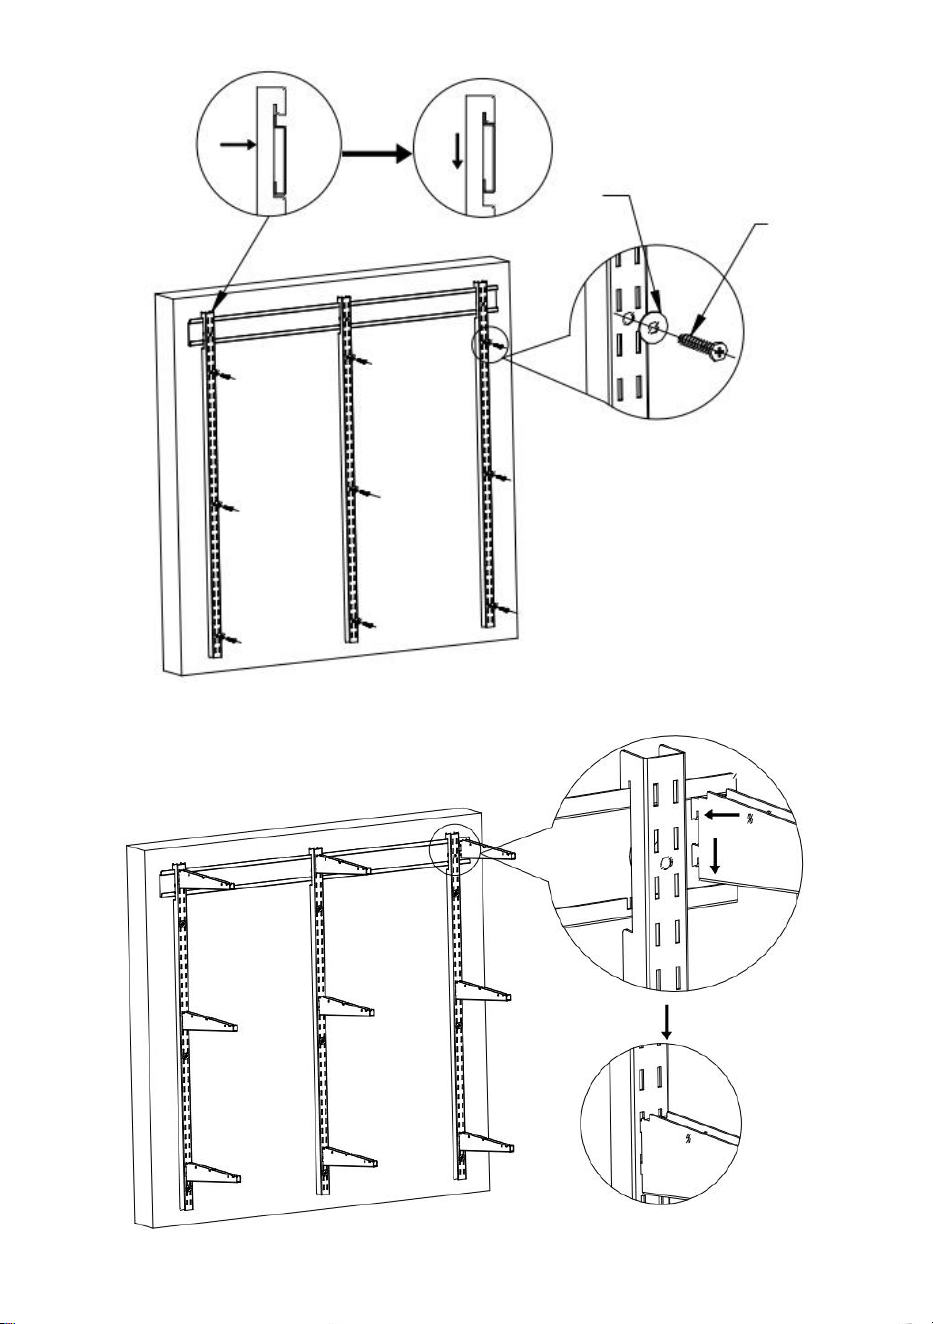
STEP 2 :Installation of the vertical beam
Positioning groove
Pencil dotting

- 7 -
Plastic pin plug
6.Screw-ST6.3*60
7.Gaskets

- 8 -
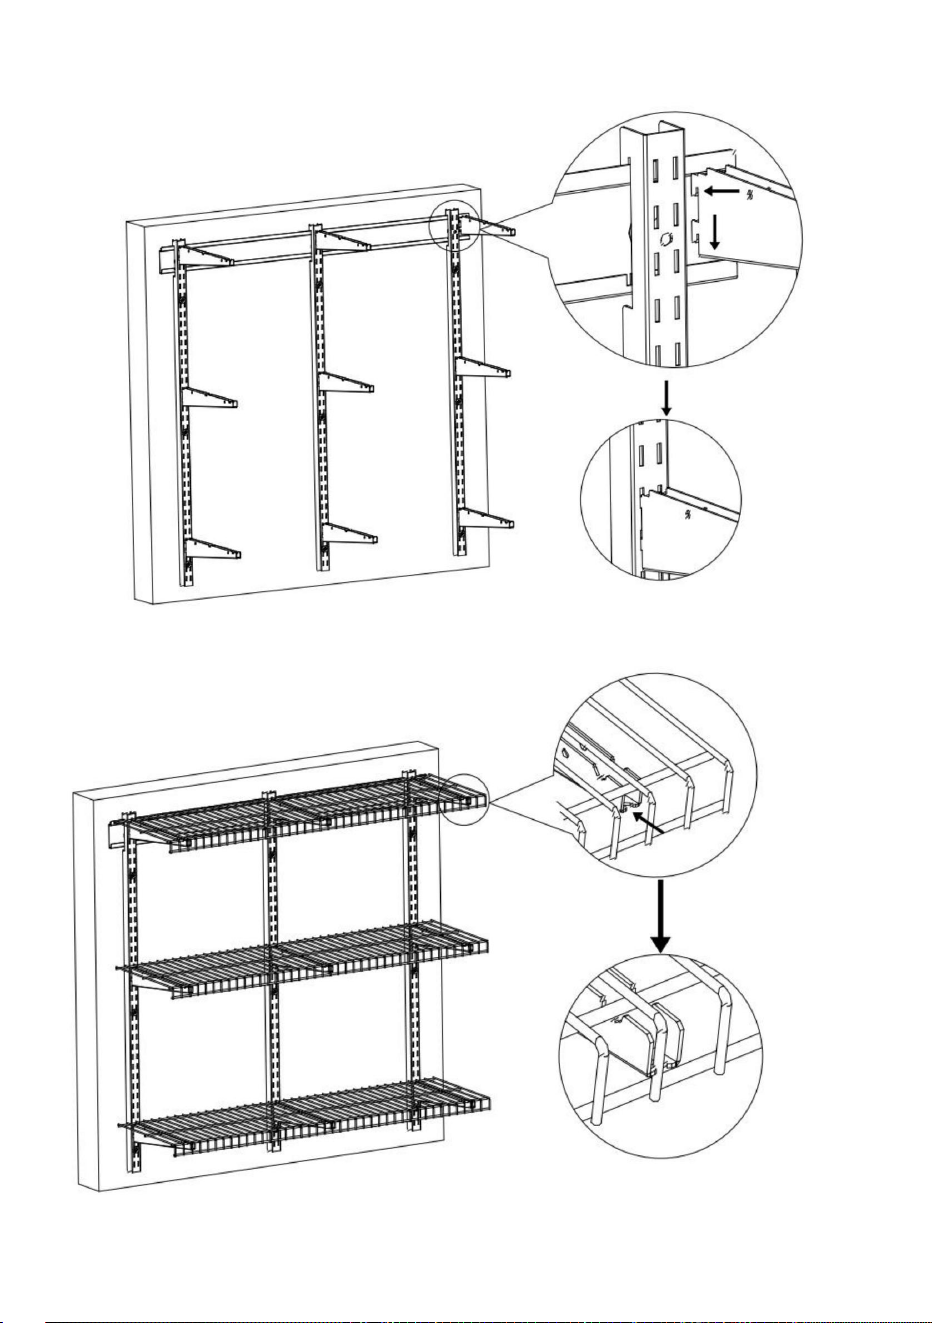
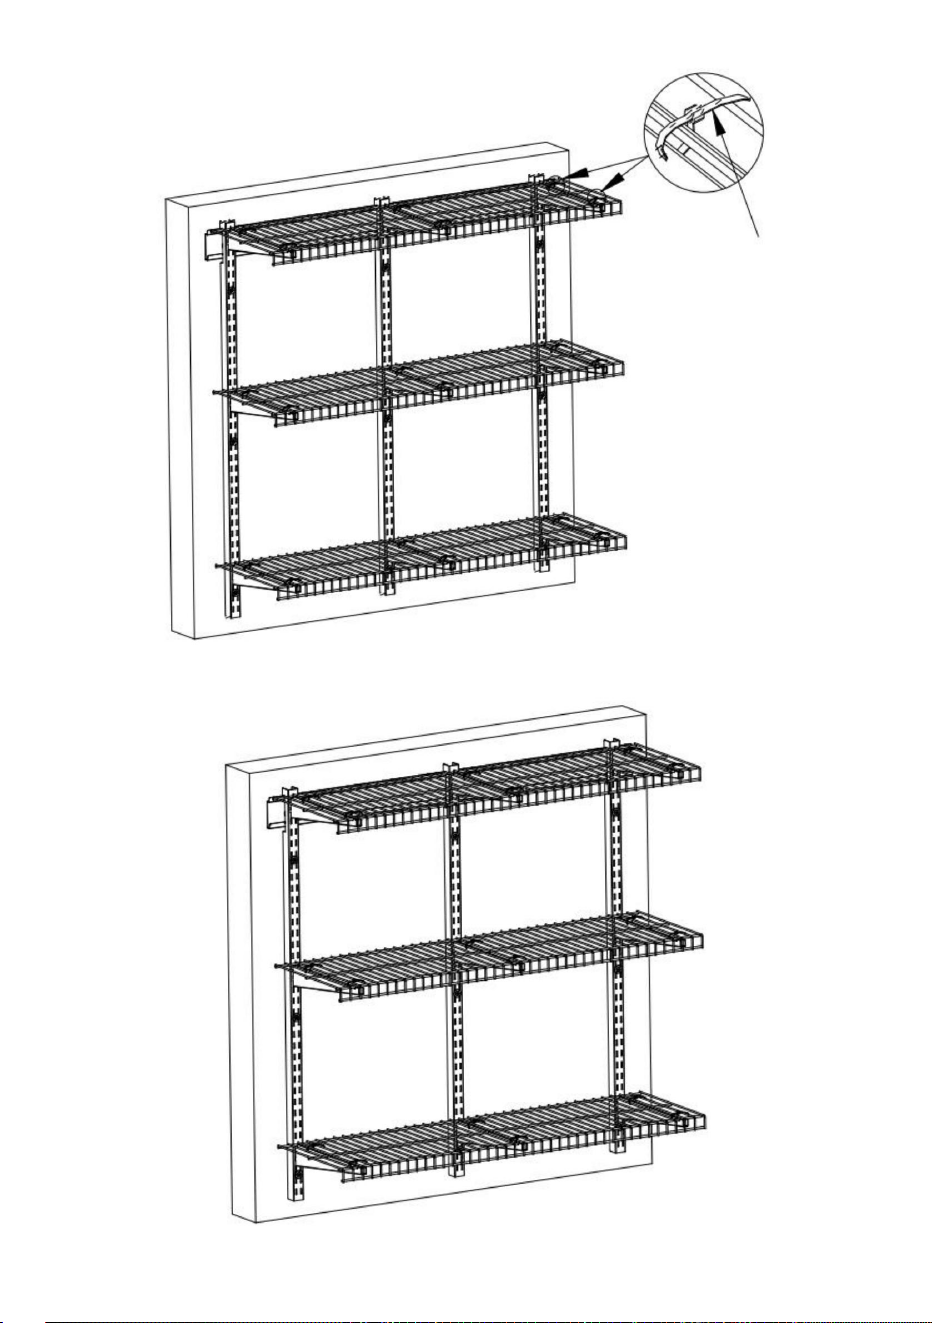
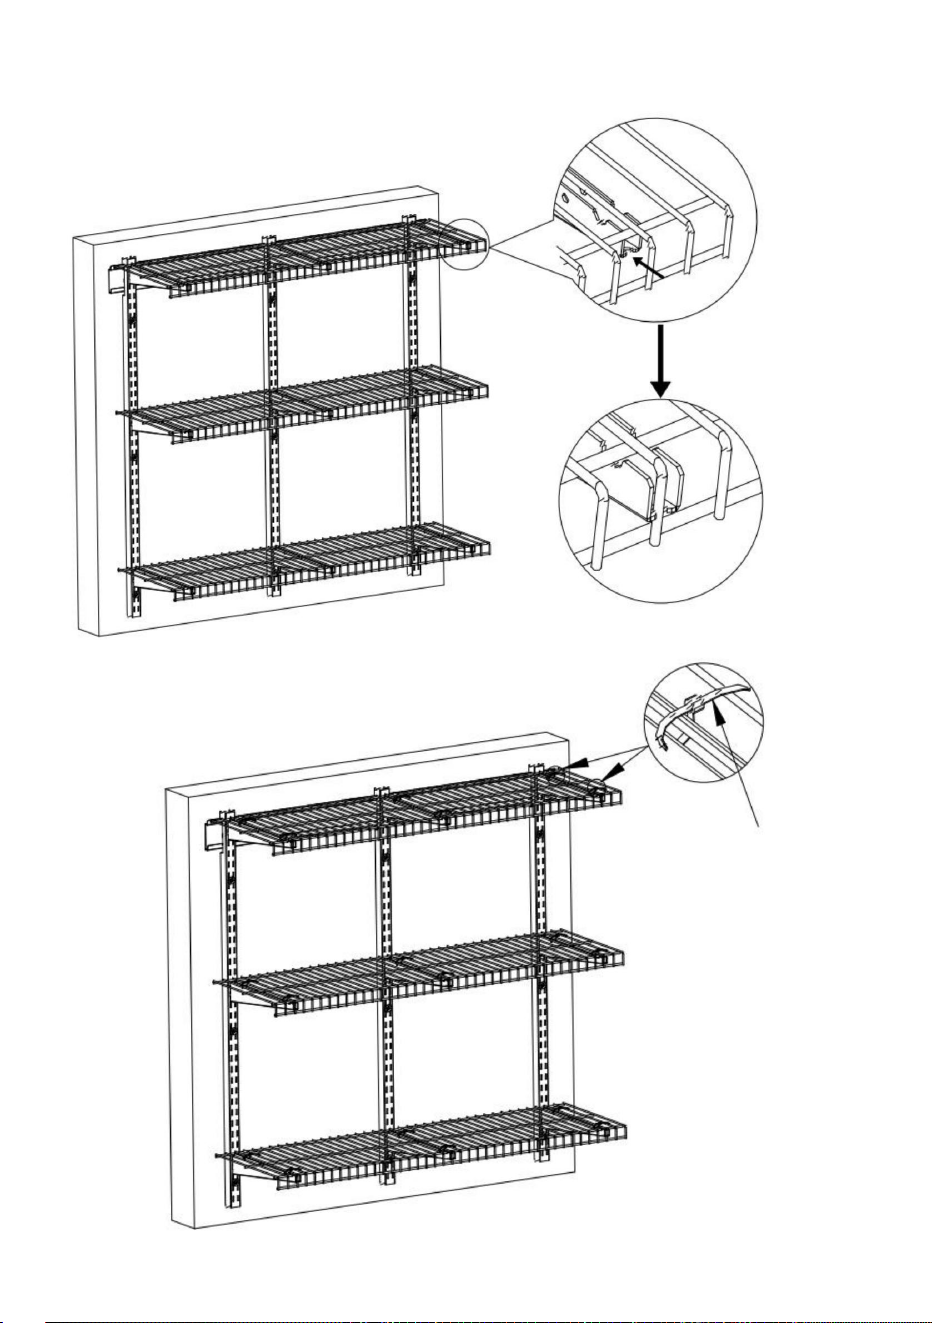
STEP 3 :Installation of the Bracket
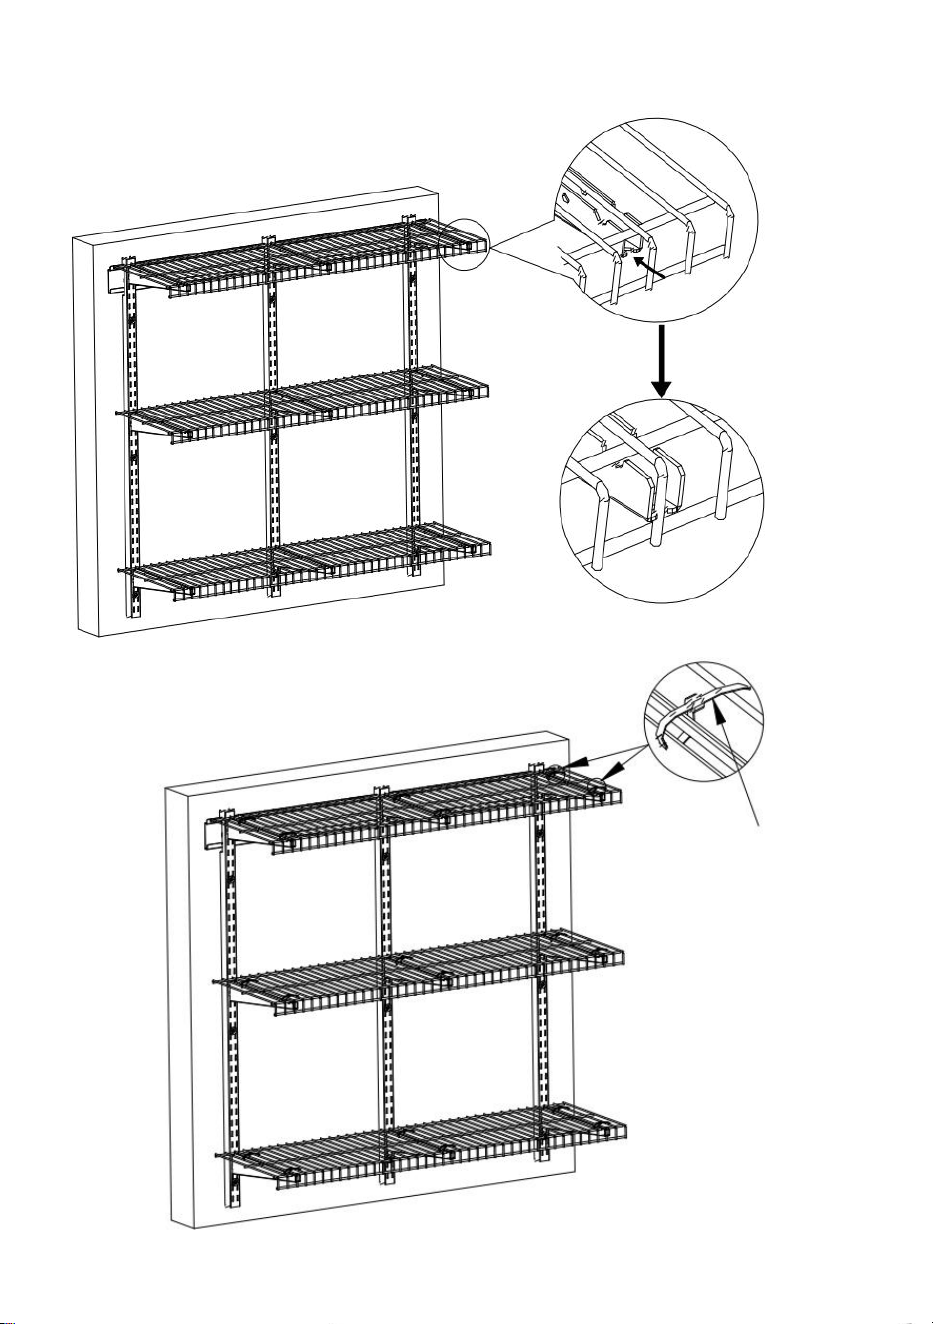
STEP 4:Installation of the Shelf
Fit into the slot

- 9 -
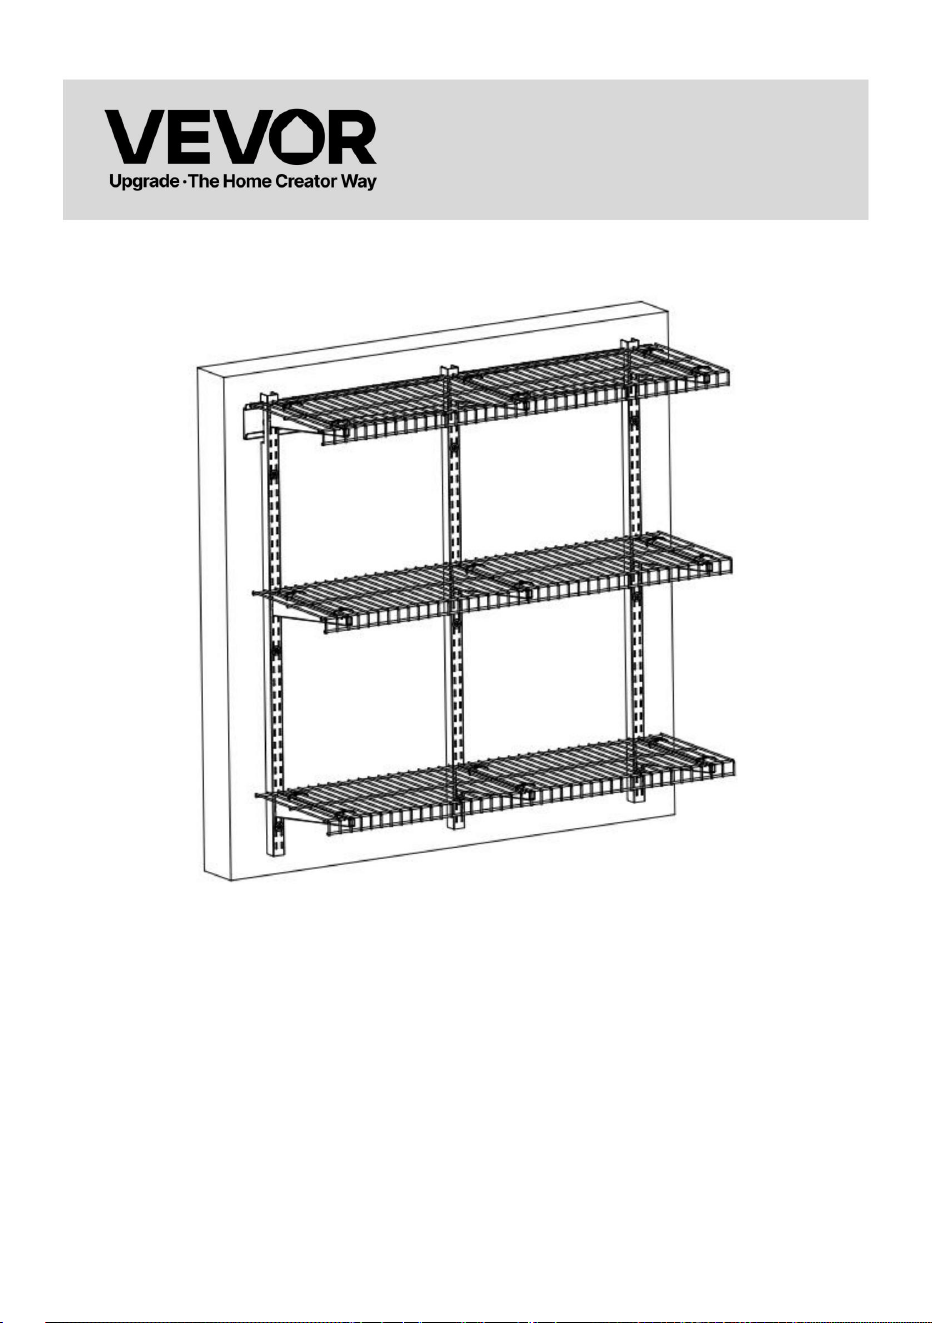
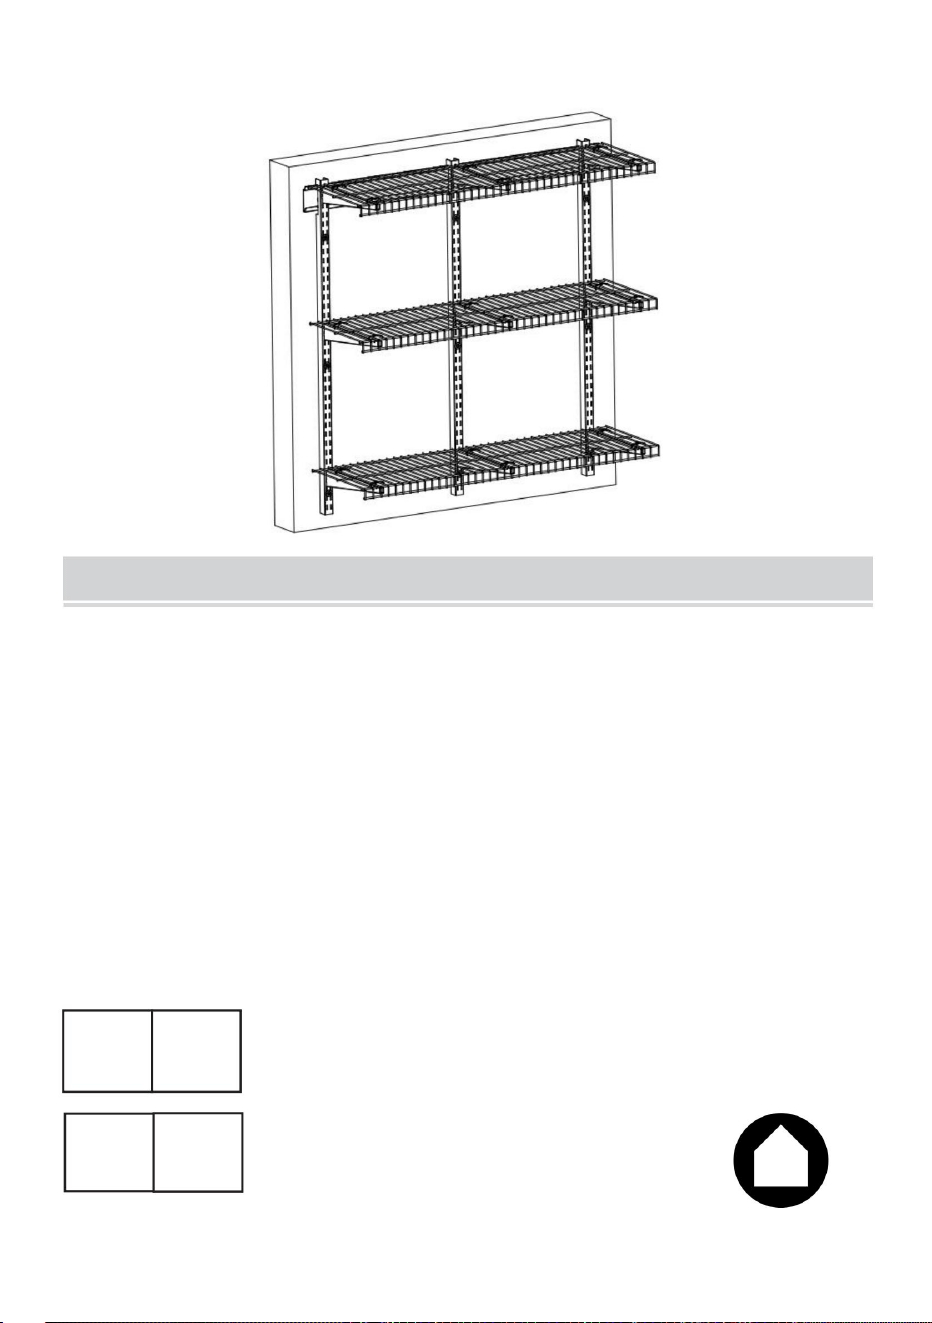
STEP 5 : Finish
Each bracket is fixed with
six straps.

- 10 -
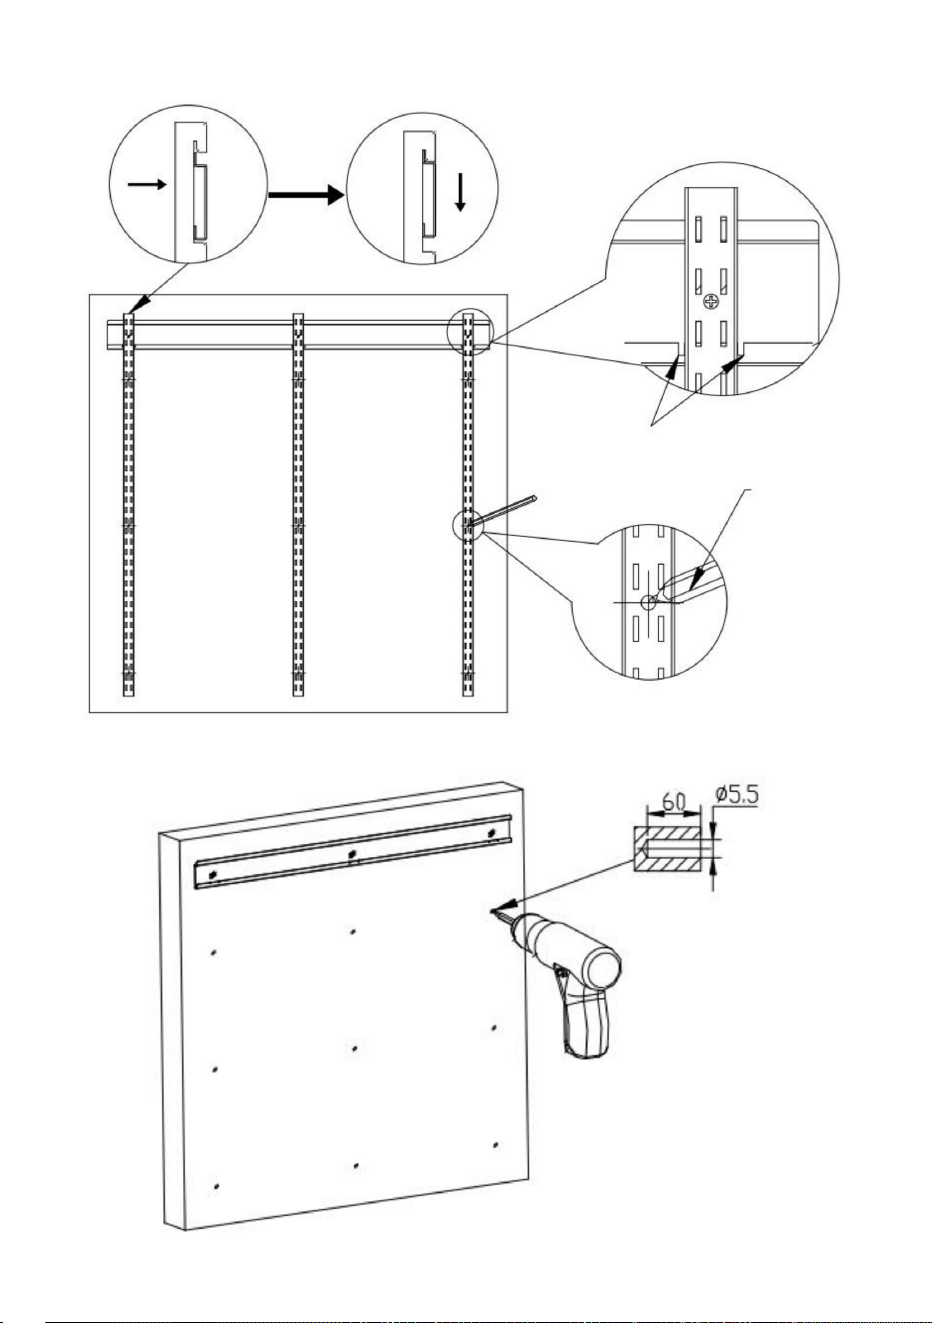
STEP 1-B : Installation on wooden wall post
Pencil dotting
Micro Level Vial
Hanging board

- 11 -
1. Paste the hanging board to the appropriate height, glue the Micro
level vial to adjust the level, and then draw dots with a pencil.
2. Remove the hanging board and drill holes(Φ5.5x60mm) into the
wall.
3. Install and fix the hanging board. The screw must be screwed in
completely and pressed tightly !
Hanging board
7.Gaskets
6.Screw-ST6.3*60

- 12 -
STEP 2 :Installation of the vertical beam
Positioning groove
Pencil dotting
- 13 -
STEP 3 :Installation of the Bracket
6.Screw-ST6.3*60
7.Gaskets
- 14 -
STEP 4:Installation of the Shelf
Fit into the slot
Each bracket is fixed with
six straps.
- 15 -
STEP 5 : Finish
MAINTENANCE
1. Do not overload.
2. Please try to avoid putting wet items on shelves. Keep the warehouse from getting too wet.
3. Please check and confirm whether the screws are loose every two months.
4. Dust off regularly with a clean rag, and arrange items neatly on shelves.
Manufacturer: Shanghaimuxinmuyeyouxiangongsi
Address: Shuangchenglu 803nong11hao1602A-1609shi, baoshanqu,shanghai 200000 CN.
Imported to AUS: SIHAO PTY LTD. 1 ROKEVA STREETEASTWOOD NSW 2122 Australia
Imported to USA: Sanven Technology Ltd. Suite 250, 9166 Anaheim Place, Rancho
Cucamonga, CA 91730
REP
UK
YH CONSULTING LIMITED. C/O YH Consulting
Limited Office 147, Centurion House, London
Road, Staines-upon-Thames, Surrey, TW18 4AX
REP
EC
E-CrossStu GmbH
Mainzer Landstr.69,
60329 Frankfurt am Main.

Étagèresmuralesde
MODÈLE:LR1236
garage

Modèle:LR1236
Étagèresmuralesde
REMARQUE:Photononcontractuelle.L'apparencepeutêtrelégèrementaméliorée.
Veuillezvousréféreràvotreachat.
Voicilesinstructionsoriginales.Veuillezlireattentivementtouteslesinstructionsdu
manuelavantutilisation.VEVORseréserveledroitd'interprétercemanuelàsa
guise.L'apparenceduproduitquevousrecevrezpeutdifférer.Nousvousprionsde
nousexcusersinousvousinformonsdesmisesàjourtechniquesoulogicielles
concernantnotreproduit.
garage
1

CONSIGNESDE
1.Perceusepistoletélectrique.
2.Tourneviscruciforme
3.Maillet(oumarteau)encaoutchouc
4.Crayon
SÉCURITÉ
AVERTISSEMENT:Ceproduitcontientdepetitespièces.Encasd’ingestion,ilpeutprésenterunrisquepourlasanté.
Risqued'étouffement.Tenircespetitespièceshorsdeportéedesenfants!
1.Avantl'installation,prenezdesmesuresdeprotectionpouréviterlesblessurescorporelles!
2.Leproduitdoitêtreinstallésurunmurenboisouenbéton.Avant
Lorsdel'installation,assurezvousquelacapacitéportantedumurdépasselavaleurmaximale.
Capacitéportante!Veuillezrenforcerlastructuredumuràtempspour
Consolidezlacapacitéportantedumur!Sinon,leproduitrisqued'êtreendommagé.
Desdommagesoudesblessurescorporellespeuventsurvenir!
3.Ceproduitestdestinéàunusageintérieuruniquement.Sonutilisationàl'extérieurpeutendommagerleproduit.
dommagesoublessurescorporelles.
4.Veuillezvérifieretconfirmerquelesvisnesontpasdesserréestouslesdeuxmois.
5.L'installationnécessiteaumoinsdeuxpersonnes.
6.Assurezvousd'avoirlulesinstructionsetd'avoirparfaitementcompriscommentprocéder.
Installez.Sivousnecomprenezpasuneétapedel'installation,contactezuntechnicien.
Personneld'installationprofessionnel.
7.Nepassurcharger!Capacitémaximale:150lb/parcouche(répartieuniformément!)
Préparationdel'installation:
PORTDEPROTECTIONDESYEUX,DESPIEDSETDESMASQUESANTI
2
POUSSIÈRE

Étagère
Support
Ficheàbrocheen
Joints
plastique
Modèle
Nombrede
Portancemaximale
Vis
Flacondeniveaumicro
ST6.3*60
Couleur
Bapacité
couches
LR1236
Matériel
3
Dimensionsdelasurfacedesétagères
11x36pouces/275x914mm
150lb/68kg(par
Acier
Noir
couche)
MODÈLEET
COMPOSANTS
PARAMÈTRES
Qté
1
3
9
3
12
12
12
1
Image Nom
panneaususpendu
Poutre
Non.
verticale
1
2
3
4
5
6
7
3
8

ASSEMBLÉE
ÉTAPE1A:Installationsurdesmursenbéton
Flacondeniveaumicro
massif
10
9
sangles
Manuel
pointilléau
4
crayon
d'utilisation
18
panneaususpendu
1

Ficheàbrocheen
panneau
5
suspendu
plastique
6.VisST6.3*60
7.Joints
1.Collezlepanneaudesuspensionàlahauteurappropriée,puiscollezlemicroniveau.
Utilisezunefiolepourajusterleniveau,puistracezdespointsaucrayon.
2.Retirezlepanneaudesuspensionetpercezdestrous(Φ10x60mm)danslemur.
3.Aprèsavoirenlevélaterrerésiduelledutrou,enfoncezlebouchond'expansiondansle
troucomplètement.
4.Installezetfixezlepanneaudesuspension.Lavisdoitêtrevisséedans
complètementetfermementpressé!
ÉTAPE2:Installationdelapoutre
6
verticale
Rainurede
pointilléaucrayon
positionnement

Ficheàbrocheen
6.VisST6.3*60
plastique
7.Joints
7

ÉTAPE3:Installationdusupport
ÉTAPE4:Installationde
8
l'étagère
S'insérerdansl'emplacement

Chaquesupportestfixéavec
six
9
sangles.
ÉTAPE5:Terminer

pointilléau
10
crayon
ÉTAPE1B:Installationsurpoteaumuralen
panneaususpendu
bois
Flacondeniveaumicro
6.Vis
panneau
11
suspendu
ST6.3*60
7.Joints
1.Collezlepanneaudesuspensionàlahauteurappropriée,collezleMicro
Utilisezleniveauàbullepourajusterleniveau,puistracezdespointsaucrayon.
2.Retirezlepanneaudesuspensionetpercezdestrous(Φ5,5x60mm)dansle
mur.
3.Installezetfixezlepanneaudesuspension.Lavisdoitêtrevisséedans
complètementetfermementpressé!

ÉTAPE2:Installationdelapoutre
12
verticale
Rainuredepositionnement
pointilléaucrayon

7.
ÉTAPE3:Installationdusupport
Joints
6.VisST6.3*60
13

ÉTAPE4:Installationde
14
l'étagère
S'insérerdansl'emplacement
Chaquesupportestfixéavec
sixsangles.

1.Nepassurcharger.
2.Veuillezéviterdeplacerdesarticleshumidessurlesétagères.Veillezàcequel'entrepôtnedeviennepastrophumide.
3.Veuillezvérifieretconfirmerquelesvisnesontpasdesserréestouslesdeuxmois.
4.Dépoussiérezrégulièrementavecunchiffonpropreetrangezsoigneusementlesarticlessurles
15
étagères.
YHCONSULTINGLIMITED.C/OYHConsulting
ÉTAPE5:
Fabricant:Shanghaimuxinmuyeyouxiangongsi
Adresse:Shuangchenglu803nong11hao1602A1609shi,baoshanqu,Shanghai200000CN.
ImportéenAustralie:SIHAOPTYLTD.1ROKEVASTREET,ESTWOODNSW2122,Australie
ImportéauxÉtatsUnis:SanvenTechnologyLtd.,Suite250,9166AnaheimPlace,Rancho
Cucamonga,CA
Bureau147,CenturionHouse,Londres
Route,StainesuponThames,Surrey,TW184AX
ECrossStuGmbH
MainzerLandstr.69,
60329FrancfortsurleMain.
91730
Terminer
ENTRETIEN
ReprésentantduRoyaumeUni
ReprésentantdelaCE

Garagenwandregale
MODELL: LR1236
- 1 -
Garagenwandregale
Modell: LR1236
Hinweis: Foto dient nur als Referenz. Das Erscheinungsbild kann teilweise verbessert worden sein.
Bitte beziehen Sie sich auf Ihren Kauf.
Dies ist die Originalanleitung. Bitte lesen Sie die gesamte Bedienungsanleitung vor der
Inbetriebnahme sorgfältig durch. VEVOR behält sich die Auslegung der Bedienungsanleitung vor.
Das Aussehen des Produkts kann von dem gelieferten Produkt abweichen. Wir bitten um
Verständnis, dass wir Sie nicht erneut über etwaige Technologie- oder Software-Updates informieren
werden.

Erstickungsgefahr. Kleinteile von Kindern fernhalten!
1. Treffen Sie vor der Installation Schutzmaßnahmen, um Verletzungen zu
Augenschutz, Fußschutz, Staubmaske, Schutzkleidung
vermeiden!
SICHERHEITSHINWEISE
WARNUNG: Dieses Produkt enthält Kleinteile. Verschlucken kann lebensgefährlich
Installationsvorbereitung:
sein.
2. Das Produkt muss an einer Holz- oder Betonwand montiert werden. Vorher
Bei der Installation ist sicherzustellen, dass die Tragfähigkeit der Wand den maximalen Wert übersteigt.
Tragfähigkeit! Bitte verstärken Sie die Wandkonstruktion rechtzeitig.
Die Tragfähigkeit der Wand muss unbedingt erhöht werden! Andernfalls kann das Produkt beschädigt werden.
Es können Sachschäden oder Personenschäden entstehen!
3. Dieses Produkt ist nur für den Gebrauch in Innenräumen bestimmt. Die Verwendung im Freien kann zu Produktschäden führen.
Sachschaden oder Personenschaden.
4. Bitte überprüfen und bestätigen Sie alle zwei Monate, ob die Schrauben locker sind.
5. Für die Installation werden mindestens zwei Personen benötigt.
6. Stellen Sie sicher, dass Sie die Anweisungen gelesen und vollständig verstanden haben.
Installieren Sie die Installation. Wenn Sie einen der Installationsschritte nicht verstehen, wenden Sie sich an einen Fachmann.
professionelles Installationspersonal.
7. Nicht überladen! Maximale Tragfähigkeit: 150 Pfund pro Lage (gleichmäßig
- 2 -
verteilt!)
1. Elektrische Pistolenbohrmaschine.
2. Kreuzschlitzschraubendreher
3. Gummihammer (oder Hammer)
4. Bleistift

Halterung
Regal
Dichtungen
Kunststoffstiftstecker
Hängebrett
Vertikaler Balken
1
3
9
3
12
12
12
Schraube-
Mikro-Niveau-Ampulle
ST6.3*60
1
Menge
NameNEIN. Bild
1
2
3
4
5
6
7
8
MODELL UND
- 3 -
PARAMETER
Anzahl der
KOMPONENTEN
Schichten
Modell LR1236
Regalflächengröße
Maximale Tragfähigkeit
3
11 x 36 Zoll / 275 x 914 mm
150 Pfund/68 kg (pro
Material
Schicht)
Stahl
Farbe Schwarz
MONTAGE
SCHRITT 1-A: Montage auf massiven Betonwänden
10
9
Riemen
- 4 -
Bleistiftpunktierung
Benutzerhandbuch
18
Hängebrett
1
Mikro-Niveau-Ampulle
- 5 -
Hängebrett
Kunststoffstift
6. Schraube-ST6.3*60
7. Dichtungen
1. Kleben Sie die Aufhängeplatte in der passenden Höhe an und befestigen Sie die Mikrowasserwaage.
Mit einer Libelle den Pegel einstellen und dann mit einem Bleistift Punkte zeichnen.
2. Entfernen Sie die Aufhängevorrichtung und bohren Sie Löcher (ÿ10x60mm) in die Wand.
3. Nachdem der restliche Boden aus dem Loch entfernt wurde, klopfen Sie den Spreizdübel in die Öffnung.
komplett durchlöchert.
4. Montieren und befestigen Sie das Hängebrett. Die Schraube muss eingeschraubt werden.
vollständig und fest gepresst!

Positionierungsnut
SCHRITT 2: Montage des vertikalen
Bleistiftpunktierung
Trägers
- 6 -

Kunststoffstift
7.
6. Schraube-ST6.3*60
Dichtungen
- 7 -
SCHRITT 3: Montage der Halterung
SCHRITT 4: Montage des
- 8 -
Regals
In den Schlitz einpassen

Jede Halterung ist befestigt mit
sechs
SCHRITT 5: Fertigstellen
Riemen.
- 9 -

SCHRITT 1-B: Montage an einem
Hängebrett
Bleistiftpunktierung
Holzpfosten
Mikro-Niveau-Ampulle
- 10 -

6. Schraube-
1. Bringen Sie die Aufhängeplatte in der passenden Höhe an und kleben Sie das Mikro-Folienmaterial darauf.
Verwenden Sie eine Libelle, um das Niveau einzustellen, und zeichnen Sie dann Punkte mit einem Bleistift.
2. Entfernen Sie das Aufhängebrett und bohren Sie Löcher (æ5,5x60mm) in die
Wand.
3. Montieren und befestigen Sie das Hängebrett. Die Schraube muss eingeschraubt
- 11 -
werden.
Hängebrett
ST6.3*60
7. Dichtungen
vollständig und fest gepresst!

SCHRITT 2: Montage des vertikalen
- 12 -
Trägers
Positionierungsnut
Bleistiftpunktierung

7.
- 13 -
Dichtungen
6. Schraube-ST6.3*60
SCHRITT 3: Montage der Halterung

In den Schlitz einpassen
SCHRITT 4: Montage des
Jede Halterung ist befestigt mit
sechs Riemen.
Regals
- 14 -
SCHRITT 5:
UK
EG-
- 15 -
Vertreter
REP
Fertigstellen
WARTUNG
1. Nicht überladen.
2. Bitte vermeiden Sie es, nasse Gegenstände in die Regale zu stellen. Achten Sie darauf, dass das Lager nicht zu feucht wird.
3. Bitte überprüfen und bestätigen Sie alle zwei Monate, ob die Schrauben locker sind.
4. Wischen Sie die Gegenstände regelmäßig mit einem sauberen Lappen ab und ordnen Sie sie ordentlich in den Regalen an.
Hersteller: Shanghai muxinmuyeyouxiangongsi
Adresse: Shuangchenglu 803nong11hao1602A-1609shi, baoshanqu, Shanghai 200000 CN.
Importiert nach Australien: SIHAO PTY LTD. 1 ROKEVA STREET, EASTWOOD NSW 2122, Australien
Importiert in die USA: Sanven Technology Ltd. Suite 250, 9166 Anaheim Place, Rancho
Cucamonga, CA 91730
YH CONSULTING LIMITED. C/O YH Consulting
Limited Office 147, Centurion House, London
Straße, Staines-upon-Thames, Surrey, TW18 4AX
E-CrossStu GmbH
Mainzer Landstr.69,
60329 Frankfurt am Main.

Scaffalature da parete per garage
MODELLO:LR1236

Scaffalature da parete per
- 1 -
garage
NOTA: Foto a scopo illustrativo. L'aspetto potrebbe essere parzialmente migliorato.
Modello:LR1236
Si prega di fare riferimento al proprio acquisto.
Queste sono le istruzioni originali, si prega di leggere attentamente tutte le istruzioni
del manuale prima dell'uso. VEVOR si riserva la piena interpretazione del proprio
manuale utente. L'aspetto del prodotto dipenderà dal prodotto ricevuto. Vi preghiamo
di scusarci se non vi informeremo più in caso di aggiornamenti tecnologici o software
sul nostro prodotto.

ISTRUZIONI DI SICUREZZA
ATTENZIONE: Questo prodotto contiene piccole parti. Se ingerito, può rappresentare un rischio.
Pericolo di soffocamento. Tenere queste piccole parti lontano dalla portata dei bambini!
1. Prima dell'installazione, adottare misure di protezione per evitare lesioni
- 2 -
personali!
2. Il prodotto deve essere installato su una parete in legno o cemento. Prima
installazione, assicurarsi che la capacità portante del muro superi il massimo
capacità portante! Si prega di rafforzare la struttura del muro in tempo per
consolidare la capacità portante del muro! In caso contrario, il prodotto potrebbe essere
potrebbero verificarsi danni o lesioni personali!
3. Questo prodotto è destinato esclusivamente all'uso interno. L'uso esterno può causare danni al prodotto.
danni o lesioni personali.
4. Controllare e confermare ogni due mesi che le viti siano allentate.
5. Per completare l'installazione sono necessarie almeno due persone.
6. Assicurati di aver letto le istruzioni e di aver compreso appieno come
installare. Se non capisci uno qualsiasi dei passaggi di installazione, contatta un
personale addetto all'installazione professionale.
7. Non sovraccaricare! Capacità massima: 150 libbre/per strato (distribuito uniformemente!)
Preparazione all'installazione:
PROTEZIONE DEGLI OCCHI PROTEZIONE DEI PIEDI MASCHERA ANTIPOLVERE INDUMENTI DI
1. Trapano elettrico a pistola.
2. Cacciavite a croce
3. Martello di gomma (o martello)
4. Matita
PROTEZIONE

Immagine Nome
Quantità
MODELLO E
NO.
1
2
3
4
5
6
7
- 3 -
8
COMPONENTI
PARAMETRI
Modello
Numero di
Dimensioni della superficie della scaffalatura
LR1236
strati
Capacità massima del
Materiale
cuscinetto
3
11*36 pollici/275×914 mm
150 libbre/68 kg (per strato)
Acciaio
Colore Nero
Spina a perno in plastica
1
3
9
3
12
12
12
Tavola sospesa
Trave
Guarnizioni
verticale
1
Staffa
Mensola
Vite-ST6.3*60
Fiala di livello micro

ASSEMBLEA
FASE 1-A: Installazione su pareti in calcestruzzo
Fiala di livello micro
pieno
- 4 -
9
18
Cinghie
Manuale
10
utente
1
punteggiatura a matita
Tavola sospesa

Spina a perno in
Tavola
7.
1. Incollare la tavola sospesa all'altezza appropriata, incollare il Micro livello
fiala per regolare il livello, quindi tracciare dei punti con una matita.
2. Rimuovere la tavola di sospensione e praticare dei fori (ÿ10x60mm) nel muro.
3. Dopo aver rimosso il terreno residuo nel foro, inserire il tappo di espansione nel
buco completamente.
4. Installare e fissare la tavola sospesa. La vite deve essere avvitata
completamente e premuto saldamente!
Guarnizioni
sospesa
plastica
6.Vite-ST6.3*60
- 5 -

FASE 2: Installazione della trave
- 6 -
verticale
Scanalatura di posizionamento
punteggiatura a matita

Spina a perno in plastica
7. Guarnizioni
6.Vite-ST6.3*60
- 7 -

FASE 3: Installazione della staffa
FASE 4: Installazione dello
- 8 -
scaffale
Inserire nello slot

Ogni staffa è fissata con
sei
- 9 -
cinghie.
FASE 5: Fine

FASE 1-B: Installazione su montante in
Fiala di livello
- 10 -
micro
legno
punteggiatura a
Tavola sospesa
matita

6.Vite-
7.
- 11 -
Guarnizioni
ST6.3*60
Tavola sospesa
1. Incollare la tavola sospesa all'altezza appropriata, incollare il Micro
livella per regolare il livello, quindi disegna dei punti con una matita.
2. Rimuovere la tavola sospesa e praticare dei fori (ÿ5,5x60mm) nel
3. Installare e fissare la tavola sospesa. La vite deve essere avvitata
completamente e premuto saldamente!
parete.

FASE 2: Installazione della trave
- 12 -
verticale
Scanalatura di
punteggiatura a matita
posizionamento

7.
FASE 3: Installazione della staffa
Guarnizioni
6.Vite-ST6.3*60
- 13 -

FASE 4: Installazione dello
- 14 -
scaffale
Inserire nello slot
Ogni staffa è fissata con
sei cinghie.

FASE 5:
RAPPRESENTANZA DEL REGNO
Rappresentante della CE
UNITO
MANUTENZIONE
Fine
1. Non sovraccaricare.
2. Si prega di evitare di mettere oggetti bagnati sugli scaffali. Evitare che il magazzino si bagni troppo.
3. Controllare e confermare ogni due mesi che le viti siano allentate.
4. Spolverare regolarmente con uno straccio pulito e disporre gli oggetti in modo ordinato sugli scaffali.
Produttore: Shanghai muxinmuyeyouxiangongsi
Indirizzo: Shuangchenglu 803nong11hao1602A-1609shi, baoshanqu, Shanghai 200000 CN.
Importato in AUS: SIHAO PTY LTD. 1 ROKEVA STREETEASTWOOD NSW 2122 Australia
Importato negli USA: Sanven Technology Ltd. Suite 250, 9166 Anaheim Place, Rancho
Cucamonga, CA 91730
YH CONSULTING LIMITED. Per conto di YH Consulting
Ufficio limitato 147, Centurion House, Londra
Strada, Staines-upon-Thames, Surrey, TW18 4AX
E-CrossStu GmbH
Mainzer Landstr. 69,
60329 Francoforte sul Meno.
- 15 -

Estanteríasdeparedparagaraje
MODELO:LR1236

Estanteríasdeparedpara
1
garaje
Modelo:LR1236
NOTA:Fotodereferencia.Laaparienciapodríamejorarseparcialmente.
Porfavorconsultesucompra.
Estassonlasinstruccionesoriginales;leaatentamentetodaslasinstrucciones
delmanualantesdeutilizarlo.VEVORsereservaelderechodeinterpretarsu
manualdeusuario.Laaparienciadelproductodependerádelproductoquehaya
recibido.Lerogamosquenosdisculpesinoleinformamosdenuevosihay
actualizacionestecnológicasodesoftwareennuestroproducto.

INSTRUCCIONESDESEGURIDAD
ADVERTENCIA:Esteproductocontienepiezaspequeñas.Siseingiere,puedecausar
Peligrodeasfixia.¡Mantengaestaspiezaspequeñasfueradelalcancedelosniños!
1.¡Antesdelainstalación,tomemedidasdeprotecciónparaevitarlesiones
2
personales!
PROTECCIÓNPARALOSOJOSPROTECCIÓNPARALOSPIESMASCARILLACONTRAELPOLVOROPADE
2.Elproductodebeinstalarseenunapareddemaderaodehormigón.Antes
Durantelainstalación,asegúresedequelacapacidaddecargadelaparedsupereellímitemáximo
¡Capacidaddecarga!Porfavor,refuercelaestructuradelmuroatiempopara
¡Consolidelacapacidadportantedelmuro!Delocontrario,elproductopodría...
¡Podríanproducirsedañosolesionespersonales!
3.Esteproductoessoloparausoeninteriores.Elusoenexteriorespuedecausarquemaduras.
dañosolesionespersonales.
4.Compruebeyconfirmesilostornillosestánflojoscadadosmeses.
5.Serequierenalmenosdospersonasparacompletarlainstalación.
6.Asegúresedehaberleídolasinstruccionesycomprendidocompletamentecómo
instalar.Sinoentiendealgunodelospasosdeinstalación,póngaseencontactoconun
Personaldeinstalaciónprofesional.
7.¡Nosobrecargue!Capacidadmáxima:150lbporcapa(distribuidauniformemente).
Preparacióndelainstalación:
1.Taladrodepistolaeléctrico.
2.Destornilladordeestrella
3.Mazodegoma(omartillo)
4.Lápiz
PROTECCIÓN

Soporte
1
3
9
3
12
12
12
Tapóndeclavijadeplástico
TornilloST6.3*60
Estante
1
Modelo
Númerode
Capacidadmáximadel
Juntas
Vialdenivelmicro
rodamiento
LR1236
capas
Material
3
Tamañodelasuperficiedelaestantería
11x36pulgadas/275x914mm
150libras/68kg(por
Color
capa)
Acero
Negro
MODELOY
COMPONENTES
PARÁMETROS
Nombre
Tablerocolgante
Vigavertical
No. Imagen
Cantidad
1
2
3
4
5
6
7
3
8

ASAMBLEA
PASO1A:Instalaciónenparedesdehormigónmacizo
10
9
Correas
Manualde
4
usuario
Punteadoconlápiz
18
Tablerocolgante
1
Vialdenivelmicro
Tapóndeclavijade
Tablero
7.
5
Juntas
colgante
plástico
6.TornilloST6.3*60
1.Pegueeltablerocolgantealaalturaadecuada,pegueelnivelMicro
vialparaajustarelnivelyluegodibujarpuntosconunlápiz.
2.Retireeltablerocolganteytaladreagujeros(Φ10x60mm)enlapared.
3.Despuésdelimpiarlatierraresidualenelagujero,golpeeeltapóndeexpansiónenel
agujerocompletamente.
4.Instaleyfijeeltablerocolgante.Eltornillodebeestarbienatornillado.
¡Completamenteybienapretado!
PASO2:Instalacióndelaviga
6
vertical
Ranuradeposicionamiento
Punteadoconlápiz

Tapóndeclavijade
7.Juntas
plástico
6.TornilloST6.3*60
7

PASO3:Instalacióndelsoporte
PASO4:Instalacióndel
8
estante
Encajarenlaranura

Cadasoportesefijacon
seis
9
correas.
PASO5:Terminar

PASO1B:Instalaciónenpostedeparedde
Vialdenivel
10
micro
madera
Punteadocon
Tablerocolgante
lápiz

6.Tornillo
7.
11
Juntas
ST6.3*60
Tablerocolgante
1.Pegueeltablerocolgantealaalturaadecuada,pegueelMicro
nivelvialparaajustarelnivelyluegodibujarpuntosconunlápiz.
2.Retirelatablaparacolgarytaladreagujeros(Φ5,5x60mm)enla
muro.
3.Instaleyfijeeltablerocolgante.Eltornillodebeestarbienatornillado.
¡Completamenteybienapretado!

PASO2:Instalacióndelaviga
12
vertical
Ranurade
Punteadoconlápiz
posicionamiento

7.
6.Tornillo
13
ST6.3*60
Juntas
PASO3:Instalacióndelsoporte

PASO4:Instalacióndel
14
estante
Encajarenlaranura
Cadasoportesefijacon
seiscorreas.

PASO5:
RepresentantedelReino
RepresentantedelaCE
Unido
MANTENIMIENTO
Terminar
1.Nosobrecargue.
2.Evitecolocarartículoshúmedosenlosestantes.Evitequeelalmacénsemojedemasiado.
3.Compruebeyconfirmesilostornillosestánflojoscadadosmeses.
4.Quiteelpolvoperiódicamenteconuntrapolimpioycoloquelosartículosdeformaordenadaenlosestantes.
Fabricante:Shanghaimuxinmuyeyouxiangongsi
Dirección:Shuangchenglu803nong11hao1602A1609shi,baoshanqu,Shanghai200000CN.
ImportadoaAUS:SIHAOPTYLTD.1ROKEVASTREET,EASTWOOD,NSW2122,Australia
ImportadoaEE.UU.:SanvenTechnologyLtd.Suite250,9166AnaheimPlace,Rancho
Cucamonga,CA91730
YHCONSULTINGLIMITADA.A/CYHConsulting
Oficinalimitada147,CenturionHouse,Londres
Carretera,StainesuponThames,Surrey,TW184AX
ECrossStuGmbH
MainzerLandstr.69,
60329FráncfortdelMeno.
15

Półki ścienne do garażu
MODEL:LR1236

Model:LR1236
UWAGA: Zdjęcie ma charakter poglądowy. Wygląd może być częściowo poprawiony.
Proszę zapoznać się z dokonanym zakupem.
Półki ścienne do
To jest oryginalna instrukcja obsługi. Przed użyciem prosimy o dokładne zapoznanie się z
treścią instrukcji. Firma VEVOR zastrzega sobie prawo do jednoznacznej interpretacji
niniejszej instrukcji obsługi. Wygląd produktu zależy od stanu, w jakim go otrzymali
Państwo. Prosimy o wyrozumiałość, ale nie będziemy Państwa ponownie informować o
aktualizacjach technologicznych lub oprogramowania naszego produktu.
garażu
- 1 -

OCHRONA OCZU OCHRONA STÓP MASKA PRZECIWPYŁOWA ŚRODKI OCHRONNE
2. Produkt należy zamontować na ścianie drewnianej lub betonowej. Przed
podczas montażu należy upewnić się, że nośność ściany przekracza maksymalną
Nośność! Proszę wzmocnić konstrukcję muru na czas
wzmocnić nośność ściany! W przeciwnym razie produkt może
może dojść do uszkodzenia ciała lub obrażeń ciała!
INSTRUKCJE
3. Produkt przeznaczony jest wyłącznie do użytku wewnątrz pomieszczeń. Stosowanie na zewnątrz może spowodować
BEZPIECZEŃSTWA
OSTRZEŻENIE: Ten produkt zawiera małe części. Połknięcie może spowodować poważne obrażenia.
Niebezpieczeństwo zadławienia. Trzymaj te małe części poza zasięgiem dzieci!
1. Przed montażem należy podjąć środki ostrożności, aby uniknąć obrażeń ciała!
uszkodzenia lub obrażenia ciała.
4. Proszę sprawdzać i potwierdzać, czy śruby nie są poluzowane co dwa miesiące.
5. Do przeprowadzenia instalacji potrzebne są co najmniej dwie osoby.
6. Upewnij się, że przeczytałeś instrukcję i w pełni zrozumiałeś, jak ją wykonać.
Instalacja. Jeśli nie rozumiesz żadnego z kroków instalacji, skontaktuj się z
profesjonalny personel instalacyjny.
7. Nie przeciążaj! Maksymalna ładowność: 150 funtów na warstwę (równomiernie rozłożone!)
Przygotowanie
- 2 -
instalacji:
1. Wiertarka elektryczna pistoletowa.
2. Śrubokręt krzyżakowy
3. Młotek gumowy (lub młotek)
4. Ołówek

Model
Liczba warstw
LR1236
Rozmiar powierzchni półki
Maksymalna nośność
Tworzywo
3
MODEL I
11*36 cali/275×914 mm
150 funtów/68 kg (na
Stal
Kolor Czarny
warstwę)
PARAMETRY
KOMPONENTY
ZdjęcieNIE.
1
2
3
4
5
6
7
- 3 -
8
Nazwa
Tablica wisząca
Nawias
Półka
Śruba-ST6.3*60
Belka
Fiolka Micro Level
pionowa
Plastikowa wtyczka bolcowa
Ilość
1
3
9
3
12
12
12
Uszczelki
1

MONTAŻ
KROK 1-A: Montaż na ścianach z litego betonu
10
9
Instrukcja
Kropkowanie
- 4 -
ołówkiem
obsługi
Paski
18
Tablica wisząca
1
Fiolka Micro Level

Plastikowa wtyczka
Tablica
7.
- 5 -
Uszczelki
wisząca
bolcowa
6. Śruba-ST6.3*60
1. Przyklej tablicę wiszącą do odpowiedniej wysokości, przyklej poziomicę Micro
fiolkę, aby dostosować poziom, a następnie narysuj kropki ołówkiem.
2. Zdejmij płytę mocującą i wywierć otwory (Φ10x60mm) w ścianie.
3. Po usunięciu resztek gleby z otworu wbij w niego kołek rozporowy.
całkowicie dziurę.
4. Zamontuj i zamocuj deskę wiszącą. Wkręt musi być wkręcony.
całkowicie i mocno ściśnięte!

Rowek pozycjonujący
KROK 2: Montaż belki
Kropkowanie ołówkiem
pionowej
- 6 -

Plastikowa wtyczka
7. Uszczelki
bolcowa
6. Śruba-ST6.3*60
- 7 -

KROK 3: Montaż uchwytu
KROK 4: Montaż
- 8 -
półki
Pasuje do gniazda

Każdy wspornik jest zamocowany za pomocą
sześć
KROK 5: Zakończ
pasków.
- 9 -

KROK 1-B: Montaż na drewnianym słupku
Kropkowanie
Tablica wisząca
ołówkiem
ściennym
Fiolka Micro Level
- 10 -

6. Śruba-
7.
- 11 -
Uszczelki
ST6.3*60
Tablica wisząca
1. Przyklej tablicę wiszącą do odpowiedniej wysokości, przyklej Micro
Użyj poziomicy, aby wyregulować poziom, a następnie narysuj kropki ołówkiem.
2. Zdejmij deskę wiszącą i wywierć w niej otwory (Φ5,5 x 60 mm).
ściana.
3. Zamontuj i zamocuj deskę wiszącą. Wkręt musi być wkręcony.
całkowicie i mocno ściśnięte!

Rowek pozycjonujący
KROK 2: Montaż belki
Kropkowanie ołówkiem
pionowej
- 12 -

7.
- 13 -
Uszczelki
6. Śruba-ST6.3*60
KROK 3: Montaż uchwytu

Pasuje do gniazda
KROK 4: Montaż
Każdy wspornik jest zamocowany za pomocą
sześć pasków.
półki
- 14 -

REP WIELKIEJ
- 15 -
BRYTANII
KROK 5:
Przedstawiciel WE
KONSERWACJA
Zakończ
1. Nie przeciążaj.
2. Staraj się unikać umieszczania mokrych przedmiotów na półkach. Chroń magazyn przed nadmiernym zawilgoceniem.
3. Proszę co dwa miesiące sprawdzać i potwierdzać, czy śruby nie są poluzowane.
4. Regularnie przecieraj kurz czystą szmatką i układaj przedmioty starannie na
Producent: Szanghaj muxinmuyeyouxiangongsi
Adres: Shuangchenglu 803nong11hao1602A-1609shi, baoshanqu, Szanghaj 200000 CN.
Importowane do Australii: SIHAO PTY LTD. 1 ROKEVA STREETEASTWOOD NSW 2122 Australia
Importowane do USA: Sanven Technology Ltd. Suite 250, 9166 Anaheim Place, Rancho
Cucamonga, Kalifornia
YH CONSULTING LIMITED. C/O YH Consulting
91730
półkach.
Biuro Limited 147, Centurion House, Londyn
Droga, Staines-upon-Thames, Surrey, TW18 4AX
E-CrossStu GmbH
Mainzer Landstr. 69,
60329 Frankfurt nad Menem.

Garagewandplanken
MODEL:LR1236

Model: LR1236
LET OP: Foto ter referentie. Het uiterlijk kan gedeeltelijk verbeterd worden.
Raadpleeg uw aankoopbewijs.
Dit is de originele handleiding. Lees alle instructies in de handleiding zorgvuldig door
voordat u het product in gebruik neemt. VEVOR behoudt zich het recht voor om de
gebruikershandleiding anders te interpreteren. Het uiterlijk van het product kan
afwijken van het product dat u ontvangt. Wij zullen u niet opnieuw informeren over
eventuele technologische of software-updates voor ons product.
Garagewandplanken
- 1 -

OOGBESCHERMING VOETBESCHERMING STOFMASKER BESCHERMENDE DRAAG
2. Het product moet op een houten of betonnen muur worden gemonteerd.
Zorg er bij de installatie voor dat het draagvermogen van de muur het maximum overschrijdt.
draagvermogen! Versterk de muurconstructie tijdig.
Versterk het draagvermogen van de muur! Anders kan het product beschadigd raken.
Schade of persoonlijk letsel kan het gevolg zijn!
VEILIGHEIDSINSTRUCTIES
WAARSCHUWING: Dit product bevat kleine onderdelen. Bij inslikken kan dit een gevaar opleveren.
Verstikkingsgevaar. Houd deze kleine onderdelen uit de buurt van kinderen!
1. Neem vóór de installatie beschermende maatregelen om persoonlijk letsel te
3. Dit product is uitsluitend bestemd voor gebruik binnenshuis. Gebruik buitenshuis kan leiden tot schade aan het product.
voorkomen!
schade of persoonlijk letsel.
4. Controleer en bevestig elke twee maanden of de schroeven loszitten.
5. Voor de installatie zijn minimaal twee personen nodig.
6. Zorg ervoor dat u de instructies hebt gelezen en volledig begrijpt hoe u
installeren. Als u een van de installatiestappen niet begrijpt, neem dan contact op met een
professioneel installatiepersoneel.
7. Niet overbelasten! Maximale capaciteit: 150 lbs/per laag (gelijkmatig verdeeld!)
Voorbereiding voor de
- 2 -
installatie:
1. Elektrische pistoolboormachine.
2. Kruiskopschroevendraaier
3. Rubberen hamer (of gewone hamer)
4. Potlood

Model
Aantal
Afmetingen van het schapoppervlak
lagen
Maximale draagkracht
LR1236
Materiaal
3
MODEL EN
11*36 inch / 275×914 mm
150 lbs/68 kg (per
Staal
Kleur Zwart
laag)
PARAMETERS
COMPONENTEN
AfbeeldingNee. Naam
Aantal
1
2
3
4
5
6
7
- 3 -
8
Beugel
Hangbord
Verticale
Plank
balk
Kunststof stekker
Schroef-ST6.3*60
1
3
9
3
12
12
12
Pakkingen
Microniveau-flesje
1

MONTAGE
STAP 1-A: Installatie op massieve betonnen muren
10
9
- 4 -
Potloodstippen
Gebruikershandleiding
Bandjes
18
Hangbord
1
Microniveau-flesje

Kunststof
6.Schroef-
7.
- 5 -
Pakkingen
ST6.3*60
stekker
Hangbord
1. Plak de ophangplank op de juiste hoogte en lijm de micro-waterpas
Gebruik het flesje om het niveau aan te passen en teken vervolgens stippen met een potlood.
vast.
2. Verwijder het ophangbord en boor gaten (ÿ10x60mm) in de muur.
3. Nadat u de resterende grond in het gat hebt verwijderd, tikt u de expansieplug in het gat.
Het gat is volledig open.
4. Installeer en bevestig de ophangplank. De schroef moet erin worden geschroefd.
volledig en stevig aangedrukt!
Positioneringsgroef
STAP 2: Installatie van de verticale
Potloodstippen
balk
- 6 -

Kunststof stekker
7. Pakkingen
6.Schroef-ST6.3*60
- 7 -

STAP 3: Installatie van de beugel
STAP 4: Installatie van de
- 8 -
plank
Plaats in de gleuf
Elke beugel is vastgemaakt met
zes
STAP 5: Voltooien
bandjes.
- 9 -

STAP 1-B: Installatie op houten
Hangbord
Potloodstippen
muurpaal
Microniveau-flesje
- 10 -

6.Schroef-
7.
- 11 -
Pakkingen
ST6.3*60
Hangbord
1. Plak het ophangbord op de juiste hoogte vast en lijm de micro erop.
Gebruik het libellenblad om het niveau aan te passen en teken vervolgens stippen met een potlood.
2. Verwijder de ophangplank en boor gaten (ÿ5,5x60mm) in de
muur.
3. Installeer en bevestig de ophangplank. De schroef moet erin worden geschroefd.
volledig en stevig aangedrukt!

STAP 2: Installatie van de verticale
- 12 -
balk
Potloodstippen
Positioneringsgroef

7.
STAP 3: Installatie van de beugel
Pakkingen
6.Schroef-ST6.3*60
- 13 -
STAP 4: Installatie van de
- 14 -
plank
Plaats in de gleuf
Elke beugel is vastgemaakt met
zes bandjes.

1. Niet overbelasten.
2. Probeer te voorkomen dat u natte artikelen op de schappen plaatst. Zorg ervoor dat het magazijn niet te vochtig wordt.
3. Controleer en bevestig elke twee maanden of de schroeven loszitten.
4. Stof de planken regelmatig af met een schone doek en zet de spullen netjes op hun
- 15 -
plaats.
YH CONSULTING LIMITED. T.a.v. YH Consulting
STAP 5:
Fabrikant: Shanghai muyeyouxiangongsi
Adres: Shuangchenglu 803nong11hao1602A-1609shi, baoshanqu, Shanghai 200000 CN.
Geïmporteerd naar Australië: SIHAO PTY LTD. 1 ROKEVA STREET, EASTWOOD NSW 2122 Australië
Geïmporteerd naar de VS: Sanven Technology Ltd. Suite 250, 9166 Anaheim Place, Rancho
Cucamonga, CA
Kantoor van Limited, 147 Centurion House, Londen
Weg, Staines-upon-Thames, Surrey, TW18 4AX
E-CrossStu GmbH
Mainzer Landstr. 69,
60329 Frankfurt am Main.
91730
Voltooien
ONDERHOUD
Britse
EC-VERTEGENWOORDIGER
vertegenwoordiger

Garagevägghyllor
MODELL: LR1236

Modell: LR1236
OBS: Fotot är endast för referens. Utseendet kan delvis förbättras.
Vänligen se ditt köp.
Detta är originalinstruktionerna, vänligen läs alla instruktioner noggrant innan
du använder produkten. VEVOR förbehåller sig en tydlig tolkning av vår
användarmanual. Produktens utseende ska vara beroende av den produkt du
mottagit. Vi ber om ursäkt för att vi inte kommer att informera dig igen om det
finns några teknik- eller programuppdateringar för vår produkt.
Garagevägghyllor
- 1 -

ÖGONSKYDD FOTSKYDD DAMMMASK SKYDDSKLÄDER
SÄKERHETSINSTRUKTIONER
VARNING: Denna produkt innehåller smådelar. Om den sväljs kan den orsaka en
Kvävningsrisk. Förvara dessa smådelar utom räckhåll för barn!
1. Vidta skyddsåtgärder före installation för att undvika
Förberedelse av installation:
personskador!
2. Produkten måste installeras på en trä- eller betongvägg. Innan
installationen, se till att väggens bärförmåga överstiger den maximala
bärförmåga! Vänligen förstärk väggens struktur i tid för att
konsolidera väggens bärförmåga! Annars kan produkten bli
skada eller personskada kan uppstå!
3. Denna produkt är endast avsedd för inomhusbruk. Utomhusbruk kan orsaka produktskador
skada eller personskada.
4. Kontrollera och bekräfta om skruvarna är lösa varannan månad.
5. Minst två personer krävs för att slutföra installationen.
6. Se till att du har läst instruktionerna och förstått hur du gör
installera. Om du inte förstår något av installationsstegen, kontakta en
professionell installationspersonal.
7. Överbelasta inte! Maximal kapacitet: 150 lbs/per lager (jämnt
- 2 -
fördelat!)
1. Elektrisk pistolborrmaskin.
2. Stjärnskruvmejsel
3. Gummiklubba (eller hammare)
4. Penna
Modell LR1236
Antal lager
Hyllytans storlek
Maximal lagerkapacitet
Material
MODELL OCH
3
11*36 tum/275×914 mm
68 kg (per
Stål
Färg Svart
lager)
PARAMETRAR
KOMPONENTER
BildInga. Namn
Antal
1
2
3
4
5
6
7
- 3 -
8
Konsol
Hängande bräda
Vertikal
1
balk
Hylla
Plastplugg
Skruv-ST6.3*60
12
12
12
1
3
9
Packningar
Mikronivåflaska
3

MONTERING
STEG 1-A: Installation på massiva betongväggar
10
9
Remmar
Prickning med
- 4 -
blyertspennor
Användarmanual
18
Hängande bräda
1
Mikronivåflaska

6. Skruv-
7.
- 5 -
Packningar
ST6.3*60
Plastplugg
Hängande bräda
1. Klistra fast hängbrädan på lämplig höjd, limma fast mikronivån
ampullen för att justera nivån och rita sedan prickar med en penna.
2. Ta bort hängbrädan och borra hål (ÿ10x60mm) i väggen.
3. Efter att ha rensat den kvarvarande jorden i hålet, knacka in
hålet helt.
4. Montera och fäst hängbrädan. Skruven måste vara inskruvad
helt och hårt tryckt!
expansionspluggen i

Positioneringsspår
STEG 2: Installation av den vertikala
Prickning med blyertspennor
balken
- 6 -
7. Packningar
Plastplugg
6. Skruv-ST6.3*60
- 7 -

STEG 3: Installation av fästet
STEG 4: Installation av
- 8 -
hyllan
Passa in i springan

Varje fäste är fixerat med
sex
STEG 5: Avsluta
remmar.
- 9 -
STEG 1-B: Installation på väggstolpe av
Prickning med
Hängande bräda
blyertspennor
trä
Mikronivåflaska
- 10 -

2. Ta bort upphängningsbrädan och borra hål (Ø 5,5 x 60
- 11 -
mm)
6. Skruv-
7.
1. Klistra in hängbrädan i lämplig höjd, limma fast Micro
vattenpassflaskan för att justera nivån och rita sedan prickar med en
i
penna.
Packningar
ST6.3*60
Hängande bräda
vägg.
3. Montera och fäst upphängningsbrädan. Skruven måste vara inskruvad
helt och hårt tryckt!
Positioneringsspår
STEG 2: Installation av den vertikala
Prickning med blyertspennor
balken
- 12 -

7.
- 13 -
Packningar
6. Skruv-ST6.3*60
STEG 3: Installation av fästet

Passa in i springan
STEG 4: Installation av
Varje fäste är fäst med
sex remmar.
hyllan
- 14 -

Storbritanniens
- 15 -
republikaner
STEG 5:
EG-representant
UNDERHÅLL
Avsluta
1. Överbelasta inte.
2. Försök att undvika att ställa våta varor på hyllorna. Se till att lagret inte blir för blött.
3. Kontrollera och bekräfta om skruvarna är lösa varannan månad.
4. Damma regelbundet med en ren trasa och arrangera sakerna prydligt på
Tillverkare: Shanghai muxinmuyeyouxiangongsi
Adress: Shuangchenglu 803nong11hao1602A-1609shi, baoshanqu, Shanghai 200000 CN.
Importerad till Australien: SIHAO PTY LTD. 1 ROKEVA STREETEASTWOOD NSW 2122 Australien
Importerad till USA: Sanven Technology Ltd. Suite 250, 9166 Anaheim Place, Rancho
Cucamonga, Kalifornien
YH CONSULTING LIMITED. C/O YH Consulting
91730
hyllorna.
Begränsat kontor 147, Centurion House, London
Väg, Staines-upon-Thames, Surrey, TW18 4AX
E-CrossStu GmbH
Mainzer Landstr. 69,
60329 Frankfurt am Main.