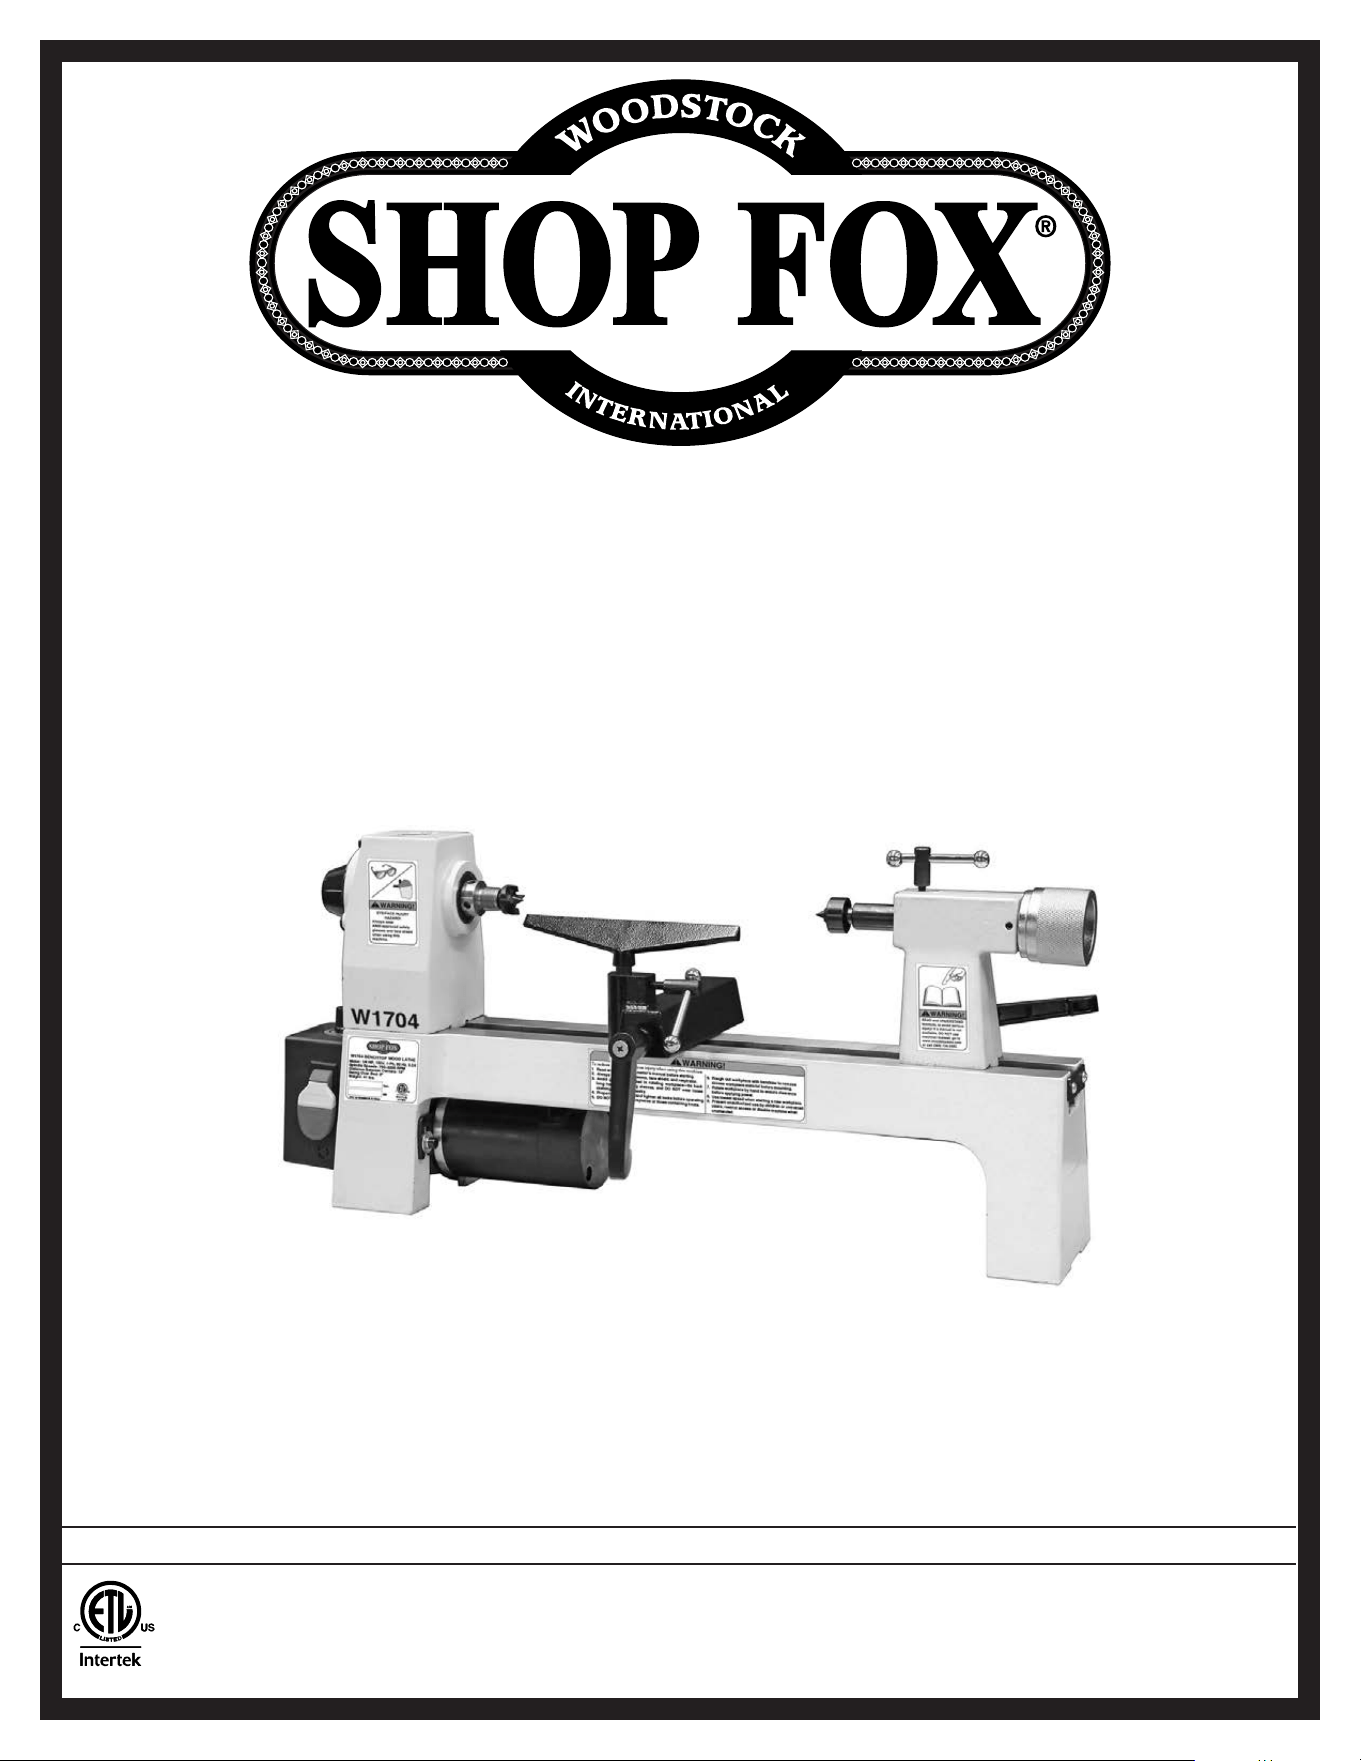
OWNER'S MANUAL
(FOR MODELS MANUFACTURED SINCE 01/20)
MODEL W1704
8" X 13" BENCHTOP
WOOD LATHE
Phone: (360) 734-3482 • Online Technical Support: [email protected]
COPYRIGHT © DECEMBER, 2003 BY WOODSTOCK INTERNATIONAL, INC. REVISED APRIL, 2021 (JL)
WARNING: NO PORTION OF THIS MANUAL MAY BE REPRODUCED IN ANY SHAPE OR FORM WITHOUT
THE WRITTEN APPROVAL OF WOODSTOCK INTERNATIONAL, INC.
#5378TR Printed in China
4000909

This manual provides critical safety instructions on the proper setup,
operation, maintenance, and service of this machine/tool. Save this
document, refer to it often, and use it to instruct other operators.
Failure to read, understand and follow the instructions in this manual
may result in fire or serious personal injury—including amputation,
electrocution, or death.
The owner of this machine/tool is solely responsible for its safe use.
This responsibility includes but is not limited to proper installation in
a safe environment, personnel training and usage authorization,
proper inspection and maintenance, manual availability and compre-
hension, application of safety devices, cutting/sanding/grinding tool
integrity, and the usage of personal protective equipment.
The manufacturer will not be held liable for injury or property
damage from negligence, improper training, machine modifications or
misuse.
Some dust created by power sanding, sawing, grinding, drilling, and
other construction activities contains chemicals known to the State of
California to cause cancer, birth defects or other reproductive harm.
Some examples of these chemicals are:
• Lead from lead-based paints.
• Crystalline silica from bricks, cement and other masonry products.
• Arsenic and chromium from chemically-treated lumber.
Your risk from these exposures varies, depending on how often you
do this type of work. To reduce your exposure to these chemicals:
Work in a well ventilated area, and work with approved safety equip-
ment, such as those dust masks that are specially designed to filter
out microscopic particles.

SET UPELECTRICAL MAINTENANCE
SERVICE PARTS
OPERATIONS
SAFETYINTRODUCTION
USE THE QUICK GUIDE PAGE LABELS TO SEARCH OUT INFORMATION FAST!
INTRODUCTION......................................2
Woodstock Technical Support
.................. 2
Machine Specifications
.......................... 3
Identification
..................................... 5
Controls & Components
......................... 6
SAFETY................................................7
Standard Machinery Safety Instructions
...... 7
Additional Safety for Wood Lathes
............ 9
Glossary of Terms
.............................. 10
ELECTRICAL........................................ 11
Circuit Requirements
.......................... 11
Grounding Requirements
...................... 12
Extension Cords
................................ 12
SETUP............................................... 13
Unpacking
....................................... 13
Items Needed for Setup
....................... 13
Inventory
........................................ 14
Hardware Recognition Chart
................. 15
Cleaning Machine
............................... 16
Machine Placement
............................ 16
Assembly
......................................... 17
Test Run
.......................................... 18
OPERATIONS....................................... 19
General
.......................................... 19
Workpiece Inspection
.......................... 20
Selecting Turning Tools
........................ 21
Adjusting Tailstock
............................. 22
Adjusting Tool Rest
............................. 23
Installing/Removing Headstock Center
..... 24
Installing/Removing Tailstock Center
....... 25
Installing/Removing Faceplate
............... 26
Changing Spindle Speed
....................... 27
Spindle Turning
................................. 28
Faceplate Turning
.............................. 30
Sanding/Finishing
.............................. 31
ACCESSORIES....................................... 32
Wood Lathe Accessories
....................... 32
MAINTENANCE..................................... 34
General
.......................................... 34
Cleaning & Protecting
......................... 34
Lubrication
...................................... 34
SERVICE............................................. 35
General
.......................................... 35
Aligning Pulleys
................................. 35
Changing/Tensioning Belt
..................... 36
Replacing Fuse
.................................. 37
Replacing Brushes
.............................. 37
Troubleshooting
................................. 38
Electrical Safety Instructions
................. 40
Electrical Components
........................ 41
Wiring Diagram
................................. 42
PARTS............................................... 43
Main
.............................................. 43
WARRANTY......................................... 45
Contents
-2-
Model W1704 (For Machines Mfd. Since 01/20)
INTRODUCTI ON
Woodstock.Technical .Support
INTRODUCTION
If you need the latest edition of this manual, you can download it from http://www.shopfox.biz.
If you have comments about this manual, please contact us at:
Woodstock. International,.Inc.
Attn:.Technical.Documentation.Manager
P.O.. Box.2309
Bellingham,.WA.98227
Email:.manuals@woodstockint.com
Like.all.machinery.there.is.potential.danger.
when.operating.this.machine..Accidents.are.
frequently. caused. by. lack. of. familiarity. or.
failure. to. pay. attention.. Use. this. machine.
with. respect. and. caution. to. decrease. the.
risk. of. operator. injury.. If. normal. safety.
precautions. are. overlooked. or. ignored,.
serious.personal.injury.may.occur.
No.list.of.safety.guidelines.can.be.complete..
Every.shop.environment.is.different..Always.
consider. safety. first,. as. it. applies. to. your.
individual. working.conditions..Use.this. and.
other.machinery. with.caution.and.respect..
Failure. to. do. so. could. result. in. serious.
personal. injury,. damage. to. equipment,. or.
poor.work.results.
This machine has been specially designed to provide many years of trouble-free service. Close attention
to detail, ruggedly built parts and a rigid quality control program assure safe and reliable operation.
Woodstock International, Inc. is committed to customer satisfaction. Our intent with this manual is to
include the basic information for safety, setup, operation, maintenance, and service of this product.
We stand behind our machines! In the event that questions arise about your machine, please contact
Woodstock International Technical Support at (360) 734-3482 Ext. 2 or send e-mail to: techsupport@
woodstockint.com. Our knowledgeable staff will help you troubleshoot problems and process warranty
claims.

-3-
Model W1704 (For Machines Mfd. Since 01/20)
INTRODUCTI ON
Model W1704 Machine Specifications, Page 1 of 2
MODEL W1704
8" X 13" BENCHTOP WOOD LATHE
Product Dimensions
Weight........................................................................................................... 41 lbs.
Width (side‐to‐side) x Depth (front‐to‐back) x Height................................... 29 x 10‐1/2 x 13 in.
Footprint (Length x Width)..................................................................... 23‐1/2 x 5‐1/2 in.
Shipping Dimensions
Type.................................................................................................... Cardboard Box
Content........................................................................................................ Machine
Weight........................................................................................................... 52 lbs.
Length x Width x Height............................................................................. 30 x 15 x 8 in.
Electrical
Power Requirement.................................................................... 120V, Single‐Phase, 60 Hz
Full‐Load Current Rating........................................................................................ 3.2A
Minimum Circuit Size............................................................................................. 15A
Connection Type......................................................................................... Cord & Plug
Power Cord Included.............................................................................................. Yes
Power Cord Length............................................................................................... 6 ft.
Power Cord Gauge............................................................................................ 18 AWG
Plug Included....................................................................................................... Yes
Included Plug Type............................................................................................... 5‐15
Switch Type............................................................ Paddle Safety Switch w/Removable Key
Motors
Main
Horsepower.............................................................................................. 1/3 HP
Phase.............................................................................................. Single‐Phase
Amps........................................................................................................... 4A
Speed.................................................................................................. 4600 RPM
Type.................................................................................................... Universal
Power Transfer ............................................................................................ Belt
Bearings............................................................... Shielded & Permanently Lubricated
Main Specifications
Operation Information
Swing Over Bed............................................................................................ 8 in.
Distance Between Centers.............................................................................. 13 in.
Max. Distance Tool Rest to Spindle Center....................................................... 2‐3/4 in.
No of Spindle Speeds................................................................................. Variable
Spindle Speed Range......................................................................... 750 – 3200 RPM
Floor to Center Height.............................................................................. 9‐3/4 in.

-4-
Model W1704 (For Machines Mfd. Since 01/20)
INTRODUCTI ON
Model W1704 Machine Specifications, Page 2 of 2
Spindle Information
Spindle Taper.............................................................................................. MT#1
Spindle Thread Size............................................................................. 3/4" x 16 TPI
Spindle Thread Direction......................................................................... Right Hand
Spindle Bore........................................................................................... 0.394 in.
Type of Included Spindle Center........................................................................ Spur
Tailstock Information
Tailstock Taper........................................................................................... MT#1
Type of Included Tailstock Center...................................................................... Live
Construction
Bed................................................................................ Precision‐Ground Cast Iron
Frame........................................................................................ Cast Iron & Steel
Headstock.................................................................................... Cast Iron & Steel
Tailstock..................................................................................... Cast Iron & Steel
Paint Type/Finish...................................................................................... Enamel
Other Related Information
Bed Width............................................................................................. 5‐1/8 in.
Faceplate Size........................................................................................ 5‐3/4 in.
Other
Country of Origin ............................................................................................... China
Warranty ....................................................................................................... 2 Years
Approximate Assembly & Setup Time ................................................................. 15 Minutes
Serial Number Location .................................................................... ID Label on Lathe Bed
ISO 9001 Factory .................................................................................................. Yes
Certified by a Nationally Recognized Testing Laboratory (NRTL) ......................................... Yes
-5-
Model W1704 (For Machines Mfd. Since 01/20)
INTRODUCTI ON
I dentification
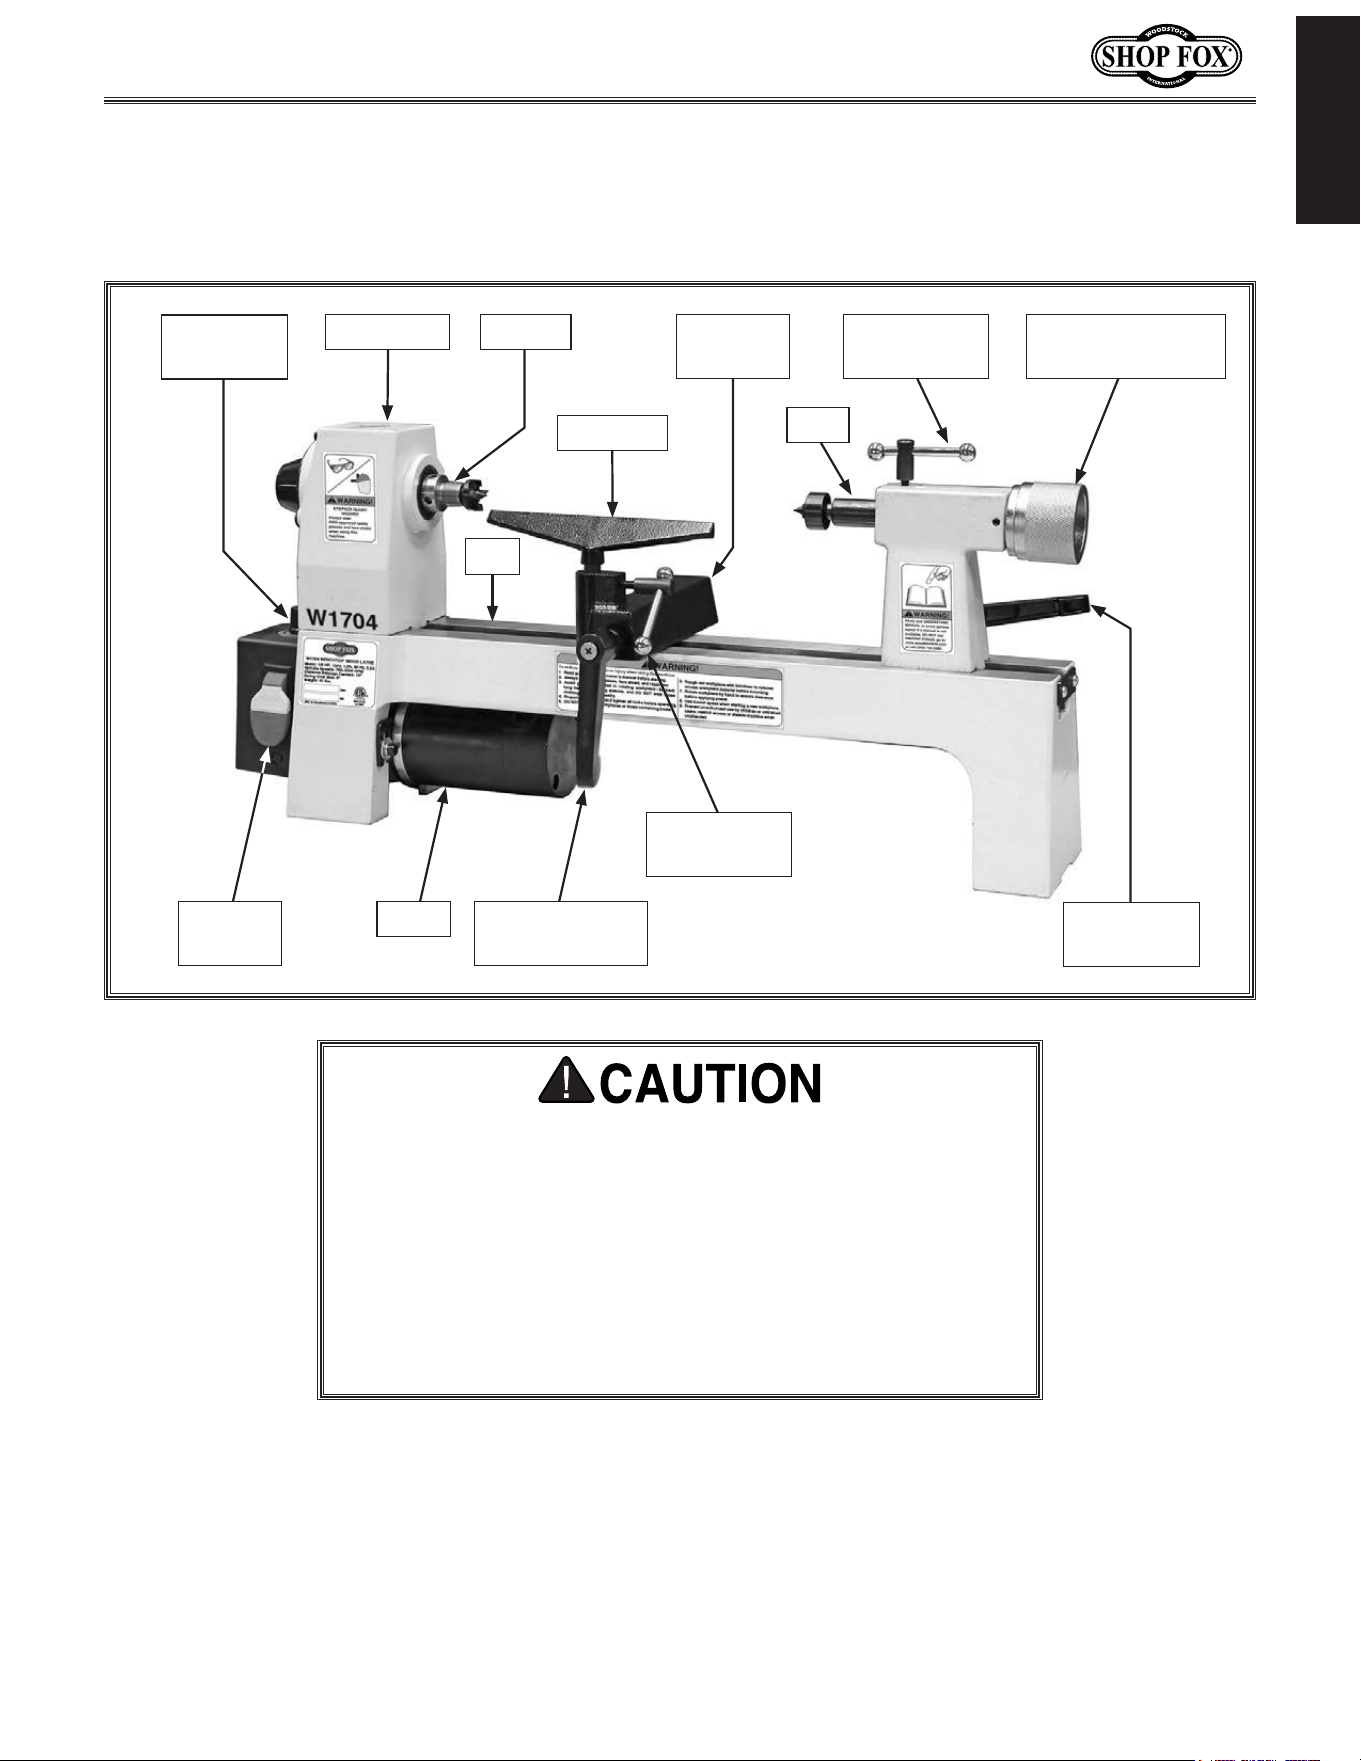
Become familiar with the names and locations of the controls and features shown below to better
understand the instructions in this manual.
For Your Own Safety Read Instruction Manual Before
Operating Lathe
a) Wear eye protection.
b) Do not wear gloves, necktie, or loose clothing.
c) Tighten all locks before operating.
d) Rotate workpiece by hand before applying power.
e) Rough out workpiece before installing on faceplate.
f) Do not mount split workpiece or one containing knot.
g) Use lowest speed when starting new workpiece.
Quill
Bed
Tool Rest
MotorON/OFF
Switch
Headstock Spindle Tailstock
Adjustment Knob
Spindle
Speed Dial
Tool Rest
Base
Tool Rest Base
Lock Lever
Tool Rest
Lock Handle
Tailstock
Lock Lever
Quill
Lock Handle
-6-
Model W1704 (For Machines Mfd. Since 01/20)
INTRODUCTI ON
Controls.&.Components
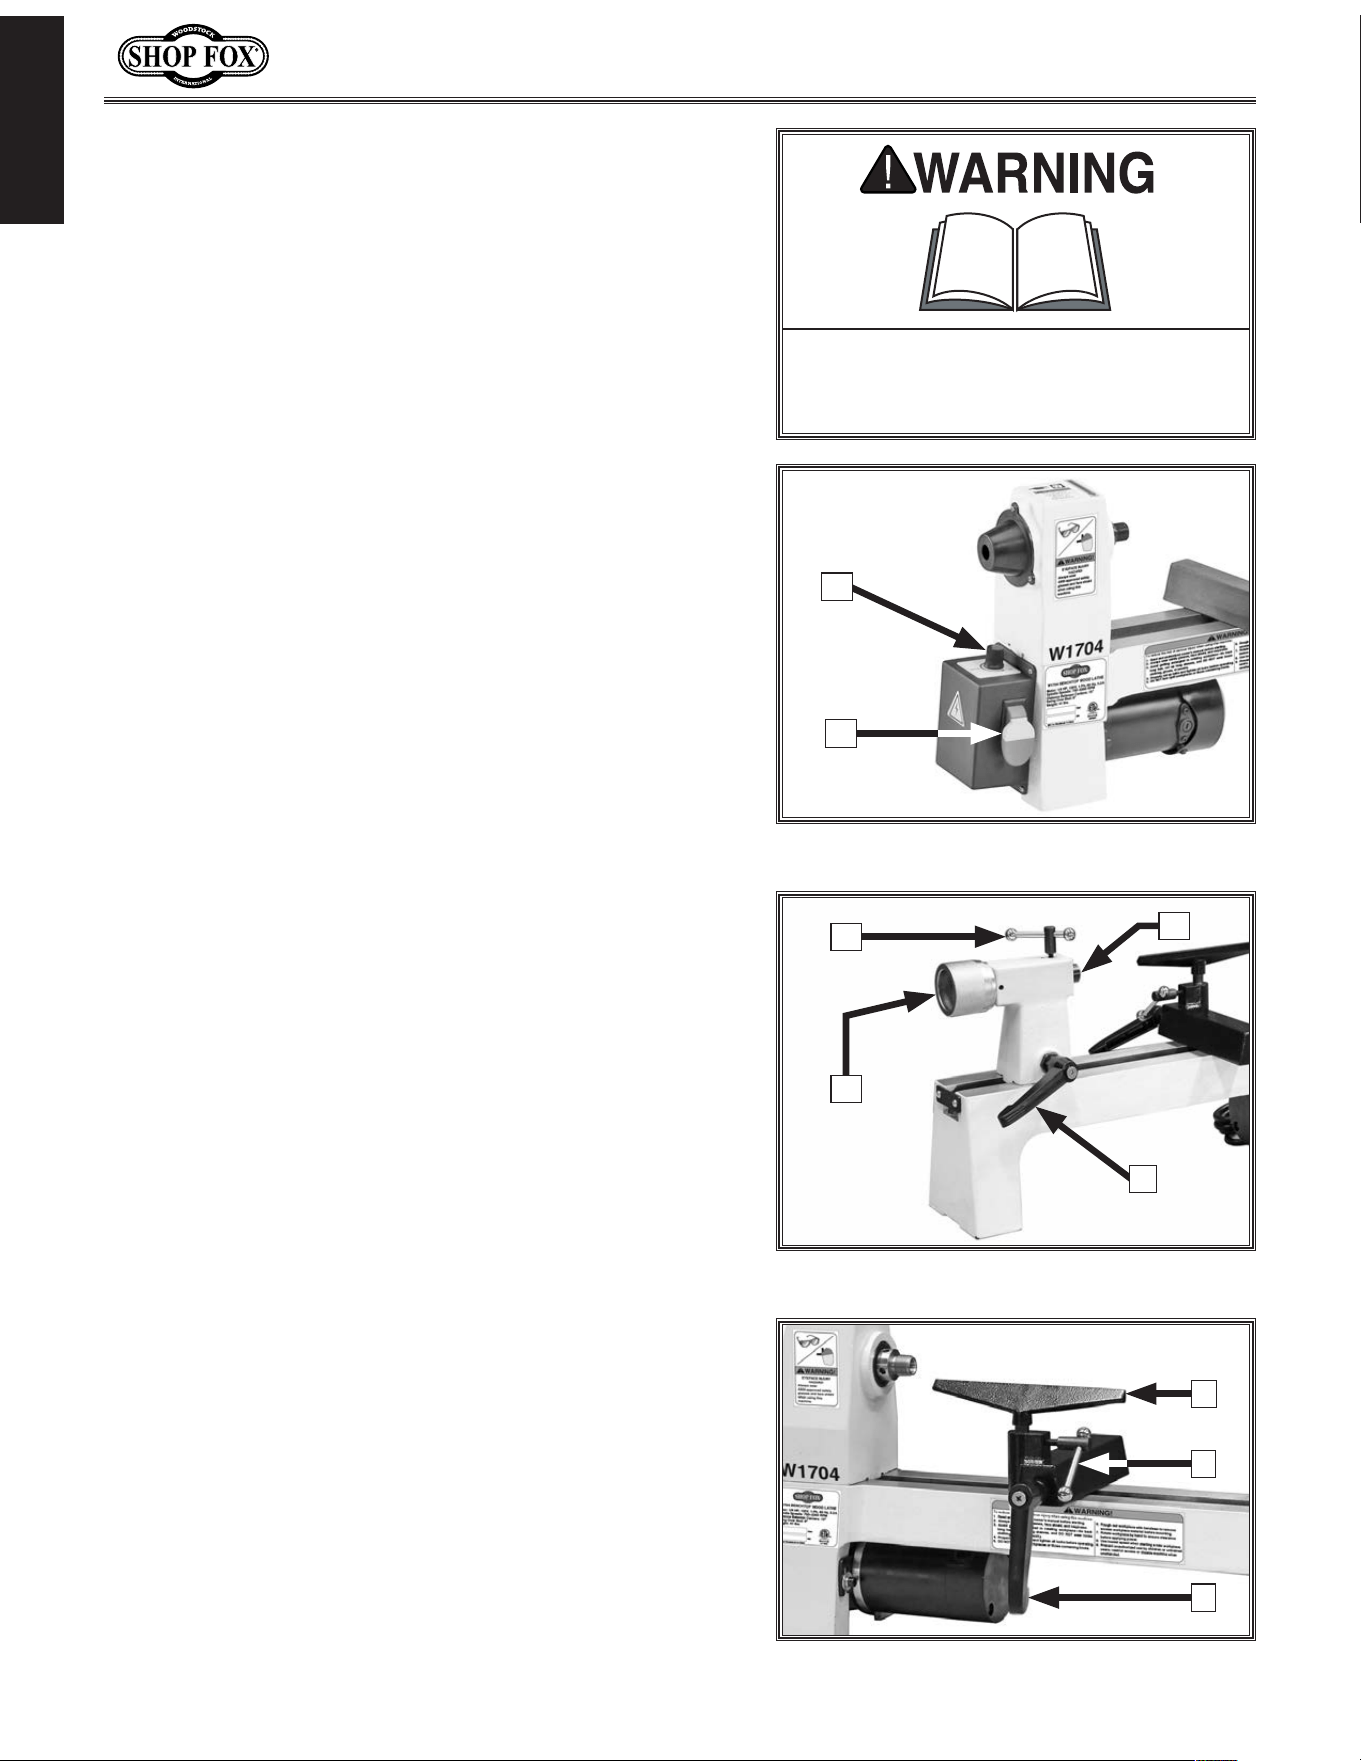
Refer to Figures.1–3 and the following descriptions to
become familiar with the basic controls and components
of this machine. Understanding these items and how they
work will help you understand the rest of the manual and
stay safe when operating this machine.
To. reduce. your. risk. of. serious. injury.
or. damage. to. the. machine,. read. this.
entire.manual.BEFORE.using.machine.
A.. Spindle. Speed. Dial: Controls spindle speed. Always
turn dial to lowest setting before starting lathe.
B.. ON/OFF.Paddle.Switch: Turns lathe ON and OFF.
C.. Tailstock. Adjustment. Knob: Moves quill toward or
away from spindle.
D.. Quill.Lock.Handle: Secures quill in position.
E
.. Quill: Holds centers or tooling. Can be moved toward
and away from spindle.
F.. Tailstock. Lock. Lever: Secures tailstock in position
along bed.
G.. Tool.Rest: Provides stable platform for cutting tools.
H.. Tool.Rest.Lock.Handle: Secures tool rest in position.
I.. Tool. Rest. Base. (Banjo). Lock. Lever: Secures tool
rest holder when tool rest is proper distance from
workpiece.
Figure.1. Switch box controls.
A
B
Figure.2..Tailstock controls.
D
F
C
E
Figure.3..Tool rest controls.
I
H
G

-7-
Model W1704 (For Machines Mfd. Since 01/20)
SAFETY
Indicates.a.potentially.hazardous.situation. which,.if.not.avoided,.
MAY.result.in.minor.or. moderate.injury.
Indicates.an.imminently.hazardous.situation. which,.if.not.avoided,.
WILL.result.in.death.or. serious.injury.
Indicates.a.potentially.hazardous.situation. which,.if.not.avoided,.
COULD.result.in.death.or. serious.injury.
This.symbol.is.used.to. alert.the.user.to.useful.information.about.
proper.operation.of.the.equipment.or.a.situation.that.may.cause.
damage.to.the.machinery.
NOTICE
SAFETY
OWNER’S.MANUAL..
Read and understand this
owner’s manual BEFORE using machine.
TRAINED.OPERATORS.ONLY..
Untrained operators
have a higher risk of being hurt or killed. Only
allow trained/supervised people to use this
machine. When machine is not being used,
disconnect power, remove switch keys, or
lock-out machine to prevent unauthorized
use—especially around children. Make
workshop kid proof!
DANGEROUS.ENVIRONMENTS..
Do not use
machinery in areas that are wet, cluttered,
or have poor lighting. Operating machinery
in these areas greatly increases the risk of
accidents and injury.
MENTAL.ALERTNESS.REQUIRED..
Full mental
alertness is required for safe operation of
machinery. Never operate under the influence
of drugs or alcohol, when tired, or when
distracted.
ELECTRICAL.EQUIPMENT.INJURY.RISKS..You can
be shocked, burned, or killed by touching live
electrical components or improperly grounded
machinery. To reduce this risk, only allow an
electrician or qualified service personnel to
do electrical installation or repair work, and
always disconnect power before accessing or
exposing electrical equipment.
DISCONNECT.POWER.FIRST..Always disconnect
machine from power supply BEFORE making
adjustments, changing tooling, or servicing
machine. This eliminates the risk of injury
from unintended startup or contact with live
electrical components.
EYE.PROTECTION..Always wear ANSI-approved
safety glasses or a face shield when operating
or observing machinery to reduce the risk of
eye injury or blindness from flying particles.
Everyday eyeglasses are not approved safety
glasses.
Standard.Machinery.S afety.Instructio ns
For.Your.Own.Safety,
Read.Ma nual.Before.Operatin g.Machine
The. purpose. of. safety. symbols. is. to. attract. your. attention. to. possible. hazardous. conditions.. This.
manual.uses.a.series.of.symbols.and.signal.words.intended.to.convey.the.level.of.importance.of.the.
safety.messages..T he.progression.of.symbols.is.described.below..Remember.that.safety.messages.by.
themselves.do. not. eliminate.danger.and.are.not.a. substitute. for.proper. accident.prevention.mea-
sures—this.responsibility.is.ultimately.up.to.the.operator!
SAFETY
Standard.Machinery.S afety.Instructio ns

-8-
Model W1704 (For Machines Mfd. Since 01/20)
SAFETY
WEARING.PROPER.APPAREL..Do not wear
clothing, apparel, or jewelry that can become
entangled in moving parts. Always tie back
or cover long hair. Wear non-slip footwear to
avoid accidental slips, which could cause loss
of workpiece control.
HAZARDOUS
.DUST..Dust created while using
machinery may cause cancer, birth defects,
or long-term respiratory damage. Be aware of
dust hazards associated with each workpiece
material, and always wear a NIOSH-approved
respirator to reduce your risk.
HEARING.PROTECTION..
Always wear hearing
protection when operating or observing
loud machinery. Extended exposure to this
noise without hearing protection can cause
permanent hearing loss.
REMOVE.ADJUSTING.TOOLS..
Tools left on
machinery can become dangerous projectiles
upon startup. Never leave chuck keys,
wrenches, or any other tools on machine.
Always verify removal before starting!
INTENDED.USAGE..
Only use machine for its
intended purpose—never make modifications
without prior approval from Woodstock
International. Modifying machine or using
it differently than intended will void the
warranty and may result in malfunction or
mechanical failure that leads to serious
personal injury or death!
AWKWARD.POSITIONS..
Keep proper footing and
balance at all times when operating machine.
Do not overreach! Avoid awkward hand
positions that make workpiece control difficult
or increase the risk of accidental injury.
CHILDREN.&.BYSTANDERS..
Keep children and
bystanders at a safe distance from the work
area. Stop using machine if they become a
distraction.
GUARDS.&.COVERS..
Guards and covers reduce
accidental contact with moving parts or flying
debris—make sure they are properly installed,
undamaged, and working correctly.
FORCING.MACHINERY..Do not force machine. It
will do the job safer and better at the rate for
which it was designed.
NEVER.STAND.ON.MACHINE..Serious injury may
occur if machine is tipped or if the cutting
tool is unintentionally contacted.
STABLE.MACHINE..Unexpected movement during
operation greatly increases risk of injury or
loss of control. Before starting, verify machine
is stable and mobile base (if used) is locked.
USE.RECOMMENDED.ACCESSORIES..Consult
this owner’s manual or the manufacturer for
recommended accessories. Using improper
accessories will increase risk of serious injury.
UNATTENDED.OPERATION..To reduce the risk
of accidental injury, turn machine OFF and
ensure all moving parts completely stop
before walking away. Never leave machine
running while unattended.
MAINTAIN.WITH.CARE..Follow all maintenance
instructions and lubrication schedules to
keep machine in good working condition. A
machine that is improperly maintained could
malfunction, leading to serious personal injury
or death.
CHECK.DAMAGED.PARTS..Regularly inspect
machine for any condition that may affect
safe operation. Immediately repair or replace
damaged or mis-adjusted parts before
operating machine.
MAINTAIN.POWER.CORDS..When disconnecting
cord-connected machines from power, grab
and pull the plug—NOT the cord. Pulling the
cord may damage the wires inside, resulting
in a short. Do not handle cord/plug with wet
hands. Avoid cord damage by keeping it away
from heated surfaces, high traffic areas, harsh
chemicals, and wet/damp locations.
EXPERIENCING.DIFFICULTIES..If at any time
you experience difficulties performing the
intended operation, stop using the machine!
Contact Technical Support at (360) 734-3482.

-9-
Model W1704 (For Machines Mfd. Since 01/20)
SAFETY
Additional.Safety.for.Wood.Lathes
INTEGRITY.OF.STOCK.
Verify each workpiece is
free of knots, splits, nails, or foreign material
to ensure it can safely rotate on spindle
without breaking apart or causing turning tool
kickback.
WORKPIECE.PREPARATION.
Before mounting, cut
off waste portions with a bandsaw or other
tool to ensure workpiece has no large edges to
catch turning tool, and it will rotate without
dangerous wobbling.
SECURING.LOCK S.
.Verify tool rest, headstock,
and tailstock are secure before turning lathe
ON.
SECURING.WORKPIECE.
An improperly secured
workpiece can fly off spindle with deadly
force. Use proven setup techniques and always
verify workpiece is well-secured before starting
lathe. Only use high-quality fasteners with non-
tapered heads for faceplate attachment.
TOOL.SUPPORT.
An improperly supported tool
may be grabbed or ejected. Adjust tool rest
approximately
1
⁄4” away from workpiece and
1
⁄8” above workpiece center line to provide
proper support for turning tool. Firmly hold
turning tool with both hands against tool rest.
TOOL.K ICKBACK
. Occurs when turning tool is
ejected from workpiece with great force,
striking operator or bystanders. Commonly
caused by poor workpiece selection/
preparation, improper tool usage, or improper
machine setup or tool rest adjustment.
ADJUSTMENT.TOOLS
..Remove all chuck keys,
wrenches, and adjustment tools before turning
lathe ON. A tool left on the lathe can become
a deadly projectile when spindle is started.
SAFE.CLEARANCES
. Before starting spindle, verify
workpiece has adequate clearance by hand-
rotating it through its entire range of motion.
EYE/FACE.PROTECTION. Always wear a face
shield and safety glasses when operating lathe.
PROPER.APPAREL.
Do not wear gloves, necktie or
loose clothing. Keep keep long hair away from
rotating spindle.
SPEED.RATES. Select correct spindle speed for
workpiece size, type, shape, and condition.
Use low speeds when roughing or when turning
large, long, or non-concentric workpieces.
Allow spindle to reach full speed before
turning.
NE W.SETUPS. Test each new setup by starting
spindle rotation at the lowest speed and
standing to the side of the lathe until
workpiece reaches full speed and you can
verify safe rotation.
ROUGHING.
Use correct tool. Take light cuts, use
low speeds, and firmly support tool with both
hands.
SHARP.TOOLS. Only use sharp turning tools—
they cut with less resistance than dull tools.
Dull turning tools can catch or grab and pull
your hands into the rotating workpiece.
STOPPING.SPINDLE. Always allow spindle to
completely
stop on its own. Never put hands or
another object on spinning workpiece.
ADJUSTMENTS/MAINTENANCE. Make sure wood
lathe is turned OFF
, disconnected from power,
and all moving parts are completely stopped
before doing adjustments or maintenance.
MEASURING.WORKPIECE. Only measure
workpiece after it has stopped. Trying to
measure a spinning workpiece increases
entanglement risk.
SANDING/POLISHING. To reduce entanglement
risk, remove tool rest before sanding. Never
completely wrap sandpaper around workpiece.
MAIN.INJURY.HAZARDS:.Death. or.crushing.injury.from.getting.entangled.in.rotating.spindle.or.
workpiece;.death,.blindness,.or.broken.bones.from.being.struck.by.a.workpiece.that.breaks.
apart.or.comes.loose.during.rotation,.turning.tool.kickback,.or.flying.wood.chips..To.minimize.
your.risk.of.these.hazards,.always.heed.the.following.warning.information:

-10-
Model W1704 (For Machines Mfd. Since 01/20)
SAFETY
The following is a list of common definitions, terms and phrases used throughout this manual as they relate
to this wood lathe and woodworking in general. Become familiar with these terms for assembling, adjust-
ing or operating this machine.
Glossary.of.Terms
Bed: The long, rail-like metal base to which the
tailstock, tool base, and headstock are attached.
Chuck: A mechanical device that attaches to the
spindle and holds the workpiece.
Faceplate: The metal disc that threads onto the
headstock spindle.
Faceplate Turning: Turning situation in which the
grain of the turning stock is at right angles to the
lathe bed axis.
Backing Block: A sacrificial piece of wood glued
to the base of the workpiece and screwed to the
faceplate. Often used to prevent mounting marks
from appearing on the completed workpiece.
Headstock: The cast metal box to which the
motor is attached and contains the spindle, bear-
ings, belts, and electrical components for operat-
ing the lathe.
Offset Turning: A turning situation where the
center of the workpiece is offset at various
stages of the work to produce different shapes.
Outboard Turning: Turning of workpiece with
the headstock situated at the far end of the lathe
so the work done is not over the bed of the lathe.
Roughing Out: Taking stock from square billet to
round blank.
Spindle: This term has two meanings. First, it
refers to the threaded shaft in the headstock to
which the faceplate is attached. Second, it refers
to any work that is spindle-turned.
Spindle-Turning: Work performed where the
grain and length of the workpiece are parallel to
the axis of the bed.
Swing: The capacity of the lathe, measured by
doubling the distance from the bed to the spindle
center.
Tailstock: The metal component at the opposite
end of the bed from the headstock containing a
quill and live or dead centers. It maintains pres-
sure on the spindle-turned workpiece.
Tool Base: The movable metal fixture attached
to the bed upon which the tool rest is fixed.
Tool Rest: The adjustable metal arm upon which
the tool rests during a turning operation.
Way: One of the metal rails that make up the bed
of the lathe.
-11-
Model W1704 (For Machines Mfd. Since 01/20)
ELECTRICAL
ELECTRICAL
Circuit.Requirements
This machine must be connected to the correct size and
type of power supply circuit, or fire or electrical damage
may occur. Read through this section to determine if an
adequate power supply circuit is available. If a correct
circuit is not available, a qualified electrician MUST install
one before you can connect the machine to power.
A power supply circuit includes all electrical equipment
between the breaker box or fuse panel in the building
and the machine. The power supply circuit used for
this machine must be sized to safely handle the full-
load current drawn from the machine for an extended
period of time. (If this machine is connected to a circuit
protected by fuses, use a time delay fuse marked D.)
Circuit.Requirements
This machine is prewired to operate on a power supply
circuit that has a verified ground and meets the following
requirements:
Circuit.Type .............. 110V/120V,.60.Hz,.Single-Phase
Circuit.Size ............................................ 15.Amps
Plug/Receptacle ................................... NEMA.5-15
Full-Load.Current.Rating
The full-load current rating is the amperage a machine
draws at 100% of the rated output power. On machines
with multiple motors, this is the amperage drawn by the
largest motor or sum of all motors and electrical devices
that might operate at one time during normal operations.
Full-Load.Current.Rating.at.120V................ 3.2.Amps
The machine must be properly set up
before it is safe to operate. DO NOT
connect this machine to the power
source until instructed to do so later
in this manual.
Incorrectly. wiring. or. grounding. this.
machine.can.cause.electrocution,.fire,.
or.machine.damage..To.reduce.this.risk,.
only.an.electrician.or.qualified.service.
personnel. should. do. any. required.
electrical.work.on.this.machine.
NOTICE
The.circuit.requirements.listed.in.this.
manual. apply. to.a.dedicated.circuit—
where.only.one.machine.will.be.running.
at. a. time.. If. this. machine. will. be.
connected. to. a. shared. circuit. where.
multiple.machines.will.be.running.at.the.
same.time,.consult.with.an.electrician.
to. ensure. that. the. circuit. is. properly.
sized.for.safe.operation.
-12-
Model W1704 (For Machines Mfd. Since 01/20)
ELECTRICAL
Grou nding.Requirements
This machine MUST be grounded. In the event of certain
types of
malfunctions or breakdowns, grounding provides
a path of least resistance for electric current
to travel—in
order
to reduce the risk of electric shock.
Improper connection of the equipment-grounding
wire
will
increase
the risk of electric shock. The wire with green
insulation
(with/without yellow stripes) is the equipment-
grounding
wire. If repair or replacement of the power
cord or plug is necessary, do not connect the equipment-
grounding
wire to a live (current carrying) terminal.
Check with a qualified electrician or service personnel
if
you do not understand these grounding requirements,
or if
you are in doubt about whether the tool is
properly grounded.
If you ever notice that a cord or
plug is damaged or worn, disconnect it from power, and
immediately replace it with a new one.
For.120V.Connection
Extension.Cords
We do not recommend using an extension cord with
this machine. Extension cords cause voltage drop, which
may damage electrical components and shorten motor
life. Voltage drop increases with longer extension cords
and smaller gauge sizes (higher gauge numbers indicate
smaller sizes).
Any extension cord used with this machine must contain a
ground wire, match the required
plug and receptacle, and
meet the following requirements:
Minimum.Gauge.Size.at.120V....................... 16.AWG
Maximum.Length.(Shorter.is.Better).................50.ft.
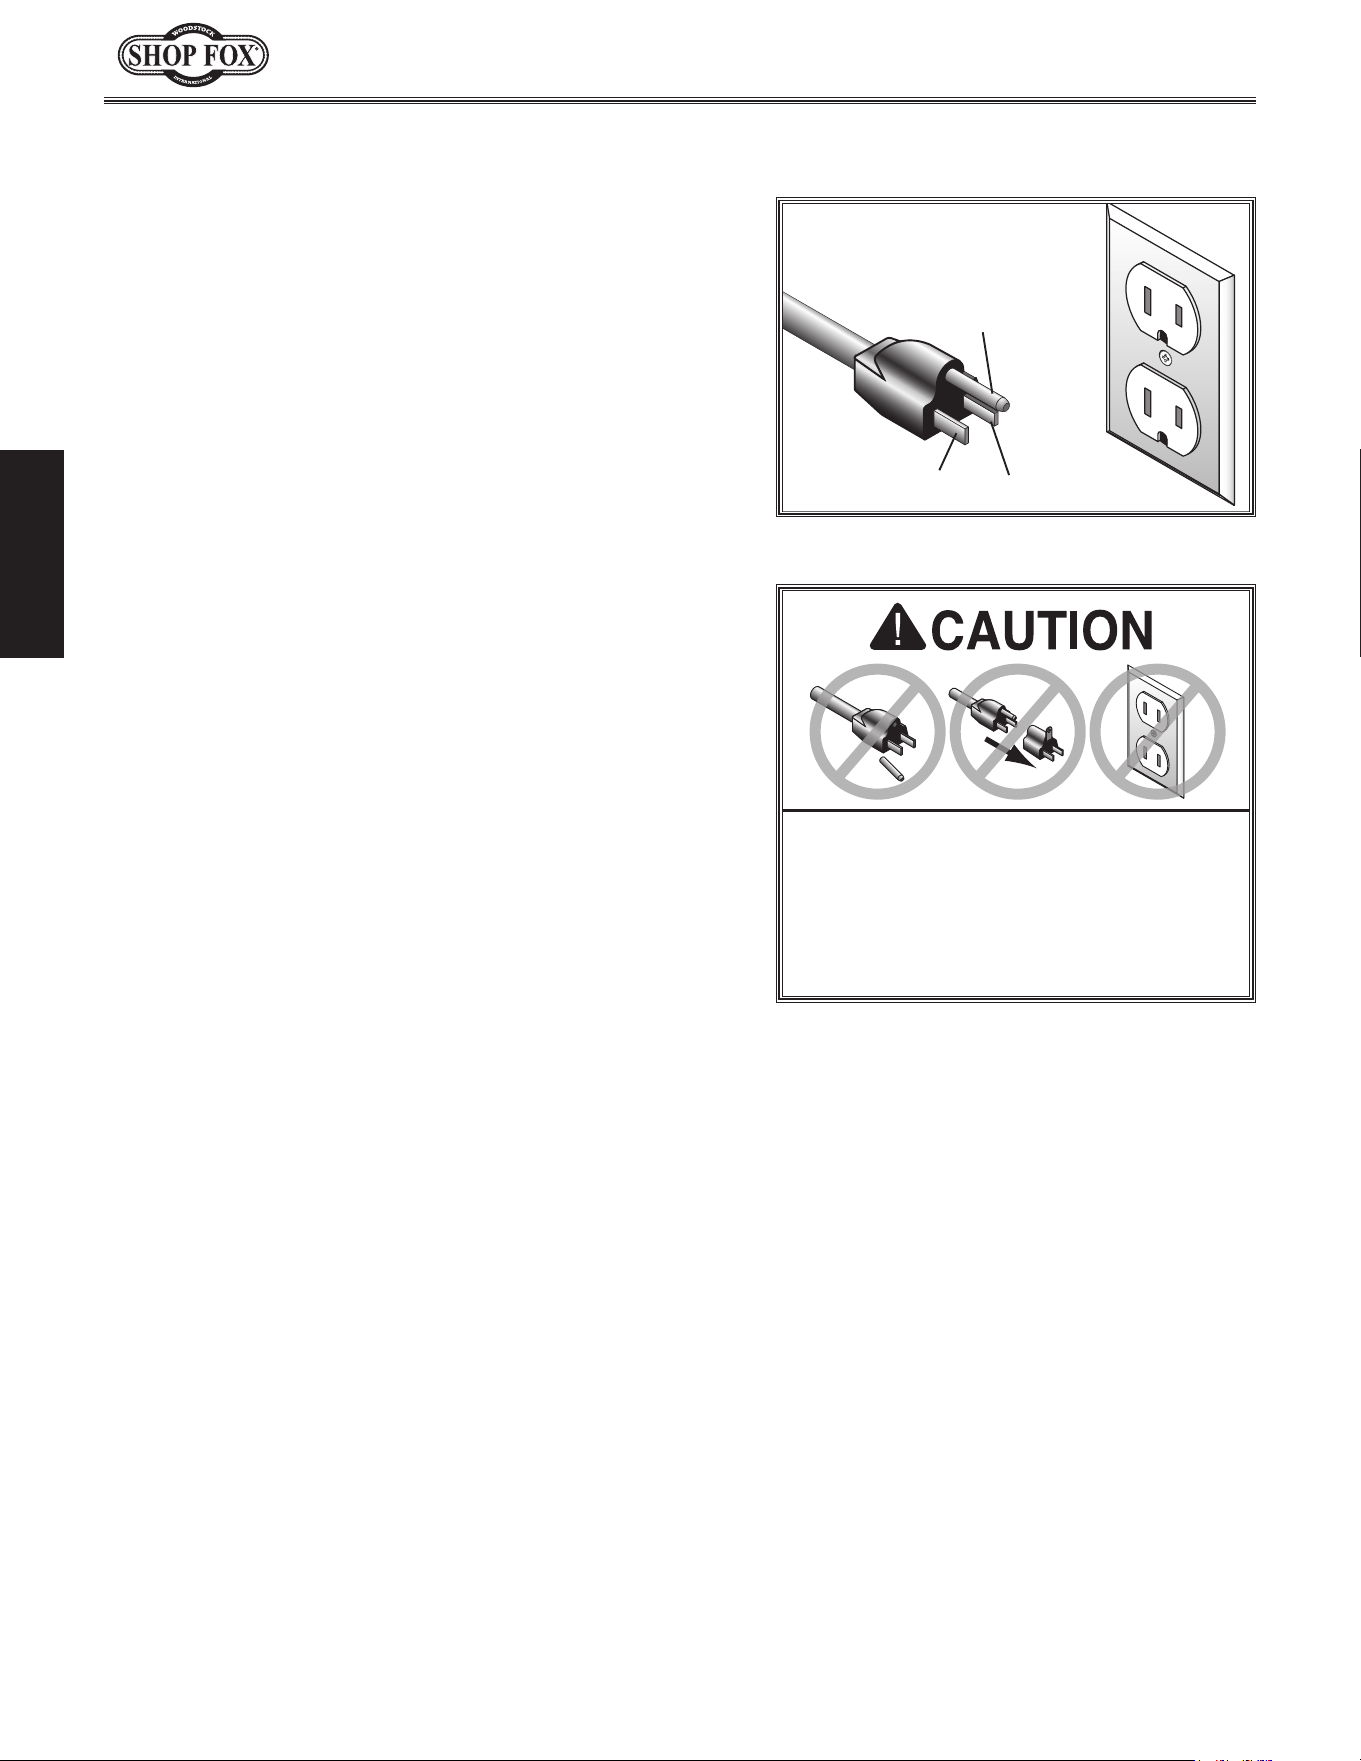
Grounding Pin
Neutral Hot
5-15 PLUG
GROUNDED
5-15 RECEPTACLE
120V
Figure.4. NEMA 5-15 plug & receptacle.
DO. NOT. modify. the. provided. plug. or.
use. an. adapter. if. the. plug. will. not.
fit . the. receptacle.. Instead,. have. an.
electrician.install.the.proper.receptacle.
on. a. power. supply. circuit. that. meets.
the.requirements.for.this.machine.
This machine is equipped with a power cord with an
equipment-grounding
wire and NE MA 5-15 grounding
plug
(see figure). The plug must only be inserted into
a matching
receptacle that is properly installed and
grounded in accordance with local codes and ordinances.
-13-
Model W1704 (For Machines Mfd. Since 01/20)
SETUP
SET UP
Unpacking
This machine has been carefully packaged for safe
transportation. If you notice the machine has been
damaged during shipping, please contact your authorized
Shop Fox dealer immediately.
USE. helpers. or. power.
lifting. equipment. to. lift.
this.machine..Other wise,.
serious. personal. injury.
may. occur..
Wear safety glasses during
entire setup process!
This machine presents
serious injury hazards
to untrained users. Read
through this entire manual
to become familiar with
the controls and opera-
tions before starting the
machine!
Items.Needed.for.Setup
The following items are needed, but not included, to set
up your machine.
Description. Qty
• Safety Glasses (for each person) ........................1
• Solvent/Cleaner ...........................................1
• Gloves ................................................. 1 Pair
• Shop Rags ....................................... As Needed
• Additional Person ..........................................1
• Phillips Head Screwdriver #2 ............................1
• Quality Metal Protectant Lubricant......... As Needed
-14-
Model W1704 (For Machines Mfd. Since 01/20)
SETUP
Inventory
The following is a list of items shipped with your machine.
Before beginning setup, lay these items out and inventory
them.
Note:
If you cannot find an item on this list, carefully
check around/inside the machine and packaging materials.
Often, these items get lost in packaging materials while
unpacking or they are pre-installed at the factory.
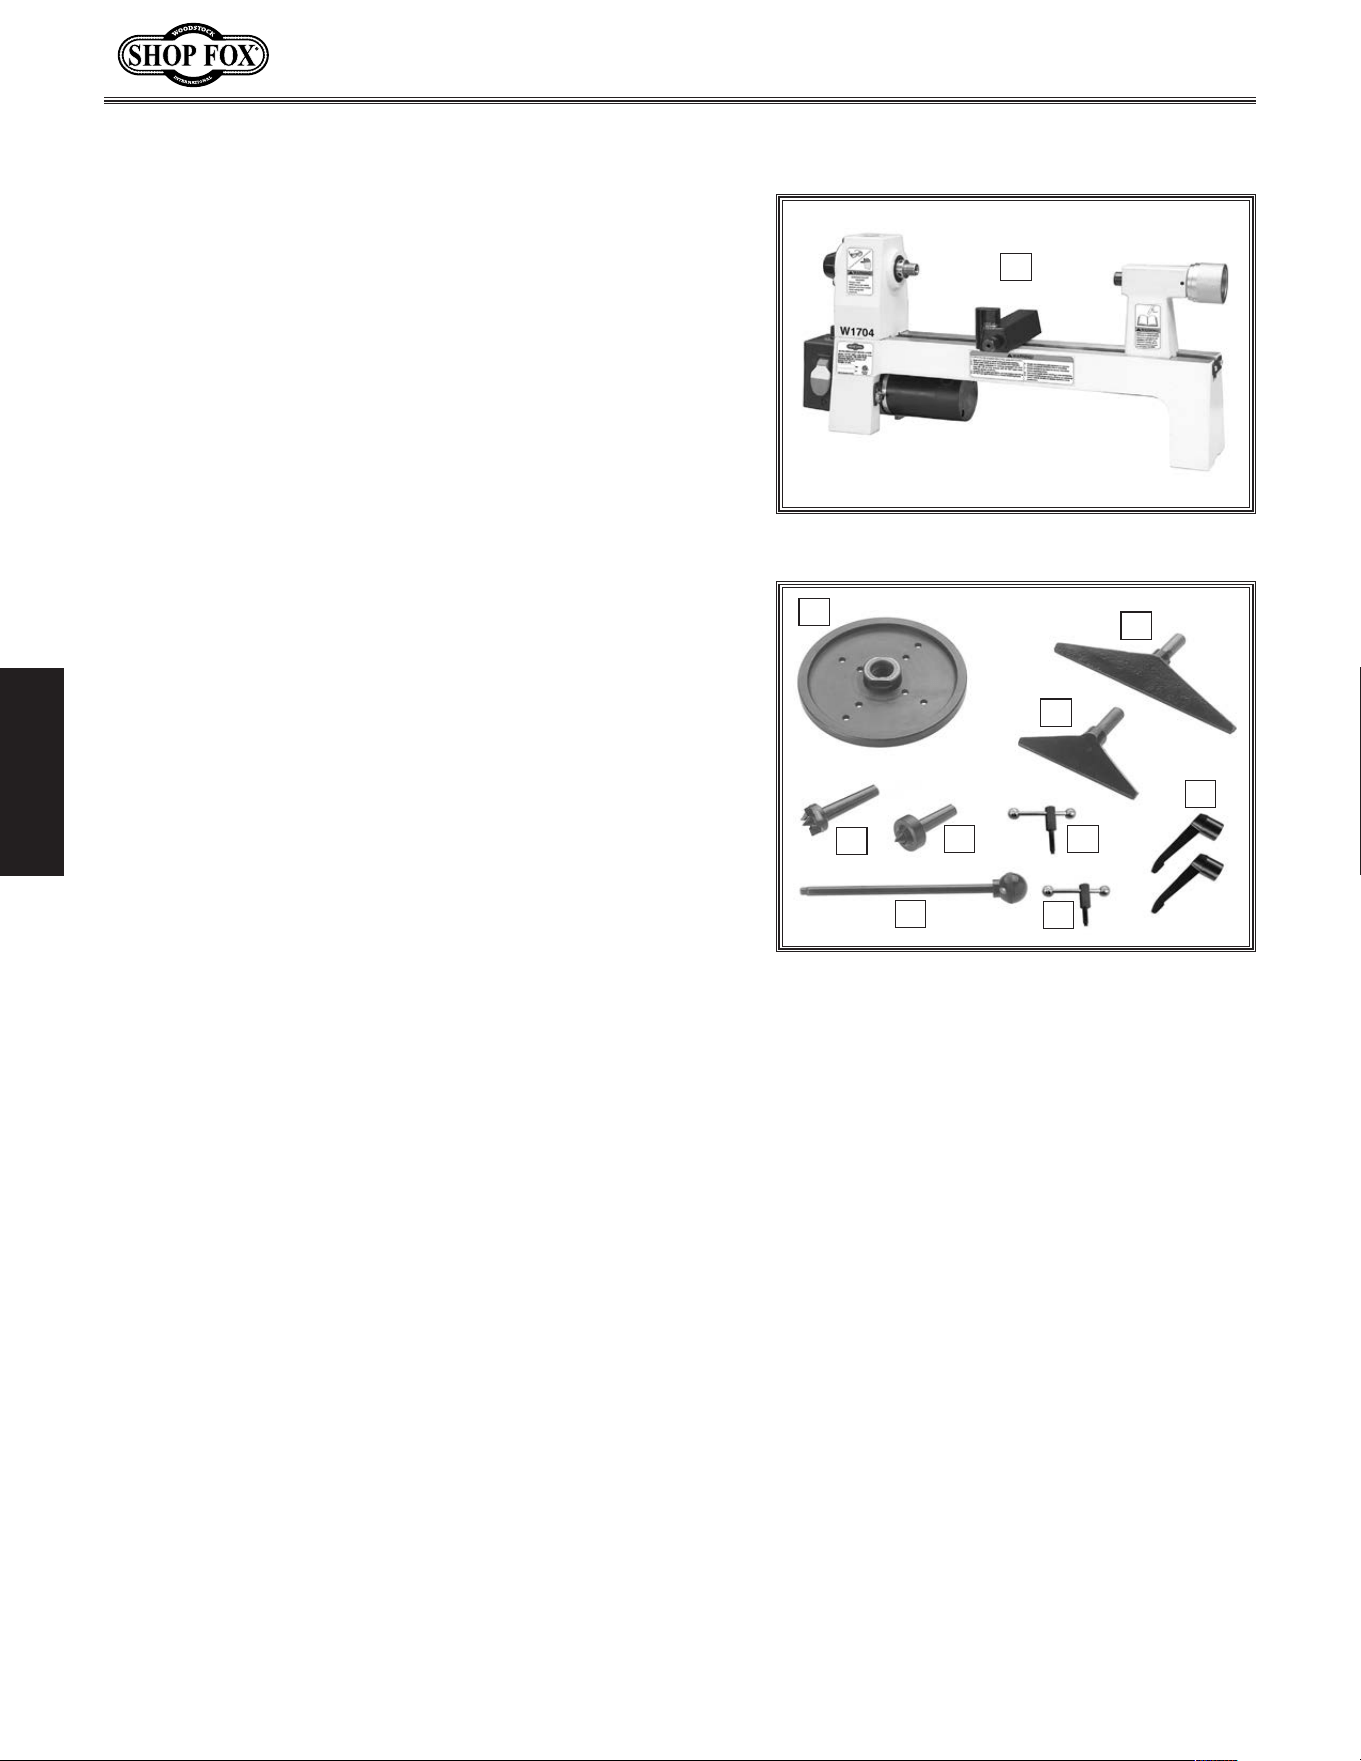
Inventory.(Figures.5–6). Qty
A. Lathe Assembly
—Tool Rest Base (mounted) ..............................1
—Tailstock (mounted)
.....................................1
B.
Faceplate 5
3
⁄4" .............................................1
C.. Tool Rest 7" .................................................1
D
.. Tool Rest 4
1
⁄2" ..............................................1
E.
Adjustable Levers (Tool Rest Base, Tailstock) .........2
F
.. Lock Handle M6-1 x 28 (Tool Rest) ......................1
G.
Live Center .................................................1
H.
Spur Center .................................................1
I
.. Knockout Tool ..............................................1
J
.. Lock Handle M6-1 x 17 (Quill) ...........................1
K.
Hardware (Not Shown)
—Hex Wrenches 3, 5mm .............................. 1 Ea
—Open-Ends Wrench 19/27mm
..........................1
A
Figure.5. Lathe assembly.
Figure.6. Loose inventory.
C
D
E
F
H
G
B
I
J
-15-
Model W1704 (For Machines Mfd. Since 01/20)
SETUP
Hex
Wrench
16mm
MEASURE BOLT DIAMETER BY PLACING INSIDE CIRCLE
7
⁄16"
3
⁄8"
1
⁄4"
5
⁄16"
#10
1
⁄2"
WASHERS ARE MEASURED BY THE INSIDE DIAMETER
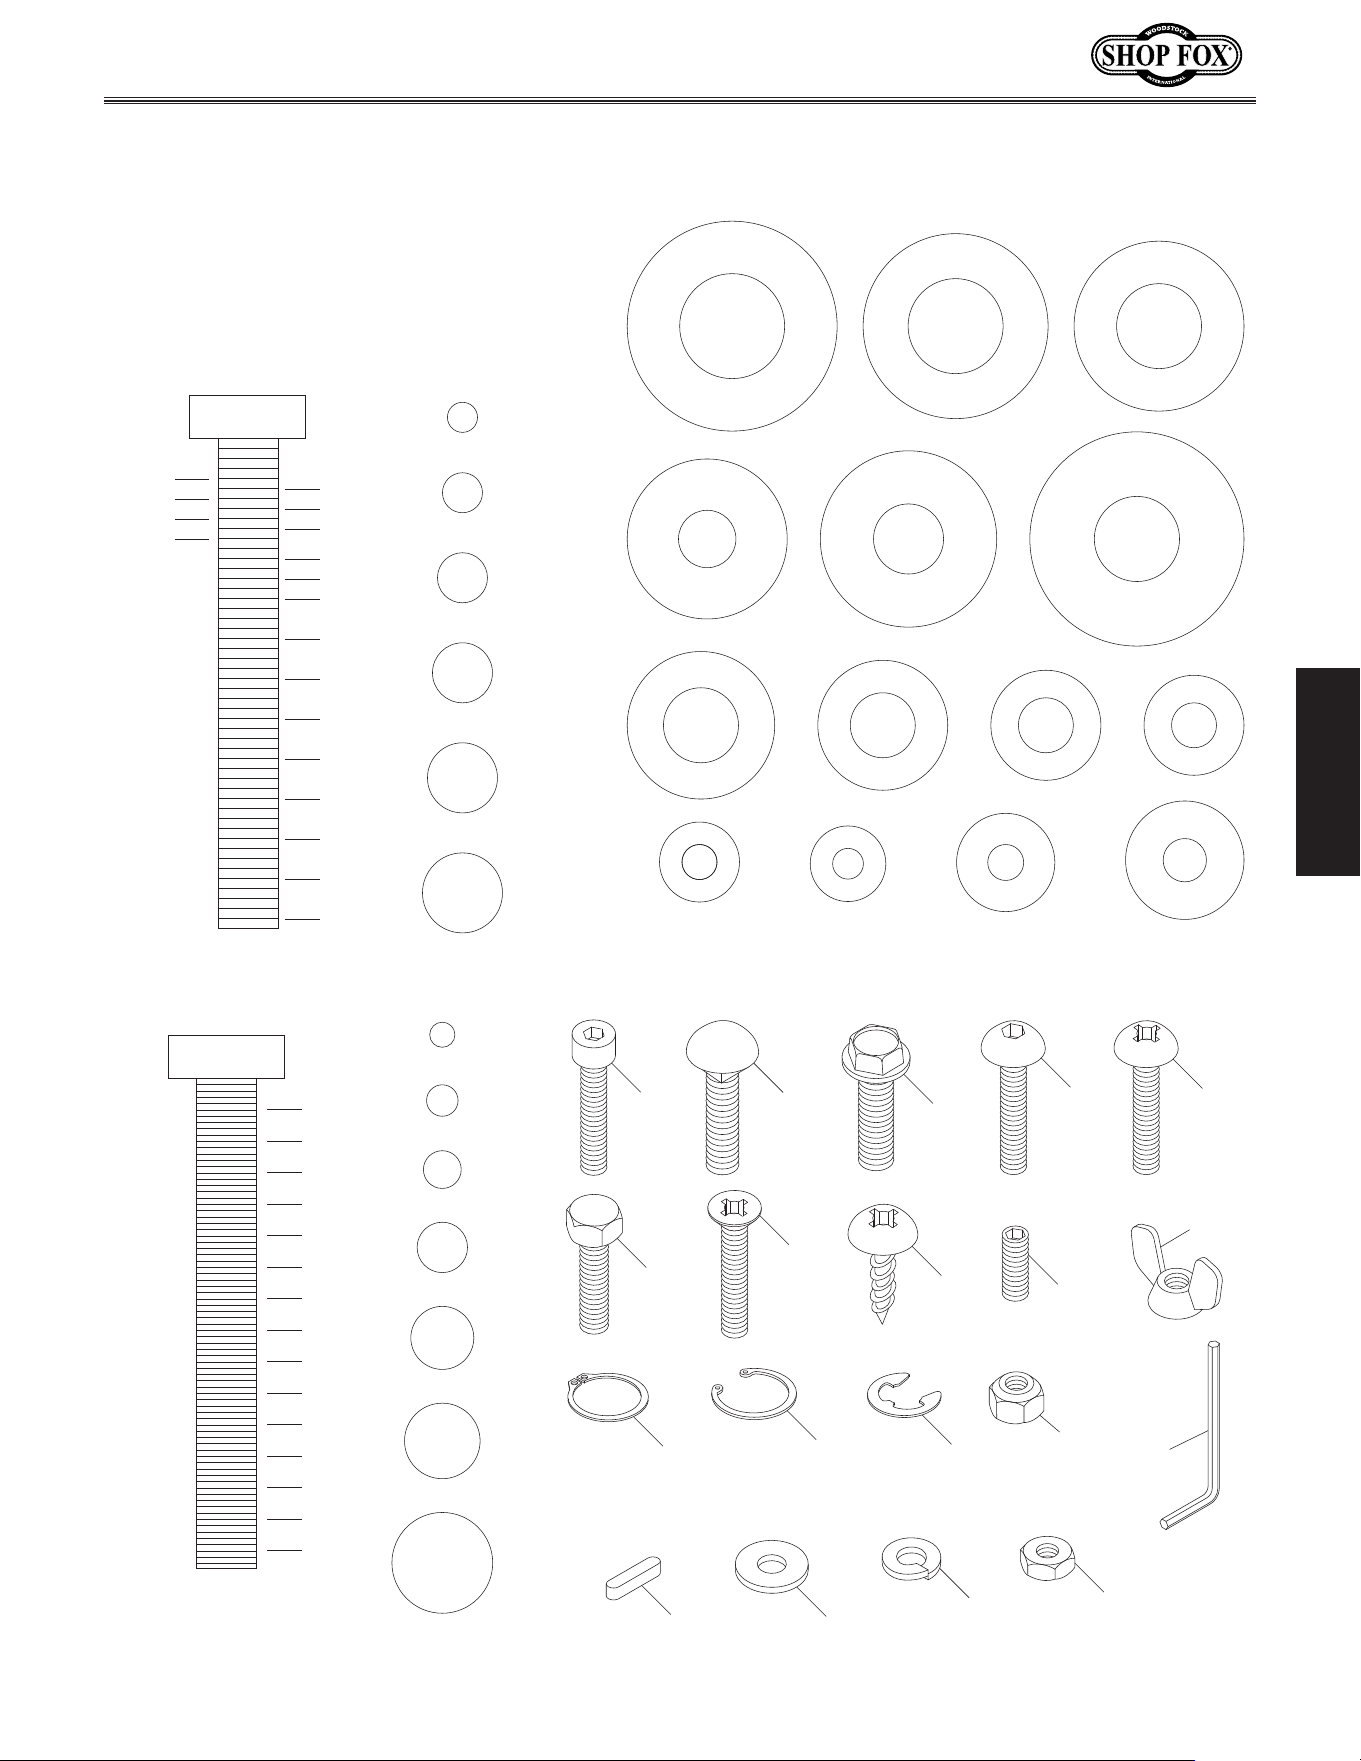
USE THIS CHART TO IDENTIFY
HARDWARE DURING THE
INVENTORY/ASSEMBLY
PROCESS.
Flat Washer
Lock
Washer
Hex
Nut
Wing
Nut
Set
Screw
Cap
Screw
Carriage
Bolt
Hex
Bolt
Button
Head
Screw
Flange
Bolt
LINES ARE
1
⁄16" INCH APART
1
⁄4"
3
⁄8"
1
⁄2"
5
⁄8"
5
⁄16"
7
⁄16"
9
⁄16"
3
⁄4"
7
⁄8"
3
2
1
⁄4"
2
1
⁄2"
2
3
⁄4"
2
1
3
⁄4"
1
1
⁄2"
1
1
⁄4"
1
LINES ARE 1MM APART
5mm
10mm
20mm
15mm
25mm
40mm
30mm
35mm
45mm
50mm
60mm
55mm
70mm
65mm
75mm
W
A
S
H
E
R
D
I
A
M
E
T
E
R
5
⁄8"
W
A
S
H
E
R
D
I
A
M
E
T
E
R
9
⁄16"
1
⁄2"
W
A
S
H
E
R
D
I
A
M
E
T
E
R
W
A
S
H
E
R
D
I
A
M
E
T
E
R
12mm
W
A
S
H
E
R
D
I
A
M
E
T
E
R
10mm
7
⁄16"
W
A
S
H
E
R
D
I
A
M
E
T
E
R
W
A
S
H
E
R
D
I
A
M
E
T
E
R
8mm
3
⁄8"
W
A
S
H
E
R
D
I
A
M
E
T
E
R
5
⁄16"
W
A
S
H
E
R
D
I
A
M
E
T
E
R
1
⁄4"
W
A
S
H
E
R
D
I
A
M
E
T
E
R
#10
W
A
S
H
E
R
D
I
A
M
E
T
E
R
W
A
S
H
E
R
D
I
A
M
E
T
E
R
4mm
W
A
S
H
E
R
D
I
A
M
E
T
E
R
6mm
W
A
S
H
E
R
D
I
A
M
E
T
E
R
5mm
4mm
6mm
5mm
8mm
10mm
12mm
Tap
Screw
Phillips
Head
Screw
Flat
Head
Screw
E-Clip
External
Retaining
Ring
Internal
Retaining
Ring
Key
Lock
Nut
Hardware.Recognition.Chart
-16-
Model W1704 (For Machines Mfd. Since 01/20)
SETUP
Cleaning.Machine Machine.Placement
Workbench.Load
Refer to the Machine.Spec ifications for the
weight and footprint specifications of your
machine. Some workbenches may require
additional reinforcement to support the weight
of the machine and workpiece materials.
Consider anticipated workpiece sizes and
additional space needed for auxiliary stands,
work tables, or other machinery when
establishing a location for this machine in the
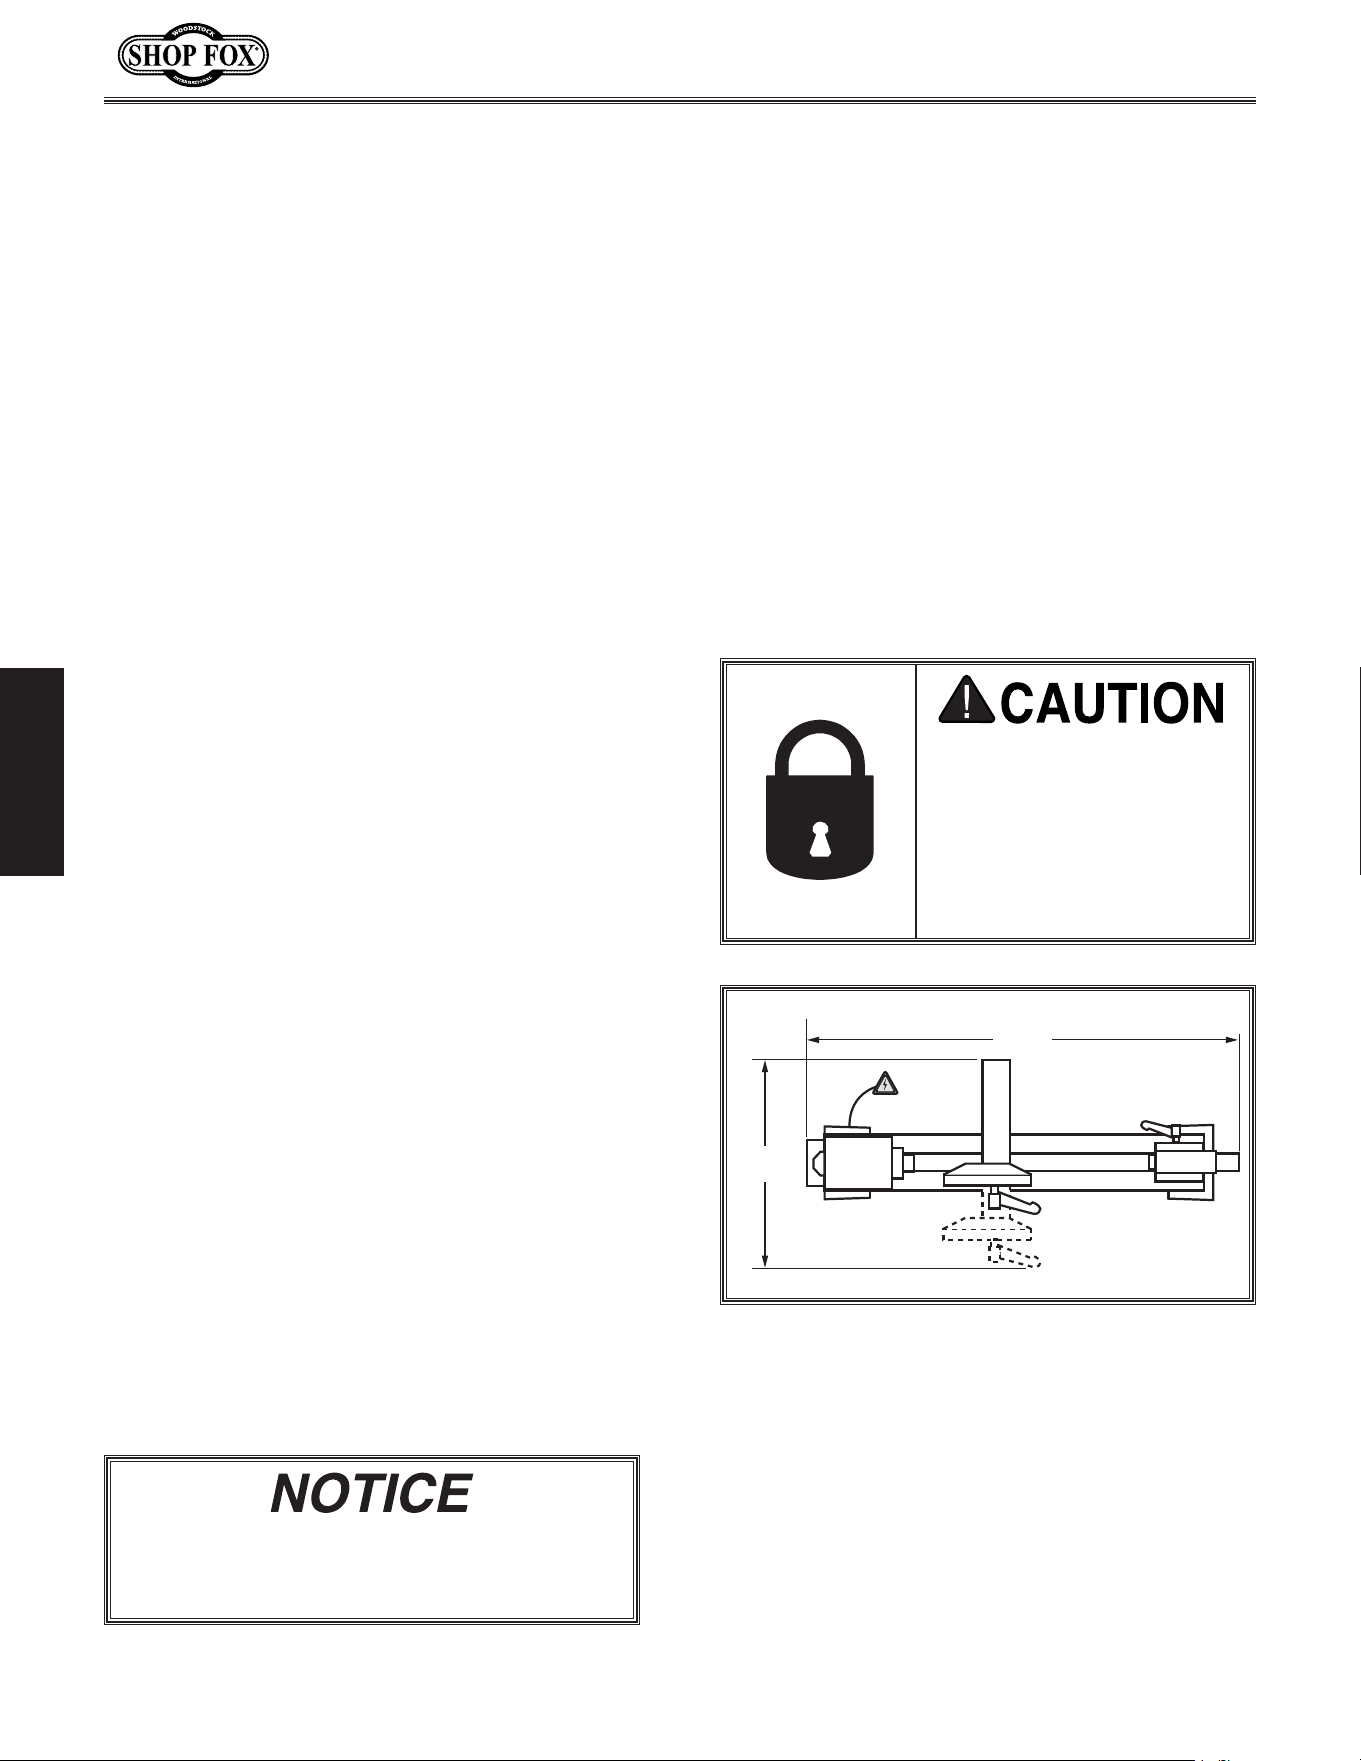
shop. Below is the minimum amount of space
needed for the machine.
Placement.Location
INJURY.HAZARD!.Untrained.
users.can.injure.themselves.
with.this.machine..Restrict.
access. to. machine. when.
you.are.away,. especially.if.
it. is. installed. where. chil-
dren.are.present.
The unpainted surfaces of your machine are
coated with a heavy-duty rust preventative that
prevents corrosion during shipment and storage.
This rust preventative works extremely well, but
it will take a little time to clean.
Be patient and do a thorough job cleaning your
machine. The time you spend doing this now will
give you a better appreciation for the proper
care of your machine's unpainted surfaces.
There are many ways to remove this rust
preventative, but the following steps work well
in a wide variety of situations. Always follow the
manufacturer’s instructions with any cleaning
product you use and make sure you work in a
well-ventilated area to minimize exposure to
toxic fumes.
Before.cleaning,.gather.the.following:
• Disposable rags
• Cleaner/degreaser (WD•40 works well)
• Safety glasses & disposable gloves
• Plastic paint scraper (optional)
Basic.steps.for.removing.rust.preventative:
1.
Put on safety glasses.
2.
Coat the rust preventative with a liberal
amount of cleaner/degreaser, then let it
soak for 5–10 minutes.
3.
Wipe off the surfaces. If your cleaner/
degreaser is effective, the rust
preventative will wipe off easily. If you
have a plastic paint scraper, scrape off as
much as you can first, then wipe off the
rest with the rag.
4.
Repeat Steps.2–3 as necessary until clean,
then coat all unpainted surfaces with a
quality metal protectant to prevent rust.
Avoid. chlorine-based. solvents,. such. as.
acetone. or. brake. parts. cleaner,. that. may.
damage.painted.surfaces..
36"
11
1
/
2
"
Figure.7. Minimum working clearances.
-17-
Model W1704 (For Machines Mfd. Since 01/20)
SETUP
Assembly
Before beginning the assembly process, refer to Items.
Needed.for.Setup
and gather everything you need.
Ensure all parts have been properly cleaned of any
heavy-duty rust-preventative applied at the factory (if
applicable). Be sure to complete all steps in the assembly
procedure prior to performing the
Test.Run.
or connecting
the machine to power.
To.assemble.machine,.do.these.steps:
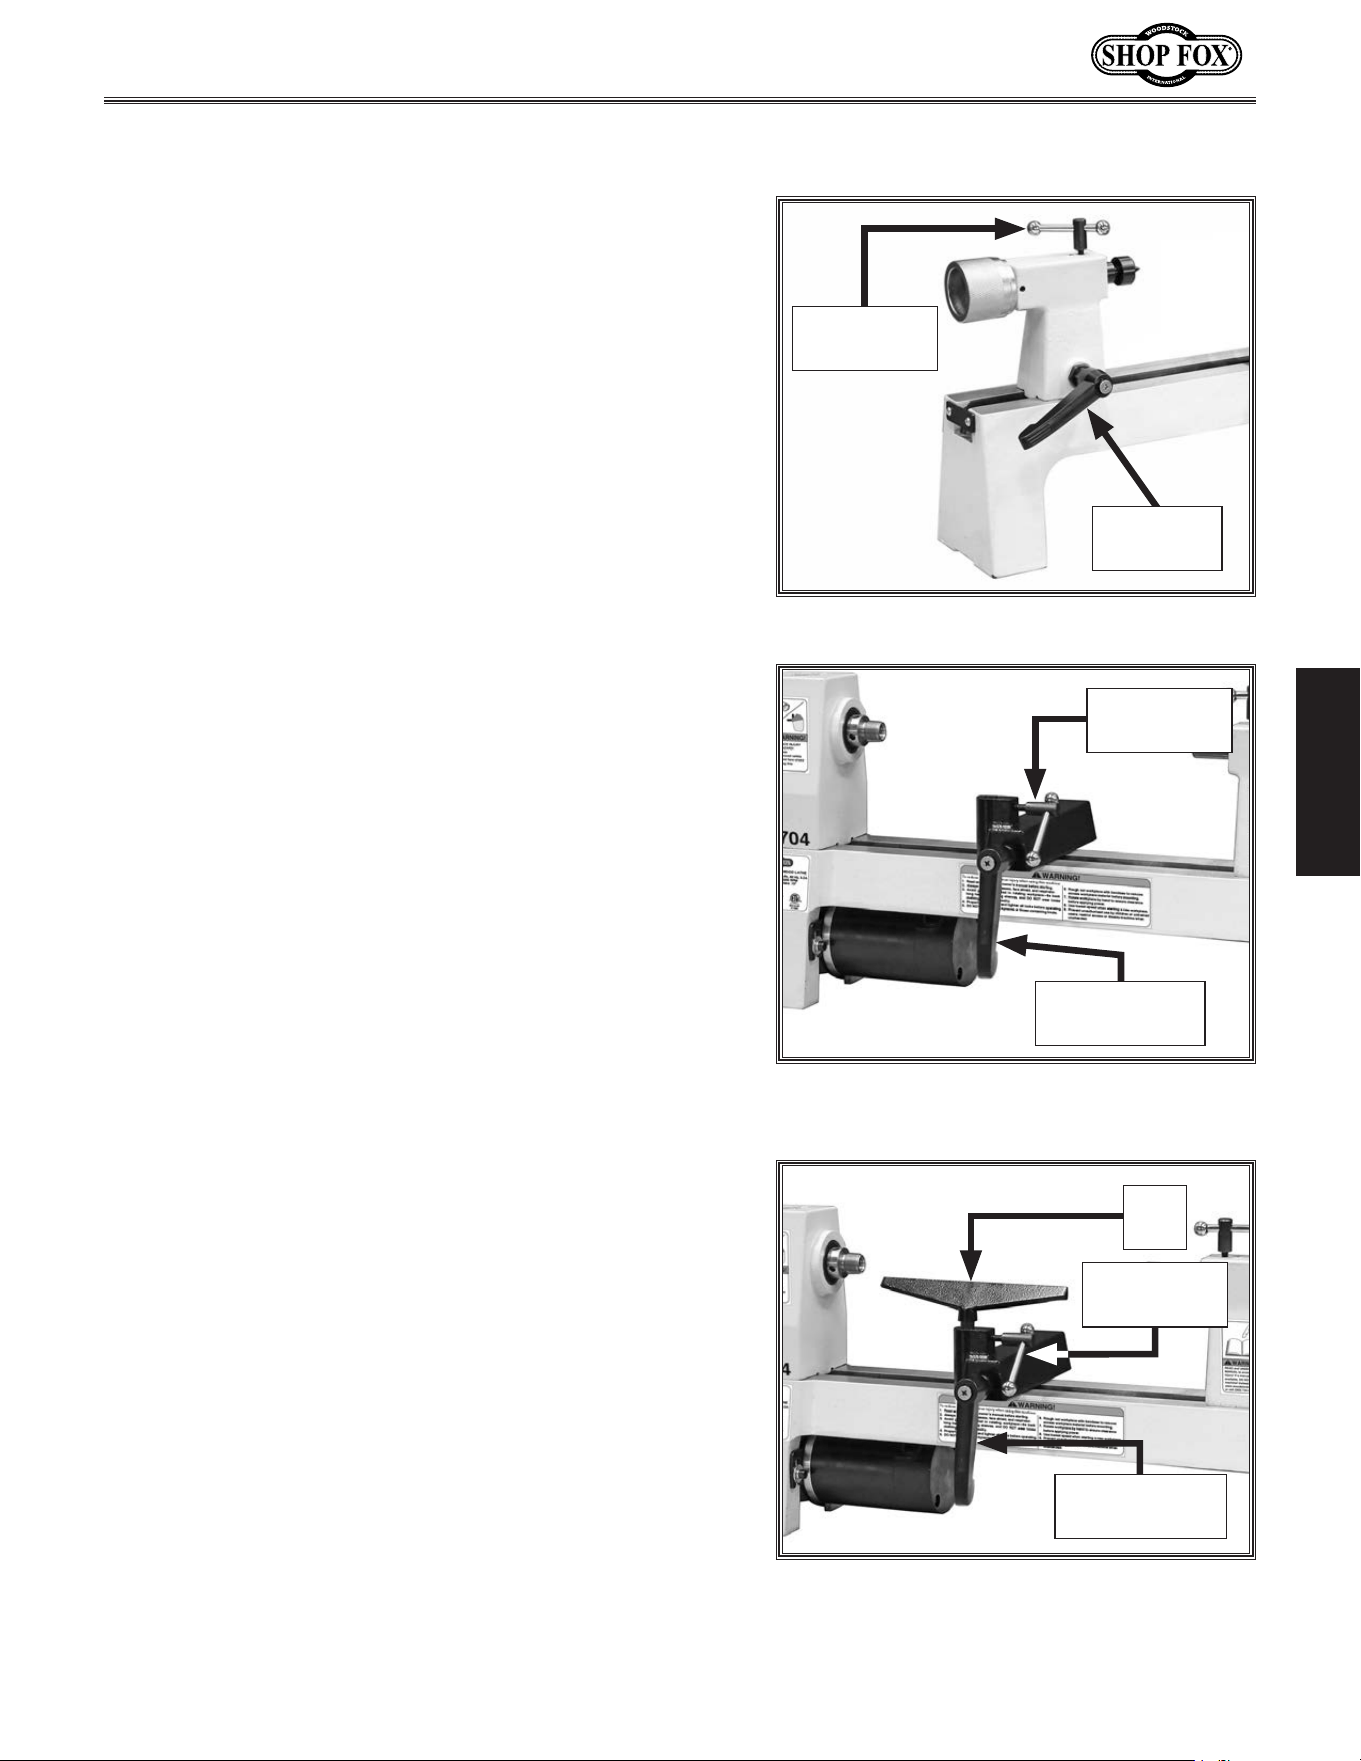
1.. Install tailstock lock lever and M6-1 x 17 quill lock
handle, as shown in Figure 8.
2
.. Install tool rest base lock lever and M6-1 x 28 tool
rest lock handle, as shown in
Figure.9.
3
.. Insert tool rest into tool rest base and tighten tool
rest lock handle (see Figure 10).
Note: Unless workpiece clearance is an issue, always
install the larger of the (2) tool rests included with
this machine to give yourself more room to work.
lock levers
Figure.8. Hardware installed on tailstock.
Quill
Lock Handle
Tailstock
Lock Lever
Figure.9. Hardware installed on tool rest
base.
Tool Rest
Lock Handle
Tool Rest Base
Lock Lever
Figure.10. Tool rest installed on tool rest
base.
Tool
Rest
Tool Rest
Lock Handle
Tool Rest Base
Lock Lever
-18-
Model W1704 (For Machines Mfd. Since 01/20)
SETUP
Test. Run
Serious. injury. or. death. can. result.
from. using. this. machine. BEFORE.
understanding. its. controls. and. related.
safety.information..DO.NOT.operate,.or.
allow.others.to.operate,.machine.until.
the.information.is.understood..
DO. NOT. start. machine. until. all.
preceding.setup.instructions.have.been.
performed..Operating.an.improperly.set.
up. machine. may. result. in. malfunction.
or. unexpected. results. that. can. lead.
to. serious. injury,. death,. or. machine/
property.damage.
Once assembly is complete, test run the machine to
ensure it is properly connected to power and safety
components are functioning properly.
If you find an unusual problem during the test run,
immediately stop the machine, disconnect it from power,
and fix the problem BEFORE operating the machine again.
The
Troubleshooting table in the SERVICE
section of this
manual can help.
To.test.run.machine,.do.these.steps:
1. Clear all setup tools away from machine.
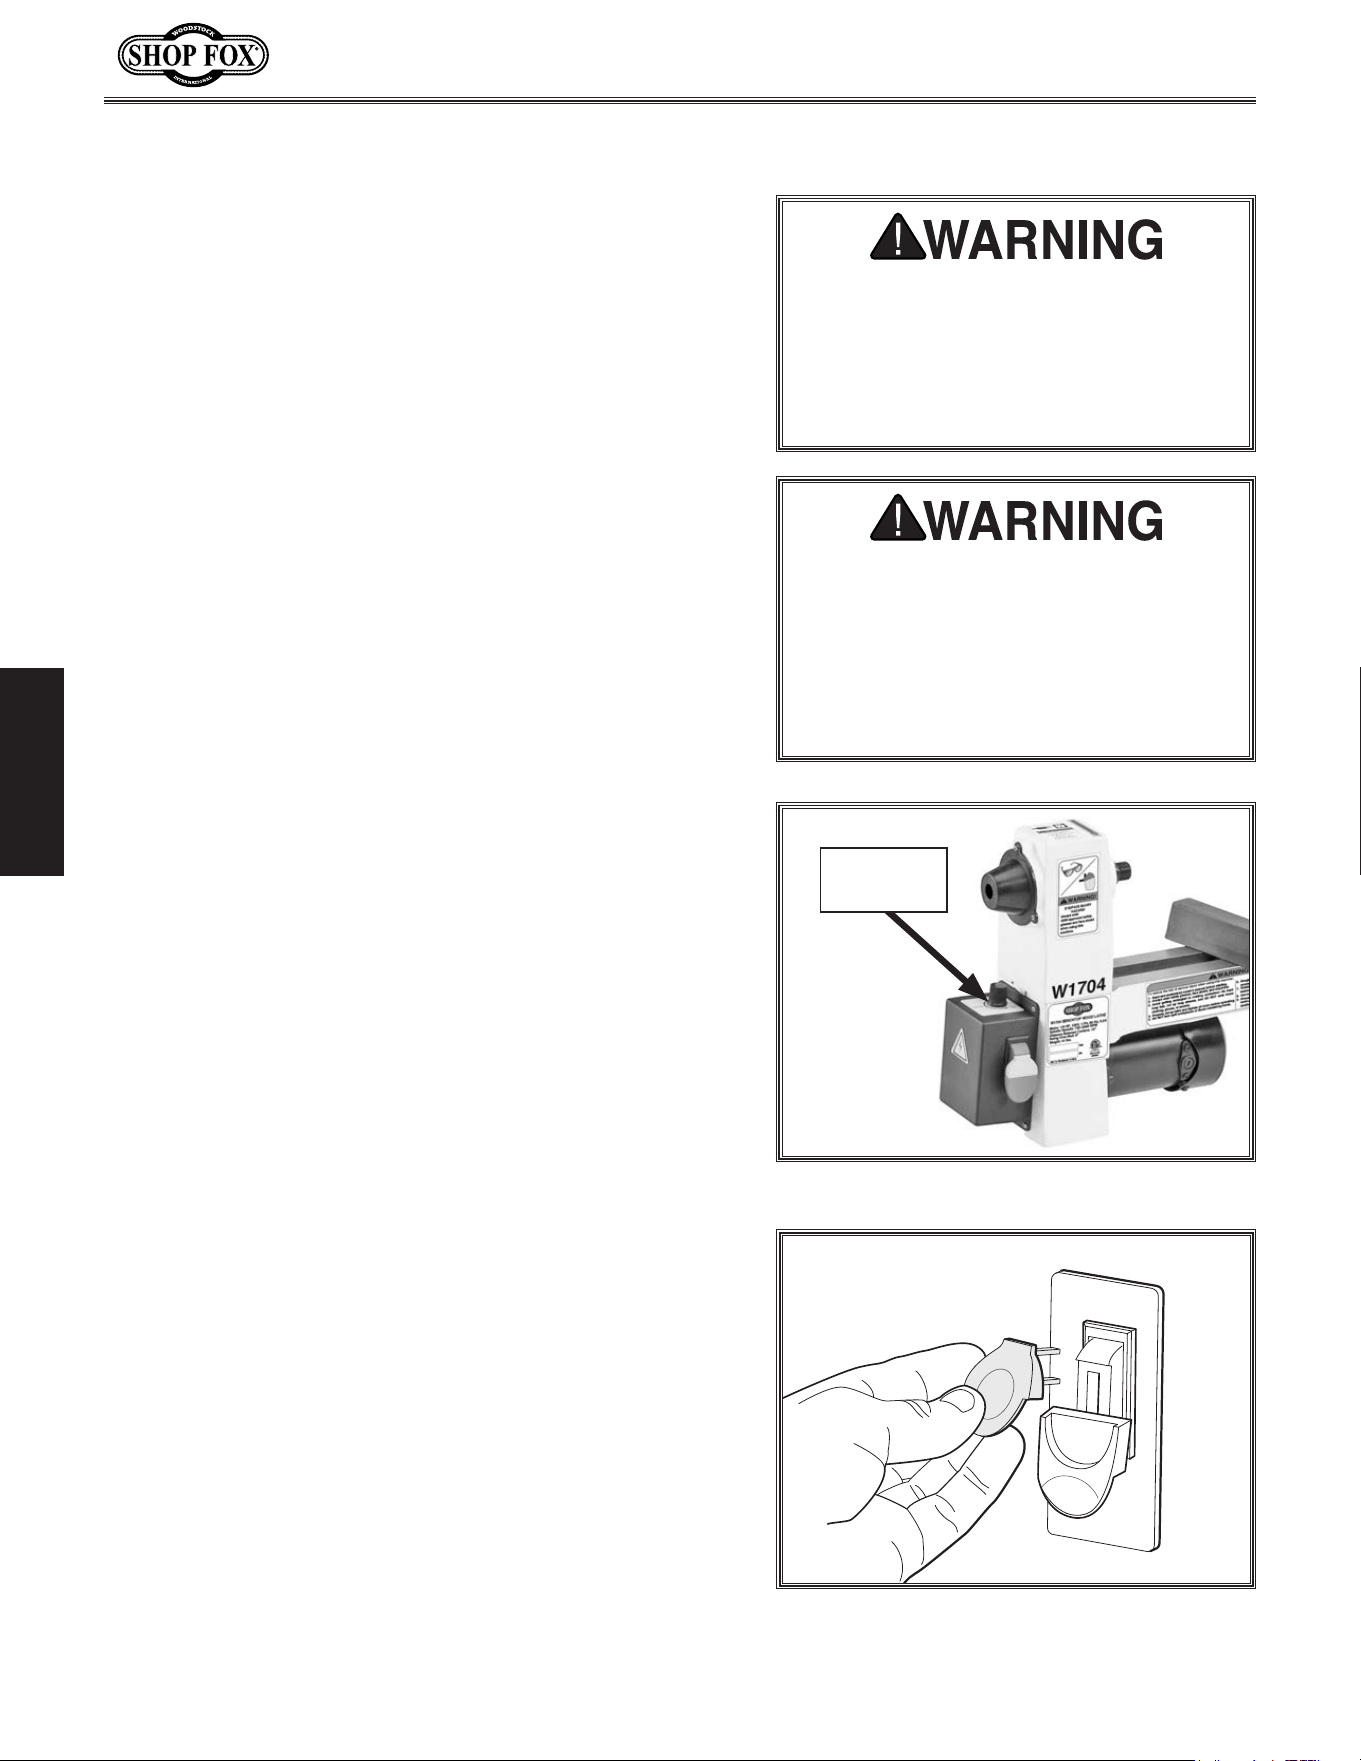
2. Turn spindle speed dial all the way counterclockwise
(see Figure.11).
3.
Connect machine to power supply.
4. Verify machine is operating correctly by flipping ON/
OFF paddle switch up, then slowly turning spindle
speed dial clockwise.
—
.When operating correctly, machine runs smoothly
with little or no vibration or rubbing noises.
— Investigate and correct strange or unusual noises
or vibrations before operating machine further.
Always disconnect machine from power when
investigating or correcting potential problems.
5.
Turn spindle speed dial all the way counterclockwise.
6. Turn machine OFF.
7.
Remove switch disabling key (see Figure.12).
8.
Try to start machine with paddle switch.
— If machine does not start, switch disabling feature
is working correctly.
— If machine does start, immediately disconnect
power to machine. Switch disabling feature is not
working correctly. Call Tech Support for help.
Congratulation! The Test Run is complete.
The test run consists of verifying the following: 1) The
motor powers up and runs correctly, and 2) the safety
disabling mechanism on the switch works correctly.
Figure.11. Location of spindle speed dial.
Figure.12. Removing switch key from
paddle switch.
Spindle
Speed Dial
-19-
Model W1704 (For Machines Mfd. Since 01/20)
OPERATIONS
General
To. reduce. your. risk. of. serious. injury.
or. damage. to. the. machine,. read. this.
entire.manual.BEFORE.using.machine.
To. reduce. the. risk. of. eye. injury. and.
long-term. respirator y. damage,. always.
wear.safety. glasses,.face.shield.and. a.
respirator. while.operating.machine.
If you are an inexperienced operator,
we strongly recommend that you read
books or trade articles, or seek training
from an experienced operator of this
type of machinery before performing
unfamiliar operations. Above.all,.safety.
must.come.first!
To.complete.a.typical.operation,.operator.does.the.
following:
1.
Examines workpiece to make sure it is suitable for
turning. No extreme bows, knots, or cracks present.
2.
Prepares and trims up workpiece with a bandsaw or
table saw to make it roughly concentric.
3.
Installs workpiece between centers, or attaches it to
faceplate or chuck.
4.
Adjusts tool rest to
1
⁄8" above workpiece centerline,
and sets minimum clearance between workpiece and
lip of tool rest to
1
⁄4" gap.
5. Rotates workpiece by hand to verify spindle and
workpiece rotate freely through full range of motion.
6.
Verifies spindle speed dial is turned all the way
counterclockwise so spindle does not start in high
speed.
7.
Puts on safety glasses, face shield, and respirator.
8.
Turns lathe ON, adjusts lathe speed, and carefully
begins turning operation, keeping chisel against tool
rest entire time it is cutting.
9.
Turns lathe OFF when cutting operation is complete.
This machine will perform many types of operations
that are beyond the scope of this manual. Many of these
operations can be dangerous or deadly if performed
incorrectly.
The instructions in this section are written with the
understanding that the operator has the necessary
knowledge and skills to operate this machine. If at any
time you are experiencing difficulties performing any
operation, stop using the machine!
The overview below provides the novice machine operator
with a basic understanding of how the machine is used
during operation, so the machine controls/components
discussed later in this manual are easier to understand.
Due to its generic nature, this overview is
NOT intended
to be an instructional guide.
OPERATIONS

-20-
Model W1704 (For Machines Mfd. Since 01/20)
OPERATIONS
Workpiece.Inspection
Some workpieces are not safe to turn or may
require modification before they can be made
safe to turn.
Before.turning,.get.in.the.habit.of.insp ecting.
all.workpieces. for.the.following:
• Material Type: This machine is intended
for turning natural wood products. Never
attempt to turn any composite wood
materials, plastics, metal, stone, or rubber
workpieces; turning these materials can
lead to machine damage or severe injury
• Foreign Objects: Nails, staples, dirt,
rocks and other foreign objects are often
embedded in wood. While turning, these
objects can become dislodged and hit the
operator, cause tool grab, or break the
turning tool, which might then fly apart.
Always visually inspect your workpiece for
these items. If they can't be removed, DO
NOT turn the workpiece.
•. Large/Loose Knots:.Loose knots can
become dislodged during the turning
operation. Large knots can cause a
workpiece to completely break in half
during turning and cause machine damage
and injury. Choose workpieces that do not
have large/loose knots.
•. Wet or "Green" Stock: Turning wood with
a moisture content over 20% can cause
increased wear on tooling.
• Excessive Warping: Workpieces with
excessive bowing or twisting are unstable
and unbalanced. Never turn these
workpieces at high speed, or instability will
be magnified and the workpiece can be
ejected from the lathe causing injury. Only
turn concentric workpieces!

-21-
Model W1704 (For Machines Mfd. Since 01/20)
OPERATIONS
Lathe tools come in a variety of shapes and sizes, and
usually fall into five major categories.
• Gouges—Mainly used for rough cutting, detail
cutting, and cove profiles. The rough gouge is a
hollow, double-ground tool with a round nose, and
the detail gouge is a hollow, double-ground tool with
either a round or pointed nose.
Selecting.Turning.Tools
Figure.13. Example of a gouge.
Figure.14. Example of a skew chisel.
Figure.15. Example of a round nose
scraper.
Figure.16. Example of a parting tool.
• Parting.Tools—Used for sizing and cutting off work.
This is a flat tool with a sharp pointed nose that may
be single- or double-ground.
• Specialty.Tools—These are the unique, special
function tools to aid in hollowing, bowl making,
cutting profiles, etc.
• Scrapers—Typically used where access for other tools
is limited, such as hollowing operations. This is a
flat, double-ground tool that comes in a variety of
profiles (round nose, spear point, square nose, etc.)
to match many different contours.
• Skew.Chisel—A very versatile tool that can be used
for planing, squaring, V-cutting, beading, and parting
off. The skew chisel is flat, double-ground with one
side higher than the other (usually at an angle of
20°–40°).
-22-
Model W1704 (For Machines Mfd. Since 01/20)
OPERATIONS
Adjusting.Tailstock
To.position.tailstock.along.length.of.bed,.d o.these.
ste ps:
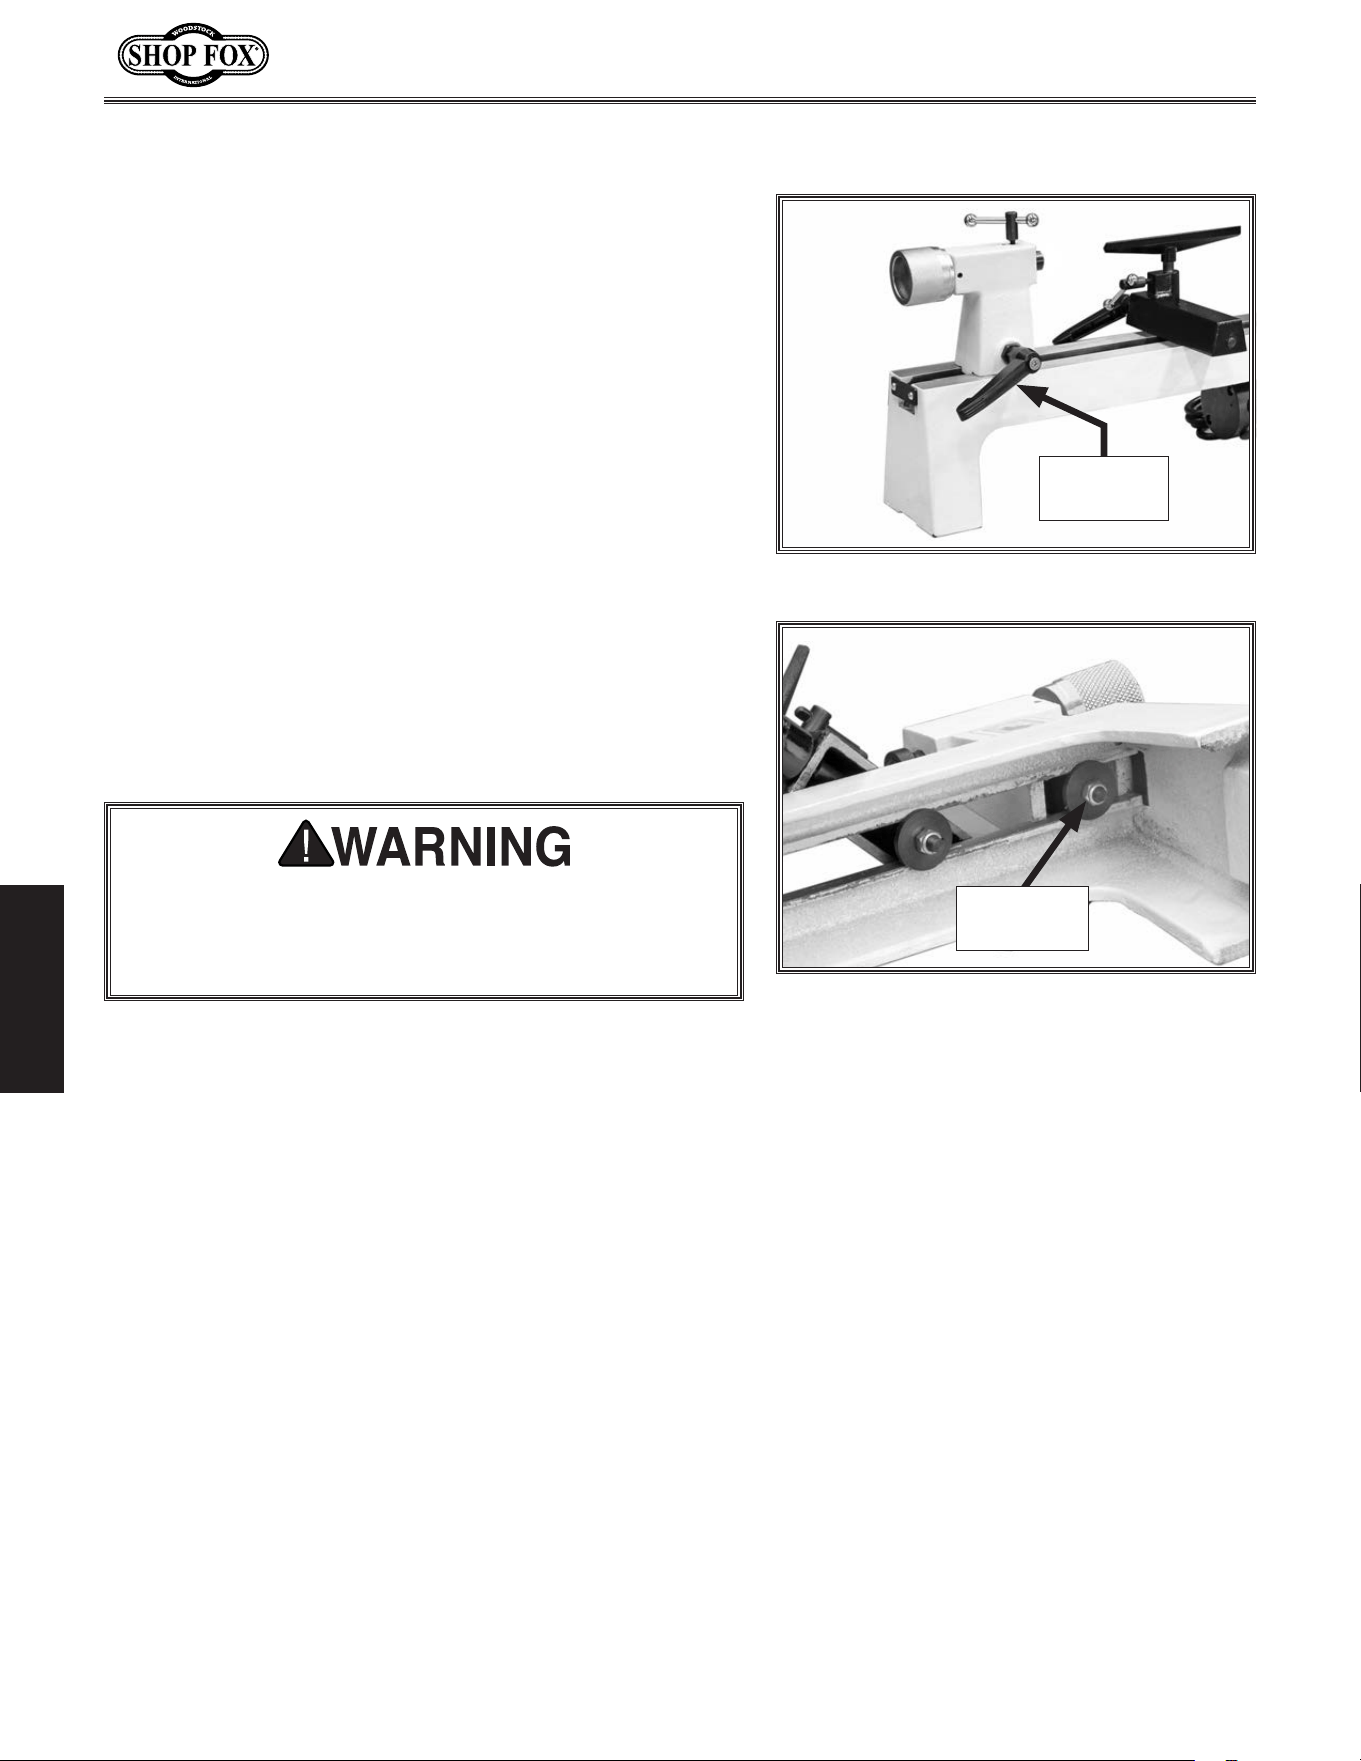
1.. Loosen tailstock lock lever (see Figure.17) and move
tailstock to desired position along bed.
2.. Tighten tailstock lock lever to secure tailstock in
position.
Note: The clamp nut underneath the tailstock (see
Figure 18) will require occasional adjusting to
ensure proper clamping pressure of the tailstock to
the bed. Turn this lock nut in small increments to
fine tune the clamping pressure as needed.
Figure.18. Location of tailstock clamp nut.
Tailstock
Clamp Bolt
Always.operate.lathe.with.tailstock.firmly.locked.to.
bed.. Otherwise,. serious. personal. injury. may. occur.
by.tailstock.moving.during.operation.and.workpiece.
being.ejected.at.high.speed.
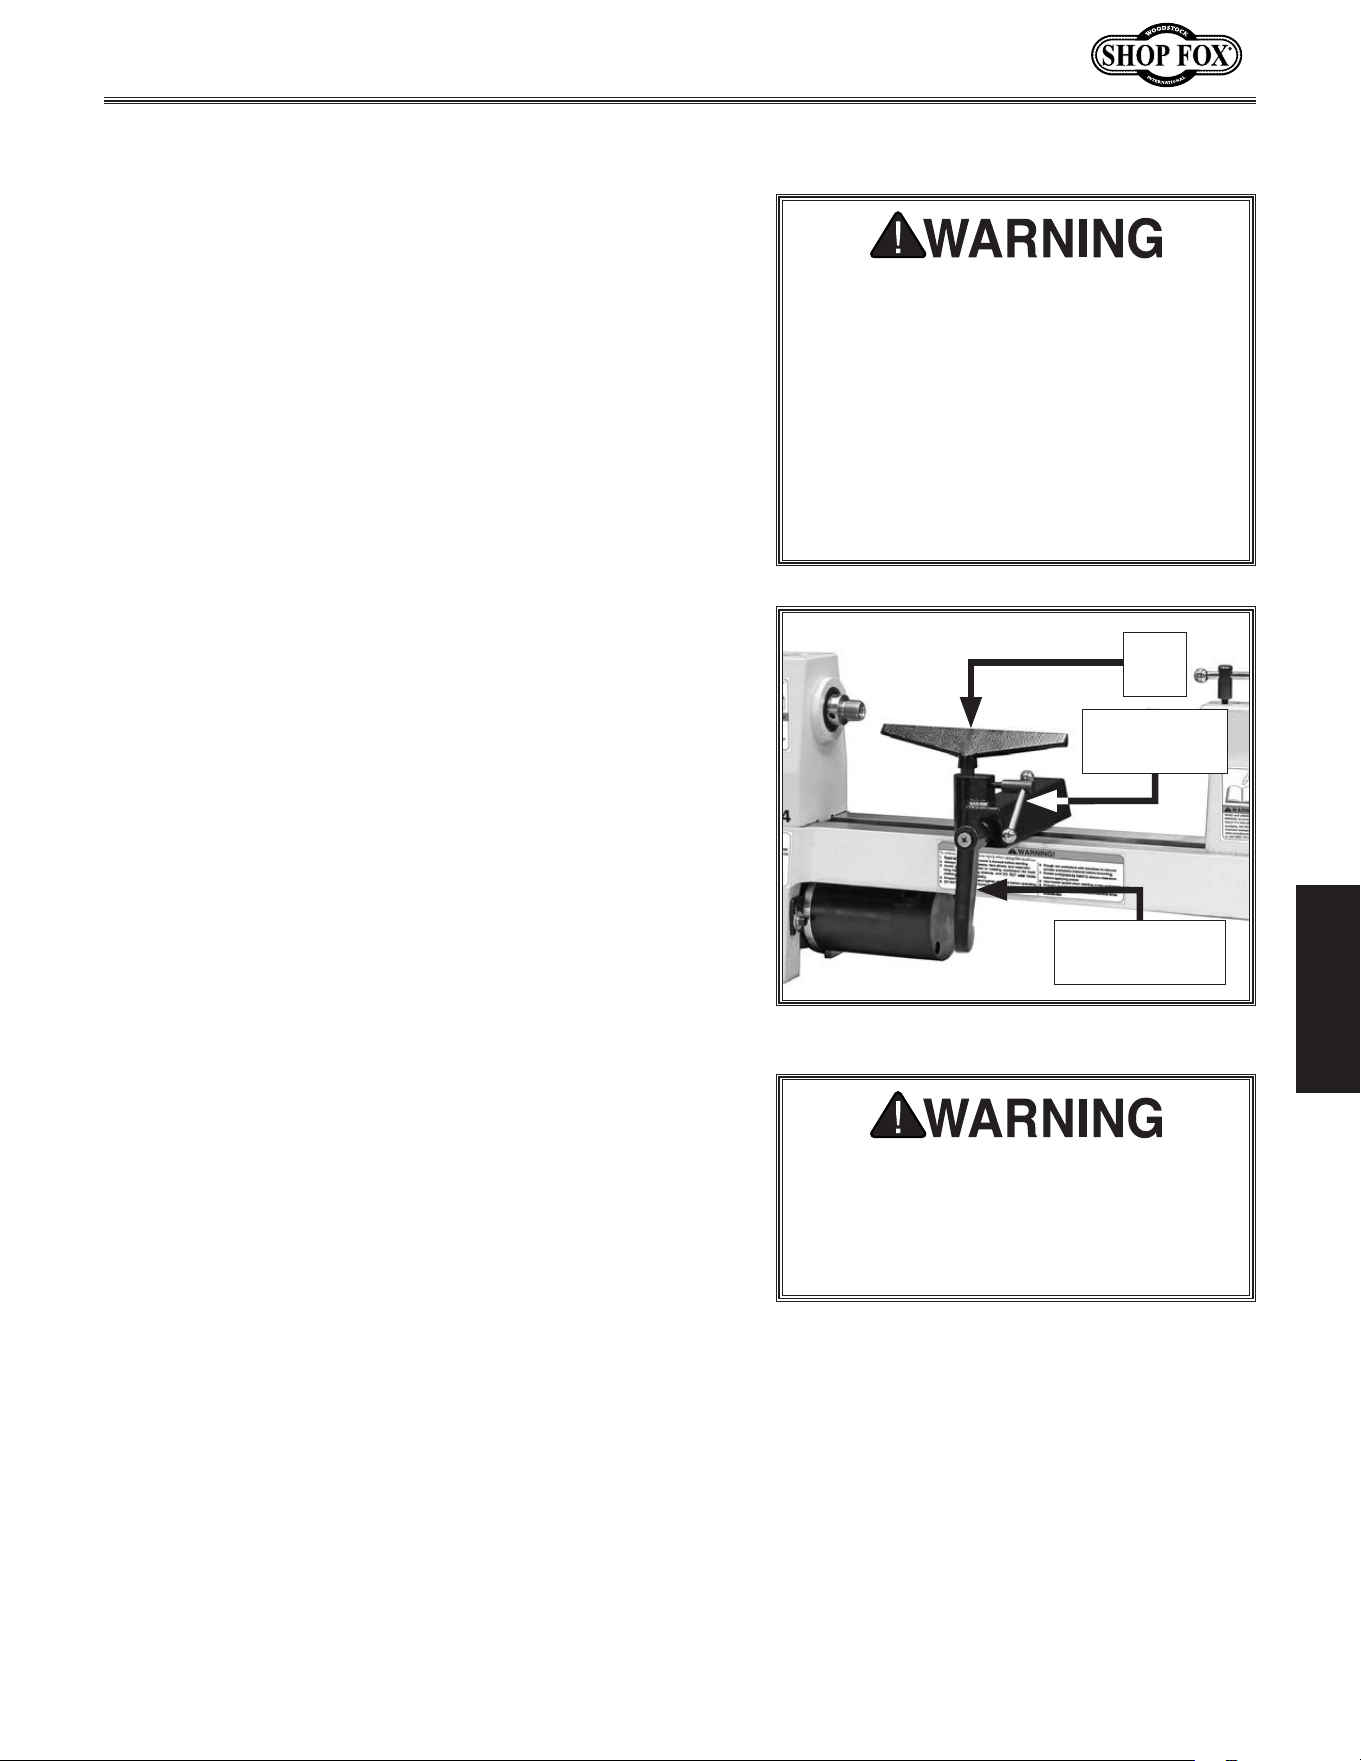
The tailstock on this lathe is equipped with a cam-action
clamping system to secure it to the lathe bed. When the
lever is tightened, a locking plate lifts up underneath the
bed and secures the tailstock in place. The tailstock can
be positioned anywhere along the lathe bed.
Figure.17. Location of tailstock lock lever.
Tailstock
Lock Lever
-23-
Model W1704 (For Machines Mfd. Since 01/20)
OPERATIONS
Adjust ing.Tool.Rest
The tool rest assembly consists of two components: the
tool rest base (or banjo) and the tool rest. The tool rest
base moves forward/backward and along the length of the
lathe bed. The tool rest rotates and moves up and down
in the tool rest base. Locks for both components allow
you to secure the tool rest in position as needed after
making these adjustments.
When adjusting the tool rest, position it as close as
possible to the workpiece without actually touching it.
This maximizes support where the cutting occurs and
minimizes leverage, reducing the risk of injury if a "catch"
occurs.
Many woodturners typically set the height of the tool
rest
1
⁄8" above or below the centerline of the workpiece,
depending on their height, the type of tool they're using,
and the type of operation they're performing.
As a rule of thumb: For most (spindle) turning operations,
the cutting tool should contact the workpiece slightly
above centerline. For most inside (bowl) turning
operations, the cutting tool should contact the workpiece
slightly below centerline.
Keeping all these factors in mind, your main goal when
adjusting the tool rest should be providing maximum
support for the type of tool being used, in a position that
is safe and comfortable for you.
Improperly. supported. or. positioned.
cutting.tools.can."catch".on.workpiece,.
ejecting.tool.from.your.hands.with.great.
force..To.reduce.this.risk,.always.ensure.
tool.rest.is.properly.positioned.for.each.
type.of.operation,.cutting.tool.is.firmly.
supported. against. tool. rest. BEFORE.
cutting,. and. cutting. tool. is. properly.
positioned. to. cut. at. the. correct. angle.
for.tool.and.operation.type.
To.position.tool.rest.forward/backward.and.along.the.
length.of.the.bed,.do.these.steps:
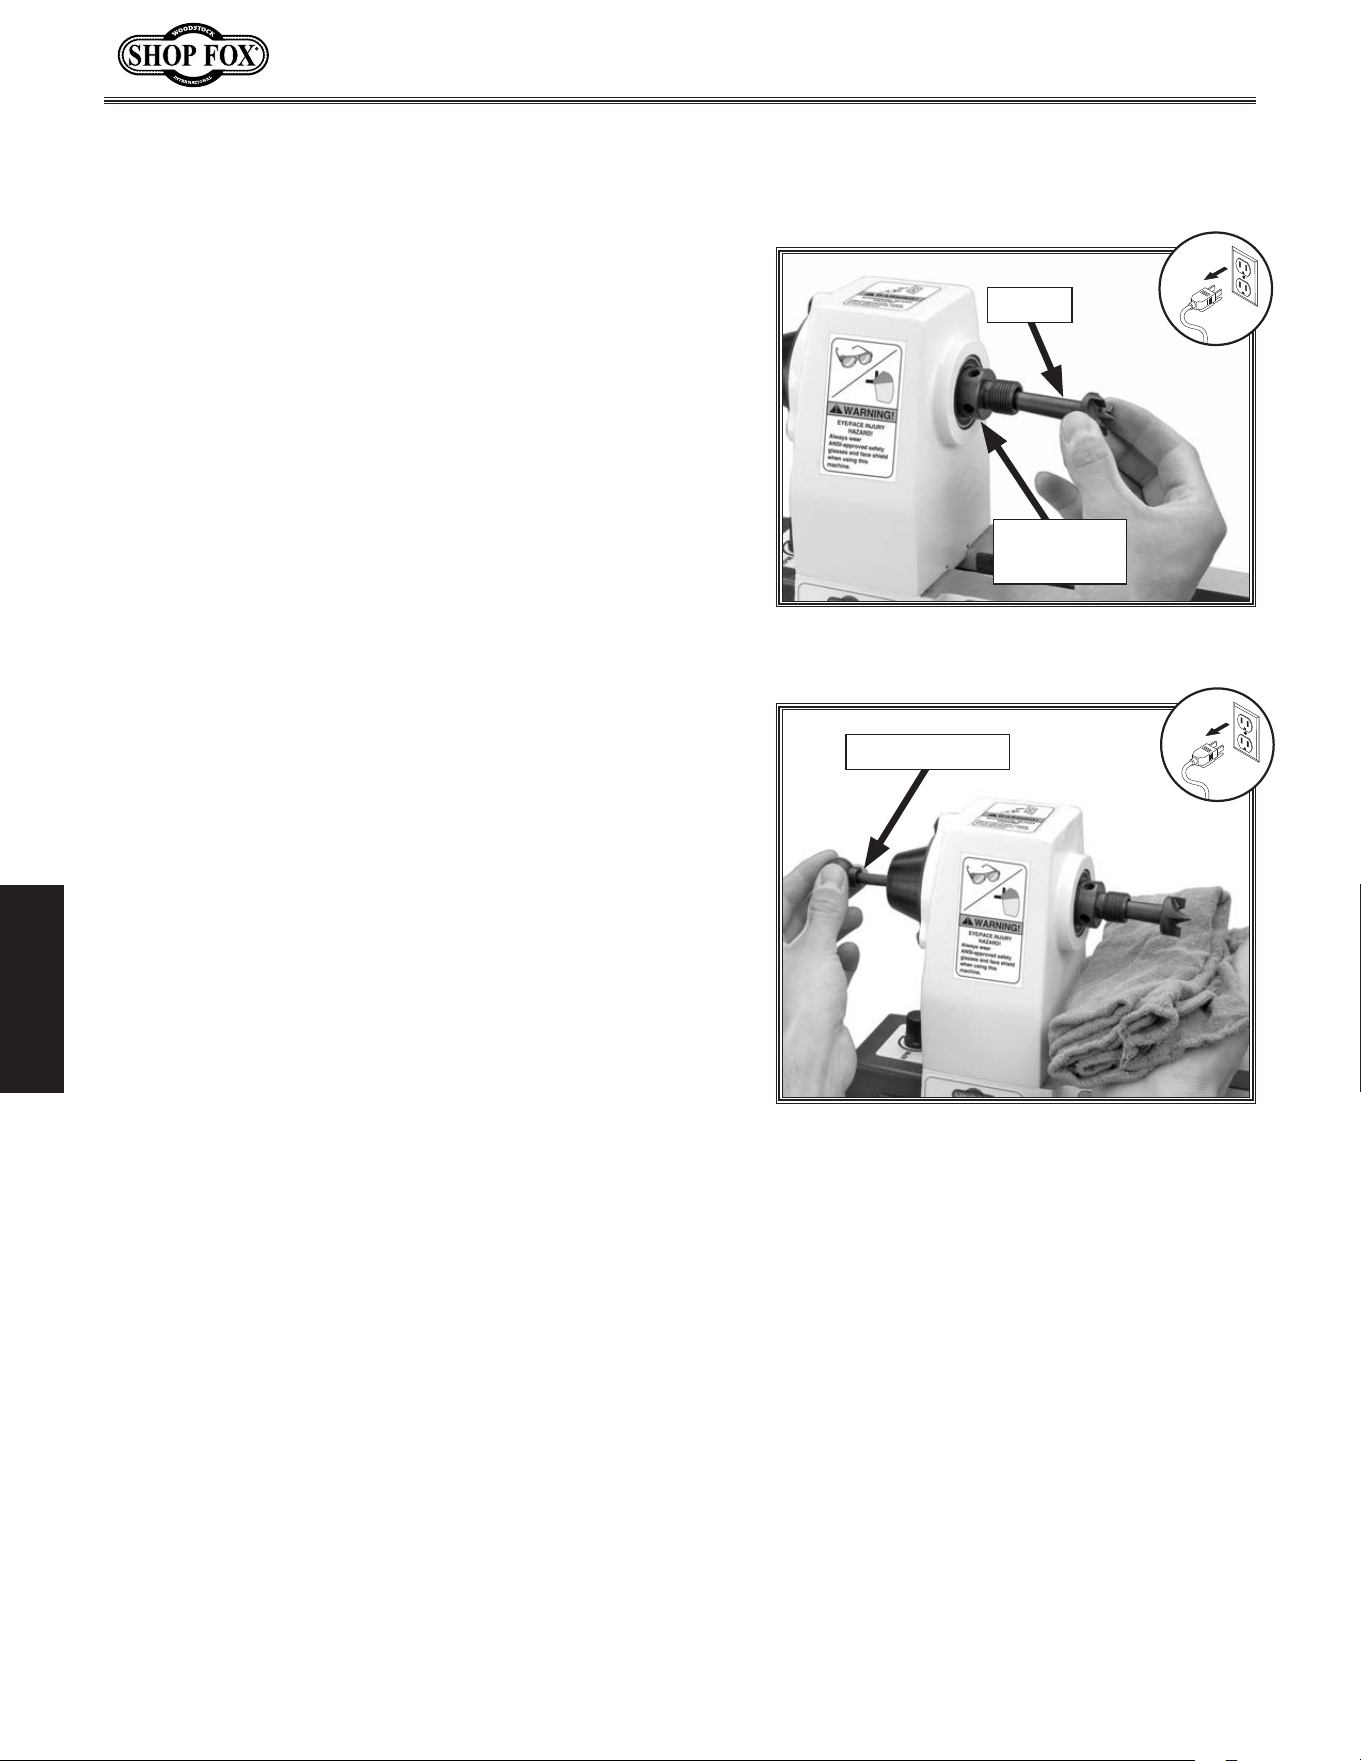
1.. Loosen tool rest base lock lever (see Figure 19) and
move tool rest assembly to desired position on lathe
bed.
Note:.To maximize support, the tool rest base
should always be locked on both sides of the bed.
Never pull the tool rest so far back that it is only
secured on one side.
2.
Re-tighten tool rest base lock lever to secure tool
rest assembly in position.
Note: The clamping hex nut underneath the tool
rest base will require occasional adjusting to ensure
proper clamping pressure of the tool rest assembly
to the bed. Turn this hex nut in small increments to
fine tune the clamping pressure as needed.
Always. operate. lathe. with. tool. rest.
assembly. firmly. locked. in. position..
Otherwise,. serious. personal. injury.
may. occur. by. tool. being. pulled. from.
operator's.hands.
To. adjust.angle.or.height.of.tool.rest,.do.
these.steps:
1.. Loosen tool rest lock handle (see
Figure 19).
2.
Position tool rest in desired location.
3.
Re-tighten tool rest lock handle to
secure tool rest in position.
tool rest height
Figure.19. Tool rest controls.
Tool
Rest
Tool Rest Base
Lock Lever
Tool Rest
Lock Handle
-24-
Model W1704 (For Machines Mfd. Since 01/20)
OPERATIONS
In stalling/Removing.
Hea dstock.Center
Installing.Headstock.Center
The included spur center installs in the headstock spindle
with an MT#1 tapered fit.
1.. DISCONNECT MACHINE FROM POWER!
2.
Make sure mating surfaces of center and spindle are
free of debris and oily substances before inserting
center to ensure a good fit and reduce runout.
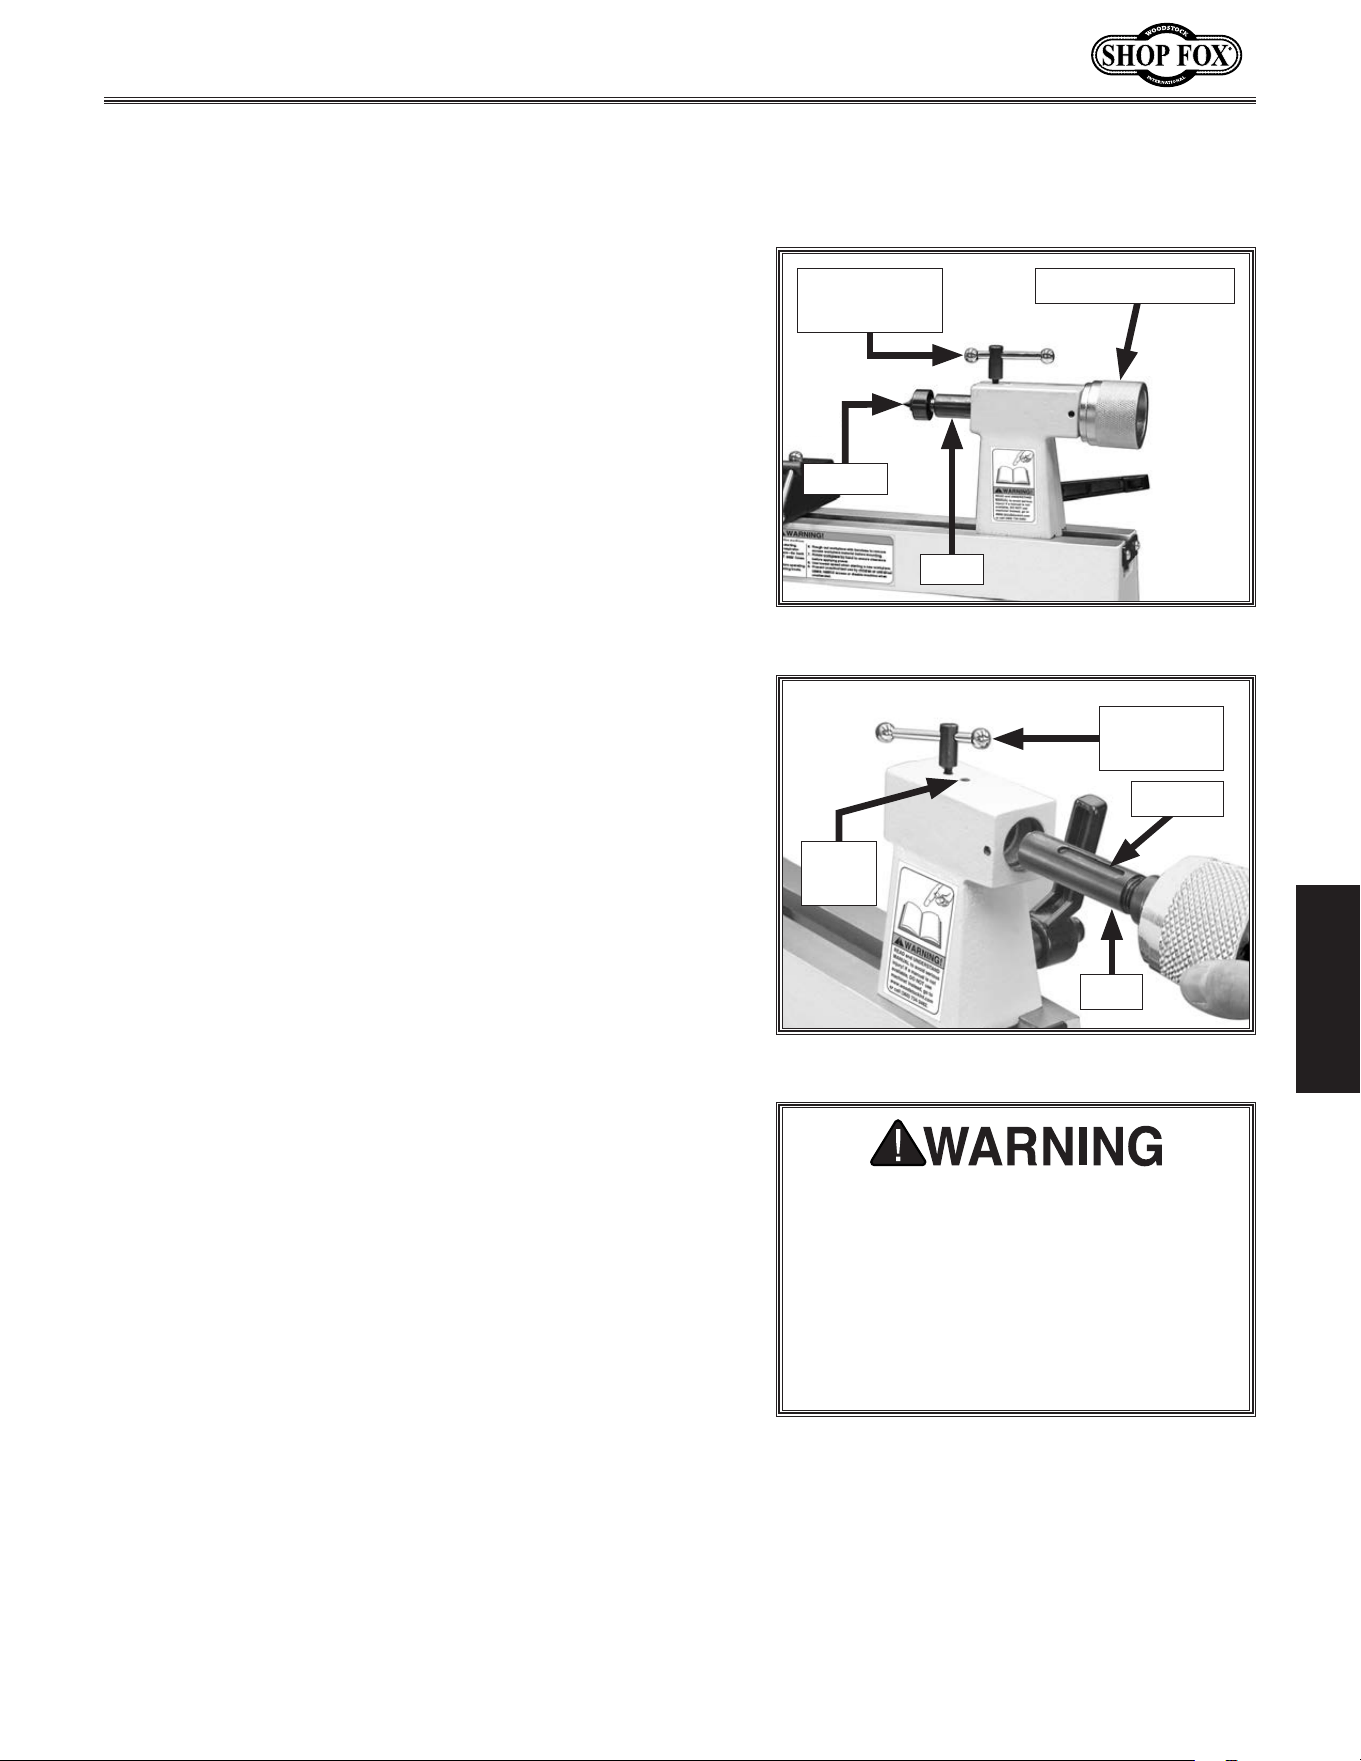
3.. Insert tapered end of center into spindle, and push it
in with a quick, firm motion, as shown in
Figure.20.
4.
Make sure center is securely installed by attempting
to pull it out by hand—a properly installed center
will not pull out easily.
Figure.20. Installing center in headstock
spindle.
Headstock
Spindle
Center
Removing.Headstock.Center
1. DISCONNECT MACHINE FROM POWER!
2.
Hold a clean rag under spindle or wear leather glove
to catch center when you remove it.
3.
Insert knockout tool through outbound end of spindle
and firmly tap back of center, catching it as it falls,
as shown in
Figure.21.
Figure.21. Removing center from
headstock spindle with knockout tool.
Knockout Tool
Items.Needed. Qty
Heavy Gloves/Clean Rag .......................................1
Knockout Rod
....................................................1
-25-
Model W1704 (For Machines Mfd. Since 01/20)
OPERATIONS
In stalling/Removing.
Tail stock.Center
The included live center installs into the tailstock quill
with an MT#1 tapered fit.
Installing.Tailstock.Center
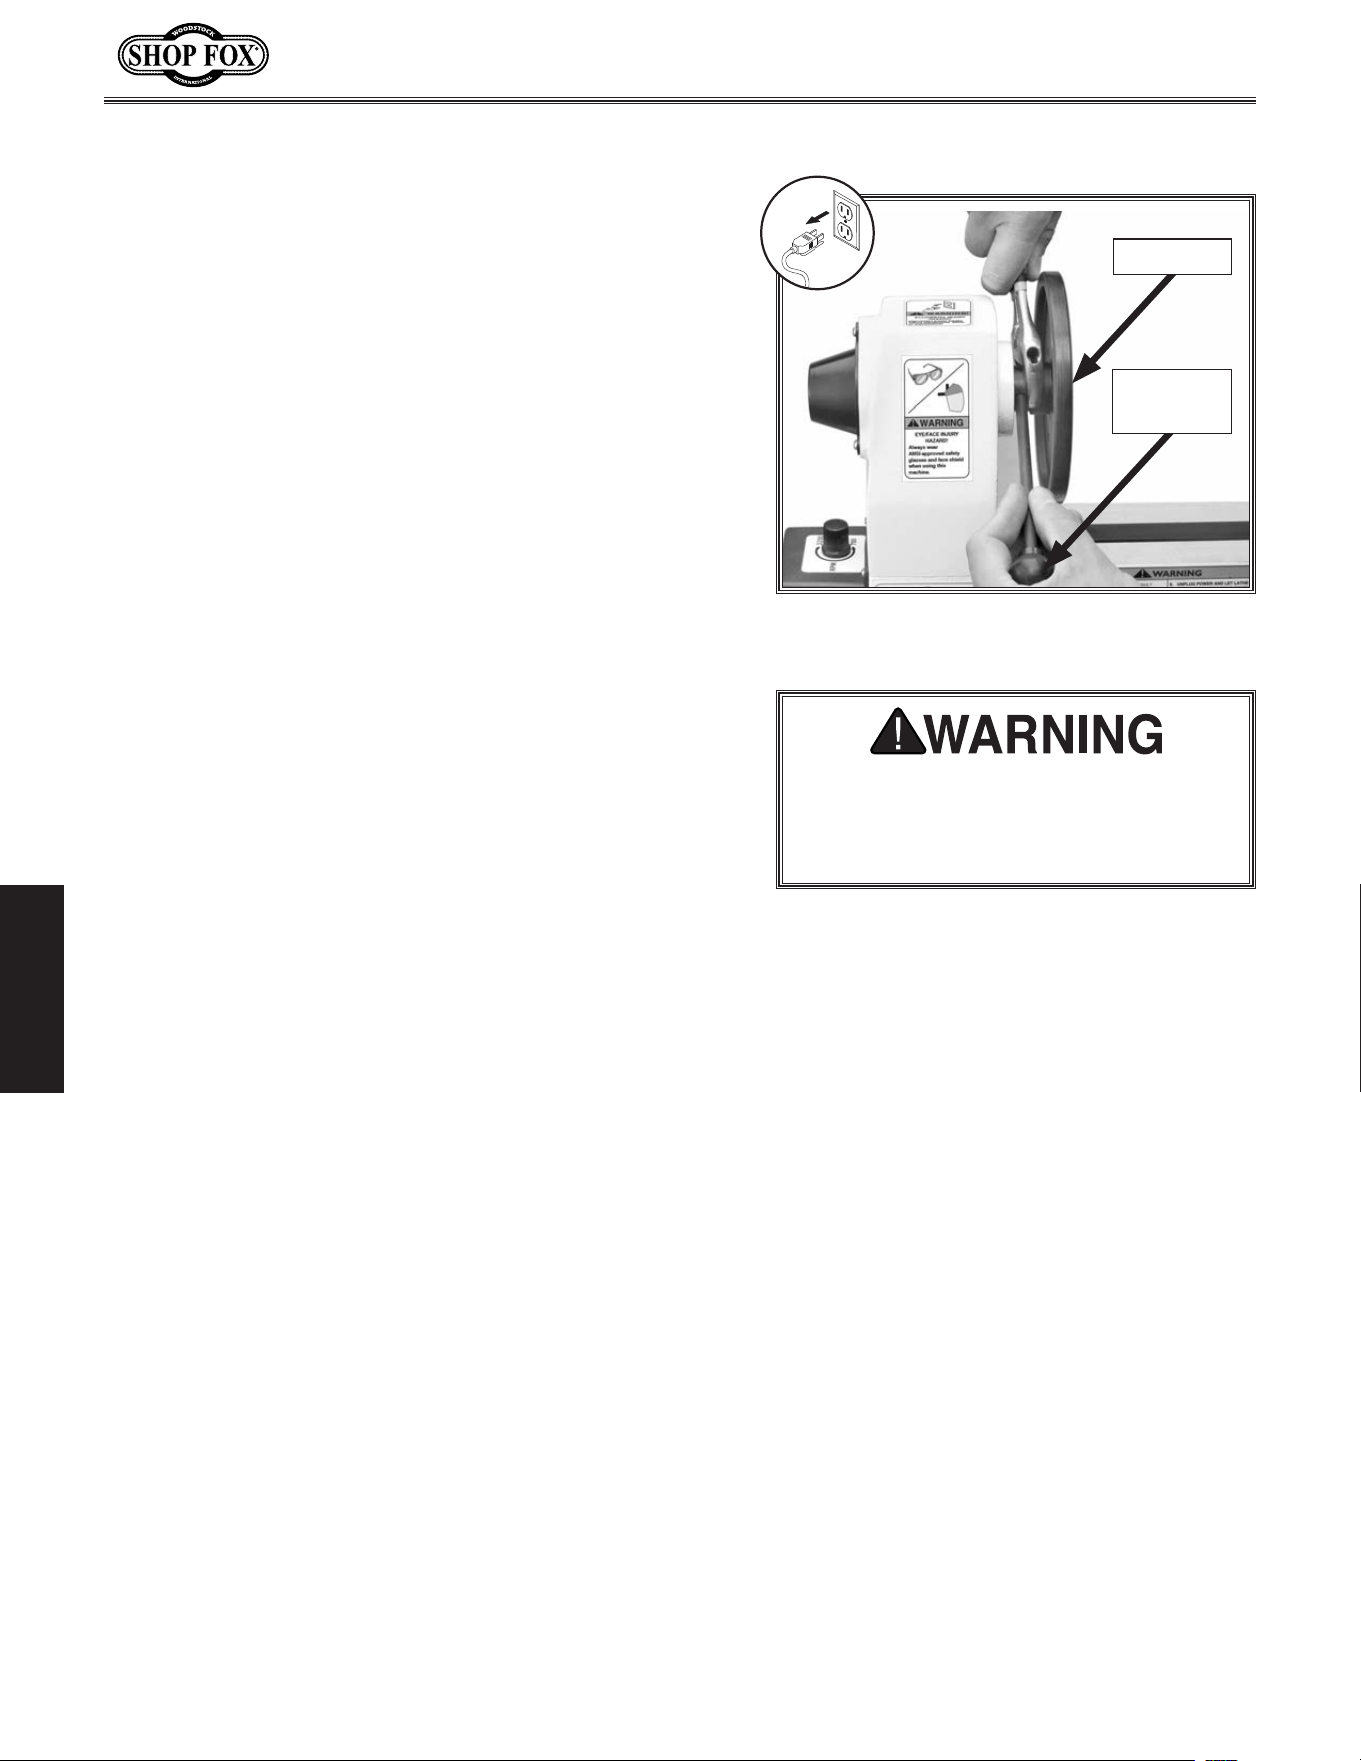
1. Loosen quill lock handle, and rotate tailstock
adjustment knob clockwise until quill extends about
1", as shown in
Figure.22.
2.. Make sure mating surfaces of center and quill are
free of debris and oily substances before inserting
center to ensure a good fit and reduce runout.
3.
Firmly insert tapered end of center into tailstock
quill, as shown in Figure.22.
4.
Make sure center is securely installed by attempting
to pull it out by hand—a properly installed center
will not pull out easily.
5.. Make sure set screw (see Figure.23) is aligned with
quill keyway to ensure center and quill will not
freely rotate under load.
6.
Secure quill in place by tightening quill lock handle.
Removing.Tailstock.Center
1. Loosen quill lock handle.
2.
Hold a clean rag under spindle or wear a glove to
catch center when you remove it.
3.
Rotate adjustment knob counterclockwise—quill will
retract back into tailstock, causing center to be
forced out. If necessary, use knockout rod to remove
center.
Tailstock. quill. must. always. be. locked.
in.place.during. lathe.operation..Before.
tightening.quill. lock. handle,. set.screw.
in. front. of. handle. must. be. properly.
aligned. with. quill. keyway.. Otherwise,.
workpiece. can. be. thrown. from. lathe,.
causing. serious. personal. injury. or.
death.
Figure.22. Tailstock center installed in quill.
Items
.Needed. Qty
Heavy Gloves/Clean Rag .......................................1
Knockout Rod
....................................................1
Quill
Adjustment Knob
Center
Figure.23. Tailstock quill alignment slot.
Keyway
Quill
Set
Screw
Quill Lock
Handle
Quill
Lock Handle
-26-
Model W1704 (For Machines Mfd. Since 01/20)
OPERATIONS
Headstock Faceplate
To. prevent. faceplate. and. workpiece.
separating. from. spindle. during.
operation,. headstock. faceplate. MUST.
be.firmly.threaded.onto.spindle.
In stalling/Removing.
Faceplate
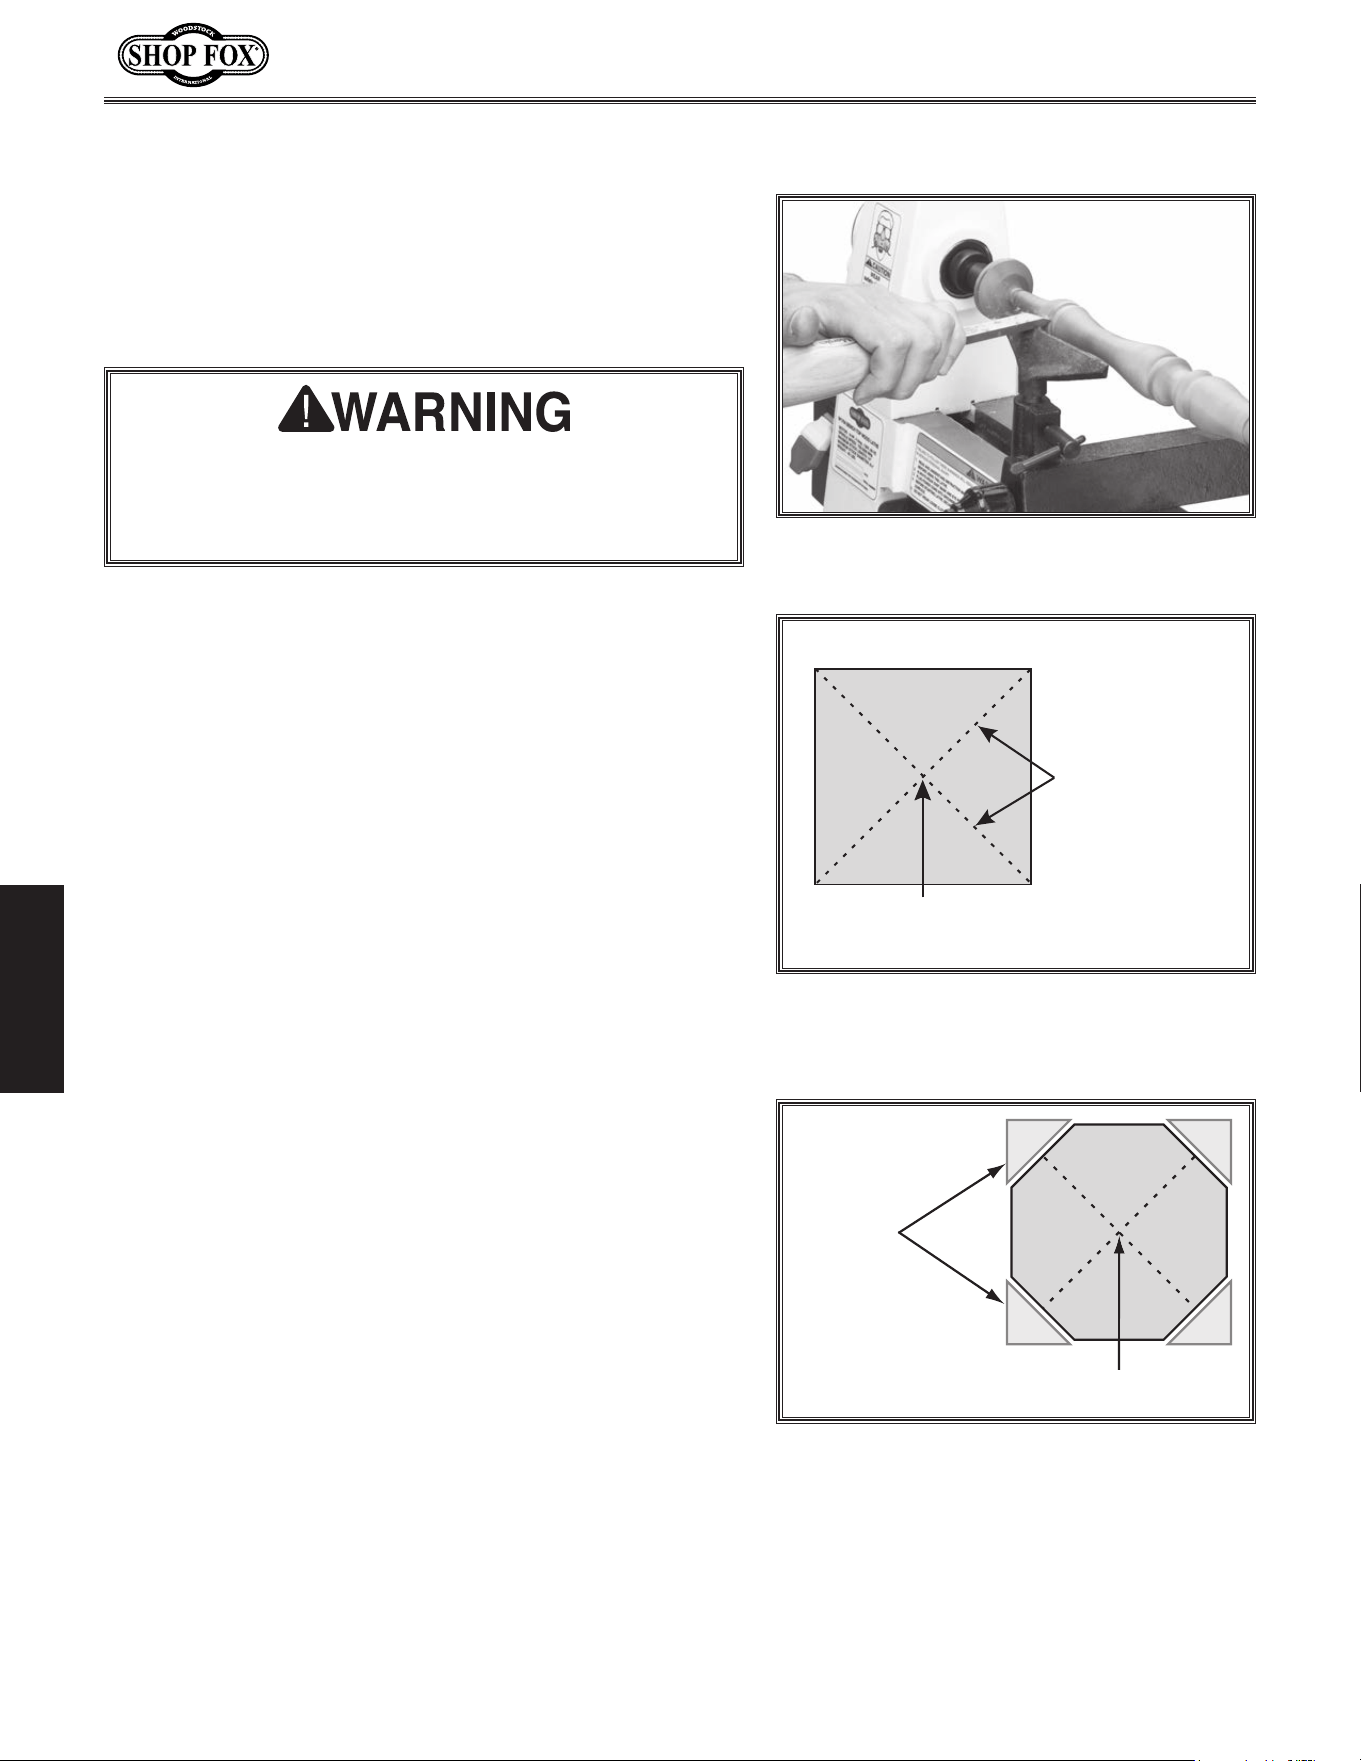
These instructions cover removing and installing the
faceplate. To mount a workpiece to your faceplate, refer
to
Faceplate.Turning on Page.30.
Items
.Needed. Qty
Open-End Wrench 19/27mm ..................................1
Knockout Rod
....................................................1
Removing.Faceplate
1. DISCONNECT MACHINE FROM POWER!
2.
Put open end of wrench over flats behind faceplate.
While holding spindle in place with knockout rod,
turn wrench counterclockwise until faceplate is
removed (see
Figure.24).
Note: If spur center is installed, it will be removed
during this process.
Installing.Faceplate
1. DISCONNECT MACHINE FROM POWER!
2.
While holding spindle in place, thread faceplate
clockwise onto spindle shaft until secure against
shoulder on spindle shaft.
3.
Insert knockout rod into one hole on spindle, then
tighten faceplate with open-end wrench (see
Figure.
24).
Figure.24. Attaching faceplate to
headstock spindle.
Faceplate
Knockout
Rod
-27-
Model W1704 (For Machines Mfd. Since 01/20)
OPERATIONS
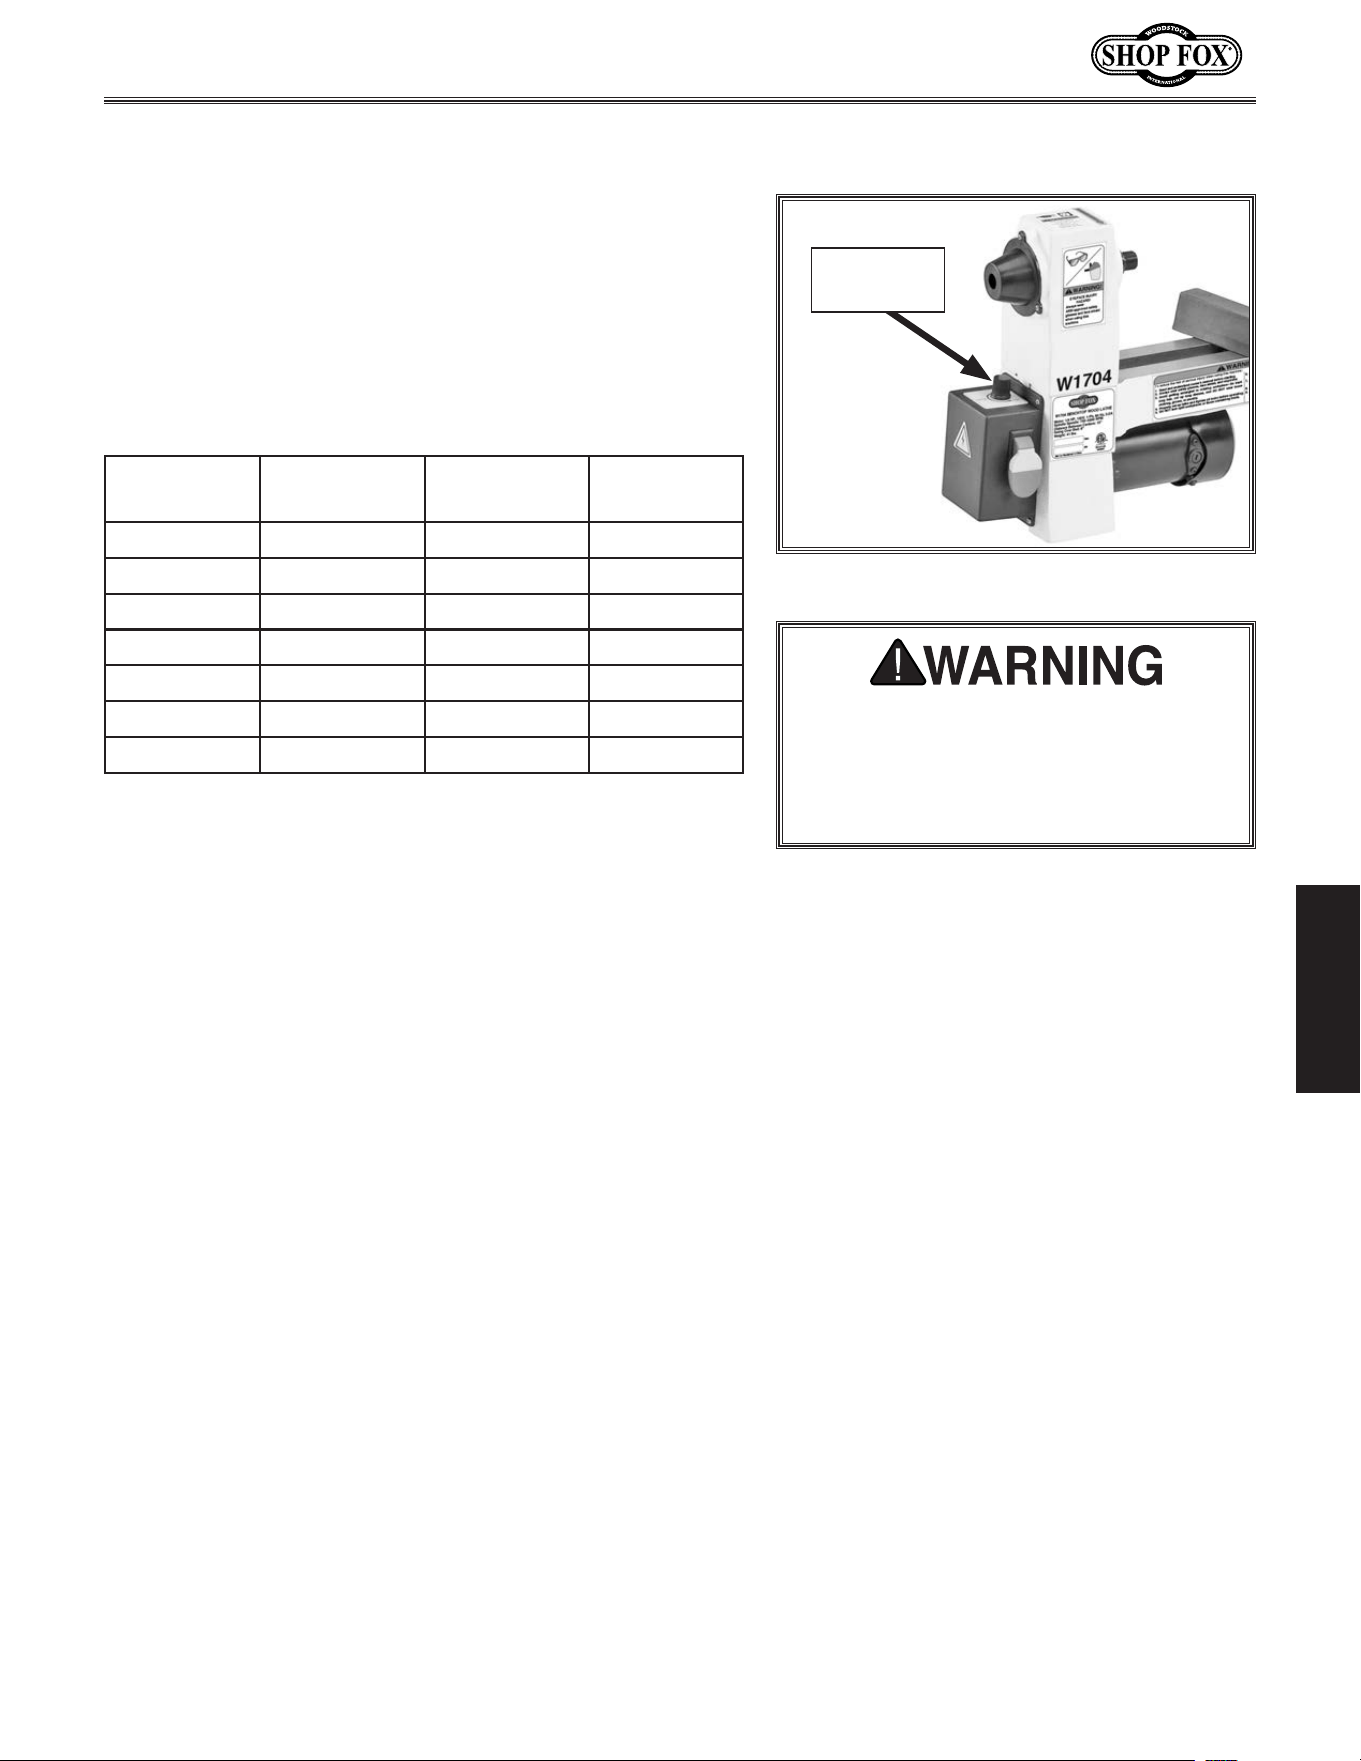
The Model W1704 utilizes a spindle speed dial (see Figure
26) that allows for on-the-fly spindle speed changes from
750 to 3200 RPM. Rotate the spindle speed dial clockwise
to increase speed and counterclockwise to decrease
speed.
Refer to the speed recommendations chart in
Figure.25
to choose the appropriate RPM for your operation.
Changing Speed Ranges
Workpiece.
Diameter
Roughing.
RPM
General.
Cutting.RPM
Finishing.
RPM
Under 2" 1520 3200 3200
2–4" 760 1600 2480
4–6" 510 1080 1650
6–8" 380 810 1240
8–10" 300 650 1000
10–12" 255 540 830
12–14" 220 460 710
Figure.25. Typical spindle speed recommendations.
Changing.Spindle.Speed
Always. choose. correct. spindle. speed.
for. an. operation.. Using. wrong. speed.
may. lead. to. workpiece. being. thrown.
at. high. speed,. causing. fatal. or. severe.
impact .injuries.
Figure.26. Location of spindle speed dial.
Spindle
Speed Dial
— When a lot of material must be removed and a
rough finish does not matter, use lower speed
range.
— When making light cuts or when a clean finish is
required, use higher speed range.
— For general turning operations, or as a compromise
between the two ranges, use mid range.
-28-
Model W1704 (For Machines Mfd. Since 01/20)
OPERATIONS
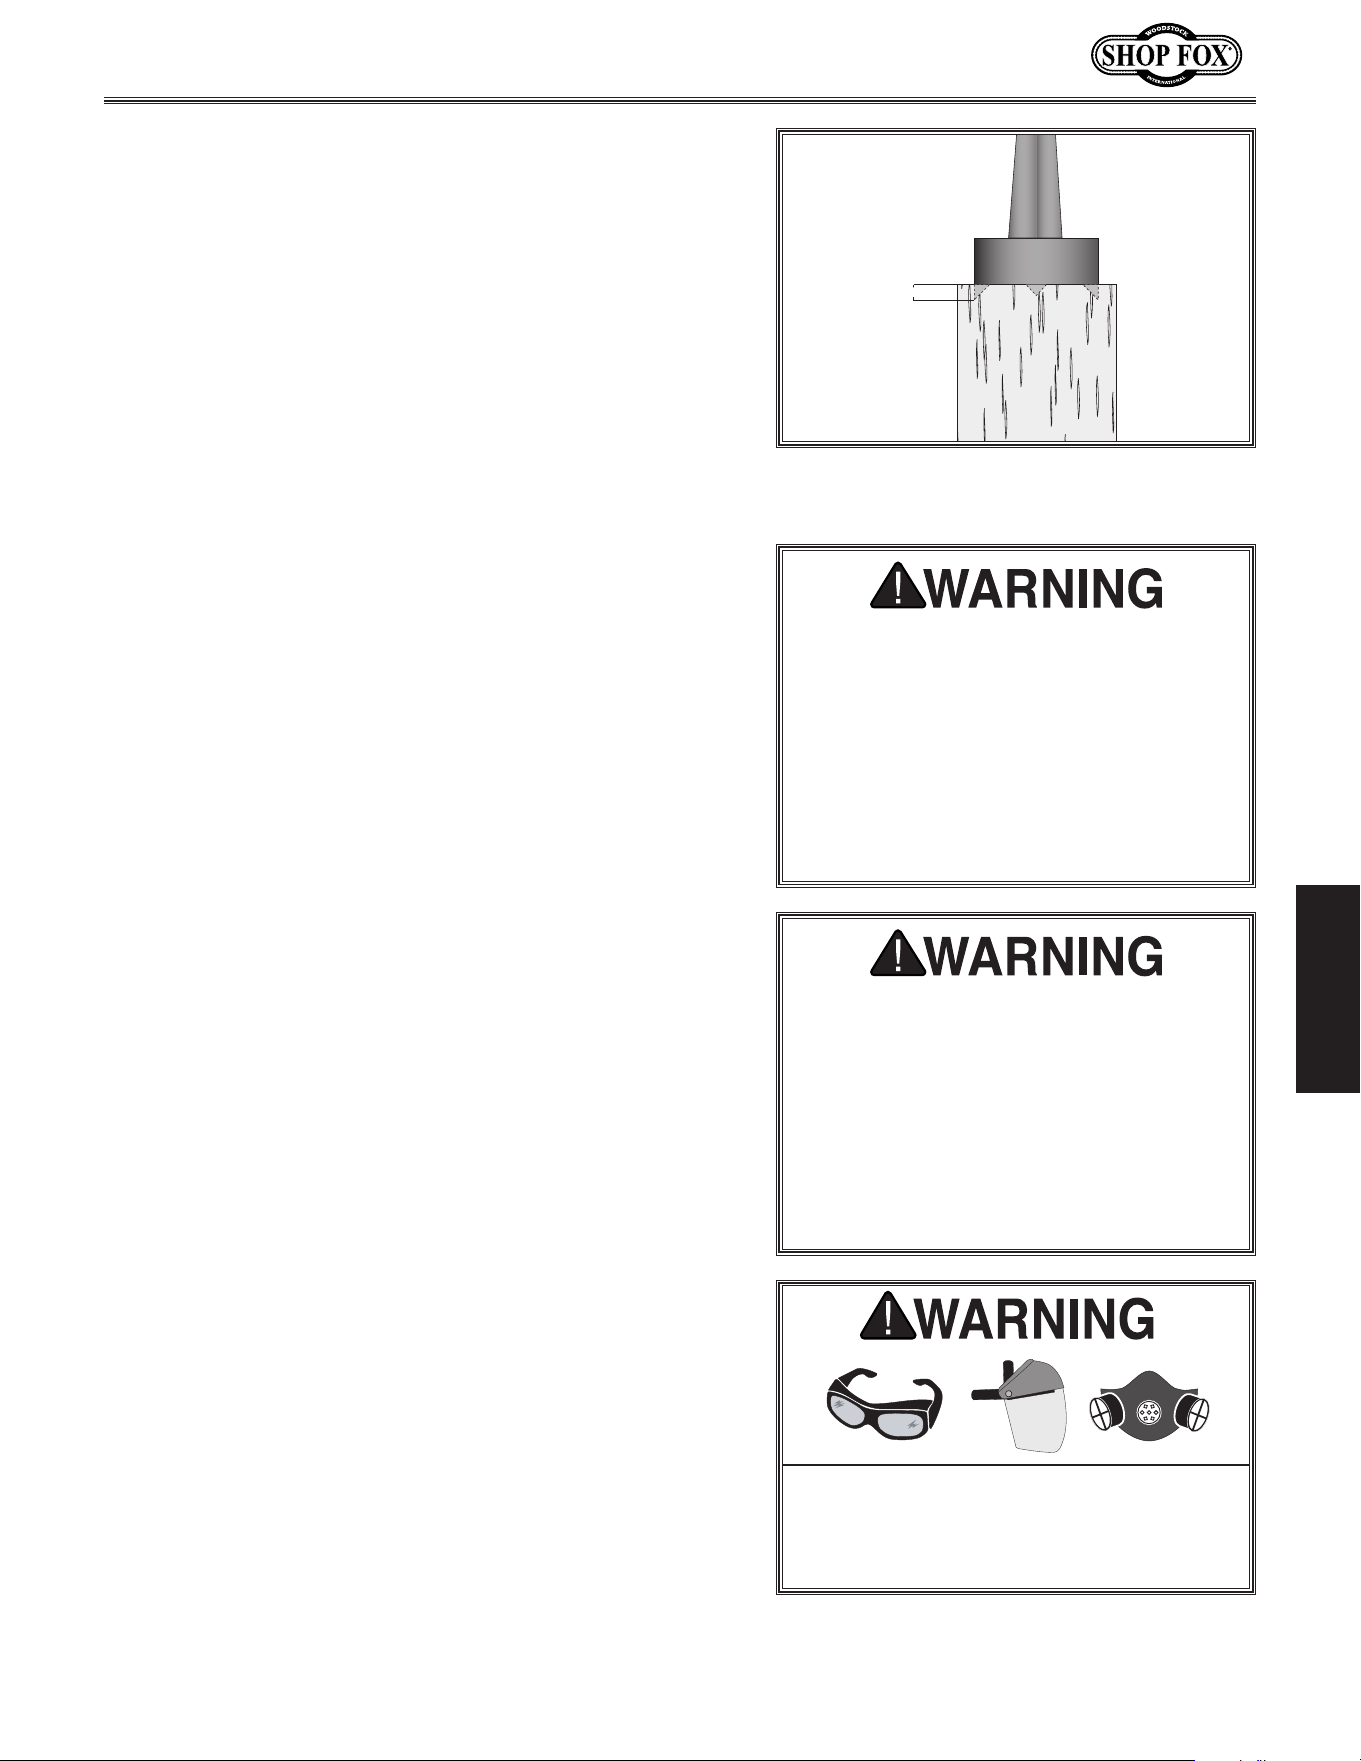
Spindle turning is the operation performed when a
workpiece is mounted between the headstock and the
tailstock, as shown in Figure 27. Bowls, table legs, tool
handles, and candlesticks are typical projects where this
operation is used.
S pindle.Turning
Figure.27. Example of typical spindle
turning operation.
Damage to your eyes and lungs could result from
using this machine without proper protective gear.
Always wear safety glasses, a face shield, and a respi-
rator when operating this machine.
To.set.up.a.spindle.turning.operation,.do.these.steps:
1. Find center point of both ends of your workpiece by
drawing diagonal lines from corner to corner across
end of workpiece, as shown in
Figure.28.
2.
Make a center mark by using a wood mallet and
tapping point of spur center into center of workpiece
on both ends.
3.
Using a
1
⁄4" drill bit, drill a
1
⁄4" deep hole at center
mark on end of the workpiece to be mounted on
headstock spur center.
4.
To help embed spur center into workpiece, cut
1
⁄8"
deep saw kerfs in headstock end of workpiece along
diagonal lines marked in
Step.1.
5.
If your workpiece is over 2" x 2", cut corners off
workpiece lengthwise to make turning safer and
easier (see Figure 29).
Workpiece
Workpiece
Center
Pencil Lines
Marked
Diagonally
Across Corners
Figure.28. Workpiece marked diagonally
from corner to corner to determine the
center.
Workpiece Center
Corners
Removed
Figure.29. Corners of workpiece removed.
Items
.Needed. Qty
Precision Ruler ..................................................1
Wood Mallet
.....................................................1
Drill Bit
1
⁄4" ......................................................1
Table Saw/Bandsaw
............................................1
-29-
Model W1704 (For Machines Mfd. Since 01/20)
OPERATIONS
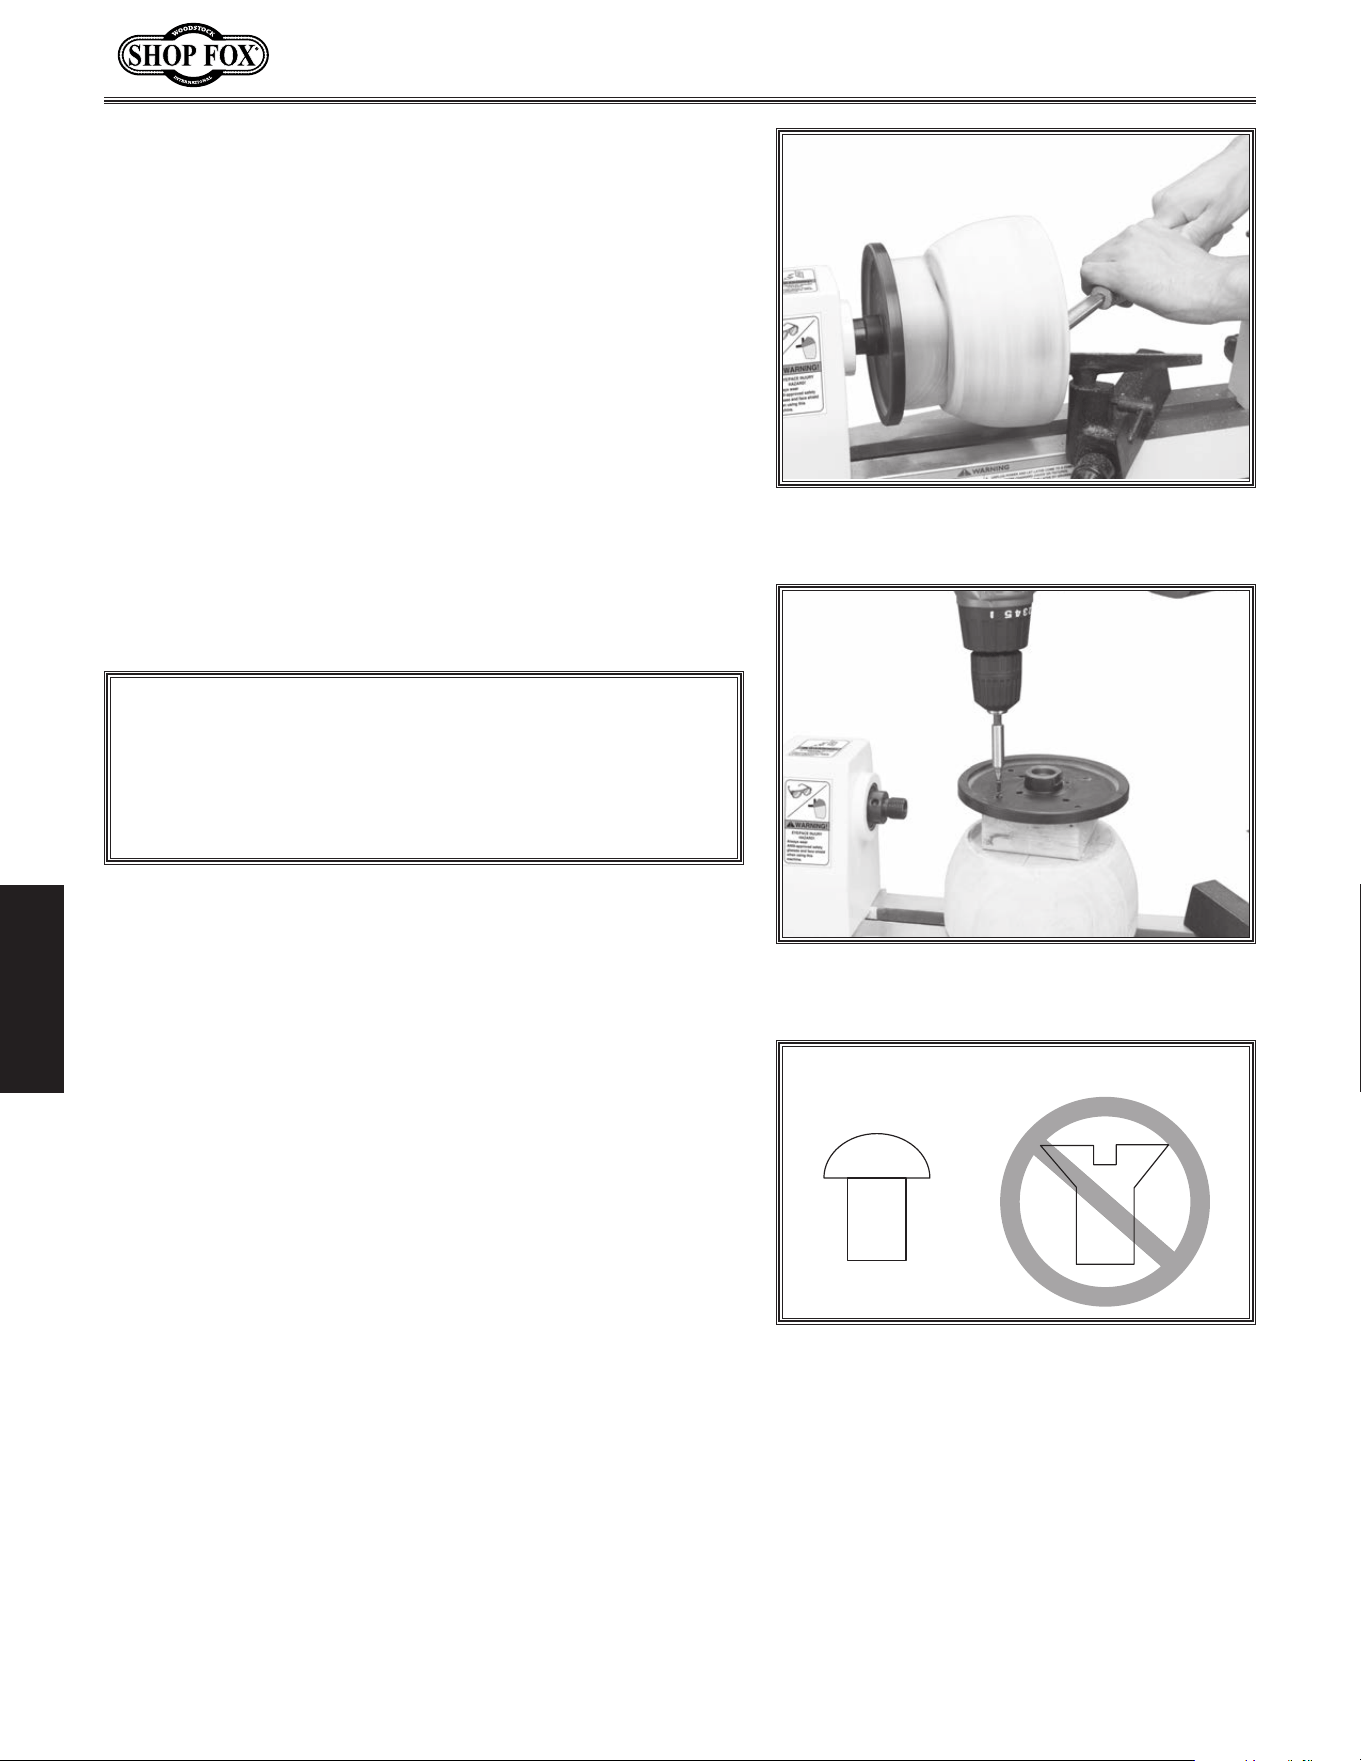
6. Drive spur center into end center mark of workpiece
with a wood mallet to embed it at least
1
⁄4" into
workpiece, as shown in
Figure.30.
7.
With workpiece still attached, insert spur center
into headstock spindle (refer to Installing/Removing.
Headstock.Center on Page.24.for additional
instructions).
Note:.Use tool rest to support opposite end of
workpiece so that workpiece and spur center do not
separate during installation.
8.
Install live center into tailstock quill and tighten
quill lock handle to lock quill in position (refer to
Page.25.for additional instructions).
9.
Slide tailstock toward workpiece until point of live
center touches workpiece center mark, then lock
tailstock in this position.
10.
Loosen quill lock handle and rotate tailstock
handwheel to push live center into workpiece at
least
1
⁄4".
11.
Properly adjust tool rest to workpiece (see.Adjusting.
Tool.Rest.on Page.23).
12.
Before beginning lathe operation, rotate workpiece
by hand to ensure there is safe clearance on all
sides.
1
/
4
"
Figure.30. Spur center properly
embedded.
• When turning the lathe ON, stand away from the
path of the spinning workpiece until the spindle
reaches full speed and you can verify that the
workpiece will not come loose.
• Use the slowest speed when starting or stopping the
lathe.
• Select the right speed for the size of workpiece that
you are turning (refer to Figure.25.on Page.27).
• Keep the turning tool on the tool rest the ENTIRE
time that it is in contact with the workpiece.
• Learn the correct techniques for each tool you
will use. If you are unsure about how to use the
lathe tools, read books or magazines about lathe
techniques, and seek training from experienced and
knowledgeable lathe users.
Spindle.Turning.Tips:
Do.not.press.the.workpiece.too.firmly.
with. the. tailstock. or. the.bearings. will.
bind. and. overheat.. Do. not. adjust. the.
tailstock. too. loosely.or. the. workpiece.
will. spin. off. the. lathe.. Use. good.
judgment.and.care,.otherwise,.serious.
personal. injury. could. result. from.
the. workpiece. being. ejected. at. high.
speeds..
Keep. lathe. tool. resting. on. tool. rest.
the. ENTIRE. time. it. is. in. contact.
with. workpiece. or. when. preparing.
to. make. contact. between. lathe. tool.
and. workpiece.. Otherwise,. spinning.
workpiece.could.force.lathe.tool.out.of.
your.hands.or.entangle.your.hands.with.
workpiece..Failure.to.heed.this.warning.
could. result.in.serious.personal.injury.
To. reduce. the. risk. of. eye. injury. and.
long-term. respirator y. damage,. always.
wear.safety. glasses,.face.shield.and. a.
respirator. while.operating.machine.
-30-
Model W1704 (For Machines Mfd. Since 01/20)
OPERATIONS
Mounting.Workpiece.on.Faceplate
1. Mark workpiece center in same manner as described
in Spindle.Turning.(see Page.28).
Note:.Cut off corners of workpiece to make it as
close to "round" as possible, as described in Spindle
Turning, Step 5 (see Page 28).
2.
Center faceplate on workpiece and attach it (see
Figure.32) with wood screws.
Faceplate Turning
Faceplate.Turning
Faceplate turning is when a workpiece is mounted to the
faceplate, which is then mounted to the headstock spindle,
as shown in
Figure.31. This type of turning is usually done
with open-faced workpieces like bowls or plates.
Figure.31. Example of faceplate turning
operation.
Figure.32. Example of attaching faceplate
to workpiece.
NOTICE
Only. use. screws. with. non-tapered. heads. (see.
Figure. 33). to. attach. faceplate. to. the. workpiece..
Screws. with. tapered. heads. can. split. faceplate. or.
snap.off.during.operation.
Correct Incorrect
Figure.33. Correct and incorrect screw
types.
3.
Thread and secure faceplate onto headstock spindle
(refer to Installing.Faceplate.on Page.26).
— If wood screws cannot be placed in workpiece,
faceplate can be mounted to a backing block
attached to workpiece (see Mounting the
Workpiece to a Backing Block).
1.
Make backing block from a suitable size piece of
scrap wood.
. Note:.Faces of backing block must be flat and
parallel to each other, or uneven surfaces will cause
workpiece to spin eccentrically, causing unnecessary
vibration and runout. It is best to mount backing
block to faceplate and turn other surface flat prior
to mounting.
2.
Locate and mark center of workpiece and backing
block.
3.
Drill a
1
⁄4" hole through center of backing block.
4.. Look through hole in backing block to line up center
with workpiece and glue and clamp backing block to
workpiece.
Mounting.Workpiece.to.Backing.Block
Note:.Allow glue to cure according to
manufacturer's instructions.
5.. Follow Steps 1–3 under Mounting.
Workpiece.on.Faceplate (see This
Page) to attach backing block to
faceplate.
-31-
Model W1704 (For Machines Mfd. Since 01/20)
OPERATIONS
Sanding/Finishing
After the turning operations are complete, the workpiece
can be sanded and finished before removing it from the
lathe, as shown in Figure
.34.
Note: Whenever sanding or finishing, move the tool rest
holder out of the way to increase personal safety and
gain adequate working room.
Figure.34. Typical sanding operation.
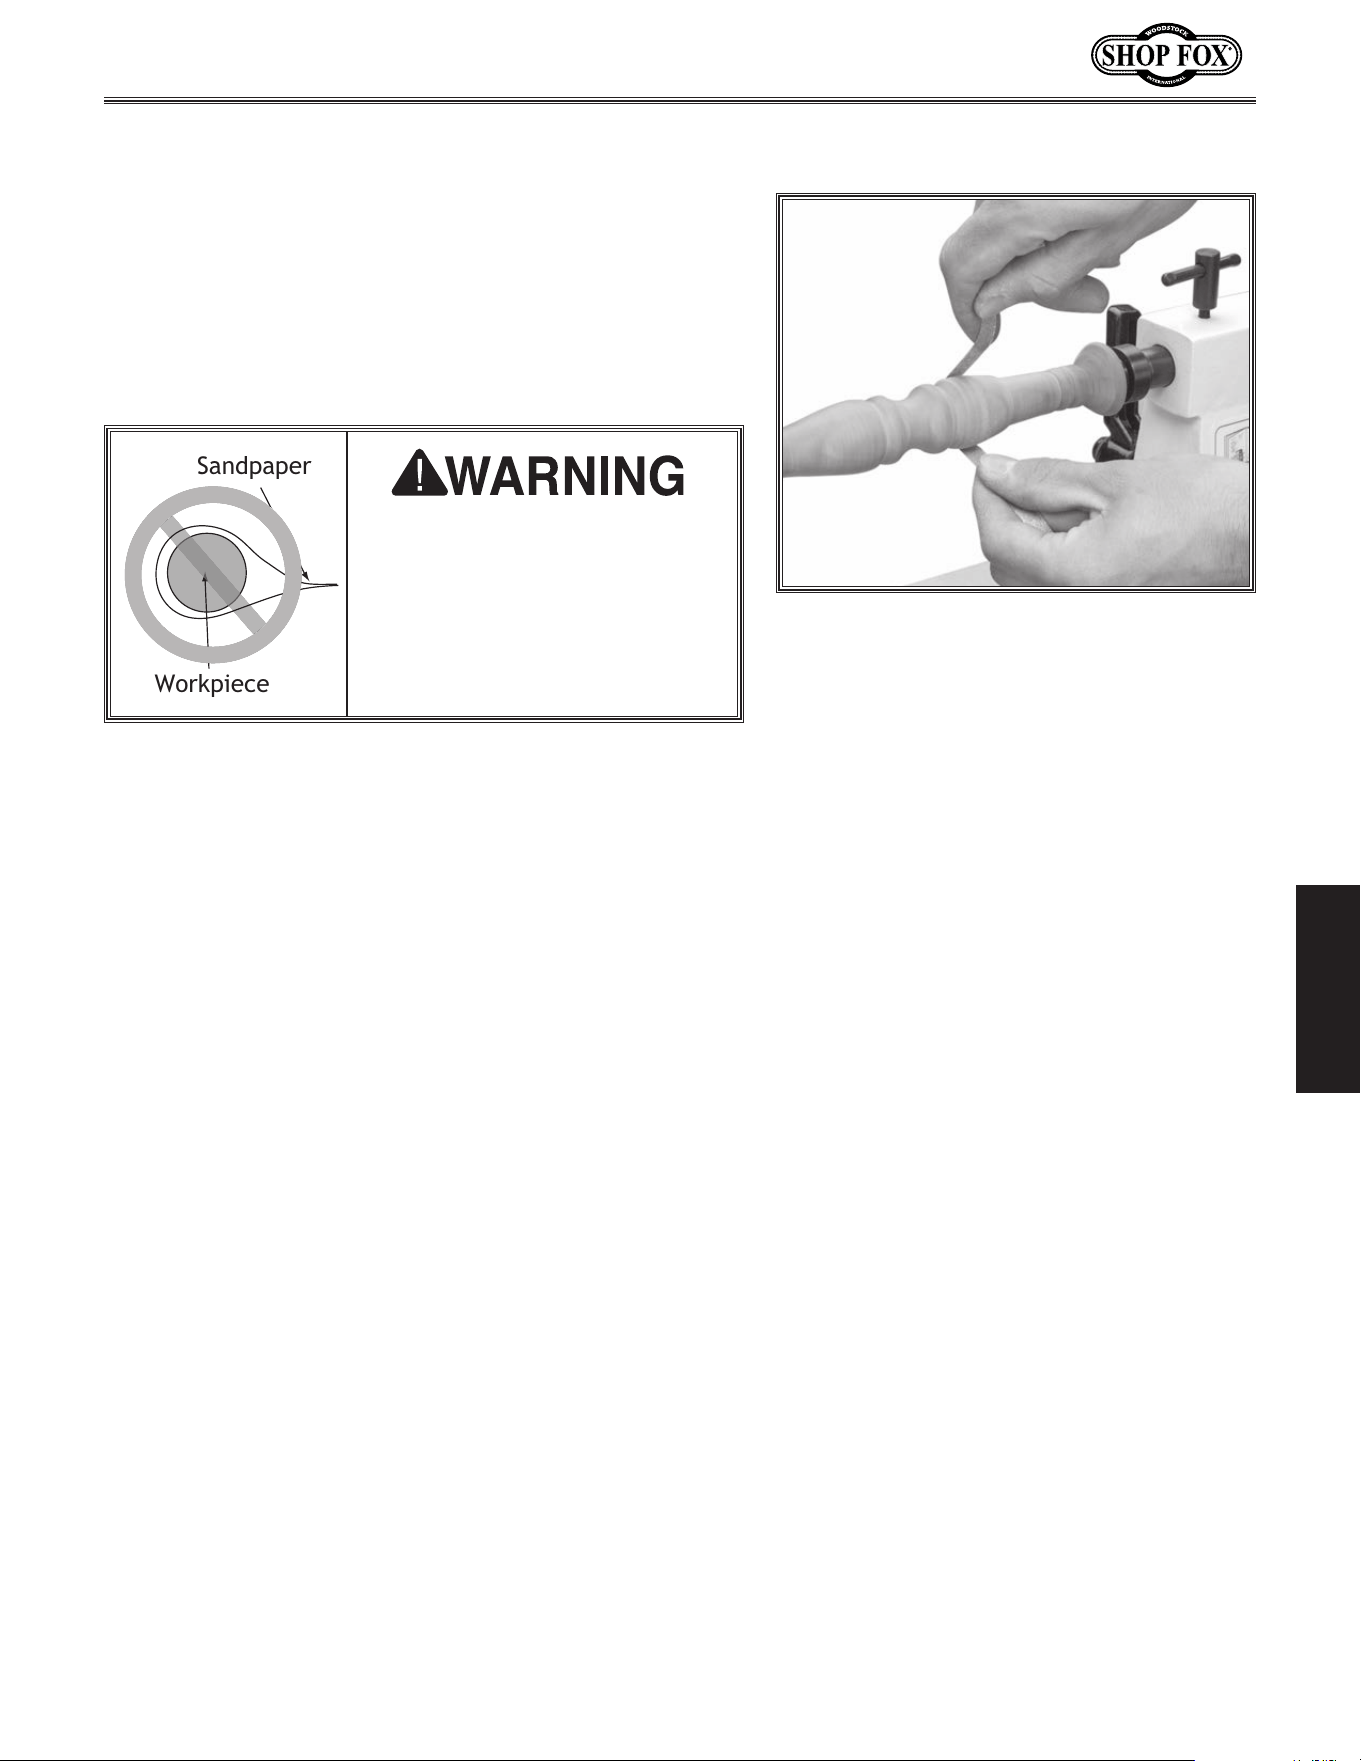
Wrapping.sandpaper.completely.
around. . workpiece. could.
pull. your. hands. into. moving.
workpiece. and. may. cause.
serious. injury.. Never. wrap.
sandpaper.or.finishing.materials.
completely.around.workpiece.
Sandpaper
Workpiece
-32-
Model W1704 (For Machines Mfd. Since 01/20)
OPERATIONS
ACCESSORIES
The following wood lathe accessories may be available through your local Woodstock International Inc.
Dealer. If you do not have a dealer in your area, these products are also available through online deal-
ers. Please call or e-mail Woodstock International Inc. Customer Service to get a current listing of deal-
ers at: 1-800-545-8420 or at sales@woodstockint.com.
The
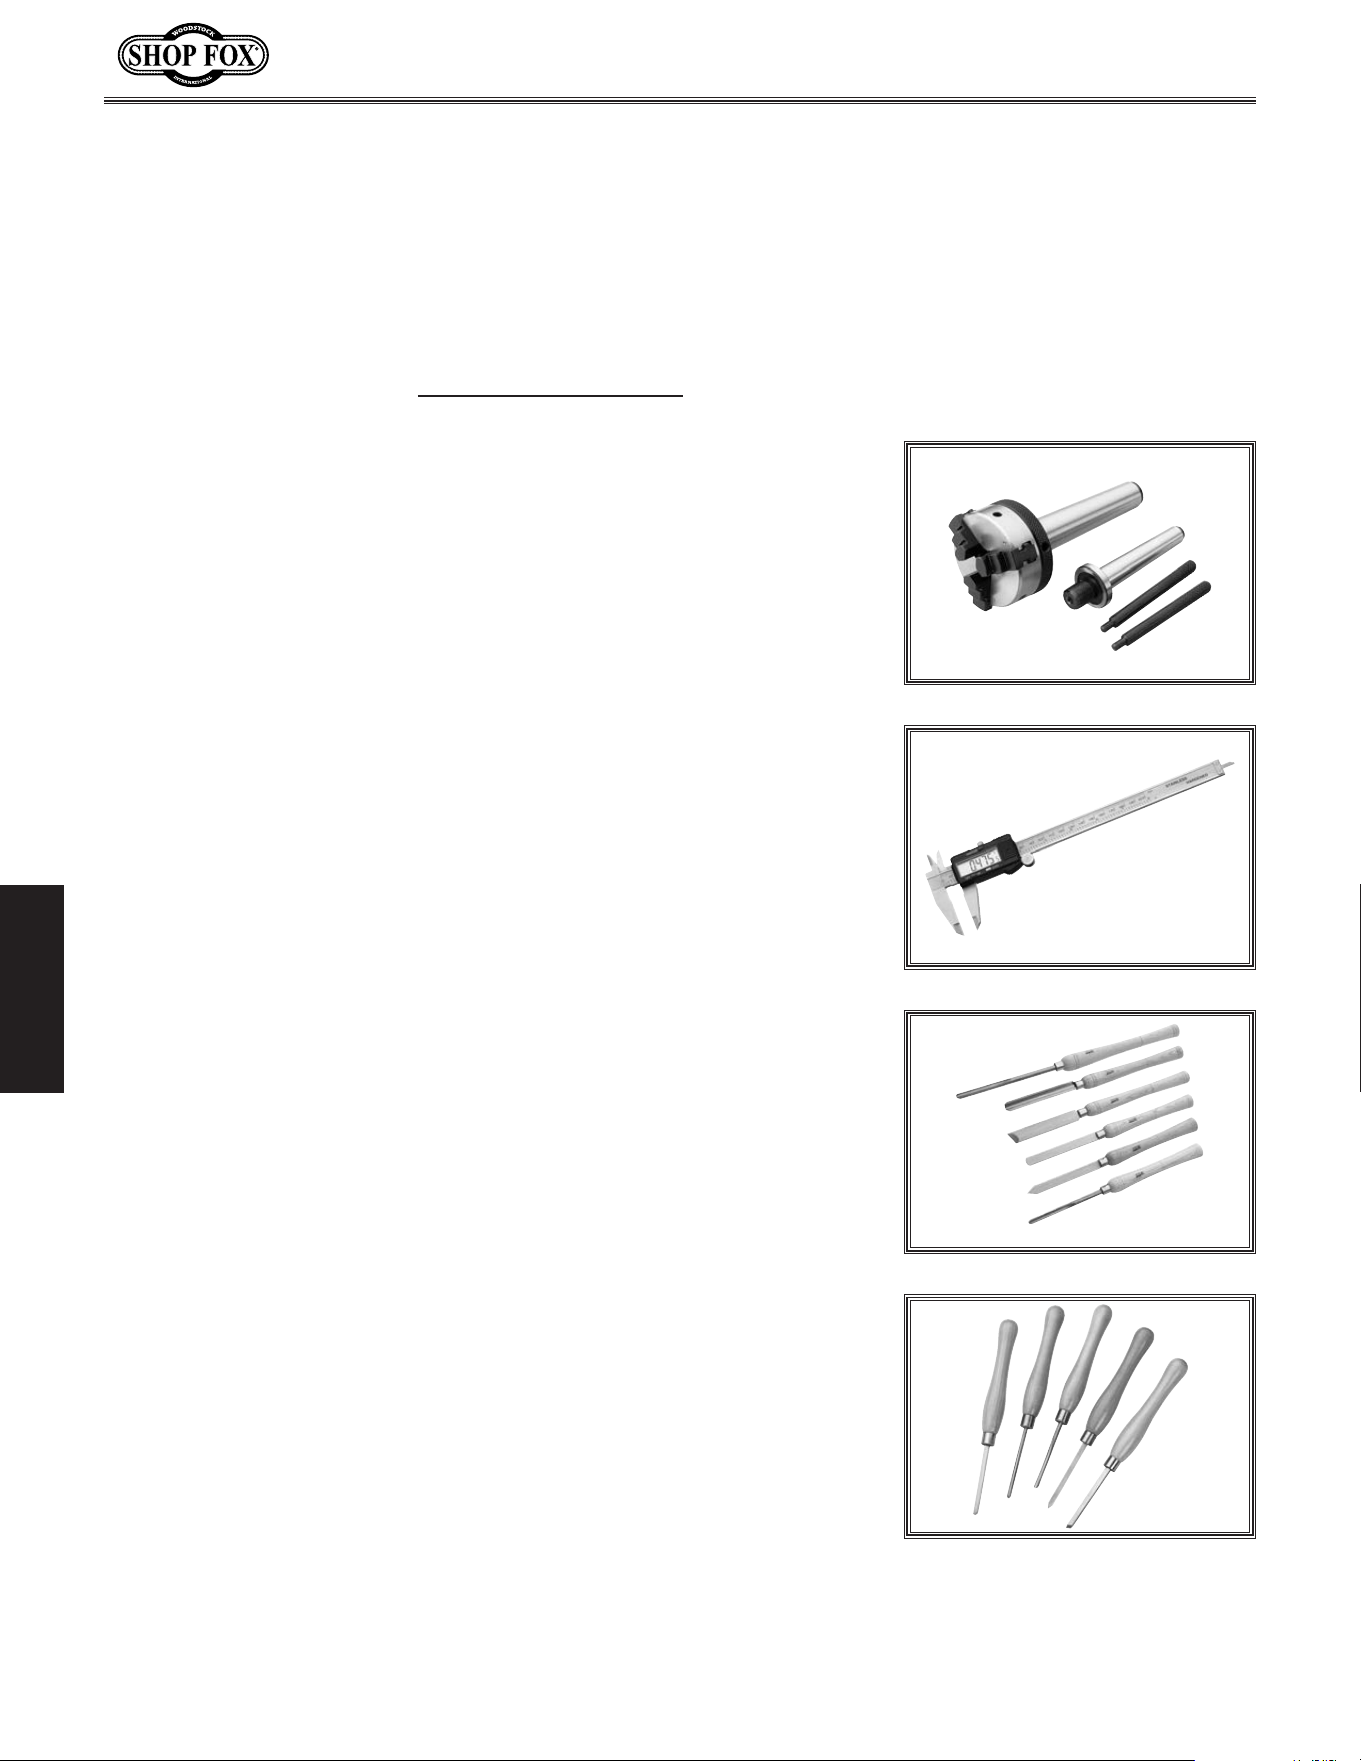
.D4103.Mini Lathe Chuck with Arbors is a "must have" for the
serious wood turner. This 2" diameter 3-jaw mini lathe chuck is a
self-centering scroll-type chuck with reversible jaws. Includes MT#1
and MT#2 arbors and wrenches.
The D2304 Steelex Plus.6-Pc..Deluxe.Lathe.Chisel.S et features
beefy ash handles for unsurpassed control, brass ferrules, and high-
speed steel blades. Includes: a 17" long
13
⁄16" parting tool,
13
⁄16" round
nose,
3
⁄8" gouge, 19" long 1" skew,
5
⁄8" gouge, and a 22
3
⁄4" long
3
⁄8"
gouge. Comes in a beautiful red blow-molded carrying case.
The D2250.Steelex 5-Pc..Turning.Chisel.Set.is for those fine detail
turning operations. This set features well balanced hardwood handles
and high carbon steel cutting edges. Includes: a
1
⁄16" radius gouge,
1
⁄8" radius gouge,
3
⁄16" parting tool,
1
⁄4" spear point, and a
1
⁄4" skew.
All tools are 10
1
⁄2" overall in length.
The.D4105.8".Digital.Caliper.features.stainless steel construc-
tion and an extra-large LCD readout. Accuracy: ±0.001" / 0.02mm.
Resolution: 0.0005" / 0.01mm. Includes SAE and metric modes with
digital display and automatic shutoff.
Wood.Lathe.Acce ssories
-33-
Model W1704 (For Machines Mfd. Since 01/20)
OPERATIONS
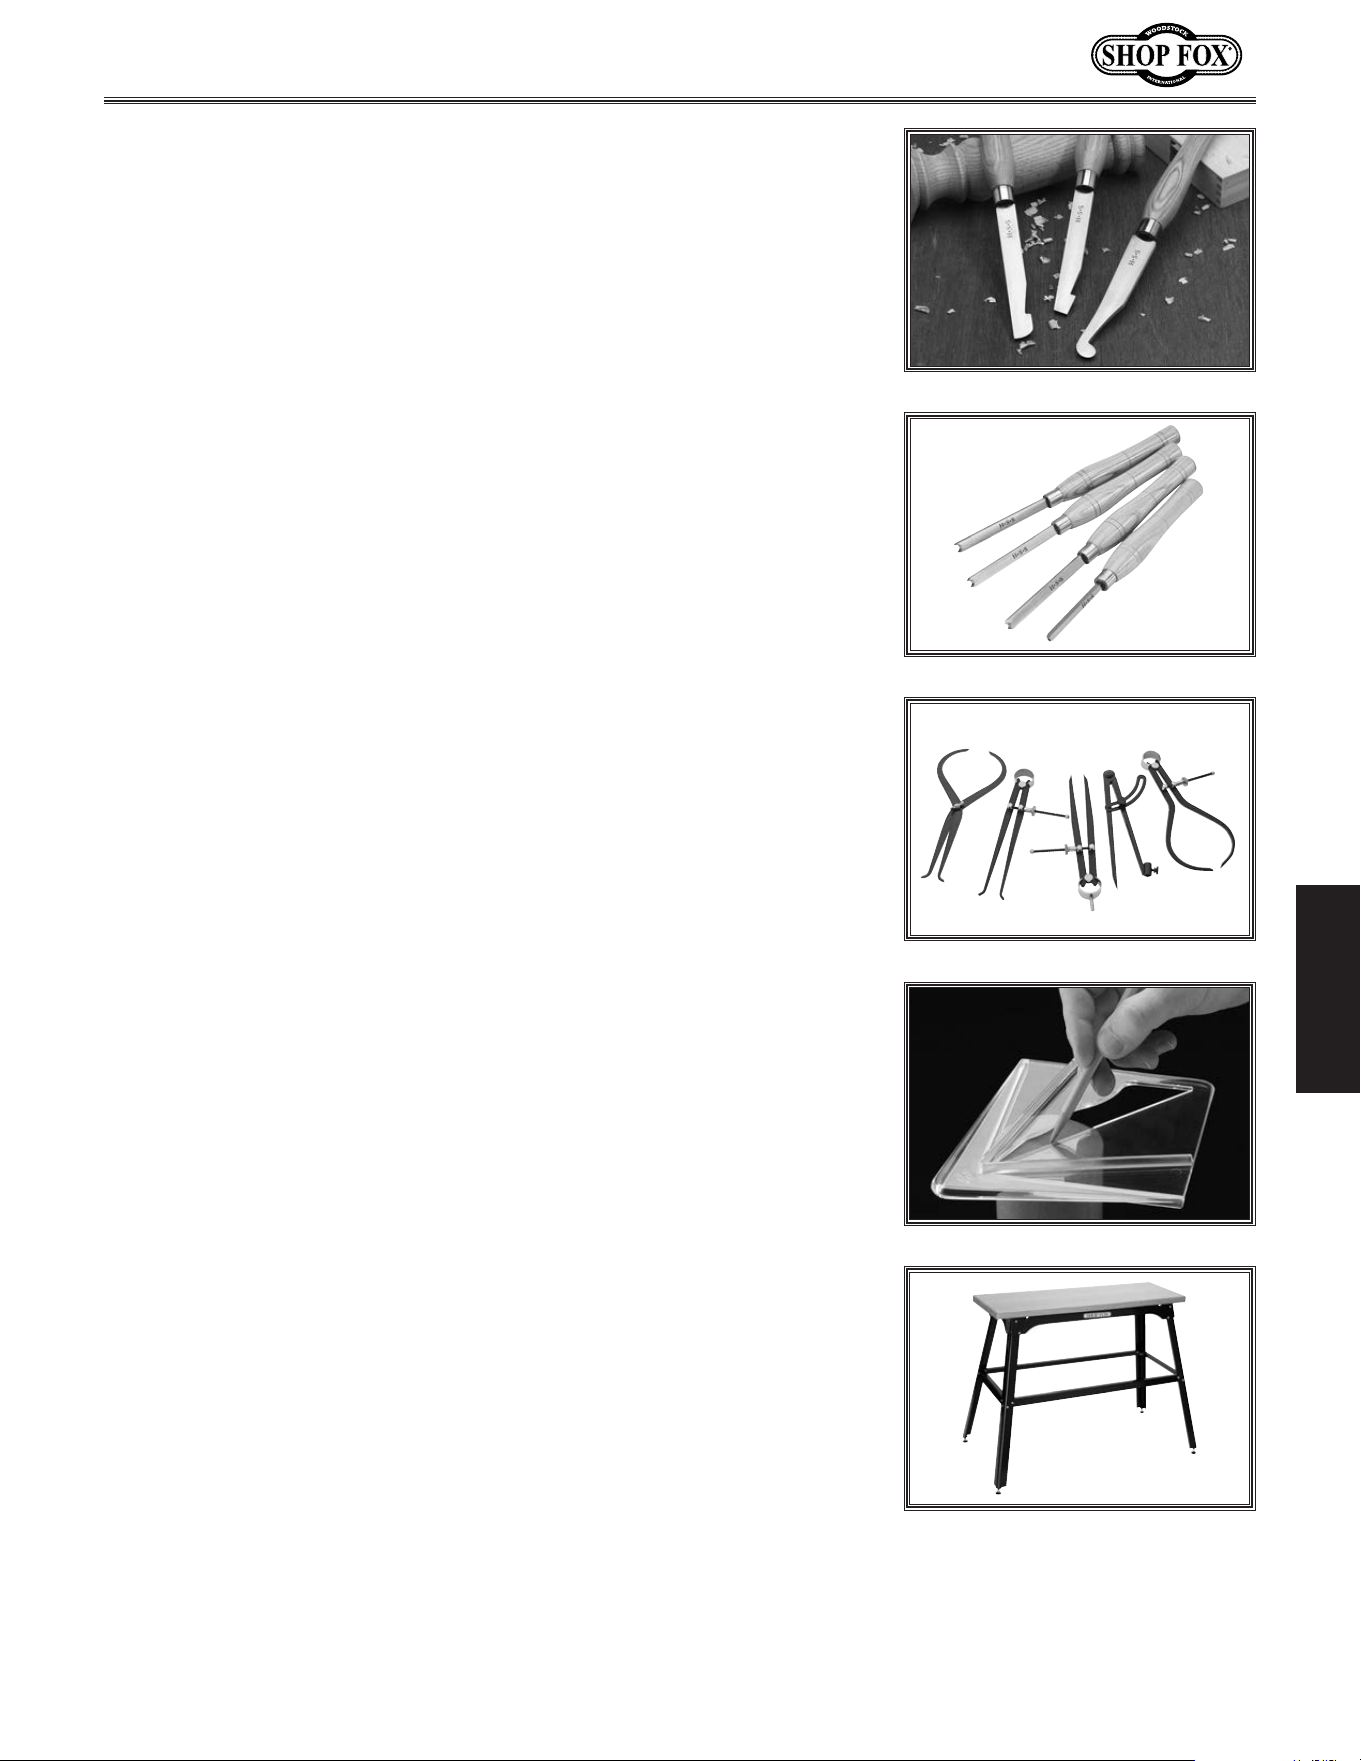
The D4596.5-Pc..Woodworking.Caliper.Set includes compass,
straight dividers, inside calipers, outside calipers, and inside/outside
calipers. Perfect for woodturning and general layout work.
The
.D4058.3-Pc..HSS.Lathe.Chisel.Set.is ideal for bowl turning and
detail work. Each chisel measures roughly 16" long, with 10" ash han-
dles, and the high-speed steel blades measure a full
7
⁄32" thick! The
set includes one round, one curved, and one 90° corner chisel. Chisel
set is protected in a fitted wooden box.
The.D3781.4-Pc..HSS.Beading.Lathe.Chisel.Set.turns beaded spin-
dles with ease. Perfectly ground half-round profiles include
1
⁄8",
1
⁄4",
5
⁄16", and
3
⁄8" diameters. Tapered sides allow closely-spaced, multiple
beads for complete design flexibility. Naturally finished ash handles
measure 8
7
⁄8" and the high-speed steel blades measure 5
1
⁄8" long (the
1
⁄8" beaded chisel blade measures 4" long).
Find the center of round or square stock for lathe turning with the
D3098 Center Finder. One side locates a diagonal line on square
stock up to 8" x 8", and the other side locates a diagonal line on
round stock up to 4
1
⁄2" in diameter. Marking two opposite diagonal
lines determines the center point. It's that simple!
The
.D3640.Tool.Table.Plus.is designed to accommodate larger
benchtop machines. The table has a butcher block finish and mea-
sures 14" x 40" x 1
1
⁄4" thick. The wide A-frame stand has a 700 lb.
capacity and measures 33" high. Bottom measures 47
1
⁄2" x 25
1
⁄4".
Includes stand frame and top.

-34-
Model W1704 (For Machines Mfd. Since 01/20)
MAINTENANCE
MAINTENA N CE
For optimum performance from your machine, follow
this maintenance schedule and refer to any specific
instructions given in this section.
Ongoing
• Loose faceplate or mounting bolts.
• Damaged center or tooling.
•
Worn or damaged wires.
• Loose machine components.
• Any other unsafe condition.
Daily.Check
• Clean off dust buildup.
•
Clean and lubricate lathe bed, spindle, and quill.
Monthly.Check
• Belt tension, damage, or wear.
General
Lubrication
All bearings on this lathe are lubricated and sealed at the
factory, and do not need additional lubrication.
Wipe a lightly oiled shop rag on the outside of the
headstock spindle. DO NOT allow any oil to get on the
inside mating surfaces of the spindle.
Use the tailstock adjustment knob to extend the quill out
to the furthest position and apply a thin coat of white
lithium grease to the outside of the quill. DO NOT allow
any oil or grease to get on the inside mating surfaces of
the quill.
MAKE. SURE. that. your. machine. is.
unplugged. during. all. maintenance.
procedures!. If.this. warning.is. ignored,.
serious.personal.injury.may.occur.
Cleaning.&.Protecting
Cleaning this lathe is relatively easy. Vacuum excess wood
chips and sawdust, and wipe off the remaining dust with
a dry cloth. If any resin has built up, use a resin-dissolving
cleaner to remove it.
Protect the unpainted cast-iron surfaces by wiping them
clean after every use—this ensures moisture from wood dust
does not remain on bare metal surfaces. Keep the surfaces
rust-free with regular applications of light machine oil.
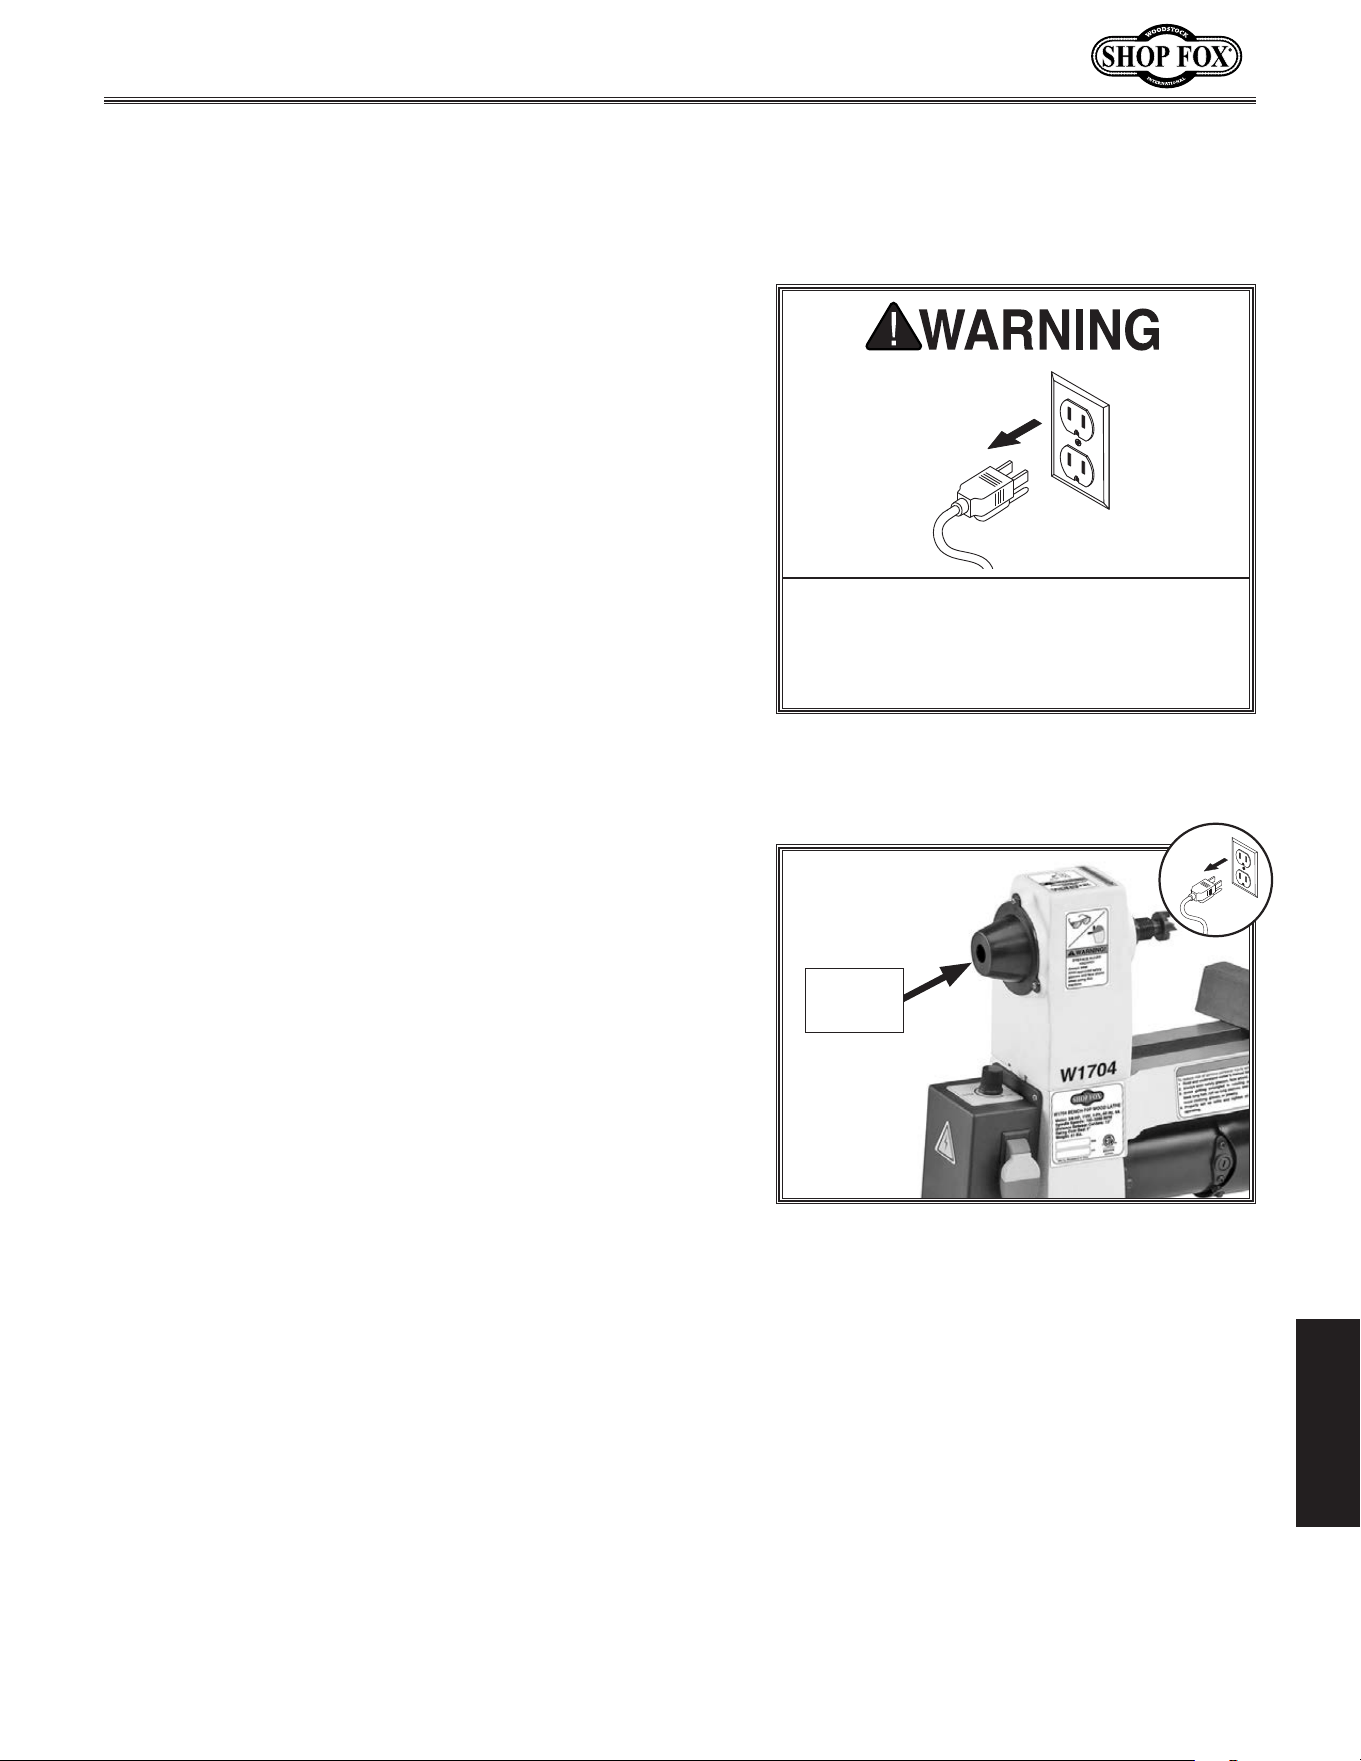
-35-
Model W1704 (For Machines Mfd. Since 01/20)
SERVICE
SERVICE
General
This section covers the most common service adjustments
or procedures that may need to be made during the life
of your machine.
If you require additional machine service not included
in this section, please contact Woodstock International
Technical Support at (360) 734-3482 or send e-mail to:
techsupport@woodstockint.com.
MAKE. SURE. that. your. machine. is.
unplugged. during. all. maintenance.
procedures!. If.this. warning.is. ignored,.
serious.personal.injury.may.occur.
The motor and spindle pulleys are aligned at the factory
and should not require any adjustment. If they become
misaligned over time, it is important that they be
re-aligned in order to extend belt life and maximize the
transfer of power from the motor to the spindle.
Tools.Needed. Qty
Phillips Head Screwdriver #2 ..................................1
Hex Wrench 3mm
...............................................1
To align motor and spindle pulleys, do these steps:
1.
DISCONNECT MACHINE FROM POWER!
2.
Remove outboard spindle cover (see Figure 35).
3.
Loosen M6-1 x 8 set screw on spindle pulley.
4.
Slide spindle pulley into alignment with motor
pulley.
Note: When pulleys are properly aligned, there
should be no unusual or pulsing sounds coming from
the belt.
5.
Tighten set screw on spindle pulley.
6. Install spindle cover.
Aligning.Pulleys
Figure.35. Location of outboard spindle
cover.
Spindle
Cover
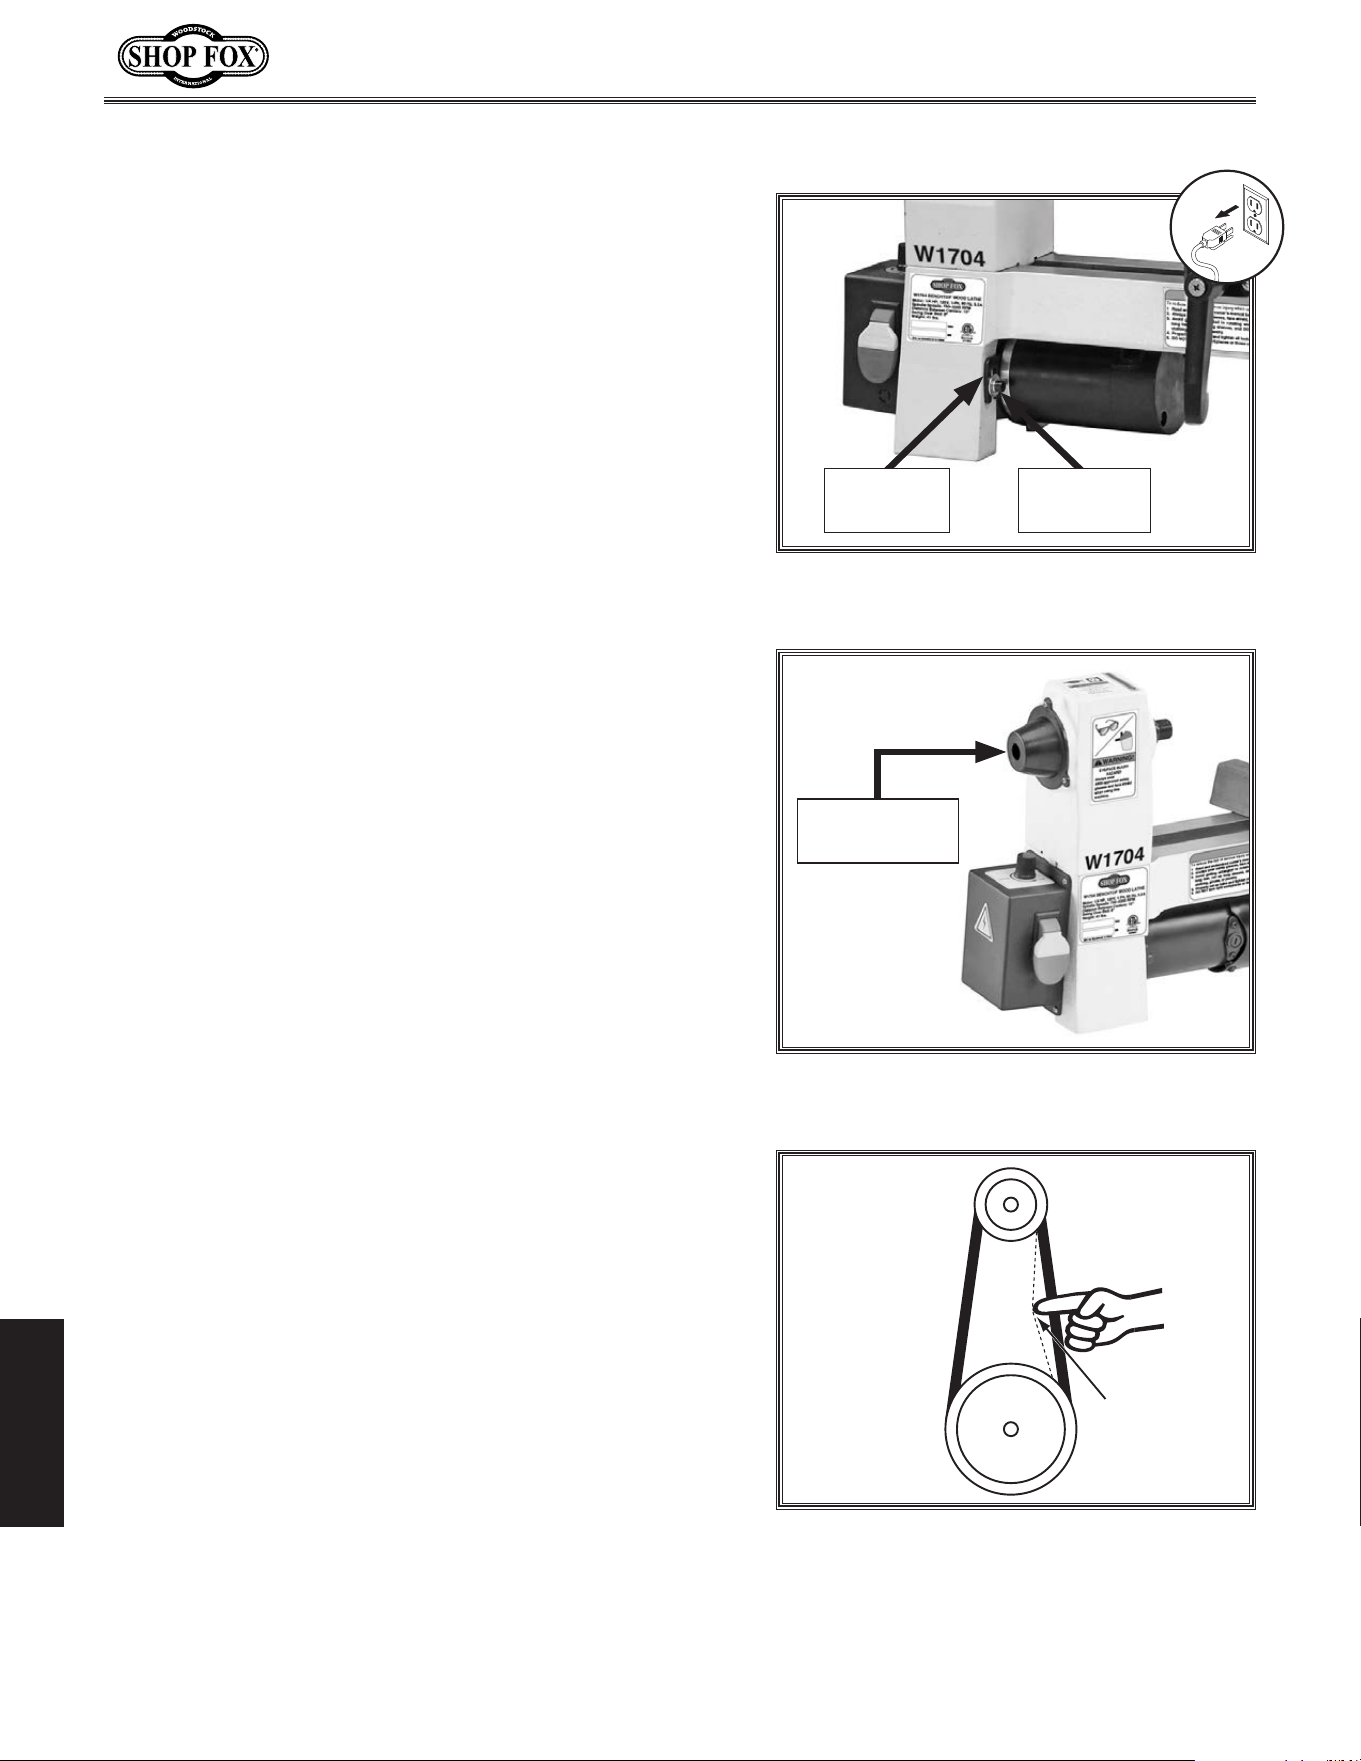
-36-
Model W1704 (For Machines Mfd. Since 01/20)
SERVICE
Cha nging/Tensioning.Belt
To change/replace belt, do these steps:
1.
DISCONNECT MACHINE FROM POWER!
2.
Loosen (2) M6-1 x 1 cap screws on motor mounting
plate (see
Figure.36).
3.
Lift motor assembly all the way up, then re-tighten
both motor mounting plate cap screws—this will hold
motor in place while you change belt position.
4.
Remove outboard spindle cover (see Figure 37) by
removing (3) M4-.7 x 8 Phillips head screws.
5.
Roll belt off spindle pulley, then pull belt off motor
pulley and through bottom of lathe.
Tip: This step may be easier to accomplish by gently
rolling machine onto its back.
6.
Install new belt by performing Step 5.in reverse.
7.
Loosen motor mounting plate cap screws and apply
downward pressure on motor assembly to properly
tension drive belt, then re-tighten cap screws.
Note:.When properly tensioned, belt should deflect
about
1
⁄8" when moderate pressure is applied to
belt mid-way between upper and lower pulley, as
illustrated in Figure
.38.
8.
Ensure belt is fully seated on pulleys, roll machine
upright if necessary, and re-install outboard spindle
cover.
Pulley
Deflection
Pulley
Figure.38. Testing for
1
⁄8" belt deflection.
Over time, the belt will slightly wear and stretch, eventu-
ally losing its efficiency of transmitting power, and will
require re-tensioning. A new belt typically has a break-in
period and should be checked/re-tensioned after the first
16 hours of belt life, as it will stretch during this time.
Figure.36. Location of motor mounting
plate.
Mounting
Plate
Cap Screw
(1 of 2)
Figure.37. Location of outboard spindle
cover.
Outboard
Spindle Cover
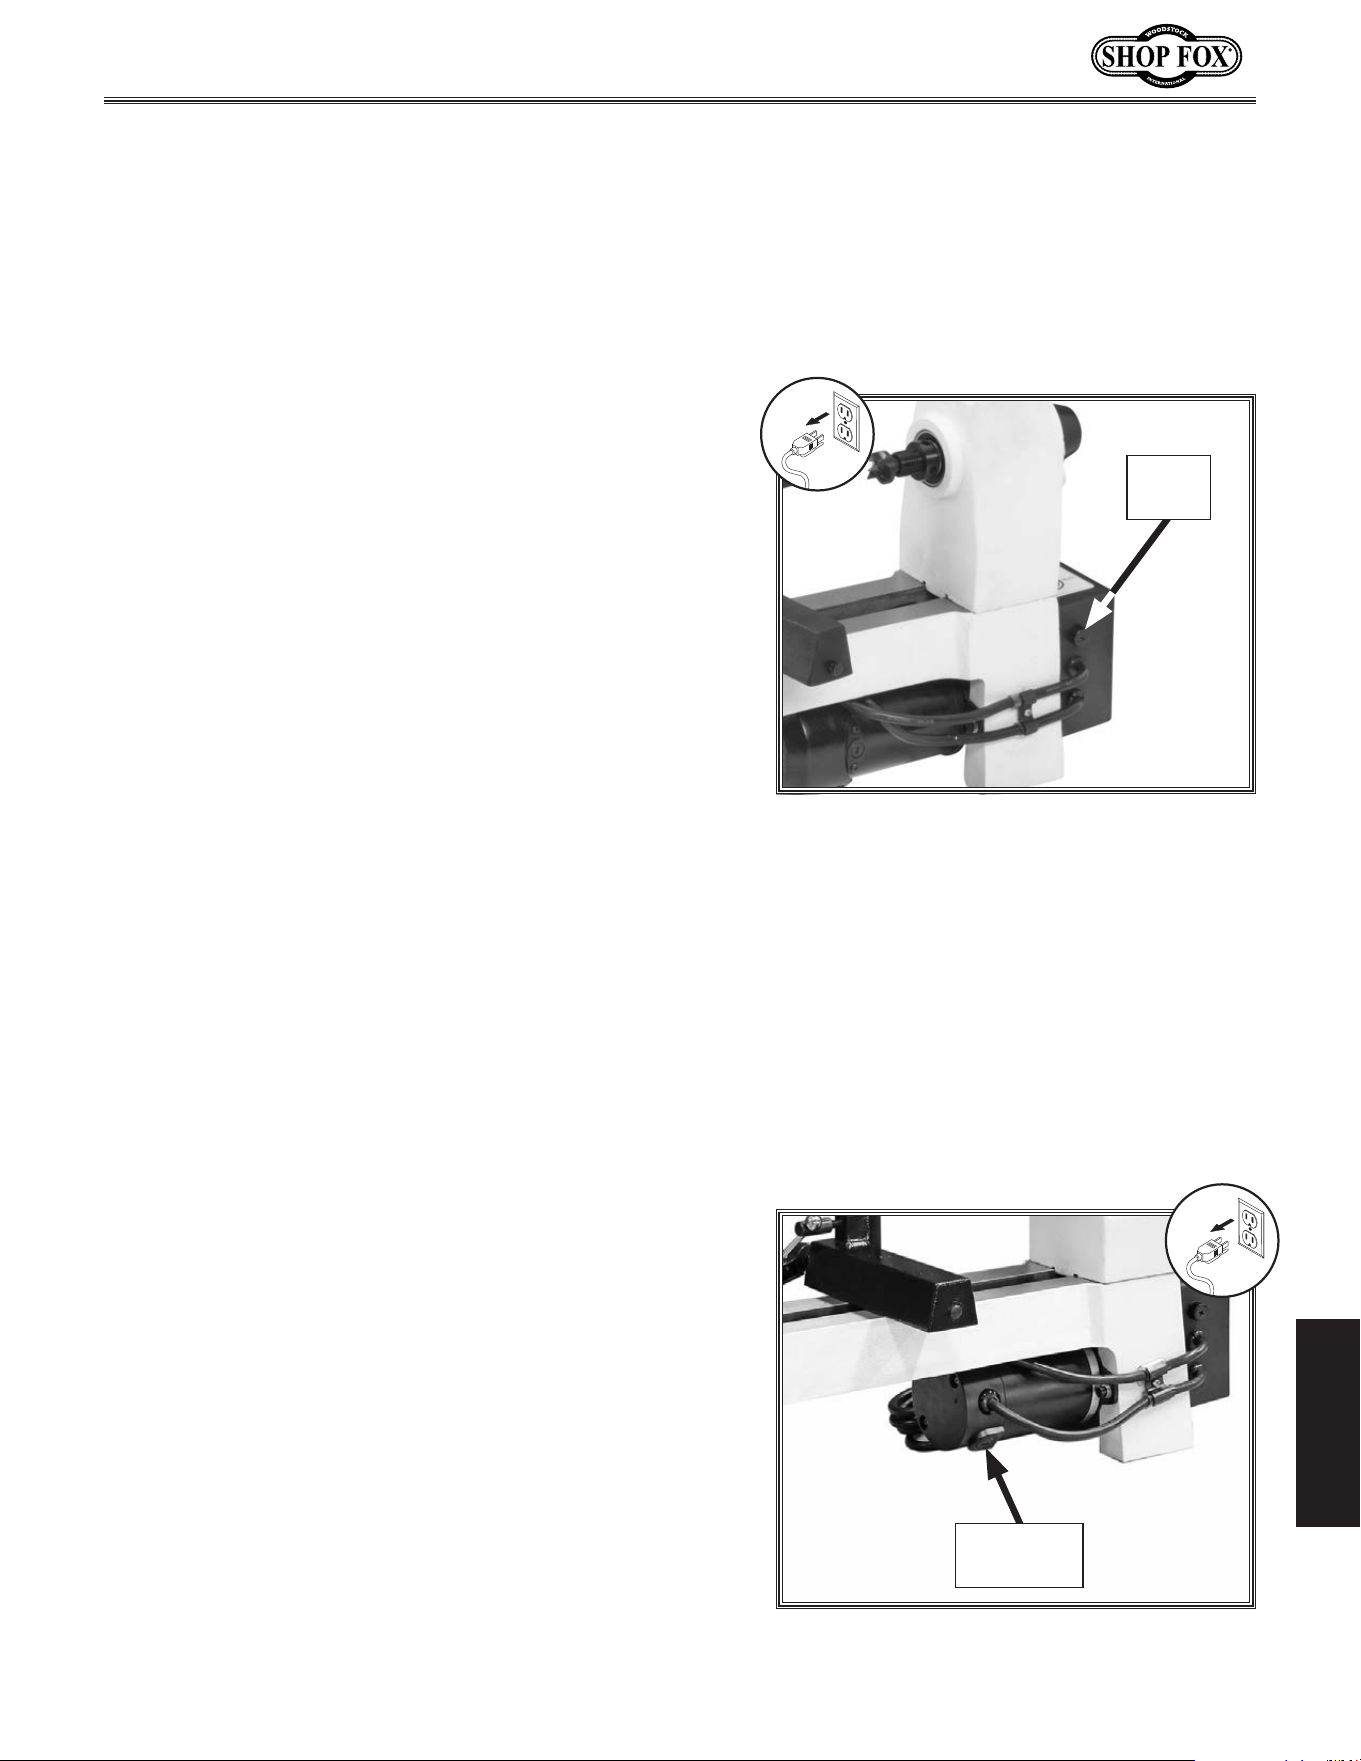
-37-
Model W1704 (For Machines Mfd. Since 01/20)
SERVICE
This machine features an onboard fuse designed to
protect sensitive electrical parts in the event of electrical
overload. If the fuse has blown, the motor will not start.
To verify the condition of the fuse, remove it from the
switch box and hold it up to the light. If the element is
broken, the fuse is blown and must be replaced.
Items.Needed. Qty
Phillips Head Screwdriver #2 ..................................1
Fuse (PN X1704059)
............................................1
Replacing.Fuse
To replace fuse, do these steps:
1.
DISCONNECT MACHINE FROM POWER!
2.
Remove fuse holder on back of switch box (see
Figure 39).
3.
Remove old fuse from holder and install new fuse.
4.
Re-install fuse holder in switch box. Figure.39. Location of fuse holder.
Fuse
Holder
Replacing.Brushes
This machine is equipped with a universal motor that
uses two carbon brushes to transmit electrical current
inside the motor. These brushes are considered to be
regular "wear items" or "consumables" that will need to be
replaced during the life of the motor. The frequency of
required replacement is related to how much the motor is
used and how hard it is pushed.
Replace both carbon brushes at the same time when the
motor no longer reaches full power, or when the brushes
measure less than
1
⁄4" long (new brushes are
5
⁄8" long).
Items.Needed. Qty
Flat Head Screwdriver #2 ......................................1
Motor Brushes (PN X1704041V2-1)
...........................2
To replace motor brushes, do these steps:
1. DISCONNECT MACHINE FROM POWER!
2.
Remove brush caps (see Figure 40) and worn brushes
from motor.
3.
Replace both motor brushes and re-install brush caps. Figure.40. Location of motor brushes.
Brush Cap
(1 of 2)

-38-
Model W1704 (For Machines Mfd. Since 01/20)
SERVICE
Troubleshooting
Motor.and.Electrical
The following troubleshooting tables cover common problems that may occur with this machine. If you
need replacement parts or additional troubleshooting help, contact our Technical Support.
Note:
Before contacting Tech Support, find the machine serial number and manufacture date, and if
available, your original purchase receipt. This information is required to properly assist you.
PROBLEM POSSIBLE.CAUSE CORRECTIVE.ACTION
Machine does
not start, or
power-supply
fuse/breaker
trips immediately
after startup.
1. Switch disabling key removed.
2. Incorrect power supply voltage or circuit
size.
3. Machine fuse blown.
4. Power supply circuit breaker tripped or fuse
blown.
5. Wiring broken, disconnected, or corroded.
6. Spindle speed dial at fault.
7. ON/OFF switch at fault.
8. Motor brushes worn or at fault.
9. Machine circuit breaker tripped/at fault.
10. Circuit board at fault.
11. Motor at fault.
1. Install switch disabling key.
2. Ensure correct power supply voltage and circuit
size.
3. Replace fuse.
4. Ensure circuit is sized correctly and free of shorts.
Reset circuit breaker or replace fuse.
5. Check/fix broken, disconnected, or corroded
wires.
6. Test/replace if at fault.
7. Inspect/replace if at fault.
8. Remove/replace brushes (Page 37).
9. Reset circuit breaker; inspect/replace if at fault.
10. Inspect/replace if at fault.
11. Test/repair/replace.
Machine stalls or
is underpowered.
1. Machine undersized for task.
2. Workpiece material not suitable for machine.
3. Feed rate/cutting speed too fast.
4. Belt slipping.
5. Pulley slipping on shaft.
6. Spindle speed dial at fault.
7. Motor brushes worn or at fault.
8. Circuit board at fault.
9. Motor at fault.
1. Use sharp chisels; reduce feed rate/depth of cut.
2. Only cut wood/ensure moisture is below 20%.
3. Decrease feed rate/cutting speed.
4. Tension/replace belt (Page 36); ensure pulleys are
aligned (Page 35); ensure belt is clean and not
damaged.
5. Tighten/replace loose pulley/shaft.
6. Test/replace if at fault.
7. Remove/replace brushes (Page 37).
8. Inspect/replace if at fault.
9. Test/repair/replace.
Machine has
vibration or noisy
operation.
1. Motor or component loose.
2. Machine sits unevenly on workbench.
3. Belt worn, loose, or misaligned.
4. Pulley loose.
5. Workpiece/faceplate at fault.
6. Motor mount loose/broken.
7. Motor bearings at fault.
1. Inspect/replace damaged bolts/nuts, and retight-
en with thread-locking fluid.
2. Adjust rubber feet.
3. Inspect/replace belt (Page 36). Re-align pulleys if
necessary (Page 35).
4. Re-align/replace shaft, pulley, set screw, and key.
5. Center workpiece in chuck/faceplate; reduce RPM;
replace defective chuck.
6. Tighten/replace.
7. Test by rotating shaft; rotational grinding/loose
shaft requires bearing replacement.

-39-
Model W1704 (For Machines Mfd. Since 01/20)
SERVICE
Operation
PROBLEM POSSIBLE.CAUSE CORRECTIVE.ACTION
Bad surface
finish.
1. Dull tooling or wrong tool used for task.
2. Tool height is not
1
⁄8" above spindle center-
line.
3. Spindle speed is wrong.
4. Excessive vibration.
1. Sharpen tooling, select correct tool for operation.
2. Adjust tool rest so tool is
1
⁄8" above spindle
centerline.
3. Adjust for appropriate spindle speed (Page 27).
4. Troubleshoot possible causes/solutions in this
table.
Excessive vibra-
tion upon startup
(when workpiece
is installed).
1. Workpiece is mounted incorrectly.
2. Workpiece warped, out of round, or flawed.
3. Lathe is resting on an uneven surface.
4. Spindle speed too fast for workpiece.
5. Workpiece hitting stationary object.
6. Tailstock or tool rest not securely clamped
to lathe bed.
7. Belt pulleys are not properly aligned.
8. Motor mount bolts are loose.
9. Belt is worn or damaged.
10. Spindle bearings are worn or damaged.
1. Remount workpiece, making sure that centers are
embedded in true center of workpiece.
2. Cut workpiece to be concentric, or use a different
workpiece.
3. Shim machine base to eliminate wobble.
4. Reduce spindle speed (Page 27).
5. Stop lathe and fix interference problem.
6. Check lock levers and handles and tighten if nec-
essary (Page 17).
7. Align belt pulleys (Page 35).
8. Tighten motor mount bolts.
9. Replace belt (Page 36).
10. Test by rotating shaft; rotational grinding/loose
shaft requires bearing replacement.
Chisel grabs
or digs into
workpiece.
1. Wrong chisel/tool being used.
2. Chisel/tool too dull.
3. Tool rest height not set correctly.
4. Tool rest is set too far from workpiece.
1. Use correct chisel/tool.
2. Sharpen or replace chisel/tool.
3. Correct tool rest height (Page 23).
4. Move tool rest closer to workpiece.
Tailstock moves
under load.
1. Tailstock mounting bolt/hex nut is loose.
2. Bed or clamping surface is excessively oily or
greasy.
1. Tighten mounting bolt/hex nut.
2. Clean bed or clamping surface to remove excess
oil/grease.
Spindle lacks
turning power or
starts up slowly.
1. Belt is slipping.
2. Pulleys loose.
3. Workpiece too heavy for spindle.
1. Tighten/adjust belt (Page 36).
2. Tighten pulley set screws; re-align/replace shaft,
pulley set screws, and key.
3. Remove excess material before remounting; use
lighter workpiece.
Quill will not
move forward
when knob is
turned.
1. Keyway is not aligned with quill lock lever. 1. Align quill keyway and quill lock lever and slightly
tighten lever to engage keyway (Page 25).

-40-
Model W1704 (For Machines Mfd. Since 01/20)
SERVICE
Elec trical.Safety.Instructions
SHOCK.HAZARD. Working on wiring that is
connected to a power source is extremely
dangerous. Touching electrified parts will
result in personal injury including but not
limited to severe burns, electrocution,
or death. Disconnect the power from
the machine before servicing electrical
components!
QUALIFIED.ELECTRICIAN. Due to the inherent
hazards of electricity, only a qualified
electrician should perform wiring tasks on
this machine. If you are not a qualified
electrician, get help from one before
attempting any kind of wiring job.
WIRE.CONNECTIONS. All connections must
be tight to prevent wires from loosening
during machine operation. Double-check all
wires disconnected or connected during any
wiring task to ensure tight connections.
WIRE/COMPONENT.DAMAGE..Damaged wires
or components increase the risk of serious
personal injury, fire, or machine damage. If
you notice that any wires or components are
damaged while performing a wiring task,
replace those wires or components before
completing the task.
MODIFICATIONS. Using aftermarket parts or
modifying the wiring beyond what is shown
in the diagram may lead to unpredictable
results, including serious injury or fire.
MOTOR.WIRING. The motor wiring shown
in these diagrams is current at the time
of printing, but it may not match your
machine. Always use the wiring diagram
inside the motor junction box.
CAPACITORS/INVERTERS. Some capacitors
and power inverters store an electrical
charge for up to 10 minutes after being
disconnected from the power source.
To reduce the risk of being shocked,
wait at least this long before working on
capacitors.
CIRCUIT.REQUIREMENTS. You MUST follow
the requirements at the beginning of this
manual when connecting your machine to a
power source.
EXPERIENCING.DIFFICULTIES. If you are
experiencing difficulties understanding
the information included in this section,
contact our Technical Support at
(360) 734-3482.
The photos and diagrams
included in this section are
best viewed in color. You
can view these pages in
color at www.shopfox.biz.
BLACK
WHITE
GREEN
RED
BLUE
BROWN
GRAY
ORANGE
YELLOW
YELLOW
GREEN
PURPLE
PINK
LIGHT
BLUE
BLUE
WHITE
TUR-
QUOISE
WIRING DIAGRAM COLOR KEY
These pages are current at the time of printing. However, in the spirit of improvement, we may make
changes to the electrical systems of future machines. Compare the manufacture date of your machine to
the one stated in this manual, and study this section carefully.
If there are differences between your machine and what is shown in this section, call Technical Support
at (360) 734-3482
for assistance BEFORE making any changes to the wiring on your machine. An updated
wiring diagram may be available. Note: Please gather the serial number and manufacture date of your
machine before calling. This information can be found on the main machine label.
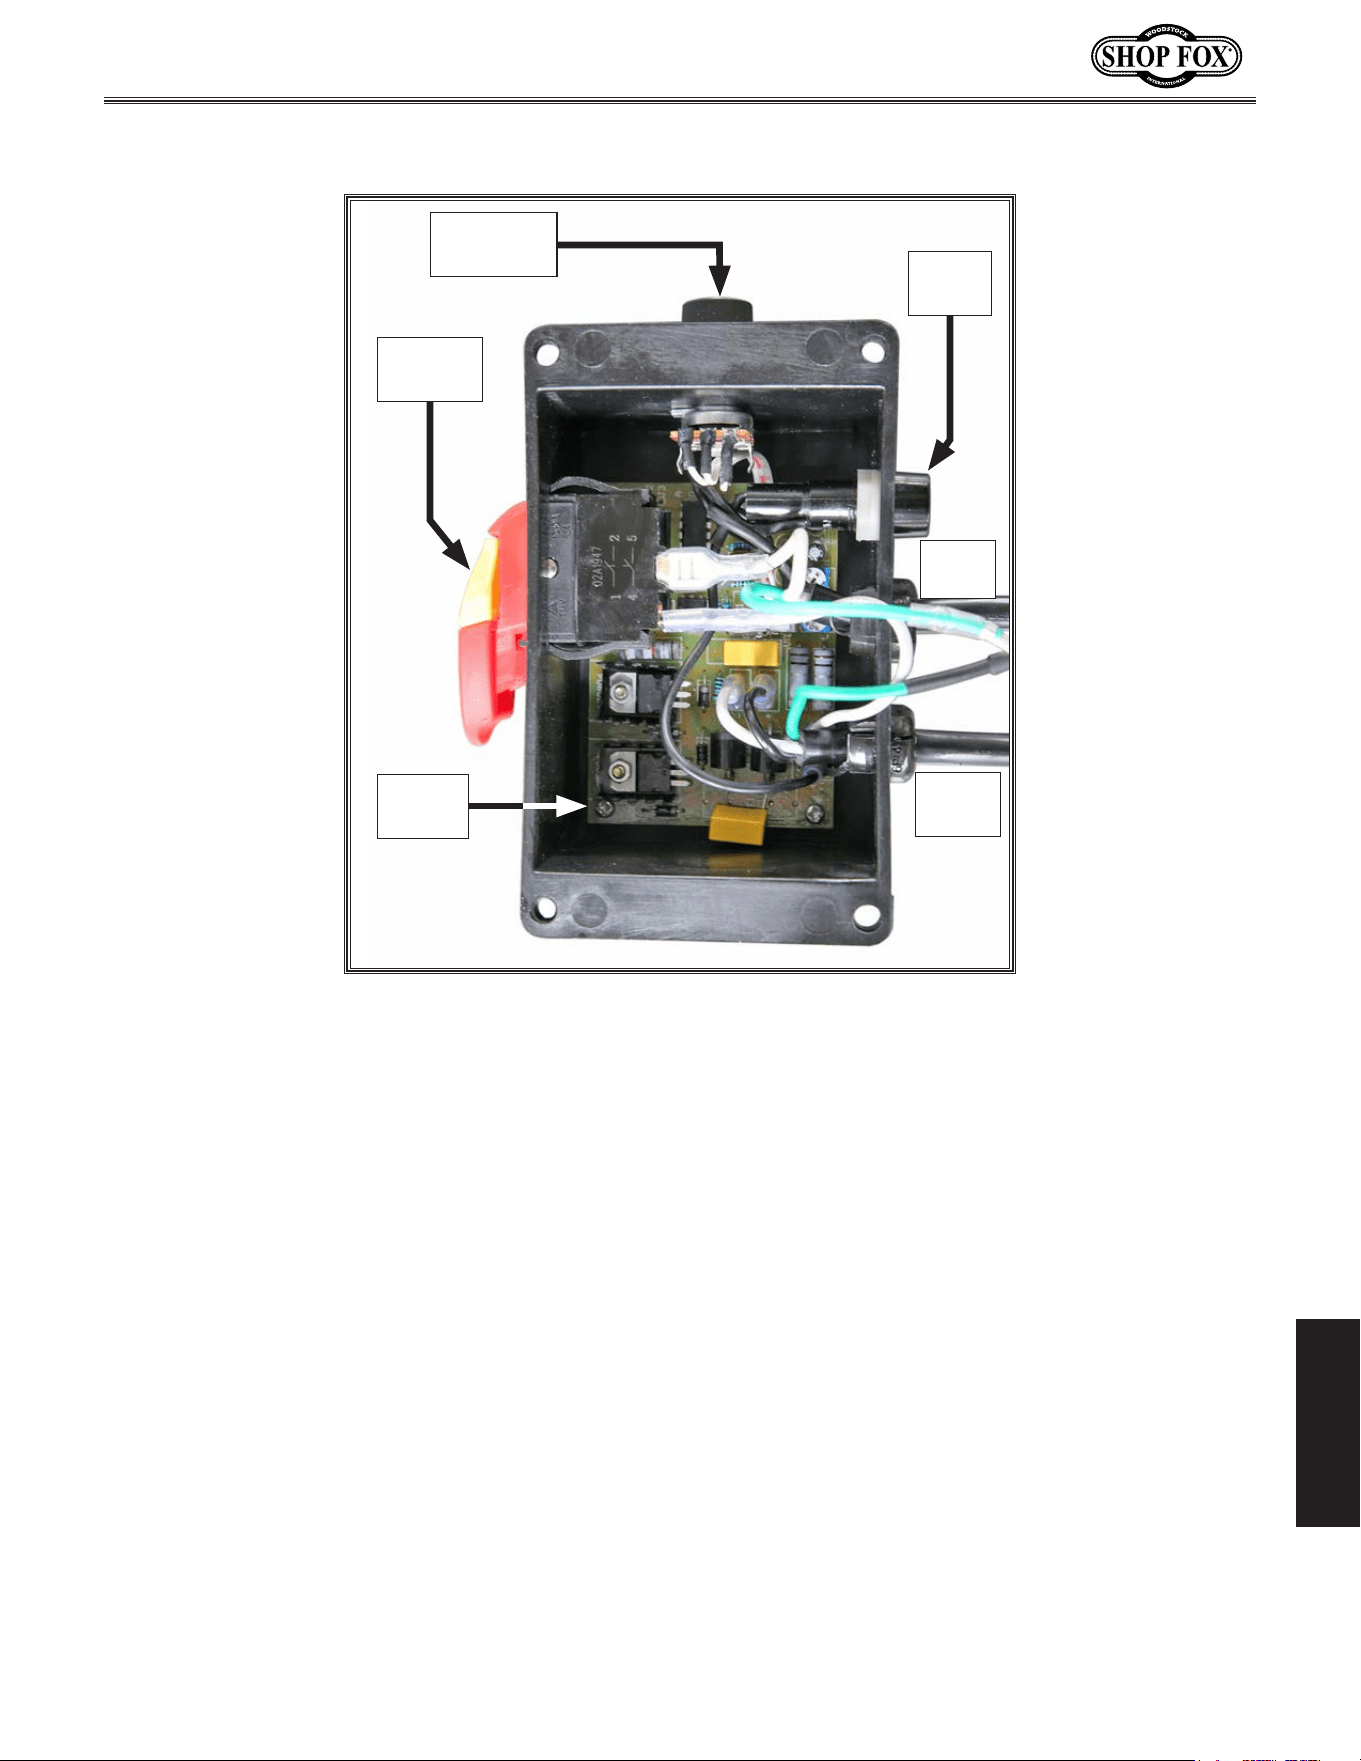
-41-
Model W1704 (For Machines Mfd. Since 01/20)
SERVICE
Electrical.Components
Figure.41. Switch box wiring and components.
Power
Cord
Spindle
Speed Dial
Fuse
Holder
ON/OFF
Switch
Circuit
Board
Motor
Cord
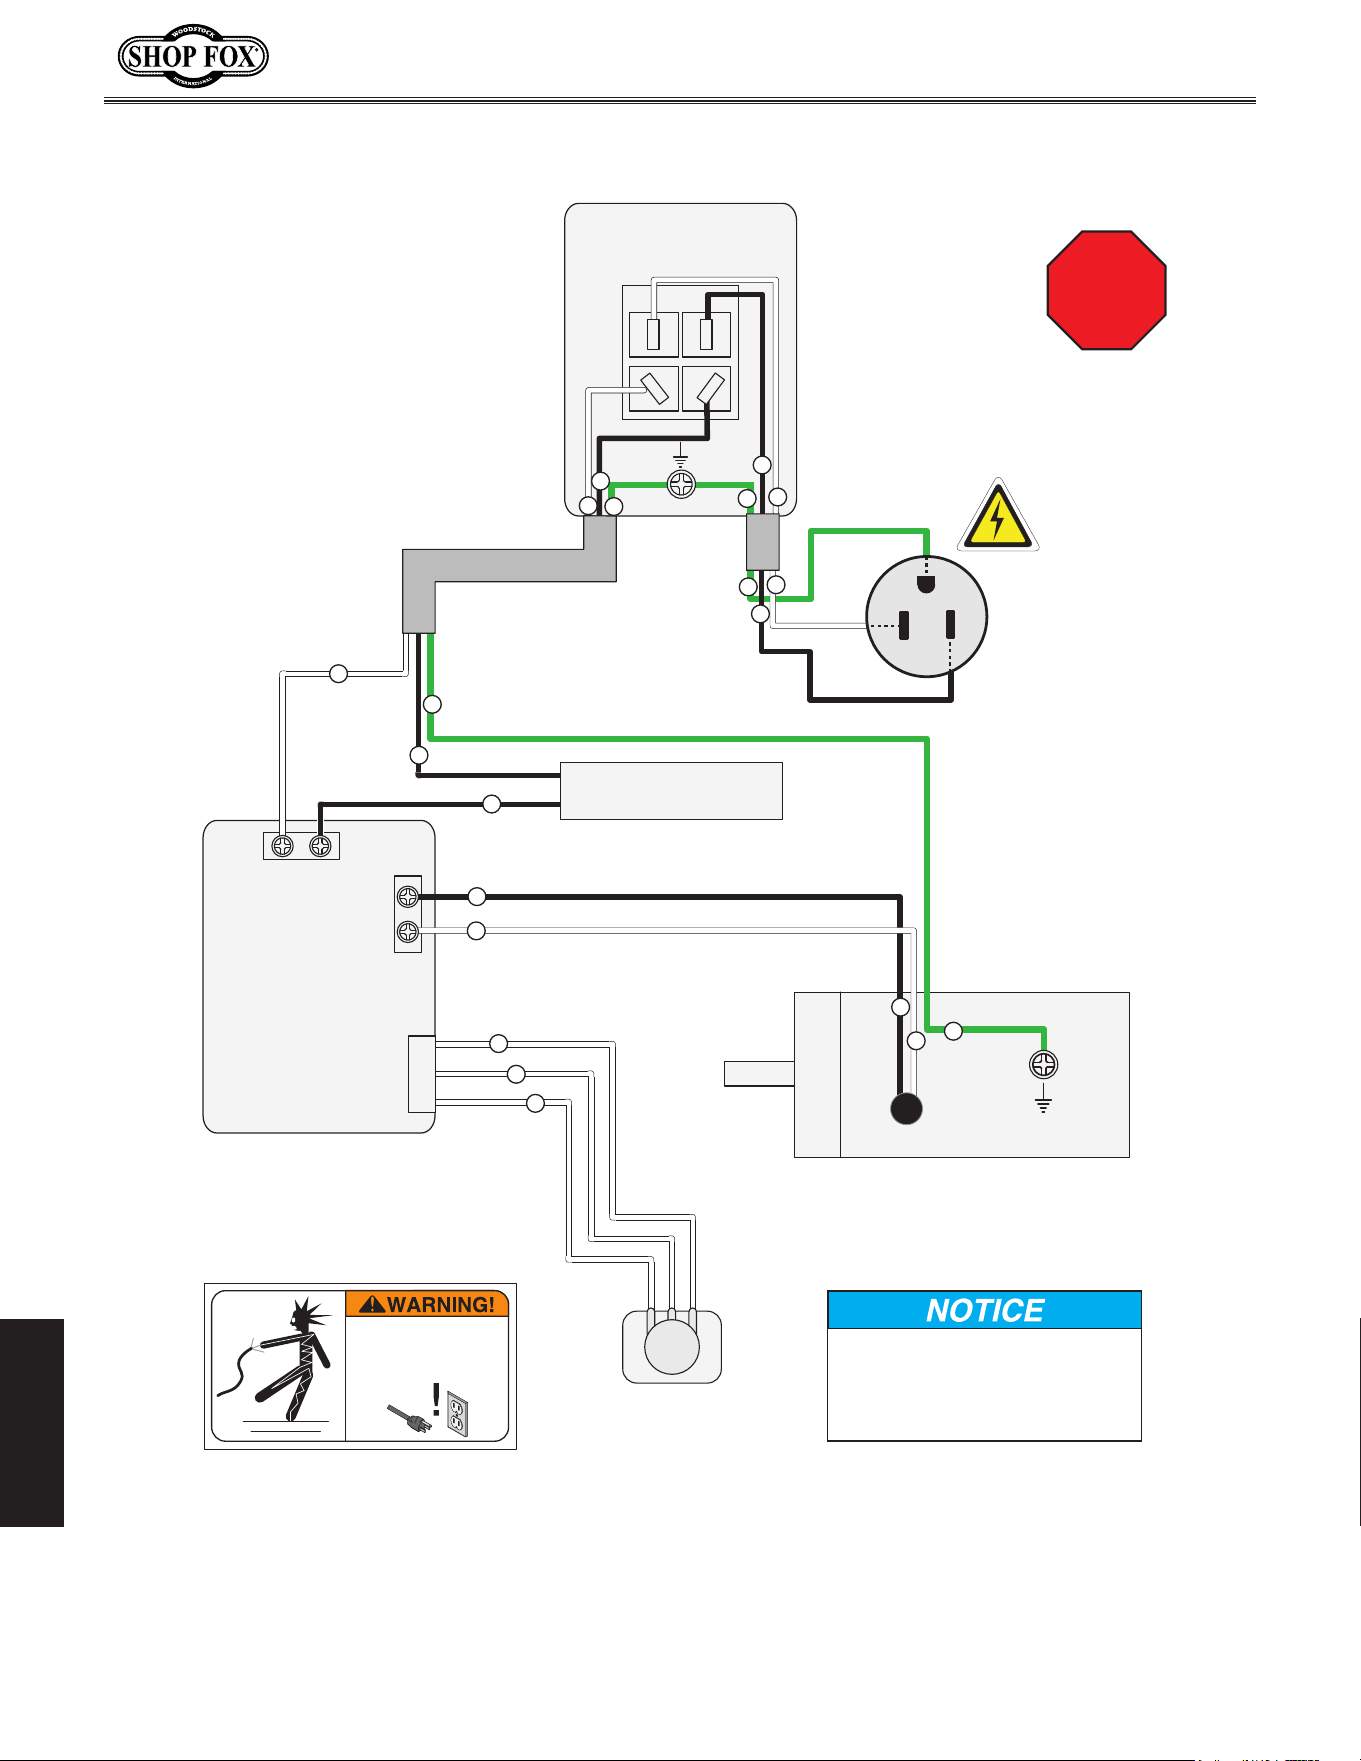
-42-
Model W1704 (For Machines Mfd. Since 01/20)
SERVICE
Wiring.Diagram
5-15 Plug
White
Neutral
Black
Hot
Green
Ground
PADDLE SWITCH
110
VAC
Bk
Bk
Bk
Wt
Wt
Wt
Gn
Gn
Gn
Ground
Gn
CIRCUIT
BOARD
VARIABLE SPEED
DIAL
MOTOR
Bk
Wt
Bk
Wt
Wt
Wt
Wt
Gn
Bk
Wt
FUSE 10A
Bk
The motor wiring shown here is
current at the time of printing, but
it may not match your machine.
Always use the wiring diagram inside
the motor junction box.
SHOCK HAZARD!
Disconnect power
before working on
wiring.
STOP
Read
Page 40
Before
Wiring
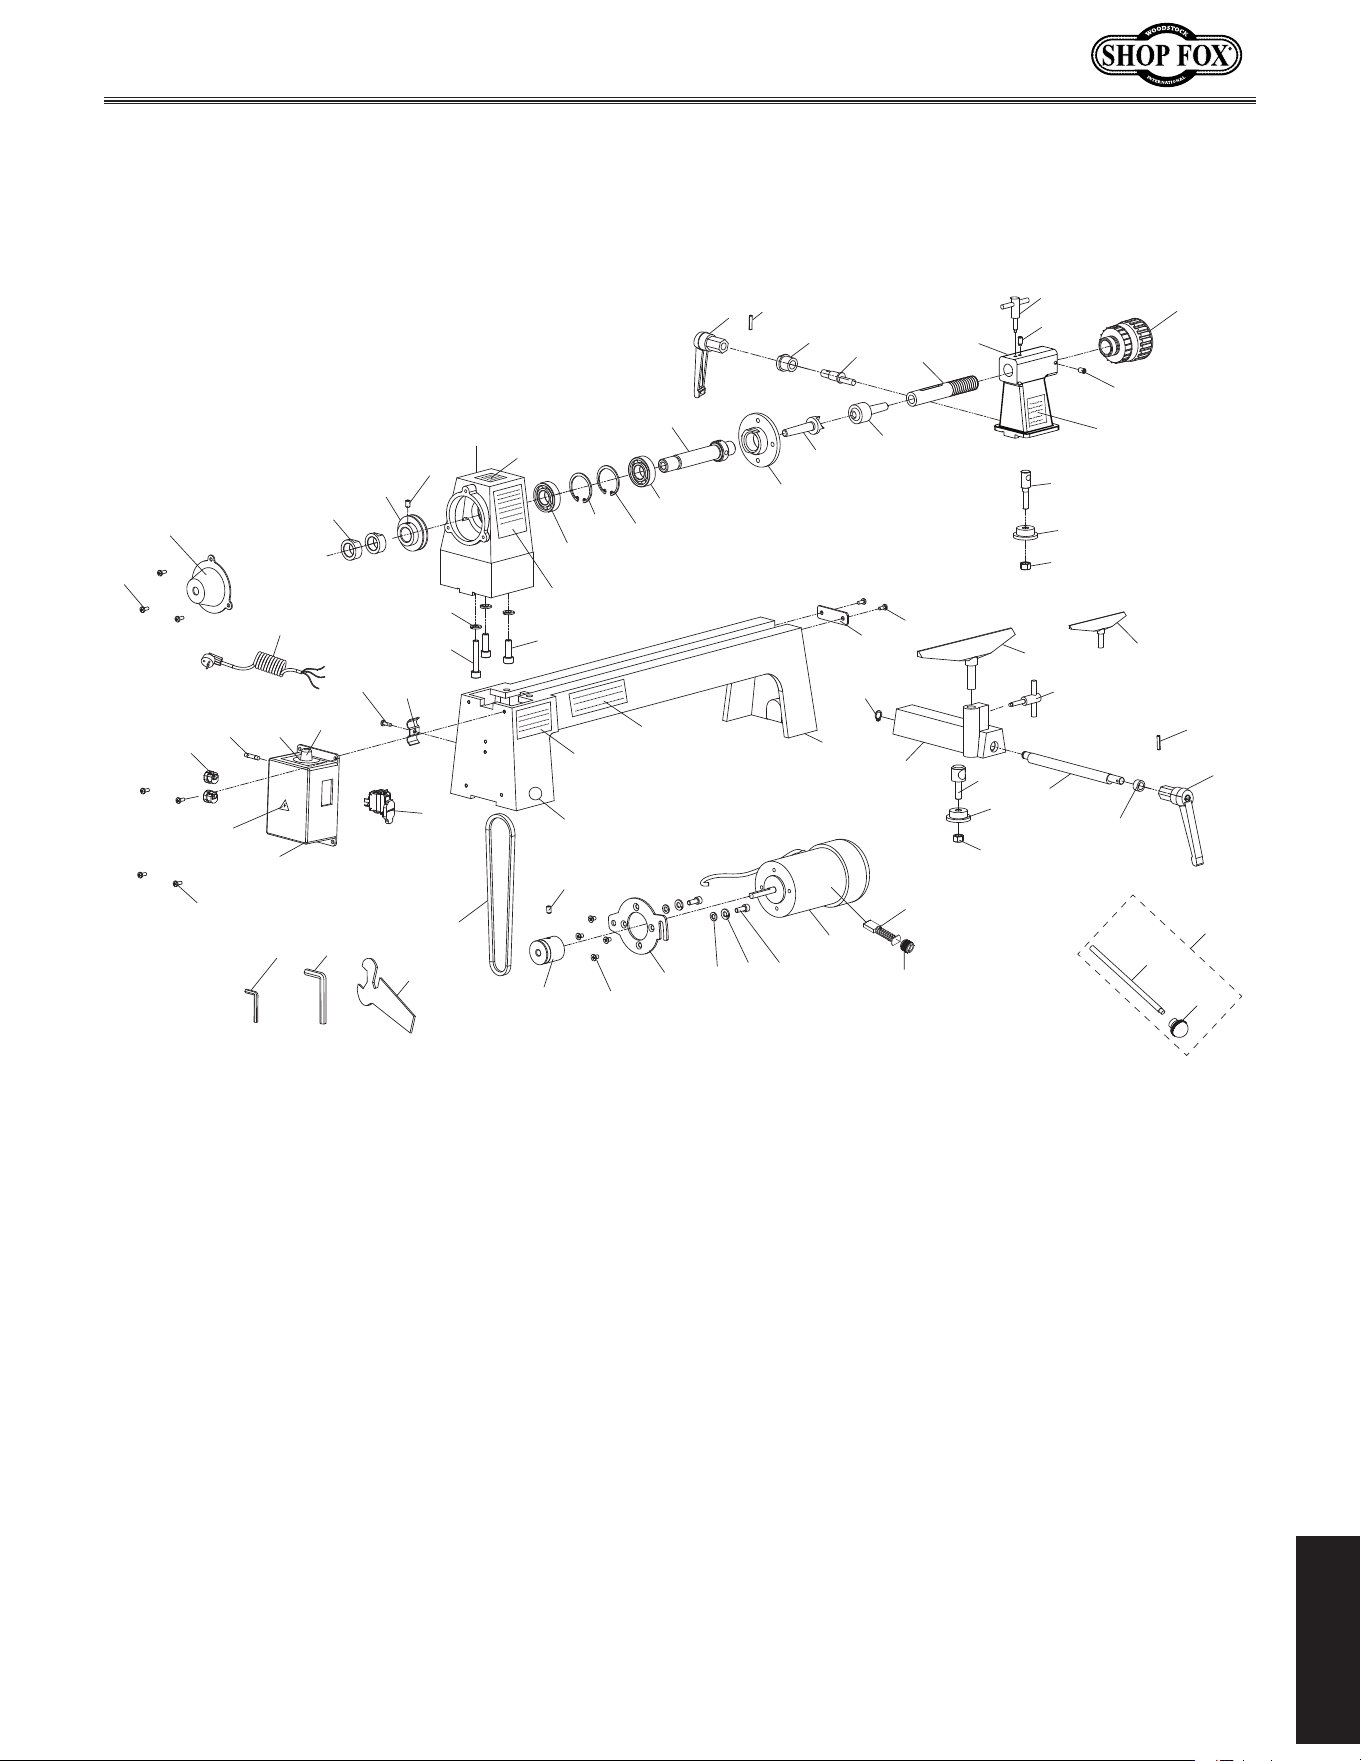
-43-
Model W1704 (For Machines Mfd. Since 01/20)
PARTS
PARTS
Main
2
3
4
5
6V2
7
8V2
9
10
11
14
15
16
17
18
19
20
21
22
23
24
25
26
27
28
29
30V2
31
32
33
34
35
36V2
37
38
39
40
41V2
42V2
43
44
45
46
47
48
49
50
51
52
53
54
55
56
57
58
59
60
61
62
64
65
70
72
73
74
76
1
24
50A
7-1
73
68-1
68
68A
75
71
77
41V2-1
41V2-2
-44-
Model W1704 (For Machines Mfd. Since 01/20)
PARTS
Main.Parts.List
REF PART # DESCRIPTION REF PART # DESCRIPTION
1 X1704001 BED 41V2 X1704041V2 MOTOR V2.01.20
2 X1704002 RETAINING PLATE 41V2-1 X1704041V2-1 CARBON BRUSH
3 X1704003 PHLP HD SCR M5-.8 X 8 41V2-2 X1704041V2-2 BRUSH CAP
4 X1704004 SET SCREW M6-1 X 8 DOG-PT 42V2 X1704042V2 MACHINE ID LABEL V2.01.20
5 X1704005 TAILSTOCK ADJUSTMENT KNOB 43 X1704043 EXT RETAINING RING 10MM
6V2 X170400V2 TAILSTOCK BODY V2.04.21 44 X1704044 TOOL REST BASE
7 X1704007 T-LOCK KNOB BOLT M6-1 X 18 45 X1704045 TOOL REST CLAMP BOLT M8-1.25 X 32
7-1 X1704007-1 T-LOCK KNOB BOLT M6-1 X 28 46 X1704046 CLAMP BLOCK
8V2 X1704008V2 CAP SCREW M8-1.25 X 50 V2.09.15 47 X1704047 LOCK WASHER 8MM
9 X1704009 SLEEVE 48 X1704048 SLEEVE
10 X1704010 ECCENTRIC AXI S 49 X1704049 ECCENTRIC ROD
11 X1704011 TAILSTOCK QUILL 50 X1704050 TOOL REST 7" LARGE
14 X1704014 LIVE CENTER ASSEMBLY 50A X1704050A TOOL REST 4-1/2" SMALL
15 X1704015 SPUR CENTER 51 X1704051 TAILSTOCK CLAMP BOLT M8-1.25 X 32
16 X1704016 TAILSTOCK LOCK LEVER 52 X1704052 CLAMP BLOCK
17 X1704017 FACEPLATE 5-3/4" 53 X1704053 ELECTRICITY LABEL
18 X1704018 HEADSTOCK SPINDLE 54 X1704054 TOOL REST LOCK LEVER
19 X1704019 BALL BEARING 6004ZZ 55 X1704055 UNPLUG MACHINE LABEL
20 X1704020 INT RETAINING RING 42MM 56 X1704056 LATHE WARNING LIST LABEL
21 X1704021 INT RETAINING RING 42MM 57 X1704057 READ MANUAL LABEL
22 X1704022 BALL BEARING 6004ZZ 58 X1704058 SHOP FOX PADDLE SWITCH
23 X1704023 HEADSTOCK 59 X1704059 FUSE 10A
24 X1704024 LOCK NUT M8-1.25 60 X1704060 SPINDLE SPEED DIAL SWITCH
25 X1704025 SPEED DIAL LABEL 61 X1704061 FLAT WASHER 6MM
26 X1704026 HEADSTOCK SPINDLE NUT 62 X1704062 LOCK WASHER 6MM
27 X1704027 OUTBOARD SPINDLE COVER 64 X1704064 PHLP HD SCR M4-.7 X 10
28 X1704028 PHLP HD SCR M4-.7 X 8 65 X1704065 CABLE HOLDER
29 X1704029 EYE/EAR/LUNG HAZARD LABEL 68A X1704068A KNOCK-OUT TOOL ASSY
30V2 X1704030V2 SET SCREW M6-1 X 8 V2.12.19 68 X1704068 KNOCK-OUT TOOL ROD
31 X1704031 DRIVE PULLEY 68-1 X1704068-1 KNOCK-OUT TOOL END BALL
32 X1704032 BELT K-516 70 X1704070 HEX WRENCH 3MM
33 X1704033 SET SCREW M6-1 X 10 71 X1704071 HEX WRENCH 5MM
34 X1704034 MOTOR PULLEY 72 X1704072 FLAT HD SCR M5-.8 X 8
35 X1704035 POWER CORD 18AWG 3W 72" 5-15P 73 X1704073 ROLL PIN 4 X 16
36V2 X1704036V2 CIRCUIT BOARD W/BOX V2.01.20 74 X1704074 STRAIN RELIEF TYPE-1 3/8"
37 X1704037 PHLP HD SCR M4-.7 X 10 75 X1704075 WRENCH 19 X 27MM OPEN-ENDS
38 X1704038 CAP SCREW M8-1.25 X 25 76 X1704076 SET SCREW M6-1 X 12
39 X1704039 CAP SCREW M6-1 X 16 77 X1704077 TOUCH-UP PAINT, SHOP FOX WHITE
40 X1704040 MOTOR MOUNTING PLATE
Safety.labels.warn.about.machine.hazards.and.how.to.prevent.serious.personal.injury..The.owner.
of.this.machine.MUST.maintain.the.original.location.and.readability.of.all.labels.on.this.machine..
If.any.label.is.removed.or.becomes.unreadable,.REPLACE.that.label.before.allowing.machine.to.
be.operated.again..Contact.us.at.(360).734-3482.or.www.woodstockint.com.to.order.new.labels..

WARRANTY
WARRANTY
Woodstock International, Inc. warrants all Shop Fox machinery to be free of defects from workmanship
and materials for a period of two years from the date of original purchase by the original owner. This
warranty does not apply to defects due directly or indirectly to misuse, abuse, negligence or accidents,
lack of maintenance, or reimbursement of third party expenses incurred.
Woodstock International, Inc. will repair, replace, or arrange for a dealer refund, at its expense and
option, the Shop Fox machine or machine part proven to be defective for its designed and intended
use, provided that the original owner returns the product prepaid to an authorized warranty or repair
facility as designated by our Bellingham, Washington office with proof of their purchase of the product
within two years, and provides Woodstock International, Inc. reasonable opportunity to verify the
alleged defect through inspection. If it is determined there is no defect, or that the defect resulted
from causes not within the scope of Woodstock International Inc.'s warranty, then the original owner
must bear the cost of storing and returning the product.
This is Woodstock International, Inc.’s sole written warranty and any and all warranties that may be
implied by law, including any merchantability or fitness, for any particular purpose, are hereby limited
to the duration of this written warranty. We do not warrant that Shop Fox machinery complies with
the provisions of any law, acts or electrical codes. We do not reimburse for third party repairs. In no
event shall Woodstock International, Inc.’s liability under this limited warranty exceed the purchase
price paid for the product, and any legal actions brought against Woodstock International, Inc. shall be
tried in the State of Washington, County of Whatcom. We shall in no event be liable for death, injuries
to persons or property or for incidental, contingent, special or consequential damages arising from the
use of our products.
Every effort has been made to ensure that all Shop Fox machinery meets high quality and durability
standards. We are commited to continuously improving the quality of our products, and
reserve the
right to change specifications at any time
.
To register the warranty, go to
https://www.woodstockint.com/warranty, or scan the QR code below.
You will be directed to the Warranty Registration page on www.woodstockint.com. Enter all applicable
production information.
WARRANTY
WOODSTOCKINT.COM