Rev.23.11
ELECTRIC RANGE
COS-ERC305WKTD
USER MANUAL
IMPORTANT:
INSTALLER:
OWNER:
30" SLIDE-IN RANGE
READ AND SAVE THESE INSTRUCTIONS.
FOR RESIDENTIAL USE ONLY.
PLEASE LEAVE THESE INSTRUCTIONS WITH THIS UNIT FOR
THE OWNER.
PLEASE RETAIN THESE INSTRUCTIONS FOR FUTURE
REFERENCE.

2
THANK YOU FOR YOUR PURCHASE
Thank you for your purchase. We know that you have many brands and
products to choose from and we are honored to know that you have decided
to take one of our products into your home and hope that you enjoy it.
COSMO Appliances are designed according to the strictest safety and
performance standard for the North American market. We follow the most
advanced manufacturing philosophy. Each appliance leaves the factory after
thorough quality inspection and testing. Our distributors and our service
partners are ready to answer any questions you may have regarding how to
install, use and care for your products. We hope that this manual will help you
learn to use the product in the safest and most effective manner.
Before using this product, please read through this manual carefully. Keep
this user manual in a safe place for future reference. Please ensure that other
persons using this product are familiar with these instructions as well.
If you have any questions or concerns, please contact the dealer from whom you
purchased the product, or contact our Customer Support at:
1-888-784-3108
Reach us online at:
www.cosmoappliances.com

3
TABLE OF CONTENTS
RANGE SAFETY.................................................................................................... 5
Anti-tip Device ........................................................................................................... 6
Important Safety Instructions ................................................................................. 7
OVERVIEW .......................................................................................................... 12
Range Layout ............................................................................................................ 12
Control Panel ............................................................................................................ 13
FEATURES ........................................................................................................... 15
Clock ........................................................................................................................... 15
Timer ........................................................................................................................... 16
Settings ...................................................................................................................... 17
Oven Light ................................................................................................................ 20
Lock ............................................................................................................................ 20
OPERATION ........................................................................................................ 21
Cooktop ..................................................................................................................... 21
Before Using the Cooktop .................................................................................. 21
Cooking Areas ..................................................................................................... 23
Warming Zone .................................................................................................... 24
Hot Surface Indicator ........................................................................................ 24
Using the Cooktop Elements ............................................................................ 25
Using the Proper Cookware .............................................................................. 26
Oven .......................................................................................................................... 28
Before Using the Oven ...................................................................................... 28
Before Using the Oven for the First Time ....................................................... 28
Oven Vent ............................................................................................................ 29
Oven Door............................................................................................................ 29
Using Oven Racks ............................................................................................... 29
Preheating ........................................................................................................... 30
Cooking Modes .................................................................................................... 31
Pizza ...................................................................................................................... 32
Air Fry .................................................................................................................... 32
Bake ...................................................................................................................... 33

4
Broil ....................................................................................................................... 34
Convect Roast ..................................................................................................... 35
Convect Bake ...................................................................................................... 36
Proof...................................................................................................................... 37
Keep Warm .......................................................................................................... 37
Cook Time ............................................................................................................ 38
Delay ..................................................................................................................... 39
Using the Sabbath Mode ................................................................................... 41
Tips and Techniques .......................................................................................... 43
RANGE CARE AND MAINTENANCE .................................................................. 50
Manual Cleaning .................................................................................................... 50
Self/Steam Clean .................................................................................................... 55
Steam Clean ........................................................................................................ 55
Self Clean ............................................................................................................. 57
TROUBLESHOOTING ......................................................................................... 59
Cooktop Problems ................................................................................................... 59
Oven Problems ......................................................................................................... 61
LIMITED WARRANTY ........................................................................................ 64
5
RANGE SAFETY
READ ALL INSTRUCTIONS BEFORE USING THE APPLIANCE
Your safety and the safety of others are very important.
We have provided many important safety messages in this manual and on
your appliance. Always read and obey all safety messages.
This is the safety alert symbol.
This symbol alerts you to potential hazards
that can kill or hurt you and others.
All safety messages will follow the safety alert
symbol and either the word "WARNING" or
"CAUTION." These words mean:
You can be killed or seriously injured if you
don't follow instructions.
A potentially hazardous situation which, if not
avoided, could result in minor or moderate
injury.
All safety messages will tell you what the potential hazard is, tell you how
to reduce the chance of injury, and tell you what can happen if the
instructions are not followed.
WARNING
CAUTION
California Proposition 65 Warning
WARNING:
Cancer and Reproductive Harm - www.P65Warnings.ca.gov.
6
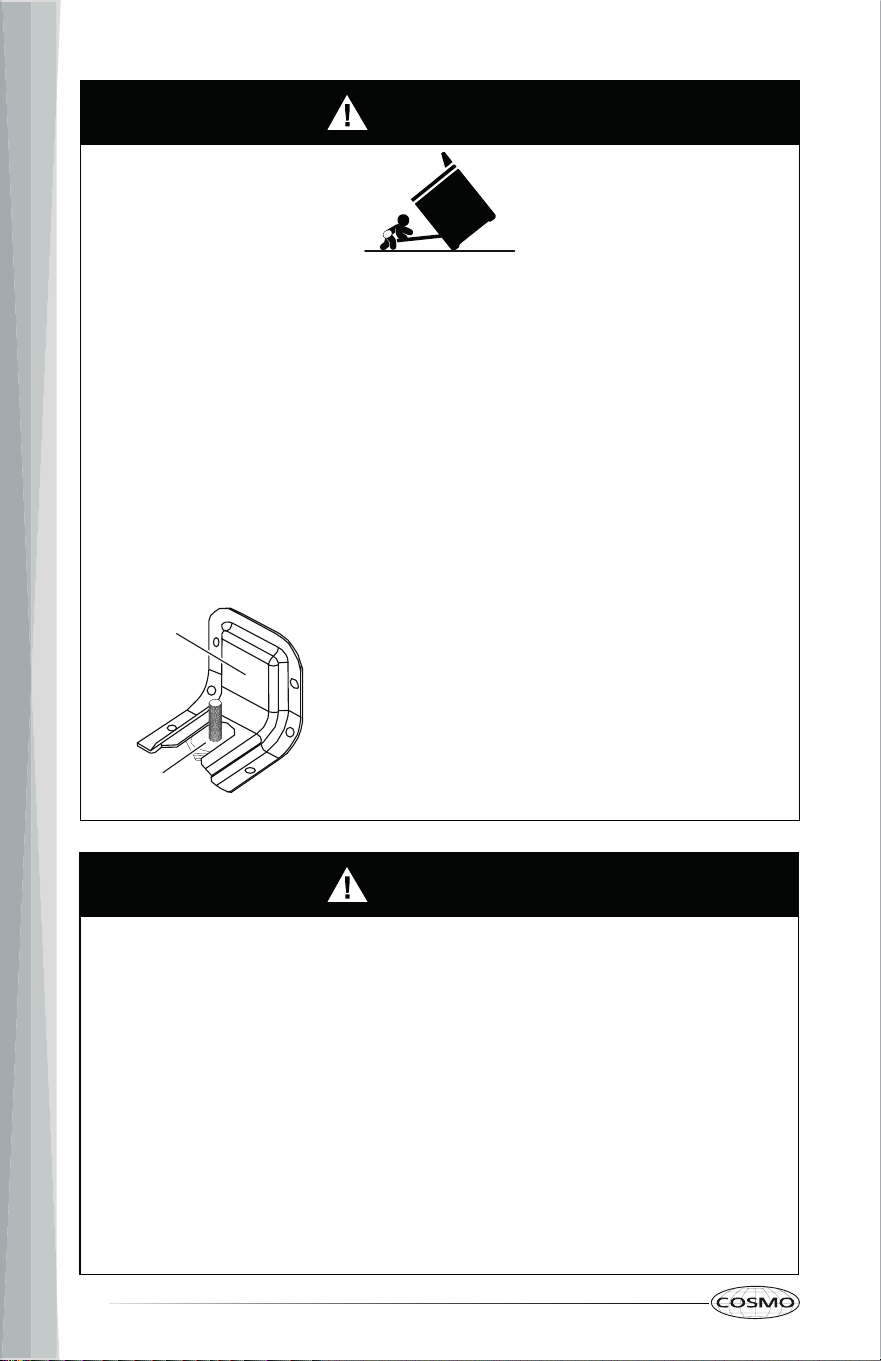
TIP OVER HAZARD
Making sure the anti-tip bracket is installed:
• Slide range forward.
• Look for the anti-tip bracket securely attached
to floor and wall.
• Slide range back so rear range foot is under
anti-tip bracket.
This appliance is intended for normal residential use. It is not approved for
commercial use, outdoor installation, or any other application not
specifically allowed by this manual.
This appliance requires connection to a 3-prong or 4-prong, 240VAC
single-phase (split-phase), 60Hz grounded electrical source. When
installed, appliance must be electrically grounded in accordance with local
codes or, in the absence of local codes, with the National Electrical Code,
NFPA 70 or the Canadian Electric Code, CSA C22.1-02.
Proper installation is the responsibility of the installer. Any adjustment and
service should be performed only by qualified range installers or service
technicians.
Product failure due to improper installation is not covered under warranty.
Anti-Tip
Bracket
Leveling
Leg
WARNING
• A child or adult can tip the range and be killed.
• Install anti-tip bracket to floor or wall per installation instructions.
• Slide range back so rear range foot is engaged in the slot of the anti-tip
bracket.
• Re-engage the anti-tip bracket if range is moved.
• Do not operate the range without anti-tip bracket installed and
engaged.
• Failure to follow these instructions can result in death or serious burns to
children and adults.
WARNING
7
IMPORTANT SAFETY
INSTRUCTIONS
WARNING: To reduce the risk of fire, electrical shock, injury to persons, or
damage when using the range, follow basic precautions, including the
following:
• WARNING: TO REDUCE THE
RISK OF TIPPING OF THE RANGE,
THE RANGE MUST BE SECURED
BY PROPERLY INSTALLED ANTI-
TIP DEVICES. TO CHECK IF THE
DEVICES ARE INSTALLED
PROPERLY, SLIDE RANGE
COMPLETELY FORWARD, LOOK
FOR ANTI-TIP BRACKET
SECURELY ATTACHED TO THE
FLOOR OR WALL, AND SLIDE
RANGE BACK SO THE REAR
RANGE FOOT IS UNDER ANTI-
TIP BRACKET.
• CAUTION: Do not store items of
interest to children in cabinets
above a range or on the back
guard of a range – children
climbing on the range to reach
items could be seriously injured.
• Do Not Leave Children Alone –
Children should not be left alone
or unattended in area where
range is in use. They should
never be allowed to sit or stand
on any part of the appliance.
• Never use your appliance for
warming or heating the room.
• Use this appliance only for its
intended purpose as described
in this manual.
• Proper Installation – The
appliance, when installed, must
be electrically grounded in
accordance with local codes, or
in the absence of local codes,
with the National Electrical
Code, ANSI/NFPA 70 or the
Canadian Electrical Code, CSA
C22.1-02. In Canada, the
appliance must be electrically
grounded in accordance with
Canadian Electrical Code. Be
sure your appliance is properly
installed and grounded by a
qualified technician.
• User Servicing – Do not repair or
replace any part of the range
unless specifically recommended
in the manual. All other servicing
should be referred to a qualified
technician.
• Before performing any service,
unplug the range or disconnect
the power supply at the
household distribution panel by
removing the fuse or switching
off the circuit breaker.
• Do Not Use Water on Grease
Fires – Smother fire or flame or
use dry chemical or foam-type
extinguisher.
READ AND SAVE THESE INSTRUCTIONS
8
IMPORTANT SAFETY
INSTRUCTIONS
• If there is a fire in the oven
during baking, smother the fire
by closing the oven door and
turning the oven off or by using
a multi-purpose dry chemical or
foam-type fire extinguisher.
• Do not use any type of foil or
liner to cover the oven bottom or
anywhere in the oven, except as
described in this manual. Oven
liners can trap heat or melt,
resulting in damage to the
product and risk of shock, smoke
or fire.
• Use Only Dry Potholders – Moist
or damp potholders on hot
surfaces may result in burns
from steam. Do not let potholder
touch hot heating elements. Do
not use a towel or other bulky
cloth.
• DO NOT TOUCH SURFACE UNITS
OR AREAS NEAR UNITS – Surface
units may be hot even though
they are dark in color. Areas
near surface units may become
hot enough to cause burns.
During and after use, do not
touch, or let clothing or other
flammable materials contact
surface units or areas near units
until they have had sufficient
time to cool. Among these areas
are the coil elements, the
cooktop, and surfaces facing the
cooktop.
• DO NOT TOUCH HEATING
ELEMENTS OR INTERIOR
SURFACES OF OVEN – Heating
elements may be hot even
though they are dark in color.
Interior surfaces of an oven
become hot enough to cause
burns. During and after use, do
not touch, or let clothing or other
flammable materials contact
heating elements or interior
surfaces of oven until they have
had sufficient time to cool. Other
surfaces of the appliance may
become hot enough to cause
burns – among these surfaces
are oven vent openings and
surfaces near these openings,
oven doors, and windows of
oven doors.
• Do Not Cook on Broken Cooktop
– If cooktop should break,
cleaning solutions and spillovers
may penetrate the broken
cooktop and create a risk of
electric shock. Contact a
qualified technician
immediately.
• Avoid scratching or impacting
glass doors, cooktops, or control
panels. The cooktop can be
scratched with items such as
knives, sharp instruments, rings
or other jewelry, and rivets on
clothing. Doing so may lead to
glass breakage.
READ AND SAVE THESE INSTRUCTIONS
9
IMPORTANT SAFETY
INSTRUCTIONS
• Never Leave Surface Units
Unattended at High Heat
Settings – Boilover causes
smoking and greasy spillovers
that may ignite.
• Do Not Heat Unopened Food
Containers – Build-up of
pressure may cause container to
burst and result in injury.
• Wear Proper Apparel – Loose-
fitting or hanging garments
should never be worn while
using the appliance.
• Use Proper Pan Size – This
appliance is equipped with one
or more surface units of different
size. Select utensils having flat
bottoms large enough to cover
the surface unit heating
element. The use of undersized
utensils will expose a portion of
the heating element to direct
contact and may result in
ignition of clothing. Proper
relationship of utensil to heating
element will also improve
efficiency.
• Glazed Cooking Utensils – Only
certain types of glass,
glass/ceramic, ceramic,
earthenware, or other glazed
utensils are suitable for range-
top service without breaking due
to the sudden change in
temperature.
• Utensil Handles Should Be
Turned Inward and Not Extend
Over Adjacent Surface Units – To
reduce the risk of burns, ignition
of flammable materials, and
spillage due to unintentional
contact with the utensil, the
handle of a utensil should be
positioned so that it is turned
inward, and does not extend
over adjacent surface units.
• If power is lost to an electric
cooktop with knob surface unit
controls while a surface unit is
ON, the surface unit will turn
back on as soon as power is
restored. In the event of power
loss, failure to turn all surface
unit knobs to the OFF position
may result in ignition of items on
or near the cooktop, leading to
serious injury or death.
• Do not place or store items that
can melt or catch fire on the
glass cooktop, even when it is
not being used. If the cooktop is
inadvertently turned on, they
may ignite. Heat from the
cooktop or oven vent after it is
turned off may cause them to
ignite also.
• Use Care When Opening Door –
Let hot air or steam escape
before removing or replacing
food.
READ AND SAVE THESE INSTRUCTIONS

10
IMPORTANT SAFETY
INSTRUCTIONS
• Never broil with door open.
Open-door broiling is not
permitted due to overheating of
control knobs.
• Care must be taken to prevent
aluminum foil and meat probes
from contacting heating
elements.
• Placement of Oven Racks –
Always place oven racks in
desired location while oven is
cool. If rack must be moved
while oven is hot, do not let
potholder contact hot heating
element in oven.
• Injuries may result from misuse
of appliance doors or drawers
such as stepping, leaning, or
sitting on the doors or drawers.
• Storage in or on Appliance –
Flammable materials should not
be stored in an oven or near
surface units.
• This appliance is not intended
for storage.
• Maintenance – Keep range area
clear and free from combustible
materials, gasoline, and other
flammable vapors and liquids.
• Do not let cooking grease or
other flammable materials
accumulate in or near the range.
Grease in the oven or on the
cooktop may ignite.
• Keep Oven Vent Ducts
Unobstructed.
• Clean Cooktop With Caution – If
a wet sponge or cloth is used to
wipe spills on a hot cooking
area, be careful to avoid steam
burn. Some cleaners can
produce noxious fumes if
applied to a hot surface.
• Use care when touching the
cooktop. The glass surface of the
cooktop will retain heat after the
controls have been turned off.
• Do Not Soak Removable
Heating Elements – Heating
elements should never be
immersed in water.
• Do Not Clean Door Gasket – The
door gasket is essential for a
good seal. Care should be taken
not to rub, damage, or move the
gasket.
• Do Not Use Oven Cleaners – No
commercial oven cleaner or
oven liner protective coating of
any kind should be used in or
around any part of the oven.
• Clean Only Parts Listed in
Manual.
• Do not use replacement parts
that have not been
recommended by the
manufacturer (e.g. parts made
at home using a 3D printer).
READ AND SAVE THESE INSTRUCTIONS
11
IMPORTANT SAFETY
INSTRUCTIONS
• Proper Disposal of Your
Appliance – Dispose of or recycle
your appliance in accordance
with Federal and Local
Regulations. Contact your local
authorities for the
environmentally safe disposal or
recycling of your appliance.
For units with ventilating hood –
• Clean Ventilating Hoods
Frequently – Grease should not
be allowed to accumulate on
hood or filter.
• When flaming foods under the
vent hood, turn the fan on.
For self-cleaning ranges –
• Before Self-Cleaning the Oven –
Remove broiler pan and other
utensils. Wipe off all excessive
spillage before initiating the
cleaning cycle.
• Wait for the oven to cool before
removing contents and cleaning
the oven.
• In the event of ignition inside the
oven during self-clean, turn off
the oven and wait for the fire to
extinguish. DO NOT FORCE THE
DOOR OPEN. Introduction of
fresh air at Self Clean
temperatures may lead to a
burst of flame from the oven.
• If the self-cleaning mode
malfunctions, keep door closed,
turn off the appliance,
disconnect the circuit at the
circuit breaker box, and contact
a qualified service provider for
repairs.
• Some birds are extremely
sensitive to the fumes produced
during a self-clean cycle. Move
birds to another well-ventilated
room.
READ AND SAVE THESE INSTRUCTIONS
12
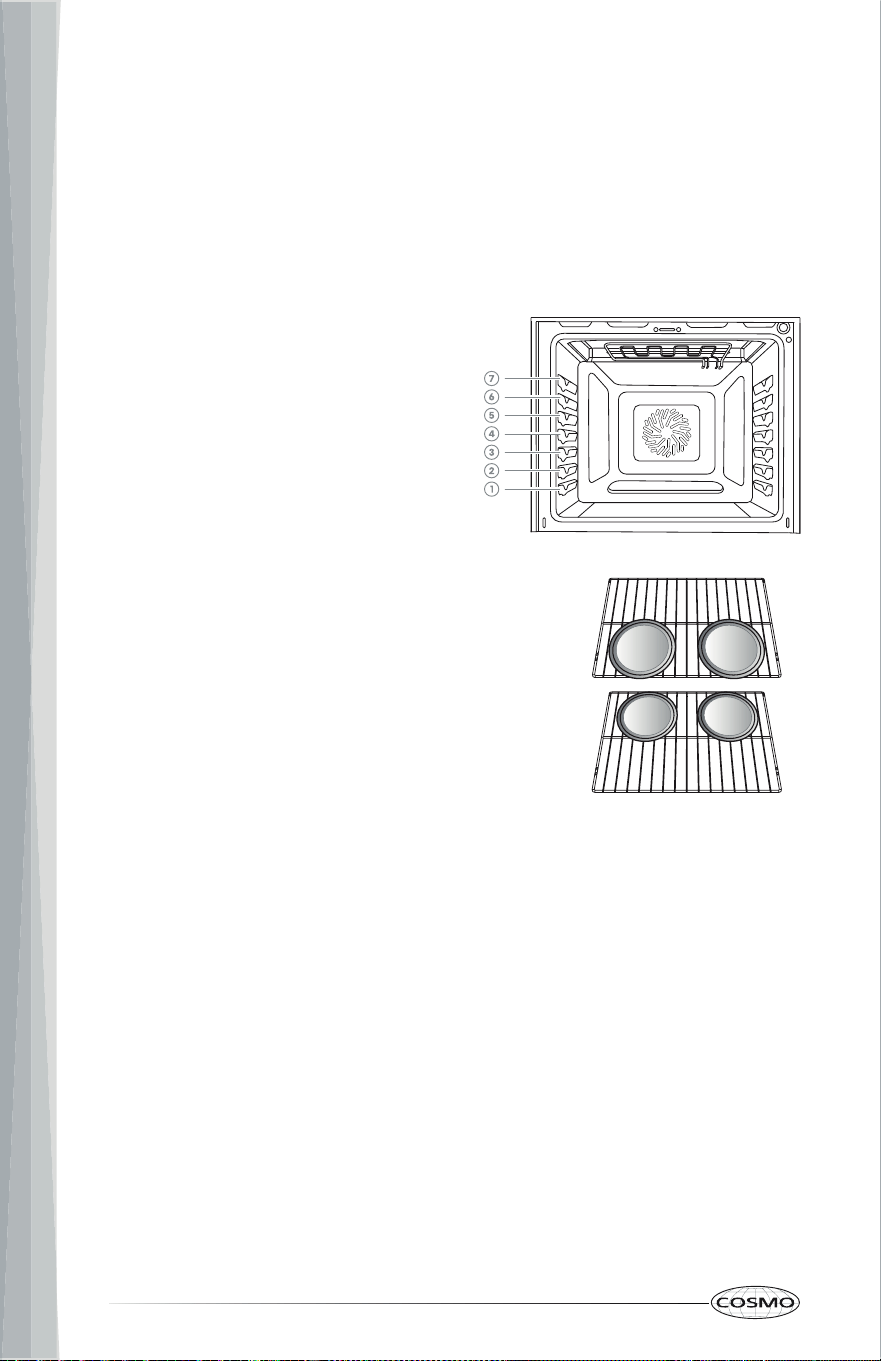
RANGE LAYOUT
The range you have purchased may have some or all of the items listed. The
locations and appearances of the features shown here may not match those
of your model.
1. Oven Vent
2. Cooktop
3. Oven Control
4. Cooktop Control
Knobs
5. Broil Heating
Element
6. Rack Positions
7. Bake Heating
Element Cover
8. Oven Door Handle
9. Cooling Vent
10. Door Lock
11. Oven Light
12. Door Gasket
13. Convection Fan
14. Door Hinge
15. Storage Drawer
16. Leveling Legs
OVERVIEW
13
WHAT'S INCLUDED
Oven racks (2)
NOTE:
• To purchase replacement parts or any other accessories, please visit
www.cosmoappliances.com or reference the contact information at
the end of this manual.
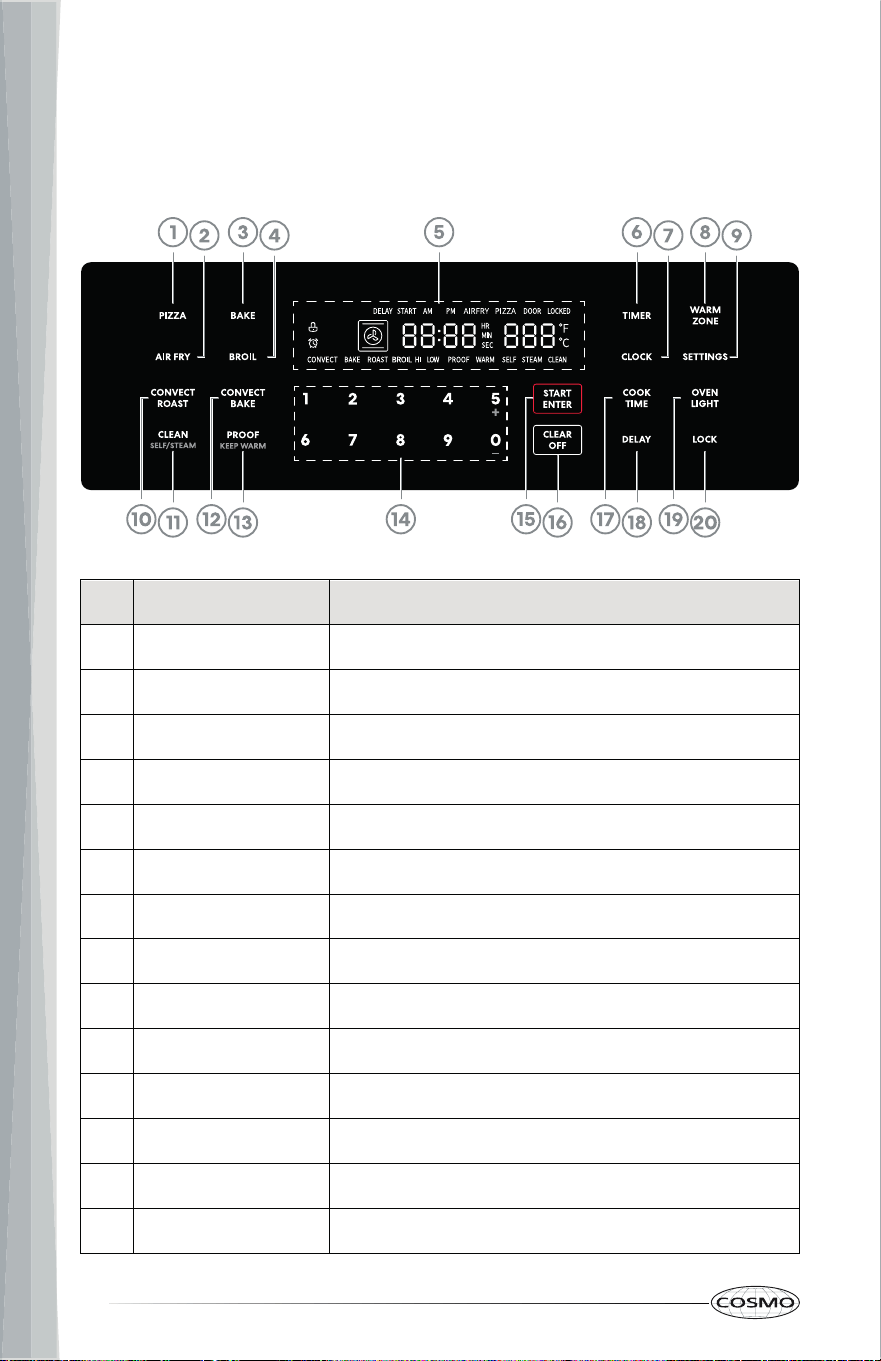
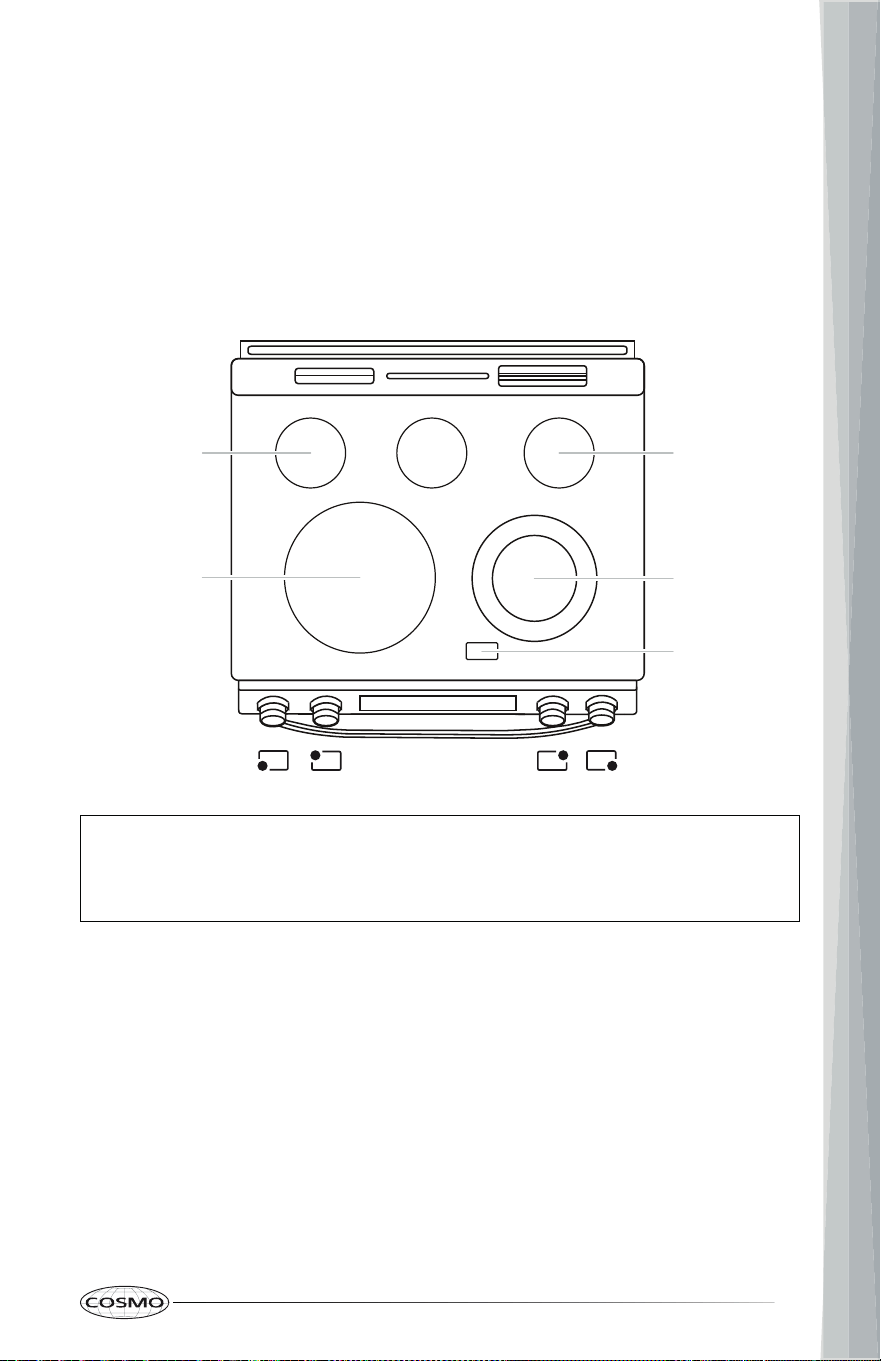
CONTROL PANEL
COOKTOP
Stronger heating elements are placed towards the front for higher
temperature or shorter duration cooking, such as boiling, searing, and pan
frying. Weaker heating elements are placed towards the rear for lower
temperature or longer duration cooking, such as simmer or melting chocolate.
Warming zone is also placed towards the rear center for keeping hot and
cooked food at serving temperature.
Warming
zone
Cooktop
control knobs
14
OVEN
Read the instructions for each feature and cooking mode in this owner's
manual carefully before using the oven.
# Name Description
1 PIZZA To select the Pizza mode.
2 AIR FRY To select the Air Fry mode.
3 BAKE To select the Bake mode.
4 BROIL To select the Broil mode.
5 Display To provide oven status.
6 TIMER To set or cancel the timer.
7 CLOCK
8 WARM ZONE To turn the warming zone on and off.
9 SETTINGS To access and adjust oven settings.
10 CONVECT ROAST To select the Convect Roast mode.
11 CLEAN To select the Self Clean / Steam Clean modes.
12 CONVECT BAKE To select the Convect Bake mode.
13 PROOF To select the Proof / Keep Warm modes.
14 Number Pads To enter temperature and all times.
To set or adjust the clock.
15
# Name Description
15 START/ENTER To start all oven functions or accept input.
16 CLEAR/OFF To stop oven operations or clear input.
17 COOK TIME To set the length of the cooking time.
18 DELAY To set delay start time of the cooking.
19 OVEN LIGHT To turn the oven lights on and off.
20 LOCK
FEATURES
CLOCK
IMPORTANT: The 12-hour clock must be set to the correct time of day for the
automatic oven timing functions to work properly. The time of day cannot be
changed during a timed cooking, timer cycle, or Self/Steam Clean cycle.
Setting the Clock
1. Press CLOCK, the time in the display will begin to flash.
2. Press the numbers to enter the correct time of day. For example, to set
12:34, press the numbers 1, 2, 3, and 4.
3. Press CLOCK to toggle and select AM or PM.
4. Press START/ENTER to confirm the time entered.
NOTE:
To deactivate and activate oven control.
• In the event of a power failure, the clock time set will be lost. When the
power returns, "12:00" will flash in the display and clock must be set
again.
16
TIMER
The Timer will beep when the set time has run out, and can be used during
any of the other oven control functions. It does not start or stop cooking.
Setting the Timer (Up to 12 Hours)
1. Press TIMER once. "00:00" will show in the display.
2. Press the numbers to enter the length of time. For example, to set a 30-
minute timer, press the numbers 3 and 0.
NOTE:
3. Press START/ENTER to start the timer.
NOTE:
• The set time counting down is shown in the display.
• For remaining time less than an hour, the display shows MM:SS
(minutes : seconds); for remaining time over an hour, the display
shows HH:MM (hours : minutes).
4. Press TIMER to cancel the current timer at any time. When the set time
has run out and the remaining time "00:00" shows in the display, the
alarm rings until any key is pressed.
NOTE:
• Pressing CLEAR/OFF will not cancel the current timer, but will
cancel any oven cooking modes in progress.
• If no numbers are entered, the timer returns to the time of day.
17
SETTINGS
The oven has a variety of settings which can be accessed and adjusted using
the SETTINGS button. These settings can only be adjusted or activated while
no oven operation is in progress. They remain in the control's memory after a
power failure or until changed.
Settings Description Default
VOL Volume
• Adjust the tone volume.
2 (MAX)
DISP Display Brightness
• Adjust the brightness of the display.
3 (MAX)
HOLD Keep Warm When Done Mode
• Turn Keep Warm When Done on or off to
automatically turn on "Keep Warm" or turn off
oven at the end of a timed cook.
Off
SABB Sabbath Mode
• Turn Sabbath mode on or off.
Off
DEG Temperature Scale
• Switch the temperature scale between
Fahrenheit and Celsius.
°F
CAL Oven Temperature Calibration
• Adjust the oven offset temperature.
00°F
SALE Demo Mode
• Turn Demo mode on or off.
Off
SETTING TONE VOLUME
1. Press SETTINGS.
2. Press START/ENTER to enter "VOL" setting.
3. Press + or – to toggle and select 0, 1, or 2 (MAX), and press START/ENTER.
4. Press CLEAR/OFF or SETTINGS to exit oven settings.

18
SETTING DISPLAY BRIGHTNESS
1. Press SETTINGS.
2. Press + or – repeatedly to select "DISP", and press START/ENTER.
3. Press + or – to toggle and select 1, 2, or 3 (MAX), and press START/ENTER.
4. Press CLEAR/OFF or SETTINGS to exit oven settings.
TURNING ON/OFF KEEP WARM WHEN DONE MODE
Keep Warm When Done mode turns on "Keep Warm" automatically to
maintain oven temperature of 150°F at the end of a timed cook to keep food
warm. This feature only works with cooking modes mentioned in "Cook Time"
section.
1. Press SETTINGS.
2. Press + or – repeatedly to select "HOLD", and press START/ENTER.
3. Press + or – to toggle and select On or Off, and press START/ENTER.
• On: Turn on "Keep Warm" at the end of a timed cooking.
• Off: Turn off oven at the end of a timed cooking.
4. Press CLEAR/OFF or SETTINGS to exit oven settings.
TURNING ON/OFF SABBATH MODE
Sabbath mode is designed for those whose religious observances require
disabling certain oven features. By turning on Sabbath Mode, the oven will
conform to Star-K Jewish Sabbath requirements.
To Turn On/Off Sabbath Mode:
1. Press SETTINGS.
2. Press + or – repeatedly to select "SABB", and press START/ENTER.
3. Press + or – to toggle and select On or Off, and press START/ENTER. A
single bracket "]" will appear in the display indicating that the Sabbath
mode is active.
4. Press CLEAR/OFF or SETTINGS to exit oven settings.

19
SETTING TEMPERATURE SCALE
1. Press SETTINGS.
2. Press + or – repeatedly to select "DEG", and press START/ENTER.
3. Press + or – to toggle and select F or C, and press START/ENTER.
• F: Fahrenheit
• C: Celsius
4. Press CLEAR/OFF or SETTINGS to exit oven settings.
SETTING TEMPERATURE CALIBRATION
This oven may cook differently than the one it replaced. Use the oven for a
few weeks to become more familiar with it before adjusting the thermostat
settings. Do not use thermometers, such as those found in grocery stores, to
check the temperature setting of your oven. These thermometers may vary
20–40 degrees.
1. Press SETTINGS.
2. Press + or – repeatedly to select "CAL", and press START/ENTER.
3. Press + or – to toggle and select between -25°F and 25°F, and press
START/ENTER.
4. Press CLEAR/OFF or SETTINGS to exit oven settings.
TURNING ON/OFF DEMO MODE
Demo Mode allows user to explore various features and options on the oven
user interface without turning on all the functionality (i.e. turning on the
heating elements).
1. Press SETTINGS.
2. Press + or – repeatedly to select "SALE", and press START/ENTER.
3. Press + or – to toggle and select On or Off, and press START/ENTER.
4. Press CLEAR/OFF or SETTINGS to exit oven settings.

20
OVEN LIGHT
The oven lights automatically turn on when the door is opened and turn off
when the door is closed.
• Press OVEN LIGHT to manually turn the oven lights on or off.
NOTE:
• The oven lights cannot be turned on if the Self Clean feature is active.
LOCK
The Lock feature locks most oven controls to avoid unintended use of the
oven.
• Press and hold LOCK for 3 seconds to activate or deactivate the oven
controls.
21
OPERATION
COOKTOP
BEFORE USING THE COOKTOP
Read all instructions before using.
• Do not cook on a broken cooktop. If the cooktop is broken, cleaning
solutions and spillovers may penetrate the broken cooktop and create a
risk of electric shock. Contact a qualified technician immediately.
• Do not place or store items that can melt or catch fire on the glass
cooktop, even when it is not being used.
• Never leave surface units unattended at high heat settings. Boilovers
cause smoking and greasy spills that may catch on fire.
• Keep flammable items away from the cooktop.
• Turn off all controls when done cooking.
• Turn cookware handles inward and not extend over adjacent surface
units to reduce the risk of burns, ignition of flammable materials, and
spillage due to unintentional contact with the cookware.
• Always place the pan in the center of the surface unit you are cooking
on. Proper contact of cookware to heating element also will improve
efficiency.
• Clean cooktop with caution. If a wet sponge or cloth is used to wipe
spills on a hot cooking area, be careful to avoid steam burn. Some
cleaners can produce noxious fumes if applied to a hot surface.
WARNING
22
• Never cook directly on the glass. Always use cookware.
• Do not use the glass cooktop surface as a cutting board.
• Do not slide metal or glass across the cooktop surface. Cookware with
rough or uneven bottoms can mark or scratch the cooktop surface.
• Do not place sealed containers on the cooktop.
• Do not place aluminum foil or plastic items such as salt and pepper
shakers, spoon holders, or plastic wrappings or any other material on
the range when it is in use.
• Do not turn surface units on before placing cookware.
• Always turn the surface units off before removing cookware.
• The surface element may appear to have cooled after it has been
turned off. The element may still be hot and touching the element
before it has cooled sufficiently can cause burns.
• Only certain types of glass, glass-ceramic, ceramic, earthenware, or
other glazed cookware are suitable for range-top service without
breaking due to the sudden change in temperature.
• Choose proper heating element size. For smaller pots and pans, use the
smaller heating elements. For larger pots and pans, use the larger
heating elements. Select pans that have flat bottoms large enough to
cover the heating elements. Using undersized pans exposes a portion of
the heating element to direct contact and may result in clothing
burning.
• Immediately clean spills on the cooking area to prevent a tough
cleaning chore later.
• Do not use a steel-wool pad or scrub pad or abrasive cleaning pads.
They can scratch the surface.
CAUTION
23
COOKING AREAS
The cooking areas on your range are identified by permanent circles on the
glass cooktop surface.
For the most efficient cooking, fit the pan size to the element size. Pans should
not extend more than 1/2" to 1" beyond the cooking area.
When a control is turned on, a glow can be seen through the glass cooktop
surface.
NOTE:
• It is normal for the cooktop elements to cycle on and off during
cooking, even on higher settings.
Warming
zone
Hot surface
indicator
Dual
element
Single
element
Single
element
(high power)
Single
element
24
WARMING ZONE
FOOD POISON HAZARD
Bacteria may grow in food at temperatures below 140°F.
• Always start with hot food. Do not use the warming zone to heat cold
food.
• Do not use the warming zone for more than 2 hours.
The warming zone, located in the back center of the glass surface, will keep
hot, cooked food at serving temperature. Use the warming zone to keep food
warm after it has already been cooked.
Attempting to cook uncooked or cold food on the warming zone could result
in a food-borne illness.
NOTE:
• For best results, all foods on the warming zone should be covered with
a lid or aluminum foil. When warming pastries or breads, the cover
should be vented to allow moisture to escape.
• The warmer will not glow red like the other cooking elements.
HOT SURFACE INDICATOR
The hot surface indicator light glows and indicates that one or more cooktop
elements are still hot. When the hot surface indicator turns off, the glass
surface may still feel slightly hot to touch.
NOTE:
• The hot surface indicator light remains on after the element is turned
off and until the surface has cooled to approximately 150°F.
• The hot surface indicator may illuminate when the cooktop heats up
during self-clean or long baking cycle. This is normal.
WARNING
25
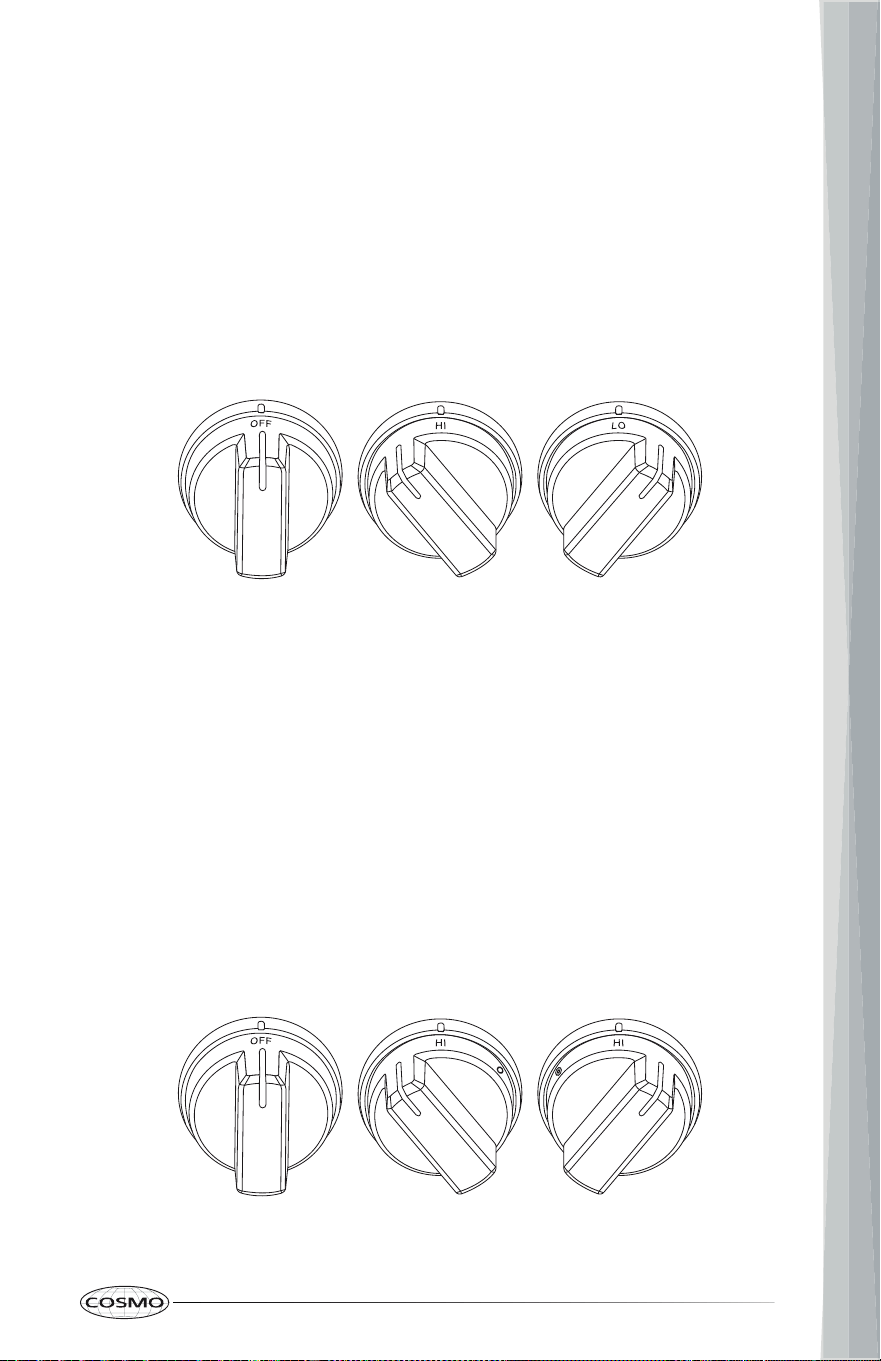
USING THE COOKTOP ELEMENTS
Turning on a Single Element
1. Select a single element, and find its control knob.
2. Push the control knob in and turn it in either direction to the desired
setting.
3. To turn off an element, turn the control knob to the OFF position.
OFF position HI position LO position
Turning on the Dual Element
1. Select the dual element, and find its control knob.
2. Push the control knob in and turn it to use it as a single element or a dual
element.
• Single: Turn the knob counterclockwise.
• Dual: Turn the knob clockwise.
3. To turn off an element, turn the control knob to the OFF position.
OFF position
Single element
HI position
Dual element
HI position
OFF position
Single element Dual element

26
Turning on the Warming Zone
1. Press WARM ZONE on the oven control panel to turn on warming zone.
"WARMING ZONE" will be shown in the display.
2. Press WARM ZONE again to turn off warming zone.
In Case of Power Failure
The electric cooktop and oven cannot be used during a power outage.
If power is lost while a cooktop element is ON, the cooktop element will turn
back on as soon as power is restored.
In the event of power loss, failure to turn all cooktop element knobs to the OFF
position may result in ignition of items on or near the cooktop, leading to
serious injury or death.
USING THE PROPER COOKWARE
The size and type of cookware will influence the settings needed for the best
cooking results. Cookware should have flat bottoms that make good contact
with the entire surface heating element.
Cookware Recommendations
• Flat bottom and straight sides
• Heavy-gauge pans
• Pan sizes that match the amount of food to be prepared and the size of
the surface element
• Weight of handle does not tilt pan. Pan is well balanced
• Tight-fitting lids
• Flat bottom woks
NOTE:
• Do not use woks that have support rings. This type of wok will not heat
on glass surface elements.
• Do not use foil or foil-type containers. Foil may melt onto the glass. Do
not use the cooktop if metal has melted on it.

27
Choosing Cookware
The cookware material determines how evenly and quickly heat is transferred
from the surface element to the pan bottom.
Recommended
• Aluminum - Excellent heat conductor. Some types of food will cause
it to darken (anodized aluminum cookware resists staining and
pitting). If aluminum pans slide across the ceramic cooktop, they may
leave metal marks which will resemble scratches. Remove these
marks immediately. Because of its low melting point, thin weight
aluminum should not be used.
• Copper - Excellent heat conductor but discolors easily. May leave
metal marks on glass-ceramic (see Aluminum above). Do not let
these pots boil dry. Overheated metal can bond to glass cooktops.
An overheated copper bottom pot will leave a residue that will
permanently stain the cooktop if not removed immediately.
• Stainless Steel - Slow heat conductor with uneven cooking results. Is
durable, easy to clean and resists staining.
• Enamel (painted) on Cast Iron - Bottom of pan must be smooth
coated and smooth.
Not Recommended
• Enamel (painted) on Steel - Heating empty pans can cause
permanent damage to cooktop glass. The enamel can melt and
bond to the ceramic cooktop.
• Cast iron - A poor heat conductor, slow to absorb heat but retains
heat very well. Will scratch the glass surface. Not recommended
unless designed specifically for use on ceramic cooktops.
• Glass-ceramic - Slow heat conductor. Poor performance, and will
scratch the glass surface.
• Stoneware - Poor performance, and may scratch the glass surface.
28
OVEN
BEFORE USING THE OVEN
Read all instructions before using.
• Do not use any type of foil or oven liner to cover the oven bottom. These
items can trap heat or melt, resulting in damage to the product and risk
of shock, smoke or fire. Damage from improper use of these items is not
covered by the product warranty.
• Foil may be used to catch spills by placing a sheet on a lower rack,
several inches below the food. Do not use more foil than necessary and
never entirely cover an oven rack with aluminum foil. Keep foil at least
1-1/2" (3.8 cm) from oven walls to prevent poor heat circulation.
• Do not block, touch or place items around the oven vent during
cooking. Your oven is vented through ducts at the center above the rear
cooktop. Do not block the oven vent when cooking to allow for proper
air flow.
• The oven and broiler cannot be used during a power outage. If the
oven is in use when a power failure occurs, the oven heating element
shuts off and cannot be used until power is restored. Once power is
restored, you will need to reset the oven (or Broil mode).
• As the oven heats up, the heated air in the oven may cause
condensation to appear on the oven door glass. These water drops are
harmless and will evaporate as the oven continues to heat up.
NOTE:
• Because the oven temperature cycles, an oven thermometer placed in
the oven cavity may not show the same set temperature on the oven.
BEFORE USING THE OVEN FOR THE FIRST TIME
Start the oven in Bake mode at the highest available temperature setting.
Allow oven to run for 1 hour to remove any dust or impurities. There will be a
distinctive odor - this is normal. Ensure your kitchen is well ventilated during
this conditioning period.
CAUTION
29
OVEN VENT
Areas near the vent may become hot during operation and may cause burns.
Avoid placing plastics near the vent as heat may distort or melt the plastic.
Do not block the vents (air openings) of the range. They provide the air inlet
and outlet that are necessary for the range to keep cool and operate properly
with correct combustion.
It is normal for steam to be visible when cooking foods with high moisture
content.
OVEN DOOR
Oven heating elements and, if in operation, convection fan will temporarily
shut off any time door is opened, and will resume when door is closed within 5
minutes.
NOTE:
• Do not leave the door open any longer than necessary. If the door is
left open too long for over 5 minutes, the cooking mode will be
automatically cancelled.
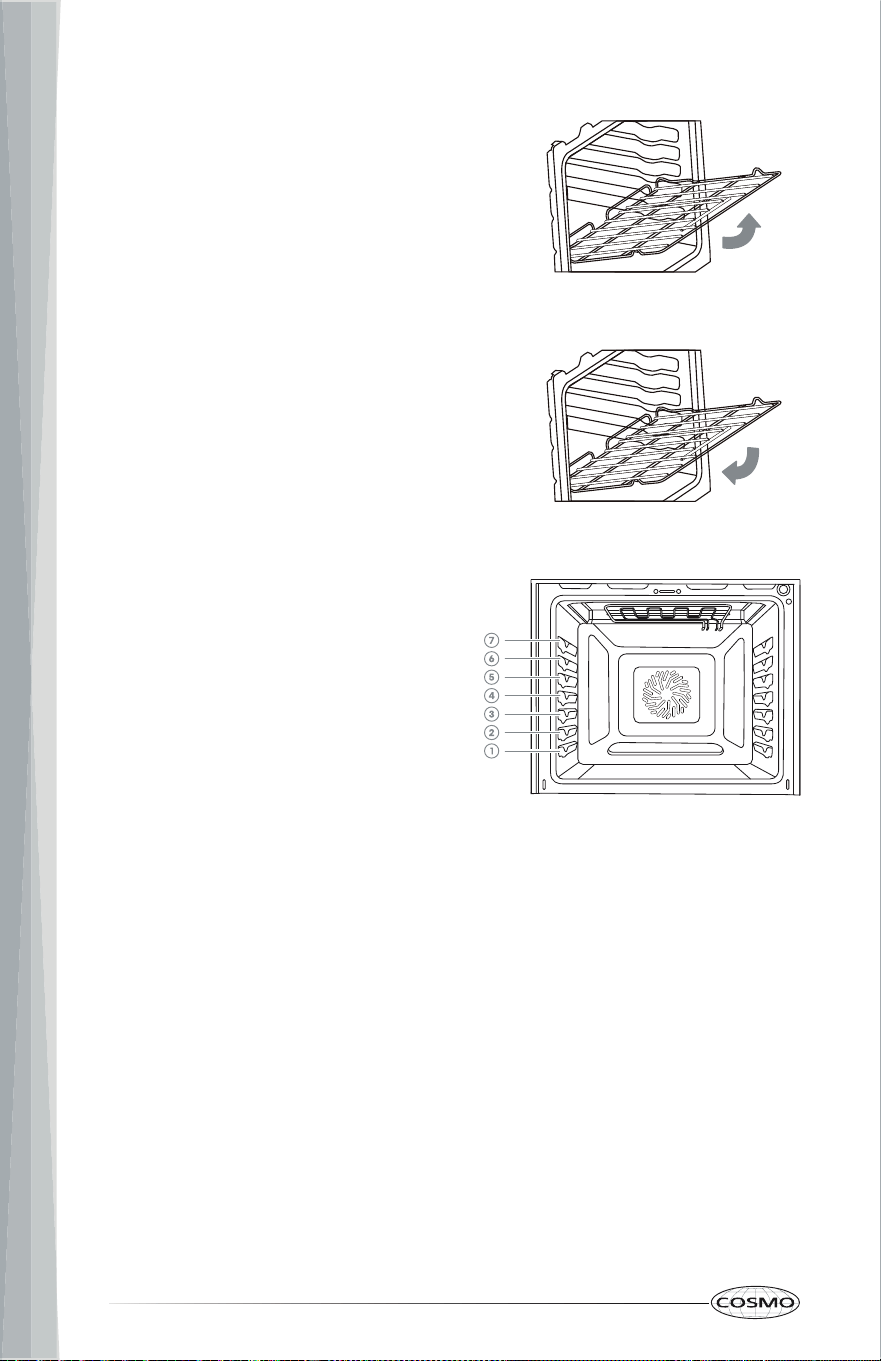
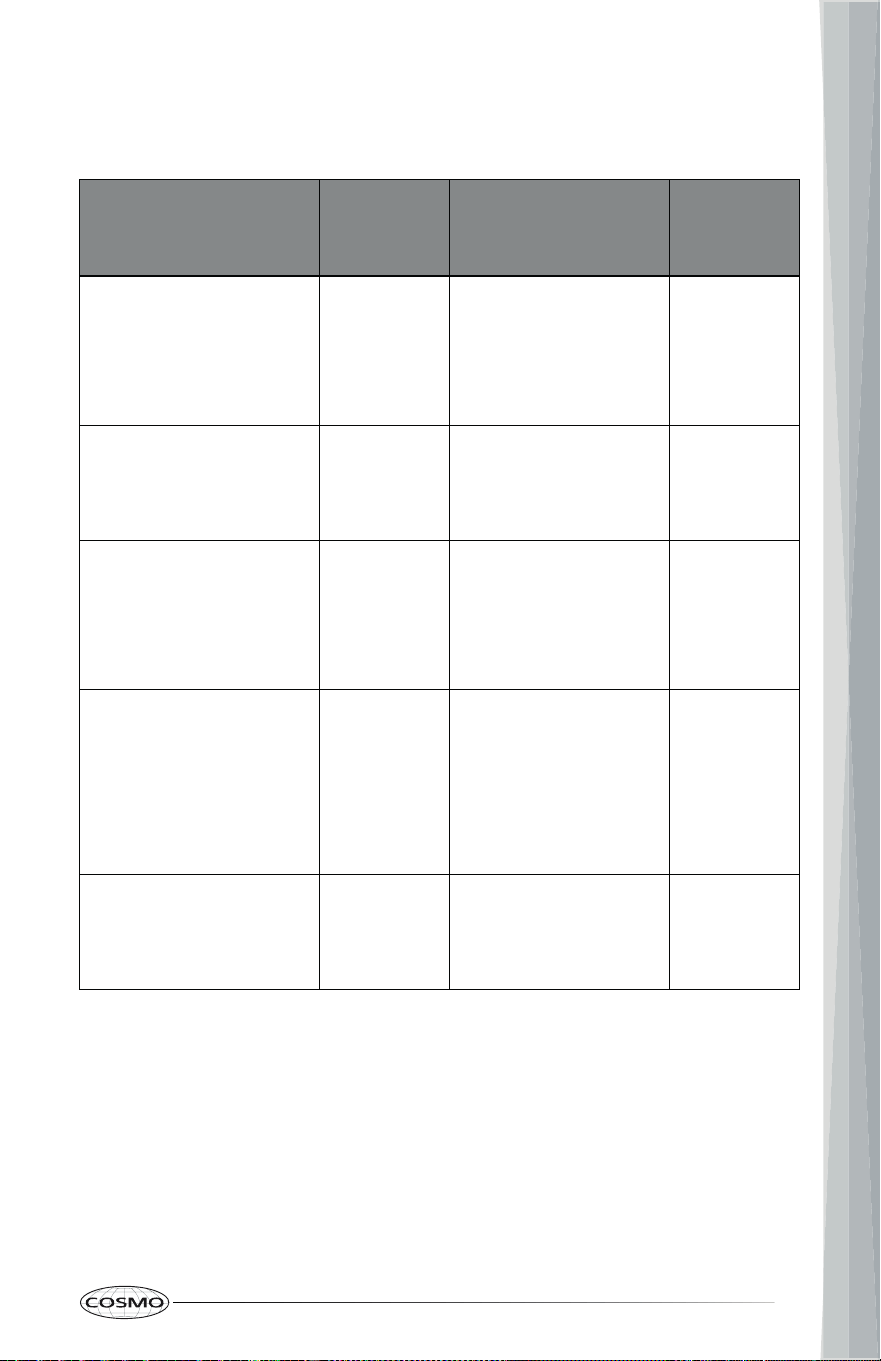
USING OVEN RACKS
The racks have a turned-up back edge that prevents them from being pulled
out of the oven cavity.
• Replace oven racks before turning the oven on to prevent burns.
• Do not cover the racks with aluminum foil, or any other material, or
place anything on the bottom of the oven. Doing so will result in poor
baking and may damage the oven bottom.
• Only arrange oven racks when the oven is cool.
CAUTION
30
Removing Racks
1. Pull the rack straight out until it
stops.
2. Lift up the front of the rack and
pull it out.
Replacing Racks
1. Place the end of the rack on the
support.
2. Tilt the front end up and push the
rack in.
Rack Positions
For best cooking results, adjust rack so
food is placed at the center of the
oven. For most foods this will be rack
position #4. For larger foods like roasts
and turkey, move the rack position
down to #3 or #2 to keep the food
centered in the oven.
When using multiple racks
simultaneously, try to space the food
out around the oven center (rack
position #3 and #5 for two racks).
Broiling performs best with the food
close to the broil heating element -
typically rack position #6 or #7.
PREHEATING
Preheating is generally desirable, although not absolutely necessary in all
circumstances. For oven modes that utilizes preheat, the control will
automatically enter preheat mode after "START/ENTER" is pressed. The
display will show the current oven temperature, and will continue to show the
oven temperature increasing until the set temperature is reached. Once the
set temperature is reached, a tone will sound to alert the user that preheat is
complete.
31
Some foods are more robust and may have acceptable results without
preheating. These foods include large pieces of meat (whole roasts, hams, or
poultry) where the total cooking time is much longer than the time required to
preheat. These foods also include frozen potato products and frozen
processed dinners that, by their nature and design, are more robust to baking
variations. More delicate foods, such breads (including cakes, cookies,
pastries, and pizzas), desserts, soufflés, etc. will likely not have acceptable
results without proper preheating.
NOTE:
• It is normal for the convection fan to operate during preheating of
various baking modes.
COOKING MODES
The various baking modes have a 12-hour time limit, after which the control
will automatically end the baking mode. Broil modes have a 1-hour time limit.
If desired, these modes can be restarted after the time limit expires.
Mode
Temperature
Minimum Maximum Default/Target
PIZZA 170°F (78°C) 550°F (285°C) 400°F (205°C)
AIR FRY 170°F (78°C) 550°F (285°C) 400°F (205°C)
BAKE 170°F (78°C) 550°F (285°C) 350°F (175°C)
BROIL (HI) - - 590°F (310°C)
BROIL (LO) - - 550°F (288°C)
CONVECT ROAST 170°F (78°C) 550°F (285°C) 350°F (175°C)
CONVECT BAKE 170°F (78°C) 550°F (285°C) 350°F (175°C)
PROOF - - ~86°F (~30°C)
KEEP WARM - - 150°F (65°C)

32
PIZZA
The Pizza mode uses heat from the upper and lower heating elements and
adopts customized heating algorithm to optimize baking performance for
pizza, which is also ideal for pastries and cakes with wet covering and little
sugar and damp desserts in moulds, or dishes requiring more heat in the
lower area. Always preheat the oven first and place food near the middle
racks.
Setting the Pizza Mode
1. Press PIZZA. The default set temperature 400°F is shown in the display.
2. (Optional) Enter desired temperature with the number pads.
3. Press START/ENTER. The oven turns on and starts preheating. As the oven
preheats, the oven temperature is displayed. Once the oven reaches the
set temperature, a tone sounds.
4. Place the food in the oven after preheating.
5. Press CLEAR/OFF when cooking is finished, and remove the food from the
oven.
AIR FRY
The Air Fry mode uses heat from the upper and lower heating elements and
air movement from the fans to circulate hot air inside the oven. This mode is
specially designed for oil-free frying, and to produce foods with a crispier
exterior than traditional oven cooking. The Air Fry mode is intended for single
rack cooking only. Always preheat the oven first and place food centrally near
the middle racks. Use pans with low sides or no sides for better air flow over
foods.
Setting the Air Fry Mode (Example: Set Air Fry at 375°F.)
1. Press AIR FRY. The default air fry temperature 400°F is shown in the
display.
2. Set the air fry temperature. (Press 3, 7, and 5.)
3. Press START/ENTER. The oven turns on and starts preheating. As the oven
preheats, the oven temperature is displayed. Once the oven reaches the
set temperature, a tone sounds.
4. Place the food in the oven after preheating.
5. Press CLEAR/OFF when cooking is finished, and remove the food from the
oven.
33
BAKE
The Bake mode uses heat from the lower heating element primarily and the
upper heating element to achieve exceptional baking performance. This
mode works best with food placed on a single rack. When using this mode to
prepare baked goods such as cakes, cookies and pastries, always preheat the
oven first and place food centrally near the middle racks.
Setting the Bake Mode (Example: Set Bake at 375°F.)
1. Press BAKE. The default bake temperature 350°F is shown in the display.
2. Set the bake temperature. (Press 3, 7, and 5.)
3. Press START/ENTER. The oven turns on and starts preheating. As the oven
preheats, the oven temperature is displayed. Once the oven reaches the
set temperature, a tone sounds.
4. Place the food in the oven after preheating.
5. Press CLEAR/OFF when cooking is finished, and remove the food from the
oven.
NOTE:
• Baking time and temperature will vary depending on the
characteristics, size, and shape of the baking pan used.
• Check for food doneness at the minimum recipe time.
• Use metal bakeware (with or without a nonstick finish), heatproof
glass-ceramic, ceramic or other bakeware recommended for oven use.
• Dark metal pans or nonstick coatings will cook food faster with more
browning. Insulated bakeware will slightly lengthen the cooking time
for most foods.

34
BROIL
The Broil mode uses intense heat from the upper heating element to sear
foods. This mode works best for tender cuts of meat, fish, and thinly cut
vegetables, and is ideal for toasting, melting cheese, browning and searing
surface. Food should be placed near the upper racks, and should not be
cooked for too long on each side of the food. It is not necessary to preheat
when using this mode.
Setting the Broil Mode
1. Press BROIL. The default broil setting is High Broil.
• High Broil temperature: 590°F (310°C)
• Low Broil temperature: 550°F (288°C)
2. (Optional) Press BROIL again to select Low Broil if desired.
3. Press START/ENTER. The oven turns on and starts preheating.
4. Allow the oven preheat for approximately 5 minutes before placing the
food in the oven.
5. Press CLEAR/OFF when cooking is finished, and remove the food from the
oven.
NOTE:
• The range is designed for closed-door broiling. Broil mode will not
operate with the oven door open.
• Opening the door turns off the broil heating element during broiling. If
the door is left open, an alert will sound. If the door is not closed, the
Broil mode will ultimately cancel itself.
• The broil heating element is very powerful. Follow recipe directions and
monitor food closely to reduce risk of burning food.
• Always use a broiler pan and grid for excess fat and grease drainage.
This will help to reduce splatter, smoke, and flare-ups.
• Do not use a broiler pan without a grid. Oil can cause a grease fire.
• Do not cover the grid and broiler pan with aluminum foil. Doing so will
cause a fire.
35
CONVECT ROAST
The Convection Roast mode uses heat from both upper and lower elements
and hot air movement from the convection fan to enhance cooking efficiency
and evenness across multiple racks. Ideal for roasting meats and poultry.
Heated air circulates around the food from all sides, sealing in juices and
flavors. Foods are crispy brown on the outside while staying moist on the
inside. A meat probe may be used with this feature. Roasting times may be
slightly longer for multiple racks than what would be expected for a single
rack.
Setting the Convect Roast Mode
(Example: Set Convection Roast at 375°F.)
1. Press CONVECT ROAST. The default roast temperature 350°F is shown in
the display.
2. Set the roast temperature. (Press 3, 7, and 5.)
3. Press START/ENTER. The oven turns on and starts preheating. As the oven
preheats, the oven temperature is displayed. Once the oven reaches the
set temperature, a tone sounds.
4. Place the food in the oven after preheating.
5. Press CLEAR/OFF when cooking is finished, and remove the food from the
oven.
NOTE:
• The oven fan runs while convection roasting.
• Always use a broiler pan and grid for excess fat and grease drainage.
This will help to reduce splatter, smoke, and flare-ups.
• Do not use a broiler pan without a grid. Oil can cause a grease fire.
• Do not cover the grid and broiler pan with aluminum foil. Doing so will
cause a fire.
36
CONVECT BAKE
The Convection Bake mode uses heat from the lower heating element
primarily and the upper heating element and hot air movement from the
convection fan to enhance cooking efficiency and evenness across multiple
racks. Always preheat the oven first. Baking times may be slightly longer for
multiple racks than what would be expected for a single rack.
Setting the Convect Bake Mode
(Example: Set Convection Bake at 375°F.)
1. Press CONVECT BAKE. The default convection bake temperature 350°F is
shown in the display.
2. Set the bake temperature. (Press 3, 7, and 5.)
3. Press START/ENTER. The oven turns on and starts preheating. As the oven
preheats, the oven temperature is displayed. Once the oven reaches the
set temperature, a tone sounds.
4. Place the food in the oven after preheating.
5. Press CLEAR/OFF when cooking is finished, and remove the food from the
oven.
NOTE:
• The oven fan runs while convection baking.
• Use Convection Bake for faster and more even multiple-rack cooking
of pastries, cookies, muffins, biscuits, and breads of all kinds.
• Place the oven racks in positions suggested in the "Tips and
Techniques" section.
• Bake cookies and biscuits on pans with no sides or very low sides to
allow heated air to circulate around the food. Food baked on pans
with a dark finish will cook faster.
37
PROOF
The Proof mode uses heat from the oven lights and air movement from the
convection fan to maintain a gently warm oven temperature at around 86°F
(30°C) for rising yeast-leavened products before baking. Preheating is not
required. Place dough centrally near the middle racks, and cover dough well
to prevent drying out. Check bread products early to avoid over-proofing.
Setting the Proof Mode
1. Press PROOF once.
2. Place the food in the oven.
3. Press START/ENTER.
4. To cancel the Proof mode, press CLEAR/OFF.
NOTE:
• Proof mode will not start if the oven temperature is too warm.
• To avoid lowering the oven temperature and lengthening proofing
time, do not open the oven door unnecessarily.
• Do not use the Proof mode for warming food or keeping food hot. The
proofing oven temperature is not hot enough to keep foods at safe
temperatures. Use the Keep Warm mode to keep food warm.
KEEP WARM
The Keep Warm mode uses heat from the lower heating element primarily
and the upper heating element to maintain oven temperature at around
150°F (65°C) and keep cooked food warm for serving up to 3 hours after
cooking has finished. Cover foods that need to remain moist and do not cover
foods that should be crisp. Preheating is not required. This mode should not
be used to reheat cold food. It is also recommended that food not be kept
warm for more than 2 hours.
Setting the Keep Warm Mode
1. Press PROOF twice.
2. Place or keep the food in the oven.
3. Press START/ENTER.
4. To cancel the Keep Warm mode, press CLEAR/OFF.
38
COOK TIME
Set the oven to cook for a specific length of time up to 12 hours and the oven
turns off automatically at the end of the cooking time. This feature can only
be used with the Bake, Keep Warm, Convect Roast, Convect Bake modes, and
may be set at any point during the oven cooking cycle.
Cook Time can be set after Delay in conjunction for a delayed timed cook.
(Refer to the "Delay" section.)
NOTE:
• The clock must be set to the correct time of day for the Cook Time
feature to work properly.
• Cooking mode must be selected before you can set a cook time.
• To change the cook time during cooking, cancel the current cooking
cycle and start a new cooking with a new cook time.
Setting a Timed Cook (Example: Set Bake at 375°F for 30 minutes.)
1. Press BAKE. The default bake temperature 350°F is shown in the display.
2. Set the bake temperature. (Press 3, 7, and 5.)
3. Press START/ENTER. The oven turns on and starts preheating. As the oven
preheats, the oven temperature is displayed. Once the oven reaches the
set temperature, a tone sounds.
4. Place the food in the oven after preheating.
5. Press COOK TIME. The default countdown timer 00:00 (hh:mm) is shown
in the display.
6. Set the cooking time. (Press 3, and 0.)
7. Press START/ENTER. The countdown timer starts running, and the oven
starts or continues to cook for the set amount of time. When the
countdown timer reaches 00:00, a cook end tone sounds and the oven
turns off automatically, unless the Keep Warm When Done feature was
enabled. (Refer to "Turning On/Off Keep Warm When Done Mode" in the
"Settings" section.)
8. Press CLEAR/OFF to cancel this cooking at any time or to clear the cook
end tone when cooking is finished.
39
DELAY
Set the oven to turn on at a specific time of day within the next 12 hours. This
feature can only be used with the Bake, Keep Warm, Convect Roast, Convect
Bake, Proof, Self Clean, and Steam Clean modes.
Cook Time can be set after Delay for a delayed timed cook. The oven will turn
on at a specific time of day within the next 12 hours and cook for a specific
length of time up to 12 hours, and the oven will turn off automatically at the
end of the cooking.
NOTE:
• Cooking mode must be selected before you can set a cook time.
• The clock must be set to the correct time of day for the Delay feature to
work properly.
• When a delayed cook is set, "DELAY START" is shown in the display, and
the clock alternates between the current time of day and the time
when the oven will turn on.
• Pressing CLEAR/OFF before the start of a set delayed cook will cancel
the delayed cook.
• To change the cook time during cooking, cancel the current cooking
cycle and start a new cooking with a new cook time.
Setting a Delayed Cook
(Example: Set Bake at 375°F starting at 4:30 p.m.)
1. Press BAKE. The default bake temperature 350°F is shown in the display.
2. Set the bake temperature. (Press 3, 7, and 5.)
3. Press DELAY. The current clock flashes in the display.
WARNING
FOOD POISONING HAZARD
• Foods that can easily spoil such as milk, eggs, fish, meat or poultry,
should be chilled in the refrigerator first. Even when chilled, they should
not stand in the oven for more than 1 hour before cooking begins, and
should be removed promptly when finished cooking.
• Eating spoiled food can result in sickness from food poisoning.

40
4. Set the start time of day. (Press 0, 4, 3, and 0. Use the DELAY button to
switch between AM and PM if needed.)
5. Press START/ENTER, and place the food in the oven. "DELAY START" is
shown in the display, and the clock alternates between the current time
of day and the time when the oven will turn on.
6. At the set start time, a cook start tone sounds and the oven begins to
cook.
7. Press CLEAR/OFF when cooking is finished, and remove the food from the
oven.
Setting a Delayed Timed Cook
(Example: Set Bake at 375°F for 30 minutes starting at 4:30 p.m.)
1. Press BAKE. The default bake temperature 350°F is shown in the display.
2. Set the bake temperature. (Press 3, 7, and 5.)
3. Press DELAY. The current clock flashes in the display.
4. Set the start time of day. (Press 0, 4, 3, and 0. Use the DELAY button to
switch between AM and PM if needed.)
5. Press START/ENTER. "DELAY START" is shown in the display, and the clock
alternates between the current time of day and the time when the oven
will turn on.
6. Press COOK TIME. The default countdown timer 00:00 (hh:mm) is shown
in the display.
7. Set the cooking time. (Press 3, and 0.)
8. Press START/ENTER. At the set start time, a cook start tone sounds, the
countdown timer starts running, and the oven begins to preheat and
cook for the set amount of time. When the countdown timer reaches
00:00, a cook end tone sounds and the oven turns off automatically,
unless the Keep Warm When Done feature was enabled. (Refer to
"Turning On/Off Keep Warm When Done Mode" in the "Settings" section.)
9. Press CLEAR/OFF to cancel this cooking at any time or to clear the cook
end tone when cooking is finished.
Canceling a Delayed Cook before the Set Time
1. Press CLEAR/OFF at any time. "DELAY START" will disappear in the
display.
41
USING THE SABBATH MODE
The Sabbath mode complies with Jewish Sabbath requirements, and is
typically used on the Jewish Sabbath and Holidays. Some of these standards
that will be noticed by the consumer include the disabling of tones, disabling
of oven lights, and delays of about 30 seconds to one minute on display
changes. When the Sabbath mode is activated, the oven does not turn off
until the Sabbath mode is deactivated. Only continuous baking or timed
baking is allowed. Cooking in the Sabbath mode is a two-step process, first
the Sabbath mode must be set and then the bake mode must be set.
Sabbath Mode Control Layout
During Sabbath Mode, the function of the buttons on the oven control panel
are modified to perform the functions described in the diagram below.
To Turn On/Off Sabbath Mode:
1. Press Settings to enter oven settings.
2. Press + or – repeatedly to select SABB, and press START/ENTER.
3. Press + or – to toggle and select On or Off, and press START/ENTER. A
single bracket "]" will appear in the display indicating that the Sabbath
mode is active.
4. Press CLEAR/OFF or SETTINGS to exit oven settings.
NOTE:
• If a power outage occurs, the unit will return to Sabbath mode when
power is restored but any baking operations that may have been in
progress will not resume.
Bake 200°F Bake 250°F Bake 300°F Bake 350°F Bake 400°F
90 minutes 2 hours 3 hours 4 hours 5 hours

42
Setting a Continuous Bake in Sabbath Mode
(Example: Set Bake at 250°F.)
1. Place the food in the oven.
2. Press 2 in the number pads to select preset 250°F Bake.
3. Press START/ENTER. After a delay between 30 and 60 seconds, a second
bracket "] [" will appear in the display indicating that the oven is baking.
4. Press CLEAR/OFF when cooking is finished, and remove the food from the
oven. After a delay between 30 and 60 seconds, the display will change
back to a single bracket "]" indicating that the oven is no longer baking.
1. Place the food in the oven.
2. Press 2 in the number pads to select preset 250°F Bake.
3. Press 7 in the number pads to select preset 2 hours Cook Time.
4. Press START/ENTER. After a delay between 30 and 60 seconds, a second
bracket "] [" will appear in the display indicating that the oven is baking.
5. When the cook time expires, the display will change back to a single
bracket "]" indicating that the oven is no longer baking. No tone will
sound when the cook time is complete.
NOTE:
• Baking temperature can be changed at any time in Sabbath mode by
pressing the desired temperature preset in the 1 through 5 number
pads.
• Press CLEAR/OFF to cancel any baking in progress at any time. After a
delay between 30 and 60 seconds, the display will change back to a
single bracket "]" indicating that the oven is no longer baking.
Setting a Timed Bake in Sabbath Mode
(Example: Set Bake at 250°F for 2 hours.)

43
TIPS AND TECHNIQUES
BAKE
Baking is cooking with heated air. Both upper and lower elements in the oven
are used to heat the air but no fan is used to circulate the heat.
Follow the recipe or convenience food directions for baking temperature, time
and rack position. Baking time will vary with the temperature of ingredients
and the size, shape and finish of the baking utensil.
• For best results, bake food on a single rack with at least 1" - 1½" (2.5 - 3
cm) space between utensils and oven walls.
• Use one rack when selecting the bake mode.
• Check for doneness at the minimum time.
• Use metal bakeware (with or without a non-stick finish), heatproof glass,
glass-ceramic, pottery or other utensils suitable for the oven.
• When using heatproof glass, reduce temperature by 25°F (15°C) from
recommended temperature.
• Use baking sheets with or without sides or jelly roll pans.
• Dark metal pans or nonstick coatings will cook faster with more browning.
Insulated bakeware will slightly lengthen the cooking time for most foods.
• Do not use aluminum foil or disposable aluminum trays to line any part of
the oven. Foil is an excellent heat insulator and heat will be trapped
beneath it. This will alter the cooking performance and can damage the
finish of the oven.
• Avoid using the opened door as a shelf to place pans.
• See Troubleshooting for tips on solving Oven Problems.
44
Bake Chart
FOOD ITEM
RACK
POSITION
BAKE
TEMP. SETTING °F (°C)
(PREHEATED OVEN)
TIME (MIN)
Cake
Cupcakes
Bundt Cake
Angel Food
4
3
3
350 (175)
350 (175)
350 (175)
19-22
40-45
35-39
Pie
2 crust, fresh, 9"
2 crust, frozen fruit, 9"
4
4
375-400 (190-205)
375 (190)
45-50
68-78
Cookies
Sugar
Chocolate Chip
Brownies
4
4
4
350-375 (175-190)
350-375 (175-190)
350 (175)
8-10
8-13
29-36
Breads
Yeast bread loaf, 9x5
Yeast rolls
Biscuits
Muffins
3
3
4
3
375 (190)
375-400 (190-205)
375-400 (190-205)
425 (220)
18-22
12-15
7-9
15-19
Pizza
Frozen
Fresh
4
4
400-450 (205-235)
475 (246)
23-26
15-18
BROIL
The Broil mode uses intense heat from the upper heating element to sear
foods. The size, weight, thickness, starting temperature, and your preference
of doneness will affect broiling times.
• For best results when broiling, use a pan designed for broiling.
• Preheat the oven for about 5 minutes before placing food in the oven.
45
Broil Chart
FOOD ITEM
RACK
POSITION
BROIL
SETTING
INTERNAL
FOOD
TEMP.
°F (°C)
TIME
SIDE 1
(MIN)
TIME
SIDE 2
(MIN)
Beef
Steak (¾"-1")
Medium Rare
Medium
Well Done
Hamburgers (¾"-1")
Medium
Well Done
6
6
6
5
5
Hi
Hi
Hi
Hi
Hi
145 (65)
160 (71)
170 (77)
160 (71)
170 (77)
5-7
6-8
8-10
8-11
10-13
4-6
5-7
7-9
6-9
8-10
Poultry
Breast (bone-in)
Thigh (very well done)
5
5
Lo
Lo
170 (77)
180 (82)
10-12
28-30
8-10
13-15
Pork
Pork Chips (1")
Sausage (fresh)
Ham Slice (½")
6
6
6
Hi
Hi
Hi
160 (71)
160 (71)
160 (71)
7-9
5-7
4-6
5-7
3-5
3-5
Seafood
Fish Filets (1" buttered) 5 Lo Cook until
opaque &
flakes
easily with
fork
10-14 Do
not
turn
Lamb
Chops (1")
Medium Rare
Medium
Well Done
6
6
6
Hi
Hi
Hi
145 (63)
160 (71)
170 (77)
5-7
6-8
7-9
4-6
4-6
5-7
Bread
Garlic Bread, (1" slices)
Garlic Bread, (1" slices)
5
4
Hi
Hi
2-3
4-6
46
CONVECTION ROAST
The Convection Roast mode uses heat from both upper and lower elements
and hot air movement from the convection fan to enhance cooking efficiency
and evenness across multiple racks. Heated air circulates around the food
from all sides, sealing in juices and flavors.
• Use the 2-piece broil pan, and roast in a low-sided, uncovered pan.
• When roasting whole chickens or turkey, tuck wings behind back and
loosely tie legs with kitchen string.
• Use a meat thermometer to determine the internal doneness.
• Double-check the internal temperature of meat or poultry by inserting
meat thermometer into another position.
• Large food item may need specific areas to be covered with foil (and pan
roasted) during part of the roasting to prevent over-browning.
• The minimum safe temperature for stuffing in poultry is 165°F (75°C).
• After removing the item from the oven, cover loosely with foil for 10 to 15
minutes before carving if necessary to increase the final foodstuff
temperature by 5°F to 10°F (3°C to 6°C).
Convection Roasting Chart
FOOD ITEM
WT
(LB)
RACK
POS.
CONV ROAST
TEMP.
SETTING
°F (°C)
INTERNAL
FOOD
TEMP.
°F (°C)
TIME
(MIN/
LB)
Beef
Rib Roast
Medium Rare
Medium
Rib Eye Roast
Medium Rare
Medium
Rump, Eye, Tip, Sirloin
Medium Rare
Medium
Tenderloin Roast
Medium Rare
4-6
4-6
3-6
2-3
3
3
3
3
325 (160)
325 (160)
325 (160)
400 (205)
145 (63)
160 (71)
145 (63)
160 (71)
145 (63)
160 (71)
145 (63)
16-20
18-22
16-20
18-22
16-20
18-22
15-20
47
CONVECTION BAKE
The Convection Bake mode uses heat from the lower heating element
primarily and the upper heating element and hot air movement from the
convection fan to enhance cooking efficiency and evenness across multiple
racks. Reduce recipe baking temperatures by 25°F (15°C).
• For best results, foods should be cooked uncovered, in low-sided pans to
take advantage of the forced air circulation. Use shiny aluminum pans for
best results unless otherwise specified.
• Heatproof glass or ceramic can be used. Reduce temperature by another
25°F (15°C) when using heatproof glass dishes for a total reduction of
50°F (30°C).
FOOD ITEM
WT
(LB)
RACK
POS.
CONV ROAST
TEMP.
SETTING
°F (°C)
INTERNAL
FOOD
TEMP.
°F (°C)
TIME
(MIN/
LB)
Pork
Loin Roast - Medium
Shoulder - Medium
5-8
3-6
3
3
350 (175)
350 (175)
160 (71)
160 (71)
16-20
20-25
Poultry
Chicken Whole
Turkey (unstuffed)
Turkey (unstuffed)
Turkey (unstuffed)
Turkey Breast
Cornish Hen
3-4
12-15
16-20
21-25
3-8
1-1½"
3
2
2
2
2
3
375 (190)
325 (160)
325 (160)
325 (160)
325 (160)
350 (175)
180 (82)
180 (82)
180 (82)
180 (82)
170 (77)
180 (82)
18-21
10-14
9-11
6-10
15-20
45-75
Lamb
Half Leg
Medium
Well Done
Whole Leg
Medium
Well Done
3-4
6-8
3
2
325 (160)
325 (160)
160 (71)
170 (77)
160 (71)
170 (77)
22-27
28-33
22-27
28-33
48
Foods recommended for convection bake mode:
Appetizers, Biscuits, Cakes, Casseroles, Coffee Beans, Cookies (2 to 4 racks),
Cream Puffs, Popovers, Yeast Breads, One-Dish Entrées, Oven Meals (rack
positions 1, 2, 3), and Air Leavened Foods (Soufflés, Meringue, Meringue-
Topped Desserts, Angel Food Cakes, Chiffon Cakes).
Rear
Placement
Front
Placement
• Dark metal pans may be used. Note that food may brown faster when
using dark metal bakeware.
• The number of racks used is determined by the height of the food to be
cooked.
• Baked items, for the most part, cook extremely well in convection. Don’t
try to convert recipes such as custards, quiches, pumpkin pie, or
cheesecakes, which do not benefit from the convection-heating process.
Use the regular Bake mode for these foods.
• Multiple rack cooking for oven
meals is mostly done on rack
positions 1, 2, 3, 4, 5, and 6. All six
racks can be used for cookies,
biscuits and appetizers.
- 2 Rack baking: Use positions 2
and 4.
- 3 rack baking: Use positions 2,
4 and 6 or 1, 3 and 5.
- When baking four cake layers
at the same time, stagger
pans so that one pan is not
directly above another. For
best results, place cakes on
front of upper rack and back
of lower rack (See graphic at
right). Allow 1" - 1 ½" (2.5 – 3
cm) air space around pans.
• Converting your own recipe can be easy. Choose a recipe that will work
well in convection.
• Reduce the temperature and cooking time if necessary. It may take some
trial and error to achieve a perfect result. Keep track of your technique for
the next time you want to prepare the recipe using convection.
• See Troubleshooting for tips on solving Oven Problems.
49
Convection Bake Chart
Reduce standard recipe temperature by 25°F (15°C) for Convection Bake.
Temperatures have been reduced in this chart.
FOOD ITEM
RACK
POSITION
CONV BAKE TEMP.
SETTING °F (°C)
(PREHEATED OVEN)
TIME (MIN)
Cake
Cupcakes
Bundt Cake
Angel Food
4
3
3
325 (160)
325 (160)
325 (160)
20-22
43-50
43-47
Pie
2 crust, fresh, 9"
2 crust, frozen fruit, 9"
4
4
350-400 (175-205)
350 (175)
40-52
68-78
Cookies
Sugar
Chocolate Chip
Brownies
4
4
4
325-350 (160-175)
325-350 (160-175)
325 (160)
9-12
8-13
29-36
Breads
Yeast bread loaf, 9x5
Yeast rolls
Biscuits
Muffins
3
3
4
3
350 (175)
350-375 (175-190)
375 (190)
400 (205)
18-22
12-15
8-10
17-21
Pizza
Frozen
Fresh
4
4
375-425 (190-220)
450 (232)
23-26
15-18
50
RANGE CARE AND MAINTENANCE
MANUAL CLEANING
IMPORTANT: Before cleaning, make sure all controls are off and the oven and
cooktop are cool. Always follow label instructions on cleaning products. Soap,
water and a soft cloth or sponge are suggested first unless otherwise noted.
Do not use abrasive cleaning products.
NOTE:
• Do not clean the oven door gasket. The material of the gasket cannot
withstand abrasion. It is essential for the gasket to remain intact. If you
notice it becoming worn or frayed, replace it.
GLASS-CERAMIC COOKTOP
• Before using the cooktop for the first time, clean it with a ceramic cooktop
cleaner. This helps protect the top and makes cleanup easier.
• Regular use of ceramic cooktop cleaner will help keep the cooktop
looking new.
• If any sugar or food containing sugar spills, or plastic or foil melts on the
cooktop, remove the material IMMEDIATELY with a metal razor scraper
while the cooking surface is still hot to avoid the risk of damage to the
glass-ceramic surface. When used correctly, the scraper will not damage
the cooktop surface.
• For your safety, please use an oven mitt or pot holder while scraping the
hot cooking surface.
• If water or food containing water spills, remove the spill IMMEDIATELY
with a dry paper towel.
• Do not use scrub pads or abrasive cleaning pads. They may damage your
cooktop surface.
Cleaning Method:
• Use ceramic cooktop cleaner on the glass cooktop. Other creams may not
be as effective or may scratch, damage or stain the cooktop surface.
• Use a paper towel or non-scratch cleaning pad to clean the entire
cooktop surface.
• Rinse with clear water and use a dry cloth or paper towel to remove all
cleaning residue.
51
NOTE:
• Any damage or failure of the product resulting from the items
below may not be covered under the Limited Warranty.
- Sugary spillovers (such as preserves, ketchup, tomato sauce,
jellies, fudge, candy, syrups, or chocolate) or melted plastics
can cause pitting on the surface of your cooktop.
- If food or water containing calcium (such as baking powder,
wine, milk, spinach, or broccoli) is spilled on the cooktop, it can
permanently stain or discolor the surface.
BURNED-ON RESIDUE
• Allow the cooktop to cool.
• For additional protection, after all residue has been removed, polish the
entire surface with ceramic cooktop cleaner and a paper towel.
Cleaning Methods:
• Spread a few drops of ceramic cooktop cleaner on the entire burned
residue area. Using a non-scratch cleaning pad for ceramic cooktops, rub
the residue area, applying pressure as needed. Leave the cleaner on for
10 minutes before rinsing it off.
• Rinse with clear water and wipe the cooktop surface with a clean, dry
paper towel. If any residue remains, repeat the steps listed above as
needed.
NOTE:
• Damage to your glass surface may occur if you use scrub pads
other than those recommended.
HEAVY BURNED-ON RESIDUE
• Allow the cooktop to cool.
• For additional protection, after all residue has been removed, polish the
entire surface with ceramic cooktop cleaner and a paper towel.
52
Cleaning Methods:
• While the cooktop is still warm, use a single-edge razor blade scraper at
approximately a 30° to 45° angle against the glass surface and scrape
the soil. It will be necessary to apply pressure to the razor scraper in order
to remove the residue.
• When the cooking surface is completely cooled, spread a few drops of
ceramic cooktop cleaner on the entire burned residue area. Using a non-
scratch cleaning pad for ceramic cooktops, rub the residue area, applying
pressure as needed. Leave the cleaner on for 10 minutes before rinsing it
off.
• Rinse with clear water and wipe the cooktop surface with a clean, dry
paper towel.
NOTE:
• Do not use a dull or nicked blade.
METAL MARKS AND SCRATCHES
• Cookware with rough or uneven bottoms can mark or scratch the cooktop
surface. Carefully check the bottom of pans.
• Do not slide metal or glass across the cooktop surface.
• Do not use cookware with any dirt build-up on the bottom.
• Always clean the cooktop surface before cooking.
• Be careful not to place aluminum baking sheets or aluminum frozen
entrée containers on a hot cooktop surface. It will leave shinny dots or
markings on the cooktop surface. These markings are permanent and
cannot be cleaned off.
Cleaning Methods:
• Be careful not to slide pots and pans across your cooktop. It will leave
metal markings on the cooktop surface. These marks are removable using
the ceramic cooktop cleaner with a non-scratch cleaning pad for ceramic
cooktops.
• If pots with a thin overlay of aluminum or copper are allowed to boil dry,
the overlay may leave black discoloration on the cooktop. This should be
removed immediately before heating again or the discoloration may be
permanent.
53
EXTERIOR STAINLESS STEEL
• Rub in direction of grain to avoid damaging.
Cleaning Methods:
• Liquid detergent or all-purpose cleaner: Rinse well with clean water and
dry with soft, lint-free cloth.
• Stainless Steel Cleaner and Polish. Vinegar for hard water spots.
NOTE:
• Do not use soap-filled scouring pads, abrasive cleaners, cooktop
polishing cream, steel-wool pads, gritty washcloths or some paper
towels. Damage may occur, even with one-time or limited use.
OVEN DOOR
• Do not immerse the door in water.
• Do not spray water or glass cleaner on the door vents.
• Do not use oven cleaners, cleaning powders, or harsh abrasive cleaning
materials on the outside of the oven door.
• Do not clean the oven door gasket.
Cleaning Method:
• Glass cleaner and paper towels or nonabrasive plastic scrubbing pad:
Apply glass cleaner to soft cloth or sponge, not directly on panel.
COOKTOP CONTROL KNOBS
• Pull knobs straight away from control panel to remove.
• When replacing knobs, make sure knobs are in the OFF position.
Cleaning Method:
• Wash with soap and water.
NOTE:
• Do not use steel wool, abrasive cleansers or oven cleaner. Do not
soak knobs.
54
CONTROL PANEL
• It’s a good idea to wipe the control panel after each use.
• Deactivate the touch pads before cleaning. See "Lock" in the "Features"
section.
Cleaning Method:
• Glass cleaner and soft cloth or sponge: Apply glass cleaner to soft cloth or
sponge, not directly on panel.
• Clean up splatters with a damp cloth.
NOTE:
• Do not use abrasive cleaners, steel-wool pads, gritty washcloths or
some paper towels. Damage may occur.
OVEN CAVITY
• Food spills should be cleaned when oven cools. At high temperatures,
foods react with porcelain, so staining, etching, pitting or faint white
spots can result.
Cleaning Method:
• Mild detergent and warm water.
NOTE:
• Do not use oven cleaners.
OVEN RACKS
• All racks can be washed with warm, soapy water.
Cleaning Method:
• Clean with warm, soapy water, and use steel-wool pad if necessary.
• Rinse with clean water and dry.
55
SELF/STEAM CLEAN
STEAM CLEAN
The Steam Clean feature is designed to use water and a lower temperature
than Self Clean to generate steam to warm the oven interior surfaces and
loosen light soils before hand-cleaning.
Before Starting Steam Clean
• Allow the oven to cool to room temperature before starting.
• Remove all items from the oven, including oven racks.
• Wipe any heavy spillovers or excess debris. Scrape off and remove any
burnt-on debris with a plastic scraper. (Suggested plastic scrapers
includes hard plastic spatula, plastic pan scraper, plastic paint scraper,
and old credit card.)
• The range should be level to ensure that the bottom surface of the oven
cavity is entirely covered by water at the beginning of the Steam Clean
cycle.
• For best results, use distilled or filtered water. Tap water may leave
mineral deposits on the surfaces.
• For improved softening of tough stains, spray inside surfaces with water
spray bottle or wipe surfaces with a wet sponge before starting.
• The Steam Clean cycle cannot be started if the Lock feature is active.
BURN HAZARD
• Do not leave small children unattended near the appliance during the
cleaning cycle. The outside of the range can become very hot to the
touch.
• During the cleaning cycle, the oven becomes hot enough to cause
burns. Wait until the cycle is over before wiping the inside surface of the
oven. Failure to do so may result in burns.
• Oven surfaces may be hot after the cleaning cycle. Use caution and
wear rubber gloves while cleaning to prevent burns.
• Hot surfaces may create hot steam in wet sponge or cloth while
cleaning. If steam is evident when wiping out oven, wait until oven has
cooled slightly.
CAUTION
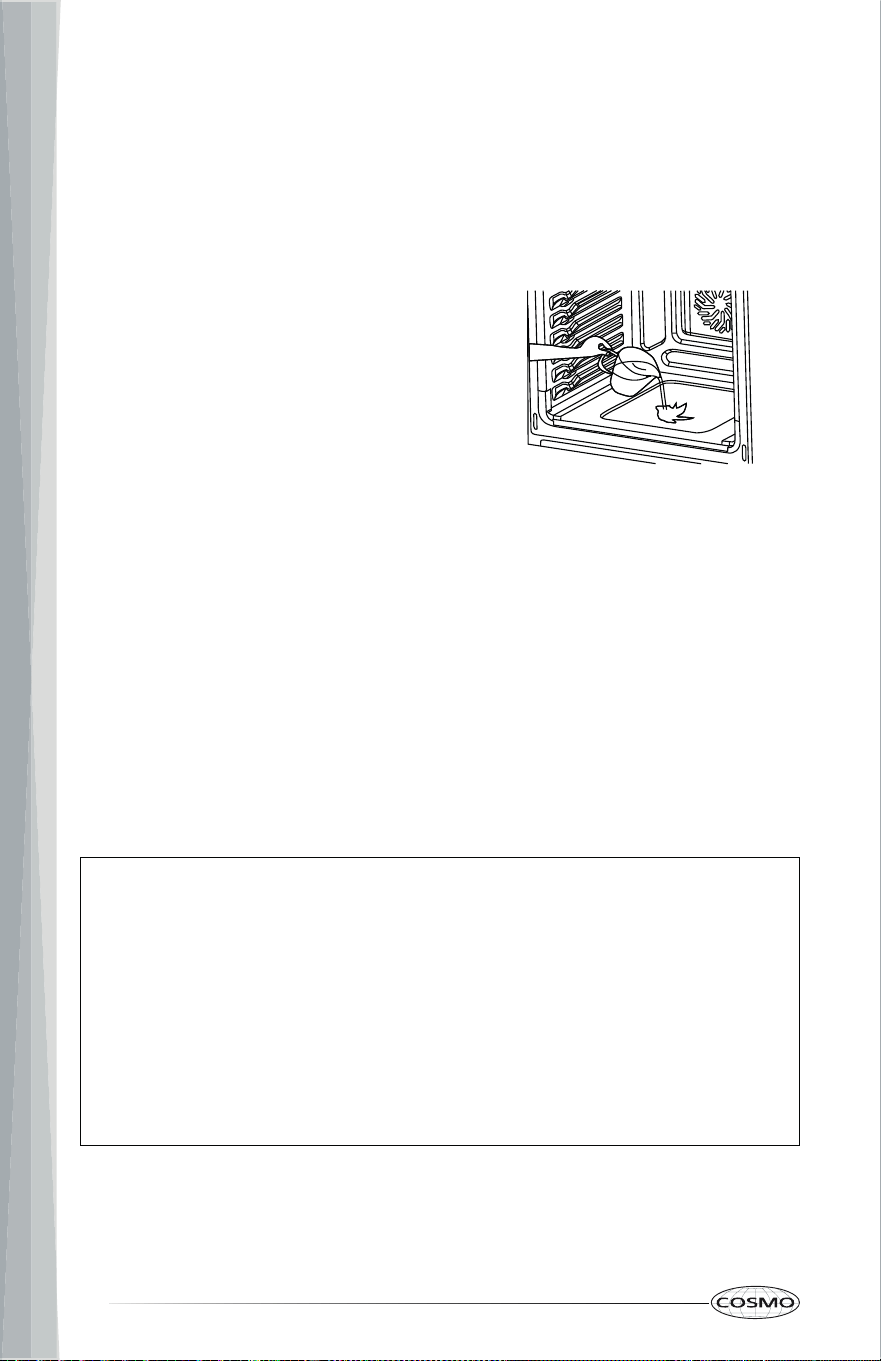
56
Setting Steam Clean
1. Start with oven at room temperature. Remove oven racks and accessories
from the oven.
2. Scrape off and remove any burnt-on debris with a plastic scraper.
3. For improved softening of tough stains, fill a spray bottle with water and
use the spray bottle to thoroughly spray the inside surfaces of the oven,
or wipe surfaces with a wet sponge.
4. Pour 1 cup (8 oz or 240 ml) of
water onto the bottom center of
the oven cavity. The indentation
on the oven bottom should be
fully covered to submerge all soils.
5. Close the oven door.
6. Press CLEAN twice. "STEAM CLEAN" is shown in the display.
7. (Optional) To set delayed Steam Clean, press DELAY and set the start
time of day. (Use the DELAY button to switch between AM and PM if
needed.)
8. Press START/ENTER to start the 30-minute Steam Clean cycle.
9. After the Steam Clean cycle, soak up any remaining water and clean the
oven cavity immediately by scrubbing with a soft, damp, non-abrasive
sponge or cloth. Place a towel on the floor in front of the oven to capture
any water that may spill out during hand-cleaning. If some light soils
remain, repeat the above steps, making sure to thoroughly soak the
soiled areas. Once the oven cavity is cleaned, wipe any excess water with
a clean dry towel. Replace racks and any other accessories.
NOTE:
• Press CLEAR/OFF to cancel Steam Clean at any time.
• Oven door does not lock during Steam Clean cleaning cycle. Do not
open door until the cleaning cycle has fully completed. Water will not
get hot enough if the door is opened during the cycle.
• Avoid leaning or resting on the oven door glass while cleaning the
oven cavity.
• Do not use any steel scouring pads, abrasive pads or cleaners as these
materials can permanently damage the oven surface.

57
SELF CLEAN
Self Clean is designed to use very high temperatures to clean the oven interior
by reducing stubborn soils to ash that can be easily wiped out after. The Self
Clean feature has cycle times of 3, 4, or 5 hours. These cycle times do not
include the time required for the oven to cool down and the door to unlock.
(Allow an addition 60 to 90 minutes for door to unlock.)
Before Starting Self Clean
IMPORTANT: The health of some birds is extremely sensitive to the fumes
given off during the self-cleaning cycle of any range. Move birds to another
well-ventilated room.
• Read Self-Cleaning Range Important Safety Instructions at the beginning
of this manual.
• The kitchen should be well ventilated to minimize the odors from
cleaning. Open a window or turn on a ventilation fan or hood before self-
cleaning.
• Allow the oven to cool to room temperature before starting.
• Remove all items from the oven, including oven racks.
• Wipe any heavy spillovers or excess debris. Scrape off and remove any
burnt-on debris with a plastic scraper. (Suggested plastic scrapers
includes hard plastic spatula, plastic pan scraper, plastic paint scraper,
and old credit card.)
• Self Clean cannot be started if the Lock feature is active or the surface
cooktop is in use. If a surface element is turned on during a Self Clean
cycle, the system will beep every 3 seconds and the Self Clean cycle will
be cancelled after 2 minutes.
• Delayed Self Clean will be cancelled automatically if the surface cooktop
is in use at the set time.
• The oven door will lock and the display will show the Lock icon several
minutes after the start of a Self Clean cycle. If the door is opened prior to
being locked, the Self Clean cycle will be automatically cancelled. After
the Self Clean cycle, the lock releases automatically once the oven is
cooled.
• As the oven heats, you may hear sounds of metal parts expanding and
contracting. This is normal and will not damage the oven.
• While running the Self Clean cycle, you may notice smoking or an odor.
This is normal, especially if the oven is heavily soiled.
• Due to the high temperatures generated, it may be preferable to delay
using the self-clean feature until the weather is colder to avoid
unnecessarily burdening the home air conditioning system.
58
Oven Cavity Soil Level Self Clean Cycle Setting Select Button
Lightly Soiled 3-Hour 3
Moderately Soiled 4-Hour 4
Heavily Soiled 5-Hour (Default) 5
Setting Self Clean
1. Start with oven at room temperature. Remove oven racks and accessories
from the oven.
2. Wipe any heavy spillovers or excess debris. Close the oven door.
3. Press CLEAN once. "SELF CLEAN" and the default 5-hour cycle setting are
shown in the display.
4. (Optional) Press 3, 4, or 5 to select a different cycle setting if desired.
5. (Optional) To set delayed Self Clean, press DELAY and set the start time
of day. (Use the DELAY button to switch between AM and PM if needed.)
6. Press START/ENTER to start the Self Clean cycle. The oven door will lock
and the display will show the Lock icon after several minutes.
7. After the Self Clean cycle, the lock releases automatically once the oven is
cooled. Wipe out any ashy residue with a damp, non-abrasive sponge or
cloth. Once the oven cavity is cleaned, replace racks and any other
accessories.
NOTE:
• Press CLEAR/OFF to cancel Self Clean at any time. The oven door will
remained locked until the oven temperature has cooled sufficiently.
• Do not force the oven door open when the Lock icon is displayed.
Forcing the door open will damage the door.
• After a Self Clean cycle, fine lines may appear in the porcelain because
it went through heating and cooling. This is normal and will not affect
performance.
• Avoid leaning or resting on the oven door glass while cleaning the
oven cavity.
• Do not use oven cleaners. Commercial oven cleaner or oven liner
protective coating of any kind should not be used in or around any
part of the oven.
• Do not use any steel scouring pads, abrasive pads or cleaners as these
materials can permanently damage the oven surface.
59
TROUBLESHOOTING
First try the solutions suggested here to possibly avoid the cost of a service
call.
COOKTOP PROBLEMS
PROBLEM POSSIBLE CAUSE SOLUTION
Surface units
do not work
properly
There is no power to
the range.
Make sure electrical plug is plugged
into a live, properly grounded outlet.
Replace the fuse or reset the circuit
breaker.
Cooktop controls
improperly set.
Check to see the correct control is
set for the surface unit you are
using.
Excessive
heat around
cookware on
cooktop
The cookware is not
the proper size for
the burner.
Use cookware with a bottom surface
approximately the same size as the
cooking area and burner. Cookware
should not extend more than 1" (2.5
cm) outside the cooking area. Adjust
the flame so that it does not come
up around the cookware.
Frequent
cycling on
and off of
surface units
The element cycle
on and off to
maintain the heat
setting.
This is normal even when the
element is on the highest setting.
Surface unit
stops
glowing
when
changed to a
lower setting
The unit is still on
and hot.
This is normal.
Cooking
results are
not what
expected
Using incorrect
cookware.
See the "Using The Proper
Cookware" section.
The control knob is
not set to the
proper heat level.
See the "Using The Gas Surface
Burners" section.
60
PROBLEM POSSIBLE CAUSE SOLUTION
Unable to
maintain a
rolling boil or
will not cook
fast enough
Using improper
cookware.
Use pans with flat bottoms and that
match the diameter of the cooktop
burner selected. See the "Using The
Proper Cookware" section.
Using large
cookware without
lid.
Large pots and pans can lose a lot
of heat from the top. Cover pot or
pan with a lid to retain heat better.
Areas of
discoloration
on the
cooktop
Food spillovers not
cleaned before next
use.
See the "Manual Cleaning" section.
Cooktop is not
cleaned thoroughly.
See the "Manual Cleaning" section.
Mineral deposits
from water and
food.
Remove using a glass-ceramic
cooktop cleaning crème. Use
cookware with clean, dry bottoms.
Scratches or
abrasions on
cooktop
surface
Coarse particles
such as salt or sand
between cooktop
and utensils can
cause scratches.
Be sure the cooktop surface and
bottoms of utensils are clean before
using. Small scratches do not affect
cooking and will become less visible
with time.
Cookware with
rough bottom has
been used.
Use smooth, flat-bottomed
cookware.
Cleaning materials
not recommended
for glass-ceramic
cooktop have been
used.
See the "Manual Cleaning" section.
Metal marks
Scraping of metal
utensils on cooktop
surface.
Do not slide metal utensils on
cooktop surface. Use a glass-
ceramic cooktop cleaning crème to
remove the marks. See the "Manual
Cleaning" section.
Brown
streaks or
specks
Boilovers are
cooked onto
surface.
Use a blade scraper to remove soil.
See the "Manual Cleaning" section.
61
OVEN PROBLEMS
PROBLEM POSSIBLE CAUSE SOLUTION
Strong odor
when using
new oven
Manufacturing
protective coating
on the oven
surfaces.
This is normal with a new range and will
disappear after a few uses.
Packaging
materials exist.
Double-check that all packaging has
been removed from the appliance -
check around door sides and inside
drawer.
Oven is not
heating
No power to the
range.
Check the circuit breaker or fuse box to
your house. Make sure there is proper
electrical power to the oven.
Oven control not
turned on.
Make sure the oven temperature has
been selected.
Oven is not
cooking
evenly
Refer to the "Using Oven Racks" section
and the cook charts for recommended
rack position. Always reduce recipe
temperature by 25°F (15°C) when
baking with Convention Bake mode.
Recipe may perform better at a
different rack position. Try moving the
food down a rack position to make the
bottom darker. Try moving food up a
rack position to make the top darker.
Oven is
taking too
long to cook
All ovens operate
slightly differently
from each other.
Adjust oven calibration upwards to
make oven cook faster. See the "Setting
Temperature Calibration" section.
Food is
overcooked
All ovens operate
slightly differently
from each other.
Adjust oven calibration downwards to
reduce overcooking. See the "Setting
Temperature Calibration" section.
Cooling fan
continues to
run after
oven is
turned off
The electronic
components have
not yet cooled
sufficiently.
The fan will turn off automatically when
the electronic components have cooled
sufficiently.
Not using the
correct bakeware
or oven rack
position.
62
PROBLEM POSSIBLE CAUSE SOLUTION
Oven
display
stays Off
Power
interruption.
Turn off power at the main power
supply (fuse or breaker box). Turn
breaker back on. If condition persists,
call for service.
The oven is in
Sabbath mode.
If control panel display shows only "]" or
"] [", the control is in Sabbath Mode. See
the "Using The Sabbath Mode" section
to turn off Sabbath mode.
Oven
display is on
but will not
respond
Lock feature is
active.
See the "Lock" section.
System error.
Resetting the power at the breaker box
can usually reset the oven control and
clear response issues.
Oven door
is locked
and will not
open
Self Clean
recently finished.
If self-clean recently finished, this is
normal. Wait for the oven to cool fully
and it will unlock automatically.
Otherwise, try resetting the appliance
by resetting the circuit breaker.
Oven light is
not working
properly
Light bulb loose
or burned-out.
Reinsert or replace the light bulb.
Touching the bulb with fingers may
cause the bulb to burn out.
The oven is in
Sabbath mode.
If control panel display shows only "]" or
"] [", the control is in Sabbath Mode. See
the "Using The Sabbath Mode" section
to turn off Sabbath mode.
Oven light
stays on
Door is not closing
completely
Check for obstruction in oven door.
Check to see if hinge is bent or door
switch broken.
Cannot
remove lens
cover
Soil build-up
around the lens
cover.
Wipe lens cover area with a clean, dry
towel prior to attempting to remove the
lens cover.
Oven racks
are difficult
to slide
The shiny, silver-
colored racks
were cleaned in a
Self Clean cycle.
Apply a small amount of vegetable oil
to a paper towel and wipe the edges of
the oven racks with the paper towel.
63
PROBLEM POSSIBLE CAUSE SOLUTION
Clock and
timer are
not working
properly
No power to the
range.
Check the circuit breaker or fuse box to
your house. Make sure there is proper
electrical power to the oven.
The oven
will not start
Self Clean
The cooktop is in
use.
If cooktop is in use, Self Clean cannot be
started. This is normal.
The current oven
temperature is
too high.
If oven was in use recently, this is
normal. Self Clean can only be initiated
when the oven has cooled sufficiently.
"Popping"
sounds
during Self
Clean
Metal frame
expanding.
This is normal as the extreme
temperatures cause the metal frame to
expand.
Oven not
clean after
a Self Clean
cycle
Self Clean uses
very high
temperatures to
turn stubborn soils
to ash.
After Self Clean cycle, the remaining
white/grey ash must still be wiped out
by hand. If black soiling still remains,
oven may have been too heavily soiled
to clean with the settings selected. Re-
run self-clean using the longest possible
setting. Some areas, such as bottom
door corners, may be too cool to turn
soils into ash. These areas may need to
be cleaned by hand.
Excessive
Moisture on
door glass
Condensation
from cooking
foods with high
moisture content.
This is normal. Condensation will
evaporate as oven heats up.
Convection Bake and Convection Roast
will eliminate any moisture in the oven.
Porcelain
Chips
Porcelain interior
is chipped by
oven racks
When removing and replacing oven
racks, always tilt racks upward and do
not force them to avoid chipping the
porcelain.
"E" and a
number
appears in
display
System error
detected.
This is an error code. Press CLEAR/OFF
to clear the display and stop beeping. If
necessary, reset oven power at the
circuit breaker. If error code remains or
repeats, write down error code and
contact a qualified service provider for
repairs.

64
LIMITED WARRANTY
WARRANTY AND SERVICE
TO RECEIVE WARRANTY SERVICE, YOUR PRODUCT MUST BE REGISTERED.
TO REGISTER AND REVIEW FULL WARRANTY DETAILS, VISIT:
WWW.COSMOAPPLIANCES.COM/WARRANTY
SCAN TO REGISTER
CUSTOMER SUPPORT
TO CHAT WITH US LIVE FOR ASSISTANCE, VISIT:
WWW.COSMOAPPLIANCES.COM/CHAT
SCAN TO CHAT
65
IMPORTANT
Do Not Return This Product To The Store
If you have a problem with this product, please contact COSMO Customer
Support at
+1 (888) 784-3108
DATED PROOF OF PURCHASE, MODEL #, AND SERIAL # REQUIRED FOR
WARRANTY SERVICE.
IMPORTANT
Ne pas Réexpédier ce Produit au Magasin
Pour tout problème concernant ce produit, veuillez contacter le service des
consommateurs Cosmo Customer Support au
+1 (888) 784-3108
UNE PREUVE D’ACHAT DATEE EST REQUISE POUR BENEFICIER DE LA GARANTIE.
IMPORTANTE
No regrese este producto a la tienda
Si tiene algún problema con este producto, por favor contacte el ayuda al
cliente COSMO al
+1 (888) 784-3108
(Válido solo en E.U.A.)
NECESITA UNA PRUEBA DE DE COMPRA FECHADA, NÚMERO DE MODELO Y DE
SERIE PARA EL SERVICIO DE LA GARANTÍA.
Correct disposal of this product:
This marking indicates that this appliance should not be
disposed with other household wastes. To prevent
possible harm to the environment or human health from
uncontrolled waste disposal, recycle it responsibly to
promote the sustainable reuse of material resources.

MEMO

MEMO