Rev. 25.03
MICROWAVE DRAWER
USER MANUAL
INSTALLER:
IMPORTANT:
OWNER:
READ AND SAVE THESE INSTRUCTIONS.
FOR RESIDENTIAL USE ONLY.
PLEASE LEAVE THESE INSTRUCTIONS WITH THIS
UNIT FOR THE OWNER.
PLEASE RETAIN THESE INSTRUCTIONS FOR FUTURE
REFERENCE.
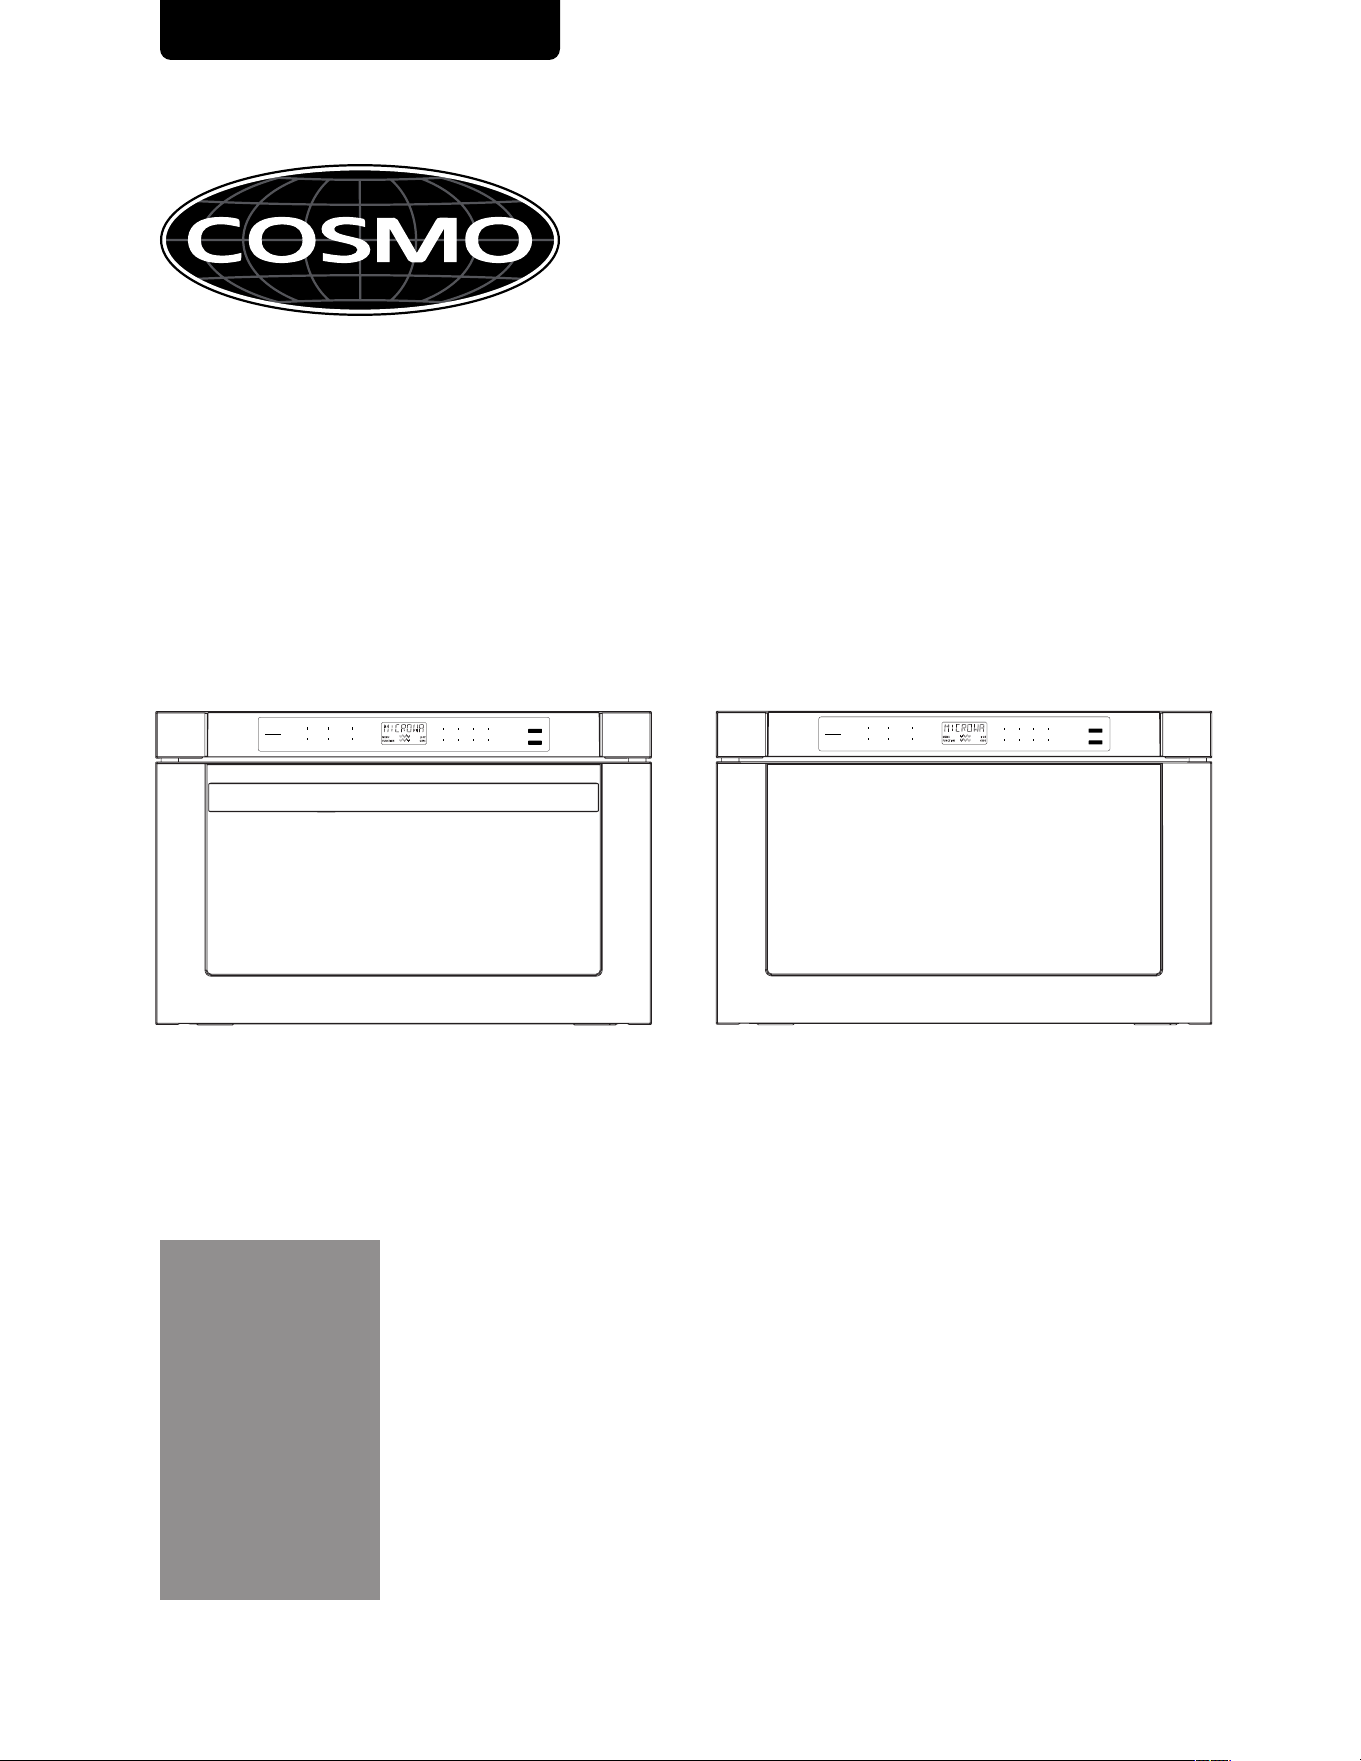
24 in. BUILT-IN MICROWAVE DRAWER
OPEN
CLOSE
SETUP
CLOCK
KITCHEN TIMER
SOFTEN
MELT POPCORN
BEVERAGE
DEFROST
WEIGHT
DEFROST
TIME
TIME COOK
POWERPOWER
START
STOP
+30SEC.
CANCEL
2
3
4
5
6
7
8
9
0
11
COS-12MWDSS
COS-12MWDBK
COS-12MWDSS-NH
COS-12MWDBK-NH
OPEN
SETUP
MELT POPCORN DEFROST
11
2
3
4
5
START
PPOOWWEERR
WEIGHT
+30SEC.
CLOSE
CLOCK SOFTEN
BEVERAGE DEFROST
6
7
8
9
0
STOP
TIME COOK
KITCHEN TIMER
TIME
CANCEL

2
THANK YOU FOR YOUR PURCHASE
Thank you for your purchase. We know that you have many brands and products
to choose from and we are honored to know that you have decided to take one of
our products into your home and hope that you enjoy it.
COSMO Appliances are designed according to the strictest safety and performance
standard for the North American market. We follow the most advanced manufacturing
philosophy. Each appliance leaves the factory after thorough quality inspection and
testing. Our distributors and our service partners are ready to answer any questions
you may have regarding how to install, use and care for your products. We hope that
this manual will help you learn to use the product in the safest and most effective
manner.
Before using this product, please read through this manual carefully. Keep this user
manual in a safe place for future reference. Please ensure that other persons using this
product are familiar with these instructions as well.
If you have any questions or concerns, please contact the dealer from whom you
purchased the product, or contact our Customer Support at:
1-888-784-3108
Reach us online at:
www.cosmoappliances.com

3
TABLE OF CONTENTS
MICROWAVE DRAWER SAFETY .................................................................................... 4
Important Safety Instructions ......................................................................................... 5
PRODUCT OVERVIEW .................................................................................................... 9
Microwave Drawer Layout .............................................................................................. 9
Control Panel .................................................................................................................... 10
OPERATION ....................................................................................................................... 11
Power on ........................................................................................................................... 11
Setting the clock .............................................................................................................. 11
Setting the kitchen timer ............................................................................................... 11
Microwave cooking ........................................................................................................ 12
Speedy cooking ............................................................................................................... 12
Defrost by weight ............................................................................................................ 13
Defrost by time ............................................................................................................... 13
Auto menu--beverage ................................................................................................... 13
Auto menu--popcorn
..................................................................................................... 13
Auto menu--melt ............................................................................................................ 14
Auto menu--soften ......................................................................................................... 14
Silent mode ....................................................................................................................... 15
Lock function for children .............................................................................................. 15
Inquiring function ............................................................................................................ 16
Other specifications ....................................................................................................... 16
MICROWAVE DRAWER CARE ....................................................................................... 17
General Cleaning ............................................................................................................ 17
TROUBLESHOOTING.................................................................................................... 19
LIMITED WARRANTY ................................................................................................... 2 1
4
MICROWAVE DRAWER SAFETY
READ ALL INSTRUCTIONS BEFORE USING THE APPLIANCE
Your safety and the safety of others are very important.
We have provided many important safety messages in this manual and on your
appliance. Always read and obey all safety messages.
This is the safety alert symbol.
This symbol alerts you to potential hazards that can kill or hurt
you and others.
All safety messages will follow the safety alert symbol and
either the word "WARNING" or "CAUTION." These words mean:
You can be killed or seriously injured if you don't follow
instructions.
A potentially hazardous situation which, if not avoided, could
result in minor or moderate injury.
All safety messages will tell you what the potential hazard is, tell you how to reduce
the chance of injury, and tell you what can happen if the instructions are not
followed.
WARNING
CAUTION
California Proposition 65 Warning
WARNING: Cancer and Reproductive Harm - www.P65Warnings.ca.gov.
This device complies with Part 18 of the FCC Rules.
5
READ AND SAVE THESE INSTRUCTIONS
IMPORTANT SAFETY INSTRUCTIONS
WARNING
If the information
in this manual is not followed exactly, a fire or
electrical shock may result that could cause property damage,
personal injury or death.
• Read all instructions before using
the microwave oven.
• Read and follow the specific
"PRECAUTIONS TO AVOID
POSSIBLE EXPOSURE TO EXCESSIVE
MICROWAVE ENERGY" found in this
section.
• The microwave oven must be
grounded. Connect only to properly
grounded outlet. See "GROUNDING
INSTRUCTIONS" found in this
section and in the provided
Installation Instructions.
• Install or locate the microwave
oven only in accordance with the
provided Installation Instructions.
• Some products such as whole eggs
in the shell and sealed containers –
for example, closed glass jars – are
able to explode and should not be
heated in the microwave oven.
• Use the microwave oven only for its
intended use as described in the
manual. Do not use corrosive
chemicals or vapors in the
microwave oven. This type of oven
is specifically designed to heat,
cook, or dry food. It is not designed
for industrial or laboratory use.
•
• Do not operate the microwave
oven if it has a damaged cord or
plug, if it is not working properly, or
if it has been damaged or dropped.
• The microwave oven should be
serviced only by qualified service
personnel. Call an authorized
service company for examination,
repair, or adjustment.
• Do not cover or block any openings
on the microwave oven.
• Do not store this mi crowave oven
outdoors. Do not use the
microwave oven near water - for
example, near a kitchen sink, in a
wet basement, near a swimming
pool, or similar locations.
• Do not immerse cord or plug in water.
• Keep cord away from heated surfaces.
• Do not let cord ha ng over edge of
table or counter.
• See cleaning instructions in the
"Microwave Drawer Care" section.
HOT CONTENTS CAN CAUSE SEVERE
BURNS. DO NOT ALLOW CHILDREN
TO USE THE MICROWAVE. Use caution
when removing hot items.
6
IMPORTANT SAFETY INSTRUCTIONS
• To reduce the risk of fire in the oven
cavity:
- Do not overcook food.
Carefully attend the
microwave oven when paper,
plastic, or other combustible
materials are placed inside
the oven to facilitate cooking.
- Remove wire twist-ties from
paper or plastic bags before
placing bags in oven.
- If materials inside the oven
ignite, keep oven door closed,
turn oven off, and disconnect
the power cord, or shut off
power at the fuse or circuit
breaker panel.
- Do not use the cavity for
storage purposes. Do not
leave paper products, cooking
utensils, or food in the cavity
when not in use.
• Do not mount over a sink.
• Do not store anything directly on
top of the microwave oven when
the microwave oven is in operation.
• Liquids, such as water, coffee, or
tea are able to be overheated
beyond the boiling point without
appearing to be boiling. Visible
bubbling or boiling when the
container is removed from the
microwave oven is not always
present. THIS COULD RESULT IN
VERY HOT LIQUIDS SUDDENLY
BOILING OVER WHEN THE
CONTAINER IS DISTURBED OR A
SPOON OR OTHER UTENSIL IS
INSERTED INTO THE LIQUID.
• To reduce the risk of injury to
persons:
- Do not overheat the liquid.
- Stir the liquid both before and
halfway through heating it.
- Do not use straight-sided
containers with narrow necks.
- After heating, allow the
container to stand in the
microwave oven for a short
time before removing the
container.
- Use extreme care when
inserting a spoon or other
utensil into the container.
READ AND SAVE THESE INSTRUCTIONS
7
PRECAUTIONS TO AVOID POSSIBLE
EXPOSURE TO EXCESSIVE
MICROWAVE ENERGY
• Use care when cleaning the vent-
hood filter. Corrosive cleaning
agents, such as lye-based oven
cleaners, may damage the filter.
• Do not attempt to operate this
oven with the door open since
open-door operation can result in
harmful exposure to microwave
energy. It is important not to defeat
or tamper with the safety
interlocks.
• Do not place any object between
the oven front face and the door or
allow soil or cleaner residue to
accumulate on sealing surfaces.
• Do not operate the oven if it is
damaged. It is particularly
important that the oven door close
properly and that there is no
damage to the:
a. Door (bent),
b. Hinges and latches (broken or
loosened),
c. Door seals and sealing
surfaces.
• The oven should not be adjusted or
repaired by anyone except
properly qualified service
personnel.
RADIO INTERFERENCE
1. Operation of the microwave oven may cause interference to your radio, TV or
similar equipment.
2. When there is interference, it may be reduced or eliminated by taking the
following measures:
a. Clean door and sealing surface of the oven.
b. Reorient the receiving antenna of radio or television.
c. Relocate the microwave oven with respect to the receiver.
d. Move the microwave oven away from the receiver.
e. Plug the microwave oven into a different outlet so that microwave oven
and receiver are on different branch circuits.
READ AND SAVE THESE INSTRUCTIONS
8
GROUNDING INSTRUCTIONS
ELECTRICAL REQUIREMENTS
WARNING ELECTRIC SHOCK HAZARD
Observe all governing codes and ordinances.
Required:
• Plug into a grounded 3 prong outlet.
• Do not remove ground prong.
• Do not use an adapter or an extension cord.
• Failure to following these instructions can result in death, fire, or electrical
shock.
Recommended:
• A 120 VAC, 60 Hz, only, 15 or 20 A electrical supply with a fuse or circuit
breaker.
• A time-delay fuse or time-delay circuit breaker.
• A separate circuit serving only this microwave oven.
For all cord connected appliances:
The microwave oven must be grounded. In the event of an electrical short circuit,
grounding reduces the risk of electric shock by providing an escape wire for the
electric current. The microwave oven is equipped with a cord having a grounding
wire with a grounding plug. The plug must be plugged into an outlet that is
properly installed and grounded.
WARNING: Improper use of the grounding plug can result in a risk of electric shock.
Consult a qualified electrician or serviceman if the grounding instructions are not
completely understood, or if doubt exists as to whether the microwave oven is
properly grounded.
Do not use an extension cord. If the power supply cord is too short, have a qualified
electrician or serviceman install an outlet near the microwave oven.
READ AND SAVE THESE INSTRUCTIONS
9
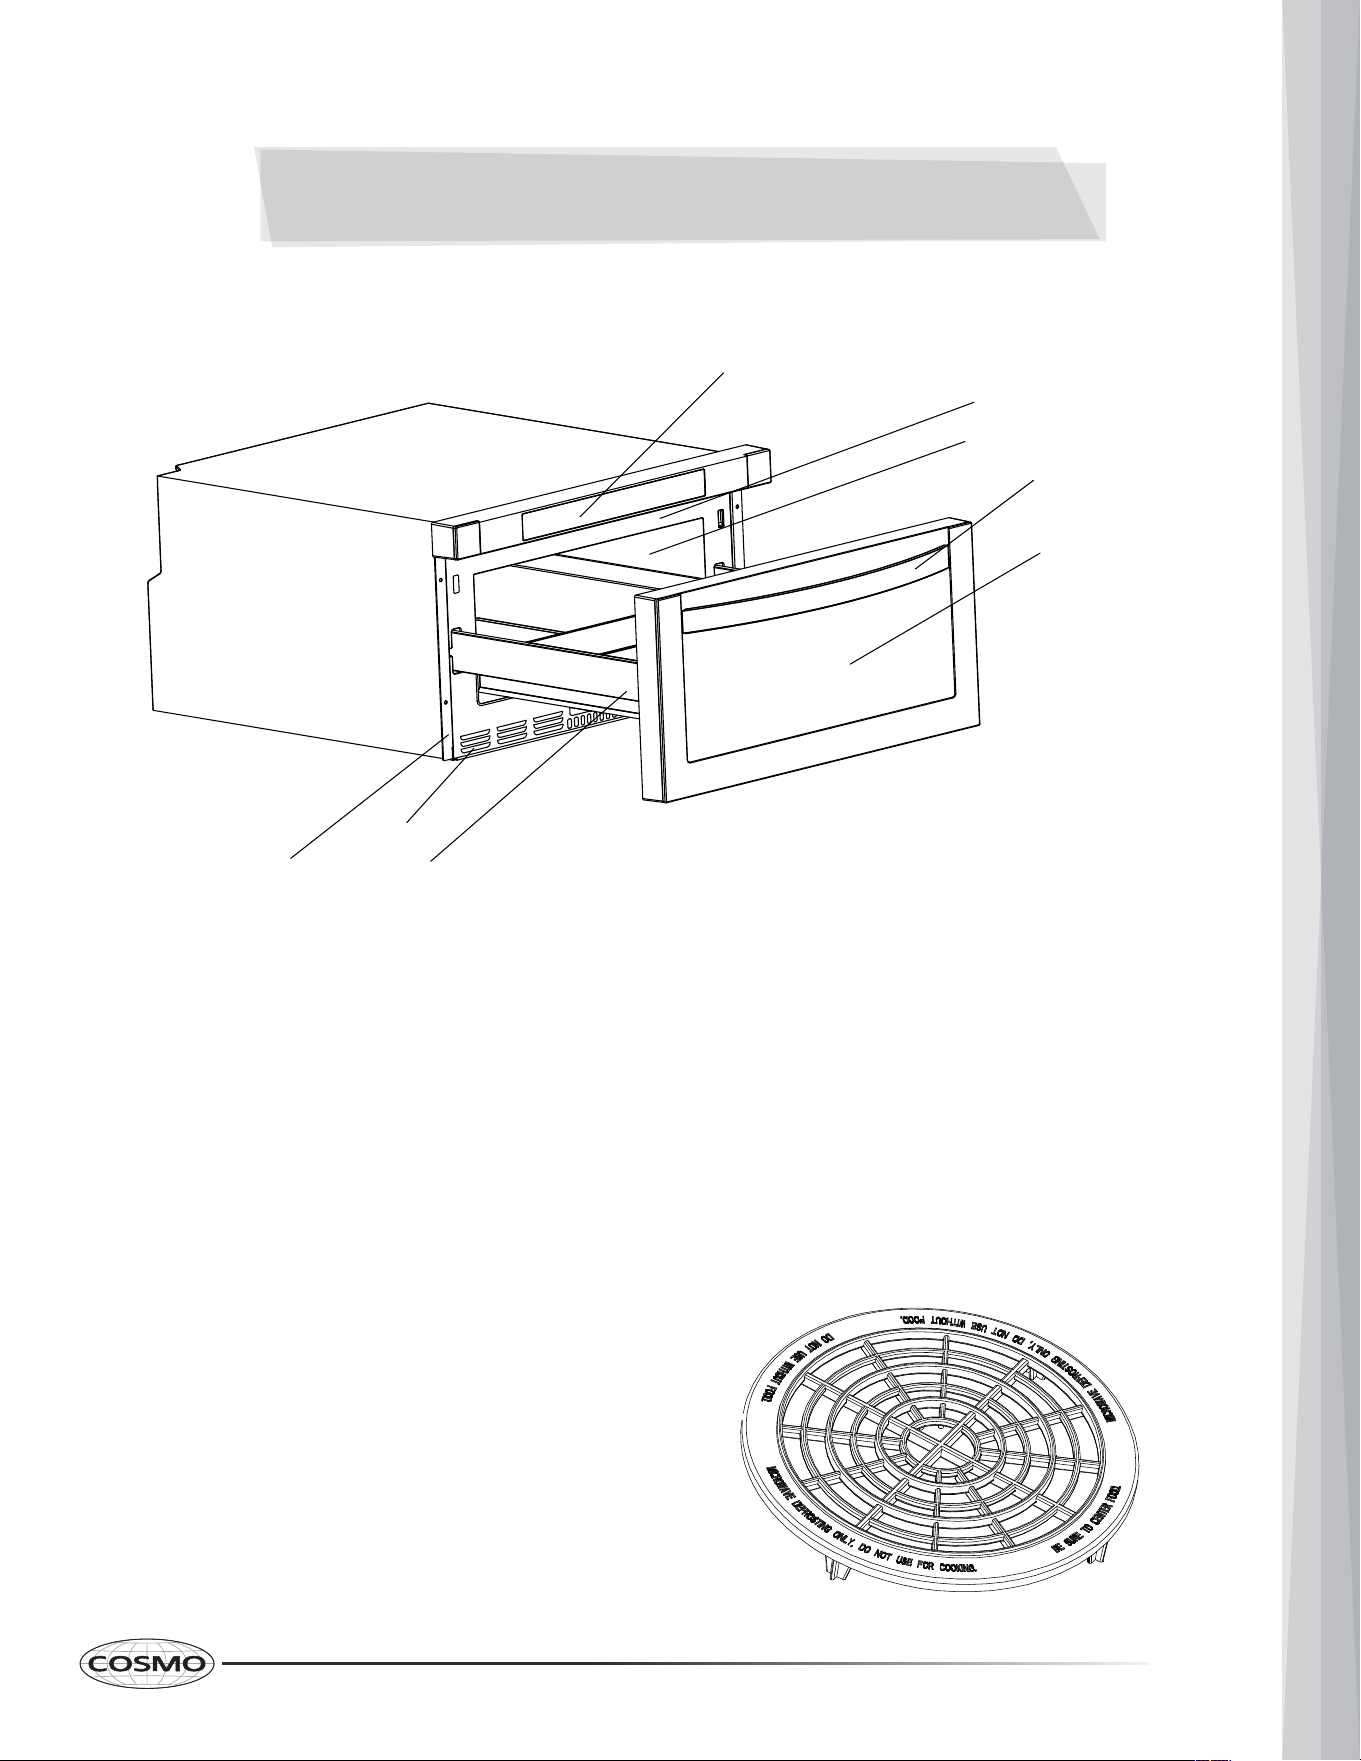
PRODUCT OVERVIEW
MICROWAVE DRAWER LAYOUT
ACCESSORI
ES
Defrosting Rack
• Only to be used in defrosting
function.
• Do not use for cooking.
• Do not use without good.
A
B
C
D
E
G
H
F
A. Control Panel
B. Rating Plate
C. Microwave Oven Cavity
D. Drawer Handl
e
(COS-12MWDSS, COS-12MWDBK only)
E. Drawer Window
F. Drawer Guide
G. Vent
H. Mounting Flange
10
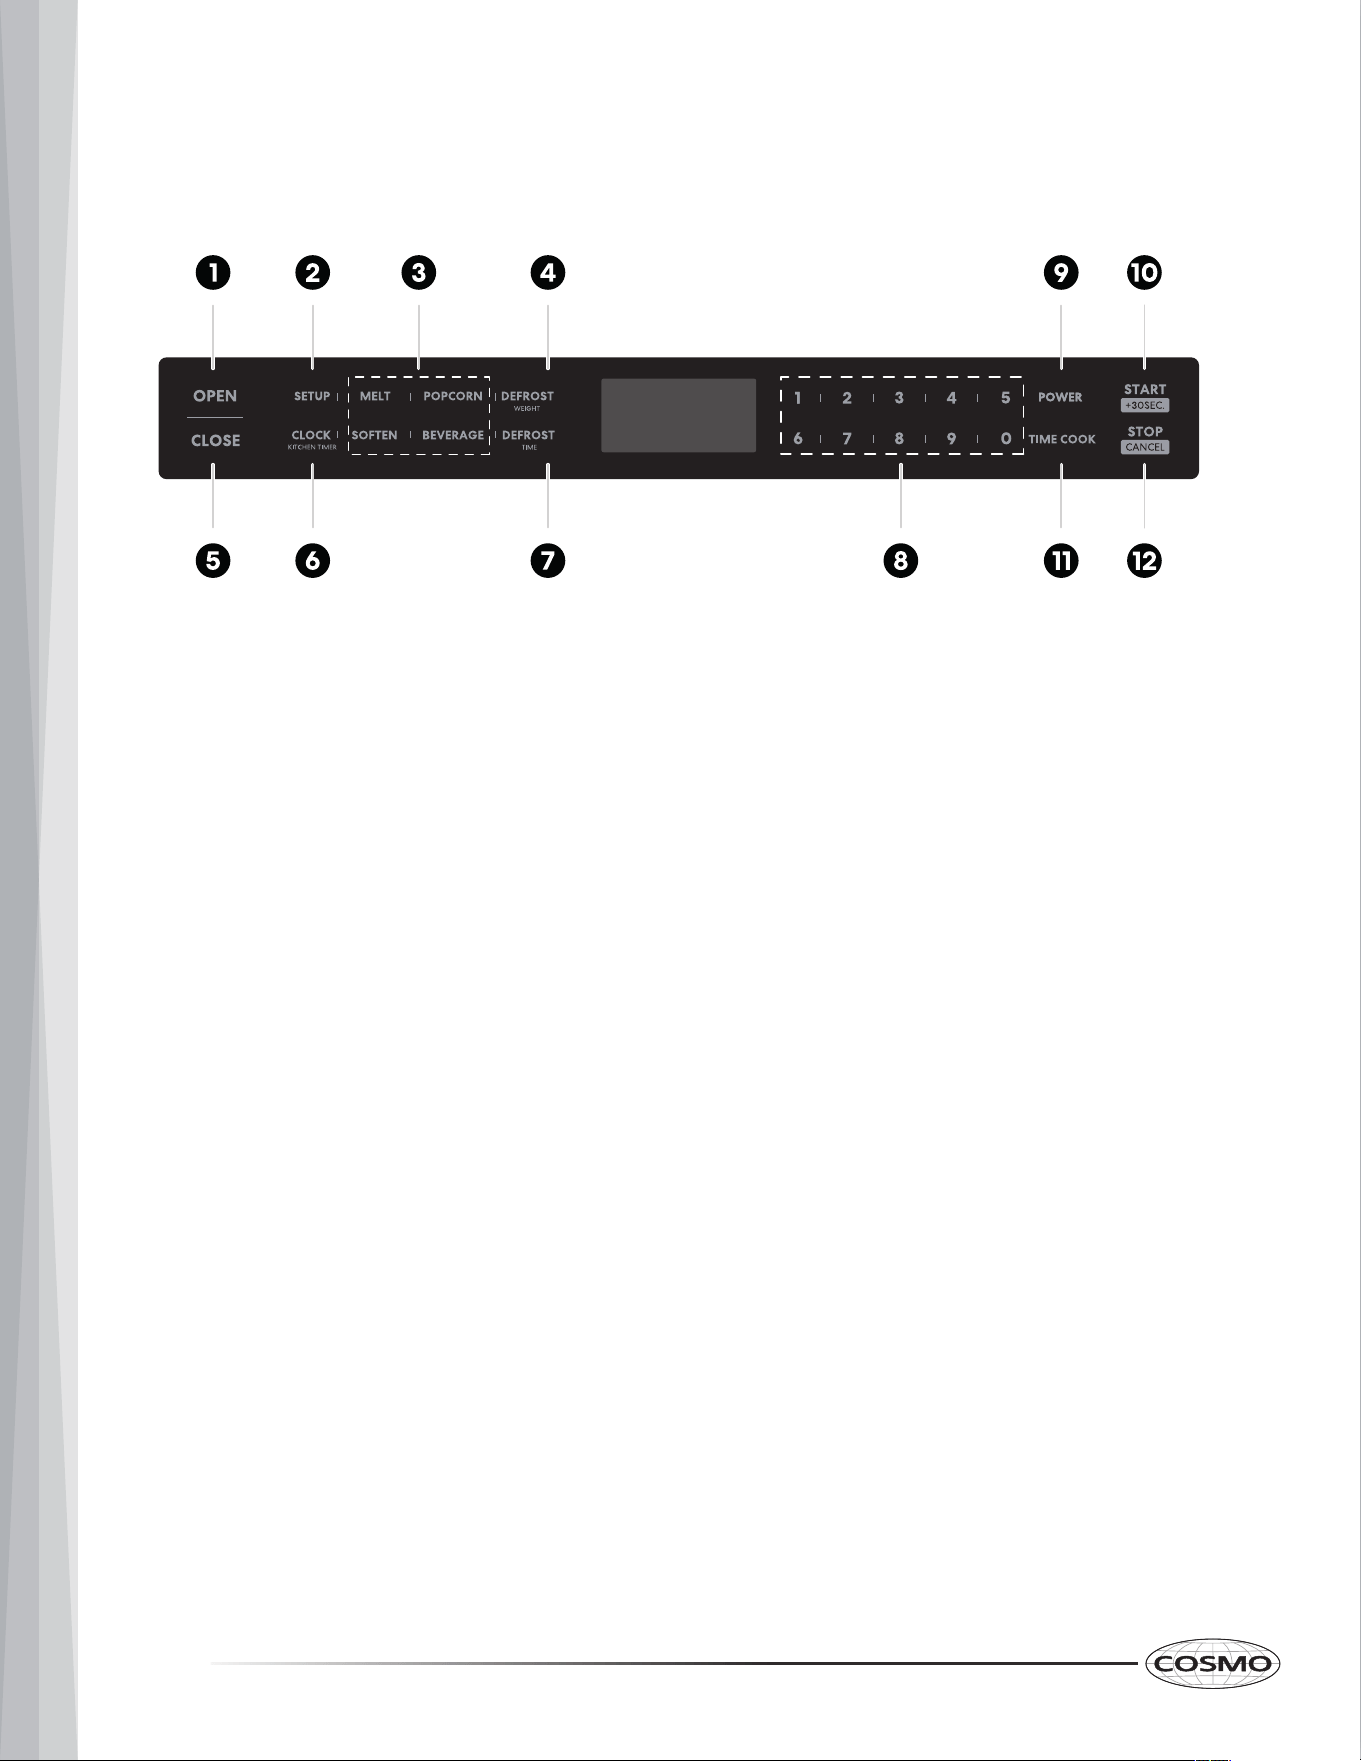
CONTROL PANEL
1. OPEN
2.
SETUP
3.
AUTO MENU
4.
WEIGHT DEFROST
5.
CLOSE
6.
CLOCK/KITCHEN TIMER
10
. START/ +30SEC.
11.
TIME COOK
12.
STOP/C NCEL
7.
TIME DEFROST
8.
NUMBER KEYS
9.
POWER

11
OPERATION
Power On
1. When the microwave oven is plugged into an outlet, buzzer sounds once.
Screen displays "WELCOME". Then the oven turns into standby mode. The
screen displays "00:00".
2. In standby mode, the screen will display the current time if the clock has
been set. Otherwise, "00:00" will display.
3. Press OPEN to open the drawer, and screen displays "OPEN". The screen
will display "PLEASE CLOSE" when the drawer is fully opened.
Press CLOSE to close the drawer, and the screen displays "CLOSE". The
screen will display the current time or "00:00" when the drawer is fully
closed.
If there are mistakes to open or close the drawer, buzzer will sound five
times, and the screen will display "CLOSE OR OPEN ".
NOTE:
• In the process of clock setting, if the STOP/CANCEL is pressed or if there is no
operation within 1 minute, the setting is invalid.
• To reset the clock, please repeat step 1 to step 3.
• If the clock is not set,it would not work when powered.
Setting the Clock
1. Press CLOCK/KITCHEN TIMER once. The first hour figure will flash and other
"0" will light.
2. Press the number keys to enter the correct time. The input time should be
between 01:00-12:59.
3. Press CLOCK/KITCHEN TIMER to confirm. The clock is set.
NOTE:
• The kitchen timer is differ from 12-hour system. Kitchen Timer is a timer.
• Any other program can’t be set during kitchen timer.
• STOP/CANCEL can be pressed to cancel the Kitchen Timer.
Setting the Kitchen Timer
1
. Pr
ess CLOCK/KITCHEN TIMER twice, “00:00” will display .
2
. Press the number keys
keys to enter the time. The maximum cooking time is
“
99:99”.
3. Press START/+30SEC. to confirm. The timer starts counting down.
12
Mic
rowave Cooking
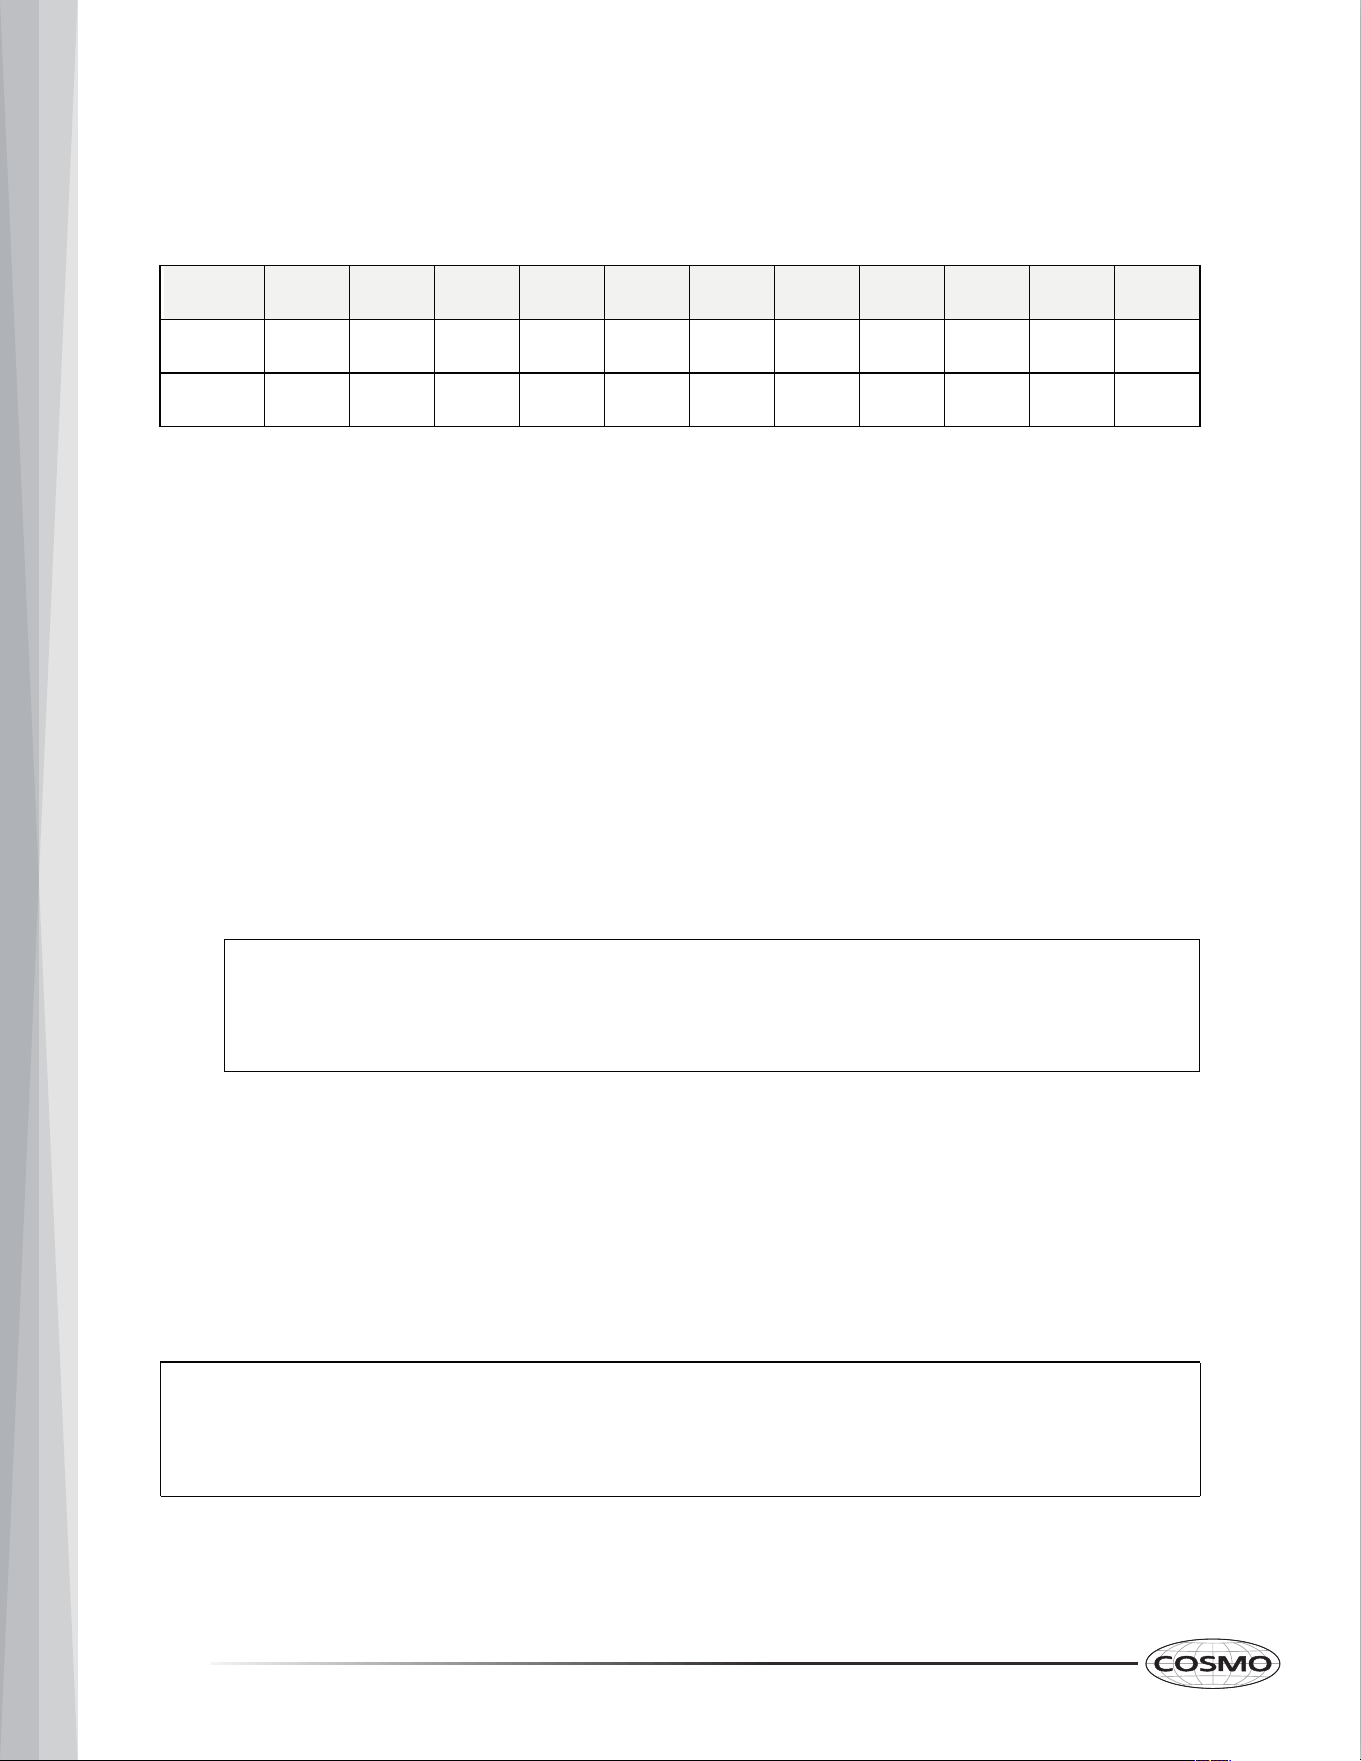
11 power levels are available.
NOTE:
• In the process o
f setting, if the STOP/CANCEL is pressed or if
there is no operation within 1 minute, the setting is invalid.
Level
10 9 8 7 6 5 4 3 2 1 0
Power
100% 90% 80% 70% 60% 50% 40% 30% 20% 10%
Display
PL100 PL90 PL80 PL70 PL60 PL50 PL40
PL30
PL20
PL10
0%
PL00
1. Press TIME COOK once, “00:00” will display.
Press number keys to enter the cooking time. The maximum cooking time is
“99:99”.
2. Press POWER and then press number keys to adjust the power level.
The 11 power levels are available
3. Press START/+30SEC. to start cooking.
• Press TIME COOK”once.
• Press
1, 5, 0, 0 in order.
• Press POWER and then press
5
to select PL50.
• Press START/+30S
EC. to start
cooking.
Example: To cook the food with PL50 for 15 minutes.
NOTE:
• START/+30SEC. cannot be pressed to increase cooking time for
defrost by weight and Auto menu.
Speedy Cooking
1
. I
n
standby mode, press START/+30SEC. to cook food with 100% power level
for 30 seconds. Each press on the same key can increase 30 seconds.
2. During microwave cooking and defrosting by time, START/+30SEC. can be
pressed to increase cooking time. Each press will increase 30 seconds.
13
NOTE:
• The defrost power is PL30.
Defrost by Weight
1. Press DEFROST WEIGHT once. "WEIGHT DEFROST" will display.
2. Press numeber keys to input the weight of the food. The input weight
should be between 0.1-6.0 lbs.
3. Press START/+30SEC. to start defrosting.
4. Once defrosting has finished, the buzzer will sound five times and “FINISH”
will display.
Defrost by Time
1. Press
DEFROST TIME once, “TIME DEFROST” will display.
2. Press number keys to set the desired defrost ti
me.
The maximum time value
is “99:99”.
3. Press
START/+30SEC. to start defrosting.
4
. Once defrosting has finished, the buzzer will sound five times and “FINISH”
will display.
NOTE:
• The buzzer will sound to remind you to turn the food over during
defrosting. If no operation, the oven will continue working.
14
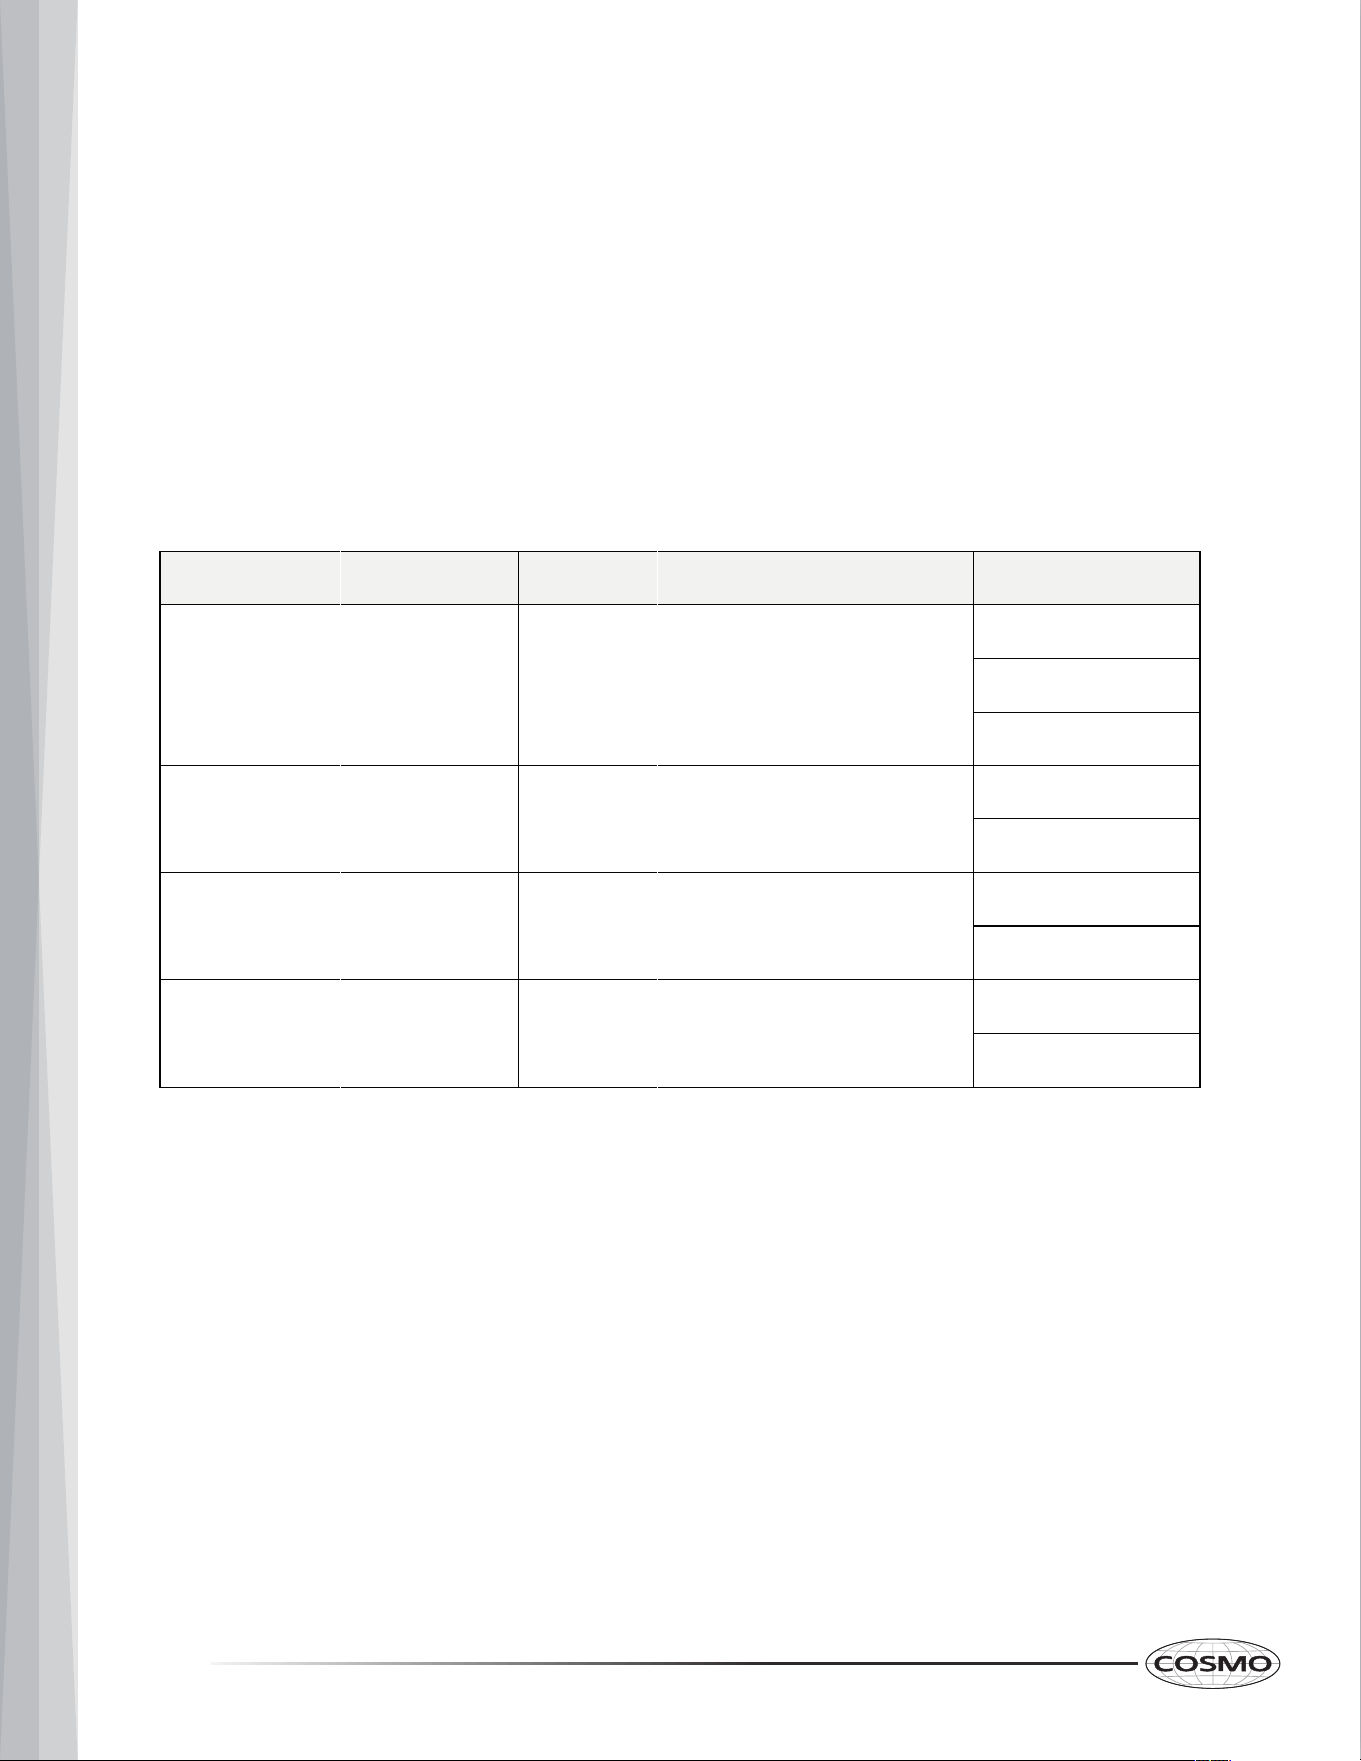
Display
Weight
Butter/Margarine BUTTER
1(STICH)
2(STICHS)
3(STICHS)
Chocolate
CHOCOLA
4
8
Cheese
CHEESE
8
16
Marshmallows
MARSHMA
5
10
Soften
1
. Pr
ess
SOFTEN once, The screen displays "BUTTER". "AUTO MENU" indicator
w
ill light.
2
. Co
ntinue to press SOFTEN, "BUTTER", "ICE-CRE" or "CHEESE" will display in
order.
3. Press START/+30SEC. to confirm the selection.
4. Press SOFTEN to select the weight. "OZ" will light except butter menu.
5. Press START/+30SEC. to start cooking. Buzzer sounds once. "OZ" will go out.
The cooking time starts counting down. Once cooking has finished, buzzer
sounds five times and "FINISH" displays.
Menu
Auto Menu--Melt
1
. Press MELT once, The screen displays "BUTTER". "AUTO MENU" indicator will
light.
2. Continue to press MELT
, "BUTTER", "CHOCOLA", "CHEESE" or "MARSHMA"
w
ill display in order.
3. Pr
ess START/+30SEC. to confirm the selection.
4. Press MELT to select the weight. "OZ" will light except butter menu.
5
. Press START/+30SEC. to start cooking. Buzzer sounds once. "OZ" will go out.
The cooking time starts counting down. Once cooking has finished, buzzer
sounds five times and "FINISH" displays.
Auto Menu--
15
Silent mode
To activate the silent mode:
1
. Press
"SETUP "
once, the screen displays "BUZ OFF".
2. Press
START/+30SEC.
. The oven will turn to standby mode. Buzzer is turned
off.
No beep will sound.
To deactivate the silent mode:
1. Press "SETUP " once, the screen displays "BUZ ON".
2. Press START/+30SEC.. The oven will turn to stanby mode. Buzzer is turned
on.
Buz zer will sound normally.
Lock Function for Children
You can use this function to prevent children from accidentally turning the oven
on.
To activate the lock:
In standby mode, press and hold STOP/CANCEL for three seconds. A beep
sounds and the locked icon will display.
To deactivate the lock:
In locked state, press and hold STOP/CANCEL for three seconds. A beep
sounds.
NOTE:
• The lock function for children cannot be set when the oven door has opened.
Display
Weight
Butter BUTTER
1(STICH)
2(STICHS)
3(STICHS)
Ice cream/ Frozen juice
8
16
Cream Cheese
CHEESE
32
3
8
Menu
ICE-CRE

Inquiring Function
1. If the clock has been set, the current time will display for three seconds by
pressing
CLOCK/KITCHEN TIMER in the cooking state.
2. In the microwave cooking state, press POWER to inquire the power level.
It will display for three seconds. In defrosting state and auto menu, the
power level cannot be inquired.
Other Specifications
1. The buzzer sounds once by efficient press, inefficient press will be no
responce.
2. In cooking state, OPEN cannot be pressed to open the drawer unless
STOP/CANCEL
is pressed to pause the cooking. Press CLOSE to close the
drawer. Then START/+30SEC. must be pressed to continue cooking.
3. If the cooking programme has been set , START/+30SEC. is not pressed
within 1 minute, The setting is invalid.
If the oven door is open, the lamp will light until the oven is powered off.
16

MICROWAVE DRAWER CARE
GENERAL CLEANING
To avoid damage to the microwave drawer caused by arcing due to soil buildup,
keep cavity, drawer, microwave inlet cover, and area where the drawer touches the
frame clean.
Always follow label instructions on cleaning products.
Clean with mild soap, water, and a soft cloth or sponge or as indicated below.
Exterior
• Clean the outside with mild soap and water; rinse and dry with a soft cloth. Do
not use any type of household or abrasive cleaner.
Stainless Steel Surface
• Wipe with a soft damp cloth and polish with a soft dry cloth to maintain its
beauty. There are also a variety of products designed especially for cleaning
and shining the stainless exterior of the microwave drawer. Follow cleaning
product directions carefully.
Front Side of the Drawer
• Wipe the window on both sides with a soft damp cloth to remove any spills or
spatters. Metal parts will be easier to maintain if wiped frequently with a soft
damp cloth. Avoid the use of spray and other harsh cleaners as they may stain,
streak or dull the drawer surface.
Control Panel
• Activate the control lock to lock the control panel before cleaning. (See "Control
Lock" section.) Wipe the panel with a cloth dampened slightly with water only.
Dry with a soft cloth. Do not scrub or use any sort of chemical cleaners.
Interior
• Wipe with a soft damp cloth. DO NOT USE ABRASIVE OR HARSH CLEANERS OR
SCOURING PADS. For heavier soil, use mild soap; wipe clean with a soft damp
cloth. Do not use any chemical oven cleaners.
17

Microwave Drawer Guides
• Remove the food crumbs from the microwave drawer guides. Wipe with a soft
dry cloth in order to keep the microwave drawer opening and closing smoothly.
Waveguide Cover
• Keep the waveguide cover located on the inside top of the microwave drawer
area clean to assure good microwave performance. Carefully wipe with a soft
damp cloth any food spatters from the surface of the cover immediately after
they occur. Built-up splashes may overheat and cause smoke or possibly catch
fire. Do not remove the waveguide cover.
18
TROUBLESHOOTING
First try the solutions suggested here that may help you avoid a service call. If you
need further assistance or more recommendations, refer to the limited warranty
page or the contact information at the end of this manual.
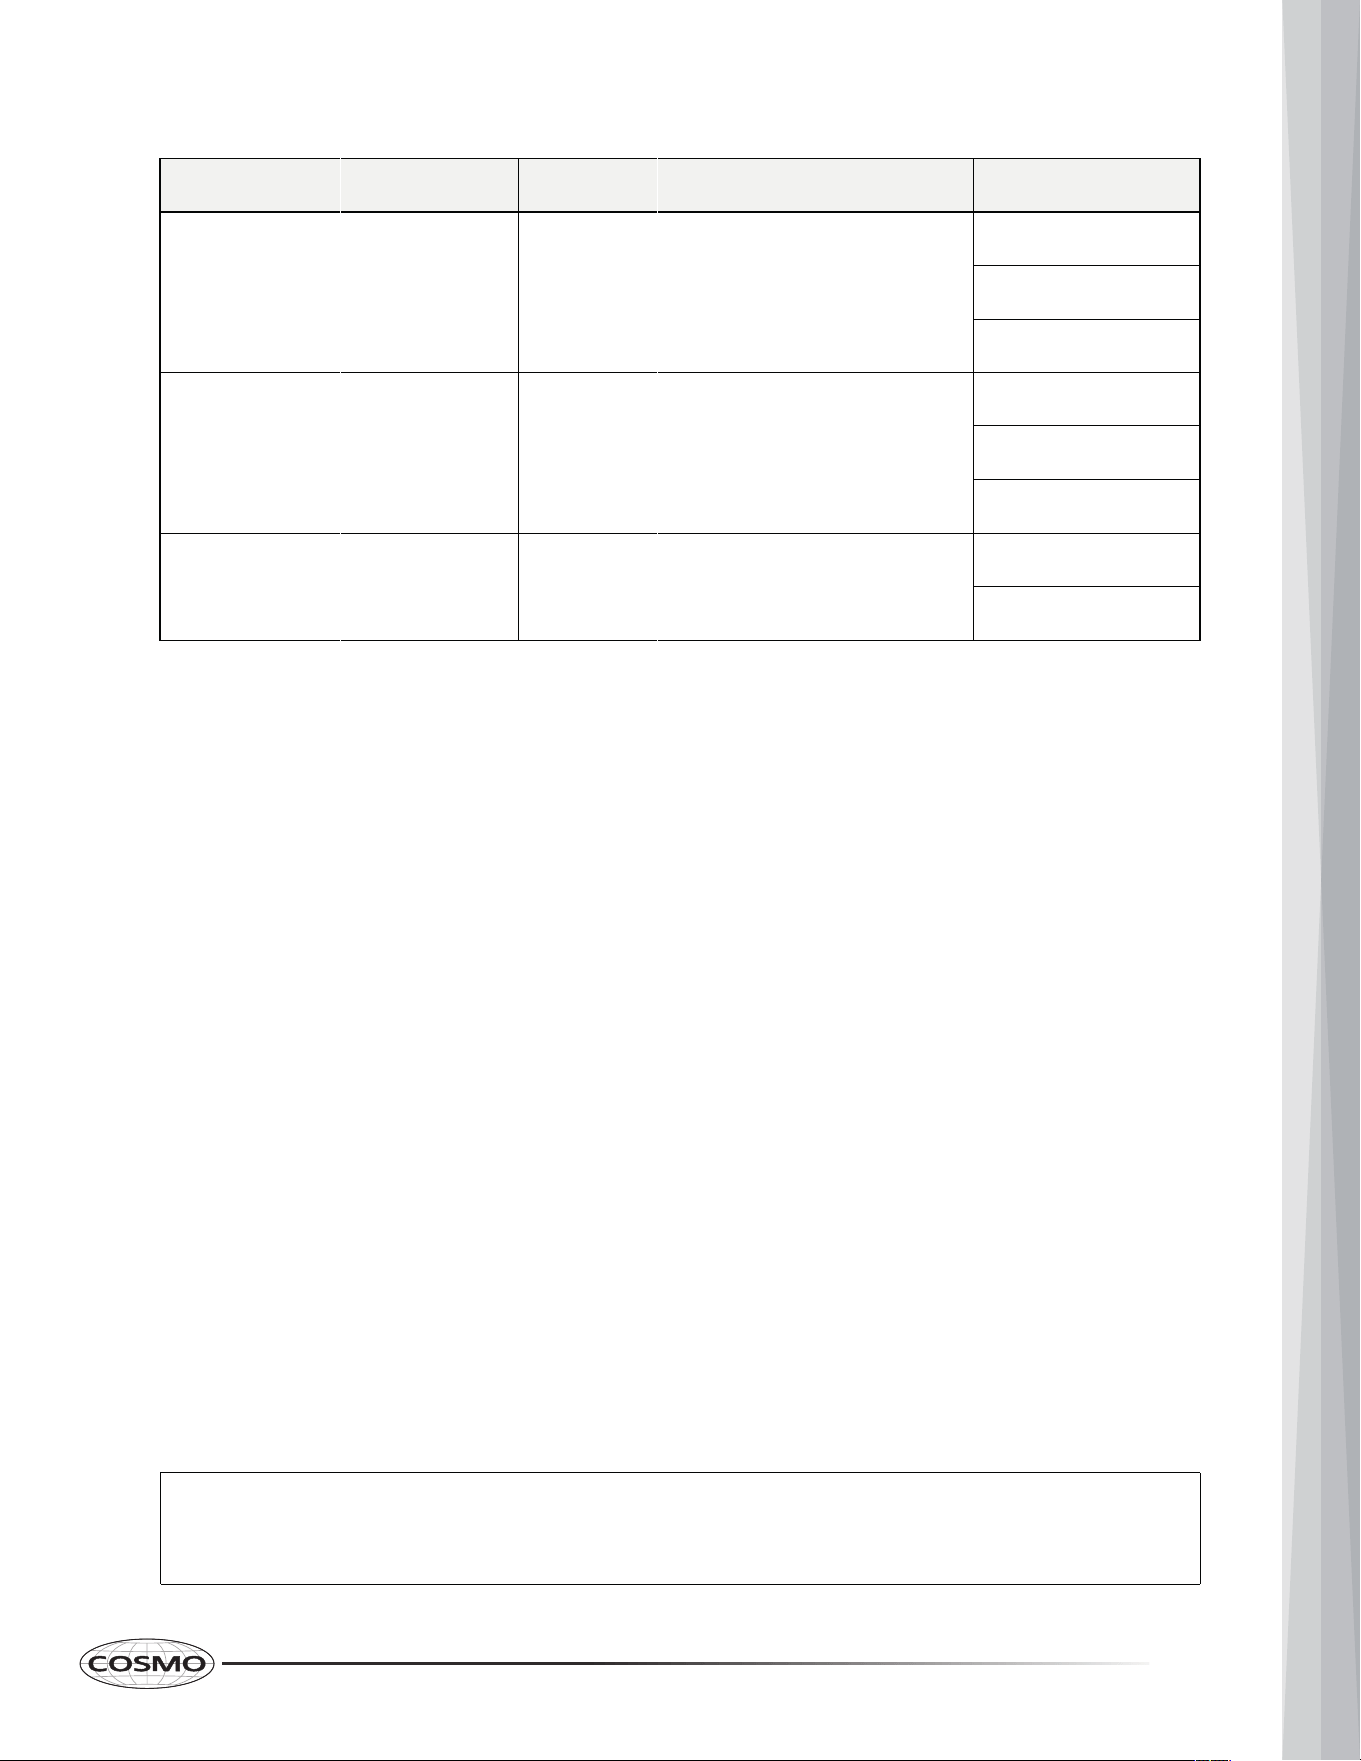
If you experience Recommended Solutions
Microwave drawer
will not start or
operate
Check the following:
• Household fuse or circuit breaker: If a household fuse
has blown or a circuit breaker has tripped, replace the
fuse or reset the circuit breaker. If the problem continues,
call an electrician.
• Magnetron: Try to heat 1 cup (250 mL) of cold water for 2
minutes at 100% cooking power. If water does not heat,
check if the drawer is firmly closed and try again. If
microwave drawer still does not operate, call for service.
• Drawer: Check and remove any packaging material
attached to inside of the drawer or below the drawer,
then firmly close drawer.
If a message "Food" appears in the display, the drawer
has been closed for 5 minutes or more without the
microwave oven being started. This occurs to avoid
unintended starting of the microwave oven. Open and
close the drawer, then start the cycle again.
• Timer: When the timer is running, cooking functions
cannot be operated.
• Control: Make sure control is set properly. Make sure
Control Lock is not activated. Make sure Demo mode (on
some models) is OFF.
Arcing in the
microwave drawer
• Soil buildup: Soil buildup on cavity walls, microwave inlet
cover, cooking rack supports, and area where the drawer
door touches the frame can cause arcing. See
"Microwave Drawer Care" section.
• Cookware: Use microwave-safe cookware only.
19

If you experience Recommended Solutions
Unevenly cooked
food
• Turn over or stir food midway through the cooking.
• Completely defrost food before cooking.
• Use appropriate cooking time and power level.
• Use microwave-safe cookware only.
Overcooked food • Use appropriate cooking time and power level.
Undercooked food • Completely defrost food before cooking.
• Use appropriate cooking time and power level.
• Use microwave-safe cookware only.
Improper
defrosting
• Turn over or stir food midway through the cooking.
• Use appropriate cooking time and power level.
• Use microwave-safe cookware only.
20

LIMITED WARRANTY
WARRANTY AND SERVICE
TO RECEIVE WARRANTY SERVICE, YOUR PRODUCT MUST BE REGISTERED.
TO REGISTER AND REVIEW FULL WARRANTY DETAILS, VISIT:
WWW.COSMOAPPLIANCES.COM/WARRANTY
SCAN TO REGISTER
CUSTOMER SUPPORT
TO CHAT WITH US LIVE FOR ASSISTANCE, VISIT:
WWW.COSMOAPPLIANCES.COM/CHAT
SCAN TO CHAT
21

IMPORTANT
Do Not Return This Product To The Store
If you have a problem with this product, please contact COSMO Customer Support at
+1 (888) 784-3108
DATED PROOF OF PURCHASE, MODEL #, AND SERIAL # REQUIRED FOR WARRANTY
SERVICE.
IMPORTANT
Ne pas Réexpédier ce Produit au Magasin
Pour tout problème concernant ce produit, veuillez contacter le service des
consommateurs Cosmo Customer Support au
+1 (888) 784-3108
UNE PREUVE D’ACHAT DATEE EST REQUISE POUR BENEFICIER DE LA GARANTIE.
IMPORTANTE
No regrese este producto a la tienda
Si tiene algún problema con este producto, por favor contacte el ayuda al cliente
COSMO al
+1 (888) 784-3108
(Válido solo en E.U.A.)
NECESITA UNA PRUEBA DE DE COMPRA FECHADA, NÚMERO DE MODELO Y DE SERIE
PARA EL SERVICIO DE LA GARANTÍA.
Correct d
isposal of this product:
This marking indicates that this appliance should not be
disposed with other household wastes. To prevent possible
harm to the environment or human health from uncontrolled
waste disposal, recycle it responsibly to promote the
sustainable reuse of material resources.
22

MEMO
23

Cosmo is constantly making efforts to improve
the quality and performance of our products, so
we may make changes to our appliances without
updating this manual.
Electronic version of this manual is available at:
www.cosmoappliances.com
APPLIANCES
