

2
EN
TABLE OF CONTENTS
Section Page
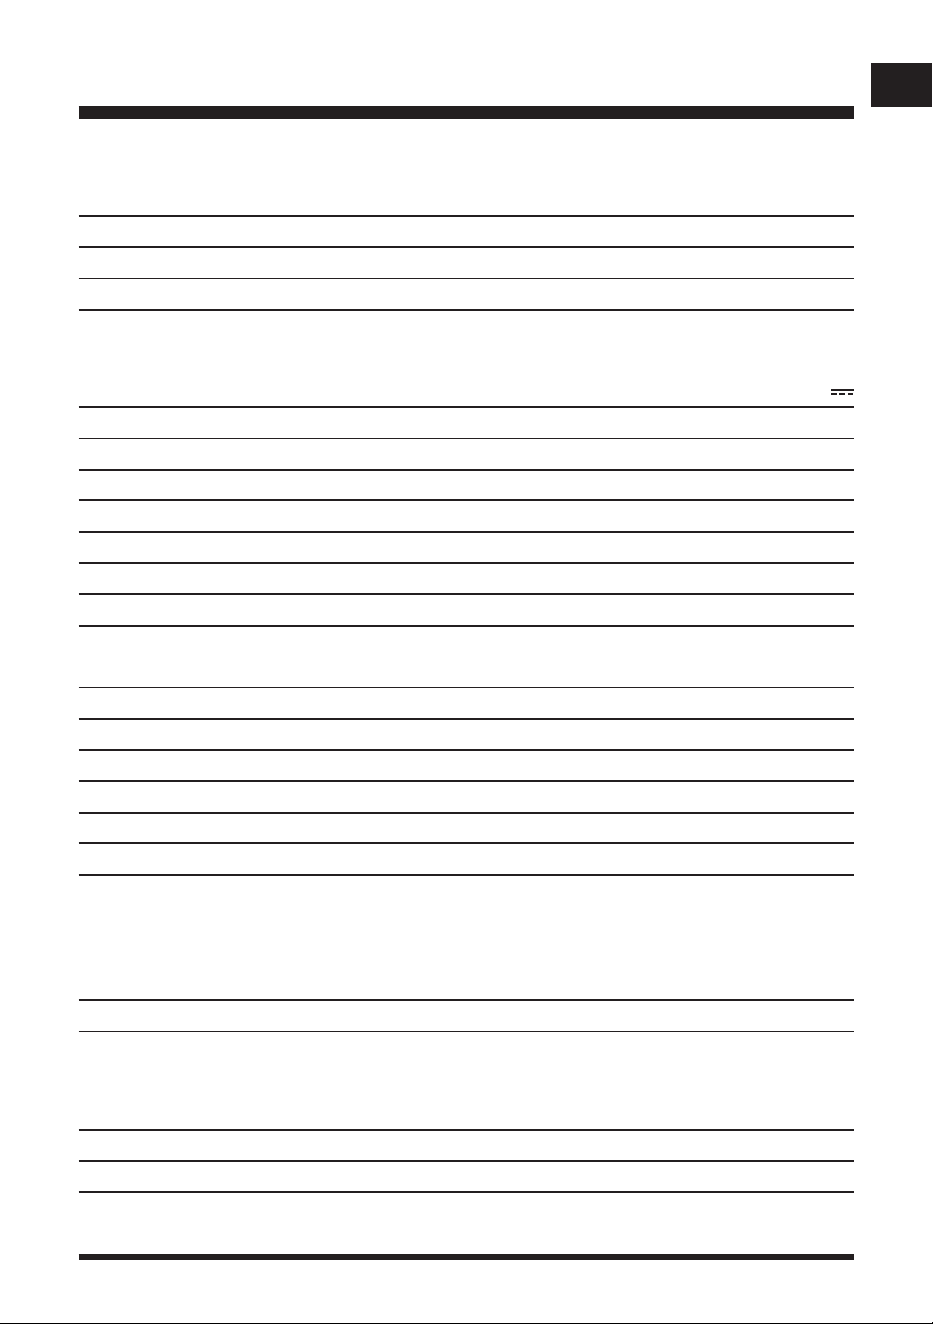
TABLE OF CONTENTS
SPECIFICATIONS
IMPORTANT SAFETY INSTRUCTIONS
SYMBOLS
KNOW YOUR ROBOTIC MOWER
SET UP
ASSEMBLY
OPERATION
MAINTENANCE
ENVIRONMENTALLY SAFE BATTERY DISPOSAL
TROUBLESHOOTING
LAWNMASTER
®
WARRANTY
EXPLODED VIEW
PARTS LIST
NOTES
2
3-5
6-10
11-13
14-15
16-22
23-28
29-49
50-53
54
55-62
63
64
65
66-67
3
EN
Voltage
Cutting System
Blade Motor Speed
Cutting Width
Cutting Height Adjustment
Narrowest Possible Passage
Power Consumption during Cutting
Maximum Slope for Cutting Area
Working Capacity: Auto charging Mode
(Depending on Product Specication)
Working Capacity: Drop and Mow (Using a single battery once)
Working Capacity: Drop and Mow (With repeated uses)
Wi-Fi: Operating Frequency Band
Wi-Fi: Maximum Transmission Power
BLE: Operating Frequency Band
BLE: Maximum Transmission Power
GNSS: Operating Frequency Band
GNSS: Maximum Transmission Power
SPECIFICATIONS
MOWING
Length
Width
Height
Weight (Without 4.0 Ah Battery)
DIMENSIONS
21.65'' (55 cm)
14.88'' (37.8 cm)
9.65'' (24.5 cm)
18.19 lbs (8.25 kg)
3 Pivoted Cutting Blades
3400 RPM
7'' (18 cm)
1.2''-3.1'' (30-80 mm, 6 Positions)
≥3.3’ (1 m)
43 W±20 %
20°
861 sq.ft
1615 sq.ft
2400 MHz~2483.5 MHz
19 dBm
2400 MHz~2483.5 MHz
10 dBm
GPS: L1, L5
BDS: B1l
GLONASS: G1
Galileo: E1, E5a
Receiving
21.6 V
Up to 1/6 acre
Robotic Lawnmower
Base Station
Power Adaptor
IP-CLASSIFICATION
IPX4
IPX4
IPX4

4
EN
SPECIFICATIONS
Model No.
Voltage Of Battery
Capacity of Battery
Battery Type
Weight of Battery
BATTERY PACK
24LB4005-CN
24 V
4.0 Ah
Lithium-Ion
1.54 lbs (0.7 kg)
Sound Power Level (L
WA
) Measured
Noise Emissions Uncertainties K
WA
Sound Power Level (L
WA
) Guaranteed
Sound Pressure Level (L
PA
) at the Operator’s Ear
The noise emission declarations conforms to EN 50636-2-107:2015
Noise emissions in the environment measured as sound power (LWA) in conformity with EC
directive 2000/14/EC. The guaranteed sound power level includes variation in production as well
as variation from the test code with 1-3 dB(A).
Sound pressure noise uncertainties KpA, 2-4 dB(A).
NOISE EMISSIONS MEASURED IN THE ENVIRONMENT AS SOUND POWER
65.4 dB(A)
3 dB(A)
68 dB(A)
54.4 dB(A)
Battery Type
Power Supply
Charging Station Current
Power Cable Length
Charging Period (Battery Fully Discharged)
ELECTRICAL SYSTEM
24V Max Lithium-Ion, 4.0 Ah
100-240V
2.0 A
10 m
2 hours

5
EN
SPECIFICATIONS
About This Product
Thank you for choosing the LawnMaster
®
VBRM701i4 Plus robotic lawn mower. This mower will
independently mow the lawn in a random pattern before returning to the base station to charge the
battery. The mower will alternately mow and charge for the working time selected, before returning
to the base station to standby until the next scheduled working period. The mower detects grass
in order to know where to mow and is also equipped with ultrasonic sensors which detect higher
obstacles such as shrubs and fences. For successful operation, the lawn must be dened with at
borders such as paving or raised edges. When the mower does not detect grass or encounters an
obstacle, it changes route in a random manner and starts mowing again in a new direction. The
mower can be moved around to different lawn areas provided that they are dened as described in
this instruction manual.
The mower uses a detachable MX 24V battery which is compatible with all products in the
LawnMaster
®
24V range. Excessively long or wet grass may impact performance, it is therefore
important to maintain a regular mowing schedule to keep on top of growth and development of a
neat lawn nish.
This mower can be controlled remotely using our OcuMow
®
app and requires a Wi-Fi network
connection.
First Operation
The VBRM701i4 Plus is designed to detect grass and move into areas it identies as grass. If the
mower cannot see a clear boundary it will continue to move into areas off the lawn and into plants
that it may identify as grass. Trimming the lawns edge with a grass trimmer before use will help
dene a better lawn edge. During rst operation on a new lawn, it is important to monitor the robot
as it detects edges to see where the boundary denition needs to be improved. Please read the
instructions fully, our instructions have been written to help you to get the best results and also
provides useful ideas for temporary boundaries as well as examples of how to dene a better lawn
edge in all seasons.
FOR YOUR SAFETY: CAREFULLY READ AND UNDERSTAND ALL INSTRUCTIONS.
6
EN
IMPORTANT SAFETY INSTRUCTIONS
READ CAREFULLY BEFORE USE. KEEP FOR FUTURE REFERENCE
TRAINING
■ Read the instructions carefully. Be familiar with the controls and the proper use of the machine.
■ Never allow people unfamiliar with these instructions or children to use the machine. Local
regulations may restrict the age of the operator.
■ The operator or user is responsible for accidents or hazards occurring to other people or their
property.
■ The operator or user is responsible for informing neighbours about the risks. Keep a safe
distance from the machine when operating.
■ If your lawn is open to the street and/or your neighbours, you must be present during the
mower’s operation to prevent others from accessing your lawn. Alternatively, you must protect /
fence your lawn so that others do not access the mower during operation.
■ This appliance is not intended for use by persons (including children) with reduced physical,
sensory or mental capabilities, or lack of experience and knowledge, unless they have been
given supervision or instruction concerning use of the appliance by a person responsible for
their safety. Children should be supervised to ensure that they do not play with the appliance.
IMPORTANT!
The robotic lawn mower can be dangerous if used incorrectly.
WARNING
Never use the robotic lawn mower when people, especially children or pets, are in the cutting area.
WARNING
PREPARATION
■ Ensure that the lawn area is dened as described in the section Preparing the Mowing Area and
Deng the Mowing Area.
■ Periodically inspect the area where the machine is to be used and remove all stones, sticks, wires,
pet toys, and other foreign objects.
■ Periodically visually inspect to see that the blades, blade bolts and cutting assembly are not worn
or damaged. Replace worn or damaged blades and bolts in sets to preserve balance.
■ On multi-spindle machines, take care as rotating one blade can cause other blades to rotate.
OPERATION
■ Do not leave the machine to operate unattended if you know that there are pets, children or
people in the vicinity.
■ Never operate the machine with defective guards, or without safety devices, for example
deectors in place.
■ Do not put hands or feet near or under rotating parts. Do not touch moving hazardous parts before

7
EN
IMPORTANT SAFETY INSTRUCTIONS
these have come to a complete stop. Keep clear of the discharge opening at all times.
■ Never pick up or carry a machine while the motor is running.
■ Always switch off the On/Off switch and remove the battery:
- Before clearing a blockage;
- Before checking, cleaning or working on the machine.
■ It is not permitted to modify the original design of the mower. All modications are made at your
own risk.
■ Avoid using the mower and its peripherals in bad weather conditions, especially when there is a
risk of lightning.
■ Do not use the mower for any purpose other than cutting the lawn.
■ In the event of accident or breakdown while the mower is cutting the lawn, immediately press the
STOP button.
■ Do not put anything on top of the mower. Never allow people or animals to sit on the mower.
■ Do not use the mower if the On/Off switch does not work.
■ Do not use the mower when a sprinkler system is running. Ensure that the mower and the
sprinkler system do not operate at the same time. Do not wash the mower with running water and
do not immerse it in water. This product is not waterproof.
■ Always switch off the mower using the On/Off Switch when the mower is not in use.
■ The robotic lawn mower must never be stored, operated or charged in temperatures below 32ºF
(0°C) or above 122ºF (50°C). This might cause damage to the product or battery.
■ Mow only in daylight or in good articial light. The mower requires good light to correctly identify
the lawn area.
■ Avoid operating the machine in very long or wet grass.
■ Never use the machine in or near explosive and/or ammable environments.
■ Do not operate the machine when barefoot or wearing open sandals. Always wear substantial
footwear and long pants.
■ Always be sure of your footing on slopes.
■ Always switch on the motor according to instructions keeping feet away from the blade(s).
■ Warning signs shall be placed around the working area of the robotic lawn mower if it is used in
public areas. The signs shall have the following text:
Warning! Automatic lawn mower! Keep away from the machine! Supervise children!
MAINTENANCE AND STORAGE
■ Keep all nuts, bolts, and screws tight to be sure the machine is in safe working condition.
■ Replace worn or damaged parts for safety.
■ Only use replacement blades recommended by the manufacturer.
■ In the event of coming into contact with electrolytes caused by battery leakage, ush the affected
area with water/neutralizing agent for several minutes. Seek medical attention if ingested, or if it
comes into contact with your eyes, or if skin irritation persists.
■ Servicing of the machine should be according to manufacturers’ instructions.
■ In case of abnormal vibrations, stop the mower, remove the safety key and the battery pack and
check for any damage to the blade. Replace blades in full sets to preserve balance. If the vibration
continues, contact Customer Service.
■ Use heavy gloves when inspecting or servicing blades.
■ Cleaning and maintenance must not be performed by unsupervised children.
■ Do not use the mower when the cutting blade is damaged. Replace the cutting blade.
■ Use only original equipment and accessories. It is not permitted to modify the original design of
the mower. All modications are made at your own risk.
8
EN
IMPORTANT SAFETY INSTRUCTIONS
■ Always remove the battery pack before storing the mower.
TRANSPORTATION
Within the working area:
■ Press the STOP button to stop the mower. Use the carry handle to carry the mower. Carry the
mower with the blade disc away from the body.
Long distances:
■ When transporting your mower over long distances, press the STOP button and turn the mower
off using the power button.
■ IMPORTANT! It is recommended to keep the original packaging to avoid damage during
transportation over long distances.
BATTERY SAFETY INFORMATION
■ This battery is only compatible with LawnMaster
®
24LFC14-ETL, 24LFC02-ETL or 24LSC01-ETL
chargers.
■ Recharge only with the charger specied by the manufacturer and listed in this manual. A charger
that is suitable for one type of battery pack may create a risk of re when used with another
battery pack.
■ Do not place battery powered lawn mowers or their batteries near re or heat. This will reduce the
risk of explosion and possibly injury.
■ Do not open or mutilate the battery. Released electrolyte is corrosive and may cause damage to
the eyes or skin. It may be toxic if swallowed. Fumes may be emitted. In such situations, move to
a well-ventilated area, preferably outdoors and seek medical assistance in the event of discomfort.
■ Do not dispose of battery packs in re. They will explode or leak and cause injury. Liquid ejected
from the battery may cause irritation or burns.
■ Do not crush, drop or damage the battery pack. Do not use a battery pack or charger that has
been dropped or received a sharp blow. A damaged battery is subject to explosion. Properly
dispose of a dropped or damaged battery immediately.
■ Batteries can explode in the presence of an ignition source, such as a pilot light. To reduce the risk
of serious personal injury, never use any cordless product in the presence of an open ame. An
exploded battery can propel debris and chemicals. If exposed, wash with water immediately.
■ Under extreme usage or temperature conditions, battery leakage may occur. If liquid comes in
contact with your skin, wash immediately with soap and water. If liquid gets into your eyes, ush
them with clean water for at least 10 minutes, then seek immediate medical attention. Following
this rule will reduce the risk of serious personal injury.
■ When the battery pack is not in use, keep it away from other metal objects like: paper clips, coins,
keys, nails, screws, or other small metal objects that can make a connection from one terminal to
Do not lift the mower when it is parked in the base station. It can damage the base station and/or the
mower. Press STOP button and pull the mower out of the base station before lifting it.
WARNING
Disconnect all connections to the base station (power supply) if there is a risk of a thunderstorm.
WARNING

9
EN
another. Shorting the battery terminals together may cause burns or a re.
■ Do not expose a battery pack or lawn mower to re or excessive temperature. Exposure to re or
temperature above 265°F (130°C) may cause an explosion.
■ Do not modify or attempt to repair the lawn mower or the battery pack (as appliance) except as
indicated in the instructions for use and care.
■ Follow all charging instructions and do not charge the battery pack or lawn mower outside of the
temperature range specied in the instructions. Charging improperly or at temperatures outside of
the specied range may damage the battery and increase the risk of re.
■ All tool services should be performed by a qualied repair person using only identical replacement
parts. This will ensure that the safety of the product is maintained.
BATTERY CHARGER
■ To reduce the risk of injury, charge only the specied lithium-ion rechargeable batteries. Other
types of batteries may burst, causing personal injury or damage.
■ Keep cord and charger away from heat to prevent damage to housing or internal parts.
■ Do not operate charger with a damaged cord or plug, which could cause shorting and electric
shock. If damaged, immediately discontinue use. Replace the charger with the identical unit as
listed in the Parts List of this manual.
■ Do not use a charger that has been dropped or received a sharp blow.
■ Do not disassemble charger. Take it to a qualied service center to check or replace it. Incorrect
reassembly may result in a risk of electric shock or re.
■ Do not abuse the charger cord. Never use the cord for carrying, pulling.
■ Keep cord away from heat, oil, sharp edges or moving parts. Damaged or entangled cords
increase the risk of electric shock. If the charger cord is damaged, replace the charger with an
identical model as listed in this manual.
■ A charger that is suitable for one type of battery pack may create a risk of re when used with
another battery pack.
■ Charge the battery at the normal charging temperature between 40°F (4°C) and 100°F (38°C).
CHARGING STATION SAFETY INFORMATION
■ Do not use non-rechargeable batteries!
■ Do not operate the charging station with a damaged cord or plug, which could cause shorting
and electric shock. If damaged, immediately discontinue use. Replace the charging station with
the identical unit as listed in the Parts List of this manual. If the power cord for this equipment is
damaged, it must be replaced by the manufacturer, a customer service agent of the same or a
fully qualied person in order to prevent hazards.
■ Operate the charging station only with the appropriate original batteries. Charging other batteries
may result in injuries and risk of re.
■ The voltage indicated on the charging station rating plate must correspond to the voltage of the
power source.
■ Never touch the mains plug with wet hands.
PRODUCT END OF USE
■ The mower and its accessories should be recycled correctly at the end of their life to prevent
waste of electrical and electronic equipment from ending up in landll sites, and to protect and
improve the quality of the environment.
■ Do not dispose of the mower or any other of its parts (including the Power Supply and Base
Station) as unsorted municipal waste - they should be collected separately.
■ Ask your local distributor/dealer about return and collection systems availability.
IMPORTANT SAFETY INSTRUCTIONS

10
EN
IMPORTANT SAFETY INSTRUCTIONS
■ Do not dispose of the battery pack in a re, and do not place used batteries in your household
waste.
■ Dispose of batteries in accordance with the local regulations where they will be recycled in an
environmentally friendly manner.
FCC COMPLIANCE
■ This device complies with Part 15 of the FCC Rules. Operation is subject to the following two
conditions:
- This device may not cause harmful interference, and
- This device must accept any interference received, including interference that may cause
undesired operation.
■ NOTE: This equipment has been tested and found to comply with the limits for a Class B digital
device, pursuant to Part 15 of the FCC Rules. These limits are designed to provide reasonable
protection against harmful interference in a residential installation.
■ This equipment generates, uses and can radiate radio frequency energy and, if not installed
and used in accordance with the instructions, may cause harmful interference to radio
communications. However, there is no guarantee that interference will not occur in a particular
installation. If this equipment does cause harmful interference to radio or television reception,
which can be determined by turning the equipment off and on, the user is encouraged to try to
correct the interference by one or more of the following measures:
- Reorient or relocate the receiving antenna.
- Increase the separation between the equipment and receiver.
- Connect the equipment into an outlet on a circuit different from that of the receiver.
- Consult the dealer or an experienced radio/ TV technician for help.
SAVE THESE INSTRUCTIONS
Refer to them frequently and use them to instruct others who may use this power tool. If you loan
someone this power tool, loan them these instructions also.
11
EN
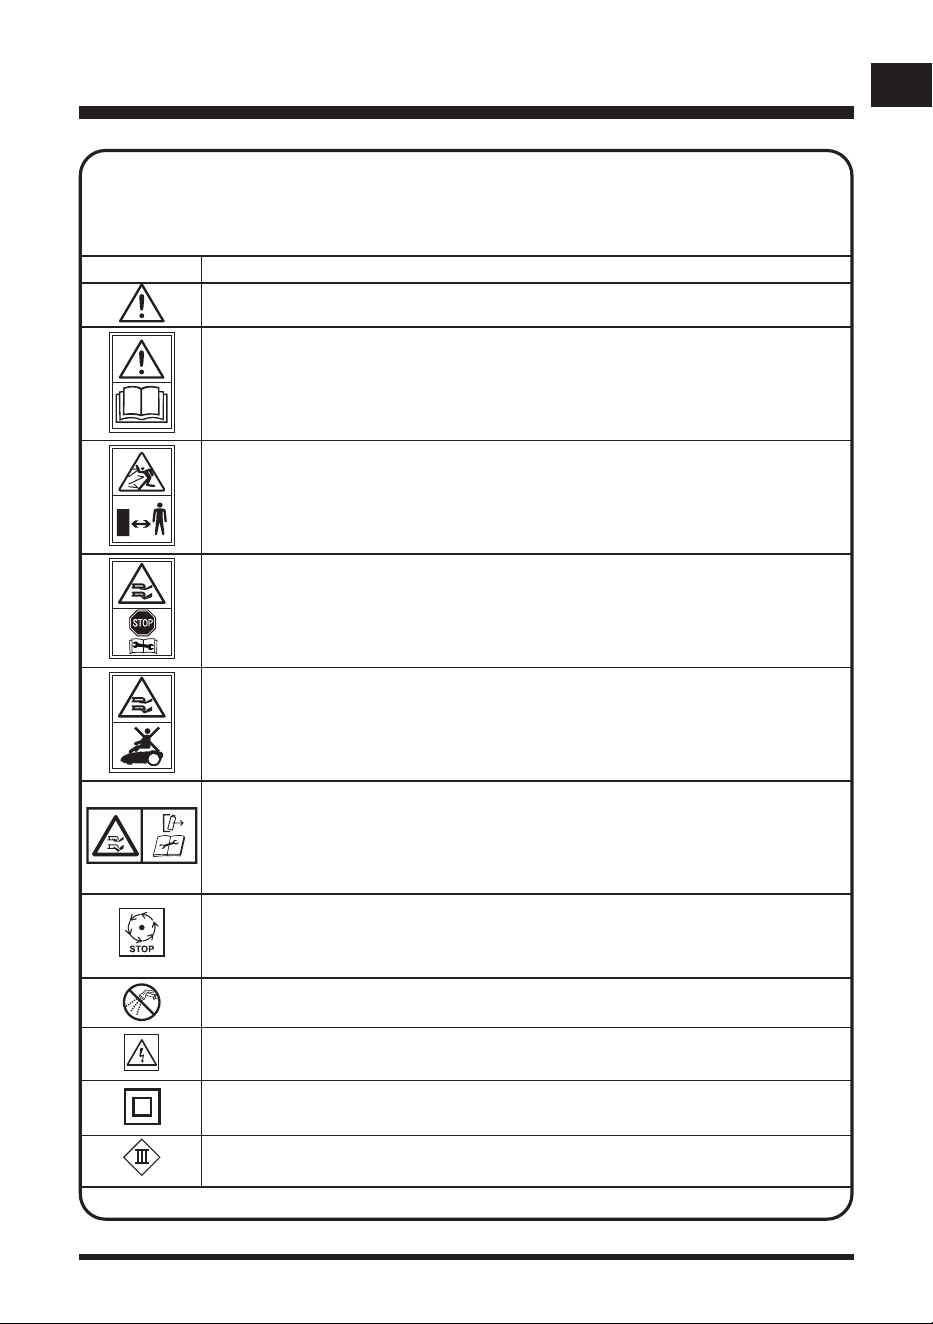
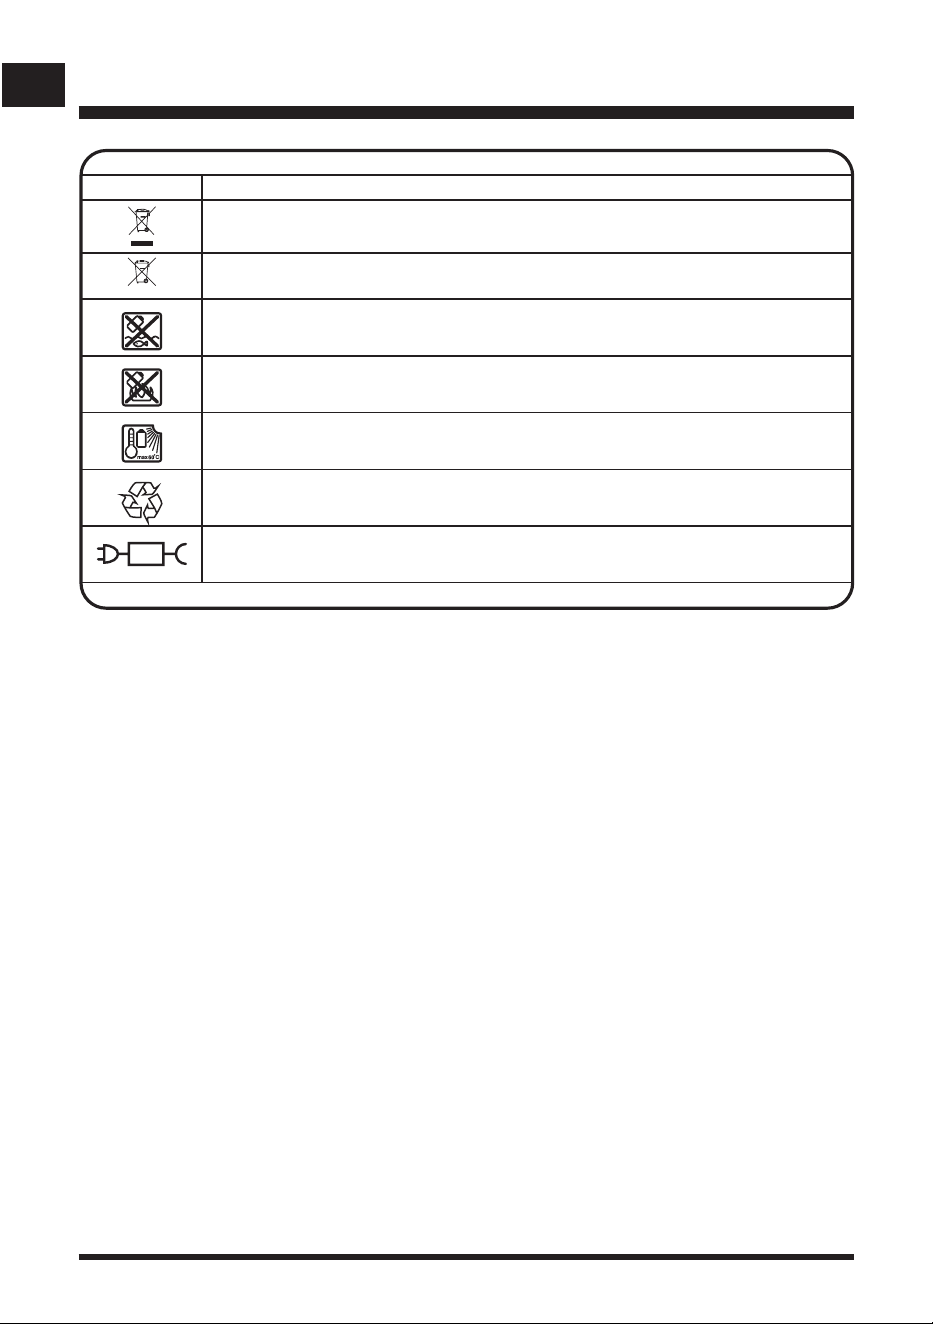
SYMBOL DESIGNATION/EXPLANATION
WARNING - The robotic lawnmower can be dangerous if used incorrectly.
Read instruction manual before operating the machine.
WARNING: Beware of thrown objects. Keep bystanders away.
Remove the battery before working on or lifting the machine.
Do not ride on the machine.
WARNING: Do not touch rotating blade. Disconnect battery before maintenance.
Wait until all moving parts have stopped completely before touching them. The
blade may continue to rotate after the machine is switched off, a rotating blade
can cause injury.
Do not wash or immerse the machine in water.
WARNING! Beware of electric shocks.
Protection class II (Double insulation)
Class III machines.
SYMBOLS
Some of the following symbols may be used on this product. Please study them and
learn their meaning. Proper interpretation of these symbols will allow you to operate
the product better and safer.
12
EN
SYMBOLS
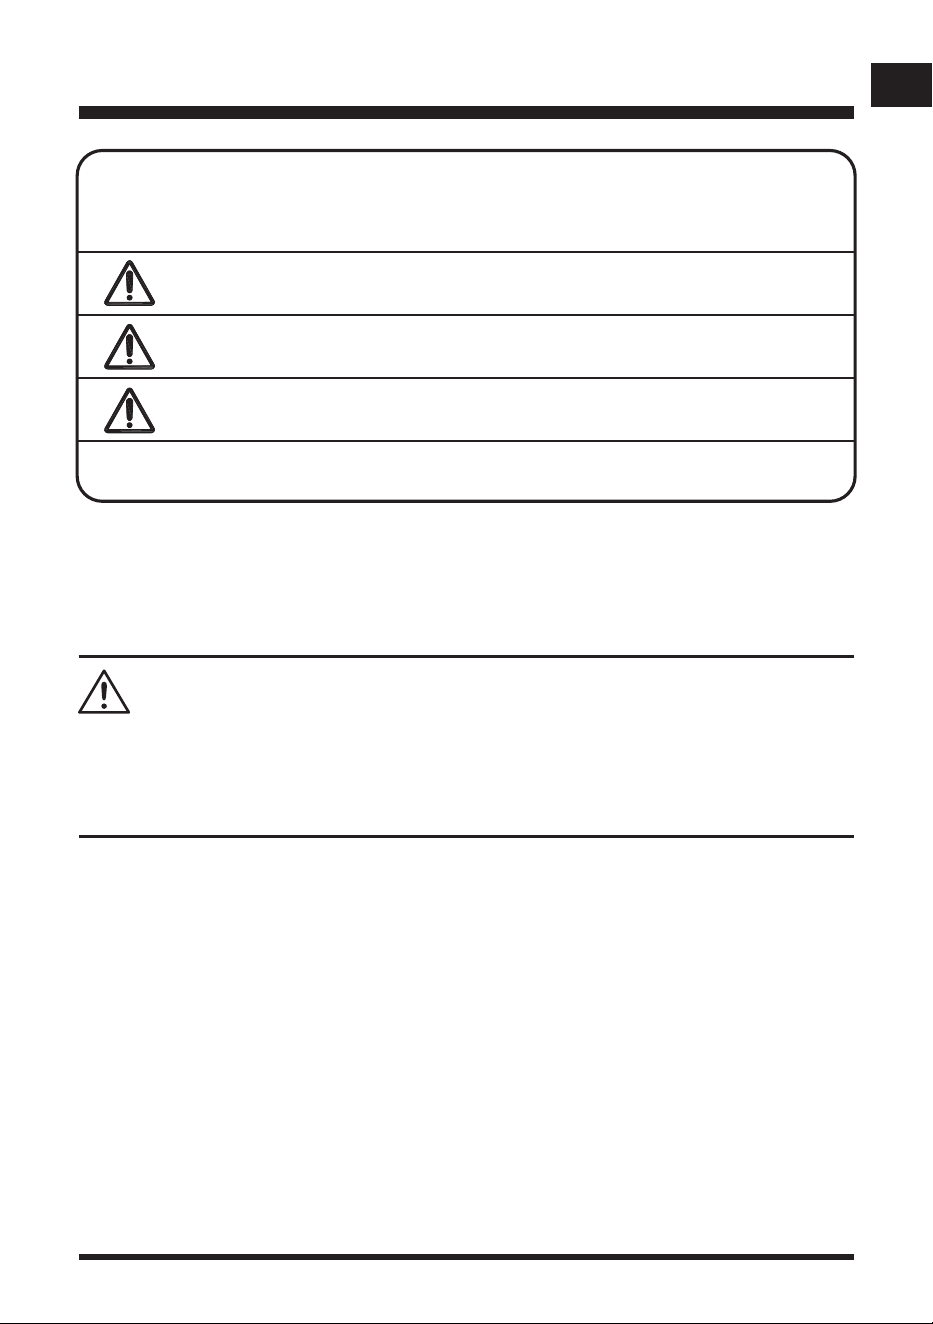
SYMBOL DESIGNATION/EXPLANATION
Electrical appliances must not be disposed of with the domestic waste.
Batteries contain Lithium-ion. Do not dispose of batteries in household waste.
Do not dispose of battery packs in rivers or immerse in water.
Do not dispose of battery packs in re.
Do not subject the battery to direct sunlight over long periods and do not leave it
on or near a heat source (max. 60°C).
Recycle electrical waste products in an environmentally safe way where facilities
exist.
WARNING: For the purposes of recharging the battery, only use the detachable
supply unit provided with this appliance.
Li-ion
13
EN
To avoid serious personal injury, do not attempt to use this product until you read thoroughly and
understand completely the Operator’s Manual.
If you do not understand the warnings and instructions in the Operator’s Manual, do not use this
product. Call Customer Service for assistance (Toll free number 1-866-384-8432).
WARNING
SYMBOLS
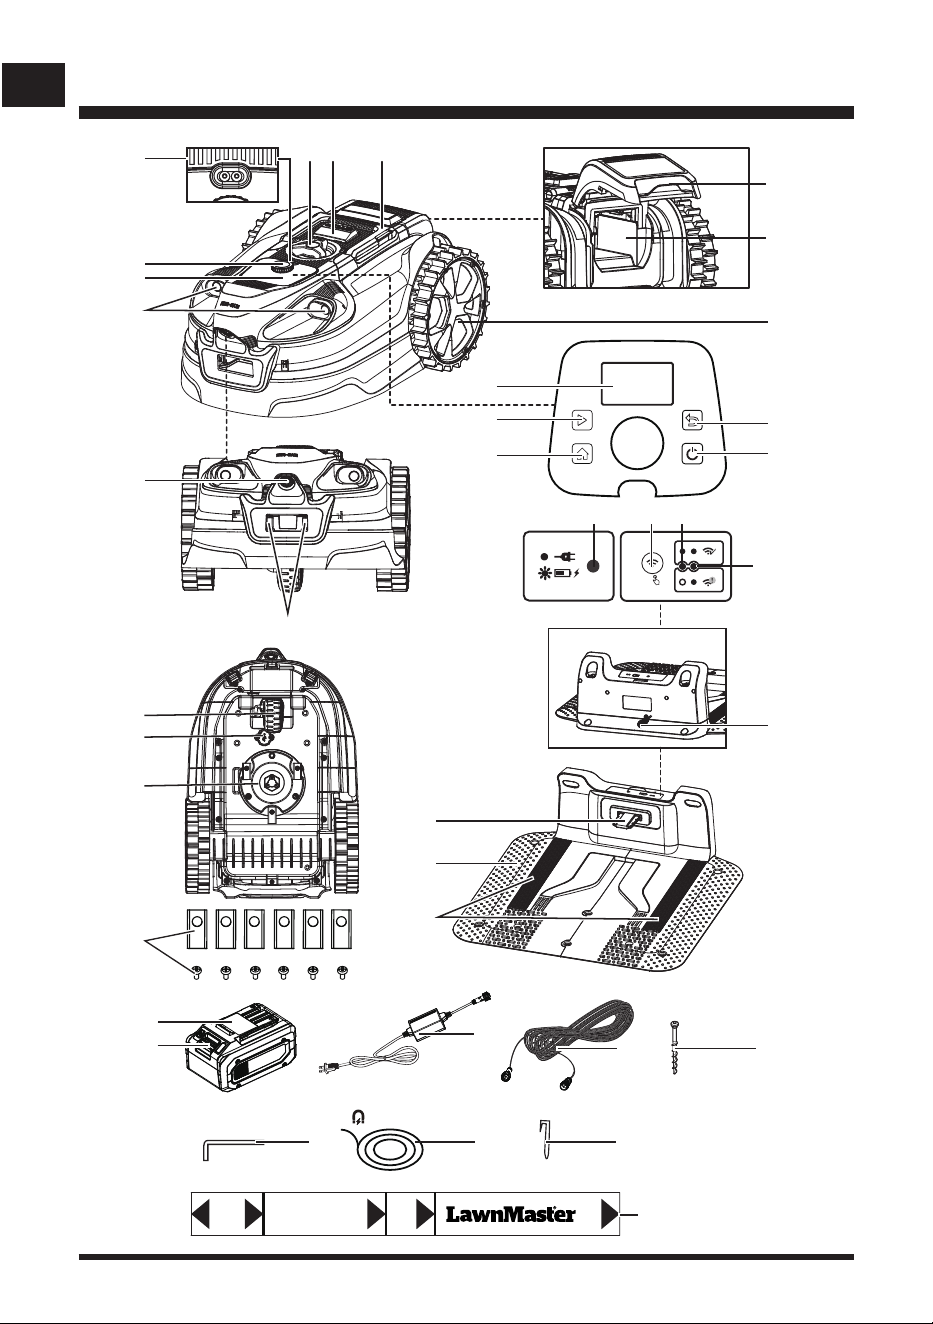
SYMBOL SIGNAL MEANING
DANGER
Indicates an imminently hazardous situation, which, if not
avoided, will result in death or serious injury.
WARNING
Indicates a potentially hazardous situation, which, if not
avoided, could result in death or serious injury.
CAUTION
Indicates a potentially hazardous situation, which, if not
avoided, may result in minor or moderate injury.
NOTICE
(Without Safety Alert Symbol) Indicates a situation that may
result in property damage.
The following signal words and meanings are intended to explain the levels of risk
associated with this product.
SERVICE
Service requires extreme care and knowledge and should be performed only by a qualied service
technician. When servicing, use only identical replacement parts.
For troubleshooting or replacement, please call Customer Service for assistance (Toll free number
1-866-384-8432).
14
EN
KNOW YOUR ROBOTIC MOWER
21
22
23
24
123
4
5
6
7
8
9
10
11
12
13
14
29
25
15
5S
282726
30
34
37
3635
31
33
32
2.36''
13.78''
0
6.3''
7.87''
38
20
18
19
17
16

15
EN
KNOW YOUR ROBOTIC MOWER
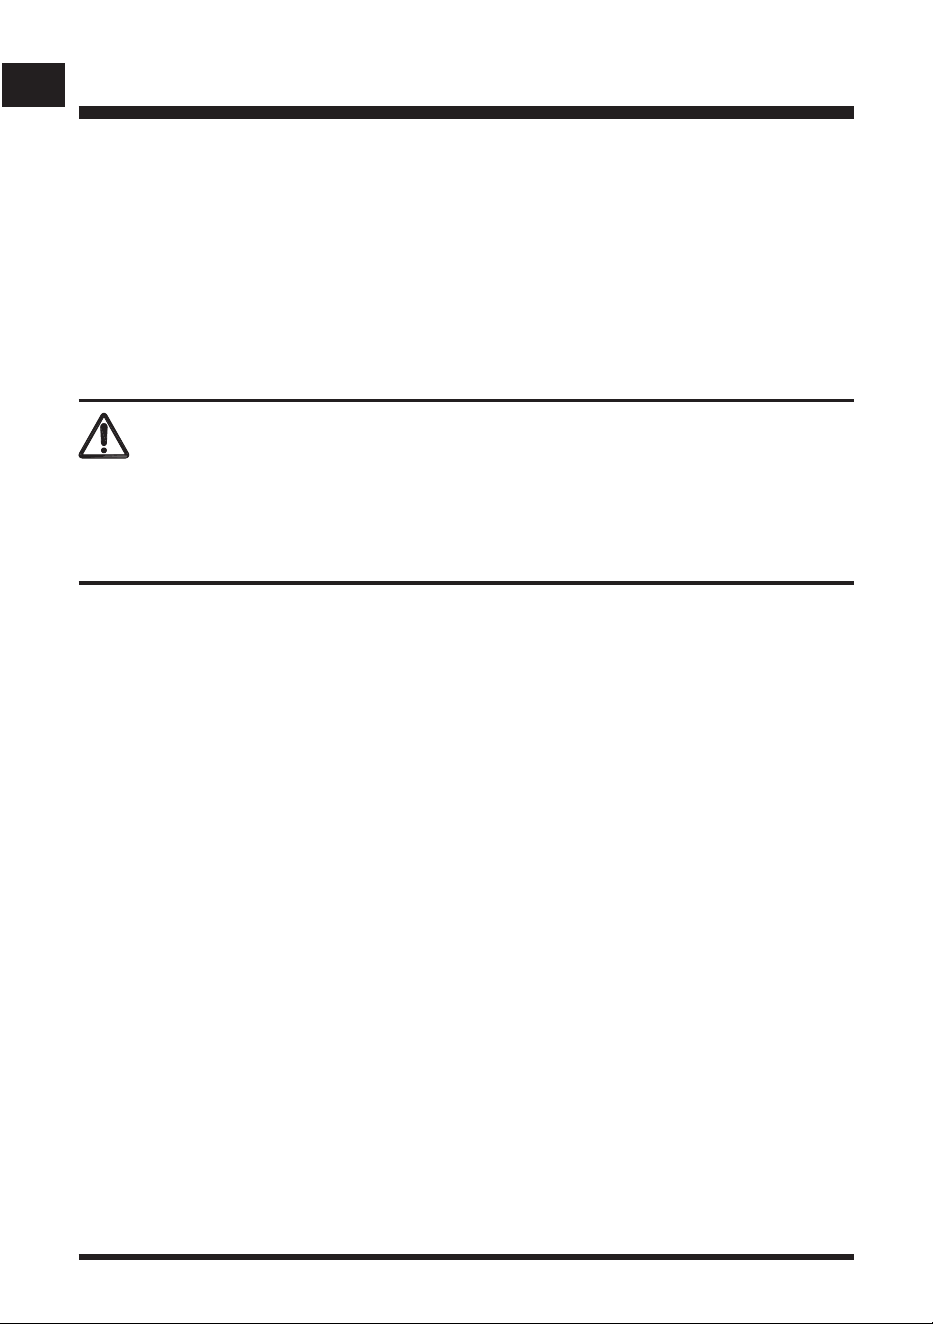
1. Carry Handle
2. STOP Button
3. Cutting Height Adjustment Knob
4. Rain Sensor
5. Selection Dial
6. Control Panel
7. Ultrasonic Object Sensors
8. Grass Detection Camera
9. Charging Strips
10. LCD Panel
11. Start Button
12. HOME Button
13. Back Button
14. On/Off Button
15. Rear Wheel
16. Battery Compartment
17. Battery Compartment Cover
18. Front Wheel
19. USB Port (Covered by Resin Cap)
20. Blade Disc
21. Spare Blade and Screw (X6)
22. Contact Strip
23. Base Station
24. Guide Strips on the Base Station
25. Base Station’s Power Cord
26. Charging Indicator on the Base Station
27. Wi-Fi Connection Setting Button
28. Wi-Fi Indicator
29. Signal Indicator
30. Battery Pack
31. Battery Release Button
32. Power Adaptor
33. Extension Cable (32.8 ft /10 m)
34. Base Station Fixing Screw (X10)
35. Hex Key
36. Magnetic Strip (16.4 ft / 5 m, x 4)
37. Magnetic Strip Peg (X40)
38. Box Lid Measurement Gauge
KNOW YOUR ROBOTIC MOWER
The safe use of this product requires an understanding of the information on the product and in
this Operator’s Manual as well as a knowledge of the project you are attempting to use. Before use
of this product, familiarize yourself with all operating features and safety rules.
16
EN
SET UP
UNPACKING
This product has been shipped partially assembled.
■ Carefully remove the product and any accessories from the box. Make sure all items listed in
the packing list are included.
■ Inspect the product carefully to make sure no breakage or damage occurred during shipping.
■ Do not discard the packing material until you have carefully inspected and satisfactorily
operated the product.
■ If any parts are damaged or missing, do not operate the product. Please call Customer Service
(Toll free number 1-866-384-8432).
PACKING LIST
(1) Robotic Mower
(2) Base Parts of the Base Station
(1) Upper Part of the Base Station
(10) Base Station Fixing Screws
(4) Magnetic Strip (16.4 ft / 5 m)
(40) Magnetic Strip Pegs
(6) Spare Blades and Screws
(1) 24V Max* 4.0 Ah Lithium-Ion Battery
(1) Power Adaptor
(1) Extension Cable (32.8 ft /10 m)
(1) Hex Key
(1) Operator's Manual
WARNING
Do not use this product if any parts on the Packing List are already assembled to your product
when you unpack it. Parts on the packing list are not assembled to the product and require
customer installation. Use of a product that may have been improperly assembled could result in
serious personal injury.
17
EN
Fig. 1 Fig. 2
SET UP
PREPARING YOUR LAWN
Understanding your lawn will reduce unnecessary mistakes and make the installation process
easier and smoother.
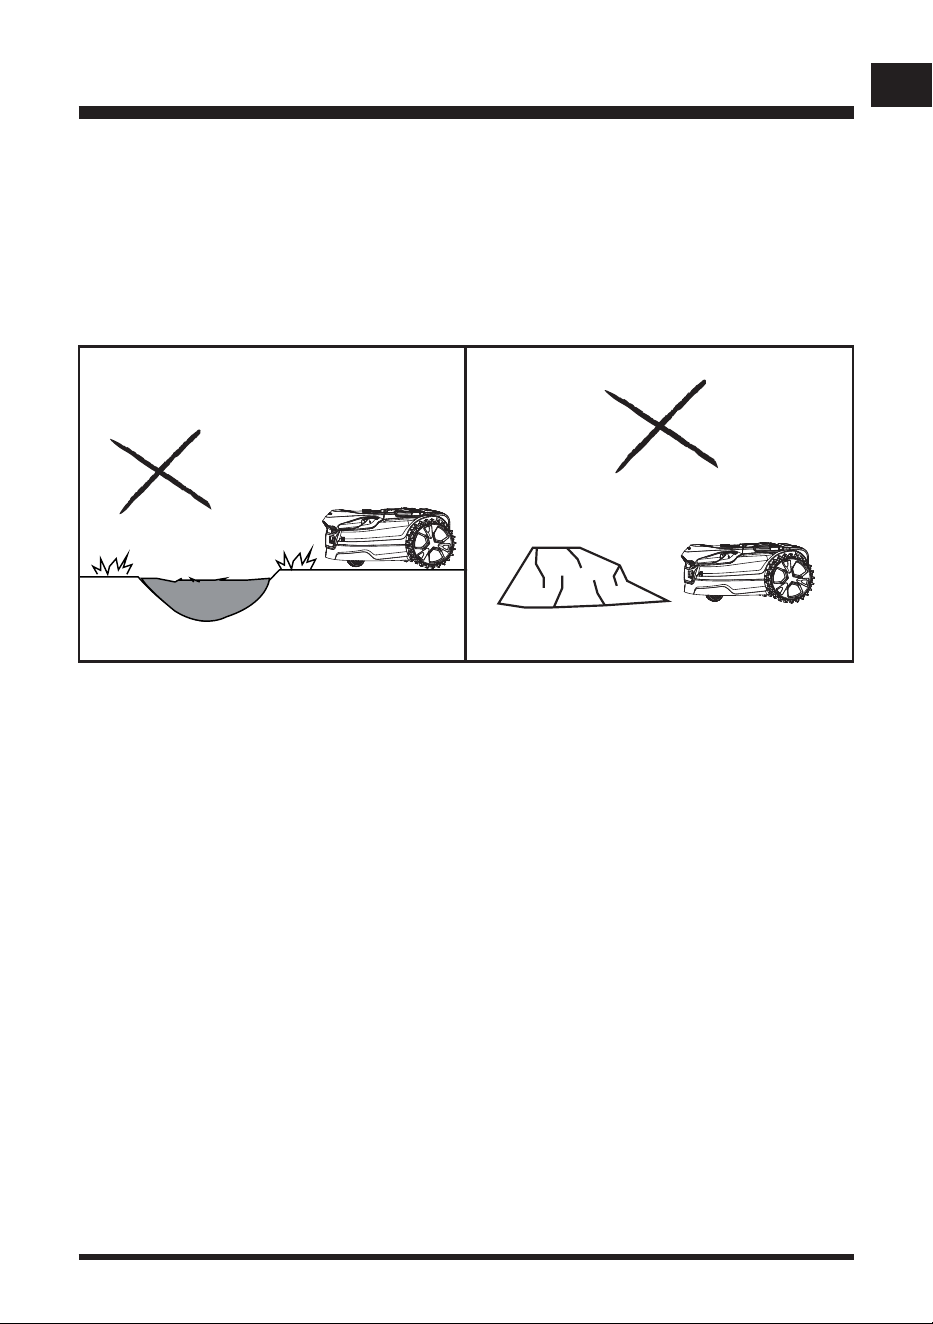
■ Bare patches and leaves can interfere with the camera operation. Repair dead patches with
grass seed.
■ Level all surfaces to prevent the mower from becoming stuck (Fig. 1).
■ Remove all small loose objects which may damage the blade (Fig. 2).
NOTE: This mower is not designed to cut excessively long or overgrown and neglected areas. Cut
grass to a height of 2.36'' (60 mm) before use. Do not allow grass to grow excessively long between
uses.
ABOUT YOUR ROBOTIC LAWNMOWER
The mower uses a camera and ultrasonic sensors to identify grass and navigate around the lawn.
It can:
■ Detect grass and well-dened edges such as paving, gravel, and earth.
■ Raised edges such as sleepers, fences and walls.
■ Find the way home to the charge itself using GNSS positioning and the guide strips on the base
station.
It cannot:
■ Work at twilight or at night – the camera requires daylight in order to work effectively.
■ Work on patchy or dead grass.
■ Distinguish between lawn and weedy ower beds.
■ Cross boundaries in the lawn such as paths or stepping stones.
The mower can be used in either of two modes
:
■ Schedule Mode (Refer to page 34-36)
■ Drop and Mow Mode (Refer to page 36)
18
EN
SET UP
The ultrasonic sensors can be turned off when the lawn is clear of obstacles. In this case, hedges,
walls, or other similar barriers in the lawn can be used as the border of the working area.
When the robotic mower detects that there is no grass or encounters an obstacle, it changes route
in a random manner and starts mowing again in a new direction. To allow the robotic mower to
move freely inside the lawn, the lawn must be properly checked and adjusted so that the robotic
mower has enough space for recognizing when there is no grass. Carefully follow instructions
listed as below for types of borders/protections that can/cannot be used for dening the working
area.
This robotic mower generates an electromagnetic eld during operation. Under certain
circumstances, this eld can actively or passively interfere with medical implants. To reduce the
risk of serious injury or death, we recommend that people with medical implants consult their
physician and the manufacturer of the medical implant before using the robotic lawnmower.
WARNING
DEFINING THE MOWING AREA
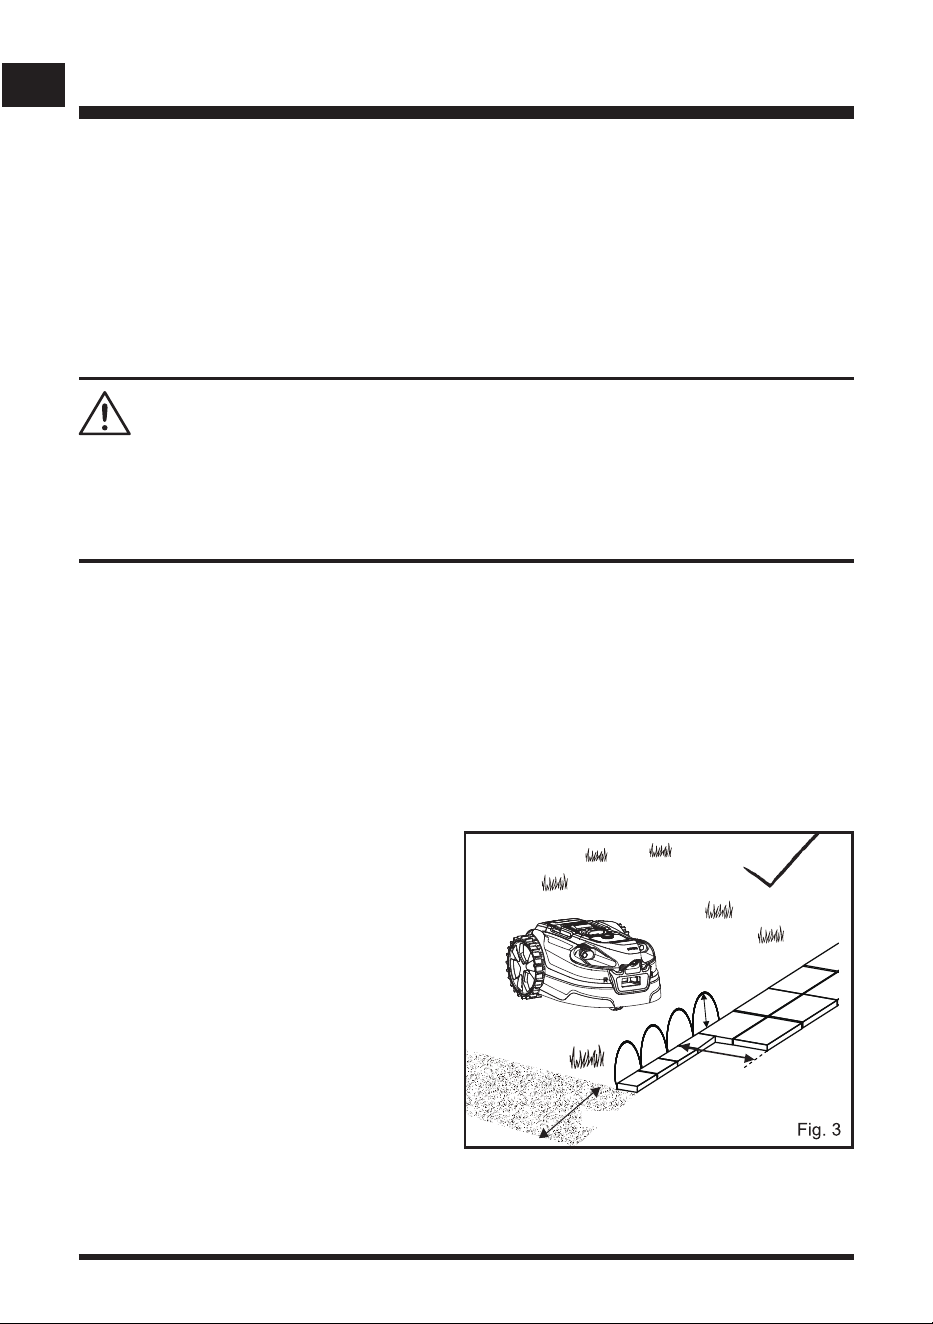
Lawn edges must be clearly dened by at edging or raised barriers in order for this mower to
function properly. Use the provided measurement gauge to ensure the proper distance.
■ Visual boundaries: need to look different from grass; therefore, changes in color and texture
are very effective.
■ Physical boundaries: help stop the mower when a visual boundary is not possible.
■ Temporary physical boundaries: can be used where and when needed.
Suitable Boundary Types
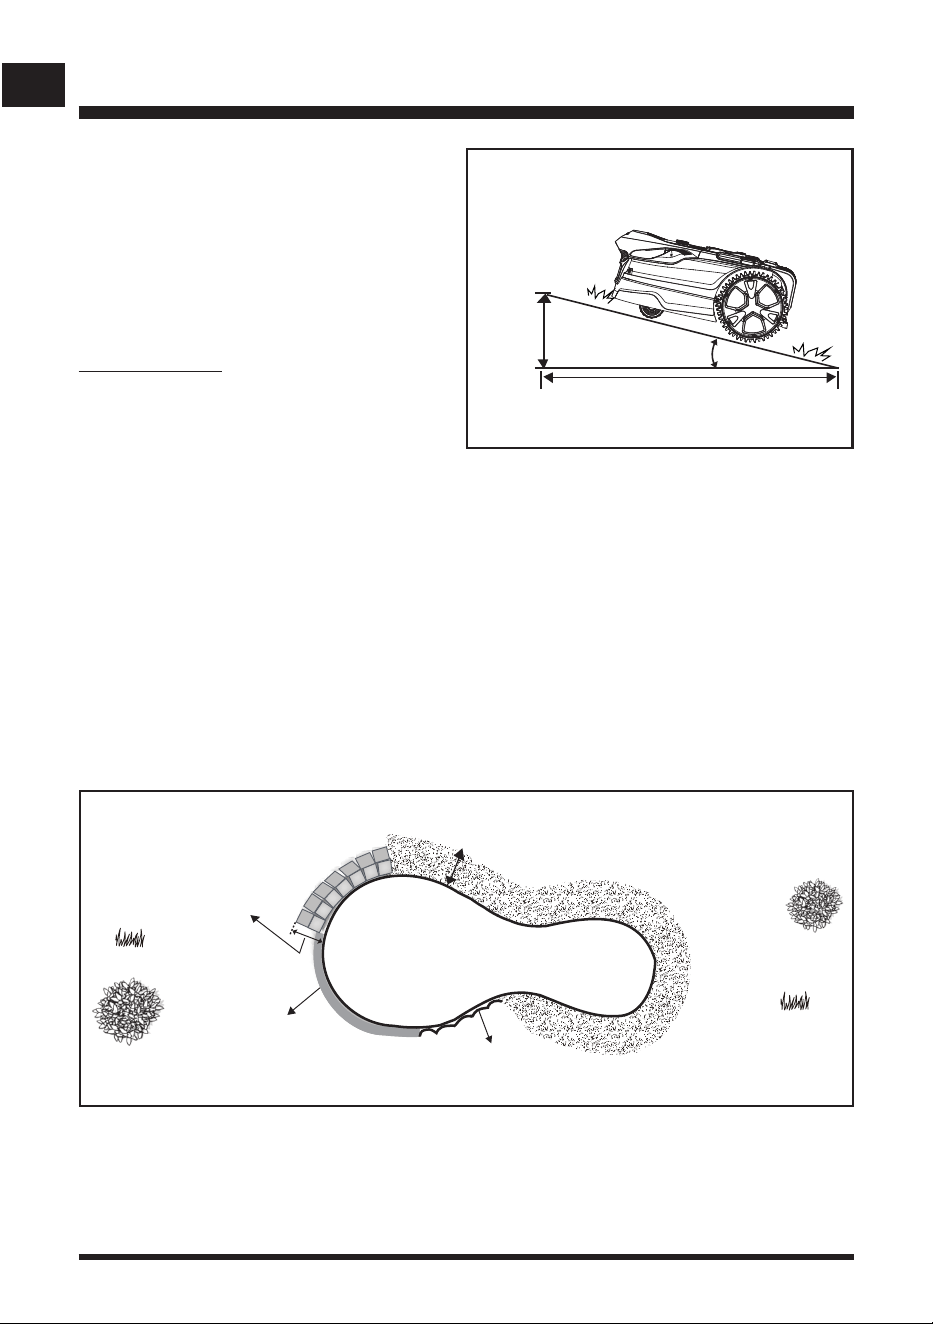
■ Paving
The lawn requires a paved or wooden edge of
at least 13.78'' (35 cm) wide for it to stop safely
and change direction.
Paving or wooden edge less than 13.78'' (35
cm) wide must be widened or can be used in
conjunction with a barrier. See Raised Barrier
section below (Fig. 3).
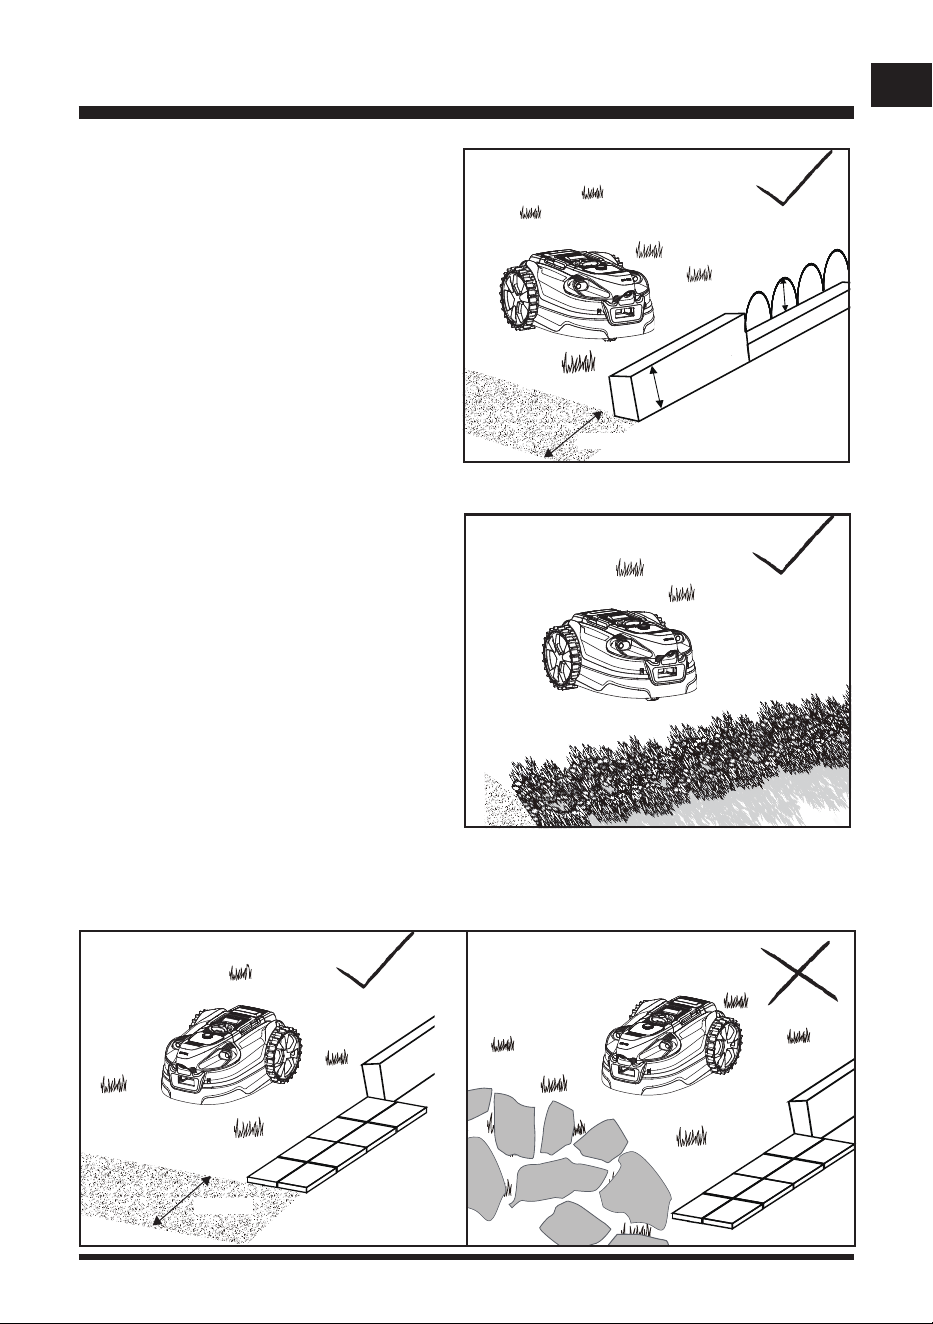
■ Raised barrier (Using ultrasonic sensors)
With the ultrasonic sensors on, a perimeter
barrier at a height 6.3'' (16 cm) can be used
to dene the border of the working area. The
ultrasonic sensors will detect the barrier, and
the mower will change direction.
> 6.3’’
>13.78''
>13.78''
19
EN
SET UP
> 6.3’’
> 6.3’’
>13.78''
Fig. 4
Fig. 5
If an existing barrier is shorter than 6.3'' (16
cm), see Raised barrier (Using bump sensor)
(Fig. 4).
■ Raised barrier (Using bump sensor)
A raised barrier (min 2.36’’) that physically
obstructs the movement of the mower can
also be used. This boundary could be lower
than 6.3'' (16 cm) and will be undetectable by
the ultrasonic object sensors. When the robot
meets this low barrier, it will bump off, reverse
and turn. This type of boundary may suit your
lawn in some areas.
■ Hedging
With the ultrasonic sensors on, hedges can be
used to dene the working area (Fig. 5).
NOTE: Foliage is usually recognized as grass
by the robotic mower. Therefore, ultrasonic
sensors must be always kept on when using
hedges as the border of the working area.
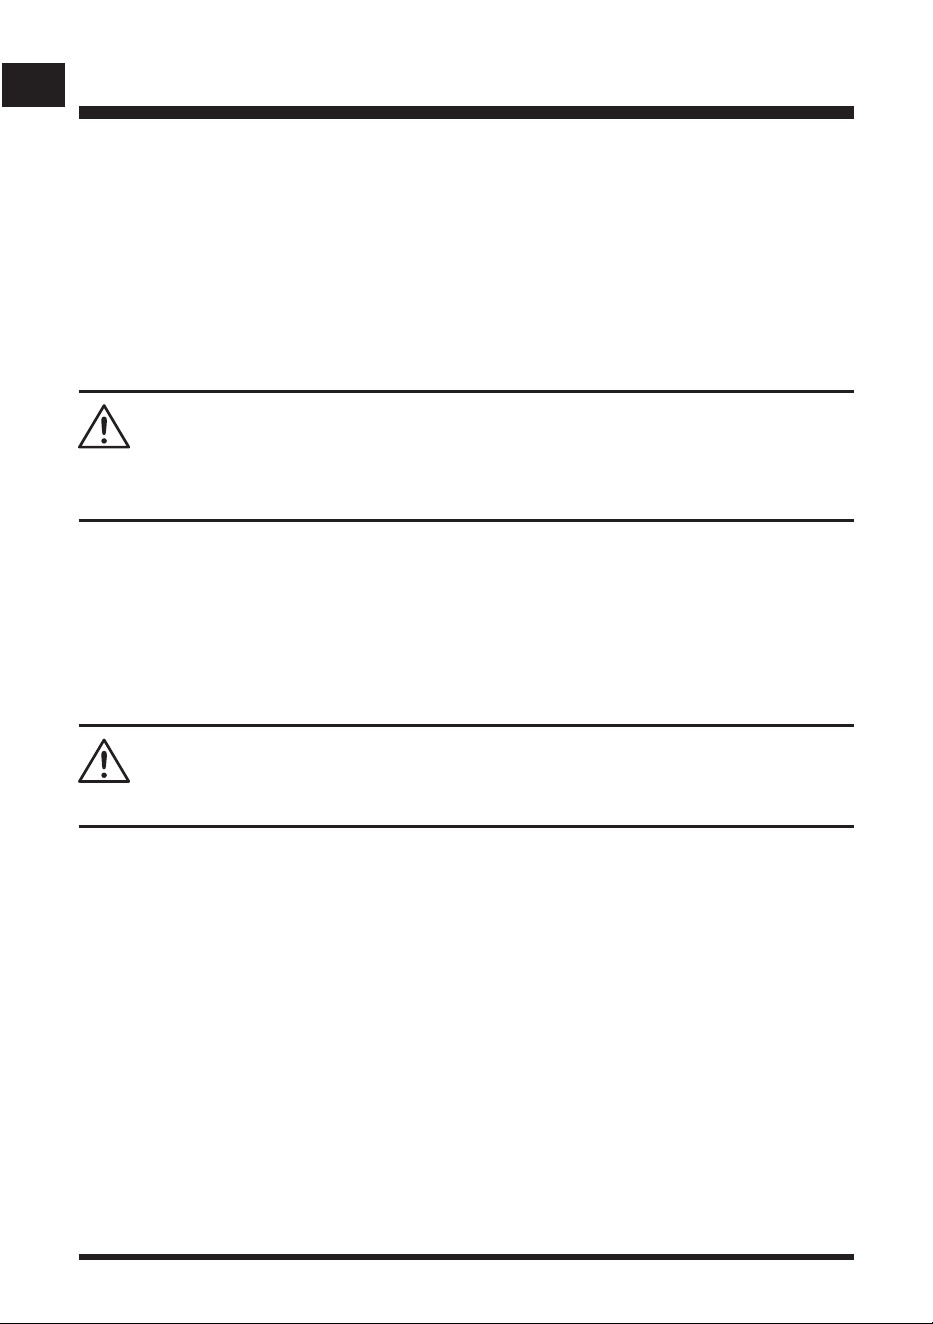
■ Fine gravel
If ne gravel or small stones are used to border
the lawn, make sure the width of the border is
more than 13.78'' (35 cm) wide and has clear
edges (Fig. 6).
NOTE: Never use gravel, stones or similar materials with irregular edges for dening the working
area (Fig. 7). Failure to provide clear edges will result in the mower leaving the mowing area and
blade damage.
>13.78''
Fig. 6 Fig. 7
20
EN
SET UP
■ Temporary raised barriers
During rst use, while lawn patches are being seeded or seasonal lawn plants such as spring
bulbs are in ower, it may be desirable to use a temporary method to protect or dene the lawn
area for the robot to cut. In this case, garden canes are particularly effective and can be removed
later. In spring, you can protect ower bulbs in the lawn from the mower by sinking short canes
vertically into the lawn around the area spaced at 7.87'' (20 cm). Leave at least 2.36’’ (6 cm) of
cane above ground. The mower will be physically prevented from entering any protected areas.
■ Magnetic strip
The magnetic strip serves as a mobile and temporary boundary for creating areas where the
robotic mower is not allowed to mow. It can also be left permanently in place if needed.
The robotic mower is equipped with a magnetic strip sensor for recognizing a magnetic strip lying
on the ground. When the robotic mower comes across a magnetic strip, it will stop and begin to
mow again in a random direction.
NOTE: Magnetic particles are attached to the surface of the magnetic strip, please wear gloves
before use.
Magnetic Strip Installation
■ Lay the magnetic strip a few centimeters away from the area or object in question.
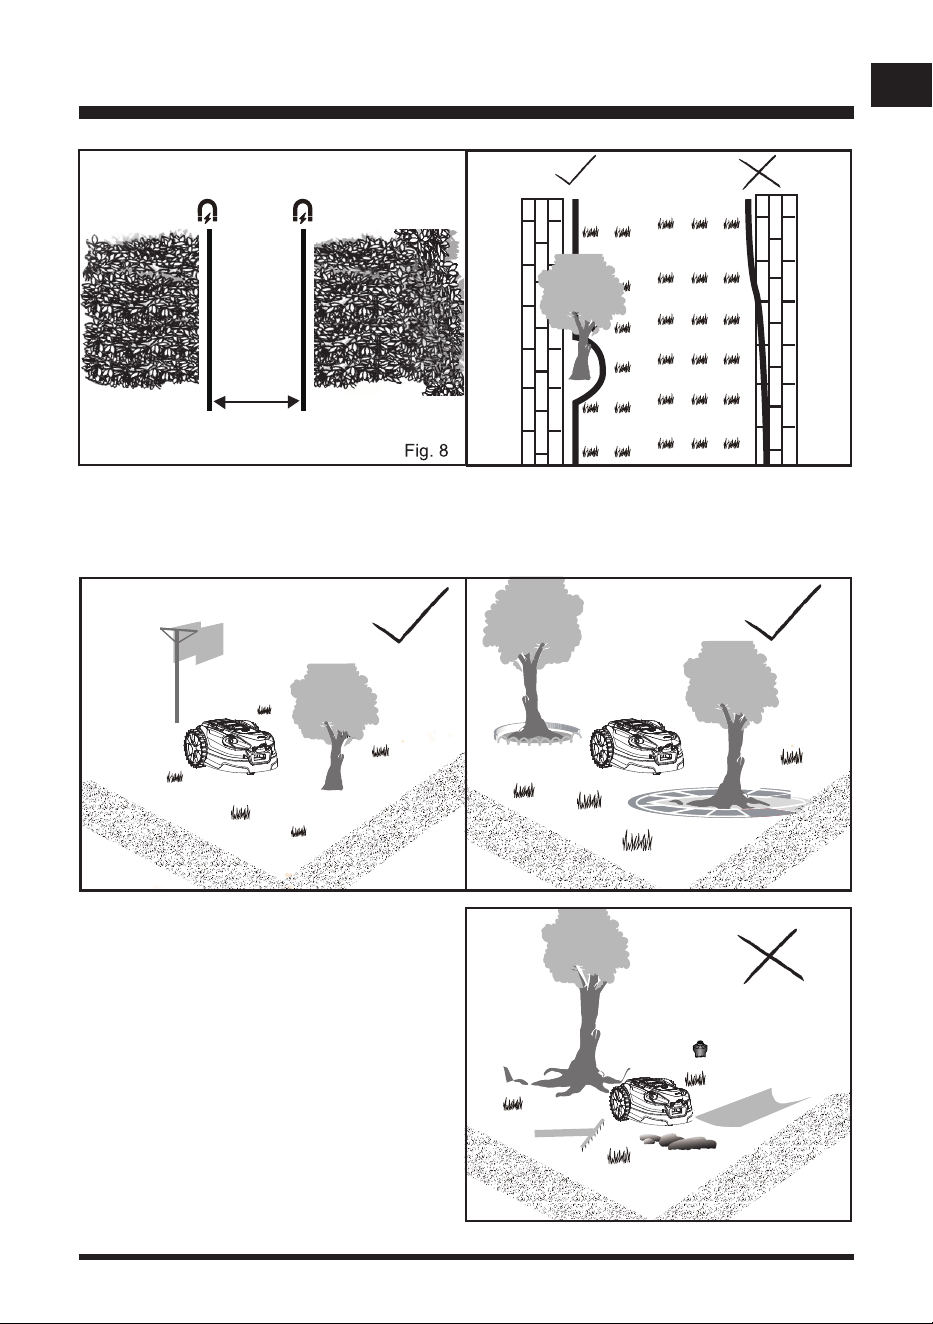
■ Keep a distance of at least 47.24’’ (120 cm) between two individual boundary areas made up of
magnetic strips (Fig. 8).
■ Fasten the magnetic strip to the ground with the supplied magnetic strip pegs spaced 39.37’’ (1
m) apart.
■ Do not run the magnetic strip outside of the lawn area. The mower may follow the magnetic strip
and become stuck (Fig. 9).
■ Obstacles in the mowing area
With the ultrasonic sensors on, objects which do not impede the robotic mower’s normal
functioning, such as trees (without raised roots), vertical poles, etc., do not require exclusion from
the mowing area (Fig. 10).
If you have an ICD or pacemaker, avoid close or prolonged contact with magnets or their magnetic
elds. Keep magnets at least six inches away from where your device is implanted.
WARNING
Strong magnetic force can create a nger pinch risk. Wear gloves and handle with care.
WARNING
21
EN
>47.24''
SET UP
When objects, such as exposed tree roots, exposed wires, irrigation systems, etc., are present on
the surface of the lawn, it is required to protect these objects with paving, walls or magnetic strip to
prevent the damage to them and to the robotic mower (Fig. 11).
The working area cannot be dened by
holes or ditches. Ensure that there are
no objects such as toys, work tools, small
stones, branches, or sprinklers, etc., on
the lawn or protruding from the ground
which could impede the mower or cause
damage to the blade (Fig. 12).
NOTE: Avoid leaves accumulating on
the lawn, as they may not be detected
correctly by the robotic mower. Remove
leaves at regular intervals.
Fig. 10 Fig. 11
Fig. 9
Fig. 12
22
EN
SET UP
■ Pools and ponds
If there is a pool or pond in the mowing area, create appropriate borders to protect it.
■ Raised barriers higher than 7.87'' (20 cm).
■ Flat edging (paving, gravel or wooden boards wider than 27.56'' (70 cm)).
■ Magnetic strip placed at least 10cm away from the water edge.
The illustration shows a correctly dened working area for the correct functioning of the mower (Fig.
14).
It is very important to make visual boundaries around ponds wide and obvious for the
mower. Pond plants and algae could be interpreted as grass. Physical boundaries or
magnetic strip around ponds are highly recommended and will prevent any accidental
water damage to your mower which is not covered by the manufacturers guarantee.
Fig. 14
Width > 27.56''
Height > 7.87''
Height > 7.87''
Width of non-grassy ground > 39.37''
Pool
13.78''
(35 cm)
100 cm
Max. 35% slope
(20º incline)
35cm (Elevation)
100cm (Length)
35% (slope)
=
■ Slopes
The robotic mower has the ability to safely
climb slopes of 35% or 20º inclines, and areas
that are steeper than this should be excluded
(Fig. 13).
To calculate the slope of your lawn, see Fig. 13.
The slope would be calculated as below:
Fig. 13
23
EN
ASSEMBLY
SELECTING THE BASE STATION LOCATION
It is important to select a proper location for the base station to charge the robotic mower in order
to allow for docking to take place successfully.
The base station should be located in an area that is:
■ At the edge of the lawn with 6.56 ft (2 m) of clearance around the open sides of the charging
station
■ Level
■ Within 32.8 ft (10 m) of an outdoor power socket
■ Within reach of your home Wi-Fi signal
■ Clear of any sharp objects and obstacles
The mower can be operated in multi-zone lawns. Place the base station in the largest zone if there
are additional zones in your lawn.
Regularly clean the base station and keep it free of dust and weeds to ensure the camera can
detect the orange guide strips.
NOTE: The ground leading up to the base station should be level without corners, slopes or
obstacles to ensure proper docking. It may be necessary to adjust the location of the base station
to ensure both a good GPS signal as well as a good WiFi signal. See page 29-31 for more
information about GPS.
IMPORTANT:
Keep the area around the base station free of long grass to allow easy identication by the
camera.
Keep the guide strips clean and tidy for easy identication by the camera.
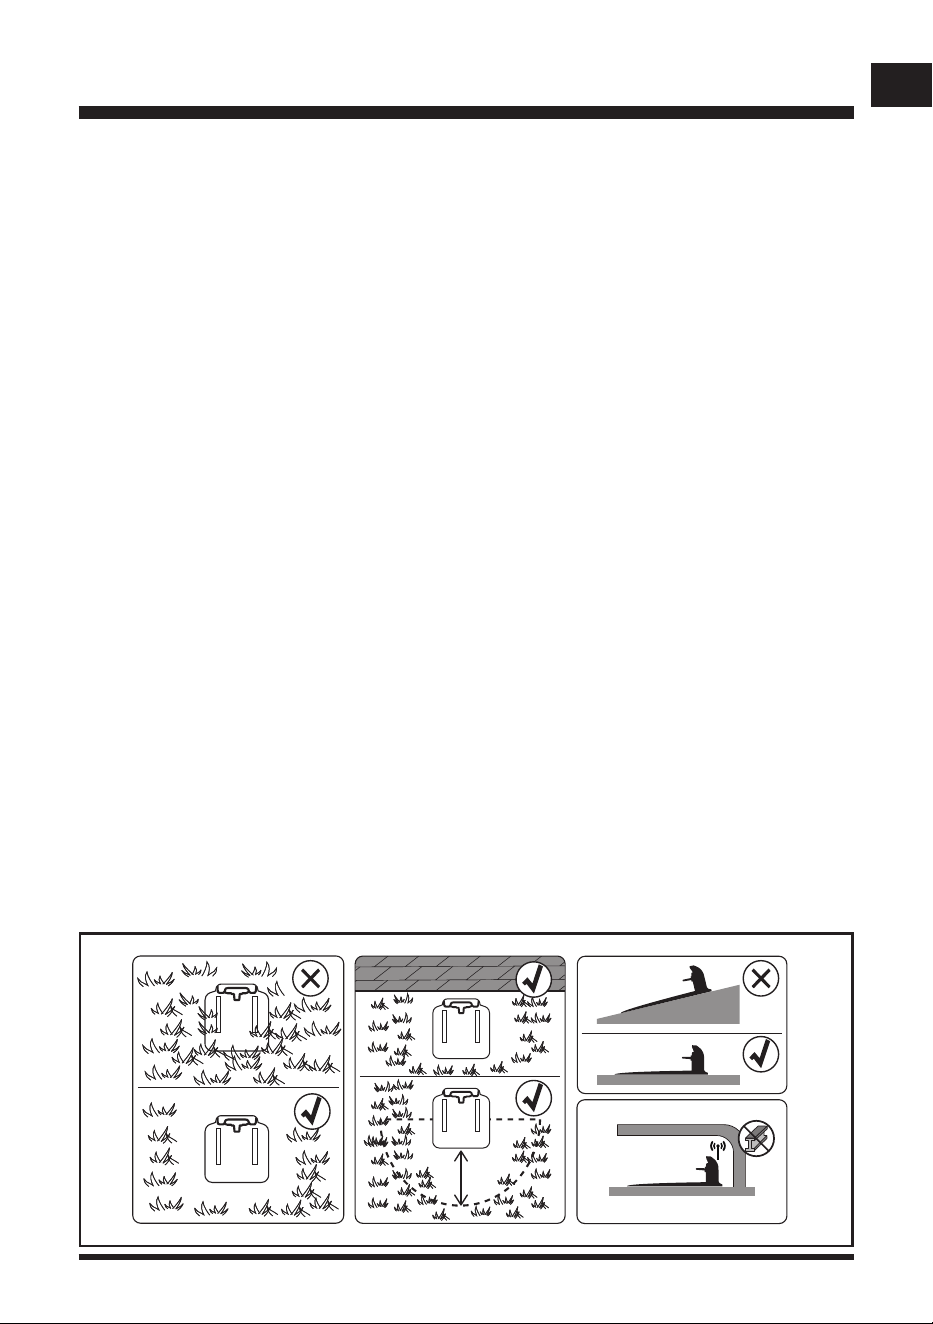
Covering the base station with metal coverings is prohibited and can interfere with GPS
signal reception (Fig. 15).
It is recommended to purchase the ofcial LawnMaster Garage accessory. See Page 65 for
parts list.
Fig. 15
≥2M
24
EN
ASSEMBLY
INSTALLING THE BASE STATION
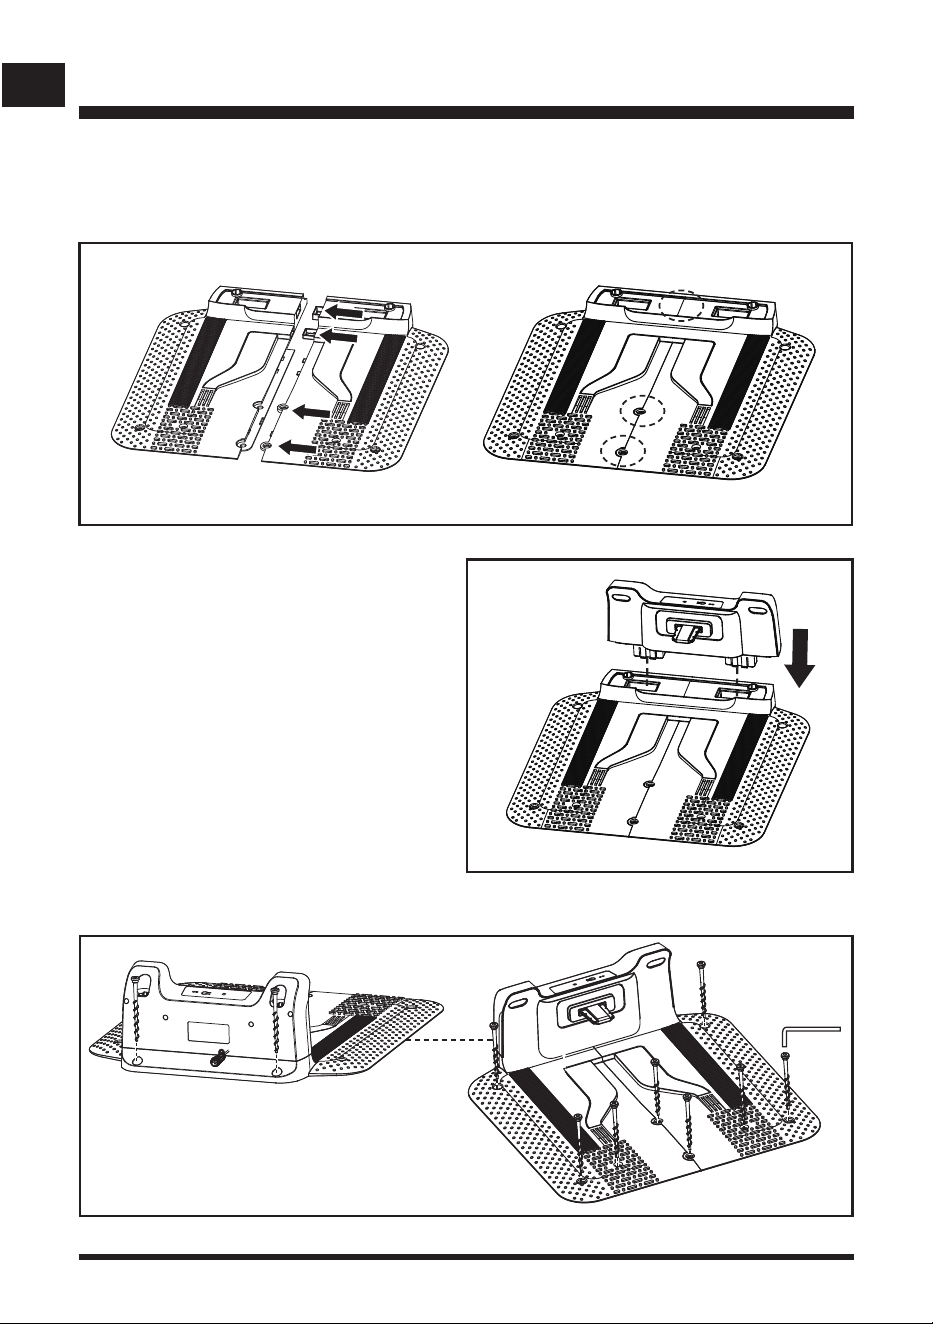
■ Connect the two base parts of the base station as shown. Ensure they click together rmly (Fig.
16).
■ Fully insert the upper part of the base station
onto the base. Ensure the upper part clicks
rmly into place. Ensure the orange strips on
the charging station base are facing up and
clearly visible (Fig. 17).
■ Place the base station on the ground in
an appropriate position within the lawn
boundary. The back of the charging station
should be ush to the boundary to minimize
any trimming needed near the power cable.
Follow the instructions in section 2 “Selecting
the Base Station Location” on page 23.
■ Secure the base station to the ground with
the supplied screws (Fig. 18).
Fig. 16
Fig. 18
Fig. 17
25
EN
ASSEMBLY
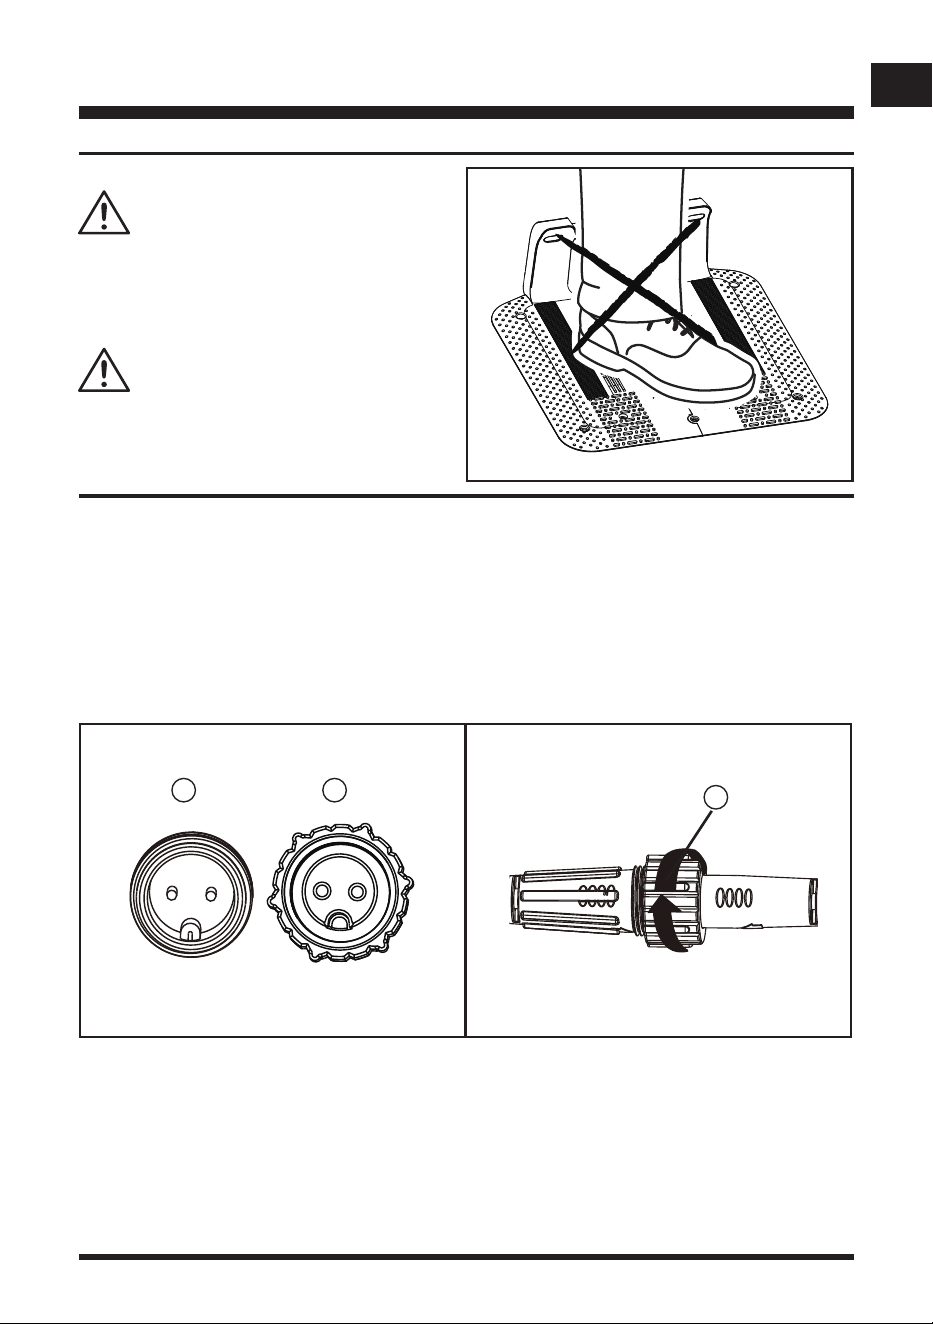
Do not make new holes in the plate of the
base station. Only use the existing holes in
the base station to secure it to the ground.
Do not tread or walk on the plate of the base
station (Fig. 19).
WARNING
WARNING
Fig. 20 Fig. 21
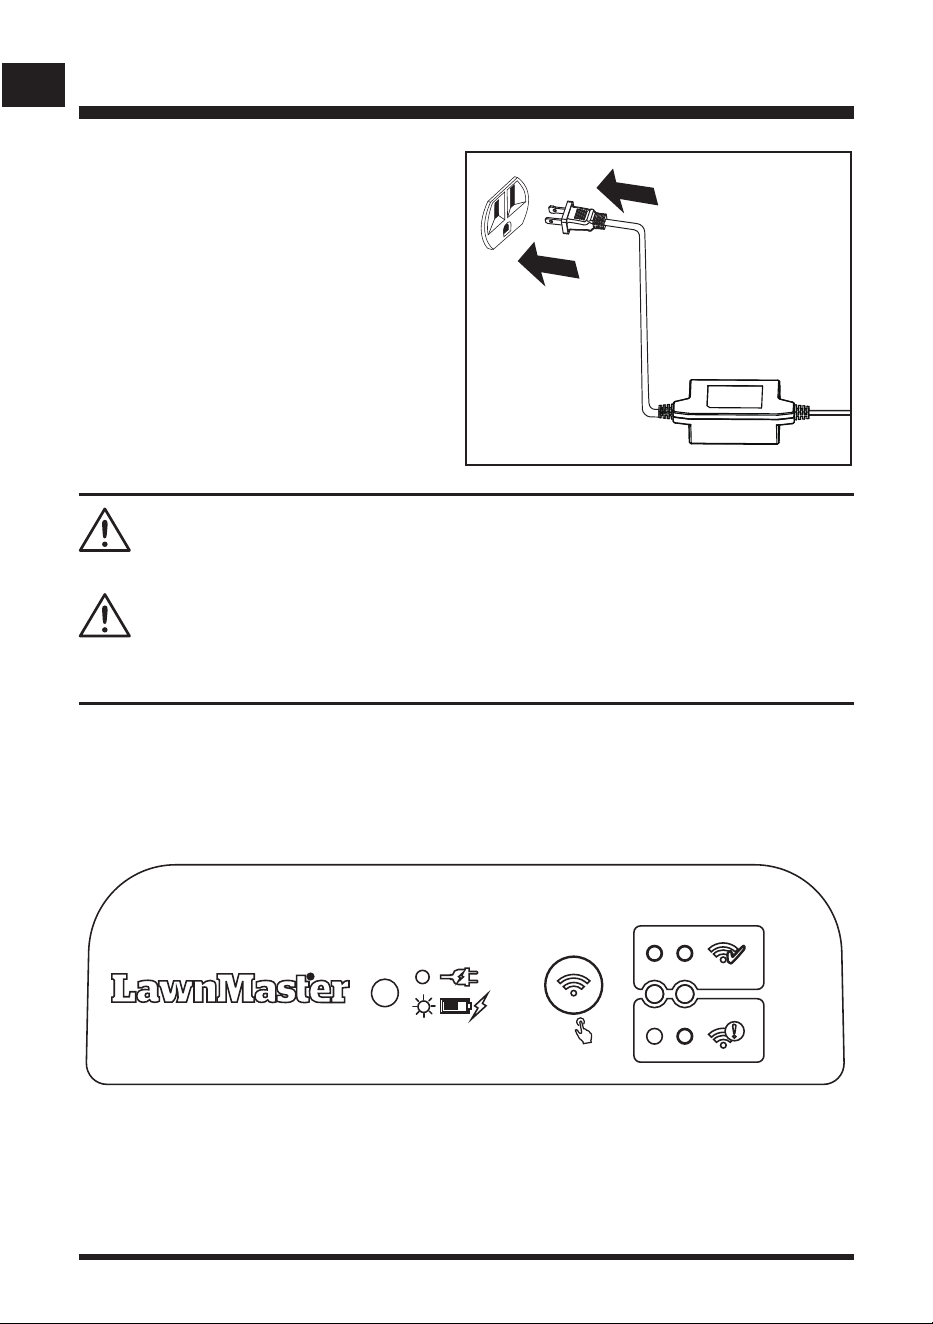
CONNECTING THE BASE STATION TO THE POWER SOURCE
■ First connect the extension cable to the power adapter. Align the notch
①
) on the extension
cable with the groove (
②
) on the adaptor and turn the locking sleeve (
③
) clockwise to lock
into place (Fig. 20 & 21).
2) Then connect the base station’s power cord to the extension cable. Align the notch (
①
) on
the power cord with the groove (
②
) on the extension cable and turn the locking sleeve (
③
)
clockwise to lock into place (Fig. 20 & 21).
1 2
3
Fig. 19
26
EN
ASSEMBLY
Do not put the power cable in the working area, or the mower may cut the power cable.
Recharge the mower only with the base station specied by the manufacturer. Incorrect use may
result in electric shock, overheating or leakage of corrosive liquid from the battery.
WARNING
WARNING
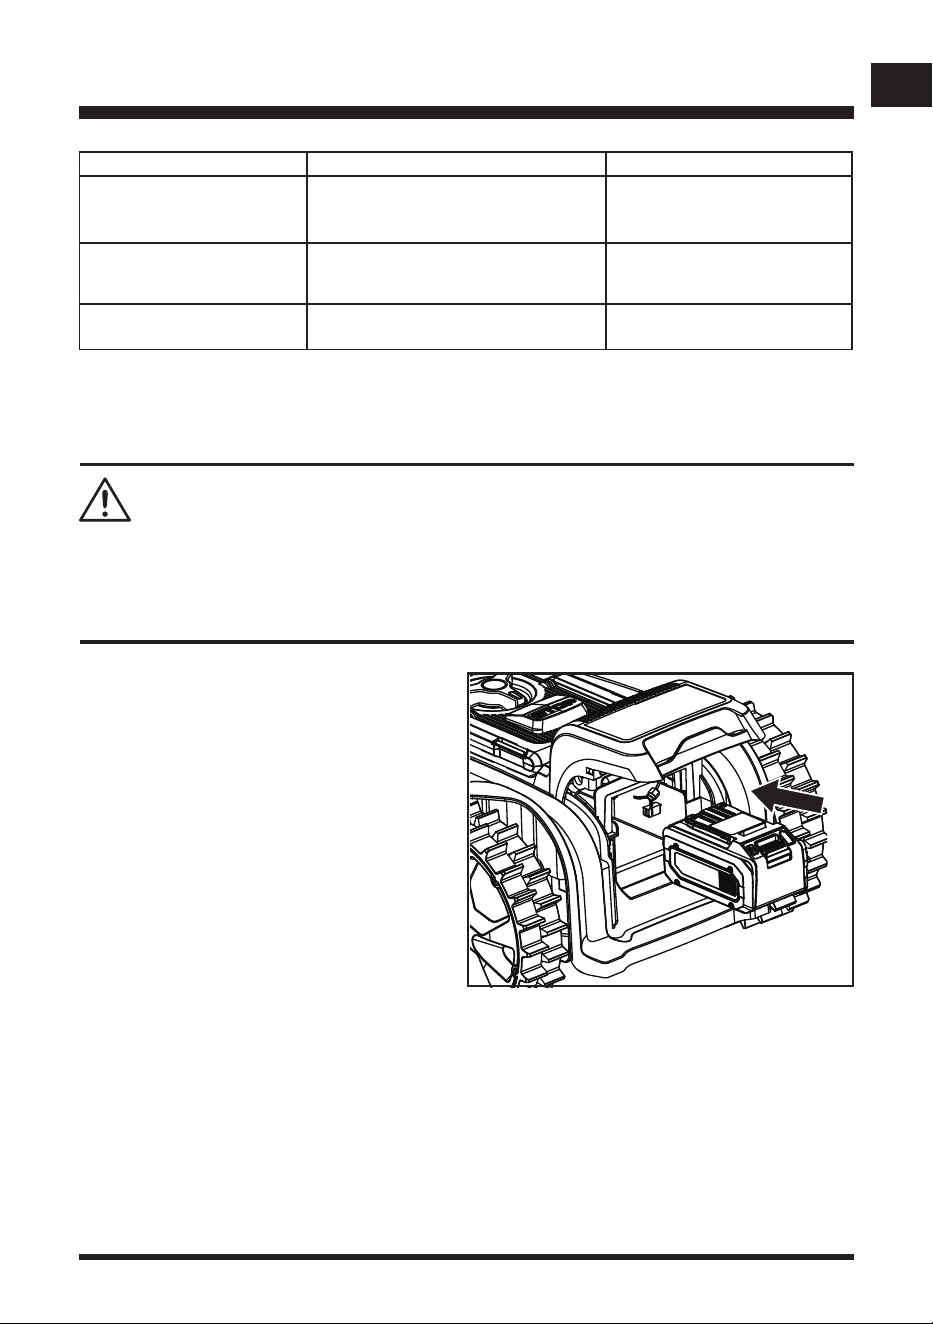
Charging Indicators
When the base station is installed successfully and the power adaptor is connected to an electrical
outlet, the LED on the base station will be solid green. Check the LED status as below to make
sure the connection between the base station and power source is OK.
5S
■ Position the power adaptor on the
ground as shown to protect from water.
Alternatively, to keep it away from standing
water, the power adaptor can be wall
mounted by screwing it to the wall through
the holes provided (Fig. 22).
■ Connect the power adaptor to a 100-
240V wall socket. If the power supply is
connected to an electrical outlet outdoors,
make sure the electrical outlet is always in
a dry place and the wattage is compatible
with the mower.
Fig. 22
27
EN
ASSEMBLY
IMPORTANT! The battery pack is not charged when it is purchased. Before using the mower, read
all safety precautions, and follow the instructions in the Battery Pack section. With regular use, it
will need shorter charging time. If storing for a prolonged period of time, remove the battery. When
ready to use again, charge the battery pack.
WARNING
LED on the Base Station Status Action
Solid green
Base station is connected
successfully; the robotic mower is
fully charged.
/
Flashing green The robotic mower is charging. /
Off No power supply.
Check the power adaptor,
cord, breakers, and fuses.
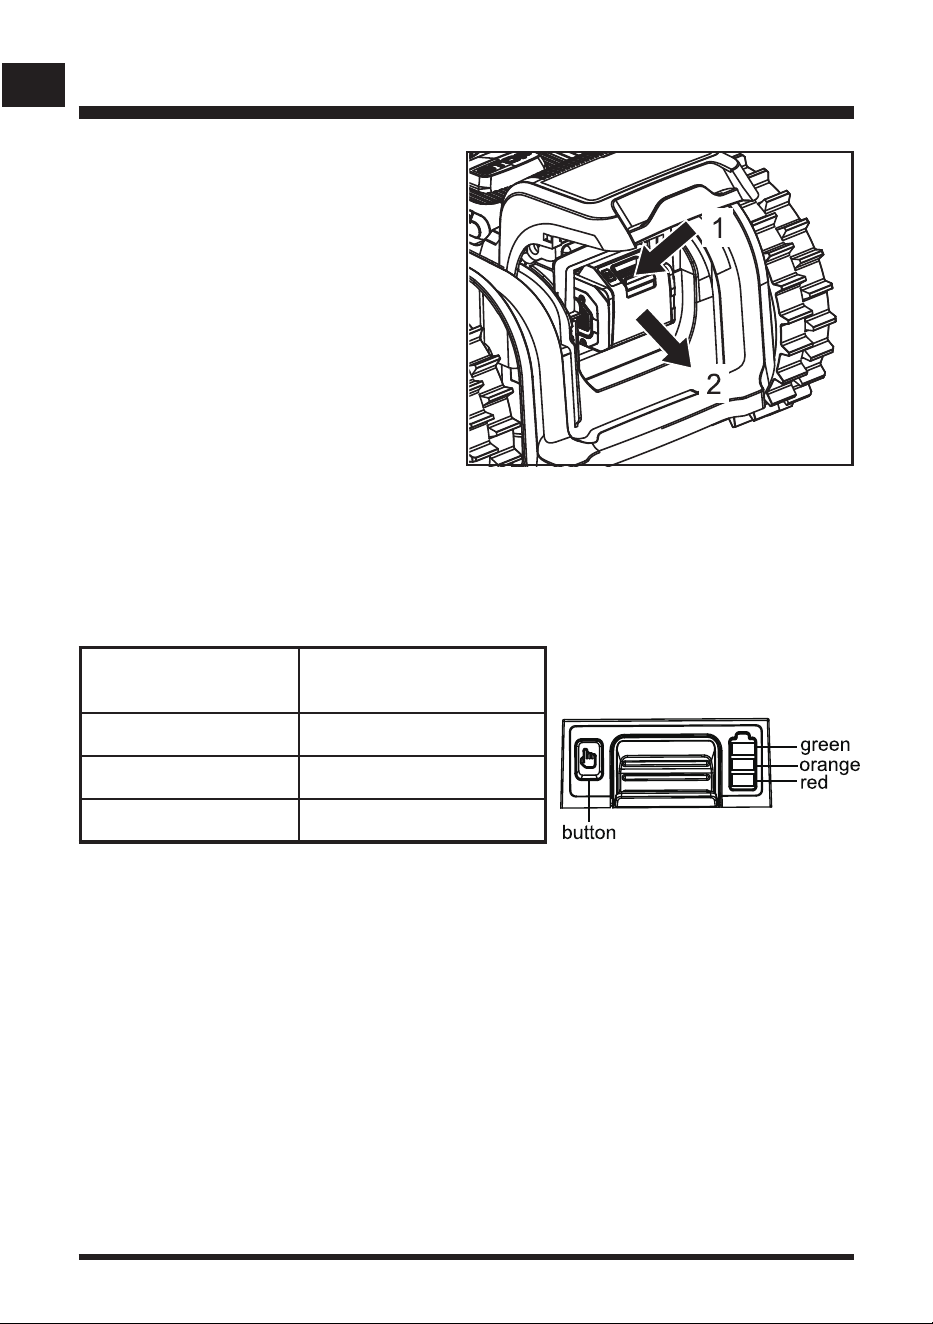
INSTALLING/REMOVING THE BATTERY PACK
To install the battery pack:
■ Lift the battery compartment cover.
■ Align the support rails located within the
battery compartment with the guides in the
battery pack, and then insert the battery
pack into the compartment (Fig. 23).
■ Push the battery pack until you hear a “click”.
■ Close the battery compartment cover.
NOTE: Make sure that the battery pack
rmly snaps into place and is secured to the
mower before starting operation. If the battery
compartment cover is not closed properly,
“Close the battery cover” will display on the
main screen.
Fig. 23
28
EN
ASSEMBLY
To remove the battery pack:
■ Stop the mower. Lift the battery
compartment cover.
■ Press and hold the release button on
the battery pack (1), grasp the battery
pack rmly and pull out (2) of the battery
compartment (Fig. 24).
■ Close the battery compartment cover.
BATTERY LED PANEL
■ The panel consists of 3 LEDs on the battery. Press and hold the button, then release it, the
LEDs will show you the charge levels.
■ The battery’s charge level can be checked either when the battery is attached on the charger/
mower or removed from the charger/mower.
LEDs on Battery
(Continuous Lighting)
Battery Capacity
3 LEDs
Fully charged
2 LEDs (orange & red)
≥40%
1 LED (red only)
<40% (Recharge required).
Indicator Lights
Fig. 24
29
EN
OPERATION
Control Panel (Fig. 26)
POWER ON AND FIRST USE
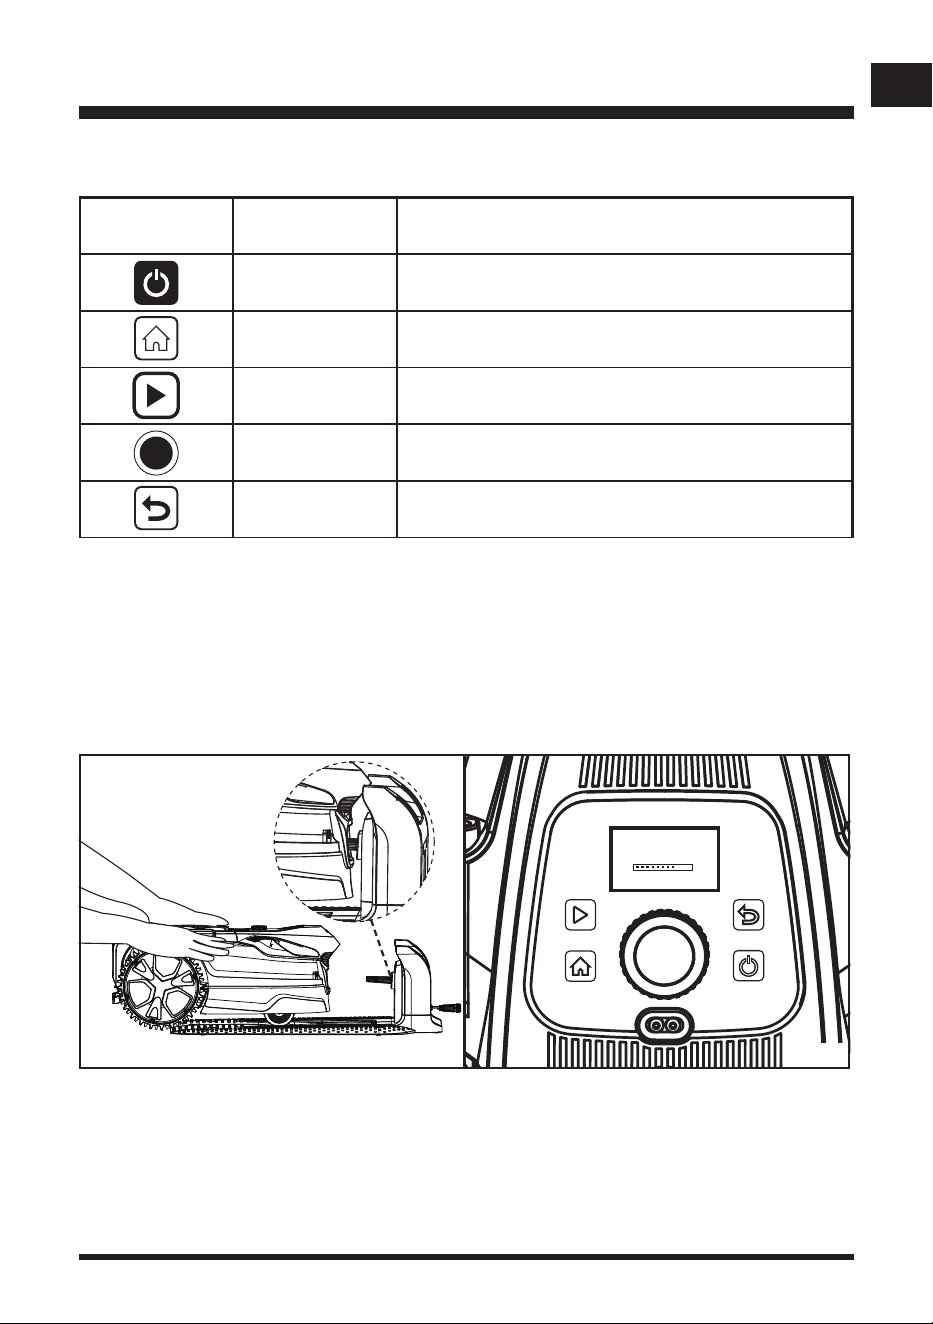
■ Make sure the battery is secured in place, and the base station is installed correctly and
powered on successfully.
■ Place the mower on the base station. Make sure the mower’s charging strips are fully connected
with the contact strip of the base station (Fig. 25). The mower will automatically start initialization
(Fig. 26). It will take about 15 seconds to complete this process. The mower will beep twice, and
the LCD panel will display the Main Screen (Fig. 27).
■ The GPS icon on the main screen will rotate while the mower is being positioned. When the
mower is positioned successfully, the GPS icon will be solid (see page 31).
Button Name Function
On/Off Button Press to turn on/off the robotic mower.
HOME Button Press to send mower to base station.
Start Button Press to start mowing.
Selection Dial
Turn right or left to select the menu settings. Press to
conrm.
Back Button Press to return to the previous level.
LawnMaster
Fig. 25 Fig. 26
30
EN
OPERATION
■ The battery is supplied in a partially charged state and will require charging before use. Allow
the battery to fully charge before rst use.
NOTE: The robotic mower will recheck the GPS position for up to three minutes every time it
returns to the base station. When the GPS signal is good and the positioning is complete, the GPS
icon will be solid. When affected by weather or if the base station is covered by a metal covering,
the GPS signal will be weak, and the GPS icon will ash. If the GPS signal is weak, the mower
may not dock correctly. Please try adjusting the position of the base station.
Place the base station in an open area, avoiding trees or other tall objects. Ensure there are no
obstacles taller than 1 metre within a 3-metre radius in front of the base station.
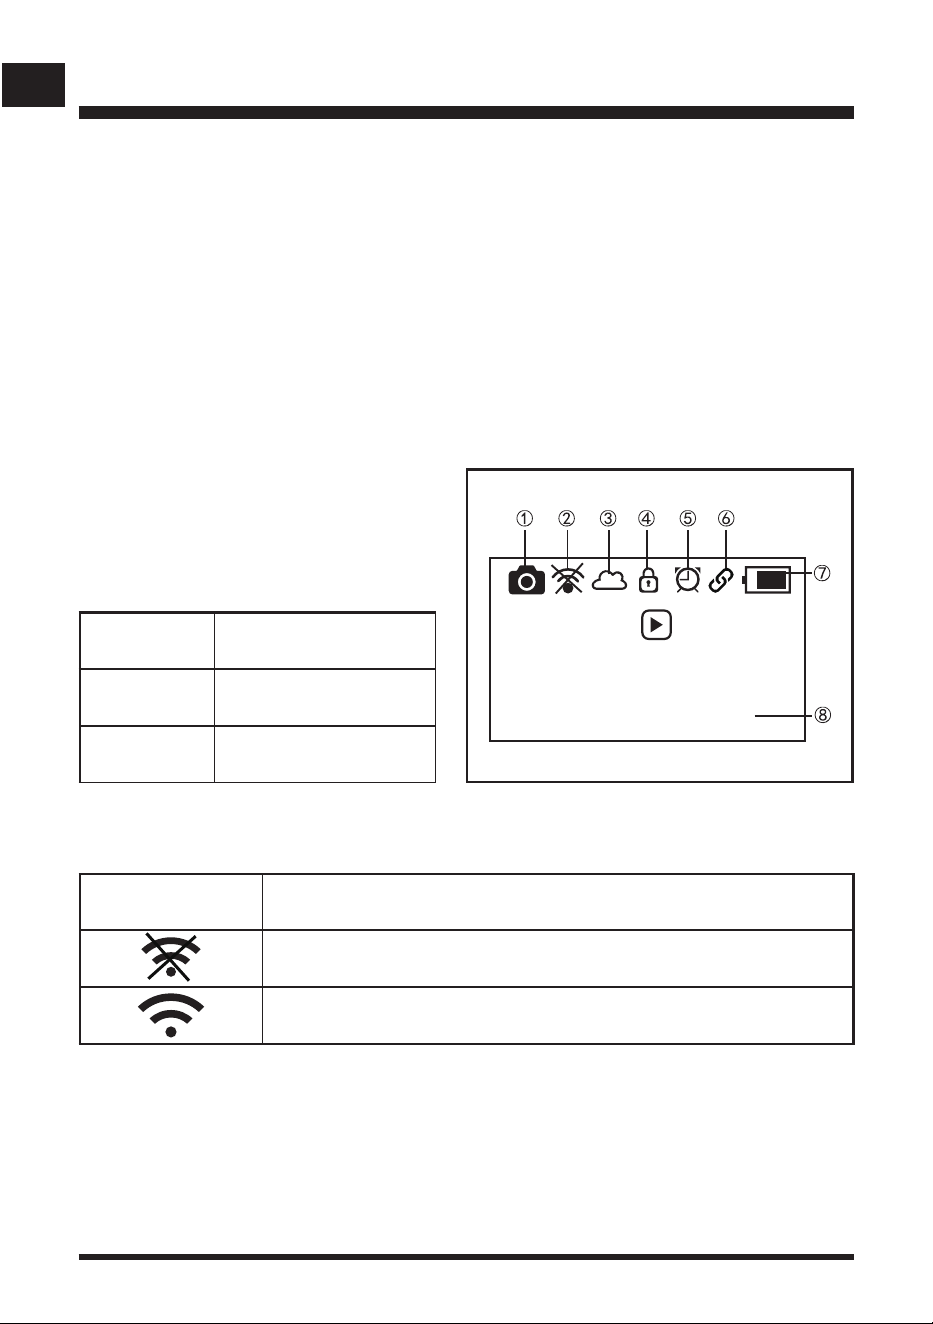
Camera Icon Status
Solid
Communication of the
camera is normal.
Flashing
Communication of the
camera is abnormal.
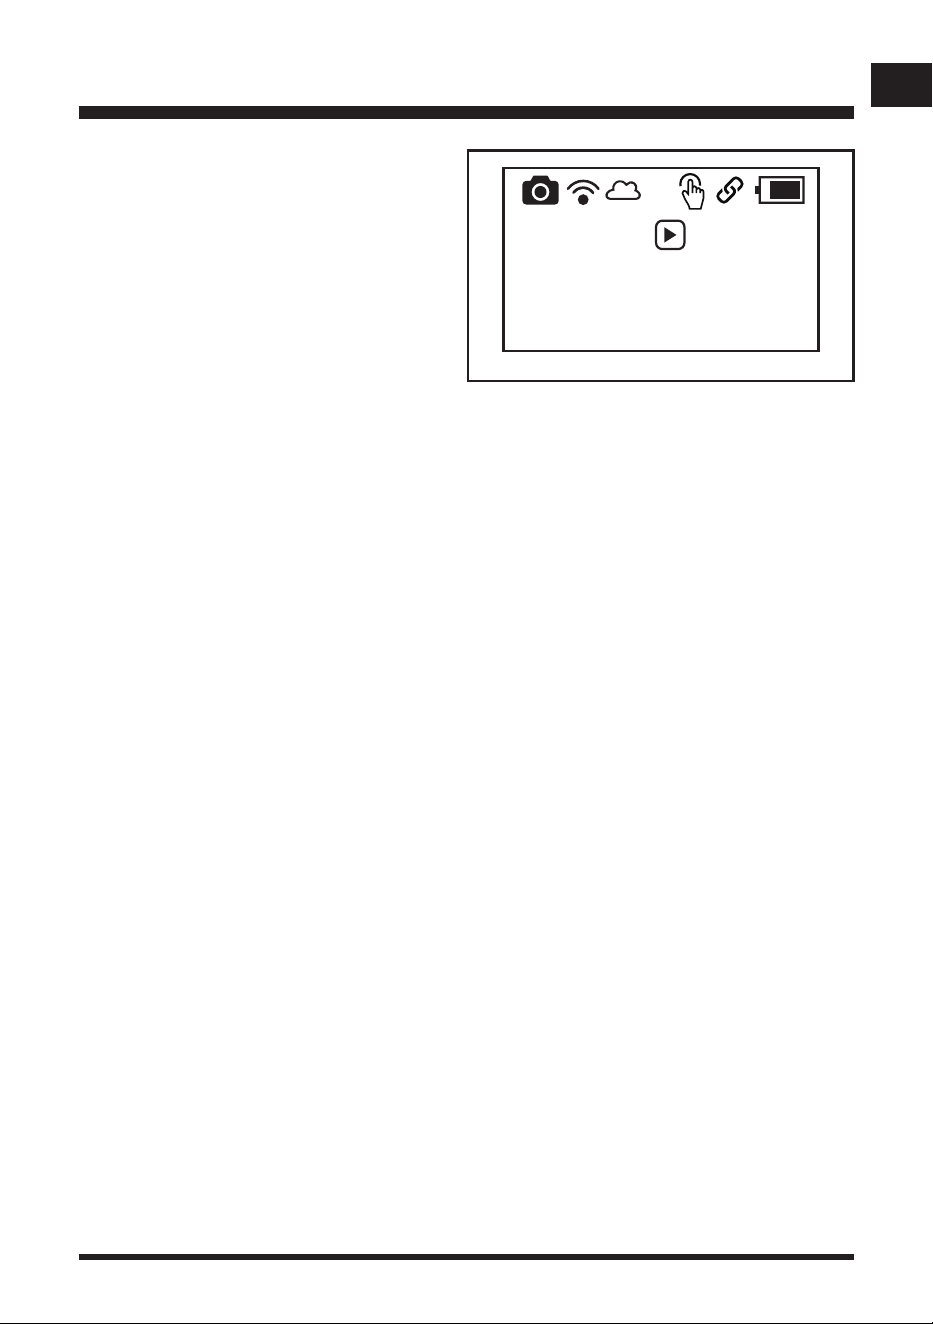
MAIN SCREEN (Fig. 27)
This section explains the symbols shown on
the Main Screen.
①
Camera Icon
The camera icon is always on when the
robotic mower is on.
②
App Icon
Press then
press dial to
start mowing
08-11-2024 13:57
App Icon Status
The base station is not connected to Wi-Fi .
The base station is connected to Wi-Fi successfully.
Fig. 27
31
EN
OPERATION
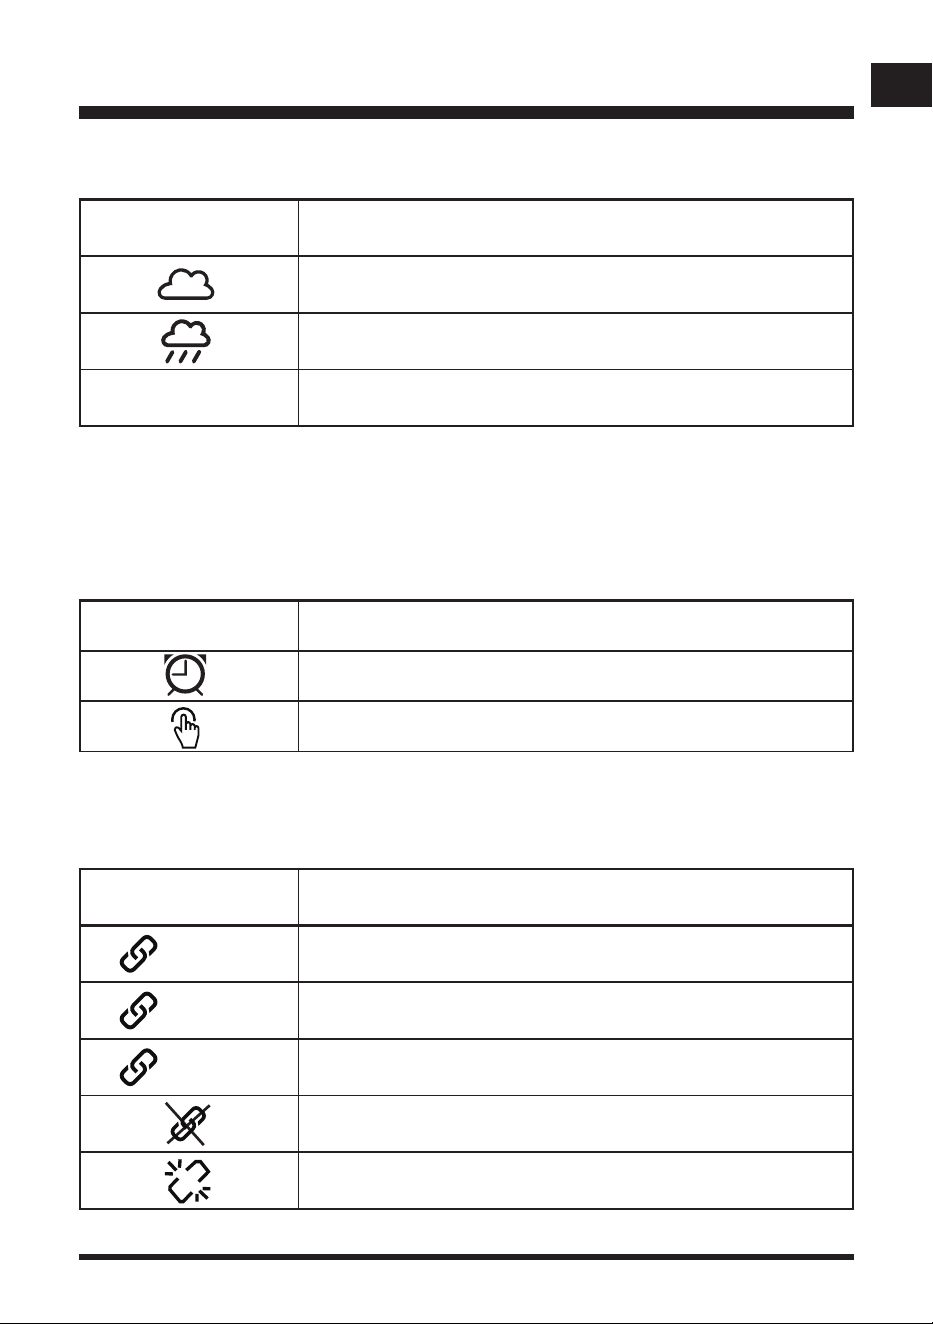
Rain Sensor Icon Status
The rain sensor is not activated.
The rain sensor is activated.
Empty The rain sensor is off.
③
Rain Sensor Icon
④
Lock Icon
Only visible when a PIN is set. Refer to page 38-39 for more details.
⑤
Working Mode Icon
Please refer to page 33-36 for a more detailed overview of these two modes.
⑥
GPS Icon
The GPS icon is on when the robotic mower is on.
Working Mode Icon Status
Schedule Mode
Drop & Mow Mode
GPS Icon Status
(Solid) The robotic mower is positioned successfully.
(Rotating) The robotic mower is being positioned.
(Flashing) Bad signal (Refer to Troubleshooting Section)
No valid GPS data (Refer to Troubleshooting Section)
Temporary problem on GPS communication; or the GPS module is
damaged. (Refer to Troubleshooting Section)
32
EN
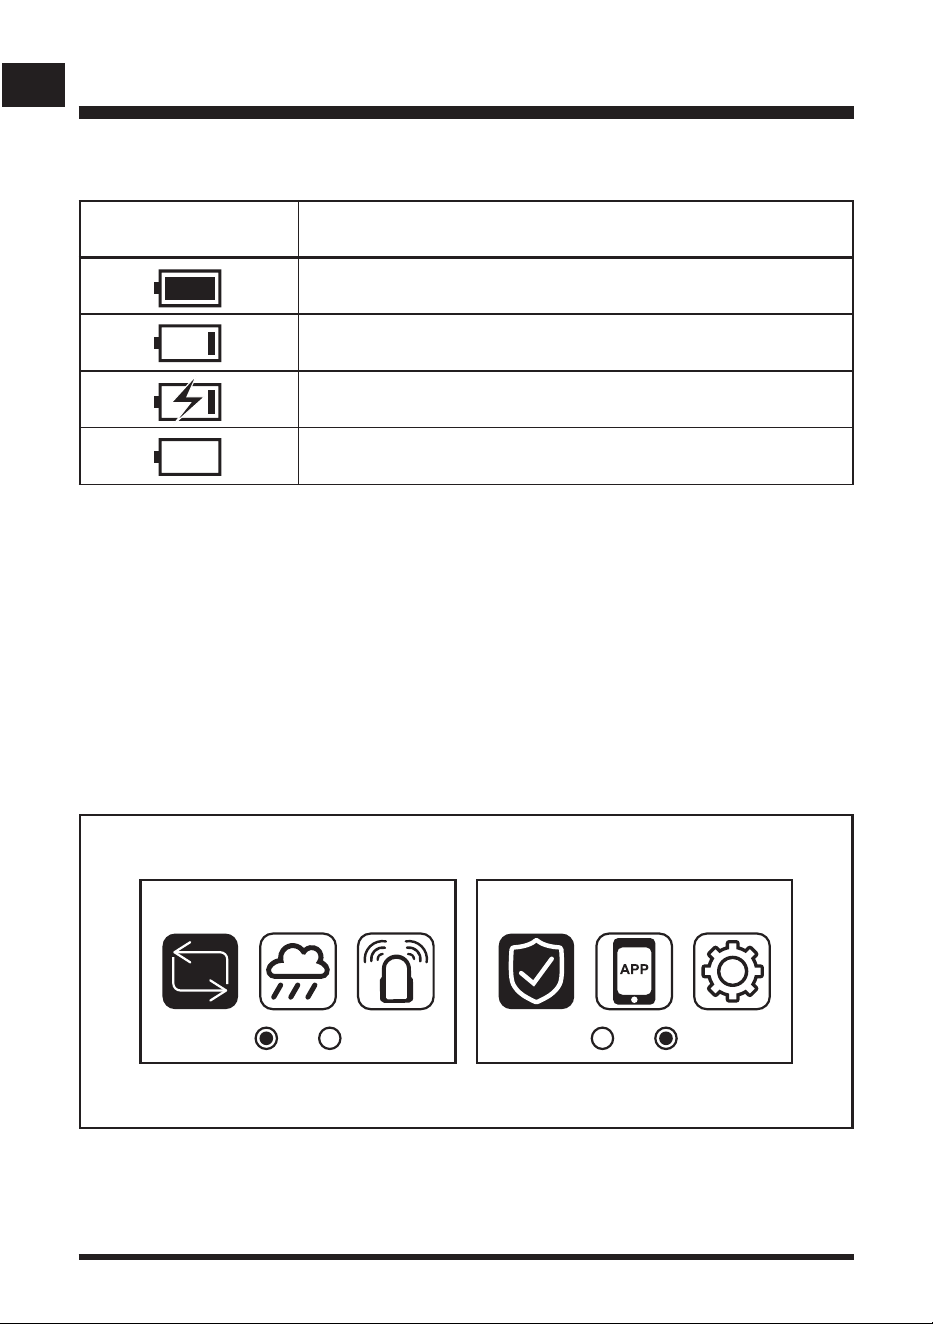
Battery Indicator Status
The robotic mower is fully charged.
Low power.
Charging
The robotic mower is in charging station, no battery pack inserted.
OPERATION
⑦
Battery Indicator
Fig. 28
⑧
Time and Date
The time will be set following GPS information when the mower is powered on rst time or after
factory reset. The default time setting is Summer Time (i.e. one hour ahead of the standard
regional time zone).
Changing the time manually will override this.
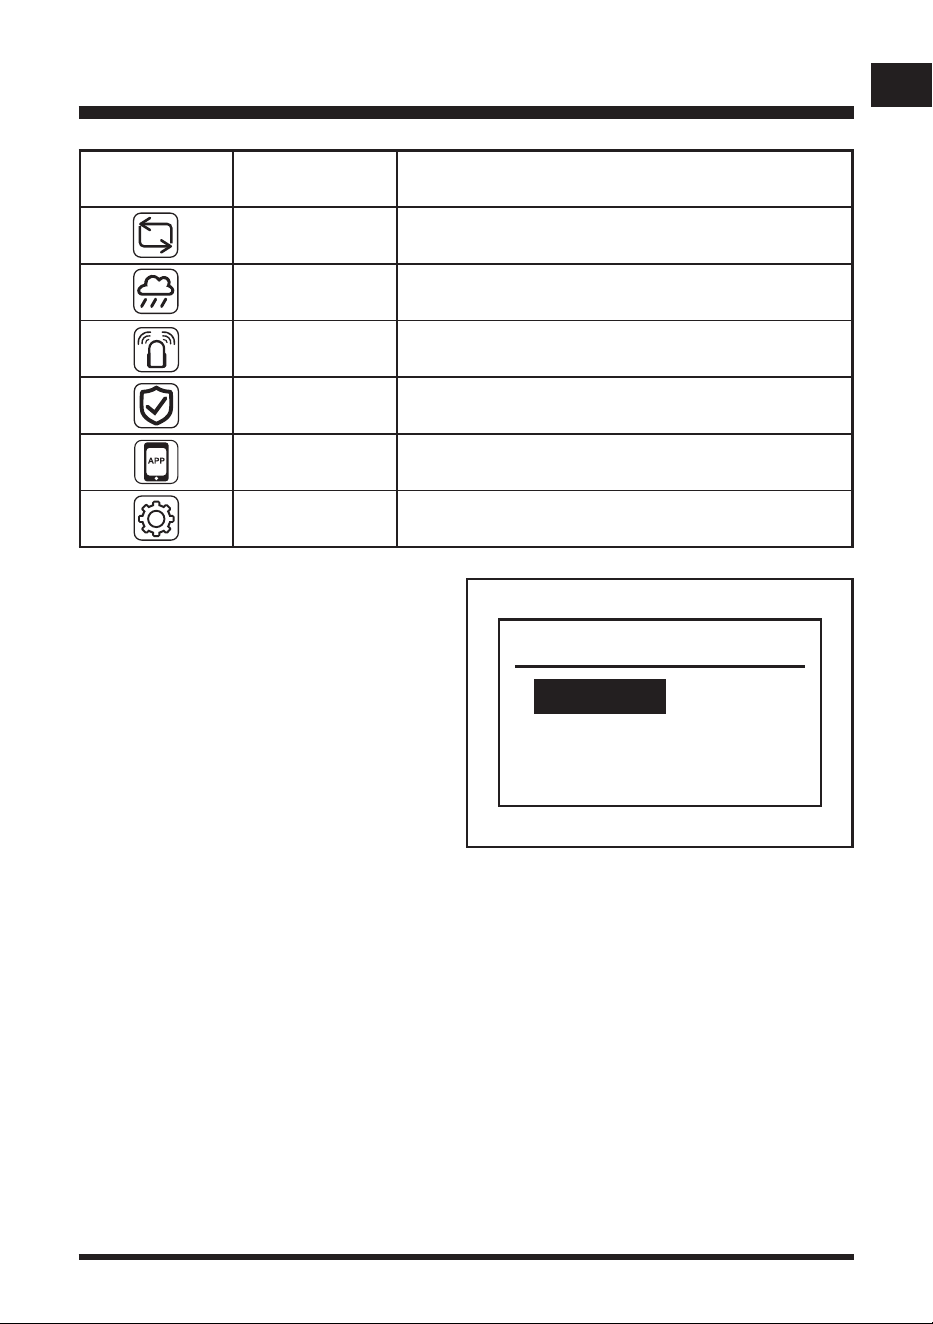
SETTINGS MENU
Press the Selection Dial (referred to afterwards as the “Dial”) to select the settings menu.
Turn the Dial right or left to scroll through the settings menu icons (Fig. 28).
Press the Dial again to enter the submenu for each setting.
Press the back arrow to go back in the menu.
Mode Security
33
EN
OPERATION
Icon Name Function
Mode
Select the working mode: Schedule or Drop & Mow (see
page 33-36)
Rain Sensor
Rain sensor setting, to turn the rain sensor function on
and off and select the desired time delay.
Ultrasonic Turn ultrasonic sensors on and off.
Security Adjust security settings, such as PIN code protection.
App App connection operation
Settings General settings
Mode
Schedule
Drop & Mow
Mode Page
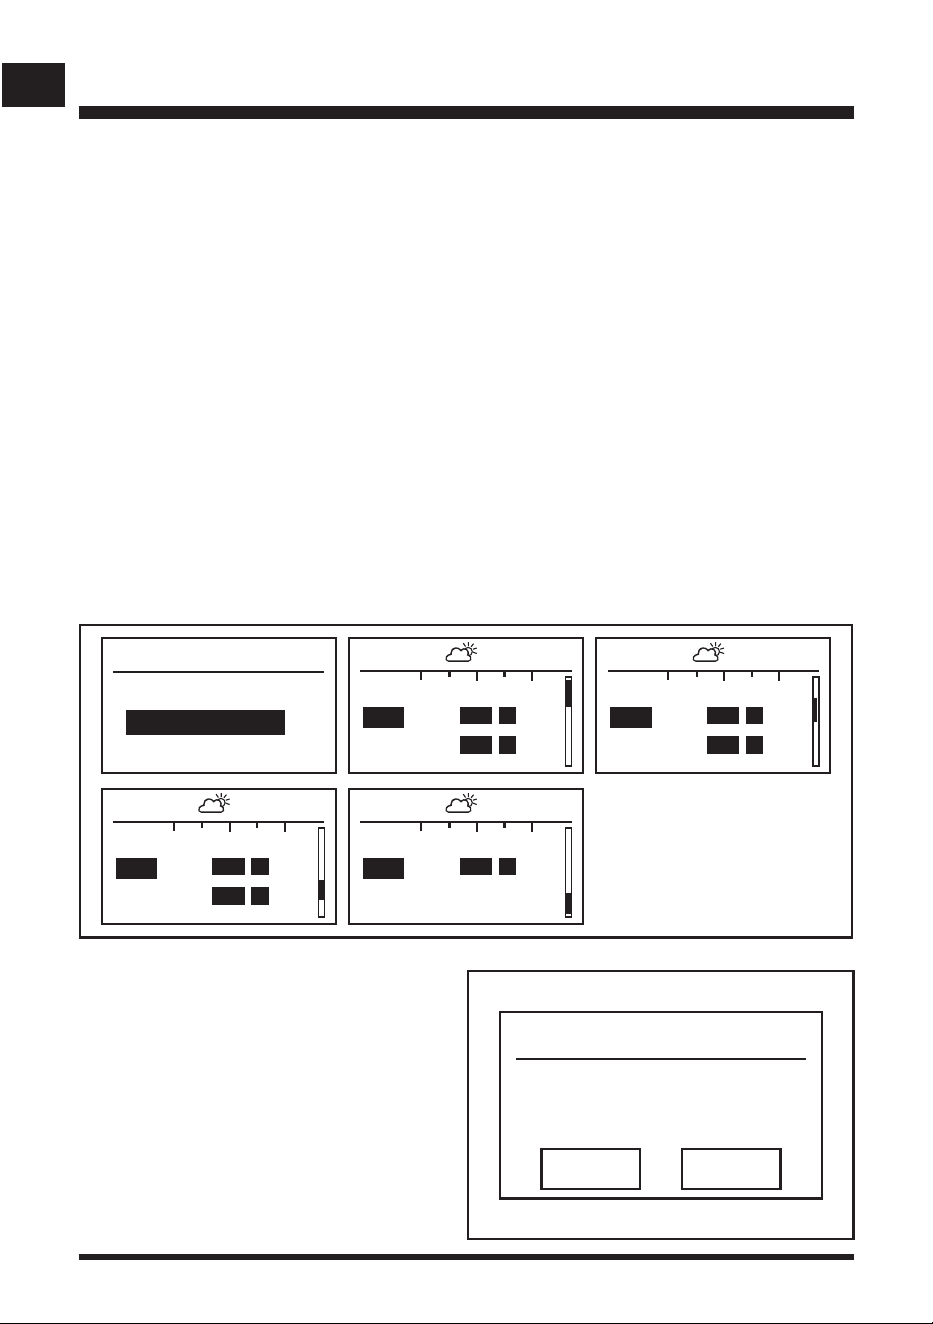
Press the Dial and select the Mode page. Turn
the Dial to switch between Schedule and Drop
& Mow (Fig. 29). Schedule is the default mode
setting.
Fig. 29
34
EN
OPERATION
Fig. 30
Schedule
Start Schedul e
Amend Schedul e
00
08:07 - - 17:24
12 24
Mon
Tue
00
08:07 - - 17:24
12 24
Fri
Sat
00
08:07 - - 17:24
12 24
Wed
Thu
00
08:07 - - 17:24
12 24
Sun
Monday
08:00-17:00
00:00-00:00
Copy Clear
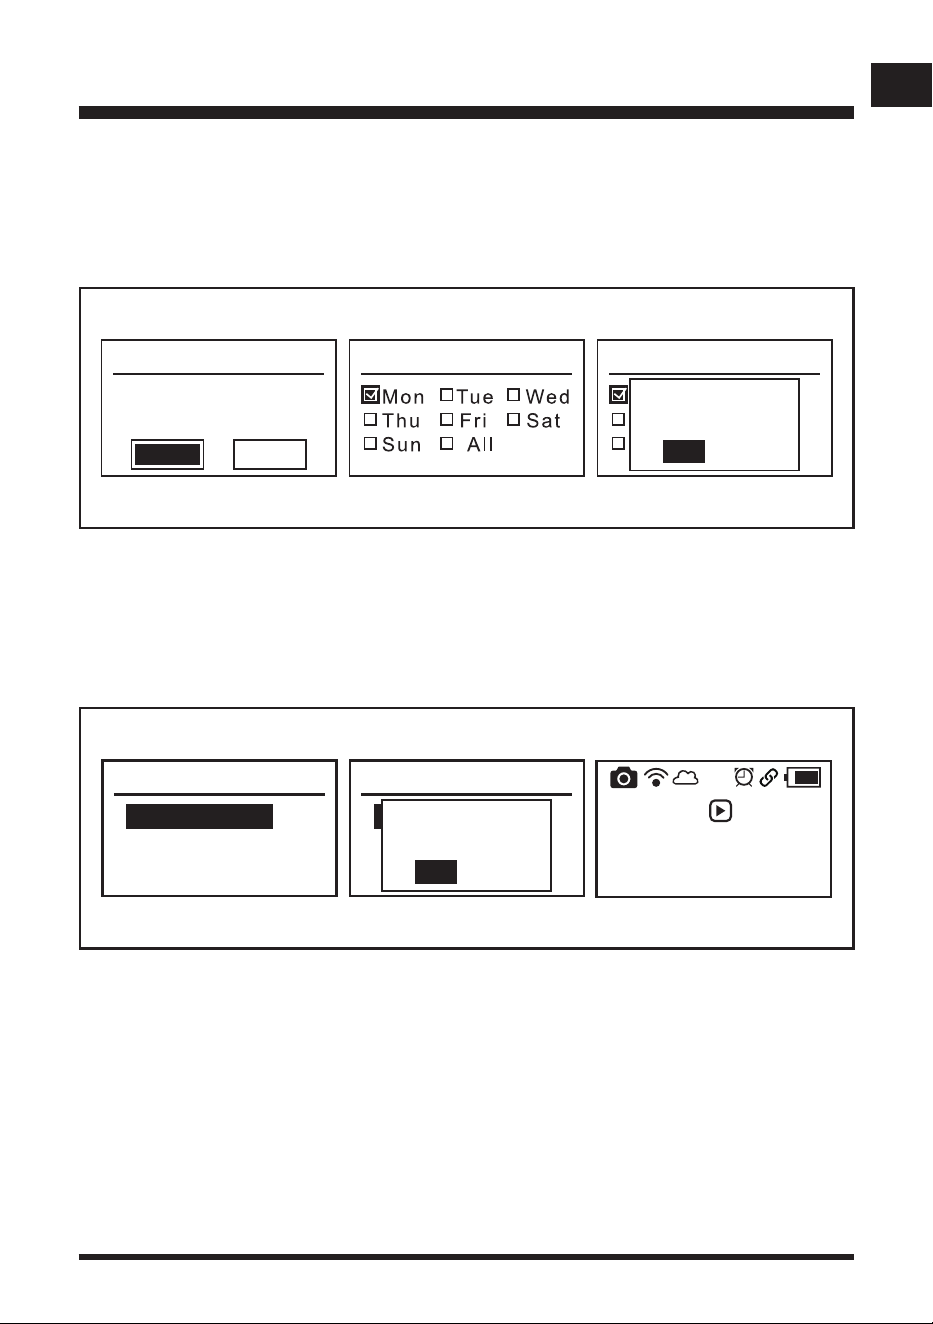
Two working time periods can be set for each
day according to your requirements. The daily
working time settings can be copied to other
days (Fig. 31).
To clear the time settings, turn the dial to
select “Clear” and press to conrm (Fig. 31).
Fig. 31
Schedule Mode
The robotic mower mows the lawn within the properly dened borders in daylight hours following
the set schedule. It will automatically recharge. It will alternately charge and mow until the end of
the set working session. A schedule of 08:00 to 17:00 is set by default.
Ensure the time and date are set according to the local time zone.
Choose the start and end times:
■ Select “Schedule”. Press the Dial to conrm.
■ Turn the Dial to select Amend Schedule, and then press the Dial to enter the schedule overview
page (Fig. 30).
■ On the schedule overview page, the current working sessions are highlighted with a solid bar.
The sunrise and sunset times are shown at the top of the screen. NOTE: The mower will not
operate outside of these times.
■ Turn the dial to toggle through the daily schedules (Fig. 30).
■ Turn the dial to the desired day and press to select.
■ Adjust each digit of the start time and end time by turning the Dial and pressing to conrm.
■ If a wrong digit is entered, press the back button to return to the previous digit.
35
EN
OPERATION
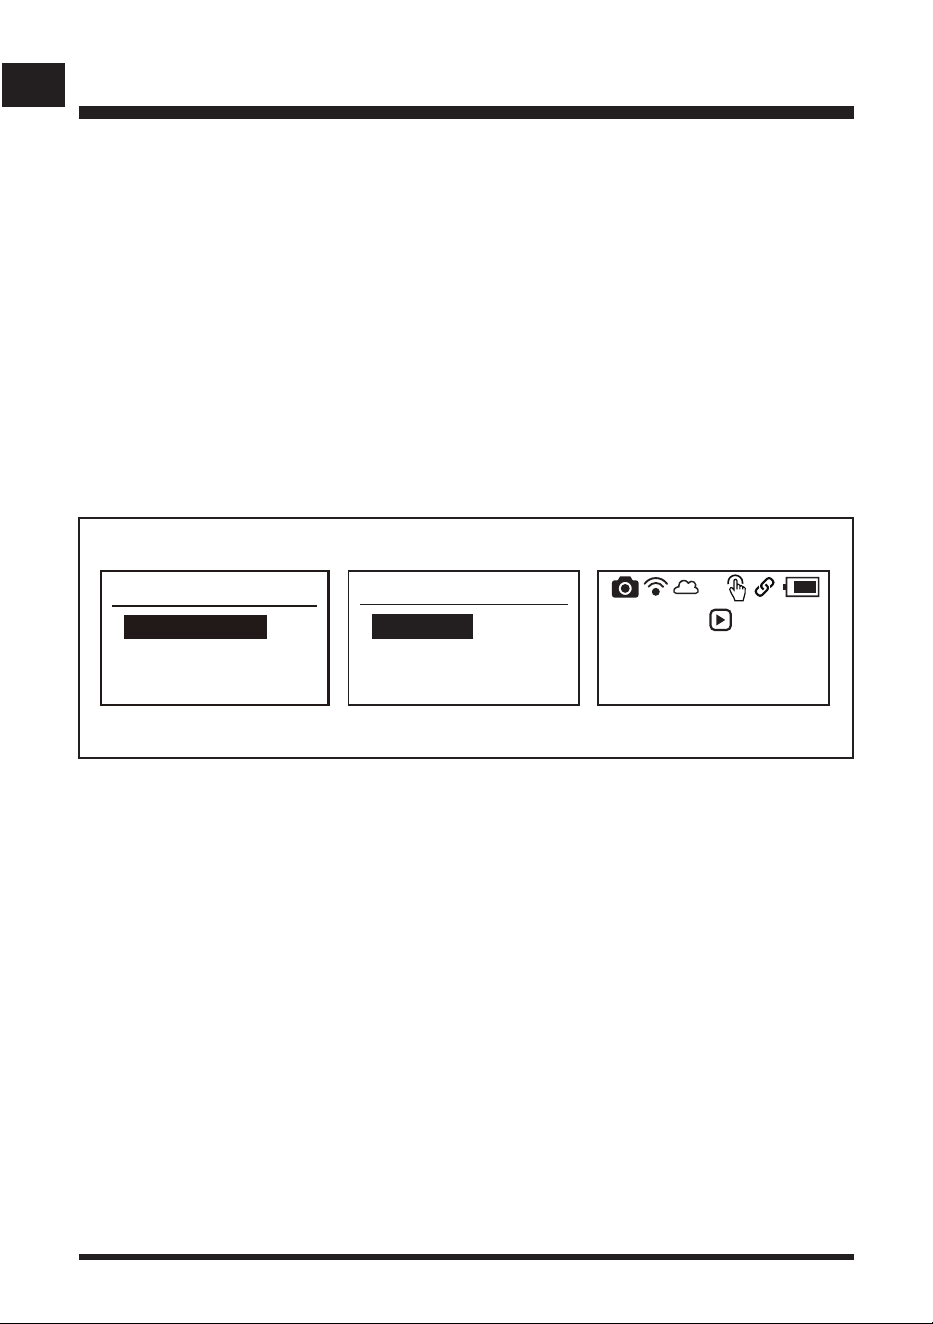
To copy daily time settings to other days:
■ Turn the Dial to select Copy, and then press the Dial to enter the Copy page (Fig. 32).
■ Turn the Dial to select the desired day and press to conrm with a tick.
■ To apply the times to all days, select “All”.
■ Press the back button, select Yes and press the Dial to conrm changes (Fig. 32).
Press the back button to return to the schedule overview page. The newly set start and end times
can be seen.
The mower schedule is now set. To start schedule, turn the Dial to select Start Schedule, and then
press the Dial to conrm (Fig. 33).
Monday
08:00-17:00
00:00-00:00
Copy Clear
Copy Copy
Mon T ue We d
Thu Fri Sat
Sun All
Save Changes?
Yes
No
Fig. 32
Schedule
Start Schedul e
Amend Schedul e
Schedule
Start Schedul e
Amend Schedul e
Activate
Schedule Mode?
Yes
No
Press then
press dial to
start mowing
08-11-2024 13:57
Fig. 33
36
EN
Refer to STARTING/STOPPING THE ROBOTIC MOWER on page 42-44 to begin the rst
scheduled mowing session.
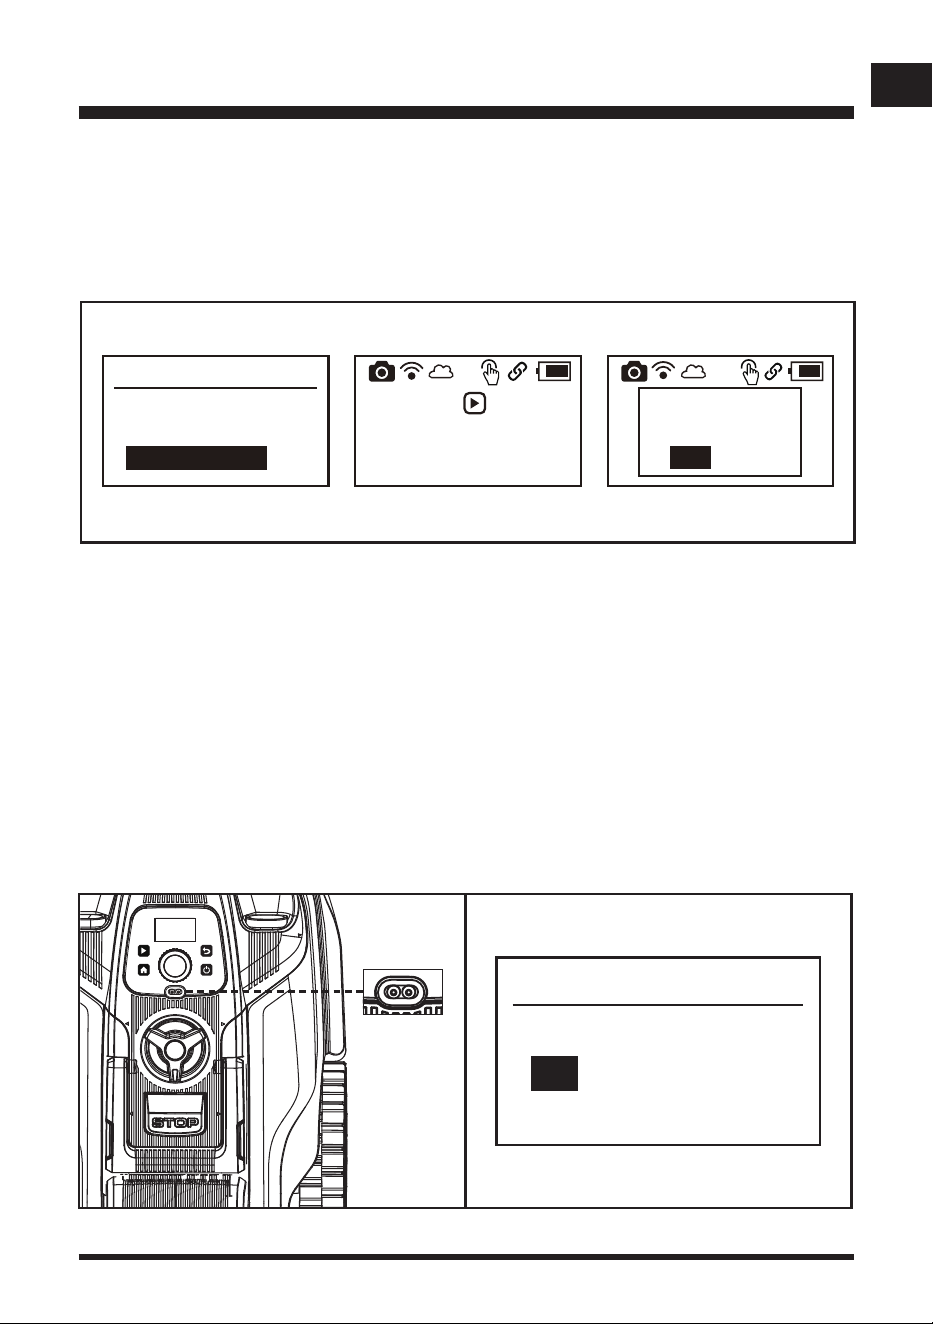
Drop & Mow Mode – the mower is sent out for a one-time mow.
This mode can be used either on “Main Area” (i.e. the lawn that contains the charging station) or
“Other Area” (e.g. front lawn or lawn at another property):
Main area – the mower will mow once and return to the charging station.
Other area – the mower will mow until the battery runs out and wait on the lawn to be collected
and placed on the charging station.
■ Select “Drop and Mow”. Press the Dial to conrm.
■ Select Random Mode, Spiral Mode or Edge Cutting by turning the Dial. Press the Dial to conrm
(Fig. 34).
■ Choose the Main Area or Other Area according to your requirement.
■ Press the Dial to conrm (Fig. 34).
OPERATION
Fig. 34
- Random Mode:
The robotic mower mows the lawn in a random pattern. It will automatically search for a suitable
working area. If the robotic mower does not nd grass, it will change direction and start running
again in a new direction. The blades will not spin until the mower can detect grass for more than
5 seconds.
- Spiral Mode:
The robotic mower mows in a spiral outwards from where it is placed on the lawn. This is best
used to tidy up any areas that may not have been mowed during a random mowing session.
The robotic mower will spiral for up to 3 minutes. After the spot cut is nished, the mower will
start to mow in a random pattern automatically.
If the area to be mowed is too narrow for the robotic mower to carry out the spot cut, after
searching, the mower will mow in a random pattern automatically.
NOTE: The mower will beep when lifted and transported from different areas. This is a normal
warning sound.
Random Mode
Main Area
Other Area
Press then
press dial to
start mowing
08-11-2024 13:57
Random Mode
Drop & Mow
Spiral Mode
Edge Cutting
37
EN
OPERATION
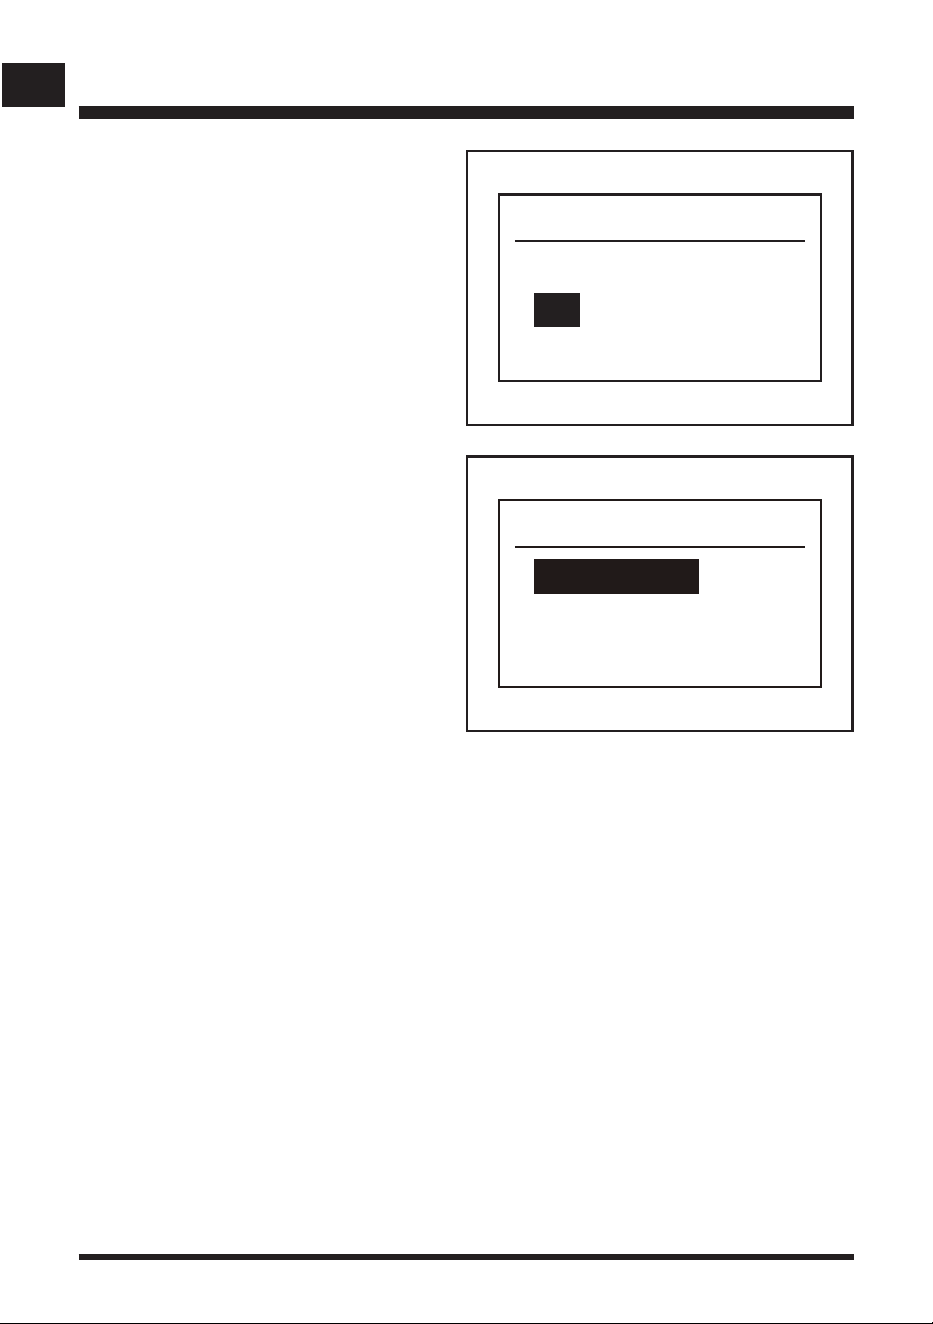
- Edge Cutting:
The robotic mower will automatically search for and follow the edge of lawn to trim the grass
nearby. Select Edge Cutting by turning the Dial. Press the Dial to conrm. To start the mower,
press the Start button, and then press the Dial to conrm.
After the edge cutting is nished, the mower will start to mow in a random pattern automatically.
Rain Sensor Page
The robotic mower is equipped with a rain sensor (Fig. 36). It is on by default.
When it rains, the rain sensor will be activated. The robotic mower will stop mowing and return to
the base station. The time delay is effective from the time the sensor dries.
■ Turn the Dial to the rain sensor menu and press to select.
■ Turn the Dial and select on or off.
■ Select the required time delay using the Dial. This can be set between 0 and 10 hours.
NOTE: The default delay time is 2 hours as shown (Fig. 37). The time delay prevents lawn
damage arising from cutting on wet lawn.
To turn the rain sensor off, turn the Dial to select Off and press the Dial to conrm.
Press then
press dial to
start mowing
08-11-2024 13:57
Drop & Mow
Random Mode
Spiral Mode
Edge Cutting
Press then
press dial to
start mowing
08-11-2024 13:57
Start
Yes
No
Fig. 36 Fig. 37
Rain sensor
Off
On 2 h
Fig. 35
38
EN
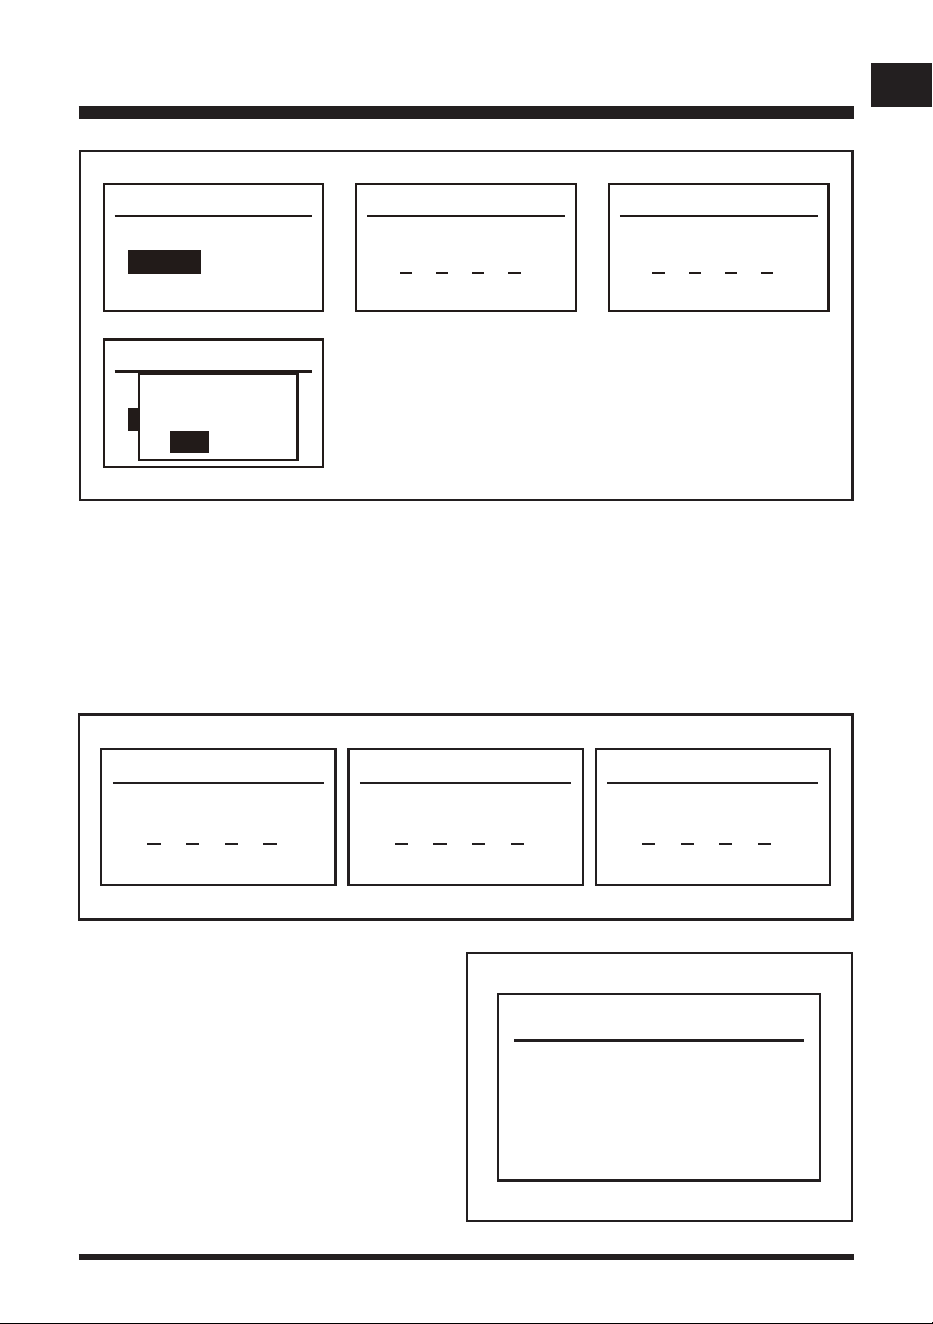
Security Page
Turn and press the Dial to enter the Security
page (Fig. 39). This page is used to switch the
PIN on and off, change the PIN, and view the
software version.
Fig. 39
1) PIN On/Off (Fig. 40)
This function is used to turn the PIN on and off. When the PIN function is turned on, you need to
enter the PIN code to operate the control panel; when the PIN function is disabled, the control
panel can be directly operated.
Please note there is no default PIN code. After enabling the PIN function, set a PIN code
immediately.
■ Use the Dial to select PIN On/Off and press the Dial to enter the PIN On/Off page.
■ Turn the Dial to select Enable and press the Dial to enter the Set PIN code page.
■ Turn and press the Dial to input a four digit PIN code. Conrm the same PIN once again.
■ Press the Dial to conrm Yes.
OPERATION
Ultrasonic Page
Turn and press the Dial to enter the Ultrasonic
settings menu (Fig. 38).
The ultrasonic object sensors are turned on
by default. To turn the ultrasonic sensor off,
turn the Dial to select Off and press the Dial to
conrm Yes.
Ultrasonic
Off
On
Fig. 38
Security
Change PIN
PIN On/Off
Software Version
39
EN
OPERATION
New PIN code
00 0 0
Old PIN code
0 0 0 0 0 0
Confirm
Fig.41
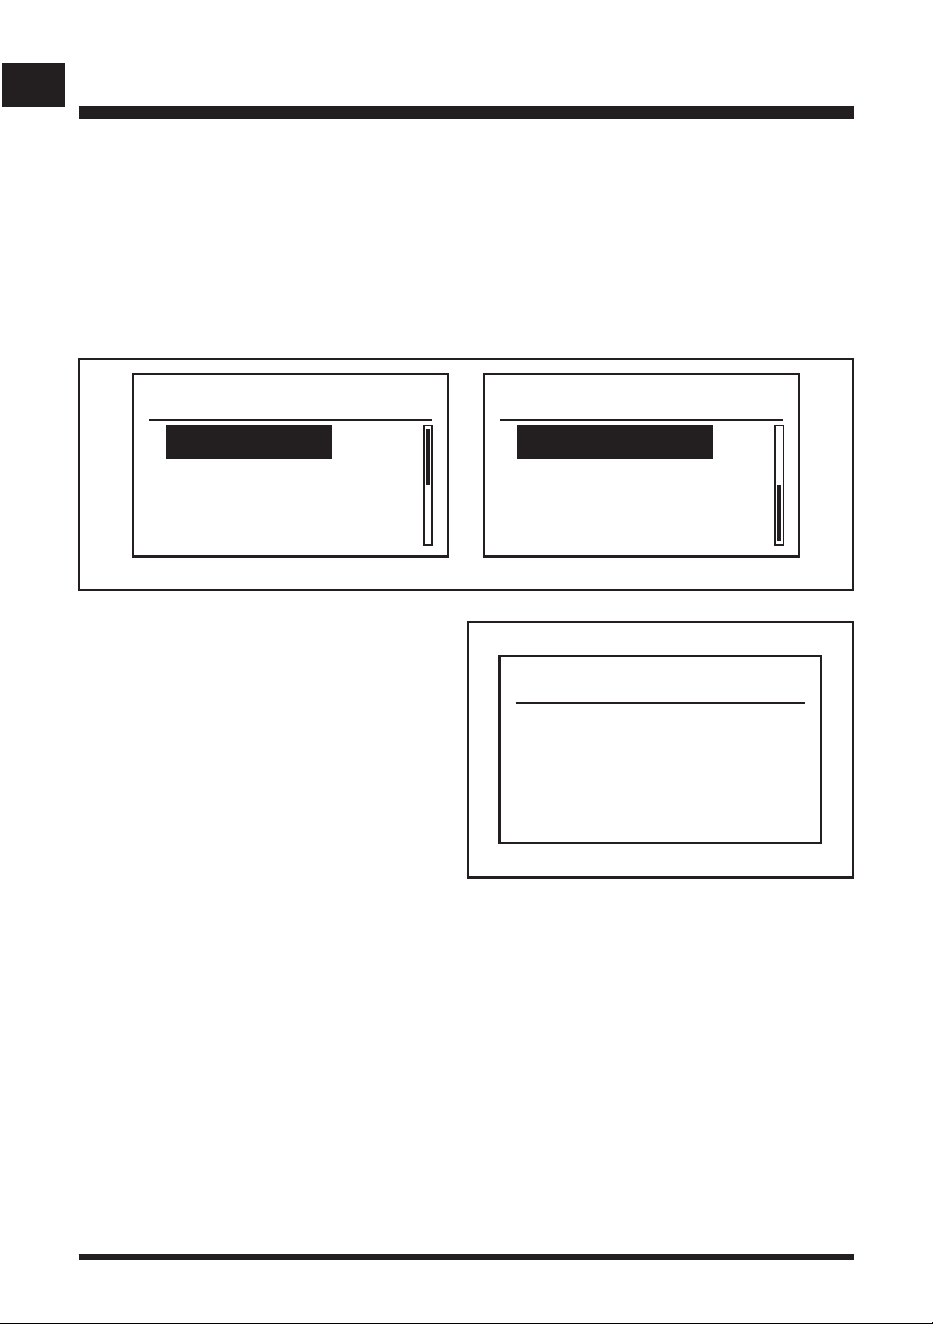
2) Change the PIN (Fig. 41)
NOTE: If the PIN On/Off function is disabled, your set PIN cannot be changed. Please ensure
the PIN On/Off function is enabled.
■ Use the Dial to select Change PIN and press the Dial to enter the Old PIN code page.
■ Turn the Dial and press to input the new PIN code. Conrm once again. Press the Dial to
conrm Yes.
Set PIN code
00 0 0
Confirm
0 0 0
PIN On/Off
Disable
Enable
PIN On/Off
Disable
Enable
Save Changes?
Yes
No
Fig. 40
Software Version
DEC
LCD
CAM
EXE
1 . 0 . 0 . 1
1 . 0 . 0 . 1
1 . 0 . 0 . 1
1 . 0 . 0 . 1
3) Software Version (Fig. 42)
This displays information about the robotic
mower’s software version. If necessary,
check the software version using this
setting.
Fig. 42
40
EN
OPERATION
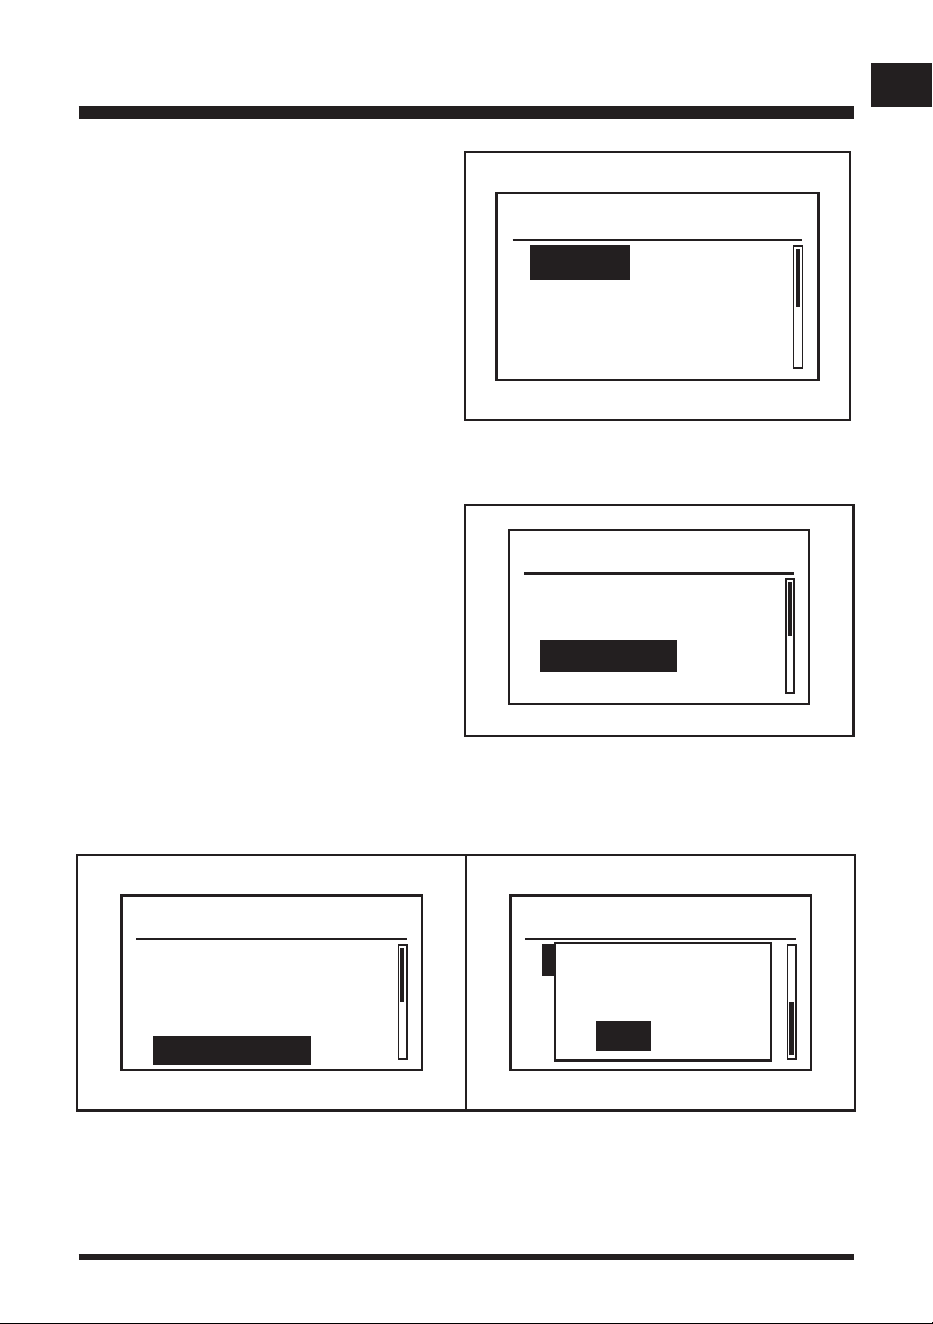
Settings Page
Turn and press the Dial to enter the Settings page (Fig. 43). This page is to view/change general
settings, such as date, time and language, etc.
Settings
Date & Time
Language
Error Log
Clear Grid
Settings
Factory Reset
Fig. 43
1) Date & Time
Use the Dial to select Date & Time and
press the Dial to enter the Date & Time
page (Fig. 44). This setting allows you to set
current date and time.
Use the Dial to edit the date and time:
- Press the Dial to select each digit.
- Turn the Dial right/left to increase/
decrease the time of each digit.
- Press the Dial to conrm each digit.
- Press the Dial to conrm Yes.
The set date and time can be seen on the bottom of the Main Page. It is important to set the
correct date and time so the mower schedule functions correctly.
Date & Time
27 - 09 - 2024
10 : 09
Fig. 44
App Page
NOTE:The robotic mower is paired with the base station when it leaves the factory. If the robotic
mower breaks down and needs to be paired again, use this page to pair it. See page 47-49 for
detailed instructions.
41
EN
OPERATION
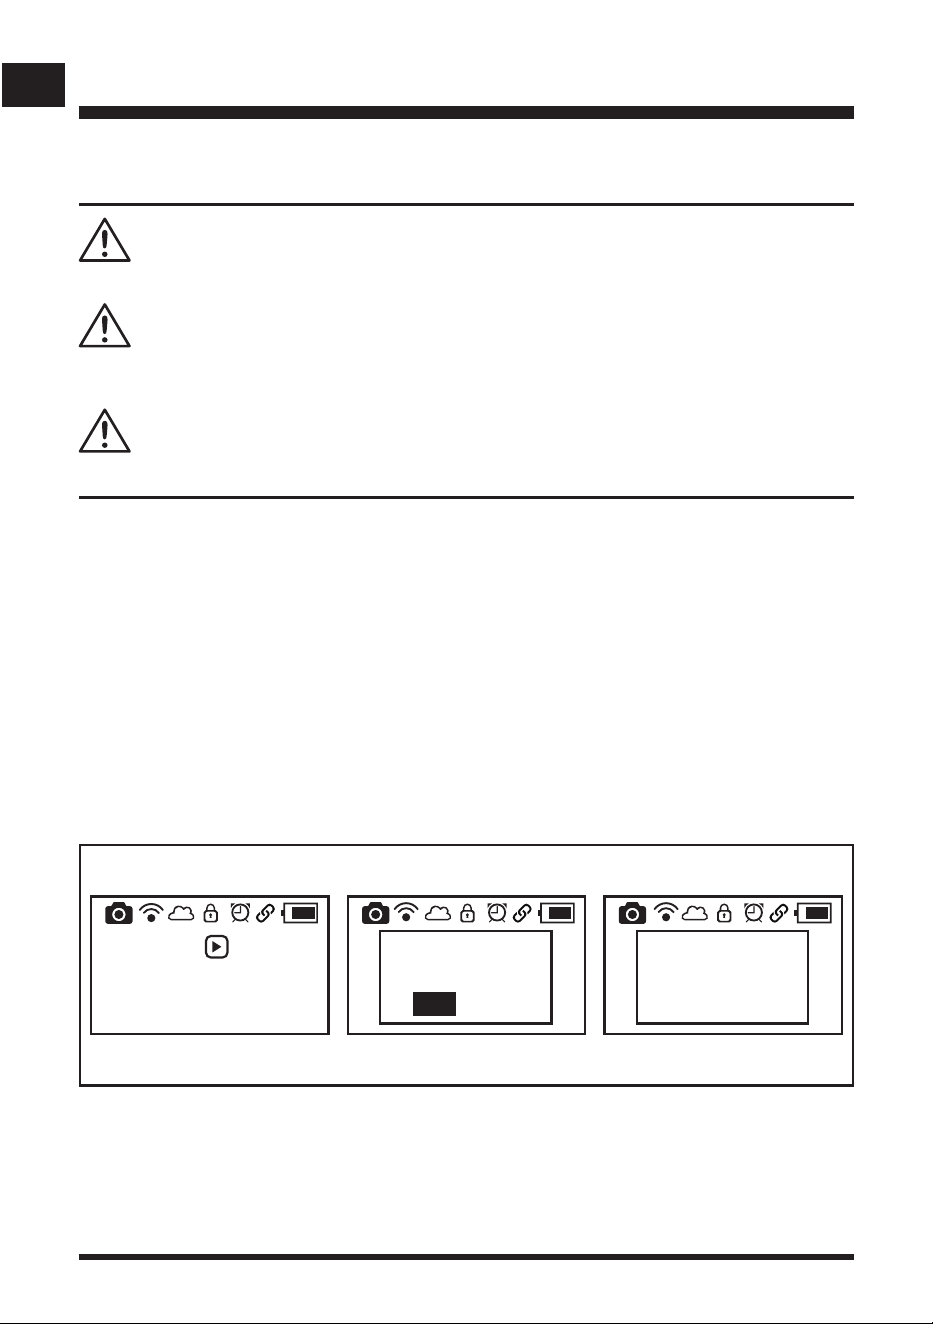
2) Language
Use the Dial to toggle through the pages
to select your desired language. Press the
Dial to conrm. (Fig. 45).
3) Error Log
Use the Dial to select Error Log and press
the Dial to enter the Error Log page (Fig.
46). The latest two errors are displayed in
this error log. Select and press the Dial to
enter the Error log page to view.
Fig. 45
Settings
Date & Time
Language
Error Log
Clear Grid
Fig. 46
4) Clear Grid
Reset map of lawn or after changing or repositioning the charging base station. Select and
press the Dial to conrm (Fig. 47).
5) Factory Reset
This setting allows you to reset the parameters of robotic mower to the factory default settings.
Conrm with Yes (Fig. 48). After the factory reset, the mower should be repositioned. On rst
use in schedule mode, start the mower from the charging station.
Settings
Factory Reset
Reset Mower?
Yes
No
Settings
Date & Time
Language
Error Log
Clear Grid
Fig. 47 Fig. 48
Language
English
German
French
Italian
42
EN
OPERATION
Starting/Stopping the Robotic Mower
Read the safety instructions carefully before you start your robotic lawnmower.
Keep your hands and feet away from the rotating blades. Never put your hands or feet close to or
under the mower when the motor is running.
Never use the robotic lawnmower when people, especially children, or pets, are in the cutting area.
WARNING
WARNING
WARNING
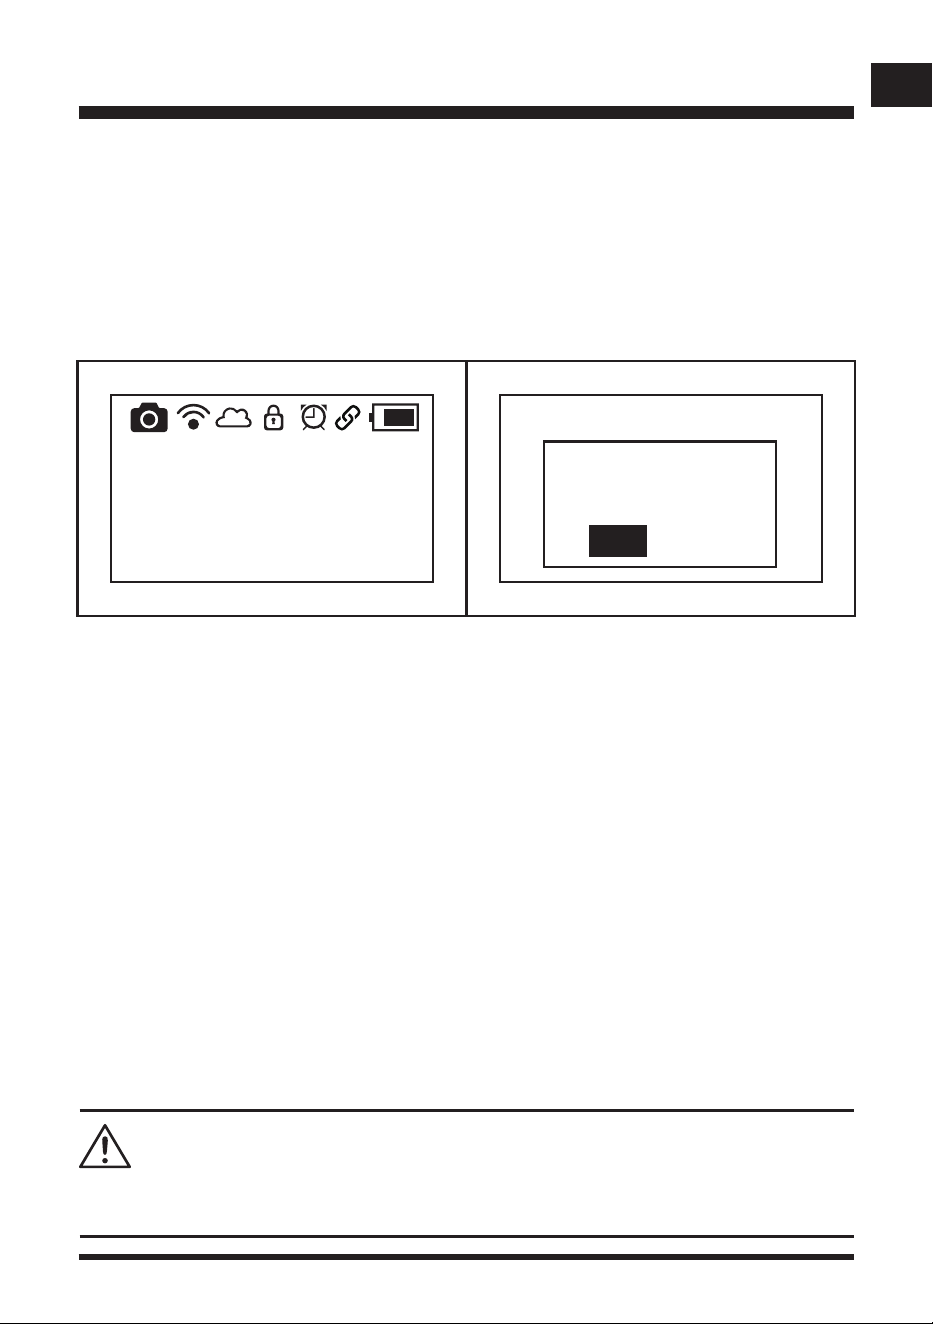
■ Make sure the battery is secured in place.
■ Place the mower on the docking station. Allow the battery to fully charge before rst use.
■ If the mower is off, press the On/Off button to turn the mower on.
■ Select the desired mower settings (e.g. Rain Sensor, Ultrasonic Sensor, Time & Date) according
to the information in Section 4 “Settings Menu”.
■ Choose Schedule Mode or Drop & Mow Mode according to the instructions on page 33-36.
■ On rst use in schedule mode, start the mower from the charging station. To start the mower,
press the Start button, and then press the Dial to conrm. The robotic mower will start mowing
in 5 seconds.
■ In Drop and Mow mode, put the mower into the area to be mowed and press the Start button,
then press the Dial to conrm (Fig. 49).
Press then
press dial to
start mowing
08-11-2024 13:57
Press then
press dial to
start mowing
08-11-2024 13:57
Start
Yes
No
Press then
press dial to
start mowing
08-11-2024 13:57
5
Fig. 49
43
EN
OPERATION
■ In Schedule mode, when charging is required, the robotic lawnmower will automatically return
to the base station. It takes around 2 hours and 10 minutes to be fully charged, after this the
robotic mower will resume mowing. When the scheduled working time is over, it will return to the
base station and remain on standby on the base station for the next working schedule.
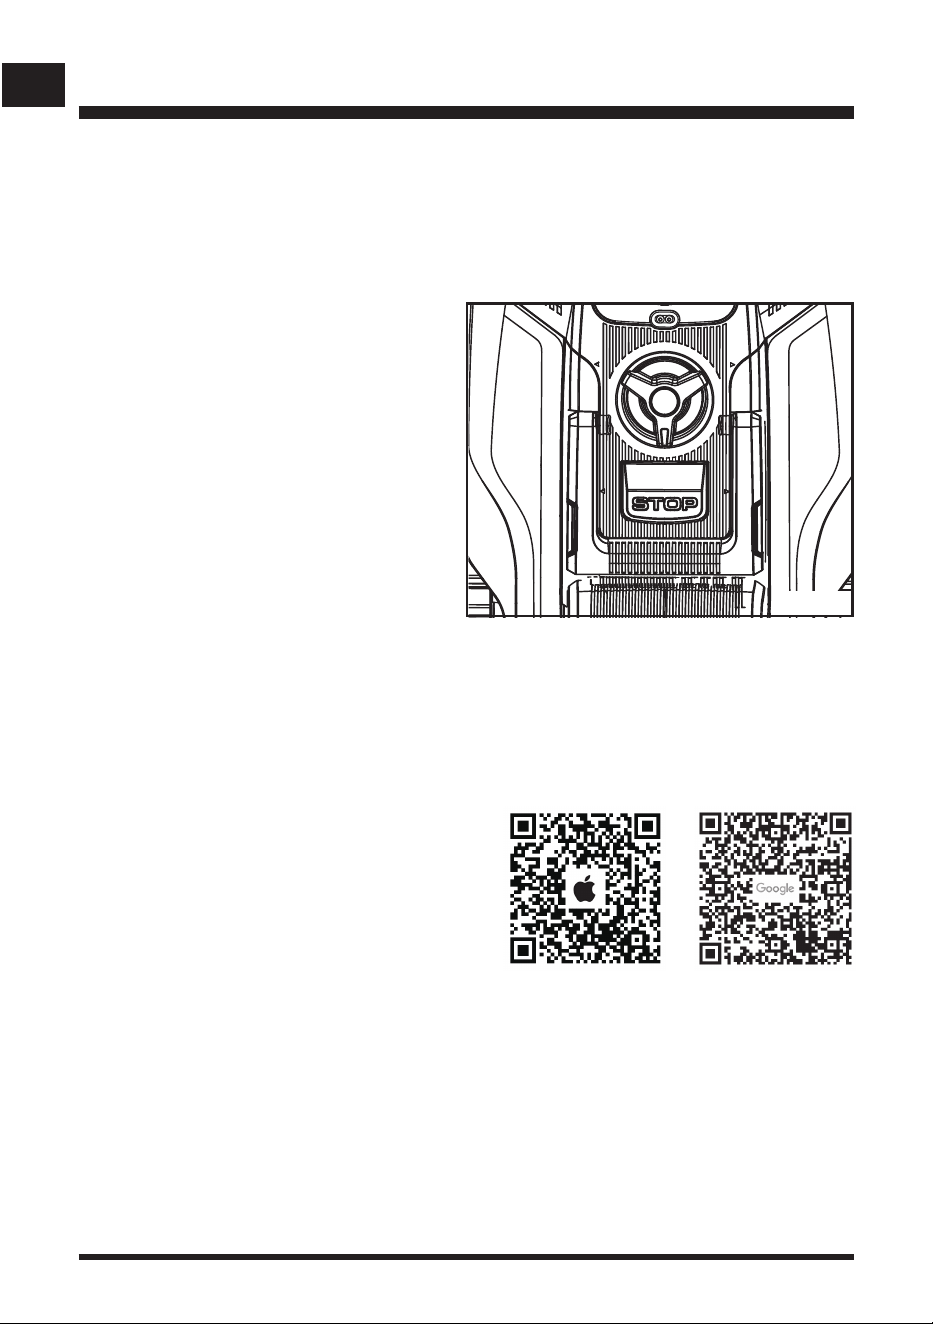
■ To stop the mower manually during operation, press the STOP button. The LCD panel will
display as below (Fig. 50). To recover the mower from the stopped state, press any button, and
then press the Dial to conrm (Fig. 51).
NOTE: When the mower is charging on the base station, press the STOP button, the LCD panel
will display as per Fig. 50. The mower will not resume working after charging is nished.
■ To turn off the mower, press the On/Off button for 2 seconds.
NOTE: The mower is always on and cannot be turned off when on the charging station.
NOTE: If the mower is not on the charging station and the control panel has not been operated for
25 minutes, the mower will automatically enter sleep mode (the LCD panel will turn off). Press
the On/Off button to turn off the mower. Then turn on the mower again.
NOTE: If the operating temperature is over 65°C, the LCD panel will display “Battery Over
Temperature”. The robotic mower will search automatically to return to the base station. Allow the
machine to cool down to reach a normal temperature. Then restart the mower, it will work again.
Setting the Cutting Height
Cancel
stopped-state?
Yes
No
Stopped
08-11-2024 13:57
Do not make any adjustment to the robotic mower without rst stopping the motor. Keep your feet
away from the blade turning disc when adjusting its height.
WARNING
Fig. 50 Fig. 51
44
EN
OPERATION
The cutting height of the robotic mower can be adjusted from MIN 1.2'' (30 mm) to MAX 3.1'’ (80
mm) (Fig. 52).
During the rst week of use, select a cutting height of 2.36’’ (60 mm). The cutting height can be
lowered step by step every week until the desired cutting height has been reached.
Fig. 52
■ Press the STOP button to stop the robotic
lawnmower.
■ Turn the cutting height adjustment knob to
set the cutting height.
- Turn clockwise to raise the cutting height.
- Turn anti-clockwise to lower the cutting
height.
■ For the rst cut each season, a higher
cutting setting should be selected. USING
A CUTTING HEIGHT THAT IS TOO LOW
IN LONGER GRASS WILL USE MORE
POWER AND REDUCE BATTERY RUN
TIME.
■ Before you begin to mow, check to ensure that the blade is not dull and that none of the
fasteners are damaged. To prevent any imbalance, replace dull and/or damaged blades. To
carry out this check, rst switch off the mower using the On/Off button.
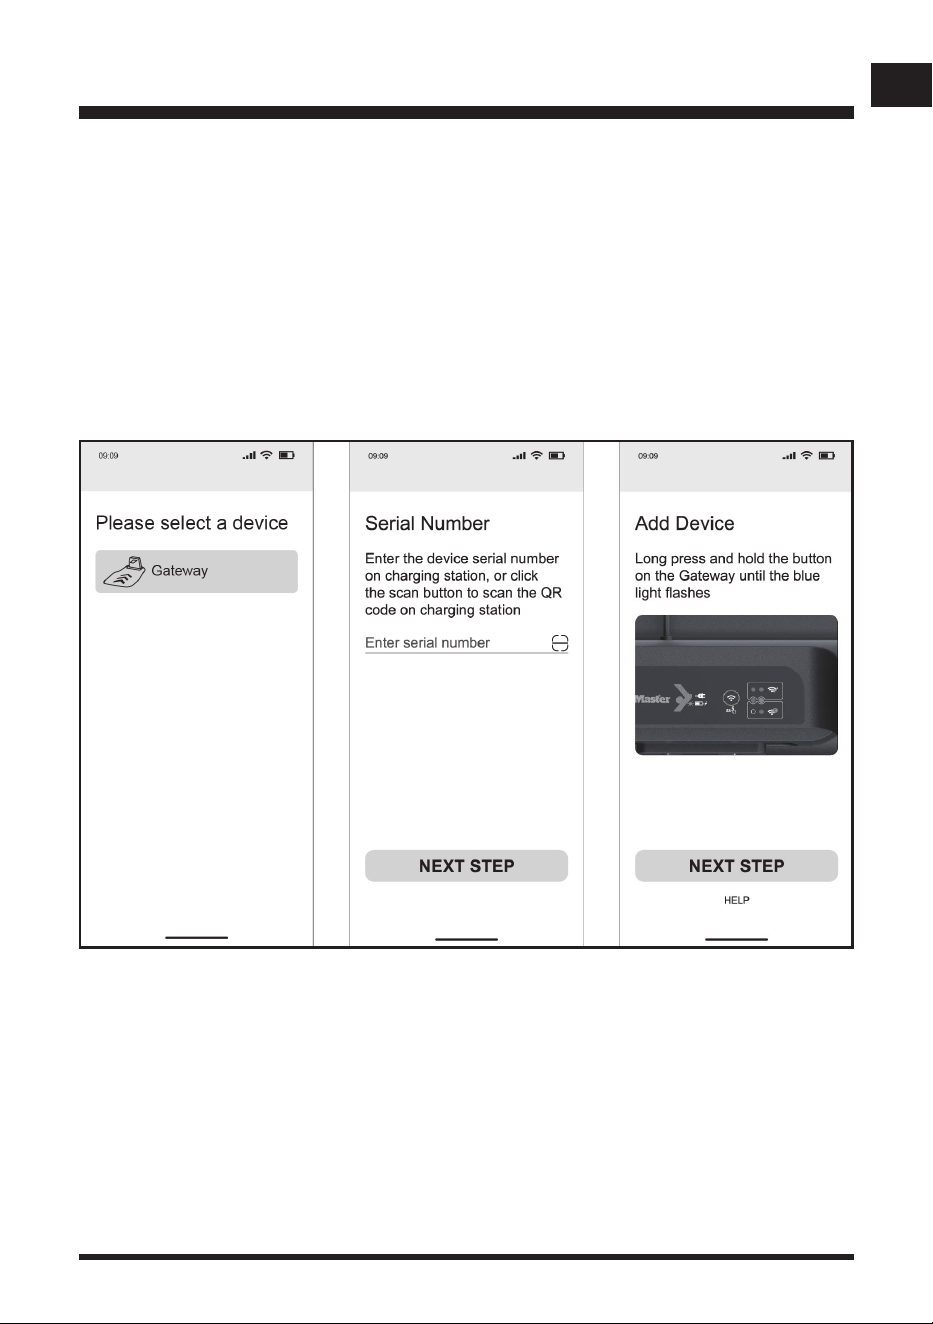
WI-FI CONNECTION
NOTE: This Lawnmaster Robotic Lawnmower
supports 2.4GHz Wi-Fi networks and is compatible
with Apple iOS 13 and above & Android 5.0 and
above.
Download the Lawnmaster app by scanning the
QR code. The app can also be downloaded from
the Apple App Store or Google Play Store by
searching for “OcuMow”. Open the app and create
a prole.
NOTE: The robotic mower is paired with the base station during production. When you connect the
base station using the app, the mower must be connected into the base station. Ensure the phone,
mower, and base station are all in close proximity.
45
EN
OPERATION
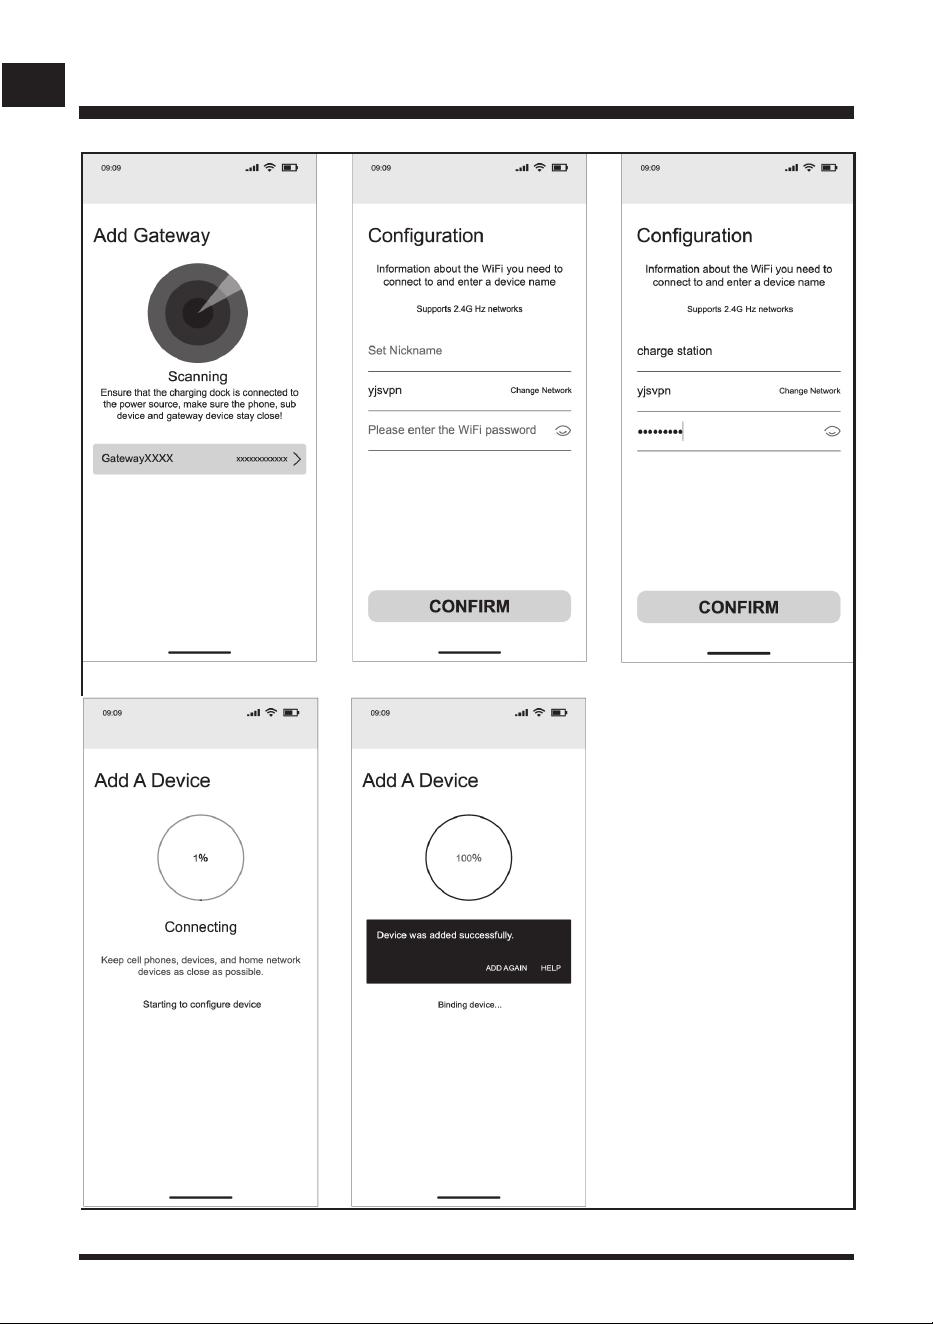
Your mower connects to your phone using a cloud connection. This connection is provided via
a gateway in the charging station. First, the base station must be connected to your home Wi-Fi
network.
■ When the base station is connected successfully and the power adapter is connected to an
electrical outlet, the signal indicator on the base station will be solid blue.
■ Press and hold the Wi-Fi connection setting button for 5 seconds. The base station starts
the Wi-Fi pairing. The signal indicator on the base station ashes blue slowly. This lasts for 4
minutes. Make Wi-Fi connection within this duration.
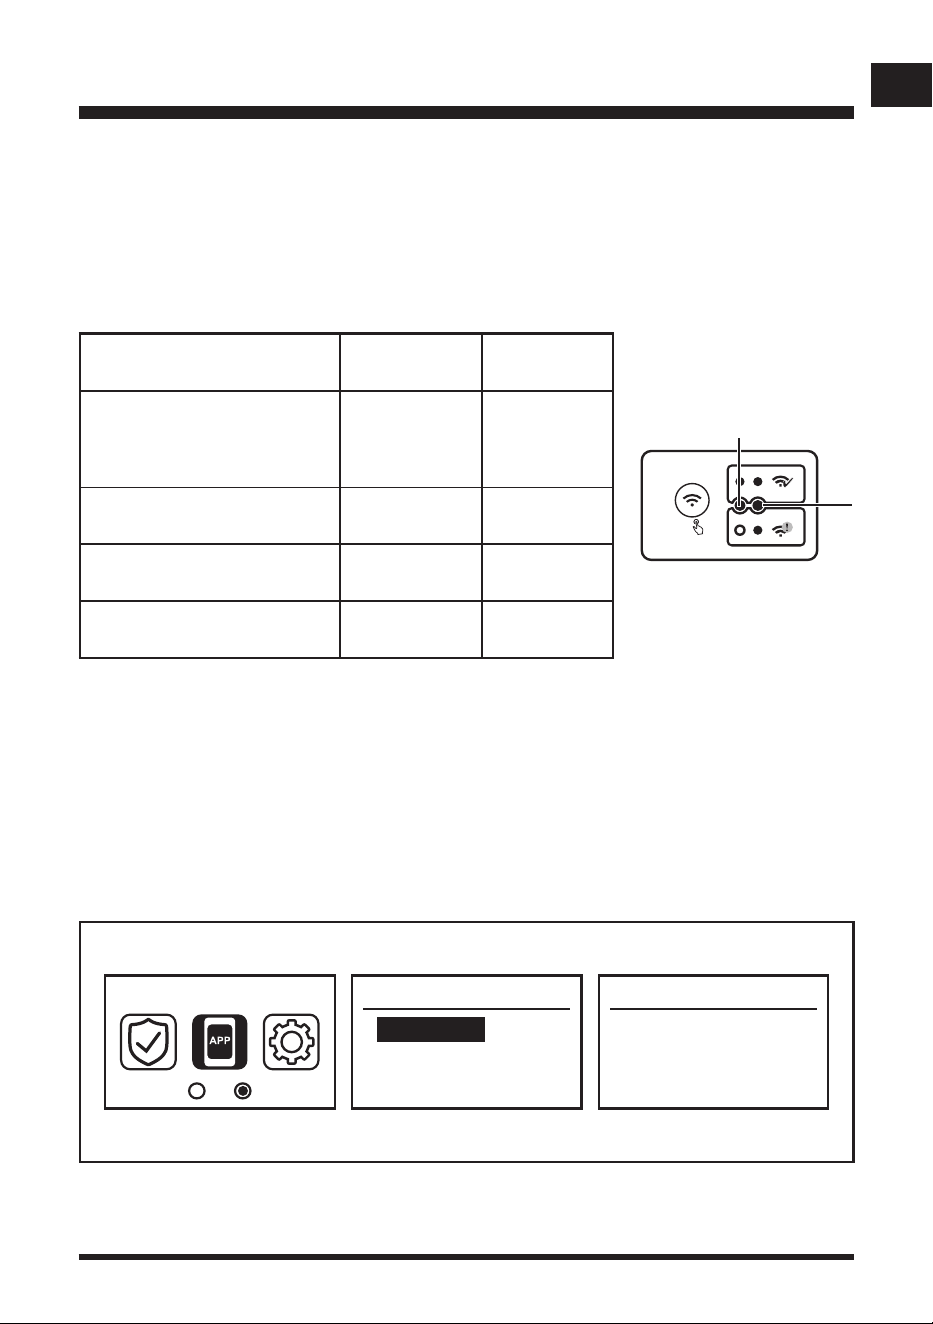
■ Open the App and congure the network according to the app operation process (Fig. 53).
46
EN
OPERATION
Fig. 53
47
EN
■ When the base station is successfully connected to the Wi-Fi network, both signal indicator and
Wi-Fi indicator on the base station will be solid blue.
■ If Wi-Fi connection fails, or the Wi-Fi network is disconnected, the signal indicator (A) on the
base station will be solid blue. The Wi-Fi indicator (B) will be turned off.
■ To reset Wi-Fi, press and hold the Wi-Fi connection setting button for 5 seconds. The base
station starts the Wi-Fi pairing. This lasts for 4 minutes. Repeat above steps in Fig. 53.
Status
Signal
Indicator (A)
Wi-Fi
Indicator (B)
The base station is connected
successfully, and power
adaptor is connected
successfully
Solid blue Off
Pairing Blue, ashing Off
Successful Wi-Fi Connection Solid blue Solid blue
Wi-Fi Connection Failed / The
Wi-Fi network is disconnected
Solid blue Off
A
5S
B
OPERATION
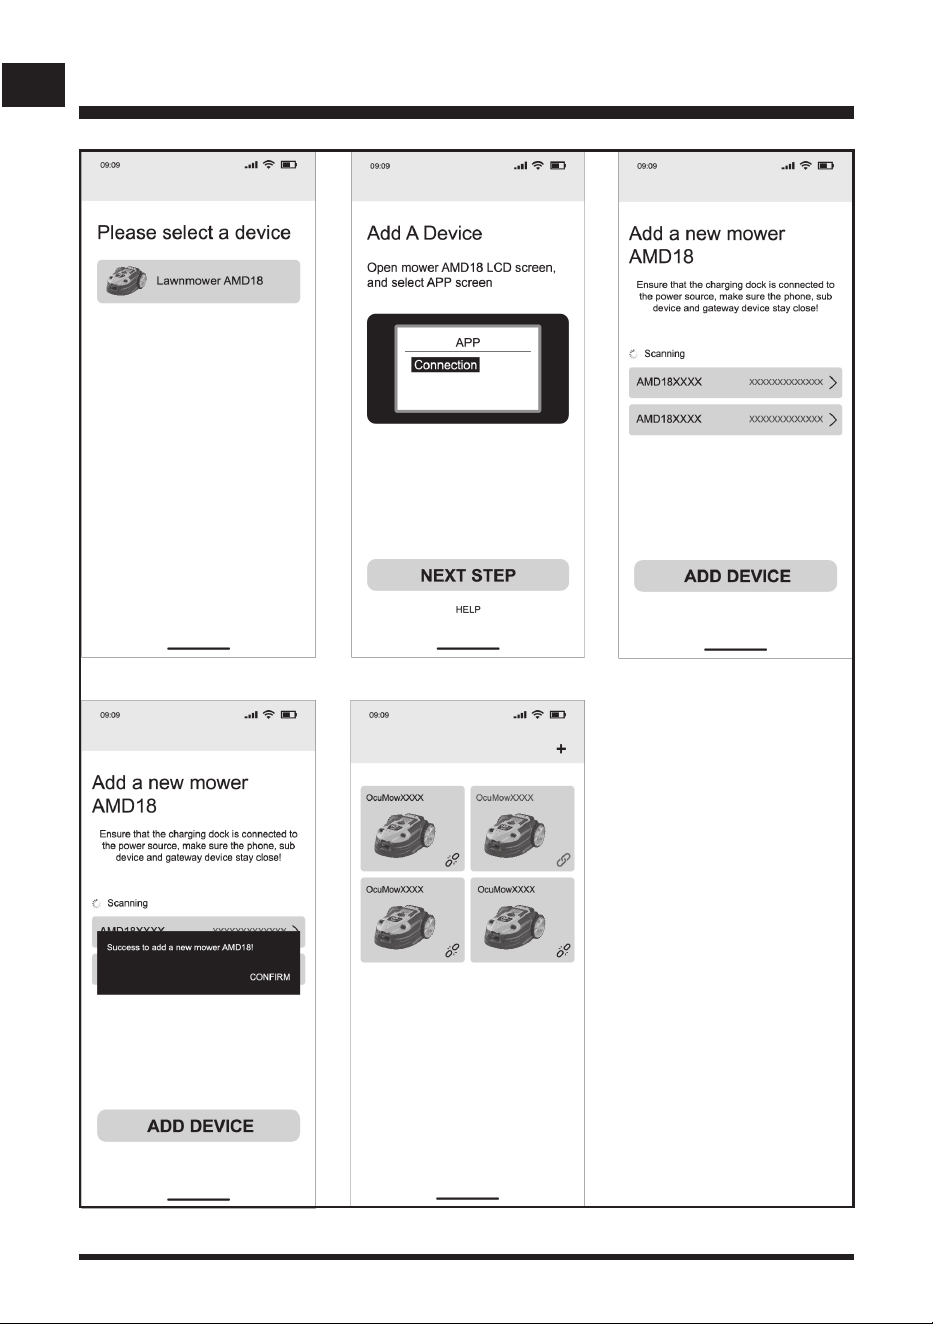
How to re-pair the robotic mower and base station?
The robotic mower is paired with the base station when it leaves the factory. If the robotic mower
breaks down and needs to be paired again, use the App page in the mower’s settings menu to pair it.
This App page will switch on the signal of the robot mower and allow it to pair to a charging station.
Turn and press the Dial to enter the App page. Use the Dial to select Connection and press the
Dial to enter the Connection page (Fig. 54).
Then, open the App and congure the network according to the app operation process (Fig. 55).
APP
Connection
APP Connection
Open App to
check connection
Fig. 54
48
EN
Fig. 55
OPERATION
49
EN
OPERATION
When the robotic mower is successfully
connected to the base station, the main page
will display as below (Fig. 56).
Press then
press dial to
start mowing
24-10-2024 12:00
Fig. 56
50
EN
MAINTENANCE
General Maintenance
■ Keep all safety devices and the motor housing free of dirt and dust. Avoid using solvents
when cleaning plastic parts. Most plastics are susceptible to damage from various types of
commercial solvents and may be damaged by their use. Use clean, dry cloths to remove dirt,
dust, oil, grease, etc.
■ Periodically check all nuts and bolts for proper tightness to ensure safe operation of the robotic
mower.
■ Remove any buildup of grass and leaves on or around the robotic mower and base station.
Wipe the mower clean with a dry cloth occasionally.
■ Inspect the base station and clean it from mud and debris to allow proper docking.
Replacing the Mower Blade (See Figs. 57-58)
Always check to see if the blades are in good condition. If the blades are blunt, damaged or
showing signs of imbalance, they must be replaced. Only use recommended replacement blades.
Make certain ALL 3 blades and screws are replaced at the same time to keep a balanced cutting
Always switch the product off, remove the battery pack and let the product cool down before
performing inspection, maintenance and cleaning work!
Always wear protective, heavy gloves and/or wrap the cutting edges of the blade with rags when
performing blade maintenance. Failure to heed this warning could result in serious personal injury.
If a part becomes worn or damaged, use manufacturer’s recommended replacement parts. Use of
any other parts may create a hazard or cause product damage.
Do not use any attachments or accessories not recommended by the manufacturer of this product.
The use of attachments or accessories not recommended can result in serious personal injury.
WARNING
WARNING
WARNING
WARNING
Before performing any maintenance, make sure the battery has been removed. Failure to heed
this warning could result in serious personal injury.
WARNING
51
EN
MAINTENANCE
system. Visit www.lawnmaster.com for information on where to purchase additional blades.
Consumables and Accessory part numbers can be found at the back of this manual.
To replace the blades
■ Press the STOP button and allow the blade to come to a complete stop.
■ Press the On/Off button to turn off the mower.
■ Lift the battery compartment cover. Remove the battery.
■ Slowly turn the mower over. Place it on a soft and clean surface.
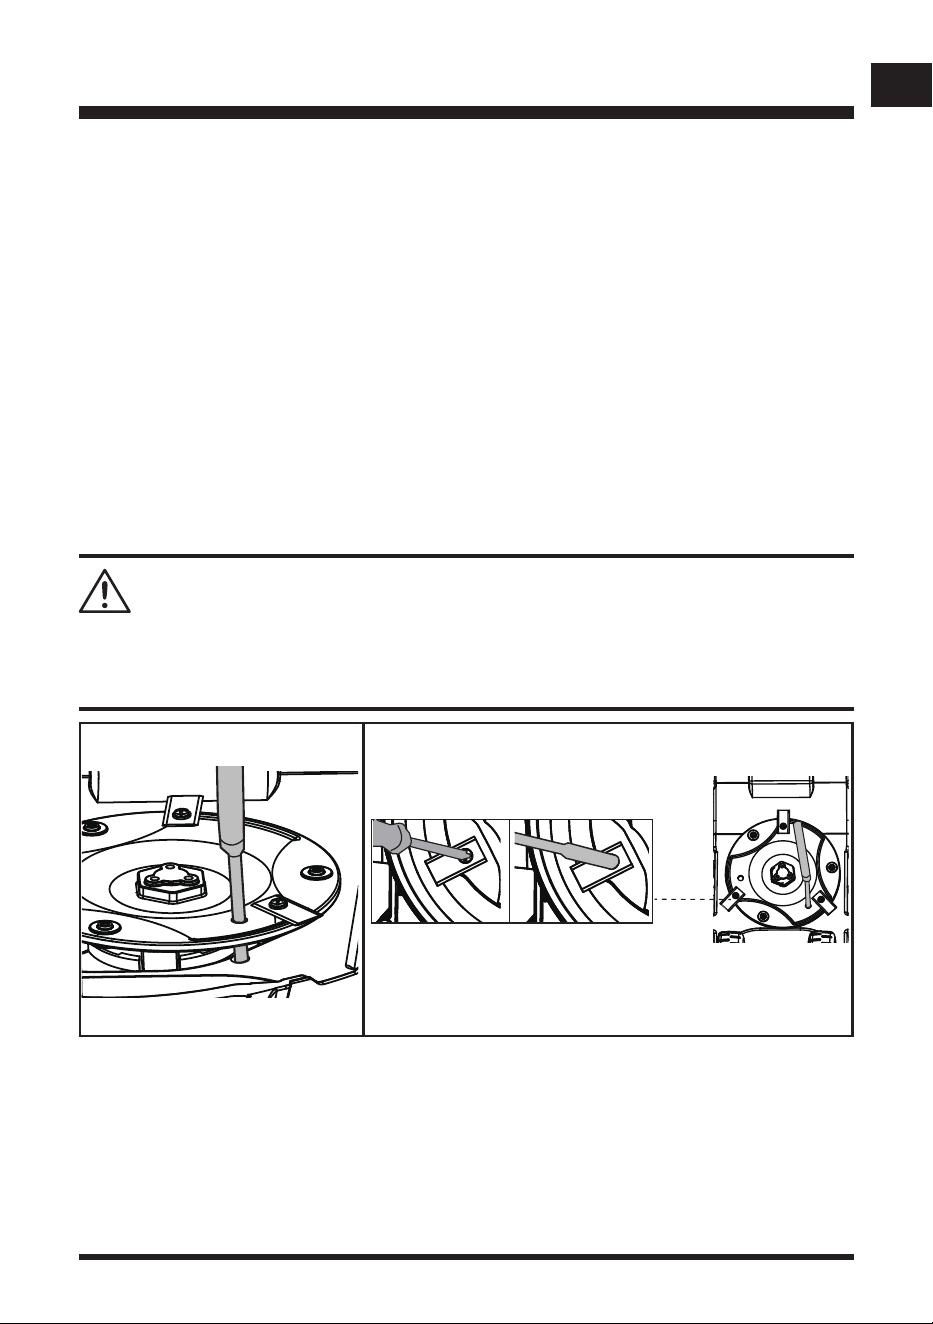
■ Use a suitable tool (e.g., a screwdriver) to insert into one of three holes in the blade disc to x it
in place (Fig. 57). This ensures the blade disc is not turning when replacing the blades to avoid
personal injury.
■ Wear protective gloves and use a screwdriver or hexagonal socket wrench to remove all three
screws and blades (Fig. 58).
■ Secure the new blades with new screws.
■ Make sure all blades can spin freely.
Cleaning the Underside
It is recommended to check and clean the underside of the robotic mower regularly.
■ Press the STOP button and allow the blade to come to a complete stop.
■ Press the On/Off button to turn off the mower.
■ Lift the battery compartment cover. Remove the battery.
■ Slowly turn the mower over. Place it on a soft and clean surface.
Use of an electric screwdriver to remove blade bolts could cause the blade disc to turn rapidly,
resulting in personal injury. Take care and ensure the blade disc is locked in place with a suitable
tool.
WARNING
Fig. 57 Fig. 58
52
EN
MAINTENANCE
■ Use a soft brush or damp cloth to remove dirt, dust, oil, grease, etc. from the underside of the
mower.
IMPORTANT: Do not wash the mower with running water.
■ Wear safety gloves to clean the blade disc, the chassis, and the front and rear wheels
thoroughly with a soft brush or damp cloth. Remove any lodged debris around them.
■ Make sure the blade disc can rotate freely and all blades can spin freely.
STORING THE MOWER
It is recommended to store the mower indoors
during the winter. Storing the mower or battery in
sub-zero temperatures can result in damage.
■ To optimize the battery longevity, ensure the
mower is fully charged before storage during
winter.
■ Press the On/Off button to turn off the mower.
Remove the battery.
■ Clean the mower thoroughly.
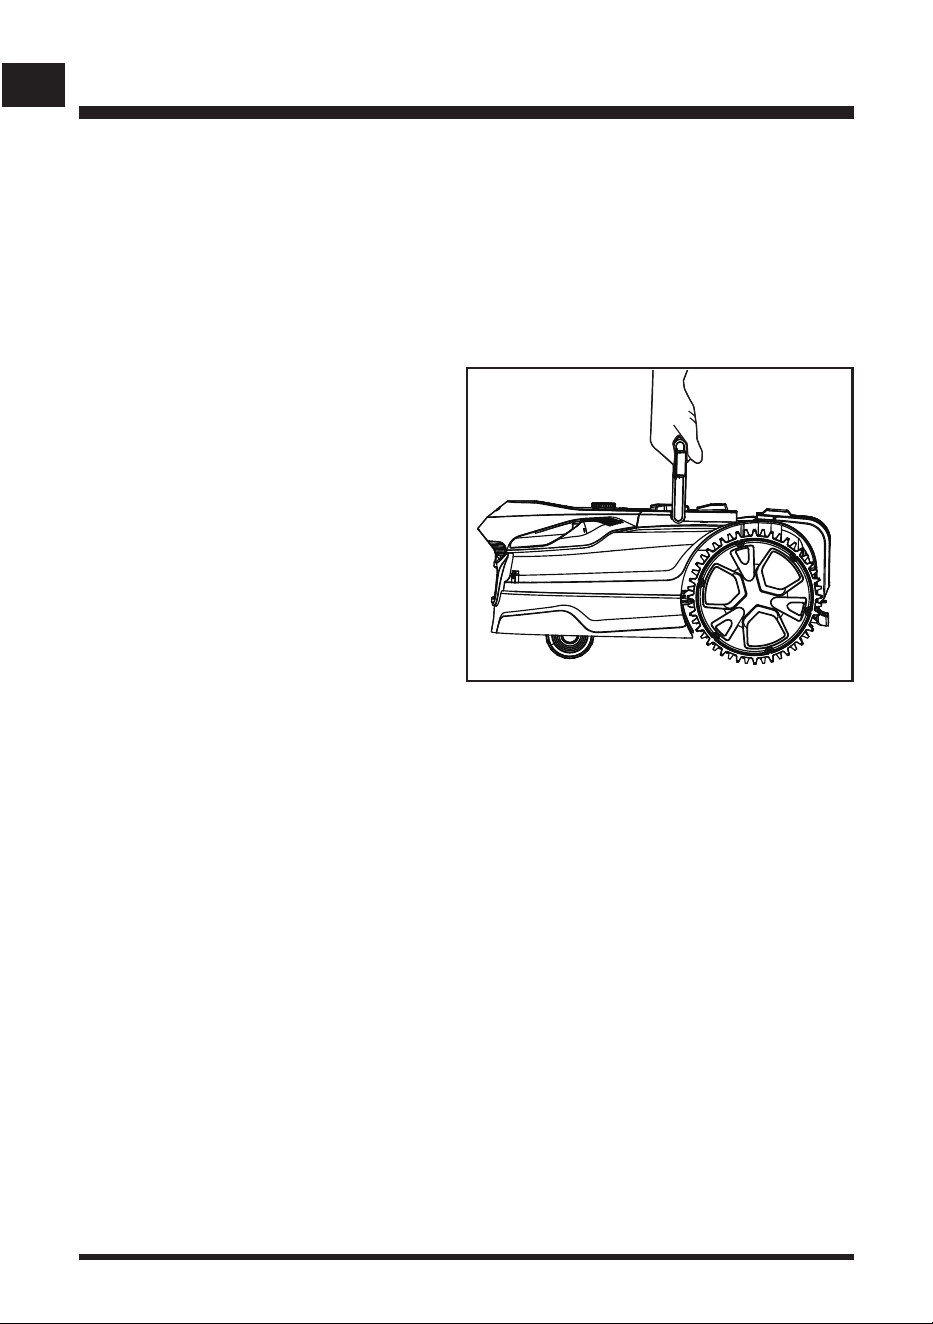
■ Use the carry handle to carry the mower. Carry
the mower with the blade disc away from the
body (Fig. 59).
■ Store the mower indoors in a clean, dry place out of the reach of children.
IMPORTANT: Protect the underside of mower from standing water. NEVER store the mower
upside down outdoors.
BATTERY PACK MAINTENANCE
■ Fully charge the battery before placing in storage.
■ Recharge the battery pack whenever there is a noticeable reduction in the performance. Do not
allow the battery pack to become completely discharged.
■ Do not recharge a battery pack that is already fully charged. Overcharging shortens battery life.
■ Once the battery pack is fully charged, remove the battery from the charger and disconnect
charger from the outlet.
■ Do not store the battery pack on the tool or on the charger.
■ If the battery pack is hot, allow it to cool down before recharging.
Storing the Base Station
■ Disconnect the power adaptor from the power outlet.
■ The base station can be left outside in the winter.
■ It is recommended to place the base station in a dry and sheltered location.
Fig. 59
53
EN
MAINTENANCE
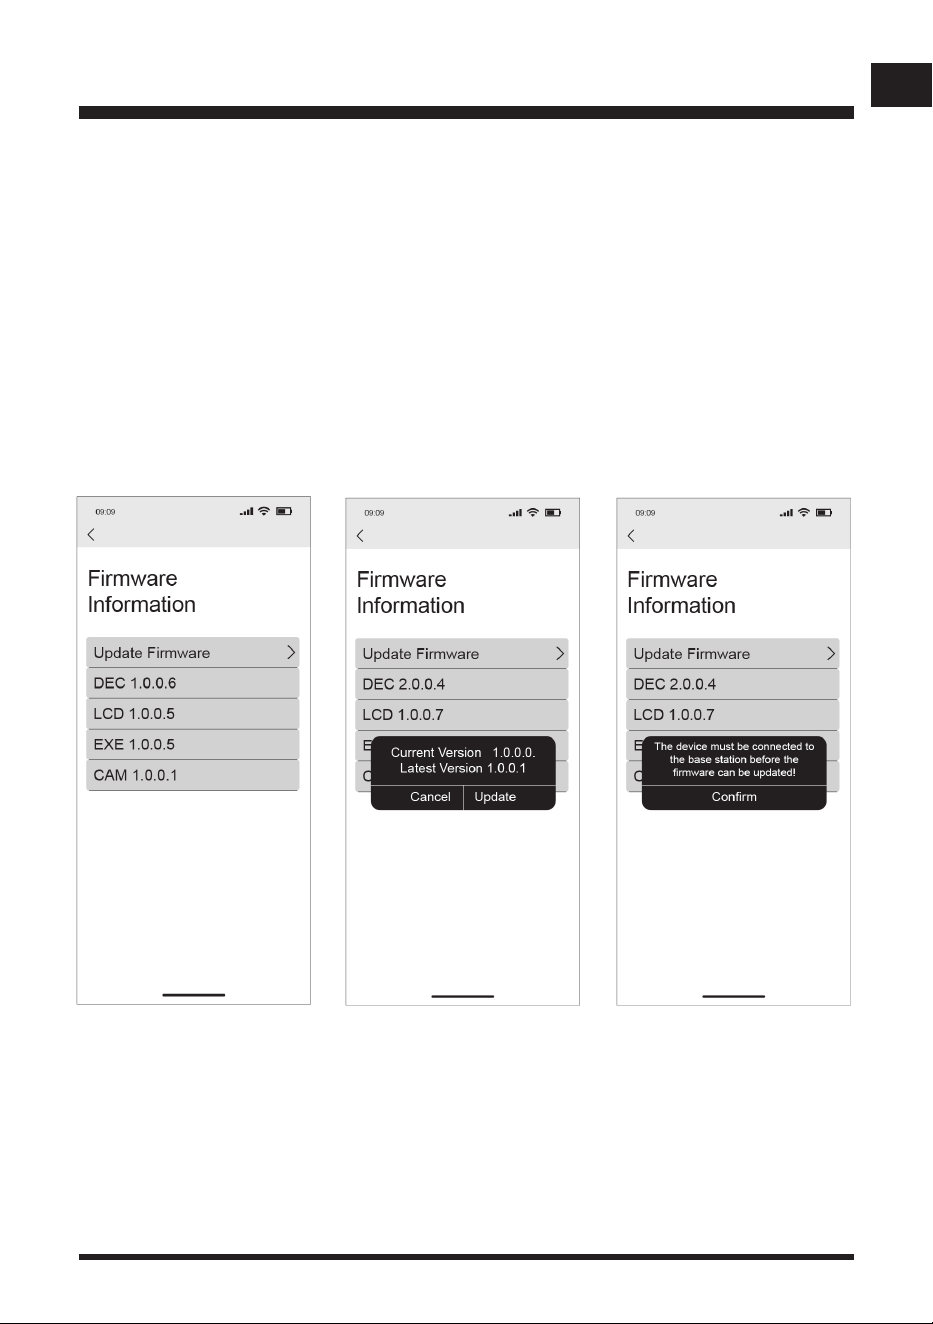
Updating the Software via OTA (Over-The-Air)
The robotic mower's software can be updated wirelessly through the App using OTA technology.
This ensures your mower always has the latest features and improvements.
NOTE: Before updating, the robotic mower must be successfully connected to the app. Ensure
your mobile device has a stable Wi-Fi connection.
During the update process, the mower must be placed on its base station, and the base station
must be powered on successfully. Ensure the mower remains on the base station with a stable
power supply.
■ Open the app and navigate to the "Firmware Information" screen showing the current software
version. Tap “Update Firmware” to see if a new version is available.
■ To start the update, tap “Update”. The update process will take several minutes.
NOTE: Do not operate or interrupt the mower during the update.
■ After the update is completed, the mower will automatically restart. It is then ready for use.
■ Conrm the successful update by checking the "Firmware Information" screen in the app. It will
display the new version number. You can also check the new version number in the Software
Version page in Security Page on the mower’s LCD display.
■ If the update fails or an error occurs, please contact the Aftersales Helpline.
54
EN
ENVIRONMENTALLY SAFE BATTERY DISPOSAL
The following toxic and corrosive materials are in the batteries used in this battery pack:
lithium-ion, a toxic material.
WARNING
All toxic materials must be disposed of in a specic manner to prevent contamination of the
environment. Before disposing of damaged or worn-out lithium-ion battery packs, contact your local
waste disposal agency, or the local Environment Protection Agency for information and specic
instructions.
WARNING
If the battery pack cracks or breaks, with or without leaks, do not recharge it and do not use it.
Dispose of it and replace with a new battery pack.
DO NOT ATTEMPT TO REPAIR IT!
To avoid injury and risk of re, explosion, or electric shock, and to avoid
damage to the environment:
• Cover the battery terminals with heavy-duty adhesive tape.
• DO NOT attempt to remove or destroy any of the battery pack components.
• DO NOT attempt to open the battery pack.
• If a leak develops, the released electrolytes are corrosive and toxic. DO NOT get the solution in
eyes or on skin, and do not swallow it.
• DO NOT place damaged or defective batteries in your regular household trash.
• DO NOT incinerate.
• DO NOT place batteries where they will become part of any waste landll or municipal solid
waste stream.
• Take batteries to a certied recycling or disposal center.
55
EN
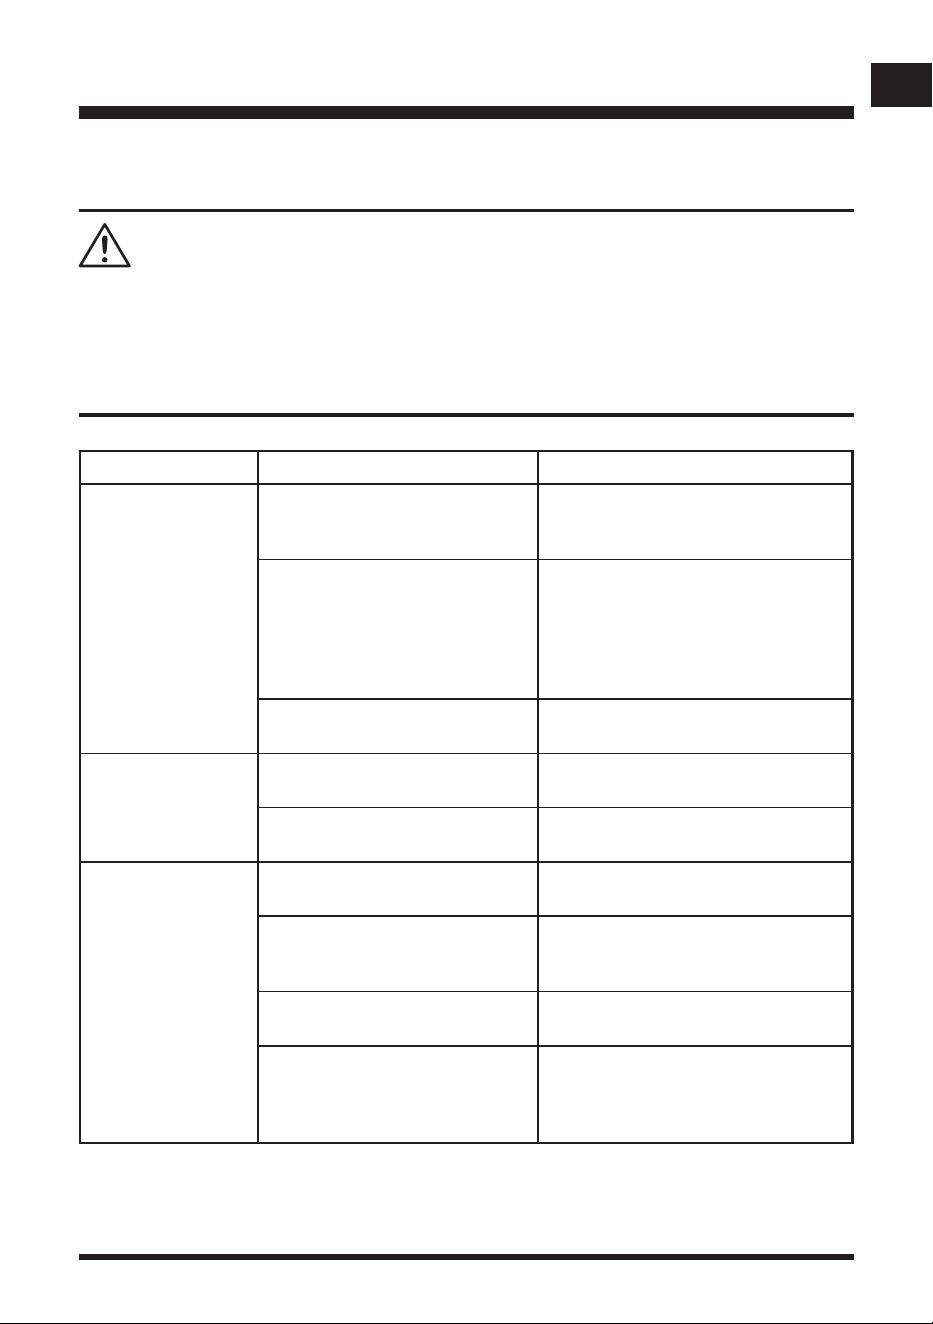
TROUBLESHOOTING
Only perform the steps described within these instructions!
All further inspection, maintenance and repair work must be performed by an authorized service
center or a similarly qualied specialist if you cannot solve the problem yourself!
Gloves and appropriate protective clothing must be worn when performing these instructions.
Always turn off the mower before making any adjustment.
WARNING
Suspected malfunctions are often due to causes that the user can x themselves.
Therefore, check the product using this section. In most cases the problem can be solved quickly.
PROBLEM POSSIBLE CAUSE SOLUTION
The base station
cannot connect.
Wi-Fi signal is weak.
Move the base station closer to the
Wi-Fi router or install Wi-Fi signal
booster to increase signal strength.
The signal of the base station is
not switched on.
Press and hold the Wi-Fi connection
setting button on the base station for
5 seconds to enter pairing mode for
the base station. This only lasts for
4 minutes. Make Wi-Fi connection
within this duration.
Your phone is not close to the
base station when Wi-Fi pairing.
Move your phone closer to the base
station.
App verication
email not received.
Email is blocked by email
provider.
Allow up to one-minute for this to
arrive. Check junk/spam folder.
Sending the verication request
failed.
Retry to send a verication request
after the one-minute countdown.
The robotic
lawnmower is stuck
during mowing.
Grass or other debris is wrapped
around the wheels.
Check wheels and remove the grass
or objects.
Grass or other debris is wrapped
around the blade disc.
Check the blade disc and remove
the grass or objects (always wear
gardening gloves).
The robotic lawnmower has got
caught in something.
Free the mower and remove the
obstacle.
The robotic lawnmower is stuck
in one area of the garden.
Check if there are any obstacles
which make it hard for the robotic
lawnmower to move on from this
location. Remove the obstacles.
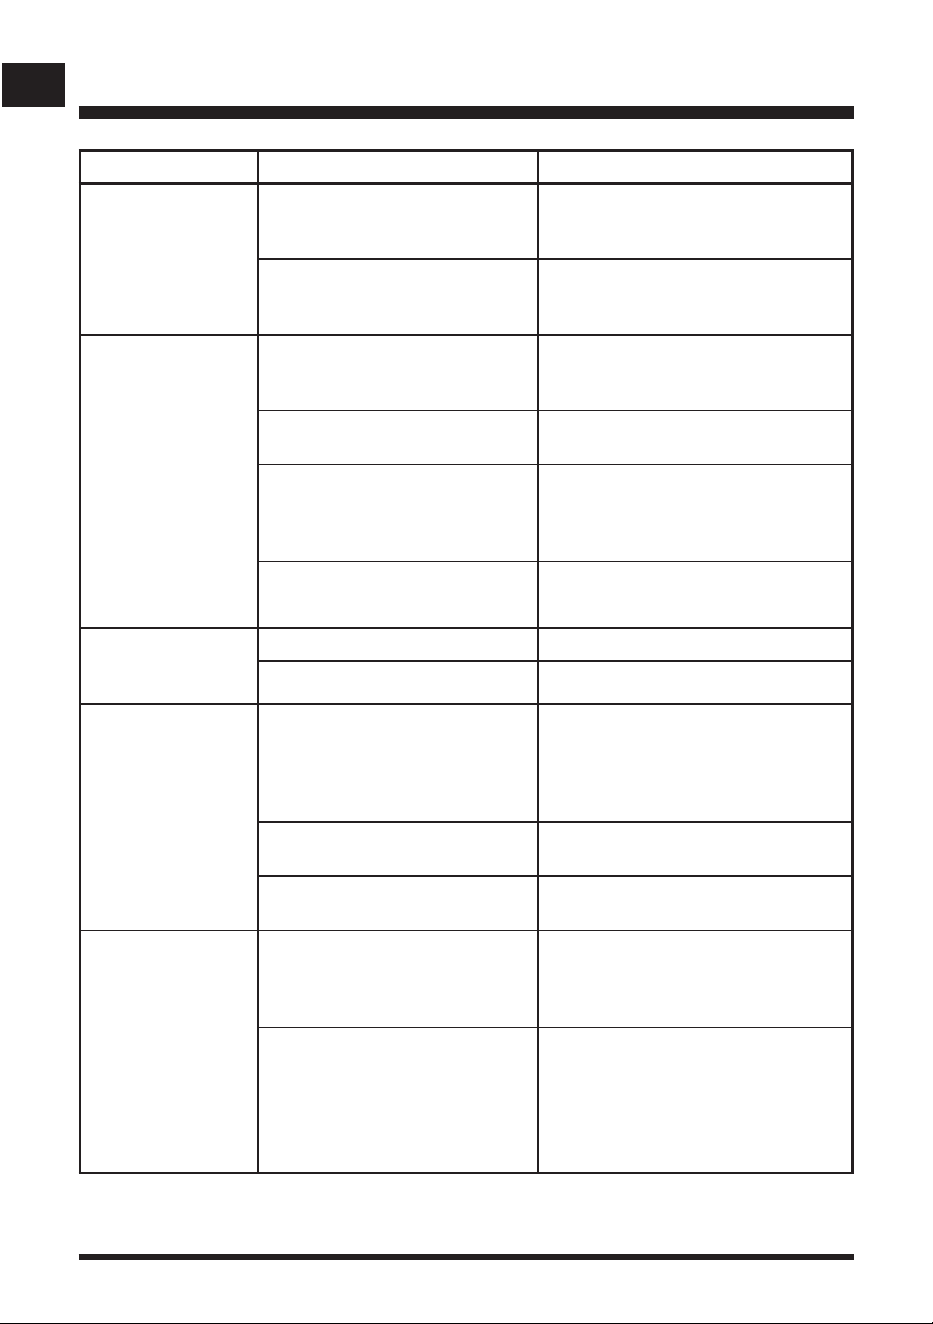
56
EN
TROUBLESHOOTING
PROBLEM POSSIBLE CAUSE SOLUTION
The robotic
lawnmower is stuck
during mowing.
The mower is stuck in an uneven
dip or hollow in the lawn.
Ensure that dips and holes in the lawn
are leveled with topsoil and over-
seeded with grass seed.
The lift sensor has been activated
as the mower has become
trapped.
Free the mower.
The robotic
lawnmower fails to
start.
The battery is not installed
correctly.
Ensure the battery is pushed into the
battery slot until it clicks.
The battery is not fully charged. Charge the battery.
Possible clogging.
Remove the battery. Check
underneath the mower and clear as
necessary (always wear gardening
gloves).
The grass is too long. Set a higher cutting height.
The robotic
lawnmower fails to
start.
The battery is defective. Replace the battery.
Defective On/Off Button. Contact the Aftersales Helpline.
The robotic
lawnmower leaves
the lawn.
Incorrect barriers are used for
dening the working area.
Adjust borders/barriers correctly for
dening the working area. Make
improvements or temporary barriers
if necessary. Refer to Dening the
Mowing Area on page 18-22.
The ultrasonic sensors are turned
off.
Turn on the ultrasonic sensors
according to instructions on page 38.
The working area is steeper than
35%.
Restrict the area that is steeper than
35%.
The robotic
lawnmower has
difculty docking.
The base station is on a slope.
The mower will have difculty
identifying the guide strips. Place
the base station on a surface that is
entirely level.
Poor connection caused by
debris on the charging strips.
Clean the contact strip located on the
base station and the charging strips
on the mower using a cloth.
57
EN
TROUBLESHOOTING
PROBLEM POSSIBLE CAUSE SOLUTION
The robotic
lawnmower has
difculty docking.
The grass around the base
station is too high.
Trim the grass around the front of
the base station to ensure smooth
docking.
Base station is not located
correctly or is covered by a metal
covering.
Check to make sure the base station
arrangement is correct. Remove any
metal covering away from the base
station location. Refer to Selecting the
Base Station Location on page 23.
The robotic
lawnmower is stuck
in the base station.
There is an object in the way of
the robotic lawnmower preventing
it from leaving the base station.
Remove the object.
The grass around the base
station is too high.
Trim the grass around the front of
the base station to ensure smooth
docking.
The robotic
lawnmower does
not mow when
expected/
The robotic mower
keeps returning to
the base station.
Incorrect Schedule settings.
Check the Schedule settings. The
mower will begin and end its work
based on the set time window.
Outside this time window the mower
stays in the base station. Ensure
the local time and date settings are
correct.
The robotic
lawnmower does
not mow when
expected/
The robotic mower
keeps returning to
the base station.
The rain sensor is triggered.
Wait until the mower is dry and the
delay time is nished.
The robot mower was sent home
manually using the home button.
Start the mower according to
instructions on page 41-43.
The Stop button was pressed
while the mower was on the
charging station.
Start the mower according to
instructions on page 41-43.
The robotic
lawnmower is upside
down.
The robotic lawnmower has tilted
too much or is ipped over.
Turn the robotic lawnmower the right
way up and rectify the reason for it
getting turned over.
Collision sensor
problem, front/rear.
Mower body cannot move freely
around its chassis.
Check that the mower body can
move freely around its chassis. If
the problem remains, contact the
Aftersales Helpline.
Unknown problem
with control or
function.
Temporary electronic or software
related issue in the mower.
Switch off the mower. Restart the
mower. Download and install the
latest software update. If the problem
remains, contact the Aftersales
Helpline.
58
EN
TROUBLESHOOTING
PROBLEM POSSIBLE CAUSE SOLUTION
The robotic
lawnmower runs to
the base station, but
the blade disc does
not rotate.
The robotic lawnmower searches
for the base station.
This is normal. The mower needs to
recharge. The blade disc does not
rotate while it is searching for the
base station automatically.
The robotic
lawnmower vibrates.
Cutting blades are damaged.
Replace the blades. Refer to
Replacing the Mower Blades section
on page 50-51. Visit www.lawnmaster.
com for info on where to buy blades.
Refer to the parts list on page 65.
Too many blades in the same
position lead to imbalance in the
cutting system.
Check that only one blade is tted at
each screw and that blades are not
stuck.
Different types (thickness) of
blades are used.
Check if the blades are of different
types (thickness).
The blade screw is loose. Tighten the blade screws.
Grass is being cut
unevenly.
Working area is too big.
Adjust the boundary to decrease the
size of the mowing area or add more
working time.
Grass is being cut
unevenly.
Blades are dull.
Replace all the blades and screws.
Refer to Replacing the Mower Blades
section on page 50-51. Visit www.
lawnmaster.com for info on where to
buy blades.
Height of cut is too low, or the
grass is too high.
Increase the height of cut.
There is grass wrapped around
the blade disc.
Check underneath the mower and
clear as necessary (always wear
gardening gloves).
The charging time is
much longer than 2
hours.
The charging strips and contact
strip are obstructed by debris.
Use a cloth to clean the contact strip
located on the base station and the
charging strips on the mower.
Charging protector has activated
due to high temperature.
Place the base station in a shady
area or wait until the temperature has
cooled down.
59
EN
TROUBLESHOOTING
PROBLEM POSSIBLE CAUSE SOLUTION
The robotic
lawnmower does not
charge.
No power.
Make sure the power cord is
connected properly to the power
adaptor and the power adaptor is
connected to a suitable power supply.
Check the wall socket connection and
whether an earth-fault breaker has
tripped.
The charging strips and contact
strip are contaminated.
Use a cloth to clean the contact strip
located on the base station and the
charging strips on the mower.
Socket outlet, fuse, mains cable
or base station is defective.
Check the mains voltage and fuse,
if necessary have the base station
checked by qualied person.
The battery has a fault. Contact the Aftersales Helpline.
Run time is shorter
than expected.
Height of cut is too low, or the
grass is too high.
Increase the height of cut.
The grass is wet or damp. Wait until the grass is dry.
The grass is dense.
Increase the height of cut and add
more working time.
The cutting blade is
not rotating while the
mower is switched
on.
The cutting blade is obstructed.
Switch off the mower and remove
the battery. Clear obstruction (always
wear gardening gloves).
The blade screw is loose. Tighten the blade screws.
The cutting blade is
not rotating while the
mower is switched
on.
The mower cannot detect grass
Place the mower in an area with
grass. Brown patchy lawn may not be
recognized by the camera.
LED on the base
station does not turn
on.
No power supply.
Check the power adaptor, cord,
breakers, and fuses.
The robotic mower
fails to recognize the
magnetic strip and
travels over it and
past it.
The magnetic strip is laid too
deep in the ground.
Lay the magnetic strip on the ground
or at a depth of approx. 5 cm in the
ground.
The outside temperature is too
high.
Wait for the temperature to cool.
Avoid operating the mower during the
hot hours of the day.
60
EN
TROUBLESHOOTING
PROBLEM POSSIBLE CAUSE SOLUTION
The robotic mower
stops or travels out
of control when it is
near the boundary
area with magnetic
strip.
Magnetic strips are laid too close
together.
Keep a distance of at least 120 cm
between two boundary areas with
magnetic strips.
Interference arises in the mowing
area due to electric cables.
Avoid electric cables which run
through the mowing area. Keep away
from mowing areas of your neighbors,
which are operated with a perimeter
wire.
Bad GPS signal/ no
valid GPS data.
Environmental factors
Move the mower to areas with open
terrain. Keep the mower far from
buildings.
Equipment problems
Regularly check and maintain the
mower to ensure that the GPS
module is working properly. If the
GPS module is damaged, contact the
Aftersales Helpline.
Weather inuence
Do not let the mower operate in bad
weather.
Battery level is insufcient.
Charge the battery. Keep the battery
power sufcient.
61
EN
TROUBLESHOOTING
ERROR INFORMATION DISPLAY ON THE LCD PANEL
If sensors of the robotic mower have been activated, the mower will beep 10 times continuously.
The error information will display on the LCD panel.
ERROR
INFORMATION
POSSIBLE CAUSE SOLUTION
Wheel slip Wheel slipping
Free the mower and remove the
obstacle.
Control system error Control system fault
Switch off the mower. Restart the
mower. If the problem remains,
contact the Aftersales Helpline.
Outside border
Mower has left the lawn and
cannot detect grass.
Refer to solutions for “The robotic
lawnmower leaves the lawn” in
Troubleshooting on page 56.
Battery error Battery fault
Change the battery. If the problem
remains, contact the Aftersales
Helpline.
Mower lifted The mower has become lifted.
Free the mower and remove the
obstacle.
Motor fault Motor fault
Switch off the mower. Restart the
mower. If the problem remains,
contact the Aftersales Helpline.
Rolling over
Mower is upside down or tilted
too far.
Free the mower and remove the
obstacle.
Battery too hot/cold
Temperature of battery pack is
too high or too low.
Allow the battery pack to cool to
normal temperature.
Mower tilted The mower has become tilted.
Free the mower and remove the
obstacle.
Stop button error Stop button error
Switch off the mower. Restart the
mower. If the problem remains,
contact the Aftersales Helpline.
Rain sensor
triggered
Rain sensor has been triggered.
Wait until the mower is dry and the
delay time is nished.
Too close to station
The mower is too close to or on
the base station when performing
a spot cut or the home button is
pressed.
Move the mower away from the base
station.
62
EN
TROUBLESHOOTING
ERROR
INFORMATION
POSSIBLE CAUSE SOLUTION
Magnetic sensor
error
The magnetic sensor has a fault.
Switch off the mower. Restart the
mower. If the problem remains,
contact the Aftersales Helpline.
No camera signal No signal to camera
Switch off the mower. Restart the
mower. If the problem remains,
contact the Aftersales Helpline.
No GPS data GPS signal abnormal at startup
Move the mower to an open ground.
Switch off the mower. Restart the
mower.
Far from home
The robotic lawnmower is 1
kilometer away from charging
station.
This is a theft prevention setting.
Ensure the mower is operated in
Drop and Mow mode when using the
mower at a property more than 1km
away from home.
Ribbon not visible
Guide strips on the base station
are not visible.
Clean the guide strips on the base
station. If the problem remains,
contact the Aftersales Helpline.
Close battery hatch
Battery compartment cover is
open.
Close the battery compartment cover.
Low voltage The battery voltage is too low. Charge the battery.
No battery No battery in the mower
Ensure the battery is correctly
installed.
Cutter fault Mowing motor fault
Switch off the mower. Restart the
mower. If the problem remains,
contact the Aftersales Helpline.
Cutter blocked Blade disc is blocked.
Check underneath the mower and
clear as necessary (always wear
protective gloves).
Docking Failed
Base station is disconnected or
not powered on.
Check to make sure that the base
station is not blocked, the guide strips
on the base station are clear and the
base station is powered on.
Too dark
The mower is activated outside
the sunrise and sunset range.
Check the Schedule settings. The
mower will begin and end its work
based on the set time window. Ensure
the local time and date settings are
correct.

63
EN
LAWNMASTER
®
WARRANTY
We take pride in producing a high quality, durable product. This Lawnmaster
®
product carries a
limited two (2) year warranty against defects in workmanship and materials from date of purchase
under normal household use. If product is to be used for commercial, industrial or rental use, a 30
day limited warranty will apply. Batteries carry a one-year warranty against defects in
workmanship and materials. Batteries must be charged in accordance with the operator’s
manual directions and regulations in order to be valid. Warranty does not apply to defects due
to direct or indirect abuse, negligence, misuse, accidents, repairs or alterations and lack of
maintenance. Please keep your receipt/packing list as proof of purchase. This warranty gives you
specic legal rights, and you may have other rights, which vary from state to state. For product
service call Customer Service at 1-866-384-8432.
Items not covered by warranty:
1. Any part that has become inoperative due to misuse, commercial use, abuse, neglect, accident,
improper maintenance, or alteration;
2. The unit, if it has not been operated and/or maintained in accordance with the owner's manual;
3. Normal wear, except as noted below;
4. Routine maintenance items such as lubricants, blade sharpening;
5. Normal deterioration of the exterior nish due to use or exposure.
SAVE YOUR RECEIPTS. THIS WARRANTY IS VOID WITHOUT THEM.
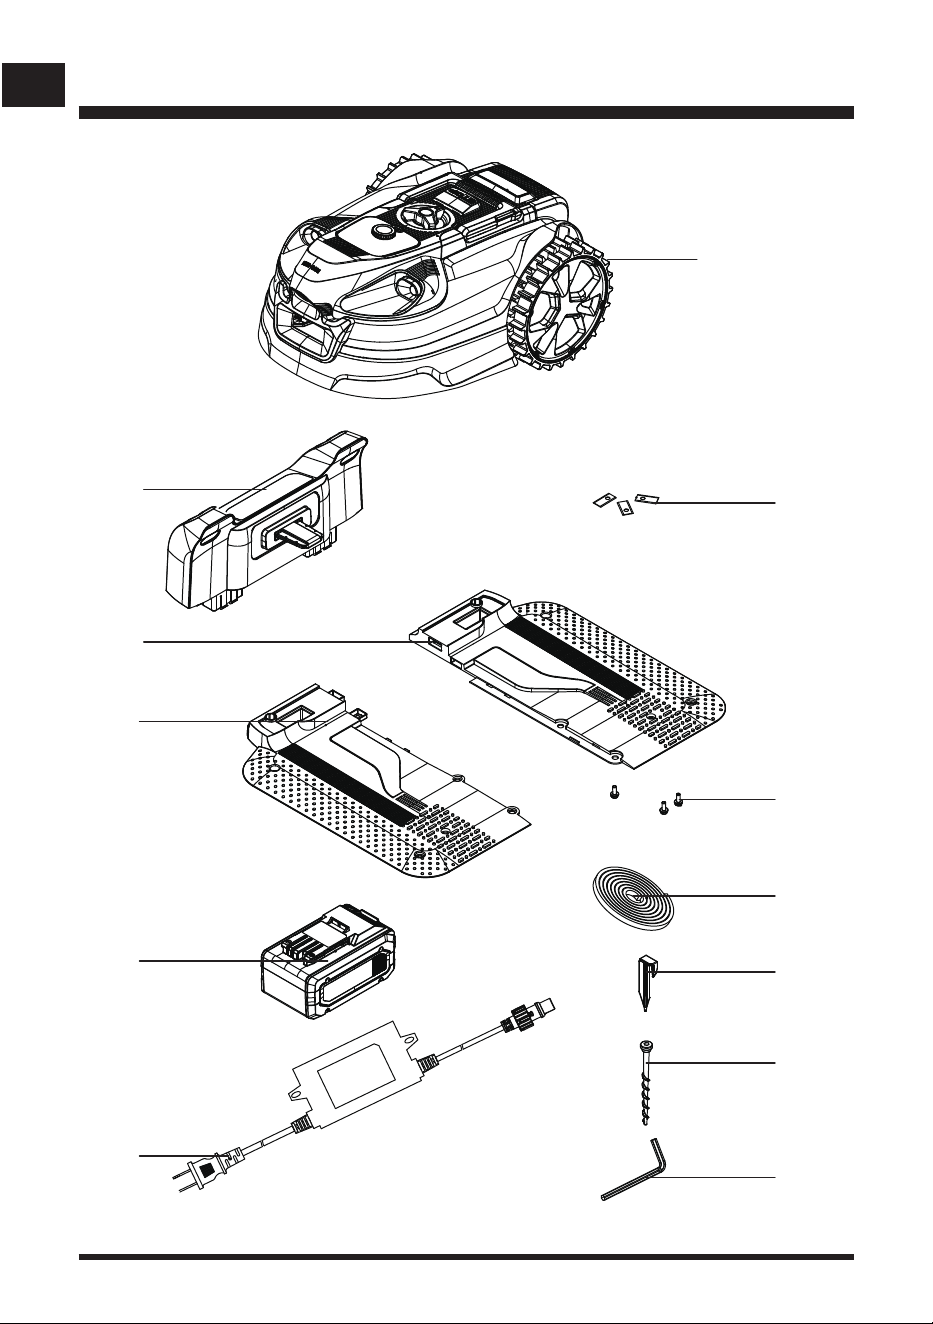
64
EN
EXPLODED VIEW
1
2
3
4
5
6
7
8
9
11
10
12
65
EN
PARTS LIST
Key Number Part Number Description Quantity
1 Mower Assembly 1
2 Upper Part of the Base Station 1
3 Left Base Part of the Base Station 1
4 Right Base Part of the Base Station 1
5 Spare Blade 6
6 Screw for Blade 6
7
523113
Magnetic Strip (16.4 ft / 5 m) 4
8 Magnetic Strip Peg (10 pcs) 4
9 24LB4005-CN Battery 1
10 Base Station Fixing Screw 10
11 Power Adaptor 1
12 Hex Key 1
Replacement parts highlighted in grey are available for after sales purchase. Replacement of
repair or internal parts should only be done by a qualied service professional. Please contact your
authorized service dealer or Customer Service at 1-866-384-8432.
Below parts are available, please call 1-866-384-8432 to order.
Part Part Number
Anti-Slip Wheel and Screw 952688
Garage 952642
Blade Assembly Pack of 15 523830

66
EN
NOTES

67
EN
NOTES