
I
EN
Original Instructions
Read the operator’s manual carefully and make sure that you
understand the instructions before you use the product.
Instruction Manual
Original Instructions
Read the operator’s manual carefully and make sure that you
understand the instructions before you use the product.
S4

II
EN
EN..........................................................................................................................................................2
DE.......................................................................................................................................................30
FR.......................................................................................................................................................59
IT.........................................................................................................................................................88
NL...................................................................................................................................................... 116
DK..................................................................................................................................................... 145
SE......................................................................................................................................................17 3
NO....................................................................................................................................................203
FI........................................................................................................................................................231
PL......................................................................................................................................................259
CZ.....................................................................................................................................................287
HU..................................................................................................................................................... 315
ES.................................................................................................................................................... 343
SI.......................................................................................................................................................371
RO.....................................................................................................................................................399
EE.....................................................................................................................................................427
LV......................................................................................................................................................455
LT..................................................................................................................................................... 483
BG...................................................................................................................................................... 512
SK.................................................................................................................................................... 544.

2
EN
Contents
Table of

3
EN
1..Safety.and.Regulations.............................................................................................................4
1.1 General .......................................................................................................................................................................................................4
1.2 General Safety Instructions ............................................................................................................................................................4
1.3 Safety Instructions for Installation ..............................................................................................................................................5
1.4 Safety Instructions for Daily Operation.....................................................................................................................................6
1.5 Safety Instructions for Maintenance ..........................................................................................................................................6
1.6 Battery Safety ........................................................................................................................................................................................6
2..Symbols.and.Decals................................................................................................................. 6
3..Contents.and.Specification....................................................................................................7
3.1 Box Contents .......................................................................................................................................................................................... 7
3.2 Parts and Functions ..........................................................................................................................................................................8
3.3 Specications .......................................................................................................................................................................................9
4..Installation.and.Mapping.......................................................................................................10
4.1 Preparations ...........................................................................................................................................................................................11
4.2 Install the Charging Station .......................................................................................................................................................... 11
4.3 Activate the Mower ..........................................................................................................................................................................12
4.4 App Connection .................................................................................................................................................................................12
4.5 Mapping .................................................................................................................................................................................................13
5..Daily.Operation.......................................................................................................................... 17
5.1 Display and Control on the Mower ...........................................................................................................................................17
5.2 Change the PIN code ..................................................................................................................................................................... 17
5.3 Schedule Setting ............................................................................................................................................................................... 18
5.4 APP Introduction ............................................................................................................................................................................... 19
5.5 IoT ............................................................................................................................................................................................................20
5.6 Obstacle Avoidance ........................................................................................................................................................................20
6..Maintenance............................................................................................................................... 21
6.1 Cleaning ..................................................................................................................................................................................................21
6.2 Replace Blades .................................................................................................................................................................................22
6.3 Transportation ...................................................................................................................................................................................23
6.4 Battery ................................................................................................................................................................................................... 23
6.5 Power Supply .....................................................................................................................................................................................24
6.6 Storage ..................................................................................................................................................................................................24
6.7 Recycling and End-of-life Disposal .........................................................................................................................................25
7..FAQ.and.Troubleshooting...................................................................................................... 25
7.1 Error message .....................................................................................................................................................................................25
7.2 Trouble shooting ...............................................................................................................................................................................26
8..Important.Information........................................................................................................... 27
8.1 Data Privacy ......................................................................................................................................................................................... 27
8.2 Limited Warranty ............................................................................................................................................................................. 27
8.3 Disclaimers .........................................................................................................................................................................................28
8.4 Contact Us ...........................................................................................................................................................................................28
4
EN
1..Safety.and.Regulations
1.1 General
IMPORTANT
READ CAREFULLY BEFORE USE
KEEP FOR FUTURE REFERENCE
Intended Use
This garden product is only intended for lawn mowing,
automatically cutting garden grass at any time of the day.
Any usage beyond the intended purpose may pose hazards,
potentially causing harm to individuals or damage to
property. It is imperative to adhere strictly to the specified
guidelines to ensure safety and prevent accidents.
Not Intended Use
This garden product is not intended for use by children
under the age of 14 or persons with reduced physical,
sensory or mental capabilities, or lack of experience and
knowledge, unless they have been given supervision or
instruction concerning the use of the product by a person
responsible for their safety.
Improper use encompasses, but is not limited to,
transporting people, children, or animals on the machine;
being transported by the machine; using the machine to pull
or push loads; and employing the machine for cutting non-
grass vegetation.
Residual risks- Wear protective gloves and eye goggles
when conducting maintenance or replacing the blades in
case of injuries.
Do not extend the cable between the power supply unit and
charging station.
WARNING
- Do not touch hazardous moving parts before they
have come to a complete stop.
- Keep the power cable, power supply unit, extension
cable and all other electric cables which do not
belong to the product outside the cutting area to
maintain their distance from hazardous moving parts
and prevent damage to cables which may come into
contact with live parts. There is a risk of injury of
death for operator or bystanders if the instructions in
the manual are not obeyed.
- Automatic lawn mower! Keep away from the
machine! Children must be supervised!
- Save all warnings and instructions for future
reference.
- Read all safety warnings, instructions, illustrations
and specifications provided with this product. Failure
to follow all instructions listed below may result in
electric shock, fire and/or serious injury.
- a warning to never allow children, persons with
reduced physical, sensory or mental capabilities or
lack of experience and knowledge or people unfamiliar
with these instructions to use the machine,local
regulations may restrict the age of the operator.
- a warning, not to allow children to be in the vicinity
or play with the machine when it is operating.
1.2 General Safety Instructions
Work area safety
A. Do not operate machines in explosive atmospheres,
such as in the presence of flammable liquids, gases or dust.
Machines create sparks which may ignite the dust or fumes.
B. Read the instructions carefully. Be familiar with the
controls and the proper use of the machine.
C. Never allow people unfamiliar with these instructions or
children to use the machine. Local regulations may restrict
the age of the operator.
D. The operator or user is responsible for accidents or
hazards occurring to other people or their property.
Electrical safety
A. Mains plugs must match the outlet. Never modify the
plug in any way. Do not use any charger plugs with earthed
(grounded) devices. Unmodified plugs and matching outlets
will reduce risk of electric shock.
B. Avoid body contact with earthed or grounded surfaces,
such as pipes, radiators, ranges and refrigerators. There is
an increased risk of electric shock if your body is earthed or
grounded.
C. Do not abuse power cables. Never use the power cable
for carrying, pulling or unplugging a device. Keep power
cables away from heat, oil, sharp edges or moving parts.
Damaged or entangled power cables increase the risk of
electric shock.
D. If it is unavoidable to operate a mains-powered device
in a damp location, use a residual current device (RCD)
protected supply. The use of an RCD reduces the risk of
electric shock.
E. Ensure the correct installation of the automatic perimeter
delineation system as instructed.
F. Periodically inspect the area where the machine is to be
used, and remove all stones, sticks, wires, bones and other
obstacles.
G. Check the blades, blade bolts and cutter assembly
regularly for wear or damage Replace worn or damaged
blades and bolts in sets to preserve balance.
H. On multi-spindle machines, take care as rotating one
blade can cause other blades to rotate.
Personal safety
A. Do not allow persons unfamiliar with the machine or
these instructions to operate the machine. Machines are
dangerous in the hands of untrained users.
B.
Stay alert, watch what you are doing and use common sense
when operating the machine. Do not use the machine while you
are tired or under the influence of drugs, alcohol or medication.
A moment of inattention while operating the machine may
result in serious personal injury.

5
EN
C.
Remove any adjusting key or wrench before operating the
machine. A wrench or a key left attached to a rotating part of
the machine may result in personal injury.
D. When controlling the machine manually, keep proper
footing and balance at all times. This enables better control
of the machine in unexpected situations.
E. Do not let familiarity gained from frequent use of machines
allow you to become complacent and ignore machine safety
principles. A careless action can cause severe injury within a
fraction of a second.
Machine use and care
A. Disconnect the plug from the power source and/or
remove the battery pack (if detachable) from the machine
or other devices before making any adjustments, changing
accessories, or storing. Such preventive safety measures
reduce the risk of unintended starting.
B. Maintain machines and accessories. Check for
misalignment or binding of moving parts, breakage of parts
and any other condition that may aect the machine’s
operation. If damaged, have the machine repaired before use.
Many accidents are caused by poorly maintained machines
and accessories.
C. Use the machine and accessories in accordance
with these instructions, taking into account the working
conditions and the work to be performed. Use of the
machine for operations dierent from those intended could
result in a hazardous situation.
D. Never operate the machine with defective guards, or
without safety devices.
E. Do not put hands or feet near or under rotating parts.
Keep clear of the discharge opening at all times.
F. Never pick up or carry an machine while the motor is
running.
G. Activate device lock/Set into "LOCK" to the machine
- before clearing a blockage;
- before checking, cleaning or working on the machine.
H. Do not leave the machine to operate unattended if you
know that there are pets, children or people in the vicinity.
Service
A. Have your machine serviced by a qualified repair person
using only identical replacement parts. This will ensure that
the safety of the machine is maintained.
B. Keep all nuts, bolts, and screws tight to ensure the
machine is in safe working condition.
C. Replace worn or damaged parts for safety.
D. Ensure that correct blades are replaced.
E. Ensure that batteries are charged using the correct
charger recommended by the manufacturer. Incorrect
use may result in electric shock, overheating or leakage of
corrosive liquid from the battery.
F. In the event of leakage of electrolyte flush with water/
neutralizing agent, seek medical help if it comes into contact
with the eyes, etc.
G. Servicing of the machine should be according to
manufacturers’ instructions.
BATTERY tool use and care
A. Recharge only with the charger specified by the
manufacturer. A charger that is suitable for one type of
BATTERY pack may create a risk of fire when used with
another BATTERY pack.
B. Only use power tools with specifically designated
BATTERY packs. Use of any other BATTERY packs may
create a risk of injury and fire.
C. When BATTERY pack is not in use, keep it away from
other metal objects, like paper clips, coins, keys, nails,
screws or other small metal objects, that can make a
connection from one terminal to another. Shorting the
BATTERY terminals together may cause burns or a fire.
D. Under abusive conditions, liquid may be ejected from the
BATTERY; avoid contact. If contact accidentally occurs, flush
with water. If liquid contacts eyes, additionally seek medical
help.
Liquid ejected from the BATTERY may cause irritation or
burns.
E. Do not use a BATTERY pack or tool that is damaged
or modified. Damaged or modified batteries may exhibit
unpredictable behaviour resulting in fire, EXPLOSION or risk
of injury.
F. Do not expose a BATTERY pack or tool to fire or excessive
temperature. Exposure to fire or temperature above 130 °C
may cause explosion.
G. Follow all charging instructions and do not charge the
BATTERY pack or tool outside the temperature range
specified in the instructions. Charging improperly or at
temperatures outside the specified range may damage the
BATTERY and increase the risk of fire.
1.3 Safety Instructions for Installation
A. Do not install the charging station, including any
accessory, at a location that is below, or within 24 inch. from,
any combustible material. In case of malfunction, heating of
the charging station and the power supply may occur and
create a potential risk of fire.
B. Do not put the power supply at a height where there is a
risk it can be put in water. Do not put the power supply on
the ground.
C. Do not encapsulate the power supply. Condensed water
can harm the power supply and increase the risk of electrical
shock.
D. Applicable to USA/Canada. If power supply is installed
outdoors: Risk of Electric Shock. Install only to a covered
Class A GFCI receptacle (RCD) with a weatherproof
enclosure and access to insert or remove the attachment
plug cover.
6
EN
E. Do not install the charging station where there is a risk of
standing water.
1.4 Safety Instructions for Daily
Operation
A. Keep your hands and feet away from the rotating
blades. Do not put your hands or feet near or below the
product when it is set to ON.
B. Stop the product or set the product to OFF when
persons, especially children or animals are in the work
area.
C. Make sure that there are no objects such as stones,
branches, tools or toys on the lawn. The blades can be
damaged if they hit such objects.
D. Do not lift the product or move it when it is set to ON.
E. Do not let the product collide with persons or animals. If
a person or animal comes in the way of the product, stop
the product immediately.
F. Do not put objects on top of the product or the charging
station.
G. Do not use the product if the STOP button does not
work.
H. Always set the product to OFF when it is not in
operation.
I. Do not use the product and a pop-up sprinkler at the
same time. Use the Schedule function at the same time.
J. Do not let the product operate when there is standing
water in the work area, such as an area with pools of water
formed by heavy rain.
1.5 Safety Instructions for Maintenance
A. Set the product to OFF when you do maintenance on
the product.
B. Do not use a high-pressure washing machine to clean
the product. Do not use solvents to clean the product.
C. Disconnect the plug from the charging station before
you clean or do maintenance on the charging station.
1.6 Battery Safety
Lithium-ion batteries can explode or cause fire if
disassembled, short-circuited, or exposed to water,
fire, or high temperatures. Handle carefully and do not
dismantle or open the battery or use any type of electrical/
mechanical abuse. Avoid storage in direct sunlight.
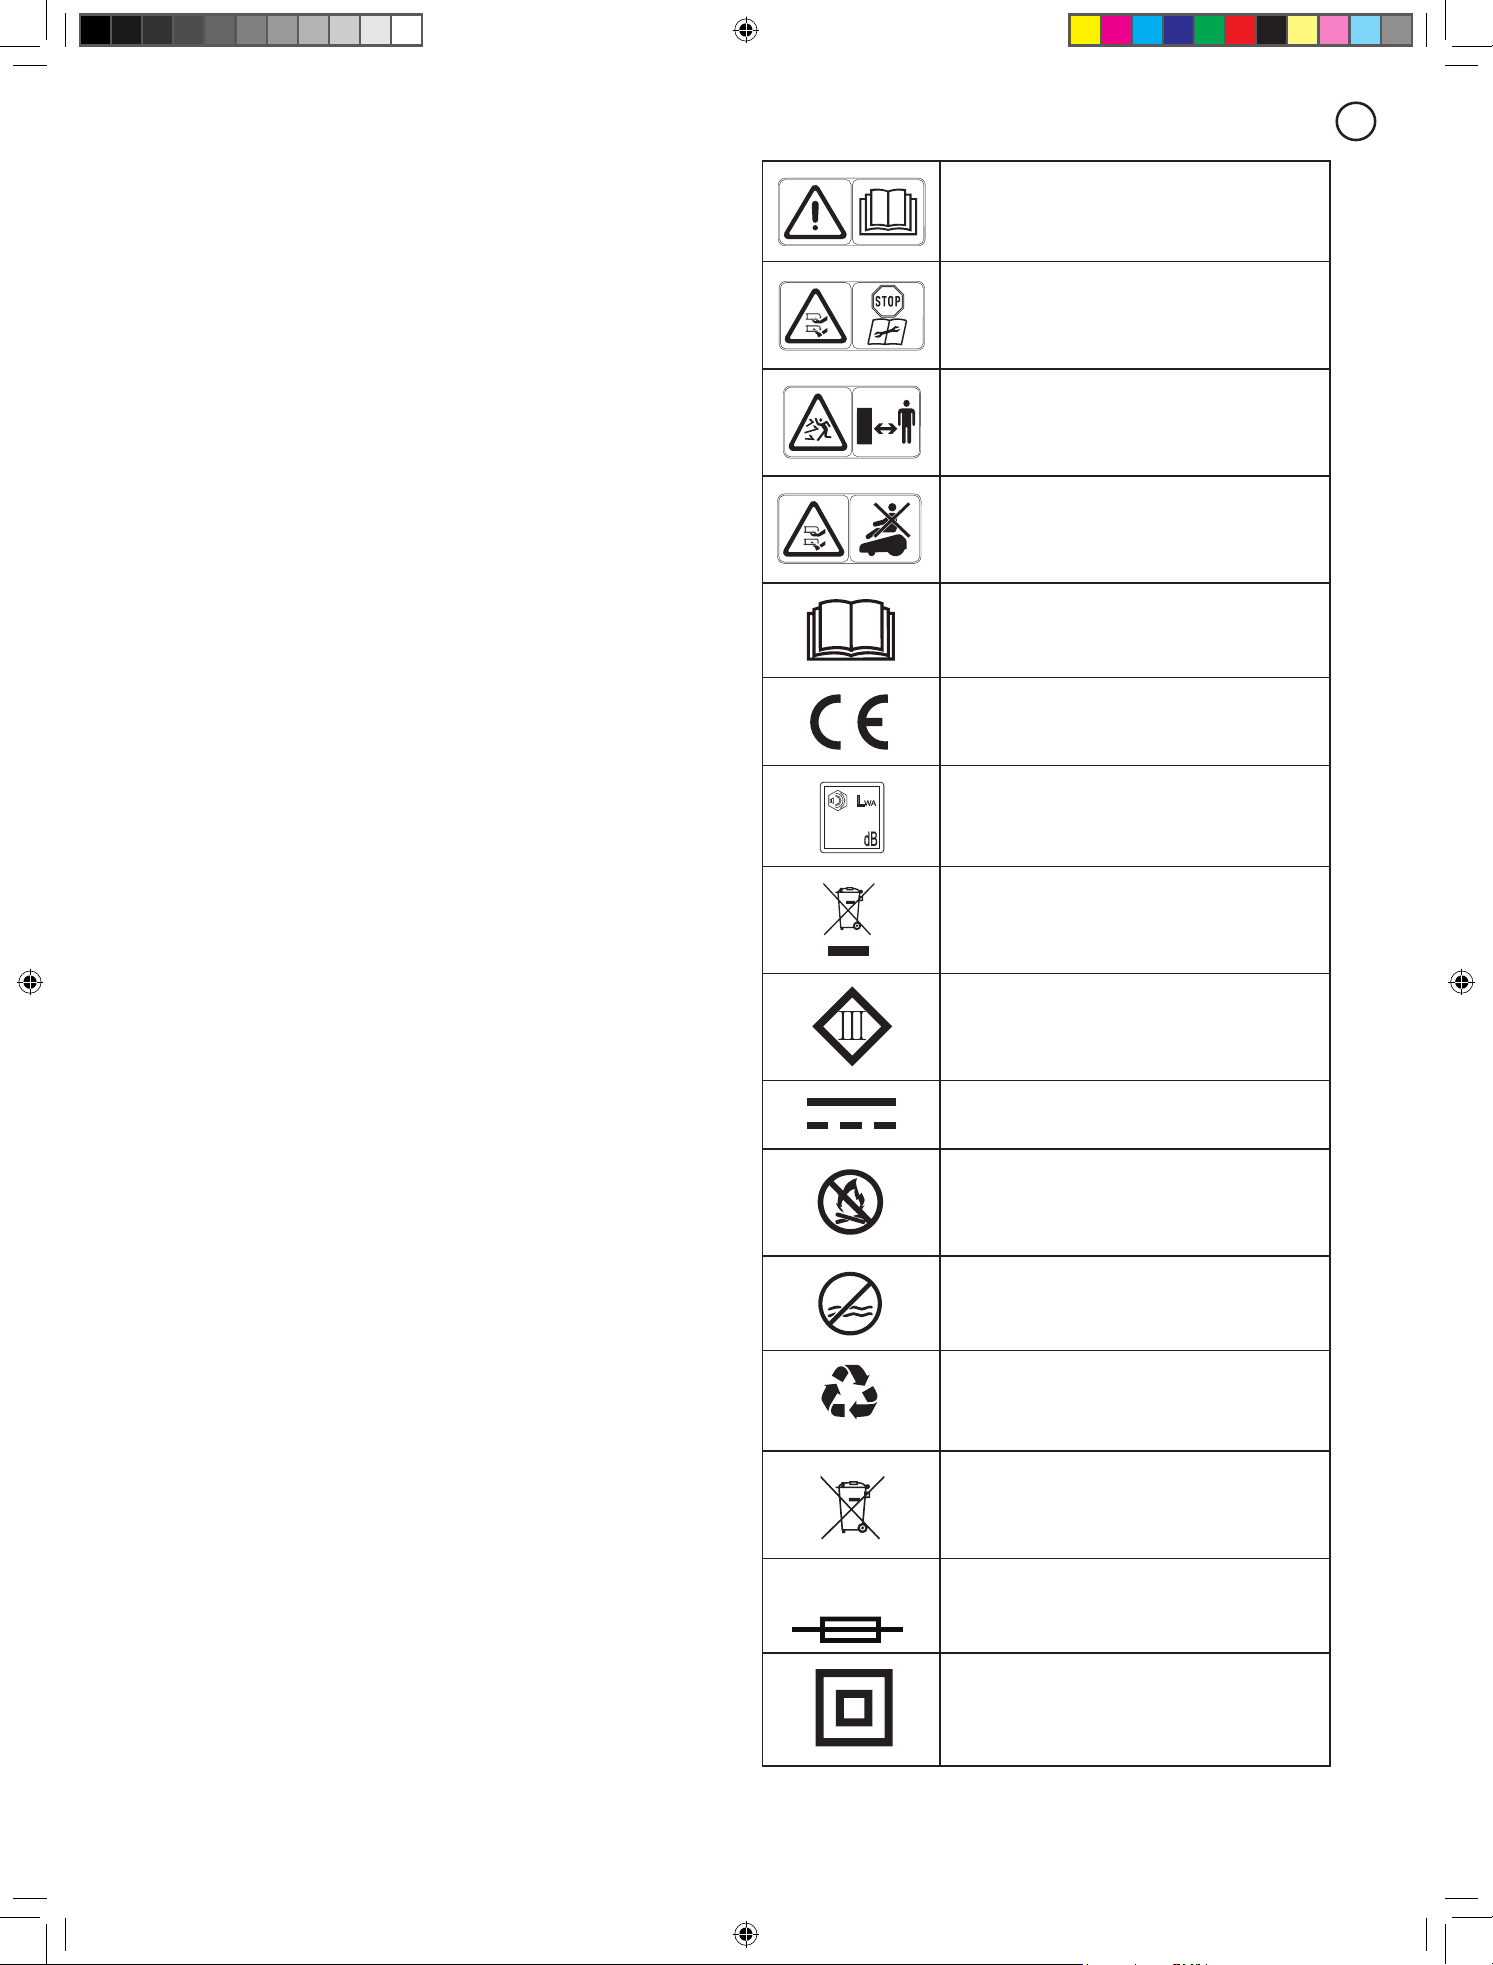
2..Symbols.and.Decals
Please study the symbols on the product and labels
carefully and understand their meaning:
WARNING:
Read the user instructions before
operating the product.
WARNING:
Disable the product before working
on or lifting the machine.
Never touch the rotating blade.
WARNING:
Keep a safe distance from the
machine when operating. Keep other persons
out of the danger area.
WARNING:
Do not ride on the machine.
Read the user instructions.
CE conformity mark.
60
Sound power level, determined by European
outdoor noise directive.
Do not dispose this product as normal
household waste. Ensure that the product
is recycled in accordance with local legal
requirements.
Class III
DC
Li-ion
Li-ion
Do not discard the battery into re and do not
expose the battery to a heat source.
Li-ion
Li-ion
Do not immerse the battery into water.
Li-ion
Li-ion
Recyclable mark.
Li-ion
Li-ion
It is not permitted to dispose this battery pack
as normal household waste. Ensure that the
battery pack is recycled in accordance with
local legal requirements.
T3.15A
Replace with fuse in accordance with rating.
Class II construction.
7
EN
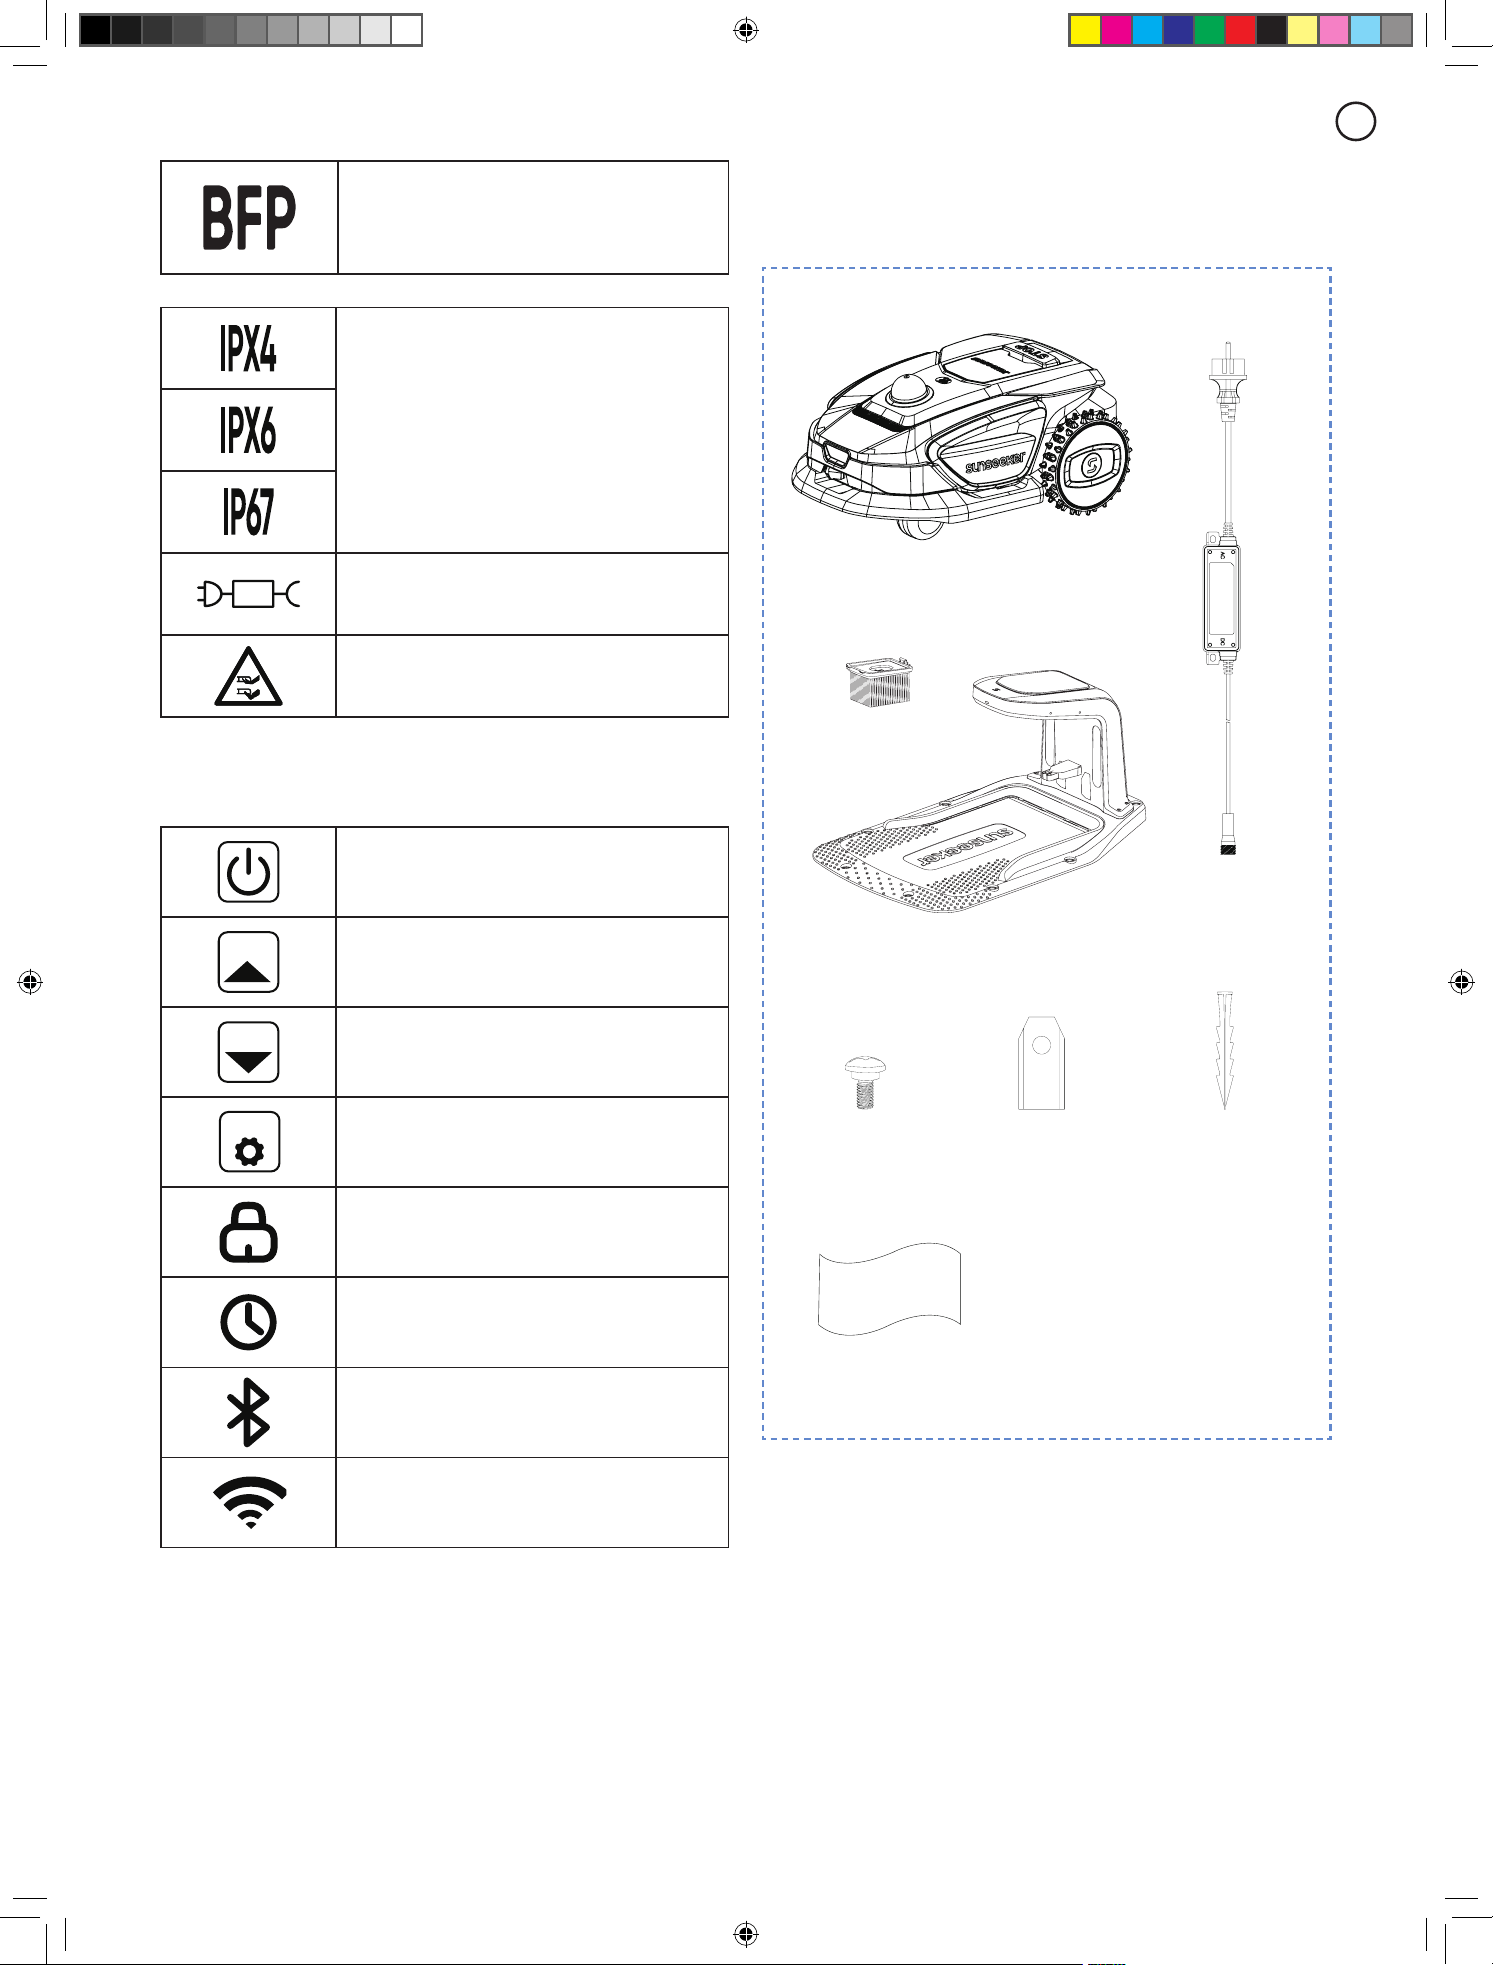
BFP/Backfeed protection.
Degrees of protection provided by enclosures
(IP Code)
Detachable power supply part
CAUTION-Do not touch rotating blade
Symbols on robot screen
Power on/o
START
Start button
HOME
Home button
OK
OK button
PIN code setting
Times setting
Bluetooth
Wi-Fi
3..Contents.and.Specification
3.1 Box Contents
Microfiber Wiping
Cloth
Robotic
Lawnmower
Charging Station
Cleaning Brush
Charger for
charging station
Spare Screws Spare Blades Nails for
Charging Station
8
EN
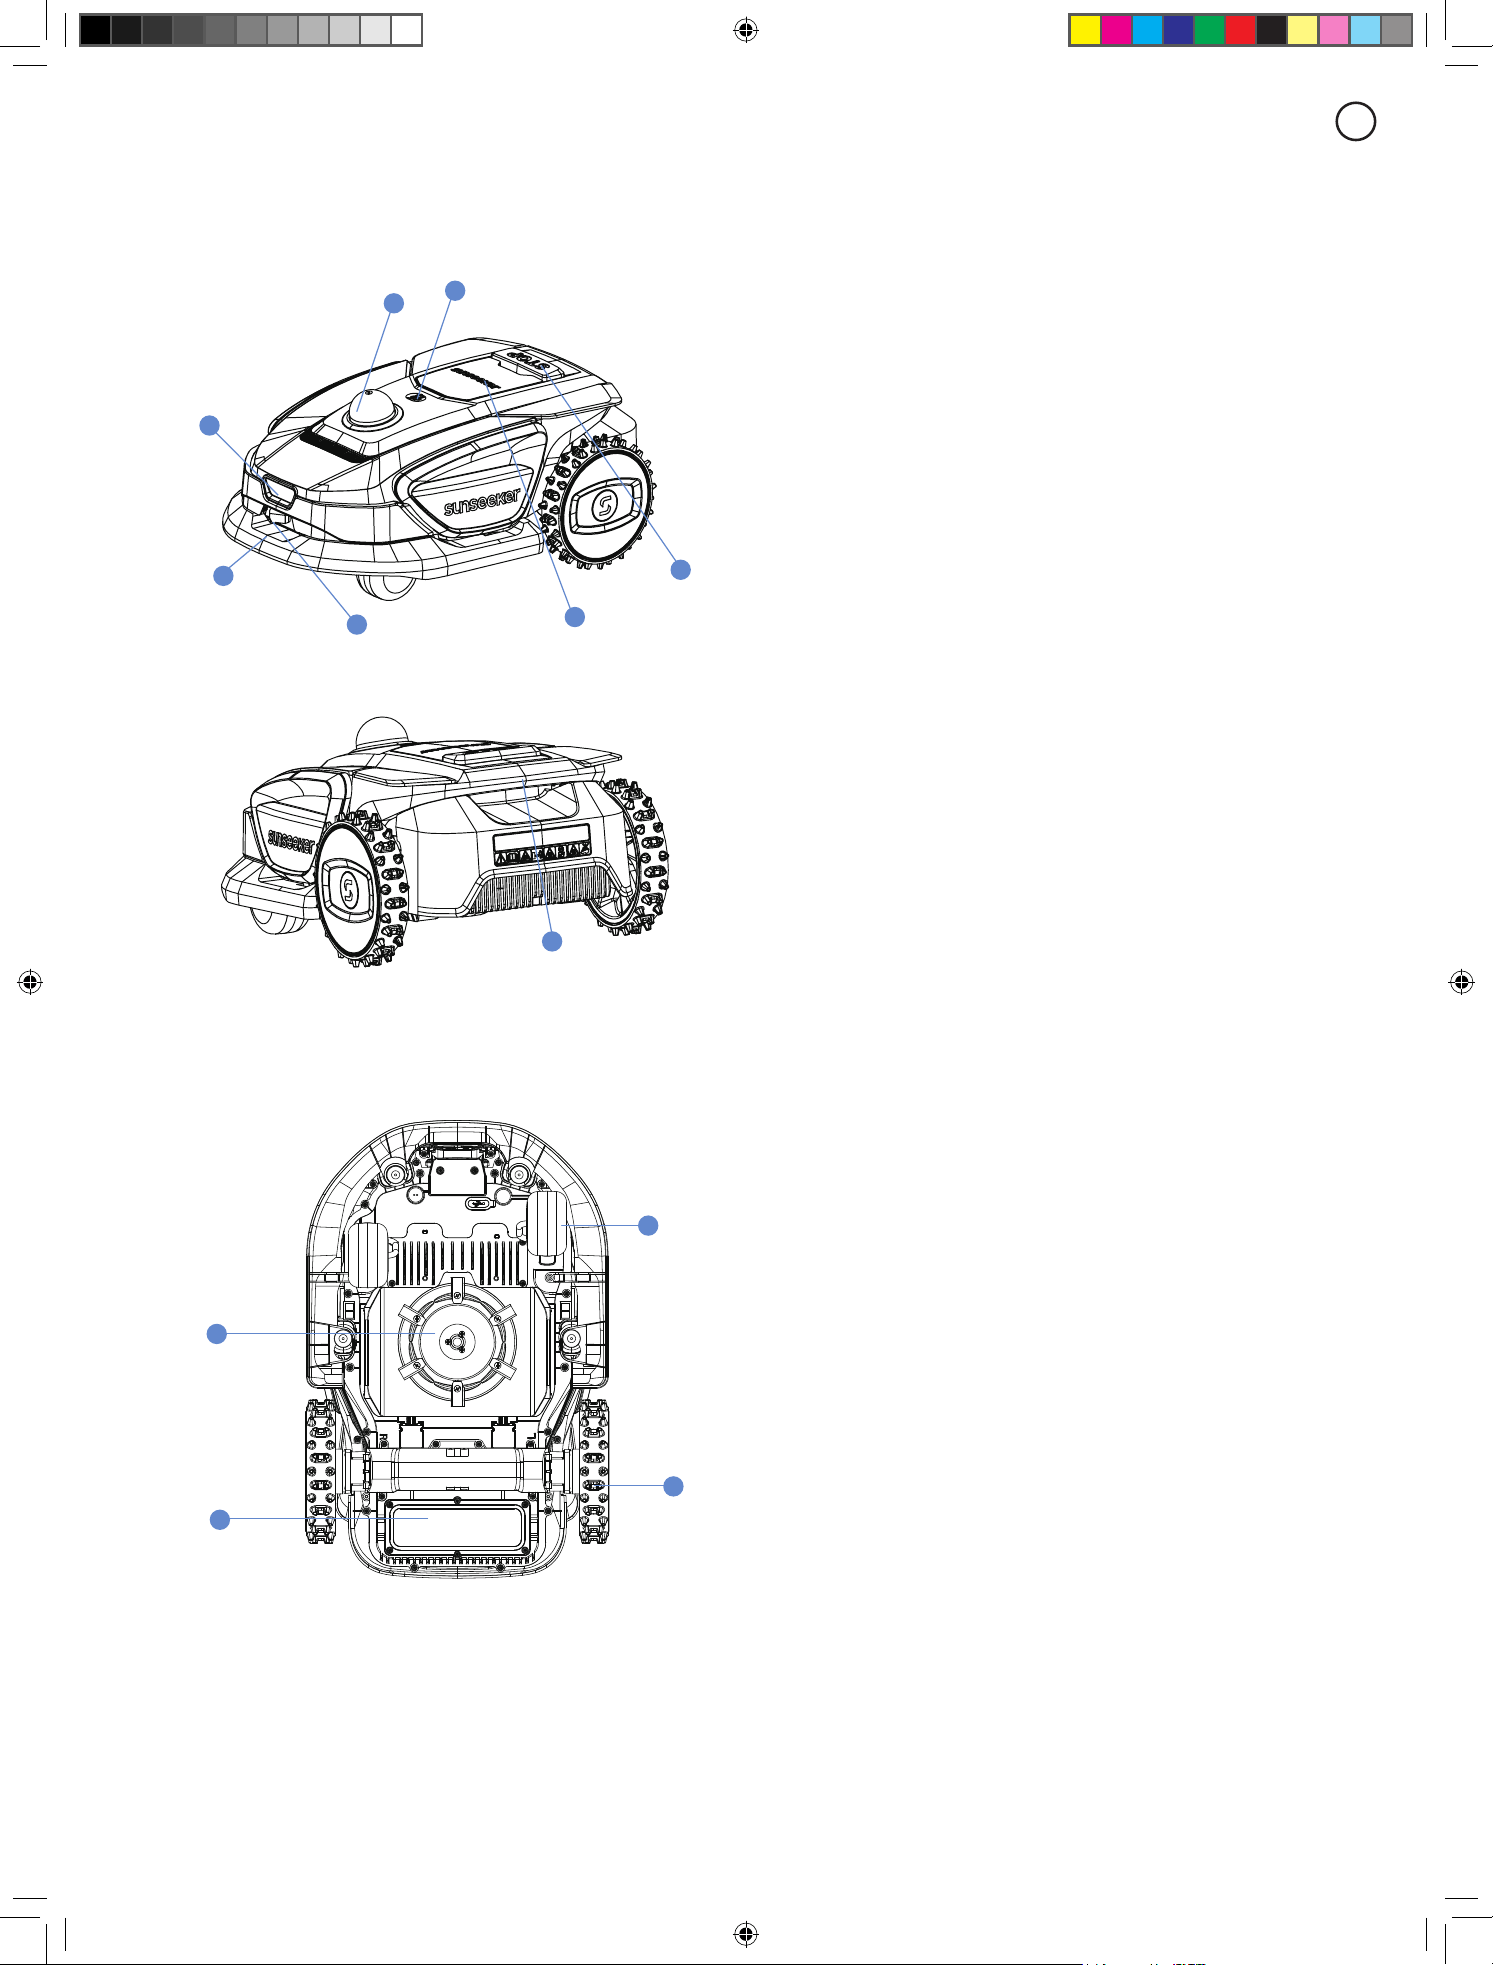
3.2 Parts and Functions
Top View
D
G
B
C
A
F
E
H
Bottom View
J
L
K
I
Note
Do not immerse the machine in water, as this may damage
the components and void the warranty within the specied
period.
A.
Collision Bumper
When visual positioning is not available, the collision
bumper can ensure the machine's normal operation.
B.
Control Panel
The panel to turn the machine's power on and o, to
command the machine to work or return; and etc. The
panel is located beneath the protective cover.
Please close the protective cover after using the control
panel.
C.
STOP Button
Emergency stop button to stop the machine in case of any
urgent situation.
D.
Rain Sensor
The rain sensor can detect rain and the machine can
return to the charging station automatically to avoid rain
according to the user's setting.
E.
Monocular Camera
The Al-assisted monocular camera helps the mower
detect and avoid obstacles.
F.
Charging Electrodes
The charging electrodes on the machine connect to those
on the charging station electrodes to charge the machine's
battery.
G.
LiDAR:
Obstacle Avoidance and Path Planning via Lasers.
H.
Handle Bar
Comfort grip handle.
I.
Battery Compartment
The compartment for storing the battery.
J.
Rotating Cutting Plate
Device for trimming the lawn when the machine is in
operation.
K.
Drive Wheels
Power output for movement with excellent o-road
capabilities.
L.
Caster wheel
Rotates to assist with movement and direction.

9
EN
3.3 Specications
TECHNICAL SPECIFICATION S4 (RMR1001M20V)
Boundary wire Wireless / boundary free
Max mowing area 1000 m²
Cutting height min/max 20 - 60 mm
Height adjustment Manual
Cutting width 180 mm
Battery Capacity 4 Ah
Charging Station
Model: CB10A
Input: 20V DC, 3.0A
Output: 20VDC, 3.0A
User interface LED Display
Max slope 42% (22°)
Robot dimensions 638 * 422 * 274 mm
Certicates CE RoHS REACH
Net weight 11 kg
Sound power level LWA 60 dB(A)
Sound Power Uncertainties KWA 3 dB(A)
Sound Pressure Level LpA 52 dB
Sound Pressure Uncertainties KpA 3 dB(A)
FEATURES
Wi / Bluetooth Y
Wire-free mapping Y
Path planning 3 options
3D Lidar-SLAM Y
VSLAM Y
Super Wi Y
FOTA Y
Quick return to charging station Y
Multi-zones Up to 100
Working schedule Schedule setting in APP
Bump sensor Y
Water wash Y
GPS and 4G module Optional
Google assistant & Amazon Alexa Y
PIN code Y
Lift & Tilt sensor Y
Rain sensor Y
ACCESSORIES
Spare Blade & Spare Screw 6 pcs
Nails for Charging Station 8 pcs
Charger for Charging Station 3 A (CGF253)
WiFi and Bluetooth - Frequency Band(s) BT: 2402~2480MHZ
WiFi 2.4G: 2412~2472MHZ
WiFi 5.2G: 5180~5240MHZ
WiFi 5.3G: 5260~5320MHz
WiFi 5.6G: 5500~5700MHz
WiFi 5.8G: 5745~5825MHZ
WiFi and Bluetooth - Max Output Power BT BDR+EDR: 8.99 dBm Max.
BT BLE: 7.35 dBm Max.
WiFi 2.4G:18.98 dBm Max.
WiFi 5.2G: 15.68 dBm Max.
WiFi 5.3G: 15.26 dBm Max.
WiFi 5.6G: 16.04 dBm Max.
WiFi 5.8G: 13.07 dBm Max.
4..Installation.and.Mapping
Sunseeker’s advanced hardware and software (intelligent algorithms) signicantly enhance the mower’s environmental
recognition, positioning accuracy, and overall performance. With Sunseeker AllSense (Allsense 3D sensing system)
a seamless fusion of 3D Lidar-SLAM and VSLAM visual technology, the robotic lawnmover can perform positioning and
navigation tasks in various scenarios, including complex environments, ensuring high-quality lawn maintenance.
3D LiDAR-SLAM and VSLAM technology, which scans the garden environment in real time to generate a 3D map and
performs real-time positioning, enables users to set virtual boundaries for their lawnmowers, eliminating the need for
traditional boundary wires. With the 3D map and real-time positioning, the lawnmower can plan its mowing paths with
high precision and eiciency, achieving optimal mowing coverage.

10
EN
4..Installation.and.Mapping
Sunseeker’s advanced hardware and software (intelligent algorithms) signicantly enhance the mower’s environmental
recognition, positioning accuracy, and overall performance. With Sunseeker AllSense (Allsense 3D sensing system)
a seamless fusion of 3D Lidar-SLAM and VSLAM visual technology, the robotic lawnmover can perform positioning and
navigation tasks in various scenarios, including complex environments, ensuring high-quality lawn maintenance.
3D LiDAR-SLAM and VSLAM technology, which scans the garden environment in real time to generate a 3D map and
performs real-time positioning, enables users to set virtual boundaries for their lawnmowers, eliminating the need for
traditional boundary wires. With the 3D map and real-time positioning, the lawnmower can plan its mowing paths with
high precision and eiciency, achieving optimal mowing coverage.
11
EN
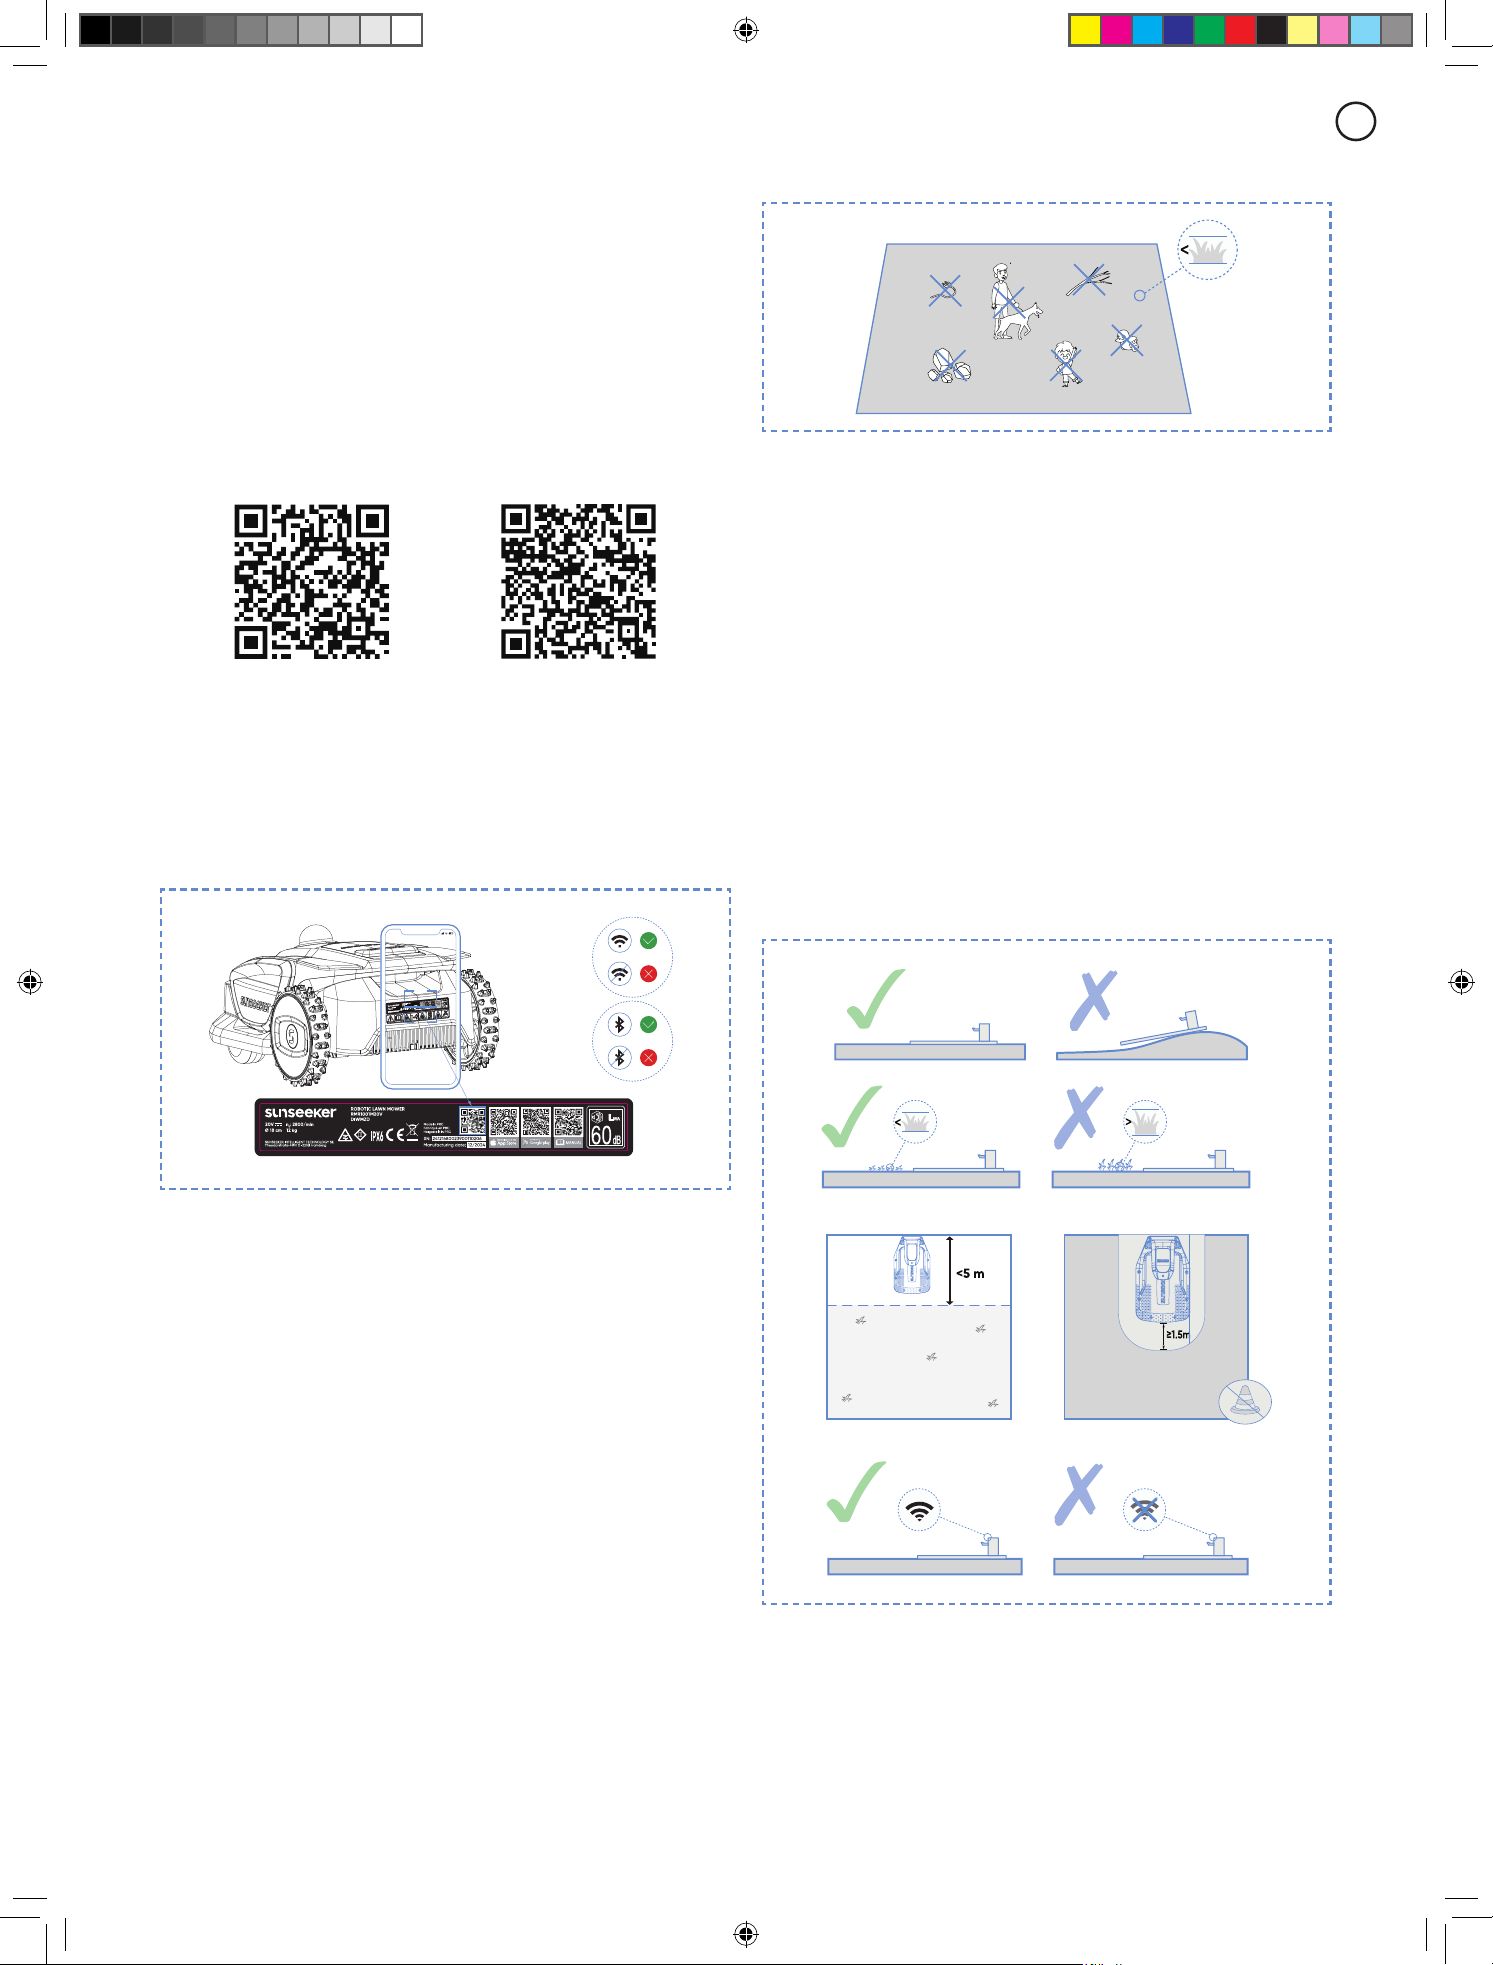
Recommended lawn types are shown in the pictures below:
6cm
4.2 Install the Charging Station
Find a proper location
A.
To ensure that the lawn mower can successfully exit
and return to the charging station, install the charging
station on an open at non-hardened ground.
B.
The charging station should be within the coverage
area of the household Wi-Fi and close to a power source.
C.
The charging station can be placed either inside or
outside the mower’s working area. For safety reasons, it
is recommended to keep the charging cable outside the
mowing area.
D.
There should be no obstacles within 1.5 m in front of the
charging station.
E.
If there is grass, it should be lower than 6 cm.
6cm 6cm
F.
Ensure that the area above the charging station is as open
as possible, free from trees, buildings, or other obstructions.
4.1 Preparations
Install Sunseeker APP
Note
When necessary, the App will request access to Bluetooth
and Wi-Fi networking, to ensure proper setup and future
functionality, grant access to these features.
Scan the QR code to download the Robotic Mower App,
or search for "Sunseeker Robot" in the Google Play Store
(Android) or the Apple App Store (iOS). After installation,
please create a new account and sign in.
iOS
Android
Prepare the mower
Ensure that Bluetooth on your phone is turned on, and
scan the machine’s SN QR code to identify the model and
proceed with the corresponding installation guide.
Prepare the lawn
A.
Clear away any debris, piles of leaves, toys, wires,
stones, or other obstacles.
B.
To ensure safety, please make sure that children and
pets are o the lawn.
C.
Please cut your lawn to a height of no more than 80 mm
before using the robotic mower.
D.
The working area specications for the robotic lawn
mower are as follows: 1000 m
2
(S4).
E.
If there are narrow passages within the working area,
ensure the passage width is greater than 80 cm.
12
EN
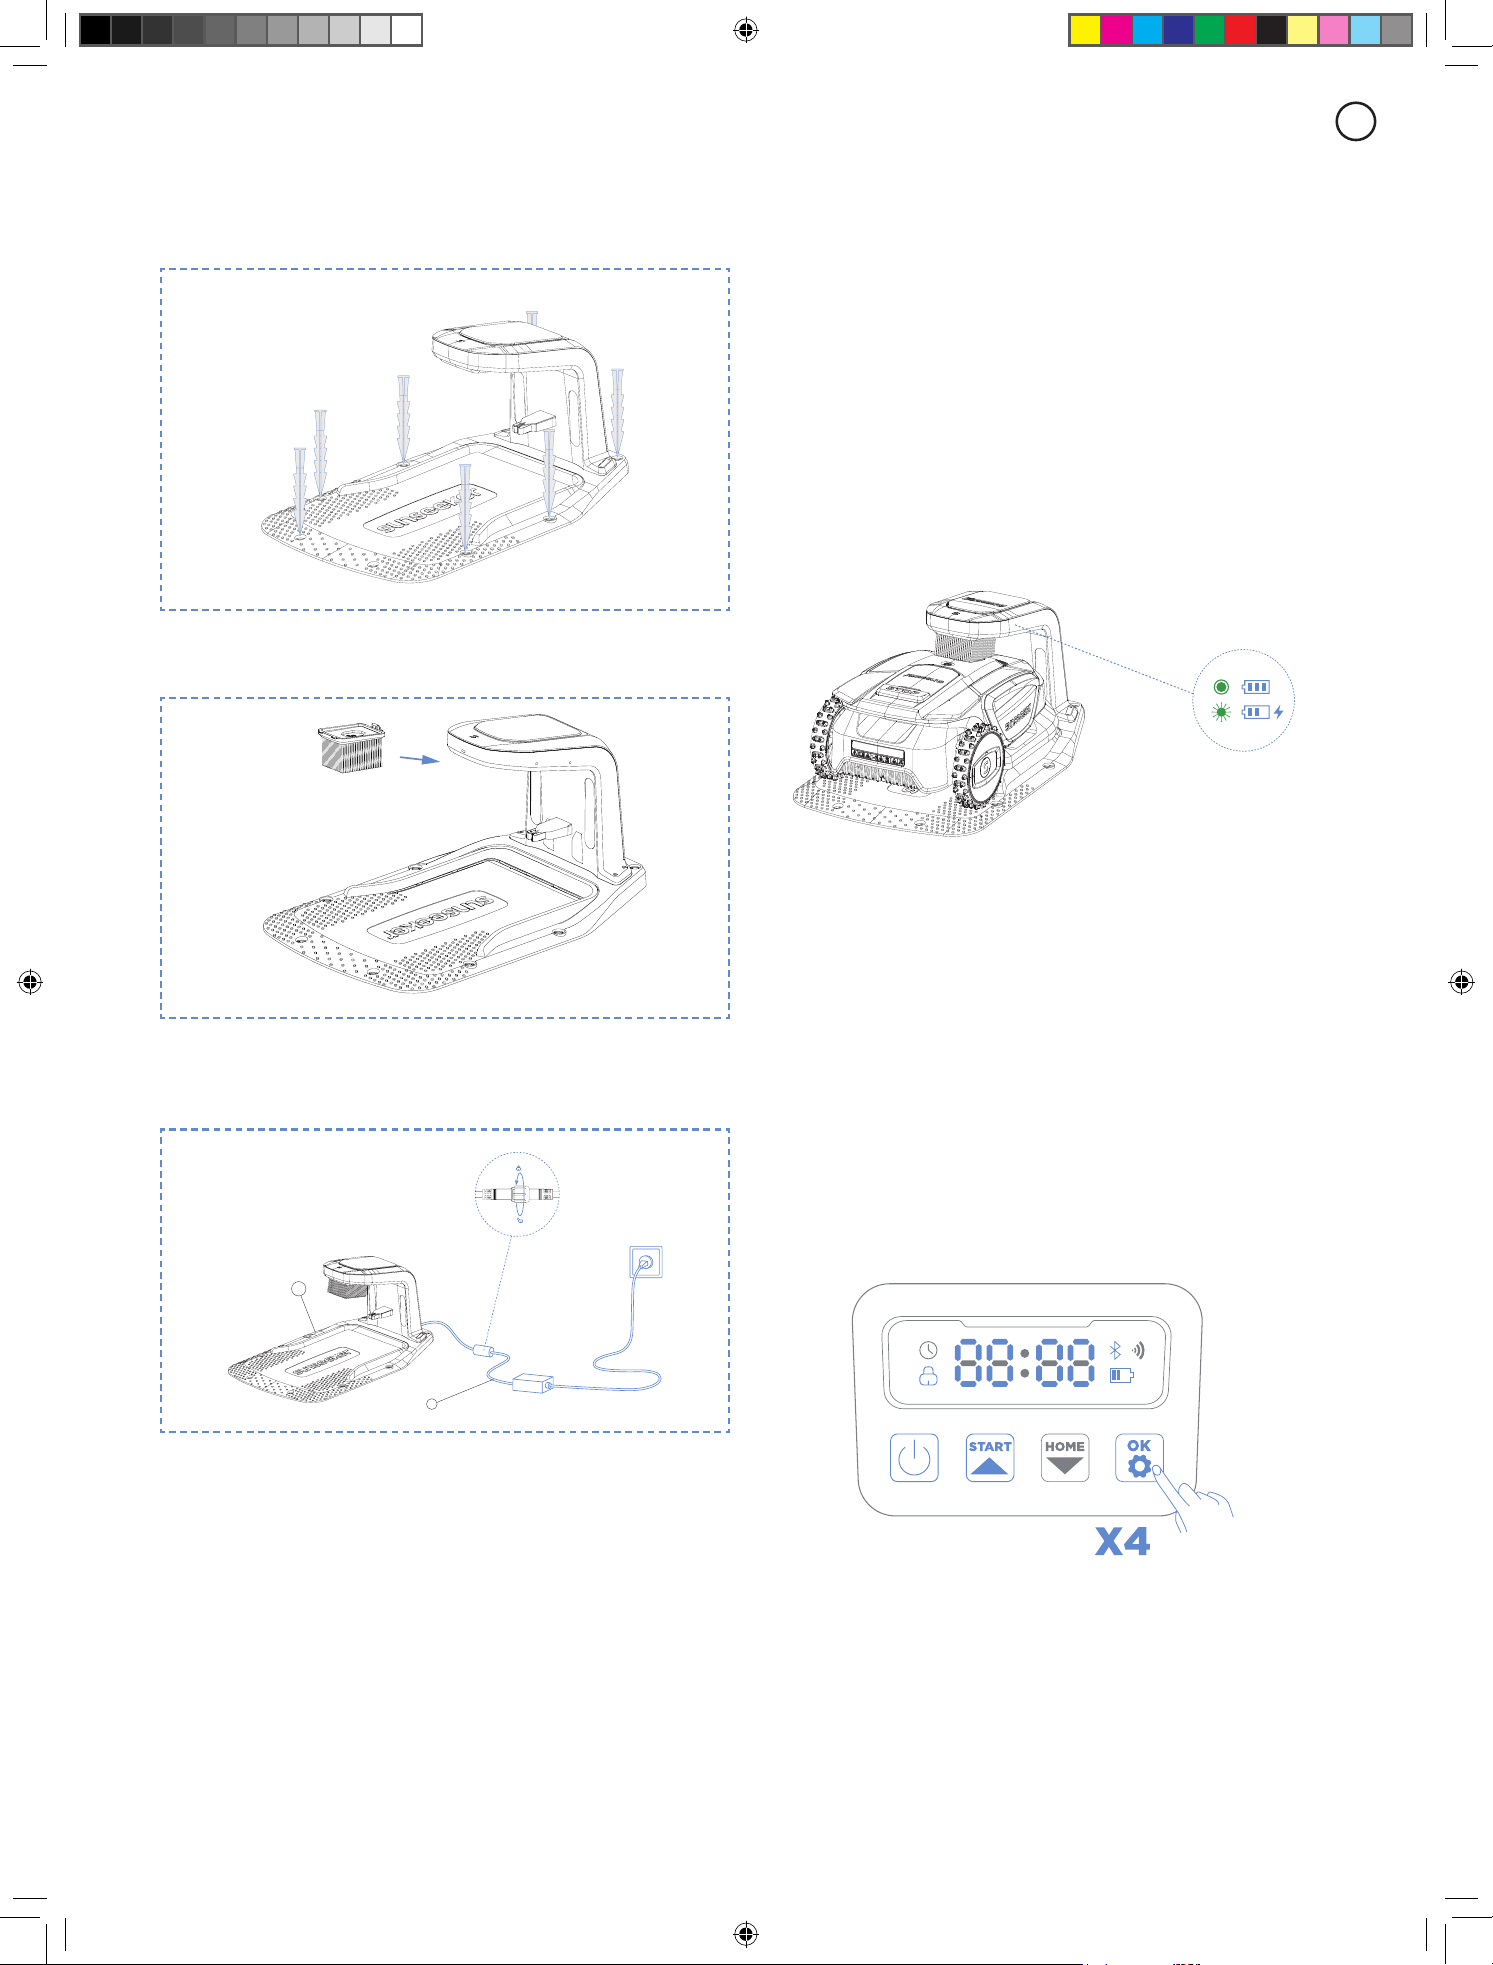
Install the charging station
A.
Use the supplied screws and hex wrench to secure the
base plate to the ground.
B.
Align the cleaning brush with the charging dock slot
and insert the charger.
C.
Connect the power cord to an extension cord, then plug
it into a power outlet. Please keep the power cord at least
30 centimeters above the ground.
Note
The LED indicator light on the charging dock will remain
steadily lit in green when powered on.
D.
Remove the LiDAR protective cover, and place the robot
into the charging dock to charge. Ensure that the charging
contacts of the robot and the charging dock are properly
connected.
Note
If additional protection is needed, you can purchase the
matching SUNSEEKER charging station, which is available
for purchase at both local stores and online platforms.
Using a non-SUNSEEKER certied charging station may
cause charging malfunctions.
4.3 Activate the Mower
Preparation
Please make sure that the charging station has been
properly installed and connected to the power supply.
Activate the mower
A.
Push the mower into the charging station, ensure that
the charging electrodes connect properly. The green light
on the charging station ashing indicates normal charging.
When the mower is fully charged, the indicator light will
remain solid green.
Note
If the indicator light remains o even when there is power
supplied properly, please contact customer service.
B.
Once the machine charges successfully on the charging
station, it will power on automatically. You can also
manually power it on by pressing and holding the power
button.
C.
Enter the default Pin code "0000". Press OK each time
you enter "0" to complete the process.
D.
If you want to change the password, long press the
START and HOME button at the same time to change
the password. For more detailed information, please refer
to 5.2 Change the PIN Code.
4.4 App Connection
Note
The following illustrations regarding the App are for
demonstration purposes only. Options available may vary
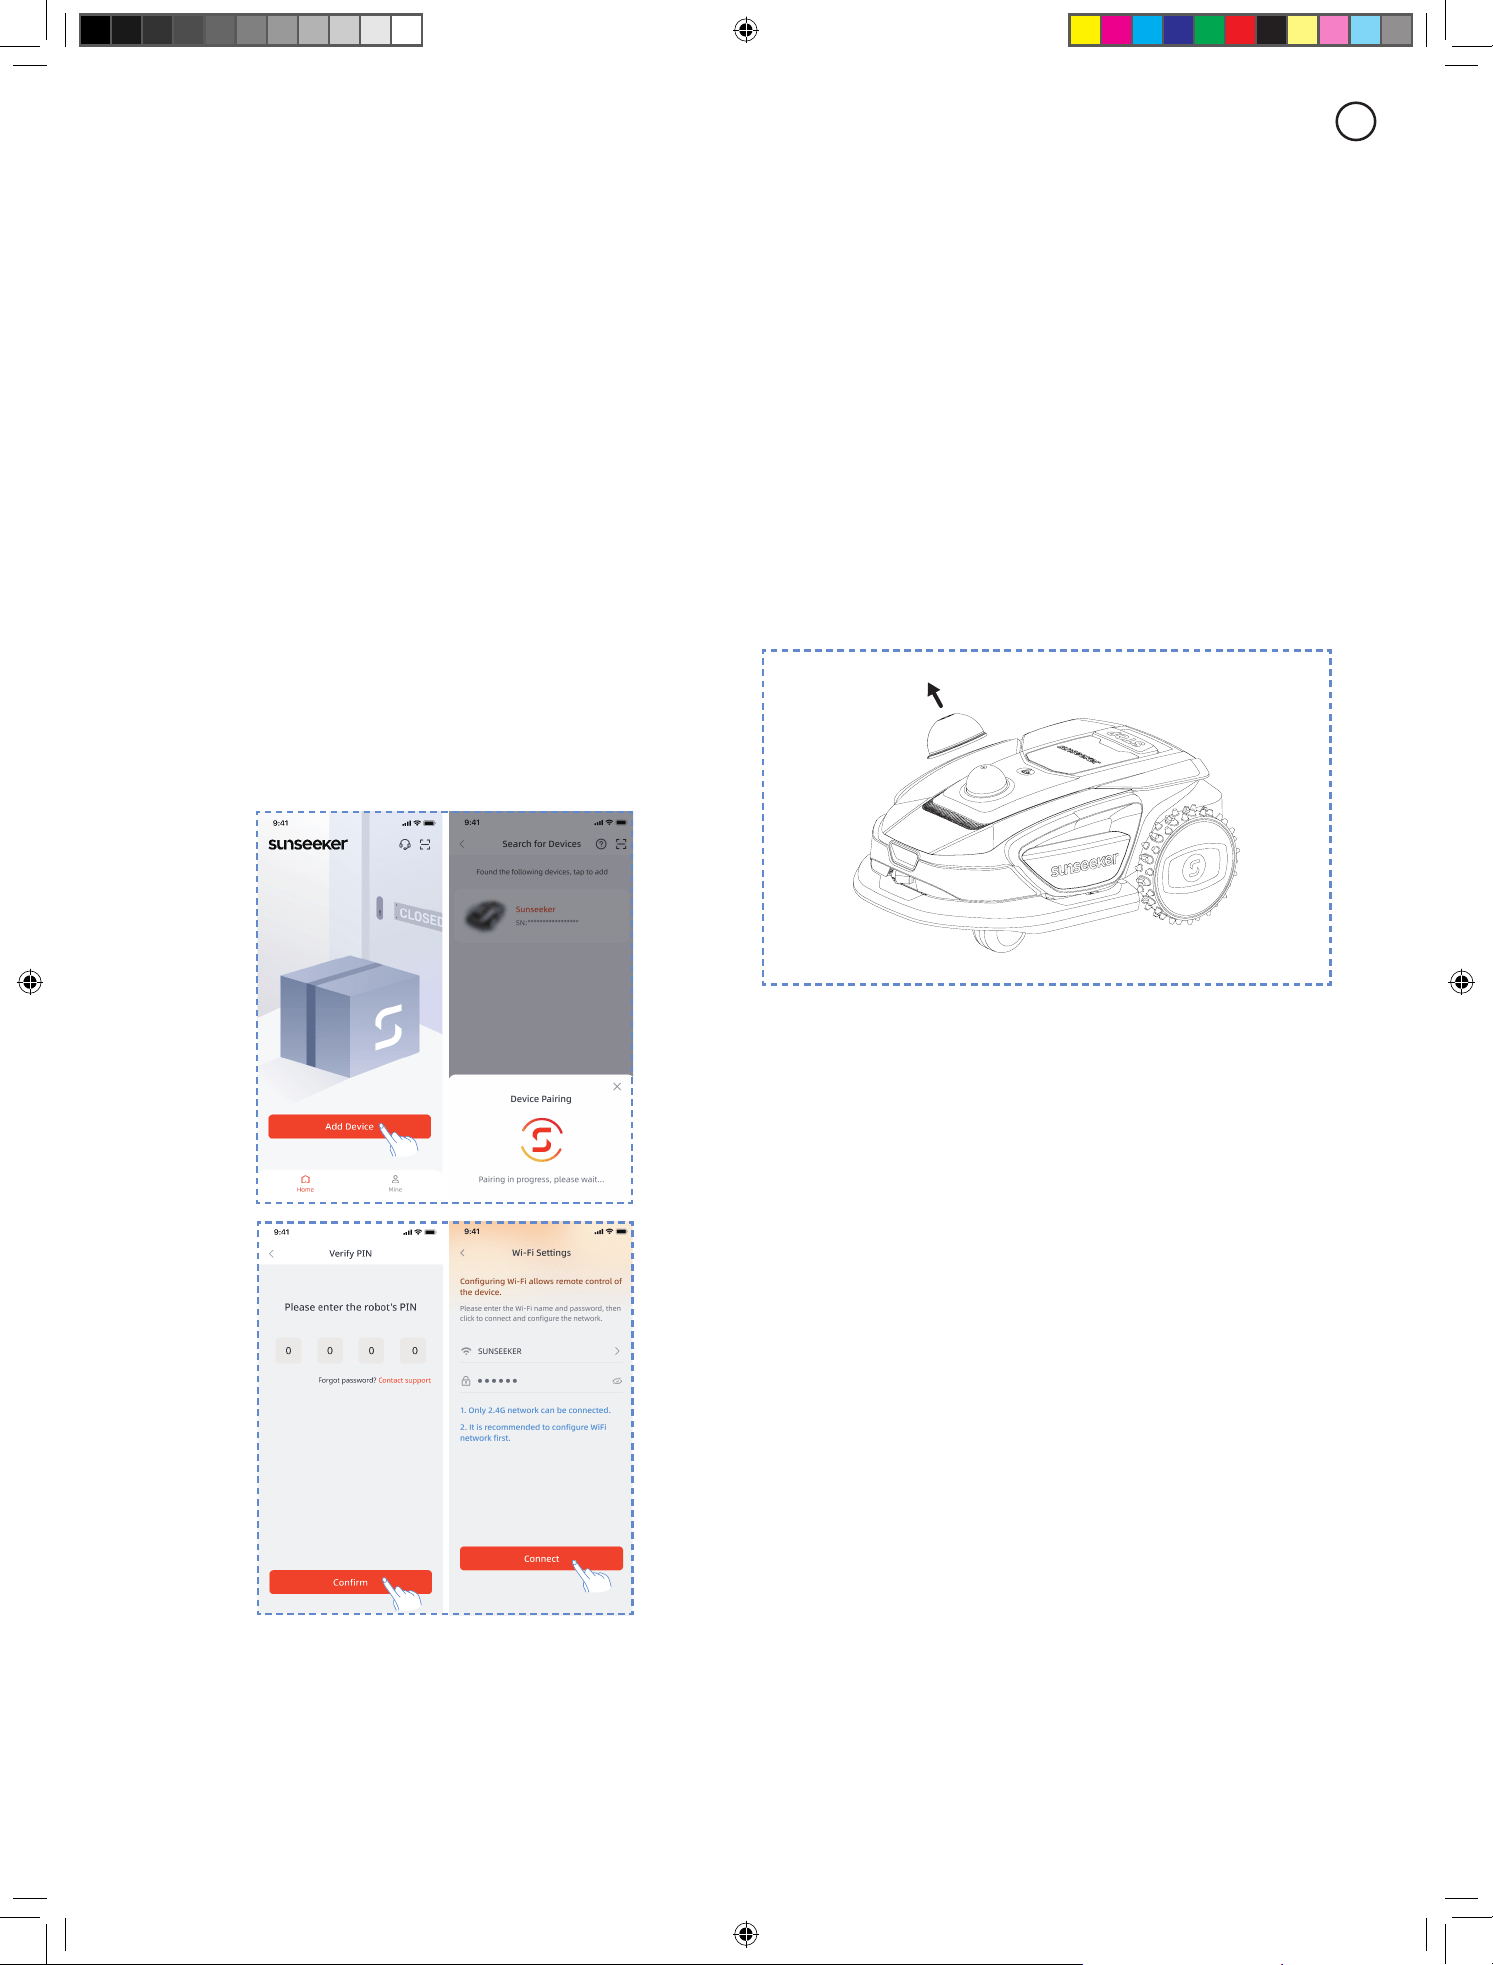
13
EN
depending on software version.
Preparation
A.
Make sure that the machine is on the charging station,
charging properly, powered on, and the PIN code has been
entered.
B.
Ensure that Bluetooth on your phone is turned on. For
easier network conguring, we recommend that your phone
and the mower remain connected to the same Wi-Fi network.
App Connection
A.
Scan the machine's SN QR code to add your robotic
lawn mower. If scanning is not available, you can also
connect via Bluetooth.
If you have already scanned the QR code during the
"Prepare the Mower" step, the mower will automatically
bind to the APP when Bluetooth is enabled on your phone,
eliminating the need for another scan.
B.
After successful pairing, enter the default PIN code
"0000". PIN code can be changed on the phone.
C.
Congure your Wi-Fi for the machine in the App.
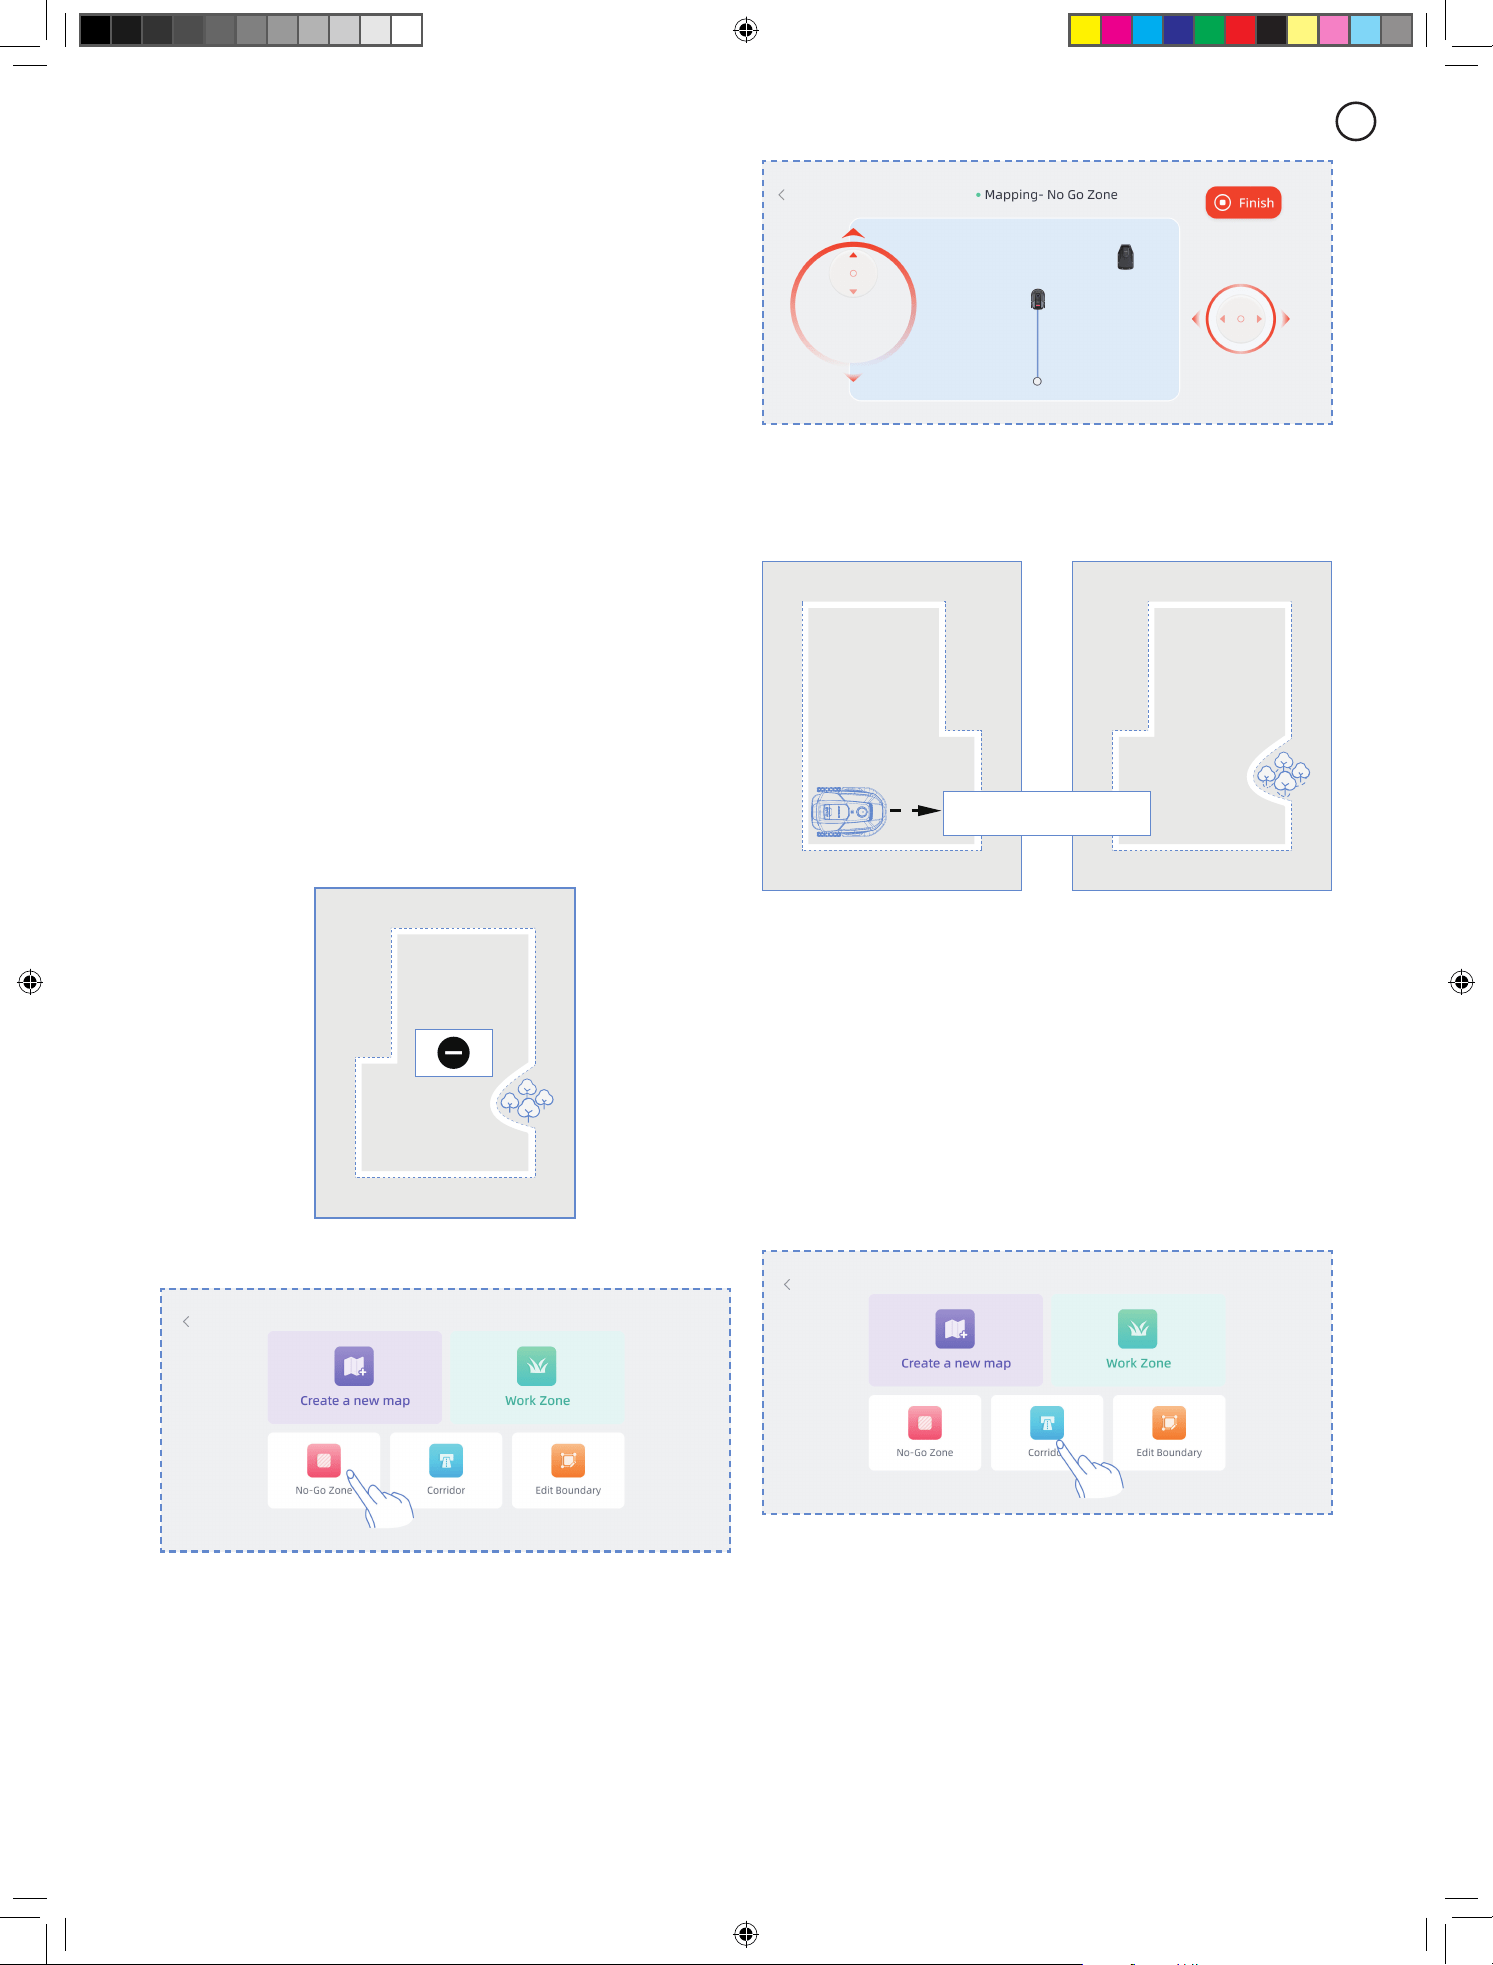
4.5 Mapping
Note
The following illustrations regarding the App are for
demonstration purposes only. Options available may vary
depending on software version.
Preparation
To have the robot mow the lawn, you rst need to scan
and map your yard to create a virtual map in its memory.
Check and prepare for mapping:
A.
The robot has entered the charging dock and is
powered on.
B.
The battery level is above 50%.
C.
You have connected to the robot via the SUNSEEKER
app.
D.
The LiDAR protective cover is open.
E.
The robot's front camera is clean and unobstructed.
Be sure to remove the protective lm from the front
camera before use. If the lens gets dirty during subsequent
use, wipe it with a soft cloth.
Automatic mapping
The robot adopts advanced 3D LiDAR scanning combined
with visual recognition technology, enabling it to
independently detect and map your lawn. It will:
•
Identify boundaries: Precisely recognize the lawn edges
•
Scan the terrain: Cruise along the boundaries to collect
environmental details
•
Generate a virtual map: Create an accurate digital layout
for eicient mowing
Start Automatic Mapping
Before mapping:
A.
Clear the weed-covered lawn boundaries to ensure they
are clearly visible.
B.
If there are clis or step areas along your lawn
boundaries, be sure to take control of the robot before
it reaches these areas while boundary-searching, and
navigate through these sections using manual remote-
controlled mapping.
C.
For lawns without clear boundaries, manual remote
control mapping is required to draw the map boundaries.
D.
The robot cannot pass through narrow spaces or
passages less than 0.8 meters wide. Please ensure there
is a passage space of more than 0.8 meters inside the

14
EN
boundaries of the lawn you want to map.
Through the following two methods, you can quickly start
mapping.
A.
On the robot's operation panel, press START and OK
successively.
B.
Open the app and tap "Start Mapping" to activate the
automatic mapping function.
Pause/Resume Automatic Mapping
Under the following scenarios, automatic mapping will be
paused:
A.
The emergency stop button (STOP) on the robot is
pressed
B.
The "Pause" button is tapped on the APP interface.
C.
Robot anomalies: such as wheels getting stuck,
excessive tilting of the body, or body overturning.
After checking and ensuring the robot is functioning
normally without errors, you can resume automatic
mapping by tapping the "AUTO" button on the APP
interface.
We recommend following the robot during mapping. If the
robot fails to detect the boundaries accurately, you can
exit the automatic mapping mode and switch to manual
control at any time.
Manual Remote-Controlled Mapping
The robot's ability to automatically recognize boundaries is
limited by system performance and the lawn environment.
There may be scenarios where the robot cannot
successfully complete automatic mapping. In such cases,
you need to resort to manual remote-controlled mapping
to help the robot nish scanning and mapping the lawn.
Entering Remote-Controlled Mapping Mode
You can enter manual remote control mapping mode from
automatic mapping mode in the following ways:
A.
During the automatic mapping process, if the robot fails
to recognize the lawn boundaries for an extended period,
it will automatically switch to manual remote-controlled
mapping mode, prompt you to take over, and remotely
control the robot to continue mapping.
B.
You can also proactively switch to manual remote-
controlled mapping mode by tapping the "Remote-
Controlled Mapping" button on the automatic mapping
interface.
Start Remote-Controlled Mapping
Ensure the robot is near the lawn boundary. Otherwise,
rst remotely control the robot to get near the lawn
boundary, and ensure the boundary is on the robot's right
side.
Operate the remote control panel on the APP interface
to remotely control the robot to drive along the lawn
boundary for mapping.
Important Notes:
15
EN
A.
Do not manually move the robot when creating the
boundary; otherwise, it may result in mapping failure.
B.
When starting mapping, do not remotely dock the
robot to the charging dock before the mapping process is
completed. Otherwise, the LiDAR may be blocked, leading
to mapping failure.
C.
When using remote control, stay within 5 meters behind
the robot.
D.
The robot can navigate slopes with a gradient of up to
42% (22°). Please keep the gradient of the working area
below this limit.
E.
If the lawn is more than 4 cm higher than the adjacent
ground, keep the robot at least 5 cm away from the edge.
If your lawn is ush with the adjacent ground, the robot
can cross the boundary line to achieve the best mowing
results for the edge areas.
F.
Ensure the turning angle is greater than 90°; angles less
than 90° may cause the robot to have diiculty achieving
clean cuts.
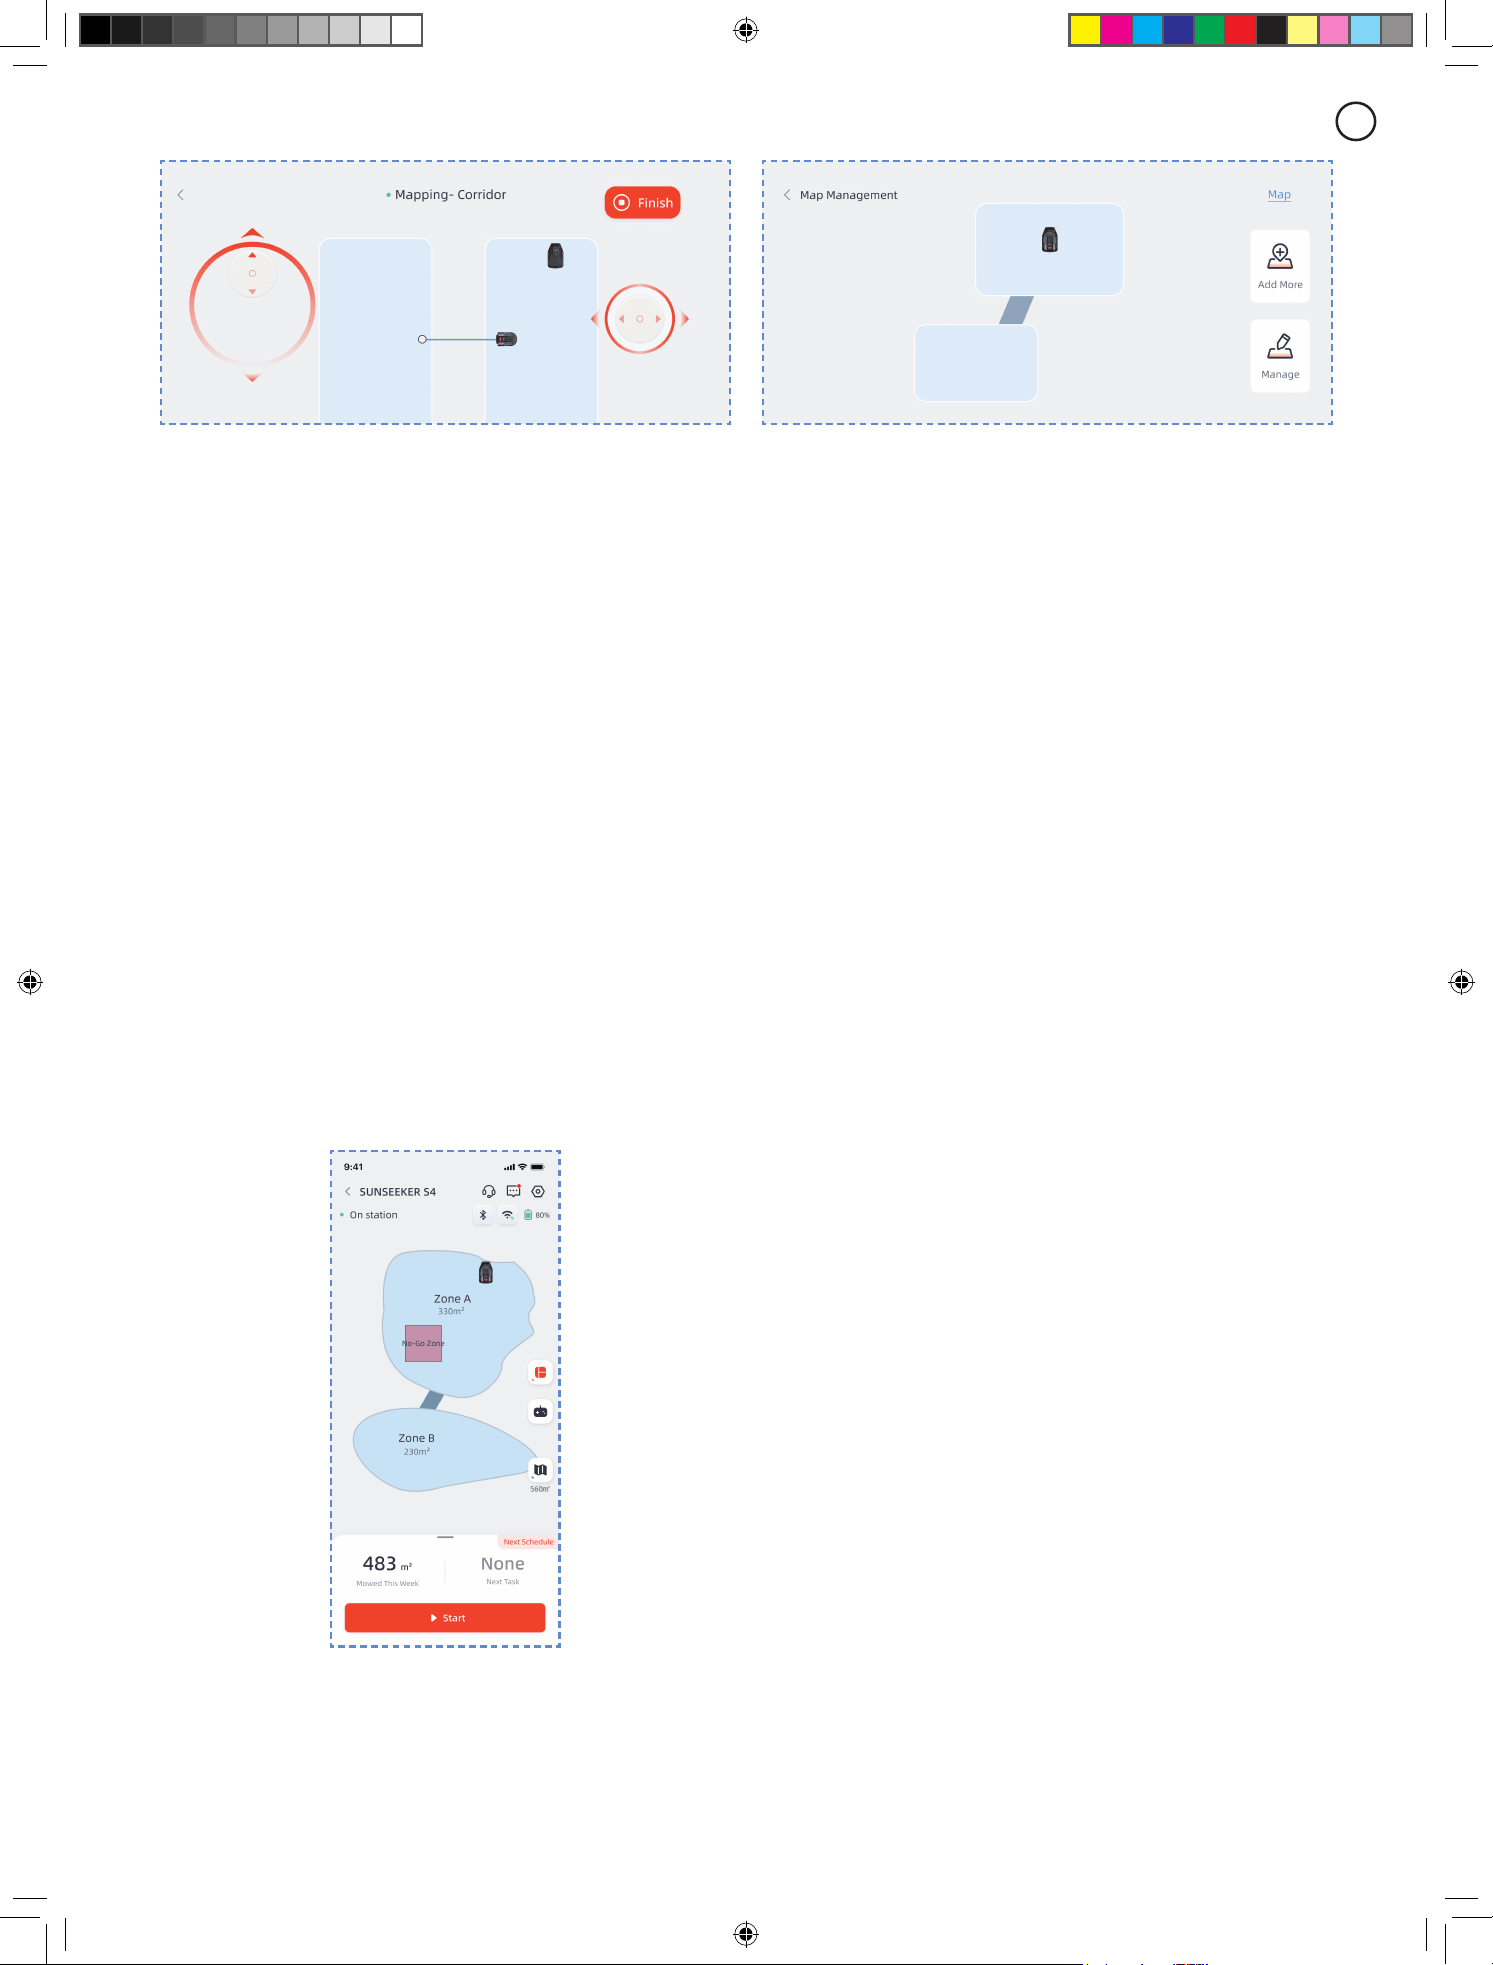
Create No-go Zone
If your work area contains a pool or other no-mow zones,
it is recommended to create a No-Go Zone to generate a
virtual boundary and protect these areas.
A
A.
Click No-go zone.
B.
Remotely control the mower to the starting point where
the No-Go Zone needs to be created, then click Start
Mapping.
C.
Remotely control the mower to close the area, then
click Finish.
Create multi-zone
If your lawn needs to be divided into multiple work zones,
you can create multiple work zones and passages.
BA
Corridor
After creating the rst work zone, you can add a corridor
and then create the second work zone:
A.
Click Corridor.
B.
Remotely control the mower to the location where the
corridor needs to be created, then click Start Mapping.
Make sure the corridor overlaps with the rst work zone.
C.
Remotely control the mower to the end of the corridor,
then click Finish.
D.
Create the second work zone, ensuring that the corridor
overlaps with the second work zone.
16
EN
After creating the rst work zone, you can add the second
work zone and then create the corridor:
A.
Click Work Zone.
B.
Remotely control the mower to the location where the
second work zone needs to be created and create the
second work zone.
C.
Create a corridor between the two work zones, ensuring
that the corridor overlaps with both work zones.
Note
- When creating multiple work zones, it is best not to have
the second work zone overlap with the rst. If the overlap
is too large, the two zones will be automatically merged
into one work zone.
- If the corridor does not overlap with the work zone or if
no corridor is established between the two work zones,
the mower may have diiculty returning to the charging
station or completing its tasks.
Manage
You can also merge, split, rename, and delete work zones,
and delete corridors or no-go zones. These operations
can be performed under Details > Map Management >
Management.
17
EN
5..Daily.Operation
5.1 Display and Control on the Mower
Display
STOP
ST
ART
HOME
OK
Power icon:
The battery power icon shows the remain
power of the machine. This icon displaying 1 bar indicates
that the power is 30% or under, displaying 2 bars indicates
that the remain power is between 31-66%, and displaying
3 bars indicates power of 67% and higher.
Wi-Fi icon:
The Wi-Fi icon indicates whether the
machine connects successfully to the Wi-Fi or not.
Bluetooth icon:
The Bluetooth icon indicates whether the
machine is connected to Bluetooth successfully or not.
Time setting icon:
The time setting icon indicates that the
machine has entered the time setting mode.
Password setting icon:
The lock icon lighting up
indicates that you need to enter the password or change
the machine’s password.
Dashboard display:
The dashboard display shows the
dierent states and modes the machine is in:
. idle:
The machine is in standby mode and there are no
tasks in execution at this time.
. Running light:
The machine is in working mode. At this
time, the disk is rotating at high speed. Please keep away
from it.
. ----:
When the rain delay is turned on, the machine
recognizes that it is raining at this moment, ends the
current work and returns to the charging station.
. stop:
The emergency stop button was pressed on the
machine.
Basic Control
Turn on:
Press and hold power button for 2 s.
Turn o:
Press and hold power button for 3 s.
When the mower is turned o, you will see the word "bye"
displayed on the dashboard and then the screen will turn o.
Start working:
Press START button and then OK.
Back to station:
Press HOME button and then OK.
Stop mower operation:
Press STOP.
Exit STOP mode:
Press START button and then OK, or
press HOME button and then OK.
Times setting
icon
Bluetooch
icon
Power icon
Comfirm
Back to station
Wi-Fi
Password
setting icon
Turn on/o
Start working
STO P
Time setting:
Press and hold START button for 3 s.
Restart the mower:
Press and hold the power button for
10s to turn o the machine, then turn it on again or directly
push the machine into the charging station and connect it
to the charging electrodes on the station.
Note
- If the mower restarts, make sure there is at least 1.5
meters of at, obstacle-free space in front of it.
- If the work area includes drop hazards such as pools or
elevated edges, it is recommended to keep the mower on
the charging station during restart, or let it return to the
station after restart for position calibration.
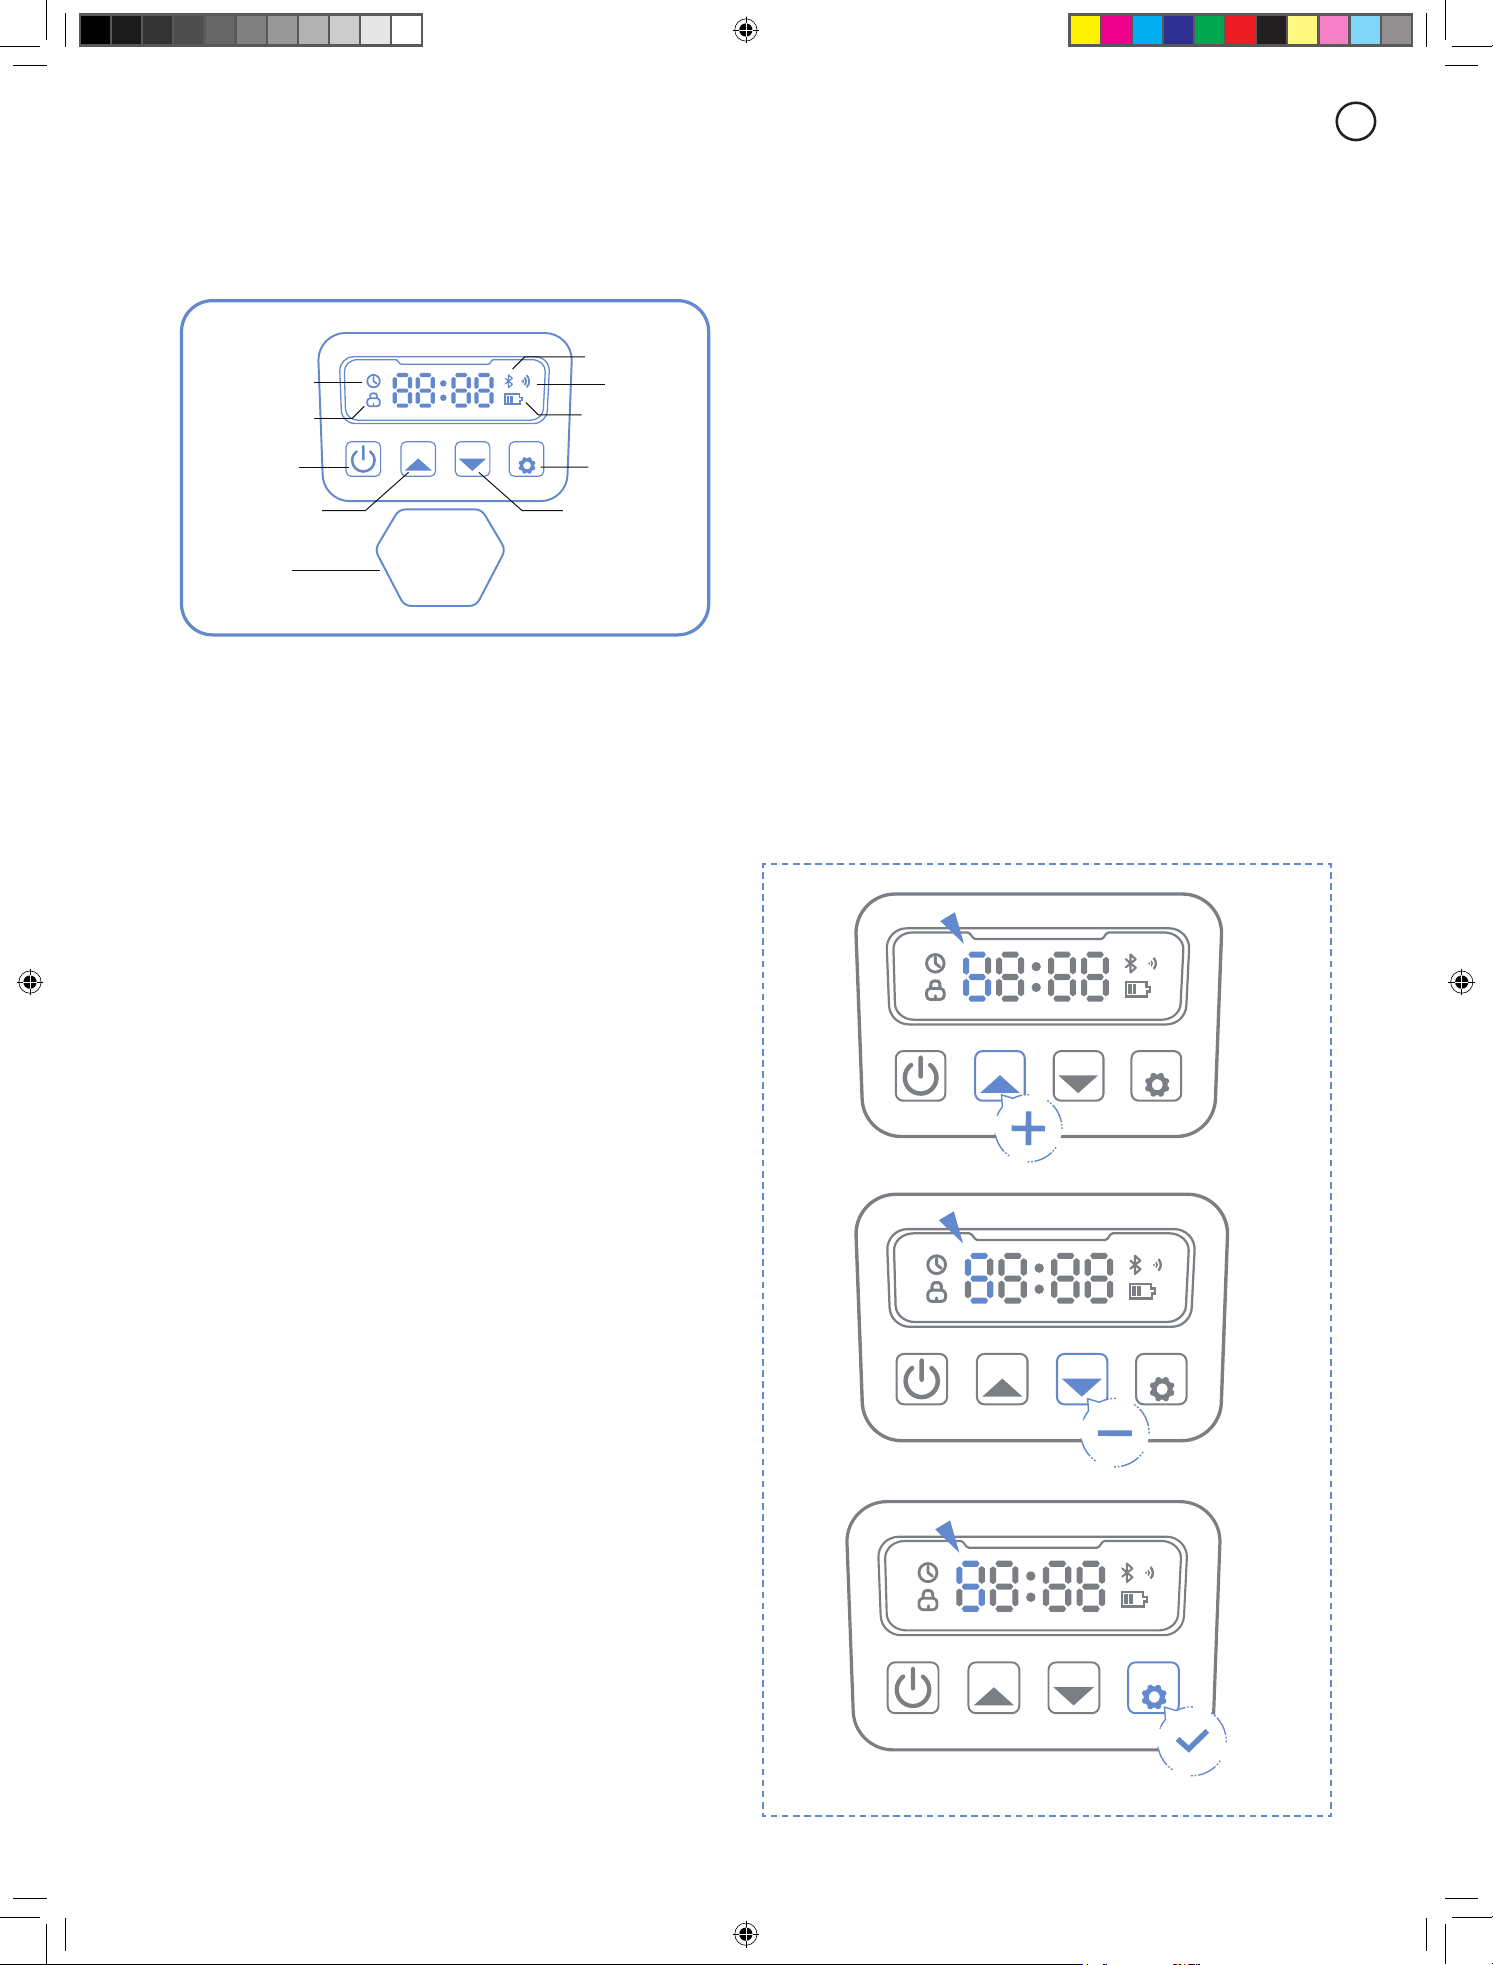
5.2 Change the PIN code
If the mower is in lock status, enter the PIN code before
manually operating the mower. The default code also be
changed via the SunseekerRobot app.
A.
Long press START and HOME buttons for 3 seconds.
B.
When PIN1 is displayed, and after "0---" appears, input
the old password.
C.
When PIN2 is displayed, and after "0---" appears, input
the new password. Press OK to conrm.
ST
ART
HOME
OK
ST
ART
HOME
OK
ST
ART
HOME
OK
18
EN
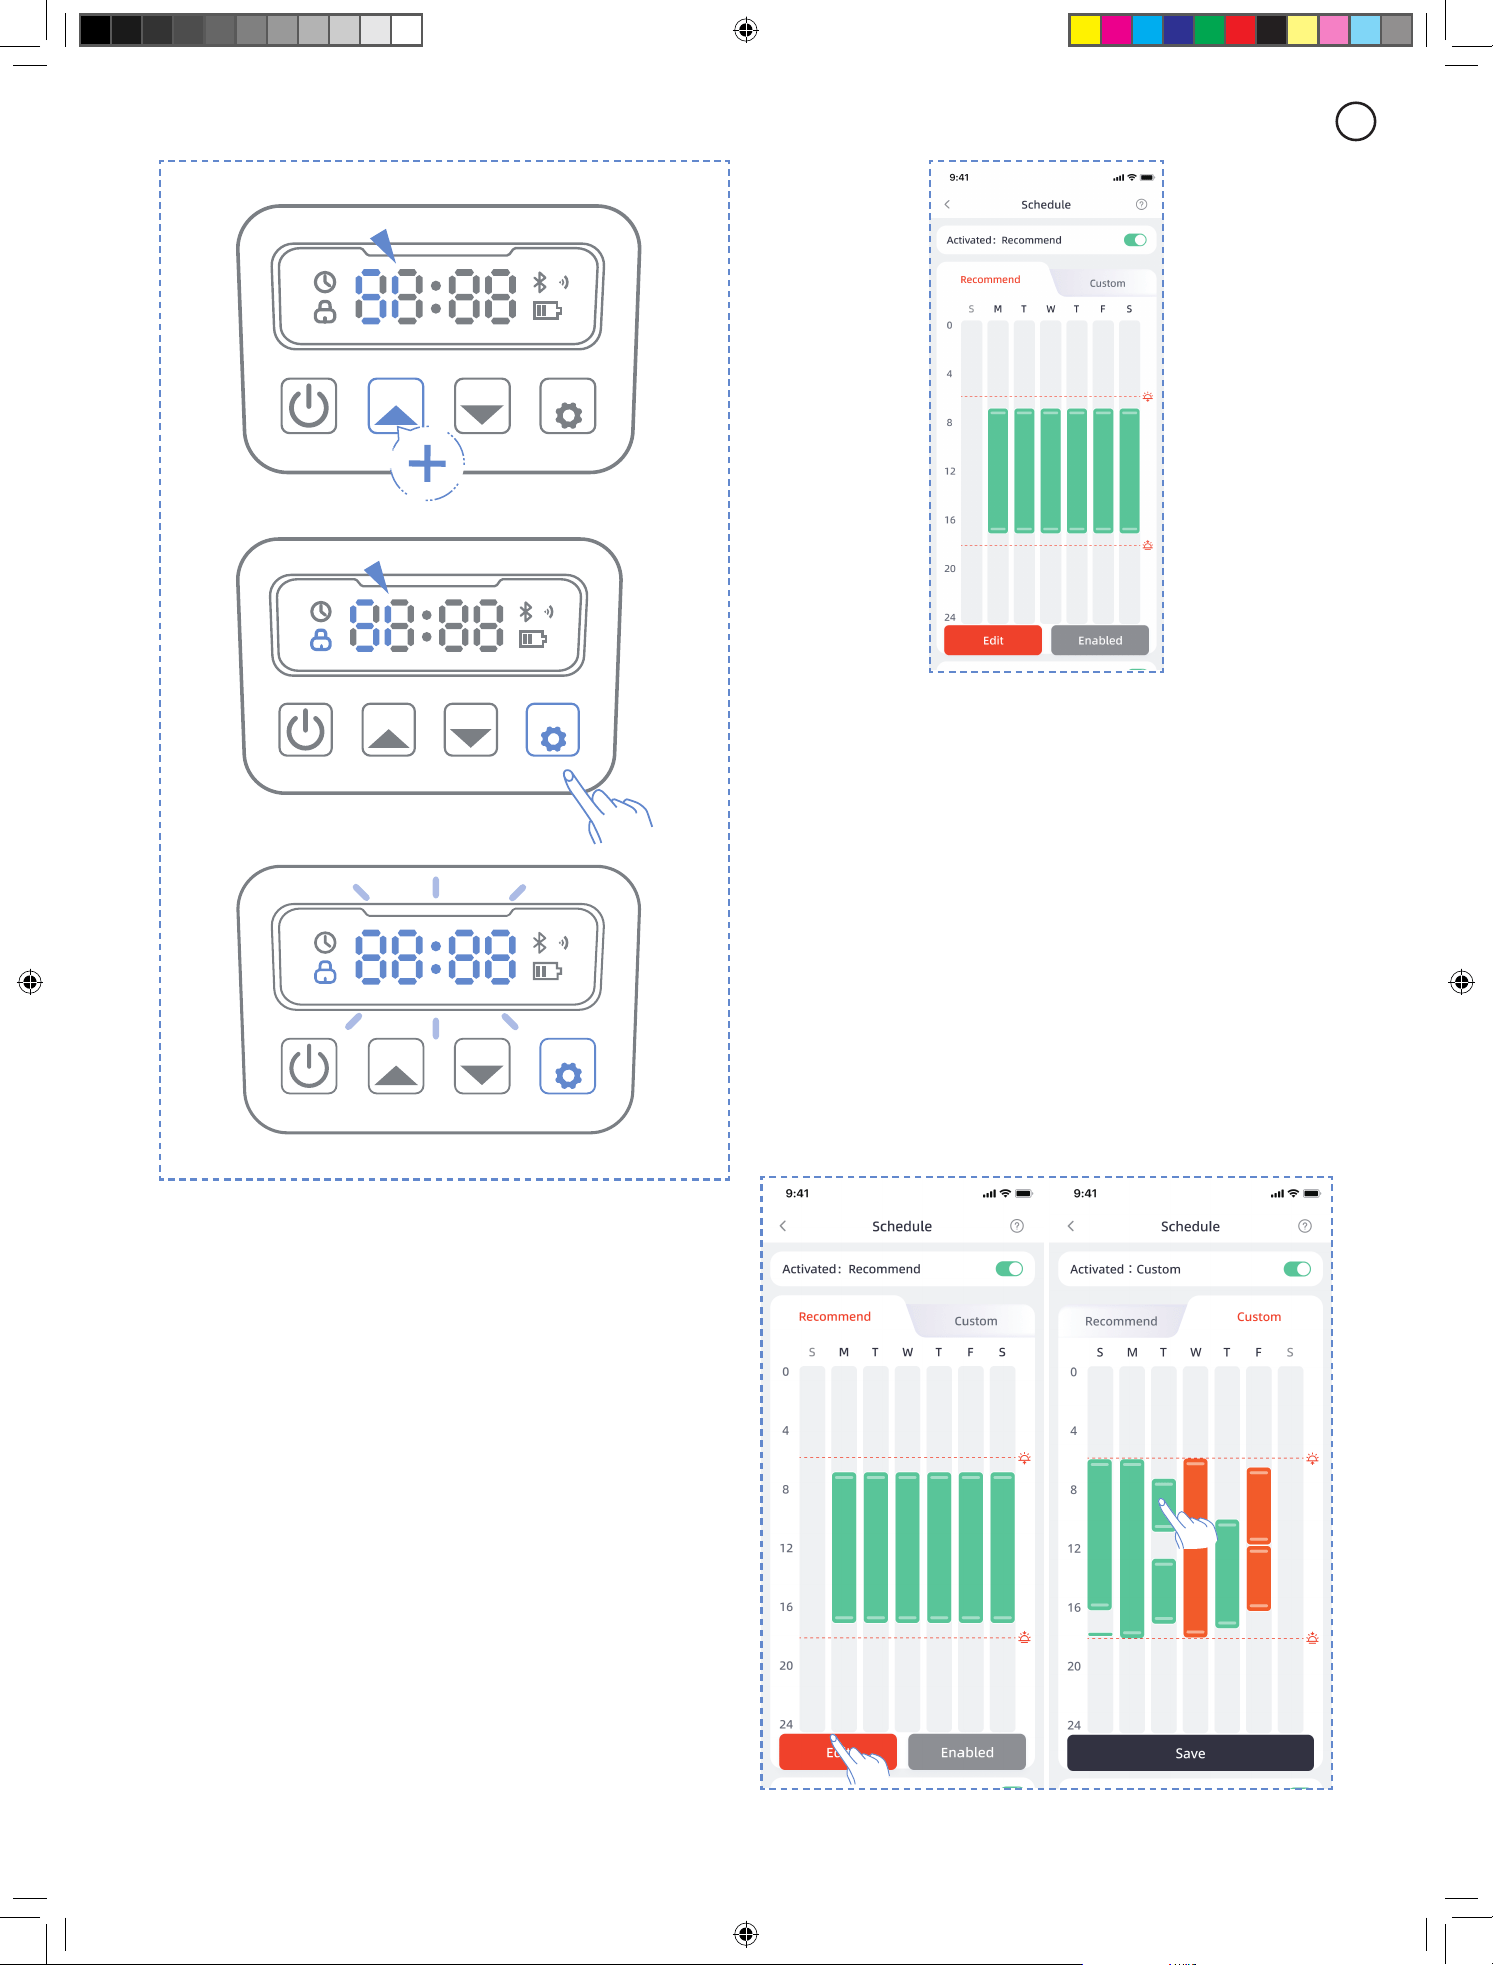
Custom schedule
If you need to modify the recommended schedule, you can
also choose to set a custom schedule.
A.
Press Adjust or Custom button to enter custom settings.
B.
Select the day you want the mower to work.
C.
Choose the area where you want the mower to work on
that day, or select all areas.
D.
Set the start and end times for the mower's operation.
Note
If the custom schedule time does not fall within the
daytime working hours, which are based on the local
sunrise and sunset times, the mower will not leave the
charging station to mow during schedule times outside of
these hours.
Note
If the pin code is input wrong, the display will show "ERR".
5.3 Schedule Setting
Note
The following illustrations regarding the App are for
demonstration purposes only. Options available may vary
depending on software version.
Recommended schedule
The mower will intelligently generate a mowing schedule
based on the sunrise and sunset times at your location.
Recommend Schedule will be enabled by default.
ST
ART
HOME
OK
ST
ART
HOME
OK
ST
ART
HOME
OK
19
EN
5.4 APP Introduction
Note
The following illustrations regarding the App are for
demonstration purposes only. Options available may vary
depending on software version.
Main page introduction
A
C
E
H
I
F G
D
B
A.
Mower name – Click to rename
B.
Mower status display
C.
Help & Guidance
D.
Add device
E.
Mower Bluetooth connection status
F.
Mower Wi-Fi signal status
G.
Mower battery level
H.
Start mowing
I.
Device details page
H I
A
B
C
D E
F
G
J K
A.
Area selection. Choose between working the entire area
or divided zones
B.
Remote control of the mower
C.
Map management / Antenna signal map
D.
Area worked / Estimated work area
E.
Time worked / Next work time
F.
Start mowing
G.
Return to charging station
H.
Message list
I.
Settings
J.
Work log
K.
Schedule settings
20
EN
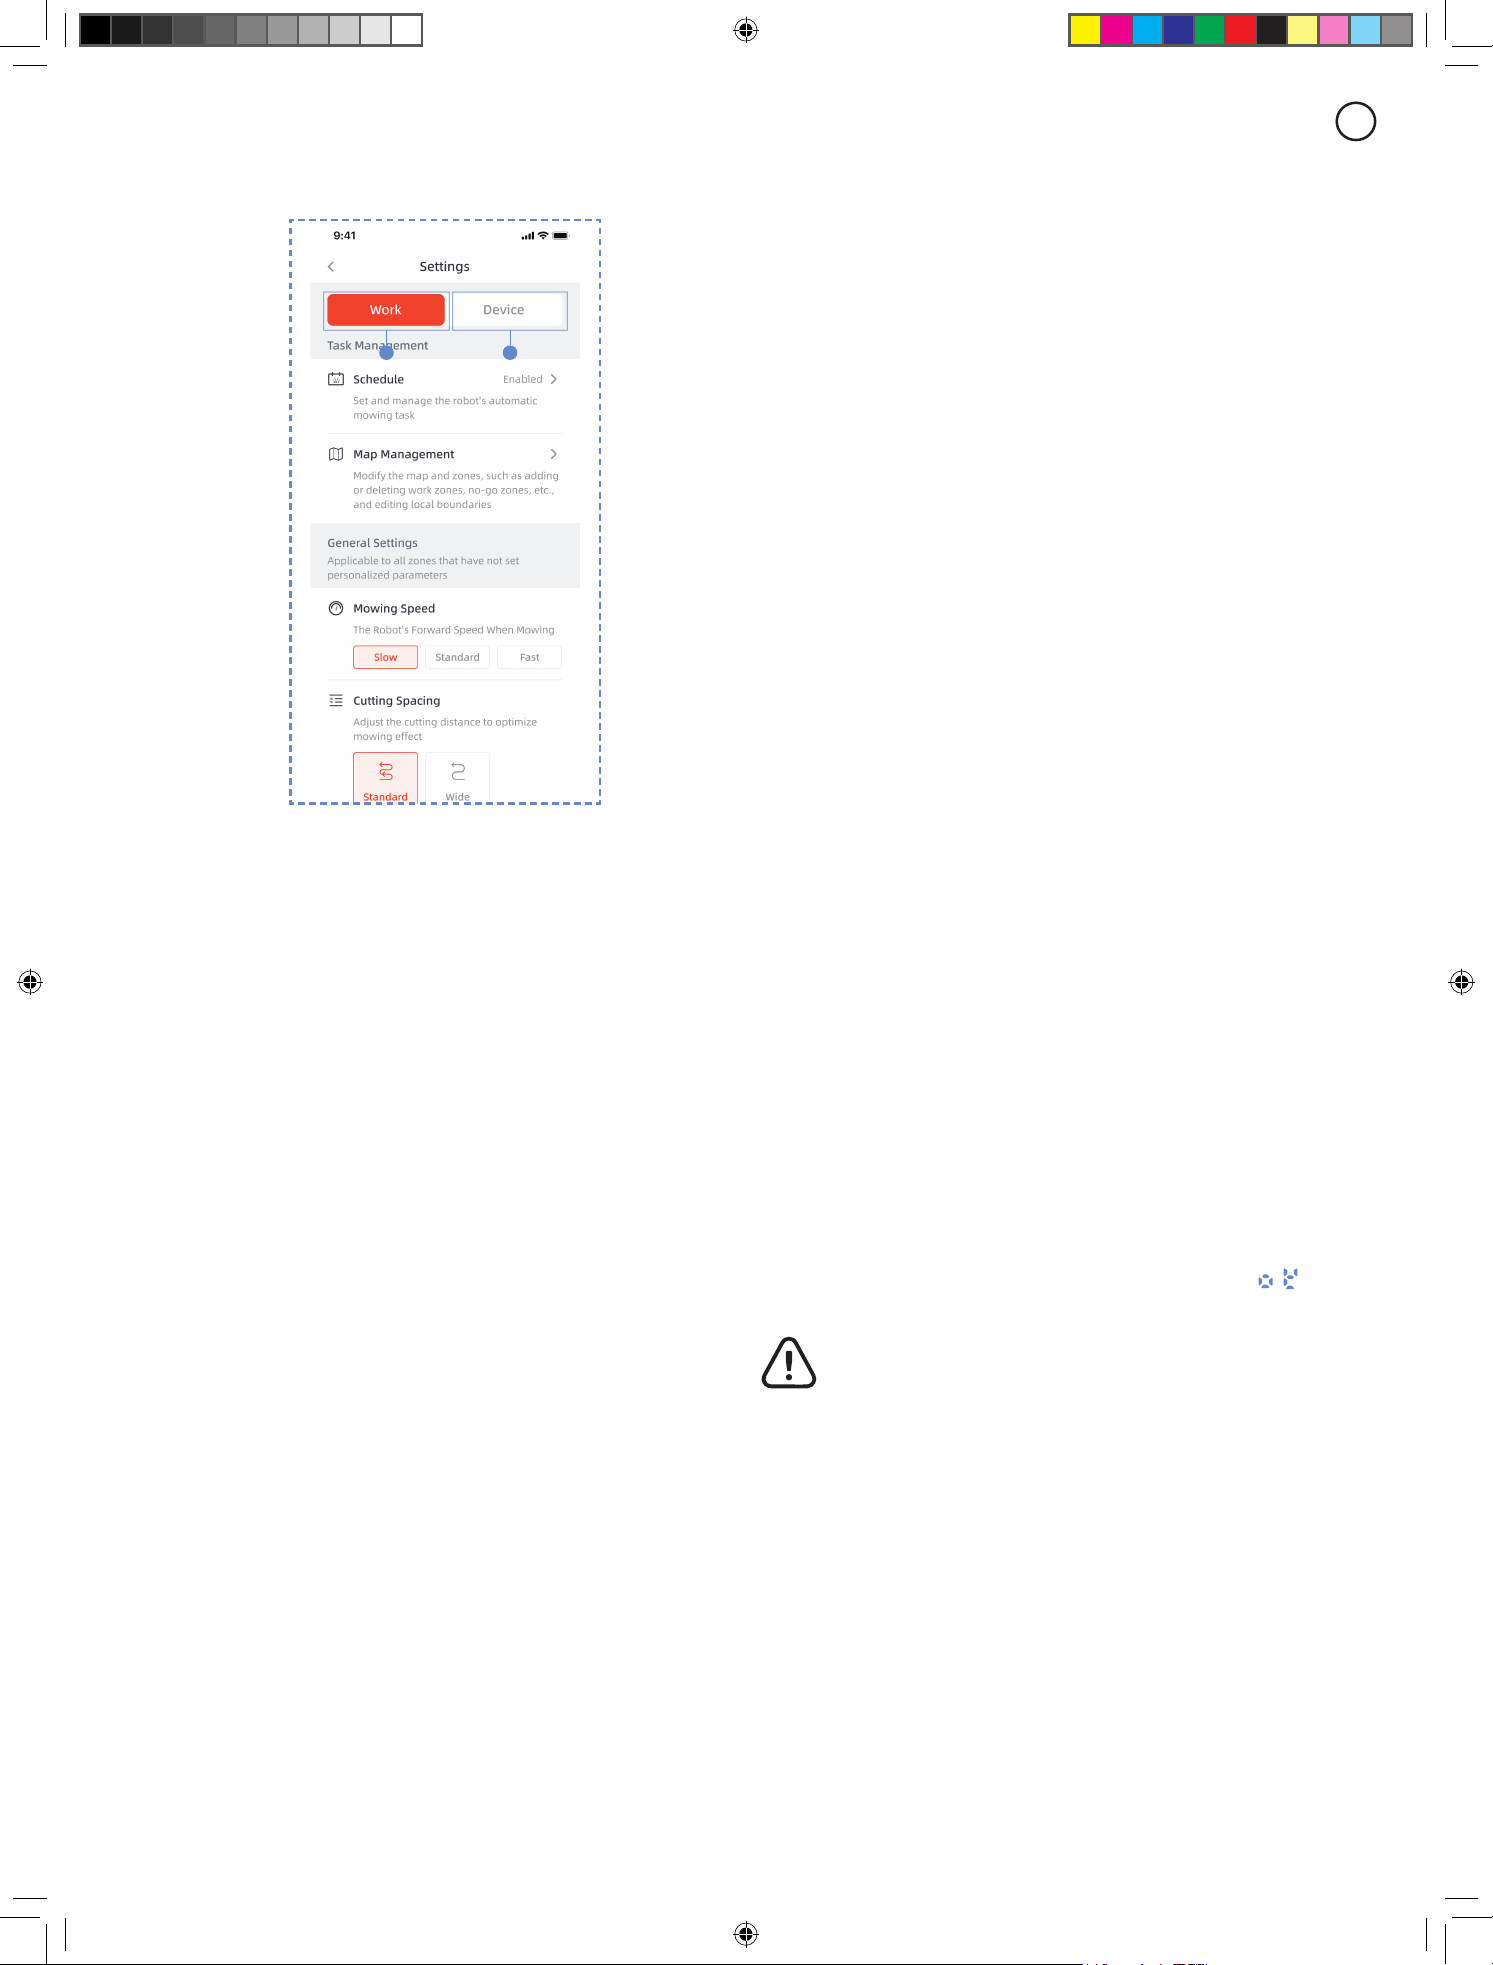
Settings
A B
A.
Work settings
Here you can adjust the settings related to the mower's
operation.
- Schedule
- Map Management
- Cutting Spacing
- Mowing Speed
- Cutting Direction
- Edge Cutting Frequency
- Obstacle Avoidance
- Rain delay
- Energy Saving Mode
- Zone Settings
B.
Device settings
You can adjust the device-related settings here.
- Device Info
- PIN Code
- Firmware Update
- Work Log
- Network Settings
- Time Zone
- Feedback
5.5 IoT
The Platform S is an Internet of Things (IoT) device.
Connect the mower to the Internet via cellular network or
your Wi-Fi network, enabling the following functionalities:
A.
Firmware Updates Over-The-Air (OTA), keep your
mower updated to the latest features.
B.
Enable remote control through the network:
start mowing, stop mowing, return to charging station, set
mowing schedule, set cutting height and other functions.
C.
Remotely monitor the mowing progress and mower
location.
D.
Report error codes and the mower status through the
network.
Wi-Fi
Platform S uses Wi-Fi to connect to a network.
See Wi-Fi Setting for more details.
Note
- Platform S only supports 2.4GHz Wi-Fi network.
- If you are using an iOS device, the mower can only
connect to the Wi-Fi that your mobile device is connected
to. Please follow the instructions in the app. Connect your
mobile device to the Wi-Fi rst, then connect the mower
to the same Wi-Fi. There are no such requirements for
Android devices.
Firmware updates
We will continue to update the mower's rmware. If there
is a new version of the rmware, you will receive a pop-up
notication in the app. It is recommended that you update
as soon as the latest rmware is available.
When updating the rmware, the conditions below need to
be met:
- The machine is on the charging station.
- The network is connected.
- The battery power is more than 30%.
- There is no mowing plan in an hour.
In the process of updating, you can see the update
progress on your app. After the update is completed, The
LED screen on the mower will display the symbol "
"
to indicate OK.
WARNING
- DO NOT move the mower during the update process.
5.6 Obstacle Avoidance
Monocular camera
Monocular camera is part of the standard equipment
of Platform S. They are designed for visual boundary
detection, prior obstacle avoidance and visual recognition
of QR codes during the charging process, making the
mower more intelligent.
21
EN
Note
- If there are too many obstacles in your lawn, consider
setting up no-go zones around them or removing some of
the obstacles to improve the machine's eiciency.
ALLSense (Allsense 3D sensing system)
Equitpped with 3D Lidar and monocular camera,
Sunseeker's AI and Deep-learning System excels in
perceiving the surrounding environment and navigating
obstacles seamlessly. Supported by our proprietary
deep learning algorithms, it consistently enhances its
comprehension of garden landscapes through continuous
data accumulation.
Bumper sensor
Sensors are installed inside the Platform S to detect
obstacles. When the bumper bumps into an obstacle and
triggers the sensor, the mower will go backward and avoid
the obstacle.
Note
- Your Platform S is able to avoid objects after bumping
into them. However, it is recommended to remove excess
clutter before mowing.
6..Maintenance
A.
Experience superior mowing results and extend the
lifespan of your mower with Maintenance.
B.
Regular inspection and upkeep by an adult every week
are essential to ensure the optimal performance of the
machince.
C.
Safeguard your well-being by adhering to safety
guidelines: refrain from performing maintenance while
wearing open sandals or being barefoot.
D.
Always prioritize safety by donning long trousers and
work shoes during mower servicing.
E.
Replace any damaged or worn parts promptly to
guarantee seamless operation.
ONLY authorized service technicians are permitted to
open and reseal the chassis compartment located behind
the bumper. The Limited Warranty may be voided if you
perform your own servicing.
NOTICE: INSURANCE
You might not be covered for accidents involving this
product by your insurance policies. Please get in touch
with your insurance provider or agent to nd out if
coverage is oered.
6.1 Cleaning
A.
Turn o the mower.
B.
Utilize a gentle brush or cloth to meticulously clean
the exterior, avoiding any corrosive solvents such as
alcohol, gasoline, or acetone. These substances have the
potential to cause harm to both the aesthetics and internal
components of your mower.
Note
-
For seamless docking, it is crucial to regularly examine
and cleanse the charging station from any debris or mud
accumulation.
- Ensure that all connecting parts of the charging station,
extension cable, and power supply remain unobstructed
for optimal performance.
Chassis and blade disc
A.
Put on the LiDAR protective cover and turn the mower
upside down gently so as not to damage the LiDAR.
B.
To clean the chassis and blade disc, it is recommended
to use a brush or a water hose.
C.
Do not use a high-pressure washer as it can cause
damage.
D.
Ensure that the blade disc rotates smoothly and the
blades have the ability to pivot without any restrictions.
22
EN
CAUTION
- High pressure water can leak into the sealings and
damage electronic and mechanical parts.
Wheels
Grass on the wheels can impair the performance of the
mower when climbing slopes. Use the brush to remove
mud or other objects in between to ensure a good grip.
Rain sensor
A.
Check the rain sensor once a month and make sure that
it is not covered by mud, grass or other objects.
B.
Wash mud, grass or other objects o or use a soft brush
to clean it.
C.
Dry the sensor area after cleaning to prevent it from
being triggered as it would be by rain.
Camera
Clean the camera regularly to keep it in good condition.
Use a clean, soft cotton cloth to avoid scratching the lens.
WARNING
- Make sure that the mower is powered o before
cleaning.
- When the mower is upside down, turn it o.
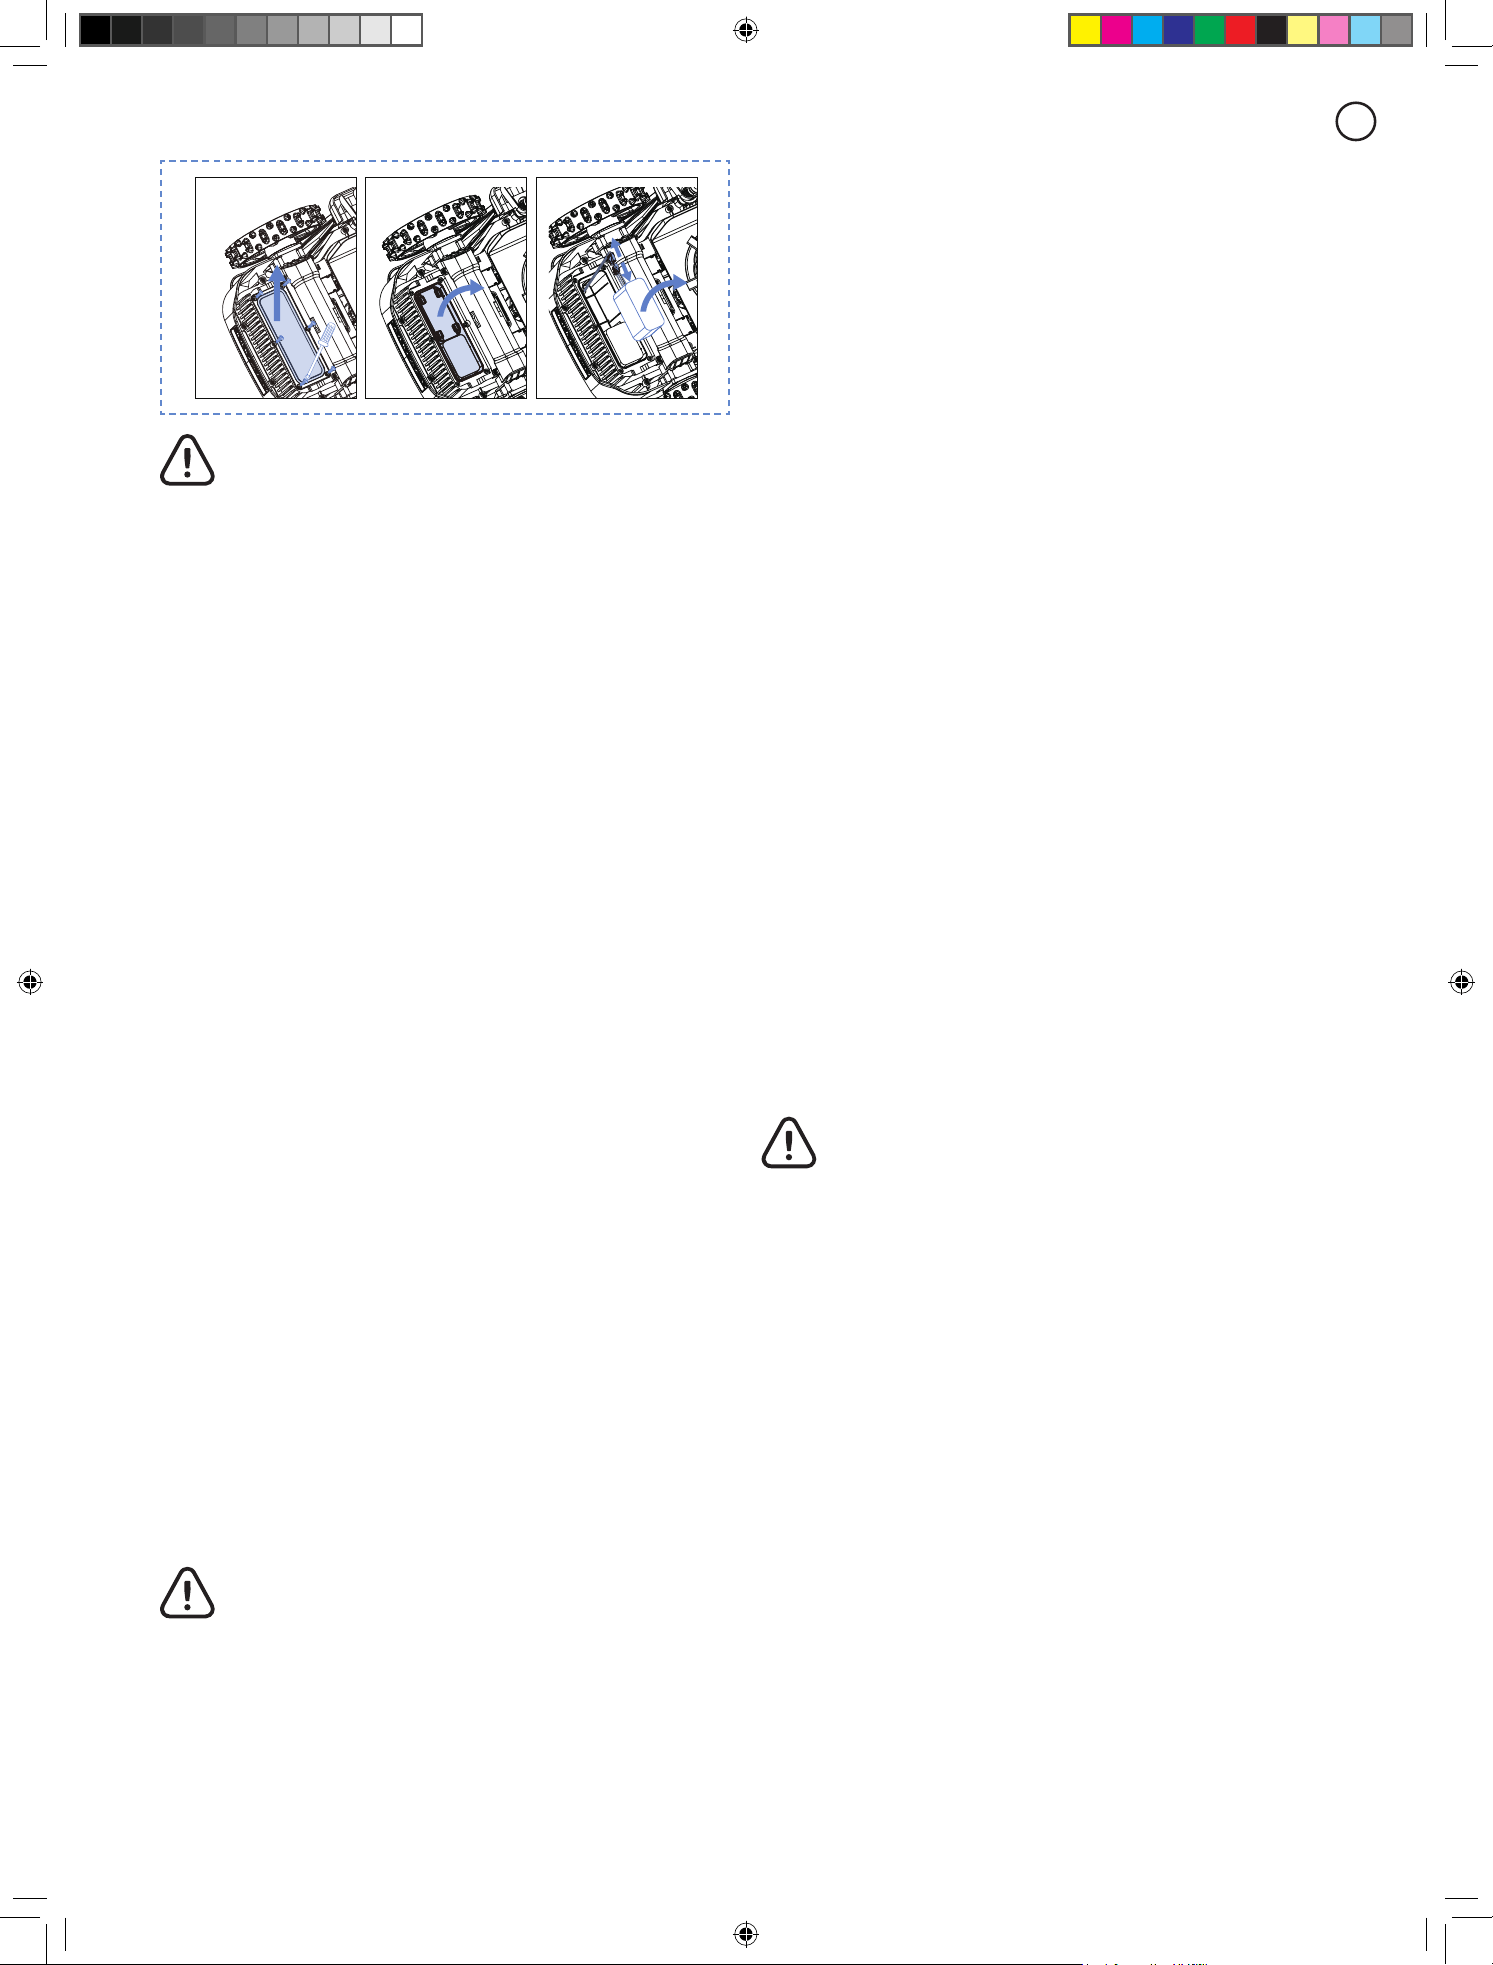
6.2 Replace Blades
For improved mowing performance and safety, it is
recommended to change the mower's screws and blades
every 1-2 months if it is used frequently. For a safe cutting
system, replace all blades along with their screws at the
same time. Refer to section "Specication - accessories"
for parts can be used.
WARNING
- When inspecting or servicing the blade, wear thick
gloves.
- DO NOT reuse the screws. Serious injury may
result from doing this.
- We strongly advise using the correct screws
and original blades that have been sold by us.
(NO.80203054).
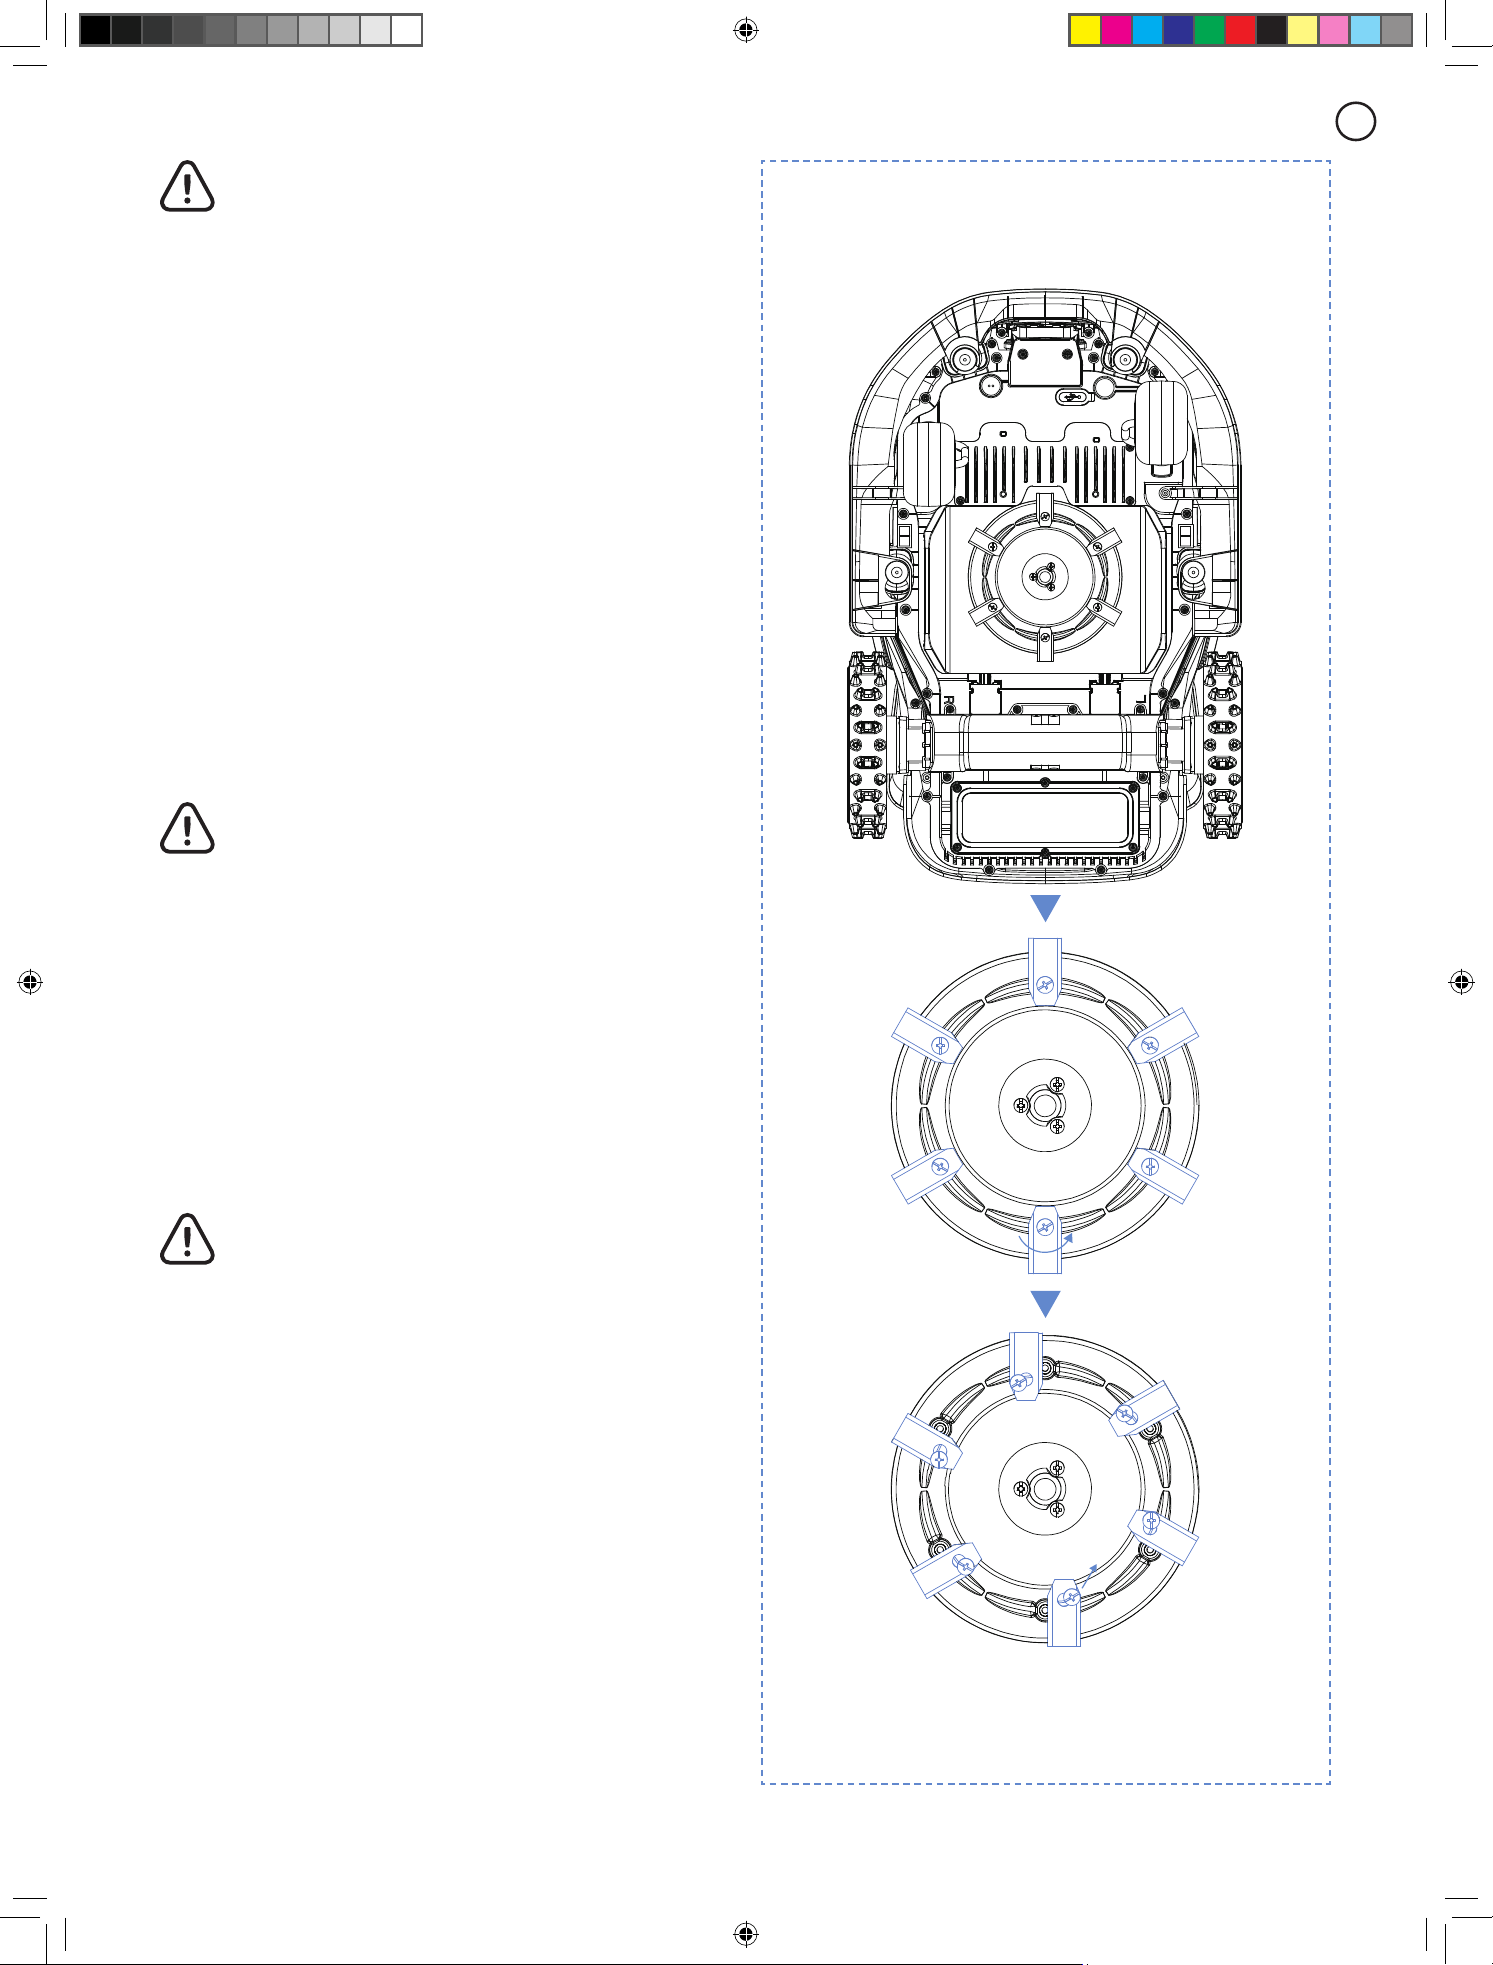
How to replace the blades
A.
Turn o the mower.
B.
Set the mower upside-down on a spotless, soft surface
to prevent scratches.
C.
Use a cross-tip screwdriver to loosen the screws.
D.
Remove the screws and blades.
E.
Fasten the new blades and screws (Torque: 1.0+0.2 N.m).
23
EN
D.
If the battery pack is charged when the air temperature
is between 18 °C and 25 °C, it can extends its life and
improve its performance.
E.
Battery pack performs best when it is operated at
normal room temperature (20 °C±5 °C).
Note
- The battery life depends on how often the product is
used and the total working hours. When the operation
time is signicantly shorter than usual per full charge or
the lawn is not well-cut, it is recommended to replace the
battery.
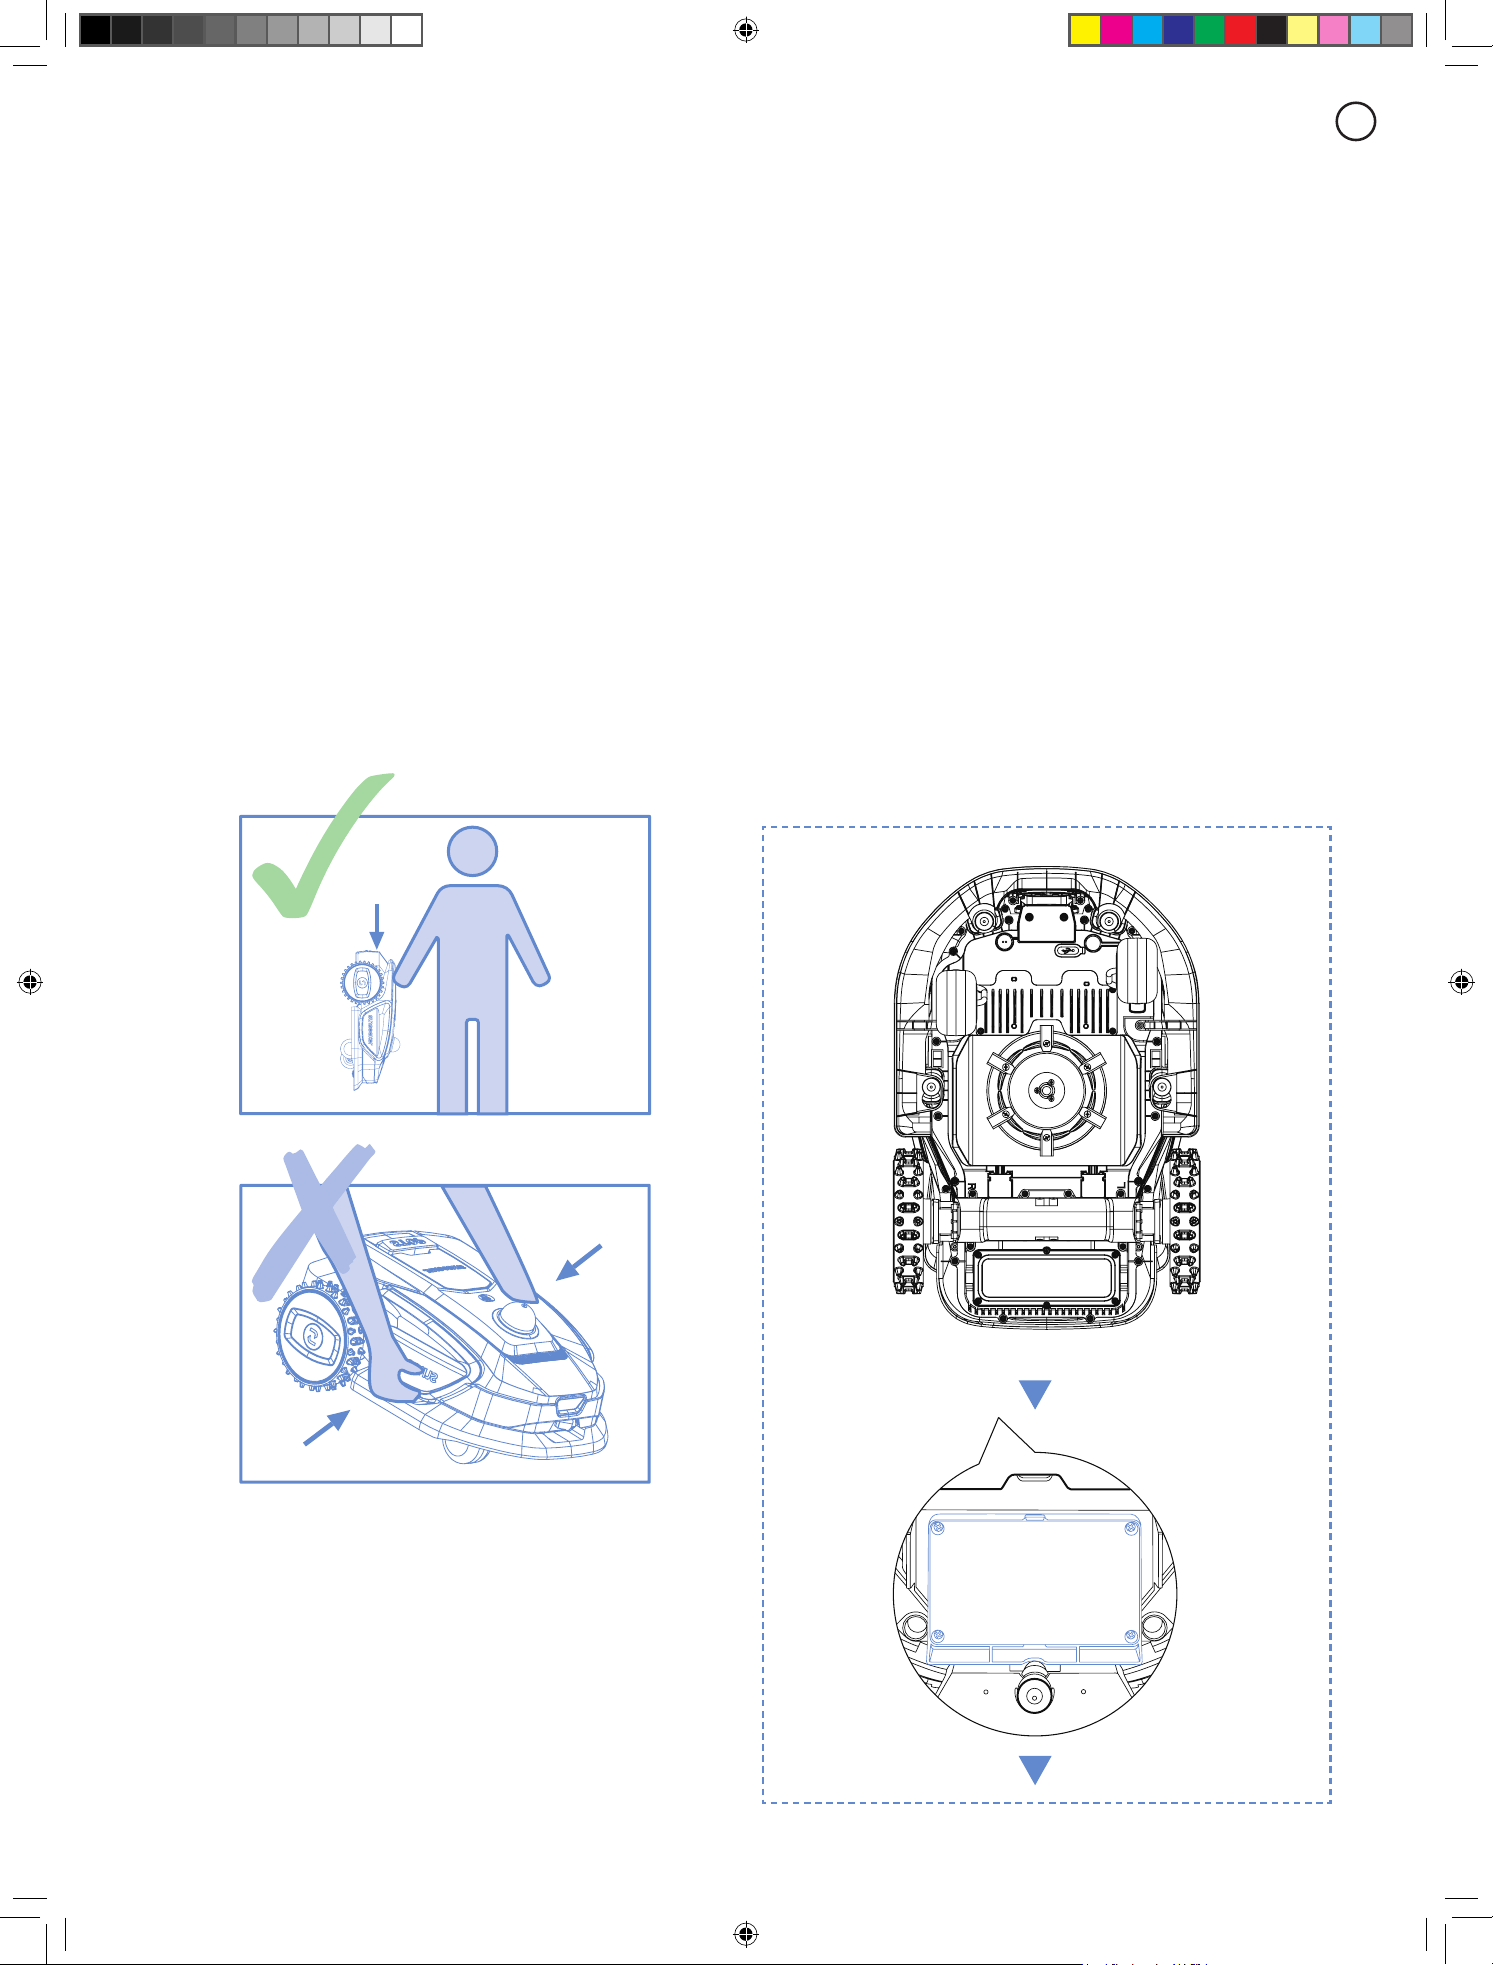
How to replace the battery
A.
Turn o the mower.
B.
Place the lawnmower upside-down on a spotless, soft
surface.
C.
Loosen the 4 screws holding the battery compartment
in place with a cross-tip screwdriver.
D.
Disconnect the plug.
E.
Take out the battery pack and replace it with the new
one.
Make sure that the blades can pivot freely.
Note
- Replace the screws with a standard torque of 1.0+0.2
N.m. Incorrect torque may lead to avoidable issues.
- Ensure that the mower is turned o and check the
blades for proper application. Check for abnormal noise or
shaking.
6.3 Transportation
Make sure that the safety of the mower during long-
distance transportation by utilizing the original packaging.
Before lifting, moving, or transporting the product, make
sure to power it o. Handle with care and avoid violent
force, such as throwing and heavy pressure. Never pick up
or carry the mower while the motor is running.
How to move or lift properly
Carry the mower by the handle. Keep the blade disc facing
away from your body.
6.4 Battery
A.
Before storing, fully charge the battery to prevent over-
discharge and harm to the electrical parts.
B.
The Limited Warranty will not protect against over-
discharge battery damage.
C.
DO NOT charge the battery pack in air temperatures
below 5 °C, or above 40 °C.
24
EN
WARNING
- Use only the original battery pack or that of the
same model as specied by SUNSEEKER. Each
mower contains one battery pack.
- Depending on the specic mower model, the rated
capacity of the battery is 4000mAh.
- Do not use non-rechargeable batteries. For the
purposes of recharging the battery, only use the
detachable supply unit provided with this product.
- Avoid breaking or disassembling the battery
casing. Avoid contacting with metal objects to
prevent short circuits. Keep away from heat sources,
re, and direct sunlight.
- Please get in touch with your point-of-sale, your
local or regional waste management oice, or
your household waste disposal service for more
information about battery and electrical waste.
- It is not intended for the battery compartment to
be opened frequently. If a new battery is required,
only then should you open the battery compartment.
- The battery pack contains electrolytes. If the
electrolyte leakage comes into contact with your
skin, wash o with soap and water immediately. Get
medical help in case of eye contact and immediately
ush the eyes with plenty of water for at least 15
minutes without rubbing.
6.5 Power Supply
Disconnect the power supply:
A.
Before clearing a blockage.
B.
Before checking, cleaning or working on the machine.
C.
After striking a foreign object to inspect the machine for
damage.
D.
Regularly examine the cable, plug, enclosure and other
parts. If any damage or signs of aging are found, stop
using immediately.
WARNING
- NEVER use a damaged power supply for
operation. To prevent a hazard, the damaged supply
cable must be replaced by the manufacturer, its
service agent, or other appropriately qualied
individuals. If the extension cable is faulty, replace it
with a SUNSEEKER approved 10 m cable.
- NEVER touch an extension cable or damaged cord
before it has been unplugged from the power source
or connect it to the power supply. A damaged cable
may cause contact with electrical components.
- The power supply should not be used with any
other device or battery as this increases the risk
of electrical shock, re, or personal injury. If you
use anything other than original batteries, product
safety cannot be guaranteed.
- DO NOT charge when the battery is leaking.
- Keep the extension cable away from moving
hazardous parts to avoid damage to the cables
which can lead to contact with live parts.
Recommendation
Connect the mower and/or its peripherals only to a supply
circuit protected by a residual current device (RCD) with a
tripping current of not more than 30 mA.
6.6 Storage
A.
Make sure that the mower is fully charged and turned
o before storing it to prevent over-discharge, which could
result in permanent damage.
B.
Store in a dry, cool place indoors. Exposure to sunlight
and extreme temperatures (either hot or cold) will
accelerate the aging process of components and may
cause permanent damage.
C.
Keep chemicals and heat sources (stoves, radiators,
etc.) away from the mower, charging station, and power
supply.
D.
Store the power supply in an area with good ventilation
and protect it from moisture.
WARNING
- Unplug the power supply from the power socket
if a thunderstorm is predicted. Disconnect all wires
and cables that are attached to the charging station.
Reconnect when there is no longer a possibility of a
thunderstorm.
Extra requirements for winter storage
The mower:
A.
Clean the mower thoroughly before storage.
B.
Check the components subject to wear such as the
blades.
C.
Repair or replace them if they are in poor condition.
D.
Store the mower in a dry and frost-free place,
while standing on all wheels, preferably in the original
packaging.
The charging station:
A.
Disconnect from the charging station and unplug the
power supply from the power outlet.
B.
Bring the charging station inside if the ambient
temperature falls below -20
o
C.

25
EN
6.7 Recycling and End-of-life Disposal
This product is NOT household waste. Get in touch with your municipality, point of sale, or domestic waste service for
information on recycling.
WARNING
- This product should not be disposed of in a landll, burned, or combined with regular household trash. Electrical
components may cause danger or serious damage.
7..FAQ.and.Troubleshooting
7.1 Error message
LED.code App.message Solution
E1 Robot out of work zone
1. Conrm if the machine is outside the map.
2.Bring it back into the work area or start working from the
charging station.
E2
Left wheel motor overcurrent (blocked) error Left wheel motor is stuck, please remove obstacles.
Right wheel motor overcurrent (blocked) error Right wheel motor is stuck, please remove obstacles.
E3 Cutter motor overcurrent (blocked) error
1.Cutter motor is stuck, please remove obstacles.
2.Conrm the current cutting height is reasonable.
E4 Robot bumper stuck
1. Conrm if the bumper is stuck or detached.
2. Check for obstacles around the machine.
3. After conrming that the bumper is functioning properly, press
any of the START/HOME/OK buttons to unlock it.
E5 Robot lifted
1. Conrm if the machine has been lifted and if there are any
obstacles under the machine.
2. Place the robot on a at surface and press any of the START/
HOME/OK buttons to unlock it.
E6 Robot ipped Conrm if the machine is turned over.
E7 Robot tilted Conrm if the machine is placed on uneven ground.
E8
Failure to dock on the charging station
during recharging
1. Unclean charging contacts on mower or charging station, please
clean them with alcohol.
2. Check if the light on charging station is on, maybe charging
station has no power.
3. Check if the charging station is installed on a at surface. If it is
uneven, adjust the position of the charging station.
4. Check if there are any obstacles in front of the charging station.
If there are any obstacles, please remove them.
5. Check if the machine is obstructed at the charging station area.
6. The reective strips on the charging station is dirty or damaged,
try to clean it or order a new one from service center.
E9
Robot trapped
1. Conrm if there are too many obstacles around the machine.
2. The robot entered a narrow space and couldn't get out.
3. There is a visual misidentication in this area. Use the function of
a safe zone to ignore the visual recognition results.
4. Mower is Slipping.
Out of station error
Out of station timeout
E10 Firmware upgrade failed
1. Check if the WiFi signal is very weak
2. Check if the machine is charging on a charging station
E13 Charging abnormality
1. Unclean charging contacts on mower or charging station, please
clean them with alcohol.
2. Check if the light on charging station is on, maybe charging
station has no power.
3. Check if the charging station is installed on a at surface. If it is
uneven, adjust the position of the charging station.
E14
The current map area is too large and
exceeds the maximum working area
supported by the robot
Build a new map within the nominal capability range of product.

26
EN
LED.code App.message Solution
E17
Path plan failed, please check whether any
obstacles around the robot
1. Conrm if there are too many obstacles around the machine.
2. The robot entered a narrow space and couldn't get out.
3. There is a visual misidentication in this area. Use the function of
a safe zone to ignore the visual recognition results.
4. Conrm if the charging station is out of map and customer
doesn’t build a corridor from station to the map.
5. Try to rebuild the corridors between dierent areas and rebuild
the connecting corridors between charging stations and the map if
it’s out of map.
E18 Low battery cannot start to work
Conrm if the battery pack is too low, and let it work after it is fully
charged.
E22
The front camera is obscured
Please check if the camera is cover by some object and wipe the
camera before starting.
the front camera error Please restart the robot before working.
E23 Empty Map Error Please create a map before starting.
E25 Mapping failed
1. Conrm the camera is not obstructed or dirty.
2. Conrm the LiDAR is not obstructed or dirty.
E28 Location failed
1. Please wipe the lidar to ensure there is no stain on the surface of the
lidar.
2. Please ensure the lidar is not blocked by obstacles.
3. If the machine is in a narrow space, please remotely control the
machine to an open area and try again.
4. If the above methods cannot solve the problem, please put the robot
back to the charging pile and then restart it.
E30 Lidar recovering.Please wait
Please do not move the robot. The radar abnormality is being restored.
Please wait patiently.
BP Battery temperature error
Conrm if the ambient temperature is too high or too low, wait until
the temperature returns to normal before letting the mower work.
NA
Unable to reach other work areas, will go
back to charging station
1. Conrm if there are too many obstacles around the machine
2. The robot entered a narrow space and couldn't get out
3. There is a visual misidentication in this area, Use the function of
a safe zone to ignore the visual recognition results
4. Try to rebuild the corridors between dierent areas.
PIN code input error Please enter the correct PIN code to unlock the robot.
the schedule task is not executed
1. The battery is low and cannot execute the currently scheduled task.
2. Battery is fully charged, machine will automatically begin working if
it is within the scheduled time.
3. The machine has detected rain and cannot execute the currently
scheduled task.
4. After the rain stops, the machine will automatically begin working if
it is within the scheduled time.
STOP
The machine is in "STOP" mode, the device
can not work.
1. If you have pressed the stop button before, need to click "START"
and "OK" to restart.
2.Check if the red stop button is stuck, click "START" and "OK" to
restart after cleaning is complete.
EE
Machine component abnormality
Please turn o the machine and restart itMachine sensor abnormality
The Lidar abnormality
Instructions on how to proceed in case of abnormal vibrations:
A.
Turn o the machine.
B.
Place the lawnmower upside-down on a spotless, soft surface.
C.
Check the condition of the blades for damage or malfunction.
D.
It is recommended to replace all blades.
E.
Turn the machine back over to start working.
7.2 Trouble shooting
If you encounter any product or app-related problems, common issues and questions, check out the FAQ articles on the
Sunseeker oicial website (www.sunseekertech.com) or from the "Help and feedback" section from the App.

27
EN
8..Important.Information
8.1 Data Privacy
Processing of personal data within Platform S
• Who and why?
When you register for and use Sunseeker’s Platform S,
Sunseeker (or “we”), as the controller, will process your
personal data. We will process your personal data in order
to:
1. Provide you with Platform S connection or to make
you an oer for such service. The legal basis is that
the processing is necessary for the performance of the
contract that you have entered into with us, or to take
steps prior to entering into a contract with us.
2. Further develop and improve our products and services.
The legal basis is our legitimate interest in developing and
improving our products and services.
3. Enable connectivity of Platform S (Internet of Things):
use partner integrations (for example smart assistants,
including voice enabled devices); use connectivity
platforms to connect Platform S to third party devices,
apps, and services; and build your own smart home
integration. The legal basis is that the processing is
necessary for the performance of the contract that you
have entered into with us.
4. Provide you with relevant information relating to your
Platform S experience. The legal basis is our legitimate
interest to keep you informed of your specic products
and services and its features.
5. Provide you with support and troubleshooting regarding
Platform S. The legal basis is that the processing is
necessary for the performance of the contract that you
have entered into with us.
If you have given us your consent (in which case the legal
basis is your consent), we may also process your personal
data for the following purposes:
1. Send you customized advertisements and newsletters
about our products and services.
2. Send you customer surveys and analyze the input you
provide as further detailed in such communication.
Your data will be processed for as long as it is required
by Sunseeker to full the above-mentioned purposes, but
under no circumstances for longer than the applicable
laws allow.
• What personal data do we process?
We may process the following personal data:
1. Personal details: rst and last name, nationality,
language preferences;
2. Contact details: email address, postal address;
3. Account information: account age, password, account
number;
4. Other data related to your Platform S: mower name,
pairing names, actions triggered through the use of
partner integrations, and device information.
• Use of location data
Some of our services only work if we can determine the
location of your mower (e.g. weather display). When you
share your mower location with us, the data is stored as
part of your prole and may be sent to third parties in
pseudonymized form for the purposes of providing the
relevant service (e.g. to park the mower in case of heavy
rain).
8.2 Limited Warranty
This Limited Warranty covers only defects in materials
or workmanship of the product and its components
when used under normal, ordinary conditions. If a defect
covered by this Limited Warranty arises, Sunseeker or its
authorized representatives, at their sole discretion, will
repair or replace the defective Product or components in
accordance with this Limited Warranty. The applicable
warranty period begins on the date of original purchase
from Sunseeker or an authorized Sunseeker reseller,
distributor, or dealer.
Warranty Conditions
Registration:
Register the product online at
www.
sunseekertech.com
within 30 days of purchase to receive
a 36-month warranty. Without registration, a 24-month
warranty will apply.
Battery Warranty:
Battery packs are covered for a
12-month period only, regardless of online registration.
Proper Use:
The product must not have been misused,
abused, neglected, altered, modied, or repaired by
anyone other than an authorized service center.
Approved Parts:
Only Sunseeker Elite-approved
accessories and parts may be used with this product.
Damage Prevention:
The product must not have
sustained damage due to foreign objects, substances, or
accidents.
Storage Conditions:
The battery and product must be
stored indoors if the outside temperature is below 0°C.
Exclusions from Warranty
Normal Wear and Tear:
Components that experience
natural wear and tear from standard use, such as blades,
are not covered under this warranty.
Unauthorized Maintenance:
Damage, malfunctions,
or failures resulting from unauthorized or improper
maintenance, handling, or overloading are excluded.
High-Pressure Washer Damage:
Damage caused by
exposure to high-pressure washing is not covered.
To make a warranty claim, you must provide proof of
purchase in the form of a valid receipt that shows the date
and place of purchase.
This warranty is in addition to your statutory rights and
does not cover any accessories supplied with the product.
All repairs and replacement products are covered under
the limited warranty for the remainder of the original
warranty period from the date of purchase.

28
EN
8.4 Contact Us
Sunseeker Intelligent Technology SE
Address: Theodorstraße 41M1, D-22761 Hamburg
Email: suppor[email protected]
Website: www.sunseekertech.com
8.3 Disclaimers
We provide customers with after-sale services, excluding
the following circumstances:
1. Crashes damage caused by non-manufacturing factors,
including but not limited to, user errors.
2. Damage caused by unauthorized modication,
disassembly, or shell opening not in accordance with
oicial instructions or manuals.
3. Damage caused by improper installation, incorrect use,
or operation not in accordance with oicial instructions or
manuals.
4. Damage caused by a non-authorized service provider.
5. Damage caused by unauthorized modication of circuits
and/or mismatch or misuse of the battery and charger.
6. Damage caused by users who do not follow instructions
and manual recommendations.
7. Damage caused by operation in bad lawn conditions
(i.e. large areas of puddles when restricted areas are not
properly set, locations with abundance of stones covering
lawn surface, etc.)
8. Damage caused by operating the product in
environments with electromagnetic interference, including
mining areas or proximity to radio transmission towers,
high-voltage wires, substations, etc.
9. Damage caused by operating the product in
environments suering from interference from other
wireless devices, such as transmitters, video-downlinks,
Wi-Fi signals, etc.
10. Damage caused by reliability or compatibility issues
when using unauthorized third-party parts.
11. Damage caused by operating the unit with a low-
charged or defective battery.
12. Damage caused by unpredictable factors such as car
collisions, wild animal attacks, oods, etc.
This content is subject to change without prior notice.
WARNING for button cell or coin battery:
a) Remove and immediately recycle or dispose of used
batteries according to local regulations and keep away
from children.
b) Do NOT dispose of batteries in household trash or
incinerate.
c) Even used batteries may cause severe injury or death.
d) Call a local poison control center for treatment
information.
e) Battery type: CR2032.
f) Nominal voltage: 3.0 Vdc.
g) Non-rechargeable batteries are not to be recharged.
h) Do not force discharge, recharge, disassemble, heat
above (manufacturer's specied temperature rating) or
incinerate. Doing so may result in injury due to venting,
leakage or explosion resulting in chemical burns.
i) The product contains non-replaceable button cell.