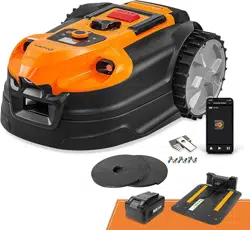
MX 24V Lithium-Ion Robotic Lawn Mower VBRM701YAMIDR
Save this manual for future reference
*Maximum initial battery workload voltage (measured without a workload) is 24 volts.
Nominal voltage is 21.6 volts.
Battery Model Number is 24LB4005-CN
El número de modelo de la batería es 24LB4005-CN
Le numéro de modèle de la batterie est 24LB4005-CN
EN
Operator's Manual / Manual del Operador /
Manuel de l'opérateur
Robot cortacésped MX 24V Ion-Litio VBRM701YAMIDR
Guarde este manual para futuras consultas
*El voltaje máximo de carga inicial de la batería (medido sin carga de trabajo) es de 24
voltios.La tensión nominal es de 21,6 voltios.
Tondeuse robot MX 24V Lithium-Ion VBRM701YAMIDR
Conservez ce manuel pour toute référence ultérieure
*La tension initiale maximale de la batterie (mesurée sans charge de travail) est de 24 volts.
La tension nominale est de 21,6 volts.
ES
FR
Read all safety rules and instructions carefully before operating this tool.
Distributed By: Suzhou Cleva Electric Appliance Co., Ltd.
NO.8 Ting Rong Street 215122 Suzhou - China
Lea atentamente todas las normas e instrucciones de seguridad antes de utilizar esta herramienta.
Distribuido por: Suzhou Cleva Electric Appliance Co., Ltd.
NO.8 Ting Rong Street 215122 Suzhou - China
Lisez attentivement toutes les règles de sécurité et les instructions avant d'utiliser cet outil.
Distribué par : Suzhou Cleva Electric Appliance Co., Ltd.
NO.8 Ting Rong Street 215122 Suzhou - Chine

2
TABLE OF CONTENTS
Section Page
TABLE OF CONTENTS
SPECIFICATIONS
IMPORTANT SAFETY INSTRUCTIONS
SYMBOLS
KNOW YOUR ROBOTIC MOWER
SET UP
ASSEMBLY
OPERATION
MAINTENANCE
ENVIRONMENTALLY SAFE BATTERY DISPOSAL
TROUBLESHOOTING
LAWNMASTER
®
WARRANTY
EXPLODED VIEW
PARTS LIST
NOTES
2
3-5
6-10
11-13
14-15
16-22
23-28
29-47
48-51
52
53-59
60
61
62
63-64

3
Voltage
Cutting System
Blade Motor Speed
Cutting Width
Cutting Height Adjustment
Narrowest Possible Passage
Power Consumption during Cutting
Maximum Slope for Cutting Area
:RUNLQJ&DSDFLW\$XWRFKDUJLQJ0RGH'HSHQGLQJRQ3URGXFW6SHFL¿FDWLRQ
:RUNLQJ&DSDFLW\'URSDQG0RZ8VLQJDVLQJOHEDWWHU\RQFH
:RUNLQJ&DSDFLW\'URSDQG0RZ:LWKUHSHDWHGXVHV
SPECIFICATIONS
MOWING
Length
Width
Height
:HLJKW:LWKRXW$K%DWWHU\
DIMENSIONS
FP
FP
FP
OEVNJ
3 Pivoted Cutting Blades
3400 RPM
FP
¶PP3RVLWLRQV
P
43 W±20 %
20°
Up to 800 m
2
100 m
2
250 m
2
Robotic Lawnmower
Base Station
Power Adaptor
IP-CLASSIFICATION
IPX4
IPX4
IPX4
Battery Type
Power Supply
Charging Station Current
Power Cable Length
&KDUJLQJ3HULRG%DWWHU\)XOO\'LVFKDUJHG
ELECTRICAL SYSTEM
24 V Max Lithium-Ion, 4.0 Ah
100-240 V
2.0 A
10 m
2 hours
21.6 V

4
SPECIFICATIONS
Model No.
Voltage Of Battery
Capacity of Battery
Battery Type
Weight of Battery
BATTERY PACK
24LB4005-CN
24 V
4.0 Ah
Lithium-Ion
0.7 kg
Sound Power Level (L
WA
0HDVXUHG
Noise Emissions Uncertainties K
WA
Sound Power Level (L
WA
*XDUDQWHHG
Sound Pressure Level (L
PA
DWWKH2SHUDWRU¶V(DU
G%$
G%$
G%$
G%$
The noise emission declarations conforms to EN 50636-2-107:2015
1RLVHHPLVVLRQVLQWKHHQYLURQPHQWPHDVXUHGDVVRXQGSRZHU/:$LQFRQIRUPLW\ZLWK(&
directive 2000/14/EC. The guaranteed sound power level includes variation in production as well
DVYDULDWLRQIURPWKHWHVWFRGHZLWKG%$
6RXQGSUHVVXUHQRLVHXQFHUWDLQWLHV.S$G%$
About This Product
Thank you for choosing the LawnMaster
®
VBRM701YAMIDR robotic lawn mower. This mower will
independently mow the lawn in a random pattern before returning to the base station to charge the
battery. The mower will alternately mow and charge for the working time selected, before returning
to the base station to standby until the next scheduled working period. The mower detects grass
in order to know where to mow and is also equipped with ultrasonic sensors which detect higher
REVWDFOHVVXFKDVVKUXEVDQGIHQFHV)RUVXFFHVVIXORSHUDWLRQWKHODZQPXVWEHGH¿QHGZLWKÀDW
borders such as paving or raised edges. When the mower does not detect grass or encounters an
obstacle, it changes route in a random manner and starts mowing again in a new direction. The
PRZHUFDQEHPRYHGDURXQGWRGLIIHUHQWODZQDUHDVSURYLGHGWKDWWKH\DUHGH¿QHGDVGHVFULEHGLQ
this instruction manual.
The mower uses a detachable MX 24V battery which is compatible with all products in the
LawnMaster® 24V range. Excessively long or wet grass may impact performance, it is therefore
important to maintain a regular mowing schedule to keep on top of growth and development of a
QHDWODZQ¿QLVK
This mower can be controlled remotely using our OcuMow
®
app and requires a Wi-Fi network
connection.
NOISE EMISSIONS MEASURED IN THE ENVIRONMENT AS SOUND POWER

5
SPECIFICATIONS
First Operation
7KH9%50<$0,'5LVGHVLJQHGWRGHWHFWJUDVVDQGPRYHLQWRDUHDVLWLGHQWL¿HVDVJUDVV,I
the mower cannot see a clear boundary it will continue to move into areas off the lawn and into
plants that it may identify as grass. Trimming the lawns edge with a grass trimmer before use will
KHOSGH¿QHDEHWWHUODZQHGJH'XULQJ¿UVWRSHUDWLRQRQDQHZODZQLWLVLPSRUWDQWWRPRQLWRUWKH
URERWDVLWGHWHFWVHGJHVWRVHHZKHUHWKHERXQGDU\GH¿QLWLRQQHHGVWREHLPSURYHG3OHDVHUHDG
the instructions fully, our instructions have been written to help you to get the best results and also
SURYLGHVXVHIXOLGHDVIRUWHPSRUDU\ERXQGDULHVDVZHOODVH[DPSOHVRIKRZWRGH¿QHDEHWWHUODZQ
edge in all seasons.
FOR YOUR SAFETY: CAREFULLY READ AND UNDERSTAND ALL INSTRUCTIONS.
6
IMPORTANT SAFETY INSTRUCTIONS
READ CAREFULLY BEFORE USE. KEEP FOR FUTURE REFERENCE
TRAINING
Ŷ5HDGWKHLQVWUXFWLRQVFDUHIXOO\%HIDPLOLDUZLWKWKHFRQWUROVDQGWKHSURSHUXVHRIWKHPDFKLQH
Ŷ1HYHUDOORZSHRSOHXQIDPLOLDUZLWKWKHVHLQVWUXFWLRQVRUFKLOGUHQWRXVHWKHPDFKLQH/RFDO
regulations may restrict the age of the operator.
Ŷ7KHRSHUDWRURUXVHULVUHVSRQVLEOHIRUDFFLGHQWVRUKD]DUGVRFFXUULQJWRRWKHUSHRSOHRUWKHLU
property.
Ŷ7KHRSHUDWRURUXVHULVUHVSRQVLEOHIRULQIRUPLQJQHLJKERXUVDERXWWKHULVNV.HHSDVDIH
distance from the machine when operating.
Ŷ,I\RXUODZQLVRSHQWRWKHVWUHHWDQGRU\RXUQHLJKERXUV\RXPXVWEHSUHVHQWGXULQJWKH
mower’s operation to prevent others from accessing your lawn. Alternatively, you must protect /
fence your lawn so that others do not access the mower during operation.
Ŷ7KLVDSSOLDQFHLVQRWLQWHQGHGIRUXVHE\SHUVRQVLQFOXGLQJFKLOGUHQZLWKUHGXFHGSK\VLFDO
sensory or mental capabilities, or lack of experience and knowledge, unless they have been
given supervision or instruction concerning use of the appliance by a person responsible for
their safety. Children should be supervised to ensure that they do not play with the appliance.
IMPORTANT!
The robotic lawn mower can be dangerous if used incorrectly.
WARNING
Never use the robotic lawn mower when people, especially children or pets, are in the cutting area.
WARNING
PREPARATION
Ŷ(QVXUHWKDWWKHODZQDUHDLVGH¿QHGDVGHVFULEHGLQWKHVHFWLRQ3UHSDUHWKH0RZLQJ$UHDDQG
'H¿QHWKH0RZLQJ$UHD
Ŷ3HULRGLFDOO\LQVSHFWWKHDUHDZKHUHWKHPDFKLQHLVWREHXVHGDQGUHPRYHDOOVWRQHVVWLFNVZLUHV
pet toys, and other foreign objects.
Ŷ3HULRGLFDOO\YLVXDOO\LQVSHFWWRVHHWKDWWKHEODGHVEODGHEROWVDQGFXWWLQJDVVHPEO\DUHQRWZRUQ
or damaged. Replace worn or damaged blades and bolts in sets to preserve balance.
Ŷ2QPXOWLVSLQGOHPDFKLQHVWDNHFDUHDVURWDWLQJRQHEODGHFDQFDXVHRWKHUEODGHVWRURWDWH
OPERATION
Ŷ'RQRWOHDYHWKHPDFKLQHWRRSHUDWHXQDWWHQGHGLI\RXNQRZWKDWWKHUHDUHSHWVFKLOGUHQRU
people in the vicinity.
Ŷ1HYHURSHUDWHWKHPDFKLQHZLWKGHIHFWLYHJXDUGVRUZLWKRXWVDIHW\GHYLFHVIRUH[DPSOH
GHÀHFWRUVLQSODFH
Ŷ'RQRWSXWKDQGVRUIHHWQHDURUXQGHUURWDWLQJSDUWV'RQRWWRXFKPRYLQJKD]DUGRXVSDUWVEHIRUH

7
IMPORTANT SAFETY INSTRUCTIONS
these have come to a complete stop. Keep clear of the discharge opening at all times.
Ŷ1HYHUSLFNXSRUFDUU\DPDFKLQHZKLOHWKHPRWRULVUXQQLQJ
Ŷ$OZD\VVZLWFKRIIWKH2Q2IIVZLWFKDQGUHPRYHWKHEDWWHU\
- Before clearing a blockage;
- Before checking, cleaning or working on the machine.
Ŷ,WLVQRWSHUPLWWHGWRPRGLI\WKHRULJLQDOGHVLJQRIWKHPRZHU$OOPRGL¿FDWLRQVDUHPDGHDW\RXU
own risk.
Ŷ$YRLGXVLQJWKHPRZHUDQGLWVSHULSKHUDOVLQEDGZHDWKHUFRQGLWLRQVHVSHFLDOO\ZKHQWKHUHLVD
risk of lightning.
Ŷ'RQRWXVHWKHPRZHUIRUDQ\SXUSRVHRWKHUWKDQFXWWLQJWKHODZQ
Ŷ,QWKHHYHQWRIDFFLGHQWRUEUHDNGRZQZKLOHWKHPRZHULVFXWWLQJWKHODZQLPPHGLDWHO\SUHVVWKH
STOP button.
Ŷ'RQRWSXWDQ\WKLQJRQWRSRIWKHPRZHU1HYHUDOORZSHRSOHRUDQLPDOVWRVLWRQWKHPRZHU
Ŷ'RQRWXVHWKHPRZHULIWKH2Q2IIVZLWFKGRHVQRWZRUN
Ŷ'RQRWXVHWKHPRZHUZKHQDVSULQNOHUV\VWHPLVUXQQLQJ(QVXUHWKDWWKHPRZHUDQGWKH
sprinkler system do not operate at the same time. Do not wash the mower with running water and
do not immerse it in water. This product is not waterproof.
Ŷ$OZD\VVZLWFKRIIWKHPRZHUXVLQJWKH2Q2II6ZLWFKZKHQWKHPRZHULVQRWLQXVH
Ŷ7KHURERWLFODZQPRZHUPXVWQHYHUEHVWRUHGRSHUDWHGRUFKDUJHGLQWHPSHUDWXUHVEHORZ)
&RUDERYH)&7KLVPLJKWFDXVHGDPDJHWRWKHSURGXFWRUEDWWHU\
Ŷ0RZRQO\LQGD\OLJKWRULQJRRGDUWL¿FLDOOLJKW7KHPRZHUUHTXLUHVJRRGOLJKWWRFRUUHFWO\LGHQWLI\
the lawn area.
Ŷ$YRLGRSHUDWLQJWKHPDFKLQHLQYHU\ORQJRUZHWJUDVV
Ŷ1HYHUXVHWKHPDFKLQHLQRUQHDUH[SORVLYHDQGRUÀDPPDEOHHQYLURQPHQWV
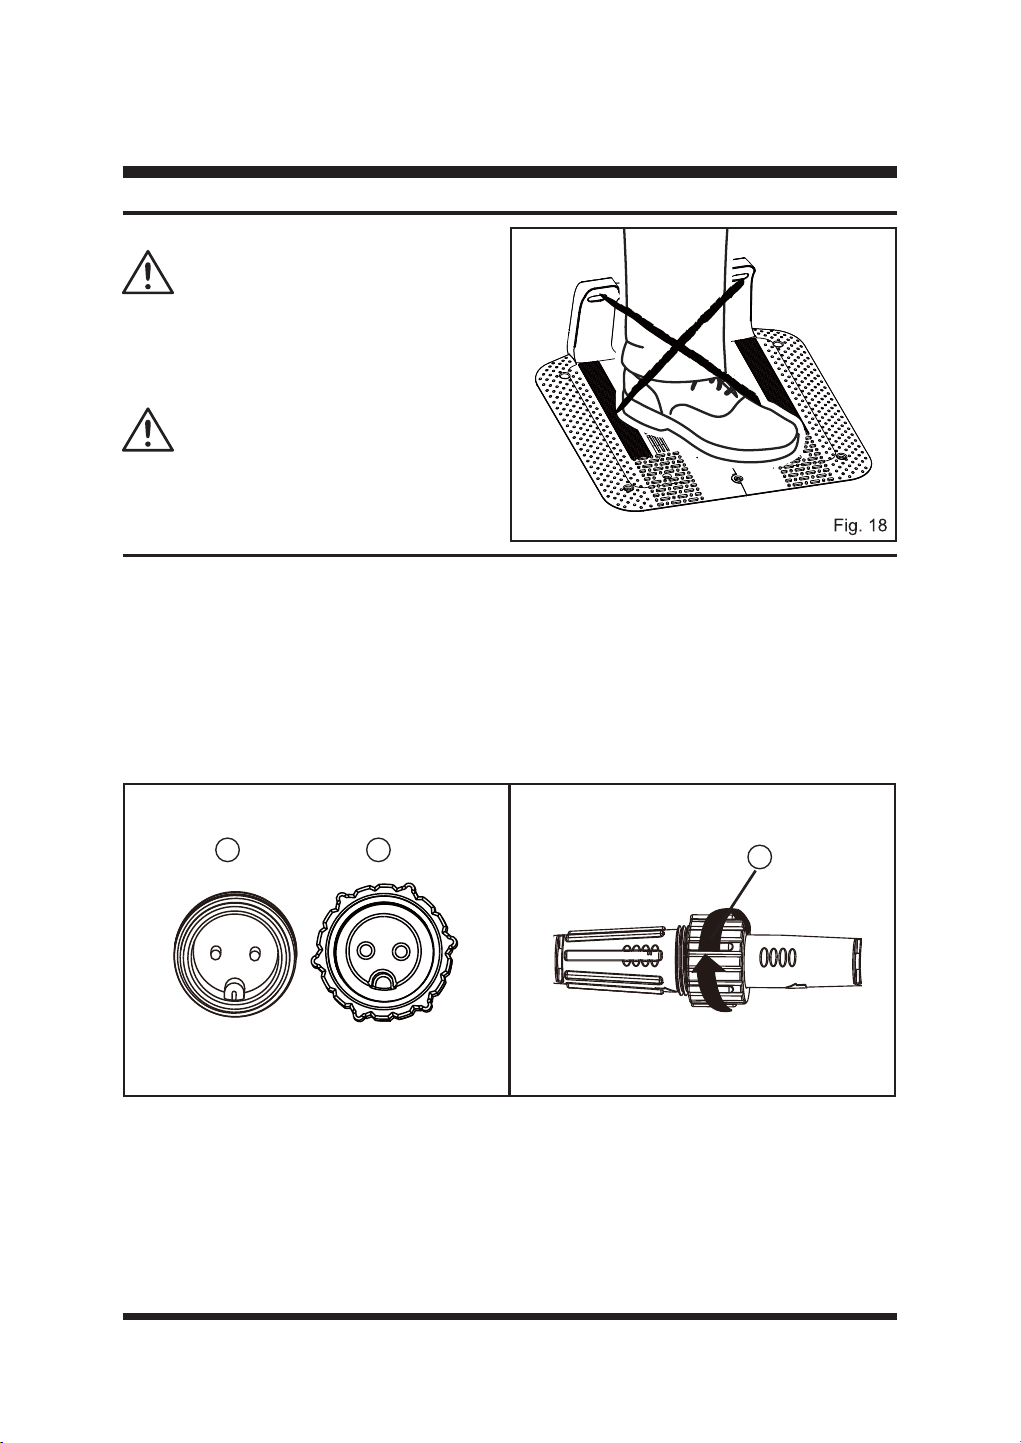
Ŷ'RQRWRSHUDWHWKHPDFKLQHZKHQEDUHIRRWRUZHDULQJRSHQVDQGDOV$OZD\VZHDUVXEVWDQWLDO
footwear and long pants.
Ŷ$OZD\VEHVXUHRI\RXUIRRWLQJRQVORSHV
Ŷ$OZD\VVZLWFKRQWKHPRWRUDFFRUGLQJWRLQVWUXFWLRQVNHHSLQJIHHWDZD\IURPWKHEODGHV
Ŷ:DUQLQJVLJQVVKDOOEHSODFHGDURXQGWKHZRUNLQJDUHDRIWKHURERWLFODZQPRZHULILWLVXVHGLQ
public areas. The signs shall have the following text:
Warning! Automatic lawn mower! Keep away from the machine! Supervise children!
MAINTENANCE AND STORAGE
Ŷ.HHSDOOQXWVEROWVDQGVFUHZVWLJKWWREHVXUHWKHPDFKLQHLVLQVDIHZRUNLQJFRQGLWLRQ
Ŷ5HSODFHZRUQRUGDPDJHGSDUWVIRUVDIHW\
Ŷ2QO\XVHUHSODFHPHQWEODGHVUHFRPPHQGHGE\WKHPDQXIDFWXUHU
Ŷ,QWKHHYHQWRIFRPLQJLQWRFRQWDFWZLWKHOHFWURO\WHVFDXVHGE\EDWWHU\OHDNDJHÀXVKWKHDIIHFWHG
DUHDZLWKZDWHUQHXWUDOL]LQJDJHQWIRUVHYHUDOPLQXWHV6HHNPHGLFDODWWHQWLRQLILQJHVWHGRULILW
comes into contact with your eyes, or if skin irritation persists.
Ŷ6HUYLFLQJRIWKHPDFKLQHVKRXOGEHDFFRUGLQJWRPDQXIDFWXUHUV¶LQVWUXFWLRQV
Ŷ,QFDVHRIDEQRUPDOYLEUDWLRQVVWRSWKHPRZHUUHPRYHWKHVDIHW\NH\DQGWKHEDWWHU\SDFNDQG
check for any damage to the blade. Replace blades in full sets to preserve balance. If the vibration
continues, contact Customer Service.
Ŷ8VHKHDY\JORYHVZKHQLQVSHFWLQJRUVHUYLFLQJEODGHV
Ŷ&OHDQLQJDQGPDLQWHQDQFHPXVWQRWEHSHUIRUPHGE\XQVXSHUYLVHGFKLOGUHQ
Ŷ'RQRWXVHWKHPRZHUZKHQWKHFXWWLQJEODGHLVGDPDJHG5HSODFHWKHFXWWLQJEODGH
Ŷ8VHRQO\RULJLQDOHTXLSPHQWDQGDFFHVVRULHV,WLVQRWSHUPLWWHGWRPRGLI\WKHRULJLQDOGHVLJQRI
WKHPRZHU$OOPRGL¿FDWLRQVDUHPDGHDW\RXURZQULVN
8
IMPORTANT SAFETY INSTRUCTIONS
Ŷ$OZD\VUHPRYHWKHEDWWHU\SDFNEHIRUHVWRULQJWKHPRZHU
TRANSPORTATION
Within the working area:
Ŷ3UHVVWKH6723EXWWRQWRVWRSWKHPRZHU8VHWKHFDUU\KDQGOHWRFDUU\WKHPRZHU&DUU\WKH
mower with the blade disc away from the body.
Long distances:
Ŷ:KHQWUDQVSRUWLQJ\RXUPRZHURYHUORQJGLVWDQFHVSUHVVWKH6723EXWWRQDQGWXUQWKHPRZHU
off using the power button.
Ŷ,03257$17,WLVUHFRPPHQGHGWRNHHSWKHRULJLQDOSDFNDJLQJWRDYRLGGDPDJHGXULQJ
transportation over long distances.
BATTERY SAFETY INFORMATION
Ŷ7KLVEDWWHU\LVRQO\FRPSDWLEOHZLWK/DZQ0DVWHU
®
24LFC14-ETL, 24LFC02-ETL or 24LSC01-ETL
chargers.
Ŷ5HFKDUJHRQO\ZLWKWKHFKDUJHUVSHFL¿HGE\WKHPDQXIDFWXUHUDQGOLVWHGLQWKLVPDQXDO$FKDUJHU
WKDWLVVXLWDEOHIRURQHW\SHRIEDWWHU\SDFNPD\FUHDWHDULVNRI¿UHZKHQXVHGZLWKDQRWKHU
battery pack.
Ŷ'RQRWFKDUJHEDWWHU\LQDGDPSRUZHWORFDWLRQ)ROORZLQJWKLVUXOHZLOOUHGXFHWKHULVNRIHOHFWULF
shock.
Ŷ'RQRWSODFHEDWWHU\SRZHUHGODZQPRZHUVRUWKHLUEDWWHULHVQHDU¿UHRUKHDW7KLVZLOOUHGXFHWKH
risk of explosion and possibly injury.
Ŷ'RQRWRSHQRUPXWLODWHWKHEDWWHU\5HOHDVHGHOHFWURO\WHLVFRUURVLYHDQGPD\FDXVHGDPDJHWR
the eyes or skin. It may be toxic if swallowed. Fumes may be emitted. In such situations, move to
a well-ventilated area, preferably outdoors and seek medical assistance in the event of discomfort.
Ŷ'RQRWGLVSRVHRIEDWWHU\SDFNVLQ¿UH7KH\ZLOOH[SORGHRUOHDNDQGFDXVHLQMXU\/LTXLGHMHFWHG
from the battery may cause irritation or burns.
Ŷ'RQRWFUXVKGURSRUGDPDJHWKHEDWWHU\SDFN'RQRWXVHDEDWWHU\SDFNRUFKDUJHUWKDWKDV
been dropped or received a sharp blow. A damaged battery is subject to explosion. Properly
dispose of a dropped or damaged battery immediately.
Ŷ%DWWHULHVFDQH[SORGHLQWKHSUHVHQFHRIDQLJQLWLRQVRXUFHVXFKDVDSLORWOLJKW7RUHGXFHWKHULVN
RIVHULRXVSHUVRQDOLQMXU\QHYHUXVHDQ\FRUGOHVVSURGXFWLQWKHSUHVHQFHRIDQRSHQÀDPH$Q
exploded battery can propel debris and chemicals. If exposed, wash with water immediately.
Ŷ8QGHUH[WUHPHXVDJHRUWHPSHUDWXUHFRQGLWLRQVEDWWHU\OHDNDJHPD\RFFXU,IOLTXLGFRPHVLQ
FRQWDFWZLWK\RXUVNLQZDVKLPPHGLDWHO\ZLWKVRDSDQGZDWHU,IOLTXLGJHWVLQWR\RXUH\HVÀXVK
them with clean water for at least 10 minutes, then seek immediate medical attention. Following
this rule will reduce the risk of serious personal injury.
Do not lift the mower when it is parked in the base station. It can damage the base station and/or the
mower. Press STOP button and pull the mower out of the base station before lifting it.
WARNING
'LVFRQQHFWDOOFRQQHFWLRQVWRWKHEDVHVWDWLRQSRZHUVXSSO\LIWKHUHLVDULVNRIDWKXQGHUVWRUP
WARNING

9
Ŷ:KHQWKHEDWWHU\SDFNLVQRWLQXVHNHHSLWDZD\IURPRWKHUPHWDOREMHFWVOLNHSDSHUFOLSVFRLQV
keys, nails, screws, or other small metal objects that can make a connection from one terminal to
DQRWKHU6KRUWLQJWKHEDWWHU\WHUPLQDOVWRJHWKHUPD\FDXVHEXUQVRUD¿UH
Ŷ'RQRWH[SRVHDEDWWHU\SDFNRUODZQPRZHUWR¿UHRUH[FHVVLYHWHPSHUDWXUH([SRVXUHWR¿UHRU
WHPSHUDWXUHDERYH)&PD\FDXVHDQH[SORVLRQ
Ŷ'RQRWPRGLI\RUDWWHPSWWRUHSDLUWKHODZQPRZHURUWKHEDWWHU\SDFNDVDSSOLDQFHH[FHSWDV
indicated in the instructions for use and care.
Ŷ)ROORZDOOFKDUJLQJLQVWUXFWLRQVDQGGRQRWFKDUJHWKHEDWWHU\SDFNRUODZQPRZHURXWVLGHRIWKH
WHPSHUDWXUHUDQJHVSHFL¿HGLQWKHLQVWUXFWLRQV&KDUJLQJLPSURSHUO\RUDWWHPSHUDWXUHVRXWVLGHRI
WKHVSHFL¿HGUDQJHPD\GDPDJHWKHEDWWHU\DQGLQFUHDVHWKHULVNRI¿UH
Ŷ$OOWRROVHUYLFHVVKRXOGEHSHUIRUPHGE\DTXDOL¿HGUHSDLUSHUVRQXVLQJRQO\LGHQWLFDOUHSODFHPHQW
parts. This will ensure that the safety of the product is maintained.
BATTERY CHARGER
Ŷ 7RUHGXFHWKHULVNRILQMXU\FKDUJHRQO\WKHVSHFL¿HGOLWKLXPLRQUHFKDUJHDEOHEDWWHULHV2WKHU
types of batteries may burst, causing personal injury or damage.
Ŷ .HHSFRUGDQGFKDUJHUDZD\IURPKHDWWRSUHYHQWGDPDJHWRKRXVLQJRULQWHUQDOSDUWV
Ŷ 'RQRWRSHUDWHFKDUJHUZLWKDGDPDJHGFRUGRUSOXJZKLFKFRXOGFDXVHVKRUWLQJDQGHOHFWULF
shock. If damaged, immediately discontinue use. Replace the charger with the identical unit as
listed in the Parts List of this manual.
Ŷ 'RQRWXVHDFKDUJHUWKDWKDVEHHQGURSSHGRUUHFHLYHGDVKDUSEORZ
Ŷ 'RQRWGLVDVVHPEOHFKDUJHU7DNHLWWRDTXDOL¿HGVHUYLFHFHQWHUWRFKHFNRUUHSODFHLW,QFRUUHFW
UHDVVHPEO\PD\UHVXOWLQDULVNRIHOHFWULFVKRFNRU¿UH
Ŷ 'RQRWDEXVHWKHFKDUJHUFRUG1HYHUXVHWKHFRUGIRUFDUU\LQJSXOOLQJ
Ŷ .HHSFRUGDZD\IURPKHDWRLOVKDUSHGJHVRUPRYLQJSDUWV'DPDJHGRUHQWDQJOHGFRUGV
increase the risk of electric shock. If the charger cord is damaged, replace the charger with an
identical model as listed in this manual.
Ŷ $FKDUJHUWKDWLVVXLWDEOHIRURQHW\SHRIEDWWHU\SDFNPD\FUHDWHDULVNRI¿UHZKHQXVHGZLWK
another battery pack.
Ŷ &KDUJHWKHEDWWHU\DWWKHQRUPDOFKDUJLQJWHPSHUDWXUHEHWZHHQ)&DQG)&
CHARGING STATION SAFETY INFORMATION
Ŷ 'RQRWXVHQRQUHFKDUJHDEOHEDWWHULHV
Ŷ 'RQRWRSHUDWHWKHFKDUJLQJVWDWLRQZLWKDGDPDJHGFRUGRUSOXJZKLFKFRXOGFDXVHVKRUWLQJ
and electric shock. If damaged, immediately discontinue use. Replace the charging station with
the identical unit as listed in the Parts List of this manual. If the power cord for this equipment is
damaged, it must be replaced by the manufacturer, a customer service agent of the same or a
IXOO\TXDOL¿HGSHUVRQLQRUGHUWRSUHYHQWKD]DUGV
Ŷ 2SHUDWHWKHFKDUJLQJVWDWLRQRQO\ZLWKWKHDSSURSULDWHRULJLQDOEDWWHULHV&KDUJLQJRWKHUEDWWHULHV
PD\UHVXOWLQLQMXULHVDQGULVNRI¿UH
Ŷ 7KHYROWDJHLQGLFDWHGRQWKHFKDUJLQJVWDWLRQUDWLQJSODWHPXVWFRUUHVSRQGWRWKHYROWDJHRIWKH
power source.
Ŷ 1HYHUWRXFKWKHPDLQVSOXJZLWKZHWKDQGV
PRODUCT END OF USE
Ŷ 7KHPRZHUDQGLWVDFFHVVRULHVVKRXOGEHUHF\FOHGFRUUHFWO\DWWKHHQGRIWKHLUOLIHWRSUHYHQW
ZDVWHRIHOHFWULFDODQGHOHFWURQLFHTXLSPHQWIURPHQGLQJXSLQODQG¿OOVLWHVDQGWRSURWHFWDQG
improve the quality of the environment.
Ŷ 'RQRWGLVSRVHRIWKHPRZHURUDQ\RWKHURILWVSDUWVLQFOXGLQJWKH3RZHU6XSSO\DQG%DVH
IMPORTANT SAFETY INSTRUCTIONS

10
IMPORTANT SAFETY INSTRUCTIONS
6WDWLRQDVXQVRUWHGPXQLFLSDOZDVWHWKH\VKRXOGEHFROOHFWHGVHSDUDWHO\
Ŷ $VN\RXUORFDOGLVWULEXWRUGHDOHUDERXWUHWXUQDQGFROOHFWLRQV\VWHPVDYDLODELOLW\
Ŷ 'RQRWGLVSRVHRIWKHEDWWHU\SDFNLQD¿UHDQGGRQRWSODFHXVHGEDWWHULHVLQ\RXUKRXVHKROG
waste.
Ŷ 'LVSRVHRIEDWWHULHVLQDFFRUGDQFHZLWKWKHORFDOUHJXODWLRQVZKHUHWKH\ZLOOEHUHF\FOHGLQDQ
environmentally friendly manner.
FCC COMPLIANCE
Ŷ7KLVGHYLFHFRPSOLHVZLWK3DUWRIWKH)&&5XOHV2SHUDWLRQLVVXEMHFWWRWKHIROORZLQJWZR
conditions:
- This device may not cause harmful interference, and
- This device must accept any interference received, including interference that may cause
undesired operation.
ŶNOTE: This equipment has been tested and found to comply with the limits for a Class B digital
device, pursuant to Part 15 of the FCC Rules. These limits are designed to provide reasonable
protection against harmful interference in a residential installation.
Ŷ7KLVHTXLSPHQWJHQHUDWHVXVHVDQGFDQUDGLDWHUDGLRIUHTXHQF\HQHUJ\DQGLIQRWLQVWDOOHG
and used in accordance with the instructions, may cause harmful interference to radio
communications. However, there is no guarantee that interference will not occur in a particular
installation. If this equipment does cause harmful interference to radio or television reception,
which can be determined by turning the equipment off and on, the user is encouraged to try to
correct the interference by one or more of the following measures:
- Reorient or relocate the receiving antenna.
- Increase the separation between the equipment and receiver.
- Connect the equipment into an outlet on a circuit different from that of the receiver.
- Consult the dealer or an experienced radio/ TV technician for help.
SAVE THESE INSTRUCTIONS
Refer to them frequently and use them to instruct others who may use this power tool. If you loan
someone this power tool, loan them these instructions also.
11
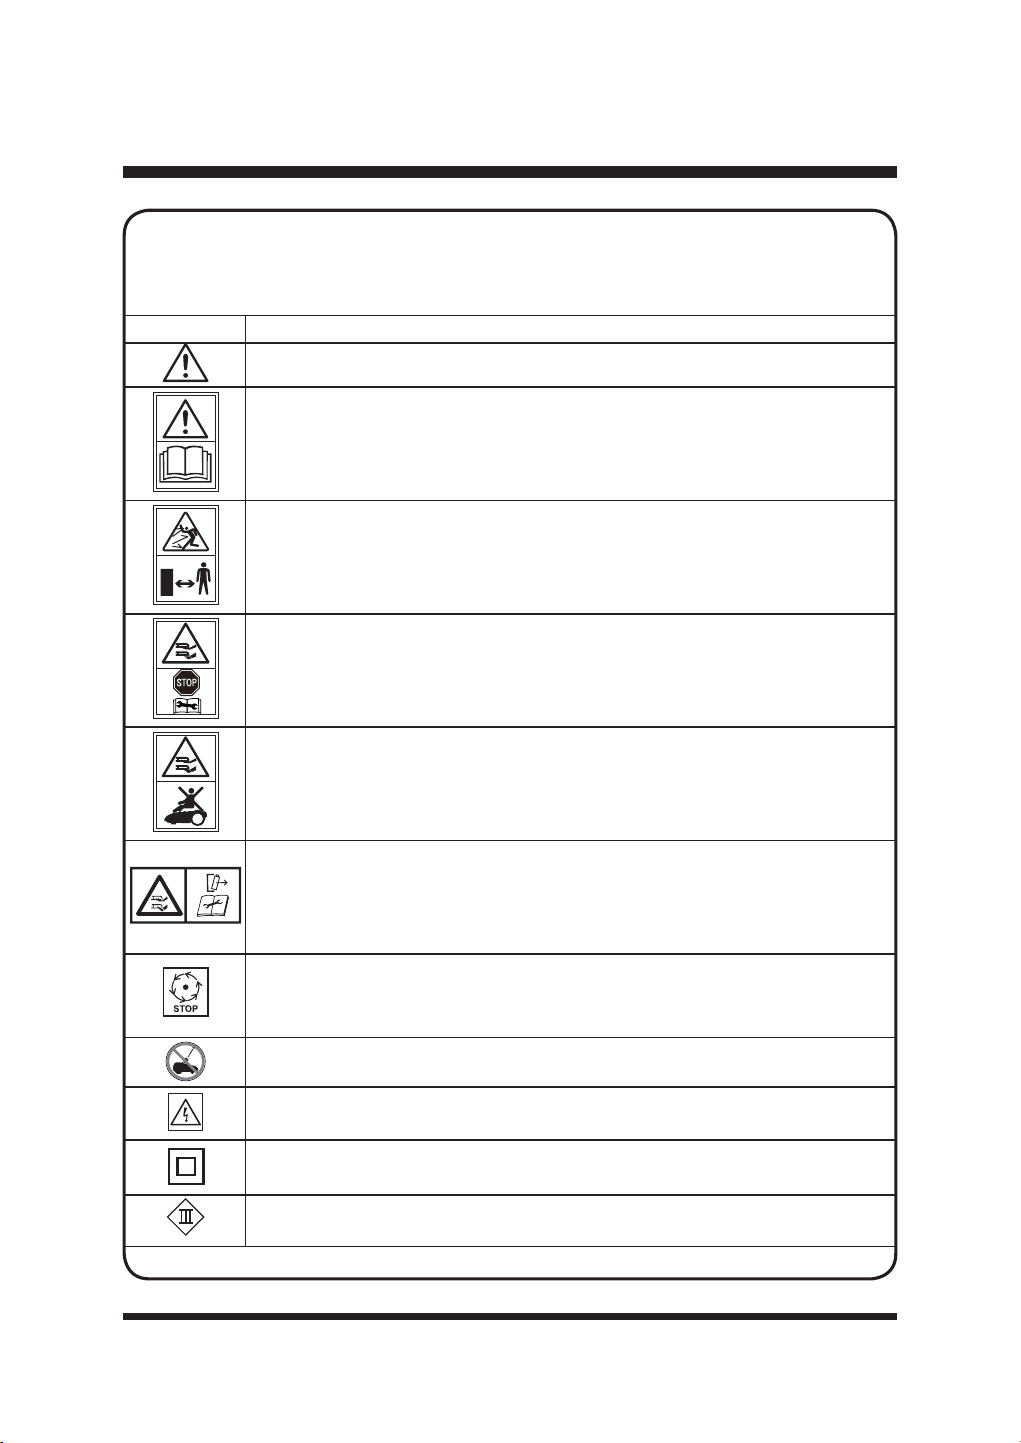
SYMBOL DESIGNATION/EXPLANATION
WARNING - The robotic lawnmower can be dangerous if used incorrectly.
Read instruction manual before operating the machine.
WARNING: Beware of thrown objects. Keep bystanders away.
Remove the battery before working on or lifting the machine.
Do not ride on the machine.
WARNING: Do not touch rotating blade. Disconnect battery before maintenance.
Wait until all moving parts have stopped completely before touching them. The
blade may continue to rotate after the machine is switched off, a rotating blade
can cause injury.
Do not wash or immerse the machine in water.
WARNING! Beware of electric shocks.
3URWHFWLRQFODVV,,'RXEOHLQVXODWLRQ
Class III machines.
SYMBOLS
Some of the following symbols may be used on this product. Please study them and
learn their meaning. Proper interpretation of these symbols will allow you to operate
the product better and safer.
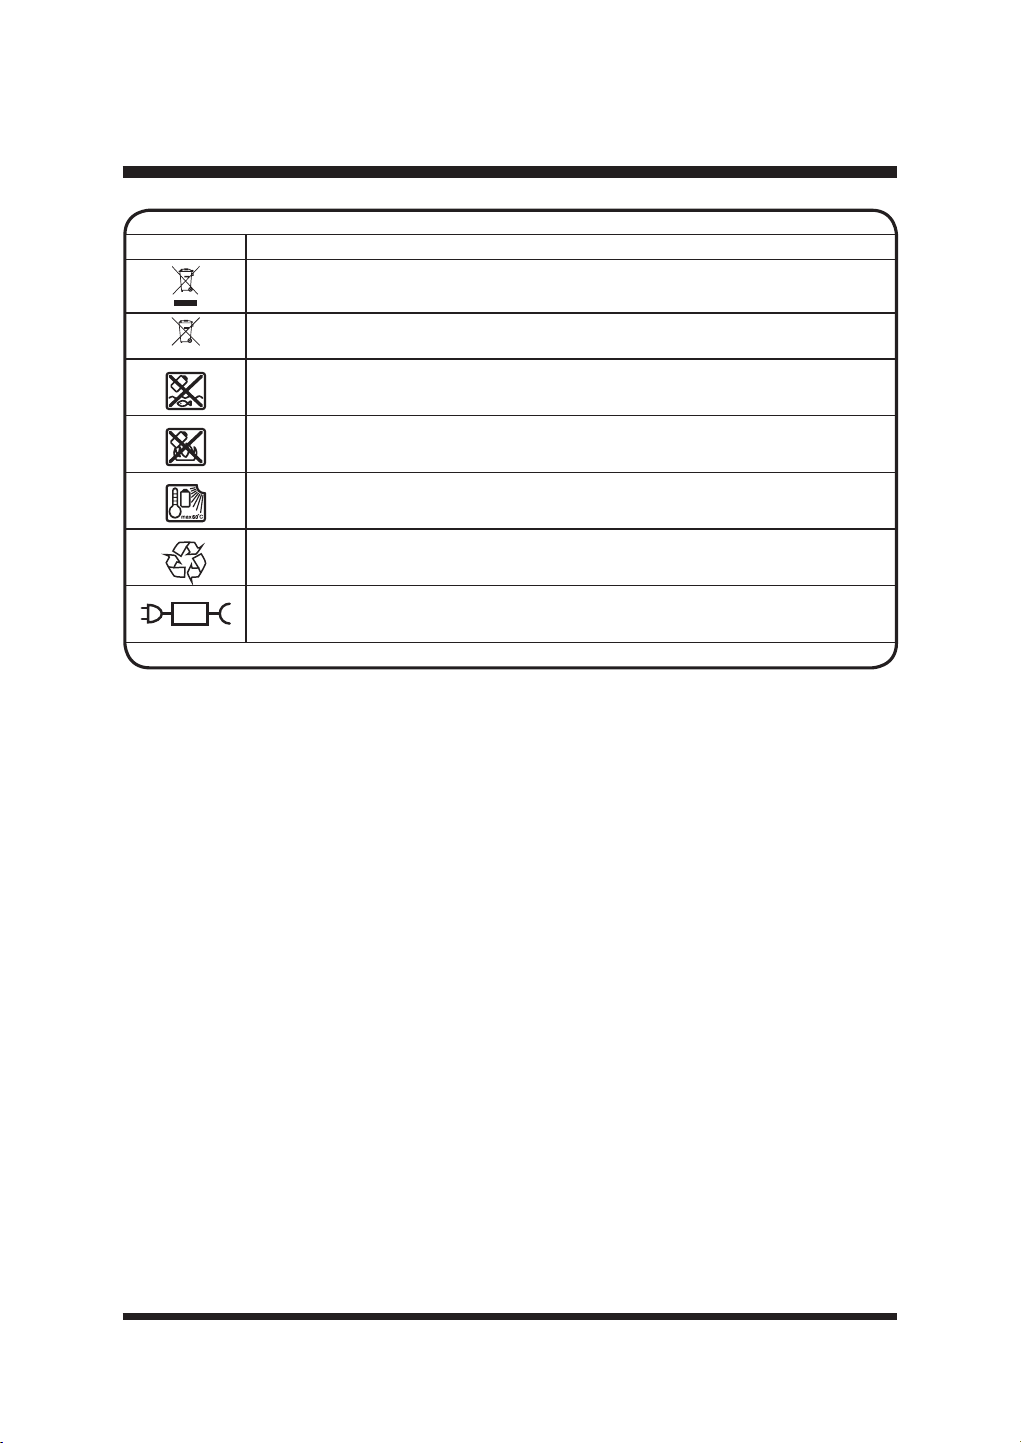
12
SYMBOLS
SYMBOL DESIGNATION/EXPLANATION
Electrical appliances must not be disposed of with the domestic waste.
Batteries contain Lithium-ion. Do not dispose of batteries in household waste.
Do not dispose of battery packs in rivers or immerse in water.
'RQRWGLVSRVHRIEDWWHU\SDFNVLQ¿UH
Do not subject the battery to direct sunlight over long periods and do not leave it
RQRUQHDUDKHDWVRXUFHPD[&
Recycle electrical waste products in an environmentally safe way where facilities
exist.
Detachable power supply part.
Li-ion
13
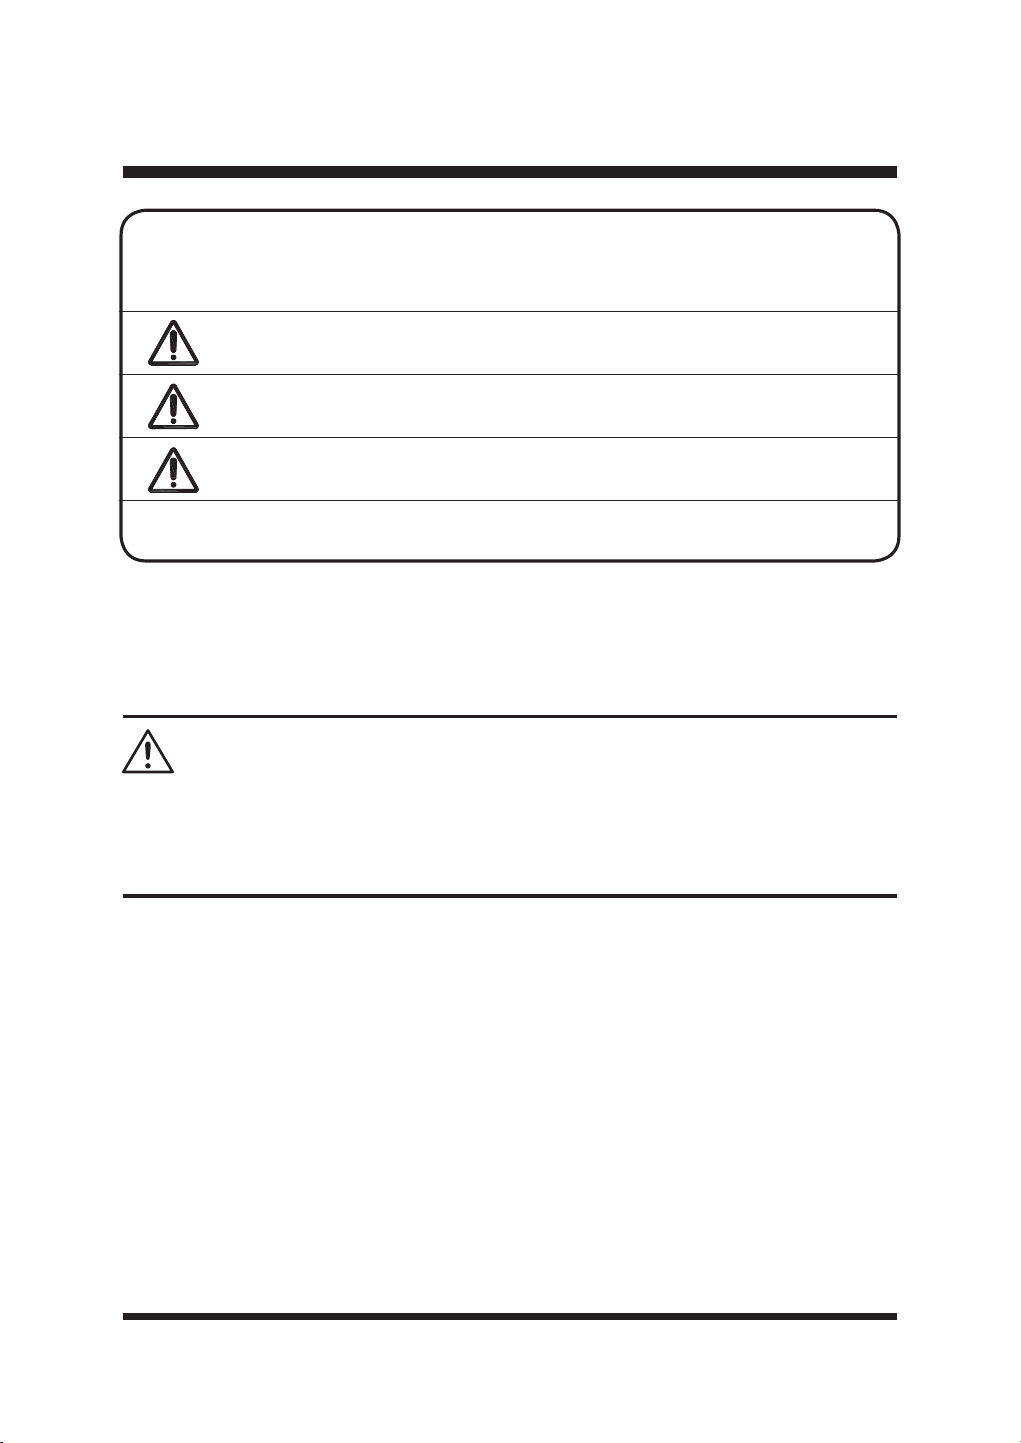
To avoid serious personal injury, do not attempt to use this product until you read thoroughly and
understand completely the Operator’s Manual.
If you do not understand the warnings and instructions in the Operator’s Manual, do not use this
SURGXFW&DOO&XVWRPHU6HUYLFHIRUDVVLVWDQFH7ROOIUHHQXPEHU
WARNING
SYMBOLS
SYMBOL SIGNAL MEANING
DANGER
,QGLFDWHVDQLPPLQHQWO\KD]DUGRXVVLWXDWLRQZKLFKLIQRW
avoided, will result in death or serious injury.
WARNING
,QGLFDWHVDSRWHQWLDOO\KD]DUGRXVVLWXDWLRQZKLFKLIQRW
avoided, could result in death or serious injury.
CAUTION
,QGLFDWHVDSRWHQWLDOO\KD]DUGRXVVLWXDWLRQZKLFKLIQRW
avoided, may result in minor or moderate injury.
NOTICE
:LWKRXW6DIHW\$OHUW6\PERO,QGLFDWHVDVLWXDWLRQWKDWPD\
result in property damage.
The following signal words and meanings are intended to explain the levels of risk
associated with this product.
SERVICE
6HUYLFHUHTXLUHVH[WUHPHFDUHDQGNQRZOHGJHDQGVKRXOGEHSHUIRUPHGRQO\E\DTXDOL¿HGVHUYLFH
technician. When servicing, use only identical replacement parts.
For troubleshooting or replacement, please call Customer Service for assistance (Toll free number

14
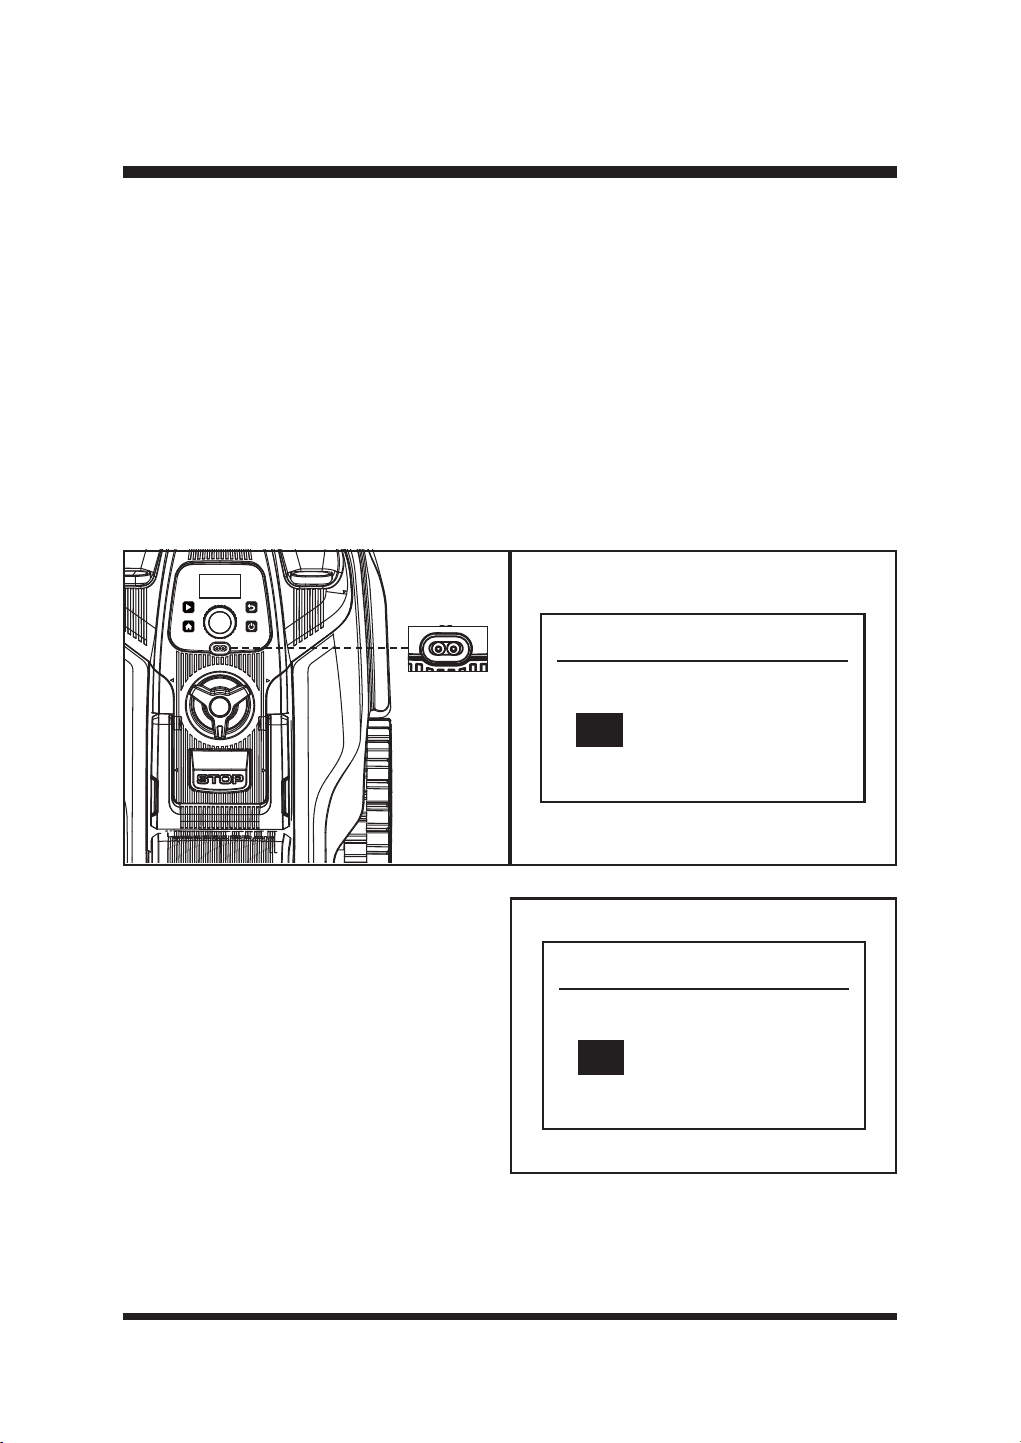
KNOW YOUR ROBOTIC MOWER
21
22
23
24
123
4
5
6
7
8
9
10
11
12
19
20
13
14
29
25
15
16
17
18
5S
282726
30
34
37
3635
31
33
32

15
KNOW YOUR ROBOTIC MOWER
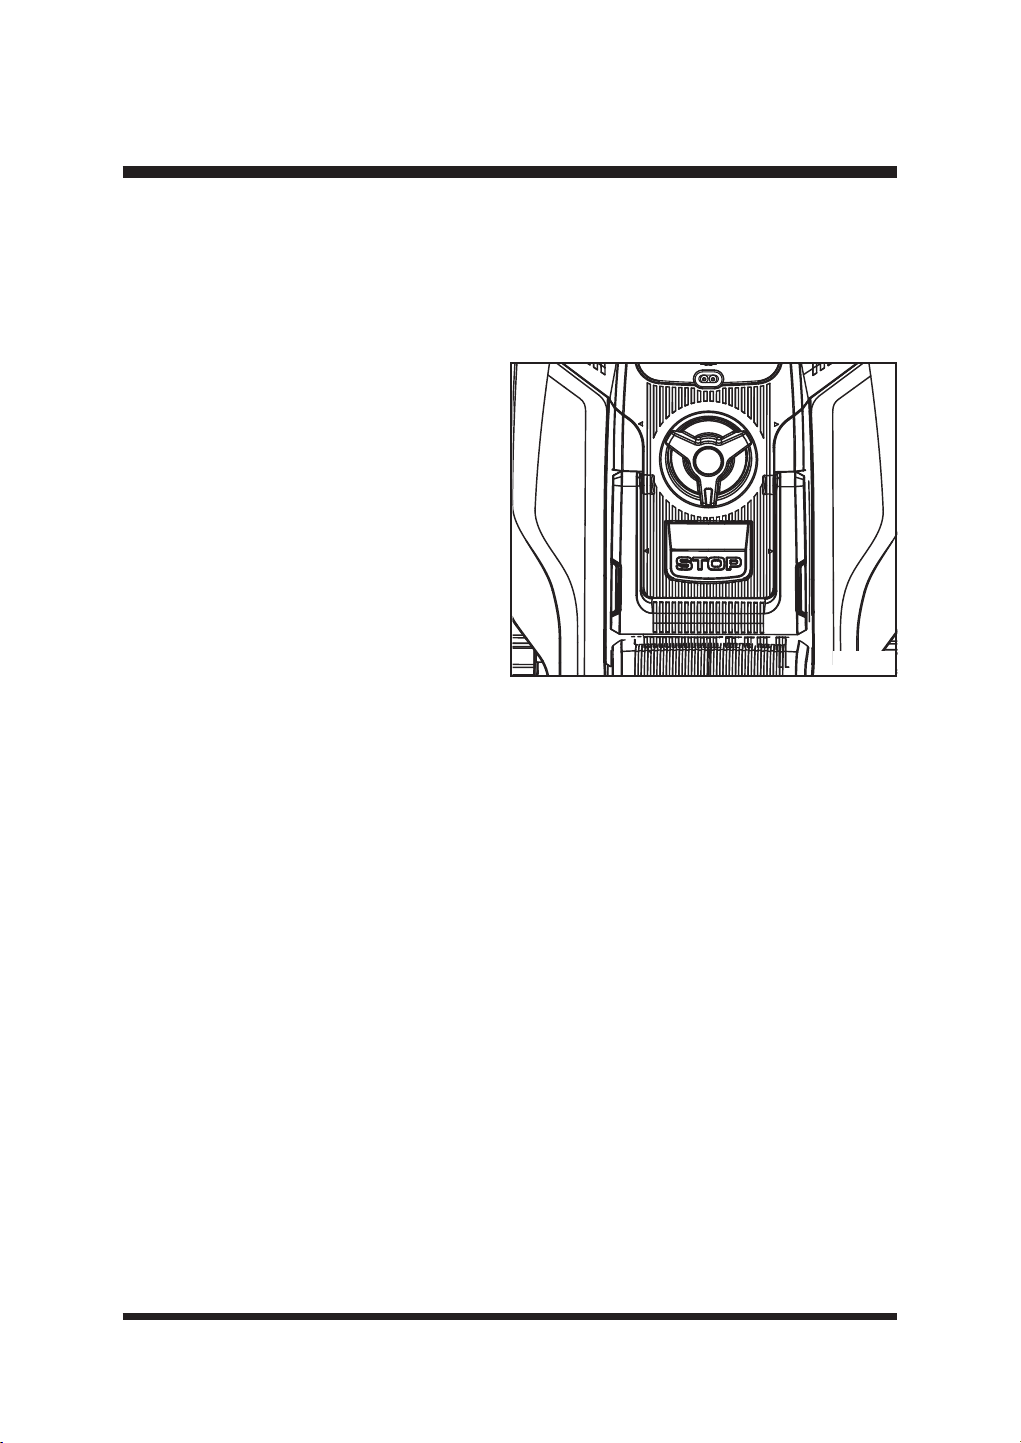
1. Carry Handle
2. STOP Button
3. Cutting Height Adjustment Knob
4. Rain Sensor
5. Selection Dial
6. Control Panel
7. Ultrasonic Object Sensors
8. Grass Detection Camera
9. Charging Strips
10. LCD Panel
11. Start Button
12. HOME Button
13. Back Button
14. On/Off Button
15. Rear Wheel
86%3RUW&RYHUHGE\5XEEHU&DS
17. Battery Compartment
18. Battery Compartment Cover
19. Front Wheel
20. Blade Disc
6SDUH%ODGHDQG6FUHZ;
22. Contact Strip
23. Base Station
24. Guide Strips on the Base Station
25. Base Station’s Power Cord
26. Charging Indicator on the Base Station
27. Wi-Fi Connection Setting Button
28. Wi-Fi Indicator
29. Signal Indicator
30. Battery Pack
31. Battery Release Button
32. Power Adaptor
([WHQVLRQ&DEOHIWP
%DVH6WDWLRQ)L[LQJ6FUHZ;
35. Hex Key
0DJQHWLF6WULSIWP[
0DJQHWLF6WULS3HJ;
KNOW YOUR ROBOTIC MOWER
The safe use of this product requires an understanding of the information on the product and in
this Operator’s Manual as well as a knowledge of the project you are attempting to use. Before use
RIWKLVSURGXFWIDPLOLDUL]H\RXUVHOIZLWKDOORSHUDWLQJIHDWXUHVDQGVDIHW\UXOHV
16
SET UP
UNPACKING
This product has been shipped partially assembled.
ŶCarefully remove the product and any accessories from the box. Make sure all items listed in
the packing list are included.
ŶInspect the product carefully to make sure no breakage or damage occurred during shipping.
ŶDo not discard the packing material until you have carefully inspected and satisfactorily
operated the product.
ŶIf any parts are damaged or missing, do not operate the product. Please call Customer Service
7ROOIUHHQXPEHU
PACKING LIST
5RERWLF0RZHU
%DVH3DUWVRIWKH%DVH6WDWLRQ
8SSHU3DUWRIWKH%DVH6WDWLRQ
%DVH6WDWLRQ)L[LQJ6FUHZV
0DJQHWLF6WULSIWP
0DJQHWLF6WULS3HJV
6SDUH%ODGHVDQG6FUHZV
90D[$K/LWKLXP,RQ%DWWHU\
3RZHU$GDSWRU
([WHQVLRQ&DEOHIWP
+H[.H\
2SHUDWRUV0DQXDO
WARNING
Do not use this product if any parts on the Packing List are already assembled to your product
when you unpack it. Parts on the packing list are not assembled to the product and require
customer installation. Use of a product that may have been improperly assembled could result in
serious personal injury.
17
Fig. 1 Fig. 2
SET UP
PREPARING YOUR LAWN
Understanding your lawn will reduce unnecessary mistakes and make the installation process
easier and smoother.
Ŷ %DUHSDWFKHVDQGOHDYHVFDQLQWHUIHUHZLWKWKHFDPHUDRSHUDWLRQ5HSDLUGHDGSDWFKHVZLWK
grass seed.
Ŷ /HYHODOOVXUIDFHVWRSUHYHQWWKHPRZHUIURPEHFRPLQJVWXFN)LJ
Ŷ 5HPRYHDOOVPDOOORRVHREMHFWVZKLFKPD\GDPDJHWKHEODGH)LJ
NOTE: This mower is not designed to cut excessively long or overgrown and neglected areas. Cut
JUDVVWRDKHLJKWRIPPEHIRUHXVH'RQRWDOORZJUDVVWRJURZH[FHVVLYHO\ORQJEHWZHHQ
uses.
ABOUT YOUR ROBOTIC LAWNMOWER
The mower uses a camera and ultrasonic sensors to identify grass and navigate around the lawn.
It can:
Ŷ'HWHFWJUDVVDQGZHOOGH¿QHGHGJHVVXFKDVSDYLQJJUDYHODQGHDUWK
Ŷ5DLVHGHGJHVVXFKDVVOHHSHUVIHQFHVDQGZDOOV
Ŷ)LQGWKHZD\KRPHWRWKHFKDUJHLWVHOIXVLQJ*166SRVLWLRQLQJDQGWKHJXLGHVWULSVRQWKHEDVH
station.
It cannot:
Ŷ:RUNDWWZLOLJKWRUDWQLJKW±WKHFDPHUDUHTXLUHVGD\OLJKWLQRUGHUWRZRUNHIIHFWLYHO\
Ŷ:RUNRQSDWFK\RUGHDGJUDVV
Ŷ'LVWLQJXLVKEHWZHHQODZQDQGZHHG\ÀRZHUEHGV
Ŷ&URVVERXQGDULHVLQWKHODZQVXFKDVSDWKVRUVWHSSLQJVWRQHV
The mower can be used in either of two modes
:
Ŷ6FKHGXOH0RGH5HIHUWRSDJH
Ŷ'URSDQG0RZ0RGH5HIHUWRSDJH
18
SET UP
The ultrasonic sensors can be turned off when the lawn is clear of obstacles. In this case, hedges,
walls, or other similar barriers in the lawn can be used as the border of the working area.
When the robotic mower detects that there is no grass or encounters an obstacle, it changes route
in a random manner and starts mowing again in a new direction. To allow the robotic mower to
move freely inside the lawn, the lawn must be properly checked and adjusted so that the robotic
PRZHUKDVHQRXJKVSDFHIRUUHFRJQL]LQJZKHQWKHUHLVQRJUDVV&DUHIXOO\IROORZLQVWUXFWLRQV
OLVWHGDVEHORZIRUW\SHVRIERUGHUVSURWHFWLRQVWKDWFDQFDQQRWEHXVHGIRUGH¿QLQJWKHZRUNLQJ
area.
7KLVURERWLFPRZHUJHQHUDWHVDQHOHFWURPDJQHWLF¿HOGGXULQJRSHUDWLRQ8QGHUFHUWDLQ
FLUFXPVWDQFHVWKLV¿HOGFDQDFWLYHO\RUSDVVLYHO\LQWHUIHUHZLWKPHGLFDOLPSODQWV7RUHGXFHWKH
risk of serious injury or death, we recommend that people with medical implants consult their
physician and the manufacturer of the medical implant before using the robotic lawnmower.
WARNING
DEFINING THE MOWING AREA
/DZQHGJHVPXVWEHFOHDUO\GH¿QHGE\ÀDWHGJLQJRUUDLVHGEDUULHUVLQRUGHUIRUWKLVPRZHUWR
function properly.
ŶVisual boundaries: need to look different from grass; therefore, changes in color and texture
are very effective.
ŶPhysical boundaries: help stop the mower when a visual boundary is not possible.
ŶTemporary physical boundaries: can be used where and when needed.
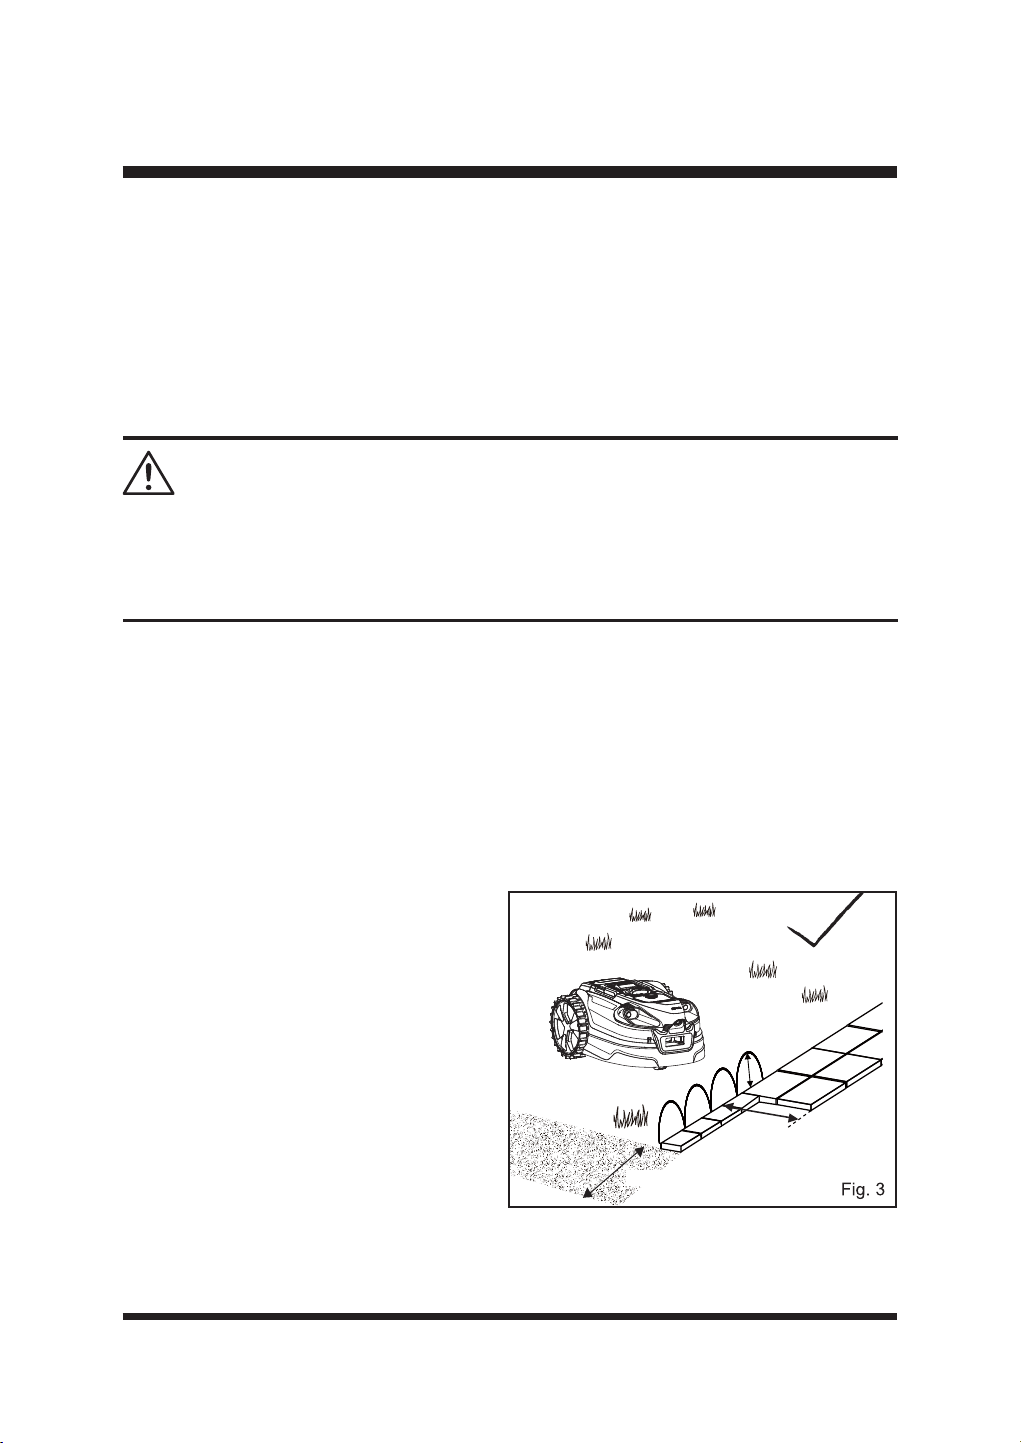
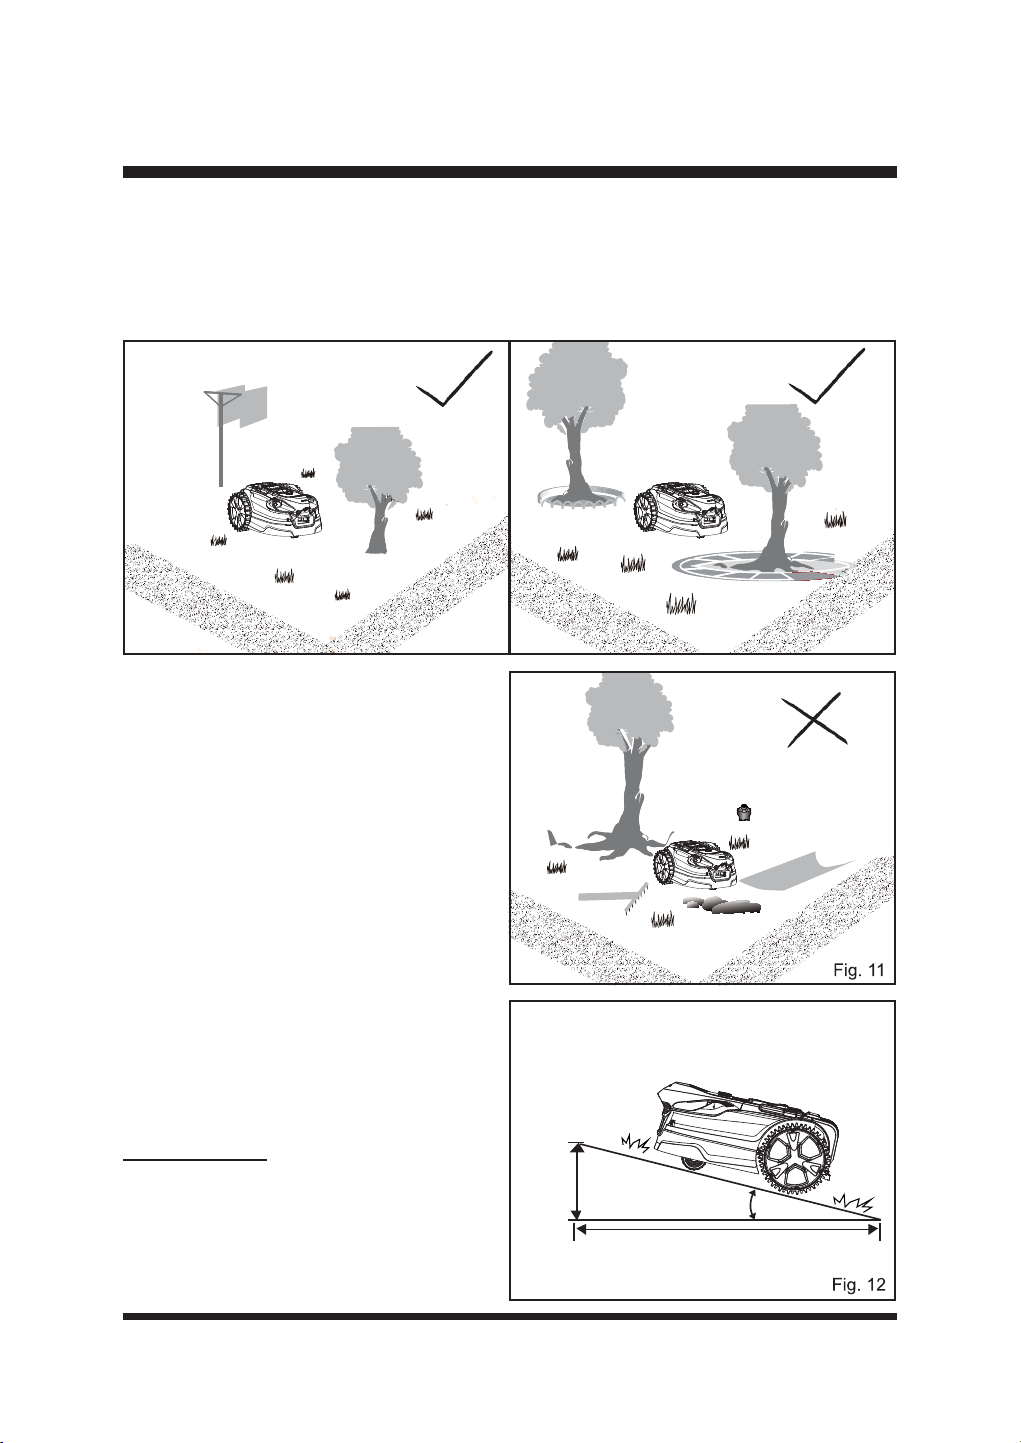
Suitable Boundary Types
ŶPaving
The lawn requires a paved or wooden edge of
DWOHDVWFPZLGHIRULWWRVWRSVDIHO\
and change direction.
Paving or wooden edge less than 13.78'' (35
FPZLGHPXVWEHZLGHQHGRUFDQEHXVHGLQ
conjunction with a barrier. See Raised Barrier
VHFWLRQEHORZ)LJ
ŶRaised barrier (Using ultrasonic sensors)
With the ultrasonic sensors on, a perimeter
EDUULHUDWDKHLJKWFPFDQEHXVHG
WRGH¿QHWKHERUGHURIWKHZRUNLQJDUHD7KH
ultrasonic sensors will detect the barrier, and
the mower will change direction.
> 6.3’’
>13.78''
>13.78''
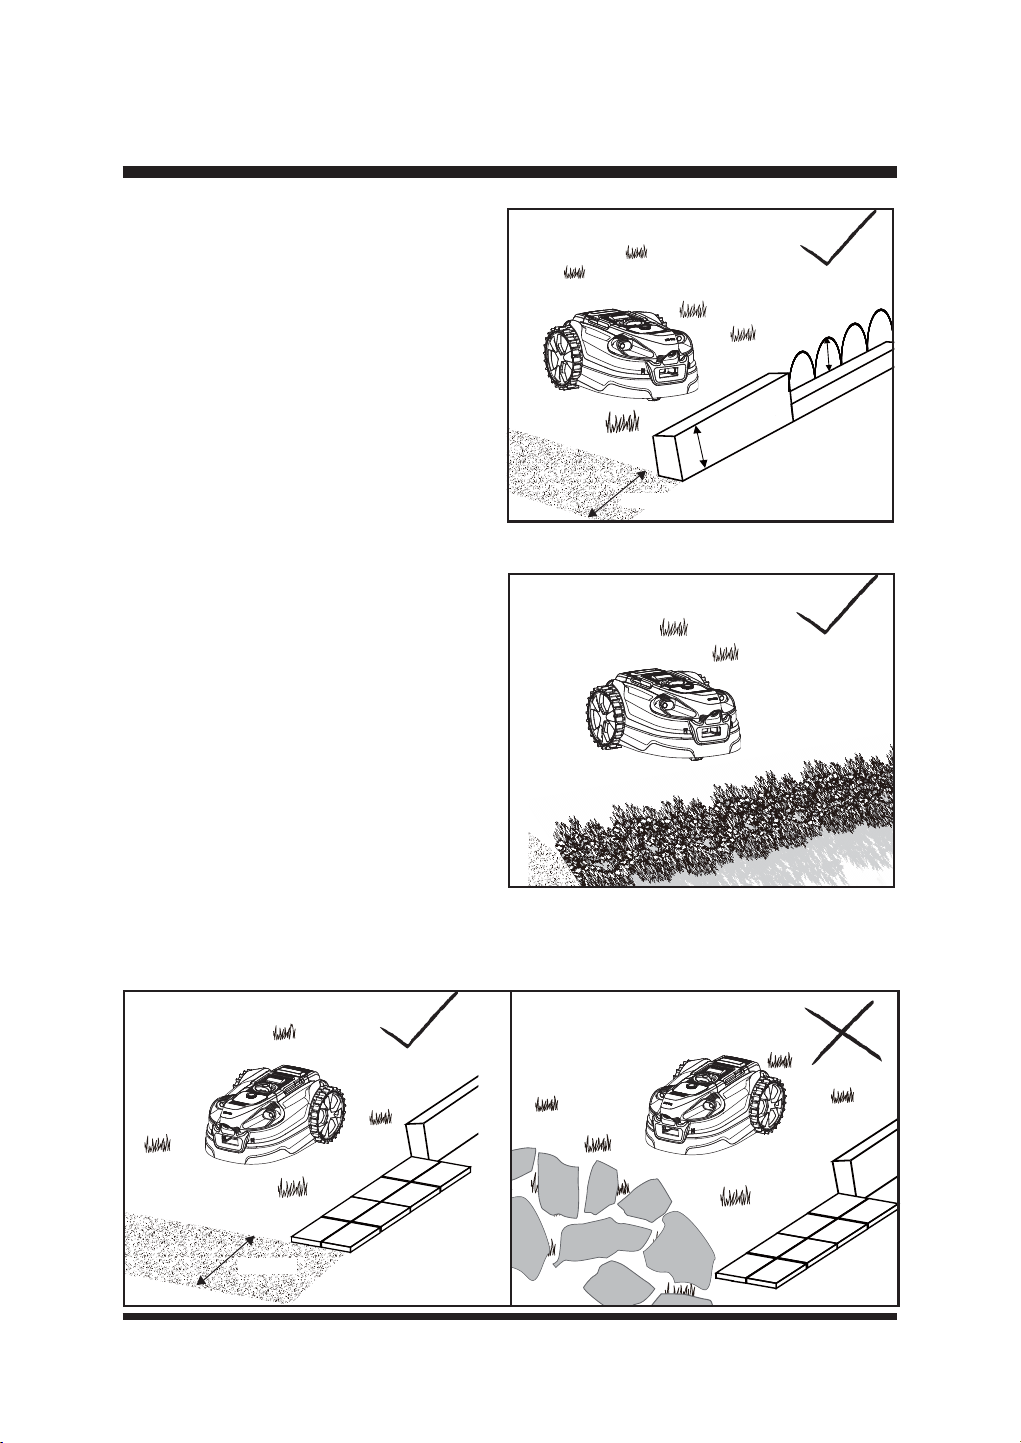
19
SET UP
> 6.3’’
> 6.3’’
>13.78''
Fig. 4
Fig. 5
If an existing barrier is shorter than 6.3'' (16
FPVHH5DLVHGEDUULHU8VLQJEXPSVHQVRU
)LJ
ŶRaised barrier (Using bump sensor)
$UDLVHGEDUULHUPLQ¶¶WKDWSK\VLFDOO\
obstructs the movement of the mower can
also be used. This boundary could be lower
WKDQFPDQGZLOOEHXQGHWHFWDEOHE\
the ultrasonic object sensors. When the robot
meets this low barrier, it will bump off, reverse
and turn. This type of boundary may suit your
lawn in some areas.
ŶHedging
With the ultrasonic sensors on, hedges can be
XVHGWRGH¿QHWKHZRUNLQJDUHD)LJ
NOTE: )ROLDJHLVXVXDOO\UHFRJQL]HGDVJUDVV
by the robotic mower. Therefore, ultrasonic
sensors must be always kept on when using
hedges as the border of the working area.
Ŷ Fine gravel
,I¿QHJUDYHORUVPDOOVWRQHVDUHXVHGWRERUGHU
the lawn, make sure the width of the border is
PRUHWKDQFPZLGHDQGKDVFOHDU
HGJHV)LJ
NOTE:1HYHUXVHJUDYHOVWRQHVRUVLPLODUPDWHULDOVZLWKLUUHJXODUHGJHVIRUGH¿QLQJWKHZRUNLQJ
DUHD)LJ)DLOXUHWRSURYLGHFOHDUHGJHVZLOOUHVXOWLQWKHPRZHUOHDYLQJWKHPRZLQJDUHDDQG
blade damage.
>13.78''
Fig. 6 Fig. 7
20
SET UP
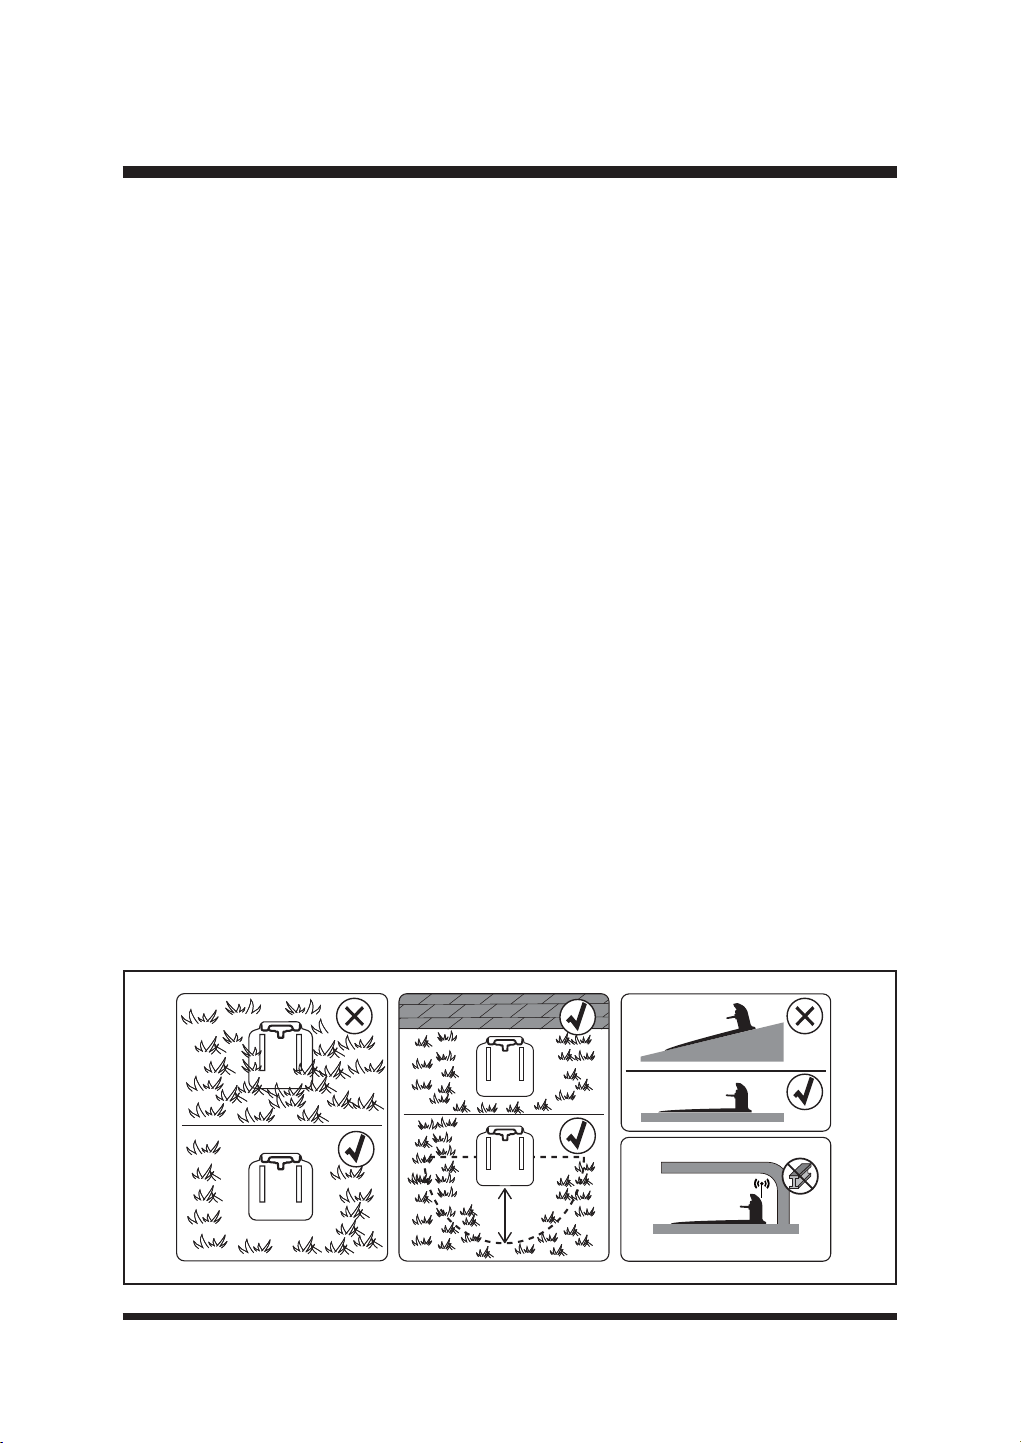
ŶTemporary raised barriers
'XULQJ¿UVWXVHZKLOHODZQSDWFKHVDUHEHLQJVHHGHGRUVHDVRQDOODZQSODQWVVXFKDVVSULQJ
EXOEVDUHLQÀRZHULWPD\EHGHVLUDEOHWRXVHDWHPSRUDU\PHWKRGWRSURWHFWRUGH¿QHWKHODZQ
area for the robot to cut. In this case, garden canes are particularly effective and can be removed
ODWHU,QVSULQJ\RXFDQSURWHFWÀRZHUEXOEVLQWKHODZQIURPWKHPRZHUE\VLQNLQJVKRUWFDQHV
YHUWLFDOO\LQWRWKHODZQDURXQGWKHDUHDVSDFHGDWFP/HDYHDWOHDVW¶¶FPRI
cane above ground. The mower will be physically prevented from entering any protected areas.
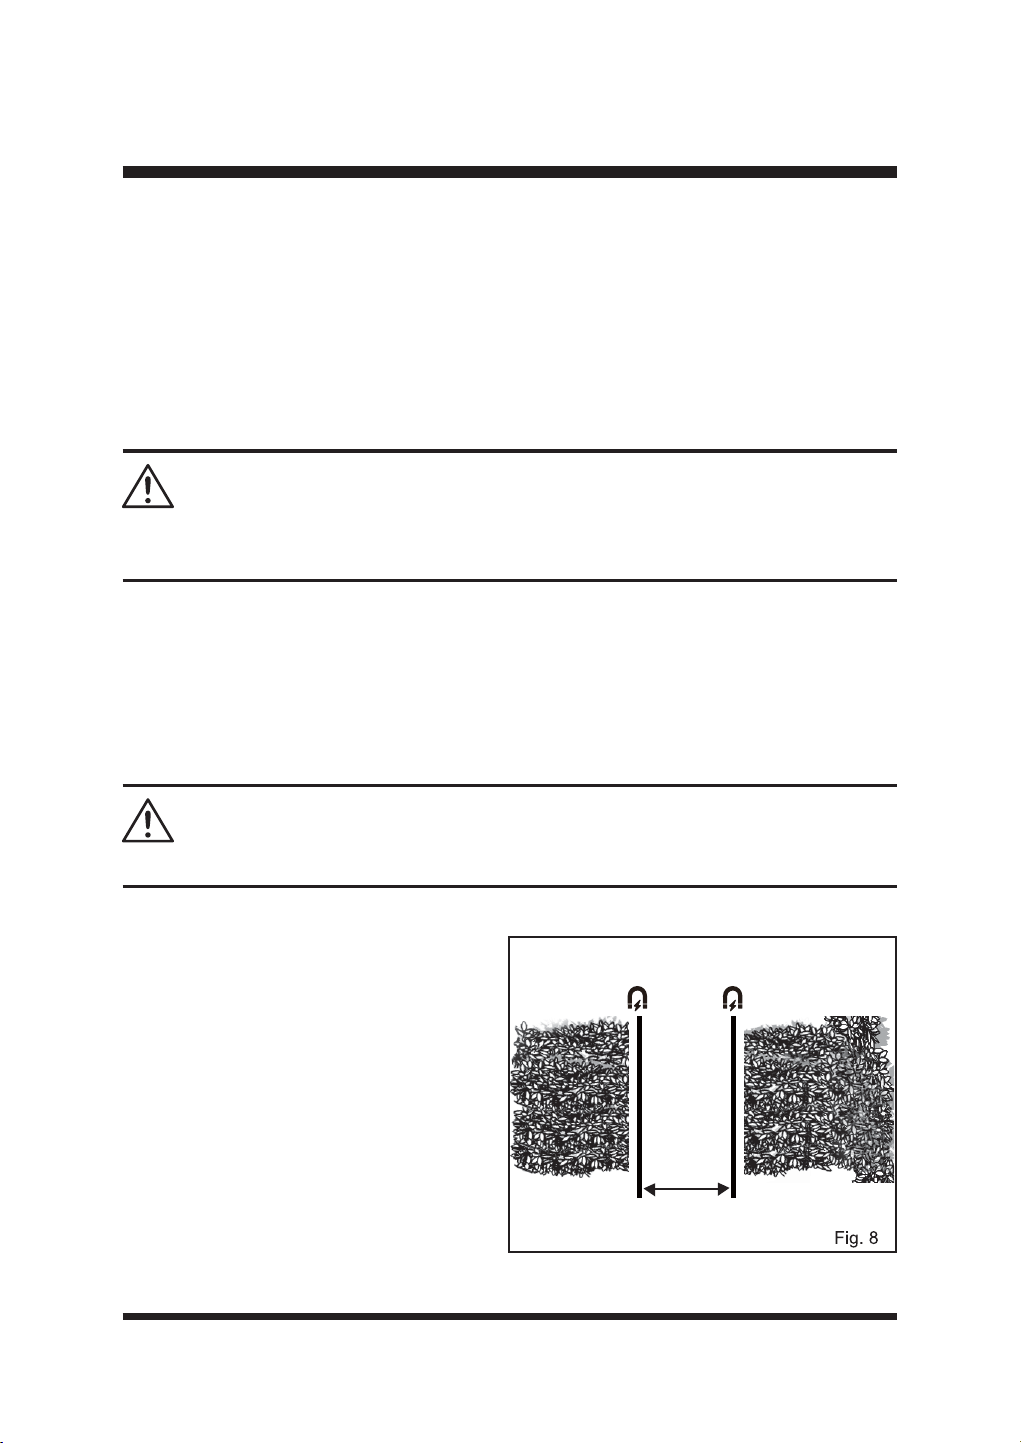
ŶMagnetic strip
The magnetic strip serves as a mobile and temporary boundary for creating areas where the
robotic mower is not allowed to mow. It can also be left permanently in place if needed.
7KHURERWLFPRZHULVHTXLSSHGZLWKDPDJQHWLFVWULSVHQVRUIRUUHFRJQL]LQJDPDJQHWLFVWULSO\LQJ
on the ground. When the robotic mower comes across a magnetic strip, it will stop and begin to
mow again in a random direction.
NOTE: Magnetic particles are attached to the surface of the magnetic strip, please wear gloves
before use.
Magnetic Strip Installation
Ŷ/D\WKHPDJQHWLFVWULSDIHZFHQWLPHWHUV
away from the area or object in question.
Ŷ .HHSDGLVWDQFHRIDWOHDVW¶¶FP
between two individual boundary areas
made up of magnetic strips, so that the
robotic mower can travel through without
GLI¿FXOW\)LJ
Ŷ )DVWHQWKHPDJQHWLFVWULSWRWKHJURXQGZLWK
the supplied magnetic strip pegs spaced
¶¶PDSDUW
Ŷ Obstacles in the mowing area
With the ultrasonic sensors on, objects which
do not impede the robotic mower’s normal
If you have an ICD or pacemaker, avoid close or prolonged contact with magnets or their magnetic
¿HOGV.HHSPDJQHWVDWOHDVWVL[LQFKHVDZD\IURPZKHUH\RXUGHYLFHLVLPSODQWHG
WARNING
6WURQJPDJQHWLFIRUFHFDQFUHDWHD¿QJHUSLQFKULVN:HDUJORYHVDQGKDQGOHZLWKFDUH
WARNING
>47.24''
21
SET UP
IXQFWLRQLQJVXFKDVWUHHVZLWKRXWUDLVHGURRWVYHUWLFDOSROHVHWFGRQRWUHTXLUHH[FOXVLRQIURP
WKHPRZLQJDUHD)LJ
When objects, such as exposed tree roots, exposed wires, irrigation systems, etc., are present on
the surface of the lawn, it is required to protect these objects with paving, walls or magnetic strip to
SUHYHQWWKHGDPDJHWRWKHPDQGWRWKHURERWLFPRZHU)LJ
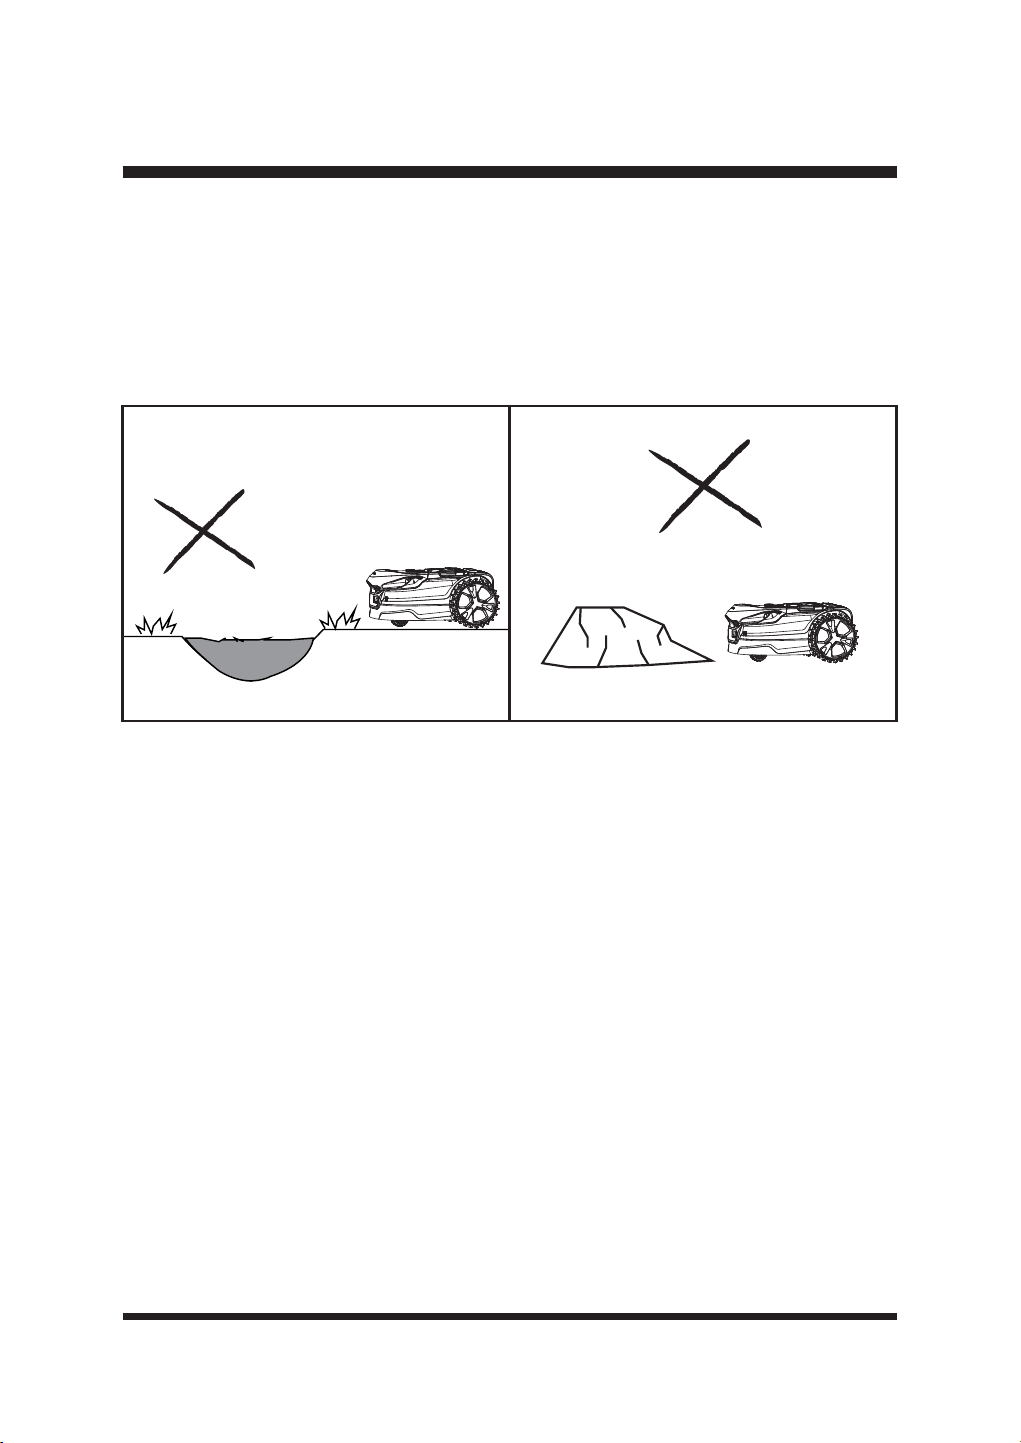
7KHZRUNLQJDUHDFDQQRWEHGH¿QHGE\KROHVRU
ditches. Ensure that there are no objects such
as toys, work tools, small stones, branches, or
sprinklers, etc., on the lawn or protruding from
the ground which could impede the mower or
FDXVHGDPDJHWRWKHEODGH)LJ
NOTE: Avoid leaves accumulating on the
lawn, as they may not be detected correctly by
the robotic mower. Remove leaves at regular
intervals.
ŶSlopes
The robotic mower has the ability to safely
climb slopes of 35%, and areas that are steeper
WKDQWKLVVKRXOGEHH[FOXGHG)LJ
To calculate the slope of your lawn, see Fig. 12.
The slope would be calculated as below:
Fig. 9 Fig. 10
FP(OHYDWLRQ
FP/HQJWK
VORSH
=
35 cm
100 cm
Max. 35% slope
(20º incline)
22
SET UP
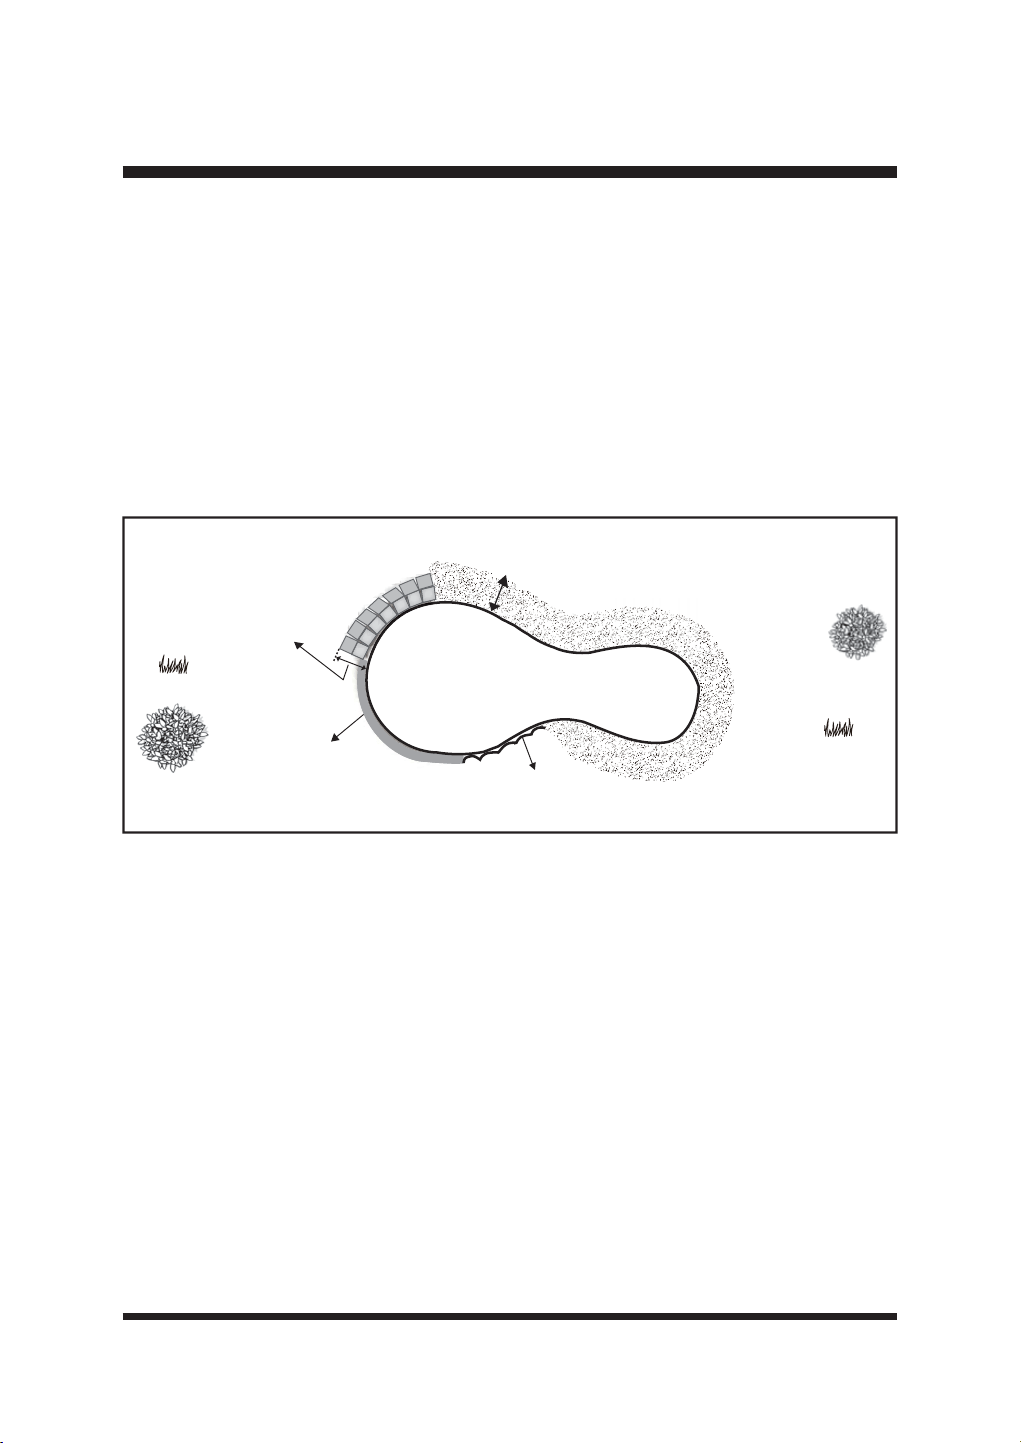
ŶPools and ponds
If there is a pool or pond in the mowing area, create appropriate borders to protect it.
Ŷ5DLVHGEDUULHUVKLJKHUWKDQFP
Ŷ)ODWHGJLQJSDYLQJJUDYHORUZRRGHQERDUGVZLGHUWKDQFP
ŶMagnetic strip placed at least 10cm away from the water edge.
7KHLOOXVWUDWLRQVKRZVDFRUUHFWO\GH¿QHGZRUNLQJDUHDIRUWKHFRUUHFWIXQFWLRQLQJRIWKHPRZHU)LJ
It is very important to make visual boundaries around ponds wide and obvious for the
mower. Pond plants and algae could be interpreted as grass. Physical boundaries or
magnetic strip around ponds are highly recommended and will prevent any accidental
water damage to your mower which is not covered by the manufacturers guarantee.
Fig. 13
Width > 27.56''
Height > 7.87''
Height > 7.87''
Width of non-grassy ground > 39.37''
23
ASSEMBLY
SELECTING THE BASE STATION LOCATION
It is important to select a proper location for the base station to charge the robotic mower in order
to allow for docking to take place successfully.
The base station should be located in an area that is:
Ŷ :LWKLQWKHODZQDUHDZLWKIWPRIFOHDUDQFHDURXQGWKHRSHQVLGHVRIWKHFKDUJLQJ
station
Ŷ /HYHO
Ŷ 6KDGHG
Ŷ :LWKLQIWPRIDQRXWGRRUSRZHUVRFNHW
Ŷ :LWKLQUHDFKRI\RXUKRPH:L)LVLJQDO
Ŷ &OHDURIDQ\VKDUSREMHFWVDQGREVWDFOHV
7KHPRZHUFDQEHRSHUDWHGLQPXOWL]RQHODZQV3ODFHWKHEDVHVWDWLRQLQWKHODUJHVW]RQHLIWKHUH
DUHDGGLWLRQDO]RQHVLQ\RXUODZQ
Regularly clean the base station and keep it free of dust and weeds to ensure the camera can
detect the orange guide strips.
NOTE: The ground leading up to the base station should be level without corners, slopes or
obstacles to ensure proper docking.
IMPORTANT:
.HHSWKHDUHDDURXQGWKHEDVHVWDWLRQIUHHRIORQJJUDVVWRDOORZHDV\LGHQWL¿FDWLRQE\WKH
camera.
.HHSWKHJXLGHVWULSVFOHDQDQGWLG\IRUHDV\LGHQWL¿FDWLRQE\WKHFDPHUD
Covering the base station with metal coverings is prohibited and can interfere with GPS
signal reception (Fig. 14).
,WLVUHFRPPHQGHGWRSXUFKDVHWKHRI¿FLDO/DZQ0DVWHU*DUDJHDFFHVVRU\6HH3DJHIRU
parts list.
Fig. 14
Ő0
24
ASSEMBLY
INSTALLING THE BASE STATION
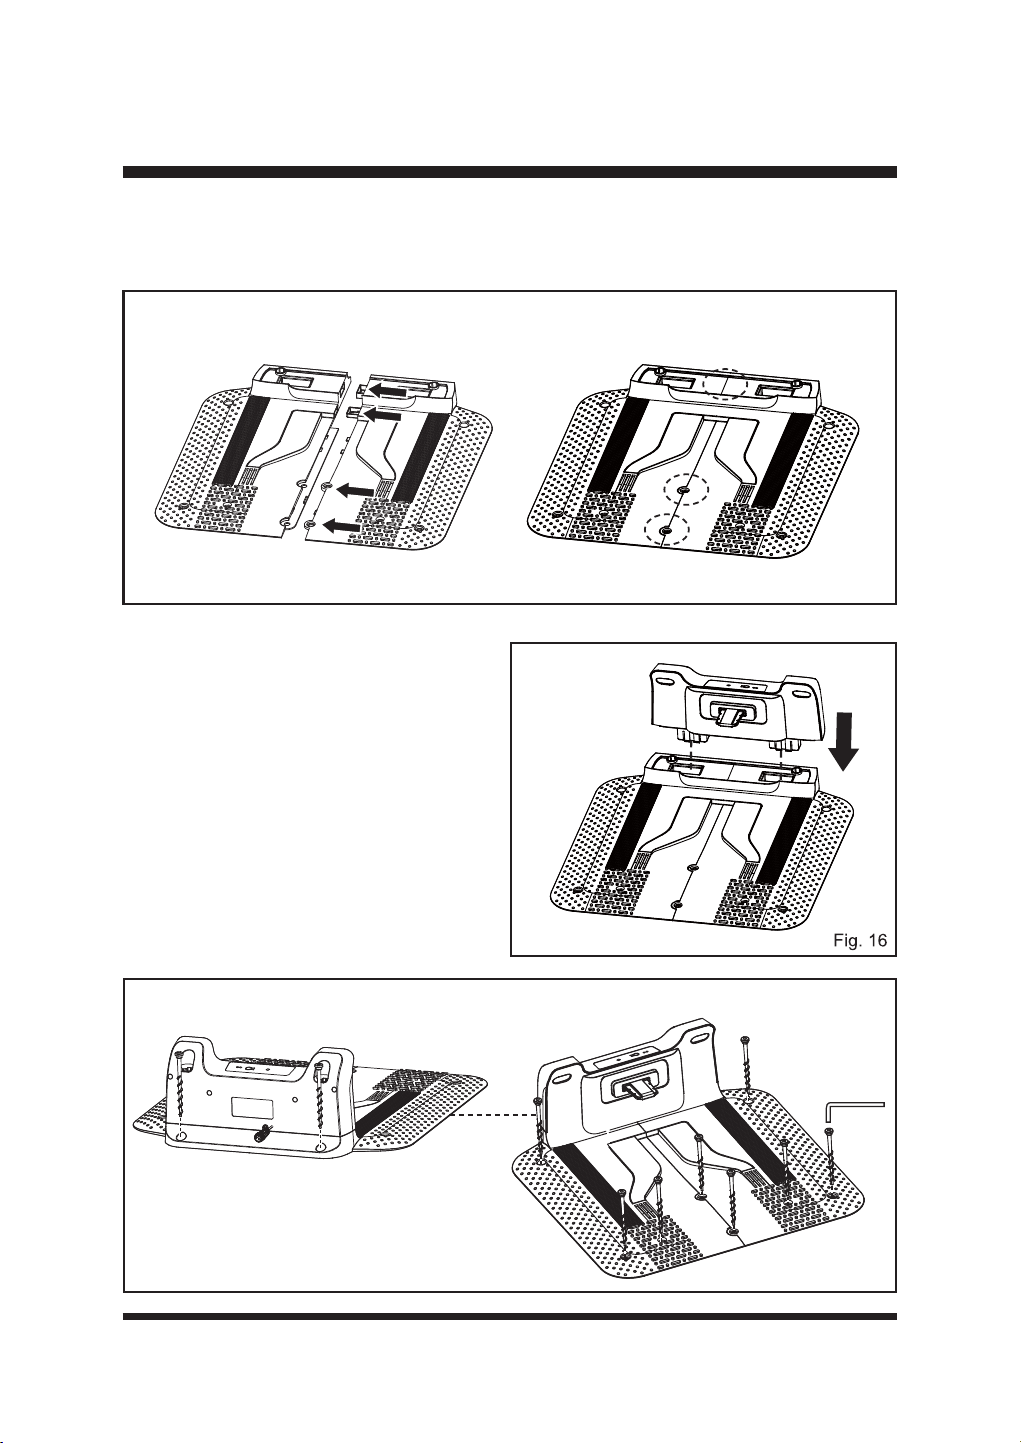
Ŷ&RQQHFWWKHWZREDVHSDUWVRIWKHEDVHVWDWLRQDVVKRZQ(QVXUHWKH\FOLFNWRJHWKHU¿UPO\)LJ
Ŷ)XOO\LQVHUWWKHXSSHUSDUWRIWKHEDVHVWDWLRQ
onto the base. Ensure the upper part clicks
¿UPO\LQWRSODFH)LJ
Ŷ3ODFHWKHEDVHVWDWLRQRQWKHJURXQGLQ
an appropriate position within the lawn
boundary. The back of the charging station
VKRXOGEHÀXVKWRWKHERXQGDU\WRPLQLPL]H
any trimming needed near the power cable.
Follow the instructions in section 2 “Selecting
the Base Station Location” on page 23.
Ŷ6HFXUHWKHEDVHVWDWLRQWRWKHJURXQGZLWK
WKHVXSSOLHGVFUHZV)LJ
Fig. 15
Fig. 17
25
ASSEMBLY
Do not make new holes in the plate of the
base station. Only use the existing holes in
the base station to secure it to the ground.
Do not tread or walk on the plate of the base
VWDWLRQ)LJ
WARNING
WARNING
Fig. 19 Fig. 20
CONNECTING THE BASE STATION TO THE POWER SOURCE
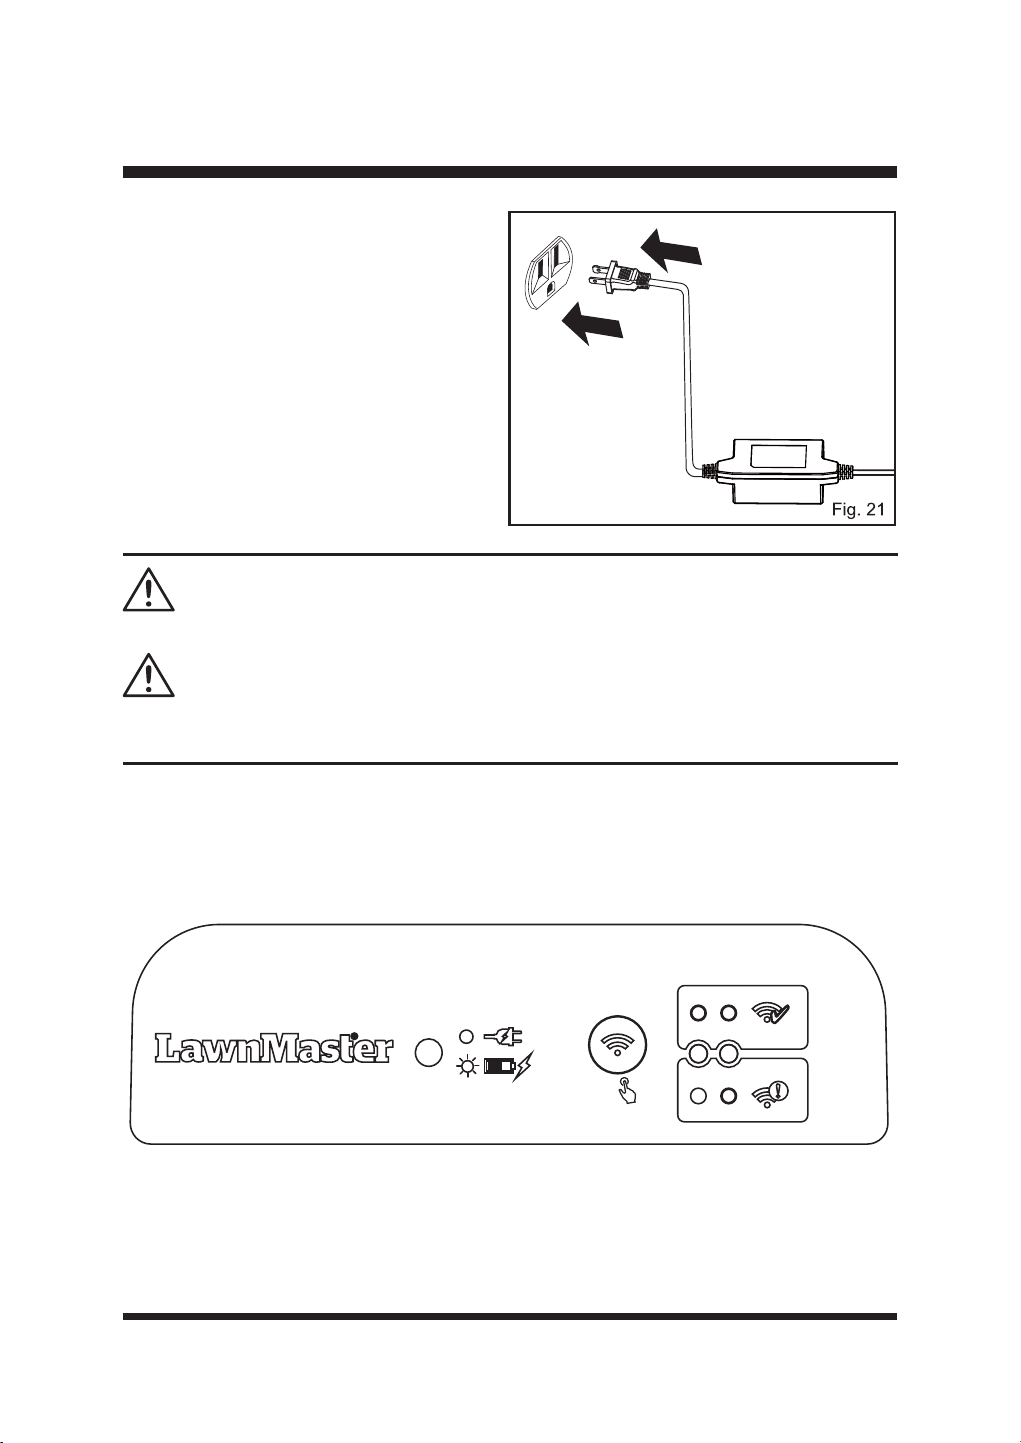
Ŷ )LUVWFRQQHFWWKHH[WHQVLRQFDEOHWRWKHSRZHUDGDSWHU$OLJQWKHQRWFK
①
RQWKHH[WHQVLRQ
cable with the groove (
②
RQWKHDGDSWRUDQGWXUQWKHORFNLQJVOHHYH
③
FORFNZLVHWRORFN
LQWRSODFH)LJ
7KHQFRQQHFWWKHEDVHVWDWLRQ¶VSRZHUFRUGWRWKHH[WHQVLRQFDEOH$OLJQWKHQRWFK
①
RQ
the power cord with the groove (
②
RQWKHH[WHQVLRQFDEOHDQGWXUQWKHORFNLQJVOHHYH
③
FORFNZLVHWRORFNLQWRSODFH)LJ
1 2
3
26
ASSEMBLY
Do not put the power cable in the working area, or the mower may cut the power cable.
5HFKDUJHWKHPRZHURQO\ZLWKWKHEDVHVWDWLRQVSHFL¿HGE\WKHPDQXIDFWXUHU,QFRUUHFWXVHPD\
result in electric shock, overheating or leakage of corrosive liquid from the battery.
WARNING
WARNING
Charging Indicators
When the base station is installed successfully and the power adaptor is connected to an electrical
outlet, the LED on the base station will be solid green. Check the LED status as below to make
sure the connection between the base station and power source is OK.
5S
Ŷ 3RVLWLRQWKHSRZHUDGDSWRURQWKH
ground as shown to protect from water.
Alternatively, to keep it away from standing
water, the power adaptor can be wall
mounted by screwing it to the wall through
WKHKROHVSURYLGHG)LJ
Ŷ &RQQHFWWKHSRZHUDGDSWRUWRD
240V wall socket. If the power supply is
connected to an electrical outlet outdoors,
make sure the electrical outlet is always in
a dry place and the wattage is compatible
with the mower.
27
ASSEMBLY
IMPORTANT! The battery pack is not charged when it is purchased. Before using the mower, read
all safety precautions, and follow the instructions in the Battery Pack section. With regular use, it
will need shorter charging time. If storing for a prolonged period of time, remove the battery. When
ready to use again, charge the battery pack.
WARNING
LED on the Base Station Status Action
Solid green
Base station is connected
successfully; the robotic mower is
fully charged.
/
Flashing green The robotic mower is charging. /
Off No power supply.
Check the power adaptor,
cord, breakers, and fuses.
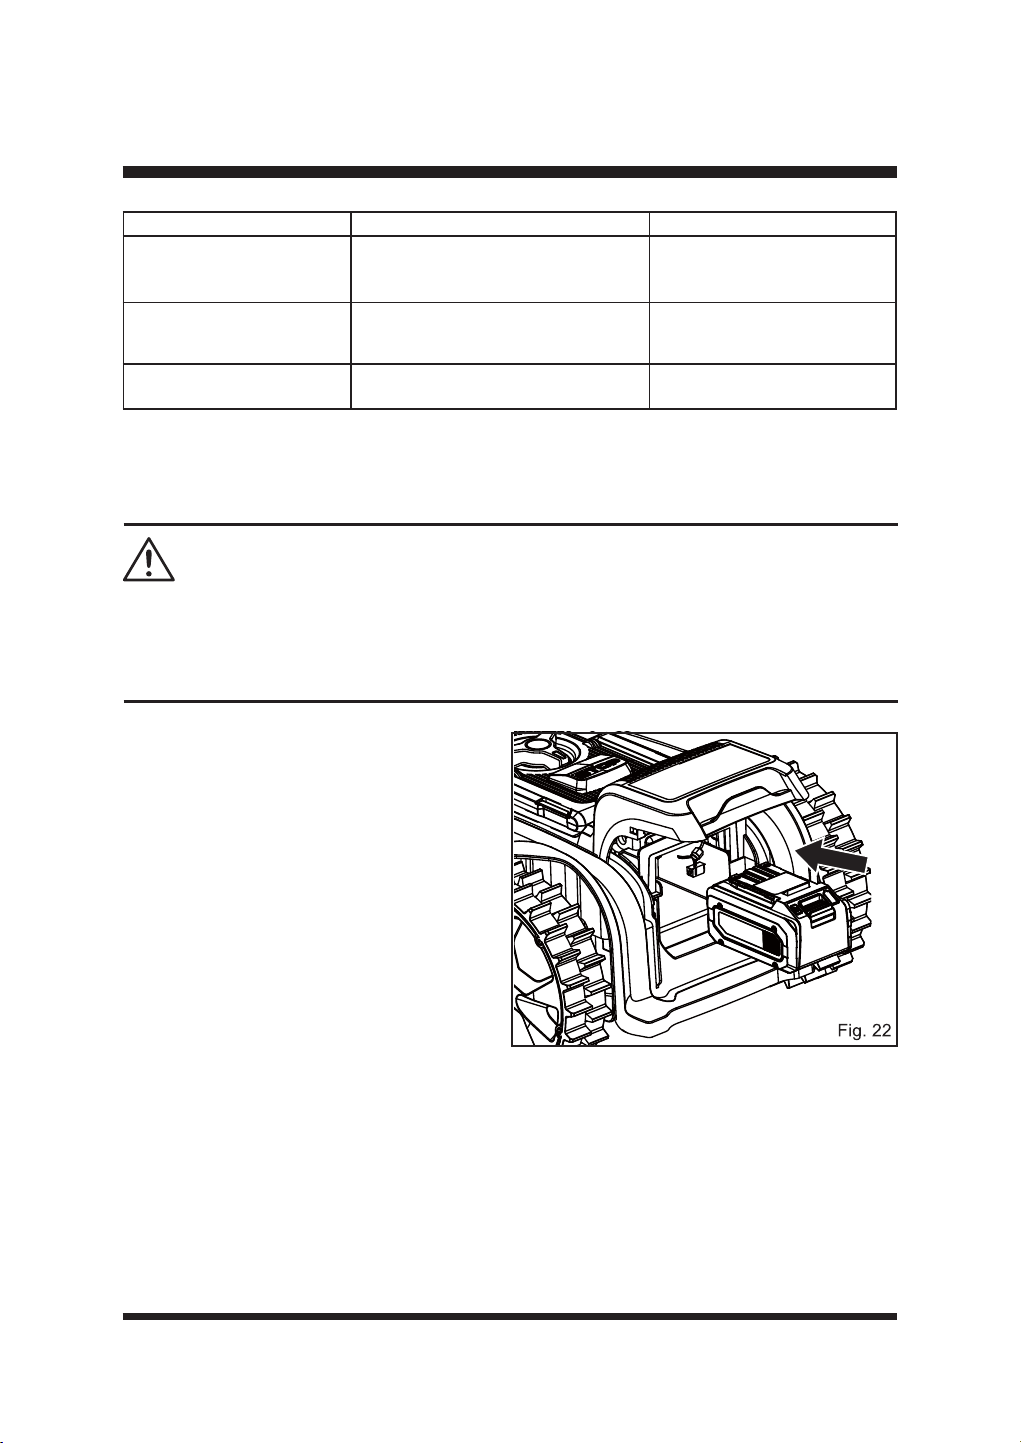
INSTALLING/REMOVING THE BATTERY PACK
To install the battery pack:
Ŷ /LIWWKHEDWWHU\FRPSDUWPHQWFRYHU
Ŷ $OLJQWKHVXSSRUWUDLOVORFDWHGZLWKLQWKH
battery compartment with the guides in the
battery pack, and then insert the battery
SDFNLQWRWKHFRPSDUWPHQW)LJ
Ŷ 3XVKWKHEDWWHU\SDFNXQWLO\RXKHDUD³FOLFN´
Ŷ &ORVHWKHEDWWHU\FRPSDUWPHQWFRYHU
NOTE: Make sure that the battery pack
¿UPO\VQDSVLQWRSODFHDQGLVVHFXUHGWRWKH
mower before starting operation. If the battery
compartment cover is not closed properly,
“Close the battery cover” will display on the
main screen.
28
ASSEMBLY
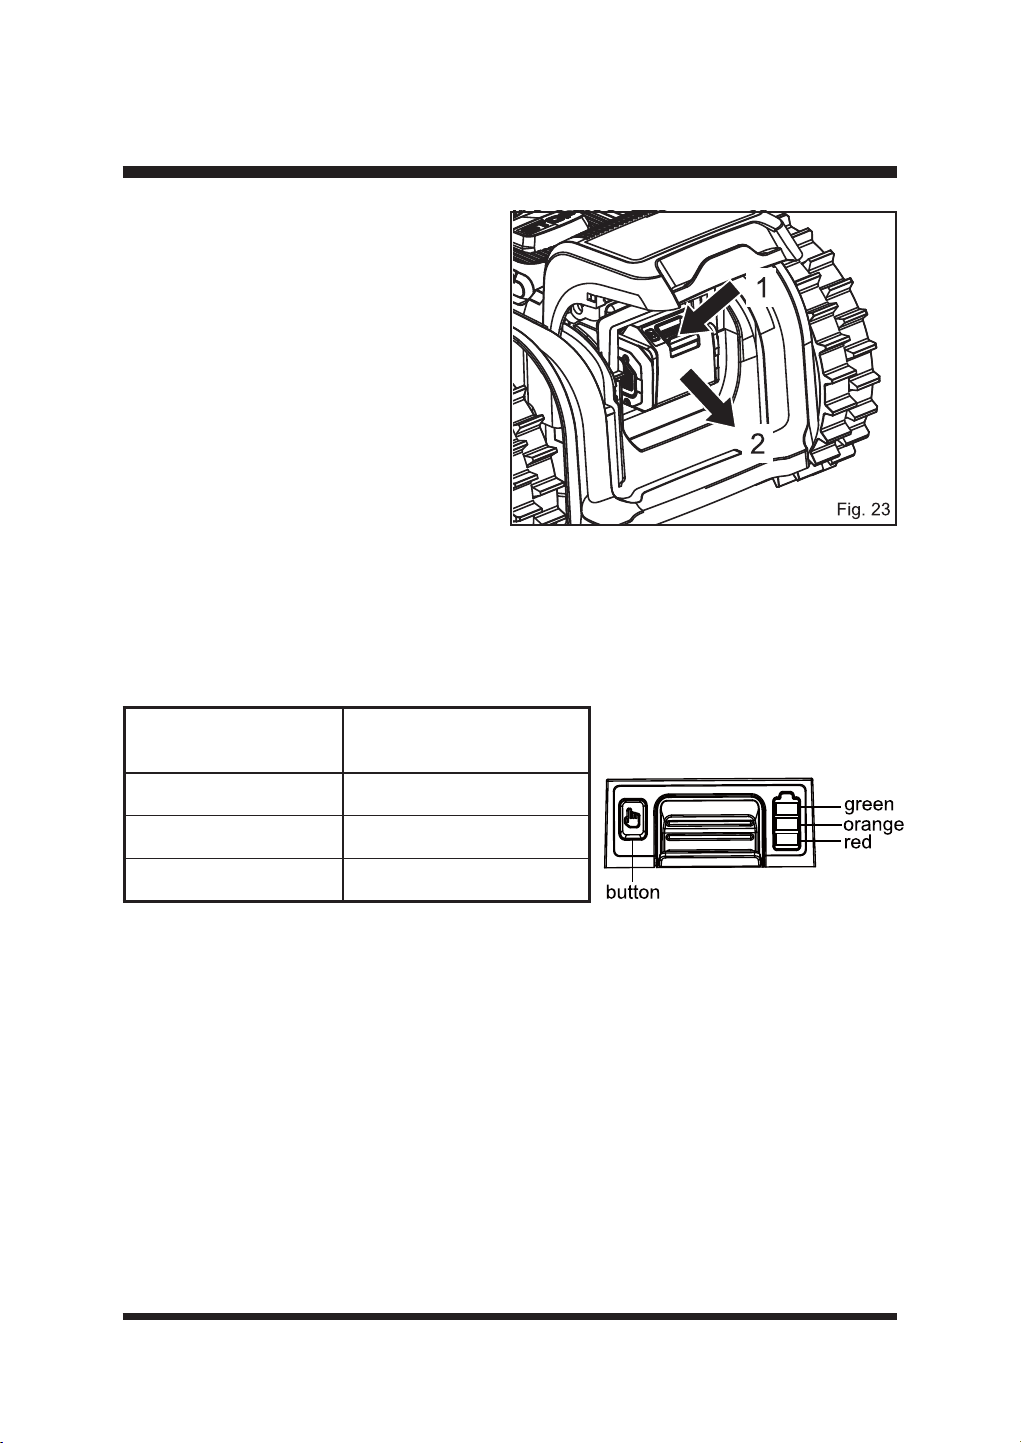
To remove the battery pack:
Ŷ 6WRSWKHPRZHU/LIWWKHEDWWHU\
compartment cover.
Ŷ 3UHVVDQGKROGWKHUHOHDVHEXWWRQRQ
WKHEDWWHU\SDFNJUDVSWKHEDWWHU\
SDFN¿UPO\DQGSXOORXWRIWKHEDWWHU\
FRPSDUWPHQW)LJ
Ŷ &ORVHWKHEDWWHU\FRPSDUWPHQWFRYHU
BATTERY LED PANEL
Ŷ 7KHSDQHOFRQVLVWVRI/('VRQWKHEDWWHU\3UHVVDQGKROGWKHEXWWRQWKHQUHOHDVHLWWKH
LEDs will show you the charge levels.
Ŷ 7KHEDWWHU\¶VFKDUJHOHYHOFDQEHFKHFNHGHLWKHUZKHQWKHEDWWHU\LVDWWDFKHGRQWKHFKDUJHU
mower or removed from the charger/mower.
LEDs on Battery
(Continuous Lighting)
Battery Capacity
/('VLQFJUHHQ
Fully charged
/('VRUDQJHUHG
/('UHGRQO\
5HFKDUJHUHTXLUHG
Indicator Lights
29
OPERATION
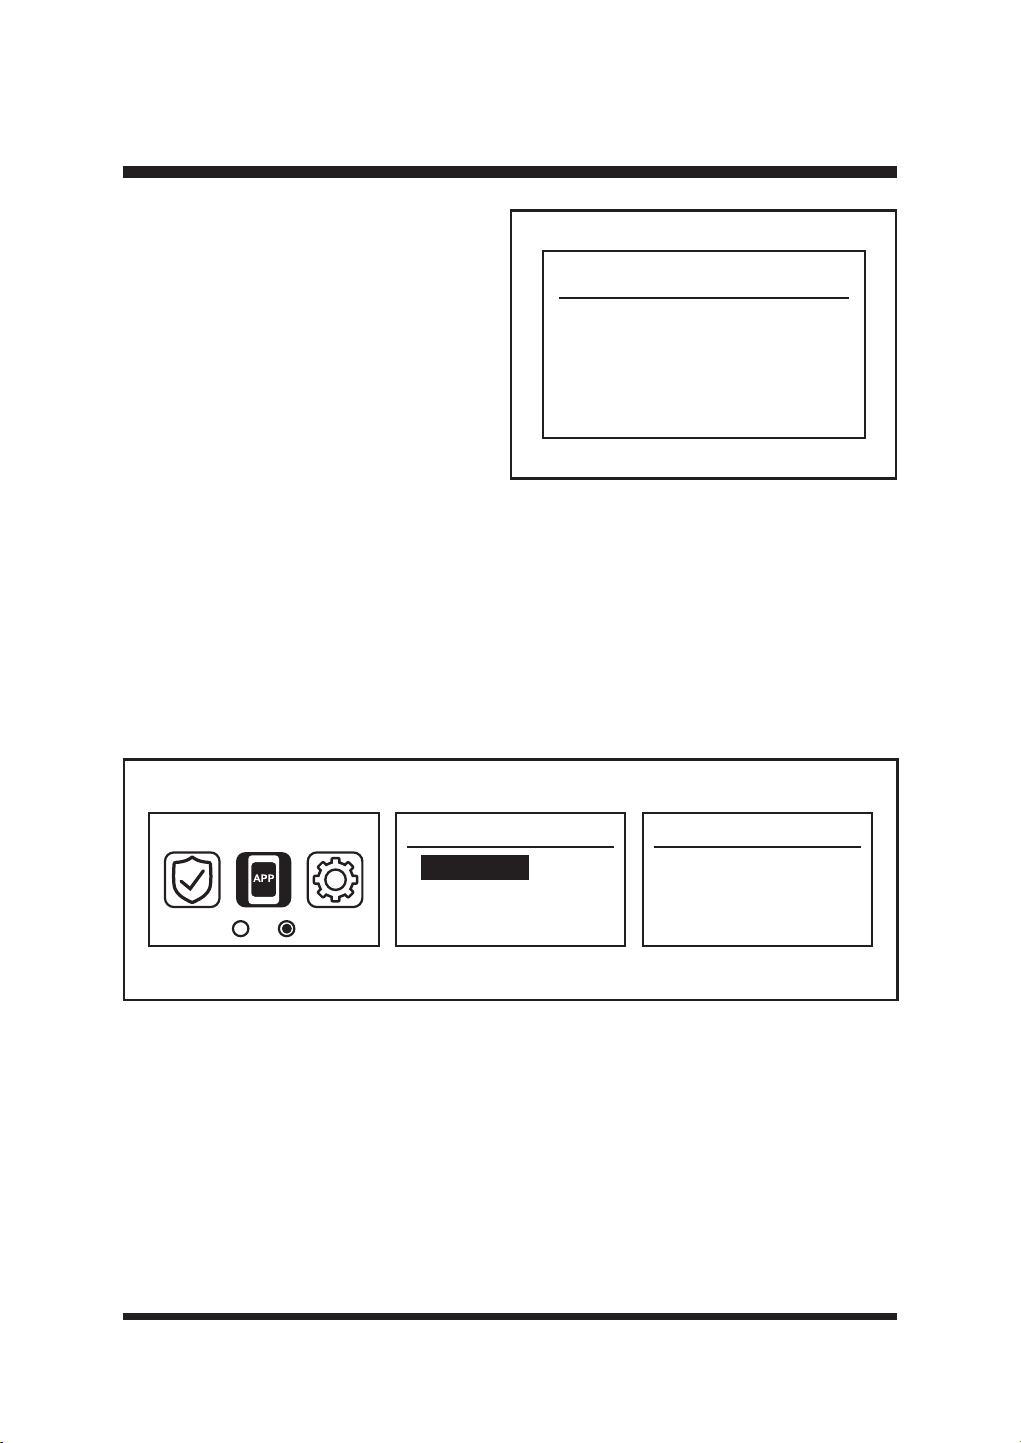
Control Panel (Fig. 25)
POWER ON AND FIRST USE
Ŷ 0DNHVXUHWKHEDWWHU\LVVHFXUHGLQSODFHDQGWKHEDVHVWDWLRQLVLQVWDOOHGFRUUHFWO\DQG
powered on successfully.
Ŷ 3ODFHWKHPRZHURQWKHEDVHVWDWLRQ0DNHVXUHWKHPRZHU¶VFKDUJLQJVWULSVDUHIXOO\FRQQHFWHG
ZLWKWKHFRQWDFWVWULSRIWKHEDVHVWDWLRQ)LJ7KHPRZHUZLOODXWRPDWLFDOO\VWDUWLQLWLDOL]DWLRQ
)LJ,WZLOOWDNHDERXWVHFRQGVWRFRPSOHWHWKLVSURFHVV7KHPRZHUZLOOEHHSWZLFHDQG
WKH/&'SDQHOZLOOGLVSOD\WKH0DLQ6FUHHQ)LJ
Ŷ 7KH*36LFRQRQWKHPDLQVFUHHQZLOOURWDWHZKLOHWKHPRZHULVEHLQJSRVLWLRQHG:KHQWKH
PRZHULVSRVLWLRQHGVXFFHVVIXOO\WKH*36LFRQZLOOEHVROLGVHHSDJH
NOTE: The robotic mower will recheck the GPS position for up to three minutes every time it
returns to the base station. When the GPS signal is good and the positioning is complete, the GPS
icon will be solid. When affected by weather or if the base station is covered by a metal covering,
WKH*36VLJQDOZLOOEHZHDNDQGWKH*36LFRQZLOOÀDVK
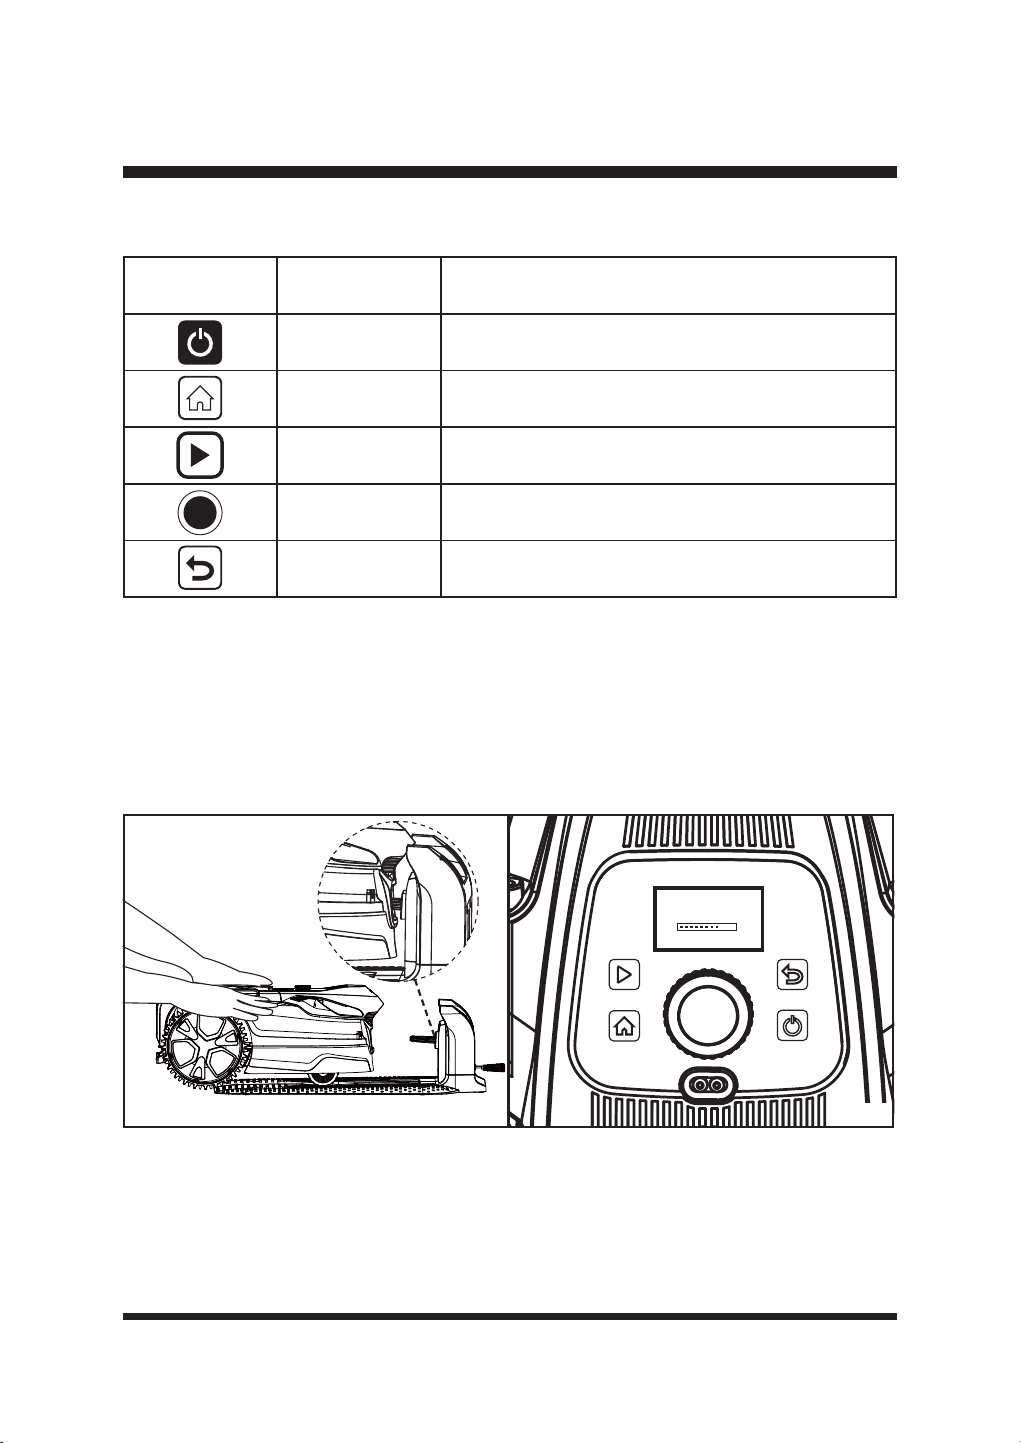
Button Name Function
On/Off Button Press to turn on/off the robotic mower.
HOME Button Press to send mower to base station.
Start Button Press to start mowing.
Selection Dial
Turn right or left to select the menu settings. Press to
FRQ¿UP
Back Button Press to return to the previous level.
LawnMaster
Fig. 24 Fig. 25
30
Ŷ 7KHEDWWHU\LVVXSSOLHGLQDSDUWLDOO\FKDUJHGVWDWHDQGZLOOUHTXLUHFKDUJLQJEHIRUHXVH$OORZ
WKHEDWWHU\WRIXOO\FKDUJHEHIRUH¿UVWXVH
OPERATION
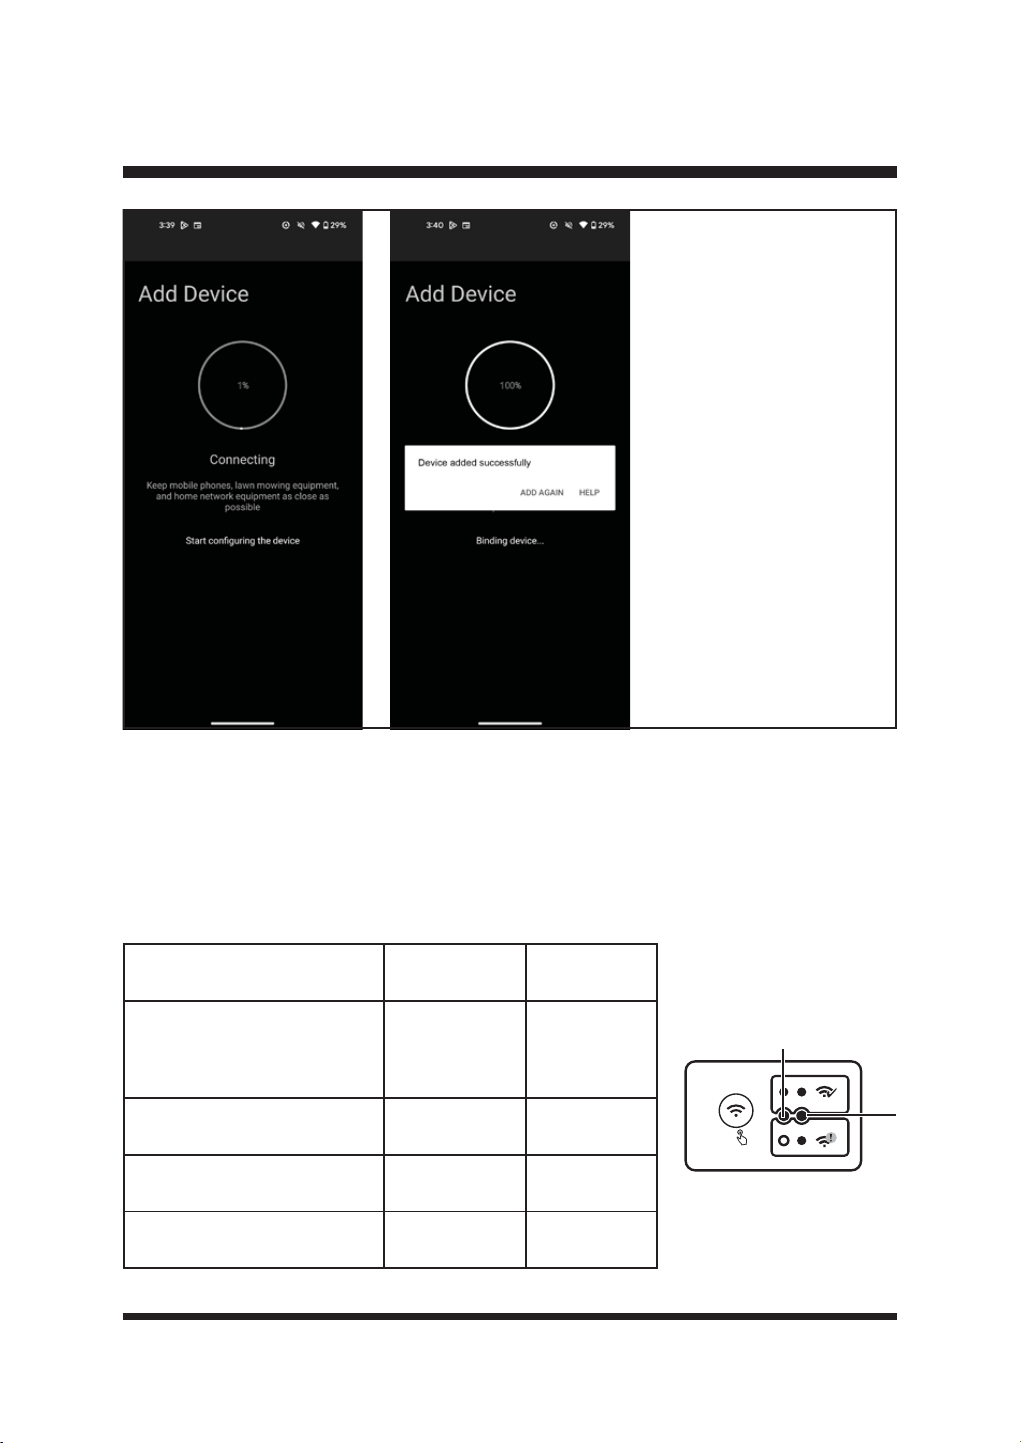
WI-FI CONNECTION
NOTE: This LawnMaster Robotic Lawnmower
VXSSRUWV*+]:L)LQHWZRUNVDQGLVFRPSDWLEOH
with Apple iOS 13 and above & Android 5.0 and
above.
Download the Lawnmaster app by scanning the
QR code. The app can be also be downloaded
from the Apple App store or Google Play Store by
searching “OcuMow”. Open the app and create a
SUR¿OH
Open the app, select your location and create a user account.
Download address:
Apple App store https://apps.apple.com/us/app/ocumow/id6450198129
Google play https://play.google.com/store/apps/details?id=com.cleva.bluetoothmower
NOTE: The robotic mower is paired with the base station during production. When you connect the
base station using the app, the mower must be connected into the base station. Ensure that the
phone, the mower, and the base station are as close as possible.
Your mower connects to your phone using a cloud connection. This connection is provided via
a gateway in the charging station. First, the base station must be connected to your home Wi-Fi
network.
Ŷ :KHQWKHEDVHVWDWLRQLVFRQQHFWHGVXFFHVVIXOO\DQGWKHSRZHUDGDSWRULVFRQQHFWHGWRDQ
electrical outlet, the signal indicator on the base station will be solid blue.
Ŷ 3UHVVDQGKROGWKH:L)LFRQQHFWLRQVHWWLQJEXWWRQIRUVHFRQGV7KHEDVHVWDWLRQVWDUWV
WKH:L)LSDLULQJ7KHVLJQDOLQGLFDWRURQWKHEDVHVWDWLRQÀDVKHVEOXHVORZO\7KLVODVWVIRU
minutes. Make Wi-Fi connection within this duration.
Ŷ 2SHQWKH$SSDQGFRQ¿JXUHWKHQHWZRUNDFFRUGLQJWRWKHDSSRSHUDWLRQSURFHVV)LJ

31
OPERATION
32
OPERATION
Ŷ:KHQWKHEDVHVWDWLRQLVVXFFHVVIXOO\FRQQHFWHGWRWKH:L)LQHWZRUNERWKVLJQDOLQGLFDWRUDQG
Wi-Fi indicator on the base station will be solid blue.
Ŷ,I:L)LFRQQHFWLRQIDLOVRUWKH:L)LQHWZRUNLVGLVFRQQHFWHGWKHVLJQDOLQGLFDWRU$RQWKH
EDVHVWDWLRQZLOOEHVROLGEOXH7KH:L)LLQGLFDWRU%ZLOOEHWXUQHGRII
Ŷ7RUHVHW:L)LSUHVVDQGKROGWKH:L)LFRQQHFWLRQVHWWLQJEXWWRQIRUVHFRQGV7KHEDVH
station starts the Wi-Fi pairing. This lasts for 4 minutes. Repeat above steps in Fig. 26.
Status
Signal
Indicator (A)
Wi-Fi
Indicator (B)
The base station is connected
successfully, and power
adaptor is connected
successfully
Solid blue Off
Pairing %OXHÀDVKLQJ Off
Successful Wi-Fi Connection Solid blue Solid blue
Wi-Fi Connection Failed / The
Wi-Fi network is disconnected
Solid blue Off
A
5S
B
Fig. 26
33
OPERATION
Camera Icon Status
Solid
Communication of the
camera is normal.
Flashing
Communication of the
camera is abnormal.
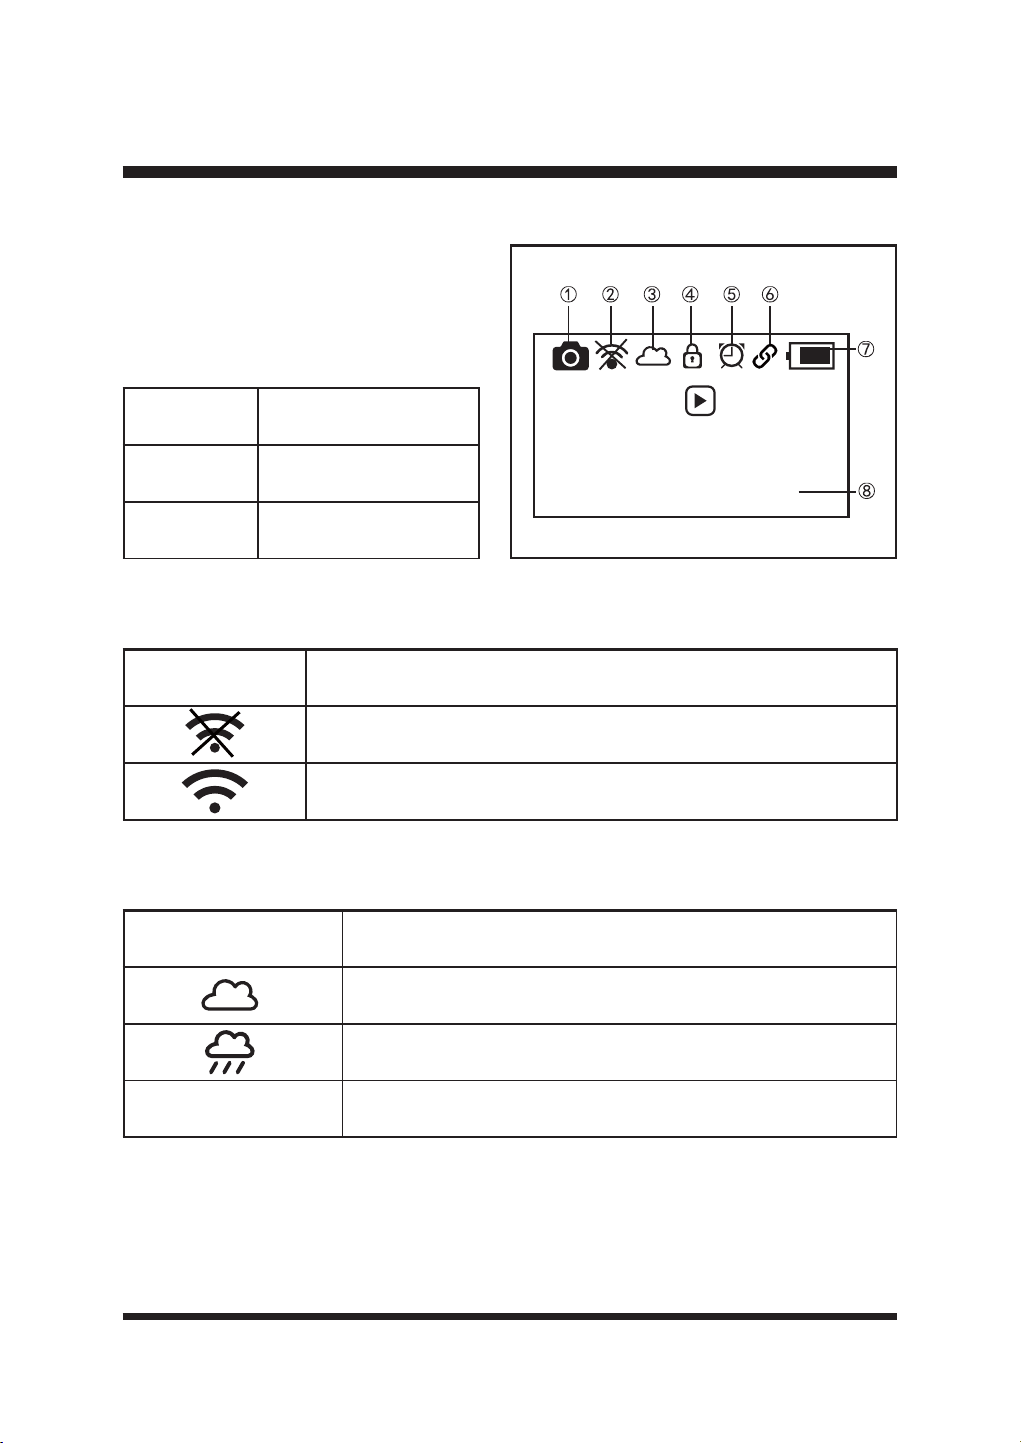
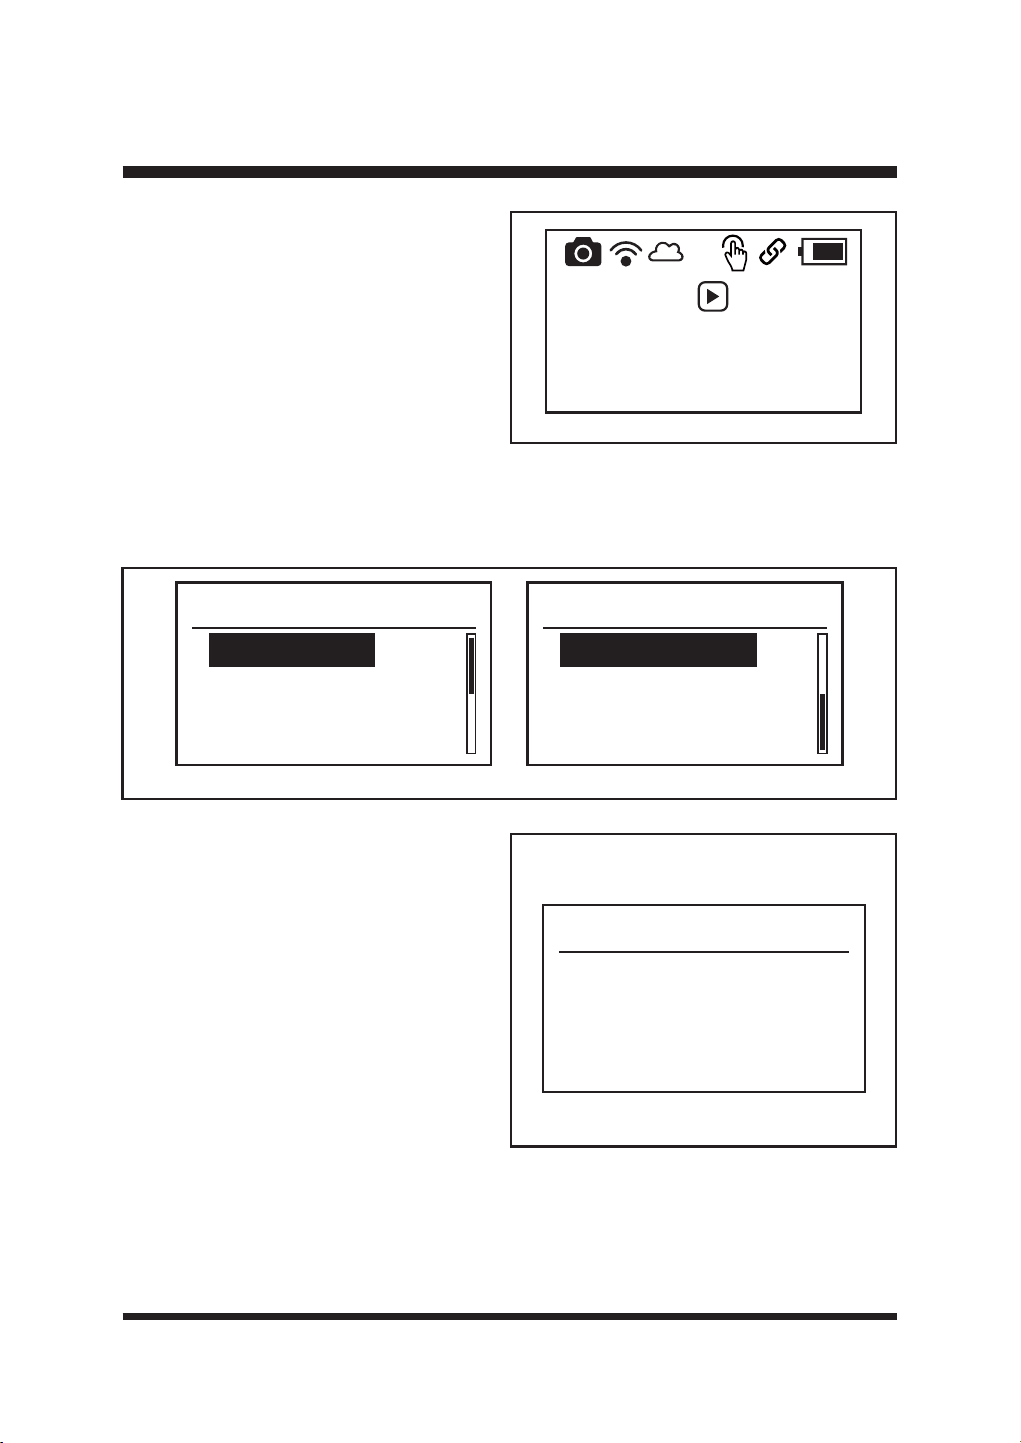
MAIN SCREEN (FIG. 27)
This section explains the symbols shown on
the Main Screen.
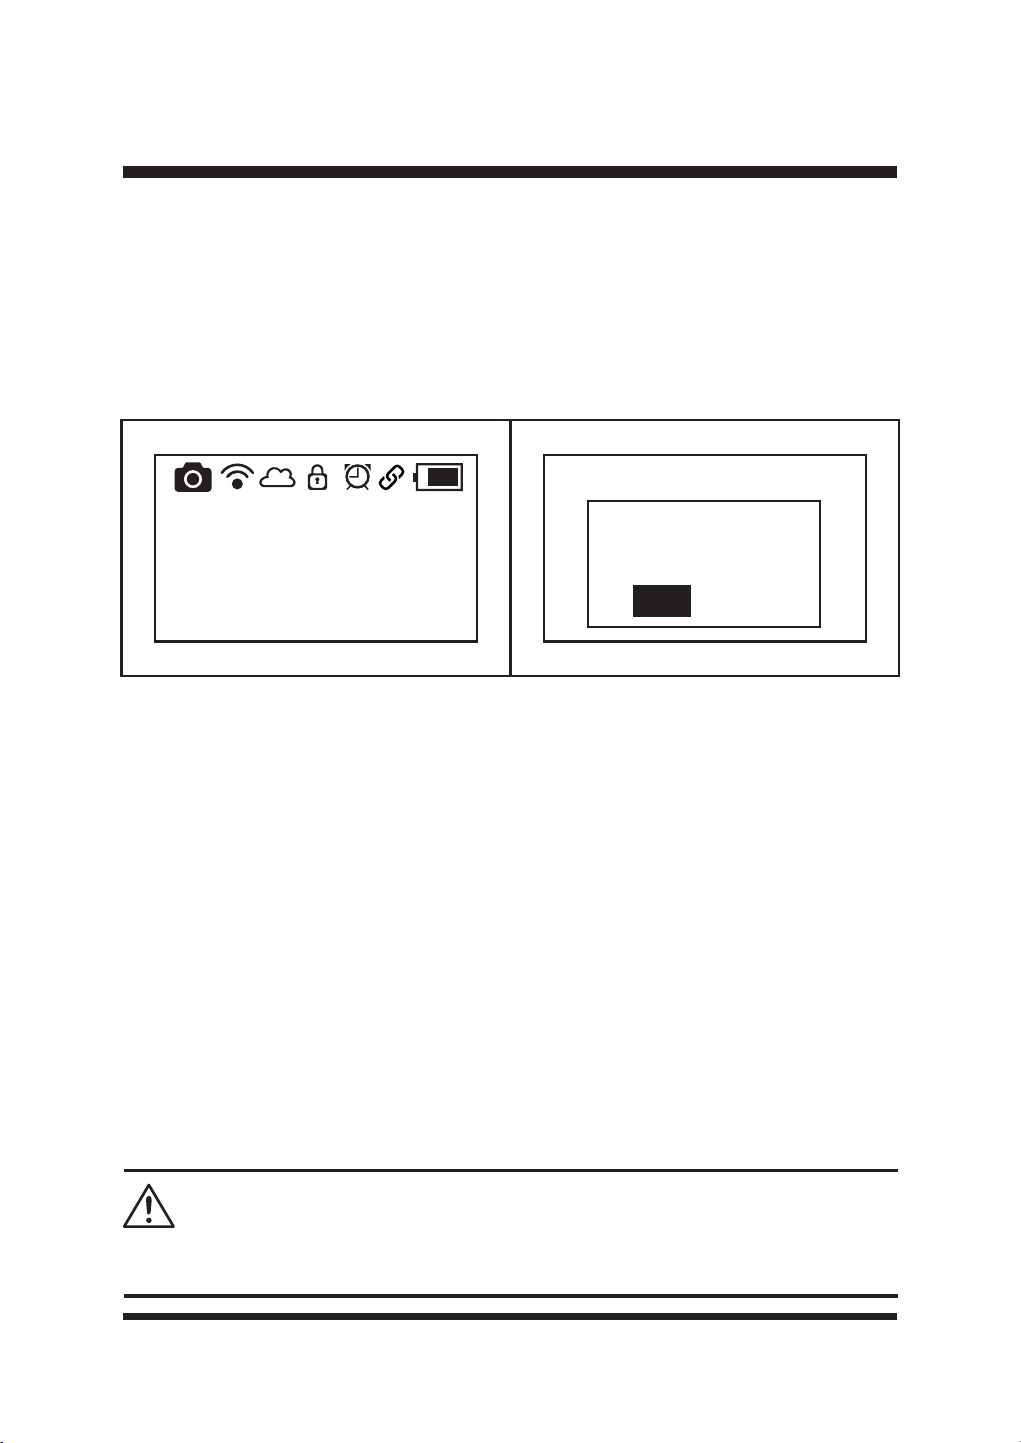
Ś
Camera Icon
The camera icon is always on when the
robotic mower is on.
ś
App Icon
Ŝ
Rain Sensor Icon
Press then
press dial to
start mowing
08-11-2024 13:57
App Icon Status
The base station is not connected to Wi-Fi .
The base station is connected to Wi-Fi successfully.
Rain Sensor Icon Status
The rain sensor is not activated.
The rain sensor is activated.
Empty The rain sensor is off.
Fig. 27

34
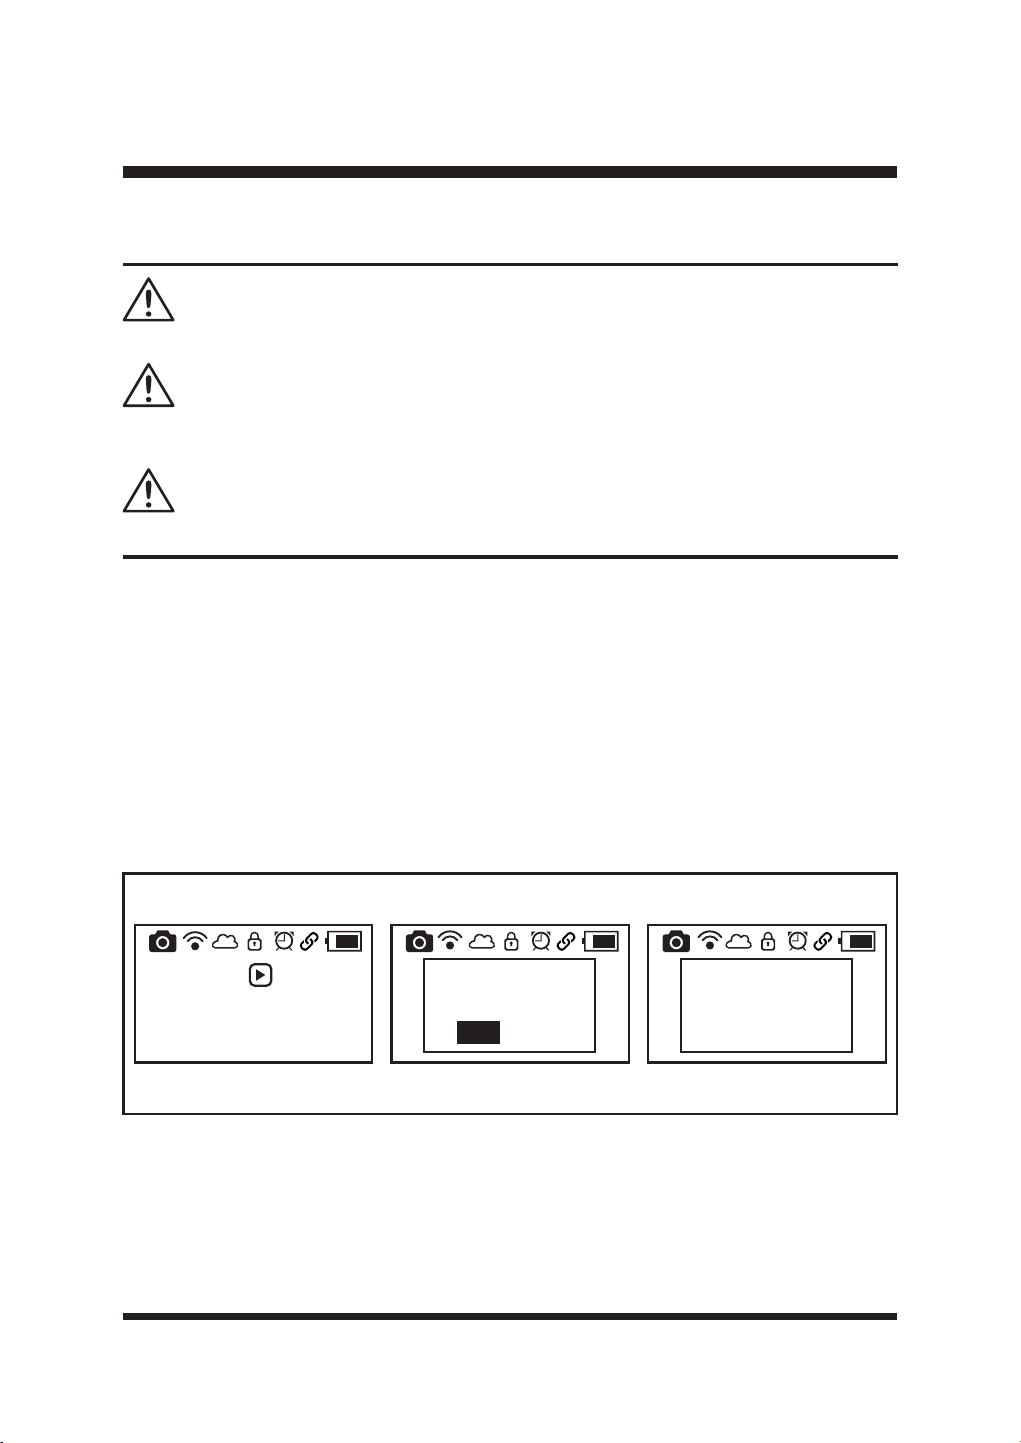
GPS Icon Status
6ROLG The robotic mower is positioned successfully.
5RWDWLQJ The robotic mower is being positioned.
)ODVKLQJ %DGVLJQDO5HIHUWR7URXEOHVKRRWLQJ6HFWLRQ
1RYDOLG*36GDWD5HIHUWR7URXEOHVKRRWLQJ6HFWLRQ
Temporary problem on GPS communication; or the GPS module is
GDPDJHG5HIHUWR7URXEOHVKRRWLQJ6HFWLRQ
Battery Indicator Status
The robotic mower is fully charged.
Low power.
Charging
The robotic mower is in charging station, no battery pack inserted.
OPERATION
Working Mode Icon Status
Schedule Mode
Drop & Mow Mode
ŝ
Lock Icon
Only visible when a PIN is set. Refer to page 40 for more details.
Ş
Working Mode Icon
Please refer to page 36-38 for a more detailed overview of these two modes.
ş
GPS Icon
The GPS icon is on when the robotic mower is on.
Š
Battery Indicator
35
Fig. 28
OPERATION
š
Time and Date
7KHWLPHZLOOEHVHWIROORZLQJ*36LQIRUPDWLRQZKHQWKHPRZHULVSRZHUHGRQ¿UVWWLPHRUDIWHU
factory reset. The default time setting is Summer Time (i.e. one hour ahead of the standard
UHJLRQDOWLPH]RQH
Changing the time manually will override this.
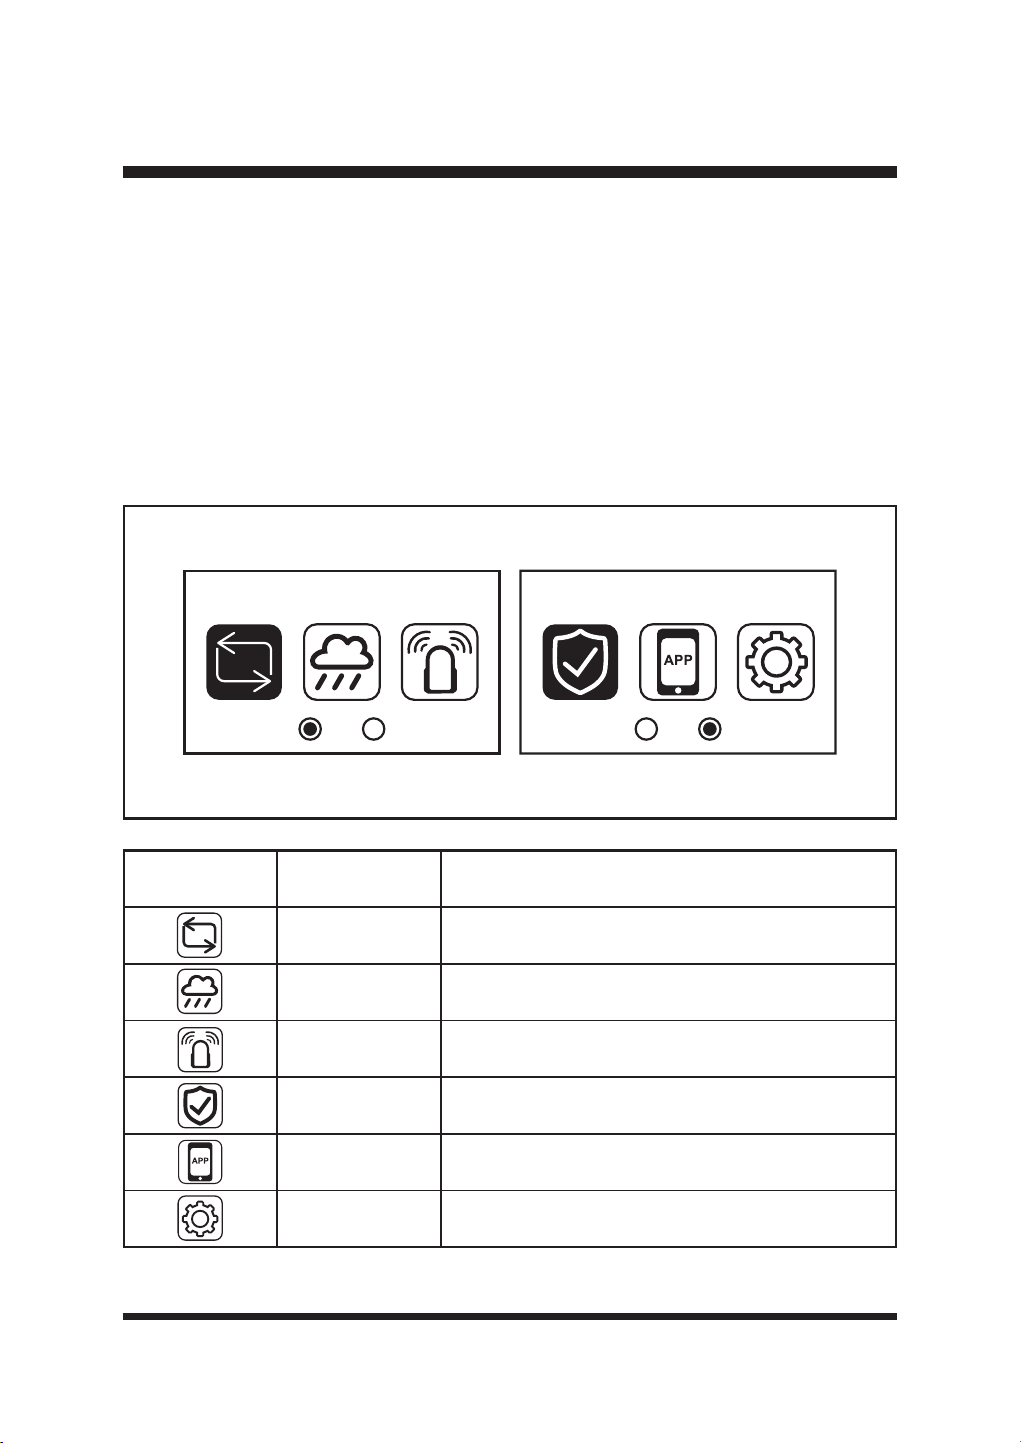
SETTINGS MENU
3UHVVWKH6HOHFWLRQ'LDOUHIHUUHGWRDIWHUZDUGVDVWKH³'LDO´WRVHOHFWWKHVHWWLQJVPHQX
7XUQWKH'LDOULJKWRUOHIWWRVFUROOWKURXJKWKHVHWWLQJVPHQXLFRQV)LJ
Press the Dial again to enter the submenu for each setting.
Press the back arrow to go back in the menu.
Mode Security
Icon Name Function
Mode
Select the working mode: Schedule or Drop & Mow (see
SDJH
Rain Sensor
Rain sensor setting, to turn the rain sensor function on
and off and select the desired time delay.
Ultrasonic Turn ultrasonic sensors on and off.
Security Adjust security settings, such as PIN code protection.
App App connection operation
Settings General settings
36
OPERATION
Mode
Schedule
Drop & Mow
Fig. 30
Schedule
Start Schedule
Amend Schedule
00
08:07 - - 17:24
12 24
Mon
Tue
00
08:07 - - 17:24
12 24
Fri
Sat
00
08:07 - - 17:24
12 24
Wed
Thu
00
08:07 - - 17:24
12 24
Sun
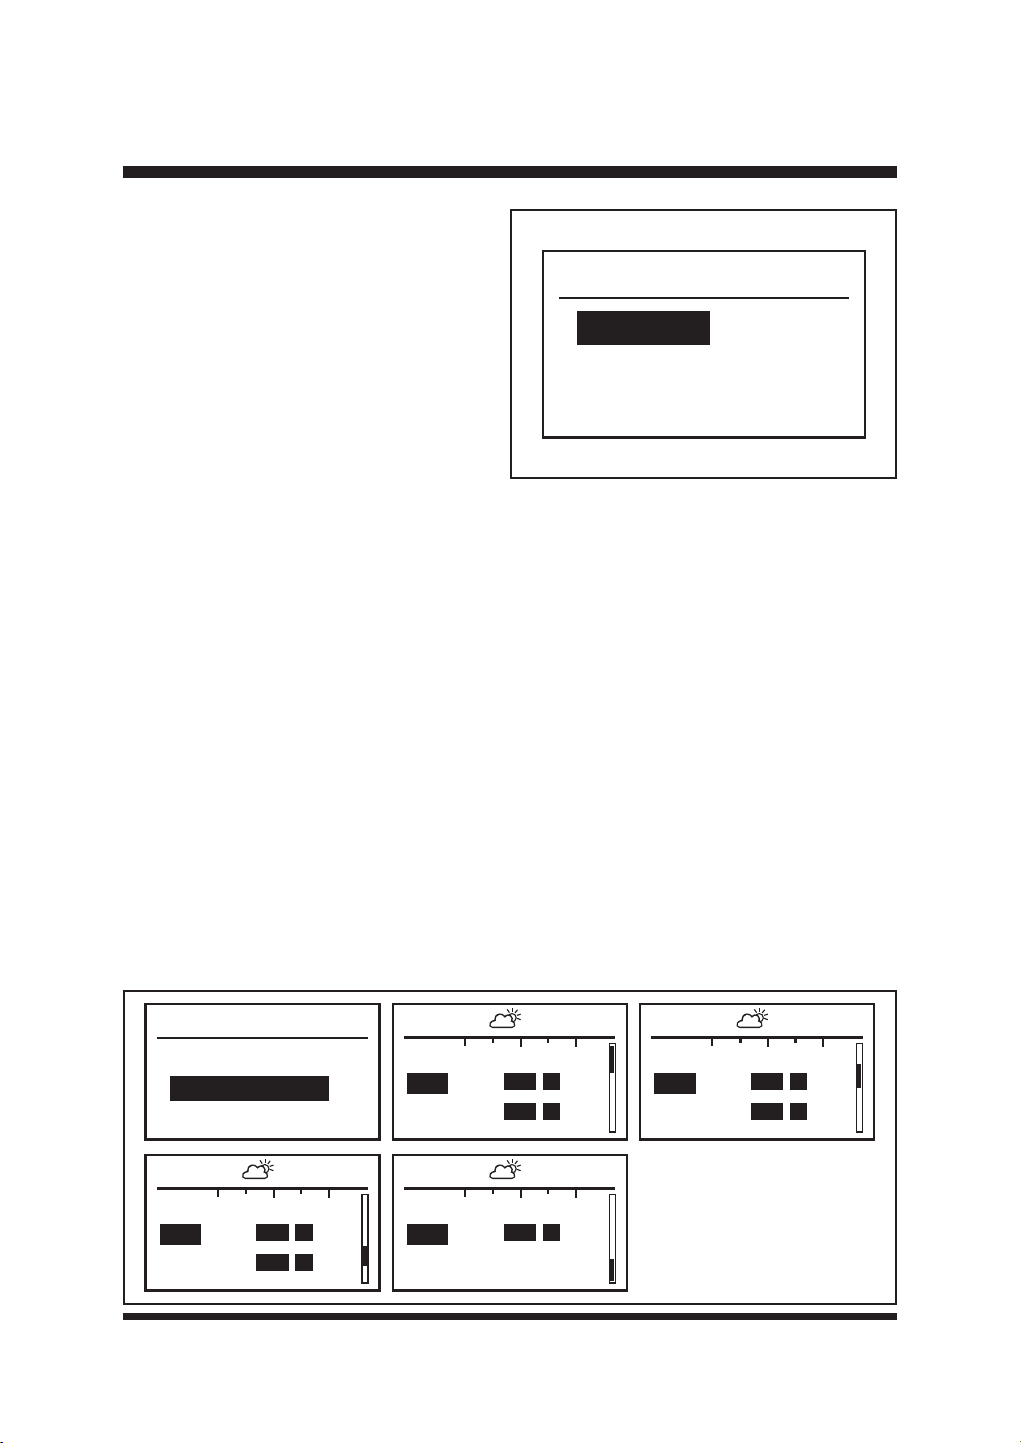
Mode Page
Press the Dial and select the Mode page. Turn
the Dial to switch between Schedule and Drop
0RZ)LJ6FKHGXOHLVWKHGHIDXOWPRGH
setting.
Schedule Mode
7KHURERWLFPRZHUPRZVWKHODZQZLWKLQWKHSURSHUO\GH¿QHGERUGHUVLQGD\OLJKWKRXUVIROORZLQJ
the set schedule. It will automatically recharge. It will alternately charge and mow until the end of
the set working session. A schedule of 08:00 to 17:00 is set by default.
(QVXUHWKHWLPHDQGGDWHDUHVHWDFFRUGLQJWRWKHORFDOWLPH]RQH
Choose the start and end times:
Ŷ6HOHFW³6FKHGXOH´3UHVVWKH'LDOWRFRQ¿UP
Ŷ7XUQWKH'LDOWRVHOHFW$PHQG6FKHGXOHDQGWKHQSUHVVWKH'LDOWRHQWHUWKHVFKHGXOHRYHUYLHZ
SDJH)LJ
Ŷ2QWKHVFKHGXOHRYHUYLHZSDJHWKHFXUUHQWZRUNLQJVHVVLRQVDUHKLJKOLJKWHGZLWKDVROLGEDU
The sunrise and sunset times are shown at the top of the screen. NOTE: The mower will not
operate outside of these times.
Ŷ7XUQWKHGLDOWRWRJJOHWKURXJKWKHGDLO\VFKHGXOHV)LJ
Ŷ7XUQWKHGLDOWRWKHGHVLUHGGD\DQGSUHVVWRVHOHFW
Ŷ$GMXVWHDFKGLJLWRIWKHVWDUWWLPHDQGHQGWLPHE\WXUQLQJWKH'LDODQGSUHVVLQJWRFRQ¿UP
Ŷ,IDZURQJGLJLWLVHQWHUHGSUHVVWKHEDFNEXWWRQWRUHWXUQWRWKHSUHYLRXVGLJLW
Fig. 29
37
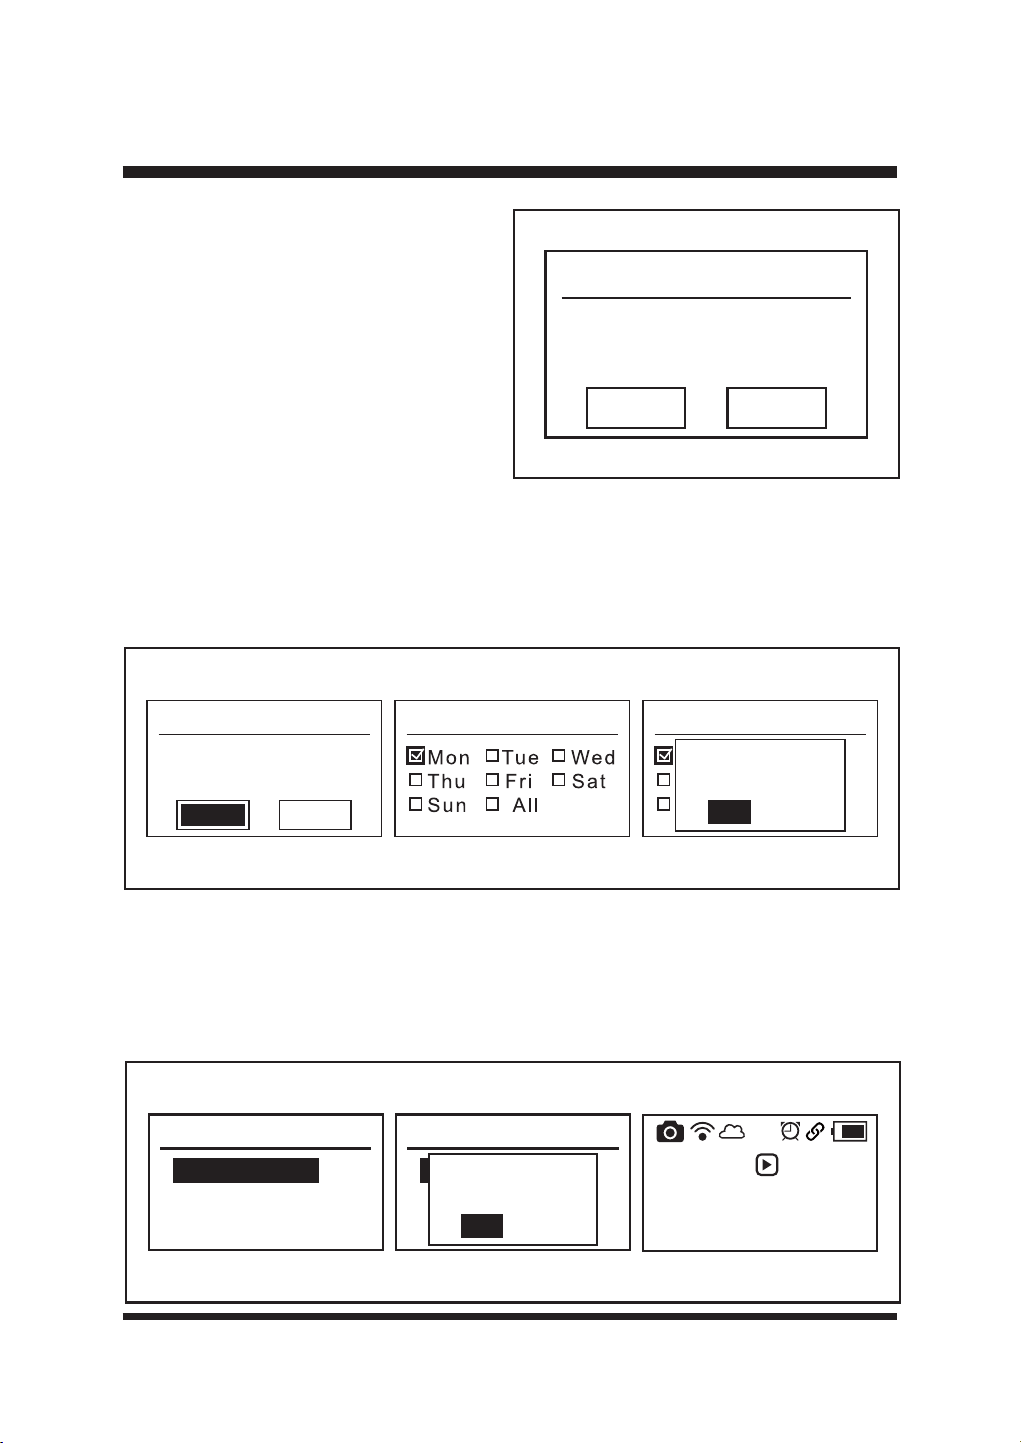
Monday
08:00-17:00
00:00-00:00
Copy Clear
Two working time periods can be set for each
day according to your requirements. The daily
working time settings can be copied to other
GD\V)LJ
To clear the time settings, turn the dial to
VHOHFW³&OHDU´DQGSUHVVWRFRQ¿UP)LJ
OPERATION
Fig. 31
To copy daily time settings to other days:
Ŷ7XUQWKH'LDOWRVHOHFW&RS\DQGWKHQSUHVVWKH'LDOWRHQWHUWKH&RS\SDJH)LJ
Ŷ7XUQWKH'LDOWRVHOHFWWKHGHVLUHGGD\DQGSUHVVWRFRQ¿UPZLWKDWLFN
Ŷ7RDSSO\WKHWLPHVWRDOOGD\VVHOHFW³$OO´
Ŷ3UHVVWKHEDFNEXWWRQVHOHFW<HVDQGSUHVVWKH'LDOWRFRQ¿UPFKDQJHV)LJ
Press the back button to return to the schedule overview page. The newly set start and end times
can be seen.
The mower schedule is now set. To start schedule, turn the Dial to select Start Schedule, and then
SUHVVWKH'LDOWRFRQ¿UP)LJ
Monday
08:00-17:00
00:00-00:00
Copy Clear
Copy Copy
Mon Tue We d
Thu Fri Sat
Sun All
Save Changes?
Yes
No
Fig. 32
Schedule
Start Schedule
Amend Schedule
Schedule
Start Schedule
Amend Schedule
Activate
Schedule Mode?
Yes
No
Press then
press dial to
start mowing
08-11-2024 13:57
Fig. 33
38
5HIHUWR67$57,1*67233,1*7+(52%27,&02:(5RQSDJHWREHJLQWKH¿UVW
scheduled mowing session.
Drop & Mow Mode – the mower is sent out for a one-time mow.
7KLVPRGHFDQEHXVHGHLWKHURQ³0DLQ$UHD´LHWKHODZQWKDWFRQWDLQVWKHFKDUJLQJVWDWLRQRU
³2WKHU$UHD´HJIURQWODZQRUODZQDWDQRWKHUSURSHUW\
0DLQDUHD±WKHPRZHUZLOOPRZRQFHDQGUHWXUQWRWKHFKDUJLQJVWDWLRQ
2WKHUDUHD±WKHPRZHUZLOOPRZXQWLOWKHEDWWHU\UXQVRXWDQGZDLWRQWKHODZQWREHFROOHFWHG
and placed on the charging station.
Ŷ6HOHFW³'URSDQG0RZ´3UHVVWKH'LDOWRFRQ¿UP
Ŷ6HOHFW5DQGRP0RGHRU6SLUDO0RGHE\WXUQLQJWKH'LDO3UHVVWKH'LDOWRFRQ¿UP)LJ
Ŷ&KRRVHWKH0DLQ$UHDRU2WKHU$UHDDFFRUGLQJWR\RXUUHTXLUHPHQW
Ŷ3UHVVWKH'LDOWRFRQ¿UP)LJ
OPERATION
Drop & Mow
Random Mode
Spiral Mode
Random Mode
Main Area
Other Area
Press then
press dial to
start mowing
08-11-2024 13:57
Fig. 34
- Random Mode:
The robotic mower mows the lawn in a random pattern. It will automatically search for a suitable
ZRUNLQJDUHD,IWKHURERWLFPRZHUGRHVQRW¿QGJUDVVLWZLOOFKDQJHGLUHFWLRQDQGVWDUWUXQQLQJ
again in a new direction. The blades will not spin until the mower can detect grass for more than
5 seconds.
- Spiral Mode:
The robotic mower mows in a spiral outwards from where it is placed on the lawn. This is best
used to tidy up any areas that may not have been mowed during a random mowing session.
7KHURERWLFPRZHUZLOOVSLUDOIRUXSWRPLQXWHV$IWHUWKHVSRWFXWLV¿QLVKHGWKHPRZHUZLOO
start to mow in a random pattern automatically.
If the area to be mowed is too narrow for the robotic mower to carry out the spot cut, after
searching, the mower will mow in a random pattern automatically.
NOTE: The mower will beep when lifted and transported from different areas. This is a normal
warning sound.
39
OPERATION
Rain Sensor Page
7KHURERWLFPRZHULVHTXLSSHGZLWKDUDLQVHQVRU)LJ,WLVRQE\GHIDXOW
When it rains, the rain sensor will be activated. The robotic mower will stop mowing and return to
the base station. The time delay is effective from the time the sensor dries.
Ŷ7XUQWKH'LDOWRWKHUDLQVHQVRUPHQXDQGSUHVVWRVHOHFW
Ŷ7XUQWKH'LDODQGVHOHFWRQRURII
Ŷ6HOHFWWKHUHTXLUHGWLPHGHOD\XVLQJWKH'LDO7KLVFDQEHVHWEHWZHHQDQGKRXUV
NOTE: 7KHGHIDXOWGHOD\WLPHLVKRXUVDVVKRZQ)LJ7KHWLPHGHOD\SUHYHQWVODZQ
damage arising from cutting on wet lawn.
7RWXUQWKHUDLQVHQVRURIIWXUQWKH'LDOWRVHOHFW2IIDQGSUHVVWKH'LDOWRFRQ¿UP
Fig. 35 Fig. 36
Rain sensor
Off
On 2 h
Ultrasonic Page
Turn and press the Dial to enter the Ultrasonic
VHWWLQJVPHQX)LJ
The ultrasonic object sensors are turned on
by default. To turn the ultrasonic sensor off,
turn the Dial to select Off and press the Dial to
FRQ¿UP<HV
Ultrasonic
Off
On
Fig. 37

40
OPERATION
Security
Change PIN
PIN On/Off
Software Version
Security Page
Turn and press the Dial to enter the Security
SDJH)LJ7KLVSDJHLVXVHGWRFKDQJH
the PIN, switch the PIN on and off, and view
the software version.
Fig. 38
1) Change the PIN (Fig. 39)
Ŷ8VHWKH'LDOWRVHOHFW&KDQJH3,1DQGSUHVVWKH'LDOWRHQWHUWKH2OG3,1FRGHSDJHRQ¿UVW
XVHHQWHUWKHGHIDXOW3,1ZKLFKLV
Ŷ7XUQWKH'LDODQGSUHVVWRLQSXWWKHQHZ3,1FRGH&RQ¿UPRQFHDJDLQ
Ŷ3UHVVWKHEDFNEXWWRQWRH[LW
2) PIN On/Off (Fig. 40)
This function is used to turn the PIN on and off. When the PIN function is turned on, you need to
enter the PIN code to operate the control panel; when the PIN function is disabled, the control
panel can be directly operated.
Use the Dial to select PIN On/Off and press the Dial to enter the PIN Control page.
7XUQWKH'LDOWRVHOHFW'LVDEOHRU(QDEOHDQGWKHQSUHVVWKH'LDOWRFRQ¿UP<HV
PIN On/Off
Disable
Enable
PIN On/Off
Disable
Enable
Save Changes?
Yes
No
New PIN code
0000
Old PIN code
000 000
Confirm
Fig. 39
Fig. 40
41
OPERATION
Software Version
DEC
LCD
CAM
EXE
1 . 0 . 0 . 1
1 . 0 . 0 . 1
1 . 0 . 0 . 1
1 . 0 . 0 . 1
3) Software Version (Fig. 41)
This displays information about the robotic
mower’s software version. If necessary,
check the software version using this
setting.
Fig. 41
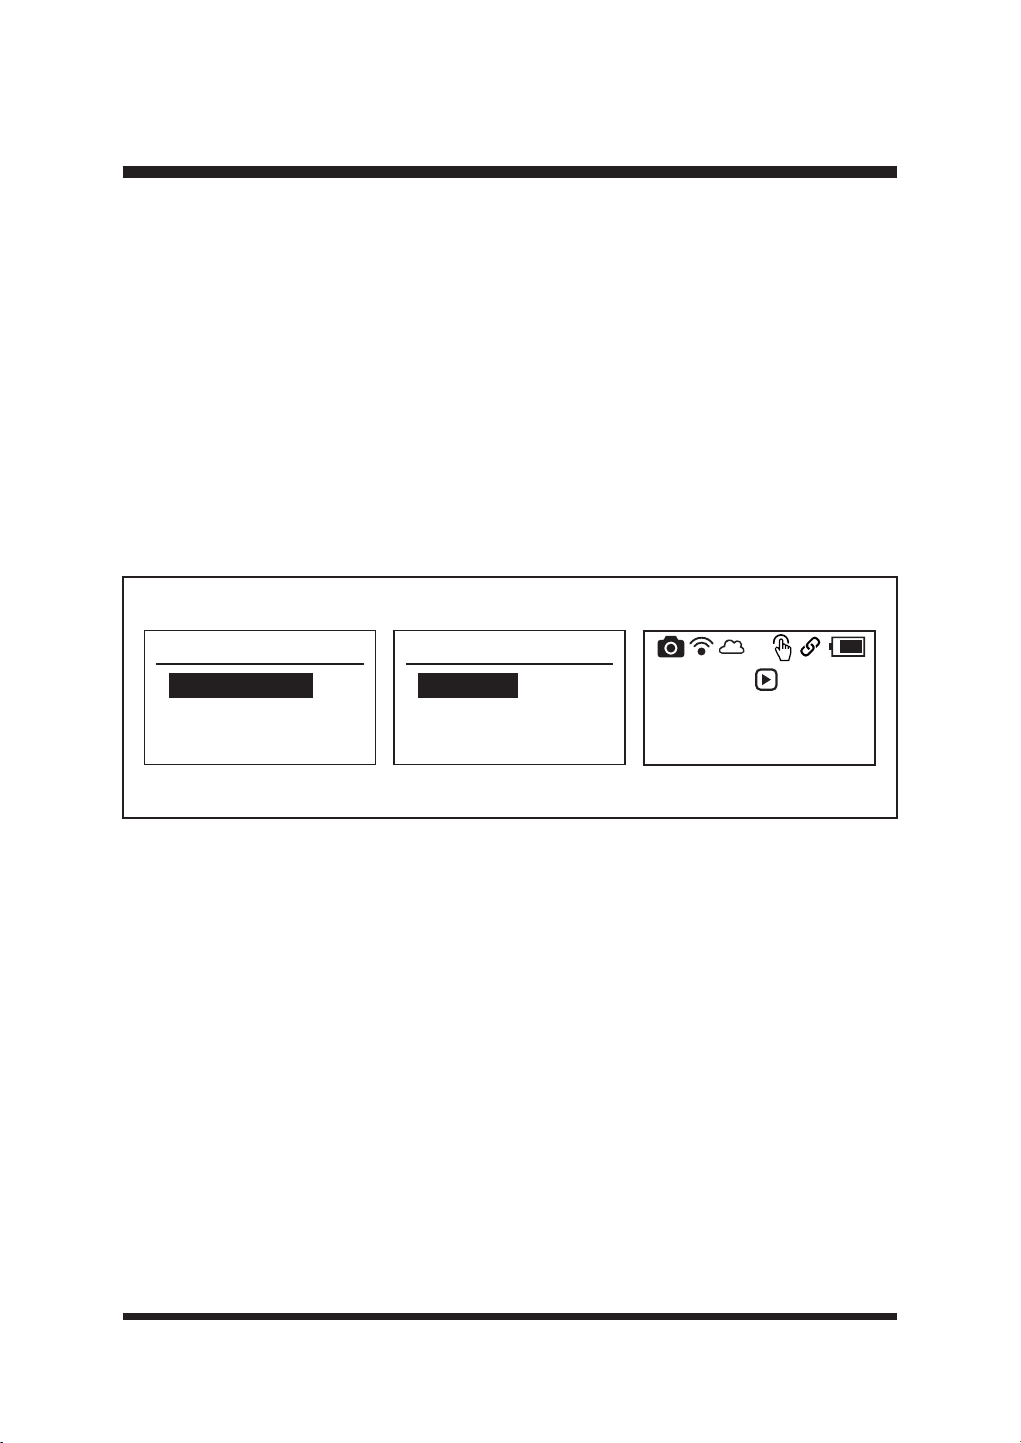
App Page
NOTE:The robotic mower is paired with the base station when it leaves the factory. If the robotic
mower breaks down and needs to be paired again, use this page to pair it.
This page operates to switch on the bluetooth signal of your robotic mower and add the mower to
the base station.
Turn and press the Dial to enter the App page. Use the Dial to select Connection and press the
'LDOWRHQWHUWKH&RQQHFWLRQSDJH)LJ
7KHQRSHQWKH$SSDQGFRQ¿JXUHWKHQHWZRUNDFFRUGLQJWRWKHDSSRSHUDWLRQSURFHVV)LJ
APP link
Connection
APP Connection
Open App to
check connection
Fig. 42

42
OPERATION
Fig. 43
43
OPERATION
When the robotic mower is successfully
connected to the base station, the main page
ZLOOGLVSOD\DVEHORZ)LJ
Press then
press dial to
start mowing
24-10-2024 12:00
Fig. 44
Settings Page
7XUQDQGSUHVVWKH'LDOWRHQWHUWKH6HWWLQJVSDJH)LJ7KLVSDJHLVWRYLHZFKDQJHJHQHUDO
settings, such as date, time and language, etc.
Settings
Date & Time
Language
Error Log
Clear Grid
Settings
Factory Reset
Fig. 45
1) Date & Time
Use the Dial to select Date & Time and
press the Dial to enter the Date & Time
SDJH)LJ7KLVVHWWLQJDOORZV\RXWRVHW
current date and time.
Use the Dial to edit the date and time:
- Press the Dial to select each digit.
- Turn the Dial right/left to increase/
decrease the time of each digit.
3UHVVWKH'LDOWRFRQ¿UPHDFKGLJLW
3UHVVWKH'LDOWRFRQ¿UP<HV
Date & Time
27 - 09 - 2024
10 : 09
The set date and time can be seen on the bottom of the Main Page. It is important to set the
correct date and time so the mower schedule functions correctly.
Fig. 46

44
OPERATION
2) Language
8VHWKH'LDOWRVHOHFW\RXUGHVLUHGODQJXDJH3UHVVWKH'LDOWRFRQ¿UP)LJ
Language
Espanol
Language
English
Deutsch
Francais
Italiano
3) Error Log
Use the Dial to select Error Log and press
the Dial to enter the Error Log page (Fig.
7KHODWHVWWZRHUURUVDUHGLVSOD\HGLQ
this error log. Select and press the Dial to
enter the Error log page to view.
Fig. 47
Settings
Date & Time
Language
Error Log
Clear Grid
Fig. 48
4) Clear Grid
Reset map of lawn or after changing or repositioning the charging base station. Select and
SUHVVWKH'LDOWRFRQ¿UP)LJ
5) Factory Reset
This setting allows you to reset the parameters of robotic mower to the factory default settings.
&RQ¿UPZLWK<HV)LJ
Settings
Factory Reset
Reset Mower?
Yes
No
Settings
Date & Time
Language
Error Log
Clear Grid
Fig. 49 Fig. 50
45
OPERATION
Starting/Stopping the Robotic Mower
Read the safety instructions carefully before you start your robotic lawnmower.
Keep your hands and feet away from the rotating blades. Never put your hands or feet close to or
under the mower when the motor is running.
Never use the robotic lawnmower when people, especially children, or pets, are in the cutting area.
WARNING
WARNING
WARNING
Ŷ3XWWKHURERWLFODZQPRZHULQWKHSURSHUO\GH¿QHGZRUNLQJDUHDDQGQHDUWKHFKDUJLQJVWDWLRQ
Ŷ0DNHVXUHWKHEDWWHU\LVVHFXUHGLQSODFH
Ŷ7KHPRZHUPD\DOUHDG\EHRQLILWKDVUHFHQWO\EHHQRQWKHFKDUJLQJVWDWLRQ,IWKHPRZHULVRII
SUHVVWKH2Q2IIEXWWRQWRWXUQWKHPRZHURQ7KHURERWLFPRZHUVWDUWVLQLWLDOL]DWLRQ$IWHUWKH
process is completed, the mower will beep twice.
Ŷ6HOHFWWKHGHVLUHGPRZHUVHWWLQJVHJ5DLQ6HQVRU8OWUDVRQLF6HQVRU7LPH'DWHDFFRUGLQJ
to the information in Section 4 “Settings Menu”.
Ŷ&KRRVH6FKHGXOH0RGHRU'URS0RZ0RGHDFFRUGLQJWRWKHLQVWUXFWLRQVRQSDJH
Ŷ7RVWDUWWKHPRZHUSUHVVWKH6WDUWEXWWRQDQGWKHQSUHVVWKH'LDOWRFRQ¿UP7KHURERWLF
PRZHUZLOOVWDUWPRZLQJLQVHFRQGV)LJ
Press then
press dial to
start mowing
08-11-2024 13:57
Press then
press dial to
start mowing
08-11-2024 13:57
Start
Yes
No
Press then
press dial to
start mowing
08-11-2024 13:57
5
Fig. 51
46
OPERATION
Ŷ,Q6FKHGXOHPRGHZKHQFKDUJLQJLVUHTXLUHGWKHURERWLFODZQPRZHUZLOODXWRPDWLFDOO\UHWXUQ
to the base station. It takes around 2 hours and 10 minutes to be fully charged, after this the
robotic mower will resume mowing. When the scheduled working time is over, it will return to the
base station and remain on standby on the base station for the next working schedule.
Ŷ7RVWRSWKHPRZHUPDQXDOO\GXULQJRSHUDWLRQSUHVVWKH6723EXWWRQ7KH/&'SDQHOZLOO
GLVSOD\DVEHORZ)LJ7RUHFRYHUWKHPRZHUIURPWKHVWRSSHGVWDWHSUHVVDQ\EXWWRQDQG
WKHQSUHVVWKH'LDOWRFRQ¿UP)LJ
NOTE: When the mower is charging on the base station, press the STOP button, the LCD panel
ZLOOGLVSOD\DVSHU)LJ7KHPRZHUZLOOQRWUHVXPHZRUNLQJDIWHUFKDUJLQJLV¿QLVKHG
Ŷ7RWXUQRIIWKHPRZHUSUHVVWKH2Q2IIEXWWRQIRUVHFRQGV
NOTE: The mower is always on and cannot be turned off when on the charging station.
NOTE: If the mower is not on the charging station and the control panel has not been operated for
25 minutes, the mower will automatically enter sleep mode (the LCD panel will turn off). Press
the On/Off button to turn off the mower. Then turn on the mower again.
NOTE: If the operating temperature is over 65°C, the LCD panel will display “Battery Over
Temperature”. The robotic mower will search automatically to return to the base station. Allow the
machine to cool down to reach a normal temperature. Then restart the mower, it will work again.
Setting the Cutting Height
Cancel
stopped-state?
Yes
No
Stopped
08-11-2024 13:57
'RQRWPDNHDQ\DGMXVWPHQWWRWKHURERWLFPRZHUZLWKRXW¿UVWVWRSSLQJWKHPRWRU.HHS\RXUIHHW
away from the blade turning disc when adjusting its height.
WARNING
Fig. 52 Fig. 53
47
OPERATION
7KHFXWWLQJKHLJKWRIWKHURERWLFPRZHUFDQEHDGMXVWHGIURP0,1PPWR0$;
PP)LJ
'XULQJWKH¿UVWZHHNRIXVHVHOHFWDFXWWLQJKHLJKWRI¶¶PP7KHFXWWLQJKHLJKWFDQEH
lowered step by step every week until the desired cutting height has been reached.
Fig. 54
Ŷ3UHVVWKH6723EXWWRQWRVWRSWKHURERWLF
lawnmower.
Ŷ7XUQWKHFXWWLQJKHLJKWDGMXVWPHQWNQREWR
set the cutting height.
- Turn clockwise to raise the cutting height.
- Turn anti-clockwise to lower the cutting
height.
Ŷ)RUWKH¿UVWFXWHDFKVHDVRQDKLJKHU
cutting setting should be selected. USING
A CUTTING HEIGHT THAT IS TOO LOW
IN LONGER GRASS WILL USE MORE
POWER AND REDUCE BATTERY RUN
TIME.
Ŷ%HIRUH\RXEHJLQWRPRZFKHFNWRHQVXUHWKDWWKHEODGHLVQRWGXOODQGWKDWQRQHRIWKH
fasteners are damaged. To prevent any imbalance, replace dull and/or damaged blades. To
FDUU\RXWWKLVFKHFN¿UVWVZLWFKRIIWKHPRZHUXVLQJWKH2Q2IIEXWWRQ
48
MAINTENANCE
General Maintenance
Ŷ.HHSDOOVDIHW\GHYLFHVDQGWKHPRWRUKRXVLQJIUHHRIGLUWDQGGXVW$YRLGXVLQJVROYHQWV
when cleaning plastic parts. Most plastics are susceptible to damage from various types of
commercial solvents and may be damaged by their use. Use clean, dry cloths to remove dirt,
dust, oil, grease, etc.
Ŷ3HULRGLFDOO\FKHFNDOOQXWVDQGEROWVIRUSURSHUWLJKWQHVVWRHQVXUHVDIHRSHUDWLRQRIWKHURERWLF
mower.
Ŷ5HPRYHDQ\EXLOGXSRIJUDVVDQGOHDYHVRQRUDURXQGWKHURERWLFPRZHUDQGEDVHVWDWLRQ
Wipe the mower clean with a dry cloth occasionally.
Ŷ,QVSHFWWKHEDVHVWDWLRQDQGFOHDQLWIURPPXGDQGGHEULVWRDOORZSURSHUGRFNLQJ
Replacing the Mower Blade (See Figs. 55-56)
Always check to see if the blades are in good condition. If the blades are blunt, damaged or
showing signs of imbalance, they must be replaced. Only use recommended replacement blades.
Make certain ALL 3 blades and screws are replaced at the same time to keep a balanced cutting
Always switch the product off, remove the battery pack and let the product cool down before
performing inspection, maintenance and cleaning work!
Always wear protective, heavy gloves and/or wrap the cutting edges of the blade with rags when
performing blade maintenance. Failure to heed this warning could result in serious personal injury.
If a part becomes worn or damaged, use manufacturer’s recommended replacement parts. Use of
DQ\RWKHUSDUWVPD\FUHDWHDKD]DUGRUFDXVHSURGXFWGDPDJH
Do not use any attachments or accessories not recommended by the manufacturer of this product.
The use of attachments or accessories not recommended can result in serious personal injury.
WARNING
WARNING
WARNING
WARNING
Before performing any maintenance, make sure the battery has been removed. Failure to heed
this warning could result in serious personal injury.
WARNING
49
MAINTENANCE
system. Visit www.cleva-europe.com for information on where to purchase additional blades.
Consumables and Accessory part numbers can be found at the back of this manual.
To replace the blades
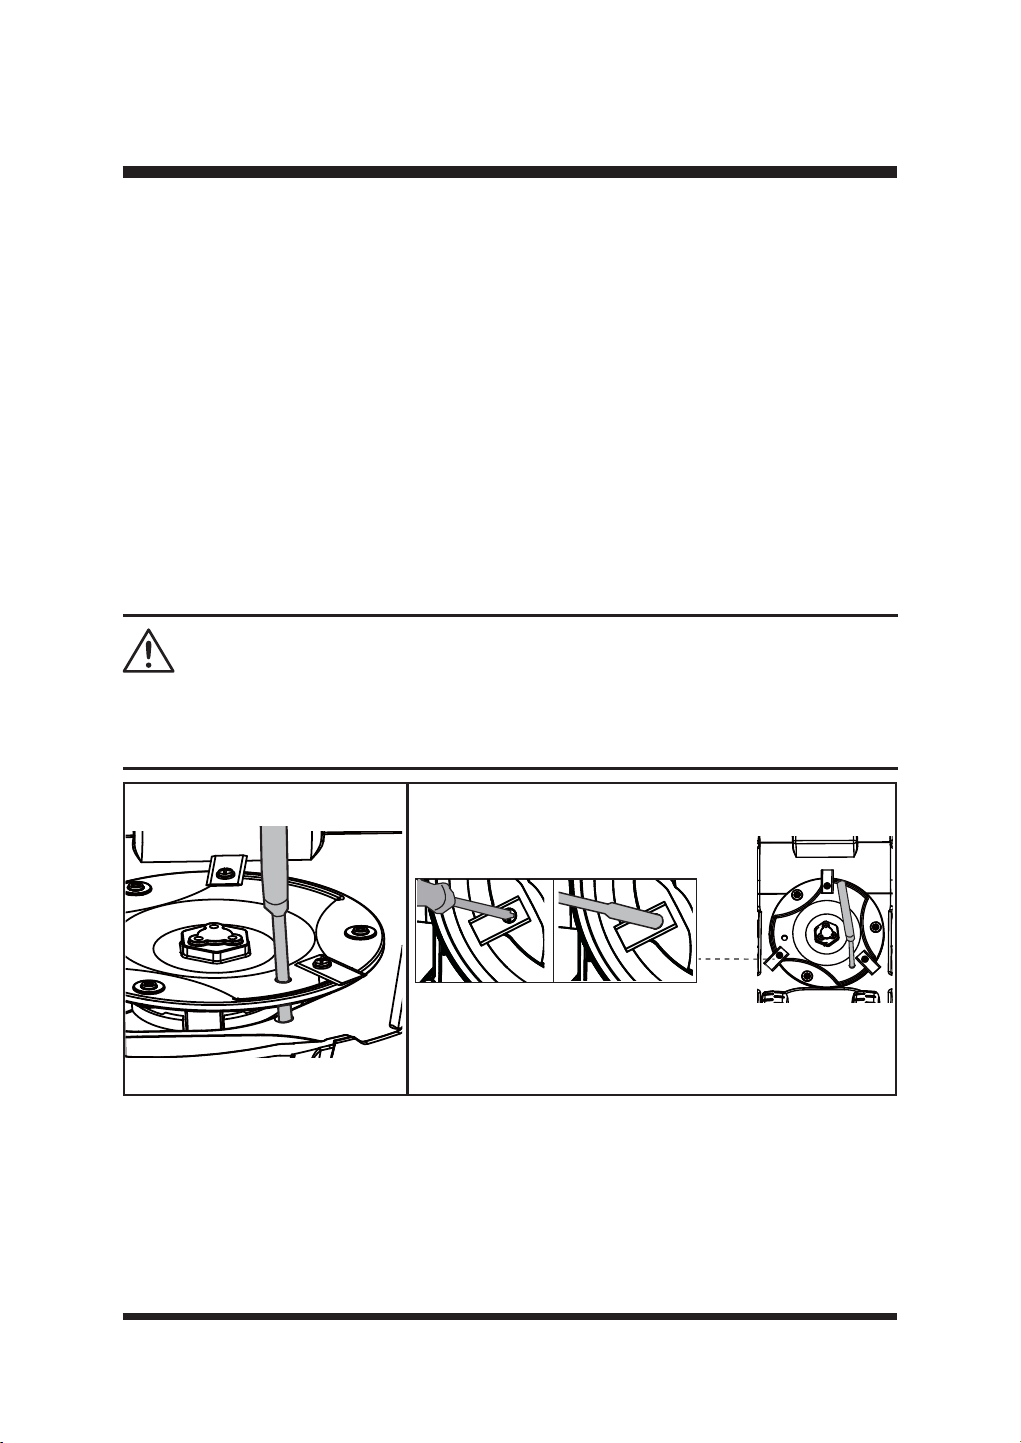
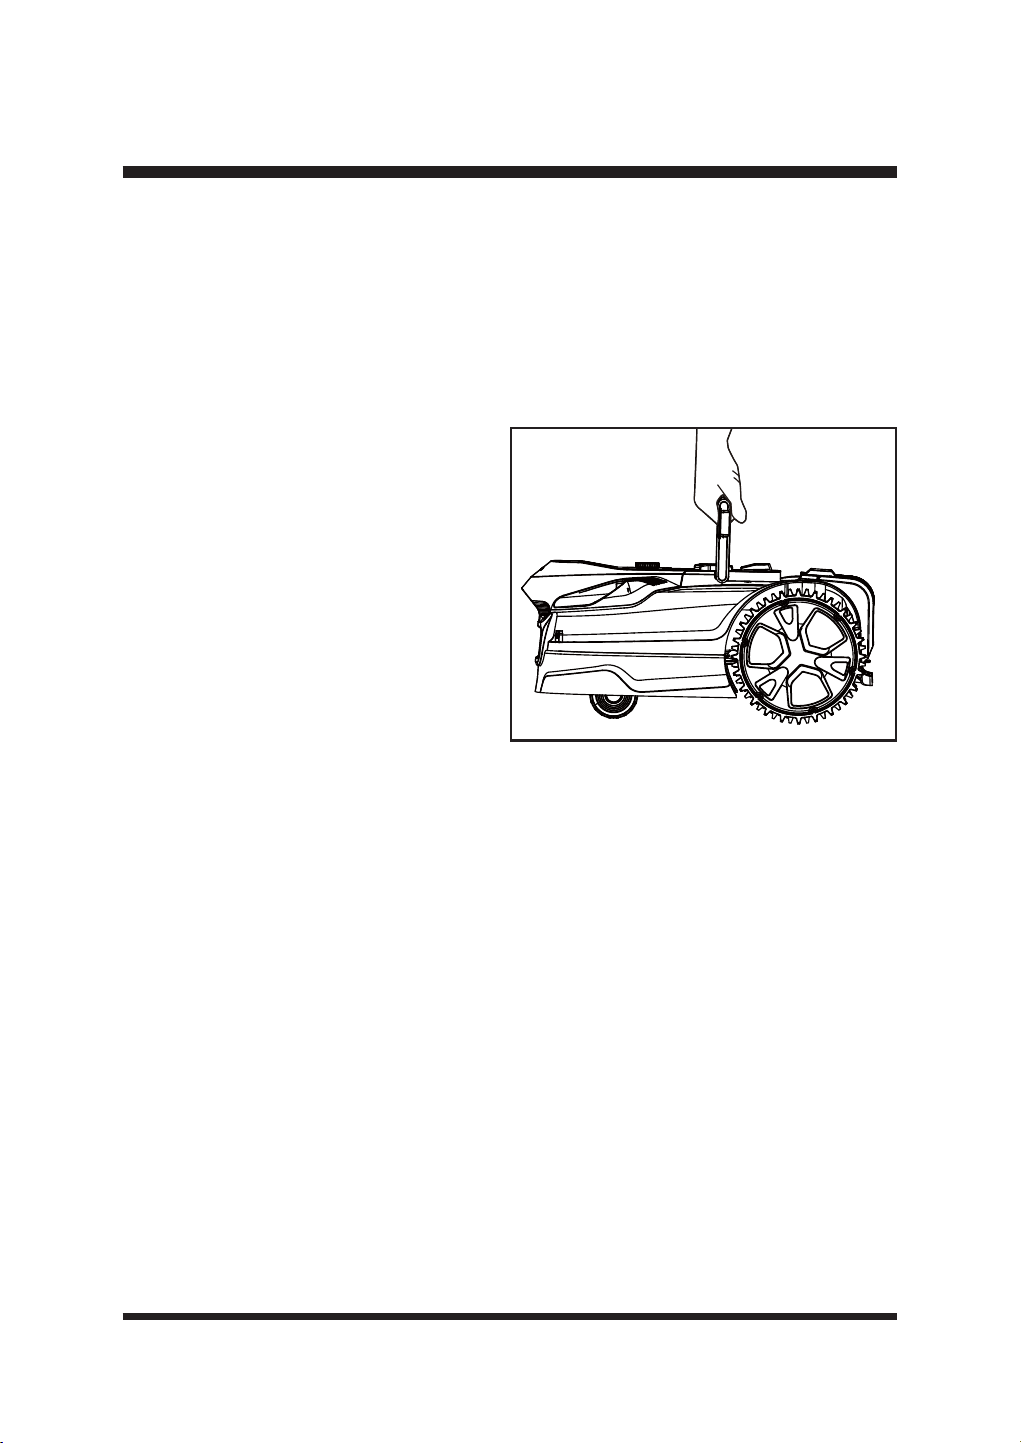
Ŷ3UHVVWKH6723EXWWRQDQGDOORZWKHEODGHWRFRPHWRDFRPSOHWHVWRS
Ŷ3UHVVWKH2Q2IIEXWWRQWRWXUQRIIWKHPRZHU
Ŷ/LIWWKHEDWWHU\FRPSDUWPHQWFRYHU5HPRYHWKHEDWWHU\
Ŷ6ORZO\WXUQWKHPRZHURYHU3ODFHLWRQDVRIWDQGFOHDQVXUIDFH
Ŷ8VHDVXLWDEOHWRROHJDVFUHZGULYHUWRLQVHUWLQWRRQHRIWKUHHKROHVLQWKHEODGHGLVFWR¿[LW
LQSODFH)LJ7KLVHQVXUHVWKHEODGHGLVFLVQRWWXUQLQJZKHQUHSODFLQJWKHEODGHVWRDYRLG
personal injury.
Ŷ:HDUSURWHFWLYHJORYHVDQGXVHDVFUHZGULYHURUKH[DJRQDOVRFNHWZUHQFKWRUHPRYHDOOWKUHH
VFUHZVDQGEODGHV)LJ
Ŷ6HFXUHWKHQHZEODGHVZLWKQHZVFUHZV
Ŷ0DNHVXUHDOOEODGHVFDQVSLQIUHHO\
Cleaning the Underside
It is recommended to check and clean the underside of the robotic mower regularly.
Ŷ3UHVVWKH6723EXWWRQDQGDOORZWKHEODGHWRFRPHWRDFRPSOHWHVWRS
Ŷ3UHVVWKH2Q2IIEXWWRQWRWXUQRIIWKHPRZHU
Ŷ/LIWWKHEDWWHU\FRPSDUWPHQWFRYHU5HPRYHWKHEDWWHU\
Ŷ6ORZO\WXUQWKHPRZHURYHU3ODFHLWRQDVRIWDQGFOHDQVXUIDFH
Use of an electric screwdriver to remove blade bolts could cause the blade disc to turn rapidly,
resulting in personal injury. Take care and ensure the blade disc is locked in place with a suitable
tool.
WARNING
Fig. 55 Fig. 56
50
MAINTENANCE
Ŷ8VHDVRIWEUXVKRUGDPSFORWKWRUHPRYHGLUWGXVWRLOJUHDVHHWFIURPWKHXQGHUVLGHRIWKH
mower.
IMPORTANT: Do not wash the mower with running water.
Ŷ:HDUVDIHW\JORYHVWRFOHDQWKHEODGHGLVFWKHFKDVVLVDQGWKHIURQWDQGUHDUZKHHOV
thoroughly with a soft brush or damp cloth. Remove any lodged debris around them.
Ŷ0DNHVXUHWKHEODGHGLVFFDQURWDWHIUHHO\DQGDOOEODGHVFDQVSLQIUHHO\
STORING THE MOWER
It is recommended to store the mower indoors
during the winter. Storing the mower or battery in
VXE]HURWHPSHUDWXUHVFDQUHVXOWLQGDPDJH
Ŷ7RRSWLPL]HWKHEDWWHU\ORQJHYLW\HQVXUHWKH
mower is fully charged before storage during
winter.
Ŷ3UHVVWKH2Q2IIEXWWRQWRWXUQRIIWKHPRZHU
Remove the battery.
Ŷ&OHDQWKHPRZHUWKRURXJKO\
Ŷ8VHWKHFDUU\KDQGOHWRFDUU\WKHPRZHU&DUU\
the mower with the blade disc away from the
ERG\)LJ
Ŷ6WRUHWKHPRZHULQGRRUVLQDFOHDQGU\SODFHRXWRIWKHUHDFKRIFKLOGUHQ
IMPORTANT: Protect the underside of mower from standing water. NEVER store the mower
upside down outdoors.
BATTERY PACK MAINTENANCE
Ŷ)XOO\FKDUJHWKHEDWWHU\EHIRUHSODFLQJLQVWRUDJH
Ŷ5HFKDUJHWKHEDWWHU\SDFNZKHQHYHUWKHUHLVDQRWLFHDEOHUHGXFWLRQLQWKHSHUIRUPDQFH'RQRW
allow the battery pack to become completely discharged.
Ŷ'RQRWUHFKDUJHDEDWWHU\SDFNWKDWLVDOUHDG\IXOO\FKDUJHG2YHUFKDUJLQJVKRUWHQVEDWWHU\OLIH
Ŷ2QFHWKHEDWWHU\SDFNLVIXOO\FKDUJHGUHPRYHWKHEDWWHU\IURPWKHFKDUJHUDQGGLVFRQQHFW
charger from the outlet.
Ŷ'RQRWVWRUHWKHEDWWHU\SDFNRQWKHWRRORURQWKHFKDUJHU
Ŷ,IWKHEDWWHU\SDFNLVKRWDOORZLWWRFRROGRZQEHIRUHUHFKDUJLQJ
Storing the Base Station
Ŷ'LVFRQQHFWWKHSRZHUDGDSWRUIURPWKHSRZHURXWOHW
Ŷ7KHEDVHVWDWLRQFDQEHOHIWRXWVLGHLQWKHZLQWHU
Ŷ,WLVUHFRPPHQGHGWRSODFHWKHEDVHVWDWLRQLQDGU\DQGVKHOWHUHGORFDWLRQ
Fig. 57
51
MAINTENANCE
UPDATING THE SOFTWARE
The software of the robotic mower can be updated if necessary.
NOTE: 0DNHVXUHWKH86%ÀDVKGULYHZRUNVQRUPDOO\DQGWKHURERWLFPRZHULVVZLWFKHGRQE\
pressing the START/ON button before updating.
NOTE:0DNHVXUHWKHPRZHUKDVVXI¿FLHQWSRZHUIRUXSGDWLQJWKHVRIWZDUH
Fig. 58
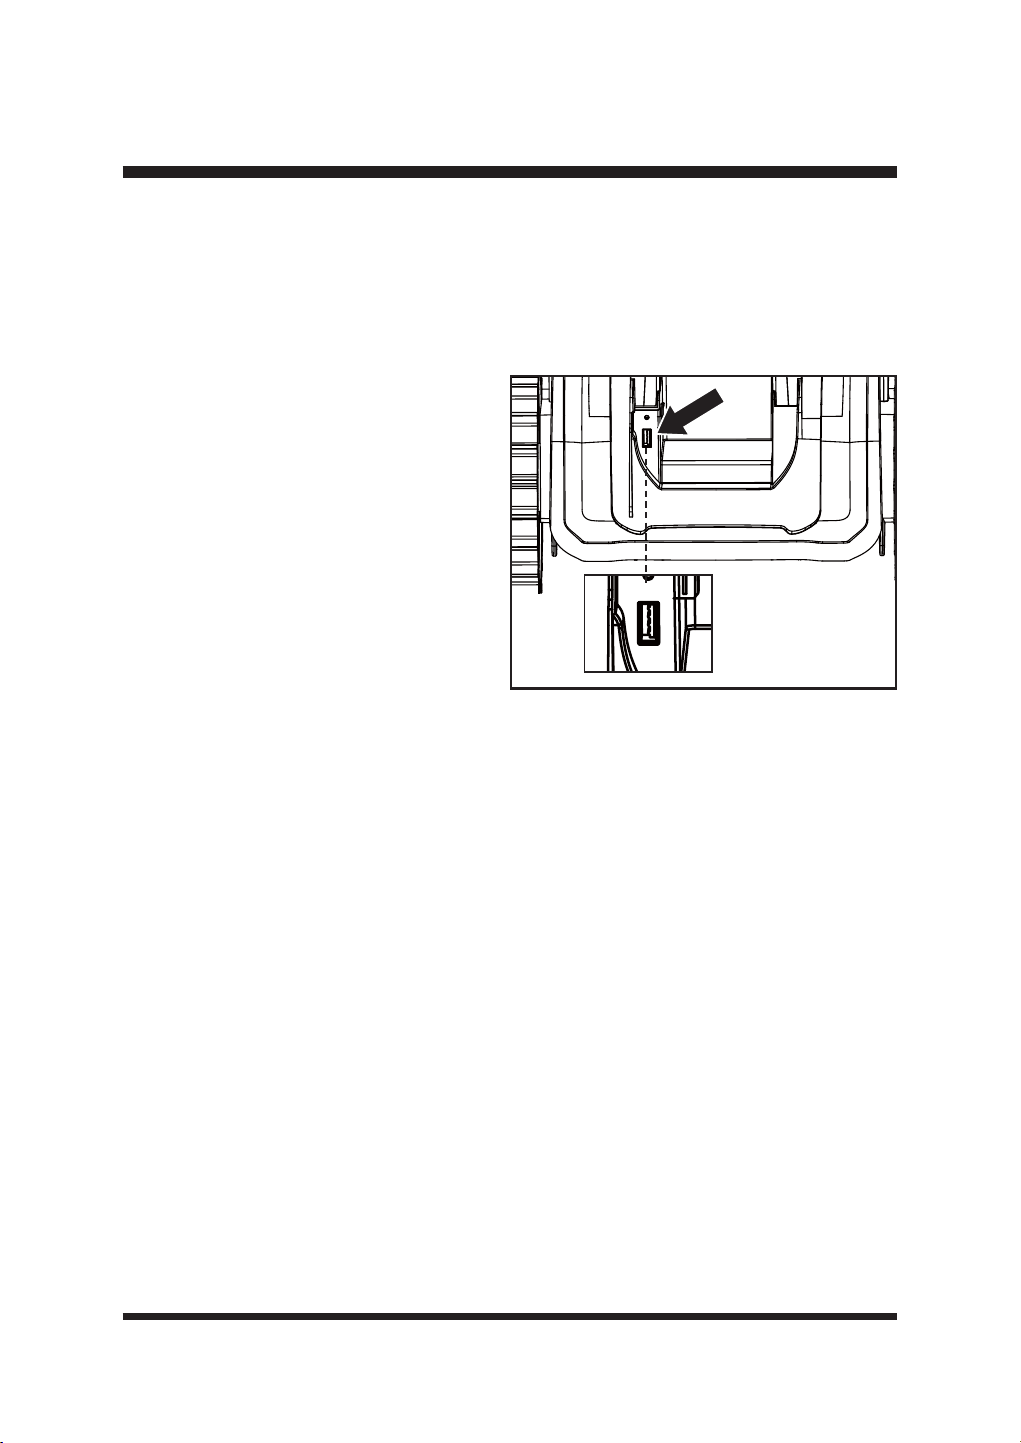
Ŷ7KH/&'GLVSOD\VWKDWWKHVRIWZDUHLVXSGDWLQJ
Ŷ$IWHU¿QLVKLQJWKHXSGDWLQJRIWKHVRIWZDUH\RXZLOOKHDUFRQWLQXRXVEHHSLQJDQGWKH/&'
displays “Update successful! Remove USB Stick and restart mower”.
Ŷ5HPRYHWKH86%ÀDVKGULYH5HSODFHWKH86%SRUWUXEEHUFDS
Ŷ7RFRPSOHWHWKHVRIWZDUHXSGDWHUHVWDUWWKHURERWLFPRZHU
Ŷ'RZQORDGWKHURERWLFPRZHU¶VODWHVW
software from our support website (www.
ODZQPDVWHUFRPRQWRDEODQN86%ÀDVK
drive device.
Ŷ6WRSWKHPRZHUDQGSUHVVWKH2Q2II
button to turn off the mower.
Ŷ/LIWWKHEDWWHU\FRPSDUWPHQWFRYHU2SHQ
the USB port rubber cap to reveal the USB
SRUW)LJ
Ŷ,QVHUWWKH86%ÀDVKGULYHLQWRWKH86%
port.
Ŷ3UHVVWKH2Q2IIEXWWRQWRWXUQRQWKH
robotic mower.
52
ENVIRONMENTALLY SAFE BATTERY DISPOSAL
The following toxic and corrosive materials are in the batteries used in this battery pack:
lithium-ion, a toxic material.
WARNING
$OOWR[LFPDWHULDOVPXVWEHGLVSRVHGRILQDVSHFL¿FPDQQHUWRSUHYHQWFRQWDPLQDWLRQRIWKH
environment. Before disposing of damaged or worn-out lithium-ion battery packs, contact your local
ZDVWHGLVSRVDODJHQF\RUWKHORFDO(QYLURQPHQW3URWHFWLRQ$JHQF\IRULQIRUPDWLRQDQGVSHFL¿F
instructions.
WARNING
If the battery pack cracks or breaks, with or without leaks, do not recharge it and do not use it.
Dispose of it and replace with a new battery pack.
DO NOT ATTEMPT TO REPAIR IT!
7RDYRLGLQMXU\DQGULVNRI¿UHH[SORVLRQRUHOHFWULFVKRFNDQGWRDYRLG
damage to the environment:
• Cover the battery terminals with heavy-duty adhesive tape.
• DO NOT attempt to remove or destroy any of the battery pack components.
• DO NOT attempt to open the battery pack.
• If a leak develops, the released electrolytes are corrosive and toxic. DO NOT get the solution in
eyes or on skin, and do not swallow it.
• DO NOT place damaged or defective batteries in your regular household trash.
• DO NOT incinerate.
• DO NOT SODFHEDWWHULHVZKHUHWKH\ZLOOEHFRPHSDUWRIDQ\ZDVWHODQG¿OORUPXQLFLSDOVROLG
waste stream.
7DNHEDWWHULHVWRDFHUWL¿HGUHF\FOLQJRUGLVSRVDOFHQWHU
53
TROUBLESHOOTING
Only perform the steps described within these instructions!
$OOIXUWKHULQVSHFWLRQPDLQWHQDQFHDQGUHSDLUZRUNPXVWEHSHUIRUPHGE\DQDXWKRUL]HGVHUYLFH
FHQWHURUDVLPLODUO\TXDOL¿HGVSHFLDOLVWLI\RXFDQQRWVROYHWKHSUREOHP\RXUVHOI
Gloves and appropriate protective clothing must be worn when performing these instructions.
Always turn off the mower before making any adjustment.
WARNING
6XVSHFWHGPDOIXQFWLRQVDUHRIWHQGXHWRFDXVHVWKDWWKHXVHUFDQ¿[WKHPVHOYHV
Therefore, check the product using this section. In most cases the problem can be solved quickly.
PROBLEM POSSIBLE CAUSE SOLUTION
The robotic
lawnmower is stuck
during mowing.
Grass or other debris is wrapped
around the wheels.
Check wheels and remove the grass
or objects.
Grass or other debris is wrapped
around the blade disc.
Check the blade disc and remove
the grass or objects (always wear
JDUGHQLQJJORYHV
The robotic lawnmower has got
caught in something.
Free the mower and remove the
obstacle.
The robotic lawnmower is stuck
in one area of the garden.
Check if there are any obstacles
which make it hard for the robotic
lawnmower to move on from this
location. Remove the obstacles.
The mower is stuck in an uneven
dip or hollow in the lawn.
Ensure that dips and holes in the lawn
are leveled with topsoil and over-
seeded with grass seed.
The lift sensor has been activated
as the mower has become
trapped.
Free the mower.
The robotic
lawnmower fails to
start.
The battery is not installed
correctly.
Ensure the battery is pushed into the
battery slot until it clicks.
The battery is not fully charged. Charge the battery.
Possible clogging.
Remove the battery. Check
underneath the mower and clear as
necessary (always wear gardening
JORYHV
The grass is too long. Set a higher cutting height.

54
TROUBLESHOOTING
PROBLEM POSSIBLE CAUSE SOLUTION
The robotic
lawnmower fails to
start.
The battery is defective. Replace the battery.
Defective On/Off Button. Contact the Aftersales Helpline.
The robotic
lawnmower leaves
the lawn.
Incorrect barriers are used for
GH¿QLQJWKHZRUNLQJDUHD
Adjust borders/barriers correctly for
GH¿QLQJWKHZRUNLQJDUHD0DNH
improvements or temporary barriers
LIQHFHVVDU\5HIHUWR'H¿QLQJWKH
Mowing Area on page 18-22.
The ultrasonic sensors are turned
off.
Turn on the ultrasonic sensors
according to instructions on page 39.
The working area is steeper than
35%.
Restrict the area that is steeper than
35%.
The robotic
lawnmower has
GLI¿FXOW\GRFNLQJ
The base station is on a slope.
7KHPRZHUZLOOKDYHGLI¿FXOW\
identifying the guide strips. Place
the base station on a surface that is
entirely level.
Poor connection caused by
debris on the charging strips.
Clean the contact strip located on the
base station and the charging strips
on the mower using a cloth.
The grass around the base
station is too high.
Trim the grass around the front of
the base station to ensure smooth
docking.
Base station is not located
correctly or is covered by a metal
covering.
Check to make sure the base station
arrangement is correct. Remove any
metal covering away from the base
station location. Refer to Selecting the
Base Station Location on page 23.
The robotic
lawnmower is stuck
in the base station.
There is an object in the way of
the robotic lawnmower preventing
it from leaving the base station.
Remove the object.
The grass around the base
station is too high.
Trim the grass around the front of
the base station to ensure smooth
docking.
The robotic
lawnmower does
not mow when
expected/
The robotic mower
keeps returning to
the base station.
Incorrect Schedule settings.
Check the Schedule settings. The
mower will begin and end its work
based on the set time window.
Outside this time window the mower
stays in the base station. Ensure
the local time and date settings are
correct.

55
TROUBLESHOOTING
PROBLEM POSSIBLE CAUSE SOLUTION
The robotic
lawnmower does
not mow when
expected/
The robotic mower
keeps returning to
the base station.
The rain sensor is triggered.
Wait until the mower is dry and the
GHOD\WLPHLV¿QLVKHG
The robot mower was sent home
manually using the home button.
Start the mower according to
instructions on page 45-46.
The Stop button was pressed
while the mower was on the
charging station.
Start the mower according to
instructions on page 45-46.
The robotic
lawnmower is upside
down.
The robotic lawnmower has tilted
WRRPXFKRULVÀLSSHGRYHU
Turn the robotic lawnmower the right
way up and rectify the reason for it
getting turned over.
Collision sensor
problem, front/rear.
Mower body cannot move freely
around its chassis.
Check that the mower body can
move freely around its chassis. If
the problem remains, contact the
Aftersales Helpline.
Unknown problem
with control or
function.
Temporary electronic or software
related issue in the mower.
Switch off the mower. Restart the
mower. Download and install the
latest software update. If the problem
remains, contact the Aftersales
Helpline.
The robotic
lawnmower runs to
the base station, but
the blade disc does
not rotate.
The robotic lawnmower searches
for the base station.
This is normal. The mower needs to
recharge. The blade disc does not
rotate while it is searching for the
base station automatically.
The robotic
lawnmower vibrates.
Cutting blades are damaged.
Replace the blades. Refer to
Replacing the Mower Blades
section on page 48-49. Visit www.
clevaeurope.com for info on where to
buy blades. Refer to the parts list on
page 62.
Too many blades in the same
position lead to imbalance in the
cutting system.
&KHFNWKDWRQO\RQHEODGHLV¿WWHGDW
each screw and that blades are not
stuck.
'LIIHUHQWW\SHVWKLFNQHVVRI
blades are used.
Check if the blades are of different
W\SHVWKLFNQHVV
The blade screw is loose. Tighten the blade screws.
Grass is being cut
unevenly.
Working area is too big.
Adjust the boundary to decrease the
VL]HRIWKHPRZLQJDUHDRUDGGPRUH
working time.

56
TROUBLESHOOTING
PROBLEM POSSIBLE CAUSE SOLUTION
Grass is being cut
unevenly.
Blades are dull.
Replace all the blades and screws.
Refer to Replacing the Mower Blades
section on page 48-49. Visit www.
clevaeurope.com for info on where to
buy blades.
Height of cut is too low, or the
grass is too high.
Increase the height of cut.
There is grass wrapped around
the blade disc.
Check underneath the mower and
clear as necessary (always wear
JDUGHQLQJJORYHV
The charging time is
much longer than 2
hours.
The charging strips and contact
strip are obstructed by debris.
Use a cloth to clean the contact strip
located on the base station and the
charging strips on the mower.
Charging protector has activated
due to high temperature.
Place the base station in a shady
area or wait until the temperature has
cooled down.
The robotic
lawnmower does not
charge.
No power.
Make sure the power cord is
connected properly to the power
adaptor and the power adaptor is
connected to a suitable power supply.
Check the wall socket connection and
whether an earth-fault breaker has
tripped.
The charging strips and contact
strip are contaminated.
Use a cloth to clean the contact strip
located on the base station and the
charging strips on the mower.
Socket outlet, fuse, mains cable
or base station is defective.
Check the mains voltage and fuse,
if necessary have the base station
FKHFNHGE\TXDOL¿HGSHUVRQ
The battery has a fault. Contact the Aftersales Helpline.
Run time is shorter
than expected.
Height of cut is too low, or the
grass is too high.
Increase the height of cut.
The grass is wet or damp. Wait until the grass is dry.
The grass is dense.
Increase the height of cut and add
more working time.
The cutting blade is
not rotating while the
mower is switched
on.
The cutting blade is obstructed.
Switch off the mower and remove
the battery. Clear obstruction (always
ZHDUJDUGHQLQJJORYHV
The blade screw is loose. Tighten the blade screws.

57
TROUBLESHOOTING
PROBLEM POSSIBLE CAUSE SOLUTION
The cutting blade is
not rotating while the
mower is switched
on.
The mower cannot detect grass
Place the mower in an area with
grass. Brown patchy lawn may not be
UHFRJQL]HGE\WKHFDPHUD
LED on the base
station does not turn
on.
No power supply.
Check the power adaptor, cord,
breakers, and fuses.
The robotic mower
IDLOVWRUHFRJQL]HWKH
magnetic strip and
travels over it and
past it.
The magnetic strip is laid too
deep in the ground.
Lay the magnetic strip on the ground
or at a depth of approx. 5 cm in the
ground.
The outside temperature is too
high.
Wait for the temperature to cool.
Avoid operating the mower during the
hot hours of the day.
The robotic mower
stops or travels out
of control when it is
near the boundary
area with magnetic
strip.
Magnetic strips are laid too close
together.
Keep a distance of at least 120 cm
between two boundary areas with
magnetic strips.
Interference arises in the mowing
area due to electric cables.
Avoid electric cables which run
through the mowing area. Keep away
from mowing areas of your neighbors,
which are operated with a perimeter
wire.
Bad GPS signal/ no
valid GPS data.
Environmental factors
Move the mower to areas with open
terrain. Keep the mower far from
buildings.
Equipment problems
Regularly check and maintain the
mower to ensure that the GPS
module is working properly. If the
GPS module is damaged, contact the
Aftersales Helpline.
:HDWKHULQÀXHQFH
Do not let the mower operate in bad
weather.
%DWWHU\OHYHOLVLQVXI¿FLHQW
Charge the battery. Keep the battery
SRZHUVXI¿FLHQW

58
TROUBLESHOOTING
ERROR INFORMATION DISPLAY ON THE LCD PANEL
If sensors of the robotic mower have been activated, the mower will beep 10 times continuously.
The error information will display on the LCD panel.
ERROR
INFORMATION
POSSIBLE CAUSE SOLUTION
Wheel slip Wheel slipping
Free the mower and remove the
obstacle.
Control system error Control system fault
Switch off the mower. Restart the
mower. If the problem remains,
contact the Aftersales Helpline.
Outside border
Mower has left the lawn and
cannot detect grass.
Refer to solutions for “The robotic
lawnmower leaves the lawn” in
Troubleshooting on page 54.
Battery error Battery fault
Change the battery. If the problem
remains, contact the Aftersales
Helpline.
Mower lifted The mower has become lifted.
Free the mower and remove the
obstacle.
Motor fault Motor fault
Switch off the mower. Restart the
mower. If the problem remains,
contact the Aftersales Helpline.
Rolling over
Mower is upside down or tilted
too far.
Free the mower and remove the
obstacle.
Battery too hot/cold
Temperature of battery pack is
too high or too low.
Allow the battery pack to cool to
normal temperature.
Mower tilted The mower has become tilted.
Free the mower and remove the
obstacle.
Stop button error Stop button error
Switch off the mower. Restart the
mower. If the problem remains,
contact the Aftersales Helpline.
Rain sensor
triggered
Rain sensor has been triggered.
Wait until the mower is dry and the
GHOD\WLPHLV¿QLVKHG
Too close to station
The mower is too close to or on
the base station when performing
a spot cut or the home button is
pressed.
Move the mower away from the base
station.

59
TROUBLESHOOTING
ERROR
INFORMATION
POSSIBLE CAUSE SOLUTION
Magnetic sensor
error
The magnetic sensor has a fault.
Switch off the mower. Restart the
mower. If the problem remains,
contact the Aftersales Helpline.
No camera signal No signal to camera
Switch off the mower. Restart the
mower. If the problem remains,
contact the Aftersales Helpline.
No GPS data GPS signal abnormal at startup
Move the mower to an open ground.
Switch off the mower. Restart the
mower.
Far from home
The robotic lawnmower is 1
kilometer away from charging
station.
This is a theft prevention setting.
Ensure the mower is operated in
Drop and Mow mode when using the
mower at a property more than 1km
away from home.
Ribbon not visible
Guide strips on the base station
are not visible.
Clean the guide strips on the base
station. If the problem remains,
contact the Aftersales Helpline.
Close battery hatch
Battery compartment cover is
open.
Close the battery compartment cover.
Low voltage The battery voltage is too low. Charge the battery.
No battery No battery in the mower
Ensure the battery is correctly
installed.
Cutter fault Mowing motor fault
Switch off the mower. Restart the
mower. If the problem remains,
contact the Aftersales Helpline.
Cutter blocked Blade disc is blocked.
Check underneath the mower and
clear as necessary (always wear
SURWHFWLYHJORYHV
Docking Failed
Base station is disconnected or
not powered on.
Check to make sure that the base
station is not blocked, the guide strips
on the base station are clear and the
base station is powered on.
Too dark
The mower is activated outside
the sunrise and sunset range.
Check the Schedule settings. The
mower will begin and end its work
based on the set time window. Ensure
the local time and date settings are
correct.
60
LAWNMASTER
®
WARRANTY

61
EXPLODED VIEW
1
2
3
4
5
6
7
8
9
11
10
12
62
PARTS LIST
Key Number Part Number Description Quantity
1 Mower Assembly 1
2 Upper Part of the Base Station 1
3 Left Base Part of the Base Station 1
4 Right Base Part of the Base Station 1
5 Spare Blade 6
6 Screw for Blade 6
7
523113
0DJQHWLF6WULSIWP 2
8 0DJQHWLF6WULS3HJSFV 2
9 24LB4005-CN Battery 1
10 Base Station Fixing Screw 10
11 Power Adaptor 1
12 Hex Key 1
Replacement parts highlighted in grey are available for after sales purchase. Replacement of
UHSDLURULQWHUQDOSDUWVVKRXOGRQO\EHGRQHE\DTXDOL¿HGVHUYLFHSURIHVVLRQDO3OHDVHFRQWDFW\RXU
DXWKRUL]HGVHUYLFHGHDOHURU&XVWRPHU6HUYLFHDW
Below parts are available, please call 866-384-8432 to order.
Part Part Number
Anti-Slip Wheel and Screw 952688
Garage 952642
Blade Assembly Pack of 15 523830

63
NOTES

64
NOTES


2
ÍNDICE
Sección PÁGINA
ÍNDICE
ESPECIFICACIONES
INSTRUCCIONES IMPORTANTES DE SEGURIDAD
SÍMBOLOS
CONOZCA SU ROBOT CORTACÉSPED
CONFIGURAR
MONTAJE
OPERACIÓN
MANTENIMIENTO
ELIMINACIÓN DE BATERÍAS RESPETUOSA CON EL MEDIO AMBIENTE
SOLUCIÓN DE PROBLEMAS
GARANTÍA DE LAWNMASTER
®
VISTA EXPLOTADA
LISTA DE PIEZAS
NOTAS
2
3-5
6-10
11-13
14-15
16-22
23-28
29-47
48-51
52
53-59
60
61
62
63-64

3
Tensión
Sistema de corte
Velocidad del motor de la pala
Anchura de corte
Ajuste de la altura de corte
El paso más estrecho posible
Consumo de energía durante el corte
Pendiente máxima de la zona de corte
&DSDFLGDGGHWUDEDMR0RGRGHFDUJDDXWRPiWLFDVHJ~QODVHVSHFL¿FDFLRQHV
del producto)
Capacidad de trabajo: Soltar y Segar (Usando una sola batería una vez)
Capacidad de trabajo: Tirar y Segar (Con usos repetidos)
ESPECIFICACIONES
SEGAR
Longitud
Anchura
Altura
Peso (sin batería de 4,0 Ah)
DIMENSIONES
21,65'' (55 cm)
14,88'' (37,8 cm)
9,65'' (24,5 cm)
8,25 kg (18,19 lbs)
3 cuchillas pivotantes
3400 RPM
7'' (18 cm)
1,2''-3,1'' (30-80 mm, 6 Posiciones)
P
43 W±20 %
20°
100 m
2
250 m
2
Robot cortacésped
Estación base
Adaptador de corriente
CLASIFICACIÓN IP
IPX4
IPX4
IPX4
Tipo de batería
Fuente de alimentación
Corriente de la estación de carga
Longitud del cable de alimentación
Período de carga (batería totalmente descargada)
SISTEMA ELÉCTRICO
24 V Max Litio-Ion, 4,0 Ah
100-240 V
2.0 A
10 m
2 horas
21,6 V
Hasta 800 m
2

4
ESPECIFICACIONES
Nº de modelo
Tensión de la batería
Capacidad de la batería
Tipo de batería
Peso de la batería
PAQUETE DE BATERÍAS
24LB4005-CN
24 V
4,0 Ah
Iones de litio
0,7 kg
Nivel de potencia acústica (L
WA
) Medido
Incertidumbres de las emisiones sonoras K
WA
Nivel de potencia acústica (L
WA
) Garantizado
Nivel de presión sonora (L
PA
) en el oído del operador
68 dB(A)
3 dB(A)
66 dB(A)
54,4 dB(A)
Las declaraciones de emisión de ruido se ajustan a la norma EN 50636-2-107:2015
Emisiones sonoras en el entorno medidas como potencia acústica (LWA) de conformidad con
la Directiva CE 2000/14/CE. El nivel de potencia acústica garantizado incluye la variación en la
producción, así como la variación del código de ensayo con 1-3 dB(A).
Incertidumbres de ruido de presión sonora KpA, 2-4 dB(A).
Acerca de este producto
Gracias por elegir el robot cortacésped LawnMaster
®
VBRM701YAMIDR. Este robot cortacésped
cortará el césped de forma independiente siguiendo un patrón aleatorio antes de volver a la
estación base para cargar la batería. El cortacésped cortará y cargará alternativamente durante
el tiempo de trabajo seleccionado, antes de volver a la estación base para estar en espera hasta
el siguiente periodo de trabajo programado. El cortacésped detecta la hierba para saber dónde
cortar y también está equipado con sensores ultrasónicos que detectan obstáculos más altos,
FRPRDUEXVWRV\YDOODV3DUDTXHIXQFLRQHFRUUHFWDPHQWHHOFpVSHGGHEHHVWDUGH¿QLGRFRQ
bordes planos, como pavimento o bordes elevados. Cuando el cortacésped no detecta césped
o encuentra un obstáculo, cambia de ruta de forma aleatoria y vuelve a empezar a cortar en una
nueva dirección. El cortacésped puede desplazarse a diferentes zonas de césped siempre que
HVWpQGH¿QLGDVFRPRVHGHVFULEHHQHVWHPDQXDOGHLQVWUXFFLRQHV
El cortacésped utiliza una batería MX 24V desmontable que es compatible con todos los
productos de la gama LawnMaster
®
24V. La hierba excesivamente larga o húmeda puede afectar
al rendimiento, por lo que es importante mantener un programa de corte regular para controlar el
crecimiento y el desarrollo de un césped limpio.
Este cortacésped se puede controlar a distancia mediante nuestra aplicación OcuMow
®
y requiere
una conexión de red Wi-Fi.
EMISIONES SONORAS MEDIDAS EN EL ENTORNO COMO POTENCIA
ACÚSTICA

5
ESPECIFICACIONES
Primera operación
El VBRM701YAMIDR está diseñado para detectar el césped y desplazarse a las zonas que
LGHQWL¿TXHFRPRFpVSHG6LQRSXHGHYHUXQOtPLWHFODURFRQWLQXDUiPRYLpQGRVHKDFLD]RQDV
IXHUDGHOFpVSHG\KDFLDSODQWDVTXHSXHGDLGHQWL¿FDUFRPRFpVSHG5HFRUWDUHOERUGHGHOFpVSHG
FRQXQFRUWDERUGHVDQWHVGHXVDUORD\XGDUiDGH¿QLUPHMRUHOERUGHGHOFpVSHG'XUDQWHOD
primera operación en un césped nuevo, es importante vigilar al robot mientras detecta los bordes
SDUDYHUGyQGHHVQHFHVDULRPHMRUDUODGH¿QLFLyQGHORVOtPLWHV3RUIDYRUOHDODVLQVWUXFFLRQHV
en su totalidad, nuestras instrucciones han sido escritas para ayudarle a obtener los mejores
resultados y también proporciona ideas útiles para los límites temporales, así como ejemplos de
FyPRGH¿QLUXQPHMRUERUGHGHOFpVSHGHQWRGDVODVHVWDFLRQHV
POR SU SEGURIDAD: LEA ATENTAMENTE Y COMPRENDA TODAS LAS INSTRUCCIONES.
6
INSTRUCCIONES IMPORTANTES DE SEGURIDAD
LEER ATENTAMENTE ANTES DE USAR. CONSÉRVELO PARA FUTURAS
CONSULTAS
FORMACIÓN
Ŷ/HDDWHQWDPHQWHODVLQVWUXFFLRQHV)DPLOLDUtFHVHFRQORVPDQGRV\HOXVRFRUUHFWRGHOD
máquina.
Ŷ1RSHUPLWDQXQFDTXHSHUVRQDVQRIDPLOLDUL]DGDVFRQHVWDVLQVWUXFFLRQHVRQLxRVXWLOLFHQOD
máquina. La normativa local puede restringir la edad del operador.
Ŷ(ORSHUDGRURXVXDULRHVUHVSRQVDEOHGHORVDFFLGHQWHVRSHOLJURVTXHVHSURGX]FDQDRWUDV
personas o a sus bienes.
Ŷ(ORSHUDGRURXVXDULRHVUHVSRQVDEOHGHLQIRUPDUDORVYHFLQRVVREUHORVULHVJRV0DQWHQJD
una distancia de seguridad con la máquina cuando la utilice.
Ŷ6LVXFpVSHGHVWiDELHUWRDODFDOOH\RDVXVYHFLQRVGHEHHVWDUSUHVHQWHGXUDQWHHO
funcionamiento del cortacésped para evitar que otras personas accedan a su césped.
Alternativamente, debe proteger/vallar su césped para que otras personas no accedan al
cortacésped durante el funcionamiento.
Ŷ(VWHDSDUDWRQRHVWiGLVHxDGRSDUDVHUXWLOL]DGRSRUSHUVRQDVLQFOXLGRVQLxRVFRQ
capacidades físicas, sensoriales o mentales reducidas, o con falta de experiencia y
conocimientos, a menos que hayan recibido supervisión o instrucciones sobre el uso del
aparato por parte de una persona responsable de su seguridad. Los niños deben ser vigilados
para evitar que jueguen con el aparato.
IMPORTANTE!
El robot cortacésped puede ser peligroso si se utiliza de forma incorrecta.
ADVERTENCIA:
No utilice nunca el robot cortacésped cuando haya personas, especialmente niños o mascotas,
en la zona de corte.
ADVERTENCIA:
PREPARACIÓN
Ŷ$VHJ~UHVHGHTXHOD]RQDGHFpVSHGHVWiGH¿QLGDFRPRVHGHVFULEHHQODVHFFLyQ3UHSDUDFLyQ
GHOD]RQDGHFRUWH\'H¿QLFLyQGHOD]RQDGHFRUWH
Ŷ,QVSHFFLRQHSHULyGLFDPHQWHOD]RQDGRQGHVHYDDXWLOL]DUODPiTXLQD\UHWLUHWRGDVODVSLHGUDV
palos, cables, juguetes de mascotas y otros objetos extraños.
Ŷ5HDOLFHSHULyGLFDPHQWHXQDLQVSHFFLyQYLVXDOSDUDFRPSUREDUTXHODVFXFKLOODVORVSHUQRVGH
las cuchillas y el conjunto de corte no están desgastados ni dañados. Sustituya las cuchillas y los
pernos desgastados o dañados en juegos para preservar el equilibrio.
Ŷ(QODVPiTXLQDVPXOWLKXVLOORWHQJDFXLGDGR\DTXHODURWDFLyQGHXQDFXFKLOODSXHGHSURYRFDUOD
rotación de las demás.

7
INSTRUCCIONES IMPORTANTES DE SEGURIDAD
OPERACIÓN
Ŷ1RGHMHODPiTXLQDHQIXQFLRQDPLHQWRVLQYLJLODQFLDVLVDEHTXHKD\DQLPDOHVGRPpVWLFRV
niños o personas en las proximidades.
Ŷ1RXWLOLFHQXQFDODPiTXLQDFRQSURWHFFLRQHVGHIHFWXRVDVRVLQGLVSRVLWLYRVGHVHJXULGDGSRU
HMHPSORGHÀHFWRUHVFRORFDGRV
Ŷ1RFRORTXHODVPDQRVQLORVSLHVFHUFDRGHEDMRGHODVSLH]DVJLUDWRULDV1RWRTXHODVSLH]DV
móviles peligrosas antes de que se hayan detenido por completo
Ŷ1ROHYDQWHQLWUDQVSRUWHQXQFDXQDPiTXLQDFRQHOPRWRUHQPDUFKD
Ŷ'HVFRQHFWHVLHPSUHHOLQWHUUXSWRUGHHQFHQGLGRDSDJDGR\UHWLUHODEDWHUtD
- Antes de desatascar;
- Antes de revisar, limpiar o trabajar en la máquina.
Ŷ1RHVWiSHUPLWLGRPRGL¿FDUHOGLVHxRRULJLQDOGHOFRUWDFpVSHG7RGDVODVPRGL¿FDFLRQHVVH
realizan bajo su propia responsabilidad.
Ŷ(YLWHXWLOL]DUHOFRUWDFpVSHG\VXVSHULIpULFRVHQFRQGLFLRQHVPHWHRUROyJLFDVDGYHUVDV
especialmente cuando exista riesgo de rayos.
Ŷ1RXWLOLFHHOFRUWDFpVSHGSDUDQLQJ~QRWUR¿QTXHQRVHDFRUWDUHOFpVSHG
Ŷ(QFDVRGHDFFLGHQWHRDYHUtDPLHQWUDVHOFRUWDFpVSHGHVWiFRUWDQGRHOFpVSHGSXOVH
inmediatamente el botón STOP.
Ŷ1RFRORTXHQDGDHQFLPDGHOFRUWDFpVSHG1RSHUPLWDQXQFDTXHSHUVRQDVRDQLPDOHVVH
sienten sobre el cortacésped.
Ŷ1RXWLOLFHHOFRUWDFpVSHGVLHOLQWHUUXSWRUGHHQFHQGLGRDSDJDGRQRIXQFLRQD
Ŷ1RXWLOLFHHOFRUWDFpVSHGFXDQGRKD\DXQVLVWHPDGHULHJRHQIXQFLRQDPLHQWR$VHJ~UHVHGH
que el cortacésped y el sistema de riego no funcionan al mismo tiempo. No lave el cortacésped
con agua corriente ni lo sumerja en agua. Este producto no es impermeable.
Ŷ$SDJXHVLHPSUHHOFRUWDFpVSHGFRQHOLQWHUUXSWRUGHHQFHQGLGRDSDJDGRFXDQGRQRORXWLOLFH
Ŷ(OURERWFRUWDFpVSHGQXQFDGHEHDOPDFHQDUVHXWLOL]DUVHQLFDUJDUVHDWHPSHUDWXUDVLQIHULRUHV
a 0°C (32ºF) ni superiores a 50°C (122ºF). Esto podría dañar el producto o la batería
Ŷ6LHJXHVyORDODOX]GHOGtDRFRQEXHQDOX]DUWL¿FLDO(OFRUWDFpVSHGQHFHVLWDEXHQDOX]SDUD
LGHQWL¿FDUFRUUHFWDPHQWHOD]RQDGHFpVSHG
Ŷ(YLWHXWLOL]DUODPiTXLQDHQKLHUEDPX\ODUJDRK~PHGD
Ŷ1RXWLOLFHQXQFDODPiTXLQDHQRFHUFDGHHQWRUQRVH[SORVLYRV\RLQÀDPDEOHV
Ŷ1RXWLOLFHODPiTXLQDVLHVWiGHVFDO]RROOHYDVDQGDOLDVDELHUWDV/OHYHVLHPSUHFDO]DGR
resistente y pantalones largos.
Ŷ$VHJ~UHVHVLHPSUHGHSLVDUELHQHQODVSHQGLHQWHV
Ŷ(QFLHQGDVLHPSUHHOPRWRUVLJXLHQGRODVLQVWUXFFLRQHV\PDQWHQLHQGRORVSLHVDOHMDGRVGHODV
cuchilla(s).
Ŷ6HFRORFDUiQVHxDOHVGHDGYHUWHQFLDDOUHGHGRUGHOD]RQDGHWUDEDMRGHOURERWFRUWDFpVSHGVL
se utiliza en zonas públicas. Las señales tendrán el texto siguiente: ¡Atención! ¡Cortacésped
automático! Manténgase alejado de la máquina. ¡Vigile a los niños!
MANTENIMIENTO Y ALMACENAMIENTO
Ŷ0DQWHQJDWRGDVODVWXHUFDVSHUQRV\WRUQLOORVDSUHWDGRVSDUDDVHJXUDUVHGHTXHODPiTXLQDHVWi
en condiciones de trabajo seguras.
Ŷ6XVWLWX\DODVSLH]DVGHVJDVWDGDVRGDxDGDVSRUUD]RQHVGHVHJXULGDG
Ŷ8WLOLFH~QLFDPHQWHFXFKLOODVGHUHFDPELRUHFRPHQGDGDVSRUHOIDEULFDQWH
Ŷ(QFDVRGHHQWUDUHQFRQWDFWRFRQHOHFWUROLWRVFDXVDGRVSRUIXJDVGHODEDWHUtDODYHOD]RQD
afectada con agua/agente neutralizante durante varios minutos. Acudir al médico en caso de
ingestión, contacto con los ojos o si persiste la irritación cutánea.
8
Ŷ(OPDQWHQLPLHQWRGHODPiTXLQDGHEHUHDOL]DUVHGHDFXHUGRFRQODVLQVWUXFFLRQHVGHOIDEULFDQWH
Ŷ(QFDVRGHYLEUDFLRQHVDQRUPDOHVGHWHQJDHOFRUWDFpVSHGUHWLUHODOODYHGHVHJXULGDG\HO
paquete de baterías y compruebe que las cuchillas no estén dañadas. Sustituya las cuchillas por
juegos completos para preservar el equilibrio. Si la vibración continúa, póngase en contacto con
el Servicio de Atención al Cliente.
Ŷ8WLOLFHJXDQWHVJUXHVRVSDUDLQVSHFFLRQDURUHDOL]DUHOPDQWHQLPLHQWRGHODVFXFKLOODV
Ŷ/DOLPSLH]D\HOPDQWHQLPLHQWRQRGHEHQVHUUHDOL]DGRVSRUQLxRVVLQVXSHUYLVLyQ
Ŷ1RXWLOLFHHOFRUWDFpVSHGVLODFXFKLOODGHFRUWHHVWiGDxDGD6XVWLWX\DODFXFKLOODGHFRUWH
Ŷ8WLOLFH~QLFDPHQWHHTXLSRV\DFFHVRULRVRULJLQDOHV1RHVWiSHUPLWLGRPRGL¿FDUHOGLVHxRRULJLQDO
GHOFRUWDFpVSHG7RGDVODVPRGL¿FDFLRQHVVHUHDOL]DQEDMRVXSURSLDUHVSRQVDELOLGDG
Ŷ5HWLUHVLHPSUHODEDWHUtDDQWHVGHJXDUGDUHOFRUWDFpVSHG
TRANSPORTE
Dentro de la zona de trabajo:
Ŷ3XOVHHOERWyQ6723SDUDGHWHQHUHOFRUWDFpVSHG8WLOLFHHODVDGHWUDQVSRUWHSDUDWUDQVSRUWDU
el cortacésped. Transporte el cortacésped con el disco de corte alejado del cuerpo.
Largas distancias:
Ŷ&XDQGRWUDQVSRUWHVXFRUWDFpVSHGDODUJDVGLVWDQFLDVSXOVHHOERWyQ6723\DSDJXHHO
cortacésped con el botón de encendido.
Ŷ,03257$17(6HUHFRPLHQGDFRQVHUYDUHOHPEDODMHRULJLQDOSDUDHYLWDUGDxRVGXUDQWHHO
transporte a largas distancias.
PAQUETE DE BATERÍAS
Ŷ(VWDEDWHUtDVyORHVFRPSDWLEOHFRQORVFDUJDGRUHV/DZQ0DVWHU
®
24LFC14-ETL, 24LFC02-ETL o
24LSC01-ETL.
Ŷ5HFDUJXHVyORFRQHOFDUJDGRUHVSHFL¿FDGRSRUHOIDEULFDQWH\TXH¿JXUDHQHVWHPDQXDO8Q
cargador adecuado para un tipo de batería puede crear riesgo de incendio si se utiliza con otro
tipo de batería.
Ŷ1RFDUJXHODEDWHUtDHQXQOXJDUK~PHGRRPRMDGR6HJXLUHVWDQRUPDUHGXFLUiHOULHVJRGH
descarga eléctrica.
Ŷ1RFRORTXHORVFRUWDFpVSHGHVDEDWHUtDQLVXVEDWHUtDVFHUFDGHOIXHJRRGHOFDORU(VWRUHGXFLUi
el riesgo de explosión y, posiblemente, de lesiones.
Ŷ1RDEUDQLPXWLOHODEDWHUtD(OHOHFWUROLWROLEHUDGRHVFRUURVLYR\SXHGHFDXVDUGDxRVHQORV
ojos o la piel. Puede ser tóxico si se ingiere. Pueden desprenderse humos. En tales situaciones,
No levante el cortacésped cuando esté aparcado en la estación base. Puede dañar la estación
base y/o el cortacésped. Pulse el botón STOP y saque el cortacésped de la estación base antes de
levantarlo.
ADVERTENCIA:
Desconecte todas las conexiones a la estación base (fuente de alimentación) si hay riesgo de
tormenta eléctrica.
ADVERTENCIA:
INSTRUCCIONES IMPORTANTES DE SEGURIDAD

9
trasládese a una zona bien ventilada, preferiblemente al aire libre, y solicite asistencia médica en
caso de malestar.
Ŷ1RDUURMHODVEDWHUtDVDOIXHJR3XHGHQH[SORWDURWHQHUIXJDV\FDXVDUOHVLRQHV(OOtTXLGR
expulsado de la batería puede causar irritación o quemaduras.
Ŷ1RDSODVWHGHMHFDHUQLGDxHODEDWHUtD1RXWLOLFHXQDEDWHUtDRXQFDUJDGRUTXHVHKD\DFDtGRR
haya recibido un golpe fuerte. Una batería dañada puede explotar. Deseche inmediatamente una
batería dañada o que se haya caído.
Ŷ/DVSLODVSXHGHQH[SORWDUHQSUHVHQFLDGHXQDIXHQWHGHLJQLFLyQFRPRXQDOODPDSLORWR3DUD
reducir el riesgo de lesiones personales graves, no utilice nunca ningún producto inalámbrico en
presencia de una llama abierta. Una batería que explota puede propulsar residuos y productos
químicos. En caso de exposición, lave con agua inmediatamente.
Ŷ(QFRQGLFLRQHVH[WUHPDVGHXVRRWHPSHUDWXUDSXHGHQSURGXFLUVHIXJDVGHODEDWHUtD6LHO
líquido entra en contacto con la piel, lávese inmediatamente con agua y jabón. Si le entra líquido
en los ojos, láveselos con agua limpia durante al menos 10 minutos y, a continuación, acuda
inmediatamente al médico. Seguir esta norma reducirá el riesgo de lesiones personales graves.
Ŷ&XDQGRODEDWHUtDQRHVWpHQXVRPDQWpQJDODDOHMDGDGHRWURVREMHWRVPHWiOLFRVFRPRFOLSV
monedas, llaves, clavos, tornillos u otros objetos metálicos pequeños que puedan hacer una
conexión de un terminal a otro. Un cortocircuito entre los terminales de la batería puede provocar
quemaduras o un incendio.
Ŷ1RH[SRQJDODEDWHUtDQLHOFRUWDFpVSHGDOIXHJRQLDWHPSHUDWXUDVH[FHVLYDV/DH[SRVLFLyQDO
fuego o a temperaturas superiores a 265 °F (130°C) puede provocar una explosión.
Ŷ1RPRGL¿TXHQLLQWHQWHUHSDUDUHOFRUWDFpVSHGQLHOSDTXHWHGHEDWHUtDVFRPRDSDUDWRH[FHSWR
en los casos indicados en las instrucciones de uso y cuidado.
Ŷ6LJDWRGDVODVLQVWUXFFLRQHVGHFDUJD\QRFDUJXHODEDWHUtDQLHOFRUWDFpVSHGIXHUDGHOLQWHUYDOR
GHWHPSHUDWXUDVHVSHFL¿FDGRHQODVLQVWUXFFLRQHV8QDFDUJDLQFRUUHFWDRDWHPSHUDWXUDVIXHUD
GHOUDQJRHVSHFL¿FDGRSXHGHGDxDUODEDWHUtD\DXPHQWDUHOULHVJRGHLQFHQGLR
Ŷ7RGDVODVUHSDUDFLRQHVGHODKHUUDPLHQWDGHEHQVHUUHDOL]DGDVSRUXQDSHUVRQDFXDOL¿FDGD
que utilice únicamente piezas de repuesto idénticas. Esto garantizará el mantenimiento de la
seguridad del producto.
CARGADOR DE BATERÍA
Ŷ 3DUDUHGXFLUHOULHVJRGHOHVLRQHVFDUJXHVyORODVSLODVUHFDUJDEOHVGHLRQHVGHOLWLR
HVSHFL¿FDGDV2WURVWLSRVGHEDWHUtDVSXHGHQH[SORWDUFDXVDQGROHVLRQHVSHUVRQDOHVRGDxRV
Ŷ 0DQWHQJDHOFDEOH\HOFDUJDGRUDOHMDGRVGHOFDORUSDUDHYLWDUGDxRVHQODFDUFDVDRHQODVSLH]DV
internas.
Ŷ 1RXWLOLFHHOFDUJDGRUFRQXQFDEOHRHQFKXIHGDxDGR\DTXHSRGUtDSURYRFDUXQFRUWRFLUFXLWR\
una descarga eléctrica. Si está dañado, deje de utilizarlo inmediatamente. Sustituya el cargador
por una unidad idéntica a la indicada en la Lista de piezas de este manual.
Ŷ 1RXWLOLFHXQFDUJDGRUTXHVHKD\DFDtGRRKD\DUHFLELGRXQJROSHIXHUWH
Ŷ 1RGHVPRQWHHOFDUJDGRU/OpYHORDXQFHQWURGHVHUYLFLRFXDOL¿FDGRSDUDTXHORUHYLVHQROR
sustituyan. Un montaje incorrecto puede provocar un riesgo de descarga eléctrica o incendio.
Ŷ 1RDEXVHGHOFDEOHGHOFDUJDGRU1XQFDXWLOLFHHOFDEOHSDUDWUDQVSRUWDUWLUDU
Ŷ 0DQWHQJDHOFDEOHDOHMDGRGHOFDORUDFHLWHERUGHVD¿ODGRVRSLH]DVPyYLOHV/RVFDEOHVGDxDGRV
o enredados aumentan el riesgo de descarga eléctrica. Si el cable del cargador está dañado,
sustitúyalo por un modelo idéntico al indicado en este manual.
Ŷ 8QFDUJDGRUDGHFXDGRSDUDXQWLSRGHEDWHUtDSXHGHFUHDUULHVJRGHLQFHQGLRVLVHXWLOL]DFRQ
otro tipo de batería.
Ŷ &DUJXHODEDWHUtDDODWHPSHUDWXUDGHFDUJDQRUPDOHQWUH)&\)&
INSTRUCCIONES IMPORTANTES DE SEGURIDAD

10
INFORMACIÓN DE SEGURIDAD DE LA ESTACIÓN DE CARGA
Ŷ 1RXWLOLFHSLODVQRUHFDUJDEOHV
Ŷ
No utilice la estación de carga con un cable o enchufe dañado, ya que podría provocar un
cortocircuito y una descarga eléctrica. Si está dañado, deje de utilizarlo inmediatamente. Sustituya
la estación de carga por una unidad idéntica a la indicada en la Lista de piezas de este manual.
Si el cable de alimentación de este equipo está dañado, debe ser sustituido por el fabricante, un
DJHQWHGHDWHQFLyQDOFOLHQWHGHOPLVPRRXQDSHUVRQDSOHQDPHQWHFXDOL¿FDGDSDUDHYLWDUULHVJRV
Ŷ 8WLOLFHODHVWDFLyQGHFDUJDVyORFRQODVEDWHUtDVRULJLQDOHVDGHFXDGDV&DUJDURWUDVEDWHUtDV
puede provocar lesiones y riesgo de incendio.
Ŷ /DWHQVLyQLQGLFDGDHQODSODFDGHFDUDFWHUtVWLFDVGHODHVWDFLyQGHFDUJDGHEHFRUUHVSRQGHUD
la tensión de la fuente de alimentación.
Ŷ 1RWRTXHQXQFDHOHQFKXIHFRQODVPDQRVPRMDGDV
FIN DE USO DEL PRODUCTO
Ŷ (OFRUWDFpVSHG\VXVDFFHVRULRVGHEHQUHFLFODUVHFRUUHFWDPHQWHDO¿QDOGHVXYLGD~WLOSDUDHYLWDU
que los residuos de aparatos eléctricos y electrónicos acaben en vertederos, y para proteger y
mejorar la calidad del medio ambiente.
Ŷ 1RGHVHFKHHOFRUWDFpVSHGQLQLQJXQDGHVXVSLH]DVLQFOXLGDVODIXHQWHGHDOLPHQWDFLyQ\OD
HVWDFLyQEDVHFRPRUHVLGXRVXUEDQRVVLQFODVL¿FDUGHEHQUHFRJHUVHSRUVHSDUDGR
Ŷ
Pregunte a su distribuidor/vendedor local sobre la disponibilidad de sistemas de devolución y recogida.
Ŷ 1RDUURMHHOSDTXHWHGHSLODVDOIXHJRQLGHSRVLWHODVSLODVXVDGDVHQODEDVXUDGRPpVWLFD
Ŷ (OLPLQHODVSLODVGHDFXHUGRFRQODQRUPDWLYDORFDOGRQGHVHUiQUHFLFODGDVGHIRUPDUHVSHWXRVD
con el medio ambiente.
CUMPLIMIENTO DE LA FCC
Ŷ(VWHGLVSRVLWLYRFXPSOHOD3DUWHGHODVQRUPDVGHOD)&&6XIXQFLRQDPLHQWRHVWiVXMHWRD
las dos condiciones siguientes:
- Este dispositivo no puede causar interferencias perjudiciales, y
- Este aparato debe aceptar cualquier interferencia recibida, incluidas las que puedan causar
un funcionamiento no deseado.
ŶNOTA: Este equipo ha sido sometido a pruebas y se ha determinado que cumple los límites
establecidos para los dispositivos digitales de Clase B, de conformidad con el apartado 15
de las normas de la FCC. Estos límites están diseñados para proporcionar una protección
razonable contra interferencias perjudiciales en una instalación residencial.
Ŷ
Este equipo genera, utiliza y puede irradiar energía de radiofrecuencia y, si no se instala y utiliza de
acuerdo con las instrucciones, puede causar interferencias perjudiciales para las comunicaciones
por radio. No obstante, no se garantiza que no se produzcan interferencias en una instalación
concreta. Si este equipo causa interferencias perjudiciales en la recepción de radio o televisión,
lo cual puede determinarse apagando y encendiendo el equipo, se recomienda al usuario que
intente corregir la interferencia mediante una o más de las siguientes medidas:
- Reoriente o reubique la antena receptora.
- Aumente la separación entre el equipo y el receptor.
- Conecte el equipo a una toma de corriente de un circuito distinto al del receptor.
- Consulte al distribuidor o a un técnico experto en radio/televisión para obtener ayuda.
GUARDE ESTAS INSTRUCCIONES
Consúltelas con frecuencia y utilícelas para instruir a otras personas que puedan utilizar este
producto. Si presta este producto a alguien, préstele también estas instrucciones.
INSTRUCCIONES IMPORTANTES DE SEGURIDAD
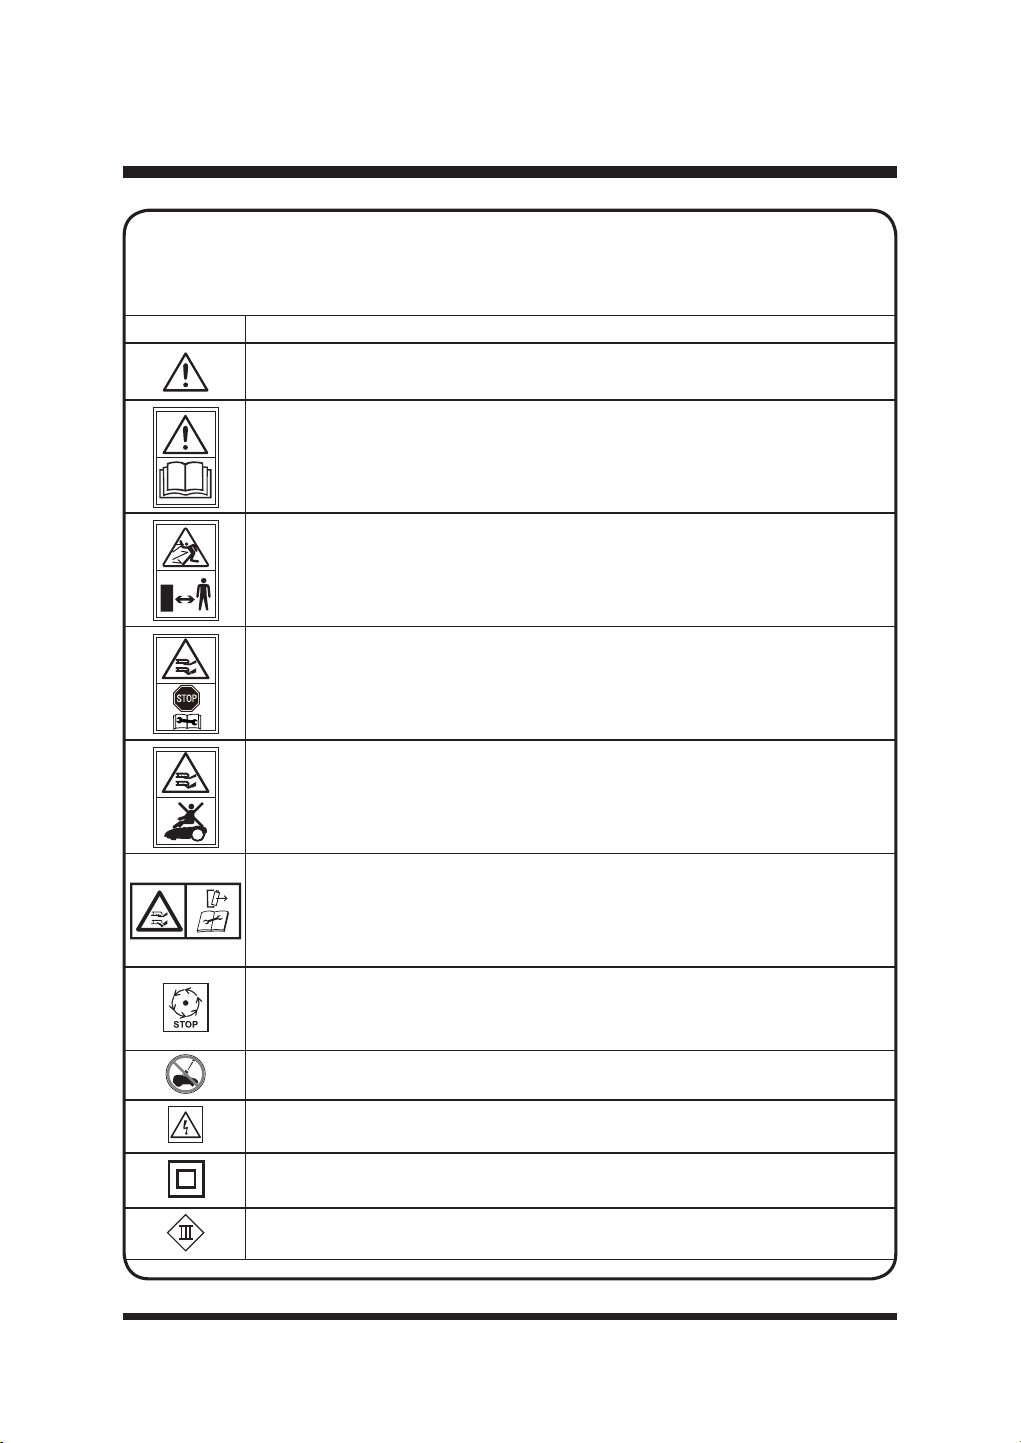
11
SÍMBOLO DESIGNACIÓN/EXPLICACIÓN
ADVERTENCIA - El robot cortacésped puede ser peligroso si no se utiliza
correctamente.
Lea el manual de instrucciones antes de utilizar la máquina.
ADVERTENCIA: Cuidado con los objetos arrojados. Mantenga alejados a los
transeúntes.
Retire la batería antes de trabajar en la máquina o levantarla.
No monte en la máquina.
ADVERTENCIA: No toque la cuchilla giratoria. Desconecte la batería antes del
mantenimiento.
Espere a que todas las piezas móviles se hayan detenido por completo antes de
tocarlas. La cuchilla puede seguir girando después de apagar la máquina, una
cuchilla giratoria puede causar lesiones.
No lave ni sumerja la máquina en agua.
ADVERTENCIA Cuidado con las descargas eléctricas.
Clase de protección II (doble aislamiento).
Máquinas de clase III.
SÍMBOLOS
Algunos de los siguientes símbolos pueden ser utilizados en este producto. Por favor,
HVW~GLHORV\DSUHQGDVXVLJQL¿FDGR/DFRUUHFWDLQWHUSUHWDFLyQGHHVWRVVtPERORVOH
permitirá utilizar el producto de forma mejor y más segura.
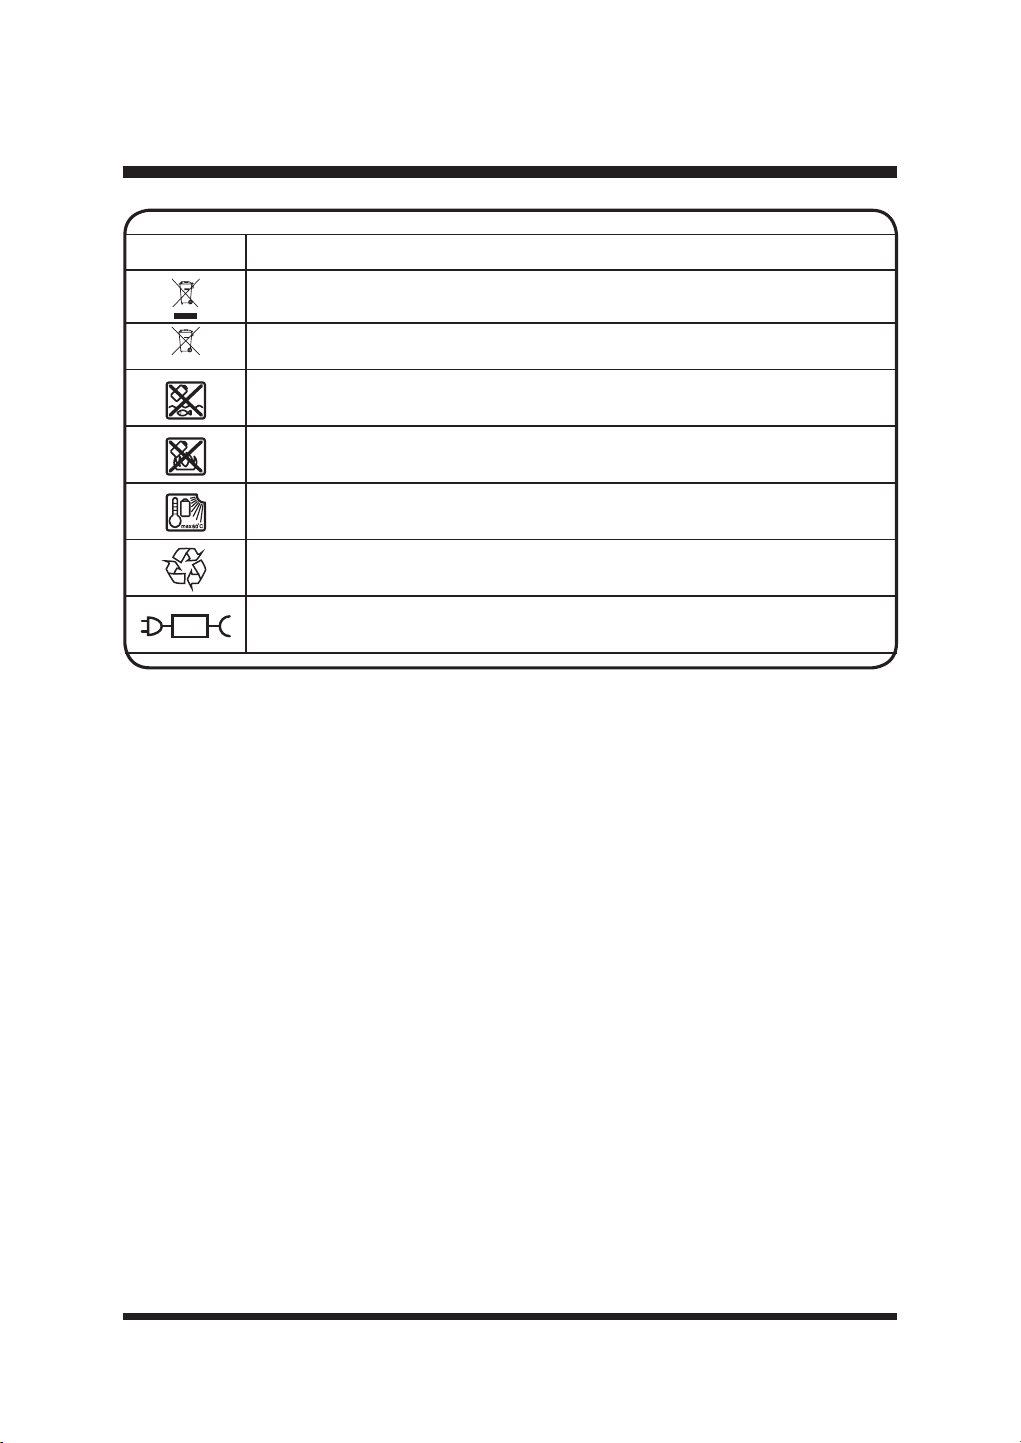
12
SÍMBOLOS
SÍMBOLO DESIGNACIÓN/EXPLICACIÓN
Los aparatos eléctricos no deben eliminarse con la basura doméstica.
Las pilas contienen iones de litio. No tire las pilas a la basura doméstica.
No tire las pilas a los ríos ni las sumerja en agua.
No arroje las baterías al fuego.
No exponga la batería a la luz solar directa durante periodos prolongados y no la
deje encendida ni cerca de una fuente de calor (máx. 60°C).
Reciclar los residuos eléctricos de forma segura para el medio ambiente cuando
existan instalaciones para ello.
Pieza de alimentación desmontable.
Li-ion
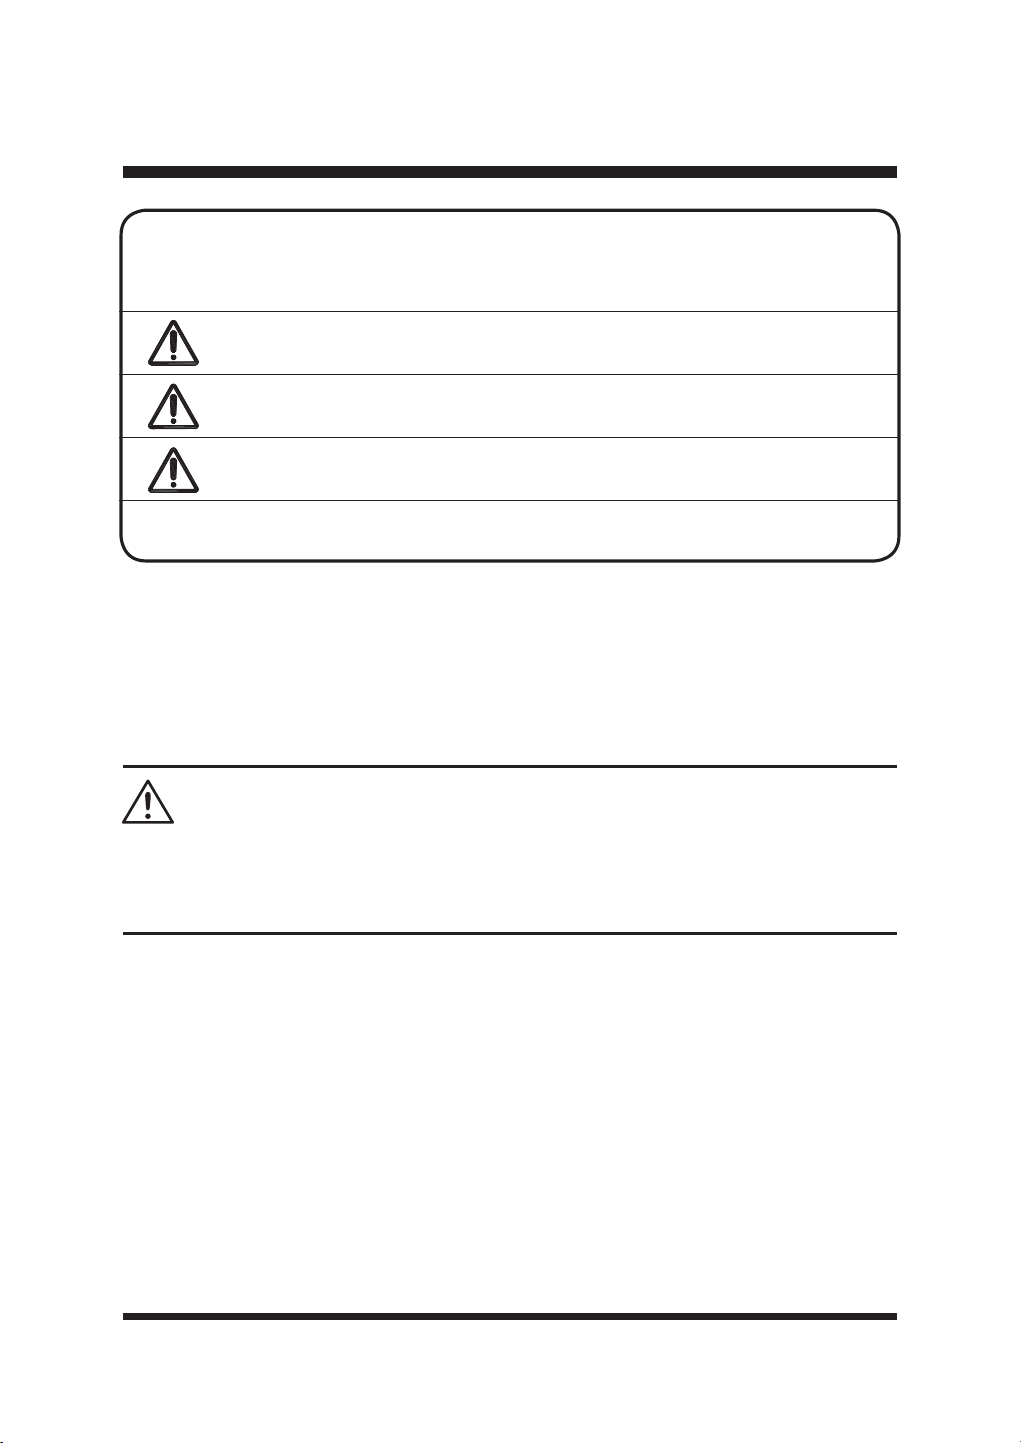
13
SERVICIO
El mantenimiento requiere un cuidado y un conocimiento extremos y solo debe ser realizado
SRUXQWpFQLFRGHVHUYLFLRFDOL¿FDGR$OUHDOL]DUHOPDQWHQLPLHQWRXWLOLFH~QLFDPHQWHSLH]DVGH
repuesto idénticas.
Para solucionar problemas o realizar un reemplazo, llama al Servicio de atención al cliente para
obtener ayuda (número gratuito 866-384-8432).
Para evitar lesiones personales graves, no intente utilizar este producto hasta que haya leído
detenidamente y comprendido completamente el Manual del Operador.
No utilice este producto si no comprende las advertencias e instrucciones del Manual del Operador.
Llame al Servicio de Atención al Cliente para obtener ayuda (número gratuito 866-384-8432).
ADVERTENCIA
SÍMBOLOS
SÍMBOLO SEÑAL SIGNIFICADO
PELIGRO
Indica una situación de peligro inminente que, si no se
evita, provocará la muerte o lesiones graves.
ADVERTENCIA
Indica una situación potencialmente peligrosa que, si no se
evita, podría provocar la muerte o lesiones graves.
PRECAUCIÓN
Indica una situación potencialmente peligrosa que, si no se
evita, podría provocar la muerte o lesiones graves.
AVISO
(Sin símbolo de alerta de seguridad) Indica una situación
que puede provocar daños a la propiedad.
/DVVLJXLHQWHVSDODEUDVLQGLFDWLYDV\VLJQL¿FDGRVSUHWHQGHQH[SOLFDUORVQLYHOHVGH
riesgo asociados con este producto.
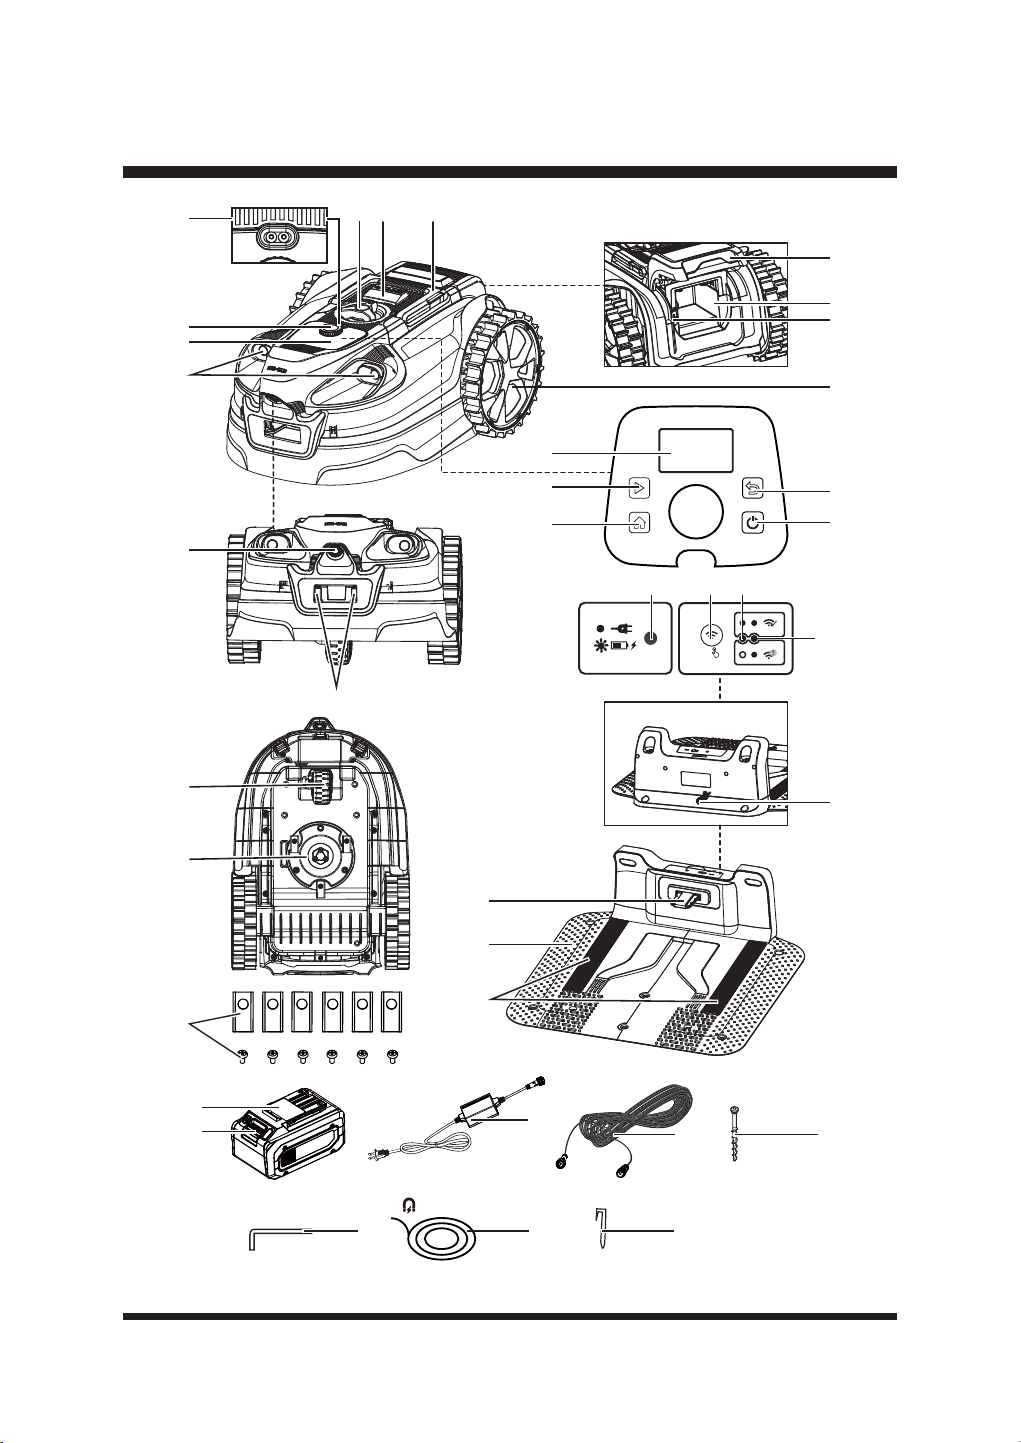
14
CONOZCA SU ROBOT CORTACÉSPED
21
22
23
24
123
4
5
6
7
8
9
10
11
12
19
20
13
14
29
25
15
16
17
18
5S
282726
30
34
37
3635
31
33
32

15
CONOZCA SU ROBOT CORTACÉSPED
1. Asa de transporte
2. Botón STOP
3. Pomo de ajuste de la altura de corte
4. Sensor de lluvia
5. Dial de selección
6. Panel de control
7. Sensores ultrasónicos de objetos
8. Cámara de detección de hierba
9. Regletas de carga
10. Panel LCD
11. Botón de inicio
12. Botón HOME
13. Botón trasero
14. Botón de encendido/apagado
15. Rueda trasera
16. Puerto USB (cubierto por una tapa de goma)
17. Compartimento de la batería
18. Tapa del compartimento de la batería
19. Rueda delantera
20. Disco de corte
21. Cuchilla de repuesto y tornillo (X6)
22. Banda de contacto
23. Estación base
24. Tiras guía en la estación base
25. Cable de alimentación de la estación base
26. Indicador de carga la estación base
27.
%RWyQGHFRQ¿JXUDFLyQGHODFRQH[LyQ:L)L
28. Indicador Wi-Fi
29. Indicador de señal
30. Batería
31. Botón de liberación de la batería
32. Adaptador de corriente
33. Cable alargador (10 m / 32,8 pies)
7RUQLOORGH¿MDFLyQGHODHVWDFLyQEDVH;
35. Llave hexagonal
36. Cinta magnética (5 m, x 2)
37. Tira magnética (X12)
CONOZCA SU ROBOT CORTACÉSPED
El uso seguro de este producto requiere la comprensión de la información que aparece en
el producto y en este Manual del operador, así como el conocimiento del proyecto que está
intentando utilizar. Antes de utilizar este producto, familiarícese con todas las características de
funcionamiento y las normas de seguridad.

16
CONFIGURAR
DESEMBALAJE
Este producto se ha enviado parcialmente montado.
Ŷ6DTXHFRQFXLGDGRHOSURGXFWR\ORVDFFHVRULRVGHODFDMD$VHJ~UHVHGHTXHHVWiQLQFOXLGRV
WRGRVORVDUWtFXORVTXH¿JXUDQHQODOLVWDGHHPEDODMH
Ŷ,QVSHFFLRQHHOSURGXFWRFXLGDGRVDPHQWHSDUDDVHJXUDUVHGHTXHQRVHKDURWRQLGDxDGR
durante el transporte.
Ŷ1RGHVHFKHHOPDWHULDOGHHPEDODMHKDVWDTXHKD\DLQVSHFFLRQDGRFXLGDGRVDPHQWHHO
producto y lo haya utilizado satisfactoriamente.
Ŷ6LDOJXQDSLH]DHVWiGDxDGDRIDOWDQRXWLOLFHHOSURGXFWR/ODPHDOVHUYLFLRGHDWHQFLyQDO
cliente (número gratuito 866-384-8432).
LISTA DE EMBALAJES
(1) Robot cortacésped
(2) Partes de la estación base
(1) Parte superior de la estación base
7RUQLOORVGH¿MDFLyQGHODHVWDFLyQEDVH
(2) Cinta magnética (5 m / 16,4 pies)
(12) Tira magnética
(6) Cuchillas y tornillos de repuesto
(1) Batería de iones de litio de 24 V Max* y 4,0 Ah
(1) Adaptador de corriente
(1) Cable de extensión (10 m / 32,8 pies)
(1) Llave hexagonal
(1) Manual del operador
ADVERTENCIA
No utilice este producto si alguna de las piezas de la lista de embalaje ya está montada en el
producto al desembalarlo. Las piezas de la lista de embalaje no están montadas en el producto
y deben ser instaladas por el usuario. El uso de un producto que puede haber sido ensamblado
incorrectamente podría resultar en lesiones personales graves.
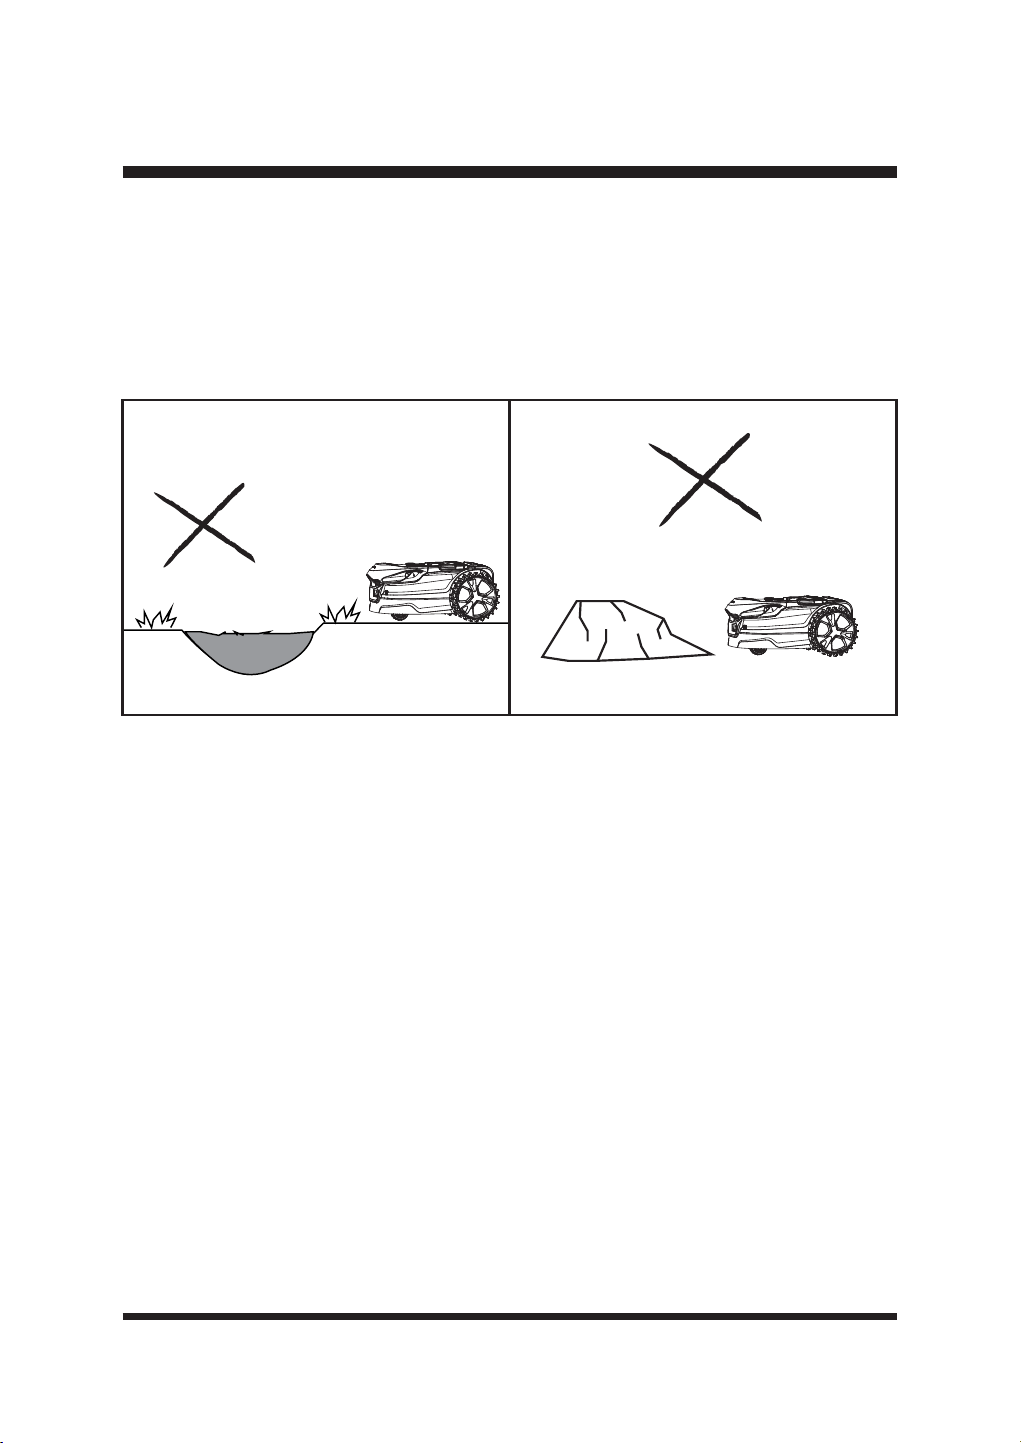
17
Fig. 1 Fig. 2
CONFIGURAR
PREPARACIÓN DEL CÉSPED
Comprender su césped reducirá errores innecesarios y hará que el proceso de instalación sea
PiVIiFLO\ÀXLGR
Ŷ /RVSDUFKHVGHVQXGRV\ODVKRMDVSXHGHQLQWHUIHULUHQHOIXQFLRQDPLHQWRGHODFiPDUD5HSDUH
las zonas muertas con semillas de césped.
Ŷ 1LYHOHWRGDVODVVXSHU¿FLHVSDUDHYLWDUTXHHOFRUWDFpVSHGVHDWDVTXH)LJ
Ŷ 5HWLUHWRGRVORVSHTXHxRVREMHWRVVXHOWRVTXHSXHGDQGDxDUODFXFKLOOD)LJ
NOTA: Este cortacésped no está diseñado para cortar zonas excesivamente largas o descuidadas.
Corte la hierba a una altura de 60 mm (2,36'') antes de utilizarlo. No deje que la hierba crezca
excesivamente entre usos.
SOBRE SU ROBOT CORTACÉSPED
(OFRUWDFpVSHGXWLOL]DXQDFiPDUD\VHQVRUHVXOWUDVyQLFRVSDUDLGHQWL¿FDUODKLHUED\GHVSOD]DUVH
por el césped.
Puede:
Ŷ'HWHFWDKLHUED\ERUGHVELHQGH¿QLGRVFRPRSDYLPHQWRJUDYD\WLHUUD
Ŷ%RUGHVHOHYDGRVFRPRWUDYLHVDVYDOODV\PXURV
Ŷ(QFXHQWUDHOFDPLQRGHYXHOWDDFDVDKDVWDODSURSLDFDUJDXWLOL]DQGRHOSRVLFLRQDPLHQWR*166
y las tiras de guía de la estación base.
No puede:
Ŷ
7UDEDMDHQHOFUHS~VFXORRSRUODQRFKHODFiPDUDQHFHVLWDOX]GLXUQDSDUDIXQFLRQDUH¿FD]PHQWH
Ŷ7UDEDMDUVREUHKLHUEDGHVLJXDORPXHUWD
Ŷ'LVWLQJDHQWUHFpVSHG\PDFL]RVGHÀRUHVFRQPDODVKLHUEDV
Ŷ&UX]DUORVOtPLWHVGHOFpVSHGFRPRFDPLQRVRHVFDORQHV
El cortacésped puede utilizarse en dos modos distintos
:
Ŷ0RGR3URJUDPDFLyQ9HUSiJLQD
Ŷ0RGRVROWDU\VHJDU&RQVXOWHODSiJLQD
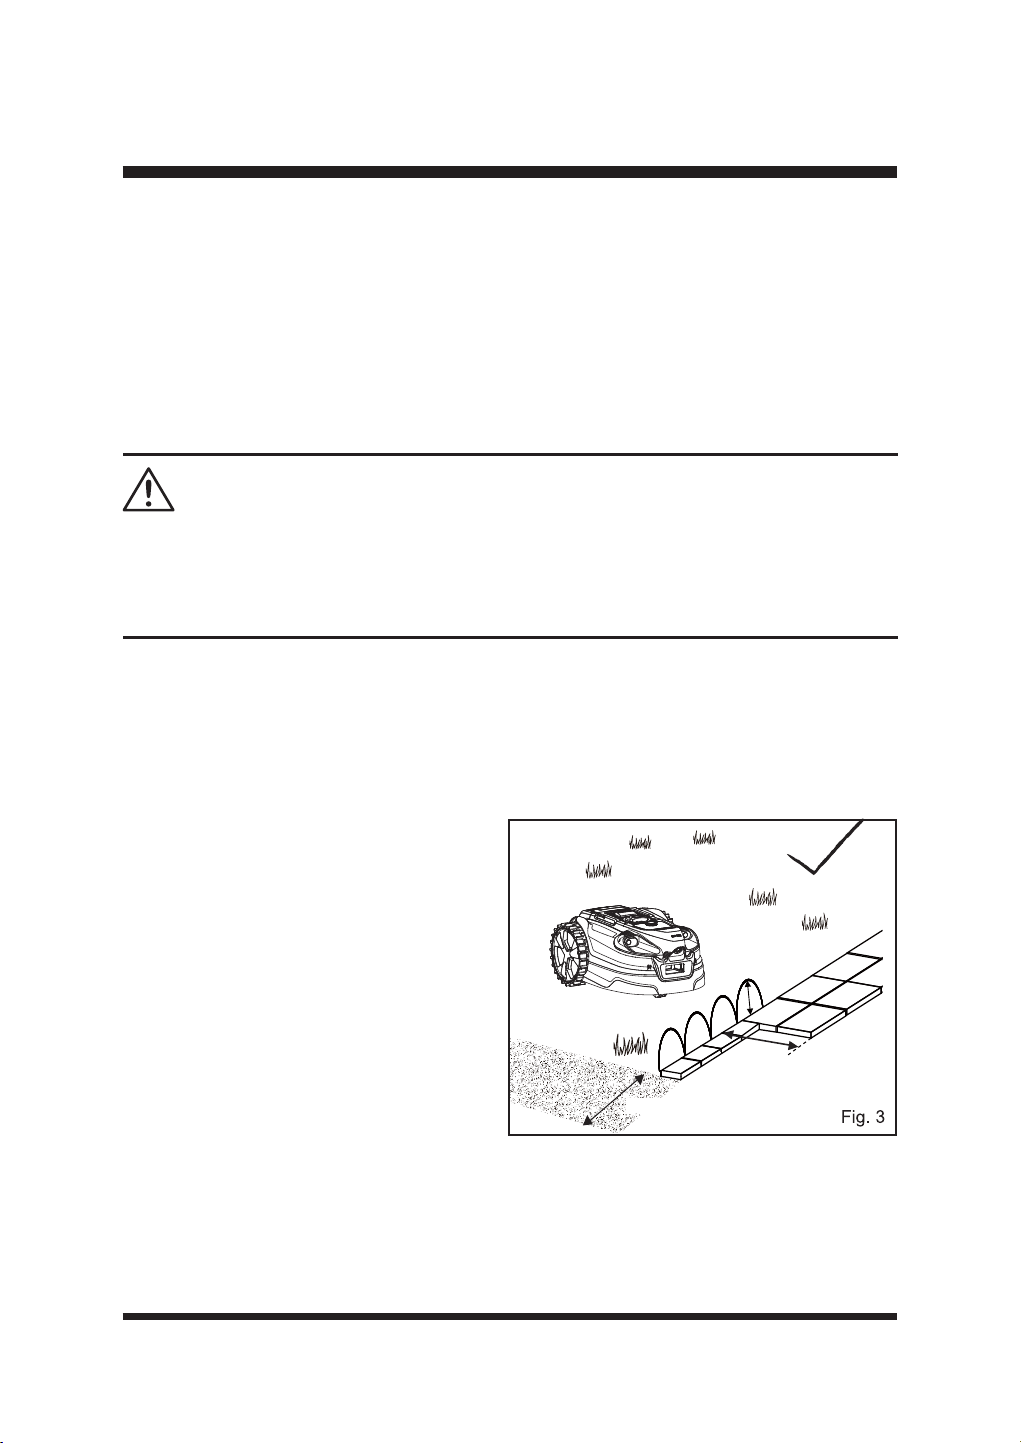
18
CONFIGURAR
Los sensores ultrasónicos pueden desactivarse cuando el césped está libre de obstáculos. En
este caso, se pueden utilizar setos, muros u otras barreras similares en el césped como límite de
la zona de trabajo.
Cuando el robot cortacésped detecta que no hay hierba o encuentra un obstáculo, cambia de
ruta de forma aleatoria y vuelve a empezar a cortar en una nueva dirección. Para permitir que el
robot cortacésped se mueva libremente dentro del césped, éste debe comprobarse y ajustarse
DGHFXDGDPHQWHSDUDTXHHOURERWFRUWDFpVSHGWHQJDHVSDFLRVX¿FLHQWHSDUDUHFRQRFHUFXDQGR
no hay hierba. Siga atentamente las instrucciones que se indican a continuación para conocer los
tipos de bordes/protecciones que pueden/no pueden utilizarse para delimitar la zona de trabajo.
Este robot cortacésped genera un campo electromagnético durante su funcionamiento. En
determinadas circunstancias, este campo puede interferir activa o pasivamente con implantes
médicos. Para reducir el riesgo de lesiones graves o muerte, recomendamos que las personas
con implantes médicos consulten a su médico y al fabricante del implante médico antes de utilizar
el robot cortacésped.
ADVERTENCIA:
DELIMITACIÓN DE LA ZONA DE SIEGA
/RVERUGHVGHOFpVSHGGHEHQHVWDUFODUDPHQWHGH¿QLGRVSRUERUGHVSODQRVREDUUHUDVHOHYDGDV
para que este cortacésped funcione correctamente.
ŶLímites visuales: deben tener un aspecto diferente del césped; por ello, los cambios de color y
WH[WXUDVRQPX\H¿FDFHV
Ŷ
Límites físicos: ayudan a detener el
cortacésped cuando no es posible establecer
un límite visual.
ŶLímites físicos temporales: pueden
utilizarse donde y cuando sea necesario.
Tipos de límites adecuados
ŶPavimentación
El césped necesita un borde pavimentado o de
madera de al menos 35 cm (13,78'') de ancho
para detenerse y cambiar de dirección con
seguridad.
El pavimento o el borde de madera de
menos de 35 cm (13,78'') de ancho debe
ensancharse o puede utilizarse junto con una
barrera. Consulte la sección Barrera elevada a
continuación (Fig. 3).
ŶBarrera elevada (mediante sensores ultrasónicos)
Con los sensores ultrasónicos activados, se puede utilizar una barrera perimetral a una altura de 6,3''
FPSDUDGH¿QLUHOOtPLWHGHOD]RQDGHWUDEDMR/RVVHQVRUHVXOWUDVyQLFRVGHWHFWDUiQODEDUUHUD\
el cortacésped cambiará de dirección.
> 6.3’’
>13.78''
>13.78''

19
CONFIGURAR
> 6.3’’
> 6.3’’
>13.78''
Fig. 4
Fig. 5
Si la barrera existente es inferior a 16 cm (6,3''),
consulte Barrera elevada (con sensor de
impacto) (Fig. 4).
ŶBarrera elevada (con sensor de impacto)
También se puede utilizar una barrera elevada
(mín. 2,36'') que obstruya físicamente el
movimiento del cortacésped. Este límite puede
ser inferior a 16 cm (6,3'') y será indetectable
por los sensores ultrasónicos de objetos.
Cuando el robot se encuentre con esta barrera
baja, saltará, dará marcha atrás y girará. Este
tipo de límite puede ser adecuado para su
césped en algunas zonas.
ŶCobertura
Con los sensores ultrasónicos encendidos, se
pueden utilizar setos para delimitar la zona de
trabajo (Fig. 5).
NOTA: El robot cortacésped suele reconocer el
follaje como hierba. Por lo tanto, los sensores
ultrasónicos deben mantenerse siempre
activados cuando se utilicen setos como límite
de la zona de trabajo.
Ŷ*UDYD¿QD
6LVHXWLOL]DJUDYD¿QDRSLHGUDVSHTXHxDV
para bordear el césped, asegúrese de que la
anchura del borde sea superior a 13,78'' (35
cm) y tenga bordes despejados (Fig. 6).
NOTA: No utilice nunca grava, piedras o materiales similares con bordes irregulares para delimitar
la zona de trabajo (Fig. 7). Si no se proporcionan bordes despejados, el cortacésped se saldrá de
la zona de siega y se dañarán las cuchillas.
>13.78''
Fig. 6 Fig. 7

20
CONFIGURAR
ŶBarreras provisionales elevadas
'XUDQWHHOSULPHUXVRPLHQWUDVVHVLHPEUDQODVSDUFHODVGHFpVSHGRÀRUHFHQODVSODQWDVGH
temporada, como los bulbos de primavera , puede ser conveniente utilizar un método temporal
para proteger o delimitar la zona de césped que cortará el robot. En este caso, las cañas de jardín
VRQHVSHFLDOPHQWHH¿FDFHV\SXHGHQUHWLUDUVHPiVWDUGH(QSULPDYHUDSXHGHSURWHJHUGHO
FRUWDFpVSHGORVEXOERVGHÀRUHVHQHOFpVSHGKXQGLHQGRFDxDVFRUWDVYHUWLFDOPHQWHHQHOFpVSHG
alrededor de la zona espaciadas a 20 cm (7,87''). Deje al menos 6 cm de caña por encima del
suelo. Se impedirá físicamente que el cortacésped entre en las zonas protegidas.
ŶBanda magnética
La banda magnética sirve como límite móvil y temporal para crear zonas en las que el robot
cortacésped no puede segar. También puede dejarse permanentemente en su sitio si es necesario.
El robot cortacésped está equipado con un sensor de banda magnética para reconocer una banda
magnética en el suelo. Cuando el robot cortacésped encuentre una banda magnética, se detendrá
y empezará a segar de nuevo en una dirección aleatoria.
NOTA:/DVSDUWtFXODVPDJQpWLFDVVHDGKLHUHQDODVXSHU¿FLHGHODEDQGDPDJQpWLFDSRUIDYRU
use guantes antes de usar.
Instalación de bandas magnéticas
Ŷ&RORTXHODEDQGDPDJQpWLFDXQRV
centímetros de la zona u objeto en cuestión.
Ŷ0DQWHQJDXQDGLVWDQFLDGHDOPHQRV
cm (47,24'') entre dos zonas delimitadoras
individuales formadas por bandas
magnéticas, para que el robot cortacésped
SXHGDDWUDYHVDUODVVLQGL¿FXOWDG)LJ
Ŷ
Fije la banda magnética al suelo con las
clavijas suministradas, separadas 1 m (39,37'').
Ŷ Obstáculos en la zona de siega
Con los sensores ultrasónicos activados, los
objetos que no impiden el funcionamiento
normal del robot cortacésped, como árboles
(sin raíces elevadas), postes verticales, etc.,
no requieren la exclusión de de la zona de corte (Fig. 9).
Si tiene un DAI o un marcapasos, evite el contacto estrecho o prolongado con imanes o sus
campos magnéticos. Mantenga los imanes a una distancia mínima de 15 cm del lugar donde tiene
implantado el dispositivo.
ADVERTENCIA:
La fuerte fuerza magnética puede crear un riesgo de pellizco en los dedos. Utilice guantes y
manipúlelo con cuidado.
ADVERTENCIA:
>47.24''
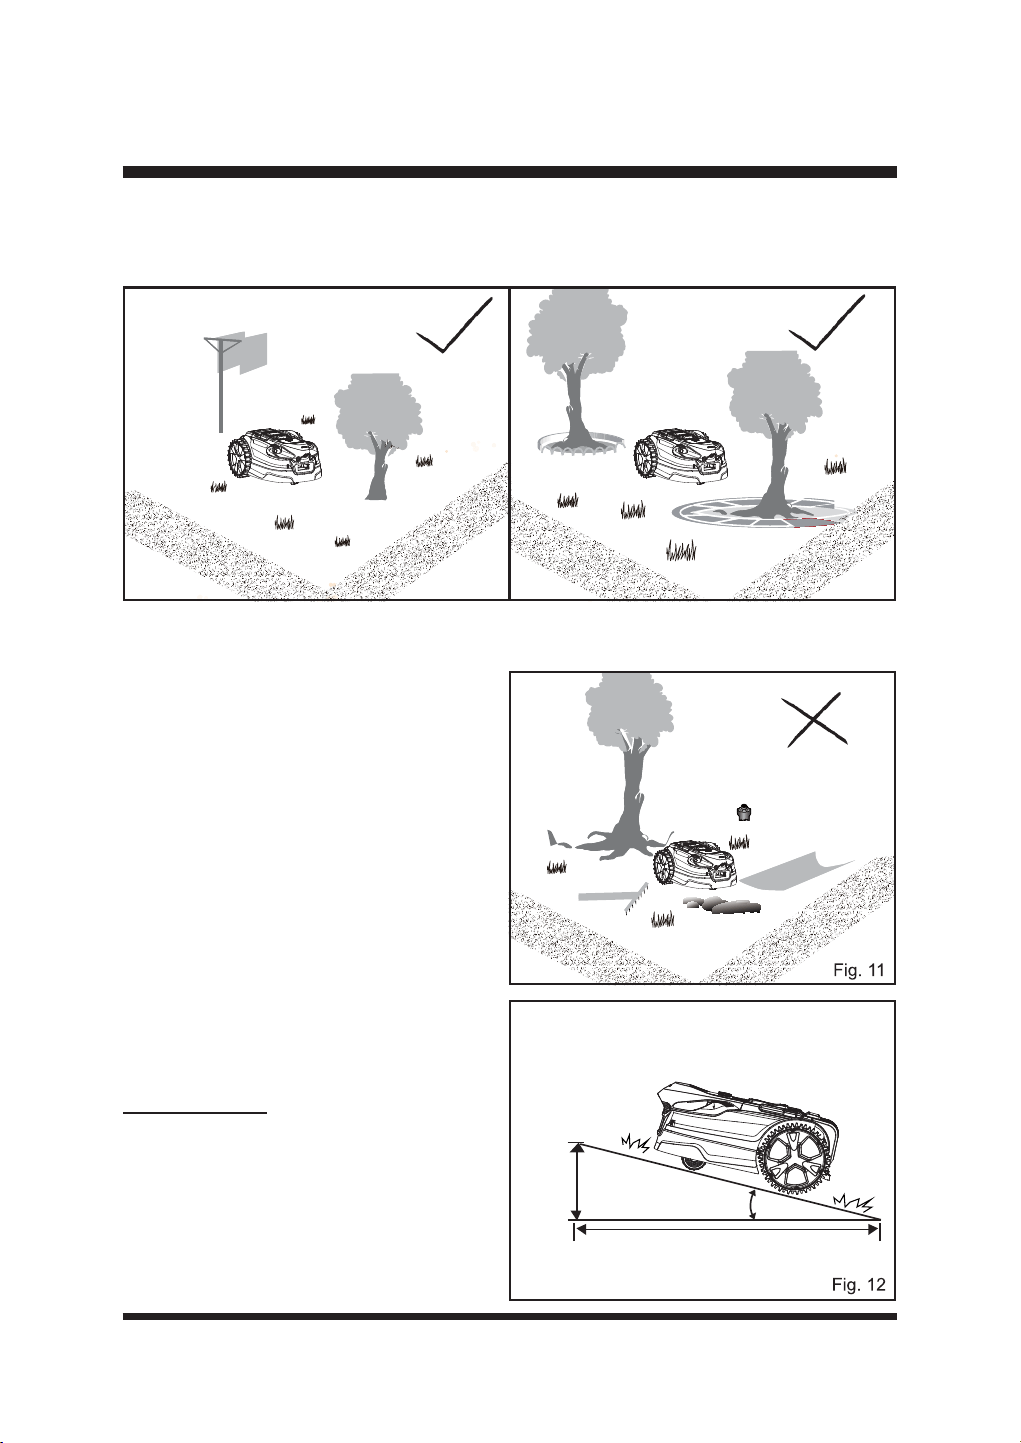
21
CONFIGURAR
&XDQGRHQODVXSHU¿FLHGHOFpVSHGKD\REMHWRVFRPRUDtFHVGHiUEROHVH[SXHVWDVFDEOHV
expuestos, sistemas de riego, etc., es necesario proteger estos objetos con pavimento, muros o
banda magnética para evitar que se dañen y que se dañe el robot cortacésped (Fig. 10).
La zona de trabajo no puede estar delimitada por agujeros o zanjas. Asegúrese de que no haya
objetos como juguetes, herramientas de trabajo, piedras pequeñas, ramas o aspersores, etc.,
sobre el césped o sobresaliendo del suelo que
puedan obstaculizar el cortacésped o causar
daños a la cuchilla (Fig. 11).
NOTA: Evite que se acumulen hojas en el
césped, ya que podrían no ser detectadas
correctamente por el robot cortacésped.
Retire las hojas a intervalos regulares.
ŶPendientes
El robot cortacésped es capaz de subir con
seguridad pendientes del 35% o de 20º, por
lo que deben excluirse las zonas con más
pendiente (Fig. 12).
Para calcular la pendiente de su césped,
consulte la Fig. 12.
La pendiente se calcularía como se indica
a continuación:
Fig. 9 Fig. 10
35cm (Elevación)
100cm (longitud)
35% (pendiente)
=
35 cm
100 cm
Máx. 35% pendiente
(20º de inclinación)
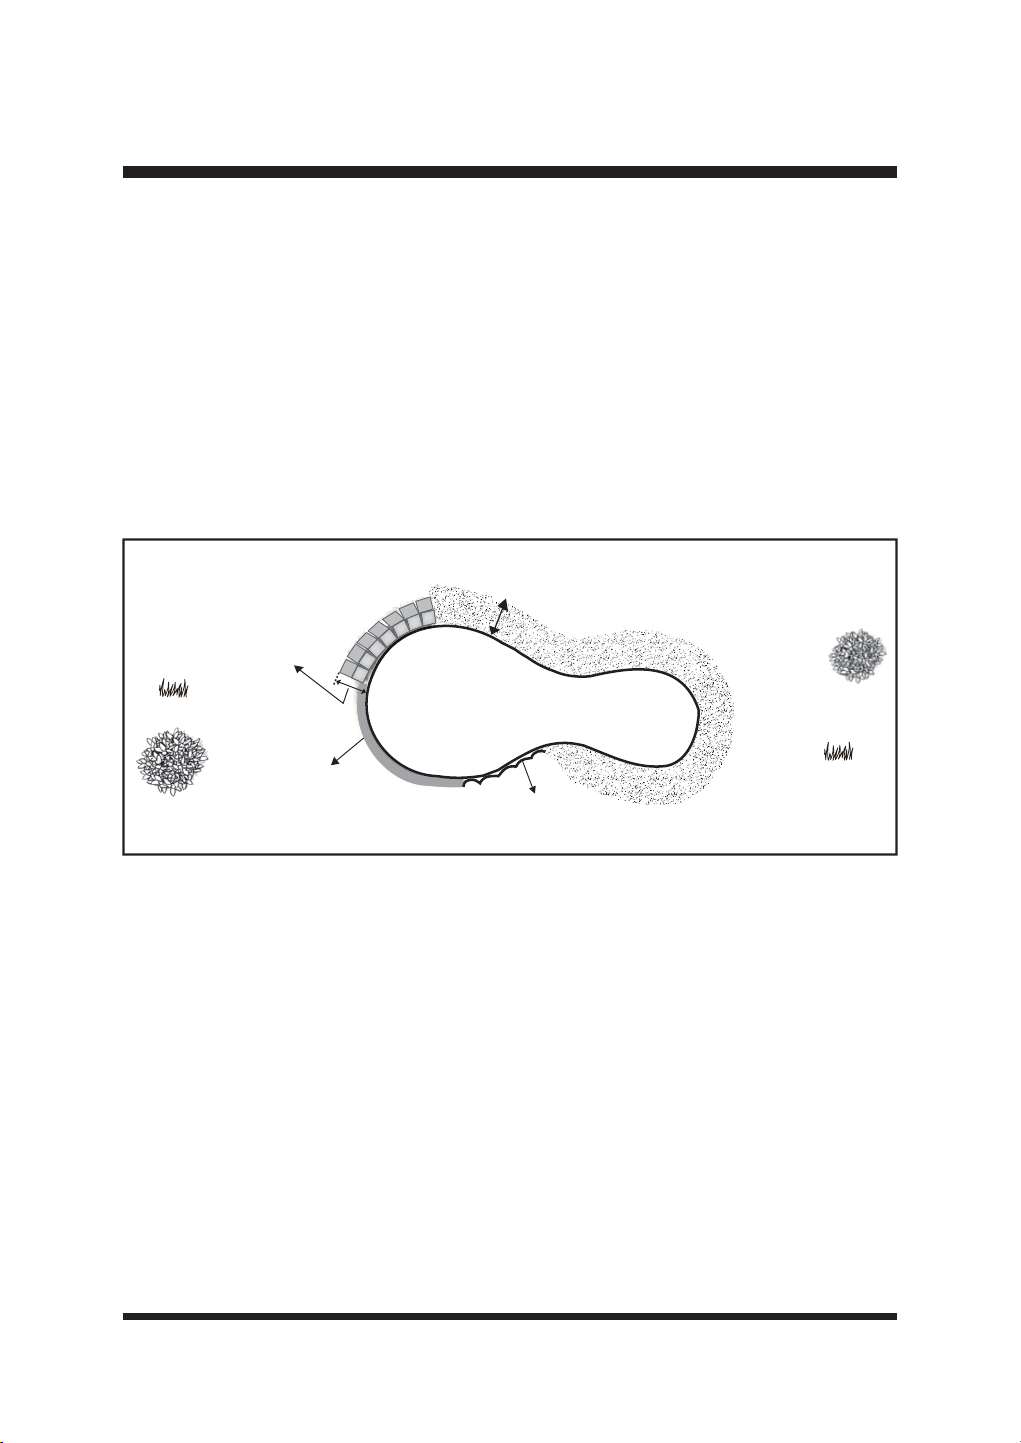
22
CONFIGURAR
ŶPiscinas y estanques
Si hay una charca o estanque en la zona de siega, cree bordes adecuados para protegerlo.
ŶBarreras elevadas a más de 20 cm (7,87'').
Ŷ%RUGHVSODQRVSDYLPHQWRJUDYDRWDEODVGHPDGHUDPiVDQFKDVGHFP
Ŷ%DQGDPDJQpWLFDFRORFDGDDXQDGLVWDQFLDPtQLPDGHFPGHOERUGHGHODJXD
La ilustración muestra una zona de trabajo correctamente delimitada para el buen funcionamiento
de la segadora (Fig. 13).
Es muy importante que los límites visuales alrededor de los estanques sean amplios y
evidentes para el cortacésped. Las plantas y algas del estanque podrían interpretarse
como césped. Los límites físicos o la banda magnética alrededor de los estanques son muy
recomendables y evitarán cualquier daño accidental causado por el agua a su cortacésped
que no esté cubierto por la garantía del fabricante.
Fig. 13
Anchura > 27.56''
Altura > 7.87''
Altura
Piscina
> 7.87''
Anchura del suelo no herboso > 39.37''

23
MONTAJE
SELECCIÓN DE LA UBICACIÓN DE LA ESTACIÓN BASE
Es importante seleccionar una ubicación adecuada para que la estación base cargue el robot
FRUWDFpVSHGFRQHO¿QGHSHUPLWLUXQDFRSODPLHQWRFRUUHFWR
La estación base debe estar situada en una zona que sea:
Ŷ 'HQWURGHOD]RQDGHFpVSHGFRQPGHHVSDFLROLEUHDOUHGHGRUGHORVODGRVDELHUWRVGHOD
estación de carga.
Ŷ 1LYHO
Ŷ 6RPEUHDGR
Ŷ $PHQRVGHPGHXQDWRPDGHFRUULHQWHH[WHULRU
Ŷ $ODOFDQFHGHODVHxDO:L)LGHWXFDVD
Ŷ 'HVSHMDGRGHREMHWRVSXQ]DQWHV\REVWiFXORV
El cortacésped puede funcionar en céspedes de varias zonas. Coloque la estación base en la
zona más grande si hay zonas adicionales en su césped.
Limpie regularmente la estación base y manténgala libre de polvo y malas hierbas para garantizar
que la cámara pueda detectar las bandas guía naranjas.
NOTA: El suelo que conduce a la estación base debe estar nivelado, sin esquinas, pendientes ni
obstáculos, para garantizar un acoplamiento correcto.
IMPORTANTE:
Mantenga el área alrededor de la estación base libre de hierba larga para permitir una fácil
LGHQWL¿FDFLyQSRUSDUWHGHODFiPDUD
0DQWHQJDODVWLUDVJXtDOLPSLDV\RUGHQDGDVSDUDIDFLOLWDUVXLGHQWL¿FDFLyQSRUODFiPDUD
Está prohibido cubrir la estación base con revestimientos metálicos, ya que pueden
interferir en la recepción de la señal GPS (Fig. 14).
6HUHFRPLHQGDDGTXLULUHODFFHVRULRR¿FLDO/DZQ0DVWHU*DUDJH&RQVXOWHODSiJLQDSDUD
ver la lista de piezas.
Fig. 14
Ő0
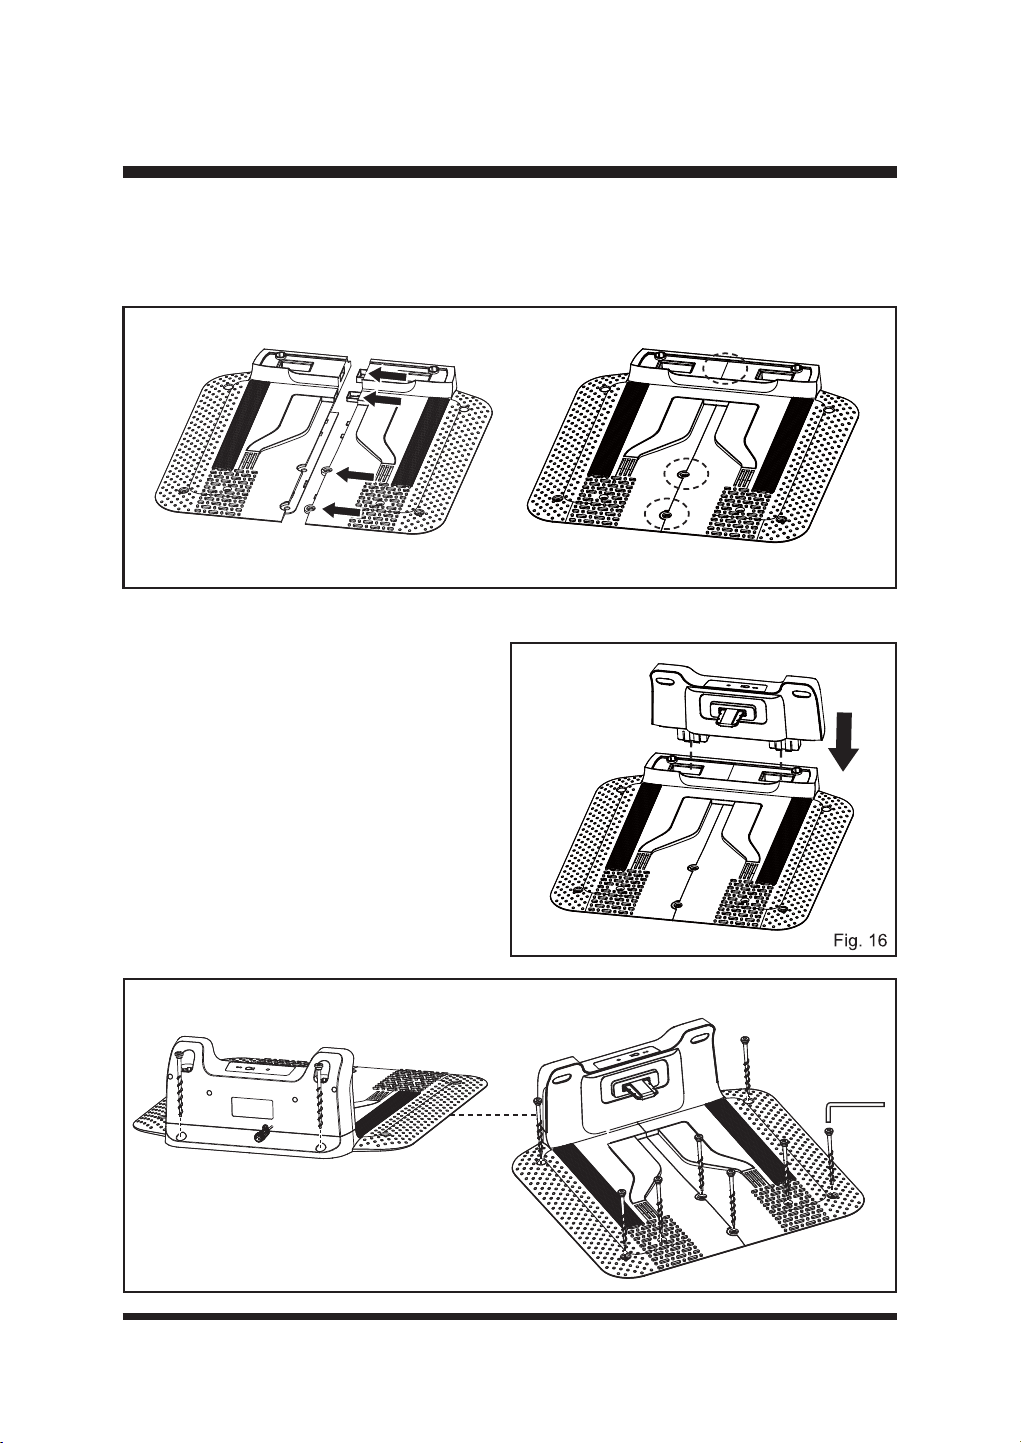
24
MONTAJE
INSTALACIÓN DE LA ESTACIÓN BASE
ŶConecte las dos partes de la base de la estación base tal y como se muestra. Asegúrese de
TXHHQFDMDQ¿UPHPHQWH)LJ
Ŷ,QVHUWHFRPSOHWDPHQWHODSDUWHVXSHULRUGHODHVWDFLyQEDVHHQODEDVH$VHJ~UHVHGHTXHOD
SDUWHVXSHULRUHQFDMH¿UPHPHQWHHQVXVLWLR
(Fig. 16).
Ŷ&RORTXHODHVWDFLyQEDVHHQHOVXHORHQ
una posición adecuada dentro del límite
del césped. La parte trasera de la estación
de carga debe estar a ras del límite para
minimizar cualquier recorte necesario
cerca del cable de alimentación. Siga las
instrucciones de la sección "SELECCIÓN
DE LA UBICACIÓN DE LA ESTACIÓN
BASE" en la página 23.
Ŷ)LMHODHVWDFLyQEDVHDOVXHORFRQORVWRUQLOORV
suministrados (Fig. 17).
Fig. 15
Fig. 17
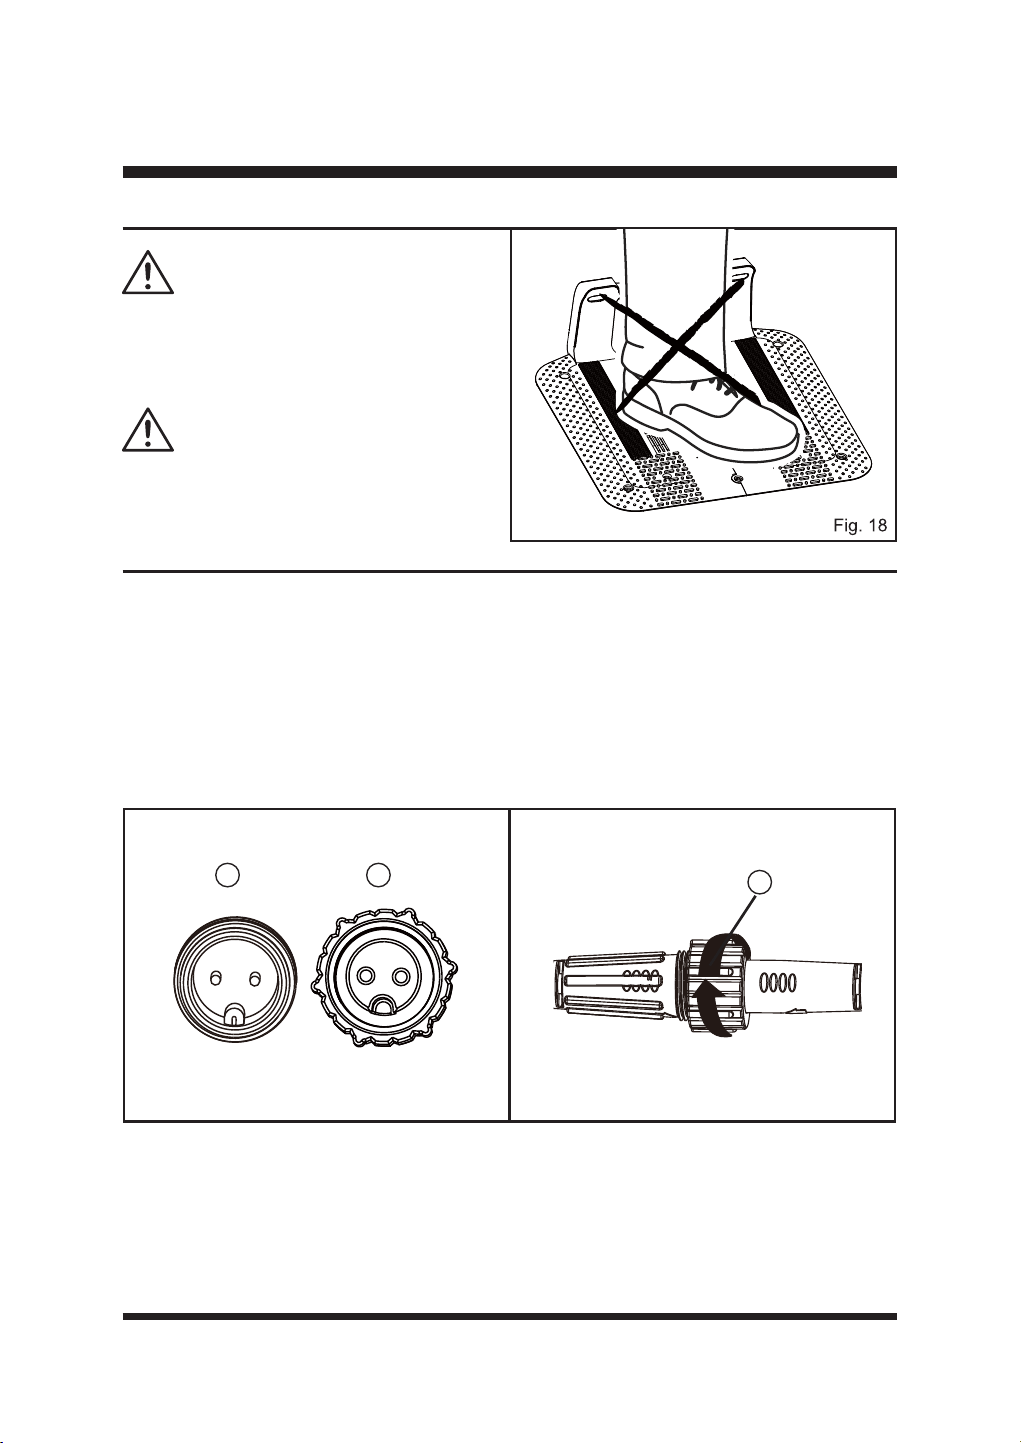
25
MONTAJE
1RKDJDQXHYRVRUL¿FLRVHQODSODFDGHOD
HVWDFLyQEDVH8WLOLFH~QLFDPHQWHORVRUL¿FLRV
H[LVWHQWHVHQODHVWDFLyQEDVHSDUD¿MDUODDO
suelo.
No pise ni camine sobre la placa de la estación
base (Fig. 18).
ADVERTENCIA
ADVERTENCIA
Fig. 19 Fig. 20
CONECTAR LA ESTACIÓN BASE A LA FUENTE DE ALIMENTACIÓN
Ŷ &RQHFWHSULPHURHOFDEOHDODUJDGRUDODGDSWDGRUGHFRUULHQWH$OLQHHODPXHVFD
①
) del cable
alargador con la ranura (
②
) del adaptador y gire el casquillo de bloqueo (
③
) en el sentido de
las agujas del reloj para encajarlo (Fig. 19 y 20).
Ŷ $FRQWLQXDFLyQFRQHFWHHOFDEOHGHDOLPHQWDFLyQGHODHVWDFLyQEDVHDOFDEOHDODUJDGRU$OLQHH
la muesca (
①
) del cable de alimentación con la ranura (del cable alargador y gire el casquillo
de cierre (
③
HQHOVHQWLGRGHODVDJXMDVGHOUHORMSDUD¿MDUORHQVXVLWLR)LJ\
1 2
3
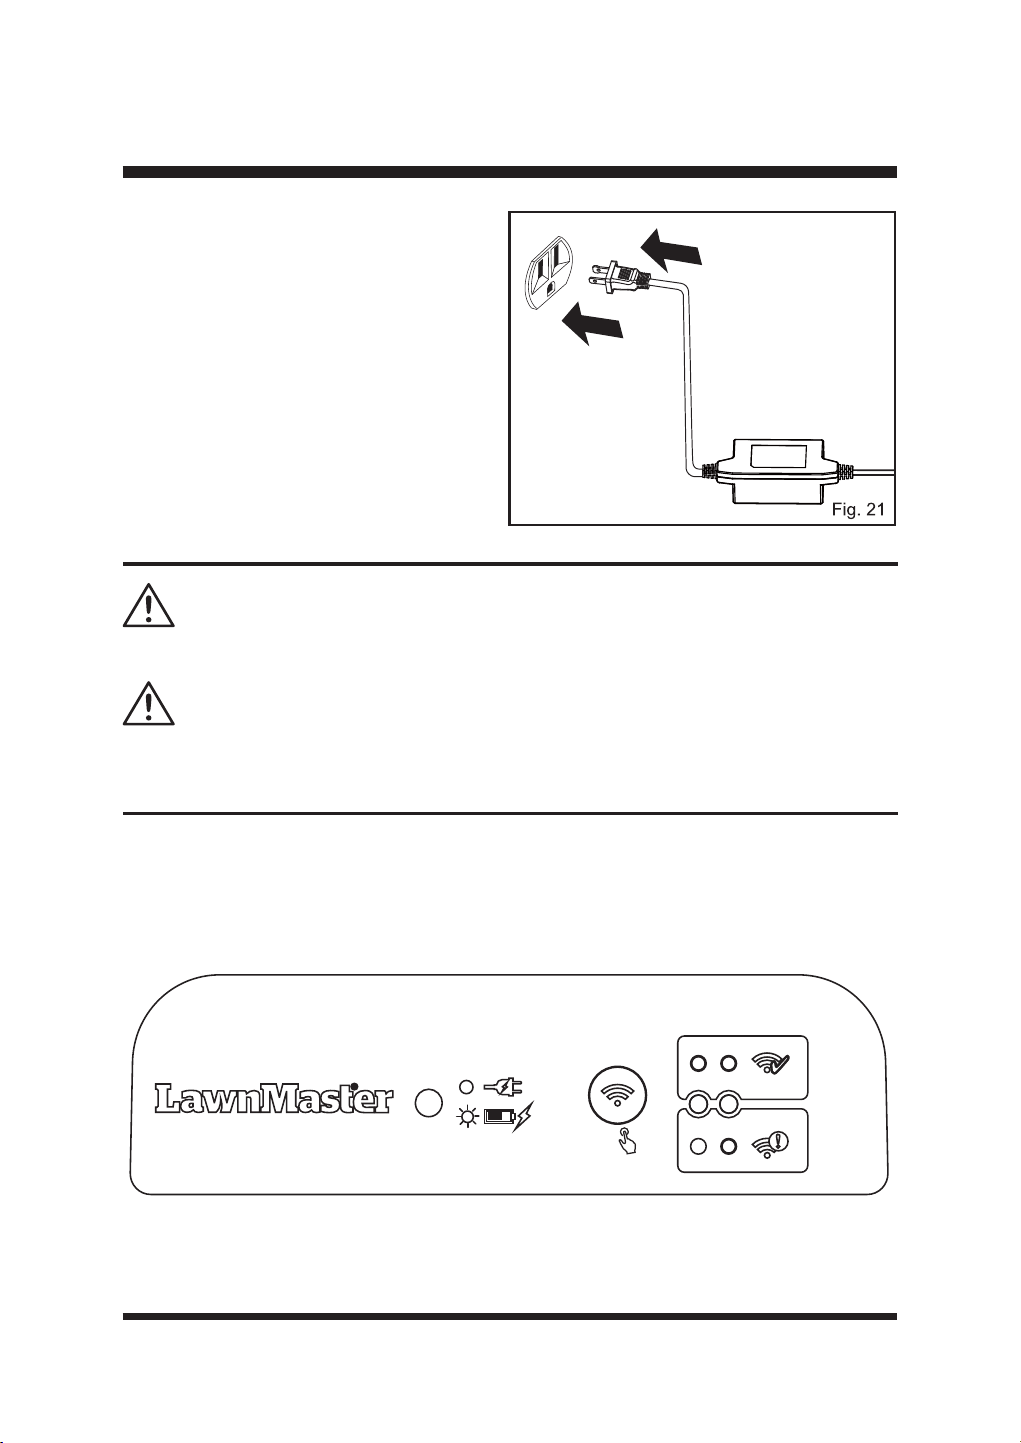
26
MONTAJE
No coloque el cable de alimentación en la zona de trabajo, o el cortacésped podría cortarlo.
5HFDUJXHHOFRUWDFpVSHGVyORFRQODHVWDFLyQEDVHHVSHFL¿FDGDSRUHOIDEULFDQWH(OXVR
incorrecto puede provocar descargas eléctricas, sobrecalentamiento o fugas de líquido corrosivo
de la batería.
ADVERTENCIA
ADVERTENCIA
Indicadores de carga
Cuando la estación base se haya instalado correctamente y el adaptador de corriente esté
FRQHFWDGRDXQDWRPDGHFRUULHQWHHO/('GHODHVWDFLyQEDVHVHLOXPLQDUiHQYHUGH¿MR
Compruebe el estado del LED como se indica a continuación para asegurarse de que la conexión
entre la estación base y la fuente de alimentación es correcta.
5S
Ŷ &RORTXHHODGDSWDGRUGHFRUULHQWHHQHO
suelo como se muestra para protegerlo del
agua. Alternativamente, para mantenerlo
alejado del agua estancada, el adaptador
de corriente puede montarse en la pared
atornillándolo a la misma a través de los
RUL¿FLRVSUHYLVWRV)LJ
Ŷ &RQHFWHHODGDSWDGRUGHFRUULHQWHDXQD
toma de pared de 100-240V. Si la fuente
de alimentación se conecta a una toma de
corriente al aire libre, asegúrese de que la
toma de corriente esté siempre en un lugar
seco y de que la potencia sea compatible
con el cortacésped.

27
MONTAJE
IMPORTANTE La batería no está cargada en el momento de la compra. Antes de utilizar el
cortacésped, lea todas las precauciones de seguridad y siga las instrucciones de la sección
Batería. Con el uso regular, necesitará menos tiempo de carga. Si lo va a almacenar durante
un periodo prolongado de tiempo, retire la batería. Cuando vaya a utilizarlo de nuevo, cargue la
batería.
ADVERTENCIA
LED de la estación base Estado Acción
Verde sólido
La estación base está conectada
correctamente; el robot cortacésped
está completamente cargado.
/
Verde intermitente
El robot cortacésped se está
cargando.
/
Fuera de No hay suministro eléctrico.
Compruebe el adaptador
de corriente, el cable, los
disyuntores y los fusibles.
INSTALACIÓN/EXTRACCIÓN DE LA BATERÍA
Para instalar la batería:
Ŷ /HYDQWHODWDSDGHOFRPSDUWLPHQWRGHODV
pilas.
Ŷ $OLQHHORVUDtOHVGHVRSRUWHVLWXDGRVGHQWUR
del compartimento de la batería con las
guías de la batería y, a continuación,
introduzca la batería en el compartimento
(Fig. 22).
Ŷ (PSXMHODEDWHUtDKDVWDTXHRLJDXQFOLF
Ŷ &LHUUHODWDSDGHOFRPSDUWLPHQWRGHODVSLODV
NOTA: Asegúrese de que el paquete de
EDWHUtDVHQFDMD¿UPHPHQWHHQVXVLWLR\HVWi
¿MDGRDOFRUWDFpVSHGDQWHVGHSRQHUORHQ
funcionamiento. Si la tapa del compartimento
de la batería no está bien cerrada, en la
SDQWDOODSULQFLSDODSDUHFHUiHOPHQVDMH&LHUUH
ODWDSDGHODEDWHUtD
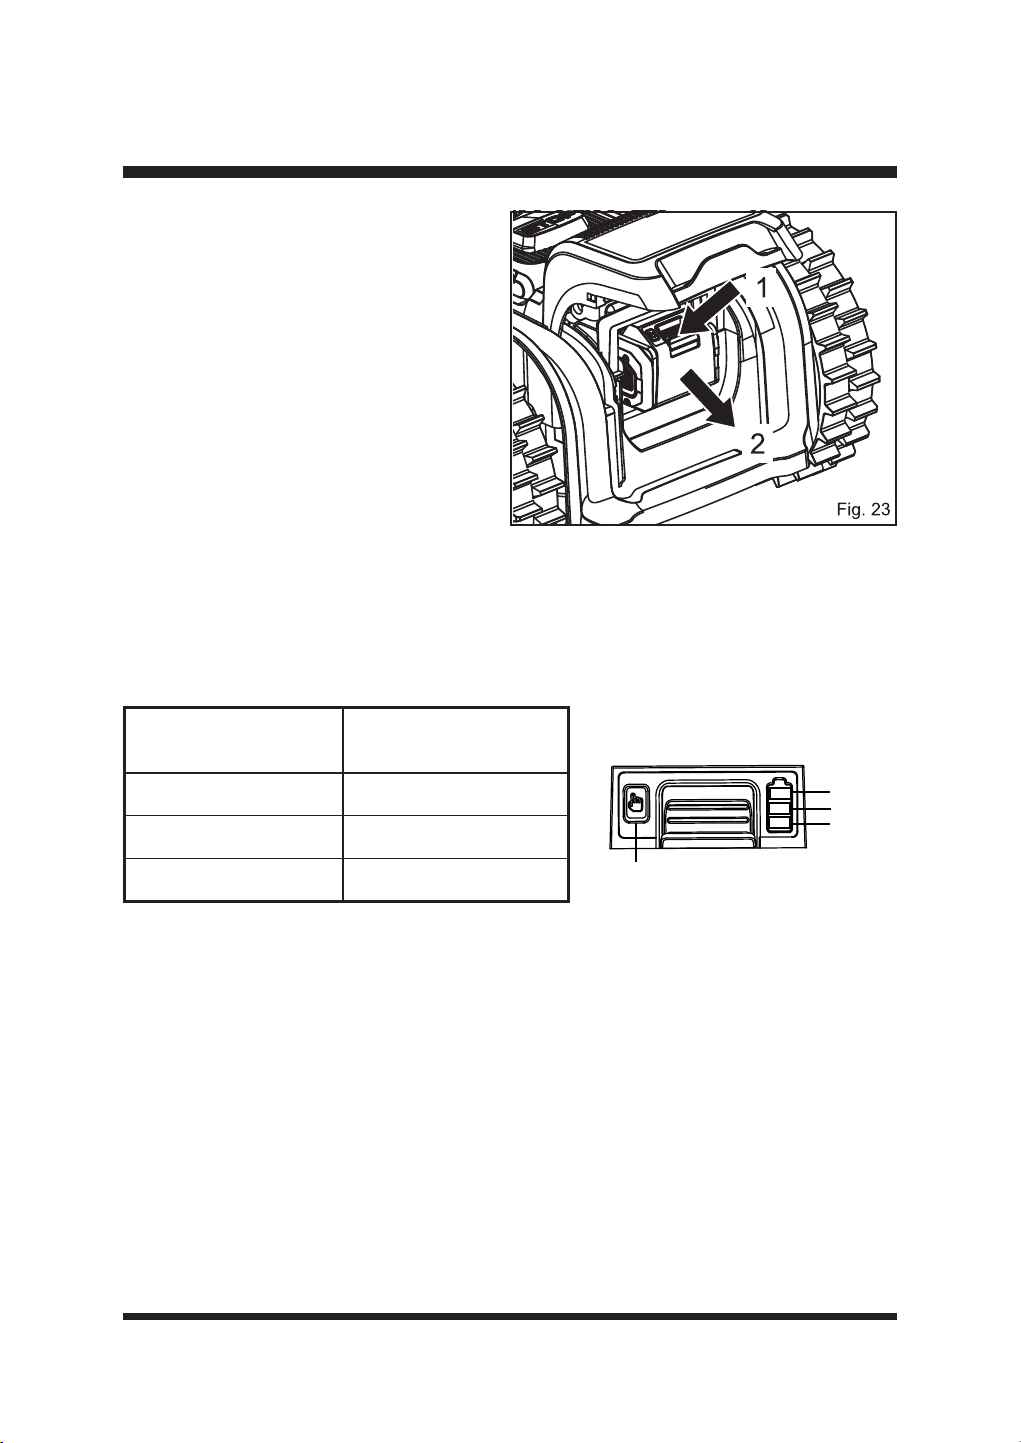
28
MONTAJE
Para extraer la batería:
Ŷ'HWHQJDHOFRUWDFpVSHG/HYDQWHODWDSD
del compartimento de la batería.
Ŷ 0DQWHQJDSXOVDGRHOERWyQGHOLEHUDFLyQ
GHODEDWHUtDVXMHWH¿UPHPHQWHOD
batería y (2) del compartimento de la
batería (Fig. 23).
Ŷ &LHUUHODWDSDGHOFRPSDUWLPHQWRGHODV
pilas.
PANEL LED BATERÍA
Ŷ (OSDQHOFRQVWDGH/('HQODEDWHUtD0DQWHQJDSXOVDGRHOERWyQ\DFRQWLQXDFLyQVXpOWHOR
los LED le mostrarán los niveles de carga.
Ŷ (OQLYHOGHFDUJDGHODEDWHUtDSXHGHFRPSUREDUVHWDQWRFXDQGRODEDWHUtDHVWiFRQHFWDGDDO
cargador/cortacésped como cuando está desconectada del cargador/cortacésped.
LEDs en batería
(iluminación continua)
Capacidad de la batería
3 LED
Totalmente cargado
2 LED (naranja y rojo)
1 LED (sólo rojo)
<40% (requiere recarga).
Indicadores luminosos
Botón
Verde
Naranja
Rojo
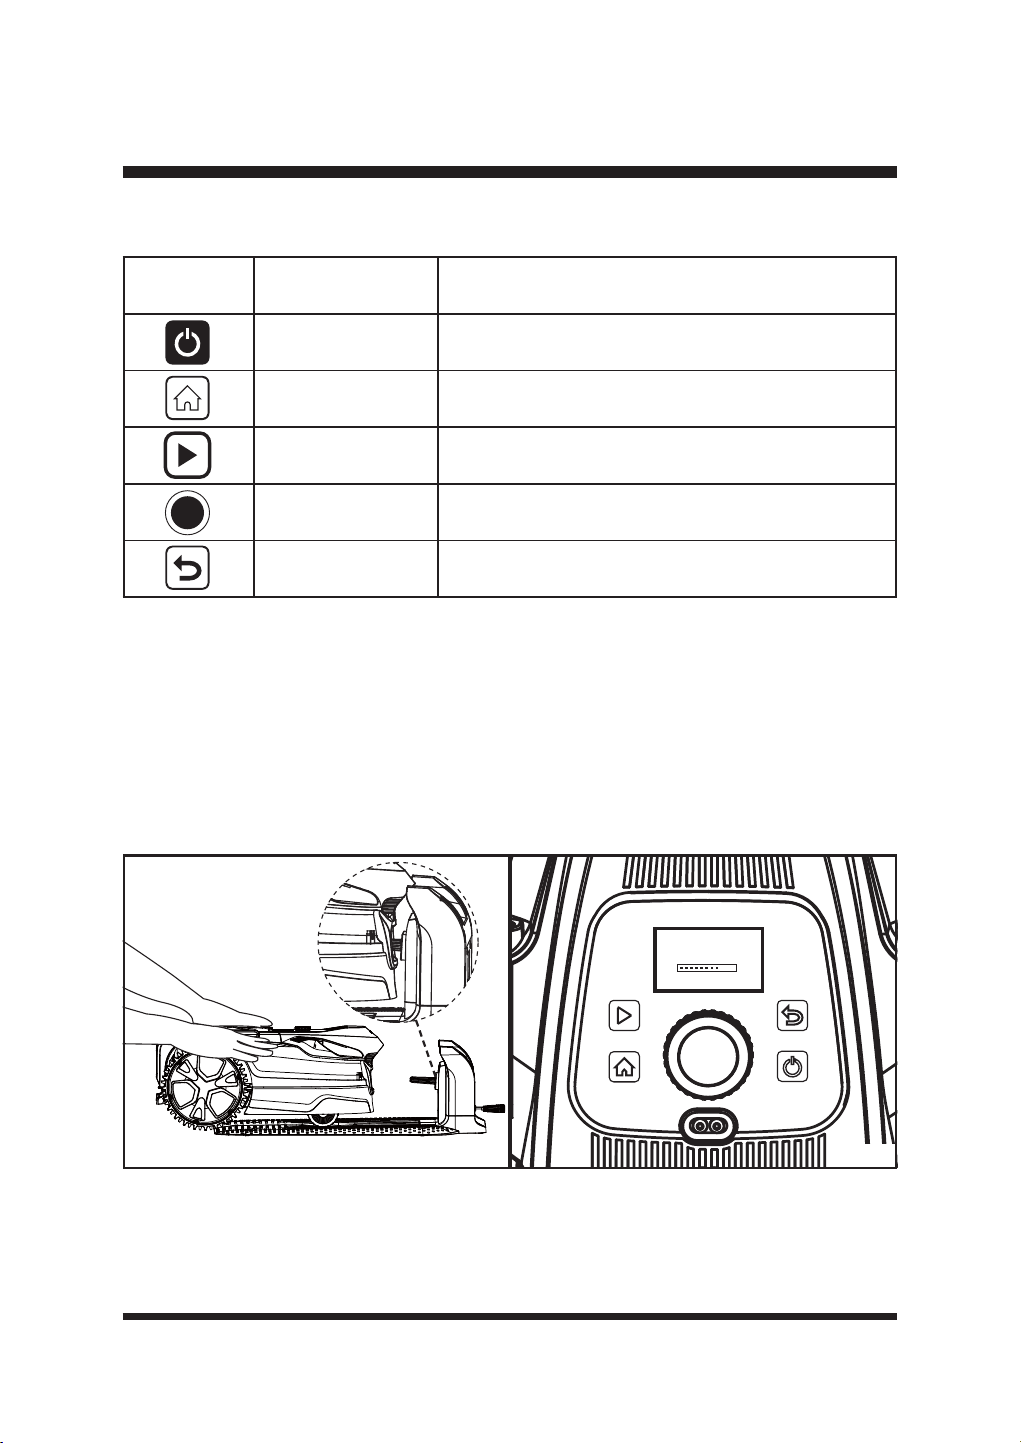
29
OPERACIÓN
PANEL DE CONTROL (FIG. 25)
ENCENDIDO Y PRIMER USO
Ŷ $VHJ~UHVHGHTXHODEDWHUtDHVWiELHQFRORFDGD\GHTXHODHVWDFLyQEDVHHVWiFRUUHFWDPHQWH
instalada y encendida.
Ŷ
Coloque el cortacésped en la estación base. Asegúrese de que las tiras de carga del cortacésped
están completamente conectadas con la tira de contacto de la estación base (Fig. 24). El
cortacésped iniciará automáticamente la inicialización (Fig. 25). Tardará unos 15 segundos en
completar este proceso. El cortacésped emitirá dos pitidos y panel LCD mostrará la pantalla
principal (Fig. 27).
Ŷ (OLFRQR*36GHODSDQWDOODSULQFLSDOJLUDUiPLHQWUDVVHSRVLFLRQDHOFRUWDFpVSHG&XDQGRHO
FRUWDFpVSHGVHKD\DSRVLFLRQDGRFRUUHFWDPHQWHHOLFRQRGHO*36VHTXHGDUi¿MRFRQVXOWHOD
página 34).
Botón Nombre Función
Botón de encendido/
apagado
Press to turn on/off the robotic mower.
Botón HOME Pulse para enviar el cortacésped a la estación base.
Botón de inicio Pulse para iniciar la siega.
Dial de selección
Gire a la derecha o a la izquierda para seleccionar los
DMXVWHVGHOPHQ~3XOVHSDUDFRQ¿UPDU
Botón trasero Pulse para volver al nivel anterior.
LawnMaster
Fig. 24 Fig. 25
30
NOTA: El robot cortacésped volverá a comprobar la posición GPS durante un máximo de tres minutos
cada vez que regrese a la estación base. Cuando la señal GPS es buena y el posicionamiento se ha
FRPSOHWDGRHOLFRQR*36HVWDUi¿MR&XDQGRVHYHDDIHFWDGRSRUODVFRQGLFLRQHVPHWHRUROyJLFDV
o si la estación base está cubierta por un revestimiento metálico, la señal GPS será débil y el icono
GPS parpadeará.
Ŷ /DEDWHUtDVHVXPLQLVWUDSDUFLDOPHQWHFDUJDGD\HVQHFHVDULRFDUJDUODDQWHVGHXWLOL]DUOD'HMH
que la batería se cargue completamente antes de utilizarla por primera vez.
OPERACIÓN
CONEXIÓN WI-FI
NOTA: Este robot cortacésped LawnMaster es
compatible con redes Wi-Fi de 2,4 GHz y es
compatible con Apple iOS 13 y superior y Android
5.0 y superior.
Descargue la aplicación Lawnmaster escaneando
el siguiente código QR. La aplicación también
se puede descargar desde Apple App Store o
Google Play Store buscando «OcuMow». Abre la
DSOLFDFLyQ\FUHDXQSHU¿O
Abre la aplicación, selecciona tu ubicación y crea una cuenta de usuario.
Dirección de descarga:
Apple App store https: //apps.apple.com/us/app/ocumow/id6450198129
Google play https: //play.google.com/store/apps/details?id=com.cleva.bluetoothmower
NOTA: The robotic mower is paired with the base station during production. When you connect the
base station using the app, the mower must be connected into the base station. Ensure that the
phone, the mower, and the base station are as close as possible.
Tu cortacésped se conecta a tu teléfono mediante una conexión en la nube. Esta conexión se
realiza a través de una pasarela en la estación de carga. En primer lugar, la estación base debe
estar conectada a tu red Wi-Fi doméstica.
Ŷ &XDQGRODHVWDFLyQEDVHHVWpFRQHFWDGDFRUUHFWDPHQWH\HODGDSWDGRUGHFRUULHQWHHVWp
conectado a una toma de corriente, el indicador de señal de la estación base se iluminará en
D]XO¿MR
Ŷ 0DQWHQJDSXOVDGRHOERWyQGHFRQ¿JXUDFLyQGHODFRQH[LyQ:L)LGXUDQWHVHJXQGRV/D
estación base inicia el emparejamiento Wi-Fi. El indicador de señal de la estación base parpadea
lentamente en azul. Esto dura 4 minutos. Realice la conexión Wi-Fi dentro de este tiempo.
Ŷ $EUDOD$SS\FRQ¿JXUHODUHGVHJ~QHOSURFHVRGHIXQFLRQDPLHQWRGHODDSS)LJ

31
OPERACIÓN
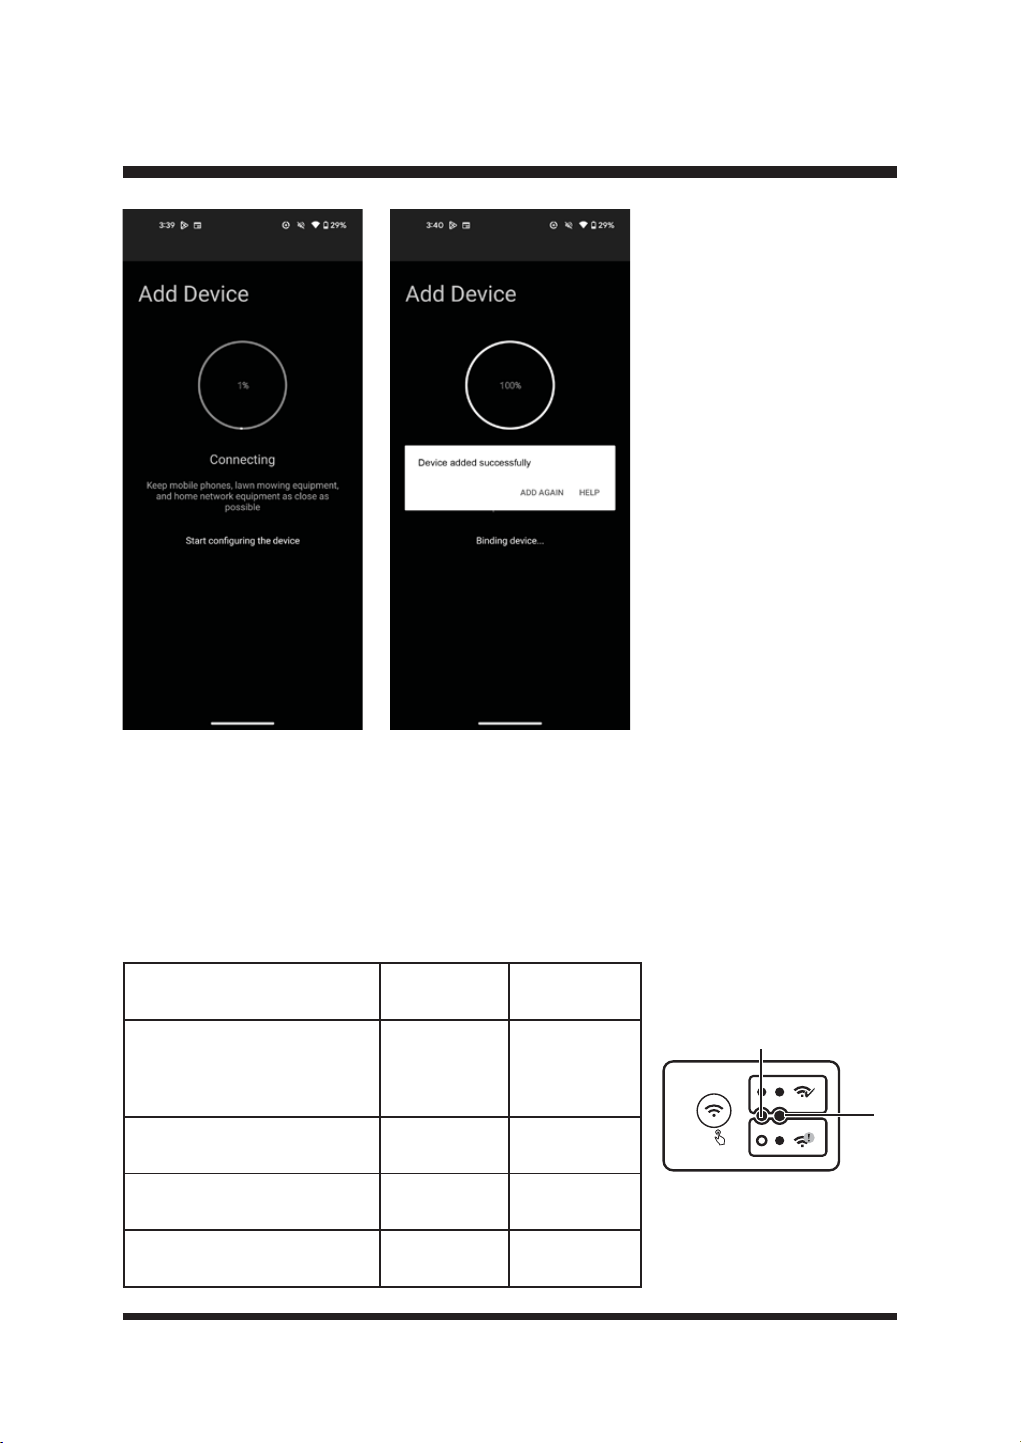
32
OOPERACIÓN
Ŷ&XDQGRODHVWDFLyQEDVHVHKD\DFRQHFWDGRFRUUHFWDPHQWHDODUHG:L)LWDQWRHOLQGLFDGRUGH
VHxDOFRPRHOLQGLFDGRU:L)LGHODHVWDFLyQEDVHVHLOXPLQDUiQHQD]XO¿MR
Ŷ6LIDOODODFRQH[LyQ:L)LRVHGHVFRQHFWDODUHG:L)LHOLQGLFDGRUGHVHxDO$GHODHVWDFLyQ
EDVHVHLOXPLQDUiHQD]XO¿MR(OLQGLFDGRU:L)L%VHDSDJDUi
Ŷ3DUDUHVWDEOHFHUODFRQH[LyQ:L)LPDQWHQJDSXOVDGRHOERWyQGHFRQ¿JXUDFLyQGHODFRQH[LyQ
Wi-Fi durante 5 segundos. La estación base inicia el emparejamiento Wi-Fi. Esto dura 4 minutos.
Repita los pasos anteriores en la Fig. 26.
Estad
Indicador de
señal (A)
Indicador
Wi-Fi (B)
La estación base se ha
conectado correctamente
y el adaptador de corriente
también.
Azul sólido Fuera de
Emparejamiento
Azul,
intermitente
Fuera de
Conexión Wi-Fi correcta Azul sólido Azul sólido
Conexión Wi-Fi fallida / La red
Wi-Fi está desconectada
Azul sólido Fuera de
A
5S
B
Fig. 26
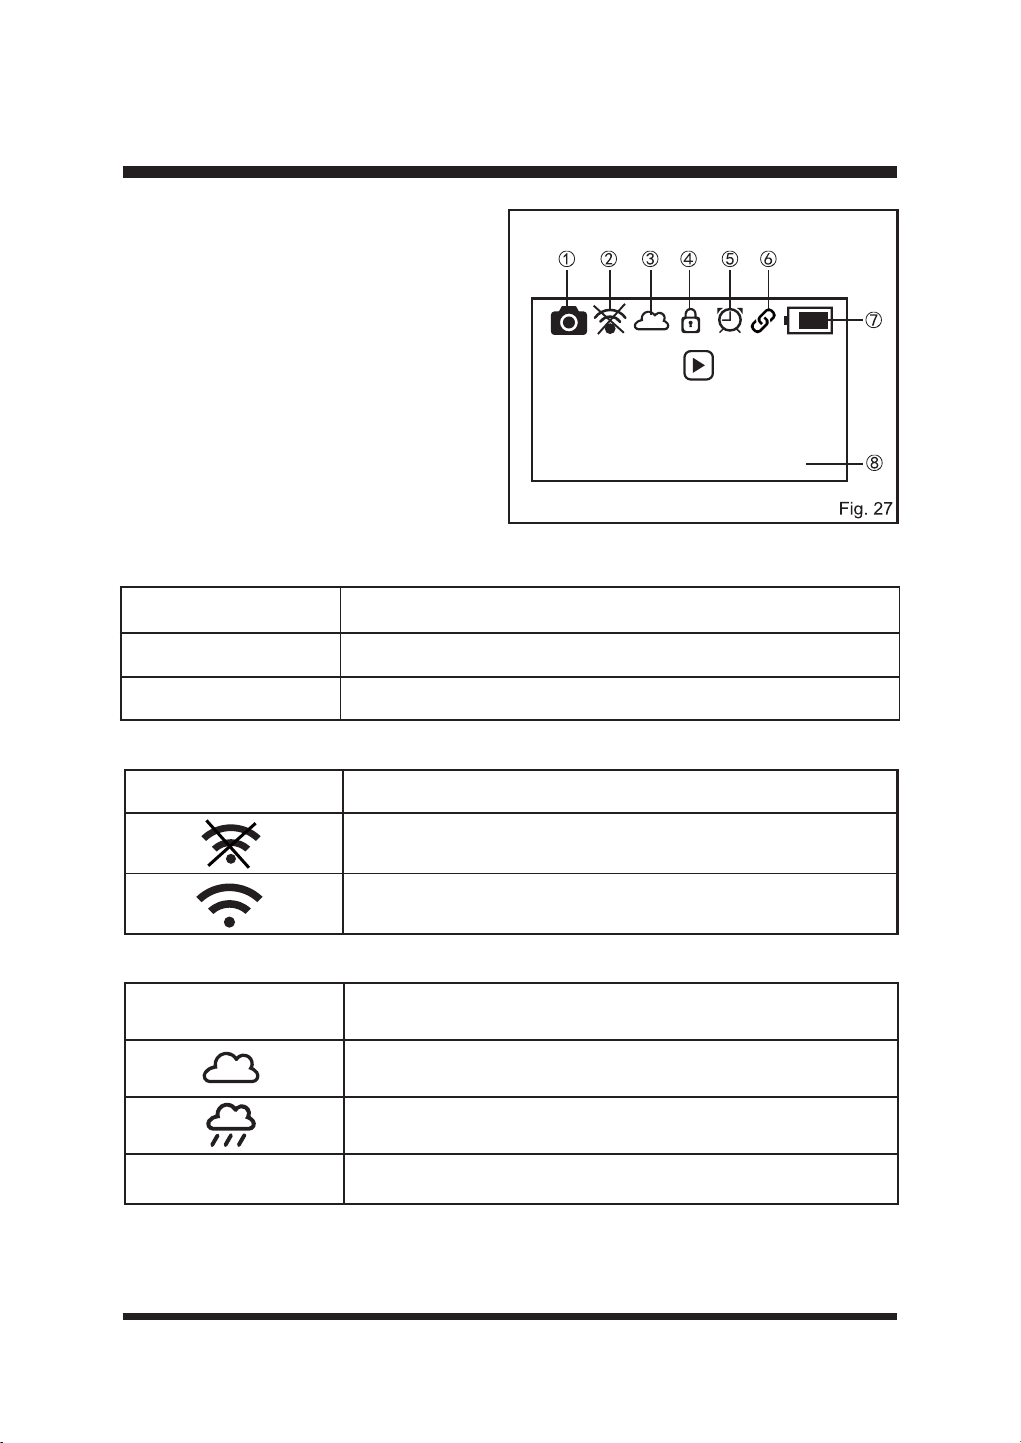
33
PANTALLA PRINCIPAL (FIG. 27)
En esta sección se explican los símbolos que
aparecen en la pantalla principal.
Ś
Icono de cámara
El icono de la cámara siempre está encendido cuando el robot cortacésped está encendido.
ś
Icono de la aplicación
Ŝ
Icono del sensor de lluvia
ŝ
Icono de bloqueo
Sólo visible cuando se ha establecido un PIN. Consulte la página 40 para obtener más detalles.
OPERACIÓN
Icono de cámara Estado
Sólido La comunicación de la cámara es normal.
Intermitente La comunicación de la cámara es anormal.
Press then
press dial to
start mowing
08-11-2024 13:57
Icono de la aplicación Estado
La estación base no está conectada a Wi-Fi.
La estación base se conecta a Wi-Fi correctamente.
Icono del sensor de
lluvia
Estado
El sensor de lluvia no está activado.
El sensor de lluvia está activado.
Empty El sensor de lluvia está apagado.
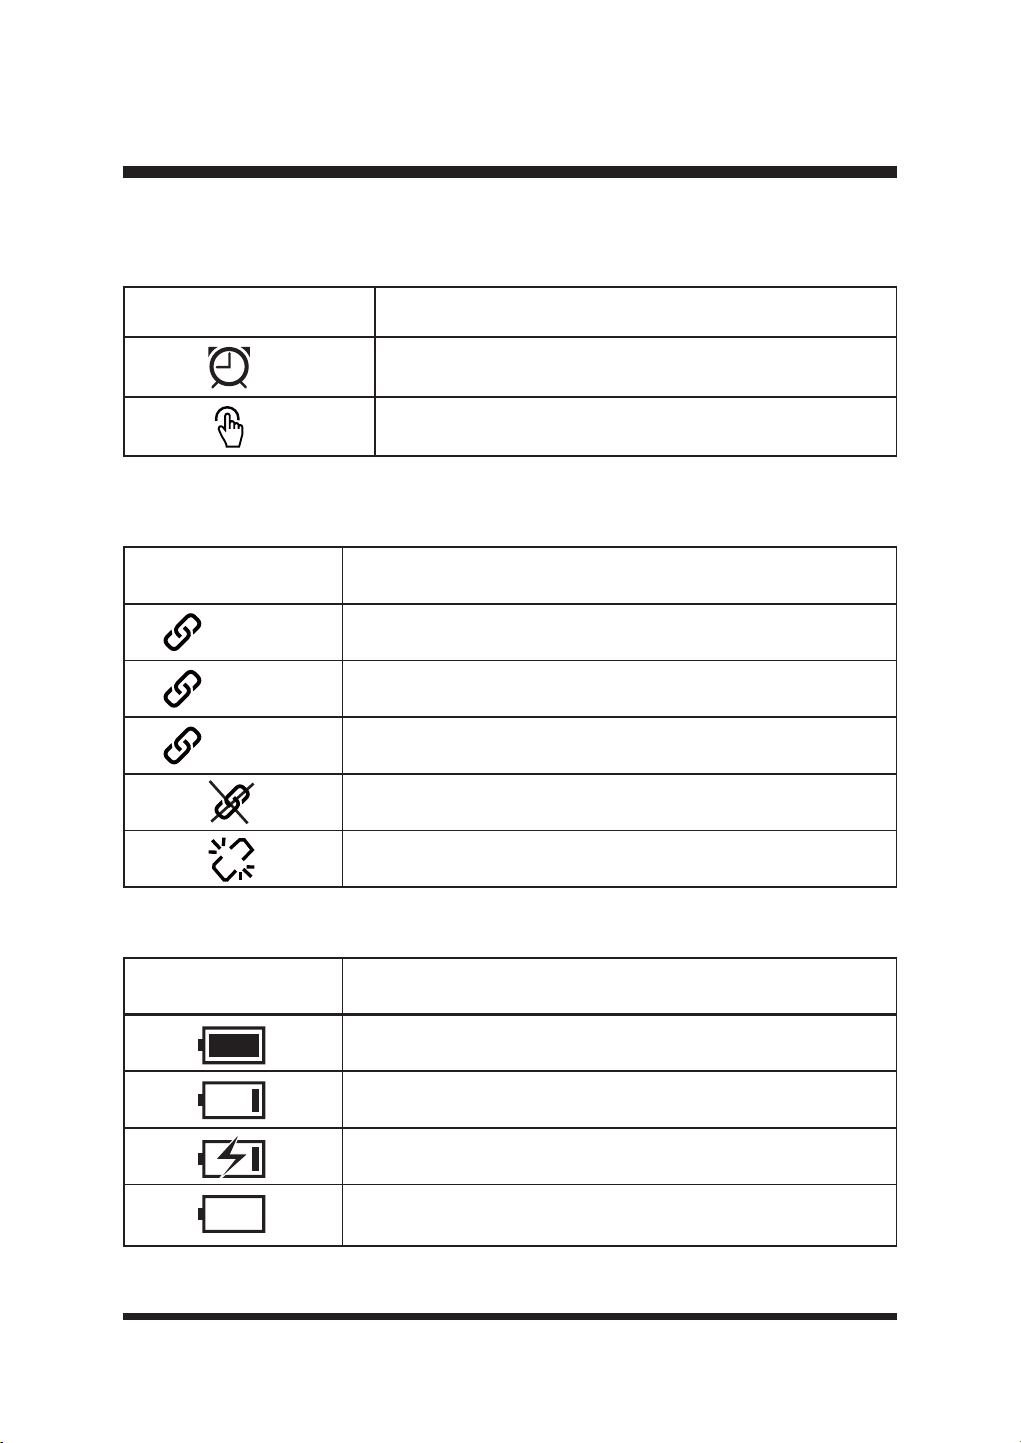
34
Icono GPS Estado
(Sólido) El robot cortacésped se posiciona correctamente.
(Giratorio) El robot cortacésped se está posicionando.
(Flashing) Mala señal (consulte la sección de resolución de problemas).
No hay datos GPS válidos (consulte la sección de resolución de
problemas).
Problema temporal en la comunicación GPS; o el módulo GPS está
dañado. (Consulte la sección de resolución de problemas).
Indicador de batería Estado
El robot cortacésped está completamente cargado.
Baja potencia.
cargando
El robot cortacésped está en la estación de carga, sin la batería
insertada.
OPERACIÓN
Icono del modo de trabajo Estado
Modo Horario
Modo Drop & Mow
Ş
Icono del modo de trabajo
Consulte la página 36-38 para obtener información más detallada sobre estos dos modos.
ş
Icono GPS
El icono GPS se enciende cuando el robot cortacésped está encendido.
Š
Indicador de batería
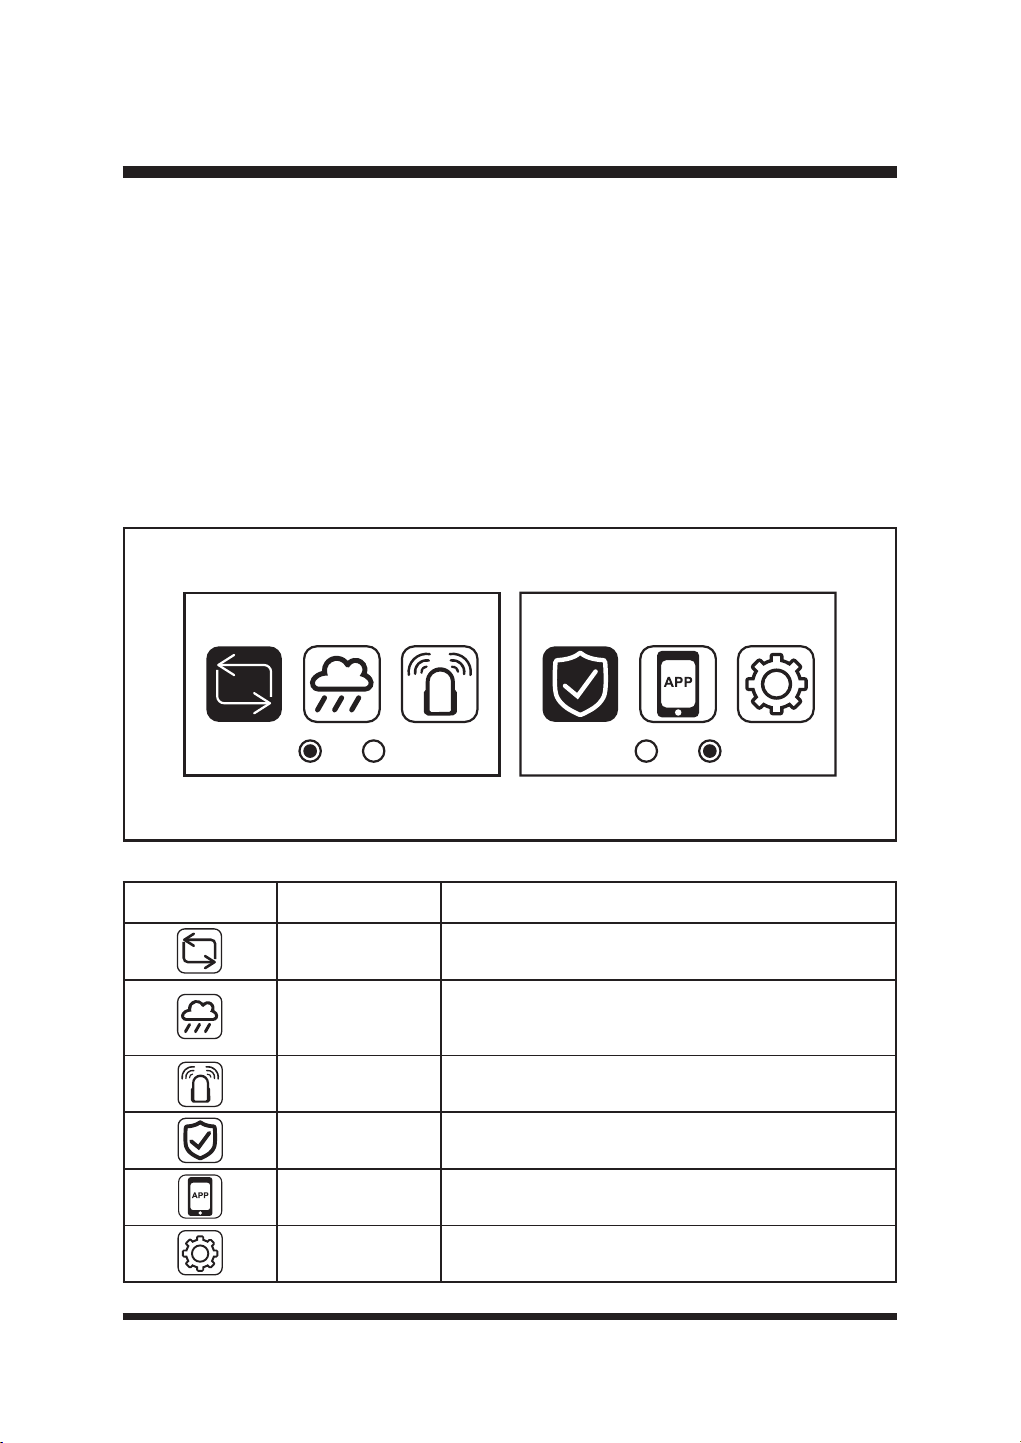
35
Fig. 28
OPERACIÓN
š
Fecha y hora
La hora se ajustará siguiendo la información del GPS cuando el cortacésped se encienda por
primera vez o después de un restablecimiento de fábrica. El ajuste de hora predeterminado es
el horario de verano (es decir, una hora por delante de la zona horaria regional estándar).
Cambiar la hora manualmente anulará esta opción.
MENÚ DE AJUSTES
3XOVHHOGLDOGHVHOHFFLyQHQORVXFHVLYRGHQRPLQDGRGLDOSDUDVHOHFFLRQDUHOPHQ~GHDMXVWHV
Gire el dial hacia la derecha o hacia la izquierda para desplazarse por los iconos del menú de
ajustes (Fig. 28).
Pulse de nuevo el dial para acceder al submenú de cada ajuste.
3XOVHODÀHFKDDWUiVSDUDUHWURFHGHUHQHOPHQ~
Mode Security
Icono Nombre Función
Mode
Seleccione el modo de trabajo: Programar o Dejar y
Segar (consulte la página 36-38).
Sensor de lluvia
Ajuste del sensor de lluvia, para activar y desactivar la
función del sensor de lluvia y seleccionar el tiempo de
retardo deseado.
Ultrasonidos Enciende y apaga los sensores ultrasónicos.
Seguridad
$MXVWHODFRQ¿JXUDFLyQGHVHJXULGDGFRPROD
protección mediante código PIN.
Aplicación Operación de conexión de la aplicación
Ajustes &RQ¿JXUDFLyQJHQHUDO

36
OPERACIÓN
Mode
Schedule
Drop & Mow
Fig. 30
Schedule
Start Schedule
Amend Schedule
00
08:07 - - 17:24
12 24
Mon
Tue
00
08:07 - - 17:24
12 24
Fri
Sat
00
08:07 - - 17:24
12 24
Wed
Thu
00
08:07 - - 17:24
12 24
Sun
Modo Página
Pulse el selector y seleccione la página Modo.
Gire el selector para cambiar entre Programar
y Dejar y Segar. Programar es el modo
predeterminado (Fig. 29).
Modo Horario
(OURERWFRUWDFpVSHGVLHJDHOFpVSHGGHQWURGHORVOtPLWHVFRUUHFWDPHQWHGH¿QLGRVHQKRUDV
diurnas siguiendo el programa establecido. Se recarga automáticamente. Se cargará y cortará
DOWHUQDWLYDPHQWHKDVWDHO¿QDOGHODVHVLyQGHWUDEDMRHVWDEOHFLGD(OKRUDULRSUHGHWHUPLQDGRHV
de 08:00 a 17:00.
Asegúrese de que la hora y la fecha están ajustadas según la zona horaria local.
(OLMDODVKRUDVGHLQLFLR\¿Q
Ŷ6HOHFFLRQH3URJUDPDU3XOVHHOGLDOSDUDFRQ¿UPDU
Ŷ*LUHHOGLDOSDUDVHOHFFLRQDU0RGL¿FDUKRUDULR\DFRQWLQXDFLyQSXOVHHOGLDOSDUDDFFHGHUDOD
página de resumen del horario (Fig. 30).
Ŷ(QODSiJLQDGHUHVXPHQGHOKRUDULRODVVHVLRQHVGHWUDEDMRHQFXUVRVHUHVDOWDQFRQXQD
barra sólida. Las horas de salida y puesta del sol se muestran en la parte superior de la
pantalla. NOTA: El cortacésped no funcionará fuera de estas horas.
Ŷ*LUHHOGLDOSDUDDOWHUQDUHQWUHORVSURJUDPDVGLDULRV)LJ
Ŷ*LUHHOGLDOKDVWDHOGtDGHVHDGR\SXOVHSDUDVHOHFFLRQDUOR
Ŷ$MXVWHFDGDGtJLWRGHODKRUDGHLQLFLR\GH¿QJLUDQGRHOGLDO\SXOVDQGRSDUDFRQ¿UPDU
Ŷ6LVHLQWURGXFHXQDFLIUDHUUyQHDSXOVHHOERWyQGHUHWURFHVRSDUDYROYHUDODFLIUDDQWHULRU
Fig. 29
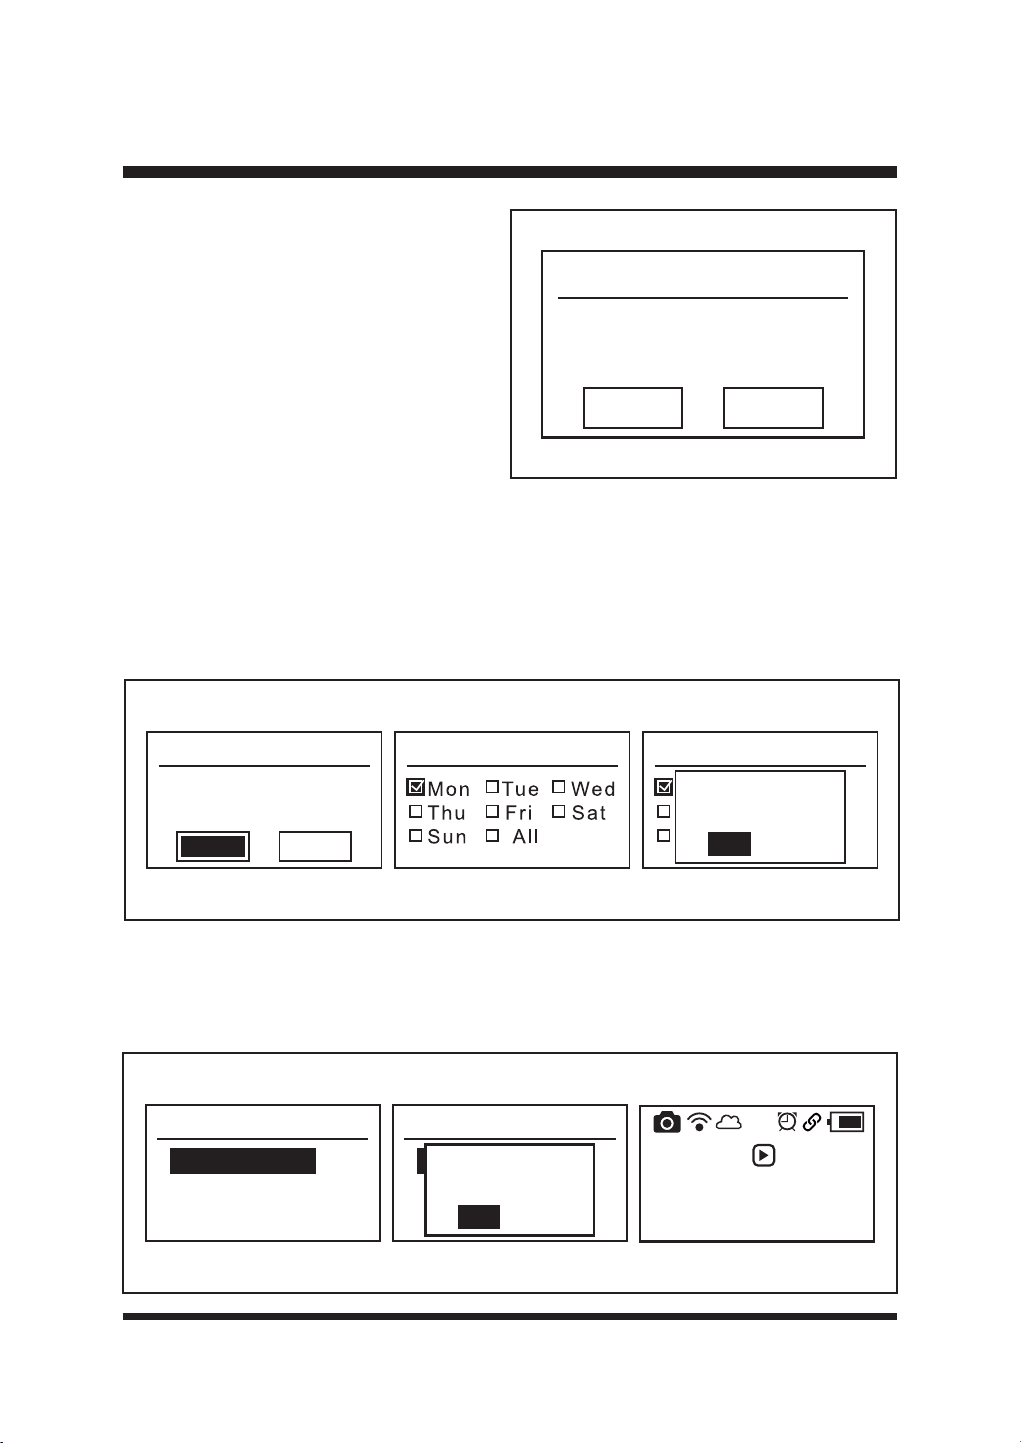
37
Monday
08:00-17:00
00:00-00:00
Copy Clear
Para cada día pueden ajustarse dos
periodos de tiempo de trabajo en función de
sus necesidades. Los ajustes del tiempo de
trabajo diario pueden copiarse a otros días
(Fig. 31).
Para borrar los ajustes de la hora, gire el
GLDOSDUDVHOHFFLRQDU%RUUDU\SXOVHSDUD
FRQ¿UPDU)LJ
OPERACIÓN
Fig. 31
Para copiar los ajustes de la hora diaria a otros días:
Ŷ*LUHHOGLDOSDUDVHOHFFLRQDU&RSLDU\DFRQWLQXDFLyQSXOVHHOGLDOSDUDHQWUDUHQODSiJLQD
Copiar (Fig. 32).
Ŷ*LUHHOGLDOSDUDVHOHFFLRQDUHOGtDGHVHDGR\SXOVHSDUDFRQ¿UPDUFRQXQDPDUFD
Ŷ3DUDDSOLFDUORVKRUDULRVDWRGRVORVGtDVVHOHFFLRQH7RGRV
Ŷ3XOVHHOERWyQ$WUiVVHOHFFLRQH6t\SXOVHHOGLDOSDUDFRQ¿UPDUORVFDPELRV)LJ
Pulse el botón Atrás para volver a la página de resumen de horarios. Se pueden ver las horas de
LQLFLR\¿QUHFLpQHVWDEOHFLGDV
El programa de siega ya está ajustado. Para iniciar la programación, gire el selector giratorio para
VHOHFFLRQDU,QLFLDUSURJUDPDFLyQ\DFRQWLQXDFLyQSXOVHHOVHOHFWRUJLUDWRULRSDUDFRQ¿UPDU)LJ
Monday
08:00-17:00
00:00-00:00
Copy Clear
Copy Copy
Mon Tue We d
Thu Fri Sat
Sun All
Save Changes?
Yes
No
Fig. 32
Schedule
Start Schedule
Amend Schedule
Schedule
Start Schedule
Amend Schedule
Activate
Schedule Mode?
Yes
No
Press then
press dial to
start mowing
08-11-2024 13:57
Fig. 33

38
Consulte ARRANQUE/PARADA DEL CORTACÉSPED ROBÓTICO en la página 45-46 para
comenzar la primera sesión de corte programada.
0RGR'URS0RZHOFRUWDFpVSHGVHHQYtDSDUDXQ~QLFRFRUWH
(VWHPRGRSXHGHXWLOL]DUVHWDQWRHQHOÈUHDSULQFLSDOHVGHFLUHOFpVSHGTXHFRQWLHQHODHVWDFLyQ
GHFDUJDFRPRHQ2WUDiUHDSRUHMHPSORHOFpVSHGGHODQWHURRHOFpVSHGGHRWUDSURSLHGDG
Zona principal - el cortacésped cortará una vez y volverá a la estación de carga.
Otra zona - el cortacésped cortará hasta que se agote la batería y esperará en el césped para
recogerlo y colocarlo en la estación de carga.
Ŷ6HOHFFLRQH6ROWDU\6HJDU3XOVHHOGLDOSDUDFRQ¿UPDU
Ŷ6HOHFFLRQH0RGR$OHDWRULRR0RGR(VSLUDOJLUDQGRHOERWyQJLUDWRULR3XOVHHOGLDOSDUDFRQ¿UPDU
(Fig. 34).
Ŷ(OLMDHOÈUHD3ULQFLSDOX2WUDÈUHDVHJ~QVXVQHFHVLGDGHV
Ŷ3XOVHHOERWyQJLUDWRULRSDUDFRQ¿UPDU)LJ
OPERACIÓN
Drop & Mow
Random Mode
Spiral Mode
Random Mode
Main Area
Other Area
Press then
press dial to
start mowing
08-11-2024 13:57
Fig. 34
- Modo aleatorio:
El robot cortacésped corta el césped siguiendo un patrón aleatorio. Buscará automáticamente
una zona de trabajo adecuada. Si el robot cortacésped no encuentra hierba, cambiará de
dirección y volverá a funcionar en una nueva dirección. Las cuchillas no girarán hasta que el
robot cortacésped detecte hierba durante más de 5 segundos.
- Modo espiral:
El robot cortacésped siega en espiral moviéndose hacia fuera desde donde está colocado en
el césped. La mejor forma de utilizarlo es para arreglar las zonas que no se hayan cortado
durante una sesión de corte aleatoria.
(OURERWFRUWDFpVSHGFRUWDUiHQHVSLUDOGXUDQWHXQPi[LPRGHPLQXWRV8QDYH]¿QDOL]DGRHO
corte puntual, el robot cortacésped empezará a cortar en un patrón aleatorio automáticamente.
Si la zona a segar es demasiado estrecha para que el robot cortacésped realice el
corte puntual, tras la búsqueda, el cortacésped segará siguiendo un patrón aleatorio
automáticamente.
NOTA: El cortacésped emitirá un pitido al levantarlo y transportarlo desde diferentes zonas. Se
trata de un sonido de advertencia normal.
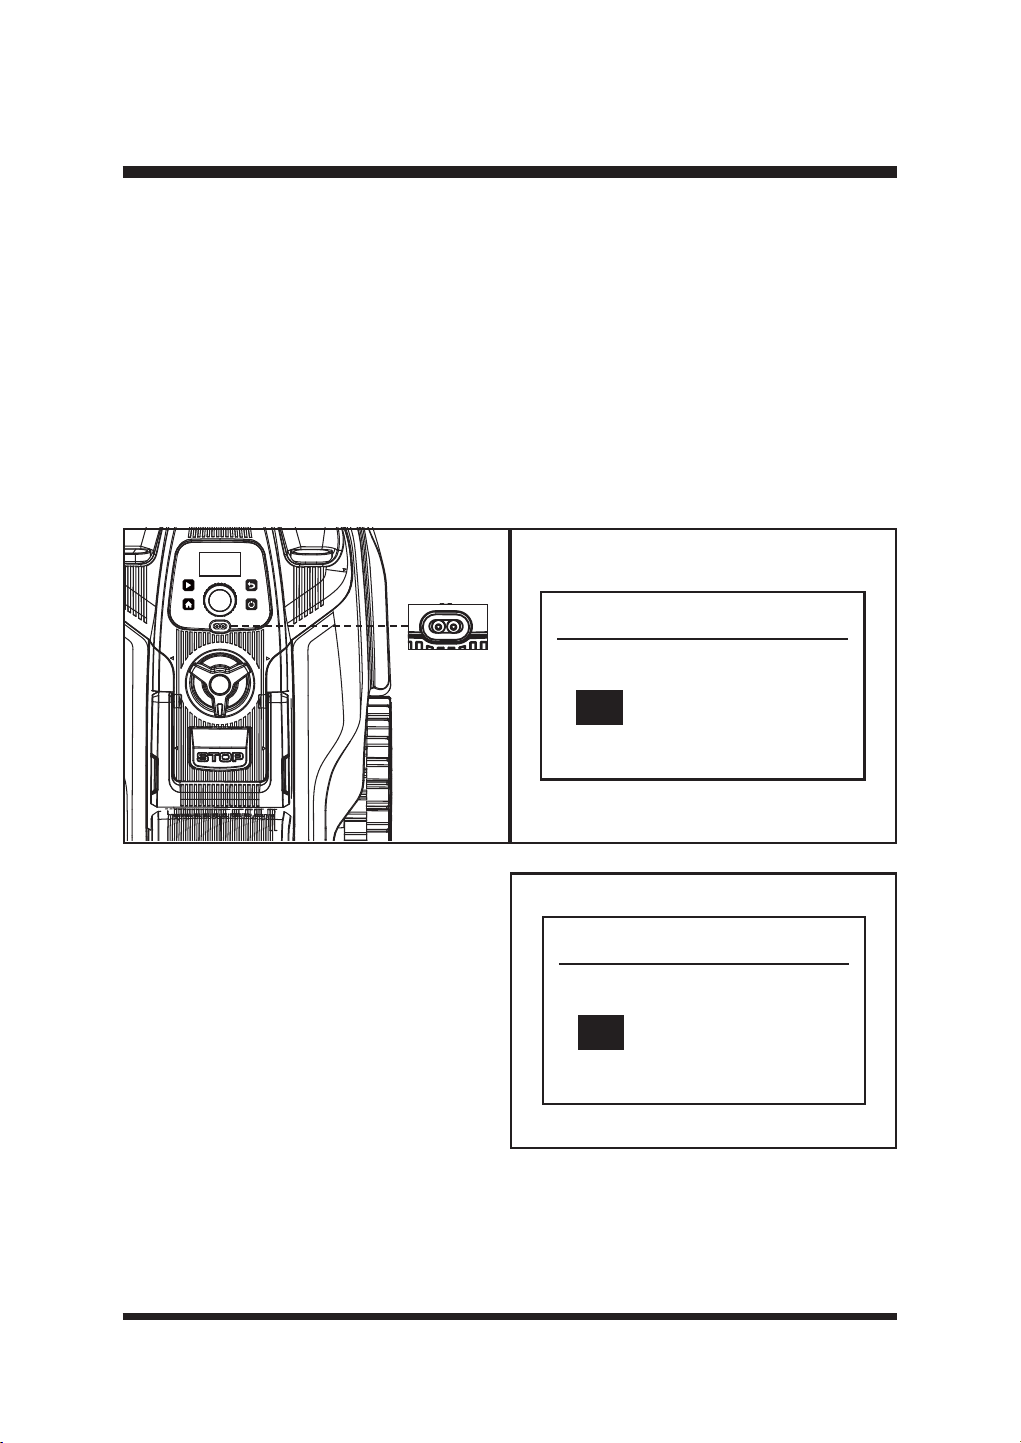
39
OPERACIÓN
Página del sensor de lluvia
El robot cortacésped está equipado con un sensor de lluvia (Fig. 35). Está activado por defecto.
Cuando llueva, se activará el sensor de lluvia. El robot cortacésped dejará de cortar y volverá a la
estación base. La temporización es efectiva desde el momento en que el sensor se seca.
Ŷ*LUHHOGLDOKDVWDHOPHQ~GHOVHQVRUGHOOXYLD\SXOVHSDUDVHOHFFLRQDUOR
Ŷ*LUHHOGLDO\VHOHFFLRQHHQFHQGLGRRDSDJDGR
Ŷ6HOHFFLRQHHOWLHPSRGHUHWDUGRGHVHDGRFRQHOGLDO3XHGHDMXVWDUVHHQWUH\KRUDV
NOTA: El tiempo de retardo predeterminado es de 2 horas, como se muestra (Fig. 36). El tiempo
de retardo evita daños en el césped provocados por el corte en césped mojado.
3DUDGHVDFWLYDUHOVHQVRUGHOOXYLDJLUHHOGLDOSDUDVHOHFFLRQDU2II\SXOVHHOGLDOSDUDFRQ¿UPDU
Fig. 35 Fig. 36
Rain sensor
Off
On 2 h
Página de ultrasonidos
Gire y pulse el botón giratorio para entrar en
el menú de ajustes ultrasónicos (Fig. 37).
Los sensores ultrasónicos de objetos están
activados por defecto. Para desactivar
el sensor ultrasónico, gire el dial para
seleccionar Desactivado y pulse el dial para
FRQ¿UPDU6t
Ultrasonic
Off
On
Fig. 37
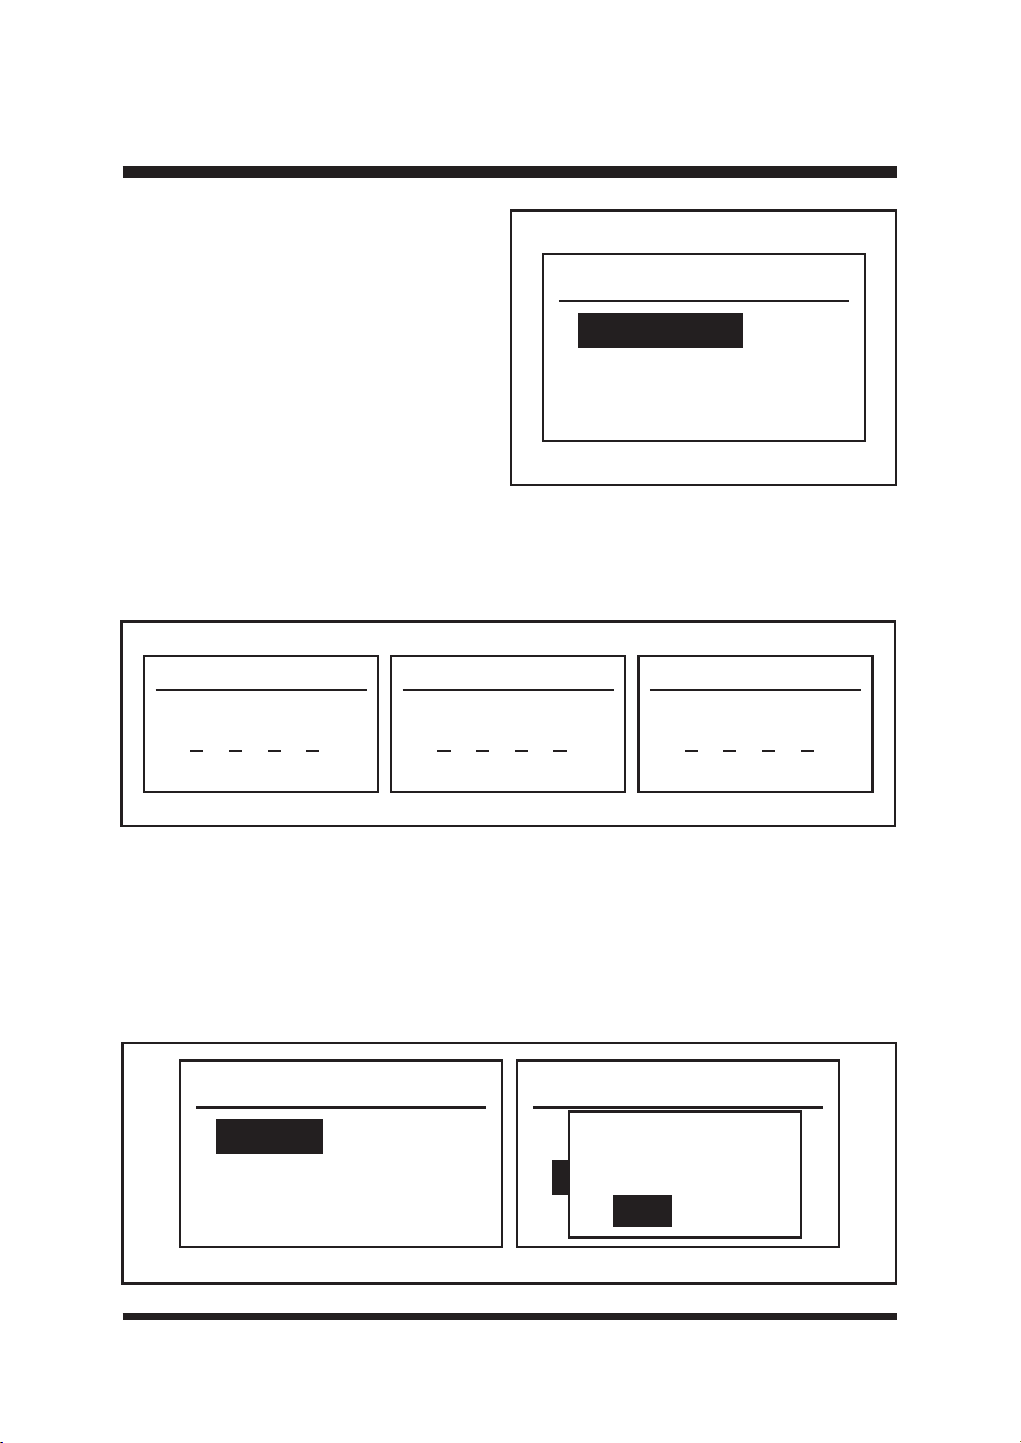
40
OPERACIÓN
Security
Change PIN
PIN On/Off
Software Version
Página de seguridad
Gire y pulse el dial para acceder a la página
Seguridad (Fig. 38). Esta página se utiliza
para cambiar el PIN, activarlo y desactivarlo,
y ver la versión del software.
Fig. 38
2) PIN On/Off (Fig. 40)
Esta función se utiliza para activar y desactivar el PIN. Cuando la función PIN está activada, es
necesario introducir el código PIN para manejar el panel de control; cuando la función PIN está
desactivada, el panel de control se puede manejar directamente.
Utilice el dial para seleccionar PIN On/Off y pulse el dial para entrar en la página PIN Control.
*LUHHOGLDOSDUDVHOHFFLRQDU'HVDFWLYDUR$FWLYDU\DFRQWLQXDFLyQSXOVHHOGLDOSDUDFRQ¿UPDU
Sí.
PIN On/Off
Disable
Enable
PIN On/Off
Disable
Enable
Save Changes?
Yes
No
New PIN code
0000
Old PIN code
000 000
Confirm
Fig. 39
Fig. 40
1) Cambiar el PIN (Fig. 39)
ŶUtilice el botón de marcación para
seleccionar Cambiar PIN y pulse el botón
de marcación para acceder a la página
del código PIN antiguo (en el primer uso,
introduzca el PIN predeterminado, que es
1234).
Ŷ*LUHHOGLDO\SXOVHSDUDLQWURGXFLUHOQXHYR
FyGLJR3,1&RQ¿UPHXQDYH]PiV
Ŷ3XOVHHOERWyQ$WUiVSDUDVDOLU
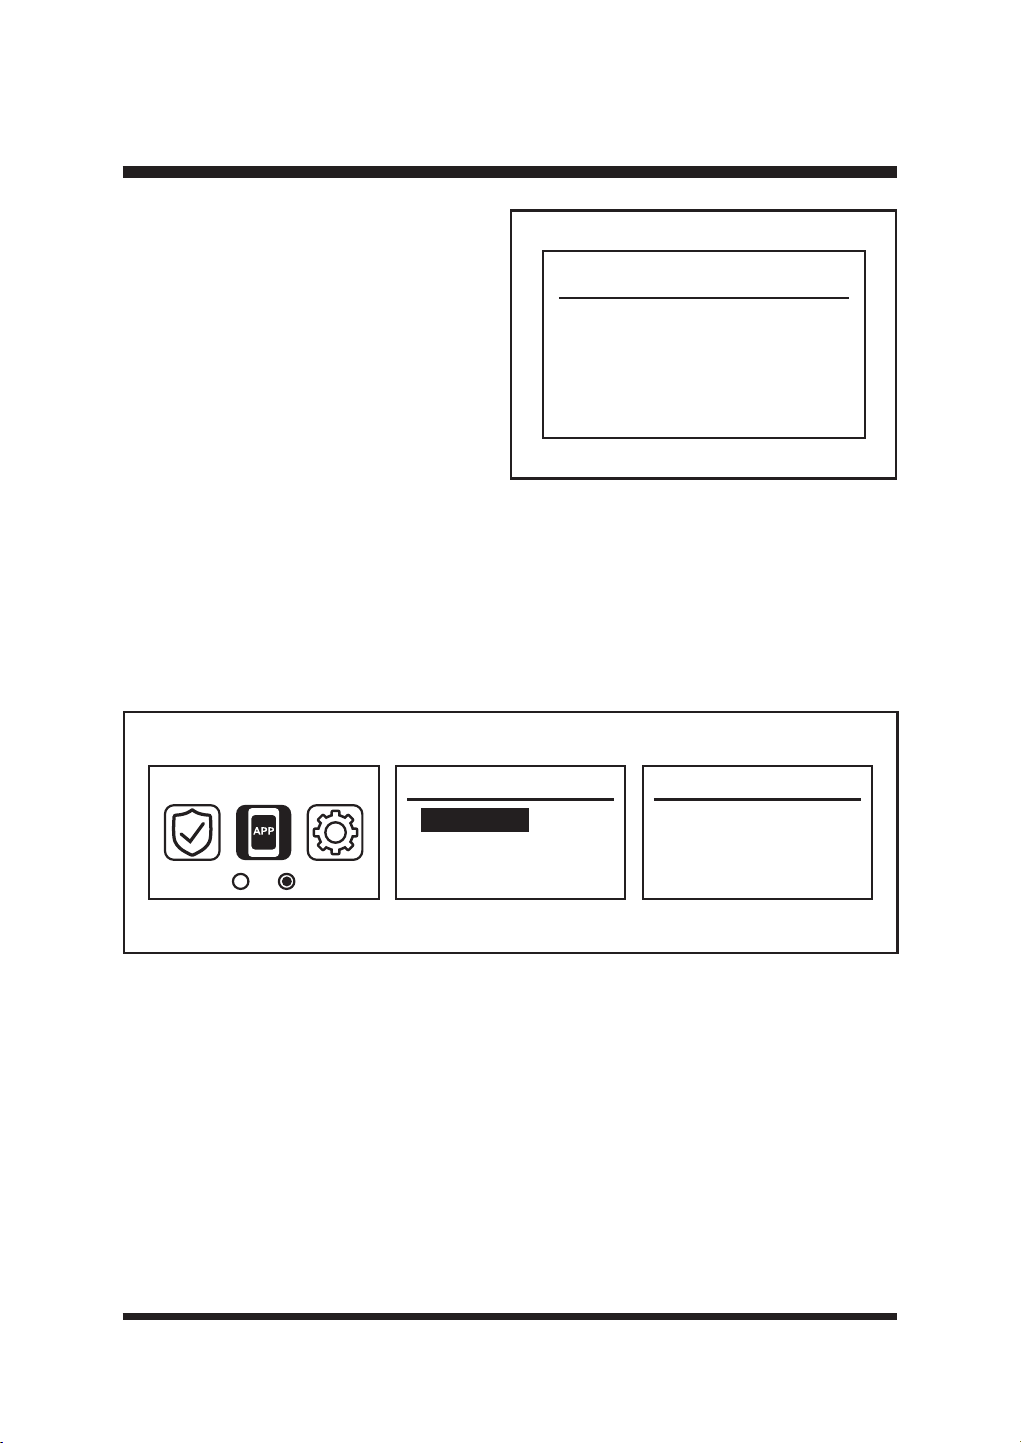
41
OPERACIÓN
Software Version
DEC
LCD
CAM
EXE
1 . 0 . 0 . 1
1 . 0 . 0 . 1
1 . 0 . 0 . 1
1 . 0 . 0 . 1
9HUVLyQGHVRIWZDUH)LJ
Muestra información sobre la versión
de software del robot cortacésped. Si
es necesario, compruebe la versión de
software mediante este ajuste.
Fig. 41
La aplicación
NOTA: El robot cortacésped se empareja con la estación base cuando sale de fábrica. Si el robot
cortacésped se avería y es necesario emparejarlo de nuevo, utilice esta página para emparejarlo.
Esta página funciona para encender la señal bluetooth de su robot cortacésped y añadir el
cortacésped a la estación base.
Gire y pulse el dial para acceder a la página App. Utilice el dial para seleccionar Conexión y pulse
el dial para entrar en la página Conexión (Fig. 42).
$FRQWLQXDFLyQDEUDODDSOLFDFLyQ\FRQ¿JXUHODUHGGHDFXHUGRFRQHOSURFHVRGHIXQFLRQDPLHQWR
de la aplicación (Fig. 43).
APP link
Connection
APP Connection
Open App to
check connection
Fig. 42
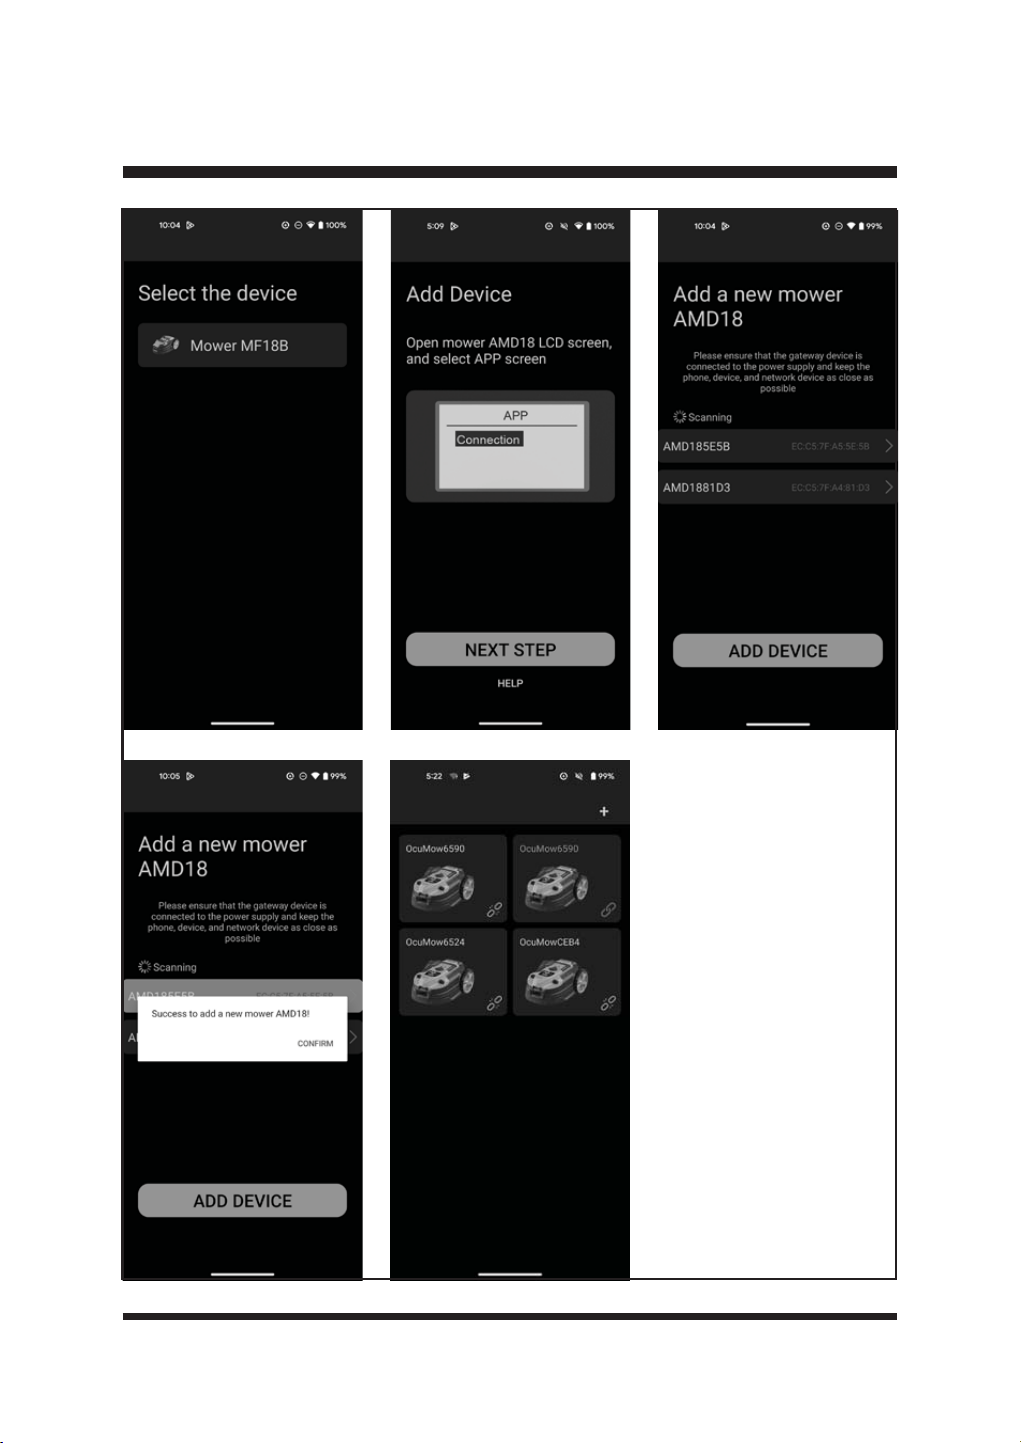
42
OPERACIÓN
Fig. 43
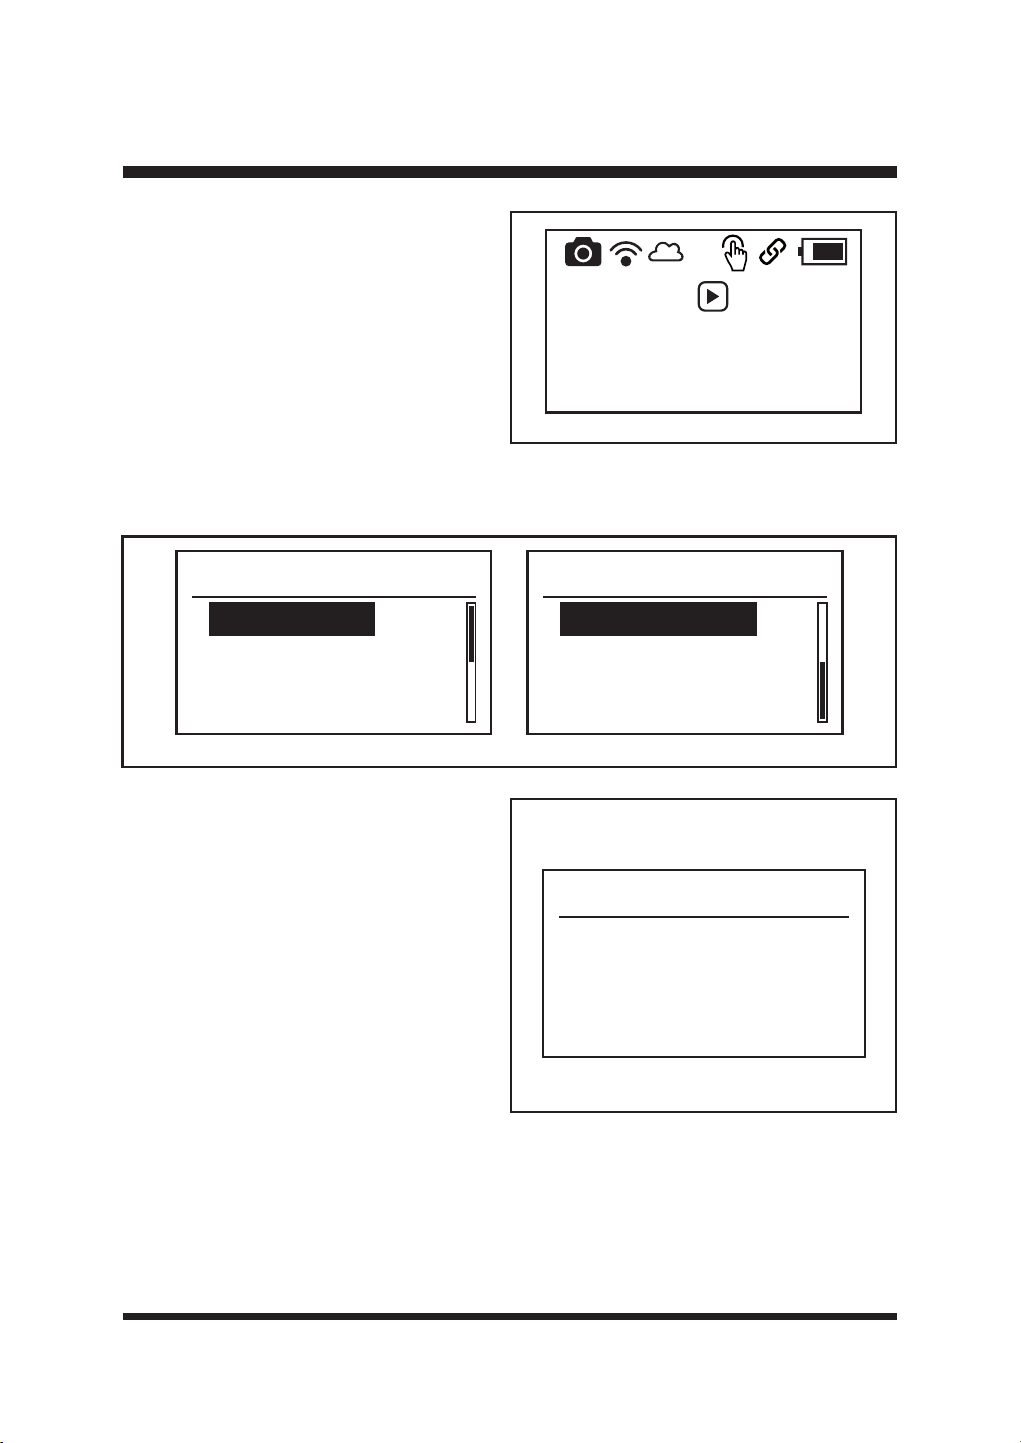
43
OPERACIÓN
Cuando el robot cortacésped se haya conectado
correctamente a la estación base, aparecerá la
siguiente página principal (Fig. 44).
Press then
press dial to
start mowing
24-10-2024 12:00
Fig. 44
3iJLQDGHFRQ¿JXUDFLyQ
*LUH\SXOVHHOGLDOSDUDDFFHGHUDODSiJLQD&RQ¿JXUDFLyQ)LJ(VWDSiJLQDVLUYHSDUDYHU
cambiar ajustes generales, como la fecha, la hora y el idioma, etc.
Settings
Date & Time
Language
Error Log
Clear Grid
Settings
Factory Reset
Fig. 45
1) Fecha y hora
Utilice el dial para seleccionar Fecha y Hora
y pulse el dial para entrar en la página Fecha
y Hora (Fig. 46). Este ajuste le permite
FRQ¿JXUDUODIHFKD\ODKRUDDFWXDOHV
Utilice el dial para editar la fecha y la hora:
- Pulse el dial para seleccionar cada dígito.
- Gire el dial hacia la derecha/izquierda
para aumentar/disminuir el tiempo de
cada dígito.
3XOVHODWHFODGHPDUFDFLyQSDUDFRQ¿UPDU
cada dígito.
3XOVHHOGLDOSDUDFRQ¿UPDU6t
Date & Time
27 - 09 - 2024
10 : 09
La fecha y la hora ajustadas pueden verse en la parte inferior de la página principal. Es importante
ajustar la fecha y hora correctas para que la programación del cortacésped funcione correctamente.
Fig. 46
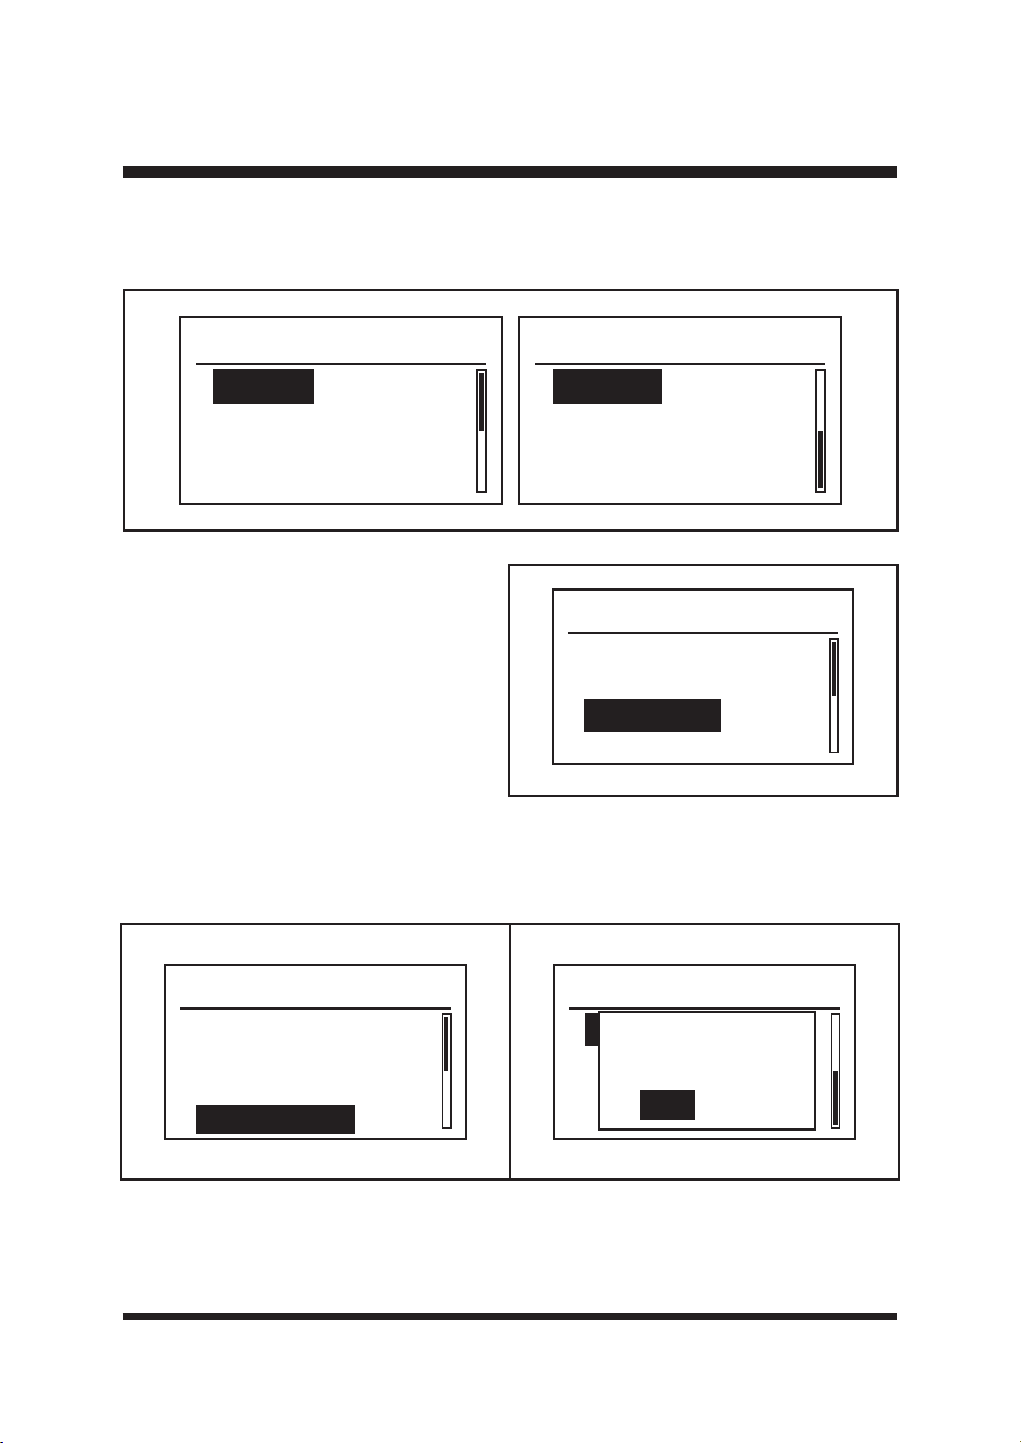
44
OPERACIÓN
2) Ldioma
8WLOLFHHOERWyQJLUDWRULRSDUDVHOHFFLRQDUHOLGLRPDGHVHDGR3XOVHHOGLDOSDUDFRQ¿UPDU)LJ
Language
Espanol
Language
English
Deutsch
Francais
Italiano
3) Registro de errores
Utilice el botón giratorio para seleccionar
Registro de errores y pulse el botón
giratorio para acceder a la página Registro
de errores (Fig. 48). Los dos últimos
errores se muestran en este registro de
errores. Seleccione y pulse el dial para
acceder a la página de registro de errores.
Fig. 47
Settings
Date & Time
Language
Error Log
Clear Grid
Fig. 48
4) Rejilla transparente
Restablecer mapa de césped o después de cambiar o reposicionar la estación base de carga.
6HOHFFLRQH\SXOVHHOERWyQJLUDWRULRSDUDFRQ¿UPDU)LJ
5) Restablecimiento de fábrica
Este ajuste permite restablecer los parámetros del robot cortacésped a los valores predeterminados
GHIiEULFD&RQ¿UPHFRQ6t)LJ
Settings
Factory Reset
Reset Mower?
Yes
No
Settings
Date & Time
Language
Error Log
Clear Grid
Fig. 49 Fig. 50
45
OPERACIÓN
ARRANQUE/PARADA DEL ROBOT CORTACÉSPED
Lea atentamente las instrucciones de seguridad antes de poner en marcha el robot cortacésped.
Mantenga las manos y los pies alejados de las cuchillas giratorias. No ponga nunca las manos o
los pies cerca o debajo del cortacésped cuando el motor esté en marcha.
No utilice nunca el robot cortacésped cuando haya personas, especialmente niños, o animales
domésticos, en la zona de corte.
ADVERTENCIA
ADVERTENCIA
ADVERTENCIA
Ŷ&RORTXHHOURERWFRUWDFpVSHGHQOD]RQDGHWUDEDMRGHELGDPHQWHGHOLPLWDGD\FHUFDGHOD
estación de carga.
Ŷ$VHJ~UHVHGHTXHODEDWHUtDHVWiELHQVXMHWD
Ŷ(VSRVLEOHTXHHOFRUWDFpVSHG\DHVWpHQFHQGLGRVLKDHVWDGRUHFLHQWHPHQWHHQODHVWDFLyQGH
carga. Si el cortacésped está apagado, pulse el botón Encendido/Apagado para encenderlo.
(OURERWFRUWDFpVSHGLQLFLDODLQLFLDOL]DFLyQ8QDYH]¿QDOL]DGRHOSURFHVRHOURERWFRUWDFpVSHG
emitirá dos pitidos.
Ŷ6HOHFFLRQHORVDMXVWHVGHVHDGRVGHODFRUWDGRUDGHFpVSHGSRUHMHPSORVHQVRUGHOOXYLD
VHQVRUXOWUDVyQLFRKRUD\IHFKDGHDFXHUGRFRQODLQIRUPDFLyQGHODVHFFLyQ0HQ~GH
DMXVWHV
Ŷ(OLMDHOPRGRGHSURJUDPDFLyQRHOPRGRGHVROWDU\FRUWDUVHJ~QODVLQVWUXFFLRQHVGHODSiJLQD
36-38.
Ŷ3DUDSRQHUHQPDUFKDHOURERWFRUWDFpVSHGSXOVHHOERWyQ,QLFLR\DFRQWLQXDFLyQSXOVHHO
VHOHFWRUSDUDFRQ¿UPDU(OURERWFRUWDFpVSHGHPSH]DUiDFRUWDUHQVHJXQGRV)LJ
Press then
press dial to
start mowing
08-11-2024 13:57
Press then
press dial to
start mowing
08-11-2024 13:57
Start
Yes
No
Press then
press dial to
start mowing
08-11-2024 13:57
5
Fig. 51

46
OPERACIÓN
Ŷ(QHOPRGR3URJUDPDGRFXDQGRVHDQHFHVDULRFDUJDUORHOURERWFRUWDFpVSHGYROYHUi
automáticamente a la estación base. Tarda unas 2 horas y 10 minutos en cargarse por
FRPSOHWRWUDVORFXDOHOURERWFRUWDFpVSHGUHDQXGDUiODVLHJD&XDQGR¿QDOLFHHOWLHPSRGH
trabajo programado, volverá a la estación base y permanecerá en espera en la estación base
para el siguiente horario de trabajo.
Ŷ3DUDGHWHQHUHOFRUWDFpVSHGPDQXDOPHQWHGXUDQWHHOIXQFLRQDPLHQWRSXOVHHOERWyQ6723
pantalla LCD mostrará lo siguiente (Fig. 52). Para recuperar el cortacésped del estado de
SDUDGDSXOVHFXDOTXLHUERWyQ\DFRQWLQXDFLyQSXOVHHOGLDOSDUDFRQ¿UPDU)LJ
NOTA: Cuando el cortacésped se está cargando en la estación base, pulse el botón STOP, panel
/&'PRVWUDUiORLQGLFDGRHQOD)LJ(OFRUWDFpVSHGQRYROYHUiDIXQFLRQDUXQDYH]¿QDOL]DGD
la carga.
Ŷ3DUDDSDJDUHOFRUWDFpVSHGSXOVHHOERWyQGHHQFHQGLGRDSDJDGRGXUDQWHVHJXQGRV
NOTA: El cortacésped está siempre encendido y no se puede apagar cuando está en la estación
de carga.
NOTA: Si el cortacésped no está en la estación de carga y no se ha accionado el panel de control
durante 25 minutos, el cortacésped entrará automáticamente en modo de reposo (el panel LCD
se apagará). Pulse el botón de encendido/apagado para apagar el cortacésped. A continuación,
vuelva a encender el cortacésped.
NOTA: 6LODWHPSHUDWXUDGHIXQFLRQDPLHQWRHVVXSHULRUD&HOSDQHO/&'PRVWUDUi%DWHUtD
VREUHWHPSHUDWXUD(OURERWFRUWDFpVSHGEXVFDUiDXWRPiWLFDPHQWHSDUDYROYHUDODHVWDFLyQEDVH
Deje que la máquina se enfríe hasta alcanzar una temperatura normal. A continuación, reinicie el
robot cortacésped y volverá a funcionar.
AJUSTE DE LA ALTURA DE CORTE
Cancel
stopped-state?
Yes
No
Stopped
08-11-2024 13:57
No realice ningún ajuste en el robot cortacésped sin antes parar el motor. Mantenga los pies
alejados del disco de giro de la cuchilla cuando ajuste su altura.
ADVERTENCIA
Fig. 52 Fig. 53
47
OPERACIÓN
La altura de corte del robot cortacésped puede ajustarse de MIN 1,2'' (30 mm) a MAX 3,1'' (80
mm) (Fig. 54).
Durante la primera semana de uso, seleccione una altura de corte de 2,36'' (60 mm). La altura de
corte puede reducirse paso a paso cada semana hasta alcanzar la altura de corte deseada.
Fig. 54
Ŷ3XOVHHOERWyQ6723SDUDGHWHQHUHOURERW
cortacésped.
Ŷ*LUHHOPDQGRGHDMXVWHGHODDOWXUDGH
corte para ajustar la altura de corte.
- Gire en el sentido de las agujas del reloj
para elevar la altura de corte.
- Gire en sentido contrario a las agujas del
reloj para bajar la altura de corte.
Ŷ3DUDHOSULPHUFRUWHGHFDGDWHPSRUDGD
debe seleccionarse un ajuste de corte
más alto. EL USO DE UNA ALTURA DE
CORTE DEMASIADO BAJA EN CÉSPED
MÁS LARGO CONSUMIRÁ MÁS
POTENCIA Y REDUCIRÁ EL TIEMPO DE
FUNCIONAMIENTO DE LA BATERÍA.
Ŷ$QWHVGHHPSH]DUDVHJDUFRPSUXHEHTXHODFXFKLOODQRHVWpGHVD¿ODGD\TXHQLQJXQDGHODV
¿MDFLRQHVHVWpGDxDGD3DUDHYLWDUFXDOTXLHUGHVHTXLOLEULRVXVWLWX\DODVFXFKLOODVGHVD¿ODGDV\
o dañadas. Para realizar esta comprobación, apague primero el cortacésped con el botón de
encendido/apagado.
48
MANTENIMIENTO
MANTENIMIENTO GENERAL
Ŷ0DQWHQJDWRGRVORVGLVSRVLWLYRVGHVHJXULGDG\ODFDUFDVDGHOPRWRUOLEUHVGHVXFLHGDG\SROYR
Evite utilizar disolventes para limpiar las piezas de plástico. La mayoría de los plásticos son
susceptibles de ser dañados por diversos tipos de disolventes comerciales y pueden resultar
dañados por su uso. Utilice paños limpios y secos para eliminar la suciedad, el polvo, el aceite,
la grasa, etc.
Ŷ&RPSUXHEHSHULyGLFDPHQWHTXHWRGDVODVWXHUFDV\WRUQLOORVHVWiQELHQDSUHWDGRVSDUD
garantizar un funcionamiento seguro del robot cortacésped.
Ŷ(OLPLQHFXDOTXLHUDFXPXODFLyQGHKLHUED\KRMDVVREUHRDOUHGHGRUGHOURERWFRUWDFpVSHG\OD
estación base. Limpie de vez en cuando el robot cortacésped con un paño seco.
Ŷ
Inspeccione la estación base y límpiela de barro y residuos para permitir un acoplamiento correcto.
SUSTITUCIÓN DE LAS CUCHILLAS DEL CORTACÉSPED
&RPSUXHEHVLHPSUHVLODVFXFKLOODVHVWiQHQEXHQHVWDGR6LODVFXFKLOODVHVWiQGHVD¿ODGDVGDxDGDV
o muestran signos de desequilibrio, deben sustituirse. Utilice únicamente cuchillas de repuesto
recomendadas. Asegúrese de sustituir TODAS las cuchillas y tornillos al mismo tiempo para mantener un
sistema de corte equilibrado. Puede adquirir cuchillas de repuesto poniéndose en contacto con el Servicio
de Atención al Cliente.Consumables and Accessory part numbers can be found at the back of this manual.
Apague siempre el producto, retire la batería y deje que se enfríe antes de realizar tareas de
inspección, mantenimiento y limpieza.
Utilice siempre guantes gruesos de protección cuando realice el mantenimiento de las cuchillas.
La inobservancia de esta advertencia puede provocar lesiones personales graves.
Si una pieza se desgasta o daña, utilice las piezas de repuesto recomendadas por el fabricante.
El uso de cualquier otra pieza puede crear un peligro o causar daños al producto.
No utilice implementos o accesorios no recomendados por el fabricante de este producto. El uso
de implementos o accesorios no recomendados puede provocar lesiones personales graves.
ADVERTENCIA
ADVERTENCIA
ADVERTENCIA
ADVERTENCIA
Antes de realizar cualquier operación de mantenimiento, asegúrese de haber extraído la batería.
La inobservancia de esta advertencia puede provocar lesiones personales graves.
ADVERTENCIA
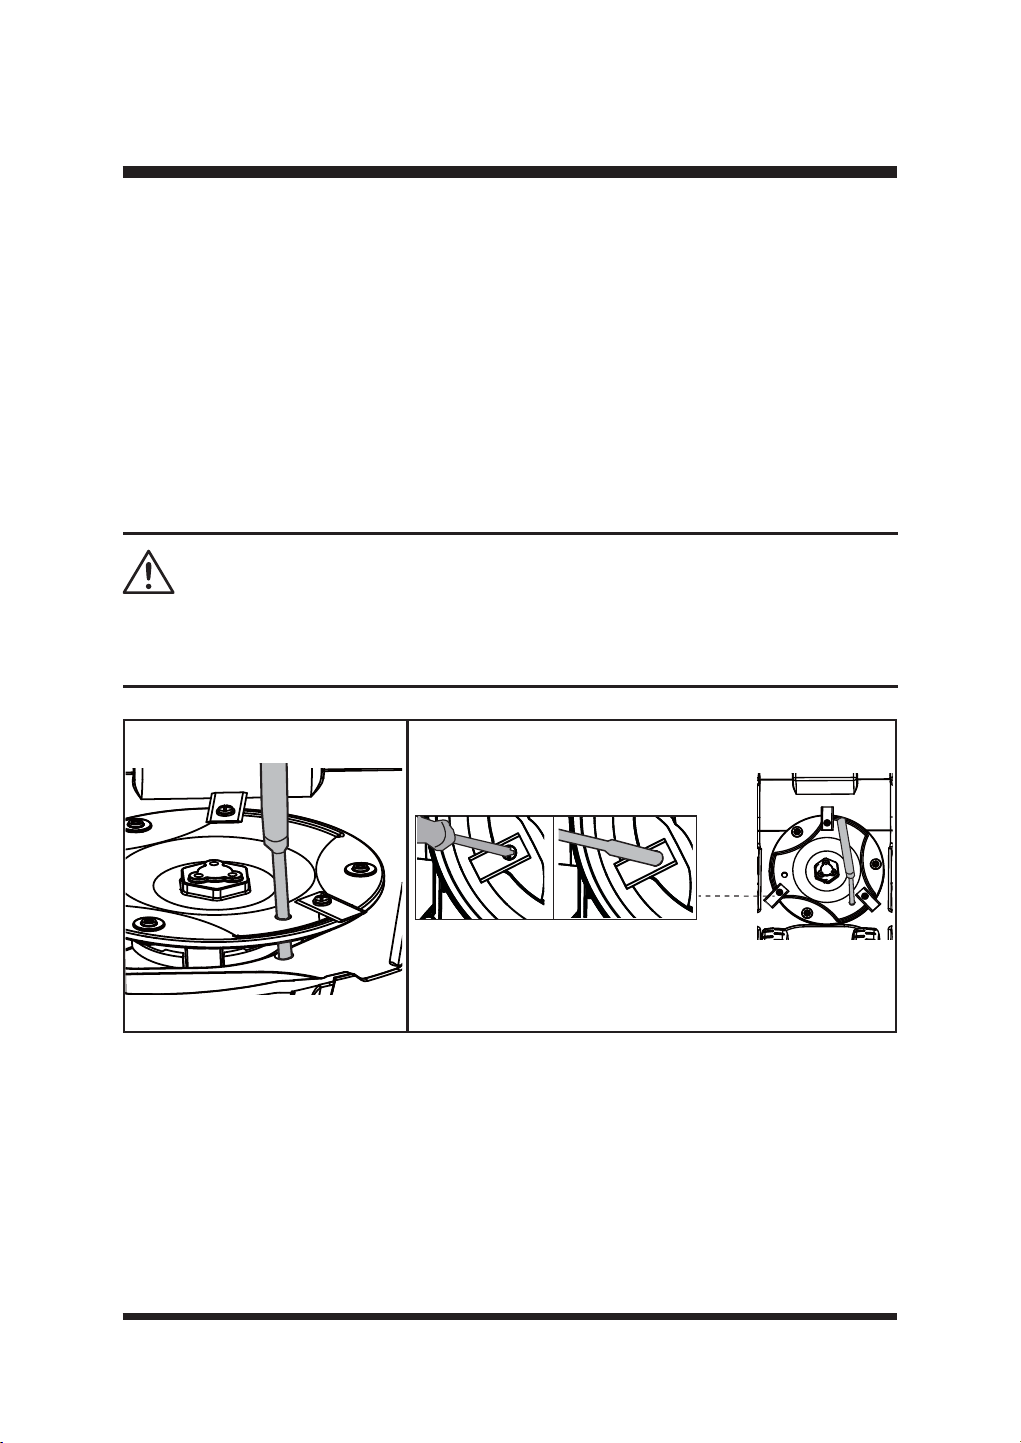
49
MANTENIMIENTO
Para sustituir las cuchillas
Ŷ3XOVHHOERWyQ6723\GHMHTXHODFXFKLOODVHGHWHQJDSRUFRPSOHWR
Ŷ3XOVHHOERWyQ2Q2IISDUDDSDJDUHOFRUWDFpVSHG
Ŷ/HYDQWHODWDSDGHOFRPSDUWLPHQWRGHODSLOD([WUDLJDOD
Ŷ*LUHOHQWDPHQWHHOFRUWDFpVSHG&ROyTXHORVREUHXQDVXSHU¿FLHVXDYH\OLPSLD
Ŷ8WLOLFHXQDKHUUDPLHQWDDGHFXDGDSRUHMHPSORXQGHVWRUQLOODGRUSDUDLQWURGXFLUODHQXQRGH
ORVWUHVRUL¿FLRVGHOGLVFRGHFXFKLOODVSDUD¿MDUORHQVXVLWLR)LJ(VWRDVHJXUDTXHHOGLVFR
de cuchillas no gire al sustituir las cuchillas para evitar lesiones personales.
Ŷ3yQJDVHJXDQWHVGHSURWHFFLyQ\XWLOLFHXQGHVWRUQLOODGRURXQDOODYHKH[DJRQDOSDUDUHWLUDUORV
tres tornillos y las cuchillas (Fig. 56).
Ŷ)LMHODVFXFKLOODVQXHYDVFRQWRUQLOORVQXHYRV
Ŷ$VHJ~UHVHGHTXHWRGDVODVFXFKLOODVSXHGDQJLUDUOLEUHPHQWH
LIMPIEZA
DE LA PARTE INFERIOR
Se recomienda revisar y limpiar regularmente la parte inferior del robot cortacésped.
Ŷ3XOVHHOERWyQ6723\GHMHTXHODFXFKLOODVHGHWHQJDSRUFRPSOHWR
Ŷ3XOVHHOERWyQ2Q2IISDUDDSDJDUHOFRUWDFpVSHG
Ŷ/HYDQWHODWDSDGHOFRPSDUWLPHQWRGHODSLOD([WUDLJDOD
Ŷ*LUHOHQWDPHQWHHOFRUWDFpVSHG&ROyTXHORVREUHXQDVXSHU¿FLHVXDYH\OLPSLD
Ŷ8WLOLFHXQFHSLOORVXDYHRXQSDxRK~PHGRSDUDHOLPLQDUODVXFLHGDGHOSROYRHODFHLWHOD
grasa, etc. de la parte inferior del cortacésped.
El uso de un destornillador eléctrico para retirar los pernos de las cuchillas puede hacer que el
disco de corte gire rápidamente, provocando lesiones personales. Tenga cuidado y asegúrese de
que el disco de corte está bloqueado en su sitio con una herramienta adecuada.
ADVERTENCIA
Fig. 55 Fig. 56
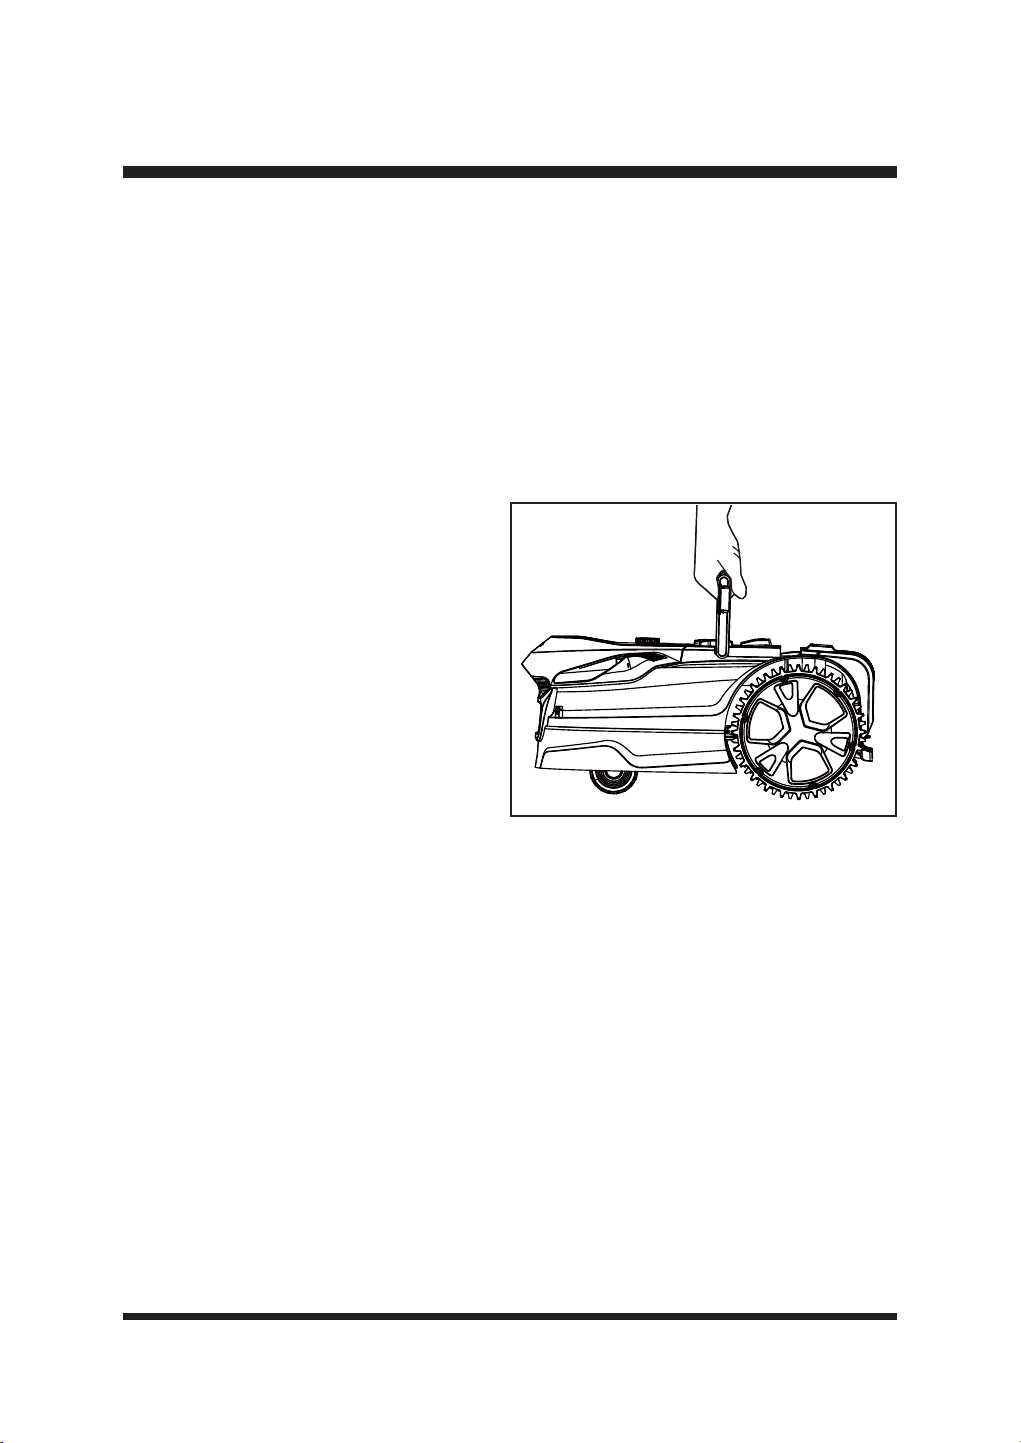
50
PRECAUCIÓN: No lave el cortacésped con agua corriente.
ŶUtilice guantes de seguridad para limpiar a fondo el disco de corte, el chasis y las ruedas
delanteras y traseras con un cepillo suave o un paño húmedo. Elimine cualquier residuo alojado
a su alrededor.
Ŷ$VHJ~UHVHGHTXHHOGLVFRGHFXFKLOODVSXHGHJLUDUOLEUHPHQWH\TXHWRGDVODVFXFKLOODVSXHGHQ
girar libremente.
GUARDAR EL CORTACÉSPED
Se recomienda guardar el cortacésped bajo techo durante el invierno. El almacenamiento
del cortacésped o de la batería a temperaturas bajo cero puede provocar daños.
Ŷ3DUDRSWLPL]DUODORQJHYLGDGGHODEDWHUtDDVHJ~UHVHGHTXHHOFRUWDFpVSHGHVWi
completamente cargado antes de guardarlo
durante el invierno.
Ŷ3XOVHHOERWyQGHHQFHQGLGRDSDJDGRSDUD
apagar el cortacésped. Retire la batería.
Ŷ/LPSLHDIRQGRHOFRUWDFpVSHG
Ŷ8WLOLFHHODVDGHWUDQVSRUWHSDUDWUDQVSRUWDU
el cortacésped. Transporte el cortacésped con
el disco de corte alejado del cuerpo (Fig. 57).
Ŷ*XDUGHHOFRUWDFpVSHGHQXQOXJDUOLPSLR
seco y fuera del alcance de los niños.
IMPORTANT: Proteja la parte inferior del
cortacésped del agua estancada. No guarde
NUNCA el cortacésped boca abajo en el exterior.
MANTENIMIENTO DE LA BATERÍA
Ŷ&DUJXHFRPSOHWDPHQWHODEDWHUtDDQWHVGHJXDUGDUOD
Ŷ5HFDUJXHHOSDFNGHEDWHUtDVVLHPSUHTXHVHSURGX]FDXQDUHGXFFLyQQRWDEOHGHOUHQGLPLHQWR
No deje que la batería se descargue por completo.
Ŷ1RUHFDUJXHXQDEDWHUtDTXH\DHVWpFRPSOHWDPHQWHFDUJDGD/DVREUHFDUJDDFRUWDODYLGD~WLO
de la batería.
Ŷ8QDYH]TXHODEDWHUtDHVWpFRPSOHWDPHQWHFDUJDGDUHWtUHODGHOFDUJDGRU\GHVFRQHFWHHO
cargador de la toma de corriente.
Ŷ1RJXDUGHODEDWHUtDHQODKHUUDPLHQWDQLHQHOFDUJDGRU
Ŷ6LODEDWHUtDHVWiFDOLHQWHGHMDTXHVHHQIUtHDQWHVGHUHFDUJDUOD
ALMACENAMIENTO DE LA ESTACIÓN BASE
Ŷ'HVFRQHFWHHODGDSWDGRUGHFRUULHQWHGHODWRPDGHFRUULHQWH
Ŷ/DHVWDFLyQEDVHSXHGHGHMDUVHDODLUHOLEUHHQLQYLHUQR
Ŷ6HUHFRPLHQGDFRORFDUODHVWDFLyQEDVHHQXQOXJDUVHFR\SURWHJLGRGHODLQWHPSHULH
MANTENIMIENTO
Fig. 57
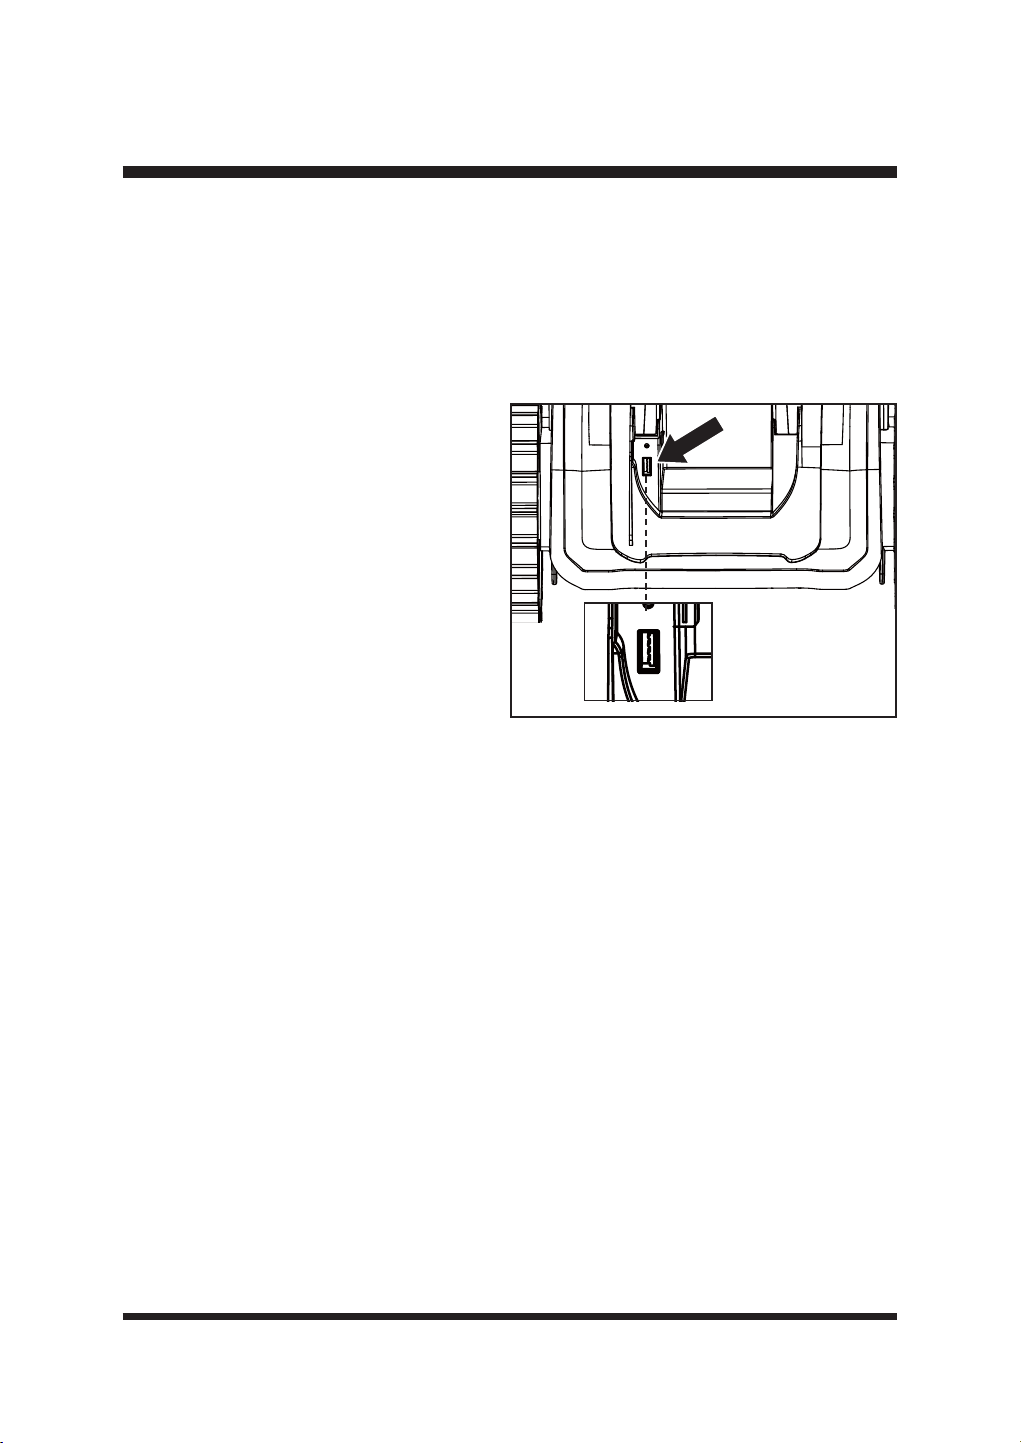
51
MANTENIMIENTO
ACTUALIZACIÓN DEL SOFTWARE
El cortacésped puede requerir actualizaciones periódicas del software para mejorar su
funcionalidad.
NOTA: $VHJ~UHVHGHTXHODXQLGDGÀDVK86%IXQFLRQDFRQQRUPDOLGDG\GHTXHHOURERW
cortacésped está encendido pulsando el botón START/ON antes de actualizar.
NOTE:$VHJ~UHVHGHTXHHOFRUWDFpVSHGWLHQHSRWHQFLDVX¿FLHQWHSDUDDFWXDOL]DUHOVRIWZDUH
Fig. 58
Ŷ'HVFDUJXHHOVRIWZDUHPiVUHFLHQWHGHO
robot
cortacésped desde nuestro sitio web de
asistencia (www.lawnmaster.com) en una
XQLGDGÀDVK86%YDFtD
Ŷ'HWHQJDHOFRUWDFpVSHG\SXOVHHOERWyQ2Q
Off para apagarlo.
Ŷ/HYDQWHODWDSDGHOFRPSDUWLPHQWRGHODV
pilas. Abra la tapa de goma del puerto USB
para ver el puerto USB (Fig. 58).
Ŷ,QVHUWHODPHPRULD86%HQHOSXHUWR86%
Ŷ3XOVHHOERWyQGHHQFHQGLGRDSDJDGRSDUD
encender el robot cortacésped.
Ŷ/DSDQWDOOD/&'PXHVWUDTXHHOVRIWZDUHVH
está actualizando.
Ŷ8QDYH]¿QDOL]DGDODDFWXDOL]DFLyQGHOVRIWZDUHRLUiXQSLWLGRFRQWLQXR\ODSDQWDOOD/&'
PRVWUDUi£$FWXDOL]DFLyQFRUUHFWD5HWLUHODPHPRULD86%\UHLQLFLHHOFRUWDFpVSHG)LJ
Ŷ([WUDLJDODPHPRULD86%9XHOYDDFRORFDUODWDSDGHJRPDGHOSXHUWR86%
Ŷ3DUDFRPSOHWDUODDFWXDOL]DFLyQGHOVRIWZDUHUHLQLFLHHOURERWFRUWDFpVSHG

52
ELIMINACIÓN DE BATERÍAS SIN PELIGRO PARA EL MEDIO AMBIENTE
Las baterías utilizadas en este paquete de baterías contienen los siguientes materiales
tóxicos y corrosivos: iones de litio, un material tóxico.
ADVERTENCIA
7RGRVORVPDWHULDOHVWy[LFRVGHEHQGHVHFKDUVHGHPDQHUDHVSHFt¿FDSDUDHYLWDUODFRQWDPLQDFLyQ
del medio ambiente. Antes de desechar los paquetes de baterías de iones de litio dañados o
desgastados, póngase en contacto con su agencia local de eliminación de residuos o con la
$JHQFLDGH3URWHFFLyQ$PELHQWDOORFDOSDUDREWHQHULQIRUPDFLyQHLQVWUXFFLRQHVHVSHFt¿FDV
ADVERTENCIA
Si el paquete de baterías se agrieta o se rompe, con o sin fugas, no lo recargue ni lo utilice.
Deséchelo y reemplácelo con un nuevo paquete de baterías.
¡NO INTENTE REPARARLO!
Para evitar lesiones y riesgos de incendio, explosión o descarga eléctrica,
y para evitar daños al medio ambiente:
• Cubra las terminales de la batería con cinta adhesiva resistente.
• NO intente extraer ni destruir ninguno de los componentes del paquete de baterías.
• NO intente abrir el paquete de baterías.
• Si se produce una fuga, los electrolitos liberados son corrosivos y tóxicos. NO deje que la
solución entre en contacto con los ojos o la piel y no la trague.
• NO coloque las baterías dañadas o defectuosas en la basura doméstica habitual.
• NO las incinere.
• NO FRORTXHODVEDWHUtDVGRQGHSXHGDQIRUPDUSDUWHGHQLQJ~QYHUWHGHURGHUHVLGXRVRÀXMRGH
residuos sólidos municipales.
/OHYHODVEDWHUtDVDXQFHQWURGHUHFLFODMHRGHHOLPLQDFLyQFHUWL¿FDGR
53
SOLUCIÓN DE PROBLEMAS
Realice únicamente los pasos descritos en estas instrucciones.
Todos los trabajos de inspección, mantenimiento y reparación posteriores deben ser realizados
SRUXQFHQWURGHVHUYLFLRDXWRUL]DGRRXQHVSHFLDOLVWDFRQFXDOL¿FDFLyQVLPLODUVLQRSXHGH
solucionar el problema usted mismo.
Al realizar estas instrucciones deben utilizarse guantes y ropa de protección adecuada. Apague
siempre el cortacésped antes de realizar cualquier ajuste.
¡AVISO!
Las sospechas de mal funcionamiento suelen deberse a causas que el usuario puede solucionar
por sí mismo.
Por lo tanto, compruebe el producto utilizando esta sección. En la mayoría de los casos, el
problema puede resolverse rápidamente
PROBLEMA POSIBLE CAUSA SOLUCIÓN
El robot cortacésped
se atasca durante el
corte.
La hierba u otros residuos se
enredan alrededor de las ruedas.
Compruebe las ruedas y retire la
hierba u objetos.
La hierba u otros residuos están
enrollados alrededor del disco de
corte.
Compruebe el disco de corte y retire
la hierba u objetos (utilice siempre
guantes de jardinería).
El robot cortacésped se ha
enganchado en algo.
Libere el cortacésped y retire el
obstáculo.
El robot cortacésped se atasca
en una zona del jardín.
Compruebe si hay algún obstáculo
TXHGL¿FXOWHHOPRYLPLHQWRGHOURERW
cortacésped desde esta ubicación.
Elimine los obstáculos.
El cortacésped se queda atascado
en un desnivel o hueco del césped.
Asegúrese de que las zanjas y agujeros
del césped se nivelan con tierra vegetal
y se siembran con semillas de césped.
El sensor de elevación se ha
activado porque el cortacésped ha
quedado atrapado.
Libera el cortacésped.
El robot cortacésped
no arranca.
La batería no está instalada
correctamente.
Asegúrese de que la batería se introduce
en la ranura hasta que encaje.
La batería no está completamente
cargada.
Carga la batería.
Posible atasco.
Retire la batería. Compruebe los
bajos del cortacésped y límpielos si
es necesario (utilice siempre guantes
de jardinería).
La hierba es demasiado larga. Ajuste una altura de corte mayor.

54
SOLUCIÓN DE PROBLEMAS
PROBLEMA POSIBLE CAUSA SOLUCIÓN
El robot cortacésped
no arranca.
La batería está defectuosa. Sustituya la batería.
Botón de encendido/apagado
defectuoso.
Póngase en contacto con el servicio
de asistencia posventa.
El robot cortacésped
abandona el césped.
Se utilizan barreras incorrectas
para delimitar la zona de trabajo.
Ajustar correctamente los bordes/
barreras para delimitar la zona de
trabajo. Realice mejoras o barreras
temporales si es necesario. Consulte
'H¿QLFLyQGHOiUHDGHVLHJDHQOD
página 18-22.
Los sensores ultrasónicos están
apagados.
Encienda los sensores ultrasónicos
según las instrucciones de la página 39.
El área de trabajo tiene una
pendiente superior al 35%.
Restringir la zona con una pendiente
superior al 35%.
El robot cortacésped
WLHQHGL¿FXOWDGHV
para acoplarse.
La estación base está en una
pendiente.
(OFRUWDFpVSHGWHQGUiGL¿FXOWDGHV
SDUDLGHQWL¿FDUODVEDQGDVJXtD
Coloque la estación base sobre una
VXSHU¿FLHWRWDOPHQWHQLYHODGD
Mala conexión causada por
residuos en las tiras de carga.
Limpie con un paño la banda de
contacto situada en la estación base y
las bandas de carga del cortacésped.
La hierba alrededor de la
estación base es demasiado alta.
Recorta la hierba alrededor de la
parte delantera de la estación base
para garantizar un acoplamiento sin
problemas.
La estación base no está situada
correctamente o está cubierta por
un revestimiento metálico.
Compruebe que la disposición de
la estación base es correcta. Retire
cualquier recubrimiento metálico de
la ubicación de la estación base.
Consulte Selección de la ubicación de
la estación base en la página 23.
El robot cortacésped
está atascado en la
estación base.
Hay un objeto en el camino del
robot cortacésped que le impide
salir de la estación base.
Retira el objeto.
La hierba alrededor de la
estación base es demasiado alta.
Recorte la hierba alrededor de la
parte delantera de la estación base
para garantizar un acoplamiento sin
problemas.

55
SOLUCIÓN DE PROBLEMAS
PROBLEMA POSIBLE CAUSA SOLUCIÓN
El robot cortacésped
no corta cuando se
espera/
El robot cortacésped
sigue volviendo a la
estación base.
Programación incorrecta.
Compruebe los ajustes de
Programación. El cortacésped
comenzará y terminará su trabajo
en función de ventana de tiempo
establecida. Fuera de esta ventana de
tiempo, el permanece en la estación
base. Asegúrese de que los ajustes
de fecha y hora locales son correctos.
Se activa el sensor de lluvia.
Espere hasta que el cortacésped esté
seco y haya transcurrido el tiempo de
retardo.
El robot cortacésped fue enviado
a casa manualmente mediante el
botón de inicio.
Arranque el cortacésped según las
instrucciones de la página 45-46.
Se ha pulsado el botón de parada
mientras el cortacésped estaba
en la estación de carga.
Arranque el cortacésped según las
instrucciones de la página 45-46.
El robot cortacésped
está al revés.
El robot cortacésped se ha
inclinado demasiado o está
volcado.
Gire el robot cortacésped en el
VHQWLGRFRUUHFWR\UHFWL¿TXHHOPRWLYR
por el que se ha volcado.
Problema con el
sensor de colisión,
delantero/trasero.
El cuerpo de la cortadora de
césped no puede moverse
libremente alrededor de su
chasis.
Compruebe que el cuerpo del
cortacésped puede moverse libremente
alrededor de su chasis. Si el problema
persiste, póngase en contacto con el
servicio de asistencia posventa.
Problema
desconocido con el
control o la función.
Problema temporal relacionado
con la electrónica o el software
del cortacésped.
Apague el cortacésped. Reinicie el
cortacésped. Descargue e instale la
última actualización del software. Si el
problema persiste, póngase en contacto
con el servicio de asistencia posventa.
El robot cortacésped
se dirige a la estación
base, pero el disco
de corte no gira.
El robot cortacésped busca la
estación base.
Esto es normal. El cortacésped
necesita recargarse. El disco
de corte no gira mientras busca
automáticamente la estación base.
El robot cortacésped
vibra.
Las cuchillas de corte están
dañadas.
Sustituya las cuchillas. Consulte la
sección Sustitución de las cuchillas del
cortacésped en la página 48-49. Visite
www.clevaeurope.com para obtener
información sobre dónde comprar
cuchillas. Consulte la lista de piezas
en la página 62.
Demasiadas cuchillas en la misma
posición provocan un desequilibrio
en el sistema de corte.
Compruebe que sólo hay una cuchilla
montada en cada tornillo y que las
cuchillas no están atascadas.

56
SOLUCIÓN DE PROBLEMAS
PROBLEMA POSIBLE CAUSA SOLUCIÓN
El robot cortacésped
vibra.
Se utilizan distintos tipos (grosor)
de cuchillas.
Compruebe si las cuchillas son de
distinto tipo (grosor).
El tornillo de la cuchilla está suelto.
Apriete los tornillos de las cuchillas.
El césped se corta
de forma desigual.
El área de trabajo es demasiado
grande.
Ajuste el límite para reducir el tamaño
de la zona de siega o añadir más
tiempo de trabajo.
/DVFXFKLOODVQRWLHQHQ¿OR
Sustituya todas las cuchillas y tornillos.
Consulte la sección Sustitución de las
cuchillas del cortacésped en la página
48-49. Visite www.clevaeurope.com
para obtener información sobre dónde
comprar cuchillas.
La altura de corte es demasiado
baja o la hierba está demasiado
alta.
Aumentar la altura de corte.
Hay hierba enrollada alrededor
del disco de cuchillas
Compruebe los bajos del cortacésped
y límpielos si es necesario (utilice
siempre guantes de jardinería).
El tiempo de carga
es muy superior a 2
horas.
Las tiras de carga y la banda de
contacto están obstruidas por
residuos.
Utilice un paño para limpiar la banda
de contacto situada en la estación
base y las bandas de carga del
cortacésped.
El protector de carga se ha
activado debido a la alta
temperatura.
Coloca la estación base en una zona
sombreada o espera a que se enfríe
la temperatura.
El robot cortacésped
no se carga.
No hay energía.
Asegúrese de que el cable de
alimentación está conectado
correctamente al adaptador de
corriente y de que éste está conectado
a una fuente de alimentación
adecuada. Comprueba la conexión
de la toma de corriente y si ha saltado
algún disyuntor de fallo a tierra.
Las tiras de carga y la tira de
contacto están contaminadas.
Utilice un paño para limpiar la banda
de contacto situada en la estación
base y las bandas de carga del
cortacésped.
La toma de corriente, el fusible,
el cable de alimentación o la
estación base están defectuosos.
Compruebe la tensión de red y el
fusible; si es necesario, haga revisar la
HVWDFLyQEDVHSRUSHUVRQDOFXDOL¿FDGR
La batería tiene un fallo.
Póngase en contacto con el servicio
de asistencia posventa.

57
SOLUCIÓN DE PROBLEMAS
PROBLEMA POSIBLE CAUSA SOLUCIÓN
La duración es
menor de lo
esperado.
La altura de corte es demasiado
baja o la hierba está demasiado alta.
Aumentar la altura de corte.
La hierba está mojada o húmeda. Espere a que la hierba esté seca.
La hierba es densa.
Aumente la altura de corte y añada
más tiempo de trabajo.
La cuchilla de corte
no gira mientras el
cortacésped está
encendido.
La cuchilla de corte está
obstruida.
Apague el cortacésped y retire la
batería. Despeje la obstrucción (lleve
siempre guantes de jardinería).
El tornillo de la cuchilla está suelto.
Apriete los tornillos de las cuchillas.
El cortacésped no detecta la
hierba
Coloque el cortacésped en una zona
con césped. Es posible que la cámara
no reconozca el césped con manchas
marrones.
El LED de la estación
base no se enciende.
No hay suministro eléctrico.
Compruebe el adaptador de corriente,
el cable, los disyuntores y los fusibles.
El robot cortacésped
no reconoce la
banda magnética y
por encima de ella.
La banda magnética demasiado
hundida en el suelo.
Coloque la banda magnética en el
suelo o a una profundidad de unos 5
cm en el suelo.
La temperatura exterior es
demasiado alta.
Espere a que se enfríe la temperatura.
Evite utilizar el cortacésped durante
las horas calurosas del día.
El robot cortacésped
se detiene o se sin
control cuando se
acerca a la zona
delimitada con
banda magnética.
Las bandas magnéticas están
demasiado juntas.
Mantenga una distancia de al menos
120 cm entre dos zonas delimitadas
con bandas magnéticas.
Se producen interferencias en
la zona de siega debido a los
cables eléctricos.
Evite los cables eléctricos que
atraviesan la zona de siega.
Manténgase alejado de las zonas de
siega de sus vecinos, que funcionan
con un cable perimetral.
Mala señal GPS/
no hay datos GPS
válidos.
Factores medioambientales.
Desplace el cortacésped a zonas
con terreno abierto. Mantenga el
FRUWDFpVSHGOHMRVGHHGL¿FLRV
Problemas de equipamiento.
Compruebe y mantenga regularmente
el cortacésped para asegurarse
de que el módulo GPS funciona
correctamente. Si el módulo GPS está
dañado, póngase en contacto con el
servicio de asistencia posventa.
,QÀXHQFLDGHOWLHPSR
No deje que el cortacésped funcione
con mal tiempo.
El nivel de la batería es
LQVX¿FLHQWH
Cargue la batería. Mantenga la
SRWHQFLDGHODEDWHUtDVX¿FLHQWH

58
SOLUCIÓN DE PROBLEMAS
VISUALIZACIÓN DE LA INFORMACIÓN DE ERROR EN EL PANEL LCD
Si se han activado los sensores del robot cortacésped, éste emitirá 10 pitidos continuos. La
información de error se mostrará en el panel LCD.
INFORMACIÓN DE
ERROR
POSIBLE CAUSA SOLUCIÓN
Patinaje de las
ruedas
Patinaje de las ruedas.
Libere el cortacésped y retire el
obstáculo.
Error del sistema de
control
Fallo del sistema de control.
Apague el cortacésped. Vuelva a
arrancar el cortacésped. Si el problema
persiste, póngase en contacto con el
servicio de asistencia posventa.
Frontera exterior
El cortacésped se ha salido del
césped y no detecta la hierba.
&RQVXOWHODVVROXFLRQHVSDUD(OURERW
FRUWDFpVSHGDEDQGRQDHOFpVSHG
en Resolución de problemas en la
página 54.
Error de batería Fallo de la batería.
Cambie la batería. Si el problema
persiste, póngase en contacto con el
servicio de asistencia posventa.
Segadora levantada El cortacésped se ha levantado.
Libere el cortacésped y retire el
obstáculo.
Fallo del motor Fallo del motor
Apague el cortacésped. Vuelva a
arrancar el cortacésped. Si el problema
persiste, póngase en contacto con el
servicio de asistencia posventa.
Darse la vuelta
El cortacésped está al revés o
demasiado inclinado.
Libere el cortacésped y retire el
obstáculo.
Batería demasiado
caliente/fría
La temperatura de la batería es
demasiado alta o demasiado baja.
Deje que la batería se enfríe hasta
alcanzar la temperatura normal.
Segadora inclinada El cortacésped se ha inclinado.
Libere el cortacésped y retire el
obstáculo.
Error del botón de
parada
Error del botón de parada
Apague el cortacésped. Vuelva
a arrancar el cortacésped. Si el
problema persiste, póngase en
contacto con el servicio de asistencia
posventa.
Activación del
sensor de lluvia
Se ha activado el sensor de
lluvia.
Espere hasta que el cortacésped esté
seco y haya transcurrido el tiempo de
retardo.
Demasiado cerca de
la estación
El cortacésped está demasiado
cerca o sobre la estación base
cuando se realiza un corte puntual
o se pulsa el botón de inicio.
Aleje el cortacésped de la estación
base.

59
SOLUCIÓN DE PROBLEMAS
INFORMACIÓN DE
ERROR
POSIBLE CAUSA SOLUCIÓN
Error del sensor
magnético
El sensor magnético tiene un
fallo.
Apague el cortacésped. Vuelva a
arrancar el cortacésped. Si el problema
persiste, póngase en contacto con el
servicio de asistencia posventa.
No hay señal de la
cámara
No hay señal a la cámara
Switch off the mower. Restart the
mower. If the problem remains,
contact the Aftersales Helpline.
Sin datos GPS Señal GPS anormal al arrancar
Mueva el cortacésped a un terreno
abierto. Apague el cortacésped.
Vuelva a arrancar el cortacésped.
Lejos de casa
El robot cortacésped está a 1
kilómetro de la estación de carga.
Este es un ajuste de prevención
de robo. Asegúrese de que el
cortacésped funciona en modo Bajar
y Segar cuando lo utilice en una
propiedad situada a más de 1 km de
distancia de su domicilio.
Cinta no visible
Las tiras de guía de la estación
base no son visibles.
Limpie las tiras de guía de la estación
base. Si el problema persiste,
póngase en contacto con el servicio
de asistencia posventa.
Cerrar la tapa de la
batería
La tapa del compartimento de las
pilas está abierta.
Cierre la tapa del compartimento de
las pilas.
Baja tensión
La tensión de la batería es
demasiado baja.
Carga la batería.
Sin batería No hay batería en el cortacésped.
Asegúrese de que la batería está
correctamente instalada.
Fallo del cortador Fallo del motor de siega.
Apague el cortacésped. Vuelva a
arrancar el cortacésped. Si el problema
persiste, póngase en contacto con el
servicio de asistencia posventa.
Cortador bloqueado El disco de corte está bloqueado.
Compruebe los bajos del cortacésped
y límpielos si es necesario (utilice
siempre guantes de protección).
Acoplamiento fallido
La estación base está desconectada
o no está encendida.
Compruebe que la estación base no
está bloqueada, que las bandas guía
de la estación base están despejadas
y que la estación base está encendida.
Demasiado oscuro
El cortacésped se activa fuera
de la franja horaria de salida y
puesta del sol.
Compruebe los ajustes de Programación.
El cortacésped comenzará y terminará
su trabajo en función de la ventana
horaria establecida. Asegúrese de que
los ajustes de fecha y hora locales son
correctos.

60
GARANTÍA DE LAWNMASTER
®
Nos enorgullecemos de fabricar un producto duradero y de alta calidad. Este producto LawnMaster
®
tiene una garantía limitada de dos (2) años contra defectos de fabricación y materiales a partir de
la fecha de en condiciones normales de uso doméstico. Si el producto se va a utilizar para uso
comercial, industrial o de alquiler, se aplicará una garantía limitada de 30 días. Las baterías tienen
una garantía de un año contra defectos de fabricación y materiales. Para que sean válidas,
las baterías deben cargarse de acuerdo con las instrucciones y normas del manual del operador.
La garantía no se aplica a defectos debidos a abuso directo o indirecto, negligencia, uso indebido,
accidentes, reparaciones o alteraciones y falta de mantenimiento. Conserve su recibo/lista de
HPEDODMHFRPRSUXHEDGHFRPSUD(VWDJDUDQWtDOHRWRUJDGHUHFKRVOHJDOHVHVSHFt¿FRV\XVWHG
puede tener otros derechos, que varían de un estado a otro. Para el servicio del producto llame al
Servicio de Atención al Cliente al 1-866-384-8432.
Artículos no cubiertos por la garantía:
1. Cualquier pieza que haya quedado inoperativa debido a un uso incorrecto, uso comercial, abuso,
negligencia, accidente, mantenimiento inadecuado o alteración;
2. La unidad, si no ha sido operada y/o mantenida de acuerdo con el Manual del Operador;
3. Desgaste normal, salvo lo indicado a continuación;
(OHPHQWRVGHPDQWHQLPLHQWRUXWLQDULRFRPROXEULFDQWHVD¿ODGRGHFXFKLOODV
5. Deterioro normal del acabado exterior debido al uso o a la exposición.
Gastos de transporte: Los cargos de transporte por el traslado de cualquier unidad o accesorio del
equipo de potencia son responsabilidad del comprador. Es responsabilidad del comprador pagar los
de transporte de cualquier pieza enviada para su sustitución en virtud de esta garantía, a menos
que LawnMaster
®
solicite dicha devolución por escrito.
GUARDE SUS RECIBOS. ESTA GARANTÍA NO ES VÁLIDA SIN ELLOS.
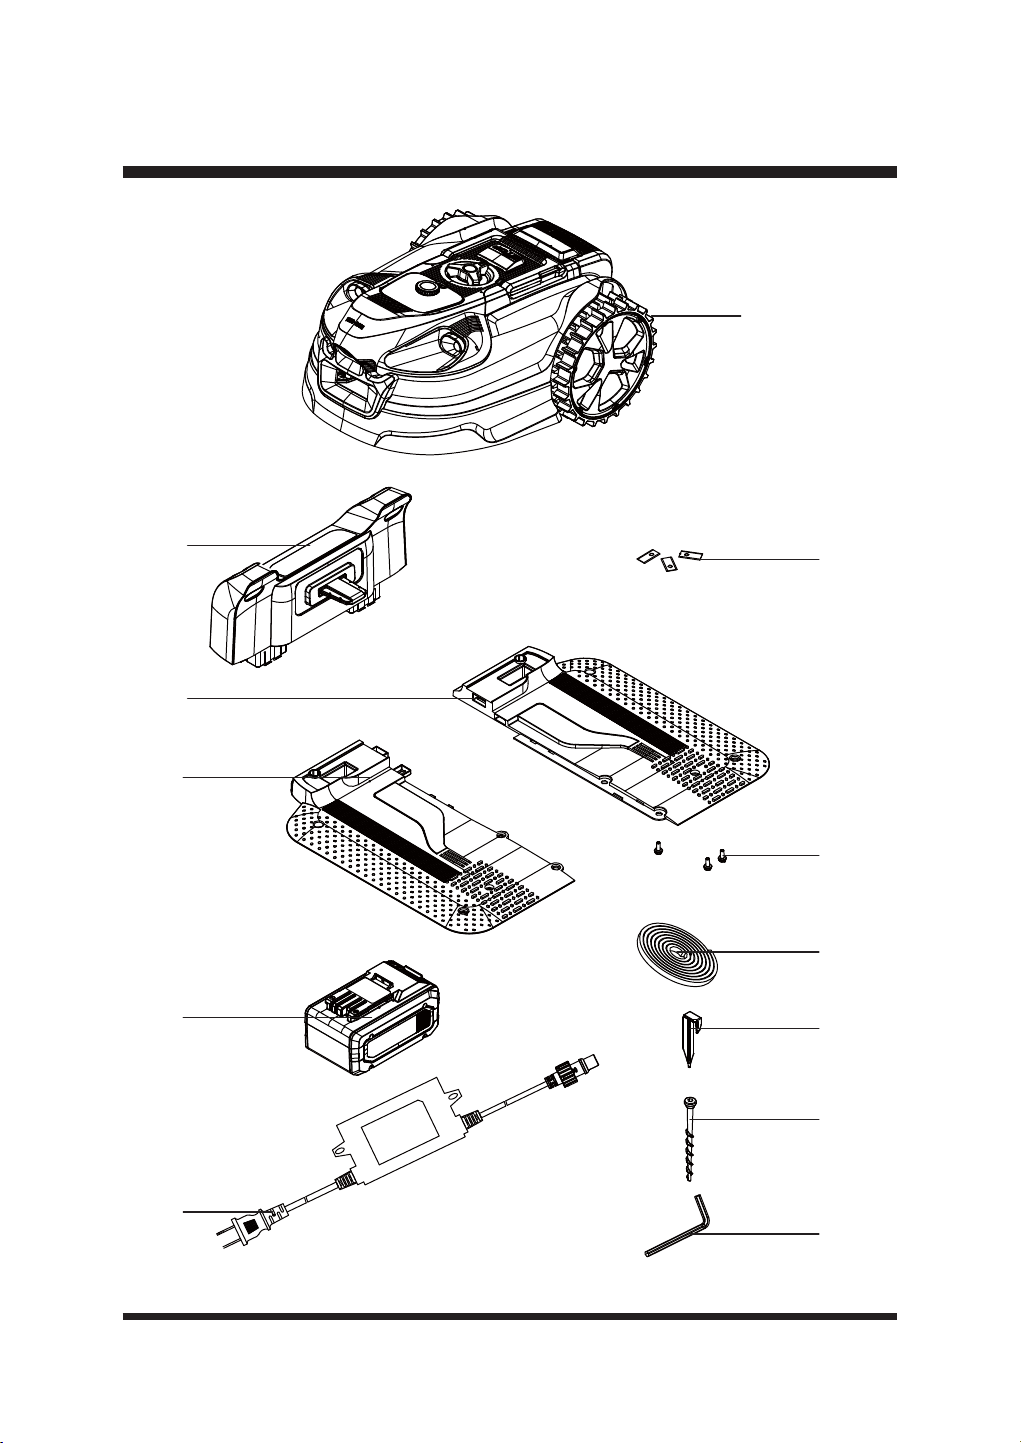
61
VISTA EXPLOTADA
1
2
3
4
5
6
7
8
9
11
10
12
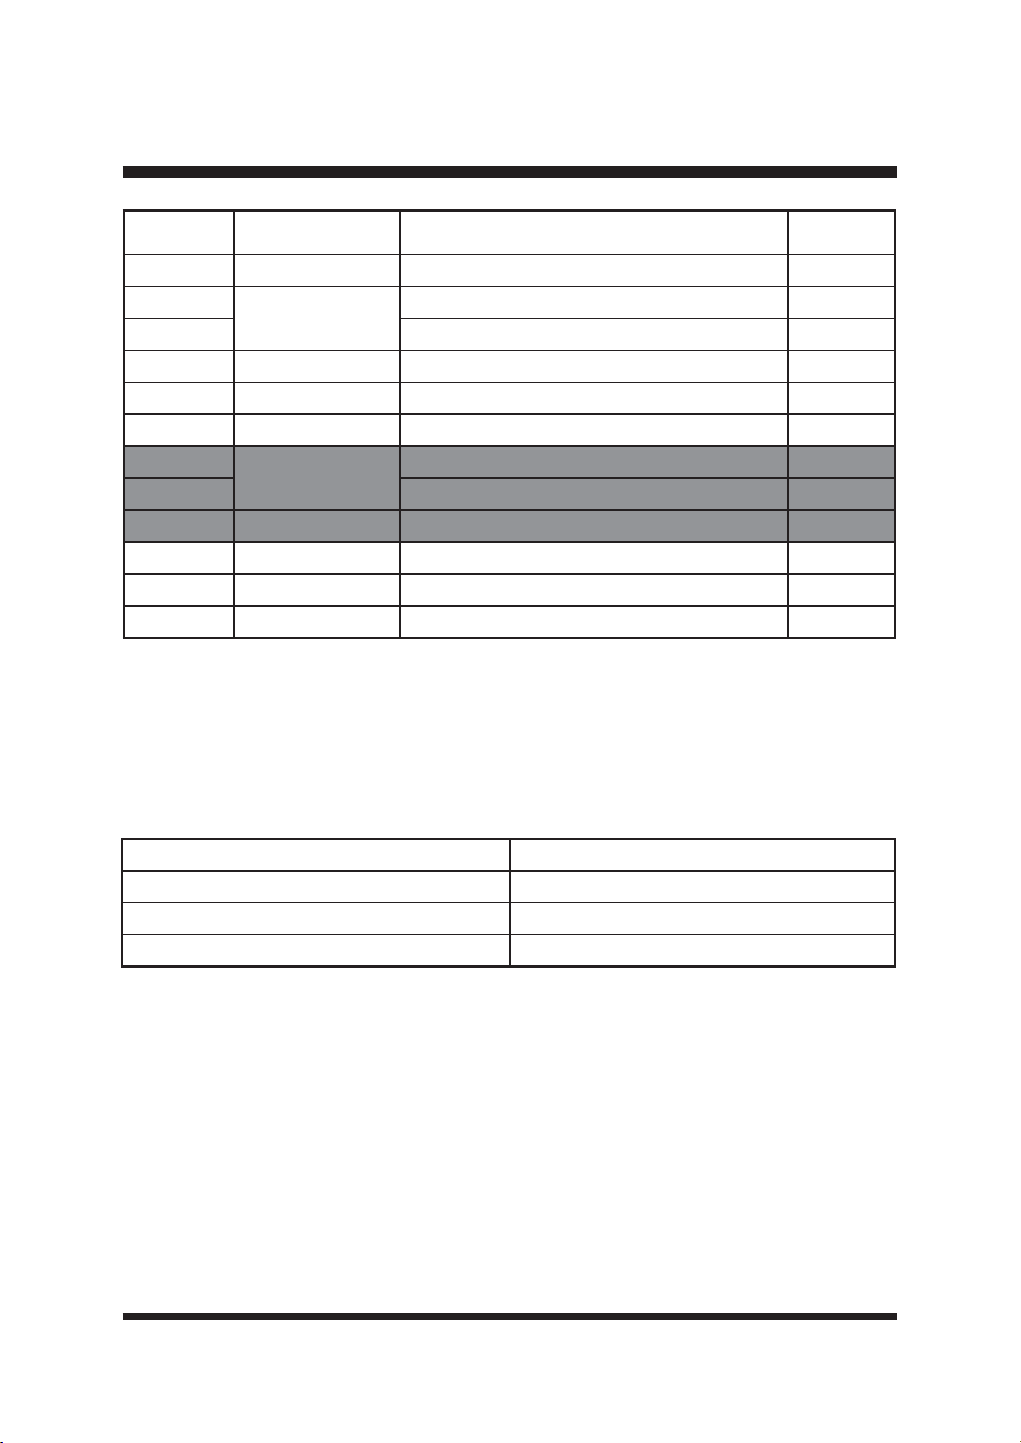
62
LISTA DE PIEZAS
1~PHUR
clave
1~PHURGHSLH]D Descripción Cantidad
1 Ensamblaje de la podadora 1
2 Parte superior de la estación base 1
3 Parte izquierda de la estación base 1
4 Parte derecha de la estación base 1
5 Cuchilla de repuesto 6
6 Tornillo para cuchilla 6
7
523113
Banda magnética (16.4 pies / 5 m) 2
8 Clavija de la banda magnética (6 piezas) 2
9 24LB4005-CN Batería 1
10 7RUQLOORVGH¿MDFLyQGHODHVWDFLyQEDVH 10
11 Adaptador de corriente 1
12 Llave hexagonal 1
Las piezas de repuesto resaltadas en gris están disponibles para su adquisición postventa. La
sustitución de piezas de reparación o internas sólo debe ser realizada por un profesional de
VHUYLFLRFXDOL¿FDGR3yQJDVHHQFRQWDFWRFRQVXGLVWULEXLGRURFRQHO6HUYLFLRGH$WHQFLyQDO
Cliente llamando al 866-384-8432.
Las siguientes piezas están disponibles, llame al 866-384-8432 para hacer su pedido.
Pieza 1~PHURGHSLH]D
Rueda antideslizante y tornillo 952688
Garaje 952642
Paquete de 15 cuchillas 523830

63
NOTAS

64
NOTAS

