
Quick Operation Manual for
Professional Walkie-Talkies
Familiarize with Product
Unboxing Inspection
Please carefully open the packaging box and verify that it contains the
items listed in the table below. If any items are missing or damaged,
please contact your dealer promptly.
1. Plug the charging power adapter into a suitable AC power outlet.
2. Lift the USB cover on the bottom side of the accessory cover, connect one end of the
USB cable to the power adapter, and plug the other end into the TYPE-C port on the right
side of the terminal. The blue indicator light turns on to start charging (please charge with
the device off).
3. After about 4 hours of charging, the blue indicator light turns off, indicating the battery
is fully charged.
4. Remove the charging power adapter from the AC power outlet.
Charging Method: Dock Charger (Optional)
1.Plug the dock charger power adapter into a suitable AC power outlet.
2.Insert the walkie-talkie into the charging dock; the blue indicator light
turns on to start charging (please charge with the device off).
3.After about 4 hours of charging, the blue indicator light turns off,
indicating the battery is fully charged.
4.Remove the dock charger power adapter from the AC power outlet.
1. The walkie-talkie battery is not charged when it leaves the factory. Please
charge the battery before the first use.
2. When charging the walkie-talkie with the battery, please turn off the
walkie-talkie.
3. For a new battery's first charge or a battery that has been stored for a long
time (over 2 months), it should be charged several times to reach normal
capacity. Ensure that the battery is charged at least once every three months.
Note:
Installing/R
emovin
g the Battery
1. Align the top of the battery with the
battery
installation position on the
back of the walkie-talkie, and insert the
batt
ery.
2. Press the battery down and push the batte
ry cover downwards until you
hear a "click" sound, ensuring the battery latch is in the correct position.
Installing the Battery
Removing
the Battery
1. Press the bo
ttom 【PUSH】 latch of the battery.
2. Once the battery is loosened, it can be removed.
Note:
1. Do not short-circuit the battery terminals o
r dispose of the battery in fire.
2. Do not disassemble the battery casing on your own.
Installing/Removing the Antenna
1. For installation, insert the threaded end of the ante
nna into the antenna port
at the top of the walkie- talkie, and rotate it clockwis
e until it is tight.
2. To remove the antenna, rotate it counterclockwise.
Installing/Removing the Belt Clip
1. Flatten the belt clip bracket.
2. Align the raised rib on
the back of the main unit's battery cov
er with the notch in the belt
clip bracket.
3. Push the belt clip downward until you hear a "click" sound, indicating the belt clip is
properly installed.
Installing the Belt Clip
1. Lift the spring latch on the belt clip bracket upwards to release it from the slot.
2. Push the belt clip upward to slide it out of the slot on top of th
e battery cover.
3. Remove the belt clip.
Removing the Belt Clip
Basic Operations
1. Turning On/Off the walkie-talkie
In the off state, press and hold the [P
ower] button for 5 seconds until you hear the announcement "Welcome
to use", indicati ng successful power
o
n.
In the on state, press and hold the [P
ower]
button for 5 seconds until you hear the a
nnouncement "Off",
indicat ing the device is turned off.
2. Sel ecting a Channel
In standby mode, rotate the [Channe
l Knob] to select the desired c
hannel.
3. Adjusting Volume
To increase volume: Briefly press th
e side [▲] button to raise the vol
ume, accompanied by a volume
prompt sound from the speaker.
To decrea se volume: Briefly press t
he side [▼] button to lower the volume,
accompanied by a volume
prompt sound from the speaker.
4.
One-Click Frequency Matching Mode
(1) Take down the antenna of "sub- telephone", press and hold the Power button and the side UP key
until you hear "welcome to use", reporting the current channel, and then you hear a "dip" sound, the
green light flashes once every 0.5 second, indicating entering the "Frequency matching mode".
(2) Keep the walkie-talkie (mother telephone) to be intercommunicated 10 cm or less away from the
"sub-telephone", and press and hold the Launch button until the frequency matching is success
ful an
d
the green light of the "sub-telephone" is always on, the current channel number will be repor
ted, at the
moment, you can talk to each other.
(3) When switching to other chann
els, just operate according to Step 2, then shut dow
n and restart it to
put an end to the frequency matching.
Note:If the operation of Step 2 fails
, please switch the channel and try again.
5. Copy Mode
(1) Take down the antenna of "sub
- telephone", press and hold
the Power button and the side Down key
until you hear "welcome to use", reporting the current chann
el, and then you hear two "dip" sounds, the
green light flashes once every 0.5
secon
d, indicating ent
ering the "Copy mode".
(
2) Operate according to Step 1 in other machines to
be copied.
(3) For the mother telephone, you do not need to t
ake down the antenna and operate according to
Step 1; keep it 10 cm or less away
from t
he "su
b-telephone", and press PTT button; the red indicator
is
always on, at the moment,it starts to copy
the channel information in wireless way.
(4) The green indicators of other copied
machines are always on, and after receiving the signal, the
machine will automatically shut do
wn
and
the replication is completed.
Note: The copy is only applicabl
e for the machines with the same model.
6.
Intercom Comm unicat
ion
Press the [PTT] k
ey to initiate a call, then speak into the microphone using a norm al voice tone.
Ke
ep the microp
hone about 3 to 5 c
entime
ters from your lips for optimal sound quality. Release the
[PTT] key to
switch the walkie-talkie to receive mode.
LED Indicator
Co
mmon Faults and Troubleshooting
Golden Sunshine Service
Kirisun Corporation introduces the "Golden Sunshine Service" policy,
solemnly launching the following service commitments:
I. Kiris
un products are warranted for 12 months for the main unit from
the date o
f sale (based on the warranty card or invoice).
Accesso
ries are warranted for 6 months; if there are no special
agreements, the national warranty laws apply.
II. If the purchased main unit and accessories encounter
non-human-made quality issues during the warranty period, customers can
enjoy free warranty services at Kirisun Customer Service Center or its
authorized
service stations with the warranty card or invoice.
The foll
owing information should be completely filled out by the sales
unit to
ass
ist the user: <Customer Retention Copy>
Mod
el:
C
ustomer:
Purchase Date:
Customer Address:
Sales Unit Contact Person:
Name of Sales Unit (Valid with Stamp)
Name:
Tel:
Postal Code:
Tel:
SN
Material Name Quantity
1
2
3
4
5
6
7
8
9
10
Walkie-talkie
Charging Power Adapter
Power Cord
Battery
Belt Clip
Antenna
Lanyard
Certification of Conformity
User Manual
Charging Base (Optional)
1
1
1
1
1
1
1
1
1
1
Indicator Light Status
Red Light On
Green Light On
Blue Light On
Walkie-talkie Operating S
tatus
Transmitting
Receiving sig
nal.
Chargin
g the battery
Failure
Symptoms
Won't Turn On
Low
Volume in
Walki
e-talkie
Unable to
Intercom
Causes of Failure and Troublesho
oting Met
hods
①
Battery is dead: Please char
ge with a data cable o
r
replace with a new batt
ery.
②
Faulty switch or oth
er issues: Please visit a
designated repai
r station for repair.
①
Speakin
g too far from the microphone: Optimal
dista
nce is 3- 10cm.
②
In
correct volume setting: Increase the volume.
①
Incorrect channel parameter settings: Reset the
parameters and try again.
② Check if the antenna is properly installed.
③ Exceeded the communication range of the device.
SN
1
2
3
Charging Method
Golden Sunshine Service
Kirisun Corporation introduces the "Golden Sunshine Service" policy,
solemnly launching the following service commitments:
I. Kirisun products are warranted for
12 mon
ths for the main unit from
the date of sale (based on the warranty c
ard o
r invoice).
Accessories are warranted for 6
m
onths; if there are no special
agreements, the national warranty law
s a
pply.
II. If the purchased main unit an
d acc
essories encounter
n
o
n-human-made quality issue
s during t
he warranty period, customers can
enj
oy free warranty service
s at Kirisun
Customer Service Center or its
aut
horized service stations wit
h the war
ranty card or invoice.
T
he following information shou
ld be c
ompletely filled out by the sales
unit to assist the user: <Sales Return Note>
Model:
Customer:
Purchase Date:
Customer Address:
Sales Unit Contact Person:
Name of Sales Unit (Valid with Stamp)
Name:
Tel:
Postal Code:
Tel:
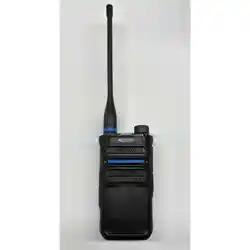
Channe
l
Speaker
An
tenna
PTT
Increase V
olume
Decrease V
olume
Power
Button
External Interface
Belt Clip
Type-C Charging Port
Battery
“This device complies with part 15 of the FCC Rules. Operation is subject to the
following two conditions: (1) This device may not cause harmful interference, and (2)
this device must accept any interference received,
including interference that may cause
undesi
red operation”
This equip
ment has been tested and found to comply with Class B digital
device pursuant to part 15 of the FCC Rules. These limits are designed to
provide re
asonable protection against harmful interference when the
equipment
is operated in a commercial environment. This equipment
generates,
u
s
es, and can rad
iate radio frequ
ency energy and, if not install
ed
and used in acc
ordance
with the instruction
manual, may cause harmf
ul
interference to radio
communications. Ope
ration of this equipmen
t in a
residential area is like
ly to cause harmful i
nterference in whic
h case the
user
will be required to correc
t the interference
at his own expense.
Warning (part 15.21)
Changes o
r modifications not exp
re
ssly ap
proved by the party r
esponsibl
e
for
complianc
e could void the use
r’s autho
rity
to operate the eq
uipment.
167W06000688

FCC Warning:
Any Changes or modications not expressly approved by the party responsible for
compliance could void the user's authority to operate the equipment.
This device complies with part 15 of the FCC Rules. Operation is subject to the following
two conditions: (1) This device may not cause harmful interference, and (2) this device
must accept any interference received, including interference that may cause undesired
operation.
Note: This equipment has been tested and found to comply with the limits for a Class B digital
device, pursuant to part 15 of the FCC Rules. These limits are designed to provide reasonable
protection against harmful interference in a residential installation. This equipment generates, uses
and can radiate radio frequency energy and, if not installed and used in accordance with the
instructions, may cause harmful interference to radio communications. However, there is no
guarantee that interference will not occur in a particular installation. If this equipment does cause
harmful interference to radio or television reception, which can be determined by turning the
equipment o and on, the user is encouraged to try to correct the interference by one or more of the
following measures:
— Reorient or relocate the receiving antenna.
— Increase the separation between the equipment and receiver.
— Connect the equipment into an outlet on a circuit dierent from that to which the receiver is
connected.
— Consult the dealer or an experienced radio/TV technician for help.
RF Exposure Compliance and Control Guidelines and Operating Instructions
To control your exposure and ensure compliance with the occupational/controlled environment
exposure limits always adhere to the following procedures.
Guidelines:
• Do not remove the RF Exposure Label from the device.
• User awareness instructions should accompany device when transferred to other users.
• Do not use this device if the operational requirements described herein are not met.
Operating Instructions:
• Transmit no more than the rated duty factor of 50% of the time. To transmit (talk), push the
Push-To-Talk (PTT) button. To receive calls, release the PTT button. Transmitting 50% of the
time, or less, is important because this radio generates measurable RF energy exposure only
when transmitting (in terms of measuring for standards compliance).

• Hold the radio in a vertical position in front of face with the microphone (and the other
parts of the radio, including the antenna) at least one inch (2.5 cm) away from the nose.
Keeping the radio at the proper distance is important because RF exposures decrease with
distance from the antenna. Antenna should be kept away from eyes.
• When worn on the body, always place the radio in approved clip, holder, holster, case, or
body harness for this product. Use of non-approved accessories may result in exposure
levels, which exceed the occupational/controlled environment RF exposure limits.
• Use only manufacturer’s name approved supplied or replacement antennas, batteries, and
accessories. Use of non-manufacturer-name approved antennas, batteries, and accessories
may exceed the FCC RF exposure guidelines.
• For a list approved accessories please consult your local dealer for information.