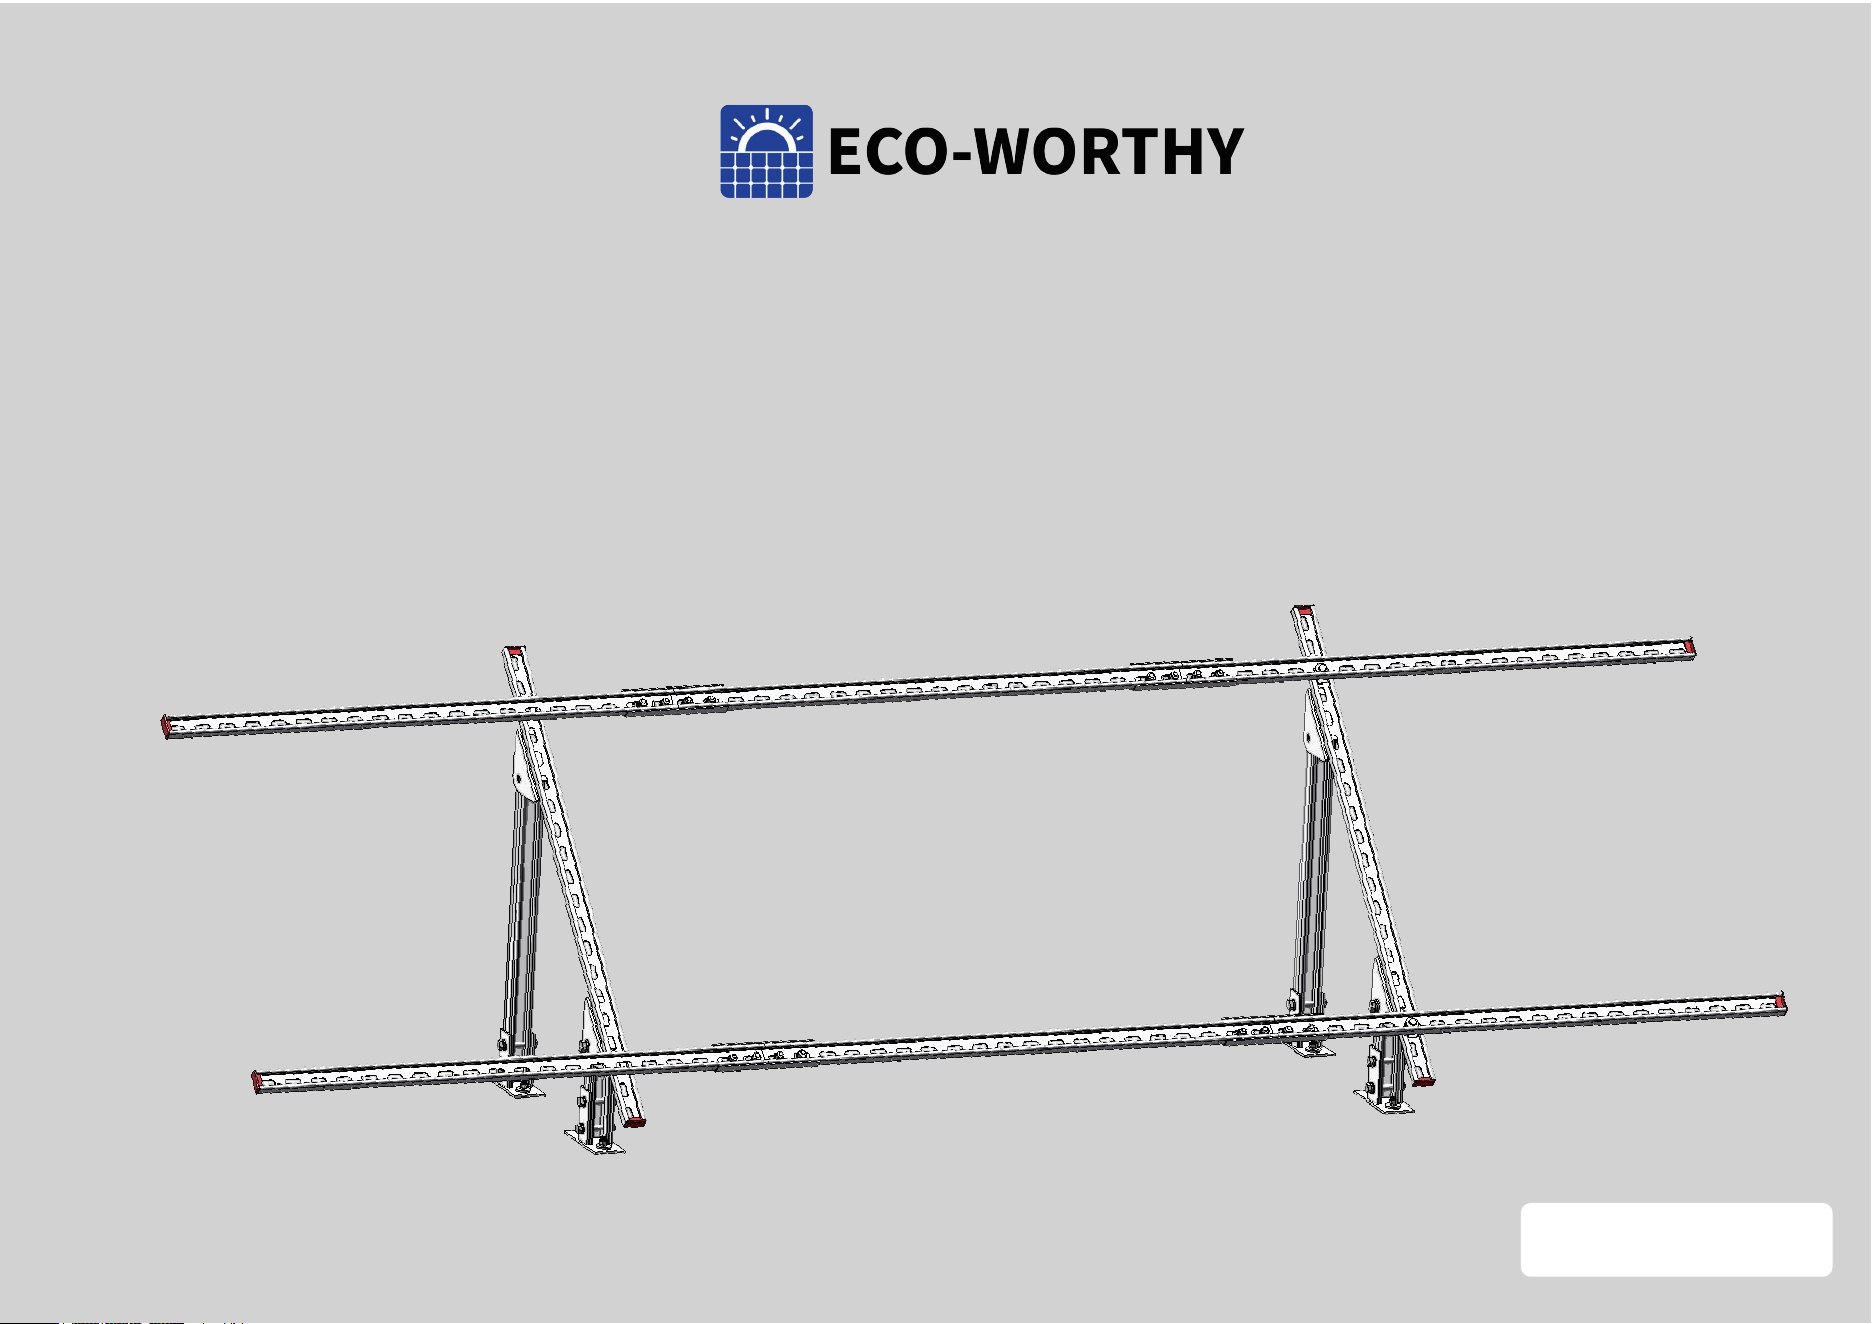
Multi-Pieces Solar Panel
Mounting Brackets
Version 1.1
Welcome to ECO-WORTHY Solar Expert!
Produced with high strength galvanised steel, this bracket will make your solar panels
get more power from the sun at the proper angle. Changing the installation position of the
poles to get the bracket angle changed according to the latitude of where you live.
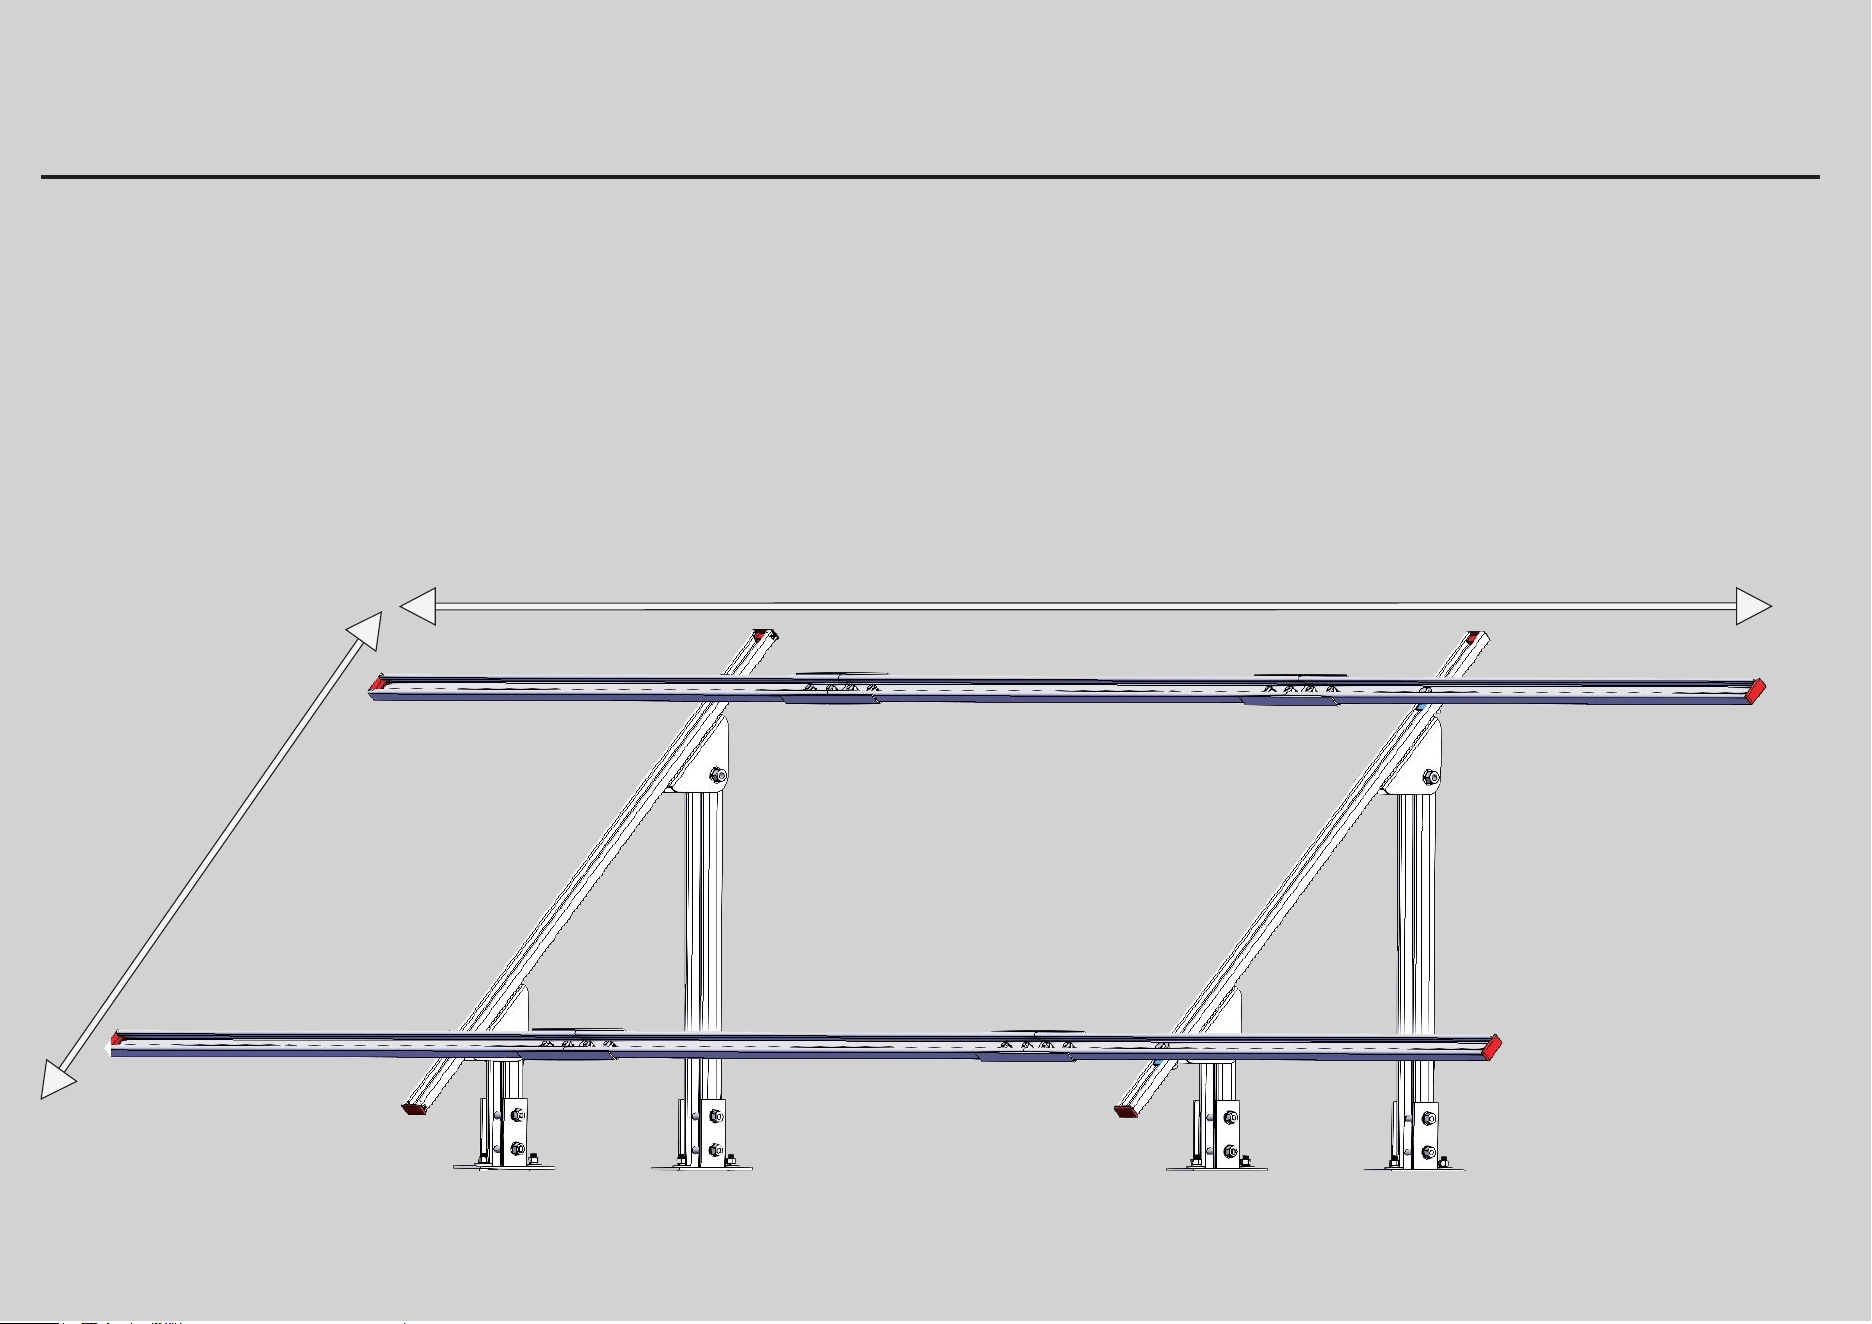
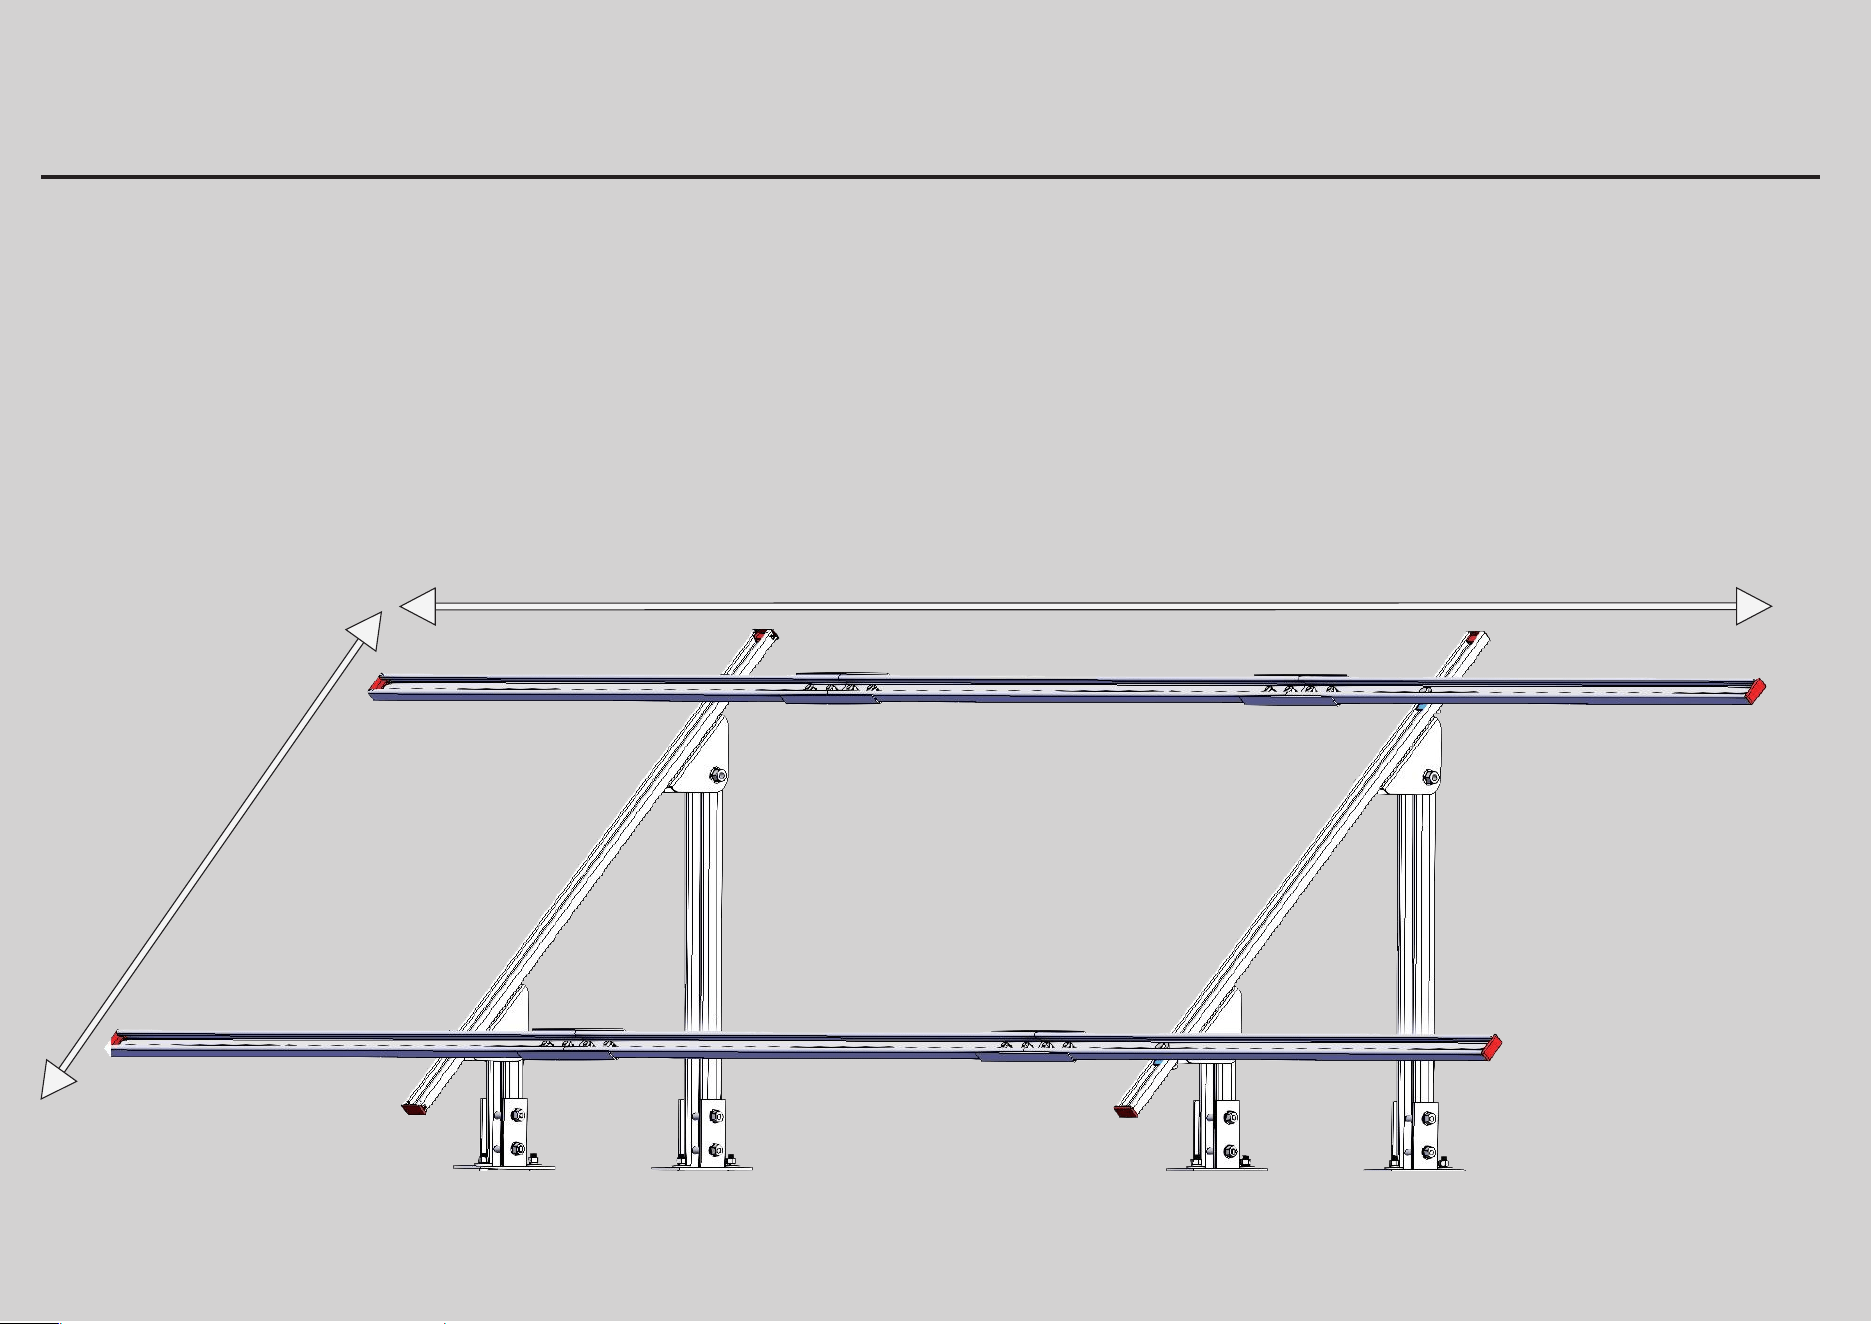
Bracket width: 3m/9.84in.
300cm/9.84ft
100cm/3.28ft
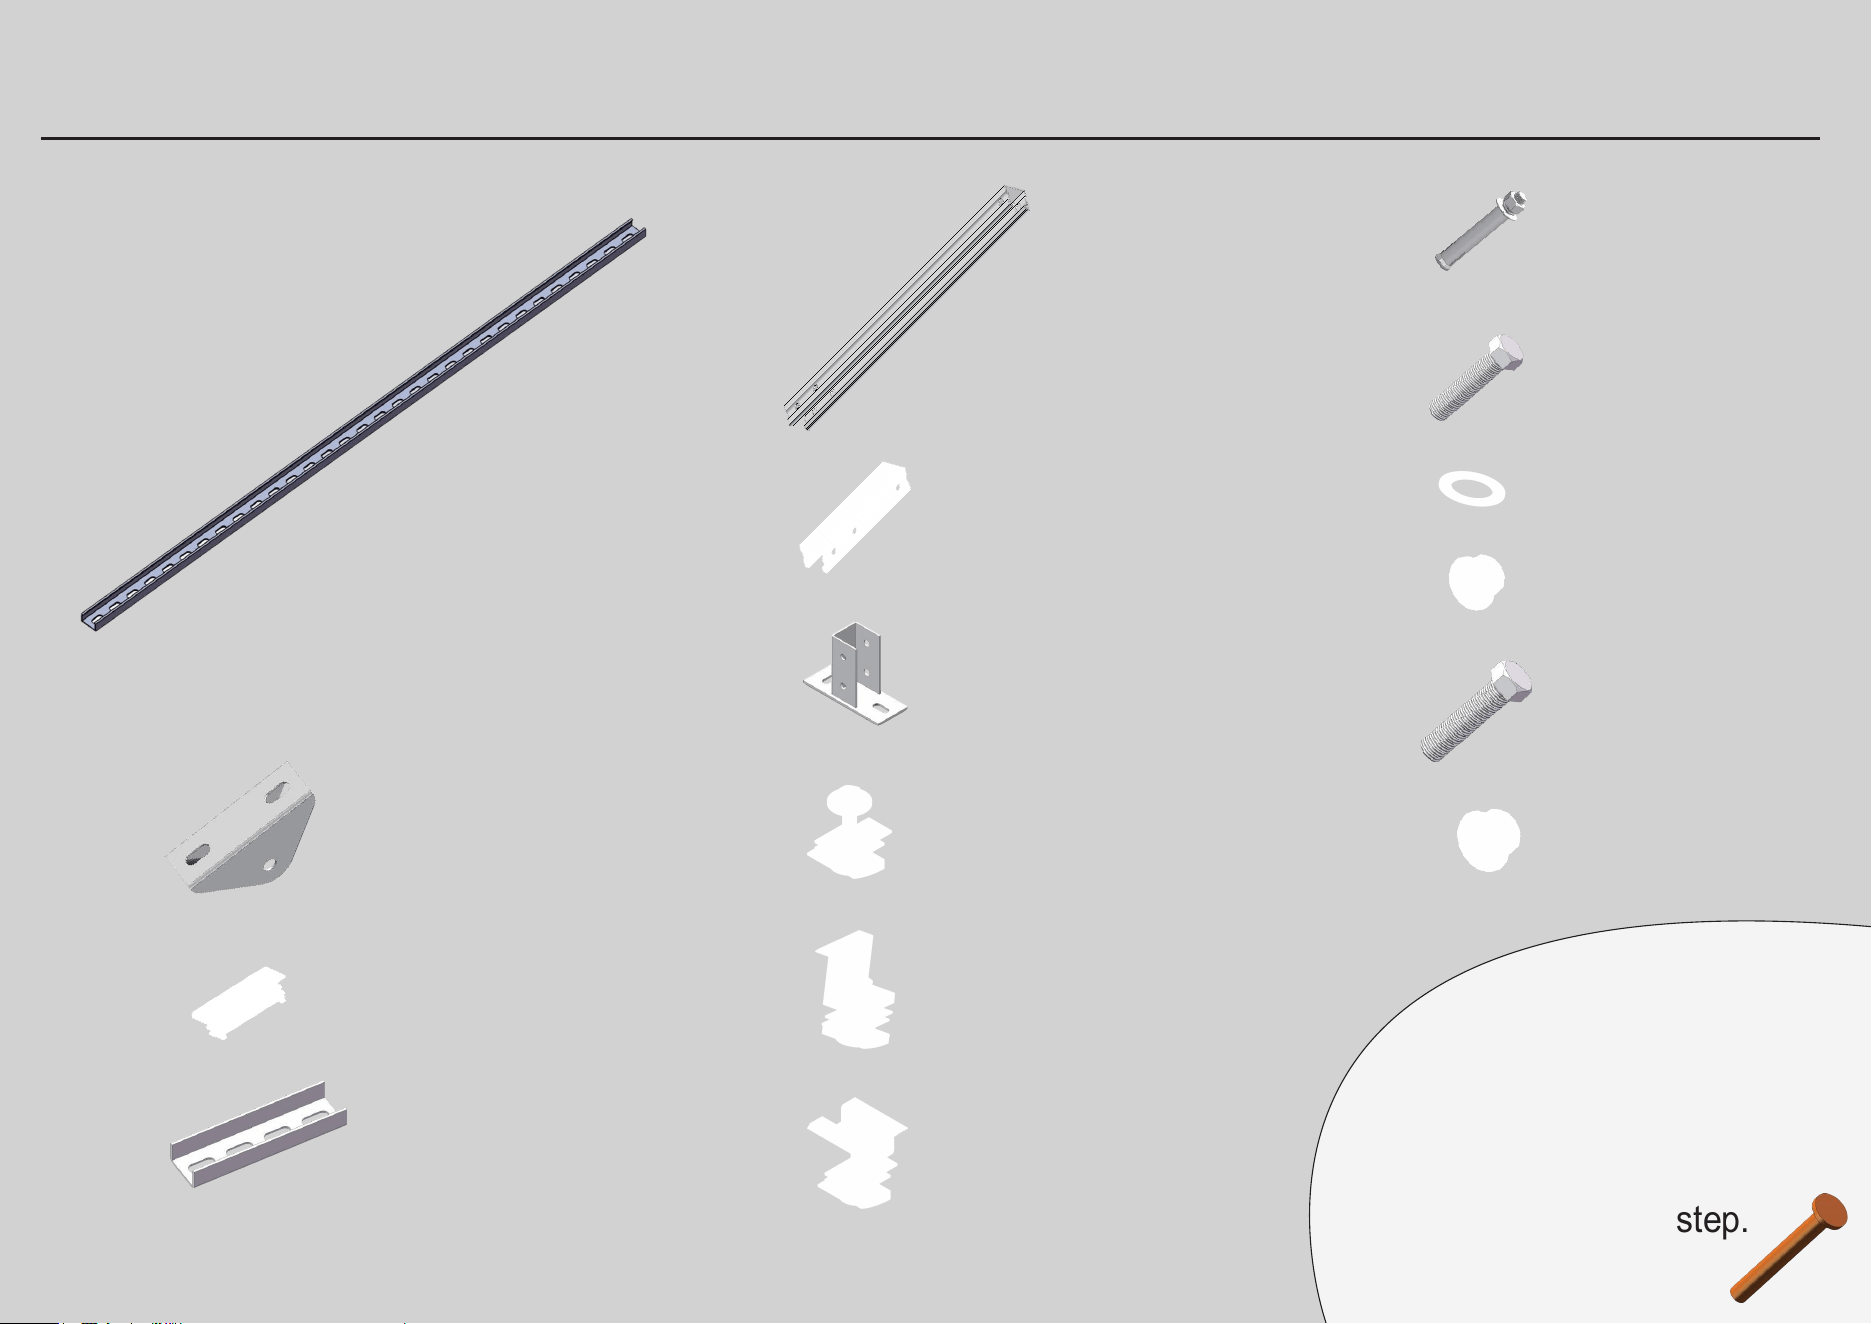
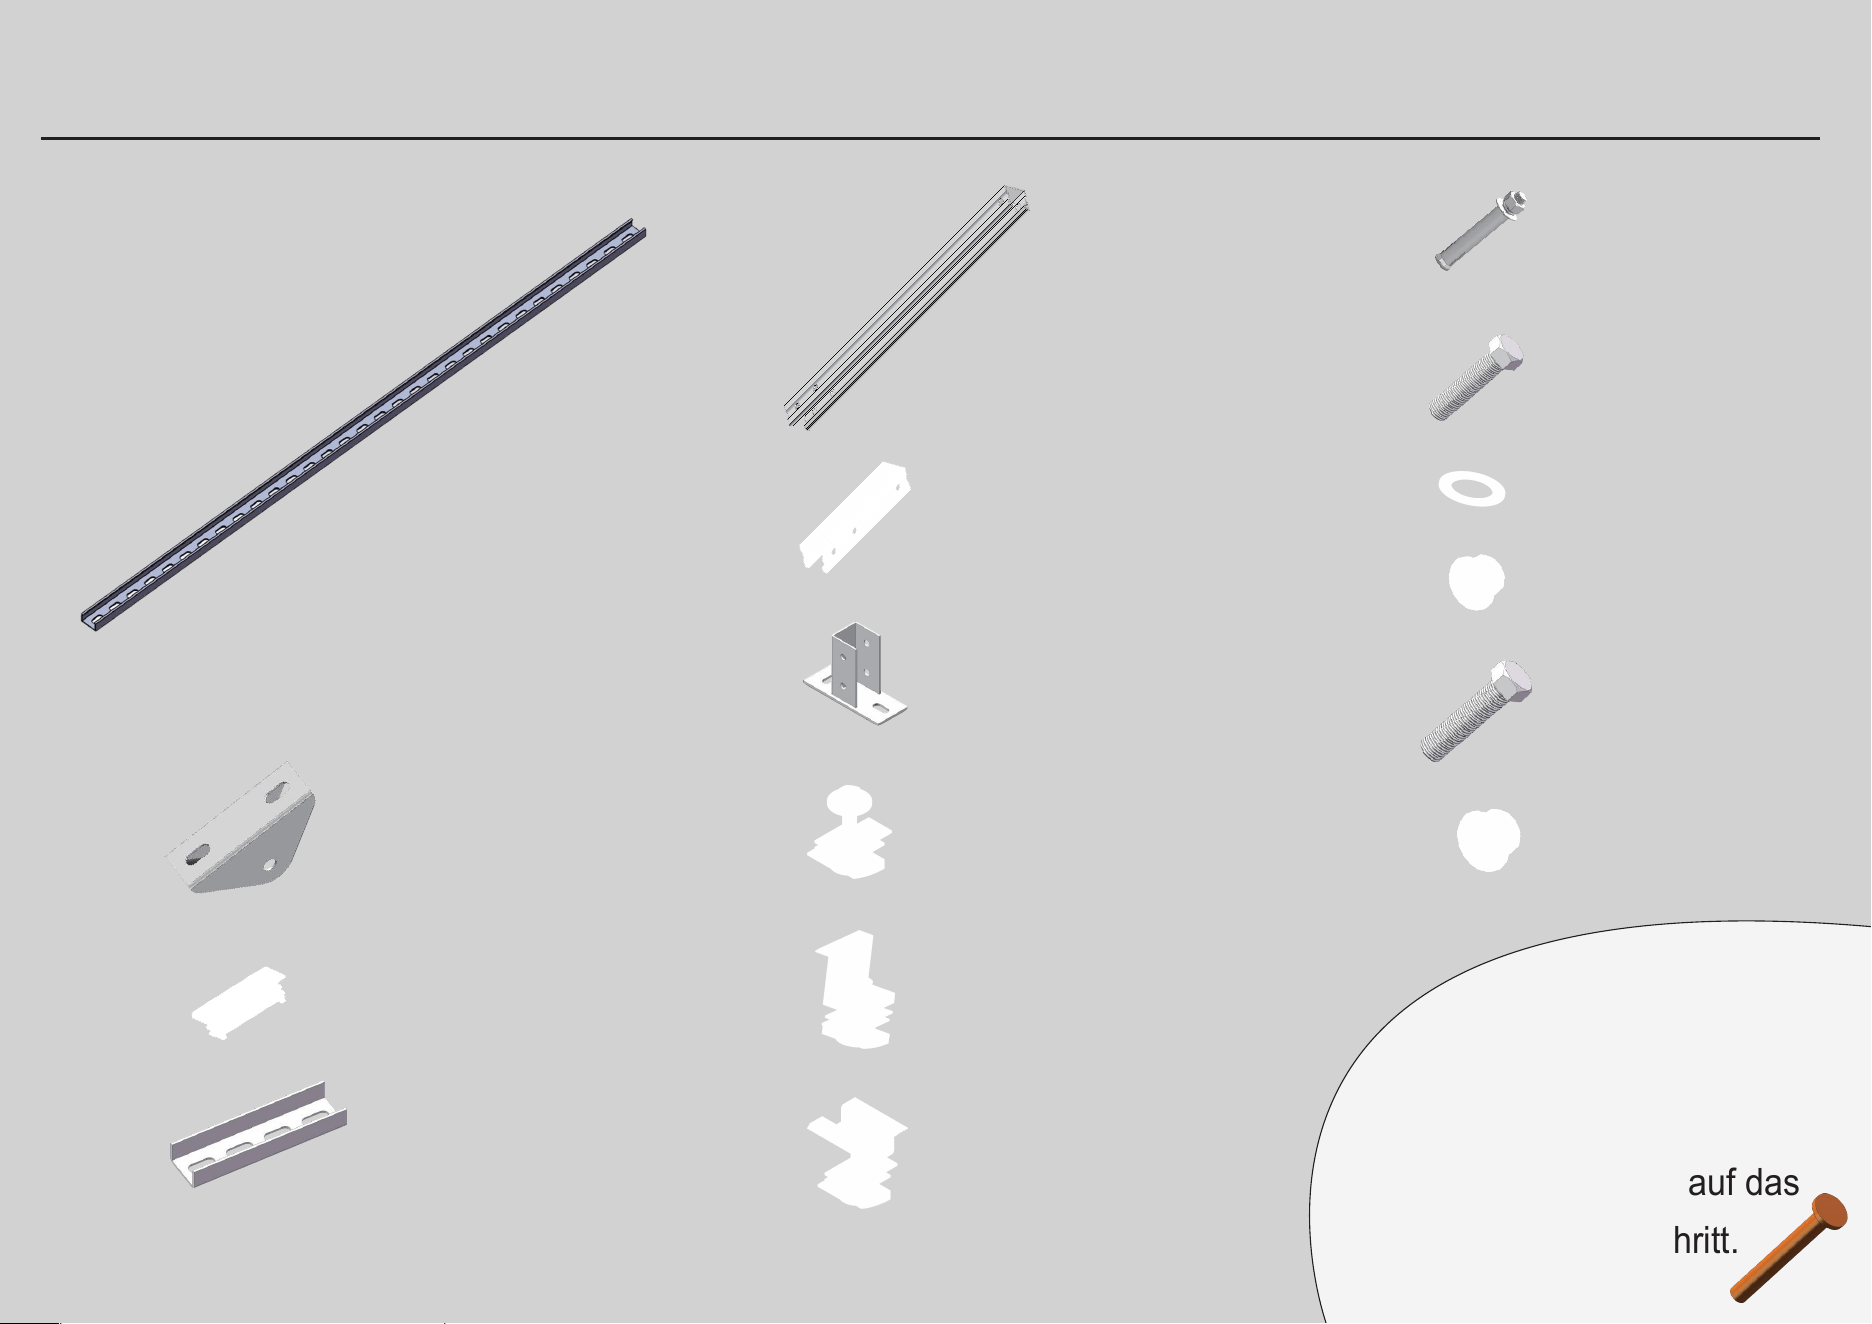
WHAT’S IN THE BOX
x8
1000mm
Channel Steel
x8
Expansion
Bolt
x12
M10 Flange Nut
x16
M8 flange nut
x48
Flat Washer
x12
60mm M10
Hex Cap Bolt
x24
20mm M8
Hex Cap Bolt
x2
41*41*1.2*600mm
Steel with Perforation
x2
41*41*1.2*200mm
Steel with Perforation
x4
41mm bracket
Bracket Base
x4
U-Shaped
Connector
x4
Solar Panel
Side Clamp
x6
Solar Panel
Middle Clamp
x4
Bracket Base
Middle Clamp
x4
Triangle Joint
x8
41*21mm Cap
For the convenience
of display, some of the bolts
would be shown as a simplified
figure. Please refer to the material
box on the top of every step.
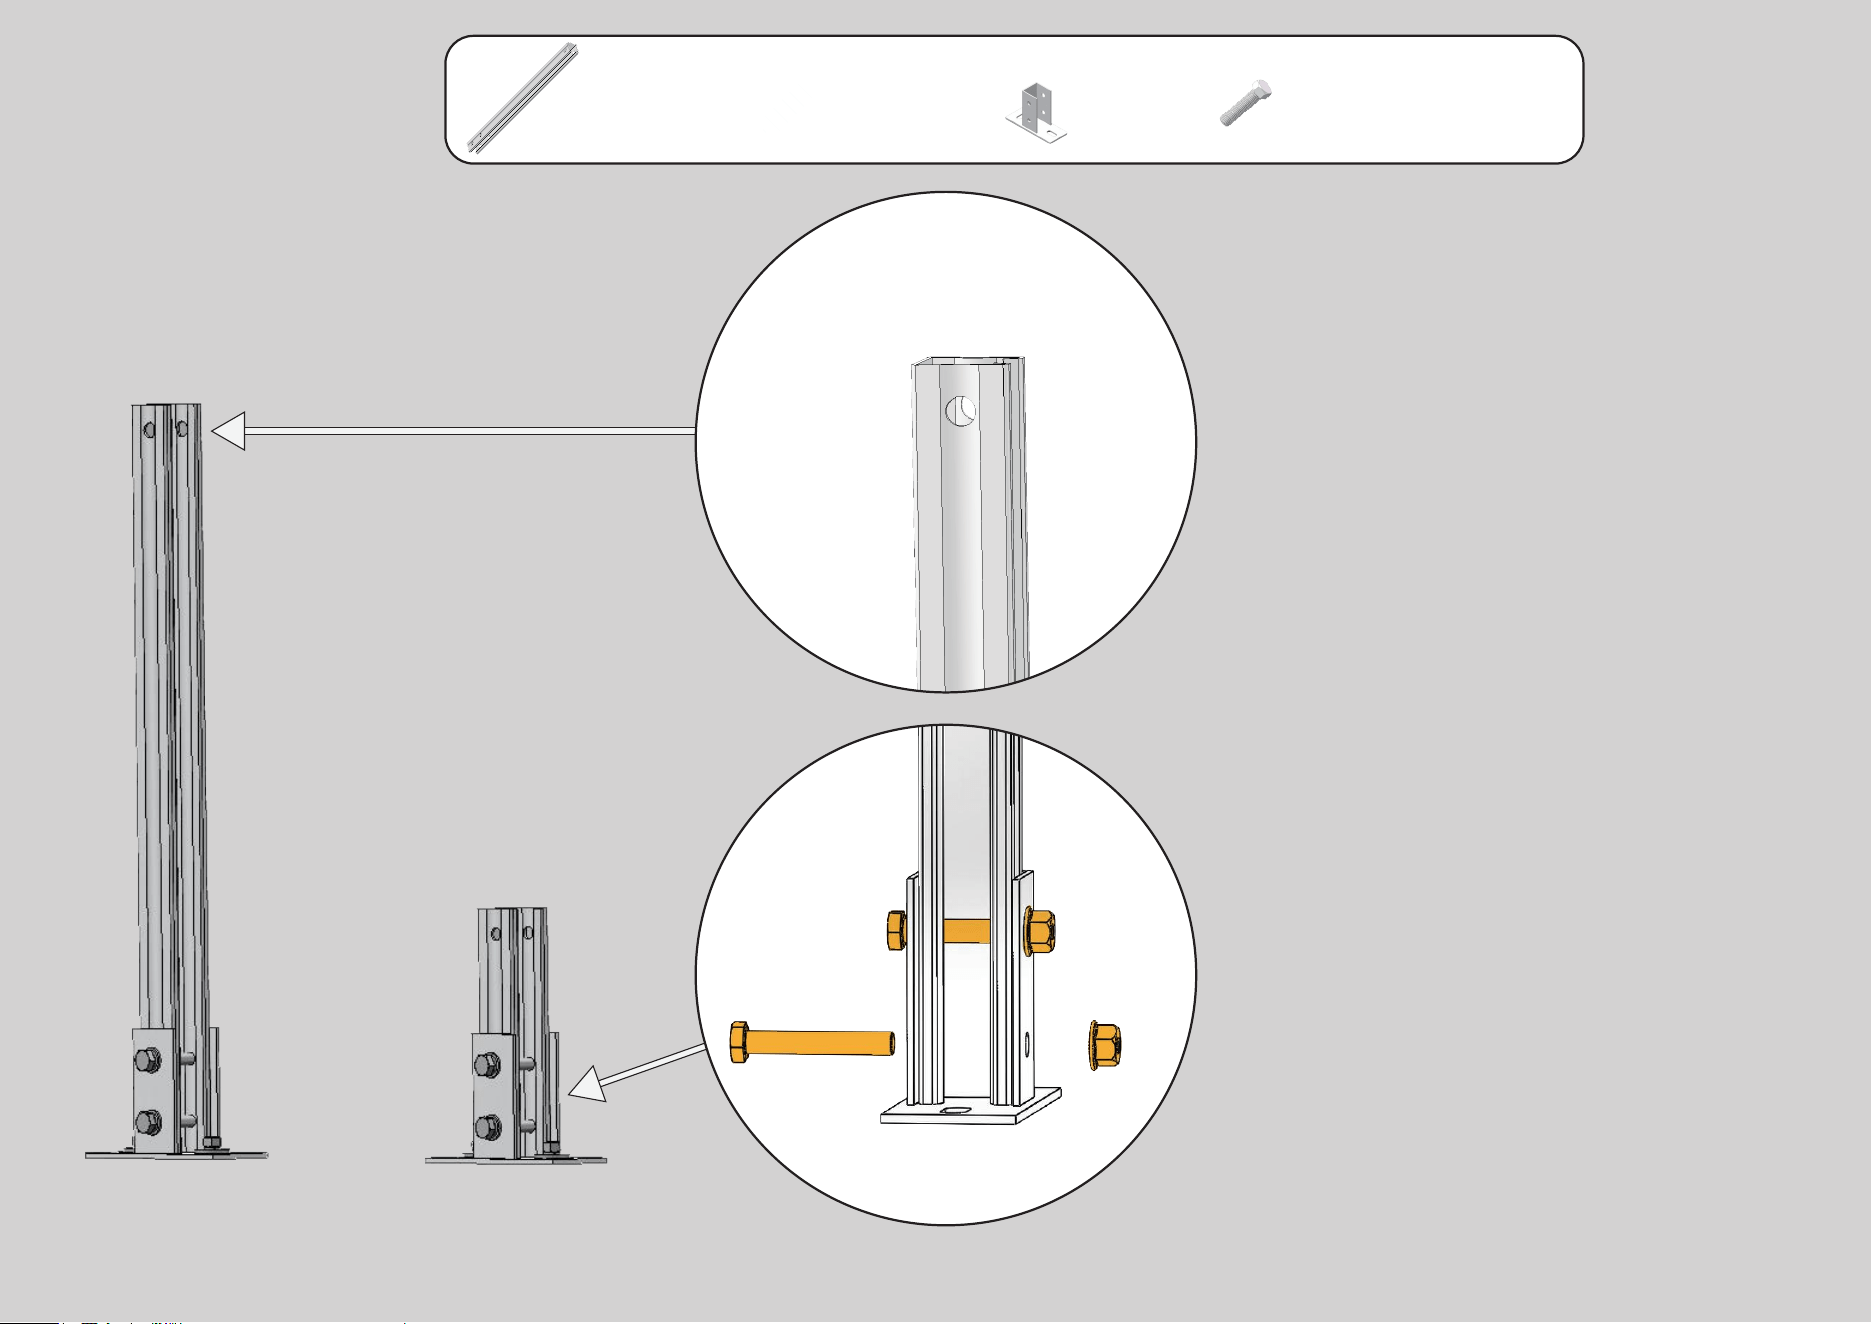
1
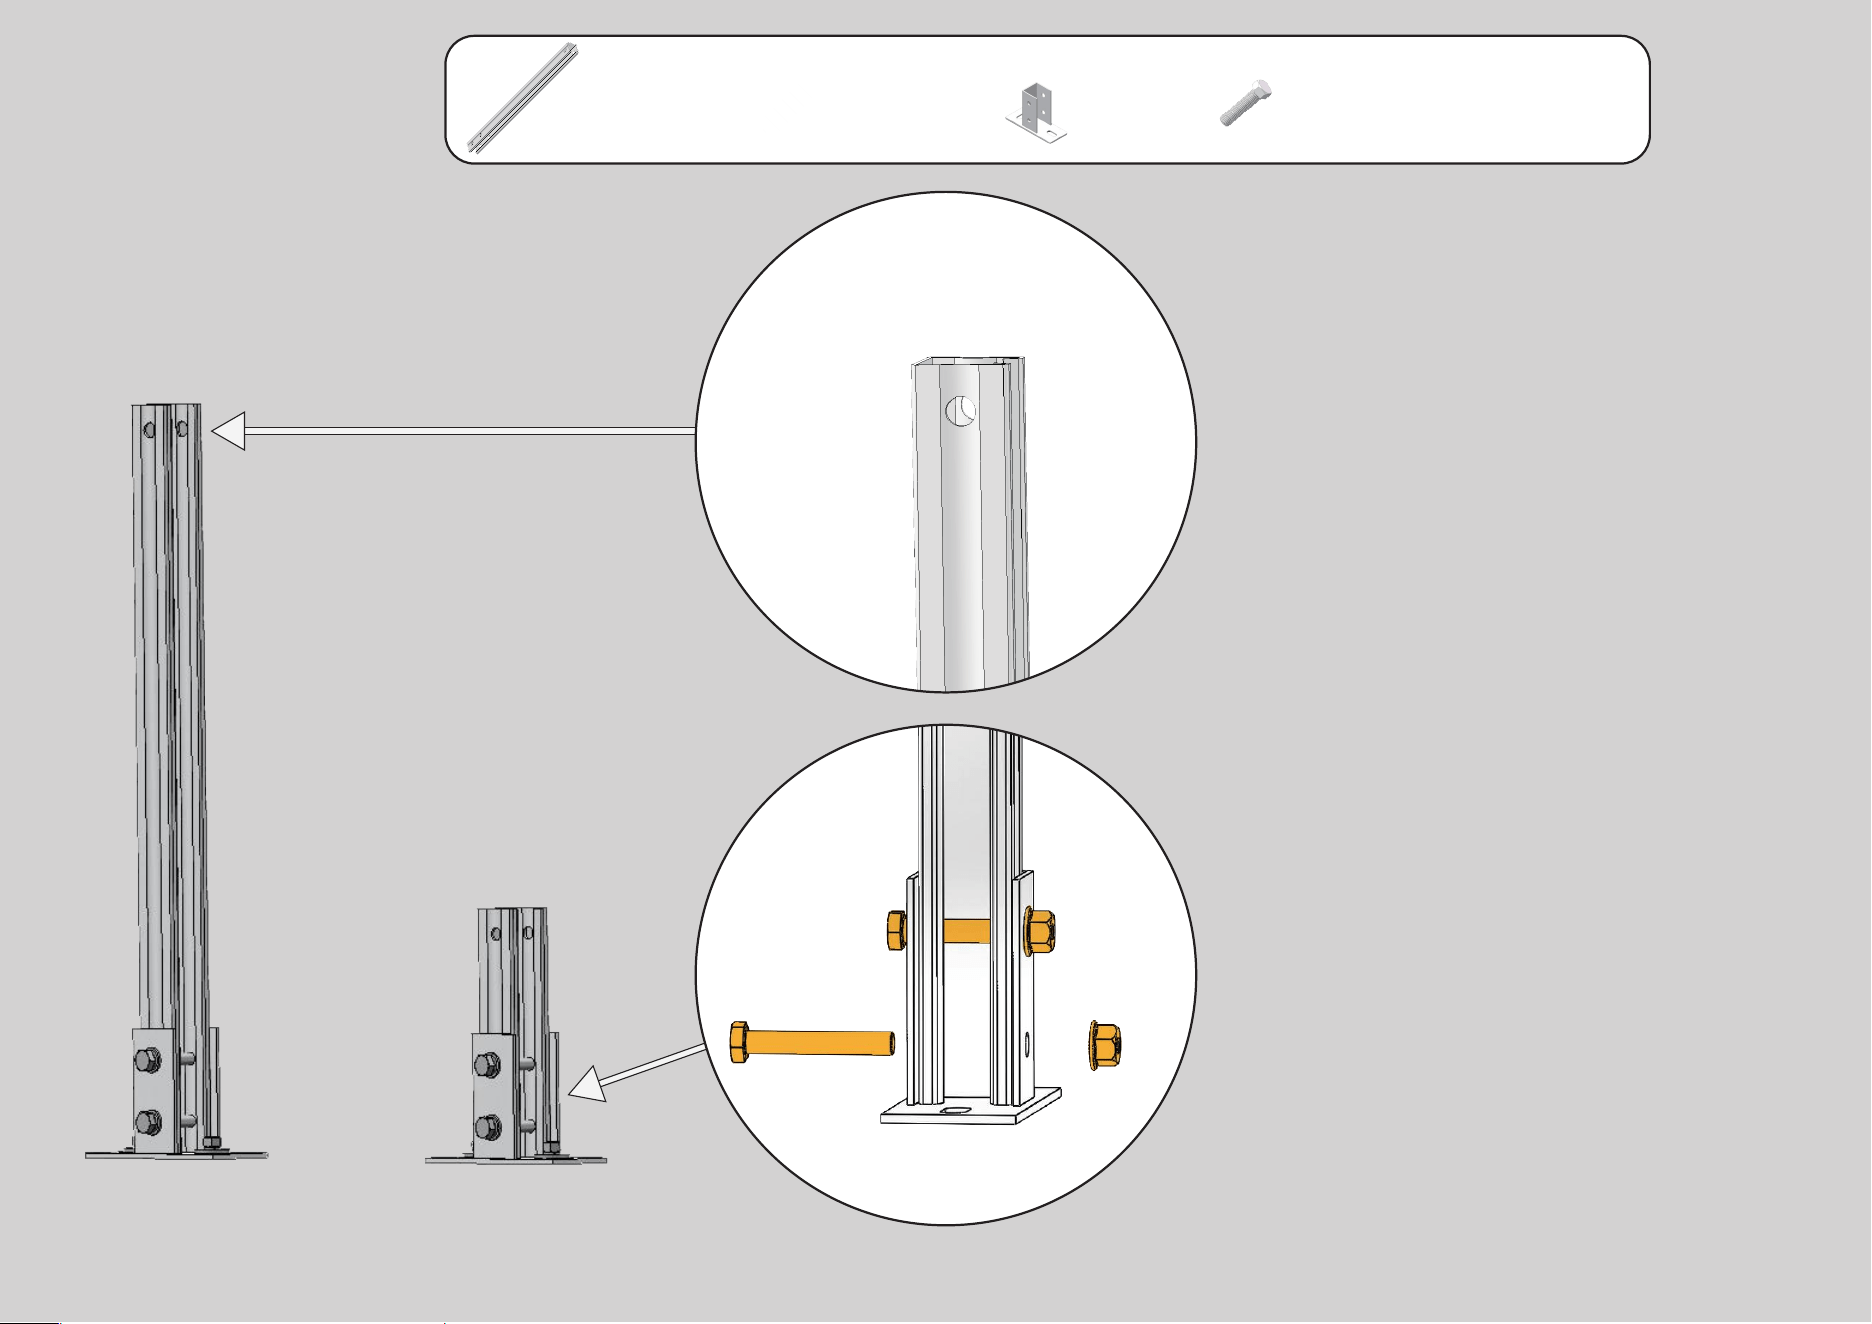
Bulid the
Main Poles
For the convenience
of display, some of the bolts
would be shown as a simplified
figure. Please refer to the material
box on the top of every step.
Make the single-hole end face up-
wards.
Install the Bracket Bases with the
Main Poles with M10 60mm Hex
Cap Bolt and M10 Flange Nut.
x2
41*41*1.2*600mm
Steel with Perforation
x2
41*41*1.2*200mm
Steel with Perforation
x4
41mm
Bracket Base
x8
M10 Hex
Cap Bolt
x8
60mm M10
Flange Nut
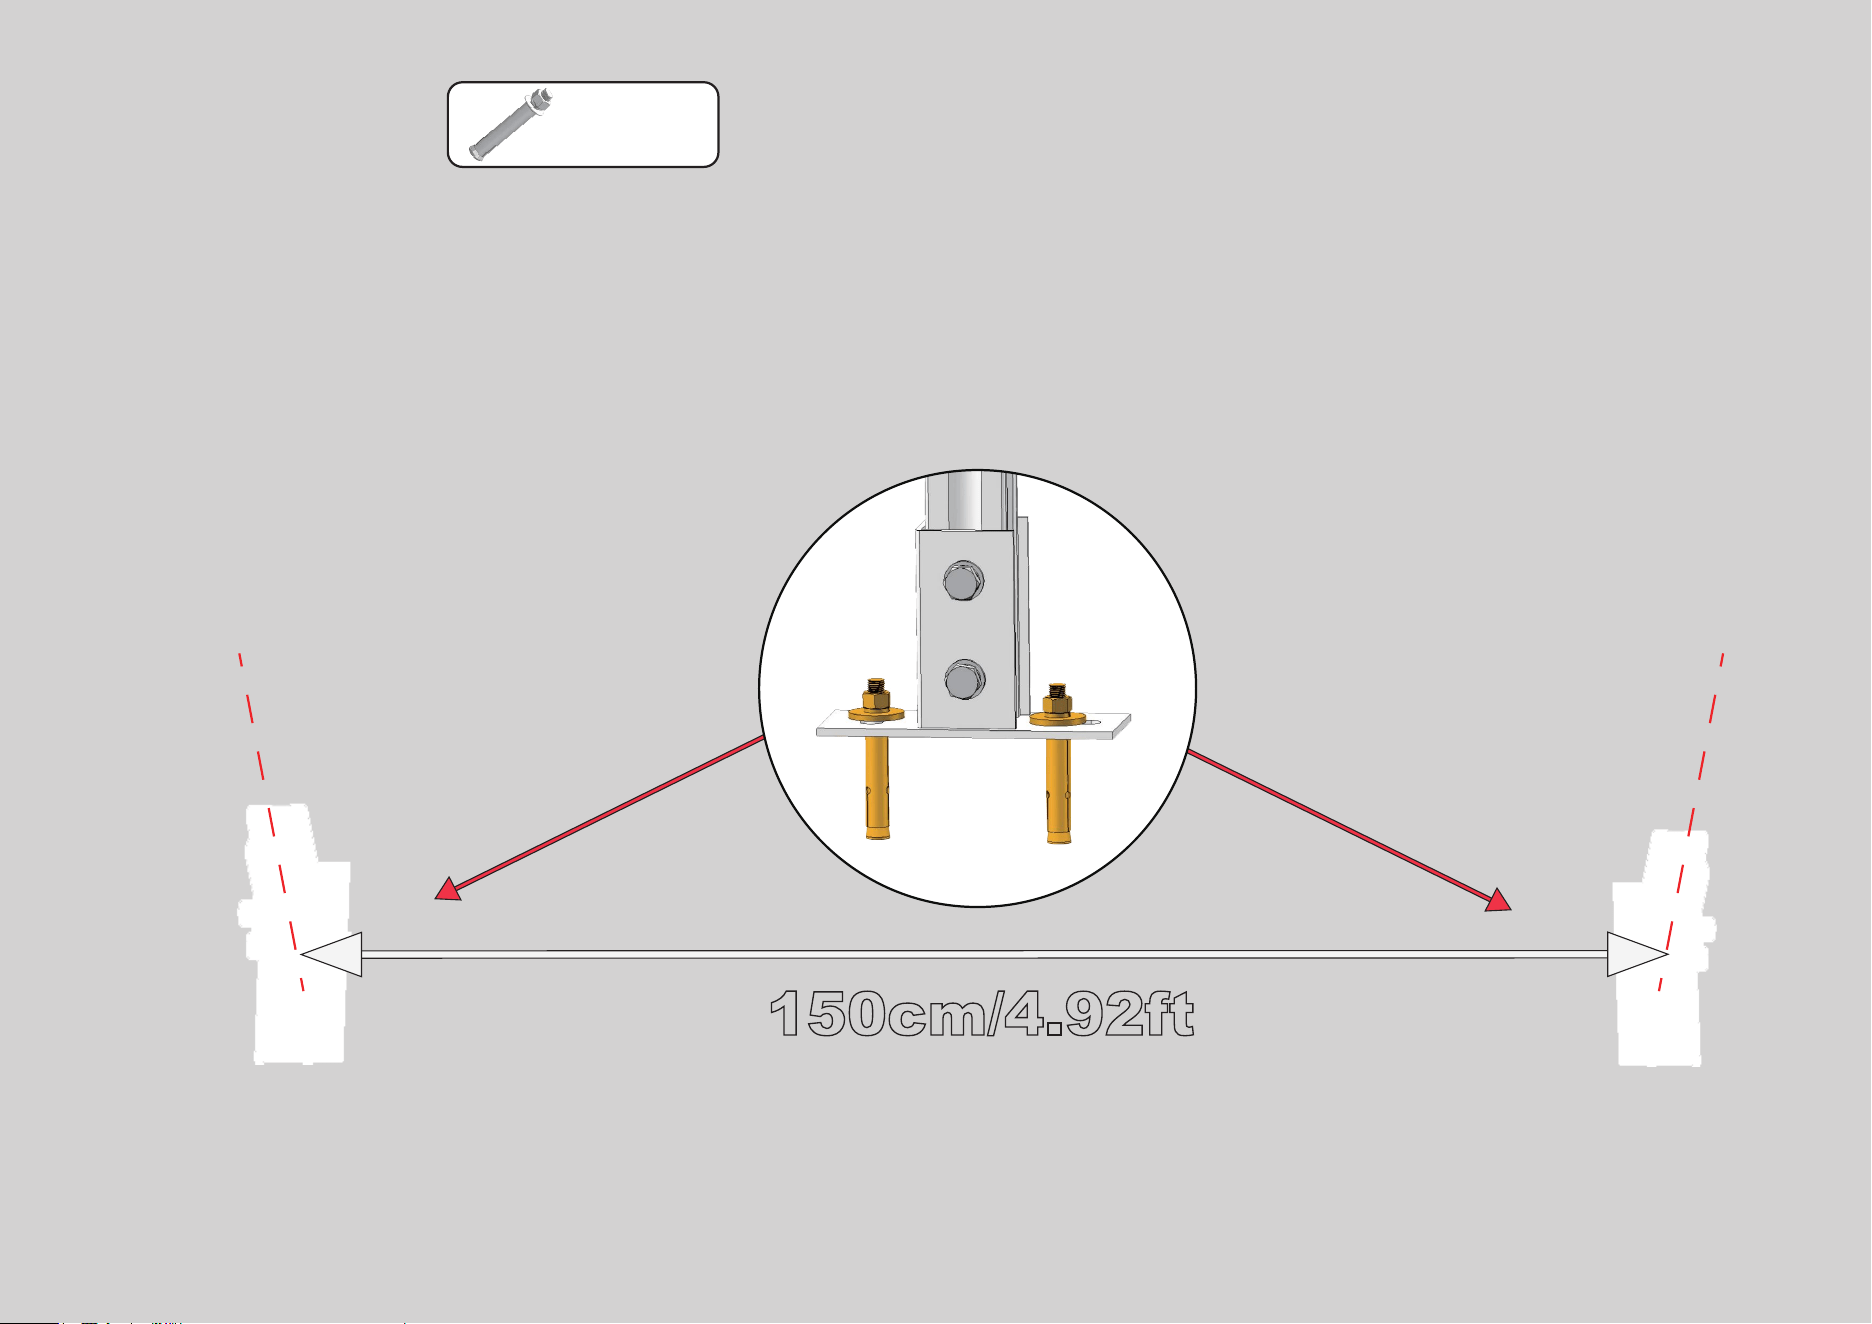
Fix the
Main Poles
2
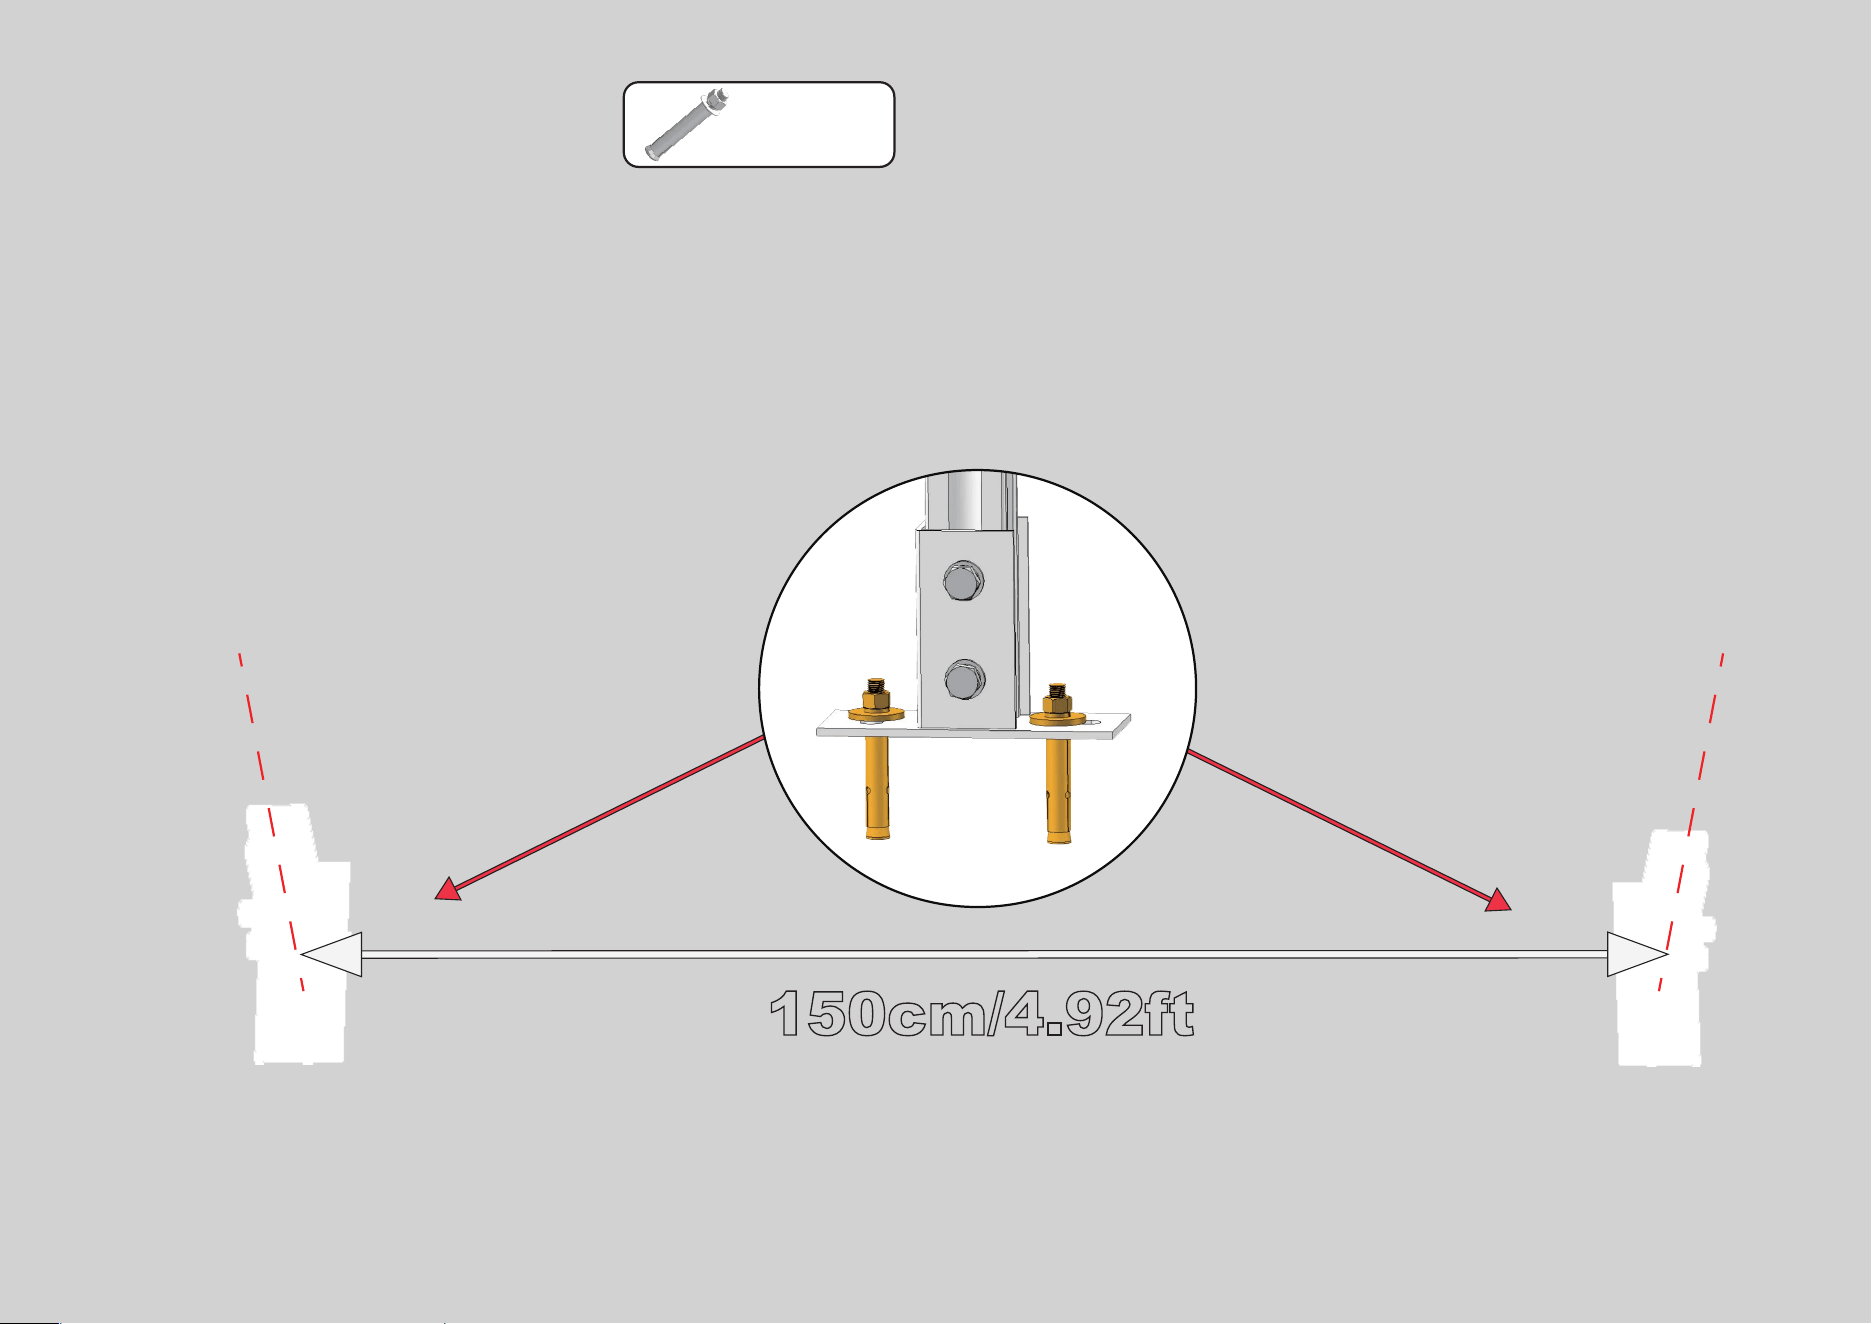
Tips: All concave sides of columns need to face south.
The spacing between the same columns must be 150cm/4.92ft.
150cm/4.92ft
x4
Expansion
Bolt
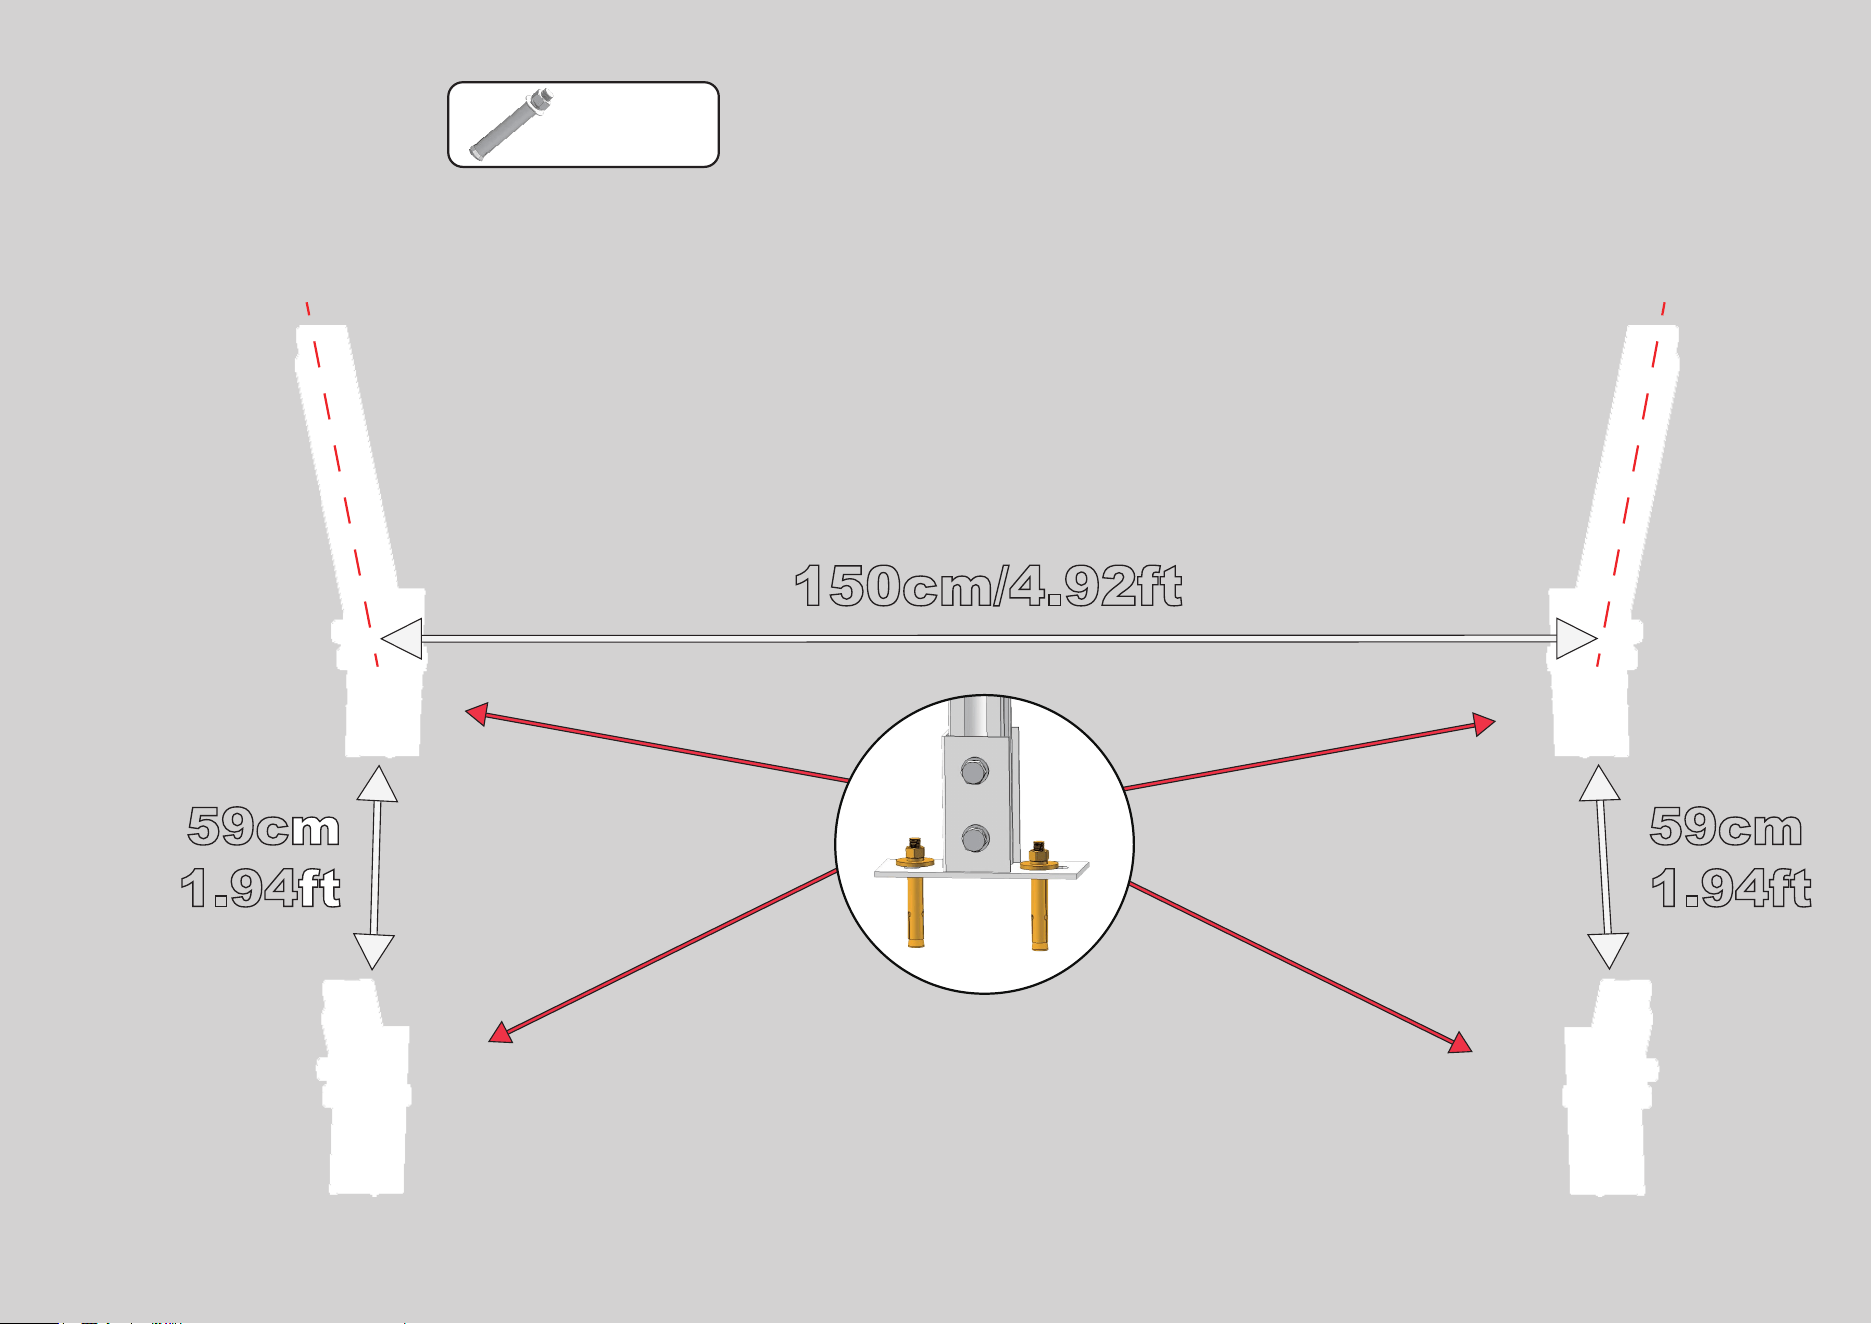
Fix the
Main Poles
3
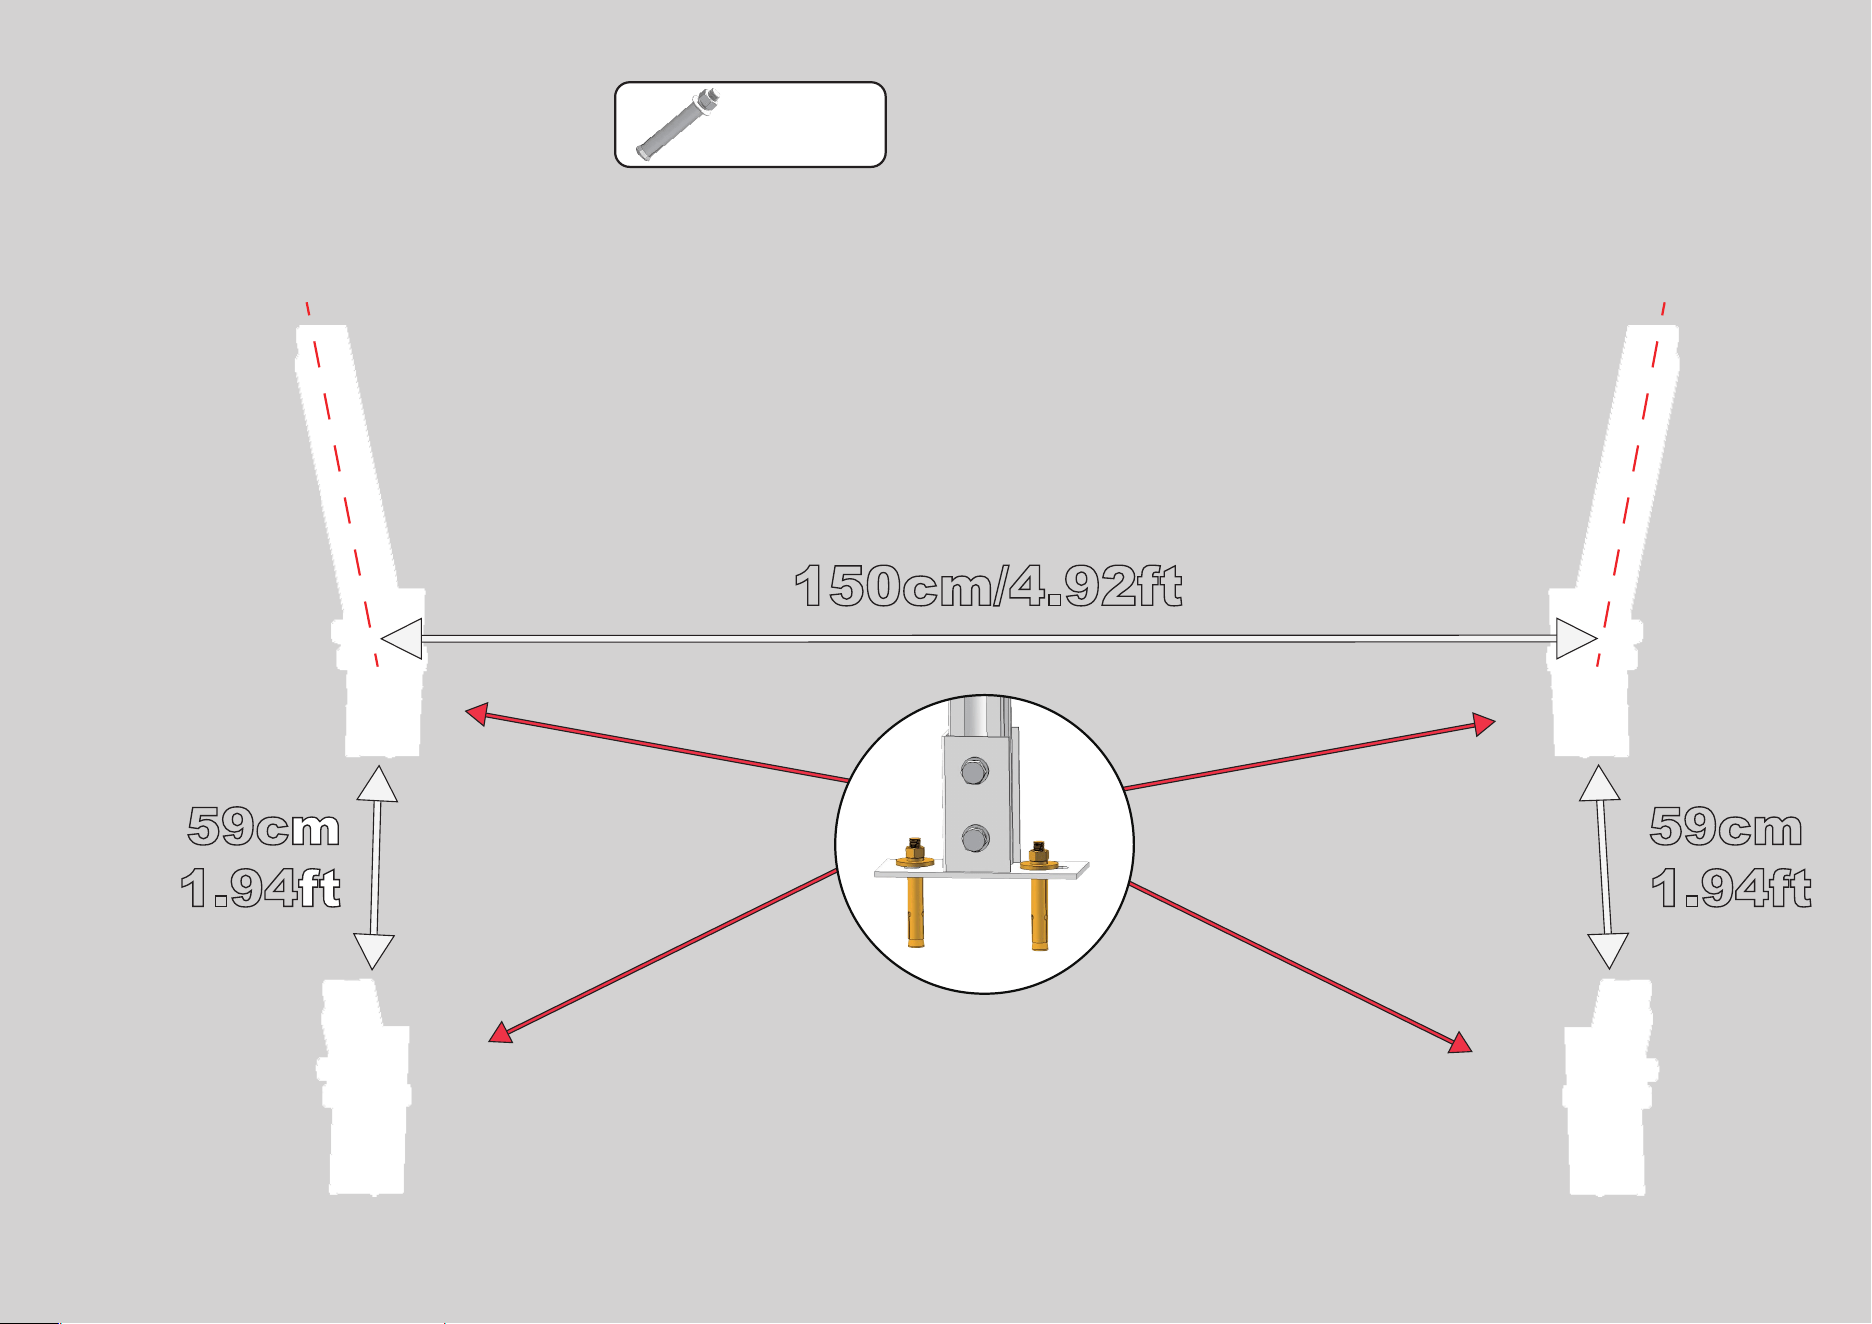
Tips:It is very important to figure out the best angle of your bracket before installation because once the 4 bases
are fixed, the angle can not be changed anymore. Any problems please contact customer service team.
The closer the long poles and the short poles are, the more tilting the bracket will be.
When the distance is 59cm, the angle will be 28.5°.
150cm/4.92ft
59cm
1.94ft
59cm
1.94ft
x4
Expansion
Bolt
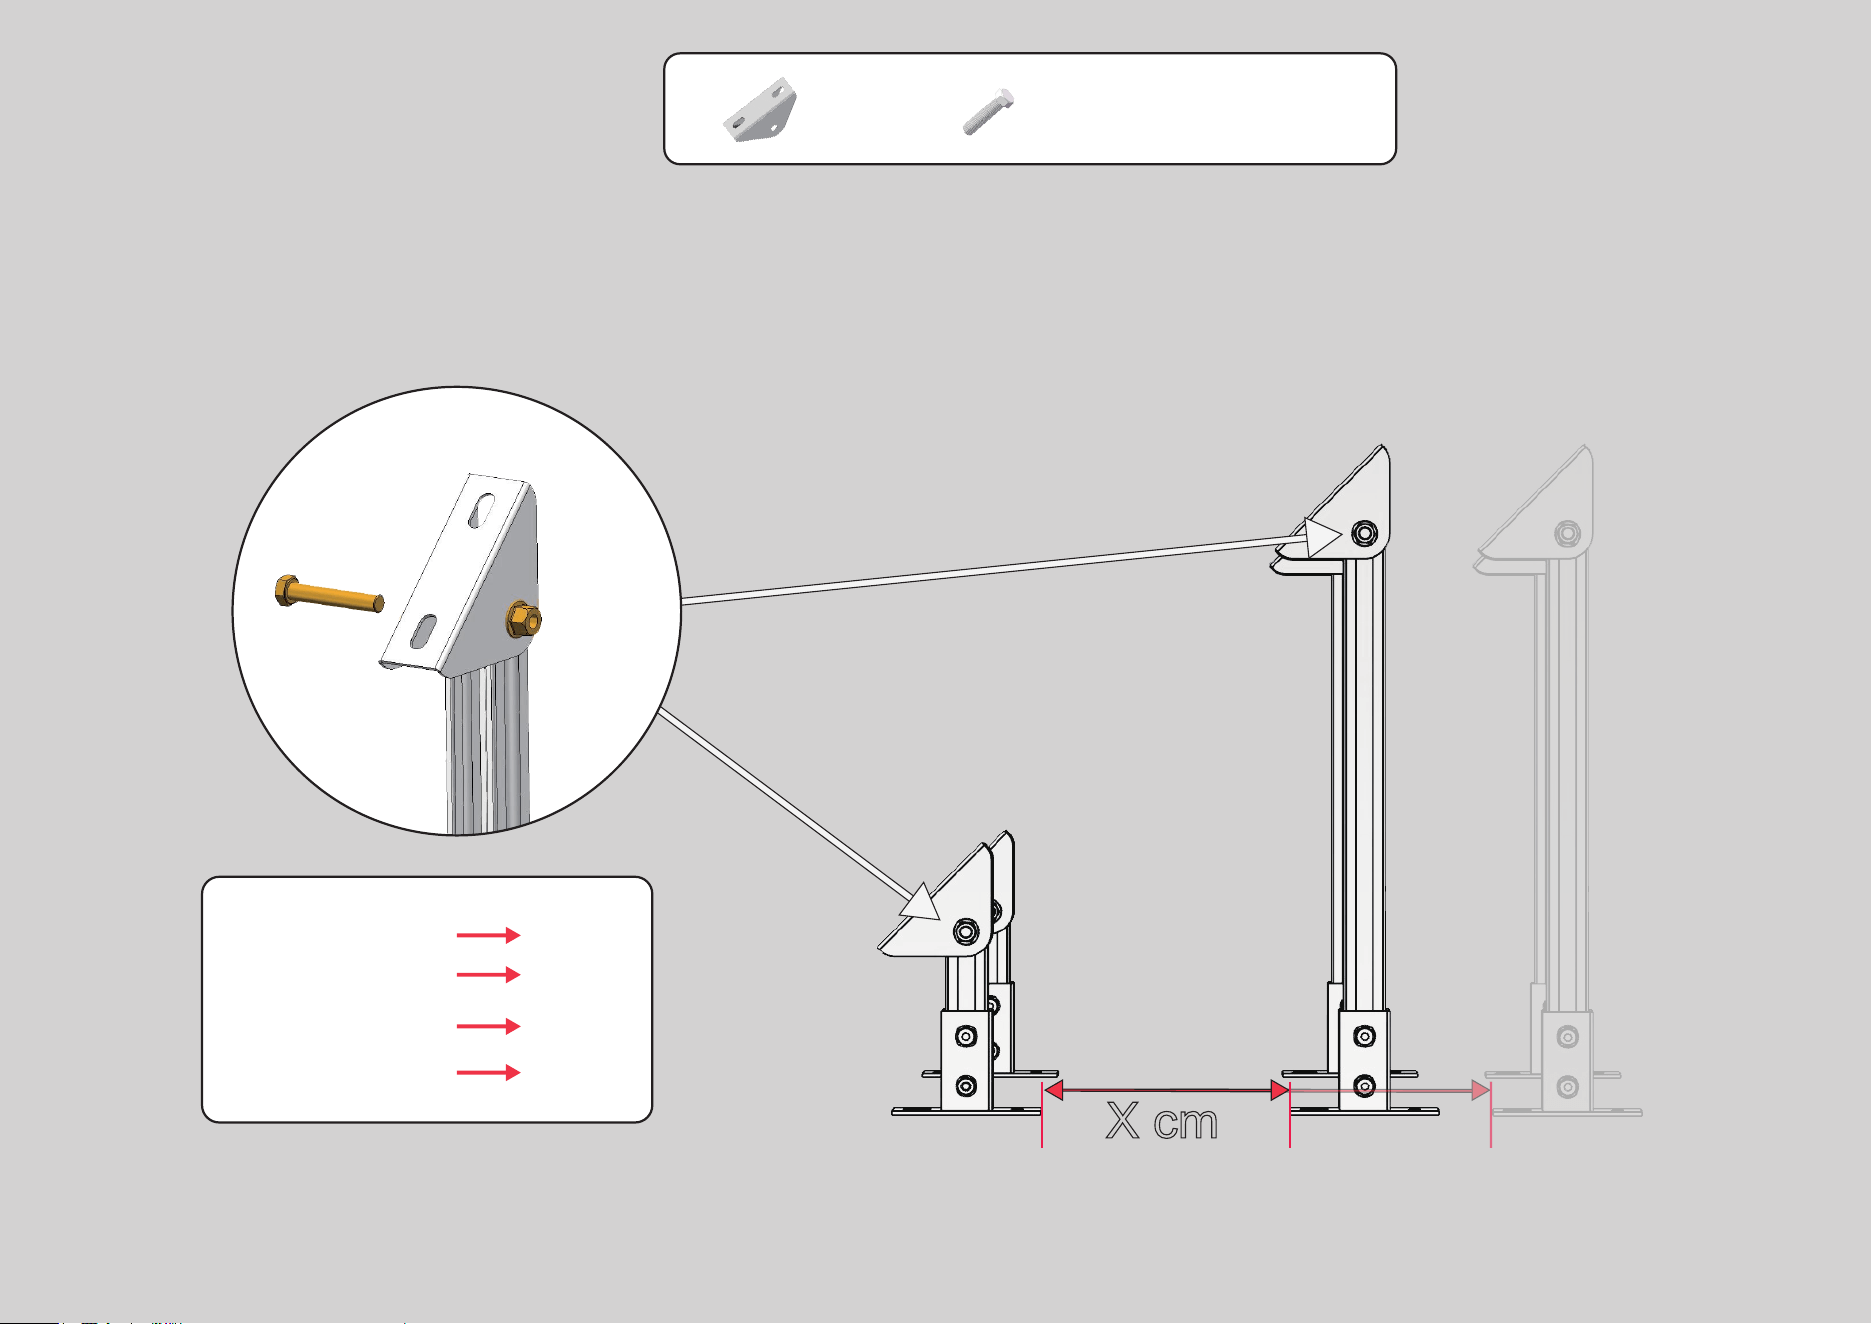
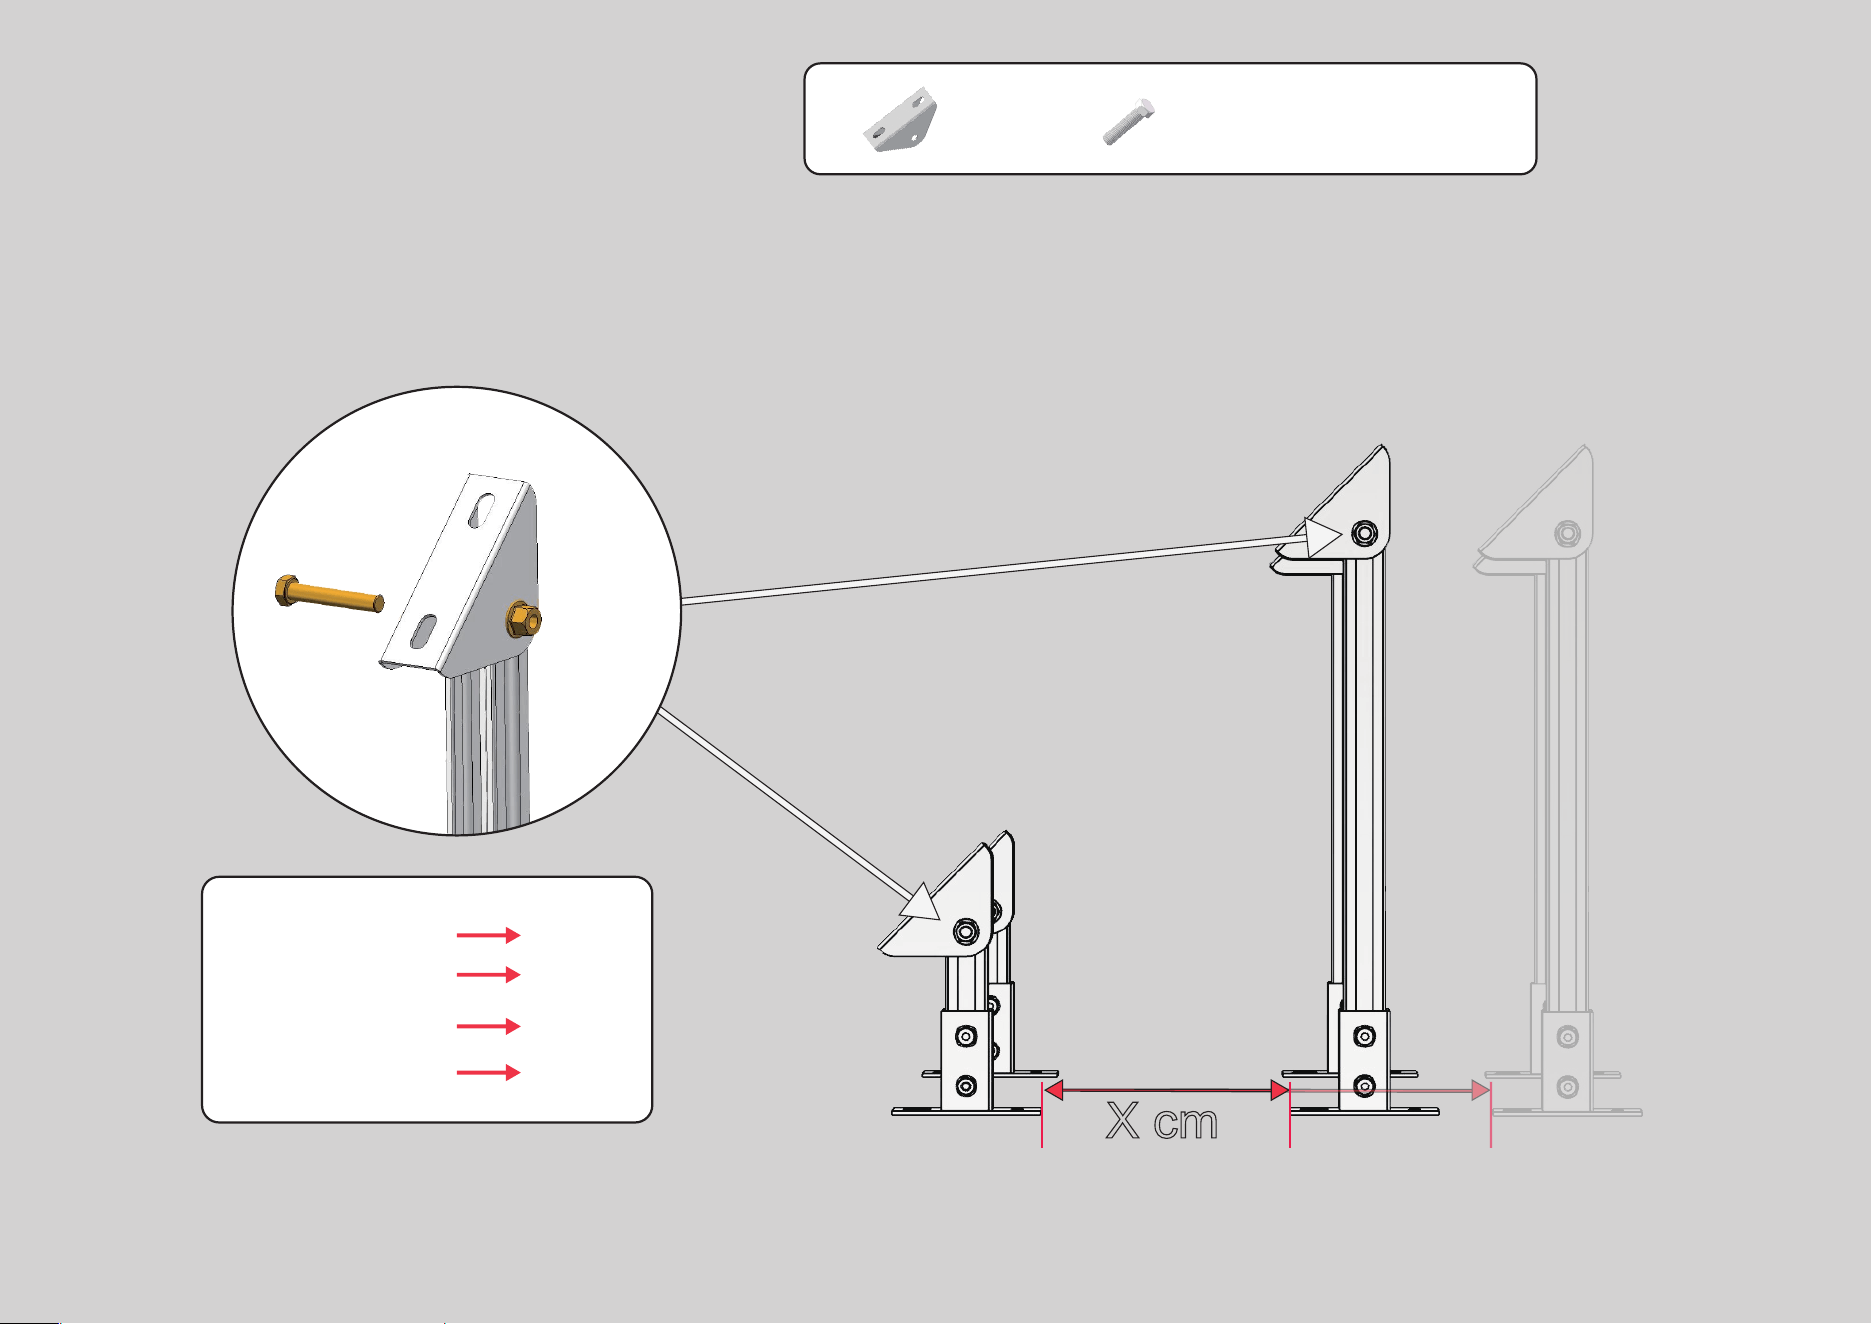
Connect the Triangle
Joint to the Poles
Confirm the best angle and connect the Triangle Joint to the poles. Take Los Angeles as example, the
best angle will be 35°/40°.
x4
Triangle
Joint
4
Tips:Do not fix the bolts tightly before installing the tilt bracket.
x4
M10 Hex
Cap Bolt
x4
M10 Flange
Nut
X cm
X cm =59cm
=45cm
=35cm
=25cm
28.5°
33°
38°
45°
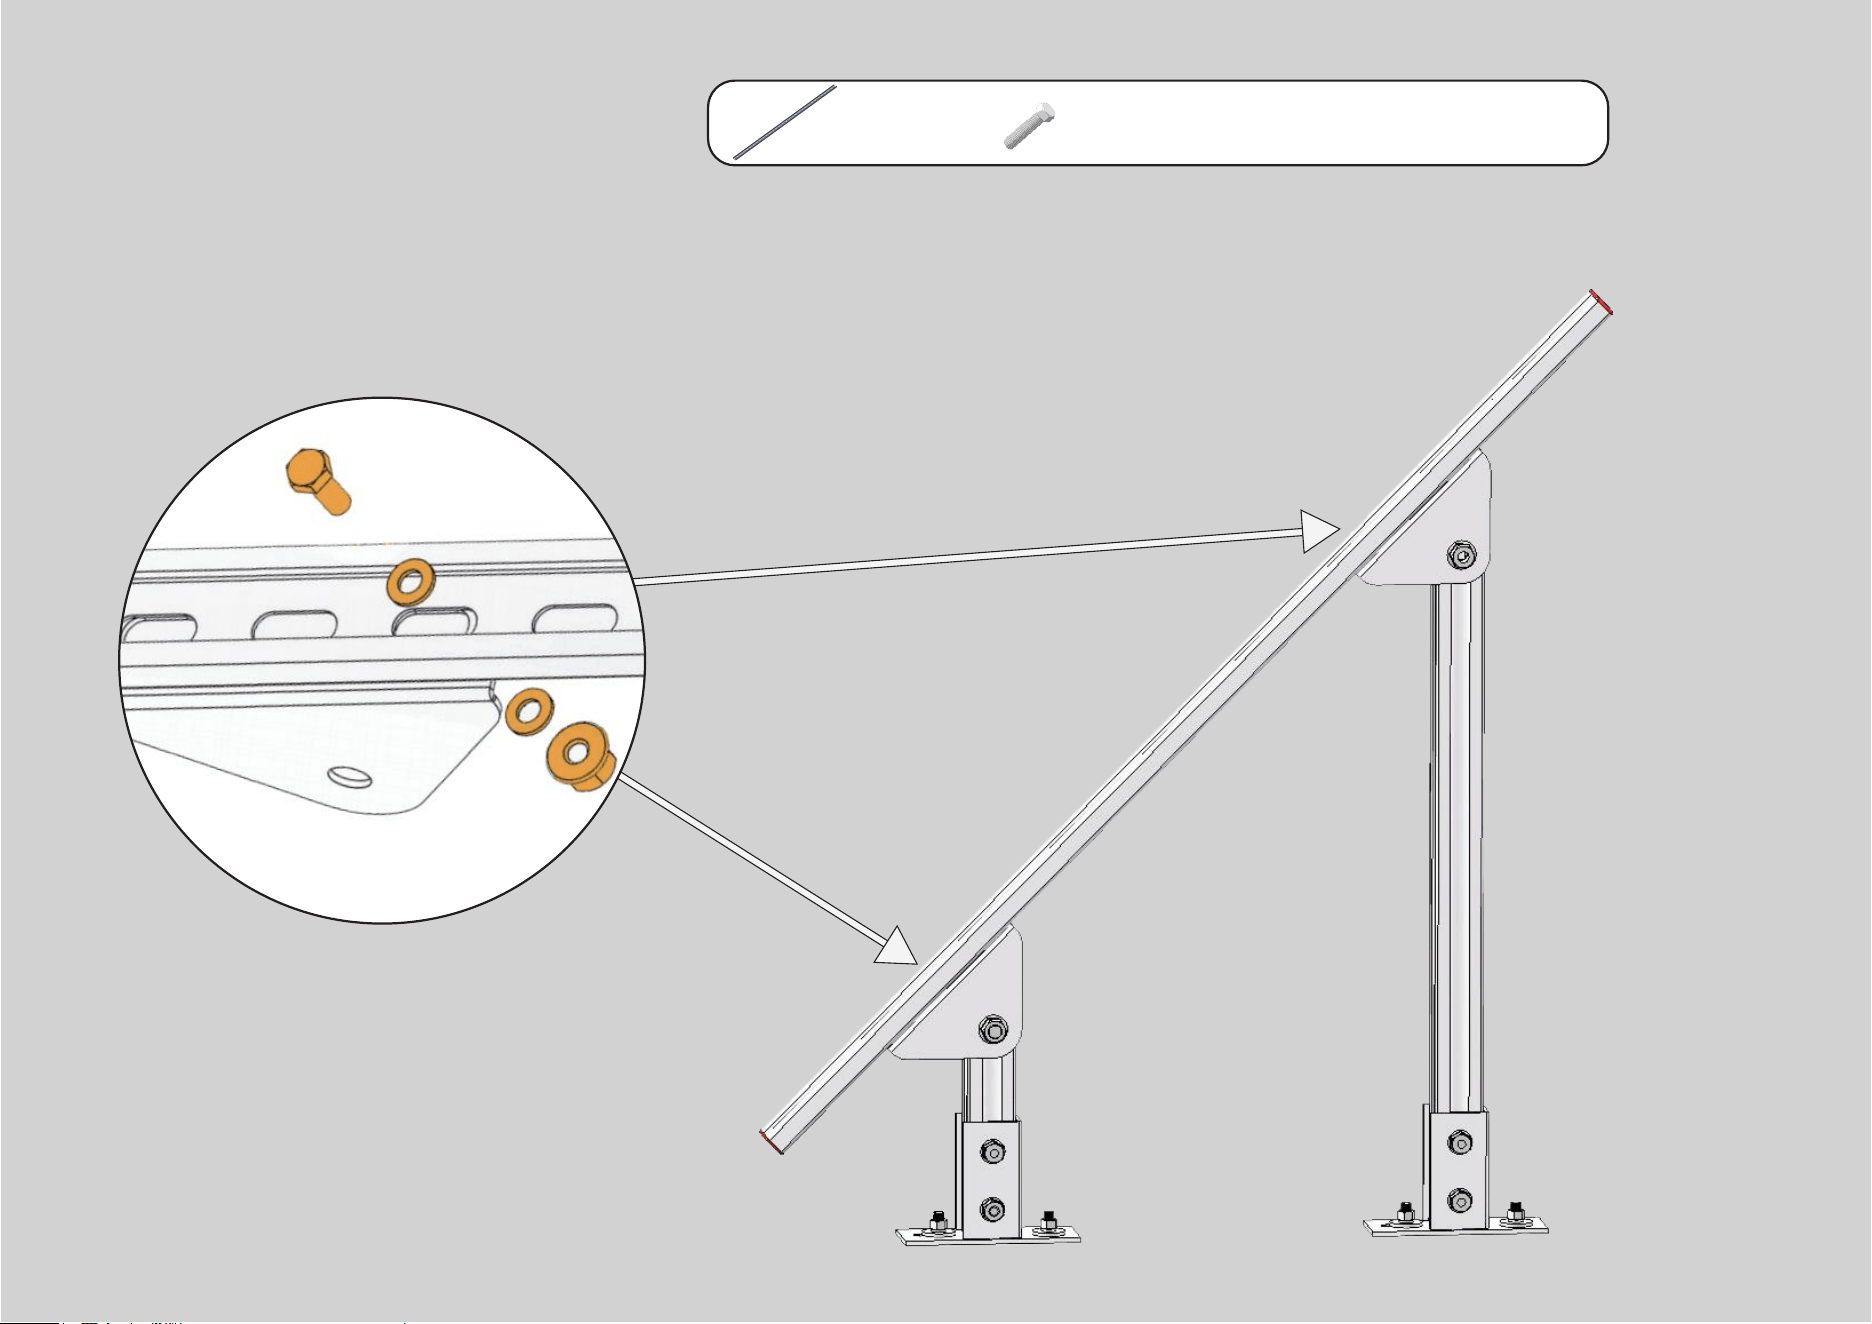
5
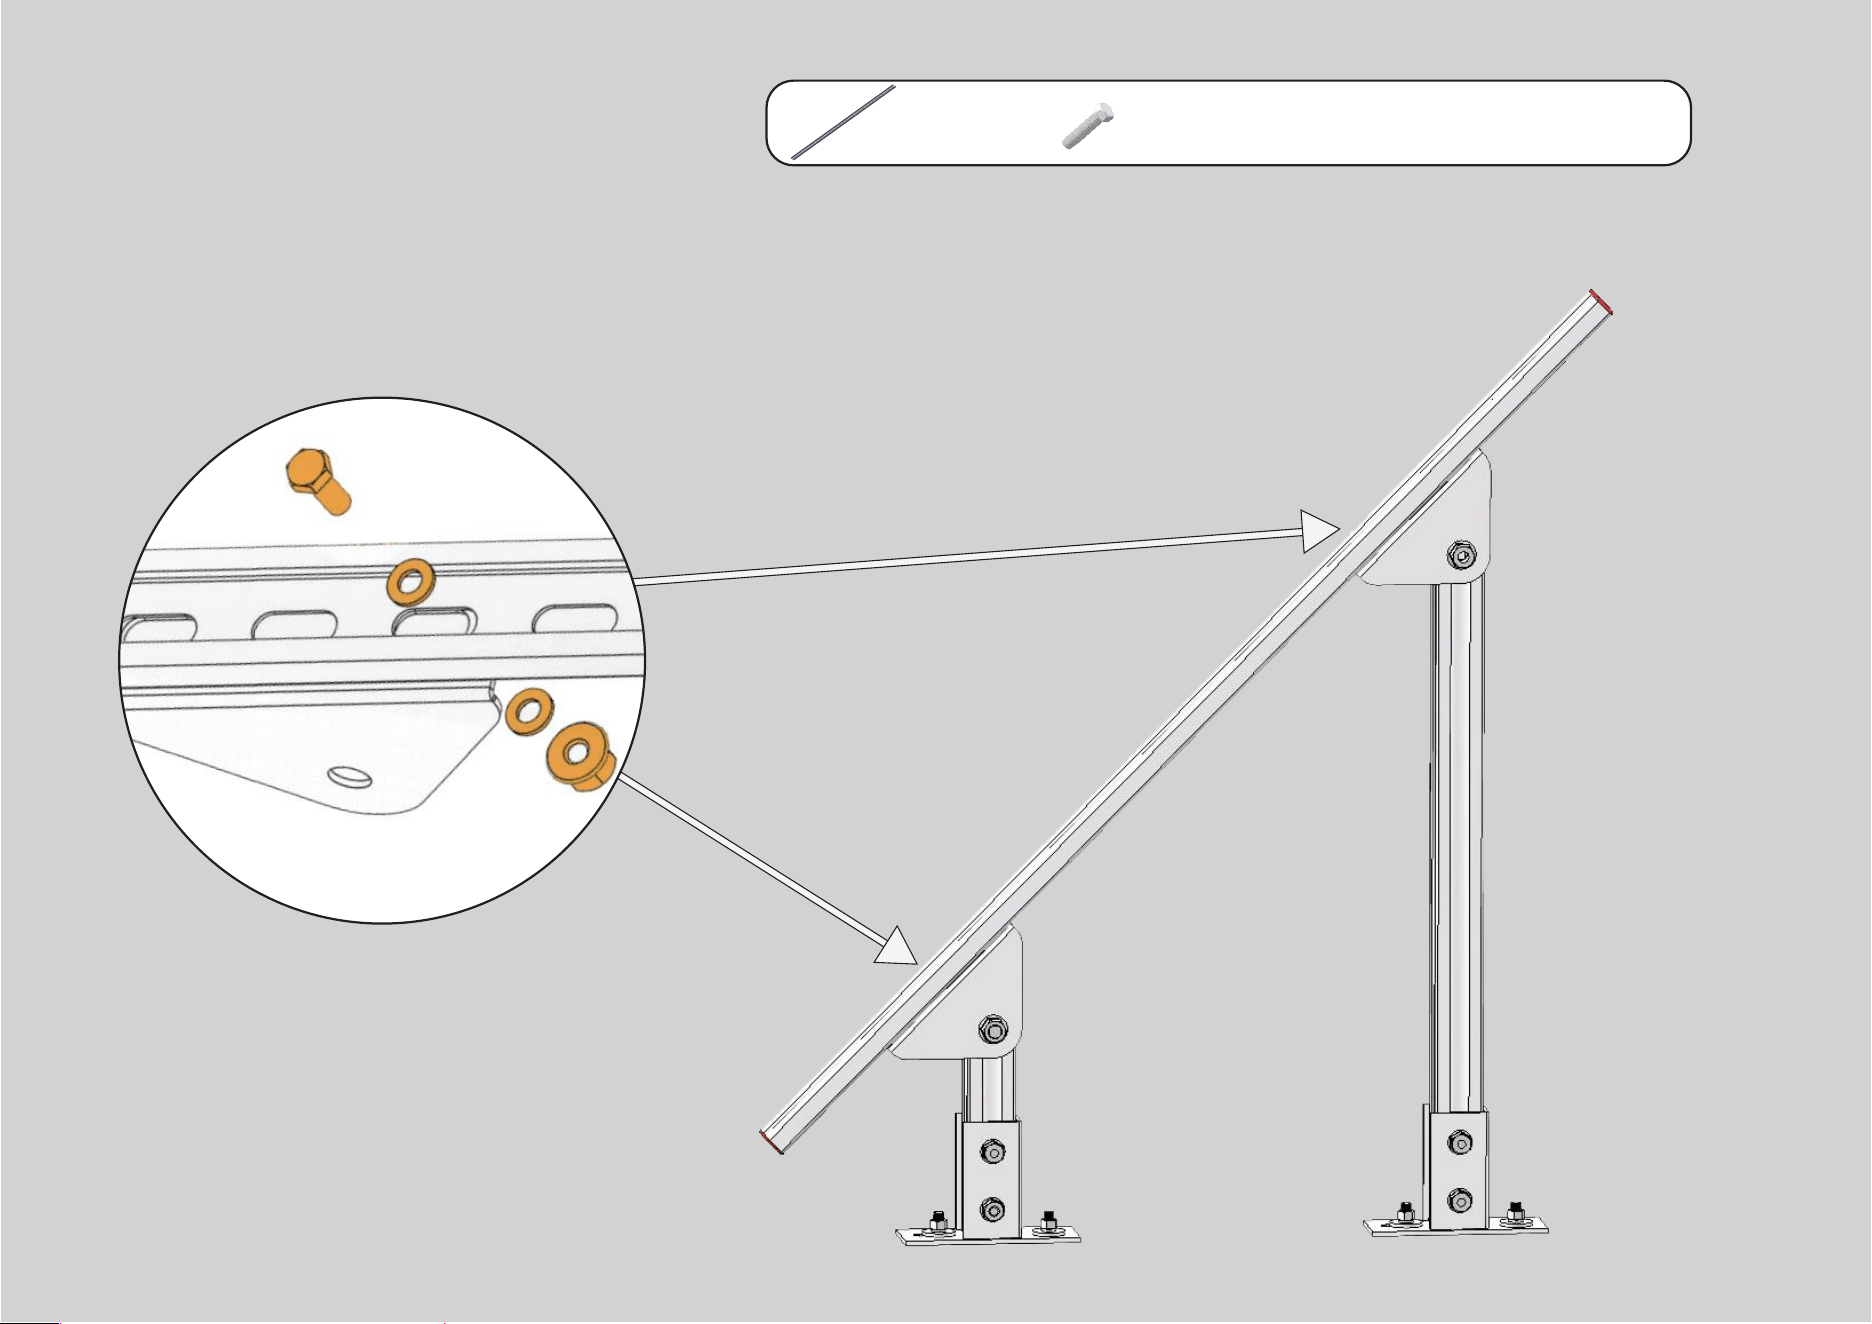
Put the Channel Steel on the Joint and connect them together as the
following fig shows.
Connect the Channel
Steel to the Joint
x2
1000mm
Channel Steel
x8
M8 Hex
Cap Bolt
x8
M8 Flange
Nut
x16
Flat
Washer
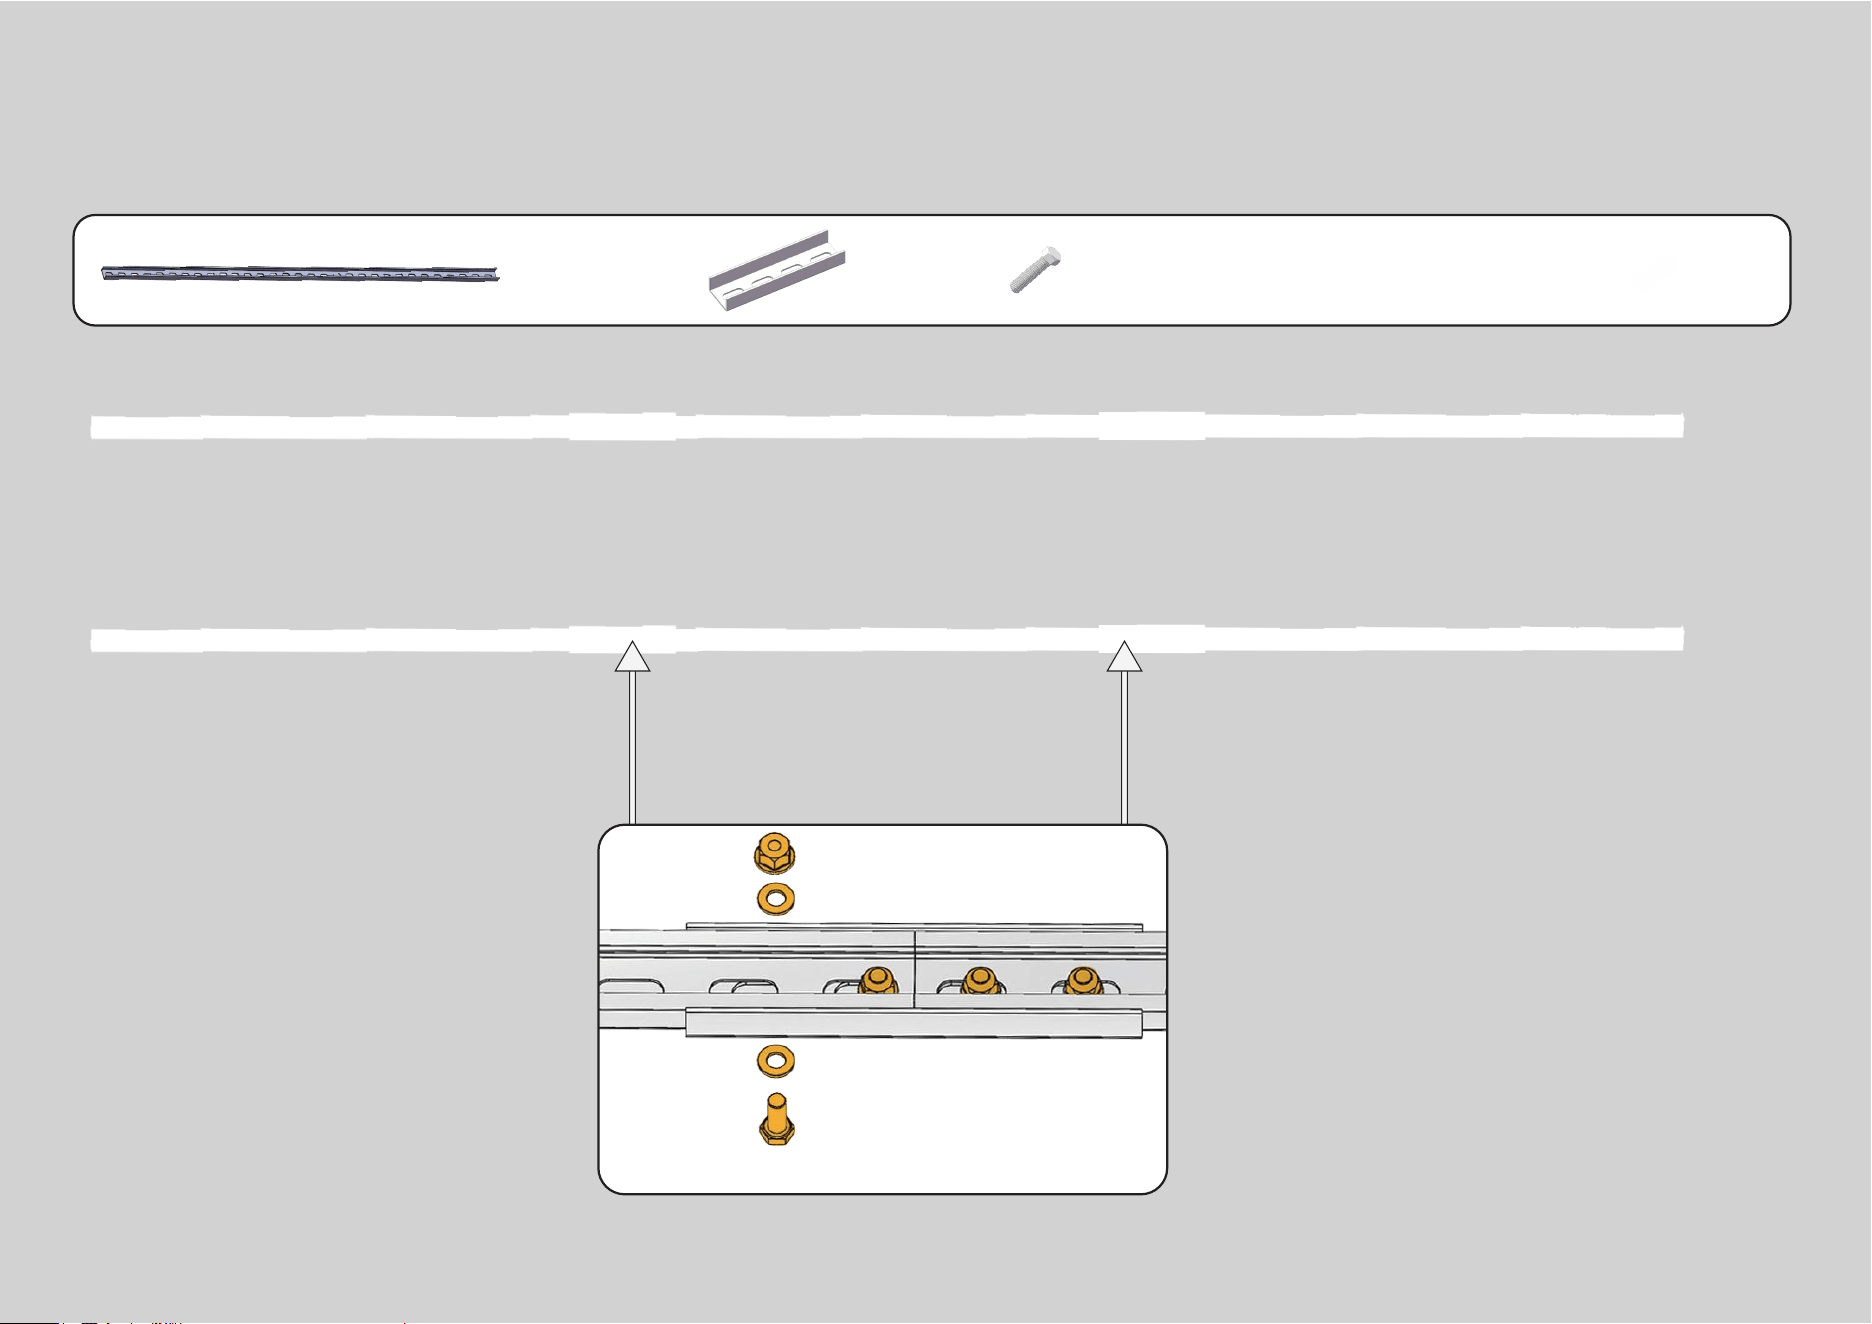
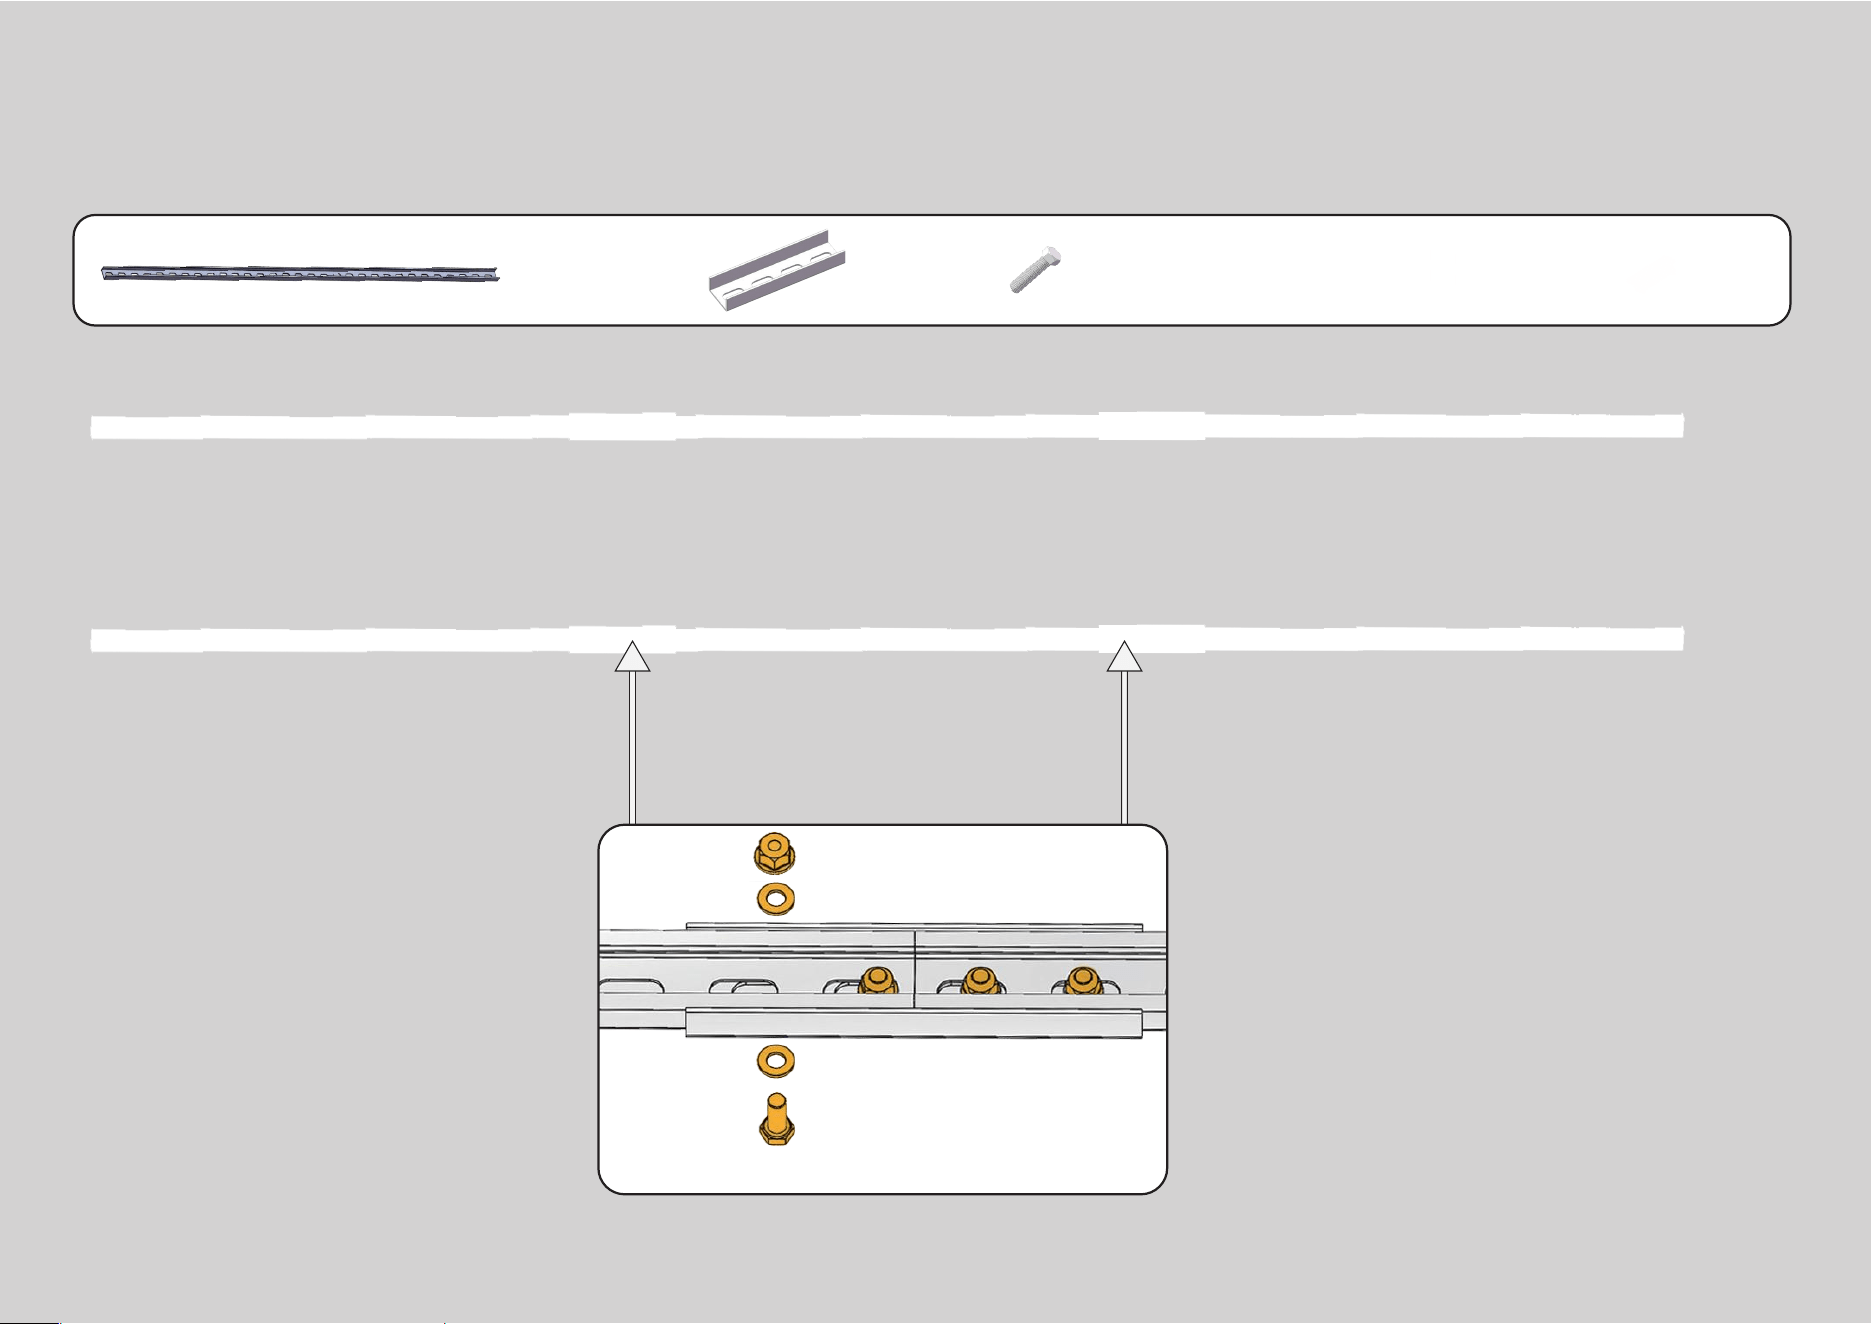
Build 3m-long Poles with
the Channel Steel
6
Tips:Please note the connection must be very tightened.
x6
1000mm
Channel Steel
x4
U-Shaped
Connector
x8
M8 Hex
Cap Bolt
x8
M8 Flange
Nut
x16
Flat
Washer
x8
41*21mm
Cap
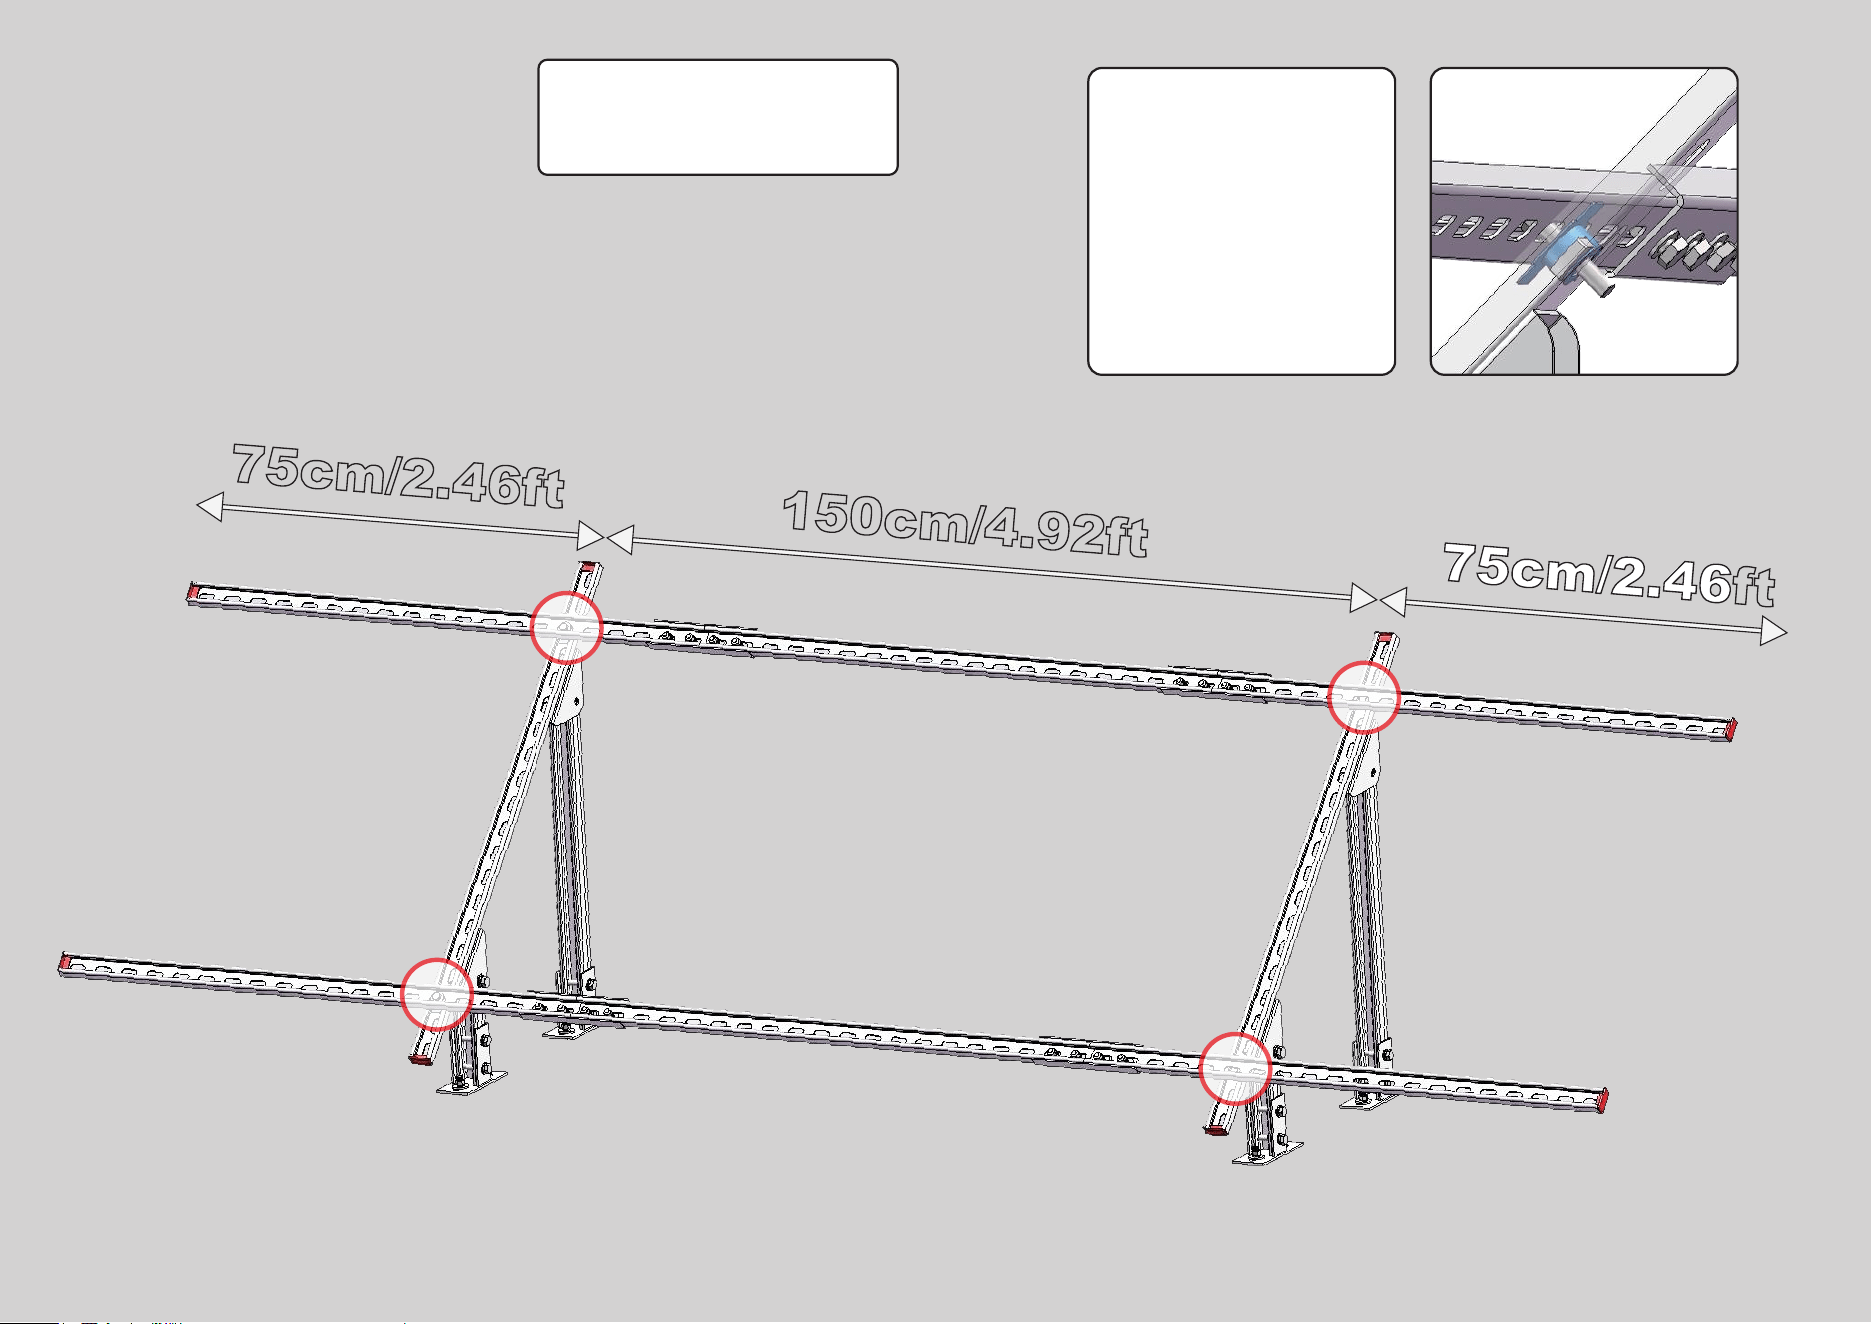
Install the
3m-long Poles
7
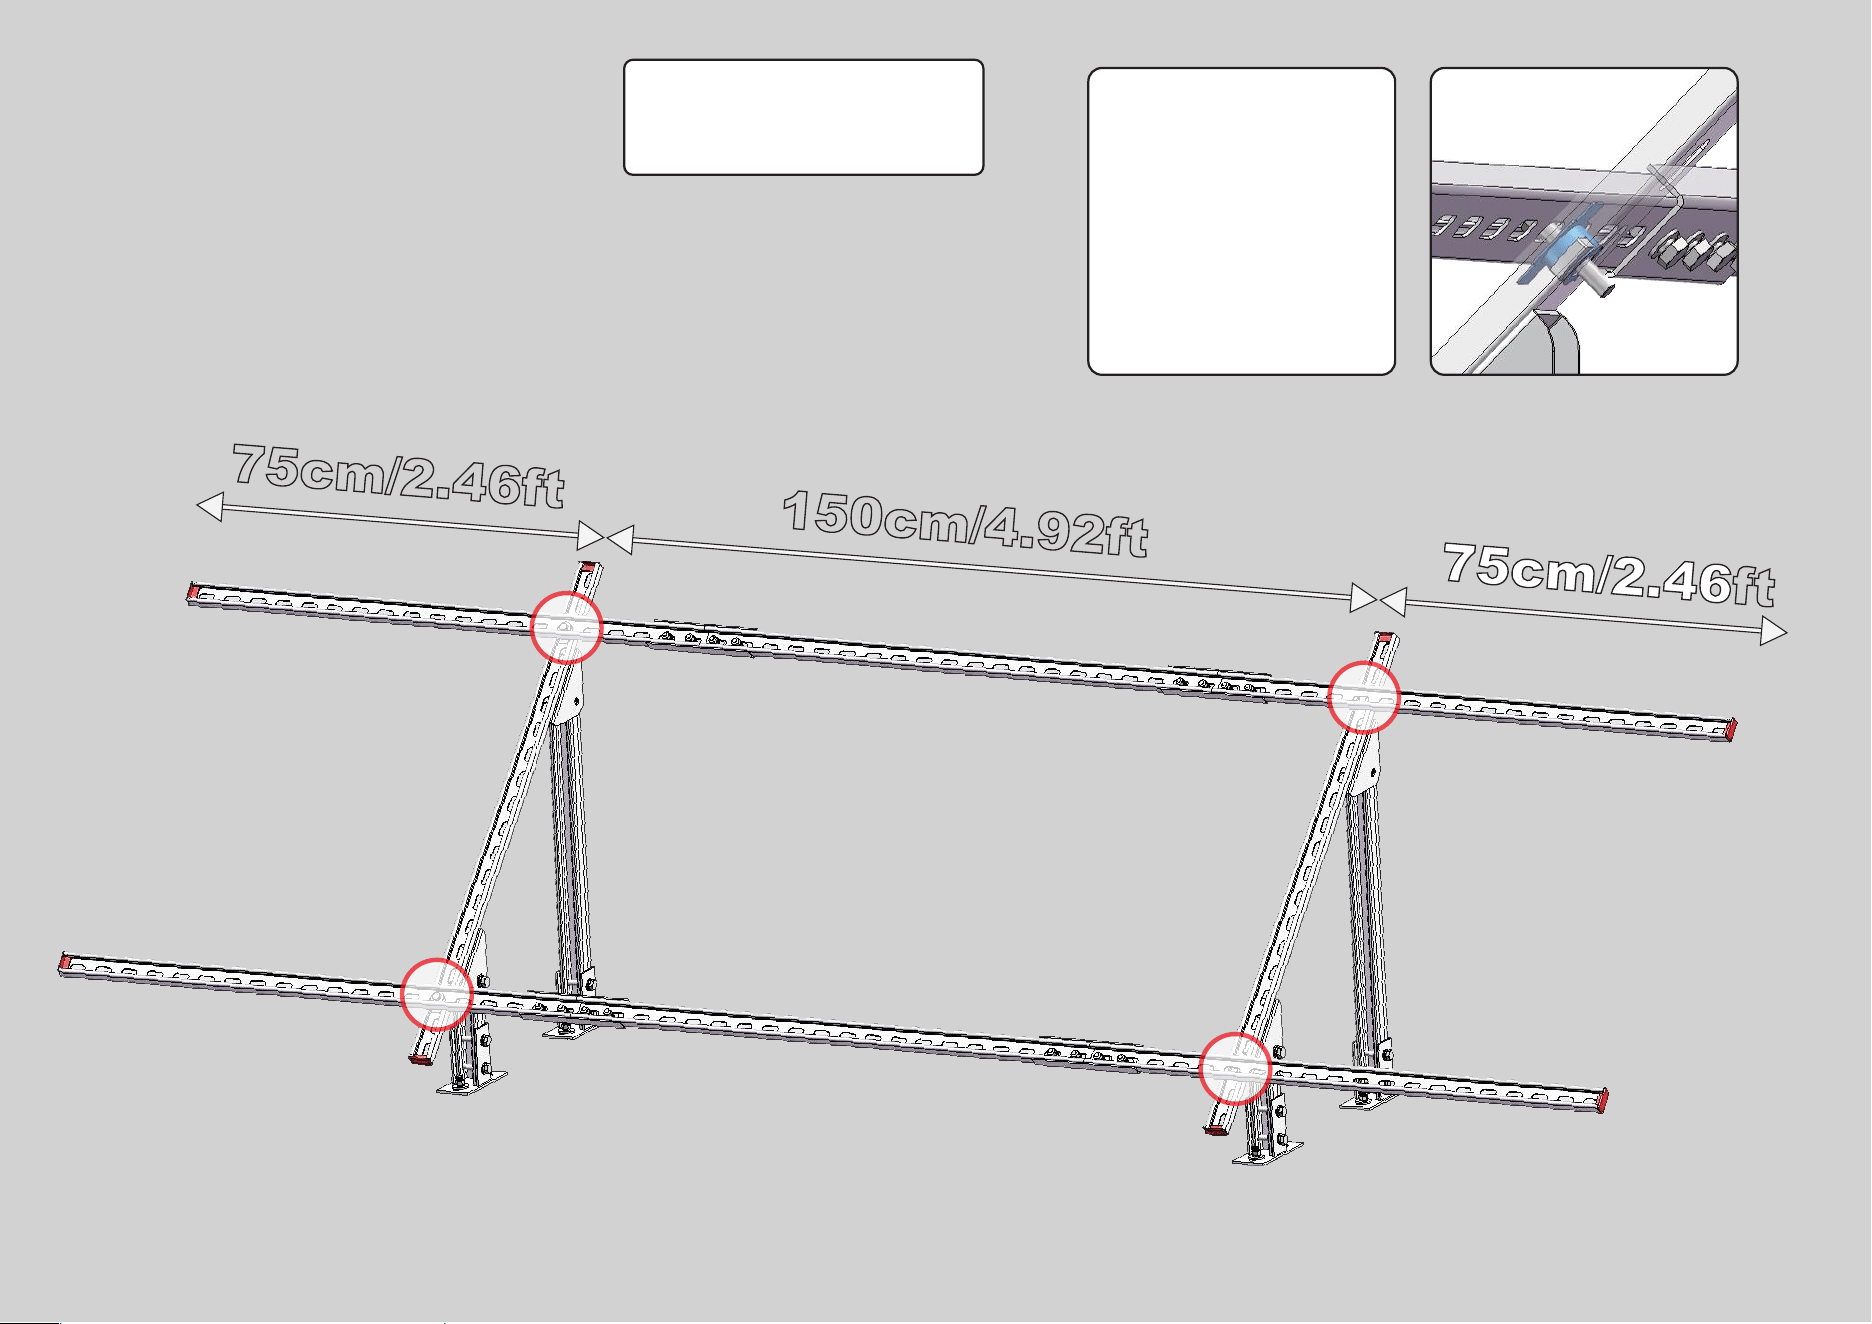
Tips:Please note the 3m-long poles should be fixed at the middle of the Triangle Joint as the zoom in fig shows.
150cm/4.92ft
75cm/2.46ft
75cm/2.46ft
1
3
4
2
x4
Bracket Base
Middle Clamp
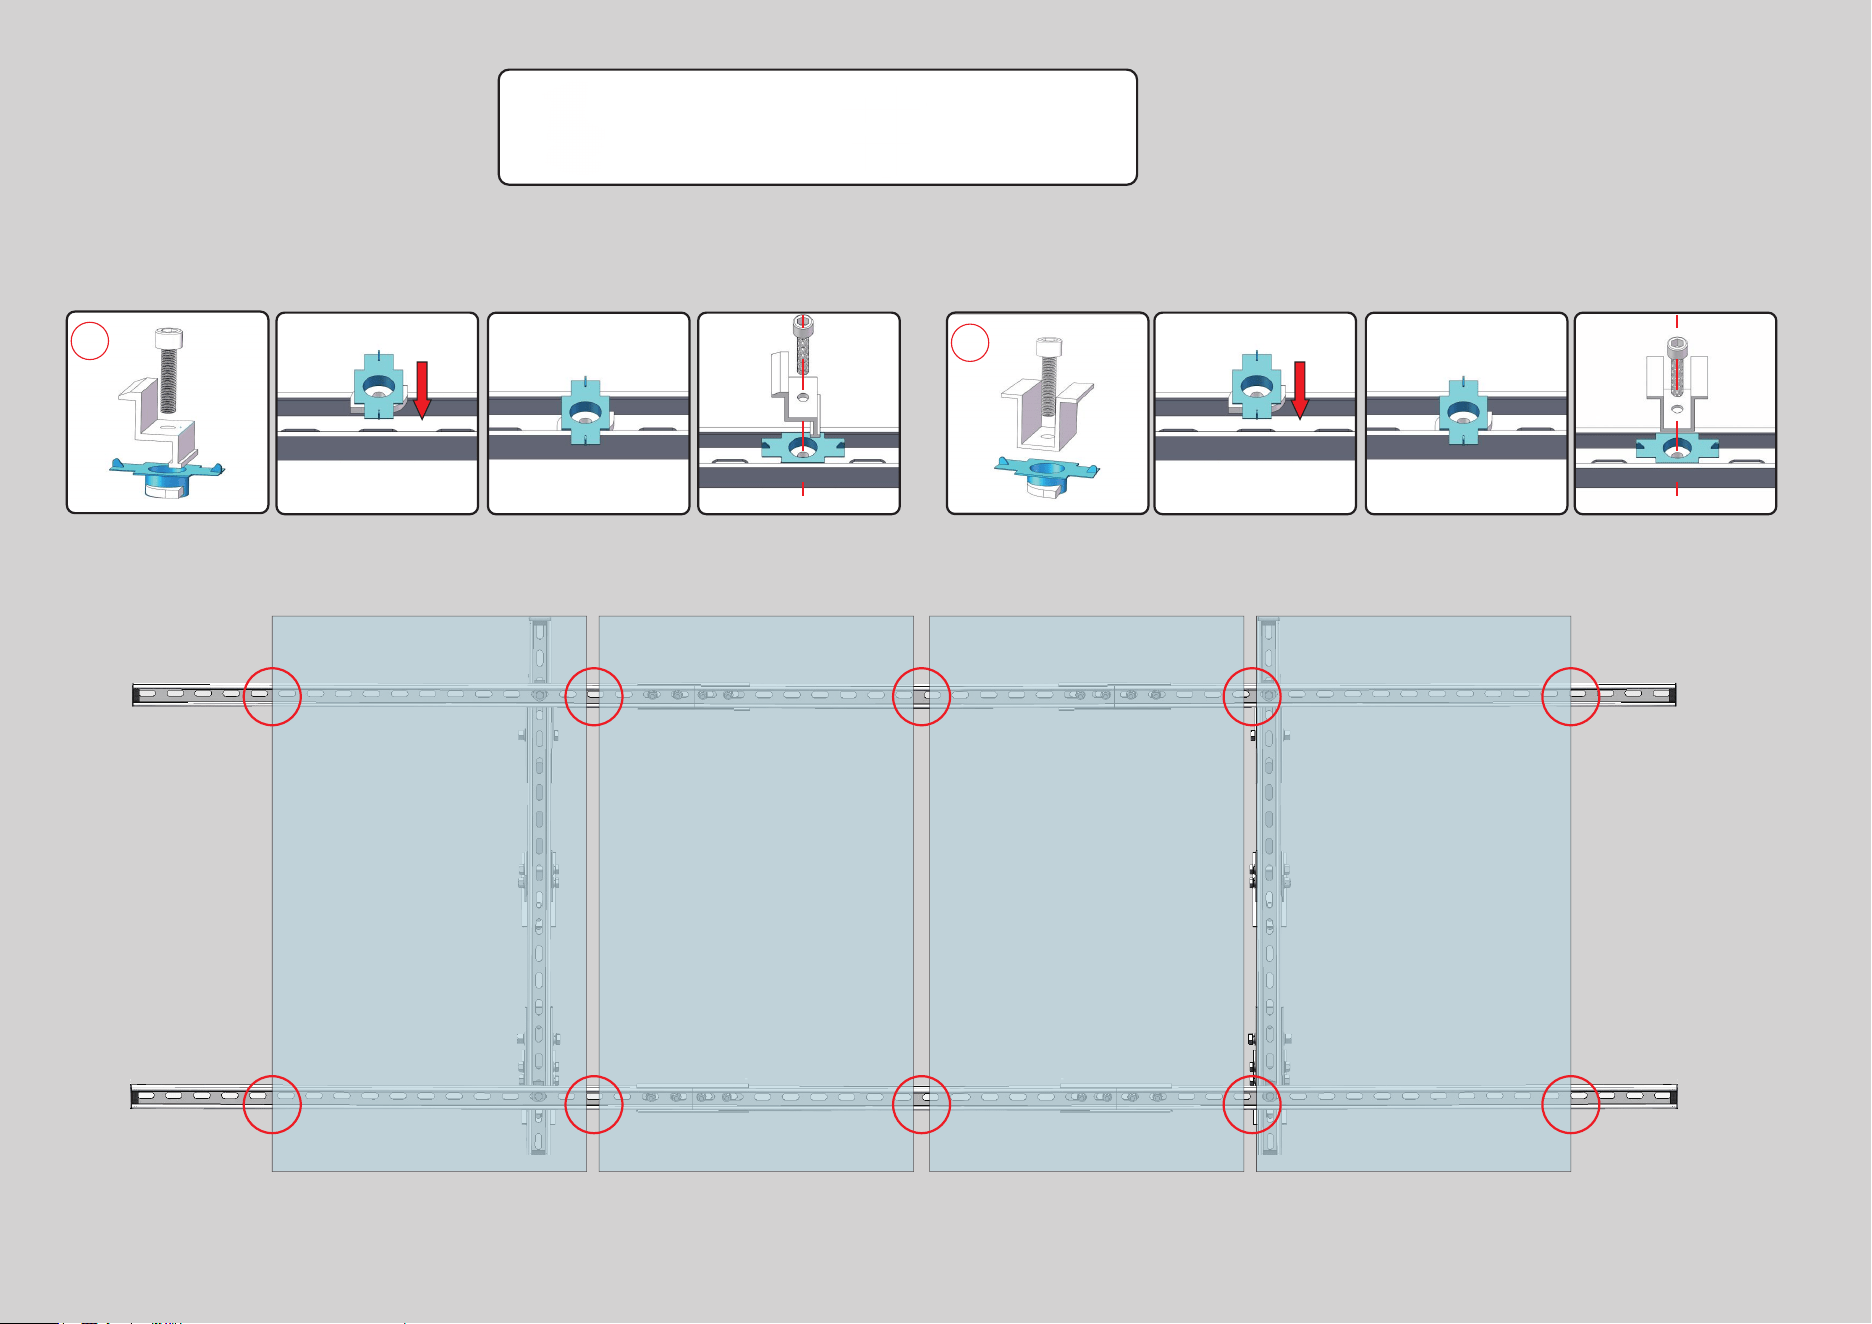
8
x4
Solar Panel
Side Clamp
x6
Solar Panel
Middle Clamp
A
B
90° 90°
Installing
Solar Panels
B
B
B
B
B
B
A
A
A
A
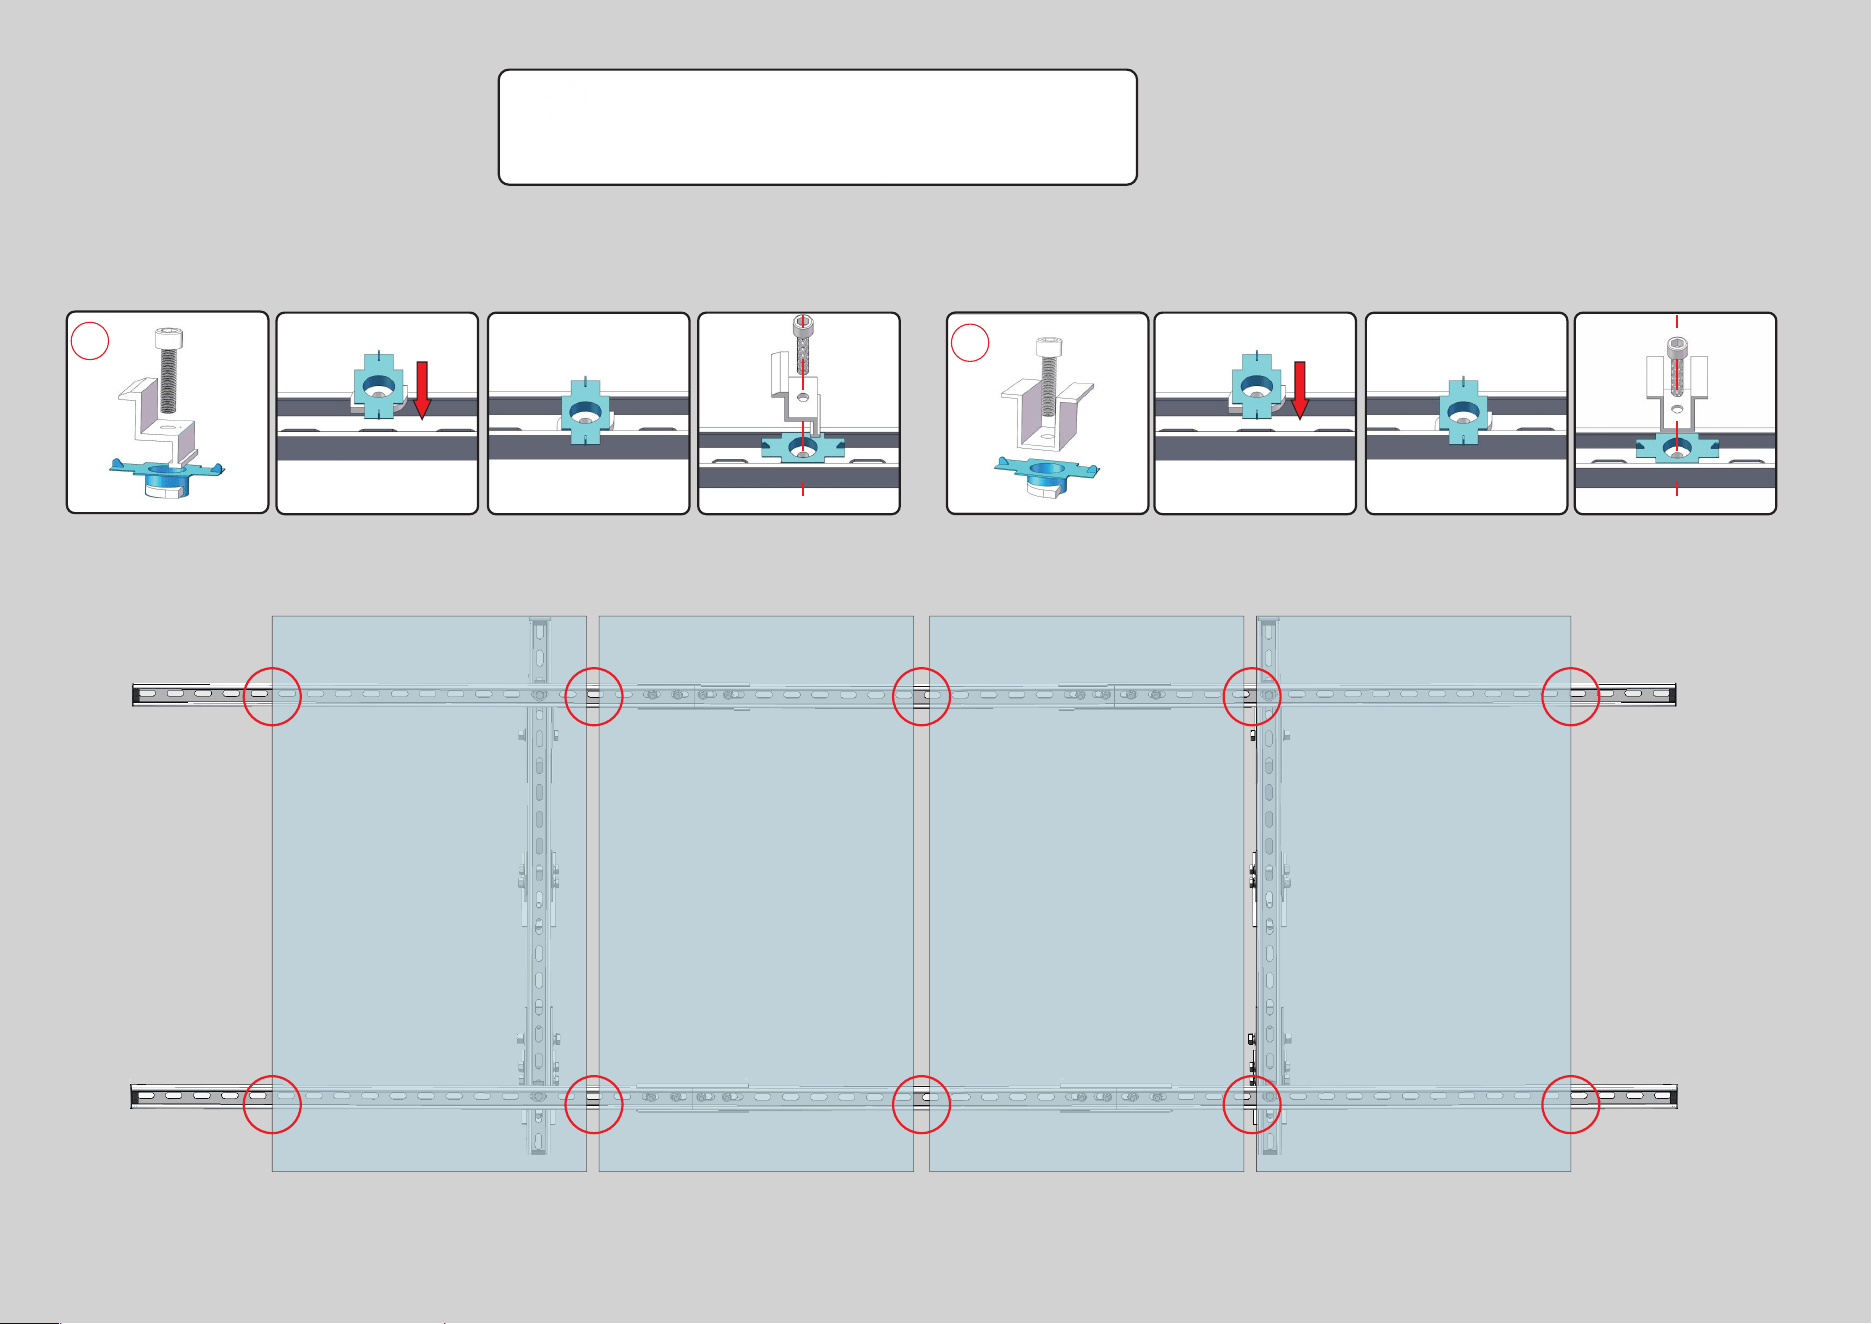
Tips:Only suitable for standard solar panels with a thickness of 35mm.
ECO-WORTHY
Solar Panel
195W
ECO-WORTHY
Solar Panel
195W
Step 1 Step 2 Step 3 Step 1 Step 2 Step 3
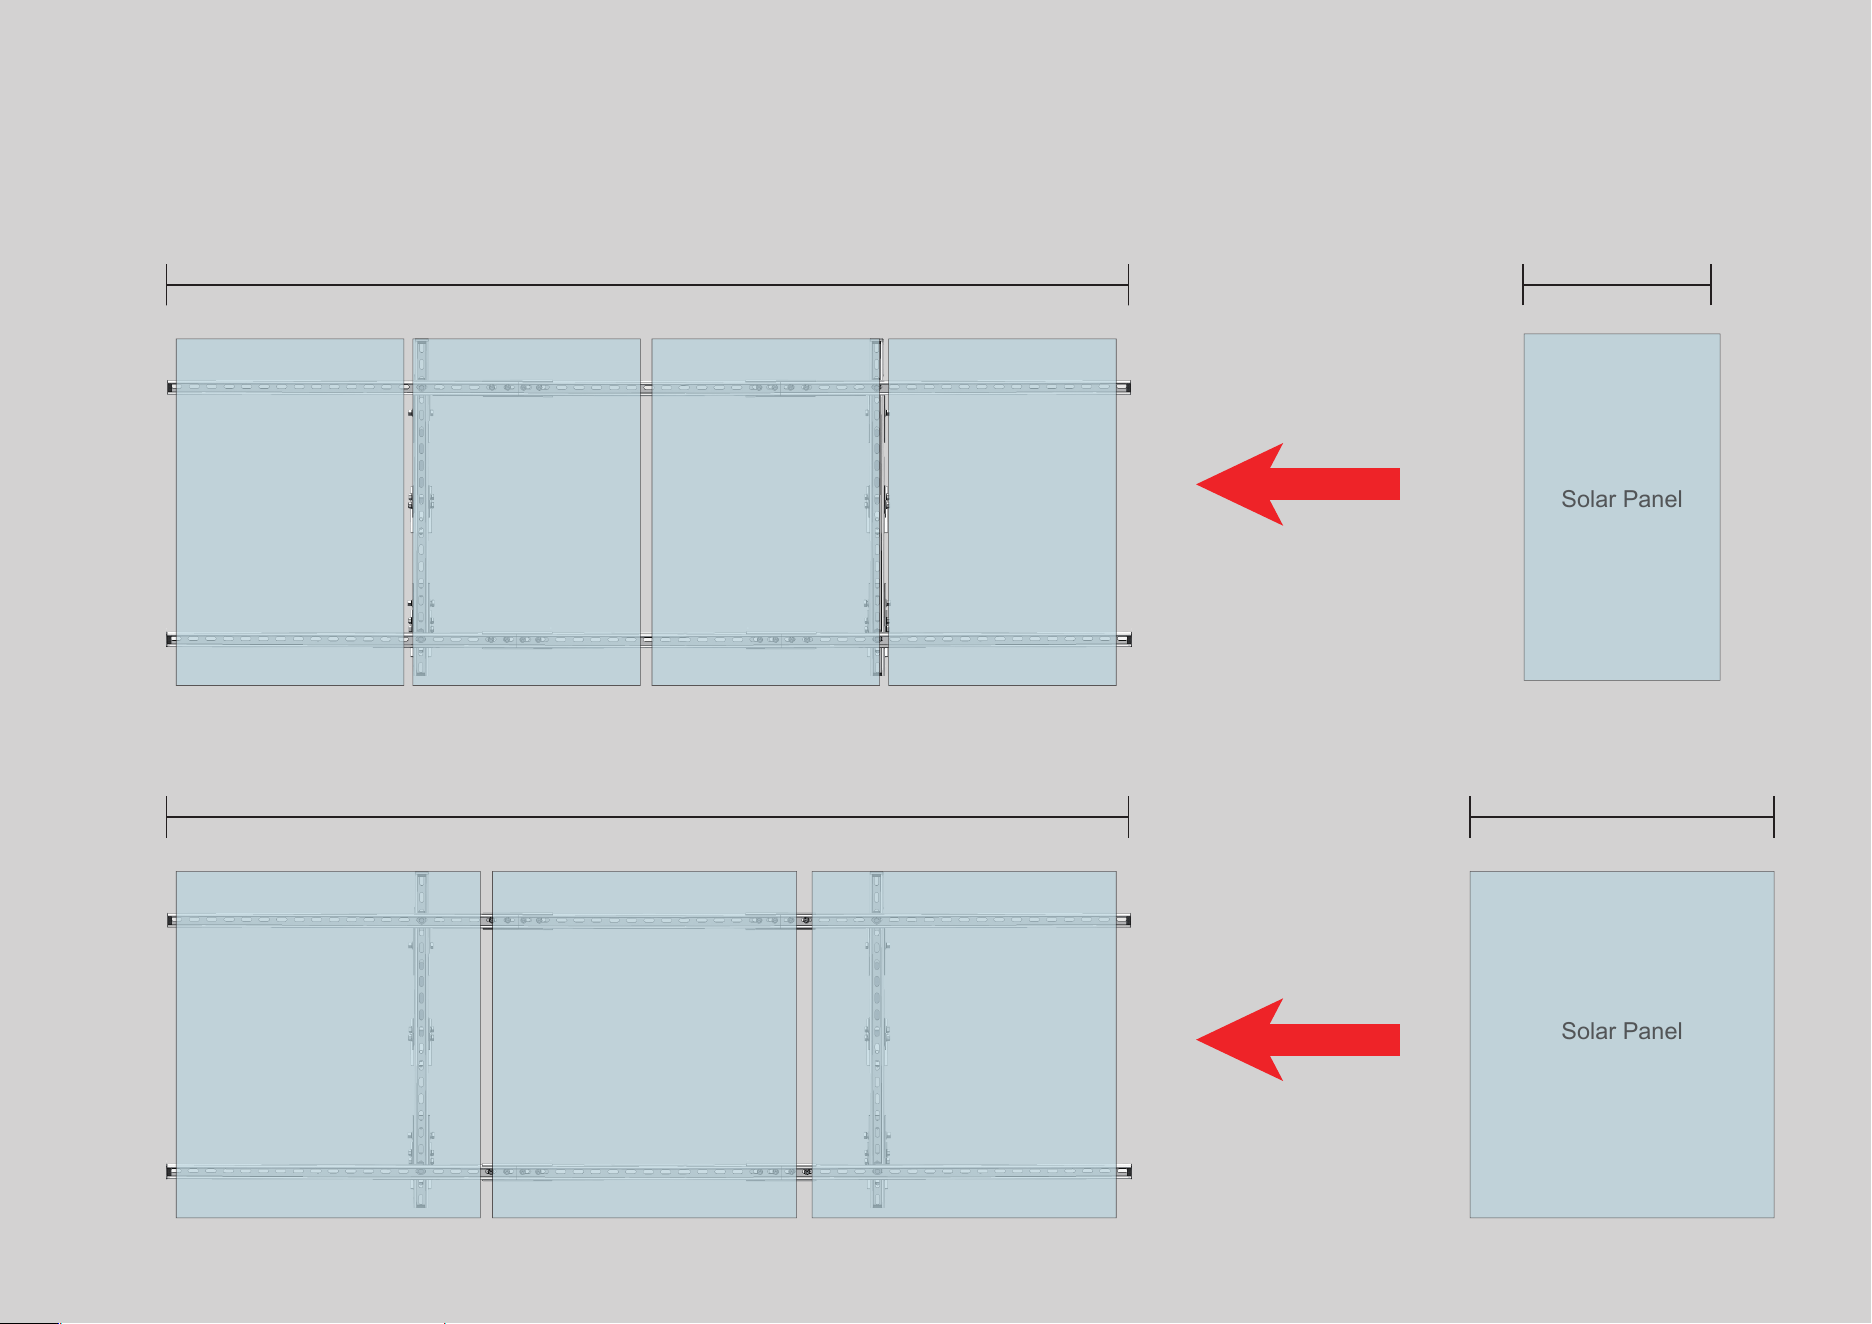
< 700mm/27.5in
<
930mm/38.6in
3000mm
9
Solar Panel
Size Adaptation
Solar Panel
3000mm
Solar Panel
4PCS
Solar Panel
3PCS
Solar Panel
SUPPORT
· For the use of this manual and the conditions or methods of installation, operation, use, and maintenance of product are
beyond ECO-WORTHY's control, ECO-WORTHY does not accept responsibility and expressly disclaims liability for any
loss, damage, or expense arising out of or in any way connected with such installation, operation, use or mainteneance.
· No responsibility is assumed by ECO-WORTHY for any infringement of patents or other rights of third parties, which may
result from the use of the product.
· No license is granted by implication or otherwise under any patent or patent rights.
· The information in this manual is based on ECO-WORTHY's knowledge and experience and is believed to be reliable,
but such information including product specification (without limitations) and suggestions do not constitute a warranty,
expresses or implied.
· ECO-WORTHY reserves the right to change the manual, the products, the specifications, or product information sheets
without prior notice.
· This product is covered by a 1 year warranty provided by ECO-WORTHY Ltd. We will refund or partial refund or replace
any products with defects due to our imprudence. If you are experiencing technical problems and cannot find a solution in
this manual, please contact ECO-WORTHY for further assistance.
Contact Number: Email: Installation & Setting Video:
US: 1-866-939-8222 customer.service@eco-worthy.com
UK: +44 20 7570 0328
DE: +49 693-1090-113
Mehrteiliges Solarpanel
Montagebügel
Version 1.1
Willkommen bei ECO-WORTHY Solar Expert!
Hergestellt aus hochfestem verzinktem Stahl, wird diese Halterung dazu führen, dass Ihre
Solarmodule mehr Energie von der Sonne im richtigen Winkel erhalten. Ändern der Ein-
bauposition der Pfosten, um den Winkel der Halterung entsprechend dem Breitengrad
Ihres Wohnortes zu ändern.
Breite der Halterung: 3m/9,84in.
300cm/9.84ft
100cm/3.28ft
For the convenience
of display, some of the bolts
would be shown as a simplified
figure. Please refer to the material
box on the top of every step.
WAS IST IN DER BOX
x8
1000mm
Kanalstahl
x8
Expansion
Bolt
x12
M10 Flanschmutter
x16
M8 Flache
Unterlegscheibe
x48
Flache Unterlegscheibe
x12
60mm M10
Sechskantschraube
x24
20mm M8
Sechskantschraube
x2
41*41*1.2*600mm
Stahl mit Perforation
x2
41*41*1.2*200mm
Stahl mit Perforation
x4
41mm bracket
Halterungsbasis
x4
U-förmig
Verbinder
x4
Solarpanel
Seitenklemme
x6
Solarpanel
Mittelklemme
x4
Halterungsbasis
Mittelklemme
x4
Dreieckgelenk
x8
41*21mm Kappe
Für die Bequemlichkeit
der Anzeige, einige der Bolzen
würde als vereinfachteAbbildung.
Bitte beziehen Sie sich auf das
Material auf jedem Schritt.
1
Bulid der
Hauptpole
Das Ende mit einem Loch nach
oben zeigen.
Installieren Sie die Bracket Bases
mit den Main Poles mit M10
60mm Sechskantschraube und
M10 Flanschmutter.
x2
41*41*1.2*600mm
Stahl mit Perforation
x2
41*41*1.2*200mm
Stahl mit Perforation
x4
41mm
Halterungsbasis
x8
M10 Hex
Kappenschraube
x8
60mm M10
Flanschmutter
Reparieren Sie die
Hauptpole
2
Tipps: Alle konkaven Seiten der Säulen müssen nach Süden ausgerichtet sein.
Der Abstand zwischen den gleichen Säulen muss 150cm/4,92ft betragen.
150cm/4.92ft
x4
Erweiterung
Bolzen
Reparieren Sie die
Hauptpole
3
Tipps:Es ist sehr wichtig, den besten Winkel Ihrer Halterung vor der Installation herauszufinden, denn sobald die 4-Sockel
befestigt sind, kann der Winkel nicht mehr geändert werden. Bei Problemen wenden Sie sich bitte an den Kundendienst.
Je näher die langen Stangen und die kurzen Stangen sind, desto mehr neigt sich die Hal-
terung. Wenn der Abstand 59cm beträgt, beträgt der Winkel 28,5°.
150cm/4.92ft
59cm
1.94ft
59cm
1.94ft
x4
Erweiterung
Bolzen
Verbinden Sie das Dreieck
Gemeinsam mit den Polen
Bestätigen Sie den besten Winkel und verbinden Sie das Dreiecksgelenk mit den Polen. Nehmen Sie
Los Angeles als Beispiel, der beste Winkel ist 35°/40°.
x4
Dreieck
Gelenk
4
Tipps: Fixieren Sie die Schrauben nicht fest, bevor Sie die Neigungshalterung installieren.
x4
M10 Hex
Kappenschraube
x4
M10 Flansch
Nuss
X cm
X cm =59cm
=45cm
=35cm
=25cm
28.5°
33°
38°
45°
5
Setzen Sie den Kanalstahl auf den Joint und verbinden Sie sie zusam-
men, wie die folgende Abbildung zeigt.
Verbinden Sie den Kanal
Stahl zum Gelenk
x2
1000mm
Kanalstahl
x8
M8 Hex
Kappenschraube
x8
M8 Flansch
Nuss
x16
Flach
Unterlegscheibe
3m lange Pole bauen mit
der Kanal Stahl
6
Tipps:Bitte beachten Sie, dass die Verbindung stark angezogen werden muss.
x6
1000mm
Kanalstahl
x4
U-förmig
Verbinder
x8
M8 Hex
Kappenschraube
x8
M8 Flansch
Nuss
x16
Flach
Unterlegscheibe
x8
41*21mm
Kappe
Installieren Sie die
3m lange Pole
7
Tipps:Bitte beachten Sie, dass die 3m langen Stangen in der Mitte des Dreiecksgelenks befestigt werden sollten, wie der
Zoom in Abb zeigt.
150cm/4.92ft
75cm/2.46ft
75cm/2.46ft
1
3
4
2
x4
Halterungsbasis
Mittelklemme
8
x4
Installation
Solarpanele
x6
Installation
Solarpanele
A
B
90° 90°
Installation
Solarpanele
B
B
B
B
B
B
A
A
A
A
Tipps: Nur geeignet für Standard-Solarmodule mit einer Dicke von 35mm.
ECO-WORTHY
Solarpanel
195W
ECO-WORTHY
Solarpanel
195W
Schritt 1 Schritt 2 Schritt 3 Schritt 1 Schritt 2 Schritt 3
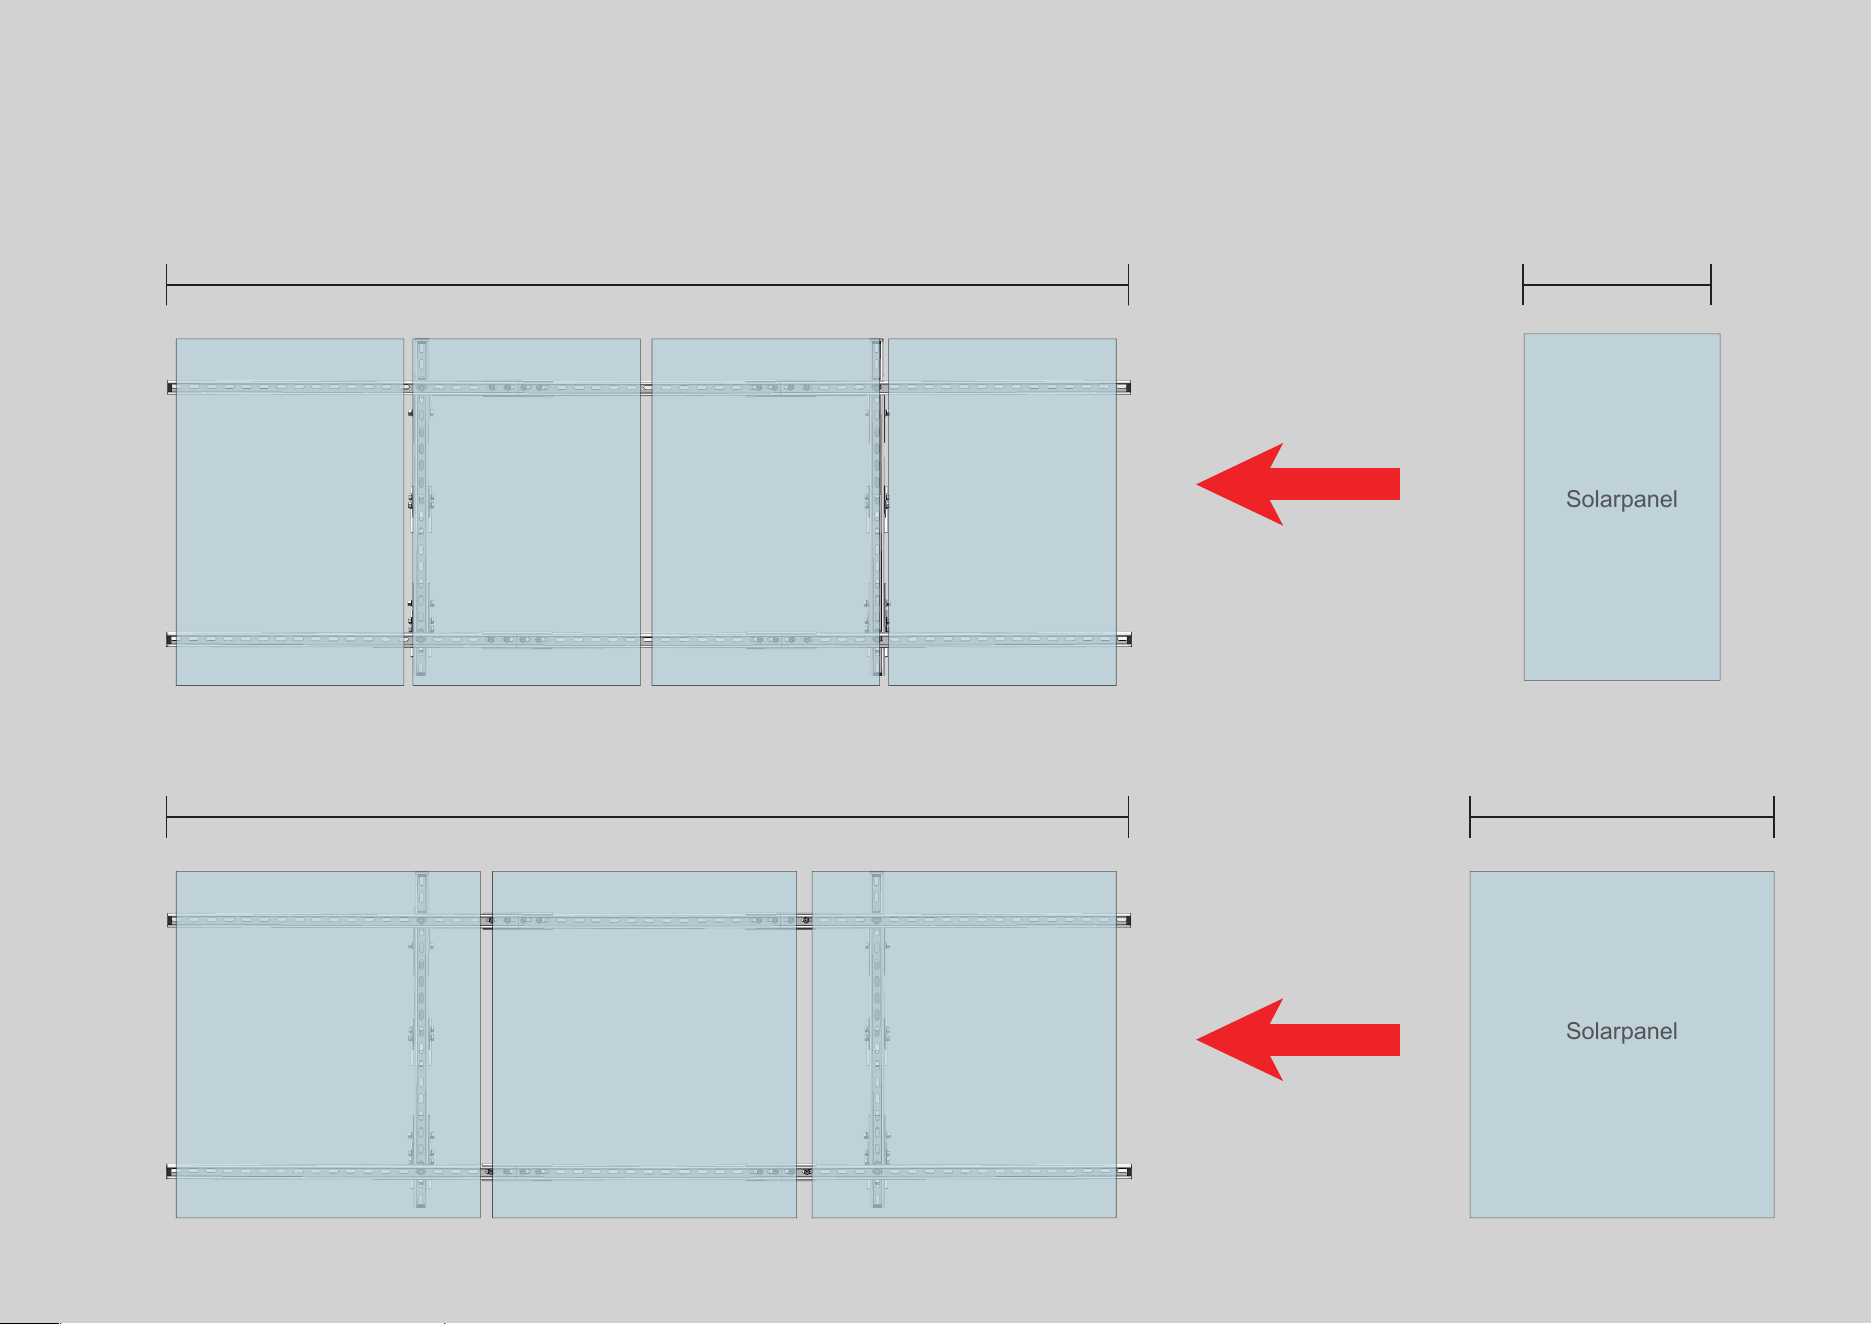
< 700mm/27.5in
<
930mm/38.6in
3000mm
9
Solarpanel
Größenanpassung
Solarpanel
3000mm
Solarpanel
4PCS
Solarpanel
3PCS
Solarpanel
UNTERSTÜTZUNG
· Für die Verwendung dieses Handbuchs und die Bedingungen oder Methoden der Installation, des Betriebs, der Verwendung und
der Wartung des Produkts außerhalb der Kontrolle von ECO-WORTHY liegen, übernimmt ECO-WORTHY keine Verantwortung
und lehnt ausdrücklich die Haftung für Verluste, Schäden oder Kosten ab, die aus oder in irgendeiner Weise mit einer solchen
Installation, Betrieb, Verwendung oder Wartung entstehen.
· ECO-WORTHY übernimmt keine Verantwortung für jegliche Verletzung von Patenten oder anderen Rechten Dritter, die sich aus
der Verwendung des Produkts ergeben können.
· Keine Lizenz wird stillschweigend oder anderweitig unter Patent- oder Patentrechten erteilt.
· Die Informationen in diesem Handbuch basieren auf dem Wissen und der Erfahrung von ECO-WORTHY und werden als
zuverlässig angesehen, aber solche Informationen einschließlich Produktspezifikationen (ohne Einschränkungen) und Vorschläge
stellen keine ausdrückliche oder implizite Garantie dar.
· ECO-WORTHY behält sich das Recht vor, das Handbuch, die Produkte, die Spezifikationen oder Produktinformationsblätter ohne
vorherige Ankündigung zu ändern.
· Dieses Produkt ist durch eine einjährige Garantie von ECO-WORTHY Ltd. abgedeckt. Wir erstatten oder teilweise Rückerstattung
oder ersetzen Produkte mit Mängeln aufgrund unserer Unvorsichtigkeit. Wenn Sie technische Probleme haben und in diesem
Handbuch keine Lösung finden können, wenden Sie sich bitte an ECO-WORTHY, um weitere Hilfe zu erhalten.
Kontaktnummer: E-Mail: Installation-Einstellung Video:
US: 1-866-939-8222 customer.service@eco-worthy.com
UK: +44 20 7570 0328
DE: +49 693-1090-113