
SUPPORT
If you are experiencing technical problems and cannot find a solution in this
manual,please contact ECO-WORTHY for further assistance.
·Call:1-866 939 8222(US) +44 20 7570 0328(UK) +49 693 1090 113(GE)
·Email:ecoworthy.ca@gmaicom
200W
COMPLETE
OFF GRID
SOLAR PANEL KIT

Contents
1.2 Wiring & Installtion
3.1 Overview
3.2 Advantage·More Efficient Monocrystalline Solar Panel, Kit for 4Kwh
electricity power/day
4.1 Mounting location
4.2 Installtion
4.3 Connect controller to battery
5.1 Location
5.1.1 Using Z-Brackets on an rv roof: “Flat Mount”
5.1.2 Well-nuts and blind holes
5.2 solar panel connection
5.2.1 Connect every 2 solar parallel in series
5.2.2 connect solar panels to controller
1.Introduction
2.General safety CAUTION
3.Product Introduction
4.Charge Controller Installation
5.Solar Panel Installtion
6.Inverter Wiring
7.Maintenance
8.support
.....................................................1
......................................1
............................................2
....................................3
...........................................6
.................................................11
....................................................13
.........................................................13
....................................................................1
..............................................................................2
....................................................................2
....................................................................3
...............................................................................4
......................................................5
................................................................................6
...........................7
....................................................9
..............................................................9
...............................10
.......................................10
1.Introduction
2.General safety
Congratulations on purchasing a high quality renewable energy product
where building your own off-grid solar system has never been easier.
Although installation is quick and professional using the materials
included in your kit, it is important to read this manual and understand
all the mechanical and electrical requirements prior to beginning instal-
lation.
If you have any concerns about the suitability of
the kit for your application, or doubts about any of
the instructions in this manual, please contact our
Support at 1-866 939 8222(US) or via E-mail at
ecoworthy[email protected]
1.2 Wiring & Installtion
• Disconnect all power sources before carrying out the installation.
• Make sure the correct polarity is observed when making connections
between the solar panel, charge controller, and battery. Damage due to
reverse polarity connection is not covered by warranty.
• Wear appropriate clothing and safety gear including protective
eyewear when performing any electrical installation.
CAUTION:
Please read the instruction manual carefully before attempting to carry
out any installation or wiring. Contact Technical support for any ques-
tions concerning the installation.
CAUTION:
When solar panels are placed in sunlight or other light sources, they
produce electrical energy and a voltage will appear on the output termi-
nals. To avoid a shock hazard, keep the panel covered with a dark
material during installation and avoid contact with the output terminals.
Before handling the solar panel, test the voltage output of the solar
panel with a voltmeter to confirm it is not outputting voltage.
-1-

3.Product Introduction
3.1 Overview
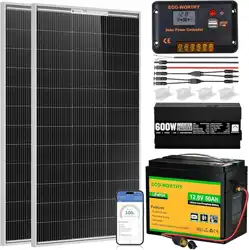
ECO-WORTHY 200W Complete Kit, An electricity supply project, which
is clean, quiet and compatible with RV, Trailer, Shed and House roof.
The complete kit contains 2 efficient Mono-crystalline solar panels,
PWM solar charger controller, Deep-Cycle Lithium batteries, Pure
sine-wave Inverter, and all necessary wires. The installation compo-
nents also includes resistant aluminum Z shape brackets and bolts and
nuts designed for plane installation.
ECO-WORTHY offer various photovoltaic off-grid kits and combina-
tions, designed to be modifiable and easy expandable, contact us for
more information.
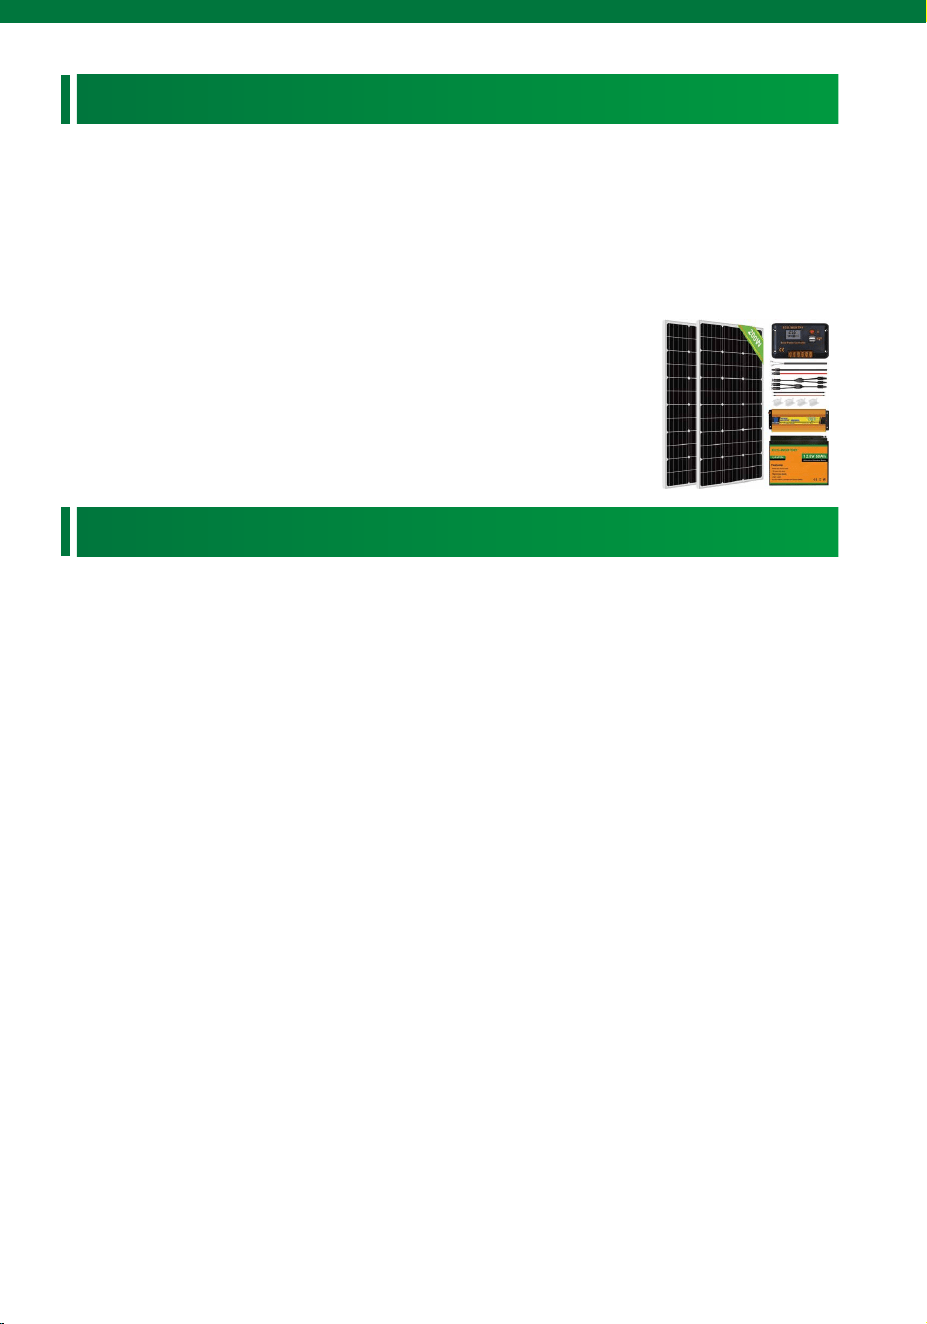
3.2 Package Included
2 pieces 100W 18V Mono solar panel 1
piece 600W 12V-220V Inverter
1 piece 50Ah Lithium Battery
2 sets Z style mounting sets
1 piece 20A controller
1 pair 5m (16.4') solar cables with a
connector in each.(black & red cable)
1 pair Y Style solar connector
1 piece controller to battery cable
• Wiring size and installation must comply with the National Electrical
Code (NEC).
• Make sure all wire connections are tight and secure, loose connec-
tions may cause sparks and intermittent behavior.
• Do not perform installation in the presence of any flammable materials.
• Make sure you work in a well-ventilated area
• Use properly insulated tools and remove metal items such as rings,
bracelets, and watches.
-2-
4.Charge Controller Installation
3.2 Advantage
• Efficient Mono-crystalline solar panels, 0.8Kwh/day maximum electric-
ity generation
• 600W Pure sine-wave Inverter (Peak Power 1200w), practicable for
AC appliances, fridge, TV, radio, kettle, etc.
• Auxiliary power for RV ,Boat,Cabin,Shed
• Power supply for kinds of appliances in multiple off-grid circumstances
• 3000+ times deep cycle Lithium battery
-3-
4.1 Mounting location
Insure all terminating connections are clean and tight to prevent arcing
and overheating.The controller must be installed in an area that satis-
fies all of the following conditions:
1. Dry: Avoid any location where water can contact the controller
2. Cool: Ambient air temperature between 30°F and 105°F (0°C and
40°C)
3. Ventilated: Allow at least 2 in (50 mm) of clearance above and below
and at least 1 in (25 mm) on each side for proper air flow.
Mounting is optional but for best results, locate the charge controller as
close as possible to the batteries and the batteries and charge controller
as close to the panels as practical.
The controller can be mounted on a vertical or horizontal surface. Be
sure to orient the controller so that any open end of the controller (if
applicable) is at the top. This will prevent foreign material from settling
into the unit.
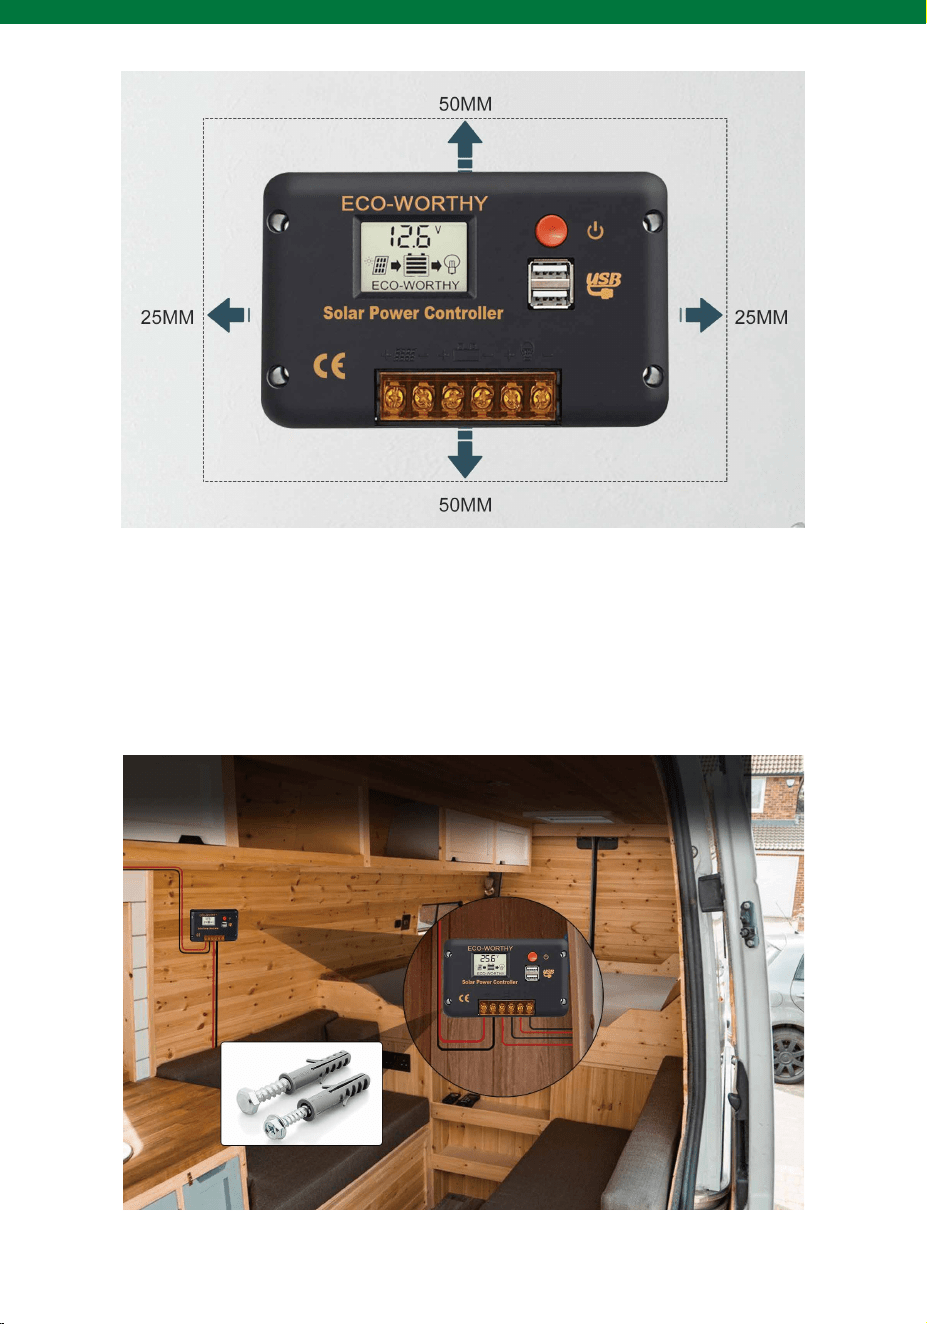
4.2 Installtion
Drill the holes and make sure that the holes are sized appropriately to
avoid loose screws. If you are mounting the controller on drywall, it is
recommended that you use expansion anchors
-4-
-5-
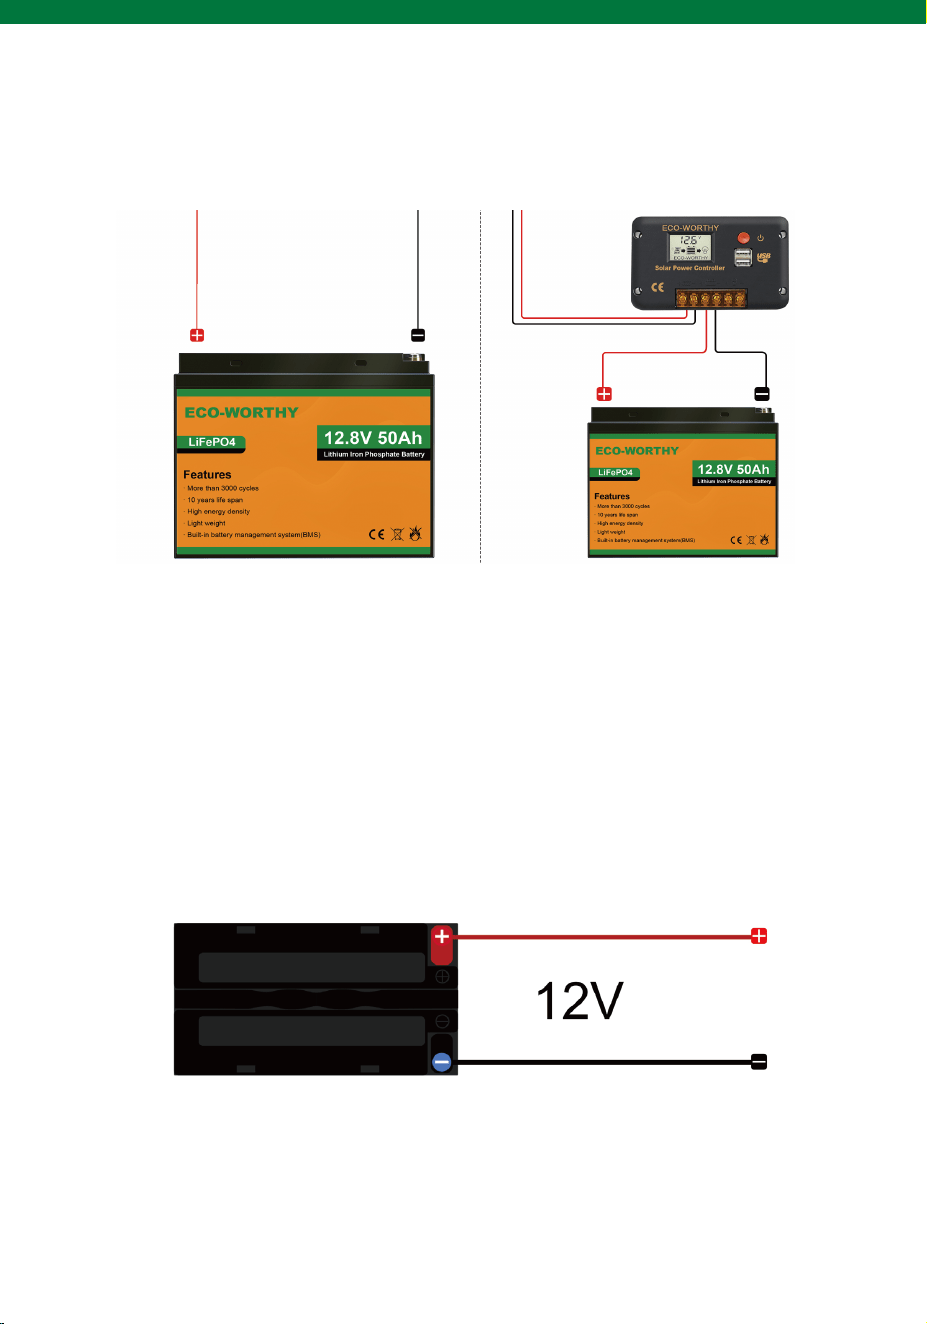
4.3 Connect controller to battery
Wire 2*20Ah batteries in parallel with the battery cables, then connect
the battery group to the controller.
The battery(s) must firstly be connected to the charge controller before
proceeding to any other connections. Most of PWM controllers are
equipped with auto battery voltage testing function, it’s necessary to
measure if the charging voltage is compatible with the battery.
1.First, connect the negative cable to the negative (−) battery post. The
best way to secure the battery cable to the battery post is by using a ring
terminal. A bolt is sufficient to secure the ring terminal onto the battery
post, allowing for better electrical contact. Next, connect the bare
stranded portion of the cable to the negative (−) battery input terminal
on the charge controller.
2.Similarly to the instructions described above, connect the positive
cable to the positive (+) battery post. An in-line fuse can be added to this
cable for better protection, a fuse holder would be commonly recom-
mended. This is usually done with a fuse holder.

5.Solar Panel Installtion
5.1 Location
Determine a location for the solar panel that is in direct sunlight and
clear of any shading by adjacent obstacles such as trees, roof over-
hangs, etc. Ideally, the panels will be positioned to minimize the wiring
distance between the solar panel and the charge controller.
For Northern Hemisphere installations, the solar panels should be
mounted at angle facing true south (true north for Southern Hemisphere
installations). The mounting angle should be equal to the latitude loca-
tion of where you are installing the solar panels.
For example, the latitude of Miami, Florida, USA is 25 degrees. There-
fore, solar panels installed in this area should ideally be facing true
south at a tilt angle of 25 degrees.
It’s hard to get a perfect installation angle due to limit of installation
space.
Try to make it a ideal angel face to the sun, to get the output power as
much as possible.
-6-
-7-
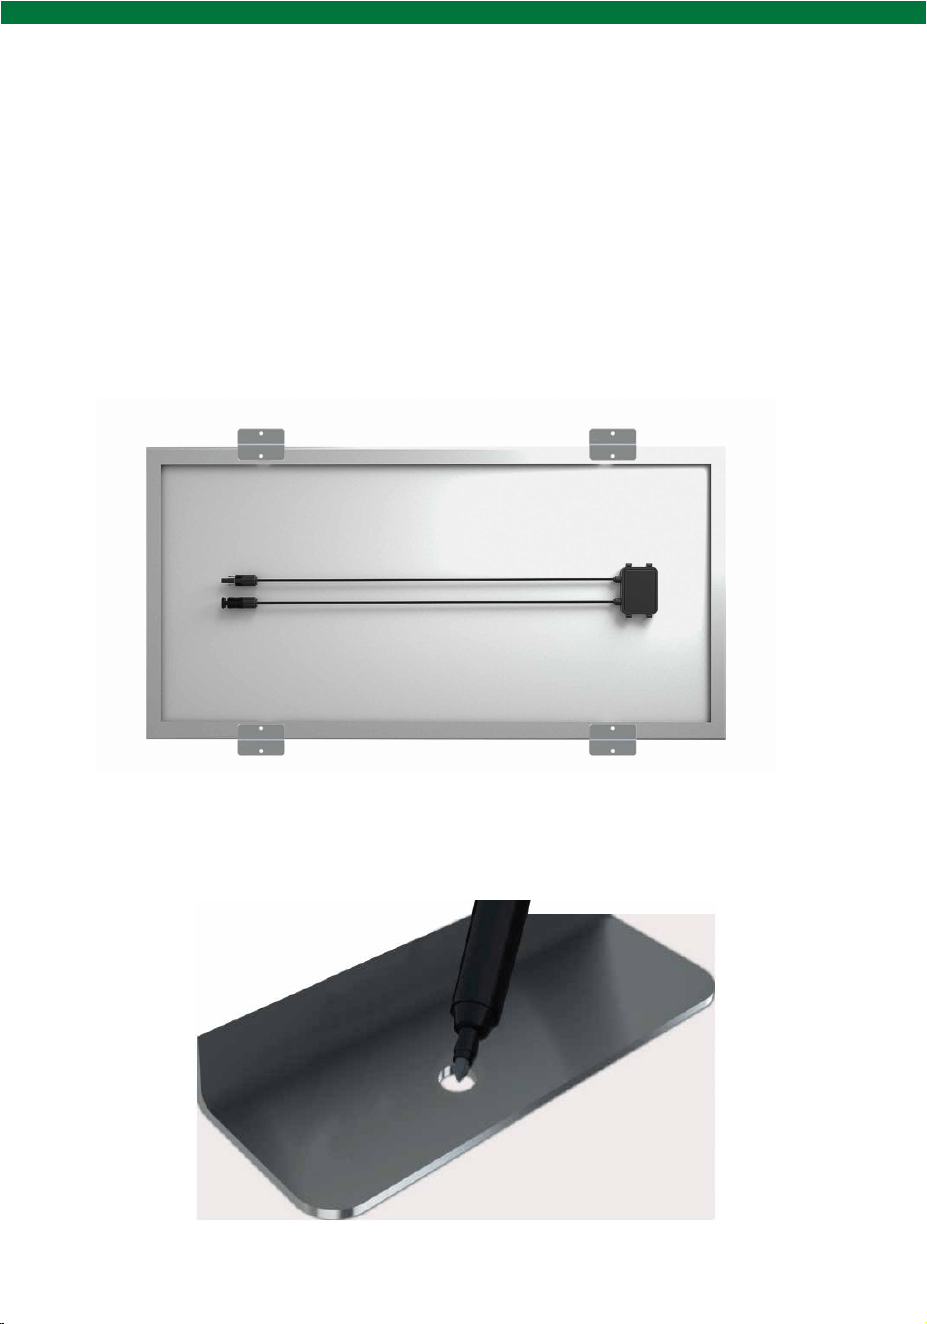
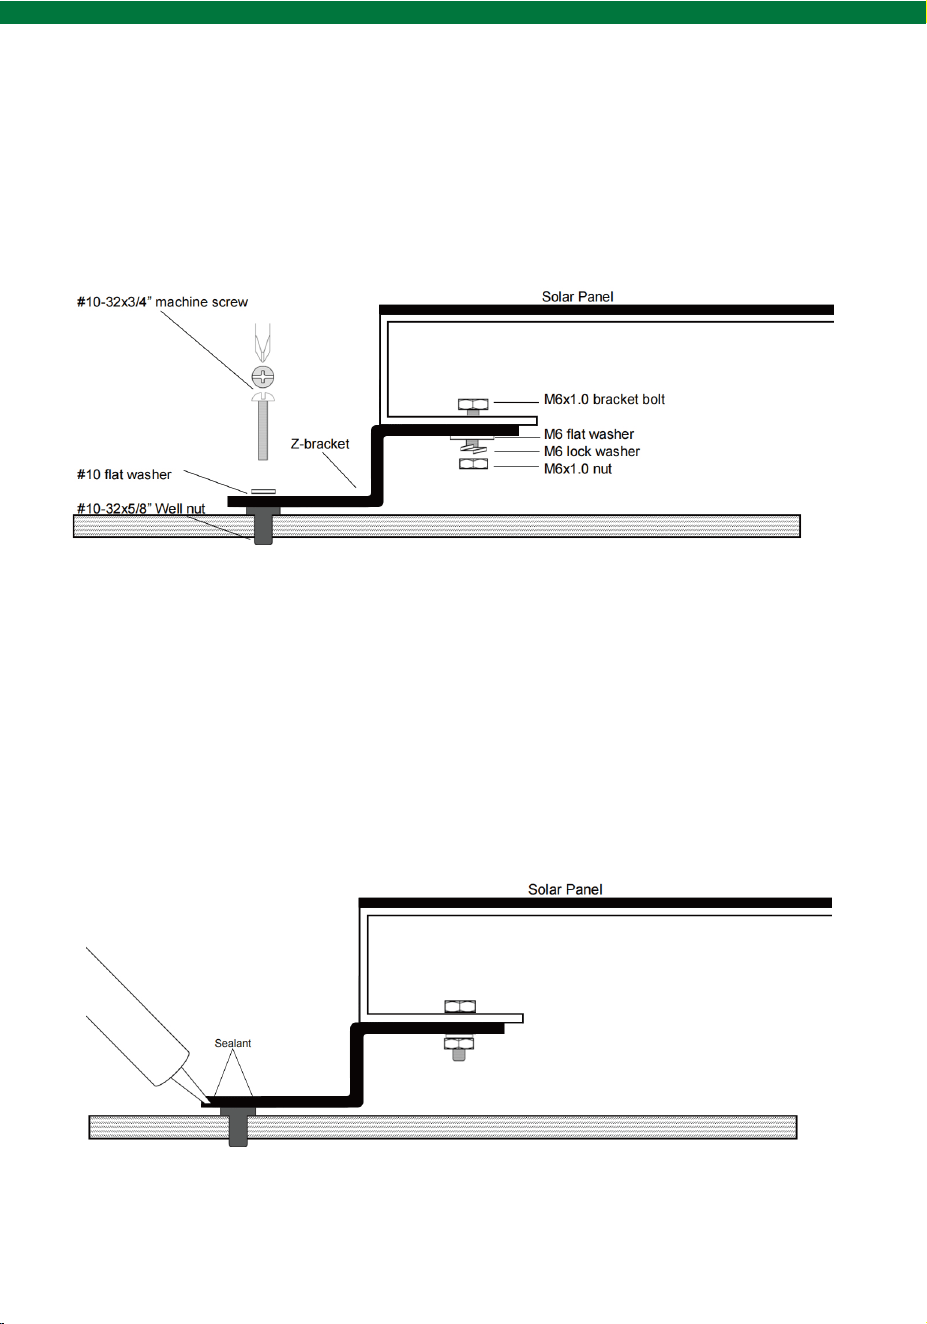
5.1.1 Use Z-Brackets on an rv roof: “Flat Mount”
When mounting a panel using Z-Brackets, a well-nut (also known as
“expansion nut”) is often used on a pre-drilled hole. This procedure
safely secures the panel on thin cabin roofs or RV roofs. Using a
well-nut is recommended, as the rubber expansion prevents water leak-
age.( The Z-Bracket set does not include well nuts)
Step1:Attaching the Z-Bracket to a solar panel
Locate the mounting holes on the solar panel.Solar Panels have four
mounting holes on each side.
Step2:Mark and drill holes
With the Z-Brackets attached to the frame, the panel can be laid on a
mounting surface, making it easier to mark the holes for the well-nut.
-8-
Step 3: Attaching the panel to the roof
Figure picture below illustrates the correct way to use the well-nut. The
rubber flange has to be flushed on the roofline. The Z-Bracket,along
with the flat washer and lock washer, hold the well-nut in place when the
screw is fastened.
Gently insert the well nut into the drill hole . Be careful not to push the
well nut flange completely into the holes. Make sure the flange is
flushed on the roofline.Before attaching the panel to the roof, a film of
caulk can be laid between the RV roof and the Z-Bracket. Even though
the well-nut provides a watertight bond, this provides additional sealant.
-9-
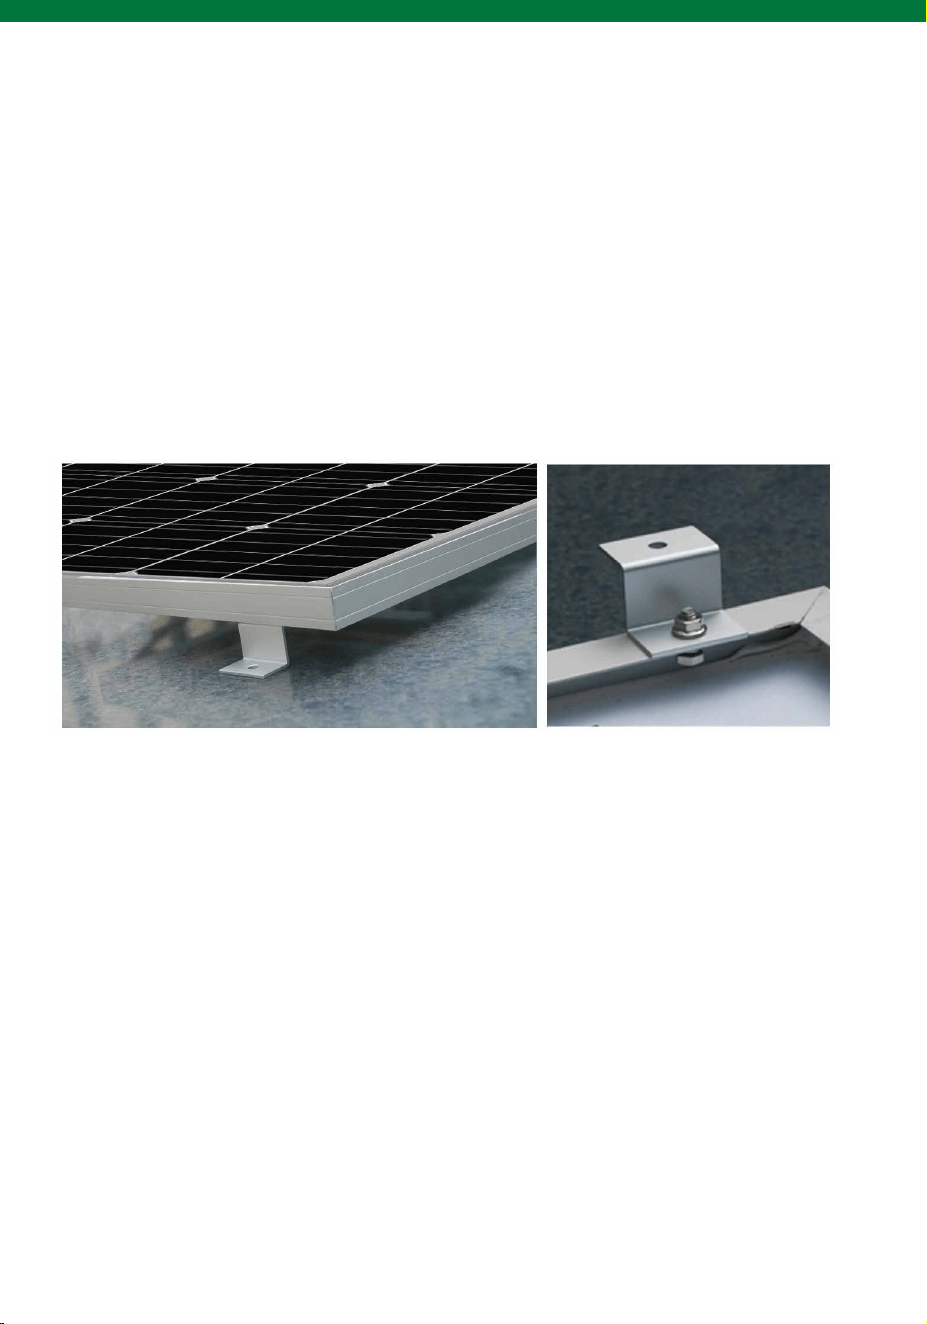
5.1.2 Well-nuts and blind holes
The well-nut does not only work for thin RV roofs, but also works in blind
holes. Tightening a well-nut in a blind hole will cause the body to expand
and apply pressure against the walls of the hole. This also creates a
secure hold of the solar module.
Using the Z-Brackets on a house roof
The Z-Brackets can also be used on a house roof if the proper roof pen-
etration sealant is used between the roof and the Z-Bracket. A roof pen-
etration sealant is necessary, as water might leak into the house if the
holes are not properly sealed.
5.2 solar panel connection
Do NOT connect the solar panels to the solar charge controller
until the solar charge controller has been completely connected to
the 12v volt batteries
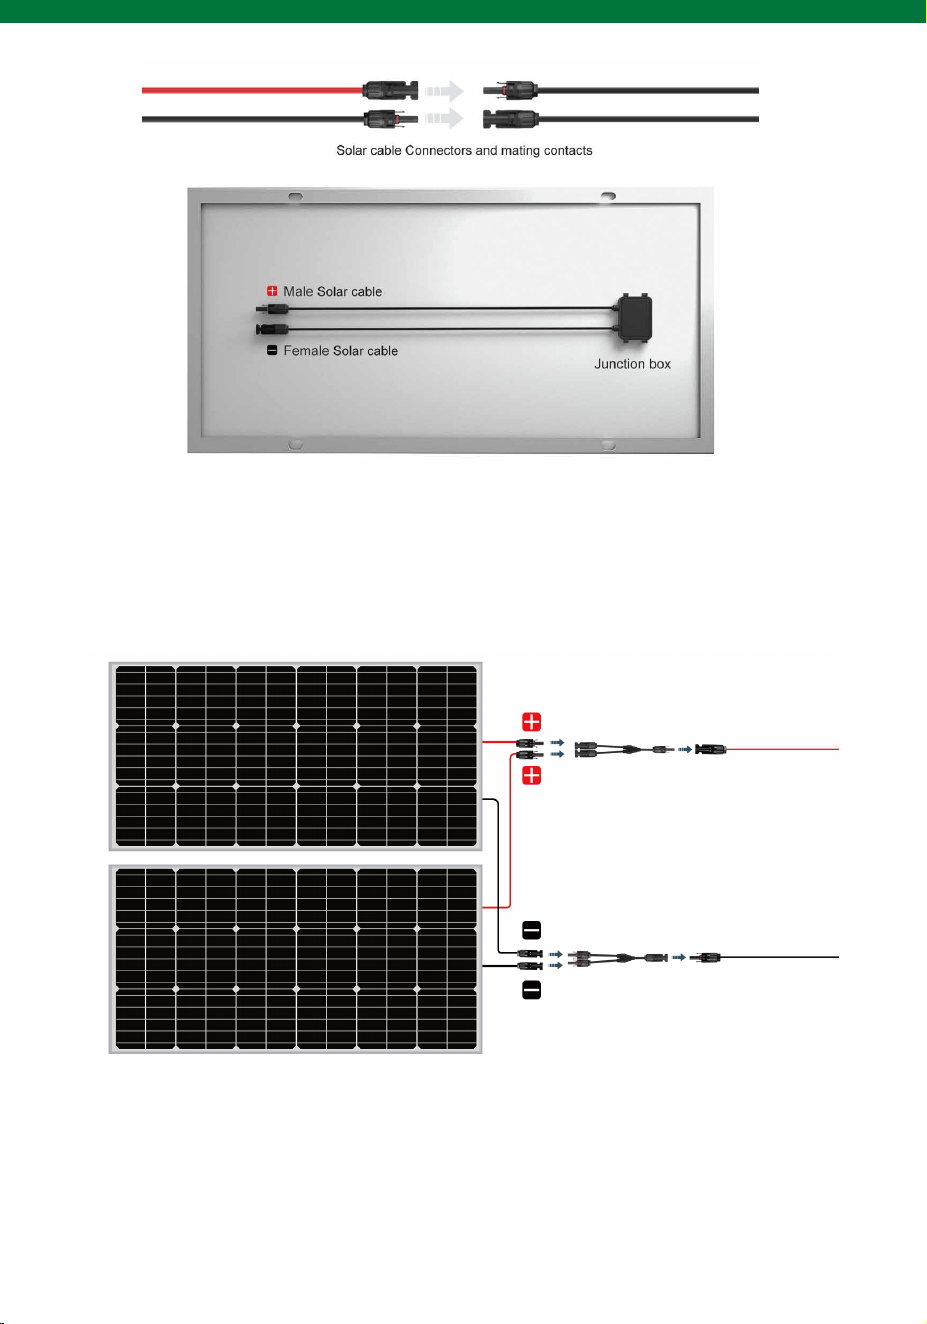
Each ECO-WORTHY Solar Panel will have an a pair of solar cable Con-
nector System that consists of male and female connectors. This type
of connector system is easy to install and uses a “snap-in” type of safety
locking clips to lock the two mating connectors. The “snap in” feature
avoids unintentional disconnection. The mating contacts are sealed
against the ingress of dust and water.
-10-
5.2.1 Connect every 2 solar parallel in series
To build a 12v DC solar panel kit with 2 panels, wire them in parallel with
the Y branch connectors.
5.2.2 Connect solar panels to controller
Wire the panels’ positive and negative posts comes from the Y branch-
es separately to the P&N posts of the controller with 1 pair of solar
cable.
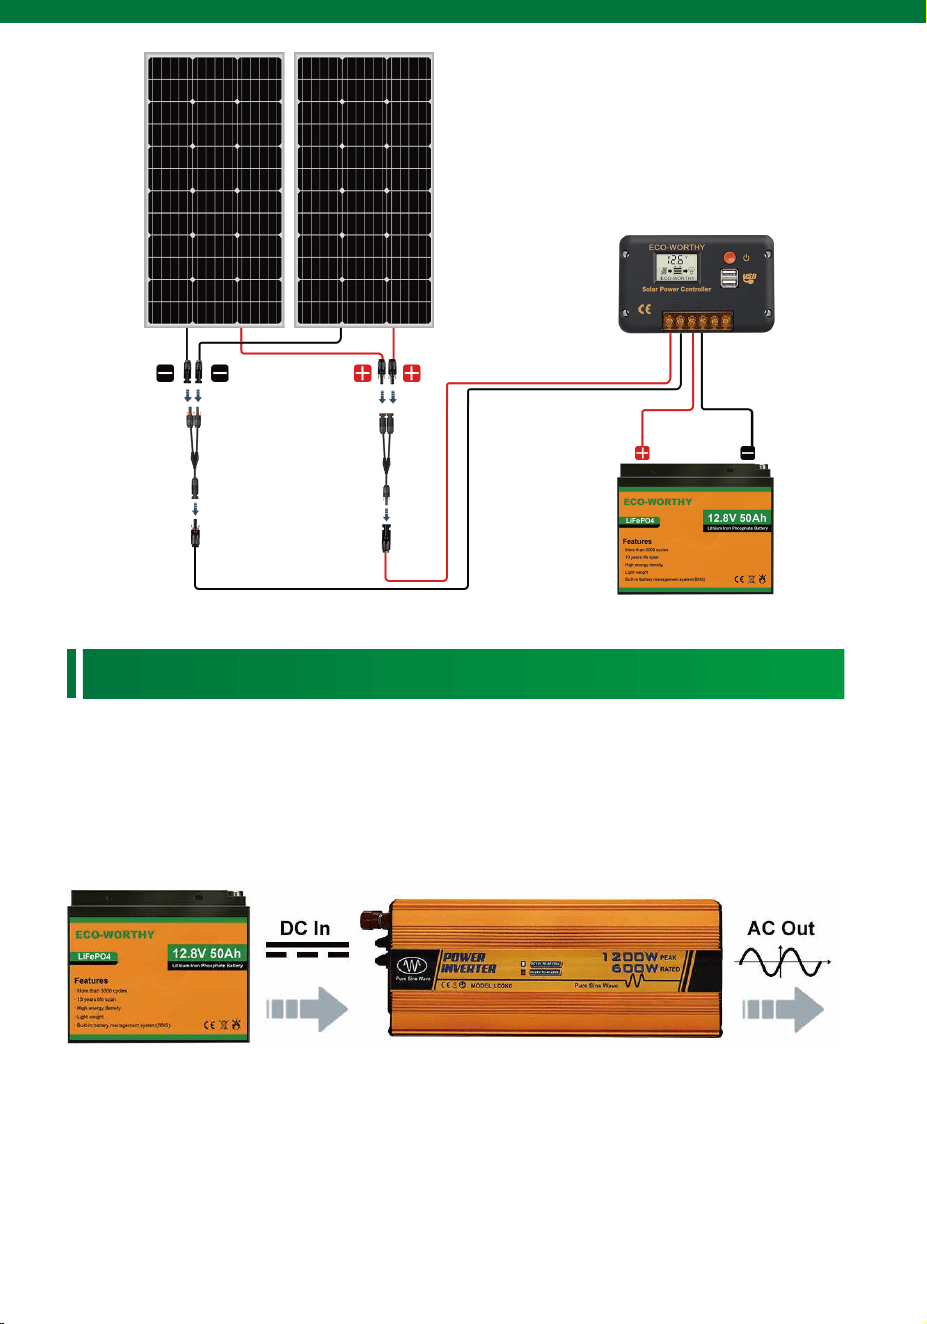
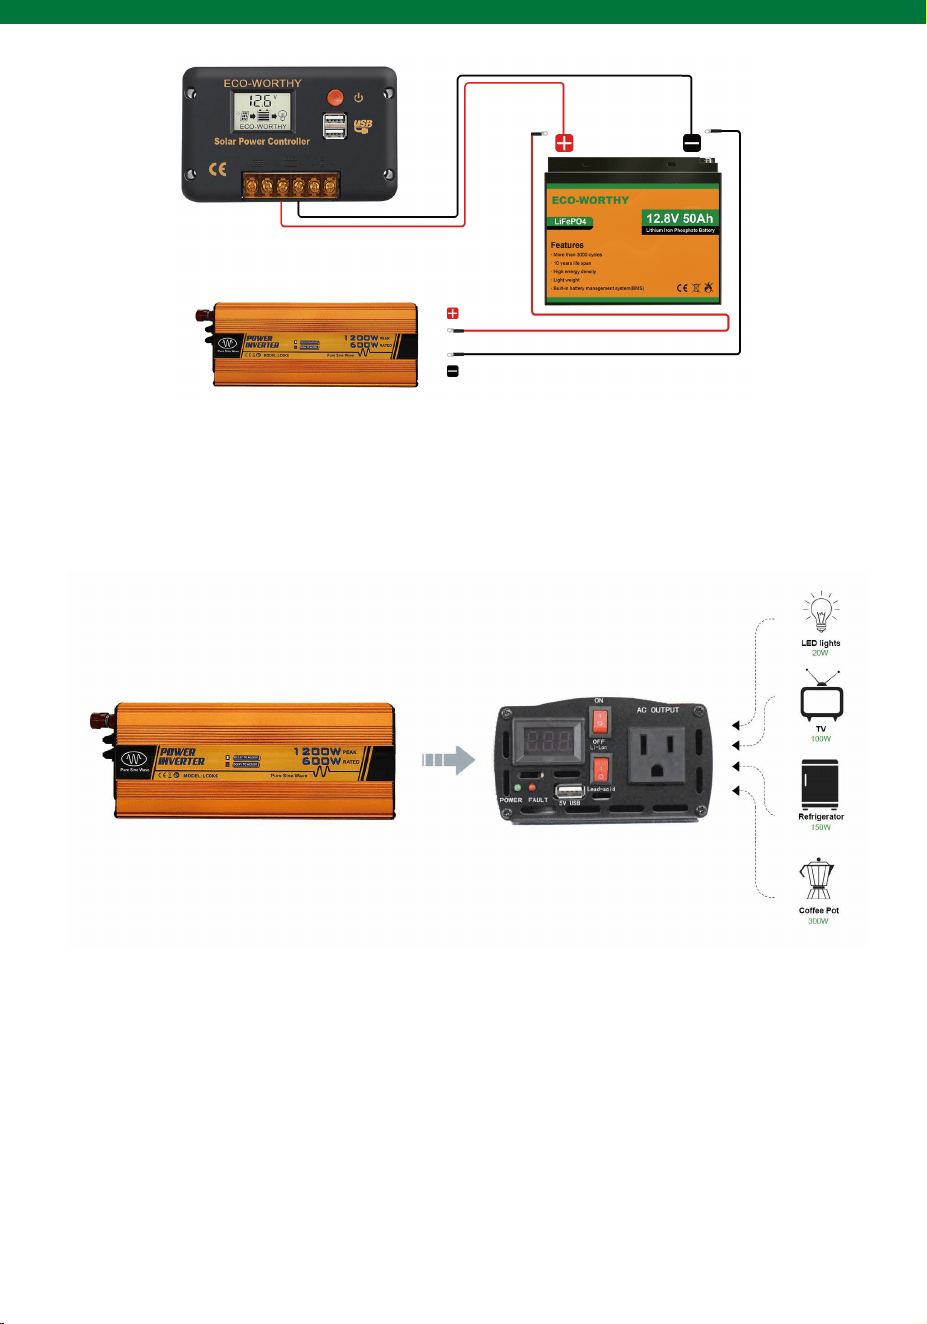
6.Inverter Wiring
-11-
A power inverter, or inverter, is an electrical device that transform the
direct current (DC) from the panel to alternating current (AC) for those
AC appliances.
Diagram
Step 1: Set the switch to OFF position (inverter and appliances).
Step 2: Connecting inverter to battery
Connect the battery cables to their respective colors on the inverter.
-12-
Step 3: Connecting electrical appliances to inverter
Make sure the power load is within the rated power of the inverter. The
start power of the appliances should not exceed the peak power of the
inverter.
Caution!
The negative battery terminal and the chassis ground of the inverter
should be connected to a system ground.
Once the devices are connected to the AC outlet, they are ready to be
powered. When the inverter is not in use, it is recommended that you
turn off the inverter (switch in OFF position)

7.Maintenance
-13-
The following maintenance is recommended to ensure optimum perfor-
mance and longevity of the solar system:
• Clean the glass surface of the solar panel when necessary. Always
use water and a soft sponge or cloth for cleaning. A mild, non-abrasive
cleaning agent can be used to remove dirt.
• Check the electrical and mechanical connections every six months to
verify that they are clean, secure and undamaged.
• Inspect the solar panels and make sure the surfaces are free from
dust, dirt, and other debris; clean with a wet cloth or glass cleaner if
necessary.
• Check to make sure all structural components, mechanical fasteners,
and electrical connections are secure, clean, and corrosion-free.
• Check and maintain the battery electrolyte levels at regular intervals
as per the battery manufacturer’s recommendations if flooded wet cell
lead acid batteries are used.
• Check and replace damaged components if necessary
8.Support
This product is covered by a 1 year warranty provided by ECO-WOR-
THY Ltd. We will refund or a partial refund or replace any products with
defects at our discretion.
If you are experiencing technical problems and cannot find a solution in
this manual, please contact ECO-WROTHY for further assistance.
• Call: (417) 459-7063
• Email:customer.service@eco-worthy.com