
58.03.001.0470
Operational Instruction
@ReolinkTech https://reolink.com
Apply to: Argus Eco Ultra
July 2024
QSG1_A_EN
Item No. : B360
EnglishEnglish1 2
What’s in the Box ············································································2
Camera Introduction ········································································3
Set up the Camera ··········································································4
Charge the Camera ·········································································6
Install the Camera ···········································································7
Troubleshooting ·············································································11
Specications ··············································································11
Important Safety Instructions (For Battery-Powered Cameras) ·······························11
Legal Disclaimer ············································································13
Notication of Compliance ··································································14
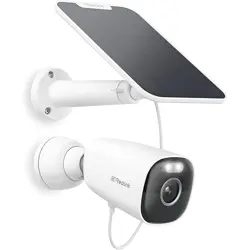
What's in the Box
Camera Security Mount Bracket’s
Mounting Plate
Surveillance Sign Mounting
Hole Template
Pack of Screws
USB-C Cable
EN
Contents
24 /7 V IDE O
SURV EILLANCE
PROTECTED BY
reolink. com
Strap
Operational
Instruction
Operational Instruction
EnglishEnglish3 4
MicroSD RESET
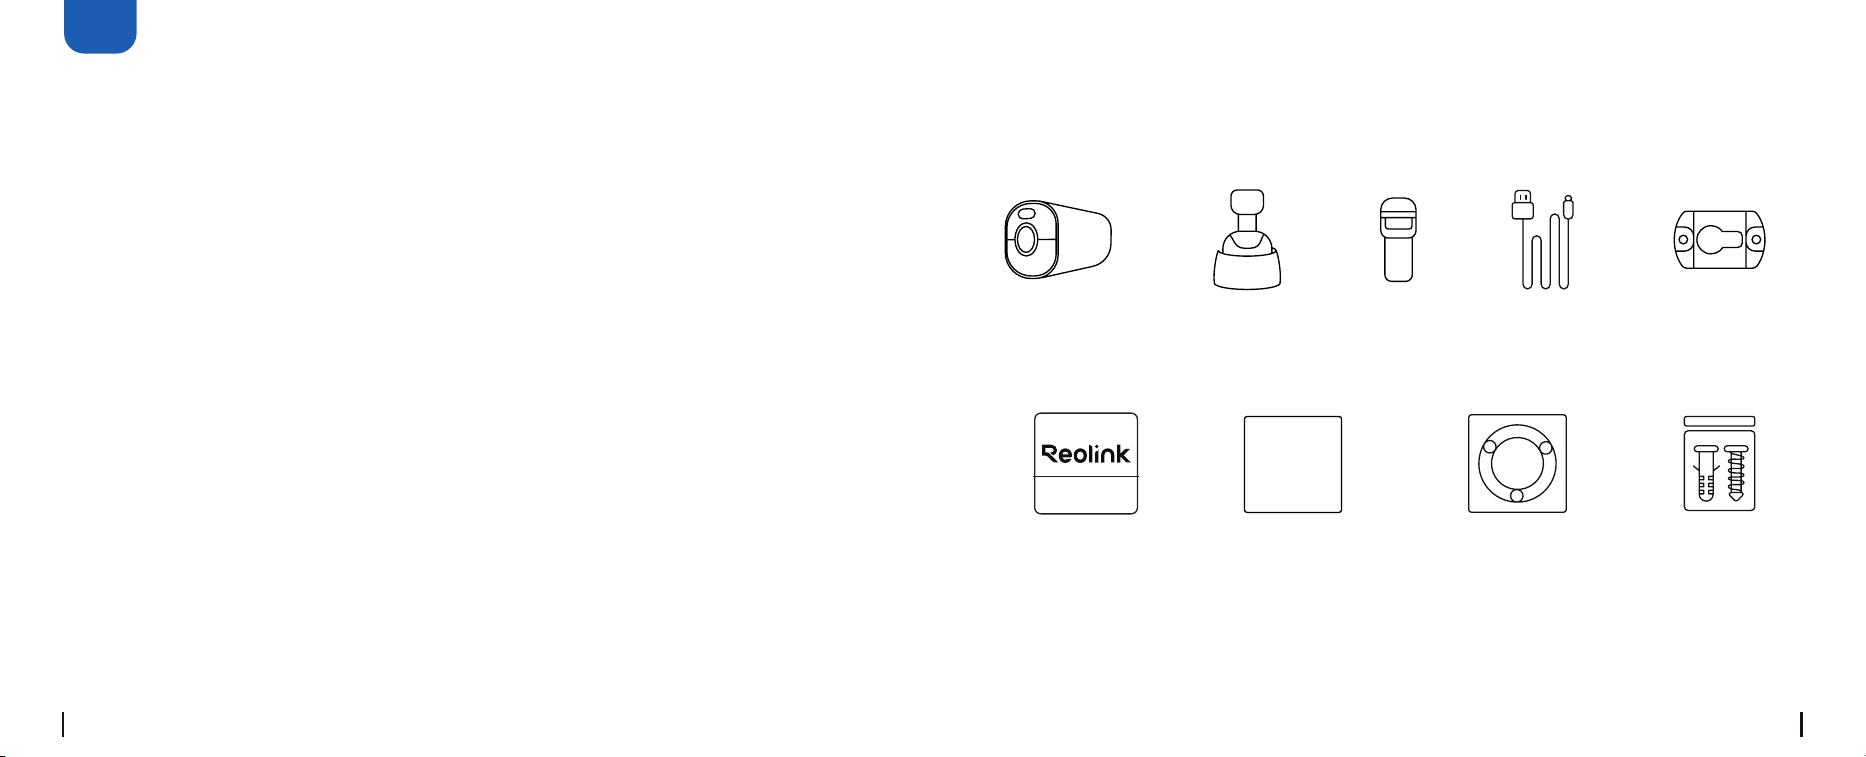
Camera Introduction
Dierent states of the status LED:
Camera States of Dierent Power Switch Actions:
Power on: Press and hold for 2s
Power o: Press and hold for 5s
Reset to factory settings: Press the button 3 times in a row when the camera is on
Blinking: Standby statusRed Light: Wi-Fi connection failed
Blue Light: Wi-Fi connection succeeded On: Working status
Status LED
Buit-in Mic
Spotlight
Infrared LEDs
Lens
Daylight Sensor
PIR Sensor
Power Switch
micro SD Card Slot
Speaker
USB-C Port
1
2
3
4
5
6
8
10
11
7
9
Set up the Camera
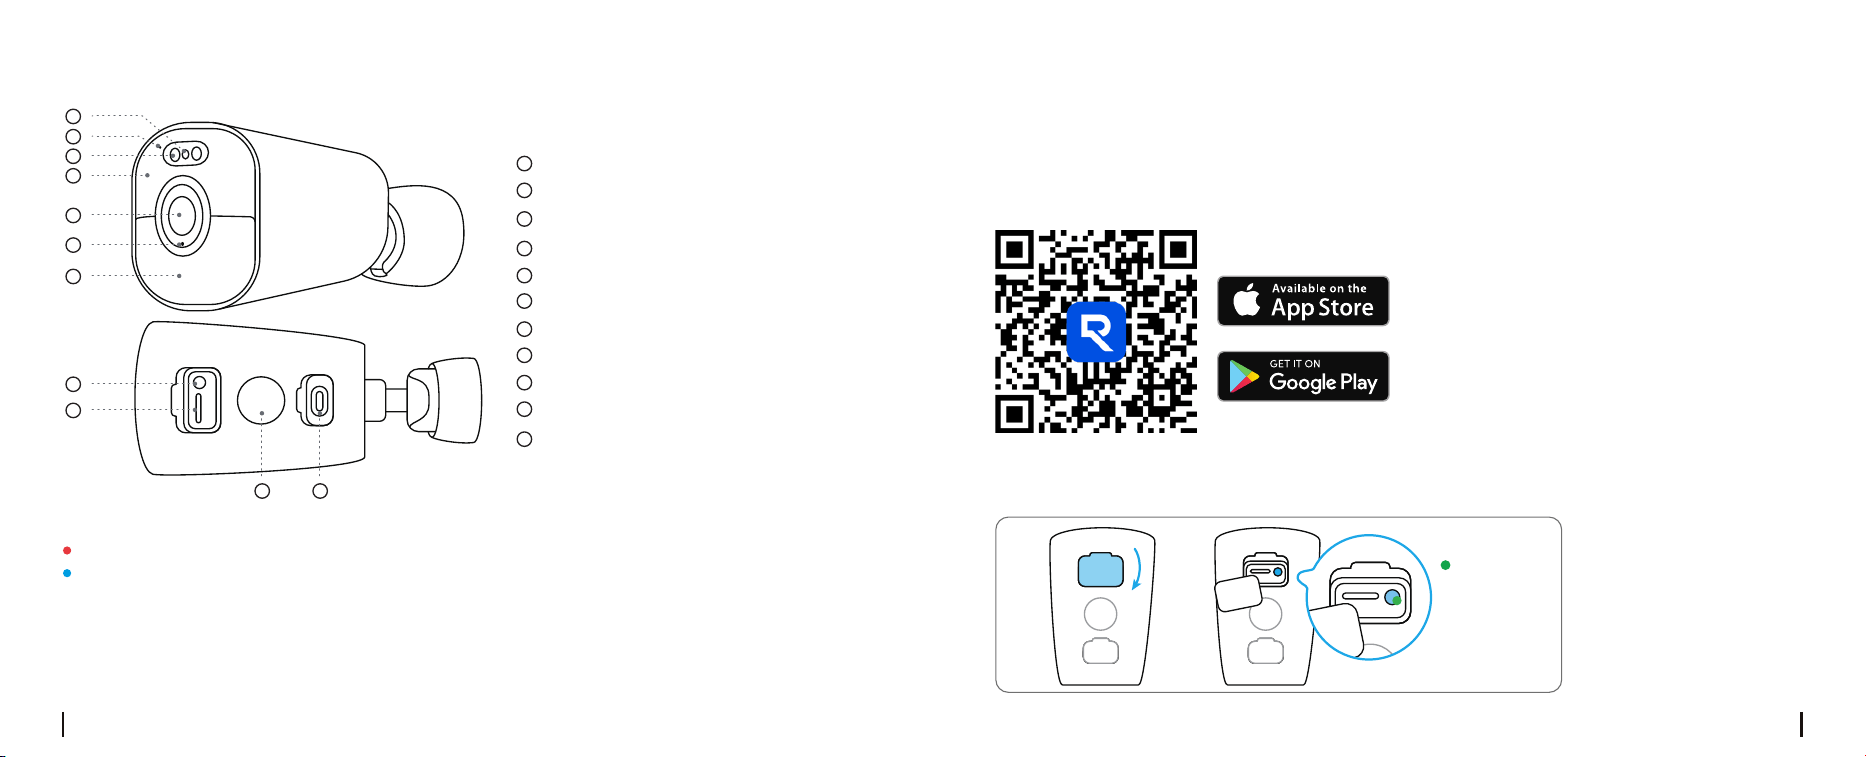
Set up the Camera Using a Smartphone
Press
Step 1 Scan to download the Reolink App from the App Store or Google Play store.
Step 2 Press and hold the power switch for two seconds to power on the camera.
5
3
4
2
1
6
7
8
10 11
9
EnglishEnglish5 6
Step 3 Launch the Reolink App, click the “ ” button in the top right corner to add the camera.
Scan the QR code on the device and follow the onscreen instructions to nish initial setup.
NOTE: This device supports 2.4 GHz and 5 GHz Wi-Fi networks. It is recommended to connect the
device to 5 GHz Wi-Fi for a better network experience.
Step 1 Download and install the Reolink Client: Go to https://reolink.com > Support > App&Client.
Step 2 Launch the Reolink Client, click the “ ” button, input the UID code of the camera to add it
and follow the onscreen instructions to nish initial setup.
Set up the Camera on PC (Optional)
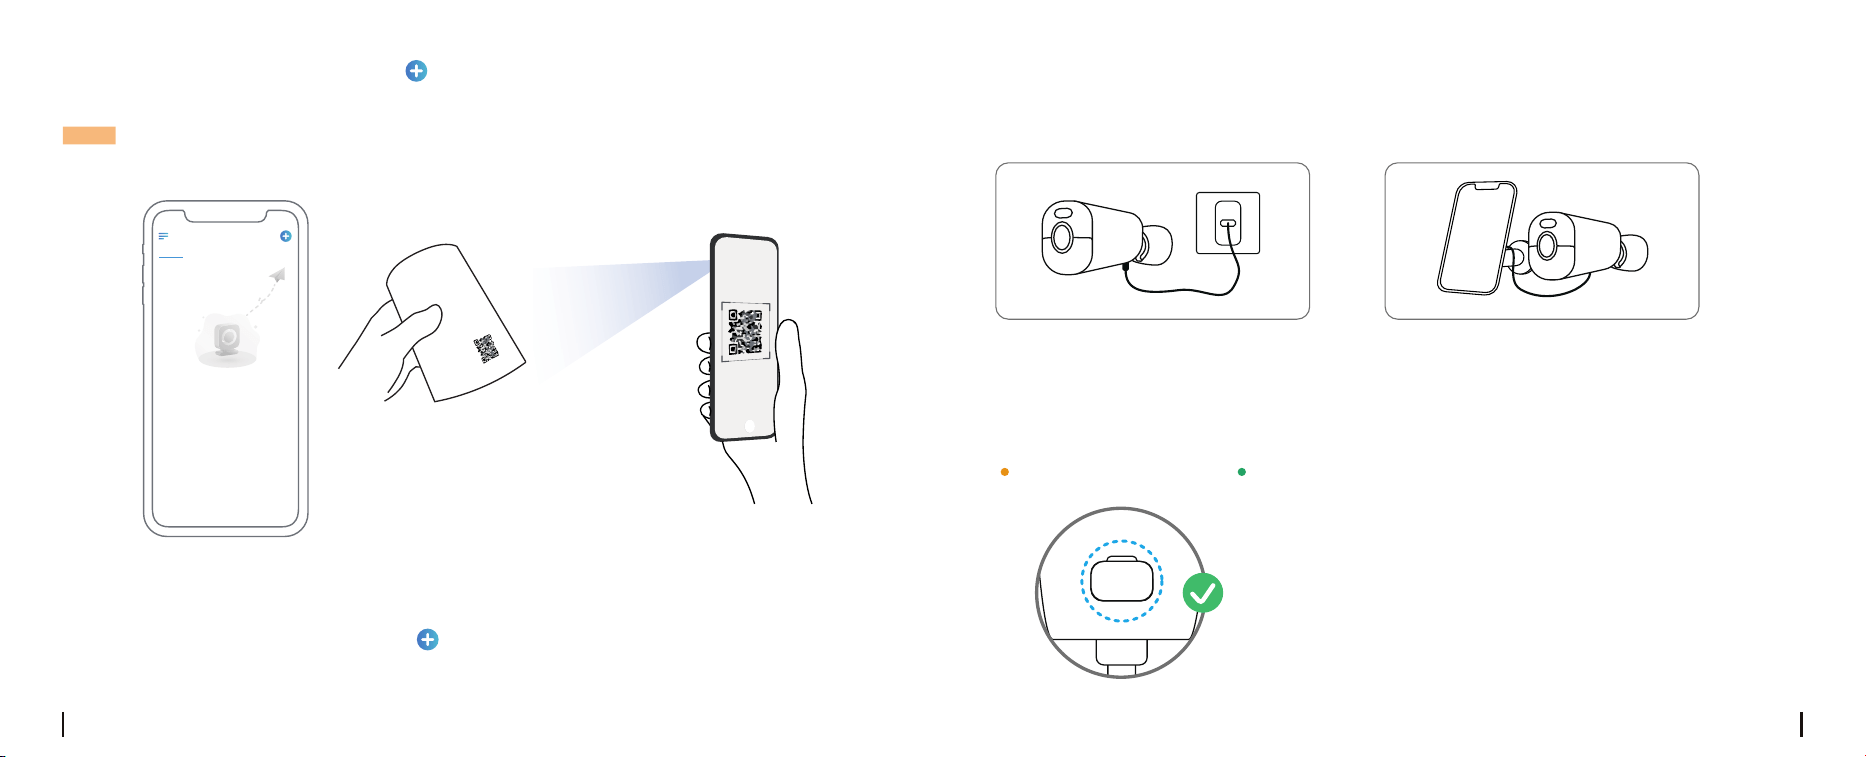
Charge the camera with a 5V power
Charge the Camera
adapter (not included).
Charge the camera with the Reolink Solar Panel
(not included if you only purchase the camera).
For better weatherproof performance, please
always cover the charging port with the rubber
plug after charging the camera.
Orange LED: Charging Green LED: Fully charged
Charging Indicator:
It’s recommended to fully charge the camera before installing it.
Devices
Cloud
You haven't added any device. Please click
the"+"button in the top right corner to add
EnglishEnglish7 8
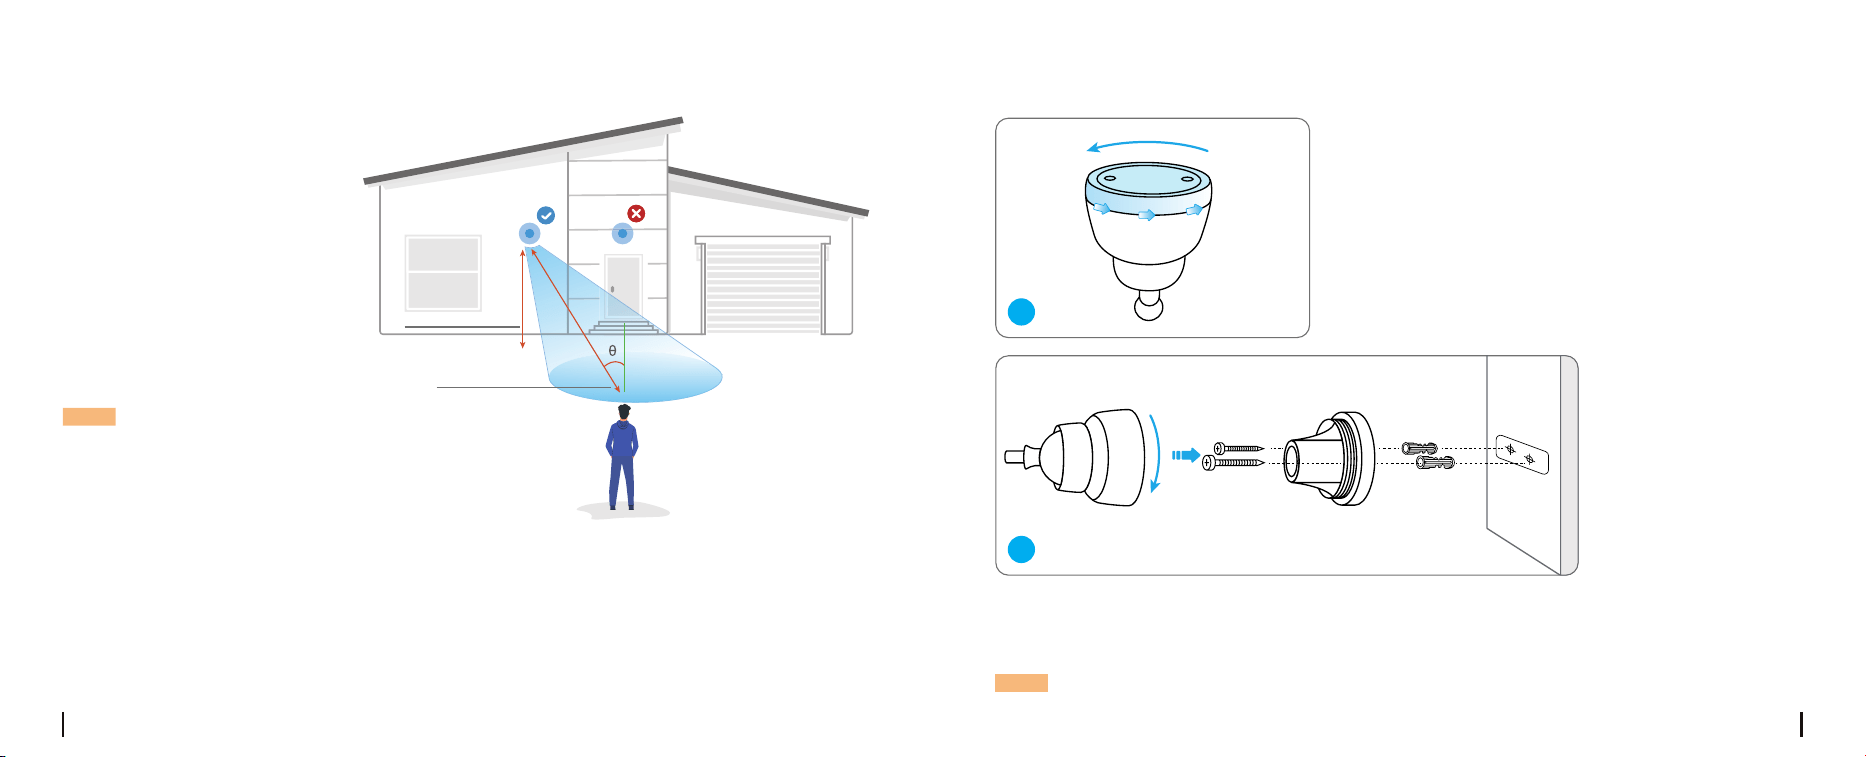
Install the Camera
• Install the camera 2-3 meters
(7-10 ft) above the ground. This
height maximizes the detection
range of the PIR motion sensor.
• For better motion detection
performance, please install the
camera angularly.
Notes on Camera
Installation Position
NOTE: If a moving object
approaches the PIR sensor
vertically, the camera may fail
to detect motion.
Mounting Height:
2-3 Meters
PIR Detection Distance:
2-10 Meters
Mount the Camera
Rotate to separate the base from
the bracket.
NOTE: Use the drywall anchors included in the package if needed.
1
2
long screws base drywall
anchors
In the desired location, mark drilling points with the mounting template, drill the holes, secure the
bracket base to the wall using the provided long screws, and then twist and tighten the other part
of the bracket onto the base.
EnglishEnglish9 10
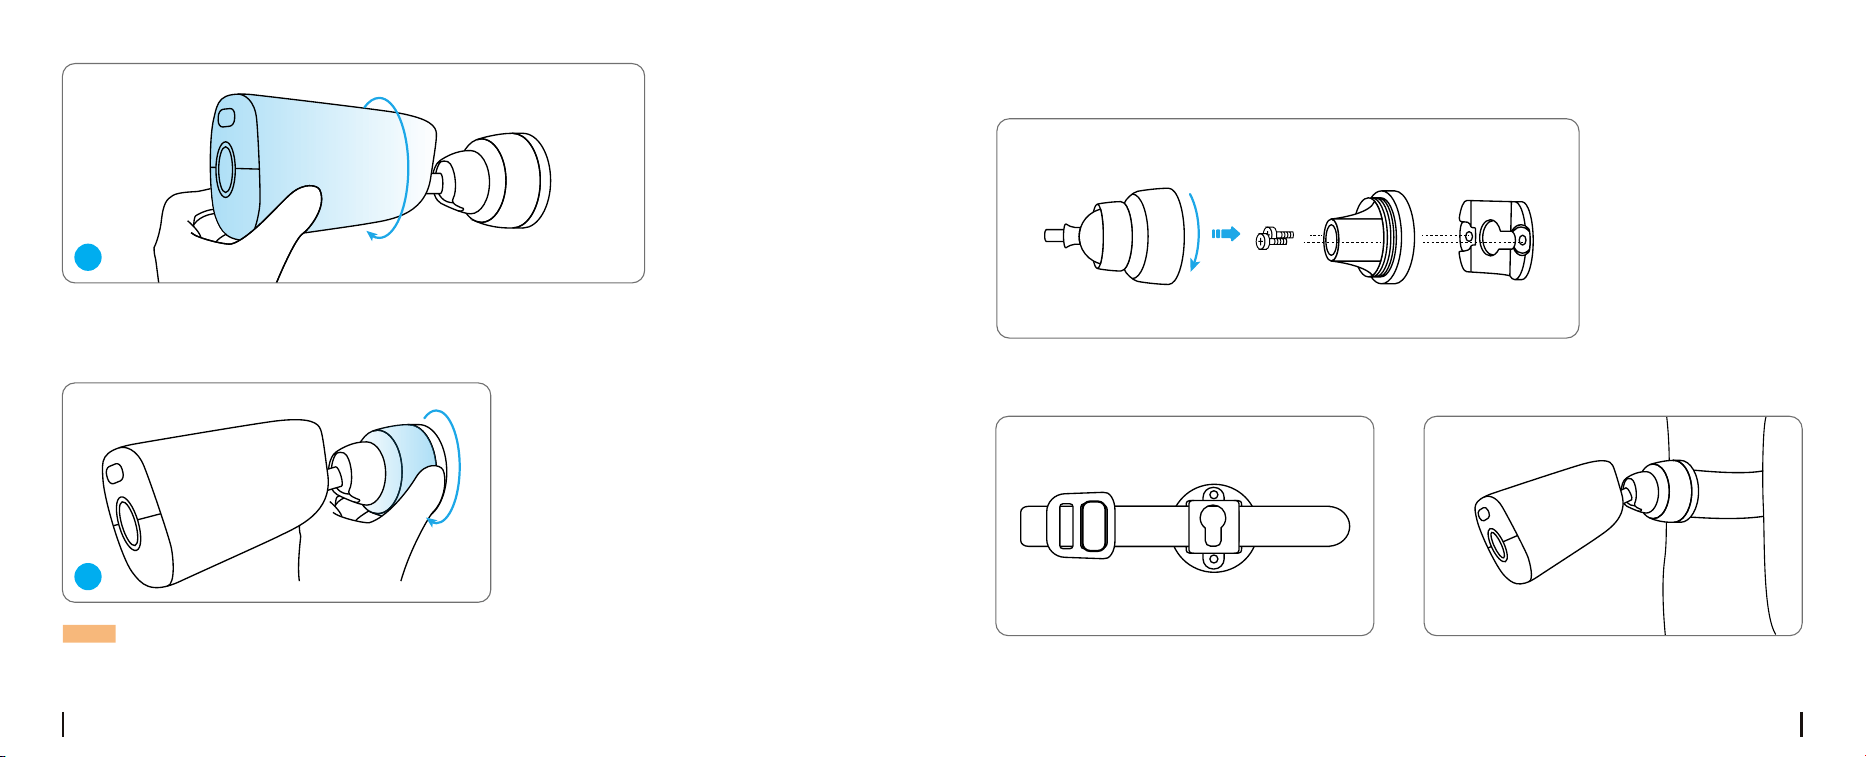
Install the Camera with Loop Strap
Thread the provided strap to the plate and fasten it to a tree. Next, attach the camera to the plate
and you are good to go.
Screw the camera to the bracket.
Adjust the camera angle to get the best eld of view.
3
Secure the camera by turning the
part on the bracket identied in
the chart clockwise.
Attach the bracket base to the mounting plate using the two short screws provided. Then, twist
4
NOTE: To adjust the camera angle later, please loosen the bracket by turning the upper part
anticlockwise.
and tighten the other part of the bracket onto the base.
base
bracket’s
mounting plate

EnglishEnglish11 12
Troubleshooting
If your camera is not powering on,
please apply the following solutions:
• Make sure the power switch is turned on.
• Charge the battery with a DC 5V/2A power
adapter. When the green light is on, the
battery is fully charged.
If these won’t work, please contact Reolink
Support https://support.reolink.com/.
If the camera cannot scan the QR code on
your phone, please try the following solutions:
• Remove the protective lm from the camera
lens.
• Wipe the camera lens with a dry
paper/towel/tissue.
• Vary the distance between your camera
and the mobile phone so that the camera
can focus better.
Camera is not Powering on
Failed to Scan the QR
Code on the Phone
If these won’t work, please contact Reolink
• Try to scan the QR code under sucient
lighting.
Support https://support.reolink.com/.
Specications
For more specications, visit the
Operating Temperature:
-10°C to 55°C (14°F to 131°F)
Size: 188x75x78mm
Weight (Battery included): 431 g
Reolink ocial website.
Important Safety
Instructions (For Battery-
Powered Cameras)
Please read the instructions carefully before
using the camera. For tips on extending
battery life, visit our support post:
https://support.reolink.com/hc/en-us/
articles/360006991893
1. Charge the battery with a standard and
high-quality DC 5V battery charger or Reolink
solar panel. It is not compatible with solar
panels from any other brands.
2. Replace only with the same or equivalent
type of equipment and accessories
recommended by the manufacturer. Using an
incorrect type poses an explosion risk.
3. Do not remove a built-in battery from the
camera.
4. Charge the battery only in temperatures
between 0
℃
and 45
℃
. And use it only in
temperatures ranging from -10
℃
and 55
℃
.
5. Do not charge, use or store a battery
camera near heat sources, such as space
heaters, cooking surfaces, cooking appliances,
irons, radiators, or replaces. Extreme heat
may cause an explosion.
6. Do not expose the camera with a battery to
extremely low air pressure environments, as
this may cause an explosion.
8. Do not hit or heavily compress the camera
with a battery, as this poses a risk of re or
7. Do not place the camera with a battery in
hot wilderness areas or expose it to lightning,
as this poses a risk of re.
explosion.
9. Do not use the battery if it appears
damaged, swollen, or compromised in any
way (e.g., leaking, emitting odors, dented,
corroded, rusted, cracked, swollen, melted,
or scratched).
10. Keep the camera and battery away from
children.
11. Do not ingest or swallow battery. If the
battery is ingested or swallowed, it can
cause severe internal burns and damage.
Seek immediate medical attention if you
suspect the battery has been ingested or
placed inside any part of the body.
12. Do not attempt to disassemble, repair, or
alter the camera or battery by yourself.
13. Keep the charging port dry, clean and
free of any debris. Cover it with the rubber
plug after the battery is fully charged.
14. Always follow the local safety laws and
regulations when using the camera.

13 14
15. Always follow the local waste and recycling laws to dispose of used batteries.
To the maximum extent permitted by applicable law, this document and the product described,
with its hardware, software, rmware, and services, are delivered on an “as-is” and “as-available”
basis, with all faults and without warranty of any kind. Reolink disclaims all warranties, express
or implied, including but not limited to, warranties of merchantability, satisfactory quality, tness
for a particular purpose, accuracy, and non-infringement of third-party rights. In no event will
Reolink, its directors, ocers, employees, or agents be liable to you for any special, consequential,
incidental or indirect damages, including but not limited to damages for loss of business prots,
business interruption, or loss of data or documentation, in connection with the use of this product,
even if Reolink has been advised of the possibility of such damages.
To the extent permitted by applicable law, your use of the Reolink products and services is at
your sole risk and you assume all risks associated with internet access. Reolink does not take any
responsibilities for abnormal operation, privacy leakage or other damages resulting from cyber
attacks, hacker attacks, virus inspections, or other internet security risks. However, Reolink will
provide timely technical support if required.
The laws and regulations related to this product vary by jurisdiction. Please check all relevant
laws and regulations in your jurisdiction before using this product to ensure that your use
conforms to the applicable law and regulation. During the use of the product, you must comply
with relevant local laws and regulations. Reolink is not responsible for any illegal or improper use
and its consequences. Reolink is not liable in the event that this product is used with illegitimate
purposes, such as third-party rights infringement, medical treatment, safety equipment, or other
situations where the product failure could lead to death or personal injury, or for weapons of
mass destruction, chemical and biological weapons, nuclear explosion, and any unsafe nuclear
energy uses or anti-humanity purposes. In the event of any conicts between this manual and the
applicable law, the latter prevails.
Legal Disclaimer
Notication of
Compliance
This device complies with Part 15 of the FCC
Rules. Operation is subject to the following
two conditions:
(1) This device may not cause harmful
interference, and
(2) This device must accept any interference
received, including interference that may
cause undesired operation. Changes or
modications not expressly approved by the
party responsible for compliance could void
the user’s authority to operate the equipment.
This equipment has been tested and found
to comply with the limits for a Class B digital
device, pursuant to Part 15 of the FCC Rules.
These limits are designed to provide
reasonable protection against harmful
interference in a residential installation. This
equipment generates uses and can radiate
radio frequency energy and, if not installed
and used in accordance with the instructions,
may cause harmful interference to radio
communications. However, there is no
guarantee that interference will not occur in a
FCC Statement
particular installation. If this equipment does
cause harmful interference to radio or
television reception, which can be determined
by turning the equipment o and on, the
user is encouraged to try to correct the
interference by one or more of the following
measures:
• Reorient or relocate the receiving antenna.
• Increase the separation between the
equipment and receiver.
• Connect the equipment into an outlet on a
circuit dierent from that to which the
receiver is connected.
• Consult the dealer or an experienced radio/
TV technician for help.
This equipment complies with FCC radiation
exposure limits set forth for an uncontrolled
environment. This equipment should be
installed and operated with minimum distance
20cm between the radiator & your body.
FCC Radiation Exposure statement
EnglishEnglish
EnglishEnglish15 16
RF exposure information: The Maximum
Permissible Exposure (MPE) level has been
calculated based on a distance of 20cm
between the device and the human body.
To maintain compliance with RF exposure
requirement, use product that maintain a
20cm distance between the device and
human body.Reolink declares that this
device is in compliance with the essential
requirements and other relevant provisions of
Directive 2014/53/EU.
Declaration of Conformity
This device complies with Industry Canada
licence-exempt RSS standard(s). Operation is
subject to the following two conditions:
(1) this device may not cause interference, and
(2) this device must accept any interference,
including interference that may cause
undesired operation of the device.”
This equipment should be installed and
operated with a minumum distance of 20 cm
between the radiator and your body.
Le présent appareil est conforme aux CNR
d’Industrie Canada applicables aux appareils
radio exempts de licence. L’exploitation est
autorisée aux deux conditions suivantes :
(1) l’appareil nedoit pas produire de brouillage,
et
(2) l’utilisateur de l’appareil doit accepter tout
brouillage radioélectrique subi, même si le
brouillage est susceptible d’en compromettre
le fonctionnement.” Cet équipement doit être
installé et utilisé avec une distance minimale
de 20 cm entre le radiateur et votre corps.
MODIFICATION: Any changes or modications
not expressly approved by the grantee of
this device could void the user’s authority to
operate the device.
ISED Statement
Toute modication non approuvé
explicitement par le fournisseur de licence de
l’appareil peut entraîner l’annulation du droit
de l’utilisateur à utiliser l’appareil.
This Class B digital apparatus complies with
Canadian ICES-003.
Cet appareil numérique de la classe B est
conforme à la norme NMB-003 du Canada.
Operation of 5150-5350 MHz is restricted to
indoor use only.
Le fonctionnement de 5150-5350 MHz est
limité à une utilisation en intérieur uniquement.
WiFi Operating Frequency
OPERATING FREQUENCY:
2412~2472MHz RF Power:≤20dBm(EIRP)
5150~5250MHz RF Power:≤23dBm(EIRP)
5250~5350MHz RF Power:≤23dBm(EIRP)
5470~5725MHz RF Power:≤23dBm(EIRP)
5725~5875MHz RF Power:≤14dBm(EIRP)
The functions of Wireless Access
Systems including Radio Local
Area Networks(WAS/RLANs) within
the band 5150-5350 MHz for this device
are restricted to indoor use only within all
European Union countries
(BE/BG/CZ/DK/DE/EE/IE/EL/ES/FR/HR/
IT/CY/LV/LT/LU/HU/MT/NL/AT/PL/PT/
RO/SI/SK/FI/SE/TR/NO/CH/IS/LI/UK(NI)
This marking indicates that this product
should not be disposed with other household
wastes throughout the EU. To prevent possible
harm to the environment or human health
from uncontrolled waste disposal, recycle it
responsibly to promote the sustainable reuse
of material resources. To return your used
device, please use the return and collection
systems or contact the retailer where the
product was purchased. They can take this
product for environmentally safe recycling.
Correct Disposal of This Product
This product comes with a 2-year limited
warranty that is valid only if purchased from
Reolink Ocial Store or a Reolink authorized
reseller. Learn more:
https://reolink.com/warranty-and-return/.
NOTE: We hope that you enjoy the new
purchase. But if you are not satised with
the product and plan to return, we strongly
suggest that you reset the camera to factory
default settings and take out the inserted SD
card before returning.
Limited Warranty
EnglishEnglish17 18
Use of the product is subject to your agreement to the Terms of Service and Privacy Policy
at reolink.com
Terms and Privacy
Technical Support
If you need any technical help, please visit our official support site and contact our support
team before returning the products, https://support.reolink.com.
Terms of Service
By using the Product Software that is embedded on the Reolink product, you agree to the
terms&conditions between you and Reolink. Learn more:
https://reolink.com/terms-conditions/
REOLINK INNOVATION LIMITED
FLAT/RM 705 7/F FA YUEN COMMERCIAL BUILDING 75-77 FA YUEN STREET MONG
KOK KL HONG KONG
For more information, go to
www.P65Warnings.ca.gov
WARNING
This product can expose you to the
chemical lead, which is known to the
state of California to cause cancer.