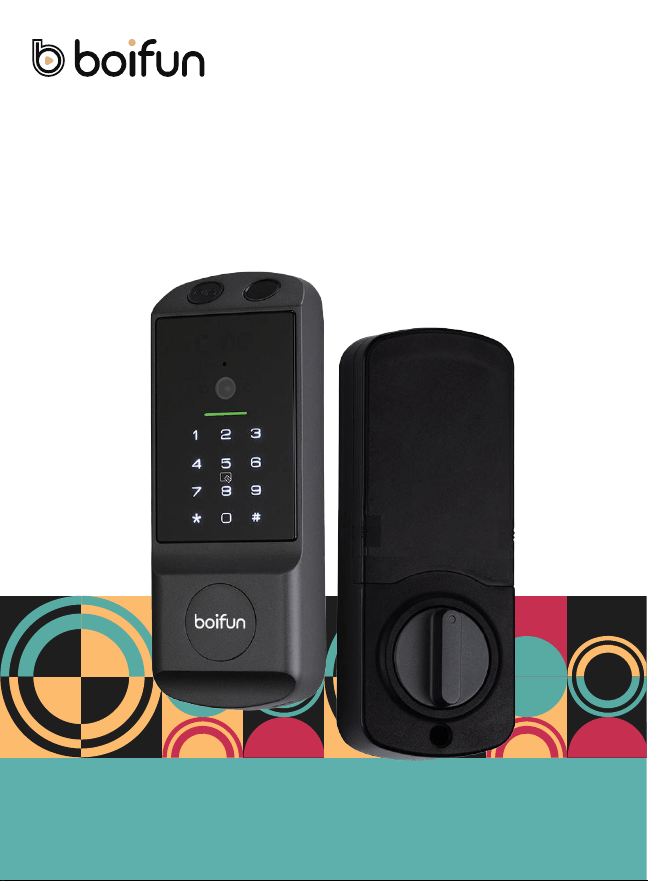
6313-Ultra Smart Lock
User Manual
Before installing the smart lock, please read the manual
carefully and keep it properly for future reference.
Model 6313-Ultra | Version 1.0

Contents
Tuya Smart App
12
Product Overview
Installation Diagrams &
Package Contents
02
Installation Guide
03
Using the Smart Lock
10
Installation video
Top view of door opening direction
Measuring the dimensions of the door
Adjust the lock body
Install lock body
Install the Strike Box and Strike Plate
Precautions
Outdoor unlocking/locking
Indoor lock/unlock
Install door locks
Registration and Login
Add Wi-Fi door lock
Door Lock Homepage
Member Management - Add Administrator
Member Management - Add Regular Users
Password Management
Card Management
Palm vein management
Fingerprint Management
Temporary Password Management - Creation
Delete user
Door opening records and equipment alarms
Door lock sleep setting
Temporary Password Management - Deletion
01
1
2
3
4
5
Local Operation Guide
27
Additional Information
31
Product Specifications
34
FCC Statement
35
FAQs
36
Menu structure diagram
Add administrator
Delete administrator
Restore factory settings
Add regular users
Verification mode settings
Volume adjustment
Door opening direction
Delete regular user
Restore factory settings
Mute button
Human body sensing
How to use palm veins
Emergency power supply
Accessibility
Join the network
Exit the network
8
9
10
6
7
1
2
3
4
5
6
7
8
9
10
1 1
1 2
1 3
1 4
1 5
01
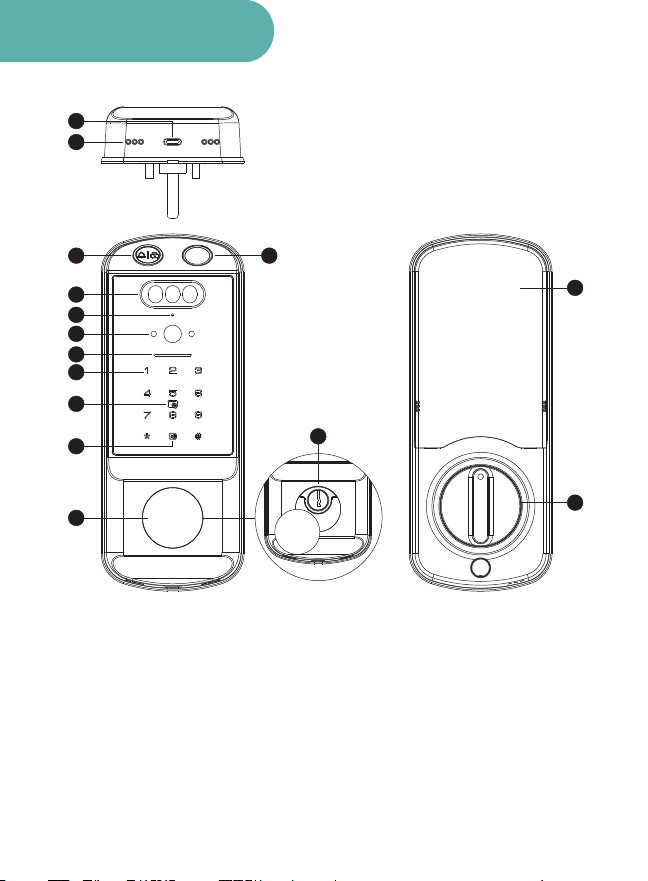
Product Overview
1. 5V Emergency Power Port
2. Speaker
3. Doorbell / Lock Button
4. Palm Vein Sensor
5. Microphone
6. Peephole Camera
7. Status Indicator
8. Keypad
9. IC Card Reader
10. Mute Button
11. Key Cylinder Cover
12. Fingerprint Sensor
13. Lock Cylinder
14. Battery Cover
15. Interior Thumb-Turn
Exterior Components
02
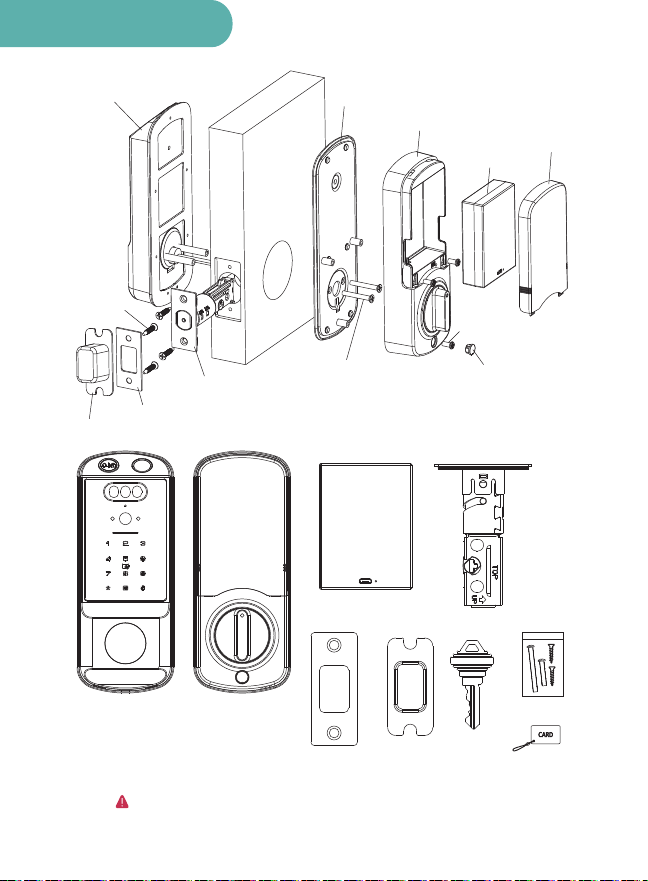
Package Contents
Keys X2
Rechargeable
Battery X1
Rechargeable
Battery X1
Battery cover X1
Deadbolt X1
Deadbolt X1
silicone plug X1
Fixed plate X1
Screws X2
Screws X3
IC Cards X2
Screw Kit X1
Closure box X1
Closure box X1
strike plate X1
strike plate X1
Interior Assembly X1
Interior Assembly X1
Exterior Assembly X1
Exterior Assembly X1
Screw X4
Upon unpacking, check if the above-mentioned accessories are included.
03
Installation instructions
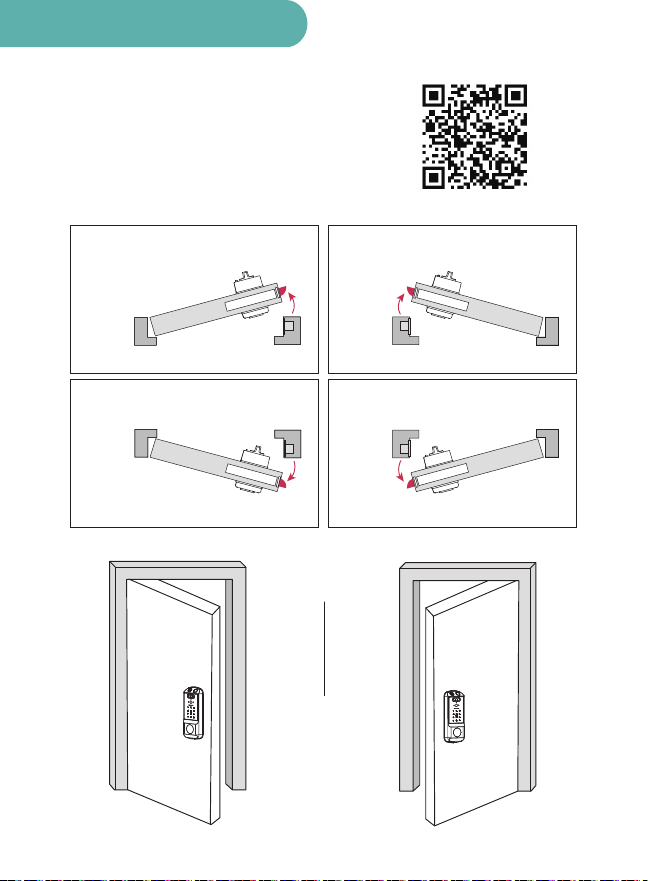
Scan the QR code to get a door lock installation video.
1. Installation video
2. Top view of the door opening
Right door
Left door
Left-Hand Inswing Right-Hand Inswing
Left-Hand Outswing Right-Hand Outswing
Inside the door
Inside the door
Outside the door
Inside the door
Outside the door
Outside the door
Inside the door
Outside the door
04
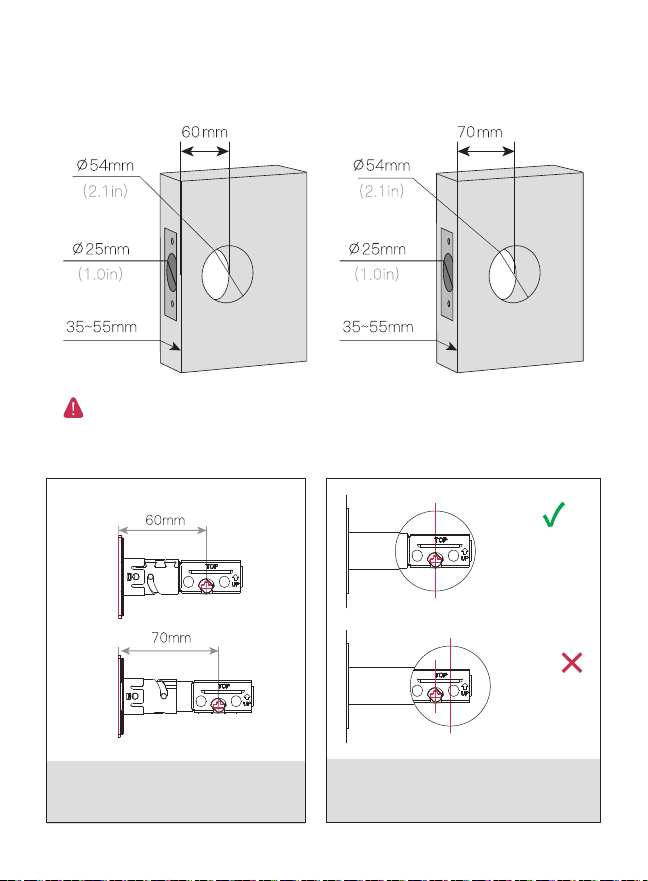
Suitable for door thicknesses of 35~55mm. If your door thickness exceeds this range,
please contact us for more information.
Ensure the door thickness is between 35 and 55 mm, the door opening diameter is 54 mm,
and the distance from the lock body to the bolt is 60 mm and 70 mm
3. Measuring the dimensions of the door
4. Adjust the lock body
① Select or adjust the appropriate lock body size
according to the keyhole (default size is 60mm).
Right
Mistake
No adjustments are
needed; proceed to
the next step
The slot is not cen
tered and needs
adjustment
② Observe whether the slot of the lock is centered.
If it is not centered, proceed to the next adjustment.
05
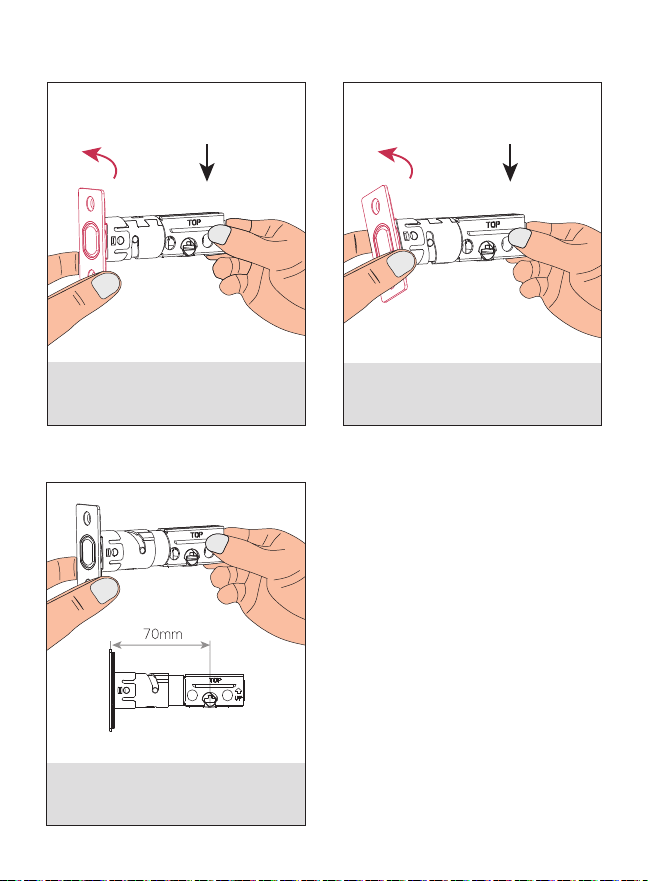
70mm Lock body diagram
⑤ After the front end of the lock body is reset,
the center distance of the lock body is 70mm,
at which point the lock adjustment is complete.
Rotatio
Fixed
Rotatio
Fixed
③ To adjust to a 70mm lock body, first fix the
end of the lock body, then rotate the front end.
④ At this point, pull and rotate the front end of
the lock body outwards.
06
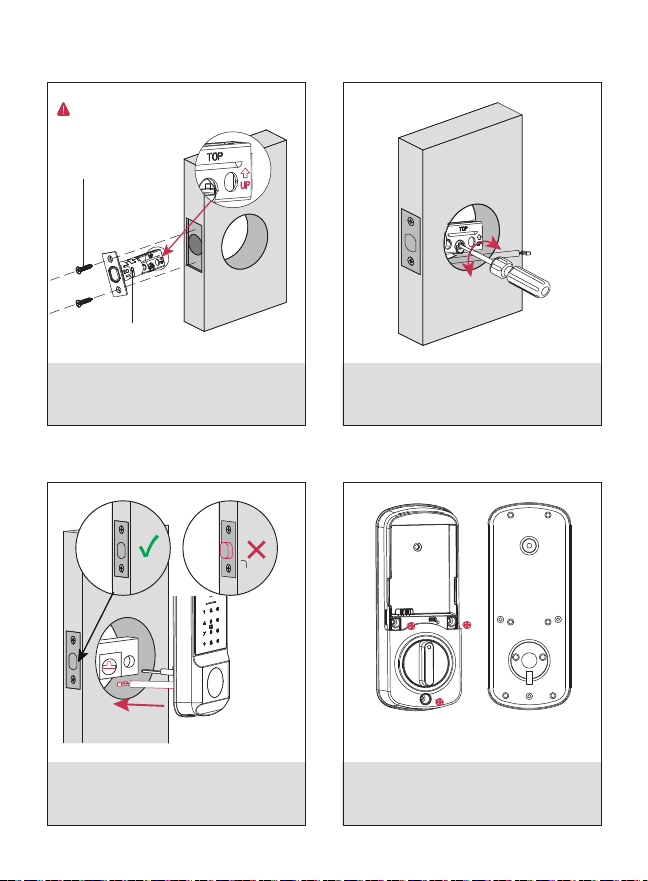
Note the upward sign
20mm flathead screw
Neck lock
Open the screws above
the battery cover
Fixed plate
① Secure the lock body to the door frame using
two pointed screws.
① Align the front panel with the door opening
and pass it through the keyhole (the main cable
passes under the lock body).
② Open the battery cover, remove the three
screws on the back panel, and take out
the mounting plate.
② Use a flathead screwdriver to check if
the lock body moves smoothly.
5. Install lock body
6. Install door locks
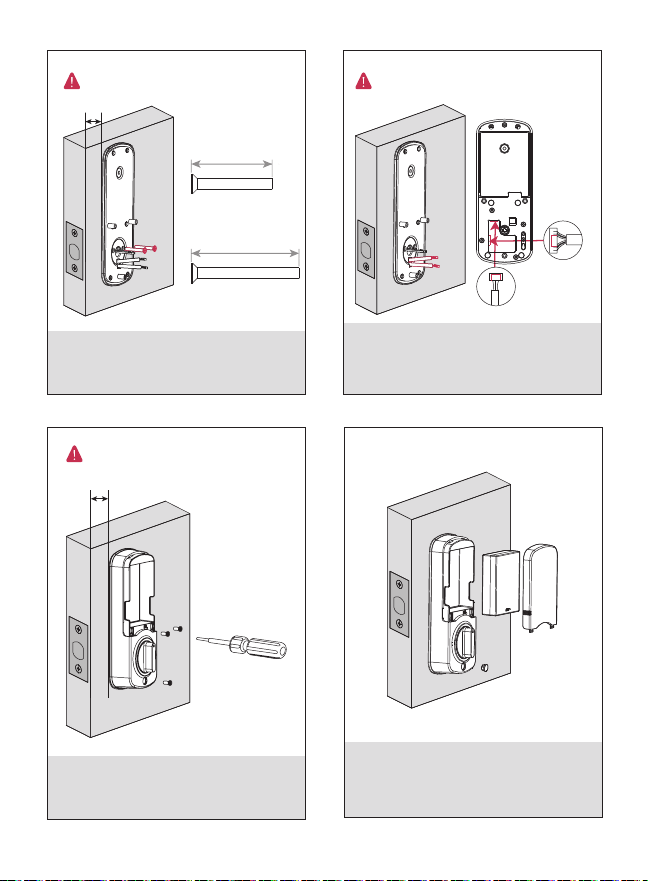
40mm
30m m
07
Make sure the mounting plate
is parallel to the door edge.
Make sure the interior assembly
is parallel to the door edge.
Note the direction of the
wire insertion.
Suitable for door
thicknesses of 35-45mm
Suitable for door
thicknesses of 45-55mm
Main
storyline
Lock body line
⑤ Secure the three screws removed from the
back panel and tighten them.
⑥ Install the lithium battery onto the rear panel,
then replace the battery cover and silicone plug.
The installation is now complete.
③ Secure the base plate with two flathead screws
(do not overtighten to prevent the lock body from
deforming).
④ Insert the main cable and lock body cable into
the socket, pushing them firmly until they make full
contact (make sure to remove the batteries before
installation, otherwise it will affect the installation!).
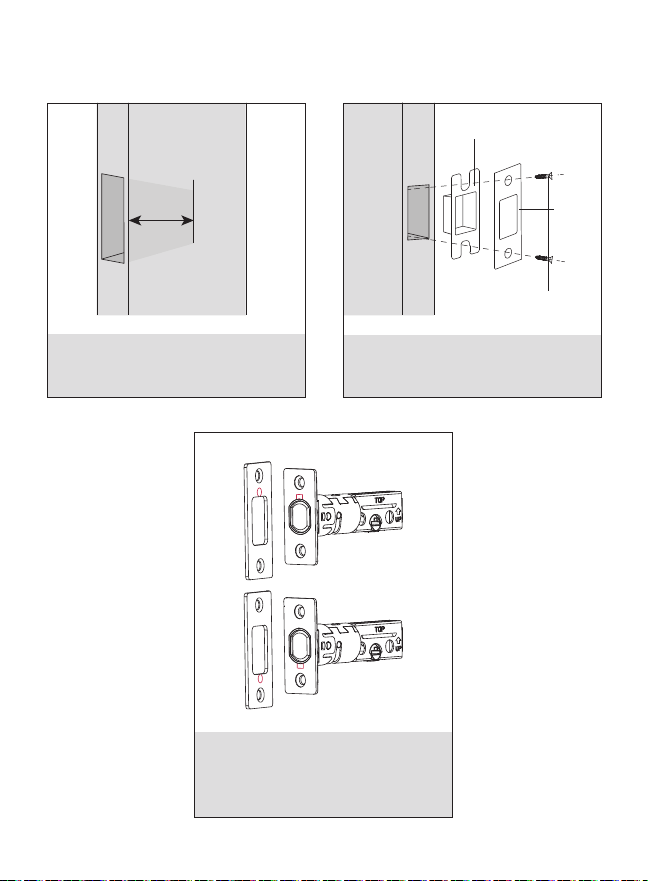
30mm
08
strike
plate
20mm tapping screw
① Make sure the strike pocket in the door frame
is at least 30 mm deep so the deadbolt can fully
extend.
② Secure the latch box and latch plate to the do
or frame using two pointed tail screws.
③ Depending on the orientation of the lock
body, when installing the strike plate, the points
on the strike plate must be in the same direction
as the points on the lock body.
7. Install the Strike Box and Strike Plate
Strike Box
09
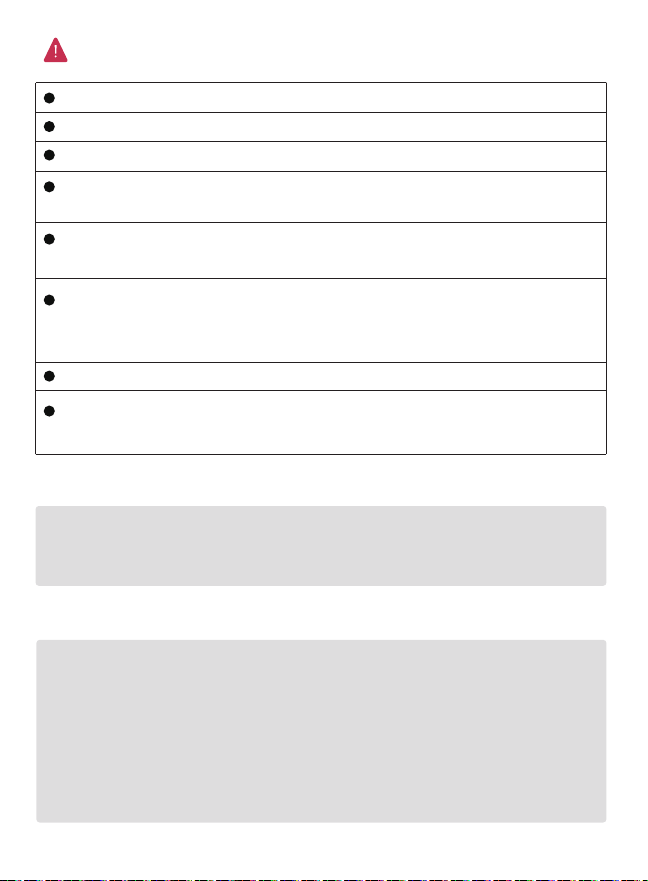
Install the battery only after the smart lock has been completely installed;
The lock automatically calibrates and detects the door-opening direction;
The lock mechanism must rotate smoothly and freely;
In factory-default mode, any palm vein, fingerprint, password, or card can
unlock the lock. Add an administrator immediately after installation;
Manual unlocking requires the mechanical key. Remove the key from the
package and store it in a secure location outside the home;
Keep your fingers clean and dry when using the lock;
When setting up the mobile app, make sure your phone is connected to a 2.4
GHz Wi-Fi network and keep the lock within a reliable range of the router.
When the low-battery warning sounds, charge the battery immediately.
Remove the battery and connect the USB-C charging cable. A red indicator
means charging; a blue indicator means charging is complete;
Common causes of unstable Wi-Fi:
Precautions
Recommended Wi-Fi range:
For best stability, keep the router within 10 m (33 ft) of the lock
and avoid passing through two or more solid or concrete walls.
During network setup, keep the distance within 5 m (16 ft) when possible.
3.
1.
2.
In an open, unobstructed area, signal strength begins to decline noticeably
beyond 15 m (50 ft), which may cause the lock to go offline,
delay remote unlocking, or miss notifications.
A concrete/solid-brick wall plus a metal door can cause unstable connectivity even at
a distance of only 8–10 m (26–33 ft).
Beyond 20 m (65 ft), stable Wi-Fi connectivity is difficult to maintain in most homes
and may cause frequent disconnections and increased battery drain due to repeated
Wi-Fi reconnection.
10
Using the Smart Lock
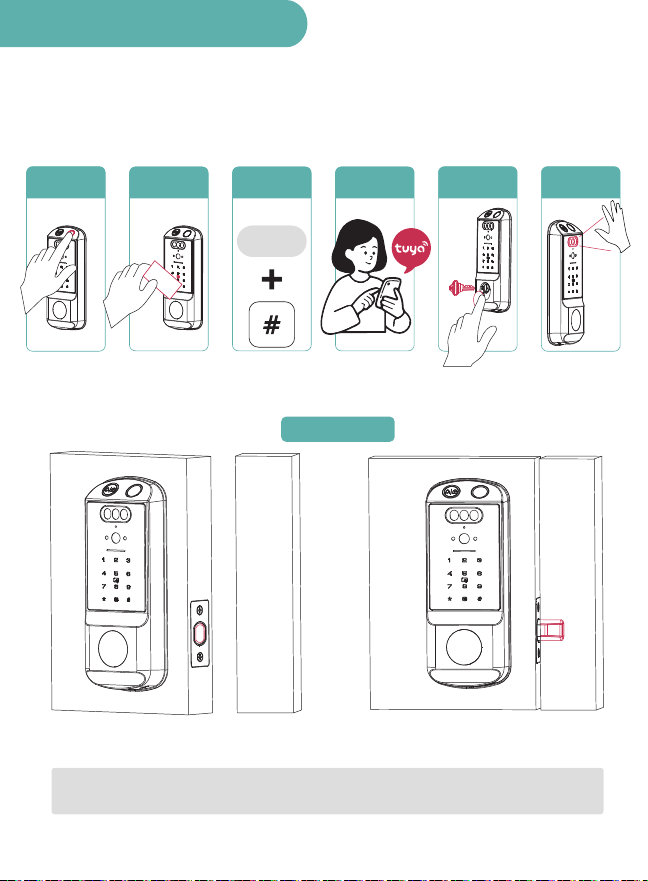
(1) Outdoor Locking / Unlocking
(2) Indoor Locking / Unlocking
Palm Vein
Fingerprint
Password
Open status Closed status
Automatic locking
Unlocking via
Mobile App
Press
and
rotate
User password
Mechanical
Key
1. Outdoor Locking / Unlocking
IC Card
When the door is closed, the lock body's switch detects the signal from the strike
plate and automatically locks.
11
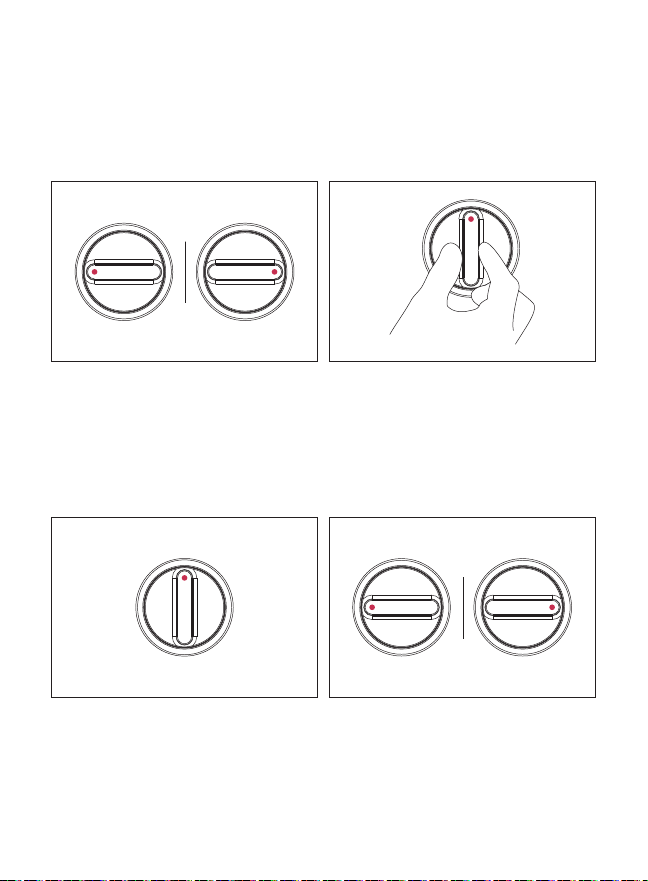
(1) Unlock from the inside
(2) Lock from inside
Closed
Unlocked state The door automatically locks
when closed.
Rotate to unlock position
2. Indoor Locking / Unlocking
12
Tuya Smart App
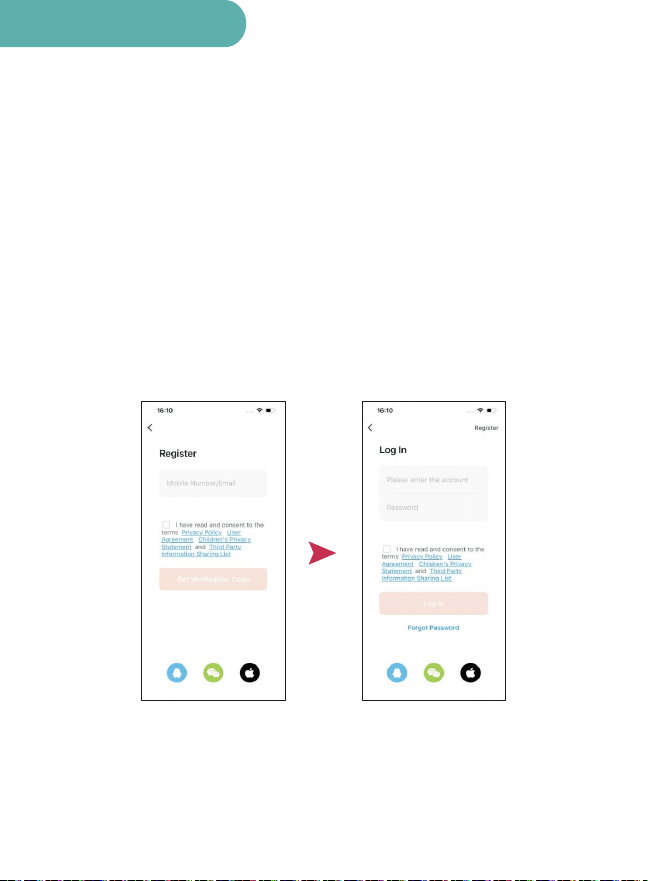
1. Register and Sign In
This article takes the intelligent living App as an example, explaining the
functions of the App's door lock panel and the usage instructions.
▲
The "Tuya Smart" App is an intelligent device management
app provided by Doodle to end consumers.
Through the Tuya Smart App, you can conveniently configure
and control all the smart products you purchased, create your
preferred scenes and automation plans, share your smart
devices with family and friends, and enjoy the fun of
full-house smart technology.
To obtain the app:
Search for "Tuya Smart" in the Android app market or
the App Store, or scan the QR code on the left to download.
(1) No account? Choose to register or log in via SMS verification code.
(2) Click [Create New Account] to enter the account registration page.
Follow the prompts to obtain the SMS verification code and set a password.
(3) Already have an account? Click [Use Existing Account] to log into the App.
Password, verification code, and social media account login are supported.
13
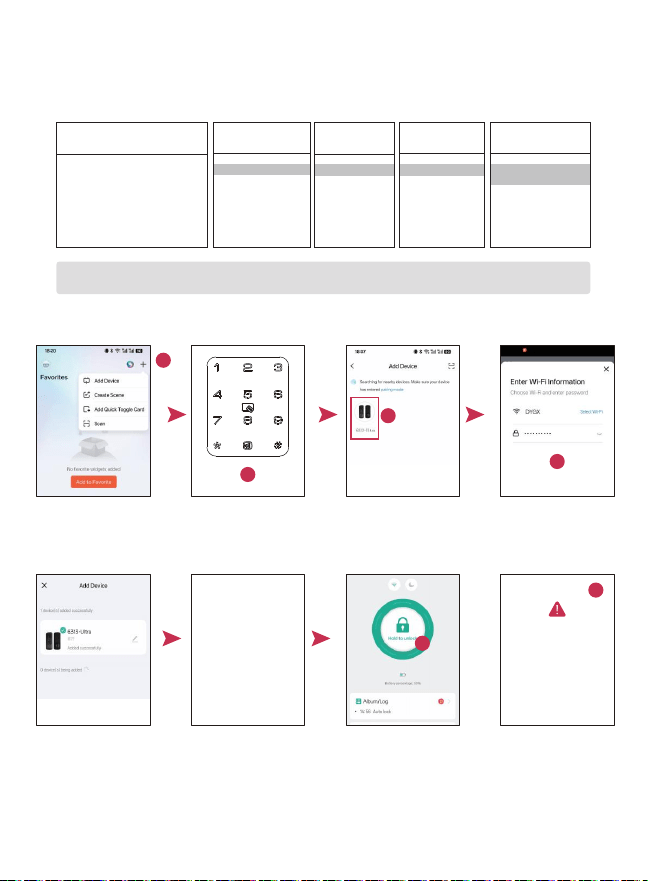
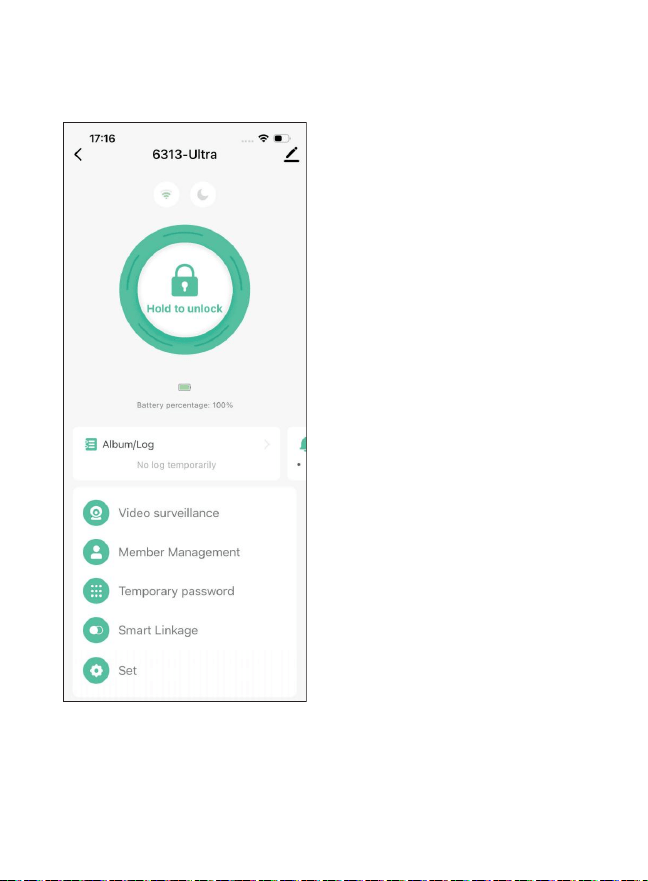
A door lock can only be connected to Wi-Fi after an administrator has been added.
2. How to connect the 2.4GHz Wi-Fi ?
Add administrator
1
Click the plus sign
Add the device
2
3
4
5
7
8
9
Step2: Press1
1. Management Settings
2. User Settings
3. System Settings
4. Network settings
Step3: Press1
1. Add Administrator
2. Delete Administrator
3. Restore Appearance
Settings
Step4: Press1
1. Add the key
Step5: Enter
Enter fingerprint / password /
card / palm vein
It is recommended to input all
of them, which will facilitate
the management of the door
locks in the future
Step1: Enter the manage
ment mode
Activate the password keypad.
Press *# to enter the management mode.
If an administrator has been added,
the administrator's information needs
to be verified.
6
Step 1:
Home Page
Step 7:
Product Details Page
Step 8:
Special circumstances
Step 9:
Step 2:
Device connection
successful
Step 6:
If the door lock
cannot be
matched, please
reset the door
lock.
The App automatically
scans and
selects the device
Select the Wi-Fi account
and enter the password
Wake up the keyboard and
press 9# to enter the rapid
network configuration mode.
Step 3: Step 4: Step 5:
14
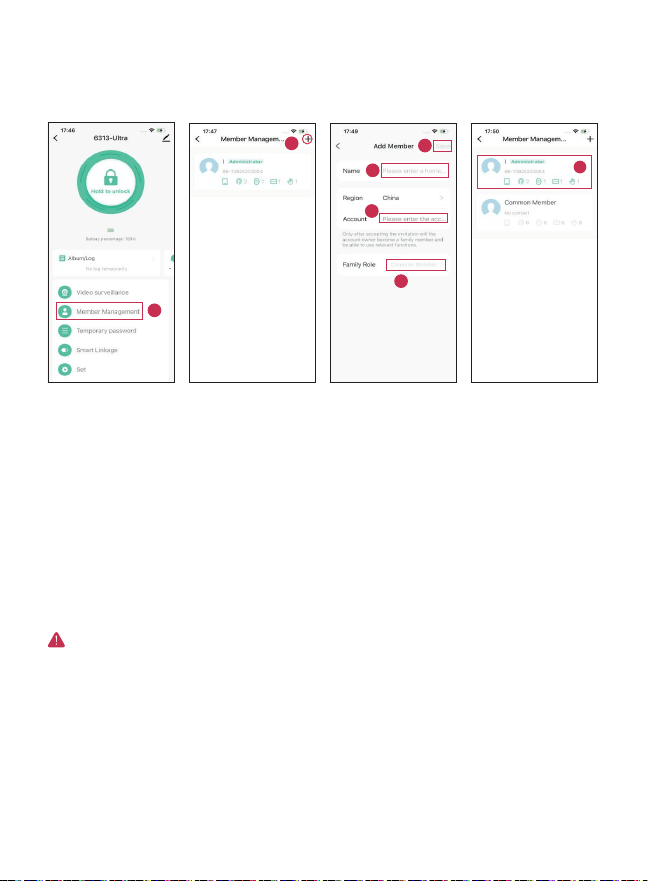
3. Door Lock Homepage
The top of the homepage displays
the device name, Wi-Fi strength,
unlock button and battery status.
Below are [Album/Log],
[Video Surveillance],
[Member Management],
[Temporary Password],
[Smart Linkage] and [Set].
After the door lock connects to Wi-Fi,
you can remotely unlock it by pressing
and holding the unlock button.
(After the door lock is successfully
added, control delays or failures may
occur due to network conditions.)
(1)
(2)
15
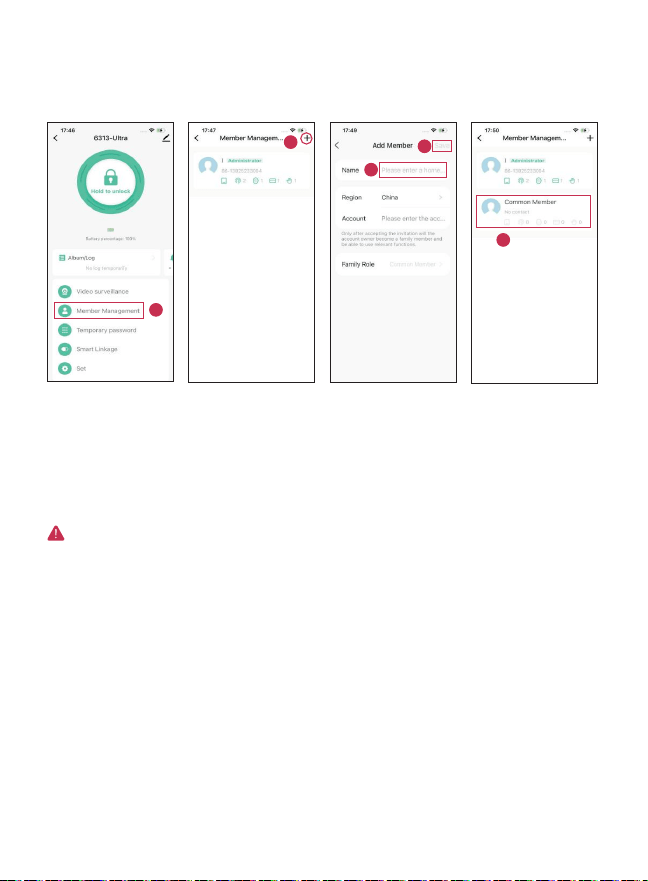
4. Member Management - Add administrator
1
2
3
5
4
6
7
(1)
(2)
Enter the member name and Tuya Smart , select administrator privileges,
and click [Save] to become an administrator.
(The account added as an administrator must be a registered Tuya Smart ;
otherwise, it will not become an administrator.)
The Tuya Smart added to the device is the administrator by default.
Click on Member
Management
Step 1: Step 2: Click the plus sign
Step 3: Enter name
Step 4: Enter account
Step 5: Choose family role
Step 6: Click Save
All key information added through this account will default to administrator privileges.
Step 7: Member
Management Page
16
5. Member Management - Add regular users
1
2
3
4
5
(1) Enter your username and click [Save] to become a regular user.
Step 1:
Click on Member
Management
Step 2: Click the plus sign Step 5:
Member
Management Page
Step 3: Enter name
Step 4: Click Save
All key information added through this account will be defaulted to a regular user account.
17
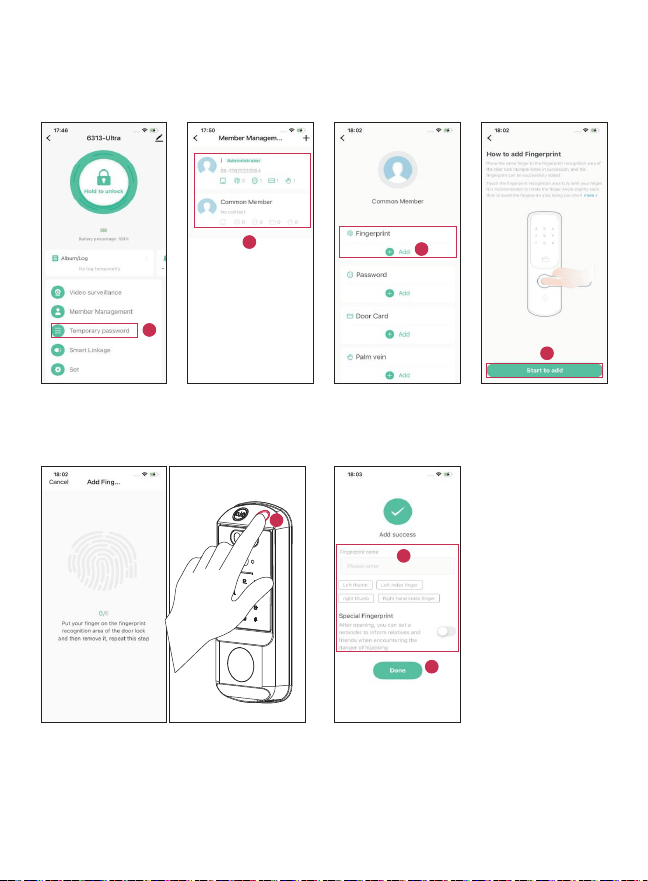
6. Fingerprint Management
2
3
4
1
Step 1: Step 2: Select User Step 3: Select to enroll
fingerprints
Step 4: Start to addClick on Member
Management
7
6
Step 5: Start fingerprinting Step 6: Enter name
Step 7: Click Save
5
18
● Use the center of your finger, not the tip,
to register.
● The same fingerprint needs to
be scanned from multiple angles.
● The same user can scan multiple fingerprints.
● Please keep your fingers clean and dry.
As shown in the image, ensuring all six fingerprint
areas are fully recorded during fingerprint enrollment
will improve recognition accuracy by 99.9%.
1
2
3
4
5
6
(1)
On the homepage, go to the "Member Management" entry point
and select the corresponding "Family Member" account
(the associated administrator will have administrator privileges,
while the associated ordinary member will only have ordinary user privileges);
Click "Start Adding". A solid blue light will indicate
that you have entered the fingerprint collection interface.
Press your fingerprint until the green light illuminates,
then release. Each fingerprint needs to be collected 6 times.
When the indicator light goes out, the fingerprint
collection is successful;
(2)
(3)
Connect the door lock via the App. The administrator can
collect fingerprints for themselves or other family members;
(4)
Unlock via fingerprint / password / card / key / palm vein
/ remote unlocking, etc.: A green light indicates successful
verification, and a red light indicates failed verification.
19
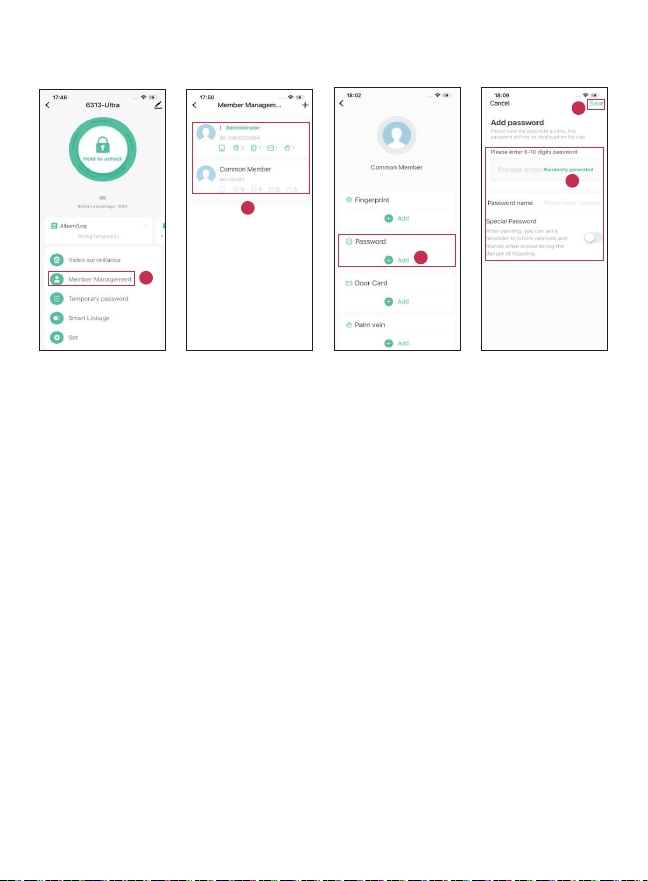
7. Password Management
4
5
2
3
1
Step 1: Step 2: Select User
Step 3: Select Password Entry Step 4:
Step 5: Click Save
Enter a 6-10 digit
password
and your name.
(1)
On the homepage, go to the [Member Management] entry and select the
[Family Member] account with the corresponding permissions;
(2)
Click [Password] and enter a password of 6 to 10 characters
( for your password security, please do not use the same numbers
or consecutive numbers, such as 000000 or 123456 ).
Click on Member
Management
7
6
5
20
2
1
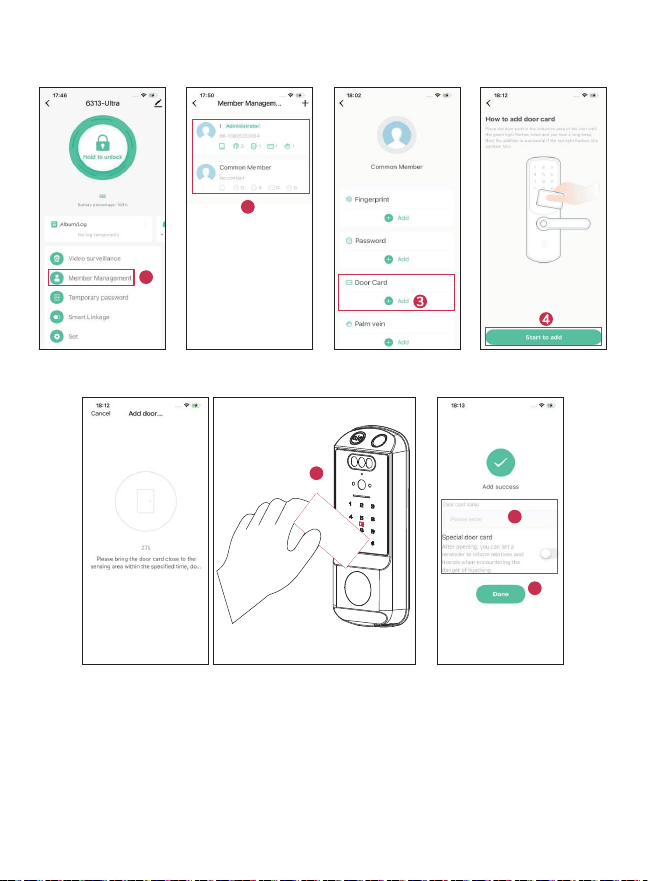
Step 5:Input Card
(1)
8. Card Management
Step 1: Click on Member
Management
Step 2: Select User
Step 3: Select Card Entry Step 4: Start to add
Step 6: Enter name
Step 7: Click Save
On the homepage, go to the [Member Management] entry and select the
[Family Member] account with the corresponding permissions.
Click on [Card] and place the card close to the recognition area. Wait for
successful recognition (supports 13.56 MHz IC cards).
(2)
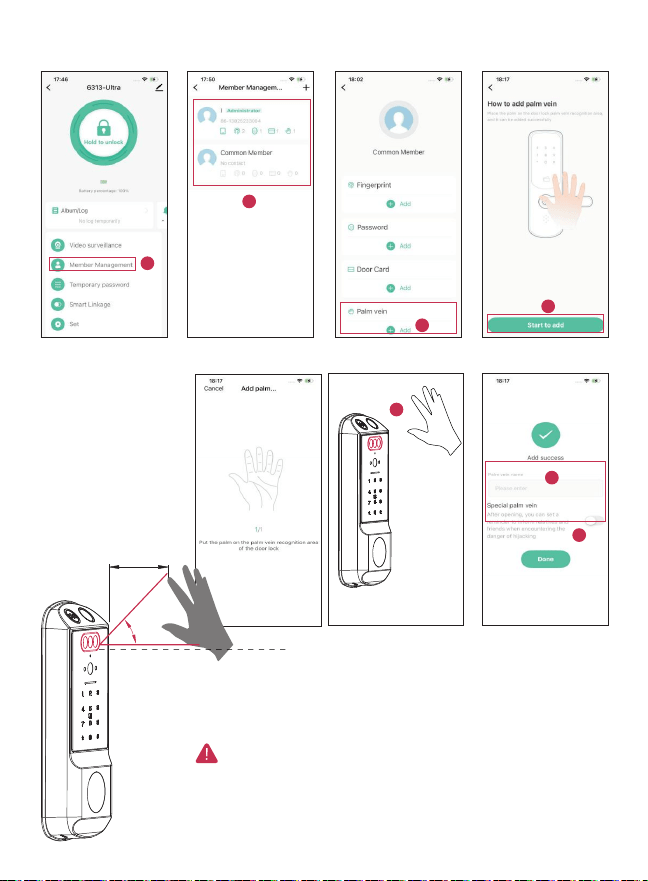
4
21
2
3
1
To ensure successful recognition, please position
your palm 15-25cm diagonally in front of the door lock,
at a 15° angle to the horizontal.
9. Palm vein management
Step 1: Click on Member
Management
Step 2: Select User Step 3: Select palm vein
recording
Step 4: Start to add
Step 5:Register palm vein
5
7
6
Step 6: Enter name
Step 7: Click Save
15- 25cm
10°~15°
2
3
4
22
1
(1)
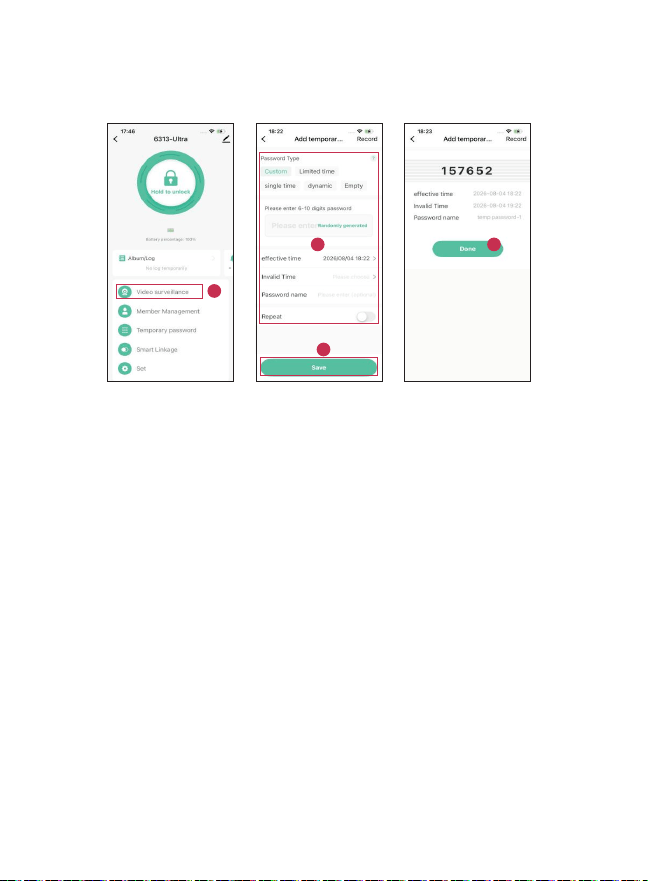
10. Temporary Password Management - Creation
Step 1: Click Temporary
Password
Step 4: Click to Done.Step 2:Input type,
password,time,
name
Step 3:click save
Click on [Temporary Password] on the App homepage
(2)
Enter the temporary unlocking interface, select the password type
and enter a 6-10 character password (cannot enter the same number or
consecutive numbers, such as: 000000 or 123456)
(3) Select the effective time and expiration time and enter the password name,
then click [Complete] to create successfully.
3
4
5
23
2
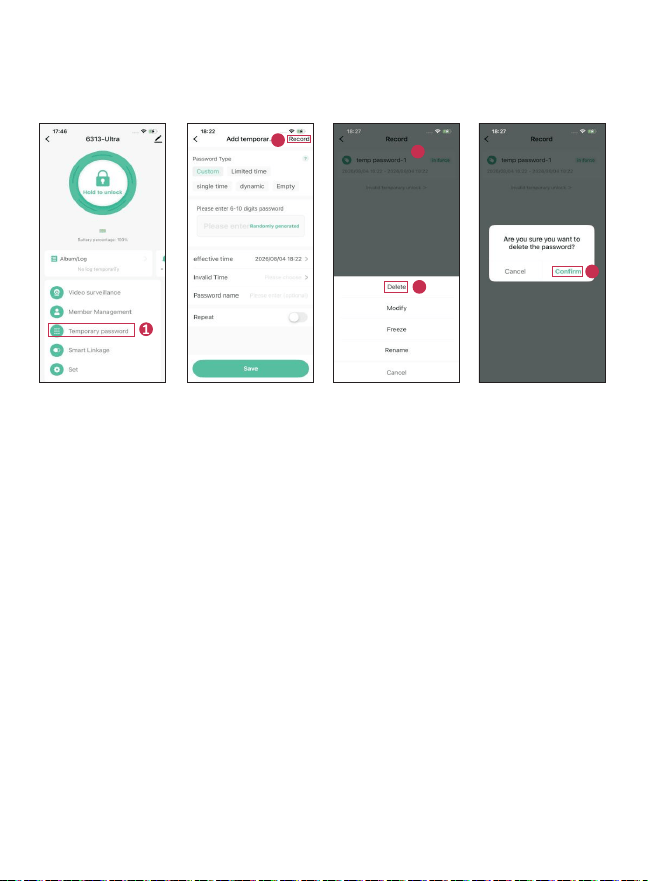
(1) Click the [Temporary Password] icon on the App homepage.
(2) Select [Directory] in the upper right corner to access the
historical [Temporary Password] records.
(3) Click on the temporary password you want to delete, select the [Delete]
option, and then click [Confirm] to delete it.
11. Temporary Password Management - Deletion
Step 1: Click Temporary
Password
Step 2: Click record Step 5: Click to confirmStep 3: Click Password
Step 4: Click Delete
3
4
5
24
2
1
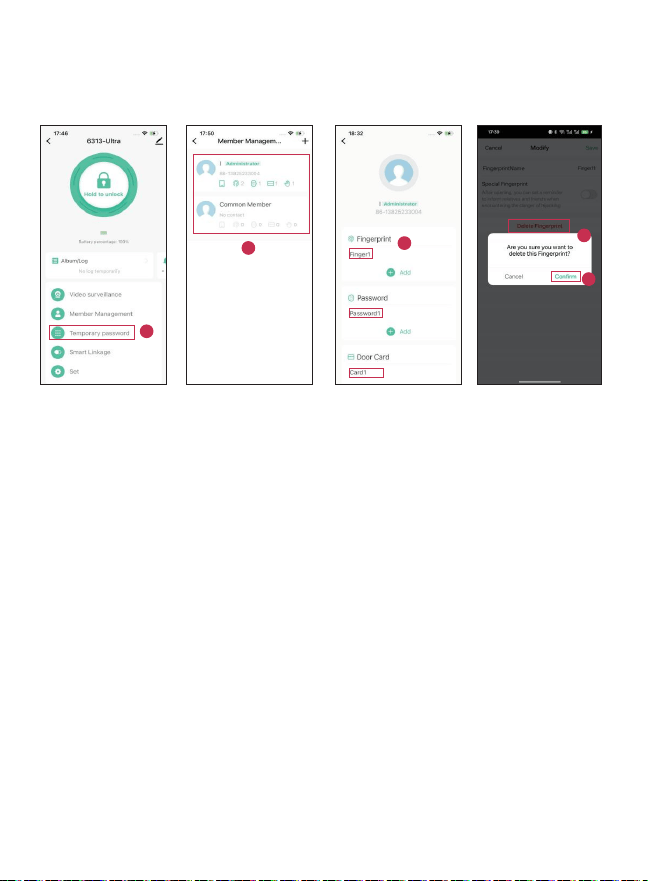
(1) On the homepage, go to the [Member Management] entry and select
the [Family Member] account corresponding to the user.
(2) Select the key type of the user to be deleted.
(3) Click Delete and confirm. The user has been successfully deleted.
12. Delete user
Step 1: Click on Member
Management
Step 2: Select User Step 3: Choose fingerprint/
password/card/palm vein
Step 4: Click to confirm deletion
Step 5: Click to confirm
2
5
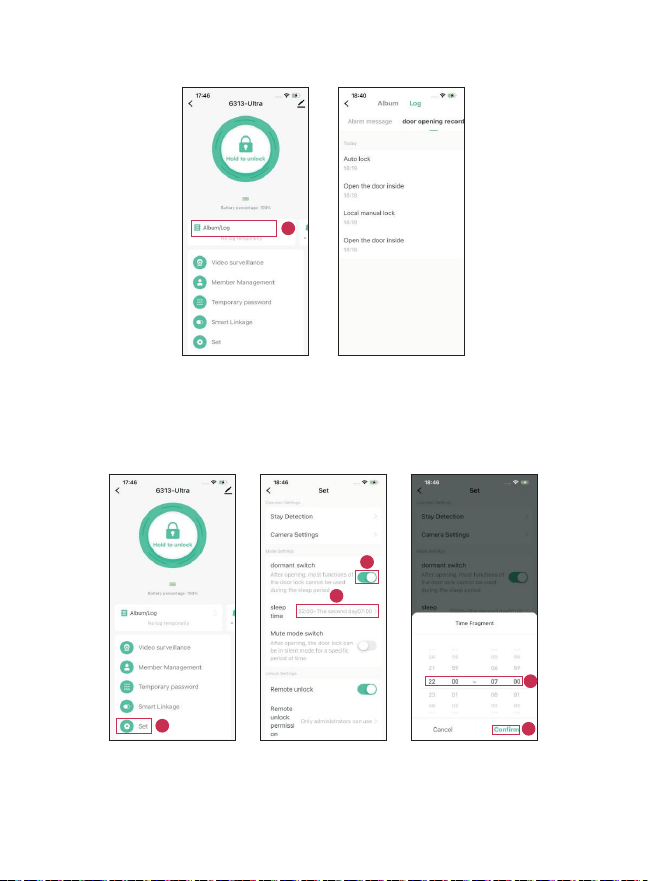
13. Door opening records and equipment alarms
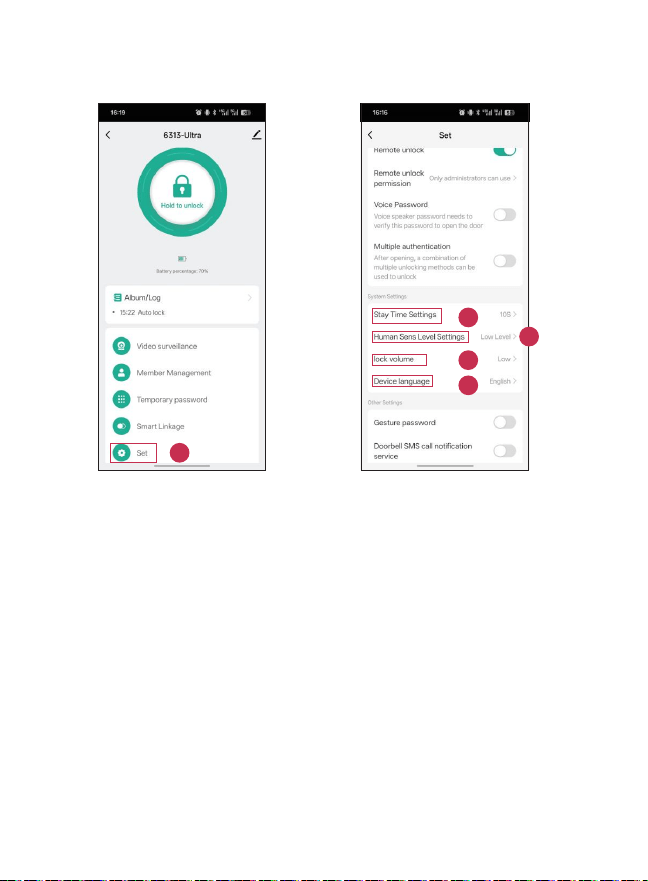
14. Door lock sleep setting
Click on [Album] / [Log] to view door opening records and abnormal alarm information.
2
3
4
5
1
Step 1: Click Settings
Management
Step 2: Click the sleep switch
Step 3: Select sleep time
Step 4: Set time
Step 5: Click to confirm
1
Step 1: Click on Album/Log Step 2: View albums/logs
(1)
On the homepage, go to [Settings] and select to turn the sleep switch on or off.
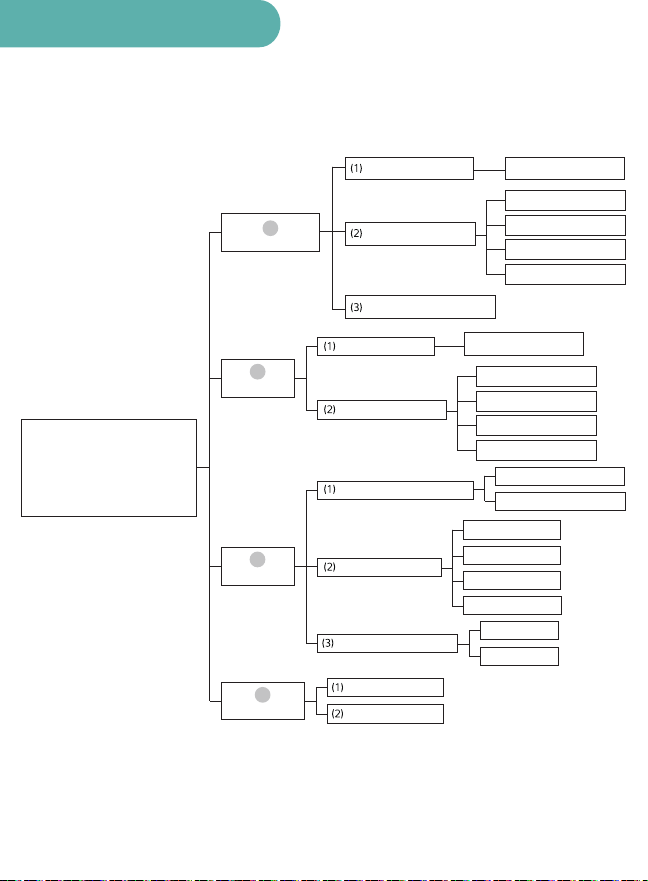
15. App-based Door Lock System Settings
(1) Access the settings menu on the homepage and select system settings.
(2) The dwell time setting is off by default;
when on, you can select 5S/10S/15S/20S/25S.
(3) Human body sensor sensitivity settings: You can choose high sensitivity/
low sensitivity/off.
(4) Volume settings: Selectable mute/low/medium/high
(5) Device language setting: Simplified Chinese/English
Step 1: Click Settings Management Step 2: Stay Time settings
(5~25S/Close)
Step 3: Human Sens Level Settings
(Hight/Low/Close)
Step 4: Lock volume
(Mute/Low/Middle/High)
Step 5: Device language
(English/Simplified Chinese)
26
1
2
3
4
5
27
Local Operation Guide
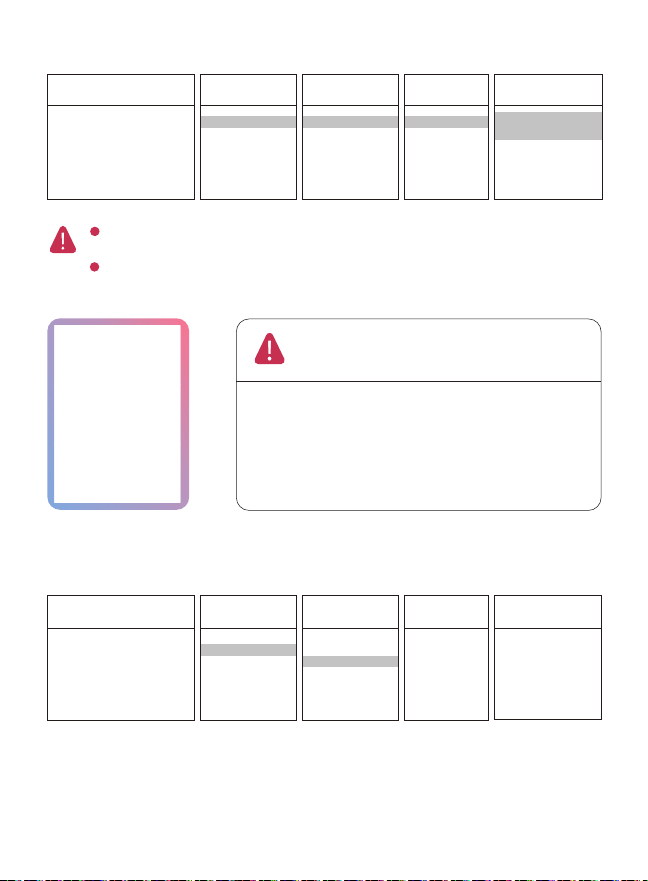
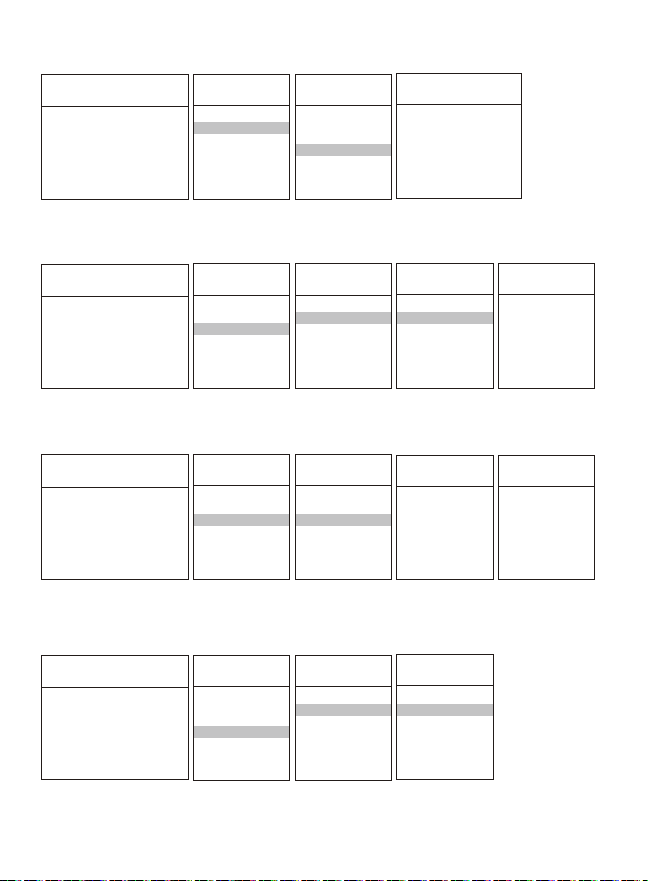
1. System architecture diagram
Wake up the keypad and press
*# to enter management mode
(if an administrator has already
been added, administrator infor
mation needs to be verified)
Management Settings
User Settings
System Settings
Network settings
Join the network
Delete network
Add administrator
Add regular users
Verification mode settings
1
Volume adjustment
Door opening direction
3
1.Single unlocking
2.Combination unlocking
1.low volume
1.Left
2.Medium volume
2.Right
3.high volume
4.Mute
1.Add key
1.Delete password
2.Delete fingerprints
3.Delete card
5.Delete palm veins
Delete administrator
Delete regular user
2
Restore factory settings
1.Add key
1.Delete password
2.Delete fingerprints
3.Delete card
5.Delete palm veins
4
28
Fingerprint verification 6 times consecutively, password verification 2 times,
IC card verification 1 time, palm vein verification 1 time.
After successful data entry, you can continue to enter other administrator in
formation.
1
2
3
4
5
6
● Use the center of your finger, not the tip, to register.
● The same fingerprint needs to be scanned from multiple
angles.
● The same user can scan multiple fingerprints.
● Please keep your fingers clean and dry.
As shown in the image, ensuring all six fingerprint
areas are fully recorded during fingerprint enrollment
will improve recognition accuracy by 99.9%.
2. Add administrator
3. Delete administrator
Step1: Enter the manage
ment mode
Step2: Press 1
1. Management Settings
2. User Settings
3. System Settings
4. Network settings
Step3: Press 2
1. Add administrator
2. Delete administrator
3. Restore factory settings
Step4: Press
1/2/3/5
1. Delete password
2. Delete fingerprints
3. Delete card
5. Delete palm veins
Select the corresponding
key type to delete.
Activate the password keypad.
Press *# to enter the management mode.
If an administrator has been added,
the administrator's information needs
to be verified.
Activate the password keypad.
Press *# to enter the management mode.
If an administrator has been added,
the administrator's information needs
to be verified.
Step1: Enter the manage
ment mode
Step2: Press 1
1. Management Settings
2. User Settings
3. System Settings
4. Wireless Settings
Step3: Press 1
1. Add Administrator
2. Delete Administrator
3. Restore Appearance
Settings
Step4: Press 1
1. Add the key
Step5: Enter
Enter fingerprint / password /
card / palm vein
It is recommended to input all
of them, which will facilitate
the management of the door
locks in the future.
Step5:
29
Single unlocking: A single user key can unlock the door.
Combination unlocking: All regular users must use two keys to unlock the door.
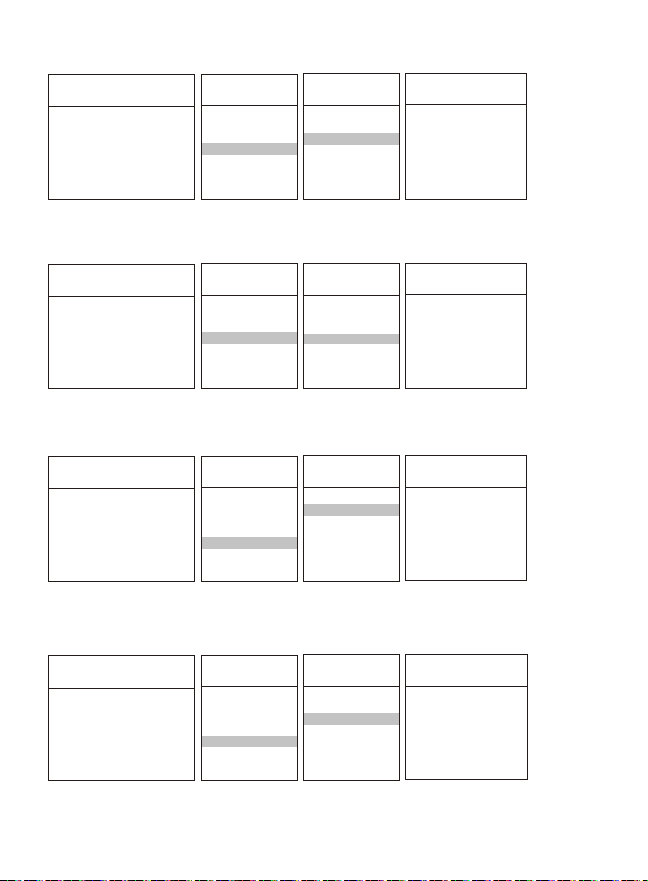
4. Restore factory settings
5. Add regular users
6. Delete regular users
7. Verification mode settings
Step4: Press 1/2
/3/5
1. Delete password
2. Delete fingerprints
3. Delete card
5. Delete palm veins
Select the corresponding
key type to delete.
Enroll fingerprint/
password/card
/palm vein
Step1: Enter the manage
ment mode
Step2: Press 2
1. Management Settings
2. User Settings
3. System Settings
4. Network settings
Step3: Press 1
1. Add regular user
2. Delete regular user
1. Add Key
Step4: Press 1
Activate the password keypad.
Press *# to enter the management mode.
If an administrator has been added,
the administrator's information needs
to be verified.
Step1: Enter the manage
ment mode
Step2: Press 2
1. Management Settings
2. User Settings
3. System Settings
4. Network settings
Step3: Press 2
1. Add regular user
2. Delete regular user
Step3: Press 1
1. Verification mode settings
2. Volume adjustment
3. Door opening direction
Step4: Choose
1 or 2
1. Single unlocking
2. Combination unlocking
Activate the password keypad.
Press *# to enter the management mode.
If an administrator has been added,
the administrator's information needs
to be verified.
Step1: Enter the manage
ment mode
Step2: Press 3
1. Management Settings
2. User Settings
3. System Settings
4. Network settings
Activate the password keypad.
Press *# to enter the management mode.
If an administrator has been added,
the administrator's information needs
to be verified.
Step1: Enter the manage
ment mode
Step2: Press 1
1. Management Settings
2. User Settings
3. System Settings
4. Network settings
Step3: Press 3
1. Add administrator
2. Delete administrator
3. Restore factory settings
Step4: Select * or #
Select *: Return to the previous menu
and cancel factory reset.
Select #: Confirm factory reset.
All user information will be
deleted.
Activate the password keypad.
Press *# to enter the management mode.
If an administrator has been added,
the administrator's information needs
to be verified.
Step 5:
Step5:
30
8. Volume adjustment
9. Door opening direction
10. Join the network
11. Exit the network
Open the Tuya App, use
2.4GHz Wi-Fi, and follow
the instructions in the App.
Step1: Enter the manage
ment mode
Step2: Press 4
1. Management Settings
2. User Settings
3. System Settings
4. Network settings
Activate the password keypad.
Press *# to enter the management mode.
If an administrator has been added,
the administrator's information needs
to be verified.
Step3: Press 1
1. Join the network
2. Delete network
Step4:
The mobile app device will
be deleted, and the door
lock will no longer be
controllable.
Step4:
Step1: Enter the manage
ment mode
Step2: Press 4
1. Management Settings
2. User Settings
3. System Settings
4. Network settings
Activate the password keypad.
Press *# to enter the management mode.
If an administrator has been added,
the administrator's information needs
to be verified.
Step3: Press 2
1. Join the network
2. Delete network
Step1: Enter the manage
ment mode
Step2: Press 3
1. Management Settings
2. User Settings
3. System Settings
4. Network settings
Step4: Press 1/2
Activate the password keypad.
Press *# to enter the management mode.
If an administrator has been added,
the administrator's information needs
to be verified.
Step3: Press 3
1. Verification mode settings
2. Volume adjustment
3. Door opening direction
1. Left
2. Right
Step1: Enter the manage
ment mode
Step2: Press 3
1. Management Settings
2. User Settings
3. System Settings
4. Network settings
Step4: Press 1/2/3/4
Activate the password keypad.
Press *# to enter the management mode.
If an administrator has been added,
the administrator's information needs
to be verified.
Step3: Press 2
1. Verification mode settings
2. Volume adjustment
3. Door opening direction
1. Low volume
2. Medium volume
3. High volume
4. Mute
Press and hold for 3 seconds, and the system will
switch to voice mode or silent mode.
31
Other notes
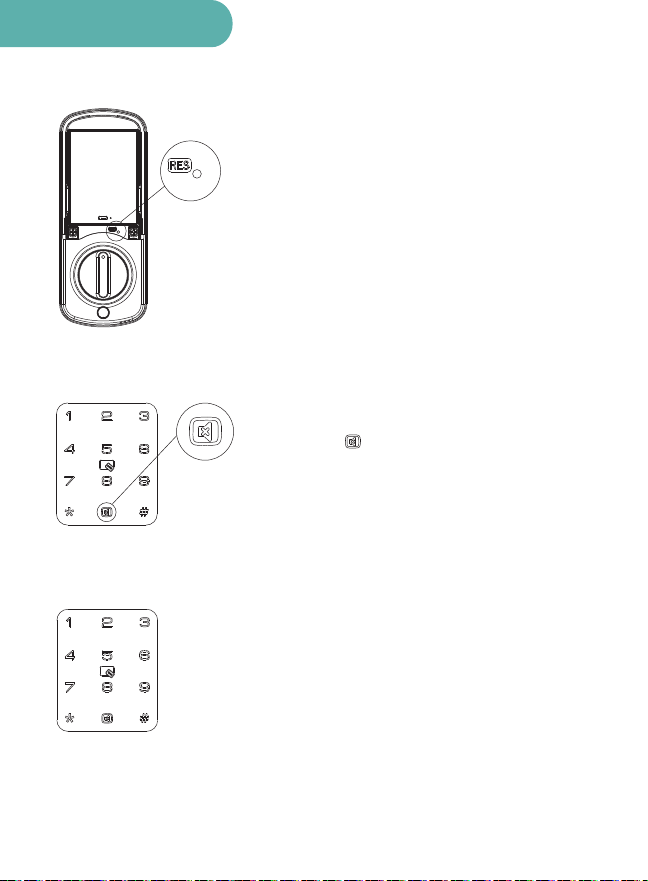
Press and hold the RES button for 5 seconds to restore
the door lock to factory settings. All information will be
deleted. Please add an administrator immediately.
3. Human body sensing
2. Mute button
1. Factory reset
Wake up the keypad and enter[888#] to access the human
body sensor settings.
Press [4] to switch between [High/Low/Off]:
1. High:
When a person approaches the door
lock 80-100cm, the door lock activates
the palm vein module for recognition.
2. Low:
When a person approaches the door
lock 50-70cm, the door lock activates
the palm vein module for recognition.
3. Off:
When a person approaches the door lock,
the door lock does not activate the palm vein
module; you need to manually wake up the
door lock for recognition.
32
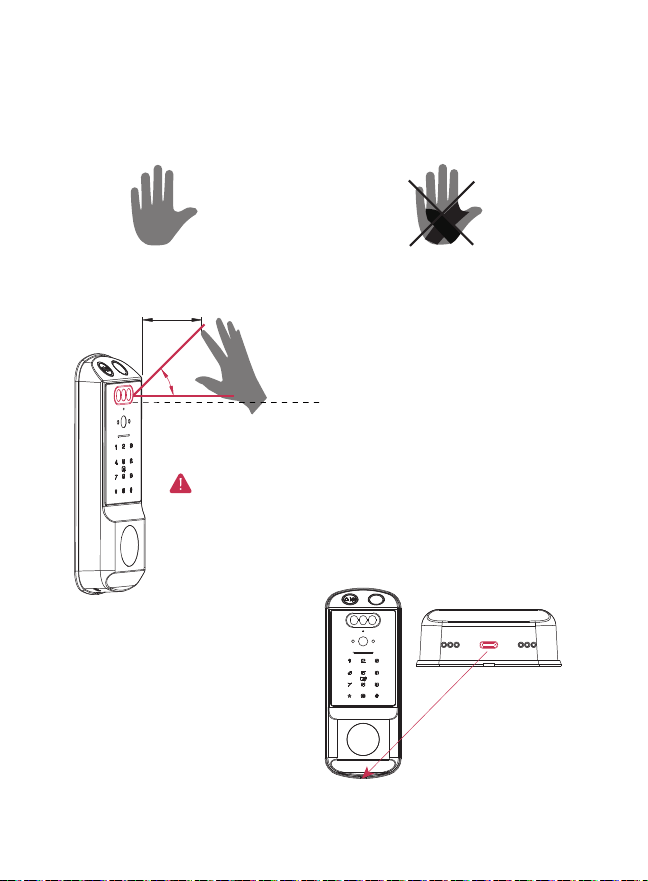
15- 25cm
10°~15°
To ensure successful recognition, please position your palm
15-25cm diagonally in front of the door lock, at a 15° angle
to the horizontal.
1. Spread all your fingers out, palm pointing
upwards, as shown in the picture below.
2. Do not let anything cover
your palms.
4. How to use palm veins
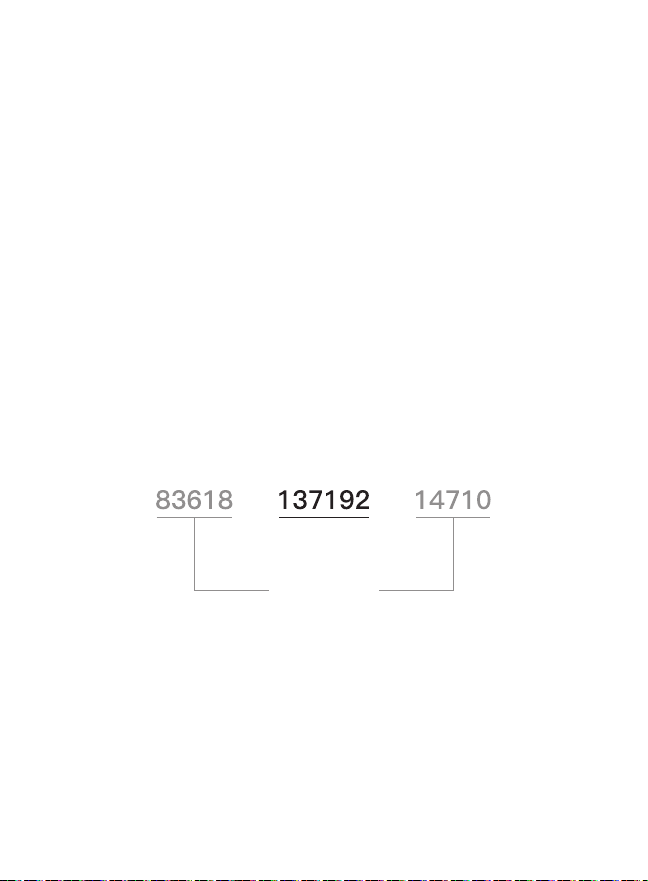
5. Emergency power supply
33
(1) Key function
(2) Trial and error constraints
Unlock password
Random numbers
The key unlocking function remains available even
when the battery is completely depleted or the user password is forgotten.
After five failed attempts to enter invalid unlocking information,
the device will lock for one minute.
To prevent your unlocking code from being seen, you can add any random numbers before
or after the password (total length not exceeding 32 characters).
6. Auxiliary function
34
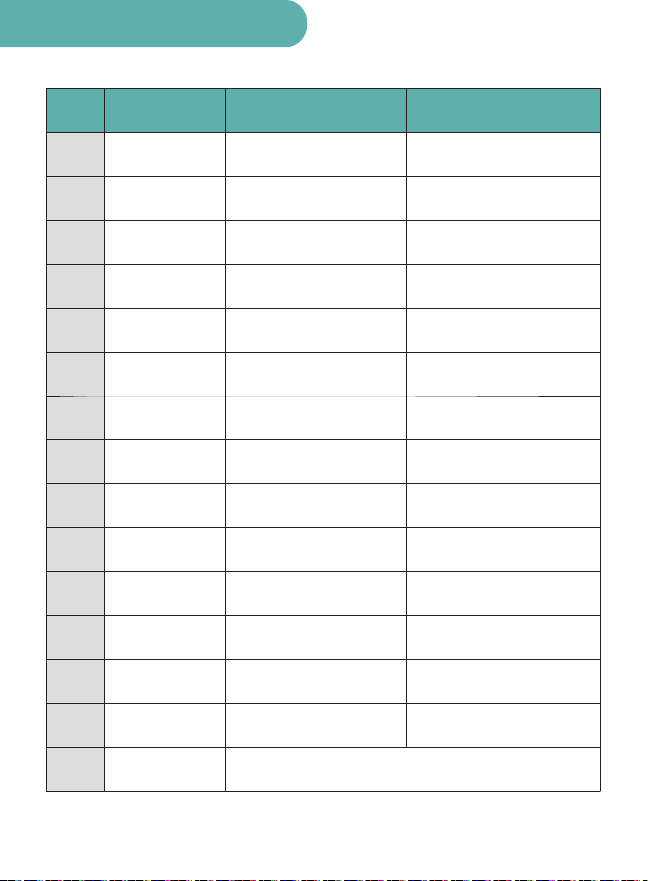
Product Specifications
Serial
Number
Function
Unlocking methods
Total number of
users
Number of finger
prints
Number of Passwords
Number of Palm
vein
False password
length
Battery voltage
Low voltage alarm
Emergency power
supply
Operating Tempe
rature
Operating Humidity
Automatic locking
Wi-Fi frequency
band
Product size
Number of IC card
350 users
100 sets
100 sets
100 sets
50 sets
Up to 32 digits
8.4V
7.0V
5V
-25°C~55°C
20%RH~90%RH
2.4GHz Wi-Fi
Support
Includes management users and
regular users
Fingerprints need to be entered
6 times.
Password length 6-10 characters
Support 13.56MHz IC card
The voltage when the battery is
fully charged
USB/Type-c power supply port
Hall-effect sensing
Exterior Keypad:188*75.5*29.5mm
Interior Keypad:188*75.5*34mm(Knob 46.5mm)
1
2
3
4
5
6
7
8
9
10
11
12
13
14
15
Fingerprint + Password + IC
Card + Palm Vein + App + Key
content
Remark

35
This equipment has been tested and found to comply with the limits for a Class B
digital device, pursuant to part 15 of the FCC rules. These limits are designed
to provide reasonable protection against harmful interference in a residential
installation. This equipment generates, uses and can radiate radio frequency
energy. If it not installed and used in accordance with the instructions, may
cause harmful interference to radio communications. However, there is no guarantee
that interference will not occur in a particular installation. If this equipment
does cause harmful interference to radio or television reception, which can be
determined by turning the equipment off and on, the user is encouraged to try to
correct the interference by one or more of the following measures:
-Reorient or relocate the receiving antenna.
-Increase the separation between the equipment and receiver.
-Connect the equipment into an outlet on a circuit different from that to
which the receiver is connected.
-Consult the dealer or an experienced radio/TV technician for help.
Responsible for compliance could void the user’s authority to operate this
equipment. (Example- use only shielded interface cables when connecting
to computer or peripheral devices).
Any Changes or modifications not expressly approved by the party
responsible for compliance could void the user’s authority to operate the
equipment.
This equipment complies with Part 15 of the FCC Rules.
Operation is subject to the following two conditions:
(1) This device may not cause harmful interference.
(2) This device must accept any interference received, including
interference that may cause undesired operation.
FCC Radiation Exposure Statement:
The equipment complies with FCC Radiation exposure limits set forth for
uncontrolled environment. This equipment should be installed and operated
with minimum distance 20cm between the radiator and your body.

Q1:
A:
.
36
Q&A(FAQ)
1. Installation Issues
After the door lock is installed, how can the opening direction (left-opening or
right-opening) be adjusted?
After the door lock is installed, when it is in the factory default state (without the
administrator password entered), a lithium battery is installed. The lock body can
automatically learn to open the door on the left or the right.
Q1:
A:
2. Power & Emergency Unlock
How to unlock the door when the battery is dead?
Two emergency solutions: 1. Use the accompanying mechanical emergency key to
open the door (please do not store the key indoors); 2. Connect an external power
bank to the bottom Type-C interface of the door lock to provide temporary power
supply. After waking up the door lock, enter the valid password/fingerprint to unlock.
The external power supply is only used to temporarily activate the door lock and can
not charge the door lock battery.
Q2:
A:
What batteries does the lock use? Can I use rechargeable batteries?
It is recommended to use the official standard rechargeable battery. In regular usage
scenarios such as reporting 10 times when opening and closing the door, and
reporting 10 times for abnormal dynamic analysis, it can last for 136 days, which is
equivalent to 4.5 months. However, if you remotely view the peephole for a long
time, in a low-temperature environment, or frequently wake up the door lock, the
battery life of the door lock will be reduced. When the device is low on power, the
keyboard light and the APP will send out reminders.
Q3:
A:
Will my fingerprints, passwords and data be lost after replacing batteries?
Normal battery replacement will not delete local data including fingerprints,
passwords, IC cards and settings. No re-pairing is required. Do not remove batteries
when the latch is working.

37
Q1:
A:
3. Unlock Functions
Fingerprint recognition is insensitive for the elderly and children, how to solve it?
When entering fingerprints, it is recommended to press them from multiple angles
to ensure the completeness of the fingerprint information. When unlocking, keep
your fingers dry and clean. Elderly people's fingerprints may be worn out, and
children's fingerprints may be too shallow, which can lead to a decrease in
recognition rate. In such cases, you can also use palm vein, password, or IC card as
backup unlocking methods.
Q2:
A:
What happens if I enter wrong password/fingerprint multiple times?
After 5 consecutive failed unlock attempts, the keypad and fingerprint sensor will be
temporarily disabled for 1 minute. Once the countdown ends, you can try again. The
door will not automatically unlock.It can also be unlocked in advance through
indoor unlocking, APP unlocking, or mechanical key opening.
Q2:
A:
The lock shows offline in APP, how to troubleshoot?
1. The lock only supports 2.4GHz Wi-Fi, not 5GHz; 2. Check if the gateway is
powered off, too far or network abnormal; 3. Re-add the lock if it is reset; 4. Restart
the gateway and lock, then reconfigure network; 5. Enable Bluetooth and location
permission on your phone (required for Android).
Q3:
A:
Does it support anti-peep virtual password?
Yes. You can enter any random digits before and after the correct password. As long
as the correct password is included in the input sequence, the lock will unlock
successfully, preventing password peeping.
Q3:
A:
What data will be cleared after lock reset?
Factory reset will clear all local user data (Palm vein, fingerprints, passwords, IC
cards, temporary permissions), device pairing records and custom settings. The
admin will restore to default, and you need to reinitialize the lock.
Q1:
A:
4. APP & Network Connection
why must the phone be connected to 2.4GHz Wi-Fi when setting up the Smart Lock?
Most routers have two frequency bands: 2.4GHz and 5GHz. 2.4GHz offers stronger
signal penetration, while 5GHz provides faster network speeds. Stronger penetration
is more suitable for doorbell transmission.Therefore, when setting up, ensure your
phone is connected to the2.4GHz Wi-Fi network.

38
Q2:
A:
Smart speaker shows "No Response", how to fix?
Restart the smart speaker and gateway; unbind the device, clear cache, re-authorize
and rediscover devices on the speaker platform; ensure your lock APP account is
online without remote login disconnection.
Q1:
A:
5. Smart Ecosystem
Does it support Alexa/Google Home voice control? Can I unlock via voice?
Supports Alexa/Google Home. To ensure home security, voice unlocking requires
enabling PIN code verification in the corresponding smart ecosystem backend.
Voice unlocking is supported.
Q2:
A:
Should palm vein and fingerprint data be stored in the cloud or locally? Is the
privacy secure?
All palm vein and fingerprint biometric information is encrypted and stored
locally on the hardware, and will not be uploaded to the cloud. Passwords and user
data are transmitted and stored in an encrypted manner, safeguarding user privacy
information and eliminating the risk of data leakage.
Q1:
A:
6. Security & Auto-Lock
What will trigger the lock alarm?
When the door lock detects any abnormal situations such as an abnormal presence
at the door, the door not being fully closed, or prolonged partial opening, it will
trigger a local buzzer alarm, and simultaneously send an abnormal reminder via the
APP, providing comprehensive security protection for home life.
Q2:
A:
Will power off during firmware update damage the lock?
Ensure sufficient battery power before firmware update, do not power off or
operate the lock during updating. If abnormal interruption occurs, restore factory
settings to repair the device.
Q1:
A:
7. Troubleshooting
Palm vein / password / fingerprint / card is correct, but the door lock cannot be unlocked?
Confirm the lock is not in security lockout mode; check if the latch is stuck by the
door frame; confirm the lock is not reset and the user data is valid.
If you encounter any problems during the installation process,
please scan the QR code or send an email to
[email protected] for assistance.
Model: 6313-Ultra
Version number: 1.0
Revision Date: 12 August 2026
Origin: Zhongshan, China