Product user
manual
Please read this manual
carefully and keep it properly.
B-001
For future reference.
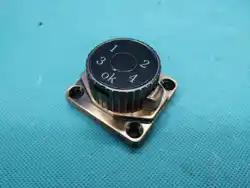
This smart lock tag can be charged via a USB-C cable for
Android devices.(Please fully charge it before first use.)
The default password is 1234, and any fingerprint can
unlock it. After registering your fingerprint, the factory
settings will be deactivated.
Fingerprint Version of Smart Lock Tag:
- Charging time per full charge: 3 hours
- Continuous battery life: Approximately 3 months
- Standby time: Approximately 3 months
Note: Actual battery performance may vary based on
usage conditions.
Indicator Light Instructions:
- Green light: Fingerprint recognized successfully
- Red light: Fingerprint recognition failed
- Flashing red light: Low battery
- Flashing white light: Fingerprint recognition failed;
long press to enter the emergency mode
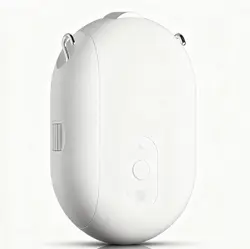
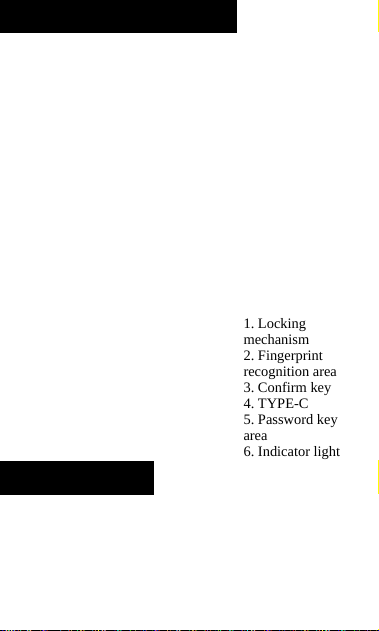
Product introduction
1. Locking
mechanism
2. Fingerprint
recognition area
3. Confirm key
4. TYPE-C
5. Password key
area
6. Indicator light
6
5
1
2
3
4
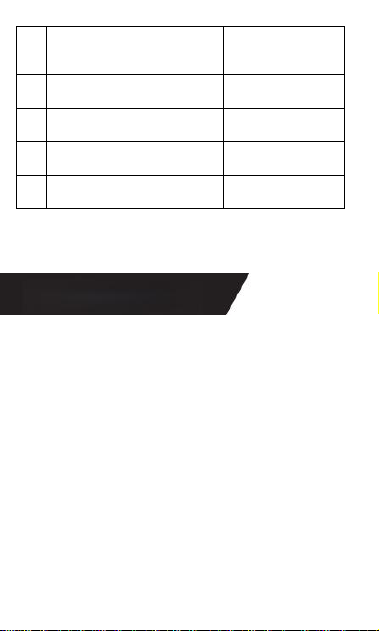
Indicator light
Using three color indicators, different color indicators
indicate different states of the equipment. See the
following table for details:
1
Note: When the battery is low, the touch fingerprint
sensor will flash the red light for 5 seconds and
make a beep sound to remind you to charge it.
Indicator Light Status Status
Green light on
Unlocked
successfully
Red light on
Unlocking
failed
Red light stays on
Charging in
progress
Green light stays on Fully charged
Using the TUYA App
Instructions for using the tuya App
"Tuya Smart App" is an intelligent device management app
provided by Tuya to end consumers. Through the "Doodle
Smart App" " You can conveniently configure and control the
smart home products you buy, configure the scenes and
automation schemes you like, share your smart devices
with family and friends, and enjoy the fun of smart home.App
acquisition: Search for "Tuya Smart" in the mobile
application market or "Apple Store", or scan the following
QR code to download.
※This document takes the Tuya Smart App as an example to
explain the function of the App door lock panel in detail.
2
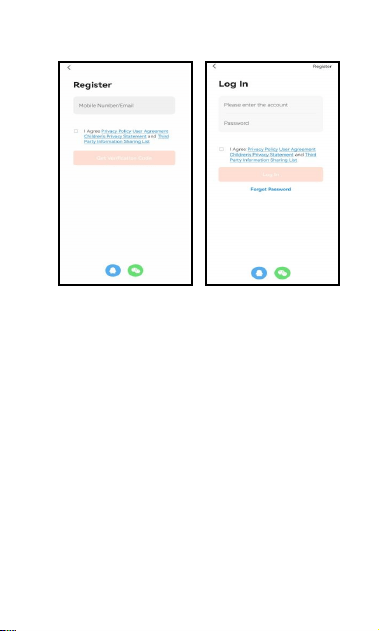
1. App registration and login
(1) App registration: Choose log in an account without an
app or log in with a SMS verification code.
(2) Click "Create a new account" to enter the registration
page of the account, and follow the prompts to obtain the
SMS verification code and set the password.
(3) If you already have an account, you can log in to the
app by clicking "Log in with an existing account," and the
login method supports password, verification code, social
account, etc.
3
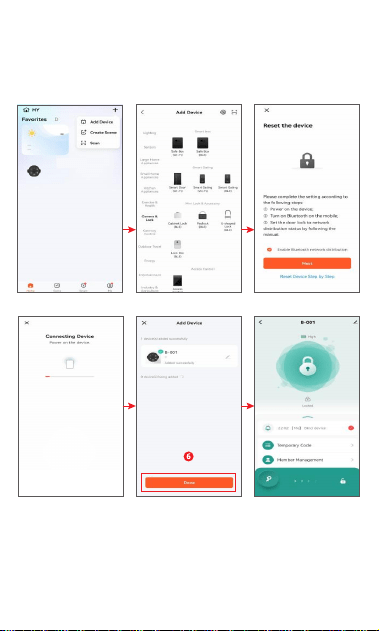
2. Add a Bluetooth door lock (you must
first turn on your phone's Bluetooth and
location function)
B-001
4
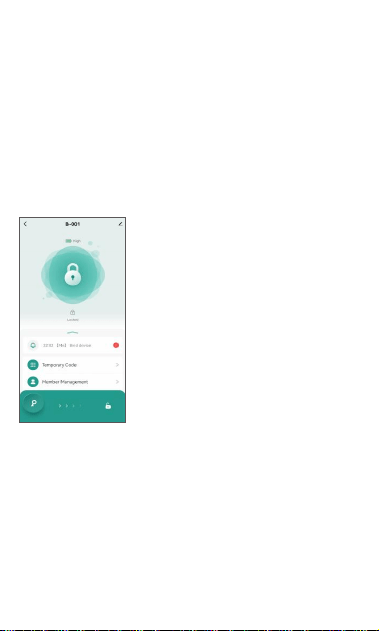
(1) The top of the home page
displays the device name and
current battery status, and the
bottom of the home page includes "
door opening records," "temporary
passwords," "member management,
" and "more settings."
(1) Click the "Add Device" icon on the App homepage.
(2) Touch the fingerprint sensor to wake up, wait for
the phone to scan the device and select "Add", press the
"+" icon to add the device and complete it.
(3) Wait for the device to be added, and the smart lock
interface will appear, indicating that it has been
successfully added.
3. Home page of the Bluetooth door lock
panel
(2) The Bluetooth connection status will be displayed in
the center of the home page. If connected, you can
swipe right to unlock and open the door lock directly.
5
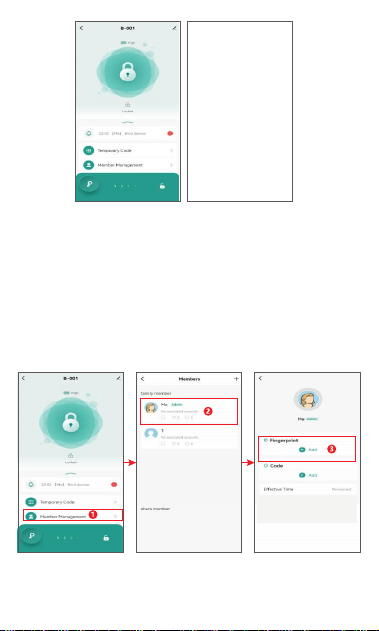
(3) If Bluetooth is not connected, "Unable to
connect Bluetooth" will be displayed (Bluetooth
cannot be turned on directly through the App), and
you need to touch the "OK" button in the bottom
right corner first to wake up the lock and then
connect Bluetooth.
4. Fingerprint management
6
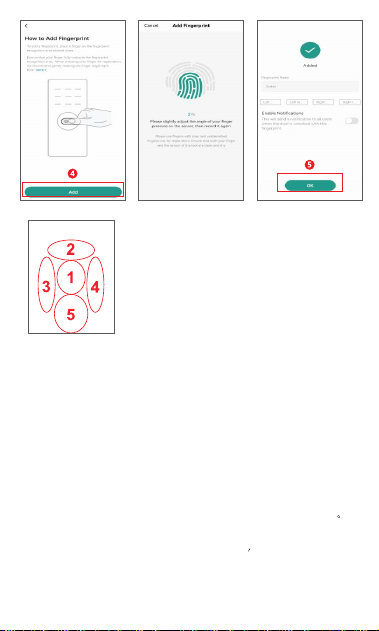
(1) Select the "Family Member" account with the
corresponding permissions in the "Member
Management " entry on the homepage (Note: the
administrator
associated will have administrator permissions, and the
ordinary member associated will only have ordinary
user permissions).
(2) Click on the "Start Collection" blue light to enter the
fingerprint collection interface. Press the fingerprint
green light and release it. Each fingerprint needs to be
collected 5 times. The indicator light will turn off, and
the fingerprint collection is successful.
7
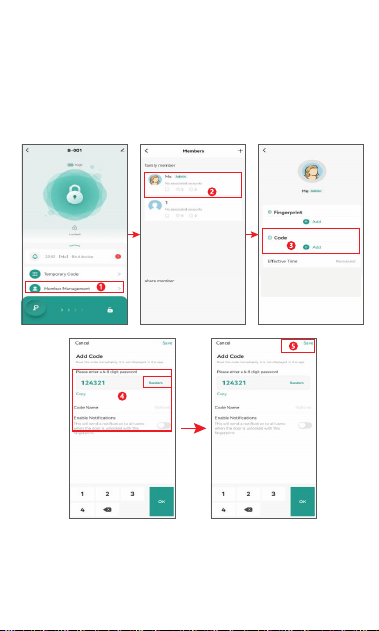
(3) Through the Bluetooth connection of the App, the
administrator can collect fingerprints for himself or other
family members.
(4) Fingerprint unlocking, green light when verification
is successful, red light when verification fails.
5. Password management
8
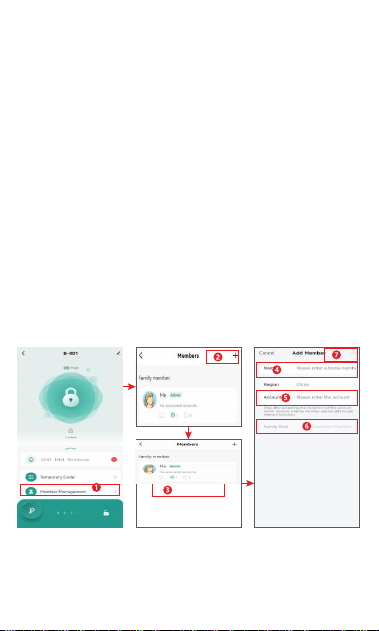
(1) Select the "Family Member" account with the
corresponding permission from the "Member
Management" entry on the homepage.
(Note: Associated administrators will be granted
administrator privileges, while associated regular
members only have regular user privileges.)
Administrator: Can enroll fingerprints and set passwords
for other members.
Regular Member: Only has the permission to unlock the
lock tag normally.
(2) Click "Add Password" and enter a 6-8 digit password
(do not enter the same number or consecutive numbers,
such as 00000 or 1234).
6. Member Management - Administrator
Addition
9
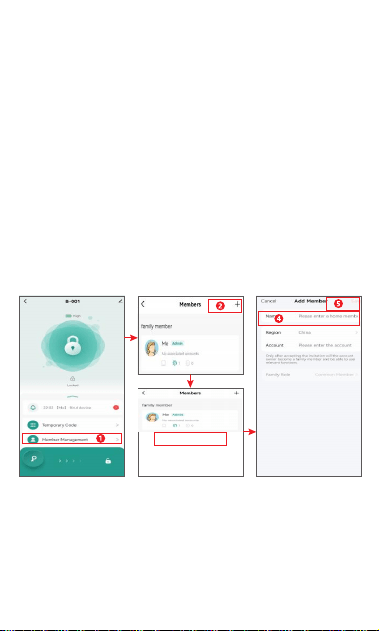
(1) Click the "+" button in the upper right corner of the "
Member Management" entry, select "Add Member", enter
the member name and doodle account, select the
permissions, and click "Save" to add the administrator
user. (Note: To add an administrator account, you must
have already registered a Tuya account; otherwise, you
will not be able to add it.)
(2) After the added account opens the mobile graffiti app,
it will receive an invitation message, and after agreeing, it
will have the management rights of the device.
(3) All key information added to this account will be
defaulted to administrator permissions.
(1) Click the "+" button in the upper right corner of the "
Member Management" entry, select "Add Member", enter
the member name, do not enter the account number, and
click "Save" to add a normal member user.
(2) All key information added to this account entry will be
7. Member management - adding ordinary
members
defaulted to ordinary user permissions.
10
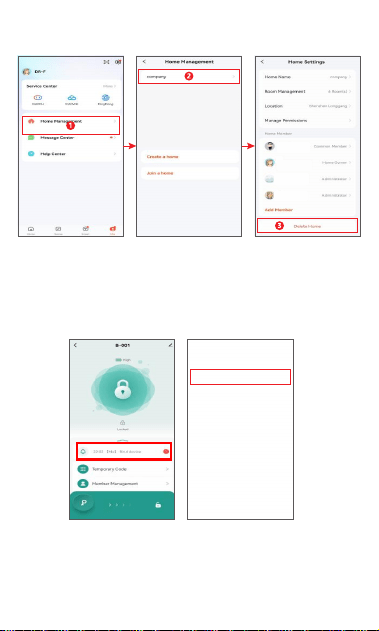
(1) Click on "Family Management" in the bottom right
corner of the App, select the family, and you can delete or
8. Delete family members
change the usage rights of the added family members.
Click the icon to view the door opening record. (Note:
When the door lock is connected to the mobile phone
Bluetooth, the door opening record will be displayed in
9. Door opening records
real time on the application;
11
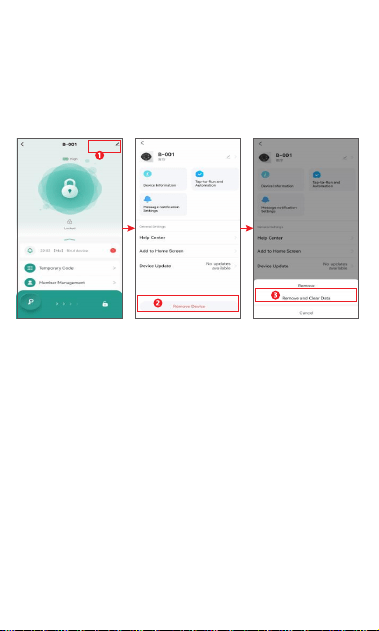
10. Restore to factory settings
Click the icon in the upper right corner of the
main page to enter the interface and find it.
"Remove device", select "Unbind and clear data"
Otherwise, the record will be cached on the local lock,
waiting for the lock to connect to the phone's Bluetooth
and open the door next time. (Note: This is the
beginning of the translation, not the end.)
1) When the mobile phone App and the door lock are in
a Bluetooth connection state, use the factory reset
operation, all door opening methods on the local door
lock will be cleared, the door lock will be restored to the
default state at the factory, and other users can also
match the door lock again through the App.
2) When the mobile phone is not in a Bluetooth connection
state with the door lock, the factory reset operation on the
mobile phone App will not affect the door opening data on
the door lock.Other users can re-pair with the lock
through the App, and all the original data on the lock will
be invalid after re-pairing.
12
指纹容量
密码容量
电源模式
应用程序
充电口
工作温度
50枚指纹
100组
锂电池
涂鸦智能APP
5V 2A TYPE-C
0°C
—
55°C
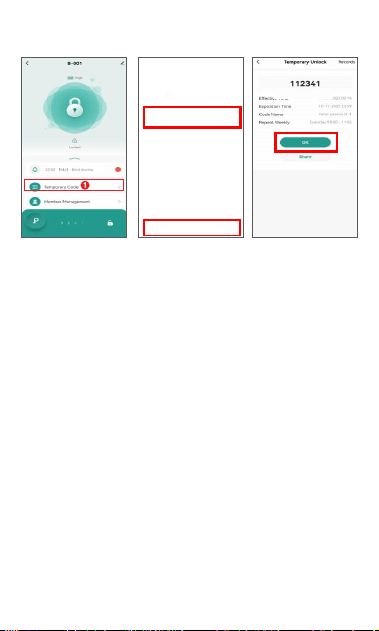
11. Temporary password
Connect Bluetooth, click temporary password, then
click customize, preset temporary password, the
temporary password set at this time is sent to the friend,
the other party enters the password to open the lock;
Generating a temporary password needs to be done
before the lock, and cannot be done remotely directly.
12. Technical parameters
50
13
FCC Caution:
This device complies with part 15 of the FCC Rules. Operation
is subject to the following two conditions: (1) this device may not
cause harmful interference, and (2) this device must accept any
interference received, including interference that may cause
undesired operation.
Any changes or modifications not expressly approved by the
party responsible for compliance could void the user's authority
to operate the equipment.
NOTE: This equipment has been tested and found to comply
with the limits for a Class B digital device, pursuant to Part 15 of
the FCC Rules. These limits are designed to provide reasonable
protection against harmful interference in a residential
installation. This equipment generates, uses and can radiate
radio frequency energy and, if not installed and used in
accordance with the instructions, may cause harmful
interference to radio communications. However, there is no
guarantee that interference will not occur in a particular
installation.
If this equipment does cause harmful interference to radio or
television reception,which can be determined by turning the
equipment off and on, the user is encouraged to try to correct
the interference by one or more of the following measures:
-- Reorient or relocate the receiving antenna.
-- Increase the separation between the equipment and receiver.
-- Connect the equipment into an outlet on a circuit different
from that to which the receiver is connected.
-- Consult the dealer or an experienced radio/TV technician for
help.
To maintain compliance with FCC’s RF Exposure guidelines,
This equipment should be installed and operated with minimum
distance between 20cm the radiator your body: Use only the
supplied antenna.