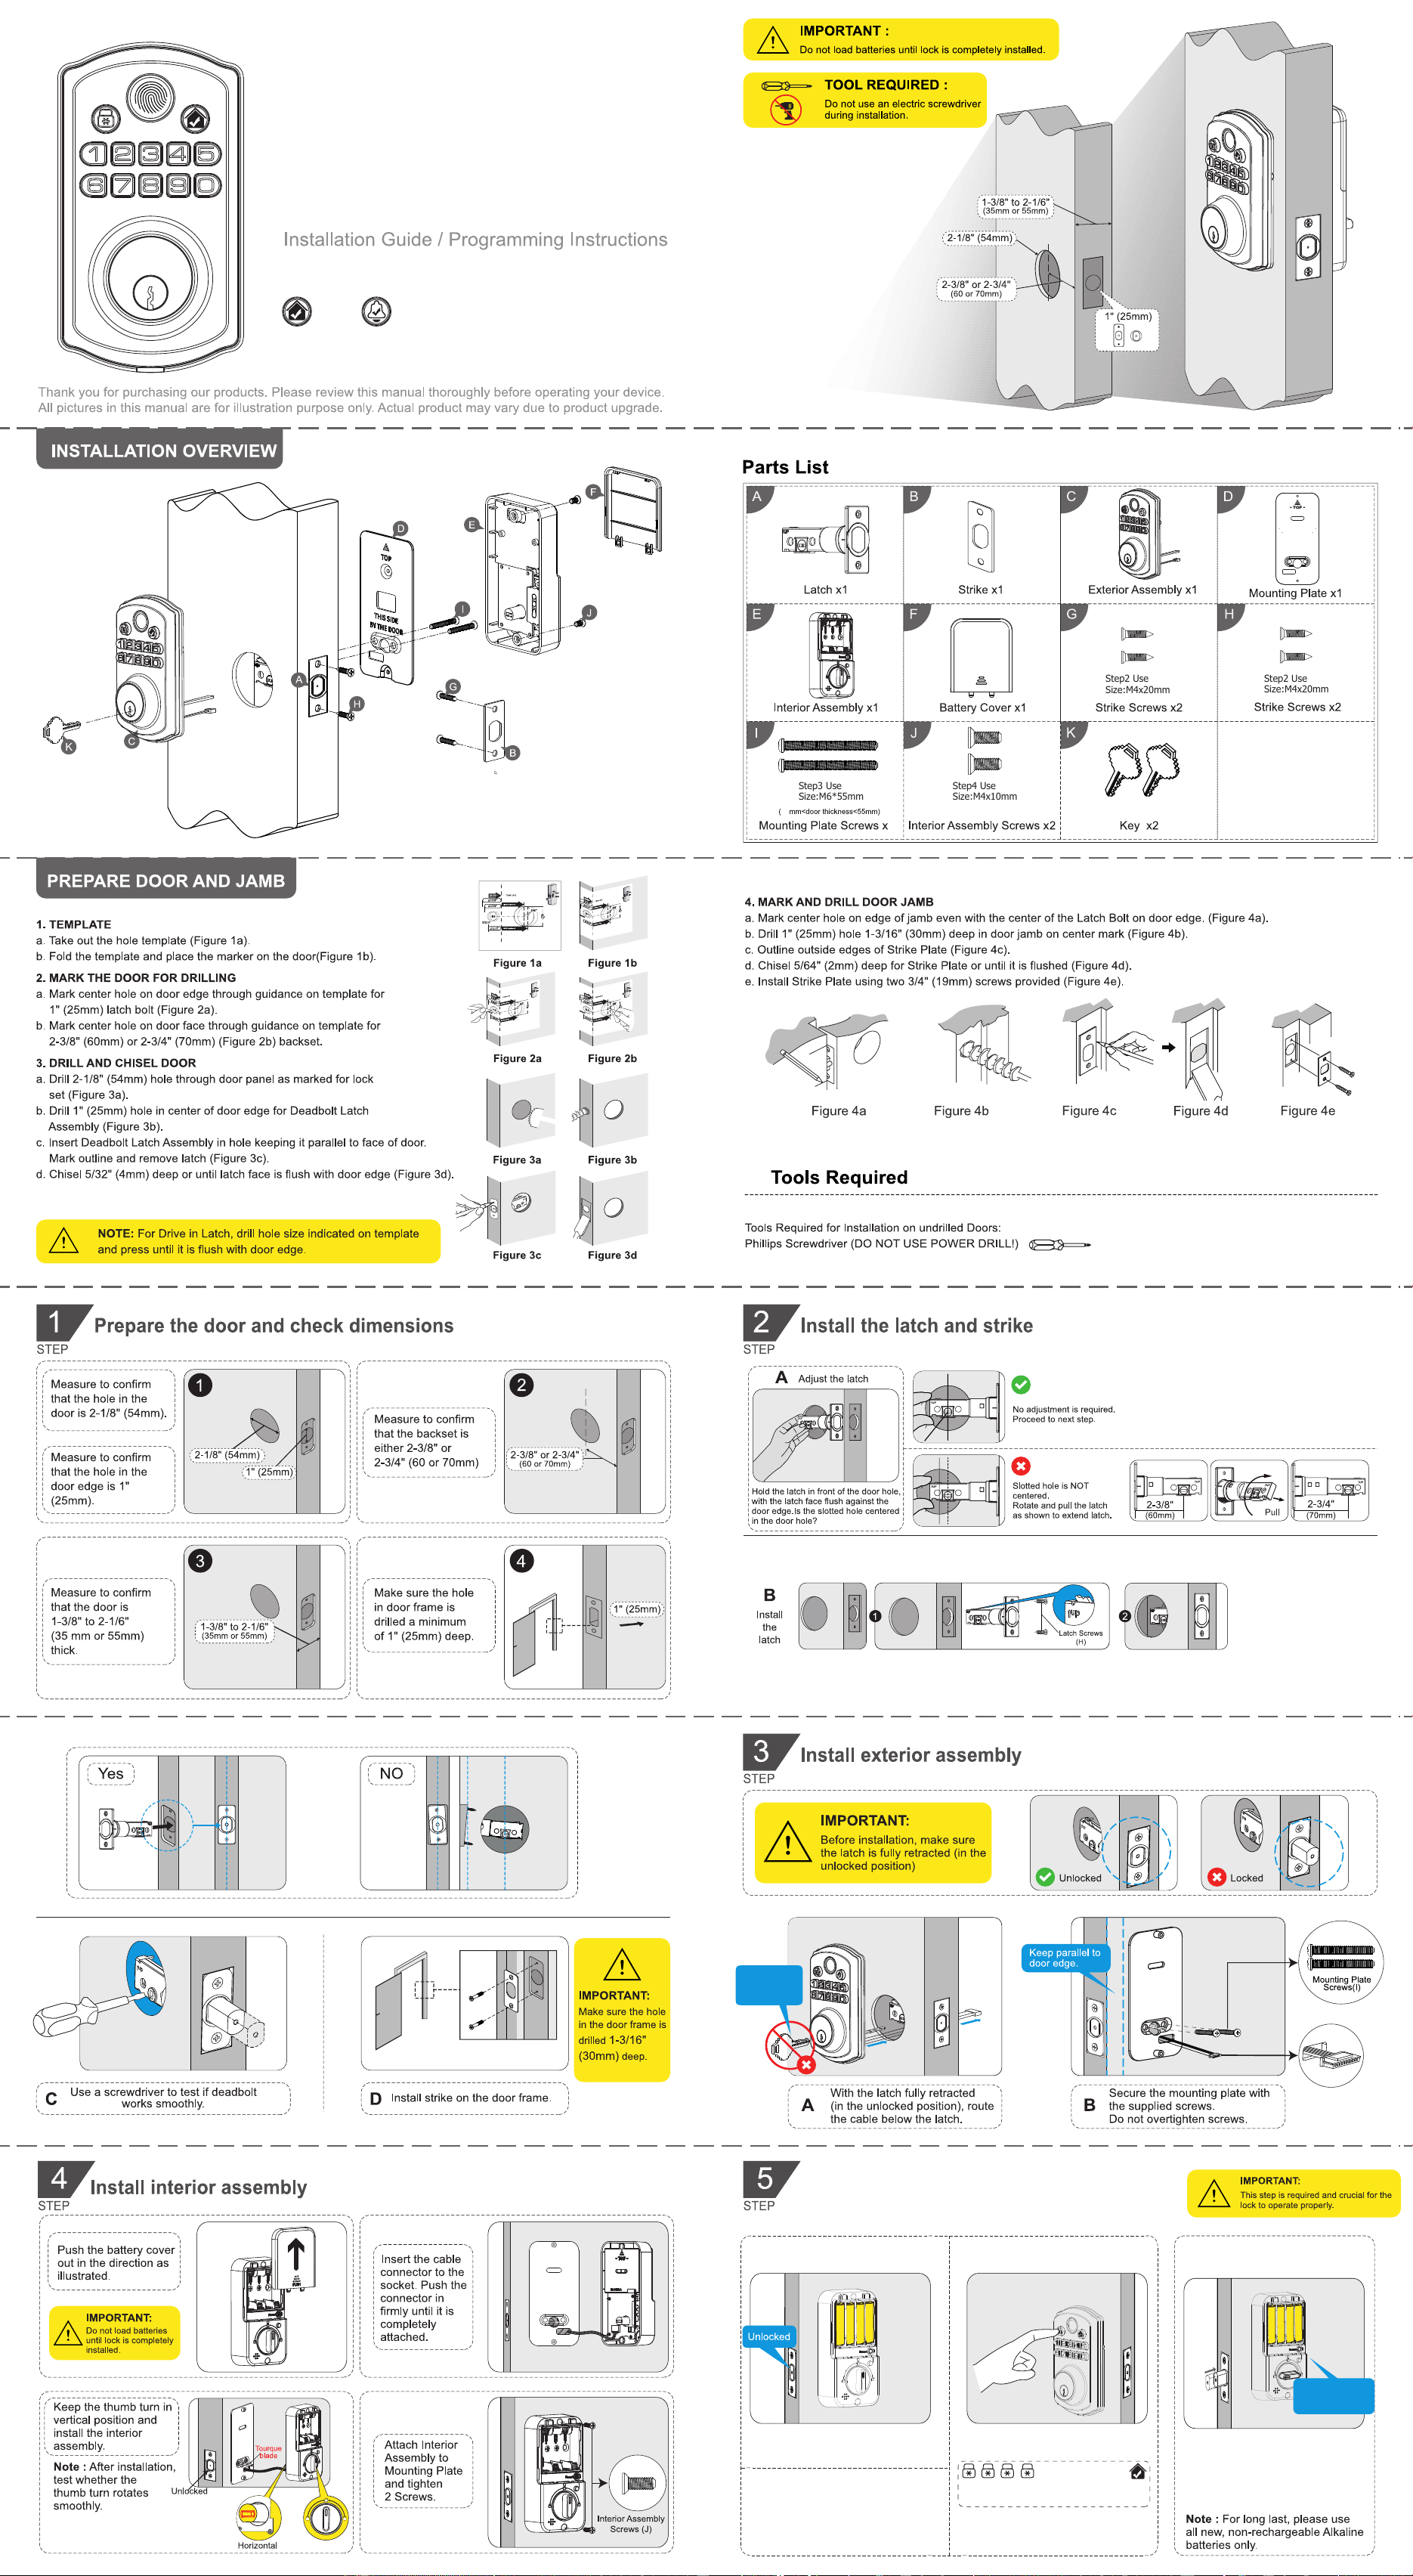
HS8-A
AGAINST DOOR
THIS SIDE INDOOR
PUSH
M P roduct Line
35
2
Load 4 AA LR6 1.5V batteries
into the battery compartment.
Until you hear the sound of
"beep". The latch bolt will
extend to learn the orientation
of the door automatically.
+
Until you hear the
sound of "beep".
Smart Digital Deadbolt
=
Explanation:
Master Code
Step2 Use
Size:M4x20mm
Step2 Use
Size:M4x20mm
Step4 Use
Size:M4x10mm
Step3 Use
Size:M6*55mm
A-way one
A-way three
B
Do not insert
the key when
installing the
lock.
V 1.2
Auto Identify left or right doors opening direction
Power supply/reset to factory defaults/quick commands - three ways to auto identify.
Press button
4times
+
Press and hold the Reset button,
Keep holding the Reset button for 4
seconds.
A-way two
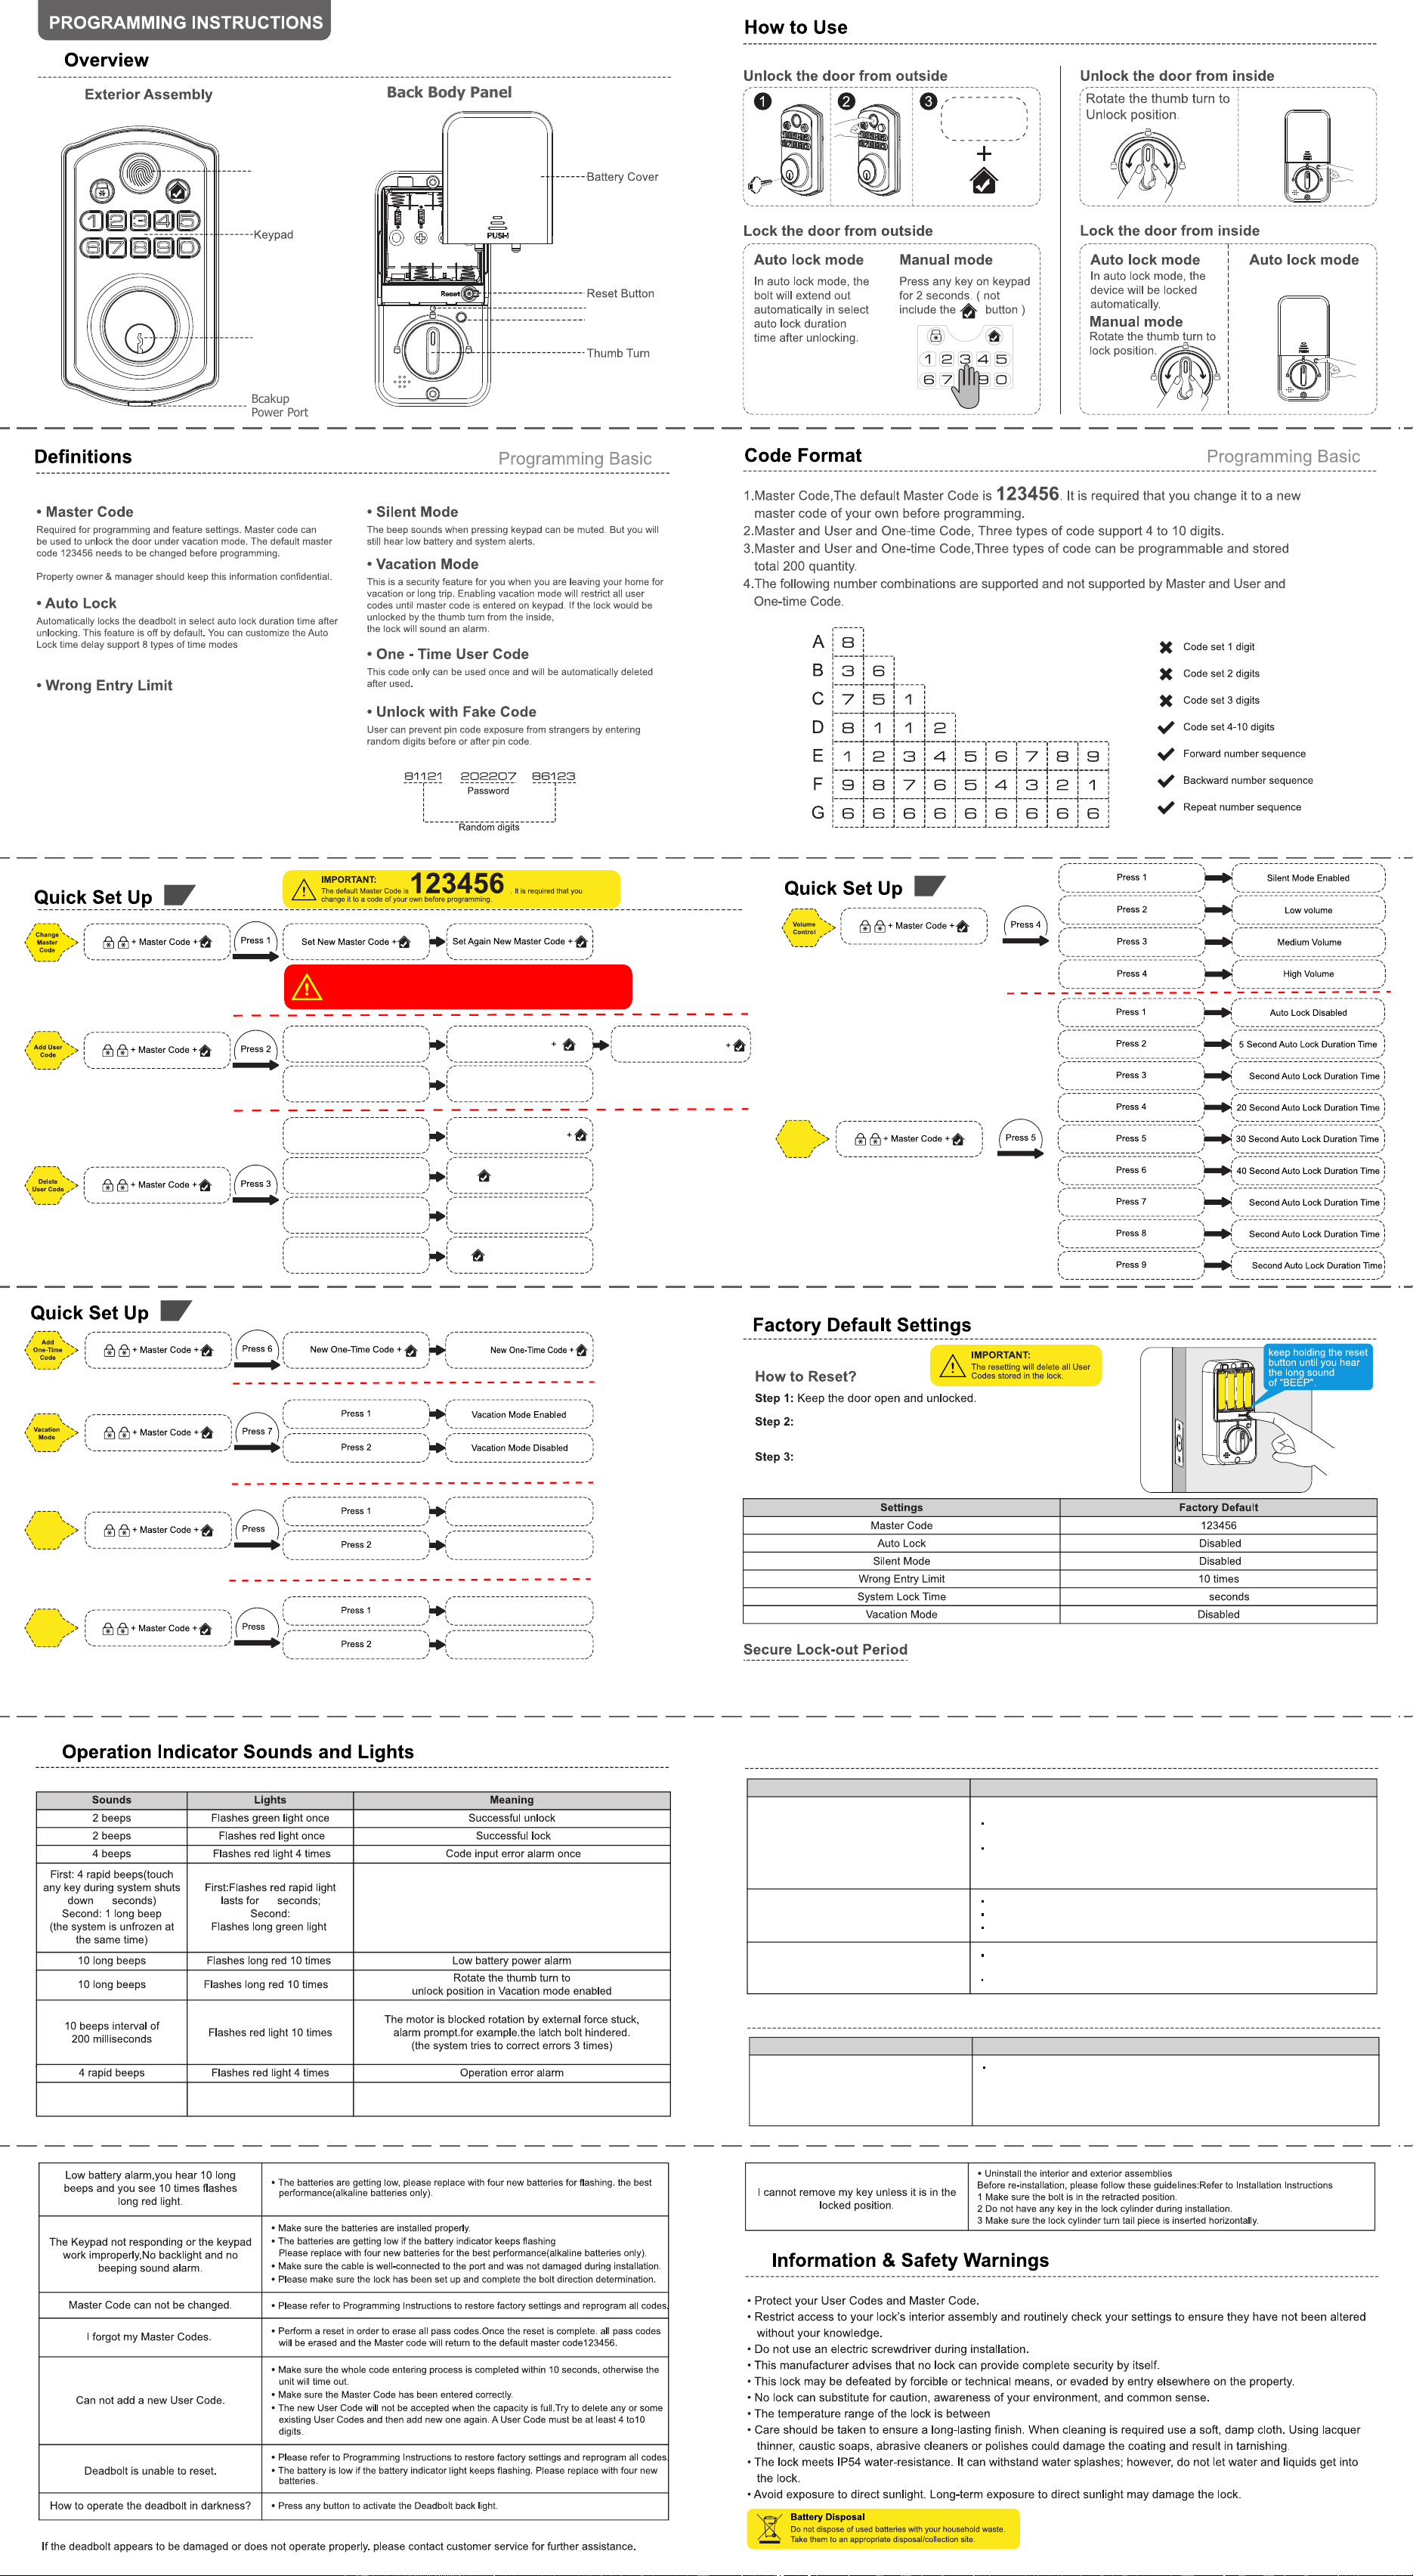
Troubleshooting—— Installation
Issues Solution
While the door is locked, you hear the latch
bolt coming out when you press the
gatehouse to lock the door;however,
2 beeps are emitted.conversel y, while
the door is open,no beeps are emitted
when locking the latch bolt.
Make sure the depth of the latch bolt hole is sufficient.Dig the latch bolt hole
used for the strike a little deeper. The minimum depth is 1" (2.5 cm).
Make sure the latch bolt is aimed at the opening of the strike.Adjust the strike
to the appropriate position.
Troubleshooting—— Operation
Issues Solution
Although the electronic deadbolt has been
functioning normally, the latch bolt suddenly
locks up, and the turn piece inside can't be
rotated, not even with a key.
Check if the deadbolt latch is stuck due to a warped door or misaligned door.If so,first,
take out one battery, then press any button on the front panel for electric discharge, and
put the battery back in. The latch bolt will automatically re-detect its position.Note: If the
latch gets stuck frequently, please check and fix the alignment of the deadbolt latch and
strike plate.
Fail to set up the lock.
Please make sure the lock is installed correctly
Please install fresh batteries and make sure the cable is connected correctl y.
After installation, reset the lock to complete the bolt direction setting.
You have installed the deadbolt and
batteries,but you still get no response
when you press any button.
Please check to see if the battery polarities have been reversed or if the battery is dead.
If so, reinstall or change the battery.
Please check to see if the cable is properly connected.
Fingerprint Head
Mechanical
Key Keyhole
Unlock/Lock Button
Press Button Unlock
Press Button lock
Master/User
code
(5s/10s/20s/30s/40s/60s/80s/100s).
Within 5 minutes,After continuous10 times unsuccessful attempts at
entering a invalid PIN code, the system will shut down for 90 seconds.
-14°F to 129°F(-10°C to 55°C)
90 90
Within 5 minutes,Code consecutive input error
10 times,system shuts down for 90 seconds
29 beeps + 1 long beep
Flashes red light 29 times
Flashes long green light 1 time
Anti Prying Alarm
(Select configuration support)
Within 5 minutes,Warning sounds and LED flashes red after 10 incorrect code attempts: System shuts down for
90 seconds.
Press and hold the Reset button,Keep holding
the Reset button for 4 seconds.
Until you hear the long sound of "BEEP",Flashes
long green light 1 time,reset successfully
Press 1 (User Code)
Press 2 (User Fingerprint)
Set New User Code
Scan The Fingerprint 6 Times
(scan successful by a short beep)
Enter Unwanted User Code
Press 1
Press 2
Press 3
Press 4
Press (Delete All User Codes)
Enter Unwanted User Fingerprint
(Scan successful by a short beep)
Press (Delete All User Fingerprint)
10
60
80
100
8
9
Set Auto
Lock T
Network
Anti Pry
Alarm Mode
Control
ime
Buletooh Signal Enabled
(factory default enabled)
Anti Pry Mode Enabled
Anti Pry Mode Disabled
Buletooh Signal Disabled
Set
Set Again
1
2
3
90
Bcakup
Power Port
LED Light
Set Again New User Code
Back Body Panel
NOTE: network version, after mobile APP successfully add lock,
still need enter the quick menu "Change Master Code" to change
the factory default master code 123456.

Federal Communications Commission (FCC) Statement.
This device complies with part 15 of the
FCC Rules. Operation is subject to the following two
conditions:
(1)
This device may not cause harmful interference, and
(2)
this device must accept
any interference received,
including interference that may cause undesired operation.
Note: This equipment has been
tested and found to comply with the limits for a Class B digital
device, pursuant to part 15 of the
FCC Rules. These limits are designed to provide Reasonable
protection against harmful
interference in a residential installation. This equipment generates,
uses and can radiate radio
frequency energy and, if not installed and used in accordance with the
instructions, may cause
harmful interference to radio communications. However, there is no
guarantee that interference
will not occur in a particular installation. If this equipment does
cause harmful interference to
radio or television reception, which can be determined by turning
the equipment off and on, the
user is encouraged to try to correct the interference by one or
more of·1
the following
measures:
•Reorient or relocate the receiving antenna.
•Increase the separation between the equipment and receiver.
•Connect the equipment into an outlet on a circuit different from that to which the receiver is
connected.
•Consult the dealer or an experienced radio/TV technician for help.
Warning: Changes or modifications made to this device not expressly approved by
may void the FCC authorization to operate this device.Note: The manufacturer is not responsible
for any radio or TV interference caused by
unauthorized modifications to this equipment. Such
modifications could void the user’s authority
to operate the equipment.
RF
exposure
statement:
This device complies with FCC RF radiation exposure limits set forth for an
uncontrolled
environment.
The device is installed and operated without restriction.