

P08
P18
P29
WG737 WG737.X
Cordless Brushless Push Lawn Mower EN
Cordless Brushless Push Lawn Mower F
Cordless Brushless Push Lawn Mower ES


1
2
3
4
5
6
7
8
9
10
11
12
13
16
15
14
17
18
A3
A2A1
A4
B1
B2
B3 C1
C2
D1
3
2
1
100%
0%
2
1
3
1
2
A3
A2A1
A4
B1
B2
B3
C1
C2
D1
3
2
1
100%
0%
2
1
3
1
2
ED2
F3
G
H1
H2
b
100%
a
0%
F1 F2
2
1
19
20
1
2
1
2
3
4
5
6
1—1-1/2” (38 mm)
2—2” (53 mm)
3—2-1/2” (64 mm)
4—2-7/8” (74 mm)
5—3-1/3” (84 mm)
6—3-1/2” (88 mm)
1
2
ED2
F3
G
H1
H2
b
100%
a
0%
F1 F2
2
1
19
20
1
2
1
2
3
4
5
6
1—1-1/2” (38 mm)
2—2” (53 mm)
3—2-1/2” (64 mm)
4—2-7/8” (74 mm)
5—3-1/3” (84 mm)
6—3-1/2” (88 mm)
1
2
L2
L1
K
K-1
K-2
K-3
21
J-1
J-2
J-3
I2
J
I1
22

8
Cordless Brushless Push Lawn Mower EN
TABLE OF CONTENTS
1. SAFETY INSTRUCTIONS
2. COMPONENT LIST
3. TECHNICAL DATA
4. INTENDED USE
5. ASSEMBLY & OPERATION
6. MAINTENANCE
7. STORAGE
8. TROUBLESHOOTING
1. SAFETY INSTRUCTIONS
PRODUCT SAFETY
WARNING: Some dust created by power
sanding, sawing, grinding, drilling and other
construction activities contains chemicals known
to the state of California to cause cancer, birth
defects or other reproductive harm. Some
examples of these chemicals are:
• Lead from lead-based paints;
• Crystalline silica from bricks and cement and
other masonry products ;
• Arsenic and chromium from chemically-
treated lumber.
Your risk from these exposures varies, depending
on how often you do this type of work. To reduce
your exposure to these chemical: work in a well
ventilated area, and work with approved safety
equipment, such as those dust masks that are
specially designed to lter out microscopic
particles.
WARNING: This product can expose you to
chemicals including lead and Di(2-
ethylhexyl)phthalate (DEHP) which are known to
the State of California to cause cancer and birth
defects or other reproductive harm. For more
information go to www.P65Warnings.ca.gov.
LAWNMOWER SAFETY
WARNINGS
WARNING: Read all safety warnings,
instructions, illustrations and specications
provided with this power tool. Failure to follow all
instructions listed below may result in electric
shock, re and/or serious injury.
Save all warnings and instructions for future
reference.
1) Work area safety
a) To avoid bystander contact with the moving
blade or a thrown object injury, keep the area
of operation clear of all bystanders, particularly
small children. Stop the lawnmower and any
attachment(s) if anyone enters the area.
Contact with the moving blade or thrown objects
may result in serious personal injury or death.
b) Only operate the lawnmower in daylight or good
articial light. Dark areas invite accidents.
c) Do not operate lawnmowers in explosive
atmospheres, such as in the presence of
ammable liquids, gases or dust. Lawnmowers
create sparks which may ignite the dust or
fumes.
d) Do not use the lawnmower in bad weather
conditions, especially when there is a risk
of lightning. This decreases the risk of being
struck by lightning.
e) Thoroughly inspect the area where the
lawnmower is to be used and remove all stones,
sticks, wires, bones, and other foreign objects.
Thrown objects can cause personal injury.
2) Electrical safety
a) Do not expose the lawnmower to rain or wet
conditions. Water entering a lawnmower may
increase the risk of electric shock.
3) Personal safety
a) Use personal protective equipment. Always
wear eye protection. Protective equipment will
reduce personal injuries.
b) Dress properly. Do not wear loose clothing or
jewellery. Keep your hair and clothing away
from moving parts. Loose clothes, jewellery or
long hair can be caught in moving parts.
c) While operating the lawnmower, always wear
long trousers. Exposed skin increases the
likelihood of injury from thrown objects.
d) While operating the lawnmower, always wear
non-slip and protective footwear. Do not
operate the lawnmower when barefoot or
wearing open sandals. This reduces the chance
of injury to the feet from contact with the
moving blade.
e) Prevent unintentional starting. Ensure the
switch is in the off-position before connecting
to power source and/or batteries, picking up or
carrying the lawnmower. Carrying a lawnmower
with your nger on the switch or energising
a lawnmower that has the switch on invites
accidents.
f) Remove any adjusting key or wrench before
turning the lawnmower on. A wrench or a key
left attached to a rotating part of the lawnmower
may result in personal injury.
g) Keep proper footing and balance at all times.
This enables better control of the lawnmower in
unexpected situations.
h) Stay alert, watch what you are doing and use

9
Cordless Brushless Push Lawn Mower EN
common sense when operating a lawnmower.
Do not use a lawnmower while you are tired
or under the inuence of drugs, alcohol or
medication. A moment of inattention while
operating a lawnmower may result in serious
personal injury.
i) Do not let familiarity gained from frequent use
of lawnmower allow you to become complacent
and ignore lawnmower safety principles. A
careless action can cause severe injury within a
fraction of a second.
j) To avoid operator blade contact or a thrown
object injury, stay in the operator zone behind
the lawnmower handles. Blade contact or
thrown objects may result in serious personal
injury.
k) Do not touch blades and other hazardous
moving parts while they are still in motion. This
reduces the risk of injury from moving parts.
4) Lawnmower use and care
a) Use the lawnmower and accessories in
accordance with these instructions, taking into
account the working conditions and the work
to be performed. Use of the lawnmower for
operations different from those intended may
result in a hazardous situation.
b) Before using the lawnmower, always visually
inspect to see that the blade(s) and the blade(s)
assembly are properly secured and not worn or
damaged. Loose, worn, or damaged parts may
increase the risk of injury.
c) Keep guards and other safety devices in place,
properly mounted, and in working order. A
guard or other safety device that is loose,
damaged, or is not functioning correctly may
result in personal injury.
d) Keep all cooling air inlets clear of debris.
Blocked air inlets and debris may result in
overheating or risk of re.
e) Do not use the lawnmower if the switch
does not turn it on and off. Any lawnmower
that cannot be controlled with the switch is
dangerous and must be repaired.
f) Do not operate the lawnmower in wet grass.
Walk, never run. This reduces the risk of
slipping and falling which may result in personal
injury.
g) Do not operate the lawnmower on excessively
steep slopes. This reduces the risk of loss of
control, slipping and falling which may result in
personal injury.
h) Do not force the lawnmower. Use the correct
lawnmower for your application. The correct
lawnmower will do the job better and safer at
the rate for which it was designed.
i) Be aware of the mower and attachment
discharge direction and do not point the mower
discharge at anyone. Thrown objects can cause
personal injury.
j) Use extreme caution when reversing or pulling
the lawnmower towards you. Always be aware
of your surroundings. This reduces the risk of
tripping during operation.
k) When working on slopes, always be sure of
your footing, always work across the face of
slopes, never up or down and exercise extreme
caution when changing direction. This reduces
the risk of loss of control, slipping and falling
which may result in personal injury.
l) Operate the disabling device and/or remove
all battery packs, if removable, from the
lawnmower before making any adjustments,
changing accessories, or storing the
lawnmower. Such preventive safety measures
reduce the risk of starting the lawnmower
accidentally.
m) Keep handles and grasping surfaces dry,
clean and free from oil and grease. Slippery
handles and grasping surfaces do not allow for
safe handling and control of the lawnmower in
unexpected situations.
n) Check the grass collection bag frequently for
wear or deterioration. A worn or damaged grass
collection bag may increase the risk of personal
injury.
o) Before removing the grass collection bag,
turn off the motor and wait until the blade(s)
comes to a complete stop. The cutting blade(s)
continues to rotate after the blade control is
released. Never place any part of the body in
the blade(s) area until you are certain the motor
is off and the blade(s) has stopped rotating.
Contact with the moving cutting blade(s) may
result in serious personal injury.
p) Before unclogging the chute, turn off the motor,
wait until the blade(s) comes to a complete
stop, operate the disabling device and/or
remove all batteries, if removable. The cutting
blade(s) continues to rotate after the blade
control is released. Never place any part of the
body in the blade(s) area until you are certain
the motor is off and the blade(s) has stopped
rotating. Contact with the moving cutting
blade(s) may result in serious personal injury.
q) Before cleaning or inspecting the lawnmower,
turn off the motor, wait until the blade(s)
comes to a complete stop, operate the
disabling device and/or remove all batteries, if
removable. Accidental contact with the moving
blade and moving parts may result in personal
injury.
r) Maintain the lawnmower and accessories.
Check for misalignment or binding of moving
parts, breakage of parts and any other
condition that may affect the lawnmower’s
operation. If damaged, have the lawnmower
repaired before use. Many accidents are caused

10
Cordless Brushless Push Lawn Mower EN
by poorly maintained lawnmowers.
s) Store idle lawnmowers out of the reach of
children and do not allow persons unfamiliar
with the lawnmower or these instructions to
operate the lawnmower. Lawnmowers are
dangerous in the hands of untrained users.
5) Battery lawnmower use and care
a) Use lawnmowers only with specically
designated battery packs. Use of any other
battery packs may create a risk of injury and re.
b) Recharge only with the charger specied by the
manufacturer. A charger that is suitable for one
type of battery pack(s) may create a risk of re
when used with another battery pack(s).
c) Follow all charging instructions and do not
charge the battery pack(s) or lawnmower
outside the temperature range specied in
the instructions. Charging improperly or at
temperatures outside the specied range may
damage the battery and increase the risk of re.
d) Do not use a battery pack or lawnmower that
is damaged or modied. Damaged or modied
batteries may exhibit unpredictable behaviour
resulting in re, explosion or risk of injury.
e) Do not expose a battery pack(s) or lawnmower
to re or excessive temperature. Exposure to
re or temperature above 130 °C may cause
explosion.
f) Under abusive conditions, liquid may be ejected
from the battery(ies); avoid contact. If contact
accidentally occurs, ush with water. If liquid
contacts eyes, additionally seek medical help.
Liquid ejected from the battery(ies) may cause
irritation or burns.
g) When battery packs are not in use, keep them
away from other metal objects, like paper
clips, coins, keys, nails, screws or other small
metal objects that can make a connection from
one terminal to another. Shorting the battery
terminals together may cause burns or a re.
6) Service
a) Have your lawnmower serviced by a
qualied repair person using only identical
replacement parts. This will ensure that
the safety of the lawnmower is maintained.
Use of parts which do not meet the original
equipment specications may lead to improper
performance and compromise safety.
b) Never service damaged battery packs. Service
of battery packs should only be performed
by the manufacturer or authorized service
providers.
SAFETY WARNINGS FOR
BATTERY PACK
a) Do not dismantle, open or shred battery pack.
b) Do not expose battery pack to heat or re.
Avoid storage in direct sunlight.
c) Do not short-circuit a battery pack. Do not
store battery packs haphazardly in a box or
drawer where they may short-circuit each
other or be short-circuited by other metal
objects. When battery pack is not in use, keep
it away from other metal objects, like paper
clips, coins, keys, nails, screws or other small
metal objects, that can make a connection from
one terminal to another. Shorting the battery
terminals together may cause burns or re.
d) Do not subject battery pack to mechanical
shock.
e) In the event of battery leaking, do not allow
the liquid to come in contact with the skin
or eyes. If contact has been made, wash the
affected area with copious amounts of water
and seek medical advice.
f) Do not use any battery pack which is not
designed for use with the equipment.
g) Keep battery pack out of the reach of children.
h) Always purchase the battery pack
recommended by the device manufacturer for
the equipment.
i) Keep battery pack clean and dry.
j) Wipe the battery pack terminals with a clean
dry cloth if they become dirty.
k) Battery pack needs to be charged before use.
Always use the correct charger and refer to
the manufacturer’s instructions or equipment
manual for proper charging instructions.
l) Do not leave battery pack on prolonged charge
when not in use.
m) After extended periods of storage, it may
be necessary to charge and discharge the
battery pack several times to obtain maximum
performance.
n) Recharge only with the charger specied
by Worx. Do not use any charger other than
that specically provided for use with the
equipment.
o) Retain the original product literature for future
reference.
p) Use only the battery pack in the application for
which it was intended.
q) Remove the battery pack from the equipment
when not in use.
r) Dispose of properly.
s) Do not mix cells of different manufacture,
capacity, size or type within a device.
t) Keep the battery away from microwaves and
high pressure.
11
Cordless Brushless Push Lawn Mower EN
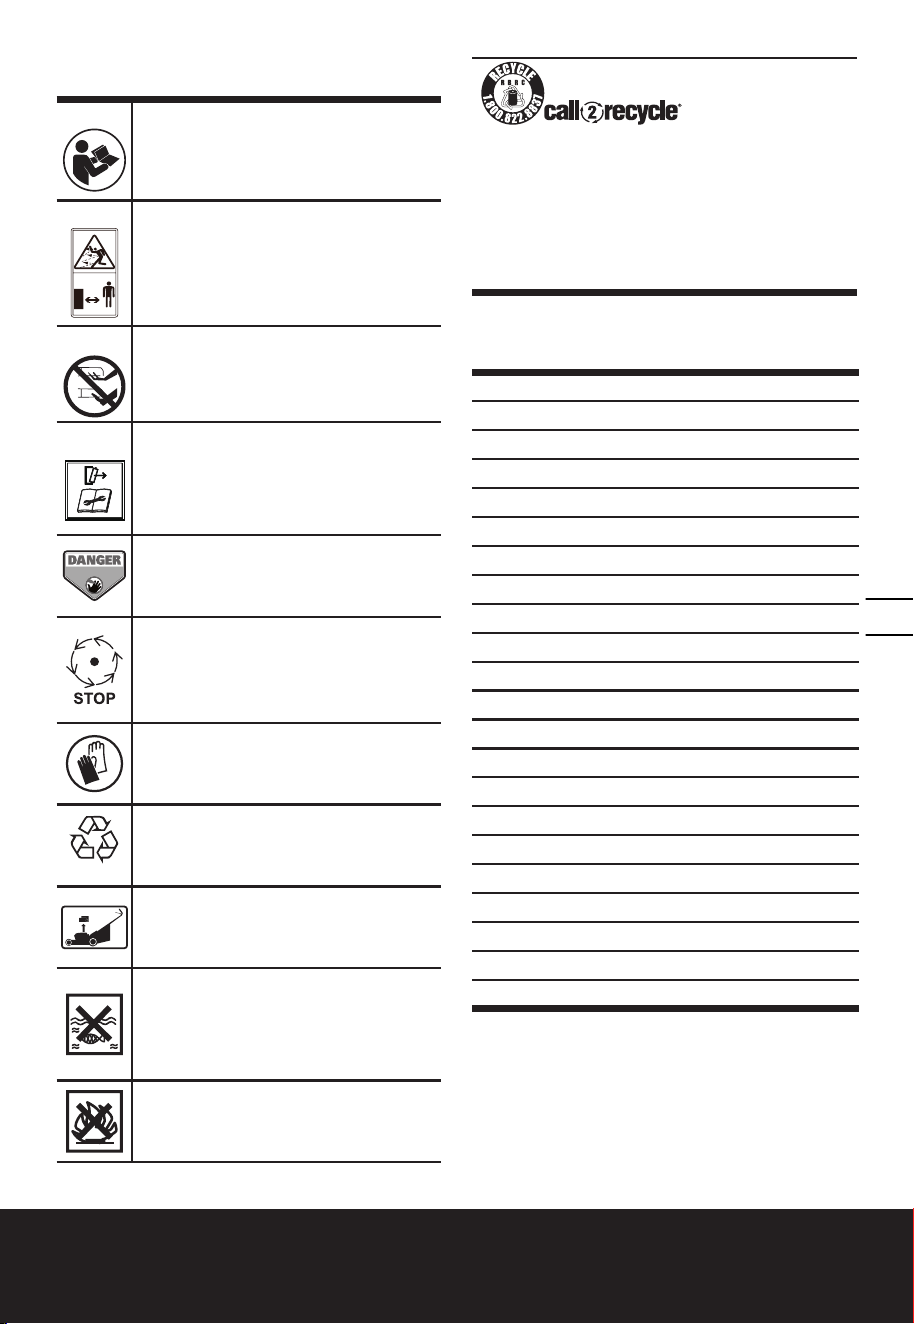
SYMBOLS
To reduce the risk of injury, user must
read instruction manual
WARNING – Beware of thrown objects
– keep bystanders away
WARNING – Keep hands and feet away
from the blades
WARNING – Disconnect battery before
maintenance
KEEP HANDS AND FEET
AWAY
GARDER MAINS ET PIEDS À DISTANCE
DANGER – Keep hands and feet away
Blade continues to rotate after the
machine is switched off. Wait until all
machine components have completely
stopped before touching them.
Wear protective gloves
Li-I on
Li-Ion battery, battery must be
recycled.
Remove battery from the socket before
carrying out any adjustment, servicing
or maintenance.
Batteries may enter water cycle if
disposed improperly, which can be
hazardous for ecosystem. Do not
dispose of waste batteries as unsorted
municipal waste.
Do not burn.
POSITEC Inc. has established a partnership with
the RBRC Corporation to recycle any Positec
batteries with the RBRC-call2recycle seal. For
environmental protection, please do not discard
batteries in the trash. After the batteries’ life
cycle is ended, then please call 1.800-822-8837
for a free service that will properly dispose of the
battery.
2. COMPONENT LIST
1. OPERATING BAIL HANDLE
2. UPPER HANDLE
3. BAG HANDLE
4. SAFETY FLAP
5. GRASS COLLECTION BAG
6. LOWER HANDLE LOCK COVER
7. CUTTING HEIGHT ADJUSTMENT KNOB
8. FRONT CARRY HANDLE
9. BATTERY PACK COVER
10. REAR CARRY HANDLE
11. HANDLE HEIGHT ADJUSTMENT LEVER
12. LOWER HANDLE
13. CABLE CLIP
14. UPPER HANDLE LEVER
15. LOCK-OFF BUTTON
16. GRASS BAG INDICATOR
17. MULCHING INSERT
18. RUBBER FLAP
19. BATTERY PACK* (SEE FIG. E)
20. CHARGE-LEVEL INDICATOR (SEE FIG. F1)
21. BLADE BOLT (SEE FIG. L1)
22. BLADE (SEE FIG. L1)
*Not all the accessories illustrated or described
are included in standard delivery.

12
Cordless Brushless Push Lawn Mower EN
3. TECHNICAL DATA
Type WG737 WG737.X (7- designation of ma-
chinery, representative of Cordless Lawn Mower)
WG737
WG737.X**
Voltage
40V Max.
(2x20V Max.)***
No load speed 3400 /min
Deck diameter 16” (41 cm)
Cutting
diameter 15” (37 cm)
Cutting height
1-1/2” - 3-1/2” (38-88 mm)
Cutting height
positions
6
Front wheel
diameter
5.9” (150 mm)
Rear wheel
diameter
7.9” (200 mm)
Grass collection
capacity
1.1 bushels (40 L)
Battery type Lithium-Ion
Machine Weight
(bare tool)
30.9 lbs (14.0 kg)
** X may be followed by one or two characters. All
models are the same except model number and
trademark. The sux in models may be number from
“1” to “999” or English letter “A” to “Z” or “M1” to” M9”
which means different package or the various of
accessories packed in the package.
*** Voltage measured without workload. Initial battery
voltage reaches maximum of 20 volts. Nominal voltage
is 18 volts.
SUGGESTED BATTERIES
AND CHARGERS
Category
Type Capacity
20V Battery WA3674 4.0 Ah
20V Charger WA3770 2.0 A
We recommend that you purchase your accessories
from the same store that sold you the tool. Choose
the type according to the work you intend to
undertake. Refer to the accessory packaging for
further details. Store personnel can assist you and
offer advice.
4. INTENDED USE
This product is intended for domestic lawn mowing.
5. OPERATION INSTRUC-
TIONS
NOTE: Read instruction handbook before
operating this machine.
ASSEMBLY & OPERATION
ACTION FIGURE
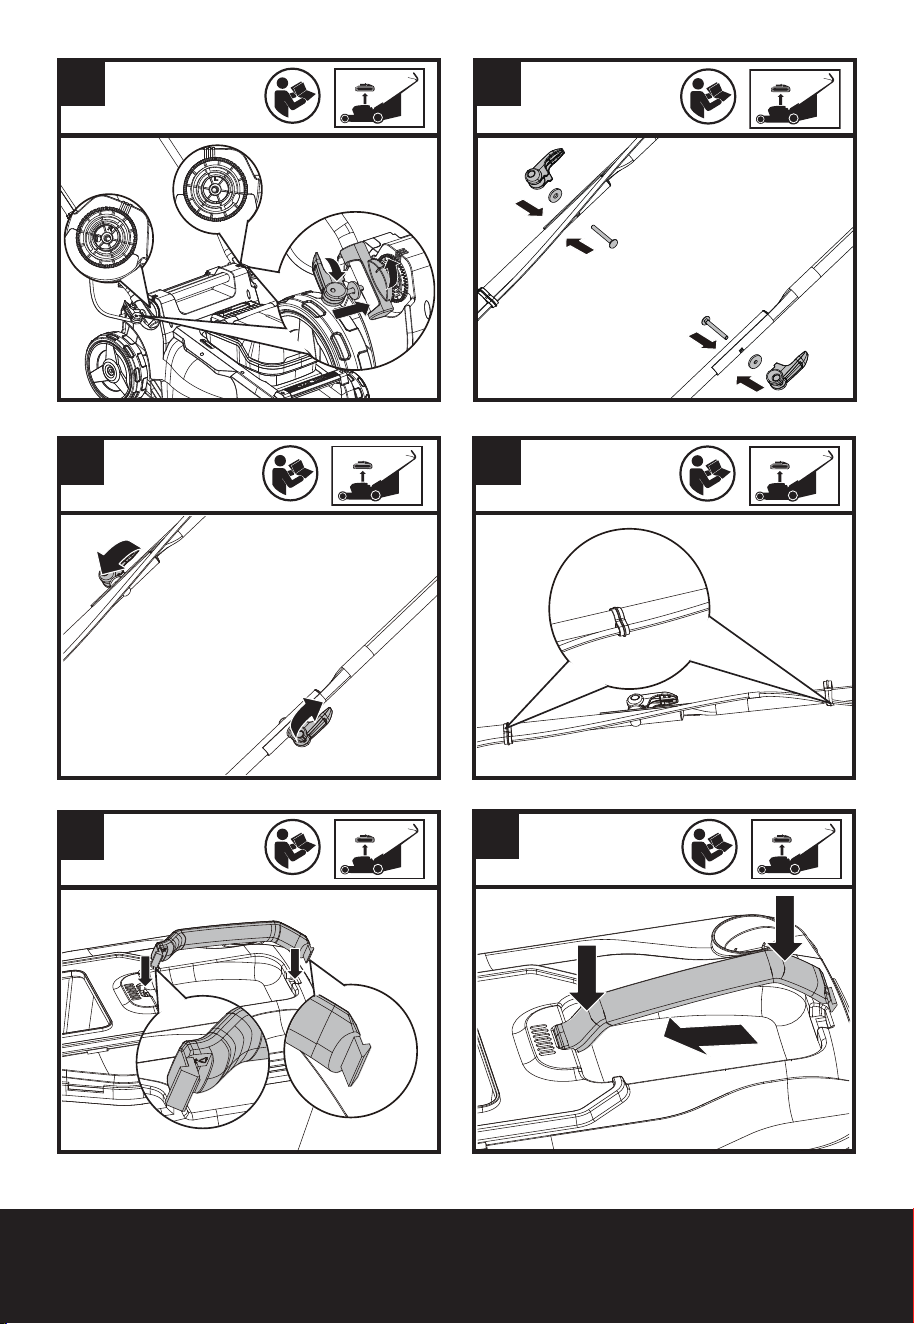
ASSEMBLY
Assembling the handle bar.
NOTE: Choose the appropriate
height and tighten the handle
levers.
See Fig. A1,
A2, A3, A4
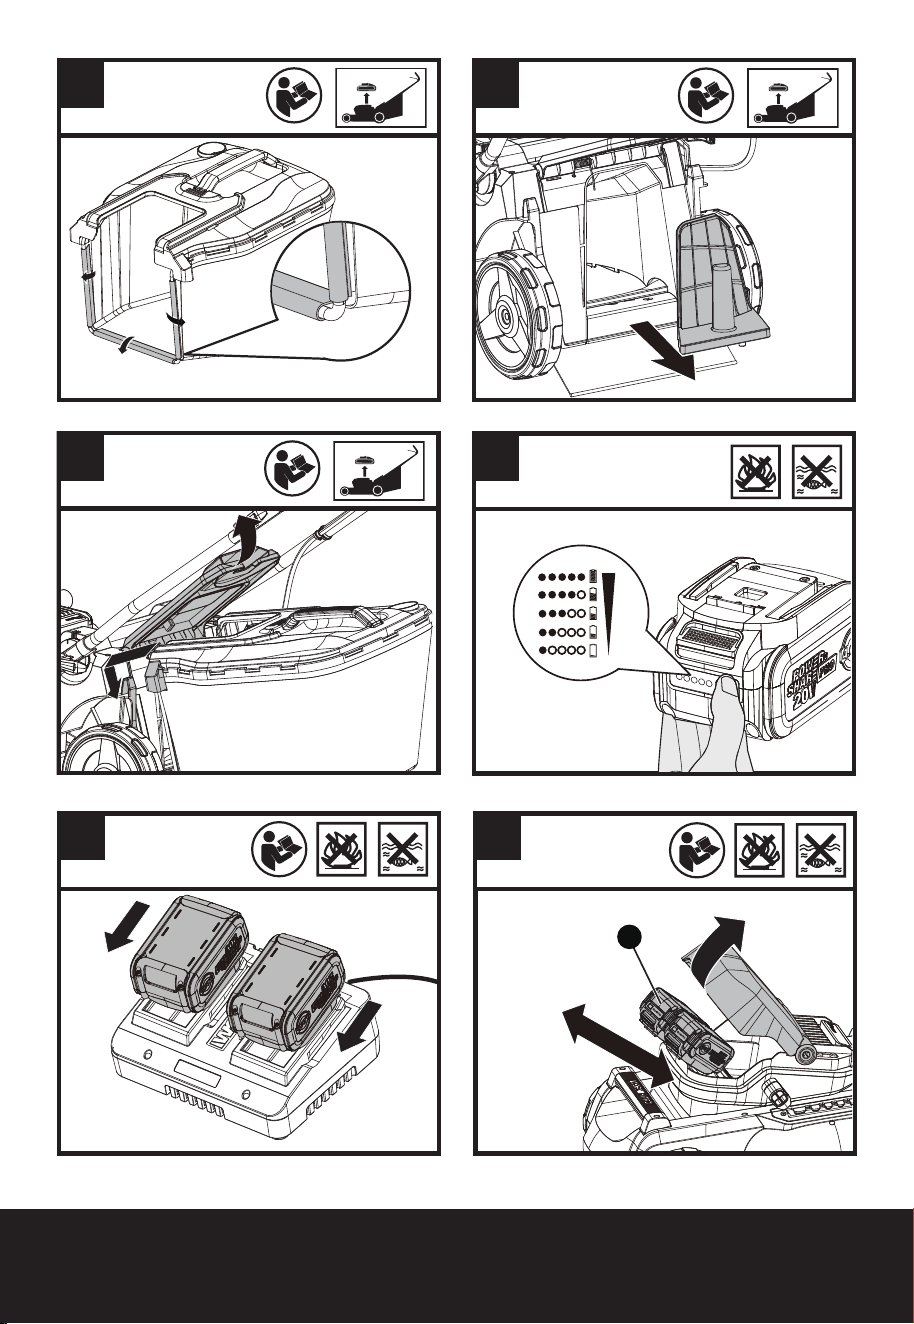
Assembling grass collection bag. See Fig. B1,
B2, B3
Fitting grass collection bag to the
mower.
NOTE: Depress the grass
collection bag slightly to ensure
that it is completely installed.
NOTE: Take the mulching insert
out of the mower before tting the
grass collection bag.
See Fig.
C1,C2
Checking the battery charge
condition.
NOTE: Fig. D1 only applies for the
battery pack with battery indicator
light.
See Fig. D1
Charging the battery pack.
NOTE: The batteries are shipped
uncharged. Each battery must be
fully charged before the rst mow.
Always fully charge the two
batteries at same time. More
details can be found in charger’s
manual.
See Fig. D2
13
Cordless Brushless Push Lawn Mower EN
Fitting/removing battery.
NOTE: This machine will only run
when 2 batteries are installed.
Please always use two batteries
with the same capacity and fully
charge the two batteries.
When you use two batteries with
different power, the machine will
only run to the lower common
denominator.
See Fig. E
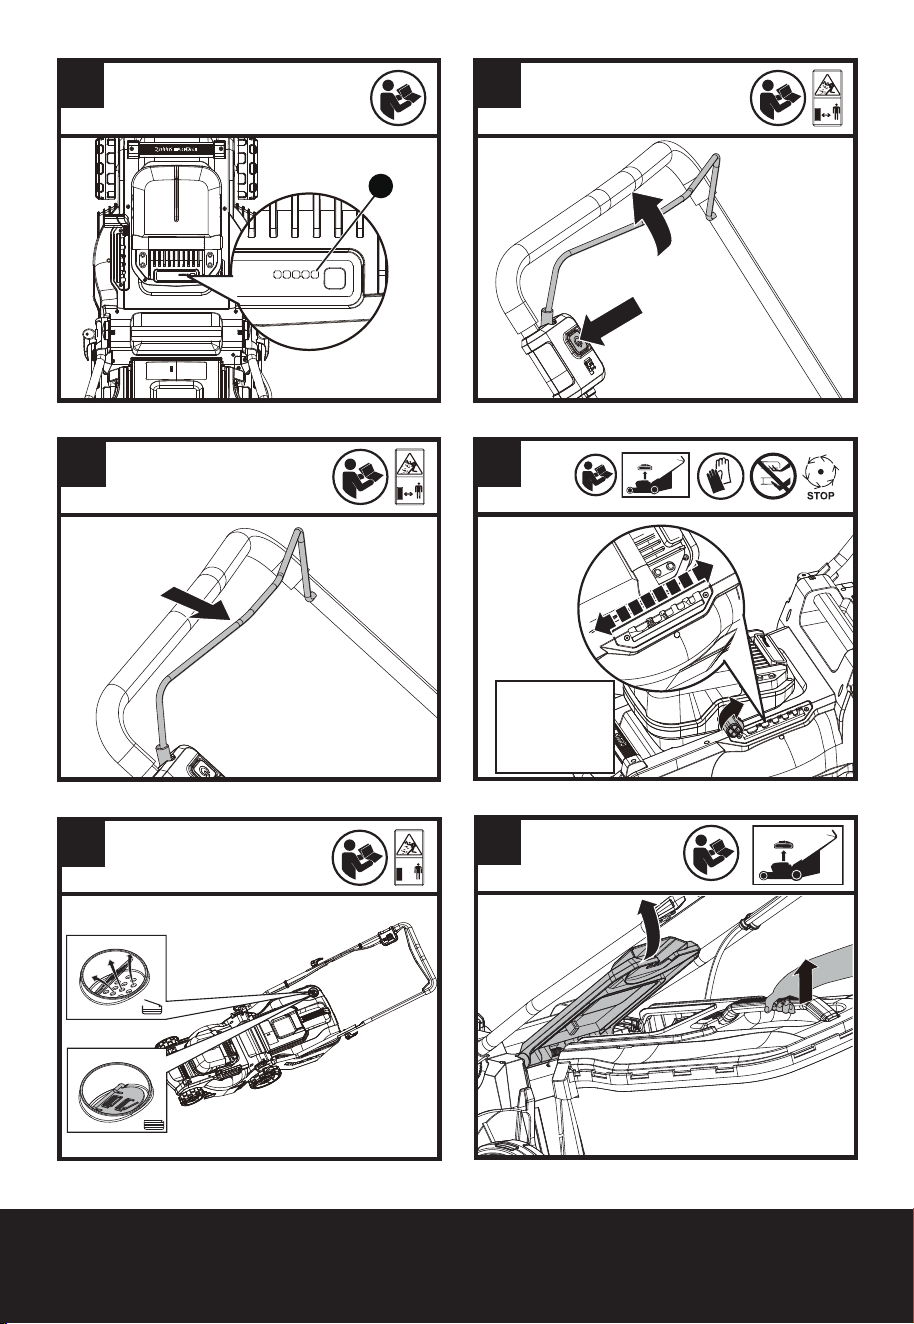
OPERATION
Charge-Level Indicator
See details in BATTERY STATUS
part
IMPORTANT:
When only one light is
illuminated, your battery is overly
discharged, even though the
machine may still be capable to
work. Continuing to operate your
machine with the battery in this
discharged condition may reduce
the life and performance of your
battery.
When no light is illuminated,
at least one battery is not fully
installed or battery may be
defective, please double check
the batteries are fully seated into
position.
See Fig. F1,
Starting & stopping
For starting, press and hold the
lock-off button, and pull the
operating bail handle.
For stopping, release the operating
bail handle.
See Fig. F2,
F3
Adjusting the cutting height
WARNING! Stop, release
operating bail handle and
wait until the motor stops before
adjusting height. The blades
continue to rotate after the
machine is switched off, a rotating
blade can cause injury. Do not
touch rotating blades.
See Fig. G
Grass Bag Filling Indicator
Empty status: ap oats (a)
Fully status: ap falls down (b)
See Fig. H1
Removing/emptying grass
collection bag.
WARNING! Always check
the safety ap close the
discharge outlet before using.
Never lift the safety ap when the
mower is being used without tted
grass collection bag.
See Fig. H2
Storage See Fig.
I1, I2
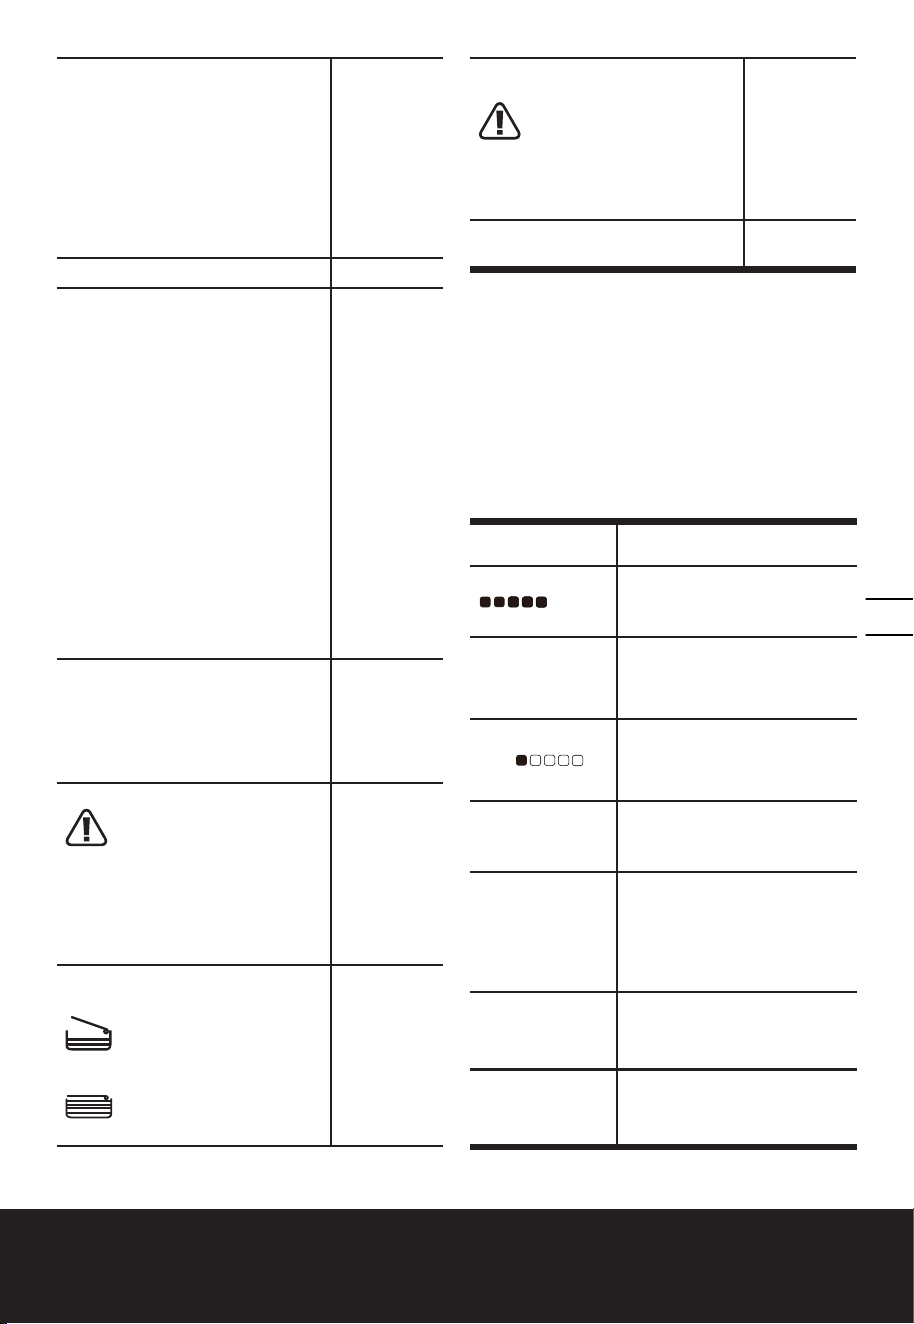
BATTERY STATUS (See Fig. F1)
• Before starting or after use, press the button
beside the charge-Level Indicator on the machine
to check the battery capacity.
• During operation, the battery capacity will be
indicated automatically by the charge-Level
Indicator. The indicator constantly senses and
displays the battery condition as follows.
• Charge the machine with 2 battery packs with
different AH , the charge-Level Indicator displays
the battery condition with the lower one of the two
batteries.
Charge-Level
Indicator status
Battery condition
Five green lights
( ) are
illuminated.
The two batteries are in a
highly charged condition.
Two, three or four
green lights are
illuminated.
The two batteries have a
remaining charge. The more
lights are illuminated, the
more battery capacity.
Only one green
light ( ) is
illuminated.
The battery level of at least
one battery pack is very low.
Please check and charge the
battery pack.
No light is
illuminated.
At least one battery is not fully
installed or battery may be
defective.
Only one light is
ashing twice per
cycle.
At least one battery is over
discharged (please refer to
the battery charge condi-
tion), please recharge the two
batteries at once before use
again or storage.
Only one light is
ashing three
times per cycle.
At least one battery is hot,
wait for them cool down
before start again.
Only one light is
ashing four times
per cycle.
The machine is over load.
Raise the cutting height or
push slowly.

14
Cordless Brushless Push Lawn Mower EN
MULCHING MOWING TIPS
NOTE: ALWAYS INSPECT AREA WHERE MOWER IS
TO BE USED AND REMOVE ALL STONES, STICKS,
WIRE, METAL AND OTHER DEBRIS WHICH MIGHT
BE THROWN BY THE ROTATING BLADE.
1. Mow across the face of slopes, never up-and-
down. Exercise extreme caution when changing
direction on slopes. Do not mow excessively steep
slopes. Always maintain good footing.
2. Release operating bail handle to turn mower “OFF”
when crossing any graveled area (stones can be
thrown by the blade).
3. Set mower at highest cutting height when mowing
in rough ground or in tall weeds. Removing too
much grass at one time can cause circuit breaker
to trip, which stops mower.
4. If a grass bag is used during the fast growing
season, the grass may tend to clog up at the
discharge opening. Release operating bail handle
to turn mower “OFF”. Remove the grass bag and
shake the grass down to the back end of the bag.
Also clean out any grass or debris which may be
packed around the discharge opening. Replace the
grass collection bag.
5. If mower should start to vibrate abnormally,
release operating bail handle to turn mower
“OFF”. Check immediately for cause. Vibration is
a warning of trouble. Do not operate mower until a
service check has been made.
6. ALWAYS RELEASE OPERATING BAIL HANDLE
TO TURN MOWER “OFF” WHEN LEAVING IT
UNATTENDED EVEN FOR A SHORT PERIOD OF
TIME.
CUTTING AREA
The cutting area can be affected by several factors,
such as cutting height, lawn humidity, grass length
and density. Besides, starting and stopping the
mower too many times during operation will reduce
the cutting area.
TIPS:
1) It is recommended to mow your lawn more
frequently, walk at normal pace, and not to start/
stop the mower too often during operation. Please
always use the same two batteries and charge the
two batteries at same time.
2) For best performance, please ensure use 2 fully
charged battery packs at the same time and
always cut off 1/3 or less of the grass height.
3) Walk slowly when cutting long grass, so as to have
more effective cutting and properly discharge the
clippings.
4) Avoid cutting wet grass, otherwise it will stick to
the underside of the deck and the clippings cannot
be collected or discharged properly.
5) A higher cutting height shall be applied to new or
thick grass and it will extend the battery duration.
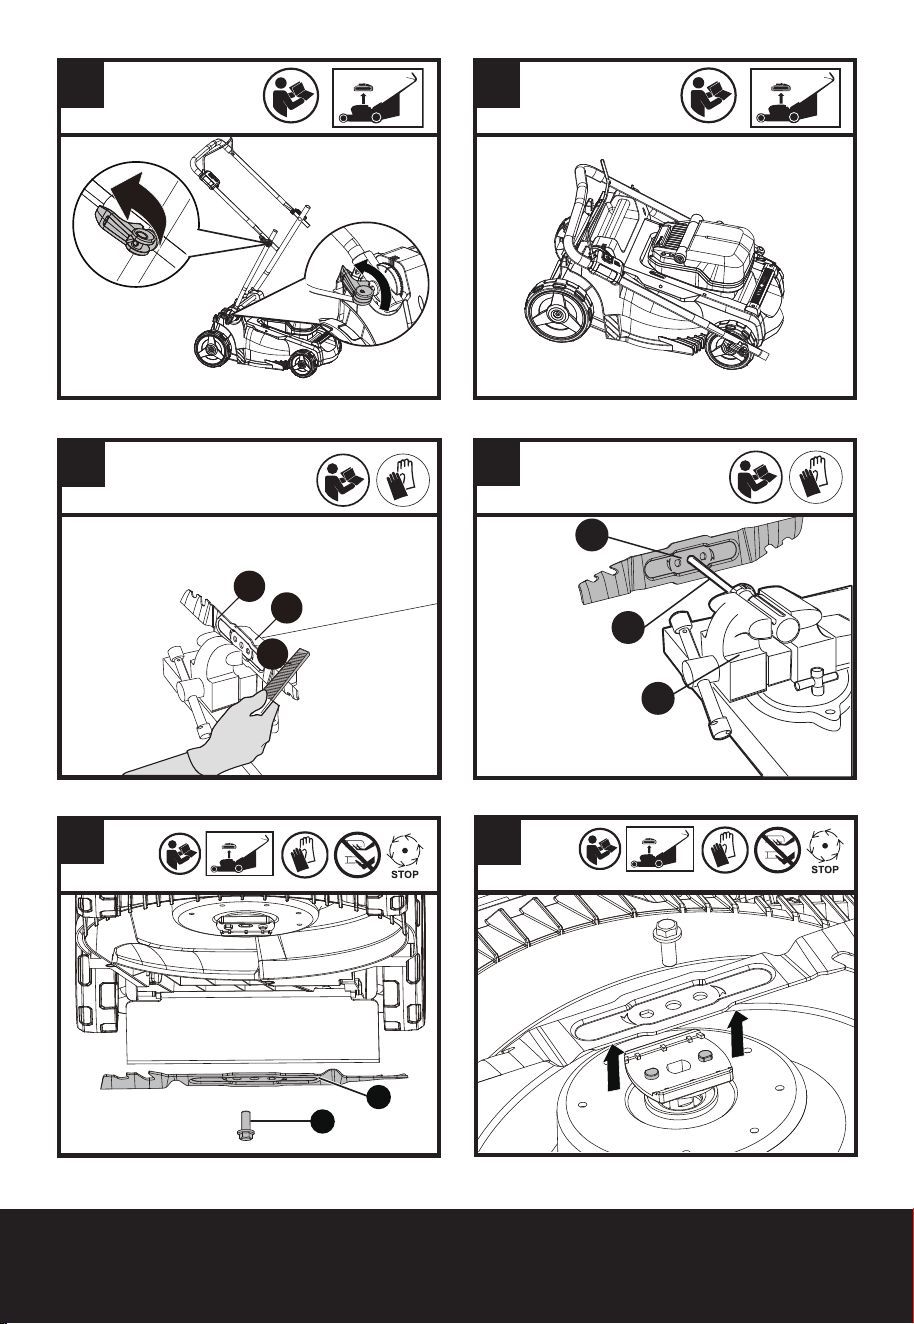
STORAGE (SEE FIG. I1, I2)
Stop the mower. Clean the exterior of the machine
thoroughly using a soft brush and cloth. Do not use
water, solvents or polishes. Remove all grass and
debris, especially from the ventilation slots.
Turn the machine on its side and clean the blade
area. If grass cuttings are compacted in the blade
area, remove with a wooden or plastic implement.
Store the machine in a dry place. Do not place other
objects on top of the machine.
To aid storage, release the handle levers, and fold
the upper handle as shown in Fig. I1 & I2.
6. MAINTENANCE
WARNING! Stop the mower before removing
the grass bag.
NOTE: To ensure long and reliable service, perform
the following maintenance procedures regularly.
Check for obvious defects such as a loose,
dislodged or a damaged blade, loose ttings,
and worn or damaged components. Check that
the covers and guards are all undamaged and
are correctly attached to mower. Carry out any
necessary maintenance or repairs before operating
mower. If the mower should happen to fail despite
regular maintenance, please call our customer
helpline for advice.
BLADE SHARPENING
KEEP BLADE SHARP FOR BEST MOWER
PERFORMANCE.
WEAR PROPER EYE PROTECTION WHILE REMOVING,
SHARPENING, AND INSTALLING BLADE.
Sharpening the blade twice during a mowing season
is usually sucient under normal circumstances.
Sand causes the blade to dull quickly. If your lawn has
sandy soil, more frequent sharpening may be required.
REPLACE BENT OR DAMAGED BLADE IMMEDIATELY.
WHEN SHARPENING THE BLADE:
1. Make sure blade remains balanced.
2. Sharpen blade at the original cutting angle.
3. Sharpen cutting edges on both ends of blade,
removing equal amounts of material from both ends.
NOTE:
1.
Be sure the mower is turned off.
2. Place the mower in stand up storage mode.
TO SHARPEN BLADE IN A VISE (SEE Fig. J)
1. Be sure the operating bail handle is released, the
blade has stopped before removing the blade.
2. Remove blade from mower. See instructions for
removing and attaching blade.

15
Cordless Brushless Push Lawn Mower EN
3. Secure blade J-1 in a vise J-2.
4. Wear safety glasses and be careful not to cut yourself.
5. Carefully le the cutting edges of the blade with a ne tooth le J-3 or sharpening stone.
6. Check balance of blade. See instructions for blade balancing.
7. Replace blade on mower and tighten securely. Refer to instructions below.
BLADE BALANCING (See Fig. K)
Check balance of blade by placing center hole in blade K-1 over a screwdriver shank K-2, clamped horizontally in
a vise K-3. If either end of the blade rotates downward, le that end. Blade is properly balanced when neither end
drops.
BLADE MAINTENANCE (See Fig. L1, L2)
Renew your metal blade after 50 hours mowing or 2 years, whichever is the sooner-regardless of condition.
Follow these procedures to remove and replace the blade. You will need garden gloves (not provided) and
a spanner wrench (not provided) to remove the blade. Hold the blade (22) and unscrew the blade bolt (21)
counter-clockwise using a spanner wrench, and then remove blade.
To re-assemble, position the blade (22) with the cutting edges towards the ground. Then securely tighten the
blade bolt (21).
FOR BATTERY TOOLS
The ambient temperature range for the use and storage of tool and battery is 0 °C-45 °C.
The recommended ambient temperature range for the charging system during charging is 0 °C-40 °C.
Details regarding safe disposal of used batteries
At the end of the life of the appliance, remove the battery pack safely before disposing of the appliance. Do not
throw batteries away or throw them in the normal trash can. Also do not dispose of the battery with the machine.
Remove the used battery pack from the appliance and dispose of it at the nearest or convenient dedicated recycling
facility. If in doubt, consult your local environmental protection department. Batteries may enter water cycle if
disposed improperly, which can be hazardous for ecosystem. Do not dispose of waste batteries as unsorted
municipal waste.
7. TROUBLESHOOTING
WARNING: SWITCH THE MACHINE OFF AND REMOVE THE BATTERY PRIOR TO ANY
TROUBLESHOOTING.
Problem Solution
1. Mower doesn’t run when
operating bail handle is
activated.
A. Release operating bail handle to turn mower off and remove the batteries.
Turn mower over and check that blade is free to turn. If not free, return to an
authorized servicer. Blade should turn freely.
B. Has battery been fully charged? Plug in charger and wait for green light to
come on.
2. Motor stops while mowing. A. Release operating bail handle to turn mower off and remove the batteries.
Turn mower over and check that blade is free to turn. If not free, return to an
authorized servicer. Blade should turn freely.
B. Raise cutting height of wheels to highest position and start mower.
C. Has battery been fully charged? Plug in charger and wait for green light to
come on.
D. Avoid overloading the mower. Slow down the cutting pace by pushing
mower slower or raise the cut height. Or both.

16
Cordless Brushless Push Lawn Mower EN
3. Mower runs but cutting
performance is unsatisfactory,
or does not cut entire lawn.
A. Has battery been fully charged? Plug in charger and wait for green light to
come on.
B. Release operating bail handle to turn mower off and remove the batteries.
Turn mower over and check: Blade for sharpness - Keep blade sharp. Deck
and discharge chute for clogging.
C. Wheel height adjustment may be set too low for grass condition. Raise
cutting height.
4. Mower is too hard to push. A. Raise cutting height to reduce deck drag on grass. Check each wheel for
free rotation.
5. Mower is abnormally noisy
and vibrates.
A. Release operating bail handle to turn mower off and remove the batteries.
Turn mower on side and check blade to ensure it has not been bent or
damaged. If blade is damaged, replace with a replacement blade. If the
underside of the deck is damaged return mower to an authorized service
center.
B. If there is no visible damage to the blade and the mower still vibrates:
Release operating bail handle to turn mower off, and remove the blade.
Rotate blade 180 degrees and retighten. If mower still vibrates, return the
mower to an authorized service center.
C. Too much debris/grass accumulation on the bottom of the deck. Wipe out
any accumulation of debris or grass on the bottom of the deck.
6. Battery charger LED’s not on. A. Check plug connection.
B. Replace charger.
7. Battery charger LED does
not ip to green.
A. Battery needs to be diagnosed. Take to authorized service center.
8. Mower not picking up
clippings with the grass
collection Bag.
A. Remove mulch plate when bagging.
B. Chute clogged. Release operating bail handle to turn mower off and
remove the batteries. Clear chute of grass clippings.
C. Too much cut grass. Raise cutting height of wheels to shorten length of
the cut.
D. Bag full. Empty bag more often.
9. When mulching there are
clippings visible.
A. Too much cut grass. Raise cutting height of wheels to shorten length of
the cut. Do not cut off more than 1/3 of total length.
B. Check blade for sharpness. Always keep blade sharp.
10. Low or diminished run-time
after many uses.
A. Return to authorized service location - may need new battery.
11. The battery charger LED
ashes red and the battery
can’t be charged.
A. The battery overheats after continuous use. Remove battery from the
charger and allow it to cool to 42
0
C or less.
Positec USA, Inc. Charlotte, NC 28216 USA
