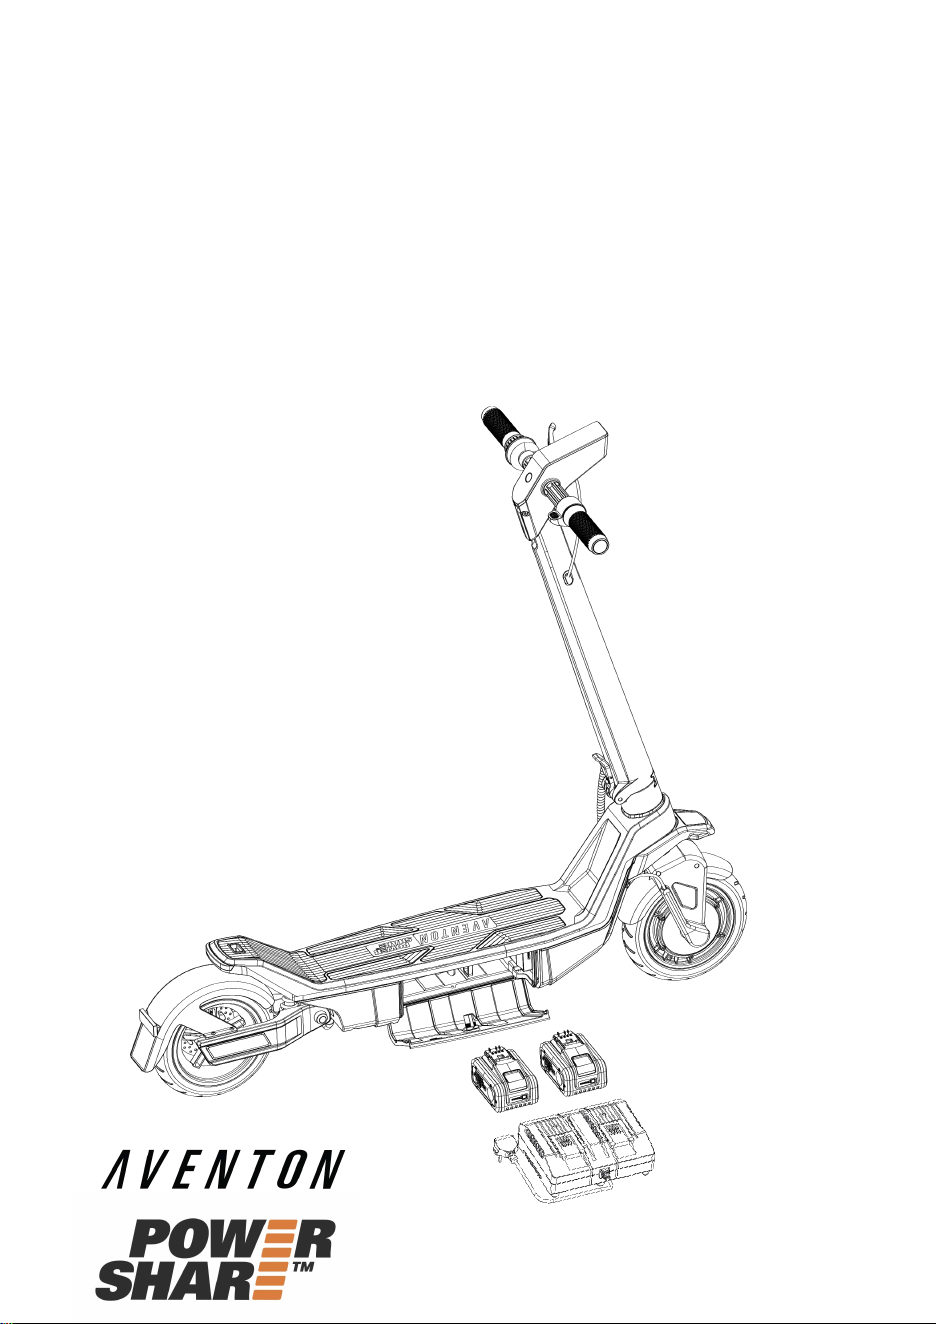
Original Instruction Manual
ELECTRIC KICK SCOOTER
Model Number:CTS36ABU1,CTS36ABU2 …
CTS36ABU10
IMPORTANT! Read this manual instruction carefully and keep it for future reference.

CONTENTS
1. SAFETY WARNINGS
2. SCOOTER WALKAROUND
3. DASHBOARD
4. ASSEMBLY
5. CHARGING
6. HOW TO RIDE
7. FOLDING AND CARRYING
8. MAINTENANCE
9 . SPECIFICATIONS
10. CONTACT
1. SAFETY WARNINGS
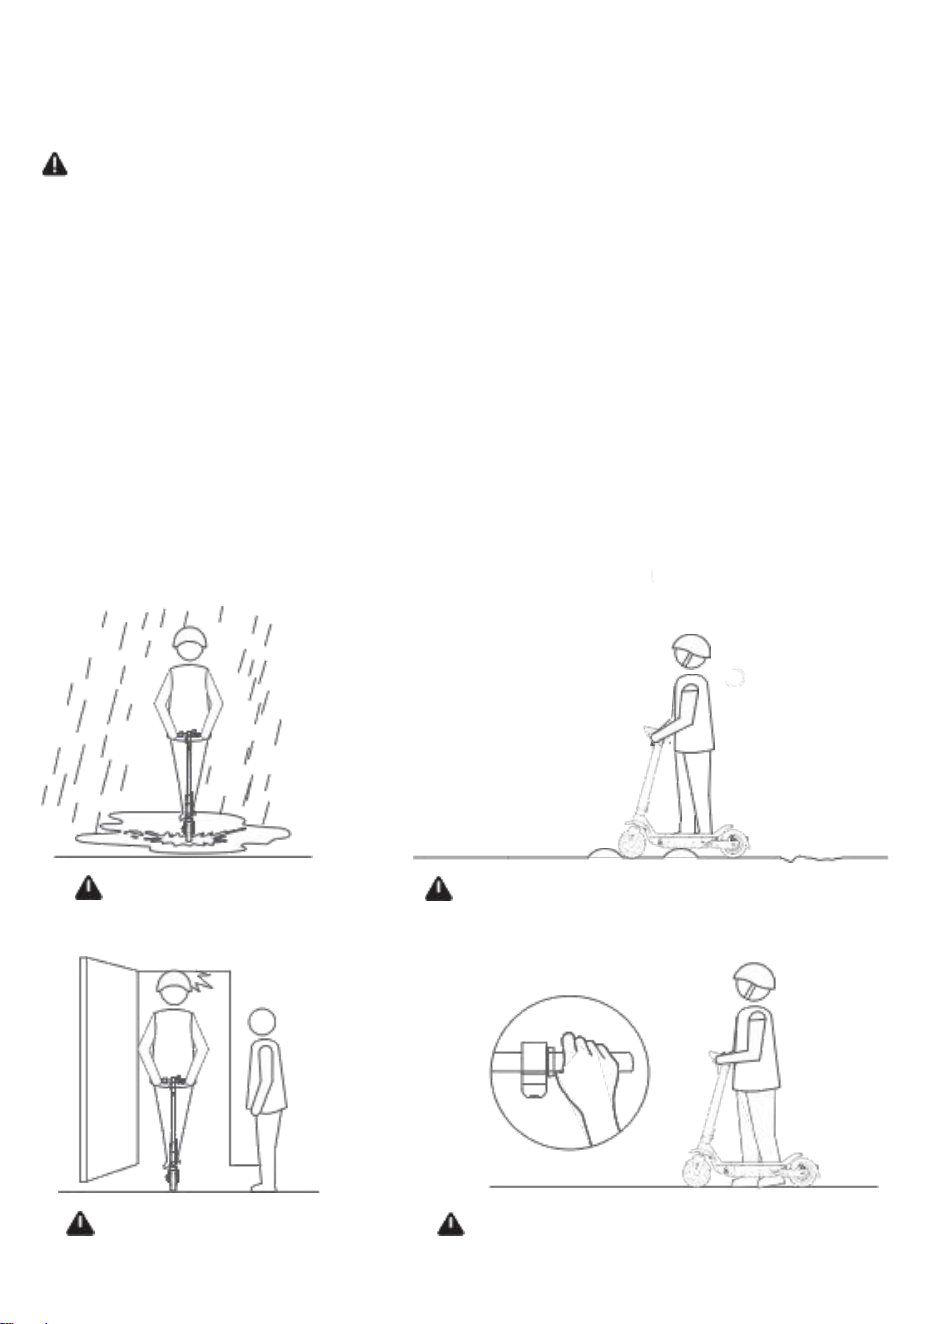
Do not ride over speed bumps, thresholds, or other bumps
at High Speed.
Watch your head when passing through
doorways.
Do not press the
throttle when walking with the scooter.
Do not ride in the snow, in the rain, or
on roads which are wet, muddy, icy,
or that are slippery for any reason.
WARNING!
Whenever you ride your scooter, you risk injury or death from loss of control, collisions, and falls.
The manufacturer recommends riders be 14+ years old. Read and understand all safety warnings listed on the
product label. Always follow these safety instructions.
People who should NOT ride this product include:
• Those with heart conditions, pregnant women, or persons with head, back, or neck ailments that limit their
ability to ride safely.
• Anyone under the influence of alcohol or drugs.
• Persons with any mental or physical conditions that may make them susceptible to injury or impair their
physical dexterity or mental capabilities to recognize, understand, and perform all of the safety instructions and
to be able to assume the hazards inherent with this product.
Comply with local laws and regulations when riding this product. Do not ride where prohibited by local law.
When braking rapidly you risk serious injury due to loss of traction and falls. Watch your speed when traveling
downhill. Apply brakes when traveling at high speeds. If brakes are loose, tighten to increase braking strength.
Ride safely to avoid falls or collisions.
Always wear a helmet while riding. A helmet is recommended, unless required by law.
Do not ride in the snow, in the rain, or on roads which are wet, muddy, icy, or that are slippery for any reason. Do not
ride over obstacles. Doing so could result in loss of balance or traction and could cause a fall. Whenever you ride
your vehicle you risk injury or death from loss of control, collisions, and falls. Be sure to read the User Manual.
Do not use the scooter for racing, stunt riding, or other maneuvers, which may cause loss of control, or may cause
uncontrolled operator actions.
Avoid contact with moving parts. Ensure hands, feet, hair, clothing, and other body parts stay clear of moving parts
like the motor or rear wheel.
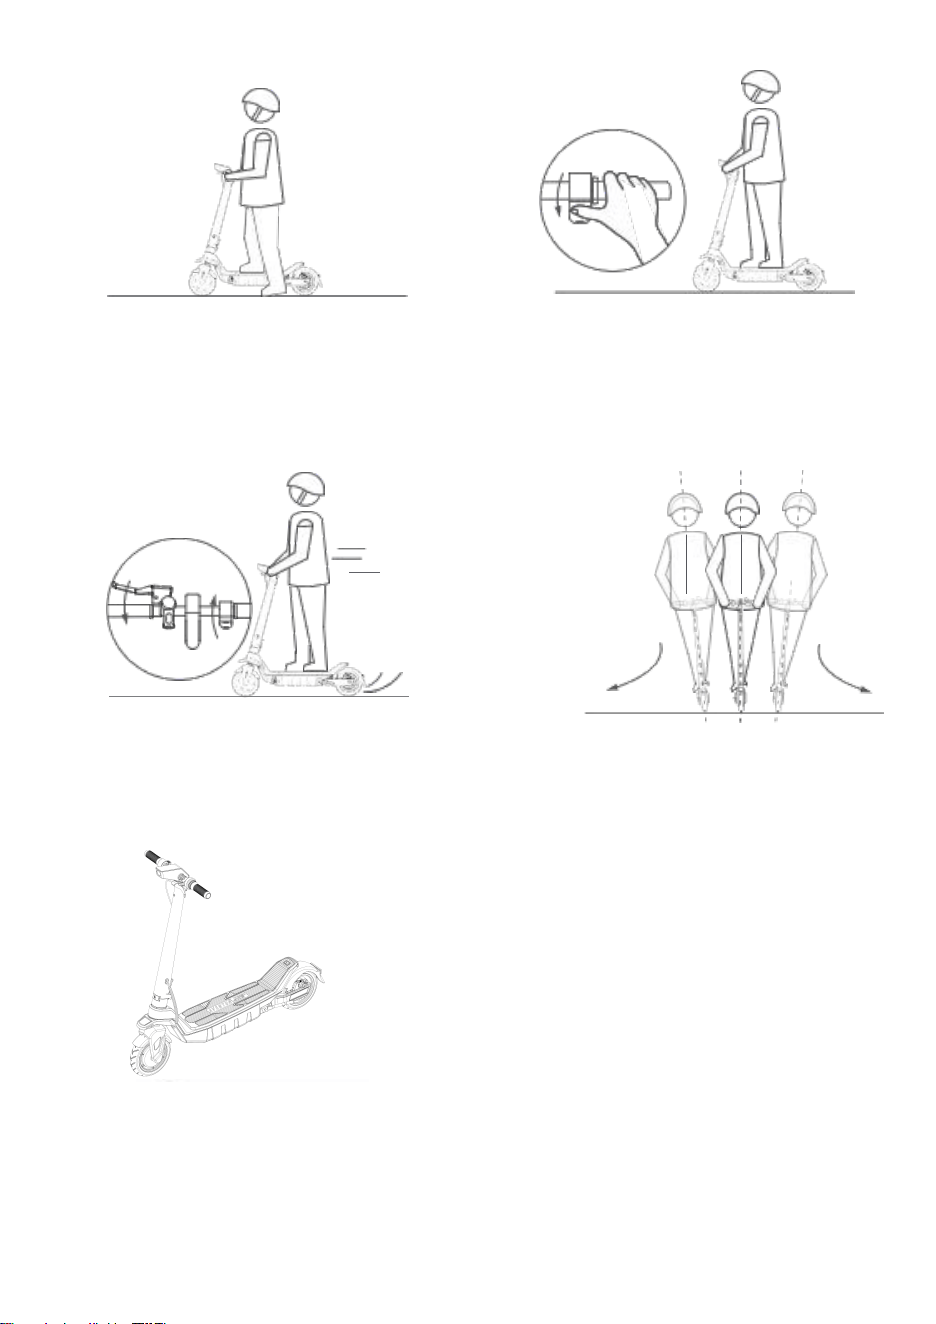
ALWAYS keep both hands on the handlebar when riding.
Do not ride over speed bumps, thresholds, or other bumps
at High Speed.
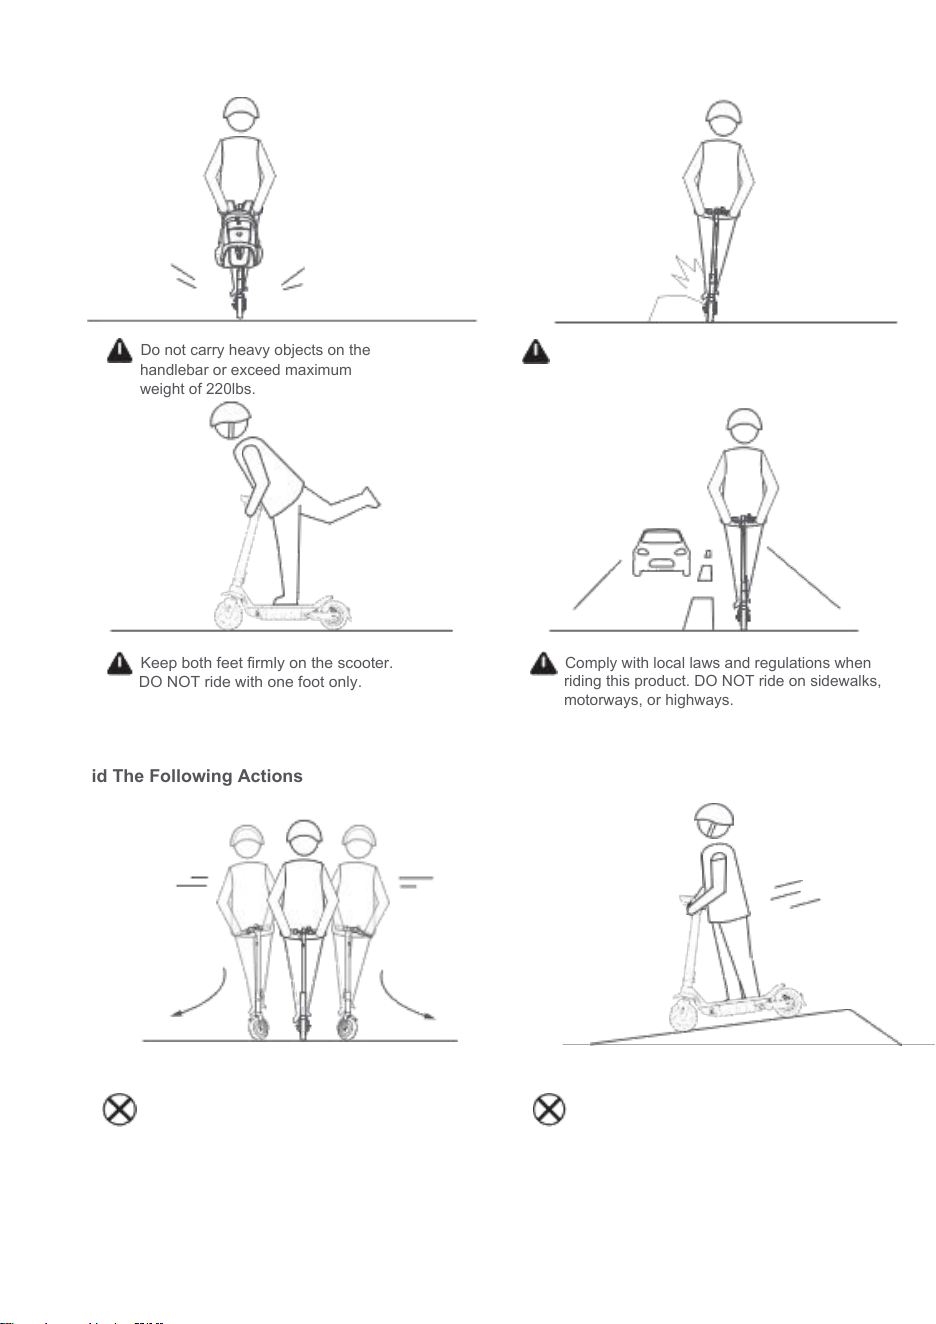
Do not carry heavy objects on the
handlebar or exceed maximum
weight of 220lbs.
Keep both feet firmly on the scooter.
DO NOT ride with one foot only.
Comply with local laws and regulations when
riding this product. DO NOT ride on sidewalks,
motorways, or highways.
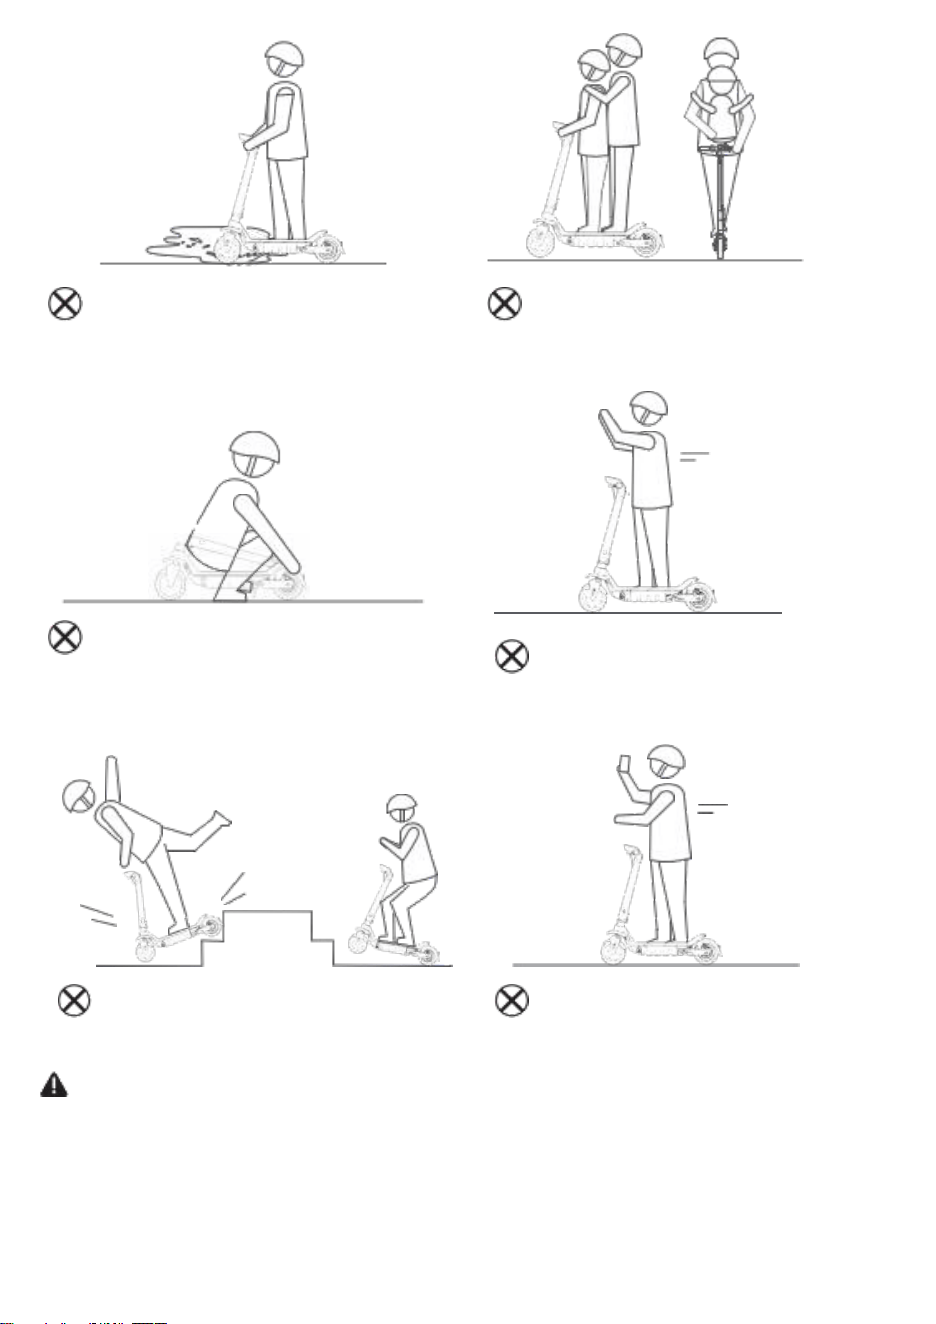
Avoid The Following Actions
When braking rapidly you risk serious
injury due to loss of traction and falls.
Watch your speed when traveling
downhill. Apply brakes when traveling at
high speeds.
DO NOT rotate the handlebars suddenly
while driving at high speeds.
Avoid all obstacles to avoid falls or
collisions.
WARNING
!
You are responsible for monitoring the condition of your scooter, maintaining the components and using only authorized
replacement parts.
If you check your scooter and identify any component that is not functioning properly, notice damage or
excessive wear and tear, or you encounter an error code, do not ride your scooter and please contact
Customer Support.
Do not modify the scooter. Doing so will void any applicable warranties and may put you at increased risk of serious
injury or death.
DO NOT ride up and down stairs. DO NOT use a mobile device or wear
earphones while riding.
Avoid contact with moving parts. Ensure
hands, feet, hair, clothing, and other body
parts stay clear of moving parts like the motor
or rear wheel.
DO NOT take your hands from the
handlebars while riding. ALWAYS
keep both hands on the handlebar.
DO NOT ride with more than one rider.
DO NOT ride the scooter in the rain or
on wet ground.
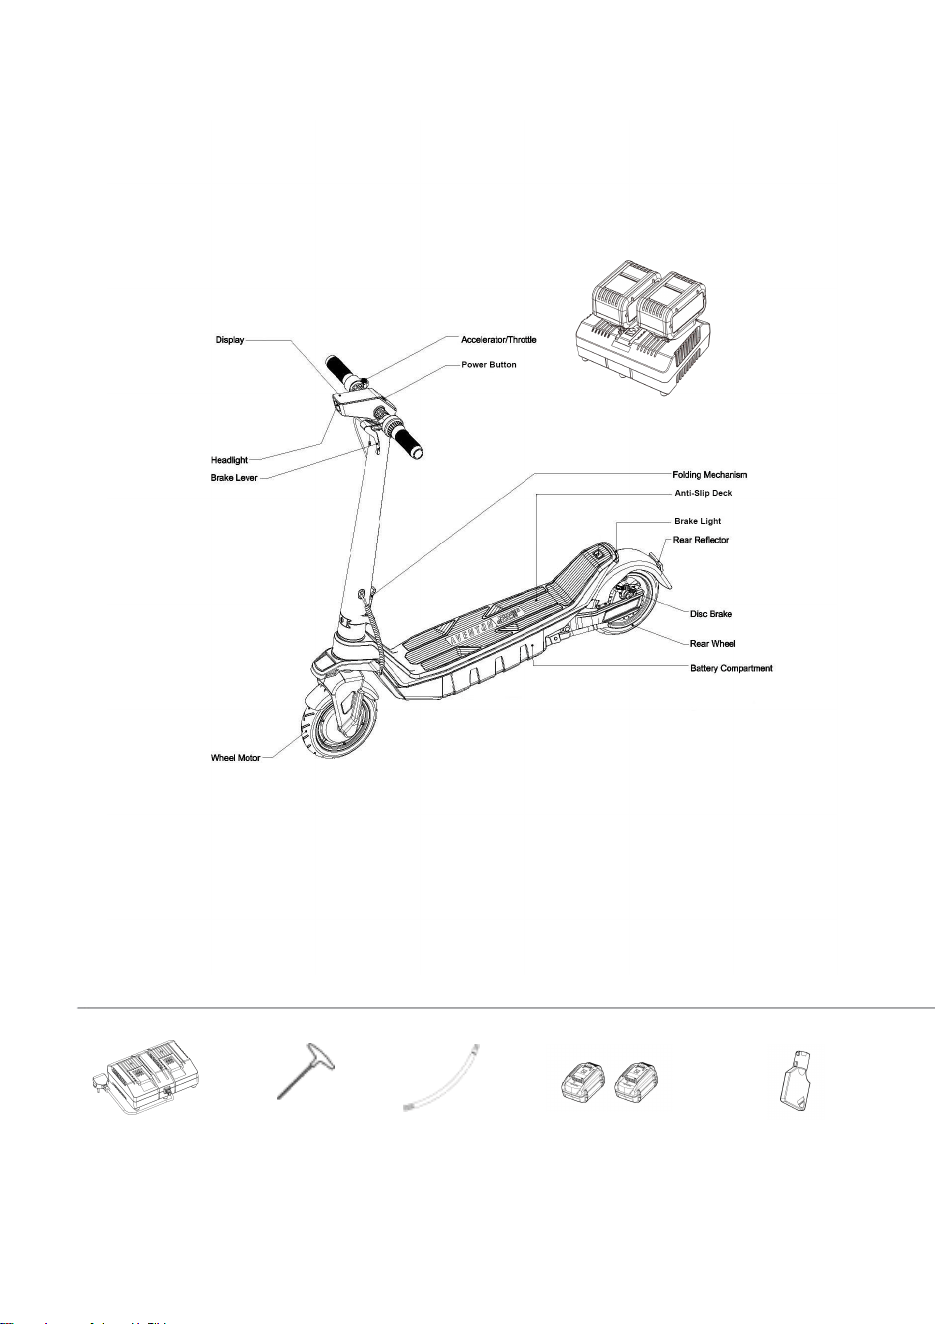
2. SCOOTER WALKAROUND
What's Included
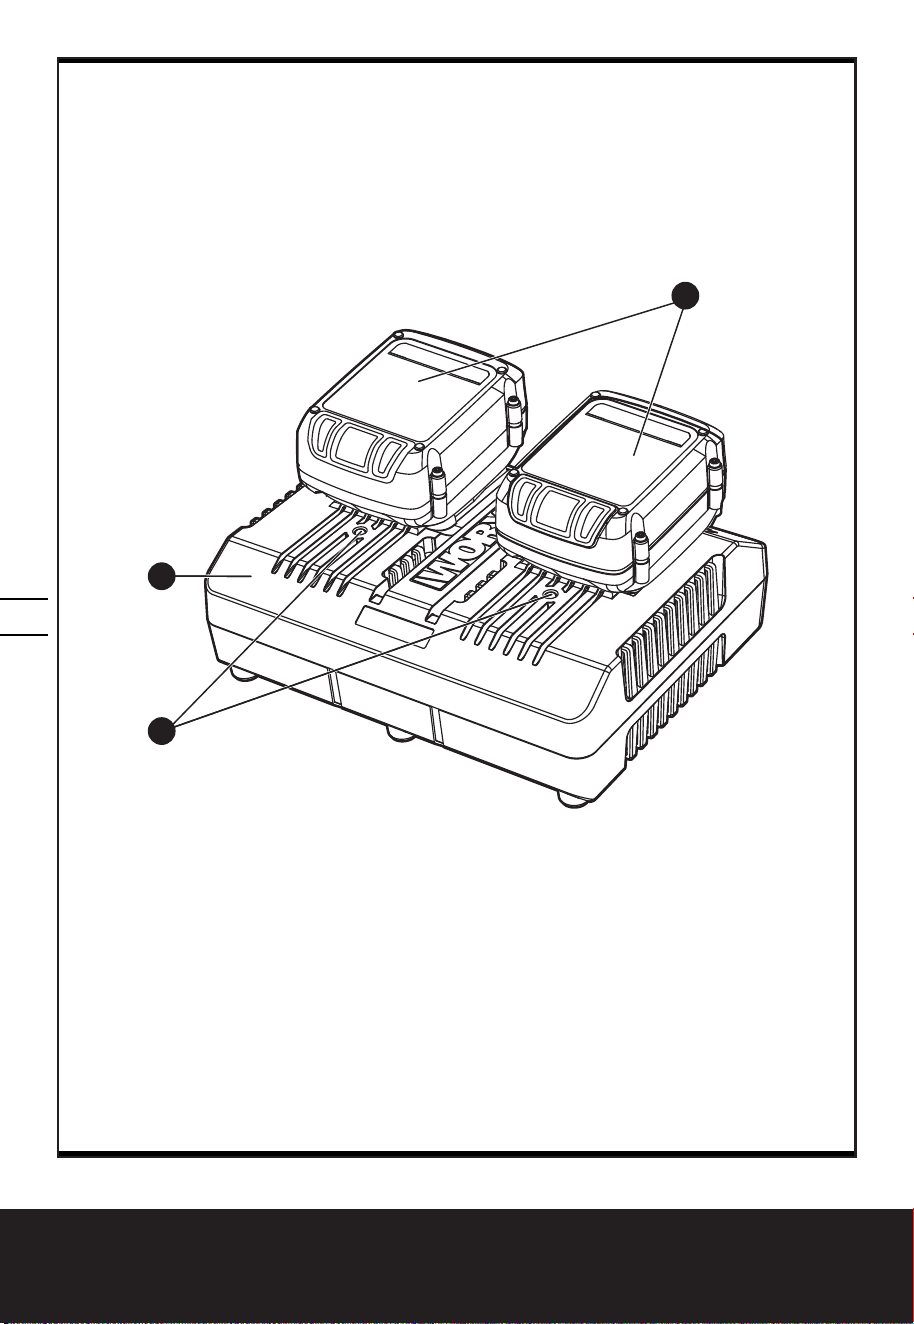
Dual Power Share Charger
Hex Wrench
Extension Hose
Before assembling your new scooter, please verify that the above items are included. If any components are missing,
please contact customer service. After verifying all components are present and in good condition, you can assemble.
CAUTION: Remember to power off your scooter and remove the batteries before assembling, mounting accessories or
cleaning.
Power Share Batteries
Dual Charger
Power Share Batteries Battery Compartment Key
3. DASHBOARD
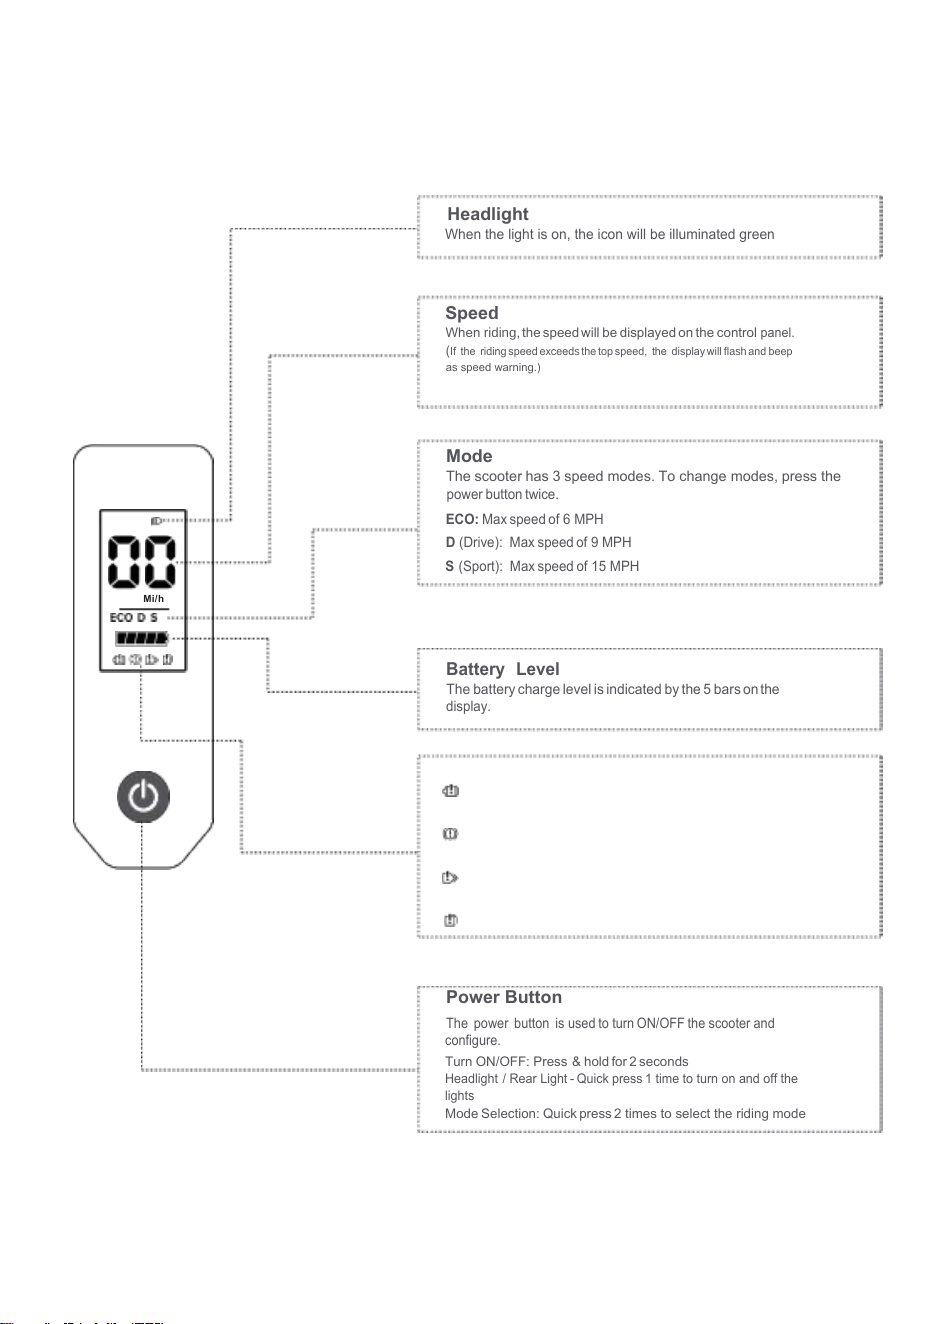
Headlight
When the light is on, the icon will be illuminated green
SpeeG
When ULGLQJ, the speed will be displayed on the control
panel.
(
If the riding speed exceedVthe top speed, the display will IODVK and beep
as speed warning.)
Mode
The scooter has
3 speed modes. To change modes, press the
power button twice.
ECO: Max speed of 6 MPH
D
(Drive): Max speed of 9 M PH
S (Sport): Max speed of 15 MPH
Mi/h
Battery Level
The battery charge level is indicated by the 5 bars onthe
display.
Error Codes
Motor Failure
Error code "E1" will flash from the speed display.
Brake Failure
Error code "E2" will flash from the speed display.
Accelerator Failure
Error code "E3" will flash from the speed display.
Controller Failure
Error code "E4" will flash from the speed display.
Power Button
The power button is used to turn ON/OFF the scooter and
configure.
Turn ON/OFF: Press & hold for 2 seconds
Headlight / Rear Light - Quick press 1 time to turn on and off the
lights
Mode Selection: Quick press 2 times to select the riding mode

4. ASSEMBLY
1.
Remove the scooter from the packaging box.
Move the kickstand out. With one hand on the pole and
one hand on the deck, place the scooter on the ground.
It should stand on its own with the kickstand out.
2.
Unfold the pole and push it until you hear a click.
Confirm that it is fully locked into place and the safety
lock pin is secured completely.
3. Firmly connect the wires inside the handlebar and the
pole. Slide the handlebar onto the pole. Be aware of the
correct orientation.
4. Tightly install the 4 screws with the included hex wrench.
5. Unlock the battery compartment underneath the deck
with the key provided.
6. After fully charging your Power Share batteries, insert
both batteries into the battery compartment.
Safety Lock Pin
WARNING!
Keep plastic covering away from children to avoid suffocation.
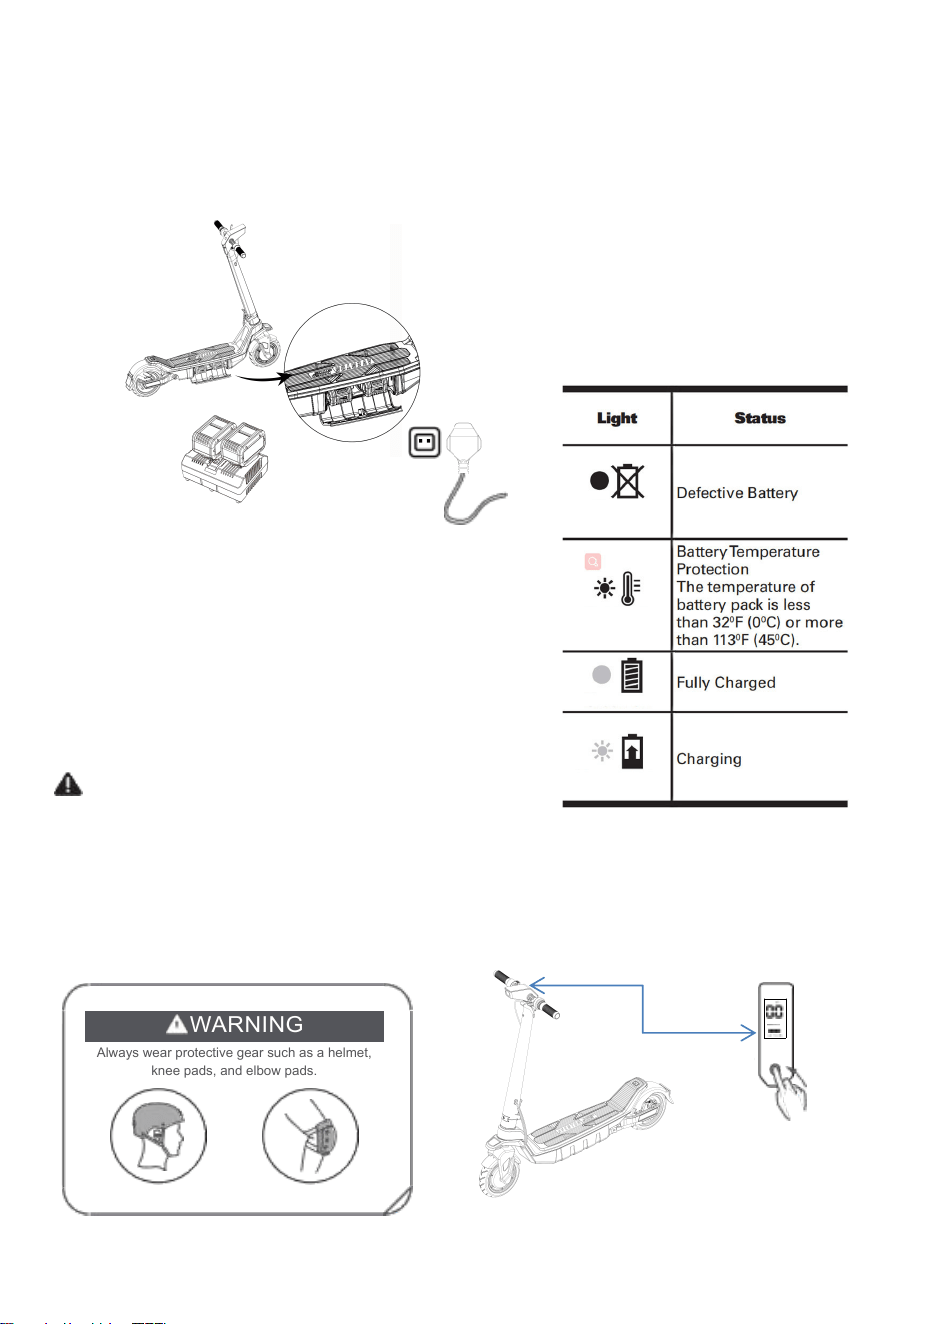
5. CHARGING
We recommend charging the batteries indoors, in moderate temperature conditions.
WARNING: read the supplied user manual for both the Power Share batteries and dual charger before use.
It is recommended to fully charge both batteries before use.
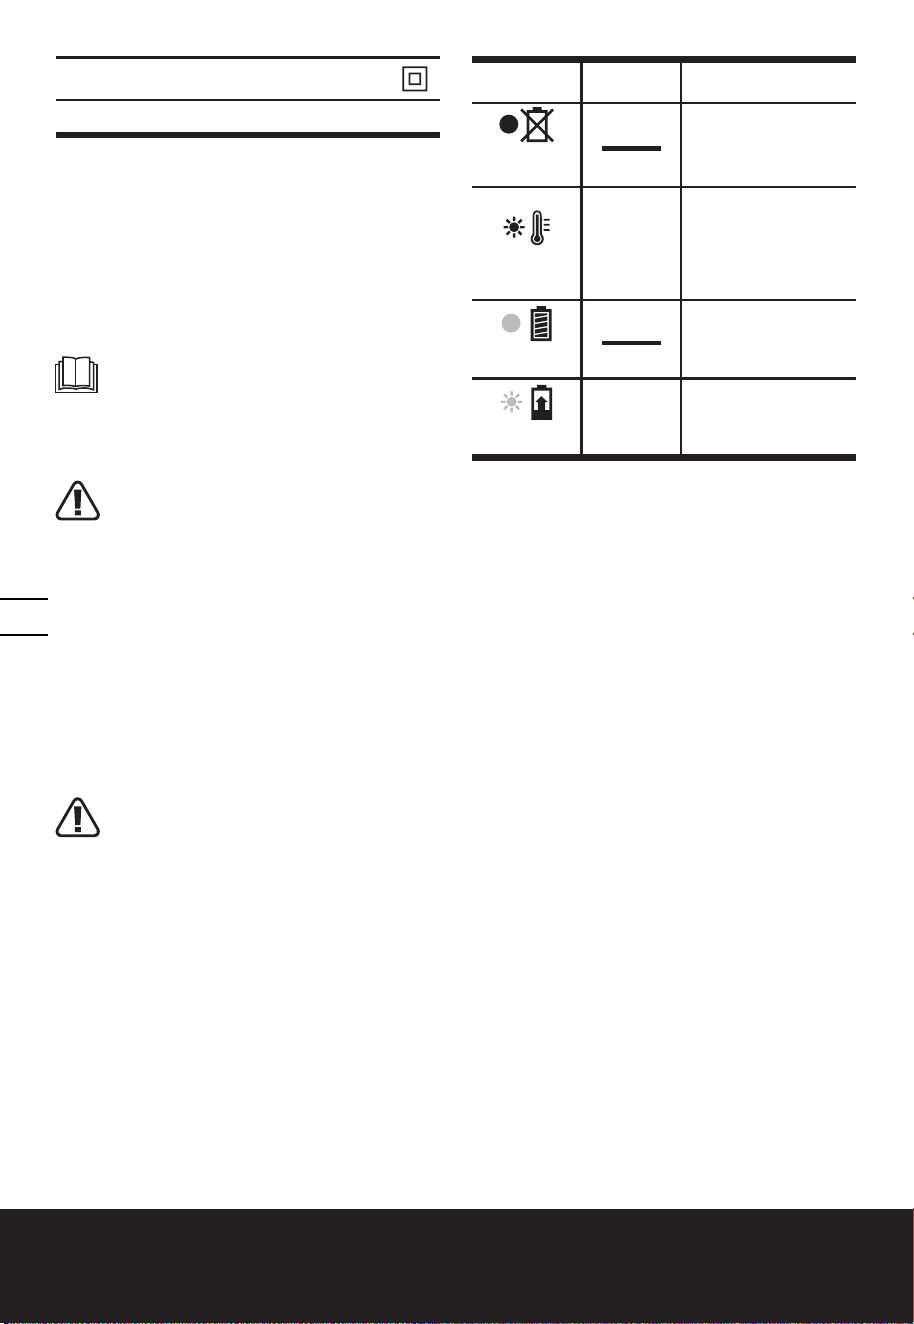
INDICATOR LIGHTS
RED
WARNING
!
Do not charge or use your battery if it is damaged or see trace of water.
Always power off your Electric Kick Scooter before removing the batteries.
6. HOW TO RIDE
WARNING
Always wear protective gear such as a helmet,
knee pads, and elbow pads.
Mi/h
How to Charge:
1. Connect the dual charger to a power supply
2. Push the battery onto the charger
Solid Red
Flashing Red
Solid Green
Flashing Green
1. Press and hold the power button for 2 seconds
to power on the scooter. Check the battery level
indicator. It is recommended to fully charge the
batteries before use.
2. Adjust the speed setting to be your desired
speed by pressing the power button twice to
choose your preferred mode.
3. Place one foot on the deck and kick with the other to
propel forward. Press the throttle to accelerate.
NOTE
: The electric scooter will not accelerate until
you manually reach a speed of approx. 1.5 MPH, for
your safety.
4. Slow down by releasing the throttle and brake
by squeezing the brake lever.
5. Tilt your body and slowly turn the handlebar to steer.
Always be aware of your surroundings before
turning.
6. Always release the kickstand and turn OFF the scooter
when not riding. Do not leave the scooter outside when it
is raining or snowing.
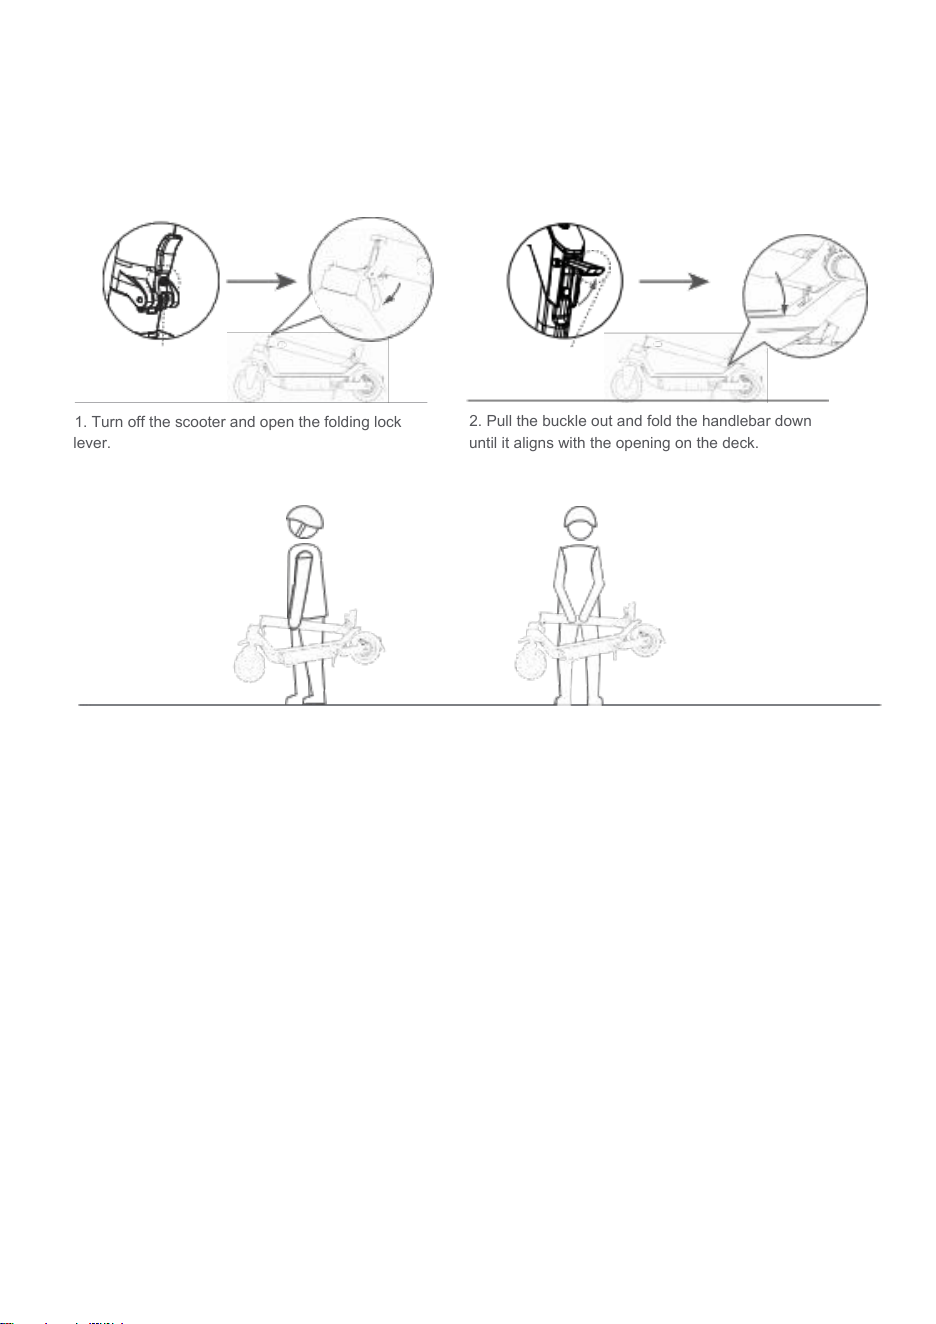
1. Turn off the scooter and open the folding lock
lever.
2. Pull the buckle out and fold the handlebar down
until it aligns with the opening on the deck.
3. When the scooter is folded and inserted into the deck, lift it by the pole to carry.
Safety Lock Pin
Buckle
7. FOLDING AND CARRYING
8. MAINTENANCE
Before each use, conduct a safety inspection of the scooter, including:
1. Brake Lever: Test the brakes by trying to roll your scooter forward and back while squeezing the brake lever. The back
wheel should not rotate.
2. Throttle: Test the throttle by applying pressure downward and then release the pressure. Check that it springs back to its
original position.
3. Damage: Check the Frame, Pole, Handlebars, and deck for any dents, cracks, or signs of other damage.
4. Steering: Check to make sure the steering is handling properly by rotating the handlebars to the left and right.
5. Lights: Make sure that your front and rear lights turn on
6. Wheels: Make sure the wheels are in good condition and check for any signs of excessive tread wear.
7. Screws: Make sure the pole is securely attached to the base of the scooter. If you notice any play in the pole (i.e.
swaying or moving back-and-forth) you likely need to tighten the screws you installed during assembly.
8. Error Codes: Check the Display for error codes. If any are present, do not ride the scooter and contact Customer
Support.
Cleaning and Storage
You can wipe it down with a soft damp cloth or towel and/or scrub it with a soft bristled toothbrush. Be sure that you do not
use corrosive substances/cleaning solutions because they could damage your Scooter (don’t use gasoline, kerosene,
acetone, alcohol, bleach etc.)
You are responsible for monitoring the condition of your scooter, maintaining the components and using only authorized
replacement parts.
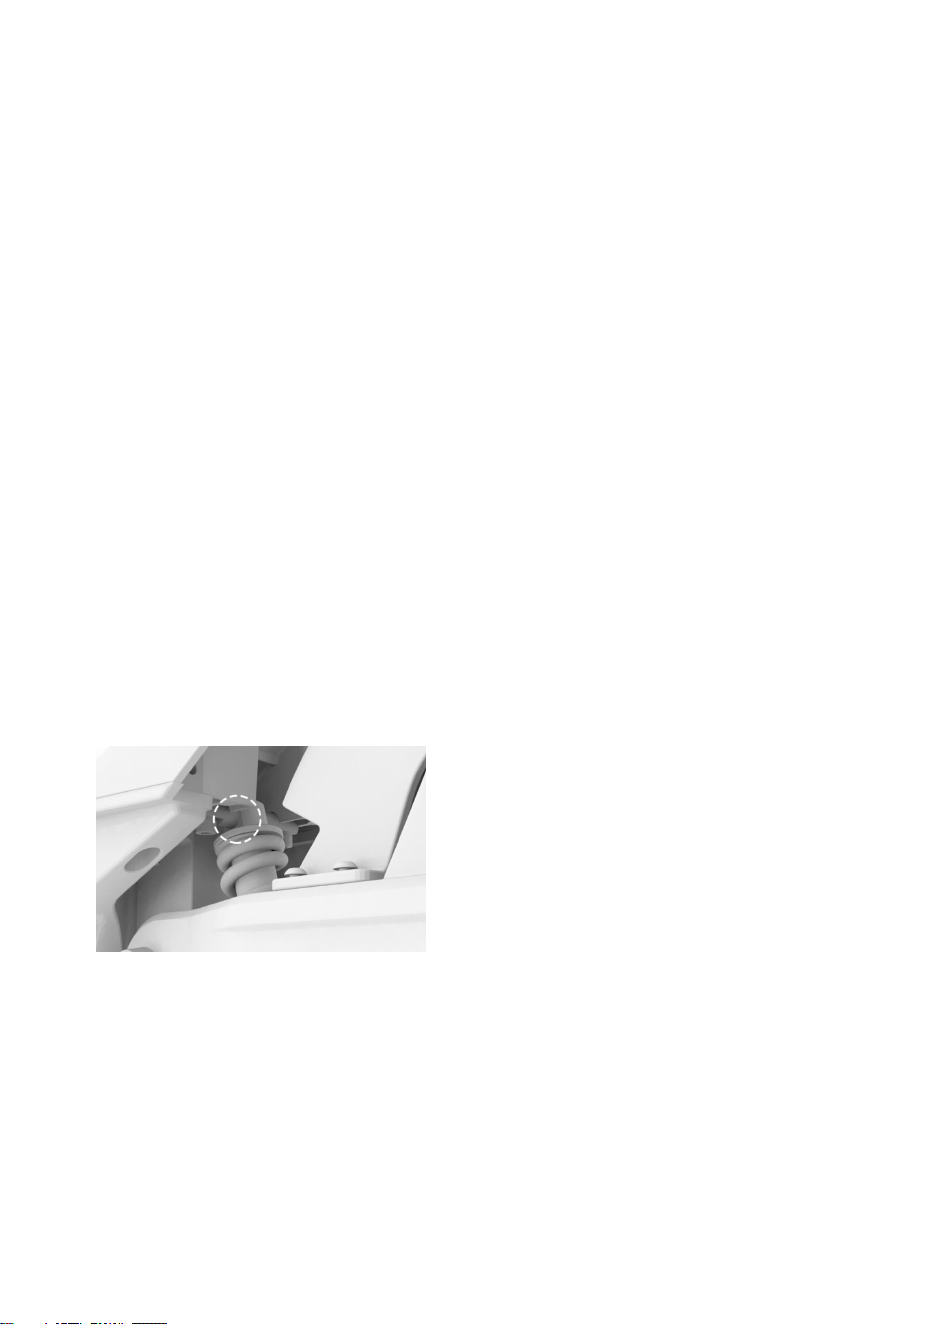
Lubrication Recommendation
It is recommended to add some lubrication grease to the rotating part on the top of the rear suspension every 3-6 months to
ensure optimal performance.
Do not modify the scooter. Doing so will void any applicable warranties and may put you at increased risk of
serious injury or death.

WARNING!
Ensure the scooter is powered OFF and the batteries are removed before cleaning and doing any maintenance.
Store your Electric Kick Scooter in a cool, dry place. Do not store it outdoors for extended periods of time.
Exposure to sunlight and extremes temperature will accelerate the aging process of the
plastic components and
may reduce battery life.
Tire Pressure
Recommend to inflate tires to 32-37psi, inflate both tires equally.
Battery Pack Maintenance
Do not store or charge the battery at temperatures outside the stated limits (see specifications). Do not puncture
the battery, refer to your local laws and regulations regarding battery recycling and or disposal.
A well-maintained battery can perform well even after many miles of riding. Charge the battery after each ride
and
avoid draining the battery completely. When used at room temperature (22 ℃) the battery range and performance is at
its best. Whereas using it at temperatures below 0 degree can decrease range and perfor-mance. Typically at -20 ℃,
battery range can be half that the same battery using at 22 ℃, Battery range will recover when the temperature rises.
NOTE:
Remember to charge the battery after each use. Completely draining the battery may cause permanent damage to the
battery.
Electronics inside the battery record the charge-discharge condition of the battery. Damage caused by
over-charged or under-charging will not be covered by the Limited Warranty.
WARNING!
Do not attempt to disassemble the battery. Do not touch battery contacts. Do not dismantle or puncture the
case.
Keep the battery contacts away from metal objects to prevent short circuits. Risk of fire and electric shock.
No
user-serviceable parts. Do not charge or use your battery if it is damaged or see a trace of water.
Do not ride when the ambient temperature is outside the machine operation temperature (see specifications)
because low or high temperatures will limit the maximum power. Doing so could result in personal injury or
property damage due to slips or falls.
This product is not intended for use at elevations greater than2000 m above sea level.
Prolonged Exposure to UV Rays, Rain and the Elements May Damage the Enclosure Materials,Store Indoors When
Not in Use.

9. SPECIFICATIONS
Dimensions
Net Weight
Max Load
Tires
Recommended Rider Age
Required Rider Height
Max Speed
Travel Range
Max Slope
Traversable Terrain
Operating Temperature
Storage Temperature
IP Rating
Charging Time
Battery Nominal Voltage
Battery Max. Charging Voltage
Battery Charging Temperature
Battery Nominal Capacity
Battery Management System
Number of Battery
Motor Maximum Continuous Power
Input Voltage of Charger
Output Voltage of Charger
Output Current of Charger
Lights
Braking System
A-Weighted sound pressure level
Unfold: 1149X 4 9 7 X 1 2 3 6 mm
Fold: 1 1 4 9 X 4 9 7 X 4 8 0 mm
38.5lbs / 17.4 kg
220lbs / 100 kg
8.5” Air-filled, Max 50 psi
14+ Years
3.94-6.56 ft
15Mph
25Mile
15%
Asphalt/flat pavement: obstacles < 0.39” , gap < 1.81”
14 - 104 ℉
-4 - 122 ℉
IPX4
Approx. 3 . 5 hours
36 VDC
42 VDC
32 - 104℉
5Ah
Over-heat, short-circuit, over-current and
overcharge
protection
2
350 W
100-240V ~50/60Hz 2.5A
42V
2*2.0A
Front LED Light and Rear LED Light
Electronic and Mechanical Disc Brakes
<70dBA
Travel range: tested while riding under full power 165lbs load and 77℉ temperature and with a speed of 9.56mile
on average on pavement. It could vary due to the different testing conditions.

10. CONTACT
Contact us if you experience issues relating to riding, maintenances, and safety, or errors/faults with your
Electric Kick Scooter.
Aventon
1950 S. Grove Ave. Building B, Ontario, CA, 91761
Contact us directly by checking https://support.aventon.com/contact-us
Call Aventon Product Support: 1-866-300-3311
Dual port battery charger EN
Chargeur de batterie à double emplacement F
Cargador de batería de puerto doble ES
P02
P06
P10
WA3884
Dual port battery charger EN
2
2
1
3
Dual port battery charger EN
3
WARNING: This product can expose you
to chemicals including lead and Di
(2-ethylhexyl) phthalate (DEHP) which are
known to the State of California to cause
cancer and birth defects or other reproductive
harm. For more information go to www.
P65Warnings.ca.gov.
Information for radiated emission
This device complies with Canadian ICES-001.
This device complies with Part 15 of the FCC Rules.
Operation is subject to the following two conditions:
(1) this device may not cause harmful interference,
and (2) this device must accept any interference
received, including interference that may cause
undesired operation.
WARNING: Changes or modifications to
this unit not expressly approved by the party
responsible for compliance could void the user’s
authority to operate the equipment.
- NOTE: This equipment has been tested and found
to comply with the limits for a Class B digital device,
pursuant to Part 15 of the FCC Rules.
These limits are designed to provide reasonable
protection against harmful interference in a
residential installation. This equipment generates,
uses and can radiate radio frequency energy and,
if not installed and used in accordance with the
instructions, may cause harmful interference to radio
communications.
However, there is no guarantee that interference
will not occur in a particular installation. If this
equipment does cause harmful interference to radio
or television reception, which can be determined
by turning the equipment off and on, the user is
encouraged to try to correct the interference by one
or more of the following measures:
• Reorient or relocate the receiving antenna.
• Increase the separation between the equipment
and receiver.
• Connect the equipment into an outlet on a
circuit different from that to which the receiver is
connected.
• Consult the dealer or an experienced radio/TV
technician for help.
SYMBOLS
Before charging, read the instruction
manual
Warning
Double insulation
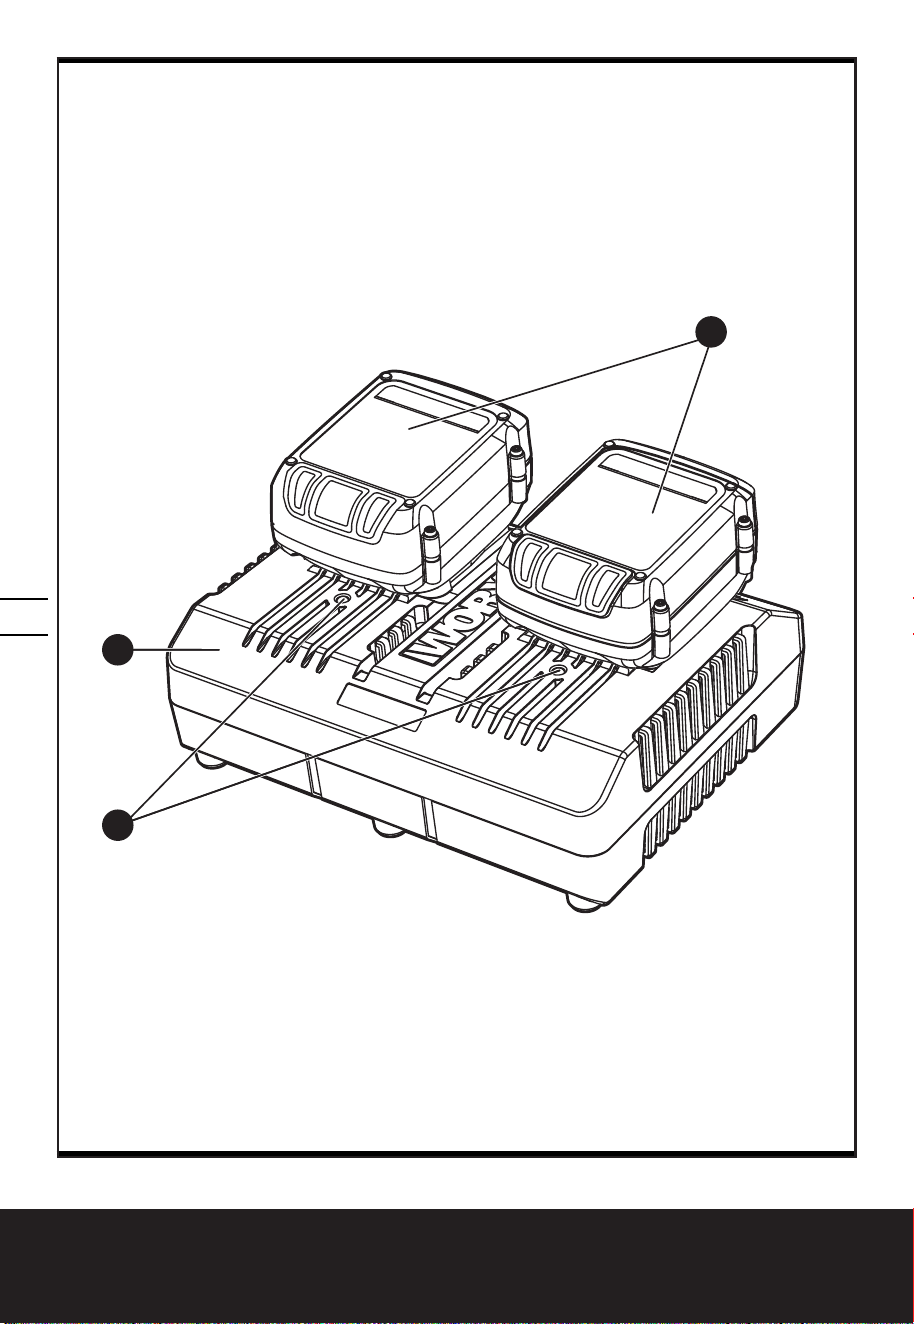
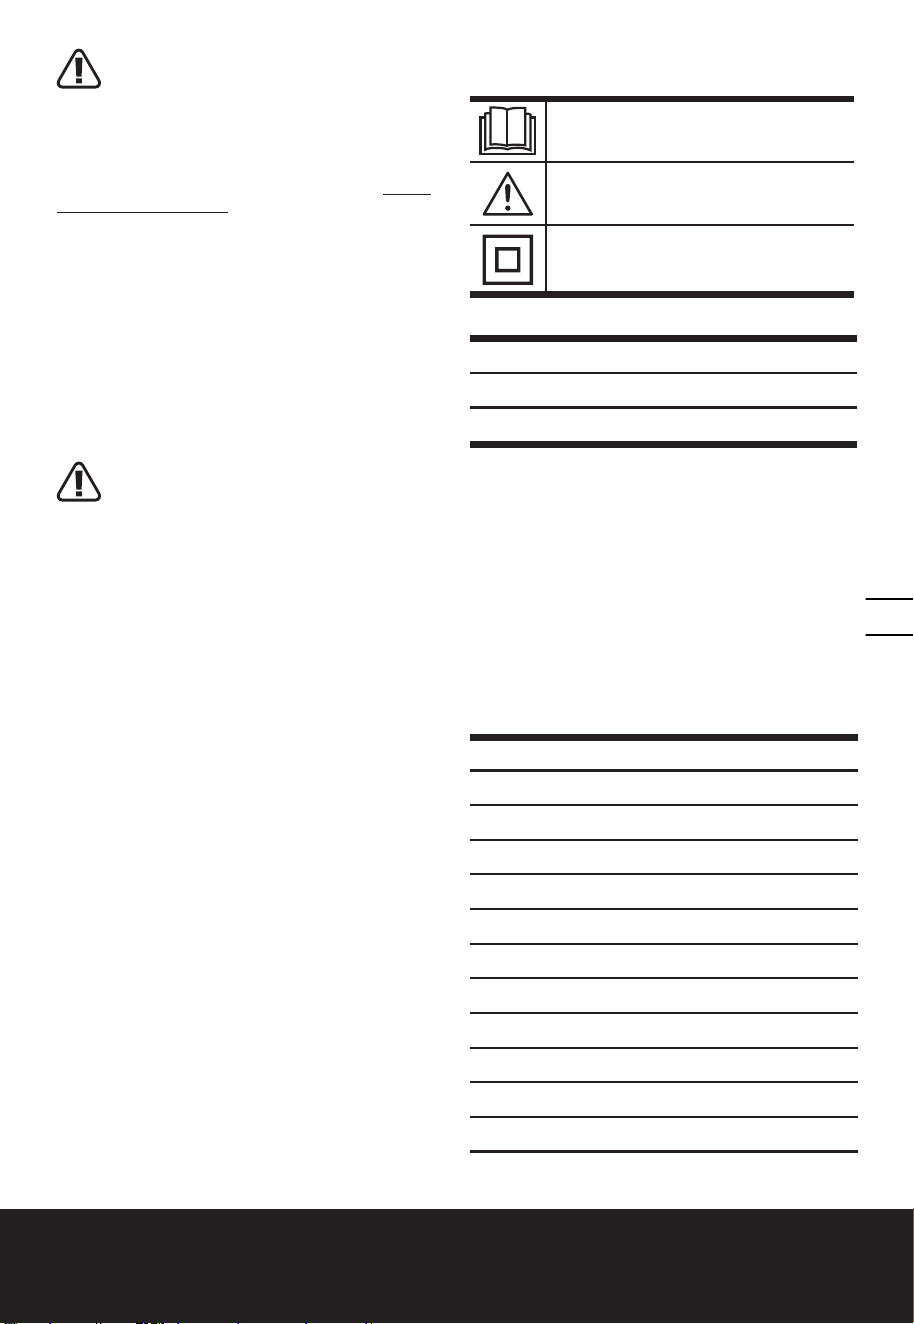
1. CHARGER
2. CHARGE INDICATOR LIGHT
3. BATTERY PACK*
*Not all the accessories illustrated or
described are included in standard delivery.
We recommend that you purchase your accessories
listed in the above list from the same store that sold
you the battery charger. Use of any other accessory
or attachment may increase the risk of injury. Refer
to the accessory packaging for further details. Store
personnel can assist you and offer advice.
TECHNICAL DATA
Rated Input voltage 120 V~60 Hz
Rated input power 100W
Charger output 1 20Vd.c., 2A *
Charger output 2 20Vd.c., 2A *
Charge battery Li-Ion
Charging time (approx.)
Battery pack
2.0 Ah (1pc) 0.5 hr
2.0 Ah (2pcs) 1 hr
4.0 Ah(1pc) 1 hr
4.0 Ah(2pcs) 2 hrs
5.0 Ah(1pc) 1.25 hrs
5.0 Ah(2pcs) 2.5 hrs
6.0 Ah(1pc) 1.5 hrs
6.0 Ah(2pcs) 3.0 hrs
Dual port battery charger EN
4
Protection class
/II
Machine weight 2.1 Ibs
* Charger output 1 and output 2 mean two ports with
the same output voltage and current.
For the technical data of the types, the number of
cells and the rated capacity of the batteries that can
be charged, please refer the nameplate of the battery
pack supplied by Worx.
CHARGING PROCEDURE
NOTE: Before using the tool, read the
instruction book carefully.
CHARGING INSTRUCTIONS
1. CHARGING YOUR BATTERY PACK
The charger is designed to charge one or two battery
packs at the same time.
WARNING:
The charger and battery pack are specifically
designed to work together so do not attempt to use
any other devices to charge. Never insert or allow
metallic objects into your charger or battery pack
connections because an electrical failure and hazard
will occur.
2. BEFORE USING YOUR CORDLESS TOOL
Your battery pack is UNCHARGED and you must
charge once before use.
3. HOW TO CHARGE YOUR BATTERY PACK
CHARGING PROCEDURE
1) Plug the charger into an appropriate outlet.
2) Slide one or two battery packs into the charger.
Normally, the relevant indication lights (2) will
flash in green color showing the battery is being
charged.
WARNING: When battery charge runs
out after continuous use or exposure
to direct sunlight or heat, allow time for the
battery to cool down before re-charging to
achieve the full charge.
CHARGING INDICATOR
This charger is designed to detect some problems that
can arise with battery packs. Indicator lights indicate
problems (see table below). If this occurs, insert a new
battery pack to determine if the charger is OK. If the
new battery charges correctly, then the original pack
is defective and should be returned to a service center
or recycling service center. If the new battery pack
displays the same problem as the original Battery
Pack, have the charger tested at an authorized service
center.
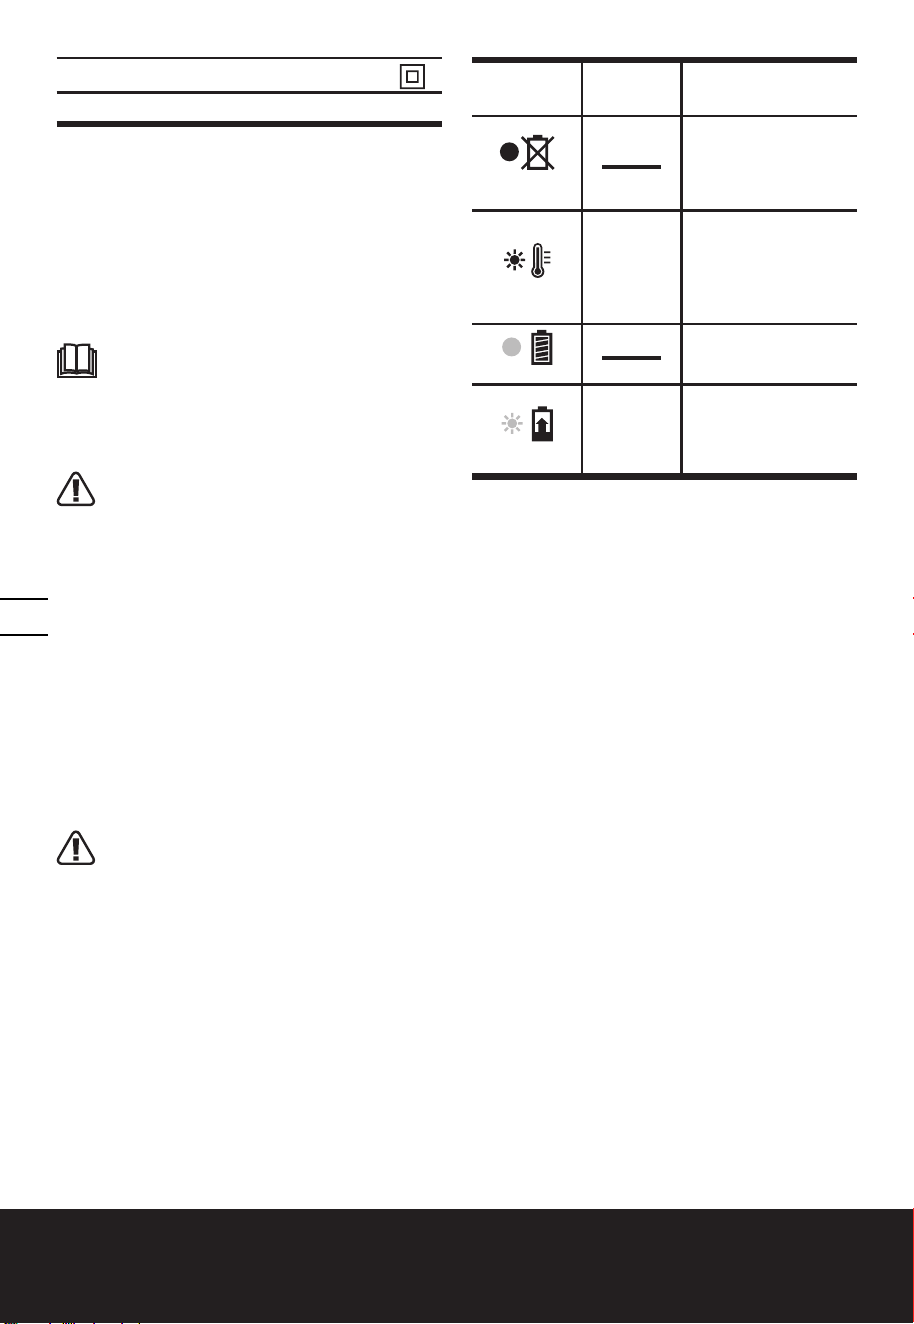
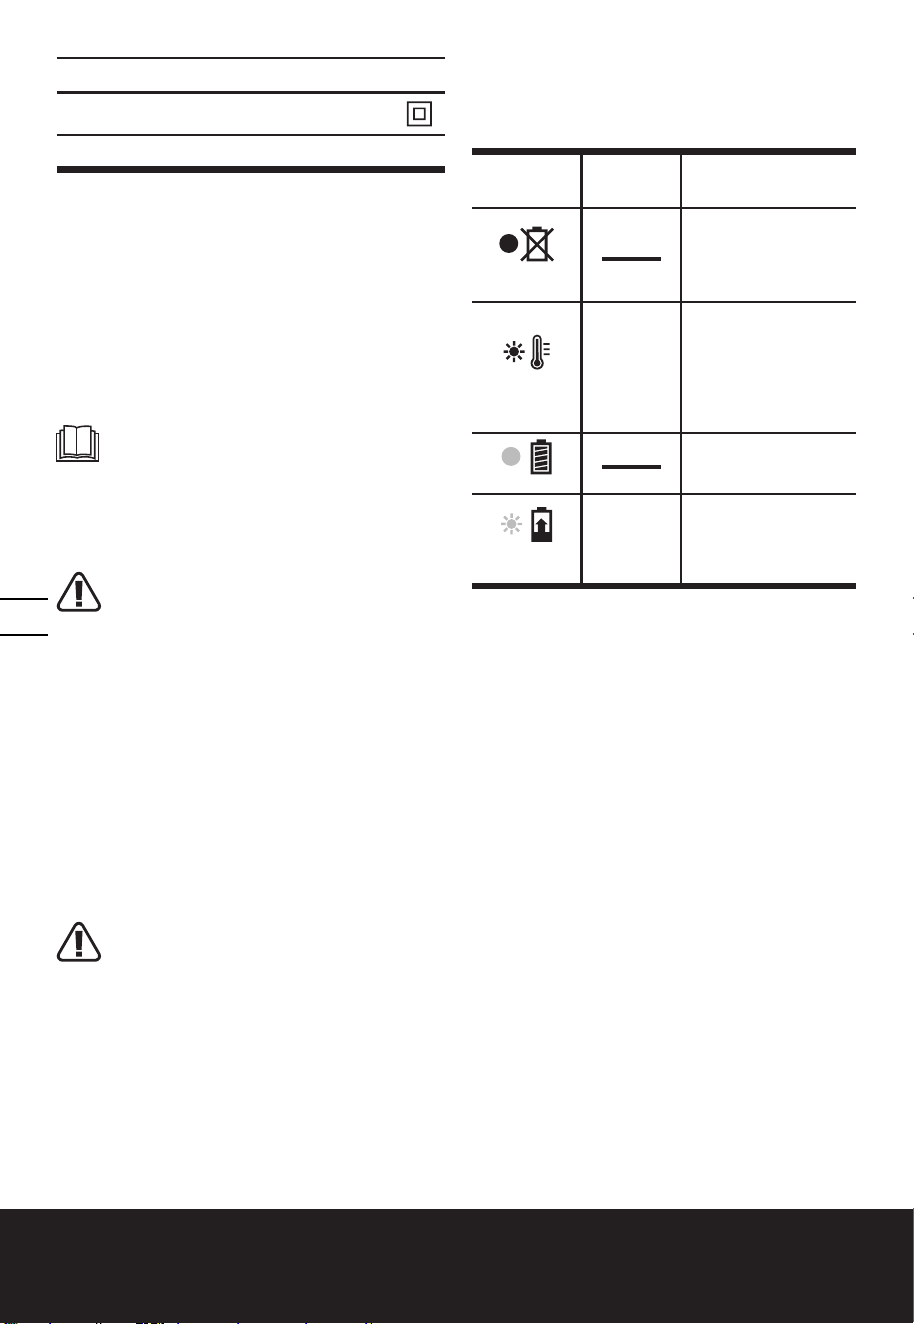
Light ON/ Flash Status
Red on
Defective Battery
Red flash
----------
Battery Temperature
Protection
The temperature of
battery pack is less
than 32
0
F (0
0
C) or more
than 113
0
F (45
0
C).
Green on
Fully Charged
Green flash
---------- Charging
DEFECTIVE BATTERY PACKS
This charger will detect a defective battery pack.
When a defective battery pack is inserted into the
charger, the charger will try to repair it. This process
will last about 30mins (the light will be green and
flash). If the repair is successful, the charger will
automatically begin to charge the battery pack to the
highest capacity possible (the light will be green and
flash). If the light becomes solid red, the battery pack
is dead.
NOTE: Repaired battery packs are still usable but
should not be expected to perform as much work as
new battery packs.
BATTERY TEMPERATURE PROTECTION
This charger has a battery temperature protection
feature. When the charger detects a battery pack that
is too hot or cold (the light will be red and flash), it
automatically activates the protection circuit, and
suspends charging until the battery pack has reached
the correct temperature. The charging process will
then automatically begin (the light will be green and
flash). This feature ensures maximum battery life.
LEAVING THE BATTERY PACK IN THE
CHARGER
If a fully charged battery pack is left in the charger,
the Light will remain green. The battery pack will
remain charging with a maintenance trickle current.

Dual port battery charger EN
5
IMPORTANT CHARGING
NOTES:
1. For a new battery pack or a battery pack that has
been in storage for a long period, please recharge it
before use. If you want to store the battery pack for
a long time, please fully charge the battery pack to
ensure maximum battery life.
2. Longer life and better performance can be obtained if
the battery pack is charged when the air temperature
is between 65
0
F and 75
0
F (18
0
-24
0
C). Do not charge
the battery pack in air temperatures below 40
0
F (4.5
0
C), or above 105
0
F (40.5
0
C). This is important as it can
prevent serious damage to the battery pack.
3. Never freeze your charger or immerse charger in
water or any other liquid.
4. When the battery pack fails to produce sufficient
power on jobs that were previously done easily,
please recharge your battery pack, do not
continue using it under this condition. You may
charge a partially used pack whenever you desire
with no adverse affect on the battery pack.
5. When charging it is normal that the charger and
battery pack may become warm to touch.
6. If the battery pack does not charge properly:
a. Check current at power outlet by plugging in
another appliance.
b. Plug and unplug to check whether the charger is
ok
c. Check whether the battery pack has been
damaged
d. Move the charger and battery pack to a location
where the surrounding air temperature is
approximately 65
0
F and 75
0
F (18
0
-24
0
C).
e. If the charging problem persists, take the tool,
battery pack and charger to an authorized service
center.
f. Under certain conditions, when the charger is
plugged into the power supply, the exposed
charging contacts inside the charger can be
shorted by foreign material. Foreign materials
of a conductive nature such as metallic particles
should be kept away from charger cavities.
Always unplug the charger from the power
supply when there is no battery pack in the
charger or before attempting to clean.
PROBLEM SOLUTION
I CANNOT FIT THE BATTERY PACK INTO THE
BATTERY CHARGER. WHY?
a) Check if the charger and the battery pack are
specifically designed for working together.
b) The battery pack can be inserted into the charger
only in one direction. Turn the battery pack
around until it can be inserted into the slot, the
indicator light should be green and flash when
the battery pack is charging.
REASONS FOR DIFFERENT CHARGING TIMES
The charging time can be affected by many reasons
which are not defects in your product.
a) If the battery pack is only partly discharged it may
be re-charged in less than rated charging time.
b) If the battery pack and ambient temperature are
very cold/hot, it may take longer to re-charge.
Please find an appropriate environment with
proper air temperature to start charging.
c) If the battery pack is very hot, remove battery
pack from the charger and allow battery pack
to cool first to ambient temperature and then
recharging can be started.
d) Batteries of higher Amp Hour rating require more
charging time.
MAINTENANCE
Remove the plug from the socket before
carrying out any adjustment, servicing or
maintenance.
Your battery charger requires no additional
lubrication or maintenance. Never use water or
chemical cleaners to clean your charger. Wipe clean
with a dry cloth. Always store your charger in a dry
place.
If the supply cord is damaged, it must be replaced
by the manufacturer, its service agent or similarly
qualified persons in order to avoid a hazard.
FCC Part 15
Supplier’s Declaration of Conformity
Product Description : DUAL PORT BATTERY
CHARGER
Model Number : WA3884
Trade Name : Worx
This device complies with part 15 of the FCC
Rules.
Operation is subject to the following two
conditions:
(1) This device may not cause harmful
interference, and
(2) This device must accept any interference
received, including interference that may
cause undesired operation.
Responsible Party :
Positec USA, Inc.
10130 Perimeter Parkway, Charlotte, NC
28216 USA
Tel.: (704) 599-3711
Fax: (704) 599-6390

Chargeur de batterie à double emplacement F
6
2
1
3
Chargeur de batterie à double emplacement F
7
AVERTISSEMENT: Ce dispositif peut
vous exposer aux produits chimiques
notamment le plomb et le di-phtalate (de
2-éthylhexyle) (DEHP) qui sont reconnus
dans l’État de Californie comme causant des
cancers et des anomalies congénitales ou
d’autres anomalies de la reproduction. Pour
en savoir plus, veuillez consulter le site www.
P65Warnings.ca.gov.
Information pour les émissions rayonnées
Cet appareil ISM est conforme à la norme
NMB-001 du Canada.
Cet appareil est conforme au paragraphe 15 du
règlement du FCC.
Son utilisation est sujette aux deux conditions
suivantes :
1) Ce dispositif ne doit pas causer d’interférences
nuisibles;
2) Ce dispositif doit accepter toute interférence reçue,
y compris toute interférence pouvant causer un
fonctionnement indésirable.
AVERTISSEMENT: Tout changement ou
toute modification à cet appareil qui n’est pas
expressément approuvé par l’institution responsable
de la conformité peut faire annuler le droit de
l’utilisateur d’utiliser ce matériel.
REMARQUE: cet équipement a été testé et jugé
conforme aux limites propres aux appareils
numériques de Classe B, conformément au
Paragraphe 15 du règlement du FCC.
Ces limites sont destinées à offrir une protection
raisonnable contre les interférences nuisibles d’une
installation résidentielle. Cet équipement produit,
utilise et peut émaner des ondes radiofréquences
et, s’il n’est pas installé et utilisé conformément aux
directives du fabricant, peut causer des interférences
nuisibles aux communications radio.
En fonction des installations réalisées, il n’est
cependant pas garanti que toute interférence soit
exclue. Si cet équipement cause des interférences
nuisibles à toute réception radio ou télévision, ce
qui peut être déterminé en allumant et éteignant
l’équipement, l’utilisateur est encouragé à tenter
de corriger ces interférences en prenant l’une ou
plusieurs des mesures suivantes:
• Réorienter l’antenne de réception ou en changer
l’emplacement;
• Augmenter la distance entre l’équipement et le
récepteur;
• Brancher l’équipement à une prise située sur un
circuit différent de celui sur lequel le récepteur est
connecté;
• Contacter le détaillant ou consulter un technicien
radio/télé qualifié.
SYMBOLES
Avant d’utiliser le chargeur de pile, lisez
le manuel
Avertissement
Double isolation
1. CHARGEUR
2. TÉMOIN LUMINEUX
3. BLOC-PILE *
* Les accessoires illustrés ou décrits ne sont
pas tous compris dans le cadre de la livraison
standard.
Nous vous recommandons d’acheter tous vos
accessoires du même magasin qui vous a vendu
l’outil. Choisissez le type d’outil approprié au travail
que vous désirez entreprendre. Pour de plus amples
renseignements, consultez l’emballage de l’accessoire.
Le personnel du magasin peut également vous
conseiller.
DONNÉES TECHNIQUES
Tension d'entrée nominale 120V~60Hz
Puissance d'entrée nominale
100W
Sortie chargeur 1 20Vd.c., 2A *
Sortie chargeur 2 20Vd.c., 2A *
Type de batterie Lithium-ion
2.0Ah (1 pièce) 0.5 heures
2.0Ah (2 pièces) 1 heures
4.0Ah (1 pièce) 1 heures
4.0Ah (2 pièces) 2 heures
5.0Ah (1 pièce) 1.25 heures
5.0Ah (2 pièces) 2.5 heures
6.0Ah (1 pièce) 1.5 heures
Chargeur de batterie à double emplacement F
8
6.0Ah (2 pièces) 3.0 heures
Classe de protection
/II
Poids 0.95kg (2.1 Ib)
* Les sorties chargeur 1 et 2 signifient deux ports
avec la même tension de sortie et le même courant.
Pour obtenir les caractéristiques techniques
concernant les types, le nombre de cellules et
la capacité nominale des batteries pouvant être
chargées, veuillez consulter la plaque signalétique de
la batterie fournie par Worx.
PROCEDURE DE
CHARGEMENT
REMARQUE: Avant d’utiliser cet outil,
assurez-vous de lire attentivement le manuel
d’utilisation.
INSTRUCTIONS DE CHARGE
1. BLOC-PILE EN RECHARGE
Le chargeur est conçu pour charger une ou deux
batteries en même temps.
AVERTISSEMENT:
Le chargeur et la batterie sont spécifiquement
conçus pour être utilisés ensemble, ne faites
pas usage d’autres articles. N’insérez jamais d’objets
métalliques et ne laissez pas non plus de tels objets
entrer en contact avec les bornes de la batterie/
chargeur. Ceci est dangereux et entraînera une panne
du chargeur.
2. AVANT D’UTILISER VOTRE PONCEUSE
Votre bloc-pile n’est PAS CHARGÉ. If faut donc le
rechargeur une fois avant d’utiliser l’outil.
3. COMMENT RECHARGEUR LE
BLOC-PILE (Voir Fig. A)
PROCEDURE DE CHARGEMENT
1)Brancher le chargeur sur une prise appropriée.
2)Positionnez une ou deux batteries dans le chargeur.
Normalement, les témoins lumineux correspondants
(2) clignoteront en verte pour indiquer que la ou les
batteries sont en cours de charge.
AVERTISSEMENT:
Lorsque la charge de la batterie s’épuise
après une utilisation continue ou
l’exposition directe à la lumière du soleil ou
à une source de chaleur, laisser la batterie se
refroidir avant la recharge pour atteindre la
charge complète.
INDICATEUR DE CHARGEMENT
Ce chargeur est destiné à détecter certains problèmes
susceptibles de survenir avec les blocs-piles. Les
voyants lumineux indiquent des problèmes (voir
tableau ci-dessous). Dans ce cas, insérez un nouveau
bloc-pile pour déterminer si le chargeur fonctionne.
Si la nouvelle batterie se charge correctement, cela
signifie que le bloc d’origine est défectueux et qu’il
doit être retourné à un centre de service ou à un
centre de recyclage. Si le nouveau bloc-pile pose
le même problème que le bloc-pile d’origine, faites
tester le chargeur dans un centre de service agréé.
Lumière
Marche/
clignotant
É tat
Rouge Allumé
Batterie défectueuse
Rouge ligno-
tant
----------
Protection de la
température de la
batterie
La température de la
batterie est inférieur à
32
0
F(0
0
C) ou supérieure
à 113
0
F(45
0
C).
Vert Allumé
Batterie pleine
Vert
clignotant
---------- Batterie en charge
BLOCS-PILES DÉFECTUEUSE
Ce chargeur détectera une batterie défectueuse.
Lorsqu’une batterie défectueuse est insérée dans
le chargeur Ce processus dure environ 30 minutes
(le voyant deviendra vert et clignotera); quand
la réparation est terminée, le chargeur se met à
charger automatiquement le bloc-pile à la plus
grande capacité possible (le voyant deviendra vert
et clignotera). Si le voyant devient rouge continu, la
batterie est morte.
REMARQUE: Les blocs-piles réparés sont encore
utilisables, mais il ne faut pas s’attendre à ce qu’ils
fonctionnent aussi bien que les blocs-piles neufs.
PROTECTION DE LA TEMPÉRATURE DE LA
BATTERIE
Ce chargeur a une fonction de protection de la
température de la batterie. Lorsque le chargeur
détectera une batterie qui est trop chaude ou trop
froide, le voyant deviendra rouge et clignotera, cela
active automatiquement le circuit de protection, et
interrompt la charge jusqu’à ce que la batterie ait
atteint la température appropriée. Le processus de
chargement commence alors automatiquement (le
voyant deviendra vert et clignotera). Cette fonction
garantit une durée de vie maximale de la batterie.
LAISSER LA BATTERIE DANS LE CHARGEUR
I Si une batterie complètement chargée est laissée
dans le chargeur, le voyant demeurera vert. La
batterie continuera à charger avec un courant
d’entretien.

Chargeur de batterie à double emplacement F
9
REMARQUES IMPORTANTES
RELATIVES AU
CHARGEMENT:
1. Pour une nouvelle batterie ou une batterie qui
a été stockée pendant un moment, veuillez
recharger la batterie avant utilisation. Si vous
voulez stocker la batterie pendant un long
moment, veuillez recharger entièrement le bloc-
pile pour assurer une durée de vie maximale de
la batterie.
2. Il est possible de prolonger la durée de vie et
d’améliorer la performance en chargeant le bloc-
pile à une température de l’air ambient comprise
entre 65
0
F et 75
0
F (18
0
et 24
0
C). Ne chargez pas
le bloc-pile à une température de l’air ambient
inférieure à 40
0
F (4,5
0
C) ou supérieur à 105
0
F
(40,5
0
C). C’est important, car cela peut éviter
d’endommager sérieusement le bloc-pile.
3. Ne faites jamais geler votre chargeur ou ne
l’immergez jamais dans l’eau ou dans tout autre
liquide.
4. Quand le bloc-pile ne produit pas assez de
courant pour des tâches qui étaient auparavant
faciles à accomplir, veuillez recharger la batterie
et cesser de l’utiliser dans cette condition. Vous
pouvez charger un bloc-pile partiellement utilisé
quand vous le souhaitez sans effet adverse sur le
bloc-pile.
5. Pendant le chargement, il est normal que le
chargeur et le bloc-pile s’échauffent.
6. Si le bloc-pilene se charge pas correctement:
a. vérifiez le courant à la prise en branchant un
autre appareil.
b. branchez et débranchez pour vérifier si le
chargeur fonctionne
c. vérifiez si la batterie a été endommagée
d. déplacez le chargeur et le bloc-pile vers un autre
emplacement où la temperature de l’air ambient
est comprise entre 65
0
F et 75
0
F (18
0
et 24
0
C).
e. si le problème de chargement persiste, apportez
l’outil, le bloc-pile et le chargeur à un centre de
service agréé.
f. dans certaines conditions, quand le chargeur est
branché dans la prise de courant, les contacts
de chargement exposés situés dans le chargeur
peuvent être court-circuités par des matières
étrangères. Les matières étrangères de nature
conductrice, telles que les particules métalliques,
doivent être tenues à l’écart des cavités du
chargeur. Débranchez toujours le chargeur de la
prise de courant quand il n’y a pas de bloc-pile
dans le chargeur ou avant le nettoyage.
PROBLEMES ET SOLUTIONS
POURQUOI NE PUIS-JE PAS INSÉRER LE BLOC-
PILE DANS LE CHARGEUR?
a) Le chargeur et les outils contenus dans cet emballage
sont spécialement conçus pour fonctionner
ensemble.
b) Le bloc-pile ne peut être insérée dans le chargeur
que dans un sens. Retournez celui-ci jusqu’à ce qu’il
s’insère correctement, Le voyant vert clignotant doit
s’allumer quand la pile est en charge.
QUELLES SONT LES RAISONS DES DIFFÉRENTS
TEMPS DE CHARGE
Le temps de charge peut être affecté par de nombreux
paramètres sans que votre produit soit défectueux.
a) Si le bloc-pile n’est déchargée que partiellement elle peut
être rechargée en moins du temps de charge prévu.
b) Si la batterie et la température ambiante sont très
froides/chaudes, le temps de recharge peut s’allonger.
Veuillez trouver un environnement approprié avec la
température de l’air appropriée pour commencer à
charger.
c) Si la batterie est très chaude, enlever la batterie du
chargeur et laisser la laisser se refroidir à la température
ambiante, puis la recharge peut commencer.
d) Les batteries à ampérage plus élevé nécessitent plus
de temps de charge.
ENTRETIEN
Retirez la prise de la prise murale avant
d’effectuer n’importe quel travail de réglage,
de réparation ou d’entretetien.
Votre outil ne nécessite aucune lubrification ou
entretien supplémentaire. N’utilisez jamais de l’eau
ou des nettoyants chimiques pour nettoyer l’outil.
Essuyez-le avec un chiffon sec. Toujours entreposer
votre outil électrique dans un endroit sec.
Si le cordon d’alimentation est endommagé, il
doit être remplacé par le fabricant, son agent de
réparation ou d’autres personnes professionnelles
afin d’éviter tout danger.
Section 15 des réglementations de la FCC
Déclaration de conformité du fournisseur
Description de l’appareil : Chargeur de batterie
à double emplacement
Numéro du modèle : WA3884
Nom commercial : Worx
Cet appareil est conforme à la section 15 des
Réglementations de la FCC.
Son utilisation est sujette aux deux conditions
suivantes :
(1) Cet appareil ne doit pas provoquer
d’interférences nuisibles, et
(2) Cet appareil doit accepter toute autre
interférence reçue, y compris les interférences
pouvant entraîner un fonctionnement non
désiré.
Partie responsable :
Positec USA, Inc.
10130 Perimeter Parkway, Charlotte, NC
28216 USA
Tel.: (704) 599-3711
Fax: (704) 599-6390
Cargador de batería de puerto doble ES
10
2
1
3

Cargador de batería de puerto doble ES
11
ADVERTENCIA: Este producto puede
exponerlo a sustancias químicas, como
plomo y di (2-etilhexilo) ftalato (DEHP), que el
estado de California reconoce como causantes
de cáncer y defectos de nacimiento u otros
daños reproductivos. Para más información
visite www.P65Warnings.ca.gov.
INFORMACIÓN PARA EMISIONES RADIADAS
Este dispositivo cumple con la Canadiense de las
normas de la ICES-001.
Este dispositivo cumple con la sección 15 de las
normas de la FCC.
Su operación está sujeta a las siguientes dos
condiciones:
1) Este dispositivo no puede causar interferencia
dañina y
2) Este dispositivo debe aceptar cualquier
interferencia que reciba, incluyendo aquella
interferencia que podría producir una operación
no deseada.
ADVERTENCIA: Los cambios o las modificaciones
que se le realicen a esta unidad sin aprobación
expresa del tercero responsable del cumplimiento
pueden anular la autorización del usuario para operar
el equipo.
- NOTA: Este equipo ha sido probado y se ha
encontrado que cumple con los límites establecidos
para dispositivos digitales Clase B, en conformidad
con la Parte 15 del Reglamento de la FCC.
Estos límites están diseñados para ofrecer un nivel
razonable de protección contra la interferencia dañina
en instalaciones residenciales. Este equipo genera,
utiliza y puede emitir energía de radiofrecuencia y, si
no se instala y utiliza de acuerdo a las instrucciones
proporcionadas, puede producir una interferencia
dañina a la comunicación radial.
Sin embargo, no existen garantías de que no ocurra
interferencia alguna en una instalación en particular.
Si este equipo produce interferencia dañina a
su recepción radial y de televisión, lo que puede
ser determinado al apagar y volver a encender el
equipo, se pide al usuario que corrija la interferencia
implementando una o más de las siguientes
medidas:
• Cambie la orientación o el lugar donde está
ubicada la antena receptora.
• Aumente el espacio que separa al equipo del
receptor.
• Conecte el equipo a una toma de corriente que
esté en un circuito diferente al circuito al que
está conectado el receptor.
• Consulte con el concesionario o con un técnico
de radio y televisión con experiencia que pueda
ayudarle.
SÍMBOLOS
Antes de utilizar el cargador de baterías,
lea el manual
Advertencia
Doble Aislamiento
1. CARGADOR
2. LUZ INDICADORA DE CARGA
3. PAQUETE DE BATERÍAS *
* No todos los accesorios ilustrados o
descritos se incluyen junto con el producto
estándar.
Le recomendamos que compre todos los accesorios
en la tienda donde adquirió la herramienta.
Seleccione los que más convengan al trabajo que
intenta hacer. Consulte el empaque de los accesorios
para obtener más detalles. El personal de la tienda
también puede ayudarle y aconsejarle.
DATOS TÉCNICOS
Voltaje de entrada nominal 120V~60Hz
Energía de entrada nominal
100W
Salida de cargador 1 20Vd.c., 2A *
Salida de cargador 2 20Vd.c., 2A *
Carga de batería Litio
2.0Ah (1 pieza) 0.5 horas
2.0Ah (2 piezas) 1 horas
4.0Ah (1 pieza) 1 horas
4.0Ah (2 piezas) 2 horas
5.0Ah (1 piezas) 1.25 horas
5.0Ah (2 piezas) 2.5 horas
6.0Ah (1 pieza) 1.5 horas
6.0Ah (2 piezas) 3.0 horas
Cargador de batería de puerto doble ES
12
Doble Aislamiento
/II
Peso 2.1 libras (0.95kg)
* La salida 1 y salida 2 del cargador significan dos
puertos con el mismo voltaje y corriente de salida.
Por favor consulte la placa de identificación del paquete
de batería suministrado por Worx respecto a los datos
técnicos de los tipos, número de celdas y capacidad
nominal de las baterías que se pueden cargar.
PROCEDIMIENTO DE CARGA
NOTA: Antes de usar la herramienta, lea
atentamente el manual de instrucciones.
INSTRUCCIONES DE CARGA
1. CARGA DE SU PAQUETE DE BATERÍA
El cargador está diseñado para cargar uno o dos paquetes
de baterías al mismo tiempo.
ADVERTENCIA: El cargador y las baterías están
diseñados especialmente para funcionar juntos;
por lo tanto, no intente utilizar otros dispositivos.
Nunca inserte o permita que objetos metálicos se
introduzcan en el cargador o en las conexiones de las
baterías, dado que ello provocará una falla eléctrica y
situación de peligro.
2. ANTES DE UTILIZAR LA HERRAMIENTA
Su batería está DESCARGADA y debe cargarla antes de
usarla.
3. CÓMO CARGAR SU PAQUETE DE BATERÍA
PROCEDIMIENTO DE CARGA
1) Conecte el cargador en el tomacorriente correcto.
2) Deslice un paquete de batería o dos paquetes de
batería en el cargador. Por lo general, las luces
de indicación correspondientes (3) parpadearán
en color verde para mostrar que la batería se
está cargando.
ADVERTENCIA: Si se agota la carga de la
batería debido al uso continuado o la
exposición a la luz solar directa o el
calor, permita un tiempo para que la batería se
enfríe antes de volver a cargar para lograr la
carga completa.
INDICADOR DE CARGA
Este cargador está diseñado para detectar algunos
problemas que puedan presentarse con las baterías.
Los problemas se señalan por medio de luces indica-
doras (ver la tabla a continuación). Si esto ocurre,
introduzca una batería nueva para determinarsi el
cargador está bien. Si la nueva batería carga cor-
rectamente, la batería original está defectuosa y se
debe devolver a un centro de servicio o de servicio
de reciclaje. Si la batería nueva muestra el mismo
problema que la batería original, haga probar el
cargador en un centro de servicio autorizado.
LUZ
ON/
Parpadeo
Condición
Luz roja
encendida
Batería defectuosa.
Luz roja
parpadeando
----------
Protección de
temperatura de batería
La temperatura de la
batería es inferior a
32
0
F(0
0
C) o superior a
113
0
F(45
0
C).
Luz verde
encendida
Carga completa
Luz verde
parpadeando
---------- Carga
BATERÍAS DEFECTUOSA
Este cargador detectará un paquete de batería
defectuoso. Cuando se inserta un paquete de batería
defectuoso en el cargador, éste tratará de repararla.
Este proceso durará aproximadamente 30 minutos
(la luz será verde y parpadeará); cuando se termina
la reparación, automáticamente empezará la carga
de la batería hasta su capacidad más alta posible (la
luz será verde y parpadeará). Si la luz se vuelve rojo
sólido, el paquete de la batería está descargada.
NOTA:
Las baterías reparadas son aún utilizables,
pero no se debe esperar de ellas un desempeño de
trabajo tan bueno como el de las baterías nuevas.
PROTECCIÓN DE TEMPERATURA DE BATERÍA
Este cargador tiene una función de protección
de temperatura de batería. Cuando el cargador
detecta un paquete de batería que está demasiado
caliente o frío (la luz será roja y parpadeará), activa
automáticamente el circuito de protección, y
suspende la carga hasta que el paquete de batería
alcanzó la temperatura correcta. El proceso de carga
empezará entonces automáticamente (la luz será
verde y parpadea). Esta característica garantiza una
máxima vida de la batería.
DEJAR EL PAQUETE DE BATERÍA EN EL
CARGADOR
Si se deja un paquete de batería completamente
cargado en el cargador, la luz permanecerá en verde.
El paquete de batería permanecerá cargando con
corriente de carga de mantenimiento.
NOTAS IMPORTANTES
SOBRE LA CARGA:
1. En el caso de una batería nueva o una batería

Cargador de batería de puerto doble ES
13
que ha estado almacenada durante algún
tiempo, recárguela antes de usarla. Si desea
almacenar la batería por un largo período de
tiempo, cárguela completamente para garantizar
su máxima vida útil.
2. Más larga vida y mejor desempeño se pueden
obtener si se carga la batería cuando la
temperatura ambiente está entre 65
0
F y 75
0
F
(18-24
0
C). No cargue la batería a temperaturas
ambiente menores de 40
0
F (4.5
0
C), o mayores de
105
0
F (40.5
0
C). Esto es importante ya que puede
evitar daños graves a la batería.
3. Nunca congele su cargador ni lo sumerja en
agua ni en ningún otro líquido.
4. Cuando la batería no produce suficiente energía
en trabajos donde previamente lo hacia con
facilidad, recárguela, no continúe usándola
bajo esas condiciones. Usted puede cargar una
batería parcialmente usada cuando lo desee sin
afectar negativamente la batería.
5. Cuando se carga una batería, es normal que el
cargador y la batería se pongan calientes al tacto.
6. Si la batería no carga correctamente:
a. Revise el tomacorriente conectando otro
artefacto eléctrico.
b. Conecte y desconecte para revisar si el cargador
está bien
c. Revise si la batería se ha dañado
d. Traslade el cargador y la batería a un sitio donde
la temperatura ambiente sea aproximadamente
65
0
F y 75
0
F (18-24
0
C).
e. Si persiste el problema de carga, lleve la
herramienta, la batería y el cargador a un centro
de servicio autorizado.
f. Bajo ciertas condiciones, cuando se conecta el
cargador al suministro de energía, los contactos
de carga expuestos dentro del cargador se
pueden poner en corto por culpa de algún
material extraño. Los materiales extraños de
naturaleza conductora, tales como las partículas
metálicas, se deben debe mantener alejadas de
las cavidades del cargador. Siempre desconecte
el cargador del suministro de energía cuando
no haya una batería en él o antes de intentar
limpiarlo.
RESOLUCIÓN DE
PROBLEMAS
NO PUEDO COLOCAR LA PAQUETE DE BATERÍA
EN EL CARGADOR. ¿POR QUÉ?
a) El cargador y las herramientas de este paquete
están diseñados específicamente para trabajar
juntos.
b) La batería se inserta en el cargador en una
sola dirección. Dé vuelta la batería hasta que
pueda ser insertada en la ranura. La luz verde
parpadeando debe encenderse mientras la
batería se está cargando.
RAZONES DE LOS DISTINTOS TIEMPOS DE
CARGA
El tiempo de carga puede ser afectado por varias
razones que no implican defectos en su producto.
a) Si el paquete de batería sólo está descargado
parcialmente se puede volver a recargar en
menos del tiempo de carga nominal.
b) Si la batería y la temperatura ambiente son muy
frías/calientes, la recarga podría prolongarse
durante mucho más tiempo. Por favor encuentre
un ambiente apropiado con temperatura de aire
adecuada para comenzar a cargar.
c) Si el paquete de batería está muy caliente
no podrá recargarse, ya que se lo impedirá
el sistema interno de seguridad de corte por
temperatura. En dicho caso, debe extraer el
paquete de batería del cargador y dejar que se
enfríe a temperatura ambiente; luego puede
comenzarse la recarga.
d) Las baterías con mayor clasificación de Amperes-
Hora requieren más tiempo de carga.
MANTENIMIENTO
Extraiga el enchufe de la toma eléctrica antes de
llevar a cabo cualquier reparación o ajuste.
Su herramienta no requiere lubricación ni
mantenimiento adicional. Nunca emplee agua o
productos químicos para limpiar su herramienta.
Use simplemente un paño seco. Siempre guarde su
cargador en un lugar seco.
Si el cable de alimentación se encuentra dañado
deberá ser reemplazado por el fabricante, su agente
de servicio o algún otro profesional igualmente
cualificado para llevar a cabo dichas operaciones,
con el fin de evitar riesgos.
FCC Parte 15
Declaración de Conformidad del Proveedor
Descripción del producto : Cargador de batería
de puerto doble
Número de Modelo : WA3884
Nombre comercial : Worx
Este dispositivo cumple con la parte 15 de las
Reglas FCC.
La operación está sujeta a las siguientes dos
condiciones:
(1) Este dispositivo no puede causar
interferencia dañina, y
(2) Este dispositivo debe aceptar cualquier
interferencia recibida, incluyendo la
interferencia que puede causar la operación
indeseada.
Parte Responsable :
Positec USA, Inc.
10130 Perimeter Parkway, Charlotte, NC
28216 USA
Tel.: (704) 599-3711
Fax: (704) 599-6390


Copyright © 2020, Positec. All Rights Reserved.
Copyright © 2020, Positec. Tous droits réservés.
© Derechos reservados 2020, Positec. Todos los derechos reservados.
AR03029302