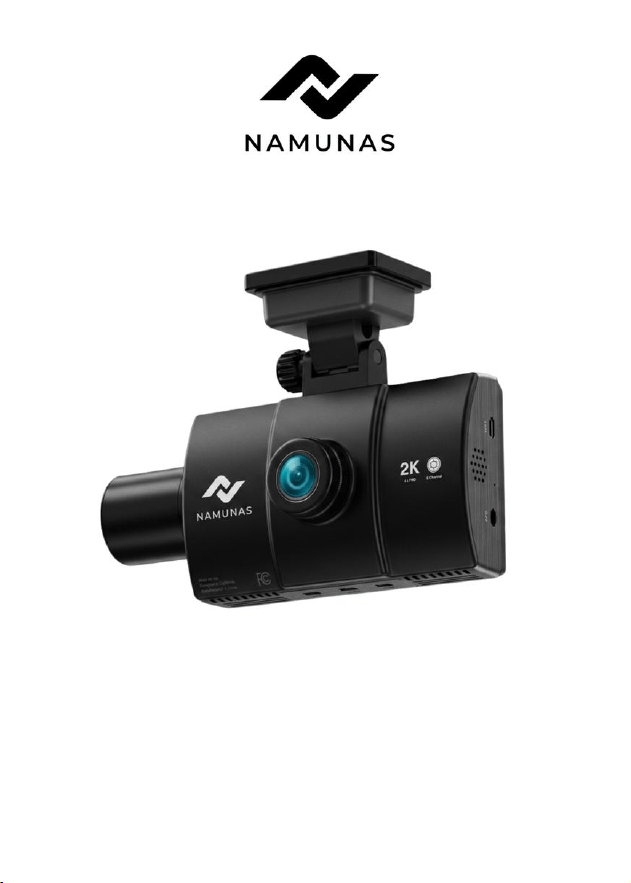
V1.1
NAMUNAS
User Manual
www.shopnamunas.com
The information in this manual is subject to change without notice.

Language
English
..................................................................................................
1

1
Content
Safety Warnings..................................................................................
2
Product Specifications
.....................................................................
3
What’s in the Box?
...........................................................................
4
Appearance
........................................................................................
5
Buttons and Functions
.....................................................................
6
User Interface Overview................................................................…
8
Function Overview
.........................................................................
11
Installation
........................................................................................
15
FAQs..................................................................................................
18
Customer Service Center..............................................................
20

2
Safety Warning:
Before using the camera for the first time, please read the
product manual carefully to ensure correct operation.
The dash cam needs to be connected to the power supply to
work properly.
To ensure driving safety, please do not operate the device
or watch the driving video via cell phone during driving.
This product needs to be inserted into the Micro SD card.
Please make sure the Micro SD card is functioning properly
and is compatible with the device.
Please do not disassemble or repair the dash cam without
authorization. If the camera malfunctions, please contact
NAMUNAS official customer service.
Please avoid installing the dash cam in a position that will
block the driver's view.
Please keep away from high temperature and humid
environment to ensure the normal operation of the device.
In order to improve the product experience, the product
firmware will be updated from time to time, you can
download the latest version to enjoy the latest features as
needed.
Please do not install the dash cam in front of the passenger
to avoid safety hazards caused by the device falling off.
Please use this product reasonably in compliance with
relevant laws and regulations.
The product power supply mode: powered by ACC wire +
cigarette lighter adapter.
For DFS frequency bands, 5260-5320MHz and 5500-5700MHz
are prohibited and not allowed for use.

3
Product Specifications
Item Name
NAMUNAS N5 Dash
Cam
Video Format
MP4/TS/MOV
Screen Size
3.99" IPS Screen
Photo Format
JPG
Recording
Resolution
Front 2K@30fps / Front 1296P@30fps /Front 1080P@30fps
Rear 1080P@30fps, Cabin 1080P@30fps, Left & Right
1080P@30fps
Input
DC 5V-2.5A
Lens
Front cam F1.8
Operating
Temperature
-4°F~149°F
Memory Card
Supports Upto
512GB
Warranty
Period
12
Months
Note:
If you experience any issues during use or receive a defective product,
we’ve got you covered with a 12-month warranty. Simply reach out to
our support team, and we’ll guide you step-by-step through the
replacement process, including how to return your unit for a new one.
The warranty period may vary depending on local laws.*
Support
If you have any questions about the product, please feel free to contact
us at support@shopnamunas.com*
Your opinion matters
NAMUNAS is firmly committed to always improving our products, services,
and user experience. If you have any thoughts on how we can do even
better, we welcome your constructive feedback and suggestions.
Connect with us today at support@shopnamunas.com*
4
What’s in the Box?
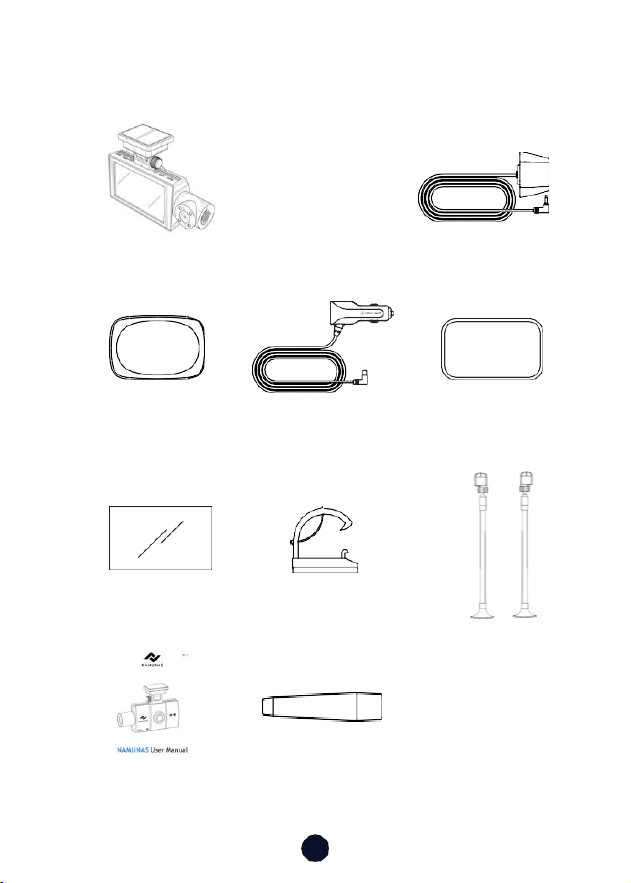
NAMUNAS Main
Dash Cam Unit
1080P Rear Camera
Adhesive Slider Power Supply Cable Extra Adhesive
with Car Charger
Electrostatic
Sticker Cable
Clips
Left & Right Cameras
User
Manual
Wire Tool
5
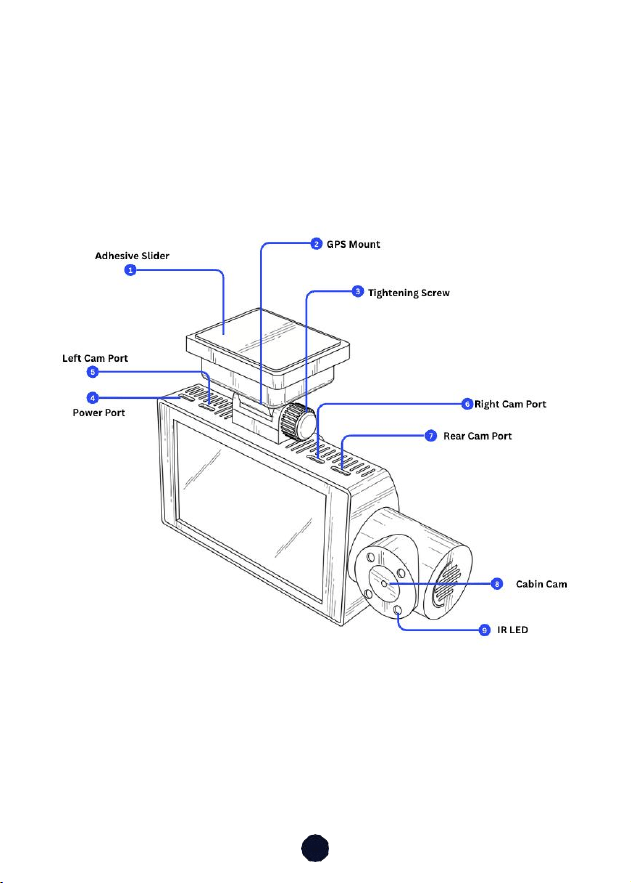
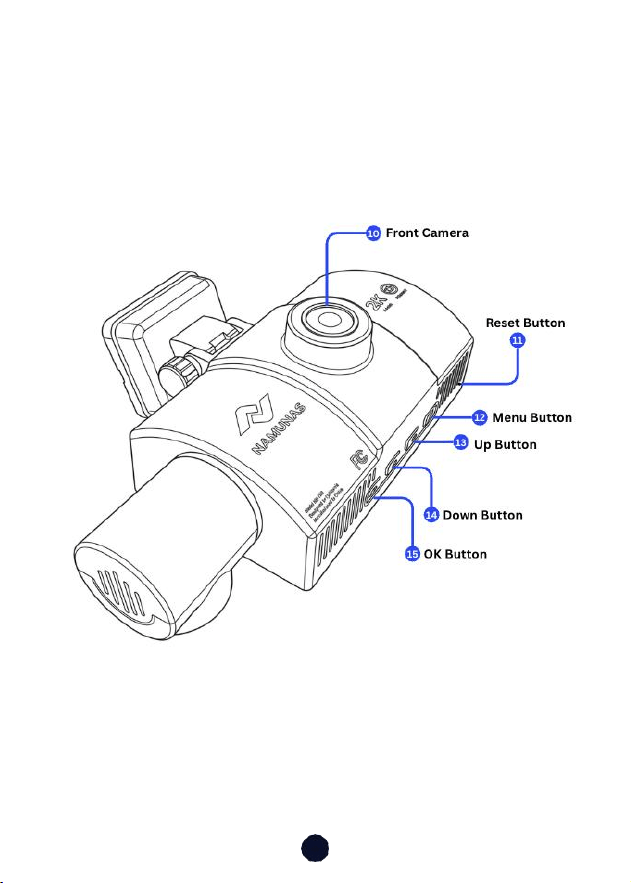
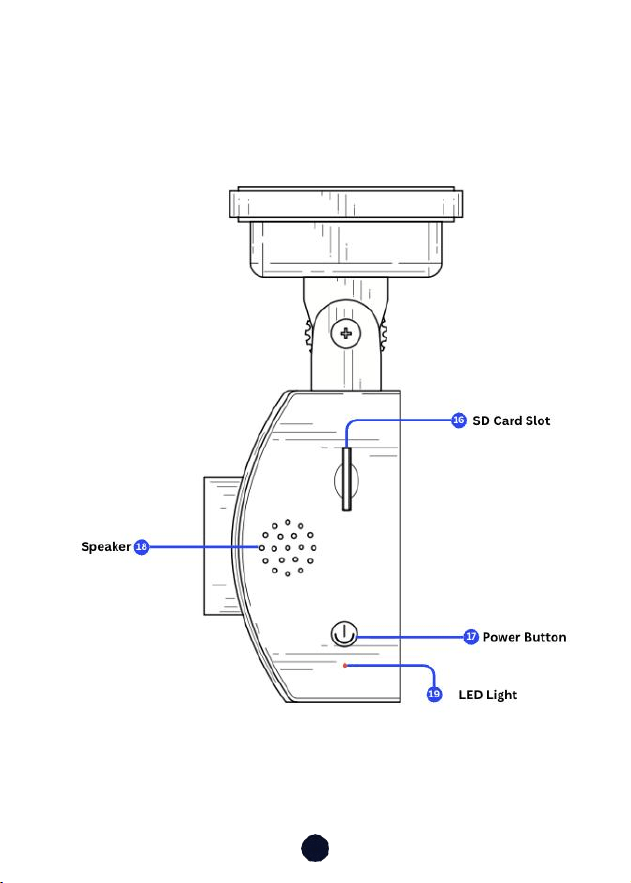
Appearance
1
6
7
8
Buttons and Functions
Power Button
•
Short press to Turn On/Turn Off the Display
•
Long press to Turn On/Turn off the Camera
Menu Button
Recording Mode:
•
Short press to Enter main menu
Setup Mode:
•
Short press to Return to the specific settings
Playback Mode:
•
Long press on Home screen to Enter into the Playback
Menu
•
Short press to Return to the specific folder
Up Button
Main 5-Channel Display Mode:
•
Short press to switch to the next camera feed
•
Long press to Enable or Disable the Mic
Setup Mode:
•
Short press to Select the previous function
Playback Mode:
•
Short press to Select the previous file
•
Short press to switch to the next video from the selected
Playback menu folder

9
Down
Button
Main 5-Channel Display Mode:
•
Short press to Take a snapshot
•
Long press to Turn On/Off Privacy Mode
Setup Mode:
•
Short press-to Select the next function
Playback Mode:
•
Short press to Select the next file
•
Short press to switch to the next video from the s
Playback menu folder
OK
Button
Main 5-Channel Display Mode:
•
Short press to Take a snapshot
•
Long press to Start/Stop recording
Setup Mode:
•
Short press to Enter/Confirm the selected function or
option
Playback Mode:
•
Short press to Select
10
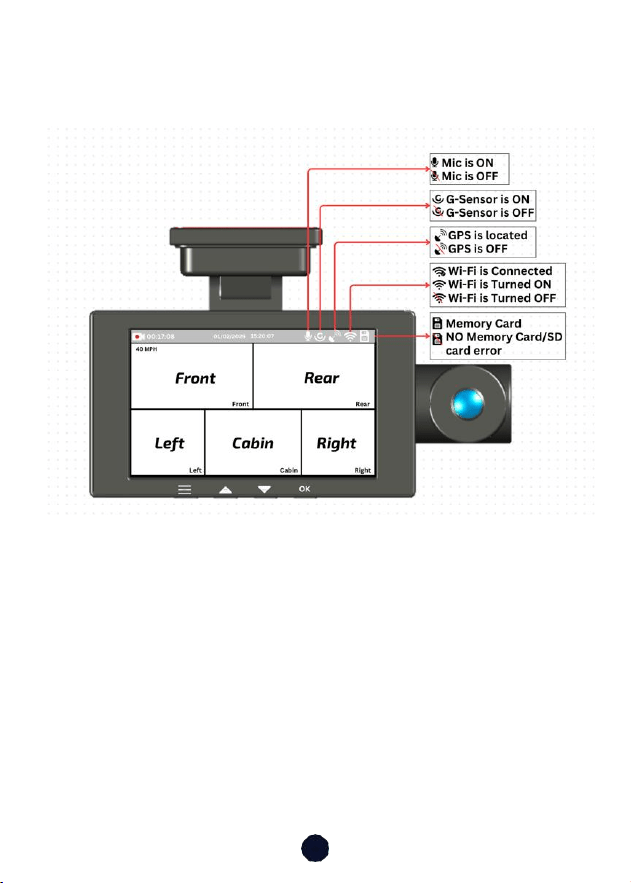
User Interface Overview
•
Recording
Mode

11
•
Menu Introduction
Loop Recording: Default setting is 1 min. You can choose
the options among 1/2/3 min.
IR LEDs: The default setting is Auto. You can set it to
auto/always off/always on.
G-Sensor: Select the level of G-sensor sensitivity you need
(low, medium, high)
Privacy Mode: The default setting is off. With it turned on,
the video is recorded with disabled microphone and cabin
camera.
Audio Recording: The default setting is on. Set recording to
on or off.
Mirror: Default setting is Off. When it is on, the screen of
the selected camera is displayed in mirror mode.
Watermark Time: Enable or disable the watermark stamp
on video and photos. The watermark stamp includes time
and date label, NAMUNAS label, GPS location information,
and speed label. All enabled by default.
Time Lapse: The default value is disabled. You can choose
to enable the time lapse recording for 1hr/6hr, 24hr, 48hr.
Parking Mode: You can choose the parking mode you
need (On/Off). Default setting is Off.
*You need an ACC hardware kit to use this function.
GPS Settings: GPS is enabled by default. The speed unit
settings (KM/MPH), time synchronization (Timezone), GPS
information (Signal Strength) are all set here.

12
•
Playback
Mode
Access the Playback Folder from the Main Menu.
Press the Up or Down button to select the folder you want to
play.
Press the OK button to watch the recorded video.
Press the Down button to play the next video.
Function Overview
Short press the
MENU
button to enter settings menu, where you
can
adjust various functions and parameters of the entire machine.
System Settings
Function
Option/Description
Volume Level
0/1/2/3/4
Screen Sleep
Off/10s/30s/60s,
Screen goes off after the set time
IR LED
Auto, Always On, Always Off
Language Settings
Choose Your Preferred Language
1
2
3
4

13
Date and Time
You can set manually Or use Timezone
feature
Key Sound
On/Off
SD Card Format
Format SD card. All data will be deleted
Restore Factory Setting
Reset All Settings
Disk Repairing
On/Off
Dashcam Wi-Fi Hotspot
On/Off
Network Information
Wi-Fi SSID
SD Card Storage
Information
Shows the SD card capacity
About
Firmware Information
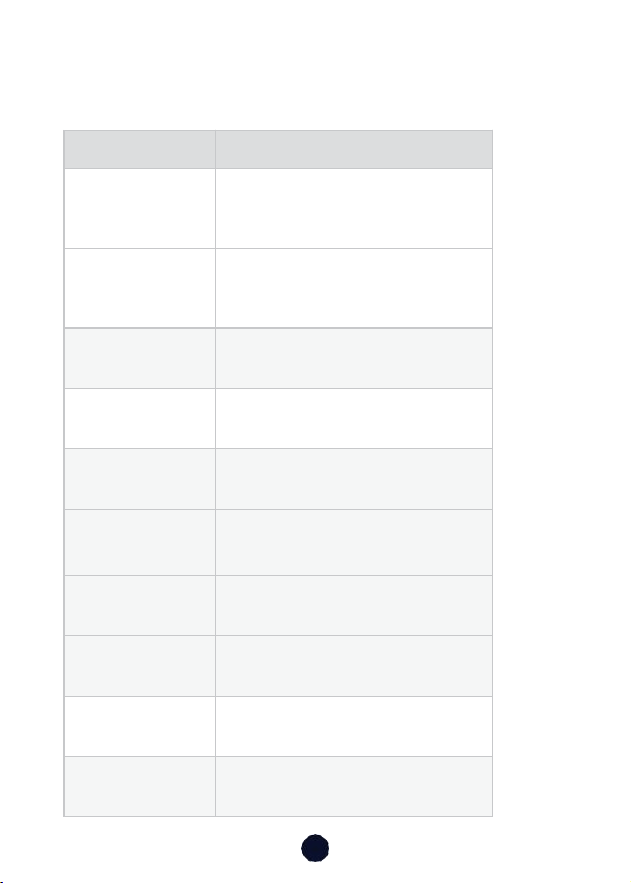
14
Driver Settings
Function
Option/Description
Loop Record
1/2/3mins
Front Camera
Resolution
Front 2K@30fps
Front 1296P@30fps
Front 1080P@30fps
Interval Record
On/Off
Microphone Enabled
On/Off
Watermark Time
On/Off
Parking Monitor
On/Off
*Please connect the ACC hardwire kit
G-
sensor Sensitivity
Off/Low/Medium/High
Encoding Mode
H264/H265
Recording Format
TS/MOV/MP4
Parking Monitor
Recording Duration
15s/30s/60s/120s

15
TimeLapse Recording
Duration
1hr/6hr/24hr/48hr
Rear Camera Mirror
On/Off
Left Camera Mirror
On/Off
Right Camera Mirror
On/Off
Cabin Camera
On/Off
GPS Menu
Time Synchronization
GPS Signal Strength
Speed Unit
Note:
•
In order to a Clean, Smooth, Comfortable using experience, we
suggest you format your Memory Card once a month.
16
WARNING
Please make sure to connect all cameras and wires before
power on the cam screen, otherwise, the camera cannot work
properly. Please follow the instructions below for the first-
time installation of the NAMUNAS N5 dash cam.
Installation
•
Insert Memory Card
Insert the Memory Card into the dash cam, taking care that the
gold contacts are facing towards the screen of the dash cam.
Push the memory card until it clicks into the slot.
•
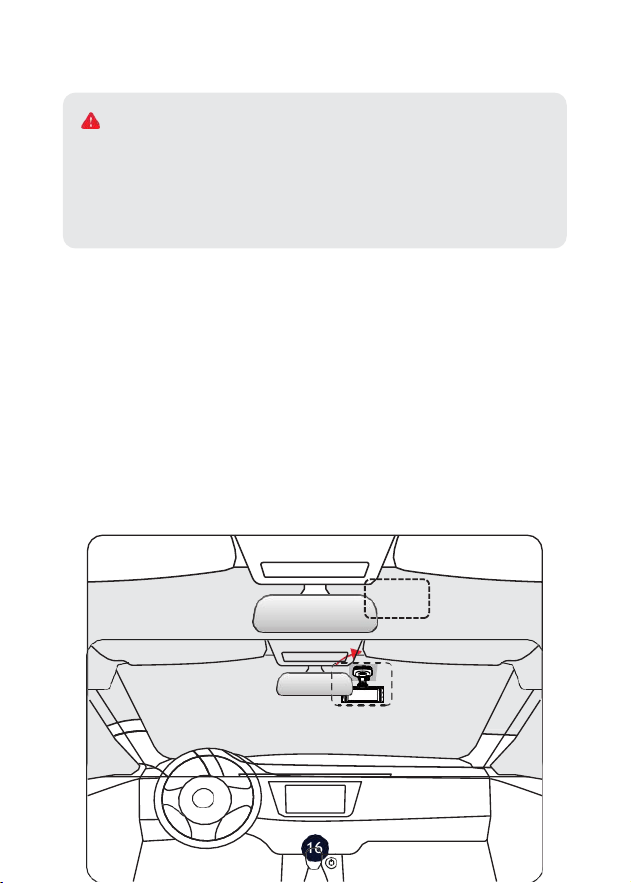
Main Camera Installation
Peel off the electrostatic sticker on the cellophane and transfer
it to where you want to stick it. Attach the front camera to the
electrostatic sticker and firmly press to secure it.
17
•
Mount The Rear Camera
Clean the rear windshield area where you want to attach the
rear camera.
Peel off the sticker from the rear camera and mount it to the
desired location (see image below for reference)
•
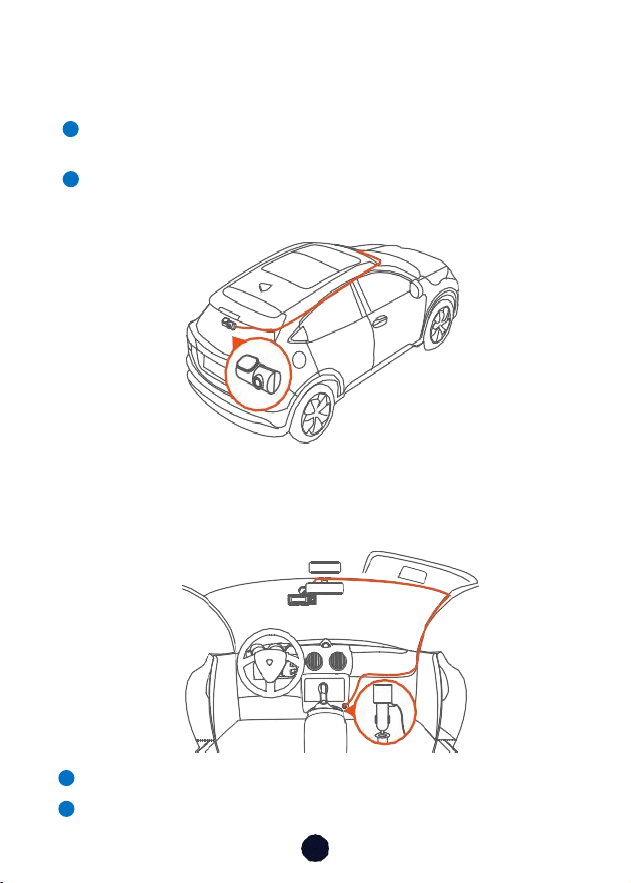
Wire Layout In The Vehicle
The car charger is connected to the cigar socket.
Connect the other end of the car charger to the dash cam.
1
2
1
2
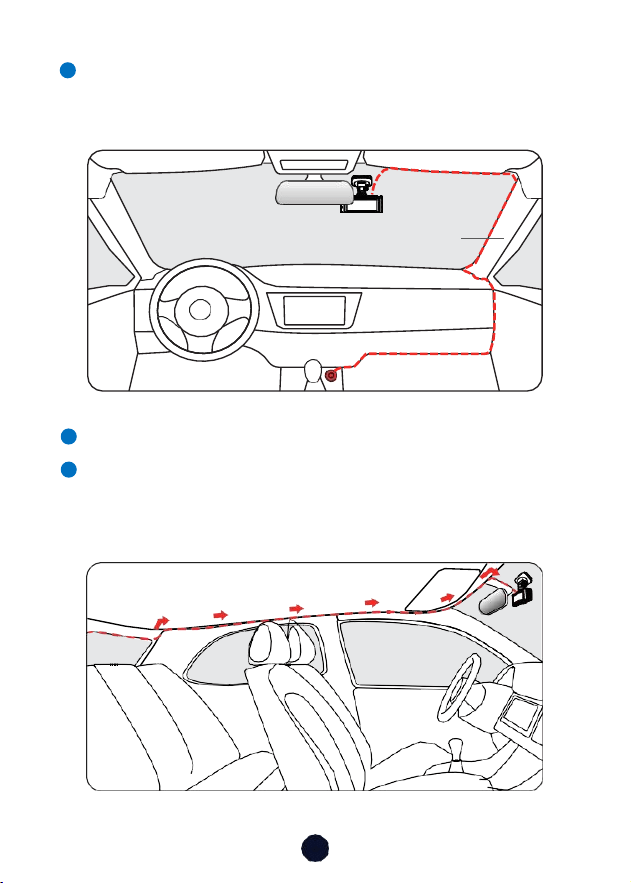
18
Pillar A
Use the crowbar to run the power cable along the front
windshield and the roof, and hide the cable down the A-pillar,
so as not to block the driver's sight and cause danger.
Connect the rear camera cable to the port on the dash cam.
Hide the rear camera cable along the gaps between the
front windshield and the ceiling, between the car body and
the ceiling on the side of the passenger seat, and between
the rear seats and the ceiling.
3
4
5

19
FAQs
•
Why is there no GPS signal?
1.
Clean and reconnect the probe on the main unit and bracket.
Check for any interference in your car, like metal film on the
windshield, radio antenna, or radar detector.
2.
Move your car to an open area. Observe if the GPS icon on
the screen turns green and displays GPS info.
3.
Once GPS locks onto a signal, a satellite icon will appear at
the bottom left of the screen. Green indicates positioning,
while white indicates no positioning.
•
Wh
y
doe
s
m
y dash
c
am
prompt “
c
ar
d
err
or” or
“
please
forma
t Memory Car
d”
e
v
ery
onc
e
in
a
while
?
Please follow the steps below to check:
1.
Please go to Settings > Format Reminder to check whether
the regular format reminder is enabled.
2.
Format the Memory Card.
3.
Restore factory settings and restart the dash cam.
•
Dash cam repeated restart/no boot?
1.
Make sure you are using the original car charger.
2.
Unplug the Memory Card, all external camera cables, and car
charger in turn, and reinstall them. Check whether the short
circuit is caused by accessories.
3.
Reset the machine through the small hole at the bottom of
the driving recorder.
4.
If none of the above can solve the problem, please try to
power on the USB cable to confirm whether the host can be
used normally.
5.
If it is not resolved, please contact your dedicated customer
service for a replacement.

20
•
Why can't I connect to Wi-Fi?
1.
Check the working distance of Wi-Fi.
2.
Check the SSID and password of the Wi-Fi, or whether there
are other devices connected to the Wi-Fi.
3.
Turn off mobile data, security software, and VPN on your
phone.
4.
If the issue persists, please contact customer support for
assistance.
•
Why is the time setting incorrect?
The dash cam features built-in GPS. It automatically adjusts
time based on your location and time zone, eliminating the
need for manual time changes. And you can adjust the time
through Settings > Time Zone.

21
For more information:
After sales:
Business Cooperation:
Customer Phone Service:
Customer Service Center
If you have any problems with the function or installation, please
feel free to reach us.
Help Center WhatsApp

Check us out here.
Product and service are the foundation of NAMUNAS.

Federal Communications Commission (FCC) Statement
This device complies with part 15 of the FCC Rules. Operation is subject to the following two
conditions: (1) This device may not cause harmful interference, and (2) this device must
accept any interference received, including interference that may cause undesired operation.
Note: This equipment has been tested and found to comply with the limits for a Class B
digital device, pursuant to part 15 of the FCC Rules. These limits are designed to provide
reasonable protection against harmful interference in a residential installation. This
equipment generates, uses and can radiate radio frequency energy and, if not installed and
used in accordance with the instructions, may cause harmful interference to radio
communications. However, there is no guarantee that interference will not occur in a
particular installation. If this equipment does cause harmful interference to radio or
television reception, which can be determined by turning the equipment off and on, the user
is encouraged to try to correct the interference by one or more of the following measures:
●Reorient or relocate the receiving antenna.
●Increase the separation between the equipment and receiver.
●Connect the equipment into an outlet on a circuit different from that to which the receiver
is connected.
●Consult the dealer or an experienced radio/TV technician for help.
Warning: Changes or modifications not expressly approved by the party responsible for
compliance could void the user's authority to operate the equipment.
Note: The manufacturer is not responsible for any radio or TV interference caused by
unauthorized modifications to this equipment. Such modifications could void the user’s
authority to operate the equipment.
RF exposure statement:
The transmitter must not be colocated or operated in conjunction with any other antenna or
transmitter. This equipment complies with the FCC RF radiation exposure limits set forth for
an uncontrolled environment. This equipment should be installed and operated with a
Minimum distance of 20cm between the radiator and any part of your body.