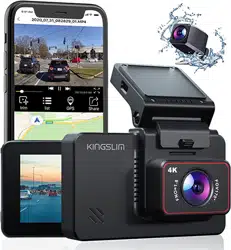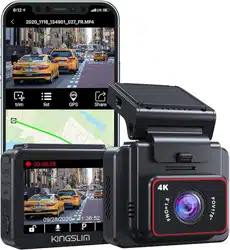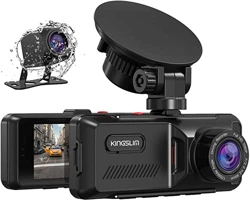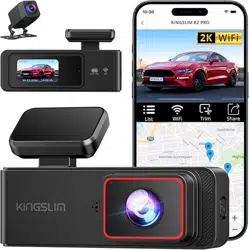
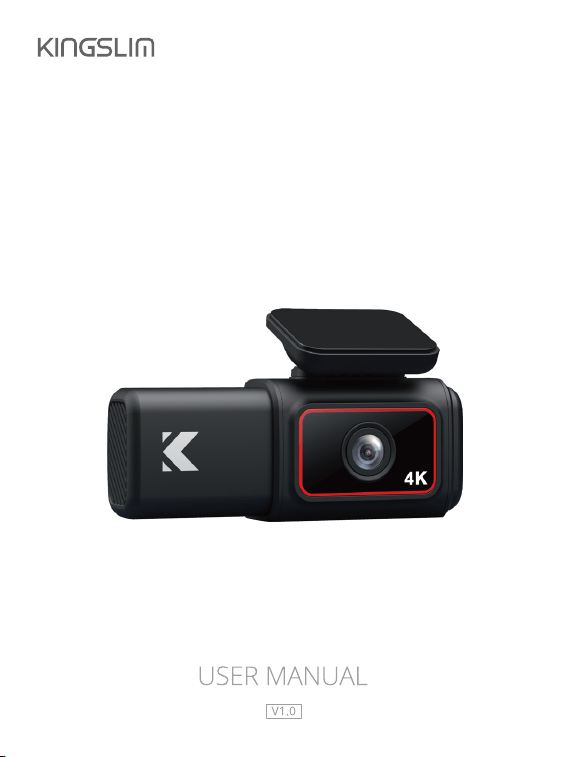
D6
DASH CAM
01 02 03 04 05 06
07 08 09 10 11 12 13
14 15 16 17 18 19 20
21 22 23 24 25 26 27
28 29 30 31 32

Contents
Important Messages------------------------------------------------------------------------ 04
Getting Started-------------------------------------------------------------------------------- 06
1. Memory card-------------------------------------------------------------------------------- 06
2. First-time charging ------------------------------------------------------------------------ 06
3. Recording ------------------------------------------------------------------------------------ 06
4. Settings---------------------------------------------------------------------------------------- 07
5. Setting date & time ----------------------------------------------------------------------- 07
6. How to hide power cable inside your car’s dash board? -------------------- 07
7. How to transfer videos to PC/MAC?------------------------------------------------- 07
8. Wifi---------------------------------------------------------------------------------------------- 07
9. Camera specifications ------------------------------------------------------------------- 08
10. What's in the box ------------------------------------------------------------------------ 09
11. Camera overview ----------------------------------------------------------------------- 10
12. Installation --------------------------------------------------------------------------------- 11
12.1 Insert the memory card---------------------------------------------------------- 11
12.2 Insert the bracket into the bracket slot ------------------------------------- 11
12.3 Install the suction cup mount-------------------------------------------------- 12
12.4 Install the D6 dash cam to the windshield --------------------------------- 13
13. Charging ------------------------------------------------------------------------------------ 14
14. Button Operation Instructions ------------------------------------------------------ 15
14.1 Preview interface ------------------------------------------------------------------ 15
14.2 Main Interface ---------------------------------------------------------------------- 16
Start Recording ------------------------------------------------------------------------------- 17
1. Resolution Setting------------------------------------------------------------------------- 17
01 02 03 04 05 06
07 08 09 10 11 12 13
14 15 16 17 18 19 20
21 22 23 24 25 26 27
28 29 30 31 32

2. Time Zone Setting ------------------------------------------------------------------------- 17
3. Memory card use-------------------------------------------------------------------------- 18
3.1 Installation ----------------------------------------------------------------------------- 18
3.2 Format Memory Card -------------------------------------------------------------- 18
3.3 Removal -------------------------------------------------------------------------------- 19
Playback ----------------------------------------------------------------------------------------- 20
1. Dash cam playback ----------------------------------------------------------------------- 20
2. Kingslim APP playback------------------------------------------------------------------- 20
2.1 APP Download------------------------------------------------------------------------ 20
2.2 Connect to Kingslim APP ---------------------------------------------------------- 20
2.3 App playback ------------------------------------------------------------------------- 22
3. PC/MAC playback-------------------------------------------------------------------------- 24
3.1 Data transmission ------------------------------------------------------------------- 24
3.2 Correct video player to play 4K videos ---------------------------------------- 25
System Settings------------------------------------------------------------------------------- 26
1. Resolution------------------------------------------------------------------------------------ 26
2. Loop recording ----------------------------------------------------------------------------- 26
3. Dual cam display--------------------------------------------------------------------------- 26
4. WDR -------------------------------------------------------------------------------------------- 26
5. Record Audio-------------------------------------------------------------------------------- 27
6. Beep Sound---------------------------------------------------------------------------------- 27
7. Date Stamp ---------------------------------------------------------------------------------- 27
8. G-Sensor-------------------------------------------------------------------------------------- 27
9. IR Cut------------------------------------------------------------------------------------------- 27
10. Screen Saver------------------------------------------------------------------------------- 28
11. Time Display------------------------------------------------------------------------------- 28
01 02 03 04 05 06
07 08 09 10 11 12 13
14 15 16 17 18 19 20
21 22 23 24 25 26 27
28 29 30 31 32

12. Wifi-------------------------------------------------------------------------------------------- 28
13. Date/Time ---------------------------------------------------------------------------------- 28
14. Time system ------------------------------------------------------------------------------- 28
15. Language ----------------------------------------------------------------------------------- 29
16. Parking Mode ----------------------------------------------------------------------------- 29
17. Frequency ---------------------------------------------------------------------------------- 29
18. Fatigue driving reminder-------------------------------------------------------------- 29
19. Time Zone ---------------------------------------------------------------------------------- 29
20. GPS speed---------------------------------------------------------------------------------- 30
21. Format--------------------------------------------------------------------------------------- 30
22. Default setting ---------------------------------------------------------------------------- 30
23. Version info -------------------------------------------------------------------------------- 30
General FAQ------------------------------------------------------------------------------------ 30
Contact Us -------------------------------------------------------------------------------------- 32
01 02 03 04 05 06
07 08 09 10 11 12 13
14 15 16 17 18 19 20
21 22 23 24 25 26 27
28 29 30 31 32

User agreement
By purchasing KINGSLIM Dash cam, it is assumed that by default you agree with
precautions, user warnings and all the terms & conditions of warranty. If for any
reason you do not agree with any of the terms mentioned in this manual, then
you may return the product in its original packaging unused within its return
window for a full refund.
Heads up:
• Do not expose this product to rain, moisture or water under any circumstances
or it will result in external or internal damage.
• Do not put the unit in a damp environment. This device is not designed to be
damp proof.
• Do not try to open the cover or try to repair it yourself. If the accessories for this
device have any problem, please contact the seller for assistance. This camera is
intended to use inside motor vehicle.
• Don’t install it where it will block the driver’s view of the road including mirrors or
the deployment of airbags.
• Please read this manual very carefully before using the camera or installation
and keep it safe for future reference. It will be helpful if you have any questions
or encounter any operational problems.
Pre-cautions
Please read and understand all instructions before using this product. If any
damage is caused by failure to follow the instructions, the warranty will be voided.
Warnings
Failure to comply with safety warnings and regulations can result in serious injury
or death.
• Do not place the camera loose on top of the dashboard or in-front of the air
bags.
• Do not mount the camera where it can be a distraction if it became loose and
fall off the windshield while driving.
Important Messages
01 02 03 04 05 06
07 08 09 10 11 12 13
14 15 16 17 18 19 20
21 22 23 24 25 26 27
28 29 30 31 32

• Do not expose this device to an excessive heat, dust or use any chemical
substance or cleaning solvent to clean this device. Instead use soft moist cloth
for cleaning. Pay careful attention when cleaning the lens surface. Use a soft,
moist cloth to clean the lens to avoid scratches which may compromise video
quality.
• Removing the camera from the vehicle when not in use is recommended. This
prevents likelihood of theft or exposure to excessive heat to prevent damage to
unit. Do not operate or install the camera while driving, or attempt to change any
setting etc.
• Pull off the road first and only do so when it is safe. Do not drop, puncture or
disassemble this product.
• Do not use the charger if the cord is broken or damaged. Keep out of reach of
children.
• Do not leave the camera in the direct sunlight for a long period of time or where
temperature could go above 158°F (70°C).
Some countries or USA states prohibit drivers from mounting anything on
windshield or prohibit mounting on certain area of the windshield. It is owner/op-
erator’s responsibility to mount or use of this device incompliance with local laws.
• The company is NOT responsible for the loss of any data or your content during
operation or in any circumstance.
01 02 03 04 05 06
07 08 09 10 11 12 13
14 15 16 17 18 19 20
21 22 23 24 25 26 27
28 29 30 31 32

Getting Started
Please read and understand warnings & safety instructions before operating.
1. Memory card
Before turning ON the camera, please insert the memory card in Class10 U3 or
above of the known brand at maximum of 256GB. Please format the memory card
before use.
Note:
1. The memory card is a consumable item and has a certain service life (please
refer to the description of the memory card of relevant brand for the specific
product life).
2. If the machine prompts that it cannot be formatted, the card is wrong, or
frequently prompts to format, please replace the card with a new one. To
ensure better protection of your memory card and machine, please format it
regularly within 2 months.
2. First-time charging
Now plug in to the power. The camera will turn on automatically as soon as it
receives the power and then it will prompt you with the initial setup on the screen
for the first-time use. Make sure to keep your camera plugging into the power all
the time because the internal battery is ONLY for emergency recording during
parking mode.
Note:
1. You can use your iPhone or Android phone’s USB charger and USB cable to
plug your dash cam into your 110V power outlet.
2. If you don’t get the initial setup prompts for any reason, you can set the
camera to factory default settings, then re-start the camera to start the initial
setup again.
3. Recording
KINGSLIM 4K D6 dash cam is programmed to turn ON and start recording automatically
when it receives power, and when the power gets disconnected, it will stop
01 02 03 04 05 06
07 08 09 10 11 12 13
14 15 16 17 18 19 20
21 22 23 24 25 26 27
28 29 30 31 32
recording, save the last video safely and then shut down within 5 seconds
automatically.
4. Settings
Now, by default all the settings are pre-set in a way that you can just start using
the camera. However, you can customize it further by learning more about the
camera by either watching How to Video or reading the User Manual so you can
get the maximum benefit out of it and the best use experience.
5. Setting date & time
Please set the correct date and time based on your location under the Time Zon
Setting by going to camera’s system settings menu.
Note: The GPS module is not included in the package.
6. How to hide power cable inside your car’s dash board?
Many people on YouTube already demonstrated how and where
to hide power cable inside your car. You can view one of the
possible ways on the link (this video is NOT recorded by us).
Video link: https://www.youtube.com/watch?v=CZYaV5Dh4ok
7. How to transfer videos to PC/Mac?
Insert memory card directly to your PC/Mac to view or download them. You can
also connect your camera to your PC/Mac with the USB data cable. Then Select
Connect as a Flash Drive. We recommend VLC Media Player to view your videos.
You can get it free at www.videolan.org.
8. Wifi
You can also connect KINGSLIM D6 Car Dash Cam to your smart phone directly by
using built-in Wifi feature. After your mobile phone is connected to the hotspot of
our device, the 4G signal of the mobile phone will be blocked, and it will automatically
recover after disconnection. It is recommended that you exit the APP or manually
disconnect the device hotspot when you do not need to connect the device to
your phone.
01 02 03 04 05 06
07 08 09 10 11 12 13
14 15 16 17 18 19 20
21 22 23 24 25 26 27
28 29 30 31 32

LCD touch screen 2-inch IPS
Video resolution 4K+2K (Front+Rear), 4K+1080P (Front+Interior)
Photo resolution 12M
Lens aperture F/1.8
GPS Included
Wifi Built-in
Video format MP4
Memory card Above Class10 U3 speed, max up to 256GB
G-sensor Built-in 3-Axis
Anti flicker 50 Hz / 60 Hz
Loop recording Support-seamless recording
Parking Mode Support
24 hours/ 12 hours Support
Mic/ Speaker Built-in Micro Phone & Speaker
Mini USB Function 1. Storage 2. Charging
Auto Power ON/OFF Support
Power Interface 5V/ 1.5A
Battery Built-in li-ion 250 mAH battery
Operation Temperature -4°F (-20°C) ~ 140°F (60°C)
SupportY/M/D D /M/Y M/D/Y
9. Camera Specifications
01 02 03 04 05 06
07
08 09 10 11 12 13
14 15 16 17 18 19 20
21 22 23 24 25 26 27
28 29 30 31 32
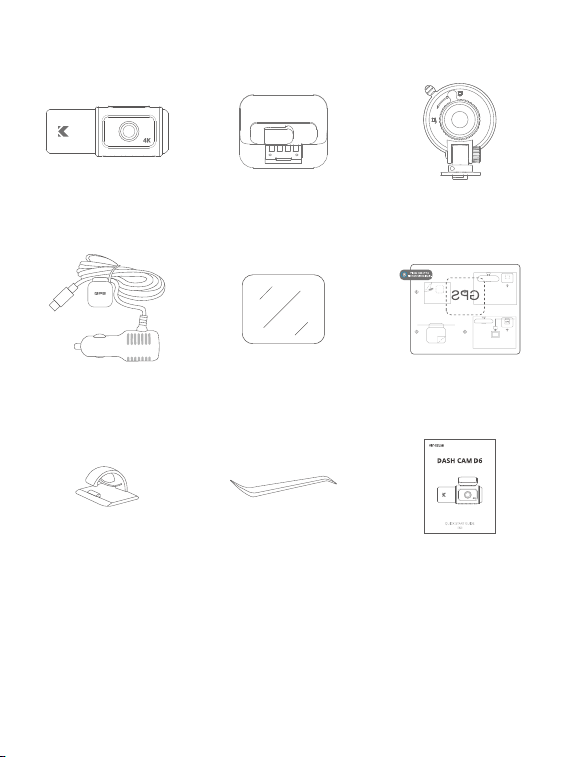
10. What is in the Box
Dual Dash Cam D6
×1
Car Charger with 3.5M
Power Cable× 1
Cable Clip
×5
Car Crowbar
×1
QuikStart Guide
×1
Double-sided Adhesive
Tape for Dash Cam× 2
Electrostatic Sticker
×2
Dash Cam Bracket
×1
Suction Cup Mount
×1
01 02 03 04 05 06
07 08
09 10 11 12 13
14 15 16 17 18 19 20
21 22 23 24 25 26 27
28 29 30 31 32
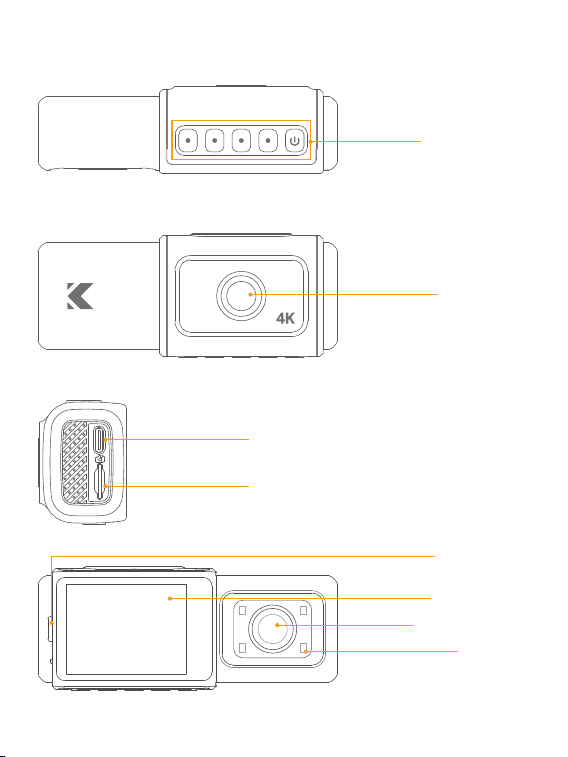
Function button
Front camera
Indicator light
Display screen
Rearview camera
IR Fill light
Type C power port
Card slot
11. Camera Overview
01 02 03 04 05 06
07 08 09
10 11 12 13
14 15 16 17 18 19 20
21 22 23 24 25 26 27
28 29 30 31 32
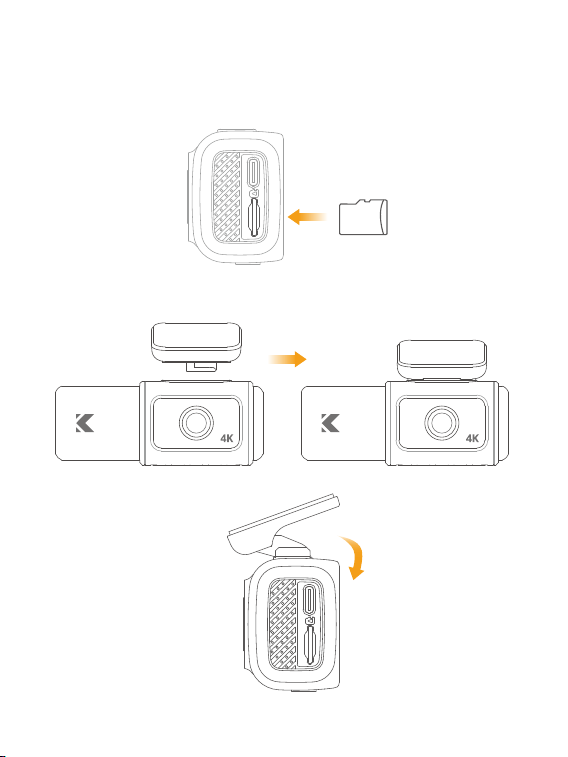
12.1 Insert the memory card.
Tips: The dash cam supports up to 256GB memory card of Class 10 or above.
Warm Tip: You can also insert the suction cup mount into the bracket slot.
12.2 Insert the bracket into the bracket slot.
memory
card
12. Installation
01 02 03 04 05 06
07 08 09 10
11 12 13
14 15 16 17 18 19 20
21 22 23 24 25 26 27
28 29 30 31 32
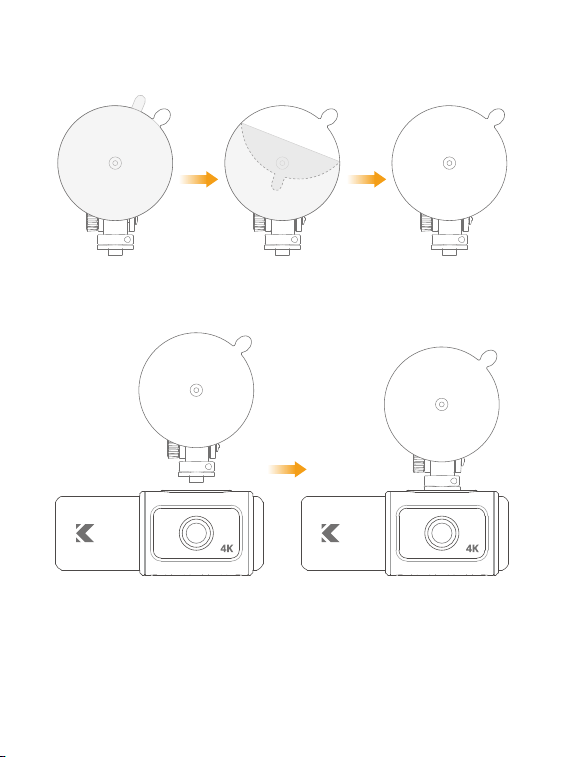
① Remove the film of the suction cup.
12.3 Install the suction cup mount.
② Insert the suction cup into the bracket slot and make sure there is no air inside
the suction cup. Rotate to secure the bracket.
01 02 03 04 05 06
07 08 09 10 11
12 13
14 15 16 17 18 19 20
21 22 23 24 25 26 27
28 29 30 31 32
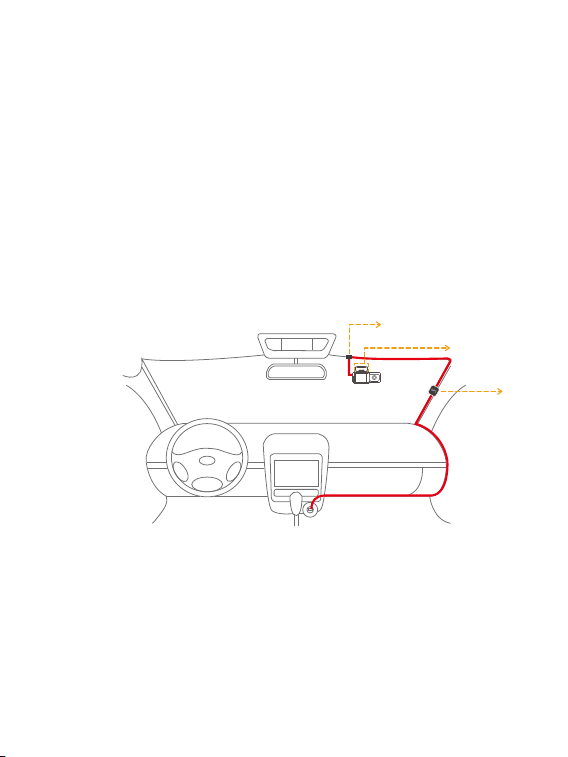
① Clean the windshield with a dry cloth.
② Remove the electrostatic sticker film and apply the sticker to the windshield
while making sure there are no air bubbles.
③ Peel off the film on one side of the double-sided adhesive tape and apply the
tape to the D6 Dash Cam.
④ Peel off the film on the other side of the adhesive tape and press the D6 Dash
Cam firmly to secure it on the electrostatic sticker (if you wish to remove the
dash cam, please take off the electrostatic sticker).
Note: You can stick the dash cam to the windshield without using the electrostatic
sticker.
⑤ Connect the USB power cable into the USB power port of the dash cam, then
plug the car charger into the cigarette lighter socket.
⑥ Use the pry tool to hide the cables.
12.4 Install the D6 Dash Cam to the windshield.
Cable clip
Electrostatic
sticker
GPS
01 02 03 04 05 06
07 08 09 10 11 12
13
14 15 16 17 18 19 20
21 22 23 24 25 26 27
28 29 30 31 32
Note:
Do NOT connect the camera to PC for charging. Instead use the 110V wall outlet.
The device will start up automatically and record as soon as power supplied, and
the device will save the last video file and power off automatically after cutting the
power supply.
Turning your camera ON/OFF
Auto Power ON: KINGSLIM D6 is designed to turn ON automatically when it
receives power, i.e. when the car engine is started.
Auto Power OFF: The camera is also pre-configured to turn itself OFF automatically
within few seconds when the power gets disconnected, i.e. when the car key is
turned to LOCK position.
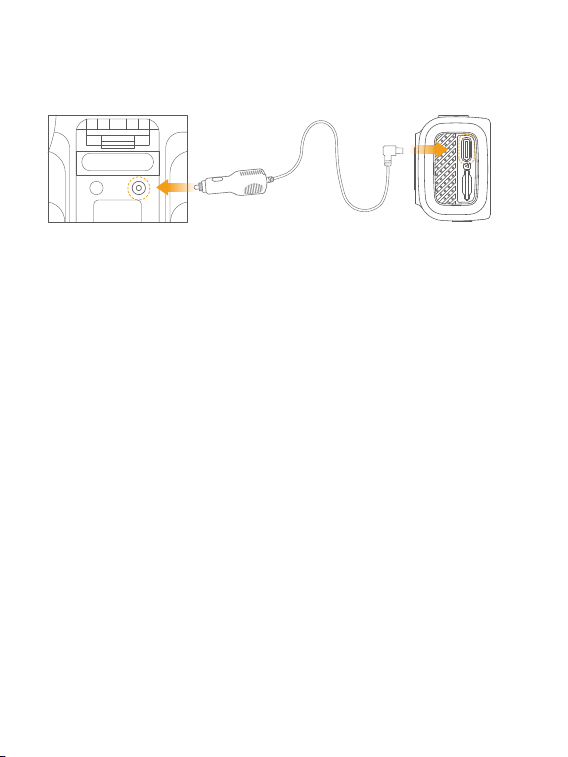
13. Charging
Connect the USB power cable into the USB power port of D6 Dash Cam, then
plug the car charger into the cigarette lighter of your car.
Car cigarette lighter socket Car cigarette lighter plug D6 Dash Cam
01 02 03 04 05 06
07 08 09 10 11 12 13
14 15 16 17 18 19 20
21 22 23 24 25 26 27
28 29 30 31 32
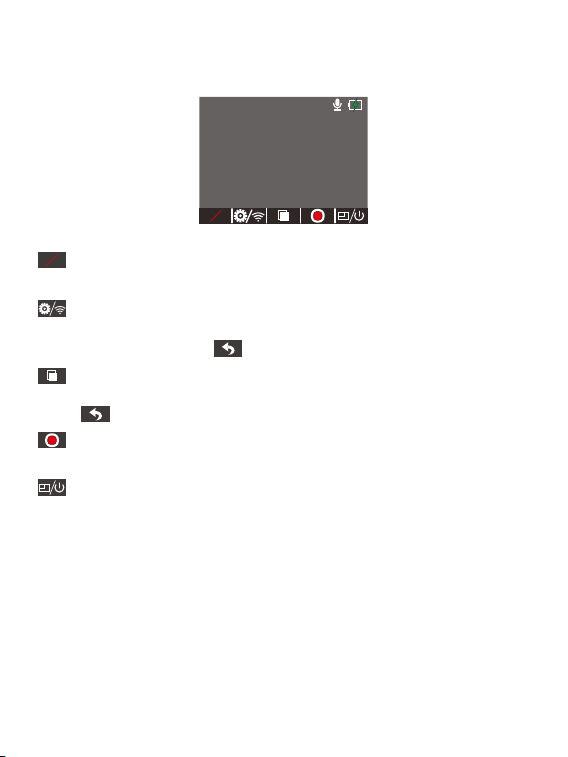
Parking monitor
Short-press this button to turn the parking monitor mode on or off.
Setup/ Wifi
Short-press this button to enter Menu, long press to enter the Wifi mode.
Short-press the Back button to return to the preview mode.
Playback
Short-press this button to enter the playback interface. Short-press the Back
button to return to the preview mode.
Start recording
Short-press this button to start recording.
Mode switching/ Power
Short-press this button to switch display modes. Long press to switch off.
14. Button Operation Instructions
14.1 Preview Interface
4K+1080P
01/1/2022 00:00:00
00:00:00
AM
P
P
01 02 03 04 05 06
07 08 09 10 11 12 13
14
15 16 17 18 19 20
21 22 23 24 25 26 27
28 29 30 31 32
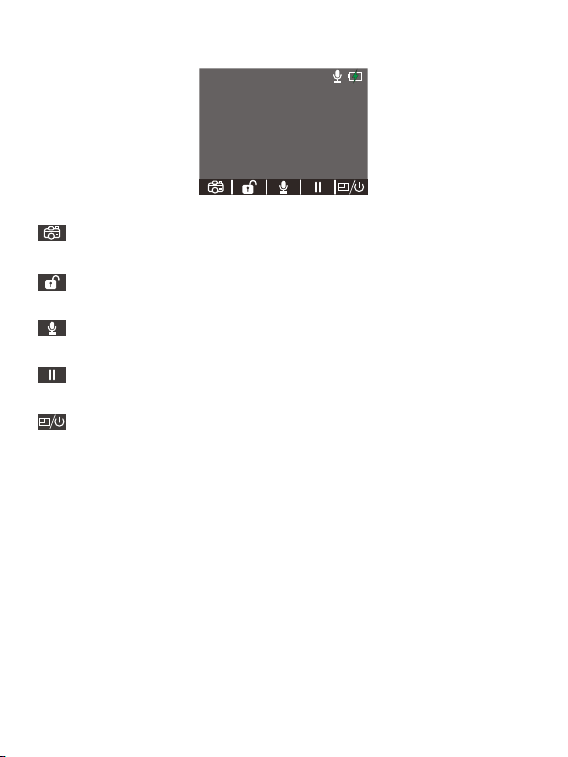
Photo
Short-press this button to take photos.
Emergency recording
Short-press this button to turn the emergency recording mode on or off.
Audio recording
Short-press this button to turn the audio on or off.
Stop recording
Short-press this button to stop recording.
Mode switching/ Power
Short-press this button to switch display modes. Long press to switch off.
14.2 Main Interface
4K+1080P
01/1/2022 00:00:00
00:00:00
AM
01 02 03 04 05 06
07 08 09 10 11 12 13
14 15
16 17 18 19 20
21 22 23 24 25 26 27
28 29 30 31 32
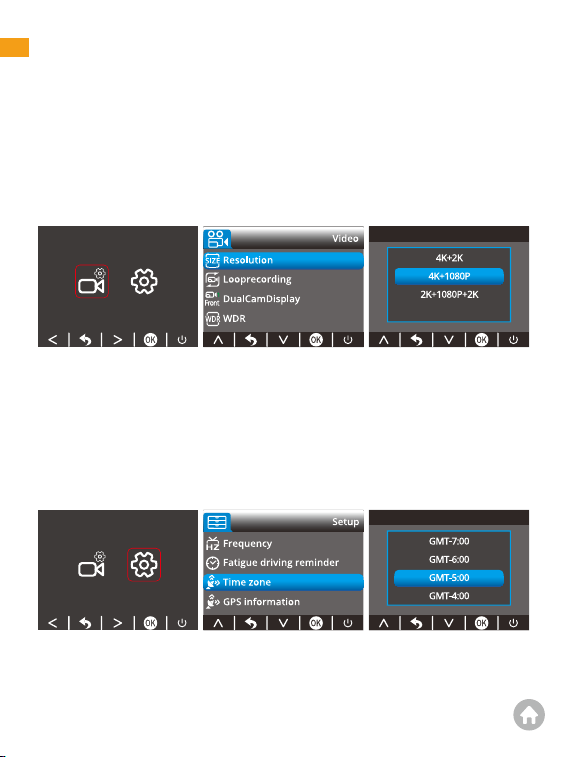
1. Resolution Setting
Three options are available.
1. Triple-channel mode, 2K+1080P+2K (Front+Interior+Rear).
2. Two-channel mode, 4K+2K (Front+Rear), or 4K+1080P (Front+Interior).
(Default setting is 4K+1080P)
Enter the menu to choose the resolution.
Note: The rear camera for the D6 dash cam is not included, please purchase it
separately to make the three-way mode possible.
2. Time Zone Setting
Choose the time zone manually before starting recording. The dash cam will then
display the time of the selected time zone.
Start recording
01 02 03 04 05 06
07 08 09 10 11 12 13
14 15 16
17 18 19 20
21 22 23 24 25 26 27
28 29 30 31 32
3. Memory card use
A Class 10 or above memory card is highly recommended for the D6 dash cam
(memory card is not included). D6 dash cam supports an up to 256GB memory
card. Please format your card in the camera before using this dash cam. Do not
remove or insert the memory card when the dash cam is turned on. This may
damage the memory card. We recommend SAMSUNG Classic10 U3 or higher
speed memory SD card. You can purchase it from Amazon:
https://www.amazon.com/dp/B09B1JFY24/ref=twister_B09Q7Q2WZ1?_encoding=UTF8&th=1
3.1 Installation
Make sure the camera is turned Off first. Insert the memory card half way in. Then
use the finger nail to push the card all the way inward until it clicks and locks in
place.
3.2 Format Memory Card
Please format your memory card in the camera before using this dash cam. Do
not remove or insert the memory card when the dash cam turns on. This may
damage the memory card.
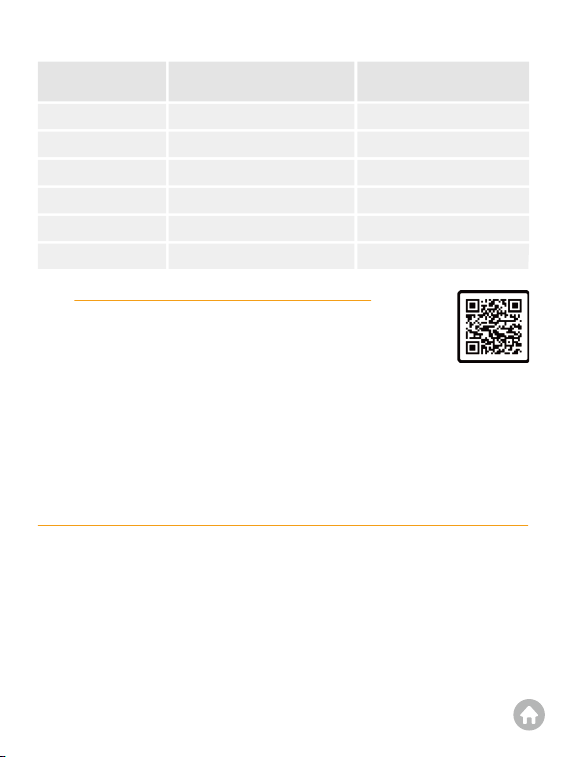
Go to http://www/greenwichmeantime/time-zone/usa to find
out your correct GMT (Greenwich Mean Time) value based on
your location in USA.
Greenwich Mean Time (GMT)
Time zone
Hawaii
Alaska
Pacific Time Zone
Mountain Time Zone
Central Time Zone
Eastern Time Zone
When Daylight Savings Begins
March-Nov
GMT(-8:00)
GMT(-7:00)
GMT(-6:00)
GMT(-5:00)
GMT(-4:00)
When Daylight Savings Ends
Nov-March
GMT(-10:00)
GMT(-9:00)
GMT(-8:00)
GMT(-7:00)
GMT(-6:00)
GMT(-5:00)
01 02 03 04 05 06
07 08 09 10 11 12 13
14 15 16 17
18 19 20
21 22 23 24 25 26 27
28 29 30 31 32
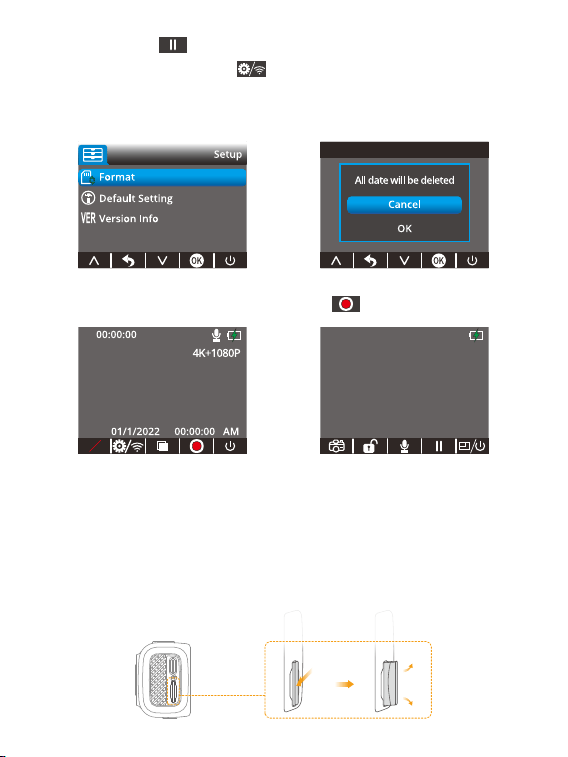
① Press the button to stop recording.
② Short-press Setup/Wifi button to enter Menu.
③ Choose options on the menu, click the OK button to confirm.
④ Click the Format option to format, then choose OK.
5. Return to the main interface, press the button to start recording.
Tip: We recommend formatting your memory card every 2 months to keep it
running smoothly. The memory card has a certain life span. After repeated reading,
writing, and wiping, the life of the memory card will be shortened. When the card
frequently reports errors, please replace it with a new one.
3.3 Removal
To remove the memory card, gently push its edge inward until it clicks, and then
pops out, then simply pull it out of the slot.
4K+1080P
01/1/2022 00:00:00
00:00:00
AM
P
01 02 03 04 05 06
07 08 09 10 11 12 13
14 15 16 17 18
19 20
21 22 23 24 25 26 27
28 29 30 31 32
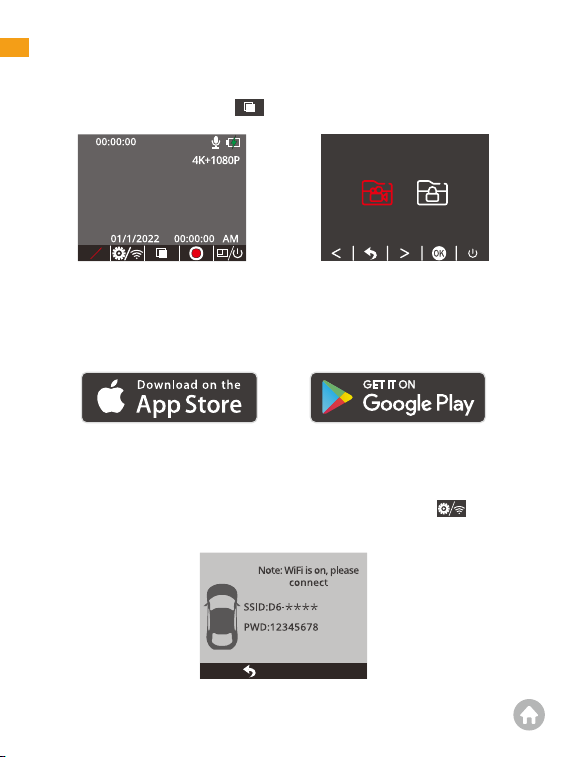
1. Dash Cam Playback
Short-press the playback button to enter the album to be played back.
2. Kingslim APP Playback
2.1 APP Download
Download the Kingslim APP on the APP Store or Google Play.
Playback
P
2.2 Connect to Kingslim APP
① Stop video recording on the dash cam.
② After pausing video recording, long press the Setup/Wifi button to enter
the Wifi mode (once you quit, the Wifi will be disconnected.)
01 02 03 04 05 06
07 08 09 10 11 12 13
14 15 16 17 18 19
20
21 22 23 24 25 26 27
28 29 30 31 32
D6-
****
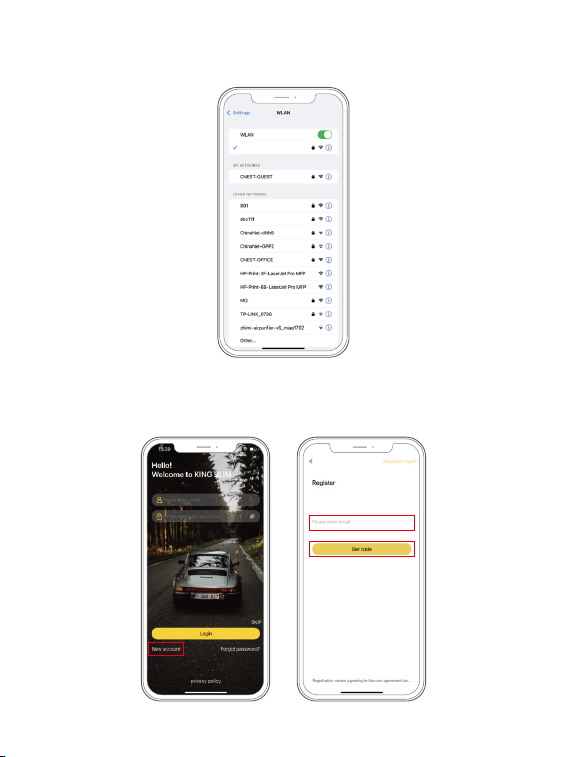
④ Open the Kingslim APP, tap the “New Account” icon, enter your email and get
the verification code for login.
③ Go to your smartphone’s Wifi settings, search for the same Wifi SSID name
displayed on the screen, and enter the password 12345678 for connection.
01 02 03 04 05 06
07 08 09 10 11 12 13
14 15 16 17 18 19 20
21 22 23 24 25 26 27
28 29 30 31 32
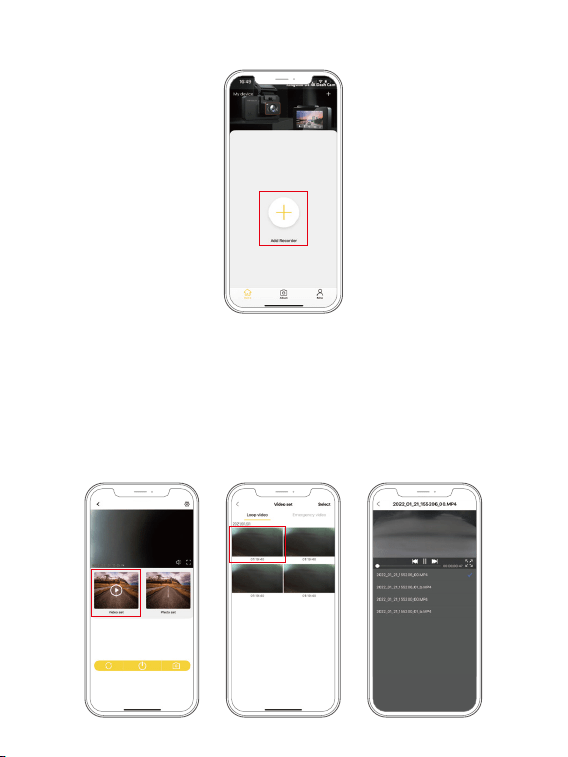
⑤ Tap "Add Recorder", wait a few seconds to enter the preview interface.
2.3 App playback
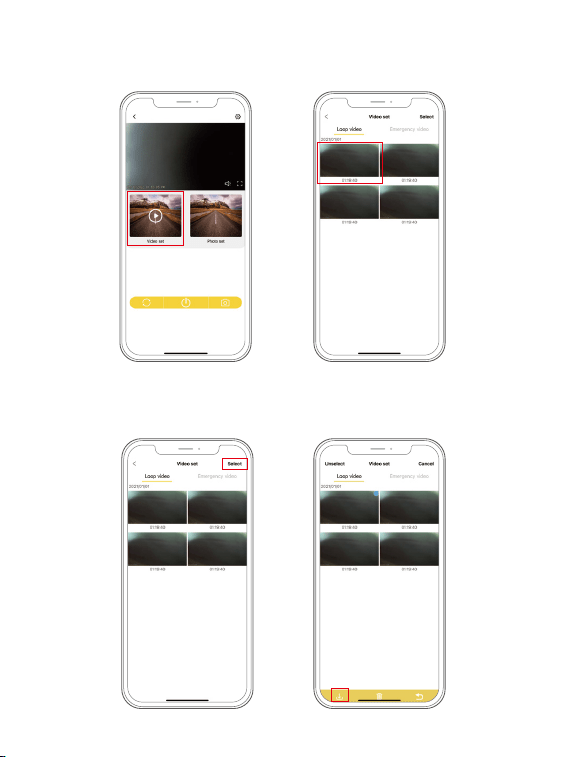
To play back videos on your smartphone, simply long press the Wifi button to turn
on the camera Wifi first, then connect the KINGSLIM hot spot by entering the default
password “12345678” . Once connected, simply open the correct Kingslim App to
add your model. Please note that for KINGSLIM models, only Kingslim App can be
used for operation. Enter the preview interface, tap the “Video set” icon, then you
can watch those videos.
D6-
****
01 02 03 04 05 06
07 08 09 10 11 12 13
14 15 16 17 18 19 20
21
22 23 24 25 26 27
28 29 30 31 32
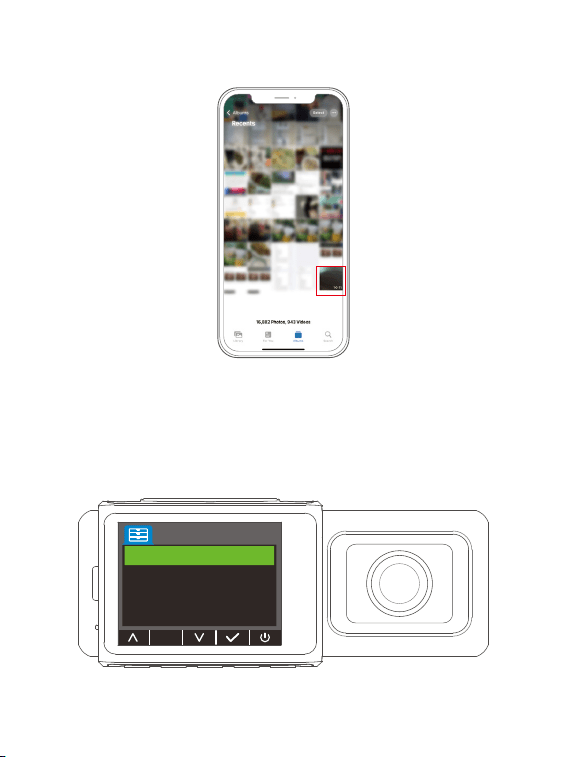
Using Kingslim App to download videos to your smartphone for local playback.
① Tap the “Video set” icon to enter the menu.
D6_
****
② Tap the “Select” icon at the upper right corner and tap the video you want to
download, tap the icon at the bottom left corner to download the video.
01 02 03 04 05 06
07 08 09 10 11 12 13
14 15 16 17 18 19 20
21 22
23 24 25 26 27
28 29 30 31 32
USB
Mass Storage
PC Camera
③ Waiting for the completion of download progress, the video will be downloaded
to phone photo album. Tap the video and it will play.
3. PC/MAC playback
3.1 Data transmission
① Connect the camera with the short USB cable and choose to connect as Mass
Storage on the camera when this message pops up. (USB cable sold separately)
01 02 03 04 05 06
07 08 09 10 11 12 13
14 15 16 17 18 19 20
21 22 23
24 25 26 27
28 29 30 31 32
② You can simply remove the memory card from camera and insert it directly in
your PC if you have a memory slot. Then find the added memory card drive on
your computer and then use the player to play the video in the memory card.
3.2 Correct video player to play 4K videos
① We recommend VLC Media player. You can get the player for free at
www.videolan.org.
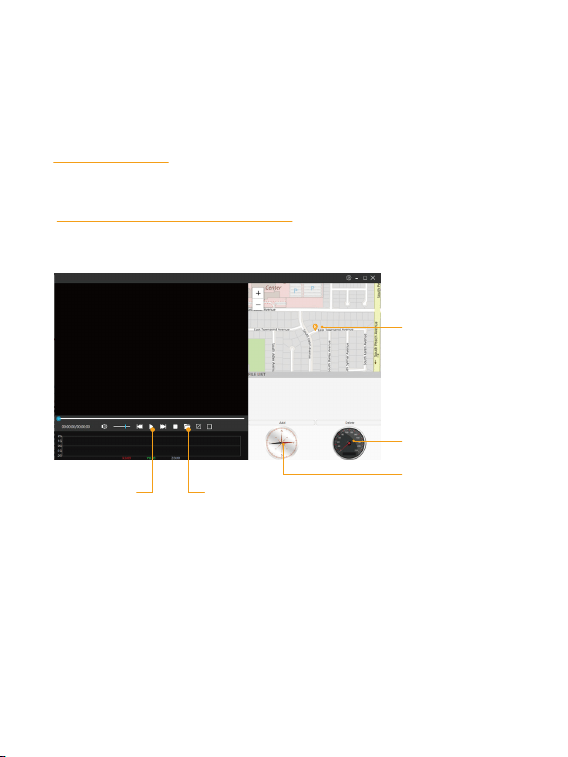
② GPS player (GPS player software installation (PC/MAC only). You can also use our
GPS Player from our website for free to view the google maps from
https://kingslim.net/pages/gps-player.
To see the exact GPS route
with the video on google
maps;
Check driving speed;
Check driving direction
(i.e. N, S, NW, SE, etc.).Play back your
recorded video
Look up recorded videos
What are the features ?
Note: For IOS system computers, please carefully read download guidance on
Apple's official website (https://support.apple.com/en-au/HT202491), otherwise
the GPS player will not be installed successfully.
01 02 03 04 05 06
07 08 09 10 11 12 13
14 15 16 17 18 19 20
21 22 23 24
25 26 27
28 29 30 31 32

1. Resolution
Select to switch resolution.
Options:
• 4K+2K
• 4K+1080P
• 2K+1080P+2K
Default setting: 4K+1080P
2. Loop Recording
If you choose the 3 Minutes option, the files will be saved every 3 minutes. When
the memory card is full, new files will overwrite the old ones if Loop Recording is
on. If it is off, the camera will stop recording when the card is full. You will then
need to format the memory card or insert a new one.
Options:
• 1 Minute
• 2 Minutes
• 3 Minutes
Default setting: 1 Minute
3. Dual cam display
• Front
• Inside
• Rear
• Front/ Middle / Rear
4. WDR
Select to turn WDR mode on/ off.
Default setting: OFF
System Settings
01 02 03 04 05 06
07 08 09 10 11 12 13
14 15 16 17 18 19 20
21 22 23 24 25
26 27
28 29 30 31 32

5.Record Audio
Select to turn on/ off.
Default setting: on
6. Beep Sound
Turn the beep sound on/ off.
Default setting: On
7. Date Stamp
Select to add a date stamp to photos/ videos.
Turn the on/ off.
Default setting: Off
8. G-Sensor
When G-Sensor Mode is turned on, it will automatically start recording and save
content if an impact or sudden braking is detected. The videos will be locked and
never overwritten by new files. The higher the sensitivity level, the easier it is to
trigger the G-Sensor.
Options:
• Off
• Low
• Middle
• High
Default Setting: Low
9. IR Cut
Select to turn IR Cut mode on/off.
Default setting: On
01 02 03 04 05 06
07 08 09 10 11 12 13
14 15 16 17 18 19 20
21 22 23 24 25 26
27
28 29 30 31 32

10. Screen Saver
The display screen will turn off automatically after a set time. When the screen is
turned off, power consumption will be reduced. The camera will still work while
the screen is turned off. Just click the screen to turn it back on.
Options:
• Off
• 30 Seconds
• 1 Minute
• 2 Minutes
• 3 Minutes
Default setting: 1 Minute
11. Time Display
Time display on the screen when the device enter the screen save mode while you
select time display “ON”
Default setting: On
12. Wifi
Select to turn Wifi mode on/ off.
Default setting: Off
13. Date/ Time
Set the date and time manually.
14. Time system
Options:
12-hour mode
24-hour mode
Default setting: 12-hour mode
01 02 03 04 05 06
07 08 09 10 11 12 13
14 15 16 17 18 19 20
21 22 23 24 25 26 27
28 29 30 31 32

15. Language
9-country languages.
Default setting: English
16. Parking Mode
If there is an impact on the car during parking, the camera will turn on automati-
cally and create a locked 20-second recording. The higher the selected level, the
easier it is to trigger the recording.
Default setting: Off
17. Frequency
Choose the right frequency to avoid flickering. This should be based on your local
AC parameters.
Options:
• 60 Hz
• 50 Hz
18. Fatigue driving reminder
Options:
Off
1hour
2hour
4hour
19. Time Zone
Choose the time zone manually. The device will then display the time of the select-
ed time zone.
Default setting: GMT – 5 (U.S. Eastern Time Zone)
01 02 03 04 05 06
07 08 09 10 11 12 13
14 15 16 17 18 19 20
21 22 23 24 25 26 27
28
29 30 31 32

1. What to do if your dash cam turns on and off automatically?
① Check if the dash cam turns on normally when you remove the memory card
and plug it in with a USB cable.
② If so, turn off your dash cam and plug it in with the original 5V car charger for
about one hour, then turn it on manually to see if it works normally.
③ If the issue remains, restore your dash cam to the factory settings.
2. Why to do if your dash cam does not turn on?
① Check if the indicator light on the car charger turns on when your dash cam is
plugged in.
General FAQ
20. GPS speed
Track your driving speed and show your preferred speed unit.
Options:
• KM/ H
• MPH
Default setting: KM/ H
21. Format
Format your memory card.
22. Default setting
Restore the default settings.
23. Version info
Check the software version of the camera. This information may be required when
technical support is needed.
01 02 03 04 05 06
07 08 09 10 11 12 13
14 15 16 17 18 19 20
21 22 23 24 25 26 27
28 29
30 31 32

② If not, plug the dash cam into another cigarette lighter or USB port for about
one hour to see if it finally turns on.
③ If so, contact customer support for further help.
3. What to do if your dash cam does not turn off?
① Turn off the dash cam manually and restart it, or reset it to the factory settings.
② If your issue remains, contact contact customer support for further help.
4. What to do if your dash cam does not hold a charge?
① Plug in your dash cam with the USB cable to see if it holds a charge normally.
② If not, contact customer support for further help.
5. What to do if your dash cam does not save the time settings?
① Plug in the dash cam with the USB cable to see if it holds a charge normally.
② Make sure the Time Zone is set according to your local time.
6. What to do if your dash cam heats up?
① The dash cam may heat up while recording or even won’t turn on in hot weather.
② We recommend you to turn on the air conditioning in your car before plugging
in your camera.
③ When the dash cam cools down, plug it in to see if it turns on again.
7. What to do if your dash cam shows “Slow Card” or prompts to format the
memory card ?
① Select the memory card according to the user manual, such as a U3 memory
card or above.
② Format the memory card in the dash cam’s settings.
8. What to do if the camera Wifi is not connected?
① Check if your dash cam enters the Wifi mode and displays the Wifi information
after you long press the Setup/Wifi button.
② If so, check if the camera Wifi appears in your phone’s Wifi list.
01 02 03 04 05 06
07 08 09 10 11 12 13
14 15 16 17 18 19 20
21 22 23 24 25 26 27
28 29 30
31 32
③ If your issue remains, contact customer support for further help.
9. What to do if you can’t connect your dash cam with the app Kingslim?
① Make sure the camera Wifi is connected normally before connecting with the
app.
② Open the APP Kingslim, tap the New Account icon, enter your email and get a
verification code for login.
③ Tap Add Recorder, and wait for a few seconds to enter the preview interface.
④ If your issue remains, contact customer support for further help.
For any inquiries about KINGSLIM products, please feel free to contact us. We will
respond within 24 hours.
Contact Us
(888) 811-1140 (US)
www.kingslim.net
01 02 03 04 05 06
07 08 09 10 11 12 13
14 15 16 17 18 19 20
21 22 23 24 25 26 27
28 29 30 31
32