V1.1
USER MANUAL
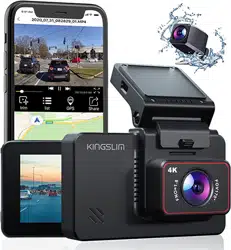
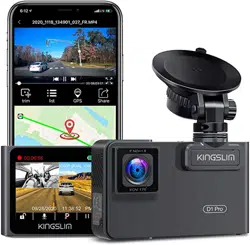
KingSlim D5 Dash Cam

CONTACT US
For any inquiries about KingSlim products, please feel free to contact us. Wewill
respondwithin24hours.
Tel: 888-811-1140 (US)
Email: [email protected]
Web: www.kingslim.net
KONTAKTIERE UNS
Bei Problemen mit KingSlim-Produkten können Sie sich gerne an uns wenden.
Wir werden Ihnen innerhalb von 24 Stunden antworten.
Email: [email protected]
Offizielle website: www.kingslim.net
CONTÁCTENOS
Para cualquier consulta sobre los productos KingSlim, por favor contáctenos.
Le responderemos en las siguientes 24 horas.
Correo electrónico: [email protected]
Sitio web oficial: www.kingslim.net
CONTACTEZ-NOUS
Pour toute demande de renseignements sur les produits KingSlim, n'hésitez pas à
nous contacter, nous vous répondrons dans les 24 heures.
Courriel: [email protected]
Site web officiel: www.kingslim.net
CONTATTARCI
Per qualsiasi richiesta di informazioni sui prodotti KingSlim, non esitate a contattarci
e vi risponderemo entro 24 ore.
Email: [email protected]
Sito ufficiale: www.kingslim.net
当社製品に関するご質問・ご意見・ご感想などは下記ア
ドレス、サイトまたはLINEまでお問い合わせください。
できるだけ早く対応致します。
E-メール:[email protected]
公式サイト:www.kingslim.net
kingslimjp
お問い合わせ
CONTENTS
01 - 15English
16 - 30Deutsch
31 - 45Español
46 - 60Français
61 - 75Italiano
76 - 90
日本語
1
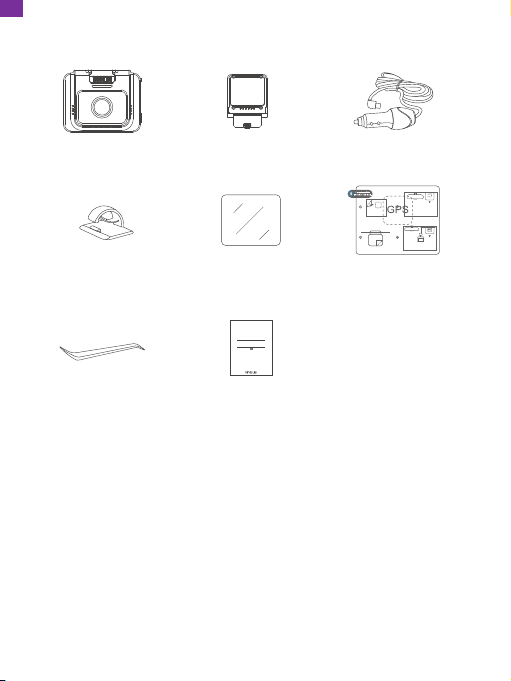
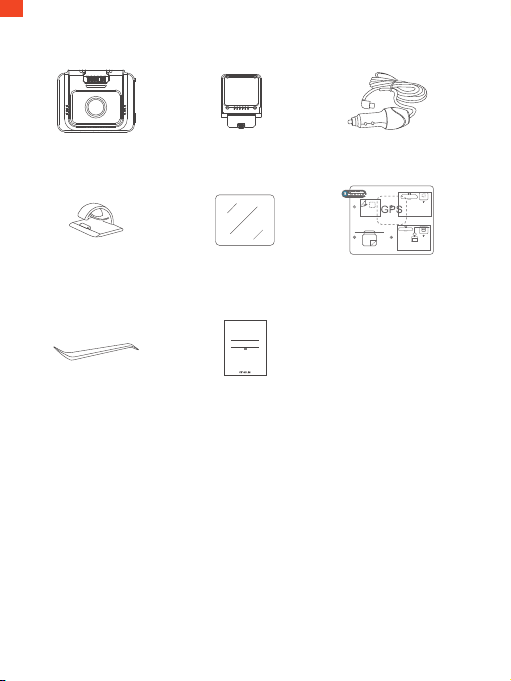
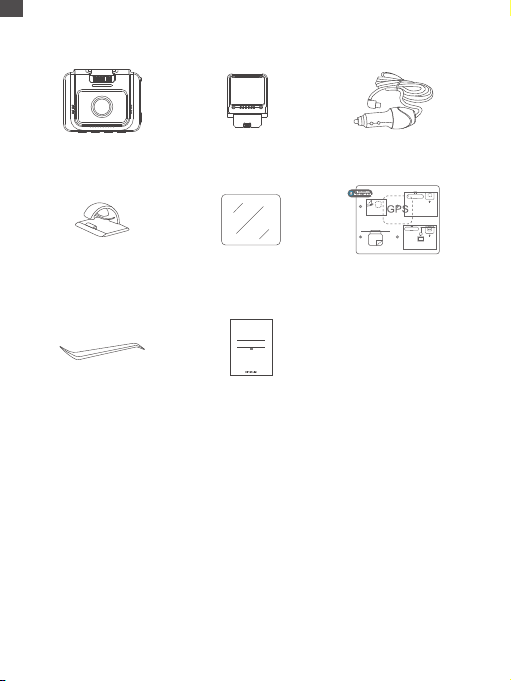
D5 Dash Cam * 1
Car Charger with
3.5m Power Cable * 1
GPS Bracket * 1
Quick Start Guide * 1
Cable Clips * 5 Static Sticker * 2
Double-sided
Adhesive Tape * 2
Pry Tool * 1
Quick Start Guide
KingSlim D5 Dash Cam
V1.0
What's in the Box
EN

2
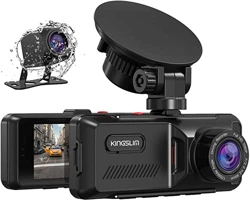
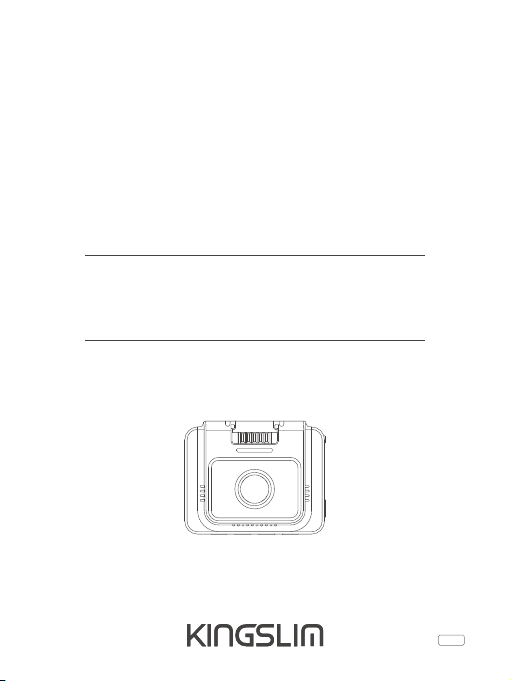
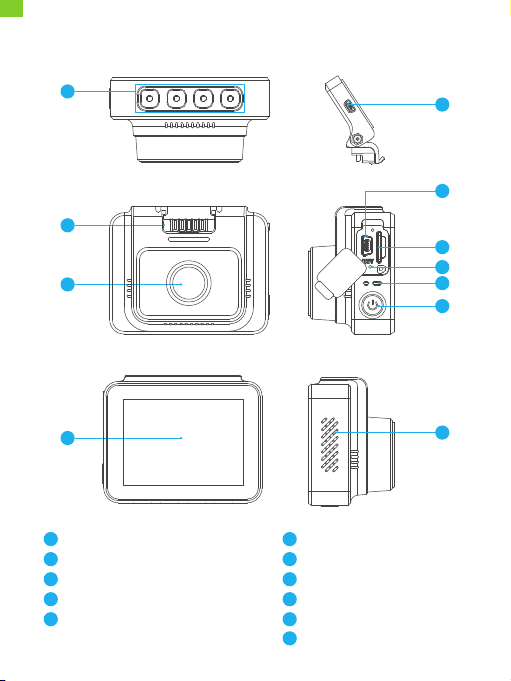
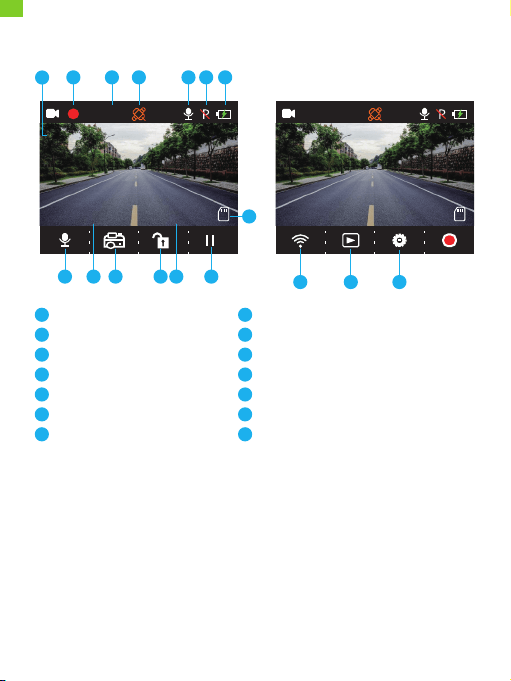
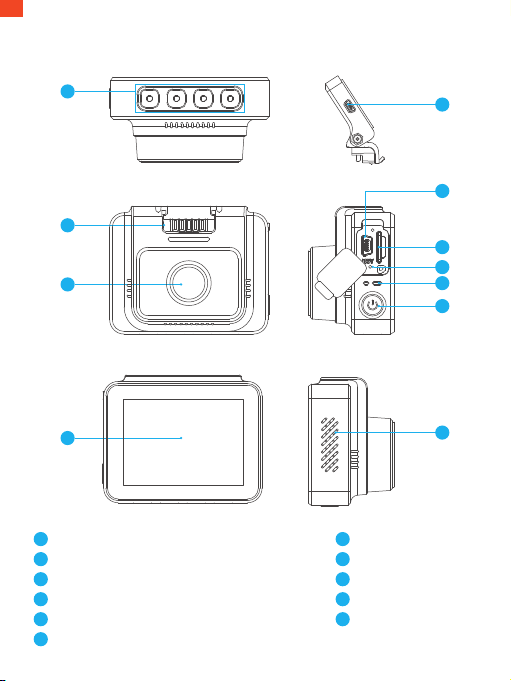
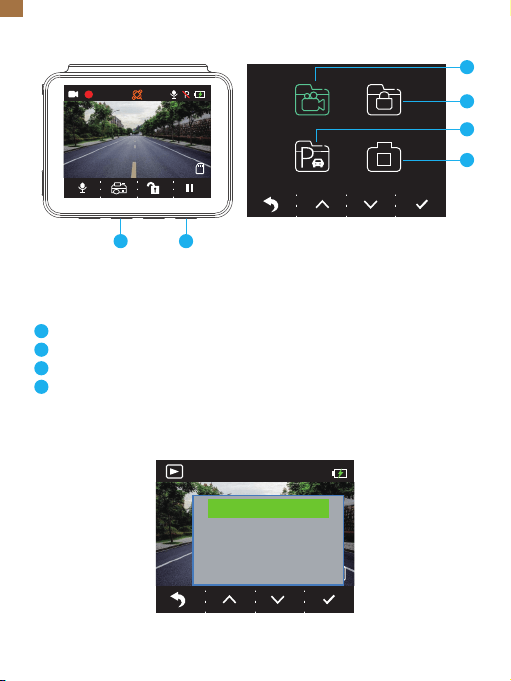
Camera Overview
1
2
3
4
5
11
10
7
6
8
9
Function Button
Bracket Slot
Front Camera
Mini USB Power Port 1 (Power supply)
Mini USB Power Port 2
Memory Card Slot
Reset
Working Indicator
Power Button
Speaker
Screen
3
11
2
1
6
8
7
9
10
5
4
EN

3
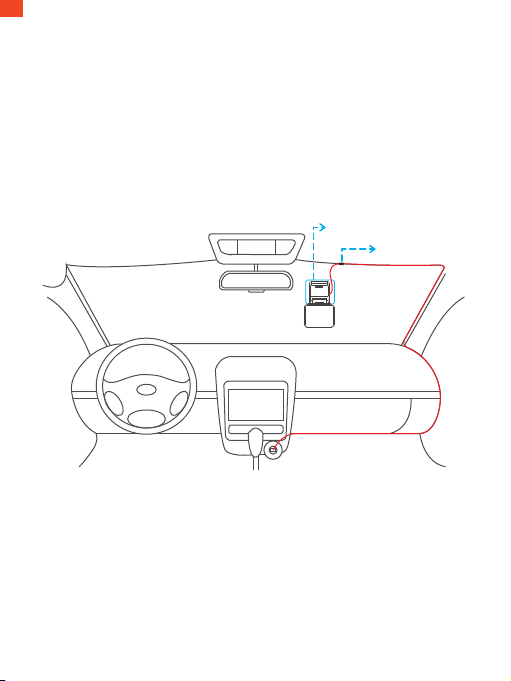
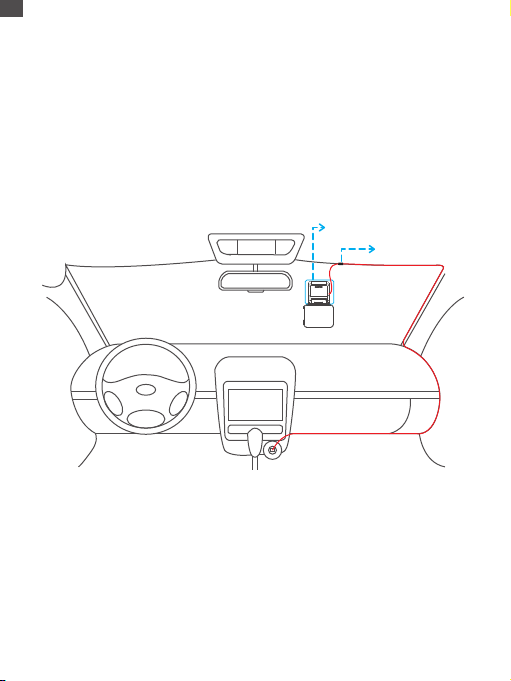
Installation
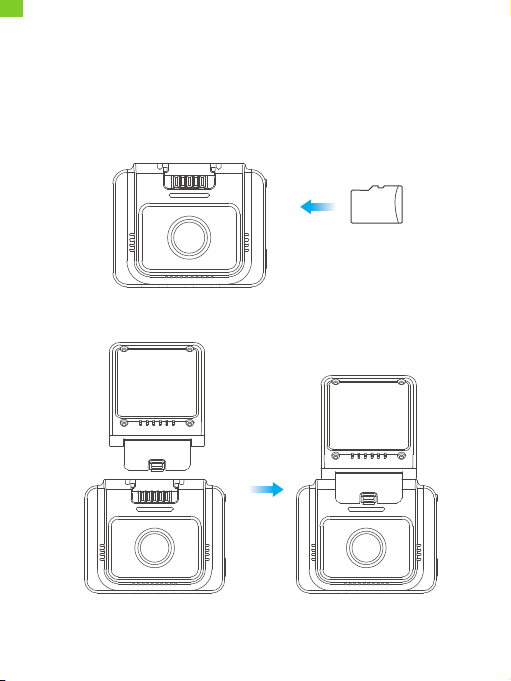
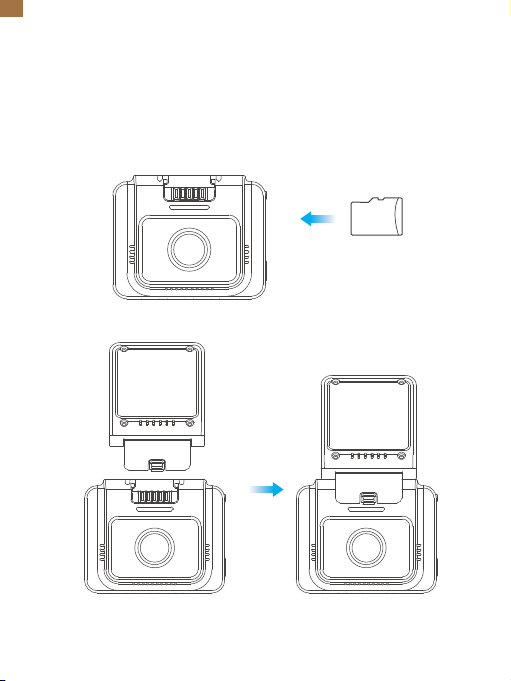
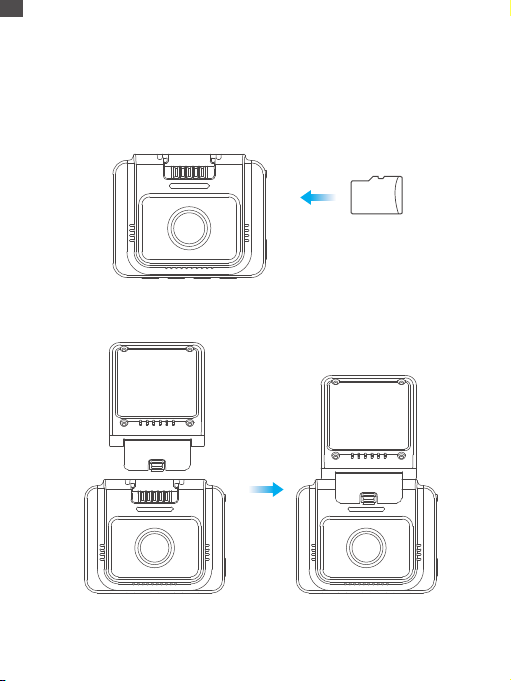
1. Insert a memory card (sold separately).
Tip: The D5 Dash Cam supports a Class 10 or above memory card of up to 256 GB
(memory card not included). Please format the card in the camera before using it
in the dash cam. Do not remove or insert the memory card when the dash cam is
turned on as this may damage the card.
2. Insert the GPS bracket into the bracket slot.
memory
EN

4
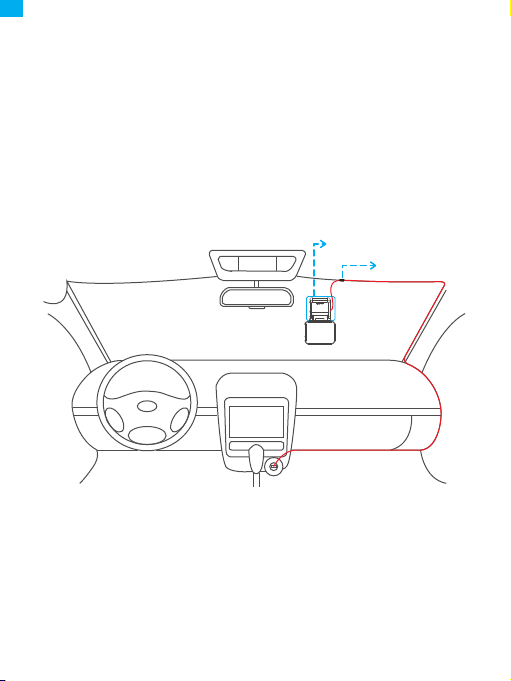
3. Install the D5 Dash Cam on the windshield.
① Clean the windshield with a dry cloth.
② Remove the static sticker film and apply the sticker to the windshield while
making sure there are no air bubbles.
③ Peel off the film on one side of the double-sided adhesive tape and apply the
tape to the D5 Dash Cam.
④ Peel off the film on the other side of the adhesive tape and press the D5 Dash
Cam firmly to secure it on the static sticker (if you wish to remove the dash cam,
please take off the static sticker).
Note: You can stick the dash cam to the windshield without using the static sticker.
Formatting the Memory Card
Please format the memory in the camera before using this dash cam.
Tip: Do not remove or insert the memory card when the dash cam is turned on as
this may damage the card.
4. Adjust the viewing angle of the dash cam accordingly.
5. Connect the car charger to the dash cam. Plug the car charger into the cigarette
lighter.
6. Use the pry tool to hide the cables.
Static Sticker
Cable Clip
EN
5
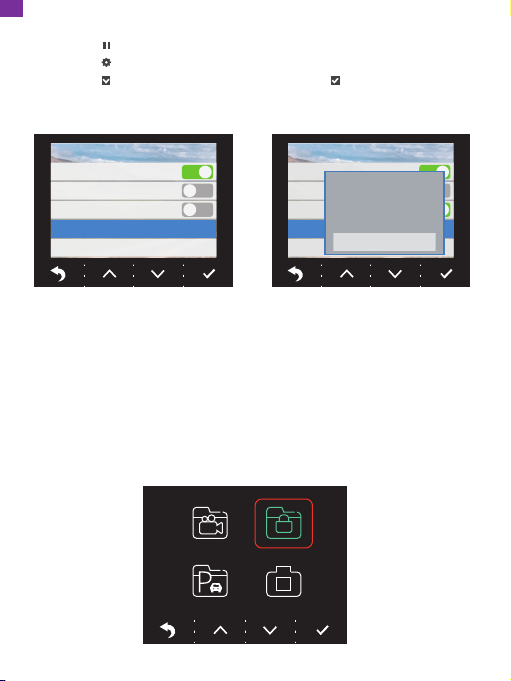
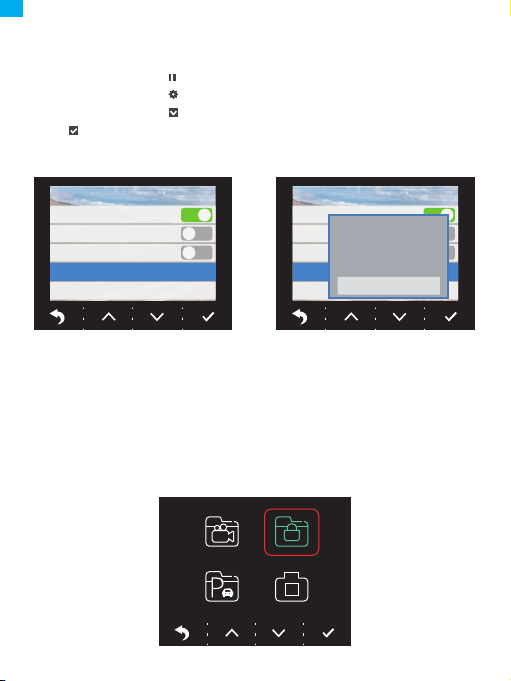
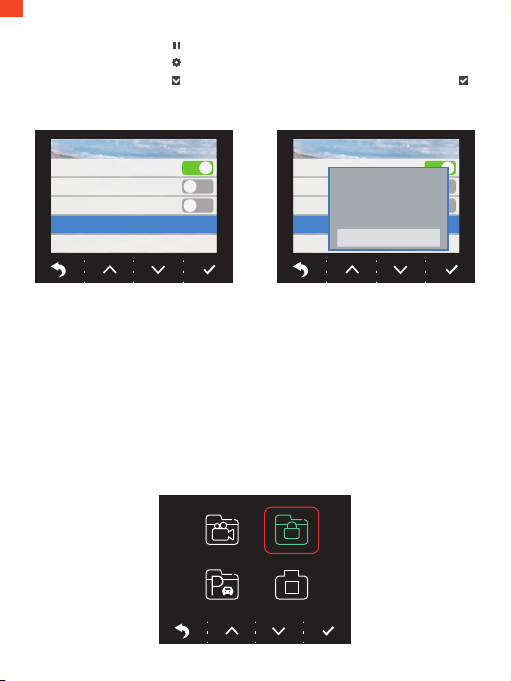
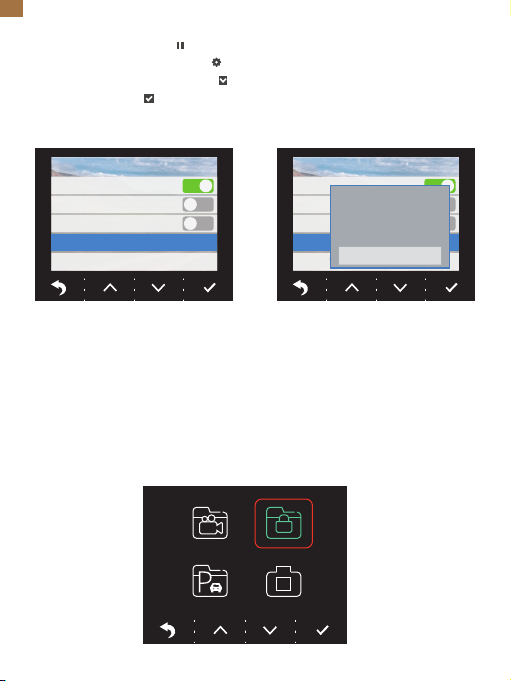
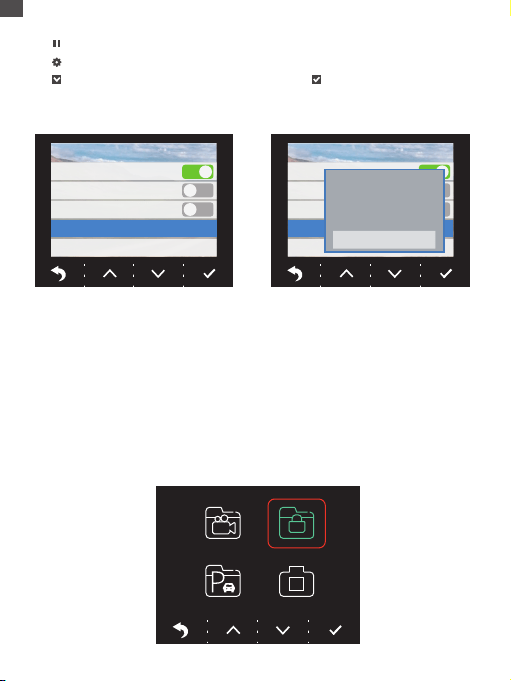
Setup
Date Stamp
HDR
Parking mode
Format
Default
Setup
Date Stamp
HDR
Parking mode
Format
Default
All data will be
formated
Cancel
OK
1. Press the button to pause recording.
2. Press the button to enter the setting page.
3. Press the button to select Format, then press the button.
4. Select "OK" and press the "Confirm" button.
Once formatting is complete, it will automatically exit this page.
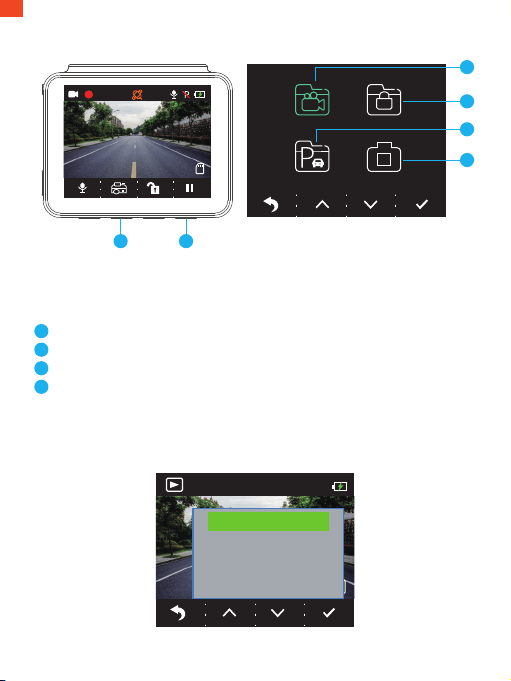
Video Recording
1. After formatting is complete, connect a car charger and start the engine; the
device will automatically turn on and begin recording.
2. Loop recording is already enabled on the D5 Dash Cam; the default setting is 3
Minutes.
3. The G-sensor is already enabled on the D5 Dash Cam; the default setting is Low.
If an impact or sudden braking is detected, it will automatically start recording and
save the footage in the "frontemr" folder.
EN

6
21/04/15
17:55
3840x2160
2021
Lock Current
Unlock Current
Lock All
Unlock All
1
2
3
4
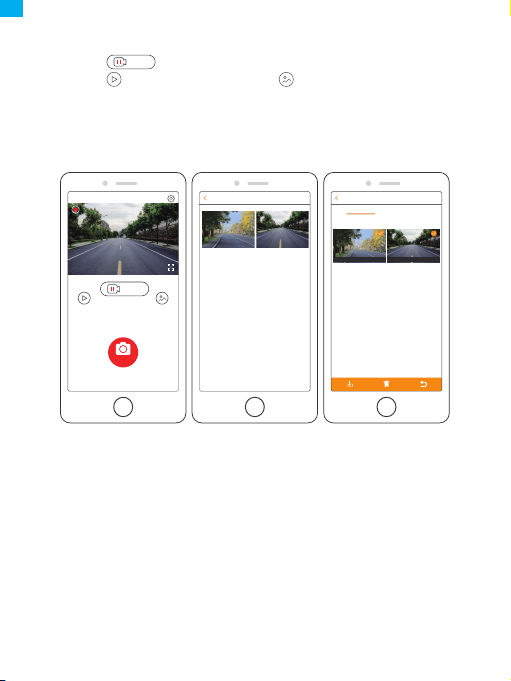
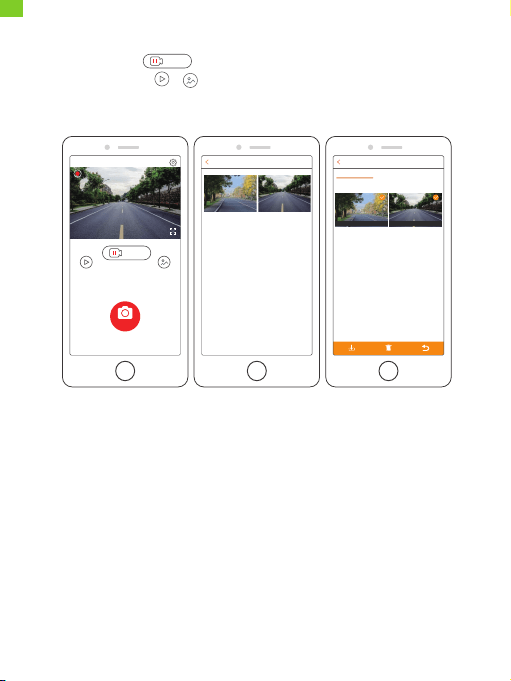
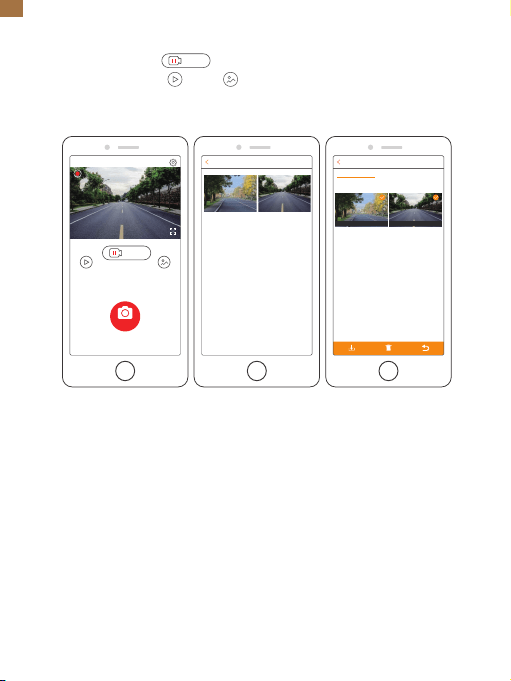
Viewing Album
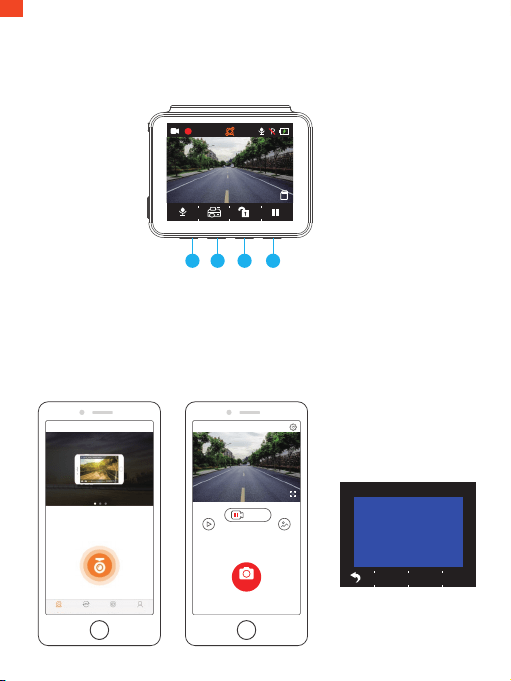
1. Press the 4th function button to stop recording.
2. Press the 2nd function button to enter the album.
Options:
Video
Emergency recording
Parking mode recording
Photo
Tips: To unlock the emergency recording, please enter the album, short press the
power button, then select your option in the Unlock menu.
1
2
3
4
4K
00:00:24
04/16/2021 07:15:25 AM
2 4
EN

7
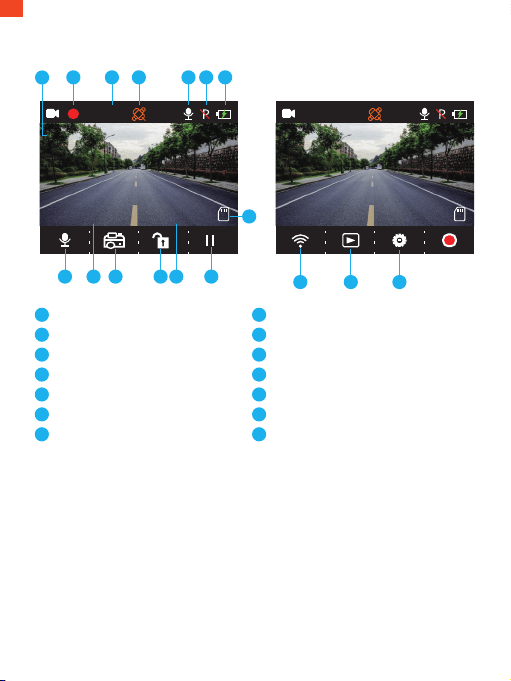
1
2
3
4
5
6
7
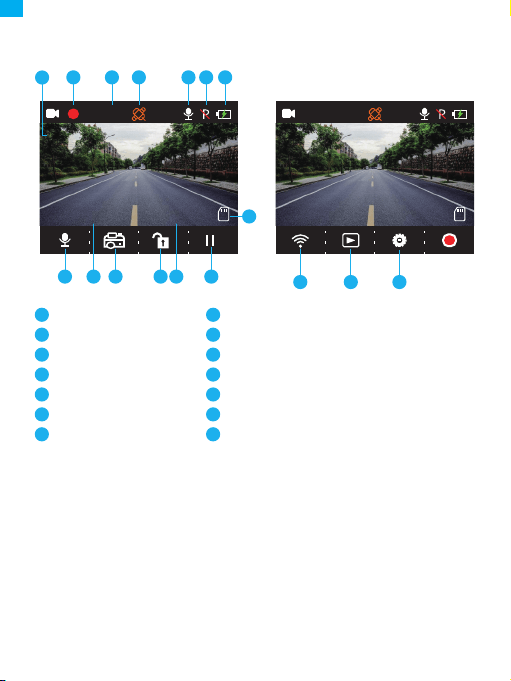
Recording Resolution
Recording Indicator
Video Time
GPS
Microphone Indicator
Parking Mode
Power Status
Icon Introduction
Setup Menu
1
2
4K
00:00:24
04/16/2021 07:15:25 AM
8
3 4 5 6 7
9
1013
11
1214
10
8
9
Memory Card Indicator
Stop/Start Recording
Time
Setting/Emergency Recording
Album/Photo
Date
Wifi Indicator/Audio Recording (Mute/Unmute)
11
12
13
14
1. Language
Select to switch language.
Options:
• English
• Français
• Español
• Deutsch
Default setting: English
• Italiano
• 简体中文
• 繁體中文
• 日本語
4K
04:12:57
04/18/2021 07:05:41 AM
111214
EN

8
2. Resolution
Select to switch resolution.
Options:
• 4K P30
• 2K P30
• 1080P P60
Default setting: 4K P30
3. Loop Recording
If you choose the 3 Minutes option, the files will be saved every 3 minutes.
When the memory card is full, new files will overwrite the old ones if Loop Recording
is on. If it is off, the camera will stop recording when the card is full. You will then
need to format the memory card or insert a new one.
Options:
• 1 Minute
• 3 Minutes
• 5 Minutes
• Off
Default setting: 3 Minutes
4. Beep Sound
Turn the beep sound on/off.
Default setting: On
5. Frequency
Choose the right frequency to avoid flickering. This should be based on your local
AC parameters.
Options:
• 60 Hz
• 50 Hz
Default setting: 60 Hz
EN

9
6. G-Sensor
When G-Sensor Mode is turned on, it will automatically start recording and save
content if an impact or sudden braking is detected. The videos will be locked and
never overwritten by new files. The higher the sensitivity level, the easier it is to
trigger the G-Sensor.
Options:
• Off
• Low
• Middle
• High
Default Setting: Low
7. EV
Select to change exposure.
Options:
• +0.0
• -1/3
• -2/3
• -1.0
• -4/3
• -5/3
• -2.0
Default setting: +0.0
8. Time Zone
Choose the time zone manually. The device will then display the time of the
selected time zone.
Default setting: GMT – 5 (U.S. Eastern Time Zone)
9. GPS
Track your driving speed and show your preferred speed unit.
Options:
• KM/H
• MPH
Default setting: KM/H
EN

10
10. Screen Saver
The display screen will turn off automatically after a set time. When the screen is
turned off, power consumption will be reduced. The camera will still work while
the screen is turned off. Just click the screen to turn it back on.
Options:
• Off
• 30 Seconds
• 1 Minute
• 2 Minutes
Default setting: 1 Minute
11. Codec
Select your video compression standard. H.265 is faster and more efficient than H.264.
Options:
• H.265
• H.264
Default setting: H.265
12. Car No.
Enter your license plate number and videos/photos will include it in the left or
right corner.
13. Date/Time
Set the date and time manually.
14. Motion Detection
When Motion Detection is on, the D5 Dash Cam will detect whether you are driving
or parked. If no movement is detected after 5 minutes of recording, Parking Mode
will be activated.
Default setting: Off
15. Time-lapse Recording
When Time-lapse Recording is selected, the camera will take static photos to create
a video montage.
Default setting: Off
EN

11
16. Date Stamp
Select to add a date stamp to photos/videos.
Default setting: On
17. HDR
Select to turn HDR mode on/off.
Default setting: Off
18. Parking Mode
If there is an impact on the car during parking, the camera will turn on automatically
and create a locked 20-second recording. The higher the selected level, the easier
it is to trigger the recording.
Default setting: Off
19. Format
Format your memory card.
20. Default
Restore the default settings.
21. Version
Check the software version of the camera. This information may be required when
technical support is needed.
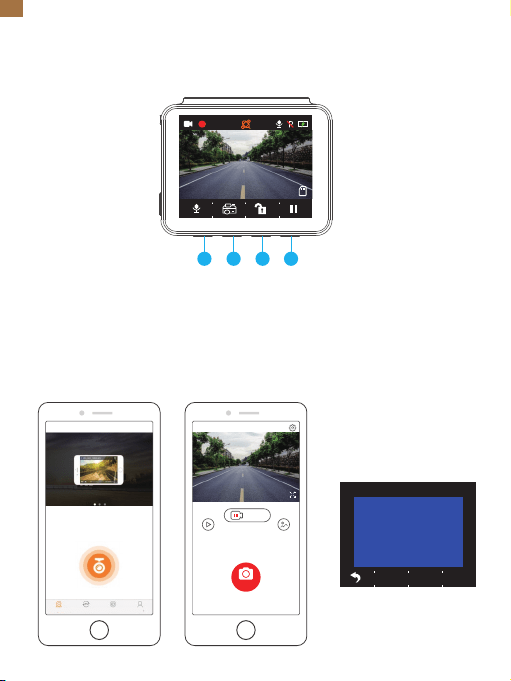
Download the App and GPS Player
Download the "Kingslim" app on the App Store or Google Play.
Download the GPS player: www.kingslim.net/player
EN

WiFi Connected
MAC: f2a5c5df892b
Press Select to Disconnect
Video Photo
Photo
Exit
2021 03 17 13:47
NVT_CARDV688fc9c17556
Stop
Recording instrument
NVT_CARDV688fc9c17556
12
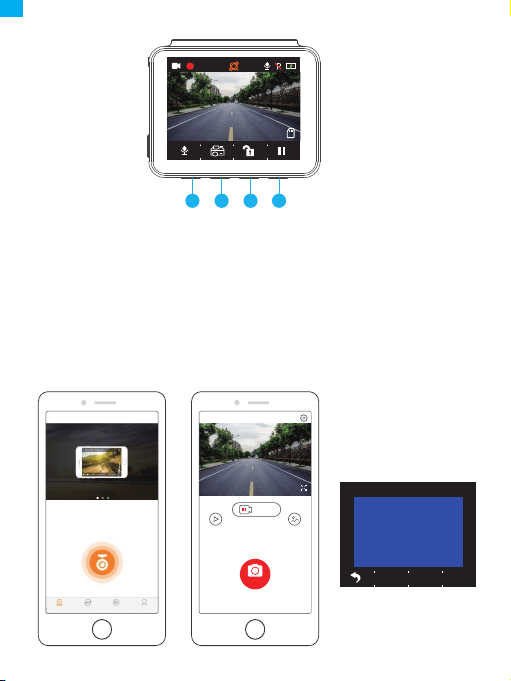
Connect the camera with the app.
1. Short press the fourth function button to stop recording on the D5 Dash Cam.
2. Short press the first function button to enter Wifi settings on the main menu.
3. Go to your smartphone's Wifi settings and connect to the Wifi name shown on
the dash cam. Enter the password and confirm the Wifi network.
4. Open the "Kingslim" app, tap "NVT_CARDVxxxx" and wait a few seconds to enter
the preview interface.
5. Tap the video or photo icon to control the D5 Dash Cam in either recording
videos or shooting photos.
Using the "Kingslim" App
4K
00:00:24
04/16/2021 07:15:25 AM
1 2 3 4
EN

Note:
To exit Wifi settings, please press the first button on the dash cam.
To delete the emergency recording on the app, please unlock the video in the
album by short pressing the power button to call out the Unlock menu.
13
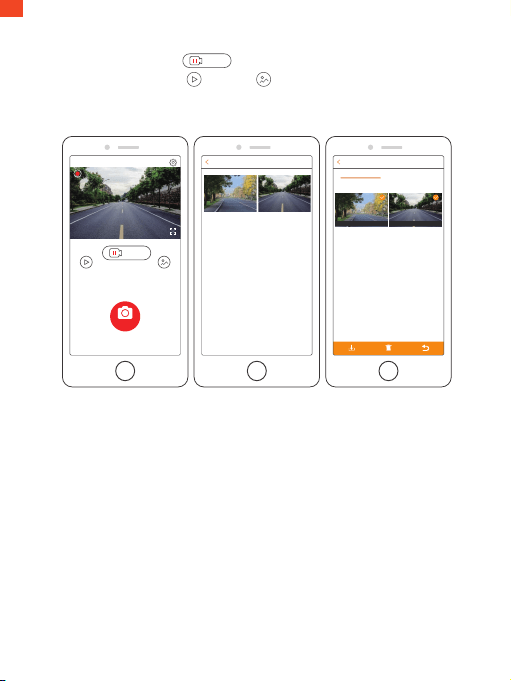
DOWNLOAD OR DELETE VIDEOS AND PHOTOS
1. Tap the icon to stop recording.
2. Tap the or icon to check the videos or photos.
3. Tap "Select" and choose videos or photos that you want.
4. Tap the download or delete icon to download or delete.
Photo Select
2021/04/21
2021/04/21 13:00
13:32:26 13:35:47
9.32MB 108.52MB
Movie Select
Loop video Emergency video
NVT_CARDV688fc9c17556
04/21/2021 07:51:29 AM
00:00:52
Video Photo
Photo
Exit
Stop
Stop
EN

14
Video: 4K at 30 fps/2K at 30 fps/1080P at 60 fps
Video Coding: H.264/H.265
Working temperature: 20–60°C (-4–140°F)
Input: 5V DC
If your D5 Dash Cam is not working properly, please follow these
troubleshooting steps:
1. The dash cam cannot record.
• Check whether the memory card has enough space. Please back up any important
data to other devices first, then format the memory card.
• Check if Loop Recording in the Settings menu is set to Off.
Set "Loop Recording" to 3 minutes.
2. Recording stops automatically.
During recording, a large amount of high-definition video data is processed.
Please use a high-speed memory card of Class 10 or higher.
3. A "File Error" prompt appears when playing back pictures and videos.
Please use a genuine memory card. Please format the memory card.
4. The image is misty.
Ensure that there are no fingerprints or other marks on the camera lens. Use a soft
dry cloth to clean the lens. Clean the front windshield.
5. The device crashes.
If your device crashes, use a sharp object to press the reset button and restart the
device.
Specifications
EN

15
6. There is no sound on the video.
Ensure that Audio Recording Mode is on.
7. The camera keeps turning on and off automatically.
Please charge the camera with the included car charger. Do not charge the battery
via the USB data cable with other adapters.
1. Please mount your device in a secure place and protect the lens from scratches
and dirt.
2. Do not expose the device to rain, moisture or water under any circumstances.
3. Avoid leaving the device in direct sunlight for extended periods of time.
4. Do not dismantle or expose the internal battery.
Caution
For any inquiries about KingSlim products, please feel free to contact us. Wewill
respondwithin24hours.
Tel: 888-811-1140 (US)
Email: [email protected]
Web: www.kingslim.net
Contact Us
EN
16
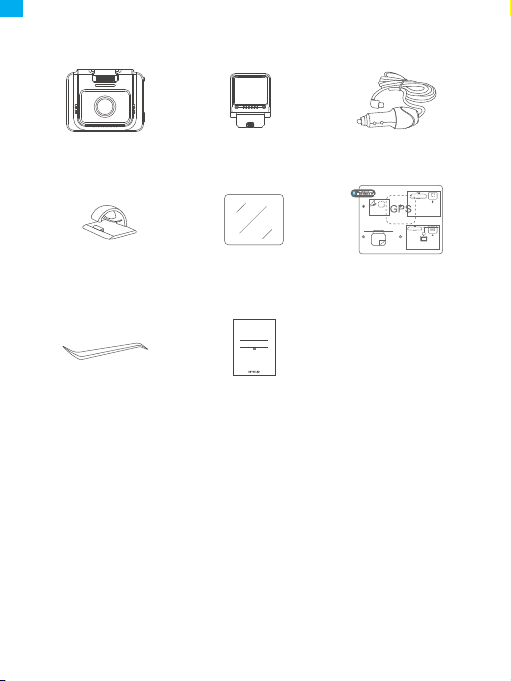
Was ist in der Box?
D5 Dash Cam * 1
Car Charger with
3.5m Power Cable * 1
GPS Bracket * 1
Quick Start Guide * 1
Cable Clips * 5 Static Sticker * 2
Double-sided
Adhesive Tape * 2
Pry Tool * 1
Quick Start Guide
KingSlim D5 Dash Cam
V1.0
DE

17
English
Kameraübersicht
1
2
3
4
5
11
10
7
6
8
9
Funktionstaste
Steckplatz für Halterung
Frontkamera
Mini-USB-Stromanschluss 1 (Stromversorgung)
Mini-USB-Stromanschluss 2
Speicherkarte-Kartensteckplatz
Sich ausruhen
Betriebsanzeige
Ein-/Aus-Taste
Lautsprecher
Bildschirm
3
11
2
1
6
8
7
9
10
5
4
DE

18
English
Installation
1. Setzen Sie eine speicherkarte ein (separat erhältlich).
Tipp: Die D5 Dashcam unterstützt eine speicherkarte der Klasse 10 oder höher
mit bis zu 256 GB (speicherkarte nicht im Lieferumfang enthalten). Bitte
formatieren Sie die Karte in der Kamera, bevor Sie sie in der Dashcam verwenden.
Entfernen oder stecken Sie die speicherkarte nicht, wenn die Dashcam
eingeschaltet ist, da dies die Karte beschädigen kann.
2. Setzen Sie die GPS-Halterung in den Halterungsschacht ein.
speicherkarte
DE
English
19
3. Befestigen Sie die D5 Dashcam an der Windschutzscheibe.
① Reinigen Sie die Windschutzscheibe mit einem trockenen Tuch.
② Entfernen Sie die statische Aufkleberfolie und kleben Sie den Aufkleber auf die
Windschutzscheibe, während Sie sicherstellen, dass keine Luftblasen vorhanden sind.
③ Ziehen Sie die Folie auf einer Seite des doppelseitigen Klebebands ab und bringen
Sie das Band an der D5 Dashcam an.
④ Ziehen Sie die Folie auf der anderen Seite des Klebebands ab und drücken Sie
die D5 Dashcam fest an, um sie auf dem statischen Aufkleber zu befestigen (wenn
Sie die Dashcam entfernen möchten, entfernen Sie bitte den statischen Aufkleber).
Hinweis: Sie können die Dashcam an die Windschutzscheibe kleben, ohne den
statischen Aufkleber zu verwenden.
Formatieren der Speicherkarte
Bitte formatieren Sie die speicherkarte in der Kamera, bevor Sie diese Dashcam
verwenden.
4. Stellen Sie den Blickwinkel der Dashcam entsprechend ein.
5. Schließen Sie das Autoladegerät an die Dashcam an. Stecken Sie das Autoladegerät
in den Zigarettenanzünder.
6. Verwenden Sie das Aufbrechwerkzeug, um die Kabel zu verbergen.
Statische Aufkleber
Kabel-Clip
DE
English
20
1. Drücken Sie die Taste , um die Aufnahme anzuhalten.
2. Drücken Sie die Taste , um die Einstellungsseite aufzurufen.
3. Drücken Sie die Taste , um Format zu wählen und drücken Sie dann die
Taste .
4. Wählen Sie „OK“ und drücken Sie die Taste „Bestätigen“.
Sobald die Formatierung abgeschlossen ist, wird diese Seite automatisch verlassen.
Tipp: Entfernen oder stecken Sie die speicherkarte nicht, wenn die Dashcam
eingeschaltet ist, da dies die Karte beschädigen kann.
Videoaufnahme
1. Schließen Sie nach Abschluss der Formatierung ein Autoladegerät an und starten
Sie den Motor. Das Gerät schaltet sich automatisch ein und beginnt mit der Aufnahme.
2. Die Daueraufzeichnung ist bei der D5 Dashcam bereits aktiviert. Die
Standardeinstellung ist 3 Minuten.
3. Der G-Sensor ist bei der D5 Dashcam bereits aktiviert. Die Standardeinstellung
ist Niedrig. Wenn ein Aufprall oder eine plötzliche Bremsung erkannt wird, startet
sie automatisch die Aufnahme und speichert das Filmmaterial im Ordner „frontemr“.
Einstellung
Datumsstempel
HDR
Parkmodus
Format
Standard
Einstellung
Datumsstempel
HDR
Parkmodus
Format
Standard
Alle Daten werden
formatiert
Abbrechen
OK
DE

English
21
21/04/15
17:55
3840x2160
2021
Strom sperren
Strom entsperren
Sperre alle
Entsperren alle
1
2
3
4
Album anzeigen
1. Drücken Sie die Pausentaste, um die Aufnahme zu stoppen.
2. Drücken Sie die 2. Funktionstaste, um das Album aufzurufen.
Optionen:
Video
Notfallaufnahme
Aufnahme im Parkmodus
Foto
Tipps: Um die Notfallaufnahme zu entsperren, geben Sie bitte das Album ein,
drücken Sie kurz die Einschalttaste und wählen Sie dann Ihre Option im Menü
Entsperren aus.
1
2
3
4
4K
00:00:24
04/16/2021 07:15:25 AM
2 4
DE
English
22
1
2
3
4
5
6
7
Aufnahmeauflösung
Aufnahmeanzeige
Videozeit
GPS
Mikrofonanzeige
Parkmodus
Stromversorgungsstatus
Erklärung der Symbole
Einstellungsmenü
1
2
4K
00:00:24
04/16/2021 07:15:25 AM
8
3 4 5 6 7
9
1013
11
1214
10
8
9
Speicherkarte-Kartenanzeige
Aufnahme stoppen/starten
Zeit
Einstellung/Notfallaufnahme
Album/Foto
Datum
WLAN-Anzeige/Audio-Aufnahme
(Stummschaltung/Stummschaltung aufheben)
11
12
13
14
1. Sprache
Auswählen, um die Sprache zu wechseln.
Optionen:
• English
• Français
• Español
• Deutsch
Standardeinstellung: Englisch
• Italiano
• 简体中文
• 繁體中文
• 日本語
4K
04:12:57
04/18/2021 07:05:41 AM
111214
DE

English
23
2. Auflösung
Auswählen, um die Auflösung einzustellen.
Optionen:
• 4K P30
• 2K P30
• 1080P P60
Standardeinstellung: 4K P30
3. Daueraufzeichnung
Wenn Sie die Option 3 Minuten wählen, werden die Dateien alle 3 Minuten
gespeichert. Wenn die speicherkarte voll ist, werden neue Dateien die alten
überschreiben, wenn die Daueraufzeichnung eingeschaltet ist. Wenn sie
ausgeschaltet ist, stoppt die Kamera die Aufnahme, wenn die Karte voll ist.
Sie müssen dann die speicherkarte formatieren oder eine neue Karte einlegen.
Optionen:
• 1 Minute
• 3 Minuten
• 5 Minuten
• Aus
Standardeinstellung: 3 Minuten
4. Signalton
Signalton ein-/ausschalten.
Standardeinstellung: Ein
5. Frequenz
Wählen Sie die richtige Frequenz, um Flackern zu vermeiden. Diese sollte sich an
Ihren lokalen AC-Parametern orientieren.
Optionen:
• 60 Hz
• 50 Hz
Standardeinstellung: 60 Hz
DE

English
24
6. G-Sensor
Wenn der G-Sensor-Modus eingeschaltet ist, startet er automatisch die Aufnahme
und speichert Inhalte, wenn ein Aufprall oder eine plötzliche Bremsung erkannt wird.
Die Videos werden gesperrt und nie durch neue Dateien überschrieben. Je höher
die Empfindlichkeitsstufe, desto einfacher ist es, den G-Sensor auszulösen.
Optionen:
• Aus
• Niedrig
• Mittel
• Hoch
Standardeinstellung: Niedrig
7. EV
Auswählen, um die Belichtung zu ändern.
Optionen:
• +0.0
• -1/3
• -2/3
• -1.0
• -4/3
• -5/3
• -2.0
Standardeinstellung: +0.0
8. Zeitzone
Wählen Sie die Zeitzone manuell aus. Das Gerät zeigt dann die Uhrzeit der
gewählten Zeitzone an.
Standardeinstellung: GMT – 5 (U.S. Eastern Time Zone)
9. GPS
Verfolgen Sie Ihre Fahrgeschwindigkeit und zeigen Sie Ihre bevorzugte
Geschwindigkeitseinheit an.
Optionen:
• KM/H
• MPH
Standardeinstellung: KM/H
DE

25
10. Bildschirmschoner
Der Bildschirm schaltet sich nach einer bestimmten Zeit automatisch aus. Wenn
der Bildschirm ausgeschaltet ist, wird der Stromverbrauch reduziert. Die Kamera
funktioniert noch, während der Bildschirm ausgeschaltet ist. Klicken Sie einfach auf
den Bildschirm, um ihn wieder einzuschalten.
Optionen:
• Aus
• 30 Sekunden
• 1 Minute
• 2 Minuten
Standardeinstellung: 1 Minute
11. Codec
Wählen Sie Ihren Videokomprimierungsstandard. H.265 ist schneller und effizienter
als H.264.
Optionen:
• H.265
• H.264
Standardeinstellung: H.265
12. Auto-Nr
Geben Sie Ihr Kennzeichen ein und die Videos/Fotos werden es in der linken oder
rechten Ecke einblenden.
13. Datum/Zeit
Datum und Uhrzeit manuell einstellen.
14. Bewegungserkennung
Wenn die Bewegungserkennung eingeschaltet ist, erkennt die D5 Dashcam, ob Sie
fahren oder parken. Wenn nach 5 Minuten Aufnahmezeit keine Bewegung erkannt
wird, wird der Parkmodus aktiviert.
Standardeinstellung: Aus
15. Zeitrafferaufnahme
Wenn die Zeitrafferaufnahme ausgewählt ist, nimmt die Kamera statische Fotos auf,
um eine Videomontage zu erstellen.
Standardeinstellung: Aus
DE

26
16. Datumsstempel
Wählen Sie diese Option, um einen Datumsstempel zu Fotos/Videos hinzuzufügen.
Standardeinstellung: Ein
17. HDR
Auswählen, um den HDR-Modus ein-/auszuschalten.
Standardeinstellung: Aus
18. Parkmodus
Wenn es beim Einparken zu einem Aufprall auf das Auto kommt, schaltet sich die
Kamera automatisch ein und erstellt eine gesperrte 20-Sekunden-Aufnahme. Je
höher der gewählte Pegel, desto einfacher ist es, die Aufnahme auszulösen.
Standardeinstellung: Aus
19. Formatierung
Formatieren Sie Ihre Speicherkarte.
20. Standard
Wiederherstellen der Standardeinstellungen.
21. Version
Überprüfen Sie die Softwareversion der Kamera. Diese Information kann benötigt
werden, wenn technische Unterstützung benötigt wird.
Verbinden Sie die Kamera mit der App.
1. Drücken Sie kurz die vierte Funktionstaste, um die Aufnahme auf der D5
Dashcam zu stoppen.
Verwenden der App „Kingslim“
Laden Sie die App „Kingslim“ im App Store oder bei Google Play herunter.
Den GPS-Player herunterladen: www.kingslim.net/player
App und den GPS-Player herunterladen
DE
WiFi verbunden
MAC: f2a5c5df892b
Video Foto
Foto
Beenden
2021 03 17 13:47
NVT_CARDV688fc9c17556
Stopp
Aufnahmegerät
NVT_CARDV688fc9c17556
27
2. Drücken Sie kurz die erste Funktionstaste, um die WLAN-Einstellungen im
Hauptmenü aufzurufen.
3. Gehen Sie zu den WLAN-Einstellungen Ihres Smartphones und verbinden Sie
sich mit dem auf der Dashcam angezeigten WLAN-Namen. Geben Sie das Passwort
ein und bestätigen Sie das WLAN-Netzwerk.
4. Öffnen Sie die App „Kingslim“, tippen Sie auf „NVT_CARDVxxxx“ und warten Sie
ein paar Sekunden, um die Vorschauoberfläche aufzurufen.
5. Tippen Sie auf das Video- oder Fotosymbol, um die D5 Dashcam entweder bei der
Aufnahme von Videos oder von Fotos zu steuern.
4K
00:00:24
04/16/2021 07:15:25 AM
1 2 3 4
Aufnahmegerät Momente Album mein
Drücken Sie die
Auswahltastezum Trennen
DE
Hinweis:
Um die Notfallaufnahme in der App zu löschen, entsperren Sie bitte das Video im
Album durch kurzes Drücken der Einschalttaste, um das Entsperrmenü aufzurufen.
28
Herunterladen/Löschen von Videos und Fotos
1. Tippen Sie auf das Symbol Stopp, um die Aufnahme zu beenden.
2. Tippen Sie auf das Symbol Videos oder Fotos, um Videos oder Fotos zu
prüfen.
3. Tippen Sie auf “Auswählen” und wählen Sie die gewünschten Videos oder Fotos aus.
4. Tippen Sie auf das Symbol Herunterladen oder Löschen, um herunterzuladen
oder zu löschen.
Foto Wählen Sie
2021/04/21
2021/04/21 13:00
13:32:26 13:35:47
9.32MB 108.52MB
Film Wählen Sie
NVT_CARDV688fc9c17556
04/21/2021 07:51:29 AM
00:00:52
Video Foto
Foto
Beenden
Stopp
Stopp
Loop-Video
Notfall-Video
DE

English
29
Video: 4K bei 30 fps/2K bei 30 fps/1080P bei 60 fps
Video-Codierung: H.264/H.265
Arbeitstemperatur: 20–60°C (-4–140°F)
Eingang: 5V DC
Wenn Ihre D5 Dashcam nicht richtig funktioniert, befolgen Sie bitte die folgenden
Schritte zur Fehlerbehebung:
1. Die Dashcam kann nichts aufzeichnen.
• Prüfen Sie, ob auf der speicherkarte genügend Speicherplatz vorhanden ist.
Sichern Sie bitte zuerst wichtige Daten auf anderen Geräten und formatieren Sie
dann die speicherkarte.
• Prüfen Sie, ob Daueraufzeichnung im Menü Einstellungen auf Aus eingestellt ist.
Stellen Sie Daueraufzeichnung auf 3 Minuten ein.
2. Die Aufnahme stoppt automatisch.
Während der Aufnahme wird eine große Menge an hochauflösenden Videodaten
verarbeitet. Bitte verwenden Sie eine Hochgeschwindigkeits-speicherkarte der
Klasse 10 oder höher.
3. Bei der Wiedergabe von Bildern und Videos erscheint die Meldung „Dateifehler“.
Bitte verwenden Sie eine echte speicherkarte. Bitte formatieren Sie die speicherkarte.
4. Das Bild ist verschwommen.
Vergewissern Sie sich, dass sich keine Fingerabdrücke oder andere Spuren auf dem
Kameraobjektiv befinden. Verwenden Sie ein weiches, trockenes Tuch, um das
Objektiv zu reinigen. Reinigen Sie die vordere Windschutzscheibe.
Spezifikationen
DE

30
5. Das Gerät stürzt ab.
Wenn Ihr Gerät abstürzt, drücken Sie mit einem spitzen Gegenstand die Reset-Taste
und starten Sie das Gerät neu.
6. Es ist kein Ton auf dem Video vorhanden.
Stellen Sie sicher, dass der Audio-Aufnahmemodus eingeschaltet ist.
7. Die Kamera schaltet sich immer wieder automatisch ein und aus.
Bitte laden Sie die Kamera mit dem mitgelieferten Autoladegerät. Laden Sie den
Akku nicht über das USB-Datenkabel mit anderen Adaptern.
1. Bitte befestigen Sie Ihr Gerät an einem sicheren Ort und schützen Sie das
Objektiv vor Kratzern und Schmutz.
2. Setzen Sie das Gerät unter keinen Umständen Regen, Feuchtigkeit oder Wasser aus.
3. Vermeiden Sie es, das Gerät für längere Zeit in direktem Sonnenlicht zu lassen.
4. Zerlegen Sie nicht den internen Akku oder exponieren Sie ihn.
Achtung
DE
31
Dash Cam D5 * 1
Cargador de automóvil con cable
de alimentación de 3.5 m * 1
Soporte de GPS * 1
Guía de inicio rápido * 1
Clip para cable * 5 Pegatina estática * 2
Cinta adhesiva
de doble cara * 2
Herramienta de palanca * 1
Quick Start Guide
KingSlim D5 Dash Cam
V1.0
Qué hay en la caja
ES
32
English
Descripción de la cámara
1
2
3
4
5
10
11
9
6
7
8
Botón de Funciones
Ranura para soporte
Cámara delantera
Puerto de alimentación Mini USB 1
(Fuente de alimentación)
Puerto de alimentación Mini USB 2
Ranura para tarjeta de memoria
Reiniciar
Indicador de funcionamiento
Botón de Encendido
Altavoz
Pantalla
3
11
2
1
6
8
7
9
10
5
4
ES
33
English
Instalación
1. Inserte una tarjeta de memoria (vendido por separado).
Consejo: la Dash Cam D5 admite tarjeta de memoria clase 10 o superior, de hasta
256 GB (la tarjeta de memoria no está incluida). Formatee la tarjeta en la cámara
antes de utilizarla en la dash cam. No retire o inserte la tarjeta de memoria cuando
la dash cam esté encendida ya que puede dañar la tarjeta.
2. Inserte el soporte de GPS en la ranura para el soporte.
tarjeta de memoria
ES

English
34
3. Instale la Dash Cam D5 en el parabrisas.
① Limpie el parabrisas con un paño seco.
② Retire la película adhesiva estática y coloque la pegatina en el parabrisas,
asegurándose de que no queden burbujas de aire.
③ Despegue un lado de la película de la cinta adhesiva de doble cara y coloque la
cinta en la Dash Cam D5.
④ Despegue el otro lado de la película de la cinta adhesiva y presione la Dash Cam
D5 firmemente, para asegurarla en la pegatina estática (si desea remover la dash
cam, retire la pegatina estática).
Nota: puede pegar la dash cam al parabrisas sin utilizar la pegatina estática.
Formateo de la tarjeta de memoria
Formatee la tarjeta de memoria en la cámara, antes de usarla en esta dash cam.
Consejo: no retire o inserte la tarjeta de memoria cuando la dash cam está
encendida ya que puede dañar la tarjeta.
4. Ajuste el ángulo de visión de la dash cam como corresponda.
5. Conecte el cargador de automóvil a la dash cam. Conecte el cargador de
automóvil al enchufe del encendedor de cigarrillos del automóvil.
6. Utilice la herramienta de palanca para ocultar los cables.
Pegatina Estática
Clip de Cable
ES

English
35
Configuración
Sello de fecha
HDR
Modo de estacionamiento
Formato
Defecto
Configuración
Sello de fecha
HDR
Modo de estacionamiento
Formato
Defecto
Todos los datos serán
formateados
Cancelar
OK
1. Presione el botón para pausar la grabación.
2. Presione el botón para ingresar a la página de configuración.
3. Presione el botón para seleccionar Formato, luego, presione el botón .
4. Seleccione "OK" y presione el botón "Confirmar".
Cuando el formateo se haya completado, saldrá automáticamente de esta página.
Grabación de video
1. Después de que se complete el formateo, conecte el cargador de automóvil y
encienda el motor; el dispositivo se encenderá automáticamente y comenzará a grabar.
2. La Dash Cam D5 viene con la Grabación en bucle ya habilitada; la configuración
predeterminada es de 3 minutos.
3. La Dash Cam D5 viene con el sensor G ya habilitado; la configuración
predeterminada es Baja. Si la cámara detecta un impacto o frenado repentino,
comenzará a grabar automáticamente y guardará la grabación en la carpeta "frontemr".
ES

English
36
21/04/15
17:55
3840x2160
2021
Bloquear actual
Desbloquear actual
Bloquear todo
Desbloquear todo
1
2
3
4
Ver el álbum
1. Presione el botón de Pausa para detener la grabación.
2. Presione la segunda función del botón para ingresar al álbum.
Opciones:
Video
Grabación de emergencia
Grabación del modo Estacionamiento
Foto
Consejo: para desbloquear la grabación de emergencia, ingrese al álbum, presione
brevemente el modo Encendido, luego, seleccione su opción en el menú Desbloquear.
1
2
3
4
4K
00:00:24
04/16/2021 07:15:25 AM
2 4
ES
English
37
1
2
3
4
5
6
7
Resolución de grabación
Indicador de grabación
Tiempo de video
GPS
Indicador de micrófono
Modo Estacionamiento
Estado de potencia
Introducción a los símbolos
Menú de configuración
1
2
4K
00:00:24
04/16/2021 07:15:25 AM
8
3 4 5 6 7
9
1013
11
1214
10
8
9
Indicador de tarjeta de memoria
Detener/Iniciar grabación
Hora
Configuración/Grabación de emergencia
Álbum/Foto
Fecha
Indicador Wifi/(Silenciar/Reactivar)
11
12
13
14
1. Idioma
Seleccione para cambiar el idioma.
Opciones:
• English
• Français
• Español
• Deutsch
Configuración predeterminada: Inglés
• Italiano
• 简体中文
• 繁體中文
• 日本語
4K
04:12:57
04/18/2021 07:05:41 AM
111214
ES

English
38
2. Resolución
Seleccione para cambiar la resolución.
Opciones:
• 4K P30
• 2K P30
• 1080P P60
Configuración predeterminada: 4K P30
3. Grabación en bucle
Si elige la opción de 3 minutos, los archivos se guardarán cada 3 minutos. Cuando
la tarjeta de memoria esté llena, los nuevos archivos sobrescribirán los anteriores
si el modo de Grabación en bucle está activo. Si este modo está apagado, la
cámara dejará de grabar cuando la tarjeta esté llena. Entonces, necesitará
formatear la tarjeta de memoria o insertar una nueva.
Opciones:
• 1 minuto
• 3 minutos
• 5 minutos
• Apagado
Configuración predeterminada: 3 minutos
4. Pitido
Encienda/apague el pitido.
Configuración predeterminada: Encendido
5. Frecuencia
Escoja la frecuencia correcta para evitar parpadeo. La selección se debe basar en
los parámetros AC locales.
Opciones:
• 60 Hz
• 50 Hz
Configuración predeterminada: 60 Hz
ES

English
39
6. Sensor G
Cuando se activa el modo Sensor G, comenzará a grabar y guardar contenidos
automáticamente al detectar un impacto o frenado repentino. Los videos serán
bloqueados y no serán sobrescritos por nuevos archivos. A mayor nivel de
sensibilidad, más fácil será activar el Sensor G.
Opciones:
• Apagado
• Bajo
• Medio
• Alto
Configuración predeterminada: Bajo
7. Valor de exposición (EV)
Seleccione para cambiar la exposición.
Opciones:
• +0.0
• -1/3
• -2/3
• -1.0
• -4/3
• -5/3
• -2.0
Configuración predeterminada: +0.0
8. Zona horaria
Seleccione la zona horaria manualmente. El dispositivo mostrará la hora de la zona
horaria seleccionada.
Configuración predeterminada: GMT – 5 (Zona horaria del este de E.E.U.U)
9. GPS
Controle su velocidad de conducción y muestre su unidad de velocidad preferida.
Opciones:
• km/h
• mph
Configuración predeterminada: km/h
ES

English
40
10. Protector de pantalla
La pantalla de visualización se apagará automáticamente después de un tiempo
establecido. Cuando la pantalla se apague, el consumo de energía será reducido.
La cámara continuará funcionando, aunque la pantalla esté apagada. Simplemente
haga clic en la pantalla para encenderla de nuevo.
Opciones:
• Apagado
• 30 segundos
• 1 minuto
• 2 minutos
Configuración predeterminada: 1 minuto
11. Compresión de video (Codec)
Seleccione su estándar de compresión de video. H.265 es más rápido y eficiente
que H.264.
Opciones:
• H.265
• H.264
Configuración predeterminada: H.265
12. No. de matrícula
Ingrese su número de matrícula y los videos/fotos la incluirán en la esquina
izquierda o derecha.
13. Fecha/Hora
Establezca la fecha y hora manualmente.
14. Detección de movimiento
Cuando la Detección de movimiento está encendida, la Dash Cam D5 detectará si
usted está conduciendo o estacionado. Si no se detecta ningún movimiento luego
de 5 minutos de grabación, el modo Estacionamiento será desactivado.
Configuración predeterminada: Apagado
15. Grabación lapso de tiempo
Cuando se selecciona la Grabación lapso de tiempo, la cámara tomará fotos
estáticas para crear un montaje de video.
Configuración predeterminada: Apagado
ES

English
41
16. Sello de fecha
Seleccione para agregar un sello de fecha a las fotos/videos.
Configuración predeterminada: Encendido
17. Alto rango dinámico (HDR)
Seleccione para encender/apagar el modo HDR.
Configuración predeterminada: Apagado
18. Modo Estacionamiento
Si ocurre un impacto en el automóvil mientras está estacionado, la cámara se
encenderá automáticamente y creará una grabación bloqueada de 20 segundos.
Cuanto más alto sea el nivel de sensibilidad seleccionado, más fácil será activar la
grabación.
Configuración predeterminada: Apagado
19. Formato
Formatee su tarjeta de memoria.
20. Configuración de fábrica
Restablezca la configuración de fábrica.
21. Versión
Verifique la versión de software de la cámara. Esta información le puede ser
requerida si necesita soporte técnico.
Descargue la aplicación y el reproductor de GPS
Descargue la aplicación "Kingslim" desde App Store o Google Play.
Descargue el reproductor de GPS: www.kingslim.net/player
ES

WiFi Connected
MAC: f2a5c5df892b
Press Select to Disconnect
Video Foto
Foto
Salida
2021 03 17 13:47
NVT_CARDV688fc9c17556
Detener
Instrumento de grabación
NVT_CARDV688fc9c17556
English
42
Sincronice la cámara con la aplicación.
1. Presione brevemente la cuarta función del botón, para detener la grabación de
la Dash Cam D5.
2. Presione brevemente la primera función del botón, para ingresar a la configuración
de Wifi en el menú principal.
3. Vaya a la configuración Wifi de su teléfono inteligente y conéctelo al nombre de
la red Wifi mostrado en la dash cam. Ingrese la contraseña y confirme la red Wifi.
4. Abra la aplicación "Kingslim", toque "Agregar grabadora" y espere unos segundos
para ingresar a la interfaz de vista previa.
5. Toque el símbolo de video o foto para controlar la Dash Cam D5 en cualquiera
de los modos, grabación de videos o captura de fotos.
Utilización de la aplicación "Kingslim"
4K
00:00:24
04/16/2021 07:15:25 AM
1 2 3 4
Instrumento
de grabación
Momentos Álbum Mío
ES
Nota:
Para eliminar la grabación de emergencia en la aplicación, desbloquee el video en
el álbum presionando brevemente el botón de Encendido, para desplegar el menú
de Desbloqueo.
English
43
Descargar/Eliminar videos y fotos
1. Toque el símbolo , para detener la grabación.
2. Toque los símbolos o para ver los videos o fotos.
3. Toque Seleccionar y seleccione los videos o fotos que desee.
4. Toque el símbolo de Descargar o Eliminar para descargar o eliminar.
Foto
2021/04/21
2021/04/21 13:00
13:32:26 13:35:47
9.32MB 108.52MB
NVT_CARDV688fc9c17556
04/21/2021 07:51:29 AM
00:00:52
Video Foto
Foto
Detener
Detener
Salida
Seleccione
Película
Seleccione
Vídeo en bucle Video de emergencia
ES

English
44
Video: 4K a 30 FPS/2K a 30 FPS/1080P a 60 FPS
Codificación de video: H.264/H.265
Temperatura de funcionamiento: 20 – 60 °C (-4 – 140 °F)
Entrada: 5 V DC
Si su Dash Cam D5 no funciona correctamente, siga los siguientes pasos para la
solución de problemas:
1. La dash cam no graba.
• Revise si la tarjeta de memoria tiene suficiente espacio. Primero, haga una copia
de seguridad de cualquier dato importante en otro dispositivo y luego, formatee la
tarjeta de memoria.
• En el menú de Configuración, revise que la Grabación en bucle esté Apagada.
Establezca la "Grabación en bucle" en 3 minutos.
2. La grabación se detiene automáticamente.
Durante la grabación se procesan una gran cantidad de datos de video en alta
definición. Utilice una tarjeta de memoria de alta velocidad, clase 10 o superior.
3. Cuando se reproducen fotos y videos aparece un mensaje de "Error de archivo".
Use tarjeta de memoria legítimas. Formatee la tarjeta de memoria.
4. La imagen aparece empañada.
Asegúrese de que no haya huellas digitales u otras marcas en la lente de la cámara.
Utilice un paño suave y seco para limpiar la lente. Limpie el parabrisas delantero.
5. El dispositivo falla.
Si su dispositivo falla, utilice un objeto puntiagudo para presionar el botón de
Reinicio y reinicie el dispositivo.
6. El video no tiene sonido.
Asegúrese de que el modo Grabación de audio esté encendido.
7. La cámara continúa encendiéndose y apagándose automáticamente.
Cargue la cámara con el cargador de automóvil provisto. No cargue la batería con
el cable de datos USB utilizando otros adaptadores.
Especificaciones
ES

45
1. Instale su dispositivo en un lugar seguro y proteja la lente de rasguños y polvo.
2. Bajo ninguna circunstancia exponga el dispositivo a la lluvia, humedad o al agua.
3. Evite dejar el dispositivo bajo la luz solar directa por periodos prolongados.
4. No desarme o exponga la batería interna.
Precaución
ES
46
Ce qu'il y a dans la boîte
D5 Dash Cam * 1
Chargeur pour voiture avec
câble d'alimentation de 3,5 m * 1
Support pour GPS * 1
Guide de mise en route rapide * 1
Clips pour câbles * 5 Autocollant statique * 2
Ruban adhésif
double-face * 2
Outil de forçage * 1
Quick Start Guide
KingSlim D5 Dash Cam
V1.0
FR
47
Aperçu de la caméra
1
2
3
4
5
11
10
7
6
8
9
Bouton de fonction
Fente du support
Caméra frontale
Port d'alimentation Mini USB 1 (alimentation)
Port d'alimentation mini USB 2
Fente pour carte mémoire
Réinitialiser
Indicateur de marche
Bouton d'alimentation
Haut-parleur
Écran
3
11
2
1
6
8
7
9
10
5
4
FR

48
Installation
1. Insérez une carte mémoire (vendu séparément).
Conseil: la D5 Dash Cam prend en charge une carte mémoire de classe 10 ou
supérieure, jusqu'à 256 Go (carte mémoire non fournie). Veuillez formater la carte
dans l'appareil avant de l'utiliser dans la dash cam. Ne retirez pas ou n'insérez pas
la carte mémoire lorsque la dash cam est allumée car cela pourrait endommager
la carte.
2. Insérez le support GPS dans la fente du support.
carte mémoire
FR
49
3. Installez la D5 Dash Cam sur le pare-brise.
①Nettoyez le pare-brise avec un chiffon sec.
② Retirez le film de l'autocollant statique et appliquez l'autocollant sur le pare-brise
en vous assurant qu'il n'y a pas de bulles d'air.
③ Décollez le film sur un côté du ruban adhésif double face et appliquez le ruban
sur la D5 Dash Cam.
④ Décollez le film de l'autre côté du ruban adhésif et appuyez fermement sur la
D5 Dash Cam pour la fixer sur l'autocollant statique (si vous souhaitez retirer la
dash cam, veuillez enlever l'autocollant statique).
Remarque: vous pouvez coller la dash cam sur le pare-brise sans utiliser
l'autocollant statique.
Formatage de la carte mémoire
Veuillez formater la carte mémoire dans la caméra avant d'utiliser cette caméra
embarquée.
Conseil: Ne retirez pas ou n'insérez pas la carte mémoire lorsque la dash cam est
allumée car cela pourrait endommager la carte.
4. Réglez l'angle de vue de la caméra en conséquence.
5. Connectez le chargeur de voiture à la dash cam. Branchez le chargeur de
voiture sur l'allume-cigare.
6. Utilisez le levier pour cacher les câbles.
Autocollant statique
Clip de câble
FR
50
1. Appuyez sur le bouton pour mettre l'enregistrement en pause.
2. Appuyez sur le bouton pour accéder à la page de réglage.
3. Appuyez sur le bouton pour sélectionner Format, puis appuyez sur le bouton .
4. Sélectionnez «OK» et appuyez sur le bouton «Confirmer».
Une fois le formatage terminé, il quittera automatiquement cette page.
Enregistrement vidéo
1. Une fois le formatage terminé, connectez un chargeur de voiture et démarrez le
moteur ; l'appareil s'allume automatiquement et commence à enregistrer.
2. L'enregistrement en boucle est déjà activé sur la D5 Dash Cam ; le réglage par
défaut est de 3 minutes.
3. Le capteur G est déjà activé sur la Dash Cam D5 ; le réglage par défaut est faible.
Si un impact ou un freinage soudain est détecté, l'appareil commence
automatiquement à enregistrer et sauvegarde la séquence dans le
dossier « frontemr » .
Paramétrage
Tampon de date
HDR
Mode parking
Format
Défault
Paramétrage
Tampon de date
HDR
Mode parking
Format
Défault
Toutes les données
seront formatées
Annulation
OK
FR
51
21/04/15
17:55
3840x2160
2021
Actuellement verrouillé
Actuellement déverrouillé
Tous verrouillés
Tous déverrouillés
1
2
3
4
Voir l'album
1. Appuyez sur le bouton de pause pour arrêter l'enregistrement.
2. Appuyez sur le 2 ème bouton de fonction pour entrer dans l'album.
Options :
Vidéo
Enregistrement d'urgence
Enregistrement en mode parking
Photo
Conseils: Pour déverrouiller l'enregistrement d'urgence, veuillez entrer dans l'album,
appuyez brièvement sur le bouton d'alimentation, puis sélectionnez votre option
dans le menu de déverrouillage.
1
2
3
4
4K
00:00:24
04/16/2021 07:15:25 AM
2 4
FR
52
1
2
3
4
5
6
7
Résolution d'enregistrement
Indicateur d'enregistrement
Heure de la vidéo
GPS
Indicateur de microphone
Mode parking
État de l'alimentation
Introduction aux icônes
Menu de configuration
1
2
4K
00:00:24
04/16/2021 07:15:25 AM
8
3 4 5 6 7
9
1013
11
1214
10
8
9
Indicateur de carte mémoire
Arrêt/Démarrage de l'enregistrement
Temps
Réglage/Enregistrement d'urgence
Album/Photo
Date
Indicateur WiFi/Enregistrement audio
(Muet/Son présent)
11
12
13
14
1. Langue
Sélectionnez pour changer de langue.
Options :
• Anglais
• Français
• Español
• Deutsch
Réglage par défaut : Anglais
• Italiano
• 简体中文
• Chinois traditionnel
• 日本語
4K
04:12:57
04/18/2021 07:05:41 AM
111214
FR

53
2. Résolution
Sélectionnez pour changer de résolution.
Options :
• 4K P30
• 2K P30
• 1080P P60
Réglage par défaut : 4K P30
3. Enregistrement en boucle
Si vous choisissez l'option 3 minutes, les fichiers seront enregistrés toutes les 3
minutes. Lorsque la carte mémoire est pleine, les nouveaux fichiers écrasent les
anciens si l'enregistrement en boucle est activé. S'il est désactivé, l'appareil photo
arrête l'enregistrement lorsque la carte est pleine. Vous devrez alors formater la
carte mémoire ou en insérer une nouvelle.
Options :
• 1 minute
• 3 minutes
• 5 minutes
• Désactivé
Réglage par défaut : 3 minutes
4. Bip sonore
Activez/désactivez le bip sonore.
Réglage par défaut : Activé
5. Fréquence
Choisissez la bonne fréquence pour éviter le scintillement. Ce choix doit être basé
sur les paramètres de votre courant alternatif local.
Options :
• 60 Hz
• 50 Hz
Réglage par défaut : 60 Hz
FR

54
6. Capteur G
Lorsque le mode capteur G est activé, il commence automatiquement à enregistrer
et à sauvegarder le contenu si un impact ou un freinage soudain est détecté.
Les vidéos seront verrouillées et ne seront jamais écrasées par de nouveaux fichiers.
Plus le niveau de sensibilité est élevé, plus le déclenchement du capteur G est facile.
Options :
• Désactivé
• Faible
• Moyen
• Haut
Réglage par défaut : Faible
7. EV
Sélectionnez pour modifier l'exposition.
Options :
• +0.0
• -1/3
• -2/3
• -1.0
• -4/3
• -5/3
• -2.0
Réglage par défaut : +0.0
8. Fuseau horaire
Choisissez le fuseau horaire manuellement. L'appareil affiche alors l'heure du
fuseau horaire sélectionné.
Réglage par défaut : GMT - 5 (fuseau horaire de l'Est des États-Unis)
9. GPS
Suivez votre vitesse de conduite et affichez votre unité de vitesse préférée.
Options :
• KM/H
• MPH
Réglage par défaut : KM/H
FR

55
10. Économiseur d'écran
L'écran s'éteint automatiquement après une durée déterminée. Lorsque l'écran
est éteint, la consommation d'énergie est réduite. L'appareil photo fonctionne
toujours lorsque l'écran est éteint. Il suffit de cliquer sur l'écran pour le rallumer.
Options :
• Désactivé
• 30 secondes
• 1 minute
• 2 Minutes
Réglage par défaut : 1 minute
11. Codec
Sélectionnez votre norme de compression vidéo. La norme H.265 est plus rapide
et plus efficace que la norme H.264.
Options :
• H.265
• H.264
Réglage par défaut : H.265
12. N° d’immatriculation de votre voiture
Saisissez votre numéro de plaque d'immatriculation et les vidéos/photos l'incluront
dans le coin gauche ou droit.
13. Date/heure
Réglez la date et l'heure manuellement.
14. Détection de mouvement
Lorsque la détection de mouvement est activée, la D5 Dash Cam détecte si vous
êtes en train de conduire ou de vous garer. Si aucun mouvement n'est détecté
après 5 minutes d'enregistrement, le mode parking est activé.
Réglage par défaut : Désactivé
15. Enregistrement en continu
Lorsque l'enregistrement en continu est sélectionné, l'appareil prend des photos
statiques pour créer un montage vidéo.
Réglage par défaut : Désactivé
FR

56
16. Tampon de date
Sélectionnez cette option pour ajouter un horodateur aux photos/vidéos.
Réglage par défaut : Activé
17. HDR
Sélectionnez cette option pour activer/désactiver le mode HDR.
Réglage par défaut : Désactivé
18. Mode parking
En cas d'impact sur la voiture pendant le stationnement, la caméra s'allume
automatiquement et crée un enregistrement verrouillé de 20 secondes. Plus le
niveau sélectionné est élevé, plus il est facile de déclencher l'enregistrement.
Réglage par défaut : Désactivé
19. Format
Formatez votre carte mémoire.
20. Défaut
Rétablir les paramètres par défaut.
21. Version
Vérifiez la version du logiciel de la caméra. Cette information peut être requise
lorsqu'une assistance technique est nécessaire.
Téléchargez l'application « Kingslim » sur l'App Store ou Google Play.
Téléchargez le lecteur GPS: www.kingslim.net/player
Téléchargez l'application et le lecteur GPS
FR
Wifi connecté
MAC: f2a5c5df892b
appuyez sur Sélectionner
pour déconnecter
Vidéo Photo
Photo
Sortir
2021 03 17 13:47
NVT_CARDV688fc9c17556
Arrêter
57
Connectez la caméra avec l'application.
1. Appuyez brièvement sur le quatrième bouton de fonction pour arrêter
l'enregistrement sur la D5 Dash Cam.
2. Appuyez brièvement sur le premier bouton de fonction pour accéder aux
paramètres Wifi dans le menu principal.
3. Allez dans les paramètres Wifi de votre smartphone et connectez-vous au nom
Wifi indiqué sur la dash cam. Entrez le mot de passe et confirmez le réseau Wifi.
4. Ouvrez l'application « Kingslim », appuyez sur « Ajouter un enregistreur » et
attendez quelques secondes pour accéder à l'interface de prévisualisation.
5. Appuyez sur l'icône vidéo ou photo pour contrôler la D5 Dash Cam lors de
l'enregistrement de vidéos ou de la prise de photos.
Utilisation de l'application « Kingslim »
4K
00:00:24
04/16/2021 07:15:25 AM
1 2 3 4
Instrument d'enregistrement
NVT_CARDV688fc9c17556
Instrument
d'enregistrement
Moments Album Mien
FR
Note:
Pour supprimer l'enregistrement d'urgence sur l'application, veuillez déverrouiller
la vidéo dans l'album en appuyant brièvement sur le bouton d'alimentation pour
appeler le menu de déverrouillage.
58
Télécharger/Supprimer des vidéos et des photos
1. Appuyez sur l'icône Stop pour arrêter l'enregistrement.
2. Appuyez sur l'icône Vidéo ou Photo pour vérifier les vidéos ou les photos.
3. Appuyez sur Sélectionner et choisissez les vidéos ou les photos que vous voulez.
4. Appuyez sur l'icône Télécharger ou Supprimer pour télécharger ou supprimer.
Photo Sélectionner
2021/04/21
2021/04/21 13:00
13:32:26 13:35:47
9.32MB 108.52MB
NVT_CARDV688fc9c17556
04/21/2021 07:51:29 AM
00:00:52
Vidéo Photo
Photo
Sortir
Arrêter
Arrêter
Film Sélectionner
Vidéo en boucle Vidéo d'urgence
FR

59
Vidéo: 4K à 30 fps/2K à 30 fps/1080p à 60 fps
Codage vidéo: H.264/H.265
Température de travail: 20-60°C (-4-140°F)
Entrée: 5V DC
Si votre D5 Dash Cam ne fonctionne pas correctement, veuillez suivre les étapes
de dépannage suivantes:
1. La dash cam ne peut pas enregistrer.
• Vérifiez si la carte mémoire dispose de suffisamment d'espace. Veuillez d'abord
sauvegarder toutes les données importantes sur d'autres appareils, puis formatez
la carte mémoire.
• Vérifiez si l'enregistrement en boucle dans le menu Paramètres est réglé sur
Désactivé.
Réglez « Enregistrement en boucle » sur 3 minutes.
2. L'enregistrement s'arrête automatiquement.
Pendant l'enregistrement, une grande quantité de données vidéo haute définition
est traitée. Veuillez utiliser une carte mémoire haute vitesse de classe 10 ou
supérieure.
3. Une message « Erreur de fichier » apparaît lors de la lecture de photos et de vidéos.
Veuillez utiliser une carte mémoire authentique. Veuillez formater la carte
mémoire.
4. L'image est brumeuse.
Assurez-vous qu'il n'y a pas d'empreintes digitales ou d'autres marques sur l'objectif
de la caméra. Utilisez un chiffon doux et sec pour nettoyer l'objectif. Nettoyez le
pare-brise avant.
5. L'appareil tombe en panne.
Si votre appareil se bloque, utilisez un objet pointu pour appuyer sur le bouton de
réinitialisation et redémarrer l'appareil.
Spécifications
FR

60
6. Il n'y a pas de son sur la vidéo.
Assurez-vous que le Mode d'Enregistrement Audio est activé.
7. L'appareil photo s'allume et s'éteint automatiquement.
Veuillez charger l'appareil photo avec le chargeur de voiture inclus. Ne chargez pas
la batterie via le câble de données USB avec d'autres adaptateurs.
1. Veuillez fixer votre appareil dans un endroit sûr et protéger l'objectif des rayures
et de la saleté.
2. N'exposez en aucun cas l'appareil à la pluie, à l'humidité ou à l'eau.
3. Évitez de laisser l'appareil à la lumière directe du soleil pendant de longues périodes.
4. Ne démontez pas et n'exposez pas la batterie interne.
Attention
FR
61
Contenuto della Confezione
D5 dash cam * 1
Caricato auto con
cavo da 3,5m * 1
Supporto GPS * 1
Guida rapida all'uso * 1
Clip cavo * 5 Adesivo statico * 2
Nastro adesivo
doppio strato * 2
Palanchino * 1
Quick Start Guide
KingSlim D5 Dash Cam
V1.0
IT

62
Descrizione Camera
1
2
3
4
5
11
10
7
6
8
9
Tasto funzione Button
Slot per il supporto GPS
Camera Frontale
Porta Mini USB 1 (Porta Alimentazione)
Porta Mini USB 2
Slot per scheda memoria
resettare
Indicatore Stato
Tasto accensione
Altoparlante
Schermo
3
11
2
1
6
8
7
9
10
5
4
IT
63
Installazione
1. Inserire una scheda memoria (venduto separatamente).
Consiglio: La Dash Cam D5 supporta scheda memoria di classe 10 o superiore fino
a 256 GB (scheda memoria non inclusa). Si raccomanda di formattare la scheda
memoria prima di usare la dash cam. Non rimuovere o inserire la scheda memoria
quando la Dash Cam è in funzione, in quanto tale operazione potrebbe danneggiare
la scheda di memoria.
2. Inserire il supporto per il GPS nell’apposito slot.
scheda memoria
IT

64
3. Installare la Dash Cam D5 sul parabrezza.
① Pulire il parabrezza con un panno asciutto.
② Rimuovere la pellicola dell’adesivo statico e applicarlo sul parabrezza assicurandosi
di non lasciare piccole sacche d’aria.
③ Rimuovere la pellicola da un lato del nastro biadesivo e applicarlo sul retro della
Dash Cam D5.
④ Rimuovere la pellicola dal lato rimanente del nastro biadesivo e premere la Dash
Cam D5 fermamente per attaccarlo all’adesivo statico (se si intende rimuovere la
dash cam, sarà necessario rimuovere anche l’adesivo).
Nota: è possibile attaccare la dash cam al parabrezza anche senza usare
l’adesivo statico.
Formattare la scheda memoria
Si consiglia di formattare la scheda memoria prima di usare la Dash Cam.
Consiglio: Non rimuovere o inserire la scheda memoria quando la dash cam è in
funzione, in quanto tale operazione potrebbe danneggiare la scheda di memoria.
4. Regolare l’angolo di inclinazione della dash cam secondo le proprie preferenze.
5. Connettere il caricabatterie alla dash cam. Connettere il caricabatterie alla presa
accendisigari della propria auto.
6. Usare l’utensile di leva per nascondere i cavi.
Adesivo statico
Clip cavo
IT
65
1. Premere il tasto “Pausa ” per interrompere la registrazione.
2. Premere il tasto “Impostazioni ” per accedere al Menu Impostazioni.
3. Premere il tasto Press the " Giù " per selezionare il formato, successivamente
premere “Conferma ” .
4. Premere “OK” e successivamente premere il tasto “Conferma”.
Una volta completata la formattazione, il software uscirà automaticamente dalla pagina.
Registrazione Video
1. Dopo avere completato la formattazione, connettere il caricabatterie da auto ed
avviare l’automobile; il dispositivo si accenderà automaticamente ed inizierà a registrare.
2. La registrazione continua è abilitata automaticamente sulla Dash Cam D5. Il tempo
di default impostato è di 3 minuti.
3. Il sensore G è attivato automaticamente. L’impostazione di default è settata su
Low. Se vengono rilevate un impatto o una frenata brusca, verrà automaticamente
avviata la registrazione ed il filmato verrà salvato nella cartella “frontemr”.
Impostazioni
Stampa data
HDR
Modalità parcheggio
Formattazione
Default
Impostazioni
Stampa data
HDR
Modalità parcheggio
Formattazione
Default
Tutti i dati verranno
formattati
Annulla
OK
IT
66
21/04/15
17:55
3840x2160
2021
Bloccare la corrente
Sblocca la corrente
Blocca tutto
Sblocca tutto
1
2
3
4
Album di raccolta dei file
1. Premere Pausa per interrompere la registrazione.
2. Premere il secondo tasto funzione per accedere all’album.
Opzioni:
Video
Registrazione Emergenza
Registrazione Parcheggio
Foto
Consigli: Per sbloccare la registrazione di emergenza, accedere all’album, premere
il tasto di accensione, selezionare l’opzione Sblocca Menu.
1
2
3
4
4K
00:00:24
04/16/2021 07:15:25 AM
2 4
IT
67
1
2
3
4
5
6
7
Risoluzione registrazione
Indicatore di registrazione
Durata Video
GPS
Indicatore Microfono
Modalità Parcheggio
Stato Batteria
Introduzione Icone
Menu Impostazioni
1
2
4K
00:00:24
04/16/2021 07:15:25 AM
8
3 4 5 6 7
9
1013
11
1214
10
8
9
Indicatore scheda memoria
Fermare/Inizio Registrazione
Ora
Impostazioni/Registrazione di Emergenza
Album/Foto
Data
Indicatore Wifi /Registrazione Audio
(Silenzia/Riattiva Audio)
11
12
13
14
1. Lingua
Selezionare per cambiare la lingua.
Opzioni:
• English
• Français
• Español
• Deutsch
Impostazione Iniziale: Inglese
• Italiano
• 简体中文
• 繁體中文
• 日本語
4K
04:12:57
04/18/2021 07:05:41 AM
111214
IT

68
2. Risoluzione
Selezionare per cambiare la risoluzione.
Opzioni:
• 4K P30
• 2K P30
• 1080P P60
Impostazioni iniziali: 4K P30
3. Registrazione continua (Loop)
Se scegliete l’opzione 3 minuti I file verranno automaticamente salvati ogni 3 minuti.
Con la modalità registrazione in Loop attivata, quando la memoria della scheda
memoria è piena, i nuovi file verranno automaticamente sovrascritti sui più vecchi.
Se la modalità Loop è disattiva, la videocamera smetterà automaticamente ti salvare
i file una volta raggiunta la massima capacità di memoria. Sarà quindi necessario
formattare scheda memoria o inserire una nuova.
Opzioni:
• 1 Minuto
• 3 Minuti
• 5 Minuti
• Off
Impostazione iniziale: 3 Minuti
4. Suono Beep
Disattivare il suono Beep ON/OFF.
Modalità Iniziale: On
5. Frequenza
Scegliere la frequenza corretta per evitare sfarfallio nella qualità dell’immagine.
La frequenza corretta è basata sulla corrente AC locale.
Opzioni:
• 60 Hz
• 50 Hz
Impostazioni Iniziali: 60 Hz
IT

69
6. Sensore G
Quando la modalità Sensore G è attivata, la registrazione verrà automaticamente
avviata e salvata se viene rilevato un impatto o una frenata improvvisa. I video
verranno salvati separatamente e non potranno essere sovrascritti da altri file.
Più alto il livello di sensibilità impostato, più facile sarà l’attivazione del Sensore G.
Opzioni:
• Off
• Bassa
• Media
• Alta
Impostazione Iniziale : Low
7. EV
Selezionare per modificare l’esposizione.
Opzioni:
• +0.0
• -1/3
• -2/3
• -1.0
• -4/3
• -5/3
• -2.0
Impostazioni Iniziali: +0.0
8. Fuso Orario
Scegliere il fuso orario manualmente. Il dispositivo mostrerà l’ora del fuso orario
selezionato.
Impostazione Iniziale: GMT – 5 (costa Est USA)
9. GPS
Rileva la velocità di guida e seleziona l’unità di misura preferita.
Options:
• KM/H
• MPH
Impostazione Iniziale: KM/H
IT

70
10. Salvaschermo
Lo schermo del display si spegnerà automaticamente dopo una determinata durata.
Quando lo schermo è spento, il consumo energetico verrà ridotto. La videocamera
rimarrà comunque attiva se lo schermo è spento. Per riattivare lo schermo, basterà
cliccare su di esso.
Opzioni:
• Off
• 30 Secondi
• 1 Minuto
• 2 Minuti
Impostazioni Iniziali: 1 Minuto
11. Codec
Selezionare lo standard di compressione video. Lo standard H.265 è più veloce ed
efficiente dello standard H.264 .
Opzioni:
• H.265
• H.264
Impostazione Iniziale: H.265
12. Numero di targa
Inserire il numero di targa ed i video e le foto lo includeranno automaticamente
nell’angolo in alto a destra.
13. Data/Ora
Selezionare la data e l’ora manualmente.
14. Rilevamento Movimento
Quando il Rilevamento Movimento è attivo, la Dash Cam D5 rileverà automaticamente
se siete fermi o in movimento. Se nessun movimento viene rilevato per più di 5
minuti, la modalità Parcheggio verrà attivata.
Impostazione Iniziale: Off
IT

71
15. Registrazione Time-lapse
Quando si seleziona la modalità Time-lapse, la videocamera registrerà l’immagine
creando video montaggi in sequenza.
Impostazione Iniziale: Off
16. Indicazione Data
Selezionare l’opzione per aggiungere una data alle foto ed ai video.
Impostazione Iniziale: On
17. HDR
Selezionare la modalità HDR on/off.
Impostazione Iniziale: Off
18. Modalità Parcheggio
Se si verifica un impatto durante le operazioni di parcheggio, la videocamera si
attiverà automaticamente è creare una registrazione salvata di 20 secondi. Più alto
il livello di sensibilità selezionato, più facile sarà la possibilità di attivare la
registrazione automatica.
Impostazione Iniziale: Off
19. Formattamento
Selezionare il formato della scheda di memoria.
20. Impostazioni Iniziali
Ripristino di tutte le impostazioni iniziali.
21. Versione
L’opzione permette di verificare la versione del software operativo della videocamera.
L’informazione può essere necessaria nel caso venga contattato il servizio di assistenza.
Scaricare la APP ed il player GPS
Scaricare la app "Kingslim" dall’App Store o da Google Play.
Scaricare il Player GPS da: www.kingslim.net/player
IT
WIFI Collegato
MAC: f2a5c5df892b
selezionare per disconnettere
Video Foto
Foto
Esci
2021 03 17 13:47
NVT_CARDV688fc9c17556
Fermare
NVT_CARDV688fc9c17556
72
Connettere la videocamera con la App.
1. Premere brevemente il quarto tasto funzione per interrompere la registrazione
sulla Dash Cam D5.
2. Premere brevemente il primo tasto funzione per accedere alle impostazioni Wifi
sul Menu principale.
3. Accedere alle impostazioni Wifi del proprio smartphone e connettersi alla rete
Wifi mostrata nella Dash Cam. Inserire la password e confermare l’accesso al network.
4. Aprire la app “Kingslim”, premere su “Aggiungi registratore” ed attendere
qualche secondo per avviare la preview dell’interfaccia.
5. Premre l’icona video o foto per controllare la Dash Cam D5 nella
modalità foto o video.
Usare la App "Kingslim"
4K
00:00:24
04/16/2021 07:15:25 AM
1 2 3 4
Strumento di registrazione
Strumento di
registrazione
Momenti Album Il mio
IT
Note:
Per cancellare le registrazioni in modalità emergenza dalla app, sbloccare i video
nell’album premendo brevemente il tasto accensione aprendo il menu Sblocco.
73
Scaricare/Eliminare Video e Foto
1. Premere l’icona Stop per interrompere la registrazione.
2. Premere l’icona Video o Foto per visualizzare i video e le foto.
3. Premere Seleziona e scegliere i video desiderati.
4. Premere l’icona Scarica o Elimina per scaricare o eliminare.
Foto Seleziona
2021/04/21
NVT_CARDV688fc9c17556
04/21/2021 07:51:29 AM
00:00:52
Video Foto
Foto
Fermare
Fermare
Esci
2021/04/21 13:00
13:32:26 13:35:47
9.32MB 108.52MB
SelezionaFilmato
Video di emergenzaVideo del ciclo
IT

74
Video: 4K at 30 fps/2K at 30 fps/1080p at 60 fps
Coding Video: H.264/H.265
Temperatura Operativa: 20–60°C (-4–140°F)
Ingresso: 5V DC
Se la vostra Dash Cam D5 non funziona regolarmente, seguire le seguenti
indicazioni:
1. La dash cam non effettua registrazioni.
• Controllare se la scheda memoria ha abbastanza memoria disponibile.
Effettuare il backup dei dati sensibili per prudenza, successivamente formattare
la scheda memoria.
• Controllare che l’opzione Registrazione Loop nel menu Impostazione sia Off.
Impostare "Loop Registrazione " a 3 minuti.
2. La registrazione si conclude automaticamente.
Durante la registrazione, una notevole quantità di dati ad alta definizione viene
processato. Usare una scheda memoria di classe 10 o superiore.
3. Il messaggio "Errore File " appare quando si scorrono foto e video in playback.
Usare una scheda memoria autentica. Formattare la scheda memoria.
4. L’immagine è sfocata.
Assicurarsi che non ci siano impronte digitali o altri segni sulle lenti della telecamera.
Usare un panno morbido per pulire le lenti. Pulire il parabrezza.
5. Il dispositivo si blocca.
Se la videocamera si blocca, usare un oggetto appuntito per premere il tasto reset
e resettare il dispositivo.
Specifiche
IT

75
6. Non ci sono né Audio né Video.
Assicurarsi che la Modalità Registrazione Audio sia attiva.
7. La videocamera si accende e spegne automaticamente.
Ricaricare la videocamera con il caricabatterie da auto fornito con il prodotto.
Non caricare il dispositivo con cavi USB di altri adattatori.
1. Si prega di montare il dispositivo in un luogo sicuro e di proteggere le lenti da
graffi e sporco.
2. Non esporre il prodotto a pioggia, umidità o contatto diretto con l’acqua per
nessun motivo.
3. Evitare di lasciare il prodotto sotto la luce diretta del sole per lunghi periodi.
4. Non estrarre o smantellare la batteria interna.
Attenzione
IT
76
パッケージ内容
D5ドライブレコ
ーダー本体 * 1
3.5m電源ケーブル付
きカーチャージャー * 1
GPSブラケット * 1
クイックスタートガイド * 1
ケーブ ルクリップ * 5 静電吸着ステッカー * 2両面粘着テープ * 2
カーバール * 1
Quick Start Guide
KingSlim D5 Dash Cam
V1.0
JP
77
デバイス概要
1
2
3
4
5
11
10
7
6
8
9
機能ボタン
マウントスロット
フロントカメラ
MiniUSB電源ポート1(電源)
MiniUSB電源ポート2
メモリカードスロット
リセット
LEDインジケーター
電源ボタン
スピーカー
スクリーン
3
11
2
1
6
8
7
9
10
5
4
JP
78
取り付け方法
1.メモリカードを差し込みます(别売スタンド)。
説明:D5ドライブレコーダーは、Class10以上の最大256GBのメモリカードに対応
します。このドライブレコーダーを使用する前に、カメラでメモリカードをフォー
マットしてください。ドライブレコーダーが起動中にメモリカードを取り外した
り、差し込んだりしないでください。カードが損傷する可能性があります。
2.GPSブラケットをブラケットスロットに挿入します。
メモリカード
JP
79
3.D5ドライブレコーダーをフロントガラスに取り付けます。
①乾いた布でフロントガラスをきれいに拭いてください。
②静電吸着ステッカーフィルムをはがし、気泡がないことを確認しながらフロント
ガラスに貼り付けます。
③両面粘着テープの片面のフィルムをはがし、D5ドライブレコーダーに貼り付けます。
④両面粘着テープの反対側のフィルムをはがし、D5ドライブレコーダーをフロント
ガラスに貼り付けた静電吸着ステッカーにしっかりと押して固定します(ドライブ
レコーダーを取り外したい場合は、静電吸着ステッカーをはがしてください)。
ご注意:静電吸着ステッカーを使用せずに、ドライブレコーダーをフロントガラス
に貼り付けることができます。
メモリカードをフォーマットする方法
このドライブレコーダーを使用する前に、カメラでメモリカードをフォーマットし
てください。
ヒント:ドライブレコーダーが起動中にメモリカードを取り外したり、差し込んだ
りしないでください。カードが損傷する可能性があります。
4.必要に応じてドライブレコーダーの視野角を調整します
5.カーチャージャーをドライブレコーダーに接続し、次にシガレットライターに接
続します。
6.カーバールを使用してケーブルを隠します。
静電吸着ステッカー
ケーブ ルクリップ
JP
80
1.ボタンを押し、録画を停止します。
2.ボタンを押し、設定ページに入ります。
3.ボタンを押してフォーマットを選択し、次にボタンを押します。
4.「OK」を選択し、「確定」ボタンを押します。
フォーマットが完了すると、このページは自動的に終了します。
ビデオの録画方法
1.フォーマットが完了した後、カーチャージャーを接続して車のエンジンを始動す
ると、デバイスの電源が自動的に入り、録画が開始します。
2.D5ドライブレコーダーでは、循環録画はデフォルトでオンになっています。デフ
ォルト設定は3分です。
3.D5ドライブレコーダーでは、Gセンサーはデフォルトでオンになっています。デ
フォルト設定は「低」です。衝撃や急ブレーキが検出されると、自動的に録画が開
始され、ビデオが「frontemr」フォルダに保存されます。
セットアップ
日付スタンプ
HDR
駐車モード
フォーマット
デフォルト
セットアップ
日付スタンプ
HDR
駐車モード
フォーマット
デフォルト
すべてのデータがフォー
マットされます
キャンセル
OK
JP

81
21/04/15
17:55
3840x2160
2021
ロック
ロックを解除
すべてのロック
すべてのロックを解除
1
2
3
4
アルバムの確認方法
1.4番目の機能ボタンを押して、録画を停止します。
2.2番目の機能ボタンを押して、てアルバムに入ります。
オプション:
ビデオ
緊急録画
駐車監視録画
写真
ヒント:緊急録画のロックを解除するには、アルバムに入り、電源ボタンを短く押
してから、[ロック解除]メニューで解除を選択してください。
1
2
3
4
4K
00:00:24
04/16/2021 07:15:25 AM
2 4
JP

82
1
2
3
4
5
6
7
録画解像度
録画インジケーター
録画時間
GPS
マイクインジケーター
駐車監視モード
電源ステータス
アイコン紹 介
設定画面
1
2
4K
00:00:24
04/16/2021 07:15:25 AM
8
3 4 5 6 7
9
1013
11
1214
10
8
9
メモリカードインジケーター
録画開始・停止
時間
設定・緊急録画
アルバム・写真
日付
WiFiインジケーター・録音(ミュート・ミュート解除)
11
12
13
14
1.言語
言語を選択します。
オプション:
•English
•Français
•Español
•Deutsch
デフォルト設定:English
•Italiano
•简体中文
•繁體中文
•日本語
4K
04:12:57
04/18/2021 07:05:41 AM
111214
JP

83
2.解像度
解像度を選択します。
オプション:
•4KP30
•2KP30
•1080PP60
デフォルト設定:4KP30
3.循環録画
3分を選択すると、ファイルは3分ごとに保存されます。循環録画がオンになってい
ると、メモリカードがいっぱいになったら、新しいファイルが古いファイルを上
書きします。オフの場合、カードがいっぱいになると録画が停止します。そうなっ
た場合、メモリカードをフォーマットするか、新しいカードを挿入する必要があ
ります。
オプション:
•1分
•3分
•5分
•オフ
デフォルト設定:3分
4.システム音
システム音のオン・オフの切り替えができます。
デフォルト設定:オン
5.周波数帯
ちらつきを避けるために適切な周波数を選択してください。この設定は、現地の
電源の電圧に基づく必要があります。
オプション:
•60Hz
•50Hz
デフォルト設定:60Hz
JP

84
6.Gセンサー
Gセンサーモードをオンにすると、衝撃や急ブレーキが検出されると、自動的に録
画が開始され、そして保存されます。ビデオはロックされ、新しいファイルで上書
きされることはありません。感度レベルが高いほど、Gセンサーを起動しやすくな
ります。
オプション:
•オフ
•低
•中
•高
デフォルト設定:低
7.EV値
露出感度を設定します。
オプション:
•+0.0
•-1/3
•-2/3
•-1.0
•-4/3
•-5/3
•-2.0
デフォルト設定:+0.0
8.タイムゾーン
タイムゾーンを手動で選択します。デバイスは、選択したタイムゾーンの時間を表
示します。
デフォルト設定:GMT‒5(米国東部時間帯)
9.GPS
運転速度を追跡し、好みの速度単位を選択することができます。
オプション:
•KM/H
•MPH
デフォルト設定:KM/H
JP

85
10.スクリーンセーバー
設定した時間が経過すると、画面が自動的にオフになります。画面をオフにすると、
電力の消耗が削減されます。画面がオフになっている間でもドライブレコーダーは
動作します。画面をタップすればオンになります。
オプション:
•オフ
•30秒
•1分
•2分
デフォルト設定:1分
11.コーデック
ビデオ圧縮規格を選択します。H.265はH.264よりも高速で効率的です。
オプション:
•H.265
•H.264
デフォルト設定:H.265
12.車両番号
ナンバープレート番号を入力すると、ビデオ・写真の左隅または右隅にナンバープ
レートが表示されます。
13.日付時刻
手動で日付と時刻を設定します。
14.モーション検知
モーション検知がオンの場合、D5ドライブレコーダーは運転中か駐車中かを検知し
ます。5分間録画後に何らかの動きを検出できなかった場合、駐車監視モードが起
動します。
デフォルト設定:オフ
15.タイムラプス録画
タイムラプス録画を選択すると、カメラが静止写真を撮影してモンタージュビデオ
を生成します。
デフォルト設定:オフ
JP

86
16.日付時刻マーク:
写真・ビデオに日付時刻マークを追加する機能です。
デフォルト設定:オン
17.HDR
HDRモードのオン・オフを設定します。
デフォルト設定:オフ
18.駐車監視モード
駐車中に車に衝撃があった場合、カメラが自動的にオンになり、ロック付きのビデ
オを20秒録画します。感度レベルが高いほど、起動しやすくなります。
デフォルト設定:オフ
19.フォーマット
メモリーカードをフォーマットする機能です。
20.デフォルト
出荷時の初期設定に戻します。
21.バージョン
ドライブレコーダーのファームウェアバージョンを確認します。こちらの情報は、
技術サポートを受ける際に必要になる場合があります。
アプリとGPSプレーヤーのダウンロード方法
AppStoreまたはGooglePlayから「Kingslim」アプリをダウンロードします。
GPSプレーヤーのダウンロード:www.kingslim.net/player
JP
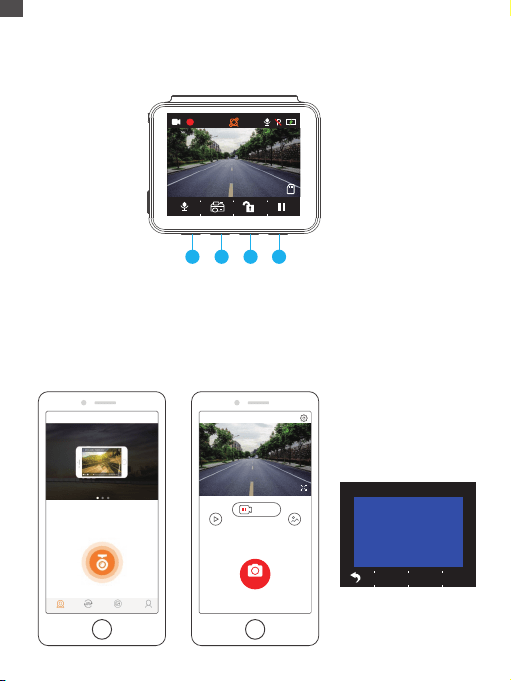
WiFi接続
MAC: f2a5c5df892b
選択を押して切断します
写真
2021 03 17 13:47
NVT_CARDV688fc9c17556
ストップ
NVT_CARDV688fc9c17556
87
アプリでドライブレコーダーに接続します。
1.4番目の機能ボタンを短く押して、D5ドライブレコーダーの録画を停止します。
2.一番目の機能ボタンを短く押して、メイン画面で設定に入ります。
3.スマートフォンの設定を開き、ドライブレコーダーに表示されている名に接続し
ます。パスワードを入力し、ネットワークに接続したこと確認します。
4.「Kingslim」アプリを開き、「デバイス追加」をタップし、数秒後にプレビュー
画面に入ります。
5.ビデオまたは写真のアイコンをタップして、D5ドライブレコーダーでビデオの
録画または写真の撮影をすることができます。
「Kingslim」アプリの使用方法
4K
00:00:24
04/16/2021 07:15:25 AM
1 2 3 4
レコーダー
レコーダー 友達の鳴り声 アルバム 私
切断されました
レコーダービデオ レコーダー写真
JP

ご注意:
アプリの緊急録画を削除するには、電源ボタンを短く押して[ロック解除]メニューから、
アルバム内のビデオのロックを解除してください。
88
ビデオと写真のダウンロードと削除方法
1.アイコンをタップして録画を停止します。
2.またはアイコンをタップしてビデオと写真を確認することができます。
3.「選択」をタップして、必要なビデオまたは写真を選択します。
4.ダウンロードまたは削除するには、ダウンロードまたは削除のアイコンをタップします。
Photo
2021/04/21
2021/04/21 13:00
13:32:26 13:35:47
9.32MB 108.52MB
NVT_CARDV688fc9c17556
04/21/2021 07:51:29 AM
00:00:52
写真
ストップ
ストップ
緊急ビデオ
切断されました
レコーダービデオ レコーダー写真
選択
ループビデオ
ビデオ 選択
JP

89
録画:4K30FPS/2K30FPS/1080P60FPS
ビデオコーディング:H.264/H.265
動作温度:20‒60°C(-4‒140°F)
入力電源:5VDC
D5ドライブレコーダーが正しく機能しない場合は、次のトラブルシューティング
手順に従って操作してください。
1.ドライブレコーダーが録画できません。
•メモリカードに十分な空き容量があるか確認してください。重要なデータを他の
デバイスでバックアップを取ってから、メモリカードをフォーマットしてください。
•設定画面で循環録画機能がオフになっているかどうかを確認してください。
「循環録画」を3分に設定してください。
2.録画は自動的に停止します。
録画中、大量の高解像度ビデオデータが処理されるので、クラス10以上の高速
メモリカードを使用してください。
3.写真やビデオを再生すると、「ファイルエラー」が表示されます。
純正のメモリカードを使用してください。メモリカードをフォーマットしてく
ださい。
4.映像がぼやけています。
ドライブレコーダーのレンズに指紋やその他の跡がないことを確認してください。
乾いた柔らかい布でレンズを拭いてください。フロントガラスをきれいにしてください。
5.デバイスがクラッシュします。
デバイスがクラッシュした場合は、細い棒状のものを使用してリセットボタンを押
し、デバイスを再起動させてください。
製品仕様
JP

90
6.ビデオに音声がありません。
録音モードがオンになっていることを確認してください。
7.ドライブレコーダーの電源が勝手に起動したり落ちたりします。
付属のカーチャージャーでドライブレコーダーを充電してください。付属のUSBデ
ータケーブルを他の電源アダプタに接続してバッテリーを充電しないでください。
1.レンズに傷や汚れがつかないように、安全な場所に置いてください。
2.いかなる状況でも、デバイスを雨、湿気または水にさらさないでください。
3.直射日光の当たる場所に長時間放置しないでください。
4.内蔵バッテリーを分解したり露出させたりしないでください。
注意
JP