
V1.0
E2 Pro
DASH CAM

User Agreement ------------------------------------------------------------------------------------- 02
Precautions-------------------------------------------------------------------------------------------- 02
Warnings ----------------------------------------------------------------------------------------------- 03
Overheating Protection -------------------------------------------------------------------------- 04
1. Specifications ------------------------------------------------------------------------------------- 05
2. What’s in the Box -------------------------------------------------------------------------------- 06
3. Camera Overview ------------------------------------------------------------------------------- 07
(1) Preview Screen ------------------------------------------------------------------------------- 08
(2) Indicator----------------------------------------------------------------------------------------- 08
(3) Button Operation Introduction --------------------------------------------------------- 08
4. Getting Started ----------------------------------------------------------------------------------- 09
(1) Using memory cards.----------------------------------------------------------------------- 09
(2) Insert the memory card. ------------------------------------------------------------------ 09
(3) Install the dash cam onto the windshield. ------------------------------------------ 10
(4) Charge the camera. ------------------------------------------------------------------------- 11
(5) Power on or off. ------------------------------------------------------------------------------ 11
(6) Install the rear camera onto the license plate. ------------------------------------ 12
5. Using the Kingslim App------------------------------------------------------------------------ 14
(1) Download the Kingslim app. ------------------------------------------------------------- 14
(2) Create an account for the Kingslim app. -------------------------------------------- 14
(3) Connect to the Kingslim app. ------------------------------------------------------------ 15
(4) Capture videos using the app. ---------------------------------------------------------- 17
(5) Playback videos on the Kingslim app. ------------------------------------------------ 17
(6) Download videos from the Kingslim app. ------------------------------------------- 18
6. Customizing Your E2 Pro Dash Cam------------------------------------------------------ 20
7. Hardwiring Your E2 Pro Dash Cam ------------------------------------------------------- 23
8. FAQ ---------------------------------------------------------------------------------------------------- 28
9. Contact US------------------------------------------------------------------------------------------ 30
A Big Thank You ------------------------------------------------------------------------------------- 31
Contents
�� �� ��

User Agreement
By purchasing Kingslim dash cams, you agree to Kingslim's terms and conditions,
which include precautions, user warnings, and warranty coverage. If you do not
agree to any of these terms mentioned in this manual for any reason, you may
return the product unused and in its original packaging within the stated return
window for a full refund.
1. To prevent external or internal damage, never expose this dash cam to rain,
moisture, or water under any circumstances.
2. This device is not designed to be damp-proof, so avoid placing it in damp
environments. Also, please refrain from opening the cover or attempting to repair
the product yourself. Instead, contact us for assistance if there are any problems
with accessories.
3. This camera is intended for use inside your vehicle only. Do not install it in locations
that obstruct the driver’s view of the road, such as mirrors or airbag deployment
zones.
4. Please read this manual carefully before using or installing the camera, and keep
it for future reference. It can help answer any questions or address any difficulties
you may encounter while using this product.
Precautions
Please read and understand all the instructions before using this product. If any
damage is caused by failure to follow the instructions, the warranty will be voided.
�� �� ��

Warnings
1. Please take note of safety warnings and regulations as failure to comply may result
in serious injury or death.
2. Avoid placing the camera on top of the instrument panel or in front of the airbag
as it may fall and cause harm.
3. Do not mount the camera anywhere on the windshield that may loosen or distract
you while driving.
4. Refrain from exposing the device to extreme heat or dust, and avoid using any
chemical substances or cleaning solvents to clean it.
5. Safeguard the dash cam from getting soaked, as it’s not waterproof.
6. When cleaning the lens, be careful and use a soft, moist cloth to prevent scratches
that can compromise video quality.
7. We recommend removing the camera from your vehicle when not in use to
prevent theft or damage from exposure to extreme heat.
8. Operating or installing the camera while driving or making any adjustments is
strictly prohibited; please pull over first and do so only when it is safe.
9. Please handle the camera with care and refrain from dropping, puncturing, or
disassembling it.
10. If the car charger cord is broken or damaged, avoid using it.
11. Keep this product out of reach of children, and avoid exposing it to direct sunlight
for extended periods.
12. Ensure this dash cam operates within its recommended temperature range.
Avoid leaving it at high or low temperatures for extended periods, as this can
reduce its lifespan.
13. Please note that some countries or states in the United States prohibit drivers
from mounting anything on certain areas of the windshield, and it is the
responsibility of the owner or operator to comply with local laws when mounting
or using this device.
�� �� ��

14. Lastly, please be advised that the company is not liable for any loss of data or
content during operation or under any circumstances.
Overheating Protection
Dash cams are electronic devices that contain various components, including a
processor, memory, camera lens, and other circuitry. When it's in use, it generates
heat due to the power consumption and operation of these components. The heat
generated during operation can cause the camera to heat up. Rest assured that our
dash cams are equipped with radiators and vents to dissipate heat, and they operate
within a temperature range between -4°F (-20°C) and 140°F (60°C). The dash cam
can still work normally though it heats up. We recommend you turn on the air
conditioning to dispel the heat inside your car before using your camera again.
Besides, we suggest parking your car in a location that allows for sufficient air and
protects your dash cam from direct sunlight or extreme temperatures.
��

Memory Card
Resolution (Front)
Resolution (Rear)
Video Format
Photo Format
Storage Temperature
Operating Temperature
Support up to 256GB (sold separately)
2K
1080P
TS
JPG
-22°F (-30°C) ~ +185°F (85°C)
-4°F (-20°C)~ +140°F (60°C)
1. Specifications
��
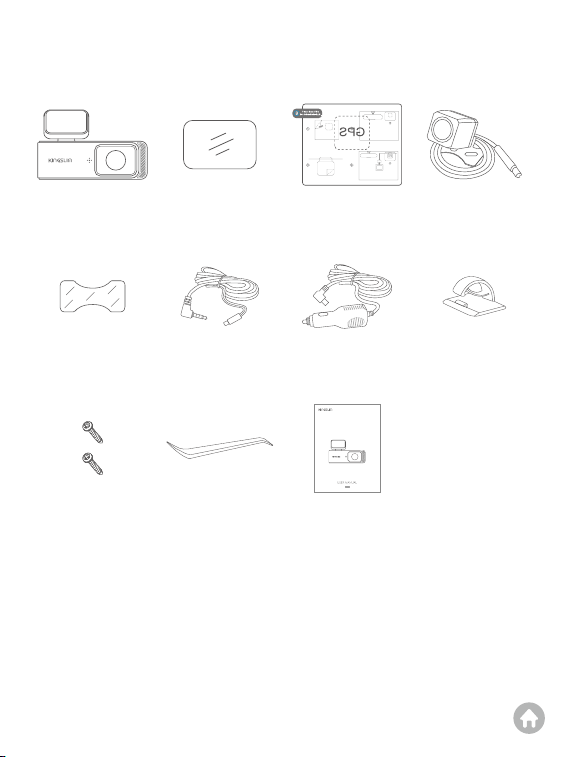
E2 Pro Dash Cam
× 1
Double-Sided Adhesive
Tape for Rear Cam × 2
Screw
× 2
Car Crowbar
× 1
User Manual
× 1
6m Rear Camera
Extension Cable × 1
Car Charger with
3.5m Power Cable × 1
Cable Clip
× 5
Double-Sided Adhesive
Tape for Dash Cam × 1
Electrostatic Sticker
× 2
Rear Camera
× 1
2. What’s in the Box
V1.0
E2 Pro
DASH CAM
��
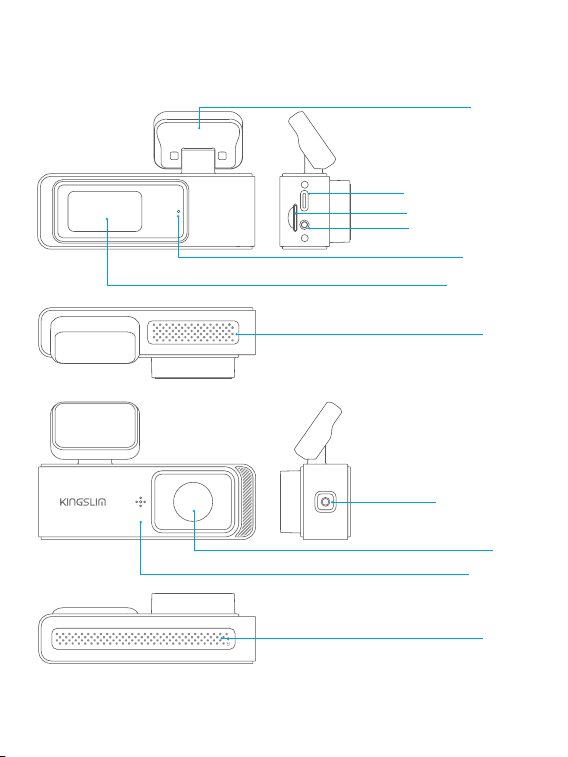
3. Camera Overview
Bracket
Type-C Power Port
Memory Card Slot
Vents
Power Button
Speaker
Lens
Vents
Rear Camera Port
Indicator
LCD Display
Note: The bracket is non-detachable, please do not attempt to dismantle it.
��
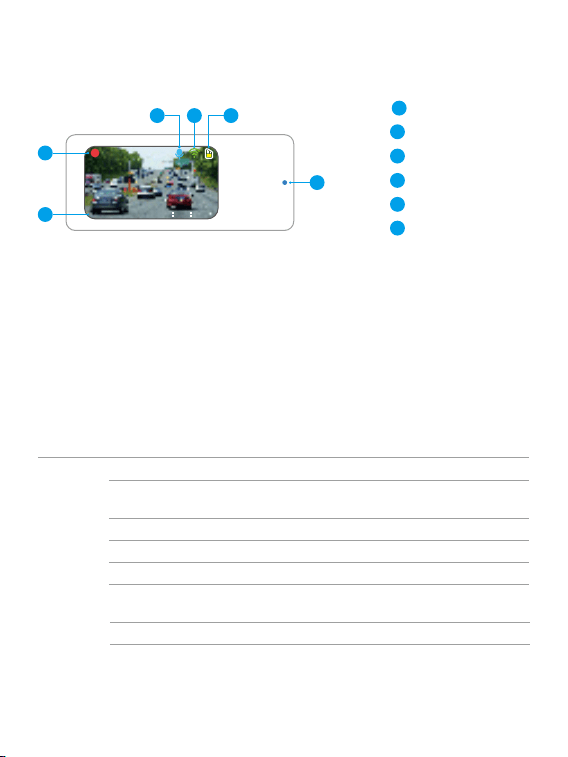
Video Time
Date & Time
Audio Recording
Wifi
Memory Card
Indicator
1
1
(1) Preview Screen
00 35
:
05-29-2024 18 26 19
6
2
2
3
4
5
6
3 5
4
(2) Indicator
Red flashing: recording video.
Yellow flashing: locking the current video.
Blue flashing: not connected to the app.
Remains on: connected to the app.
(3) Button Operation Introduction
The E2 Pro dash cam comes equipped with only one button which is primarily for
basic operation. For details, see the table below:
Note: The dash cam is designed to turn on and record automatically as soon as it’s
powered up. To stop recording or for further operation, you will need to connect
your dash cam to the Kingslim app.
Power
Button
Press this button once to view the live feed of the rear camera.
Press this button twice to get the QR code for downloading the
Kingslim app.
Press this button three times to view the camera’s date and time.
Press this button four times to view the Wifi details.
Press this button 5 times to return to the recording screen.
Press and hold this button for three seconds to turn the camera
on or off.
Quickly press this button twice to snap a photo.
��

4. Getting Started
Welcome to your Kingslim E2 Pro dash cam. To capture videos and photos, you will
need a memory card (sold separately).
(1) Using memory cards.
Use brand name memory cards that meet these requirements:
• U3 Class 10 or above
• Capacity up to 256GB (FAT32)
Note:
➀ Before using, please format the memory card on your computer and then on the
Kingslim app.
➁ To keep your memory card in good condition, we recommend you reformat it
every two months. Reformatting deletes all of your data, so be sure to transfer
your photos and videos first.
➂ After repeated reading, writing, and wiping, the memory card’s lifespan will be
shortened. When the card frequently reports errors, please replace it with a new
one.
(2) Insert the memory card.
Locate the memory card slot, then insert the memory card with the label facing the
slot. To remove the card, simply press it into the slot with your fingernail, and it will
then pop out.
Note: Be sure to turn off the camera before installation or removal.
��
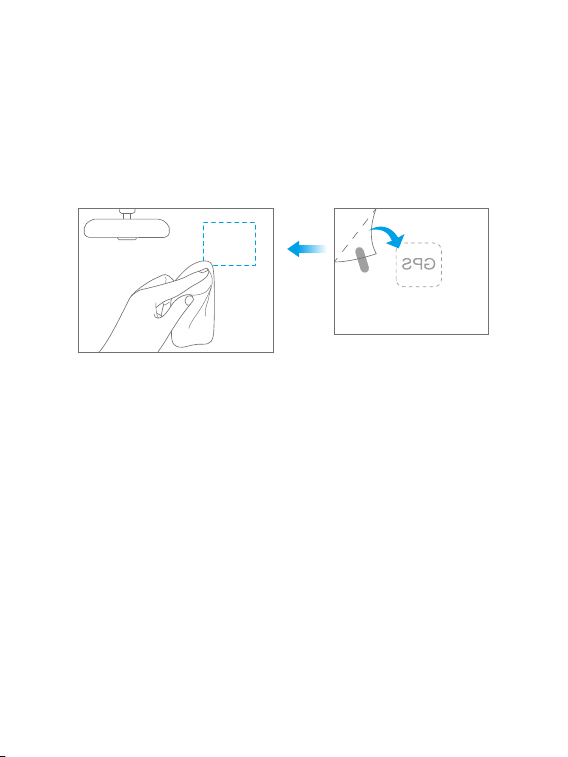
(3) Install the dash cam onto the windshield.
➀ Prepare the area.
Clean the area thoroughly with a microfiber cloth to remove any dust, dirt, or oil
that could affect the bracket's grip. After doing so, carefully peel off one film of the
electrostatic sticker and affix it to the clean area.
Tip: Make sure there is no air between the electrostatic sticker and the windshield,
as this is crucial for a stable installation.
➁ Attach the dash cam.
Tear off another film of the electrostatic sticker, and rip off the adhesive tape on the
dash cam bracket, then secure the dash cam on the electrostatic sticker.
Note:
➀ If you want to remove the dash cam, please take off the electrostatic sticker.
➁ You can stick the dash cam to the windshield without using the electrostatic sticker.
��
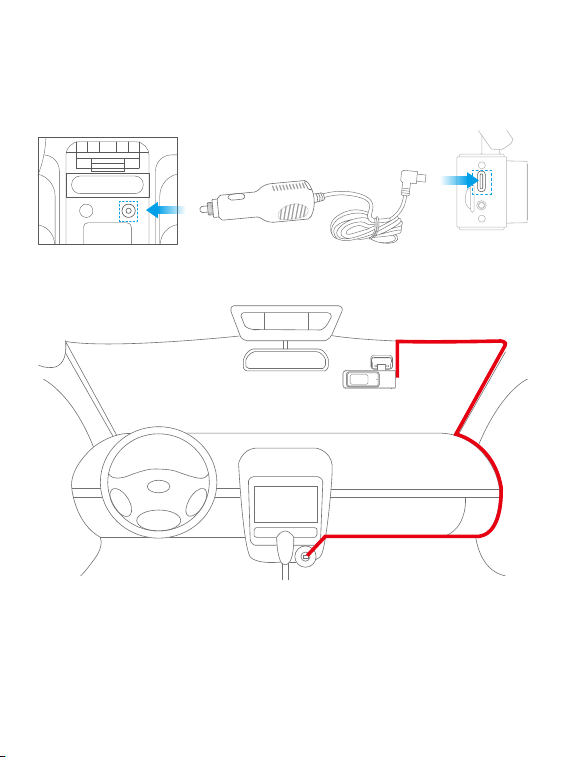
(4) Charge the camera.
Locate the USB power port, and connect the dash cam to the included car charger,
then plug it into the car cigarette lighter. The dash cam will turn on and start
recording.
(5) Power on or off.
Power on: The KINGSLIM E2 Pro dash cam is designed to turn on and record
automatically as soon as it receives power, i.e. when the car engine is started.
Power off: The camera is also pre-configured to turn off automatically as soon as
the power gets disconnected, i.e. when the car key is turned to the LOCK position.
Car Cigarette Lighter Socket Car Charger
E2 Pro Dash Cam
��
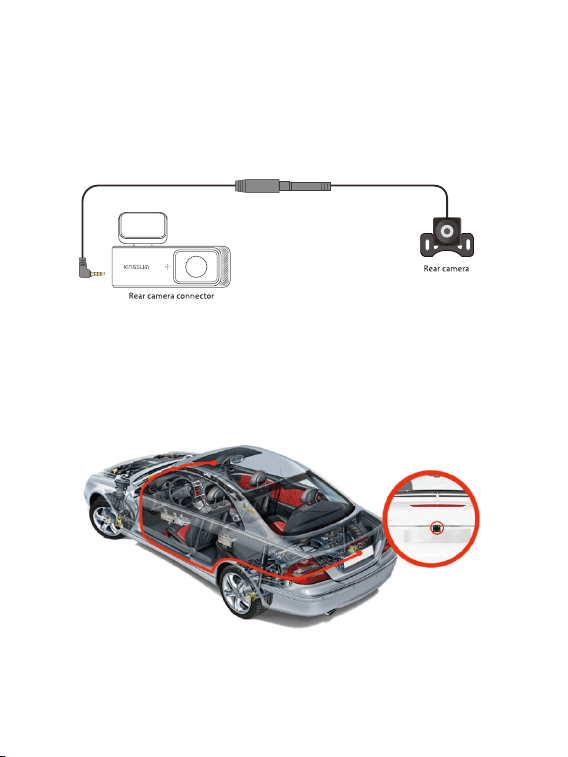
(6) Install the rear camera onto the license plate.
It is advised to install the rear camera above the license plate. This placement
ensures a clear and sharp image for rear viewing. For this method, please follow
these steps to install the rear camera and route the cables:
Step 1: Connect the rear camera to the extension cable, and insert it into the dash
cam.
Step 2: Clean the area above the car license with a microfiber cloth, and remove the
adhesive tape on the rear camera.
Step 3: Firmly affix the rear camera to the clean area above the license plate. After
doing so, you can rotate the rear camera to adjust the viewing angle.
��

Tips:
➀ Please ensure the dash cam is turned off before plugging in the rear camera. Do
not frequently hot-plug the interface in case any damage is caused to the camera.
➁ To maintain cleanliness in your car, securely fasten the car charger's power cable
or the rear camera extension cable to the roof of your car using the provided
cable clip.
➂ For optimal performance and avoid any damage to the dash cam, use only Kingslim
rear camera and extension cable.
��

5. Using the Kingslim App
The dash cam's Power button is primarily for basic operation. To view the camera's
status, capture videos or adjust settings, you will need to connect your E2 Pro dash
cam to the Kingslim app via its built-in Wifi. Once you have successfully connected
your dash cam to the app, you will be able to access its live feed, change settings,
remotely control your shots, and download videos using your phone.
(1) Download the Kingslim app.
➀ Download the Kingslim app from the App Store or Google Play. Alternatively, press
the Power button twice to get the QR code for downloading the Kingslim app.
➁ Access all app features by registering and logging into your Kingslim account.
(2) Create an account for the Kingslim app.
➀ Open the Kingslim app, then tap “Experience Now” at the bottom to enter the
registration page.
��
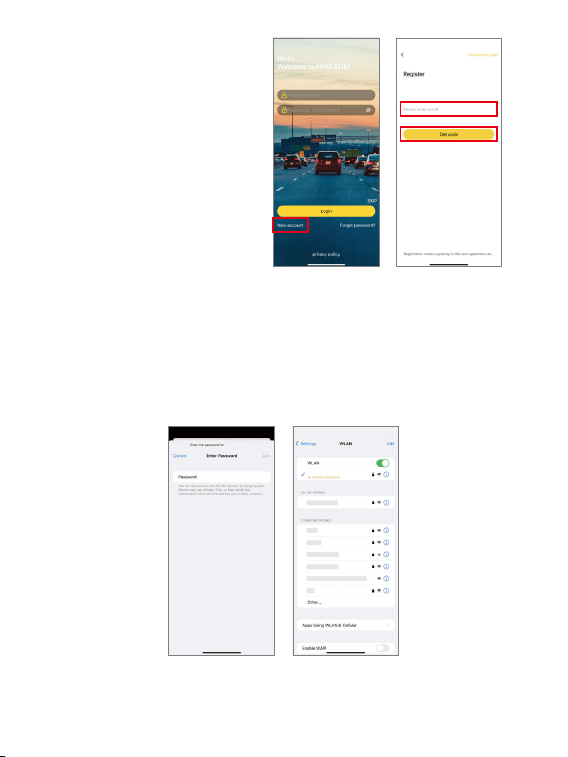
➁ Tap “New Account” to enter your
email address, then tap “Get Code”.
A verification code will be sent to
your email address. Once entered,
your new Kingslim app account
will be ready for use.
Tip: If you already have an account,
log into the app directly. You can also
access the Kingslim app without
registration by tapping “Skip”.
Tips:
➀ By default, the camera’s Wifi is turned on when your dash cam is on. To view the
Wifi SSID, press the Power button four times.
Kingslim_
********
(3) Connect to the Kingslim app.
Step 1: Plug in your E2 Pro dash cam. It will then power on with Wifi enabled.
Step 2: Connect the camera’s Wifi. Go to your smartphone's Wifi settings page,
search for the Wifi SSID, and then tap on it to enter the default password 12345678
for connection.
“Kingslim_
********”
��
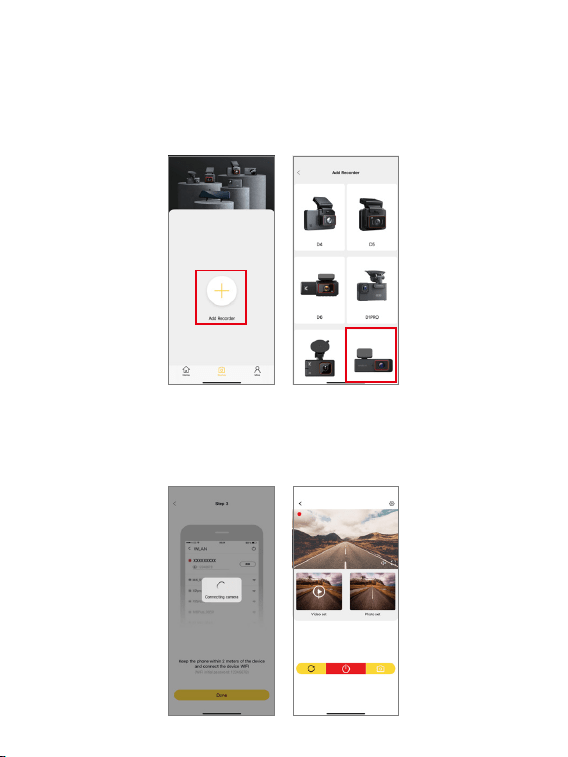
➁ Once the camera Wifi is connected, it will give you a "No Internet Connection" or
“Weak Security” notice since the 4G signal of your phone is blocked, but you can
ignore it and continue the app connection.
Step 3: Open the Kingslim app on your phone, tap “Device” at the bottom, then tap
"Add Recorder" to add your camera model.
Step 4: Wait for a few seconds till the app loads past the Connecting screen to enter
the Preview screen. Upon accessing the camera's preview screen, your E2 Pro dash
cam is successfully connected to the Kingslim app.
Kingslim_
********
��

(4) Capture videos using the app.
On the preview interface, tap the Power icon to
start or stop recording. To take a photo, simply tap
the photo icon . If you wish to switch the display
modes between the front and the rear cameras,
tap the icon .
(5) Playback videos on the Kingslim app.
➀ Connect your E2 Pro dash cam to the Kingslim app.
➁ Tap on the “Video set” icon to view all the video files stored on the memory card.
Kingslim_
********
Kingslim_
********
➂ Tap on the video you want to watch for playback. And it will then play.
Note: The Kingslim app is exclusive to KINGSLIM dash cams only.
��
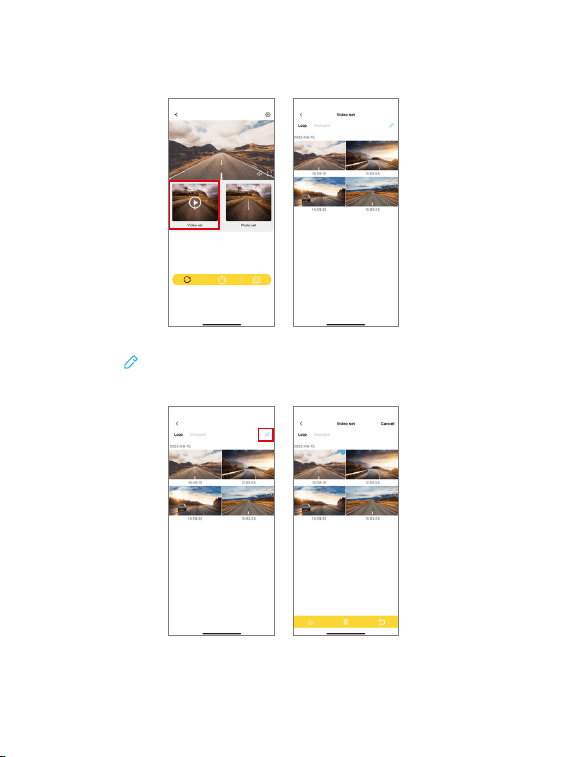
(6) Download videos from the Kingslim app.
➀ Tap on the “Video set” icon to view all the video files stored on the memory card.
➁ Tap on the icon in the upper right corner, and select the video you want to
download.
Kingslim_
********
Kingslim_
********
��
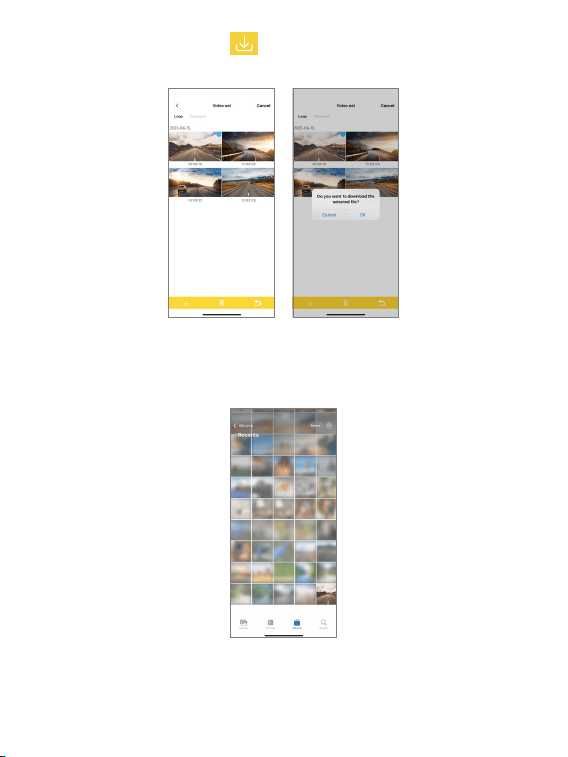
➂ Tap on the “Download” icon in the bottom left corner, then tap “OK” to
confirm the download.
➃ Wait for the completion of the download progress, the video will be saved to
your phone's album. You can tap on it for playback or share it on social media.
��
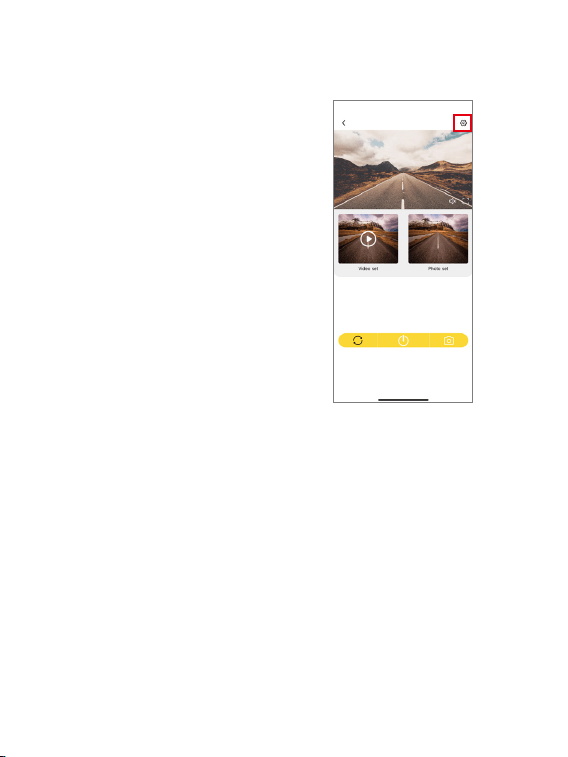
To customize your E2 Pro dash cam, you
will need to connect it to the Kingslim app.
To access the camera’s settings, first stop
recording by tapping the Power icon at the
bottom, then tap the Settings icon in the
upper right corner.
6. Customizing Your E2 Pro Dash Cam
(1) Wifi Name
Check or change the Wifi name.
(2) Wifi Password
Check or change the Wifi password.
(3) Microphone
Off/On (default)
Choose to turn this setting on or off. With this setting enabled, the dash cam will
record audio during video recording, and vice versa.
(4) Cycle Record Time
1 Minute (default)/2 Minutes/3 Minutes
Kingslim_
********
��

Set the length of each video. For instance, if you set “Cycle Record Time” to "1 Minute",
the dash cam will save videos every minute. When the memory is full, the camera
will automatically delete the earliest videos for continuous recording.
(5) Time-Lapse
Off (default)/1S/2S/3S
Set the interval at which the dash cam captures a scene in Parking Monitor mode.
The camera will capture scenes at the preset interval and seamlessly compile them
into a short video.
Note: This setting is available only when the dash cam is properly hardwired.
(6) Volume
Off/High (default)/Middle/Low
Adjust the dash cam’s system volume, such as the voice prompts.
(7) G-sensor Sensitivity
Off (default)/High/Middle/Low
With this setting enabled during video recording, your dash cam will automatically
start recording an emergency video and save the content upon detecting any sudden
braking or impact. The video will be locked in the front or the rear emergency folder,
preventing it from being overwritten by new video files. By selecting a higher
sensitivity level, your dash cam will be more likely to detect smaller impacts and
trigger emergency recording.
Tip: A flashing yellow dot will be displayed in the upper left corner of the LCD screen
during the emergency video recording.
(8) Video Resolution
2K (front)/1080P (rear)
By default, the dash cam is set to record in 2K resolution, and the rear camera in
1080P.
��

(9) Date Stamp
On (default)/Off
With Date Stamp enabled, a date and time watermark will be added to your captured
videos, and vice versa.
(10) Image Mirror
On/Off (default)
Turn Image Mirror on or off. With this setting enabled, the rear camera is flipped
horizontally and its screen layout is reversed left and right.
(11) Restore to Factory Settings
Yes/No (default)
Reset all the settings to the default values.
(12) Format Recorder
Yes/No (default)
Format the memory card. Before capturing, you will need to complete the formatting
process. Reformatting erases all of your content, so be sure to offload your photos
and videos first.
(13) Firmware Version
Check the firmware version of your dash cam.
��

Installing the hardwire kit not only helps prevent the camera battery from draining
the car battery thanks to its smart low voltage protection system but also provides
a continuous and stable power supply. So it’s of necessity to purchase a hardwire
kit and install it onto your dash cam.
Pro tip: We highly recommend the professional installation of the dashcam hardwire
kit. If you choose to install it yourself, please note that KingSlim cannot take
responsibility or liability for any product or vehicle damage, or personal injuries that
may occur due to improper operation during the process. It is crucial to ensure that
all necessary preparations are made and that the installation process is carried out
with a strong emphasis on safety.
Installation Instructions
Step 1: Make sure all the necessary components are readily available. You will need
a hardwire kit, a circuit tester, wire stripper, installation tool, and a fuse tap (sold
separately).
Tip: The red wire of the hardware kit is designed as the ACC wire, which should not
be connected to power until you start your car engine. The yellow wire requires a
constant power supply. And the black wire serves as the ground wire and should
be connected to a metal ground point.
7. Hardwiring Your E2 Pro Dash Cam
1 2 3
1
2
3
Red Wire (Connected to the ACC fuse slot)
Yellow Wire (Connected to constant power supply)
Black Wire (Connected to a metal ground point)
��
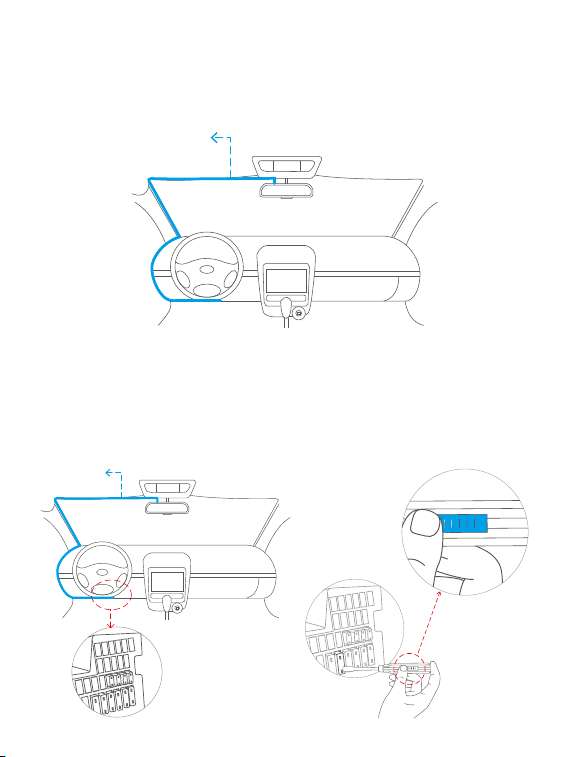
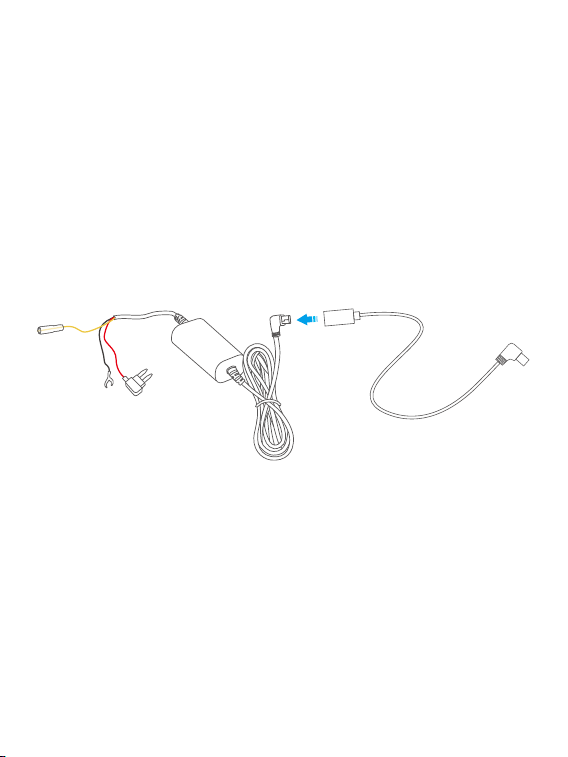
Step 2: Secure the wiring: After connecting the hardwire kit's output cable to the
dash cam's power port, use the installation tool and zip ties to neatly secure the
wiring on the windshield edge and prevent any potential hazards or distractions
while driving.
Step 3: Locate the constant fuse slot: Locate and open the fuse box typically
positioned beneath the dashboard. Then, identify the constant fuse slot within the
box. To do this, turn off your car engine, then use the circuit tester to test various
fuse slots available. Remember that if the circuit tester lights up during testing, it
indicates that you have successfully located the correct constant fuse slot.
Hardwire Kit
Hardwire Kit
��
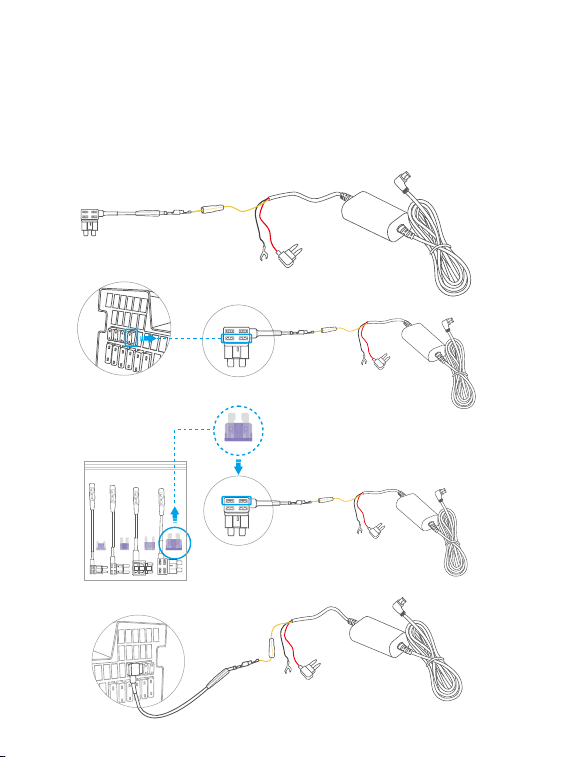
Step 4: Connect the fuse tap: After finding the constant fuse slot, first remove the
original fuse, connect it to the lower part of the connector, then connect the yellow
wire from the hardwire kit to the upper part of the connector. Second, insert yellow
wire into the fuse tap. Lastly, connect the fuse tap to the constant fuse slot.
Tip: You can directly insert the yellow wire into the constant fuse slot after
connecting it to the connector.
��
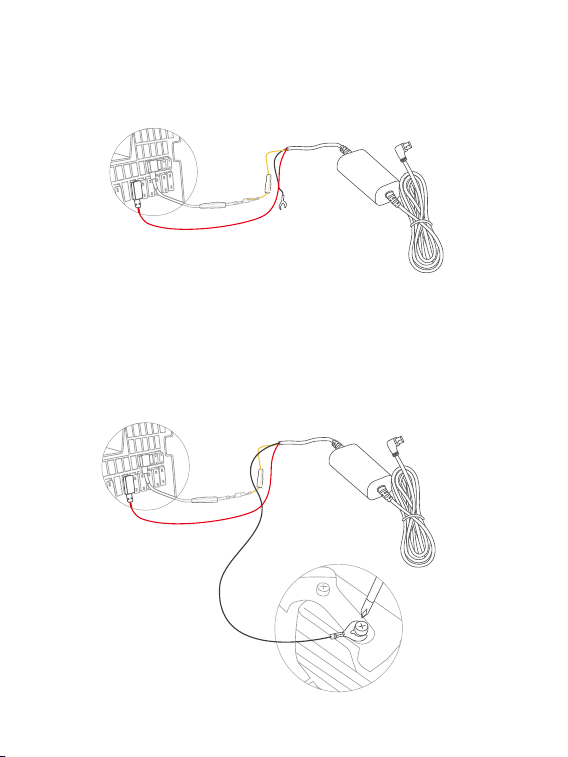
Step 5: Connect the red wire to the ACC fuse slot. To do this, turn on the vehicle's
ignition, then use the circuit tester to examine the fuse slots. If the tester lights up
while testing, it indicates that the slot has the appropriate amperage rating. You can
proceed by inserting the red wire into this slot.
Step 6: Connect the black wire to a suitable metal ground point. To do this, locate
a bolt or screw adjacent to the fuse slot and attach the black wire securely by
screwing it into place.
Tip: If the red wire is not compatible with the connector, you can cut it using the
wire stripper, twine it around the electrode, and then connect it to the slot.
Set the length of each video. For instance, if you set “Cycle Record Time” to "1 Minute",
the dash cam will save videos every minute. When the memory is full, the camera
will automatically delete the earliest videos for continuous recording.
(5) Time-Lapse
Off (default)/1S/2S/3S
Set the interval at which the dash cam captures a scene in Parking Monitor mode.
The camera will capture scenes at the preset interval and seamlessly compile them
into a short video.
Note: This setting is available only when the dash cam is properly hardwired.
(6) Volume
Off/High (default)/Middle/Low
Adjust the dash cam’s system volume, such as the voice prompts.
(7) G-sensor Sensitivity
Off (default)/High/Middle/Low
With this setting enabled during video recording, your dash cam will automatically
start recording an emergency video and save the content upon detecting any sudden
braking or impact. The video will be locked in the front or the rear emergency folder,
preventing it from being overwritten by new video files. By selecting a higher
sensitivity level, your dash cam will be more likely to detect smaller impacts and
trigger emergency recording.
Tip: A flashing yellow dot will be displayed in the upper left corner of the LCD screen
during the emergency video recording.
(8) Video Resolution
2K (front)/1080P (rear)
By default, the dash cam is set to record in 2K resolution, and the rear camera in
1080P.
��
(9) Date Stamp
On (default)/Off
With Date Stamp enabled, a date and time watermark will be added to your captured
videos, and vice versa.
(10) Image Mirror
On/Off (default)
Turn Image Mirror on or off. With this setting enabled, the rear camera is flipped
horizontally and its screen layout is reversed left and right.
(11) Restore to Factory Settings
Yes/No (default)
Reset all the settings to the default values.
(12) Format Recorder
Yes/No (default)
Format the memory card. Before capturing, you will need to complete the formatting
process. Reformatting erases all of your content, so be sure to offload your photos
and videos first.
(13) Firmware Version
Check the firmware version of your dash cam.
Step 7: Low voltage protection: The dash cam is equipped with a low voltage
protection feature. When the hardwire kit detects that the voltage drops below
11.8V/23.8V (this may vary depending on your car), the dash cam will automatically
power off within 5 seconds.
Tips:
➀ It is important to ensure that the dash cam is protected from any obstacles
caused by items in your car. If your car has side curtain airbags, please exercise
caution when running any wires along the car window. Improper wire placement
can interfere with the deployment of airbags, potentially preventing them from
functioning properly.
➁ These installation steps and and figures are for your reference only. For your
safety, please turn to professional technicians.
��

Warm Tip: For any product issues, please feel free to contact us anytime for technical
support.
1. What to do if the dash cam does not turn on anymore?
➀ Check if the indicator light on the car charger turns on after plugging in your dash
cam.
➁ If it does not turn on, plug the dash cam into another cigarette lighter or USB port
for about one hour to see if it finally turns on.
➂ If your issue remains, kindly contact customer service for further help.
2. What to do if the dash cam keeps turning on and off automatically?
➀ Remove the memory card and plug in your dash cam with a Type-C cable to see
if turns on automatically.
➁ If so, turn it off, then charge it with the original 5V car charger for about one hour.
After charging, turn it on manually to see check if it works properly.
➂ If your issue remains, restore your dash cam to the factory settings or contact
customer service for further help.
3. What to do if the dash cam doesn’t turn on when plugged in?
➀ Make sure you plug in your dash cam with the original car charger.
➁ Plug in your dash cam with a Type-C charging cable to check if it turns on and
records properly.
➂ If your issue remains, kindly contact customer service for further help.
4. What to do if you can't connect the King app to your dash cam?
➀ Make sure you have installed the up-to-date Kingslim app on your phone.
➁ Make sure you have successfully connected the camera’s Wifi.
➂ If your issue remains, kindly contact customer service for further help.
5. What to do if the camera’s Wifi is not connected?
➀ Ensure your dash cam is turned on.
8. FAQ
��

➁ Check if your phone can detect the camera’s Wifi and display it in the Wifi list.
➂ If it note, kindly contact customer service for further help.
6. What to do if the dash cam displays “Slow Card” or “Please Insert Card”?
➀ Use the correct memory card according to the user manual, such as a U3
memory card or above.
➁ Remember to format the card on the computer first and then on the Kingslim
app before capturing.
➂ If your issue remains, kindly contact customer service for further help.
7. What to do if the dash cam stops recording?
➀ Ensure that the memory card has enough available storage and is not full. We
recommend customers format the card every two months for better
performance. You can also replace it with a new one after using it for a long
period of time.
➁ Check the power supply and connections to ensure that the dash cam is receiving
constant power.
➂ Keep the dash cam out of direct sunlight and extreme temperatures.
➃ Make sure you enabled “Cycle Record Time”. Otherwise, the dash cam will stop
recording when the card is full.
➄ If your issue remains, kindly contact customer service for further help.
8. What to do if the rear camera stops recording?
➀ Make sure the rear camera is connected to the rear camera extension cable
properly before plugging it into the dash cam.
➁ Reconnect the rear camera to the extension cable a couple of times to make sure
it's connected tightly.
➂ Make sure the dash cam is plugged into the car charger properly.
➃ Reset your device to see if it makes a difference.
➄ If your issue remains, kindly contact customer service for further help.
��

For any inquiries about KINGSLIM products, please feel free to contact us.
We will respond within 24 hours.
9. Contact US
��

Thank you for purchasing our new KINGSLIM E2 Pro dash cam!
We hope our product brings a new, safe, and fun experience to you. If you need any
assistance, please feel free to email us at [email protected].
In the unlikely event that we can’t help, we’re always happy to provide a full, and
hassle-free refund under the warranty. We sincerely hope our customers are happy
and proud to use KINGSLIM dash cameras! There is no perfect product, however,
we will do our best.
A BIG THANK YOU
��