ADBMZ001
Product user manual
Product Overview
The roller shutter robot is an innovative smart home device that can convert
traditional roller shutters in your home into smart ones. It features easy installation
without the need to replace existing shutters. Adopting the ZigBee protocol and
connecting to mobile apps via a ZigBee gateway, it enables you to effortlessly control
the lifting and lowering of roller shutters. Equipped with a built-in timer function, it
allows customized opening and closing schedules, supporting remote control and
automated operation. It adds comfort and a modern touch to your home life, letting
you enjoy the convenience of smart living.
App installation
Smart Life is a mobile platform used to control smart devices. You can search for
"Smart Life" in the mobile app store to install the app.
Device charging
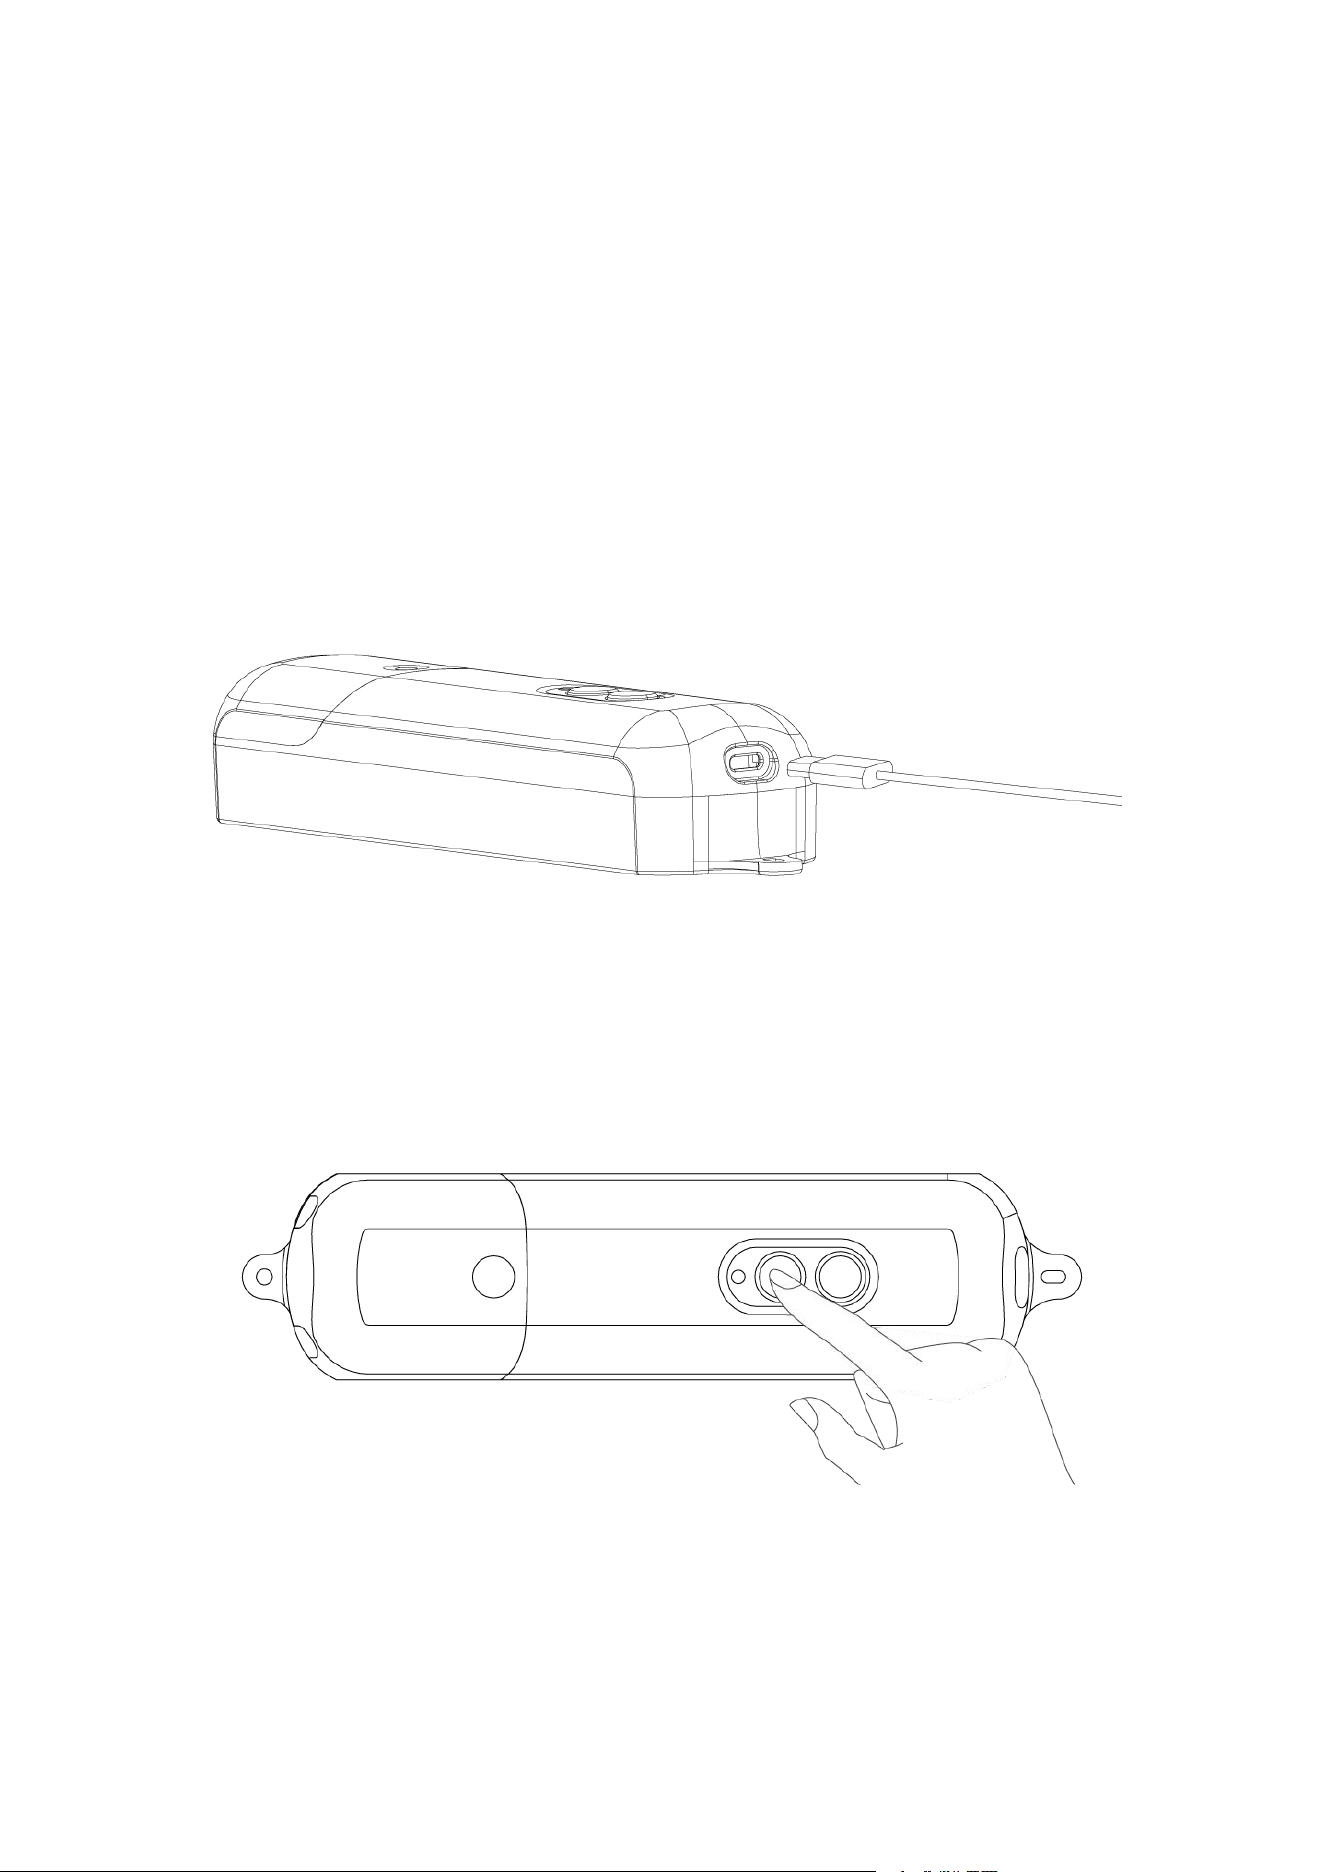
We recommend using a 5V/1A power adapter with a Type-C charging cable to
charge the product.
Device pairing
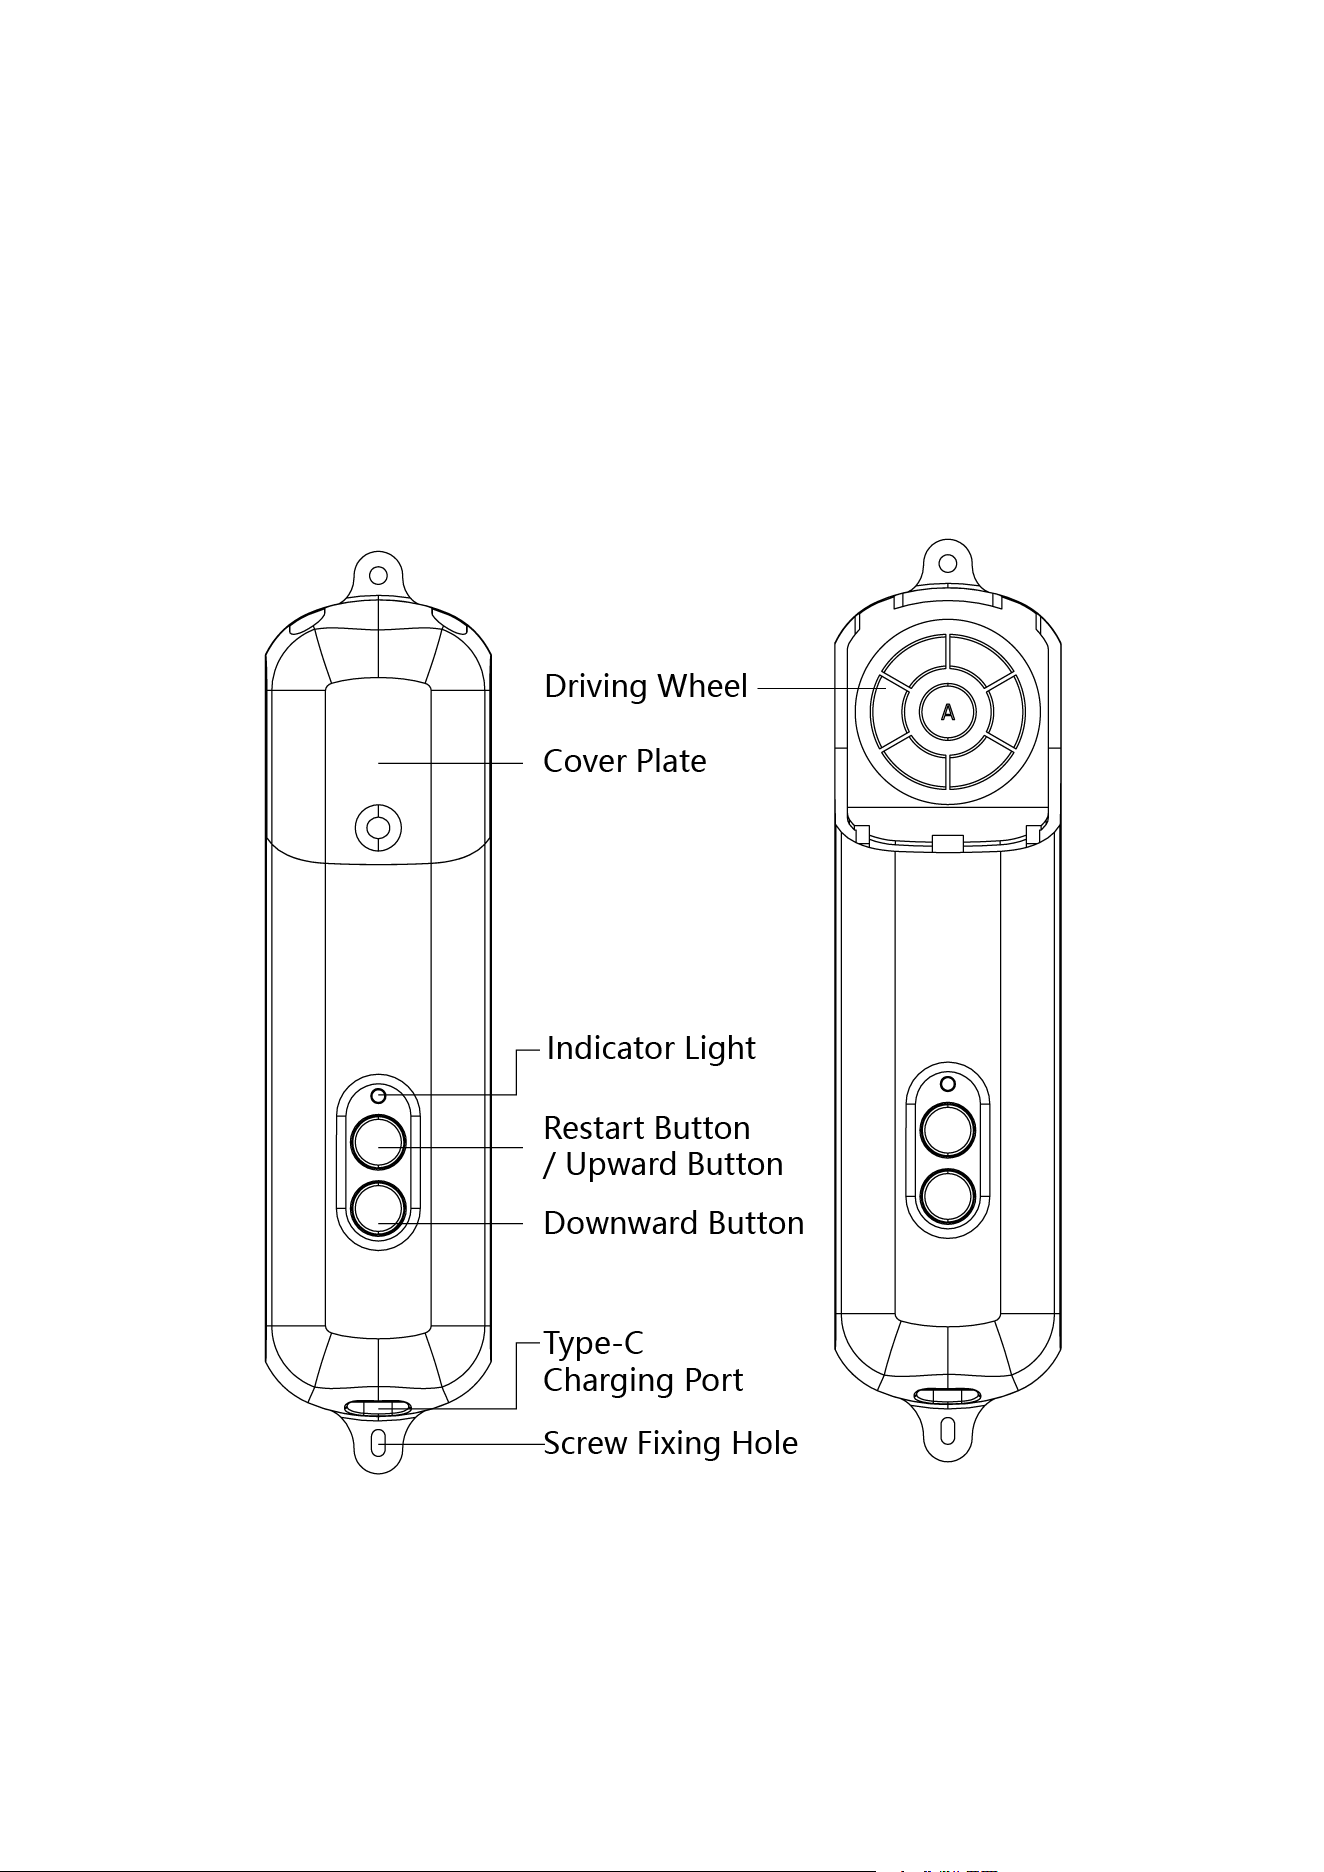
When pairing your rolling shutter robot with your APP account, you need to reset the
device. Please press and hold the reset button for 5 seconds until the blue light starts
flashing, at which point the device is already in a pairing state.
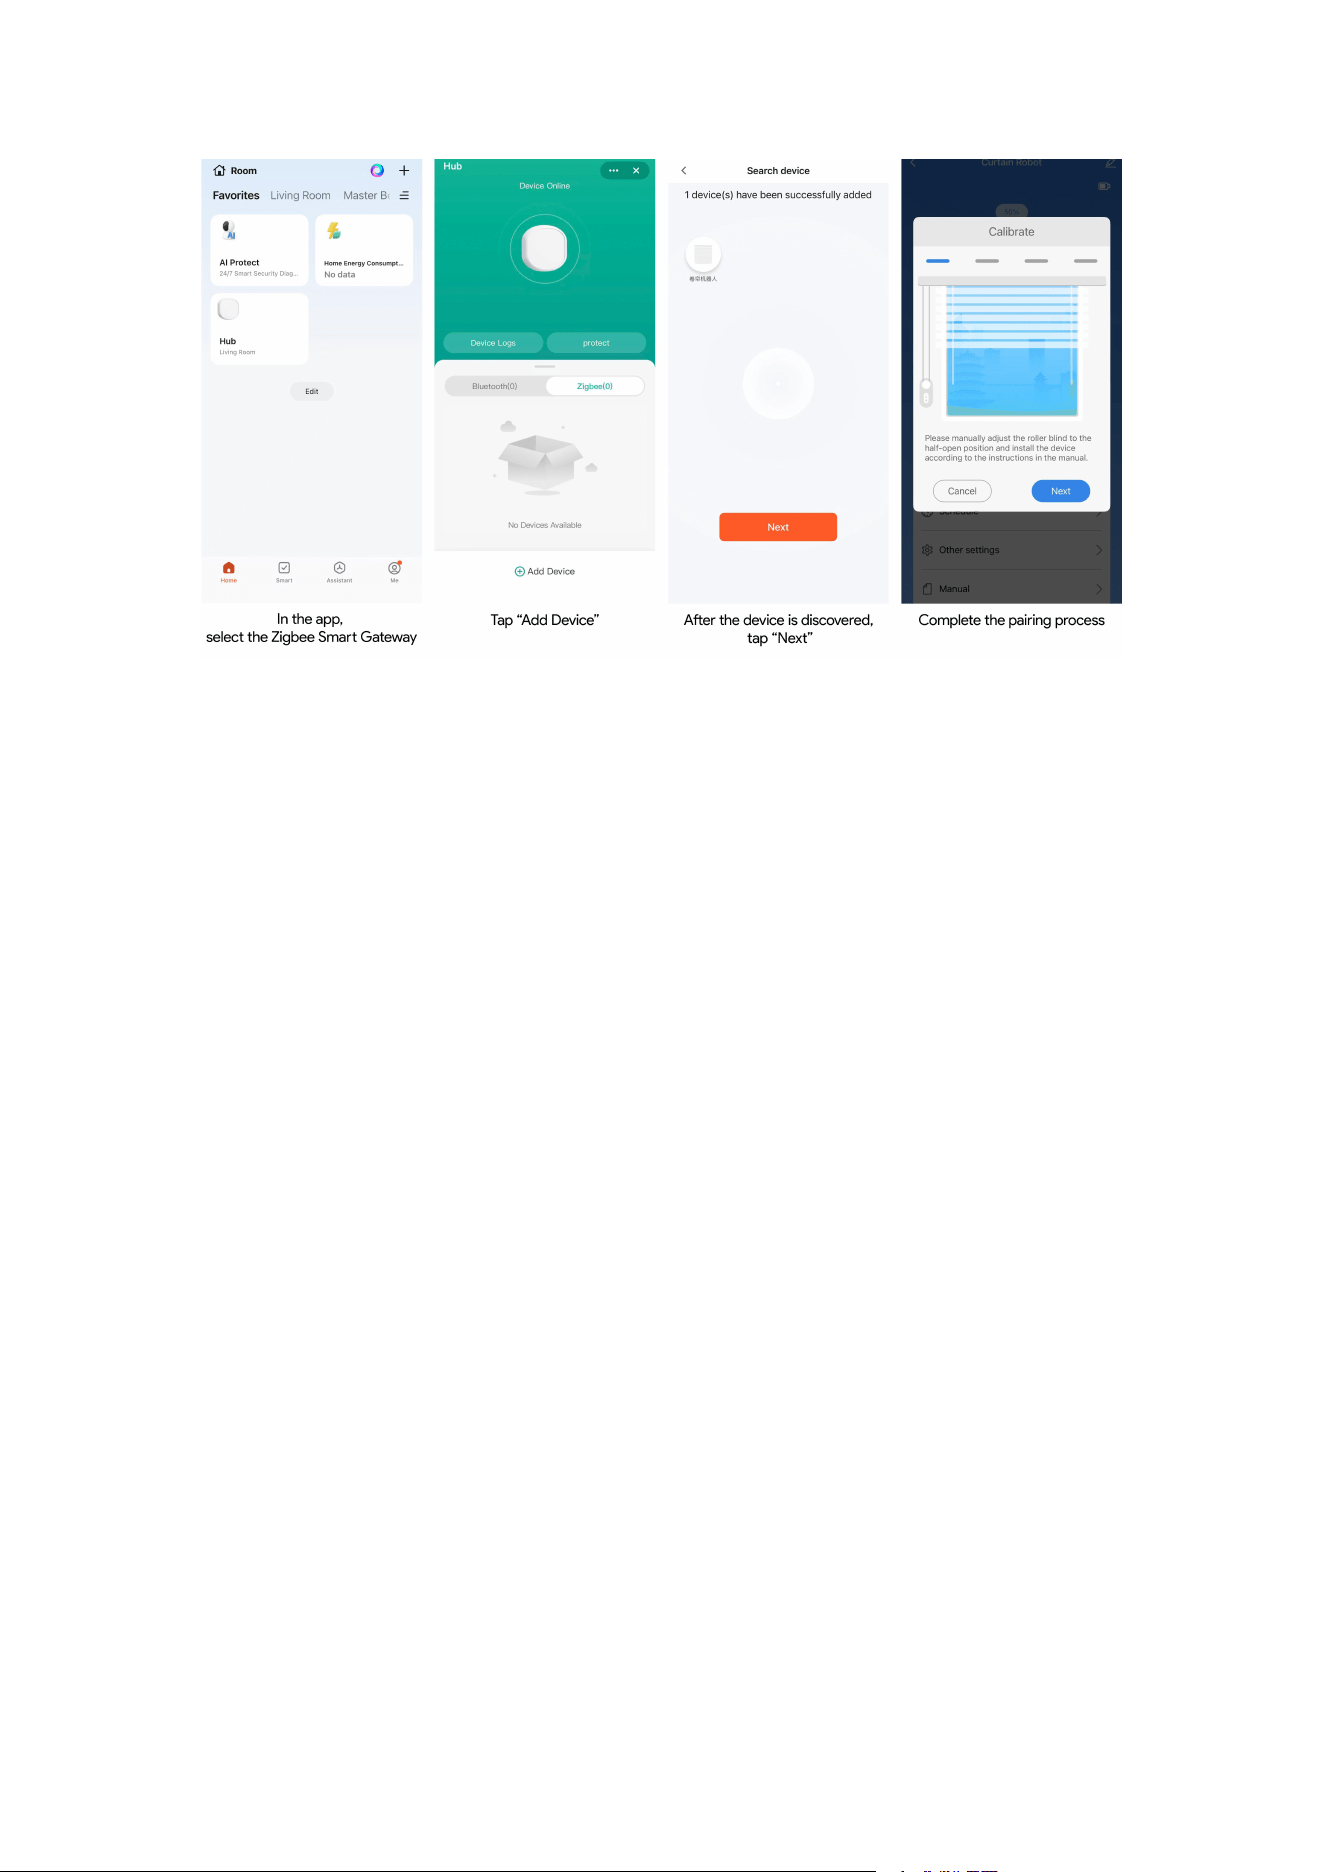
Tap the "+" icon at the top right corner in the app, then click the "Add Device" button.
In the "Discover Devices" section, select "Curtain Robot" and click "Add". Follow the
on-screen instructions to complete the device pairing
Equipment installation
Preparation work:
Prepare tools and materials
•
Roller shutter robot equipment
• Screwdriver (if required)
•
Screws and other fixtures (usually provided with equipment)
• Mobile phone (for configuration)
•
Bluetooth gateway (for remote control)
Step 1: Check equipment and accessories
Unboxing inspection: Open the packaging and confirm that all components are
complete, including the main body of the rolling shutter robot, screws, foam and other
accessories.
Step 2: Prepare the installation location
1. Clean the surface: Ensure that the installation surface is clean and dust-free to
better secure the equipment.
2. Connect the driving wheel and the bead chain: Determine the installation
position of the rolling shutter robot, connect the product driving wheel and the bead,
ensure tight connection, and avoid sliding or loosening.
Step 3: Fix the rolling shutter robot and start phone calibration
Secure the roller shutter robot and start phone calibration: Use the included screws
or other fixing accessories to securely install the roller shutter robot on the wall or
other selected location.

After installation, open the application and follow the prompts to initialize and
calibrate the device to ensure that the rolling shutter robot can accurately control the
opening and closing of the rolling shutter.
Equipment control
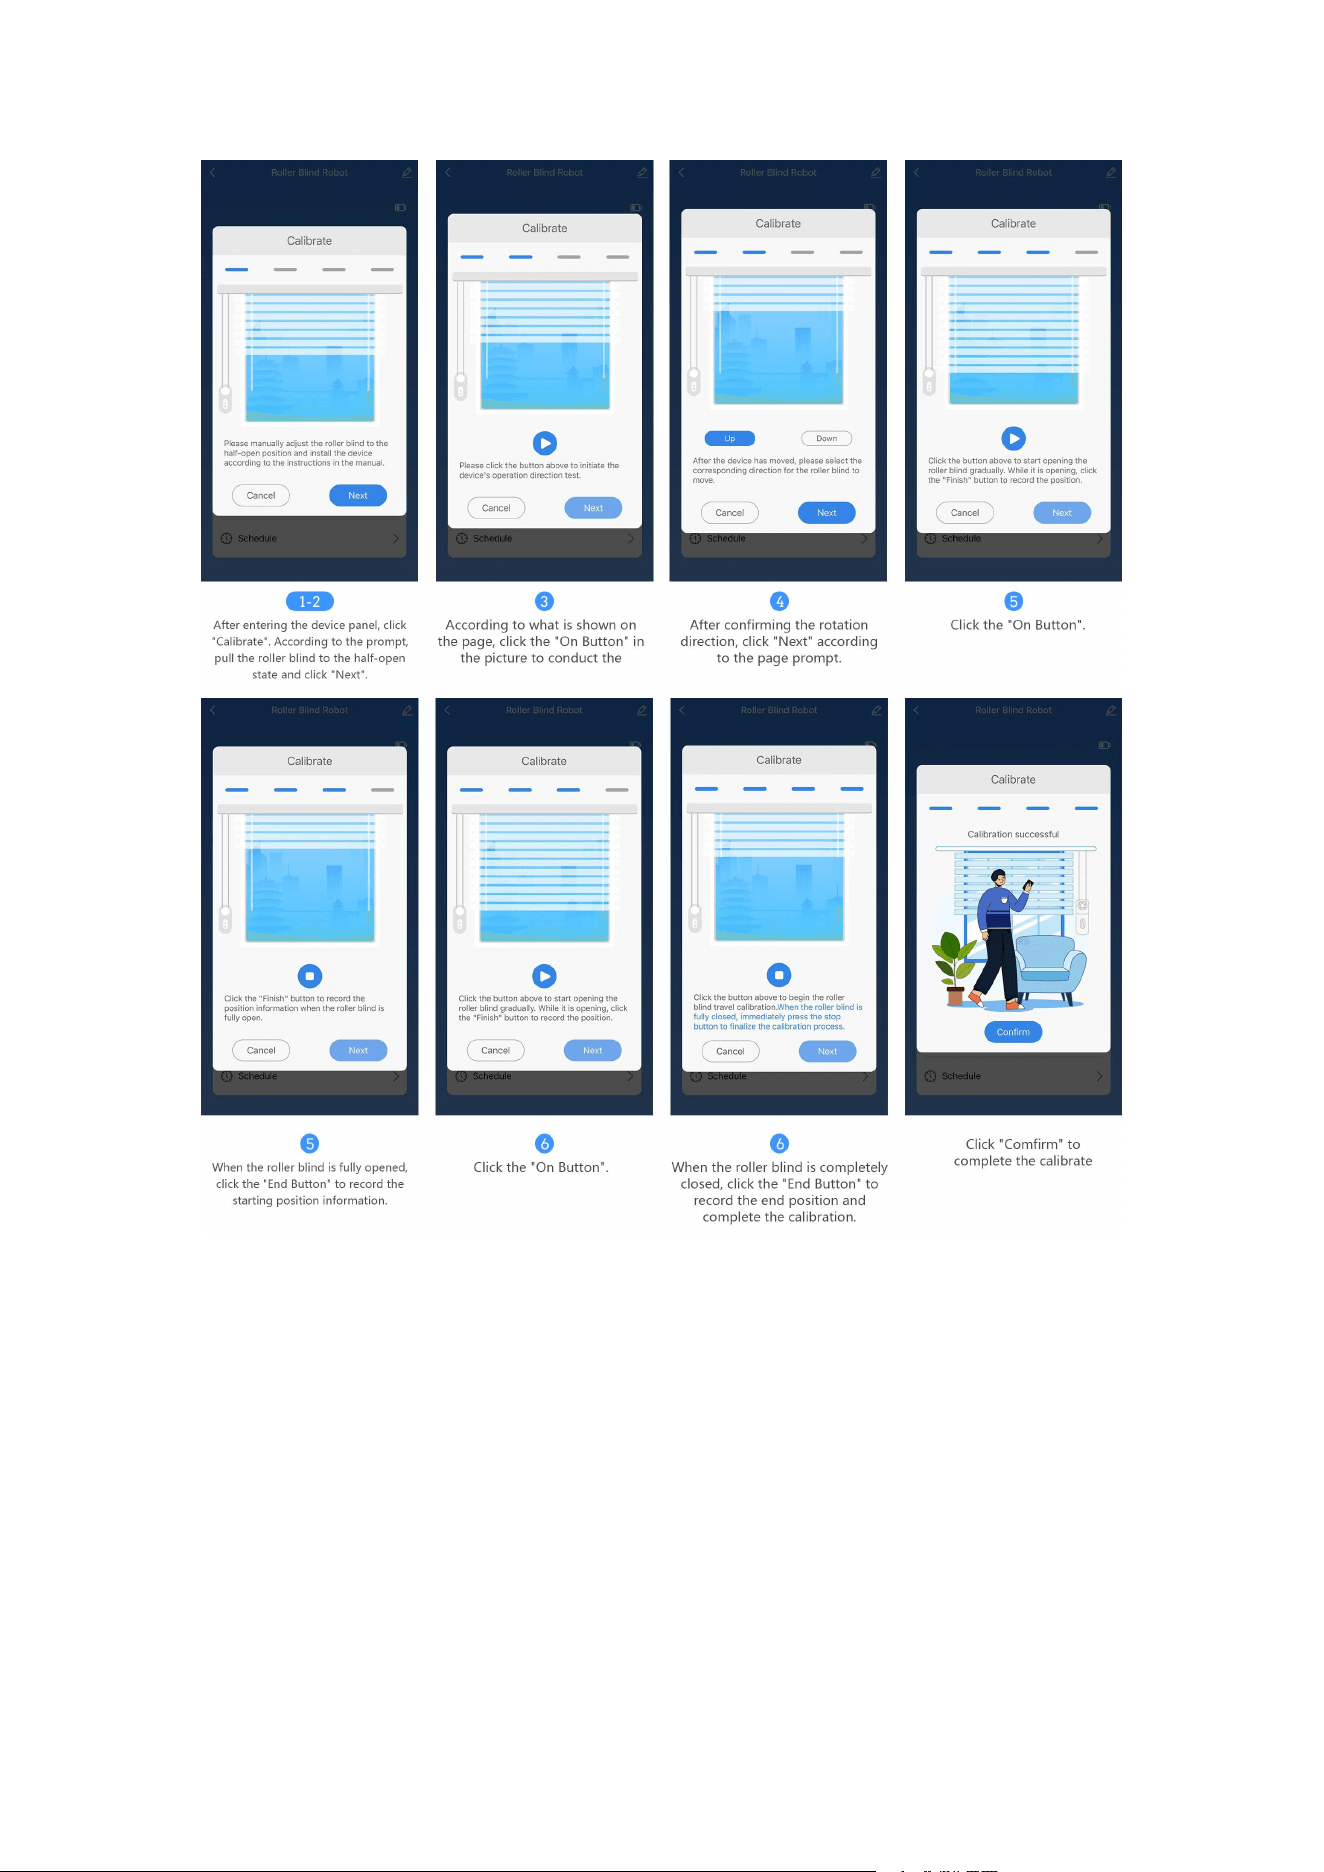
Roller shutter calibration
Before using the rolling shutter robot, please calibrate the rolling shutter robot
through the following steps:
1. After entering the equipment panel, click "Motion Calibration".
2. According to the prompt, pull the roller shutter to the half-open state and click
"Next".
3.
According to the page, click the "Open button" in the figure to perform the
direction test.
4.
After confirming the rotation direction, click "Next" according to the page
prompts.
5. Click the "Open button", and when the shutter is fully open, click the "End
button" to record the starting position information.
6. Click the "Start button" when the roller shutter is completely closed, click the
"End button" to record the end position to complete the calibration.
Action triggered
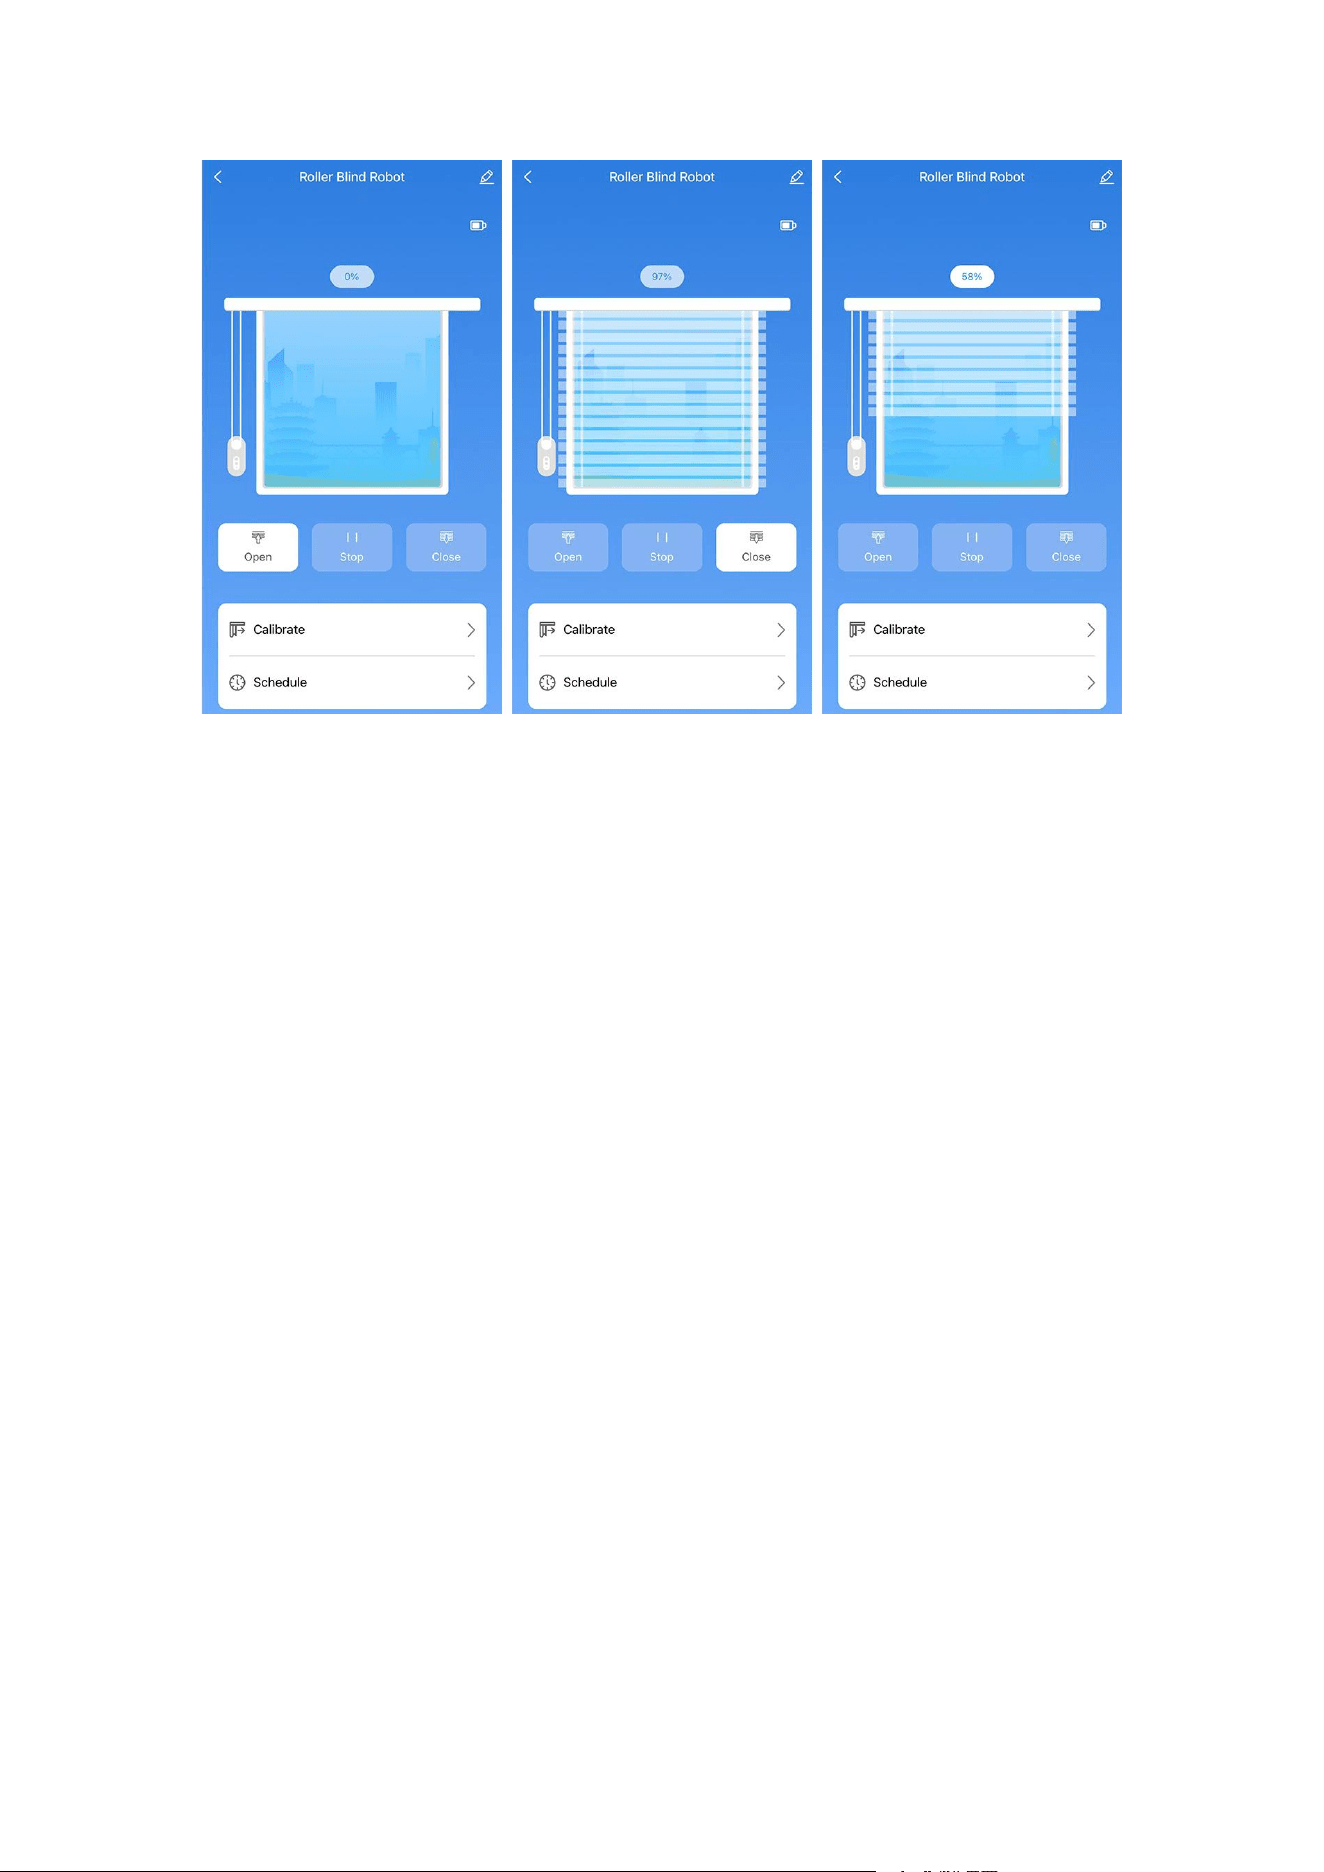
After entering the equipment panel, click the enable icon, and the rolling shutter robot
will move in the direction of opening the rolling shutter; click the close icon, and the
rolling shutter robot will move in the direction of closing the rolling shutter. If the
signal is good, the action will be triggered within 3 seconds. If you need to adjust the
rolling shutter to any position, you can slide up and down through the rolling shutter
picture to any position you want to reach.
Scene control (remote needs to be used in conjunction with gateway)
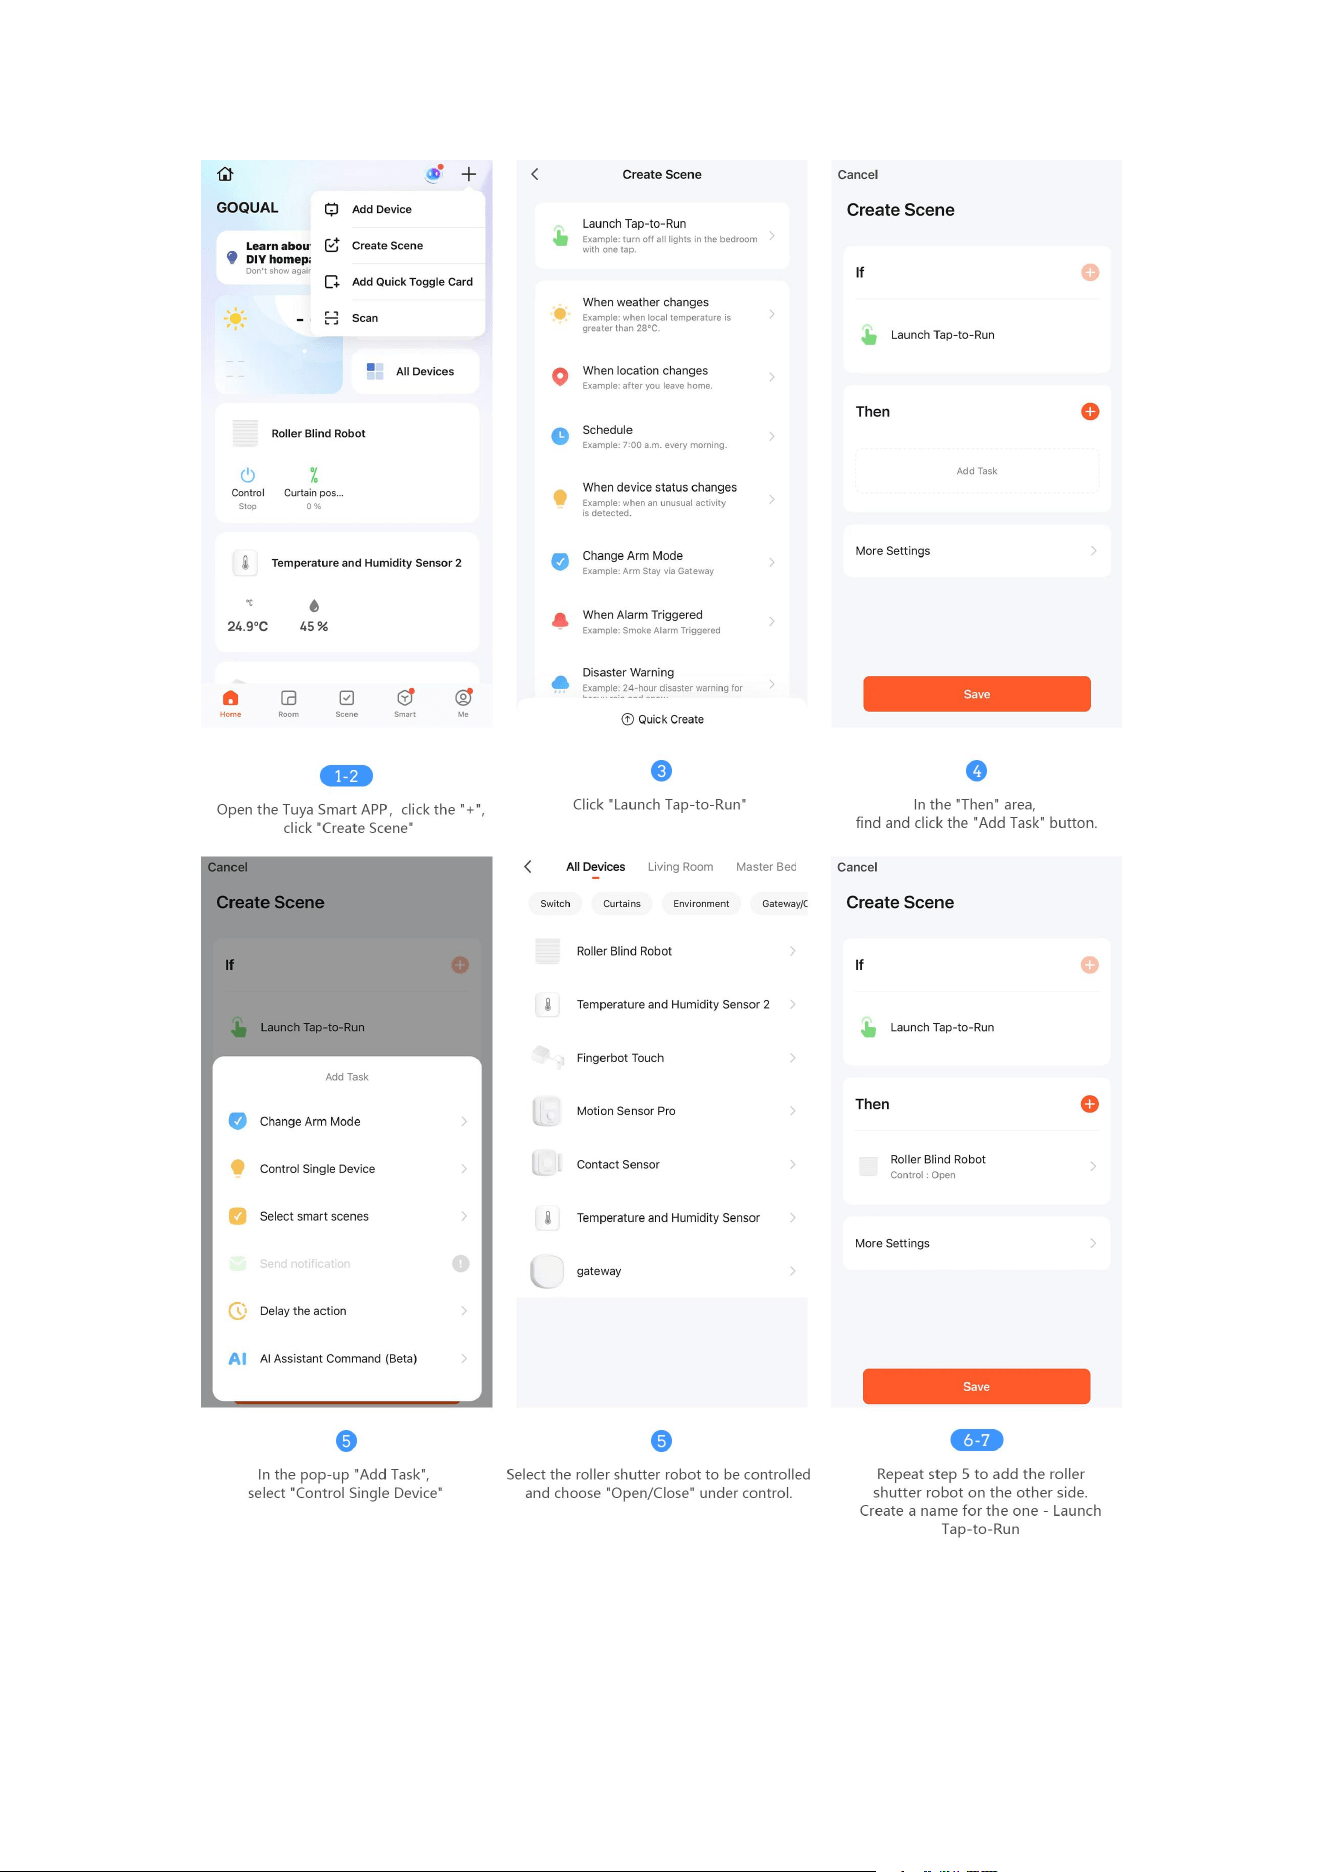
After completing the roller shutter calibration work, the opening or closing of the roller
shutter can be remotely or individually controlled through the following steps:
1. Click the plus sign in the upper right corner of the Tuya Smart APP
2.
Click Create Scene.
3.
Click to execute with one click.
4.
Select Add Task in the Execute Task box.
5. Select control of a single device in the task selection box, select the rolling
shutter robot to be controlled, and select on/off under control
6. Repeat step 5 to add the rolling shutter robot on the other side.
7. Create a name for one-click execution, such as rolling shutter full open, rolling
shutter full close, etc.
Warning
This product is not waterproof. It contains batteries, so it is prohibited to use in humid
and high-temperature environments. Do not obstruct the movement of the curtain

robot during operation. Otherwise, it may cause damage to the internal mechanical
structure and damage to the motor inside the robot.
Specification parameters
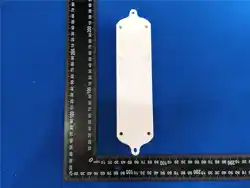
Dimensions: 209 x 52 x 38 mm
Weight: 249 g
Battery type : 3.7V lithium battery 2000 mAh
Charging port: Type-C
Wireless protocol: Zigbee
Working temperature : 0 C~45 C / 32°F ~ 113°F
Working humidity: : 0 ~ 95% RH, non-condensing
Power Input:DC 5V/1A
Package content: 1 roller blind robot , 2 × screws , 2 × foam stickers

FCC Warnning:
This equipment has been tested and found to comply with the limits for a Class B digital device,
pursuant to part 15 of the FCC Rules. These limits are designed to provide
reasonable
protection againstharmful interference in a residential installation. This equipment generates,
uses and can radiateradio
frequency
energy
and,
if
not
installed
and
used
in
accordance
with
the
instructions,
maycause
harmful
interference
to
radio
communications.
However,
there
is
no
guarantee
thatinterference
will
not
occur
in
a
particular
installation.
If
this
equipment
does
cause
harmfulinterference to radio or television reception, which can be
determined by turning the equipmentoff
and
on,
the
user
is
encouraged
to
try
to
correct
the
interference
by
one
or
more
of
thefollowing measures:
•
Reorient or relocate the receiving antenna.
•
Increase the separation between the equipment and receiver.
•
Connect the equipment into an outlet on a circuit different from that to which the receiver is
connected.
• Consult the dealer or an experienced radio/TV technician for help.
Caution:
Any
changes
or
modifications
to
this
device
not
explicitly
approved
by
manufacturer
could void your authority to operate this equipment.
This
device
complies
with
part
15
of
the
FCC
Rules.
Operation
is
subject
to
the
following
two
conditions:
(1)This
device
may
not
cause
harmful
interference,
and
(2)
this
device
must
accept
any
interference received, including interference that may cause undesired operation.
This
equipment
complies
with
FCC
radiation
exposure
limits
set
forth
for
an
uncontrolled
environment.
This
equipment
should
be
installed
and
operated
with
minimum
distance
20cm
between the radiator and your body.

