
项目名称
G2579
S00
2026/05/18
基站版擦窗机器人说明书(美版)
刘梦雅
封面 157g 哑粉纸 + 哑膜 内页 70g 双胶纸 80P
Pantone cool gary 11C
176*250mm 骑马钉
版本号
设计时间
物料名称
设计师
审核
批准
料号
材质工艺要求﹕
材质要求﹕
颜色及专色:
尺寸要求:
变更履历:
注:此页面非印刷内容
MOVA T1 Station
Window Cleaning Robot
User Manual
The illustrations in this manual are for reference only.
Please refer to the actual product for accuracy.
T

EN
������������������������������������������������������������������������������� P04~P28
FR
��������������������������������������������������������������������������������P29~P53
ES
��������������������������������������������������������������������������������P54~P78

4 5
EN EN
1 Safety Information ������������������������������������������������������������������������������������� P05
2 Product Introduction ���������������������������������������������������������������������������������� P09
3 Operation �������������������������������������������������������������������������������������������������� P14
4 Key Features ���������������������������������������������������������������������������������������������� P22
5 Maintenance ��������������������������������������������������������������������������������������������� P24
6 Troubleshooting ���������������������������������������������������������������������������������������� P26
7 Specications �������������������������������������������������������������������������������������������� P27
8 Battery Disposal and Removal �������������������������������������������������������������������� P28
Original Instructions
1�1 IMPORTANT SAFETY INSTRUCTIONS
WARNING :
Read all safety warnings and instructions. Failure to follow the
warnings and instructions may result in electric shock, re and/or serious injury.
1 Safety Information
1. This appliance can be used by persons with reduced physical, sensory or
mental capabilities or lack of experience and knowledge if they have been
given supervision or instruction concerning use of the appliance in a safe
way and understand the hazards involved. Children shall not play with the
appliance. The appliance is not to be used if it has been dropped, if there are
visible signs of damage or if it is leaking. Keep the appliance out of reach of
children when it is energized.
2. Do not use and charge the Appliance in extremely hot or cold environments
(below 0˚C/32˚F or above 40˚C/104˚F, above 85% humidity), or it may aect
battery life span.
3. The Appliance can be used to clean exterior windows if it is properly tethered to a
safe position with the Carabiner, winds are calm, and it is not raining or snowing.
4. Before use, please use the Carabiner to lock the safety tether to a strong indoor
railing, and make sure Robot is securely attached to it.
5. Do not leave the Appliance unattended when using it. To prevent bodily injury
or property damage caused by accidental falling of the Appliance, please
make sure there are no people, animals, or valuable, fragile objects under the
working area of Robot.
6. Do not use the Appliance in whole gale storms and force-10 winds, or in areas
where the altitude exceeds 2000 meters (6562 feet).
7. Do not leave the Appliance unattended when it is plugged in.
8. For household use ONLY (including exterior window). Do not use the Appliance
in commercial or industrial environments.
9. Do not use on broken or uneven glass, such as glass with static cling stickers,
advertising posters, or raised patterns, so as to prevent glass breaking or
Appliance’s falling. Do not use on surfaces with gaps, such as a piece of
glass with gaps or holes, or two pieces of adjacent, frameless glass with a
gap between them, so as to prevent the Appliance from falling due to poor
attachment.
10. Only use accessories recommended or supplied by the manufacturer.
11. Please make sure your power supply voltage matches the power voltage
marked on the Robot.
12. Do not use the Appliance on a framed glass with a frame smaller than 5 mm (0.2 in).
13. Do not use on glass less than 3 mm (0.12 in) thick or mirrors less than 4 mm
(0.16 in) thick.
14. Do not use on glass or mirrors with a handle height of 70~105 mm (2.76~ 4.13 in).
15. Do not use the Appliance on greasy windows.
16. When used in high humidity environment, the cleaning performance will be
aected.
17. Store the Appliance away from heat and ammable materials.
18. In rainy weather, do not use the Appliance on the exterior window to avoid the

6 7
EN EN
risk of Appliance’s damage or falling.
19. Do not use the Appliance if it does not rmly attach to the glass or has visible
signs of damage.
20. To reduce the risk of electrical shock, do not put the Appliance in water or other
liquid. Do not place or store Appliance where it can fall or be pulled into a tub or sink.
21. Pressing the power button continuously for 3 times can disconnect the device
from the network.
22. Do not touch power plug with wet hands.
23. When charging the Appliance, do not place it on other electrical appliances
and keep it away from re and liquid.
24. Take care not to damage the power cord. Do not pull on or carry the Appliance
by the power cord, use the power cord as a handle, close a window on the
power cord, or put heavy weights on the power cord. Keep power cord away
from hot surfaces.
25. Do not use with a damaged power cord or receptacle. Do not use the Appliance
if it is not working properly, has been dropped, damaged, or come in contact
with water. It must be repaired by the manufacturer or its service agent in order
to avoid a hazard.
26. If the supply cord is damaged, it must be replaced by the manufacturer or its
service agent in order to avoid a hazard.
27. The plug must be removed from the receptacle before cleaning or maintaining
the Appliance. Do not unplug the Power Adapter by pulling on the power cord.
28. The Safety Battery must be replaced by the manufacturer or its service agent in
order to avoid a hazard.
29. The Safety Battery must be removed and discarded according to local laws and
regulations before disposal of the Appliance.
30. The Appliance must be disconnected from the receptacle before removing the
battery for disposal of the Appliance.
31. Please dispose of used batteries according to local laws and regulations.
32. Do not incinerate the Appliance even if it is severely damaged. The battery can
explode in a re.
33. The Appliance must be used in accordance with the directions in this Instruction
Manual. The company cannot be held liable or responsible for any damages or
injuries caused by improper use.
34. WARNING: For the purposes of recharging the battery, only use the detachable
supply unit provided with this Appliance.
35. The robot contains batteries that are only replaceable by skilled persons.
36. The plug must be used indoor.
37. If the vacuum glass, which Robot is working on, is leaking, remove Robot
immediately after cleaning is completed.
38. Before cleaning, please observe the area to attach Robot for any small
particles. If there are any, please remove them or switch to a particle-free area
to avoid scratching the glass.
39. Clean the Cleaning Cloth in time and make sure that any small particles on it
are completely removed to avoid scratching the glass.
SAVE THESE INSTRUCTIONS
To satisfy RF exposure requirements, a separation distance of 20 cm or more should
be maintained between this device and persons during device Operation.
1�2 FCC&IC Statements
This device complies with Part 15 of the FCC Rules. Operation is subject to the
following two conditions:
(1) This device may not cause harmful interference, and
(2) This device must accept any interference received, including interference that
may cause undesired operation.
Note: This product has been tested and found to comply with the limits for a Class
B digital device, pursuant to Part 15 of the FCC Rules. These limits are designed
to provide reasonable protection against harmful interference in a residential
installation. This product generates, uses, and can radiate radio frequency energy
and, if not installed and used in accordance with the instructions, may cause
harmful interference to radio communications. However, there is no guarantee that
interference will not occur in a particular installation. If this product does cause
harmful interference to radio or television reception, which can be determined
by turning the equipment o and on, the user is encouraged to try to correct the
interference by one or more of the following measures:
—Reorient or relocate the receiving antenna.
—Increase the separation between the equipment and receiver.
—Connect the equipment into an outlet on a circuit dierent from that to which the
receiver is connected.
—Consult the dealer or an experienced radio/TV technician for help.
Please take attention that changes or modication not expressly approved by the
party responsible for compliance could void the user’s authority to operate the
equipment.
This equipment complies with FCC radiation exposure limits set forth for an
uncontrolled environment. This equipment should be installed and operated with
minimum distance 20cm between the radiator & your body.
This equipment complies with IC RSS-102 radiation exposure limits set forth for an
uncontrolled environment. This equipment should be installed and operated with
minimum distance 20cm between the radiator & your body.
This device complies with Industry Canada licence-exempt RSS standard(s).
Operation is subject to the following two conditions:
(1) this device may not cause interference, and
(2) this device must accept any interference, including interference that may cause
undesired operation of the device.
Under Industry Canada regulations, this radio transmitter may only operate using
an antenna of a type and maximum (or lesser) gain approved for the transmitter by
Industry Canada. To reduce potential radio interference to other users, the antenna
type and its gain should be so chosen that the equivalent isotropically radiated
power (e.i.r.p.) is not more than that necessary for successful communication.
8 9
EN EN
2 Product Introduction
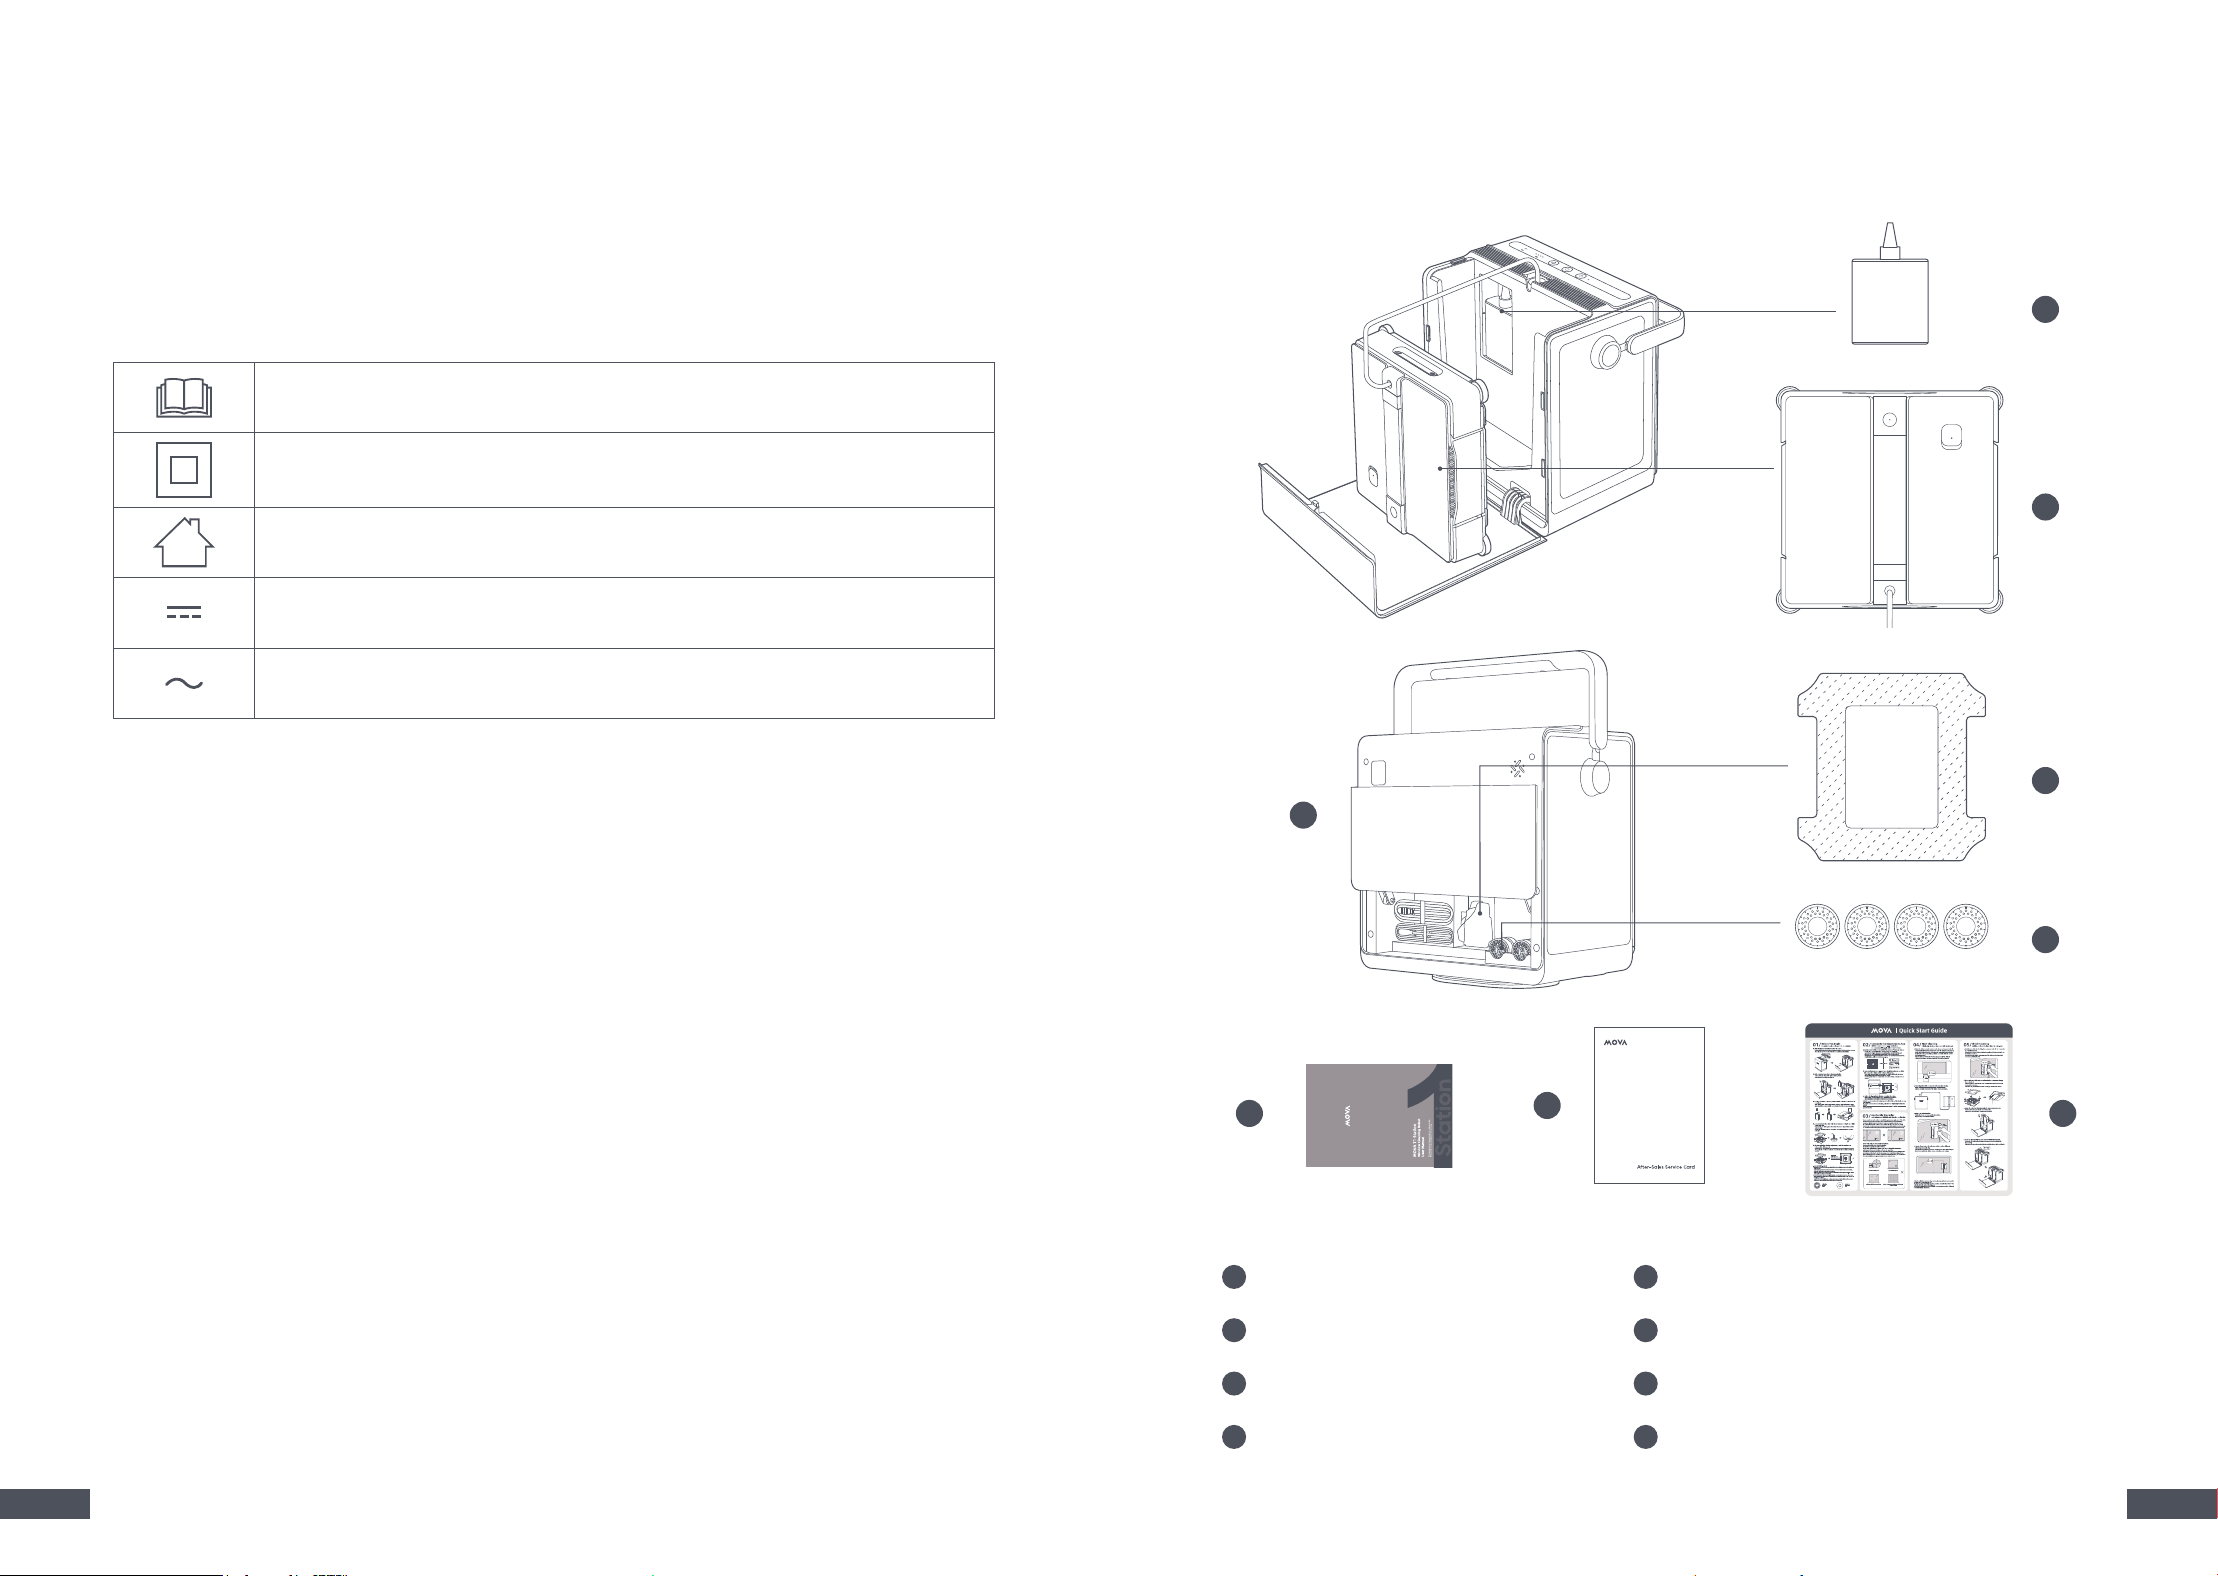
1
Robot
2
Station
3
Corner Brush × 2 (Pre-installed)
4
Cleaning Cloth × 2 (1 Pre-installed)
5
Window Cleaning Solution (230 mL)
6
User Manual
7
Warranty Card
8
Quick Start Guide
1
2
3
4
5
86
T
2�1 What's in the Box
7
Read the instructions�
Class Ⅱ
For indoor use only
Direct current
Alternating current
1�3 Correct Disposal of this Product
This marking indicates that this product should not be disposed of with other
household waste throughout the EU. To prevent possible harm to the environment
or human health from uncontrolled waste disposal, recycle it responsibly to
promote the sustainable reuse of material resources. To recycle your used device,
please use the return and collection systems or contact the retailer where the
product was purchased. They can safely recycle this product.
10 11
EN EN
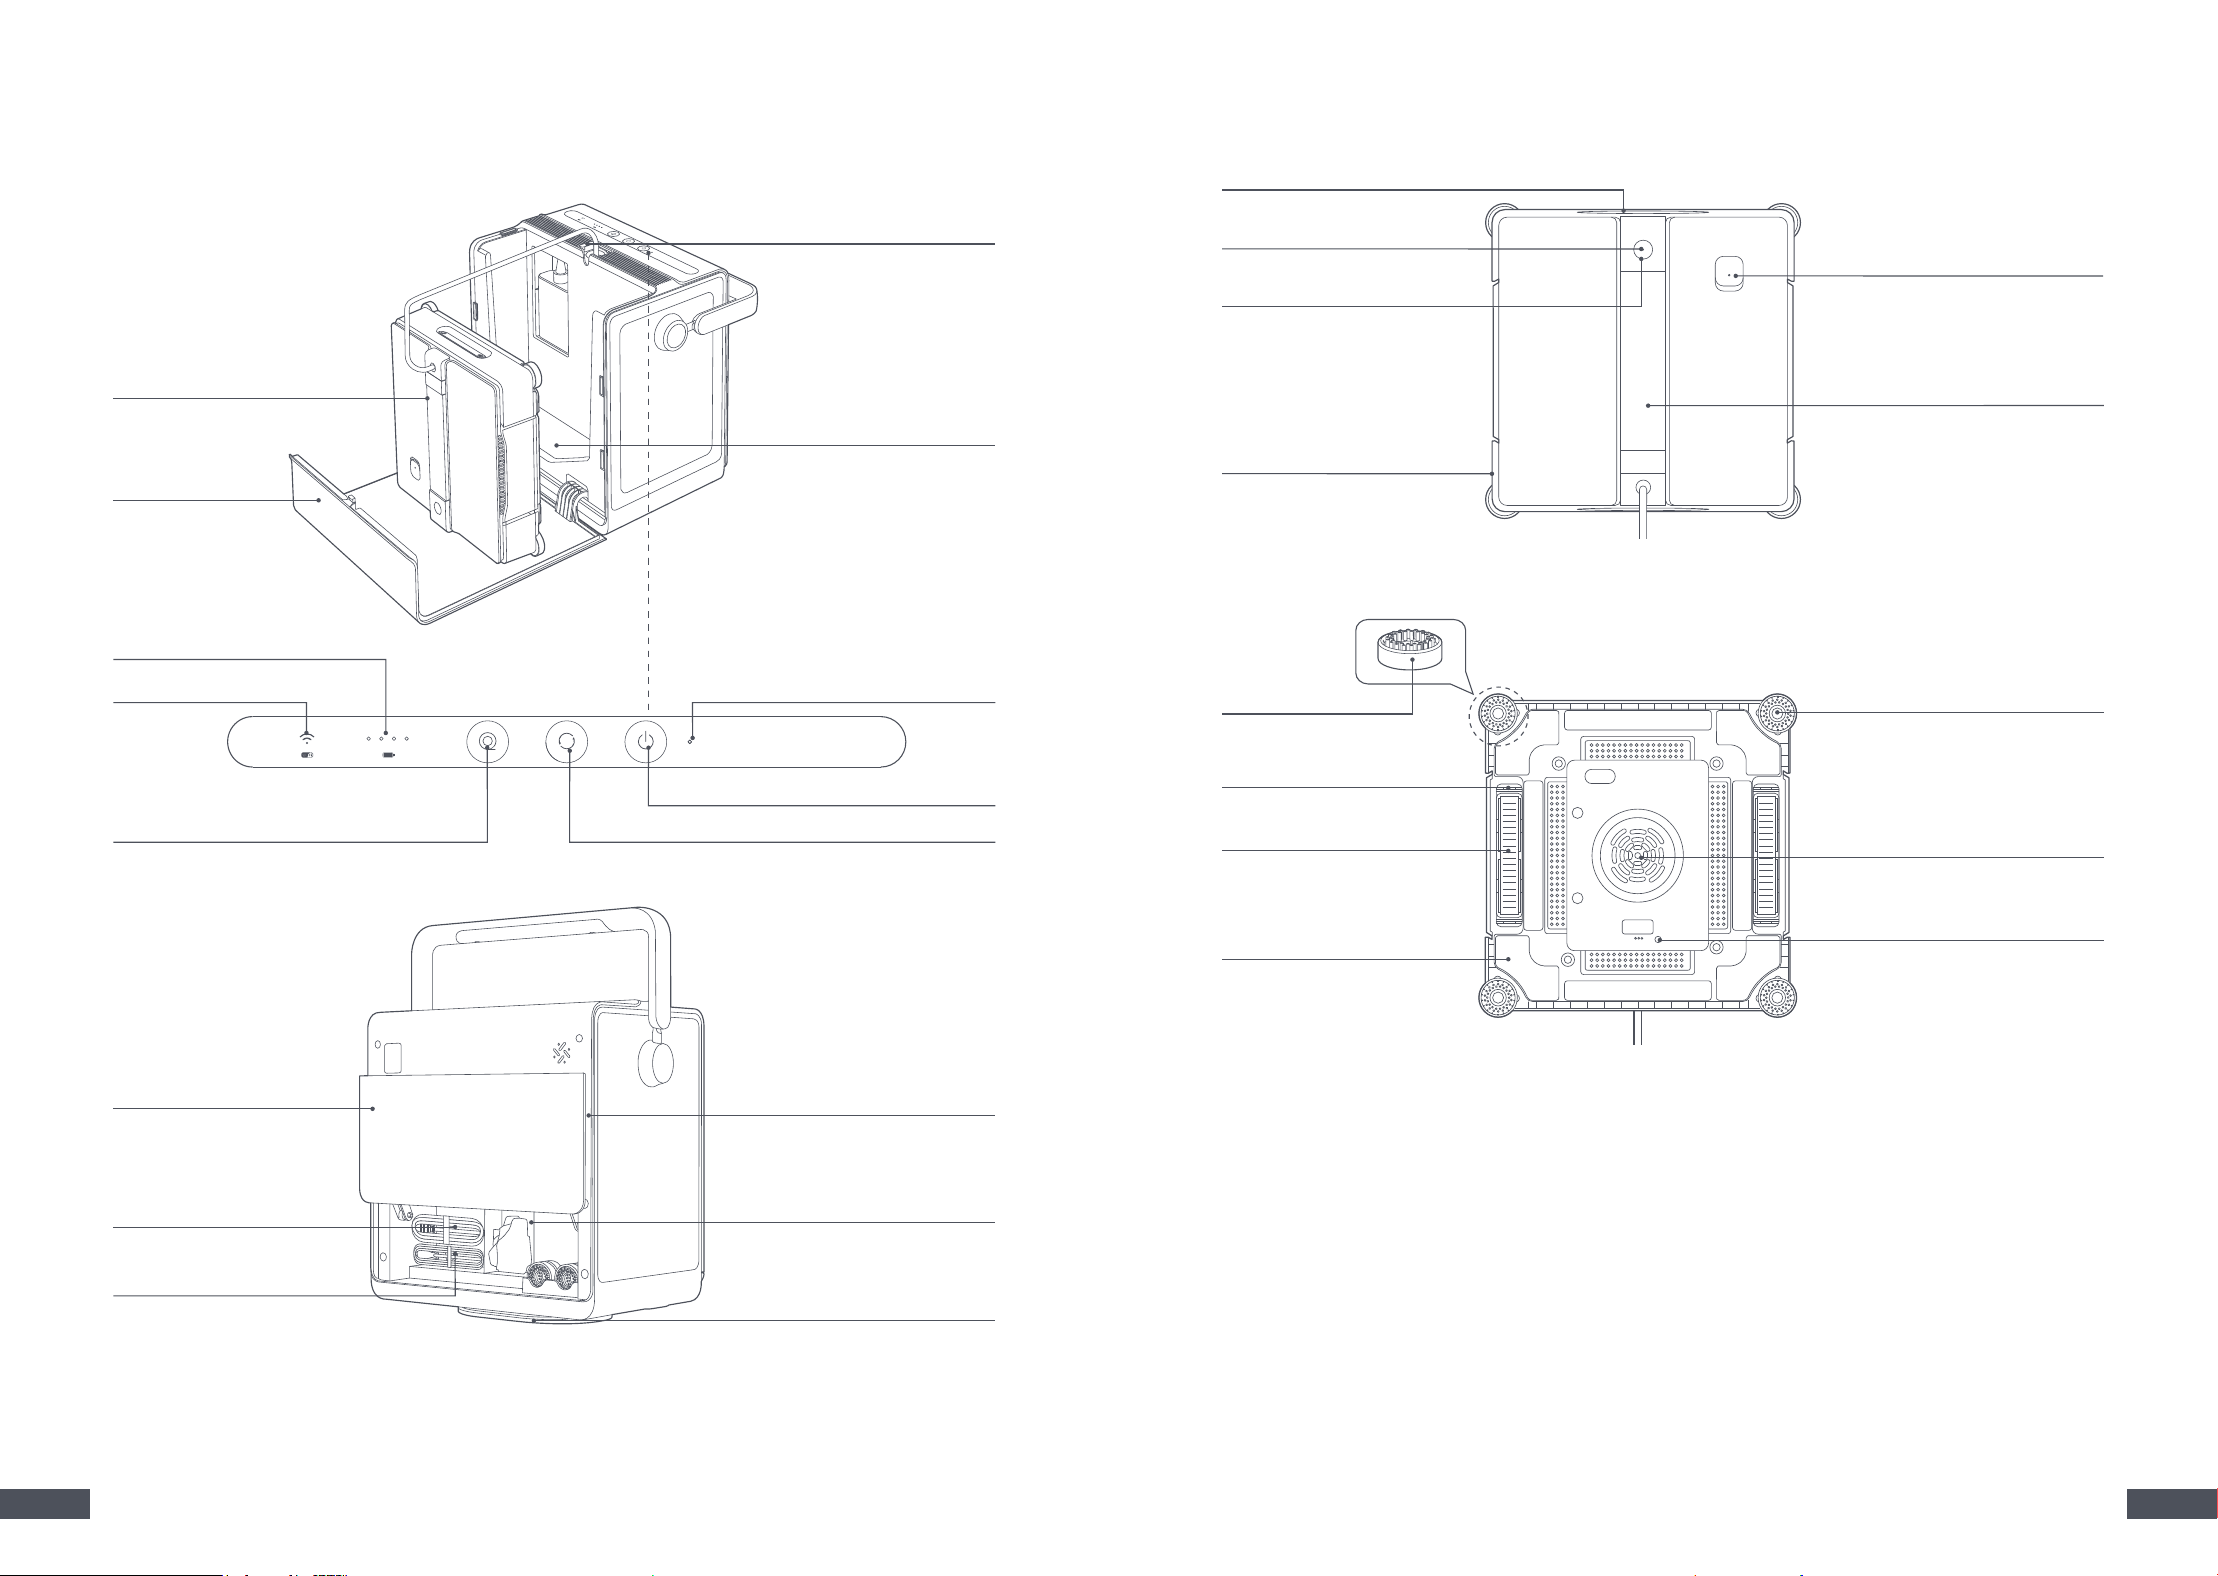
Storage
Compartment
Cover
Wi-Fi Indicator Status Indicator (on the Station)
Power Button
Mode Button
Auto-Retract Button for Power Cord
Battery Indicator
Flip Cover Lock
Storage Compartment
Robot
2�2 Product Overview
*The station battery consists of two levels. The operational battery level powers both the robot and
the station during normal operation. The safety battery level provides emergency backup to keep
the robot attached to the window when the battery is low.
Station
Flip Cover
Power Cord
Safety Tether (with Carabiner)
Storage Compartment
Suction Cup
Station Battery*
Handle
Bumper
Anti-Fall Sensor
Fan
Status Indicator
Track Belt
Cleaning Cloth Plate
Cleaning Scraper
Corner Brush
Start Button
Status Indicator
Spray Nozzles
Water Filling Port
Robot
12 13
EN EN
2�3 Controls and Indicator Light
Indicator Lights
Status Indicator on the Robot:
• Steady Green: The robot is functioning properly.
• Steady Red: An error occurs while the robot is not attached.
• Flashing Red: An error occurs while the robot is attached.
Status Indicator on the Station:
• Steady Green: Both the robot and the station are functioning properly.
• Steady Red: An error occurs in either the robot or the station.
• Flashing Red: Insucient battery power for operation or backup, and the station is not connected
to a power source.
• Pulsing Green: Firmware update in progress.
Wi-Fi Indicator:
• Pulsing Green: Connecting to Wi-Fi or Bluetooth.
• Steady Green: Successfully connected to Wi-Fi or Bluetooth.
Battery Indicator:
• Steady Green: Battery level is sucient, and the battery is functioning properly.
• Steady Yellow: Low battery level, and recharging is recommended.
• Flashing Red: Critical low battery level (both safety and operational levels) or a battery
malfunction has been detected.
• Flowing Light: Charging in progress. The indicator light color changes to red, yellow, or green to
represent the current battery level.
Note: The number of lit battery indicator lights reects the remaining power. In standby mode, only
the battery indicator light is on.
Functions Button Position Description
Detach the Robot On the Robot Press and hold
for 2 seconds.
Turn on the Fan On the Robot Press
after powering on the robot.
Power On/O On the Station Press and hold
on the station for 2 seconds.
Detach the Station
Suction Cup
On the Station
Press and hold both
and
on the station
simultaneously for 2 seconds.
Switch Cleaning Modes On the Station
The robot operates in Complete Deep Cleaning mode by
default, which includes cleaning along the edges once.
Press
to switch between cleaning modes:
•
Quick Cleaning (does not clean edges)
•
Edge Cleaning (includes one boundary pass)
Reconnect to Wi-Fi/
Bluetooth
On the Station
Press and hold
and simultaneously for 2
seconds.
Note: Upon rst use, the robot automatically enters
network conguration mode after powering on.
Auto-Retract the Power
Cord
On the Station Press
.
Wake Up the Robot
On the Station or
the Robot
Press any button while the robot is in standby to
resume operation.
Restart/Pause/Continue
a Task
On the Station or
the Robot
After the robot attaches to the window, press
on
the station or on the robot.
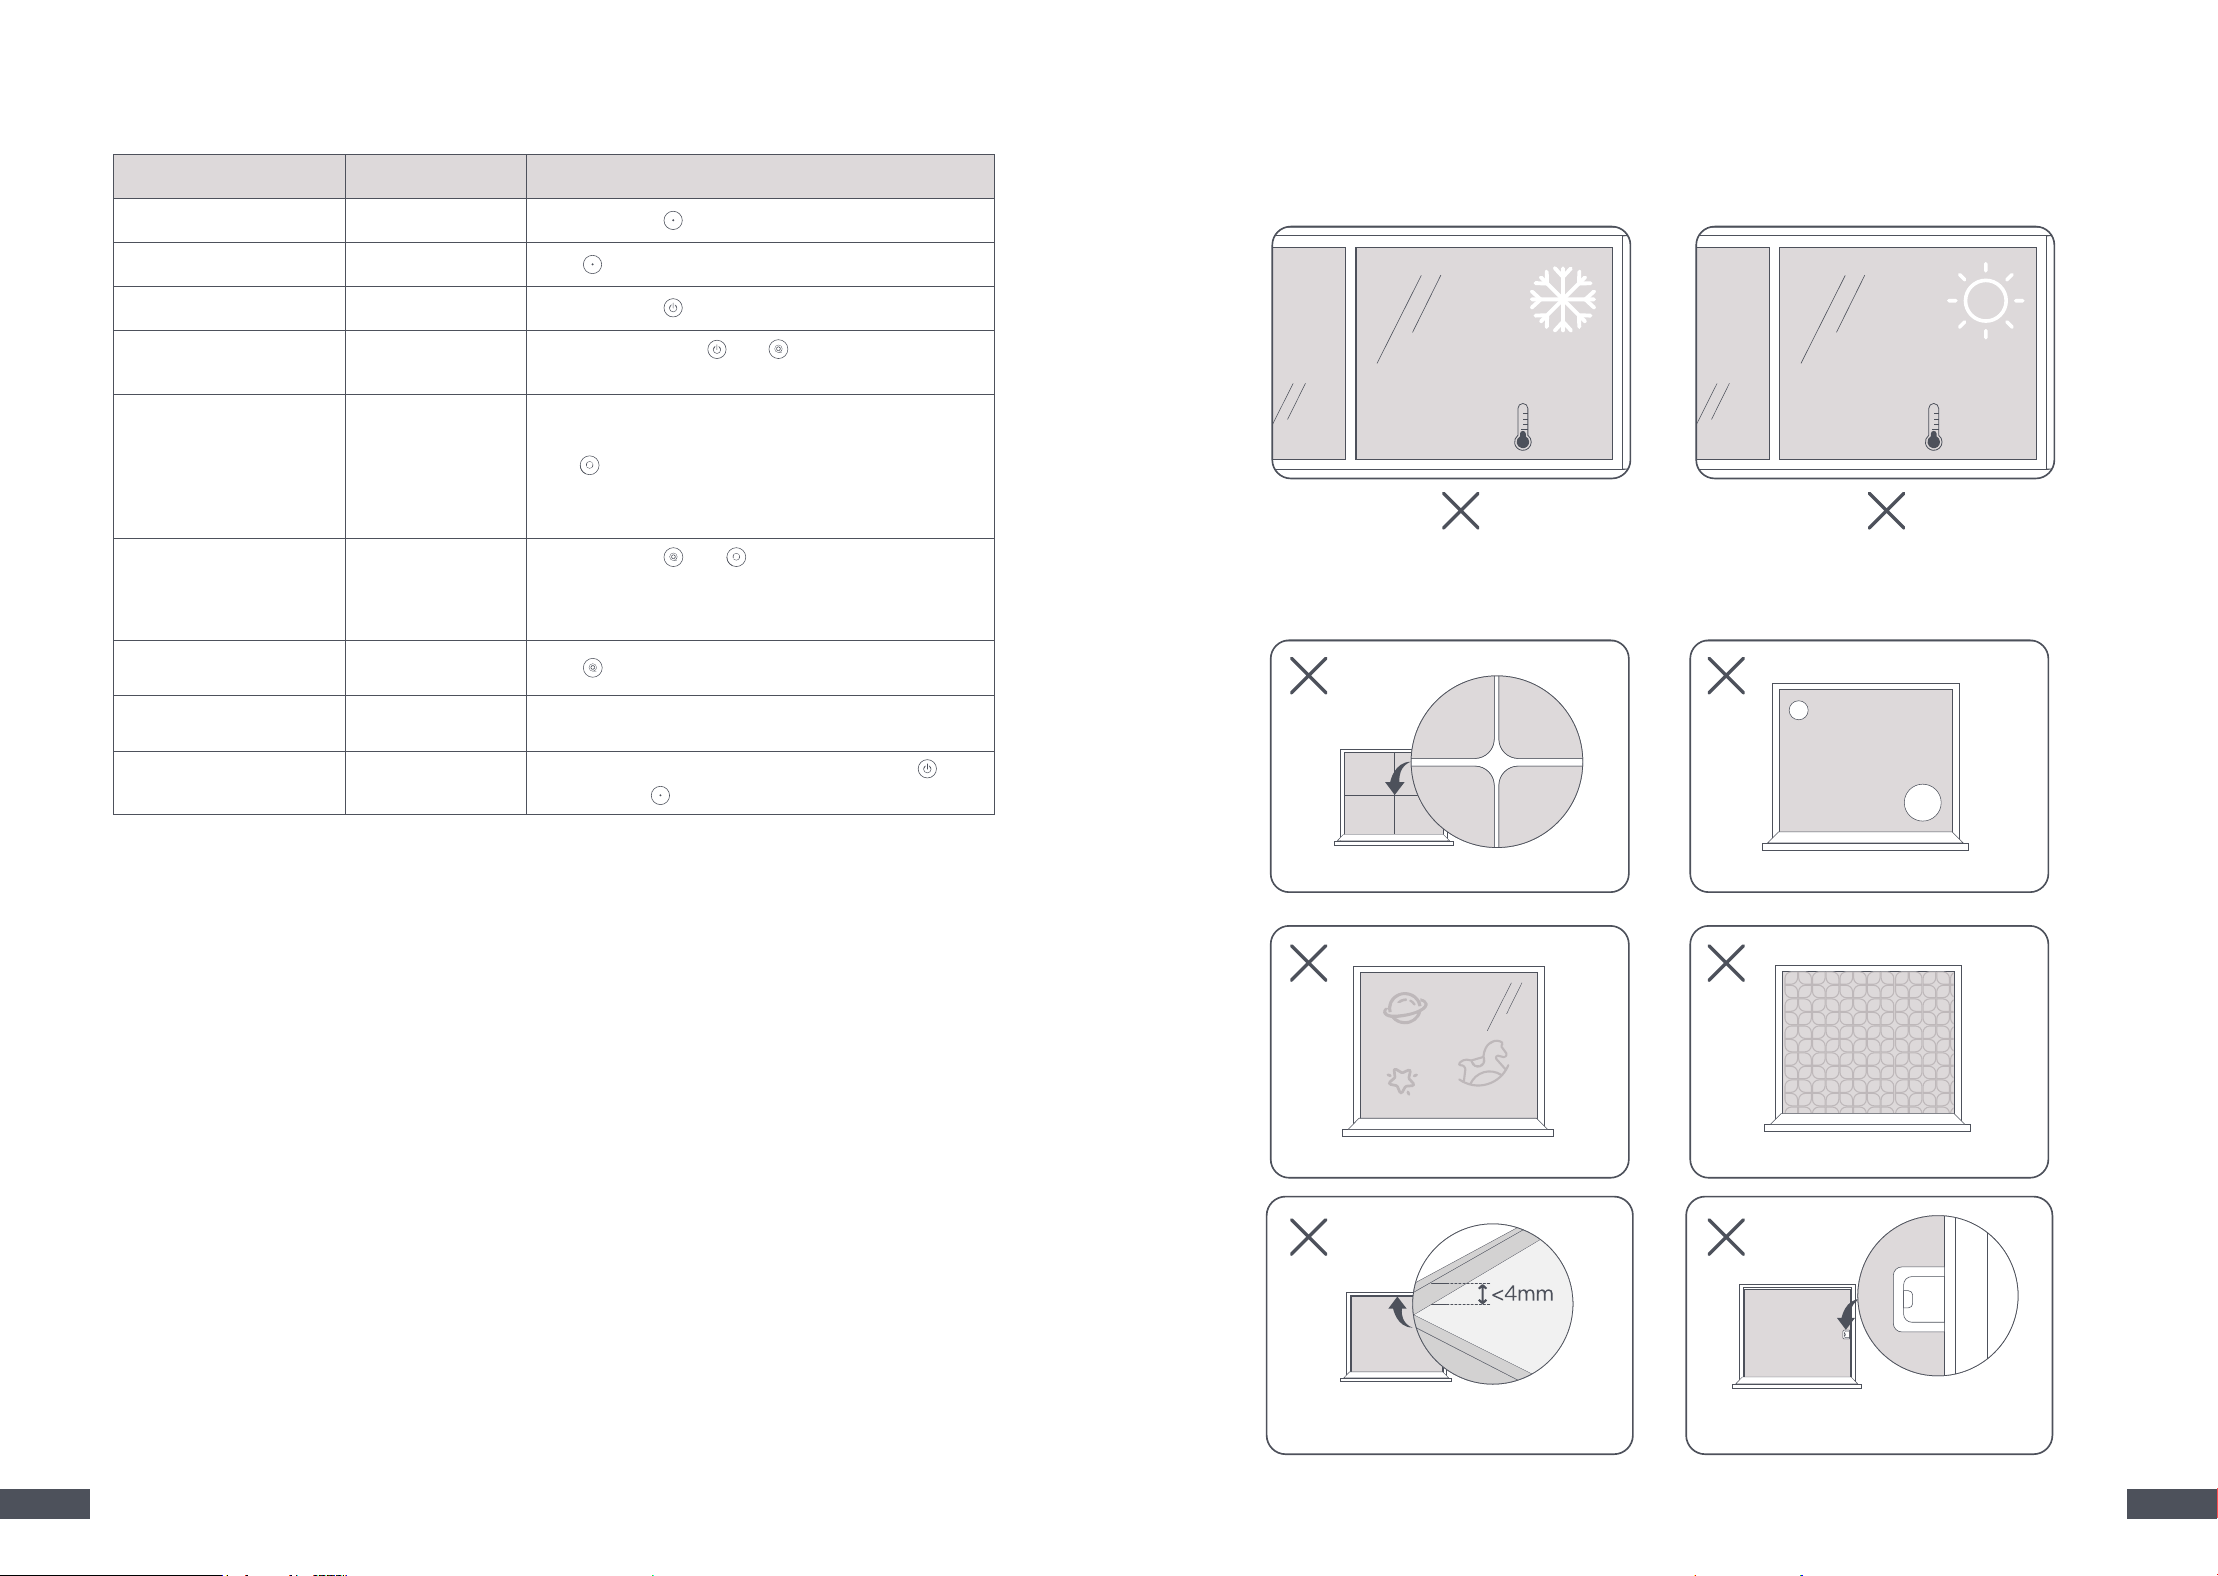
2�4 Applicable Scenarios
You can use the robot in environments with temperatures ranging from 0° C to 40° C�
Do not use the robot in extreme temperatures (below 0° C or above 40° C).
The robot is designed for smooth, at surfaces�
Avoid using the robot on surfaces with gaps, holes, stickers, or raised patterns, as these may interfere
with proper operation.
Gaps
Stickers
The hight of frames is less
than 4 mm.
Holes
Raised Patterns
The hight of obstacles is
less than 4 mm.
<0℃ >40℃
14 15
EN EN
1
Power On
Warning:
• Ensure the station's battery level is sucient�
• When cleaning elevated windows or doors without railings, place danger warning signs below�
3 Operation
3�1 Before You Begin
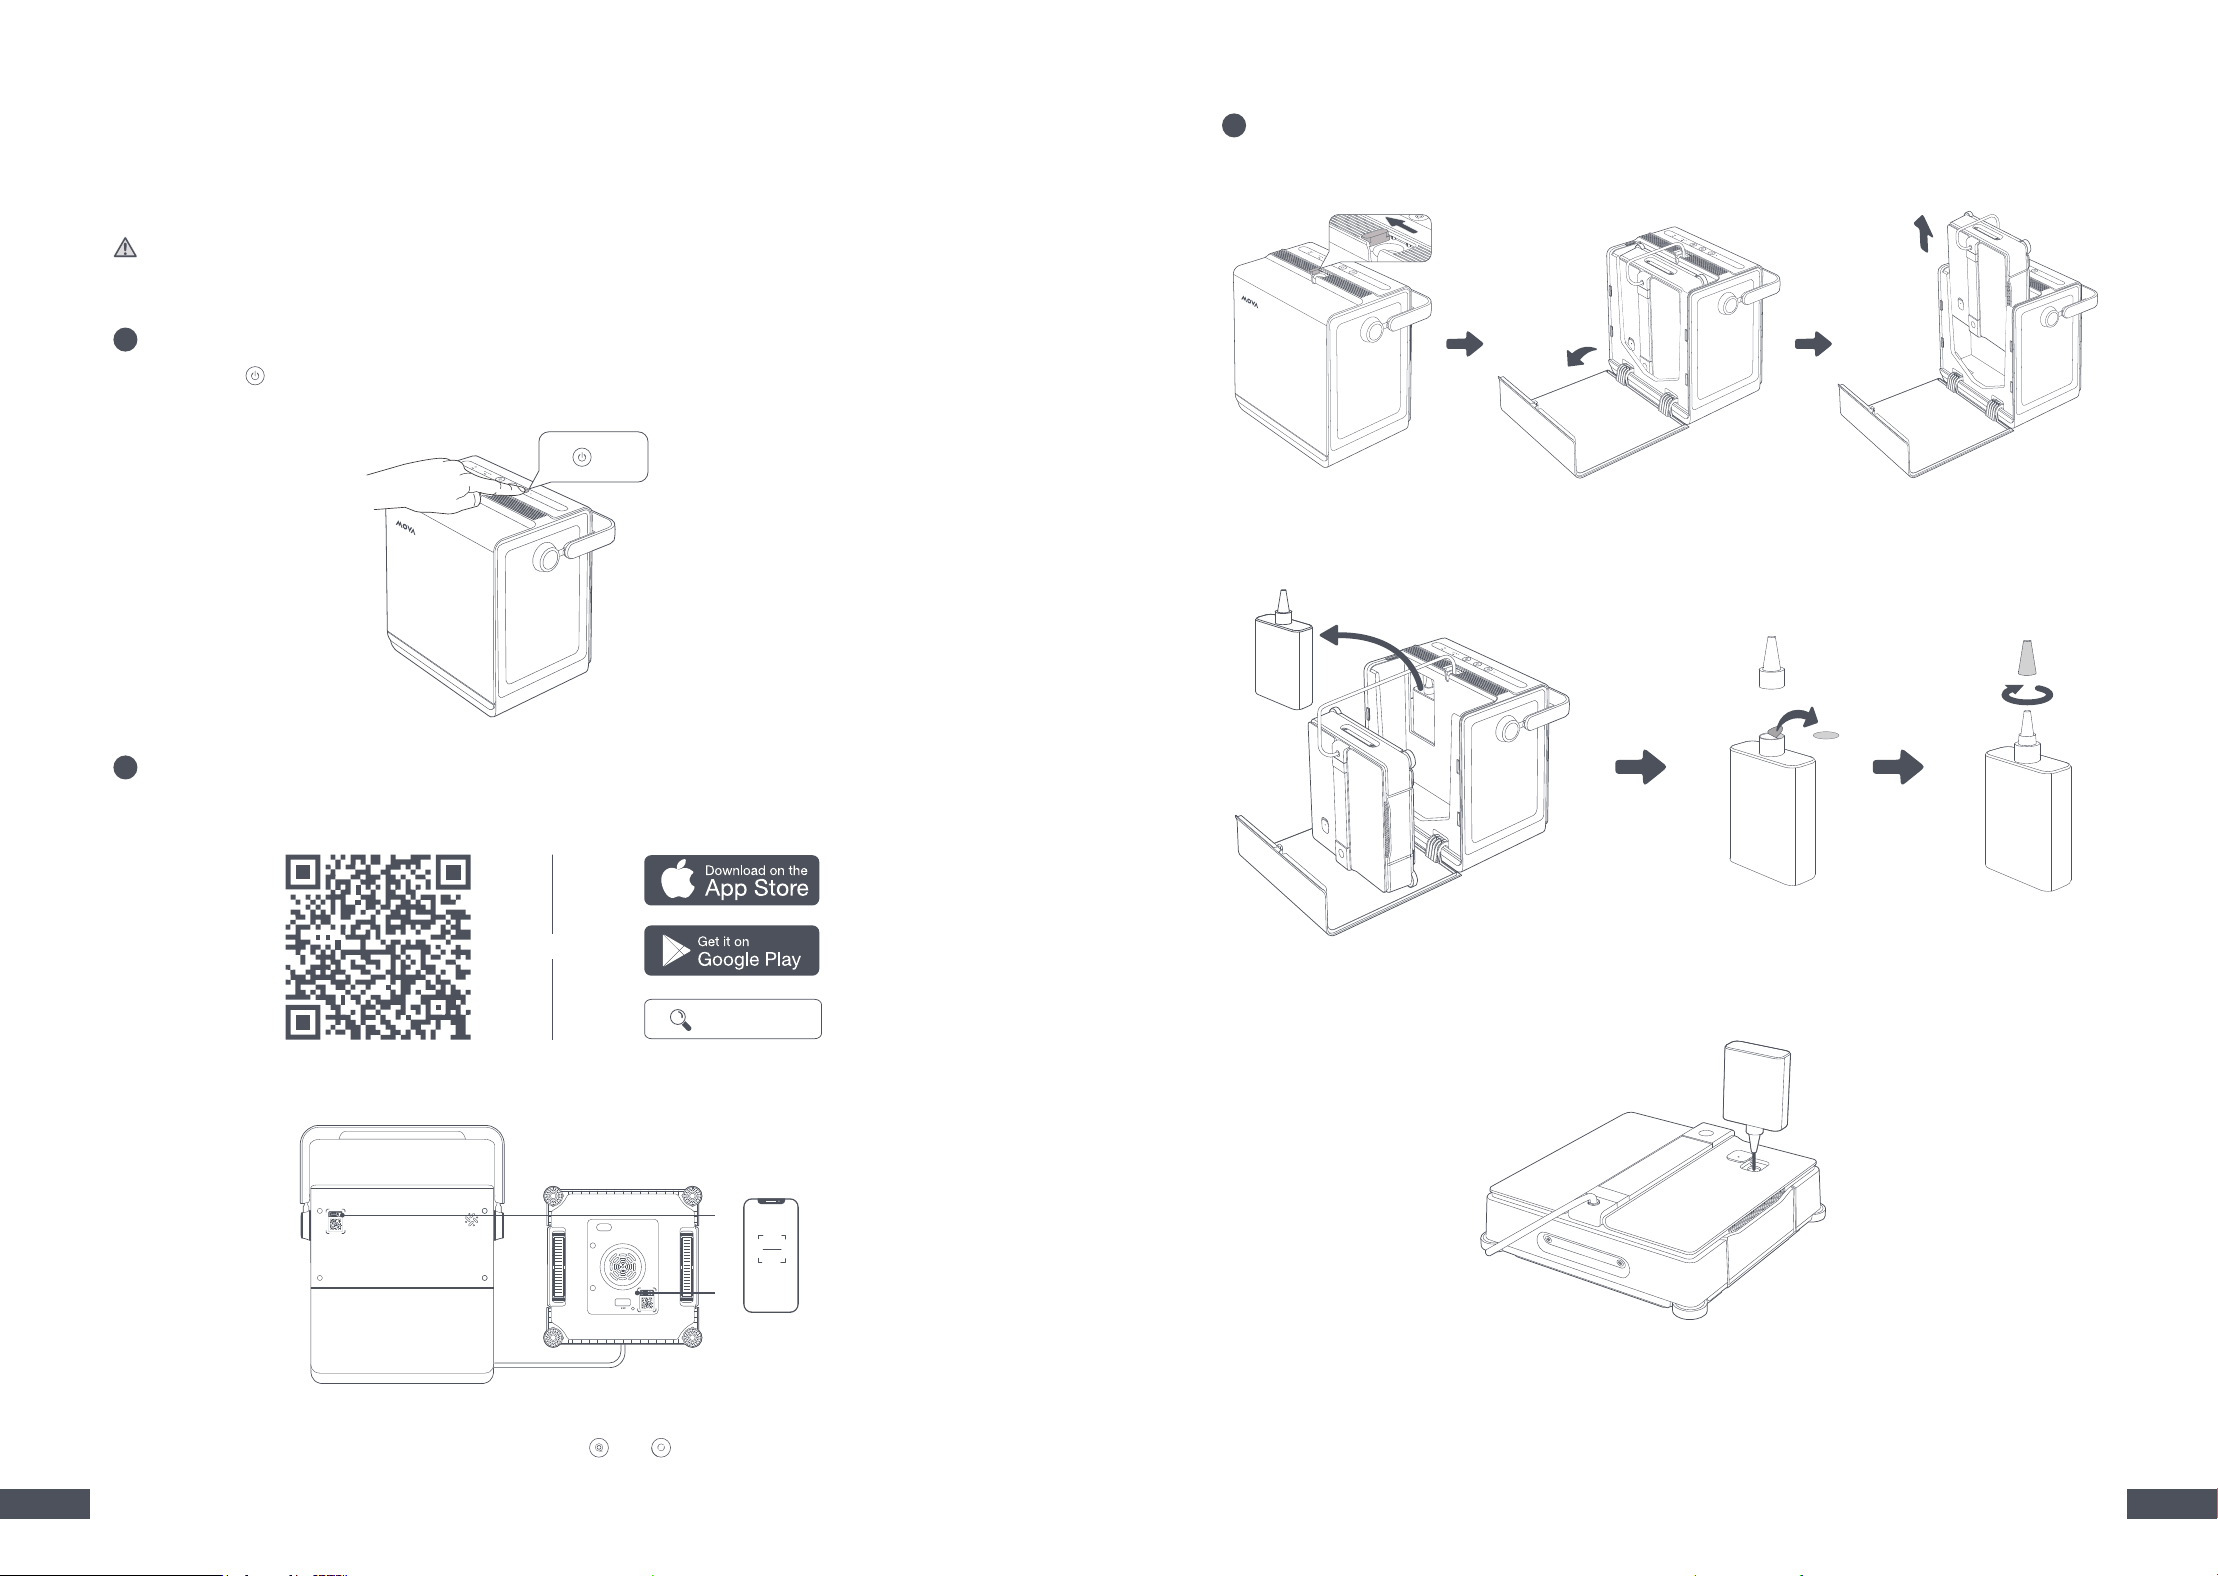
Press and hold on the station for 2 seconds to turn on both the station and the robot.
Caution: Ensure that the status light turns green. If it is red, follow the voice prompts to resolve the issue.
The following instructions will help you use the robot eortlessly to complete your cleaning tasks.
2s
2
Connect to the MOVAhome App
1. Scan the QR code below or search for "MOVAhome" in the App Store or Google Play. After installation,
create an account and log in.
2. Open the MOVAhome app and scan the QR code located on either the back of the station or the
bottom of the robot.
3. Follow the in-app instructions to complete the setup.
Note: To recongure the network, press and hold both
and simultaneously for 2 seconds.
OR
MOVAhome
3
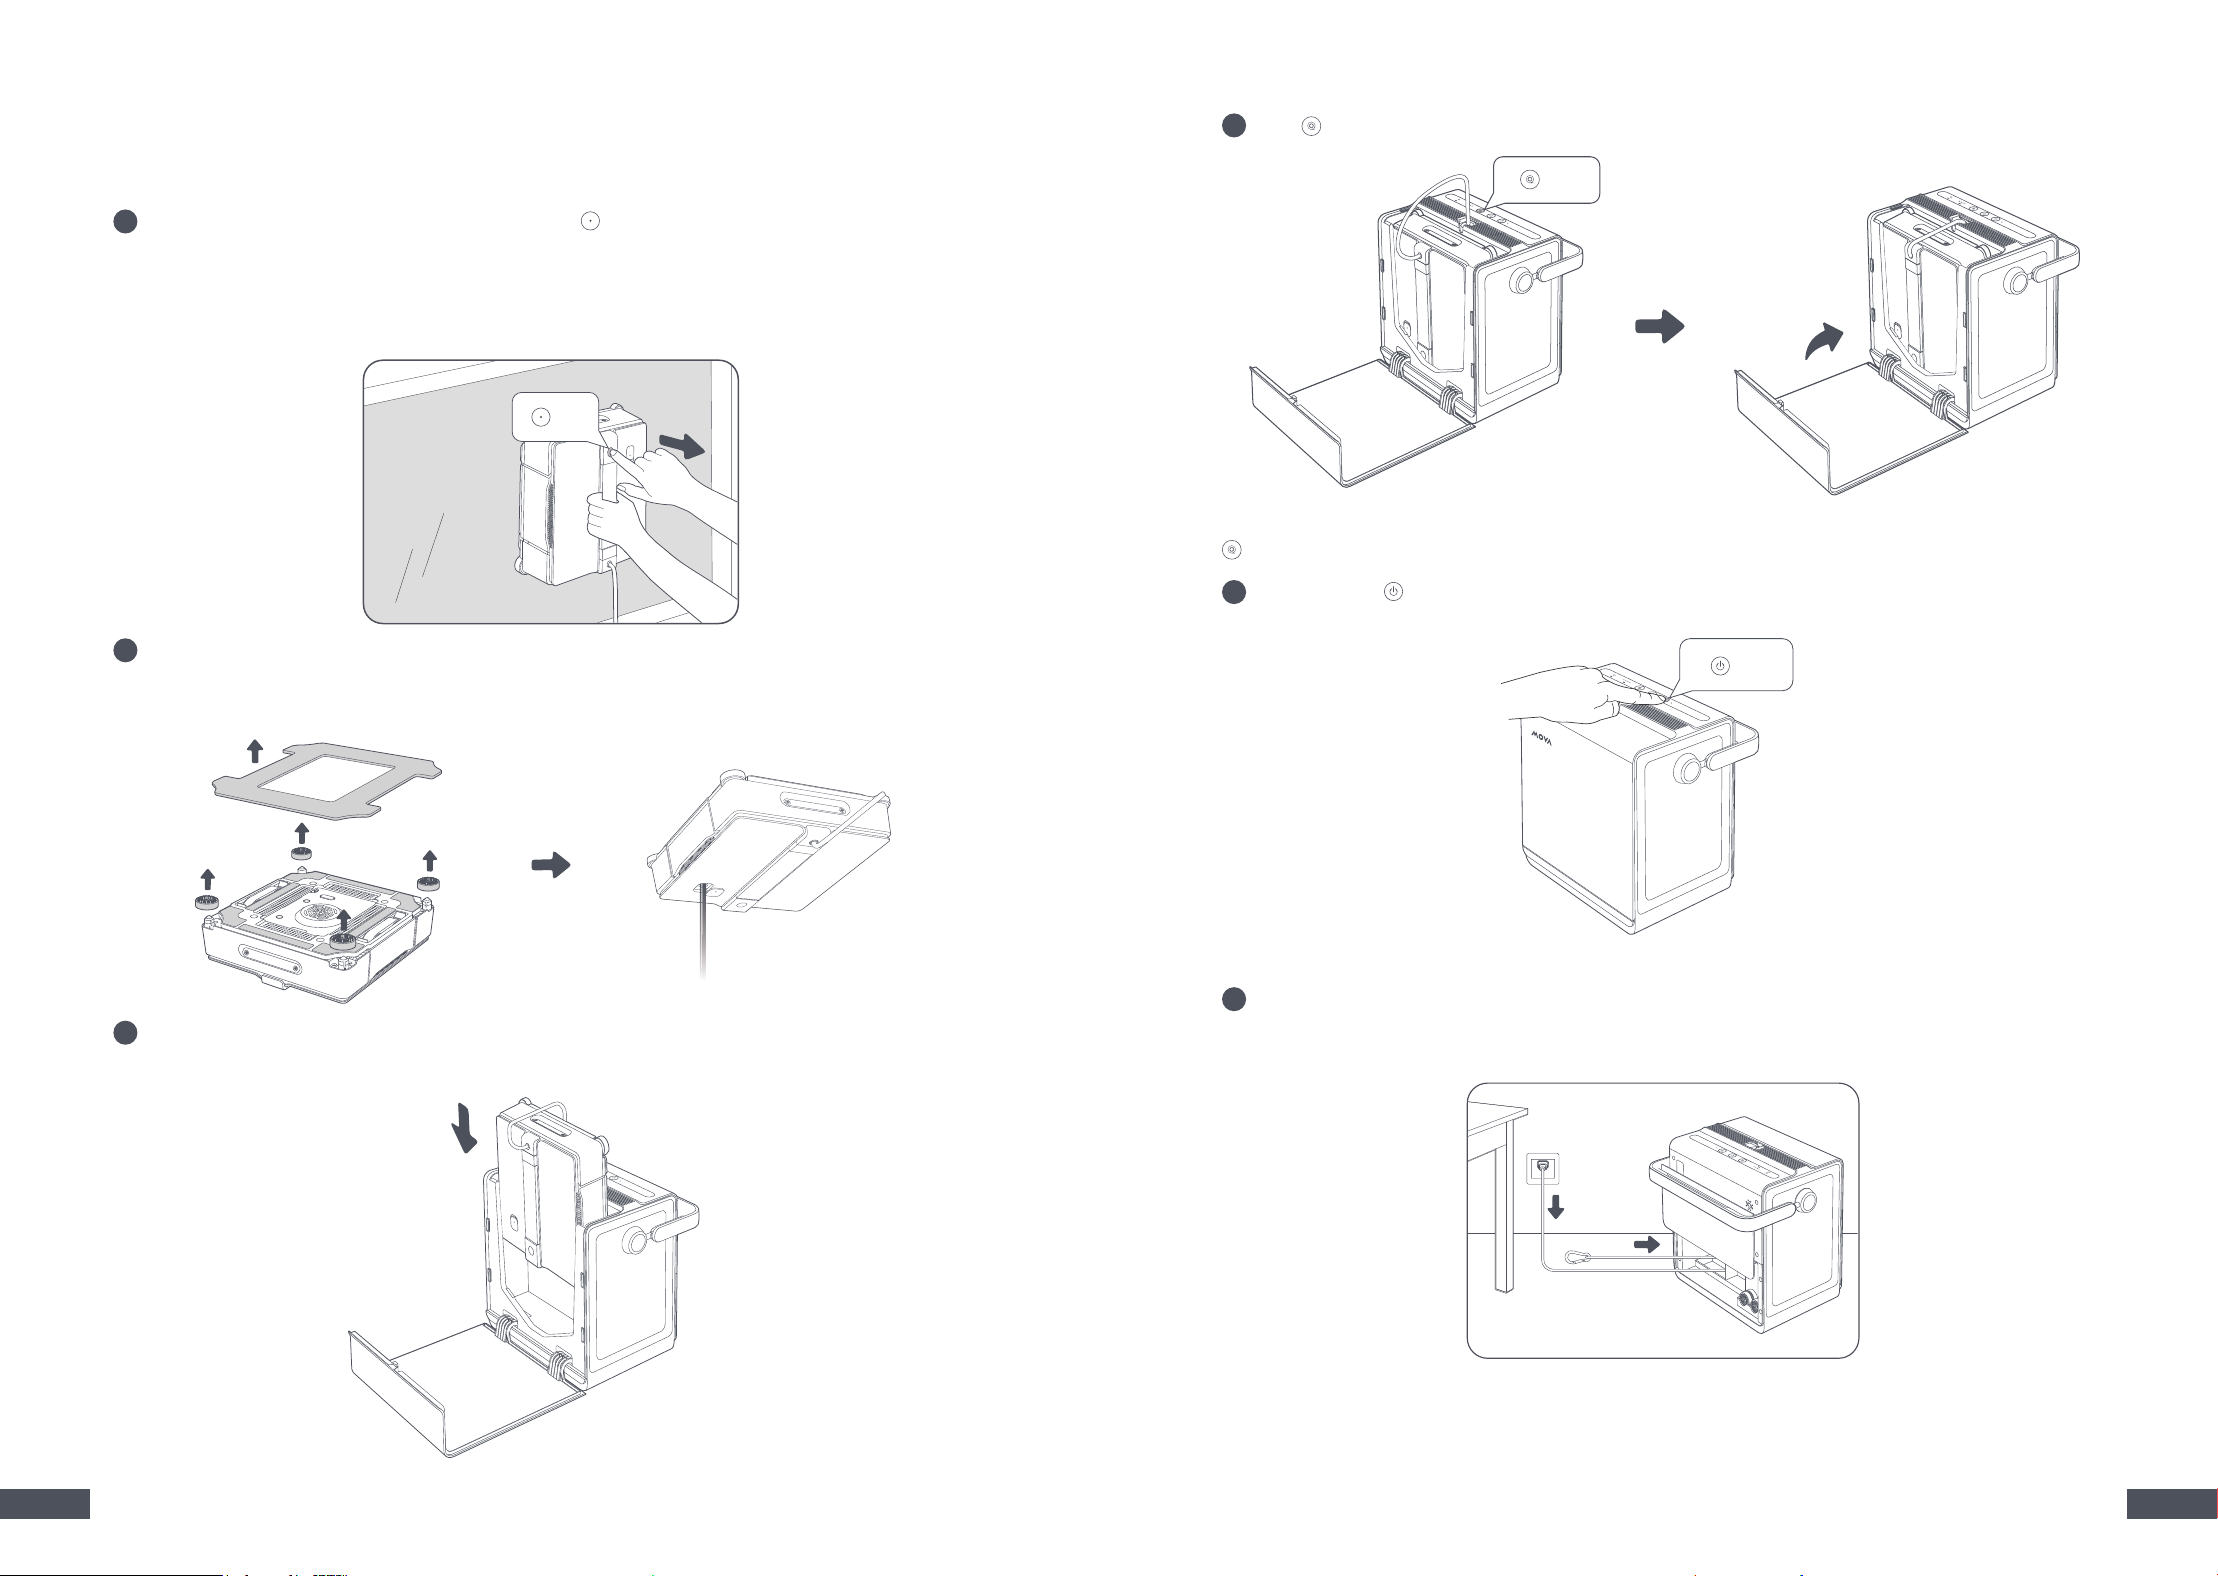
Take Out the Robot and Add Cleaning Solution
1. Slide the ip cover lock to open the ip cover. Remove the robot from the station.
2. Take out the window cleaning solution from the frontal storage compartment of the station.
Remove the seal from the cleaning solution bottle. Unscrew the cap.
3. Open the water tank cover on the robot. Add the specialized cleaning solution to the water tank.
Please avoid overlling.
16 17
EN EN
Bristles Bottom
Notes:
• Securely tie the safety tether to a guardrail or another stable, immovable object to prevent the
station from accidentally tipping over.
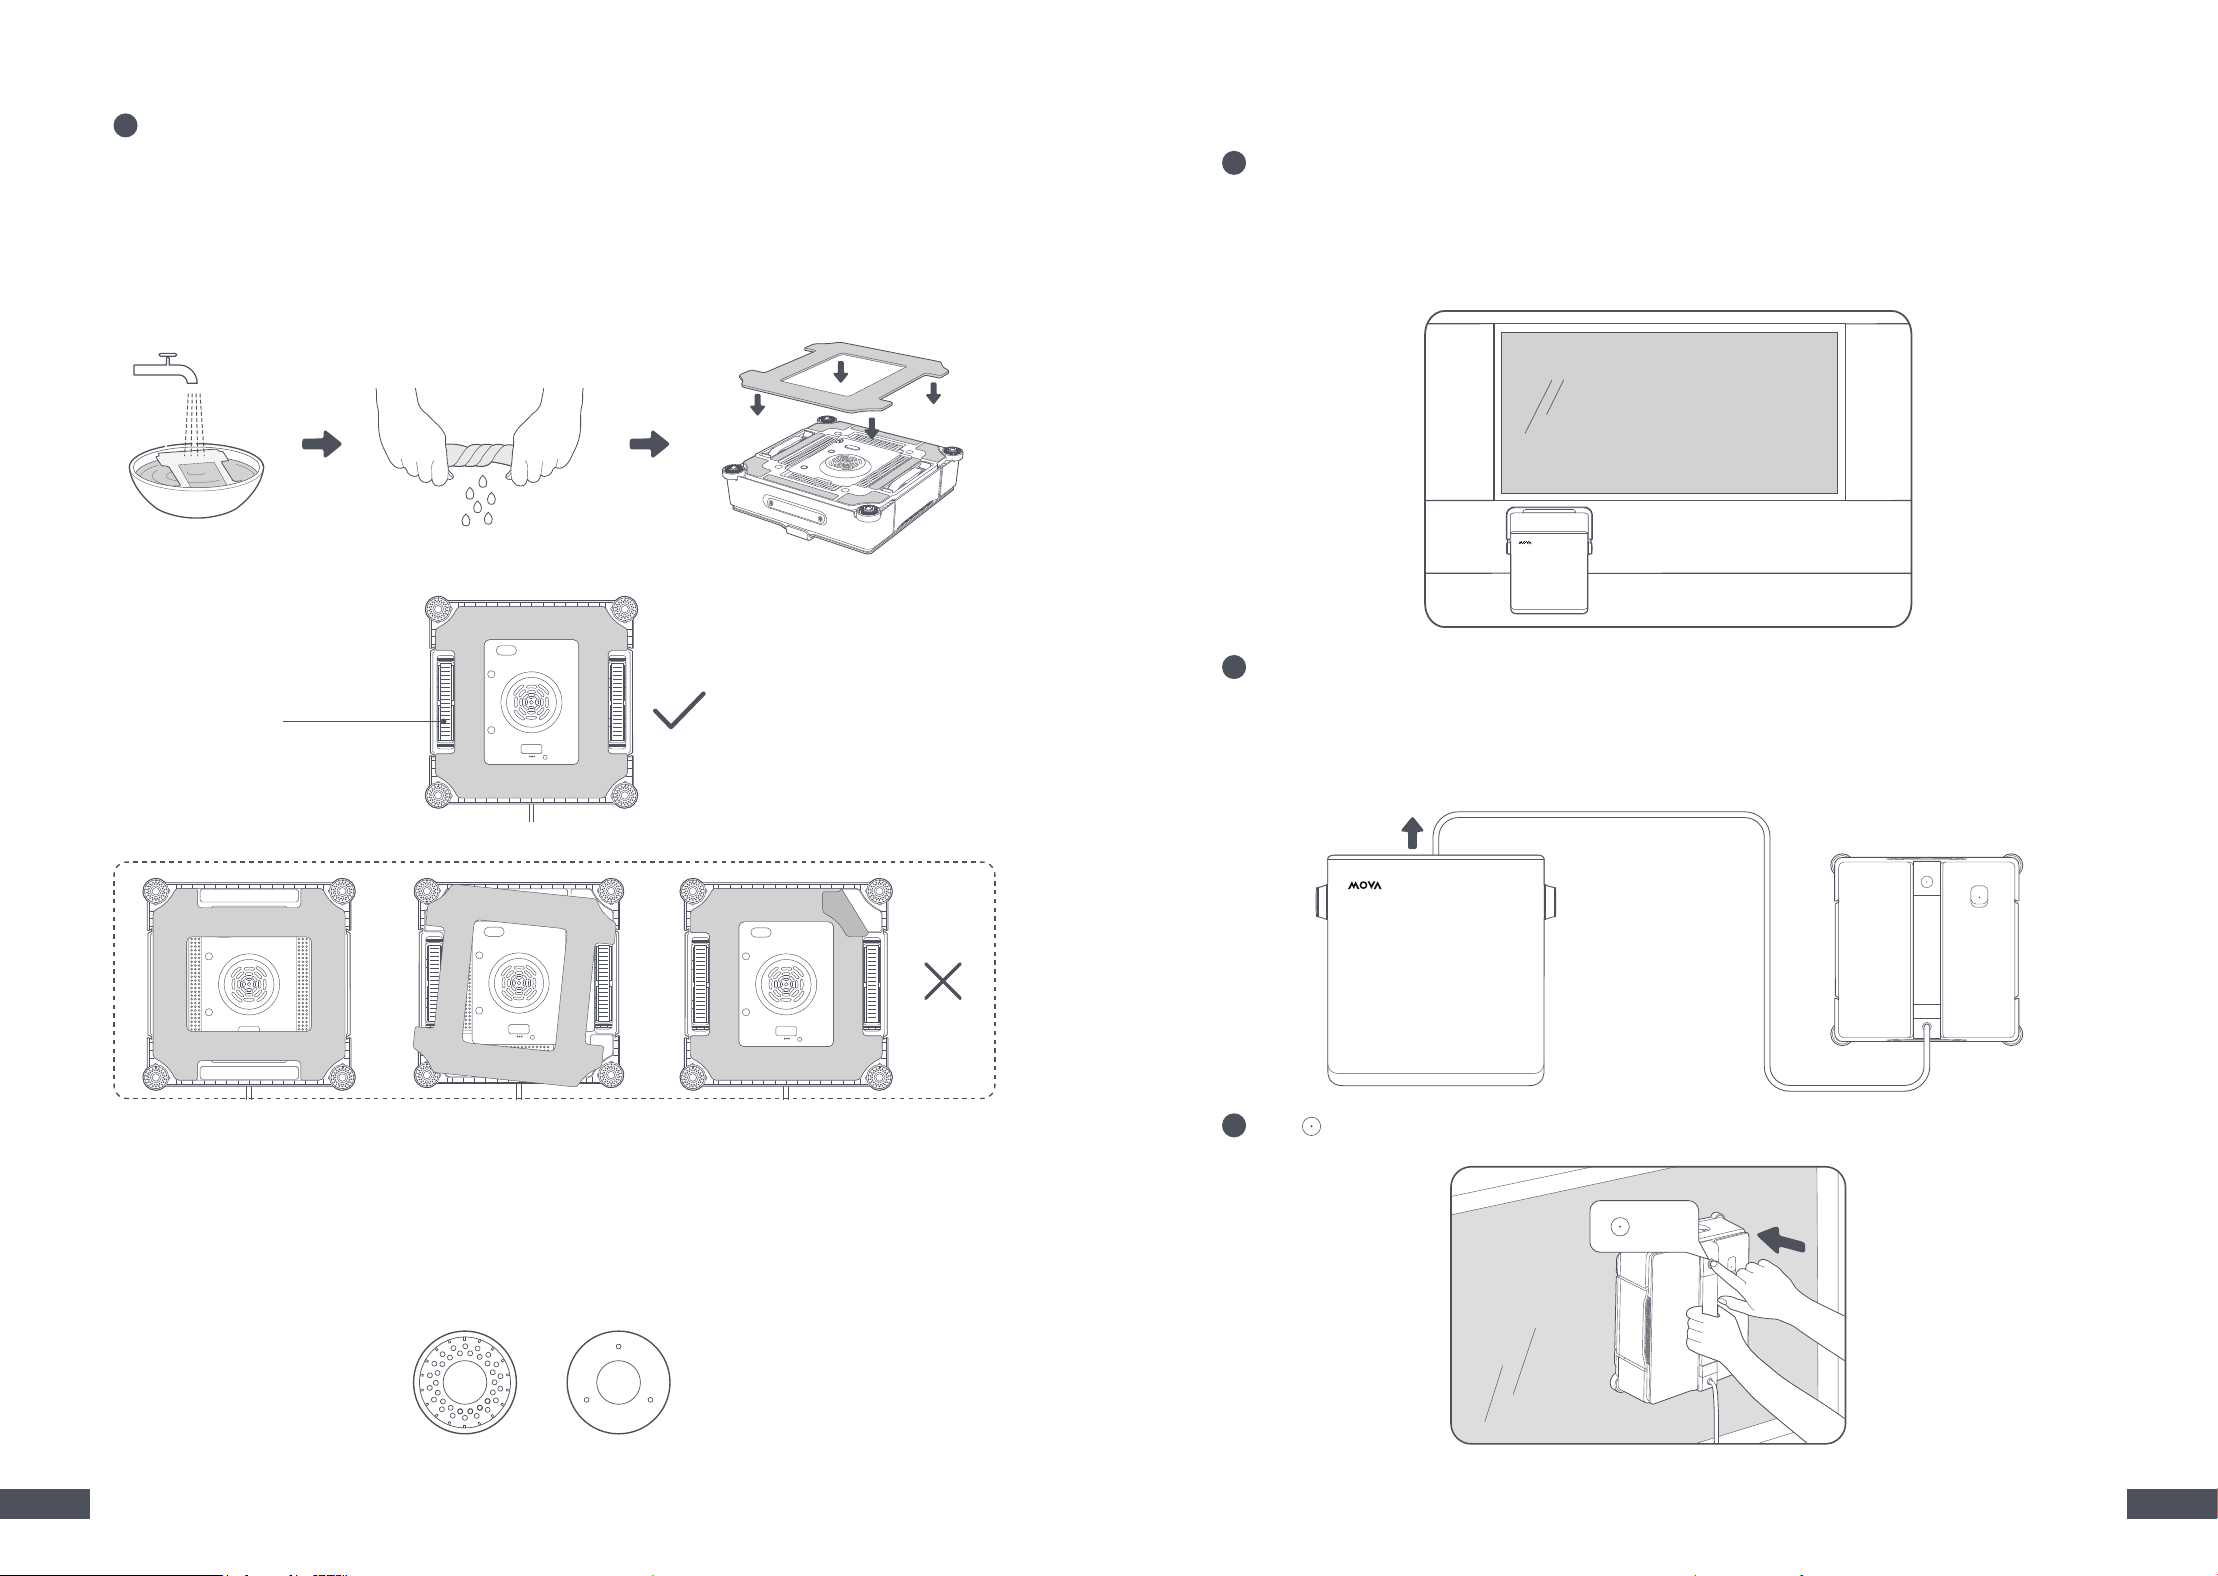
• Ensure the corner brushes are correctly installed on the anti-fall sensors. To secure or reinstall them,
press downward rmly on each brush until you hear a click. Conrm that the bristles are facing
outward.
4
Prepare Cleaning Cloth
1. Dampen the cleaning cloth with clean water and wring it out until it no longer drips.
Caution: An overly wet cleaning cloth may cause the robot to slip on the window.
2. Place the cleaning cloth evenly onto the Velcro located on the bottom plate of the robot.
Important:
• Pay attention to align the narrow and wide side accordingly.
• Make sure the track belts and anti-fall sensors are unobstructed to prevent attachment failure.
Track Belt
2
Manually extend the power cord to the required length�
Notes:
•
When cleaning, if there is excess length of the power cord, the station will automatically extend it as needed.
• The station power cord is 5.5 m long. The maximum window size for cleaning per side is 2.5 m (height) ×
4 m (width).
3
Press
to activate the fan�
1
Place the station
3�2 Start Cleaning
Press
Place the station near the window to be cleaned.
Caution:
• Do not place the station on the sink countertop, bay window, or any other elevated surfaces.
• Place the station on a smooth, at oor.
18 19
EN EN
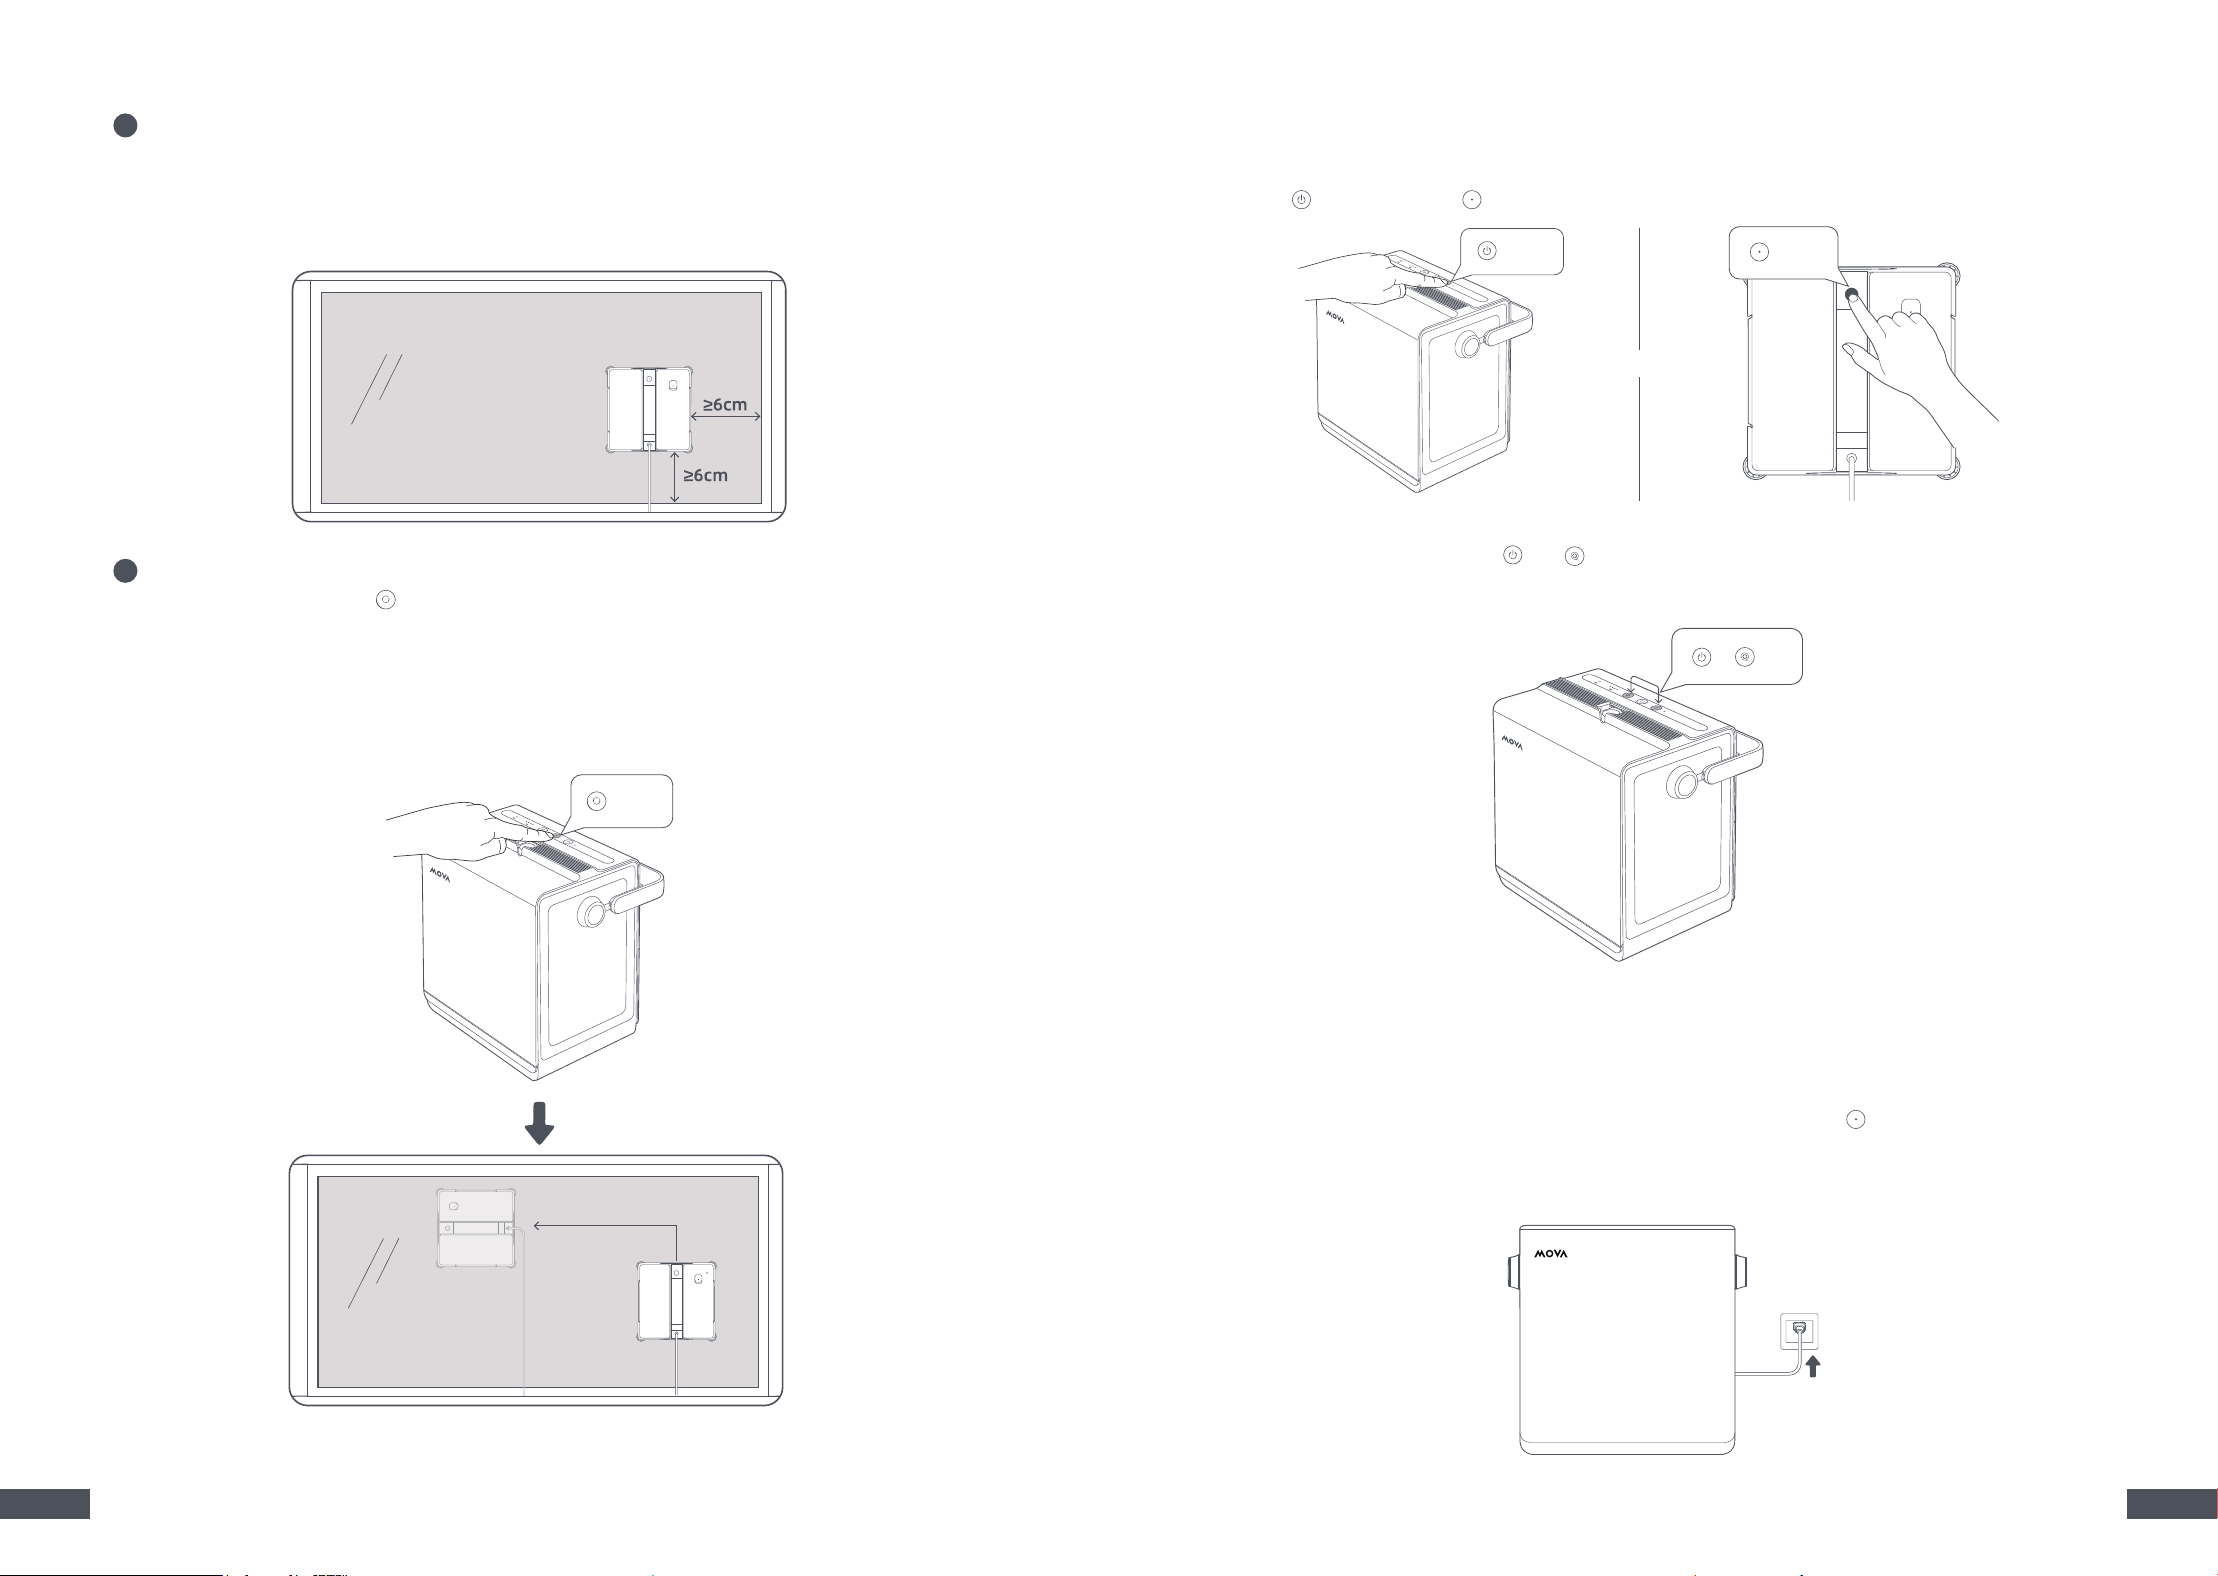
• Complete Deep Mode (Default): Ideal for removing medium to tough dirt from exterior windows.
The robot covers each area multiple times and cleans the edges once.
•
Complete Quick Mode: Ideal for removing light dirt from inner windows. Cleans faster and more eciently.
• Edge Mode: Targets the edges and corners of windows. Not suitable for frameless windows.
4
Attach the robot to the window�
Caution: Keep the robot at least 6 cm away from the window frame. Conrm the robot is securely
attached before letting go.
Note: Once the robot is attached to the window, the station’s suction cup automatically locks onto the
oor. The station remains stable even if the suction cup isn't fully secured.
Note: If the robot doesn't start cleaning automatically, refer to the voice prompt or check the app for guidance.
5
The robot will start cleaning in Complete Deep Cleaning mode by default� To switch between
cleaning modes, press the
and select from: Complete Deep Cleaning, Complete Quick
Cleaning, and Edge Cleaning�
Press
Manual Pause
Auto-Pause (Low-Battery Protection)
3�3 Pause/Resume Cleaning
1. Press on the station or . The robot will stop at its current location.
If the operational battery level is low during cleaning, the robot will automatically return to the lowest
point to prevent damage from falling.
1. Follow the voice prompt to connect the station to a power outlet.
2. Wait for the robot to return to the starting point. Then press and hold the
for 2 seconds to remove it.
Note: If the robot cannot return to a reachable location, follow the on-screen instructions in the app
and remotely guide the robot back to the starting point.
3. Once suciently charged, you can reattach the robot to continue cleaning.
2. To move the station when the robot is attached to the window:
• Simultaneously press and hold
and on the station for 2 seconds to detach the station.
• Once detached, lift the station by its handle and move it to the new location.
Note: The station will automatically reattach to the oor after one minute.
OR
Press
Press
+ 2s
20 21
EN EN
At the end of the cleaning cycle, the robot will return to the starting point for easy pickup� If the robot
stops at an inaccessible location, use remote control in the app to guide it to a suitable location�
3�4 Finish Cleaning
1
Hold the robot by the handle, then press and hold
for 2 seconds to detach the robot.
3
Place the robot back into the station's storage compartment.
2
Remove the robot, then remove the cleaning accessories. Empty the water tank.
2s
Notes:
• When releasing the suction, the air pressure will be slowly released. Please hold the handle rmly
and do not let go.
• Once the robot is detached, the station will automatically detach as well.
Note: Clean and dry the cleaning cloth and corner brushes before storage. This prevents mold
growth and damage.
Caution: Ensure that the robot's handle is facing outward and its connection to the station is facing upward.
4
Press
. Close the ip cover once the cord is fully retracted.
6
If you used the power cord and safety tether, pull the back cover of the station upward and return
them to the station.
5
Press and hold
for 2 seconds to turn o both the robot and the station.
Note: The power cord may tangle during retraction. If it jams, manually straighten the cord and press
again to continue retracting.
2s
Press
22 23
EN EN
1. Connect the station to a power outlet. You can check the charging progress by the battery indicator.
Note: When the status indicator on the station turns green, the robot has sucient safety battery
power and can clean the window while charging.
2. When all battery indicators turn steady green, the robot is fully charged. Unplug the power cord.
3. Store the station in a cool, dry place, away from direct sunlight and extreme temperatures.
Important: For long-term storage (over 1 year), charge the station periodically to maintain battery health.
3�5 Charging and Storage After Use
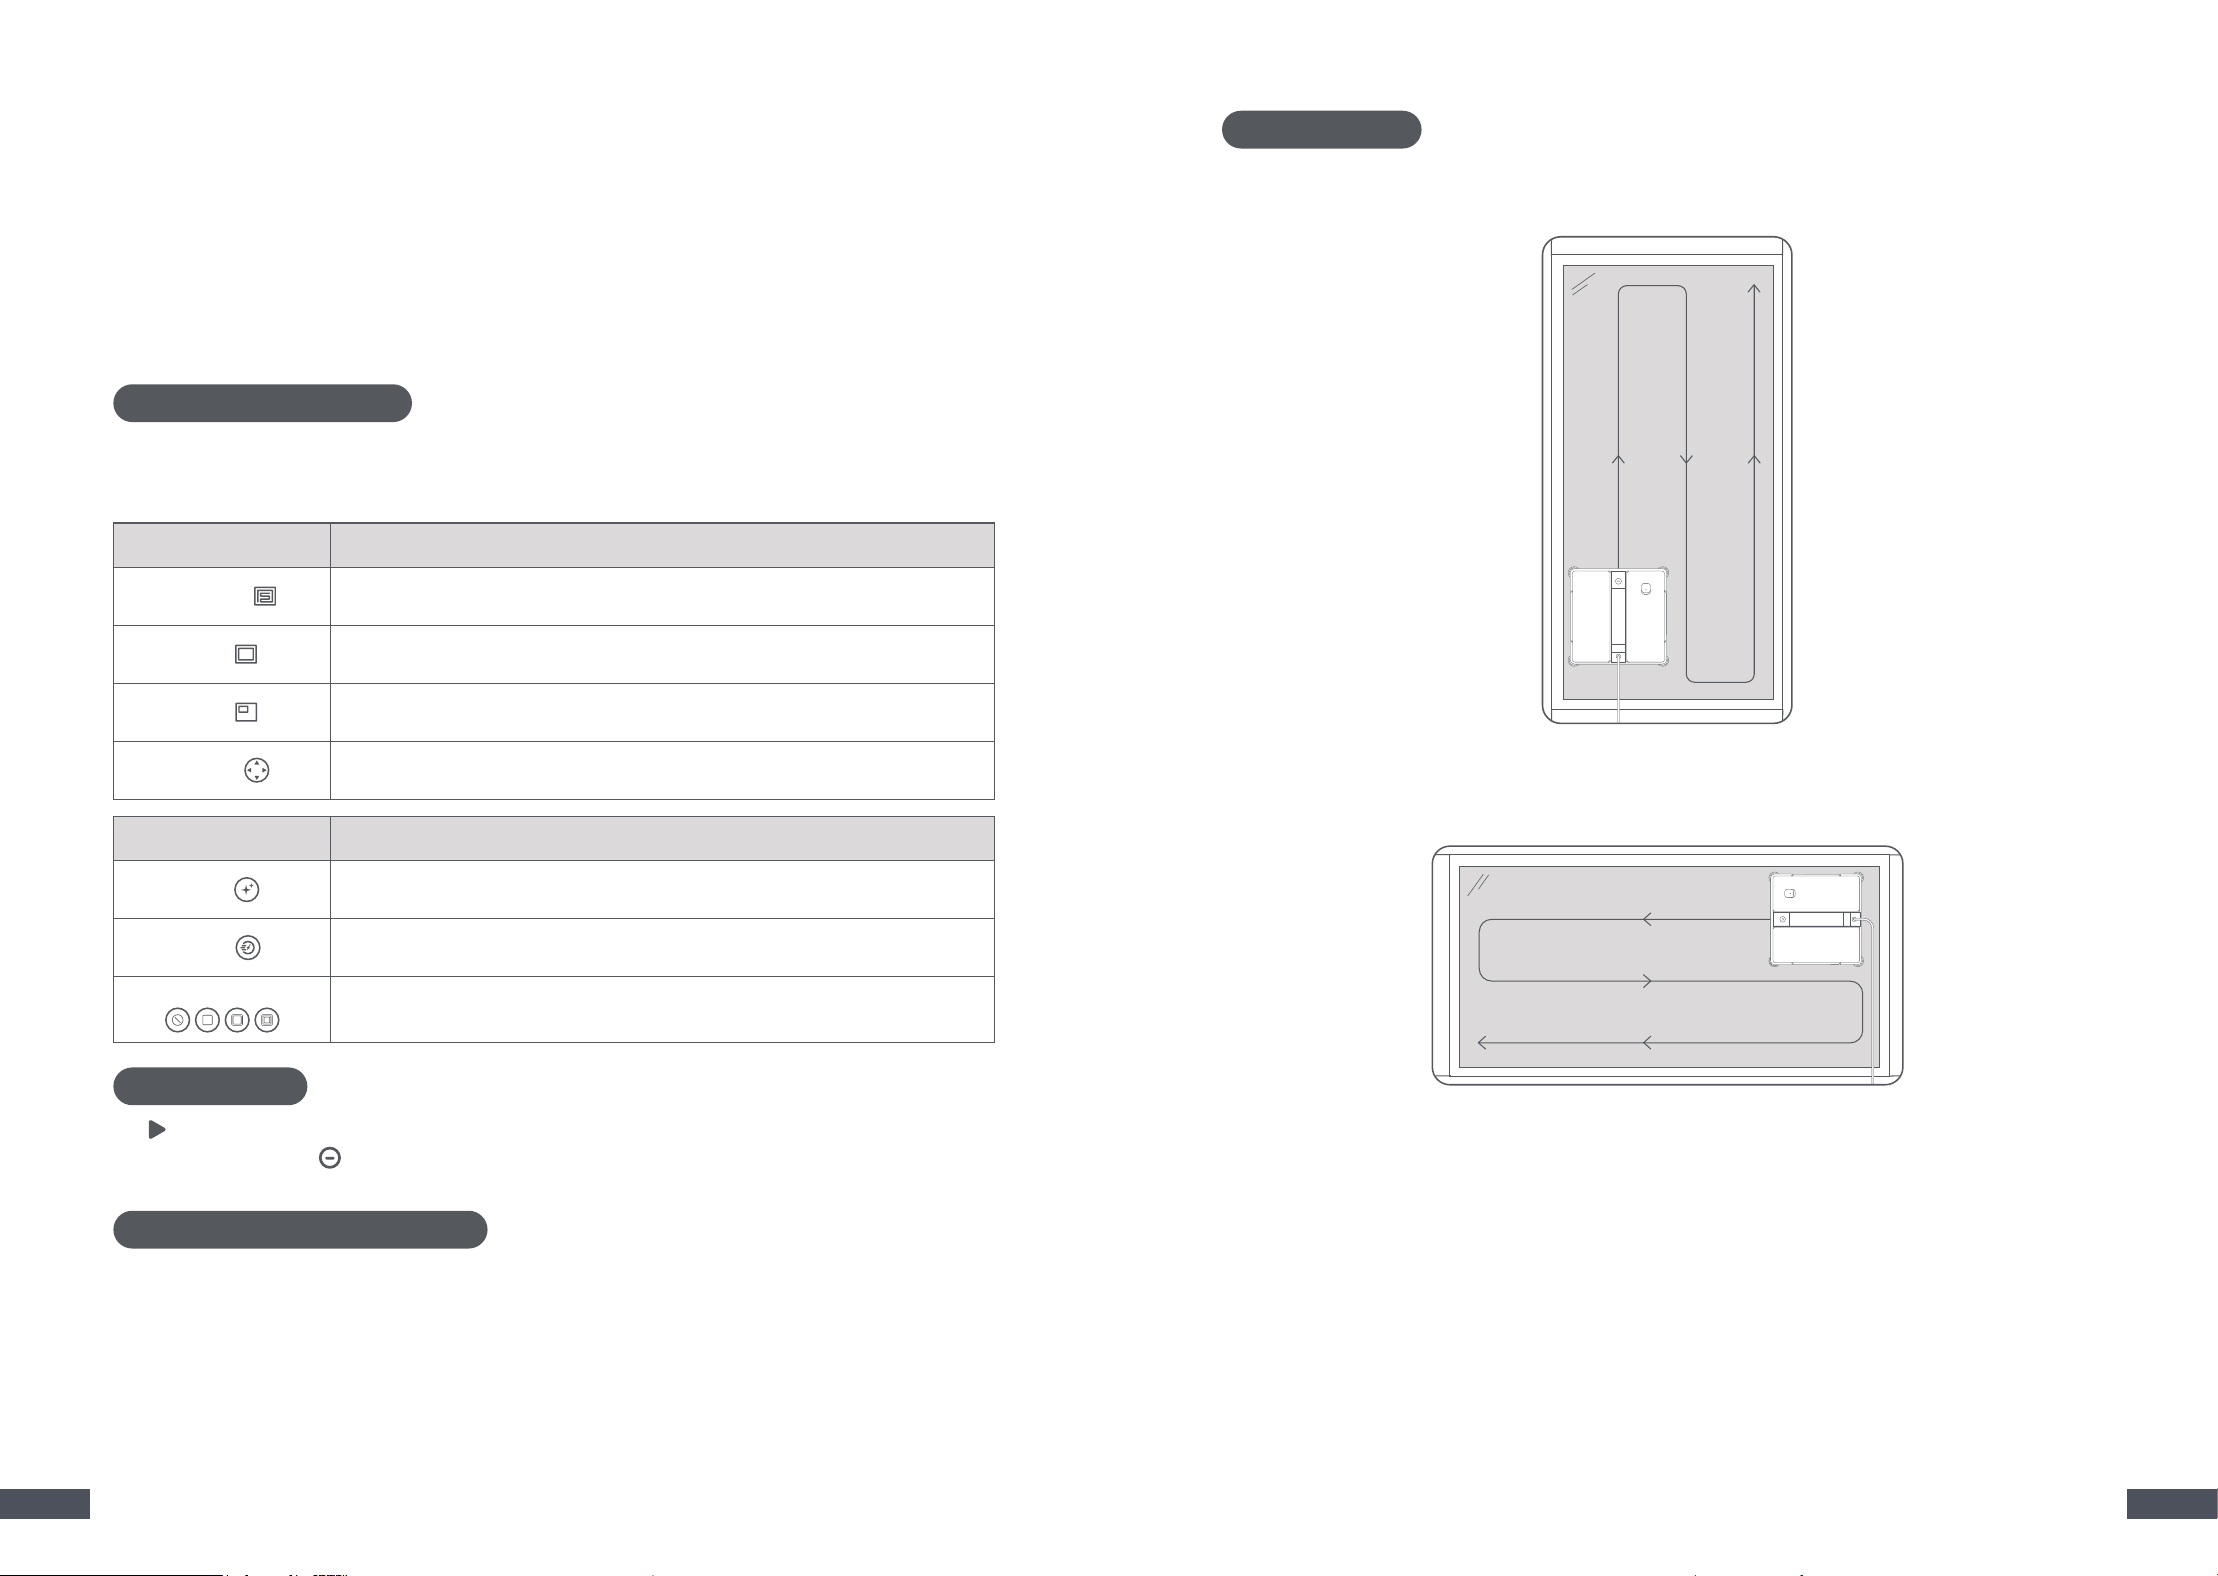
4 Key Features
Tap to spot clean a designated spot. The robot will move in a forward and backward motion for
thorough cleaning. Tap to nish cleaning, and the robot will stop at its current position. To send it
back to its starting point, tap Return or use the remote control in the app.
With this function enabled, if interrupted or paused, the robot will automatically resume from where it
left o along the planned path. You can disable Auto-Resume through the app.
Spot Cleaning
Auto-Resume after Interruption
Note: Auto-Resume may not work in the following cases:
• The cleaning area or window position has changed.
• The robot has been restarted or the Auto-Resume is disabled.
Auto-Resume is only available for Complete Cleaning.
The MOVAhome app oers a range of advanced features that enhance the functionality of your robot.
With the app, you can customize settings, view cleaning logs, access maintenance tips, and send
feedback. This gives you more control over how and where your robot cleans.
Mode Description
Complete
Covers all areas of the window.
Note: Robot runs in Complete Cleaning by default.
Edge
Focuses on cleaning corners and edges of the window.
Note: Not available for frameless glass.
Zone
Targets specic zones (upper, lower, left, right) relative to the robot’s
position.
Remote
Manually guide the robot to specic locations for spot cleaning. It cleans
continuously while moving.
App-Exclusive Features
Settings Description
Deep
Provides a thorough clean, ideal for medium to heavy dust. Recommended
for exterior windows or those not cleaned recently.
Quick
Delivers a faster clean, ideal for light to medium dust. Recommended for
interior windows or regular maintenance.
Boundary Passes
Adjust the number of cleaning passes along the boundary to suit your
needs.
N-shaped pattern: If the window's horizontal length is less than twice the robot's length, the robot
will follow an N-shaped path.
Z-shaped path: If the window's horizontal length is at least twice the robot's length, the robot will
follow a Z-shaped path.
Cleaning Path
Notes:
• Ensure your phone and station are within the same Wi-Fi network with a stable signal whe
n connecting to Wi-Fi.
• Use a single-band network of 2.4 GHz frequency.
• When using Bluetooth connection, keep your phone within 10 m of the station.
• App features may change as we continue to develop and update the application.
24 25
EN EN
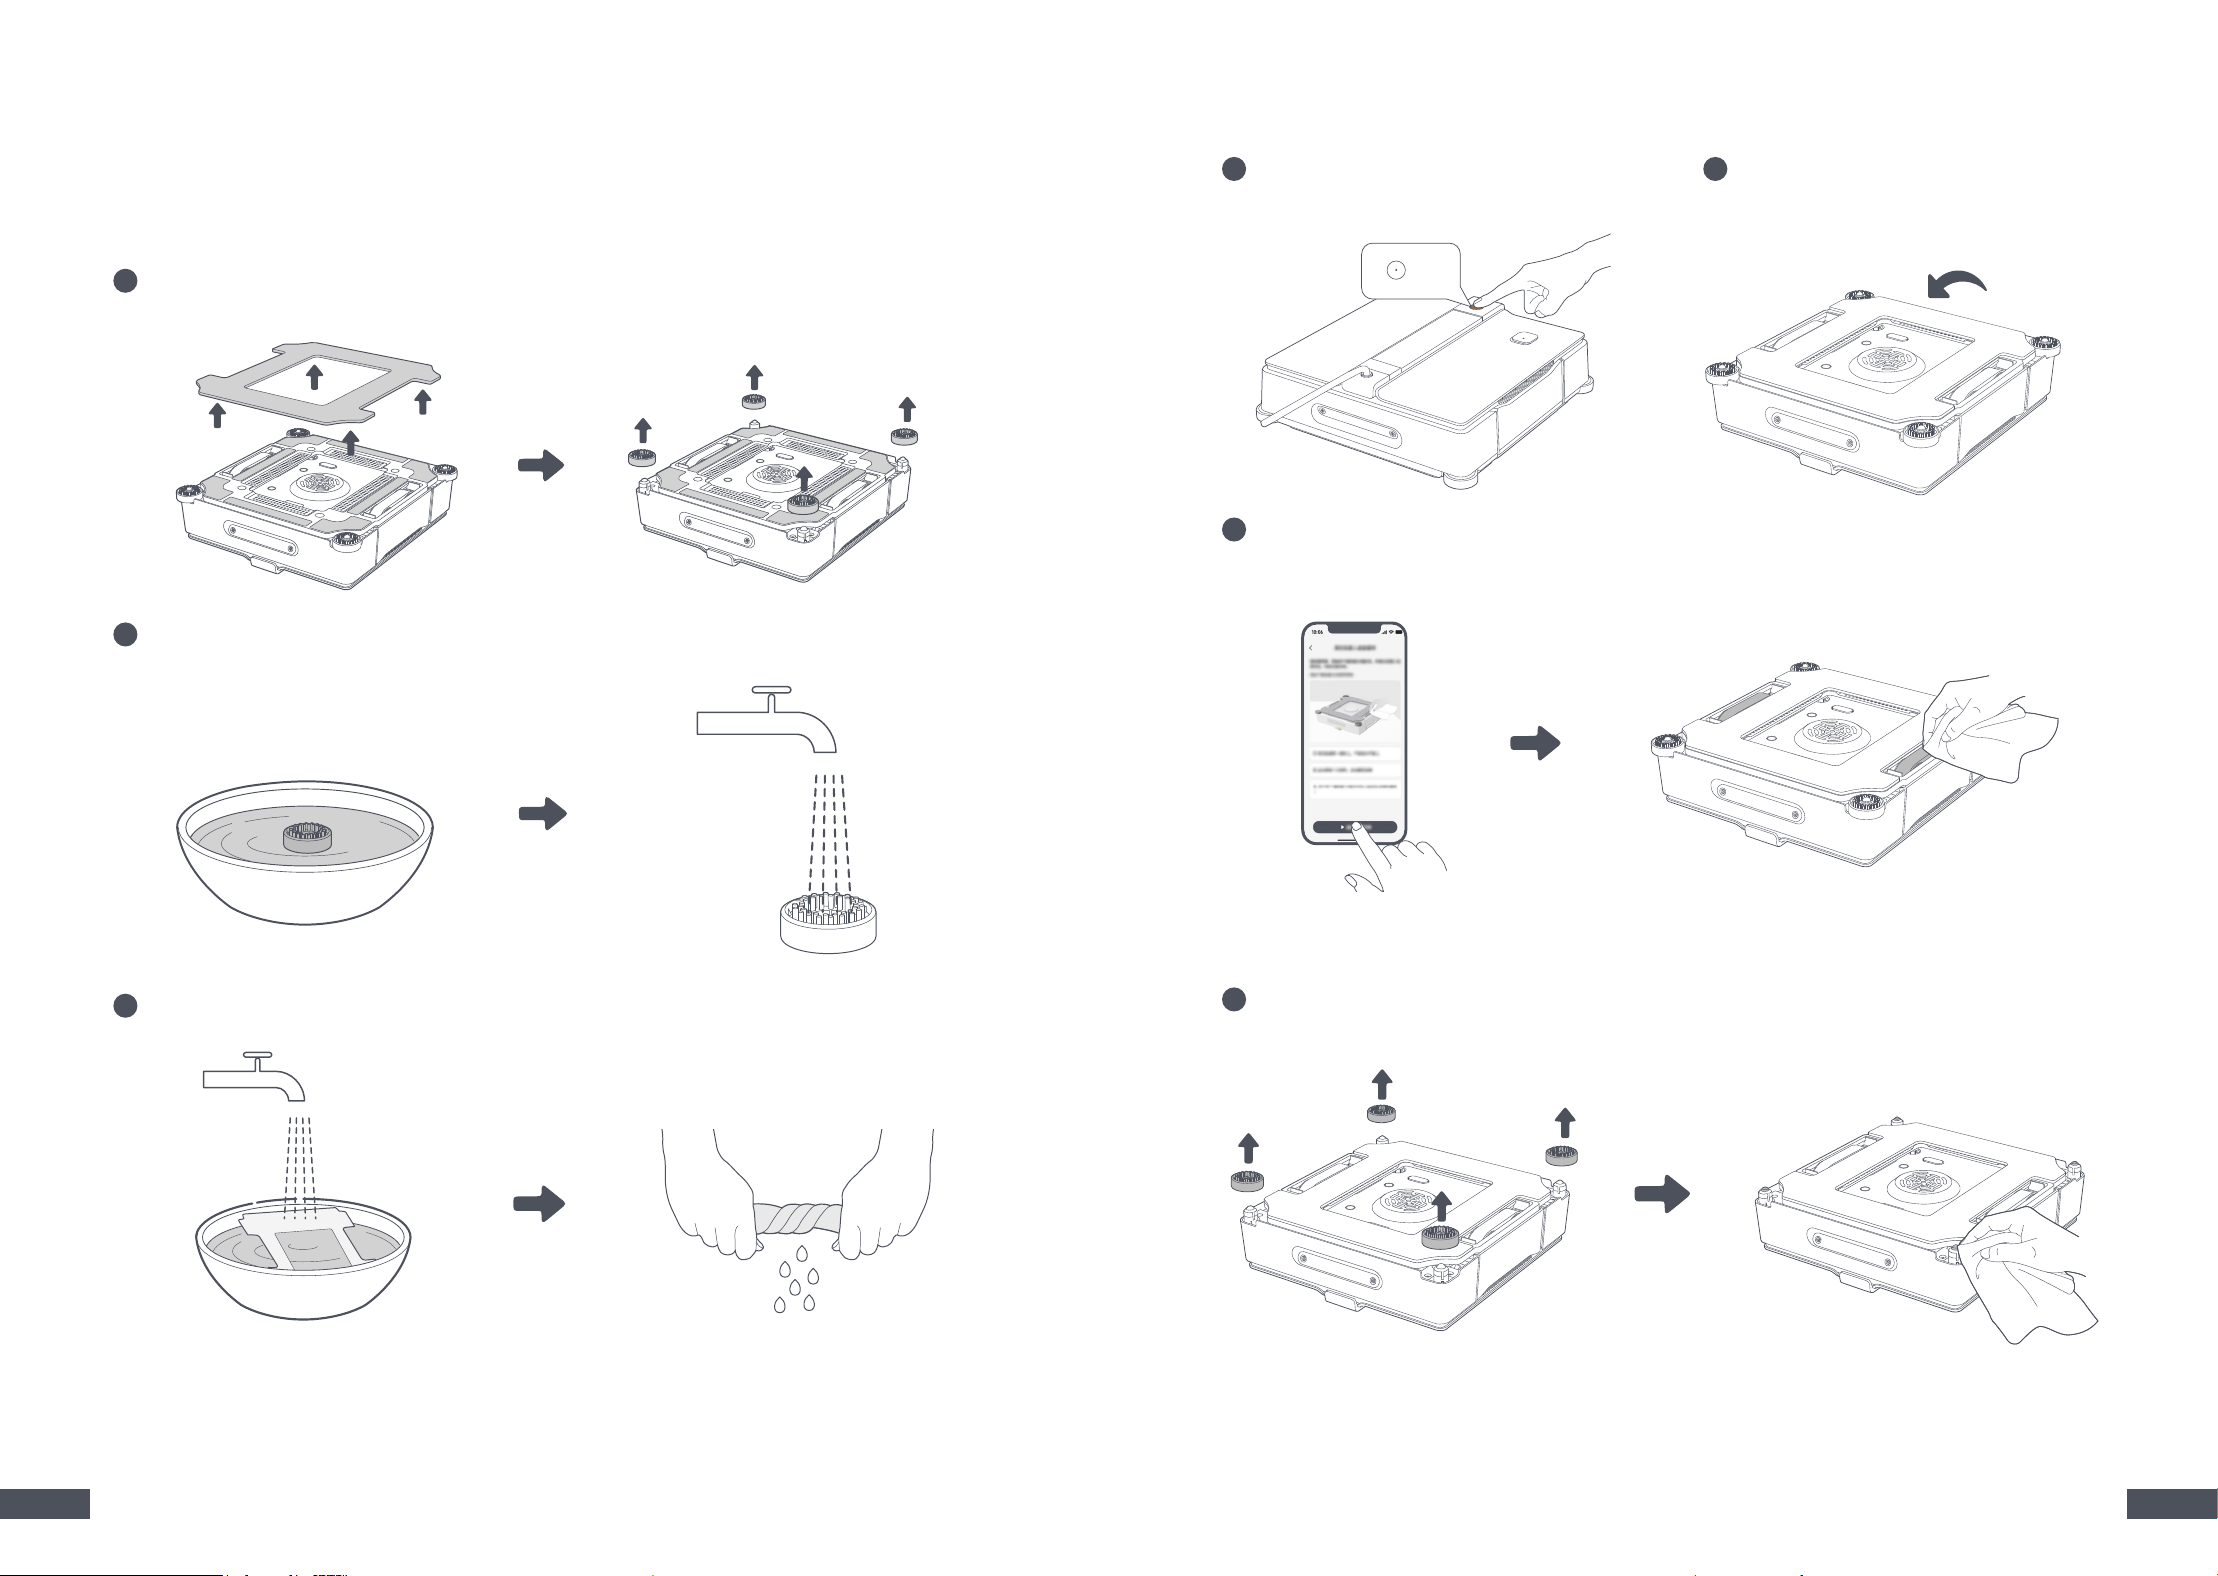
5 Maintenance
Regularly clean and maintain the window cleaning robot to maintain its optimal performance� Refer
to the maintenance and care guide in the MOVAhome app�
1
After each use, remove the cleaning cloth and corner brushes� To remove the corner brush, push
it upwards until you hear a click�
2
Soak the corner brushes for 5 minutes� Then rinse them clean� Shake o excess water, and
reinstall them�
3
Hand wash or machine wash the cleaning cloth, and wring it out until it doesn't drip before reuse�
5�1 Cleaning Cloth and Corner Brushes
Note: Replace the cleaning cloth if it becomes worn, stained, or less eective.
1
Before cleaning the track belts, ensure the robot is
switched on and not attached (fan o)�
3
Open the app and navigate to Clean Track Belts� Tap the button to start the track rotation� Place
a dry, clean cloth against the track belt for cleaning� Once nished, tap the button to stop the
rotation�
4
Remove corner brushes, then wipe the anti-fall sensors with a clean, dry cloth�
2
Place the robot upside down on a level
surface with the track belts facing up�
5�2 Track Belts and Anti-Fall Sensors
2s
Important: Regularly clean the track belts to prevent dirt buildup.