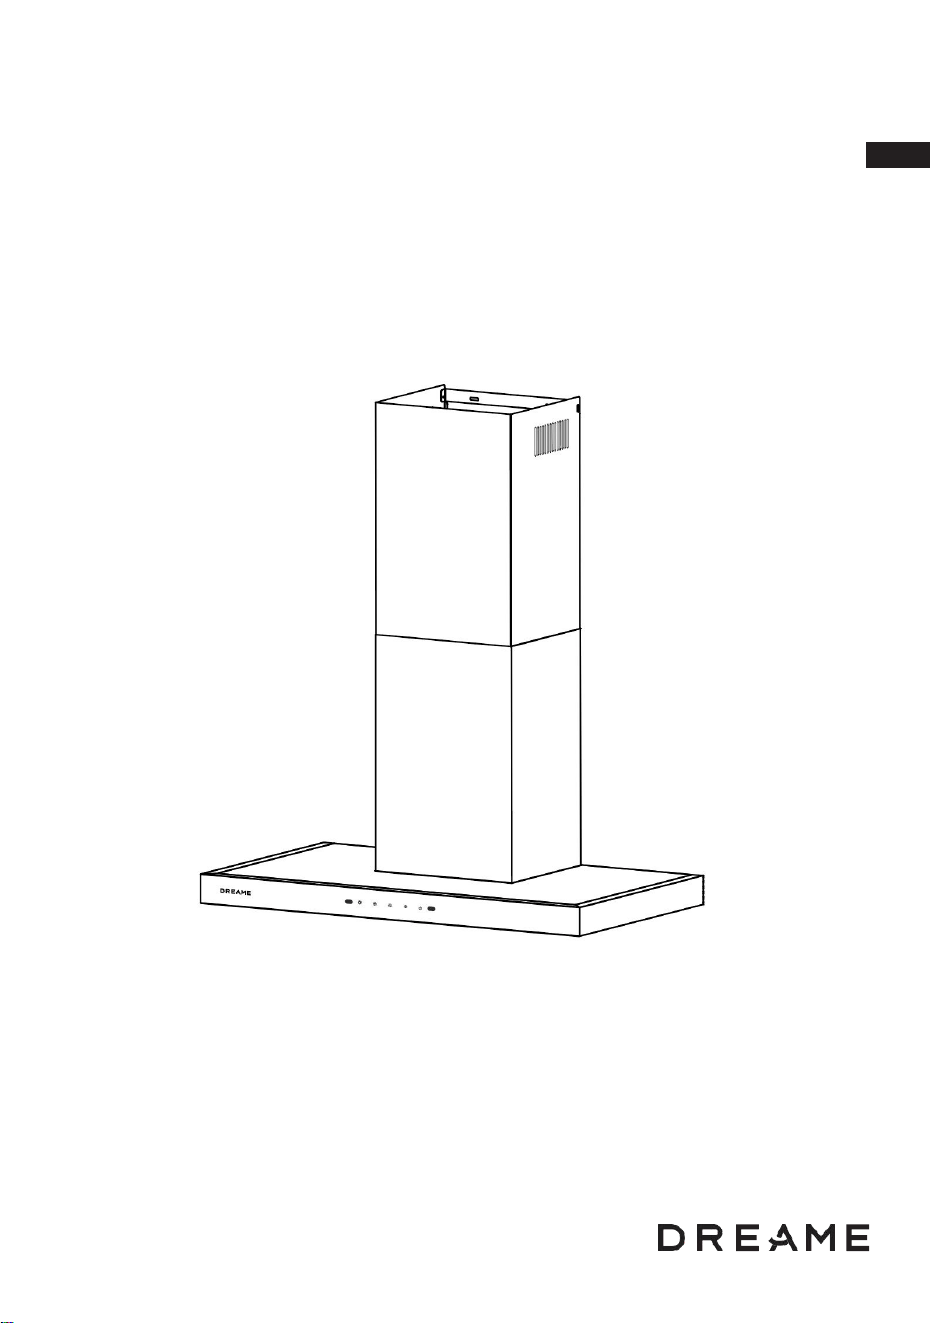
RANGE HOOD
User Manual
Model: CXL-85-HZ601TSNA
CXL-85-HZ601PTSNA
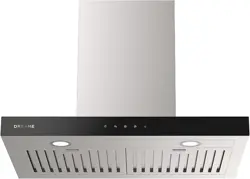
Dreame HZ601 Chimney Range Hood
Dreame HZ601 Pro Chimney Range Hood
Please read this manual carefully before using the product
and keep it for future reference.
EN

TROBULESHO OTING
THANK YOU FOR CHOOSING THIS
RANGE HOOD
READ AND SAVE THESE INSTRUCTIONS.
Before using this device, please read this manual carefully.
This manual contains important information that will help you get the most out of your
device and ensure its proper and safe installation, operation, and maintenance.
Please keep this manual in a convenient place so that you can refer to it at any time for
questions regarding the safe and proper use of this device.
In case of resale, gifting, or leaving this device behind when moving, make sure to hand
over this manual to the new owner so they can become familiar with the product and
safety instructions.
The illustrations in this manual are for reference only. Please refer to the actual product.
EN

CONTENT
Important Safety Instructions........................................................................................1
Safety Precaution..........................................................................................................1
Product Overview ........................................................................................................ 4
Installation .......................................................................................................................7
How to Use ...................................................................................................................16
Care & Maintenance..................................................................................................18
Troubleshooting......................................................................................................... 23
Specifications..............................................................................................................24
Customer Assistance Service.................................................................................25
Environmental Protection........................................................................................25
EN
TROBULESHO OTING
1
Important Safety Instructions
Thank you for choosing this RANGE HOOD.
This instruction manual is designed to provide you with all required instructions related
to the installation, use and maintenance of the appliance. In order to operate the unit
correctly and safety, please read this instruction manual carefully before installation
and usage.
The RANGE HOOD uses high quality materials, and is made with a streamlined design.
Equipped with large power electric motor and centrifugal fan, it also provides strong
suction power, low noise operation, non-stick grease filter and easy assembly
installation.
Safety Precaution
TO REDUCE THE RISK OF FIRE, ELECTRIC SHOCK, OR INJURY TO PERSONS, OBSERVE THE
FOLLOWING:
•
Use this unit only in the manner intended by the manufacturer. If you have questions,
contact the manufacturer at the address or telephone number listed in the warranty.
•
Before servicing or cleaning unit, unplug or disconnect the range hood from the power
supply. Installation work and electrical wiring must be done by a qualified person(s) in
accordance with all applicable codes and standards, including fire-rated construction.
•
Sufficient air is needed for proper combustion and exhausting of gases through the flue
(chimney) of fuel burning equipment to prevent back drafting. Follow the heating
equipment manufacturer’s guidelines and safety standards such as those published by the
National Fire Protection Association (NFPA) and the American Society for Heating,
Refrigeration and Air Conditioning Engineers (ASHRAE) and the local code authorities.
•
When cutting or drilling into wall or ceiling, do not damage electrical wiring and other
hidden utilities.
•
Ducted fans must always be vented to the outdoors.
•
Do not use this unit with any additional solid-state speed control device.
•
To reduce the risk of fire, use only metal ductwork.
•
To provide protection against electric shock, connect to properly grounded outlets only.
•
This unit must be grounded.
•
As an alternative, this product may be installed with the UL- approved cord kit designated
for the product, following instructions packed with the cord kit.
•
When applicable local regulations comprise more restrictive installation and/or certification
requirements, the aforementioned requirements prevail on those of this document and the
installer agrees to conform to these at his own expense.
WARNING: To Reduce The Risk Of Fire, Electric Shock Or Injury To Persons, Do Not Use
Replacement Parts That Have Not Been Recommended By The Manufacturer (e.g. Parts
Made At Home Using A 3D Printer).
EN
2
•
The fan shall not be modified by users.
•
This appliance is not intended for use by persons (including children) with reduced physical,
sensory or mental capabilities, or lack of experience and knowledge, unless they have been
given supervision or instruction concerning use of the appliance by a person responsible for
their safety.
•
Children should be supervised to ensure that they do not play with the appliance.
If the SUPPLY CORD is damaged, it must be replaced by the manufacturer, its service
agent or similarly qualified persons in order to avoid a hazard.
•
There shall be adequate ventilation of the room when the range hood is used at the same
time as appliances burning gas or other fuels.
•
There is a fire risk if cleaning is not carried out in accordance with the instructions.
•
Do not flambé under the range hood.
•
CAUTION: Accessible parts may become hot when used with cooking appliances.
The air must not be discharged into a flue that is used for exhausting fumes from
appliances burning gas or other fuels.
Important Safety Instructions
TO REDUCE THE RISK OF A RANGE TOP GREASE FIRE:
1) Never leave surface units unattended at high settings. Boil overs cause smoking and
greasy spillovers that may ignite. Heat oils slowly on low or medium settings.
2) Always turn hood ON when cooking at high heat or when flambeing food.
3) Clean ventilating fan frequently. Grease should not be allowed to accumulate on fan,
filters or in exhaust ducts.
4) Use proper pan size. Always use cookware appropriate for the size of the surface
element.
TO REDUCE THE RISK OF INJURY TO PERSONS IN THE EVENT OF A RANGE TOP GREASE
FIRE, OBSERVE THE FOLLOWING*:
1. SMOTHER FLAMES with a close-fitting lid, cookie sheet or metal tray, then turn off
the burner. BE CAREFUL TO PREVENT BURNS. IF THE FLAMES DO NOT GO OUT
IMMEDIATELY, EVACUATE AND CALL THE FIRE DEPARTMENT.
2. NEVER PICK UP A FLAMING PAN — You may be burned.
3. DO NOT USE WATER, including wet dishcloths or towels — This could cause a violent
steam explosion.
4. Use an extinguisher ONLY if:
a) You own a Class ABC extinguisher and you know how to operate it.
b) The fire is small and contained in the area where it started.
c) The fire department has been called.
d) You can fight the fire with your back to an exit.
* Based on “Kitchen Fire Safety Tips” published by NFPA.
EN

TROBULESHO OTING
3
CAUTION
GROUNDING INSTRUCTIONS:
This appliance must be grounded. In the event of an electrical short circuit,
grounding reduces the risk of electric shock by providing an escape wire for the electric
current. This appliance is equipped with a cord having a grounding wire with a grounding plug.
The plug must be plugged into an outlet that is
properly installed and grounded.
WARNING – Improper grounding can result in a risk of electric shock.
Consult a qualified electrician if the grounding instructions are not completely understood, or if
doubt exists as to whether the appliance is properly grounded.
Do not use an extension cord. If the power supply cord is too short, have a qualified electrician
install an outlet near the appliance.
•
For indoor use only.
•
For general ventilating use only. Do not use to exhaust hazardous or explosive materials and
vapors.
•
To avoid motor bearing damage and noisy and/or unbalanced fan blade, keep drywall spray,
construction dust, etc. off range hood.
•
Your hood motor has a thermal overload which will automatically shut off the motor if it
becomes overheated. The motor will restart when it cools down. If the motor continues to
shut off and restart, have the hood serviced.
•
For best capture of cooking fumes, the bottom of the hood MUST NOT BE LESS than 25.6”
and at a maximum of 30” above the cooking surface.
•
Always follows the cooking equipment manufacturer’s requirements regarding the ventilation
needs.
•
To reduce the risk of fire and to properly exhaust air, be sure to duct air outside — Do not
exhaust air into spaces within walls or ceiling or into attics, crawl space or garage.
•
When installing, servicing or cleaning the unit, it is recommended to wear safety glasses and
gloves.
•
Please read specification label on product for further information and requirements.
Instructions for bonding the appliance to ground.
The grounding-type attachment plug provided with this appliance shall be connected to a
grounding-type receptacle installed in accordance with CSA C22.1, Canadian Electrical Code,
Part I.
In the event of an electrical short circuit, bonding to ground reduces the risk of electric shock.
WARNING: Improper bonding to ground can result in a risk of electric shock.
AVERTISSEMENT : Une mise à la terre inadéquate pourrait entraîner des risques de décharge
électrique.
EN
4
Product Overview
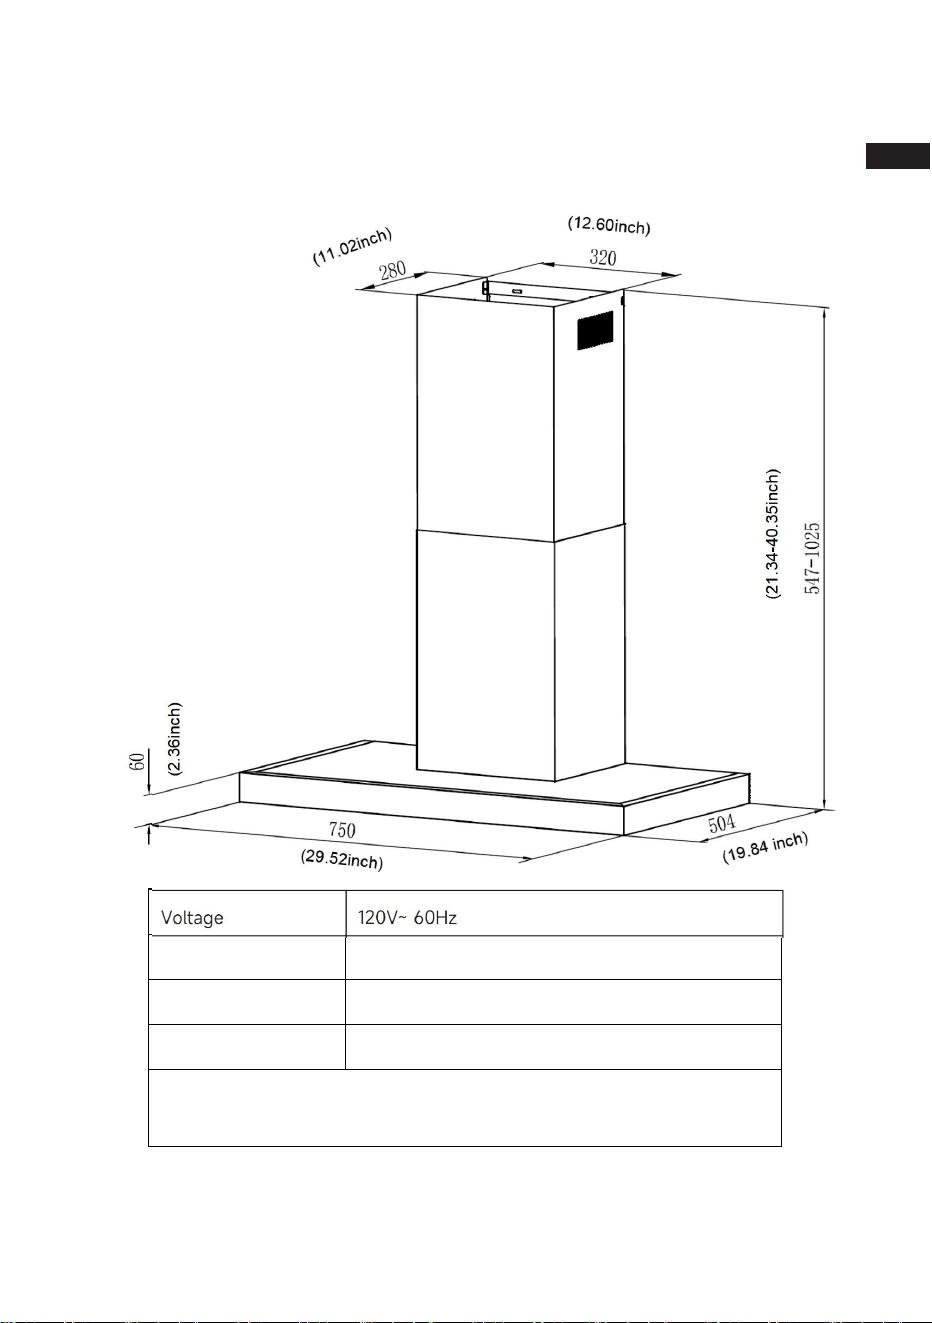
Voltage
120V~ 60Hz
Power of Motor
1 x 85W
Power of lamps
See the product rating label
Appliance Dimension
29.52*19.84*21.34~40.35 inch (W x D x H)
Note: The manufacturer reserves the right to change any technological
improvement or modification without prior notice.
EN
TROBULESHO OTING
5
Before Using the Range Hood
CAUTION: Before proceeding to the installation, check if items are missing or
damaged, contact the manufacturer. Observe all governing codes and ordinances.
Have a qualified technician install the range hood. It is the installer’s responsibility to
comply with installation clearances specified on the model/serial rating plate. The
manufacturer declines all responsibility for improper installation and does not accept
responsibility for appliance warranty in the event of damage caused by incorrect
installation.
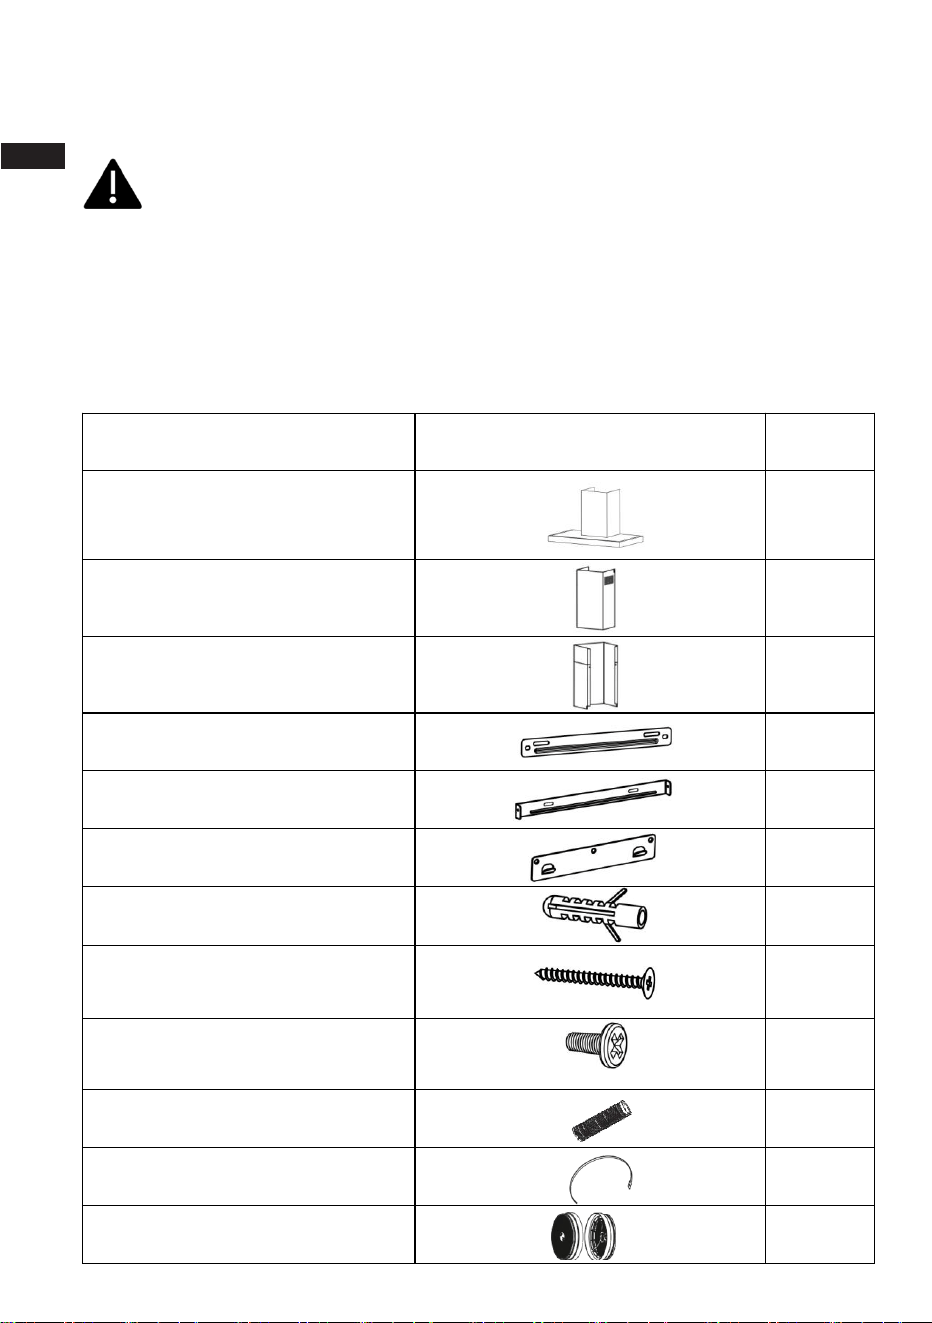
COMPONENTS
Spec.
Illustration Picture
Qty
Casing
1
Upper Chimney
1
Lower Chimney
1
Lower chimney bracket
1
Upper chimney bracket
1
Hanging Board
1
Wall Plug
9
Screws
ST4.0×30
9
Screws
ST4.0×8
2
Aluminum Exhaust Pipe
1
Cable Ties
1
Carbon Filter
2
EN
6
Prepare for Installation
Prepare for Installation:
Use only with range hood cord-connection kits that have been investigated and found
acceptable for use with this model range hood.
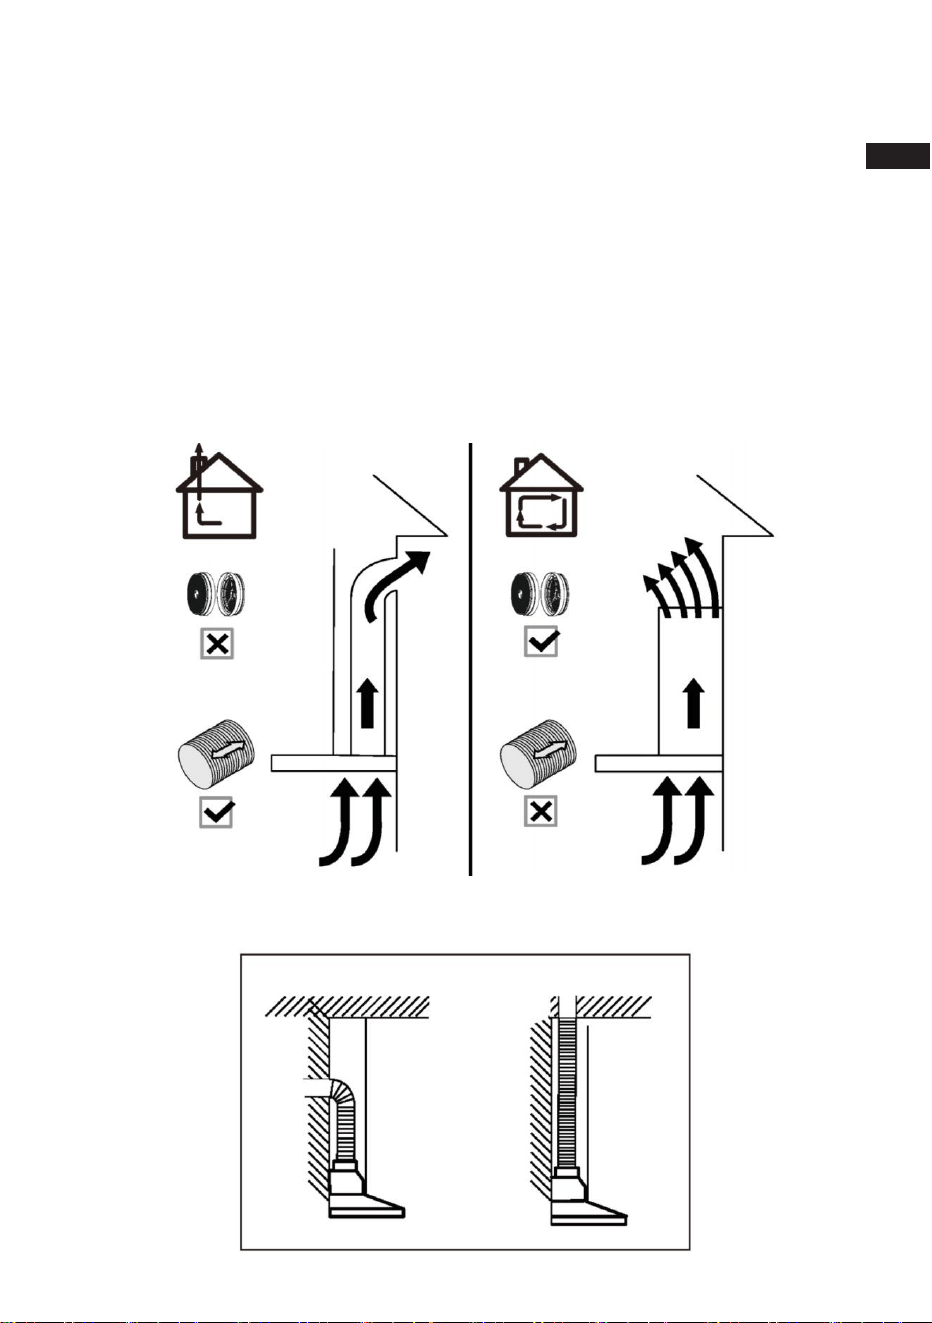
a) Ventilation Mode
Recirculation Mode: Recirculating with carbon filter (required), the smells and odors can be
filtered and vented through the top vented hole and the exhaust pipe is not required.
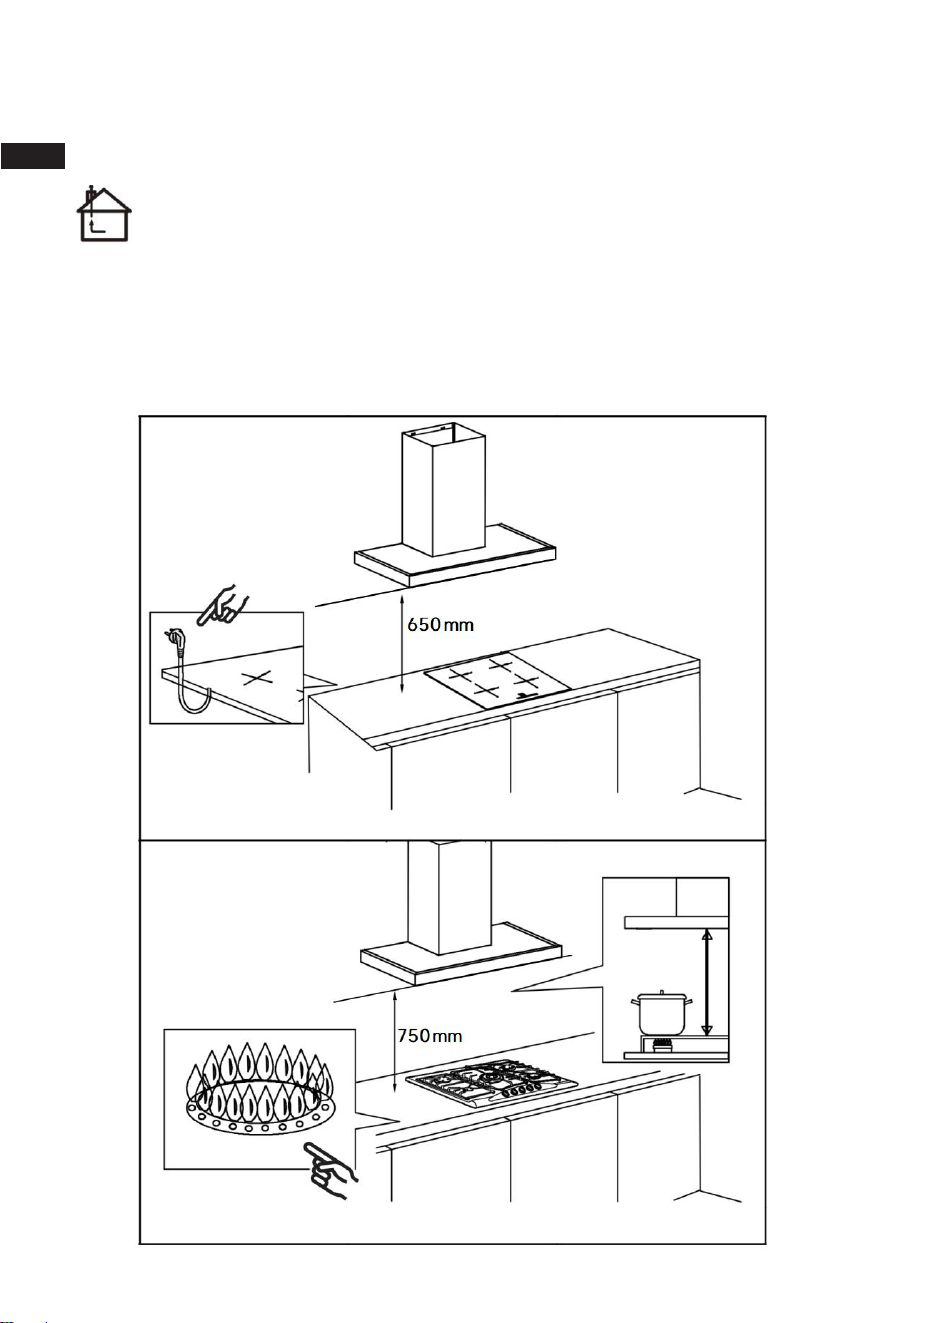
Extraction Mode: You can install the 1.5m long and 150mm diameter aluminum exhaust pipe
for extracting, which is included in the installation kit.
b) When possible, use at least 60cm straight runs before any turns. Larger duct work may be
required for best performance with longer duct runs.
EN
TROBULESHO OTING
7
c) Before installation, don't connect the power.
Installation
Install the Hood( Extraction) :
1) Remove all protective poly film from the hood and/or parts.
2) Recommend installation height: 65~75cm above the cooktop for best extraction.
Required height over gas hob: 750mm;
Required height over electric hob: 650mm.
(25.59inch)
h
(29.53inch)
EN
8
Installation
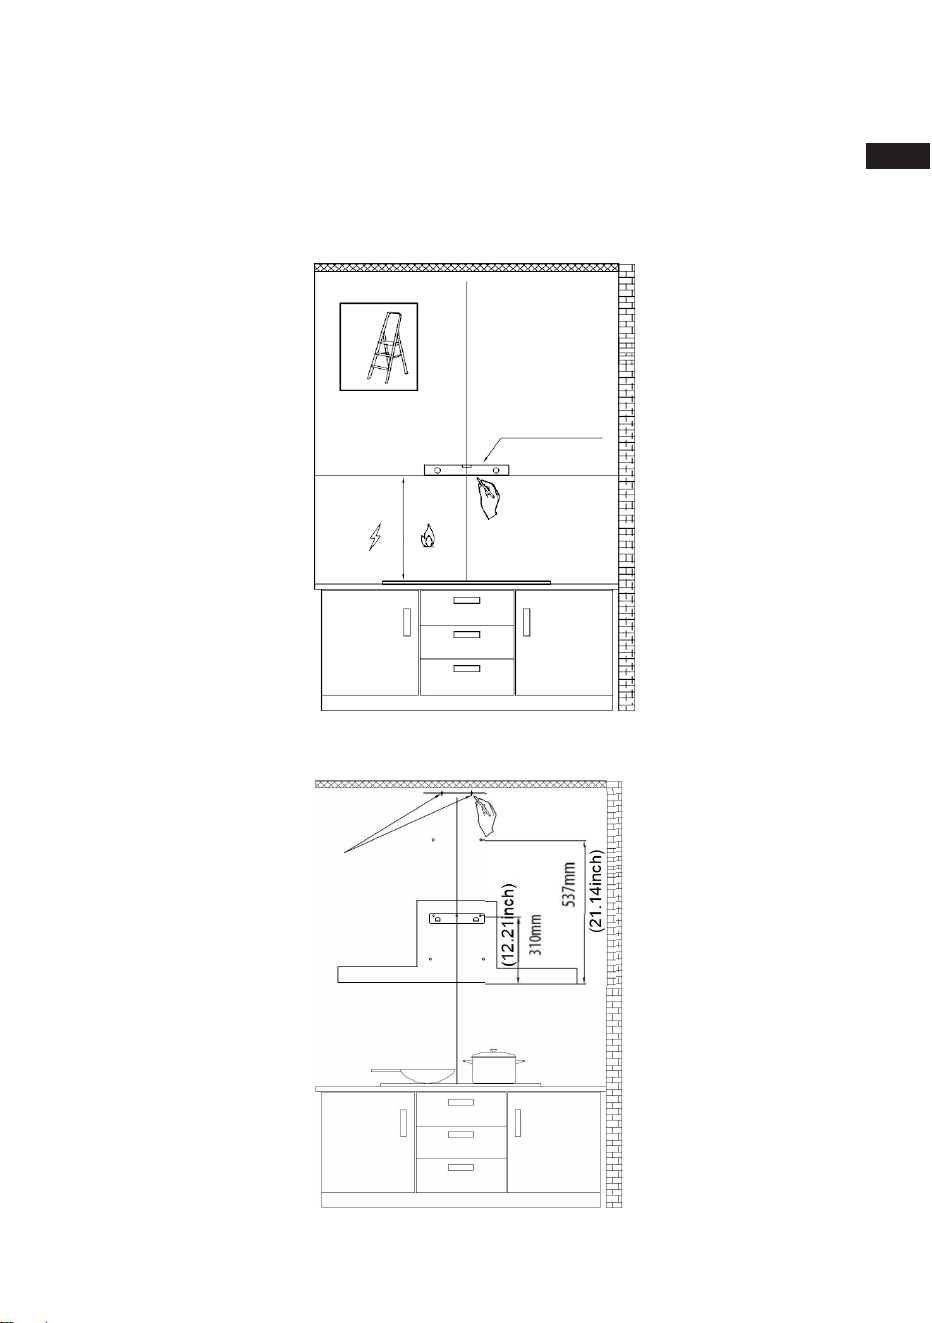
3) First use a pencil to mark the installation position on the wall, then use a Measuring Tape
to measure the height from the stove surface to the hood (the center point of aluminum
grease filter) and use a Spirit Level Ruler to maintain the level, then use a pencil to draw a
horizontal line along the level.
Spirit Level Ruler
650mm 750mm
4) Determine the maximum chimney installation height according to the actual scenario and
mark the chimney installation locations along the center line of the Installation Diagram.
Chimney
installation
locations
(25.59inch)
(29.53inch)
EN
TROBULESHO OTING
9
Wall Plug
Wall Plug X 9
4*30mm Screws
4*30mm Screws 3pcs
COMPONENTS:
4 *30mm Screws X 3
Wall Bracket X 1
Installation
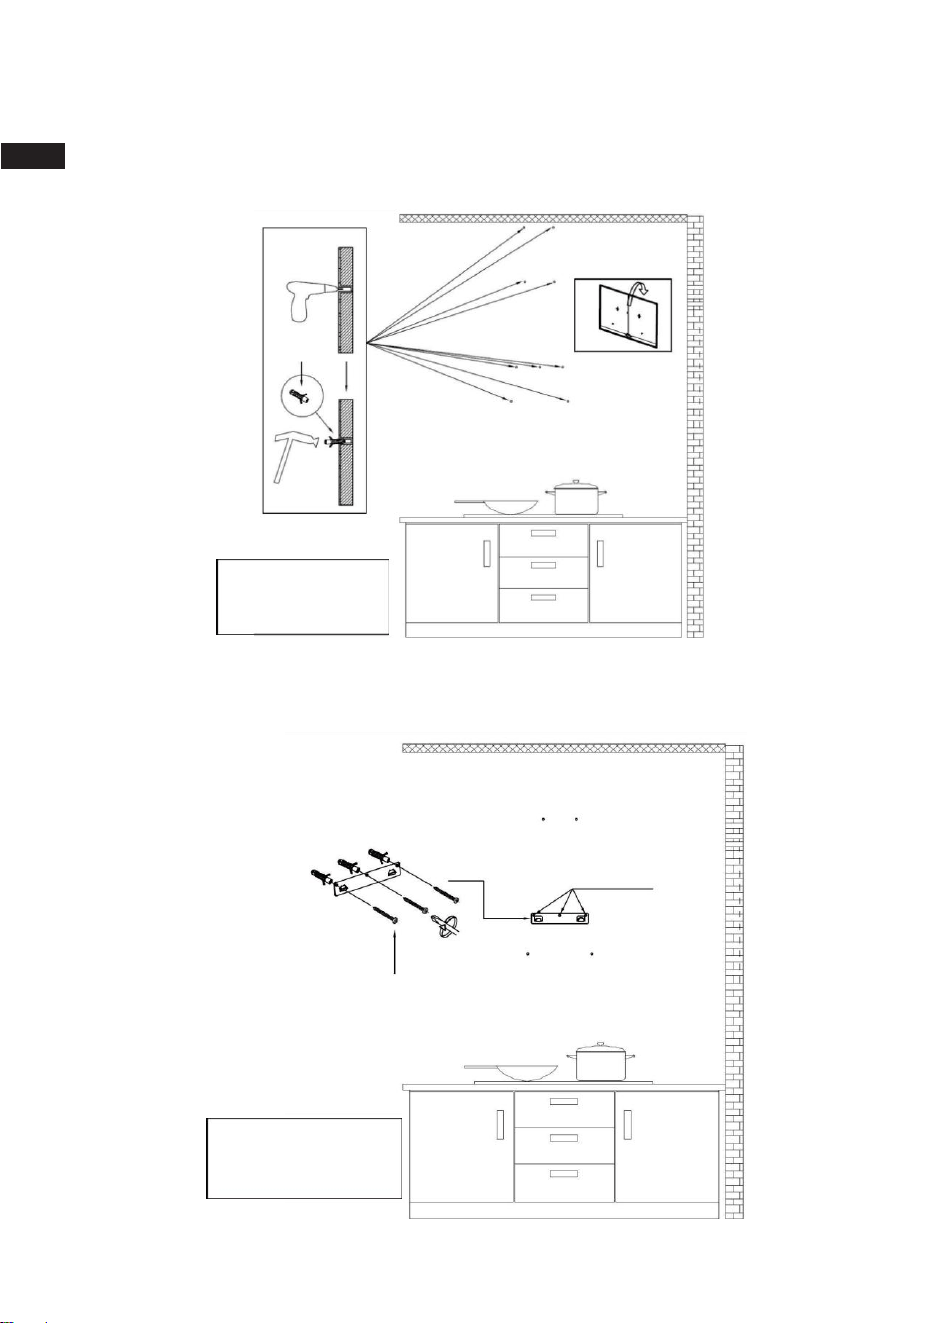
5) Drill the holes that have been marked on the wall with an Electric Drill (8mm drill), and
hammer the Wall Plug into the wall.
6) Use three 4*30mm Screws to fasten the Wall Bracket on the wall.
EN
10
Installation
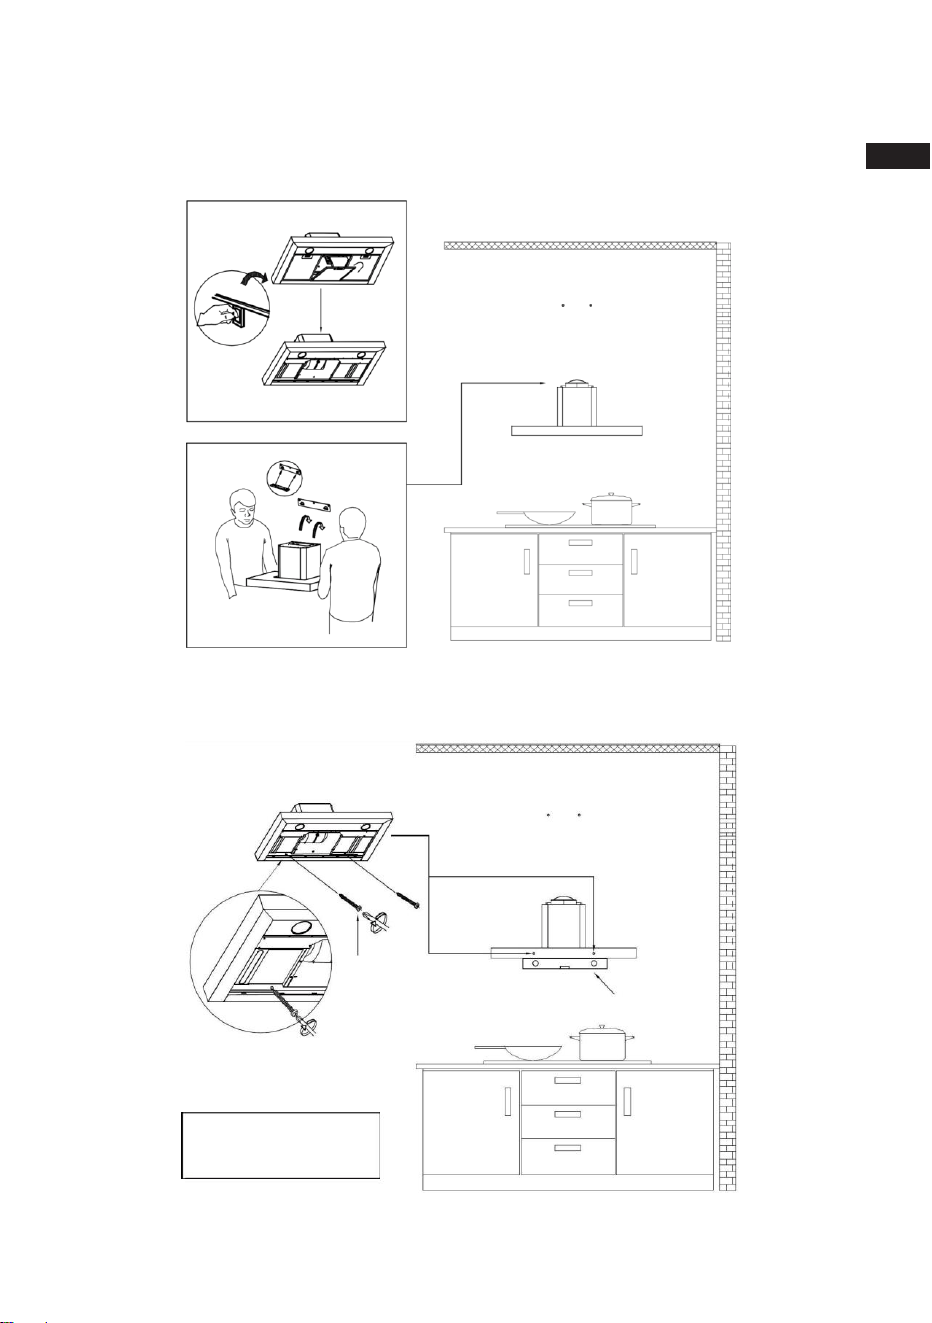
7) Remove the aluminum grease filter and hang the hood on the corresponding hook of the
Wall Bracket.
8) Use a Spirit Level Ruler to measure whether the hood is in a horizontal level, and use two
4*30mm Screws to lock into the safety hole position of the hood (not mandatory, according
to user's wishes to choose whether to lock).
COMPONENTS:
4*30mm Screws X 2
4*30mm
Screws 2pcs
Spirit Level Ruler
EN
TROBULESHO OTING
11
T
ape
Installation
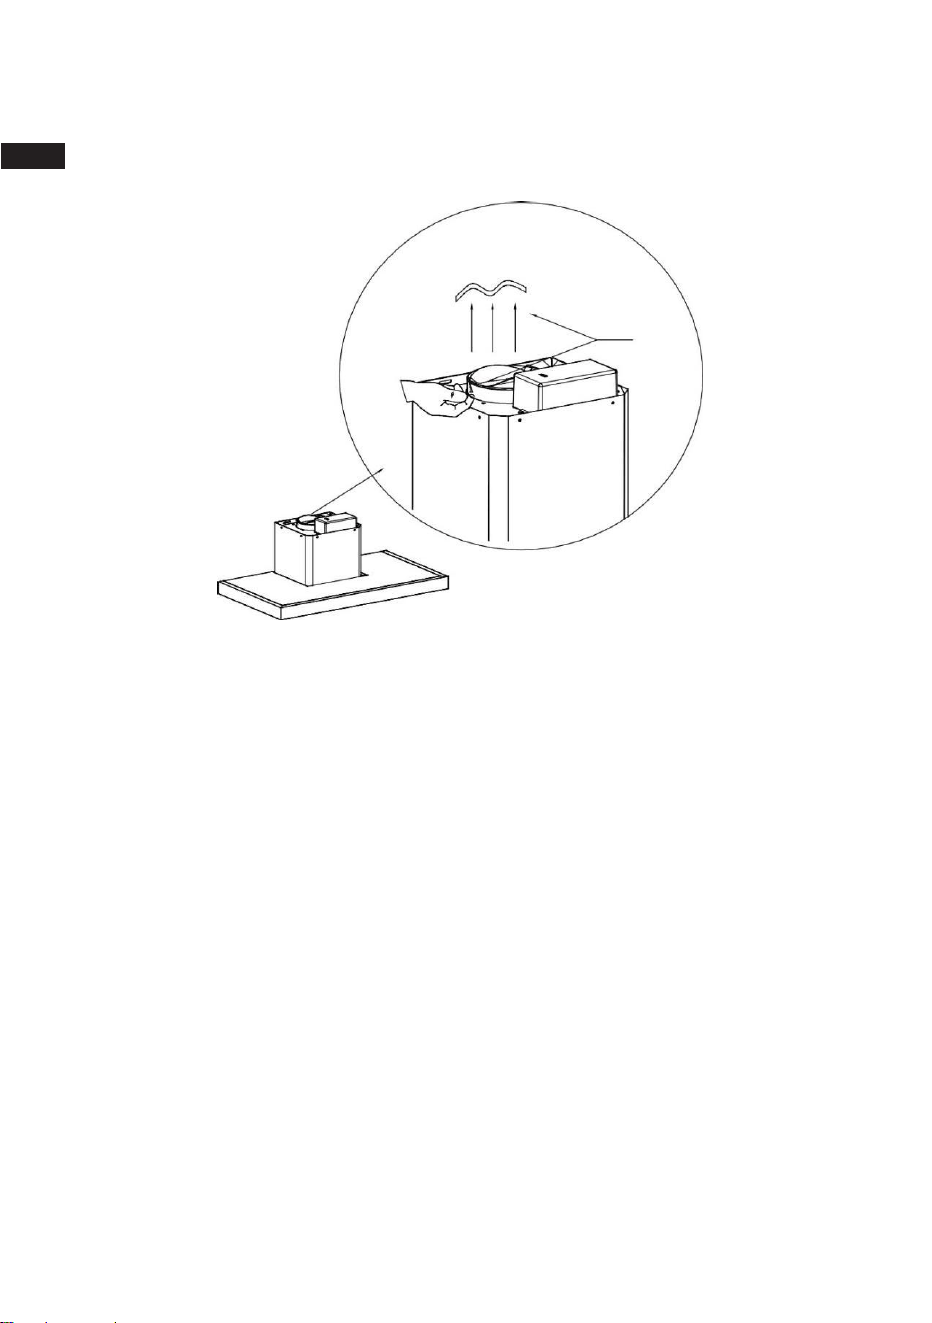
9) Tear off the tape from the air outlet.
NOTE:
Make sure you remove the tape on the damper and check if the damper opens and closes
freely, otherwise it make noises, and the range hood will be shaking.
EN
12
Installation
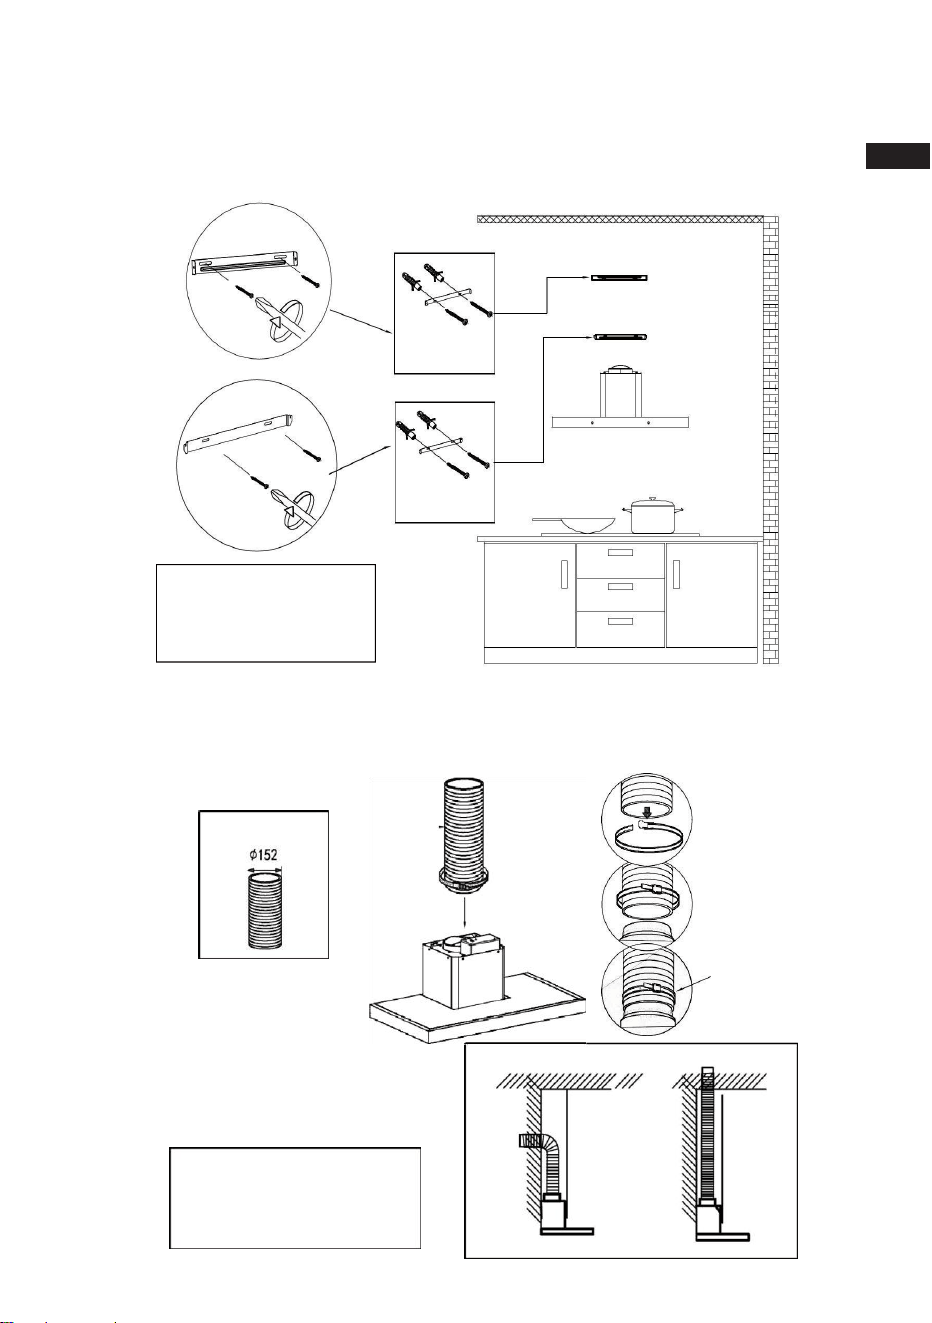
10) Use two 4*30 mm Screws to lock the Upper and Lower Chimney Brackets to the
corresponding positioning holes on the wall.
Wall Plug
Upper
Chimney
Bracket
4*30mm
Screws
Lower
Chimney
Bracket
Wall Plug
4*30mm
Screws
COMPONENTS:
Lower Chimney Bracket X 1
Upper Chimney Bracket X 1
4*30mm Screws X 4
11) Install the Aluminum Exhaust Pipe into the air outlet and lock it with a Cable Tie; the other
end of the Aluminum Exhaust Pipe will be pulled upward to outdoor and lock it with a
Cable Tie (Note: This step can be ignored if use as recirculation mode with carbon filter).
Aluminum
Exhaust Pipe
Cable Tie
provided with
an Aluminum
tape&a Cable
Tie to fix the
aluminium pipe.
COMPONENTS
:
Aluminum
Exhaust Pipe X 1
Cable Tie X 1
Aluminum tape X 1
EN
TROBULESHO OTING
13
Installation
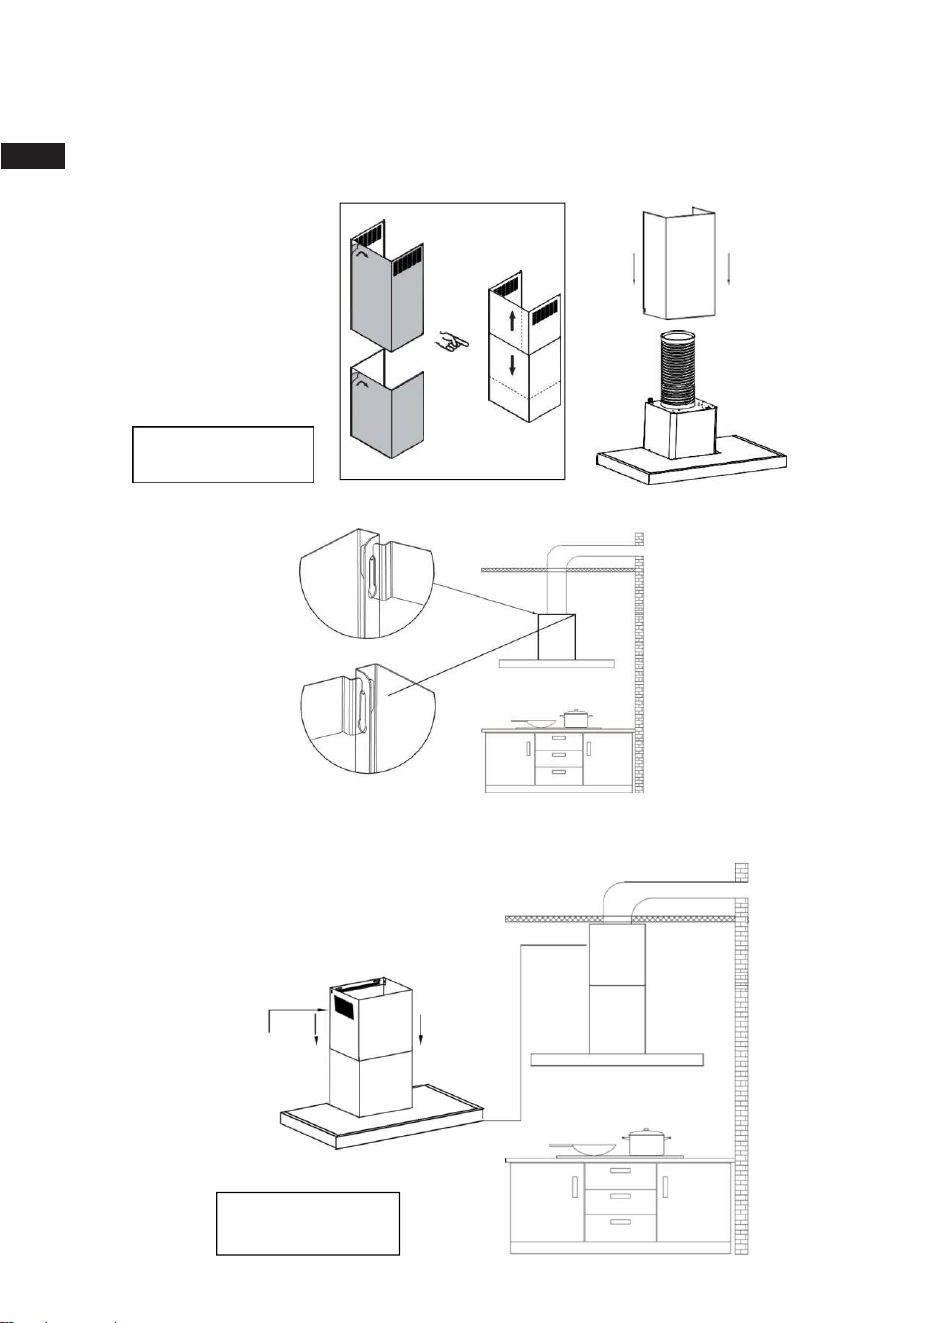
12) Insert the Lower Chimney into the hood (Note: That the power cord needs to go through
the chimney and connect the power).
13) Lock the Lower Chimney on the Lower Chimney Bracket by two sides.
14) Put the Upper Chimney into the Lower Chimney, and then pulled to the height of the
Upper Chimney Bracket.
COMPONENTS:
Lower Chimney X 1
Upper Chimney
Lower Chimney
Upper Chimney
COMPONENTS:
Upper Chimney X 1
EN
14
Installation
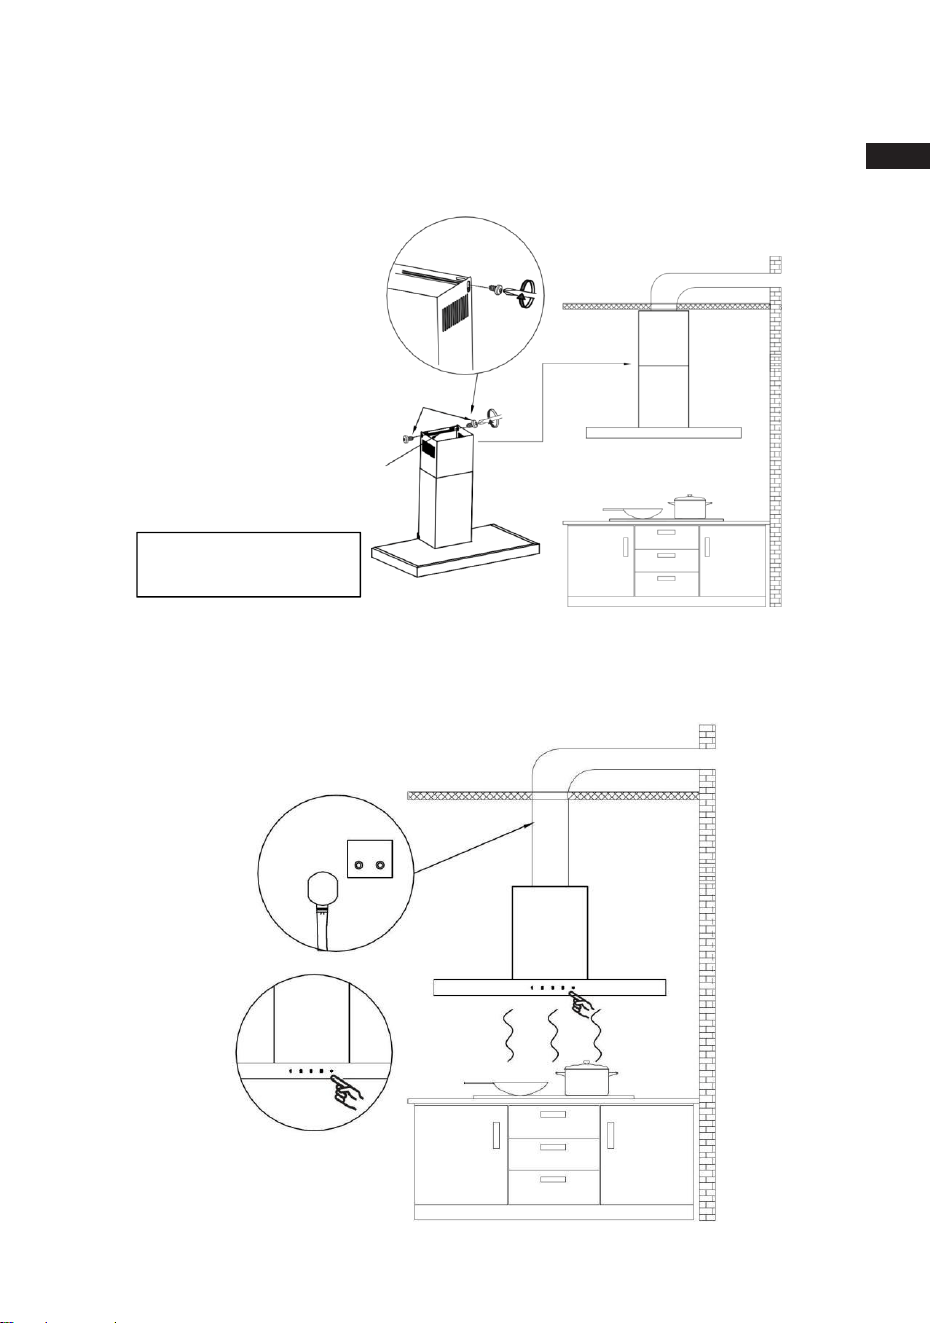
15) Put the Upper Chimney into the Lower Chimney, and then pulled to the height of the
Upper Chimney Bracket.
16) Turn the LED lights on/off, and test whether the functions are working properly.
Upper Chimney Bracket
4*8mm Screws 2pcs
COMPONENTS:
Part 3: 4*8mm Screws X 2
EN
TROBULESHO OTING
15
Installation
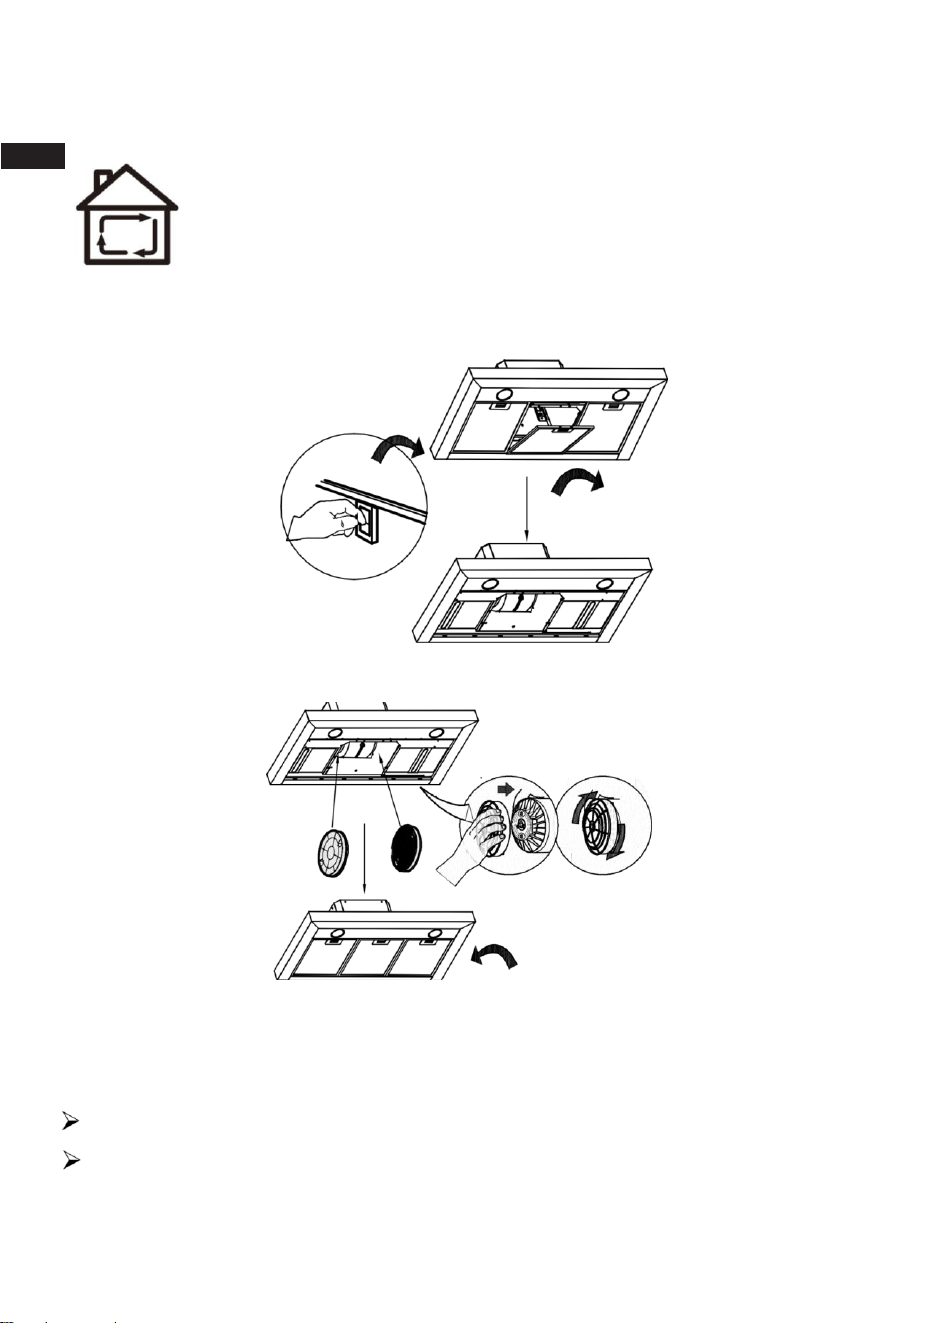
Carbon Filter Installation( Recirculation) :
1. Carbon filter can be used to trap odors. In order to install the carbon filter, the grease filter
should be detached first. Press the lock and pull it down.
2. Place the carbon filter into the unit and turn it in the clockwise direction to lock it in place.
3. If the carbon filter needs to be replaced, please turn it in the anti-clockwise direction.
NOTE:
Make sure the carbon filter is securely locked.
When the carbon filter is installed, the suction of the range hood will be reduced.
EN
16
How to Use
Always turn your hood on before you begin cooking to establish
an airflow in the kitchen.
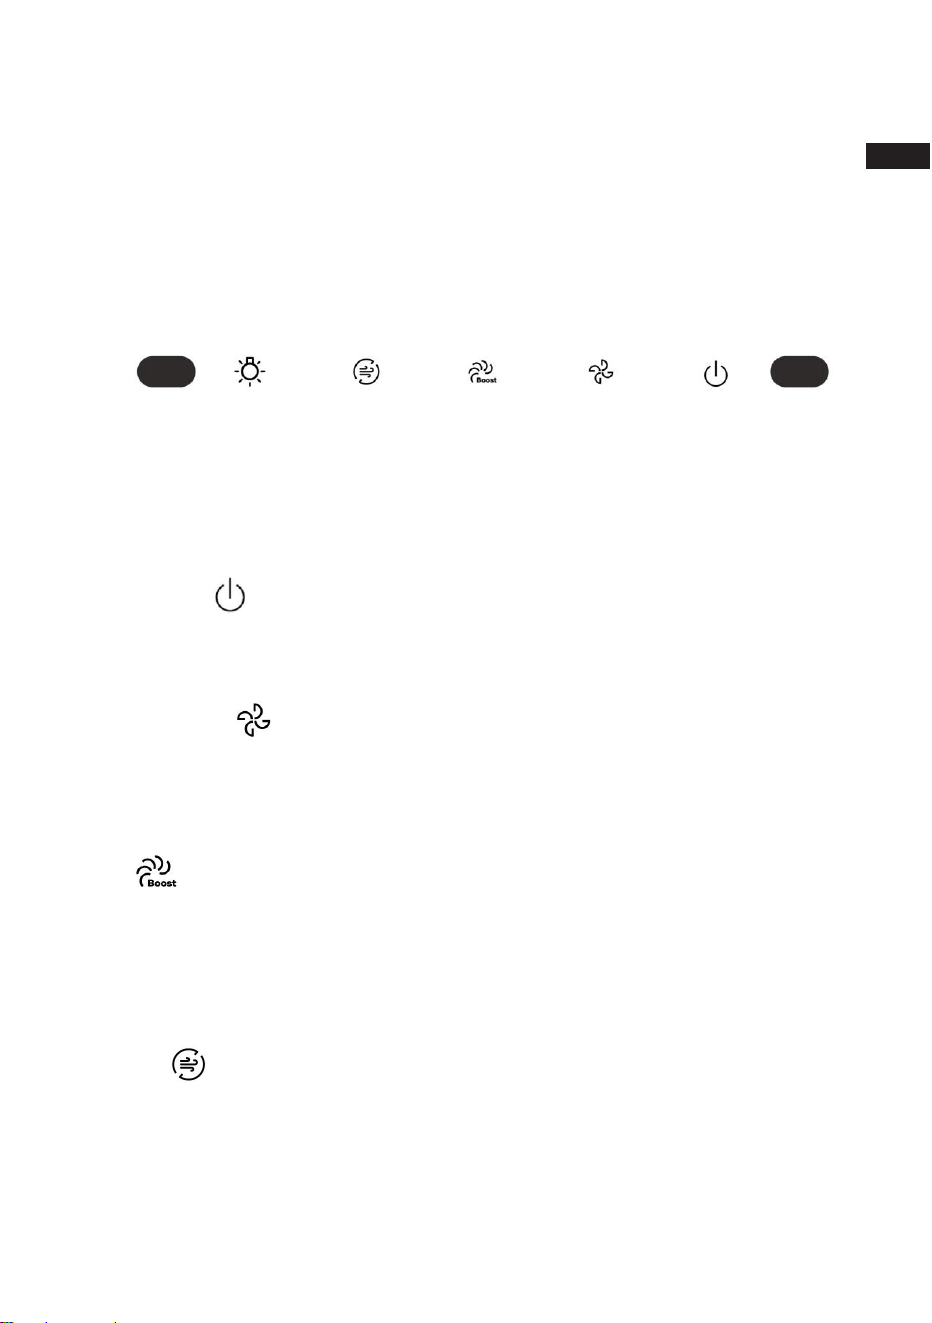
CONFIGURATION 1
OPERATION
Operate the hood as follows:
After plug in, the range hood will enter the standby mode. If you need to operate, press ON/OFF
button briefly to start up the range hood.
ON/OFF button
Short-touch the button for to turn on the power. In working mode, short-touch to active the 5-
minute delay shutdown mode, and will automatically turn to level 1, short-touch again to power off.
Speed Adjustment
Touch the speed adjustment to adjust the power level.
In the delay shutdown statue, touch the this button again to cancel the delay shutdown mode and
will turn to level 2.
Boost
In power-on mode, short-touch the turbo button: activates turbo mode (maximum airflow),
which automatically drops to level 2 airflow after 3 minutes.
Within 3 minutes of turbo mode, short press the turbo button: switches to level 2 airflow.
Ventilation
In the powered-on mode, short-touch the ventilation button to switch the motor to speed 2; the
ventilation button indicator stays on, and the speed indicator flashes with a short beep. After 5
minutes (another short beep), it enters a 10-minute delayed standby state: the power button and
speed buttons flash simultaneously, and the motor switches to speed 1. Short-press the power
button to exit ventilation.
EN

TROBULESHO OTING
17
Lighting Button
In power-on mode, short press the light button: turns the light on/off.
How to Use
Gesture Control
Detection range: palm 8-20cm from the glass surface, wave left of right.
•Detection range: palm 8–20 cm from the glass surface, wave left or right.
• In standby mode:
- wave left → right: powers on, activates turbo mode and lighting; after 3 minutes,
automatically switches to level 2.
• In power-on mode:
- Wave left → right: cycles through Turbo → Level 3 → Level 2 → Level 1; loops through
airflow levels.
- Wave right → left: switches to level 1 and enters a 5-minute delay mode, then returns
to standby.
• In delay mode:
- Wave left → right: exits delay mode, switches to level 2 airflow.
- Wave right → left: immediately exits delay mode and enters standby.
• Note: In standby mode, long press the power button for 3 seconds to enable/disable
gesture control (all lights flash 3 times as a prompt).
CRT Function Details
Activation and Execution: In standby mode, long-press the "ON/OFF" and "Light Button"
simultaneously for 3 second to activate. Two beeps will sound; the indicators of the ventilation and
boost buttons will flash twice fully then turn off. After CRT is activated, the boost speed airflow
will not exceed 300 CFM.
IMPORTANT NOTE: This change CANNOT be reverted.
Check Status: In power-on mode, long-press the "ON/OFF" and "Speed Adjustment Button"
simultaneously for 3 second; one beep will sound to check if CRT is activated. If activated, the
indicators of the ventilation and boost buttons will flash twice fully then turn off;
if not activated, only the boost button indicator will flash twice then turn off.
EN

18
Filter Cleaning Reminder
When the motor’s cumulative working time exceeds 120 hours, a filter cleaning reminder will be
activated. In standby mode, the indicator lights of the “boost” key and “power adjustment” key will
flash simultaneously. Press any key to cancel.
Care & Maintenance
Proper maintenance of the RANGE HOOD will assure proper performance of the unit. Before
cleaning unit, unplug or disconnect the RANGE HOOD from the power supply.
GREASE FILTERS
The filters must be cleaned every 2 months of operation, or more frequently for particularly
heavy usage, and can be washed in a dishwasher.
Any kind of bending of the filters has to be avoided when washing them. Before fitting them
again into the hood make sure that they are completely dry. (The color of the filter surface may
change throughout the time but this has no influence to the filter efficiency).
CARBON FILTER
The carbon filter should be changed every 2–4 months depending on the conditions of use.
Replace more often if your cooking style generates lots of greases, such as stir frying. These
filters are not washable and cannot be reused. Refer to installation instructions included with a
carbon filter.
STAINLESS STEEL CLEANING
Do:
•
Regularly clean it with a cloth or rag soaked with warm water and mild soap or liquid
dish detergent.
•
You may also use a specialized household stainless steel cleaner, or use dishwasher to
clean the filter.
Don't:
•
Use any steel or stainless–steel wool or any other scrapers to remove stubborn dirt.
•
Use any harsh or abrasive cleansers.
•
Let plaster dust or any other construction residues reach the hood.
During construction/ renovation, cover the range hood to make sure no dust sticks to the
stainless–steel surface.
Avoid when choosing a detergent:
•
Any cleaners that contain bleach will attack stainless steel.
•
Any products containing: chloride, fluoride, iodide, bromide will deteriorate surfaces
rapidly.
•
Any combustible products used for cleaning such as acetone, alcohol, ether, benzol, etc.,
are highly explosive and should never be used close to a range.
PAINTED FINISH CLEANING:
Clean with warm water and mild detergent only. If discoloration occurs, use a finish polish
such as automotive polish. (DO NOT use a rough abrasive cleaner or porcelain cleaner.)
EN
TROBULESHO OTING
19
Care & Maintenance
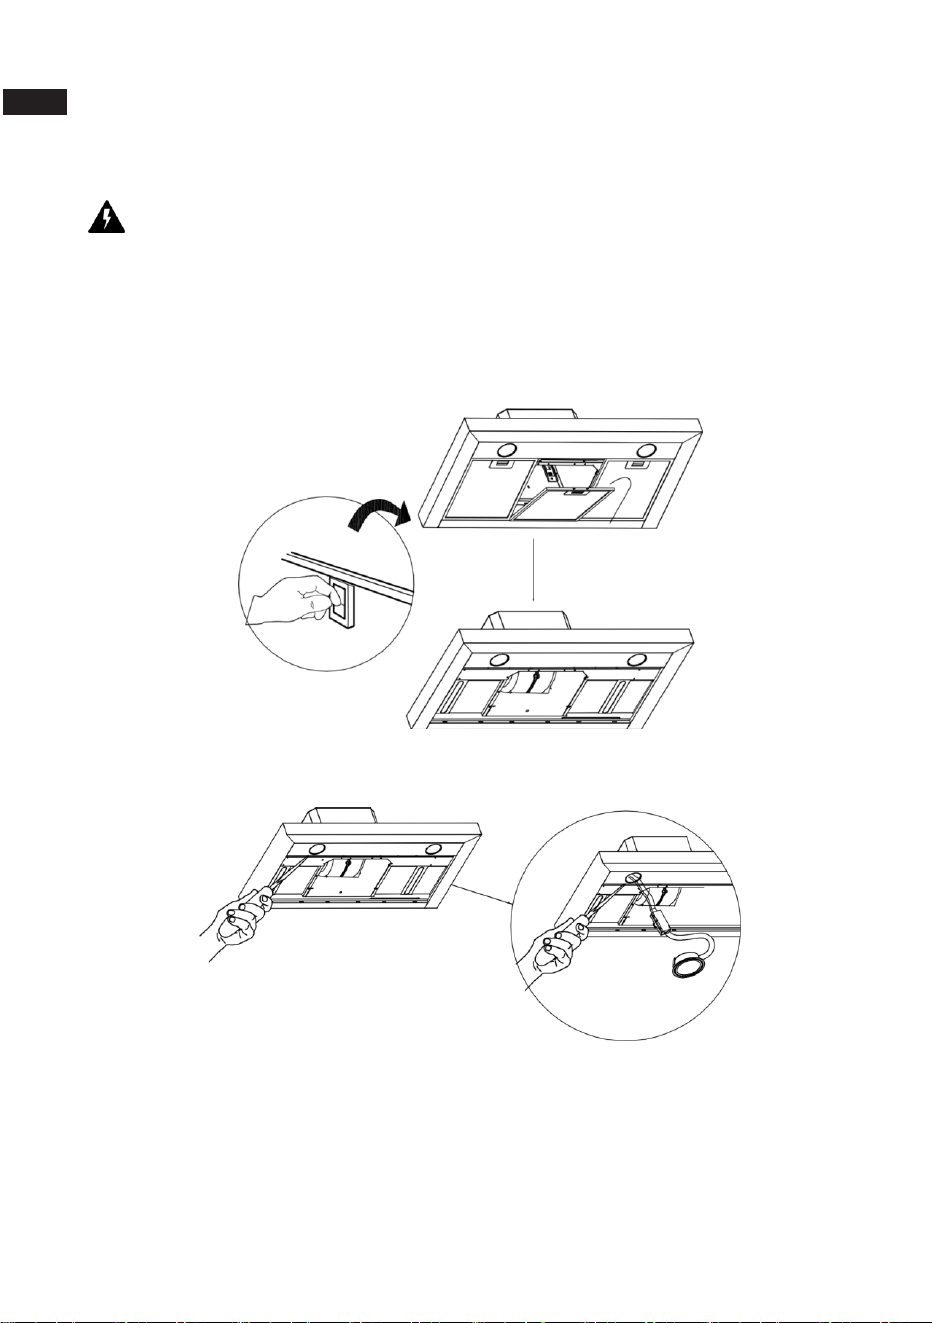
LED REPLACEMENT
CAUTION:
Before cleaning or repairing and replacing accessories, please make sure to shut down the
power before operation, so as to avoid electric shock, damage to human body and even
endanger life safety!
1. Turn off the hood and unplug the power outlet. Detach the grease filter in order for you to
replace the LED lamp.
2. Push the LED lamp holder out from the cabinet by hand, or use screwdriver to prize up the
LED lamp around the edges, pull out slotted the LED lamp and the wire together.
EN
20
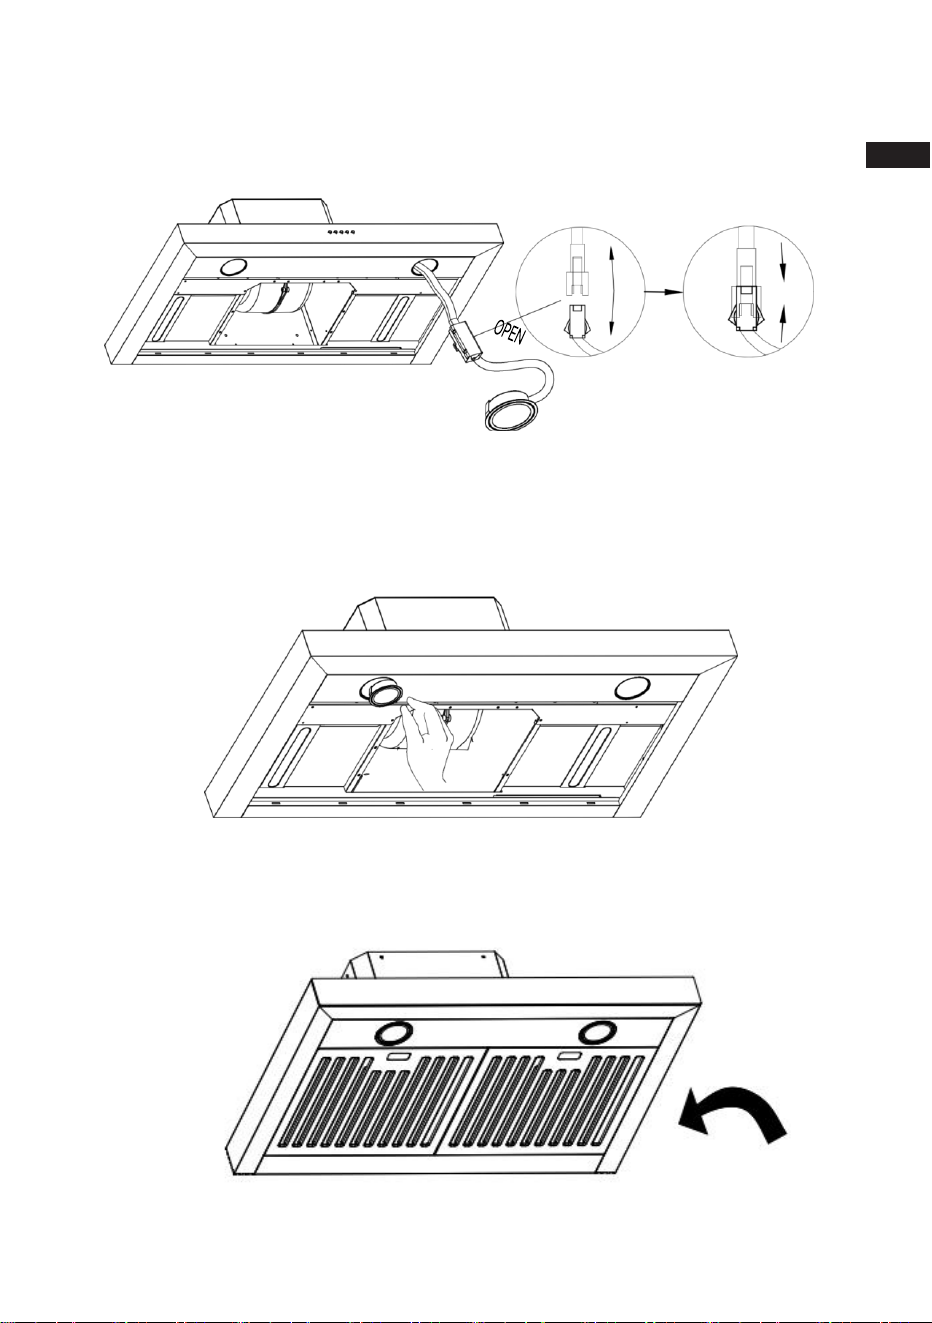
Care & Maintenance
3. Open the power protection cover, pull out the plug and replace the corresponding model of
the LED lamp.
4. Turn the power on and test all blower and light functions to ensure they are operating
properly.
Insert the new LED light gently into the light socket, please make sure you aim at the
grooves on the lighting panel when installing. Push the LED light in until it is flushed with
the light panel.
5. Put the grease filter back on, you are good to go.
EN

TROBULESHO OTING
21
Care & Maintenance
storage conditions
Dry Environment: store the range hood in a dry and well - ventilated place. Avoid humid
environments, as moisture can cause the metal components of the range hood to rust and the
electronic components to be damaged by moisture, affecting its performance and service life.
Appropriate Temperature: The storage temperature should not be too high or too low. It is
generally recommended to be between 5℃ and 35℃ . Excessively high temperatures may
cause the plastic components to deform and age, while low temperatures may affect the
performance of the lubricating oil and even cause some components to crack.
Avoid Direct sunlight: prolonged direct sunlight will cause the surface of the range hood to
fade and age, reducing its appearance quality and protection performance.
well - packaged: If it is a new range hood that has not been installed and used, it is best to
keep the original packaging to protect it from collision, scratch and other damages during
storage. If the original packaging has been discarded, the range hood should be wrapped with
a soft covering (such as bubble wrap, soft cloth, etc.) to prevent dust and debris from
attaching and to avoid accidental collision.
spacious space: The range hood should be placed in a spacious space, and there should be no
clutter piled around it to avoid squeezing the range hood and causing deformation. At the
same time, it is also convenient for handling and access. For large - scale range hoods or
integrated range hoods, pay more attention to reserving enough space.
If it is a range hood that has been used for a period of time and needs to be stored temporarily,
it also needs to be cleaned first to remove oil stains, dust and other impurities on the surface, so
as to better protect the range hood and prolong its service life. Transporting or moving.
Transporting or moving.
transporting or moving
1. Packaging
use original packaging: whenever possible, utilize the original packaging that the range hood
came in. The original packaging is specifically designed to protect the appliance during transit,
with appropriate cushioning materials such as foam inserts and cardboard dividers. If the
original packaging is unavailable, obtain suitable replacement packaging materials.
secure Loose parts: Before packing, make sure to secure any detachable parts, such as filters,
control knobs, or decorative elements. place these parts in a sealed plastic bag and tape them
to the main body of the range hood or pack them separately in a clearly labeled box to
prevent loss.
2. Handling
Lift with caution: Range hoods can be heavy and bulky. Always have at least two people to lift
and move the appliance. Bend your knees and lift with your legs, keeping your back straight to
avoid injury. Grasp the range hood firmly at its sturdy points, such as the metal frame or the
base, and avoid holding it by delicate parts like the exhaust ducts or the control panel.
Avoid Tipping and Tilting: keep the range hood in an upright position during transportation and
moving. Tipping or tilting the appliance may cause internal components to shift, which could
lead to damage. If the range hood has a glass or plastic front panel, extra care should be taken
to prevent any impact on this area.
EN

22
Care & Maintenance
3. Transportation
choose the Right vehicle: select a vehicle with enough space to accommodate the range hood
without squeezing or overcrowding it. If using a truck or van, ensure that the cargo area is
clean and free of sharp objects that could scratch or puncture the range hoods surface.
secure the Range Hood: once in the vehicle, use ropes, straps, or bungee cords to secure the
range hood firmly in place. Do not rely solely on gravity to keep it stable. Fasten the
restraints around the sturdy parts of the range hood and make sure they are tight enough to
prevent movement during transit but not so tight that they cause damage.
4. After Transportation
Inspect for Damage: After reaching the destination, carefully inspect the range hood for any
signs of damage. check the exterior for scratches, dents, or cracks, and open the appliance to
examine the internal components. If any damage is detected, do not attempt to install or use
the range hood. contact the manufacturer or the seller immediately to report the issue and
follow their instructions for resolution.
EN
23
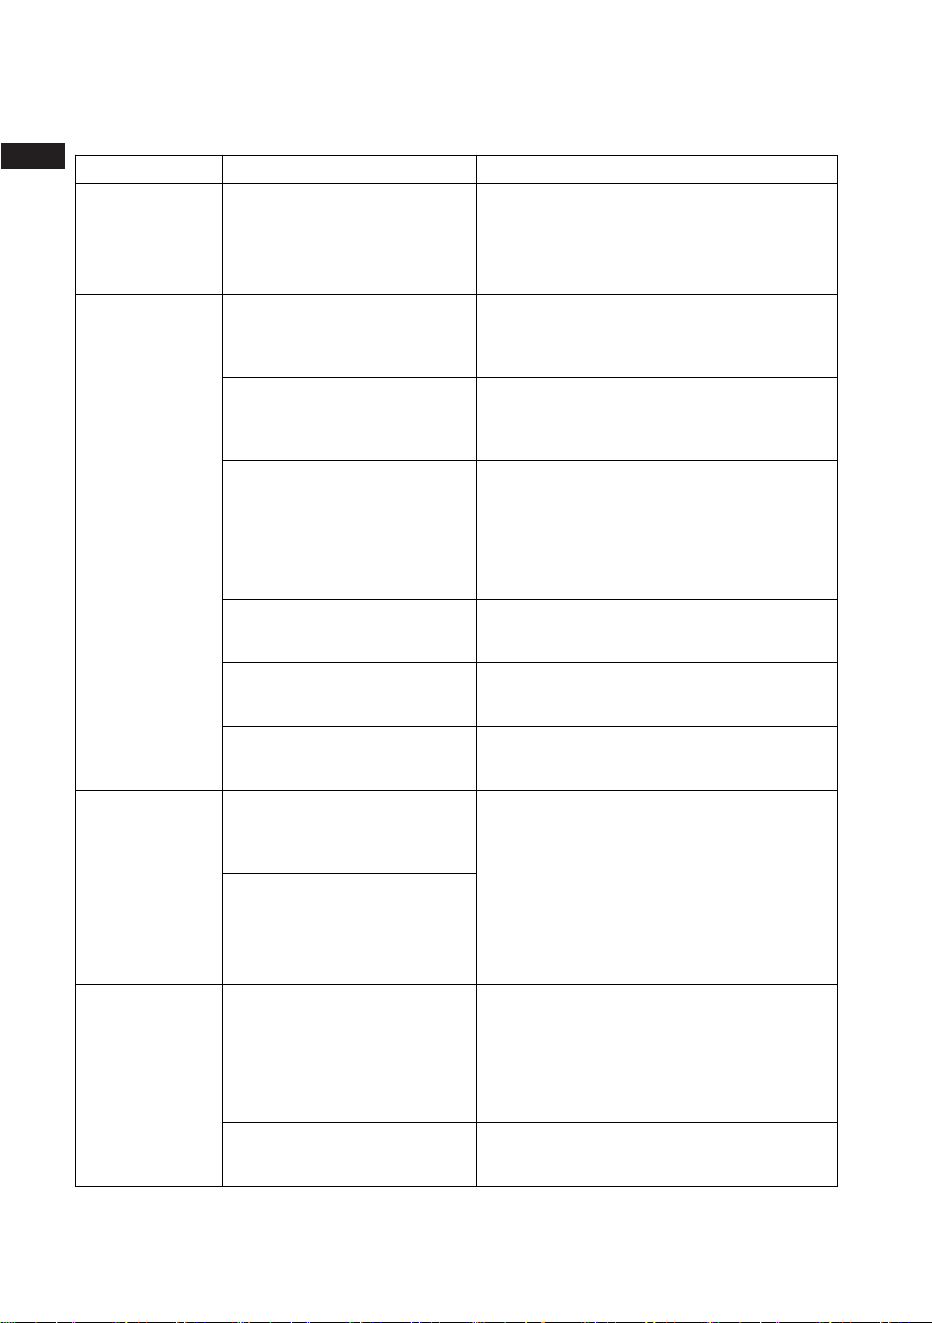
Troubleshooting
Problem
Possible Cause
Solution
Extractor
hood does
not turn on
No electrical supply
Make sure that range hood is
plugged into powered outlet. Test
outlet with other device if not
working
My range
hood has
poor
performance
Inadequate ventilation
Ensure that the kitchen is
sufficiently ventilated to allow
entry of fresh air
The range hood and
cooktop are too far
away from each other
Optimal distance is
65~75cm above
the cooktop for best extraction
Check and make sure
the tape holding down
the damper flaps at the
vent hole are removed
before use
Remove the tape holding down the
damper
Grease filters clogged
with grease build-up
Clean the grease filters or replace
the grease filters
Carbon filters clogged
with grease build-up
Replace new carbon filters
Motor is running but no
extraction
Please contact Customer Care Service
My range
hood is noisy
Check inside the range
hood for any loose
debris and remove
Please contact Customer Care Service
If the noise is from the
motor, please contact
our Customer Care
Service
Lights are
not working
Light is damaged
Replace with new LED lamp; remove
grease filters, reach inside behind the
control
panel and locate the wire with clip
behind the light housing.
The light wire terminal
is loose
Reset the connection
EN
24
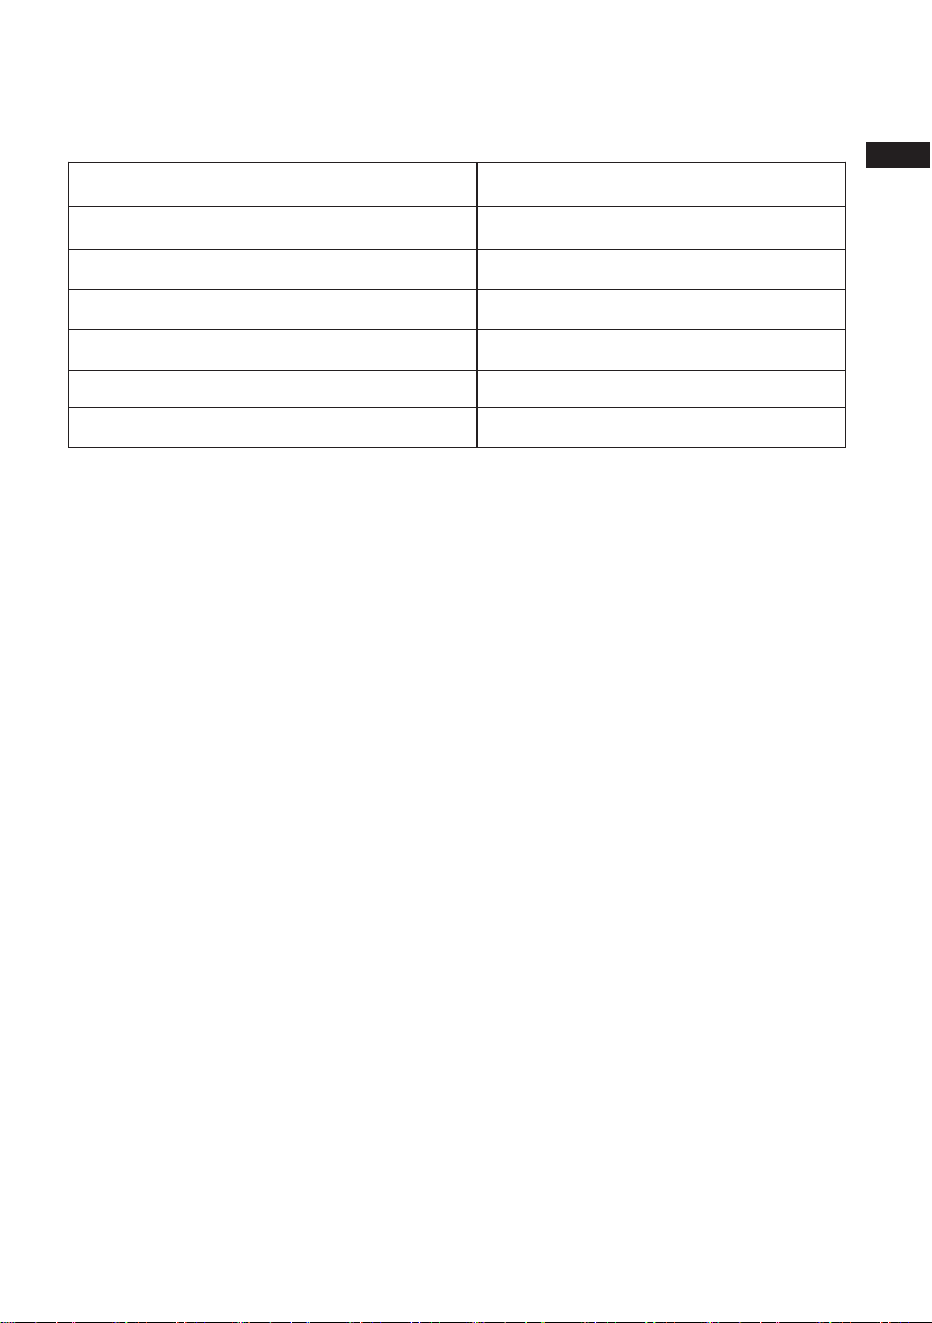
Specifications
Voltage
120V
Frequency
60 Hz
Motor (qty × power)
1 × 85 W
Lighting (qty × power - type)
2 × 1.5W - LED Lamp
Total power
88 W
Controls
touch control
Speed levels
4
EN

25
Customer Assistance Service
If you cannot identify the cause of the operating anomaly, switch off the appliance and
contact the Assistance Service.
PRODUCT SERIAL NUMBER. Where can I find it?
It is important to inform the Assistance Service of your product code and serial number,
which can be found on the guarantee certificate or on the data plate located on the
appliance.
Providing this information helps avoid unnecessary technician visits and saves on
potential service call charges.
Environmental Protection
Waste electrical products should not be disposed of with household waste. Please recycle
where facilities exist. Check with your Local Authority or retailer for recycling advice.
By ensuring this product is disposed of correctly, you will help prevent
potential negative consequences for the environment and human health, which could
otherwise be caused by inappropriate waste handling of this product.
The symbol on the product indicates that this product may not be treated as household
waste. Instead it shall be handed over to the applicable collection point for the recycling
of electrical and electronic equipment.
Disposal must be carried out in accordance with local environmental regulations for waste
disposal.
For more detailed information about treatment, recovery and recycling of this product,
please contact your local city office, your household waste disposal service or the shop
where you purchased the product.
EN

26
Warranty Terms
Dear Customer,
Thank you for choosing Dreame products. In accordance with the provisions of the
Consumer Protection Law and our sincere commitment to users, we will provide the
following services based on this warranty card and valid proof of purchase:
Warranty Policy
This product provides a warranty period in accordance with the legal and regulatory
requirements of the place of sale. Defects that occur within this warranty period under
normal use and care can get related warranty service. lf your product is faulty or you
are experiencing difficulties to use this product and require assistance, please also
contact with your local dealers or authorized after service center for help.
Warranty Does Not Cover the Following Parts
• Dishwasher water supply and drainage hoses;
• Built-in steam oven trays, steam plates, grill racks, and baking racks;
• Gas stove pot supports and inner/outer burner caps;
• Range hood decorative covers.
Warranty service does not apply under the following conditions
• Use of the machine outside a household environment or in public places;
• Product defects caused by the consumer’s violation of product operation,
storage, or transportation conditions;
• Consumable wear and tear of the product, such as battery capacity loss;
• Damage and defects caused by the following reasons:
-
Use, storage, or maintenance inconsistent with the operating instructions, as well as
installation not in accordance with installation guidelines;
-
Consumable materials used during operation, such as detergents, cleaning agents,
-
regeneration salts, rinse aids, maintenance agents, or other consumables not suitable
for the product;
-
Repairs, modifications, alterations, or structural changes performed by the user or
unauthorized personnel that cause product defects;
-
Damage caused by external factors unrelated to the manufacturer, including force
majeure events (natural disasters, fire, lightning, etc.);
-
Intentional or negligent acts by consumers or third parties, including those causing
mechanical damage to the product;
-
Consumable and wear parts.
• Installation and connection of electrical wiring, water supply, drainage, or gas
must be performed by qualified professionals; otherwise, the warranty will be
void.
If the equipment is transported and used in other EU/European Free
Trade Association countries, its technical specifications (such as
voltage, frequency, gas type, etc.) must be the same as in the original
country of purchase. Provided that Dreame has a service network in the
area, warranty terms can be consulted with the local representative in the
country of use; otherwise, the warranty will be invalid.
EN

27
Warranty Card
To access Dreame’s after-sales services, please fill out this warranty card
carefully before purchase. We will establish a user profile based on your
information to
provide better service.
Warranty Card
Product Name:
Customer Name:
Product Model:
Customer Phone No.:
Manufacturing Serial No.:
Customer Address:
Purchase Date:
Purchase Store:
Contract No.:
Store Phone No.:
Repair Records
Repair Date:
Fault Description:
Handling Details:
Technician Signature:
After-sales Contact:
dreamesupport@dreame.tech
Please complete this warranty card immediately upon purchasing Dreame
products. Keep the warranty card safe; consumers do not need to mail it back to
the company. Please bring the warranty card and the original valid invoice for any
repairs.
Zhiyue Youchuang Technology (Suzhou) Co., Ltd.
EN

Scan the QR Code
• To view the Digital User Manual
Contact us
Please contact:
• If you encounter any problems
during use, you can scan the QR
code on the right to obtain the
service hotline number and call for consultation.
Manufacturer: Zhiyue Youchuang Technology (Suzhou) Co., Ltd.
Address: Room 552, Unit 5010, No.282 Dongping Street, Suzhou Industrial Park, Suzhou Area,
China (Jiangsu) Pilot Free Trade Zone
Website: global.dreametech.com
Version No.: 251211A1
EN