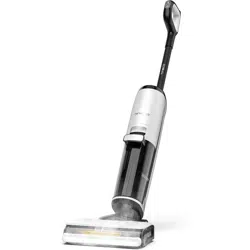
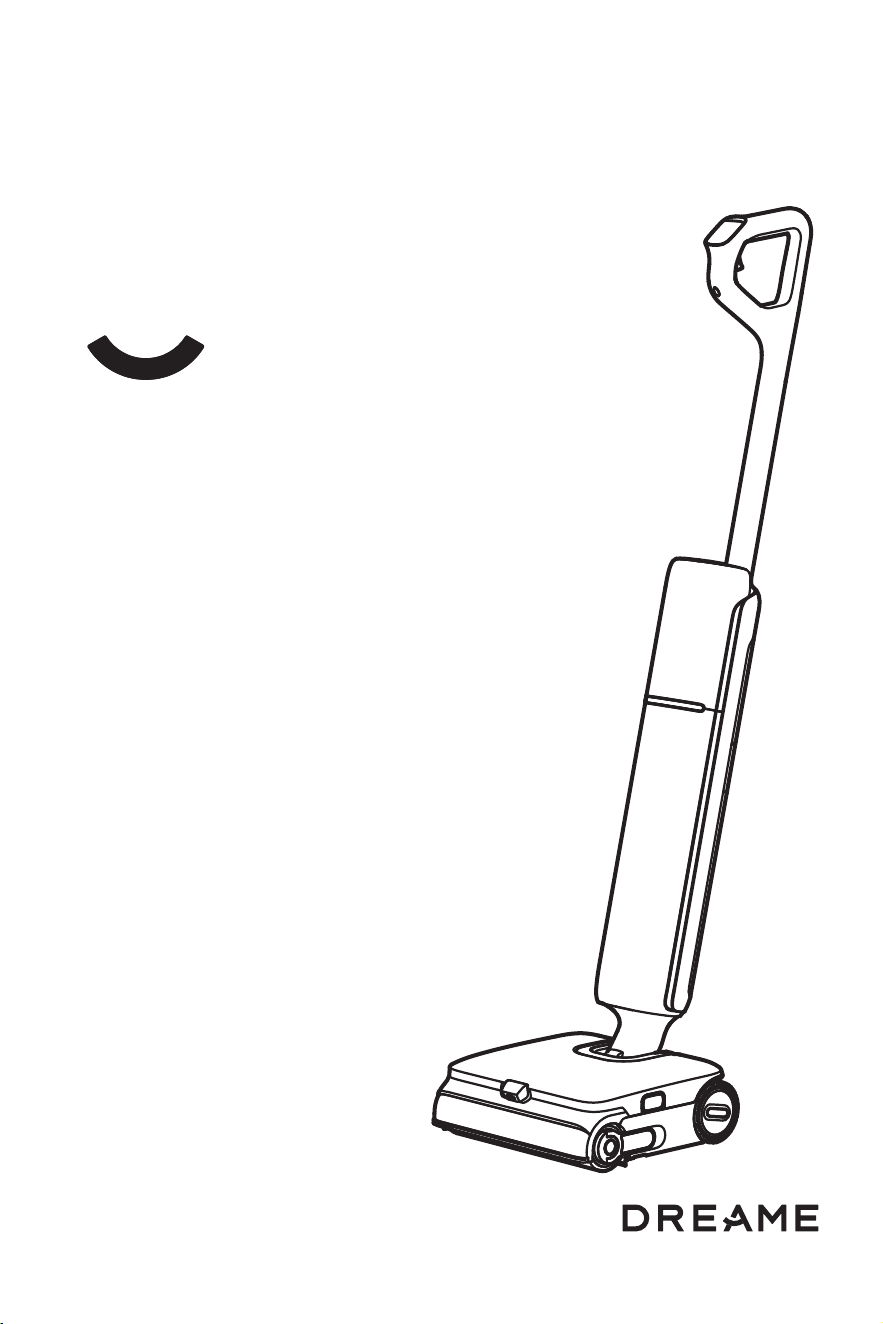
Aero Ultra Steam
Cordless Floor Washer
User Manual
The illustrations in this manual are for reference only.
Please refer to the actual product.
THANK YOU
FOR PURCHASING THIS DREAME
CORDLESS FLOOR WASHER.
Scan for Quick Start
Contact Us for Support
Scan the QR code to access the video tutorial and
the user manual.
Register your Dreame account to receive special
offers and updates.
Your satisfaction is our priority. Before considering a return, please reach out to
our friendly support team. We are ready to help troubleshoot and find a solution,
ensuring you get the most out of your product.
Customer Service: +1 (866) 977-5177
(Mon.to Sat.9:00-21:00,Sun.9:00-12:00 Eastern Time)

Contents
EN
User Manual
01

11
EN
Important Safety Instructions
When using an electrical appliance, basic precautions should always be followed,
including the following:
READ ALL INSTRUCTIONS BEFORE USING (THIS APPLIANCE). Failure to follow
the warnings and instructions may result in electric shock, fire and/or serious injury.
To reduce the risk of fire, electric shock, or injury:
WARNING-
IMPORTANT SAFETY INSTRUCTIONS
• Do not use outdoors. Do not use on wet surfaces during charging.
• Do not allow to be used as a toy. Close attention is necessary when used by
or near children, pets or plants.
• Use only as described in this manual. Use only manufacturer’s recommended
attachments.
• Do not use with damaged cord or plug. If appliance is not working as it should,
has been dropped, damaged, left outdoors, or dropped into water, return it to
a service center.
• Do not pull or carry by cord, use cord as a handle, close a door on cord, or
pull cord around sharp edges or corners. Do not run appliance over cord. Keep
cord away from heated surfaces.
• Do not unplug by pulling on cord. To unplug, grasp the plug, not the cord.
• Do not handle charging base, including charging base plug, and charging base
terminals with wet hands.
• Do not put any object into openings. Do not use with any opening blocked;
keep free of dust, lint, hair, and anything that may reduce air flow.
• Keep hair, loose clothing, fingers, and all parts of body away from openings
and moving parts.
• Use extra care when cleaning on stairs.
• Do not use to pick up flammable or combustible liquids, such as gasoline, or
use in areas where they may be present.
• Do not pick up anything that is burning or smoking, such as cigarettes,
matches, or hot ashes.
• To reduce the risk of fire, do not use a flammable or combustible liquid to clean a floor.
• Do not use without water tank and/or filter in place.
• Prevent unintentional starting. Ensure the switch is in the off-position before
picking up or carrying the appliance. Carrying the appliance with your finger on the
switch or energizing appliance that has the switch on invites accidents.
• Recharge only with the charger specified by the manufacturer. A charger that
is suitable for one type of battery pack may create a risk of fire when used
with another battery pack.
• Use appliances only with specifically designated battery packs. Use of any
other battery packs may create a risk of injury and fire.
• When battery pack is not in use, keep it away from other metal objects,
like paper clips, coins, keys, nails, screws or other small metal objects, that
can make a connection from one terminal to another. Shorting the battery
terminals together may cause burns or a fire.
22
EN
Important Safety Instructions
• Under abusive conditions, liquid may be ejected from the battery; avoid
contact. If contact accidentally occurs, flush with water. If liquid contacts
eyes, additionally seek medical help. Liquid ejected from the battery may
cause irritation or burns.
• Do not use a battery pack or appliance that is damaged or modified.
Damaged or modified battery packs may exhibit unpredictable behavior
resulting in fire, explosion or risk of injury.
• Do not expose a battery pack or appliance to fire or excessive temperature.
Exposure to fire or temperature above 130° C/266° F may cause explosion.
• Follow all charging instructions and do not charge the battery pack or
appliance outside of the temperature range specified in the instructions.
Charging improperly or at temperatures outside of the specified range may
damage the battery and increase the risk of fire.
• Have servicing performed by a qualified repair person using only identical
replacement parts.This will ensure that the safety of the appliance is
maintained.
• Do not modify or attempt to repair the appliance or the battery pack except
as indicated in the instructions for use and care.
• Always turn off this appliance before connecting or disconnecting motorized
nozzle.
• Risk of injury. Brush may start unexpectedly. Keep the switch in off position
before cleaning or servicing.
• Turn off all controls before unplugging.
• The appliance should be stored, used and charged only in the temperature
range of 4° C/39.2° F~40° C/104° F.
• This appliance contains batteries that are non-replaceable.
• To reduce the risk of fire and electric shock due to internal component damage,
use only dreame cleaning fluid intended for use with this appliance. See the
Cleaning Fluid section of this manual.
• To reduce the risk of fire and electric shock due to internal component
damage, use only Dreame Trading (Tianjin) Co., Ltd. cleaning fluid intended
for use with this appliance. See the Cleaning Fluid section of this manual.
SAVE THESE INSTRUCTIONS
Household use only.
To reduce the risk of electric shock, the appliance has a polarized plug (one-blade
is wider than the other). This plug will fit in a polarized outlet only one way. If the
plug does not fit fully in the outlet, reverse the plug. If it still does not fit, contact a
qualified electrician to install the proper outlet. Do not change the plug in any way.
Direct current
Alternating current
Warning: Danger of steam scalding
33
EN
Caution:
This device complies with Part 15 of the FCC Rules / Innovation, Science and
Economic Development Canada’s licence-exempt RSS(s). Operation is subject to the
following two conditions: (1) this device may not cause harmful interference. (2) this
device must accept any interference received, including interference that may cause
undesired operation.
Changes or modifications not expressly approved by the party responsible for
compliance could void the user's authority to operate the equipment.
This equipment has been tested and found to comply with the limits for a Class
B digital device, pursuant to part 15 of the FCC Rules. These limits are designed
to provide reasonable protection against harmful interference in a residential
installation. This equipment generates uses and can radiate radio frequency energy
and, if not installed and used in accordance with the instructions, may cause
harmful interference to radio communications. However, there is no guarantee that
interference will not occur in a particular installation. If this equipment does cause
harmful interference to radio or television reception, which can be determined by
turning the equipment off and on, the user is encouraged to try to correct the
interference by one or more of the following measures:
—Reorient or relocate the receiving antenna.
—Increase the separation between the equipment and receiver.
—Connect the equipment into an outlet on a circuit different from that to which the
receiver is connected.
—Consult the dealer or an experienced radio/TV technician for help.
Compliance Information
Product Name Cordless Floor Washer with Charging Base
Produce Model
Cordless Floor Washer Model: HHR32F
Charging Base Model: HCBBT
Compliance
Statement
This device complies with p art 15 of the FCC Rules. Operation
is subject to the following two conditions: (1) This device may
not cause harmful interference, and (2) this device must accept
any interference received, including interference that may cause
undesired operation.
Correspondence of the responsible party in USA
Company DREAME TECHNOLOGY USA INC
Address 16192 Coastal Highway, Lewes, Delaware 19958, County of Sussex
Email
FCC Information
44
EN
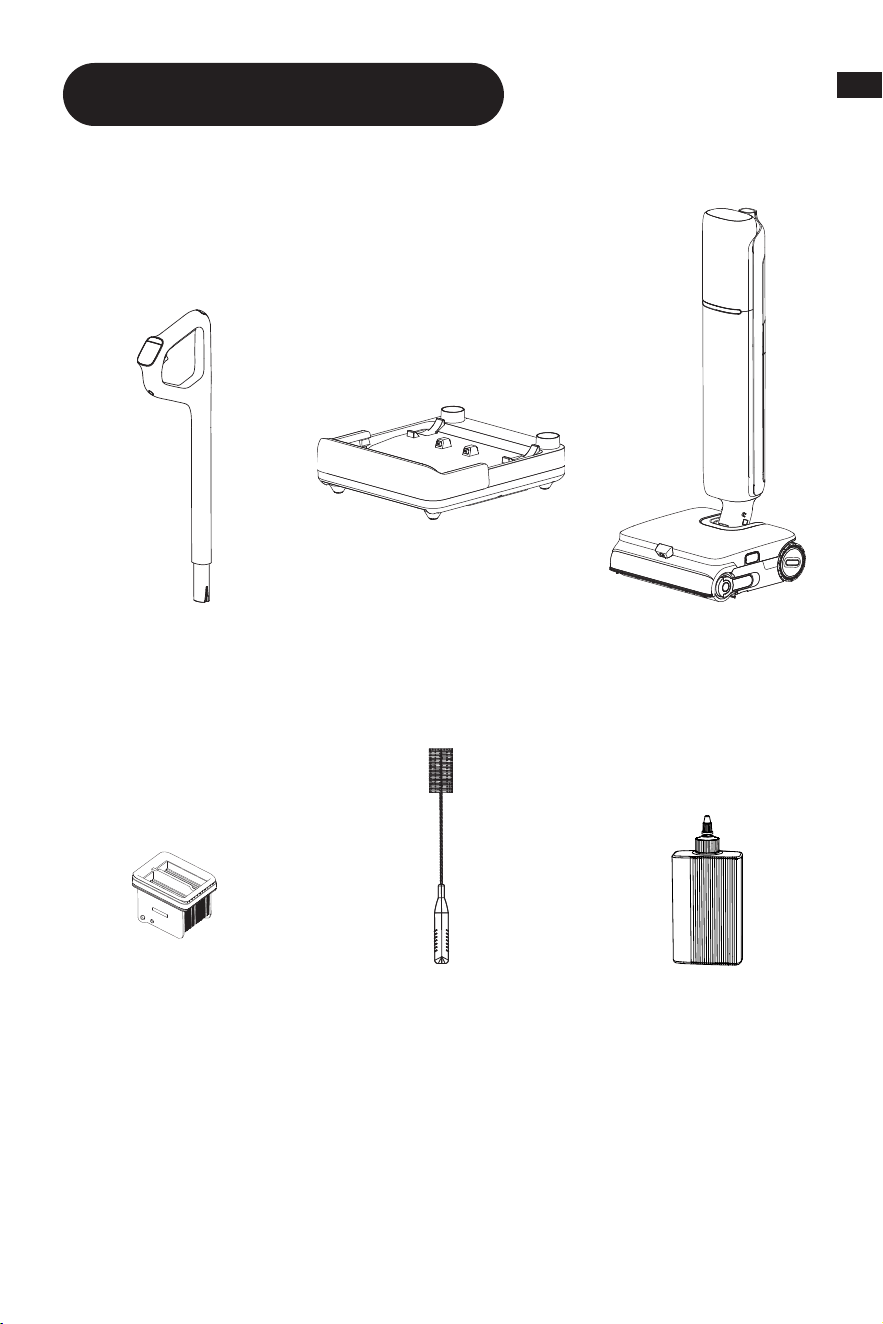
Packing List
Main BodyCharging Base
Cleaning
Brush
Replacement
Filter
Cleaning
Solution
Handle
Product Overview
55
EN
Product Overview
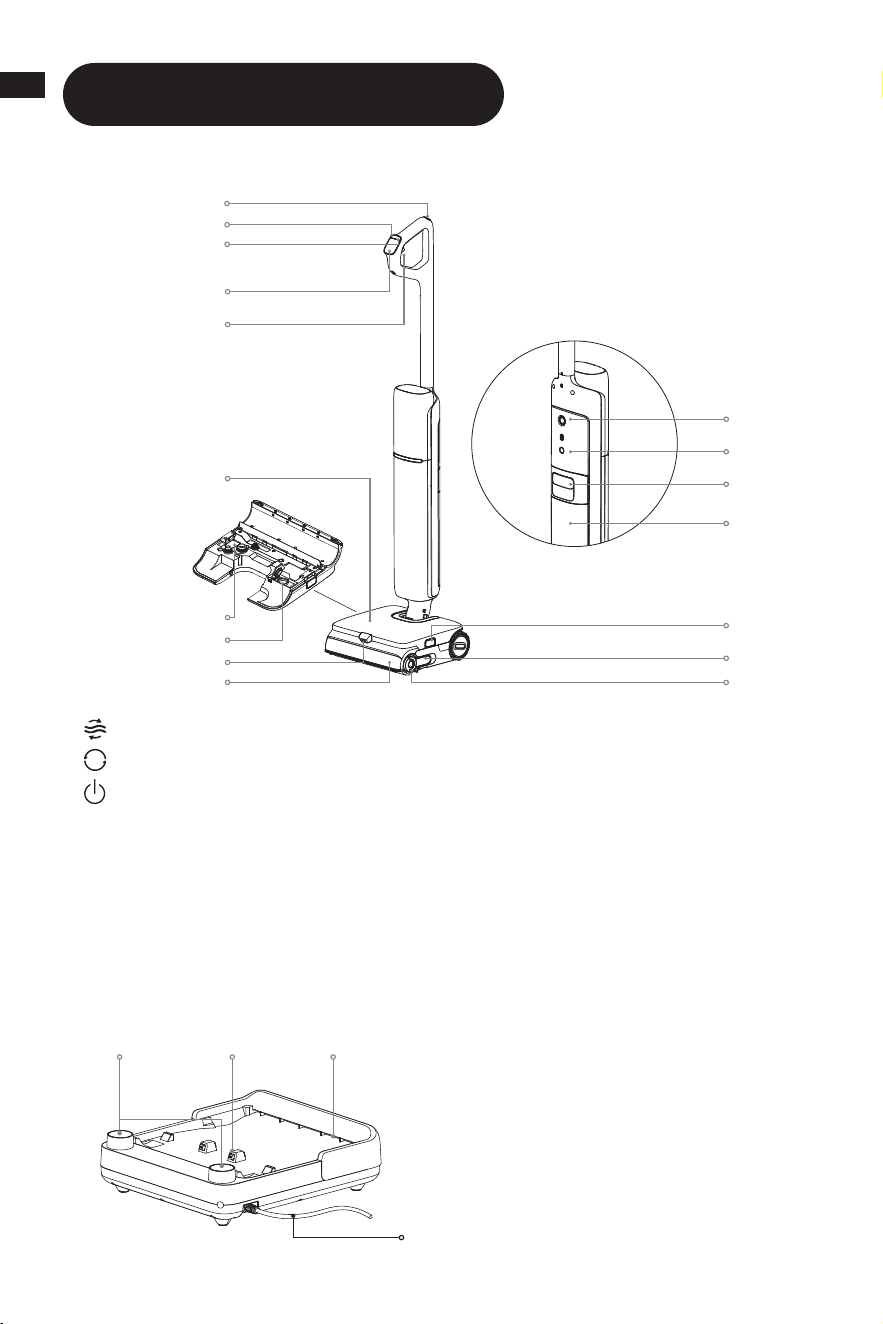
Floor Washer
Used Water Tank Handle
Voice Prompt Button
Omnidirectional Wheel
Clean Water Inlet
Foam Release Nozzle
Roller Brush Cover
Roller Brush
Roller Brush Handle
Tank Release Buttons
Used Water Tank
Self-Cleaning Button
Mode Switch
Power Switch
Display Screen
Foam Release Switch
Clean Water Tank
Cleaning Solution Inlet
1
2
3
4
5
6
7
8
9
10
11
12
13
14
15
16
17
Charging Base
2. Charging Contacts
3. Accessory Storage Slot
4. Power Cord
1. Air-Drying Outlet
123
4
1
17
16
15
14
13
12
11
2
3
4
7
8
9
10
6
5
• Press briefly to activate the
voice prompt or adjust the
volume.
• Press and hold for 3
seconds to access the
language settings. Press to
switch between languages.
Press and hold to confirm
the selection.
66
EN
Installation & Charging
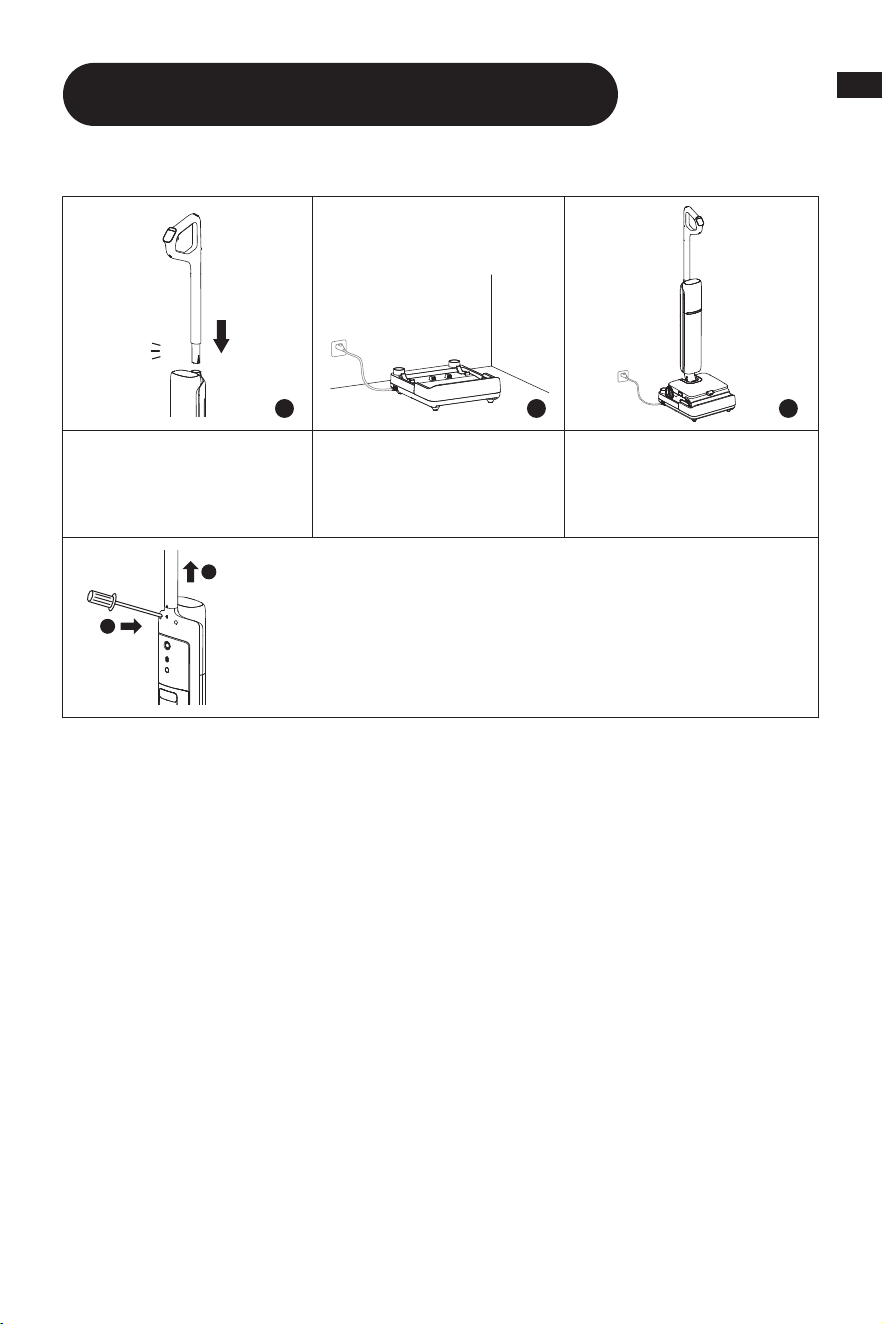
Fully charge the appliance before first use.
Note:
• If there is no operation within 10 minutes of being fully charged, the appliance will
enter sleep mode. Please restart the appliance if you need to use it.
• To extend the battery life time, the battery keeps cooling down automatically after
you have used the appliance for a long time.
1 2 3
2
1
click
1. Insert the end of the
handle vertically into the
port on the top of the
appliance until it clicks.
2. Place the charging
baseagainst a wallon
level ground and connect
it to a powersource.
* To disassemble, extend a hard object into the hole of
the appliance as indicated to press in the contacts and
pull the handle upwards at the same time.
3. Place the appliance on
the charging base. Fully
charge the appliance
before first use.
77
EN
Starting Cleaning
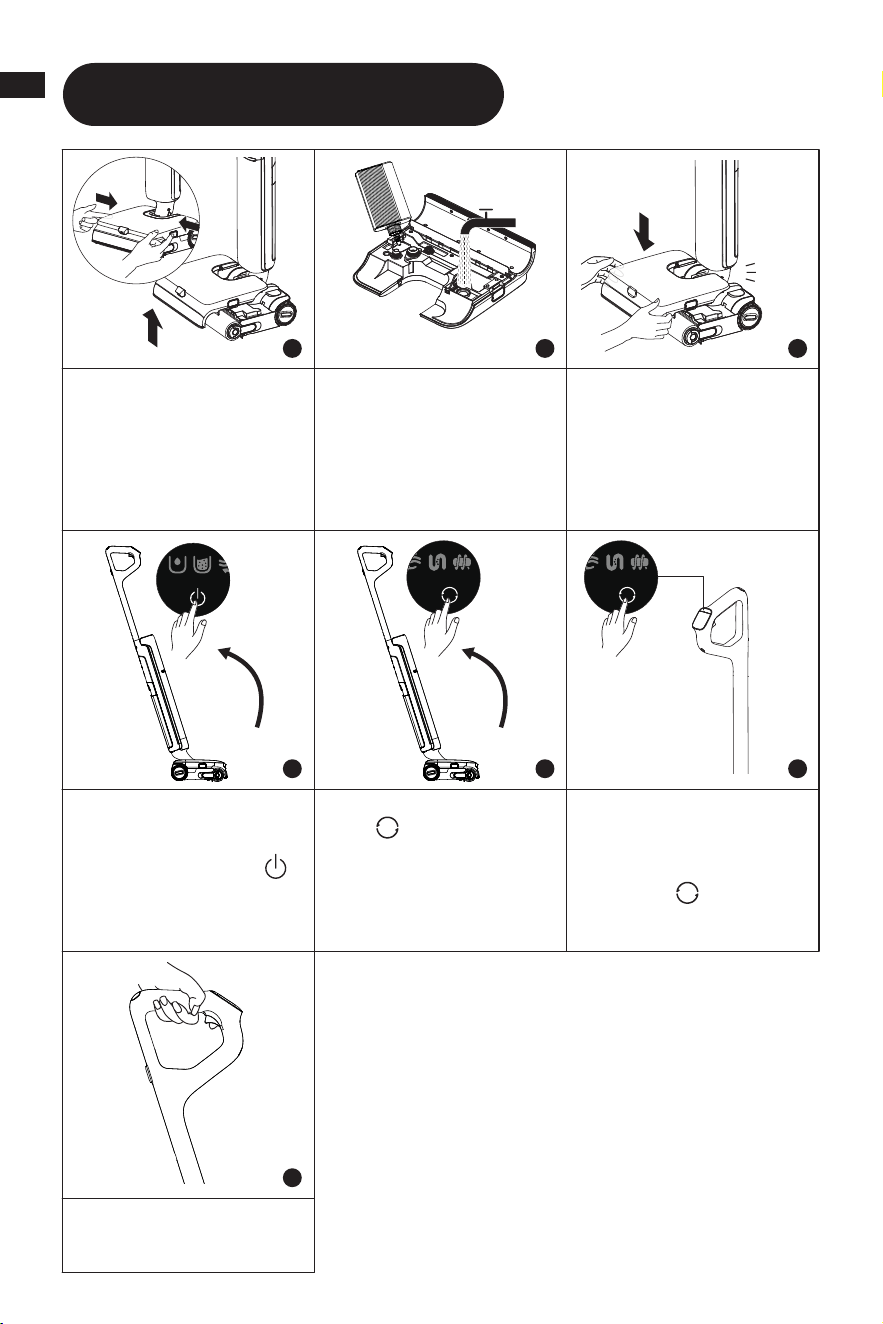
4. Gently step on the floor
brush and recline the
appliance backwards. Briefly
press the power switch
button to start/stop operating.
7. Press and hold the Foam
Release Switch to dispense
foam for deep cleaning.
1
1.
Press the Tank Release
Buttons to remove the tank.
2.
Flip over the clean water
tank. Open the clean water
inlet and fill the tank with
clean water. Open the
cleaning solution inlet, fill the
box with cleaning solution,
and close the cover tightly.
5. Briefly press the mode
switch to switch modes
according to your needs.
6. Automatically adjusts
cleaning solution based on
dirt levels. This default can
be changed or tuned off by
pressing the button for 3
seconds.
3.
Reinstall the clean water
tank until it clicks.
4
2
5
3
6
7
Click

88
EN
Note:
• Do not vacuum any foamy liquids.
• The appliance is suitable for cleaning floors, marble, tiles and other hard surfaces.
• When the appliance is in operation, do not lift it off the ground, move it or tilt it.
Otherwise, the used water may flow into the motor.
• Do not add any liquids other than the officially-approved cleaner. The cleaner
can be available on the official online store. Refer to the cleaning solution label
for specific usage instructions.
• When powered on for the first time, the device defaults to Smart Mode. For
subsequent use, it will automatically enter the last used mode upon startup
(Except for steam mode).
WARNING:
To reduce the risk of fire and electric shock due to internal
component damage, use only Dreame Trading (Tianjin) Co., Ltd. HFF7 cleaning
fluid intended for use with the appliance.
1. Unscrew bottle cap.
2. Completely fill the cleaning solution box with floor cleaner.
Before you clean your hard floors, test a small, hidden area and check the care
instructions from your flooring manufacturer. Do not use on the unsealed floors.
Starting Cleaning
Add the Cleaning Solution
99
EN
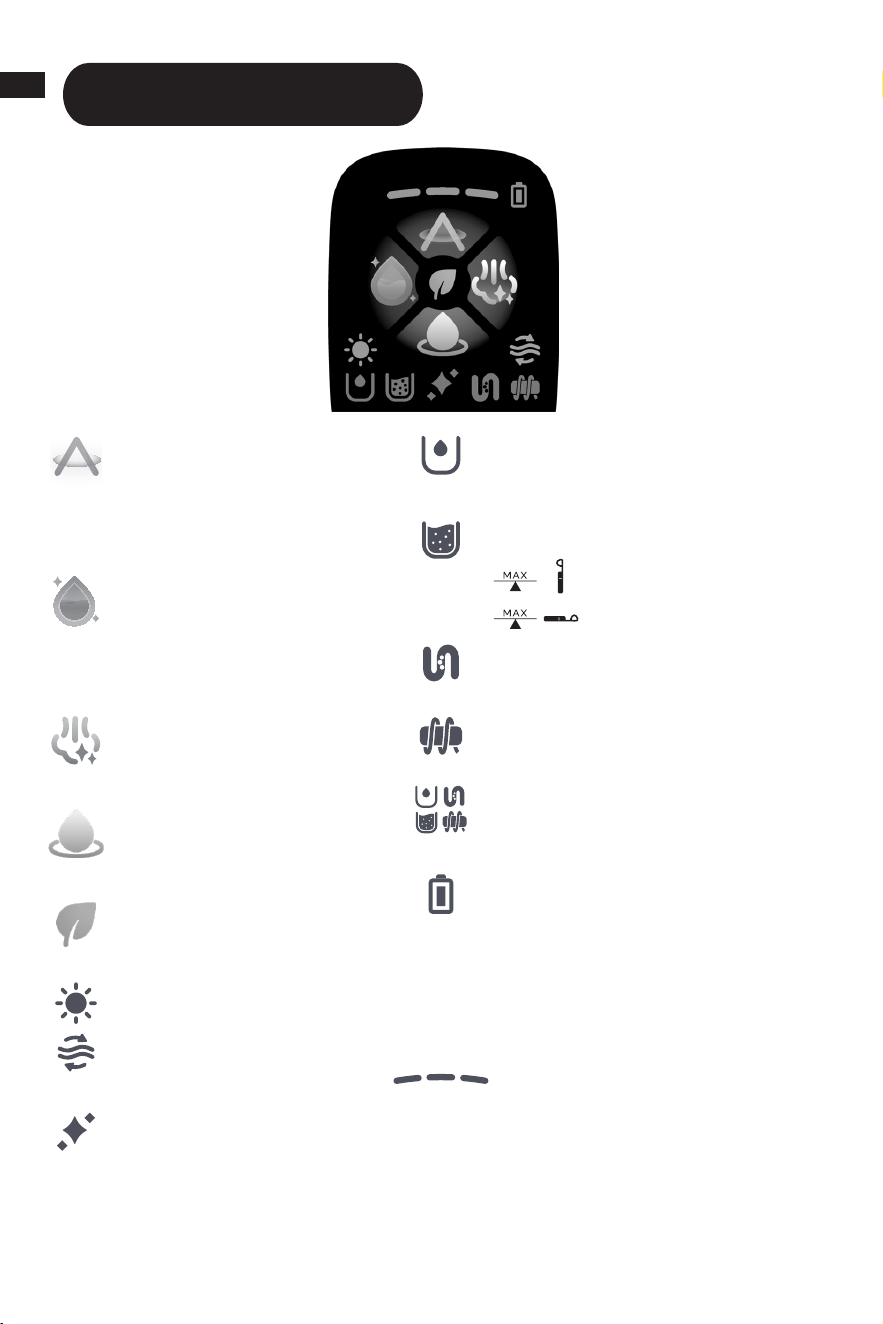
Display Screen
Smart Mode
The appliance will detect the
stain level and intelligently adjust
the suction power and water
flow accordingly.
Hot Water Mode
Suitable for cleaning moderate
stains, with the water
temperature gradually rising to
the hot water level.
Steam Mode
When activated, it generates
steam to dissolve stains.
Suction Mode
Suck up a large amount of water
from the floor.
Eco Mode
Maintain moderate suction and
water flow to extend runtime.
Drying Mode
Self-Cleaning Mode
Cleaning Solution Status Indicator
Solid On: Diluting function
enabled
Flashing: FoamWash On
Insufficient water in the clean
water tank
The used water tank is full
Blocked tube
Roller brush stuck
Appliance malfunction
Three-segment indicator
Color and progress segments
indicate real-time status:
Dust Concentration/Hot Water
Preparation/Steam Preparation/
Self-Cleaning & Drying Progress/
Charging Progress.
Battery Indicator
• Solid Green: 50% < Battery level ≤ 100%
• Red: Battery level ≤ 20%
*Battery Indicator color cycles
from green to yellow, orange,
and red as charge decreases.
Recharge when red.
Max capacity-Upright
Max capacity-Flat
1010
EN
• Solid Green: 50% < Battery level ≤ 100%
• Red: Battery level ≤ 20%
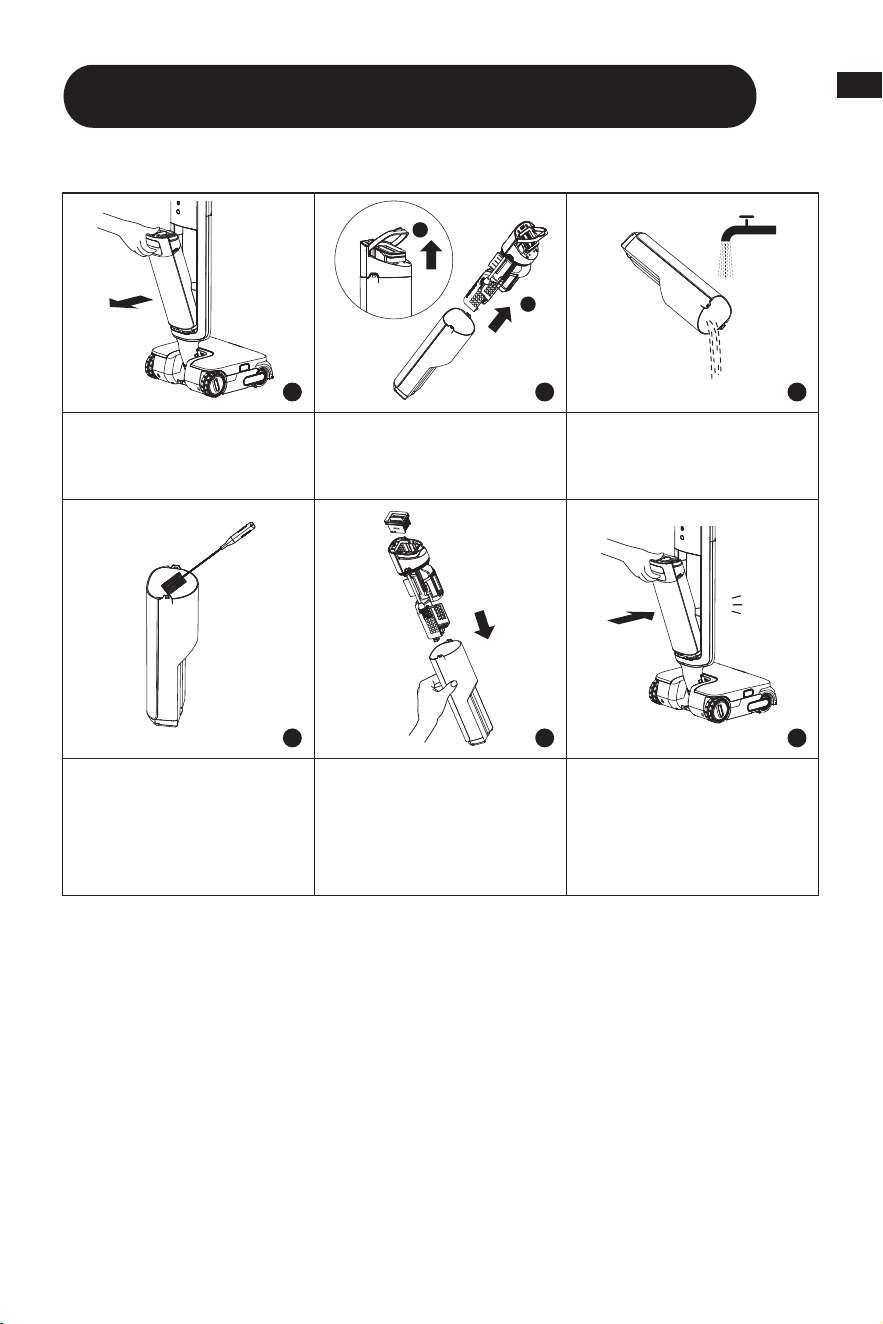
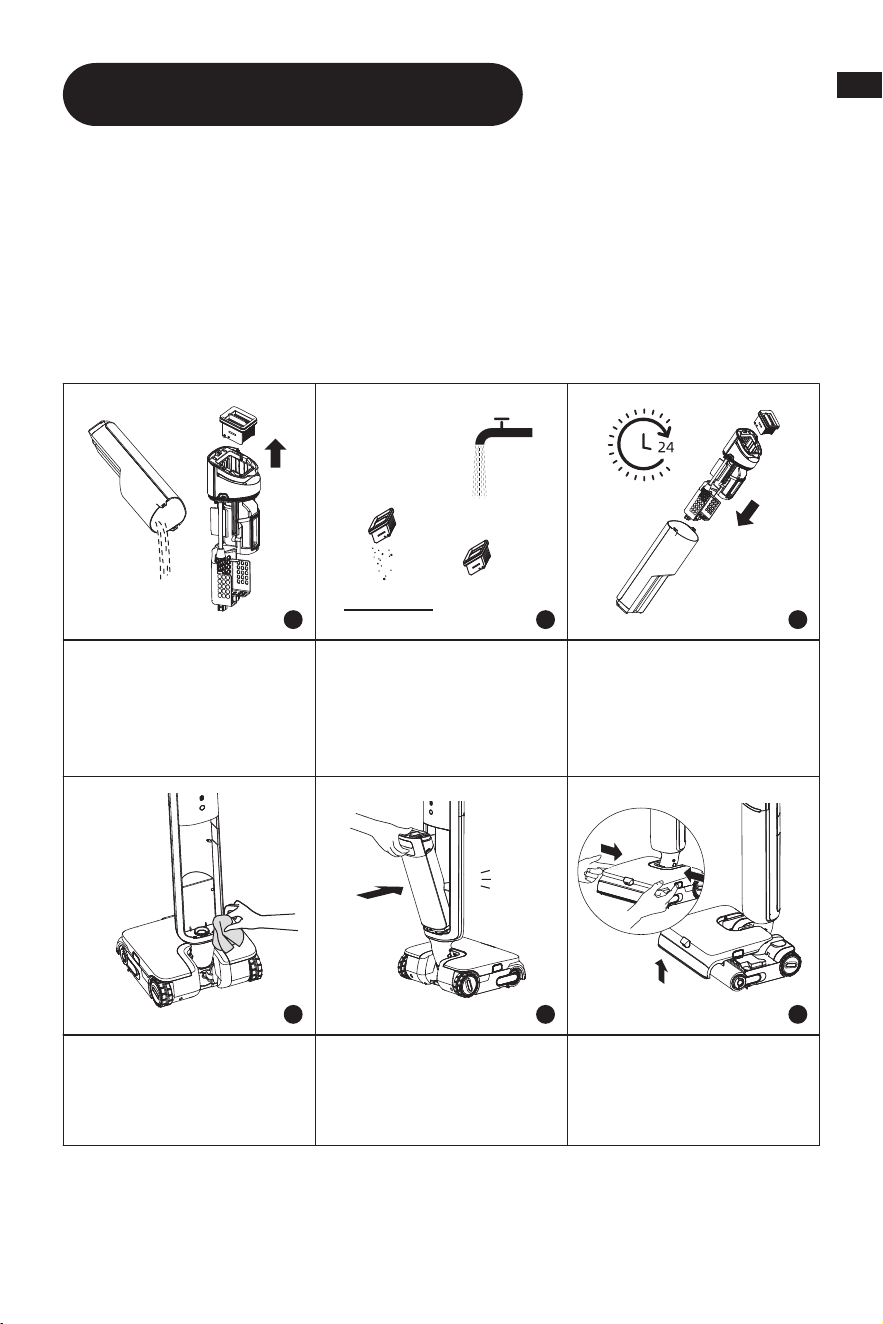
Emptying the Used Water Tank
4. Use the provided
cleaning brush to clean
the inner walls of the tank.
1
1. Pull up the used water
tank handle to remove the
tank.
2. Lift the handle of the
used water tank cover
and pull the cover out.
5. After cleaning, insert
filter into the used water
tank cover, and insert used
water tank cover into the
tank.
6. Reinstall the Used
Water Tank until you hear
a click.
3. Pour dirty water out and
rinse tank with clean water.
4
2
5
3
6
2
1
Click
1111
EN
Self-Cleaning
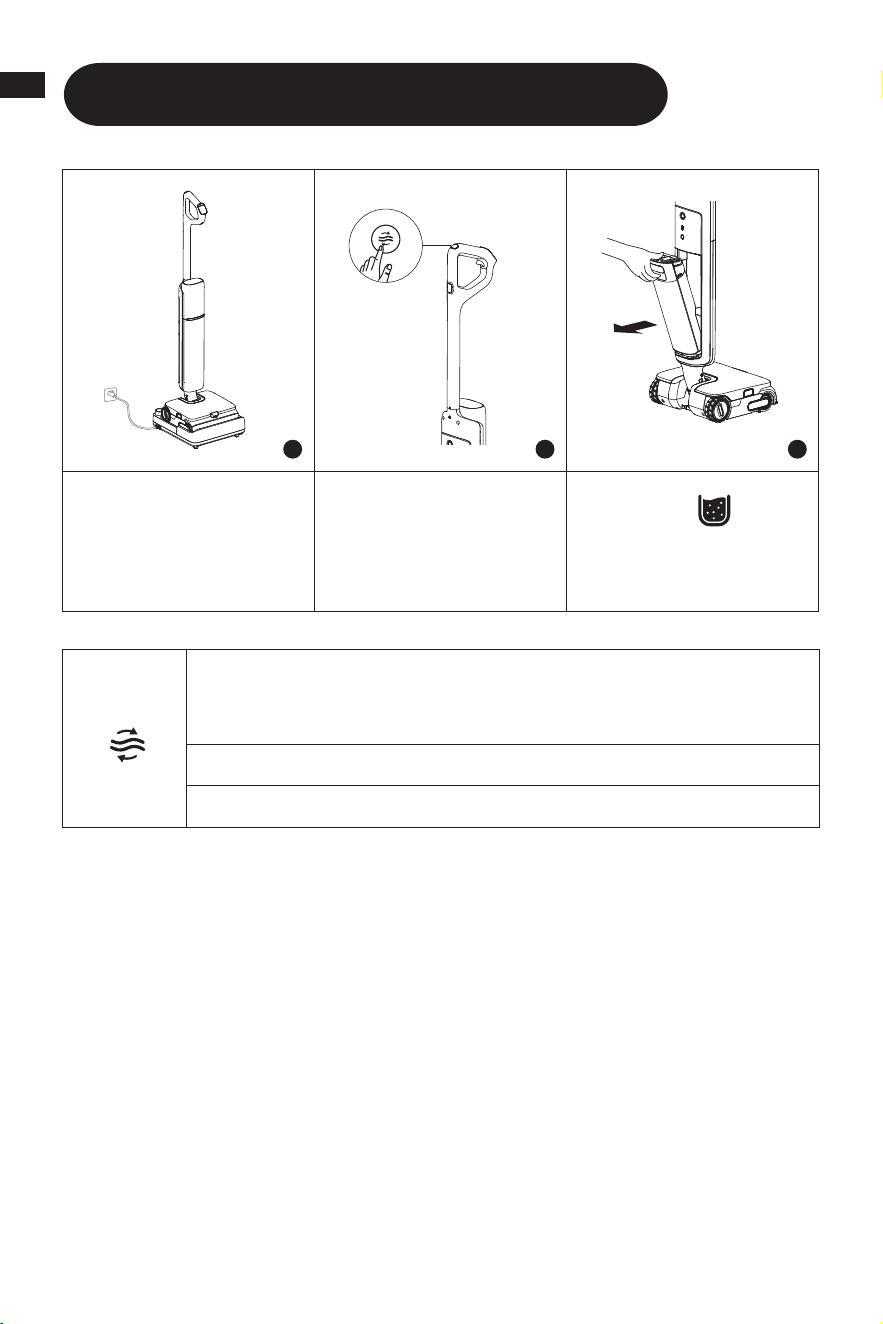
& Drying Mode
To switch from Smart Self-cleaning (default) and Steam Self-
cleaning, press the button again within 3 seconds.
Press and hold for 3 seconds to enter independent drying mode.
In drying mode, press briefly to exit drying mode.
Note:
• Self-cleaning can be enabled only when the appliance is being charged and the
battery level is more than 20% (Steam Self-cleaning: 25% min.).
• After Smart self-cleaning, if the battery level is low, the appliance
automatically switches drying from 5 minutes to 30 minutes.
• After Steam self-cleaning, the appliance automatically enters 30 minutes
drying mode.
1
1. Place the appliance back
onto the base. Ensure that
the water in the clean
water tank is sufficient for
self-cleaning.
2. Briefly press the
self-cleaning button on
the top of the handle to
start/stop self-cleaning
(Battery level ≥ 20%).
3. After self-cleaning is
complete, the will light
up. Empty the used water
tank promptly.
2 3
1212
EN
Tips:
• Turn off the appliance before maintenance. Do not touch the power switch.
• Replace parts if needed. The parts must be replaced by those available from the
manufacturer or its service agent.
• If the appliance is not used for an extended period, fully charge it, unplug the
power plug, and store the appliance in a cool, low-humidity environment away
from direct sunlight. To avoid over-discharge of the battery, charge the appliance
at least once every 3 months.
Care & Maintenance
1
4
2
5
3
6
Click
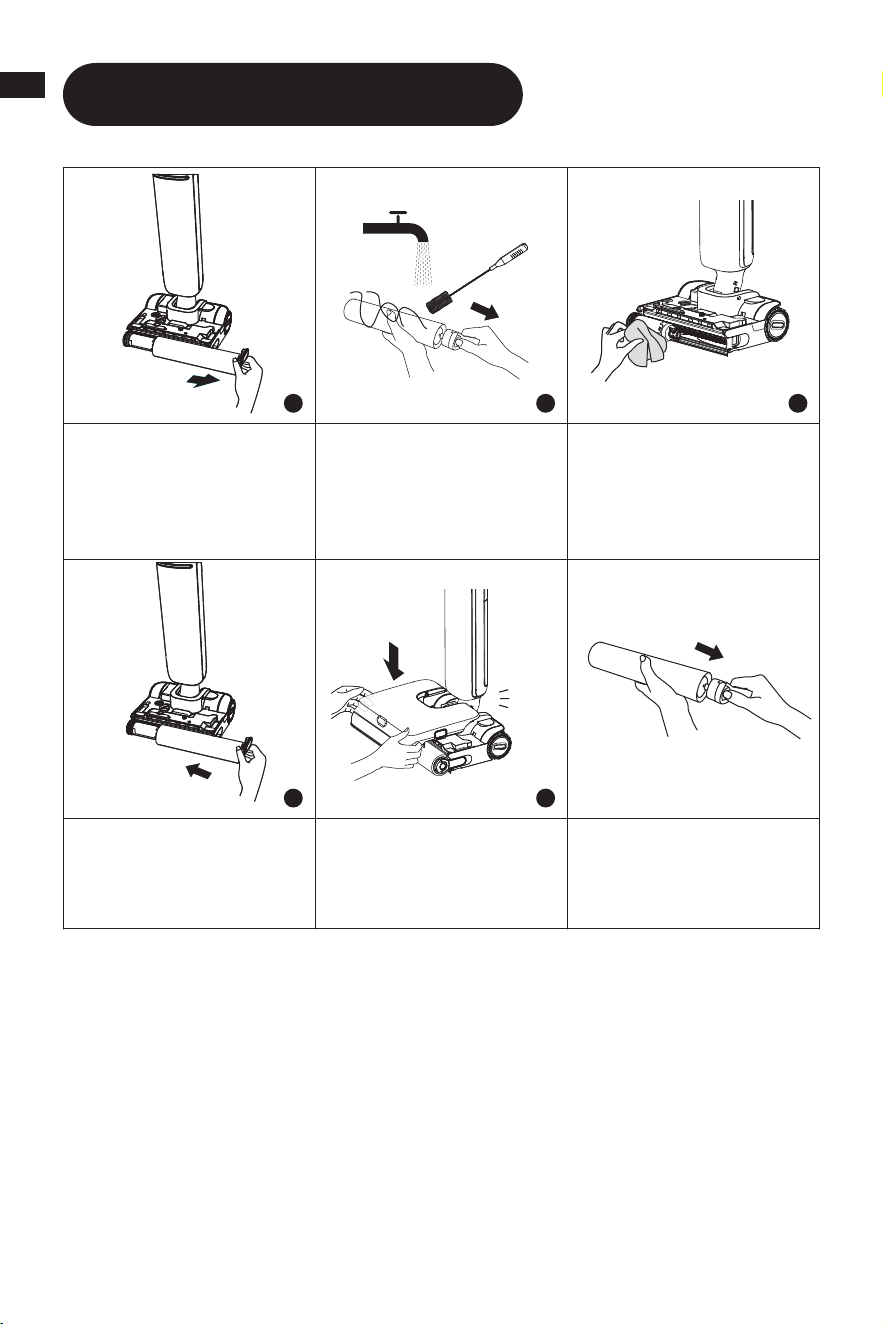
1. Pour dirty water out,
remove the filter, and rinse
tank and tank cover with
clean water.
2. Gently knock off the
floating dust on the filter
surface. When the filter is
dirty and needs washing,
rinse it with water.
3. After fully drying the
filter, reinstall it into the
used water tank cover.
Insert used water tank
cover into the tank.
4. Gently wipe the tube
with a wet cloth before
use. Do not rinse the tube.
5. Insert bottom of tank
into main body. Tilt tank
towards main body until it
clicks.
6.Remove the clean water
tank.
1313
EN
Note:
• Replacing the filter every 3 to 6 months is recommended.
• Clean as needed. Replacing the roller brush every 3 to 6 months is recommended.
Care & Maintenance
7
10
8
11
9
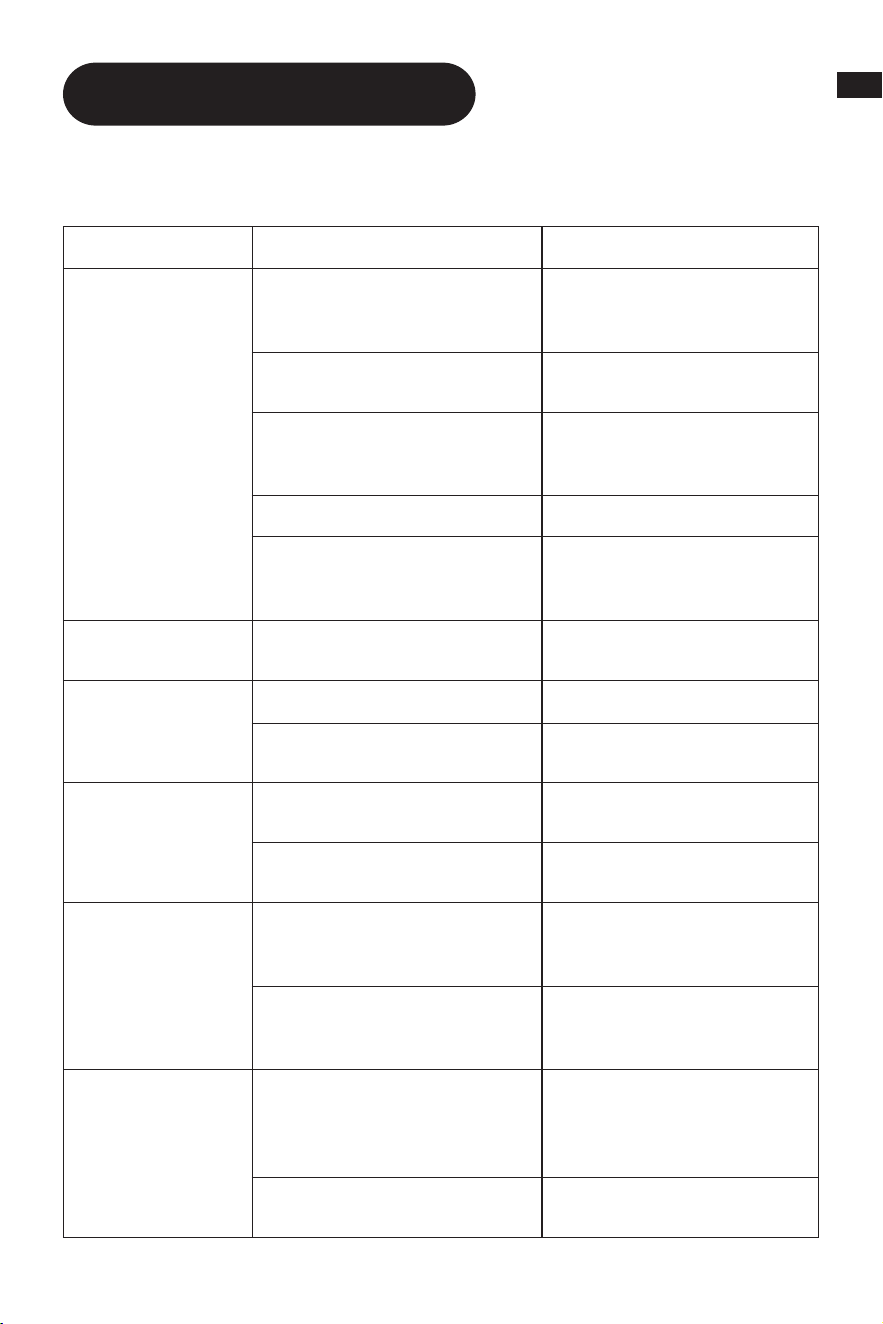
10. After fully drying the
roller brush, hold the roller
brush handle and reinstall it.
7. Pull out the brush handle
and remove the brush.
8. Remove hair or debris
tangled on the roller brush
with the provided cleaning
brush. Rinse the roller brush
with clean water.
9. Wipe the suction inlet
with a dry cloth or wet
tissue. Do not rinse the
brush assembly with water.
11. Reinstall the clean water
tank until you hear a click.
* Remove the roller brush
handle to replace it with a
new roller brush, and press
it firmly into place.
Click
1414
EN
Troubleshooting
If an error occurs, the appliance will stop working. Please refer to the following
table for troubleshooting. If the problem persists, please contact customer service.
Error Possible Cause Solution
The appliance
does not work.
The appliance is out of
battery or its battery level is
low.
Fully charge its battery
before use.
The appliance is in the
upright position.
Recline the appliance
backwards.
Blockage activated overheat
protection mode.
Clear the blockage and
wait until the temperature
returns normal.
The Used Water Tank is full. Empty the Used Water Tank.
The handle, roller brush,
or Used Water Tank is not
properly installed.
Ensure the handle, roller
brush, or Used Water Tank
are all properly in place.
The appliance
charges slowly.
The temperature of the
battery is too low or too high.
Wait until the battery's
temperature returns normal.
The suction power
of the appliance is
weak.
The filter is clogged. Clean the filter.
The suction inlet or tube is
blocked by a foreign object.
Clean the tube and the
suction inlet.
The motor is
making a strange
noise.
There is too much used water
in the Used Water Tank.
Empty the Used Water Tank.
The suction inlet is blocked.
Clear any blockage in the
suction inlet.
The display screen
does not light up
while charging.
The charging base cable
is not plugged into the
electrical outlet.
Make sure the charging
base cable is plugged in.
The appliance is not placed
onto the charging base
properly.
Make sure the appliance is
placed onto the charging
base properly.
No water is
coming out
of the appliance.
The Clean Water Tank is not
properly installed in place, or
the water in the Clean Water
Tank is insufficient.
Reinstall or fill the Clean
Water Tank.
It takes 30 seconds to dampen
the roller brush.
Turn on the appliance and
check again in 30 seconds.
1515
EN
For additional services, please contact us via https://global.dreametech.com/
pages/contact-us
Website: https://global.dreametech.com
Troubleshooting
The vent leaks
water.
A collision or a sharp pull
causes water to enter the
motor.
Move the appliance gently
back and forth while it is
turned on.
The filter is not completely dry
after being cleaned.
Dry the filter completely
before use.
Self-cleaning fails
The roller brush may be
jammed by large debris.
Open the roller brush cover
to check and clean the roller
brush.
The appliance is not placed
onto the charging base
properly.
Make sure the appliance is
being charged before self-
cleaning.
Self-cleaning requires at
least 20% battery (Steam
Self-cleaning: 25% min.).
The self-cleaning function can
only be enabled when the
appliance is being charged
and the battery level is
more than 20% (Steam Self-
cleaning: 25% min.).
The Used Water Tank is not
installed in place, or the Used
Water Tank is full.
Reinstall or empty the Used
Water Tank.
The Clean Water Tank is not
installed in place, or the water
in the Clean Water Tank is
insufficient.
Reinstall or fill the Clean
Water Tank.
No foam or uneven
foam spray
Insufficient time for foam
preparation.
Press and hold the foam
spot spray button to allow
sufficient foam preparation.
Nozzle clogged due to long
periods of non-use (dust/
cleaning solution residue).
Rinse the nozzle or use a tool
to unclog it.
1616
EN
Cordless Floor Washer
Model HHR32F Charging Time Approx. 4 hours
Rated Voltage 21.6 V
Rated Power 400 W
Charging Base
Model HCBBT
Rated Input
Current
1.3 A (charging)
Rated Power
Input*
350W Rated Input 120 V 60 Hz
Rated Output 27.5 V
1.68 A
Specifications
* The rated input power is the power value taken from the operating state during
the self-cleaning period.
If the appliance is not working properly, the screen display will show an error
message. Please refer to the troubleshooting table to find your solution.
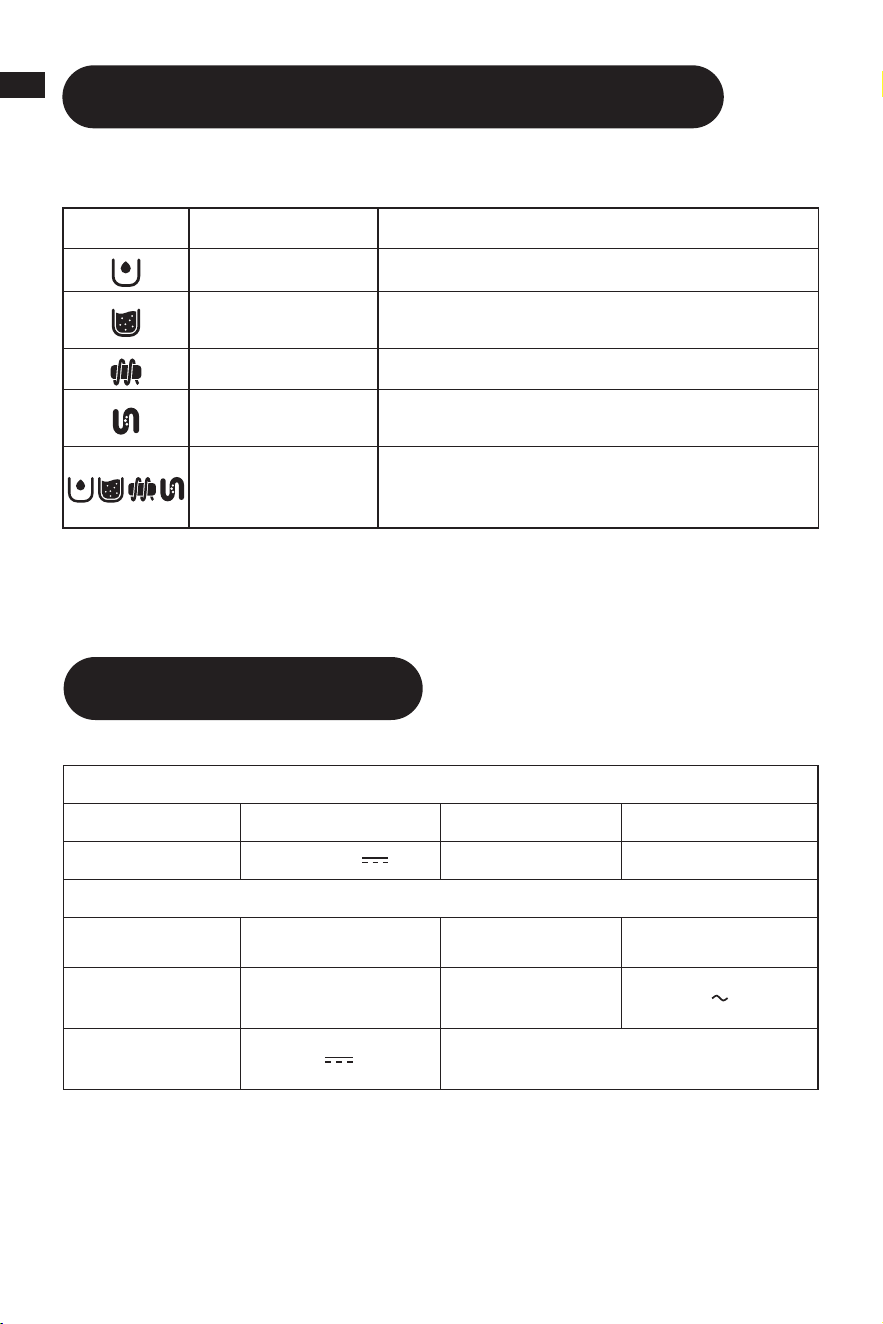
Error Prompts and Solutions
Error Icon Possible Cause Solution
Insufficient water. Fill the clean water tank.
The Used Water
Tank is full.
Please clean the used water tank.
Roller brush stuck. Clean the roller brush.
Blocked tube.
Refer to the Care & Maintenance section to
clean the tube and dirt sensor.
Appliance
malfunction
Restart the appliance for troubleshooting. If
the problem persists, please contact customer
service.

1717
EN
The built-in lithium-ion battery contains substances that are hazardous to the
environment. Before disposing of the battery, make sure the battery is removed by
qualified technicians and discarded at an appropriate recycling facility.
– The battery must be removed from the appliance before it is scrapped;
– The appliance must be disconnected from the supply mains when removing the
battery;
– The battery is to be disposed of safely.
Removal Guide
CAUTION:
• Before removing the battery, disconnect the power and run out the battery as
much as possible.
• Unneeded batteries should be discarded at an appropriate recycling facility.
• Do not expose to high temperature environment to avoid risks of explosion.
• Under abusive conditions, liquid may be ejected from the battery. If contact
occurs, flush with water and seek medical help.
1. Use tools to sequentially disassemble the main unit of the appliance and the
power source components.
2. Disconnect the terminal connecting the battery to the mainboard.
3. Use tools to sequentially remove the screws securing the battery bracket, then
pry open the bracket with a tool and remove the battery.
4. Disassembly should be performed by the manufacturer, an authorized service
provider, or qualified professionals.
1. Dreame is liable to the consumer for any lack of conformity in material or
workmanship not detectable at the time of the purchase.
2. Warranty period: please refer to the customer service office for more information. If
the territory where the consumer is located has different regulations, local regulations
prevail.
3. The warranty will not be applicable in the following cases:
a) Issues due to carelessness, use, or installation that does not comply with the
instructions provided by Dreame.
b) Tampering and/or modifications of the product by entities or individuals not
expressly authorized by Dreame.
c) Damage due to accidental causes and/or negligence on the part of the consumer,
with particular reference to external parts.
d) Parts subject to wear that do not have manufacturing defects.
e) No valid purchasing document (receipt, invoice, or other) is provided to certify the
date the product was purchased.
f) The model and/or numbers of the product on the purchase certificate is not
consistent with the model and/or numbers shown on the product.
4. For more warranty information, please refer to the official Dreame website:
https://global.dreametech.com
Warranty
Battery Disposal and Removal