
User Manual
Door Sensor
20241121.63

Contents
Mounting Kit
Factory Reset
Mounting your Door Sensor
Setup with Smart Bridge MZ1
Setup with Third Reality Hub and SKILL
Setup with Compatible Third-Party Zigbee Hubs
Pairing with SmartThings
Pairing with Amazon Alexa
Pairing with Hubitat
Pairing with Home Assistant
Troubleshooting
FCC Regulatory Conformance
01
02
02
03
06
08
09
13
16
19
24
26
01
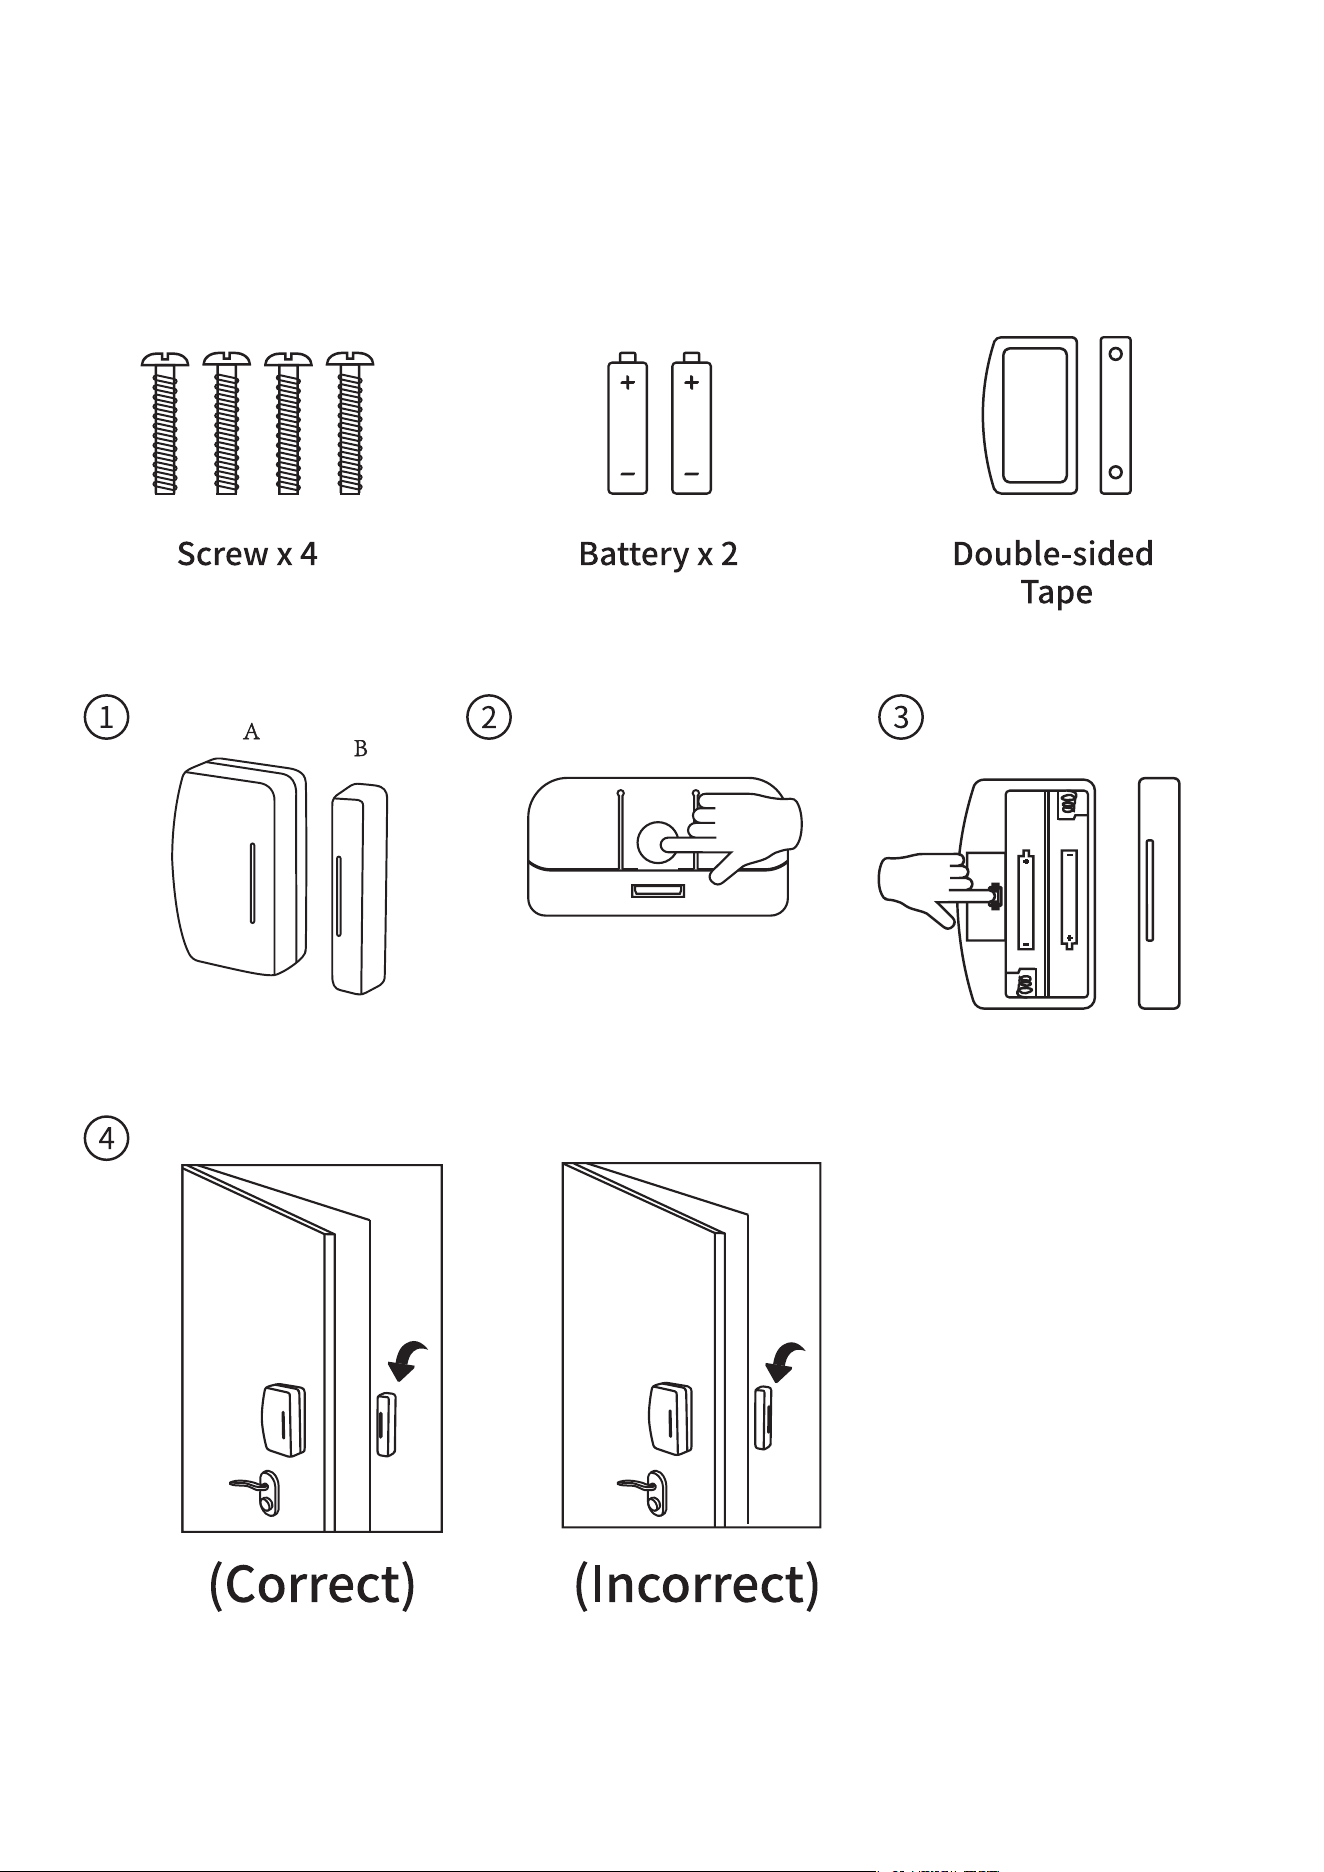
Mounting Kit

Make sure the installation surfaces are clean and dry before instal-
lation.
Attach Part A and B with double-sided tape separately, make sure
the marks on two parts should be aligned and facing each other,
the space in between should be less than 5/8 inches(16mm) when
closed.
1.
2.
02
Long press the reset button (Fig. 3) for 3 seconds to factory reset the
sensor and put it into pairing mode.
Factory Reset
Mounting your Door Sensor

03
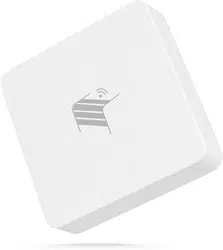
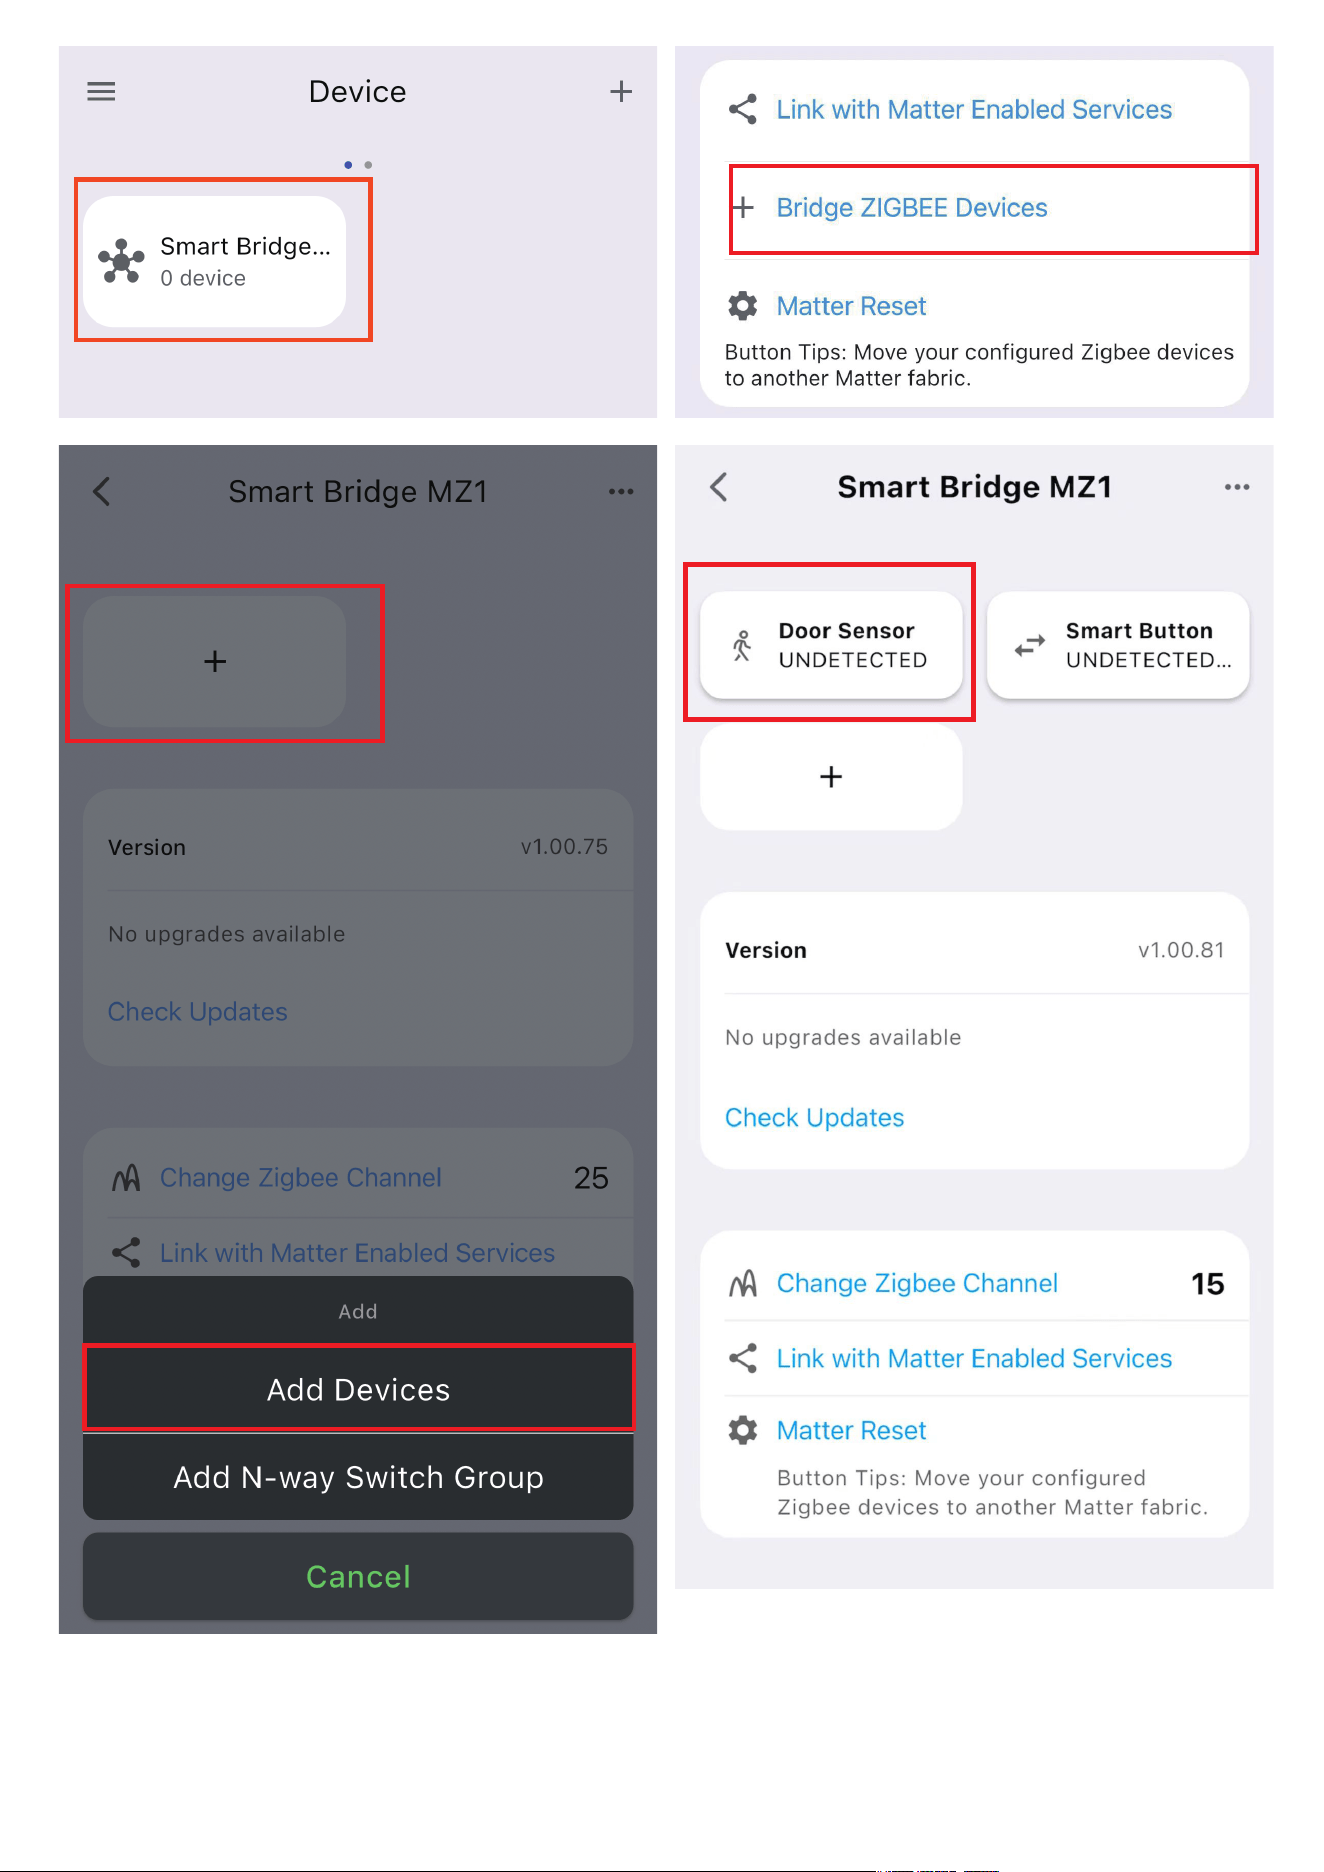
The Smart Bridge (sold separately) enables your Zigbee device to become
Matter-compatible, allowing seamless integration with major Matter eco-
systems like Apple Home, Google Home, Amazon Alexa, Samsung Smart-
Things, and Home Assistant. By setting up your Zigbee sensor with the
Smart Bridge, it transforms into a Matter compatible door sensor, en-
abling local control through Matter. Third Reality also offers the 3R-In-
staller APP, which lets you configure Zigbee sensor attributes such as de-
fault-on behavior and perform firmware updates.
Ensure your bridge is already set up within your smart home
system.
Press to open part A (Fig. 2), install the batteries and close the back
cover, the LED indicator flashes rapidly in blue, the sensor is now
ready for setup. If this sequence doesn’t occur, long press the reset
button (Fig. 3) for 3 seconds to factory reset the sensor and put it
into pairing mode again.
Press the pinhole button on the bridge to activate Zigbee pairing
mode. The Zigbee blue LED should start blinking.
The sensor will pair with the bridge, and a new device will appear
in your smart home app, such as Google Home or Alexa.
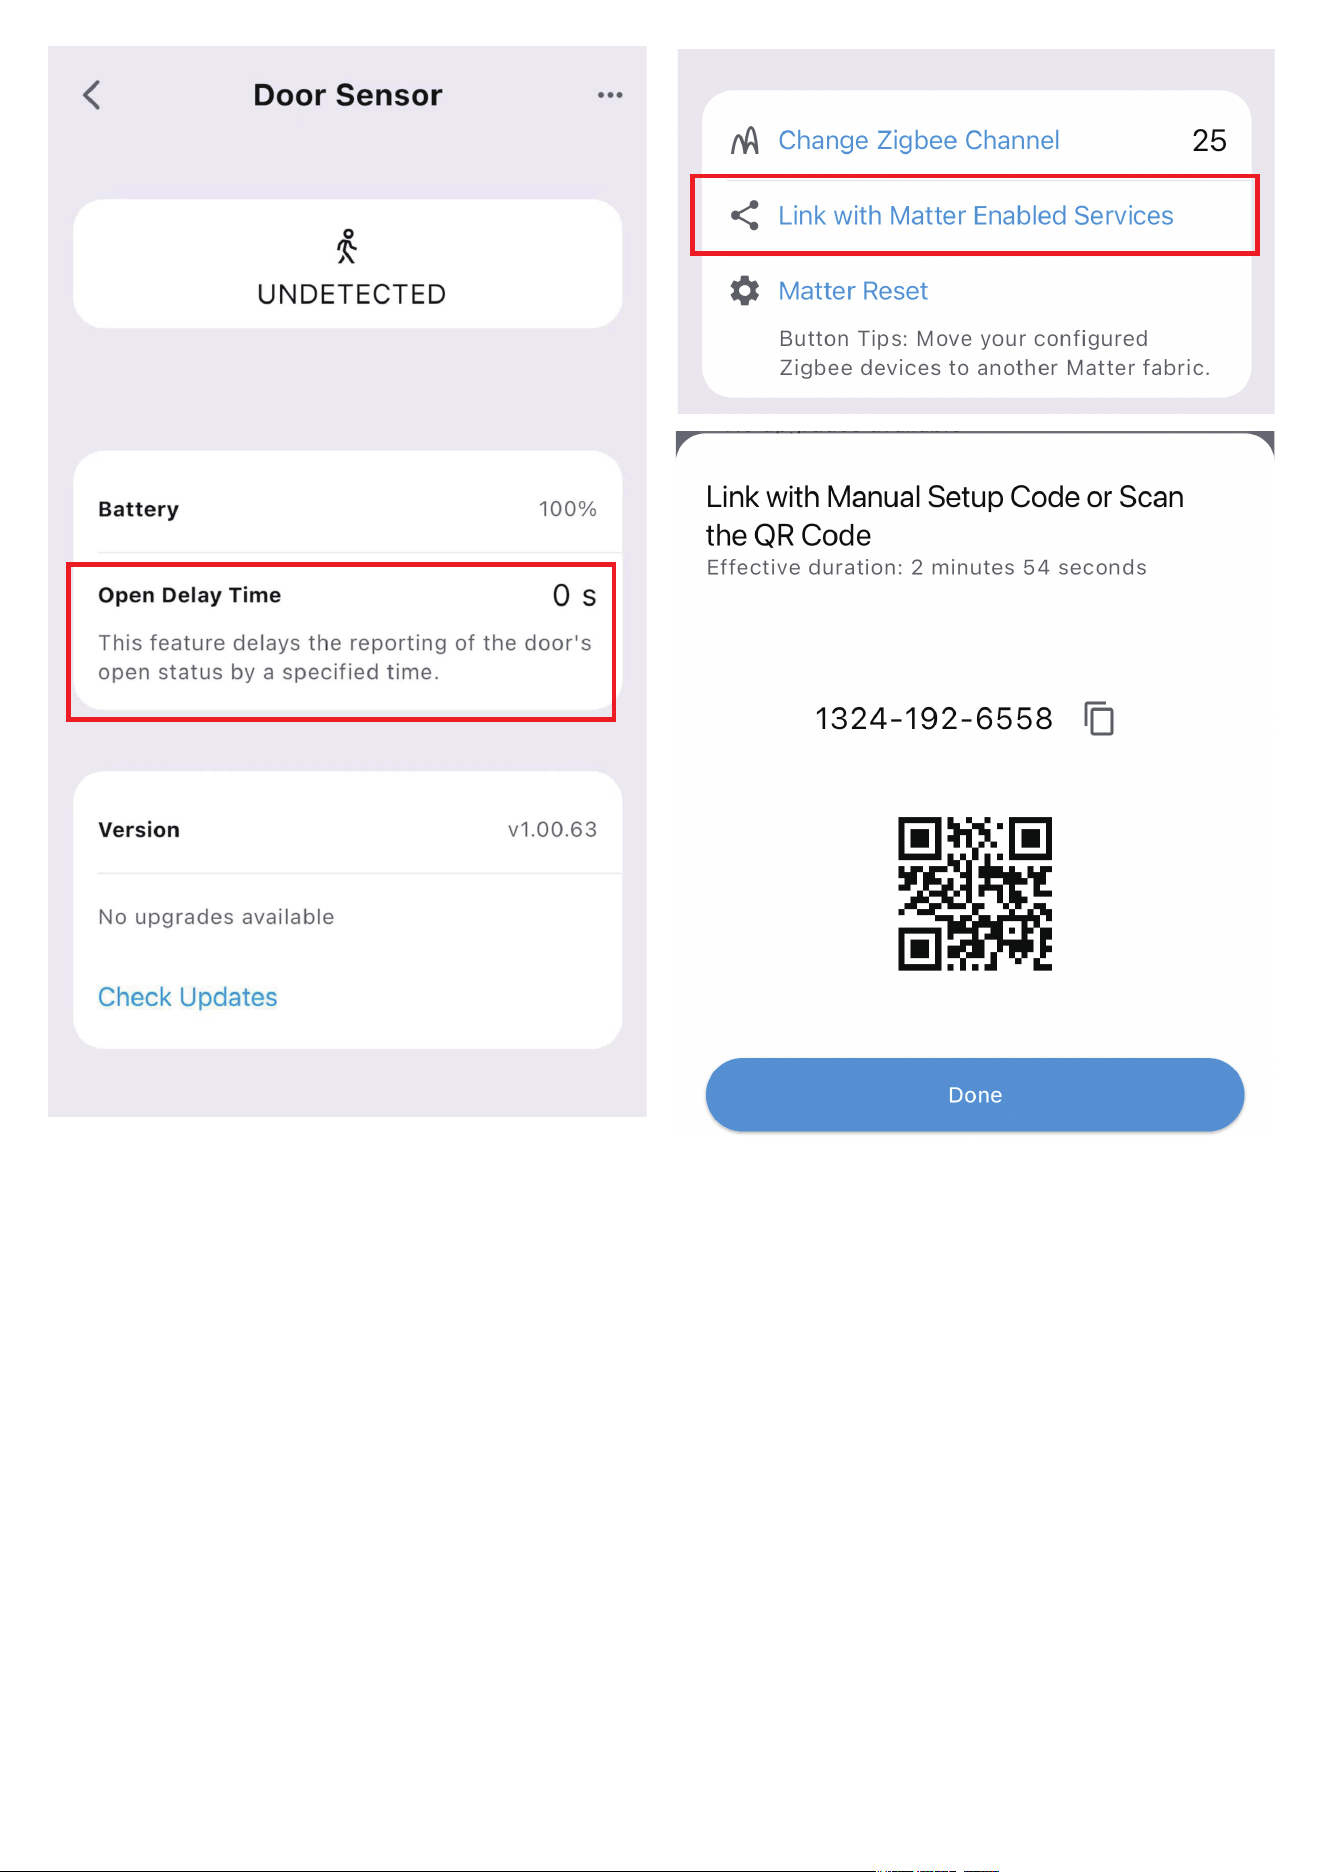
Optionally, you can install the 3R-Installer APP and set the open
delay time by smart bridge. Then, use the multi-admin feature in
your smart home app to share permissions with the 3R-Installer
APP.
1.
2.
3.
4.
5.
Setup with Smart Bridge MZ1
04
05

06
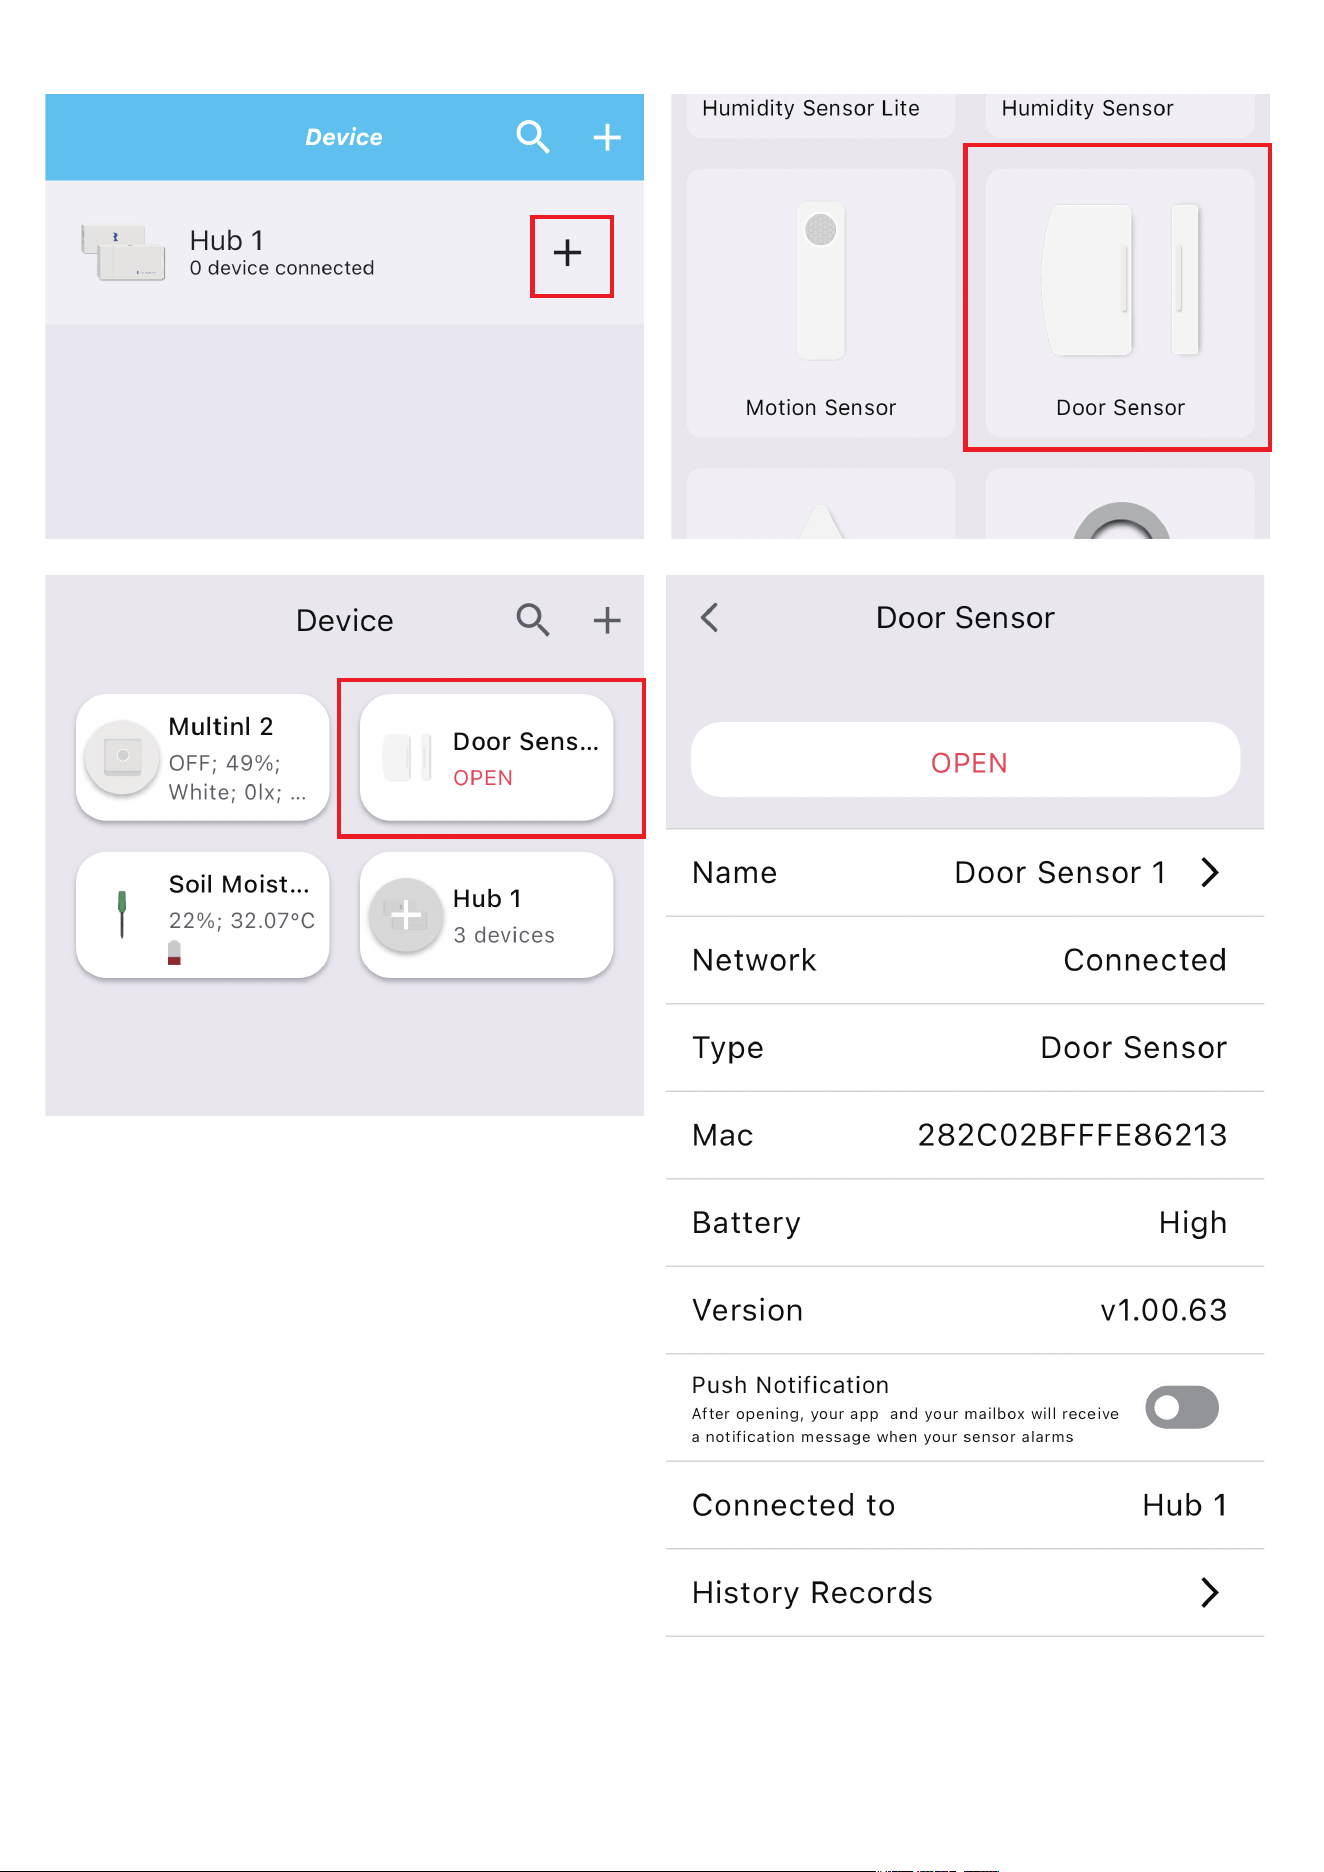
The Third Reality Hub (sold separately) allows you to control your device
remotely via the Third Reality APP, making it a great option for smart
home beginners or those without a system from major providers. Addi-
tionally, the Third Reality Cloud supports SKILL integration with Google
Home or Amazon Alexa, enabling you to connect your device to these
platforms. However, due to the potential for slow and unreliable
Cloud-to-Cloud connections, we recommend using the Bridge solution if
Google Home or Alexa is your primary smart home platform.
Ensure your hub is properly set up with Third Reality App.
Press to open part A (Fig. 2), install the batteries and close the back
cover, the LED indicator flashes rapidly in blue, the sensor is now
ready for setup. If this sequence doesn’t occur, long press the reset
button (Fig. 3) for 3 seconds to factory reset the sensor and put it
into pairing mode again.
Open the Third Reality APP, press the “+” icon next to the hub, and
select “Quick Pair.”
The sensor will pair with your hub and appear in the Third Reality
APP.
Optionally, you can enable the Third Reality SKILL in either the
Alexa or Google Home app to enable Cloud-to-Cloud
communication.
1.
2.
3.
4.
5.
Setup with Third Reality Hub and SKILL
07

08
Third Reality supports integration with various open Zigbee platforms,
including Amazon Echo with built-in Zigbee, Samsung SmartThings,
Home Assistant (with ZHA or Z2M), Homey and Hubitat. If you own any of
these devices, you can pair the door sensor directly without the need for
an additional bridge or hub.
Ensure your Zigbee Hub is already set up within your smart home
system.
Press to open part A (Fig. 2), install the batteries and close the back
cover, the LED indicator flashes rapidly in blue, the sensor is now
ready for setup. If this sequence doesn’t occur, long press the reset
button (Fig. 3) for 3 seconds to factory reset the sensor and put it
into pairing mode again.
Open your smart home app and follow the on-screen instructions
to begin the Zigbee pairing process.
The door sensor will flash and then turn red, indicating it has
successfully paired with the Zigbee hub.
You can now use your smart home app to turn the sensor on/off.
1.
2.
3.
4.
5.
Setup with Compatible Third-Party
Zigbee Hubs
App: SmartThings App
Devices: SmartThings Hub 2nd Gen(2015) and 3rd Gen(2018), Aeotec
Smart Home Hub.
Pairing with SmartThings
Pairing steps:
09
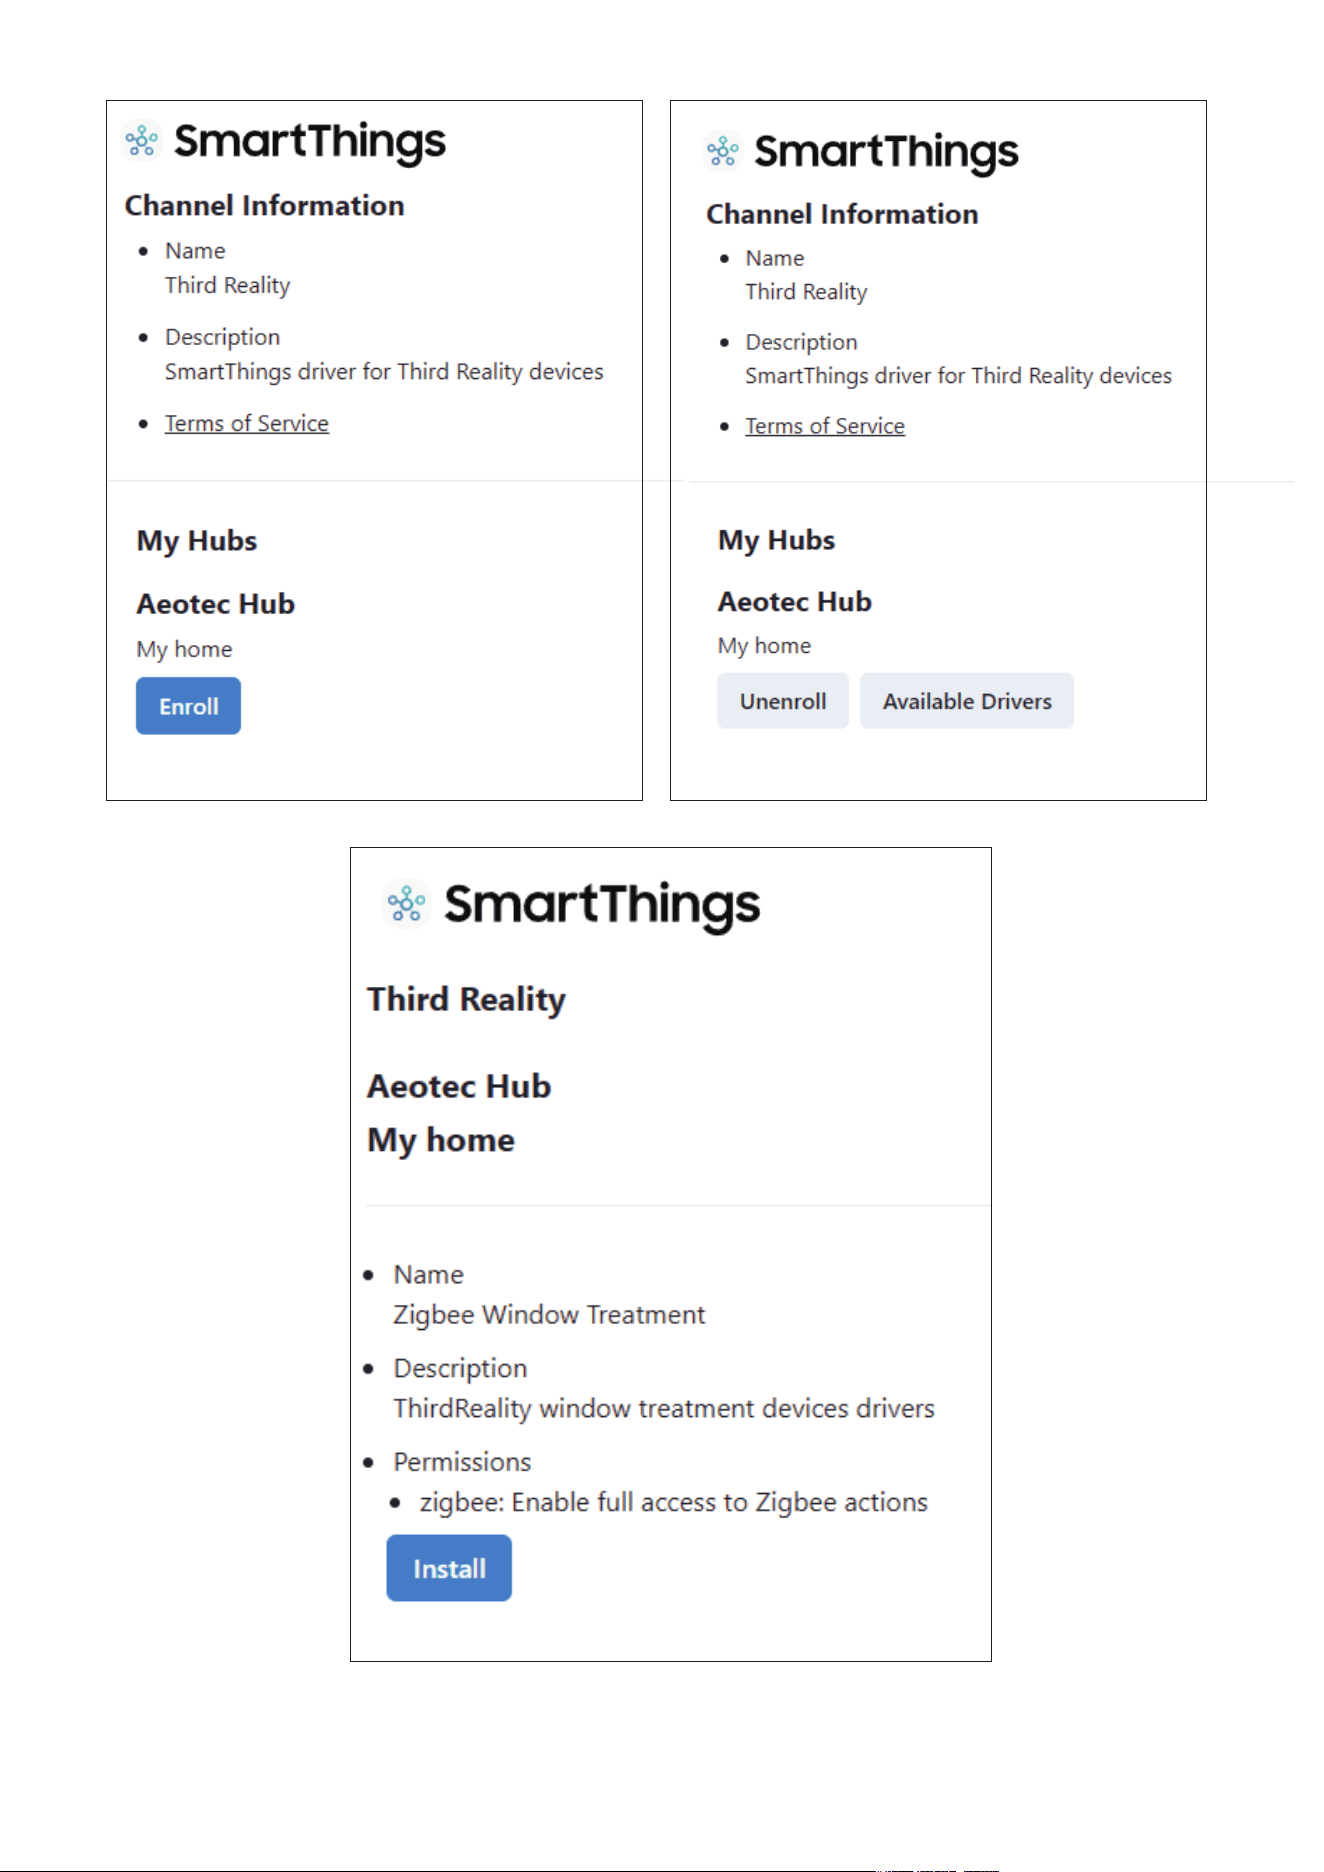
Before pairing, check for updates to make sure the SmartThings
Hub firmware is up to date.
1.
Open this link in your PC browser. Log in your SmartThings Ac-
count.
https://bestow-regional.api.smartthings.com/invite/adMKr50EXzj9
Click "Enroll" --"Available Drivers" -- "Install" to install the
device driver.
Add SmartThings drivers for Third Reality Door Sensor2.
10
11
Press to open part A (Fig. 2), install the batteries and close the back
cover, the LED indicator flashes rapidly in blue, the sensor is now
ready for setup. If this sequence doesn’t occur, long press the reset
button (Fig. 3) for 3 seconds to factory reset the sensor and put it
into pairing mode again.
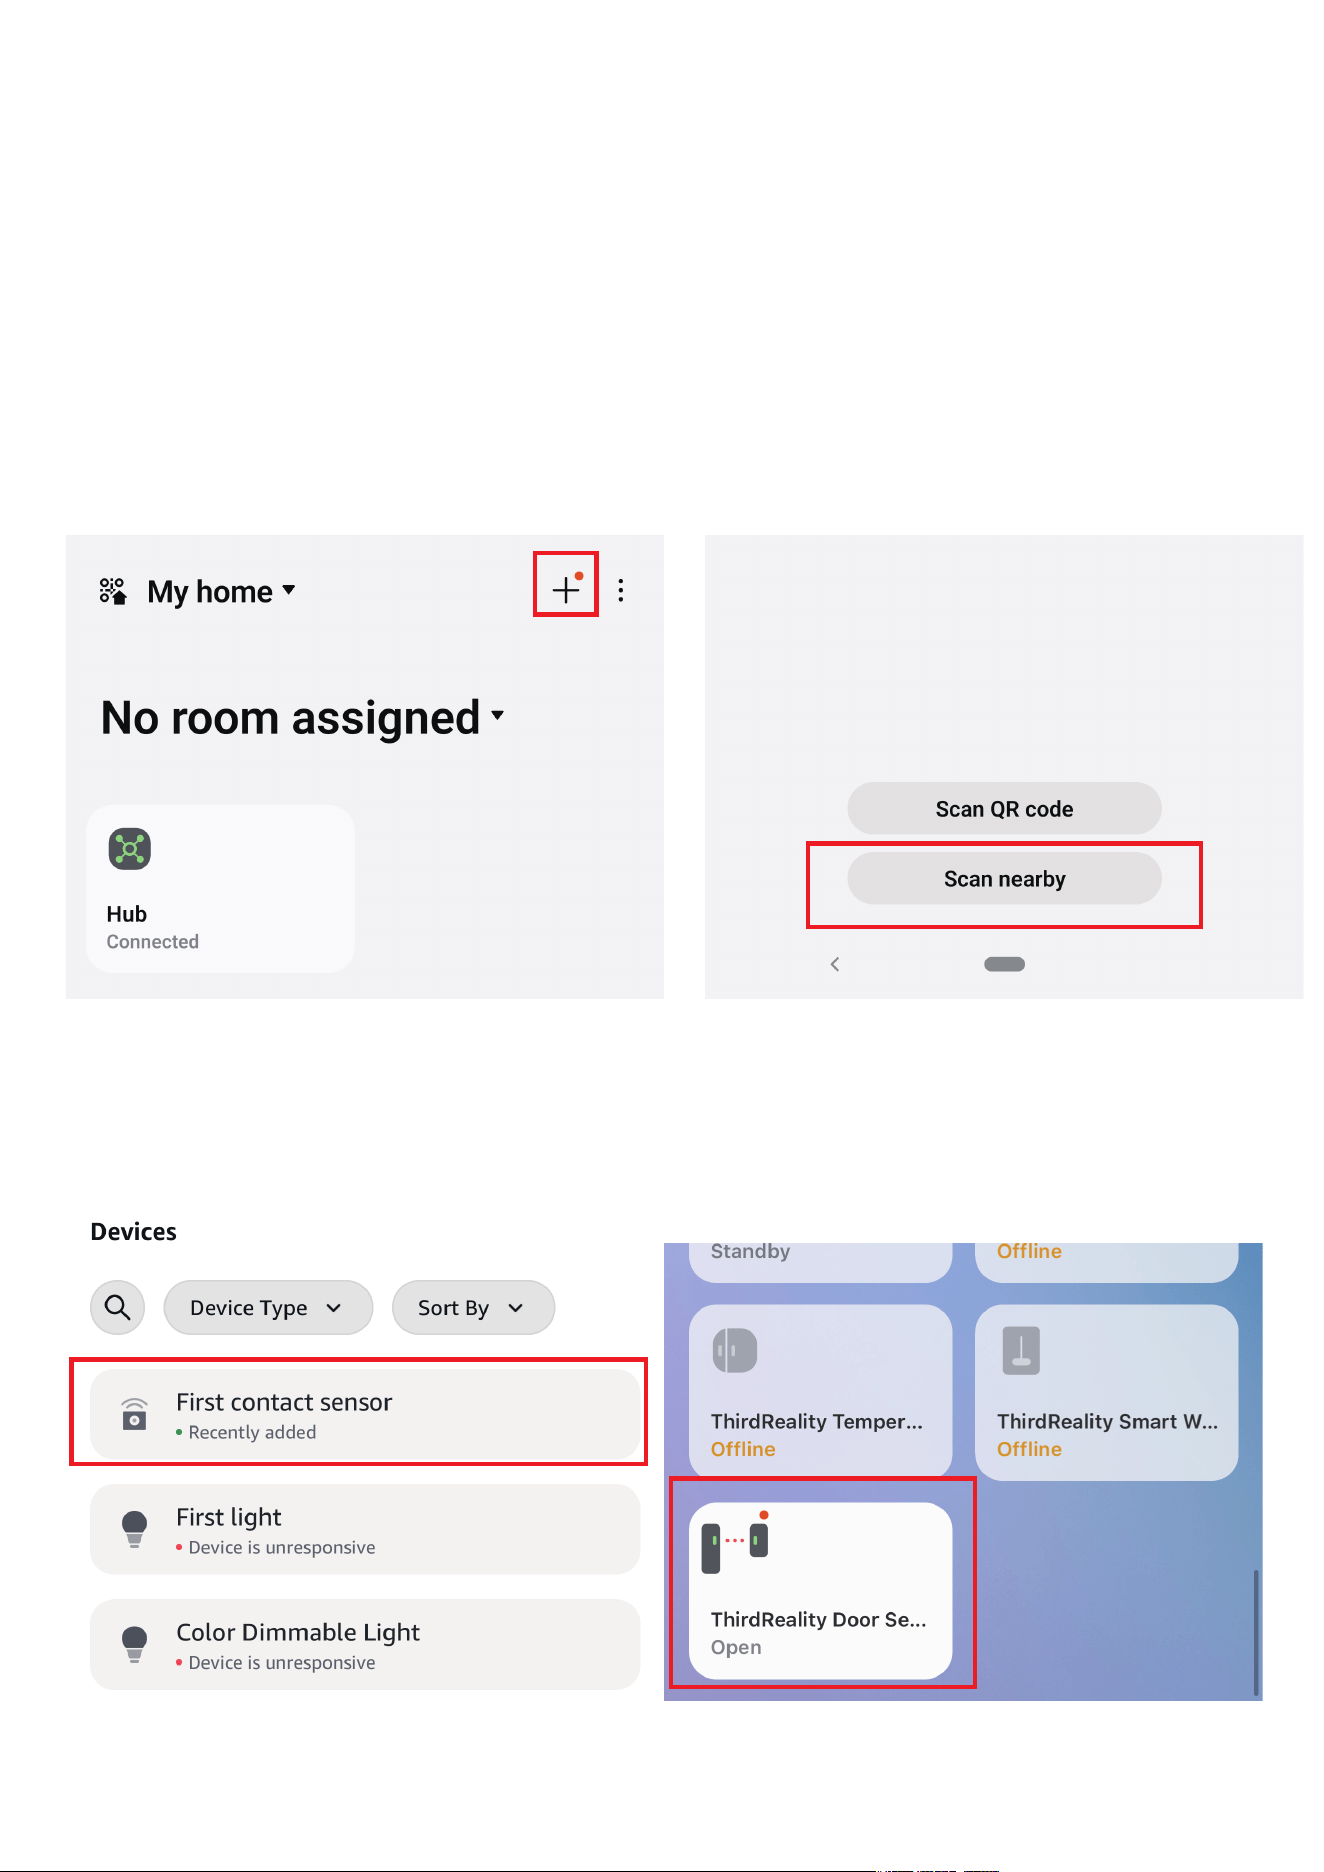
Open your SmartThings App, tap “+” on the up right corner to ”Add
device” and then tap “Scan nearby”.
3.
4.
The sensor will be added to your SmartThings hub in a few sec-
onds.
5.
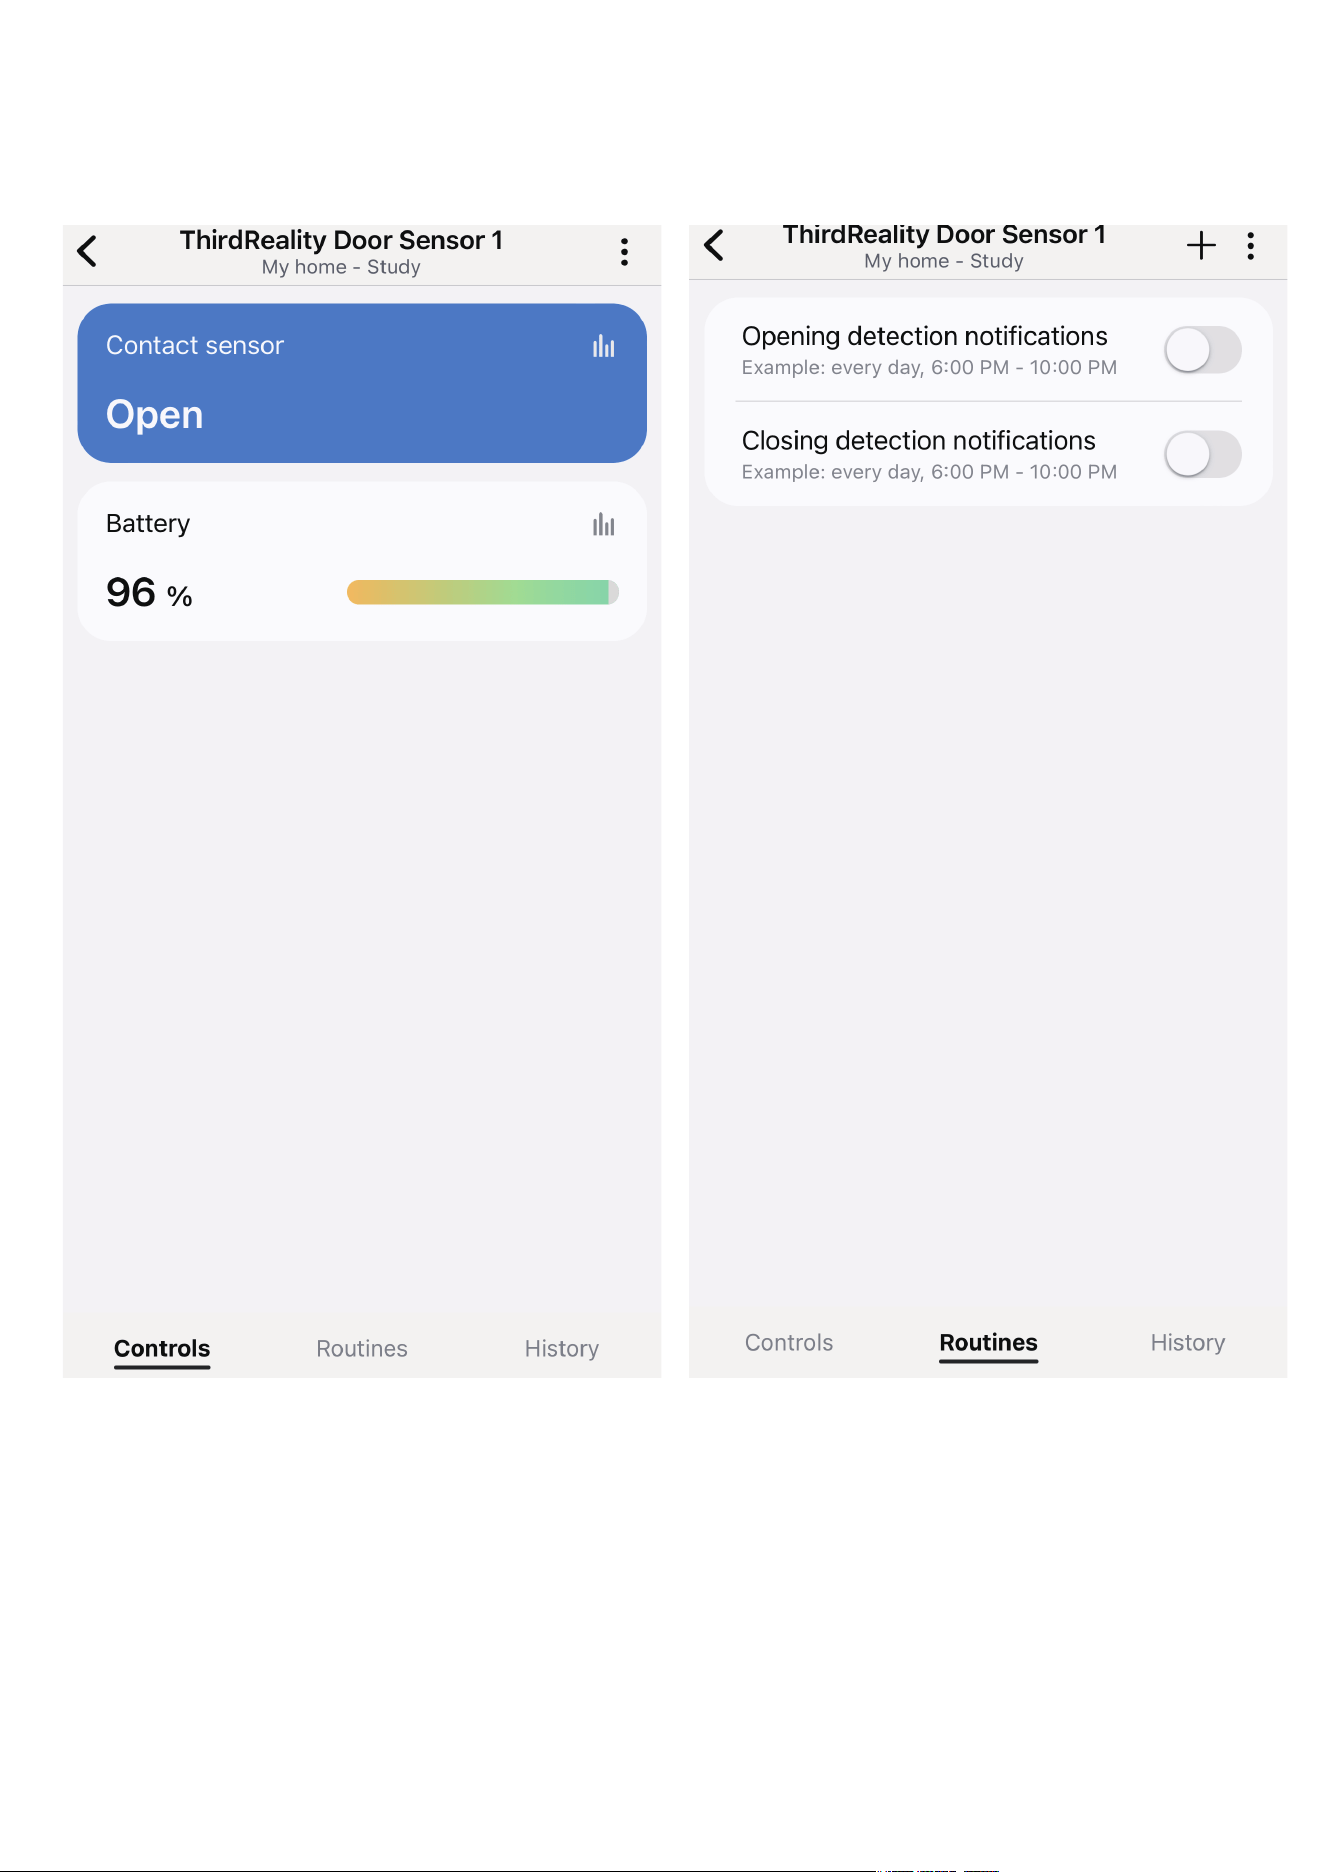
Create routines to control connected devices.6.
12

13
App: Amazon Alexa
Devices: Echo speakers with built-in Zigbee hub, Echo 4th Gen, Echo Plus
1st & 2nd Gen, Echo Studio
Ask Alexa to check for updates before pairing.
Press to open part A (Fig. 2), install the batteries and close the back
cover, the LED indicator flashes rapidly in blue, the sensor is now
ready for setup. If this sequence doesn’t occur, long press the reset
button (Fig. 3) for 3 seconds to factory reset the sensor and put it
into pairing mode again.
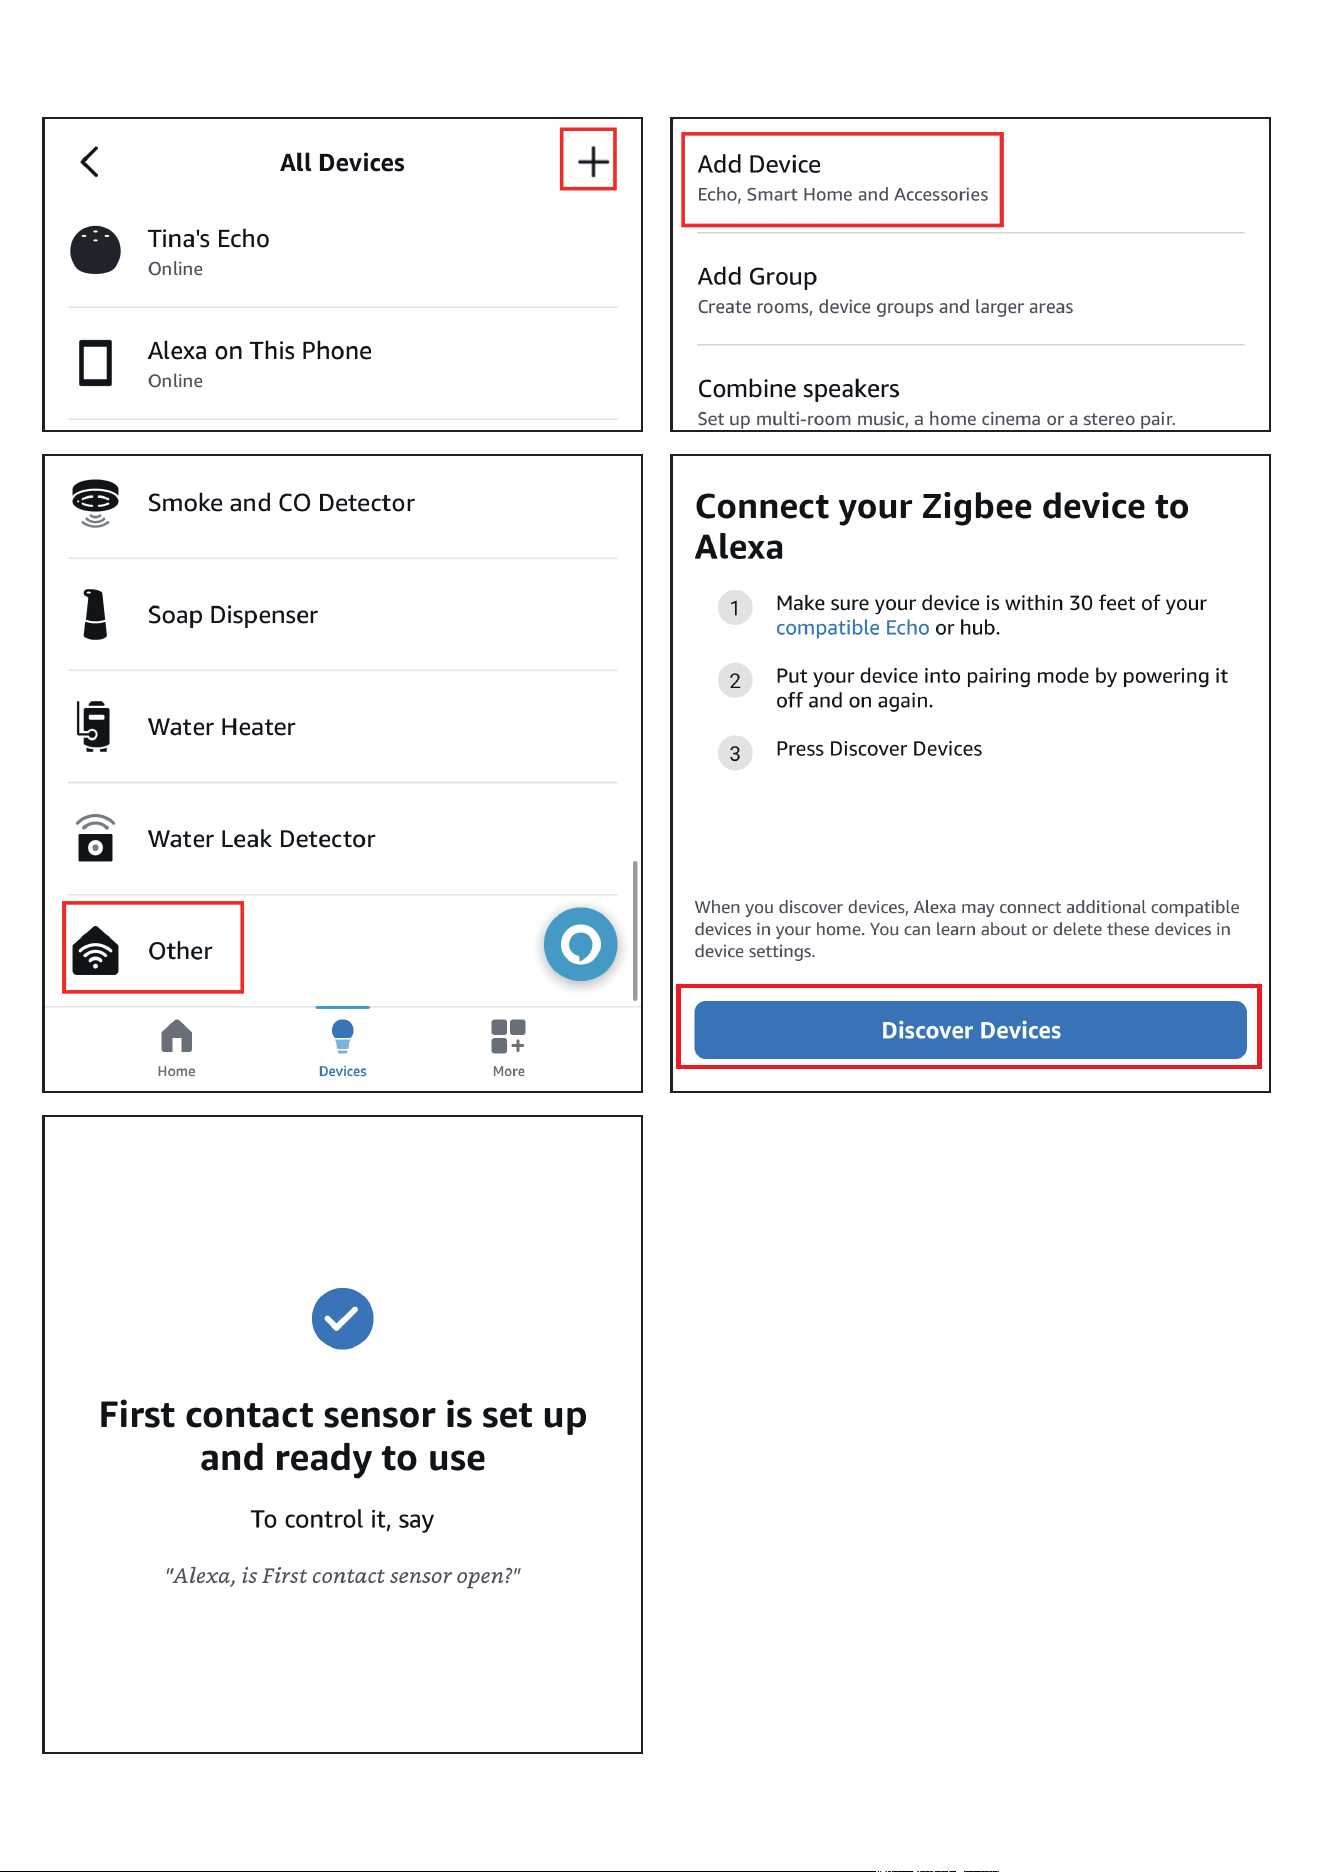
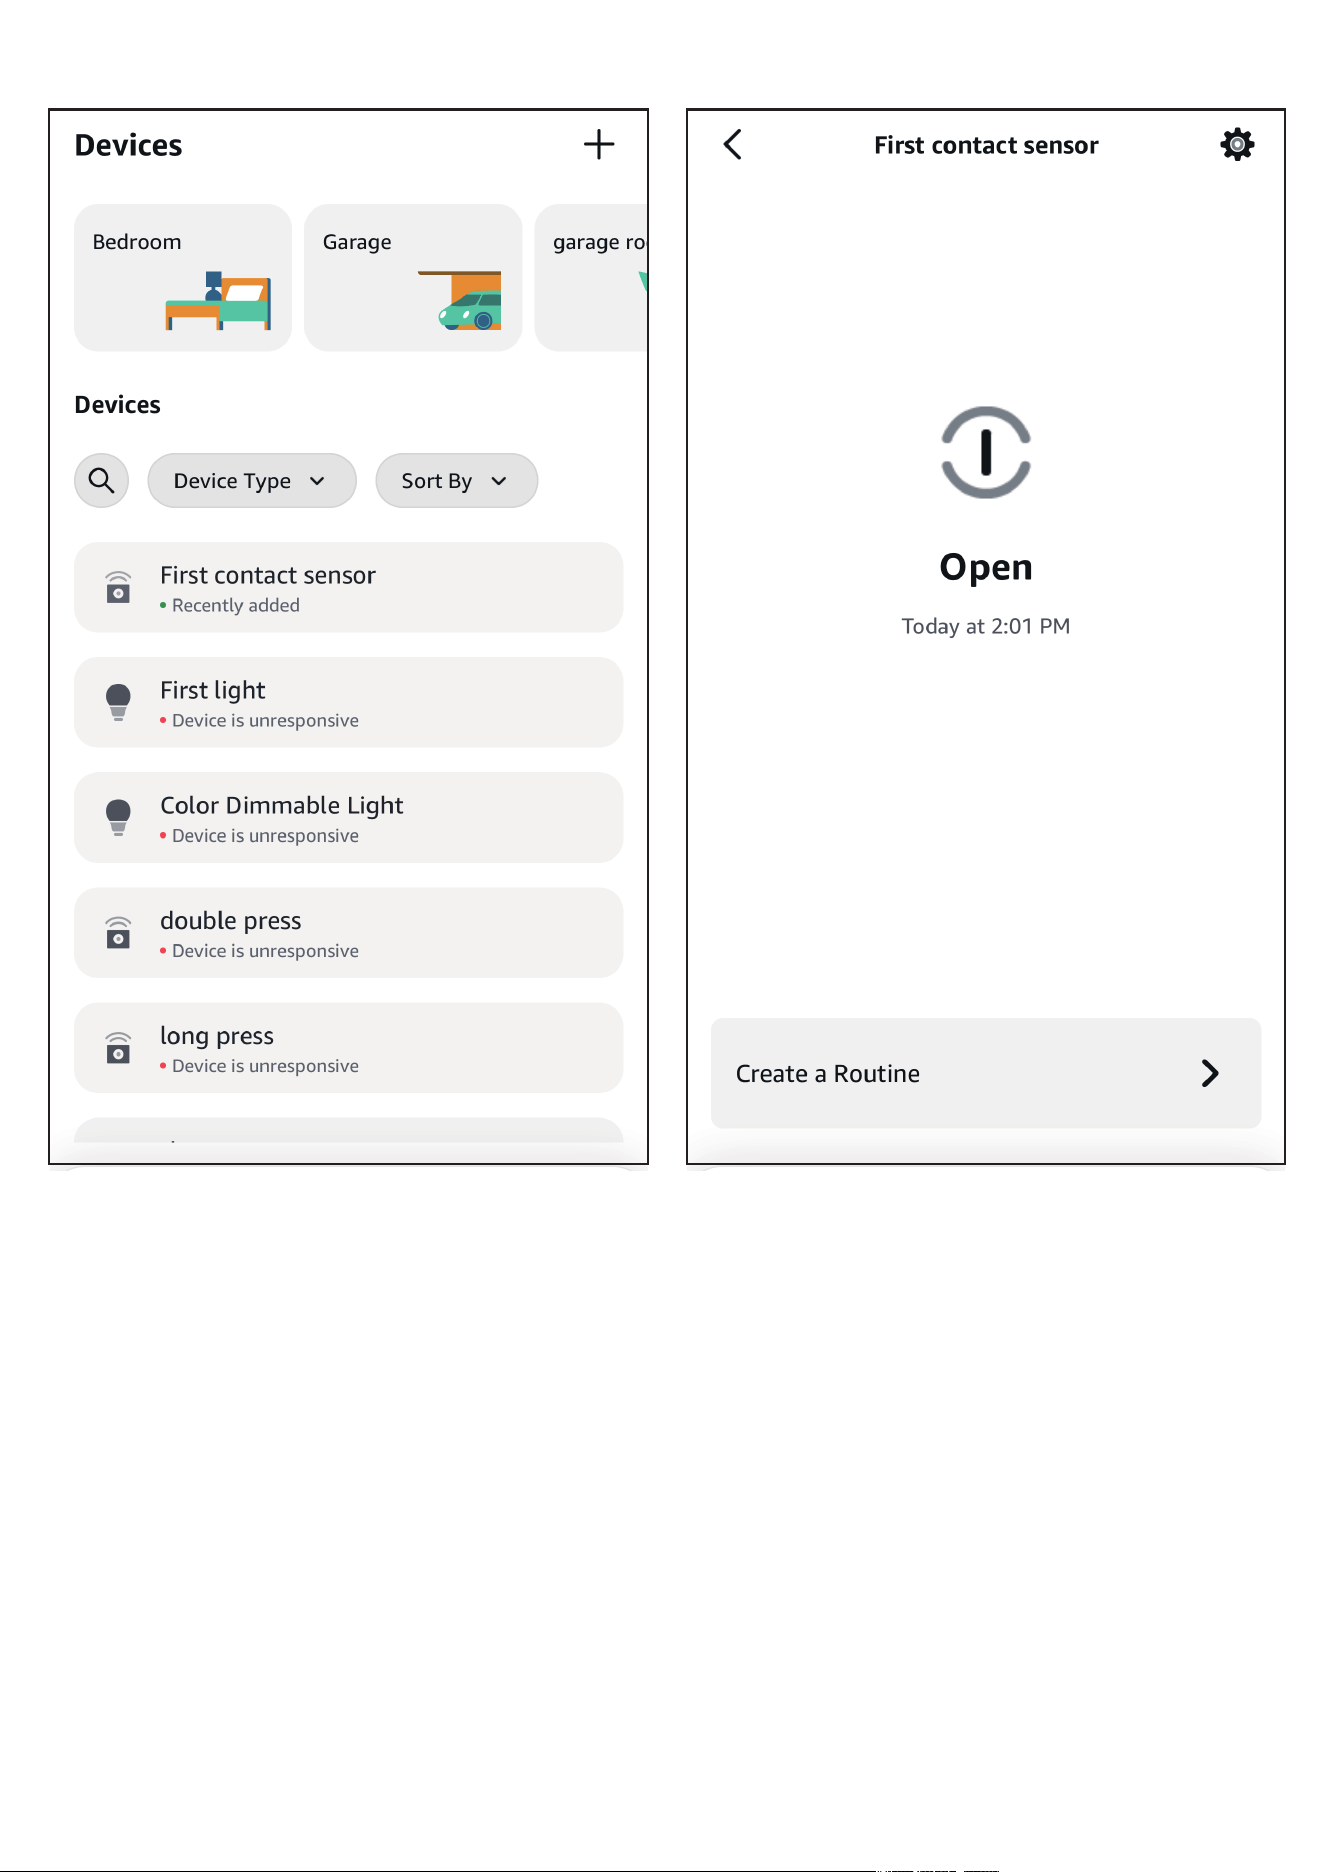
Tab "+" in the Alexa App, choose "Other" and "Zigbee" to add
device, the sensor will be added.
You can create routines with the device.
1.
2.
3.
4.
Pairing with Amazon Alexa
Pairing steps:
14
15

Website: http://find.hubitat.com/
Press to open part A (Fig. 2), install the batteries and close the back
cover, the LED indicator flashes rapidly in blue, the sensor is now
ready for setup. If this sequence doesn’t occur, long press the reset
button (Fig. 3) for 3 seconds to factory reset the sensor and put it
into pairing mode again.
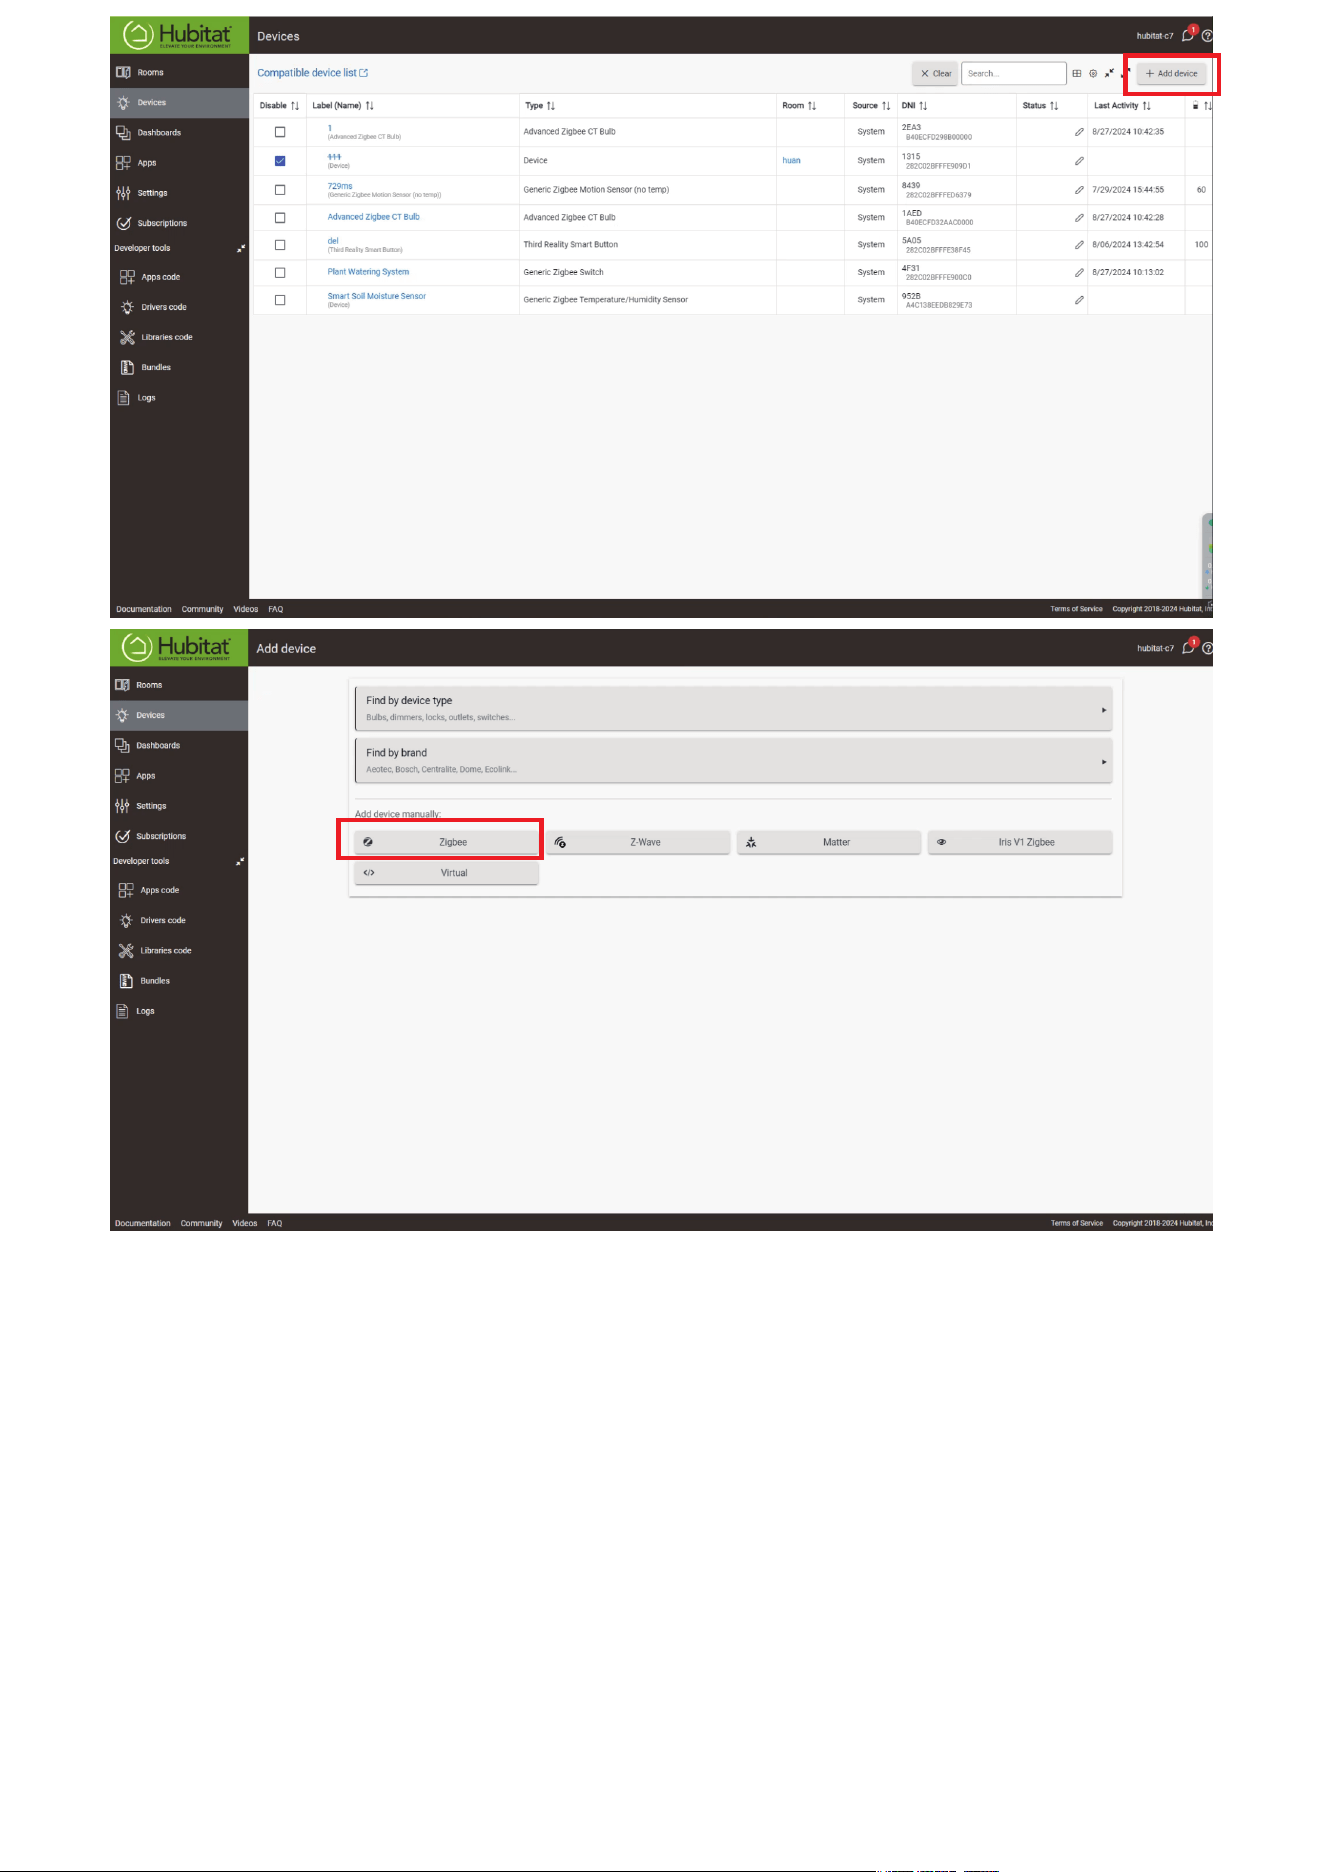
Visit your Hubitat Elevation hub device page from your web brows-
er, select the Devices menu item from the sidebar, then select Dis-
cover Devices in the upper right.
Click Start Zigbee Pairing button after you select a Zigbee device
type, the Start Zigbee Pairing button will put the hub in Zigbee
pairing mode for 60 seconds.
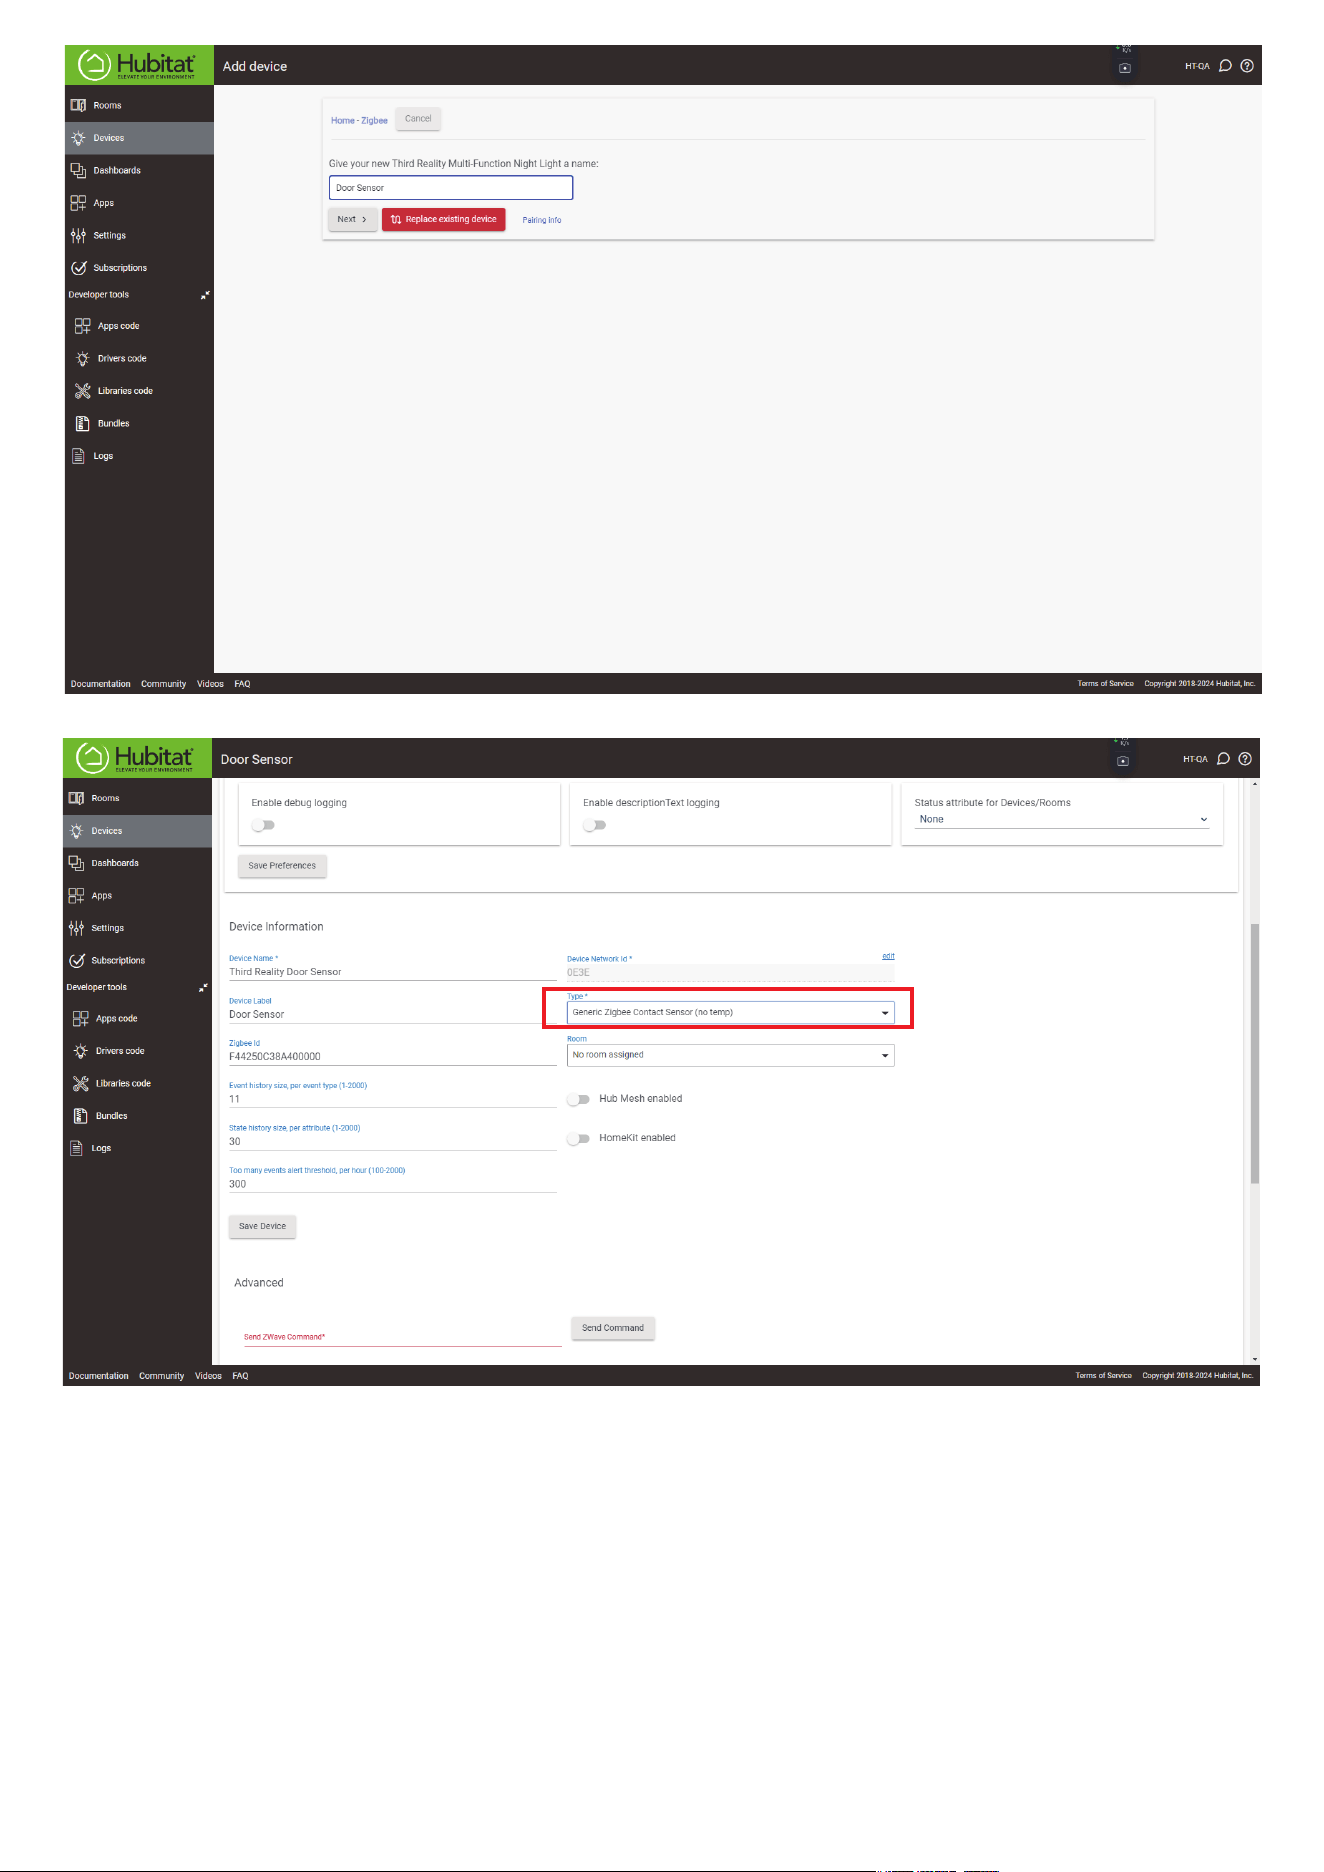
Pairing is completed. Change type to Generic Zigbee Contact Sen-
sor(no temp).
Tap Apps, and Create New Basic Rules.
1.
2.
3.
4.
5.
Pairing with Hubitat
Pairing steps:
16
17
18

Device: Zigbee dongle
Press to open part A (Fig. 2), install the batteries and close the back
cover, the LED indicator flashes rapidly in blue, the sensor is now
ready for setup. If this sequence doesn’t occur, long press the reset
button (Fig. 3) for 3 seconds to factory reset the sensor and put it
into pairing mode again.
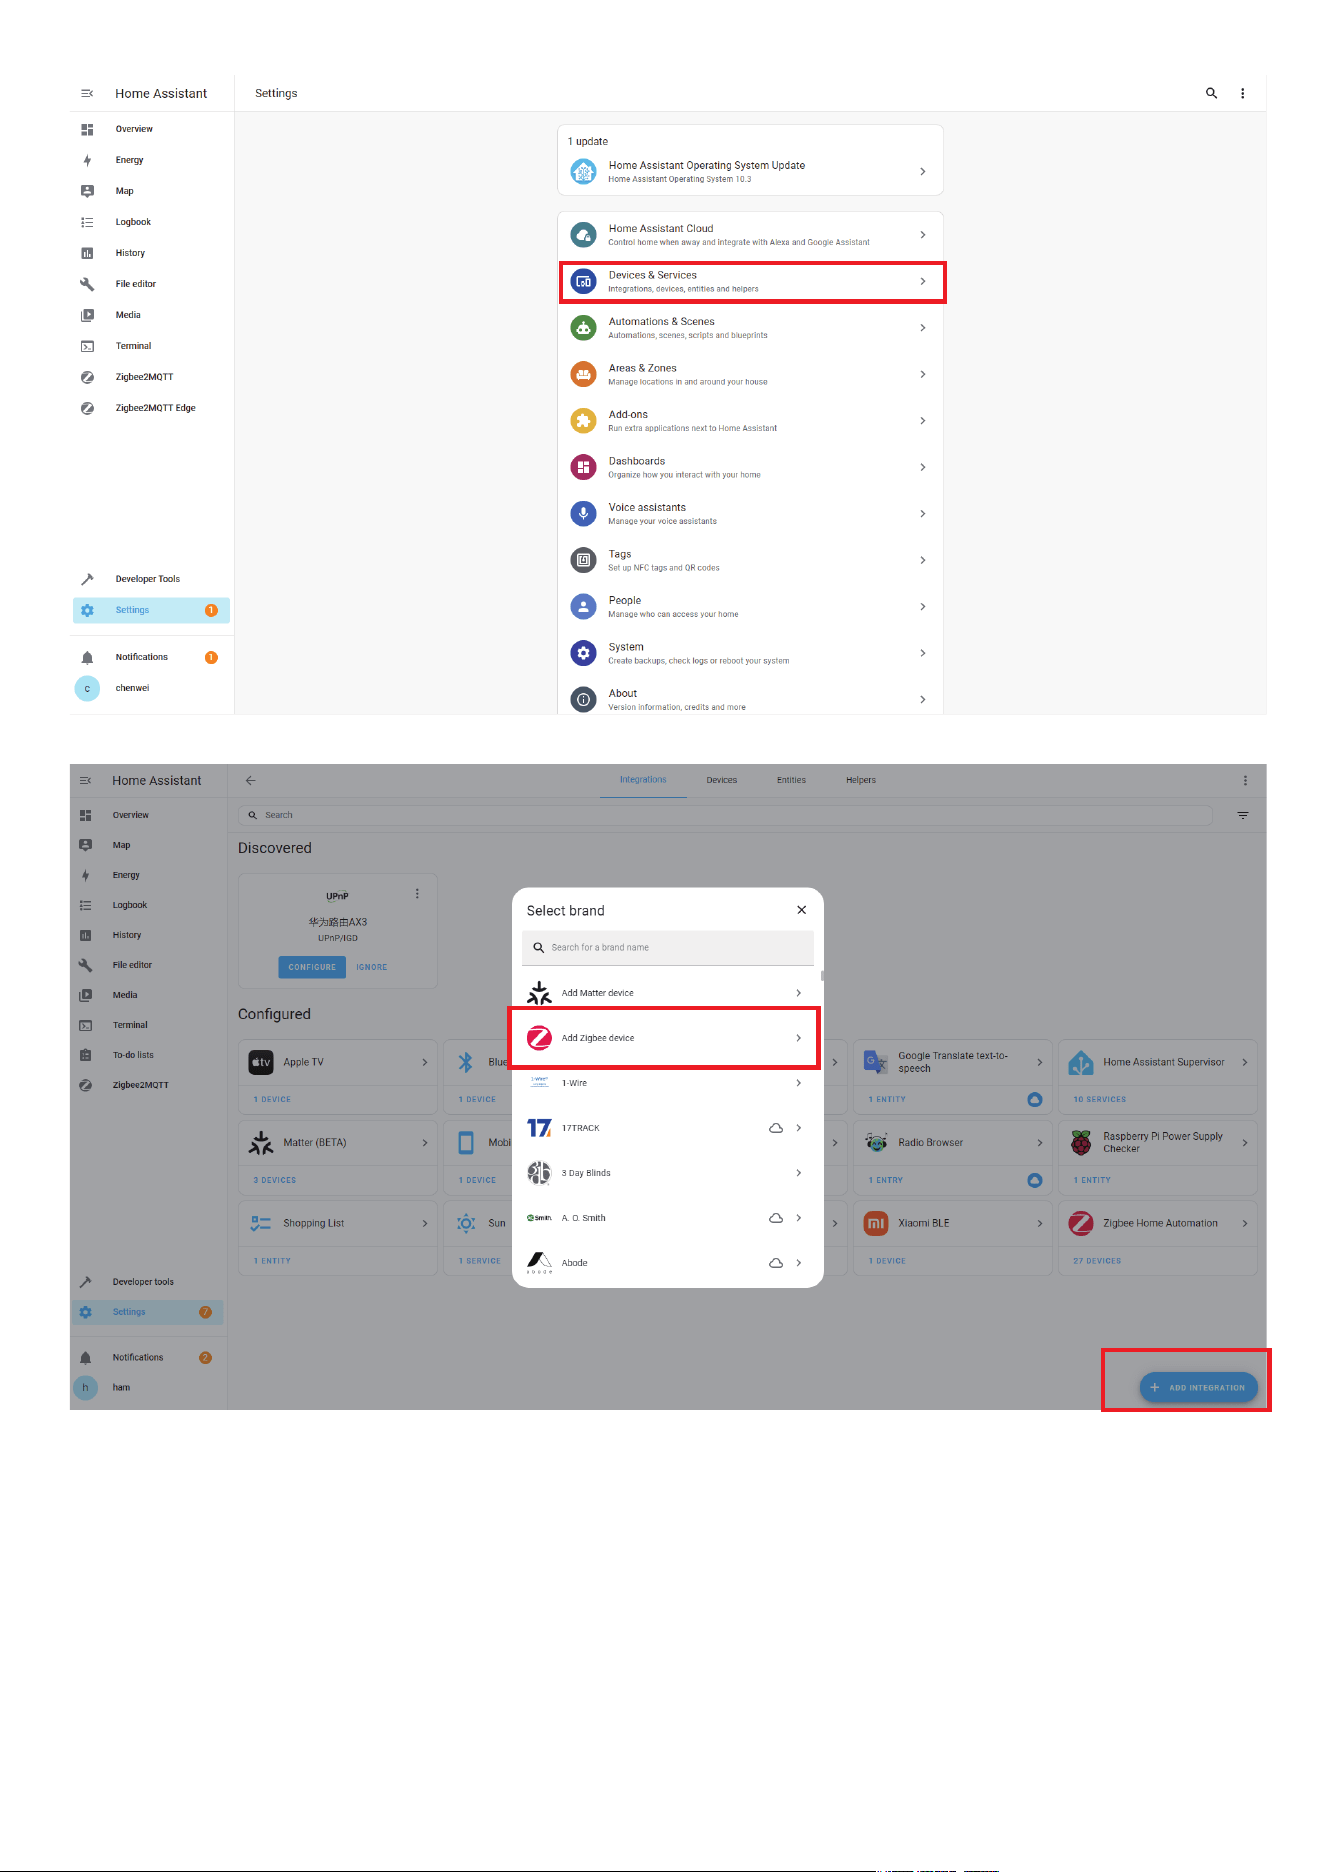
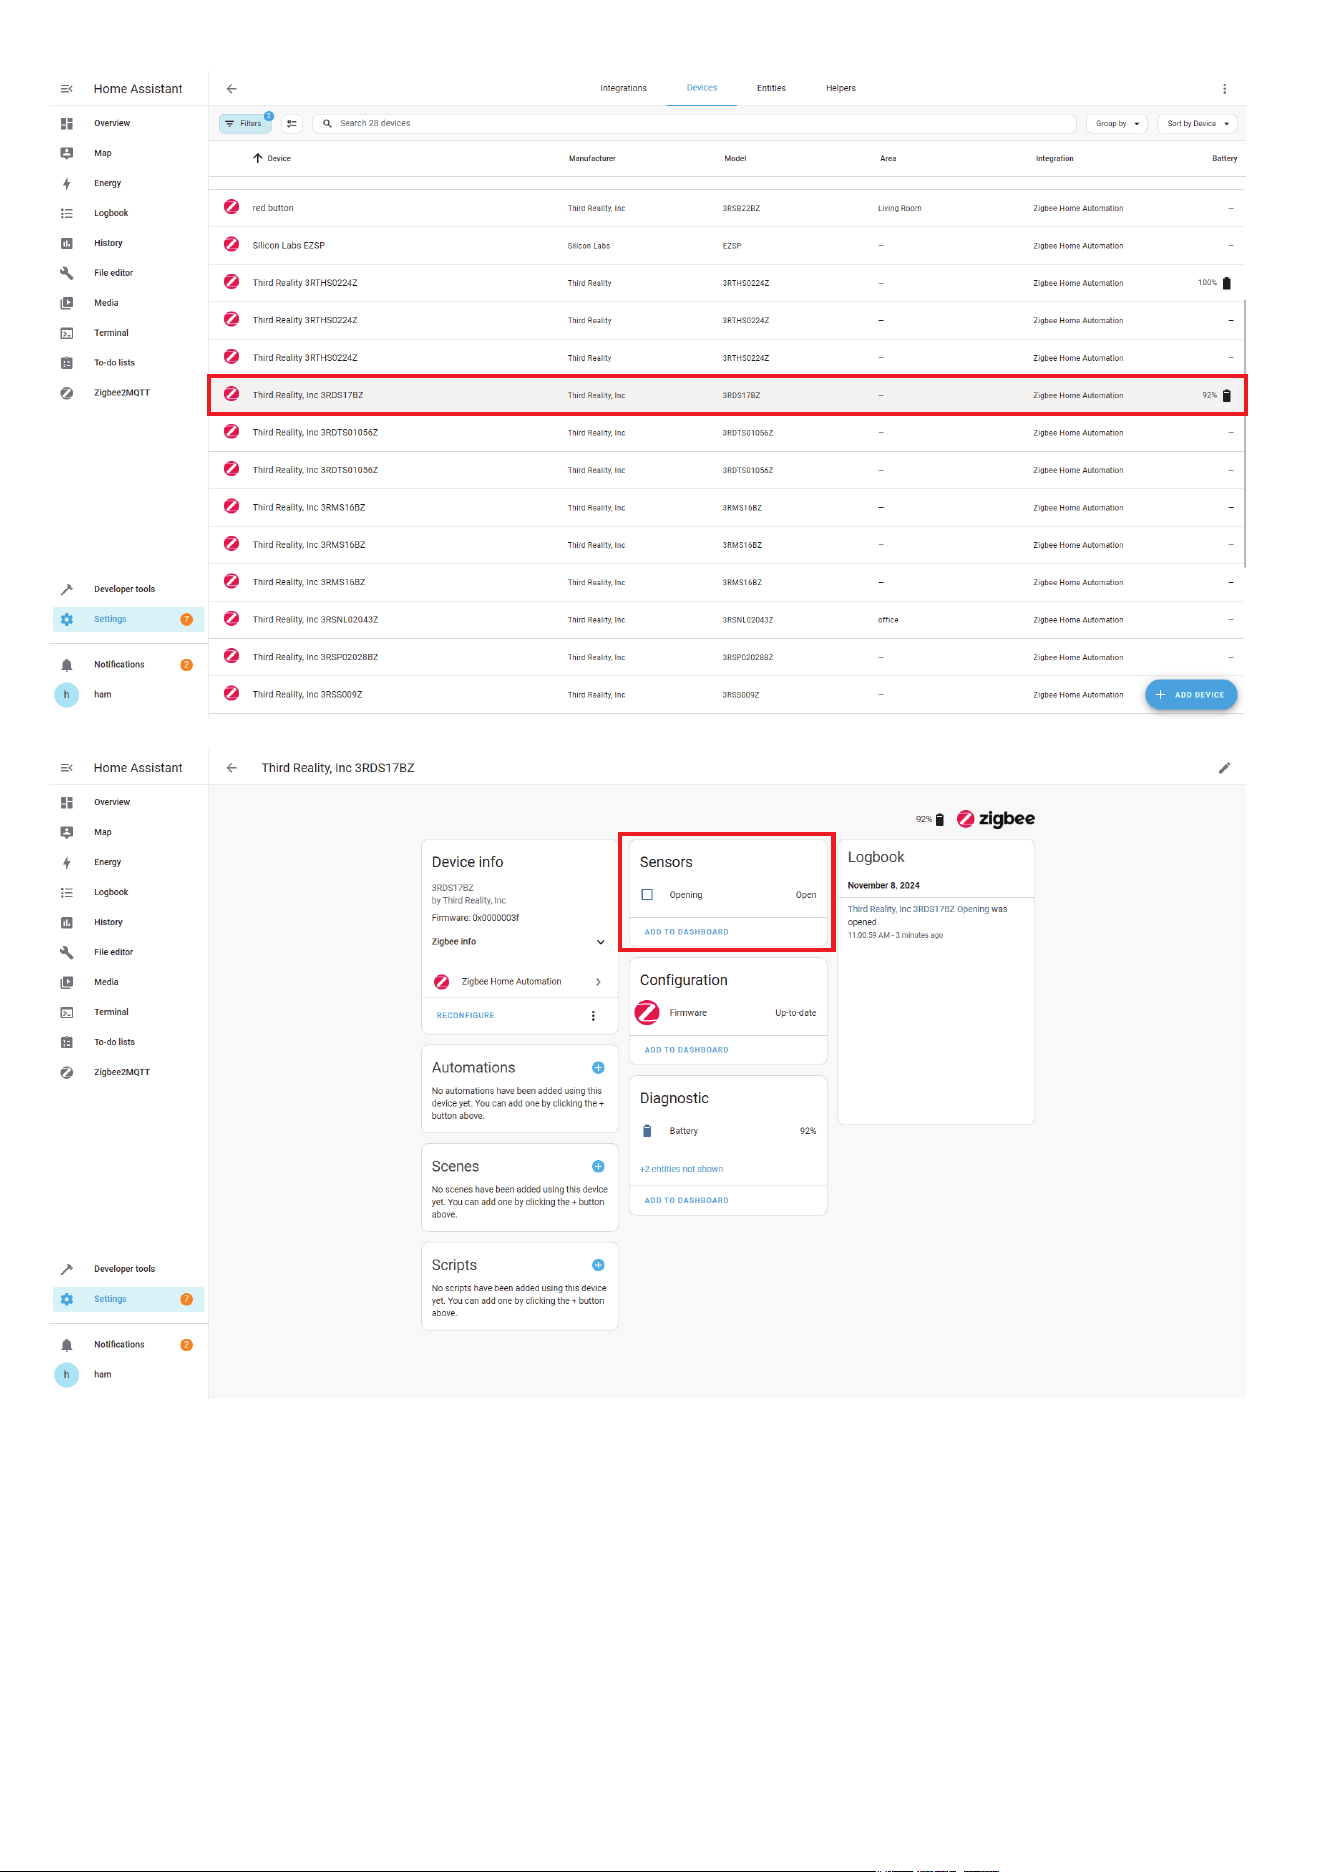
In Zigbee Home Automation, go to “Configuration” page, click “in-
tegration”.
Then click the “Devices” on the Zigbee item, the click “Add Devic-
e s ”.
Pairing completed.
Back to “Devices” page to find the sensor added.
Click to enter in the control interface to see detailed information .
Click “+” belongs to Automation and add trigger and actions.
1.
2.
3.
4.
5.
6.
7.
Pairing With Home Assistant
Zigbee Home Automation
19
20
21
Press to open part A (Fig. 2), install the batteries and close the back
cover, the LED indicator flashes rapidly in blue, the sensor is now
ready for setup. If this sequence doesn’t occur, long press the reset
button (Fig. 3) for 3 seconds to factory reset the sensor and put it
into pairing mode again.
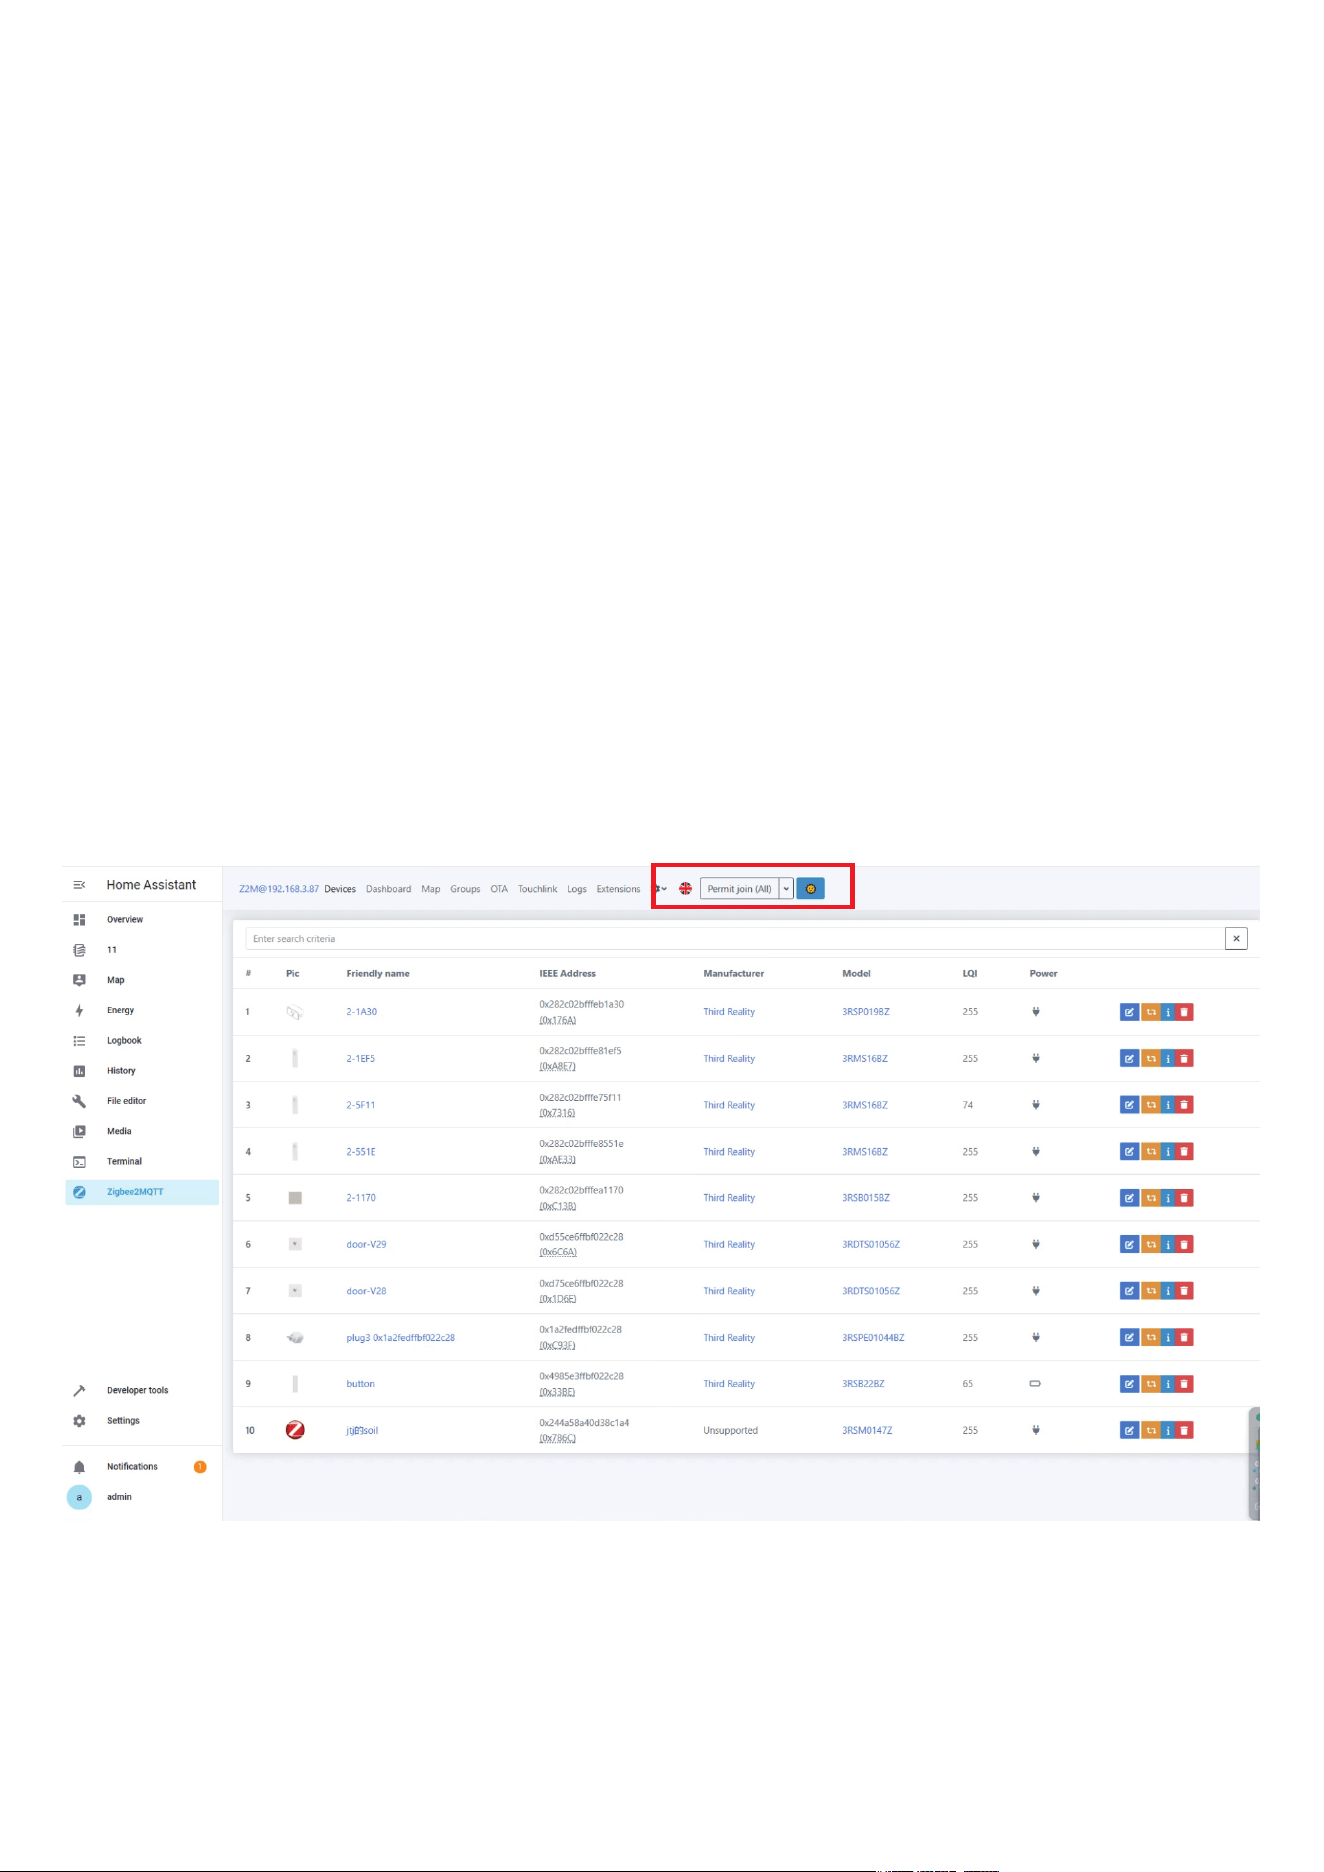
Permit join to start Zigbee pairing in Zigbee2MQTT.
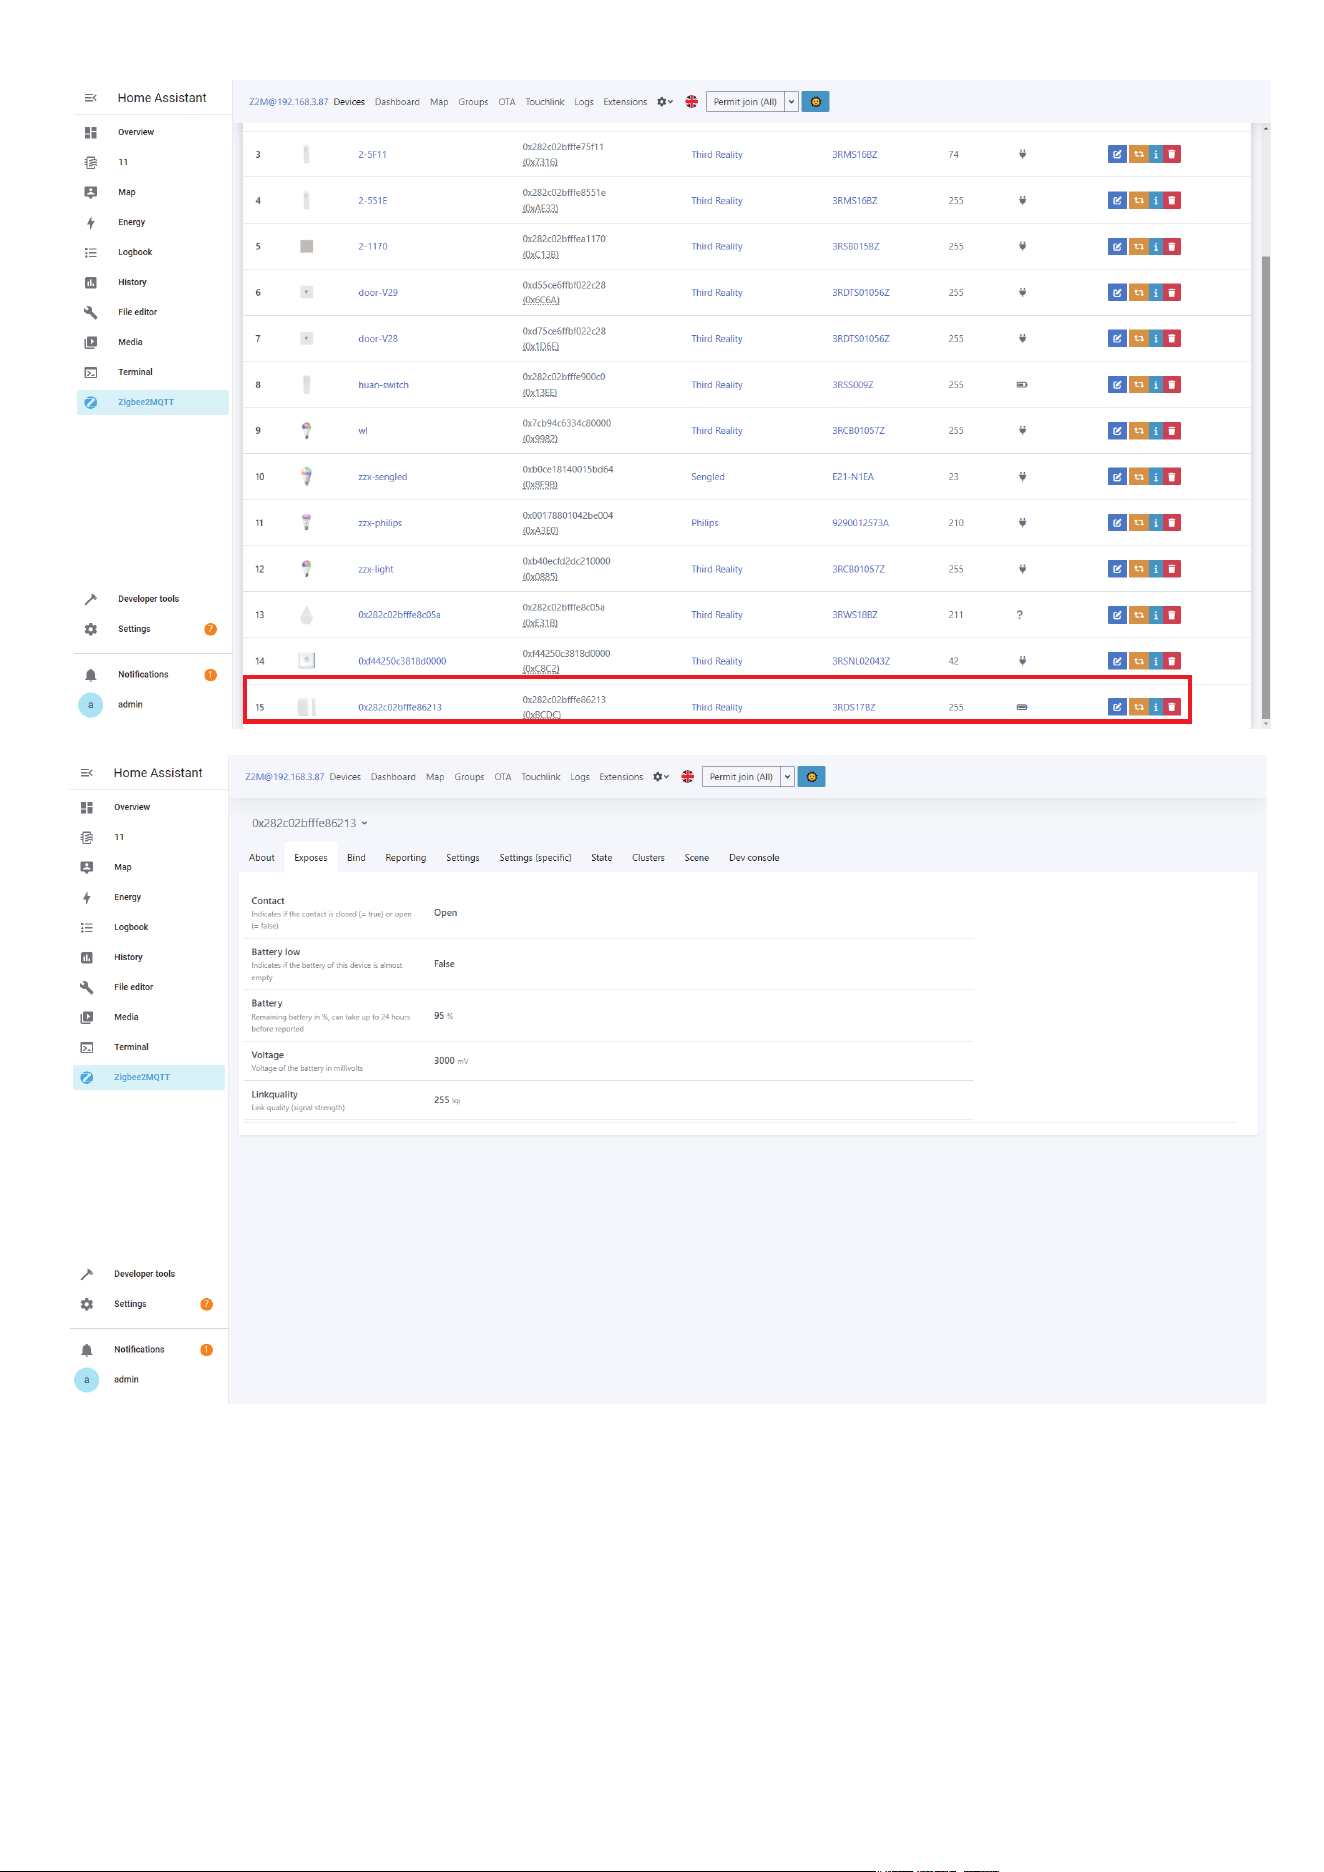
Pairing completed, the sensor will be displayed in the device list
Go to Settings page, create automation.
1.
2.
3.
Zigbee2MQTT
22
23

24
Why can’t my Echo discover the door sensor? It has a ZigBee hub
built-in.
Reboot your Echo by unplugging/plugging it back in.
Set the door sensor into pairing mode by long press the reset
button inside the device, the blue LED flashes rapidly.
Keep the door sensor near the Echo with ZigBee hub build-in,
then ask Alexa to “discover devices”.
If it is still not working, please factory reset your Echo, re-add
echo then re-discover device again, then pair it with your Echo
device again.
Enable the SmartThings Skill inyour Alexa app and sign in to link
your accounts on both platforms.
Go to Devices tabin your Alexa app and add devices to sync your
devices under SmartThings to Alexa: “+” icon(on the upper right
corner)->Add Device->Other.
Create a routinefor the door sensor and light switches in your
Alexa app, you can use door open/close to trigger things like
light on/off, or you can set an Alexa “custom message” when the
door sensor detects a door is opened.
1.
I have a SmartThings hub, do I need a special hub for the door
sensor?
2.
Troubleshooting

25
Why nothing shows up for devices or group on the Third Reality
app? I am using a SmartThings hub.
Because you are using Echo (Alexa APP) and SmartThings (Smart-
Things APP), it will bypass Third Reality app. Only when you are
using Third Reality Hub (which is equivalent to SmartThings Hub),
then the Third Reality app is required and will show the device in
the app.
3.

FCC Regulatory Conformance
26
This device complies with part 15 of the FCC rules. Operation is subject
to the following two conditions: (1) this device may not cause harmful
interference, and (2) this device must accept any interference received,
including interference that may cause undesired operation.
Changes or modifications not expressly approved by the party responsi-
ble for compliance could
void the user’s authority to operate the equipment.
NOTE: This equipment has been tested and found to comply with the
limits for a Class B digital device, pursuant to part 15 of the FCC Rules.
These limits are designed to provide reasonable protection against
harmful interference in a residential installation.
This equipment generates uses and can radiate radio frequency energy
and, if not installed and used in accordance with the instructions, may
cause harmful interference to radio communications. However, there is
no guarantee that interference will not occur in a particular installation.
If this equipment does cause harmful interference to radio or television
reception, which can be determined by turning the equipment off and
on, the user is encouraged to try to correct the interference by one or
more of the following measures:

27
RF Exposure
Limited Warranty
‐Reorient or relocate the receiving antenna.
‐Increase the separation between the equipment and receiver.
‐Connect the equipment into an outlet on a circuit different from that
to which the receiver is connected.
‐Consult the dealer or an experienced radio/TV technician for help im-
portant announcement.
NOTE: The manufacturer is not responsible for any radio or TV interfer-
ence caused by unauthorized modifications to this equipment. Such
modifications could void the user’s authority to operate the equipment.
This equipment complies with FCC radiation exposure limits set forth for
an uncontrolled environment.
This equipment should be installed and operated with minimum dis-
tance 20cm between the radiator and your body.
This transmitter must not be co-located or operating in conjunction with
any other antenna or transmitter.
For limited warranty, please visit www.3reality.com/devicesupport.
For customer support, please contact us at info@3reality.com or visit
www.3reality com.
For help and troubleshooting related to Amazon Alexa, visit the Alexa
app.